

Page 1
Warning
B54-4500-08
GPS NAVIGATION SYSTEM
INSTALLATION MANUAL
Failure to avoid the following potentially hazardous situations could result in serious injury or fi re.
• Do not attempt to install or service the KNA-G510 by yourself. Installing or servicing the unit without training and experience in
electronic equipment and automotive accessories may be dangerous and could expose you to the risk of electric shock or other hazards.
• When extending ignition, battery, or ground wires, use automotive-grade wires or other wires with AWG 18 (0.75 mm
greater to prevent wire deterioration and damage to the wire coating.
• If the unit starts to emit smoke or strange smells, turn off the power immediately and consult your Kenwood dealer.
• Keep small articles (like screws or batteries) out of the reach of children. If any such object is accidentally swallowed, consult a doctor
immediately.
Caution
Failure to avoid the following potentially hazardous situations may result in injury or property damage.
• Make sure to ground the unit to the chassis of your vehicle.
• Secure all wiring with cable clamps or electrical tape. Insulate unconnected wires; do not allow any bare wiring to remain exposed.
• Do not let unconnected wires or terminals touch metal on the vehicle or anything else that can conduct electricity.
• Do not open the top or bottom covers of the unit.
• The KNA-G510 is not waterproof.
2
gauge) or
February 2006 Part Number 190-00493-01 Rev. A Printed in Taiwan
Page 2
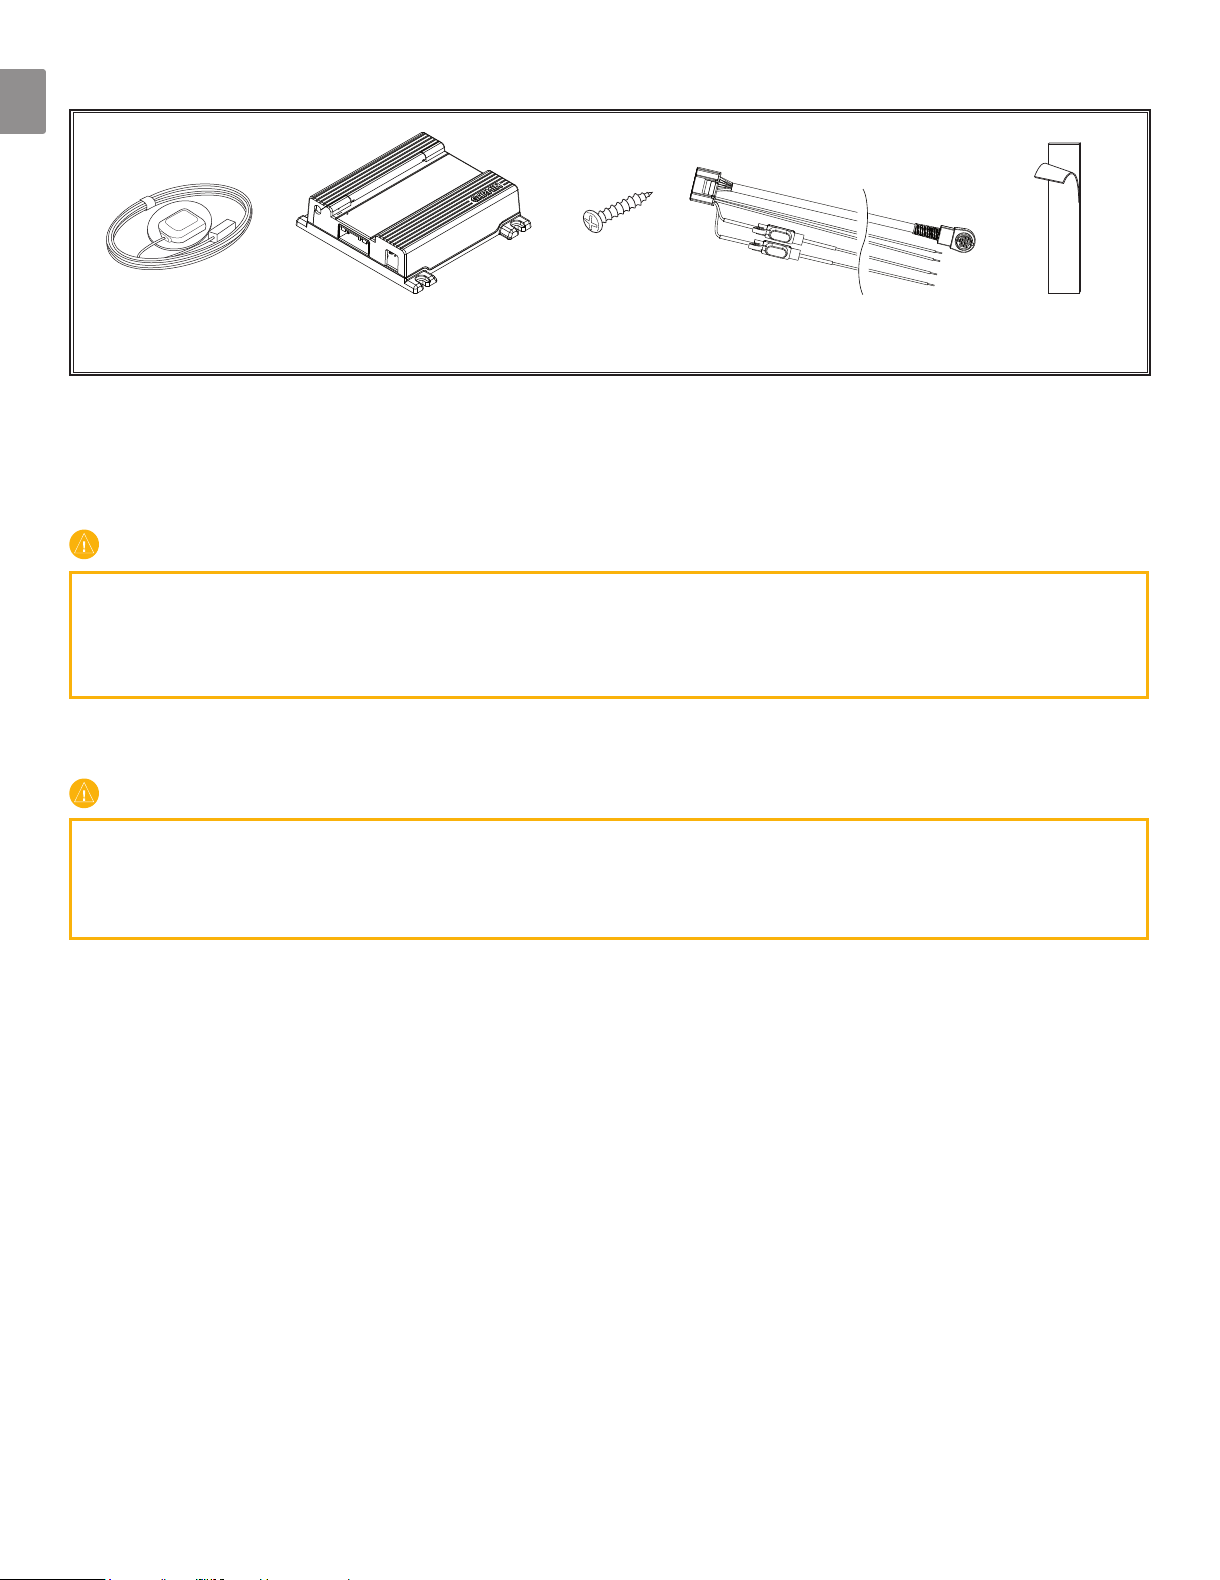
What’s Included
English
GPS antenna main unit screws (4) wiring harness hook and loop
fasteners (2)
Installing the main unit
Use the screws or the hook and loop fasteners (similar to Velcro®) provided to mount the main unit in the vehicle. Select a
location that allows you to access the unit’s SD card slot.
Caution
• Do not install the unit where it will be exposed to direct sunlight, excessive heat or humidity, dust, spills, or
liquids. Use only the screws provided. If you use the wrong screws, you could damage the unit.
• Check for cables or other parts underneath the floor mat before cutting the floor mat.
Installing the GPS antenna
Caution
• Do not paint the antenna. This will impair or disable signal reception.
• Remove any object or accumulated snow, etc., from the top of the antenna. It will reduce reception strength.
• Do not pull the cord when removing the antenna or adjusting its position. This can cause a short or snap the wires.
The GPS antenna can be installed either inside or outside the vehicle. It should be placed horizontally for best GPS
reception. The GPS antenna must have a clear view of the sky. If you install the antenna inside the vehicle, place it
close to a window; GPS signals can pass through glass but not through metal. Refer to the image on the next page for
recommended places to install the antenna. Place the GPS antenna on a metallic surface, such as the roof of your vehicle,
for best reception.
Installing optional accessories
The optional XM Smart Antenna (such as the GXM 30) can be placed inside or outside the vehicle. Like the GPS
antenna, it must have a clear view of the sky. If you use an extension cable with the XM antenna, wrap the two connectors
with electrical tape. For information on installing the optional FM traffic receiver (such as the GTM 10), refer to the
Installation Guide included with the traffic receiver.
Page 3
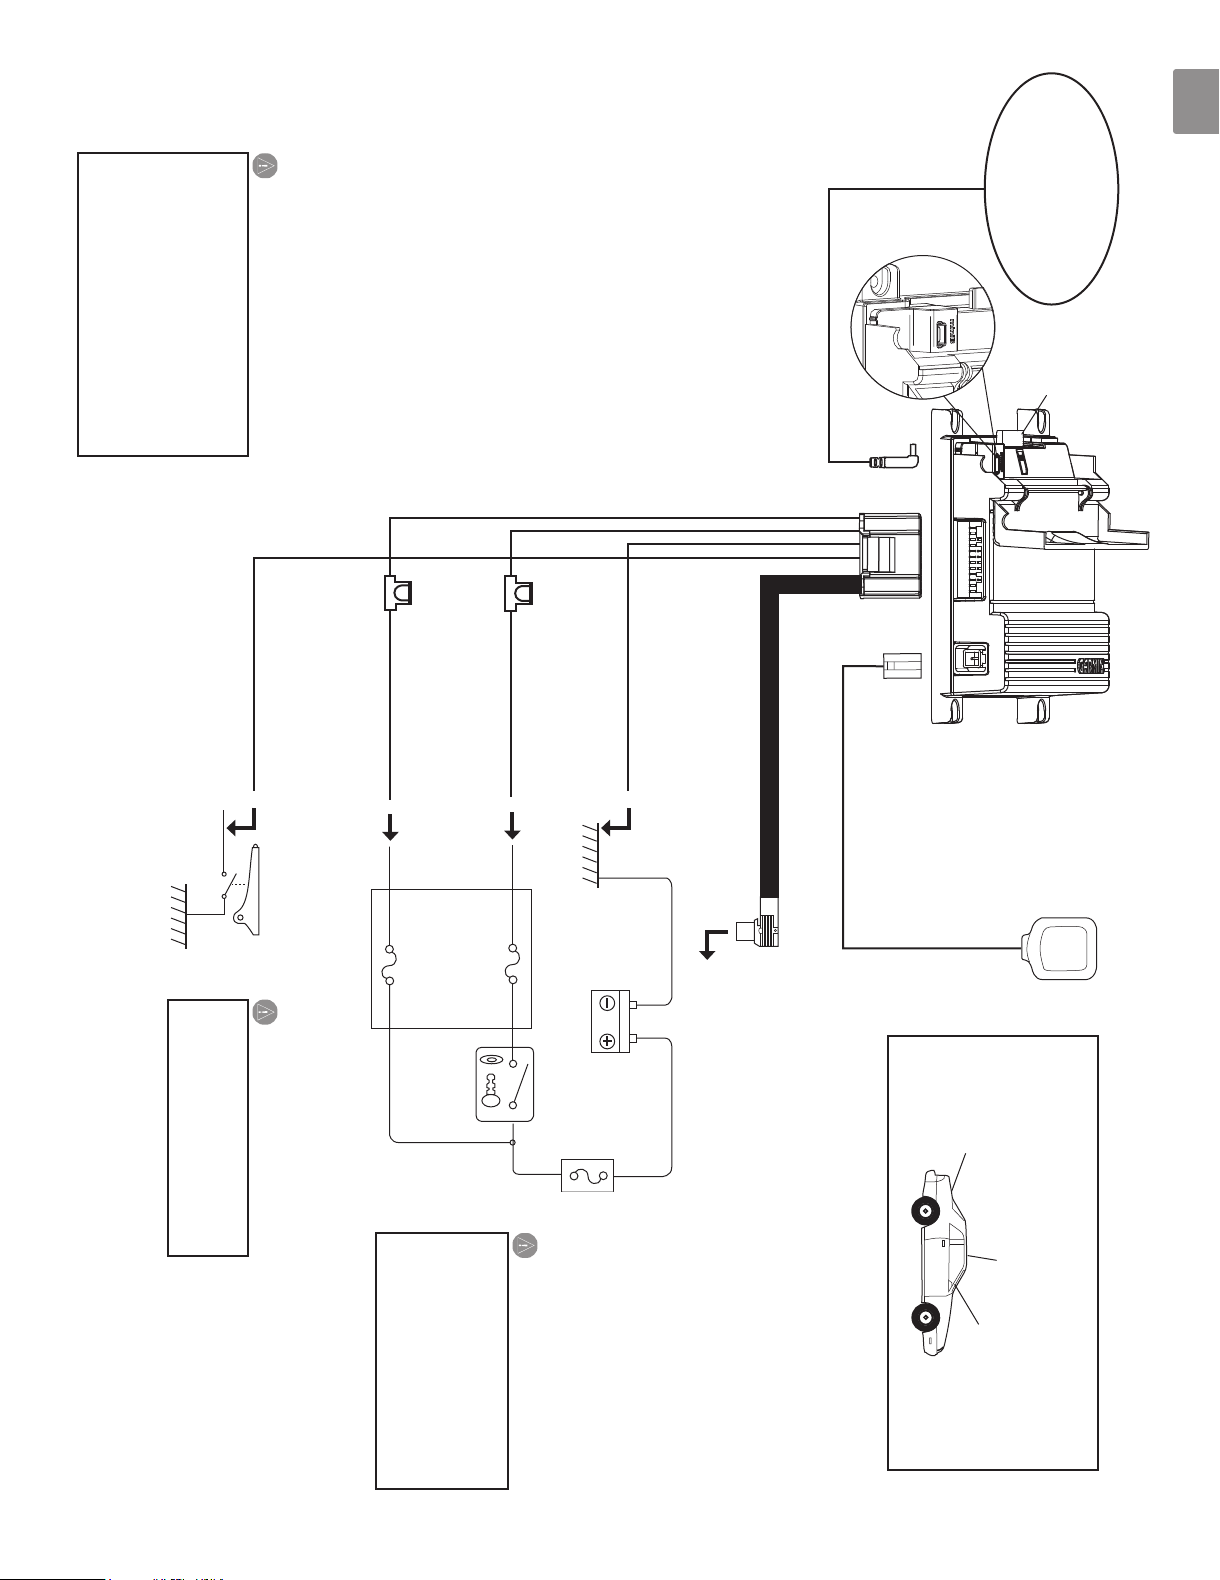
To battery (12 V)
To ignition (12 V)
Yellow
Light green
Black
To vehicle chassis
To parking brake
detection switch
Optional accessory:
XM Smart Antenna or
FM traffic receiver
To display unit (NAV I/F terminal)
GPS antenna
Ignition key switch
Car fuse box
Car fuse box
(main fuse)
Do not connect the yellow wire
lead directly to the vehicle battery.
Connecting directly to the battery
may cause the wire insulation to
fail and may pose a risk of short
circuit and electric shock.
WARNING
Be sure to connect the parking
brake wire to ensure safe
navigation.
WARNING
If your vehicle’s ignition does not have
an ACC position, connect the ignition
wires to a power source that can be
turned on and off with the ignition key. If
you connect the ignition wire to a power
source with a constant voltage supply,
as with battery wires, the vehicle’s
battery may die.
CAUTION
2 A
2 A
Best (roof of
vehicle)
Good (inside car
on dashboard)
Better (trunk
of vehicle)
Installing the GPS antenna
Red
SD card
4. Connect the wiring harness to the
5. Install the main unit. Refer to the tips on the
6. Reconnect the negative battery cable.
main unit.
previous page.
3. Connect the wiring harness to your vehicle
and disconnect the negative battery cable.
on the previous page.
in the following order: ground, battery,
ignition.
Steps to install the KNA-G510
1. Remove the key from the vehicle’s ignition
2. Install the GPS antenna. Refer to the tips
English
Page 4

Acquiring GPS Signals
The first time you turn on the KNA-G510, you must wait while the system acquires satellite signals for the first time. This
English
process could take up to several minutes. Make sure your vehicle is outdoors in an open area away from tall buildings
and trees for fastest acquisition. After the system acquires satellites for the first time, it will acquire satellites quickly each
time thereafter.
Changing the Fuses
If you need to replace a fuse on the red or yellow wires, make sure the wires are not touching to prevent a short circuit.
Then replace the old fuse with a new 2 Amp fuse.
Caution
When replacing a fuse, use only a new fuse with the prescribed rating. Using a fuse with the wrong rating may
cause your unit to malfunction. Disconnect the wiring harness before replacing a fuse to prevent short circuits.
Information in this document is subject to change without notice.
Specifications
General
Operating Temperature: -15°C to 70°C
Storage Temperature: -40°C to 85°C
Operating Voltage: 9.5 V to 25 V
Current Consumption: 0.12 A typical at 13 V (Max 1.0 A at 13 V)
ACC off Current: 70 uA typical at 13 V
Dimensions: 1 3/16” H x 4 3/4” W x 4 5/8” L (30 mm x 120 mm x 117 mm)
Weight: 0.41 lb (184 g)
Map Storage: Internal non-removable memory (pre-loaded City Navigator map data) and optional removable SD card
Connectors: System/power, GPS antenna, SD card slot, Mini-B for optional XM or FM traffic receivers
Navigation
Receiver: 12 parallel channel GPS receiver
Frequency: 1,575.42 MHz
Acquisition Times:
Warm: Approx. 15 seconds
Cold: Approx. 45 seconds
AutoLocate®: Approx. 2 minutes
Update Rate: 1/second, continuous
GPS Accuracy: 15 meters (49 feet) RMS 95% typical with GPS
DGPS (WAAS) Accuracy: < 3 meters (10 ft) 95% typical with DGPS (WAAS/EGNOS) corrections
Antenna: external GPS antenna
Page 5

MANUEL D’INSTALLATION
SYSTÈME DE NAVIGATION DE GPS
Francais
Avertissement
Le non-respect des recommandations suivantes pourrait causer des blessures graves ou des incendies.
• Ne tentez pas d’installer ou de réparer le système KNA-G510 vous-même. L’installation ou la réparation de l’appareil sans formation
ni expérience en matériel électronique et en accessoires automobiles pourrait vous exposer à des risques de choc électrique ou à
d’autres dangers.
• Lorsque vous avez besoin de câbles de rallonge pour les fi ls d’allumage, de batterie ou de mise à la terre, utilisez des câbles pour
automobile de calibre AWG 18 (0,75 mm
• Si l’appareil emet de la fume ou une odeur bizarre, mettez immediatement l’appareil hors tension et consultez un revendeur Kenwood.
• Tenez toujours les petits objets (comme les vis ou les batteries) hors de la portee des enfants. En cas d’ingestion de ces objets,
contactez immediatement un medecin.
Attention
Le non-respect des recommandations suivantes pourrait causer des blessures ou des dommages matériels.
• Assurez-vous de relier l’appareil à le châssis du véhicule.
• Fixer tous les câbles avec des colliers ou du ruban diélectrique. Isolez les fi ls non branchés et faites en sorte qu’aucun conducteur nu ne
soit exposé.
• Ne laissez pas des fi ls ou des terminaux non branchés en contact avec du métal ou tout autre matériau conducteur.
• N’ouvrez pas le couvercle superieur ou inferieur de l’appareil.
• Le système KNA-G510 n’est pas étanche.
2
) ou inférieur pour prévenir la surchauffe.
Page 6

Contenu
Francais
antenne GPS unité principale vis (4) faisceau de fils attaches auto
grippantes (2)
Installation de l’unité principale
Installez l’unité principale dans le véhicule à l’aide des vis ou des attaches de type Velcro® fournies. Choisissez un endroit
qui vous permettra d’accéder facilement à la fente pour carte SD.
Attention
• N’installez pas l’appareil dans un endroit où il pourrait être exposé à la lumière directe du soleil, à des
températures ou une humidité excessives, à la poussière ou à des liquides. Utilisez uniquement les vis fournies.
L’utilisation d’autres vis pourrait endommager l’appareil.
• Vérifiez si des câbles ou des pièces se trouvent sous le tapis de sol avant de le découper.
Installation de l’antenne GPS
Attention
• Ne pas peindre l’antenne pour ne pas deteriorer ou empecher la reception des signaux.
• Enlevez tout objet ou amas de neige etc. du sommet de l’antenne pour ne pas reduire la reception.
• Ne tirez pas le cable pendant la depose de l’antenne ou le reglage de sa position pour ne pas provoquer un courtcircuit ou a casser le cable.
L’antenne GPS peut être installée à l’intérieur ou à l’extérieur du véhicule. Elle doit être placée à l’horizontale pour
optimiser la réception GPS et dans un endroit offrant une vue dégagée du ciel. Si vous installez l’antenne à l’intérieur
du véhicule, placez-la près d’une fenêtre; les signaux GPS peuvent traverser le verre, mais non le métal. Reportezvous à l’illustration de la page suivante pour voir les endroits où il est recommandé d’installer l’antenne. En plaçant
l’antenne GPS sur une surface métallique, tel que le toit d’un véhicule, vous obtiendrez une meilleure réception.
Installation des accessoires en option
L’antenne intelligente XM (dont le modèle GXM 30) peut être placée à l’intérieur ou à l’extérieur du véhicule. Tout
comme l’antenne GPS, elle doit être installée dans un endroit offrant une vue dégagée du ciel. Si vous utilisez un câble
de rallonge avec l’antenne XM, recouvrez les deux connecteurs de ruban diélectrique. Pour savoir comment installer le
récepteur FM (tel que le modèle GTM 10), consultez le Guide d’installation fourni avec le récepteur.
Page 7

Sur l'allumage (12 V)
Rouge
Vert clair
Noir
Jaune
Antenne GPS
2 A
2 A
Optimal (toit
du véhicule)
Mieux (coffre
du véhicule)
Accessoire en option :
antenne intelligente XM
ou récepteur FM
Bien (à l'intérieur du
véhicule sur le
tableau de bord)
Sur le commutateur
de détection du frein
à main
Sur le châssis
du véhicule
Sur la batterie (12 V)
Sur l'afficheur (terminal d'interface de navigation)
AVERTISSEMENT
AVERTISSEMENT
Pour une conduite sécuritaire,
assurez-vous de brancher le câble
du frein de stationnement.
Ne reliez pas le fil jaune
directement à la batterie du
véhicule car cela pourrait
détériorer l'isolant du fil et
occasionner des courts-circuits
ou des chocs électriques.
Boîtier à fusibles
(fusible principal)
Interrupteur
de clé de contact
Boîtier à fusibles
ATTENTION
Si le barillet de clé de contact n'est pas
doté d'une position ACC (accessoires),
branchez les fils à un circuit qui peut être
ouvert et fermé avec la clé de contact.
Si vous branchez le fil d'allumage à une
source d'alimentation continue, comme
pour les fils de la batterie, celle-ci pourrait
se décharger.
Installation de l'antenne GPS
carte SD
4. Branchez le faisceau de fils à l’unité
5. Installez l’unité principale. Reportez-vous aux
6. Rebranchez le câble négatif de la batterie.
principale.
recommandations à la page précédente.
3. Branchez le faisceau de fils au véhicule en
débranchez le câble négatif de la batterie.
recommandations à la page précédente.
respectant l’ordre suivant : masse, batterie,
allumage.
Installation du système KNA-G510
1. Enlevez la clé de contact du véhicule et
2. Installez l’antenne GPS. Reportez-vous aux
Francais
Page 8

Acquisition des signaux GPS
Lorsque vous allumez le système KNA-G510 pour la première fois, vous devez attendre qu’il capte des signaux satellites.
Cette opération peut durer quelques minutes. Pour accélérer l’acquisition de signaux, assurez-vous que le véhicule se
trouve à l’extérieur dans un espace découvert sans grands immeubles ou arbres à proximité. Après la première acquisition,
les subséquentes sont plus rapides.
Remplacement des fusibles
Francais
Si vous devez remplacer un fusible pour les fils rouges ou jaunes, assurez-vous que les fils ne se touchent pas pour éviter
un court-circuit. Remplacez ensuite le fusible grillé par un fusible de 2 A.
Attention
Lorsque vous remplacez un fusible, utilisez seulement un nouveau fusible de même capacité. L’utilisation d’un
fusible de mauvaise capacité peut perturber le bon fonctionnement de l’appareil. Débranchez le faisceau de fils
avant de remplacer un fusible pour éviter un court-circuit.
Les informations dans ce document sont susceptibles de changement sans preavis.
Spécifications
Généralités
Température de fonctionnement : -15 °C à 70 °C
Température d’entreposage : -40 °C à 85 °C
Tension de fonctionnement : 9,5 à 25 V c. c.
Consommation de courant : 0,12 A @ à 13 V (max. 1,0 A @ 13 V)
Courant avec ACC désactivé : 70 uA @ 13 V
Dimensions : 1 3/16” H x 4 3/4” W x 4 5/8” L (30 mm x 120 mm x 117 mm)
Poids : 0.41 lb (184 g)
Stockage des cartes : Mémoire interne fixe (données cartographiques City Navigator préinstallées) et carte SD amovible
Connecteurs: Système-alimentation électrique, antenne GPS, fente pour carte SD, Mini-B pour récepteurs XM ou FM
en option
Navigation
Récepteur : GPS à 12 canaux parallèles
Fréquence : 1 575,42 MHz
Temps d’acquisition :
À chaud : Environ 15 secondes
À froid : Environ 45 secondes
AutoLocateMD : Environ 2 minutes
Fréquence d’actualisation : 1/seconde, continue
Précision GPS : 15 m eff. dans 95 % des cas avec GPS
Précision DGPS (WAAS) : < 3 m dans 95 % des cas avec corrections DGPS (WAAS/EGNOS)
Antenne : antenne GPS externe
Page 9

Advertencia
MANUAL DE INSTALACIÓN
SISTEMA DE NAVEGACIÓN DEL GPS
Evite las siguientes situaciones de riesgo; de lo contrario, podría sufrir o provocar lesiones graves o incendios.
Español
• No intente instalar o reparar la unidad KNA-G510 usted mismo. La instalación o reparación de la unidad sin contar con conocimientos
o experiencia en equipos electrónicos y accesorios para automóviles, puede resultar peligrosa y exponerlo a descargas eléctricas u otros
riesgos.
• Si extiende los cables de encendido, de la batería o de conexión a tierra, utilice cables para vehículos automotrices con AWG 18
(grosor de 0,75 mm2) o superior para evitar que se deterioren y se dañe su revestimiento.
• Si nota que la unidad emite humos u olores extraños, desconecte inmediatamente la alimentación y consulte con su distribuidor
Kenwood.
• Mantenga los artículos pequeños (como tornillos o baterías) fuera del alcance de los niños. Si los injirieran accidentalmente, consulte
inmediatamente a un médico.
Precaución
Evite las siguientes situaciones de riesgo; de lo contrario, podría sufrir o provocar lesiones o daños materiales.
• Asegúrese de conectar a tierra la unidad al chasis del vehículo.
• Asegure todos los cables con abrazaderas para cables o cinta eléctrica. Aísle los cables no conectados. No deje expuesto ningún cable
descubierto.
• No permita que los cables o los terminales sin conectar entren en contacto con partes metálicas o cualquier otro elemento que sea
conductor de electricidad.
• No abra las cubiertas superior o inferior de la unidad.
• El dispositivo KNA-G510 no es resistente al agua.
Page 10

Elementos incluidos
antena GPS unidad principal tornillos (4) arnés de
cableado
Español
Instalación de la unidad principal
Utilice los tornillos o los cierres de enganche y giro (similares al Velcro®) incluidos para montar la unidad principal en el
vehículo. Seleccione un lugar que le permita acceder a la ranura de la tarjeta SD de la unidad.
Precaución
• No instale la unidad en lugares en los que esté expuesta a la luz directa del sol, a un nivel de humedad o calor
excesivos, al polvo, a caídas o a líquidos. Utilice únicamente los tornillos que vienen con la unidad. Si no lo hace,
puede dañarla.
• Revise los cables u otros elementos que se encuentren debajo de la alfombrilla antes de cortarla.
cierres de enganche y
giro (2)
Instalación de la antena GPS
Precaución
• No pinte la antena. Se podría limitar o desactivar la recepción de la señal.
• Elimine la nieve o todo objeto que se encuentre encima de la antena ya que podrían reducir el nivel de recepción.
• Cuando quite la antena o esté ajustando la posición de la misma, no tire el cable. Podría provocar un cortocircuito
o la rotura de los cables.
La antena GPS se puede instalar en el interior o en el exterior del vehículo. Para conseguir una recepción óptima, se
debe colocar en posición horizontal. No debe haber nada que obstaculice la antena GPS. Si la instala dentro del vehículo,
colóquela cerca de una ventana; las señales GPS pueden traspasar el cristal, pero no el metal. Consulte la imagen de la
página siguiente para saber los lugares en que se recomienda instalar la antena. Coloque la antena GPS en una superficie
metálica, como el techo del vehículo, para conseguir una recepción óptima.
Instalación de accesorios opcionales
La antena inteligente XM opcional (como el modelo GXM 30) se puede colocar en el interior o en el exterior del
vehículo. Al igual que la antena GPS, ningún elemento debe obstaculizarla. Si utiliza un cable de extensión con la antena
XM, envuelva los 2 conectores con cinta eléctrica. Para ver información sobre la instalación del receptor de tránsito FM
opcional (como el modelo GTM 10), consulte la guía de instalación que viene con el receptor.
Page 11

Al encendido (12 V)
A la batería (12 V)
Amarillo
Negro
Accesorio opcional:
antena inteligente XM o
receptor de tránsito FM
Antena GPS
2 A
2 A
Instalación de la antena GPS
Mejor (portaequipaje
del vehículo)
Óptimo (techo del
vehículo)
Bueno (en el
tablero del auto)
A la unidad de visualización (terminal NAV I/F)
Al chasis del vehículo
Verde claro
Al interruptor de
detección del freno
de estacionamiento
Caja de fusibles del auto
(fusible principal)
Interruptor de la llave de encendido
Caja de fusibles
del auto
ADVERTENCIA
ADVERTENCIA
No conecte el cable amarillo
directamente a la batería del
vehículo. Si lo hace, puede
provocar daños en el aislamiento
del cable y correr el riesgo de que
se produzcan cortocircuitos y
descargas eléctricas.
Asegúrese de conectar el cable
del freno de estacionamiento
para garantizar una navegación
segura.
PRECAUCIÓN
Si en el encendido del vehículo no se
incluye la posición ACC, conecte los
cables de encendido a una fuente de
energía que se pueda encender y apagar
con la llave de encendido. Si conecta el
cable de encendido a una fuente de
energía con voltaje constante, como en
el caso de los cables de batería, puede
agotar la batería del vehículo.
Rojo
tarjeta SD
2. Instale la antena GPS. Consulte las
4. Conecte el arnés de cableado a la unidad
5. Instale la unidad principal. Consulte las
6. Vuelva a conectar el cable del polo
principal.
sugerencias de la página anterior.
negativo de la batería.
3. Conecte el arnés de cableado al vehículo
sugerencias de la página anterior.
en el siguiente orden: tierra, batería,
encendido.
Pasos para instalar el dispositivo
KNA-G510:
1. Retire la llave de encendido del vehículo y
desconecte el cable del polo negativo de la
batería.
Español
Page 12

Obtención de señales GPS
Al encender el dispositivo KNA-G510 por primera vez, debe esperar hasta que el sistema obtenga señales del satélite
por primera vez. Este proceso puede llevar varios minutos. Asegúrese de que el vehículo no esté bajo techo, en una zona
abierta y alejada de edificios y árboles de gran altura, para que la recepción de la señal sea más rápida. Una vez que el
sistema haya adquirido la señal por primera vez, lo hará más rápido la próxima vez que se conecte.
Cambio de los fusibles
Si debe reemplazar un fusible de los cables rojo o amarillo, asegúrese de que los cables no se tocan, pues podría provocar
un cortocircuito. A continuación, reemplace el fusible antiguo por uno nuevo de 2 amperios.
Precaución
Español
Al reemplazar un fusible, use sólo fusibles nuevos del tipo especificado. De lo contrario, puede provocar un
funcionamiento incorrecto de la unidad. Desconecte el arnés de cableado antes de reemplazar un fusible para
evitar cortocircuitos.
Especificaciones
Generales
Temperatura de funcionamiento: de -15° C a 70° C
Temperatura de almacenamiento: de -40° C a 85° C
Voltaje de funcionamiento: de 9,5 V a 25 V
Consumo eléctrico: 0,12 A (típico) a 13 V (1,0 A (máximo) a 13 V)
ACC sin corriente: 70 uA (típica) a 13 V
Dimensiones: (alto x ancho x largo) 1 3/16” H x 4 3/4” W x 4 5/8” L (30 mm x 120 mm x 117 mm)
Peso: 0.41 lb (184 g)
Almacenamiento de mapas: memoria interna no extraíble (datos de mapas de City Navigator precargados) y tarjeta SD extraíble
opcional
Conectores: sistema/alimentación, antena GPS, ranura para tarjeta SD, Mini-B para receptores de tránsito XM o FM
opcionales
Navegación
Receptor: receptor GPS de 12 canales paralelos
Frecuencia: 1.575,42 MHz
Tiempos de adquisición:
En caliente: aproximadamente 15 segundos
En frío: aproximadamente 45 segundos
AutoLocate®: aproximadamente 2 minutos
Frecuencia de actualización: 1 vez por segundo, continua
Precisión GPS: 15 metros, valor RMS 95% típico con GPS
Precisión DGPS (WAAS): < 3 metros, 95% típica con correcciones DGPS (WAAS/EGNOS)
Antena: antena GPS externa
 Loading...