

Page 1

KNA-DV2600
DVD NAVIGATION SYSTEM
INSTRUCTION MANUAL
© B64-2784-00/00 (C)
Page 2

2
|
English
Contents
Safety precautions 3
Replacing Map Discs 4
Inserting the Map Disc ............................................... 4
Removing the Map Disc ............................................. 4
Starting Up Navigation System 5
Basic Operations 6
Marks and Controls on Current Position
Map screen ............................................................... 6
Changing map scales .................................................................. 6
Change of Map Orientation.....................................................7
Showing marks of the facilities.............................................. 8
■ When showing marks for only one category....8
■ When canceling display of marks for facilities.. 9
■ When searching for Surrounding facilities.......... 9
■ When displaying Lists in consideration
of routes ................................................................................. 10
■ When displaying facility information................... 10
Marks and Controls on Scrolling Map screen...... 11
Operation of MENU screen......................................12
Adjust the volume of voice guidance............................ 13
■ When adjusting the volume......................................13
■ When setting up the automatic volume
adjustment ...........................................................................13
■ Set the sound in other modes................................. 14
Switching to the twin-screen display............................. 15
■ When switching to the twin-screen display....15
■ When switching to the single-screen
display...................................................................................... 16
Calling up maps 17
Calling up according to the syllabary ...................18
When narrowing down according to the area.........19
When narrowing down according to the
categories of facilities.......................................................... 20
Calling up maps in terms of facilities .................... 21
Calling up maps in terms of telephone
numbers .................................................................. 22
Calling up maps in terms of addresses ................. 23
Calling up maps in terms of postal codes ............24
Setting routes and route navigation 25
Set destinations and search routes .......................25
Set destinations and conduct route searches .......... 25
Displaying whole route ........................................................... 26
■ When displaying route information..................... 27
■ When displaying 5 routes to compare them.. 28
Changing routes........................................................ 29
Adding destinations .................................................................. 29
Sorting destinations ..................................................................31
Clearing destinations ................................................................ 32
Setting passing roads ............................................................... 33
■ When correcting the passing roads..................... 34
■ Canceling designation of passing roads............35
Changing search conditions................................................ 36
Route Guidance .........................................................37
Initiate route guidance ............................................................ 37
■ When cancel or resume route guidance...........37
Open road route guidance ................................................... 38
■ Information on intersections.....................................39
■ In order to switch indications of remaining
distances ................................................................................ 40
Route guidance on expressway......................................... 41
Voice route guidance .............................................................. 42
Scrolling the map along the route................................... 43
■ When scrolling to the next facility......................... 44
Demonstration (Demo) ........................................................... 45
Another route search................................................ 46
When the vehicle is deviated from the route........... 47
Conduct another route search manually..................... 47
Setting navigation .................................................... 48
■ When setting the average vehicle speed......... 49
■ When correcting the current position................ 50
■ When correcting settings of distances
manually................................................................................. 51
History of destinations ............................................................. 52
■ When clearing history of destinations................ 52
Indicating information on the map disc............... 53
Registration of points 54
Registering your home ............................................ 54
Registering your home............................................................ 54
Registering memory points..................................... 55
■ When registering displayed places....................... 56
Correcting memory points.................................................... 57
■ When changeing the marks ..................................... 57
■ When inputting names.................................................58
■ When inputting chinese character using
pinyin........................................................................................ 59
■ When indicating names on the map...................60
■ When correcting positions......................................... 60
■ To input telephone numbers....................................60
Clearing memory points.........................................................61
Registering of special memory points ..................62
Correcting special memory points ..................................63
Clearing special memory points........................................ 63
AVN-2675's Monitor Unit 64
Basic Operations .......................................................................... 64
Picture Quality Adjusting........................................................65
Setup Menu screen....................................................................66
General Information 70
Troubleshooting 71
Specifications 72
Page 3
English
|
3
Warning Messages
For safe usage please observe the following !!!
READ THIS MANUAL FIRST
Read this manual carefully before starting to operate the
Kenwood Car Navigation System and follow the manual's
instructions. Kenwood are not liable for problems or accidents
resulting from failure to observe the instructions in this manual.
OBSERVE LOCAL TRAFFIC SIGNS AND REGULATIONS
Always observe the local traffic signs and regulations when
driving and check them against the system's instructions.
Due to frequent changes in local signs and regulations, the
traffic sign and regulation data on the Map DVD-ROM may be
outdated. Furthermore the Map DVD-ROM cannot reckon with
certain conditions such as traffic density at certain times of
the day, (temporary) road closures due to construction work,
weather conditions or special events taking place. Therefore
always obey the local traffic signs and regulations rather
than the system's instructions. Failure to do so may place
you in illegal, unsafe or dangerous situations.
DRIVE SAFELY
Before following the system's guidance instructions, such
as changes in direction, always check first whether it is safe
to do so given the current traffic conditions. Then follow the
given instructions, but make sure you do so in a safe manner.
VOLUME LEVEL
Keep the system's volume at a low enough level to be able to
hear outside noises whilst driving. If you can no longer hear
outside noises, you may be unable to react adequately to the
traffic situation. This may cause accidents.
FOREIGN OBJECTS
Keep fingers and foreign objects out of the disc-loading slot, so
as not to cause accidents. In the event of there being foreign
objects inside the unit, or smoke or noxious odours coming out,
stop operation immediately and contact the closest Kenwood
dealer.
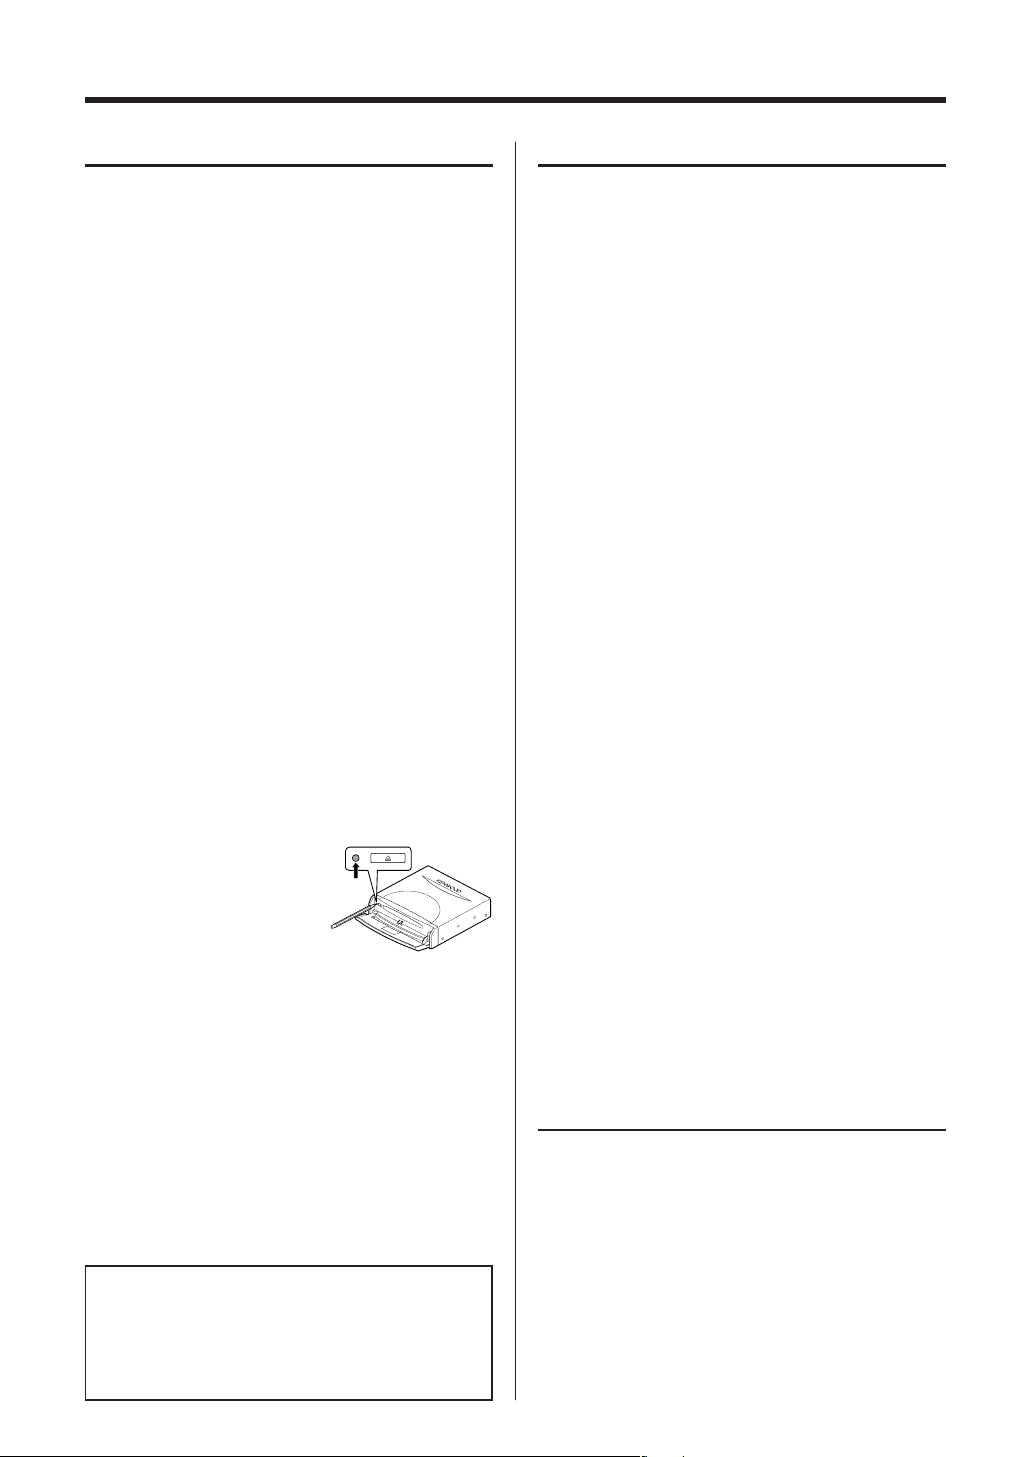
STOP OPERATION IN THE EVENT OF PROBLEMS
In event of problems such as a
lack of sound or video occurring,
stop operation and push the reset
button. Should the problems
persist, stop operation of the
system and contact the closest
Kenwood dealer.
When upgrading the program,
insert the version-up disc and press
the reset button.
NEVER DISASSEMBLE OR ALTER
Never try to disassemble or alter the navigation equipment. Any
attempt to do so may cause accidents, fire or electric shock.
REPLACING FUSES
When replacing fuses always use the same rated ampere. Failure
to do so may cause fire.
SMALL ARTICLES
Keep small articles (like screws or batteries) out of the reach of
children. If any such object is accidentally swallowed, consult a
doctor immediately.
Information in this document is subject to change without
notice.
The illustrations of the display and the panel appearing in this
manual are examples used to explain more clearly how the
controls are used. Therefore, what appears on the display in
the illustrations may differ from what appears on the display
on the actual equipment, and some of the illustrations on
the display may represent something impossible in actual
operation.
Before Use
Start the car engine before use
This mobile navigation system can be used when the ignition
key is turned to ON or ACC. However, to preserve the battery,
it should be used with the engine running whenever possible.
Using the navigation system for a long time with the engine
switched off can cause the battery to run down.
Time before current position is displayed
The mobile navigation system will not display the correct current
position of the vehicle the first time it is used after purchase, or
if the battery has been removed for a long time. GPS positioning
signals will soon be received, however, and the correct position
will be displayed.
Reading programmes after the battery has been turned off
The navigation programmes will be deleted if the battery
is removed for repairs, etc. If this happens, set the map disc
provided into the mobile navigation system and switch on the
engine. The mobile navigation system will automatically load the
programmes and start operating normally again.
When driving on rough roads
The mobile navigation system might not operate properly or be
able to read map data from the disc if there is severe vibration
caused by driving on rough roads.
Handling the GPS antenna
• Do not paint the antenna. This will impair or disable signal
reception.
• Remove any object or accumulated snow, etc., from the top of
the antenna. It will reduce reception strength.
• Do not pull the cord when removing the antenna or adjusting
its position. This can cause a short or snap the wires.
Operating whilst driving
The GPS voice navigation system displays the switches disabled
during driving in fainter colors. These switches stop functioning
and no message is displayed.
Precautions for handling precision machines
Be careful of the surrounding temperature. Using the mobile
navigation system at extremely high or low temperatures can
lead to malfunction or damage.
Also note that the unit can be damaged by strong vibration or
by metal objects or water getting inside.
Condensation
Condensation can form on the lens inside the main unit just
after the car heater is switched on in cold weather, for example,
leading to malfunction. The main unit will start working
normally again if it is just left alone for about one hour for this
condensation to go away. If normal operation is not restored
after several hours, return the main unit to the store where you
purchased the mobile navigation system.
Map disc
Always replace the map disc with another compatible map disc.
Never insert an incompatible disc. It can damage the main unit.
Precautions when Handling Map Discs
• You should handle discs carefully, as excessive warping or
scratches on the disc surface or label can lead to reading errors.
• Store discs away from direct sunlight. The disc might warp and
become unusable.
• Lightly wipe the disc with a soft cloth in a straight line from
the centre of the disc towards the outer edge.
• If you touch the data surface of a disc (the surface without a
label printed on it) it might get dirty and lead to a malfunction.
Always hold a disc either by its centre hole and an edge or by
two edges.
• Do not write on, or stick paper or seals onto, the surface of a disc.
• Never clean discs with benzene, thinners, record spray, antistatic spray or chemical swabs.
• Map discs rotate at high speed inside the main unit. Do not
use a cracked or badly warped disc, therefore, because it might
damage the main unit.
Safety precautions
Page 4
4
|
English
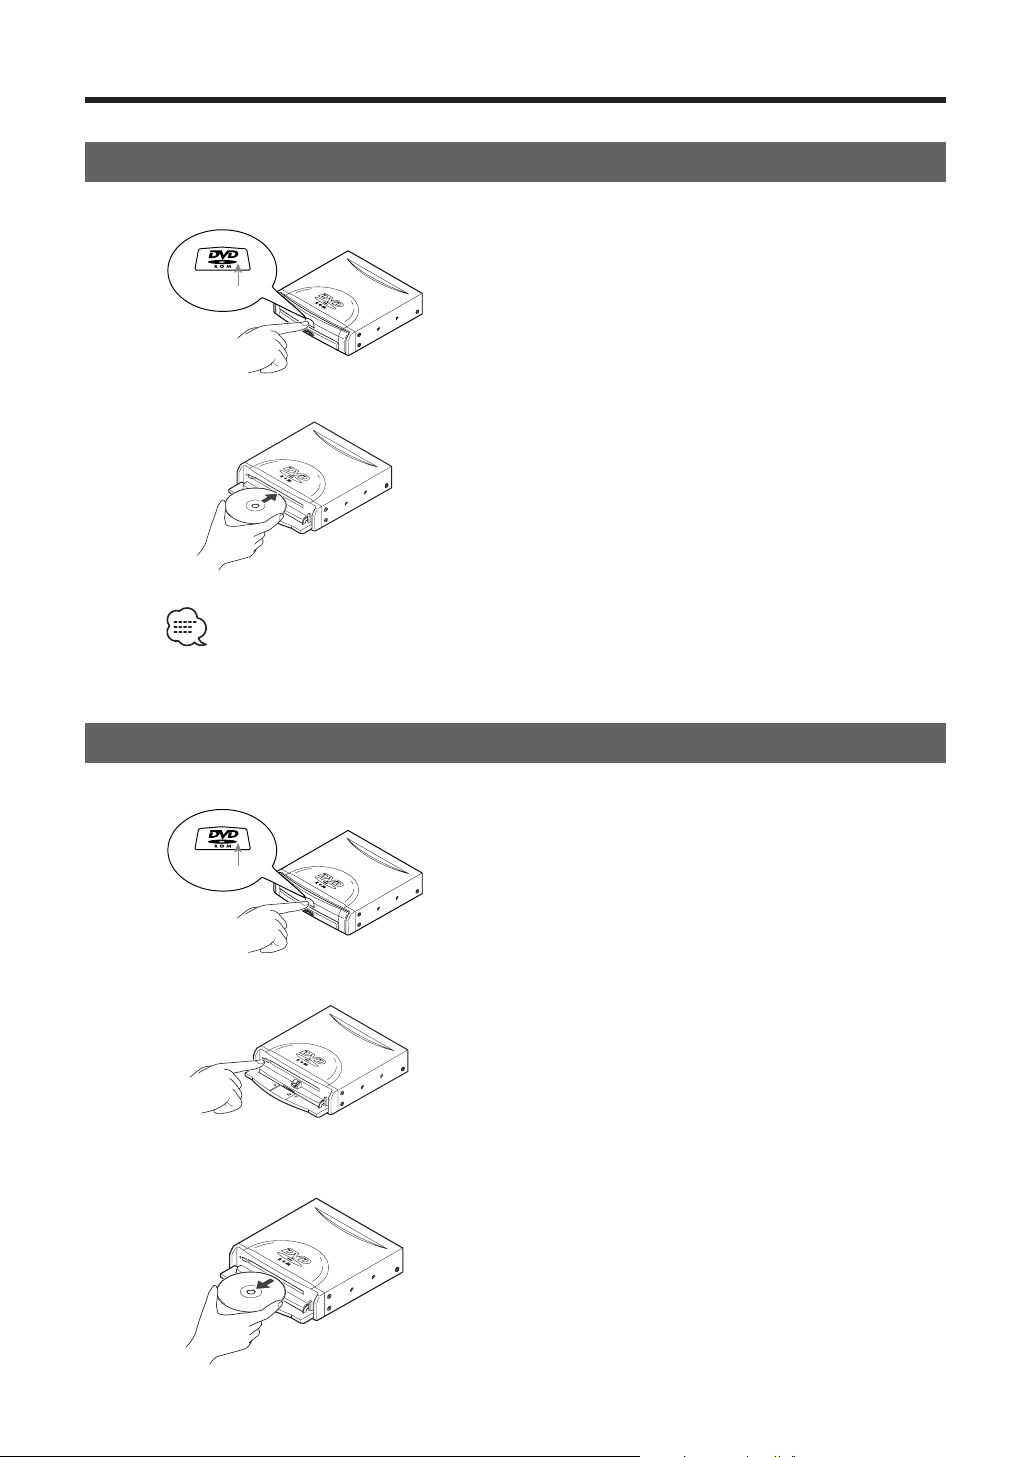
Inserting the Map Disc
1
Press the right side of the button marked DVD to
open the cover.
2
Insert a map disc with the label side upward and close
the cover.
• No DVD Video disc can be played back by this unit.
Removing the Map Disc
1
Press the right side of the button marked DVD to
open the cover.
2
Press the eject button.
3
Remove the map disc and close the cover.
Press here!
Press here!
Replacing Map Discs
Page 5
English
|
5
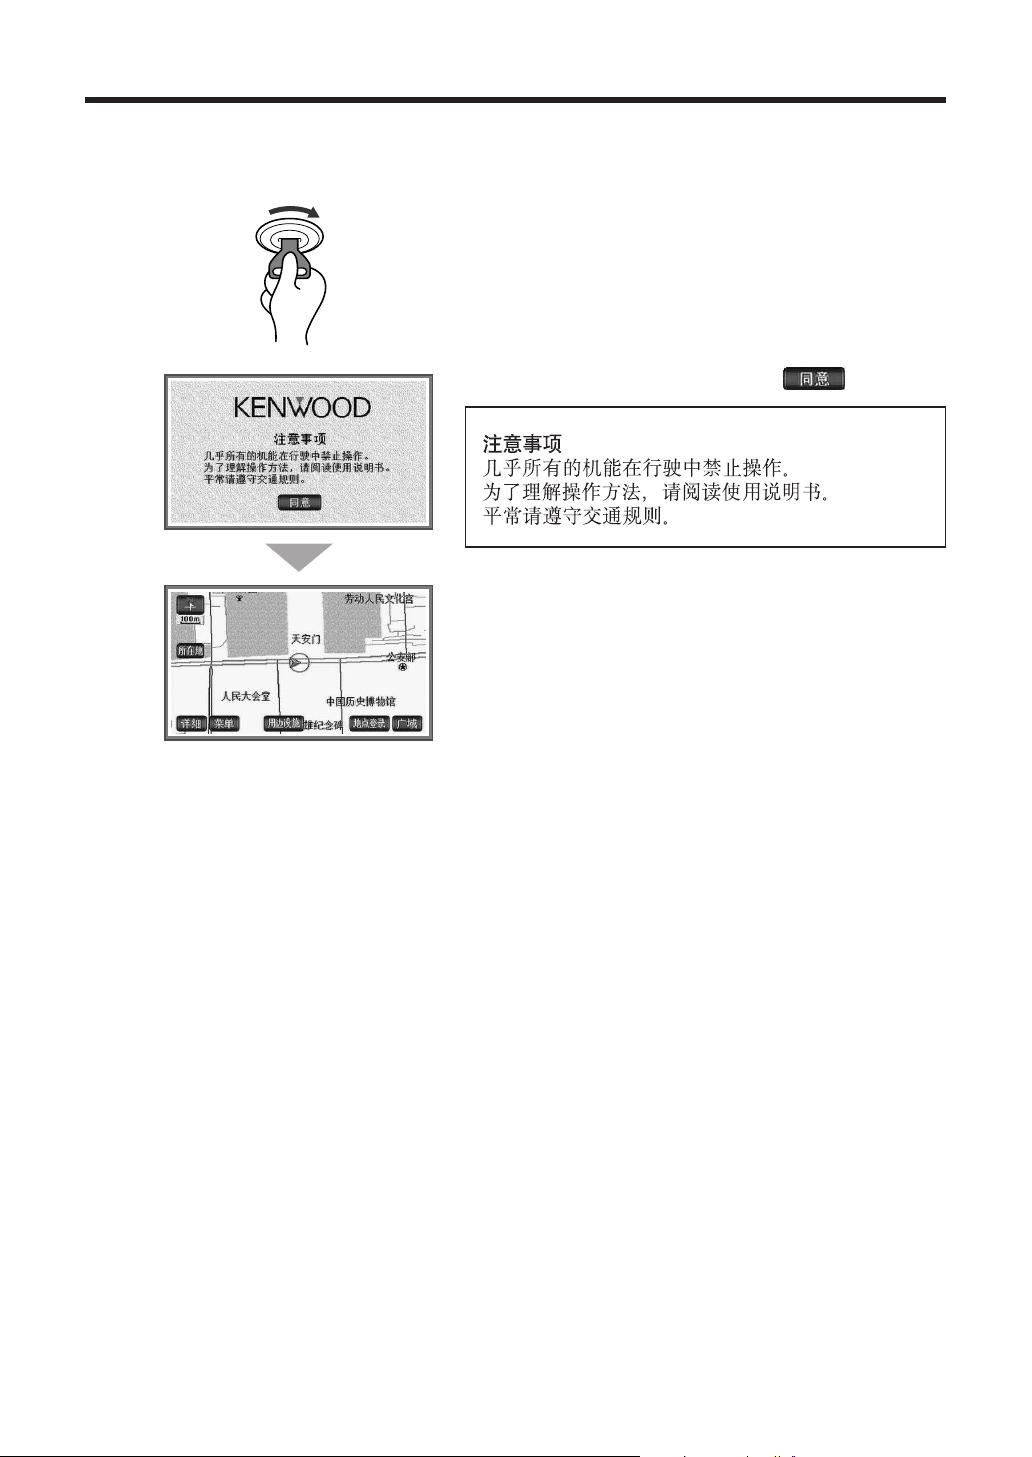
Start up the navigation system and display the map of the area around your vehicle.
1
Start the engine.
The CAUTION screen is displayed on the screen.
2
Read CAUTION carefully, and select .
The current position is displayed on the screen.
Starting Up Navigation System
Page 6
6
|
English
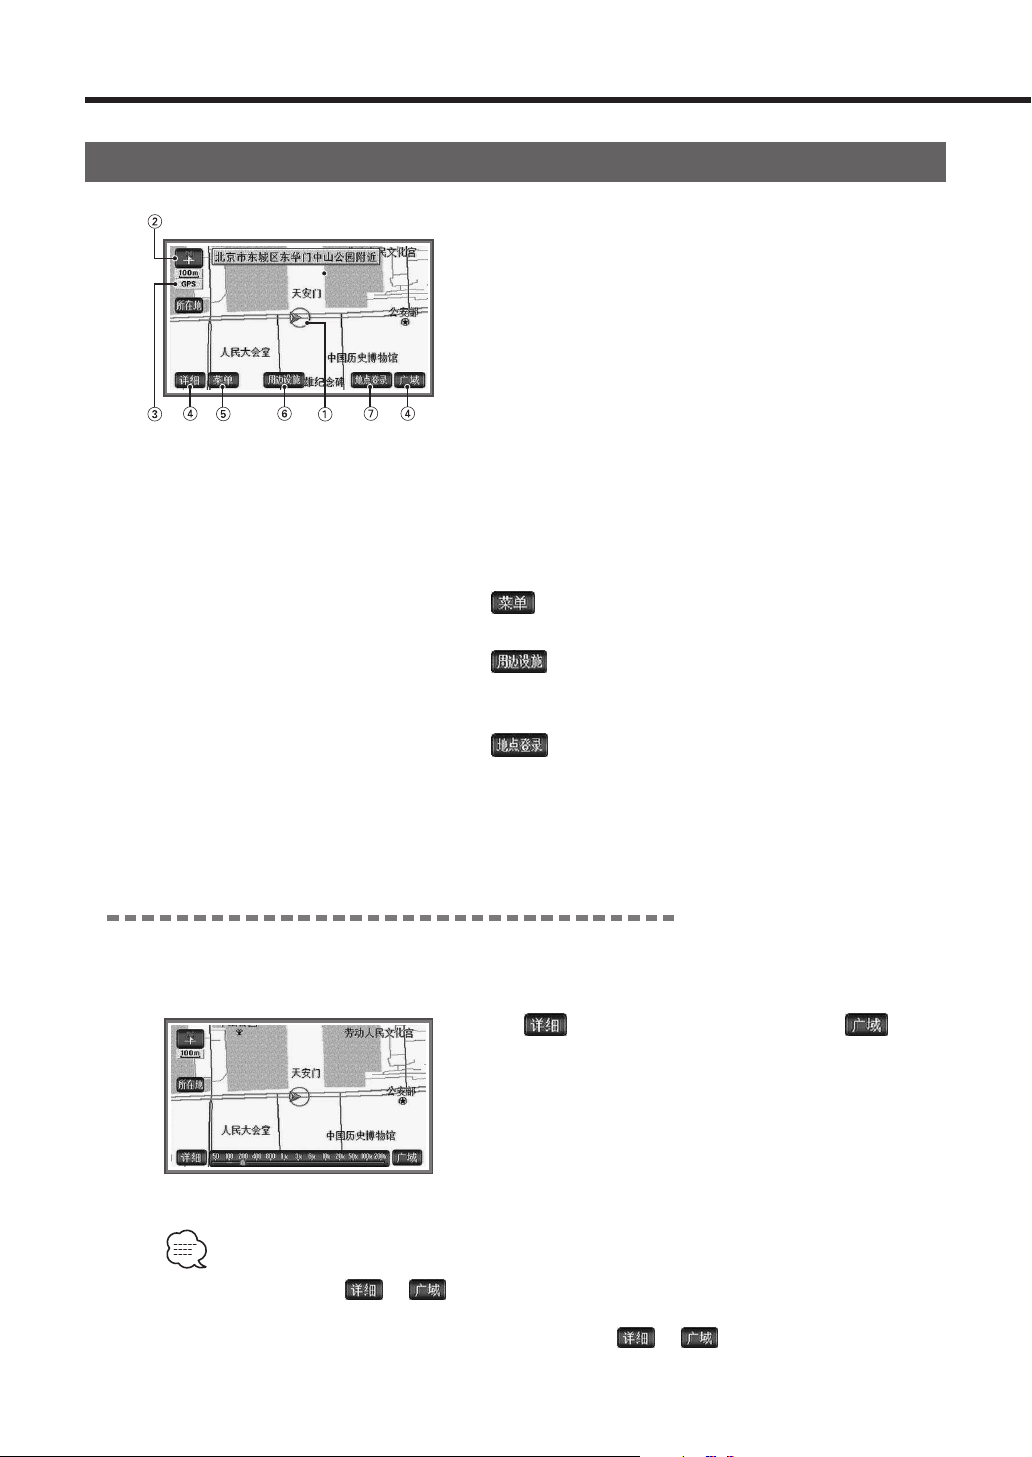
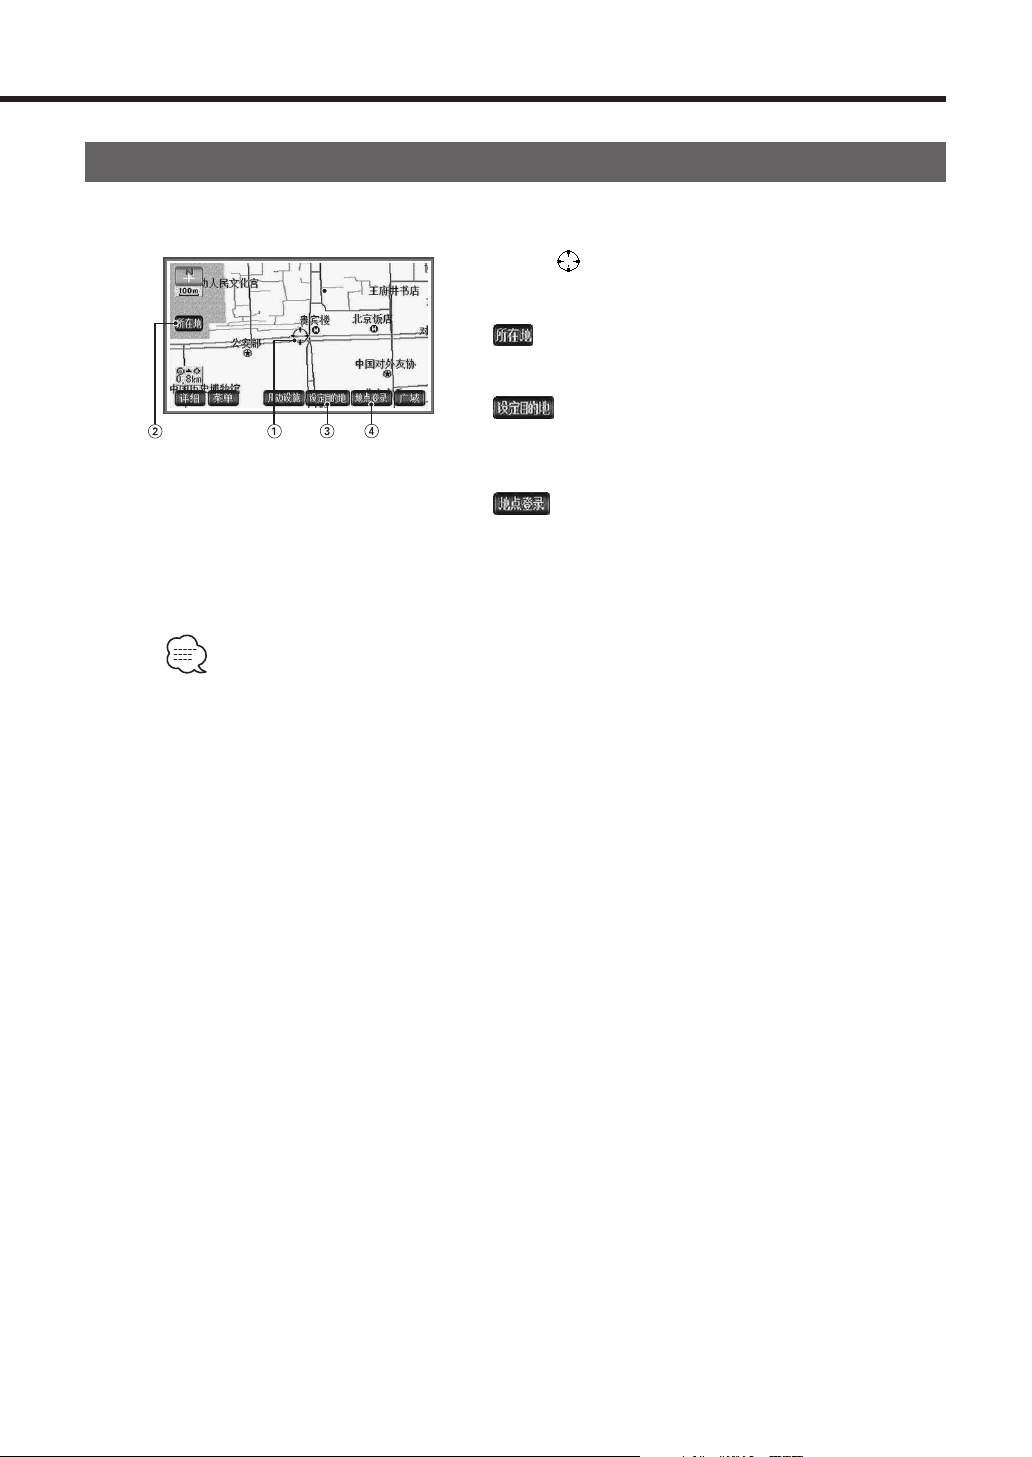
Marks and Controls on Current Position Map screen
1 Vehicle marker
Shows both its current position and the direction of
the vehicle.
2 Map Orientation control
Indicates the direction of "North".
It also switches Map Orientation. (see page 7)
3 GPS (Global Positioning System) marker
Shows the status of the signal from the GPS satellite.
When this marker appears, the GPS satellite signal is
being received and used to calculate the position of
your vehicle.
4 Scale control
Indicates the current scale.
It also changes the map scale. (see page 6)
5
button
Displays the Menu screen. (see page 12)
6
button
Searches facilities round the current position, and
displays their marks on the map. (see page 8)
7
button
Registers the current position to the memory point.
(see page 55)
Changing map scales
The scale of the map displayed on the screen can be changed in the range 50m scale (1/5000) to
200km scale (1/20,480,000).
1
Select to display a detailed map, and to
display wide area map.
The scale is changed one level by one level.
• If you keep selecting or , the scale changes continuously without regard to scale
levels.
• By selecting the scale figures indicated when selecting or , the scale can be changed
at once.
• For safety, the 2 operations described above should not be conducted while driving.
Basic Operations
Page 7
English
|
7
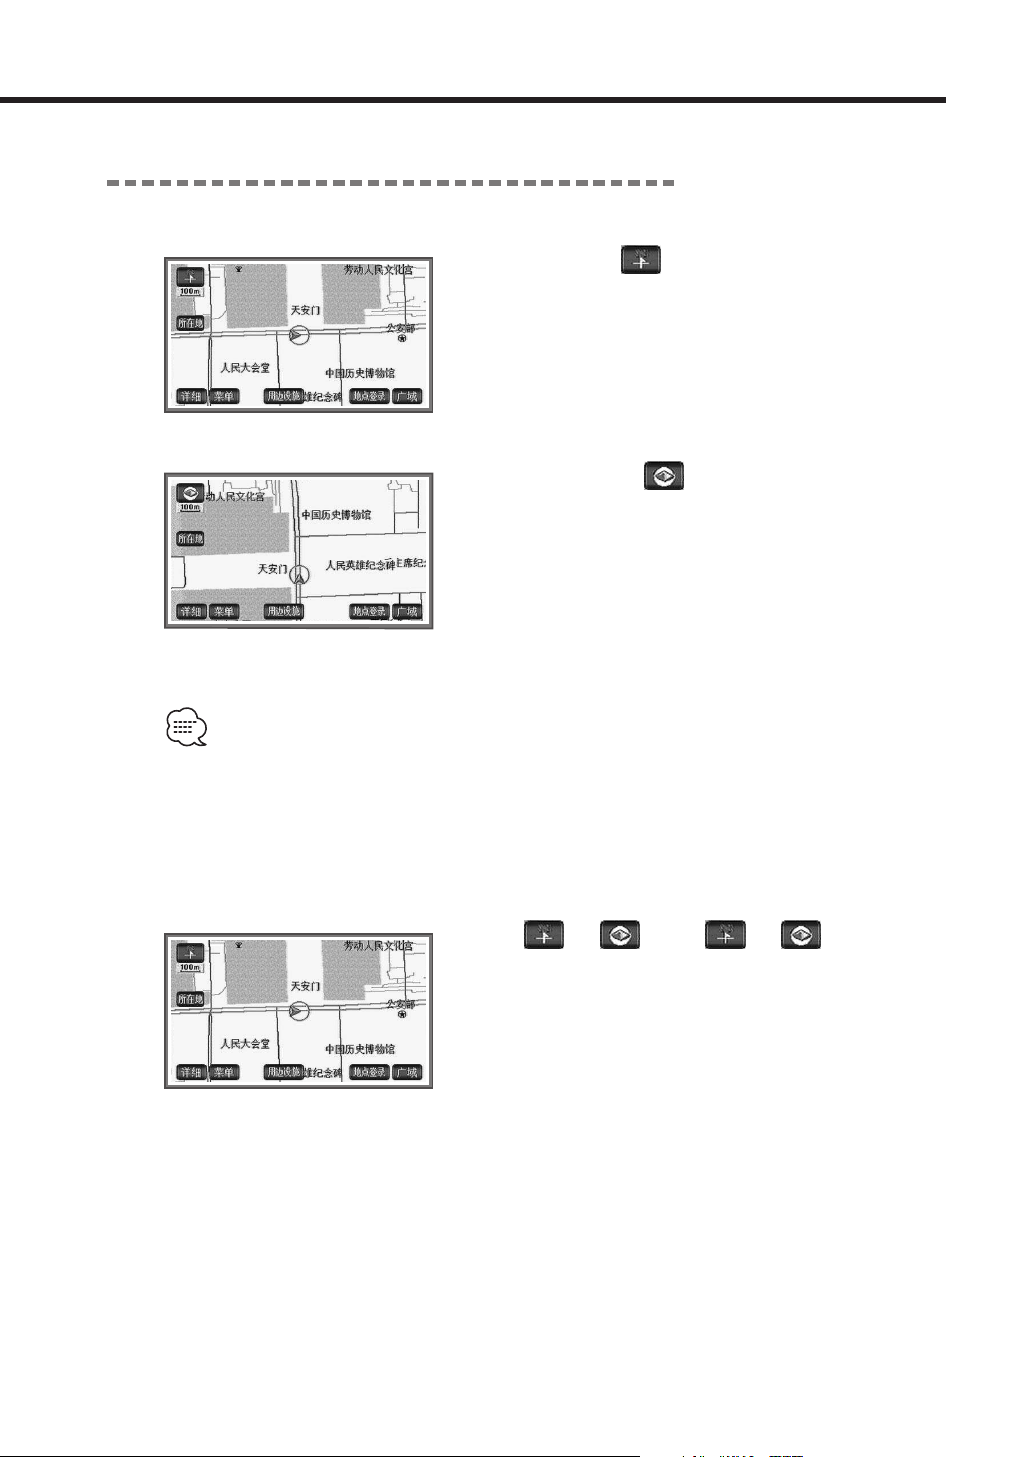
Change of Map Orientation
Yo u can change orientations of the map displayed.
North-up display
Regardless of the vehicle’s direction of traveling, map is
always shown with north upward.
Heading-up display (This indicates north)
Map is always shown with the vehicle’s direction of
traveling upward.
• Even when the heading-up display is on, maps and all the route maps called up on the screen
for setting destinations are shown in north-up display. However once switched to the Current
Position Map screen, the heading-up display is restored.
1
Select (or ) when (or ) is blue.
North-up display and Heading-up display switch
alternatively.
<North-up>
<Heading-up>
Page 8
8
|
English
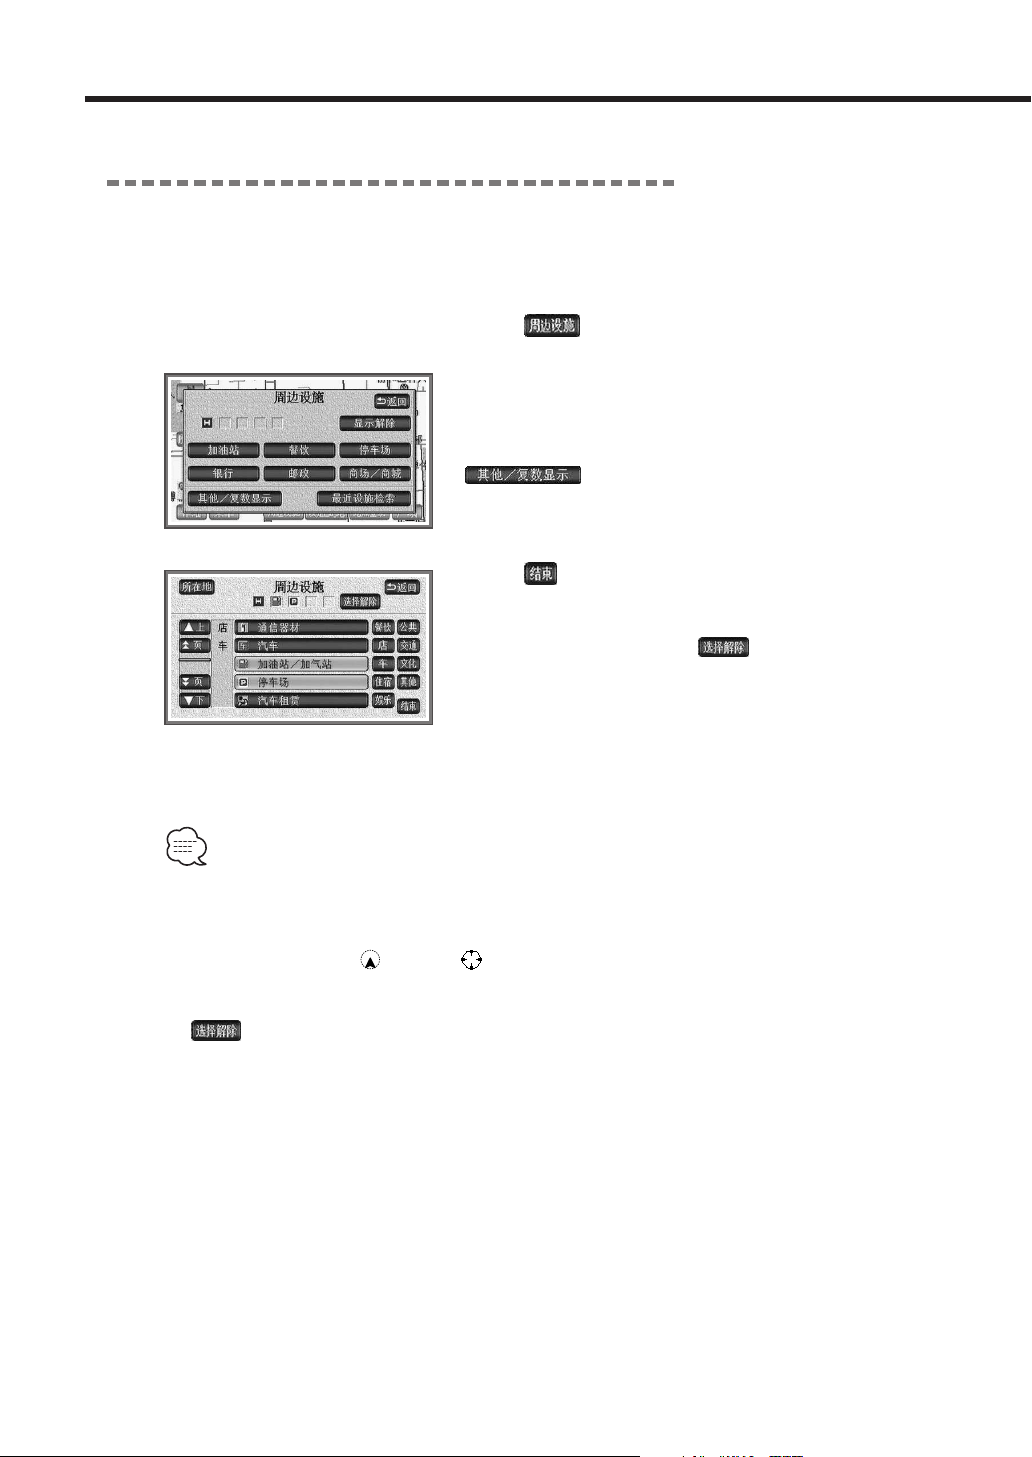
Showing marks of the facilities
Facility marks can be displayed on the map.
■ When showing marks for only one category
1
Select .
2
Select the facilities to be displayed.
Marks for the selected facilities will be displayed.
If the desired category is not displayed, select
.
3
Select .
Marks for the selected facilities will be displayed.
If mistakes are made, select to cancel one mark by
one mark.
•Facilities whose information is not included in the map disc are not displayed.
•Marks can be displayed on a 1:100,000 map or larger (Except for all the route map screens).
•Facility landmarks which can be displayed are limited to facilities located within a 10km-radius
of the current position or cursor (up to 200 landmarks).
• Up to 5 kinds of facilities can be displayed.
• If the selected facilities are selected again, the selection will be cancelled.
• If is selected, the category which has been selected last time can be cancelled.
Basic Operations
Page 9
English
|
9
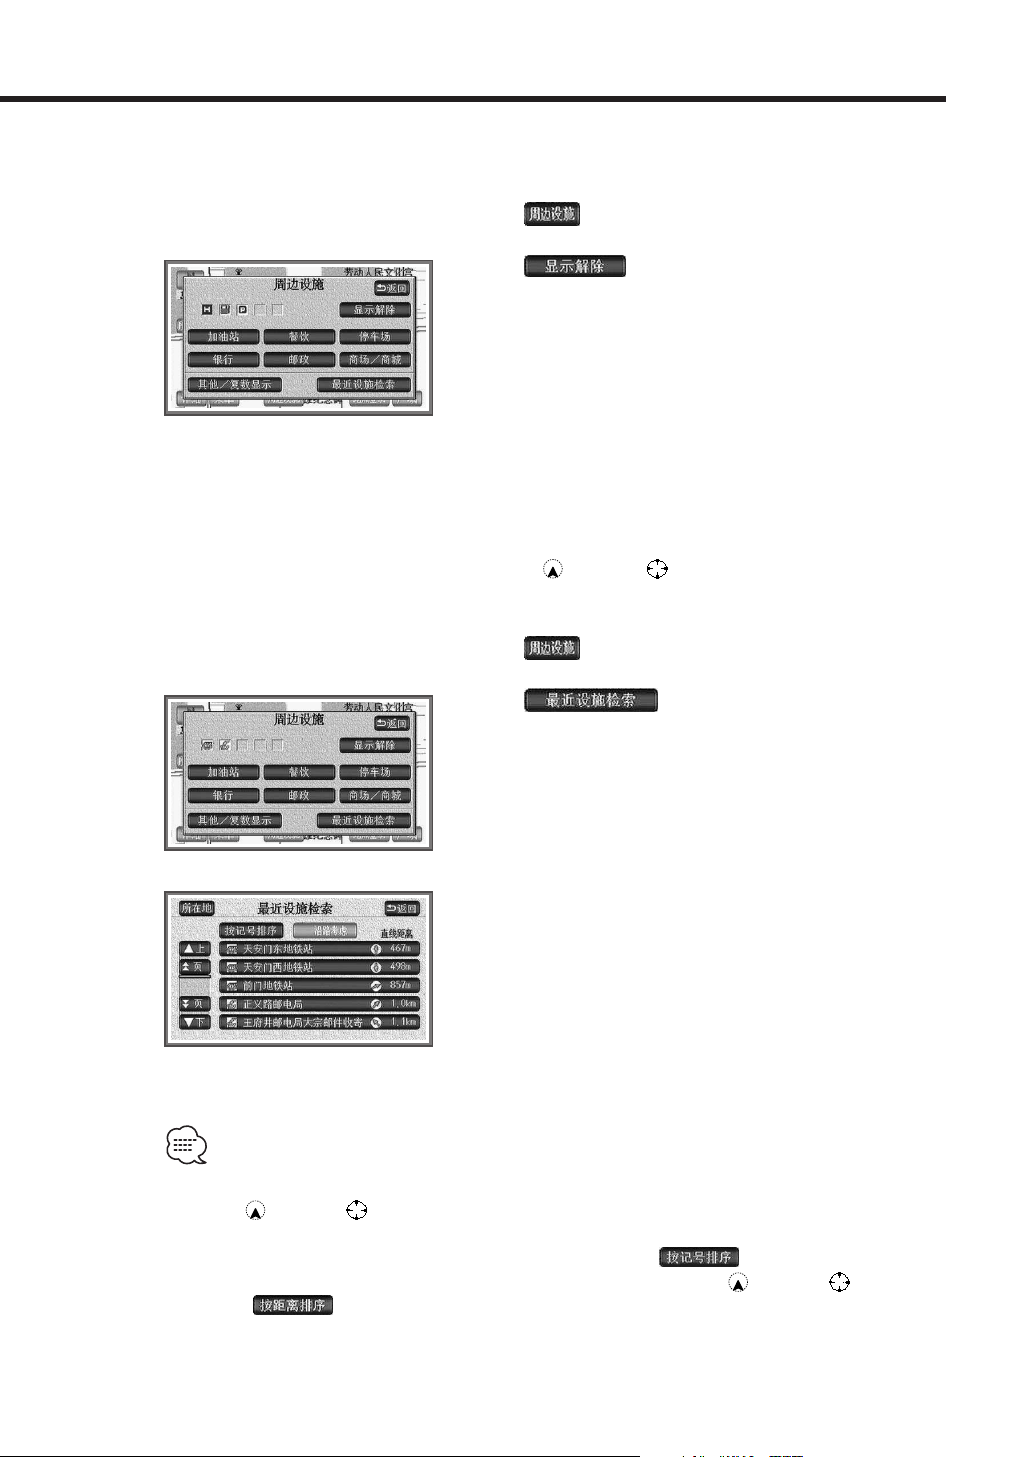
■ When canceling display of marks for facilities
1
Select .
2
Select .
■ When searching for Surrounding facilities
Names of facilities located near the current position or cursor , or the slant distance and
direction from can be displayed.
1
Select .
2
Select .
List of selected facilities will be displayed.
3
Select names of facilities to be displayed.
Maps featuring selected facilities will appear and names
of facilities and the slant distance from the current
position will be displayed.
• Searchable facilities are limited to those located within about 10km radius of the current
position or cursor (Up to 200 facilities)
• Facilities in the list can be arranged in the order of shorter distances, or categories of the marks.
• Facilities are sorted according to the categories by selecting .
• They are sorted in the order of facilities closer to the current position or cursor by
selecting .
Page 10
10
|
English
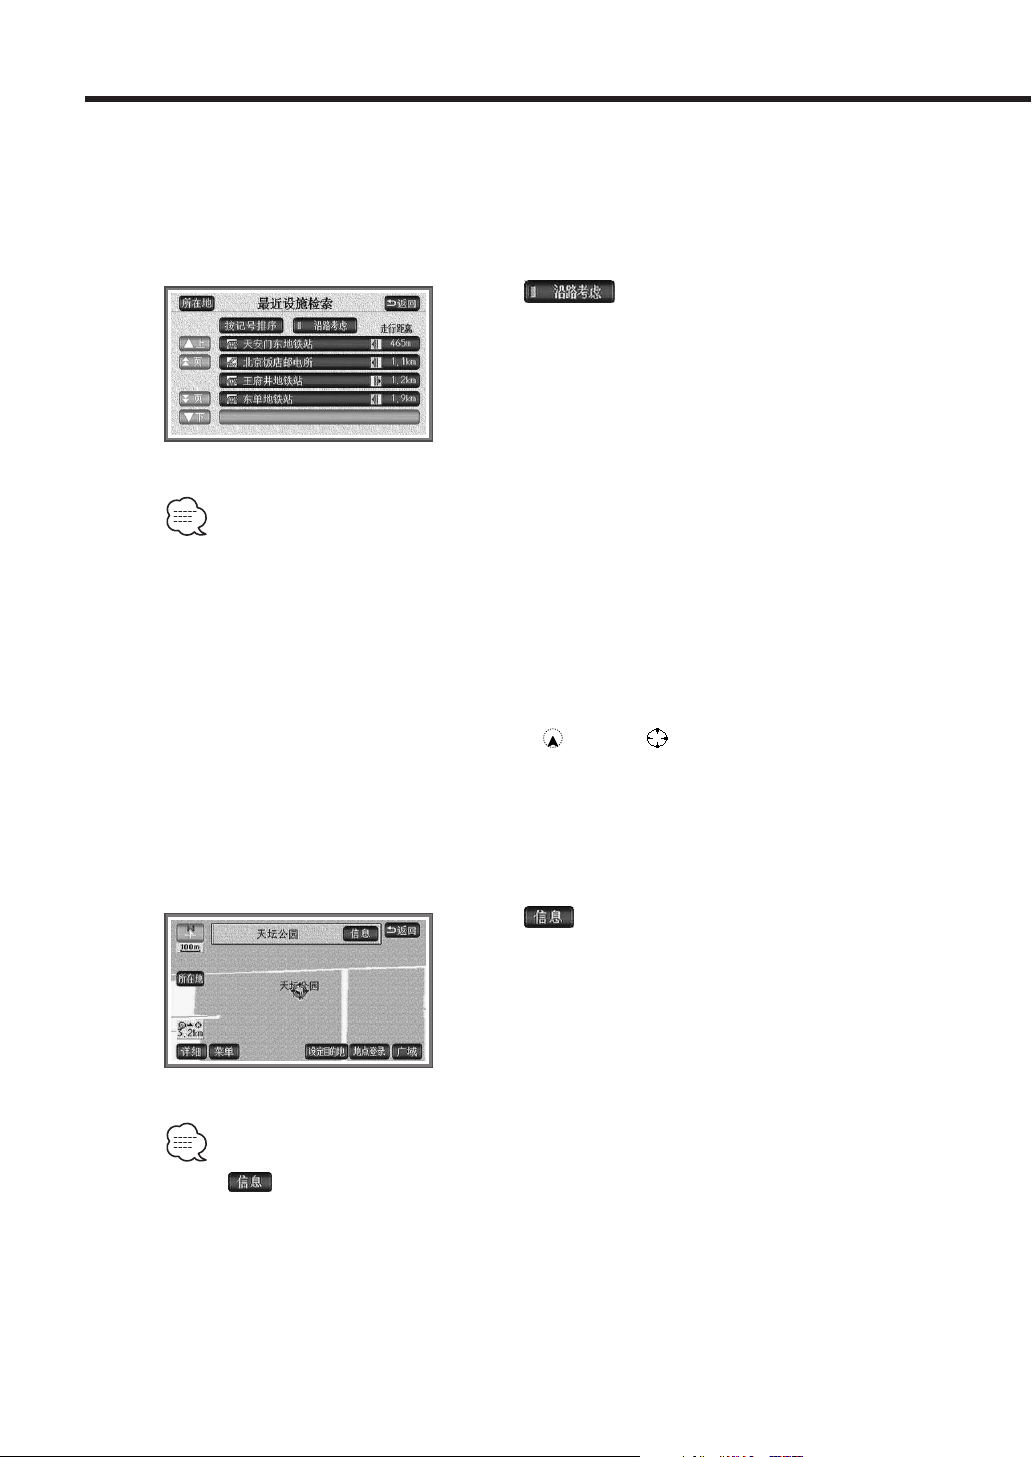
■ When displaying Lists in consideration of routes
When destination(s) are set up, lists with distances, directions combined with routes can be shown.
In this case, distances are displayed with the roads and distances and the displayed marks show
which side their facilities are located.
1
Select .
When the list in consideration of routes is shown, the
operation indicator lamp turns green.
• When the displayed map has no routes displayed on it, the list in consideration of routes can
not be displayed.
■ When displaying facility information
Names of facilities located near the current position or cursor , or the slant distance and
direction from can be displayed.
1
Select marks for facilities.
Names of the facilities and the slant distances from the
current position will be displayed.
2
Select .
Details of facilities will be displayed.
• When is not displayed, information of the facilities is not included in the map disc.
Basic Operations
Page 11
English
|
11
Marks and Controls on Scrolling Map screen
Touch the screen when the current map is displayed, so that the Scrolling Map screen appears.
1 Cursor
Indicates the position of the operation target.
2 button
Restores the Current Position Map screen.
3 button
Sets the cursor position for the destination. (see page
25)
4 button
Registers the cursor location to the memory point.
(see page 55)
• When touched at the other than the controls on the Scrolling Map screen, the map is scrolled
to moves to the location of the cursor.
•The scale (see page 6) or the orientation (see page 7) of the map can also be changed on the
Scrolling Map screen.
Page 12
12
|
English
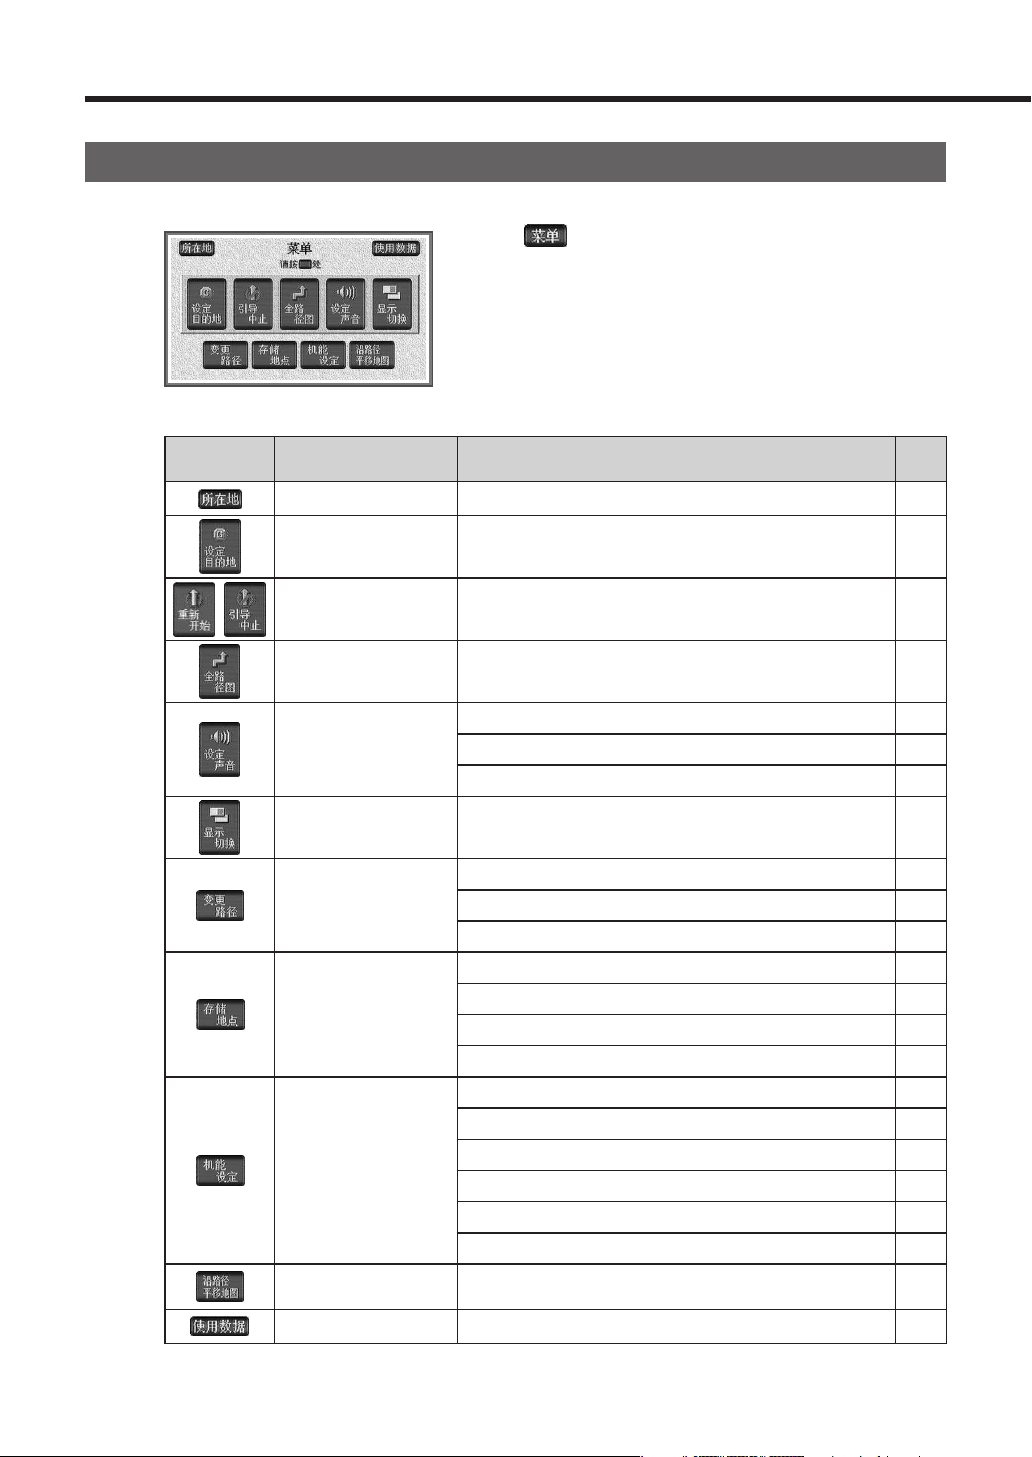
Operation of MENU screen
1
Select .
MENU screen will appear.
The following operations can be conducted from the MENU screen.
Button Items Functions pages
Current position Displaying the Current Position Map screen —
Setting of the destination Setting of the destination 25
/
Guidance stop/
Guidance restart*
Stop and restart of navigation of destinations 37
All of routes* Display entire route 26
Voice Guidance Setting
Adjusting of the volume 13
Setting of the automatic volume switch 13
Setting of the voice guidance in other modes 14
Display switching Switching of the twin-screen display and the single-screen display 15
Route changing
Addition, sorting and clearance of destinations 29
Designation, correction, cancellation of roads to pass 33
Changes of searching conditions 36
Memory points
Registration, correction, clearance of memorized locations 55
Registration, correction and clearance of specially memory points 62
Registration and clearance of your home address 54
Clearance of destination history records 52
Navigation setting
Correction 50
Setting another automatic search 48
Setting the average vehicle speed 49
Setting expected arrival time display 48
Setting of the navigation voice in another mode 14
Switching of map display colors 48
On-route scroll* Scrolling to the destinations and near-by facilities 43
Used data Provision of information on the map from DVD-ROM 53
* When the destinations are not set up, inversion (tone down) takes place.
Basic Operations
Page 13
English
|
13
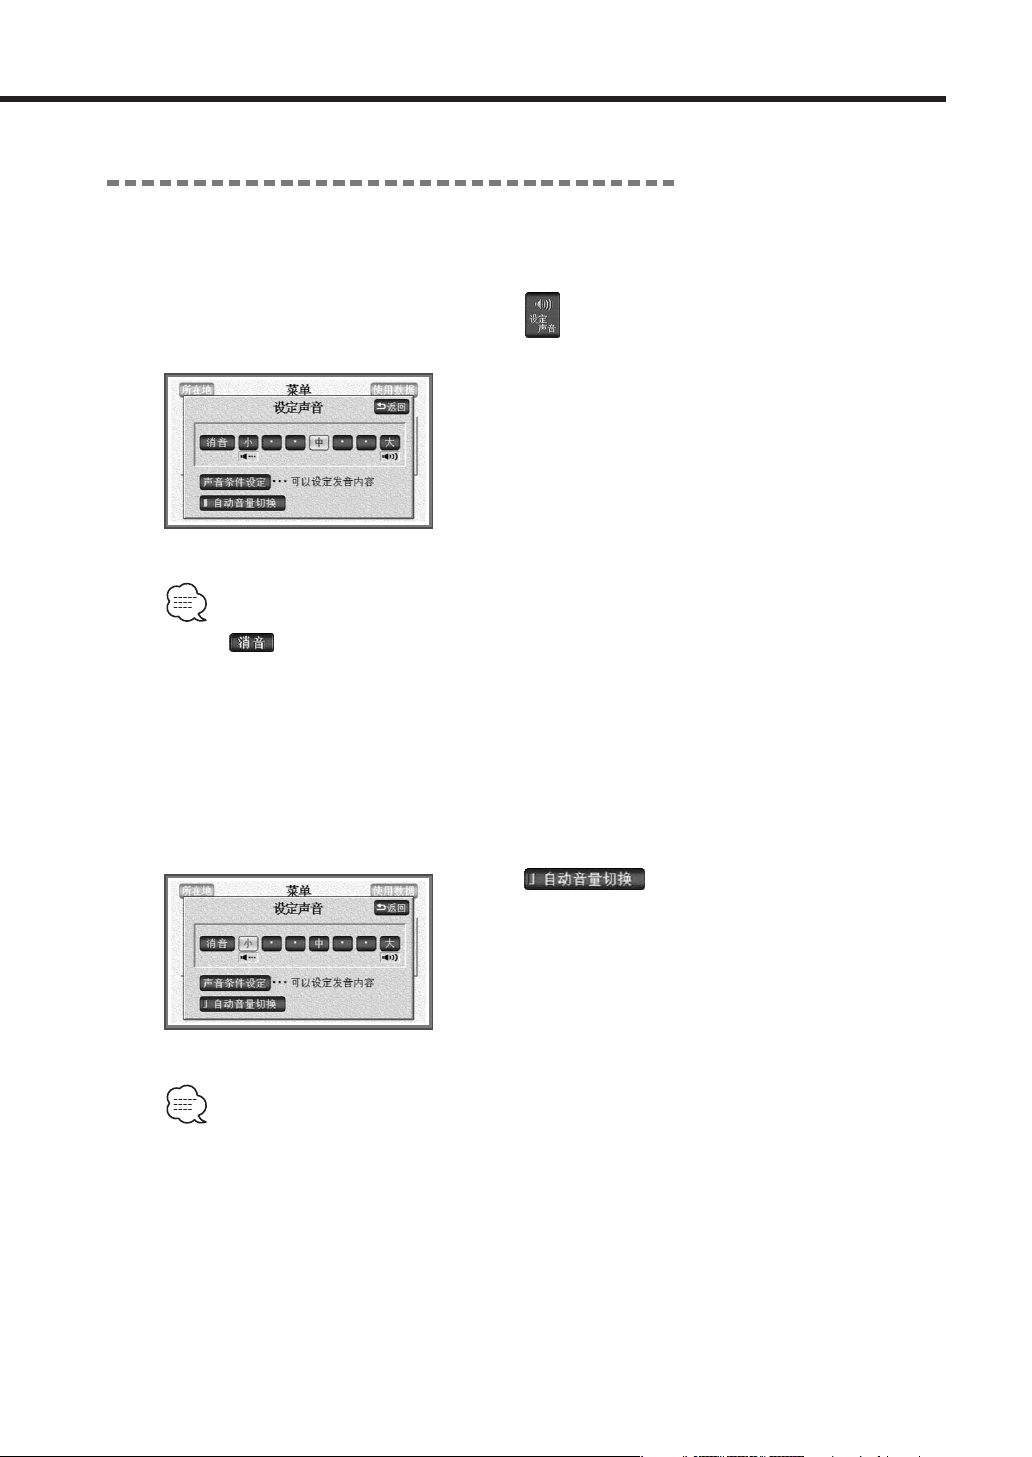
Adjust the volume of voice guidance
■ When adjusting the volume
The navigation volume is adjustable.
1
Select on the MENU screen.
2
Select each button for the volume adjustment.
The button turns green when selected.
•Select to turn OFF the voice guidance. If one of the volume buttons is selected when the
voice guidance is OFF, the voice guidance turns ON.
■ When setting up the automatic volume adjustment
The set volume can be set to be raised one level higher automatically while driving at high speed.
1
Select .
When turned ON, the operation indicator lamp turns
green.
•The volume is raised one level higher automatically when the vehicle speed becomes faster tan
about 80km/h, and the volume is restored when lower than about 70km/h.
Page 14
14
|
English
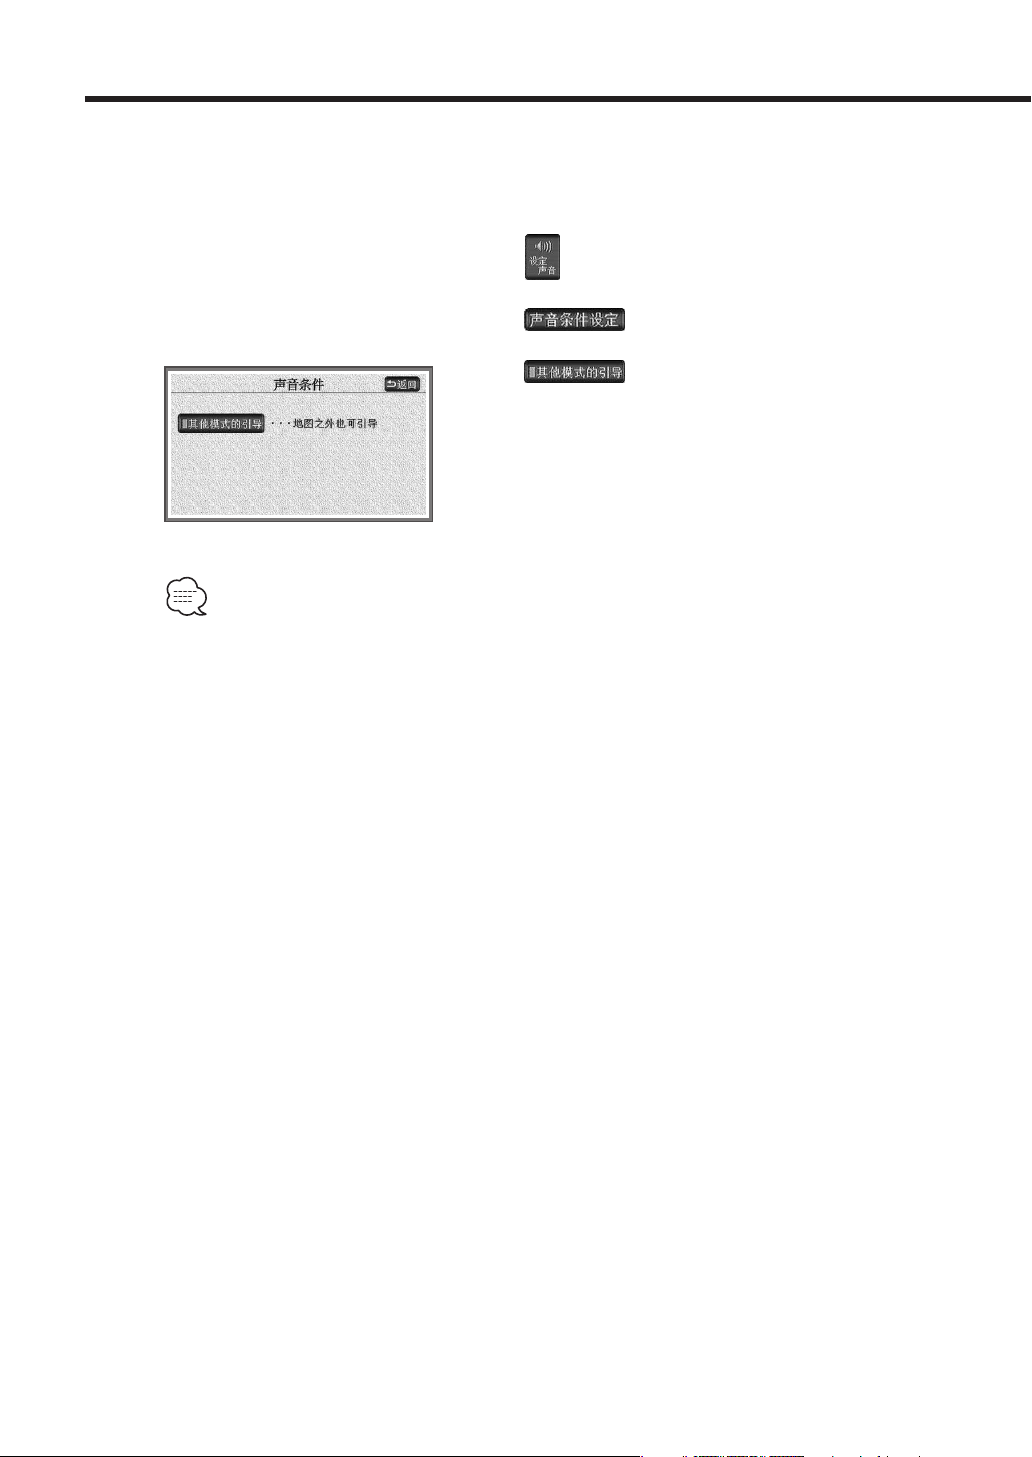
■ Set the sound in other modes
It is possible to choose whether the voice guidance is turned ON or OFF when switched to other
modes.
1
Select on the MENU screen.
2
Select .
3
Select .
When turned ON, the operation indicator lamp turns
green.
•It is also possible to switch by using the operation showed in <Setting Navigation> (see page
48).
• When you approach to a guide point while listening to another sound source, the voice
guidance of the Navigation System starts automatically.
Basic Operations
Page 15
English
|
15
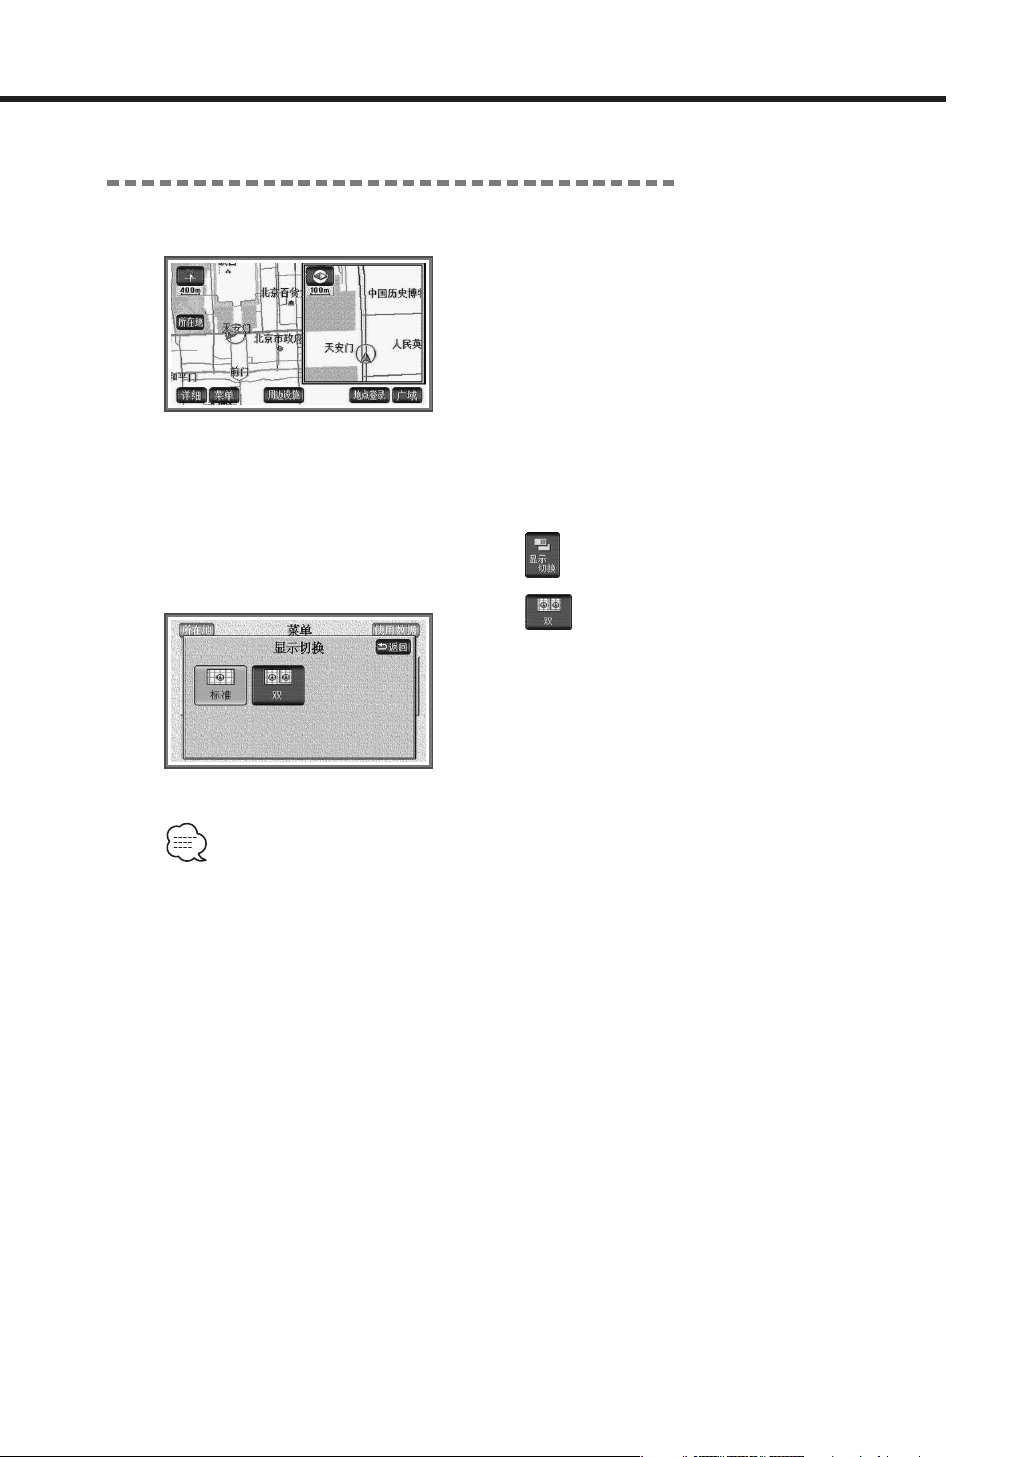
Switching to the twin-screen display
When maps are displayed, the following is possible by splitting the screen into two vertically.
Example:
Display using different scales between the right and left
frames, the heading-up display and the North-up display,
ON and OFF display of facilities.
■ When switching to the twin-screen display
1
Select on the MENU screen.
2
Select .
Two maps are displayed on the screen.
The selected switch turns green.
•The left map can be operated in the same way as a single screen. When operating the right
map, touch it first.
• When the twin-screen display is ON, one-touch scrolling function is available only on the left
screen.
•The single-screen display for maps such as all the route-maps called up for setting destinations
will replace the twin-screen display, however once switched to the Current Position Map screen,
the twin-screen display will be restored.
Page 16

16
|
English
■ When switching to the single-screen display
1
Select on the MENU screen.
2
Select .
• When switching to the twin-screen display again, the maps with the scale from the previous
twin-screen display will appear.
Basic Operations
Page 17
English
|
17
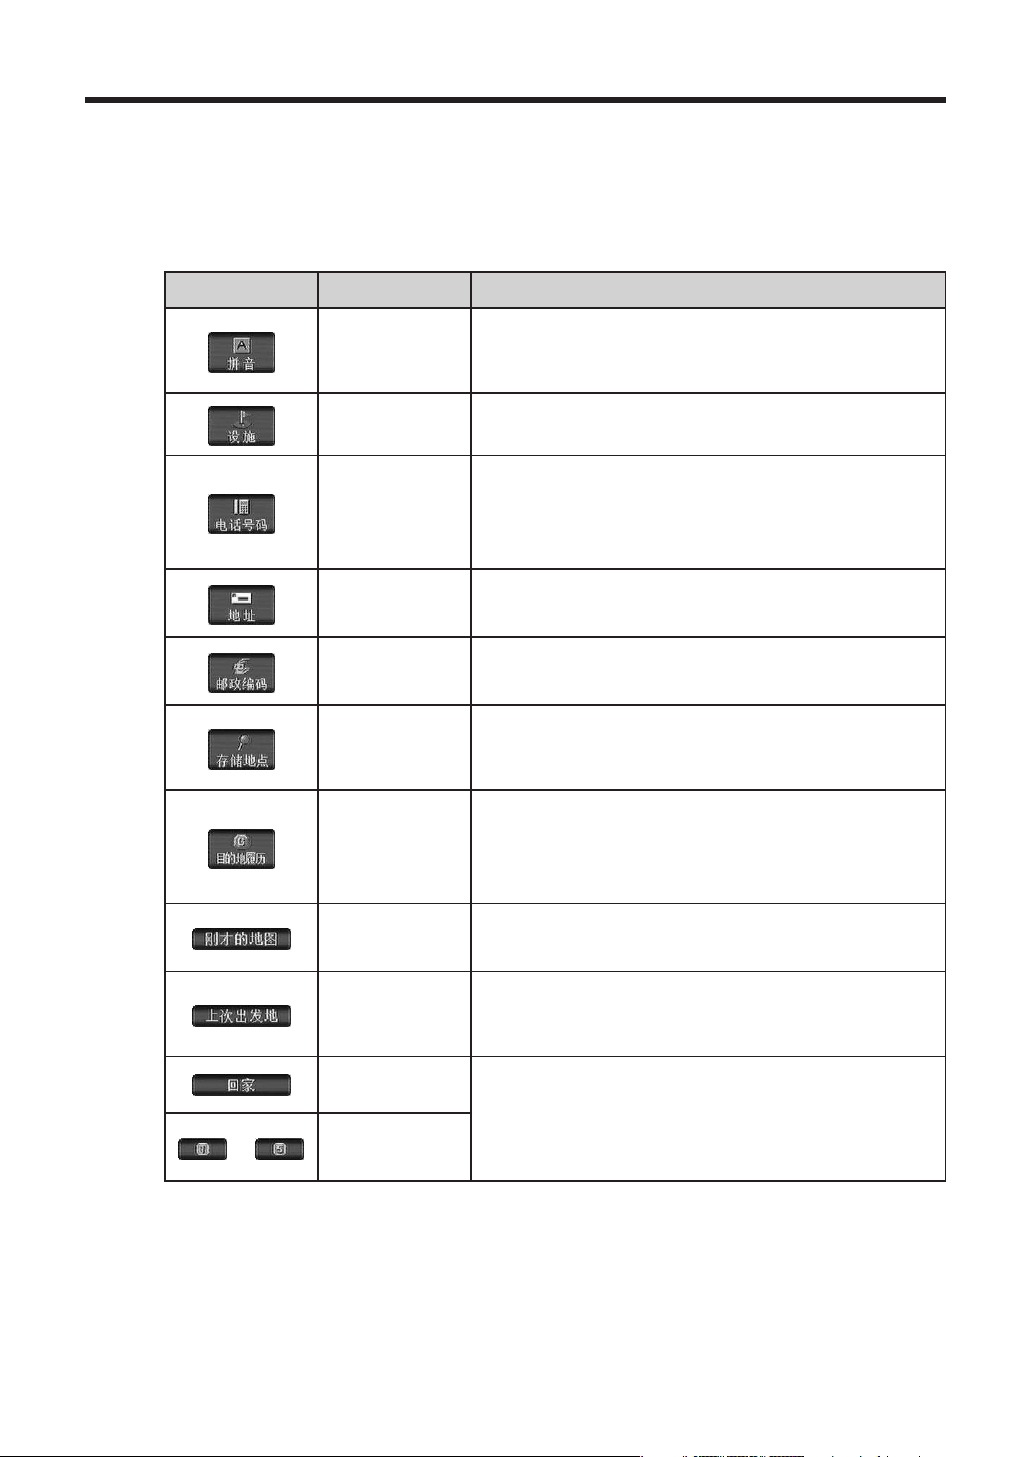
When setting and additions of destinations, registration of the home, memory points and specially
memory points are performed, various ways can be used to call up maps and display them.
As for the procedure to select the way to call up maps, please refer to the concerned pages for each
item.
Buttons Items Functions
The order of the
syllabary
Entering facility names enables maps to show surroundings of the
facilities. The maps of the area can be displayed by entering the
addresses. (see page 18)
Facilities
It is possible to select facilities from various categories and display the
maps of the surroundings. (see page 21)
Telephone No.
It is possible to enter a telephone number and display the map of
surroundings there.
It is also possible to display the map of the area where the telephone
number is used. (see page 22)
Addresses
It is possible to enter an address to display its location (or its area). (see
page 23)
Postal codes
It is possible to enter a postal code and display the maps where the code
is used. (see page 24)
Memory points
It is possible to display maps of surroundings of a memory point.
(It is limited to the case where such a memory point is registered.)
• <Registering memory points> (see page 55)
History of
destinations
It is possible to display maps of surroundings of destinations set in the
past.
(It is limited to the case when their destination history is registered.)
• <History of destinations> (see page 52)
The previous maps
It is possible to display maps for the previous navigations before
displaying the menu and the screen for setting destinations.
The previous
starting point
It is possible to display the map of the starting point for which the route
guidance is requested. (It is limited to the case where a guidance has
already been provided.)
Returning home
Route search will start with the registered point as destinations. (It is
limited to the case where each point is registered.)
• <Registering your home> (see page 54)
• <Registration of special memory points> (see page 62)
—
Special memory
Calling up maps
Page 18
18
|
English
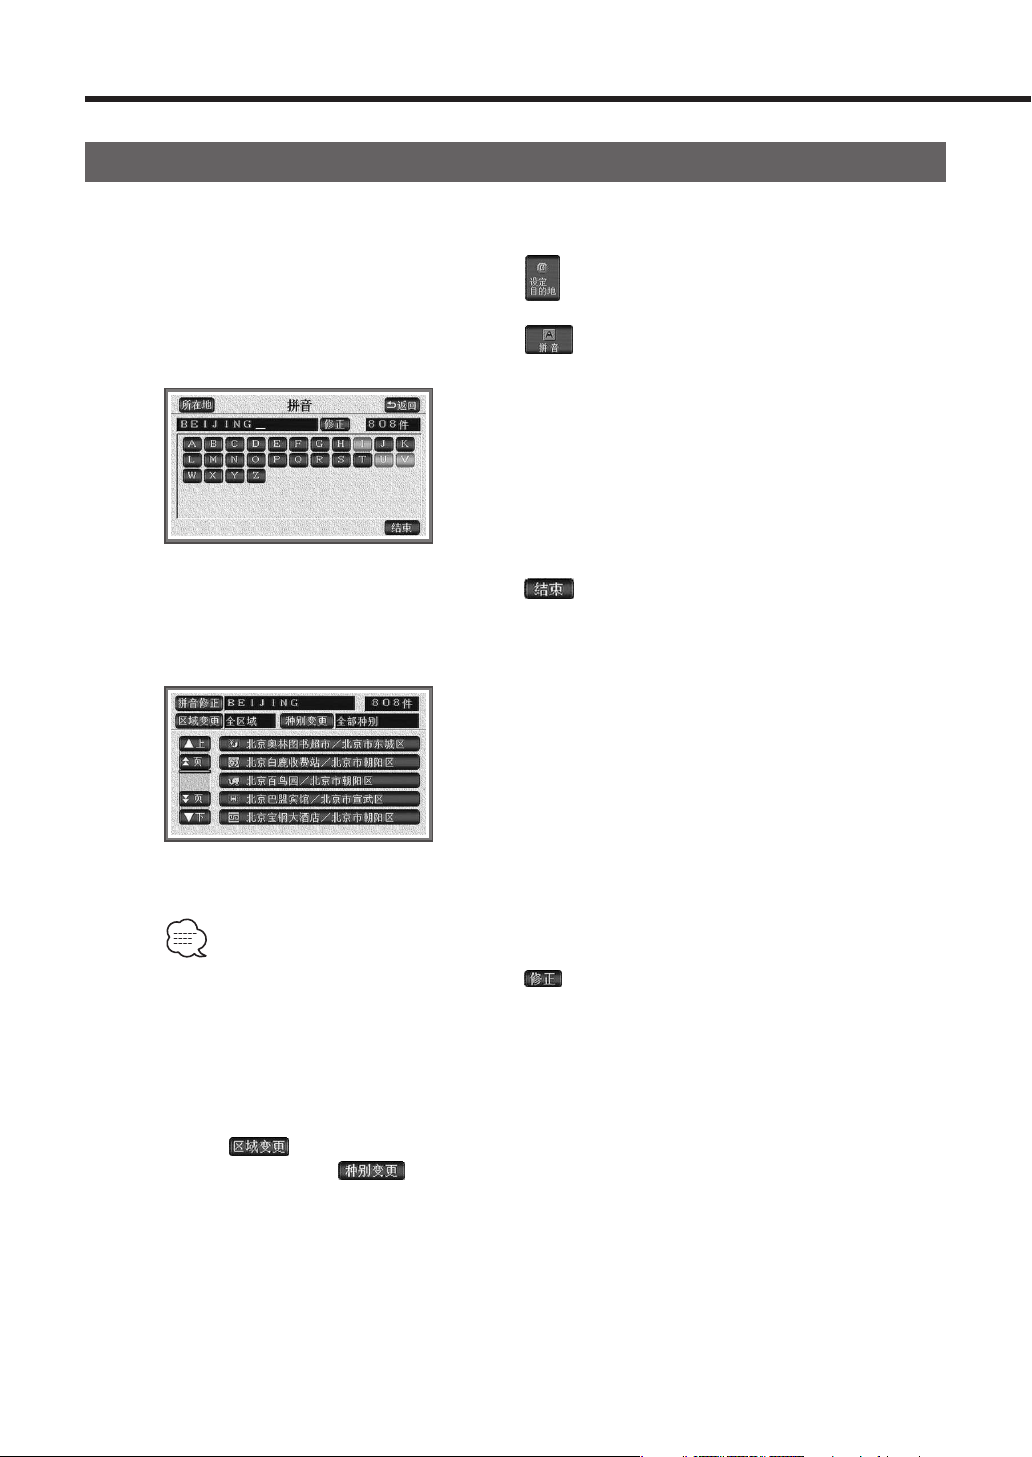
Calling up according to the syllabary
It is possible to enter a facility name that you only know partly using syllabary and narrow the number
of candidates down in terms of the category, the area and names of cities and towns.
1
Select on the MENU screen.
2
Select .
3
Enter the facility name (or its address) by selecting
one character by one character.
4
Select .
Then, the screen of the facility list searched by the
entered characters will be displayed.
5
Select the name of the facilities in the list.
The map will appear.
• When wrong characters are entered, select and they will be deleted one character by one
character.
• When no candidate for a certain search exists, buttons of characters for the candidate are
inversed and it is impossible to enter it even if selected.
•Every time one character is selected, the number of facility names to be searched is indicated.
• When the candidates are reduced to 5 while searching, the screen for the facility list with facility
names appears.
•Select to designate the area of the facility to be displayed on the facility list screen (see
page 19) and select to designate the category of facilities. (see page 20)
•As for the operation of displayed maps, refer to <Calling up maps> (see page 17).
Calling up maps
Page 19
English
|
19
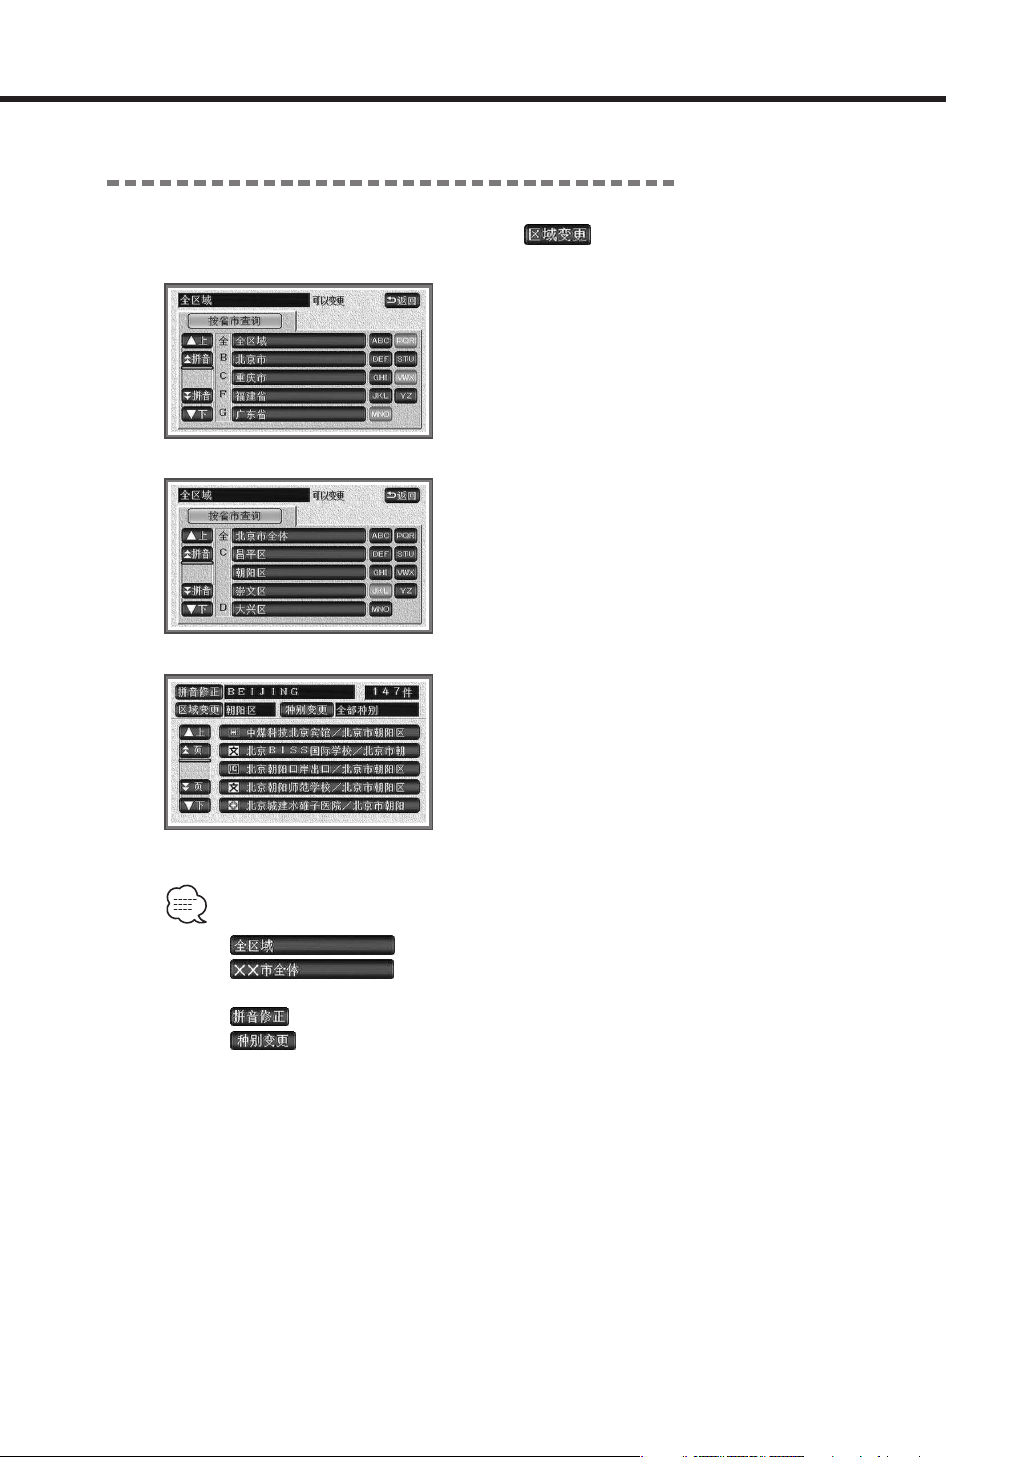
When narrowing down according to the area
1
Select on the facility list screen.
2
Select the name of city where the facility exists.
3
Select the name of cities, prefectures or wards in the
list.
4
Select the name of the facilities in the list.
•Select in the step 2, and the facility list screen is restored.
•Select in the step 3, and the screen for the designated facility lists in terms
of cities will be displayed.
•Select , the character entry screen will be restored.
•Select , and categories of facilities to be displayed on the facility list screen can be
designated. (see page 20)
•As for the displayed maps, refer to <Calling up maps> (see page 17).
Page 20
20
|
English
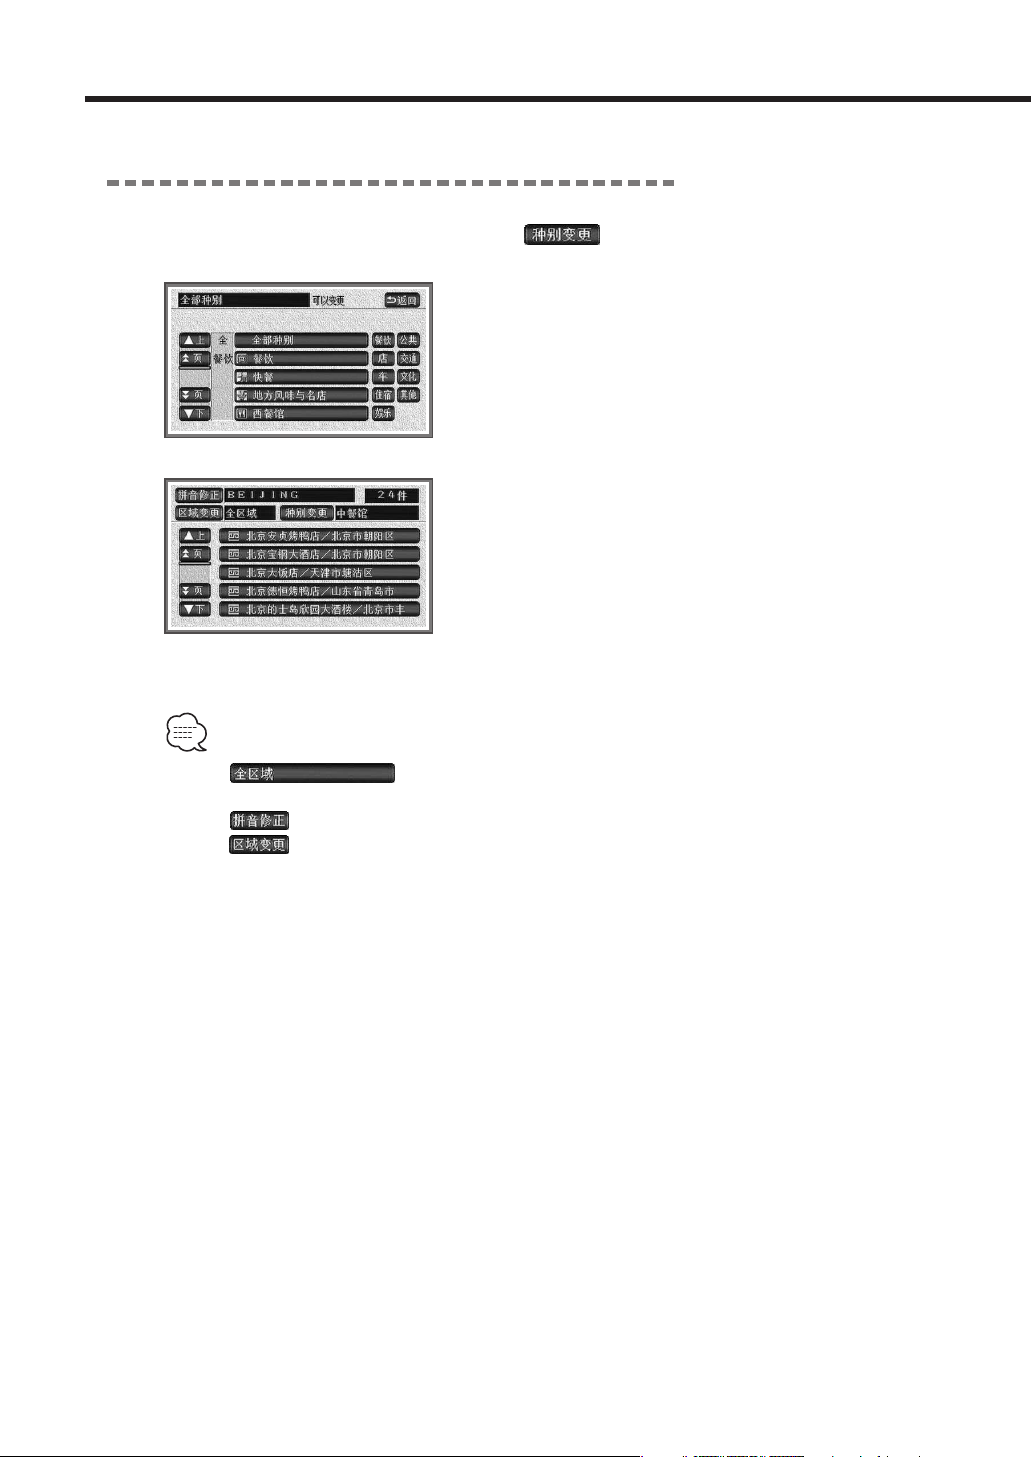
When narrowing down according to the categories of facilities
1
Select on the facility list screen.
2
Select the category of facilities to be displayed.
3
Select the name of the facilities in the list.
•Select in the step 2, and the facility list screen (the previous page 3) will be
restored.
•Select , the character entry screen will be restored.
•Select , and the area to be displayed on the facility list screen can be designated. (see
page 19)
•As for the displayed map, refer to <Calling up maps> (see page 17).
Calling up maps
Page 21
English
|
21
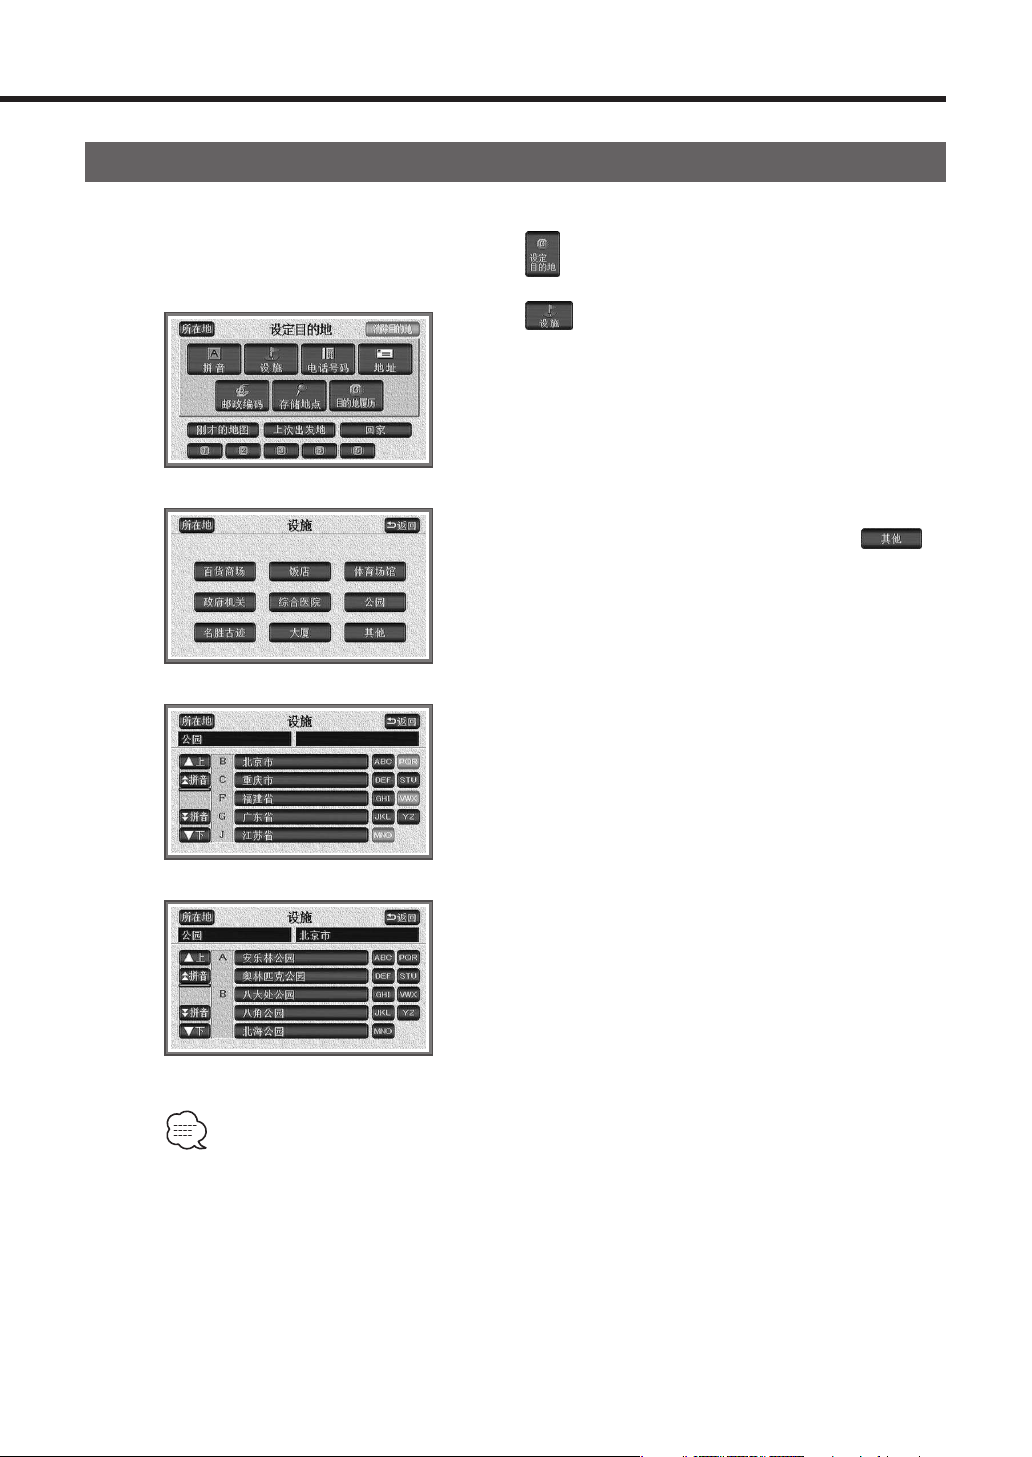
Calling up maps in terms of facilities
When the facility name is known, the map can be called up by selecting from the facility category.
1
Select on the MENU screen.
2
Select .
3
Select the category of facilities to be displayed.
Other categories will be displayed by selecting .
4
Select the name of the city where the facility exists.
5
Select the name of the facility to be displayed.
The map will appear.
•In the step 3, names of prefectures, cities, and wards can be displayed again in some cases. At
this time, select and touch the name among those as well.
•As for the displayed maps, refer to <Calling up maps> (see page 17).
Page 22
22
|
English
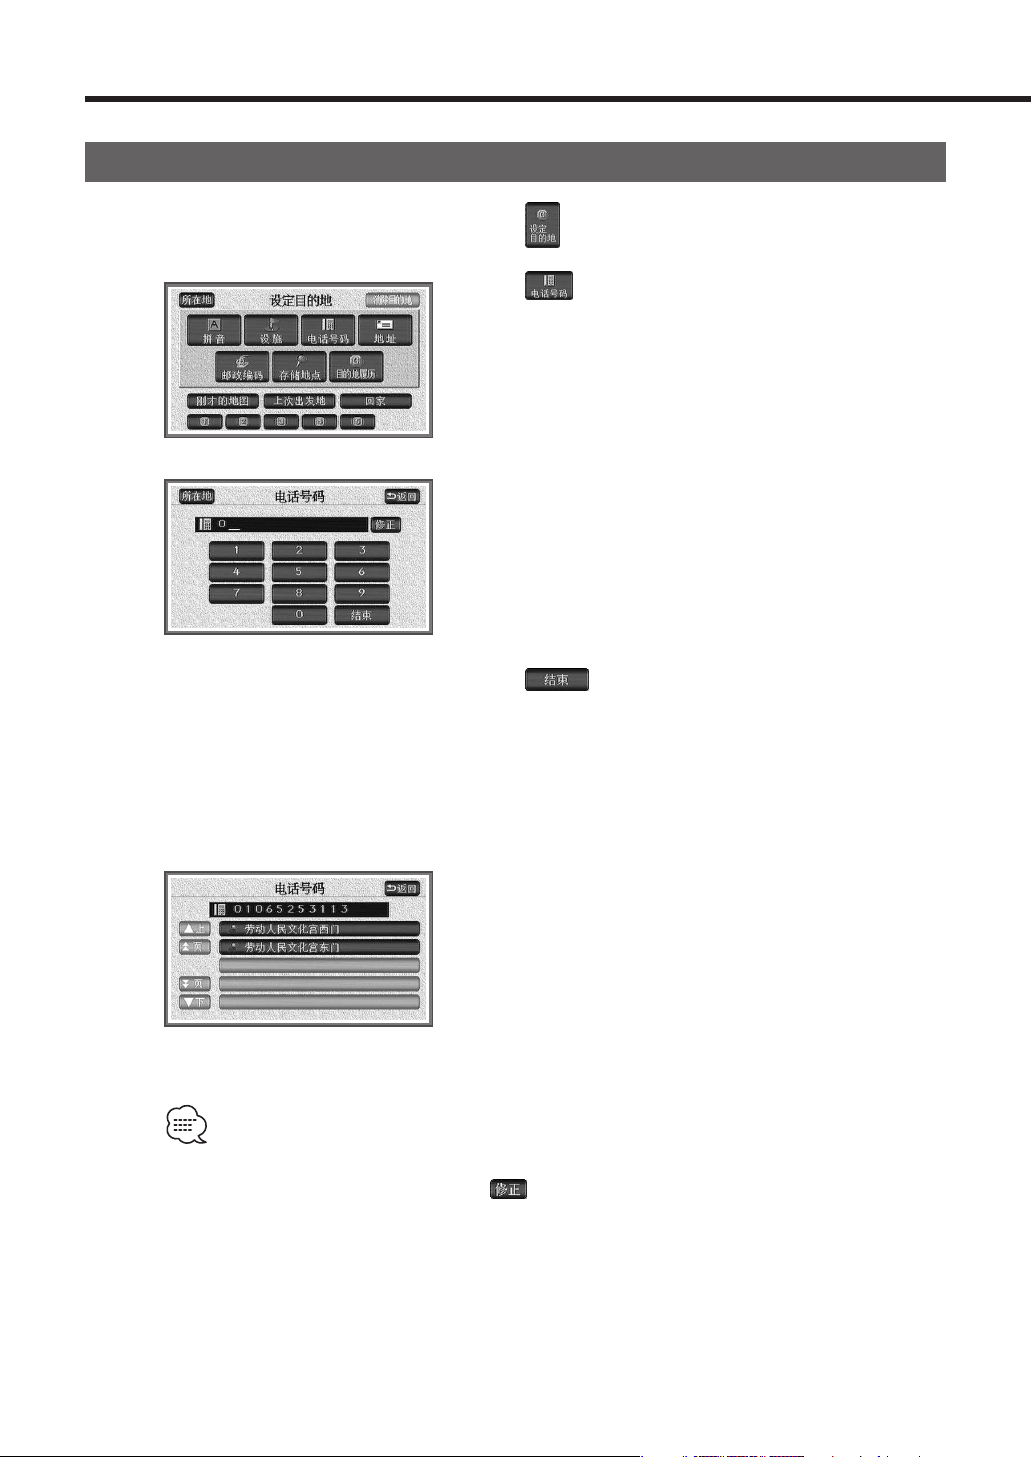
Calling up maps in terms of telephone numbers
1
Select on the MENU screen.
2
Select .
3
Enter numerals one by one.
4
Select .
The map searched in terms of the entered telephone
number will appear.
When multiple places with the identical telephone
number exist, the screen to select the specific facility
name will appear.
5
Select the name of the facility to be displayed.
The map searched using the entered telephone number
will appear.
• Enter the area code of such telephone numbers first.
• When entering wrong numbers, select , and they will be deleted one by one.
•Multiple facilities having the identical names can be displayed.
•As for the displayed maps, refer to <Calling up maps> (see page 17).
Calling up maps
Page 23

English
|
23
Calling up maps in terms of addresses
1
Select on the MENU screen.
2
Select .
3
Select place names to be displayed in the order of
provinces, cities, prefectures, wards and highways.
The map will appear.
Page 24

24
|
English
Calling up maps in terms of postal codes
1
Select on the MENU screen.
2
Select .
3
Enter numerals one by one.
4
Select .
The maps that have been searched in terms of the postal
code will appear.
• Enter 6-digit postal codes.
• When entering wrong numerals, select , and they are deleted one by one.
•As for the displayed maps, refer to <Calling up maps> (see page 17).
Calling up maps
Page 25

English
|
25
Set destinations and conduct route searches
Set destinations and search routes
Set destinations from the screen for setting destinations.
1
Place the cursor at the point for the destination, and
select .
<Calling up maps> (see page 17) is convenient to use.
2
Select .
Destinations will set at the points of the cursor using
mark and route searching will begin.
• Besides <Calling up maps>, it is possible to set up
destinations by scrolling maps manually on the scrolling
map screen and moving the cursor to the destination. In
this case, select on the scrolling map screen.
In this case, maps larger than 1:100,000-scale map should be
used.
•If the destination is located on express ways or in places
where it is impossible to enter, the following messages will
appear.
If you wish to set the destination at the place, select
, and if another road will be the destination,
select .
•If a route search is conducted on an express way or a toll road, routes from the nearby open
road can be searched. In such cases, conduct a route search again. (see page 46)
•If one or more destination have already been set, the
following message will appear.
In order to clear the destinations that have already been
set and set a new destination, select . In order
to keep the destinations that have already been set and set
additional destinations, select .
•Select for the map where the object is difficult to pinpoint in the search, and the cursor
become movable.
•Details of facilities are only displayed when maps are called up by the ways described in the
previous page.
•Details of facilities are not displayed in some cases.
Setting routes and route navigation
Page 26

26
|
English
Displaying whole route
Once route searches have been completed, the screen for the whole route will appear.
Regarding display
The display screen will show the whole route to the final destination.
1
Indication of distances
of express ways
The distances of all the toll roads to pass through to the destination are indicated.
2
Indication of distances The distances to the destinations will be indicated.
3
Indication of
estimated time arrival
Estimated time arrival at the destinations will be displayed.
4
Indication of
remaining distances
Remaining distances to the destinations through the displayed routes are
indicated.
When 2 or more destinations are set, touch the remaining distance display, and the
destinations with the remaining distance indication will be switched.
Regarding Controls
The following are possible by touching the touch switch on the screen for displaying the
whole routes.
5
Displays the other routes for selection. (see page 28)
6
Changes search conditions.
7
Starts the guidance or demonstrations. (see page 37)
After destination navigation, the screen with the current point will be restored.
8
Information on routes (Information on guided roads) can be displayed. (see page
27)
• When is selected after the map with whole route is displayed, or when no operation is
performed for more than about 3 seconds after driving, automatic destination navigation will
begin.
•Routes to be searched are reference routes to periphery of the destinations. They are not always
the shortest route, the fastest route or less traffic-jammed route.
• Estimated time arrival is calculated based on the average vehicle speed (see page 49), so a little
error can occur.
•Even after destination navigation, whole route can be displayed by selecting
on the MENU
screen.
Setting routes and route navigation
Page 27

English
|
27
■ When displaying route information
It will include road types, distances or expected passing times.
1
Select on the Whole Route screen.
Route information is displayed separately in terms of
destinations or road types.
Each of such separated route information has the road
name and its distance.
2
Select .
The respective maps for the set points will appear.
•The current position of the vehicle will be indicated on the route information screen if it is on
the route.
• When the current vehicle position is not on any of the routes (when deviated from the routes),
the route information will be displayed from the starting points of such routes.
• Estimated time arrival are calculated based on the average vehicle speed (see page 49), so some
error may occur depending on driving conditions.
Page 28

28
|
English
■ When displaying 5 routes to compare them
It will include road types, distances or expected passing times.
1
Select on the Whole Route screen.
The 5 routes will be displayed with 5 different colors.
2
Select .
The list of distances of the 5 routes and time periods
required for driving each route.
3
Select a route.
The screen for the whole route of the selected map will
appear.
•In the following cases, it is impossible to display the 5 routes at the same time.
- In the case two or more destinations are set.
- In the case the passing points (or passing road) are designated.
- After destination navigation begins.
•Time periods required for running the routes are calculated based on the average vehicle speed
(see page 49), so some error may occur depending on driving conditions.
Setting routes and route navigation
Page 29

English
|
29
Changing routes
It is possible to change the routes that have been searched. Select on the MENU screen or the
whole route display screen, and the route-change screen will appear.
• Adding destinations (see page 29)
• Sorting destinations (see page 31)
• Clearing destinations (see page 32)
• Setting of passing roads (see page 33)
• Correcting of passing roads (see page 34)
• Canceling designation of passing roads (see page 35)
• Changing search conditions (see page 36)
Adding destinations
Additional destinations can be set after setting destinations. In the following cases, additional
destinations will be set.
- When setting passing points between the set destination and the current point.
- When changing the set destination to a passing point and setting a new destination.
1
Select on the MENU screen or the Whole
Route screen.
The screen for changing routes will be displayed.
2
Select of destinations and passing
destinations on the screen for changing routes.
3
Display the map including the points where
destinations will be set.
Refer to <Calling up maps> (see page 17).
4
Select .
The destinations will appear at the position of using
marks .
<The screen for changing routes>
Page 30

30
|
English
5
Select of road sections.
6
Select .
Route search will be performed again.
To set more destinations, select and repeat steps
1 to 4.
•It is possible to set to a maximum of 5 destinations.
When 5 destinations have already been set, delete unnecessary destinations. (see page 32)
•In the case the roads to pass through are designated, the following message may appear. If
you wish to cancel the setting of roads to pass through, select , and if not, select
.
Setting routes and route navigation
Page 31

English
|
31
Sorting destinations
It is possible to sort the multiple set destinations that have been set and search them again.
1
Select on the MENU screen or the Whole
Route screen.
2
Select of destinations and passing
destinations on the screen for changing routes.
3
Touch destination names in the order of visiting
destinations.
The new order will be displayed to the right of the
touched destination names.
When making a mistake, select , and the order of
the selected destination names will be canceled.
4
Select .
5
Select .
Route searches will be conducted again.
•In the case the roads to pass through are designated, the following message may appear prior
to step 3. If you wish to cancel the setting, select and if not, select .
•In the case you have selected in step 3, it is not necessary to select in the step 4.
The screen for step 5 will appear automatically about 5 seconds later.
•In the case only a few of the destinations are selected in step 3 and is selected in step 4,
the destinations selected in the step 3 will come first (lower).
Page 32

32
|
English
Setting routes and route navigation
Clearing destinations
It is possible to clear one of the multiple set destinations. It is also possible to clear all the
destinations at the same time.
1
Select on the MENU screen or the Whole
Route screen.
2
Select of destinations and passing
destinations on the screen for changing routes.
When only one destination has been set, the screen 3 will
appear.
3
Select the destination names.
Select when you wish to clear all the destinations.
4
Select .
If only one destination has been set when all the
destinations are cleared, the screen indicating the current
point will appear.
5
Select .
Route searches will be conducted again.
•There is no way to restore deleted destinations. Operations should be carefully performed in
order not to make mistakes.
•If you clear all the destinations, route navigation will become impossible. It is necessary to set
the destinations and conduct route searches again.
•The screen for step 3 will also appear by selecting on the MENU screen for setting
destinations.
Page 33

English
|
33
Setting passing roads
It is possible to set a maximum of 2 passing roads (passing points) on the route.
1
Select on the MENU screen or the Whole
Route screen.
2
Select of passing points (designation of
passing roads) on the screen for changing routes.
3
Scroll the map to the position for designating passing
roads.
4
Select .
5
Select to select passing roads.
When designating the displayed roads, select .
6
Select .
The passing roads will be designated with marks ◆.
7
Select of the road section to be designated.
8
Select .
Route searches will be conducted again.
• When the maps shown in step 6 have little information, no roads may be selected even if
is selected.
• When the set destination is only one and no roads to pass through are set, operations for step 7
is not necessary.
Page 34

34
|
English
■ When correcting the passing roads
1
Select on the MENU screen or the Whole
Route screen.
2
Select of passing points (designation of
passing roads) on the screen for changing routes.
When only one point has been set, the screen 3 will
appear.
3
Select a button of passing points to correct.
The map will appear.
4
Scroll the map to the position for designating passing
roads.
5
Select .
6
Select to select passing roads.
When designating the displayed roads, select .
7
Select .
The passing roads will be designated with marks.
Setting routes and route navigation
Page 35

English
|
35
8
Select .
Route searches will be conducted again.
• When the maps shown in step 6 have little information, no roads may be selected even if
is selected.
■ When canceling designation of passing roads
1
Select on the MENU screen or the Whole
Route screen.
2
Select of passing roads (designation of
passing roads).
When only one point has been set, the screen 3 will
appear.
3
Select a button of passing positions to cancel.
To cancel designation of all the passing roads, select
.
4
Select .
If is selected, the original screen will be
restored.
5
Select .
Route searches will be conducted again.
Page 36

36
|
English
Changing search conditions
It is possible to change search conditions and search again.
1
Select on the MENU screen or the Whole
Route screen.
2
Select on the screen for changing routes.
3
Select search conditions (route names) for each road
section.
4
Select .
Route searches will be conducted again.
Setting routes and route navigation
Page 37

English
|
37
Route Guidance
Initiate route guidance
Route guidance will be performed by screen display and voice (Route guidance).
1
Select on the Whole Route screen.
Route guidance will start.
When selecting after the whole route map is
displayed or when no operation has been conducted for
more than 3 seconds, automatic destination guidance
will begin.
■ When cancel or resume route guidance
1
Select on the MENU screen.
•Even if destination guide is suspended, destinations will not be cleared.
•To resume the suspended destination guide, select on the MENU screen.
Page 38

38
|
English
Open road route guidance
1
Route indication
When destinations are set, routes to them will be indicated.
• Guidance is performed only when the current position is placed on the blue
indication.
There are 2 kinds of route indicating colors as follows:
- Blue : Normal indication
- Light blue : Narrow street indication
■ Narrow street indication
Even narrow streets can be searched around the current position and the
destination.
• Destination guidance for narrow streets by means of voice guidance and screen
display (information on intersections) will not be conducted. Impassable routes
can be searched because of traffic controls (one-way traffic). Be sure to follow the
traffic controls.
2
Indication of estimated
time arrival/
Marks for directions of
destinations
The following marks will be displayed depending on situations.
■ Indication of estimated times arrival
During destination guidance, estimated times arrival will be indicated.
■ Marks for directions of destinations
When deviated from the route, the directions of the destinations will be indicated.
3
Indication of remaining
distances
Distances from the current position to the destinations will be indicated.
• During destination guidance, distances by passing the displayed route will be
indicated.
• When deviated from the route, the slant distance will be indicated.
• As for switching of the remaining distance indications, see page 39.
•It is also possible to indicate estimated times arrival. (see page 26)
Setting routes and route navigation
Page 39

English
|
39
■ Information on intersections
When the vehicle is coming closer to an intersection with a guide point, information on the
intersection will be provided with on the current position screen where route guidance is
going on (when the current position is on the route). When the vehicle is coming closer to a
forked intersection (within about 300m), the screen for information on intersections will appear
automatically.
1 Lane indication
Lanes of passing or branched intersections will be
indicated.
2 Remaining distance indication
Distances to the intersections will be indicated.
3 Guide points
Guide points will be indicated at the intersections on
the screen for information on intersections.
4 Intersection enlargement
•Intersections without any information on the map disc will have no indication of lanes or
intersection names.
• Lane indications can be different from the actual intersections.
•Information on intersections are always not provided in the following cases.
- Just after beginning of destination guidance
- At surroundings of destinations
•The screen for information on intersections can appear earlier or later.
• When the vehicle is approaching the next branched intersections, the screen for information on
intersections will appear in succession.
• When the screen for information on intersections is displayed, the intersections that will branch
off will be indicated, but those before the branched intersections will not be provided.
The intersections which do not
branch out
Branched intersections
(The screen for information on
intersections)
Page 40

40
|
English
Setting routes and route navigation
■ In order to switch indications of remaining distances
It is possible to switch such remaining distances on the Current Position Map screen (only when the
current position is on the route) while destinations are guided when 2 or more destinations are set.
1
Select .
The destinations will be switched every time it is selected.
•Values of distances to destinations will vary depending on situations.
When the current position is on the route, the distance for the route is indicated, and when it is
deviated from the route, the slant distance is indicated.
•It is impossible to switch the screens when the current position is deviated from the route.
Page 41

English
|
41
Route guidance on expressway
When driving on an express way and the vehicle is approaching a branch point (interchange exit
(IC), junction (JCT)), the screen for expressway branch point information will appear automatically.
1 Distance indication
Distance to branch points will be indicated.
2 Indication of branch point names
Names of IC exits or heading cities and towns from
JCT will be indicated.
3 Canceling guidance
Close the screen for expressway branch point
information.
Select to display the screen again when
necessary.
Page 42

42
|
English
Setting routes and route navigation
Voice route guidance
When the vehicle is approaching an intersection during destination guidance while destinations are
guided, a branch point or a destination, voice guidance informs you of the remaining distance and
which direction to turn.
1
Select .
Voice guidance will be given according to the distance to
the branch point.
An example of voice guidance while destinations are
guided.
• Before a branched intersection,
- About 300 meter ahead, on the right.
- You will see it on the right soon.
• When entering expressways,
- It can be seen on the left soon. The express way is
toward the front.
An example of voice guidance at arrival at a
destination.
• An example of voice guidance
- Here we are on the periphery of the destination. Voice
guidance will be completed.
•Voice guidance is only for reference.
• An example of this voice guidance is a generalized one and the actual voice guidance varies
depending on the road connections.
• When the current position is not identified correctly, voice guidance may not be performed or
delayed, or wrong voice guidance can be given.
•The volume of voice guidance can be adjustable. (see page 13)
•Even when switched to another mode (the screens other than those for navigation such as
input from external source or TV), voice guidance will be given. It is possible to disable voice
guidance. (see page 14)
Page 43

English
|
43
Scrolling the map along the route
The map can be automatically moved to the starting point or to the destinations along the route.
(On-route scroll)
1
Select on the MENU screen.
2
Select the control for scrolling.
: The map will be scrolled to the next
destination.
: The map of the next destination will be
displayed.
: The map will be to the previous
destination scrolled.
: The map for the previous destination will
be displayed.
: Movement of maps will be suspended.
: On-scroll will be terminated.
,
: The map movement will be fast forwarded
or backwarded.
• When the displayed map has no route indicated, on-route scroll is impossible.
•Select , scrolling to destinations or facilities along the route can be set up.
• When you wish to display a wide area map, on-route scroll for cannot be
performed.
,
: 1:50,000 scale map
,
: 1:12,500 scale map
Page 44

44
|
English
Setting routes and route navigation
■ When scrolling to the next facility
1
When selecting .
2
Select .
3
Select the facilities you wish to indicate on the on-
route scrolling screen.
It is only one facility that can be set.
Select , and marks other than those for
facilities that are displayed with the touch switch can be
displayed.
When a mistake is made, select .
4
Select .
•In the case on-route scroll will be performed until the next facility (Facilities can be touched only
when they are chosen.)
: The map will be scrolled until the next facility in the direction toward the destination.
: The map will be scrolled to the previous facility in the direction toward the starting
point.
: The map for the next facility will be displayed in the direction toward the destination.
: The map for the previous facility will be indicated along the route in the direction
toward the starting point.
•If select , map is scrolled to next destination.
Page 45

English
|
45
Demonstration (Demo)
After completion of route searches, it is possible to view demonstration of destination guidance
before it is started.
1
Keep selecting on the Whole Route map
display for more than 3 seconds.
2
If or is selected during the demonstration,
it is terminated and the screen for the current
position will be restored.
Driving during the demonstration will also cause it to
terminated and destination guidance will be started.
•After destination guide has started following the completion of route searches, it is impossible
to see the demonstration.
Page 46

46
|
English
Another route search
When you wish to change the searched routes, or the current position is not located on the route
(deviated from the route), route searches can be retried.
When the current position is indicated on the screen while the destination is guided (including the
case it is deviated from the route), route searches can be retried.
Routes to be searched again will vary by selecting the 7 items shown below.
Search for detours in the
surroundings *¹
Detours of the searched route will be searched around the current position. (Use the
detour when the searched route is impassable.)
• It cannot be conducted before the destination guidance.
Search for another road *²
Search from an expressway/Search from an open road
While driving on an open road in parallel with an expressway and the route on
the expressway is indicated or otherwise, route search for the other road will be
conducted.
• The route search cannot be conducted before the destination guidance.
*¹ When the vehicle is deviated from the route, they are not indicated.
*² Only when such a road is located where a toll road is in parallel with an open road and the route guide for it is
possible, it is indicated. When the vehicle is deviated from the route, it is not indicated.
Route names
The recommended routes Open routes will be searched from the current position to the next destination*⁴.
Routes with a priority given
to expressways
Routes will be searched with a priority on toll roads from the current points to the
next destination*⁴.
Routes with a priority given
to open roads
Routes will be searched with a priority on open roads from the current point to the
next destination*⁴.
Routes with a priority given
to the distance
Shorter distance routes will be searched from the current point to the next
destination*⁴.
Another route *³
Another route other than the other searched routes will be searched from the current
point to the next destination*⁴.
*³ When chosen from the 5 routes indicated simultaneously (see page 28), another route besides the recommended
routes will be searched.
*⁴ When interchanges (IC), passing roads are designated between the current point and the next destination, routes
will be searched between the current point and the designated interchange (IC), the passing roads.
•The second search may not be conducted because of road shapes, or the same route can be
searched even if the conditions have been changed.
• When the moving vehicle is widely deviated from the route, routes will be searched not for
returning to the original route but for heading for the destination (passing roads).
• is only one of the route search conditions.
If an express way takes a long way round, even if is selected, the routes where express ways
are not included can be searched, or even if is selected, routes using express ways can be
searched.
Setting routes and route navigation
Page 47

English
|
47
When the vehicle is deviated from the route
When the vehicle is deviated from the route, another search (peripheral search or the search for all
the route) can be conducted automatically. The routes that can be searched again vary according to
the situation where the vehicle is deviated.
• Searching the periphery: The routes to return to the original route will be searched.
• Searching all the routes: Routes will be searched between the current position and the
destination* according to the selected conditions.
* When the passing road is designated between the current position
and the next destination, routes will be searched between the current
position and the passing road.
• Another automatic search will take place when the vehicle is deviated from the route during the
destination guidance while the vehicle is driving on the road which is judged to be guidable.
•As for setting of another automatic search, see page 48.
Conduct another route search manually
1
Select on the Current Position Map screen.
2
Select the search condition.
Route search will be started.
•Select ( ) and the next destination for the current position will be
cleared (Canceling the passing roads) and another search can be conducted.
Page 48

48
|
English
Setting routes and route navigation
Setting navigation
Various kinds of settings for navigation will be set.
1
Select on the MENU screen.
2
Select the items to be set.
The selected control will turn green.
3
Select .
•The items that can be set are as follows:
Functions Items Explanation
Another automatic search
Conducted
When deviated from the route, another search will be
conducted automatically.
Not conducted
When deviated from the route, another search will not be
conducted automatically.
Expected arrival time
Indicated
Expected arrival time at the next destination will be
indicated.
Not indicated
Expected arrival time at the next destination will not be
indicated.
Voice guidance in another mode
Given Voice guidance in another mode will be given.
Not given Voice guidance in another mode will not be given.
Colors for day time screen
The color of the daytime screen will be changed to the
selected one.
Colors for the nighttime screen
The color of the nighttime screen will be changed to the
selected one.
Correction of the current position The position of the vehicle or orientation will be corrected.
•Select
, and all the items for setting navigation will get back to the factory-setting
condition.
Page 49

English
|
49
■ When setting the average vehicle speed
The average vehicle speed can be set for the criteria to calculate the times and the time periods
shown below.
- Estimated arrival times on the screen for displaying all the routes.
- Expected passing times included in the route information
- Required time for indicating 5 routes at the same time.
- Estimated arrival times at the destinations on the Current Position Map screen.
1
Select of indication of estimated arrival times.
2
Select or and input the set speed for each
road.
3
Select .
Page 50

50
|
English
Setting routes and route navigation
■ When correcting the current position
When the position or orientation of the vehicle is misaligned, or tires are changed, correction should
be conducted.
1
Select .
The screen for correcting navigation will be indicated.
2
Select .
3
Select and scroll the map to the actual current
position.
4
Select .
5
Set the direction.
Select when turning the direction counterclockwise,
and select when clockwise.
6
Select .
Page 51

English
|
51
■ When correcting settings of distances manually
1
Select .
2
Select .
3
Select or .
: When the vehicle marker moves faster than the
actual vehicle.
: When the vehicle marker moves slower than the
actual vehicle.
4
Select .
• When you purchased, this has been set in the Automatic Correction mode. The Automatic
Correction works while driving.
•Even after automatic correction is finished, owing to the learning function, the movement of the
current position mark can change depending on driving conditions.
• When automatic correction is working, manual correction cannot be performed.
•If is selected on the screen of step 4, automatic correction will be restored.
•You cannot operate when (Advance) or (Delay) is highlighted.
•If the vehicle marker is incorrect after distance correction, the vehicle speed signal switch may
have been set incorrectly. See the Instruction Manual and change the vehicle speed signal
switch position correctly.
Page 52

52
|
English
Setting routes and route navigation
History of destinations
The destinations that your vehicle has reached are automatically memorized and can be called up
when setting destinations (Up to 20 destinations).
When the number exceeds 20, they will be deleted automatically in the order of occurrence.
Unnecessary destinations can be deleted manually.
■ When clearing history of destinations
1
Select on the MENU screen.
2
Select .
3
Select the place names.
Select when clearing all the history of
destinations.
4
Select .
Select , and the original screen will be
restored.
Page 53

English
|
53
Indicating information on the map disc
Information such as a database stored in the Map DVD-ROM can be viewed.
The screen below is an example of displays and the contents will vary depending on the production
times of the Map DVD-ROM and types.
1
Select on the MENU screen.
•Information on roads, place names, and facilities can be changed after production of the Map
DVD-ROM, it can be different from the actual situation.
•In preparing the maps, we collect such information as street improvements or starting dates
of road services and conduct field surveys. However, information on road, place names and
facilities is changing with each passing hour, due to its nature, it is impossible to reduce errors
such as missing road information, wrong information on shapes and names of roads and facility
names to zero. Please keep this in mind when using this system.
Page 54

54
|
English
Registration of points
Points to be memorized on the map can be registered. The registered points can be corrected or
cleared.
Registering your home
Yo ur home address can be registered at one place on the map.
Once your home is registered, route searches can be started in one operation from the screen for
setting destinations.
Registering your home
1
Select on the MENU screen.
2
Select .
3
Select a button how to call up maps.
Refer to <Calling up maps> (see page 17).
4
Select .
Your home will be indicated at the position using a
mark .
•Select in step 2, your home registration can be cleared.
Page 55

English
|
55
Registering memory points
Up to 100 memory points (landmarks) can be registered.
1
Select on the MENU screen.
2
Select of memory points.
3
Select a button how to call up maps.
Refer to <Calling up maps> (see page 17).
4
Select .
5
Select the mark to use.
The memory point will be indicated at the position of .
Kinds of marks for memory points can be changed by
selecting , .
• When a maximum of 100 memory points have already been registered, you can clear
unnecessary items to register new ones.
•The point indicated by the vehicle mark or the cursor will be registered when on
the Current Position Map screen or the Scrolling Map screen is selected.
Page 56

56
|
English
Registration of points
■ When registering displayed places
Memory points can be registered on the map currently displayed.
1
Select .
The current position on the Current Position Map
screen or the specified position by the cursor on the
Scrolling Map screen will be registered as a memory
point, and mark will be indicated.
Page 57

English
|
57
Correcting memory points
1
Select on the MENU screen.
2
Select of memory points.
3
Select the point to be corrected.
The screen with the corrected point will appear.
•The memory points in the list can be sorted in the 2 ways: in the order of the registered
memory points and according to mark types.
- Select , and the items will be sorted according to mark types.
- Select , and the items can be sorted in the order of registered memory points.
■ When changing the marks
1
Select of marks.
2
Select the marks to be changed.
Page 58

58
|
English
Registration of points
■ When inputting names
1
Select of name.
2
Select , , , and switch the entry screens.
As for entering chinese-character, please refer to <Enter
chinese character> below.
3
Select or .
4
Select one character by one character to input names.
When wrong characters are input, select and the
characters will be cleared one by one.
5
Select .
•The number of characters that is possible to input is up to 12 characters.
Page 59

English
|
59
■ When inputting chinese character using pinyin
1
Select first sound.
If the first sound inputted is enough to confirm one
of the chinese character candidates, the screen 3 will
appear.
2
Select second sound.
3
Select the chinese character to input on the displayed
screen (chinese character list).
When chinese character candidates are so many that they
spread over multiple pages, select ( ) to switch
the pages and search the target letters.
4
The selected chinese character will appear in the
display column.
In order to input multiple chinese characters, repeat steps
1 to 3.
When wrong characters have been input, select ,
and they will be cleared one by one.
5
Select , when the input of chinese characters is
completed.
• "ü" should be inputted by changing to "v".
Page 60

60
|
English
Registration of points
■ When indicating names on the map
1
Select of name.
The selected button will turn green.
■ When correcting positions
1
Select of position.
2
Select and move the map to the position where
the memory point should be corrected.
3
Select .
■ To input telephone numbers
1
Select of telephone unmber.
2
Select the numerals one by one to input.
Input area codes first.
In the case of an input errors, select , and numbers
will be clearedone by one.
3
Select .
Page 61

English
|
61
Clearing memory points
1
Select on the MENU screen.
2
Select of the memory points.
Select when you wish to clear all the memory.
3
Select the point to delete.
4
Select .
If is selected, the original screen will be
restored.
•There is no way to restore the cleared memory points. Conduct operations careful enough not
to make mistakes.
Page 62

62
|
English
Registration of points
Registering of special memory points
Up to 5 special memory points can be registered on the map.
If such special memory points are registered, they can be called up by one-touch unlike the other
Memory points when the maps are called. When setting destinations, route searches can be started by
one-touch on the screen for setting destinations.
1
Select on the MENU screen.
2
Select of the special memory points.
3
Select the numbers of memory points.
4
Select when the number of the special
memory points has already been registered.
If is selected, the original screen will be
restored.
5
Select the way to call up the map and display the map
where the special memory points will be registered.
Refer to <Calling up maps> (see page 17).
6
Select .
The special memory points will be indicated at the cursor
using the marks (numbers) which have been selected
at step 3.
•If you select the numbers that have already been selected, and register them again, the special
memory points of such numbers will be cleared.
•You can use
and only when you have stored the special memory points.
Page 63

English
|
63
Correcting special memory points
1
Select of special memory points.
2
Select the memory point to correct and input.
3
Select on the right of items to be corrected and
inputted.
The way to correct and input is the same as the way to
correct and input memory points. (see page 55)
• Special memory points will be indicated using the dedicated marks (with numbr) and the marks
cannot be changed.
Clearing special memory points
1
Select of special memory points.
2
Select the special memory points you wish to clear.
Select when clearing all the special memory
points.
3
Select .
If is selected, the former screen will be
restored.
Page 64

64
|
English
AVN-2675's Monitor Unit
Basic Operations
Turning ON/OFF the power
Power Turning on the power:
Press the [V.SEL] button.
Turning off the power (Stand by mode):
Press the [V.SEL] button for at least 1 second.
Switching the Picture
Press the [V.SEL] button.
Each time the button is pressed the monitor’s picture
switches as follows:
Display Picture
"NAV" Navigation (During "NAV" set to "RGB" or "AV IN1")
"VD1" Video 1 (During "VD1" set to "AV-IN1")
"VD2" Video 2 (During "VD2" set to "AV-IN2")
"CAM" Video 3 (During "CAMERA/VIDEO" set to "VD")
• For "NAV", "VD" and "CAMERA/VIDEO" setting, refer to
<System Setup screen> (see page 66).
• You cannot view video pictures whilst the vehicle is
moving. To enjoy video pictures, find a safe place to
park and engage the parking brake.
Adjusting the Volume
Increasing Volume:
Press the [up] button.
Decreasing Volume:
Press the [down] button.
Switching the Video Screen Mode
Press the [WIDE MODE] button.
Each time the button is pressed the screen mode
switches as follows:
Display Setting Screen Mode
"FULL" Full screen
mode
"ZOOM" Zoom screen
mode
"JUST" Just screen
mode
"NORMAL" Normal screen
mode
NORMA
LOV
FUL L
NORMA
LL
SP
WD
AV
VD1
VS
WIDE MODE
V.SEL
down
up
Page 65

English
|
65
Picture Quality Adjusting
SCREEN
Dimmer Sensor
Adjusting the Picture Quality
1 Displaying the Screen Control screen
Press the [SCREEN] button.
2 Setting
Touch the [2] or [3] button.
Item Touch Setting
TIN [ 3 ]
[ 2 ]
Stronger green level
Stronger red level
COL [ 3 ]
[ 2 ]
Deeper colour
Paler colour
CONT [ 3 ]
[ 2 ]
Stronger contrast
Less contrast
BLK [ 3 ]
[ 2 ]
Less black level
Stronger black level
DIM [ 3 ]
[ 2 ]
Brighter screen
Darker screen
• The [ TIN ] and [ COL ] cannot be adjusted for the
RGB- navigation picture or the Setup screen.
• The [ TIN ] cannot be adjusted for the picture of PAL.
• Separate picture quality settings can be stored for
the video and Navigation screens.
As regards [DIM] (Dimmer) adjustment:
There is no connection with the vehicle’s illumination
switch. (A dimmer sensor is installed facing the front
of monitor unit for light detection).
3 Exit the Screen Control screen
• You cannot operate when the navigation picture is
displayed.
Switching the Speaker Mode
Press the [WIDE MODE] button for at least 1
second.
Each time the button is pressed for at least 1 second
the built-in speaker mode switches as follows:
Display Setting
"NORMAL" Sound with monitor picture
"NAV" Sound with navigation picture
"VIDEO1" Sound with video 1 picture
"VIDEO2" Sound with video 2 picture
"OFF" Built-in speaker is turned off
Page 66

66
|
English
AVN-2675's Monitor Unit
Setup Menu screen
SCREEN
Select the Setup Menu screen
Press the [SCREEN] button for at least 1 second.
Setup Menu screen is displayed.
Select the System Setup screen
Select the [SYSTEM] button.
System Setup screen is displayed. (see page 66)
Select the Touch Panel Adjustment screen
Select the [TOUCH] button.
Touch Panel Adjust screen is displayed. (see pgae 68)
Exit the Setup Menu screen
Select the [RTN] button.
• If you cannot selected a setup menu item. Press the
[SCREEN] button for at least 2 second, the touch panel
position settings are reset to the factory defaults.
System Setup screen-1
■ Setting the Navigation Mode <NAV>
Touch Setting
[7RGB] It becomes the RGB-image mode setting. Operate
the V.SEL button when the RGB-image from the
navigation unit connected to <NAV I/F> terminal
is shown on the monitor.
[7AV-IN1] It becomes the composite--image mode setting.
Operate the V.SEL button when the compositeimage from the navigation unit connected to <AV
IN-1> terminal is shown on the monitor.
[7OFF] It becomes the off mode setting. Use this setting
when there’s nothing connected to the <NAV I/F>
or <AV IN-1> terminal.
■ Setting the AV IN-1 Mode <VD1>
Touch Setting
[7AV-IN1] It becomes the video mode setting. Operate the
V.SEL button when the image from the device
connected to <AV IN-1> terminal is shown on the
monitor.
[7OFF] It becomes the OFF mode setting.Use this setting
when there’s nothing connected to the <AV IN-1>
terminal.
• If you select "AV-IN 1", "NAV" setting is changed to
"RGB".
SCREEN
Page 67

English
|
67
■ Setting the AV IN-2 Mode <VD2>
Touch Setting
[7AV-IN1] It becomes the video mode setting. Operate the
V.SEL button when the image from the device
connected to <AV IN-2> terminal is shown on the
monitor.
[7OFF] It becomes the OFF mode setting.Use this setting
when there’s nothing connected to the <AV IN-2>
terminal.
■ Setting the Camera Mode <CAMERA/VIDEO>
Touch Setting
[7AUTO] It becomes the Rear view camera mode setting.
When the reverse sensor cable is powered up, the
monitor image is switched to the image of the
device connected to the <CAMERA VIDEO IN>
terminal.
[7VD] It becomes the video mode setting. Operate the
V.SEL button when the image from the device
connected to <CAMERA VIDEO IN> terminal is
shown on the monitor.
[7OFF] It becomes the off mode setting.Use this setting
when there’s nothing connected to the <CAMERA
VIDEO IN> terminal.
■ Switching to the System Setup screen -2
Touch the [ 3 ] button.
■ Exit the System Setup screen
Touch the [RTN] button.
Return to the Setup Menu screen.
System Setup screen-2
■ Setting the AV Output Mode <AV OUT>
Touch Setting
[7NORMAL] Picture/sound with monitor picture
[7NAV] Navigation Sound
[7VD1] Picture/sound from <AV IN-1> terminal
[7VD2] Picture/sound from <AV IN-2> terminal
■ Touch Sensor Tone <BEEP>
Setting the operation check sound (beep sound)
ON/OFF.
Touch Setting
[7ON] Touch sensor tone is turned on
[7OFF] Touch sensor tone is turned off
■ Return to the System Setup screen -1
Selet the [ 2 ] button.
■ Exit the System Setup screen
Touch the [RTN] button.
Return to the Setup Menu screen.
Page 68

68
|
English
Touch Panel Adjustment
The touch panel can be adjusted if the position
touched and the operation performed do not match.
1 Accurately touch the mark at the lower left.
2 Accurately touch the mark at the upper right.
When the mark at the upper right is touched, the
adjustment is completed and the system Setup
Menu screen reappears.
• If the [ CANCEL ] button is selected without
touching the button at the lower left, the
adjustment is cancelled and the screen that was
set before switching to the system Setup Menu
reappears.
• If the [ CANCEL ] button is selected after touching
the button at the lower left, the button at the lower
left reappears.
• If the [ RESET ] button is selected, the settings are
reset to the factory defaults and the Setup Menu
screen reappears.
AVN-2675's Monitor Unit
On-screen Control Mode
When the current setting information is displayed
on the screen, touching a dotted line will enable
operation of each of the following items:
■ Switching the Monitor’s Picture [VS]
Touch the C part.
Each time the C part is touched the monitor’s
picture switches as follows:
Display Picture
"NAV" Navigation (During "NAV" set to "RGB" or "AV IN1")
"VD1" Video 1 (During "VD1" set to "AV-IN1")
"VD2" Video 2 (During "VD2" set to "AV-IN2")
"CAM" Video 3 (During "CAMERA/VIDEO" set to "VD")
• For "NAV", "VD" and "CAMERA/VIDEO" setting, refer to
<System Setup screen> (see page 66).
• You cannot view video pictures whilst the vehicle is
moving. To enjoy video pictures, find a safe place to
park and engage the parking brake.
■ Switching the Video Screen Mode [WD]
Press the A part.
Each time the A part is pressed the screen mode
switches as follows:
Display Setting
"FULL" Full screen mode
"ZOOM" Zoom screen mode
"JUST" Just screen mode
"NORMAL" Normal screen mode
Setup Menu screen
Page 69

English
|
69
• You cannot operate when the navigation picture is
displayed.
■ Switching the Speaker Mode [SP]
Press the B part.
Each time the B part is touched the built-in speaker
mode switches as follows:
Display Setting
"NORMAL" Sound with monitor picture
"NAV" Sound with navigation picture
"VIDEO1" Sound with video 1 picture
"VIDEO2" Sound with video 2 picture
"OFF" Built-in speaker is turned off
■ Setting the AV Output Mode [AV]
Touch the E part.
Each time the E part is touched the AV output
mode switches as follows:
Display Setting
"NORMAL" Picture/sound with monitor picture
"NAV" Navigation Sound
"VIDEO1" Picture/sound from <AV IN-1> terminal
"VIDEO2" Picture/sound from <AV IN-2> terminal
■ Exit the On Screen Mode
Touch the D part.
• If you make no operation for 10 seconds, the On
screen control mode is automatically canceled.
Page 70

70
|
English
General Information
Accuracy of the Vehicle’s Position
Area in which GPS signals cannot be received
Because the radiowave signals from the GPS satellites travel
primarily by line of sight, the navigation system might not be
able to receive the signals in the areas described below.
(If the GPS mark does not appear on the map screen, it means
that the GPS radiowave signals are not being properly received.)
(1) Inside a tunnel
(2) Inside a building
(3) Under a three-dimensional road such as a high-speed road
(4) On boulevards lined with trees
(5) Between buildings
(6) Under a cliff or in a cave
• If the GPS antenna or its surroundings are blocked by an
obstacle (including cargo), it might not be possible for the
system to receive the GPS radiowave signals.
• If multiple paths are created due to the reflection from the
buildings, a large measurement error could occur, causing
the vehicle’s mark to deviate from its actual position.
Deviation of the vehicle’s position mark
The vehicle’s position mark could deviate from its actual position
when the vehicle is being driven under the conditions listed
below or due to conditions of the GPS satellites.
If the vehicle travels on a road whose actual shape differs from
that in the map data, the vehicle’s mark could deviate from the
actual position. The correct position will eventually appear on
the screen through the correction function. If the screen does
not show the correct position for a long time, correct the current
position or make an automatic correction.
(1) The vehicle’s mark could appear on a parallel road.
(2) When the road splits into a narrow Y, the vehicle’s mark
could appear on the other fork of the Y.
(3) When the vehicle makes a right or left turn, the vehicle’s
mark could appear on one street ahead or behind.
(4) If the vehicle is transported by a means other than the
vehicle’s own power, such as on a ferry boat, the vehicle’s
mark will remain in the position it was before the transport
until the system can calculate the position through the GPS.
(5) When the vehicle is driven on a steep incline, the vehicle’s
mark could deviate from its actual position.
(6) If there are continuous gradual curves in the same direction,
the vehicle’s mark could deviate from its actual position.
(7) If the vehicle is driven in a zigzag pattern, such as through
frequent lane changes, the vehicle’s mark could deviate
from its actual position.
(8) If the vehicle is placed on a turntable , such as in a parking
area, and turned with the ignition OFF, the orientation of
the vehicle’s mark could deviate from its actual orientation.
The vehicle’s mark could also deviate even after the vehicle
has exited the parking area.
(9) The vehicle’s mark could deviate from its actual position
if the vehicle is driven on a snow-covered road or on a
mountainous road with tire chains or snow tires.
• After driving the vehicle under those conditions, perform
the same operation given in the section on "After
changing tires".
(10) The vehicle’s mark could deviate from its actual position
after the tires have been replaced.
• After replacing the tires, refer to the section on "After
changing tires".
How the Vehicle’s Position is detected
Detecting the vehicle’s position through the GPS
GPS stands for the "Global Positioning System"; it is a system for
detecting an object’s position through the use of the satellites of
the Defense Department of the United States.
Radiowave signals from three or more satellites are received
by the navigation system, which utilizes the principle of
triangulation to detect the position in which the radiowave
signals are received.
When the navigation unit is receiving the GPS radiowave signals,
a "GPS" mark will appear on the map screen.
Detecting the vehicle’s position through self-contained
navigation
Self-contained navigation is a system that detects the vehicle’s
position by calculating the vehicle’s driven distance and turning
angle though the use of various types of sensors that are
mounted on the vehicle.
Through the use of self-contained navigation, the vehicle’s
position can be detected even in an area where the GPS
radiowaves signals cannot be received.
Making corrections to the detection of the vehicle’s
position through map matching
• In map matching, the position information resulting from the
detection of the vehicle’s position and the locus of the travel of
the vehicle up to the present are constantly compared to the
shapes of the roads on the map in order to correct the vehicle’s
position mark to the most appropriate road.
• If the vehicle is driven on a road whose actual shape differs
from its map data, the vehicle’s position mark on the map
could deviate from its actual position.
Occasionally, the correction of the vehicle’s position mark to
the actual road on the map can be observed particularly after
the vehicle has turned at an intersection or has come out of a
parking area.
Accuracy of the Route Guidance
The conditions listed below do not indicate a malfunction.
(1) The guidance might prompt the driver to drive straight
even though the vehicle is being driven on a straight road.
(2) The directional guidance could display multiple place
names.
(3) If the vehicle makes a turn at an intersection before the
guided route, the wrong type of voice guidance could be
output.
(4) The guidance might not be output while the vehicle is
making a turn at an intersection.
(5) The system might not be able to search for the proper route.
(6) If there is no road to the destination or if there is only a
narrow road, the route might only indicate up to an area
that is short of the destination.
(7) The repeat search time could be long while the vehicle is
being driven at high speeds.
(8) While the system is searching again for the route, the route
indication might not appear in time for the next right or left
turn.
(9) The route might not change even if a search is made again.
(10) The system might guide the driver to make a U-turn.
(11) The system might guide the driver on a road that cannot
actually be travelled (such as on a road in which entry is
prohibited).
(12) The system might not output guidance even if the vehicle is
driven in reverse on the guided route.
(13) The system might not use a local ferry boat even if it the
ferry priority is selected.
(14) If the intersection you’re being guided to is near the end of
the route search, the system might not be able to provide
guidance.
(15) The route might not go on a toll road even the toll-road
priority is selected.
Similarly, a route that uses a toll road could appear on the
screen even if the toll-road priority is not selected.
(The driver may or may not be able to select the "toll-road
priority" if both toll and free roads are available.)
Page 71

English
|
71
Troubleshooting
■ Navigation System (KNA-DV2600)
? The power does not come on.
✔ The fuse might be blown.
☞ Check the fuse. Replace it if it is blown.
? The map does not scroll even when the vehicle is
moving.
✔ The screen shown might not be the Current Position
screen.
☞ See page 11 of this manual to display the Current
Position screen.
? The vehicle marker does not appear.
✔ The screen shown might not be the Current Position
screen.
☞ See page 6 of this manual to display the Current
Position screen.
? The GPS marker is not displayed.
✔ The GPS antenna or your vehicle might be in a position
where GPS signals cannot be received.
☞ Try moving the GPS antenna or your vehicle to a
position where there are no obstacles around.
? The GPS marker is not displayed on the road where
your vehicle is running.
✔ TV channel 15 is now received.
☞ The GPS system may be affected by the channel-
15 signals as RF signals which are twice higher
than channel-15 signals are very close to the GPS
satellite receiving frequency. Try to tune a channel
other than channel 15.
? There is no voice guidance.
✔ Route guidance might be suspended.
☞ The route guidance is off, see <Route Guidance>
(page 37).
✔ The guidance volume might be turned down low.
☞ See <Adjustment the volume of voice guidance>
(page 13).
? Small spots or bright flashes appear in the screen
displayed.
✔ This is probably due to the nature of the LCD display.
☞ There is nothing wrong with the display and no
need for concern.
? The map disc cannot be ejected.
✔ The disc might be incompatible or might have been
inserted incorrectly.
☞ Restart the engine and see page 4 of this manual.
■ AVN-2675's Monitor Unit
? The power does not turn on.
✔ The fuse has blown.
☞ After checking for short circuits in the cables,
replace the fuse with one having the same rating.
✔ No ACC position on vehicle ignition.
☞ Connect the same cable to the ignition as the
battery cable.
? No video picture appears.
✔ The unit is not connected to the parking brake
detection switch.
☞ Make proper connections according to
<Installationg Manual>.
✔ The parking brake is not engaged.
☞ For safety reasons no video picture are displayed
while the vehicle is moving. Engaging the parking
brake will cause picture to be displayed.
? The screen is dark.
✔ The unit is in a location where temperature is low.
☞ If the temperature of the monitor unit drops, the
screen may appear darker when power is first
turned on due to the characteristics of a liquid
crystal panel. Wait a while after turning power on
for the temperature to rise. Normal brightness will
return.
Confirm whether any problem is due to a minor operational error or a malfunction. Check the table
below before contacting your local dealer for any repair service.
Page 72

72
|
English
■ Navigation System (KNA-DV2600)
Navigation Section
Antenna
: Micro-strip patched antenna
Receiver channel
: Digital 8-channels parallel
Receiving frequency
: 1575.42 MHz (C/A code )
Receiving sensitivity
: Less than -130 dBm
Positioning method
: Hybrid (GPS + Wheel Pulse + Gyro Sensor)
General
Operating voltage (11 to 16 V)
: 14.4 V DC
Current consumption (13.2 V)
: Less than 1.5 A
Operational temperature range
: –10°C to +60°C
Storage temperature range
: –30°C to +85°C
Video output level (75 Ω)
: 1 Vp-p (Composite)/ 0.7 Vp-p (Analog RGB)
Audio output level (10 kΩ)
: 1.2 Vrms
Size (Navigation unit)
: 200.0(W) x 47(H) x 203.5(D) mm
7-7/8(W ) x 1-7/8(H) x 8-1/16(D) inch
Size (Antenna unit)
: 34(W) x 13.2(H) x 38(D) mm
1-5/16(W ) x 1/2(H) x 1-1/2(D) inch
Weight (Navigation unit)
: 1720 g
Weight (Antenna unit)
: 25 g (0.055 LBS)
■ AVN-2675's Monitor Unit
Monitor Unit
Screen size
: 6.95 inches wide
154.1(W ) x 86.6(H) x 176.7(Diagonal) mm
6-1/16(W ) x 3-7/16(H) inches
Display system
: Transparent TN LCD panel
Drive system
: TFT active matrix system
Number of pixels
: 336,960 pixels (480 H x 234 V x RGB)
Effective pixels
: 99.99%
Pixel arrangement
: RGB striped arrangement
Back lighting
: Cold cathode tube
Speaker power
: 1 W (40 Ø x 1)
Video Box Unit
Colour system
: NTSC/PAL
External video input level (RCA jacks)
: 1 ± 0.1 Vp-p/ 75 Ω
External audio input level (RCA jacks)
: 1 V/ 22 kΩ
Video output level (RCA jacks)
: 1 ± 0.1 Vp-p/ 75 Ω
Audio output level (RCA jacks)
: 500 mV/ 1 kΩ
Analog RGB input
: 0.7 Vp-p/ 75 Ω
General
Operating voltage (11 to 16 V)
: 14.4 V DC
Consumed Power
: 14 W
Operational temperature range
: –10°C to +60°C
Storage temperature range
: –30°C to +80°C
Size (Monitor unit)
: 189(W) x 131(H) x 37(D) mm
7-7/16(W ) x 5-3/16(H) x 1-7/16(D) inches
Size (Video box unit)
: 167(W) x 38(H) x 152(D) mm
6-9/16(W ) x 1-1/2(H) x 6(D) inches
Weight (Monitor unit)
: 580 g(1.28 LBS)
Weight (Video box unit)
: 620 g(1.37 LBS)
Specifications subject to change without notice.
Specifications
Although the effective pixels for the liquid crystal panel is
given as 99.99% or more, 0.01% of pixels may not light or
may light incorrectly.
Page 73

documentation manual, user maintenance, brochure, user reference, pdf manual
This file has been downloaded from:
User Manual and User Guide for many equipments like mobile phones, photo cameras, monther board, monitors, software, tv, dvd, and othes..
Manual users, user manuals, user guide manual, owners manual, instruction manual, manual owner, manual owner's, manual guide,
manual operation, operating manual, user's manual, operating instructions, manual operators, manual operator, manual product,
 Loading...