

Page 1

DVD NAVIGATION SYSTEM
KNA-DV2200
INSTRUCTION MANUAL
© PRINTED IN JAPAN B64-2503-00/00 (E) (+)
03/12 11 10 9 8 7 6 5 4 3 2 1 02/12 11 10 9 8 7 6
Page 2
Warning Messages
For safe usage please observe the following !!!
■ READ THIS MANUAL FIRST.
Read this manual carefully before starting to operate the Kenwood Car Navigation System and
follow the manual's instructions. Kenwood are not liable for problems or accidents resulting from
failure to observe the instructions in this manual.
■ OBSERVE LOCAL TRAFFIC SIGNS AND REGULATIONS.
Always observe the local traffic signs and regulations whilst driving and check them against
the system's instructions.
and regulation data on the Map DVD-ROM may be outdated. Furthermore the Map DVD-ROM
cannot reckon with certain conditions such as traffic density at certain times of the day, (temporary)
road closures due to construction work, weather conditions or special events taking place.
Therefore always obey the local traffic signs and regulations rather than the system's
instructions. Failure to do so may place you in illegal, unsafe or dangerous situations.
■ DRIVE SAFELY.
Before following the system's guidance instructions, such as changes in direction, always
check first whether it is safe to do so given the current traffic conditions.
given instructions, but make sure you do so in a safe manner.
■ VOLUME LEVEL.
Keep the system's volume at a low enough level to be able to hear outside noises whilst driving. If
you can no longer hear outside noises, you may be unable to react adequately to the traffic
situation. This may cause accidents.
Due to frequent changes in local signs and regulations, the traffic sign
Then follow the
■ FOREIGN OBJECTS.
Keep fingers and foreign objects out of the disc-loading slot, so as not to cause accidents. In the
event of there being foreign objects inside the unit, or smoke or noxious odours coming out, stop
operation immediately and contact the closest Kenwood dealer.
■ STOP OPERATION IN THE EVENT OF PROBLEMS.
In event of problems such as a lack of sound or video occurring, stop
operation and push the reset button. Should the problems persist, stop
operation of the system and contact the closest Kenwood dealer.
■ NEVER DISASSEMBLE OR ALTER.
Never try to disassemble or alter the navigation equipment. Any attempt to do so may cause
accidents, fire or electric shock.
■ REPLACING FUSES.
When replacing fuses always use the same rated ampere. Failure to do so may cause fire.
■ SMALL ARTICLES.
Keep small articles (like screws or batteries) out of the reach of children. If any such object is
accidentally swallowed, consult a doctor immediately.
Information in this document is subject to change without notice.
Page 3

Contents
Before Use ________________________________ 2
Precautions when Handling Map Discs______ 3
Replacing Map Discs_______________________ 4
Inserting a Map Disc______________________ 4
Removing the Map Disc __________________ 4
Touch Screen Operation ___________________ 5
Starting Up Navigation __________________ 6
Language Selection ______________________ 7
Markers (and Switches) Displayed on Maps 8
Screens Before Setting Route ____________ 8
Screens During Route Guidance ___________ 9
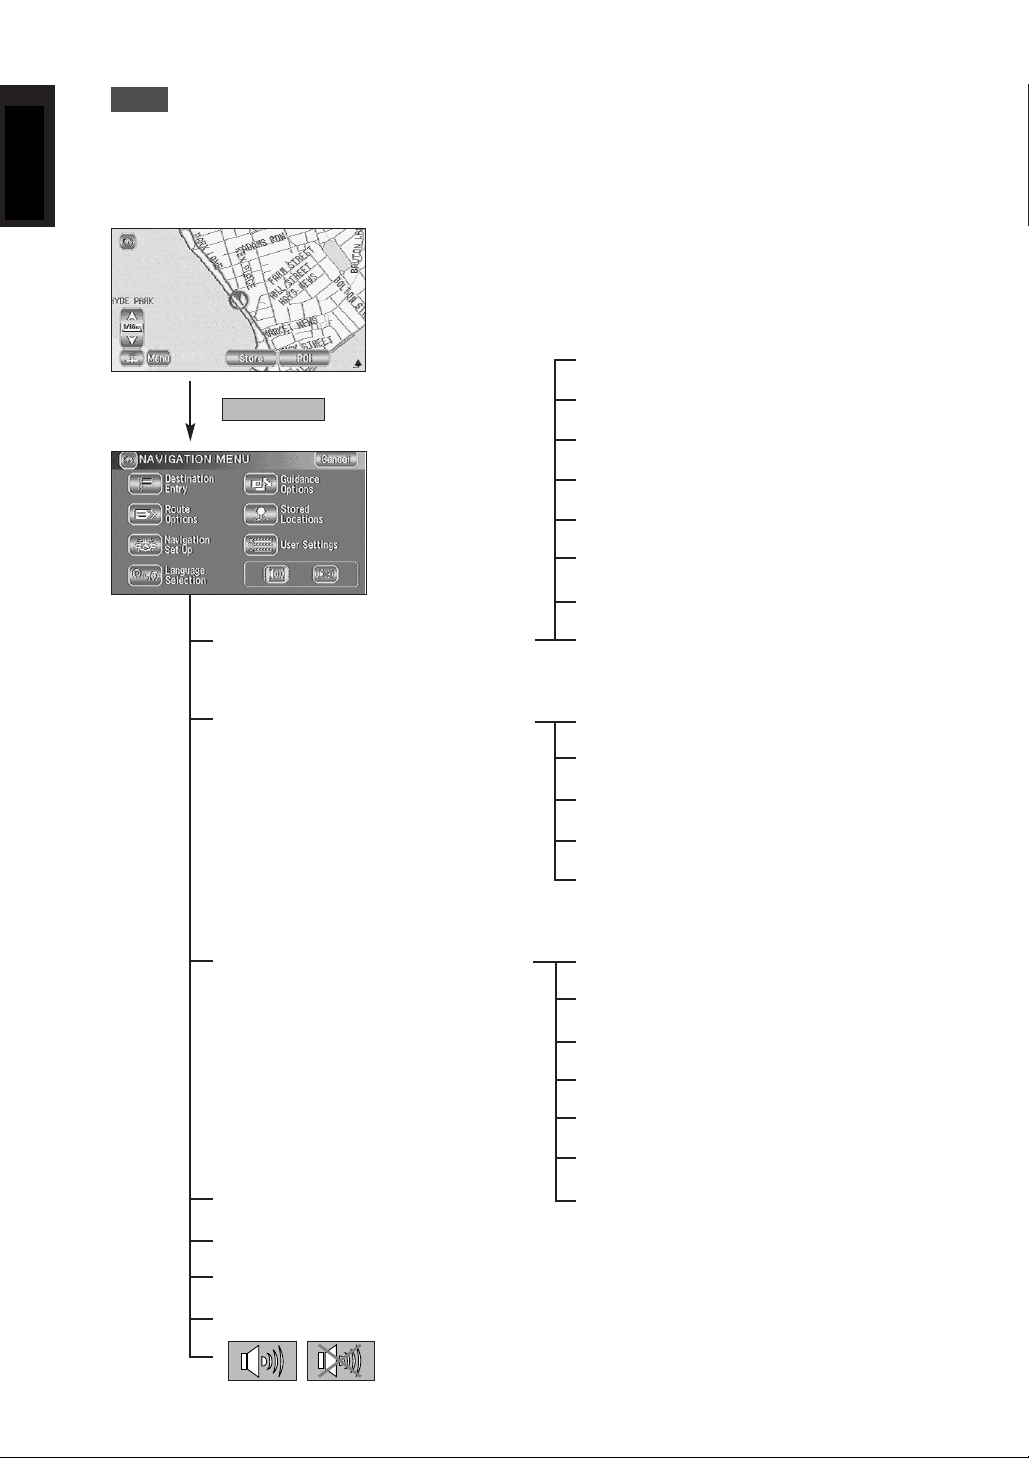
Menu Screen Change Chart ______________
Map Operations __________________________11
Changing the Orientation of the Map ______11
Changing the Scale of the Map ____________12
Map Display_______________________________13
Showing Current Position_________________13
Scrolling the Map ________________________13
Set Route ________________________________
Route Searching _________________________14
Setting Destination ______________________15
Route Guidance _________________________
Route Options __________________________25
Navigation Set Up _______________________28
Guidance Options _________________________
Stored Locations ________________________35
Editing Stored Locations __________________37
Deleting Stored Locations_________________
User Settings _____________________________41
Other Functions __________________________42
Displaying POI’s on a Map ________________42
Local Search ____________________________42
Deleting POI Markers
Showing POI Data ________________________43
Checking the Route by a Simulation Run ___44
General Information
Mechanism of Detecting the Vehicle’s
Position ________________________________45
Accuracy of the Vehicle’s Position
Accuracy of the Route Guidance___________47
Troubleshooting _________________________48
Terminology
____________________________
____________________
_____________________45
_________
10
14
23
33
40
43
45
49
1
Page 4

ENGLISH
Before Use
■ Start the car engine before use
This mobile navigation system can be used when the ignition key is turned to ON
or ACC. However, to preserve the battery, it should be used with the engine
running whenever possible. Using the navigation system for a long time with the
engine switched off can cause the battery to run down.
■ Time before current position is displayed
The mobile navigation system will not display the correct current position of the
vehicle the first time it is used after purchase, or if the battery has been removed
for a long time. GPS positioning signals will soon be received, however, and the
correct position will be displayed.
■ Reading programmes after the battery has been turned off
The navigation programmes will be deleted if the battery is removed for repairs,
etc. If this happens, set the map disc provided into the mobile navigation system
and switch on the engine. The mobile navigation system will automatically load
the programmes and start operating normally again.
■ When driving on rough roads
The mobile navigation system might not operate properly or be able to read map
data from the disc if there is severe vibration caused by driving on rough roads.
■ Handling the GPS antenna
• Do not paint the antenna. This will impair or disable signal reception.
• Remove any object or accumulated snow, etc., from the top of the antenna. It
will reduce reception strength.
• Do not pull the cord when removing the antenna or adjusting its position. This
can cause a short or snap the wires.
■ Operating whilst driving
The GPS voice navigation system displays the switches disabled during driving in
fainter colours. These switches stop functioning and no message is displayed.
■ Precautions for handling precision machines
Be careful of the surrounding temperature. Using the mobile navigation system at
extremely high or low temperatures can lead to malfunction or damage.
Also note that the unit can be damaged by strong vibration or by metal objects or
water getting inside.
■ Condensation
Condensation can form on the lens inside the main unit just after the car heater is
switched on in cold weather, for example, leading to malfunction. The main unit
will start working normally again if it is just left alone for about one hour for this
condensation to go away. If normal operation is not restored after several hours,
return the main unit to the store where you purchased the mobile navigation
system.
■ Map disc
Always replace the map disc with another compatible map disc. Never insert an
incompatible disc. It can damage the main unit.
2
Page 5
ENGLISH
Precautions when Handling Map Discs
• Data recorded on a disc is read by laser beam, so there is no wearing of the disc due
to friction from a needle. You should handle discs carefully, however, as excessive
warping or scratches on the disc surface or label can lead to reading errors.
• Store discs away from direct sunlight.
The disc might warp and become
unusable.
• If you touch the data surface of a disc
(the surface without a label printed on
it) it might get dirty and lead to a
malfunction. Always hold a disc either
by its centre hole and an edge or by
two edges.
• Lightly wipe the disc with a soft cloth in
a straight line from the centre of the
disc towards the outer edge.
• Never clean discs with benzene,
thinners, record spray, anti-static spray
or chemical swabs.
• Do not write on, or stick paper or seals
onto, the surface of a disc.
• Map discs rotate at high speed inside
the main unit. Do not use a cracked or
badly warped disc, therefore, because
it might damage the main unit.
3
Page 6
ENGLISH
Replacing Map Discs
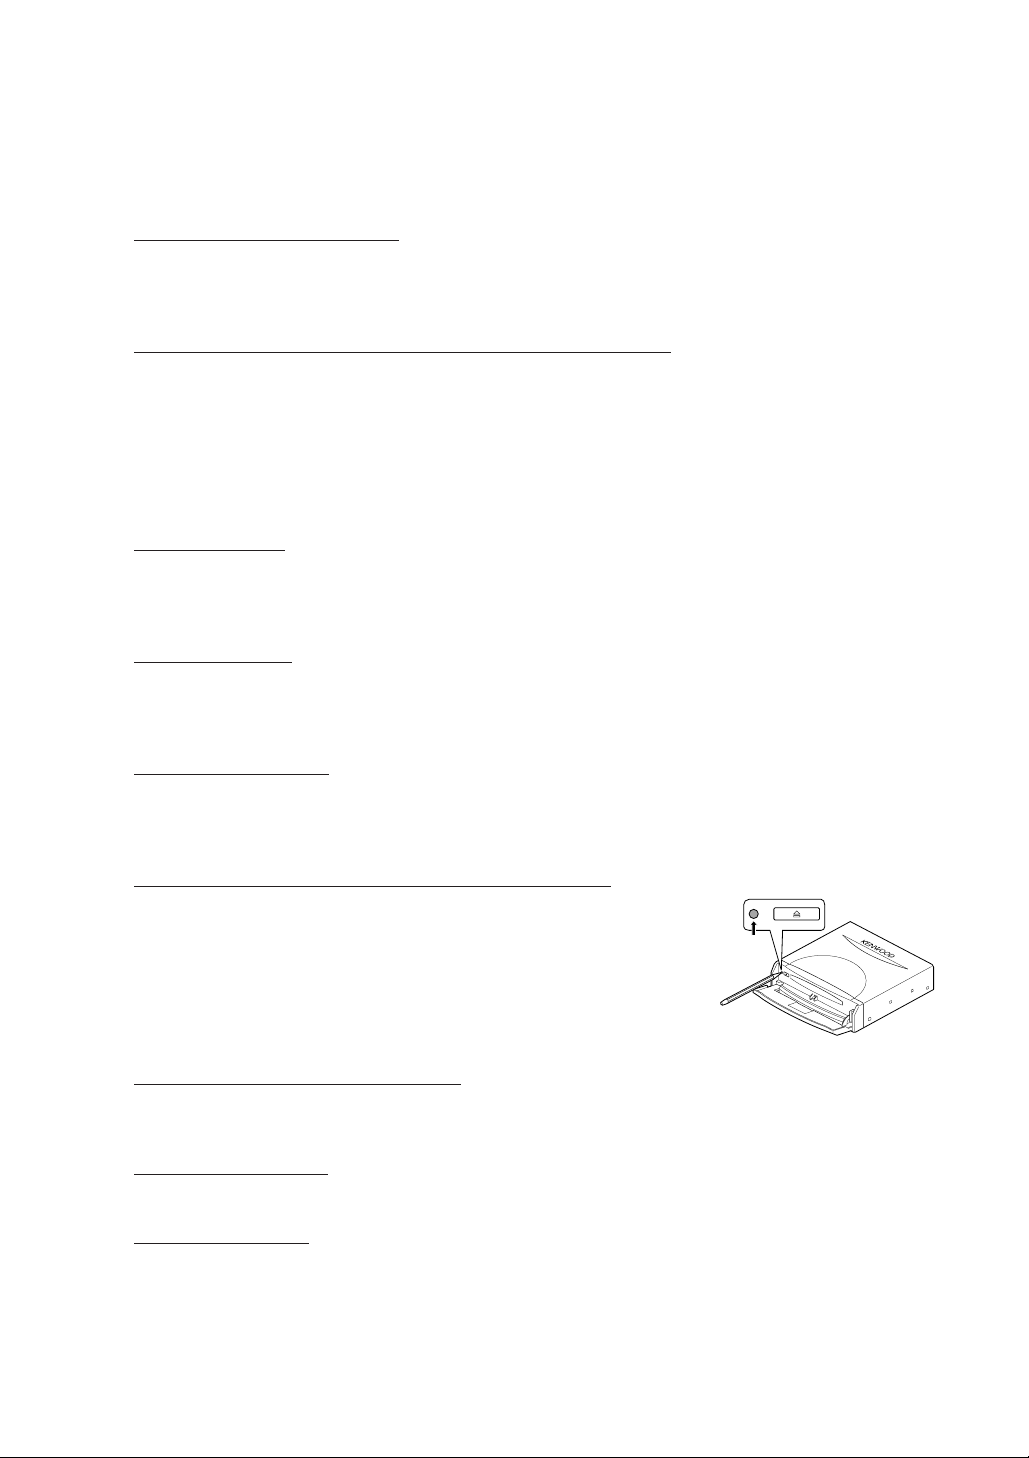
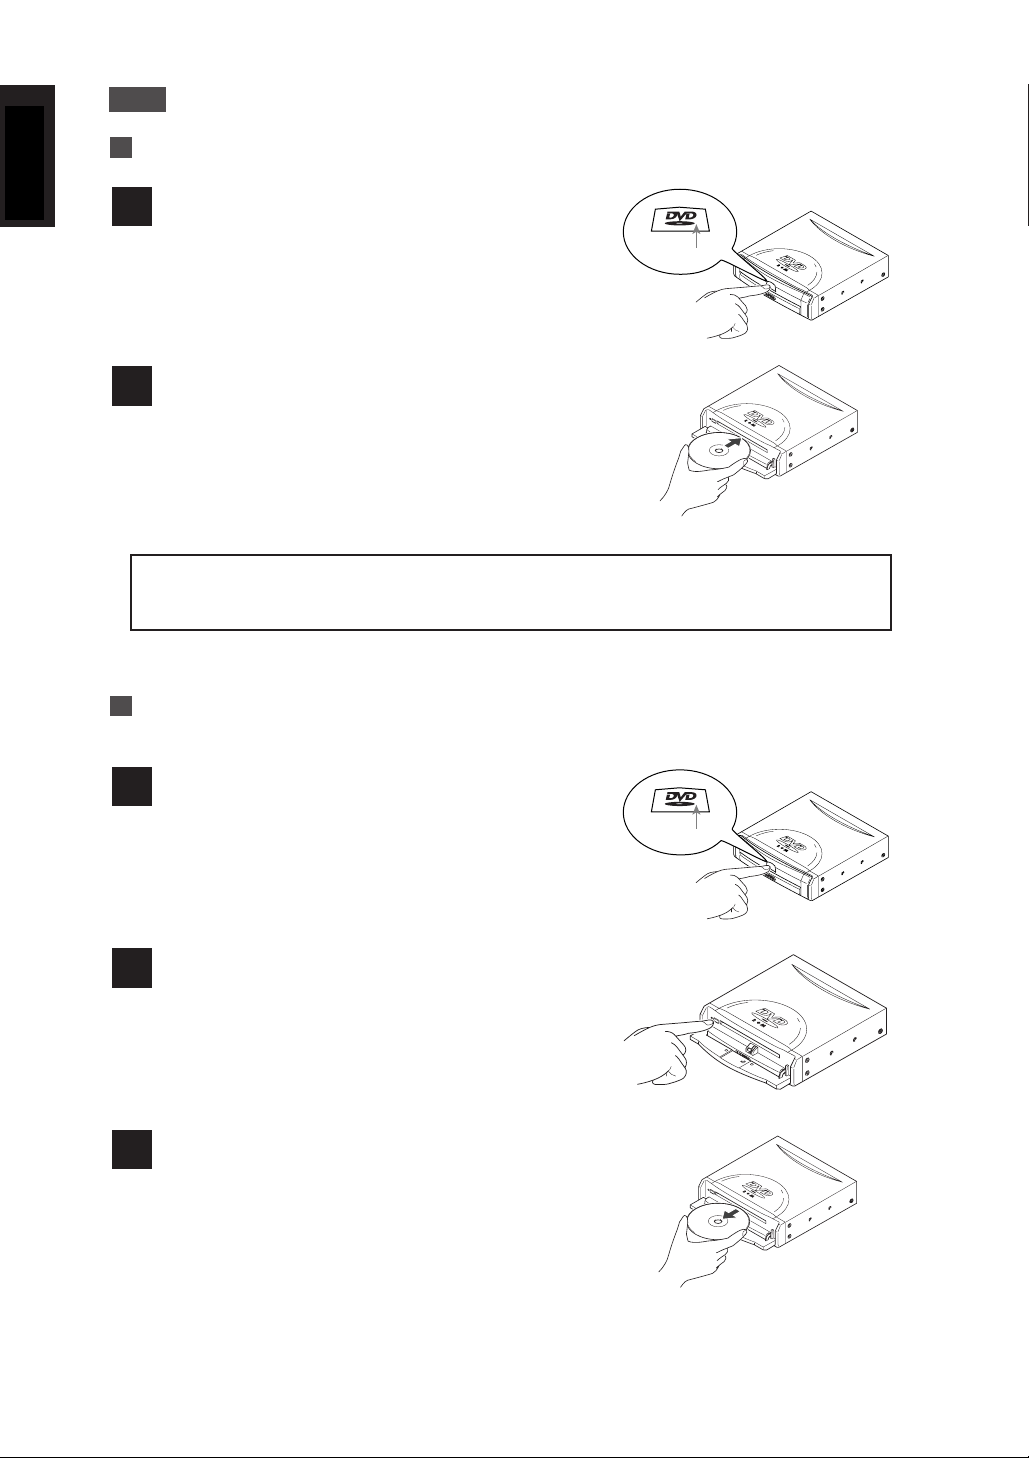
Inserting a Map Disc
Press the right side of the button marked DVD and
1
open the lid.
Insert the map disc and close the lid.
2
NOTE :
Insert the map disc with the label facing upwards.
Removing the Map Disc
ROM
Press here!
Press the right side of the button marked DVD and
1
open the lid.
Press the eject button.
2
Remove the map disc and close the lid.
3
ROM
Press here!
4
Page 7
ENGLISH
Touch Screen Operation
The switches displayed on the screen can be selected by actually touching the
screen.
[Example]
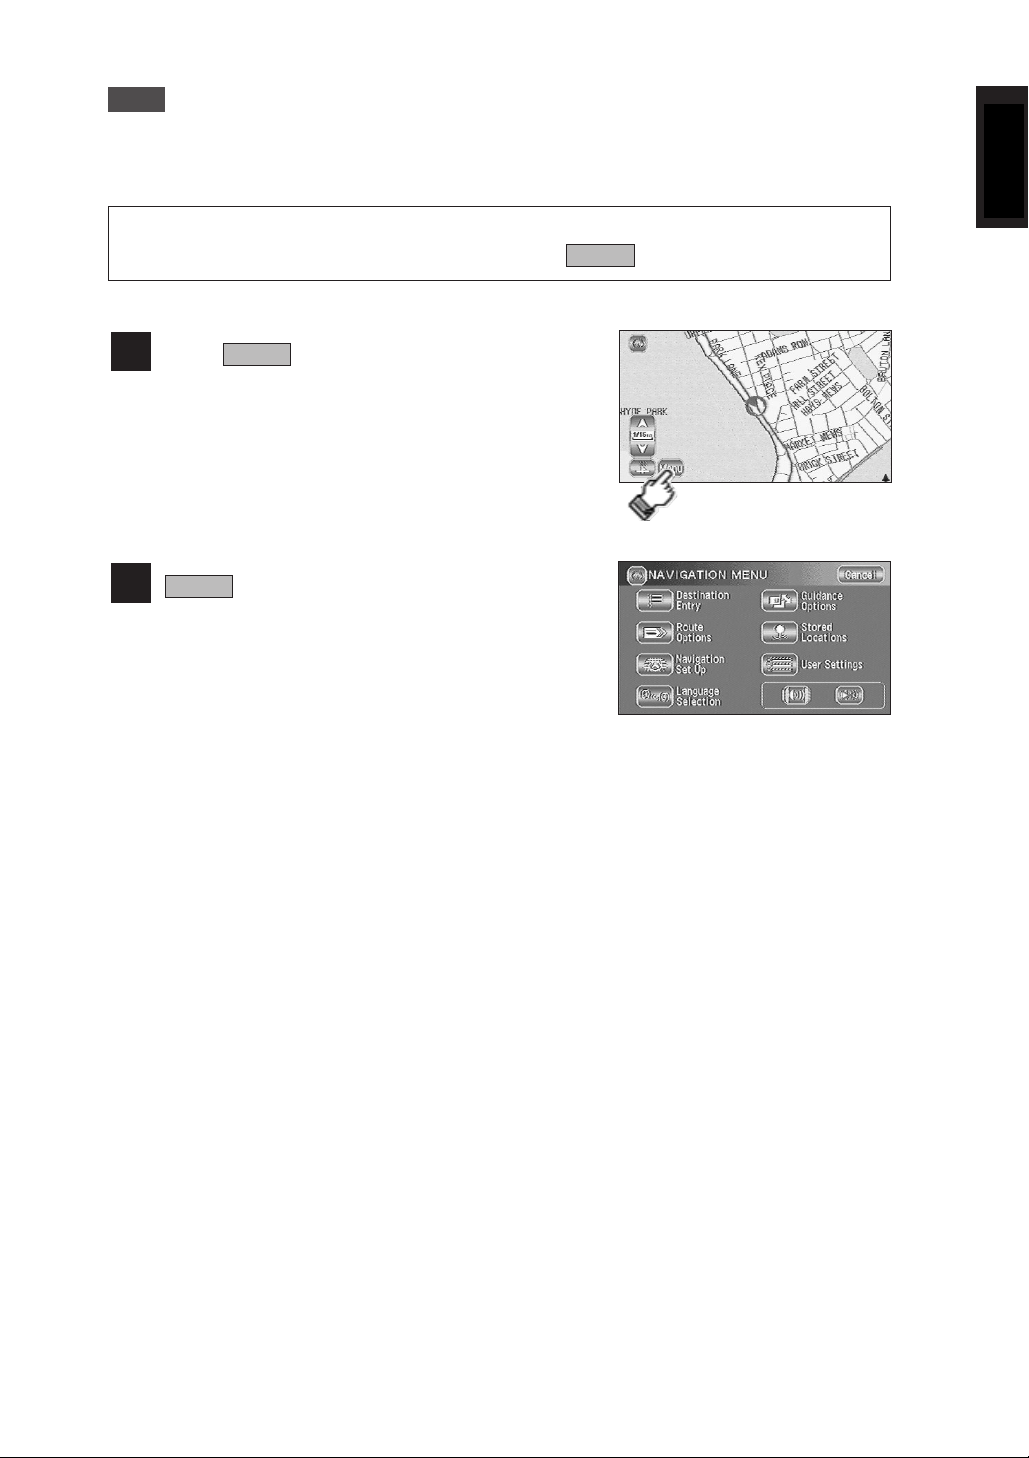
Here are the steps to display the screen by touching .
Menu
Touch .
1
Menu
2
Menu
is selected and the Menu screen appears.
5
Page 8
ENGLISH
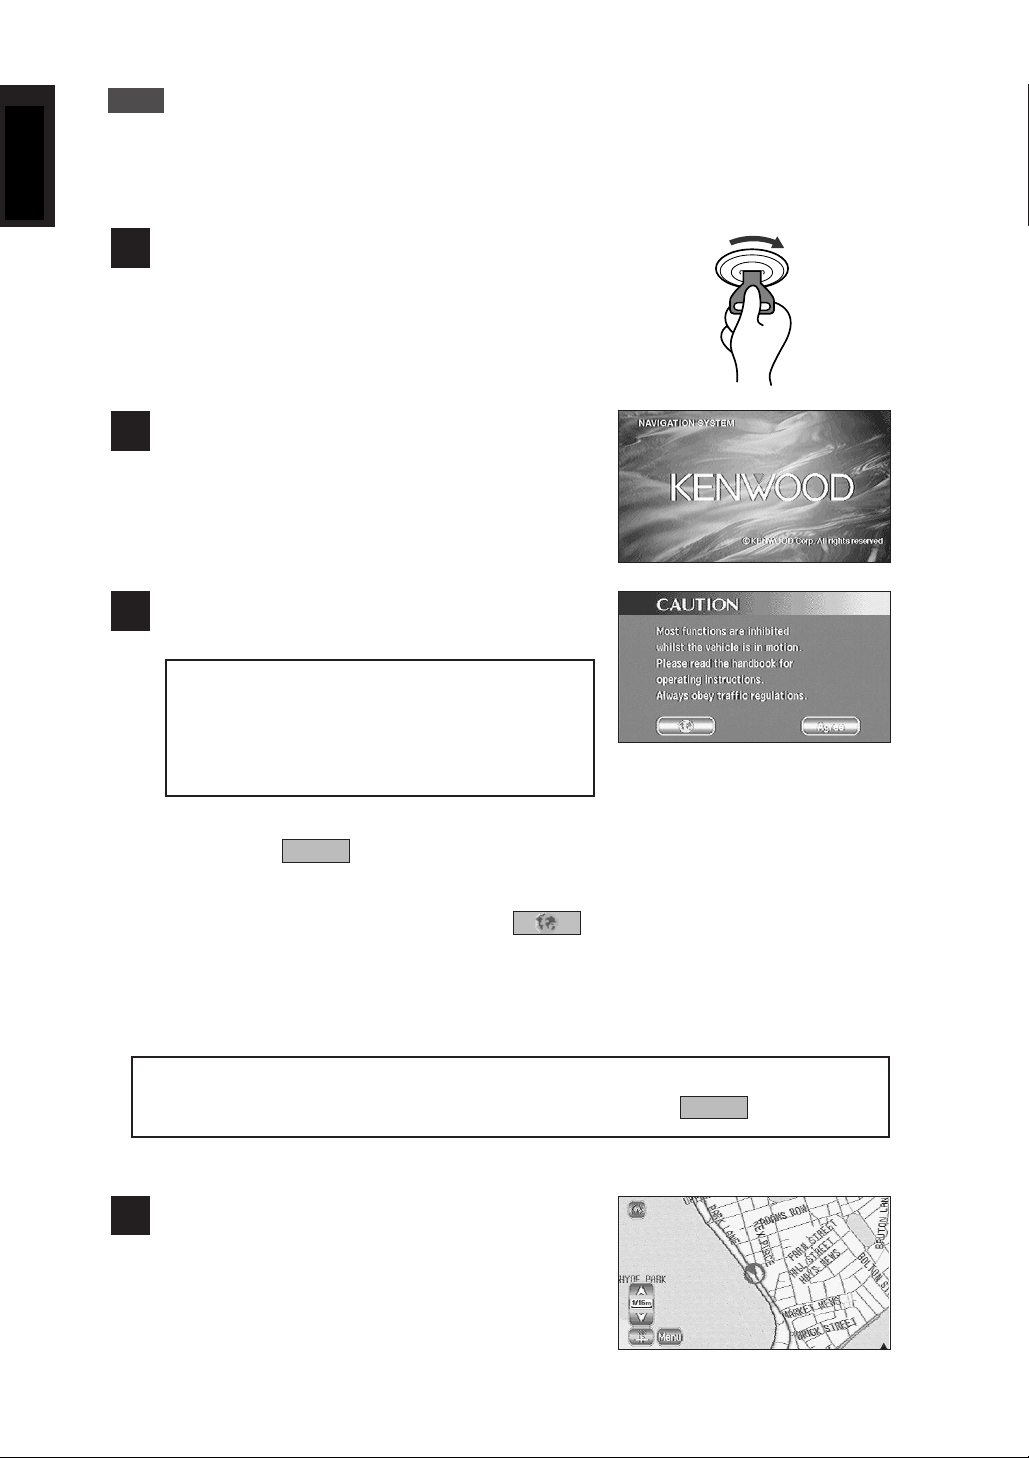
Starting Up Navigation
Start up navigation and display the map of the area around your vehicle.
Turn on the car engine.
1
The opening screen appears on the display.
2
The CAUTION screen appears.
3
Most functions are inhibited whilst the vehicle
is in motion.
Please read the handbook for operating
instructions.
Always obey traffic regulations.
Once you have consented to the message on the
screen, press .
You can select the language by pressing . You can also alter the language by
Language Selection. (See page 7)
If 3 minutes elapse without any operation, the display changes automatically to
Language Selection. (See page 7)
NOTE :
The CAUTION screen remains on the display unless you select .
The Current Position screen appears.
4
Agree
Agree
6
Page 9
ENGLISH
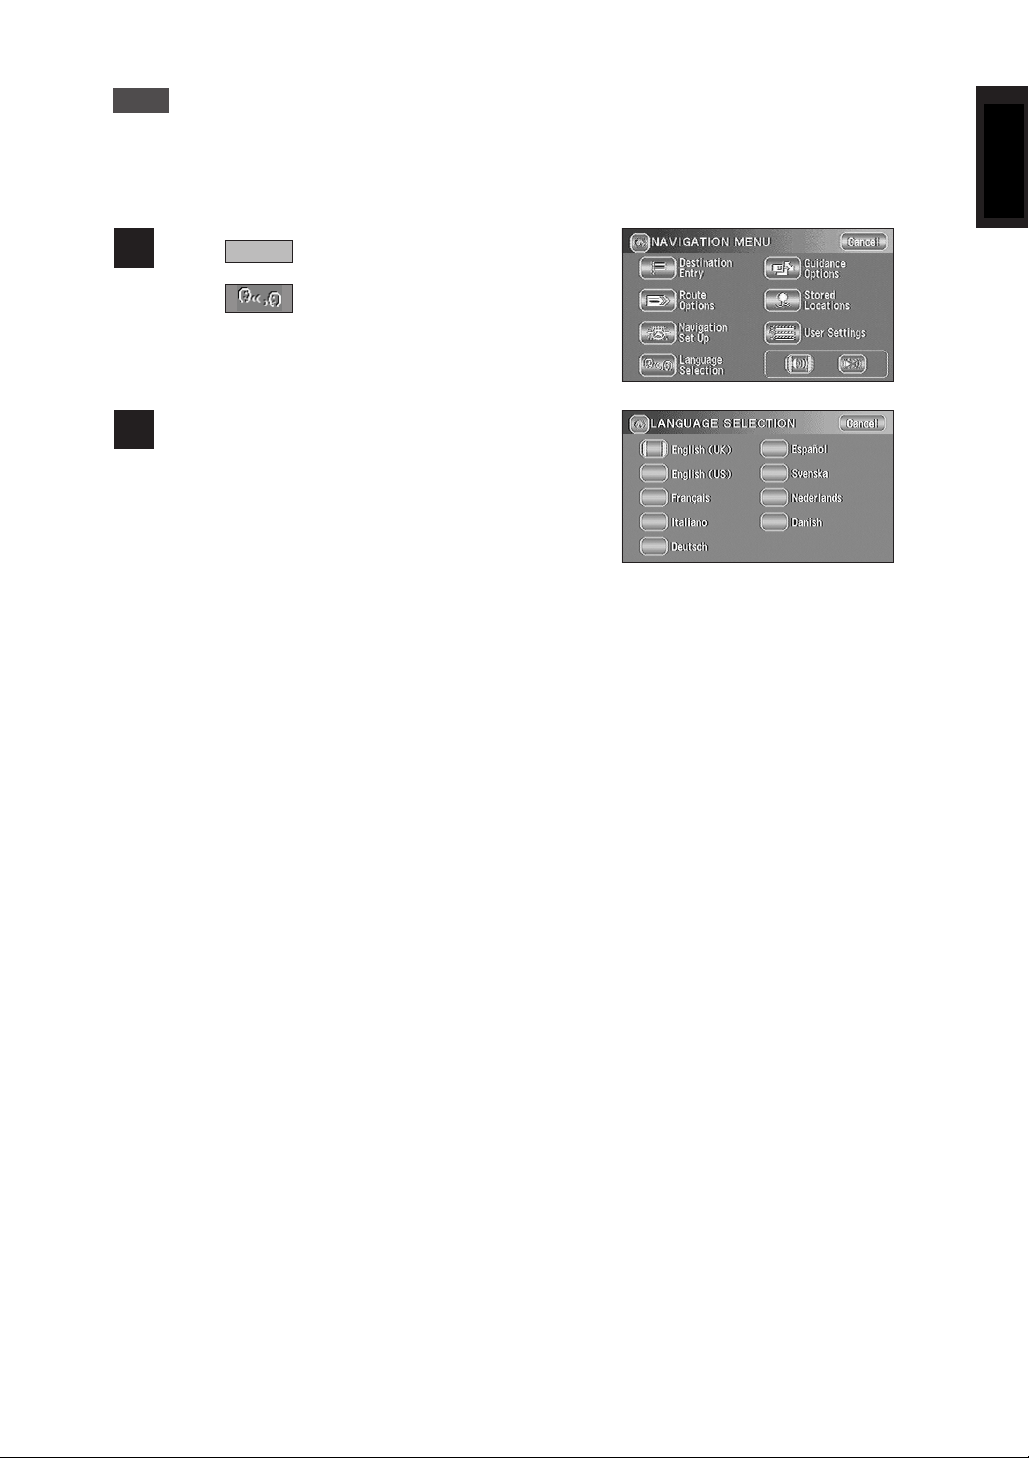
Language Selection
You can change the language of the menu and the voice guidance.
Select .
1
Select (Language Selection).
Select the language you prefer by touching the
2
appropriate switch.
Menu
7
Page 10
ENGLISH
Markers (and Switches) Displayed on Maps
Here we introduce the markers that are displayed on the map.
Screens Before Setting Route
<Current Position screen>
➀
➁
➂
➃
Touch the screen
continuously to
scroll the map
➅
➆
Touch
➇
➄
➀ Current Position switch
Selecting this switch shows the current position of your vehicle.
➁ GPS (Global Positioning System) marker
This shows the status of the signal from the GPS satellite. When this marker appears,
the GPS satellite signal is being received and used to calculate the position of your
vehicle.
➂ Zoom Out/Zoom In switch, scale display
Press to display a wide area map and to display a detailed map. The
numbers on the display indicate the scale of the map currently shown.
➃ Direction switch
Selecting this switch changes the orientation of the map shown.
➄ Menu switch
Selecting this switch shows the menu. (See page 10)
➅ Vehicle marker
This shows the position and direction of your vehicle.
➆ Store (Store Memory Point) switch
This stores markers on the map. This switch only appears if you touch the screen once.
➇ POI (Point of Interest) Display switch
Selecting this switch moves to the POI Selection screen. (See page 42) This switch only
appears if you touch the screen once.
➈ Enter Destination switch
After scrolling the map, selecting this switch sets the centre of the as the destination.
<Scroll screen>
➈
8
Page 11
ENGLISH
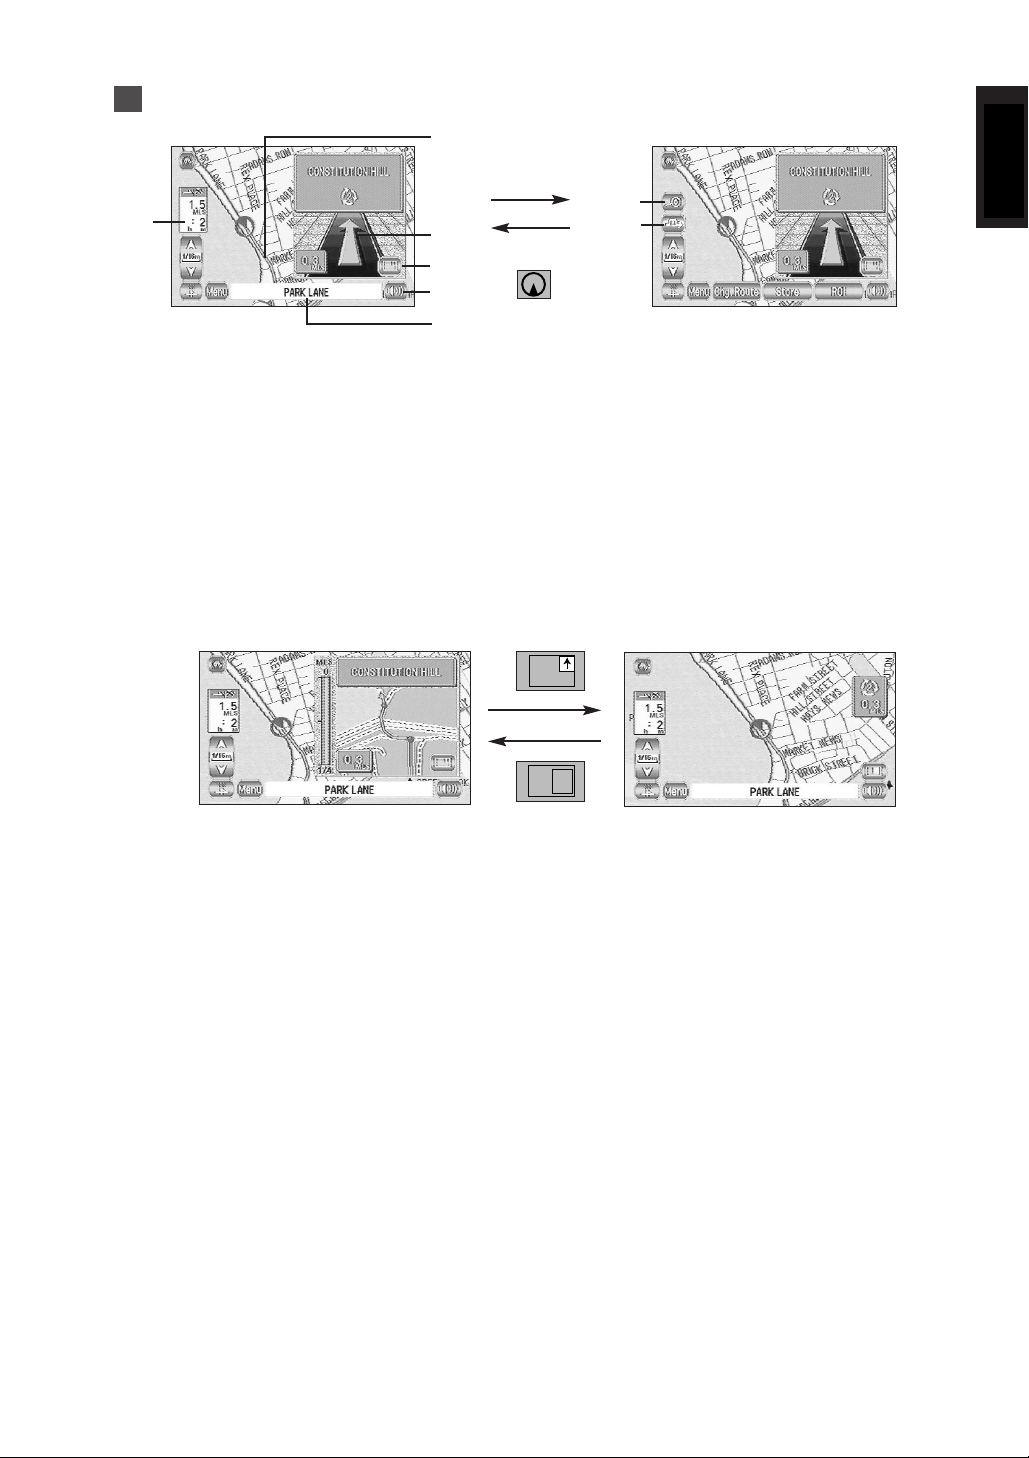
Screens During Route Guidance
➁
Touch the screen
➀
➂
➃
Touch
➄
➅
➀ Distance and Time to Destination display
This shows the driving distance and the estimated time required to the
destination. It also shows the direct distance from the current position to the
destination if the vehicle has left the route.
➁ Route display
This shows the provided route as a thick green line.
➂ Turn Arrow display
This shows the direction to turn at the next junction and the distance to the
junction.
➃ Split Screen to Full Screen switch
Selecting this switch brings up a full screen map of the vicinity in which you are
currently driving.
➆
➇
<Enlarged diagram of junction>
(Split Map)
<Mini-arrow display>
➄ Repeat Voice switch
This repeats the last voice guidance message.
➅ Current Road Name
This shows the name of the road you are currently driving along.
➆ Display Whole Route switch
This shows the entire route. (See page 27)
➇ Detour button
This shows the detour setting screen. (See page 26)
(Full Map)
9
Page 12
ENGLISH
Menu Screen Change Chart
<Current Position screen>
Address (page 16)
Menu
Destination Entry (page 16)
Route Options (page 25)
Navigation Set Up (page 28)
Memory Point (page 18)
Home (page 18)
Point of Interest (page 19)
Previous Destination (page 19)
Postcode (page 20)
Select from Map (page 20)
Motorway Entrance/Exit (page 21)
Detour (page 26)
Route Preferences (page 26)
Display Whole Route (page 27)
Calculate (page 25)
Cancel Guidance (page 25)
Average Speed Settings (page 28)
10
Language Selection (page 7)
Guidance Options (page 33)
Stored Locations (page 35)
User Settings (page 41)
(page 24)
Quick POI Selection (page 29)
Restore System Defaults (page 29)
Vehicle Signal (page 30)
Calibration (page 30)
Map Version (page 31)
2D/3D View (page 32)
Page 13
ENGLISH
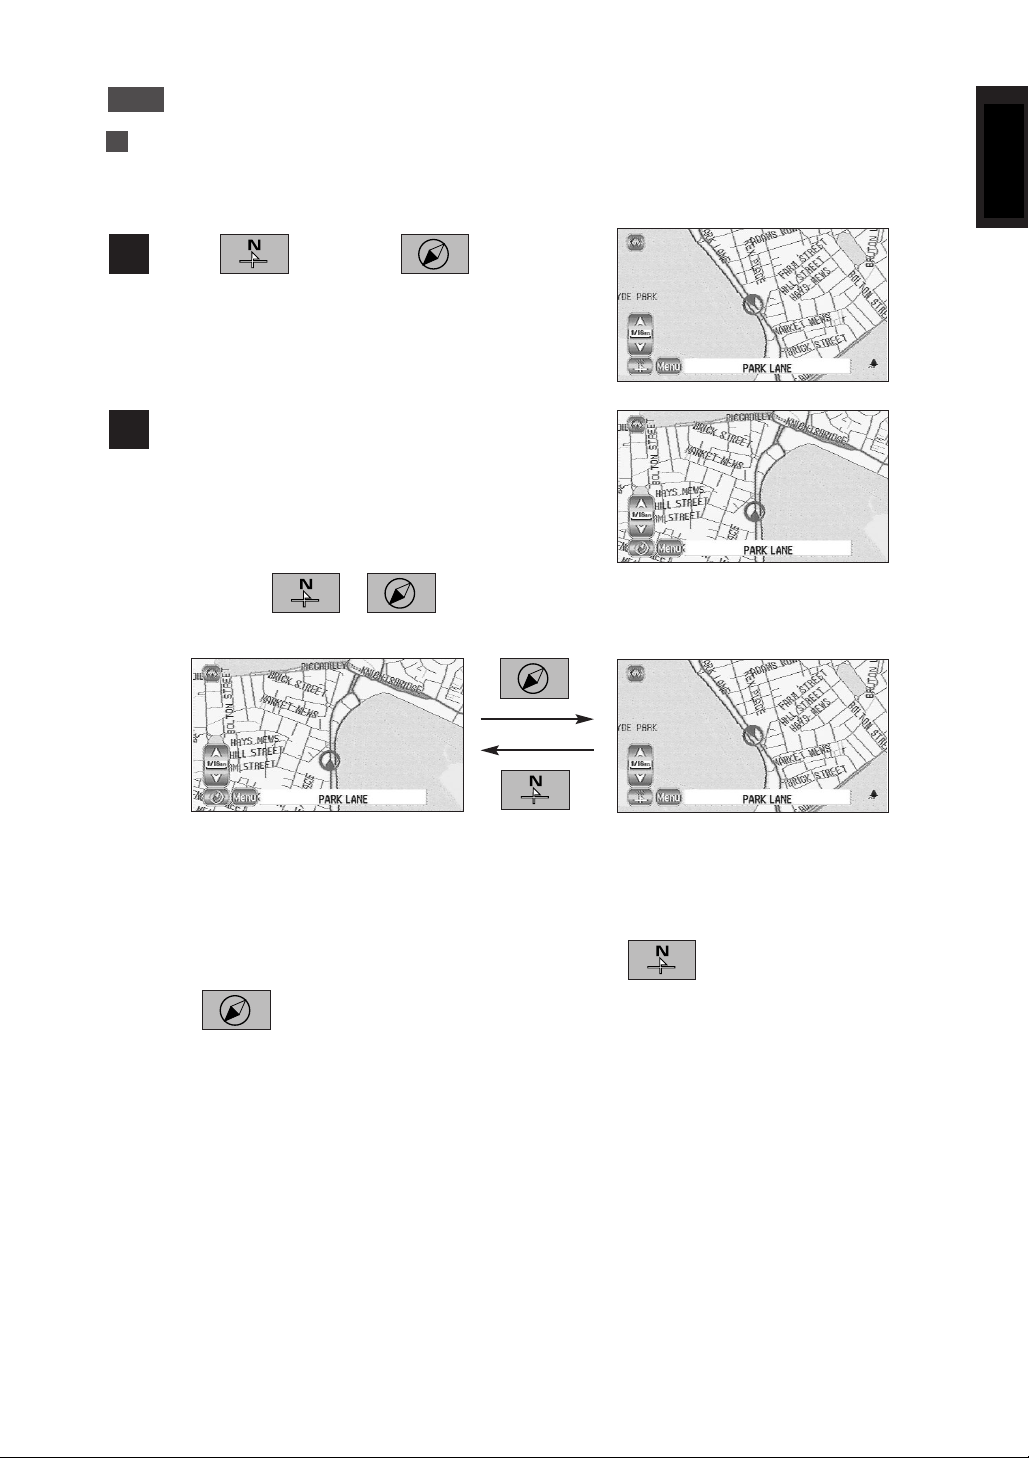
Map Operations
Changing the Orientation of the Map
Either the direction in which you are headed or north can be shown as upwards
on the map.
Select (North Up) or (Heading Up).
1
The orientation of the map will change.
2
• Selecting or changes the orientation of the map as shown
below.
Heading up
The direction in which your
vehicle is heading is always
shown as upwards on the
screen.
This orientation marker is
.
(north: red)
North up
North is always shown as
upwards on the screen.
This orientation marker is
.
11
Page 14
ENGLISH
128m (mile)
16m (mile)
2m (mile)
1/4m (mile)
1/32m (mile)
256Km
32Km
4Km
500m
50m
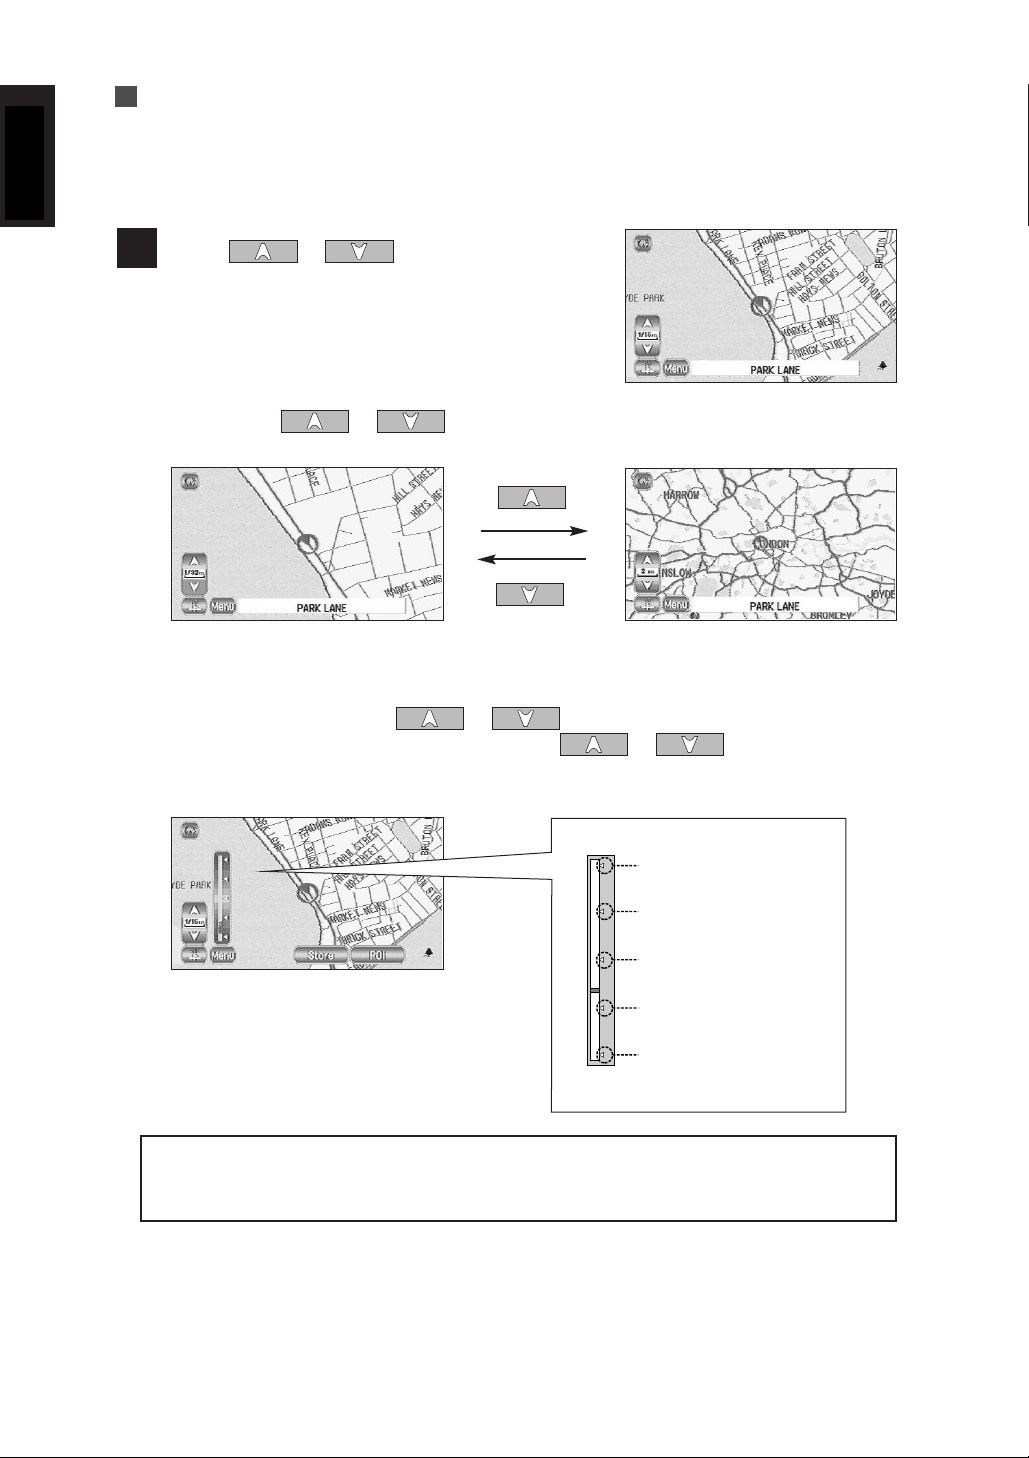
Changing the Scale of the Map
You can increase or decrease the scale of the map.
Touch or to change the map
1
scale.
• Selecting or changes the scale of the map as shown below.
Detailed Wide area
• You can keep touching or to continually change the scale.
• By touching the right of the scale bar after or is selected, you
can directly change between 5 scale levels. (See below)
Imperial display
<Scale bar>
Metric display
NOTE :
• The scale can be displayed in imperial or metric units.
• See page 41 for the method of changing the units displayed.
12
Page 15
ENGLISH
Map Display
Showing Current Position
This shows the current position of your vehicle.
Touch the switch.
1
The current position of your vehicle will be shown.
2
Scrolling the Map
Touching the screen scrolls the map.
Touch the screen.
1
Touch the map.
2
NOTE :
The screen can scroll up, down, left, right and diagonally in a total of eight directions.
Scroll the screen so that the point you touch with
3
your finger becomes the centre of the map.
• The screen that displays the present location of your vehicle is called the Current Position
screen. The screen that scrolls the maps with a cursor key is called the Map screen.
Current Position screen (auto-mode).... Scrolls automatically according to the movement of
your vehicle. (The map automatically follows your current position.)
Map screen (manual mode).... Shows the map of the location you want to see. It does not
scroll automatically.
• If you move the map, it stops automatically scrolling. If you then select the switch, the
Current Position screen reappears and the map returns to auto scroll.
• To quickly search for a location, first move the map on the wide area map scale screen to
the general area of the destination and then change to the detailed map to find the
destination.
• When you touch the screen, it scrolls towards the place touched. If you keep touching the
screen, scrolling continues in the direction of the place touched (one of eight directions). If
you keep touching the screen longer, scrolling speeds up.
13
Page 16
ENGLISH
Set Route
Route Searching
Here we explain how to set the route. Follow the example below.
CAUTION!
The mobile navigation system provides maps and voice guidance for your reference
when driving. In unusual situations, however, this guidance might be in appropriate.
When driving along the route provided, always comply with local traffic regulations
(one-way streets, etc.).
NOTE :
• The route shown is a reference route as far as the destination area. It might not be the
shortest route.
• If the street on the map disc does not agree with the actual street, the voice guidance
might be wrong.
• At a complicated junction, it might be difficult to understand where to turn from only
the voice guidance. Stop the vehicle and check the Map screen.
• If a destination or way points are not on a road that the mobile navigation system can
direct to, the route provided might not pass that destination or way points.
• The mobile navigation system might not be able to provide directions due to the
distance from the destination area or a lack of road data.
• If the current position cannot be determined properly, voice guidance and enlarged
junction diagrams will be disabled or might be incorrect.
Used for route search
Used for detailed settings
Setting Destination
Route Guidance
Route Options
Navigation Set Up
See page 15
See page 23
See page 25
See page 28
14
Page 17

ENGLISH
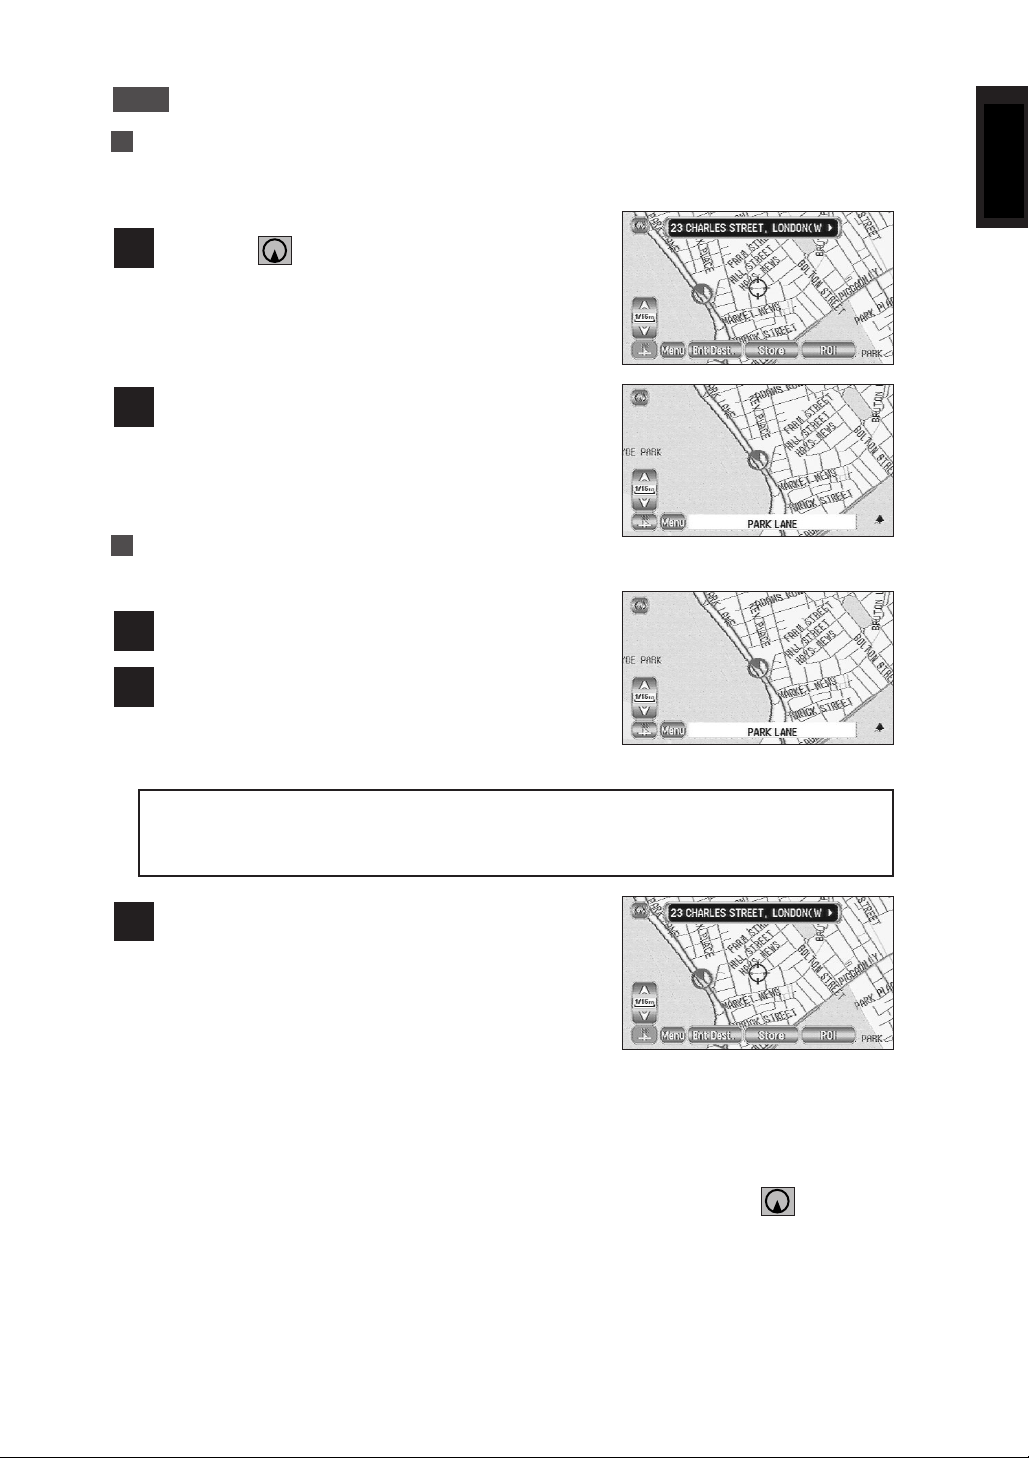
Setting Destination
Setting Destination by Scrolling the Map
[Example]
Full address not known.
Touch the screen to scroll the map until the is
1
at the destination point and select
(Enter Destination).
Ent Dest.
Select (Destination).
2
Way Pt.
A map of the whole route appears.
3
Select , if happy with the route shown.
or select
Chg. Route
When happy with the route shown, press
Route guidance begins.
4
Dest.
(Way Point) ····Sets the way point.
Start
Next
Start
(Next Route)·················This brings up the next proposed route.
(Change Route)············During route guidance you can change the route
.
options, stop or check the route. (See page 25)
15
Page 18

ENGLISH
Setting Destination from the Navigation Menu
[Example]
Here are the steps to set the destination using the Address function from the Navigation
menu.
Select .
1
Select (Destination Entry).
2
Select (Address).
3
If you cannot select wanted address check search
area is correctly selected.
Menu
(Memory Point)· · · · · · · · · · · · · · · · · · · · · · · · · · See page 18
(Home)· · · · · · · · · · · · · · · · · · · · · · · · · · · · · · · · · See page 18
(Point of Interest) · · · · · · · · · · · · · · · · · · · · · · · · See page 19
(Previous Dest.) · · · · · · · · · · · · · · · · · · · · · · · · · See page 19
(Postcode) · · · · · · · · · · · · · · · · · · · · · · · · · · · · · · See page 20
(Select from Map)· · · · · · · · · · · · · · · · · · · · · · · · See page 20
(Motorway Ent/Exit) · · · · · · · · · · · · · · · · · · · · · · See page 21
Change
· · · · · · · · · · · · · · · · · · · · · · · · · · · · ·
This allows you to designate the area to
be searched. (See page 22)
16
• You can switch between screens by selecting (Next Page) or (Prev.
Page).
NOTE :
• Depending on the selected area, you may not be able to search from the post code.
• If the destination setting is different to the Search Area shown in the right of the
screen, you must select and designate the search area again.
Enter the street name and select .
4
··········Selecting this deletes the character that was last entered. Selecting it
continuously deletes all the characters that have been entered.
• You can switch between the input screens showing different input characters by selecting
, (Symbols) or (A to Z).
• You can search for the street you want quickly by selecting and entering the name.
Change
List
A-ZSym.Others
Town
Page 19

ENGLISH
If the same street name exists in more than one
5
town, a list of those towns is shown.
Select the right town from the list.
NOTE :
If the house number data is not stored on the map disc, the system may display the
wrong location.
Select (Destination).
6
Way Pt.
NOTE :
If your destination is not on a road,set destination point on nearest main road.
The Entire Route Map appears.
7
Select .
or
Next
Chg. Route
Dest.
(Way Point)···········Sets the way point.
Start
(Next Route)················This brings up the next proposed route.
(Change Route)············You can alter the route calculation conditions, etc.
(See page 25)
The route is found and route guidance begins.
8
17
Page 20

ENGLISH
Memor
Memor
If a marked point is stored, you can make it the destination.
y Point
y Point
Menu
Select (Memory Point).
1
Select the required Memory Point.
2
See page 17, part 6 to 8 for the route search method.
NOTE :
You cannot use this function if no Memory Point is stored. (See page 35 for the
Memory Point storing method.)
Home
Home
Menu
(Destination Entry)
(Destination Entry)
Select (Home).
1
The map of the area around Home appears.
2
See page 17, part 6 to 8 for the route search method.
NOTE :
You cannot use this function if Home is not stored. (See page 35 for the Home storing
method.)
18
Page 21

ENGLISH
Point of Inter
Point of Inter
This finds a name from the list of points of interest and makes it the destination.
est
est
Menu
Select (Point of Interest).
1
Enter the name of the point and select .
2
Select the required point of interest from the list.
3
See page 17, part 6 to 8 for the route search method.
If there is more than one item with the same name, select or to
shorten the list.
(Destination Entry)
List
TownCategory
evious Destination
PrPrevious Destination
This lets you choose one of the most recent 20 destinations or way points and set it as your
new destination.
Menu
Select (Previous Dest.).
1
Select the Previous Destination you want.
2
See page 17, part 6 to 8 for the route search method.
NOTE :
You cannot use this function if there are no Previous Destinations.
(Destination Entry)
19
Page 22

ENGLISH
Postcode
Postcode
This finds a location by its postcode and makes it the destination.
Menu
Select (Postcode).
1
Enter the postcode and select .
2
See page 17, part 6 to 8 for the route search method.
··········This deletes the last character entered. Selecting it continuously deletes all of the
NOTE :
Postcodes cover a designated area so destination may be some distance from
wanted address.
Select fr
Select fr
This finds a location from the map that was last displayed and makes it the destination.
Menu
om Map
om Map
(Destination Entry)
OK
characters entered.
(Destination Entry)
20
Select (Next Page) and then (Select
1
from Map).
The map that was last displayed appears again.
2
See page 17, part 6 to 8 for the route search method.
Page 23

ENGLISH
Motor
Motor
This finds the name of a motorway entrance or exit and makes it the destination.
way Entrance/Exit
way Entrance/Exit
Menu
Select (Next Page) and then
1
(Motorway Ent/Exit).
Enter the name of the motorway and select
2
List
.
Select the name of the motorway you want.
3
Select or .
4
(Destination Entry)
ExitEntrance
Select the name of the entrance or exit you want
5
from the list.
See page 17, part 6 to 8 for the route search method.
21
Page 24

ENGLISH
Change (Change Sear
Change (Change Sear
This designates the area in which the destination can be set.
ch Ar
ch Ar
ea)
ea)
Menu
Select .
1
Select the Search Area and then .
2
See page 16 for the destination setting method.
• You can switch between screens by selecting or .
NOTE :
The SEARCH AREA screen above is the imaged screen. It may be slightly different
than the screen of the unit.
Change
(Destination Entry)
OK
22
Page 25

ENGLISH
Route Guidance
Guidance Screen
Whilst driving along during route guidance, the directions for the next junction
where you have to turn are shown as a Turn Arrow or Turn List. To change the
display, see page 33.
<Turn Arrow>
Directions are indicated by an
arrow.
<Turn List>
Directions are indicated as a
list.
Enlarged Junction Diagram
Before a fork in the road, an enlarged diagram of the junction automatically
appears in a second screen. This is to make route guidance even clearer.
During route guidance, an enlarged diagram of
an approaching fork or junction appears. When
you drive past the junction, the enlarged diagram
disappears.
• To stop the enlarged junction diagram being displayed, you can select to switch to
the following input screen.
··········The enlarged junction diagram can be displayed.
• Even if you select , an enlarged junction diagram will appear again as you
approach the next junction.
NOTE :
The name of the junction sometimes does not appear on the enlarged junction
diagram.
23
Page 26

ENGLISH
Fork Junction Diagram
During route guidance, an enlarged diagram of the motorway automatically
appears in a second screen as you approach a fork on the motorway. This is to
make route guidance even clearer.
During route guidance along a motorway, a diagram of
an approaching fork or exit appears. When you drive
past that junction, the diagram disappears.
Replaying Voice Guidance
This function allows you to listen to the last voice guidance message again during
route guidance.
Select .
You can hear the voice guidance again.
Voice Guidance
During route guidance, voice guidance will inform you of distances and turning
directions as you approach turning points, way points or the destination. If you
want voice guidance, switch on as follows.
Select .
1
Select .
2
You can hear the voice guidance.
Menu
· · · ·Voice guidance is not given.
24
Page 27

ENGLISH
Route Options
During route guidance you can change the route options, stop or check the route.
Select and then (Route Options).
1
The Route Options screen appears.
2
Detour ······································This calculates an alternative route from your current position
Route Preferences ···················Allows you to alter the route search conditions and recalculate.
Display Whole Route ··············Allows you to confirm the route information during guidance.
Menu
Calculate
Cancel Guidance
within a specified distance. (See page 26)
(See page 26)
(See page 27)
···············Recalculates the route.
···············Stops route guidance. Note that this deletes the destination and
way points. To start guidance again, select .
Calculate
NOTE :
Recalculating the route sometimes provides the same route as before.
25
Page 28

ENGLISH
Detour
You can specify the distance from your current position and the mobile
navigation system calculates an alternative route.
Menu
Select (Detour).
1
Select the distances for both Residential and
2
Motorway.
Select or .
3
Detour
New Route
You can set the conditions and the mobile navigation system calculates a route.
Menu
(Route Options)
New RouteDetour
······Recalculates a route to detour the guidance route.
······Calculates another detour.
Route Preferences
(Route Options)
26
Select (Route Preferences).
1
Set the conditions and select .
2
Select to recalculate a route.
Minimize Time/Dist. · · · · · · · · · · · · · ·Searches for a route giving priority to time or distance.
Use Toll Roads · · · · · · · · · · · · · · · · · · ·When the button No is selected, the mobile navigation
Use Ferries · · · · · · · · · · · · · · · · · · · · · ·When the button No is selected, the mobile navigation
NOTE :
The route will not necessarily follow the specified conditions.
Calculate
Store Settings
system searches for a route avoiding toll roads where
possible.
system searches for a route avoiding ferries where
possible.
Page 29

ENGLISH
Display Whole Route
This function allows you to display the entire route when the destination is set
and the guidance route shown. You can also display the map around the
destination and other route information (street names).
Menu
(Route Options)
Select (Display Whole Route).
The Entire Route screen appears.
Dest Map
Route
Turn List
(Destination Map)·········· Displays the map of the area around the destination.
··········································Displays the entire route.
··········································Displays the data for the entire route. (See below)
Avoid
Reroute
• If the data for the route cannot be shown on one screen, you can scroll using and
• You can switch to the screen shown below by selecting (Destination Map) or
Diagram of entire route
··········································You can set any areas you want to avoid from the list of
street names.
···········································Recalculates the route.
.
Dest Map
Route
.
Dest Map
Route
Destination area
27
Page 30

ENGLISH
Navigation Set Up
This function is for altering the map display conditions and the route guidance conditions
and showing the system information.
Select and then (Navigation Set
1
Up).
The Navigation Set Up screen appears.
2
Average Speed Settings ························Allows you to set the predicted average speed for each
Quick POI Selection ································Allows you to select the categories on the menu
Restore System Defaults ·······················Allows you to return all the settings in the navigation
Vehicle Signal··········································Allows you to check the condition of signals that are
Calibration ···············································Allows you to correct any error in the vehicle display
Map Version ············································Allows you to check the version of the map disc you are
2D/3D View ············································· Allows you to switch between a 2D and 3D display
Menu
category of road. (See below)
displayed when has been selected on the
Current Position screen.
system to the initial default settings. (See page 29)
connected to the navigation system. (See page 30)
position or direction. (See page 30)
currently using. (See page 31)
screen. (See page 32)
POI
28
Average Speed Settings
You can display a more accurate estimation of the time required (see page 34) by
setting the predicted average driving speed on each category of road.
Menu
Select (Average Speed Settings).
1
Select to set the average speed.
2
Select .
3
OK
(Navigation Set Up)
NOTE :
Default
·······Returns the average speed setting to the initial default setting.
Page 31

ENGLISH
Quick POI Selection
This function allows you to set the categories on the menu displayed when
POI
(Point of Interest) is selected on the map. (See page 42 for how to display
markers on the map and search for nearby points of interest)
Menu
Select (Quick POI Selection).
1
Select a switch to change the POI category.
2
Select the POI you want to display on the menu.
3
Select .
4
OK
(Navigation Set Up)
• Repeat the above steps 1 to 4 to add further POI markers displayed on the menu.
Restore System Defaults
This function replaces all the settings in the mobile navigation system with the
initial default settings.
Menu
Select (Restore System Defaults).
1
Select .
2
IMPORTANT :
If you execute Restore System Defaults, all of your Stored Locations data will be
deleted.
OK
(Navigation Set Up)
29
Page 32

ENGLISH
Vehicle Signal
In this screen you can check the navigation connections. The Reverse (REV) and
Speed-pulse (SPD) connections are necessary for accurate calibration and
functionality.
Menu
Select (Vehicle Signal).
1
REV. : With the reverse signal wire connected and
with reverse gear selected, the REV indicator
will change to ‘ON’. The current position
cursor will move backwards on the map
screen (whilst the vehicle is reversing).
PKB. : When the handbrake is applied, the destination input is activated.
ILL. : The illumination connection enables automatic switching of the map screen
between day and night mode.
SPD. : The speed-pulse is received from the vehicle’s electronics and is necessary to
tell the navigation system how fast the car is moving. This speed is an
approximation and may differ from that shown on the vehicle’s speedometer.
GPS : The number of received GPS satellites is shown and the current position,
expressed in Latitude and Longitude.
This function allows you to correct any error in the position or direction of your
vehicle display.
Position
Position
(Navigation Set Up)
Calibration
30
Menu
Select (Calibration).
1
OK
OK
Position
.
.
Select .
2
Move the to the correct position and select
3
Use or to make point in the
4
direction in which you are driving, and select
(Navigation Set Up)
Page 33

ENGLISH
Distance
Distance
This function automatically corrects any error in the display of the current
position that might occur after tyre replacement.
Menu
Select (Calibration).
1
Select .
2
NOTE :
You will have to drive about 10km (6 miles) before distance correction is complete.
This function enables you to check the version of the map disc and the software
you are currently using.
Distance
(Navigation Set Up)
Map Version
Menu
Select (Map Version).
The version of the map disc and the software you are
now using is shown.
(Navigation Set Up)
31
Page 34

ENGLISH
2D/3D View
You can switch between a 2D and 3D display screen. You can also change the
viewing angle of the 3D display.
Map Dimension
Map Dimension
Menu
Select (2D/3D View).
1
Select .
2
Select a 2D or 3D display for the Map Screen and
3
the Guidance Screen.
Select .
4
Map Screen ················ Changes the map screen display.
Guidance Screen ········Changes the route guidance screen, such as the enlarged junction
3D Map Angle
3D Map Angle
Menu
Map Dimension
OK
(Navigation Set Up)
diagrams.
(Navigation Set Up)
32
Select (2D/3D View).
1
Select .
2
Adjust the angle using and on
3
the right of the screen.
Select .
4
Default
3D Map Angle
OK
.... Restores the initial default angle setting.
Page 35

ENGLISH
Guidance Options
This allows you to set the route guidance display and method.
Select .
1
Select (Guidance Options).
2
Select the item you require and then .
3
Time to Destination···········This sets whether the estimated required time to the destination is
Audio Mute ························This turns off the sound of the car audio system, if it is being played,
Split ···································The Current Position screen always includes the Guidance screen.
Menu
OK
displayed or not during route guidance. You can also display a more
accurate estimation of the time required by carrying out Average
Speed setting. (See page 28)
(The time shown here may differ from the actual travel time.)
Show
····························The estimated required time is shown.
Hide
·····························The estimated required time is not shown.
to allow you to hear the voice guidance during the route guidance.
Full······································The Current Position screen always shows the mini-arrow.
33
Page 36

ENGLISH
Arrow··································The Guidance screen that appears whilst driving along the road
during guidance gives directions with an arrow. When is
selected, however, the mobile navigation system switches to a mini-
arrow display.
Turn List ·····························The Guidance screen that appears whilst driving along the road
during guidance gives directions as a list. When is selected,
however, the mobile navigation system switches to mini-arrow
display.
34
Page 37

ENGLISH
Stored Locations
You can store, edit or delete any destinations, way points or marked point.
[Example]
Here are the steps to add a location to Memory Point.
Select .
1
Select (Stored Locations).
2
Select the item you require.
3
Select (Memory Points).
Memory Points ····································This places a marker on the map.
Home ····················································This stores the location of your home.
Avoid Area ············································This stores any areas to be avoided.
Previous Dest. (Destinations) ··············This deletes previously stored destinations (and way
Dest. & Way Pt. (Destination and Way Point)
·······························································This sets the destination (and way points).
Menu
points).
Select .
4
You can display the map of the area you require
by selecting one of the methods on the screen.
• See page 16 for how to access maps.
Add
35
Page 38

ENGLISH
• Select the editing method you require from , , and
(Delete All).
Add
·········This is for storing a new location.
List
·········This is for displaying the list of stored locations.
Delete
Del. All
The switches displayed vary according to the item. (See below)
This is for deleting stored locations.
·········
·········This is for deleting all stored locations.
Del. AllDeleteListAdd
Memory
Points
(100)
Home
(1)
Avoid Area
Add
List
Delete
Del. All
Add
List
Delete
Add
List
Previous
Destinations
(20)
Dest. &
Way Pt.
(Destination
& Way Point)
(Destination: 1,
Way Point: 5)
Delete
Del. All
Add
List
Delete
Del. All
(10)
Delete
Del. All
The numbers in the parentheses indicate the maximum items you can store in the memory.
NOTE :
• Up to 100 memory points can be stored. You will not be able to store more than
100. Delete a memory point that you no longer require (see page 40) before storing
a new memory point. The remaining number of spaces in the memory is indicated
at the bottom of the screen.
36
Select .
5
OK
Page 39

ENGLISH
Editing Stored Locations
Edit Memory Points
Menu
Select (Memory Points) and then .
1
Select the location you want to edit.
2
• You can display the Memory Points in the desired order by selecting , ,
(Distance) or .
The Edit Point screen appears.
Icon
·····························This is the icon of the memory point that appears on the map. You
(Stored Locations)
List
Date
MarkDist.
can select from 15 kinds of normal icons and 3 kinds of audible icons.
(See below)
Name
Name
·····························This is the name of the memory point. You can change the name as
Position
Edit Icon
Edit Icon
Select the location you want to edit and then
1
Select the required icon.
2
Audible Icons ········As you approach a location marked with such an icon, the mobile navigation
·····························This is the position of the memory point. You can display and edit
Tel.
(Telephone) ······This is the telephone number of the memory point.(See page 38)
Icon
.
required. (See page 38)
this position. (See page 38)
(Stored Locations) (Memory Points)
system informs you with a sound.
ListMenu
37
Page 40

ENGLISH
Edit Name
Edit Name
(Stored Locations) (Memory Points)
Select the location you want to edit and then
1
Name
Enter the name and select .
2
NOTE :
It may be necessary to delete information before entering new details. Use the
Edit Position
Edit Position
.
··········Selecting this deletes the character that
was last entered. Selecting it
continuously deletes all the characters
that have been entered.
OK
switch.
(Stored Locations) (Memory Points)
ListMenu
ListMenu
Select the location you want to edit and then
1
Position
Move the to the required position and select
2
Edit T
Edit T
Select the location you want to edit and then
1
Enter the telephone number and select .
2
.
OK
.
elephone Number
elephone Number
(Stored Locations) (Memory Points)
Tel.
(Telephone).
ListMenu
OK
38
Page 41

ENGLISH
Edit Home
Menu
Select (Home) and then .
1
Move the to the Home position and select
2
OK
.
Menu
Select (Avoid Area) and then .
1
Select the Avoid Area item to be edited.
2
A map including the Avoid Area appears. Move
3
the to the desired point and specify the area to
be avoided using or .
(Stored Locations)
List
Edit Avoid Area
(Stored Locations)
List
EnlargeReduce
OK
OK
Edit Destination & Way Point
(Stored Locations)
MAP
.
Select .
4
Menu
Select (Dest. & Way Pt.) and then .
1
Select on the right of the location to be
2
edited.
Move the to the required position and select
3
List
39
Page 42

ENGLISH
Chg.
Order
Undo
(Change Order) ························You can change the order of the destination (or way
·····················································This restores the previous order before it was
Chg.
(Change Location) ···················This lets you edit the location of the destination or way
Loc.
points) shown on the screen below.
By selecting on the right of each point in the
order your vehicle will travel, numbers appear to
indicate this order.
Select .
switched.
points.
OK
Deleting Stored Locations
[Example]
Here are the steps to delete a location from Memory Point.
Menu
Select (Memory Points) and then .
1
Del. All
Select the marked point you want to delete.
2
Select .
3
(Delete All)······This deletes all the stored
Yes
(Stored Locations)
memory points.
Delete
40
Page 43

ENGLISH
User Settings
These are the settings for the screen display and sound.
Select .
1
Select (User Settings).
2
Select the required item.
3
Select .
4
Colour scheme ············You can set one of the four screen colours, Default, Olive, Marine or
Map Mode ···················You can set the display to the Day screen or Night screen.
• Auto···························The display will automatically switch between the Day and Night screens
• Day·····························The Day screen will be displayed regardless of whether the car lights are
• Night ·························The Night screen will be displayed regardless of whether the car lights
Volume Presets ···········You can select or to adjust the volume of the voice
Units····························· This sets the map to display metric or imperial units.
Menu
OK
Umber.
when you operate the car lights switch.
on or off.
are on or off.
+−
guidance.
41
Page 44

ENGLISH
Other Functions
Displaying POI’s on a Map
You can select one of the six categories on the menu or List Categories and then
select the POI(s) to be displayed on the map.
Touch the screen.
1
Select (Points of Interest) from the
2
map.
Select one of the six categories on the menu or
3
List Categories
displayed on the map.
All Local POI’s
The POI markers will appear.
See page 43 for the method of deleting POI’s.
POI
and then select the POI(s) to be
········Allows you to search for a
POI. (See below)
Local Search
Touch the screen.
1
Select (Points of Interest) from the
2
map.
POI
42
Select (All Local Points of
3
Interest).
Select the POI you want to find from the list.
4
The point of interest you selected appears.
All Local POI’s
·············
·············
·············
·············
Displays up to five previous suggestions.
Displays the previous suggestion.
Displays the next suggestion.
Displays up to five of the next suggestions.
Page 45

ENGLISH
Deleting POI Markers
This function deletes any POI markers shown.
Touch the screen.
1
Select (Points of Interest Off).
2
The POI markers disappear.
3
POI Off
Showing POI Data
You can display POI (Point of Interest) data, such as name, address and telephone
number.
Display the POI’s. (See pages 29 and 42)
1
Select the POI required by moving the on the
2
POI icon.
The name of the selected POI appears.
3
If no data is stored for the selected POI, the POI
name is not displayed.
Select (Information).
4
The data of that POI is displayed.
5
NOTE :
POI search and POI display can't be done at a map scale above 1 mile (2 km).
Info.
43
Page 46

ENGLISH
Checking the Route by a Simulation Run
The mobile navigation system can show you a simulation of the calculated course
automatically.
After the route has been calculated, touch
1
Start
A simulation run of the set route begins.
2
for at least 5 seconds.
···············This finishes the simulation run.
• The speed of the simulation run can be altered by changing the scale of the map. The
simulation run is faster with a wider area map and slower with a closer up map.
IMPORTANT :
• Finish the simulation run before actually starting to drive. The simulation run will
automatically finish when you actually start to drive, but this can lead to an error in
the display of the current position of your vehicle.
44
Page 47

ENGLISH
General Information
Mechanism of Detecting the Vehicle’s Position
Detecting the vehicle’s position through the GPS
*GPS stands for the “Global Positioning System”; it is a system for detecting the position
through the use of the satellites of the Defence Department of the United States.
Radiowave signals from three or more satellites are received by the system, which utilizes
the principle of triangulation, in order to detect the position in which the radiowave
signals are received.
When this navigation unit is receiving the GPS radiowave signals, a “GPS” mark will
appear on the map screen.
Detecting the vehicle’s position through self-contained navigation
* Self-contained navigation is a system that detects the vehicle’s position by calculating the
vehicle’s driven distance and turning angle though the use of various types of sensors
that are mounted on the vehicle.
Through the use of self-contained navigation, the vehicle’s position can be detected even
in an area in which the GPS radiowaves signals cannot be received.
Marking corrections to the detection of the vehicle’s position through map matching
*In map matching, the position information resulting from the detection of the vehicle’s
position and the locus of the travel of the vehicle up to the present are constantly
compared to the shapes of the roads on the map in order to correct the vehicle’s position
mark to the most appropriate road.
* If the vehicle is driven on a road whose actual shape differs from the map data, the
vehicle’s position mark on the map could deviate from the actual position.
Occasionally, the correction of the vehicle’s position mark to the actual road on the map
can be observed particularly after the vehicle has turned at an intersection or has come
out of a parking area.
Accuracy of the Vehicle’s Position
Area in which GPS signals cannot be received
* Because the radiowave signals from the GPS satellites travel primarily by line of sight, a
navigation system might not be able to receive the signals in the areas described below.
(If the GPS mark does not appear on the map screen, it means that the GPS radiowave
signals are not being properly received.)
(1) Inside a tunnel
(2) Inside a building
(3) Under a three-dimensional road such as a high-speed road
(4) On treed boulevards or in the mountain groves
(5) Between buildings
(6) Under a cliff or in a cave
• If the GPS antenna or its surroundings are blocked by an obstacle (including cargo), it
might not be possible for the system to receive the GPS radiowave signals.
• If multiple paths are created due to the reflection from the buildings, a large measurement
error could occur, causing the vehicle’s mark to deviate from the actual position.
45
Page 48

ENGLISH
Deviation of the vehicle’s position mark
* The vehicle’s mark could deviate from the actual position when the vehicle is being driven
under the conditions listed below or due to the conditions of the GPS satellites.
If the vehicle travels on a road whose actual shape differs from that in the map data, the
vehicle’s mark could deviate from the actual position. The correct position will eventually
appear on the screen through the correction function. If the screen does not show the
correct position for a long time, correct the current position or make an automatic
correction.
(1) The vehicle’s mark could appear on a parallel road.
(2) When the road splits into a narrow Y, the vehicle’s mark could appear on the other
fork of the Y.
(3) When the vehicle makes a right or left turn, the vehicle’s mark could appear on one
street ahead or behind.
(4) If the vehicle is transported by a means other than the vehicle’s own power, such as
on a ferry boat, the vehicle’s mark will remain in the position before the transport
until the system can calculate the position through the GPS.
(5) When the vehicle is driven on a steep incline, the vehicle’s mark could deviate from
the actual position.
(6) If there are continuous curves in the same direction, the vehicle’s mark could
deviate from the actual position.
(7) If the vehicle is driven in a zigzag pattern, such as through frequent lane changes,
the vehicle’s mark could deviate from the actual position.
(8) If the vehicle is placed on a turntable , such as in a parking area, and turned with
the ACC OFF, the orientation of the vehicle’s mark could deviate from the actual
orientation. The vehicle’s mark could also deviate even after the vehicle has exited
the parking area.
(9) The vehicle’s mark could deviate from the actual position if the vehicle is driven on
a snow-covered road or on a mountainous road with tyre chains or spare tyres.
*After driving the vehicle under those conditions, perform the same operation
given in the section on “After changing tyres”.
(10) The vehicle’s mark could deviate from the actual position after the tyres have been
replaced.
* After replacing the tyres, refer to the section on “After changing tyres”.
46
Page 49

ENGLISH
Accuracy of the Route Guidance
The conditions listed below do not indicate a malfunction.
(1 ) If the vehicle proceeds to the destination without passing through the transit point, a
route to return to the transit point could appear on the screen if a search is repeated.
(2) The guidance might prompt the driver to drive straight even though the vehicle is
being driven on a straight road.
(3) The directional guidance could display multiple place names.
(4) If the vehicle makes a turn at an intersection before the guided route, the wrong type
of voice guidance could be output.
(5) The guidance might not be output whilst the vehicle is making a turn at an
intersection.
(6) The system might not be able to search for the proper route.
(7) If there is no road to the destination or if there is only a narrow road, the route might
only indicate up to an area that is away from the destination.
(8) The repeat search time could be long whilst the vehicle is being driven at high
speeds.
(9) Whilst the system is searching again for the route, the route indication might not
appear in time for the next right or left turn.
(10) Whilst searching again for the route, the route could make a larger turn.
(11) The route might not change even if a search is made again.
(12) The system might guide the driver to make a U-turn.
(13) The system might guide the driver on a road that cannot actually be travelled (such
as on a road in which entry is prohibited).
(14) The system might not output a guidance even if the vehicle is driven in reverse on
the guided route.
(15) The system might not use a ferry boat even if it is located nearby.
(16) If the guided intersection is near the end of the route search, the system might not
be able to provide guidance.
(17) The route might not go on a toll road even the toll-road priority is selected.
Similarly, a route that uses a toll road could appear on the screen even if the toll-
road priority is not selected. (The driver may or may not select the “toll-road
priority” if both toll and free roads are available.)
47
Page 50

ENGLISH
Troubleshooting
See the table below to confirm whether any problem is due to a minor
operational error or a malfunction.
A problem might be due to a minor operational error rather than a malfunction.
Check the table below before contacting your local dealer for any repair service.
General problems on the navigation system
Problem
The power does not
come on.
The map does not scroll
even when the vehicle is
moving.
The vehicle marker does
not appear.
The GPS marker is not
displayed.
There is no voice
guidance.
Small spots or bright
flashes appear in the
screen displayed.
Possible cause
The fuse might be
blown.
The screen shown might
not be the Current
Position screen.
The screen shown might
not be the Current
Position screen.
The GPS antenna or your
vehicle might be in a
position where GPS
signals cannot be
received.
Route guidance might be
suspended.
The guidance volume
might be turned down
low.
This is probably due to
the nature of the LCD
display.
Probable solution
Check the fuse. Replace it
if it is blown.
See page 13 of this
manual to display the
Current Position screen.
See page 13 of this
manual to display the
Current Position screen.
Try moving the GPS
antenna or your vehicle to
a position where there are
no obstacles around.
The route guidance is off,
see Route Options (page
25).
See User Settings (page
41).
There is nothing wrong
with the display and no
need for concern.
48
The map disc cannot be
ejected.
The disc might be
incompatible or might
have been inserted
incorrectly.
Restart the engine and see
page 4 of this manual.
Page 51

ENGLISH
Terminology
Here is an explanation of the terms displayed on the screens.
All Local POI’s
A-Z
·························A to Z
Chg.
························Change Location
Loc.
Chg.
Order
Chg.Route
Del. All
Ent Dest.
························Change Order
·························Delete All
Dest.
Dist
Dest Map
Info.
POI
····················Destination
····················Distance
····················Enter Destination
·························Information
·························Point of Interest
·············All Local Points of Interest
·················Change Route/Alter Priorities
·················
Destination Map
POI Off
Sym.
Tel.
Way Pt.
····················Point of Interest Off
·························Symbol
·························Telephone
·························Way Point
49
Page 52

 Loading...