

Page 1

KDC-262U
KDC-MP262U
KDC-162U
KDC-122U
CD-RECEIVER
KDC-MP162U
KDC-220U
INSTRUCTION MANUAL
AMPLI-TUNER LECTEUR DE CD
MODE D’EMPLOI
REPRODUCTOR DE DISCOS COMPACTOS RECEPTOR DE FM/AM
MANUAL DE INSTRUCCIONES
Take the time to read through this instruction manual.
Familiarity with installation and operation procedures will help
you obtain the best performance from your new CD-receiver.
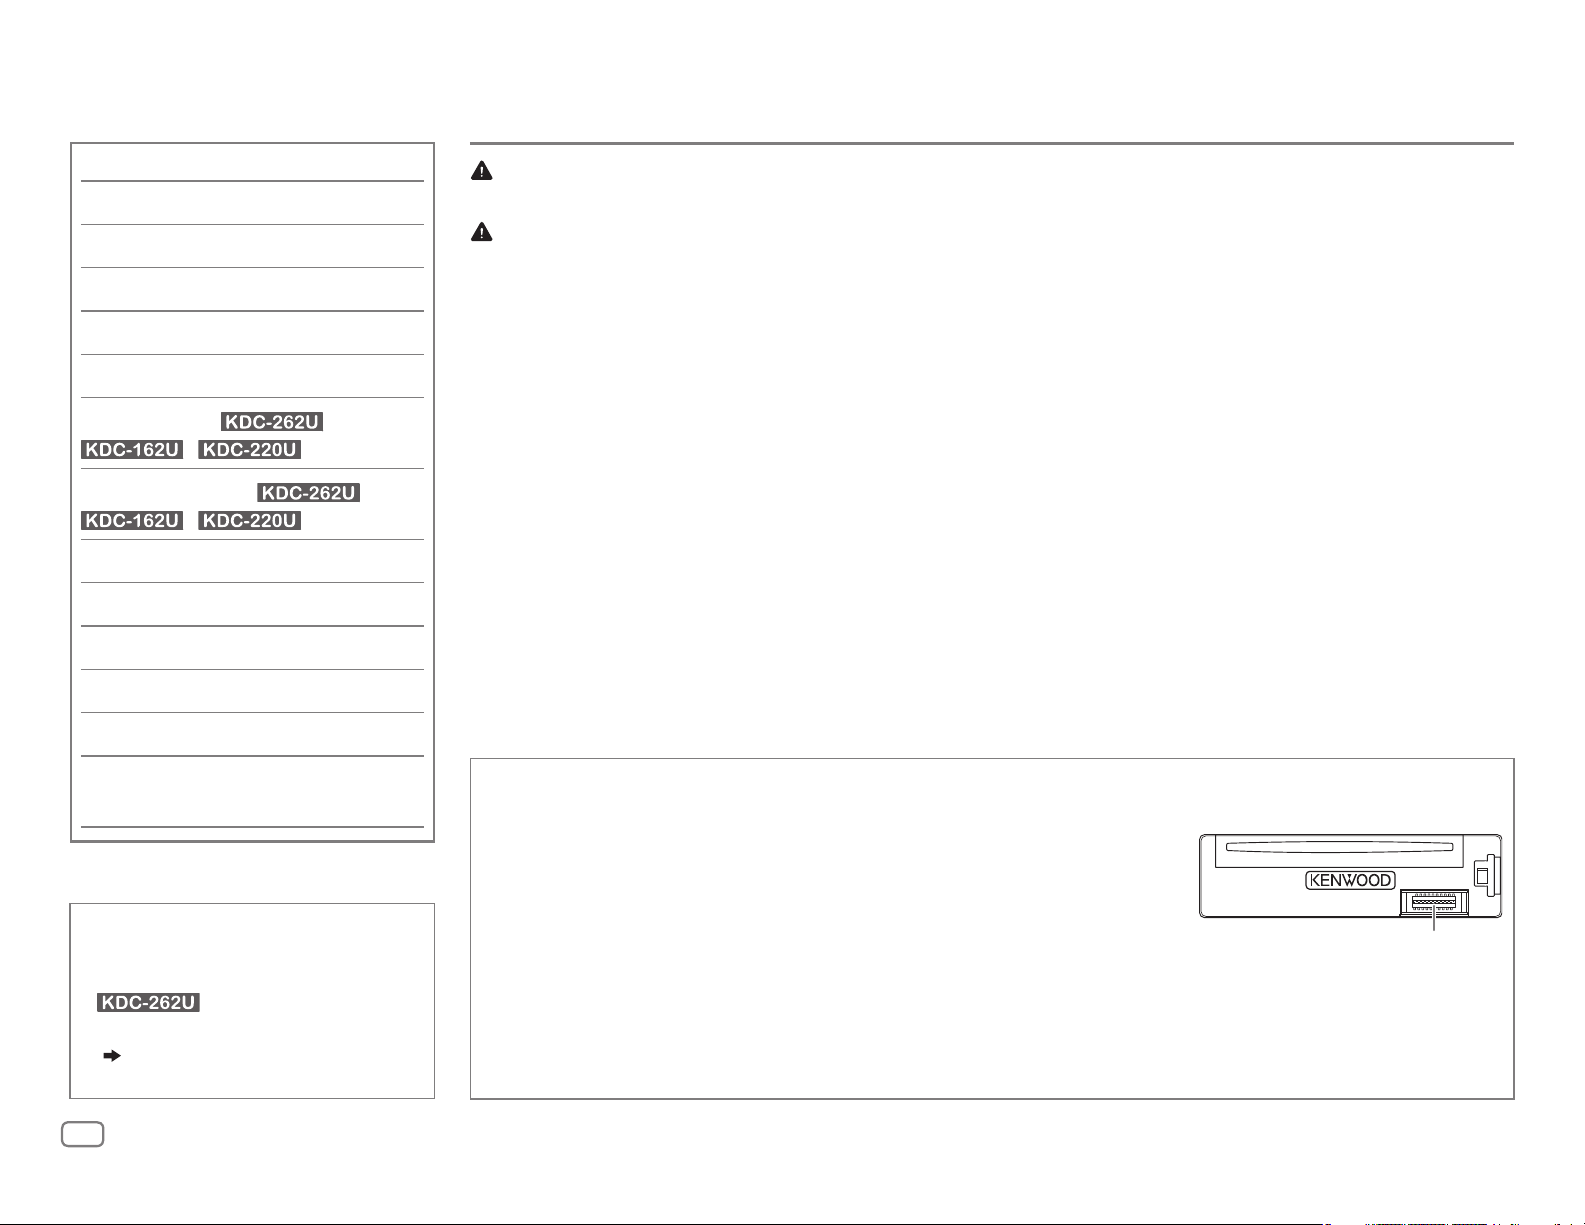
For your records
Record the serial number, found on the back of the unit, in the
spaces designated on the warranty card, and in the space provided
below. Refer to the model and serial numbers whenever you
call upon your Kenwood dealer for information or service on the
product.
Model KDC-262U/ KDC-162U/ KDC-122U/ KDC-MP262U/
KDC-MP162U/ KDC-220U
Serial number
US Residents Only
Register Online
Register your Kenwood product at www.Kenwoodusa.com
B5A-0137-00 (KN)© 2014 JVC KENWOOD Corporation
Page 2
CONTENTS
BEFORE USE
BEFORE USE 2
BASICS 3
GETTING STARTED 4
RADIO 5
AUX 6
CD / USB / iPod / ANDROID 7
Pandora®
iHeartRadio®
(for /
/ )
(for /
/ )
9
10
AUDIO SETTINGS 11
DISPLAY SETTINGS 12
TROUBLESHOOTING 12
MORE INFORMATION 14
SPECIFICATIONS 15
Warning
Do not operate any function that takes your attention away from safe driving.
Caution
Volume setting:
• Adjust the volume so that you can hear sounds outside the car to prevent accidents.
• Lower the volume before playing digital sources to avoid damaging the speakers by the sudden increase of
the output level.
General:
• Avoid using the external device if it might hinder safe driving.
• Make sure all important data has been backed up. We shall bear no responsibility for any loss of recorded
data.
• Never put or leave any metallic objects (such as coins or metal tools) inside the unit, to prevent a short
circuit.
• If a disc error occurs due to condensation on the laser lens, eject the disc and wait for the moisture to
evaporate.
Remote control (RC-406):
• Do not leave the remote control in hot places such as on the dashboard.
• The Lithium battery is in danger of explosion if replaced incorrectly. Replace it only with the same or
equivalent type.
• The battery pack or batteries shall not be exposed to excessive heat such as sunshine, fire or the like.
• Keep the battery out of reach of children and in its original packaging when not in used. Dispose of used
batteries promptly. If swallowed, contact a physician immediately.
INSTALLATION /
CONNECTION 16
How to read this manual
• Operations are explained mainly
using buttons on the faceplate of
.
• [
XX
] indicates the selected items.
• (
XX) indicates references are
available on the stated page.
2
Maintenance
Cleaning the unit: Wipe off dirt on the faceplate with a dry silicone or soft cloth.
Cleaning the connector: Detach the faceplate and clean the connector
gently with a cotton swab, being careful not to damage the connector.
Handling discs:
• Do not touch the recording surface of the disc.
• Do not stick tape etc. on the disc, or use a disc with tape stuck on it.
• Do not use any accessories for the disc.
• Clean from the center of the disc and move outward.
• Clean the disc with a dry silicone or soft cloth. Do not use any solvents.
• When removing discs from this unit, pull them out horizontally.
• Remove burrs from the center hole and disc edge before inserting a disc.
Connector (on the reverse
side of the faceplate)
Page 3
BASICS
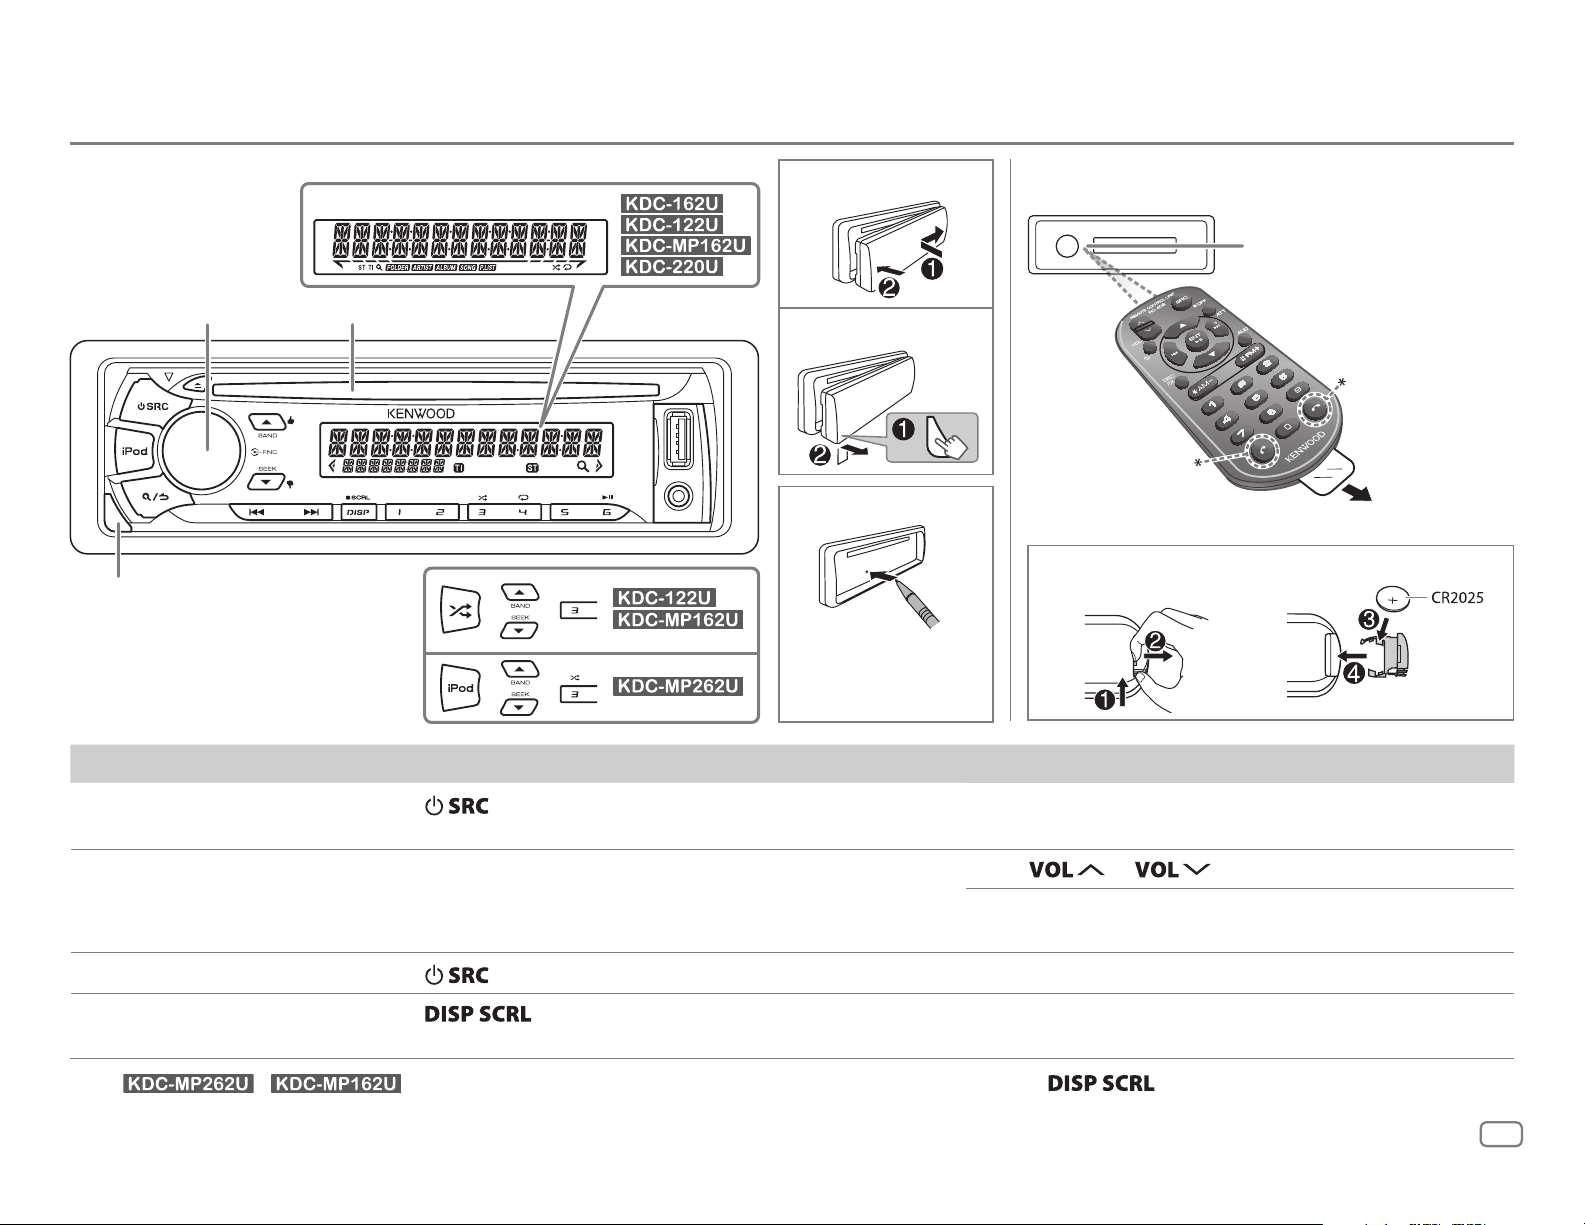
Faceplate
Volume knob
(turn/press)
Detach button
Display window
Loading slot
Attach
Detach
How to reset
Your preset
adjustments will
also be erased.
Remote control (RC-406)
Remote sensor (Do not
expose to bright sunlight.)
*
Not used
How to replace the battery
Pull out the
insulation
sheet when
using for the
first time.
To On the faceplate On the remote control
Turn on the power
Adjust the volume Turn the volume knob. Press
Select a source
Change the display
information*
* For
/ : You can also select to turn off the display information by pressing repeatedly.
Press
• Press and hold to turn off the power.
Press
Press
• Press and hold to scroll the current display information.
.
repeatedly.
repeatedly.
Press and hold SRC to turn off the power.
( Pressing SRC does not turn on the power. )
or .
Press ATT during playback to attenuate the sound.
• Press again to cancel.
Press SRC repeatedly.
( not available )
ENGLISH
3
Page 4
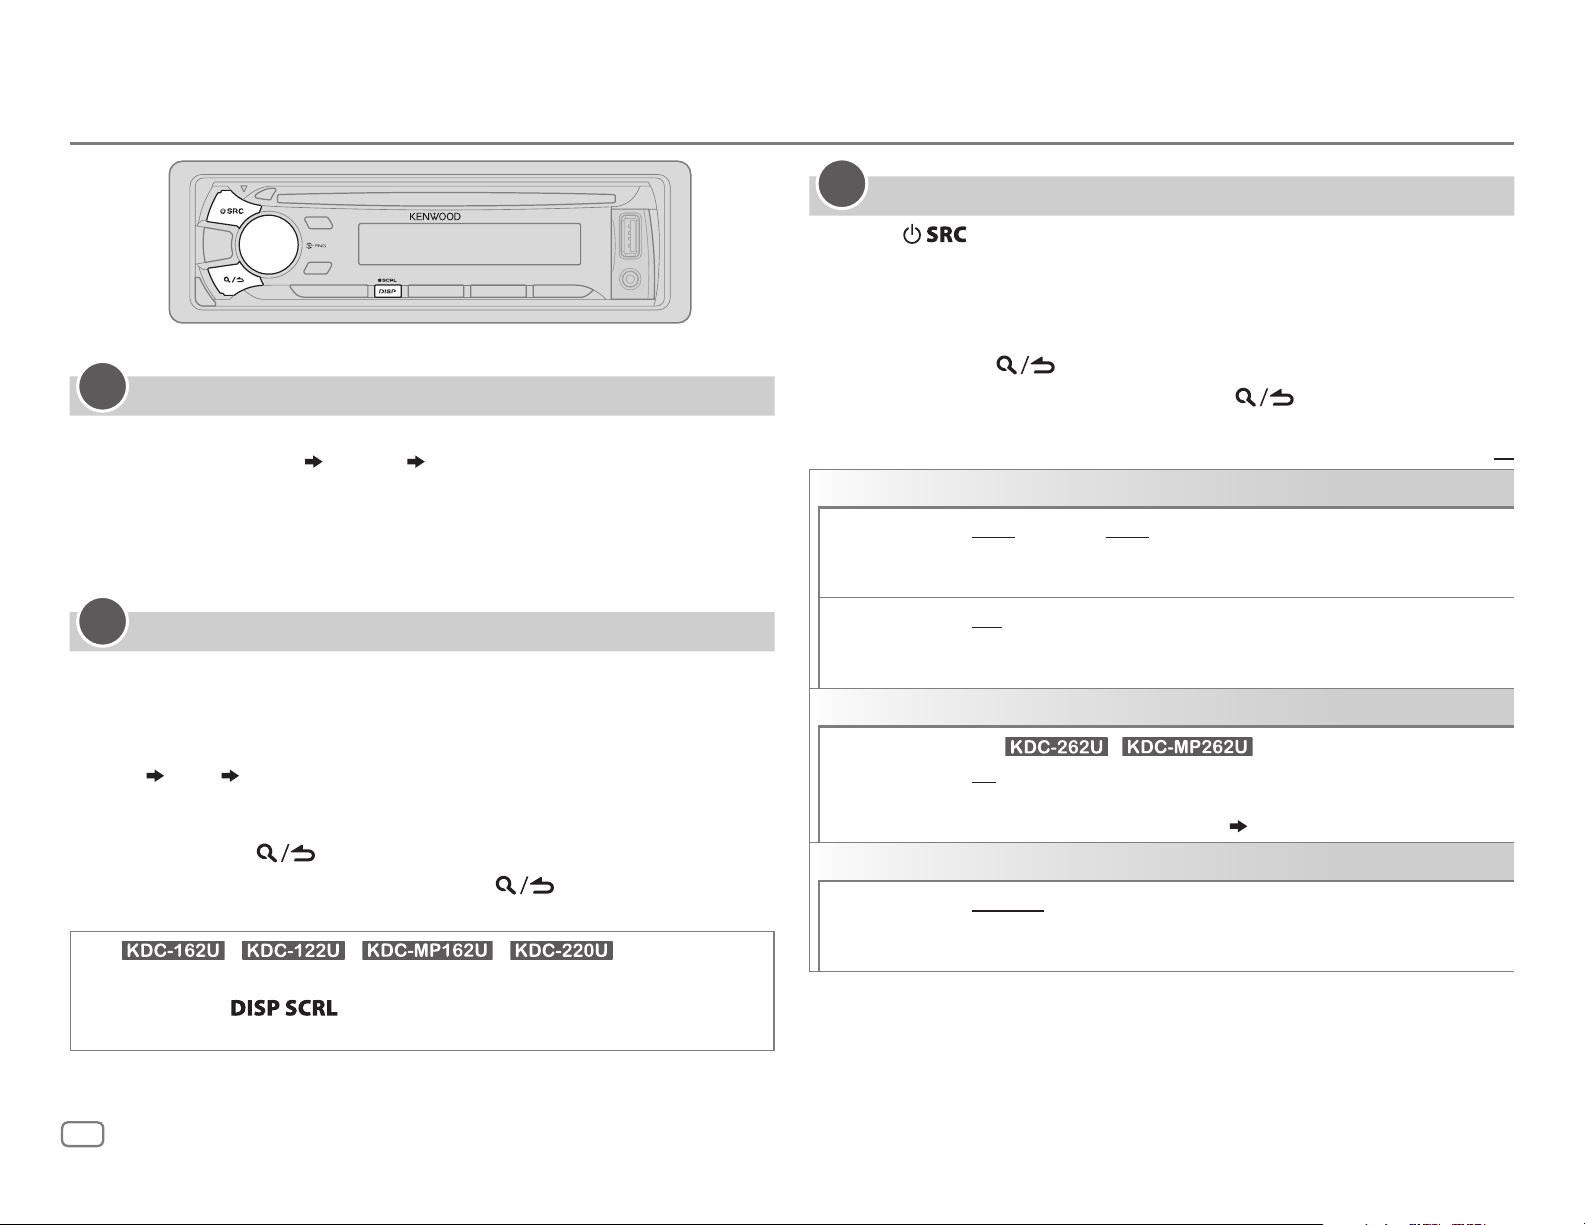
GETTING STARTED
1
Cancel the demonstration
3
Set the initial settings
Press repeatedly to enter STANDBY.
1
2 Press the volume knob to enter [
FUNCTION
].
3 Turn the volume knob to make a selection (see the following table),
then press the knob.
4 Repeat step 3 until the desired item is selected or activated.
5 Press and hold to exit.
To return to the previous setting item, press
.
When you turn on the power (or after you reset the unit), the display
shows: “CANCELDEMO”
“PRESS” “VOLUMEKNOB”
1 Press the volume knob.
[
YES
] is selected for the initial setup.
2 Press the volume knob again.
“DEMOOFF” appears.
2
Set the clock
Press the volume knob to enter [
1
2 Turn the volume knob to select [
3 Turn the volume knob to select [
FUNCTION
CLOCK
CLOCK ADJUST
].
], then press the knob.
], then press the knob.
4 Turn the volume knob to make the settings, then press the knob.
Day
5 Turn the volume knob to select [
6 Turn the volume knob to select [
Hour Minute
CLOCK FORMAT
12H
] or [
24H
], then press the knob.
], then press the knob.
7 Press and hold to exit.
To return to the previous setting item, press
(For / / / )
While in clock display screen...
Press and hold
Then, perform step
4 to set the clock.
to enter clock adjustment mode directly.
.
AUDIO CONTROL
SWITCH
PREOUT
SP SELECT OFF/ 5/4/ 6 × 9/6/ OEM
DISPLAY
EASY MENU
TUNER SETTING
PRESET TYPE
REAR/ SUB-W
a subwoofer are connected to the line out terminals on the rear (through
an external amplifier).
or 4inches, 6×9inches or 6inches) or OEM speakers for optimum
performance.
(For / )
ON
:Both display and button illumination change to white color when
entering [
remain as [
NORMAL
(FM1/ FM2/ FM3/ AM).;
button, regardless of the selected band.
or
REAR/ SUBWOOFER
FUNCTION
COLORSELECT
:Memorizes one station for each preset button in each band
Default:
: Selects whether rear speakers or
: Selects according to the speaker size (5inches
].;
OFF
:Both display and button illumination
] color. ( 12)
MIX
:Memorizes one station for each preset
XX
4
Page 5
GETTING STARTED
SYSTEM
RADIO
KEY BEEP
SOURCE SELECT
PANDORA SRC
IHEART SRC ON
BUILT-IN AUX ON
CD READ 1
F/W UPDATE
UPDATE SYSTEM
F/W UP xx.xx
CLOCK
CLOCK DISPLAY
ON
:Activates the keypress tone.;
OFF
:Deactivates.
ON
:Enables PANDORA in source selection.;
OFF
:Disables. ( 9)
:Enables IHEARTRADIO in source selection.;
OFF
:Disables. ( 10)
:Enables AUX in source selection.;
OFF
:Disables. ( 6)
:Automatically distinguishes between audio file
disc and music CD.;
CD. No sound can be heard if an audio file disc
is played.
YES
:Starts upgrading the firmware.; NO:Cancels
(upgrading is not activated).
For details on how to update the firmware, see:
www.kenwood.com/cs/ce/
ON
:The clock time is shown on the display even
when the unit is turned off.;
2
:Forces to play as a music
OFF
:Cancels.
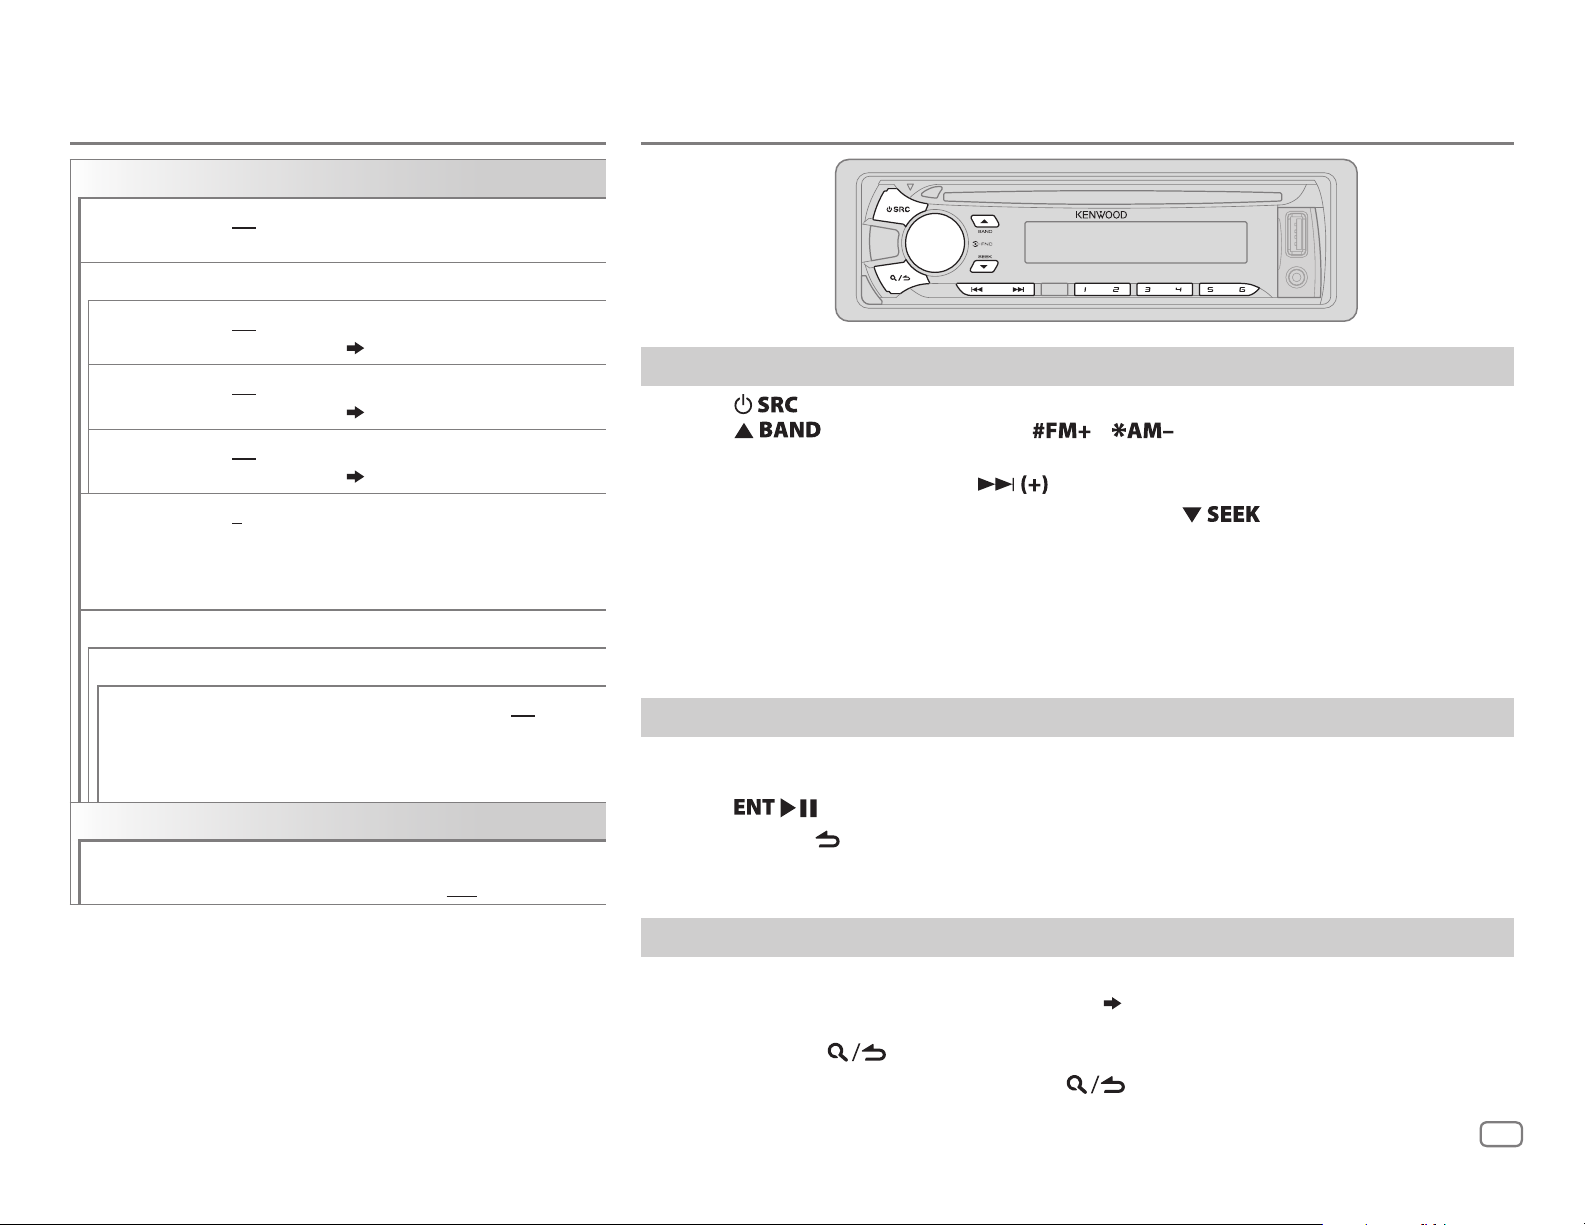
Search for a station
Press repeatedly to select TUNER.
1
2 Press repeatedly (or press / on RC-406) to select FM1/ FM2/
FM3/ AM.
3 Press S/T (or press S/ on RC-406) to search for a station.
• To change the searching method for S/T: Press
AUTO1 : Automatically search for a station.
AUTO2 : Search for a preset station.
MANUAL : Manually search for a station.
• To store a station: Press and hold one of the number buttons (1to6).
• To select a stored station: Press one of the number buttons (1to6) (or press one of the
number buttons (1to6) on RC-406).
repeatedly.
Direct Access Tuning (using RC-406)
Press DIRECT to enter Direct Access Tuning.
1
2 Press the number buttons to enter a frequency.
3 Press to search for a station.
• To cancel, press
• If no operation is done for 10seconds after step
canceled.
or DIRECT.
2, Direct Access Tuning is automatically
Other settings
Press the volume knob to enter [
1
2 Turn the volume knob to make a selection (
FUNCTION
].
6), then press the knob.
3 Repeat step 2 until the desired item is selected or activated.
4 Press and hold to exit.
To return to the previous setting item, press
.
ENGLISH
5
Page 6
RADIO
AUX
Default:
TUNER SETTING
AUTO
MEMORY
MONO SET ON
NEWS SET* ON
REGIONAL* ON
AF SET* ON
TI* ON
PTY SEARCH*
CLOCK
TIME SYNC*
*
For / : Only for FM source.
• [
MONO SET
band is FM1/ FM2/ FM3.
• Available Program Type:
SPEECH
MUSIC
The unit will search for the Program Type categorized under [
• If the volume is adjusted during reception of traffic information or news bulletin, the
adjusted volume is memorized automatically. It will be applied the next time traffic
information or news bulletin is turned on.
: NEWS
WEATHER
:
POP M (music), ROCK M (music), EASY M (music), LIGHT M (music), CLASSICS
(music), JAZZ
YES
:Automatically starts memorizing 6 stations with good reception.;
•
Selectable only if [
:Improves the FM reception, but the stereo effect may be lost.;
:The unit will temporarily switch to News Programme if available. ;
: Switches to another station only in the specific region using the “AF” control.;
: Automatically searches for another station broadcasting the same program in the same Radio
Data System network with better reception when the current reception is poor.;
: Allows the unit to temporarily switch to Traffic Information if available (“TI” lights up).;
OFF
:Cancels.
Selects the available Program Type (see below), then, press
ON
:Synchronizes the unit’s time to the Radio Data System station time.;
]/ [
NEWS SET
, AFFAIRS
]/ [
REGIONAL
, INFO (information), SPORT
, FINANCE
, COUNTRY
NORMAL
, CHILDREN
, NATION M (music), OLDIES
]/ [
AF SET
, SOCIAL
] is selected for [
]/ [TI]/ [
, RELIGION
PRESET TYPE
PTY SEARCH
, EDUCATE
, PHONE IN
]. ( 4)
S
] is selectable only when the
, DRAMA
, FOLK M (music)
, CULTURE
, TRAVEL
SPEECH
NO
:Cancels.
OFF
:Cancels.
OFF
:Cancels.
/T to start.
OFF
:Cancels.
, SCIENCE
, LEISURE
] or [
MUSIC
OFF
:Cancels.
OFF
:Cancels.
, VARIED
, DOCUMENT
, OTHER M
] if selected.
XX
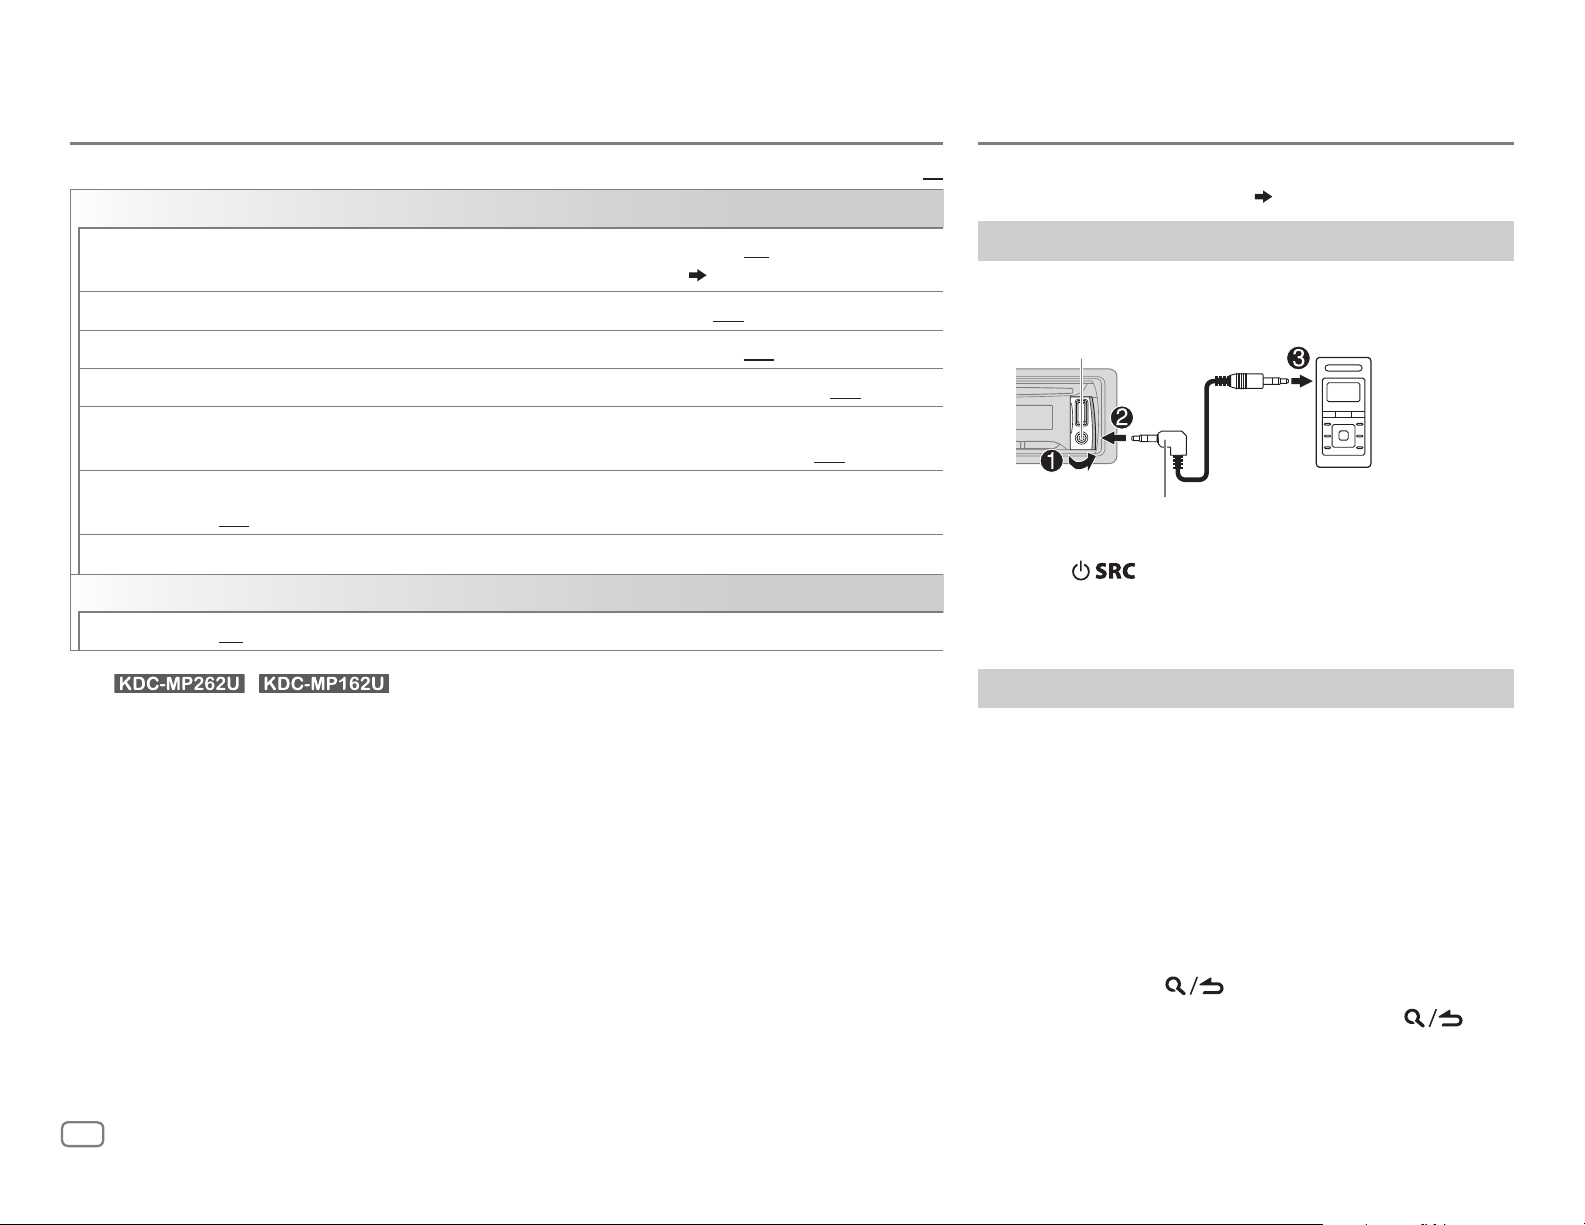
Preparation:
Select [
ON
] for [
BUILT-IN AUX
]. ( 5)
Start listening
Connect a portable audio player (commercially
1
available).
Auxiliary input jack
Portable audio
player
3.5mm (1/8") stereo mini plug with “L”
shaped connector (commercially available)
2 Press repeatedly to select AUX.
3 Turn on the portable audio player and start
playback.
Set the AUX name
While listening to a portable audio player connected to
the unit...
1 Press the volume knob to enter [
,
2 Turn the volume knob to select [
press the knob.
3 Turn the volume knob to select [
then press the knob.
FUNCTION
SYSTEM
AUX NAME SET
].
], then
],
4 Turn the volume knob to make a selection, then
press the knob.
AUX
(default)/
DVD/ PORTABLE/ GAME/ VIDEO/ TV
5 Press and hold to exit.
To return to the previous setting item, press
.
6
Page 7

CD / USB / iPod / ANDROID
Start playback
The source changes automatically and
playback starts.
M
Eject disc
Label side
USB input terminal
USB
CA-U1EX (max.: 500mA)
(optional accessory)
iPod/iPhone
(except for /
)
KCA-iP102 / KCA-iP103 (optional
1
*
accessory)
of the iPod/iPhone
ANDROID
Micro USB 2.0 cable
(commercially available)
1
*
KCA-iP102 : 30-pin type, KCA-iP103 : Lightning type
2
*
Do not leave the cable inside the car when not using.
or accessory cable
2
*
3
*
2
*
To On the faceplate On the remote control
Playback / pause Press .
4
Reverse / Fast-forward
Select a track/file
5
Select a folder
Repeat play
*
6
*
*
Press and hold S/T. Press and hold S/ .
Press S/T. Press S/
Press J/K.
Press repeatedly.
TRACK REPEAT/ REPEAT OFF
FILE REPEAT/ FOLDER REPEAT/ REPEAT OFF
: Audio CD
Press
Press
.
/ .
: MP3/WMA/WAV file, iPod or
ANDROID
Random play
FILE REPEAT/ REPEAT OFF
6
*
Press or repeatedly.
DISC RANDOM/ RANDOM OFF
FOLDER RANDOM/ RANDOM OFF
: KME Light/ KMC file
: Audio CD
: MP3/WMA/WAV file, KME Light/ KMC
file, iPod or ANDROID
8
Press and hold
or to select
ALL RANDOM
*
.
Select control mode While in iPod source, press and hold iPod.
9
*
( 8, [
ANDROID SETUP])
Select music drive
(
8, [
MUSIC DRIVE]
MODE ON
MODE OFF
: Control from the iPod
: Control from the unit
While in ANDROID source,
Press 5 repeatedly.
)
The stored songs in the following start playback.
• Selected internal or external memory of a smartphone (Mass Storage
Class).
• Selected drive of a multiple drives device.
.
7
*
ENGLISH
7
Page 8

CD / USB / iPod / ANDROID
3
*
When connecting an Android device, “Press [VIEW] to install KENWOOD MUSIC PLAY APP” is
shown. Follow the instructions to install the application. You can also install the latest version
of KENWOOD MUSIC PLAY application on your Android device before connecting. (
4
*
For ANDROID: Applicable only when [
5
*
For CD: Only for MP3/WMA files. This does not work for iPod/ ANDROID.
6
*
For iPod/ ANDROID: Applicable only when [
7
*
KME Light : KENWOOD Music Editor Light, KMC : KENWOOD Music Control ( 14)
8
*
For CD: Only for MP3/WMA files.
9
*
You can still play/pause, file skip, fast-forward or reverse files from the unit.
BROWSE MODE
MODE OFF
] is selected. ( [
]/ [
BROWSE MODE
ANDROID SETUP
] is selected.
Select a file from a folder/list
Press .
1
2 Turn the volume knob to select a folder/list, then press the knob.
3 Turn the volume knob to select a file, then press the knob.
Quick Search
If you have many files, you can search through them quickly.
For USB (for KME Light/ KMC files):
Press S/T to search at a preset skip search ratio. (
Press and hold S/T to search at a 10
%
ratio.
[
• Not applicable for CD and MP3/WMA/WAV files.
For iPod:
You can search for a file according to the first character.
Turn the volume knob quickly to enter character search.
Turn the volume knob to select the character.
To search for a character other than A to Z and 0to9, enter only “ * ”.
Press S/T to move to the entry position.
• You can enter up to 3characters.
Press the volume knob to start searching.
• To return to the root folder/ first file/ top menu, press 5.
• To return to the previous setting item, press
• To cancel, press and hold
• For iPod, applicable only when [
• For ANDROID, applicable only when [
(
[
ANDROID SETUP
])
.
MODE OFF
BROWSE MODE
] is selected. ( 7)
.
] is selected.
14).
SKIP SEARCH
Direct Music Search (using RC-406)
Press DIRECT.
1
])
2 Press the number buttons to enter a track/file number.
3 Press to search for music.
• To cancel, press
• Not available if Random Play is selected.
• Not applicable for iPod, ANDROID, KME Light/ KMC file.
or DIRECT.
Listen to TuneIn Radio/ TuneIn Radio Pro/ Aupeo
While listening to TuneIn Radio, TuneIn Radio Pro or Aupeo, connect
the iPod/iPhone to the USB input terminal of the unit.
• The unit will output the sound from these applications.
Other settings
Press the volume knob to enter [
1
FUNCTION
].
2 Turn the volume knob to make a selection (see the following
])
table), then press the knob.
3 Repeat step 2 until the desired item is selected or activated.
4 Press and hold to exit.
] to [
.
DRIVE 5
Default:
]) is selected
XX
To return to the previous setting item, press
ANDROID SETUP
BROWSE MODE
HAND MODE
: Control from the unit (using KENWOOD MUSIC PLAY application).;
:Control other media player applications from the Android device
(without using KENWOOD MUSIC PLAY application). However, you can still play/pause
and file skip from the unit.
USB
MUSIC DRIVE DRIVE CHANGE
:The next drive ([
DRIVE 1
automatically and playback starts.
Repeat steps
SKIP SEARCH 0.5%/ 1%/ 5%/ 10%
1
to 3 to select the following drives.
: While listening to iPod, ANDROID or KME
Light/ KMC file, selects the skip search ratio over the total files.
8
Page 9

Pandora®
(for / / )
Preparation:
Install the latest version of the Pandora application on your device
(iPhone/ iPod touch), then create an account and log in to Pandora.
• Select [
ON
] for [
PANDORA SRC
]. ( 5)
Start listening
Open the Pandora application on your device.
1
2 Connect your device to the USB input terminal.
USB input terminal
KCA-iP102 / KCA-iP103 (optional
1
The source changes to PANDORA and broadcast starts.
To On the faceplate On the remote control
Playback / pause
Skip a track
Thumbs up or thumbs
3
*
down
1
*
KCA-iP102 : 30-pin type, KCA-iP103 : Lightning type
2
*
Do not leave the cable inside the car when not using.
3
*
If thumbs down is selected, the current track is skipped.
accessory)
the iPod/iPhone
*
or accessory cable of
2
*
Press
Press T.
Press / .
. Press
Press
Press
.
.
/ .
Create and save a new station
Press and hold the volume knob.
1
2 Turn the volume knob to select [
press the knob.
A new station is created based on the current song or artist.
FROM TRACK
] or [
FROM ARTIST
], then
3 Press and hold one of the number buttons (1to5) to store.
To select a stored station, press one of the number buttons (1to5).
Search for a registered station
Press .
1
2 Turn the volume knob to make a selection, then press the knob.
[
BY DATE
[
A-Z
]:According to the registered date
]:Alphabetical order
3 Turn the volume knob to the desired station, then press the knob.
To cancel, press and hold
.
(or using RC-406)
Press J / K to search for a station, then press
.
Bookmark a song or artist information
Press and hold J.
1
2 Turn the volume knob to make a selection, then press the knob.
[
THIS TRACK
[
THIS ARTIST
“BOOKMARKED” appears and the information is stored to your device.
The bookmark is available on your Pandora account but not on this
unit.
]:Current song information
]:Current artist information
ENGLISH
9
Page 10

iHeartRadio®
(for / / )
Preparation:
Install the latest version of iHeart Link for KENWOOD application on your
device (iPhone/ iPod touch), then create an account and log in to iHeartRadio.
• Select [
ON
] for [
IHEART SRC
]. ( 5)
Start listening
Open the iHeart Link application on your device.
1
2 Connect your device to the USB input terminal.
USB input terminal
Search for a station
Press .
1
2 Turn the volume knob to select a category, then press the
knob.
3 Turn the volume knob to the desired station, then press the
knob.
When a city list appears, you can skip cities in alphabetical order.
To cancel, press and hold
(or using RC-406)
Press J / K to search for a station, then press
Skip cities by alphabetical order
KCA-iP102 / KCA-iP103 (optional
1
accessory)
the iPod/iPhone
*
or accessory cable of
2
*
3 Press repeatedly to select IHEARTRADIO.
Broadcast starts automatically.
While a city list appears during search...
1 Turn the volume knob quickly to enter character search.
2 Turn the volume knob or press S/T to select the
character to be searched for.
3 Press J / K to move to the previous/next page.
4 Press the volume knob to start searching.
To On the faceplate On the remote control
Playback / pause
Press
. Press
.
To cancel, press and hold
Delete a station
Skip a track for custom station
Thumbs up or thumbs down
for custom station
Create a new/custom station Press 1.—
Add to favorite stations for
live station
Scan for live station Press 5.—
1
*
KCA-iP102 : 30-pin type, KCA-iP103 : Lightning type
2
*
Do not leave the cable inside the car when not using.
3
*
If thumbs down is selected, the current track is skipped.
3
*
Press T.
Press
Press 2.
/ .
Press
—
—
.
While listening to IHEARTRADIO...
1 Press the volume knob to enter [
2 Turn the volume knob to select [
3 Turn the volume knob to select [
knob.
4 Turn the volume knob to select [
the knob.
5 Turn the volume knob to select the desired station to delete,
then press the knob.
6 Turn the volume knob to select [
7 Press and hold to exit.
To return to the previous setting item, press
.
.
FUNCTION
SYSTEM
STATION DEL
LIVE
YES
].
], then press the knob.
], then press the
] or [
CUSTOM
], then press the knob.
], then press
.
.
10
Page 11

AUDIO SETTINGS
While listening to any source...
1 Press the volume knob to enter [
2 Turn the volume knob to select [
FUNCTION
AUDIO CONTROL
].
], then press the knob.
3 Turn the volume knob to make a selection (see the following table),
then press the knob.
4 Repeat step 3 until the desired item is selected or activated.
5 Press and hold to exit.
(or using RC-406)
1 Press AUD to enter [
AUDIO CONTROL
].
2 Press J / K to make a selection, then press .
To return to the previous setting item, press
SUB-W LEVEL –15
BASS LEVEL –8
MID LEVEL –8
TRE LEVEL –8
EQ PRO
BASS ADJUST BASS CTR FRQ
to
+15 (0
to +8 (+6)
to +8 (+5)
to +8 (0)
) Adjusts the subwoofer output level.
Adjusts the level to memorize for each source. (Before
making an adjustment, select the source you want to
adjust.)
60/ 80/ 100/ 200
Selects the center frequency.
.
or
60HZ/ 80HZ/ 100HZ/ 200HZ
Default:
XX
:
PRESET EQ DRIVE EQ/ TOP40/ POWERFUL/ ROCK/ POPS/ EASY/ JAZZ
NATURAL/ USER
genre. (Select [
[
DRIVE EQ
running noise of the tyres.
BASS BOOST LV1/ LV2/ LV3
bass boost level.;
LOUDNESS LV1/ LV2
frequencies boost to produce a well-balanced sound at a low volume
level.;
OFF
SUBWOOFER SET ON
LPF SUBWOOFER THROUGH
SUB-W PHASE REVERSE
FADER R15
BALANCE L15
:Turns on the subwoofer output.;
160HZ
:Audio signals with frequencies lower than 85Hz/ 120Hz/
160Hz are sent to the subwoofer.
output to be in line with the speaker output for optimum performance.
(Selectable only if a setting other than [
[
LPF SUBWOOFER
to
F15 (0
to
R15 (0
:Selects a preset equalizer suitable to the music
USER
] to use the customized settings.)
] is a preset equalizer that reduces noise outside the car or
or
LEVEL1/ LEVEL2/ LEVEL3
OFF
:Cancels.
or
LEVEL1/ LEVEL2
:Cancels.
:All signals are sent to the subwoofer.;
(180°)/
NORMAL
].)
):Adjusts the rear and front speaker output balance.
):Adjusts the left and right speaker output balance.
:Selects your preferred low and high
(0°):Selects the phase of the subwoofer
:Selects your preferred
OFF
:Cancels.
85HZ/ 120HZ
THROUGH
] is selected for
/
/
BASS LEVEL –8
BASS Q FACTOR 1.00/ 1.25/ 1.50/ 2.00
BASS EXTEND ON
MID ADJUST MID CTR FRQ 0.5K/ 1.0K/ 1.5K/ 2.5K
MID LEVEL –8
MID Q FACTOR 0.75/ 1.00/ 1.25
TRE ADJUST TRE CTR FRQ 10.0K/ 12.5K/ 15.0K/ 17.5K
TRE LEVEL –8
to +8 (+6):Adjusts the level.
:Adjusts the quality factor.
:Turns on the extended bass.;
or
2.5KHZ
:Selects the center frequency.
to +8 (+5):Adjusts the level.
:Adjusts the quality factor.
15.0KHZ/ 17.5KHZ
to +8 (0):Adjusts the level.
:Selects the center frequency.
OFF
:Cancels.
0.5KHZ/ 1.0KHZ/ 1.5KHZ
or
10.0KHZ/ 12.5KHZ
/
/
VOLUME OFFSET
SOUND RECNSTR
(Sound
reconstruction)
• [
SUB-W LEVEL
selectable only if [
• [
SUB-W LEVEL
[
SUBWOOFER SET
]/ [
]/ [
For AUX:
adjustment level of each source. (Before adjustment, select the source
you want to adjust.)
ON
components and restoring the rise-time of the waveform that are lost
in audio data compression.;
SUBWOOFER SET
LPF SUBWOOFER
] is set to [ON].
–8
to +8(0) ; For other sources: –8 to 0:Presets the volume
:Creates realistic sound by compensating the high-frequency
OFF
:Cancels.
]/ [
SWITCH PREOUT
LPF SUBWOOFER
] is set to [
]/ [
SUB-W PHASE
]/ [
SUB-W PHASE
SUB-W
] or [
SUBWOOFER
] is selectable only if
] is
]. ( 4)
ENGLISH
11
Page 12

DISPLAY SETTINGS
TROUBLESHOOTING
1 Press the volume knob to enter [
2 Turn the volume knob to select [
knob.
FUNCTION
DISPLAY
].
], then press the
3 Turn the volume knob to make a selection (see the following
table), then press the knob.
4 Repeat step 3 until the desired item is selected/activated or
follow the instructions stated on the selected item.
5 Press and hold to exit.
To return to the previous setting item, press
COLOR
SELECT
DIMMER ON
BRIGHTNESS 0
TEXT SCROLL AUTO/ ONCE
1
*
2
*
1
*
For / .
Preset colors:
BLUE1
AQUA2
YELLOW
VARIABLE SCAN/ CUSTOM R/G/B/
preferred key and display illumination color.
You can create your own color (when [
2
colors*
[
1
2
3 Turn the volume knob to adjust the level (0 — 9), then press the
OFF
illumination (and button illumination*
automatically, or scroll only once.;
RED1/ RED2/ RED3/ PURPLE1/ PURPLE2/ PURPLE3/ PURPLE4/
/
BLUE2/ BLUE3/ SKYBLUE1/ SKYBLUE2/ LIGHTBLUE/ AQUA1/
/
GREEN1/ GREEN2/ GREEN3/ YELLOWGREEN1/ YELLOWGREEN2/
/
ORANGE1/ ORANGE2/ ORANGERED
is selected). The color you have created can be stored in
CUSTOM R/G/B
Press and hold the volume knob to enter the detailed color
adjustment.
Press S/
knob.
:Dims the display illumination (and button illumination*1).;
:Cancels.
— 31: Selects your preferred brightness level for display
].
T
to select the color (R/ G/ B) to adjust.
:Selects whether to scroll the display information
OFF
preset colors*2: Selects your
CUSTOM R/G/B
1
).
:Cancels.
.
Default:
] or preset
XX
Symptom Remedy
Sound cannot be heard.
“MISWIRING CHECK WIRING
THEN PWR ON” appears.
“PROTECTING SEND SERVICE”
appears.
General
•
Sound cannot be heard.
•
The unit does not turn on.
•
Information shown on the
display is incorrect.
The unit does not work at all. Reset the unit. (
•
Radio reception is poor.
•
Static noise while listening
adio
R
to the radio.
Disc cannot be ejected.
Noise is generated. Skip to another track or change the disc.
Tracks do not play back as
you intended them to play.
“READING” keeps flashing. Do not use too many hierarchical levels or folders.
Elapsed playing time is not
correct.
Correct characters are not
CD / USB / iPod
displayed (e.g. album name).
“NA FILE” Make sure the disc contains supported audio files. (
“NO DISC” Insert a playable disc into the loading slot.
“TOC ERROR” Make sure the disc is clean and inserted properly.
“PLEASE EJECT” Reset the unit. If this does not solve the problem, consult your
•
Adjust the volume to the optimum level.
•
Check the cords and connections.
Turn the power off, then check to be sure the terminals of the
speaker wires are insulated properly. Turn the power on again.
Send the unit to the nearest service center.
Clean the connectors. (
•
Connect the antenna firmly.
•
Pull the antenna out all the way.
Press and hold
the disc when it is ejected. If this does not solve the problem,
reset the unit. (
Playback order is determined when files are recorded.
This is caused by how the tracks are recorded.
This unit can only display uppercase letters, numbers, and a
limited number of symbols.
nearest service center.
M
2)
3)
to forcibly eject the disc. Be careful not to drop
3)
14)
12
Page 13

TROUBLESHOOTING
Symptom Remedy
“READ ERROR” Copy the files and folders onto the USB device again. If this
does not solve the problem, reset the USB device or use
another USB device.
“NO DEVICE” Connect a USB device, and change the source to USB again.
“COPY PRO” A copy-protected file is played.
“NA DEVICE”
CD / USB / iPod
“NO MUSIC” Connect a USB device that contains playable audio files.
“iPod ERROR”
•
Sound cannot be heard
during playback.
•
Sound output only
from the Android
device.
Cannot playback at
[
BROWSE MODE
ANDROID
“NO DEVICE” or
“READING” keeps
flashing.
Playback is intermittent
or sound skips.
“ANDROID ERROR” /
“NADEVICE”
].
Connect a supported USB device, and check the connections.
•
Reconnect the iPod.
•
Reset the iPod.
•
Reconnect the Android device.
•
If in [
HAND MODE
on the Android device and start playback.
•
If in [
HAND MODE
application or use another media player application.
•
Restart the Android device.
•
If this does not solve the problem, the connected Android
device is unable to route the audio signal to unit. (
•
Make sure KENWOOD MUSIC PLAY APP is installed on the
Android device. (
•
Reconnect the Android device and make the appropriate
setting in [
•
If this does not solve the problem, the connected Android
device does not support [
•
Switch off the developer options on the Android device.
•
Reconnect the Android device.
•
If this does not solve the problem, the connected Android
device does not support [
Turn off the power saving mode on the Android device.
•
Reconnect the Android device.
•
Restart the Android device.
], launch any media player application
], relaunch the current media player
8)
ANDROID SETUP
]. ( 8)
BROWSE MODE
BROWSE MODE
]. ( 14)
]. ( 14)
14)
Symptom Remedy
“ADDERROR” /
“SEARCHERROR”
“CHECKDEVICE” Check the Pandora application on your device.
“NOSKIPS” The skip limit has been reached.
“NOSTATIONS” No stations are found.
“STATIONLIMIT”
Pandora
“CONNECT ERROR” Communication is unstable.
“RATING ERROR” Registration of thumbs up/thumbs down has failed.
“LICENSE ERROR” You try to access from a country which Pandora is not
iHeartRadio station
cannot be selected.
“CANNOT CREATE” Custom station name creation is unsuccessful.
“CANNOT SAVE” Addition to the favorite category failed.
“DISCONNECTED” Check the connection to the device.
“NOSKIPS” The skip limit has been reached. Retry later.
“NOSTATIONS” No stations are found.
“NOT CONNECTED” Link to the application is impossible.
“IHEARTLINK UP” Make sure you have installed the latest version of the
iHeartRadio
“PLEASE LOGIN” You haven’t log in. Log in again.
“STATION NOT AVAILABLE”
“STATION NOT SELECTED” No station is selected.
“STREAM ERROR” Broadcast data is interrupted.
“THUMB FAILED” Registration of Thumbs Up/Down has failed.
“TIMED OUT” The request has resulted in time-out.
New station creation is unsuccessful.
The number of registered stations has reached its limit.
Retry after deleting unnecessary stations from your device.
deliverable.
If “Explicit Content” in [Account Settings] is checked in the web
version of iHeartRADIO, custom stations become unavailable.
iHeart Link for KENWOOD application on your device.
Broadcast from the station is over.
ENGLISH
13
Page 14

MORE INFORMATION
General
•
This unit can only play the following CDs:
•
Detailed information and notes about the playable audio files are stated in an
online manual on the following web site: www.kenwood.com/cs/ce/audiofile/
Playable files
•
Playable audio file: MP3 (.mp3), WMA (.wma)
•
Playable disc media: CD-R/CD-RW/CD-ROM
•
Playable disc file format: ISO 9660 Level 1/2, Joliet, Long file name.
•
Playable USB device file system: FAT12, FAT16, FAT32
Even when audio files comply with the standards listed above, playback may be
impossible depending on the types or conditions of media or device.
Unplayable discs
•
Discs that are not round.
•
Discs with coloring on the recording surface or discs that are dirty.
•
Recordable/ReWritable discs that have not been finalized.
•
8cm CD. Attempting to insert using an adapter may cause malfunction.
About USB devices
•
This unit can play MP3/WMA/WAV files stored on a USB mass storage class device.
•
You cannot connect a USB device via a USB hub.
•
Connecting a cable whose total length is longer than 5m may result in abnormal
playback.
•
This unit cannot recognize a USB device whose rating is other than 5V and
exceeds 1A.
About KENWOOD Music Editor Light and KENWOOD Music Control
•
This unit supports the PC application KENWOOD Music Editor Light and Android™
application KENWOOD Music Control.
•
When you play audio files with song data added using the KENWOOD Music Editor
Light or KENWOOD Music Control, you can search for audio files by Genres, Artists,
Albums, Playlists, and Songs.
•
KENWOOD Music Editor Light and KENWOOD Music Control are available on the
following web site: www.kenwood.com/cs/ce/
About iPod/iPhone
Made for
-
iPod touch (2nd, 3rd, 4th, and 5th generation)
-
iPod classic
-
iPod nano (3rd, 4th, 5th, 6th, and 7th generation)
-
iPhone 3G, 3GS, 4, 4S, 5, 5S, 5C
•
For the latest compatible list and software versions of iPhone/iPod, see: www.kenwood.com/cs/ce/ipod
•
You cannot operate iPod if “KENWOOD” or “ ” is displayed on iPod.
About Android device
•
This unit supports Android OS 4.1 and above.
•
Some Android devices (with OS 4.1 and above) may not fully support Android Open Accessory (AOA) 2.0.
•
If the Android device supports both mass storage class device and AOA 2.0, this unit always playback via
AOA 2.0 as priority.
•
For more information and the latest compatible list, see: www.kenwood.com/cs/ce/
About Pandora
•
Pandora is available only in the U.S., Australia and New Zealand.
•
Because Pandora is a third-party service, the specifications are subject to change without prior notice.
Accordingly, compatibility may be impaired, or some or all of the services may become unavailable.
•
Some functions of Pandora cannot be operated from this unit.
•
For issues using the application, please contact Pandora at pandora-support@pandora.com.
About iHeartRadio
•
iHeartRadio® is a third-party service, therefore the specifications are subject to change without
prior notice. Accordingly, compatibility may be impaired or some or all of the services may become
unavailable.
•
Some iHeartRadio® functionality cannot be operated from this unit.
Muting upon the reception of a phone call
Connect the MUTE wire to your telephone using a commercial telephone
accessory. (
When a call comes in, “CALL” appears. (The audio system pauses.)
• To continue listening to the audio system during a call, press
disappears and the audio system resumes.
When the call ends, “CALL” disappears. (The audio system resumes.)
17)
. “CALL”
14
Page 15

SPECIFICATIONS
FM Frequency Range
87.9 MHz — 107.9 MHz (200 kHz space)
87.5 MHz — 108.0 MHz (50 kHz space)
Usable Sensitivity (S/N=26dB) 8.2dBf (0.71μV/75Ω)
Quieting Sensitivity
(DINS/N=46dB)
Tuner
Frequency Response (±3dB) 30 Hz — 15 kHz
Signal-to-Noise Ratio (MONO) 64 dB
Stereo Separation (1kHz) 40dB
AM Frequency Range 530kHz — 1700kHz (10kHz space)
Usable Sensitivity (S/N=20dB) 29dBμ (28.2μV)
Laser Diode GaAIAs
Digital Filter (D/A) 8 times over sampling
Spindle Speed 500rpm — 200rpm (CLV)
Wow & Flutter Below measurable limit
Frequency Response (±1dB) 20Hz — 20kHz
Total Harmonic Distortion (1kHz) 0.01%
17.2dBf (2.0μV/75Ω)
/ /
/ :
/ :
USB Standard USB1.1, USB2.0
File System FAT12/16/32
Maximum Supply Current DC5V
USB
MP3 Decode Compliant with MPEG-1/2 Audio Layer-3
WMA Decode Compliant with Windows Media Audio
WAV Decode Linear-PCM
Maximum Output Power 50W×4
Full Bandwidth Power 22W×4 (at less than 1% THD)
Speaker Impedance 4Ω—8Ω
Tone Action Bass 200Hz±8dB
Audio
Preout Level/Load (CD) 2500mV/10kΩ
Preout Impedance ≤600Ω
Frequency Response (±3dB) 20Hz—20kHz
Input Maximum Voltage 1000mV
Auxiliary
Input Impedance 30kΩ
Middle 2.5kHz±8dB
Treble 12.5kHz±8dB
1A
CD player
Signal-to-Noise Ratio (1kHz) 105 dB
Dynamic Range 90dB
Channel Separation 85dB
MP3 Decode Compliant with MPEG-1/2 Audio Layer-3
WMA Decode Compliant with Windows Media Audio
Operating Voltage 14.4V (10.5V—16V allowable)
Maximum Current Consumption 10A
Operational Temperature Range 0°C—+40°C
Installation Size (W×H×D) 182mm×53mm×159mm
General
(7-3/16"×2-1/16"×6-1/4")
Weight 1.2kg (2.65lbs)
Subject to change without notice.
ENGLISH
15
Page 16

Warning
•
The unit can only be used with a 12V DC power supply, negative
ground.
•
Disconnect the battery’s negative terminal before wiring and
mounting.
•
Do not connect Battery wire (yellow) and Ignition wire (red) to the
car chassis or Ground wire (black) to prevent a short circuit.
•
Insulate unconnected wires with vinyl tape to prevent a short circuit.
•
Be sure to ground this unit to the car’s chassis again after
installation.
Caution
•
For safety’s sake, leave wiring and mounting to professionals.
Consult the car audio dealer.
•
Install this unit in the console of your vehicle. Do not touch the
metal parts of this unit during and shortly after use of the unit.
Metal parts such as the heat sink and enclosure become hot.
•
Do not connect the [ wires of speakers to the car chassis or Ground
wire (black), or connect them in parallel.
•
Mount the unit at an angle of less than 30º.
•
If your vehicle wiring harness does not have the ignition terminal,
connect Ignition wire (red) to the terminal on the vehicle’s fuse box
INSTALLATION / CONNECTION
which provides 12 V DC power supply and is turned on and off by
the ignition key.
•
Keep all cables away from heat dissipate metal parts.
•
After the unit is installed, check whether the brake lamps, blinkers,
wipers, etc. on the car are working properly.
•
If the fuse blows, first make sure the wires are not touching car’s
chassis, then replace the old fuse with one that has the same rating.
Basic procedure
1
Remove the key from the ignition switch, then
disconnect the [ terminal of the car battery.
2 Connect the wires properly.
See Wiring connection. (
17)
3 Install the unit to your car.
See Installing the unit (in-dash mounting).
4 Connect the [ terminal of the car battery.
5 Reset the unit. (
3
)
Installing the unit (in-dash mounting)
Hook on the top side
Orientate the trim plate as
illustrated before fitting.
When installing without the mounting sleeve
1
Remove the mounting sleeve and trim plate from
the unit.
2 Align the holes in the unit (on both sides) with the
vehicle mounting bracket and secure the unit with
screws (commercially available).
Use only the specified screws. Using wrong screws might damage the unit.
How to remove the unit
1
Detach the faceplate.
2 Fit the catch pin on the extraction keys into
the holes on both sides of the trim plate,
then pull it out.
3 Insert the extraction keys deeply into the
slots on each side, then follow the arrows
as shown on the right.
Do the required wiring.
(
17)
Dashboard of
your car
Bend the appropriate tabs to hold the
mounting sleeve firmly in place.
16
Page 17

Wiring connection
Part list for installation
Antenna terminal
To front speaker (left)
To front speaker (right)
To rear speaker (left)
To rear speaker (right)
Ignition switch
Car fuse box
/ / : / / :
Front output
Rear/ subwoofer output
White
White/Black
Gray
Gray/Black
Green
Green/Black
Purple
Purple/Black
Red
Fuse (10A)
If no connections are made, do not let the wire come out from the tab.
Brown
(Mute control wire)
Blue/White
(Power control wire/
Antenna control wire)
Rear/ subwoofer output
To the terminal that is grounded when the
telephone rings or during conversation
( 14)
(To connect the Kenwood navigation system,
refer your navigation manual.)
To the power control terminal when using
the optional power amplifier or to the
antenna control terminal in the vehicle
(A)
Faceplate
(B)
Trim plate
(C)
Mounting sleeve
(D)
Wiring harness
Battery
Car fuse box
(Ignition wire)
Yellow
(Battery wire)
Black (Ground wire)
To the metallic body or chassis of the car
Light blue/yellow
(Steering remote
control wire)
To the steering wheel remote control
adapter
(E)
Extraction key
ENGLISH
17
Page 18

CAUTION
Use of controls or adjustments or performance of procedures other than those specified herein may
result in hazardous radiation exposure.
In compliance with Federal Regulations, following are reproductions of labels on, or inside the
product relating to laser product safety.
JVC KENWOOD Corporation
2967-3, ISHIKAWA-MACHI,
HACHIOJI-SHI, TOKYO, JAPAN
THIS PRODUCT COMPLIES WITH DHHS RULES 21CFR
SUBCHAPTER J IN EFFECT AT DATE OF MANUFACTURE.
Location : Top Plate
• “Made for iPod,” and “Made for iPhone” mean that an electronic accessory has been designed to
connect specifically to iPod, or iPhone, respectively, and has been certified by the developer to
meet Apple performance standards. Apple is not responsible for the operation of this device or
its compliance with safety and regulatory standards. Please note that the use of this accessory
with iPod or iPhone may affect wireless performance.
• iPhone, iPod, iPod classic, iPod nano, and iPod touch are trademarks of Apple Inc., registered in
the U.S. and other countries.
• Lightning is a trademark of Apple Inc.
• Pandora, the Pandora logo, and the Pandora trade dress are trademarks or registered
trademarks of Pandora Media, Inc., used with permission.
• iHeartRadio® is a registered mark of Clear Channel Broadcasting, Inc. in the United States and
other countries. Such marks are used under license.
• Android is trademark of Google Inc.
FCC WARNING
This equipment may generate or use radio frequency energy. Changes or modifications to this
equipment may cause harmful interference unless the modifications are expressly approved in the
instruction manual. The user could lose the authority to operate this equipment if an unauthorized
change or modification is made.
FCC NOTE
This equipment has been tested and found to comply with the limits for a Class B digital device,
pursuant to Part 15 of the FCC Rules. These limits are designed to provide reasonable protection
against harmful interference in a residential installation. This equipment may cause harmful
interference to radio communications, if it is not installed and used in accordance with the
instructions. However, there is no guarantee that interference will not occur in a particular
installation. If this equipment does cause harmful interference to radio or television reception,
which can be determined by turning the equipment off and on, the user is encouraged to try to
correct the interference by one or more of the following measures:
• Reorient or relocate the receiving antenna.
• Increase the separation between the equipment and receiver.
• Connect the equipment into an outlet on a circuit different from that to which the receiver is
connected.
• Consult the dealer or an experienced radio/TV technician for help.
CALIFORNIA, USA ONLY
This product contains a CR Coin Cell Lithium Battery which contains Perchlorate Material—special
handling may apply. See www.dtsc.ca.gov/hazardouswaste/perchlorate
Información acerca de la eliminación de equipos eléctricos y electrónicos al final de
la vida útil (aplicable a los países que hayan adoptado sistemas independientes de
recogida de residuos)
Los productos con el símbolo de un contenedor con ruedas tachado no podrán
ser desechados como residuos domésticos. Los equipos eléctricos y electrónicos
al final de la vida útil, deberán ser reciclados en instalaciones que puedan dar
el tratamiento adecuado a estos productos y a sus subproductos residuales
correspondientes. Póngase en contacto con su administración local para obtener
información sobre el punto de recogida más cercano. Un tratamiento correcto
del reciclaje y la eliminación de residuos ayuda a conservar los recursos y evita al
mismo tiempo efectos perjudiciales en la salud y el medio ambiente.
Informação sobre a eliminação de pilhas
Este produto não deve ser eliminado como lixo doméstico geral. Devolva a pilha usada ao
revendedor ou entidade autorizada para que a mesma seja devolvida ao fabricante ou importador.
A reciclagem e a eliminação de lixo de maneira apropriada ajudarão a conservar os recursos
naturais ao mesmo tempo que prevenirão os efeitos prejudicais à nossa saúde e ao meio ambiente.
Page 19

MILITARY
Units purc
hased
throu
gh
the
U.S.A.
military
exchange
overseas may
be
serv
iced
under
warranty
in
the
the
service
quali
ty and workmanship
been
properly designe
pped
to you.
with instructions
formance
of
(1)
year !rom the
covers
Ken
woo
d bra
Kenwood
in
the
back
both
parts
or
workma
warranty.
disclose
anydelect covere<l
finishe
s,
bell
accessories.
has
been
effaced,
s.
to
or
from
lure
that
is duetoanyofthe
with
the vi
Center
ng the inst
to
.
produ
ct
ined
an
unauthori
at
an
authori
during
shipment (Cl
lting from
brand product.
order
to obtain
of
purchaselorprov
warran
Kenwood
inspection
in its
ori
gina
pping
c~arges
ice
Center.
continent
r.
II
lurn
all
defects
nd produ
ol this
and lab
s,
tape
an authori
sua
l in
allatio
the
qual
modification
in the
zed
zed
remova
ty
service
and approved
l
carton box
U SA, subj
ect
to t
he
lollowmg
1)
The orig
inal
warran
2)
Proof of
pur
cha
WARRANTY
Kenwood corpo
ra
of
its
audio
equi
pment.
tested
and i
nspec
installed
and
ope
it
should
give y
ou
WARRANTY PERIOD
This
product
is warranted
of
the orig
inal
purchas
SCOPE
Except as
spec
ifi
material
s and
workmans
Dur
ing
the
warranty
Center in
the
military
card
wilt provide you free-of-charge
required
to cor
rect
The
following
are not
1 .
Volta
ge co
nve
2.
Per
iodic ch
eck-ups
by
the
warra
nty
3.
Ca
bin
ets. grilles.
and other
non-durab
4.
Uni
ts onwhichtheser
or
removed.
5.
In
sta
lla
tion
and/or
6.
Damaged
magnetic
7.
Hou
se
call
cha
8. Shipp
ing
or
Kenw
ood
Service Center
9. Th
is
warJanlywill
following conditions
of
the
auth
orized
• Impr
oper
maintenan
parts
or
accessories that
specifications
~Misuse.
abuse.
or failur
e to foll
ManuaL
*
Accidental
orinten
*Repairs
or
all
emp
(All
repairs
must
SerYiceCeniBf.)
"'Dama
ges
or
deteriorations
m
ust
be presented
·D
amages
or
deteriorati
or replacement.
PURCHASER'S RESPONSIBILmES
As the
purchased
request
ed
to
do the
warran
ty
service.
1.
Retainyoursal
yo
ur
eligibility for
2. Make
your unit available
Center
in t
he
warra
nty
se
rvi
or
equivalent, tully insured
to
th
e aul
hOJized
conditions.
ty
is
in
effect
se
is
provided
to
FOR
MILITARY MARKET
lion
is
proud
of the
This
unit
has
ted bef
ore
it was shi
rat
ed
in
accordance
an
optimum
reliable per
for a period
e.
OF
WARRANTY
ed belo
w,
this
warranty
hip
of
the
period, any
authorized
market list
ed
any
defect
in
materials
covered
by
rsions
delivery
of the
esslip
milita
ce,
this
which
do
not
other
exterior
le
parts
and
ial
number
remo
val
charge
tapes
rges
for
any
repairs
charges
not
coveranyfai
in
accordance
Kenwood
Service
ce
or
repair. includi
do
not conform
original parts
neglect, unauthorized
ow ins
tructions conta
tionaldamages.
ted repairs
by
be
pertormed
caused
to
the
earner).
ons resu
of
a n
ew
Kenw
ood
following
in
or
other
evidence
requesting
Kenwood
to
an
authorized
ry
market
for
or ship
your
unit
and shi
Kenwood
Serv
service
al
d,
proper
ty
ish
ed.
.
date
in
cts
Service
warranty
or
nship.
heads
modified
zed
spection
n of
ity and
Owner's
agency
Kenwood
aims
l an
d/
you a
re
Kenwood
ing
Service
pre
paid
,
,
LIMITATION
Any
and all
imp
merchantability and
limited
in
durati
EXCLUSION OF CERTAIN DAMAGES
KENWOOD
's
liability
the repair
or
repl
sha
ll
not inc
lude
conseq
uential
or ot
by
applicable law.
OF
ness
for a part
the
leng
th
ollh
for
any defe
ctiVe
nt ot said product,
ol a
ny
IMPLIED
icular
1s
warranty
Kind,
t
to
WARRANTIES
lied warranties. including
fit
on
to
aceme
damages
herwise, expec
warranti
purpose,
product
IS li
at our poti
whet~er
incidenta
the
extent
prohibit
es
shall
mit
on, and
ed
KENWOOD AUTHORIZED SERVICE
CENTERS IN MILITARY MARKET
JAPAN:
Yokota
Kenwood Rep, c/o
Yokota B
X, JAAX
AAF
APO San
Francisco
ES-PAC,
96328
Zama
Kenwood Rep,; c/o
PX,
JAAX AAFES-PAC.
Zama
APO
San
Francisco 96343
Misawa
Kenwood Rep,; c/o
BX.
JAAX AAF
Misawa
APO
San
Francisco 96519
Yokosuka
Kenwood Rep,; c/o
A-33, Yokosuka NEX No.
FPO
Seattle 98760
Atsugi
Kenwood Rep,; c/o
At
sugi
NEX
98767
lwakuni
Kenwood Rep,; c/o
Manne Corps
Air Statio
n,
FPO
Seattle 98764
Sasebo
Sasebo NEX;
Navy Exchan
FA
Box 115
Okinawa
Kenwood Rep, c/o
AAFES-PAC
OWAX,
ES-PAC,
260-010
No. 260-020
ge
FPO
FPO
Sea
Exchange, Marine Corps
260-040
Seattle 98766
, APO
San
Francisco
ttle
96230
of
be
to
l,
ed
Dear Customer,
Thank
you
for
valid
in
the
procedure,
countries
or
write
JVC KENWOOD
purchasing
this
listed.
If
to:
Customer
kenwood
your country
Information
product.
is
not
Center
As
mentioned
listed
please
in
the
contact
pages
your
of this
retailer
3-12, Moriyacho, Kanagawa-ku, Yokohama-shi, Kanagawa 221-0022, Japan
KOREA:
Kenwood
Rep,
KOAX Repair Sho
DD-Camp Ma rket, APO
96488
GUAM:
Ke
nwo
Guam NEX No.
FPO
Ke
nw
GUAX,
96334
c/o
p, AAFE
San
od
Rep, c/o
230-010,
San
Franc1s
co 96630
ood Rep, c/o
AAFES-PAC, APO San Fr
S-PAC
Francisco
ancisc
U.S.A.:
Hawaii
Kenwood Facto
99-994
Alaska
Vrsta
861
99501
Anchorage
1450 East 9th Ave., Anchorage, Alas
9501
9
In
The
Fo
r Nearest Authorized Service Center;
Tel: 1-
Kenwood
Kenwood Factory Service;
PO Box 22745,
Street
Long
Te
l: (31
EUROPE:
Pl
ease inquire at the military resale
outlets where you bought your Ken
product
KENWOOD ELECTRONI
DEUTSC
Rembruc
Germ
Tel.: 49-06104-69010
booklet,
for information
ry
Service
., Aiea, Hawaii 967
lwaena St
Radio
TV,;
Eas
t Loop
Road,
Anchorage, Alaska
Commercial Electronics, Inc
Continental
80
0-536-9663
,
Beac
h,
01
639-5300
s,
or
HLAND GMBH:
ker-Str.
an
y
U.S.A.
Service
U.S
2201 East Do mrngu
Cali
fornia 90801-5745
15,6
3150 Heusenstamm,
our
warranty
on
.A.
CS
warra
is
only
nty
01
ka
ez
woo
Warranty Card
Ident
ifi
cation du
Mod
efo
odel
M
o
Revendeu
N
ome
ealer & stamp
D
.,
Date
d'achtat
Data
da
Purcha
d
Nom
& a
Nome
N
ame & address
Attention:
This ca
rd
and receipt (
or
invoice) are necessary
to purchase a
or damage.
Attention:
Vous au
rez beso
panneau en
cas
Aten~ao:
Em
caso
de
dano ou perda
se
de compra
©
846-0824-00
rao requisitados para a
/01 IKI (121071
in de cette carte et
de vol ou d'
du
re~u
(ou
de
endommagement.
do
paine! frontal, este Certifica
aquisi~ao
de um
Ia facture)
nov
produit
do
aparel
num
da
e
ho e numero
ber & serial numbe
r &
cachet
loja
e ca
rimb
o
compra
se
date
dres
se
du client
endere~o
do
cliente
of
custo
mer
new
panel in
cas
pour
acheter
un
do
de Garantia e a Nota Fiscal
o painel.
de serie
r
e of the
nouveau
ft
Page 20

U.S.A.
Th
is
warra
nty
wi
ll
be
h
onored
KENWOOD
FOR CAR STEREO
HOW
Kenw
ood
prod
uct
purc
hase
WHAT
Except
materia
Th
e
following
f.
Any
Kenw
auth
dea
ler
Mi
li
tary
2.
Any
mod
3.
Damage
a.
Any
to
b.
Inst
c.
Acc
u
na
in
d.
Repa
by
e.
Any
defec
LONG
U.
S.A
. Cor
for
a p
er
i
IS COVERED
as
specified
l and
workmanship
a
re
p
rodu
ct
wh
o
od
or
wh
or
i
zed
Kenwood
.
un
l
ess
the pr
Ex
c
ha
n
p
ro
duct
on
if
i
ed
or
re
move
,
de
t
er
io
sh
ip
me
nt
the
ca
rrier)
allati
on
or
i
dent
acts
uth
orized
st
ru
ctio
ns
supplied
ir
or
attempted
Kenwood.
other
cause
t
LIMITED
pora
od
of
NOT
bel
not
covere
ic
h
i
ch
is n
oduct
ge
Serv
which
d.
rati
on
of
the
.
removal
of
product
BRASIL
0
fa
br
i
ca
nte
ga
rante o
qualquer
de
feifo
de
ti
da
JVC
produ
da
u
ais
it
i
n
lns
ei
te
ito
J
VC
nos
fe
i
ranspo
lq
n
os
no
~r
t
tos
s
os
os
uer
fabr
t
err
i
t6rio
brasileiro
KENWOOD
to
e
garantido
data
de
aquisicao
ao
consum
i
dor
reparos
rea
do
se
u
prazo
como
n
Ume
resu
lt
an
t
es
u
,
6es
.
rna
tru
cQes,
mo
di
causados
por
au
da
n
os
s
ou
d
anos
resu
KENW
OO
D:
ou
deterioracOes
de
fixacao
ms.
COs
au
ou
d
anos
rt
adora)
;
ou
t
racausa
causados
p
causados
por
decorre
n
te
s do
pormau
a
umidade
do
li
u
em
or
e
va
pe
ta
Este
a
partir
de
venda
Event
dila
ta,ao
(a)
Produtos
(b)
Defe
de
de
(c)
Danos
(d)
Del
(e)
De
da
(f)
Da
parafusos
gravado
[g)
De
t
[h)
Oua
(i)
Dano
(j)
Danos
(k)
Da
(I)
Danoscausados
exposicao
on
ly
in
the
WARRANTY
COMPONENTS
IS
THE
WARRANTY
lr
on
("Kenwood")
one
[f)
year
from
AND
COVERED
ow,
this
warr
anty
in
Kenw
oo
d
car
d
by
the
warranty
is
not
di
stributed
ot
purchas
ed
car
stereo
deal
is
purchased
i
ce.
th
e
ser
i
al
nu
mber
or
malfunction
product
(cla
i
of
the
product.
n
ature,
misuse,
modificati
on
w
it
h
the
produc
repair
by
an
which
does
not
produto
identificado
ica(:Ao
ou de
ma
desde
que
Brasil
Comercio
PERiODO
pe
l
a
prazo
de
.
com
p
rovada
li
na
l
zados
no
produto
EXCLUSAO
ro
de
serie
ou
cert
de
ac
1d
entes
(queda
ti
li
zal<'lo
.
liga
l<'lo
ficacO
es
nao
a
ut
age
n
tes
da
n
atureza
decorrencia
de
ltan
tes
do
us
a
aos
acabamentos
.
t
uvas.
at
cas.
dano
s
causados
d
evi
do
ao
t
ranspor
qu
e
nao
es
teja
t
entativa
de
rou
uso
de
COs
de
desgaste
natural
usa.
(de
rramame
au
si
t
uaCOes
clim3.ti
U.S.A.
t
he
co
vers
st
er
10
t
he
er
or
th
has
res
ms
must
or
t.
yo
ne n
re
l
ate
t
!r
ia·prima
o
produ
de
01
(urn)
med
if
icadode
a
fon
oriza
consertos
de
pecas
ba
lsas
par
te
rela
ciona
bo
ou
rna
qualida
do
w
arra
nts
da
te
ol
or
WHAT
all
def
eo
components
in the
U.S
U.
S.A.
f
an
aut
omobile
ro
ugh
th
e
bee
n
defa
u
ll
i
ng
f
rom:
be
pr
ese
abuse
, n
failu
re to
ot
au
th
to a
prod
na N
ota
du
to t
enha
Eletr
Onicos
DE
GARANTIA
ano, i
iante
a
d
uran
te o peri
DA
GARANTIA
ga
s.
bat
i
da
s e
te
de
t
ensa
da
s;
(Ex:
chuvas
r
ea
ou di
sp
externos
.
esto
j
os
pil
tlas
defeit
(r
ec
l
amacoe
da
a d
fu
rto;
de;
produt
o:
nt
ode
lfqu
ca
s
extre
thi
s
igi
na
l
IS
ec
ts in
.A
.
by
ro
m
an
U.S.
A
c
ed.
n
ted
eg
l
ec
t.
fo
ll
ow
ori
zed
uct
Fiscal
de
venda
ra
nte
o
periodo
sido
adqu
Lld
a.
nc
l
uin
do
o
apresentacao
odo
de
ra
ntia
rasu
rad
et
c
).
u
so
em
o
di
feren
te
,
rai
os,
ma
li
zados
po
r
osi
ti
vos
nao
,
partes
cosmeticas
. ad
ap
t
ado
uo
sas
au
s
devem
efe
i
tos
de
ma
id
ose/o
u
al
mas
, r
iscos
KENWOOD
Th
is
warranty
We
wi
item
s.
sect
ion
HOW
If
your
1.
Ta
ke
rn
the
prob
is
author
Service
2.
Although
to
ship
sh
i
pp
within
3.
Whenever
you
as
proof
WHO
is
e
WHAT
ll
pay
for
al
Payment
of
of
this
warranty
TO
KENWOOD
orship
it
to
U.
S.A
.
alon
l
em.
(if
yo
u
i
zed
,
pl
Cen
t
er.
you
mustpay
the
product
i
ng
charges
t
he
Un
ited
you
r
must
in
cl
ude
of
warra
USA
CORPORATION
IS PROTECTED
nf
o
rc
ea
bl
e
on
ly by
WE
WILL
l
lab
or
an
d
ma
te
ship
ping char
ges
.
OBTAIN
SERVICE
pr
od
uc
t
ever
n
ee
any
KENW
OOD
g with &
com
ar
e u
ncertain
as
easec
all
l ·
BOO-KENWOO
f
·800·536·966
an
ys
hi
pp
for
wa
rranty
se
illhe
repa
irs are
States.
uni
ts are t
ak
en
or
a c
opy
of t
he
nty
coverage
.
the
or
iginal
purcha
PAY
FOR
ria
l
expenses
is
d
iscu
ssed
WARRANTY
ds
serv
i
ce:
Authoflled
SerVIce
plete
descnpt
to
whether
a
Service
D
lo
r
3)
.
ing
charges
if it
is
r
vice,
we
wi
II
pay
cove
re
d
by
th
sent
for
warranty
ori
gina
l
dated
sa
for
in
i
on
the
necessary
th
e
wa
le
s
LIMITATION OF IMPLIED
ALL
OF
PURPOSE
TH
IS
JVC
de g
iri
do
pe
riodo
da
garant
os
,
adulterados
de
da
e
r
esia,
pessoas
co
nformes
res.
com
s
er
ter
i
a·pr
i
mentos
au
q
uedas).
WARRANTIES
IMP
LIED
WARRANT
IES, I
NC
LUDIN
G
MERCHANTABILITY
WARRANTY.
,
ARE
LIMITED
AN
IN
D
FI
DU
TN
RAT
ESS
ION
FOR
TO
WARRAN
A
PARTIC
THE
LENGTH
KENWOOD DO BRASIL COMERCIO
ao
cons
um
ido
r
cont
E
sta
ras
il e
distr
el
ecido
i
va
N
ota
impli
au
co
mo
i
cada
no
e
autorizadas
as
especit
cabos,
lilas.
;
j
unto
a
fa
ox
garan
lia
i
bu
i
do
por
le
F
isca
cam
na
ileg
l
veis
ma
nu
Man
ua
etc);
;
i
cacGes
chicotes
caiJe¥15
empresa
br
ica(:Ao
id
at;a
ra
t
~ndispens.lvel
acompan
h
ado
da
r
asuras
ou
modifi
0
no
i.
l
l
nsta
do
Este
;
al
Pa
l
Servico
de
JVC
,
;
Telefone:
o,
Data
cacOes
cons
umidor
sornente
bal
c.lo
de
u
rn
Servi(O
0
QUE
l
ac<J.o
e
rem~odo
proprietario.
produto
e
desti
ra
qua
lqu
er
inf
o
Auto
ri
zad
o
AtendimentoJVC
KENWOOD
Nome
do
consum
Endere<;o:
_ _
Ci
dade:
__
___
da
co
mpra
a
rmac
arantia.
no
B
es
tab
respect
ia
nao
saco
rdo
sp
wf
enc
hentes
nao
.
an
tenas,
v
azamento
feitas
imaede
,
corrosao,
se
r
KE
NW
O
LIM
IT
ED
AT
OUR O
1.
next
2
SO
ter
LO
t
he
ALLOW
te
r
CONSEQ
st
AND
This
tu
rn
ha
rr
an
ty
tf
,
or if you
product,
or
not
Rela
T
IE
S
R
P.O
OF
CONSERTO
la
l<'lo
iva
Nota
.
te
ra
di
r
eit
o a
Au
t
or
i
zad
NAO
E COBERTO
pro
d uta, d
espesas
do
exc
l
us
i
va
men
ao
sobre
S<\J
is
pr
6x
i
mo
,
acess
O
D-
Te
DO
BRASIL
Tel:
INSTALL
TO
OTH
KE
NWOO
BASED
PRO
D
ANY
CONS
ME
STA
NG
AN
EX
wa
rranty
ve
oth
apro
blem
Au
th
or
handl
ti
ons
KENWOOD
Box
Street,
d
es
te
f
iS
cal
estes
bene
o
da
J
VC
te
ao
IMPORT
equ
ip
ame
e o
l.
:
+
55
COMERCIO
(11) 3777-6771
covered
the
Cen
ol
Cen
neare
e
re
service
receipt
ULA
apresetl
respecf
na
ma
KENWO
www.kenwood.com.br
idor:
- - -
--
___
_
__
__
___
__
____
: _ _ / _ _ /
_
__
EXCLUSION
OD'
S
LIABILIT'I
T
UCT;
E
T
CLU
er
yo
FOR
OT
HEREPAIRORREP
PTION.
K
ENWOO
AT
I
ON
OR
REM
ER
PROPERT
Y
D
CAR
STE
R
UPON
IN
CONVENIEN
OR
O
THER
DAM
A
QUENTIAL
OR
OTHERW
TES
DO
NO
T
IM
P
LIED
WARRANT'!
HE
E
XC
LU
SION
EN
TI
AL
DAMAGE
SIONS
MAY
gives
you
spec
ri
ghts
whi
ch
va
developsduringo
any
quest
u
sho
uld
contact
ed
Service
Ce
nt
to
y
our
sa
lis
la
De
partme
nt
at
the
OR
NOT
ions
e
cli
U
have
iz
ed
D SH
CAUSED
EO
GES
ALL
S,
i
ry f
ra
you
r.
on,
add
USA
22745, 2201
Long
Beach,
Tel: (310) 639·5300
DE
ELETRONICOS
EM
GARANTIA
Certificad
o
de
omp
ra
flcios.
quand
KENWOOD.
PELA
!r
ete,
seguro
usa
domesti
ANTE:
nt
o
JVC
KENW
si
te
www.k
e
(11)
377
7·
677
do
e
co.
nwo
Garanlia
produ
o o
prod
emba
O
OD
od.
f
com
de c
de
DE
----
_
_ C
_
Est
Nota
EP"
ado
---
_
:
Fi
sca
OF
DAMAGES
ANY
DE
FE
C
TIVE
E
ME
ALL
NOT
PONEN
CE.
LOSS
WH
E
I
SE.
LI
L
AS
I
TATION
THE
LY TO Y
rig
state
the
li
ng
e
prob
pl
eas
e
ess
li
NTO
BE
CH
AR
BY
A
NY
THER
MITA
TI
TS
AND/OR
OF I
ABO
OU
hts
, a
to
st
mi
tedWarran
the
OOD
Auth
l
em
or y
co
ntac
ste
d be
PROD
F
TH
LIA
GES, DA
DEFECTS
TS
.
OF
USE
I
NCID
O
NS
NC
VE
LI
.
nd
yo
ate.
ope
or
ou
t
our
lo
w:
LAC
OVAL
COM
,
OW
LIM
SO
APP
fic
l
egal
ro
m
fter
r
egardi
r
KENW
li
th
r
CORPORATION
East
Dominguez
CA
90801-5745
LTDA
de
vid
amen
te
to. de
sde
que
n
ao
u
to
f
or
en
treg
ue
GARANTIA
l
age
m
sao
de
res
pon
.
ou
pa
ra
ob
ter
o
.br,
au
da
dosabaixo
__
li
gue
-
---
_ _ _
e
pa
p
com
os
ELETRONICOS
_____
_____
l:
UC
EPR
ODUC
BLE F
DAM
OF
ENTAL
ON
DO
I
DENTA
MI
TA
TI
u
ma
tyP
ration of t
i
ze
d
r q
ues
Cu
sto
p
reenc
apr
ese
dire
ta
sabil
n
d
er
~o
ra a
Ce
reenc
h
LTDA
_
_
T IS
OR
:
MAGE
IN
AGE
THE
HOW
NO
L
OR
ONS
y
also
eriod
he
Dea
l
er
ti
on
is
mer
hid
o,
nte
me
nt
idad
d
o
n
tr
al
idos
CANADA
KENWOOD
KENWO
OD E
LE
'
KENWOO
D"
or
ig
in
al c
us
tom
Ca
n
ada
by
KENWO
by
KENW
OOD
KENWO
OD
wa
no
rmal
use
,
co
nditio
ns
s
w
ar
ran
ty
p
er
and l
abo
ur
wh
or its· au
ttlo
ma
t
er
ials or w
co
n
tac
t
K
ENW
aut
hori
zed
by
Th
is
Kenwo
od
per
io
d of o
ne
or ren
tal.
except
or
co
mm
er
ci
of
ni
n
et
y
(9
0)
ter
ms
and
co
WARRANTY
Th
is
wa
rr
anty
{a) P
ro
d
ucts
Can
ada
a
(b)
P
rod
ucts
KE
NWO
OD.
(c)
Pro
du
cts
missing
(d)
Per
i
od
ic
c
ove
red by
GARANTIE
KE
NWO
OD
ELE
"
KENW
O
OD
original
de
Ca
na
da
pa
r
KE
par
KE
NW
OOD
K
ENWO
OD
ga
(m
on
ce
s
ci
-
dess
da
ns d
es
cond
d!lauts.
Si
l'
un
KE
NWOOD
s'e
et
de
Ia
mai
n-
po
ur
vu
q
ue
detec
tueu
ses
Ke
n
wood
ou
pa
r
l'un
de
se
p
ou
r verifier si un con
auto
ri
se
par
PERIODE
Les pi
ec
es
et
de
sp
rod
u
it
sKenw
an
a
co
mpter
sa
ul
dans
les
un
but
pro
f
ess
et
de
Ia
ma
in
-d'oeu
de
qua
tr
e-v
in
co
nditi
o
ns
de
EXCLUSIONS
C
ett
e
gar
an
ti
(a
) les p
rodu
transport
es
(b)
l
es
pr
od
uits ache
p
ar
K
ENW
(c)
les
p
ro
duits
au
m
od
i
fie
{d
)
les
serv
i
ce
detaut
co
). g
is
et
i
od
ri
zed
KE
WARRANTY
(
1)
al
da
nditions
excl
purcha
nd
purc
with the
chec
").
cha
NW
r
de!au
nga
d'oeuvre
de tels
em
a
Ia
sc
KENW
Ia
de
cas
ion
gt
Ia
e
ne
its
OOD
:
s d'e
u
ve
T
S
,
T
,
e
e
.
CTRO
iVeS
er
of
eac
OD
rr
an
ts
free
fro
fo
rt
h
be
, repai
en
such
se
rvi
or
kma
OOD to
NWO
pro
duct is
ye
ar from the
lor
prod
applic
ys
f
or
ude
sed
t
ake
n
ha
se
k
·ups
th
is
warran
CT
RO
donne
que n
O
OD
ant
i
t,
so
ous, q
it
i
ons
t
g
eaassumer
pl
o
yees
mai
n-d
en
tres
O
OD
main-d'
ood
Ia
date d'
oU l
es
ne
l
ou
vre
·dix
(
90)
gara
ntie
cou
ac
het
a
I'
Bt
r
an
;
d
on
i le
nt
reti
rt
par
WARRANTY
NI
CS
CANADA
the
followin
h new
Kenw
and
purchased
that
eac
h
new
m
an
y def
ects
low
.
If
a d
efec
rs
will
be
ma
defec
ts a
re
ce
cen
tr
es
nship
at
ti
co
nf
irm if a d
OD
wa
rr
an
t
da
u
cts
which
at
ion. which a
part
s and
la
of
the
wauanly
EXCLUSIONS
s·
in
a
fore
ign cou
to
a
fore
ign co
d
from
a
ser
ial n
umb
wh
i
ch
do
ty.
KENWOOD
NI
CS
CA
N
par
OC
r ilia
gara
ouvea
u
produ
eta
chete
a
us
rese
r
ve
ue
ch
aqu
e n
d'empl
oi
nor
se
pro
du
it
pendant
l
eco
nOCessa
ires
dB
f
au
ts
son!
tors
de
'oeuvre
tel
de
serv
ic
eautor
cessionnai
re au un centre de
.
DE
GARANTIE
oeuv
re
nOCessa
son
t
garantiespenda
ac
h
at,
de
pr
odu
i
ts
Kenwoo
com
merci
deme
ure
en
j
our
s
sou
.
DE GARANTIE
vre
pa
s:
es
a
l'e
t
ra
nger
ger;
tes
a
un
co
nu
m
ero
de
en
pfr
i
odiq
cette
gara
nt
INC.
g w
r!tl
oo
d
pro
fro
Ke
nwo
.
su
bte
t s
ho
de fr
ee
de
t
ermrne
to
be
me
of
ea
ler or se
PERIOD
ed
for pa
te
of
orig
are u
re
wa
bo
ur
and
.
untry
dea
ler
er
n
ot
di
ADA
I
NC
n
lie
it
Ke
un
co
nc
d
es
t
er
m
ou
v
ea
male
s,
l
apen
Ot
des
pour
e
ffec
att
ri
buabl
Ia
fa
bri
q
u'
etab
i
ses
i
re
ba
il
ou
d
a
l,
aU
Ia
vigu
eu
r
s r
eser
ou
ac
n
cess
io
sf
ri
e
u
es
qu
ie
;
(here
en
wa
du
m a d
ea
od
ct to the
uld
oc
of
cha
d
a
tt
rib
man
uf
rt
s and la
i
na
l pu
sed
in a p
rra
nted
ar
ntry
or purc
no
t au
defaced,
sc
lo
.
(c
i
suivante
nwo
od
e
ss
ionnai
es
et
u
pro
es
t
exem
od
pi
ec
es d!l
tuer l
es
ca
t
ion
li
par
.
Ap
pel
s
pour
nt
Ia peri
de l
ocat
so
nt
ga
ra
pen
da
ve
des
h
ete
nnaire n
ma
nque, a
i
n'indi
i
na
lf
rr
an
ct
dis
tr
l
er
auth
pro
du
te
cur
wit
r
ge
by
KENWOO
uta
ble
ac
t
ur
e.
rv
i
ce
bo
rc
h
as
ro
to
r a
e su
bject
th
or
altere
se
a
ny
·a
pr
es
a
l'ach
d
is
re
d
es
cond
duit Ke
pt
e
de
ect
es
re
a
des
du
K
EN
WO
ez
K
ENWOO
ser
Ia
re
od
i
on
or
emp
loy
ntie
des
nt
une
te
rm
s au Cana
on
ete eH
qu
e
KENWOOD ELECTRONICS
{
e)
Def
ec
ts r
es
u
l
ig
ht
ni
ng
,
er
ty
ibu
ct,
rms
h
lor
to
Pl
cen
ur lor a
e,
fes
sional
pe
ha
se
i
zed
de
a
ppe
tri
bue
a
ut
nw
de
garan
ueus
pa
rations
pi
produ
OD
vi
pa
e d'
igi
es
pi
pe
es
et
auto
nt
au
ca
to
te
or
un
in
pa
fau
tre is
l
to
d
f
et
or
it
taus
ece
ce
r
at
un
na
dans
eces
ri
da
ll
the
d in
i
ze
der
and
the
rts
ease
ease
riod
the
d
by
ec
te
eur
au
ise
io
ns
ood,
li
es
ou
es
ion
(1
te,
ode
des
ri
s8
ace
cu
ed
d
D
lty
in
or
ts
e
e.
s
it
D
t
)
et
n
powe
ma
in
te
nan
ce
ins
tru
ct
ions
{f)
D
ef
e
cts
or damage
pers
on
or p
arty
(g)
De
f
ec
fs
re
sulling
not
confo
rm
{h) D
ama
ge or
de
c
osme
t
ic
pa
ta
pes
, discs or laults or damage
leaki
ng
b
aller
(i) D
efe
c
ts
ord
ama
be
p
re
s
ente
d
(j)
Prod
uc
t
vo
ltage a
(k)
Pr
od
uc
t
in
st
TO
OBTAIN
Shou
ld
your
Ken
it
to
any
au
th
or
lfle
or
igi
nal copy
as
proo
f of wa
rr
l
re
ight p
repa
id to the n
cen
tr
e. To
av
oid p
pro
du
ct
IS
prope
bi
ll
ol
sa
le and this
wit
h your
na
me
a
com
pl
et
e
return
l
au
ll
(s
). P
ro
d
uc
frei
g
ht
pr
epa
id to
is
respon
s
ib
le l
pr
od
uc
t(
s)
to
des
{
e)
l
es
dt'l
lauts
abu
s, le
se
m
c
ou
ran
t.
l
es
las
mo
di
ficat
du
mo
de
d'
emp
(f) l
es
d!fauts
ou les
e
ffec
t
uOOs
par
par
KENW
OO
(g
)
les
d!l
au
t
scau
ne
se conform
(h)
te
s
finitio
ns
de
ba
nd
es.
les
bandes,
detauts
ou do
ou
quiluie
nt;
(i) l
es
d
!f
au
ts
t'
ex
p!d1ti
on
te
lt
es
r!cl
am
(j)
les
co
nv
er
s
pr
od
uit;
(k)
l
es
I
ra
is d'i
nst
COMMENT
Au
cas
oU
un
se
s'a
ve
re n
ecessai
ce
n
tre
de
ser
vice
co
ntra
!
de
ve
nte et ce
de
ga
ran
tie au
v
port
pay
!
au c
en
pro
ch
e.
Pou
r
!VIler
le t
ra
n
sp
o
rt
,
v
eu
un
e co
pie
du
co
en
ta
n! que pr
eu
nu
me
r
os
de
tel
ep
vo
tr
e
adr
es
se et
produi
ts
so
us
ga
d
es
t
inati
ons
a
l'i
r
esponsab
le
de
rap
porte
nt po
ur
l'
exte
ri
e
ur
du Can
a
ts
or
ca
pl
ma
ions n
ex
le
des p
ati
io
SOUS
rvice
ill
nt
ta
lti
ng from di
r surg
, un
au
t
ho
rized modi
in the
ow
ne
as
n
ot
au
th
f
ro
m the
to
KEN
WO
terior
at
ion o
rt
s,
ta
pe
h
ies
.
g
eo
cc
u
rr
to
the
sh
ipping
nd
/o
r line
lla
tion
or
re
WARRANTY
w
ood
p
rod
iz
ed
K
ENWOO
of
your bill
anty, or s
en
ea
re
oss
ib
le
rly
pa
ck
e
d.
wa
rra
nty
. home
and
a
dd
ress
re
pa
i
red
de
st
inati
all
fr
ei
gh
tinati
on
s o
uses
par
o
is
inc
or
rects,
n
qu
es de so ins au d'entr
on
aut
lo
i;
do
m
u
ne
per
so
D;
ses
par
l'
emp
en
! p
as
aux
te
ri
eure
s.
le
s
ada
ptat
s d
is
q
ues
mmag
es
ca
ou do
mma
ro
duits Kenwood
ons
aup
r
ns
de
te
a
ll
ati
on
ou d'en
OBTENIR
so
us
ga
re,
veuille
z
KENWOO
D
tte
ca
eu
ill
ez
fa
ir
t
re
de
serv~
t
out
es
po
ez
bien
em
ra! de ve
nte
ve
de
ga
ran
ho
ne
au
po
un
e d
es
crip
ran
tie r
8pa
n
ter
ie
ur
du Can
us
tr
ais
de tr
faire
e
xped
ada
.
sa
st
er,
acci
de
es
. n
eg
l
ec
t or la
fi
ca
ti
on or
r'
s
ma
n
ua
l.
a resu
lt
of
re
pa
orize
d
by
K
ENWOOD
us
e of
par
ts or
OD
sp
ec
i
fic
at
io
cc
urring
to
any
eads
, a
da
pt
ors, ant
cause
ingd
ur
i
ng
shi
pp
comp
an
y)
fr
equen
cy
m
oval
c
har
ge
s.
uct r
equ
ire
war
r
an
D
service
cen
of
sa
le
an
d t
d your p
ro
du
ct
st author
ize
d
KENWO
sh
i
pp
i
ng
da
mage
Include
a
c
opy
card
as
pr
oo
/o
r
wo
rk
t
el
ep
and a detail
ed
within w
arr
an
ty
ons
wi
th
in
C
anada.
t and
relate
d co
uts
i
de
Can
ada
l
es
d
t'l
sast
res.
lesec
la
ir
s.
or
i
sees
au
les
ma
ma
g
es
ca
u
ses
nne
ou
pa
r
un
e
part
l
01
de
p
te
cesou
ex
igen
ces
de
le
s pie
ces
co
sme
eu
rs,
les
an
te
e
nd
o
mmage
s ou
us
es
par des
g
es
qui
se
pr
(On
es
des
c
ompag
nsi
on
eV
ou
lev
eme
nt
DU
GARANTIE
ran
fi
e
de
vo
t
re
li
vre
r le
pr
od
u
et pr
ese
n
ter
Ia
rte de g
aran
t
ie
en ta
e
pa
rv
en
ir
vo
t
re
c
e
K
ENW
O
OD
ss
ibi
lit
es
de d
ball
er
le
prod
ui
o
rigi
nal et
cette
he
au
ss
i bien q
ste
de
travail
ti
on
det
aill
ee
r
es
s
ero
nt
r
eto
um
ada
.
Le
co
ansp
o
rt
et d'
ier
les
prod
uits
nt,
abu
se
ck
of p
fai
lure
ir
s
pe
rf
or
dev
i
ce
ns.
ex
te
r
io
en
n
as
d
by
def
ing(clai
ms
.
co
n
vers
ions
SERVICE
ty
se
rv
ice.
tr
e and present
hi
s wa
rr
fu
lly
i
nsu
OD
. make
of
y
ou
f of warr
anty
hon
e nu
de
sc
ri
pti
wi
ll
be
The
st
s
for
the r
.
le
s
accid
l
es
su
rtensi
et
i
ens
p
t'lr
nq
u
es
de
t
ors
de r!
ie
no
n aut
d
ed
is
pos
K
EN
WO
ti
q
ues
nnes
,
l
es
deperis, ni
piles
d
ete
odu
isent pen
devra
it
dep
n
ie
s de
tra
de
fr!q
uence
du
produ
SERVICE
pr
od
uit
it
a
n'
import
co
pi
e
ofl
nt
que
prod
ui
t
auto
ri
s!
omm
ag
es
t.
Veu
ill
ez
ca
rt
e de
ue
vot
e
vou
au
des delau
es
por
t
n
so
mmat
au
tr
es
trais
a
de
stin
CANADA
.
misuse
,
er
i
od
ic
to
foll
ow
me
d
by
a
s that do
r
fin
is
hes.
,
ca
b
le
s,
ectiv
e
or
should
del
i
ve
r
an
ty
ca
rd
red
a
nd
s
er
v
iC
e
su
re
the
r original
along
mbe
r
(s
),
on
of t
he
retu
rned
cu
stomer
etu
rn
of
en
ts.
l
es
on
s
de
iodiques,
r
espe
ct
par
a
ti
ons
or
i
s8e
ili
iS
qu
1
OD
:
,
l
es
tet
es
c
ab
l
es
,
l
es
ct
ue
us
es
dan
t
os
er
de
nspo
rt
);
du
i
t.
Ke
nw
ood
e
qu
el
ginale
du
pre
u
ve
assu
re et
le
plus
pe
n
da
nt
in
clu
re
gara
ntie
re
no
m.
do
mici
le
.
ts
.
Le
s
paye
aux
e
ur
sera
qu
i s
'y
at
ions
a
INC.
ENTIRE
This wa
rr
an
by
K
ENW
OO
or
their
ag
en
enl
arg
e this
or
ver
bal
s
ta
any e
xt
en
de
by
the
dea
ler
by
K
EN
W
OOD
KEN
WO
OD
ol
th
e p
ro
du
dama
ge
to
co
mm
e
rci
al l
NOTICE TO
The
pro
v
is
ions
to
l
im
it,
mo
di
or
ri
g
ht
s you may have
pro
v
in
c
ial
or
T
hi
s
wa
rra
n
a
valid
p
roo
yo
u m
us
t present the
wa
rra
nty
ca
rd
kept in a
sa
le
KENWOOD
6070
Ontario,
Ce
tt
e
gar
an
ti
KE
N
WO
OD. K
de
to
ut
es
ext
ga
rantie lai
te
co
n
cess
io
nn
ou
emp
l
oyes
ver
ba
les
au
ec
p
rogr
ammes
l
es
conc
essio
KENW
OOD
KEN
WO
OD
d'emploi du p
ca
us
es
a
d'a
de tout
es
pe
AVIS
Les sti
pu
lat
ions
pa
s p
ou
r b
ut
d"
ex
c
lu
re
d'
aut
que
lle
s lo
is
KE
NW
OOD
ne co
et
an
l une p
reuve
so
us
gar
an
tie. it f
v
en
te
au
ss
i bien
de
ga
r
an
tie.
au
ca
s
oU e
ll
KENWOOD
6070
Ontario,
Tele
Telecopieur: (905) 670-7248
WARRAN
ty
co
n
sti
tut
es
the
No p
er
so
n, pa
or
e
mplo
y
ee
a
nty
on
be
ha
ent
or
a
dv
e
rt
i
rran
ty
progra
se
rv
ice centre,
DISCLA
ms
any
resp
any
ot
he
r i nd ir
er
pr
od
ucts or goods. i
nta
ined
in
th
is wri
ay
. disclaim or ex
wh
ich
eral
l
aw
s or
le
IMPORTANT
by
it
se
lf
IS
no
chase.
W
hen
or
igi
na
l c
of of
wa
rra
nty
e,
sh
oul
d th
enti
rty
s a
re
lf
of K
sem
ent
m or plan t
un
IM
o
ns
ecl
, i
CONSUMER
tt
are
gi
slat
t
con
ap
opy
, so we recomm
ey
be r
D.
ts
warr
tem
d wa
disclai
ct
or
oltl
os
fy
fe
ty
card
f of
as
plac
or
.
s.
co
, take aw
d
pur
pro
ELECTRONICS
Kestrel
Road,
Canada
Tel.: (905) 670-7211
Fax:
(905) 670-7248
L'ENTIERE
e
repre
ENWOOD
ensi
s
air
au n
rit
au plans de
nnai
n'y ail
ren
roduit.
utr
rt
es
AUX
de l
res
au
On
es
GARAN
sen
te
l'
en
ti
i!re
ne se tient aucun
on
s ni
de
tou
ou
ent
re
pr
ises
pa
es
au
ce
n
tres
de
om
de
KEN
WOOD
es
, d'
an
nonces ou
garant
ie ete
res
ou
les
centr
co
nsenti par
ec
RENONCIATI
o
nce
a
toutes
re
spon
de
taus
d
omm
es produits ou biens.
co
mme
rc
ia
l
es
.
CONSOMMATEU
co
n
te
n
ue
s d
an
s
Ia
im
it
er
, de
mo
di
fi
ga
ra
nt
ies
ni d
isl
at
i
ons
pro
IMPORTANT
ns
i
de
re
pas
cetl
d'
acha
t
val
i
de
.
au
dr
a p
re
senter Ia copie
qu
e c
ette
ca
rt
e de
ec
omman
de
de
ave
re
ra
ie
nt
n
ecesa
ro
vi
nc
e
Lo
l
es
I
Bg
r
s'
ga
te
r t
se
de
a
pr8
er
r
ELECTRONICS
Kestrel
Road,
Canada
phone
: (905) 670-72
TY
re
wri
tt
en
,
dea
l
er
or
auth
or
i
zed
EN
WO
OD
or
p
ro
mot
ha
t
l
ess
ap
p
ro
ER
i
bi
li
ty for
l
oss
nc
idental or
nc
en wa
rra
n
ty
clud
e a
set
for
th
in
ion
s
ider
ed
by
ply
ing
lor
wa
ol y
our
b
ill
eq
ui
red in t
CANADA INC.
Mis
si
ssauga,
L5T 1 S8
TIE
rantie d
on
emen
s
aug
m
en
ta
outes
pe
r
so
r
vic
e
au
pa
au m
oye
n d'a
p
ro
mo
ti
ons,
nd
ue que
es
de
servi
ce
rit
d'a
va
nce.
ON
sa
b i
I it
es
de
ges
indi
rec
ts
de
ta
us i
nconven
se
nt
e
ga
ra
, de dimi
nu
ils
Bno
nc
es
i
ales
ou
f
edera
gara
nti
e
louie
sq
u
'o
n d
ema
or
igi
na
gara
ntie en
ta
co
nse
rver
dans
ir
es
a
l'
a
ve
CANADA INC.
Mississau
L5T
1
warr
se
by
ion, i
ma
ved
of ti
con
onv
are
ny
any
KE
rranty
of
en
he
nee
t
ti
o
nn
r l
pu
,
pert
ou
nt
e
r,
dans
se
nde
te
nt
ni
r.
SS
11
a
nty
rv
ice
to
e
a
ny
y
be
in w
me
se
enien
no
t inten
wa
ap
NWOO
sa
le a
d
tha
fu
par
res
pon
ns
es
eurs
ff
i
y in
is
se
a
moi
e de t
acces
RS
i
e8c
de
n'
t
es
ule
du
du
cont
que
un
ga,
xt
ncl
quen
pli
rep
t
ture.
e
de
.
rm
c!
ie
r
ite n
rejet
impo
.
com
li
r
part
us
nt
ns
se
p
giv
en
ce
nt
re
e
nd
or
wr
i
tt
en
ud
in
g
o
ff
e
re
d
riti
ng
or u
se
ti
al
ce
or
de
d
ra
nti
es
cab
le
D
as
ai
rs,
nd
this
th
ey
be
cr
it
par
sa
ble
ce
tt
e
i
es
,
age
nt
s
ati
ons
to us
off
rir
que
em
ps,
so
ir
es
nts
ou
·a
nt
er
ni
rte
me
rv
ice
r
at
de
reu
ve
eu
sO
r
 Loading...