

Kenwood KDC-X303, KDC-BT375U, KDC-BT350U, KDC-BT33, KDC-BT275U Quick Start Guide [en, fr, es]
...Page 1
ENGLISH
FRANÇAIS
ESPAÑOL
KDC-X303
KDC-BT375U
KDC-BT350U
CD-RECEIVER
KDC-BT33
KDC-BT275U
KDC-BT23
Quick Start Guide
AMPLI-TUNER LECTEUR DE CD
Guide de démarrage rapide
REPRODUCTOR DE DISCOS COMPACTOS RECEPTOR DE FM/AM
Guía de inicio rápido
For your records
Record the serial number, found on the back of the unit, in the spaces designated on the warranty card, and in the space provided
below. Refer to the model and serial numbers whenever you call upon your Kenwood dealer for information or service on the product.
Model KDC-X303/KDC-BT375U/KDC-BT350U/KDC-BT33/KDC-BT275U/KDC-BT23/KDC-MP375BT/KMR-D375BT
Serial number
US Residents Only
Register Online
Register your Kenwood product at http://www.kenwood.com/usa/
© 2018 JVC KENWOOD Corporation
KDC-MP375BT
KMR-D375BT
For detailed operations and information, refer to the
INSTRUCTION MANUAL on the following website:
Pour les opérations et les informations détaillées,
reportez-vous au MODE D’EMPLOI sur le site web suivant:
Para obtener más información y detalles sobre las
operaciones, consulte el MANUAL DE INSTRUCCIONES en el
siguiente sitio web:
<www.kenwood.com/cs/ce/>
B5K-0553-10 [KN]
Page 2
CAUTION
Use of controls or adjustments or performance of procedures other than those specified herein may
result in hazardous radiation exposure.
In compliance with Federal Regulations, following are reproductions of labels on, or inside the product
relating to laser product safety.
JVC KENWOOD Corporation
2967-3, ISHIKAWA-MACHI,
HACHIOJI-SHI, TOKYO, JAPAN
THIS PRODUCT COMPLIES WITH DHHS RULES 21CFR
SUBCHAPTER J IN EFFECT AT DATE OF MANUFACTURE.
Location : Top Plate
Información acerca de la eliminación de equipos eléctricos y electrónicos al final de la vida
útil (aplicable a los países que hayan adoptado sistemas independientes de recogida de
residuos)
Los productos con el símbolo de un contenedor con ruedas tachado no podrán ser
desechados como residuos domésticos. Los equipos eléctricos y electrónicos al final
de la vida útil, deberán ser reciclados en instalaciones que puedan dar el tratamiento
adecuado a estos productos y a sus subproductos residuales correspondientes.
Póngase en contacto con su administración local para obtener información sobre el
punto de recogida más cercano. Un tratamiento correcto del reciclaje y la eliminación
de residuos ayuda a conservar los recursos y evita al mismo tiempo efectos
perjudiciales en la salud y el medio ambiente.
Informação sobre a eliminação de pilhas
Este produto não deve ser eliminado como lixo doméstico geral. Devolva a pilha usada ao revendedor ou
entidade autorizada para que a mesma seja devolvida ao fabricante ou importador.
A reciclagem e a eliminação de lixo de maneira apropriada ajudarão a conservar os recursos naturais ao
mesmo tempo que prevenirão os efeitos prejudicais à nossa saúde e ao meio ambiente.
FCC WARNING
This equipment may generate or use radio frequency energy. Changes or modifications to this
equipment may cause harmful interference unless the modifications are expressly approved in the
instruction manual. The user could lose the authority to operate this equipment if an unauthorized
change or modification is made.
FCC NOTE
This equipment has been tested and found to comply with the limits for a Class B digital device,
pursuant to Part 15 of the FCC Rules. These limits are designed to provide reasonable protection against
harmful interference in a residential installation. This equipment may cause harmful interference to
radio communications, if it is not installed and used in accordance with the instructions. However,
there is no guarantee that interference will not occur in a particular installation. If this equipment does
cause harmful interference to radio or television reception, which can be determined by turning the
equipment off and on, the user is encouraged to try to correct the interference by one or more of the
following measures:
• Reorient or relocate the receiving antenna.
• Increase the separation between the equipment and receiver.
• Connect the equipment into an outlet on a circuit different from that to which the receiver is
connected.
• Consult the dealer or an experienced radio/TV technician for help.
Supplier's Declaration of Conformity
Trade Name: KENWOOD
Products: CD RECEIVER
Model Name: KDC-X303/KDC-BT375U/KDC-BT350U/KDC-BT33/KDC-BT275U/
KDC-BT23/KDC-MP375BT/KMR-D375BT
Responsible Party: JVCKENWOOD USA CORPORATION
2201 East Dominguez Street, Long Beach, CA 90810, U.S.A.
PHONE: 310 639-9000
THIS DEVICE COMPLIES WITH PART 15 OF THE FCC RULES. OPERATION IS SUBJECT TO THE FOLLOWING
TWO CONDITIONS:
(1) THIS DEVICE MAY NOT CAUSE HARMFUL INTERFERENCE, AND
(2) THIS DEVICE MUST ACCEPT ANY INTERFERENCE RECEIVED, INCLUDING INTERFERENCE THAT MAY
CAUSE UNDESIRED OPERATION.
i
Page 3
IC (Industry Canada) Notice
This device complies with Industry Canada’s licence-exempt RSSs.
Operation is subject to the following two conditions:
(1) This device may not cause interference; and
(2) This device must accept any interference, including interference that may cause undesired
operation of the device.
Note de IC (Industrie Canada)
Le présent appareil est conforme aux CNR d’Industrie Canada applicables aux appareils radio exempts
de licence.
L’exploitation est autorisée aux deux conditions suivantes:
(1) l’appareil ne doit pas produire de brouillage;
(2) l’utilisateur de l’appareil doit accepter tout brouillage radioélectrique subi, même si le brouillage
est susceptible d’en compromettre le fonctionnement.
CAUTION
This equipment complies with FCC/IC radiation exposure limits set forth for an uncontrolled
environment and meets the FCC radio frequency (RF) Exposure Guidelines and RSS-102 of the IC radio
frequency (RF) Exposure rules. This equipment has very low levels of RF energy that it deemed to
comply without maximum permissive exposure evaluation (MPE). But it is desirable that it should be
installed and operated keeping the radiator at least 20cm or more away from person’s body.
ATTENTION
Cet équipement est conforme aux limites d’exposition aux rayonnements énoncées pour un
environnement non contrôlé et respecte les règles les radioélectriques (RF) de la FCC lignes directrices
d’exposition et d’exposition aux fréquences radioélectriques (RF) CNR-102 de l’IC. Cet équipement émet
une énergie RF très faible qui est considérée comme conforme sans évaluation de l’exposition maximale
autorisée (MPE). Cependant, il est souhaitable qu’il devrait être installé et utilisé en gardant une
distance de 20 cm ou plus entre le radiateur et le corps humain.
Contains Bluetooth Module FCC ID: ZWY8811X
IC ID: 12033A-8811X
This transmitter must not be co-located or operated in conjunction with any other antenna or
transmitter.
Para cumplimiento de la IFT:
“La operación de este equipo está sujeta a las siguientes dos condiciones:
(1) es posible que este equipo o dispositivo no cause interferencia perjudicial y
(2) este equipo o dispositivo debe aceptar cualquier interferencia, incluyendo la que pueda causar su
operación no deseada”
ii
Page 4

SOFTWARE LICENSE AGREEMENT
The software embedded in the Product (hereinafter the "Licensed Software") provided by Licensor is
copyrighted to or sublicensable by the Licensor, and this Agreement provides for the terms and conditions
which Users shall follow in order to use the Licensed Software.
The User shall use the Licensed Software by agreeing with the terms of this Software License Agreement.
This Agreement shall be deemed completed at the time the User (hereinafter the "User") initially used the
Product in which the "Licensed Software" is embedded.
The Licensed Software may include the software which has been licensed to the Licensor directly or
indirectly from any third party. In such case, some third parties require the Users to follow their conditions
for use separately from this Software License Agreement. Such software shall not be subject to this
Agreement, and the Users are urged to read the "Important Notice concerning the Software" to be provided
separately below.
Article 1 General Provision
The Licensor shall grant to the User a non-exclusive and non-transferable (other than the exceptional case
referred to in Article 3, Paragraph 1) licensed to use the Licensed Software within the country of the User.
(the country where the User bought the Product (hereinafter the "Country")
Article 2 License
1. The license granted under this Agreement shall be the right to use the Licensed Software in the
Product.
2. The User shall not duplicate, copy, modify, add, translate or otherwise alter, or lease the Licensed
Software and any related documents, whether in whole or in part.
3. The use of the Licensed Software shall be limited to personal purpose, and the Licensed Software shall
not be distributed, licensed or sub-licensed whether it is for commercial purpose or not.
4. The User shall use the Licensed Software according to the directions described in the operation
manual or help file, and is prohibited to use or duplicate any data in a manner violating the Copyright
Law or any other laws and regulations by applying whole or a part of the Licensed Software.
Article 3 Conditions for Grant of License
1. When the User transfers the Product, it may also transfer the license to use the Licensed Software
embedded in the Product (including any related materials, updates and upgrades) on condition that
no original, copies or related materials continue in the possession of the User, and that the User shall
cause the transferee to comply with this Software License Agreement.
2. The User shall not carry out reverse engineering, disassembling, decompiling or any other code
analysis works in connection with the Licensed Software.
iii
Article 4 Right pertaining to the Licensed Software
Any and all copyrights and other rights pertaining to the Licensed Software and related documents
shall belong to the Licensor or the original holder of the right who granted to the Licensor the license or
sublicense for the Licensed Software (hereinafter the "Original Rightholder"), and the User shall not be
entitled to any right other than the license granted hereunder, in respect of the Licensed Software and any
related documents.
Article 5 Indemnification of Licensor
1. Neither the Licensor nor the Original Rightholder shall be liable for any damage incurred by the User
or any third party due to the exercise of the license granted to the User under this Agreement, unless
otherwise restricted by law.
2. The Licensor will offer no guarantee for the merchantability, convertibility and consistency with
certain objective of the Licensed Software.
Article 6 Liability to Third Party
If any dispute has arisen with any third party due to an infringement upon a copyright, patent or any
other intellectual property right that was caused by the User's use of the Licensed Software, the User shall
settle such dispute at its own cost and hold the Licensor and the Original Rightholder harmless from any
inconvenience it may cause.
Article 7 Confidentiality
The User shall keep the confidentiality of such portion of the Licensed Software, related documents thereof
or any other information to be granted under this Agreement, as well as the conditions of this Agreement
as has not yet entered the public domain, and shall not disclose or divulge the same to any third party
without approval of the Licensor.
Article 8 Termination
In case the User falls under any of the events described in the following items, the Licensor may
immediately terminate this Agreement or claim that the User compensates for the damage incurred by the
Licensor due to such event:
(1) when the User violated any provision of this Agreement; or
(2) when a petition has been filed against the User for an attachment,
provisional attachment, provisional disposition or any other compulsory execution.
Article 9 Destruction of the Licensed Software
If this Agreement is terminated pursuant to the provision of Article 8, the User shall destroy the Licensed
Software, any related documents and copies thereof within two (2) weeks from such date of termination.
Page 5

Article 10 Protection of Copyright
1. The copyright and all the other intellectual property rights
relating to the Licensed Software shall belong to the Licensor
and the Original Rightholder, and in no event shall they be
under the ownership of the User.
2. The User shall, whenever it uses the Licensed Software,
comply with any laws relating to the copyright and other
intellectual property rights.
Article 11 Export Restriction
1. It is prohibited to export the Licensed Software and any
related documents outside the country of the User (including
transmission thereof outside the country of the User via
Internet of other communication tools).
2. The User shall understand that the Licensed Software shall be
subject to the export restrictions adopted by the country of
User and any other countries.
3. The User shall agree that the software will be subject to any
and all applicable international and domestic laws (including
the export control regulation of the country of User and
any other countries, and any restrictions concerning the
end-users, the use by end-users and importing countries to be
provided by the country of User and any other countries, and
any other governmental authorities).
Article 12 Miscellaneous
1. In the event any part of this Agreement is invalidated by
operation of law, the residual provisions shall continue in
force.
2. Matters not stipulated in this Agreement or any ambiguity or
question raised in the construction of this Agreement shall be
provided or settled upon good-faith consultation between the
Licensor and the User.
3. The Licensor and the User hereby agree that this Agreement
is governed by the laws of Japan, and any dispute arising
from, and relating to the rights and obligations under, this
Agreement shall be submitted to the exclusive jurisdiction of
the Tokyo District Court for its first instance.
Important Notice concerning the Software
-jansson
Copyright (c) 2009-2012 Petri Lehtinen <[email protected]>
Permission is hereby granted, free of charge, to any person obtaining a copy of this software and associated documentation files (the "Software"),
to deal in the Software without restriction, including without limitation the rights to use, copy, modify, merge, publish, distribute, sublicense, and/
or sell copies of the Software, and to permit persons to whom the Software is furnished to do so, subject to the following conditions:
The above copyright notice and this permission notice shall be included in all copies or substantial portions of the Software.
THE SOFTWARE IS PROVIDED "AS IS", WITHOUT WARRANTY OF ANY KIND, EXPRESS OR IMPLIED, INCLUDING BUT NOT LIMITED TO THE WARRANTIES
OF MERCHANTABILITY, FITNESS FOR A PARTICULAR PURPOSE AND NONINFRINGEMENT. IN NO EVENT SHALL THE AUTHORS OR COPYRIGHT HOLDERS
BE LIABLE FOR ANY CLAIM, DAMAGES OR OTHER LIABILITY, WHETHER IN AN ACTION OF CONTRACT, TORT OR OTHERWISE, ARISING FROM, OUT OF OR
IN CONNECTION WITH THE SOFTWARE OR THE USE OR OTHER DEALINGS IN THE SOFTWARE.
-cJSON
Copyright (c) 2009 Dave Gamble
Permission is hereby granted, free of charge, to any person obtaining a copy of this software and associated documentation files (the "Software"),
to deal in the Software without restriction, including without limitation the rights to use, copy, modify, merge, publish, distribute, sublicense, and/
or sell copies of the Software, and to permit persons to whom the Software is furnished to do so, subject to the following conditions:
The above copyright notice and this permission notice shall be included in all copies or substantial portions of the Software.
THE SOFTWARE IS PROVIDED "AS IS", WITHOUT WARRANTY OF ANY KIND, EXPRESS OR IMPLIED, INCLUDING BUT NOT LIMITED TO THE WARRANTIES
OF MERCHANTABILITY, FITNESS FOR A PARTICULAR PURPOSE AND NONINFRINGEMENT. IN NO EVENT SHALL THE AUTHORS OR COPYRIGHT HOLDERS
BE LIABLE FOR ANY CLAIM, DAMAGES OR OTHER LIABILITY, WHETHER IN AN ACTION OF CONTRACT, TORT OR OTHERWISE, ARISING FROM, OUT OF OR
IN CONNECTION WITH THE SOFTWARE OR THE USE OR OTHER DEALINGS IN THE SOFTWARE.
-CMP
The MIT License (MIT)
Copyright (c) 2014 Charles Gunyon
Permission is hereby granted, free of charge, to any person obtaining a copy of this software and associated documentation files (the "Software"),
to deal in the Software without restriction, including without limitation the rights to use, copy, modify, merge, publish, distribute, sublicense, and/
or sell copies of the Software, and to permit persons to whom the Software is furnished to do so, subject to the following conditions:
The above copyright notice and this permission notice shall be included in all copies or substantial portions of the Software.
THE SOFTWARE IS PROVIDED "AS IS", WITHOUT WARRANTY OF ANY KIND, EXPRESS OR IMPLIED, INCLUDING BUT NOT LIMITED TO THE WARRANTIES
OF MERCHANTABILITY, FITNESS FOR A PARTICULAR PURPOSE AND NONINFRINGEMENT. IN NO EVENT SHALL THE AUTHORS OR COPYRIGHT HOLDERS
BE LIABLE FOR ANY CLAIM, DAMAGES OR OTHER LIABILITY, WHETHER IN AN ACTION OF CONTRACT, TORT OR OTHERWISE, ARISING FROM, OUT OF OR
IN CONNECTION WITH THE SOFTWARE OR THE USE OR OTHER DEALINGS IN THE SOFTWARE.
iv
Page 6
INSTALLATION/CONNECTION
Warning
• The unit can only be used with a 12V DC power supply, negative ground.
• Disconnect the battery’s negative terminal before wiring and mounting.
• Do not connect Battery wire (yellow) and Ignition wire (red) to the car
chassis or Ground wire (black) to prevent a short circuit.
• To prevent short circuit:
– Insulate unconnected wires with vinyl tape.
– Be sure to ground this unit to the car’s chassis again after installation.
– Secure the wires with cable clamps and wrap vinyl tape around the
wires that comes into contact with metal parts to protect the wires.
Caution
• For safety’s sake, leave wiring and mounting to professionals. Consult the
car audio dealer.
• Install this unit in the console of your vehicle. Do not touch the metal parts
of this unit during and shortly after use of the unit. Metal parts such as the
heat sink and enclosure become hot.
• Do not connect the wires of speakers to the car chassis or Ground wire
(black), or connect them in parallel.
• Mount the unit at an angle of less than 30º.
• If your vehicle wiring harness does not have the ignition terminal, connect
Ignition wire (red) to the terminal on the vehicle’s fuse box which provides
12 V DC power supply and is turned on and off by the ignition key.
• Keep all cables away from heat dissipate metal parts.
• After the unit is installed, check whether the brake lamps, blinkers, wipers,
etc. on the car are working properly.
• If the fuse blows, first make sure the wires are not touching car’s chassis,
then replace the old fuse with one that has the same rating.
Basic procedure
1 Remove the key from the ignition switch, then disconnect the
terminal of the car battery.
2 Connect the wires properly. See “Wiring connection” on page 3.
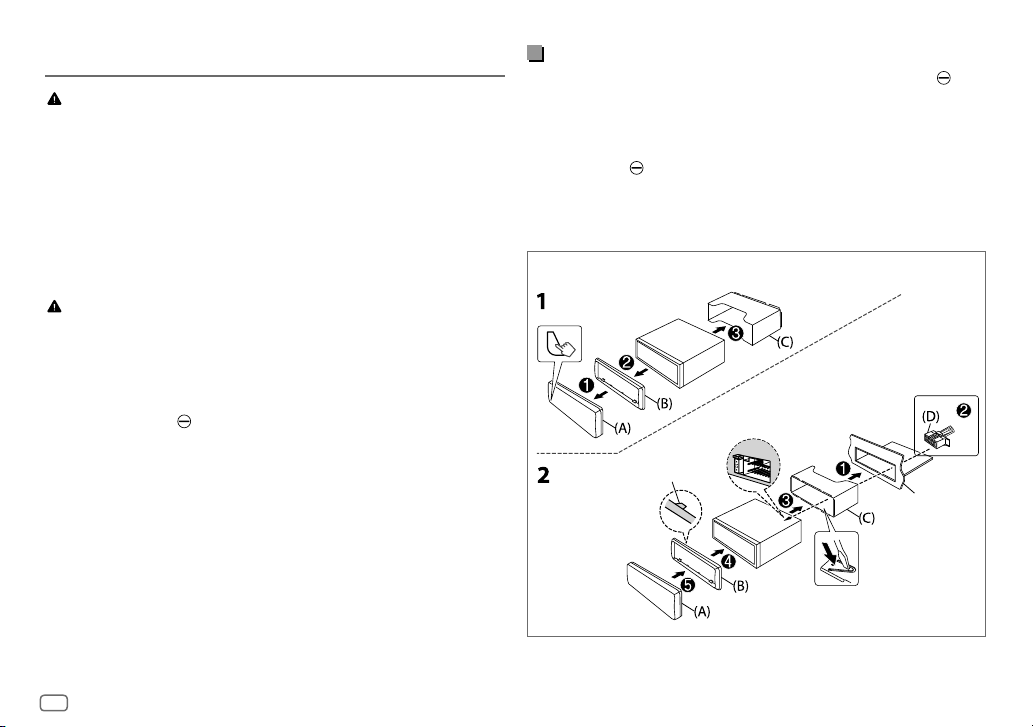
3 Install the unit to your car. See “Installing the unit (in-dash
mounting)”.
4 Connect the terminal of the car battery.
5 Press B SRC to turn on the power.
6 Detach the faceplate and reset the unit within 5 seconds. See “How to
reset” on page 4.
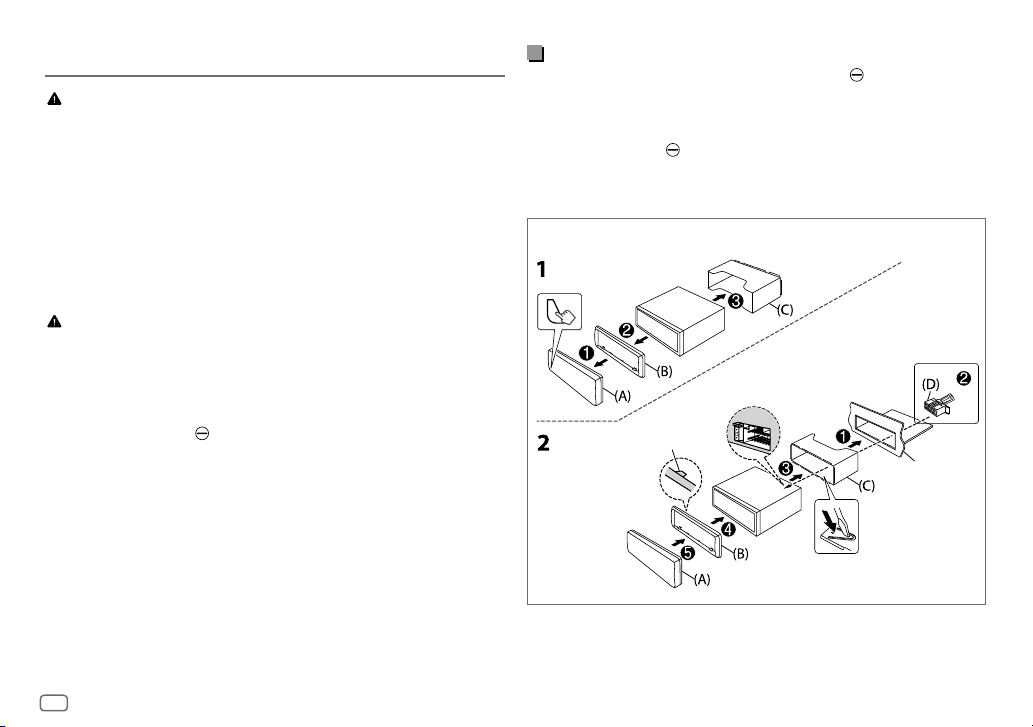
Installing the unit (in-dash mounting)
Hook on the
top side
Dashboard of
your car
Bend the appropriate tabs to hold the
sleeve firmly in place.
2
Page 7
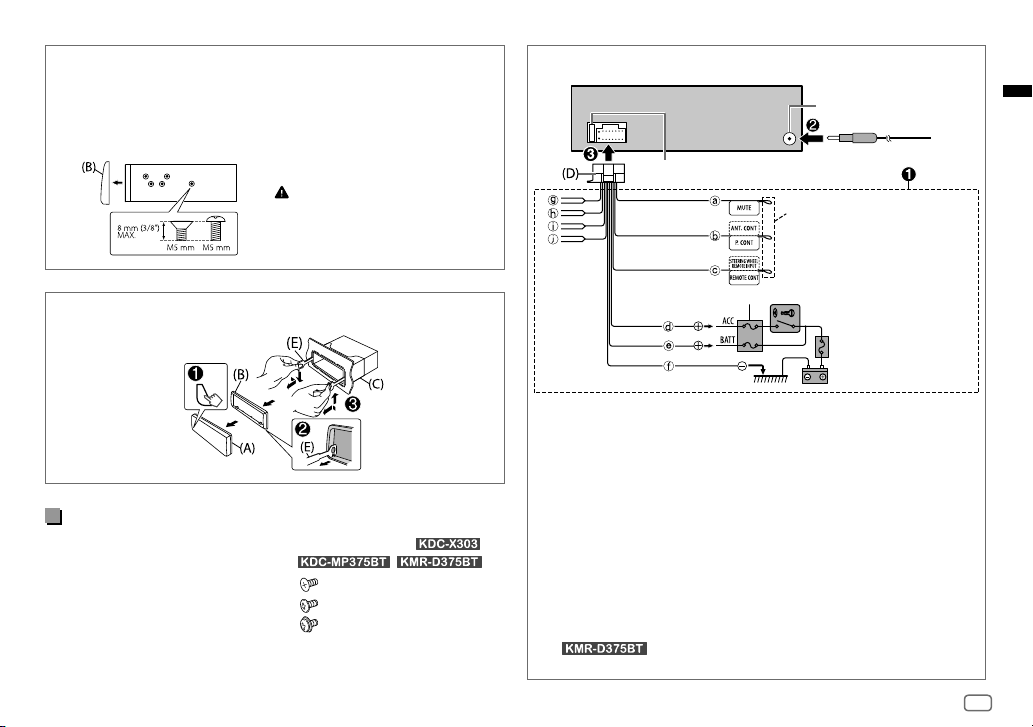
Installing the unit (without mounting sleeve)
1 Remove the mounting sleeve and trim plate from the unit.
2 Align the holes in the unit (on both sides) with the vehicle
mounting bracket and secure the unit with screws (supplied/
commercially available).
Use only the specified screws.
Using wrong screws might damage
the unit.
Wiring connection
Antenna terminal
Fuse (10 A)
If no connections are made, do not
let the wire come out from the tab.
Removing the unit
Part list (supplied)
(A) Faceplate (×1)
(B) Trimplate (×1)
(C) Mounting sleeve (×1)
(D) Wiring harness (×1)
(E) Extraction key (×2)
(F) Screw (supplied for
/ )
M5 × 7 mm (×4)
M5 × 6 mm (×4)
M4 × 8 mm (×1)
a Brown: To connect the
KENWOOD navigation system,
refer your navigation manual
b Blue/white: To the power
control terminal when using
the optional power amplifier
or to the antenna control
/
terminal in the vehicle
c Light blue/yellow: To the
steering wheel remote control
adapter or to KENWOOD
Marine Remote Control
unit (optional accessory) for
Car fuse box
Ignition switch
Car fuse box
Battery
d Red: Ignition 12V
e Yellow: Battery 12V
f Black: Ground
g White ª, White/black ·:
Front speaker (left)
h Gray ª, Gray/black ·:
Front speaker (right)
i Green ª, Green/black ·:
Rear speaker (left)
j Purple ª, Purple/black ·:
Rear speaker (right)
3
Page 8
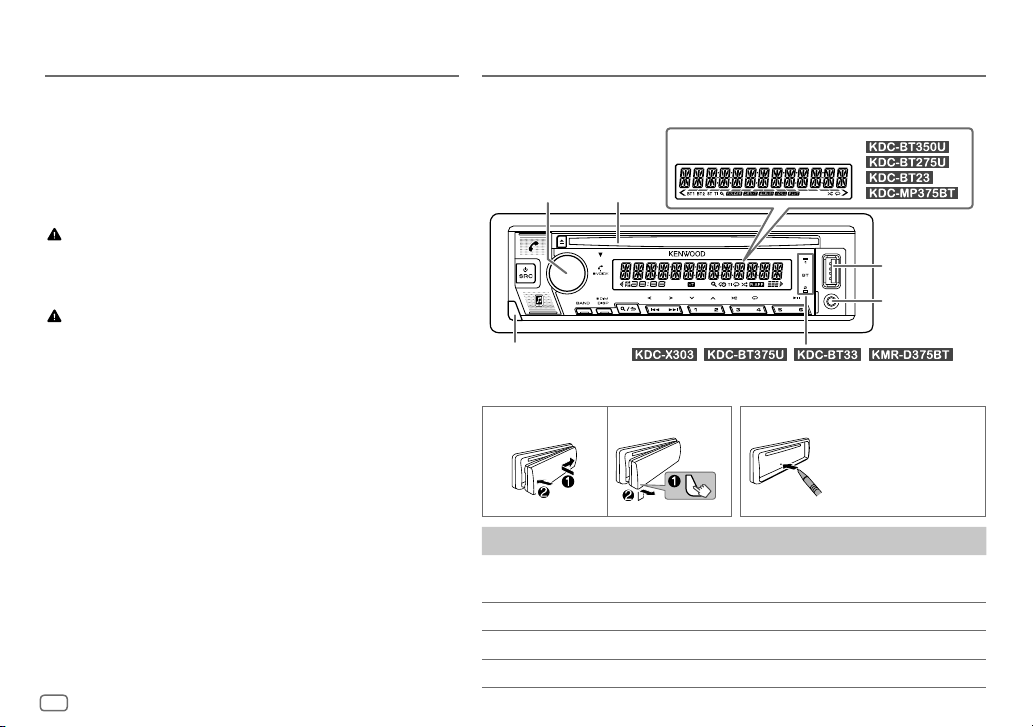
BEFORE USE
BASICS
IMPORTANT
• To ensure proper use, please read through this Guide before using
this product. It is especially important that you read and observe
Warnings and Cautions in this Guide.
• Please keep the Guide in a safe and accessible place for future
reference.
Warning
Do not operate any function that takes your attention away from safe
driving.
Caution
Volume setting:
• Adjust the volume so that you can hear sounds outside the car to
prevent accidents.
• Lower the volume before playing digital sources to avoid
damaging the speakers by the sudden increase of the output level.
General:
• Avoid using the external device if it might hinder safe driving.
• Make sure all important data has been backed up. We shall bear no
responsibility for any loss of recorded data.
• Never put or leave any metallic objects (such as coins or metal
tools) inside the unit to prevent a short circuit.
• If a disc error occurs due to condensation on the laser lens, eject
the disc and wait for the moisture to evaporate.
• USB rating is indicated on the main unit. To view, detach the
faceplate.
• Depending on the types of cars, the antenna will automatically
extend when you turn on the unit with the antenna control wire
connected. Turn off the unit or change the source to STANDBY
when parking at a low ceiling area.
4
Faceplate
Display window
Volume
knob
Detach button
Attach Detach How to reset
To On the faceplate
Turn on the power
Adjust the volume Turn the volume knob.
Select a source
Change the display information Press DISP repeatedly.
Loading
slot
/ / / :
Lights up when Bluetooth connection is established.
Press B SRC.
• Press and hold to turn off the power.
Press B SRC repeatedly.
USB input
terminal
Auxiliary input
jack
Reset the unit
within 5seconds
after detaching the
faceplate.
Page 9
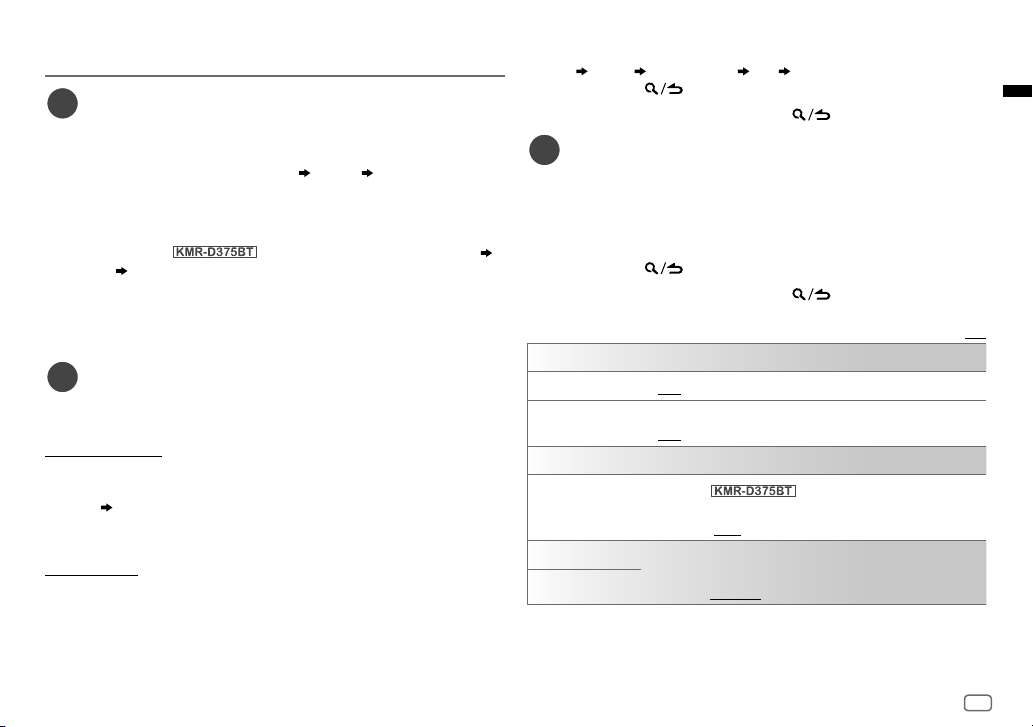
GETTING STARTED
1
Select the display language and cancel the
demonstration
When you turn on the power for the first time (or
[YES]
), the display shows: “SEL LANGUAGE” “PRESS” “VOLUME KNOB”
1 Turn the volume knob to select
press the knob.
[ENG]
is selected for the initial setup.
Then, (except for ) the display shows: “CANCEL DEMO”
“PRESS” “VOLUME KNOB”.
[ENG]
2 Press the volume knob again.
[YES]
is selected for the initial setup.
3 Press the volume knob again.
“DEMO OFF” appears.
2
Set the clock and date
1 Press the volume knob to enter
2 Turn the volume knob to select
To adjust the clock
3 Turn the volume knob to select
[FUNCTION]
[CLOCK]
[CLOCK ADJUST]
4 Turn the volume knob to make the settings, then press the knob.
Hour Minute
5 Turn the volume knob to select
6 Turn the volume knob to select
To set the date
7 Turn the volume knob to select
8 Turn the volume knob to select
the knob.
9 Turn the volume knob to select
[CLOCK FORMAT]
[12H]
[DATE FORMAT]
[DD/MM/YY]
[DATE SET]
[FACTORY RESET]
(English) or
, then press the knob.
or
[SPA]
(Spanish), then
.
, then press the knob.
, then press the knob.
[24H]
, then press the knob.
, then press the knob.
or
[MM/DD/YY]
, then press the knob.
is set to
, then press
10 Turn the volume knob to make the settings, then press the knob.
Day Month Year or Month Day Year
11 Press and hold to exit.
To return to the previous setting item, press
3
Set the initial settings
.
1 Press B SRC repeatedly to enter STANDBY.
2 Press the volume knob to enter
[FUNCTION]
.
3 Turn the volume knob to select an item (see the following table), then
press the knob.
4 Repeat step 3 until the desired item is selected or activated.
5 Press and hold to exit.
To return to the previous setting item, press
[SYSTEM]
[KEY BEEP]
[FACTORY RESET]
[CLOCK]
[CLOCK DISPLAY]
[ENGLISH]
[ESPANOL]
[ON]: Activates the keypress tone. ; [OFF]: Deactivates.
[YES]: Resets the settings to default (except the stored station). ;
[NO]: Cancels.
(Except for )
[ON]: The clock time is shown on the display even when the unit is
turned off. ; [OFF]: Cancels.
Select the display language for [FUNCTION] menu and music
information if applicable.
By default, [ENGLISH] is selected.
.
Default: [XX]
5
Page 10
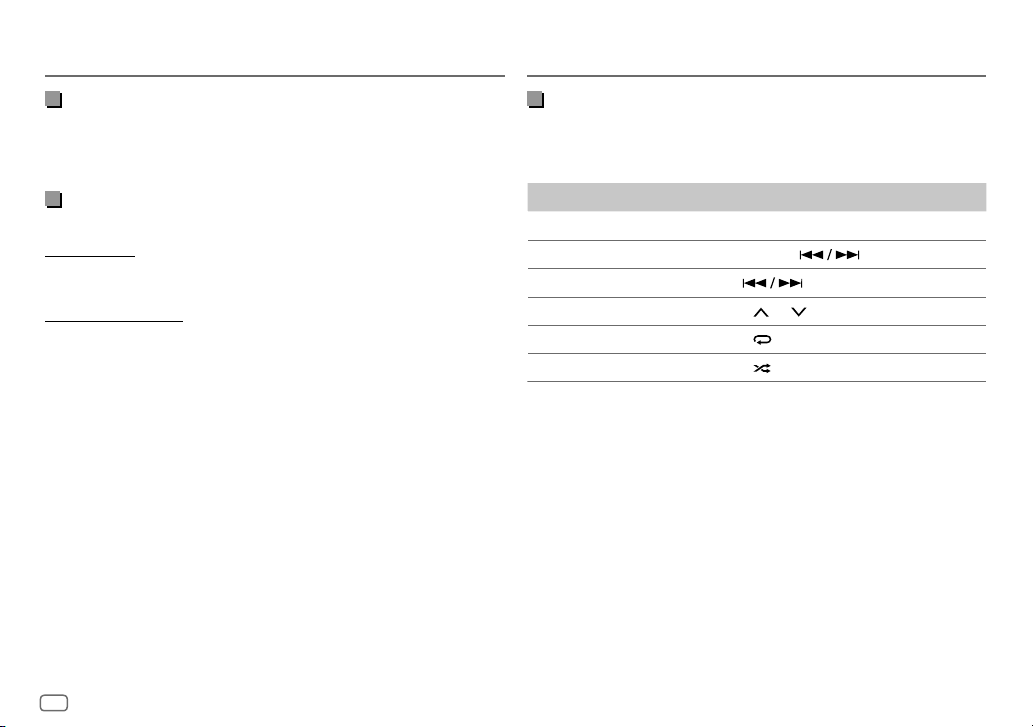
RADIO
CD/USB/iPod/ANDROID
Search for a station
1 Press B SRC repeatedly to select RADIO.
2 Press BAND repeatedly to select FM1/FM2/FM3/AM.
3 Press S / T to search for a station.
Settings in memory
You can store up to 18 stations for FM and 6 stations for AM.
Store a station
While listening to a station....
Press and hold one of the number buttons (1 to 6).
Select a stored station
Press one of the number buttons (1to6).
Start playback
The source changes automatically and playback starts when you load a disc
or attach a device (USB device/ iPod/iPhone/ Android device) to the USB
input terminal.
To On the faceplate
Play back/pause
Reverse/Fast-forward Press and hold
Select a track/file Press
Select a folder Press 2
Repeat play Press 4
Random play Press 3
Press 6IW.
.
.
/ 1 .
repeatedly.
repeatedly.
6
Page 11
FUNCTIONS SETTINGS
1 Press the volume knob to enter
2 Turn the volume knob to select an item, then press the knob.
3 Repeat step 2 until the desired item is selected or activated.
4 Press and hold to exit.
To return to the previous setting item, press
[FUNCTION]
.
.
Examples of some well-used settings
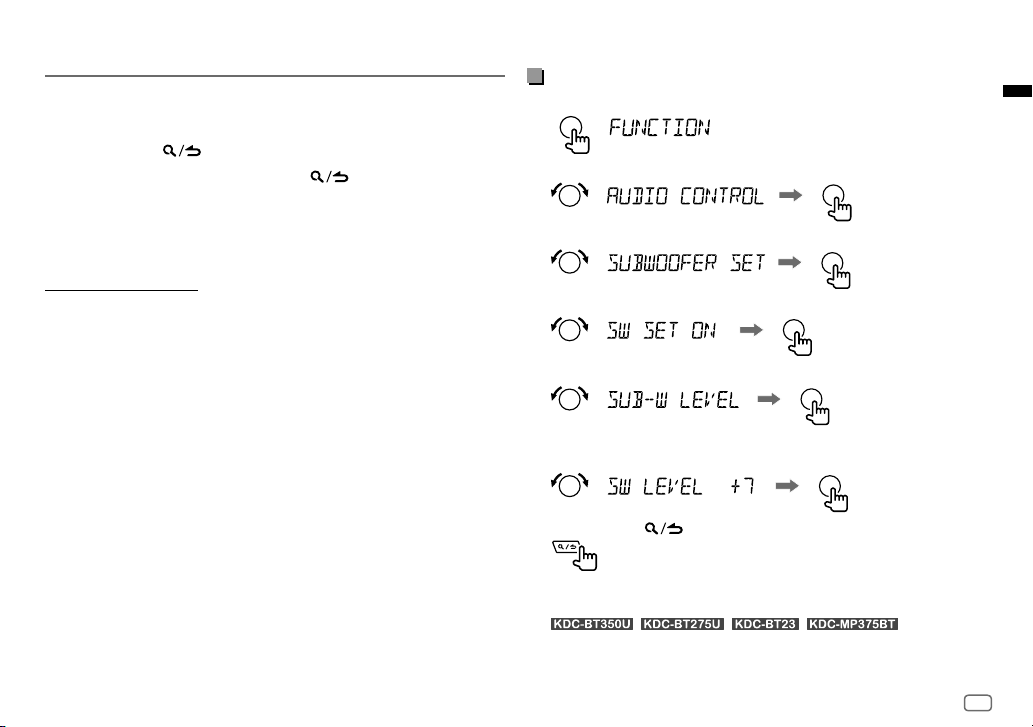
Subwoofer Level Setting
1 Press the volume knob to enter
2 Turn the volume knob to select
[FUNCTION]
[AUDIO CONTROL]
.
, then press the knob.
• Refer to the INSTRUCTION MANUAL on the following website for the
detailed explanation of each item: <www.kenwood.com/cs/ce/>
• The availability of each item vary depending on the model.
[FUNCTION] menu items
[AUDIO CONTROL]
[DISPLAY]
[TUNER SETTING]
[SIRIUS XM]
[USB]
: Settings for using a USB device.
[BT MODE]
[REMOTE APP]
[MIC GAIN]*
[NR LEVEL]*
[ECHO CANCEL]*
[SYSTEM]
[CLOCK]
[ENGLISH]
[ESPANOL]
[DEMO MODE]
* Applicable only while talking on the phone.
: Sets your preferred audio settings.
: Sets your preferred control for the display window.
: Settings for radio source.
: Settings for Sirius XM tuner.
: Settings for using a Bluetooth device.
: Settings for using smartphone to control this unit.
: Sets the sensitivity of the microphone.
: Adjusts the noise reduction level.
: Adjusts the echo cancellation delay time.
: Settings for this unit.
: Adjusts the clock.
: Selects language for the menu and music information.
: Selects language for the menu and music information.
: Activates or deactivates the display demonstration.
3 Turn the volume knob to select
4 Turn the volume knob to select
5 Turn the volume knob to select
[SUBWOOFER SET]
[SW SET ON]
[SUB-W LEVEL]
, then press the knob.
, then press the knob.
, then press the knob.
6 Turn the volume knob to adjust the subwoofer level, then press the
knob.
7 Press and hold to exit.
Note:
For / / / , you need
to set
[SWITCH PREOUT]
above settings.
to
[SUB-W]
in standby mode before you can make the
7
Page 12
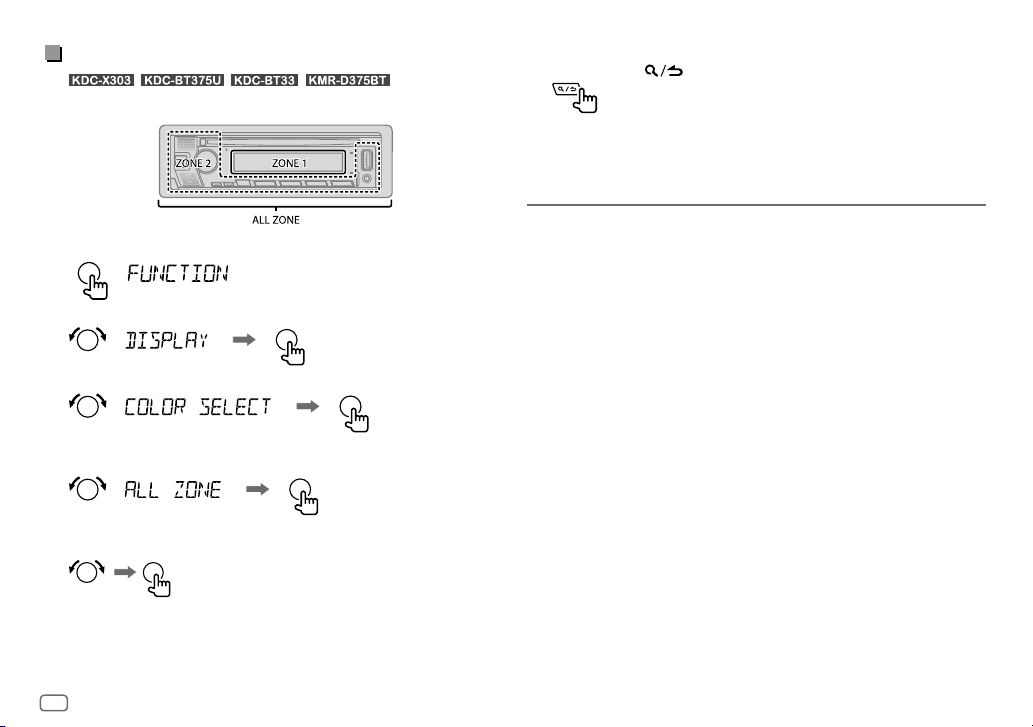
Illumination Color Setting
For
preferred illumination color for each zone.
1 Press the volume knob to enter
2 Turn the volume knob to select
3 Turn the volume knob to select
4 Turn the volume knob to select a zone (
then press the knob.
/ / / , you can set your
[FUNCTION]
.
[DISPLAY]
, then press the knob.
[COLOR SELECT]
, then press the knob.
[ALL ZONE], [ZONE 1], [ZONE 2]
5 Turn the volume knob to select a color for the selected zone, then
press the knob.
[INITIAL COLOR]/[VARIABLE SCAN]/[CUSTOM R/G/B]/
[RED1]/[RED2]/[RED3]/[PURPLE1]/[PURPLE2]/[PURPLE3]/
[PURPLE4]/[BLUE1]/[BLUE2]/[BLUE3]/[SKYBLUE1]/
[SKYBLUE2]/[LIGHTBLUE]/[AQUA1]/[AQUA2]/[GREEN1]/
[GREEN2]/[GREEN3]/[YELLOWGREEN1]/[YELLOWGREEN2]/
[YELLOW]/[ORANGE1]/[ORANGE2]/[ORANGERED]
6 Repeat step 4 and step 5 to set color for other zones.
7 Press and hold to exit.
OTHER INFORMATION
For playback operations of AUX, SPOTIFY, Pandora®, iHeartRadio®,
SiriusXM® Radio sources, refer to the INSTRUCTION MANUAL on the
following website: <www.kenwood.com/cs/ce/>
• The availability of each source vary depending on the model.
Note for specifications
Bluetooth Frequency Range:
2.402 GHz — 2.480 GHz
Bluetooth RF Output Power (E.I.R.P.):
+4 dBm (MAX), Power Class 2
Speaker Impedance:
4Ω—8Ω
),
Operating Voltage:
12 V DC car battery
8
Page 13
BLUETOOTH®
Depending on the operating system and the firmware version of your
mobile phone, Bluetooth features may not work with this unit.
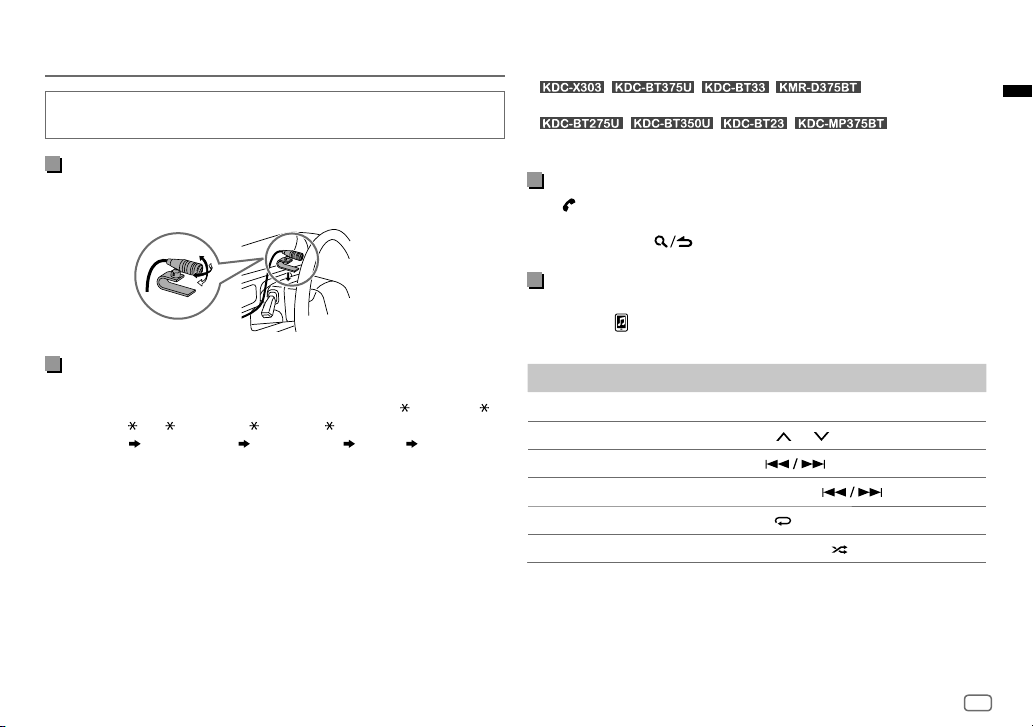
Connect the microphone
Connect the supplied microphone to the microphone input jack on the rear
panel.
Adjust the
microphone
angle
Pair and connect a Bluetooth device for the first time
1 Press B SRC to turn on the unit.
2 Search and select the name of your receiver (“KDC-X3 ”/“KDC-BT3 ”/
“KDC-BT3 /BT2 ”/“KDC-MP3 ”/“KMR-D3 ”) on the Bluetooth device.
“PAIRING” “PASS XXXXXX” “Device name” “PRESS” “VOLUME
KNOB” appears on the display.
• For some Bluetooth devices, you may need to enter the Personal
Identification Number (PIN) code immediately after searching.
3 Press the volume knob to start pairing.
“PAIRING OK” appears when pairing is completed.
Secure using cord
clamps (not supplied)
if necessary.
Once pairing is completed, Bluetooth connection is established
automatically.
•
indicator on the faceplate lights up.
• / / / : “BT1” and/or
“BT2” on the display window lights up.
/ / / : “BT1” and/or “BT2”
Answer a call
Press or the volume knob or one of the number buttons (1 to 6).
• To adjust the phone volume
• To end a call, press .
[00]
to
[35]
, turn the volume knob.
Audio player via Bluetooth
1 Press B SRC repeatedly to select BTAUDIO.
• Pressing enters BT AUDIO directly.
2 Operate the audio player via Bluetooth to start playback.
To On the faceplate
Play back/pause
Select group or folder Press 2
Reverse skip/Forward skip Press
Reverse/Fast-forward Press and hold
Repeat play Press 4
Random play Press and hold 3
Press 6 IW.
/ 1 .
.
repeatedly.
.
to select
[ALL RANDOM]
.
9
Page 14
INSTALLATION/RACCORDEMENT
Avertissement
• L’appareil peut uniquement être utilisé avec une alimentation de 12 V CC, à
masse négative.
• Déconnectez la borne négative de la batterie avant le câblage et le montage.
• Ne connectez pas le fil de batterie (jaune) et le fil d’allumage (rouge) au châssis
de la voiture ou au fil de masse (noir) pour éviter les courts-circuits.
• Pour éviter les courts-circuits:
– Isolez les fils non connectés avec du ruban adhésif.
– Assurez-vous de raccorder de nouveau la mise à la masse de cet appareil au
châssis de la voiture après l’installation.
– Fixez les câbles avec des serre-câbles et enrouler un ruban de vinyle autour
des câbles qui entrent en contact avec des pièces métalliques pour protéger
les câbles.
Précautions
• Pour des raison de sécurité, laissez le travail de câblage et de montage des
professionnels. Consultez votre revendeur autoradio.
• Installez cet appareil dans la console de votre véhicule. Ne touchez pas les
parties métalliques de cet appareil pendant ou juste après son utilisation. Les
parties métalliques, comme le dissipateur de chaleur et le boîtier, deviennent
chaudes.
• Ne connectez pas les fils
masse (noir) ou en parallèle.
• Montez l’appareil avec un angle de moins de 30º.
• Si le faisceau de fils de votre véhicule ne possède pas de borne d’allumage,
connectez le fil d’allumage (rouge) à la borne du boîtier de fusible de votre
véhicule qui offre une alimentation de 12 V CC et qui se met en et hors service
avec la clé de contact.
• Gardez tous les câbles à l’écart des dissipateurs thermiques.
• Après avoir installé l’appareil, vérifiez si les lampes de frein, les indicateurs, les
clignotants, etc. de la voiture fonctionnent correctement.
• Si un fusible saute, assurez-vous d’abord que les câbles ne touches pas le châssis
de la voiture puis remplacez le vieux fusible par un nouveau de même valeur.
des l’enceintes au châssis de la voiture, au fil de
Procédure de base
1 Retirez la clé de contact, puis déconnectez la borne de la batterie de la
voiture.
2 Connectez les fils correctement. Voir “Connexions” à la page3.
3 Installez l’appareil dans votre voiture. Reportez-vous à “Installation de
l’appareil (montage encastré)”.
4 Connectez la borne de la batterie de la voiture.
5 Appuyez sur B SRC pour mettre l’appareil sous tension.
6 Détachez la façade et réinitialisez l’appareil avant 5 secondes. Voir
“Comment réinitialiser” à la page4.
Installation de l’appareil (montage encastré)
Crochet sur le
côté supérieur
Tableau de bord
de votre voiture
Tordez les languettes appropriées pour
maintenir le manchon en place.
2
Page 15
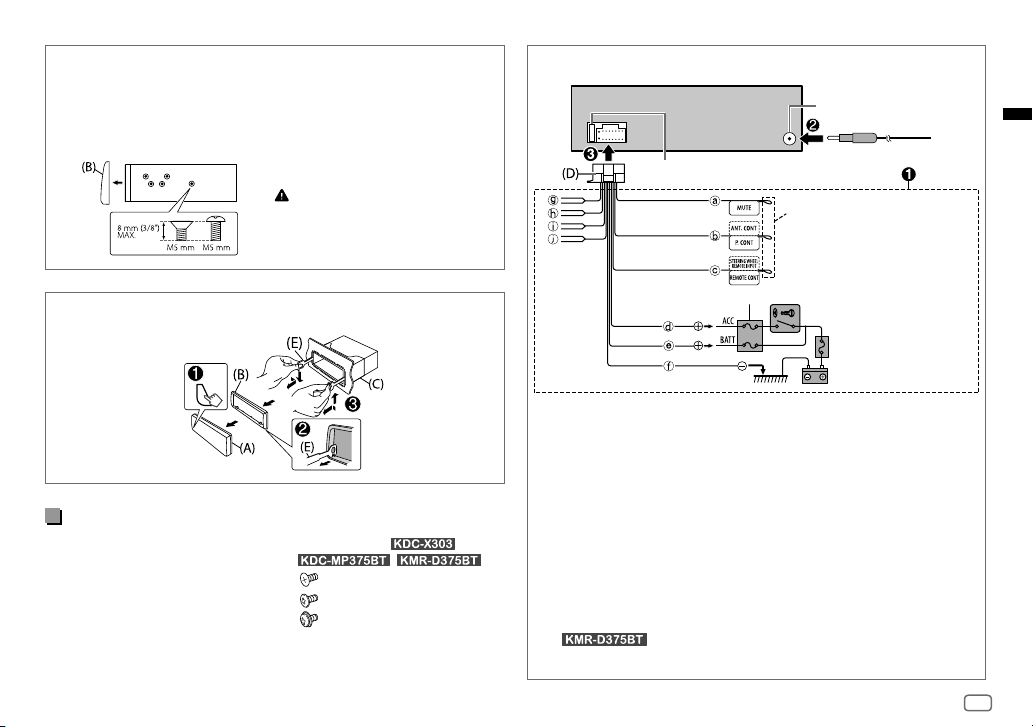
Installation de l’appareil (sans le manchon de montage)
1 Retirez le manchon de montage et la plaque d’assemblage de
l’appareil.
2 Alignez les entailles de l’appareil (des deux côtés) avec le support de
montage du véhicule et fixez l’appareil avec les vis (fourni/en vente
dans le commerce).
N’utiliser que les vis spécifiés.
L’utilisation de vis incorrects peut
endommager l’appareil.
Connexions
Fusible (10 A)
Borne de l’antenne
Si aucune connexion n’est faite,
ne laissez pas le câble sortir de la
languette.
Retrait de l’appareil
Liste de pièces (fourni)
(A) Façade (×1)
(B) Plaque de garniture (×1)
(C) Manchon de montage (×1)
(D) Faisceau de fils (×1)
(E) Clé d’extraction (×2)
(F) Vis (fournis pour
M5 × 7 mm (×4)
M5 × 6 mm (×4)
M4 × 8 mm (×1)
/ )
/
Boîte de fusible de la voiture
a Marron: Pour connecter
au système de navigation
KENWOOD, reportez-vous à
votre manuel de navigation
b Bleu/blanc: À la borne de
commande d’alimentation
lorsque vous utilisez
l’amplificateur de puissance
en option, soit à la borne de
commande d’antenne du
véhicule
c Bleu clair/jaune: À l’adaptateur
de télécommande de volant
ou à la télécommande marine
KENWOOD (en option) pour le
Interrupteur d’allumage
Boîte de fusible de la voiture
Pile
d Rouge: Allumage 12V
e Jaune: Batterie 12 V
f Noir: Masse
g Blanc ª, Blanc/Noir ·:
Enceinte avant (gauche)
h Gris ª, Gris/Noir ·:
Enceinte avant (droite)
i Ve rt ª, Vert/Noir ·:
Enceinte arrière (gauche)
j Violet ª, Violet/Noir ·:
Enceinte arrière (droite)
3
Page 16
AVANT L’UTILISATION
FONCTIONNEMENT DE BASE
IMPORTANTES
• Pour utiliser correctement l’appareil, veuillez lire ce Guide complément
avant de l’utiliser. Il est particulièrement important que vous lisiez et
acceptiez les avertissements et les précautions de ce Guide.
• Veuillez garder ce Guide dans un endroit sûr et accessible pour une
utilisation future.
Avertissement
N’utilisez aucune fonction qui risque de vous distraire de la conduite sure
de votre véhicule.
Précautions
Réglage du volume:
• Ajustez le volume de façon à pouvoir entendre les sons extérieurs à la
voiture afin d’éviter tout risque d’accident.
• Réduisez le volume avant de reproduire des sources numériques afin
d’éviter d’endommager les enceintes par la soudaine augmentation du
niveau de sortie.
Généralités:
• Éviter d’utiliser le périphérique extérieur s’il peut gêner une conduite en
toute sécurité.
• Assurez-vous que toutes les données importantes ont été sauvegardées.
Nous ne pouvons pas être tenu responsable pour toute perte des
données enregistrées.
• Veuillez faire en sorte de ne jamais mettre ou laisser d’objets métalliques
(tels que des pièces ou des outils) dans l’appareil, afin d’éviter tout
risque de court-circuit.
• Si une erreur de disque se produit à cause de la condensation sur
l’objectif laser, éjectez le disque et attendez que l’humidité s’évapore.
• La classe USB est indiquée sur l’appareil principal. Pour le voir, détachez
la façade.
• En fonction du type de voiture, l’antenne s’étendra automatiquement
quand vous mettrez l’appareil sous tension si le câble de commande
d’antenne est connecté. Mettez l’appareil hors tension ou changez la
source sur STANDBY quand vous vous garez dans un parking avec un
plafond bas.
4
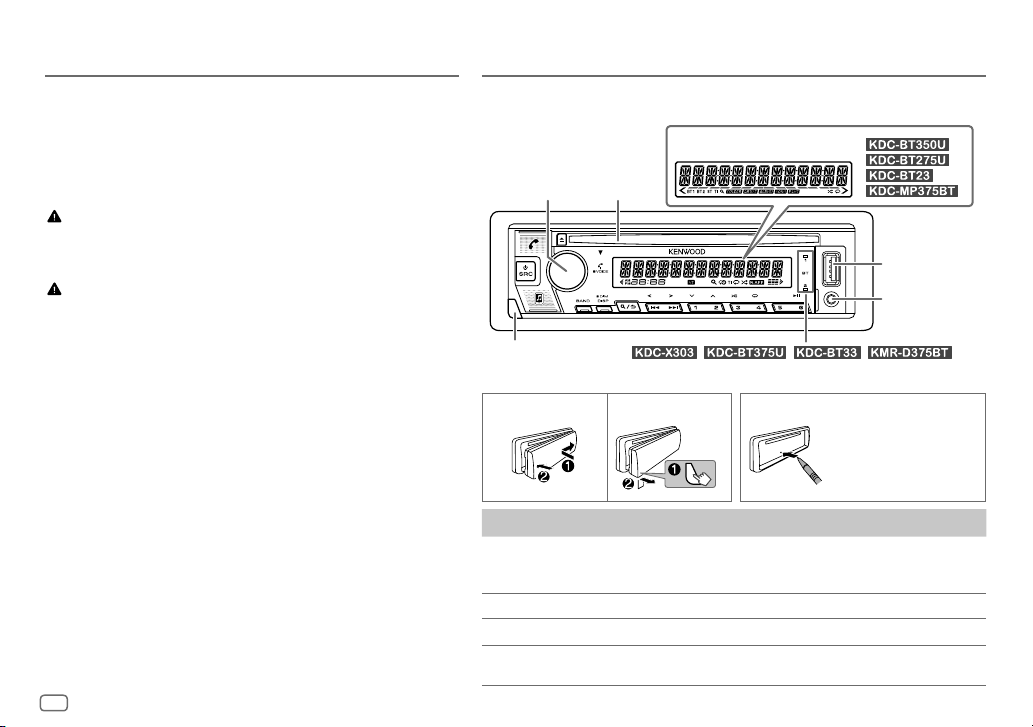
Façade
Fenêtre d’affichage
Bouton de
volume
Touche de détachement
Attachez Détachez Comment réinitialiser
Pour Sur la façade
Mettez l’appareil sous tension
Ajustez le volume Tournez le bouton de volume.
Sélectionner la source
Changez l’information sur
l’affichage
Fente
d’insertion
S’allume quand la connexion Bluetooth est établie.
/ / / :
Appuyez sur
• Maintenez la touche enfoncée pour mettre
l’appareil hors tension.
Appuyez répétitivement sur
Appuyez répétitivement sur DISP.
B SRC.
Prise d’entrée
USB
Prise d’entrée
auxiliaire
Réinitialisez l’appareil en
moins de 5 secondes
après avoir détaché la
façade.
B SRC.
Page 17
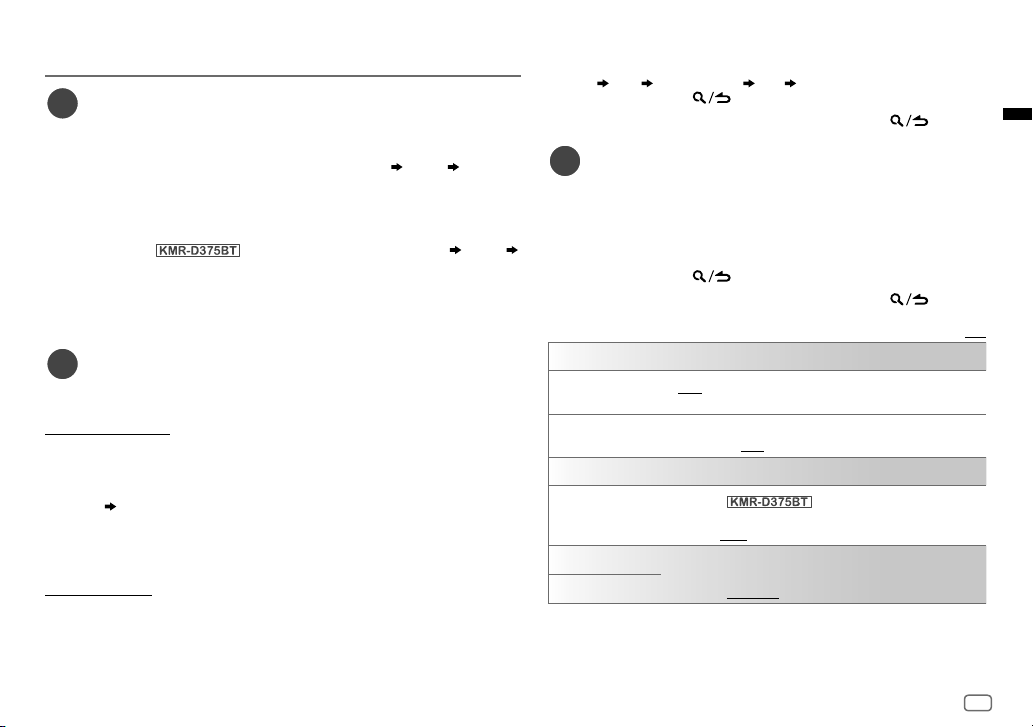
PRISE EN MAIN
1
Sélectionne la langue d’affichage et annule la
démonstration
Quand vous mettez l’appareil sous tension pour la première fois (ou que
RESET]
est réglé sur
“VOLUME KNOB”
1 Tournez le bouton de volume pour sélectionner
(espagnol), puis appuyez sur le bouton.
[ENG]
Puis, (sauf pour
“VOLUME KNOB”.
2 Appuyez de nouveau sur le bouton de volume.
[YES]
3 Appuyez de nouveau sur le bouton de volume.
“DEMO OFF” apparaît.
2
Réglez l’horloge et la date
1 Appuyez sur le bouton de volume pour entrer
2 Tournez le bouton de volume pour choisir
Pour ajuster l’horloge
3 Tournez le bouton de volume pour choisir
bouton.
4 Tournez le bouton de volume pour faire les réglages, puis appuyez sur le
bouton.
Heure
5 Tournez le bouton de volume pour choisir
bouton.
6 Tournez le bouton de volume pour choisir
bouton.
Pour régler la date
7 Tournez le bouton de volume pour choisir
bouton.
8 Tournez le bouton de volume pour choisir
appuyez sur le bouton.
9 Tournez le bouton de volume pour choisir
bouton.
[YES]
), l’affichage montre: “SEL LANGUAGE” “PRESS”
est choisi pour le réglage initial.
est choisi pour le réglage initial.
Minute
) l’affichage indique: “CANCEL DEMO” “PRESS”
[ENG]
(anglais) ou
[FUNCTION]
[CLOCK]
, puis appuyez sur le bouton.
[CLOCKADJUST]
[CLOCK FORMAT]
[12H]
ou
[24H]
[DATEFORMAT]
[DD/MM/YY]
[DATESET]
ou
, puis appuyez sur le
[FACTORY
[SPA]
.
, puis appuyez sur le
, puis appuyez sur le
, puis appuyez sur le
, puis appuyez sur le
[MM/DD/YY]
, puis
10 Tournez le bouton de volume pour faire les réglages, puis appuyez sur
le bouton.
Jour
11 Maintenez enfoncée pour quitter.
Pour retourner à l’option de réglage précédente, appuyez sur
1 Appuyez répétitivement sur B SRC pour entrer en veille STANDBY.
2 Appuyez sur le bouton de volume pour entrer
3 Tournez le bouton de volume pour sélectionner un élément (voir le
4 Répétez l’étape 3 jusqu’à ce que l’élément souhaité soit sélectionné ou
5 Maintenez enfoncée pour quitter.
Pour retourner à l’option de réglage précédente, appuyez sur
Mois Année ou Mois Jour Année
3
Faites les réglages initiaux
tableau suivant), puis appuyez sur le bouton.
activé.
[FUNCTION]
.
.
.
Défaut: [XX]
[SYSTEM]
[KEY BEEP]
[FACTORY RESET] [YES]:Réinitialise les réglages aux valeurs par défaut (sauf la station
[ON]:Met en service la tonalité des touches.; [OFF]:Met hors service
la fonction.
mémorisée).;
[NO]:Annulation.
[CLOCK]
[CLOCK DISPLAY]
[ENGLISH] Sélectionnez la langue d’affichage pour le menu [FUNCTION] et
[ESPANOL]
(Sauf pour )
[ON]:L’horloge apparaît sur l’affichage même quand l’appareil est hors
tension.;
[OFF]:Annulation.
l’information sur le morceau si elle est disponible.
Par défaut,
[ENGLISH] est sélectionné.
5
Page 18
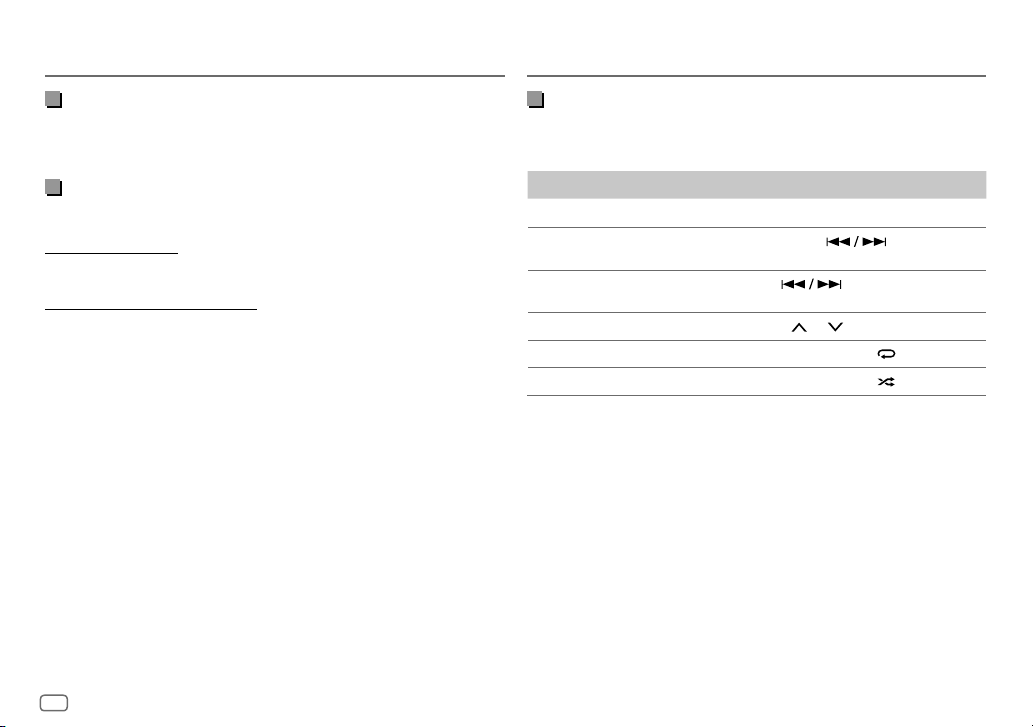
RADIO
CD/USB/iPod/ANDROID
Recherchez une station
1 Appuyez répétitivement sur B SRC pour choisir RADIO.
2 Appuyez répétitivement sur BAND pour sélectionner FM1/FM2/FM3/AM.
3 Appuyez sur S / T pour recherche une station.
Réglages en mémoire
Vous pouvez mémoriser un maximum de 18 stations pour FM et de 6 stations
pour AM.
Mémorisez une station
Pendant l’écoute d’une station....
Maintenez pressée une des touches numériques (1 à 6).
Sélectionnez une station mémorisée
Appuyez sur l’une des touches numériques (1 à 6).
Démarrez la lecture
La source change automatiquement et la lecture démarre quand vous insérez
un disque ou connectez un périphérique (périphérique USB/ iPod/iPhone/
périphérique Android) à la prise d’entrée USB.
Pour Sur la façade
Lecture/pause
Recherche rapide vers
l’arrière/vers l’avant
Sélectionnez une plage ou
un fichier
Sélectionnez un dossier Appuyez sur 2
Lecture répétée Appuyez répétitivement sur 4
Lecture aléatoire Appuyez répétitivement sur 3
Appuyez sur 6
Maintenez enfoncée
Appuyez sur
IW.
/ 1 .
.
.
.
.
6
Page 19
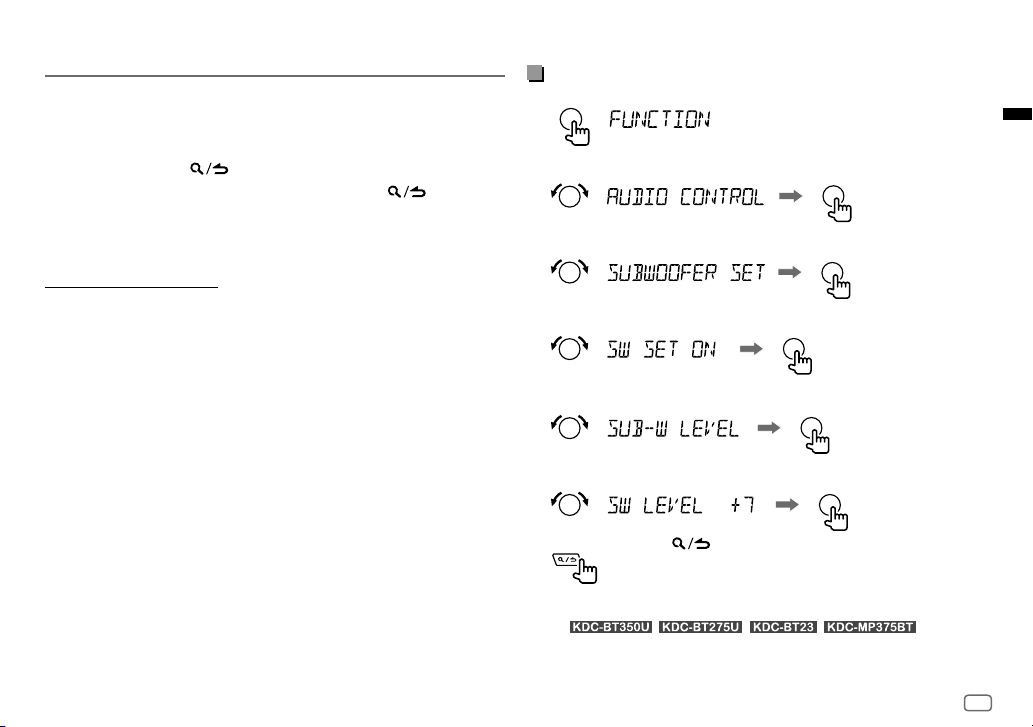
RÉGLAGES DES FONCTIONS
1 Appuyez sur le bouton de volume pour entrer
2 Tournez le bouton de volume pour choisir un élément, puis appuyez sur le
bouton.
3 Répétez l’étape 2 jusqu’à ce que l’élément souhaité soit sélectionné ou
activé.
4 Maintenez enfoncée pour quitter.
Pour retourner à l’option de réglage précédente, appuyez sur
• Reportez-vous au MODE D’EMPLOI sur les sites web suivant pour une
explication détaillée de chaque élément: <www.kenwood.com/cs/ce/>
• La disponibilité de chaque élément varient en fonction du modèle.
Articles du menu [FUNCTION]
[AUDIO CONTROL]
[DISPLAY]
[TUNER SETTING]
[SIRIUS XM]
[USB]
[BT MODE]
[REMOTE APP]
[MIC GAIN]*
[NR LEVEL]*
[ECHO CANCEL]*
[SYSTEM]
[CLOCK]
[ENGLISH]
[ESPANOL]
[DEMO MODE]
* Utilisable uniquement pendant que vous parlez au téléphone.
: Règle vos réglages audio préférés.
: Règle votre commande préférée pour la fenêtre d’affichage.
: Réglages pour la source radio.
: Réglages pour le tuner Sirius XM.
: Réglages pour l’utilisation d’un périphérique USB.
: Réglages pour l’utilisation d’un périphérique Bluetooth.
: Réglages pour l’utilisation d’un smartphone pour commander
cet appareil.
: Règle la sensibilité d’un microphone.
: Ajuste du niveau de réduction de bruit.
: Ajuste le temps de retard d’annulation de l’écho.
: Réglages pour cet appareil.
: Règle l’horloge.
: Sélectionne la langue pour le menu et les informations sur le
morceau.
: Sélectionne la langue pour le menu et les informations sur le
morceau.
: Met en ou hors service la démonstration des affichages.
[FUNCTION]
.
.
Exemples de certains réglages utilisés fréquemment
Niveau de caisson de grave
1 Appuyez sur le bouton de volume pour entrer
2 Tournez le bouton de volume pour choisir
sur le bouton.
3 Tournez le bouton de volume pour choisir
sur le bouton.
4 Tournez le bouton de volume pour choisir
bouton.
5 Tournez le bouton de volume pour choisir
le bouton.
6 Tournez le bouton de volume pour ajuster le niveau du caisson de grave,
puis appuyez sur le bouton.
7 Maintenez enfoncée pour quitter.
Remarque:
Pour le
régler
[SWITCH PREOUT]
réglages ci-dessus.
/ / / , vous devez
sur
[SUB-W]
en mode de veille avant de pouvoir réaliser les
[FUNCTION]
[AUDIOCONTROL]
[SUBWOOFER SET]
[SW SET ON]
, puis appuyez sur le
[SUB-W LEVEL]
.
, puis appuyez
, puis appuyez
, puis appuyez sur
7
Page 20
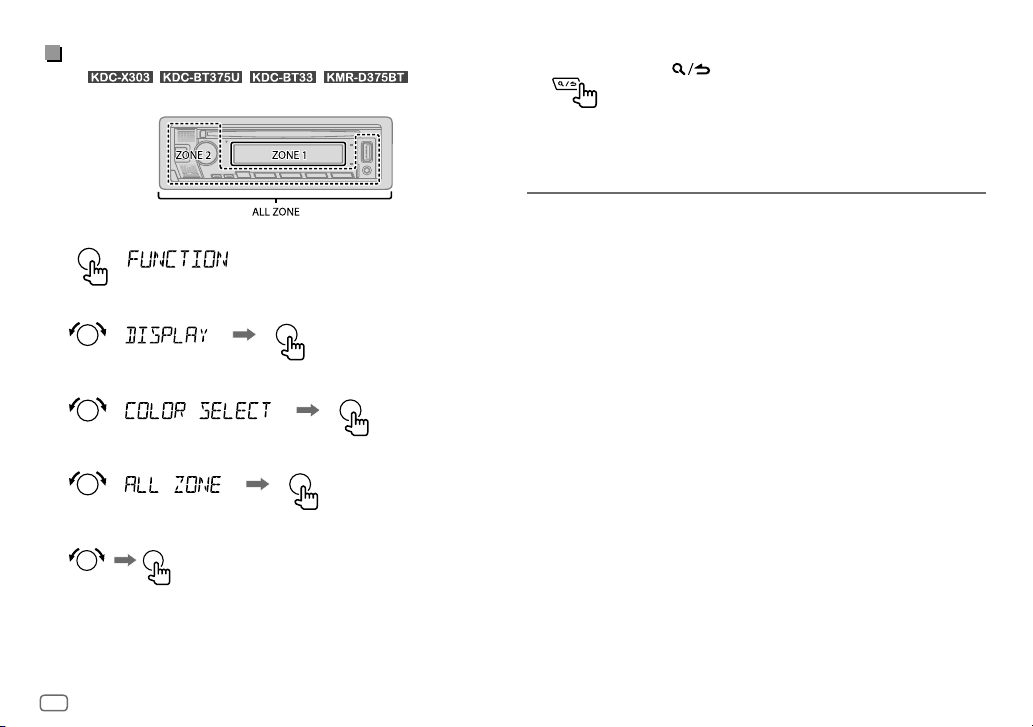
Réglage de la couleur d’éclairage
Pour le
régler votre couleur d’éclairage préférée pour chaque zone.
1 Appuyez sur le bouton de volume pour entrer
2 Tournez le bouton de volume pour choisir
bouton.
3 Tournez le bouton de volume pour choisir
le bouton.
4 Tournez le bouton de volume pour sélectionner une zone (
[ZONE 1], [ZONE 2]
5 Tournez le bouton de volume pour sélectionner une couleur pour la zone
sélectionnée, puis appuyez sur le bouton.
/ / / , vous pouvez
[FUNCTION]
.
[DISPLAY]
, puis appuyez sur le
[COLOR SELECT]
), puis appuyez sur le bouton.
[INITIAL COLOR]/[VARIABLE SCAN]/[CUSTOM R/G/B]/
[RED1]/[RED2]/[RED3]/[PURPLE1]/[PURPLE2]/[PURPLE3]/
[PURPLE4]/[BLUE1]/[BLUE2]/[BLUE3]/[SKYBLUE1]/
[SKYBLUE2]/[LIGHTBLUE]/[AQUA1]/[AQUA2]/[GREEN1]/
[GREEN2]/[GREEN3]/[YELLOWGREEN1]/[YELLOWGREEN2]/
[YELLOW]/[ORANGE1]/[ORANGE2]/[ORANGERED]
, puis appuyez sur
[ALL ZONE]
,
6 Répétez l’étape 4 et l’étape 5 pour régler la couleur pour les autres zones.
7 Maintenez enfoncée pour quitter.
AUTRES INFORMATIONS
Pour les opérations de lecture des sources AUX, SPOTIFY, Pandora®,
iHeartRadio®, radio SiriusXM®, reportez-vous au MODE D’EMPLOI sur le site web
suivant: <www.kenwood.com/cs/ce/>
• La disponibilité de chaque source varie en fonction du modèle.
Remarque pour les spécifications
Plage de fréquencesBluetooth:
2,402 GHz — 2,480 GHz
Puissance de sortie RF Bluetooth (E.I.R.P.):
+4 dBm (MAX), Power Class 2
Impédance d’enceinte:
4Ω—8Ω
Tension de fonctionnement:
Batterie de voiture 12 V CC
8
Page 21
BLUETOOTH®
En fonction du système d’exploitation et de la version du micrologiciel de votre
téléphone portable, la fonction Bluetooth peut ne pas fonctionner avec cet
appareil.
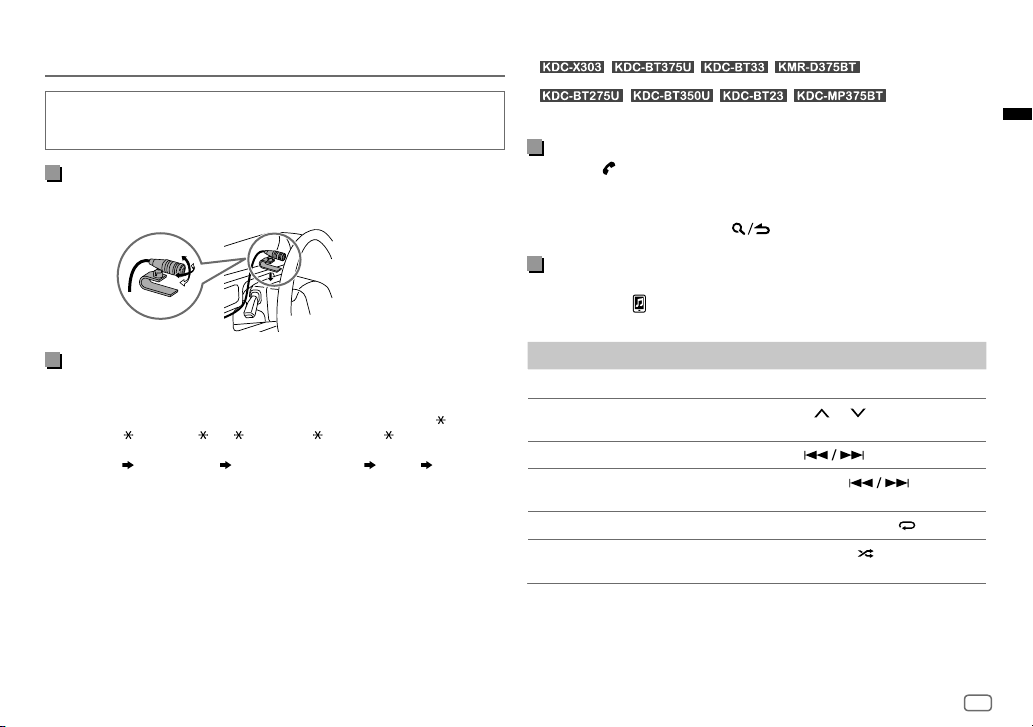
Connectez le microphone
Branchez le microphone fourni sur la prise d’entrée du microphone sur le panneau
arrière.
Ajustez
l’angle du
microphone
Fixez si nécessaire en
utilisant des serrecâbles (non fourni).
Une fois le pairage terminé la connexion Bluetooth est établie automatiquement.
•
ou “BT2” sur la façade s’allume.
•
s’allument sur la fenêtre d’affichage.
/ / / : L’indicateur “BT1” et/
/ / / : “BT1” et/ou “BT2”
Répondre à un appel
Appuyez sur , sur le bouton de volume ou sur l’une des touches numériques
(1 à 6).
• Pour ajuster le volume du téléphone entre
volume.
• Pour terminer l’appel, appuyez sur
[00]
et
[35]
, tournez le bouton de
.
Lecteur audio via Bluetooth
1 Appuyez répétitivement sur B SRC pour choisir BT AUDIO.
• Appuyer sur
2 Commandez le lecteur audio via Bluetooth pour démarrer la lecture.
permet d’accéder directement à BT AUDIO.
Faites le pairage et connectez un périphérique
Bluetooth pour la première fois
1 Appuyez sur B SRC pour mettre l’appareil sous tension.
2 Recherchez et sélectionnez le nom de votre récepteur (“KDC-X3 ”/
“KDC-BT3
périphérique Bluetooth.
“PAIRING”
KNOB” apparaît sur l’affichage.
• Pour certains périphériques Bluetooth, il se peut que vous ayez besoin
3 Appuyez sur le bouton de volume pour démarrer le pairage.
“PAIRING OK” apparait quand le pairage est terminé.
”/“KDC-BT3 /BT2 ”/“KDC-MP3 ”/“KMR-D3 ”) sur le
“PASS XXXXXX” “Nom du périphérique” “PRESS” “VOLUME
d’entrer le code PIN (numéro d’identification personnel) immédiatement
après la recherche.
Pour Sur la façade
Lecture/pause
Choisissez un groupe ou un
dossier
Saut vers l’arrière/saut vers l’avant
Recherche rapide vers l’arrière/
vers l’avant
Lecture répétée Appuyez répétitivement sur 4
Lecture aléatoire Maintenez enfoncée 3
Appuyez sur 6
Appuyez sur 2
Appuyez sur
Maintenez enfoncée
[ALL RANDOM]
IW.
/ 1 .
.
.
pour sélectionner
.
.
9
Page 22
INSTALACIÓN/CONEXIÓN
Advertencia
• La unidad puede utilizarse solamente con una fuente de alimentación de 12 V
CC con negativo a masa.
• Desconecte el terminal negativo de la batería antes de realizar el cableado y el
montaje.
• Para evitar un cortocircuito, no conecte el cable de la batería (amarillo) ni el
cable de encendido (rojo) al chasis del vehículo o cable de conexión a masa
(negro).
• Para evitar cortocircuitos:
– Utilice una cinta de vinilo para aislar los cables no conectados.
– Asegúrese de volver a conectar a masa esta unidad al chasis del automóvil
después de la instalación.
– Para proteger los cables, asegúrelos con abrazaderas de cables y con
una cinta de vinilo, enrolle los cables que entran en contacto con partes
metálicas.
Precaución
• Para fines de seguridad, deje que un profesional realice el cableado y el montaje.
Consulte con un distribuidor de productos de audio para automóviles.
• Instale esta unidad en la consola de su vehículo. No toque las partes metálicas
de la unidad durante o un poco después del uso de la unidad. Las partes
metálicas, tales como el disipador de calor o la carcasa, pueden estar muy
calientes.
• No conecte los cables
conexión a masa (negro) o en paralelo.
• Monte la unidad a un ángulo de menos de 30˚.
• Si el mazo de conductores de su vehículo no dispone de terminal de encendido,
conecte el cable de encendido (rojo) al terminal de la caja de fusibles del
vehículo, el cual suministrará una alimentación de 12 V CC y podrá conectarse y
desconectarse mediante la llave de encendido.
• Mantenga todos los cables alejados de las partes metálicas disipadoras de calor.
• Después de instalar la unidad, compruebe que las lámparas de freno, las luces
intermitentes, el limpiaparabrisas, etc. funcionen satisfactoriamente.
• Si se funde el fusible, en primer lugar asegúrese de que los cables no estén en
contacto con el chasis del vehículo y, a continuación, reemplace el fusible usado
por otro del mismo régimen.
de los altavoces al chasis del vehículo, al cable de
Procedimiento básico
1 Quite la llave del interruptor de encendido; después, desconecte el
terminal
2 Conecte los cables correctamente. Consulte “Conexión del cableado” en la
página3.
3 Instale la unidad en su automóvil. Consulte “Instalación de la unidad
(montaje en el tablero)”.
4 Conecte el terminal de la batería del automóvil.
5 Pulse B SRC para encender la unidad.
6 Extraiga la placa frontal y reinicialice la unidad en menos de 5 segundos.
Consulte “Cómo reinicializar” en la página4.
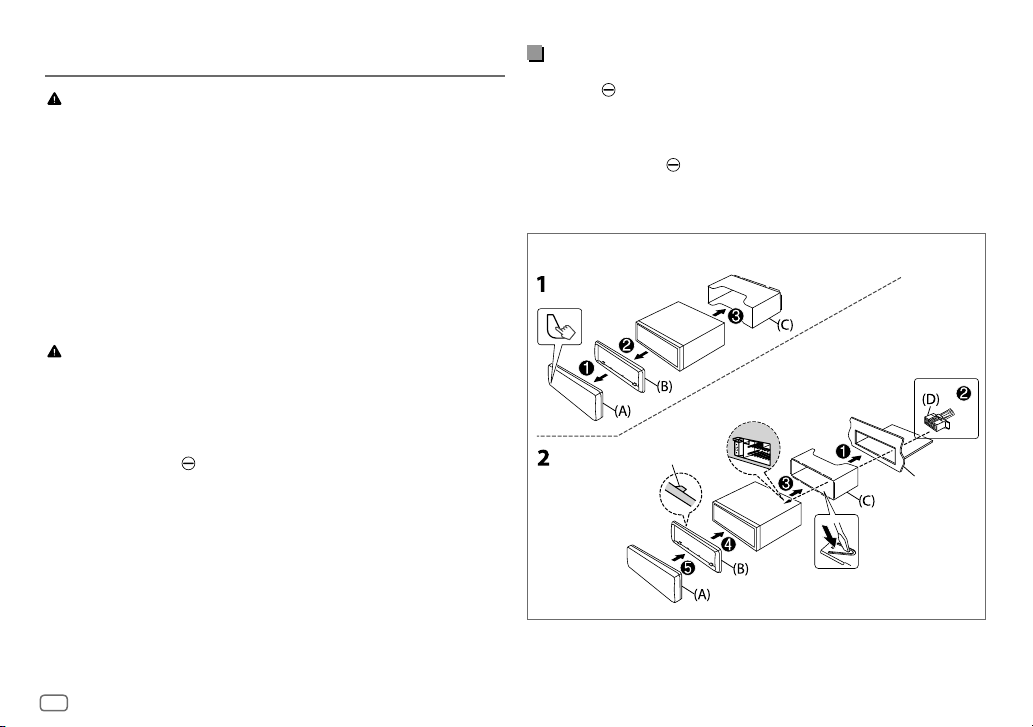
Instalación de la unidad (montaje en el tablero)
de la batería del automóvil.
Gancho en el
lado superior
Salpicadero del
automóvil
Doble las lengüetas apropiadas para retener
firmemente la manga en su lugar.
2
Page 23
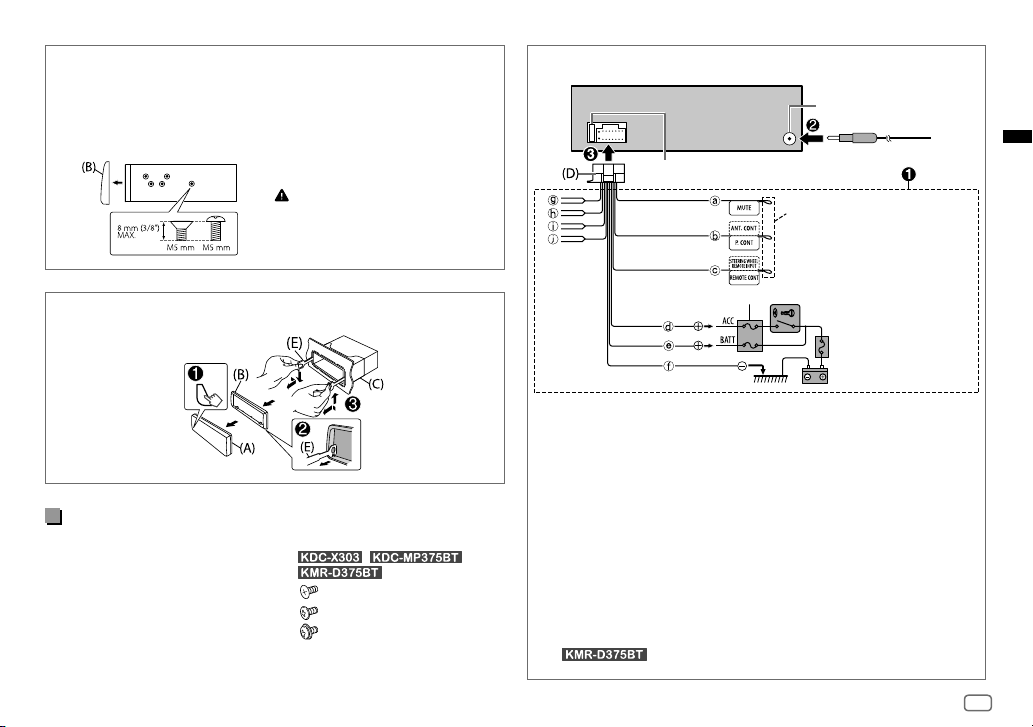
Instalación de la unidad (sin manguito de montaje)
1 Retire de la unidad, el manguito de montaje y la placa embellecedora.
2 Alinee los orificios de la unidad (en ambos lados) con la ménsula
de montaje del vehículo y asegure la unidad con los tornillos
(suministrado/disponibles en el mercado).
Utilice solo los tornillos
especificados. El uso de tornillos
incorrectos puede dañar la unidad.
Conexión del cableado
Fusible (10 A)
Terminal de la antena
Si no se ha realizado ninguna conexión,
no deje que el cable sobresalga de la
lengüeta.
Desmontaje de la unidad
Lista de piezas (suministradas)
(A) Placa frontal (×1)
(B) Placa embellecedora (×1)
(C) Manguito de montaje (×1)
(D) Mazo de conductores (×1)
(E) Herramienta de extracción (×2)
(F) Tornillo (suministrados para
/ /
)
M5 × 7 mm (×4)
M5 × 6 mm (×4)
M4 × 8 mm (×1)
Caja de fusibles del vehículo
a Marrón: Para conectar el sistema
de navegación KENWOOD,
consulte el manual de
navegación
b Azul/blanco: Al terminal de
control de potencia, cuando
utiliza el amplificador de
potencia opcional, o al terminal
de control de la antena en el
vehículo
c Luz azul/amarilla Al adaptador
del mando a distancia en el
volante de dirección o a la
unidad del mando a distancia
para uso marino KENWOOD
(accesorio opcional) para
Interruptor de encendido
Caja de fusibles del vehículo
Batería
d Rojo: Encendido de 12 V
e Amarillo: Batería de 12 V
f Negro: Tierra
g Blanco ª, Blanco/negro ·:
Altavoz delantero (izquierdo)
h Gris ª, Gris/negro ·:
Altavoz delantero (derecho)
i Verde ª, Verde/negro ·:
Altavoz trasero (izquierdo)
j Púrpura ª, Púrpura/negro ·:
Altavoz trasero (derecho)
3
Page 24
ANTES DEL USO
PUNTOS BÁSICOS
IMPORTANTE
• Antes de utilizar este producto y para asegurar su uso correcto, lea
esta guía por completo. En especial, lea y observe las Advertencias y
Precauciones incluidas en esta guía.
• Guarde la guía en un lugar seguro y accesible para futuras consultas.
Advertencia
No utilice ninguna función que pueda desviar su atención mientras está
conduciendo el vehículo.
Precaución
Ajuste del volumen:
• Ajuste el volumen a un nivel que le permita oír los ruidos del exterior
para impedir accidentes.
• Antes de reproducir fuentes digitales, baje el volumen para evitar que el
repentino aumento del nivel de salida cause daños a los altavoces.
General:
• Evite el uso de dispositivos externos cuando puedan afectar la
seguridad de conducción.
• Asegúrese de tener una copia de respaldo de todos los datos
importantes. No aceptamos responsabilidad alguna por la pérdida de
los datos grabados.
• Para evitar cortocircuitos, nunca coloque ni deje objetos metálicos (por
ejemplo, monedas o herramientas metálicas) dentro de la unidad.
• Si ocurre un error de disco debido a la condensación en el lente láser,
extraiga el disco y espere hasta que se evapore la humedad.
• La clasificación USB se encuentra en la unidad principal. Para verla,
desprenda la placa frontal.
• Dependiendo del tipo de vehículo, la antena se extiende
automáticamente cuando se enciende la unidad con el cable de control
de antena conectado. Apague la unidad o cambie la fuente a STANDBY
cuando estacione en un lugar con techo bajo.
4
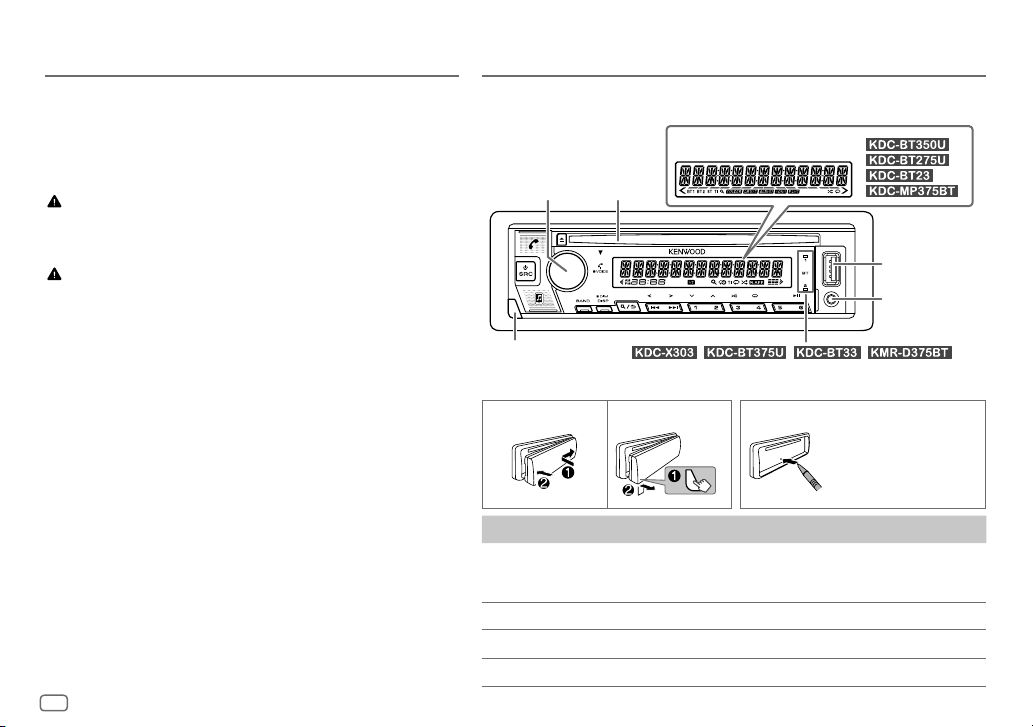
Placa frontal
Ventanilla de visualización
Rueda de
volumen
Botón de liberación
Fijar Desmontar Cómo reinicializar
Para En la placa frontal
Encender la unidad
Ajustar el volumen Gire la rueda de volumen.
Seleccionar una fuente
Cambiar la información en pantalla Pulse DISP repetidamente.
Ranura
de carga
Se ilumina cuando se establece la conexión Bluetooth.
/ / / :
Pulse
B SRC.
• Pulse y mantenga pulsado para apagar la
unidad.
Pulse
B SRC repetidamente.
Terminal de
entrada USB
Toma de
entrada auxiliar
Reinicialice la unidad en
menos de 5 segundos
después de haber
extraído la placa frontal.
Page 25
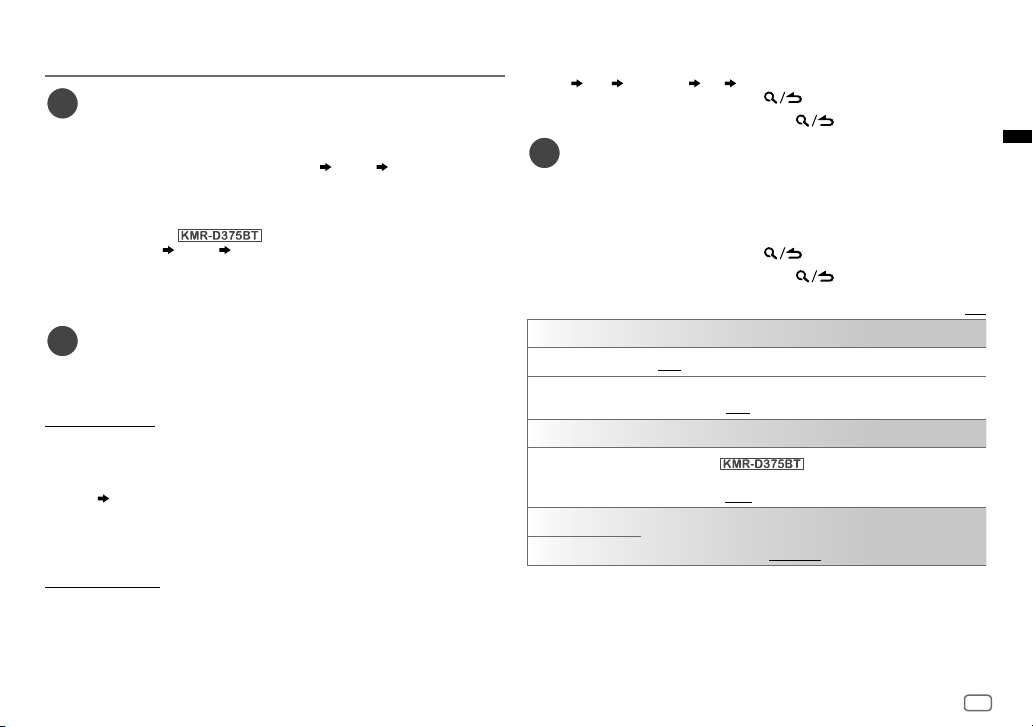
PROCEDIMIENTOS INICIALES
1
Seleccione el idioma de visualización y cancele la
demostración
Cuando enciende la unidad por primera vez (o
[YES]
), en la pantalla se muestra: “SEL LANGUAGE” “PRESS” “VOLUME KNOB”
1 Gire la rueda de volumen para seleccionar
a continuación, pulse la rueda.
Se selecciona
Entonces, (excepto
“CANCEL DEMO”
2 Pulse de nuevo la rueda de volumen.
Se selecciona
3 Pulse de nuevo la rueda de volumen.
Aparece “DEMO OFF”.
2
Ajuste del reloj y la fecha
1 Pulse la rueda de volumen para ingresar en
2 Gire la rueda de volumen para seleccionar
la rueda.
Para ajustar el reloj
3 Gire la rueda de volumen para seleccionar
pulse la rueda.
4 Gire la rueda de volumen para realizar los ajustes y, a continuación, pulse la
rueda.
Hora
5 Gire la rueda de volumen para seleccionar
pulse la rueda.
6 Gire la rueda de volumen para seleccionar
pulse la rueda.
Para ajustar la fecha
7 Gire la rueda de volumen para seleccionar
pulse la rueda.
8 Gire la rueda de volumen para seleccionar
continuación, pulse la rueda.
9 Gire la rueda de volumen para seleccionar
pulse la rueda.
Minutos
[ENG]
para la configuración inicial.
“PRESS” “VOLUME KNOB”.
[YES]
para la configuración inicial.
[FACTORY RESET]
[ENG]
) en la pantalla se muestra:
[FUNCTION]
[CLOCK]
[CLOCKADJUST]
está ajustado a
(inglés) o
.
y, a continuación, pulse
y, a continuación,
[CLOCK FORMAT]
[12H]
o
[24H]
y, a continuación,
[DATEFORMAT]
[DD/MM/YY]
[DATESET]
y, a continuación,
o
[MM/DD/YY]
y, a continuación,
[SPA]
(español) y,
y, a continuación,
y, a
10 Gire la rueda de volumen para realizar los ajustes y, a continuación, pulse la
rueda.
Día
Mes Año o Mes Día Año
11 Para salir, pulse y mantenga pulsado .
Para volver al elemento de ajuste anterior, pulse
3
Configuración de los ajustes iniciales
1 Pulse B SRC repetidamente para ingresar a STANDBY.
2 Pulse la rueda de volumen para ingresar en
3 Gire la rueda de volumen para seleccionar un elemento (consulte la
siguiente tabla), y, a continuación, pulse la rueda.
4 Repita el paso 3 hasta que se seleccione o active el elemento deseado.
5 Para salir, pulse y mantenga pulsado .
Para volver al elemento de ajuste anterior, pulse
.
[FUNCTION]
.
.
Predeterminado: [XX]
[SYSTEM]
[KEY BEEP]
[FACTORY RESET] [YES]:Se restablecen los ajustes predeterminados (excepto la emisora
[ON]:Activa el tono de pulsación de teclas.; [OFF]:Se desactiva.
memorizada).;
[NO]:Se cancela.
[CLOCK]
[CLOCK DISPLAY]
[ENGLISH] Seleccione el idioma de visualización para [FUNCTION] y la información
[ESPANOL]
(Excepto para )
[ON]:La hora del reloj siempre se visualiza en la pantalla cuando la unidad
está apagada.;
de la música, si corresponde.
Por defecto, se selecciona
[OFF]:Se cancela.
[ENGLISH].
5
Page 26
RADIO
CD/USB/iPod/ANDROID
Búsqueda de una emisora
1 Pulse B SRC repetidamente para seleccionar RADIO.
2 Pulse BAND repetidamente para seleccionar FM1/FM2/FM3/AM.
3 Pulse S / T para buscar una emisora.
Ajustes en la memoria
Puede almacenar hasta 18 emisoras de FM y 6 emisoras de AM en la memoria.
Almacene una emisora
Mientras escucha una emisora....
Pulse y mantenga pulsado uno de los botones numéricos (1 a 6).
Seleccione una emisora almacenada
Pulse uno de los botones numéricos (1a6).
Inicie la reproducción
La fuente cambia automáticamente y la reproducción se inicia al cargar un disco
o al conectar un dispositivo (dispositivo USB/ iPod/iPhone/ dispositivo Android) al
terminal de entrada USB.
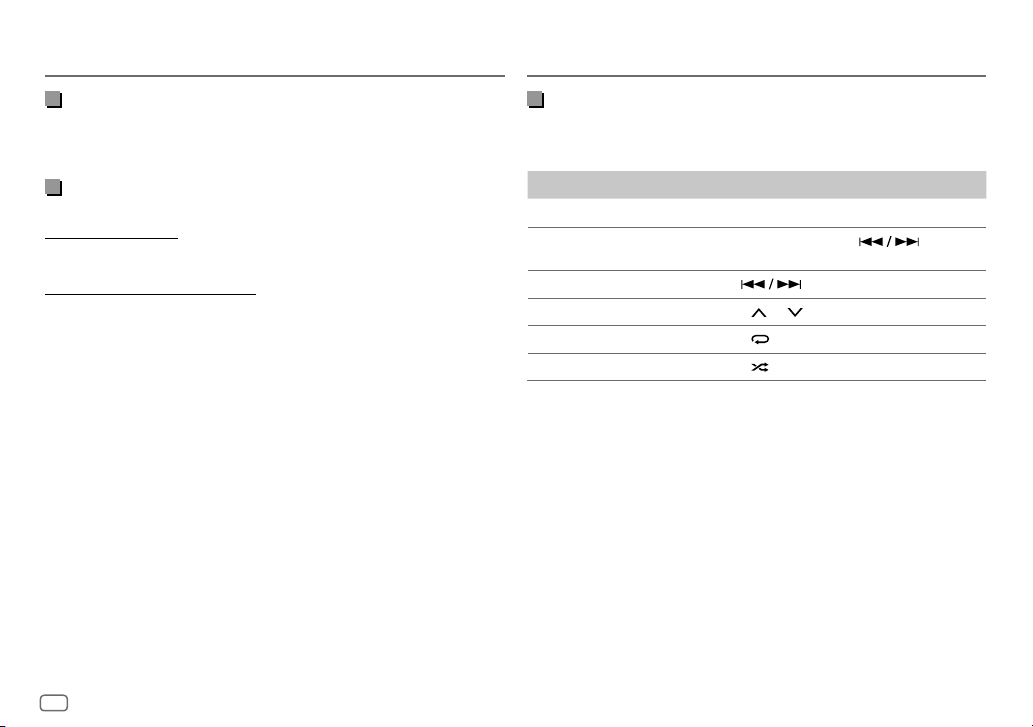
Para En la placa frontal
Reproducción/pausa
Retroceder/avanzar
rápidamente
Seleccionar una pista/archivo
Seleccionar una carpeta Pulse 2
Repetir reproducción Pulse 4
Reproducción aleatoria Pulse 3
Pulse 6
IW.
Pulse y mantenga pulsado
Pulse
.
/ 1 .
repetidamente.
repetidamente.
.
6
Page 27
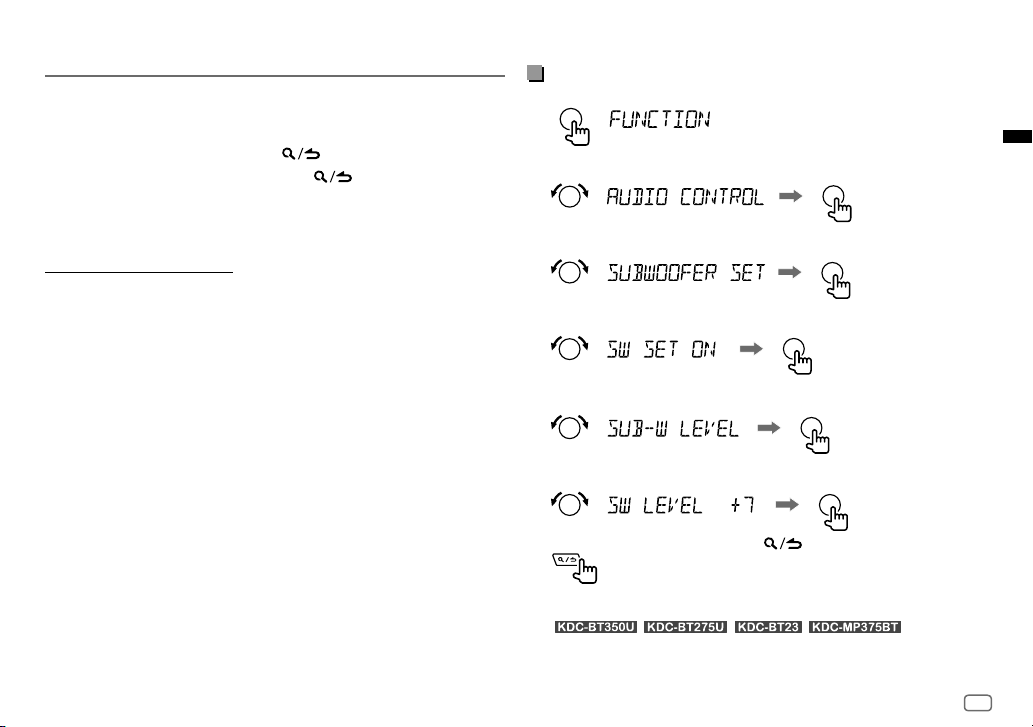
AJUSTES DE LAS FUNCIONES
1 Pulse la rueda de volumen para ingresar en
2 Gire la rueda de volumen para seleccionar un elemento y, a continuación,
pulse la rueda.
3 Repita el paso 2 hasta que se seleccione o active el elemento deseado.
4 Para salir, pulse y mantenga pulsado .
Para volver al elemento de ajuste anterior, pulse
• Para obtener más detalles sobre cada una de las opciones, consulte el MANUAL
DE INSTRUCCIONES en el siguiente sitio web: <www.kenwood.com/cs/ce/>
• La disponibilidad de cada opción varía según el modelo.
Opciones del menú [FUNCTION]
[AUDIO CONTROL]
[DISPLAY]
[TUNER SETTING]
[SIRIUS XM]
[USB]
[BT MODE]
[REMOTE APP]
[MIC GAIN]*
[NR LEVEL]*
[ECHO CANCEL]*
[SYSTEM]
[CLOCK]
[ENGLISH]
[ESPANOL]
[DEMO MODE]
* Aplicable solamente mientras se habla por teléfono.
: Establece sus ajustes de audio preferidos.
: Establece su control preferido para la ventanilla de
visualización.
: Configuración de la fuente de radio.
: Configuración del sintonizador Sirius XM.
: Configuración utilizando un dispositivo USB.
: Configuración utilizando un dispositivo Bluetooth.
: Configuración utilizando un smartphone para controlar esta
unidad.
: Establece la sensibilidad del micrófono.
: Ajusta el nivel de reducción de ruido.
: Ajusta el tiempo de retardo de cancelación de eco.
: Configuración de esta unidad.
: Ajusta el reloj.
: Selecciona el idioma para el menú y la información de música.
: Selecciona el idioma para el menú y la información de música.
: Activa o desactiva la demostración en pantalla.
[FUNCTION]
.
.
Ejemplos de algunos ajustes de uso frecuente
Ajuste del nivel de subwoofer
1 Pulse la rueda de volumen para ingresar en
2 Gire la rueda de volumen para seleccionar
continuación, pulse la rueda.
3 Gire la rueda de volumen para seleccionar
continuación, pulse la rueda.
4 Gire la rueda de volumen para seleccionar
pulse la rueda.
5 Gire la rueda de volumen para seleccionar
pulse la rueda.
6 Gire la rueda de volumen para ajustar el nivel de subwoofer y, a
continuación, pulse la rueda.
7 Para salir, pulse y mantenga pulsado .
Nota:
Para
[SWITCH PREOUT]
anteriores.
/ / / , ajuste
a
[SUB-W]
en el modo de espera antes de realizar los ajustes
[FUNCTION]
.
[AUDIOCONTROL]
[SUBWOOFER SET]
[SW SET ON]
y, a continuación,
[SUB-W LEVEL]
y, a
y, a
y, a continuación,
7
Page 28
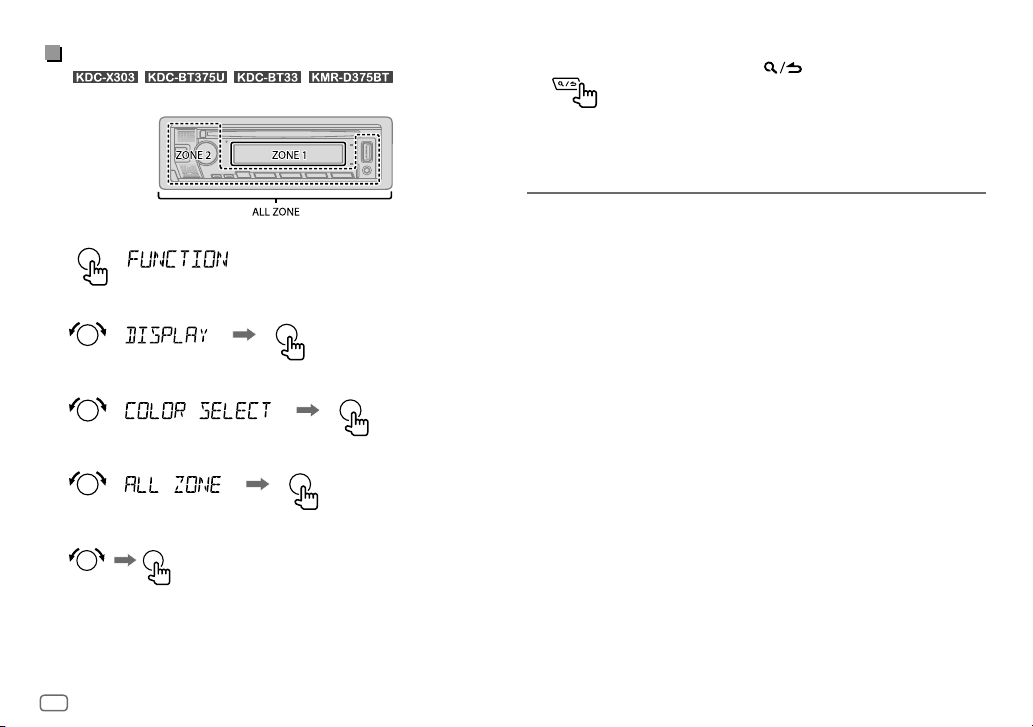
Ajuste del color de iluminación
Para
iluminación preferido se puede ajustar para cada zona.
1 Pulse la rueda de volumen para ingresar en
2 Gire la rueda de volumen para seleccionar
la rueda.
3 Gire la rueda de volumen para seleccionar
pulse la rueda.
4 Gire la rueda de volumen para seleccionar una zona (
[ZONE 2]
5 Para seleccionar un color para la zona seleccionada, gire la rueda de
volumen y, a continuación, pulse la rueda.
/ / / , el color de
[FUNCTION]
[DISPLAY]
.
y, a continuación, pulse
[COLOR SELECT]
) y, a continuación, pulse la rueda.
[INITIAL COLOR]/[VARIABLE SCAN]/[CUSTOM R/G/B]/
[RED1]/[RED2]/[RED3]/[PURPLE1]/[PURPLE2]/[PURPLE3]/
[PURPLE4]/[BLUE1]/[BLUE2]/[BLUE3]/[SKYBLUE1]/
[SKYBLUE2]/[LIGHTBLUE]/[AQUA1]/[AQUA2]/[GREEN1]/
[GREEN2]/[GREEN3]/[YELLOWGREEN1]/[YELLOWGREEN2]/
[YELLOW]/[ORANGE1]/[ORANGE2]/[ORANGERED]
[ALL ZONE], [ZONE 1]
y, a continuación,
6 Repita los pasos 4 y 5 para definir el color para las otras zonas.
7 Para salir, pulse y mantenga pulsado .
OTRAS INFORMACIONES
Con respecto a las operaciones de reproducción de las fuentes AUX, SPOTIFY,
Pandora®, iHeartRadio®, SiriusXM® Radio, consulte el MANUAL DE
INSTRUCCIONES en el siguiente sitio web: <www.kenwood.com/cs/ce/>
• La disponibilidad de cada fuente varía según el modelo.
Nota sobre las especificaciones
Rango de frecuencia Bluetooth:
2,402 GHz—2,480 GHz
Potencia de salida de RF Bluetooth (E.I.R.P.):
+4 dBm (MAX), potencia clase 2
Impedancia del altavoz:
4Ω—8Ω
Voltaje de trabajo:
Batería de 12 V CC para vehículos
,
8
Page 29
BLUETOOTH®
Las funciones Bluetooth podrían no funcionar con esta unidad, dependiendo
del sistema operativo y de la versión de firmware de su teléfono móvil.
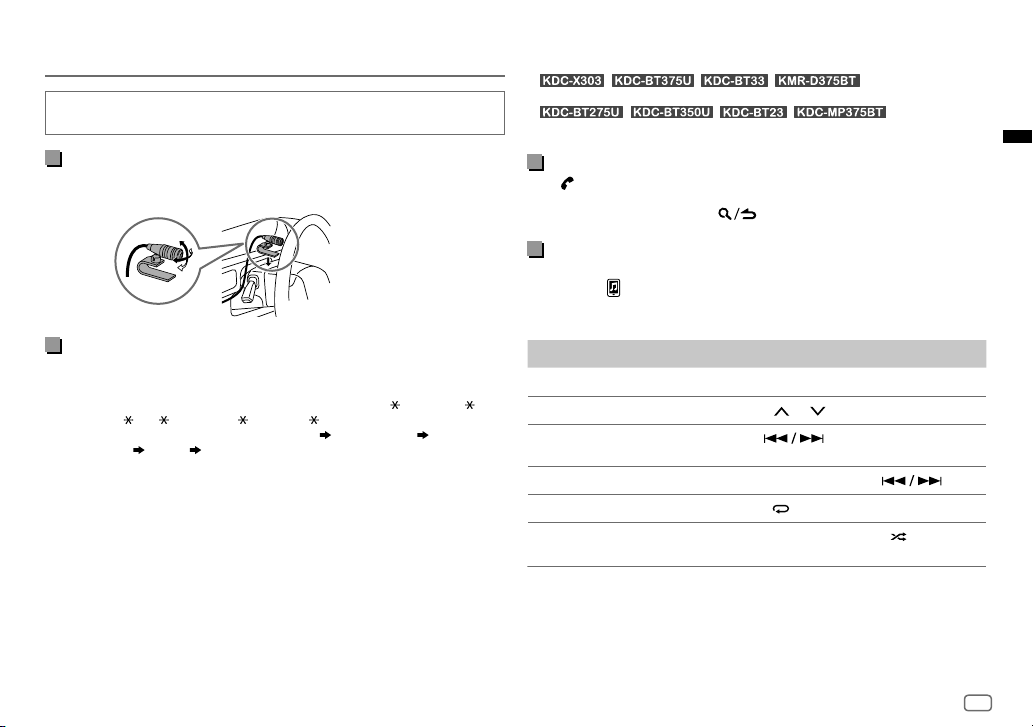
Conecte el micrófono
Conecte el micrófono suministrado a la toma de entrada de micrófono en el panel
trasero.
Ajuste el
ángulo del
micrófono
Emparejar y conectar por primera vez un dispositivo
Bluetooth
1 Pulse B SRC para encender la unidad.
2 Busque y seleccione el nombre de su receptor (“KDC-X3 ”/“KDC-BT3 ”/
“KDC-BT3
En la pantalla aparece los mensajes “PAIRING”
dispositivo”
• En el caso de algunos dispositivos Bluetooth, puede ser necesario ingresar
3 Pulse la rueda de volumen para iniciar el emparejamiento.
El mensaje “PAIRING OK” aparece cuando ha finalizado el emparejamiento.
/BT2 ”/“KDC-MP3 ”/“KMR-D3 ”) en el dispositivo Bluetooth.
“PRESS” “VOLUME KNOB”.
el número de identificación personal (código PIN) inmediatamente después
de la búsqueda.
Asegúrelo mediante
abrazaderas para cable
(no suministradas) si
fuera necesario.
“PASS XXXXXX” “Nombre del
Cuando haya finalizado el emparejamiento, la conexión Bluetooth se establece
automáticamente.
•
y/o “BT2” se iluminan en la placa frontal.
•
iluminan en la ventanilla de visualización.
/ / / : Las indicaciones “BT1”
/ / / : “BT1” y/o “BT2” se
Contestar una llamada
Pulse o la rueda de volumen o uno de los botones numéricos (1 a 6).
• Para ajustar el volumen del teléfono de
• Para finalizar una llamada, pulse
[00]
a
[35]
, gire la rueda de volumen.
.
Reproductor de audio a través de Bluetooth
1 Pulse B SRC repetidamente para seleccionar BT AUDIO.
• Si pulsa
2 Para iniciar la reproducción, utilice el reproductor de audio a través de
Bluetooth.
Para En la placa frontal
Reproducción/pausa
Seleccione un grupo o carpeta Pulse 2
Omisión hacia atrás/omisión
hacia delante
Retroceder/avanzar rápidamente
Repetir reproducción Pulse 4
Reproducción aleatoria Pulse y mantenga pulsado 3
se accede directamente a BT AUDIO.
Pulse 6
IW.
/ 1 .
Pulse
Pulse y mantenga pulsado
repetidamente.
seleccionar
[ALLRANDOM]
.
.
para
.
9
Page 30

Page 31

Page 32
• Microsoft and Windows Media are either registered trademarks or trademarks of Microsoft Corporation in the United States and/or other countries.
• Use of the Made for Apple badge means that an accessory has been designed to connect specifically to the Apple product(s) identified in the badge, and has been certified by the developer to meet Apple
performance standards. Apple is not responsible for the operation of this device or its compliance with safety and regulatory standards. Please note that the use of this accessory with an Apple product may affect
wireless performance.
• Apple, iPhone, iPod, iPod nano, iPod touch, and Lightning are trademarks of Apple Inc., registered in the U.S. and other countries.
• Pandora, the Pandora logo, and the Pandora trade dress are trademarks or registered trademarks of Pandora Media, Inc., used with permission.
• iHeartRadio® and iHeartAuto™ are trademarks owned by iHeartMedia, Inc. All uses are authorized under license.
• Sirius, XM and all related marks and logos are trademarks of Sirius XM Radio Inc. All rights reserved.
• SPOTIFY and the Spotify logo are among the registered trademarks of Spotify AB.
• Android is a trademark of Google LLC.
• The “AAC” logo is a trademark of Dolby Laboratories.
• The Bluetooth® word mark and logos are registered trademarks owned by the Bluetooth SIG, Inc. and any use of such marks by JVC KENWOOD Corporation is under license. Other trademarks and trade names are
those of their respective owners.
 Loading...