

Page 1

STEREO INTEGRATED AMPLIFIER
INSTRUCTION MANUAL
KA-S10
AMPLIFICATEUR STEREO INTEGRE
MODE D’EMPLOI
B61-1287-00 00 (E,X) KW 0508
LA DICHIARAZIONE DI CONFORMITA' "CE" DI QUESTO
PRODOTTO E' DEPOSITATA PRESSO:
KENWOOD ELECTRONICS EUROPE B.V.
AMSTERDAMSEWEG 37
1422 AC UITHOORN
THE NETHERLANDS
INTEGRIERTER STEREO-VERSTÄRKER
BEDIENUNGSANLEITUNG
GEÏNTEGREERDE STEREO VERSTERKER
GEBRUIKSAANWIJZING
AMPLIFICATORE STEREO INTEGRATO
ISTRUZIONI PER L’USO
AMPLIFICADOR ESTEREO INTEGRADO
MANUAL DE INSTRUCCIONES
ESPAÑOL
ITALIANO
NEDERLANDS
DEUTSCH
FRANÇAIS
ENGLISH
Page 2
2 ENGLISH
ENGLISH
Before applying power
Caution : Read this page carefully to ensure safe operation.
Units are designed for operation as follows.
Australia ..............................................AC 240 V only
Europe . ...............................................AC 230 V only
Information on Disposal of Old Electrical and Electronic Equipment (applicable for EU countries that have adopted separate waste collection systems)
Products with the symbol (crossed-out wheeled bin) cannot be disposed as household waste.
Old electrical and electronic equipment should be recycled at a facility capable of handling these
items and their waste byproducts.
Contact your local authority for details in locating a recycle facility nearest to you.
Proper recycling and waste disposal will help conserve resources whilst preventing detrimental
effects on our health and the environment.
Safety precautions
WARNING : TO PREVENT FIRE OR ELECTRIC SHOCK, DO NOT
EXPOSE THIS APPLIANCE TO RAIN OR MOISTURE.
CAUTION: TO REDUCE THE RISK OF ELECTRIC SHOCK, DO NOT REMOVE COVER (OR BACK). NO USER-SERVICEABLE PARTS INSIDE.
REFER SERVICING TO QUALIFIED SERVICE PERSONNEL.
THE LIGHTNING FLASH WITH ARROWHEAD SYMBOL, WITHIN AN EQUILATERAL TRIANGLE, IS INTENDED TO ALERT THE USER TO THE PRESENCE OF UNINSULATED "DANGEROUS VOLTAGE" WITHIN
THE PRODUCT’S ENCLOSURE THAT MAY BE OF SUFFICIENT MAGNITUDE TO CONSTITUTE A RISK OF
ELECTRIC SHOCK TO PERSONS.
THE EXCLAMATION POINT WITHIN AN EQUILATERAL TRIANGLE IS INTENDED TO ALERT THE
USER TO THE PRESENCE OF IMPORTANT OPERATING AND MAINTENANCE (SERVICING) INSTRUCTIONS IN THE LITERATURE ACCOMPANYING THE APPLIANCE.
RISK OF ELECTRIC SHOCK
DO NOT OPEN
CAUTION
Page 3
ENGLISH 3
ENGLISH
Read Instructions – All the safety and operating instructions
should be read before the product is operated.
Retain Instructions – The safety and operating instructions
should be retained for future reference.
Heed Warnings – All warnings on the product and in the
operating instructions should be adhered to.
Follow Instructions – All operating and use instructions
should be followed.
1. Cleaning – Unplug this product from the wall outlet before cleaning. Do not use liquid cleaners or aerosol cleaners.
Use a damp cloth for cleaning.
2. Attachments – Do not use attachments not recommended by the product manufacturer as they may cause
hazards.
3. Water and Moisture – This product shall not be exposed
to dripping and splashing - for example, near a bath tub, wash
bowl, kitchen sink, or laundry tub; in a wet basement; or near
a swimming pool; and the like. Do not place an object containing liquid, such as a flower vase, on the appliance.
4. Accessories – Do not place this product on an unstable
cart, stand, tripod, bracket, or table. The product may fall,
causing serious injury to a child or adult, and serious damage
to the product. Use only with a cart, stand, tripod, bracket, or
table recommended by the manufacturer. Any mounting of
the product should follow the manufacturer’s instructions,
and should use a mounting accessory recommended by the manufacturer.
A product and cart combination should be moved
with care. Quick stops, excessive force, and uneven surfaces may cause the product and cart
combination to overturn.
5. Ventilation – Slots and openings in the cabinet are provided for ventilation and to ensure reliable operation of the
product and to protect it from overheating, and these openings must not be blocked or covered. The openings should
never be blocked by placing the product on a bed, sofa, rug,
or other similar surface. This product should not be placed in
a built-in installation such as a bookcase or rack unless proper
ventilation is provided or the manufacturer’s instructions have
been adhered to.
6. Power Sources – This product should be operated only
from the type of power source indicated on the product. If
you are not sure of the type of power supply to your home,
consult your product dealer or local power company.
7.
CAUTION - Polarization – This product may be
equipped with a polarized alternating-current line plug (a plug
having one blade wider than the other). This plug will fit into
the power outlet only one way. This is a safety feature. If you
are unable to insert the plug fully into the outlet, try reversing
the plug. If the plug should still fail to fit, contact your electrician to replace your obsolete outlet. Do not defeat the safety
purpose of the polarized plug.
8. Power Cord Protection – Power-supply cords should be
routed so that they are not likely to be walked on or pinched
by items placed upon or against them, paying particular attention to cords at plugs, convenience receptacles, and the
point where they exit from the product.
9. Lightning – For added protection for this product during
a lightning storm, or when it is left unattended and unused
for long periods of time, unplug it from the wall outlet and
disconnect the antenna or cable system. This will prevent
damage to the product due to lightning and power-line surges.
10.Overloading – Do not overload wall outlets, extension
cords, or integral convenience receptacles as this can result
in a risk of fire or electric shock.
11. Object and Liquid Entry – Never push objects of any
kind into this product through openings as they may touch
dangerous voltage points or short-out parts that could result
in a fire or electric shock. Never spill liquid of any kind on the
product.
12.Servicing – Do not attempt to service this product yourself as opening or removing covers may expose you to dangerous voltage or other hazards. Refer all servicing to qualified service personnel.
13.Damage Requiring Service – Unplug this product from
the wall outlet and refer servicing to qualified service personnel under the following conditions:
a) When the power-supply cord or plug is damaged,
b) If liquid has been spilled, or objects have fallen into
the product,
c) If the product has been exposed to rain or water,
d) If the product does not operate normally by following
the operating instructions.
e) If the product has been dropped or damaged in any
way, and
f) When the product exhibits a distinct change in per-
formance – this indicates a need for service.
g) If an abnormal smell or smoke is detected.
14.Replacement Parts – When replacement parts are re-
quired, be sure the service technician has used replacement
parts specified by the manufacturer or have the same characteristics as the original part. Unauthorized substitutions may
result in fire, electric shock, or other hazards.
15.Safety Check – Upon completion of any service or repairs to this product, ask the service technician to perform
safety checks to determine that the product is in proper operating condition.
16.Wall or Ceiling Mounting – This product should be
mounted to a wall or ceiling only as recommended by the
manufacturer.
17. Heat – This product should be situated away from heat
sources such as radiators, heat registers, stoves, or other
products that produce heat. Do not place a flaming object,
such as a candle or lantern, or near the product.
18.Power Lines – An outside antenna system should not be
located in the vicinity of overhead power lines or other electric light or power circuits, or where it can fall into such power
lines or circuits. When installing an outside antenna system,
extreme care should be taken to keep from touching such
power lines or circuits as contact with them might be fatal.
19.Outdoor Antenna Grounding – If an outside antenna or
cable system is connected to the product, be sure the antenna or cable system is grounded so as to provide some
protection against voltage surges and built-up static charges.
Article 810 of the National Electrical Code, ANSI/NFPA 70,
provides information with regard to proper grounding of the
mast and supporting structure, grounding of the lead-in wire
to an antenna discharge unit, size of grounding conductors,
location of antenna-discharge unit, connection to grounding
electrodes, and requirements for the grounding electrode.
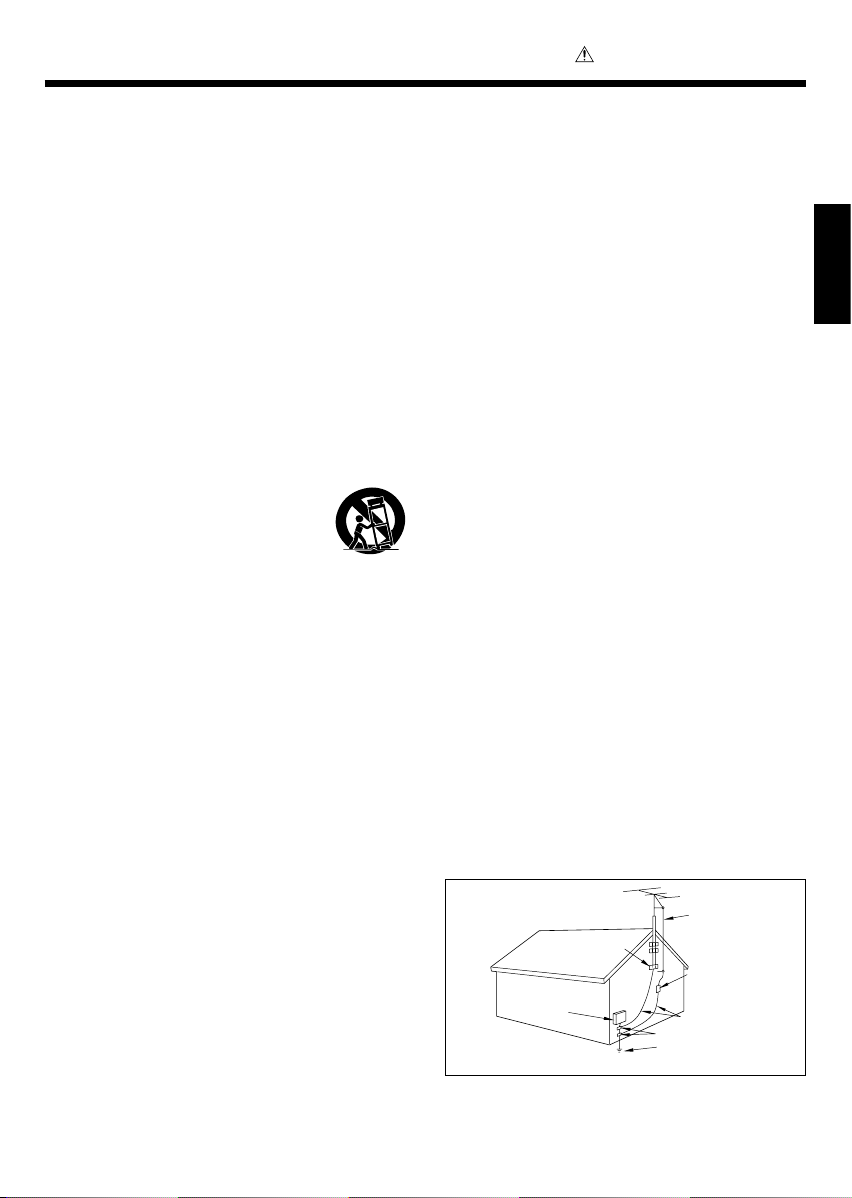
EXAMPLE OF ANTENNA
GROUNDING AS PER NATIONAL
ELECTRICAL CODE
POWER SERVICE GROUNDING
ELECTRODE SYSTEM
(NEC ART 250, PART H)
NEC – NATIONAL ELECTRICAL CODE
GROUNDING CONDUCTORS
(NEC SECTION 810-21)
ANTENNA
LEAD IN WIRE
ANTENNA
DISCHARGE UNIT
(NEC SECTION 810-20)
GROUND CLAMP
ELECTRIC
SERVICE
EQUIPMENT
GROUND
CLAMPS
Notes:
1. Item 7 is not required except for grounded or polarized
equipment.
2. Item 19 complies with UL in the U.S.A.
IMPORTANT SAFETY INSTRUCTIONS
Caution : Read this page carefully
to ensure safe operation.
Page 4
4 ENGLISH
ENGLISH
Unpacking
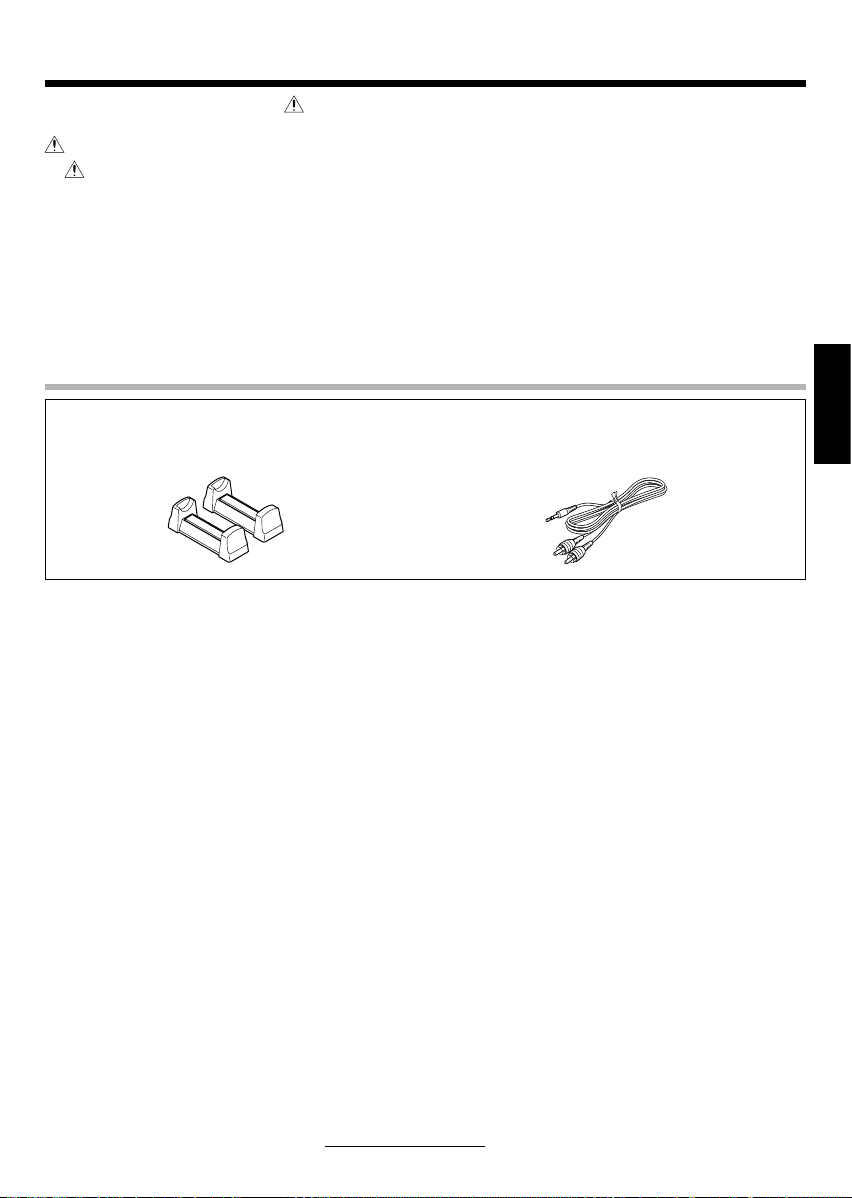
Unpack the unit carefully and make sure that all the accessories are present.
Accessories
If any accessories are missing, or if the unit is damaged or fails to operate, notify your dealer immediately. If the unit
was shipped to you directly, notify your shipper immediately. Kenwood recommends that you retain the original carton
and packing materials in case you need to move or ship the unit in the future.
Keep this manual handy for future reference.
Contents
Caution : Read the pages marked carefully to ensure safe operation.
Before applying power............................................ 2
Safety precautions ............................................................... 2
IMPORTANT SAFETY INSTRUCTIONS ................... 3
Contents ............................................................................ 4
Accessories .................................................................................. 4
Special features .............................................................. 5
Important items................................................................ 5
Reference ...................................................................................... 5
Maintenance ................................................................................ 5
Connections ..................................................................... 6
Connecting the playback components .................................... 6
Connecting the speakers ........................................................... 7
Controls and indicators.................................................. 8
Vertical installation .................................................................... 8
Operation .......................................................................... 9
In case of difficulty ....................................................... 10
Specifications................................................................ 10
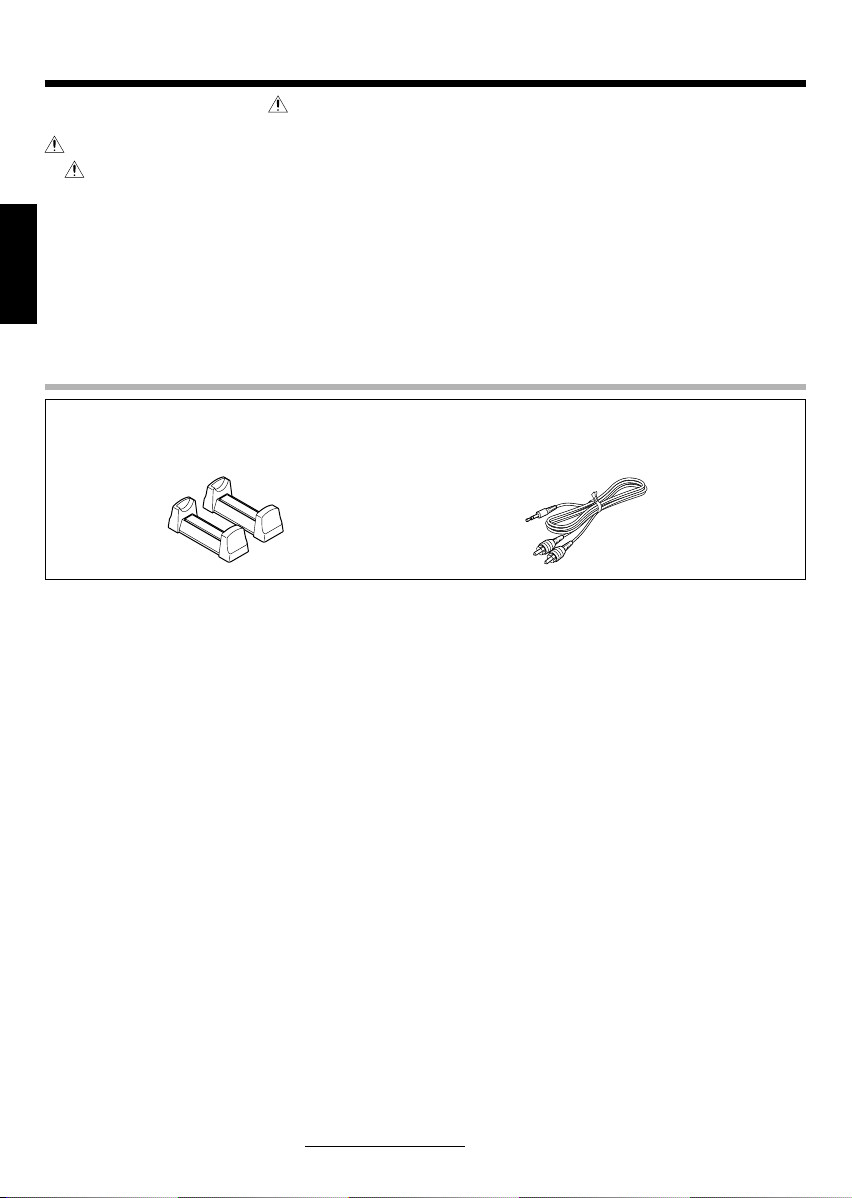
Audio cord (1)
(RCA plug - Φ3.5 mm plug)
Stand (2)
For your records
Record the serial number, found on the back of the unit, in the spaces designated on the warranty card, and in the space
provided below. Refer to the model and serial numbers whenever you call upon your dealer for information or service on
this product.
Model KA-S10 Serial Number
Page 5
ENGLISH 5
ENGLISH
Special features
Three sets of input connectors
Important items
Maintenance
Reference
Considering connection with a portable component with a low audio output level, an analog input with high
input gain (D.AUDIO) is provided in addition to two analog inputs for ordinary desktop components (CD,
AUX).
Subwoofer output connector
A subwoofer with built-in amplifier and pin jack input can be connected to this unit.
N.B. (Natural Bass) circuit
The bass sounds can be selected from three presets featuring different amplification center frequencies and
levels according to the installation environment and size of the speakers.
Either vertical or horizontal installation
A pair of stands is provided for installing this unit vertically or on its side.
Caution on condensation
Condensation (of dew) may occur inside the unit when there is a great difference in temperature between this unit and
the outside.
This unit may not function properly if condensation occurs. In this case, leave the unit for a few hours and restart the
operation after the condensation has dried up.
Be specially cautious against condensation in a following circumstances:
When this unit is carried from one place to another across a large difference in temperature, when the humidity in the
room where this unit is installed increases, etc.
Maintenance of the unit
When the front panel or case becomes dirty, wipe with a
soft, dry cloth. Do not use thinner, benzine, alcohol, etc.
for these agents may cause discoloration.
In regard to contact cleaner
Do not use contact cleaners because it could cause a
malfunction. Be specially careful not to use contact cleaners containing oil, for they may deform the plastic component.
Page 6
6 ENGLISH
ENGLISH
CAUTION
Be sure to adhere to the following, or proper ventilation will be blocked causing damage or fire hazard.
÷ Do not place any objects impairing heat radiation
onto the top of the unit.
÷ Leave some space around the unit (from the largest
outside dimension including projection) equal to or
greater than, shown below.
Top panel : 50 cm Back panel : 10 cm
÷ Do not place the equipment onto a bed, a sofa, a
carpet, or similar. Sucked-in dust can cause fire.
CONNECTION PRECAUTIONS
Do not connect the power cord plug into the power
outlet until all other connections are complete.
Before unplugging a cord or cable from the unit, be
always sure to set the POWER switch to OFF and
unplug the power plug from the power outlet.
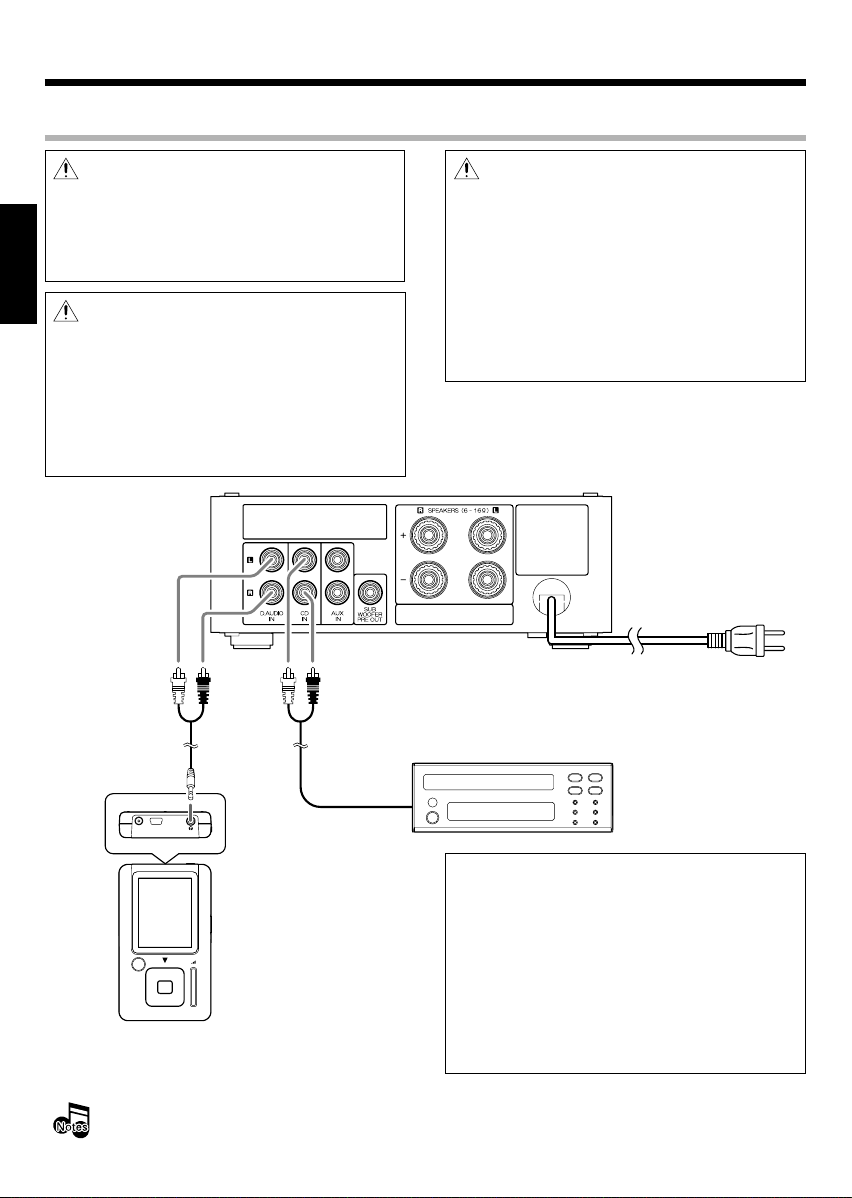
Select the input connectors according to the type of
the component connected to it.
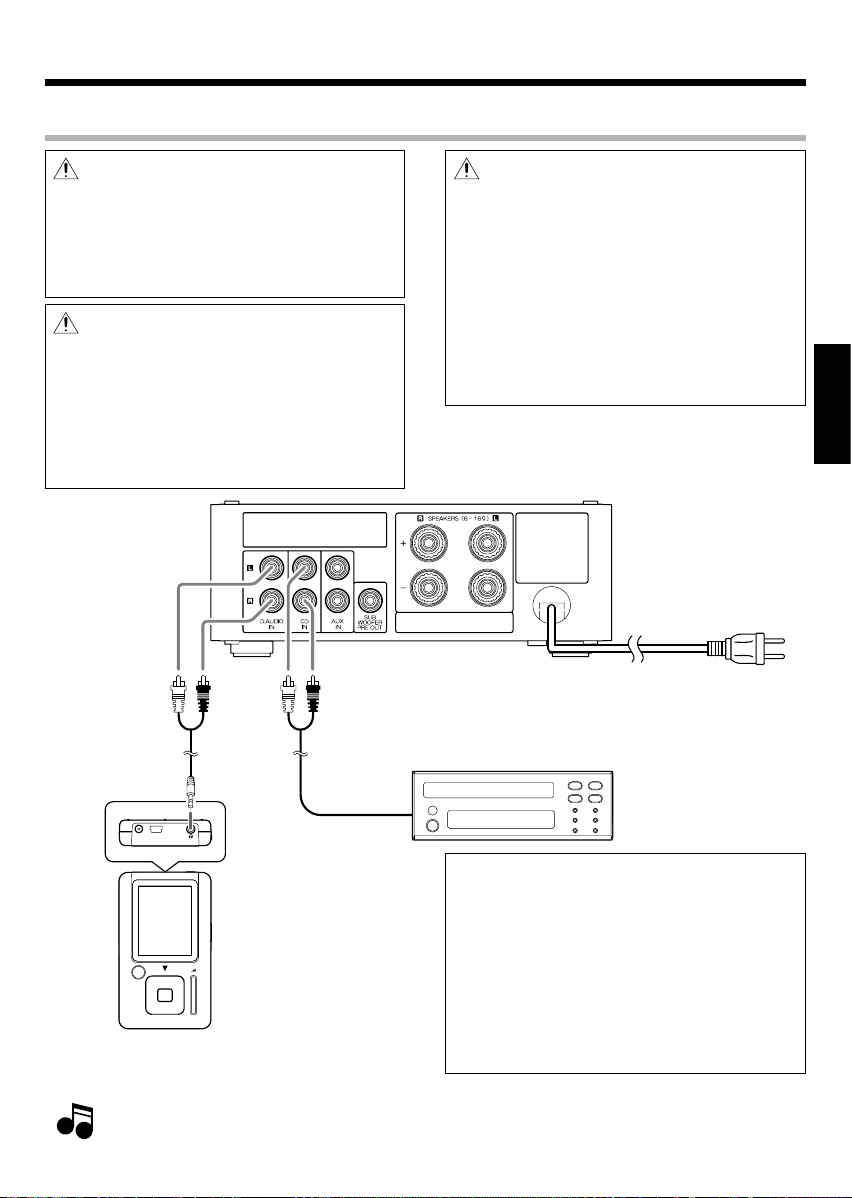
The D.AUDIO input is provided with high input gain so
that it can accept the input from the headphones output of a portable component such as a HDD (Hard Disc
Drive) audio player. If the line output from a desktop
component such as a CD player is connected to these
connectors, the audio is played at a larger volume than
when it is connected to the CD or AUX connectors. In
this case, however, the audio may be distorted if the
listening volume is set too high.
CAUTION
Simply setting the POWER switch to OFF does not
shut down the power supplied to the unit completely. To isolate this unit completely from the
power supply, it is necessary to unplug the power
cord from the power outlet.
To shut down the power supply to the unit immediately in case of an emergency, connect the power
plug to an easily accessible power outlet.
Audio cord
(provided
accessory)
White Red
HDD audio player etc.
CD player etc.
Insert the power plug all the
way and securely into a power
outlet.
Connections
Connecting the playback components
÷ In case an associated system component is connected, also read the instruction manual of the component.
÷ Be sure to insert all connection cords securely. If their connections are imperfect, the sound may not be
produced or noise may interfere.
Power plug
To AC wall outlet
AUDIO OUT
(LINE OUT)
Page 7
ENGLISH 7
ENGLISH
Connections
CONNECTION PRECAUTIONS
Do not connect the power cord plug into the power outlet until all other connections are complete.
Before unplugging a cord or cable from the unit, be always sure to set the POWER switch to OFF and unplug the
power plug from the power outlet.
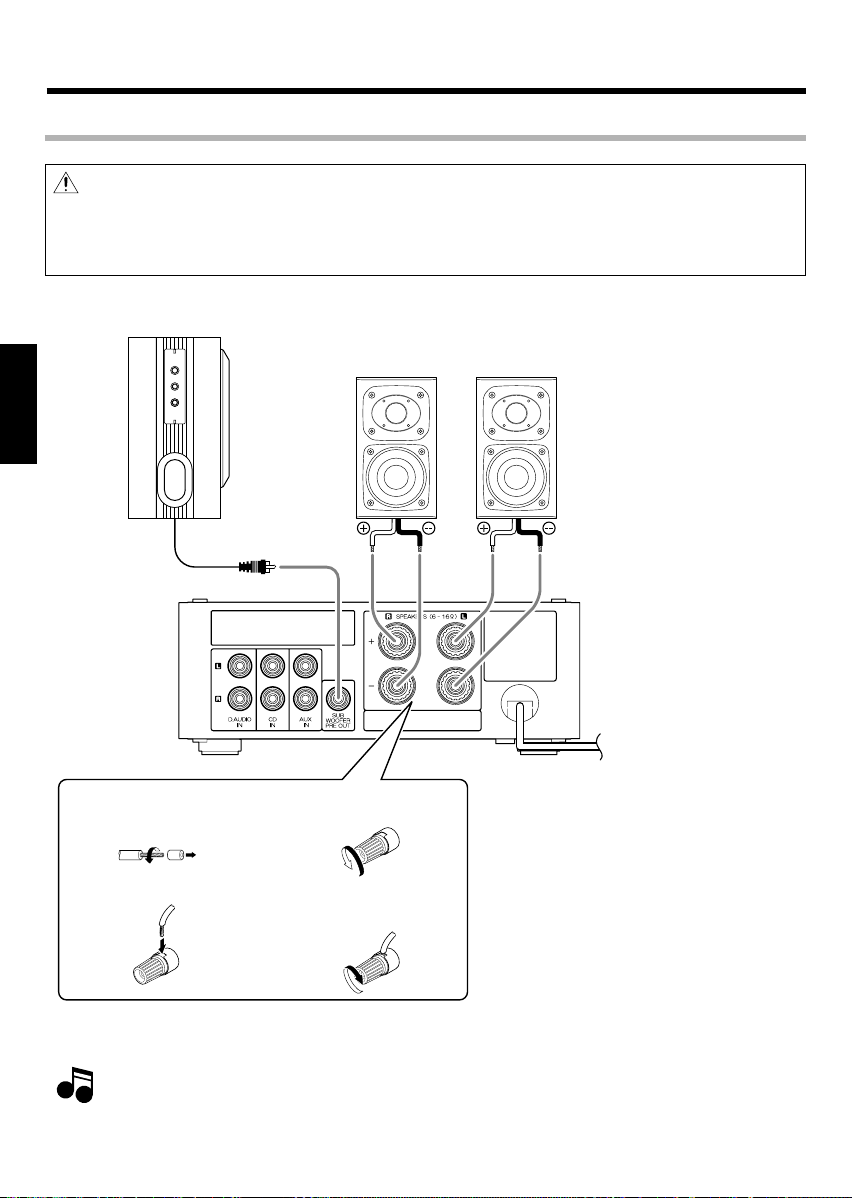
Be careful so that the conductors of speaker wires do not contact other terminals or the case of the unit.
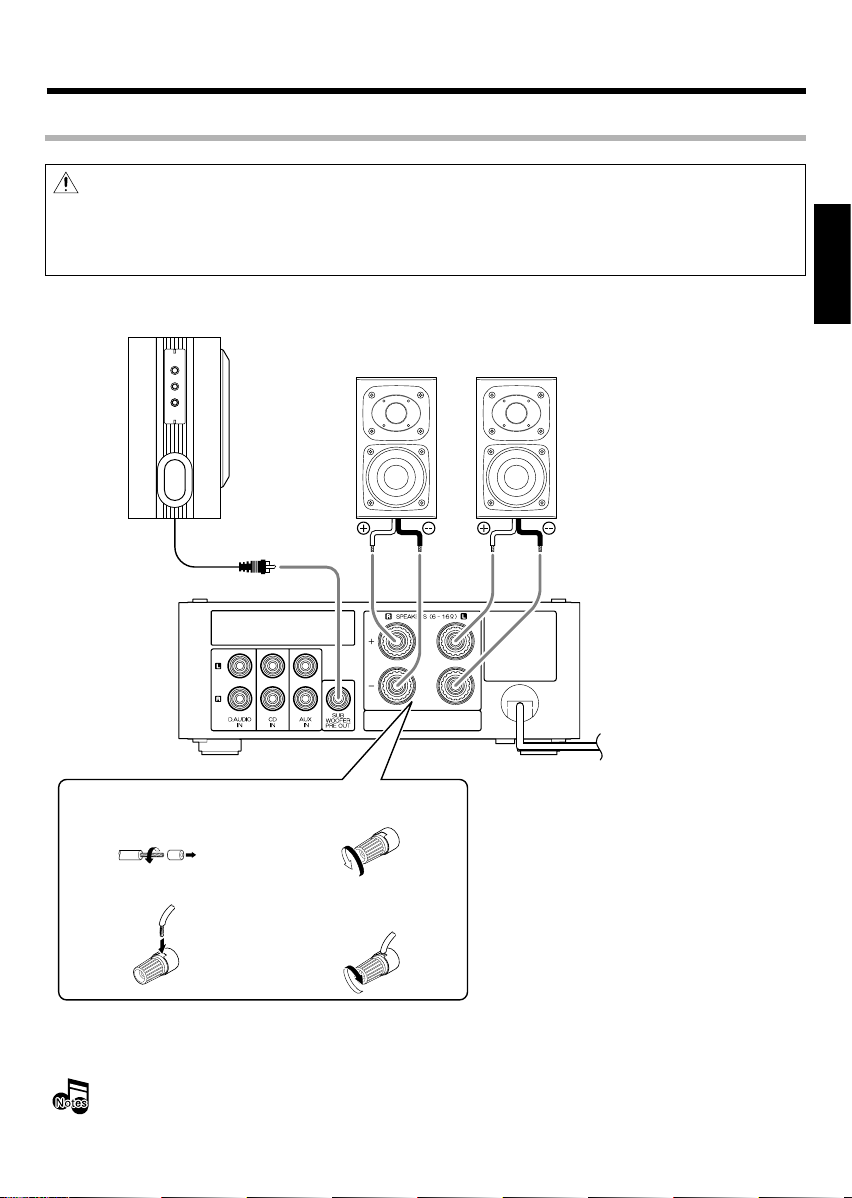
Speakers
(
Impedance 6 Ω - 16 Ω)
Powerd subwoofer
1 Strip coating 2 Loosen
4 Secure3 Insert
Left
Right
Connecting the speakers
÷ Never short-circuit the "+" and "–" speaker cords. It may cause malfunction.
÷ If the "+" and "–" polarity are inverted, the sound will be unnatural with unclear positioning of musical instruments, etc.
÷ Be sure to insert all connection cords securely. If their connections are imperfect, the sound may not be produced
or noise may interfere.
Page 8
8 ENGLISH
ENGLISH
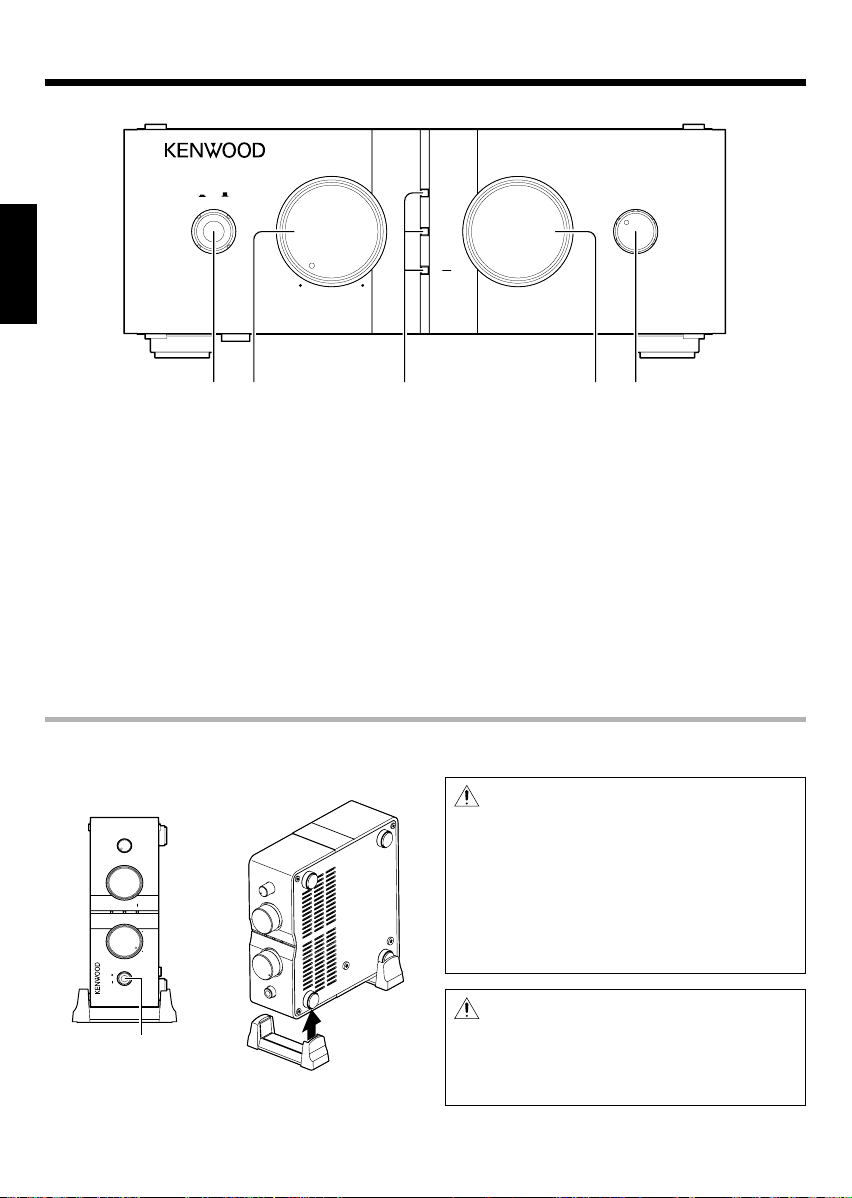
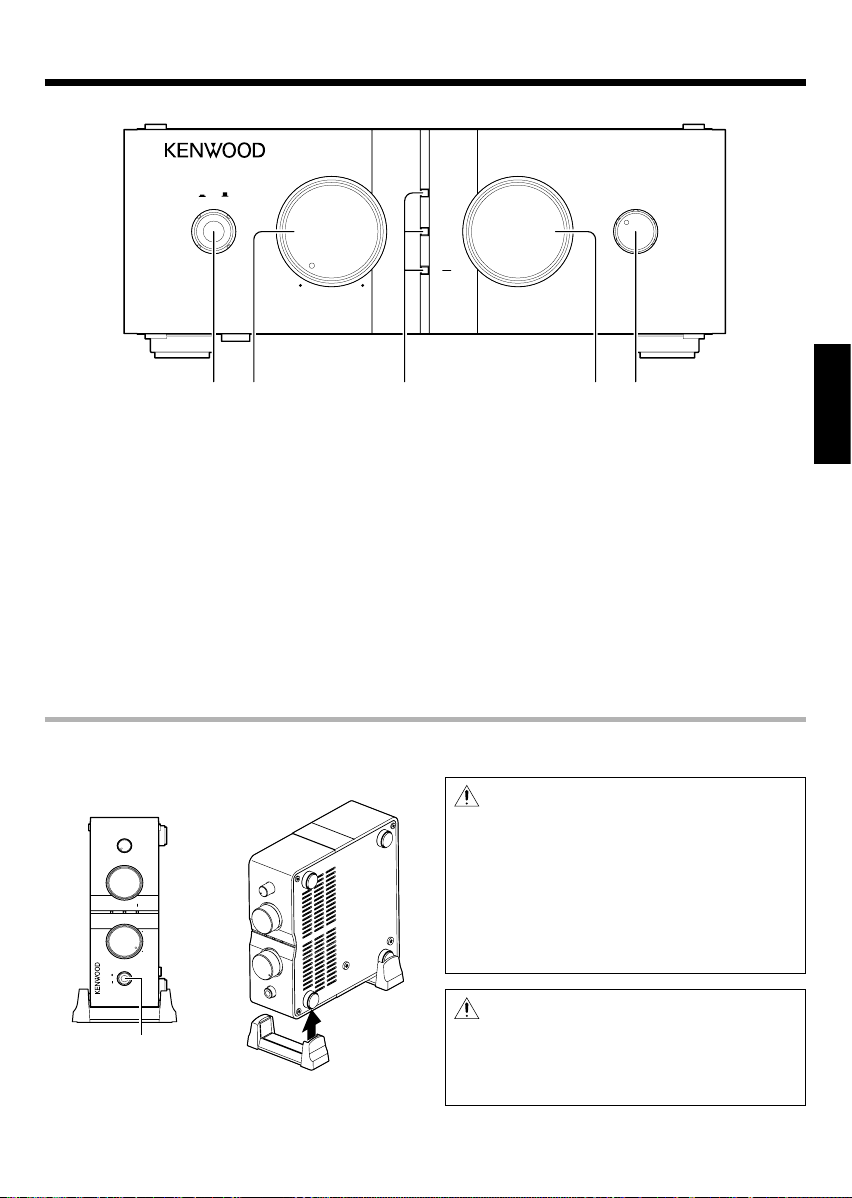
1 POWER switch
Switches the power ON and OFF.
2 VOLUME knob
Rotating the knob clockwise increases the volume level,
and rotating the knob counterclockwise decreases the
volume level.
3 Input indicator
The indicator for the input source selected with the
INPUT SELECTOR knob lights up.
All of the indicators are extinguished when the power
is switched OFF.
4 INPUT SELECTOR knob
Selects the input source (D.AUDIO, CD or AUX).
5 N.B. CIRCUIT knob
Adjusts the bass tone in three steps.
Select the position according to the speakers in use or
your liking.
CD
D.AUDIO
INPUT SELECTOR
AUX
VOLUME
POWER N.B.CIRCUIT
OFF
1
2
3
STEREO INTEGRATED AMPLIFIER KA-S10
MIN MAX
OFFON
12 3 45
The unit can be installed vertically, or on its left side, by using the pair of stands provided with it.
CAUTION
When installing the unit, be careful not to block the
ventilation openings to ensure sufficient heat radiation. Otherwise, the heat pooled inside the unit may
cause malfunction or a fire hazard.
CD
D.AUDIO
INPUT SELECTOR
AUX
VOLUME
POWER N.B.CIRCUIT
OFF
1
2
3
STEREO INTEGRATED AMPLIFIER
KA-S10
MIN MAX
OFFON
Vertical installation
CAUTION
Be sure to observe the following cautions when installing the unit. Incorrect installation may cause the
unit to turn over or topple down and cause injuries.
÷ Always use the provided stands when installing the
unit vertically.
÷ When installing the unit vertically, position it so that
the POWER switch comes at the lower position as
shown in the illustration.
POWER switch
Controls and indicators
Page 9
ENGLISH 9
ENGLISH
Operation
1. Switching the power on (off).
3. Adjusting volume.
2. Selecting the desired input sources.
Press the POWER switch to switch the unit ON.
One of the input indicators light up when the power is switched
ON.
To switch the unit OFF, press the POWER switch again. The input
indicators should turn off when the power is OFF.
Turn the VOLUME knob in either direction to adjust the volume.
Turning the knob clockwise increases the listening volume and
turning the knob clockwise decreases it.
Turn the INPUT SELECTOR knob in either direction to select the
source.
The input indicator for the selected input source lights up.
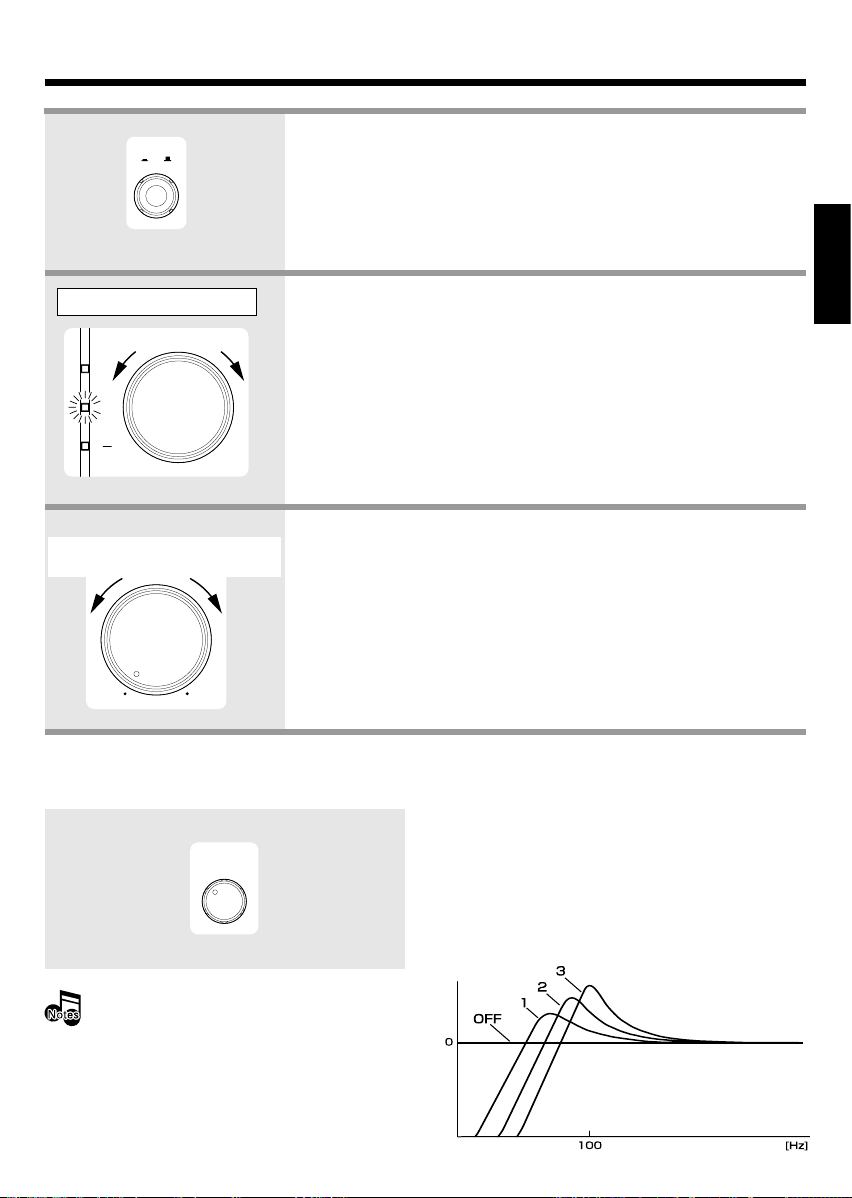
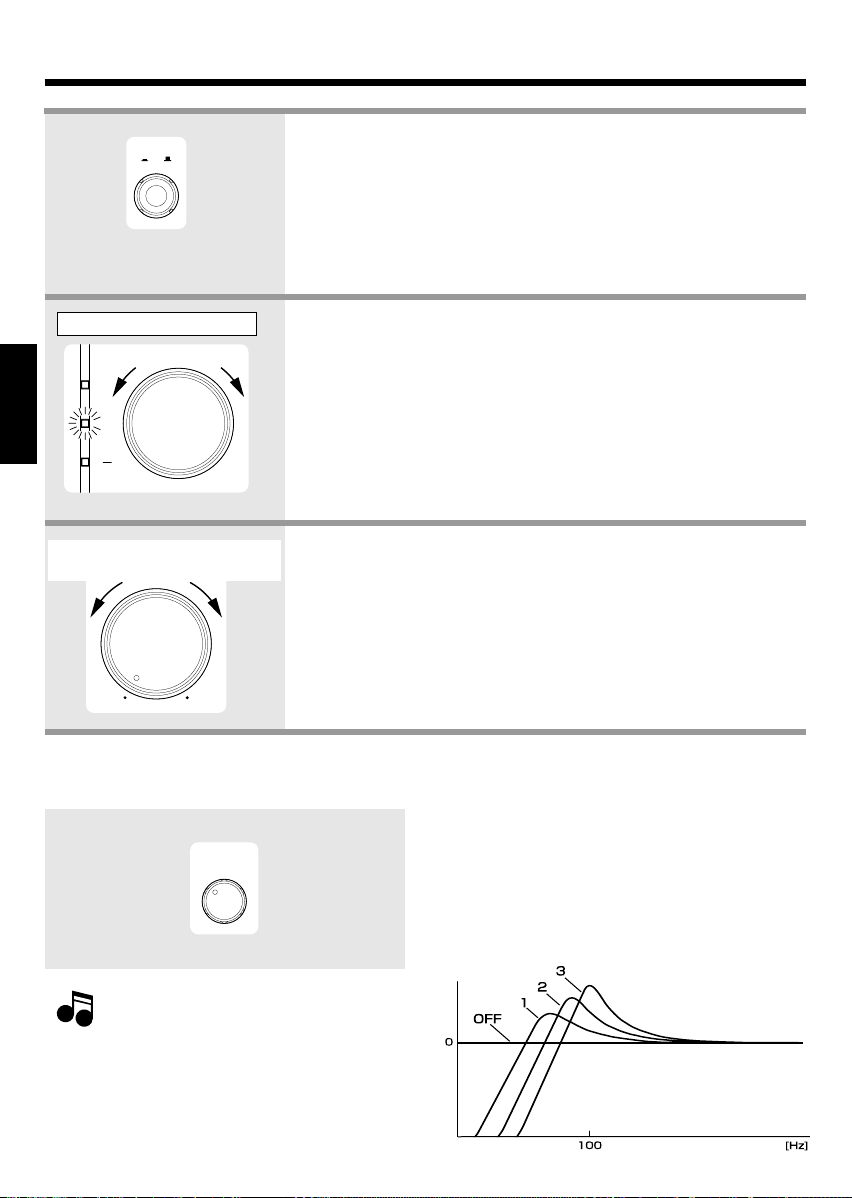
Adjusting the bass tone with N.B. (Natural Bass) CIRCUIT knob
Turn the N.B. CIRCUIT knob in either direction to adjust the low frequencies if necessary.
OFF : Normal playback (The N.B. circuit function is de-
activated.)
1 : Enhances the low frequencies around 60 Hz.
2 : Enhances the low frequencies around 70 Hz.
3 : Enhances the low frequencies around 100 Hz.
N.B.CIRCUIT
OFF
1
2
3
CD
D.AUDIO
INPUT SELECTOR
AUX
POWER
OFFON
VOLUME
MIN MAX
Decrease
volume
Increase
volume
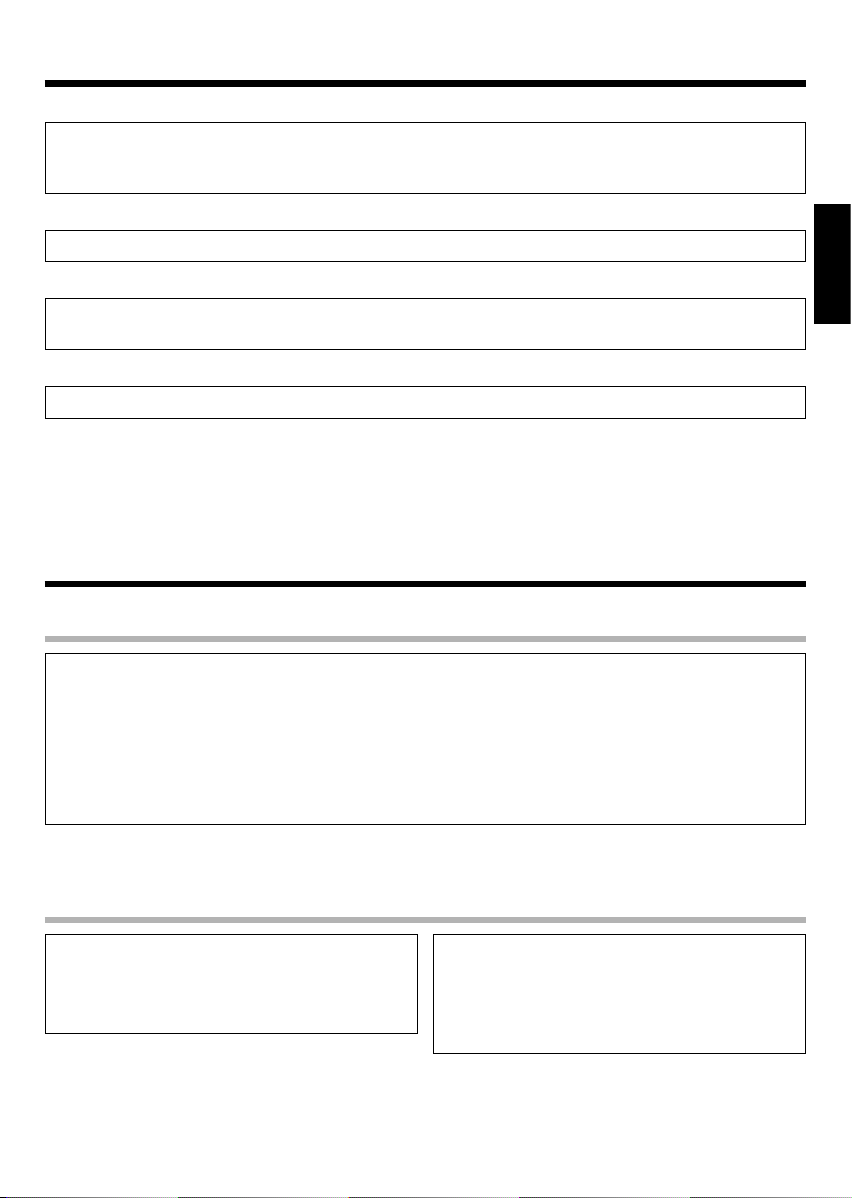
Image of enhancement effects of N.B. circuit
In general, the bass adjustment using the N.B. circuit is
most effective when using compact speakers because
the bass is often insufficient with these kinds of
speakers. The N.B. CIRCUIT knob should be set to OFF
with a subwoofer.
Frequency
Level
When CD is selected
.
Page 10
10 ENGLISH
ENGLISH
In case of difficulty
What seems to be a malfunction is not always so. Before calling for service, check the following table according to the symptom of your trouble.
Sound is not produced.
No sound is output or noise interferes.
Sound is not produced from the left or right
speaker.
Sound volume is too low.
Sound is too loud and distorted.
÷ Connect properly referring to "Connections". 67
÷ Adjust to a required volume. 9
÷ Select the desired input source with the INPUT SELECTOR
knob. 9
÷ The speaker protection circuit may be activated. Read “Speaker
protection circuit” below and remove short-circuiting of the
speaker cords. 0
÷ Connect properly referring to "Connections". 67
÷ Connect properly referring to "Connections". 67
÷ If the headphones output of a portable component is connected
to the CD or AUX input connectors, reconnect it to the D.AUDIO
input connectors. 6
÷ Connect properly referring to "Connections". 67
÷ If the line output of a desktop component such as a CD player is
connected to the D.AUDIO input connectors, reconnect it to the
CD or AUX input connectors. 6
RemedySymptom
Specifications
[Audio section]
Effective output power during STEREO operation
(1 kHz, 10 % T.H.D., at 8 Ω) ......12 W + 12 W (RMS)
(1 kHz, 10 % T.H.D., at 6 Ω) ......13 W + 13 W (RMS)
Rated output power during STEREO operation
(63 Hz ~ 12.5 kHz, at 8 Ω) ...........10 W + 10 W (DIN)
(63 Hz ~ 12.5 kHz, at 6 Ω) ...........11 W + 11 W (DIN)
Total harmonic distortion
............................. 0.03 % (AUX IN, 1 kHz, 6 W, 8 Ω)
N.B. Circuit
N.B. 1 ............................................. +3.0 dB (at 60 Hz)
N.B. 2 ............................................. +5.0 dB (at 70 Hz)
N.B. 3 ........................................... +7.5 dB (at 100 Hz)
Input (Sensitivity / Impedance)
LINE (CD, AUX) ............................... 250 mV / 22 kΩ
LINE (D.AUDIO) ............................... 140 mV / 48 kΩ
Output (Level / Impedance)
SUBWOOFER PREOUT ....................... 1.8 V / 2.9 kΩ
[General]
Power consumption .............................................. 28 W
Dimensions
Horizontal installation ............ W 171 mm (6-3/4 ")
H 67 mm (2-5/8 ")
D 207 mm (8-1/8 ")
Vertical installation................. W 89 mm (3-1/2 ")
H 182 mm(7-3/16 ")
D 207 mm (8-1/8 ")
Weight (net) ..................................................2 kg (4.4 lb)
Notes : KENWOOD follows a policy of continuous
advancements in development. For this reason specifications may be changed without notice.
÷ Sufficient performance may not be exhibited at ex-
tremely cold locations (where water freezes).
Speaker protection circuit
The speaker protection circuit is activated when the unit is switched ON while the + and – speaker cords are shorted.
When activated, the speaker protection circuit shuts off the audio output to protect both the unit and speakers.
If the speaker cords are shorted, switch the unit OFF, unplug the power cord from the power outlet, and then reconnect
the speaker cords properly by removing the short-circuiting. Plug the power plug into the power outlet and set the
POWER switch to ON to reuse the unit.
Page 11
FRANÇAIS
FRANÇAIS 11
Attention : Lire attentivement cette page pour garantir une exploitation sans danger.
Les appareils sont destinés aux opérations comme les suivantes.
L‘Europe et le Royaume-Uni......................................CA 230 V uniquement
Précautions de sécurité
AVERTISSEMENT : POUR EVITER TOUT INCENDIE OU CHOC
ELECTRIQUE, NE PAS EXPOSER CET APPAREIL A LA PLUIE OU A
L’HUMIDITE.
ATTENTION: POUR REDUIRE LES RISQUES DE CHOC ELECTRIQUE, NE PAS
DEPOSER LE COUVERCLE (OU LE PANNEAU ARRIERE). ANCUNE PIECE
REPARABLE PAR L’UTILISATEUR NE SE TROUVE A L’INTERIEUR. CONFIER
TOUT TRAVAIL D’ENTRETIEN A UN PERSONNEL DE SERVICE QUALIFIE.
LE SYMBOLE DE L’ECLAIR DANS UN TRIANGLE EQUILATERAL A POUR BUT D’ATTIRER L’ATTENTION DE L’UTILISATION SUR LA PRESENCE, A L’INTERIEUR DU COFFRET, D’UNE TENSION DANGEREUSE ET NON ISOLEE D’UNE PUISSANCE SUFFISANTE POUR CONSTITUER UN RISQUE DE
COMMOTION ELECTRIQUE AUX ETRES HUMAINS.
LE POINT D’EXCLAMATION DANS UN TRIANGLE EQUILATERAL A POUR BUT D’ATTIRER L’ATTENTION DE L’UTILISATEUR SUR LA PRESENCE, DANS LA LITTERATURE QUI ACCOMPAGNE CET
APPAREIL, D’INFORMATIONS IMPORTANTES RELATIVE A L’EXPLOITATION ET A L’ENTRETIEN.
Avant la mise sous tension
Information sur l’élimination des anciens équipements électriques et électroniques (applicable dans les pays de l’Union Européenne qui ont adopté des systèmes de collecte sélective)
Les produits sur lesquels le pictogramme (poubelle barrée)est apposé ne peuvent pas être éliminés
comme ordures ménagères.
Les anciens équipements électriques et électroniques doivent être recyclés sur des sites capables
de traiter ces produits et leurs déchets.
Contactez vos autorités locales pour connaître le site de recyclage le plus proche.
Un recyclage adapté et l’élimination des déchets aideront à conserver les ressources et à nous
préserver des leurs effets nocifs sur notre santé et sur l’environnement.
RISQUE DE CHOC ELECTRIQUE
NE PAS OUVRIR
ATTENTION
Page 12

FRANÇAIS
12 FRANÇAIS
Lire toutes les instructions – Lire attentivement toutes
les consignes de sécurité et les instructions de
fonctionnement avant d’utiliser le produit.
Conserver ce mode d’emploi – Conserver les consignes
de sécurité et les instructions de fonctionnement pour
pouvoir s’y reporter ultérieurement.
Tenir compte des avertissements – Respecter tous les
avertissements indiqués sur le produit et dans le mode
d’emploi.
Suivre les instructions – Suivre toutes les instructions de
fonctionnement et d’utilisation.
1. Nettoyage – Débrancher la prise murale du produit
avant d’entreprendre son nettoyage. Ne pas utiliser de
nettoyants liquides ni de produits en aérosol. Utiliser un
chiffon humide pour le nettoyage.
2. Equipements auxiliaires – Ne jamais employer des
équipements auxiliaires autres que ceux que recommande
le fabricant du produit car ils peuvent présenter un risque.
3. Eau et humidité – Ce produit ne doit pas être exposé
aux écoulements d’eau ni aux éclaboussures – par
exemple, près d’une baignoire, d’un lavabo, d’un évier, ou
d’u’ cuve à lessive, dans un sous-sol humide, ou près d’une
piscine, etc. Ne placer aucun objet contenant un liquide,
tel qu’un vase de fleurs, sur l’appareil.
4. Accessoires – Ne pas placer le produit sur un socle, un
chariot, un trépied, une console ou une table instable. En
plus des dégradations qu’il subirait, sa chute pourrait
provoquer de graves blessures aux enfants ou adultes à
proximité. Utiliser un socle, un chariot, un trépied, une console
ou une table conformes aux recommandations du fabricant
ou bien vendus avec le produit. Pour fixer le produit, suivre
les instructions du fabricant et utiliser des
accessoires recommandés par le fabricant.
Si le produit est placé sur un support mobile,
le déplacer avec soin. Les arrêts brusques,
contraintes ou irrégularités du plancher par
exemple pourraient provoquer une chute du
produit.
5. Aération – Le coffret comporte des ouïes et des
ouvertures destinées à assurer une ventilation suffisante
pour que l’appareil fonctionne bien sans échauffement. Ne
jamais obstruer ces ouvertures. Ne jamais bloquer les
orifices d’aération en utilisant l’appareil sur un lit, un divan,
un tapis ou autre surface similaire. Le produit ne peut être
installé dans une bibliothèque ou un autre meuble qu’à
condition de prévoir une ventilation suffisante et sous
réserve de respecter les instructions du fabricant.
6. Sources d’alimentation – Ce produit ne doit être
raccordé qu’à une alimentation du type indiqué sur le
produit. En cas de doute sur les caractéristiques du secteur
local, contacter le revendeur du produit ou la compagnie
d’électricité.
7.
ATTENTION - Polarisation – La fiche du cordon
d’alimentation du produit est de type fiche d’alimentation en
courant alternatif polarisé (fiche dont l’une des lames est plus
large que l’autre). L’une des broches de la fiche est plus large
que l’autre et la fiche ne rentre dans la prise que dans un seul
sens. Cette particularité est une mesure de sécurité. Si vous
ne parvenez pas à introduire la fiche dans la prise, essayez
dans l’autre sens. Si la fiche ne rentre pas dans l’autre sens
non plus, faites remplacer par un électricien qualifié la prise
murale par une prise du nouveau modèle. Ne supprimez pas
la fiche de sécurité.
8. Protection du cordon d’alimentation – Les cordons
d’alimentation doivent être placés de manière qu’ils ne soient
pas piétinés ni écrasés; faire attention en particulier aux
cordons près des prises ou réceptacles et au point où ils
sortent du produit.
9. Foudre – Pour assurer la protection de ce produit par
temps d’orage, ainsi que lorsqu’on le laisse sans surveillance
et ne prévoit pas de s’en servir avant longtemps, il est
recommandé de débrancher le cordon d’alimentation ainsi
que la prise d’antenne ou de distribution câblée. On évitera
ainsi le risque d’endommagement du produit par la foudre
ou les surtensions.
10.Surcharge – Ne pas utiliser les prises murales ou
rallonges en surcharge car cela fait courir le risque
d’incendie ou d’électrocution.
11.Pénétration d’objets et de liquides –
Ne jamais
enfoncer d’objets d’aucune sorte dans les ouvertures du
produit car ils risquent de toucher des points de tension
dangereux ou de court-circuiter des pièces, ce qui pourrait
provoquer un feu ou un choc électrique. Ne jamais renverser
de liquide d’aucune sorte sur le produit.
12.Entretien – Ne pas tenter de réparer le produit soimême car l’ouverture ou le retrait d’un couvercle risque
d’exposer l’utilisateur à des dangers, par exemple une
tension dangereuse. Toute réparation doit être confiée à
un personnel d’entretien qualifié.
13. Endommagement demandant réparation – Débrancher
le produit de la prise secteur et le faire réparer par un
technicien qualifié dans les cas suivants:
a) Lorsque le cordon d’alimentation secteur ou sa fiche
sont endommagés,
b) Lorsqu’un liquide a été renversé, ou que des objets
sont tombés, dans le produit,
c) Lorsque le produit a été exposé à la pluie ou à l’eau,
d) Si le produit ne fonctionne pas normalement alors
qu’il est utilisé conformément au mode d’emploi,
e) Si le produit est tombé ou qu’il a subi des dégâts,
f)
S
i les performances du produit se sont manifestement
dégradées. – Cela signifie que le produit a besoin d’être
réparé.
g) Si une odeur anormale ou de la fumée se dégage.
14.Pièces de rechange – Lorsqu’il faut changer une pièce,
s’assurer que le dépanneur utilise la pièce de rechange
prescrite par le fabricant ou bien une pièce présentant les
mêmes caractéristiques que la pièce originale. Les pièces
de substitution non agréées par le fabricant font courir un
risque d’incendie, d’électrocution et d’autres risques
encore.
15.Contrôle de sécurité – Après toute intervention
d’entretien ou de réparation sur ce produit, demander au
dépanneur d’effectuer les vérifications de sécurité pour
s’assurer qu’il est en bon état de marche.
16.Montage au mur ou au plafond – En cas de montage
du produit au mur ou au plafond, suivre les recommandations
du fabricant.
17. Chaleur – Ce produit doit être tenu à l’écart de sources
de chaleur comme les radiateurs, les trappes de chaleur,
les poêles et autres produits. Ne placer aucun objet en
combustion, telle qu’une bougie ou une lanterne, sur le
produit ou dans son voisinage immédiat.
18.Lignes électriques – Une antenne extérieure ne doit
jamais s’installer à proximité de lignes électriques
aériennes ou des fils d’un circuit électrique force ou lumière
ou encore à un endroit où elle risque de tomber sur de
tels circuits ou lignes. Pendant l’installation d’une antenne
extérieure, observer la plus grande prudence car tout
contact avec une ligne ou un circuit électrique fait courir
un danger de mort.
CONSIGNES DE SÉCURITÉ IMPORTANTES
Attention : Lire attentivement cette page pour garantir une exploitation sans danger.
Remarque:
L’article 7 n’est pas requis sauf pour un équipement mis à
la terre ou polarisé.
Page 13
FRANÇAIS
FRANÇAIS 13
Déballage
Déballez soigneusement l'appareil et assurez-vous que tous les accessoires ci-dessous sont présents.
Accessoires
Si un quelconque des accessoires est manquant, ou encore si l'appareil est endommagé ou ne fonctionne pas,
prévenez immédiatement le revendeur. Si l'appareil vous a été livré directement, faites des réserves auprès du
transporteur. Kenwood vous suggère de conserver l'emballage d'origine de manière que vous puissiez ultérieurement
réexpédier l'appareil sans risque.
Gardez ce manuel pour une référence future.
Table des matières
Attention : Lire les pages marquées avec attention pour garantir un fonctionnenment en toute sécurité.
Avant la mise sous tension................................... 11
Précautions de sécurité ................................................... 11
CONSIGNES DE SÉCURITÉ IMPORTANTES ........ 12
Table des matières ....................................................... 13
Accessoires ................................................................................ 13
Particularités ................................................................. 14
Points importants .......................................................... 14
Référence .................................................................................... 14
Entretien ...................................................................................... 14
Connexions..................................................................... 15
Raccordement des appareils de lecture ............................... 15
Raccordement des enceintes.................................................. 16
Commandes et indicateurs.......................................... 17
Installation verticale................................................................. 17
Fonctionnement .............................................................18
En cas de difficultés ..................................................... 19
Caractéristiques techniques....................................... 19
Cordon audio (1)
(Fiche RCA - fiche de Φ3,5 mm)
Support (2)
Pour votre référence
Inscrivez le numéro de série, que vous trouverez à l'arrière de l'appareil, dans les espaces prévus de la carte de garantie et
dans l'espace prévu ci-dessous. Indiquez les numéros de modèle et de série au cas où vous devrez faire appel à votre
concessionnaire pour des renseignements ou réparations de cet appareil.
Modèle KA-S10 Numéro de série
Page 14
FRANÇAIS
14 FRANÇAIS
Particularités
Trois jeux de prises d’entrée
Points importants
Précaution concernant la condensation
L'humidité ambiante peut se condenser à l'intérieur de l'appareil si une différence de température inportante existe
entre la température de l'appareil et celle de l'atmosphère ambiante. En ce cas, l'appareil peut présenter des anomalies
de fonctionnement. Si cela se produit, laissez l'appareil pendant quelques heures et ne l'utilisez qu'après l'évaporation
de l'eau condensée.
Veillez spécialement à la condensation dans les cas suivants:
L'appareil est transporté d'un endroit à un autre et une différence inportante de température existe entre les deux
endroits, l'humidité de la pièce où set trouve l'appareil augmente, etc.
Entretien
Entretien de l'appareil
Si la face avant ou le coffret sont sales, les nettoyer avec
un chiffon propre et sec. N'utiliser ni diluant, essence,
alcool, etc., car ces produits peuvent décolorer les surfaces.
En ce qui concerne les produits à nettoyer les
verres de contact
Ne pas utiliser de nettoyeur de contact car ceci pourrait
provoquer un mauvais fonctionnement. Attention en
particulier aux nettoyeurs de contact contenant de l'huile
car ils risquent de déformer les éléments de plastique.
Référence
Entrée analogique à haut niveau de gain d’entrée (D.AUDIO) pour le raccordement d’un appareil portable à
bas niveau de sortie audio, ainsi que deux entrées analogiques pour les appareils de salon (CD, AUX).
Prise de sortie de caisson de graves
Un caisson de graves amplifié avec entrée RCA peut être raccordé à cet appareil.
Circuit N.B. (Natural Bass)
Trois préréglages de basses comportant des fréquences d’amplification centrales et des niveaux différents
peuvent être présélectionnés pour reproduire les basses selon l’environnement et la taille des enceintes.
Installation verticale ou horizontale
Deux supports sont fournis pour l’installation verticale ou horizontale de l’appareil.
Page 15
FRANÇAIS
FRANÇAIS 15
ATTENTION
Veuillez respecter ce qui suit, faute de quoi la ventilation de l'appareil serait perturbée, ce qui pourrait
causer son endommagement, voire un incendie.
÷ Ne posez aucun appareil sur le dessus de celui-ci.
÷ Ménagez un espace autour de l'appareil au moins
égal aux valeurs ci-dessous (compté à partir des parties faisant saillie).
Panneau supérieur: 50 cm Panneau arrière: 10 cm
÷ Ne pas placer l'équipement sur un lit, un divan, une
carpette ou autre objet similaire. La poussière
aspirée risque de causer un incendie.
PRÉCAUTIONS CONCERNANT LES RACCORDEMENTS
Ne brancher le cordon d’alimentation sur une prise
murale que lorsque tous les appareils sont raccordés.
Avant de débrancher un cordon ou un câble de
l’application, toujours régler l’interrupteur POWER
sur OFF et débrancher la fiche d’alimentation de la
prise secteur.
Sélectionner les prises d’entrée en fonction de l’appareil
raccordé.
L’entrée D.AUDIO a un gain d’entrée élevé et peut accepter le signal de la sortie casque d’un appareil portable, comme un lecteur audio à disque dur (HDD).
Lorsque la sortie de ligne d’un appareil de salon, par
exemple un lecteur CD, est raccordée à ces prises, le
son est à un niveau sonore plus élevé que lorsqu’elle
est raccordée aux prises CD ou AUX. Dans ce cas, le
son peut être déformé si le volume d’écoute est trop
haut.
ATTENTION
L’appareil n’est pas complètement isolé du courant
secteur lorsque l’interrupteur POWER est réglé sur
OFF. Pour isoler complètement l’appareil de la source
d’alimentation, il est nécessaire de débrancher le
cordon d’alimentation de la prise secteur.
Pour pouvoir couper immédiatement le courant en
cas d’urgence, brancher la fiche du cordon
d’alimentation sur une prise secteur accessible.
Connexions
Raccordement des appareils de lecture
÷ Si on raccorde un appareil autre que ceux de cette chaîne, consulter le mode d'emploi de l'appareil en question.
÷ Veiller à ce que tous les câbles de raccordement soient correctement enfichés. S'il y a un mauvais contact, le
son reproduit est brouillé ou il n'y a pas de son du tout.
RemarquesRemarques
Cordon audio
(accessoire fourni)
Blanc Rouge
Lecteur audio HDD,
etc.
Lecteur CD, etc.
Insérer la fiche du cordon
d’alimentation à fond dans la
prise secteur.
Fiche du cordon
d’alimentation
A la prise murale secteur
AUDIO OUT
(LINE OUT)
Page 16
FRANÇAIS
16 FRANÇAIS
Connexions
PRÉCAUTIONS CONCERNANT LES RACCORDEMENTS
Ne brancher le cordon d’alimentation sur une prise murale que lorsque tous les appareils sont raccordés. Avant
de débrancher un cordon ou un câble de l’application, toujours régler l’interrupteur POWER sur OFF et débrancher
la fiche d’alimentation de la prise secteur.
Les fils des cordons d’enceintes ne doivent pas entrer en contact avec les bornes ou le coffret de l’appareil.
Enceintes
(Impédance 6 Ω - 16 Ω)
Caisson de graves amplifié
1 Dénudez le cordon. 2 Desserrez la borne.
4 Serrez la borne.3 Introduisez le cordon.
Gauche
Droit
Raccordement des enceintes
÷ Ne jamais court-circuiter les fils de haut-parleur "+" et "–". Un dysfonctionnement pourrait s’ensuivre.
÷ Si les pôles "+" et "–" sont inversés, le son perdra de son naturel, et les instruments de musique ne seront pas
bien placés.
÷ Veiller à ce que tous les câbles de raccordement soient correctement enfichés. S'il y a un mauvais contact, le
son reproduit est brouillé ou il n'y a pas de son du tout.
RemarquesRemarques
Page 17
FRANÇAIS
FRANÇAIS 17
1 Interrupteur POWER
Pour mettre sous tension (ON) ou hors tension (OFF).
2 Bouton VOLUME
Une rotation dans le sens horaire augmente le niveau
du volume qui est réduit par une rotation dans le sens
opposé.
3 Indicateur d’entrée
L’indicateur de la source d’entrée sélectionnée avec le
bouton INPUT SELECTOR s’allume.
Tous les indicateurs sont éteints lorsque l’appareil est
hors service.
4 Bouton INPUT SELECTOR
Sélectionne la source d’entrée (D.AUDIO, CD ou
AUX).
5 Bouton N.B. CIRCUIT
Ajuste les basses selon trois niveaux.
Sélectionner la position en fonction des enceintes qui
seront utilisées.
CD
D.AUDIO
INPUT SELECTOR
AUX
VOLUME
POWER N.B.CIRCUIT
OFF
1
2
3
STEREO INTEGRATED AMPLIFIER KA-S10
MIN MAX
OFFON
12 3 45
L’appareil peut être installé verticalement ou horizontalement, avec les deux supports fournis.
ATTENTION
Lors de l’installation de l’appareil, ne pas bloquer
les ailettes de ventilation pour que la chaleur puisse
se disperser. Sinon, la chaleur peut causer une panne
ou un incendie.
CD
D.AUDIO
INPUT SELECTOR
AUX
VOLUME
POWER N.B.CIRCUIT
OFF
1
2
3
STEREO INTEGRATED AMPLIFIER
KA-S10
MIN MAX
OFFON
Installation verticale
ATTENTION
Prendre les précautions suivantes avant d’installer
l’appareil. Mal installé, l’appareil pourrait se
renverser ou tomber et causer des blessures.
÷ Toujours utiliser les supports fournis pour installer
l’appareil verticalement.
÷ Lorsque l’appareil est installé verticalement, le
positionner de sorte que l’interrupteur POWER soit
vers le bas, comme sur l’illustration.
Interrupteur
POWER
Commandes et indicateurs
Page 18
FRANÇAIS
18 FRANÇAIS
Fonctionnement
1. Mise en et hors service.
3. Ajustement du volume.
2. Sélection des source d'entrée désirées.
Appuyer sur l’interrupteur POWER pour mettre l’appareil hors
service.
Un des indicateurs d’entrée s’allume lorsque l’appareil est en
service.
Pour mettre l’appareil hors service, appuyer une nouvelle fois sur
l’interrupteur POWER. Les indicateurs d’entrée s’éteignent
lorsque l’appareil est hors service.
Tourner le bouton VOLUME sans un sens ou l’autre pour régler le
volume.
Tourner le bouton dans le sens horaire pour réduire le volume
d’écoute et dans le sens antihoraire pour le réduire.
Lorsque CD est sélectionné.
Tourner le bouton INPUT SELECTOR dans un sens ou l’autre pour
sélectionner la source.
L’indicateur d’entrée de la source sélectionnée s’allume.
Réglage du grave avec le bouton N.B. (Natural Bass) CIRCUIT
Tourner le bouton N.B. CIRCUIT dans un sens ou l’autre pour régler les basses fréquences, si nécessaire.
OFF : Lecture normale (Le circuit N.B est désactivé.)
1:
Améliore les basses fréquences autour de 60 Hz.
2:
Améliore les basses fréquences autour de 70 Hz
.
3:
Améliore les basses fréquences autour de 100 Hz.
N.B.CIRCUIT
OFF
1
2
3
CD
D.AUDIO
INPUT SELECTOR
AUX
POWER
OFFON
VOLUME
MIN MAX
Baisser le
volume
Monter le
volume
Représentation de l’effet du circuit N.B.
En général, le réglage des basses avec le circuit N.B. est
plus efficace lorsque des petites enceintes sont utilisées
parce que les basses sont souvent insuffisantes sur ce
type d’enceintes. Le bouton N.B. CIRCUIT devrait être
réglé sur OFF lorsqu’un caisson de graves est utilisé.
RemarquesRemarques
Fréquence
Niveau
Page 19

FRANÇAIS
FRANÇAIS 19
En cas de difficultés
Ce qui semble être une anomalie de fonctionnement, ne l'est pas toujours. Avant de faire appel aux services d'un technicien, procéder aux vérifications mentionnées ci-dessous.
Aucun son ne sort.
Aucun son ou inférences.
Le son n'est pas produit aux haut-parleurs de
gauche ou de droite.
Le volume sonore est trop faible.
Son trop faible et distorsion.
÷ Raccorder correctement en se référant à "Connexions".
%^
÷ Régler à un niveau du volume requis. *
÷ Sélectionne la source d’entrée souhaitée avec le bouton INPUT
SELECTOR. *
÷ Le circuit de protection des enceintes s’est activé. Voir "Circuit
de protection des enceintes" ci-dessous et éliminer la source
de court-circuit dans les cordons d’enceintes. (
÷ Raccorder correctement en se référant à "Connexions".
%^
÷ Raccorder correctement en se référant à "Connexions".
%^
÷ Si la sortie casque d’un appareil portable est reliée aux prises
d’entrée CD ou AUX, la relier aux prises d’entrée D.AUDIO.
%
÷ Raccorder correctement en se référant à "Connexions".
%^
÷ Si la sortie de ligne d’un appareil de salon, comme un lecteur CD,
est reliée aux prises d’entrée D.AUDIO, la relier aux prises
d’entrée CD ou AUX. %
RemèdeNature de l'anomalie
Caractéristiques techniques
Circuit de protection des enceintes
Le circuit de protection des enceintes s’active si les cordons d’enceintes + et – sont court-circuités lorsque l’appareil est
mis en service.
Lorsque le circuit s’active, le son est coupé pour protéger les enceintes et l’appareil.
Si les cordons d’enceintes sont court-circuités, éteindre l’appareil, débrancher le cordon d’alimentation de la prise
secteur et rebrancher les cordons d’enceintes correctement en éliminant le court-circuit. Brancher le cordon d’alimentation
sur la prise secteur et régler l’interrupteur POWER sur ON pour réutiliser l’appareil.
[Section audio]
Puissance effective de sortie en mode STEREO
(1 kHz, 10 % T.H.D., sur 8 Ω) ....... 12 W + 12 W (RMS)
(1 kHz, 10 % T.H.D., sur 6 Ω) ....... 13 W + 13 W (RMS)
Puissance nominale de sortie en mode STEREO
(63 Hz ~ 12,5 kHz, sur 8 Ω)........... 10 W + 10 W (DIN)
(63 Hz ~ 12,5 kHz, sur 6 Ω)........... 11 W + 11 W (DIN)
Distorsion harmonique totale
............................. 0,03 % (AUX IN, 1 kHz, 6 W, 8 Ω)
Circuit N.B.
N.B. 1 ........................................... +3,0 dB (sur 60 Hz)
N.B. 2 ........................................... +5,0 dB (sur 70 Hz)
N.B. 3 ......................................... +7,5 dB (sur 100 Hz)
Entrée (Sensibilité / Impédance)
LINE (CD, AUX) ............................... 250 mV / 22 kΩ
LINE (D.AUDIO) ............................... 140 mV / 48 kΩ
Sortie (Niveau / Impédance)
SUBWOOFER PREOUT ....................... 1,8 V / 2,9 kΩ
[Générales]
Consommation....................................................... 28 W
Dimensions
Installation horizontale
L : 171 mm H : 67 mm P : 207 mm
Installation verticale
L : 89 mm H : 182 mm P : 207 mm
Poids (net) ................................................................. 2 kg
Remarques : KENWOOD poursuit une politique perma-
nente de recherche. Pour cette raison les caractéristiques
peuvent être modifiées sans préavis.
÷ Les températures extrêmes froides (quand l'eau gèle),
peuvent diminuer les performances.
Page 20

DEUTSCH
20 DEUTSCH
Vor Einschalten der Spannungsversorgung
Achtung : Lesen Sie diese Seite sorgfältig durch, um einen sicheren Betrieb zu gewährleisten.
Geräte sind für Betrieb wie folgt vorgesehen.
Europe und Groß britannien .............................. nur Wechselstrom 230 V
Entsorgung von gebrauchten elektrischen und elektronischen Geräten (anzuwenden in den
Ländern der Europäischen Union und anderen europäischen Ländern mit einem separaten
Sammelsystem für solche Geräte)
Das Symbol (durchgestrichene Mülltonne) auf dem Produkt oder seiner Verpackung weist darauf
hin, dass dieses Produkt nicht als normaler Haushaltsabfall behandelt werden darf, sondern an
einer Annahmestelle für das Recycling von elektrischen und elektronischen Geräten abgegeben
werden muss.
Durch Ihren Beitrag zur korrekten Entsorgung dieses Produktes schützen Sie die Umwelt und die
Gesundheit Ihrer Mitmenschen. Unsachgemässe oder falsche Entsorgung gefährden Umwelt und
Gesundheit. Weitere Informationen über das Recycling dieses Produktes erhalten Sie von Ihrer
Gemeinde oder den kommunalen Entsorgungsbetrieben.
Sicherheitshinweise
WARNUNG: DIESES GERÄT DARF NICHT IM REGEN ODER IN
FEUCHTEN RÄUMEN BETRIEBENWERDEN, UM FEUER UND
ELEKTRISCHE SCHLÄGE ZU VERMEIDEN.
ACHTUNG: ZUR VERMEIDUNG VON ELEKTRISCHEN SCHLÄGEN
KEINE GEHÄUSETEILE (ODER DIE RÜCKWAND) ENTFERNEN. IM
INNERN BEFINDEN SICH KEINE VOM BENUTZER REPARIERBAREN
TEILE. WENDEN SIE SICH FÜR REPARATUREN AN QUALIFIZIERTES
KUNDENDIENSTPERSONAL.
DAS BLITZSYMBOL MIT PFEILSPITZE IN EINEM GLEICHSEITIGEN DREIECK SOLL DEN BENUTZER AUF
NICHT ISOLIERTE, SPANNUNGSFÜHRENDE TEILE INNERHALB DES GEHÄUSES HINWEISEN, UM
ELEKTRISCHE SCHLÄGE ZU VERMEIDEN.
DAS AUSRUFUNGSZEICHEN IN EINEM GLEICHSEITIGEN DREIECK SOLL DEN BENUTZER AUF
WICHTIGE BEDIENUNG- UND WARTUNGSANWEISUNGEN IN DER MIT DEM GERÄT MITGELIEFERTEN BEDIENUNGSANLEITUNG AUFMERKSAM MACHEN.
RISK OF ELECTRIC SHOCK
DO NOT OPEN
CAUTION
Page 21

DEUTSCH
DEUTSCH 21
Lesen Sie die Bedienungsanleitung – Befolgen Sie alle
Sicherheits- und Bedienungsanweisungen, wenn Sie dieses
Produkt in Betrieb nehmen.
Bewahren Sie die Bedienungsanleitung auf – Sie sollten
die Sicherheits- und Bedienungsanweisungen für spätere
Nachschlagzwecke aufbewahren.
Befolgen Sie die Warnungen – Sie sollten alle an dem
Produkt angegebenen und in der Bedienungsanleitung
aufgeführten Warnungen strikt befolgen.
Befolgen Sie die Instruktionen – Bitte befolgen Sie alle
aufgeführten Instruktionen für die Bedienung und die
Verwendung.
1. Reinigung – Ziehen Sie den Netzstecker dieses Gerätes
von der Netzdose ab, bevor Sie dieses Produkt reinigen. Verwenden Sie niemals flüssige Reinigungsmittel oder
Reinigungssprays. Verwenden Sie nur ein angefeuchtetes
Tuch für das Reinigen.
2. Zusatzvorrichtungen – Verwenden Sie niemals Zusatzvorrichtungen, die nicht vom Hersteller empfohlen wurden,
weil dadurch Unfälle verursacht werden können.
3.
Wasser und Feuchtigkeit – Das Gerät darf niemals Was-
sertropfen oder Wasserspritzern ausgesetzt werden – wie sie
zum Beispiel in der Nähe einer Badewanne, eines Waschbekkens, einer Küchenspüle, einer Waschmaschine, in einem
feuchten Kellerraum oder in der Nähe eines Schwimmbekkens usw. auftreten.
Stellen Sie niemals mit Flüssigkeiten
gefüllte Behälter, wie z.B. Blumenvasen, auf das Gerät.
4. Zubehör – Ordnen Sie dieses Gerät niemals auf einem
instabilen Wagen, Stand, Stativ, Halter oder Tisch an. Das
Gerät könnte herunter fallen und ernsthafte Verletzungen
bei Kindern und Erwachsenen bzw. ernsthafte Beschädigungen an dem Gerät verursachen. Verwenden Sie nur
einen vom Hersteller empfohlenen Wagen, Stand, Stativ,
Halter oder Tisch. Die Montage dieses Gerätes ist gemäß
den Instruktionen des Herstellers auszuführen, wobei nur
das von dem Hersteller empfohlene Einbaumaterial verwendet werden darf. Lassen Sie äußerste Vorsicht walten, wenn Sie das auf einen Wagen angebrachte Gerät
mit dem Wagen transportieren. Schnelles Anhalten, übermäßige Kraftanwendung und unebene Bodenflächen könnten dazu führen,
dass das auf dem Wagen abgestellte Gerät
gemeinsam mit dem Wagen umfällt.
5. Ventilation – Im Gehäuse des Gerätes sind Ventilationsöffnungen vorhanden, um einen zuverlässigen Betrieb des
Gerätes zu gewährleisten und um es vor Überhitzung zu
schützen. Blockieren Sie niemals die Belüftungsöffnungen,
indem Sie das Gerät auf einem Bett, Sofa, Teppich oder
einer ähnlich weichen Unterlage abstellen. Dieses Gerät
sollte nicht in ein Bücherregal oder Einbauschrank eingebaut werden, wenn nicht für ausreichende Belüftung gesorgt ist, wie es in der Einbauanleitung des Herstellers
beschrieben ist.
6. Spannungsversorgung – Dieses Gerät darf nur an die
Netzspannung angeschlossen werden, die an dem Gerät angegeben ist. Wenn Sie sich über die Art der Spannungsversorgung in Ihrer Wohnung nicht sicher sind, wenden Sie
sich an Ihren Faschhändler oder an das örtliche Energieversorgungsunternehmen.
7. Netzkabel – Netzkabel müssen so geführt werden,
dass sie keine Stolpergefahr bilden und dass keine Beschädigung durch andere Gegenstände hervorgerufen
werden kann. Insbesondere ist Vorsicht an Steckern, Steckdosen sowie dem Austritt des Netzkabels aus dem Gerät
geboten.
8. Gewitter – Zum Schutz des Gerätes bei einem Gewitter, oder wenn es über längere Zeit nicht beaufsichtigt und
benutzt wird, sollte der Netzstecker gezogen und die Antenne oder das Kabelsystem abgetrennt werden. Dies
verhindert Schäden am Gerät aufgrund von Blitzschlag und
Spannungsstößen im Wechselstromnetz.
9. Überlastung – Überlasten Sie niemals Netzsteckdosen,
Verlängerungskabel oder Mehrfachsteckdosen, weil sonst
die Gefahr von Feuer oder elektrischen Schlägen besteht.
10.Eindringen von Fremdmaterial und Flüssigkeit –
Achten Sie darauf, dass niemals Fremdmaterial oder Flüssigkeit durch die Belüftungsöffnungen in dieses Gerät eindringt, da es anderenfalls zu Kontakt mit unter hoher Spannung stehender Bauteile bzw. zu einem Kurzschluss mit
dem sich daraus ergebenden Brand oder elektrischen
Schlag kommen kann. Verschütten Sie niemals Flüssigkeiten jeglicher Art auf dieses Gerät.
11. Wartung – Versuchen Sie niemals selbst, die Wartung
dieses Gerätes auszuführen, da durch die Öffnungen oder
durch das Entfernen von Abdeckungen unter Spannung
stehende Teile freigelegt werden können, deren Berührung
eine Gefahrenquelle darstellt. Überlassen Sie alle
Wartungsarbeiten dem qualifizierten Kundendienstpersonal.
12.Beschädigungen, die Reparatur erfordern – Ziehen Sie
den Netzstecker, und überlassen Sie unter den folgenden
Bedingungen die Wartung dem qualifizierten Kundendienstpersonal.
a) Wenn das Netzkabel oder der Netzstecker beschädigt
ist.
b) Wenn Flüssigkeit auf das Gerät verschüttet wurde
oder Gegenstände in das Gerät eingedrungen sind.
c) Wenn das Gerät Regen oder Wasser ausgesetzt war.
d) Wenn das Gerät bei Befolgung der Bedienungsan-
leitung nicht normal arbeitet.
e) Wenn das Gerät fallengelassen oder auf jegliche
Weise beschädigt wurde.
f) Wenn das Gerät eine deutliche Änderung der Lei-
stung aufweist, die auf eine erforderliche Wartung
hinweist.
g) Wenn ungewöhnlicher Geruch oder Rauch festgestellt
wird.
13.Ersatzteile – Wenn Ersatzteile benötigt werden, überzeugen Sie sich, daß der Kundendiensttechniker Ersatzteile verwendet, die vom Hersteller vorgeschrieben sind oder
die gleichen Eigenschaften wie die Originalteile aufweisen.
Nicht zugelassene Ersatzteile können zu Feuer, elektrischen Schlägen oder anderen Unfällen führen.
14.Sicherheitsprüfung – Bitten Sie den Kundendiensttechniker nach der Beendigung von Wartungs- oder Reparaturarbeiten an diesem Gerät um die Durchführung einer
Sicherheitsprüfung, um festzustellen, ob sich das Gerät
im einwandfreien Betriebszustand befindet.
15.Wand- oder Deckenmontage – Dieses Gerät darf nur
gemäß Empfehlung des Herstellers an einer Wand oder
an der Decke angebracht werden.
16.Wärme– Das Gerät darf nicht in der Nähe von Wärmequellen wie Heizgebläsen, Heizungen, Öfen oder anderen
Geräten, die Wärme erzeugen, aufgestellt werden. Stellen Sie niemals Objekte mit offenen Flammen, wie Kerzen
oder Laternen, auf oder in die Nähe des Gerätes.
17. Stromleitungen – Eine Außenantenne sollte nicht in
der Nähe von Starkstromleitungen oder anderen elektrischen Leitungen bzw. an Stellen, wo es auf derartige elektrische Leitungen fallen kann, installiert werden. Beim Installieren einer Außenantenne muß mit größter Sorgfalt
darauf geachtet werden, nicht versehentlich elektrische
Leitungen zu berühren, weil dies lebensgefährlich ist.
WICHTIGE SICHERHEITSINSTRUKTIONEN
Achtung : Lesen Sie diese Seite sorgfältig durch, um einen sicheren Betrieb zu gewährleisten.
Page 22

DEUTSCH
22 DEUTSCH
Auspacken
Packen Sie das Gerät vorsichtig aus, und achten Sie darauf, daß alle Zubehörteile vorhanden sind.
Zubehör
Falls nicht alle Zubehörteile vorhanden sind bzw. das Gerät beschädigt ist oder nicht einwandfrei funktioniert, wenden
Sie sich sofort an das Geschäft, in dem Sie das Gerät erworben haben. Wir empfehlen, den Karton und die
Verpackungsmaterialien für einen möglichen Transport des Gerätes in der Zukunft aufzubewahren.
Bitte heben Sie diese Bedienungsanleitung für zukünftiges Nachschlagen gut auf.
Inhalt
Achtung : Lesen Sie die folgendent, min markierten Seiten sorgfältig durch.
Vor Einschalten der Spannungsversorgung ......20
Sicherheitshinweise ......................................................... 20
WICHTIGE SICHERHEITSINSTRUKTIONEN......... 21
Inhalt................................................................................ 22
Zubehör........................................................................................ 22
Merkmale ....................................................................... 23
Wichtige Punkte............................................................ 23
Referenz....................................................................................... 23
Wartung ....................................................................................... 23
Anschlüsse .....................................................................24
Anschließen der Wiedergabekomponenten ........................ 24
Anschließen der Lautsprecher ............................................... 25
Bedienelemente und Anzeigen .................................. 26
Vertikale Aufstellung ................................................................ 26
Bedienung ...................................................................... 27
Bei Störungen ................................................................ 28
Technische Daten ......................................................... 28
Audio-kabel (1)
(RCA CA-Stecker - Φ3,5-mm-Stecker)
Ständer (2)
Seriennummer
Tragen Sie die Seriennummer, die sich an der Rückseite des Gerätes befindet, in die Garantiekarte und unten ein.
Geben Sie das Modell und die Seriennummer immer an, wenn Sie sich für Rückragen oder Reparaturen an lhren
Fachhändler wenden.
Modell KA-S10 Seriennummer
Page 23

DEUTSCH
DEUTSCH 23
Merkmale
Drei Sätze von Eingangsanschlüssen
Wichtige Punkte
Vorsichetshinweise zur Kondensationsbildung
Kondensation (Tau) kann sich im Innern des Geräts bilden, wenn zwischen der Temperatur des Geräts und der
Umgebungstemperatur ein wesentlicher Unterschied besteht
Sollte sich im Innern des Geräts Kondensation bilden, ist eine einwandfreie Funktion nicht mehr gewährleistet.In diesem
Fall muß einige Stunden gewartet werden; nachdem die Kondensation abgetrocknet ist, kann das Gerät wieder verwendet
werden.
Besondere Vorsicht ist unter den folgenden Umständen geboten:
Wenn das Gerät von einem Ort zu einem anderen bewegt wird, der eine wesentlich höhere oder niedrigere Temperatur
aufweist, oder wenn sich die Luftfeuchtigkeit am Aufstellort des Geräts erhöht, usw.
Wartung
Wartung des Geräts
Wenn die Frontplatte oder das Gehäuse verschmutzt sind,
können sie mit einem weichen, trockenen Lappen
abgewischt werden. Niemals Verdünner, Benzol, Alkohol
usw. verwenden, da diese Flüssigkeiten eine Verfärbung
des Gehäuses verursachen können.
Hinweis zu Kontactreinigern
Kontakt-Reinigungsmittel sollten nicht verwendet werden,
weil dadurch Fehlfunktionen verursacht werden können.
Insbesondere müssen Reinigungsmittel, die Öl enthalten,
vermieden werden, weil sich dadurch Plastikteile
verformen können.
Referenz
Zur Verbindung mit einer tragbaren Komponente mit niedrigem Audioausgangspegel ist ein Analogeingang
mit hoher Eingangsverstärkung (D.AUDIO) neben zwei Analogeingängen für normale DesktopKomponenten (CD, AUX) vorhanden.
Subwoofer-Ausgangsanschluss
Ein Subwoofer mit eingebautem Verstärker und Klinken-Eingangsbuchse kann an dieses Gerät
angeschlossen werden.
N.B.-Schaltung (natürliche Bässe)
Die Bassklänge können unter drei Vorgaben mit verschiedenen Verstärkungsmittenfrequenzen und Pegeln je
nach Aufstellungsumgebung und Lautsprechergröße gewählt werden.
Entweder vertikale oder horizontale Aufstellung
Ein paar Ständer ist zur vertikalen oder flachen Aufstellung vorhanden.
Page 24

DEUTSCH
24 DEUTSCH
ACHTUNG
Beachten Sie unbedingt die folgenden Punkte, da
anderenfalls die Belüftung blockiert wird, was zu
Feuergefahr führt.
÷ Stellen Sie niemals Gegenstände auf der Einheit ab,
welche die Wärmeabfuhr beeinträchtigen.
÷ Halten Sie ausreichend Abstand rund um die Einheit
ein (gemessen von der größten Außendimension
einschließlich ßberständen), der mindestens den
nachfolgenden Werten entspricht.
Oberseite: 50 cm Rückwand: 10 cm
÷ Stellen Sie das System nicht auf ein Bett, ein Sofa,
einen Teppich o. dgl. Durch die Lüftung eingesogene
Staubteilchen können einen Brand verursachen.
VORSICHTSMASSREGELN ZUM ANSCHLUSS
Das Netzkabel darf erst mit der Steckdose verbunden
werden, wenn alle anderen Anschlüsse erfolgt sind.
Vor dem Abziehen von Anschlusskabeln vom Gerät
muss immer der Netzschalter auf OFF gestellt und der
Netzstecker aus der Wandsteckdose gezogen werden.
Wählen Sie die Eingangsanschlüsse je nach Typ der
angeschlossenen Komponente.
Der Eingang D.AUDIO ist mit hoher Eingangsverstärkung
ausgestattet, so dass er Eingang vom Kopfhörerausgang einer
tragbaren Kompoente wie einem Audioplayer mit HDD
(Festplatte) annehmen kann. Wenn der Line-Ausgang von einer
Desktop-Komponente wie einem CD-Player an diese Anschlüsse
angeschlossen ist, wird der Ton mit einer höhere Lautstärke
abgespielt, als wenn der Anschluss an die CD- oder AUXAnschlüsse vorgenommen ist. In diesem Fall aber kann der Klang
verzerrt sein, wenn die Hörlautstärke zu hoch eingestellt ist.
ACHTUNG
Durch einfaches Umstellen des Netzsteckers auf OFF
wird die Stromversorgung zum Gerät nicht
vollständig abgebrochen. Zum vollständigen
Abtrennen des Geräts vom Stromnetz muss der
Netzstecker aus der Steckdose gezogen werden.
Um zum sofortigen Unterbrechen der
Stromversorgung im Notfall den Netzstecker schnell
abziehen zu können, wählen Sie eine leicht
zugängliche Steckdose.
Anschlüsse
Anschließen der Wiedergabekomponenten
÷ Wenn eine zugehörige Systemkomponente angeschlossen wird, muß auch deren Bedienungsanleitung
beachtet werden.
÷ Alle Anschlußkabel müssen einwandfrei angeschlossen werden. Bei unzureichenden Anschlüssen ist es
möglich, daß kein Ton reproduziert wird oder daß Störgeräusche auftreten.
HinweiseHinweise
Audio-kabel
(mitgeliefertes
Zubehör)
Weiß Rot
HDD-Audioplayer
usw.
CD-Player usw.
Stecken Sie den Netzstecker
vollständig und sicher in die
Steckdose ein.
Netzstecker
zur Netzsteckdose
AUDIO OUT
(LINE OUT)
Page 25

DEUTSCH
DEUTSCH 25
Anschlüsse
VORSICHTSMASSREGELN ZUM ANSCHLUSS
Das Netzkabel darf erst mit der Steckdose verbunden werden, wenn alle anderen Anschlüsse erfolgt sind.
Vor dem Abziehen von Anschlusskabeln vom Gerät muss immer der Netzschalter auf OFF gestellt und der
Netzstecker aus der Wandsteckdose gezogen werden.
Achten Sie immer darauf, dass Leiteradern von Lautsprecherdrähten nicht andere Klemmen oder das Gehäuse
des Geräts berühren.
Lautsprecher
(Impedanz 6 Ω - 16 Ω)
Subwoofer mit
eingebautem Verstärker
Links
Rechts
Anschließen der Lautsprecher
÷ Die positiven „+” und negativen „–” Lautsprecherkabel dürfen niemals kurzgeschlossen werden. Hierdurch
können Fehlfunktionen verursacht werden.
÷ Wenn die „+” und „–” Polarität vertauscht wird, hat dies einen unnatürlich wirkenden Ton und eine inkorrekte
Positionierung der Instrumente zur Folge.
÷ Alle Anschlußkabel müssen einwandfrei angeschlossen werden. Bei unzureichenden Anschlüssen ist es
möglich, daß kein Ton reproduziert wird oder daß Störgeräusche auftreten.
HinweiseHinweise
1 Lautsprecherkabel am
Ende abisolieren.
2 Lösen.
4 Festdrehen.3 Einstecken.
Page 26

DEUTSCH
26 DEUTSCH
1 Netzschalter (POWER-Schalter)
Zum Ein- und Ausschalten der Stromversorgung.
2 VOLUME-Regler
Wenn der Knopf im Uhrzeigersinn gedreht wird, erhöht
sich der Lautstärkepegel, und durch Drehen im
Gegenuhrzeigersinn wird die Lautstärke reduziert.
3 Eingangsanzeige
Die Anzeige für die mit dem Knopf INPUT SELECTOR
gewählte Eingangsquelle leuchtet auf.
Alle Anzeigen erlöschen, wenn das Gerät
ausgeschaltet wird.
4 INPUT SELECTOR-Knopf
Wählt die Eingangsquelle (D.AUDIO, CD oder AUX).
5 N.B. CIRCUIT-Knopf
Stellt den Bassklang in drei Schritten ein.
Zum Wählen der Position entsprechend verwendeten
Lautsprechern oder persönlichem Geschmack.
CD
D.AUDIO
INPUT SELECTOR
AUX
VOLUME
POWER N.B.CIRCUIT
OFF
1
2
3
STEREO INTEGRATED AMPLIFIER KA-S10
MIN MAX
OFFON
12 3 45
Das Gerät kann vertikal oder auf seiner linken Seite aufgestellt werden, indem das mitgelieferte
Ständerpaar verwendet wird.
ACHTUNG
Bei der Aufstellung des Geräts müssen Sie darauf
achten, nicht die Lüftungsöffnungen zu verdecken,
um für gute Hitzeabführung zu sorgen. Andernfalls
kann Hitzestau im Gerät zu Fehlfunktionen oder
Bränden führen.
CD
D.AUDIO
INPUT SELECTOR
AUX
VOLUME
POWER N.B.CIRCUIT
OFF
1
2
3
STEREO INTEGRATED AMPLIFIER
KA-S10
MIN MAX
OFFON
Vertikale Aufstellung
ACHTUNG
Bei der Aufstellung des Geräts müssen die folgenden
Vorsichtsmaßregeln beachtet werden. Falsche
Aufstellung kann zu Umkippen des Geräts oder
Herunterfallen führen und Verletzungen verursachen.
÷ Verwenden Sie immer bei der vertikalen
Aufstellung des Geräts die mitgelieferten Ständer.
÷ Bei der vertikalen Aufstellung des Geräts muss es
so platziert werden, dass der Netzschalter unten
ist, wie in der Abbildung gezeigt.
Netzschalter
Bedienelemente und Anzeigen
Page 27

DEUTSCH
DEUTSCH 27
Bedienung
1. Ein- und Ausschalten der Stromversorgung
3. Einstellung der Lautstärke.
2. Auswahl der erwünschten Ausgabequelle.
Drücken Sie den Netzschalter zum Einschalten des Geräts.
Eine der Eingangsanzeigen leuchtet auf, wenn das Gerät
eingeschaltet ist.
Drücken Sie den Netzschalter erneut zum Ausschalten des
Geräts. Die Eingangsanzeigen müssen erlöschen, wenn das Gerät
ausgeschaltet wird.
Drehen Sie den VOLUME-Regler in die betreffende Richtung, um
die Lautstärke einzustellen.
Durch Drehen im Uhrzeigersinn wird die Hörlautstärke höher
gestellt und durch Drehen gegen den Uhrzeigersinn wird sie
niedriger gestellt.
Drehen Sie den Knopf INPUT SELECTOR in die jeweilige Richtung
zum Wählen der Eingangsquelle.
Die Eingangsanzeige für die gewählte Eingangsquelle leuchtet
auf.
Einstellen des Bassklangs mit dem Regler N.B. CIRCUIT (natürliche Bässe)
Drehen Sie den N.B. CIRCUIT-Knopf in die betreffende Richtung, um bei Bedarf die niedrigen
Frequenzen einzustellen.
OFF : Normale Wiedergabe (Die N.B.-Funktion ist
deaktiviert.)
1 : Betont die niedrigen Frequenzen im Bereich
um 60 Hz
2 : Betont die niedrigen Frequenzen im Bereich
um 70 Hz
3 : Betont die niedrigen Frequenzen im Bereich
um 100 Hz
N.B.CIRCUIT
OFF
1
2
3
CD
D.AUDIO
INPUT SELECTOR
AUX
POWER
OFFON
Abbildung der Betonungswirkung der N.B.-Schaltung
Grundsätzlich ist die Basseinstellung mit der N.B.Schaltung am wirksamsten, wenn Kompaktlautsprecher
verwendet werden, da die Tiefen bei solchen
Lautsprechern häufig unzureichend sind. Der N.B.
CIRCUIT-Knopf soll bei einem Subwoofer auf OFF gestellt
werden.
HinweiseHinweise
Frequenz
Pegel
Bei Wahl von CD.
VOLUME
MIN MAX
Lautstärke
vermindern
Lautstärke
erhöhen
Page 28

DEUTSCH
28 DEUTSCH
Bei Störungen
Nicht immer handelt es sich bei einer Störung um eine Fehlfunktion des Geräts. Bevor Sie den Kundendienst benachrichtigen,
überprüfen Sie das Gerät entsprechend dem Störungssymptom und der nachstehenden Störungssuchtabelle.
Es wird kein Ton reproduziert.
Es kommt kein Ton, oder es tritt Rauschen auf.
Vom linken oder rechten Lautsprecher wird kein
Ton reproduziert.
Die Lautstärke ist zu niedrig.
Die Lautstärke ist zu hoch und der Klang
verzerrt.
÷ Nach den Anweisungen unter „Anschlüsse” richtig
anschließen. ¢∞
÷ Die Lautstärke einstellen. ¶
÷ Die gewünschte Eingangsquelle mit dem Knopf INPUT SELEC-
TOR wählen. ¶
÷ Die Lautsprecher-Schutzschaltung kann aktiviert sein. Den
Abschnitt “Lautsprecher-Schutzschaltung” unten lesen und
den Kurzschluss der Lautsprecherkabel beseitigen. •
÷ Nach den Anweisungen unter „Anschlüsse” richtig
anschließen. ¢∞
÷ Nach den Anweisungen unter „Anschlüsse” richtig
anschließen. ¢∞
÷
Wenn der Kopfhörerausgang einer tragbaren Komponente an die
Eingangsanschlüsse CD oder AUX angeschlossen ist, den Anschluss
neu an den Eingangsanschlüssen D.AUDIO vornehmen.
¢
÷ Nach den Anweisungen unter „Anschlüsse” richtig
anschließen. ¢∞
÷
Wenn der Line-Ausgang einer Desktop-Komponente wie eines CD-Players
an die Eingangsanschlüsse D.AUDIO vorgenommen ist, den Anschluss
neu an die Eingangsanschlüsse CD oder AUX vornehmen.
¢
BehebungStörung
Technische Daten
Lautsprecher-Schutzschaltung
Die Lautsprecher-Schutzschaltung wird aktiviert, wenn das Gerät eingeschaltet wird, während die + und Lautsprecherkabel kurzgeschlossen sind.
Wenn sie aktiviert ist, unterbricht die Lautsprecher-Schutzschaltung den Audioausgang, um das Gerät und die Lautsprecher
zu schützen. Wenn Lautsprecherkabel kurzgeschlossen werden, schalten Sie das Gerät aus, ziehen den Netzstecker
von der Steckdose ab und beheben dann den Kurzschluss durch richtigen Anschließen der Lautsprecherkabel. Stecken
Sie den Netzstecker in die Steckdose und schalten das Gerät mit dem Netzschalter ein.
Hinweise : Im Sinne ständiger Verbesserung aller Erzeugnisse von KENWOOD behalten wir uns Än-derungen im
Design und den technischen Daten ohne vorhergehende
Bekanntgabe vor.
÷ Bei sehr niedrigen Temperaturen (unter dem
Gefrierpunkt) wird unter Umständen keine
ausreichende Leistung erhalten.
[Audioteil]
Effektief uitgangsvermogen bei STEREO-Betrieb
(1 kHz, 10 % Klirrgrad bei 8 Ω)... 12 W + 12 W (RMS)
(1 kHz, 10 % Klirrgrad bei 6 Ω)... 13 W + 13 W (RMS)
Nennleistungsabgabe bei STEREO-Betrieb
(63 Hz ~ 12,5 kHz bei 8 Ω) ............ 10 W + 10 W (DIN)
(63 Hz ~ 12,5 kHz bei 6 Ω) ............ 11 W + 11 W (DIN)
Gesamte harmonische Verzerrung
............................. 0,03 % (AUX IN, 1 kHz, 6 W, 8 Ω)
N.B.-Schaltung
N.B. 1 ........................................... +3,0 dB (bei 60 Hz)
N.B. 2 ........................................... +5,0 dB (bei 70 Hz)
N.B. 3 ......................................... +7,5 dB (bei 100 Hz)
Eingangs (Empfindlichkeit / Impedanz)
LINE (CD, AUX) ............................... 250 mV / 22 kΩ
LINE (D.AUDIO) ............................... 140 mV / 48 kΩ
Ausgangs (Pegel / Impedanz)
SUBWOOFER PREOUT ....................... 1,8 V / 2,9 kΩ
[Allgemeine]
Leistungsaufnahme ............................................... 28 W
Abmessungen
Horizontale Aufstellung
B : 171 mm H : 67 mm T : 207 mm
Vertikale Aufstellung
B : 89 mm H : 182 mm T : 207 mm
Gewicht (net) ............................................................ 2 kg
Page 29

NEDERLANDS
NEDERLANDS 29
Let op : Om veilige bediening te waarborgen, dient deze bladzijde zorgvuldig te worden
doorgelezen.
De spanningsvereiste van het toestel zijn zoals hieronder aangegeven.
Europa en Groot-Brittannië ............................................ alleen 230 V wisseletroom
Veiligheidmaatregelen
WAARSCHUWING : STEL HET APPARAAT NIET BLOOT AAN REGEN OF
VOCHT OM BRAND OF EEN GEVAARLIJKE ELEKTRISCHE SCHOK TE
VOORKOMEN.
LET OP: VERWIJDER HET DEKSEL (OF DE ACHTERKANT) NIET OM EEN
ELEKTRISCHE SCHOK TE VOORKOMEN. IN HET INWENDIGE ZIJN GEEN
DOOR DE GEBRUIKER REPAREERBARE ONDERDELEN AANWEZIG. LAAT
ALLE REPARATIES OVER AAN HIERTOE BEVOEGDE PERSONEN.
EEN BLIKSEMPIJL IN EEN GELIJKZIJDIGE DRIEHOEK BETEKENT DE AANWEZIGHEID VAN NIET
GEISOLEERDE”GEVAARLIJKE SPANNINGEN” IN HET INWENDIGE VAN HET APPARAAT. DEZE
SPANNINGEN KUNNEN ZO GROOT ZIJN DAT ZE HET GEVAAR VAN EEN ELEKTRISCHE SCHOK
OPLEVEREN.
EEN UITROEPTEKEN IN EEN GELIJKZIJDIGE DRIEHOEK MAAKT DE GEBRUIKER EROP ATTENT DAT ER
BELANGRIJKE BEDIENING/ONDERHOUDSINFORMATIE IN DE BIJGEVOEGDE LITERATUUR IS.
Alvorens het apparaat op het stopcontact aan te sluiten
Informatie over het weggooien van elektrische en elektronische apparatuur (particulieren)
Dit symbool geeft aan dat gebruikte elektrische en elektronische producten niet bij het normale
huishoudelijke afval mogen.
Lever deze producten in bij de aangewezen inzamelingspunten, waar ze gratis worden geaccepteerd
en op de juiste manier worden verwerkt, teruggewonnen en hergebruikt.
Voor inleveradressen zie www.nvmp.nl, www.ictmilieu.nl, www.stibat.nl.
Wanneer u dit product op de juiste manier als afval inlevert, spaart u waardevolle hulpbronnen en
voorkomt u potentiële negatieve gevolgen voor de volksgezondheid en het milieu, die anders
kunnen ontstaan door een onjuiste verwerking van afval.
RISK OF ELECTRIC SHOCK
DO NOT OPEN
CAUTION
Page 30

NEDERLANDS
30 NEDERLANDS
Lees de instructies – Lees alle veiligheids- en
bedieningsinstructies voordat u het product in gebruik neemt.
Bewaar de instructies – U dient de veiligheids- en
bedieningsinstructies te bewaren zodat u er later nog eens
iets in kunt opzoeken.
Neem alle waarschuwingen in acht – U moet alle
waarschuwingen op het apparaat en in de handleiding in
acht nemen.
Volg de instructies op – Alle bedieningsinstructies moeten
worden opgevolgd.
1. Schoonmaken – Haal de stekker van dit product uit
het stopcontact voor u het gaat schoonmaken. Gebruik
geen vloeibare reinigingsmiddelen of sprays. Gebruik een
vochtige doek om het product schoon te maken.
2. Hulpstukken – Gebruik geen hulpstukken die niet door
de fabrikant worden aanbevolen; deze kunnen risico's met
zich meebrengen.
3. Water en vocht – Stel dit product niet bloot aan druipend
of spattend water – bijvoorbeeld bij een badkuip, wasbak,
aanrecht of wastobbe, of in een vochtige kelder, of in de buurt
van een zwembad of op een soortgelijke plek. Zet geen voorwerpen met vloeistoffen, zoals een bloemenvaas, op het
toestel.
4. Accessoires – Plaats dit product niet op een wankel karretje, standaard, statief of tafel. Het product zou dan kunnen
vallen en ernstig letsel toebrengen aan een kind of een volwassene, en natuurlijk ook zelf ernstig beschadigd kunnen
worden. Gebruik uitsluitend een kar, standaard, statief, steunbeugel of tafel die door de fabrikant wordt aanbevolen. Bevestigen van het product dient te geschieden in overeenstemming met de instructies van de fabrikant en met behulp van
bevestigingstoebehoren zoals aanbevolen door
de fabrikant. Wees zeer voorzichtig bij het verplaatsen van een combinatie van dit product en
een kar. Abrupt stoppen, te hard duwen en ongelijke oppervlakken kunnen de combinatie van
dit product en de kar doen kantelen.
5. Ventilatie – De openingen in de ombouw van het apparaat dienen voor de ventilatie en zorgen dat het toestel
niet door oververhitting verkeerd zou kunnen gaan functioneren. De openingen in de behuizing mogen in geen
geval worden geblokkeerd door het product op een bed,
bank, tapijt of iets dergelijks te zetten. Dit product mag
niet worden ingebouwd in bijvoorbeeld een boekenkast of
rek, behalve wanneer er gezorgd wordt voor voldoende
ventilatie, of wanneer de instructies van de fabrikant zijn
opgevolgd.
6. Stroomvoorziening – Dit product mag alleen worden
gebruikt met het type stroombron dat staat aangegeven
op het product zelf. Raadpleeg uw leverancier of het plaatselijke elektriciteitsbedrijf indien u niet zeker bent van het
type stroomvoorziening in uw huis.
7. Beschermen van het netsnoer – Leg het netsnoer zo
dat er niet over gelopen wordt en zo dat het snoer niet ergens tussen of onder bekneld kan raken, waarbij er speciaal
gelet moet worden op de aansluitpunten bij stekkers, bij stopcontacten en het punt waar het snoer het product verlaat.
8. Bliksem – Om dit product extra te beschermen tijdens
onweer, of wanneer u het langere tijd niet zult gebruiken,
dient u de stekker uit het stopcontact te halen en de antenne
of kabelaansluiting los te koppelen. Dit voorkomt beschadiging van het product bij blikseminslag en stroompieken.
9. Overschrijding – Overschrijd de capaciteit van stopcontacten, stekkerdozen, verlengsnoeren, etc.niet daar dit kan
resulteren in brand of een elektrische schok.
10.Voorwerpen en vloeistof in het product – Steek geen
voorwerpen in het product via de openingen in de behuizing,
want deze zouden binnenin onderdelen kunnen raken of kortsluiten die onder hoogspanning staan, hetgeen zou kunnen
leiden tot elektrische schokken of brand. Mors in geen geval
vloeistof op het product.
11. Reparatie – Probeer in geen geval dit product zelf te repareren, want openen of verwijderen van de behuizing kan u
blootstellen aan gevaarlijk hoge spanningen of andere gevaren. Laat alle werkzaamheden over aan bevoegd servicepersoneel.
12.Schade die reparatie behoeft – Haal de stekker van het
product uit het stopcontact en laat het product repareren door
bevoegd servicepersoneel onder de volgende omstandigheden:
a) Als het netsnoer of de stekker is beschadigd,
b) Als er vloeistof is gemorst, of als er voorwerpen in het
product terecht zijn gekomen,
c) Als het apparaat blootgesteld is aan regen of water,
d) Als het product niet naar behoren functioneert zoals
beschreven in de handleiding,
e) IAls het product is gevallen of op een andere manier
beschadigd is,
f) Wanneer de prestaties van het product merkbaar ver-
slechteren.
g) Wanneer u iets vreemds ruikt of rook uit het product
ziet komen.
13.Veiligheidstest – Na reparatie of onderhoud van dit apparaat, dient u een veiligheidstest door het onderhoudspersoneel te laten uitvoeren, zodat u kunt controleren dat
het apparaat juist functioneert.
14.Veiligheidscontrole – Vraag het onderhoudspersoneel om
na de onderhouds- of reparatiewerkzaamheden een
veiligheidscontrole uit te voeren, zodat u zeker weet dat het
product juist en veilig functioneert.
15.Wand- of plafondmontage – Dit product mag alleen op
de door de fabrikant aanbevolen manier aan de wand of het
plafond worden bevestigd.
16.Warmte – Plaats dit product niet in de buurt van warmtebronnen zoals radiatoren, verwarmingsroosters, kachels of
andere toestellen die warmte produceren. Zet geen brandende voorwerpen, zoals kaarsen of lampionnen op of in de
buurt van het product.
17. Elektriciteitskabels – Buitenantennes dienen uit de buurt
van elektriciteitkabels, andere elektrische circuits of spanningcircuits te worden geïnstalleerd. Let tevens op dat de antenne niet op deze kabels of circuits kan vallen.Voorkom fatale schokken en let op bij het installeren van antennes dat u
geen hoogspanningskabels, elektriciteitkabels en circuits
aanraakt.
BELANGRIJKE VEILIGHEIDSVOORSCHRIFTEN
Let op : Om veilige bediening te waarborgen, dient deze bladzijde zorgvuldig te worden doorgelezen.
Page 31

NEDERLANDS
NEDERLANDS 31
Uitpakken
Pak het apparaat zorgvuldig uit en controleer of geen van de accessoires ontbreekt.
Verbindingen
Indien een of meer accessoires ontbreken, of indien het apparaat beschadigd is of niet werkt, stel dan meteen uw
handelaar hiervan op de hoogte. Indien uw apparaat rechtstreeks aan u werd toegezonden, stel dan onmiddellijk het
transportbedrijb op de hoogte. Het is aan te raden dat u de originele verpakking bewaart voor het geval het apparaat in
de toekomst nogmaals vervoerd moet worden.
Bewaar deze gebruiksaanwijzing voor eventuele naslag in de toekomst.
Inhoud
Let op : Om veiligheidsredenen dienen de bladzijden voorzien van het teken zorgvuldig te worden doorgelezen.
Alvorens het apparaat op het stopcontact aan te
sluiten ........................................................................ 29
Veiligheidmaatregelen ..................................................... 29
BELANGRIJKE VEILIGHEIDSVOORSCHRIFTEN .. 30
Inhoud.............................................................................. 31
Verbindingen .............................................................................. 31
Speciale kenmerken .................................................... 32
Belangrijke opmerkingen............................................ 32
Ter referentie.............................................................................. 32
Onderhoud ...................................................................................32
Aansluitingen................................................................. 33
Aansluiten van de weergavecomponenten .......................... 33
Aansluiten van de luidsprekers .............................................. 34
Bedieningsorganen en indicators ............................. 35
Verticale installatie .................................................................. 35
Bediening ....................................................................... 36
Oplossen van problemen ............................................. 37
Specificaties ..................................................................37
Audio-aansluitsnoer (1)
(Tulpstekker - Φ3,5 mm stekker)
Standaard (2)
Voor uw administratie
Noteer het serienummer, op de achterkant van het apparaat, in de daarvoor bestemde ruimte op het garantiebewijs en in
de onderstaande ruimte. Geef het model- en serienummer aan uw dealer door wanneer u contact met hem opneemt voor
informatie of service.
Modelnummer KA-S10 Serienummer
Page 32

NEDERLANDS
32 NEDERLANDS
Speciale kenmerken
Drie sets ingangsaansluitingen
Belangrijke opmerkingen
Onderhoud
Ter referentie
Met het oog op het aansluiten van draagbare apparatuur met een laag uitgangsniveau, is er voorzien in een
analoge ingangsaansluiting met een hoge ingangsversterking (D.AUDIO), naast twee analoge
ingangsaansluitingen voor gewone componenten (CD, AUX).
Subwoofer uitgangsaansluiting
U kunt een subwoofer met een ingebouwde versterker en een ingang met penstekker-aansluiting aansluiten
op dit toestel.
N.B. (Natural Bass) schakeling
Voor de lage tonen kan, aan de hand van de installatie-omgeving en de afmetingen van de luidsprekers,
worden gekozen uit drie voorgeprogrammeerde instellingen met verschillend versterkte middenfrequenties
en niveaus.
Keuze tussen verticale of horizontale installatie
Een paar standaarden worden meegeleverd om dit toestel verticaal of op zijn zij te installeren.
Voorzorgen voor condens
Condens (of vocht) wordt mogelijk in het toestel gevormd wanneer er een groot temperatuursverschil tussen het inwendige
van het toestel en de omgeving is.
Het toestel functioneert mogelijk niet juist wanneer er condens in het toestel is gevormd. U moet in dat geval een paar
uur wachten en het toestel pas in gebruik nemen wanneer de condens is verdampt.
Let vooral bij de volgende omstandigheden goed op:
Er is gauw sprake van condensatie wanneer het toestel naar een andere ruimte met een groot verschil in temperatuur
wordt verplaatst, wanneer de kamer zeer vochtig is, etc.
Onderhoud van het toestel
Veeg het voorpaneel of de behuizing indien nodig met
een zachte droge doek schoon. Gebruik geen thinner,
benzine, alcohol voor het reinigen. Dit soort middelen tast
namelijk de behuizing aan.
Meer over contactreinigers
Gebruik geen contact-reiniger daar deze problemen kan
veroorzaken. Pas vooral op met contact-reinigers die olie
bevatten daar deze de plastic onderdelen kunnen
aantasten.
Page 33

NEDERLANDS
NEDERLANDS 33
LET OP
Let er op dat u de volgende instructies opvolgt, zo
niet, dan kan de ventilatie geblokkeerd raken hetgeen
schade of brandgevaar kan veroorzaken.
÷ Zet geen voorwerpen die de warmteuitstraling
kunnen belemmeren op het apparaat.
÷ Laat ruimte rond het apparaat (gemeten van de
grootste buitenafmetingen inclusief de uitsteeksels),
gelijk aan of groter dan, zoals hieronder aangegeven.
Bovenkant: 50 cm Achterkant: 10 cm
÷ Zet de apparatuur niet op een bed, divan, vloerkleed
of een andere dergelijke ondergrond. Het naar
binnen gezogen stof kan brand veroorzaken.
VOORZORGEN BIJ HET AANSLUITEN
Doe de stekker pas in het stopcontact wanneer u
alle andere aansluitingen correct hebt uitgevoerd.
Voor u een snoer of kabel loskoppelt van het toestel
moet u altijd de POWER schakelaar uit (OFF) zetten
en de stekker uit het stopcontact halen.
Kies de ingangsaansluiting aan de hand van het soort apparaat
dat u erop wilt aansluiten.
De D.AUDIO ingangsaansluiting is voorzien van een hoge
ingangsversterking zodat u er de hoofdtelefoonaansluiting van
draagbare apparatuur, zoals een HDD (harde schijf) audiospeler
op aan kunt sluiten. Wanneer de lijn-uitgang van reguliere
apparatuur, zoals een CD-speler, op deze ingang zou worden
aangesloten, zal het geluid met een veel groter volume worden
weergegeven dan wanneer u deze apparatuur zou aansluiten op
de CD of AUX aansluitingen. In een dergelijk geval kan de
geluidsweergave echter gemakkelijk vervormd raken wanneer het
volume te hoog wordt gezet.
LET OP
Door alleen de POWER schakelaar uit (OFF) te zetten
is dit toestel niet volledig afgesloten van de
stroomvoorziening. Om het toestel volledig af te
sluiten van de stroomvoorziening moet u de stekker
uit het stopcontact halen.
Zorg ervoor dat de stekker in een gemakkelijk
bereikbaar stopcontact zit, zodat u in geval van nood
onmiddellijk de stroomvoorziening naar het toestel
kunt onderbreken.
Aansluitingen
Aansluiten van de weergavecomponenten
÷ Mocht er een extra systeemkomponent worden aangesloten, raadpleeg dan tevens de gebruiksaanwijzing van
die component.
÷ Sluit alle snoeren stevig aan. Bij een los contact zal er mogelijk geen, of een gestoorde, weergave zijn.
OpmerkingenOpmerkingen
Audioaansluitsnoer
(meegeleverd)
Wit Rode
HDD audiospeler
enz.
CD-speler enz.
Stroomstekker
Naar stopcontact
AUDIO OUT
(LINE OUT)
Doe de stekker netjes helemaal
in het stopcontact en zorg
ervoor dat hij goed vast zit.
Page 34

NEDERLANDS
34 NEDERLANDS
Aansluitingen
VOORZORGEN BIJ HET AANSLUITEN
Doe de stekker pas in het stopcontact wanneer u alle andere aansluitingen correct hebt uitgevoerd. Voor u een
snoer of kabel loskoppelt van het toestel moet u altijd de POWER schakelaar uit (OFF) zetten en de stekker uit
het stopcontact halen.
Wees voorzichtig dat de geleidende kernen van de luidsprekerdraden geen contact maken met andere
aansluitingen of met de behuizing van het toestel.
Luidsprekers
(Impedantie 6 Ω - 16 Ω)
Subwoofer met
ingebouwde versterker
Links
Rechts
Aansluiten van de luidsprekers
÷ Sluit de "+" en "–" luidsprekersnoeren niet kort. Dit kan een foutieve werking tot gevolg hebben.
÷ Als de "+" en "–" polen worden omgewisseld, zal het geluid onnatuurlijk klinken en zullen de muziekinstrumenten
enz. niet duidelijk geplaatst kunnen worden.
÷ Sluit alle snoeren stevig aan. Bij een los contact zal er mogelijk geen, of een gestoorde, weergave zijn.
OpmerkingenOpmerkingen
1 Verwijder een stuk van
de isolatie.
2Draai los.
4Draai vast.3Insteken.
Page 35

NEDERLANDS
NEDERLANDS 35
1 POWER schakelaar
Hiermee schakelt u de stroom in (ON) en uit (OFF).
2 VOLUME knop
Draai de knop naar rechts om het volumeniveau te
verhogen en draai naar links om het te verlagen.
3 Ingangsindicator
De indicator die hoort bij de met de INPUT SELECTOR
knop geselecteerde signaalbron zal oplichten.
Wanneer de stroom wordt uitgeschakeld, gaan alle
indicators uit.
4 INPUT SELECTOR knop
Hiermee kunt u de signaalbron selecteren (D.AUDIO,
CD of AUX).
5 N.B. CIRCUIT knop
Hiermee wordt de weergave van de lage tonen
geregeld in drie stappen.
Kies de gewenste stand aan de hand van de gebruikte
luidsprekers en uw persoonlijke voorkeur.
CD
D.AUDIO
INPUT SELECTOR
AUX
VOLUME
POWER N.B.CIRCUIT
OFF
1
2
3
STEREO INTEGRATED AMPLIFIER KA-S10
MIN MAX
OFFON
12 3 45
Met behulp van de twee meegeleverde standaarden kan het toestel verticaal, op zijn linker zijkant,
worden gezet.
LET OP
Wees bij het installeren van het toestel voorzichtig
dat u de ventilatie-openingen niet blokkeert of
afdekt om zeker te kunnen zijn van voldoende
koeling. Anders zou het binnenwerk van het toestel
oververhit kunnen raken, hetgeen kan leiden tot
storingen of zelfs brandgevaar.
CD
D.AUDIO
INPUT SELECTOR
AUX
VOLUME
POWER N.B.CIRCUIT
OFF
1
2
3
STEREO INTEGRATED AMPLIFIER
KA-S10
MIN MAX
OFFON
Verticale installatie
LET OP
Neem de volgende voorzorgen in acht wanneer u
het toestel gaat installeren. Incorrecte installatie kan
ertoe leiden dat het toestel kantelt of valt en letsel
veroorzaakt.
÷ Gebruik altijd de meegeleverde standaarden
wanneer u het toestel verticaal gaat installeren.
÷ Wanneer u het toestel verticaal zet, dient u het zo te
plaatsen dat de POWER schakelaar onderaan komt,
zoals u kunt zien op de afbeelding.
POWER schakelaar
Bedieningsorganen en indicators
Page 36

NEDERLANDS
36 NEDERLANDS
Bediening
1. Aan en uit zetten van het toestel
3. Volume aanpassen.
2. De gewenste bron selecteren.
Druk op POWER om het toestel aan (ON) te zetten.
Eén van de ingangsindicatoren zal oplichten wanneer de stroom
wordt ingeschakeld.
Om het toestel uit (OFF) te zetten, dient u nog een keer op
POWER te drukken. De ingangsindicatoren horen uit te gaan
wanneer de stroom is uitgeschakeld.
Draai aan de VOLUME knop om het gewenste volume in te
stellen.
Draai deze knop met de klok mee om het volume te verhogen, of
tegen de klok in om het volume te verlagen.
Draai aan de INPUT SELECTOR knop om de gewenste
signaalbron te selecteren.
De indicator die hoort bij de geselecteerde signaalbron zal
oplichten.
Regelen van de weergave van de lage tonen met de N.B. (Natural Bass) CIRCUIT knop
Draai aan de N.B. CIRCUIT knop om, indien gewenst, de weergave van de lage tonen te regelen.
OFF : Normale weergave (De N.B. schakeling staat
uit.)
1 : De lage tonen rond 60 Hz worden versterkt.
2 : De lage tonen rond 70 Hz worden versterkt.
3 : De lage tonen rond 100 Hz worden versterkt.
N.B.CIRCUIT
OFF
1
2
3
CD
D.AUDIO
INPUT SELECTOR
AUX
POWER
OFFON
VOLUME
MIN MAX
Volume
lager
Volume
hoger
Grafische weergave van het effect van de N.B.
schakeling
In het algemeen werkt de regeling van de lage tonen via
de N.B. schakeling het meest effectief wanneer u
compacte luidsprekers gebruikt, omdat de lage tonen met
dergelijke luidsprekers vaak onvoldoende tot hun recht
komen. Zet de N.B. CIRCUIT knop uit (OFF) wanneer u
een subwoofer gebruikt.
OpmerkingenOpmerkingen
Frequentie
Niveau
Indien CD is gekozen.
Page 37

NEDERLANDS
NEDERLANDS 37
Oplossen van problemen
Zie wanneer het toestel niet juist werkt de onderstaande tabel alvorens een vakman te raaplegen. U kunt
het probleem mogelijk zelf gemakkelijk oplossen.
Geen geluidsweergave.
Geen geluidsweergave of storende ruis.
Geen geluidsweergave via de linker of rech
terluidspreker.
Het volume is te laag.
De geluidsweergave is te hard en vervormd.
÷ Sluit juist aan zoals bij "Aansluitingen" aangegeven. ‹›
÷ Stel het volume in. fl
÷ Selecteer de gewenste signaalbron met de INPUT SELECTOR
knop. fl
÷ De beveiligingsschakeling voor de luidsprekers is mogelijk in
werking getreden. Lees “Beveiligingsschakeling voor de
luidsprekers” hieronder en hef de kortsluiting tussen de
luidsprekerdraden op. ‡
÷ Sluit juist aan zoals bij "Aansluitingen" aangegeven. ‹›
÷ Sluit juist aan zoals bij "Aansluitingen" aangegeven. ‹›
÷ Als de hoofdtelefoon-uitgang van draagbare apparatuur is
verbonden met de CD of AUX ingangsaansluitingen, kunt u deze
het beste loskoppelen en dan opnieuw verbinden met de
D.AUDIO ingangsaansluiting. ‹
÷ Sluit juist aan zoals bij "Aansluitingen" aangegeven. ‹›
÷ Als de lijn-uitgang van reguliere apparatuur, zoals een CD-speler,
is verbonden met de D.AUDIO ingangsaansluitingen, kunt u
deze het beste loskoppelen en dan opnieuw verbinden met de
CD of AUX ingangsaansluitingen. ‹
OplossingProbleem
Specificaties
Opmerkingen : KENWOOD volgt een politiek van
voordurende aanpassing aan nieuwe ontwikkelingen.
Hierdoor kunnen de specificaties dan ook zonder
voorafgaande kennisgeving worden gewijzigd.
÷ Het toestel werkt mogelijk niet optimaal in een zeer
koude ruimte (bij temperaturen onder nul).
[Versterker gedeelte]
Effectief uitgangsvermogen tijdens STEREO werking
(1 kHz, 10 % T.H.D., bij 8 Ω) ........ 12 W + 12 W (RMS)
(1 kHz, 10 % T.H.D., bij 6 Ω) ........ 13 W + 13 W (RMS)
Nominaal uitgangsvermogen tijdens STEREO
werking
(63 Hz ~ 12,5 kHz, bij 8 Ω) ............ 10 W + 10 W (DIN)
(63 Hz ~ 12,5 kHz, bij 6 Ω) ............ 11 W + 11 W (DIN)
Totale harmonische vervorming
............................. 0,03 % (AUX IN, 1 kHz, 6 W, 8 Ω)
N.B. schakeling
N.B. 1 ............................................ +3,0 dB (bij 60 Hz)
N.B. 2 ............................................ +5,0 dB (bij 70 Hz)
N.B. 3 .......................................... +7,5 dB (bij 100 Hz)
Ingangs (Gevoeligheid / Impedantie)
LINE (CD, AUX) ............................... 250 mV / 22 kΩ
LINE (D.AUDIO) ............................... 140 mV / 48 kΩ
Uitgangs (Niveau / Impedantie)
SUBWOOFER PREOUT ....................... 1,8 V / 2,9 kΩ
[General]
Opgenomen vermogen ......................................... 28 W
Afmetingen
Horizontale installatie
B : 171 mm H : 67 mm D : 207 mm
Verticale installatie
B : 89 mm H : 182 mm D : 207 mm
Gewicht (netto) ........................................................ 2 kg
Beveiligingsschakeling voor de luidsprekers
De beveiligingsschakeling voor de luidsprekers treedt in werking wanneer het toestel aan wordt gezet terwijl er kortsluiting
is tussen + en - luidsprekerdraden. Wanneer deze beveiliging in werking treedt, zal het uitgangssignaal worden afgesloten
om dit toestel en de luidsprekers te beschermen. Als er kortsluiting is tussen de luidsprekerdraden, dient u het toestel uit
(OFF) te zetten, de stekker uit het stopcontact te halen en vervolgens de kortsluiting op te heffen door de luidsprekerdraden
op de juiste manier aan te sluiten. Doe daarna de stekker terug in het stopcontact en zet het toestel weer aan (ON).
Page 38

ITALIANO
38 ITALIANO
Avvertenza : Per un uso sicuro dell’apparecchio, leggete attentamente questa pagina.
Le unità sono disegnate per il funzionamento che segue.
La Gran Bretagna e l’Europa ............ solo c.a. a 230 V
Precauzioni per la sicurezza
AVVERTENZA : PER PREVENIRE FIAMME O RISCHI DI
FOLGORAZIONE NON ESPORRE QUESTO APPARECCHIO ALLA
PIOGGIA O ALL’UMIDITÀ
ATTENZIONE: PER RIDURRE I RISCHI DI SCOSSE ELETTRICHE NON
RIMUOVERE IL PANNELLO DI COPERTURA (O LA PARTE
POSTERIORE). ALL´INTERNO NON VI SONO PARTI CHE POSSONO
ESSERE UTILI ALL´UTENTE. AFFIDARE LA MANUTENZIONE A
PERSONALE QUALIFICATO.
IL SIMBOLO DEL LAMPO CON LA FRECCIA ALL’INTERNO DI UN TRIANGOLO EQUILATERO SERVE
PER AVVERTIRE L’UTENTE DELLA PRESENZA DI UN “VOLTAGGIO PERICOLOSO” NON ISOLATO
ALL’INTERNO DEL PRODOTTO SUFFICIENTEMENTE ALTO DA COSTITUIRE UN RISCHIO DI
FOLGORAZIONE PER LE PERSONE.
IL PUNTO ESCLAMATIVO ALL’INTERNO DI UN TRIANGOLO EQUILATERO SERVE PER AVVERTIRE
L’UTENTE DELLA PRESENZA DI IMPORTANTI ISTRUZIONI PER IL FUNZIONAMENTO E LA MANUTENZIONE NEL MATERIALE SCRITTO CHE ACCOMPAGNA L’APPARECCHIO.
CAUTION
Prima di attivare l’alimentazione
Informazioni sullo smaltimento delle vecchie apparecchiature elettriche ed elettroniche (valido
per i paesi europei che hanno adottato sistemi di raccolta separata)
I prodotti recanti il simbolo di un contenitore di spazzatura su ruote barrato non possono essere
smaltiti insieme ai normali rifiuti di casa.
I vecchi prodotti elettrici ed elettronici devono essere riciclati presso una apposita struttura in grado
di trattare questi prodotti e di smaltirne i loro componenti.
Per conoscere dove e come recapitare tali prodotti nel luogo a voi più vicino, contattare l’apposito
ufficio comunale.
Un appropriato riciclo e smaltimento aiuta a conservare la natura e a prevenire effetti nocivi alla
salute e all’ambiente.
RISK OF ELECTRIC SHOCK
DO NOT OPEN
Page 39

ITALIANO
ITALIANO 39
Leggere le istruzioni – Prima di usare il prodotto è necessario
leggere tutte le norme di sicurezza e le istruzioni per l’uso.
Conservare il presente manuale – Le norme di sicurezza e
le istruzioni per l’uso devono venire conservate per poter
venire usate di nuovo al momento del bisogno.
Rispettare le avvertenze – Tutte le avvertenze sul prodotto
e nelle istruzioni devono venire rispettate.
Seguire le istruzioni – Tutte le istruzioni di uso devono venire
seguite.
1. Pulizia – Scollegare questo prodotto dalla presa di rete
prima della pulizia. Non usare pulenti liquidi o aerosol. Per la
pulizia, usare solo un panno leggermente umido.
2. Accessori – Non utilizzare accessori non raccomandati dal fabbricante per questo prodotto, dato che possono causare problemi.
3. Acqua ed umidità – Questo prodotto non deve venire
esposto a spruzzi d’acqua o umidità, installandolo ad esempio vicino ad un bagno, un lavabo, un lavandino o una tinozza
di acqua, in uno scantinato umido o vicino ad una piscina,
ecc. Non posare sull’apparecchio alcun oggetto contenente liquidi, ad esempio un vaso di fiori.
4. Posizione di installazione – Non installare questo prodotto su un carrello, supporto, treppiedi o tavolino che non
sia stabile. Il prodotto potrebbe altrimenti cadere ferendo
seriamente bambini o adulti, oltre a danneggiarsi seriamente. Usare solo un carrello, supporto, treppiedi o tavolino
raccomandato dal fabbricante. L’installazione del prodotto
deve sempre venire fatta secondo le istruzioni del fabbricante ed usare gli accessori da questo raccomandati. Il prodotto su di un carrello deve venire spostato con le dovute precauzioni. Le
fermate improvvise, la forza eccessiva e le superfici irregolari possono far ribaltare il carrello che porta il prodotto.
5. Ventilazione – Sul mobile sono presenti fessure ed
aperture per la ventilazione, per assicurare un funzionamento affidabile e per proteggere l’apparecchiatura stessa dal surriscaldamento che non devono essere bloccate
o coperte. Le aperture di ventilazione non devono venire
bloccate posando l’apparecchio su di un letto, sofà, tappeto o altra superficie simile. Questo prodotto non deve venire installato in uno scaffale, a meno che non venga garantita una ventilazione adeguata seguendo le istruzioni
del fabbricante.
6. Sorgenti di alimentazione – Questo prodotto deve venire usato solo con corrente elettrica dalle caratteristiche su di
esso indicate. Se non si è certi di quali caratteristiche possieda la corrente elettrica di casa propria, consultare il proprio
negoziante di fiducia o l’azienda che produce l’energia elettrica.
7. Protezione del cavo di alimentazione – I cavi di alimentazione devono venire stesi in modo che non possano venire
calpestati o schiacciati da oggetti, prestando particolare attenzione alle giunzioni fra cavi e spine ed ai punti da cui escono dal prodotto.
8. Temporali – Per un’ulteriore protezione di questo prodotto durante un temporale oppure quando esso non viene utilizzato per un lungo periodo, scollegare la spina dalla presa di
rete e l‘antenna o i cavi. Ciò eviterà danni dovuti a fulmini e ad
improvvisi aumenti di tensione.
9. Sovraccarichi – Non sovraccaricate le prese di rete, i cavi
di estensione o le prese sull’apparecchio in quanto ciò potrebbe risultare in fiamme o scosse elettriche.
10.Ingresso di oggetti e liquidi – Non far mai penetrare
in questo prodotto oggetti di qualsiasi genere per evitare
che tocchino punti attraversati da alta tensione o causare
corto circuiti, causando incendi o folgorazioni. Non versare mai alcun liquido sul prodotto.
11. Riparazioni – Non tentare di riparare questo prodotto da
soli e non aprirlo, dato che questo vi espone ad alta tensione
ed altri pericoli. Affidare ogni riparazione a personale tecnico
autorizzato.
12.Riparazioni che richiedono manodopera specializzata – Scollegare questo prodotto dalla presa a muro ed
affidarlo per le riparazioni del caso a personale tecnico specializzato se:
a) Il cavo o la spina di alimentazione hanno subito danni.
b) Degli oggetti o dei liquidi sono penetrati nel prodotto.
c) Il prodotto è stato esposto a pioggia o acqua.
d) Il prodotto non sembra funzionare normalmente an-
che seguendo le istruzioni contenute nel manuale
d’istruzioni.
e) Il prodotto è stato fatto cadere o ha subito danni, op-
pure.
f) L’apparecchio mostra segni di marcati cambiamenti
nelle sue prestazioni - un sintomo di possibili guasti.
g) Il prodotto emette odori anormali o fumo.
13.Parti di ricambio – Quando sono necessarie parti di ri-
cambio, accertatevi che il tecnico del servizio di assistenza
utilizzi parti specificate dal fabbricante o che possiedono le
stesse caratteristiche delle parti originali. Sostituzioni non con
parti non compatibili possono causare fiamme, scosse elettriche o altri problemi.
14.Controlli sicurezza – Al termine di qualsiasi intervento
per la manutenzione o la riparazione del prodotto, chiedere al
tecnico del servizio di assistenza di eseguire controlli di sicurezza per determinare ce sia sicuro da usare.
15.Installazione su pareti o sul soffitto – Questo prodotto
deve venire installato su pareti o sul soffitto solo nel modo
suggerito dal fabbricante.
16.Calore – Proteggere il prodotto da sorgenti di calore come
termosifoni, condizionatori, stufe o altri componenti (compresi
amplificatori) che producano calore. Non mettere fiamme scoperte, ad esempio candele o lanterne, su o vicino ad esso.
17. Linee ad alta tensione – Un’antenna esterna non deve
essere installata in prossimità di linee ad alta tensione o altre
linee elettriche o in posizioni in cui essa potrebbe cadere su
quest’ultime. Quando installate un’antenna esterna, fate attenzione a non toccare tali linee in quanto il contatto potrebbe essere fatale.
NORME IMPORTANTI DI SICUREZZA
Avvertenza : Per un uso sicuro dell'apparecchio, leggete attentamente questa pagina.
Page 40

ITALIANO
40 ITALIANO
Disimballaggio
Disimballare con l’apparecchio e accertarsi che tutti gli accessori siano presenti.
Accessori
Se uno degli accessori manca o se l’apparecchio è danneggiato o non funziona, rivolgersi immediatamente al
rivenditore. Se l’apparecchio vi é stato spedito, avvertire immediatamente il corriera. Kenwood raccomanda di
conservare la scatola e il materiale d’imballaggio originali, nel caso di uno spostamento o spedizione futuri dello
apparecchio.
Conservate questo manuale per poterlo consultare ancora in futuro.
Indice
Attenzione : Per ragioni di sicurezza, leggete con prarticolare attenzione le pagine contrassegnate con il simblo .
Cavo audio (1)
(Spinotto RCA – Spinotto Φ3,5 mm)
Supporto (2)
Per vostra referenza
Riportate il numero di serie, indicato sul retro dell'unità, nell'apposito spazio sulla carta di garanzia e nello spazio qui sotto.
Citate il numero del modello e di serie ogni volta che vi rivolgete al vostro rivenditore per informazioni o assistenza.
Model KA-S10 Serial Number
Prima di attivare l’alimentazione ........................ 38
Precauzioni per la sicurezza ........................................... 38
NORME IMPORTANTI DI SICUREZZA .................. 39
Indice............................................................................... 40
Accessori .................................................................................... 40
Caratteristiche speciali ............................................... 41
Voci importanti .............................................................. 41
Riferimento ................................................................................. 41
Manutenzione .............................................................................41
Collegamenti ..................................................................42
Collegamento dei componenti per la riproduzione............. 42
Collegamento dei diffusori ...................................................... 43
Comandi e indicatori .................................................... 44
Installazione verticale .............................................................. 44
Funzionamento............................................................... 45
In caso di problemi ....................................................... 46
Dati tecnici .....................................................................46
Page 41

ITALIANO
ITALIANO 41
Caratteristiche speciali
Tre set di connettori di ingresso
Voci importanti
Manutenzione
Riferimento
Tenendo in considerazione il collegamento con un componente portatile con un basso livello in uscita, viene
fornito un ingresso analogico con elevato guadagno in ingresso (D.AUDIO) oltre a due ingressi analogici per
normali componenti da tavolo (CD, AUX).
Connettore uscita subwoofer
A questa unità è possibile collegare un subwoofer con amplificatore incorporato e presa di ingresso spinotto.
Circuito N.B. (Natural Bass)
I suoni bassi possono essere selezionati fra tre preimpostazioni che offrono frequenze e livelli di
amplificazione centrali diversi a seconda dell’ambiente di installazione e delle dimensioni dei diffusori.
Installazione verticale o orizzontale
Per l’installazione di questa unità in posizione verticale oppure su un lato viene fornita una coppia di supporti
appositi.
Avvertenza riguardante la condensa
All’interno dell’unità si può avere la formazione di condensa (umidità) quando fra essa e l’aria esterna si ha una grande
differenza di temperatura.
In tal caso, quest’unità potrebbe non funzionare correttamente. Se ciò accade, lasciarla qualche ora spenta e riprendere
ad usarla solo dopo che la condensa è evaporata. Fare attenzione in particolare nelle seguenti circostanze:
Se l’unità viene portata da un luogo molto freddo ad uno caldo o se l’umidità in una stanza dovesse aumentare
bruscamente.
Manutenzione dell'unità
Se il pannello anteriore o l’involucro dell’unità si dovessero
sporcare, pulirli con un panno soffice e pulito. Non usare
diluente, benzina, alcool, ecc., dato che essi possono
rovinarne le finiture.
Per quanto riguarda i preparati di pulizia per
contatto
Non usare un agente detegente a contatto in quanto esso
può causare delle disfunzioni. Fare particolare attenzione
agli agenti detergenti contenenti olio in quanto questi
possono deformare le parti in plastica.
Page 42

ITALIANO
42 ITALIANO
ATTENZIONE
Per evitare danni ed incendi, osservare le seguenti
norme per garantire una corretta ventilazione
dell'apparecchio.
÷ Non posare alcun oggetto davanti alle fessure di
aerazione.
÷ Lasciare uno spazio libero tutto attorno all'unità pari o
maggiore a quello indicato di seguito (a partire dalle
dimensioni esterne massime, comprese protrusioni).
Pannello superiore: 50 cm
Pannello posteriore: 10 cm
÷ Non installare quest’unità su di un letto, un sofà, un
tappeto o altre superfici simili. La polvere aspirata
potrebbe in tal caso causare guasti.
PRECAUZIONI NEI COLLEGAMENTI
Non collegare la spina del cavo di alimentazione alla
presa di rete fino a che tutti gli altri collegamenti non
sono stati completati.
Prima di scollegare un filo o un cavo dall’unità,
accertarsi sempre di portare l’interruttore POWER su
OFF e di scollegare la spina dell’alimentazione dalla
presa di rete.
Selezionare i connettori di ingresso a seconda del tipo di
componente da collegarvi.
L’ingresso D.AUDIO possiede un elevato guadagno in
ingresso in modo da essere in grado di accettare
l’ingresso dell’uscita cuffie di un componente portatile
come un lettore audio HDD (Hard Disc Drive). Se
l’uscita di linea di un componente da tavolo come un
lettore CD viene collegata a questi connettori, l’audio
viene riprodotto ad un volume maggiore di quando essa
viene collegata ai connettori CD o AUX. In questo caso
però, se il volume viene impostato troppo alto l’audio
potrebbe essere distorto.
ATTENZIONE
La semplice impostazione dell’interruttore POWER
su OFF non interrompe completamente
l’alimentazione dell’unità. Per isolare completamente
questa unità dall’alimentazione è necessario
scollegare il cavo di alimentazione dalla presa di rete.
Per interrompere l’alimentazione dell’unità
immediatamente in caso di emergenza, collegare la
spina ad una presa di rete di facile accesso.
Collegamenti
Collegamento dei componenti per la riproduzione
÷ Se deve venire collegato anche un componente addizionale, consultarne prima il manuale.
÷ Inserire bene a fondo tutti gli spinotti o la riproduzione può essere disturbata da rumori.
NoteNote
Cavo audio
(accessorio in
dotazione)
Bianco
Rosso
Lettore audio HDD,
ecc.
Lettore CD, ecc.
Inserire completamente e
saldamente in una presa di rete
la spina dell’alimentazione.
Spina alimentazione
Alla presa a muro AC
AUDIO OUT
(LINE OUT)
Page 43

ITALIANO
ITALIANO 43
Collegamenti
PRECAUZIONI NEI COLLEGAMENTI
Non collegare la spina del cavo di alimentazione alla presa di rete fino a che tutti gli altri collegamenti non sono
stati completati.
Prima di scollegare un filo o un cavo dall’unità, accertarsi sempre di portare l’interruttore POWER su OFF e di
scollegare la spina dell’alimentazione dalla presa di rete.
Fare attenzione che i conduttori dei cavi dei diffusori non entrino in contatto con altri terminali o con la scatola
dell’unità.
Collegamento dei diffusori
÷ Non mettere mai in corto circuito i cavi "+" e "–" dei diffusori. Potrebbe provocare guasti.
÷ Se le polarità "+" e "–" vengono invertite, il suono risulta innaturale e la posizione degli strumenti dello spazio
imprecisa.
÷ Inserire bene a fondo tutti gli spinotti o la riproduzione può essere disturbata da rumori.
NoteNote
Diffusori
(Impedenza 6 Ω - 16 Ω)
Subwoofer con
amplificatore incorporato
Sinistro
Destro
1
Rimuovere il rivestimento.
2Allentare.
4Fissare.3Inserire.
Page 44

ITALIANO
44 ITALIANO
1 Interruttore POWER
Commuta l’alimentazione ON e OFF.
2 Manopola VOLUME
Ruotando la manopola in direzione oraria il volume
aumenta, mentre ruotandola in direzione opposta esso
diminuisce.
3 Indicatore di ingresso
L’indicatore della sorgente in ingresso selezionata con
la manopola INPUT SELECTOR si illumina.
Tutti gli indicatori si spengono quando l’alimentazione
viene disattivata (OFF).
4 Manopola INPUT SELECTOR
Seleziona la sorgente in ingresso (D.AUDIO, CD o
AUX).
5 Manopola N.B. CIRCUIT
Regola i toni bassi in tre passi.
Selezionare la posizione a seconda dei diffusori
utilizzati o del proprio gradimento personale.
CD
D.AUDIO
INPUT SELECTOR
AUX
VOLUME
POWER N.B.CIRCUIT
OFF
1
2
3
STEREO INTEGRATED AMPLIFIER KA-S10
MIN MAX
OFFON
12 3 45
L’unità può essere installata in posizione verticale oppure sul suo lato sinistro utilizzando la coppia di
supporti appositi forniti in dotazione.
ATTENZIONE
Quando si installa l’unità, fare attenzione a non
bloccare le aperture di ventilazione onde assicurare
una sufficiente dispersione del calore. In caso
contrario, il calore accumulato all’interno dell’unità
potrebbe causare disfunzioni o pericolo di fiamme.
CD
D.AUDIO
INPUT SELECTOR
AUX
VOLUME
POWER N.B.CIRCUIT
OFF
1
2
3
STEREO INTEGRATED AMPLIFIER
KA-S10
MIN MAX
OFFON
Installazione verticale
ATTENZIONE
Accertarsi di osservare le seguenti precauzioni
quando si installa l’unità. Una installazione scorretta
potrebbe causare il rovesciamento o la caduta
dell’unità e causare lesioni.
÷ Utilizzare sempre i supporti appositi quando si
installa l’unità in posizione verticale.
÷ Quando si installa l’unità in posizione verticale,
posizionarla in modo che l’interruttore POWER
venga a trovarsi nella posizione più bassa come
indicato nell’illustrazione.
Interruttore POWER
Comandi e indicatori
Page 45

ITALIANO
ITALIANO 45
Funzionamento
1. Disattivazione dell’alimentazione (off)
3. Regolazione del volume.
2. Selezione delle sorgenti in entrta desiderate.
Premere l’interruttore POWER per accendere l’unità (ON).
Quando l’alimentazione viene attivata (ON), uno degli indicatori
di ingresso si illumina.
Per spegnere l’unità (OFF), premere nuovamente l’interruttore
POWER. Quando l’alimentazione viene disattivata (OFF) gli
indicatori di ingresso si devono spegnere.
Ruotare la manopola VOLUME nell’una o nell’altra direzione per
regolare il volume.
La rotazione in senso orario aumenta il volume mentre quella in
senso antiorario lo diminuisce.
Ruotare la manopola INPUT SELECTOR nell’una o nell’altra
direzione per selezionare la sorgente desiderata.
L’indicatore di ingresso della sorgente in ingresso selezionata si
illumina.
Regolazione dei toni bassi con la manopola N.B. (Natural Bass) CIRCUIT
Ruotare la manopola N.B. CIRCUIT nell’una o nell’altra direzione per regolare le basse frequenze se
necessario.
OFF : Riproduzione normale (La funzione del circuito
N.B. viene disattivata).
1 : Potenzia le basse frequenze attorno ai 60 Hz.
2 : Potenzia le basse frequenze attorno ai 70 Hz.
3 : Potenzia le basse frequenze attorno ai 100 Hz.
N.B.CIRCUIT
OFF
1
2
3
CD
D.AUDIO
INPUT SELECTOR
AUX
POWER
OFFON
VOLUME
MIN MAX
diminuisce
il volume
aumenta
il volume
Immagine degli affetti di potenziamento del circuito N.B.
Generalmente, la regolazione dei bassi utilizzando il
circuito N.B. è efficace al massimo quando si utilizzano dei
diffusori compatti dato che in questo tipo di diffusori i
bassi sono spesso insufficienti. Con un subwoofer la
manopola N.B. CIRCUIT dovrebbe essere impostata su
OFF.
NoteNote
Frequenza
Livello
Quando è stato selezionato un CD.
Page 46

ITALIANO
46 ITALIANO
In caso di problemi
Ciò che a prima vista può sembrare un malfunzionamento, non sempre lo è. Prima di chiamare il servizio
assistenza, procedere alle verifiche indicate nella tabella seguente.
Non viene prodotto suono.
Non viene erogato alcun suono oppure vi sono
disturbi.
Non viene erogato suono dagli altoparlanti
sinistro o destro.
Il volume del suono è troppo basso.
Il volume del suono è troppo alto e distorto.
÷ Collegare correttamente con riferimento a “Collegamenti”.
we
÷ Regolare sul livello di volume richiesto. t
÷ Selezionare la sorgente in ingresso desiderata con la manopola
INPUT SELECTOR. t
÷ Il circuito di protezione dei diffusori potrebbe essere attivato.
Leggere la sezione “Circuito protezione diffusori” in basso e
rimuovere il cortocircuito dei cavi dei diffusori. y
÷ Collegare correttamente con riferimento a “Collegamenti”.
we
÷ Collegare correttamente con riferimento a “Collegamenti”.
we
÷ Se l’uscita cuffie di un componente portatile fosse collegata ai
connettori di ingresso CD o AUX, ricollegarla ai connettori di
ingresso D.AUDIO. w
÷ Collegare correttamente con riferimento a “Collegamenti”.
we
÷ Se l’uscita di linea di un componente da tavolo come un lettore
CD fosse collegata ai connettori di ingresso D.AUDIO,
ricollegarla ai connettori di ingresso CD o AUX. w
RimedioProblema
Dati tecnici
Note : La KENWOOD persegue una politica di continuo
sviluppo attraverso attraverso la ricerca. Per questa
ragione i dati tecnici sono soggetti a modifiche senza
preavviso.
÷ In luoghi estremamente freddi (dove l’acqua congeli)
potrebbe non essere possibile ottenere un rendimento
sufficiente.
[Sezione audio]
Potenza di uscita effettiva durante il modo di STEREO
(1 kHz, 10 % T.H.D., a 8 Ω) .......... 12 W + 12 W (RMS)
(1 kHz, 10 % T.H.D., a 6 Ω) .......... 13 W + 13 W (RMS)
Potenza di uscita nominale durante il modo di STEREO
(63 Hz ~ 12,5 kHz, a 8 Ω) .............. 10 W + 10 W (DIN)
(63 Hz ~ 12,5 kHz, a 6 Ω) .............. 11 W + 11 W (DIN)
Distorsione armonica totale
............................. 0,03 % (AUX IN, 1 kHz, 6 W, 8 Ω)
Circuito N.B.
N.B. 1 .............................................. +3,0 dB (a 60 Hz)
N.B. 2 .............................................. +5,0 dB (a 70 Hz)
N.B. 3 ............................................ +7,5 dB (a 100 Hz)
Ingresso (Sensibilità / Impedenza)
LINE (CD, AUX) ............................... 250 mV / 22 kΩ
LINE (D.AUDIO) ............................... 140 mV / 48 kΩ
Uscita (Livello / Impedenza)
SUBWOOFER PREOUT ....................... 1,8 V / 2,9 kΩ
[Generalità]
Consumo................................................................. 28 W
Dimensioni
Installazione orizzontale
L : 171 mm A : 67 mm P : 207 mm
Installazione verticale
L : 89 mm A : 182 mm P : 207 mm
Peso (netto) .............................................................. 2 kg
Circuito protezione diffusori
Il circuito di protezione dei diffusori viene attivato quando l’unità viene accesa (ON) con i cavi + e - dei diffusori in cortocircuito.
Quando attivato, il circuito di protezione dei diffusori interrompe l’uscita audio per proteggere sia l’unità che i diffusori.
Se i cavi dei diffusori fossero in cortocircuito, spegnere l’unità (OFF), scollegare il cavo di alimentazione dalla presa di rete
e quindi ricollegare i cavi in modo corretto rimuovendo il cortocircuito. Reinserire la spina dell’alimentazione nella presa di
rete e portare l’interruttore POWER su ON per riutilizzare l’unità.
Page 47

ESPAÑOL
ESPAÑOL 47
Precaución : Lea cuidadosamente estas páginas para asegurar una operación sin anomalías.
Los aparatos han sido diseñados para funcionar con las tensiones siguientes.
Europa y Reino Unido ............... CA 230 V solamente
Precauciones de seguridad
AVISO : PARA EVITAR INCENDIOS O DESCARGAS ELECTRICAS, NO
EXPONGA ESTE APARATO A LA LLUVIA NI A LA HUMEDAD.
PRECAUCION: PARA REDUCIR EL RIESGO DE DESCARGA ELECTRICA,
NO RETIRE LA TAPA (O PANEL POSTERIOR). EN EL INTERIOR DEL
APARATO NO HAY PIEZAS QUE PUEDA REPARAR EL USUARIO. PIDA
AL PERSONAL CUALIFICADO QUE HAGA LAS REPARACIONES
NECESARIAS.
EL SIMBOLO DEL RAYO, EN EL INTERIOR DE UN TRIANGULO EQUILATERO, TIENE COMO FIN
AVISAR AL USUARIO DE LA PRESENCIA DE UNA TENSION PELIGROSA SIN AISLAR, EN EL INTERIOR DE LA CAJA DEL APARATO, QUE PODRIA SER DE SUFICIENTE INTENSIDAD COMO PARA
QUE LAS PERSONAS PODRIAN SUFRIR UNA DESCARGA ELECTRICA.
EL SIGNO DE EXCLAMACION, EN EL INTERIOR DE UN TRIANGULO EQUILATERO, TIENE COMO
FIN AVISAR AL USUARIO DE LA PRESENCIA DE IMPORTANTES INSTRUCCIONES DE OPERACION
Y MANTENIMIENTO (SERVICIO) EN EL MANUAL SUMINISTRADO CON EL APARATO.
Antes de encender el aparato
Información acerca de la eliminación de equipos eléctricos y electrónicos al final de la vida
útil (aplicable a los países de la Unión Europea que hayan adoptado sistemas independientes
de recogida de residuos)
Los productos con el símbolo de un contenedor con ruedas tachado no podrán ser desechados
como residuos domésticos.
Los equipos eléctricos y electrónicos al final de la vida útil, deberán ser reciclados en instalaciones
que puedan dar el tratamiento adecuado a estos productos y a sus subproductos residuales
correspondientes.
Póngase en contacto con su administración local para obtener información sobre el punto de
recogida más cercano.
Un tratamiento correcto del reciclaje y la eliminación de residuos ayuda a conservar los recursos y
evita al mismo tiempo efectos perjudiciales en la salud y el medio ambiente.
RISK OF ELECTRIC SHOCK
DO NOT OPEN
CAUTION
Page 48

ESPAÑOL
48 ESPAÑOL
Lea las instrucciones – Antes de utilizar el producto
deberán leerse todas las instrucciones relacionadas con la
seguridad y la utilización.
Guarde las instrucciones – Las instrucciones de seguridad
y utilización deberán guardarse para poder consultarlas en el
futuro.
Preste atención a las advertencias – Deberán observarse
todas las advertencias del producto y de las instrucciones de
utilización.
Siga las instrucciones – Deberán seguirse todas las
instrucciones de utilización.
1. Limpieza – Desenchufe este producto de la toma de corriente antes de limpiarlo. No utilice limpiadores líquidos ni
limpiadores en aerosol. Utilice un paño húmedo para hacer la
limpieza.
2. Aditamentos – No utilice aditamentos que no hayan
sido recomendados por el fabricante del producto porque
podrían ser un peligro.
3. Agua y humedad – Este producto no deberá exponerse
al goteo ni a las salpicaduras. Por ejemplo, no deberá colocarse cerca de una bañera, lavabo, fregadero de cocina o lavadora de ropa, ni tampoco en un sótano húmedo, próximo a
una piscina, etc. No ponga ningún objeto que contenga líquido como, por ejemplo, un florero, encima del aparato.
4. Accesorios – No ponga este producto en un carrito, base,
trípode, ménsula o mesa inestable. El producto podría caerse y lesionar gravemente a un niño o adulto, y hasta el mismo producto podría dañarse seriamente. Utilice el producto
solamente con un carrito, base, trípode, ménsula o mesa
que haya sido recomendado por el fabricante. Para cualquier
montaje que se haga del producto deberán seguirse las instrucciones del fabricante, y deberán utilizarse los accesorios
de montaje recomendados por el fabricante. Una
combinación del producto y un carrito deberá
moverse con mucho cuidado. Las paradas bruscas, la fuerza excesiva y las superficies irregulares pueden ser la causa de que la combinación
del producto y el carrito vuelque.
5. Ventilación – Las ranuras y aberturas de la caja sirven
para la ventilación del aparato,y para asegurar un funcionamiento seguro y protegerlo del sobrecalentamiento. Las aberturas no deberán bloquearse nunca colocando el producto
encima de una cama, sofá, alfombra u otra superficie similar.
Este producto no deberá colocarse en librerías o estanterías
empotradas si éstas no ofrecen la ventilación apropiada ni se
cumplen las instrucciones del fabricante.
6. Fuentes de alimentación – Este producto deberá utilizarse solamente con el tipo de fuente de alimentación
indicado en el producto. Si no está seguro del tipo de fuente
de alimentación de su hogar, consulte a su concesionario
o compañía eléctrica de la localidad.
7. Protección de cables de alimentación – Los cables
de alimentación deberán instalarse de forma que no puedan ser pisados ni atrapados al colocar sobre o contra ellos
alguna cosa. Tenga mucho cuidado con los cables en sus
enchufes, en las tomas de corriente y en los puntos por
donde los cables salen del aparato.
8. Rayos – Para mayor protección de este producto durante
una tormenta, o cuando se deje sin atender o no se utilice
durante mucho tiempo, desenchufe el cable de alimentación
de la toma de corriente y desconecte también el cable de la
antena o del sistema de televisión por cable. Esto evitará
que se estropee el aparato debido a las tormentas y a las
descargas eléctricas.
9. Sobrecarga – No sobrecargue las tomas de corriente
de la pared, cables de extensión o tomas de corriente integrales porque podría producirse un riesgo de incendido
o una sacudida eléctrica.
10.Entrada de objetos y líquidos – No meta nunca objetos de ninguna clase en este producto a través de las aberturas porque podrán tocar punto de alta tensión peligrosos o cortocircuitar piezas que podrían producir un incendio o una descarga eléctrica. No derrame nunca líquidos
de ninguna clase sobre el producto.
11. Reparaciones – No intente reparar este producto usted mismo porque al abrir o quitar las tapas podrá exponerse a una alta tensión peligrosa u otros peligros. Solicite
las reparaciones al personal de servicio cualificado.
12.Daños que deben repararse – Desenchufe este producto de la toma de corriente y solicite las reparaciones al
personal de servicio cualificado bajo las condiciones siguientes:
a) Cuando el enchufe o el cable de alimentación esté
estropeado.
b) Si han caído líquidos u objetos en el interior del pro-
ducto.
c) Si el producto ha estado expuesto a la lluvia o al agua.
d) Si el producto no funciona normalmente siguiendo
las instrucciones de utilización.
e) Si el producto se ha caído o estropeado de cualquier
forma.
f)
Cuando el producto muestra un cambio considerable
en sus prestaciones; lo que indica que debe ser reparado.
g) Si se detecta un olor anormal o humo.
13.Reemplazo de piezas – Cuando sea necesario reem-
plazar piezas, asegúrese de que el técnico de reparaciones utilice aquellas especificadas por el fabricante, u otras
de las mismas características que las originales. Los reemplazos sin autorización podrían causar un incendido,
sacudida eléctrica u otros peligros.
14.Comprobación de seguridad – Al terminar cualquier
trabajo de mantenimiento o reparación en este producto,
pida al técnico de reparaciones que realice comprobaciones de seguridad para determinar si el producto se encuentra en condiciones de funcionamiento apropiadas o
no.
15.Montaje en una pared o en el techo – Este producto
deberá montarse en una pared o en el techo sólo si se
siguen las recomendaciones del fabricante.
16.Calor – Este producto deberá colocarse lejos de fuentes de calor como, por ejemplo, radiadores, salidas de aire
caliente, estufas u otros productos que produzcan calor.
No ponga ningún objeto con llama como, por ejemplo, una
vela o un farol cerca del producto.
17. Líneas de alimentación eléctrica – El sistema de antena exterior, de utilizar uno,no debe ponerse cerca de cables de alta tensión, luces eléctricas o circuitos de alimentación eléctrica, ni tampoco donde pueda caer sobre tales
cables o circuitos. Cuando instale un sistema de antena
exterior deberá poner muchísimo cuidado para que no toque cables o circuitos de alta tensión. El contacto con ellos
podría ser fatal.
INSTRUCCIONES DE SEGURIDAD IMPORTANTES
Precaución : Lea cuidadosamente estas páginas
para asegurar una operación sin anomalías.
Page 49

ESPAÑOL
ESPAÑOL 49
Desembalaje
Desembale cuidadosamente la unidad y asegúrese de que no le falte ninguno de los accesorios siguientes.
Accesorios
Si le falta algún accesorio, o si la unidad está estropeado o no funciona, avise inmediatamente a su concesionario. Si la
unidad le fue enviado a usted directamente, avise inmediatamente a la compañía de transporte. Kenwood recomienda
guardar la caja de cartón y los materiales de embalaje originales en caso de que usted necesite tener que transportar la
unidad en el futuro.
Tenga este manual a mano para su futuro uso.
Indice
Precaución : Lea cuidadosamente las páginas con el símbolo de exclamación para asegurar un funcionamiento
seguro.
Cable de audio (1)
(Clavija RCA - Clavija de Φ3,5 mm)
Soporte (2)
Identificación de la unidad
Inscriba el número de serie de la unidad, que aparece en la parte posterior de la misma, in los espacios provistos en la tarjeta
de garantía y también en el espacio de abajo. Al dirigirse al distribuidor para cualquier información, o para solicitar su
asistencia, indíquele siempre el modelo y el número de serie del aparato.
Modelo KA-S10 Número de serie
Antes de encender el aparato.............................. 47
Precauciones de seguridad ............................................. 47
INSTRUCCIONES DE SEGURIDAD IMPORTANTES ........................
48
Indice............................................................................... 49
Accesorios .................................................................................. 49
Características especiales ......................................... 50
Itemes importantes ....................................................... 50
Referencia ...................................................................................50
Mantenimiento ........................................................................... 50
Conexiones..................................................................... 51
Conexión de componentes de reproducción ....................... 51
Conexión de los altavoces....................................................... 52
Controles e indicadores............................................... 53
Instalación vertical ................................................................... 53
Manejo ............................................................................ 54
En caso de dificultad ....................................................55
Especificaciones........................................................... 55
Page 50

ESPAÑOL
50 ESPAÑOL
Características especiales
Tres juegos de conectores de entrada
Itemes importantes
Mantenimiento
Referencia
Teniendo en consideración la conexión con un componente portátil con nivel de salida de audio bajo, se ha
provisto una entrada analógica con ganancia de entrada alta (D.AUDIO), además de dos entradas analógicas
para componentes de escritorio convencionales (CD y AUX).
Conector de salida de altavoz de subgraves
A este aparato se puede conectar un altavoz de subgraves con amplificador incorporado y una entrada con
conector de clavija.
Circuito N.B. (graves naturales)
Los sonidos graves se pueden seleccionar de entre tres ajustes predeterminados que cuentan con niveles y
frecuencias centrales de amplificación diferentes según el entorno de la instalación y el tamaño de los
altavoces.
Instalación vertical u horizontal
Se provee un par de soportes para instalar este aparato verticalmente o apoyado en su costado.
Cuidado con la condensación
La condensación de humedad puede producirse en el interior del aparato cuando existe una gran diferencia de temperatura entre
este aparato y el exterior. Este aparato puede no funcionar correctamente si se forma condensación en su interior. En este caso,
déjelo en reposo durante unas pocas horas y reanude la operación una vez desaparecida la condensación.
Tenga mucho cuidado con la condensación en las circunstancias siguientes:
Cuando este aparato se transporte de un lugar a otro siendo muy grande la diferencia de temperaturas entre ambos,
cuando aumente la humedad en la habitación donde está instalado el aparato, etc.
Mantenimiento del aparato
Cuando se ensucie el panel frontal o la caja, límpielos con
un paño blando seco. No utilice diluyente, alcohol, etc.
porque estos agentes pueden descolorar el aparato.
Respecto a los limpiadores de contacto
No utilice regeneradores de contactos porque podrían ser
la causa de que el sistema funcione mal. En especial, evite
los regeneradores de contactos que contengan aceite,
porque los componentes de plástico podrían deformarse.
Page 51

ESPAÑOL
ESPAÑOL 51
PRECAUCIÓN
Asegúrese de seguir las instrucciones siguientes.
De lo contrario se bloqueará la ventilación
apropiada y se causarán daños o peligros de
incendio.
÷ No ponga ningún objeto que impida la salida del
calor encima de la unidad.
÷ Deje un espacio alrededor de la unidad (a partir de
los extremos, incluyendo proyecciones) igual o superior al mostrado abajo.
Panel superior : 50 cm Panel trasero : 10 cm
÷ No coloque el equipo sobre una cama, un sofá, una
alfombra, ni lugares similares. El polvo succionado
podría causar un incendio.
PRECAUCIONES AL HACER LAS CONEXIONES
No conecte la clavija del cable de alimentación a la
toma de corriente hasta después de finalizar todas
las demás conexiones.
Antes de desenchufar un cable del aparato,
asegúrese de poner siempre el interruptor POWER
en OFF y desenchufar la clavija del cable de
alimentación de la toma de corriente.
Seleccione los conectores de entrada según el tipo de componente
conectado a ellos.
La entrada D.AUDIO dispone de una ganancia de entrada alta para que pueda
aceptar la entrada procedente de la salida de auriculares de un componente
portátil como, por ejemplo, un reproductor de audio HDD (unidad de disco
duro). Si la salida de línea procedente de un componente de escritorio como,
por ejemplo, un reproductor CD se conecta a estos conectores, el audio se
reproducirá con un volumen más alto que el obtenido cuando se hace la
conexión a los conectores CD o AUX. En este caso, sin embargo, el audio
puede que se distorsione si el volumen de escucha se pone demasiado alto.
PRECAUCIÓN
Poner simplemente el interruptor POWER en la
posición OFF no desconecta completamente la
alimentación suministrada al aparato. Para aislar
completamente este aparato de la red eléctrica
resulta necesario desenchufar el cable de
alimentación de la toma de corriente.
Para desconectar inmediatamente la alimentación
suministrada al aparato en caso de emergencia,
conecte la clavija del cable de alimentación a una toma
de corriente a la que se pueda tener acceso fácilmente.
Conexiones
Conexión de componentes de reproducción
÷
En el caso de onectar otro componente al sistema, lea también el manual de instrucciones de ese componente.
÷ No se olvide de conectar firmemente todos los cables de conexión. Si las conexiones están mal hechas, quizá
no se produzca sonido o el ruido podría causar interferencias.
NotasNotas
Cable de audio
(accesorio
suministrado)
BlancoRojo
Reproductor de
audio HDD, etc.
Reproductor CD,
etc.
Inserte a fondo y firmemente la
clavija del cable de alimentación
en una toma de corriente.
Clavija del cable de
alimentación
A una toma mural de CA
AUDIO OUT
(LINE OUT)
Page 52

ESPAÑOL
52 ESPAÑOL
Conexiones
PRECAUCIONES AL HACER LAS CONEXIONES
No conecte la clavija del cable de alimentación a la toma de corriente hasta después de finalizar todas las demás
conexiones.
Antes de desenchufar un cable del aparato, asegúrese de poner siempre el interruptor POWER en OFF y
desenchufar la clavija del cable de alimentación de la toma de corriente.
Tenga cuidado para que los conductores de los cables de los altavoces no entren en contacto con otros terminales
ni con la caja del aparato.
Altavoces
(Impedancia 6 Ω - 16 Ω)
Subwoofer amplificador
Izquierdo
Derecho
Conexión de los altavoces
÷ No cortocircuite nunca los cables "+" y "–" de los altavoces. Puede causar fallos de funcionamiento.
÷ Si se invierte la polaridad "+" y "–", el sonido no será natural, el posicionamiento de los instrumentos musicales
no quedará claro, etc.
÷ No se olvide de conectar firmemente todos los cables de conexión. Si las conexiones están mal hechas, quizá
no se produzca sonido o el ruido podría causar interferencias.
NotasNotas
1Retire el revestimiento. 2Aflójelo.
4Fíjelo.3Insértelo.
Page 53

ESPAÑOL
ESPAÑOL 53
1 Interruptor POWER
Enciende y apaga el aparato.
2 Control VOLUME
Al girar el control hacia la derecha aumenta el nivel del
volumen, y al girarlo hacia la izquierda, el nivel del volumen disminuye.
3 Indicador de entrada
El indicador de la fuente de entrada seleccionada con el
selector INPUT SELECTOR se enciende.
Cuando se desconecta la alimentación del aparato se
apagan todos los indicadores.
4 Selector INPUT SELECTOR
Selecciona la fuente de entrada (D.AUDIO, CD o AUX).
5 Control N.B. CIRCUIT
Ajusta los tonos graves en tres pasos.
Seleccione la posición según los altavoces que se
utilicen o sus preferencias.
CD
D.AUDIO
INPUT SELECTOR
AUX
VOLUME
POWER N.B.CIRCUIT
OFF
1
2
3
STEREO INTEGRATED AMPLIFIER KA-S10
MIN MAX
OFFON
12 3 45
El aparato puede instalarse verticalmente, o apoyado en un costado, utilizando el par de soportes
suministrados con el mismo.
PRECAUCIÓN
Cuando instale el aparato tenga cuidado para no
tapar las aberturas de ventilación y asegurar así una
disipación térmica apropiada. De lo contrario, el calor
acumulado dentro del aparato podrá causar fallos
en el funcionamiento o ser un peligro de incendio.
CD
D.AUDIO
INPUT SELECTOR
AUX
VOLUME
POWER N.B.CIRCUIT
OFF
1
2
3
STEREO INTEGRATED AMPLIFIER
KA-S10
MIN MAX
OFFON
Instalación vertical
PRECAUCIÓN
Asegúrese de tomar las precauciones siguientes
cuando instale el aparato. La instalación incorrecta
del mismo puede ser la causa de que éste se caiga y
cause heridas.
÷ Utilice siempre los soportes suministrados cuando
instale el aparato verticalmente.
÷ Cuando instale el aparato verticalmente, colóquelo
de forma que el interruptor POWER quede en la
posición más baja, como se muestra en la
ilustración.
Interruptor POWER
Controles e indicadores
Page 54

ESPAÑOL
54 ESPAÑOL
Manejo
1.
Conexión (desconexión) de la alimentación
3. Ajuste de volumen.
2. Selección de las fuentes de entrada deseada.
Pulse el interruptor POWER para encender el aparato.
Cuando se conecta la alimentación se enciende uno de los
indicadores de entrada.
Para apagar el aparato, pulse otra vez el interruptor POWER. Los
indicadores de entrada deberán apagarse cuando se desconecte
la alimentación.
Gire el control VOLUME en uno u otro sentido para ajustar el
volumen. Girándolo hacia la derecha aumenta el volumen, y
girándolo hacia la izquierda, el volumen disminuye.
Gire el selector INPUT SELECTOR en uno u otro sentido para
seleccionar la fuente de entrada.
El indicador de entrada correspondiente a la fuente de entrada
seleccionada se enciende.
Ajuste de los tonos graves con el control N.B. (graves naturales) CIRCUIT
Gire el control N.B. CIRCUIT en uno u otro sentido para ajustar las frecuencias bajas en caso de ser
necesario.
OFF : Reproducción normal (La función del circuito
N.B. se desactiva.)
1:
Mejora las frecuencias bajas alrededor de 60 Hz.
2:
Mejora las frecuencias bajas alrededor de 70 Hz.
3:
Mejora las frecuencias bajas alrededor de 100 Hz.
N.B.CIRCUIT
OFF
1
2
3
CD
D.AUDIO
INPUT SELECTOR
AUX
POWER
OFFON
VOLUME
MIN MAX
Bajar
volumen
Aumentar
volumen
Imagen de los efectos de mejora del circuito N.B.
En general, el ajuste de los graves utilizando el circuito
N.B. resulta más eficaz cuando se utilizan altavoces
compactos, porque los graves son a menudo insuficientes
cuando se emplea este tipo de altavoces. El control N.B.
CIRCUIT deberá ponerse en OFF con un altavoz de
subgraves.
NotasNotas
Frecuencia
Nivel
Cuando se ha seleccionado
un disco compacto
Page 55

ESPAÑOL
ESPAÑOL 55
En caso de dificultad
Lo que parece ser un fallo en el funcionamiento no siempre lo es. Antes de llamar al servicio de reparaciones,
compruebe la tabla siguiente según el síntoma de sí problema.
No se reproduce el sonido.
No sale sonido o hay interferencias de ruido.
No sale sonido por el altavoz derecho o
izquierdo.
El volumen del sonido está demasiado bajo.
El sonido está demasiado alto y distorsionado.
÷ Haga correctamente la conexión consultando "Conexiones".
QW
÷ Vuelva a ajustar la hora actual. R
÷ Seleccione la fuente de entrada deseada con el selector INPUT
SELECTOR. R
÷ El circuito de protección puede estar activado. Lea “Circuito de
protección de los altavoces” más abajo y elimine la causa del
cortocircuito en los cables de los altavoces. T
÷ Haga correctamente la conexión consultando "Conexiones".
QW
÷ Haga correctamente la conexión consultando "Conexiones".
QW
÷ Si la salida de auriculares de un componente portátil está
conectada a los conectores de entrada CD o AUX, conéctela a
los conectores de entrada D.AUDIO. Q
÷ Haga correctamente la conexión consultando "Conexiones".
QW
÷
Si la salida de línea de un componente de escritorio como, por ejemplo,
un reproductor CD está conectada a los conectores de entrada
D.AUDIO, conéctela a los conectores de entrada CD o AUX.
Q
RemedioSíntoma
Especificaciones
Notas : KENWOOD sigue una politica de continuos
avances en el desarrollo de modelos. Por esta razón las
especificaciones están sujetas a combios sin previo aviso.
÷ No podrá mostrarse un rendimiento suficiente en
ubicaciones extremadamente frías (en donde el agua
se congela).
[Sección de audior]
Potencia de salida efectiva durante el funcionamiento STEREO
(1 kHz, 10 % T.H.D., en 8 Ω) ........ 12 W + 12 W (RMS)
(1 kHz, 10 % T.H.D., en 6 Ω) ........ 13 W + 13 W (RMS)
Potencia de salida nominal durante el funcionamiento STEREO
(63 Hz ~ 12,5 kHz, en 8 Ω) ............ 10 W + 10 W (DIN)
(63 Hz ~ 12,5 kHz, en 6 Ω) ............ 11 W + 11 W (DIN)
Distorsión armónica total
............................. 0,03 % (AUX IN, 1 kHz, 6 W, 8 Ω)
Circuito N.B.
N.B. 1 ........................................... +3,0 dB ( en 60 Hz)
N.B. 2 ........................................... +5,0 dB (en 70 Hz)
N.B. 3 .......................................... +7,5 dB (en 100 Hz)
Entrada (Sensibilidad / Impedancia)
LINE (CD, AUX) ............................... 250 mV / 22 kΩ
LINE (D.AUDIO) ............................... 140 mV / 48 kΩ
Salida (Nivel / Impedancia)
SUBWOOFER PREOUT ....................... 1,8 V / 2,9 kΩ
[Generalidades]
Consumo................................................................. 28 W
Dimensiones
Instalación horizontal
Ancho : 171 mm Alto : 67 mm Profundo : 207 mm
Instalación vertical
Ancho : 89 mm Alto : 182 mm Profundo : 207 mm
Peso (netto) .............................................................. 2 kg
Circuito de protección de los altavoces
El circuito de protección de los altavoces se activa cuando está encendido el aparato y se cortocircuitan los cables de
altavoces + y -. Cuando se activa el circuito de protección de los altavoces se interrumpe la salida de audio para proteger
el aparato y los altavoces. Si los cables de los altavoces se cortocircuitan, apague el aparato, desenchufe el cable de
alimentación de la toma de corriente y luego vuelva a conectar los cables de los altavoces correctamente después de
eliminar el cortocircuito. Enchufe la clavija del cable de alimentación en la toma de corriente y ponga el interruptor
POWER en ON para volver a utilizar el aparato.
Page 56

Page 57

documentation manual, user maintenance, brochure, user reference, pdf manual
This file has been downloaded from:
User Manual and User Guide for many equipments like mobile phones, photo cameras, monther board, monitors, software, tv, dvd, and othes..
Manual users, user manuals, user guide manual, owners manual, instruction manual, manual owner, manual owner's, manual guide,
manual operation, operating manual, user's manual, operating instructions, manual operators, manual operator, manual product,
 Loading...