

Page 1
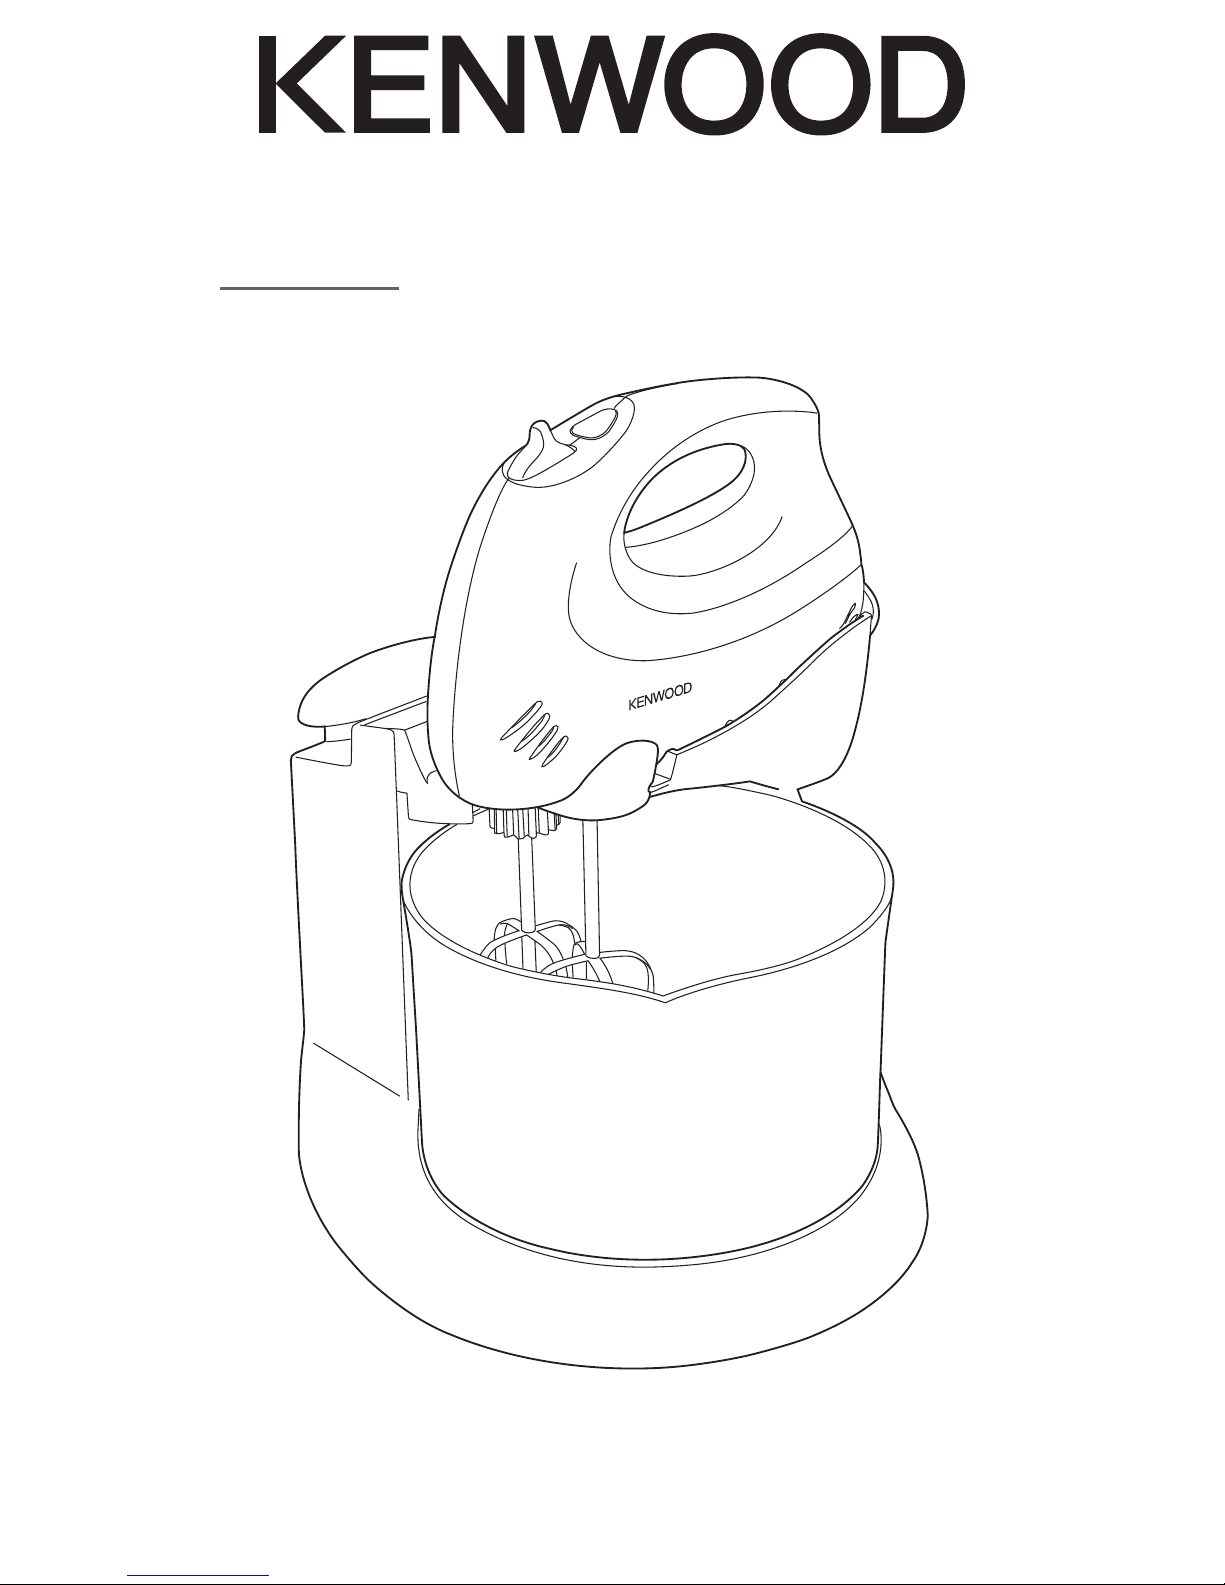
instructions
HM430
Page 2

English 2 - 6
Français 7 - 11
´¸∂w
31 - 51
Page 3
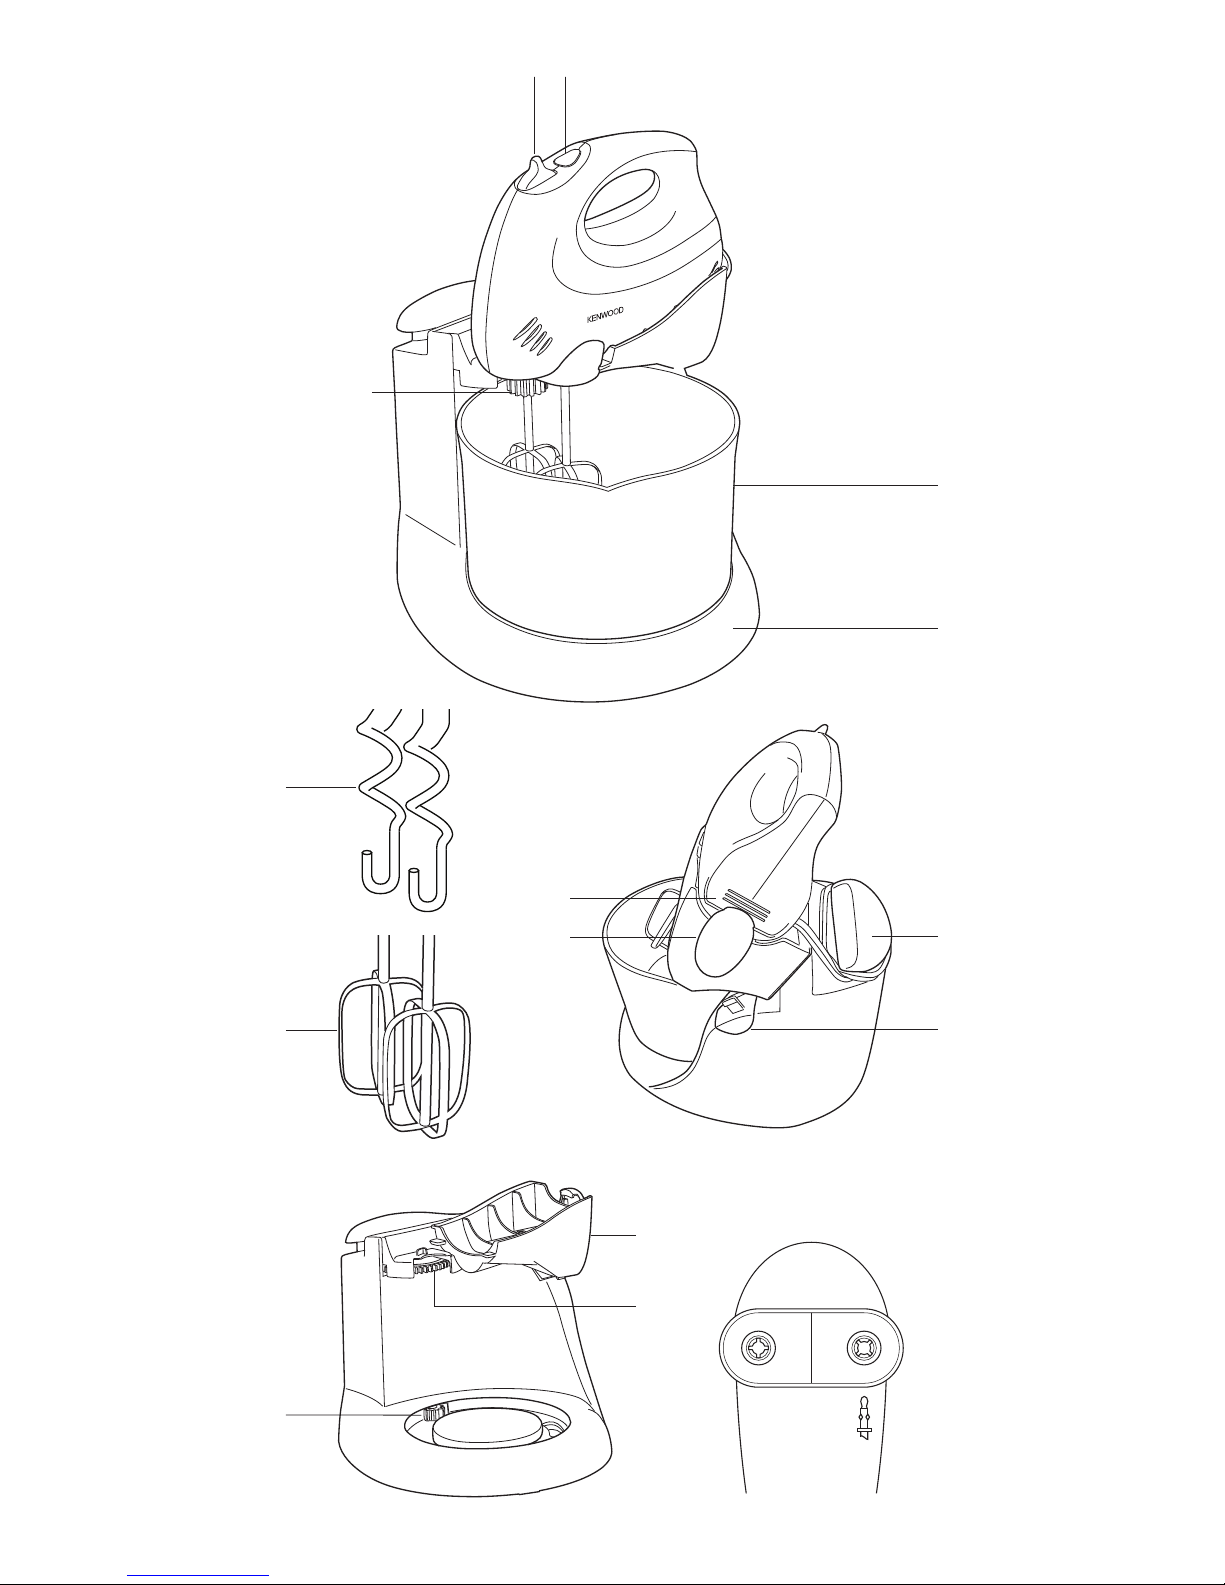
햴
햵
햸
햹
햽
햾
햿
햶
햻
햺
햲 햳
햷
Page 4

2
safety
●
Read these instructions carefully and retain
for future reference.
●
Remove all packaging and any labels.
●
Ensure the cord is fully unwound from the
cord wrap before using the handmixer.
●
Never put the handmixer body in water or let
the cord or plug get wet.
●
Keep fingers, hair, clothing and utensils away
from moving parts.
●
Never let the cord touch hot surfaces or
hang down where a child could grab it.
●
Never use a damaged handmixer. Get it
checked or repaired: see 'service and
customer care'.
●
Never use an unauthorised attachment.
●
Always unplug the appliance when not in
use, before fitting or removing parts or before
cleaning.
●
This appliance shall not be used by children.
Keep the appliance and its cord out of reach
of children.
●
Children should be supervised to ensure that
they do not play with the appliance.
●
Appliances can be used by persons with
reduced physical, sensory or mental
capabilities or lack of experience and
knowledge if they have been given
supervision or instruction concerning use of
the appliance in a safe way and if they
understand the hazards involved.
●
Only use the appliance for its intended
domestic use. Kenwood will not accept any
liability if the appliance is subject to improper
use, or failure to comply with these
instructions.
English
Page 5

U
se your Kenwood 6-speed
handmixer for mixing, beating and
whipping cream, eggs, sauces and
m
any other mixtures. Heavier doughs
and other mixtures can be prepared
with the kneaders included with
selected models of the handmixer.
b
efore plugging in
●
Make sure your electricity supply is
the same as the one shown on the
rear of your handmixer.
Important – UK only
●
The wires in the cord are coloured as
follows:
Blue = Neutral, Brown = Live.
●
The appliance must be protected by
a 3A approved (BS1362) fuse.
Note:
●
For non-rewireable plugs the fuse
cover MUST be refitted when
replacing the fuse. If the fuse cover is
lost then the plug must not be used
until a replacement can be obtained.
The correct fuse cover is identified by
colour and a replacement may be
obtained from your Kenwood
Authorised Repairer (see Service).
●
If a non-rewireable plug is cut off it
must be DESTROYED
IMMEDIATELY. An electric shock
hazard may arise if an unwanted
non-rewireable plug is inadvertently
inserted into a 13A socket outlet.
●
This appliance conforms to EC
directive 2004/108/EC on
Electromagnetic Compatibility and
EC regulation no. 1935/2004 of
27/10/2004 on materials intended for
contact with food.
before using your handmixer
for the first time
●
Wash the parts (see 'cleaning').
key
speed switch and tool release
b
utton
Turbo button
bowl
stand
kneaders
beaters
cord wrap
stand release button
mixer holding bracket
bracket recess
mixer cradle
beater/kneader drive gear
bowl drive gear
to use your handmixer
●
Unwrap the cord from the cord wrap
before use.
1 Fit the mixer to the stand by sliding
the handmixer into the cradle –
ensuring the tabs at the front of the
cradle slide into the slots on the
underside of the Handmixer.
2 Fit the holding bracket into the
bracket recess at the rear of the
Handmixer and clip securely into
place.
3 Press the stand release button
and lift the handmixer up so that the
beaters or kneaders can be fitted.
Note: for safety, the mixer will
only operate with the beaters
or kneaders in position.
4 Insert the beaters or kneaders into
the mixer – turn until a positive click
is heard.
●
If using the mixer with the stand,
ensure the beater/kneader with the
drive gear is inserted so it aligns with
the drive gear on the stand .
●
If using the mixer without the stand,
the beater/kneader with the small
metal collar must be inserted into the
socket marked with the graphic .
5 Place the ingredients into the mixing
bowl and then place the bowl on to
the stand.
6 Lower the Handmixer down until the
stand release button clicks back
into place.
7 Plug in and push the speed control
forward.
3
Page 6

●
A
s the mixture thickens, increase the
speed.
●
If the machine starts to slow or
l
abour, increase the speed and/or
push the Turbo button .
●
The Turbo button gives an extra
boost of power for those extra tough
mixing jobs. Use for up to 30seconds
at a time.
●
I
t may be necessary to scrape down
the sides of the bowl and along the
bottom at regular intervals to assist
the mixing operation.
8 When the mixtures has reached the
desired consistency, return the speed
switch to the off position and wait
until the beaters or kneaders have
stopped before removing.
9 To remove the tools, make sure the
speed switch is in the off position
and unplug the mixer. Press the
stand release button and lift the
mixer up so that the tools are clear of
the bowl. Hold on to the tool shafts
and press the tool release button .
hints
●
When creaming for cake mixtures,
use butter or margarine at room
temperature or soften before use.
●
Egg whites should be at room
temperature for best results.
●
When whisking eggs whites ensure
the bowl and beaters are completely
clean and free from traces of fat or
egg yolk.
●
For best results with small quantities,
use the handmixer without the stand.
●
Large quantities and thick mixtures
may require a longer mixing time.
●
If you wish to mix larger quantities or
heavier mixes, remove the mixer from
the stand and use a bowl of an
appropriate size.
●
To re-knead bread doughs
remove the mixer from the
stand and use hand held.
maximum quantities
Egg Whites 6 (210g)
Dough 450g (flour weight)
Pastry 250g (flour weight)
Creaming Method
Light Fruit cake 900g (total weight)
All in one cake mix 600g (total weight)
cleaning
●
Always switch off, unplug and
r
emove the beaters or kneaders
b
efore cleaning.
●
Never put the handmixer body in
w
ater or let the cord or plug get wet.
●
N
ever use abrasives to clean parts.
handmixer body/cradle/stand
●
Wipe with a damp cloth, then dry.
●
Never immerse in water or use
abrasives
all other parts
●
Wash by hand, then dry.
●
Alternatively they are dishwasher safe
and can be washed on the top rack
of your dishwasher. Avoid placing
items on the bottom rack directly
over the heating element. A short low
temperature (Maximum 50°C)
programme is recommended.
storage
●
Wrap the cord around the end of the
cradle .
4
Page 7

service and customer
care
●
I
f the cord is damaged it must, for
s
afety reasons, be replaced by
KENWOOD or an authorised
K
ENWOOD repairer.
U
K
I
f you need help with:
●
using your handmixer or
●
servicing or repairs (in or out of
guarantee)
call Kenwood customer care on
023 9239 2333. Have your
model number (HM430) and
date code (5 digit code i.e.
13H26) ready. They are located on
the rear of the power unit.
●
spares and attachments
call 0844 557 3653.
other countries
●
Contact the shop where you bought
your handmixer.
●
Made in China.
IMPORTANT INFORMATION FOR
CORRECT DISPOSAL OF THE
PRODUCT IN ACCORDANCE
WITH EC DIRECTIVE
2002/96/EC.
At the end of its working life, the product
must not be disposed of as urban waste.
It must be taken to a special local
authority differentiated waste collection
centre or to a dealer providing this
service.
Disposing of a household appliance
separately avoids possible negative
consequences for the environment and
health deriving from inappropriate
disposal and enables the constituent
materials to be recovered to obtain
significant savings in energy and
resources. As a reminder of the need to
dispose of household appliances
separately, the product is marked with a
crossed-out wheeled dustbin.
g
uarantee (UK only)
If your handmixer goes wrong within
one year from the date you bought it,
w
e will repair or replace it free of
charge provided:
●
you have not misused, neglected or
damaged it;
●
it has not been modified (unless by
Kenwood);
●
i
t is not second-hand;
●
it has not been used commercially;
●
you have not fitted a plug incorrectly;
and
●
you supply your receipt to
show when you bought it.
This guarantee does not affect your
statutory rights.
5
Page 8

white bread dough
10ml/2 tsp dried yeast (the type that
r
equires reconstituting)
5
ml/1 tsp sugar
250ml/9 fl.oz. warm water
4
50g/1 lb bread flour
5
ml/1 tsp salt
15g/
1
⁄2 oz. lard
1 Place the dried yeast, with the sugar
and water, in a mixing bowl and leave
to froth. The correct water
temperature should be 43°C and can
be achieved by mixing one third
boiling water with two thirds cold
water.
2 Add the remaining ingredients.
Combine the ingredients together on
a low speed until the flour is
incorporated. Then increase the
speed and knead for approximately
2-3 minutes, until the dough is
smooth and elastic. Cover with oiled
cling film and leave the dough to rise
in a warm place for 45-60 minutes.
3 With the mixer removed from the
stand and hand held re-knead the
dough on maximum speed for
30 – 45 seconds, keeping the
kneaders in the mix.
4 Shape the dough into a loaf, or rolls,
and place on greased baking trays.
Cover with oiled cling film and leave
somewhere warm until it has doubled
in size.
5 Bake in a preheated oven at
230°C/450°F/Gas mark 8 for 20-25
minutes (for a loaf) or 10-15 minutes
(for rolls). When ready, the dough
should sound hollow when tapped
on the base.
6
Page 9

sécurité
●
Lisez et conservez soigneusement ces
instructions pour pouvoir vous y référer
ultérieurement.
●
Retirez tous les éléments d’emballage et les
étiquettes.
●
Assurez-vous que le cordon est totalement
déroulé de l'enrouleur de cordon avant
d’utiliser le batteur à main.
●
Ne plongez jamais le corps du batteur dans
l’eau et ne mouillez jamais le cordon
d’alimentation ou la prise.
●
Gardez les doigts, les cheveux, les vêtements
et les ustensiles loin des éléments mobiles.
●
Ne laissez jamais le cordon au contact de
surfaces chaudes ou pendre de telle façon
qu’un enfant puisse s’en saisir.
●
N’utilisez jamais un batteur à main
endommagé. Faites-le vérifier ou réparer :
voir « service après-vente ».
●
N’utilisez jamais un accessoire non
recommandé.
●
Débranchez toujours l’appareil lorsque celuici n’est pas utilisé, avant d’installer et de
retirer des éléments et avant de procéder au
nettoyage.
●
Cet appareil n’est pas destiné à être utilisé
par des enfants. Conservez l'appareil et son
cordon hors de portée des enfants.
●
Les enfants doivent être surveillés afin qu'ils
ne puissent pas jouer avec cet appareil.
7
A
vant de lire, veuillez déplier la première page contenant les illustrations
Français
Page 10

Utilisez votre batteur à main
Kenwood à 6 vitesses pour
mélanger, battre et fouetter de la
crème, des œufs, des sauces et de
nombreux autres mélanges. Les
pâtes et d’autres mélanges plus
épais peuvent être préparés avec les
pétrisseurs fournis avec les modèles
sélectionnées du batteur à main.
avant de brancher l’appareil
●
Assurez-vous que votre alimentation
électrique correspond à celle qui est
indiquée au dos de votre batteur à
main.
●
Cet appareil est conforme à la
directive 2004/108/CE de la CE sur
la compatibilité électromagnétique, et
au règlement 1935/2004 de la CE du
27/10/2004 sur les matériaux
destinés au contact alimentaire.
avant la première utilisation
de votre batteur à main
●
Nettoyez les éléments (voir «
nettoyage »).
légende
contrôle de vitesse et bouton de
déblocage de l’ustensile
bouton turbo
bol
socle
pétrisseurs
fouets
rangement du cordon
bouton de déblocage du socle
support de maintien en place du
batteur
renfoncement du support
support du batteur
axe d’entraînement des batteurs /
pétrisseurs
axe d’entraînement du bol
utilisation de votre
batteur à main
●
Sortez le cordon du rangement du
cordon avant toute utilisation.
1 Installez le batteur sur le socle en
faisant glisser le batteur à main dans
le support – veillez à ce que les
onglets sur la partie avant du support
s’enclenchent dans les encoches sur
la partie inférieure du batteur.
2 Installez le support de maintien
dans le renfoncement du support
au dos du batteur à main et
enclenchez-le fermement en place.
8
●
Les appareils peuvent être utilisés par des
personnes dont les capacités physiques,
sensorielles ou mentales sont diminuées, ou
qui ne disposent pas des connaissances ou
de l’expérience nécessaires, si elles ont été
formées et encadrées pour l’utilisation de
l'appareil concerné en toute sécurité et si
elles comprennent les risques impliqués.
●
N’employez l’appareil qu’à la fin domestique
prévue. Kenwood décline toute responsabilité
dans les cas où l’appareil est utilisé
incorrectement ou que les présentes
instructions ne sont pas respectées.
Page 11

3
Appuyez sur le bouton de déblocage
du support et relevez le batteur à
main de manière à pouvoir installer
l
es batteurs / pétrisseurs.
Note : pour des raisons de
sécurité, le batteur ne
fonctionne que lorsque les
batteurs ou les pétrisseurs
sont correctement en place.
4
Insérez les batteurs ou les
pétrisseurs dans le mixeur – tournez
jusqu'à ce que vous entendiez un
clic.
●
Si vous utilisez le mixeur avec le
support, veillez à ce que le batteur /
pétrisseur avec l'axe d'entraînement
soit inséré de manière à être aligné
avec celui présent sur le support .
●
Si vous utilisez le mixeur sans le
support, le batteur / pétrisseur avec
le petit collier métallique doit être
inséré dans la prise sur laquelle figure
le graphique .
5 Disposez les ingrédients dans le bol
à mélanger et positionnez ensuite le
bol sur le support.
6 Abaissez le batteur à main jusqu'à ce
que le bouton de déblocage du
support émette un clic et revienne
en place.
7 Branchez et poussez vers l'avant la
commande des vitesses .
●
Au fur et à mesure que la préparation
épaissit, augmentez la vitesse.
●
Si l'appareil commence à ralentir ou
à peiner, augmentez la vitesse et/ou
poussez le bouton Turbo .
●
Le bouton turbo donne plus de
puissance pour les préparations
difficiles à mélanger. Utilisez pendant
30 secondes au plus à la fois.
●
Afin d'obtenir un bon résultat, il peut
s'avérer nécessaire de racler vers le
bas les parois internes du bol ainsi
que le fond à intervalles réguliers.
8 Lorsque le mélange a atteint la
consistance souhaitée, ramenez sur
arrêt la commande des vitesses et
attendez l'arrêt complet des batteurs
ou pétrisseurs avant de les retirer.
9
Pour retirer les ustensiles, assurezvous que la commande des vitesses
se trouve sur arrêt et débranchez le
m
ixeur. Appuyez sur le bouton de
déblocage du support et relevez
l'appareil de manière à ce que les
ustensiles soient nettement endehors du bol. Tenez les axes des
ustensiles et appuyez sur le bouton
d
e déblocage des ustensiles .
conseils
●
Lorsque vous montez en crème des
mélanges pour gâteau, utilisez du
beurre ou de la margarine à
température ambiante, ou
ramollissez avant utilisation.
●
Les blancs d’œufs doivent être à
température ambiante pour de
meilleurs résultats.
●
Lorsque vous battez des blancs en
neige, veillez à ce que le bol et les
batteurs soient propres et ne
comportent aucune trace de gras ou
de jaune d’œuf.
●
Pour de meilleurs résultats avec de
petites quantités, utilisez le batteur à
main sans le support.
●
Le temps de mélange peut s'avérer
plus long lorsqu'il s'agit de grandes
quantités et de mélanges épais.
●
Si vous souhaitez mélanger des
quantités plus importantes ou des
préparations plus épaisses, retirez le
mixeur du socle et utilisez un bol à la
bonne taille.
●
Pour re-pétrir les pâtes à pain,
retirez le mixeur du socle et
utilisez-le en le tenant à la
main.
quantités maximales
Blancs d’oeuf 6 (210g)
Pâte 450 g (poids en farine)
Patisserie 250 g (poids en farine)
Méthode de montage en crème
Cake léger aux fruits 900 g (poids
total)
Mélange pour 600 g (poids total)
cake tout-en-un
9
Page 12

10
nettoyage
●
Veillez à toujours éteindre et
d
ébrancher l’appareil et à retirer les
b
atteurs ou pétrisseurs avant le
nettoyage.
●
N
e plongez jamais le corps du
b
atteur dans l’eau et ne mouillez
jamais le cordon d’alimentation ni la
p
rise.
●
N’utilisez jamais de produits abrasifs
pour nettoyer les éléments.
corps du batteur à main /
socle / support
●
Essuyez avec un chiffon humide,
puis séchez.
●
Ne plongez jamais dans l’eau
et n’utilisez pas d’abrasifs.
autres pièces
●
Lavez à la main et séchez
soigneusement.
●
Ils peuvent aussi passer au lavevaisselle, sur l’étagère du haut de
votre lave vaisselle. Evitez de placer
les éléments sur l’étagère du bas,
juste au-dessus de l’élément
chauffant. Un programme court à
faible température (Maximum 50°C)
est recommandé.
rangement
●
Enroulez le cordon autour de
l'extrémité du support .
service après-vente
●
Si le cordon est endommagé, il doit
être remplacé, pour des raisons de
sécurité, par KENWOOD ou par un
réparateur agréé KENWOOD.
Si vous avez besoin d’aide
concernant :
●
l’utilisation de votre appareil
●
l’entretien ou les réparations
●
contactez le magasin où vous avez
acheté votre appareil.
●
Conçu et développé par Kenwood
au Royaume-Uni.
●
Fabriqué en Chine.
AVERTISSEMENTS POUR
L'ÉLIMINATION CORRECTE DU
PRODUIT CONFORMÉMENT AUX
TERMES DE LA DIRECTIVE
E
UROPÉENNE 2002/96/CE.
Au terme de son utilisation, le produit
ne doit pas être éliminé avec les
déchets urbains.
Le produit doit être remis à l'un des
centres de collecte sélective prévus par
l'administration communale ou auprès
des revendeurs assurant ce service.
Éliminer séparément un appareil
électroménager permet d'éviter les
retombées négatives pour
l'environnement et la santé dérivant
d'une élimination incorrecte, et permet
de récupérer les matériaux qui le
composent dans le but d'une économie
importante en termes d'énergie et de
ressources. Pour rappeler l'obligation
d'éliminer séparément les appareils
électroménagers, le produit porte le
symbole d'un caisson à ordures barré.
Page 13

pâte pour pain blanc
10 ml/2 cc de levure sèche (de type
l
evure à reconstituer)
5
ml/1 cc de sucre
250 ml d’eau tiède
4
50 g de farine complète
5
ml/1 cc de sel
15 g de lard
1 Disposez la levure sèche, l'eau et le
sel dans le bol à mélanger et laissez
monter jusqu'à ce que la préparation
mousse. La température de l'eau
devrait être idéalement de 43°C ;
pour ce faire, mélangez un tiers
d'eau bouillante à deux tiers d'eau
froide.
2 Ajoutez les ingrédients restants.
Mélangez les ingrédients ensemble à
faible vitesse jusqu’à ce que la farine
soit incorporée. Puis augmentez
ensuite la vitesse et pétrissez jusqu’à
ce que la pâte devienne souple et
élastique pendant environ 2 à 3
minutes. Recouvrez d’un papier film
huilé et laissez la pâte monter dans
un endroit chaud pendant 45 à 60
minutes
3 Après avoir retiré le batteur du
support, en le tenant par la poignée,
pétrissez une nouvelle fois la pâte à
la vitesse maximale pendant 30 à 45
secondes en maintenant les
pétrisseurs dans le mélange.
4 Façonnez la pâte en une miche ou
des petits pains et disposez sur une
plaque de cuisson graissée.
Recouvrez d’un papier film huilé et
laissez quelque part au chaud
jusqu’à ce que les petits pains ou la
pâte aient doublé de volume.
5 Faites cuire à 230° C / 450° F /
Indication 8 pour le gaz pendant 20 à
25 minutes (pour une miche) ou 10 à
15 minutes (pour des petits pains).
Pour savoir si le pain est prêt,
retournez-le et tapotez-le : si vous
entendez un son creux, cela signifie
qu’il est cuit.
11
Page 14

±FKu±U‹ ≥U±W •u‰ ØOHOW «∞∑ªKh
«∞B∫O∫W ±s «∞LM∑Z Ë≠IU ∞∑u§Ot
«ô¢∫Uœ «_˸˰w
CE/69/2002.
≠w ≤NU¥W «∞FLd «∞∑AGOKw ∞KπNU“, ¥πV ´bÂ
«∞∑ªKh ±s «∞πNU“ ≠w ≤HU¥U‹ «∞LMU©o
«∞∫Cd¥W.
°q ¥πV √îcÁ ≈∞v ±dØe ¢πLOl îU’ °πNW
±∫KOW ±∑ªBBW ≠w «∞∑ªKh ±s ≥cÁ «∞MHU¥U‹
√Ë ≈∞v ¢U§d ¥Ib ≥cÁ «∞ªb±W.
«∞∑ªKh ±s «_§Ne… «∞LMe∞OW ´Kv ≤∫u
±MHBq, ¥πMV «ü£U¸ «∞ºK∂OW «∞L∫∑LKW ´Kv
«∞∂OµW Ë«∞B∫W Ë«∞∑w ¢M∑Z ´s «∞∑ªKh ±s ≥cÁ
«∞MHU¥U‹ °Dd¥IW ¨Od ±MUß∂W, ØLU √Ê ≥cÁ
«∞FLKOW ¢ºL` °Uß∑dœ«œ «∞Lu«œ «∞LJu≤W «_±d
«∞cÍ ¥∑O` «∞∫Bu‰ ´Kv Ë≠u¸«‹ Ø∂Od… ≠w
±πU‰ «∞DUÆW Ë«∞Lu«¸œ. ∞K∑cØOd °Cd˸…
«∞∑ªKh ±s «_§Ne… «∞LMe∞OW ´Kv ≤∫u
±MHBq, ¥u§b ´Kv «∞πNU“ Åu¸… ±ADu°W
∞ºKW ÆLU±W –«‹ ´πö‹.
´πOs «∞ª∂e «_°Oi
01 ±q/2±KFIW ÅGOd… îLOd… §U≠W («∞MuŸ
«∞cÍ ¥∫∑Uà ≈´Uœ… ¢AJOq)
5 ±q/±KFIW ÅGOd… ßJd
052 ±q ±U¡ œ«≠T
054 ¨d«Â œÆOo î∂e
5 ±q/±KFIW ÅGOd… ±K`
51 ¨d«Â œ≥s •Ou«≤w
1 {Fw «∞ªLOd… «∞LπHHW ±l «∞ºJd Ë«∞LU¡
œ«îq ßKDU≤OW «∞ªKj Ë«¢dØONU ∞∫Os ¢JuÊ
¸¨u…. œ¸§W «∞∫d«¸… «∞B∫O∫W ¥πV √Ê
¢JuÊ 34 œ¸§W ±µu¥W Ë¥LJs «∞∫Bu‰ ´KONU
´s ©d¥o îKj £KY ±Ib«¸ ±U¡ ±GKw ±l £K∏w
±Ib«¸ ±U¡ °U¸œ.
2 √{OHw «∞LJu≤U‹ «∞L∑∂IOW. Æu±w °b±Z
«∞LJu≤U‹ ±l °FCNU «∞∂Fi °Uß∑ªb«Â
ßd´W ±MªHCW •∑v ¥∑r œ±Z «∞bÆOo. £r
«¸≠Fw «∞ºd´W ËË«ÅKw «∞Fπs ∞Lb… 2 ≈∞v
3 œÆUzo •∑v ¥B∂` «∞FπOs ≤U´LUΠ˱d≤UÎ.
¨Dw «∞FπOs °HOKr ±s «∞∂öß∑Op ±b≥uÊ
°D∂IW “¥X Ë«¢dØw «∞FπOs •∑v ¥ªLd
(¥d¢Hl) ∞Lb… 54 ≈∞v 06 œÆOIW.
3 √£MU¡ ≈“«∞W «∞ªö◊ ±s «∞∫U±q Ë≈±ºUØt
°U∞Ob, √´ObÍ ´πs «∞FπOs ´Kv «∞ºd´W
«∞FU∞OW ∞Lb… 03 ≈∞v 54 £U≤OW ±l «ù°IU¡ ´Kv
«∞FπU≤W œ«îq «∞FπOs.
4 ®JKw «∞FπOs ≠w Åu¸… √¸¨HW √Ë ∞HUzn
Ë{FOt ≠u‚ ÅOMOW î∂e ±b≥uÊ °D∂IW ±s
«∞e¥X.
¨Dw «∞FπOs °HOKr ±s «∞∂öß∑Op ±b≥uÊ
°D∂IW “¥X Ë«¢dØOt ≠w ±JUÊ œ«≠T •∑v
¥∑CU´n •πLt.
5 «î∂eÍ œ«îq ≠dÊ ßU°o «∞∑ºªOs ´Kv
•d«¸… 032 œ¸§W ±µu¥W - ´ö±W «∞GU“ 8 ∞Lb… 02 ≈∞v 52 œÆOIW (°U∞Mº∂W ∞Kd¨On) √Ë
01 ≈∞v 51 œÆOIW (°U∞Mº∂W ∞KHUzn). ´Mb±U
¥MCZ «∞FπOs ßOB∂` ±Hd¨UÎ ±s «∞b«îq
Ëß∑AFd¥s °c∞p ´Mb ®It ±s «∞IU´b….
51
Page 15

●●
¥LM` “¸ «∞ºd´W «∞FU∞OW (obruT) Æb¸… œ≠l
≈{U≠OW °U∞Mº∂W ∞LNU îKj «∞ªKDU‹
«∞∏ªOMW. ¥LJMp «ß∑ªb«Â “¸ «∞ºd´W «∞FU∞OW
∞Lb… 03 £U≤OW ±∑u«ÅKW ≠w «∞Ld… «∞u«•b….
●
●
Æb ¥JuÊ ±s «∞CdË¸Í ØAj §u«≤V ËÆUŸ
«∞ºKDU≤OW ∞KLºU´b… ≠w ´LKOW «∞ªKj.
8 ´Mb ËÅu‰ «∞ªKOj ≈∞v «∞Iu«Â «∞LDKu»,
√´ObÍ ±H∑UÕ «∞∑∫Jr ≠w «∞ºd´U‹ ≈∞v
±u{l «ù¥IU· (
ffo) Ë«≤∑EdÍ ∞∫Os ¢uÆn
«∞ªHUÆW √Ë «∞FπU≤W Æ∂q ≈“«∞∑NU.
9 ù“«∞W «_œË«‹, ¢QØbÍ ±s ¢u§Ot ±H∑UÕ
«∞ºd´U‹ ≠w ±u{l «ù¥IU· (
ffo) £r
«≠BKw «∞ªö◊ ´s ±Bb¸ «∞∑OU¸ «∞JNd°w.
«{GDw ´Kv “¸ ¢∫d¥d «∞∫U±q Ë«¸≠Fw
«∞ªö◊ _´Kv °∫OY ¢∂∑Fb «_œ«… ´s
ßKDU≤OW «∞ªKj. «±ºJw ±∫u¸ «_œ«…
Ë«{GDw ´Kv “¸ ¢∫d¥d «_œ«… .
¢KLO∫U‹
●●
´Mb îKj «∞ºLs °U∞ºJd ≠w îKDU‹
«∞JFJU‹, «ß∑ªb±w «∞e°b… ≠w œ¸§W •d«¸…
«∞Gd≠W √Ë ∞OMONU Æ∂q «ôß∑ªb«Â.
●●
¥πV √Ê ¥JuÊ °OU÷ «∞∂Oi ≠w œ¸§W •d«¸…
«∞Gd≠W ∞K∫Bu‰ ´Kv √≠Cq «∞M∑UzZ.
●●
´Mb îHo °OU÷ «∞∂Oi, ¢QØbÍ ±s ≤EU≠W
«∞ºKDU≤OW Ë«∞ªHUÆW ¢LU±UÎ Ë´b ˧uœ √Í
°IU¥U œ≥MOW √Ë ÅHU¸ °Oi.
●●
∞K∫Bu‰ ´Kv √≠Cq ≤∑OπW ±l «∞JLOU‹
«∞BGOd…, «ß∑ªb±w «∞ªö◊ «∞ObËÍ °bËÊ
«∞LMBW.
●●
«∞JLOU‹ «∞J∂Od… Ë«∞ªKDU‹ «∞∏ªOMW Æb ¢∑DKV
≠∑d… îKj √©u‰.
●●
≈–« √¸œ¢w îKj ØLOU‹ √Ø∂d √Ë îKDU‹ √Ø∏d
Ø∏U≠W, √“¥Kw «∞ªö◊ ±s «∞∫U±q Ë«ß∑ªb±w
ßKDU≤OW °∫πr ±MUßV.
●●
ù´Uœ… ´πs «∞FπOs, √“¥Kw «∞ªö◊ ±s
«∞∫U±q Ë«±ºJOt ≠w ¥b„ √£MU¡
«∞∑AGOq.
«∞ºFU‹ «∞IBuÈ
°OU÷ «∞∂Oi 6 (012 ¨d«Â)
«∞FπOs 054 ¨d«Â (Ë“Ê «∞bÆOo)
«∞LFπMU‹ 052 ¨d«Â (Ë“Ê «∞bÆOo)
©d¥IW «∞ªHo ∞∑∫COd «∞Jd¥LW
ØFJW «∞Hu«Øt «∞ªHOHW 009 ¨d«Â («∞u“Ê
«ù§LU∞w)
îKDU‹ «∞JFJU‹
«∞πU≥e… 006 ¨d«Â («∞u“Ê
«ù§LU∞w)
«∞∑MEOn
●
√ËÆHw œ«zLUÎ ¢AGOq «∞πNU“, «≠BKOt ´s
±Bb¸ «∞∑OU¸ «∞JNd°w Ë√“¥Kw «∞LCd» √Ë
«∞FπU≤W Æ∂q ≈§d«¡ ´LKOU‹ «∞∑MEOn.
●
¥∫c¸ ¨Ld §ºr «∞ªHUÆW «∞ObË¥W ≠w «∞LU¡ √Ë
¢Fd÷ «∞ºKp «∞JNd°w √Ë «∞IU°f ∞K∂Kq.
●
¥∫c¸ «ß∑ªb«Â ±u«œ ØU®DW ∞∑MEOn «_§e«¡.
§ºr «∞ªö◊ «∞ObËÍ/¢πu¥n
«ß∑Id«¸ «∞ªö◊/«∞∫U±q
●●
±º` °IDFW ÆLU‘ ¸©∂W £r «∞∑πHOn.
●
¥∫c¸ «∞GLd ≠w «∞LU¡ √Ë «ß∑ªb«Â «∞Lu«œ
«∞JU®DW.
§LOl «ô§e«¡ «ôîdÈ
● ¢Gºq °U∞Ob £r ¢πHn.
●
•OY √≤t ±s «ü±s ¨ºq ≥cÁ «∞LJu≤U‹ ≠w
¨ºU∞W «_©∂U‚ ≠∂Dd¥IW √îdÈ ¥LJs ¨ºKNU
´Kv «∞d· «∞FKuÍ ≠w ¨ºU∞W «_©∂U‚. ¢πM∂w
Ë{l «∞FMUÅd ´Kv «∞d· «∞ºHKw ±∂U®d…
≠u‚ ´MBd «∞∑ºªOs.¥uÅv °Uß∑ªb«Â
°d≤U±Z ÆBOd ±l œ¸§W •d«¸… ±MªHCW
(05 œ¸§W ±µu¥W Ø∫b √ÆBv).
«∞∑ªe¥s
●●
∞Hw «∞ºKp «∞JNd°w •u‰ ≤NU¥W «∞∫U±q .
«∞ªb±W ˸´U¥W «∞FLö¡
●
≠w •U∞W ¢Kn «∞ºKp «∞JNd°w, ¥πV «ß∑∂b«∞t
_ß∂U» ±∑FKIW °U∞ºö±W ±s Æ∂q
DOOWNEK √Ë ±dØe ÅOU≤W ±F∑Lb ±s Æ∂q
DOOWNEK.
●
≈–« √¸œ‹ «∞∫Bu‰ ´Kv ±ºU´b… °AQÊ:
●
«ß∑ªb«Â «∞πNU“ ´LKOU‹ ÅOU≤W Ë≈Åö•U‹
●
«¢BKw °U∞L∑πd «∞cÍ «®∑d¥∑w ±Mt «∞πNU“.
● ¢BLOr Ë¢Du¥d doowneK ≠w «∞LLKJW
«∞L∑∫b….
● ÅMl ≠w «∞BOs.
41
Page 16

«ß∑ªb±w «∞ªö◊ «∞ObËÍ 6 ßd´U‹ ±s
d
oowneK
∞ªKj ËîHo «∞IAb… Ë«∞∂Oi
Ë«∞BKBU‹ Ë«∞Fb¥b ±s «∞ªKDU‹ «_îdÈ.
¥LJs ¢ªCOd «∞FπOs «∞∏ªOs Ë«∞ªKDU‹
«_îdÈ «∞LAU°NW °Uß∑ªb«Â «∞FπU≤W
«∞LeËœ… ±l ±uœ¥ö‹ ±FOMW ±s «∞ªö◊
«∞ObËÍ.
Æ∂q ¢uÅOq «∞πNU“ °LBb¸ «∞∑OU¸
«∞JNd°w
●●
¢QØbÍ ±s ¢LU£q ±u«ÅHU‹ «∞LBb¸
«∞JNd°w ±l «∞Lu«ÅHU‹ «∞Lu{∫W ´Kv
«∞πU≤V «∞ªKHw ∞Kªö◊ «∞ObËÍ.
●
¥∑u«≠o ≥c« «∞πNU“ ±l ¢u§ONU‹ «ô¢∫Uœ
«_˸˰w
CE/801/4002 °AQÊ «∞∑u«≠o
«∞JNd˱GMU©Oºw Ë¢MEOLU‹ «ô¢∫Uœ
«_˸˰w ¸Ær
4002/5391 «∞BUœ¸… °∑U¸¥a
72/01/4002 Ë«∞L∑FKIW °U∞Lu«œ «∞L∑ö±ºW
±l «_©FLW.
Æ∂q «ß∑ªb«Â «∞ªHUÆW «∞ObË¥W ∞KLd…
«_Ë∞v
●
«¨ºKw «_§e«¡ (¸«§Fw ƺr "«∞∑MEOn").
«∞b∞Oq
±H∑UÕ «∞ºd´U‹ Ë“¸ ¢∫d¥d «_œ«…
“¸ «∞ºd´W «∞FU∞OW (
obruT)
«∞ºKDU≤OW
«∞∫U±q
«∞FπU≤W
±KFIW °öß∑OJOW
±uÆl ∞n «∞ºKp
“¸ ¢∫d¥d «∞∫U±q
Æu” •Lq «∞ªö◊
¢πUË¥n «∞Iu”
¢πu¥n «ß∑Id«¸ «∞ªö◊
¢d” ¢∫d¥p «∞ªHUÆW/«∞FπU≤W
¢d” ¢∫d¥p «∞ºKDU≤OW
ôß∑ªb«Â «∞ªHUÆW «∞ObË¥W
●●
≠Jw «∞ºKp «∞JNd°w ´s ±u{l ∞n «∞ºKp
Æ∂q «ß∑ªb«Â «∞πNU“.
1 ¸Ø∂w «∞ªö◊ ´Kv «∞∫U±q ±s îö‰ ¢∫d¥p
«∞ªö◊ «∞ObËÍ ≠w •dØW «≤eôÆOW œ«îq
¢πu¥n «ß∑Id«¸ «∞ªö◊ - ±l «∞∑QØb ±s
«≤eô‚ «_∞ºMW «∞Lu§uœ… ≠w ±Ib±W «∞∑πu¥n
œ«îq «∞H∑∫U‹ «∞Lu§uœ… ≠w «∞πU≤V «∞ºHKw
±s «∞ªö◊ «∞ObËÍ.
2 ¸Ø∂w Æu” •Lq «∞ªö◊ ≠w ¢πUË¥n
«∞Iu” «∞Lu§uœ… ≠w «∞πU≤V «∞ªKHw ±s
«∞ªö◊ «∞ObËÍ Ë«{GDw ´KOt ∞Oº∑Id ≠w
±u{l «∞∑FAOo ±∫b£UÎ Åu‹ ©IDIW.
3 «{GDw ´Kv “¸ ¢∫d¥d «∞∫U±q Ë«¸≠Fw
«∞ªö◊ «∞ObËÍ _´Kv °∫OY ¥LJMp ¢dØOV
«∞ªHUÆW √Ë «∞FπU≤W.
±ö•EW: ∞ºö±∑p, ¥FLq «∞ªö◊ ≠Ij
´Mb ¢dØOV «∞ªHUÆW √Ë «∞FπU≤W ≠w
±u{FNLU «∞B∫O`.
4 √œîKw «∞ªHUÆW √Ë «∞FπU≤W ≠w «∞ªö◊ ∞∫Os ßLUŸ Åu‹ ©IDIW ∞û®U¸… ≈∞v
«∞∑FAOo.
●●
≠w •U∞W «ß∑ªb«Â «∞ªö◊ ±l «∞∫U±q,
¢QØbÍ ±s ¢dØOV ¢d” ¢∫d¥p
«∞ªHUÆW/«∞FπU≤W ±l ±∫U–¢t ±l ¢d”
«∞∑∫d¥p «∞Lu§uœ ≠w «∞∫U±q .
●●
≠w •U∞W «ß∑ªb«Â «∞ªö◊ °bËÊ «∞∫U±q,
¥πV ≈œîU‰ «∞ªHUÆW/«∞FπU≤W –«‹ «∞Du‚
«∞LFb≤w œ«îq «∞∑πu¥n «∞LAU¸ ≈∞Ot ≠w
«∞dßr «∞∑u{O∫w .
5 {Fw «∞LJu≤U‹ ≠w ßKDU≤OW «∞ªKj £r
{Fw «∞ºKDU≤OW ´Kv «∞∫U±q.
6 «îHCw «∞ªö◊ «∞ObËÍ ∞∫Os Åb˸ Åu‹
©IDIW ±s “¸ ¢∫d¥d «∞∫U±q ≈®U¸… ≈∞v
«∞∑FAOo.
7 ËÅKw «∞πNU“ °LBb¸ «∞∑OU¸ «∞JNd°w
Ë«œ≠Fw “¸ «∞∑∫Jr ≠w «∞ºd´W ∞ú±UÂ.
●●
ØKLU ØU≤X Ø∏U≠W «∞ªKOj Ø∏OHW ¥LJMp “¥Uœ…
«∞ºd´W.
●●
≈–« °b¡ ¢AGOq «∞πNU“ ≠w «ù°DU¡ √Ë ≥MU„
ÅFu°W ≠w ´LKOW «∞ªKj, «¸≠Fw «∞ºd´W
Ë/√Ë «{GDw ´Kv “¸ «∞ºd´W «∞FU∞OW
)
obruT).
31
●
«ß∑ªb «∞πNU“ ≠w «ôß∑ªb«Â «∞LMe∞w ≠Ij. ô ¢∑∫Lq
doowneK √¥W ±ºµu∞OW ≠w •U∞W ¢Fd÷ «∞πNU“
∞öß∑ªb«Â ¨Od «∞B∫O` √Ë ´b «ô∞∑e«Â °NcÁ «∞∑FKOLU‹.
Page 17

21
∞ºö±∑p
●
«Æd√ ≥cÁ «∞∑FKOLU‹ °∫d’ Ë«•∑Hk °NU ∞∑d§l ∞NU ≠w
«∞Lº∑I∂q
●
«îKl Øq ±u«œ «∞∑GKOn Ë√Í ±KBIU‹.
●
¢QØbÍ ±s ≠p ØU±q «∞ºKp «∞JNd°w ´s ±u{l ∞n «∞ºKp
Æ∂q «ß∑ªb«Â «∞ªHUÆW «∞ObË¥W.
●
¥∫c¸ ¨Ld §ºr «∞ªHUÆW «∞ObË¥W ≠w «∞LU¡ √Ë ¢Fd÷ «∞ºKp
«∞JNd°w √Ë «∞IU°f ∞K∂Kq.
●
«°FbÍ «_ÅU°l, «∞AFd, «∞Lö°f Ë√œË«‹ «∞LUzb… °FOb«Î´s
«_§e«¡ «∞L∑∫dØW.
●
«•c¸Í ±ö±ºW «∞ºKp ∞ºD` ßUîs √Ë ¢dØt ±∑b∞OUÎ≠w
•U∞W ˧uœ ©Hq ≠Ib ¥M∑e´t.
●
ô ¢º∑ªb±w «∞ªHUÆW «∞ObË¥W ≠w •U∞W ¢KHNU. ¥πV ≠∫h
«∞πNU“ √Ë ≈Åö•t: ¸«§Fw ƺr "«∞ªb±W ˸´U¥W «∞FLö¡".
●
ô ¢º∑ªb±w √¥W ±K∫IU‹ ¨Od ±F∑Lb….
●
«≠BKw «∞πNU“ ´s ±Bb¸ «∞∑OU¸ «∞JNd°w œ«zLUÎ≠w •U∞W
´b «ß∑ªb«±t, Æ∂q ¢dØOV √Ë ≠p «_§e«¡ √Ë Æ∂q «∞∑MEOn.
●
ô ¥πu“ «ß∑ªb«Â ≥c« «∞πNU“ ±s Æ∂q «_©HU‰. «•∑HEw
°U∞πNU“ Ë«∞ºKp «∞JNd°w °FOb«Î´s ±∑MUˉ «_©HU‰.
●
¥πV ±ö•EW «_©HU‰ ∞K∑QØb ±s ´b ´∂∏Nr °U∞πNU“.
●
¥LJs «ß∑ªb«Â «_§Ne… ±s Æ∂q √®ªU’ –ËÍ Æb¸«‹
§ºb¥W √Ë •ºOW √Ë ´IKOW ±MªHCW ˱Ls ≥r œËÊ î∂d… √Ë
±Fd≠W °Uß∑ªb«Â «_§Ne… ≠w •U∞W ±M∫Nr «∞∑FKOLU‹
«∞ªUÅW °Uôß∑ªb«Â √Ë «ù®d«· ´KONr °∫OY ¥LJMNr
«ß∑ªb«±t °Dd¥IW ¬±MW ±l ≈œ¸«„ «∞LªU©d «∞∑w ¢MDuÍ ´Kv
«ß∑ªb«Â «∞πNU“.
Æ
∂q «∞Id«¡…, «∞d§U¡ ÆKV «∞BH∫W «_Ë∞v ∞Fd÷ «∞Bu¸
´d°w
Page 18

HEAD OFFICE: Kenwood Limited, 1-3 Kenwood Business Park, New Lane, Havant, Hampshire PO9 2NH
124815/1
 Loading...