

Kenwood CCL40 Instructions Manual
TYPE CCL40
instructions
istruzioni
instrucciones
Bedienungsanleitungen
gebruiksaanwijzing

English 2-24
Nederlands 25-49
Français 50-74
Deutsch 75-99
Italiano 100-125
Español 126-151
Português 152-176
Ekkgmij 177-199
(3
(2 -1
(1 ,:
(4
(5
(7
(6
(8
)1
(:
(9
(3
)5
)5
)4
)3
)3
)6
)6
)2
)7):)8*1)9 *7+8+7+6+4 +5+3 *9
*2 *3 *4 *5 *6 *8 *: +1 +2
6
DIRECT PREP
,5
,4
,3
,2
,1
,6
+9
+:
,8
,9
,7

temp
30-180˚C0-8hr 1-12
time speed
11
8
4
3b3a
5 6
7
109
1a 1b 2

2
contents
safety 3–6
key 7
language selection 7
using your cooking food processor 8-9
using your Direct Prep 9-10
display screen symbols explained 10
manual mode 11–12
using the pre-set programmes 13–19
Main Meal programme 14
Sauce programme 15
Steam programme 16-17
Soup programme 18
Stir Fry programme 18
Dessert programme 19
recommended usage chart 20
care and cleaning 21
service and customer care 22
troubleshooting guide 23–24
English

3
safety
O
Read these instructions carefully and retain for future
reference.
O
Remove all packaging and any labels.
O
If the cord is damaged it must, for safety reasons, be
replaced by KENWOOD or an authorised KENWOOD repairer.
O
For correct operation ensure that the bowl base is clean and
dry before fitting to the power unit.
O
Always switch off and unplug before:
{ assembling or disassembling;
{ when not in use;
{ before cleaning.
O
Always remove the stir tool and whisk before pouring
content from the bowl to avoid burning from splashing hot
ingredients.
O
The knife blade has been designed to be retained on the
drive shaft and should only be removed once the content
has been removed from the bowl. The knife blade is sharp,
handle with care.
O
Keep hands and utensils out of the bowl whilst connected to
the power supply.
O
When leaving the appliance unattended in the cooking mode
pay close attention to the following:
{ensure the instructions are followed with regards to
temperatures and maximum quantities to process;
{ make sure the unit and cord are positioned out of reach of
children and away from the edge of the work surface;
{ check the progress on a regular basis to ensure enough
liquid is added and food is not overcooking.
O
Take care when lifting this appliance as it is heavy. Ensure the
bowl is empty and outlet cover is secure before moving. Do
not lift by the bowl handles.
O
Do not move the unit whilst in operation or still hot.
O
Never use a damaged appliance or attachment. Get it
checked or repaired: see “service and customer care”.

4
O
Do not exceed the maximum capacities stated.
O
Do not exceed the 2.6 litres maximum fill level marked on the
inside of the bowl.
O
This appliance is not suitable for deep frying, when shallow
frying do not exceed the 0.5 litre max oil fill level marked on
the bowl. Remove any excess liquid/water before adding food
to the oil.
O
Never let the power unit, cord or plug get wet.
O
Be careful when handling or touching any part of the
appliance when being used in the cook mode or after
cooking. In particular the bowl, lid and tools as they will
remain HOT long after the appliance has been switched off.
O
Use the handles to remove and carry the bowl. Use oven
gloves when handling the hot bowl and hot tools.
O
The underside of the bowl will remain hot long after the
heating has stopped. Use caution when handling and use a
work surface protection mat when placing the bowl on heat
sensitive surfaces.
O
Be careful of steam escaping from the bowl particularly when
removing the lid or filler cap during the cooking mode or after
cooking.
O
Do not remove the lid or filler cap whilst liquid is boiling.
O
Use oven gloves to remove the lid or filler cap when the
appliance is being used in cooking mode or after cooking.
O
Always fit the filler cap when using the chopping function or
pureeing ingredients.
O
Always operate the appliance with the filler cap in place,
unless specified in the recipe.
O
Only use the bowl and tools supplied with this appliance.
O
Never use the bowl with any other heat source.
O
Never operate the appliance in the cooking mode with the
bowl empty.
O
Do not use the lid to operate the appliance, always use the
Start/Stop or Cancel button.

5
O
This appliance will be damaged and may cause
injury if the interlock mechanism is subjected to
excessive force.
O
When using this appliance ensure it is positioned on a
level surface away from the edge. Do not position below
overhanging cupboards.
O
This appliance is not intended to be operated by means of an
external timer or separate remote-control system.
O
Always ensure food is thoroughly cooked and is piping hot
before eating.
O
Food should be eaten shortly after cooking or allowed to cool
quickly and then refrigerated as soon as possible.
O
Always ensure that the sealing ring is fitted correctly to
the drive coupling to prevent leakage and damage to your
cooking food processor.
O
Always use the bowl release buttons (5 before attempting to
remove the cooking bowl.
O
Misuse of your appliance can result in injury.
O
Appliances can be used by persons with reduced physical,
sensory or mental capabilities or lack of experience and
knowledge if they have been given supervision or instruction
concerning use of the appliance in a safe way and if they
understand the hazards involved.
O
Children should be supervised to ensure that they do not play
with the appliance.
O
This appliance shall not be used by children. Keep the
appliance and its cord out of reach of children. Never let the
cord hang down where a child could grab it.
O
Only use the appliance for its intended domestic use.
Kenwood will not accept any liability if the appliance is subject
to improper use, or failure to comply with these instructions.

6
Direct Prep attachment
O
The discs are very sharp; handle with care when fitting,
removing and cleaning. Always hold by the finger grip
away from the cutting edge, both when handling
and cleaning.
O
Never remove the lid until the cutting disc has
completely stopped.
O
Never use your fingers to push food down the feed tube. Only
use the pusher supplied.
O
Do not use excessive force to push food down the feed tube
– you could damage your attachment.
O
Avoid contact with moving parts. Keep fingers out of the
discharge opening
,6
.
O
Before removing the lid from the Direct Prep:
{ switch off;
{ wait until the disc has completely stopped.
Steamer attachment
O
This attachment produces steam which can burn you.
O
Do not get burnt by steam coming out of your steamer,
especially when removing the lid.
O
Take care when handling the parts; any liquid or condensation
will be very hot. Use oven gloves.
O
Cook meat, fish and seafood thoroughly. And never cook
them from frozen.
O
If you are using the steamer tray base and shelf, put meat,
poultry and fish in the bottom basket so that its raw juice
cannot drip onto food below.
O
Do not reheat cooked rice in your steam tray attachment.
before plugging in
O
Make sure your electricity supply is the same as the
one shown on the underside of the appliance.
O
WARNING: THIS APPLIANCE MUST BE
EARTHED.
O
This appliance conforms to EC Regulation
1935/2004 on materials and articles intended to
come into contact with food.
7
before using for the first time
O
Remove the plastic blade covers from the blade.
These covers should be discarded as they are to
protect the blade during manufacture and transit only.
O
Wash the parts: see ‘care and cleaning’.
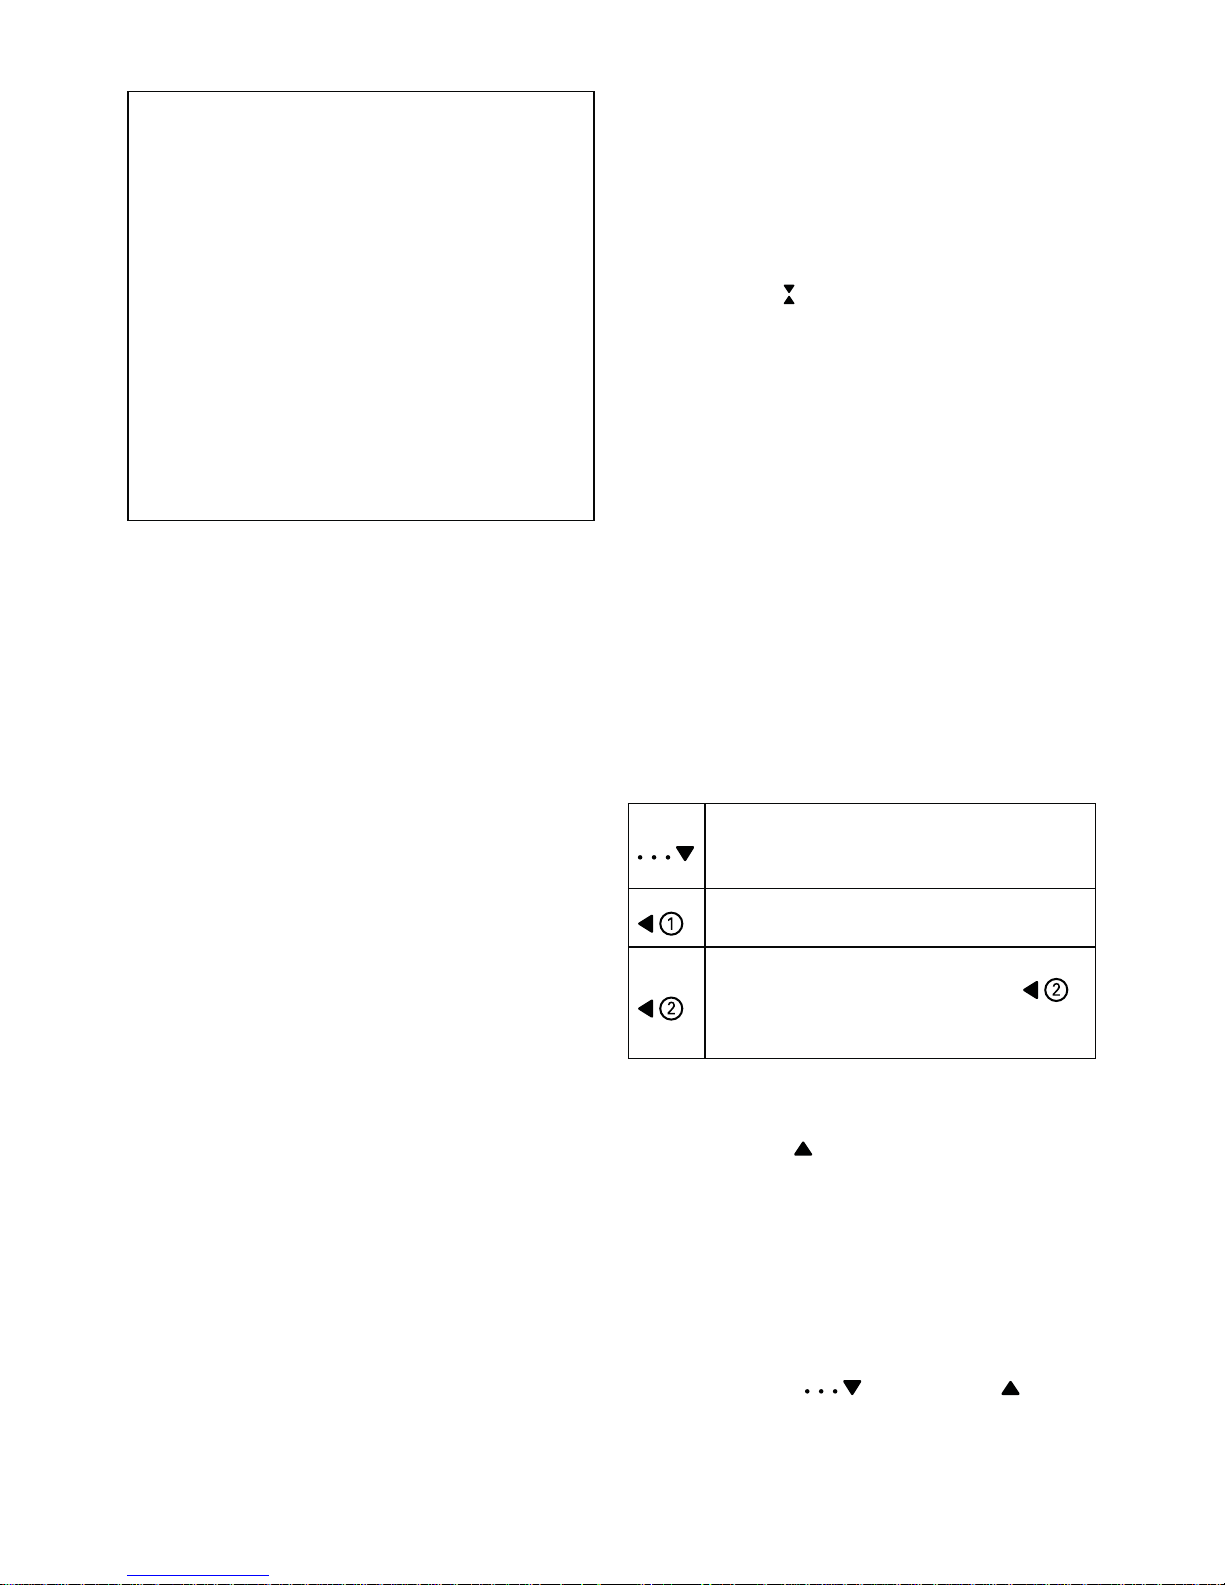
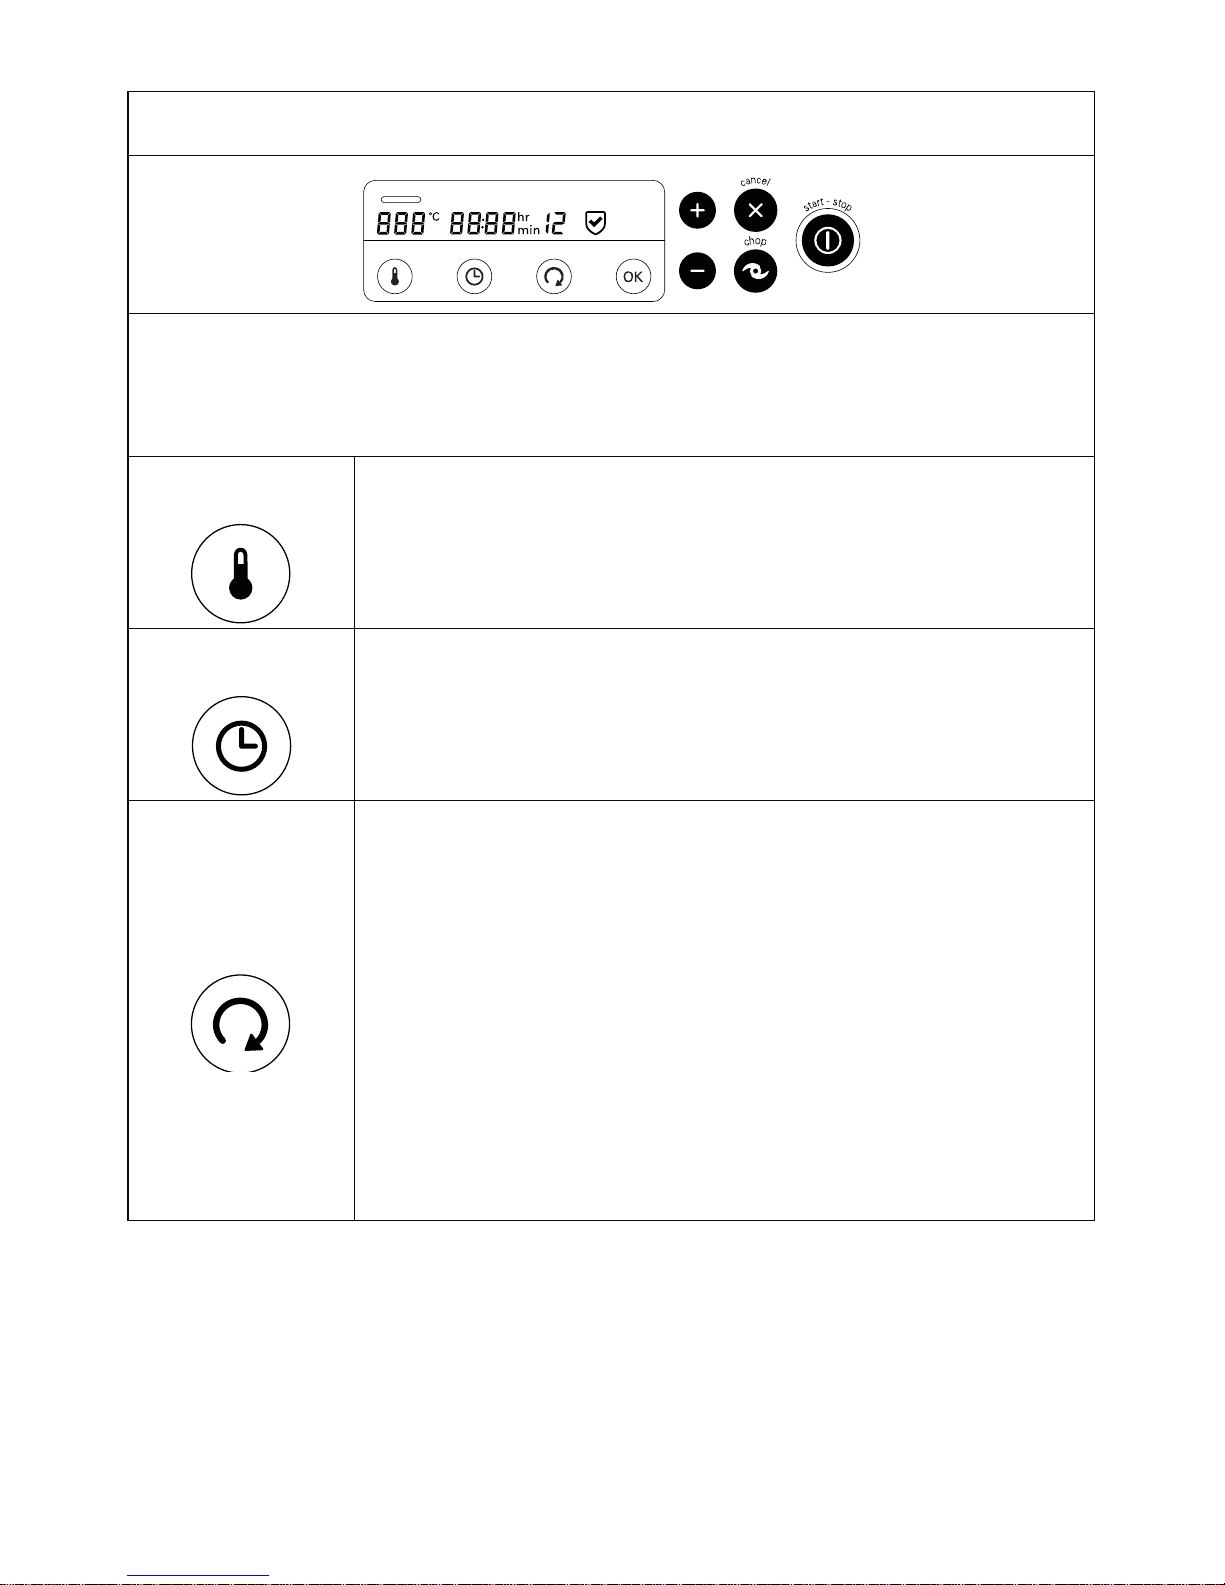
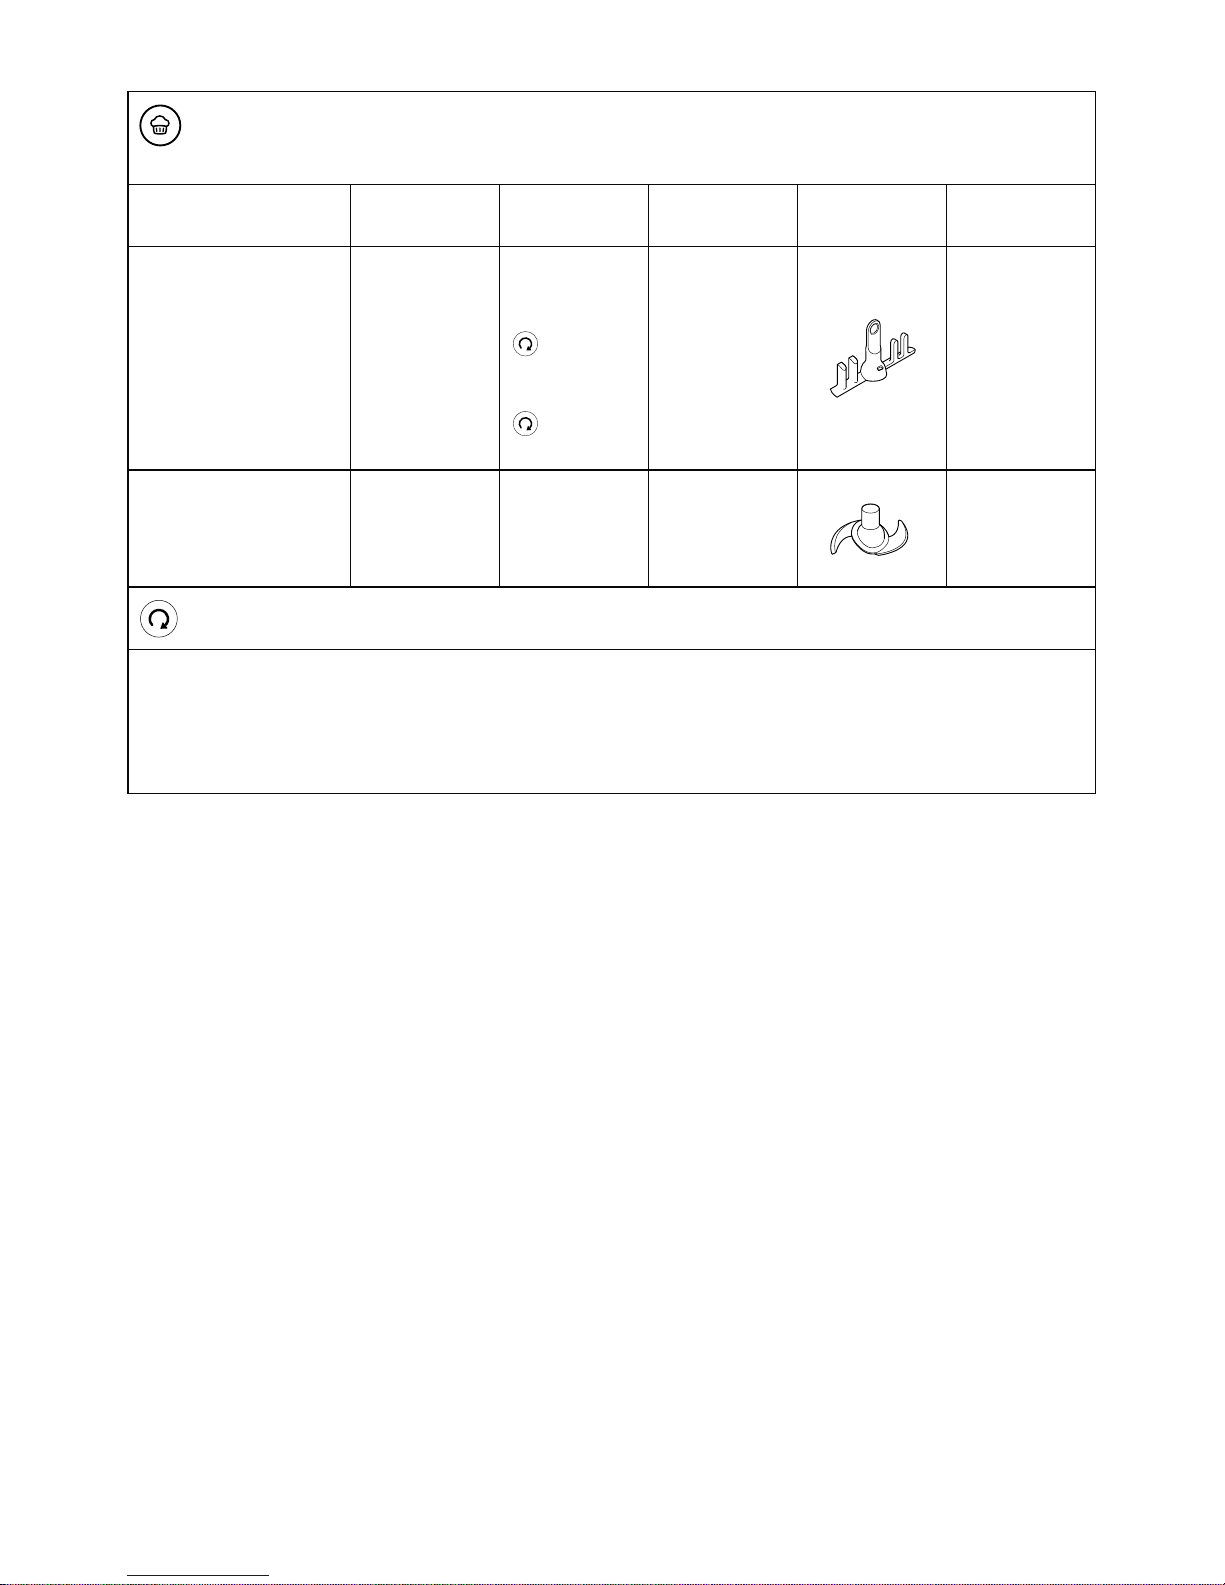
key
lid filler cap
lid outer (grey)
interlock tabs
lid inner (clear)
lid filler cap opening
lid seal
knife blade
stir tool
whisk tool
(1
drive shaft
(2
drive shaft seal
(3
bowl handles
(4
cooking bowl
(5
bowl release buttons
(6
drive shaft nut
(7
power unit
(8
display screen
(9
Direct Prep outlet cover
(:
Direct Prep outlet
)1
On/Off switch
)2
spatula
steamer
)3
steam tray base
)4
storage unit
)5
steam tray shelf
)6
steam tray lid
display panel
)7
Main Meal programme
)8
Sauce programme
)9
Steam programme
):
Soup programme
*1
Stir Fry programme
*2
Dessert programme
*3
Temperature button
*4
Time button
*5
Speed button
*6
OK button
*7
increase (+) button
*8
decrease (-) button
*9
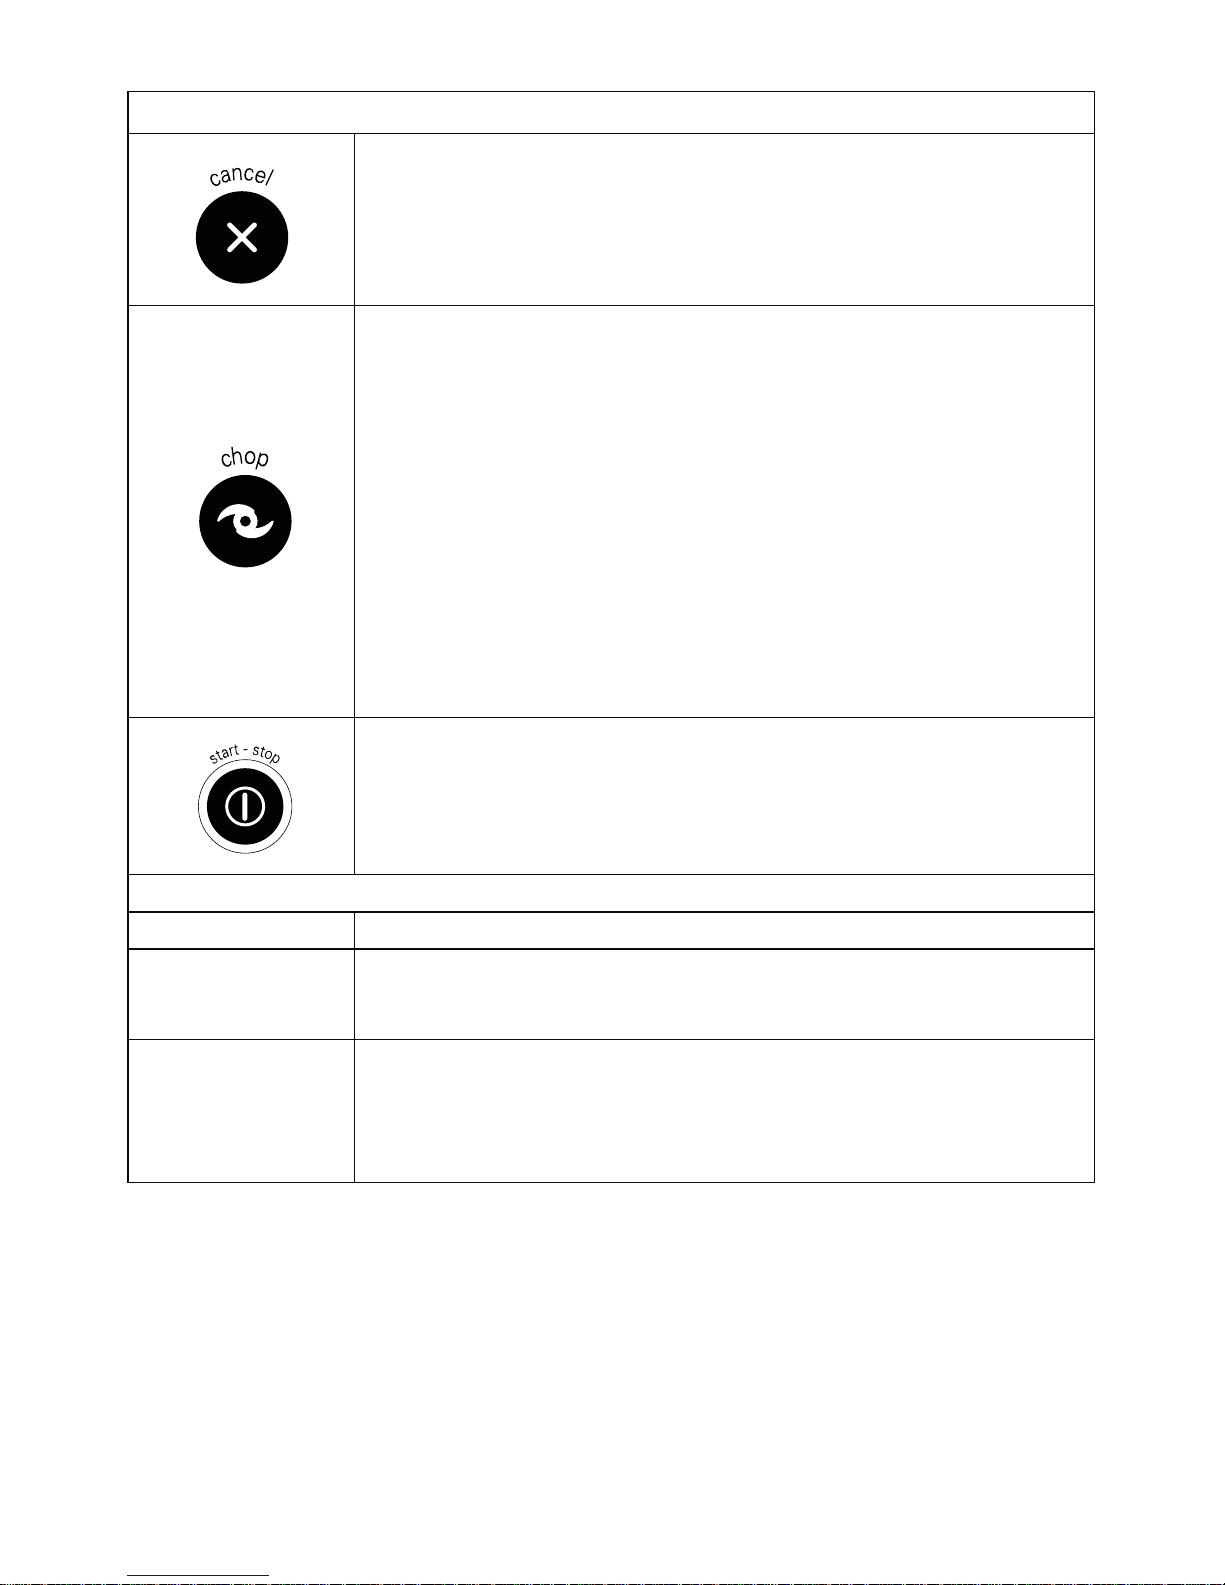
Cancel button
*:
Chop button
+1
Start/Stop button – cooking bowl
+2
Start/Stop button – Direct Prep
display screen graphics
+3
temperature selection
+4
hot temperature warning
+5
text display
+6
time selection
+7
speed selection
+8
cooking mode
Direct Prep
+9
pusher/measuring cup
+:
feed tube
,1
Direct Prep lid
,2
drive shaft
,3
disc
1 extra fine grating disc (if supplied)
2 fine grating disc (if supplied)
3 coarse grating disc
4 thin slicing disc
5 thick slicing disc (if supplied)
,4
slinger plate
,5
base
,6
food outlet
,7
extension chute
,8
tower
,9
disc storage bag
slow cook
,:
bowl plug
-1
bowl seal
language selection
When turning on your cooking food processor
for the first time, the display screen language will
default to “English”.
1 To change the language press
and hold down the OK button
*6
and use the 0n/Off switch
)1
to turn the unit on.
• “LANGUAGE SET UP PRESS
START TO CONTINUE” will be
displayed on the screen.
2 To change the language
press the (+) or (-) button
until the required language
is shown on the display
screen. Once the required
language is selected,
press the OK button to
confirm. The unit will display
“WELCOME TO kCook”.
3 To change the language at a
later stage, repeat the above
procedure.

8
using your cooking food
processor
1 Plug in and press the On/Off switch )1 on the
right side of the power unit. The unit will beep and
“WELCOME TO kCook” will be displayed.
2 Fit the bowl
(4
to the power unit by aligning the
locating tab to the back of the unit. Press down
lightly to locate. Note: the bowl cannot be located
unless fitted in the correct orientation.
O
To remove the bowl, push both bowl release
buttons
(5
(situated under the bowl handles) at the
same time and lift the bowl.
3 Select one of the following options:
3A Manual Cooking – refer to manual mode
section.
3B Pre-set Programmes:
Refer to ‘using the pre-set programmes’ section for
usage information.
Main Meal programme
)7
Sauce programme
)8
Steam programme
)9
Soup programme
):
Stir Fry programme
*1
Dessert programme
*2
Note: When a pre-set programme button is pressed
the bar above the relevant button will light up.
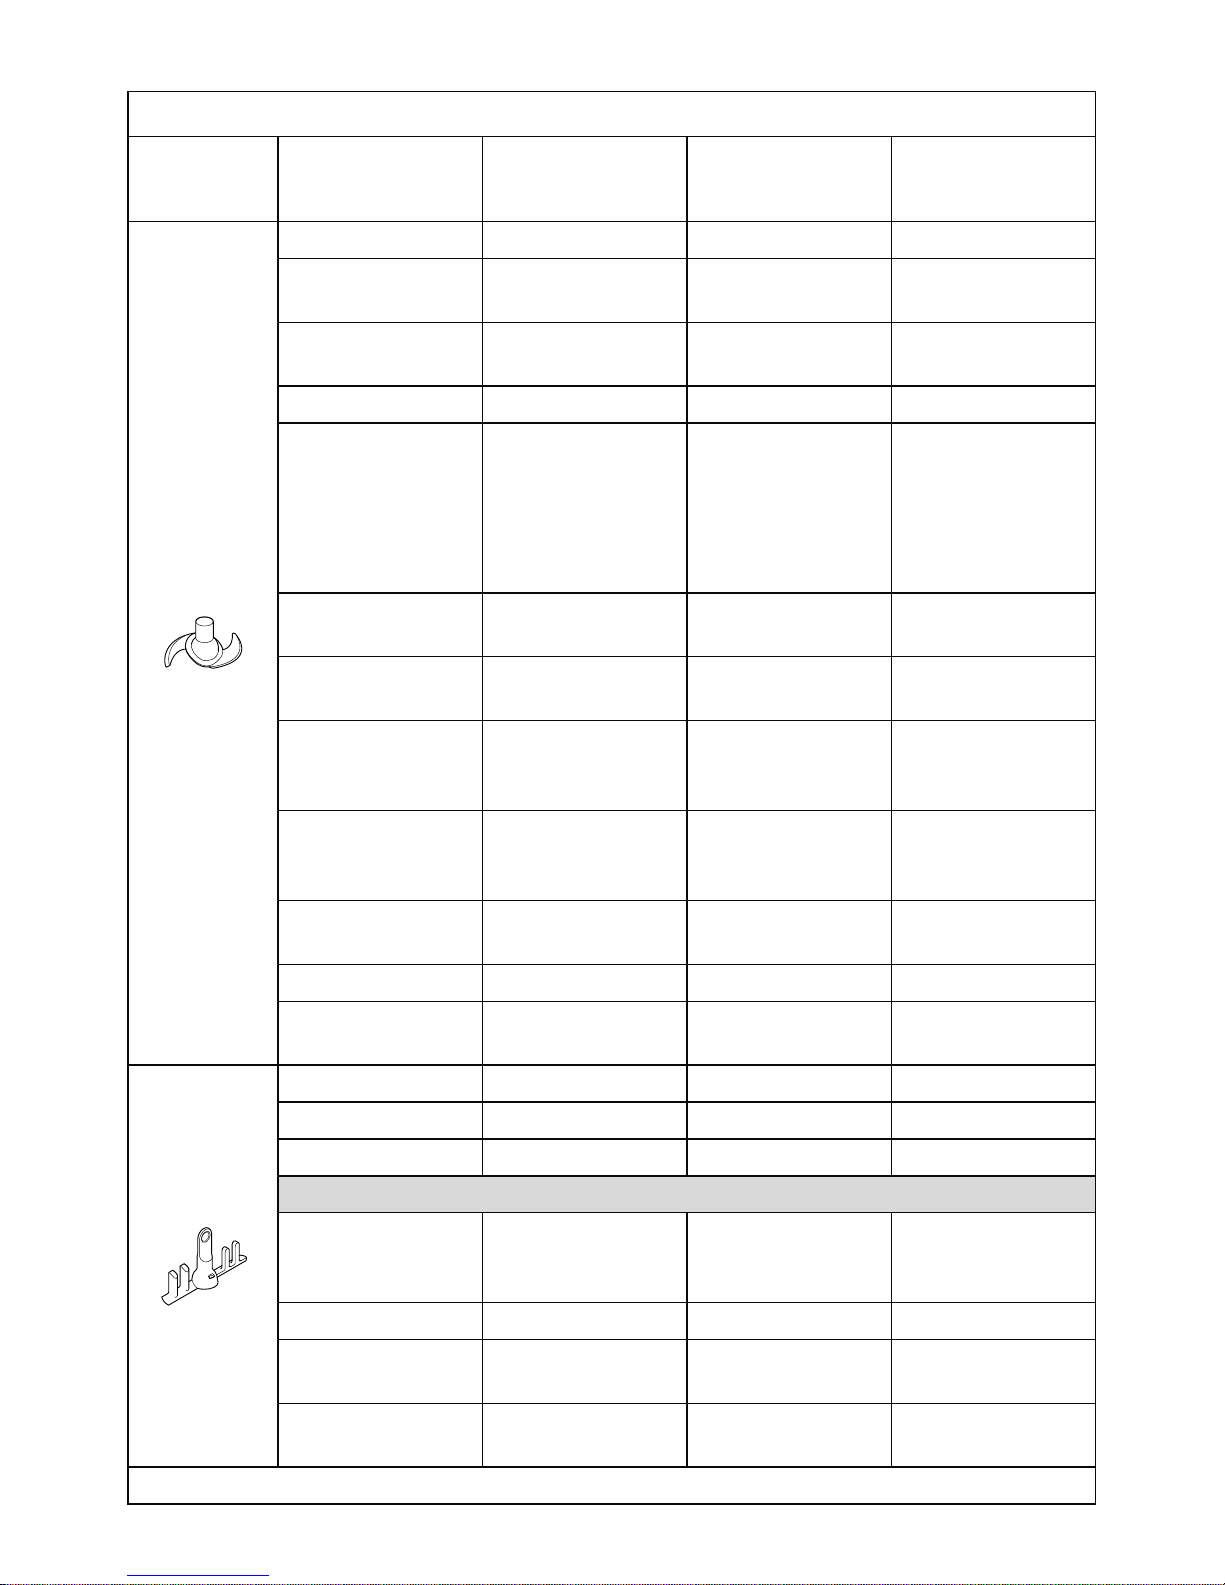
4 Fit the knife blade
, stir tool , whisk tool or
slow cook bowl plug
,:
to the bowl.
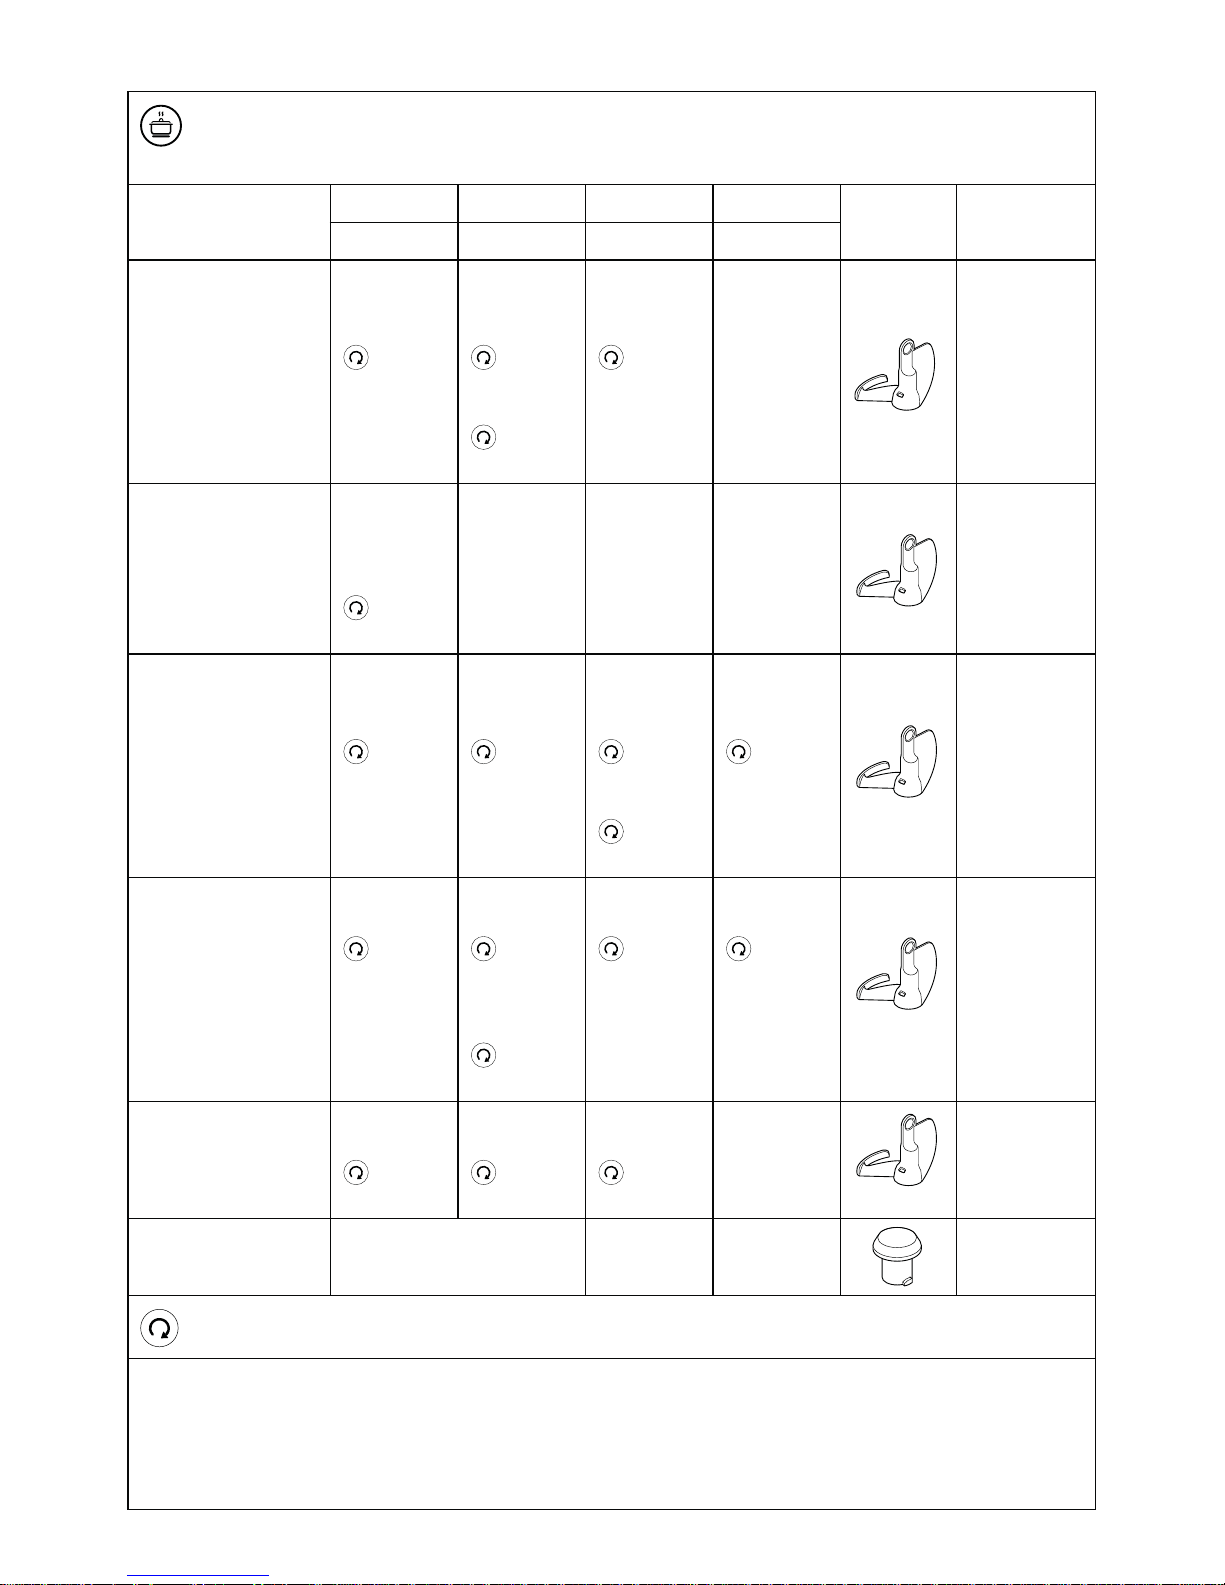
Bowl tool Use
Knife blade For chopping ingredients
before cooking and for
pureeing after cooking is
complete.
Stir tool For recipes where you want to
stir gently without breaking the
ingredients down.
Whisk tool For whisking light ingredients
such as egg whites, cream,
mayonnaise and hollandaise
sauce.
5 Add the relevant ingredients to be processed or
cooked.
6 Fit the lid and filler cap. Push the lid down and turn
anti-clockwise until aligned with the cooking bowl
handles.
The appliance will not operate unless
interlocked correctly.
7 Press the cooking bowl Start/Stop button
+1
to
start the cooking process.
8
Pre-set programmes – at the end of each stage and
once cooking has finished the unit will beep and
automatically go into the Keep Warm cycle for 30
minutes. Follow the instructions on the screen to
move to the next stage.
9 To stop the unit at any time, press the Start/Stop
button and then remove the lid. Take care as the
bowl and lid will be hot. To resume cooking, refit
the lid press the Start/Stop button.
O
Manual mode – at the end of cooking the timer will
countdown to 00:00 and the unit will beep.
Standby Mode
O
To return the unit to standby mode, press and hold
the Cancel button for 3 seconds.
O
If no selection is made within 30 minutes the unit
will go into standby mode and “WELCOME TO
kCook” will be displayed on the screen. Press any
function to reactivate the unit.
Keep Warm Cycle
O
The Keep Warm cycle will stir the ingredients at
62°C.
O
Remove the lid to check on the progress or add
other ingredients and then press the Start/Stop
button to resume cooking.
O
When the timer has counted down to 00:00 at
the end of each programme stage the unit will
automatically go into the keep warm cycle for 30
minutes.
O
The unit will beep every 10 seconds for the first
minute and then every 30 seconds to indicate the
unit is in the Keep Warm cycle and the cooking
cycle has finished.
O
The keep warm cycle will not heat if the
temperature is set to less than 62˚C.
After cooking
O
Be careful when handling or touching any part
of the appliance when being used in the cooking
mode or after cooking, IN PARTICULAR THE
BOWL AND TOOLS as they will remain HOT long
after the appliance has been switched off.
O
Use the handles to remove and carry the bowl. Use
oven gloves when handling the hot bowl and hot
tools.
O
The underside of the bowl will remain hot long
after the heating has stopped. Use caution when
handling and cleaning.
9
Hints & Tips
O
Do not exceed the 2.6 litres maximum fill level
marked on the inside of the bowl.
O
Do not exceed the 0.5 litre maximum oil level
mark when heating oil.
O
Raw meat and hard vegetables should be chopped
into small pieces before adding to the bowl.
O
Use the Direct Prep to grate or slice ingredients
directly into the bowl (see ‘using your Direct
Prep’ section).
O
To prevent sticking or burning always use one of
the tools when processing milk based recipes.
O
Cut ingredients into even sized pieces as this will
assist with even cooking.
O
Use the spatula supplied to scrape down the
ingredients between each programme stage.
Turning off sounds
O
The unit will beep in various stages of use. To turn
this off, hold down the Cancel button
*9
and at
the same time turn the unit on using the On/Off
switch.
O
To turn the beeps back on just switch off and
switch back on.
using your Direct Prep
the cutting discs
Not all of the discs listed will be included in your
pack as discs supplied are dependent upon the
model variant. Refer to the “service and customer
care” section for information on how to buy a disc
not included in your pack.
The cutting discs can be identified by the numbers
marked on them as follows:-
Disc No 1 - extra fine grating for parmesan
cheese.
Disc No 2 - fine grating for cheese and firm fruit
or vegetables.
Disc No 3 - coarse grating for cheese and firm
fruit or vegetables.
Disc No 4 - thin slice for cheese and firm fruit or
vegetables.
Disc No 5 - thick slice for cheese and firm fruit or
vegetables.
to assemble and use the
attachment
1 Fit the bowl lid and remove the filler cap if grating
or slicing straight into the bowl.
2 Remove the Direct Prep outlet cover
3 Fit the tower ,8 on to the Direct Prep drive outlet
by aligning the
, then push down and turn
clockwise to secure in place
.
4 Holding by the centre grip, push the desired cutting
disc on to the drive shaft
. Each disc is numbered
for identification and the number should be
uppermost when the disc is pushed onto the shaft.
5 Fit the slinger plate
,4
on to the drive shaft with
the wiper uppermost and against the underside of
the cutting disc
.
Note:
O
If the slinger plate is not fitted food
will clog under the disc and not exit the
chute.
6 Fit the Direct Prep lid to the base by turning in a
clockwise direction.
7 Attach the food prep attachment to the tower and
turn clockwise to lock in place
.
8 Once assembled, the Direct Prep can be turned
clockwise into the following positions
:
For fitting or removing the Direct Prep
assembly. Do not operate the Direct
Prep when located in this position.
For slicing or grating directly into the
cooking bowl through the filler cap opening.
For slicing or grating into a suitable
container. When located in position
the extension chute ,7 can be fitted by
sliding onto the food outlet
,6
.
Note: There will be a positive click when each
position is located and the relevant graphic is
aligned with the
on the unit.
9 Cut the food to fit the feed tube
+:
.
10 Press the Direct Prep Start/Stop button
and, at
the same time, push down evenly with the pusher.
O
Never put your fingers in the feed tube.
O
Use the spatula supplied to guide any
sliced or grated pieces left on the lid
down the filler cap opening.
11 To remove the attachment, turn in a clockwise
direction until the
aligns with the and lift
off.
O
Always switch off before removing the
Direct Prep lid.

10
important
O
The tower can only be rotated in a
clockwise direction. Do not attempt to
force it in an anti-clockwise direction
as this may damage the tower.
O
If the food is not exiting the food
outlet, switch off and check that food
is not clogging under the disc and
the slinger plate is fitted. Clear any
trapped food before continuing to
process.
O
When not in use remove the Direct
Prep and replace the outlet cover.
hints & tips
O
Always use fresh food.
O
Do not cut food up too small. Fill the width of the
feed tube fairly full. This prevents the food from
slipping sideways during processing.
O
There will always be a small amount of waste left
on the disc after processing.
O
When grating food placed upright will come out
shorter than food placed horizontally.
Display screen symbols explained
Hot warning indicator
Below 60°C - no red bar
Above 60°C - solid red bar
Text display shows status information, recipes information and
error messages.
Shows temperature selected.
OFF, 30°C Æ 180°C.
Note: In manual mode – Press the temperature button for
3 seconds during operation to switch between selected
temperature and actual temperature.
Shows the time selected in hours, minutes and seconds.
Time can be set from 5 seconds Æ 8 hours and will count down
once the Start/Stop button is pressed.
If no time is set in manual mode the time will count up.
Shows speed function has been selected.
Speeds range from 1 Æ 12.
When the is displayed on the screen the cooking process will
continue and no further action is required.
11
Manual Mode
Manually select the required temperature, time, stirring or chopping function.
temp time speed
O
Select the setting you wish to alter and use the (+) and (-) buttons to adjust the setting.
Note:
O
Hold down the (+) and (-) buttons to scroll through the settings more rapidly.
O
When a setting is selected, the relevant display screen symbol will flash.
O
The setting will lock after 4 seconds if no action is taken.
temp
Temperature can be set from 30°C - 180°C at 1°C increments.
Alternatively, the unit can be used without setting a temperature by selecting
“OFF”.
• To reset to “OFF” press and hold down the temperature button and the (+) and
(-) buttons for 3 seconds.
time
Time can be set from 5 seconds to 8 hours.
Note:
• If no time is set, the cooking food processor will count up to a maximum of 8
hours.
• To reset to “00:00” press and hold down the time button and the (+) and (-)
buttons for 3 seconds.
speed
Twelve speed settings are available which enable you to select the appropriate
setting for individual recipes. Some recipes will require constant stirring to stop
ingredients from sticking to the bottom of the bowl, whereas others will benefit
from intermittent stirring to maintain the consistency of the food. Higher speed
settings are available to process soups, etc.
Speed 1 – Intermittent stir with long pauses. When set to this position,
intermittently operates on a slow speed every 60 seconds
for approximately 2 revolutions, making it suitable for stirring
casseroles, etc.
Speed 2 – Intermittent stir with medium pauses. When set to this
position, intermittently operates on a slow speed every
15 seconds for approximately 2 revolutions.
Speed 3 – Intermittent stir with short pauses. When set to this position,
intermittently operates on a slow speed every 5 seconds for
approximately 2 revolutions.
Speed 4 to 12 – Continuous speeds gradually increasing to maximum speed.
12
Manual Mode continued
• Press to cancel the programme stage or function selected at any time.
• If pressed during a pre-set programme, the unit will return to the previous stage.
To cancel and return to the standby mode press and hold down for 3 seconds
and the unit will beep when the function is cancelled.
Cold Ingredients
Operate in short bursts for chopping or hold down for longer burst to puree and
blend food down.
Note: The chop function does not operate continuously when the unit or
ingredients are cold. If the button is manually held down the unit will only
operate at maximum speed and the display will count up to 2 minutes.
Hot Unit/Ingredients (Hot Temperature Warning on display)
Note: To prevent excessive splashing the processing speed will be restricted to
speed 6 when the bowl/ingredients are above 105°C. Hold the button down and
the speed will gradually increase until the desired processing speed is reached.
The button will operate for a maximum of 2 minutes before automatically
switching off.
To stop the operation before the 2 minutes has elapsed either press the Cancel
button or press the Chop button again.
O
The filler cap should always be fitted when using the chopping
function.
After selecting a programme or manually setting the required function, press the
Start/Stop button once to commence the cooking process.
Press the button again to pause the operation. The display screen will flash
when the unit has been paused.
Cooking Hints and Tips
Cooking In The Bowl • Larger quantities of ingredients will require longer stirring times to heat evenly.
Heating with Dairy
Ingredients
• Use the stir tool or whisk tool.
• Temperatures up to 90°C.
• Continuous stir speeds 4 to 6.
Frying • Temperatures up to 180°C.
• Heating the oil before adding other ingredients usually gives better results.
• Remove the bowl lid filler cap for better results when frying meat.
• Ensure the bowl and lid are dry before adding oil.
• Do not exceed the 0.5 litre maximum oil level mark in the bowl when heating oil.
13
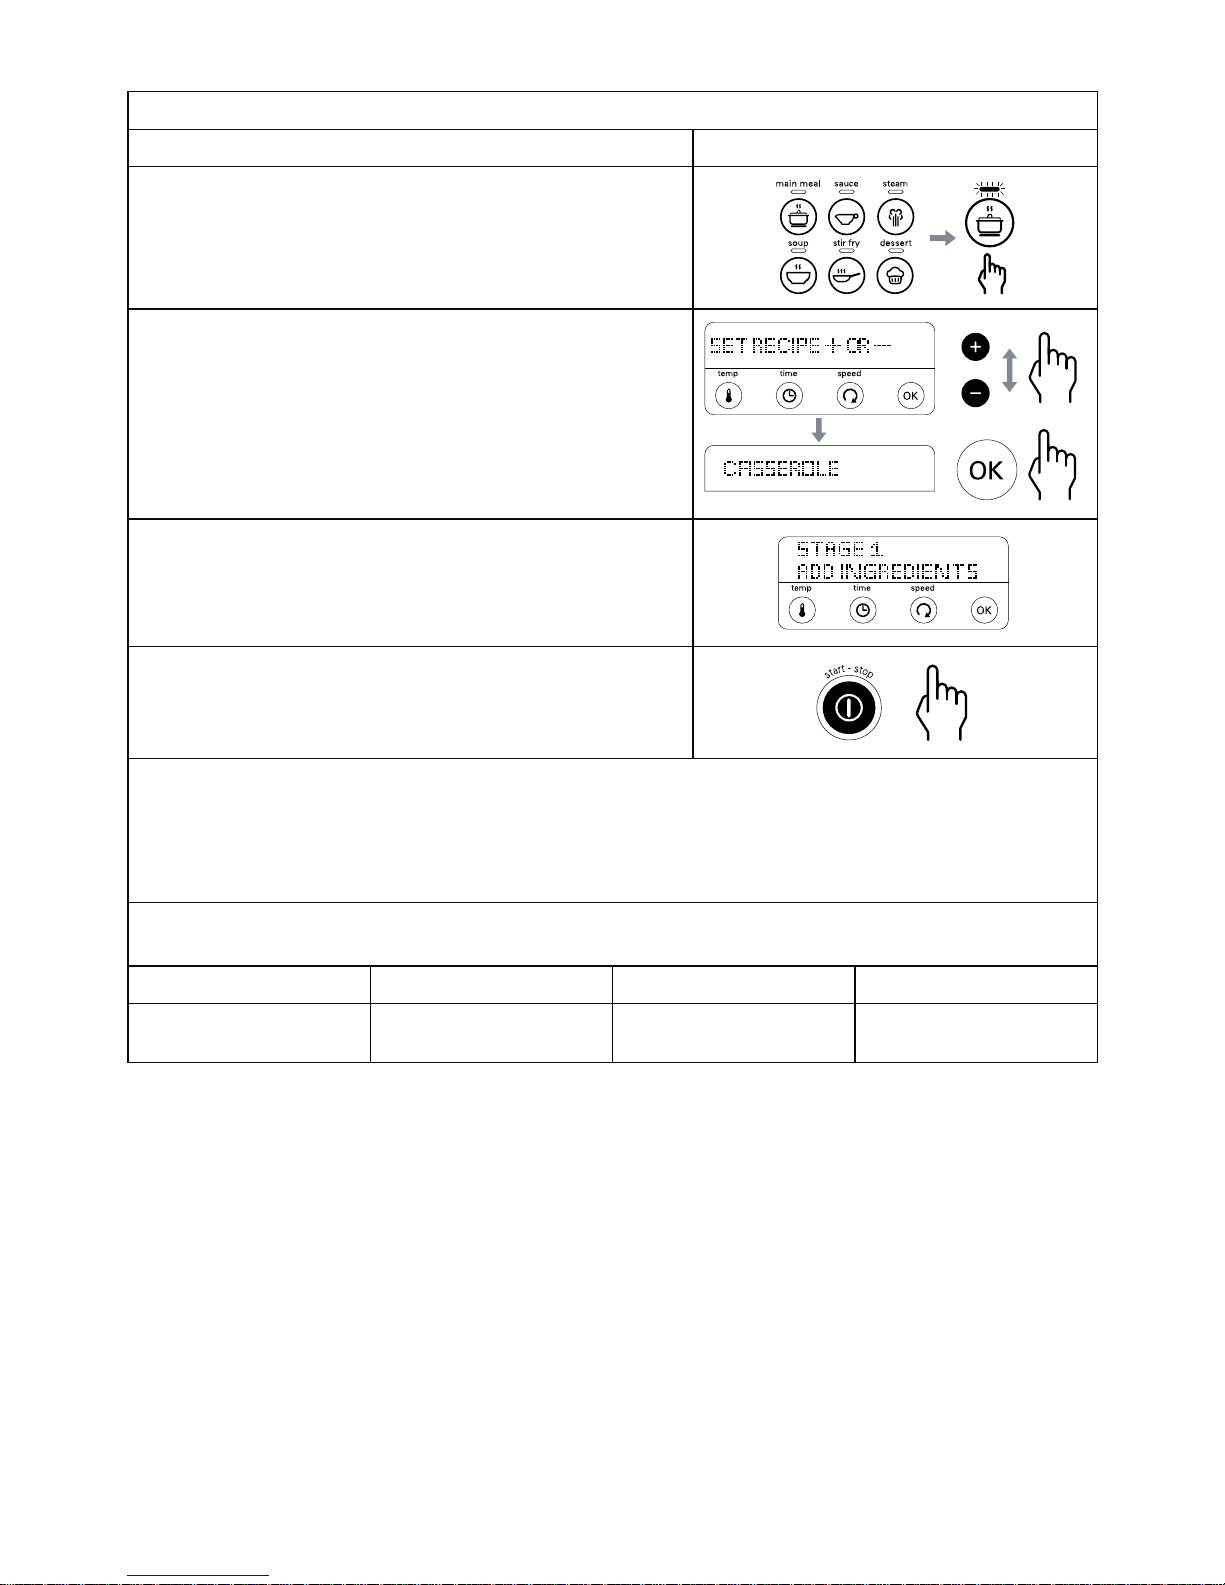
using the pre-set programmes
Select the programme
1 Press the desired programme button.
Note: When the programme button is pressed, the bar
above the relevant button will light up.
2 Press the (+) or (-) button to select the required
sub-programme.
Then press the OK button to confirm selection.
3 Follow the instructions on the display screen and refer to
the relevant recipe.
4 Press the Start/Stop button.
Adjusting the sub-programmes
O
During each stage the temperature, time and speed settings can be adjusted if required. Press the Start/
Stop button
+1
and select the setting to be adjusted. Use the (+) and (-) buttons to change the setting,
then press the Start/Stop button to resume cooking.
O
Use the spatula supplied to scrape down the ingredients in between each stage.
The number of available stages for each sub programme varies. The table below shows the range of
available temperature, time and speed settings for each stage.
Stage Temperature Range Time Range Speed Range
1–4
30°C - 180°C 5 secs – 8 hrs 1 – 12
14
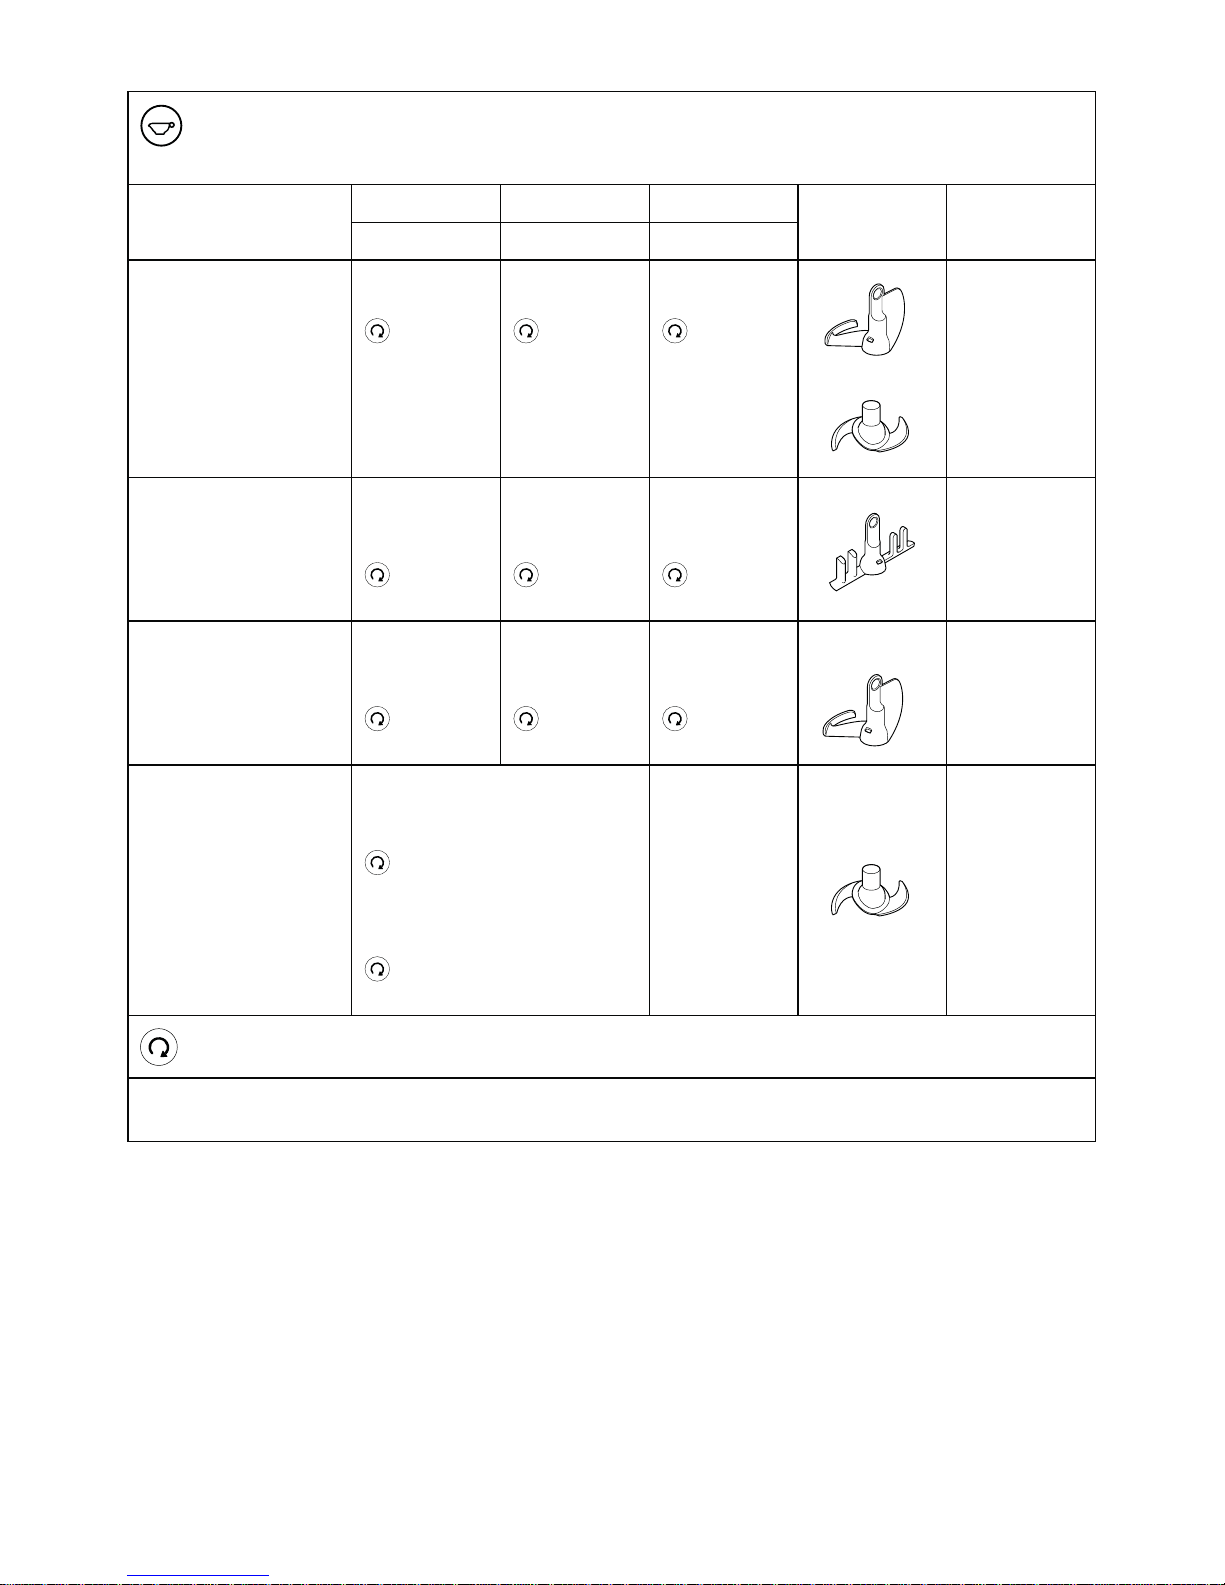
Main Meal programme
)7
Recipe ideas for guidance – adapt to personal taste and preference.
Sub
programme
Stage 1 Stage 2 Stage 3 Stage 4 Tool
used
Recipe
ideas
INGREDIENTS 1 INGREDIENTS 2 INGREDIENTS 3 INGREDIENTS
4
QUICK
CASSEROLES
Add oil
140°C
3
Heating
Add veg
& meat
180°C
4
2 mins
then
3
3 mins
Add
liquid
98°C
1
20 mins
N/A
Chicken
casserole
EASY DISHES
Add oil,
veg, meat
& liquid
98°C
3
30 mins
N/A N/A N/A
Beef stew
RISOTTO
Add oil
140°C
3
Heating
Add rice
140°C
4
4 mins
Add veg
& meat
140°C
4
2 mins
then
3
3 mins
Add
liquid
98°C
4
9 mins
Chicken
risotto
CASSEROLES
Add oil
140°C
3
Heating
Add meat
180°C
4
2 mins
then
140°C
3
3 mins
Add veg
140°C
1
10 mins
Add liquid
98°C
1
2 hours
Beef
casserole
VEGETARIAN
DISHES
Add oil
140°C
3
Heating
Add veg
120°C
3
10 mins
Add liquid
98°C
3
30 mins
N/A
Chickpea
stew
SLOW COOK
95°C Æ 90°C
Heating Æ 2 hrs
N/A N/A
Fit bowl plug
,:
= selected speed
Note: During the heating cycle on each stage “HEATING” will be shown on the display screen and the time
will not start to count down until the correct temperature is reached.
Slow cook
Remove the bowl drive shaft by unlocking the drive shaft nut
(6
on the underside of the bowl. Then lift out.
Fit the bowl plug
,:
ensuring the seal -1 is fitted and turn the drive shaft nut clockwise to lock in place.
15
Sauce programme
)8
Recipe ideas for guidance – adapt to personal taste and preference.
Sub programme Stage 1 Stage 2 Stage 3 Tool used Recipe
ideas
INGREDIENTS 1 INGREDIENTS 2 INGREDIENTS 3
SAVOURY SAUCES
Add oil
140°C
3
Heating
Add veg
140°C
3
10 mins
Add liquid
98°C
3
45 mins
or
BÉCHAMEL SAUCES
Add butter
or oil
80°C
0
1 min 15 secs
Add flour
110°C
6
5 mins
Add liquid
98°C
6
15 mins
Béchamel
sauce,
cheese sauce,
parsley sauce
COMPOTES &
RELISHES
Add oil
140°C
3
Heating
Add fruit or
veg
120°C
3
10 mins
Add sugar &
flavourings
98°C
4
30 mins
PUREE
Add veg Blend
& liquid
100°C
3
Heating
then
98°C
4
10 mins Æ 2 mins
N/A
Carrot puree
= selected speed
Note: During the heating cycle on each stage “HEATING” will be shown on the display screen and the time
will not start to count down until the correct temperature is reached.
16
Steam programme
)9
Use the steam setting for steaming vegetables, chicken and fish.
Use the RINSE setting to quickly clean the bowl before taking apart for cleaning. For best results, always take
the bowl apart for cleaning and dry thoroughly before re-assembling.
Sub programme Temperature
Range
Time Range Speed Range Tool used
STEAM
(non-adjustable) 5 secs – 2 hrs 0 (non-adjustable)
RINSE
(non-adjustable) 1 minute
cycle x 5 times
(non-adjustable) –
O
Remove the storage unit )4 before using the steamer attachment.
To steam:
1 Fit the bowl and fill with water up to the 1.0L mark.
2 Fit and lock the bowl lid. Remove the filler cap.
3 Place the steam tray base
)3
on to the lid with the food to be cooked, ensuring it is securely in position. If
required, place the steam tray shelf
)5
with additional food on top of the base.
4 Place the steam tray lid
)6
on top.
5 Press the
button and use the (+) or (-) buttons to select the STEAM programme, then press OK. Set
the desired steaming time and press the Start/Stop button to commence steaming. The unit will beep
when the steaming point is reached.
Note:
O
The time will not start counting down until the water has reached the steaming point. The time shown on
the display will flash until the the steaming point is reached.
Hints & Tips
O
The temperature is fixed at 100°C and speed options cannot be selected.
O
The cooking times are a guide only. Always check that food is thoroughly cooked before eating.
O
If your food is not cooked enough, reset the time. You may need to top up with water.
O
Leave gaps between pieces of food and do not layer the food in the basket or tray.
O
Similar sized pieces of food cook more evenly.
O
When steaming more than 1 type of food, if something needs less time, add it later or place it in the tray
shelf.
O
Do not allow the unit to boil dry, top up with water as necessary.
O
If operating for more than 1 hour you will need to top up the water to the 1 litre mark.
O
Food in the steam tray base will generally cook quicker than food in the steam tray shelf.
Rinse Function
To use the rinse function:
1 Fit the tool to be cleaned.
2 Add water to the 1.0L
mark.
3 Fit the filler cap.
4 Press the
button and select the RINSE programme.
5 Press the Start/Stop button.

17
Steaming guidelines
Note: quantities stated are based on combined capacities of steam tray base and shelf.
Food Maximum
Quantity
Preparation Recommended
cooking time (mins)
New potatoes 1.6kg Wash and cut larger
ones into smaller pieces
25 – 35
Beans
Green or runner
600g Trim and thinly slice 15 – 25
Broccoli 800g Cut into florets 15 – 25
Cauliflower 1.5kg Cut into florets 15 – 25
Carrots 800g Thinly slice 20 – 30
Sweet potato 1.5kg Cut into 3cm cubes 20 – 30
Chicken,
Boneless breast
12
(2kg)
– 20 – 30
Fish,
Fillets or steak
8
(1.4kg)
– 20 – 25
Whole fish (e.g. trout) 600g Clean, gut and scaled 20 – 30
Sweet steamed pudding
(homemade)
1.2 litre
(14cm diameter)
pudding basin
– 1½ – 2 hrs
Top up with water after 1hr
Suet pudding
(homemade)
Beef or lamb
1.2 litre
(14cm diameter)
pudding basin
– 1½ – 2 hrs
Top up with water after 1hr
18
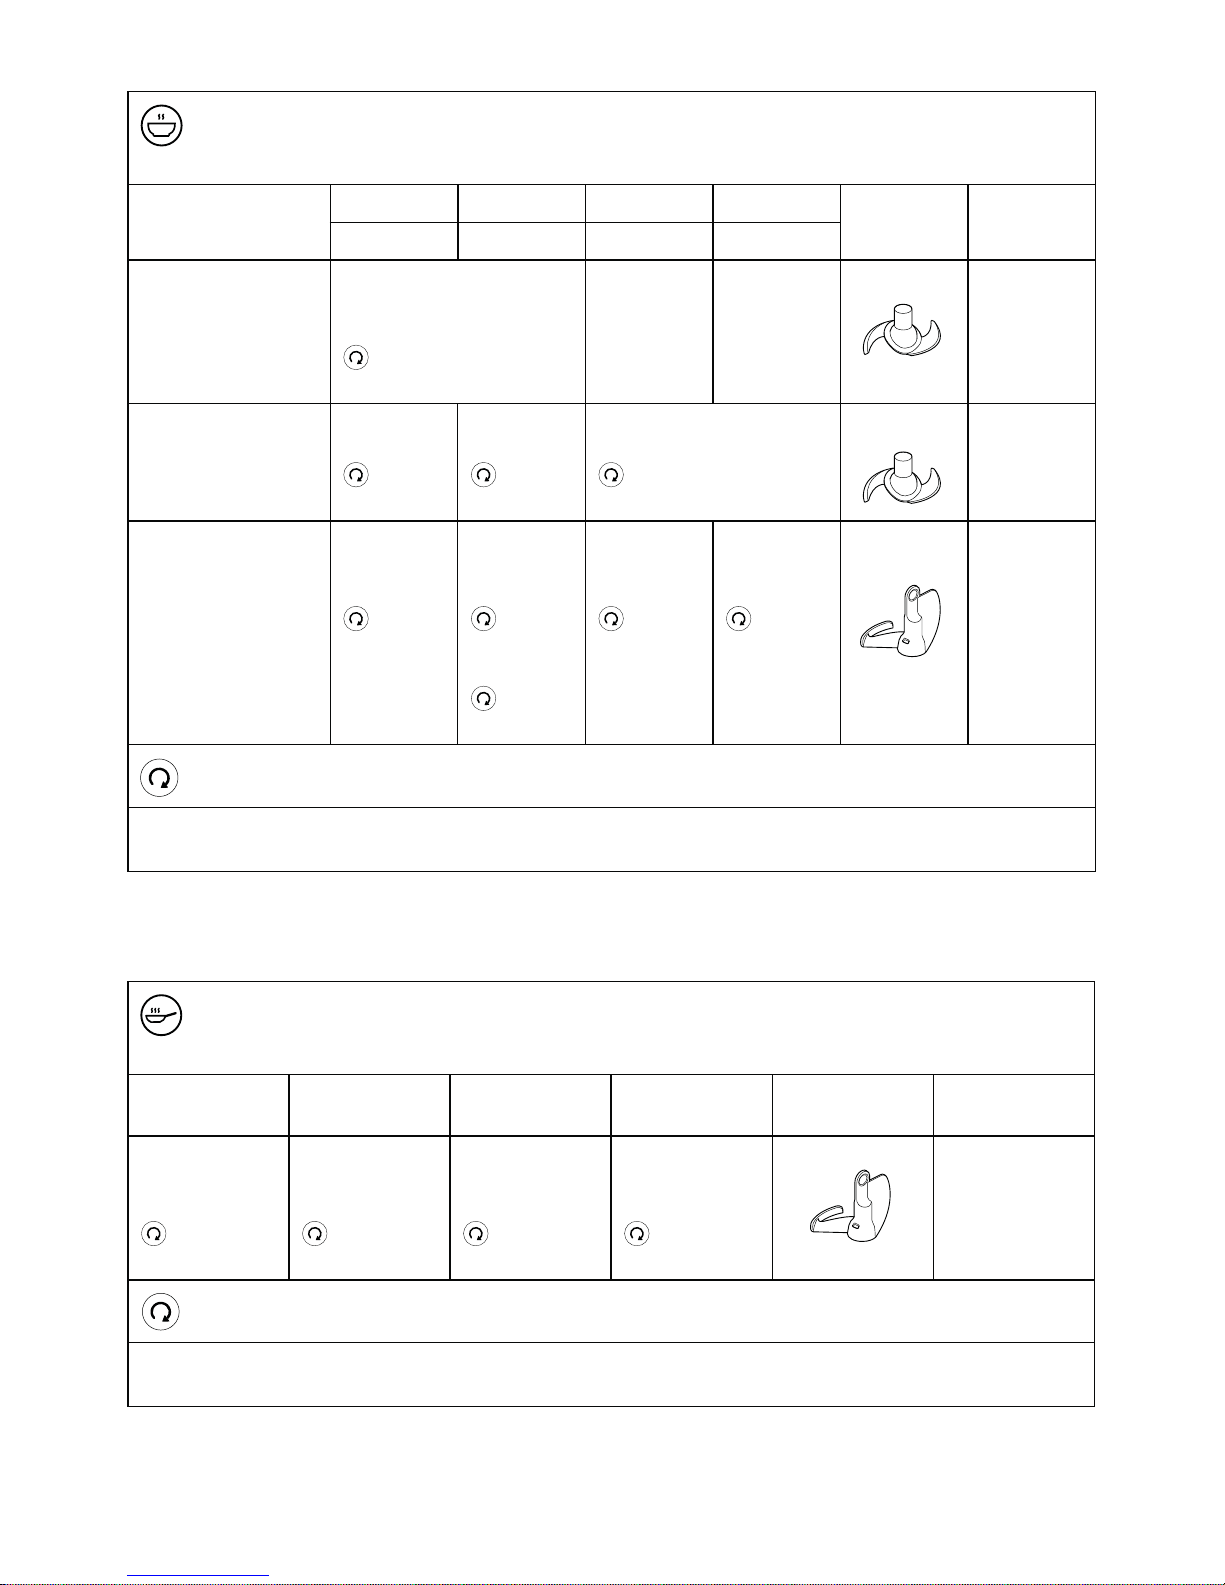
Soup programme
):
Recipe ideas for guidance – adapt to personal taste and preference.
Sub
programme
Stage 1 Stage 2 Stage 3 Stage 4 Tool used Recipe
ideas
INGREDIENTS 1 INGREDIENTS 2 INGREDIENTS 3 INGREDIENTS 4
QUICK SOUPS
Add veg Blend
& liquid
100°C
1
30 mins Æ 2 mins
N/A N/A
Vegetable
soup
SMOOTH SOUPS
Add oil
140°C
3
Heating
Add veg
180°C
2
5 mins
Add liquid Blend
98°C
3
20 mins Æ 2 mins
Mushroom
soup
BROTHS
Add oil
140°C
3
Heating
Add meat
180°C
4
2 mins
then
3
3 mins
Add veg
140°C
2
10 mins
Add
liquid
98°C
2
30 mins
Lamb broth,
chunky
soups
= selected speed
Note: During the heating cycle on each stage “HEATING” will be shown on the display screen and the time
will not start to count down until the correct temperature is reached.
Stir Fry programme
*1
Recipe ideas for guidance – adapt to personal taste and preference.
Stage 1 Stage 2 Stage 3 Stage 4 Tool used Recipe
ideas
Add oil
140°C
3
Heating
Add veg &
meat
160°C
4
3½ mins
Add
flavourings
120°C
4
2 mins
Additional
ingredients
120°C
4
45 secs
Stir fries,
sautéing
= selected speed
Note: During the heating cycle on each stage “HEATING” will be shown on the display screen and the time
will not start to count down until the correct temperature is reached.
19
Dessert programme
*2
Recipe ideas for guidance – adapt to personal taste and preference.
Sub programme Stage 1 Stage 2 Stage 3 Tool used Recipe
ideas
DESSERT SAUCES
Add dry
ingredients
2½ mins
Add liquid
98°C
5
Heating
then
6
10 mins
N/A
Custard,
crème brûlée
DOUGH
Add water
and yeast
2 mins
Add dry
ingredients
3¼ mins
N/A
Bread
= selected speed
Bread making
O
Do not exceed 400g (flour weight) / 640g (total weight) – you may overload the unit.
O
Use the knife blade at speed 10 to knead the dough.
O
Do not knead for longer than 3 minutes.
O
Use luke warm water.
20
recommended speed chart for manual functions
Tool Function Recommended
speed/
temperature
Processing time Recommended
Quantities
Chopping herbs 12 20 secs 20g – 50g
Chopping onions 12 15-20 secs Up to 300g
(2 onions)
Chopping vegetables
cut into 4cm chunks
12 20 secs Up to 500g
Chopping lean meat 12 5-20 secs 150g – 300g
Pastry – rubbing fat
into flour
Adding water to
combine pastry
ingredients
12 15 secs
15 secs
150g – 200g flour
weight
Chopping chocolate
(e.g. for melting)
12 40 secs Up to 200g
Crushing ice 12 25-30 secs Up to 250g
(12 cubes)
Chopping cauliflower
(e.g. for cauliflower
rice)
12 20 secs Up to 500g
(1 head cut into
florets)
All in one cake mixes 12 20-30 secs Up to 600g total
weight
(3 egg mix)
Drinks and
smoothies
12 60 secs 1 litre
Cold Blending 12 1 – 2 mins 2.6 litres
Bread Dough 10 3 mins 640g total weight
400g flour weight
Egg whites 8-9 3½ – 4 mins 2 – 8 (70 – 280g)
Whipping cream 9 1 – 1½ mins 200g – 600g
Mayonnaise 12 1 – 1½ mins 2 – 4 egg mix
Flapjack recipe
Stage 1
Butter
Honey
0/55˚C 10 mins 100g
300g
Stage 2
6/55˚C 1 min -
Stage 3
Oats
12/OFF 5 secs 300g
Stage 4
Sultanas
12/OFF 5 secs 100g
Note: This is for guidance only and will vary depending on the exact recipe and ingredients being processed.

21
care and cleaning
O
Always switch off and unplug before cleaning.
O
Remove the lid and tool from the bowl before
cleaning.
O
When not in use store the stir tool, whisk tool,
bowl plug, spatula and Direct Prep attachment in
the storage box
)4
. The Direct Prep discs can be
stored in the storage bag supplied
,9
.
power unit
O
Wipe with a damp cloth, then dry.
O
Never use abrasives or immerse in water.
bowl temperature sensors
O
Wipe with a damp cloth then dry thoroughly. Never
use abrasives or sharp instruments to clean the
sensors.
bowl/stir tool/knife blade/whisk tool
O
Refer to “RINSE” function section.
O
Wash the parts, then dry thoroughly.
O
If food sticks or burns on the inside of the bowl,
remove as much as possible using a spatula.
Fill the bowl with warm soapy water and allow
to soak. Remove any stubborn deposits using a
cleaning brush. Any discolouration of the bowl will
not affect its performance.
bowl drive shaft assembly/bowl plug
1 Unlock the drive shaft nut
(6
on the underside of
the bowl by turning in an anti-clockwise direction.
2 Then lift out the drive shaft
(1
or bowl plug ,:.
3 Remove and wash the sealing ring
(2
or -1.
4 Brush the bowl drive assembly or bowl plug clean
with hot soapy water, then rinse thoroughly under
the tap.
5 Ensure the seal is refitted to the drive shaft or bowl
plug correctly before refitting to the bowl.
lid
O
Always dismantle the lid before cleaning:
1 Remove the filler cap.
2 Push the lid inner section
out.
3 Remove the seal
from the lid inner section .
O
After washing, fit the seal back on to the outer
lid section with the thicker edge uppermost and
reverse the above procedure.
Note: Leaking from the lid will occur if the seal is not
fitted correctly.
direct prep
Dismantle the attachment fully before cleaning.
O
For easier cleaning, always wash the parts
immediately after use.
O
Handle the cutting discs with care – they are
extremely sharp.
O
To remove the lid ,1 from the base ,5, hold by
the feed tube
+:
and turn in an anticlockwise
direction. Then lift off.
O
Tower: Do not immerse in water. If the tower is
accidentally immersed in water, ensure that all the
water has drained out before reassembling the
attachment.
steaming basket
O
Wash the parts, then dry thoroughly.
dishwashing
Alternatively the washable parts are dishwasher
safe.
Item
Suitable for
dishwashing
Bowl
Bowl drive shaft + seal
Slow cook plug + seal
Outer lid, inner lid section and
lid seal section
Filler cap
Direct Prep outlet cover
Knife blade
Stir tool
Whisk tool
Steam tray base, shelf and lid
Storage unit
Direct Prep pusher, lid,
slinger plate, base and
extension chute
Cutting discs
Tower
Spatula
Disc storage bag

22
service and customer care
O
If you experience any problems with the operation of
your appliance, before requesting assistance refer to
the “troubleshooting guide” section in the manual or
visit www.kenwoodworld.com.
O
Please note that your product is covered by a
warranty, which complies with all legal provisions
concerning any existing warranty and consumer
rights in the country where the product was
purchased.
O
If your Kenwood product malfunctions or you
find any defects, please send it or bring it to an
authorised KENWOOD Service Centre. To find up to
date details of your nearest authorised KENWOOD
Service centre visit www.kenwoodworld.com or the
website specific to your Country.
O
Designed and engineered by Kenwood in the UK.
O
Made in China.
IMPORTANT INFORMATION FOR
CORRECT DISPOSAL OF THE PRODUCT
IN ACCORDANCE WITH THE EUROPEAN
DIRECTIVE ON WASTE ELECTRICAL AND
ELECTRONIC EQUIPMENT (WEEE)
At the end of its working life, the product must not be
disposed of as urban waste.
It must be taken to a special local authority
differentiated waste collection centre or to a dealer
providing this service.
Disposing of a household appliance separately avoids
possible negative consequences for the environment
and health deriving from inappropriate disposal and
enables the constituent materials to be recovered to
obtain significant savings in energy and resources.
As a reminder of the need to dispose of household
appliances separately, the product is marked with a
crossed-out wheeled dustbin.

23
troubleshooting guide
Problem Cause Solution
No power to appliance /display
screen not coming on.
Appliance not plugged in.
On/Off switch not operated.
Check appliance plugged in.
Press the On/Off switch
)1
to
the On position.
Appliance not operating. Bowl or lid not located correctly.
Start not pressed.
Time not set.
Check bowl is located to power
unit correctly.
Press the Start button to start
cooking.
Check time set.
Food sticking or burning on
bottom of bowl.
Stir tool or knife blade not fitted
when softening vegetables.
Temperature selected too high.
Always use the stir tool or knife
blade.
Check correct temperature has
been selected and increase stir
speed.
Leaking from lid during
processing.
Lid seal not fitted correctly to lid. Refer to “care and cleaning” for
how to fit the seal.
Stir speed cannot be increased. Bowl or ingredients temperature
above 105˚C.
Normal operation.
Stir speed restricted to speed
6 when bowl or ingredients
temperature above 105˚C.
Leaking from the base of the bowl. Bowl drive or plug seal not fitted
correctly
Check bowl seal is in place and
fitted correctly.
Timer not counting down on
display screen.
During the heating stage the
timer will not count down until the
correct temperature is reached.
Temperature set above 100˚C but
water content of food preventing
temperature going above 100˚C.
Normal operation.
Reduce or select correct
temperature.
Temperature of bowl contents
does not go above 100˚C.
Water content of ingredients may
prevent the temperature from
going above 100˚C.
Normal operation.
Display shows
“BOWL BASE WET”
“DRY BOWL BASE”
“SWITCH OFF AND RETRY”
Underside of bowl not clean and
dry.
Switch off and unplug the unit.
Rinse bowl base with clean water
and dry thoroughly. Ensure base is
clean and dry before refitting.
Plug back in and restart.
If the problem persists contact
your nearest authorised Kenwood
Service Centre.
Display shows “CHECK WATER
LEVEL” during the steaming
programme.
Boil dry protection activated.
No water or run dry during
operation.
Add water to the 1 litre
mark
and restart.
Heavy movement during operation
and “EXCESSIVE VIBRATIONS”
displayed on screen.
Uneven load in bowl causing
excessive vibrations.
Reduce quantity or rearrange food
in bowl and restart unit.

24
troubleshooting guide continued
Problem Cause Solution
Display shows “MOTOR
OVERHEAT”.
Appliance overheated. Switch off and unplug the unit.
Leave to cool down for 30 minutes
and then plug back in.
Display shows “MOTOR
OVERLOAD” or “MOTOR
STALLED”.
Appliance overloaded. Reduce the quantity in the bowl.
Display shows error message
starting with E:
Appliance not functioning correctly. Switch off and unplug the unit.
Then plug back in and restart.
If the problem persists contact
your nearest authorised Kenwood
Service Centre. To find up to date
details of your nearest Kenwood
service centre visit
www.kenwoodworld.com or the
website specific to your country.

25
inhoudsopgave
veiligheid 26-30
legenda 31
taalselectie 31
de kookmachine gebruiken 32-33
de Direct Prep gebruiken 33-34
uitleg over de weergegeven symbolen 35
handmatige stand 36-37
de ingestelde programma's gebruiken 38-44
Hoofdmaaltijd-programma 39-40
Saus-programma 40
Stoom-programma 41-42
Soep-programma 43
Roerbak-programma 43
Dessert-programma 44
tabel met aanbevolen snelheden 45-46
verzorging en reiniging 46-47
onderhoud en klantenservice 47
problemen oplossen 48-49
Nederlands

26
veiligheid
O
Lees deze instructies zorgvuldig door en bewaar ze voor
toekomstig gebruik.
O
Verwijder de verpakking en alle labels.
O
Als het snoer beschadigd is, moet het om veiligheidsredenen
door KENWOOD of een door KENWOOD geautoriseerd
reparatiebedrijf vervangen worden.
O
Voor de juiste werking zorgt u ervoor dat de onderkant van
de kom schoon en droog is, voordat u de kom aan het
motorgedeelte bevestigt.
O
Zet de machine altijd uit en haal de stekker uit het
stopcontact,
{ voordat u de machine in elkaar zet of uit elkaar haalt;
{ wanneer u de machine niet gebruikt;
{ voordat u de machine schoonmaakt.
O
Verwijder altijd de roerder en de garde voordat u de inhoud
uit de kom giet, zodat u geen brandwonden oploopt door
hete ingrediënten.
O
Het mes is zo ontworpen dat het op de draaias past en mag
alleen worden verwijderd wanneer de kom leeg is. Het mes is
scherp, ga er dus altijd voorzichtig mee om.
O
Steek geen handen of keukengerei in de kom wanneer de
stekker in het stopcontact steekt.
O
Als u de machine in de kookstand zonder toezicht laat
werken, moet u goed op het volgende letten:
{ zorg ervoor dat alle instructies over temperaturen en
maximale verwerkingshoeveelheden opgevolgd zijn;
{ zorg ervoor dat kinderen niet bij de machine of het snoer
kunnen. De machine en het snoer mogen niet over de rand
van het werkoppervlak uitsteken;
{ controleer het proces regelmatig om te zien of er
voldoende vloeistof is toegevoegd en het eten niet te gaar
wordt.
Vouw de voorpagina a.u.b. uit voordat u begint te lezen. Op deze manier zijn
de afbeeldingen zichtbaar
 Loading...