

Page 1
2-DIN 12.CAW1300-06
Installation manual for:
Toyota Avensis 2004-->
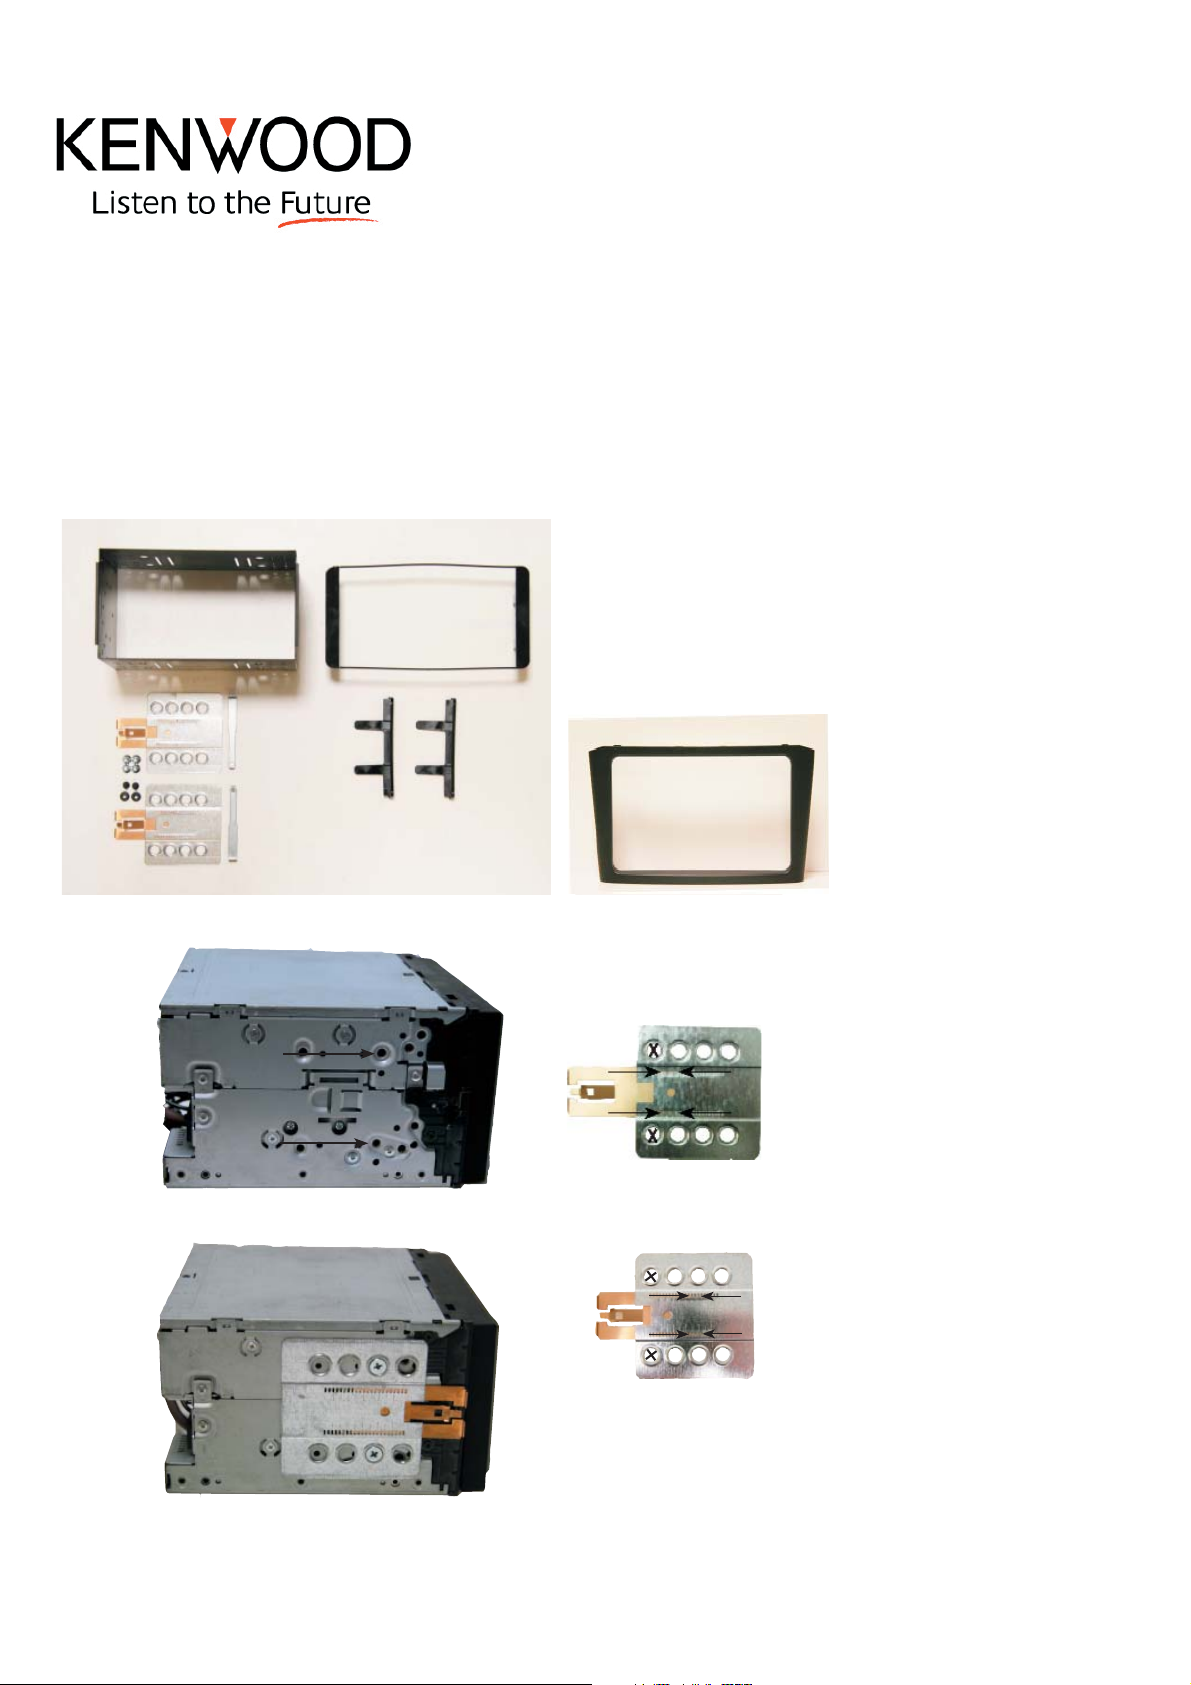
Installation kit includes the following items:
Installation kit includes the following items:
* 1X 2-ISO 100 mm. metal bracket
* 1X 2-ISO 100 mm. metal bracket
* 1x Replacement panel for non motorized screen
* 1X Radio trim
* 2X Replacement panel for motorized screen
* 2X Mounting plates
* 2X Mounting plates
* 2X Mounting spacers
* 2X Mounting spaces
* 4X Screws
* 2X Radio keys
* 2X Radio keys
* 4X Screws
Use this hole
Use this hole
You need
OEM Bezel
Part Number : 55405-05160
Kenwood DDX6029
We advice to use the following positions.
Other positions are also possible.
Use position 1 marked with a cross.
Use position 6 & 8 marked with an arrow.
Measured from left to right.
Kenwood DDX 7025
We advice to use the following positions.
Other positions are also possible.
Use position 1 marked with a cross.
Use position 14 & 16 marked with an arrow
Measured from left to right.
* Mount the plates.
Page 2
2-DIN 12.CAW1300-06
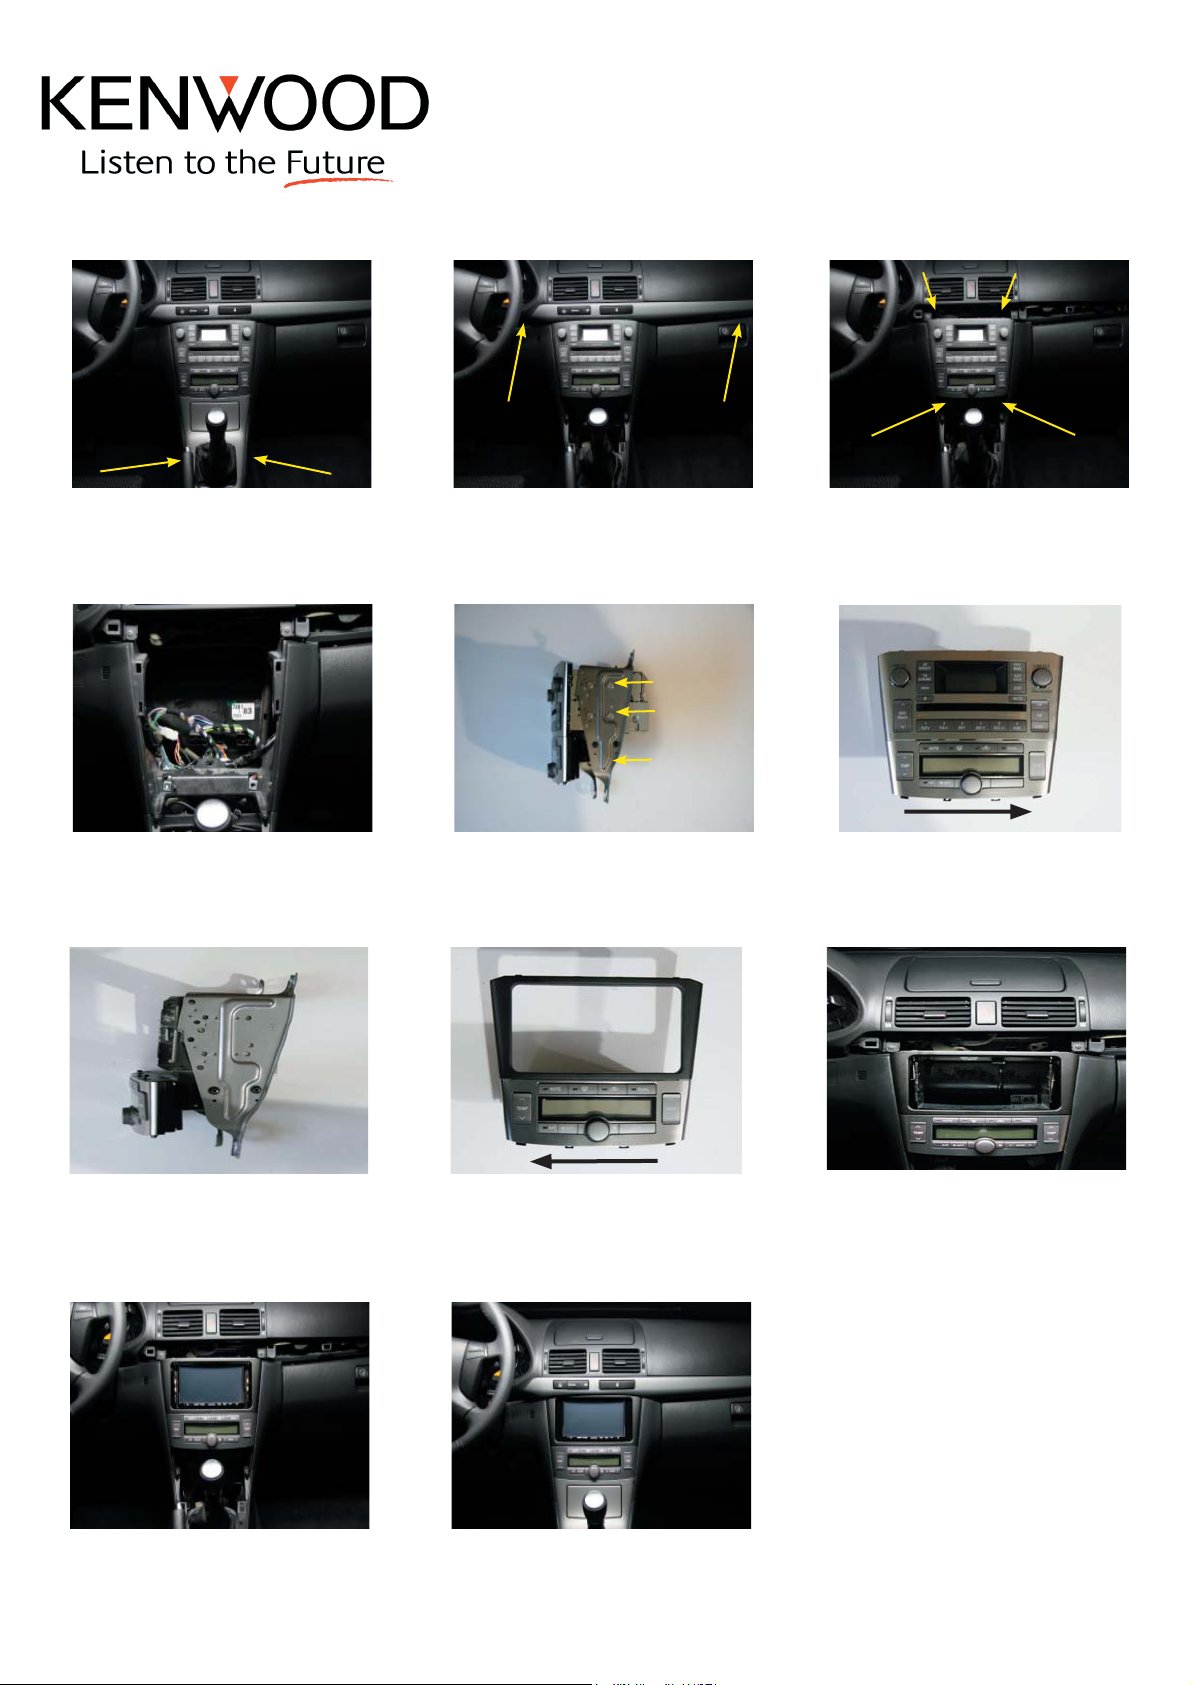
7R\RWD$YHQVLV!
123
Remove the dashboardpanels around
the radio at the location of the arrows.
Remove the frame above the radio by
using a plastic wedge at the location of
the arrows.
Remove the original radio at the location
of the arrows.
The radio is tighten by four screws.
456
Remove the original OEM metal brackets
from the radio and the climate control
unit. This is tigten by twelve screws.
Remove the original radio from the
climate control.
Slide the climate control unit to
the right.
789
Place the new metal bracket and the climate control unit between the OEM
radio brackets.Tighten the climate control
with the four original screws.
10 11
Place the new headunit.
Place the OEM replacement panel on the
climate control unit by sliding it to the
left .
Place the radio trim and replace all
dashboardpanels in reverse order.
Place the OEM replacement panel with
the climate control unit and the metal
bracket into the dashboard.
Page 3
2-DIN 12.CAW1300-06
Installation manual for:
Toyota Auris
Installation kit includes the following items:
Installation kit includes the following items:
* 1X 2-ISO 100 mm. metal bracket
* 1X 2-ISO 100 mm. metal bracket
* 1x Replacement panel for non motorized screen
* 1X Radio trim
* 2X Replacement panel for motorized screen
* 2X Mounting plates
* 2X Mounting plates
* 2X Mounting spacers
* 2X Mounting spaces
* 4X Screws
* 2X Radio keys
* 2X Radio keys
* 4X Screws
Use this hole
Use this hole
You need
OEM Bezel
Part Number :
55405-12A00 metal bronze
55405-02130 black
Kenwood DDX6029
We advice to use the following positions.
Other positions are also possible.
Use position 1 marked with a cross.
Use position 6 & 8 marked with an arrow.
Measured from left to right.
Kenwood DDX 7025
We advice to use the following positions.
Other positions are also possible.
* Mount the plates.
Use position 1 marked with a cross.
Use position 14 & 16 marked with an arrow
Measured from left to right.
Page 4

2-DIN 12.CAW1300-06
7R\RWD$XULV
123
Remove the surrounding
Remove the dashboardpanels around
around the original radio
the radio at the location of the ar-
at the location of the ar-
rows.
rows.
Remove the top air shaft by pulling
it forwards.
Remove the original radio at the
location of the arrows this is tighten
by four screws.
456
Remove the original OEM metal
brackets from the radio.This is
tighten by eight screws.
7
8
Place the OEM radio brackets on the metal bracket for the new headunit.
This will fi t in the holes of the metal
bracket(if needed mount it with screws).
9
Place the metal bracket into the dashboard between the metal OEM
brackets.
10
Place the radio trim and place all dashboard panels in reverse order.
Place the new headunit
Place the OEM replacement panel.
Page 5

2-DIN 12.CAW1300-06
Installation manual for:
Toyota Corolla Verso
Installation kit includes the following items:
Installation kit includes the following items:
* 1X 2-ISO 100 mm. metal bracket
* 1X 2-ISO 100 mm. metal bracket
* 1x Replacement panel for non motorized screen
* 1X Radio trim
* 2X Replacement panel for motorized screen
* 2X Mounting plates
* 2X Mounting plates
* 2X Mounting spacers
* 2X Mounting spaces
* 4X Screws
* 2X Radio keys
* 2X Radio keys
* 4X Screws
Use this hole
Use this hole
You need
OEM Bezel
Part Number : 55417-0F010
Kenwood DDX6029
We advice to use the following positions.
Other positions are also possible.
Use position 1 marked with a cross.
Use position 6 & 8 marked with an arrow.
Measured from left to right.
Kenwood DDX 7025
We advice to use the following positions.
Other positions are also possible.
Use position 1 marked with a cross.
Use position 14 & 16 marked with an arrow
Measured from left to right.
* Mount the plates.
Page 6

2-DIN 12.CAW1300-06
7R\RWD&RUROOD9HUVR
123
Remove the air shafts at the left and
the right side of the OEM radio by
using a plastic wedge.
Remove the climate control unit.
This is tighten by two screws and pull
the unit forwards.
Remove the original radio by
removing the four screws at the
location of the arrows.
456
Remove the original OEM metal
brackets from the radio.
This is tighten by four screws
Place the OEM metal brackets on the
metal bracket of the new headunit.
This will fi t into the holes of the metal
bracket(if needed mount it with screws).
789
Place the metal bracket into the
dashboard between the metal OEM
brackets.
10 11
Place the new OEM replacement
panel.
Remove the warning lights switch
unit from the original panel and place
it in the replacement panel.
Place the radio trim and replace all
dashboardpanels in reverse order.
Place the new headunit.
Page 7

2-DIN 12.CAW1300-06
Installation manual for:
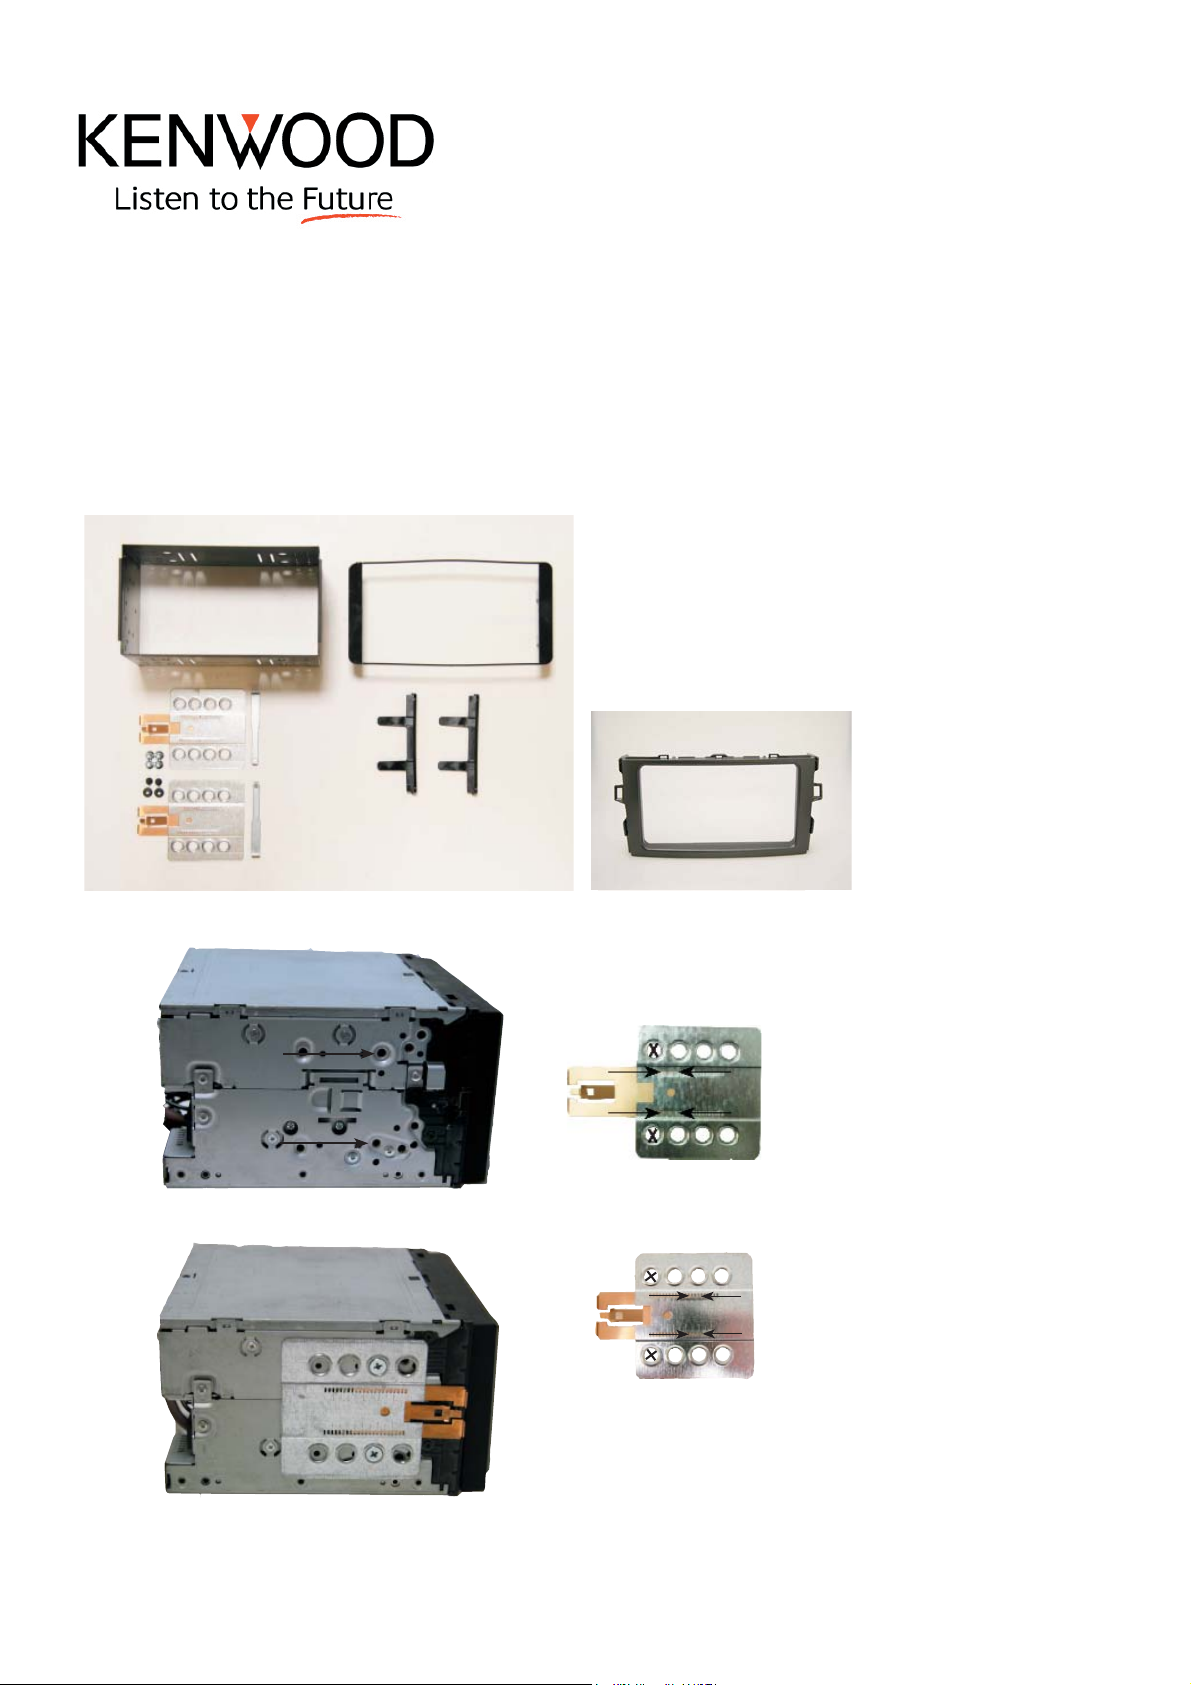
Toyota Corolla 2008-->
Installation kit includes the following items:
Installation kit includes the following items:
* 1X 2-ISO 100 mm. metal bracket
* 1X 2-ISO 100 mm. metal bracket
* 1x Replacement panel for non motorized screen
* 1X Radio trim
* 2X Replacement panel for motorized screen
* 2X Mounting plates
* 2X Mounting plates
* 2X Mounting spacers
* 2X Mounting spaces
* 4X Screws
* 2X Radio keys
* 2X Radio keys
* 4X Screws
Use this hole
Use this hole
You need
OEM Bezel
Part Number : 55406-12A71
Kenwood DDX6029
We advice to use the following positions.
Other positions are also possible.
Use position 1 marked with a cross.
Use position 6 & 8 marked with an arrow.
Measured from left to right.
Kenwood DDX 7025
We advice to use the following positions.
Other positions are also possible.
Use position 1 marked with a cross.
Use position 14 & 16 marked with an arrow
Measured from left to right.
* Mount the plates.
Page 8

2-DIN 12.CAW1300-06
7R\RWD&RUROOD
!
123
Remove the dashboardpanels around
the radio at the location of the
arrows.
Remove the top air shaft by pulling it
forwards.
456
Remove the orginal radio this is
tigten by four screws.
7
Place the OEM radio brackets on the
metal bracket of the new headunit.
This will fi t in the holes of the metal
bracket(if needed mount it with screws).
10
8
Place the metal bracket in to the
Place the metal bracket into the
dashboard.
dashboard between the metal OEM
brackets.
11
Remove the OEM brackets from the
original radio.This is tighten by eight
screws.
9
Place the OEM replacement panel.
Place the new headunit and replace
the dashboard panels in reverse
order.
Place the radio trim and replace al
dashboardpanels in reverse order.
Page 9

2-DIN 12.CAW1300-06
Installation manual for:
Toyota Yaris 2005-->
Installation kit includes the following items:
Installation kit includes the following items:
* 1X 2-ISO 100 mm. metal bracket
* 1x Replacement panel for non motorized screen
* 1X 2-ISO 100 mm. metal bracket
* 2X Replacement panel for motorized screen
* 1X Radio trim
* 2X Mounting plates
* 2X Mounting plates
* 2X Mounting spaces
* 2X Mounting spacers
* 2X Radio keys
* 4X Screws
* 4X Screws
* 2X Radio keys
Use this hole
Use this hole
You need OEM bezel
Part Number : 55405-0D260-B0
Kenwood DDX6029
We advice to use the following positions.
Other positions are also possible.
Use position 1 marked with a cross.
Use position 6 & 8 marked with an arrow.
Measured from left to right.
Kenwood DDX 7025
We advice to use the following positions.
Other positions are also possible.
Use position 1 marked with a cross.
Use position 14 & 16 marked with an arrow
Measured from left to right.
You need OEM bezel
Part Number: 55436-52010-B0 left
55435-52010-B0 Right
55436-52010-B0 left
55435-52010-B0 Right
* Mount the plates.
Page 10

2-DIN 12.CAW1300-06
a
7R\RWD<DULV!
123
Remove the surrounding around the
Remove the dashboardpanels around
original radio at the location of the
the radio at the location of the ararrows
rows.
Lift up the panel above the air shafts
at the location of the arrows by using
a plastic wedge.
456
Remove the OEM radio at the location of the arrows.The radio is tighten
by four screws.
Remove the original OEM metal brackets
from the radio.This is tighten by eight
screws.
Place the OEM radio brackets on the met
bracket of the new headunit.
This will fi t in the holes of the metal
bracket(if needed mount it with screws).
789
Place the metal bracket into the dash-
Place the metal bracket into the
board.
dashboard between the metal OEM
brackets.
10
You need the OEM side dashboard
panels for placing the new headunit.
Remove the air shafts from the original
radio and replace them in the OEM
replacement panel.
Place the OEM replacement panel.
11 12
Place the new headunit and the side
panels
Place the radio trim.
 Loading...