


PR001N
User Guide

About the Manuals
The Portable internet player comes along with the Quick Start Guide and this User Guide.
• The Quick Start Guide explains set up and the basic operations, enabling you to use and play the Internet
Radio and the Media stream mode.
• This User Guide explains standard and advanced features, enabling you to make full use of the Portable
Internet Player and troubleshoot problems.
Declaration of Conformity
All Information and specification are subject to change without further notice
1

Table of Contents
Preface .......................................................................................................................................1
Notice of Copyright.....................................................................................................................1
Safety Information.......................................................................................................................1
Disposal Instructions...................................................................................................................1
Caution: ......................................................................................................................................1
Functional Modes and Features.................................................................................................1
Description of the controls..........................................................................................................2
Getting Started............................................................................................................................3
Package contents.................................................................................................................................................3
Powering ON your Device....................................................................................................................................3
Charging your Device...........................................................................................................................................3
If a malfunction occurs under abnormal conditions..............................................................................................3
Setting up the Wi-Fi....................................................................................................................4
Internet Radio.............................................................................................................................6
Listening to the Internet Radio.............................................................................................................................6
Radio Search .......................................................................................................................................................6
Media Stream .............................................................................................................................7
Listening to Media Stream ...................................................................................................................................7
Streaming the Music ............................................................................................................................................7
Streaming of Video and images not supported....................................................................................................8
Playlists................................................................................................................................................................8
Music Player............................................................................................................................ 11
Listen to the Music Player..................................................................................................................................11
Listening to Music from a micro-SD card...........................................................................................................11
Video Player ............................................................................................................................ 12
To view the Videos.............................................................................................................................................12
Viewing Videos from the micro-SD Card............................................................................................................12
All video displays all the videos stored in the internal and MICRO-SD card........................... 12
Photo Album............................................................................................................................ 13
My Photo............................................................................................................................................................13
Viewing Photo Album from the micro-SD Card..................................................................................................13
FM Radio................................................................................................................................. 14
Scan the FM Channels.......................................................................................................................................14
Record................................................................................................................................................................14
System..................................................................................................................................... 15
Using the SD Card................................................................................................................... 16
Glossary................................................................................................................................... 17
Appendix – Setup of Media Coder Sigma Tel (STMP3600).................................................... 19
Disclaimer Note:.................................................................................................................................................19
Troubleshooting and FAQ ....................................................................................................... 22
Technical Support.................................................................................................................... 25
Warranty.................................................................................................................................. 26
All Information and specification are subject to change without further notice

Preface
Notice of Copyright
• The information contained here belongs to and is copyrighted by . The whole or part of the manual must not be copied or translated for
distribution, and must not be used for commercial purposes without written approval of the company as this constitutes an infringement of
copyright. The information contained here has been carefully put together but may be changed due to product function and performance
improvements without prior notice. Therefore, the company shall not be liable for any difference resulting from an unnoticed change between
the Device and the manual.
• We reserve the right to change the product specification without prior notice.
Safety Information
Read the safety instructions carefully before using your Device.
• Do not use Headphone/Earphones while driving, cycling or operating any motorized vehicle. This may create traffic h azard and m ay be illegal
in some areas. It can also be dangerous to play your Headphones/Earphones at high volume while walking or engaged in other activities.
You should exercise extreme caution and discontinue use in potentially hazardous situations.
• Avoid using Headphones/Earphones at high volume. Hearing expert’s advice against continuous loud and extended music play. Keep the
volume at a moderate level, so that you are able to hear outside sound, and to be considerate of the people around you.
• Keep your player away from sinks, drinks, bathtub, showers, rain and other sources of moisture. Moisture can cause electric shocks with any
electronic device.
• Follow these tips to keep your player working well for a long time:
Clean your player with a soft lint free cloth used on glass lenses.
Do not allow young children to use your player or your computer. Make sure your connectors are the identical shape and size before you connect.
Do not disassemble, crush, short-circuit or incinerate your battery as it may cause fire, injury, burns or other hazards.
Disposal Instructions
Do not dispose of this device with unsorted waste. Improper disposal may be harmful to the environment and human health. Please refer to your local
waste authority for information on return and collection systems in your area.
Caution:
Changes or modifications not expressly approved by the party responsible for compliance could void the user's authority to operate the equipment.
Note:
This device complies with part 15 of the FCC Rules. Operation is subject to the following two conditions: (1) This device may not cause harmful
interference, and (2) this device must accept any interference received, including interference that may cause undesired operation.
This equipment has been tested and found to comply with the limits for a Class B digital device, pursuant to Part 15 of the FCC Rules. These limits are
designed to provide reasonable protection against harmful interference in a residential installation. This equipment generates, uses and can radiate
radio frequency energy and, if not installed and used in accordance with the instructions, may cause harmful interference to radio communications.
However, there is no guarantee that interference will not occur in a particular installation. If this equipment does cause harmful interference to radio or
television reception, which can be determined by turning the equipment off and on, the user is encouraged to try to correct the interference by one or
more of the following measures:
-- Reorient or relocate the receiving antenna.
-- Increase the separation between the equipment and receiver.
-- Connect the equipment into an outlet on a circuit different from that to which the receiver is connected.
-- Consult the dealer or an experienced radio/TV technician for help.
All Information and specification are subject to change without further notice
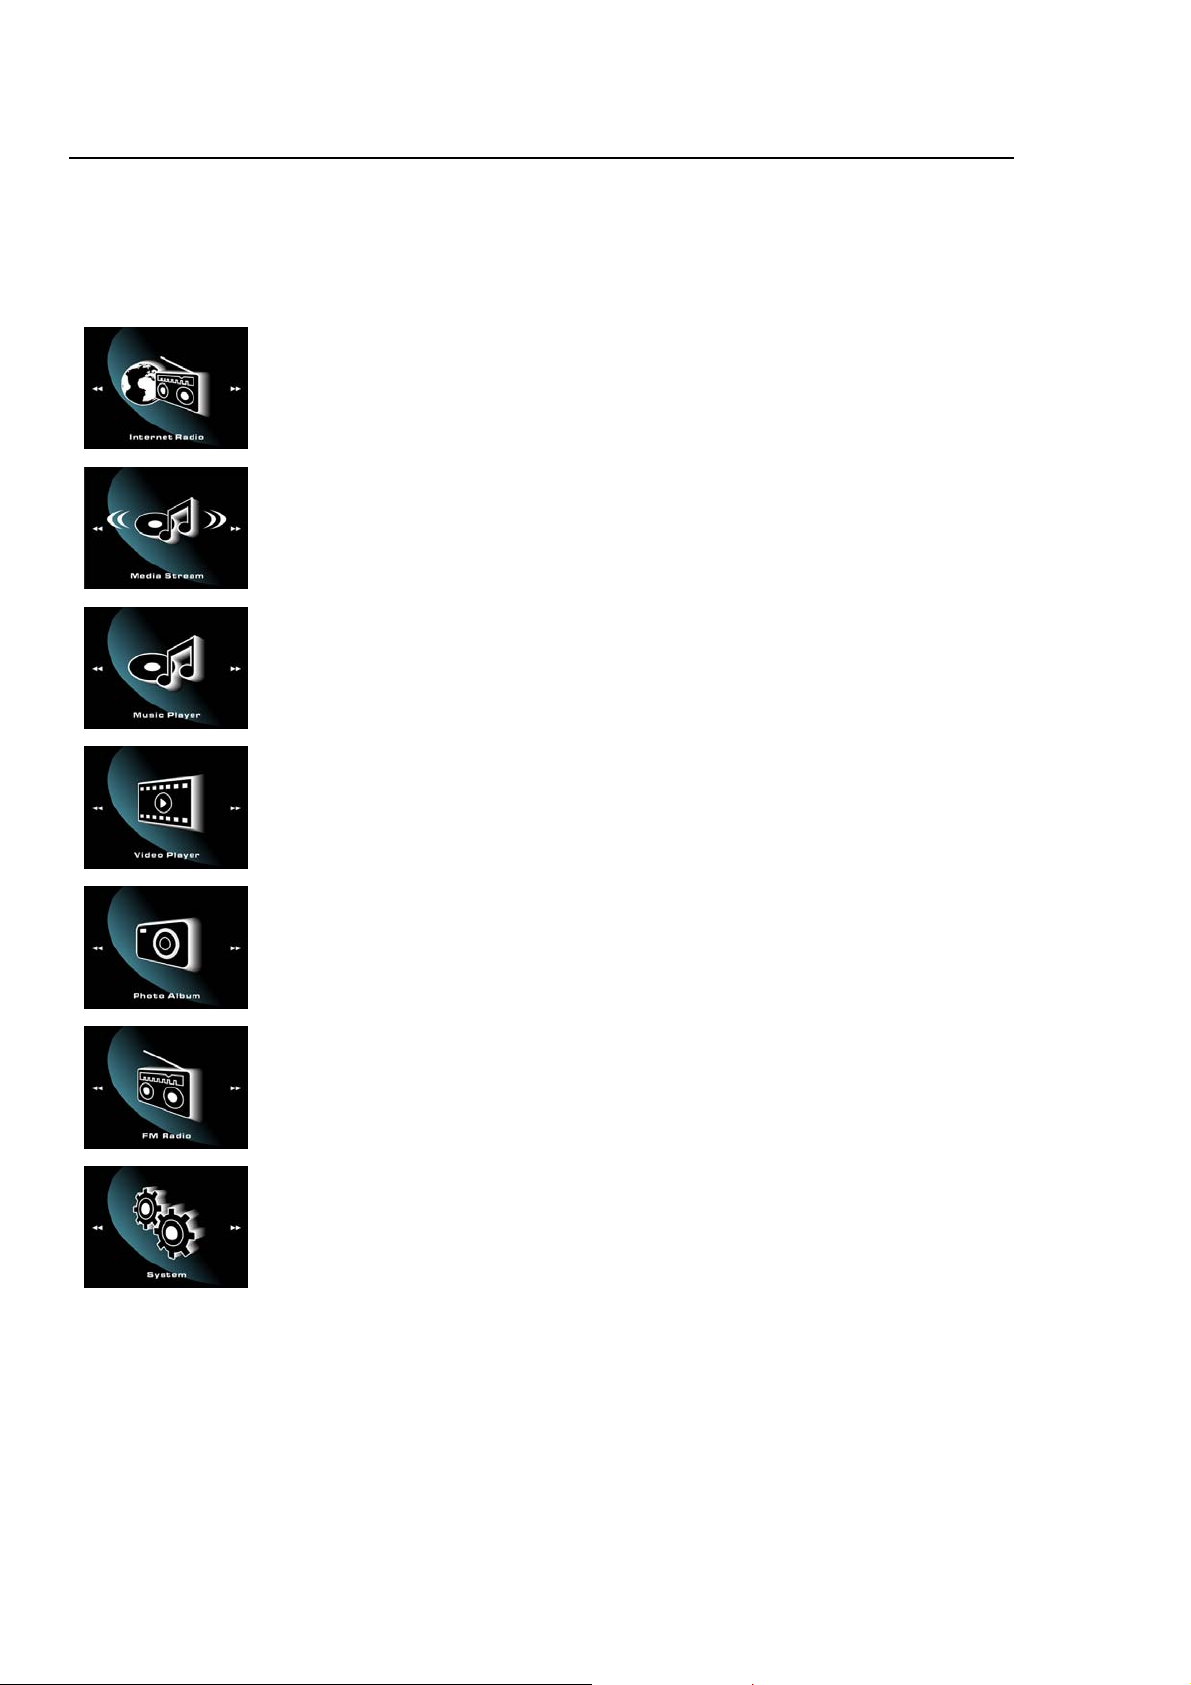
Functional Modes and Features
The Device is a small, lightweight and stylish Portable Internet Player. Incorporating an Internet radio and Media stre am over a Wi- Fi
network is the smallest; most feature-packed Portable Internet player. Other features include a Music Player, Video Player, Photo
Album and a FM Player. Powered by a lightweight, rechargeable battery, the Device provides hours of audio and video on the move.
A brief description of the features is listed below:
Internet Radio gets you connected to various radio stations around the world through the Wi-Fi
Media Stream play music streams from your Windows media player version11 application in your PC
or Notebook running Windows XP or Vista OS over the Wi-Fi connection.
Music Player, is a MP3 player and plays back the music files stored in Device
Video Player, Playback the video files (MPEG 4) stored in the Device
Photo Album, Stores and displays the photos (JPEG) from Device
FM Radio, connects to the local FM Radio Stations
System, used for performing all the settings in your Device
All Information and specification are subject to change without further notice

Description of the controls
6
4
2
7 10 10 12 11 8
1 Power On/Off Turn Device ON or OFF
2 Hold To lock or unlock all buttons when switched to lock position.
3 Reset Resets the player when you press the reset button with a small pin.
4 Micro-SD/MMC
card slot
5 Earphone Jack Press to go up one list screen level or to return to previous menu.
6 USB/Power
terminal
7 Volume down -/▼ Adjust the Volume to lower level
8 Volume up +/▲ Adjust the volume to a higher level
9 Menu Press to go to pop-up menu when on the screen or to return to previous menu
10
Backward ◀◀
11
Forward ▶▶
12
Enter ▶II
To slot in the Micro-SD/MMC card for transfer of data to the player
To connect the USB terminal to transfer music and video files or to connect the power
adopter for charging.
To scroll the menu in backward direction
To scroll the menu in Forward direction
To select an item
All Information and specification are subject to change without further notice

Getting Started
Package contents
Your Device package includes:
• Device
• Earphones
• USB Cable
• Quick Start Guide
• CD
Powering ON your Device
To Power on your Device, press Power.
After the startup is complete, you will see a welcome screen and then show you the Internet Radio mode.
Charging your Device
Your Device comes with a rechargeable battery. To charge the ba ttery, connect the small connector or the USB cable into the P C or
Notebook USB port, the first charge should takes at least 8 hrs or you can purchase the optional AC-USB charger, and plug in the
mini USB port to Device and plug AC-USB charger to the power source.
If a malfunction occurs under abnormal conditions
If the player is subjected to strong extraneous electrical noise or shock during use, or all the functions will not work properly or the
display incorrectly, in such cases, please follow the procedures as shown below:
1. Press RESET switch.
2. Press and hold POWER key to turn on the player again.
All Information and specification are subject to change without further notice
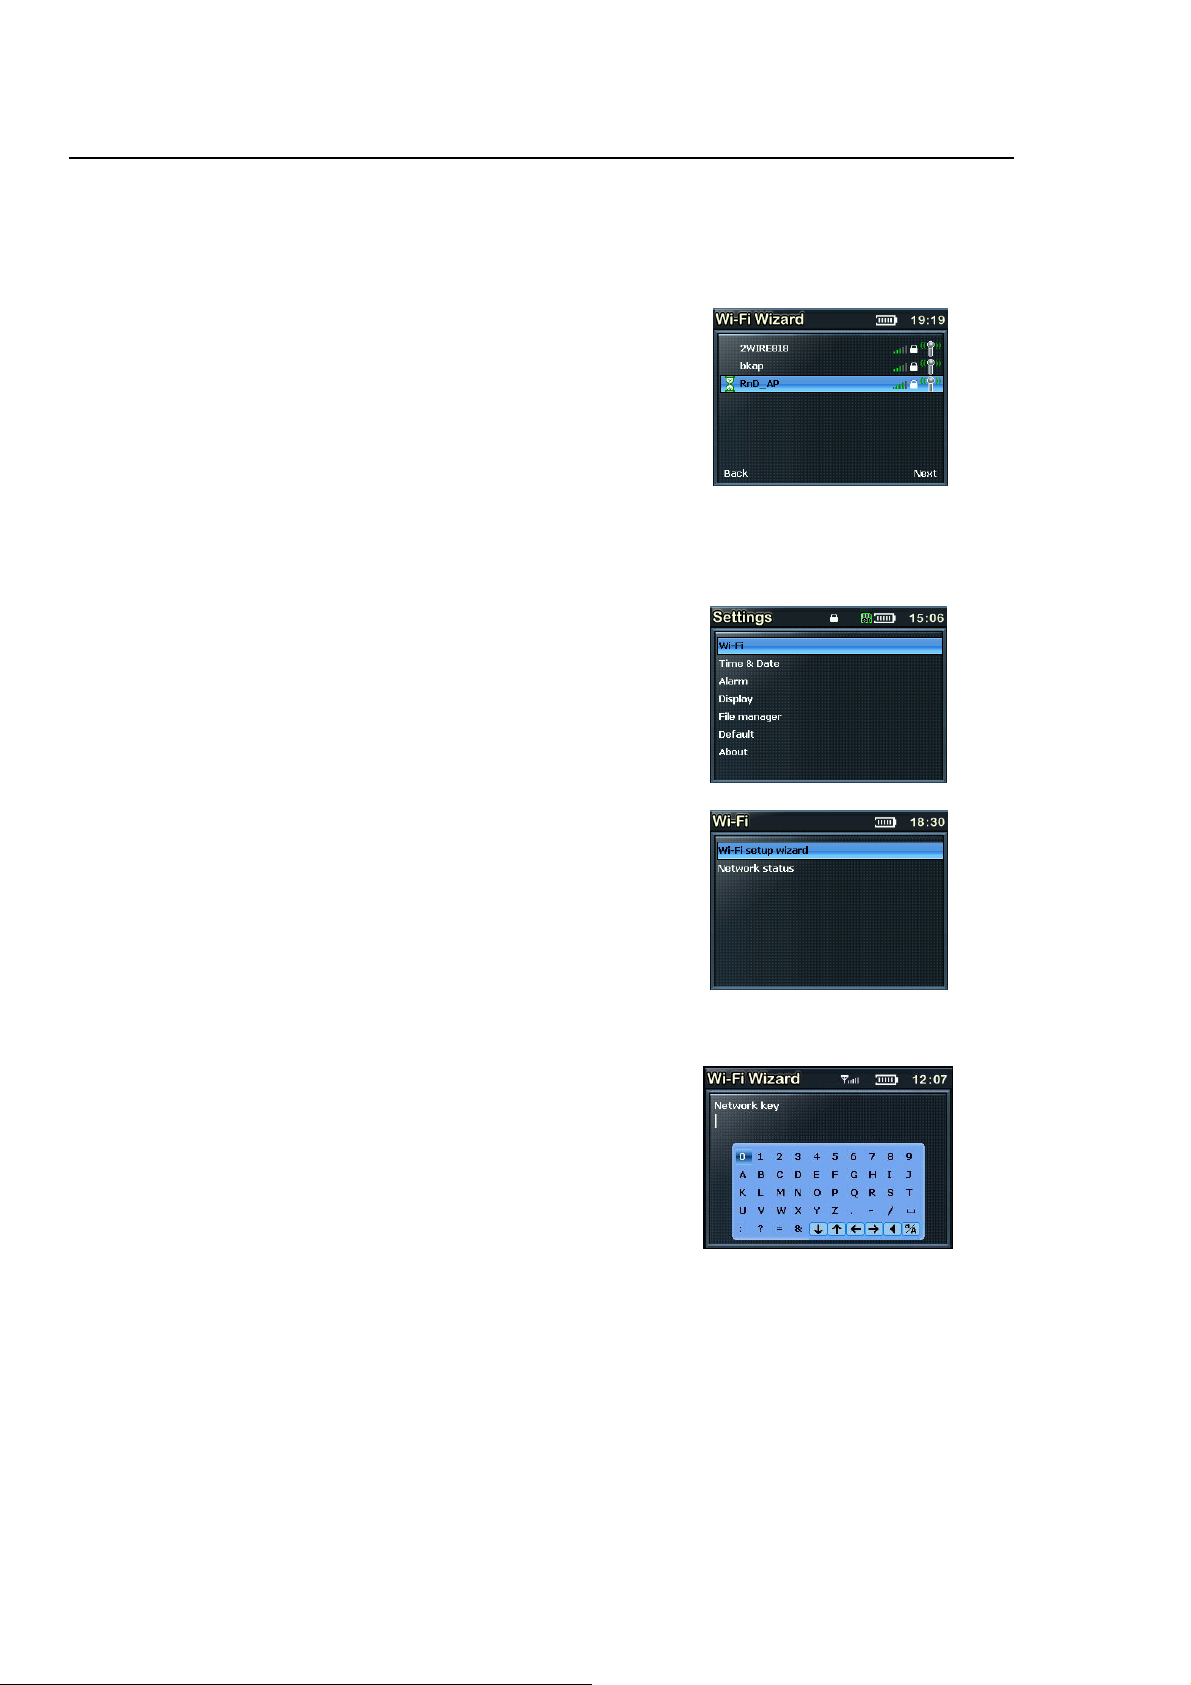
Setting up the Wi-Fi
Your Device can be easily connected to the Wi-Fi networks. When a Wi-Fi connection is require d (for instance, to play Internet
Radio or Media stream) the Device will automatically look for a network and try to connect.
When starting the Wi-Fi connection, your Device will find all the Wi-Fi
networks SSID in the range. Network SSID will be listed in order of the signal
strength (with highest first) and protected networks, which requires a
password is indicated by a lock icon. as seen
When you are connecting the Device for the first time, you will have to setup the Wi-Fi network. To do this, please follow the steps
below:
• Select the system mode from the main menu using the using ▶▶ and ◀◀ buttons to navigate.
• Next select the Wi-Fi from the menu.
• Go to the ‘Wi-Fi setup Wizard’ as shown:
• Make sure the Wi-Fi ON is selected, select search the network (If
you have saved some profile before you may select the load profile
option); you will get the list of nearby Wi-Fi networks. Once the
network you wish to connect up is selected it prompts for the
Default Network key which is the WEP/WPA default transmit key of
the Wi-Fi Access point
All Information and specification are subject to change without further notice
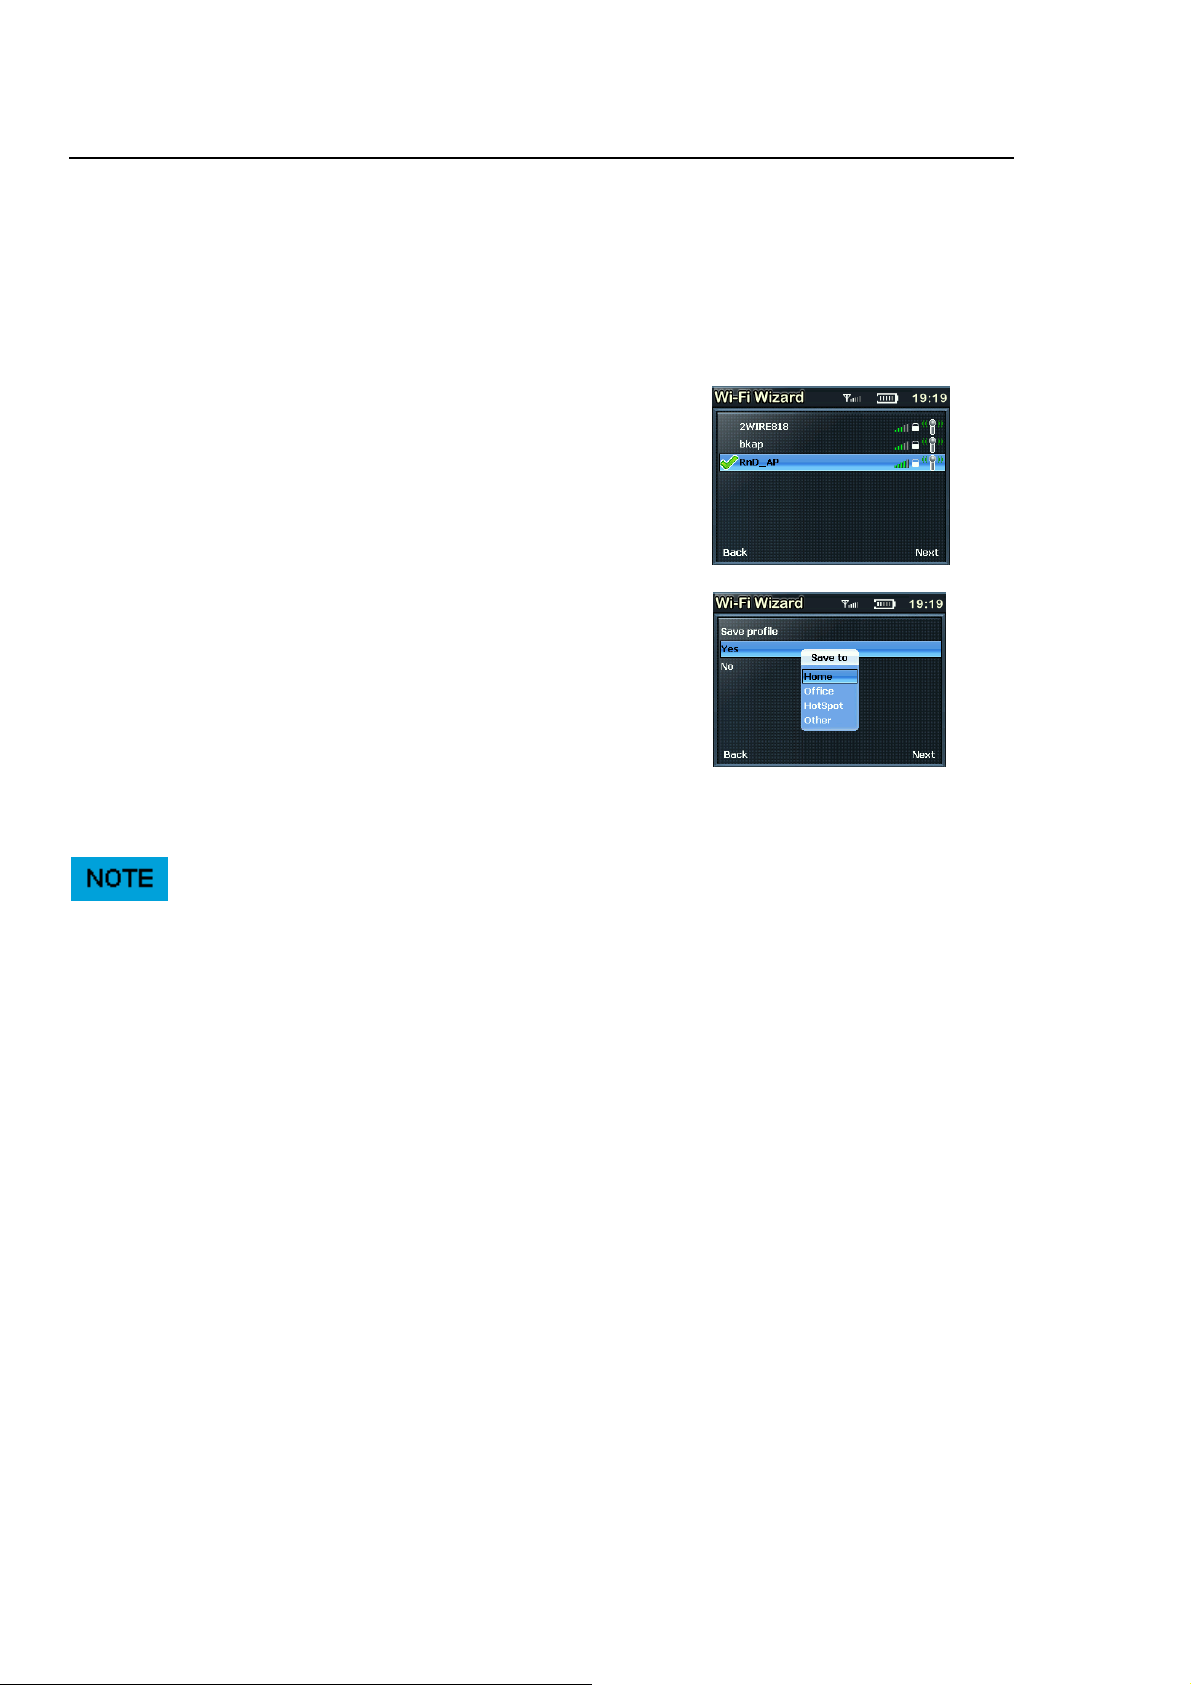
• Use ▼▲ ▶▶ and ◀◀ buttons and the delete ◀ button to type in the network ke y, and then press the menu button to
exit from the keypad.
• Next press ▶II to confirm the entered Network Key.
• There will now be a tick beside the network you have selected.
Press the ▶II button and save the profile if you wish too else select
no and press the ▶II button.
• Once you select to save the profile, it will prompt where to save as
shown. You can choose to save in the relevant folder.
Press the Menu button to back to the Main menu
Now your Wi-Fi is setup.
For the details of the Access Point please refer to Access point’s manufacturer manual.
Once the Wi-Fi is setup your Device will automatically save the Access Point SSID for you. So the next time you switch on the
player it will connect to the last connected network.
Once you are connected to the Wi-Fi, the Wi-Fi signal strength meter will appear on top of the status bar on the player LCD screen.
The more number of bars indicate a stronger signal.
All Information and specification are subject to change without further notice

Internet Radio
Internet radio gives you the access to all the Radio stations available worldwide. Once your Device is connected to the Wi-Fi, you
can listen to either all the pre-set channels or to My Radio, which has all your favorite Radio channels.
Listening to the Internet Radio
To listen to the Internet Radio, select Internet Radio, from the Main Menu. Upon selecting the Internet Radio, the radio gets
connected to the previously connected channel automatically else it will go to Radio Search if you have not save any channel in My
Radio folder. Press the menu button and hold for 2-3 seconds to get the menu screen of the Internet Radio as seen below:
My Radio consists of all your favorite radio stations that you can saved.
Radio Search is an advance search which is organized into different
categories. Please read on for details.
To Main Menu, takes you back to main menu
Radio Search
The Radio Search is organized to search the stations in the following groups:
Radio Time
RadioIO
DI Radio
Sky FM
Torian Media
Lafayette
My Radio
You can customize the radio stations in you’re My Radio. To view the Popup menu you have to press and hold the menu button for
2-3 seconds. The details of the popup menu are explained below:
My Radio consists of all your favorite radio stations.
Radio Search is an advance search which is organized into different
categories. Please read on for details.
Custom Radio, you can customize your Radio stations, see below for more
details.
Remove, will delete the station selected
Remove all, will delete the complete contents of the folder
To Main Menu, takes you back to main menu
Custom Radio, you can customize the Internal Radio URL by typing the URL
addresses.
All Information and specification are subject to change without further notice

Media Stream
Now that your Wi-Fi is setup, you can access any songs from your Windows Media Player Version 11 in Windows XP or Vista OS.
Listening to Media Stream
Select the Media Stream from the Main Menu. It will first access the Wi-Fi and scans the server. It will prompt you the menu screen
as below:
It is organized into four folders and you can select the Music or Playlists to hear your favorite music
Select the folder using ▶▶ or ◀◀ button and confirm by pressing ▶II button.
Music, has the list of the Music
Video, contains the list of videos, not supported via streaming
Pictures, Includes all the pictures, not supported via streaming
Playlists, consists a list of playlists
Make sure that you have your PC or Notebook turned-on and it is running the Windows Media Player (Version 11) in Windows XP or
the Vista OS. You should also share the Music streaming of the entire new device in your PC or Notebook Media Player. [See
Setting up PC Media Player 11]
Streaming the Music
Once you select the Music folder, you can steam and listen to all the music from your PC’s Media Player over the Wi-Fi. The player
will display the following category
All Music
Genre
All Artists
Contributing Artists
Album Artists
Composers
Album
Rating
Music Playlists
Folders
You can access the pop-up menu at any time by pressing the menu button holding it for 2-3 seconds. The menu contains:
Download, helps you to transfer a selected music file to the Music Player.
To Main menu, takes you to the main menu
All Information and specification are subject to change without further notice

Now you can stream your favorite music from your PC, acting as your Juke Box for the Device.
Streaming of Video and images not supported
Device does not support video streaming, as it is design as a network audio centric device to support Internet Radio and Music
streaming via Wi-Fi access.
However you can still see all the folders from your PC directory when you have selected Media sharing mode in your Windows
Media Player version11 application. Please read information in the coming pages on “Setting up Windows Media Player version 11”.
It does playback video and images synchronised via Windows Media Player version 11, locally on the Device.
Playlists
To View the Playlists, select the Playlists folder from the menu, once in the playlist folder you will see the following:
All Playlists
Folders
Setting up Windows Media Player version 11
You should be running Windows XP OS on your PC/Laptop, and Windows Media Player version 11. Now open the Windows Media
Player, and choose Library. From the drop down list of the menu select the Media sharing.
Now tick the ‘Share my media to’ and select settings
All Information and specification are subject to change without further notice

Please un-tick Pictures and video under Media type.
Next tick the ‘Allow new devices and computers automatically and press OK
To select the folders for monitor and for sharing, choose Library.
From the drop down list of the menu select the Add to Library.
Select the folders to monitor as below
All Information and specification are subject to change without further notice

After selected the folders to monitor and share in the Player Library, click OK
All Information and specification are subject to change without further notice

Music Player
Music Player is a MP3 player that plays back the music files stored in Device internal storage, from the external micro-SD card or
download from the Media stream. [Support for the micro-SD card up to 2GB]
Listen to the Music Player
Select the Music Player from the main menu. Once you are in the Music Player mode you will be connected to the last played song.
To view the pop-up menu press and hold the menu button for 2-3 seconds.
The pop-up menu contains:
My Music – contains the list of your favorite music
Browse Music – lets you browse through the songs according to the pre-set
category
Equalizer- choose from the list of preset equalizer modes
Repeat Mode- Helps you to play the selected songs repeatedly
To main menu – Takes you back to the main menu.
Listening to Music from a micro-SD card
You can listen to music from the micro-SD card by slotting in the micro-SD card into the slot provided. Next go to the Pop up menu
and select Browse Music. Now select the MICRO-SD Card option and play the music you like.
You can store the music in different categories like:
Internal storage, play the music stored in the player
MICRO-SD card, play the music from the MICRO-SD card
Artist, grouped according to the various artists
Album, grouped according to the album
Genre, grouped according to the type of music played
Year, grouped according to the year
Recorded list, has a list of music which has been recorded.
All audio, consists of all the music
All Information and specification are subject to change without further notice

Video Player
Video Player plays back the video files stored in Device internal storage or from the external micro-SD card
To view the Videos
Select the Video Player from the main menu. Once you are in the Video Player
mode you will see the list of video files stored in My Videos stored as shown.
To view the pop-up menu press and hold the menu button for 2-3 seconds. The menu consists of the following categories:
My Video, consists of all your favorite videos
Browse Video, you can browse all the videos from your Internal storage or
the MICRO-SD card
Remove, will remove the particular video selected
Remove all, remove all the videos
To main menu, takes you to the main menu
Viewing Videos from the micro-SD Card
From the main menu select Video Player. Insert the micro-SD card, press and hold the menu button for 2-3 seconds to get the popup menu. Now select the Browse video and you will see the following folders:
Internal Storage, includes the videos stored in the Player
MICRO-SD card, includes video stored in the MICRO-SD card
All video displays all the videos stored in the internal and MICRO-SD card.
All Information and specification are subject to change without further notice

Photo Album
Photo Album lets you view photos, either from micro-SD Card you have inserted into your Device or from the internal storage. To
access the pop-up menu, press and hold the menu button, it includes:
My photo, contains all your favorite photos
Browse photo, helps you view the photos stored in your player or from
MICRO-SD card.
Slideshow, helps you view photos in the slidesshow
Thumbnail, displays a miniature of the photos
Zoom & Pan, helps you zoom the pictures
To main menu, takes you back to the main menu
My Photo
This folder contains all your favorite photographs. To view the popup screen, go to the My Photo and press the menu button and
hold for about 2-3 seconds. You can see the menu similar to the one below:
My photo, contains all you favorite pictures
Browse photo, helps you to browse all through all the photos.
Remove, lets you delete the photo you select
Remove all, deletes all the photos in that folder
The Main Menu, takes you to the main menu
Viewing Photo Album from the micro-SD Card
Insert the micro-SD card, press and hold the menu button for 2-3 seconds to get the pop-up menu. Now select the Browse Photo
and you will see the following folders:
• Internal Storage, includes the pictures stored in the Player
• MICRO-SD card, includes pictures stored in the MICRO-SD
card
• All photo displays all the pictures stored in the internal and
MICRO-SD card.
Select the micro-SD card folder to view and transfer the photos stored in the micro-SD card.
Note that all the photos should be in the JPEG format.
You can also transfer the photos to the Player using the USB cable. You can do this by connecting the player to the USB cable
provided to your PC or Notebook.
Supports micro-SD card memory size up to 2GB
All Information and specification are subject to change without further notice

FM Radio
FM Radio connects you to the local radio channels available in your city. To listen to the FM Radio, select the FM Radio, from the
main menu and it will start playing the last played channel. To change the channels use ▶▶ and ◀◀ buttons. Press and hold the
menu button for 2-3 seconds to get the pop-up menu. To start, plug in your headphones first. The pop-up menu includes:
Preset Channels, consists of the preset channels
Auto scan, Scans the FM band and stores the Stations automatically
FM Band, includes support for FM Bands of USA and Japan
Add preset, Helps to save your favorite channel
Recording, you can record the music from the channel you are listening.
Fine tuning, allows you to do fine tuning on a channel
Turn off FM, Let you to turn off the FM
To Main Menu, Take you back to the main menu.
Scan the FM Channels
To Auto Scan the channels, press and hold the menu button for 2-3 seconds
to get the pop-up menu. Select the Auto scan option and it will scan the
channels automatically for you. To browse the scanned channels press the ▶II
button
Record
To Record the music you are listening on the radio, go to the popup menu and
select the Record Option. This will start to record the selected music and
stores as a WAV file format.
To stop the recording, press
To pause the recording, press
To resume the recording, press
All Information and specification are subject to change without further notice

System
System lets customize the settings of your Device. Select the System from the main menu and you will see the settings menu. It
includes the following categories:
Wi-Fi, helps you set up the Wi-Fi, for more details please refer ‘Setting up the
Wi-Fi’ on page 4
Time & Date, to set the Time and Date and Sleep timer
Press the up or down buttons to scroll through the above Time, Date and Sleep
Timer options for setting.
Once you have highlighted the option, press ▲ or ▼ or ▶II buttons to get to the
active underscore line for each option.
Then, press the up or down buttons to switch between the (hour and minutes) or
the (Year/Month/Date) digits of the Time/Date setting. Use or
To decrease or increase the digit of the time, lastly press ▶II to confirm.
For the Sleep Timer, once highlighted use the or to scroll
Through the options of: off, 5, 10, 20, 30 or 60 Minutes selection.
Alarm, to set the alarm
To set the Wake up alarm, select the tones used (Tone 1 to 3) and the Schedule
Alarm settings for Recurrent alarm (Monday to Sunday).
Display, to do the display settings like Auto LCD turn off after specific duration if
you never press any buttons, LCD display brightness level selection from darkest
(1) to brightest (5) level respectively.
Lastly you can set the slide show interval (1-5 Seconds) of the photo album player
here.
All the option settings are similar to that of the sleep timer in the Time and Date
settings above. Use the up or down buttons to highlight the options and use them
to scroll through the values or selections you want.
All Information and specification are subject to change without further notice

File Manager, has the memory information and file management.
It shows and allows you to access the internal and external storage memory file
folders that includes the files under them which are either in default or being
created by you under your PC environment.
You can delete a file by calling up the pop-up menu and select the Delete File
option or select Return Main Menu option.
Default, sets to the default factory settings
This allows you to restore all settings to the default factory settings, so please be
sure before confirming to restore.
About, details of the player and lets you personalize the player name by pressing
the button. A soft keypad will be displayed.
In this option, you will see the below items:
- FW / HW Ver: show you the firmware and hardware version used
- MAC: Show you the device MAC address (The device need to
connected to the Wireless AP first before you able to see this MAC
address)
- Int. storage used: show you the internal memory storage status
- microSD card used: show you the external microSD card memory
storage status
- Product support: show you the support web address
- Model no.: show you the name of the model
- Device name: lets you personalize the player name
Using the SD Card
When you would like to use the SD card, please follow the below proper steps:
After turning off the product, insert and slightly press the Micro SD card to the card slot in the correct direction
The SD card will blink every 2 seconds until it is enabled or invalid as shown below:
SD card in Idle state (standby mode)
All Information and specification are subject to change without further notice

SD card in enabled state (User can access now)
SD card is invalid and cannot be accessed by this device the card may not be
compatible with the device try to re-insert again.
Removing Micro SD card:
After turning off the product, press the Micro SD card again to remove it.
Glossary
Wi-Fi
Wi-Fi, popularly known as an acronym for wireless fidelity, was originally a brand licensed by the Wi-Fi Alliance to describe the
embedded technology of wireless local area networks (WLAN) based on the IEEE 802.11 specifications. Use of the term has no w
broadened to generically describe the wireless interface of mobile computing devices, such as laptops in LANs. Wi-Fi is now
increasingly used for more services, including Internet and VoIP phone access, gaming, and basic connectivity of consumer
electronics such as televisions, DVD players, and digital cameras.
Source - http://en.wikipedia.org/wiki/Wi-Fi
WEP
Wired Equivalent Privacy (WEP) is a scheme to secure IEEE 802.11 wireless networks. It is part of the IEEE 802.11 wireless
networking standard. Because wireless networks broadcast messages using radio, they are susceptible to eavesdropping.
Source - http://en.wikipedia.org/wiki/Wired_Equivalent_Privacy
WPA – Enterprise Version
Wi-Fi Protected Access (WPA and WPA2) is a class of systems to secure wireless (Wi-Fi) computer networks. It was created in
response to several serious weaknesses researchers had found in the previous system, Wired Equivalent Privacy (WEP). WPA
implements the majority of the IEEE 802.11i standard, and was intended as an intermediate measure to take the place of WEP while
802.11i was prepared. WPA is designed to work with all wireless network interface cards, but not necessarily with first generation
wireless access points. WPA2 implements the full standard, but will not work with some older network cards. Both provide good
security, with two significant issues:
Source - http://en.wikipedia.org/wiki/Wi-Fi_Protected_Access
DHCP
DHCP is a set of rules used by communications devices such as a computer, router or network adapter to allow the device to
request and obtain an IP address from a server which has a list of addresses available for assignment.
DHCP is a protocol used by networked computers (clients) to obtain IP addresses and other parameters such as the default gateway,
subnet mask, and IP addresses of DNS servers from a DHCP server. It facilitates access to a network because these settings would
otherwise have to be made manually for the client to participate in the network.
Source - http://en.wikipedia.org/wiki/Dynamic_Host_Configuration_Protocol
SSID
All Information and specification are subject to change without further notice

In Wi-Fi Wireless LAN computer networking, a service set identifier (SSID) is a code attached to all packets on a wireless network
to identify each packet as part of that network. The code is a case sensitive text string which consists of a maximum of 32
alphanumeric characters. All wireless devices attempting to communicate with each other must share the same SSID. Apart from
identifying each packet, SSID also serves to uniquely identify a group of wireless network devices used in a given "Service Set".
Source - http://en.wikipedia.org/wiki/SSID
All Information and specification are subject to change without further notice

Appendix – Setup of Media Coder Sigma Tel (STMP3600)
Disclaimer Note:
This is a freeware and user should use at their own risk and there is no support and software upgrade.
To setup the Media Coder Sigma Tel (STMP3600), please follow the below instructions:
• Double click the ‘MediaCoderSE-SigmaTel-20061117.exe’
• Select ‘English’ from the drop-down list and press ‘OK’
• You will now get a window of the Setup Wizard of the MediacoderSE
• Press ‘Next’
• You will now be prompted with the License Agreement, Please read
• Press ‘I Agree’
• Please select the install location for the MediaCoderSE
• Press ‘Install’ to complete the installation
How to use:
Start your newly installed MediaCoder tool.
All Information and specification are subject to change without further notice

• Select ‘Add File’ as shown.
• Next select the ‘Device’ to launch device configuration window
• Next select the Device ‘STMP3600 320x240’ for Fusion Stream Player.
• Select the ‘Output’ where you can select the target directory to save output video file.
All Information and specification are subject to change without further notice

• After you complete select ‘Start’ to run the conversion process.
• After it has been done, transfer or sync the video file into your Fusion Stream Player.
All Information and specification are subject to change without further notice

Troubleshooting and FAQ
Question: When browsing the Internet Radio I got the message ‘Unformatted Channel’. What does that mean?
Answer: That’s because the station is closed.
Question: Why can’t I play the Music even when I have selected my Media Stream?
Answer: Please check whether you have shared the Music streaming of the entire new device in the Media Player 11 in Windows
XP or Vista. Please read setting the Windows media player 11 on page 8.
Question: Why is my player not streaming even I have done the setup of the Windows media player 11?
Answer: Please check if your PC or Notebook has gone to Hibernate mode. The Media streaming does not work in the hibernate
mode.
Question: Can I download the music folder to my Music Player?
Answer: No the device supports only one file by file transfers at a time.
Question: Why doesn’t my Device appear to be charging when connected with the USB cable?
Answer: The Device requires a normal 1.1 or 2.0 USB port to provide enough power to charge. Some USB ports like the one on
your keyboard may not have enough power to support Device. Try the other USB ports on your computer t o see if they can charge
the device. Otherwise you will need to use the optional USB AC power adapter.
Question: What is Radio search? And am I required to subscribe to Radio search service for my Device in order to listen to Internet
Radio?
Answer: Radio search service provides online internet radio directory which aggregates tens of thousands of radio stations and
podcasts. The directories maintained by Radio search are updated time to time in order to make sure the maximum level of
accessibility of individual Internet Radio channel. Your Device product is shipped with bundling Radio search service to make sure
customer have seamless user experience. So, customer needs not have individual subscription for Radio search service.
Question: How do I connect my Device to a Wi-Fi network?
Answer: When you use a feature that requires an internet connection, like Internet Radio and Media Stream, the Device will
automatically connect to available network. This process is called “Wi-Fi zero-configuration”. Once the network is connected, you
can automatically enter into the function modes.
Question: What is Device Wi-Fi zero-configuration? How does it work?
Answer: Device Wi-Fi zero-configuration is an intelligent service used to provide end customer like you a harass-free user
experience on Wi-Fi setup. It will automatically connect to open Wi-Fi access point or load profiles when.
Question: What is Device Wi-Fi profile?
Answer: Device Wi-Fi profile is a configuration set for your Wi-Fi connection. It contains all the information you need to access a Wi-
Fi access point. The profile helps you to ease the trouble to remember all the details regarding access point.
Question: What is Wi-Fi setup wizard?
Answer: Wi-Fi setup wizard will help you setup up Wi-Fi network in step by step manner in certain special case, like when you
access a fresh access point with security protection for the very first time.
Question: How do I bring up Wi-Fi setup wizard?
All Information and specification are subject to change without further notice

Answer: When Wi-Fi zero-configuration is in progress, you can switch it to choose Wi-Fi setup wizard instead. Also, you may like to
go into menu “system setting -> Wi-Fi” to choose “Setup Wizard”.
Question: How do I input password for Wi-Fi security?
Answer: An input screen will automatically come up when necessary. Simple soft keypad interface gives a quick way to key in
letters, numeric and symbols. You can also do simple editing like cursor locating, delete, etc.
Question: What wireless standards are compatible with my Device?
Answer: Device is an 802.11 wireless b/g compatible device. It includes support for WEP and WPA/WPA2 Personal authentication
security standards. WPA/WPA2 Enterprise authentication security is not supported.
Question: Why does my Device only have Wi-Fi antenna icon but no signal bar?
Answer: Please check your Wi-Fi access point and network server configuration on DHCP portion. This indicates there is no DHCP
server is presented in the network environment.
Question: Can I connect to public access Wi-Fi networks (hot-spot)?
Answer: You can not connect through hot-spot access point because it usually needs an application level web-based authentication.
Question: How do I copy my music files from my PC to my Device?
Answer: You can copy music files directly, and sync playlists on the Device using program like Windows Media Player.
Question: What audio file formats does my Device support?
Answer: The Device will support local playback of MP3, WMA, secure WMA, AAC, OGG, WAV, and AIFF. For Internet Radio and
Media Stream, Device will support MP3 and WMA.
Question: Which bit rate will my Device player support?
Answer: The Device player will support 64-320Kbps for MP3 and 32-320 Kbps for WMA.
Question: Is the player compatible with podcasts?
Answer: As long as the podcasts are in a supported MP3 or WMA format, then the player is capable of playing the files or directl y
streaming down as Internet Radio or from media server.
Question: What photo file formats does my Device support?
Answer: Device will support JPEG, BMP and GIF image formats.
Question: When attempting to play some songs on the player, I get a license error. What is wrong?
Answer: For music obtained from a subscription service, the license may have expired. To refresh your music licenses, connect to
the same software you used to download the music and if your subscription is current, your licenses will renew automatically.
Question: How do I copy a CD to my Device player?
Answer: First, you must rip the CD to MP3 or WMA format using a program such as Windows Media Player. Once the songs are in
your Windows Media Player library, simply copy and sync the songs to your Device player.
Question: Why doesn’t my player display song or album information correctly?
Answer: Typically, this is because the ID3 tags have missing information.
All Information and specification are subject to change without further notice

Question: Why sometimes I try to synchronize video content in Microsoft Windows Media Player to my Fusion Stream Player, the
video content is not copied to it and received Error message like "Windows Media Player cannot convert the file to the format
required by the device"?
Answer: For some reason Windows Media Player is trying to convert the file format. This step is not required as the file is already in
the correct format for Fusion Stream Player. Suggestion is to start Microsoft Windows Explorer and copy the video content direct to
Fusion Stream Player.
Question: Why sometimes I can’t access media files in microSD card properly?
Answer: This could be the files or the microSD card already corrupted due to improper handling, you may nee d to format the
microSD card to recover it.
Question: Why my Fusion Stream need buffering before playing for Internet Radio & Media Stream?
Answer: Due to network traffic that may vary from time to time, the buffering helps to pre-fetch certain audio data from server. This
is to smooth up the streaming and improve the user listening experience. In some case, the streaming could be paused for rebuffering because of slow network throughput, or server is busy to handle too many clients. The connection to server may be
dropped in poor network environment.
All Information and specification are subject to change without further notice

Technical Support
Before you contact the Technical support, please read the Troubleshooting and FAQ section.
When you call or contact us for support, please include as much information possible from the packaging material. This will help us
in speeding the process.
All Information and specification are subject to change without further notice

Warranty
All Information and specification are subject to change without further notice
 Loading...