

KW-B25BT
User Manual
Bluetooth Speaker

Safety Instructions
1. Water and Moisture – The unit should not be used near water. For example: near a bathtub, washbowl,
kitchen sink, laundry tub, swimming pool or in a wet basement.
2. Ventilation – The unit should be situated so that its location or position does not ni terfere with its proper
ventilation. For example, it should not be situated on a bed, sofa, rug or similar surface that may block
ventilation openings. Also, it should not be placed in a built-in installation, such as a bookcase or cabinet,
hich may impede the flow of air through the ventilation openings.
w
3. Heat – The unit should be situated away from heat sources such as radiators, heat registers, stoves or other
appliances (including amplifiers) that produce heat.
4. Power Sources – The unit should be connected to a power supply only of the type described in the
o
perating instructions or as marked on the appliance.
5. Power
6. Cleaning –
7. Objects and Liquid Entry – Care should be taken so that ob
8 Attachments – Do not use attachments not recommended by the product manufacturer.
9 Lightning and Power Surge Protection – Unplug the unit from the wall socket and disconnect the antenna
10. Overloading – Do not overload wall sockets, extension cords, or integral convenience receptacles as this ca
11. Damage Requiring Service – The unit should be serviced by qualified service
12. Periods of None Use – If the unit is to be left unused for an extended period of time, such as a month or
. Servicing – The user should not attempt to service the unit beyond those methods described in the
13
14. WARNING:To reduce the risk of fire or electric shock, do not expose this apparatus to rain or moisture.
The apparatus shall not be exposed to dripping or splashing and that objects filled with liquids, such as
vases, shall not be placed on apparatus.
15. WARNING: The mains plug is used as disconnect device, the disconnect device shall remain readily
operable.
16. When not in use and during movement, please take care of the power corset, e.g. tie up the power
cordset with cable tie or something like that. It shall be free from sharp edges and the like that can
cause abrasion of the power corset. When put into use again, please make sure the power cordset
being not damaged, If any damages found, please look for the service person to replace the power
corset specified by the manufacturer or have the same characteristics as the original one.
17.
health from uncontrolled waste disposal, recycle it responsibly to promote the sustainable reuse of
material resources. To return your used device, please use the return and collection systems or contact
the retailer where the product was purchased. They can take this product for environmental safe recycling.
Cable Protection – Power supply cables should be routed so that they are not likely to be walked on
or pinched by items placed upon or against them. It is always best to have a clear area from where the
cable exits the unit to where it is plugged into an AC socket.
The unit should be cleaned only as recommended. See the Maintenance section of this
manual for cleani
any openings or vents located on the product.
or cable system dur
time. This will prevent damage to the product due to lightning and power-line surges.
result in a risk of fire or electric shock.
A. the power supply cable or plug has been damaged.
B. objects have fallen into or liquid has been spilled into the enclosure.
C. the unit has been exposed to rain.
D. the unit has been dropped or the enclosure damaged.
E. the unit exhibits a marked change in performance or does not operate normally.
longer, the power cable should be unplugged from the unit to prevent damage or corrosion.
user’s operating instructions. Service methods not covered in the operating instructions should
be referred to qualified service personnel.
Correct Disposal of this product. This marking indicates that this product should not be disposed with
other household wastes throughout the EU. To prevent possible harm to the environment or human
ng instructions.
jects do not fall and liquids are not spilled into
ing a lightning storm or when it is left unattended and unused for long periods of
personnel when:
n
English
2

Safety Instructions
18. Warning: Changes or modifications to this unit not expressly approved by the party responsible for
compliance could void the user’s authority to operate the equipment.
NOTE: This equipment has been tested and found to comply with the limits for a Class B digital
device, pursuant to Part 15 of the FCC Rules. These limits are designed to provide reasonable
protection against harmful interference in a residential installation. This equipment generates,
uses and can radiate radio frequency energy and, if not installed and used in accordance with the
instructions, may cause harmful interference to radio communications.
However, there is no guarantee that interference will not occur in a particular installation. If this
equipment does cause harmful interference to radio or television reception, which can be
determined by turning the equipment off and on, the user is encouraged to try to correct the
interference by one or more of the following measures:
o Reorient or relocate the receiving antenna.
o Increase the separation between the equipment and receiver.
o Connect the equipment into an outlet on a circuit different from that to which the receiver is
connected.
o Consult the dealer or an experienced radio/TV technician for help.
This device complies with Part 15 of the FCC Rules. Operation is subject to the following two
conditions:
(1) this device may not cause harmful interference, and
(2) this device must accept any interference received, including interference that may
cause undesired operation.
This Transmitter must be installed to provide a separation distance of at least 20 cm from all persons.
English
3

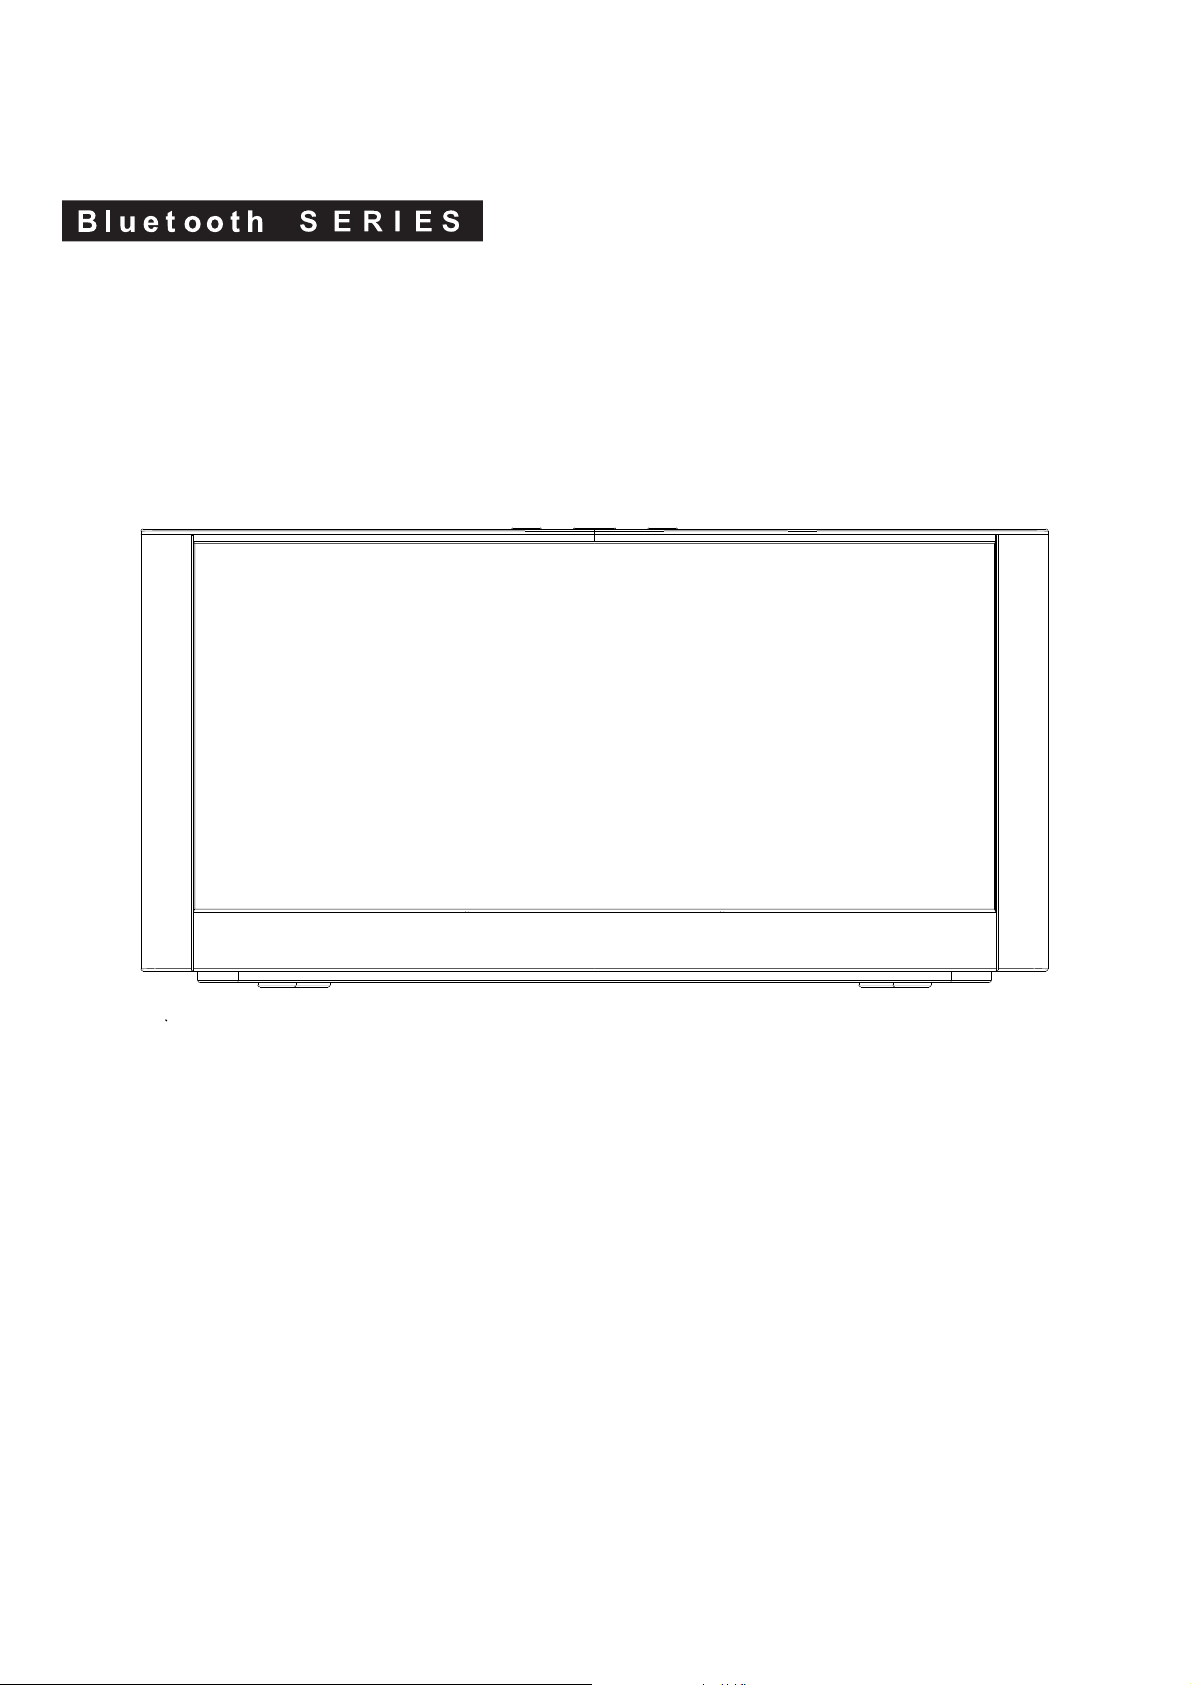
Controls
Power / Pairing / Function
Volume -
TOP PANEL
Volume +
FRONT PANEL
AUX(Green) / Bluetooth(Blue)
indicator
AUX jack
AC socket
REAR
Remote sensor
PANEL
English
REMOTE CONTROL
Power
Bluetooth
Previouse
Bass up
Bass down Volume down
Mute
AUX
Play / Pause
Next
Volume up
Remote control batteries
1. Open the batter door with the with the side the arrowhead
pointed.
2. Fit the battery observing polarity as shown with the same
CR2025 type specified.
3

Quick Start
Powering your player ON
To power the player ON:
Plug AC cord into AC jack, and plug into a live AC wall outlet.
1
P
ress the button on the top panel or the Power button on the remote control to switch the player to
2
ON mode.
Power/Pairing/Function
P
3
control to switch the player to Standby mode.
Note: To save power, the player will enter Standby mode from ON mode automatically if there is no audio input for 30 minutes.
!
button on the top panel for 2 to 5 seconds or press the Power/Pairing/Function
Power
button on the remoteress and hold the
Line in connection
Connect a sound sources with a Line or
1
headphone analogue output to play
through your player as below hookup
diagram shown.
Headphone socket
iPod/iPhone/iPad models
•
MP3 players
•
CD walkman players
•
•
Tape walkman players
•
Personal computers or laptops
Press the Power/Pairing/Function
2
button on the top panel or press the
AUX
button to select the AUX mode.
Green light indicates.
3.5mm jack cable (included)
To AUX jack
Set your personal audio player/
3
computer to PLAY.
English
4

Music Connectivity
Using Bluetooth: Paring Your Device
Before your start
Your Bluetooth device (cellphone, MP3 player, computer, ect.) must support the A2DP Bluetooth profile (Commonly known
as stereo audio profile) to work with the player. Many of the latest mobile phones and PCs with built-in Bluetooth functionality
will support this profile. For accurate information about your product, please refer to your bluetooth device’s user manual
for details on the bluetooth profiles it supports and on how to set the device’s Bluetooth pairing/searching/setup mode.
Pairing your Bluetooth device with the player
Press and hold the Power/Pairing/Function button for 5 seconds at ON mode until blue light flashes to begin pairing operation.
1.
Activate Bluetooth on your device according to the device’s use
2.
found on the device’s tools or settings menu. Turn on Bluetooth connectivity and make your device “discoverable”.
Search the device name “DKS999” on your bluetooth device listed and select it as your audio speaker.
3.
Once paired with a device, the Blue light will stop flashing and glow steadily.
4.
Pairing remains intact when the player or the Bluetooth device is powered off or is taken out of link range. The player will auto
5.
link with the last linked device when that device is in range.
Note: Connecting to a bluetooth device may take up to 5 minutes. If the pairing is unsuccessory repair your bluetooth device with
the player and repeat the above steps.
Pairing your other Bluetooth device
r manual to link to the player. Typically, Bluetooth controls are
To restart the current connection from player for s
button for 5 seconds and repeat the above steps for pairing your other Bluetooth.
P
laying Bluetooth Music
Once your device and the player are linked you can start to play Bluetooth music through the player.
1.
Turn on the player and press the Power/Pairing/Function
2.
control to select the Bluetooth mode. Blue light indicates for Bluetooth mode.
Press the button on the remote control to play your Bluetooth-enable device. (Depending on the Bluetooth device you
3.
are using, you may need to manually go into media player mode on your device to make it work properly)
4
.
Press the button on the remote control to skip the next track.
5
.
Press the button on the remote control to skip back to the beginning of the track currently play. Press the button again
immediately to skip the previous track.
Press the button on the remote control again to pause play; Press again to resume it.
6.
Press the Volume +/- button on the top panel or remote control to adjust the system volume.
7.
Please remember to turn off Bluetooth device manually.
elect the other bluetooth device, press and hold the Power/Pairing/Function
button on the top panel or press the Bluetooth button on the remote
English
5

Trouble Shooting
There is no power to the player
Ensure that the Power Switch of wall socket is physcially set to the ON position.
Ensure that the AC plug is securely connected to the player and proper wall outlet.
Trouble pairing device/computer with the player
Make sure you have the latest firmware for your iPhone/iPad/iPod.
Make sure your device is working properly. Check your device’s manual for details on Bluetooth pairing and linking.
Make sure your device supports the A2DP and AVRCP Bluetooth profiles before linking/pairing. The player
defaults to the last linked device, so a new device may need to be linked by press and hold the Power/Paring/Function
button for pairing other device.
Specification
Power supply : AC 100-240V, 50/60Hz
Output power 180W RMS:
Power consumption 140W:
AUX in jack : 3.5mm (included)
English
6
 Loading...