

Page 1
®
Manual Tire
Changing Systems
OWNERS MANUAL
MODEL #T600 (3860 0) CENTER POST TIRE CHANGING SYSTEM-
BENCH MOUNT/ RIM CLAMP A DAPTER
For use on tires size 4” to 12 ”
MODEL #T601 (3860 1) CENTER POST TIRE CHANGING SYSTEM-
FLOOR MODEL
For use on tires size 4” to 15 ”
CAUTION: Read Rules for Safe Operation and Instructions Carefully.
Sold exclusively by Ken-Tool, Akron, OH 44305, U.S.A.
Form No. 1297TCSM R1 5/98
Copyright 5/98 Ken-Tool
Page 2

Manual Tire Changing Systems
Bench Mount Model #T600 (38600)
Floor Model #T601 (38601)
Table of Contents
Safety Precautions Page 3
Parts List Page 4
Parts Illustration Page 4
Assembly Instructions Page 5
Instructions for Operation:
Section 1a) Breaking the Bead Using the Bench Mount Model Page 6
Section 1b) Breaking the Bead Using the Floor Mount Model Page 6
Section 2) Demounting the Tire from the Rim Page 7
Section 3) Mounting the Tire to the Rim Page 11
Maintenance and Care Page 15
Warranty Information Page 15
Replacement Parts and Accessories Page 16
2
Page 3

IMPORTANT SAFETY PRECAUTIONS FOR CHANGING SMALL AND
MEDIUM SIZE TIRES
READ ENTIRE SAFETY PRECAUTIONS AND INSTRUCTION MANUAL BEFORE YOU
CHANGE TIRES WITH THIS UNIT.
WARNING: If you don’t know how to use tire-changing tools – STOP!
Tire changing should only be done by trained persons. Improper tire changing can
result in injury or death.
Here are some safety rules to follow for using this tire machine, tire tools and
equipment:
1. Always wear approved safety eye protection when servicing tires and wheels and
whenever using hand tools.
2. Follow all tire and rim manufacturers' instructions when changing and inflating tires.
Ensure that tire and rim sizes match. Mismatched components can cause serious
injury during inflation.
3. While inflating tire, use clip-on chuck with sufficient length of hose, and hand-held
pressure valve to inflate tires. Do not use flammable materials when mounting or
demounting tires. Keep clear of trajectory zone.
4. Never use a tire tool for anything except mounting or demounting tires.
5. Use the right tool. Don’t force a small tool or attachment to do the work of a larger
industrial tool. Don’t use a tool for a purpose for which it was not intended.
6. Check for damaged or broken parts. Check for other conditions that may affect its
operation. Do not use damaged parts. Any part that is damaged should be replaced.
If replacement parts are needed, use only identical replacement parts. Only use
accessories intended for use with this tool. Approved replacement parts and
accessories are available from Ken-Tool. Check mounting bolts for proper tightness
prior to each use.
7. Completely deflate tire before attempting to break the bead or demount the tire from
rim. This requires removing the valve core and probing the valve with a wire to
remove any obstructions which may prevent air from escaping.
8. Keep work area clean. Cluttered areas invite injuries.
9. Don’t overreach. Keep proper footing and balance at all times.
10. Always return bead breaker to highest position with arm retracted when not in use, to
prevent possible injury.
Page 4
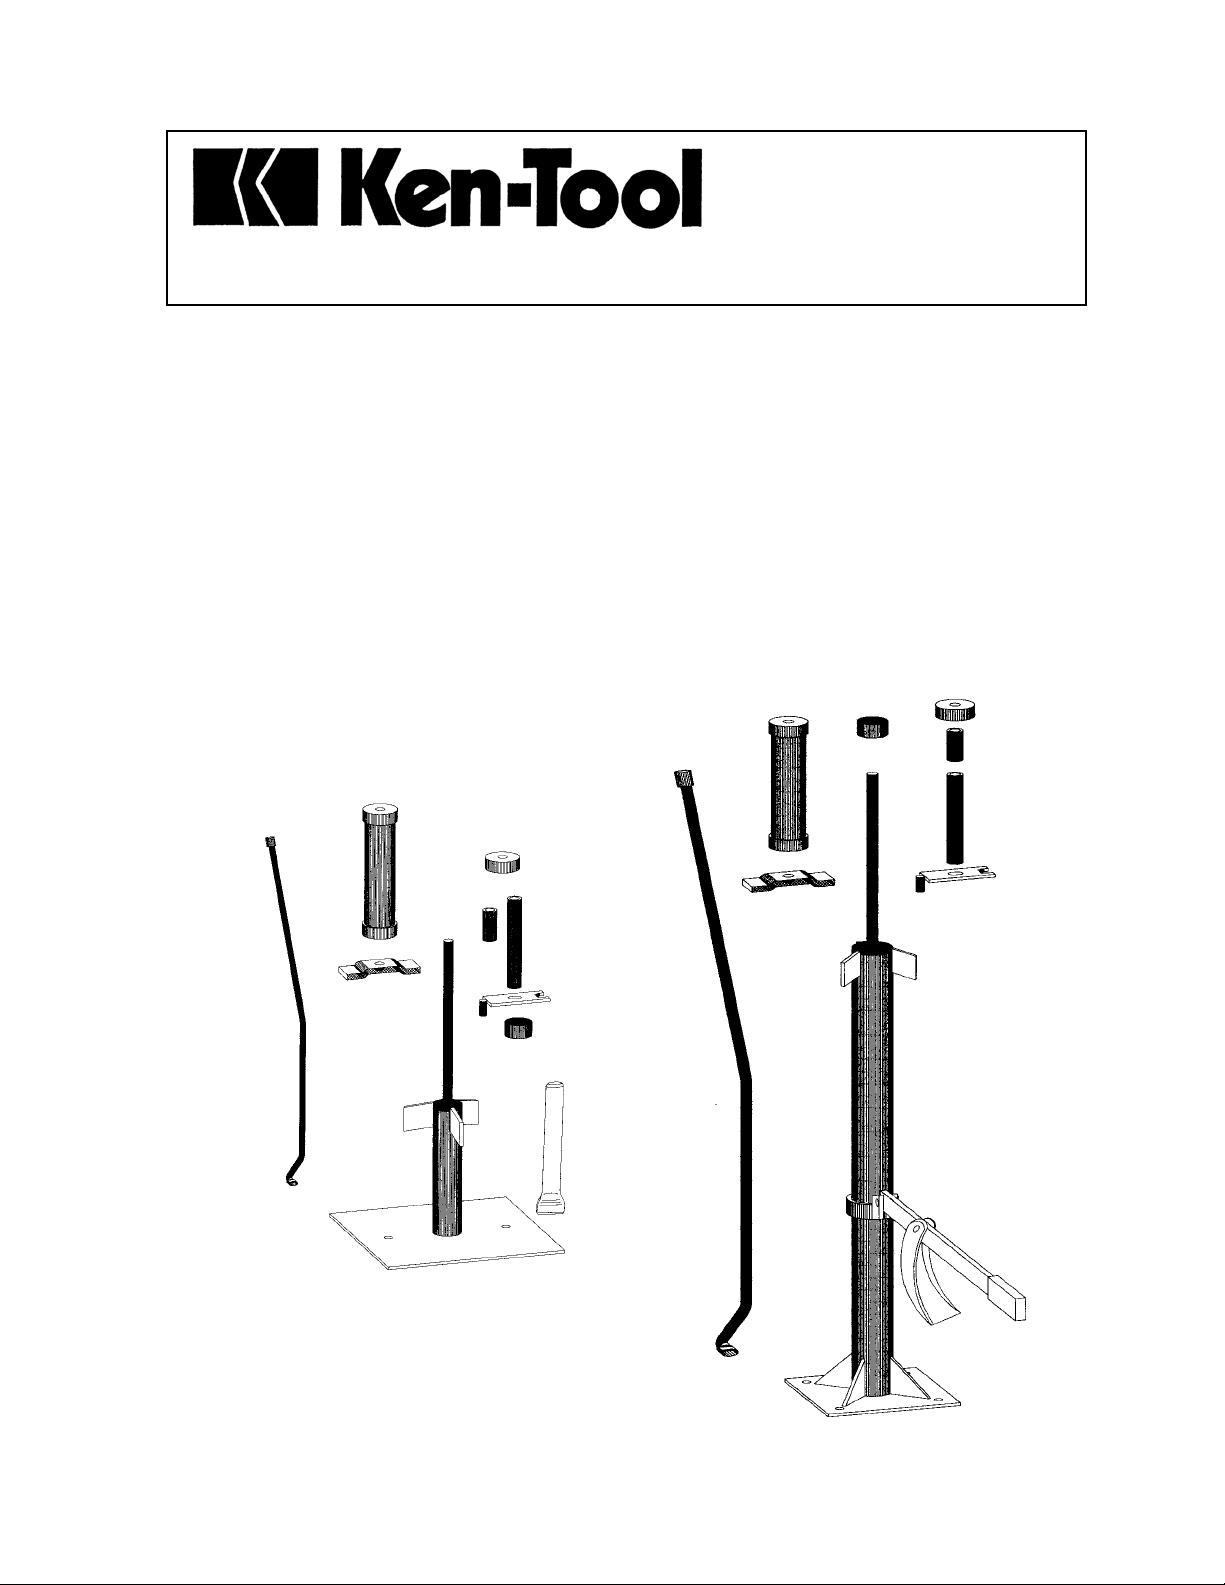
Parts List/Illustration
Bench Mount Model #38600
1) One (1) Main Body
2) One (1) Hand Held Bead Breaker
3) One (1) Bearing Guide
4) One (1) Lug-Type Wheel Hold-Down Plate
5) One (1) 6" Sleeve
6) One (1) 3" Sleeve
7) One (1) Round Nut
8) One (1) Tire Snake #34672
9) One (1) ATV Hold-Down Plate and Pin
10) One (1) Shaft Support Barrel
11) One (1) Instruction Manual
Floor Model #38601
1) One (1) Main Body
2) One (1) Parts Bag Which Includes:
Instruction Manual
Three (3) 3/8” X 1 1/2” Clevis Pins (9E)
Two (2) 3/8” Washers (9F)
Two (2) Cotter Pins (9G)
3) One (1) Shaft Support Barrel
4) One (1) Bearing Guide
5) One (1) Lug-Type Wheel Hold-Down Plate
6) One (1) 6" Sleeve
7) One (1) 3" Sleeve
8) One (1) Round Nut
9) One (1) Bead Breaker Assembly
Foot (9A)
Handle (9B)
Handle Grip (9C)
Ring (9D)
10) One (1) ATV Hold-down Plate and Pin
11) One (1) Tire Snake™ #34674
4
Page 5
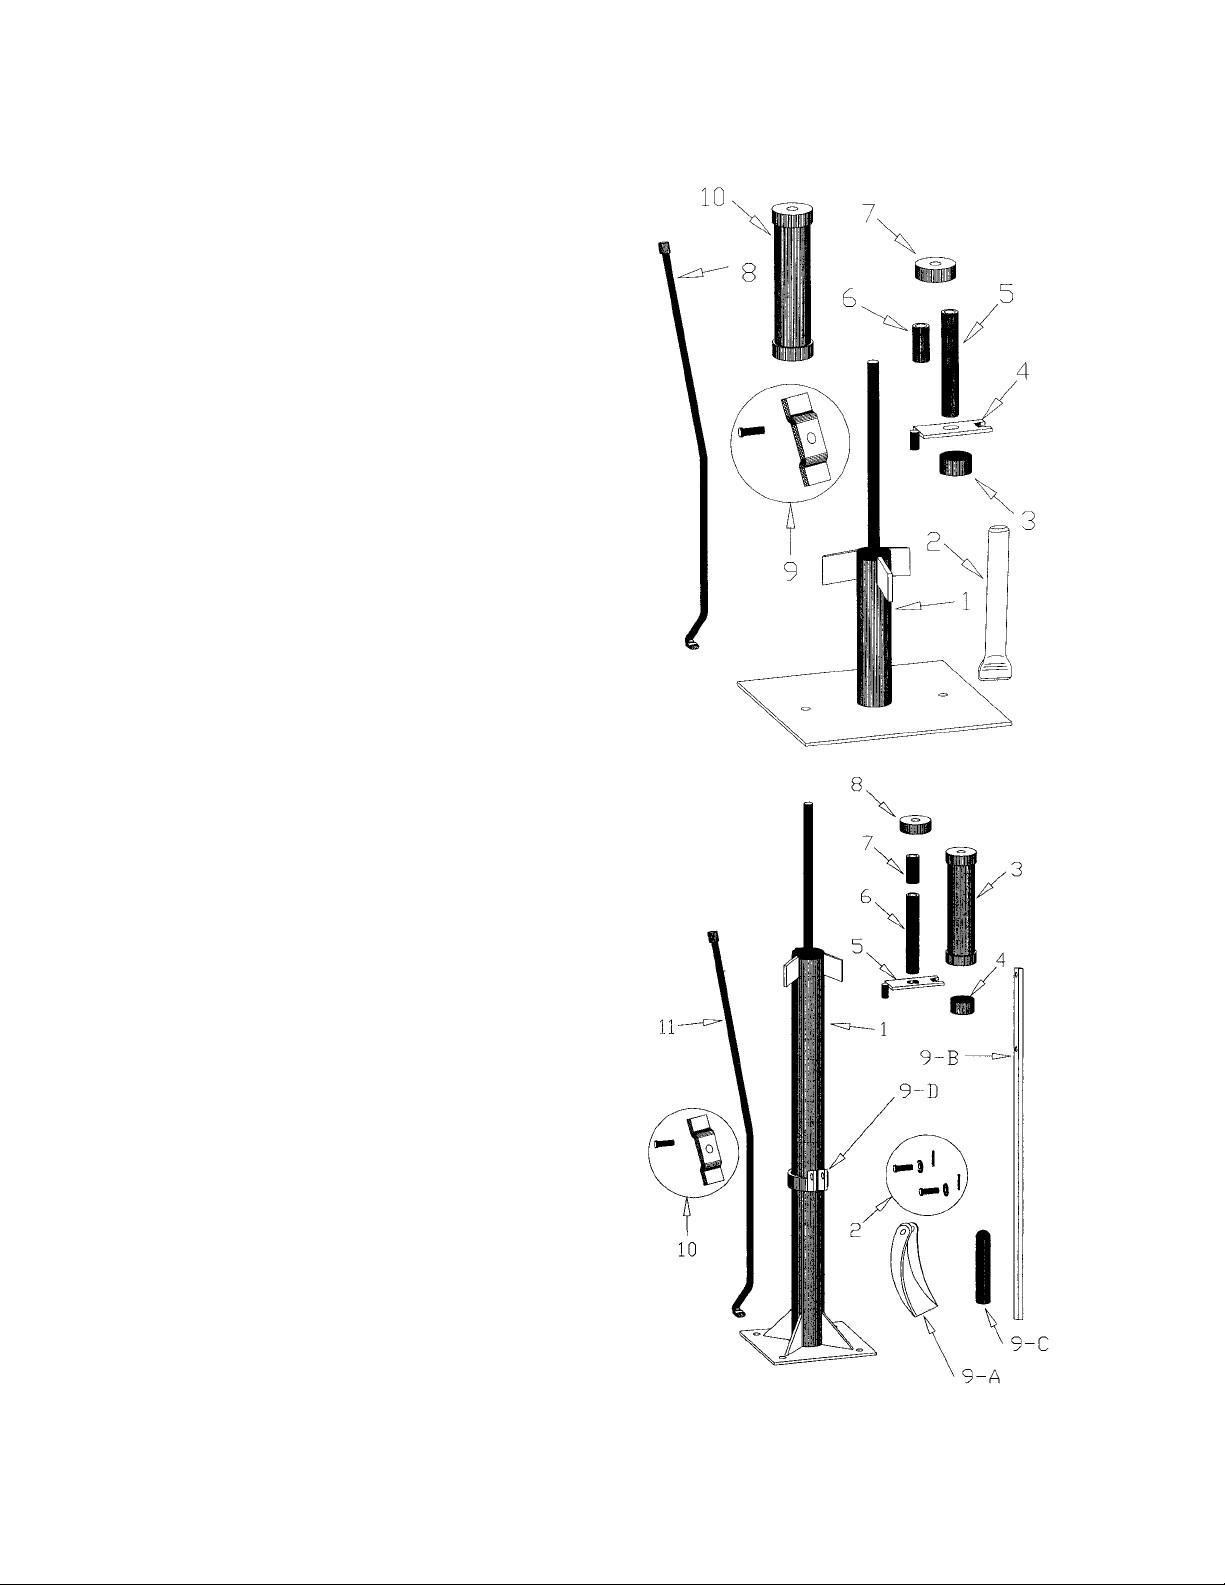
ASSEMBLY INSTRUCTIONS
Center Post Tire Changing System Bench Mount Model
#38600
1. Remove and locate all parts from the box using the parts list. If
you are missing a component, please contact Ken-Tool customer
service at 330/535-7177.
2. Secure unit to a suitable work surface. Utilize holes in base to
bolt down using bolts no smaller than 1/2”, or clamp in a rim-clamp
tire machine. Do not use wood screws.
3. Extend the threaded mounting shaft to full height by turning
counter- clockwise until it stops. Lubricate with any general
purpose oil.
Center Post Tire Changing System Floor Mount Model #38601
1. Remove and locate all parts from the box using the parts list. If you are missing a
component, please contact Ken-Tool customer service at 330/535-7177.
2. For concrete or tile floors: Locate the best work area and permanently mount your
machine to the floor using concrete inserts and bolts no smaller than ½”. (Concrete
inserts and bolts are not included and can be purchased locally.) Optional mounting
procedure for portability: (or for use on wooden, dirt or other soft floors) It is
recommended you mount your machine to any suitable steel or wooden surface having a
minimum surface area of 4 ft. X 4 ft.
3. Position bead breaker handle in bead breaker ring and insert clevis pin. Place 3/8”
washer over clevis pin and insert cotter pin.
4. Position bead breaker shoe on handle and insert clevis pin, washer, and cotter pin (see
drawing on Instruction Manual cover).
5. Place rubber grip for bead breaker onto handle end.
6. Extend threaded mounting shaft to full height by turning counter-clockwise until it stops.
Lubricate with any general purpose oil.
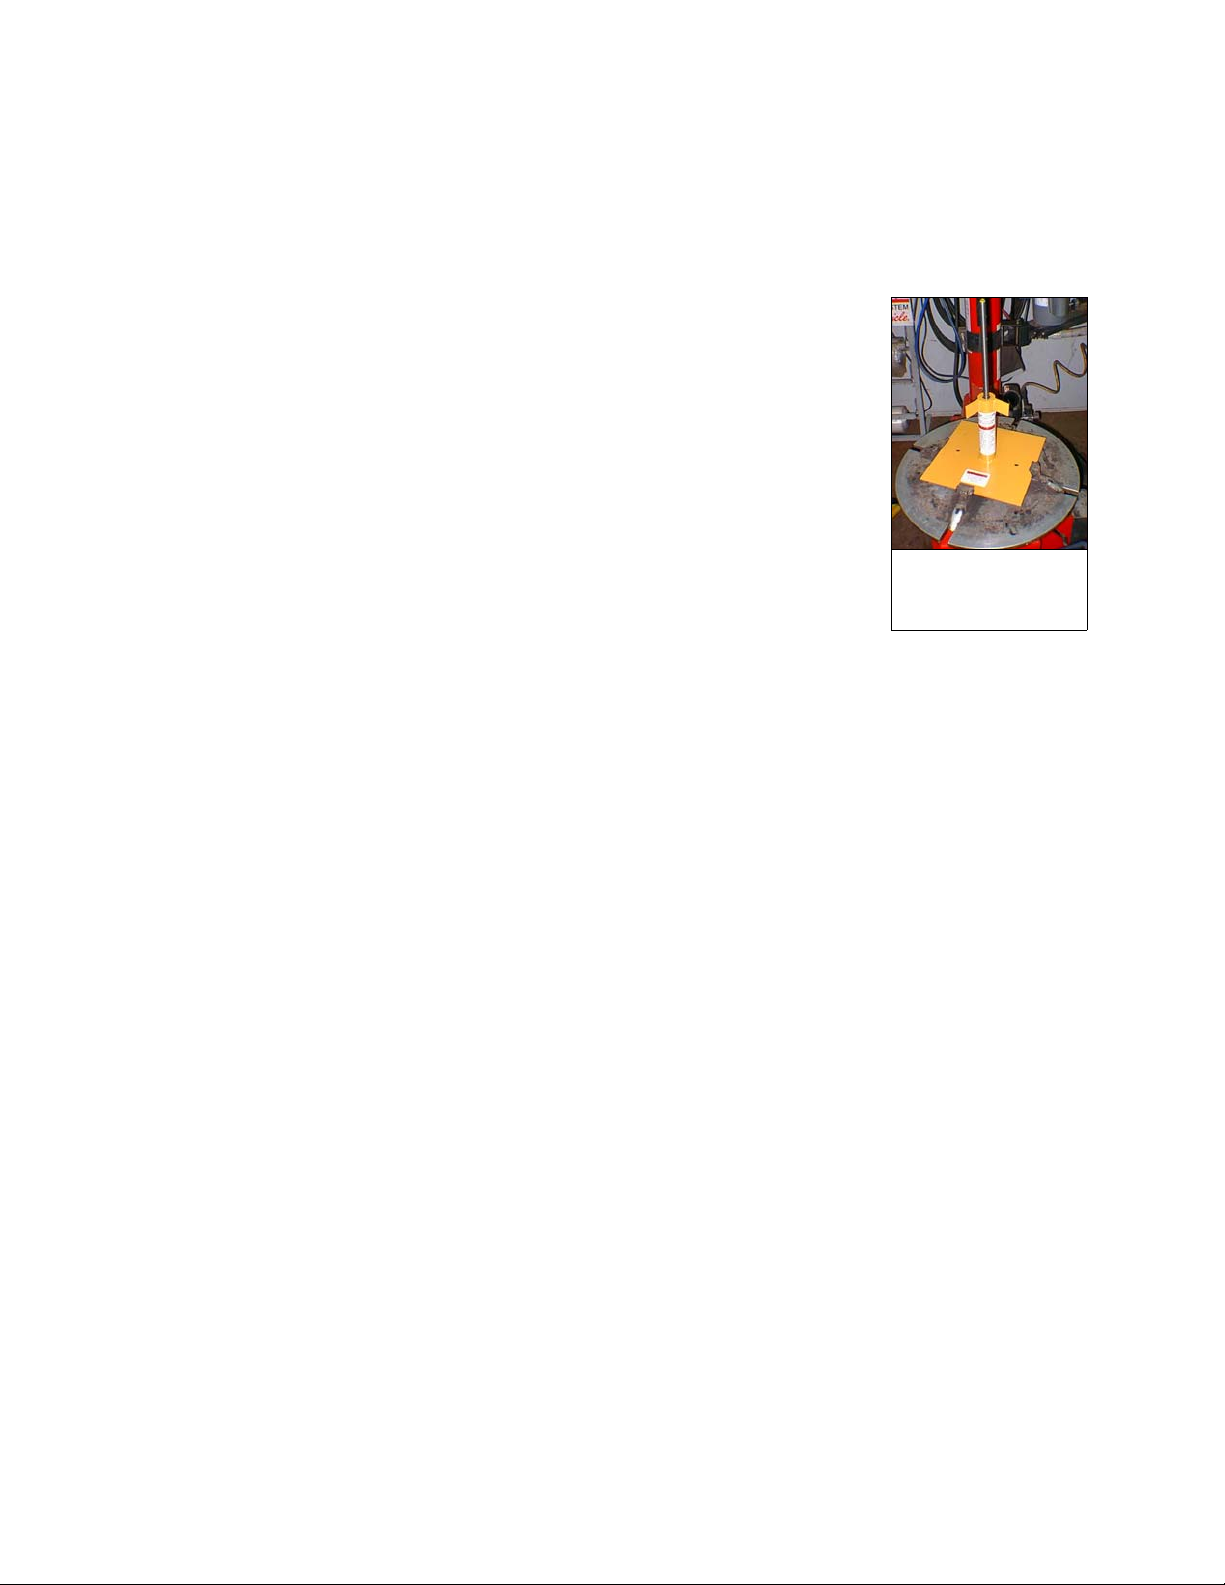
#38600 shown
secured to rim clamp
machine.
Page 6

Instructions for Use
Section 1) To break the bead from the rim on all wheel and
tire sizes
Before you start: Read all safety precautions.
Use tire lubricant whenever mounting or demounting tires.
Totally deflate the tire before attempting to break the bead.
Remove the valve core and probe for any obstacles which may
prevent air from escaping.
Section 1a) Breaking the Bead using the Bench Mount Model #T600
1. To break the bead from the rim, lay the tire flat on the floor or other suitable work
surface. (Do not break bead while tire is mounted to machine.) Position hand held
bead breaker so foot of tool rests between rim and tire. Hit end of bead breaker with
soft-faced hammer to force the bead from the rim. Do not strike metal to metal.
Rotate the tire and repeat the procedure in several locations on the tire if the bead
and wheel do not separate.
2. Turn tire over and repeat to break bead from other side of rim. The tire must be free
of the wheel in order to remove the tire.
Section 1b) Breaking the Bead using the Floor Mount Model #T601
1. To break the bead from the rim, lay the tire flat on the floor near the machine.
2. While holding the bead breaker handle in a raised position, adjust the height of the
sliding bead breaker ring so that the shoe rests on the tire against the edge of the
rim. Tire may have to be moved closer to or further from the machine for proper
placement of the bead breaking shoe. The height of the bead breaker is instantly
adjustable without disassembling and reassembling machine components.
3. Push down on handle, forcing the tire bead away from the rim. Rotate the tire and
repeat the procedure in several locations on the tire if the bead and wheel do not
separate.
4. Turn tire over and repeat to break bead from other side of rim. The tire must be free
of the wheel in order to remove the tire.
6
Page 7

Section 2) Demounting the Tire from the Rim using either
the Bench Mount Model #T600 or the Floor
Mount Model #T601 (unless noted).
A. 5/8” and larger straight axle wheels:
1. After the bead of the tire has been broken away from the wheel (see
section 1), place the tire/rim assembly over the threaded mounting
shaft with the valve stem facing up.
2. Install the bearing guide with angle side down (see diagram) to
center wheel on threaded center post.
3. Place one or both spacer sleeves over post and secure with round nut. Hand tighten
only. Caution: do not use machine without spacer sleeves. This will damage the
threaded mounting shaft and make it unusable.
4. Once the tire is securely held in place, apply adequate amount of Bead-Eze® (or
similar tire lubricant) to both sides of the tire bead and wheel. Do not use flammable
materials when servicing tires and wheels.
5. Next, place the demount (straight) end of the Tire Snake™ in between the tire and
the rim at a point closest to you, with the flat side of the demount end against the
rim and the rounded side against the tire bead (photo A). Push the bar forward,
lifting the bead over the rim until you hear the “click” of the Tire Snake as it positions
correctly against the rim. The Tire Snake should be positioned so you can use the
center post for support when pulling the bar (photo B).
6. Pull the bar toward you around the center post in a clockwise circular motion to
demount the bead (photo C).
7. After the first bead has been demounted, pull the tire up toward the top bead, place
the flat end of the demounting tool between the second bead of the tire and the rim
as before and repeat the removal process.
Photo A: Demount
Photo B: Demount
Photo C: Demount
Bearing Guide,
Tapered Side Down
Page 8

B. 5/8” and 3/4” bearing wheel types:
1. After the bead of the tire has been broken away from the wheel (see
section 1), place the tire/rim assembly over the threaded mounting
shaft with the valve stem facing up.
2. Install the bearing guide with recess side down to prevent bearing
damage (see diagram).
3. Place one or both spacer sleeves over post and secure with round nut. Hand tighten
only. Caution: Do not use machine without spacer sleeves. This will damage the
threaded mounting shaft and make it unusable.
4. Once the tire is securely held in place, apply adequate amount of Bead-Eze® (or
similar tire lubricant) to the tire bead. Do not use flammable materials when
servicing tires and wheels.
5. Next, place the demount (straight) end of the Tire Snake™ in between the tire and
the rim at a point closest to you, with the flat side of the demount end against the
rim and the rounded side against the tire bead (photo A). Push the bar forward,
lifting the bead over the rim until you hear the “click” of the Tire Snake as it positions
correctly against the rim. The Tire Snake should be positioned so you can use the
center post for support when pulling the bar (photo B).
6. Pull the bar toward you around the center post in a clockwise circular motion to
demount the bead (photo C).
7. After the first bead has been demounted, pull the tire up toward the top bead, place
the flat end of the demounting tool between the second bead of the tire and the rim
as before and repeat the
Bearing Guide,
Recessed Side Down
Photo A: Demount
removal process.
Photo B: Demount
8
Photo C: Demount
Page 9

Hold-down Plate
C. Four-lug and Five-lug wheel types (12” and smaller):
1. After the bead of the tire has been broken away from the wheel (see section 1), place
the tire/rim assembly over the center post with the valve stem facing up.
Approximately center the rim on the three fins.
2. Install the hold-down plate with the pin facing down through any lug hole (see
diagram). Turn the wheel clockwise until the pin of the hold-down plate contacts the
nearest fin, centering the wheel. Place one or both spacer sleeves over post and
secure with round nut. Hand tighten only. Caution: Do not use machine without
spacer sleeves. This will damage the threaded mounting shaft and make it unusable.
3. Once the tire is securely held in place, apply adequate amount of Bead-Eze® (or
similar tire lubricant) to tire bead. Do not use flammable materials when servicing
tires and wheels.
4. Next, place the demount (straight) end of the Tire Snake™ in between the tire and
the rim at a point closest to you, with the flat side of the demount end against the
rim and the
Photo A: Demount
rounded side against the tire bead (photo A). Push the bar forward, lifting the bead
over the rim until you hear the “click” of the Tire Snake as it positions correctly
against the rim. The Tire Snake should be positioned so you can use the center post
for support when pulling the bar (photo B).
5. Pull the bar toward you around the center post in a clockwise, circular
motion to demount the bead (photo C).
6. After the first bead has been demounted, pull the tire up toward the top
bead, place the flat end of the demounting bar between the second bead
of the tire and the rim as before and repeat the removal process.
Photo B: Demount
Photo C: Demount
Page 10

D. Four-lug and Five-lug wheel types for Passenger Car and Light
Trucks:
1. After the bead of the tire has been broken away from the wheel (see
section 1), place the tire/rim assembly over the center post with the valve stem facing
up. Approximately center the rim on the three fins.
2. Install the hold-down plate with the pin facing down through any lug hole. Turn the
wheel clockwise until the pin of the hold-down plate contacts the nearest fin,
centering the wheel. Place the shaft support barrel over the threaded rod and secure
with round nut. Hand tighten only. (see diagram).
3.
Photo A: Demount
Once the tire is securely held in place, apply adequate amount of Bead-Eze®
(or similar tire lubricant) to tire bead. Do not use flammable materials when servicing
tires and wheels.
4. Next, place the demount (straight) end of the Tire Snake™ in between the
tire and the rim at a point closest to you, with the flat side of the demount
end against the rim and the rounded side against the tire bead (photo A).
The optional large Tire Snake is recommended (available separately).
Push the bar forward, lifting the bead over the rim until you hear the
“click” of the Tire Snake as it positions correctly against the rim. The Tire
Snake should be positioned so you can use the center post for support
when pulling the bar (photo B).
5. Pull the bar toward you around the center post in a clockwise, circular motion to
demount the bead (photo C).
6. After the first bead has been demounted, pull the tire up toward the top bead, place
the flat end of the demounting bar between the second bead of the tire and the rim
as before and repeat the removal process.
Photo B: Demount
Photo C: Demount
10
Page 11

E.
Photo A: Demount
Photo B: Demount
Photo C: Demount
ATV Deep Dish Rims
1. After the bead of the tire has been broken away from the wheel (see section 1), place
the tire/rim assembly over the center post with the valve stem
facing up.
2. Place the 3/8” pin through any lug hole of the ATV wheel and turn
the
wheel clockwise until the pin contacts the nearest fin, centering the
wheel on the machine. Install the ATV mounting plate. Place the shaft support
barrel over the threaded rod and mounting plate and secure with round nut. Hand
tighten only.
3. Once the tire is securely held in place, apply adequate amount of Bead-Eze® (or
similar tire lubricant) to tire bead. Do not use flammable materials when servicing
tires and wheels.
4. Next, place the demount (straight) end of the Tire Snake™ in between the tire and
the rim at a point closest to you, with the flat side of the demount end against the
rim and the rounded side against the tire bead (photo A, page 11). The optional
large tire snake is recommended (available separately). Push the bar forward, lifting
the bead over the rim until you hear the “click” of the Tire Snake™ as it positions
correctly against the rim. The Tire Snake should be positioned so you can use the
center post for support when pulling the bar (photo B).
5. Pull the bar toward you around the center post in a clockwise, circular motion to
demount the bead (photo C).
Bearing Guide,
Tapered Side Down
Page 12

6. After the first bead has been demounted, pull the tire up toward the top bead, place the
flat end of the demounting bar between the second bead of the tire and the rim as
before and repeat the removal process.
Bearing Guide,
Recessed Side Down
Section 3) Mounting the Tire to the Rim
A. 5/8” and larger straight axle wheels:
1. Place the rim over the center post with the valve stem facing up.
2. Install the bearing guide with angle side down (see diagram) to
center wheel on threaded center post. Place one or both spacer sleeves over post and
secure with round nut. Hand tighten only. Caution: do not use machine without
spacer sleeves. This will damage the threaded mounting shaft and make it unusable.
3.
Photo A: Mount Photo B: Mount
Once the rim is securely held, apply adequate amount of Bead-Eze® (or similar
tire lubricant) to tire bead. Do not use flammable materials when servicing tires and
wheels. Place tire on rim.
4. Cock the tire on the rim and hook the mount (curved) end of the Tire Snake™ (see
photo A, p. 12) over the exposed edge of the rim on side nearest
you. Place your left hand flat against the sidewall of the tire to hold
in place. Use caution when mounting to keep fingers from being
pinched between rim and bead as tire is mounted to rim. Grasp the
Tire Snake at its farthest end, keeping it parallel with the rim. Pull
the bar in a clockwise direction around the center post until first bead is mounted (see
photo B, p. 12).
12
Photo C: Mount
Hold-down Plate
Page 13

5. To mount the second bead, follow the same procedures. Place your left hand flat
agasinst the sidewall of the tire, pushing down to keep bead below the drop-center
(smallest diameter of the rim). See photo C, p. 12.
B. 5/8” and 3/4” bearing wheel types:
1. Place the rim over the center post with the valve stem facing up.
2. Install the bearing guide with recess side down to prevent bearing damage (see
diagram ). This centers the wheel on the threaded center post. Place one or both
spacer sleeves over post and secure with round nut. Hand tighten only. Caution: Do
not use machine without spacer sleeves. This will damage the threaded mounting
shaft and make it unusable.
3. Once the rim is securely held in place, apply adequate amount of Bead-Eze® (or
similar tire lubricant) to the tire bead. Do not use flammable materials when
Photo A: Mount Photo B: Mount
servicing tires and wheels. Place tire on rim.
4. Cock the tire on the rim and hook the mount (curved) end of the Tire
Snake™ over the exposed edge of the rim on side nearest you. Place your
left hand flat against the sidewall of the tire to hold in place. Use caution
when mounting to keep fingers from being pinched between rim and bead
as tire is mounted to rim. Grasp the Tire Snake™ at its farthest end, keeping
it parallel with the rim. Pull the bar in a clockwise direction around the
center post until first bead is mounted. See photos below.
5. To mount the second bead, follow the same procedures. Place your left
hand flat against the sidewall of the tire, pushing down to keep bead below the dropcenter (smallest diameter of the rim). See photo C.
Photo C: Mount
Page 14

C. Four-lug and Five-lug wheel types (12” and smaller):
1. Place the rim over the center post with the valve stem facing up.
2. Install the hold-down plate with the pin facing down through any lug hole
(see diagram). Turn the wheel clockwise until the pin of the hold-down
plate contacts the nearest fin, centering the wheel. Place one or both
spacer sleeves over post and secure with round nut. Hand tighten only.
Caution: do not use machine without spacer sleeves. This will damage
the threaded mounting shaft and make it unusable.
3. Once the rim is securely held in place, apply adequate amount of Bead-Eze® (or
similar tire lubricant) to tire bead. Do not use flammable materials when servicing
tires and wheels. Place tire on rim.
4. Cock the tire on the rim and hook the mount (curved) end of
the Tire Snake™ over the exposed edge of the rim on side
nearest you. Place your left hand flat against the sidewall of
the tire to hold in place. Use caution when mounting to keep
fingers from being pinched between rim and bead as tire is
mounted to rim. See photo A. Grasp the Tire Snake™ at its
farthest end, keeping it parallel with the rim. Pull the bar in a
clockwise direction around the center post until first bead is
mounted. See photos below.
5. To mount the second bead, follow the same procedures. Place your left hand flat
against the sidewall of the tire, pushing down to keep bead below the drop-center
(smallest diameter of the rim). See photo C.
D.
Photo B: Mount
Photo C: Mount Photo A: Mount
Four-lug and Five-lug wheel types for Passenger Car and Light
Trucks:
1. Place the rim over the center post with the valve stem facing up.
14
Page 15

2. Install the hold-down plate with the pin facing down through any lug hole (see
diagram). Turn the wheel clockwise until the pin of the hold-down plate contacts the
nearest fin, centering the wheel. Place the shaft support barrel over the threaded rod
and secure with round nut. Hand tighten only.
3. Once the rim is securely held in place, apply adequate amount of Bead-Eze® (or
similar tire lubricant) to the tire bead. Do not use flammable materials when
servicing tires and wheels. Place tire on the rim.
4. Cock the tire on the rim and hook the mount (curved) end of the Tire Snake™ (see
photo) over the exposed edge of the rim on side nearest you. The optional large Tire
Snake™ is recommended (available separately). Place your left hand flat against the
sidewall of the tire to hold in place. Use caution when mounting to keep fingers from
being pinched between rim and bead as tire is mounted to rim. Grasp the Tire
Snake™ at its farthest end, keeping it parallel with the rim. Pull the bar in a
clockwise direction around the center post until first bead is mounted. See photo C.
5. To mount the second bead, follow the same procedures. Place your left hand flat
against the sidewall of the tire, pushing down to keep bead below the drop-center
(smallest diameter of the rim). See photo C.
E. ATV Deep Dish Rims
1. Place the rim over the center post with the valve stem facing up.
2. Place the 3/8” pin through any lug hole of the ATV wheel and turn the wheel
clockwise until the pin contacts the nearest fin, centering the wheel on the machine.
Install the ATV mounting plate (see diagram). Place the shaft support barrel over the
threaded rod and secure with round nut. Hand tighten only.
3. Once the rim is securely held, apply adequate amount of Bead-Eze® (or similar tire
lubricant) to tire bead. Do not use flammable materials when servicing tires and
wheels. Place tire on rim.
4. Using a side-to-side rocking motion, push the first bead over the rim. If bead can not
be pushed over the rim, cock the tire on the rim and hook the mount (curved) end of
the Tire Snake™ over the exposed edge of the rim on side nearest you. Place your
left hand flat against the sidewall of the tire to hold in place. Use caution when
mounting to keep fingers from being pinched between rim and bead as tire is
mounted to rim. Grasp the Tire Snake at its farthest end, keeping it parallel with the
rim. See photo A. Pull the bar in a clockwise direction around the center post until
first bead is mounted. Due to additional width, you may have to compress the
sidewall of the tire to allow the Tire Snake to remain in contact with the shaft support
barrel. See photos below.
5. To mount the second bead, follow the same procedures. Place your left hand flat
against the sidewall of the tire, pushing down to keep bead below the drop-center
(smallest diameter of the rim). See photo C.
Page 16

Maintenance and Care of
your Tire Changing
System
1. Routinely oil the threaded center post with
any general purpose oil.
2. As you use your tire changing system, the
threaded center post may turn and retract into
the main body. You will have to unscrew it to
return to its proper height.
3. Routinely check tightness of mounting bolts to ensure tire changing system is
securely fastened.
4. Worn parts should be replaced. See replacement parts list for ordering information.
Warranty Information
The Ken-Tool Tire Changing System (Model #T600 and T601) is warranted for one year from
date of purchase. If this Ken-Tool Tire Changing System fails to give complete satisfaction
within one year from date of purchase, return it to your place of purchase for full warranty.
Ken-Tool will replace the unit or any component free (Ken-Tool reserves the right to
determine if the entire unit should be warranted.) Exception: The threaded mounting
shaft is a normal wear item and is not covered by warranty.
16
 Loading...