

Page 1

Instruction Manual
yp
the bead i
and the tire is mounted
rim
©2009 Ken-Tool
Part No. 33195-98
33195 – Nineteen-Five™ Mount/Demount Tool Set
MOUNTING INSTRUCTIONS
1 2 3
Always use plenty of bead
lubrication on the tire and wheel.
Manually push lower bead over rim
and into position for mounting.
Using the bent end of the
Nineteen-Five tire iron, with stop
resting against the rim, pry the
bottom bead over the rim.
Repeat progressively around tire,
working with small sections, until
s completely over the
rim.
When mounting the top bead, place the bead holder (use #31710 for
steel rims; #33196 (shown) for aluminum rims) on the rim and slide
to one side, as a stop against the bead.
ALWAYS MOUNT WITH
WHEEL HUB SIDE UP!
See Video Demo at www.kentool.com
Follow Tire and Wheel
Manufacturer’s Instructions
Stand on the tire and use the
curved end of the tool to pry a
section of the top bead over the
.
Press the sidewall of the tire
down, as you work your way
around, to force the top bead into
the drop center of the wheel.
Curved End
768 E. North Street, Akron, Ohio 44305; Phone: 888-536-8665, Fax: 330-535-1345
Website: www.kentool.com E-Mail: sales@kentool.com
Repeat this step, taking small
sections of the bead, until the
last section is pried over the rim
.
(C)2007 Ken-Tool
654
The curved end of the tool easily
gets under the stretched bead for
“that last bite”.
Bent End
1
Page 2
Instruction Manual
between the rim and wheel until the
Sometimes it may be necessary
33195 – Nineteen-Five™ Mount/Demount Tool Set
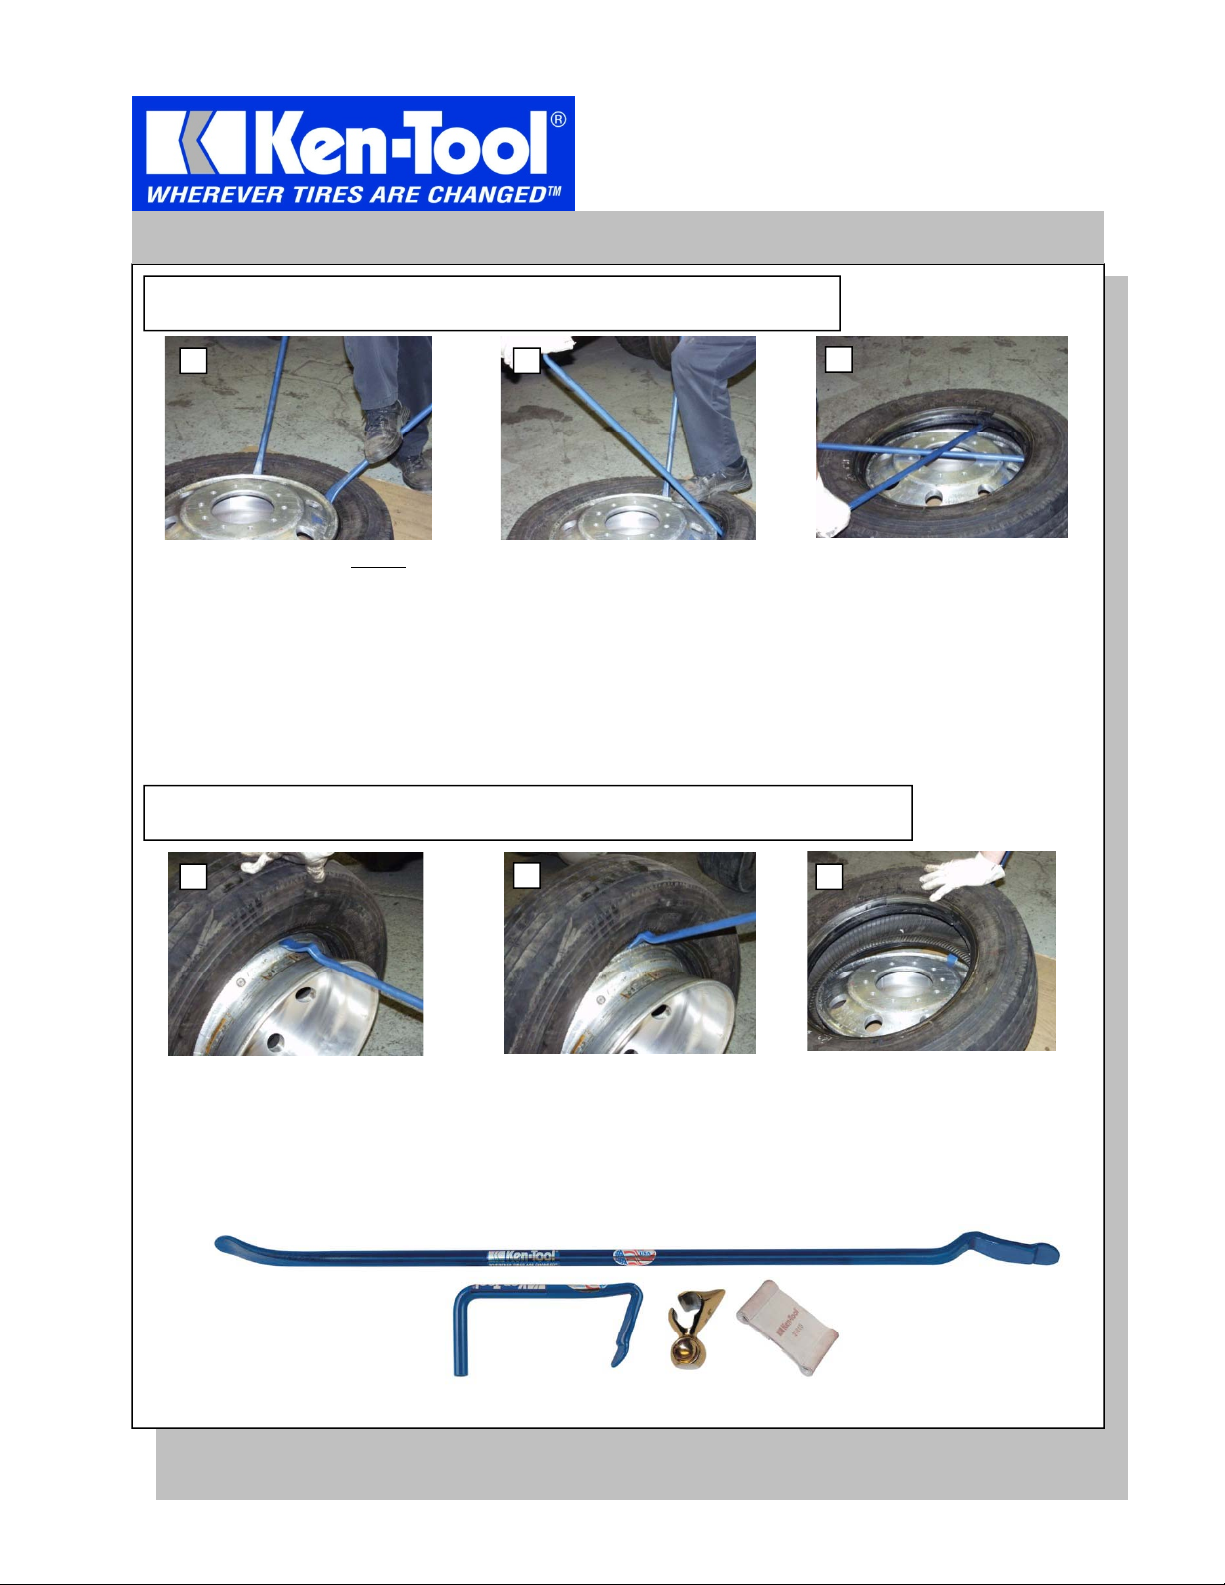
DEMOUNTING INSTRUCTIONS – First Bead
©2009 Ken-Tool
Part No. 33195-98
1 2
Break both beads and always use
plenty of bead lubrication on the tire
and wheel.
Using two Nineteen-Five bars,
insert the curved end of each bar
between the rim and wheel (about
12 inches apart) with the curve
down.
ALWAYS DEMOUNT WITH
Start by bringing one NineteenFive bar across the center of the
rim. Then cross with the second
bar as you move to the opposite
side of the tire/wheel assembly.
3
Once the two bars are crossed,
forming an “X” over the rim, press
down on the two bars. This will
cause the first bead to demount.
WHEEL HUB SIDE UP!
DEMOUNTING INSTRUCTIONS – Second Bead
4
5
6
Lift the assembly as shown to partially
release the wheel from the tire.
Insert the bent end of the tire iron
stop is resting against the rim.
Hold the curved end up as
you lean the assembly toward
you. Allow the wheel to lay flat
in front of you.
33199
33196
31710 31810
768 E. North Street, Akron, Ohio 44305; Phone: 888-536-8665, Fax: 330-535-1345
Website: www.kentool.com E-Mail: sales@kentool.com
While holding down on the tire,
lift the curved end of the bar to
demount the second bead.
to use the second bar, if the tire
is especially tight to pry the tire
off the wheel .
2
Page 3

Instruction Manual
WARNING
free wall charts about tire servicing by calling
If you don’t know how to use tire changing tools – STOP!
Tire changing should only be done by trained persons.
If you do it wrong, you could be hurt or killed.
Here are some Safety Rules.
For complete tire servicing procedures, read the tire
and rim makers’ service manuals. You can also get
OSHA.
©2007 Ken-Tool
Part No. Safety Warning
USING TIRE TOOLS
ALWAYS wear eye protection when using hammers and tire irons.
ALWAYS use soft-faced hammers when driving tire irons.
NEVER use one hammer to strike another hammer.
NEVER use a hammer with a loose or cracked hand le.
NEVER use a dented, cracked, chipped, or mushroomed tool.
NEVER use a tire tool for anything except mounting/demounting tires.
INFLATING TIRES
NEVER add air to a tire that has been run flat or unde r inflated.
NEVER hammer, strike, or pry on an inflated tire and rim.
ALWAYS use an inflation cage when inflating tires.
ALWAYS use a clip-on chuck.
ALWAYS use an extension hose with a removable valve and gauge.
NEVER inflate a tire over 40 psi if the tire beads are not seate d .
NEVER use starting fluid, ether, gasoline or other flammable liquids to lubricate or seat the beads of a
tubeless tire. A gigantic explosion can result.
768 E. North Street, Akron, Ohio 44305; Phone: 888-536-8665, Fax: 330-535-1345
Website: www.kentool.com E-Mail: sales@kentool.com
3
 Loading...