

Page 1
Instruction Handbook
for Installation, Operation
and Maintenance.
UV Purifier with Ultra Filtration Process
and Computer Controlled Operation
For customer complaints, contact customer care officer at:
A-2, Sector-59, Noida, UP-201 309, India
Call Toll-Free: 1800 100 1000 or Fixed line: +91-120-4669666
E-mail: service@kent.co.in
Manufactured by:
A-2, Sector-59, Noida, U.P.-201 309, India
Ph.: +91-120-3075075
E-mail: sales@kent.co.in Website: www.kent.co.in
KENT RO SYSTEMS LTD.
F:\LnK_Chandresh_2015_BOX & MANUALS\KENT\Manual\Export\Kent Maxx Date:09-3-15
Job: XXX
March, 2015
Do u bl e
UV + UF
Pu r if i ca t io n
GOLD MEMBER
Page 2
Dear Customer
Welcome to the world of , leaders of water purification industry in
India. With a KENT product you have all the reasons to smile, since at KENT
we take pride in the quality and laboratory-tested performance of our
products.
We are confident that your decision to own will go a long way in
serving you with purer and healthier drinking water – thus keeping you and
your family in good health. We assure you, that you will be satisfied with its
troub le-fre e perfo rmance and qual ity whi ch come s witho ut any
compromise.
This manual is an effort towards familiarizing you with the operation and
maintenance of Before operating the unit, please read it
thoroughly and retain it for future reference. To ensure that the warranty of
your water purifier is effective, fill up the enclosed warranty card and send
the installation report within 15 days of purchase. Should you need further
assistance, do not hesitate to contact your nearest dealer or branch.
Best Wishes
KENT
KENT MAXX
KENT MAXX.
KENT
KENT RO SYSTEMS LTD.
to KENT
1. Intro ducti on 1
2. Salie nt Featu res of KEN T M AXX 1
3. Items in t he Box 1
4. Impor tant Instruct ions 2
5. UV Proce ss 3
6. UF Proce ss 3
7. Water Flow Diagram 4
8. Elect rical Circuit Diagra m 4
9. Compu ter Controlle d Operat ion 5
10. UV Fail Alarm 5
11. Filte r C hange Alarm 5
12. Insta llati on Instr uction s 6
13. Start ing up the Purifie r 7
14. Maint enanc e 7
15. Clean ing the Wa ter Tank 8
16. Techn ical Specific ation s 8
Table of Contents
Page 3
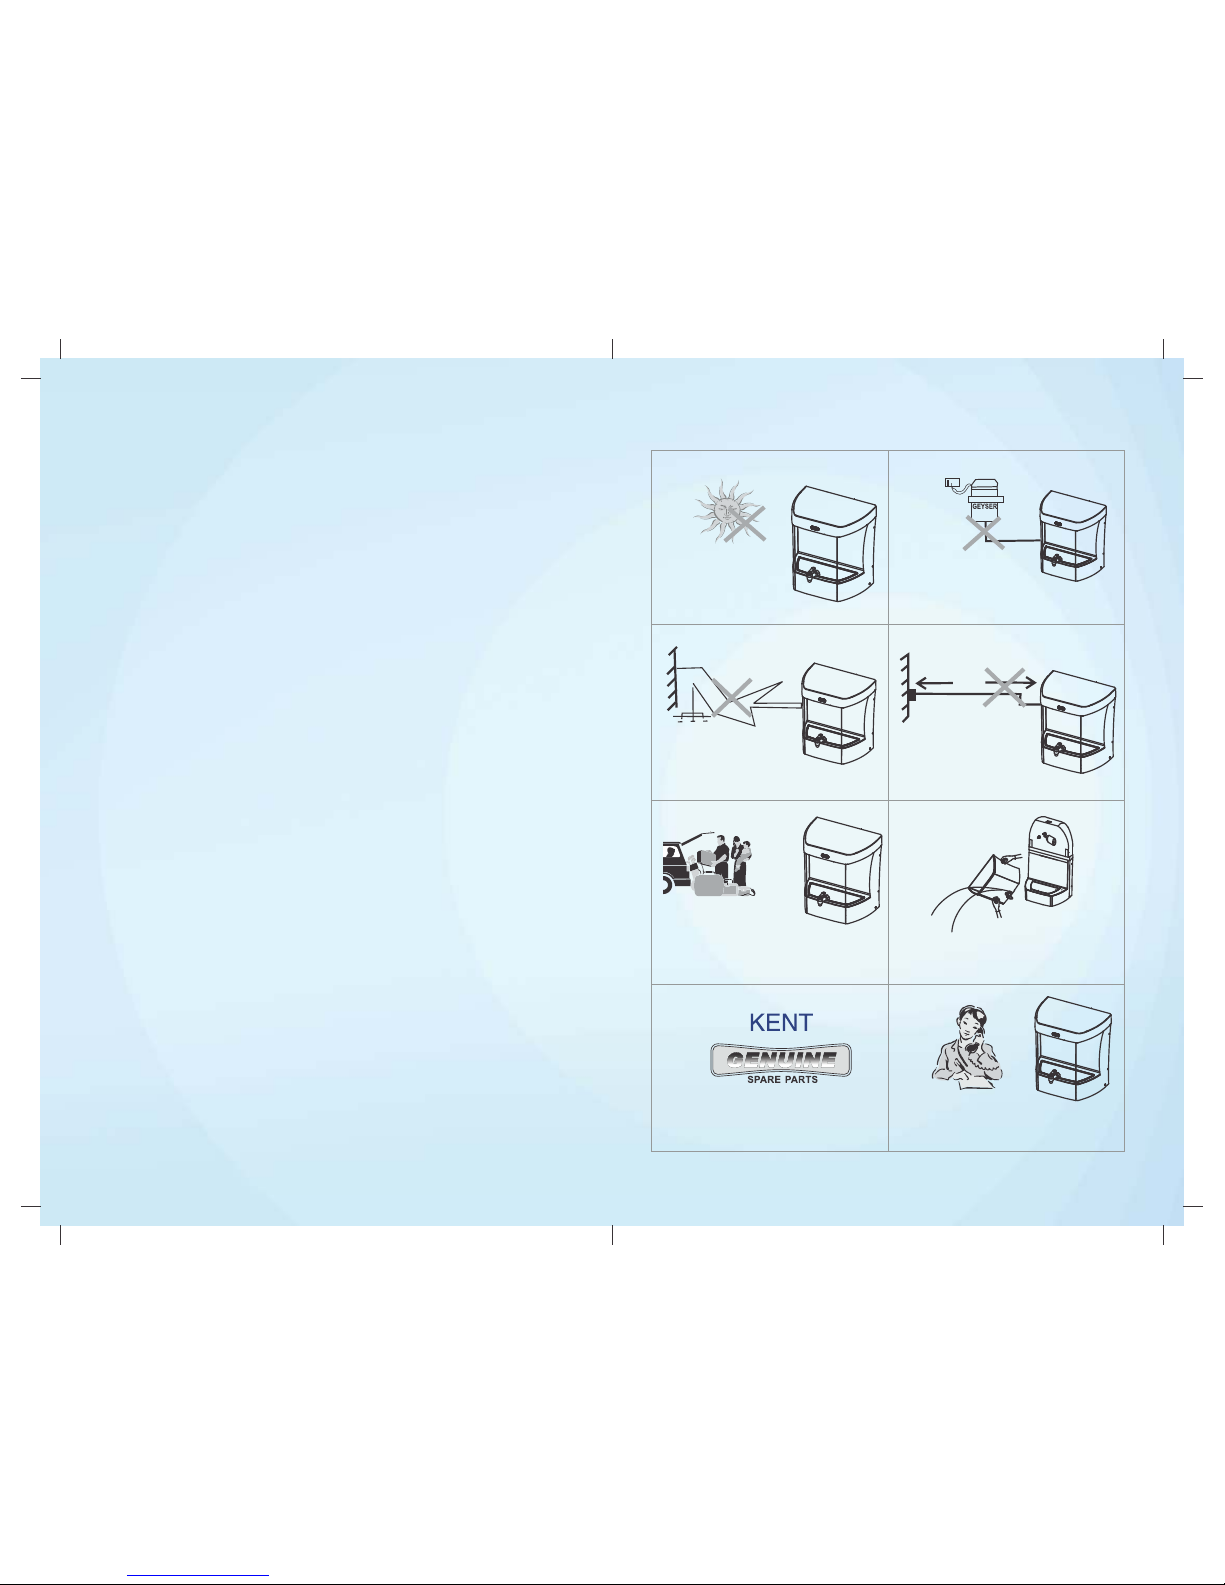
Avoid exposure to direct
sunlight and installation in damp
areas.
Make sure that the purifier is
connected to normal temperature
water supply only.
10 M
Water Source
Water in
Avoid sharp bends in pipes. Maximum distance between the
water source and the purifier should
not be more than 3 meters.
2
Do not try to service the purifier on your own. Instead,
call the service technician for help.
To keep the storage tank clean, it should be
removed, drained and wiped dry, once in 15 days.
In case the purifier is not to be used for
more than two days, switch off the power
supply and drain the storage tank.
1
KENT proud ly presents KENT MAX X - the new advanc ed fully automa tic UV purifier with
storag e tank.
The inn ovativ e KENT M AXX, dev eloped at KEN T labor atory, p rovide s the do uble
purifi cation of UV+UF. While the initial purific ation by UV deacti vates bacteri a and
viruse s, t he d ouble purificatio n by fine po res of Ho llow Fibre UF memb rane reduce s
them from t he purifie d w ater. The Ac tivated Carbon pre-filter reduces bad t aste and
odour, so that the water you drink is healthy, safe and tasty.
Introduction
Salient Features of KENT MAXX
n n
n n
n
n
n
n
n
n
n
n
Wall mounted design - best suited for LED indicators for power on and
domestic purpose purification process on display.
Dou ble pu rific atio n, f irs t by UV Tamper-proof UF Membrane fused
followed by Hollow Fiber UF membrane inside membrane housing
- filters out bacteria, virus and even
Push-fit components give leak-proof &
cysts
maintenance-free performance
Fully automatic operation with auto-on
Moun ted SM PS for over vo ltage
and auto-off facility
protection
Computer Controlled Operation with
AB S ma te ria l co ns tru ct ion f or
Filter Change Alarm and UV Fail Alarm
corrosion-free life span
Transparent, detachable tank for easy
Ideal for Tap/Municipal water supply.
on-site cleaning
Purified water storage tank with 7 ltr
capacity
1. KEN T M AXX : 01 No.
2. 3-W ay Conne ctor : 01 No.
3. S.S . B all Valve : 01 No.
4. Foo d G rade Pipe (Whit e) : 2. 5 m eters
5. Scr ews & Plas tic Inserts : 02 each
6. Ins truct ion Manual : 01 No.
7. Cen ter Drill Stick er : 01 No.
Items in the Box
Important Instructions
Use Genuine Kent spares for optimum performance
Page 4
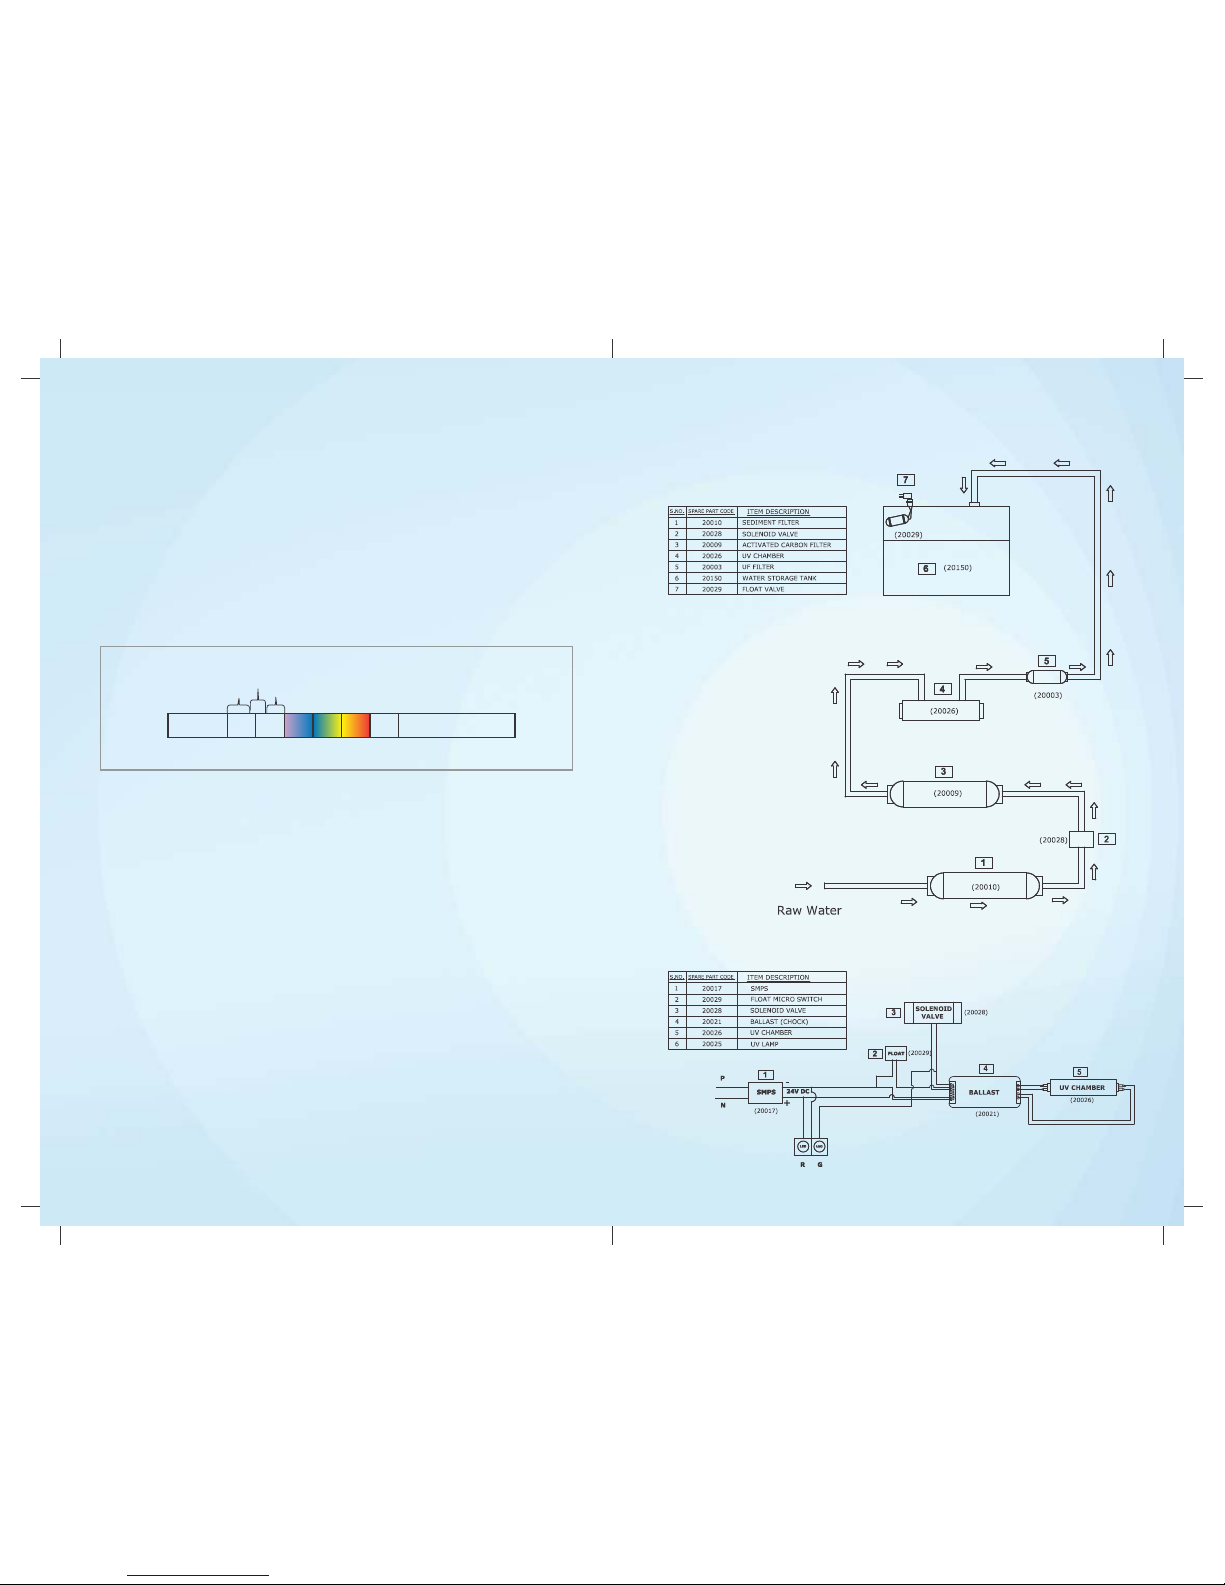
Ult ra Vi olet (UV ) ray s are the h igh ener gy ra ys h avin g a wa vel engt h sho rte r tha n the
vis ible l ight . The y are ca lled ultr a-vi olet beca use th ey are just be yon d the vi olet ligh t
in t he s pec trum . Te chn ical ly, ult ra-v iole t light is defi ned as any wave len gth of l ight
whi ch is shorte r than 400 nano mete r.
When pe netra ted int o water, t he UV rad iatio ns are abs orbed b y the DNA o f pathog ens.
These UV rays alter the DNA of these path ogens in such a way that they lose the ability to
repro duce, mult iply and infec t. Thus, they are essen tially kil led and cannot caus e
infec tion. This proces s of DNA modi ficat ion is known as inactiva tion.
UV Process
700400
Wavelength(nm)
UVB
280-315
UVA
315-400
UVC
200-280
X-Rays
Ultraviolet
Visible
Infrared
Microwaves Radio
Ultra Filt ratio n is a separ ation proce ss that uses membrane s with pore size of 0.1
micro n. The U F membr ane has the capacit y to reduce colloida l mater ials includ ing
bacte ria an d cys t from drink ing wa ter. Low ap plied press ure is there fore suffic ient to
achie ve high flux rates from an Ultra Filtratio n memb rane.
UF Process
3
Water Flow Diagram
Electrical Circuit Diagram
4
100-300 V AC, 50-60 Hz
Page 5
Installation Instructions
To ensur e purer wat er throug hout the se rvice cy cle, KENT M AXX is equi pped with an i n-
built UV Fail Alarm which gets activat ed in an event of UV lamp failur e. In case the UV lamp
malfu nction s, the puri ficati on proce ss automa ticall y stops and p urifie r starts em itting a
short beep at an interval of every 2 seconds.
UV Fail Alarm
Under such circum stance s, switch off the purifi er and call the service tech nician for help.
The purifier will stop purifica tion in such a situa tion.
KENT MAXX has an in-bui lt featu re that soun ds an audib le alarm to indi cate the
repl ace ment t ime o f filt ers. This a lar m is aud ibl e afte r 700 h rs of f ilte r use . The Fi lte r
Chan ge Alarm works as follow s:
Gives 4 shor t beeps after every two se conds l asting upto 3 0 seco nds. T he alar m gets
activ ated after every 2 hours of use.
Filter Change Alarm
Under such circums tances , the purifie r will not function unless the filters are changed.
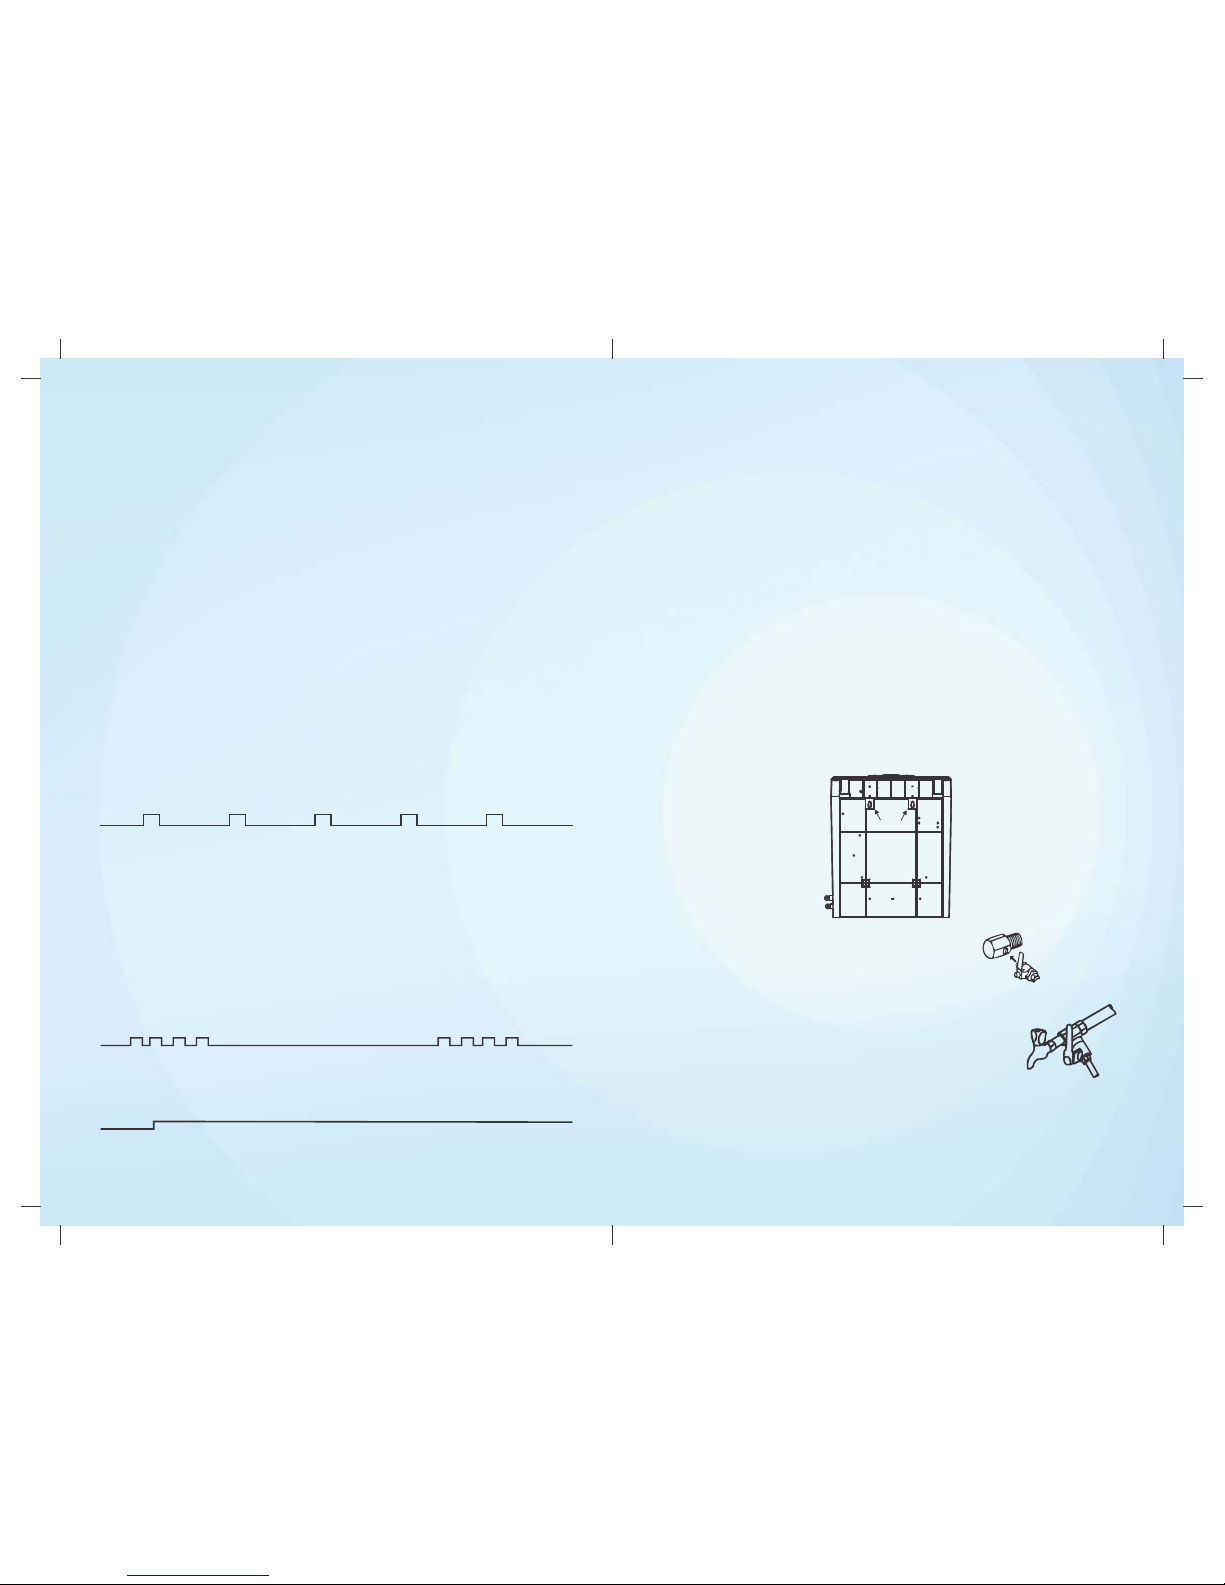
2 Sec . 2 Sec . 2 Sec . 2 Sec .
30 Se c. 3 0 Sec.
Slot holes
Computer Controlled Operation
6
5
KENT MAXX is a convenient and easy-to-install wall mounting model.
Recommended Site Preparations:
100-300 V AC, 50-60 Hz single phase AC supply not more than 3m away from the
point of installation
Raw water supply with ½ inch nipple not more than 3m away
Installation space as per the dimensions of the purifier
Wall/ plane surface for mounting screws and holding the machine. Avoid
installation on wooden and metallic stands
For optimum inlet pressure, source water tank should be at least 10 ft above the
purifier installed
Install the purifier near a sink for easy availability of inlet water lines
The system and installation must comply with applicable state and local laws &
regulation.
n
n
n
n
n
n
n
Installation Procedure:
1. Screw in two 10x50 self taping screws, 5.4 inches (138 mm) apart horizontally.
2. Wall-mount the purifier with the help of slot holes given on the back side.
3. Fasten the SS ball valve to ¼ inch port of 3-way connector.
4. Attach threaded end of 3-way connector to raw water supply and
plug off the other end or connect to a tap.
5. Now connect one end of pipe to SS ball valve and other end to elbow fitting connector
labeled as WATER IN, on the left side of purifier.
6. Turn on the lever given on SS ball valve to initiate the water flow to purifier.
To ensure the deliv ery of purer and healthie r water, a micro-pro cesso r is insta lled in the
purif ier that perf orms the following functi ons:-
UV Sta biliza tion D elay: T o ensur e that the UV lamp is pre-h eated a nd is w orking at its
optim um before it st arts disi nfecti ng water, th e contro ller prov ides a two seco nd delay
to UV lamp when a purifie r is switched on. Duri ng this perio d, only UV lamp is on and all
other electr ical devices of purifier are switched off and no water flows through.
Purif icatio n Delay : To en sure th at the w ater l ying id le in t he inte rnal pi pes an d the UV
chamb er is thorou ghly disinfe cted before being pass ed onto the storag e tank, the
syste m provide s approxi matel y 5 seconds Pur ificat ion Dela y when the pur ifier is
switc hed on. Du ring thi s period , all ele ctrica l device s except U V lamp ar e switch ed off
and UV lamp kills the micro-org anisms presen t in water inside the UV chamber . After this
delay , a ll other electric al device s s uch as sole noid valve etc., get a ctivat ed and the
norma l purif icatio n process starts.
Audi ble Alar m: Micro proc esso r also cont rols the act ivat ion of UV Fail Alar m and Filter
Chan ge Alarm .
Please call the service technician once the Filter Change Alarm is activated and get the filters
replaced. In case the filters are not replaced within next 60 hours of operation, the purifier
stops functioning to avoid the delivery of impure water and emits a beep continuously.
Page 6
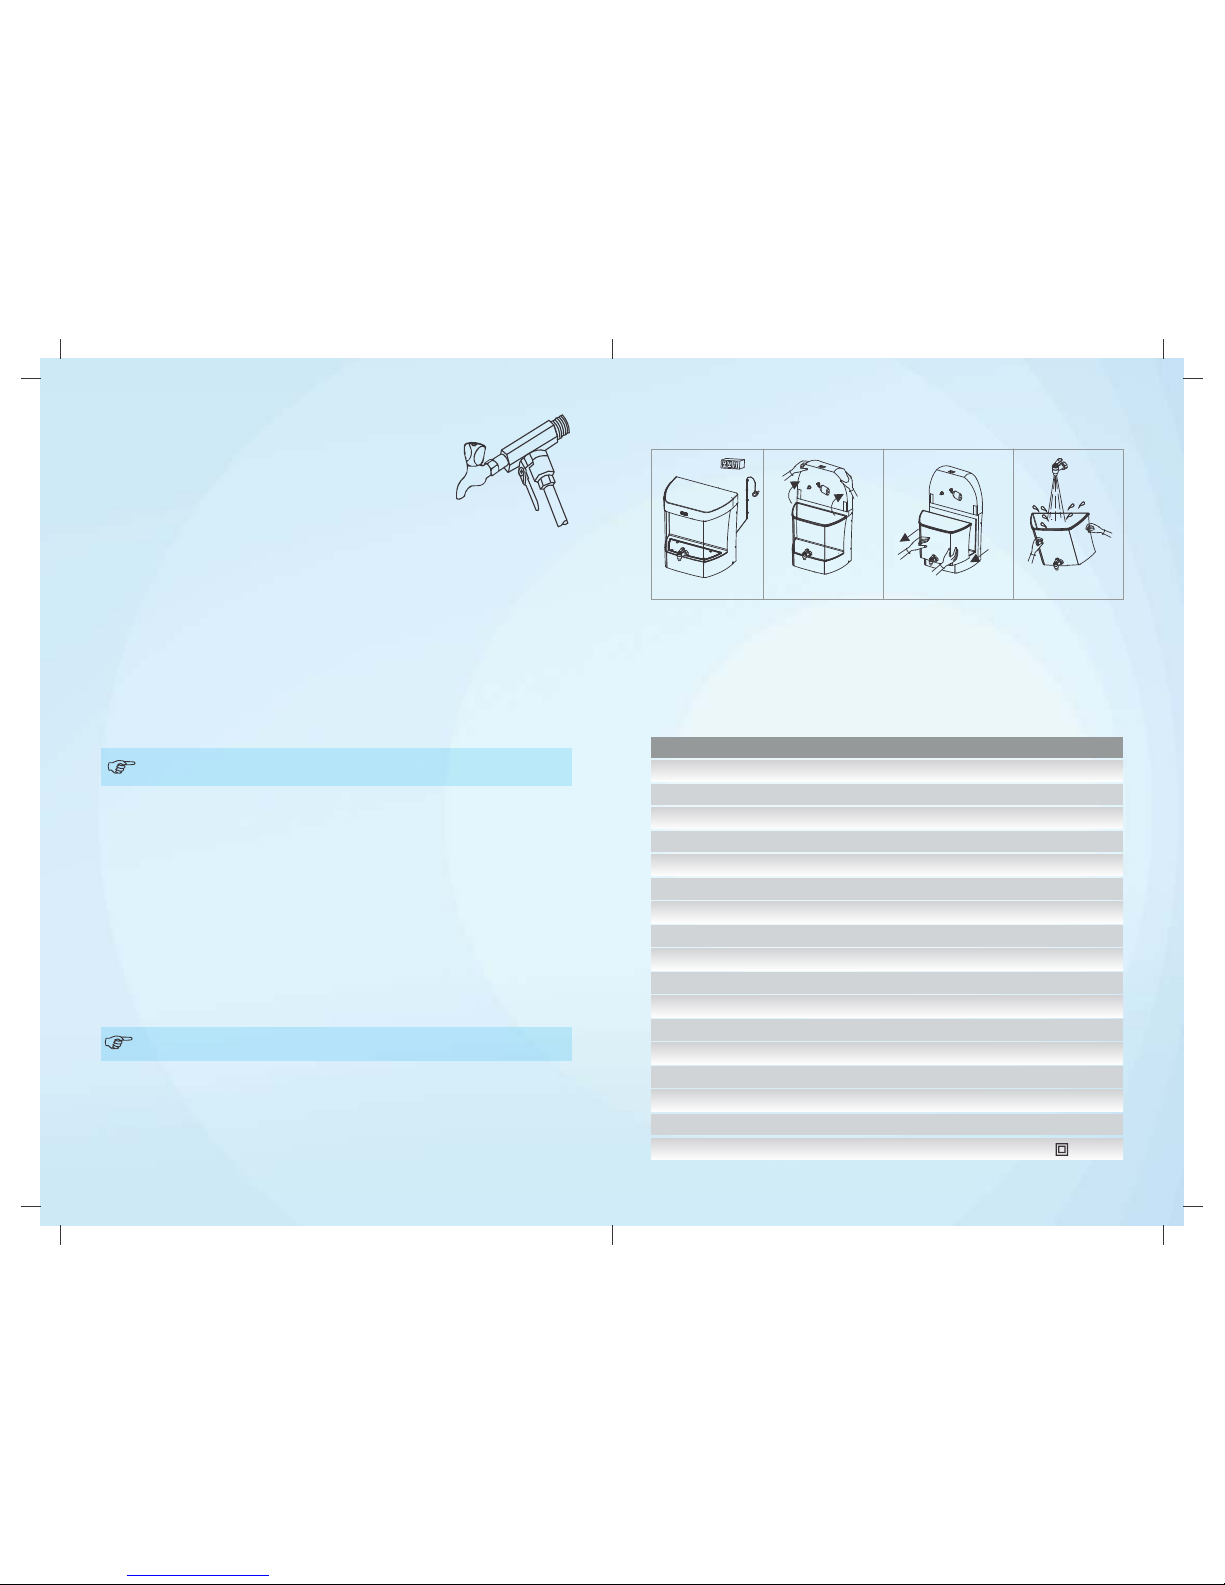
Cleaning the Water Tank
Open the Upper Cover Remove the water tank
Clean it under a running
tap water and wipe dry
Switch off the power supply.
Recommended Frequency for Filter/membrane Change
Sediment/Carbon à Once every year or earlier if gets clogged
UF Membrane à Once every 6 months or earlier if gets clogged
Technical Specifications
Maintenance
To ensure that the purifier operates at its BEST, a routine maintenance must be performed.
The frequency of the maintenance will greatly depend upon the raw water quality and
consumption of purified water.
Storage tank must be cleaned once in a week. (Refer Cleaning the water tank Pg. 8)
In the event of not using purifier for more than two days (while going on a holiday, tour
etc.), turn off the raw water supply and drain the storage tank
Replace sediment filter and carbon filter once in 12 months
Replace UF membrane once in 6 months
n
n
n
n
The replacement time of consumables such as filters and membrane is dependent
on the quality of raw water and water consumed.
Starting up the purifier
n
n
n
n
n
n
n
Switch on the power supply residual dust particles initially present
in the pipes and storage tank
Allow the storage tank to fill up to the
Maximum level Place back the storage tank and close
the upper cover
Switch off the power supply
Switch on the power supply
Open the upper cover. Lift and drain the
storage tank so as to remove the Purifier is ready to use
Note: The glowing Red LED indicates the power is on. The glowing Green LED
indicates the purification process is on.
7. Allow the filters to pre-soak in water for 2-3 minutes.
8. Connect the power supply.
9. Installation is complete.
8
7
Ideal for Tap/Municipal water supply.
7L
2
0.3 kg/ cm or 4.267 psi / 10ºC
0.1 Mic ron
11Watt
Applications
Max. Pu rification Production Rate
Body Ma terial
Installation
Dimensions (mm)
Filter Cartridge
Purified Water Tank C apacity
Inlet W ater Pressu re/Temp (min)
Weight
UF Memb rane Pore Size
UV Lamp Wattage
60L/hr. (depending on inlet water pr essure)
ABS Foo d Grade Plastic
Wall Mo unting/Counter-Top
390 (L) x 285 (W) x 400 (H)
Sediment, Activated Carbon, UF
6.100 k g
2
3 kg/cm or 42.67 psi / 35 ºC
Inlet W ater Pressu re/Temp (max)
11013
Model N o.
MODEL NAM E KENT MA XX
24V DC
Voltage Output of SMP S
Input P ower Supply
100-300 V AC, 50-60 Hz
One Yea r
Life of UV Lamp
Water P urifier Wit h Ultra Violet Disinfection
Product
 Loading...