

KENT JINDABYNE, COUNTRY, SOMERSET Owner's Manual
Tested and approved to Australian Standards
AS/NZS 2918 and AS/NZS 4013/4012.
Prior to installation check with your state and local
authorities regarding any specific regulations that
may apply.
Please keep these instructions for future
reference.
Burn hardwood only.
COVERS MODELS - JINDABYNE (STD FIRE BOX)
COUNTRY CLASSIC (STD FIRE BOX)
SOMERSET (SLIM LINE FIRE BOX)
Owners Manual
Wood Heaters
For All

FIRST THINGS FIRST...
Congratulations on your purchase of a quality Kent wood heater. This product is designed according to strict
environmental, quality and safety standards and should give you years of trouble free home heating.
Read these instructions carefully to get the most out of your heater and to ensure safe and satisfactory heater
performance. In particular, we would like to draw your attention to these warnings.
Be careful of what you burn:
Protect yourself and your family
from burns:
*
*
*
*
*
*
*
*
*
*
Use only dry, well seasoned hardwood.
Do not use coal or briquettes.
Do not burn garbage inthe fireboxas garbage
can cause a dangerous soot build up and
increase the amount of smoke your heater
produces.
Do not burn chemically treated timber as the
poisonous gases given off could damage your
stove.
CAUTION: THE USE OF SOME TYPES OF
PRESERVATIVE-TREATED WOOD AS
FUEL CAN BE HAZARDOUS.
Do not place any types of builders board eg
fibro, cement sheeting (or any other materials
not specified and tested by the manufacturer)
inside the firebox.
The exterior surfaces of the heater will
become hot during operation. For protection
of children, the elderly or infirm, provide a
firescreen to prevent contact with the
appliance in operation.
To protect against injury from burns, use
caution when operating the appliance. In
particular, when loading the firebox, provide
adequate protection for your hands.
WARNING: DO NOT USE FLAMMABLE
LIQUIDS OR AEROSOLS TO START OR
REKINDLE THE FIRE.
WARNING: OPEN AIR CONTROL BEFORE
OPENING FIRING DOOR.
Use your heater according to these
instructions:
The heater can get very hot, so
watch obvious fire hazards:
*
*
*
*
*
*
*
*
*
*
*
*
*
CAUTION: THIS APPLIANCE SHOULD BE
MAINTAINED AND OPERATED AT ALL
TIMES IN ACCORDANCE WITH THESE
INSTRUCTIONS.
DO NOT BURN WITH DOOR OPEN.
WARNING: ANY MODIFICATION OF THE
APPLIANCE THAT HAS NOT BEEN
APPROVED IN WRITING BY THE TESTING
A U T H O R I T Y I S C O N S I D E R E D A S
BREACHING AS/NZS 4013.
WARNING: DO NOT STORE FUEL WITHIN
HEATER INSTALLATION CLEARANCES.
CAUTION: THIS APPLIANCE SHOULD NOT
BE OPERATED WITH A CRACKED GLASS.
Do not throw logs into the firebox. Always
place logs carefully.
Load logs with ends pointing to the front of the
heater. This will help prevent logs rolling
forward.
Do not overfire (allow firebox to glow red) as
this could damage your firebox.
Always leave a minimum of 25mm (1) of ash
in the bottom of the firebox. Never empty it
completely.
The appliance or flue system should not be
modified in any way without the written
approval of the manufacturer.
Do not place clothing or other combustible
materials on top of the heater.
Do not store flammable liquids near the
heater.
Do not store fuel close to the stove.
* WARNING: DO NOT USE FLAMMABLE
LIQUIDS OR AEROSOLS OR PLACE
TH ESE I N TH E VIC INI TY O F THI S
APPLIANCE WHEN IT IS OPERATING.
Exclusion of Liability
Whilst every care has been taken in formulating these instructions, no responsibility whatsoever will attach to
and/or claim lie against, the manufacturer and/or the distributor of the heater as a result of any failure to follow
the whole or any part of the instructions and/or as a result of incorrect information herein and/or any omission
here from.
2

3
ASSEMBLING YOUR NEW HEATER
There are a number of heaters in the Kent range. The heaters are mounted on columns, which require some
assembly. All heaters will require
firebrick and baffle plate assembly.
Convection models are supplied with fans, which will need to be assembled.
Column Assembly
There are a fewdifferent column styles. Some do
not require screws: you assemble the column by
inserting the tags located at either end of the front
and rear panels. Push the front and rear panels
down to lock tags into position. The column can
be further secured if you wish by fitting self
tapping screws into the holes provided between
the tags (screws not provided).
Other side panels have nuts and screws
provided for you to screw the panels together.
If your heater comes with a fan, the side panels
will have two holes at the top for securing the fan.
These must face the rear of the firebox.
Next, fit the aluminium heatshield to the top of the
column, ensuring the
shield locates in the
slots at the top of the
column.
You must now attach
the firebox. Lay the
firebox on its back.
Locate the column
onto the four locating
points on the base of
the heater. Ensure the
side of the column with a 45 mm gap on the
bottom edge goes at the rear of the heater.
Secure the column to the base of the heater with
the four self tapping screws provided.
Now stand the heater and column assembly up
and place into the base.
(For Jindabyne only) Fit the top deflector and
rear heatshield to the rear of the firebox by
pushing the long screws through the holes on the
back firebox panel. Fit
the top deflector first,
then the spacers, rear
heatshield and finally the
n u t s .
Secure
tightly.
Deflector & Heat Shield
Fan Assembly
Fix the fan to the
column using the
f o u r l o c a t i n g
screws provided.
The earth wires on
the fan will need to
be fixed to the
column. Refer to
detail view below.
The fan can be removed
f o r c l e a n i n g b y
unscrewing the locating
screws. Remember to
disconnect the power
supply before touching
the fan.
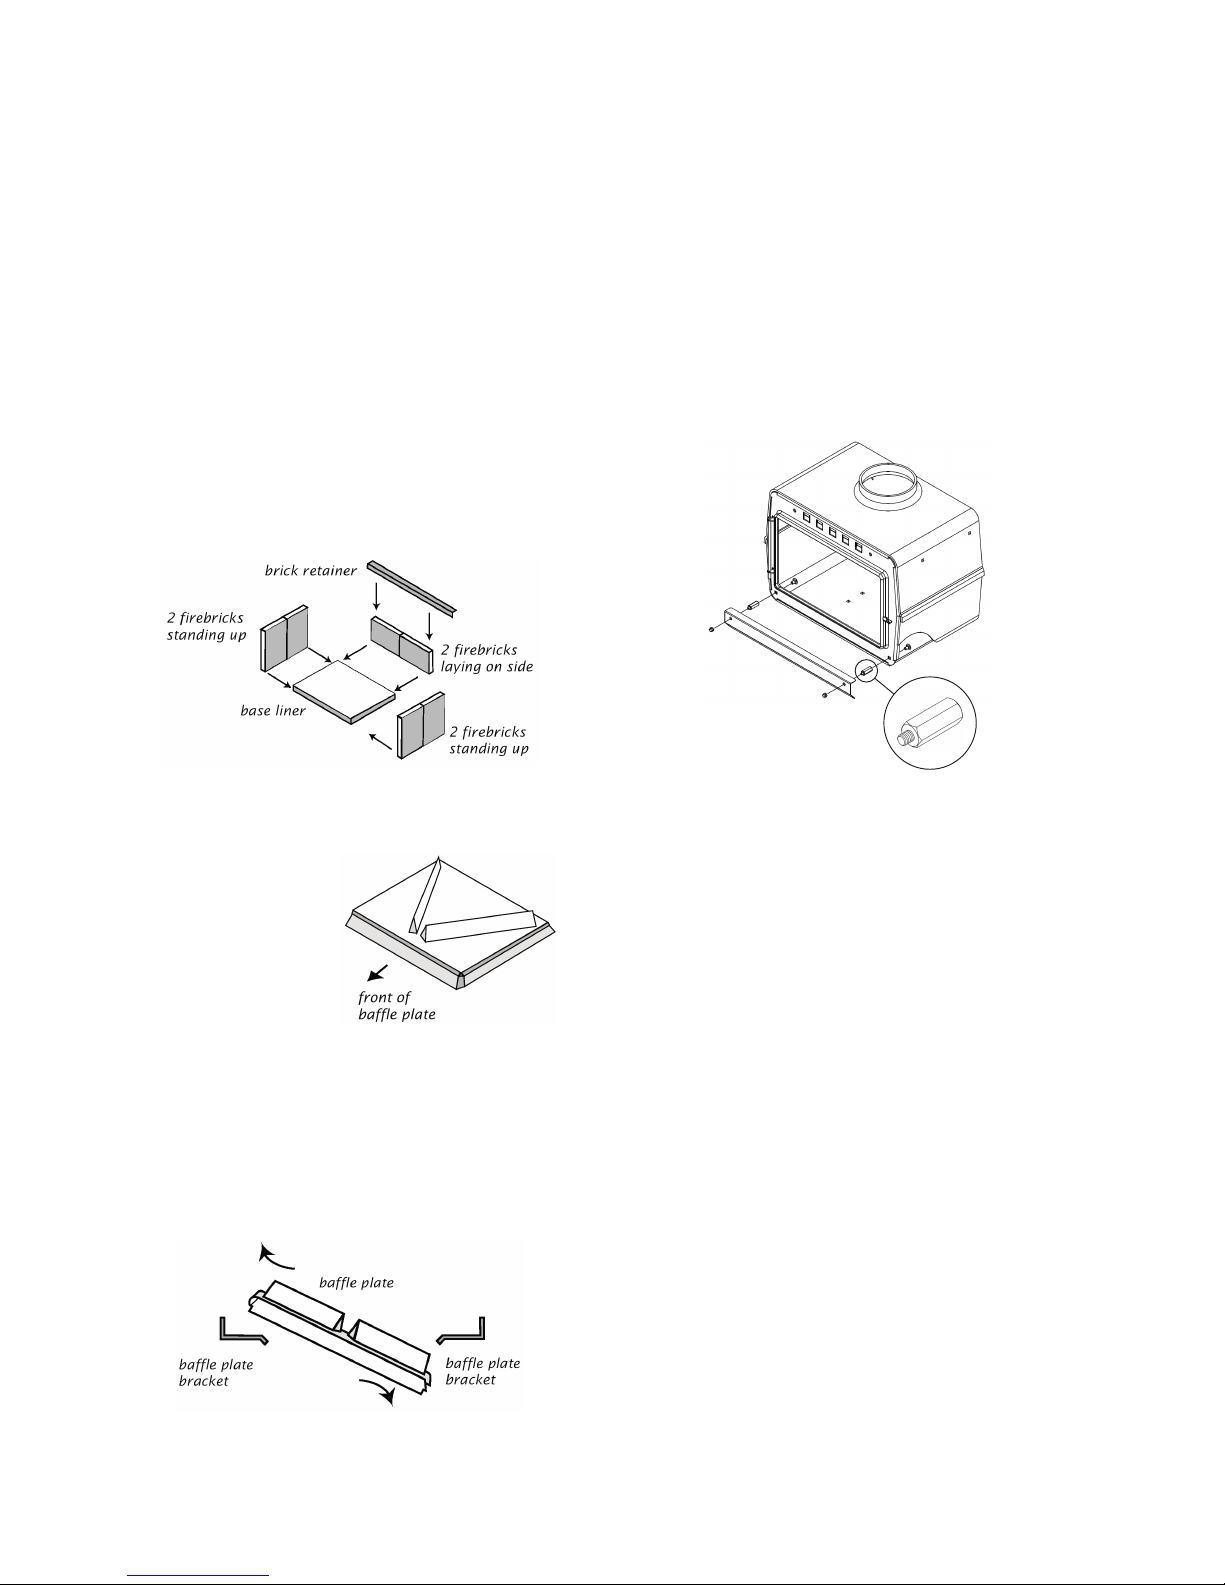
Firebricks (Standard Firebox)
Standard sized fireboxes use 7 firebricks and a
ceramic base liner in the arrangement shown
below.
Place the base liner down so that it is flush
against the front of the firebox. Place two
firebricks on each side laying down. Place
three firebricks at the back standing upright.
Now place the brick retainer along the back
firebricks so that the lip hangs over the front of
the bricks.
If necessary, push the side bricks towards the
back of the heater so they sit against the brick
retainer. This arrangement prevents the back
bricks from falling forward.
ASSEMBLING YOUR NEW HEATER
4
Firebricks (Slimline Firebox)
Slimline fireboxes use 6 firebricks and a ceramic
base liner in the arrangement shown below.
Place the base liner down so that it is flush
against the front of the firebox. Place two
firebricks on each side standing upright. Place
two firebricks at the back laying down sideways.
Now place the brick retainer along the back
firebricks so that the lip hangs over the front of
the bricks.
If necessary, push the side bricks towards the
back of the heater so they sit against the brick
retainer. This arrangement prevents the back
bricks from falling forward.
All Models - Baffle Plate
The baffle p late
MUST be installed
prior to operating the
appliance. Ensure
that the baffle plate is
pointing forward.
The left side of the
pla t e s h o u ld b e
directed over the
plate bracket and pushed against the top left
edge of the firebox. The right hand side should
then be lifted up over the right hand bracket. The
plate can now be allowed to rest into position.
Ensure the plate is sitting evenly on both
brackets, and is pushed all the way to the back of
the heater.
Kick Plate
(For Jindabyne only) To assemble the kick plate,
use the two short locating screws provided.
Insert the screws from the inside of the firebox and
then screw the spacer to the front, as shown in the
diagram below. Use the spacers with the threaded
tip.
Now, place the kick plate against the spacers and
secure with the two dome nuts provided.
 Loading...