

Kenmore Elite 79631422411, 79631423411, 79631423410, 79631422410 Owner’s Manual
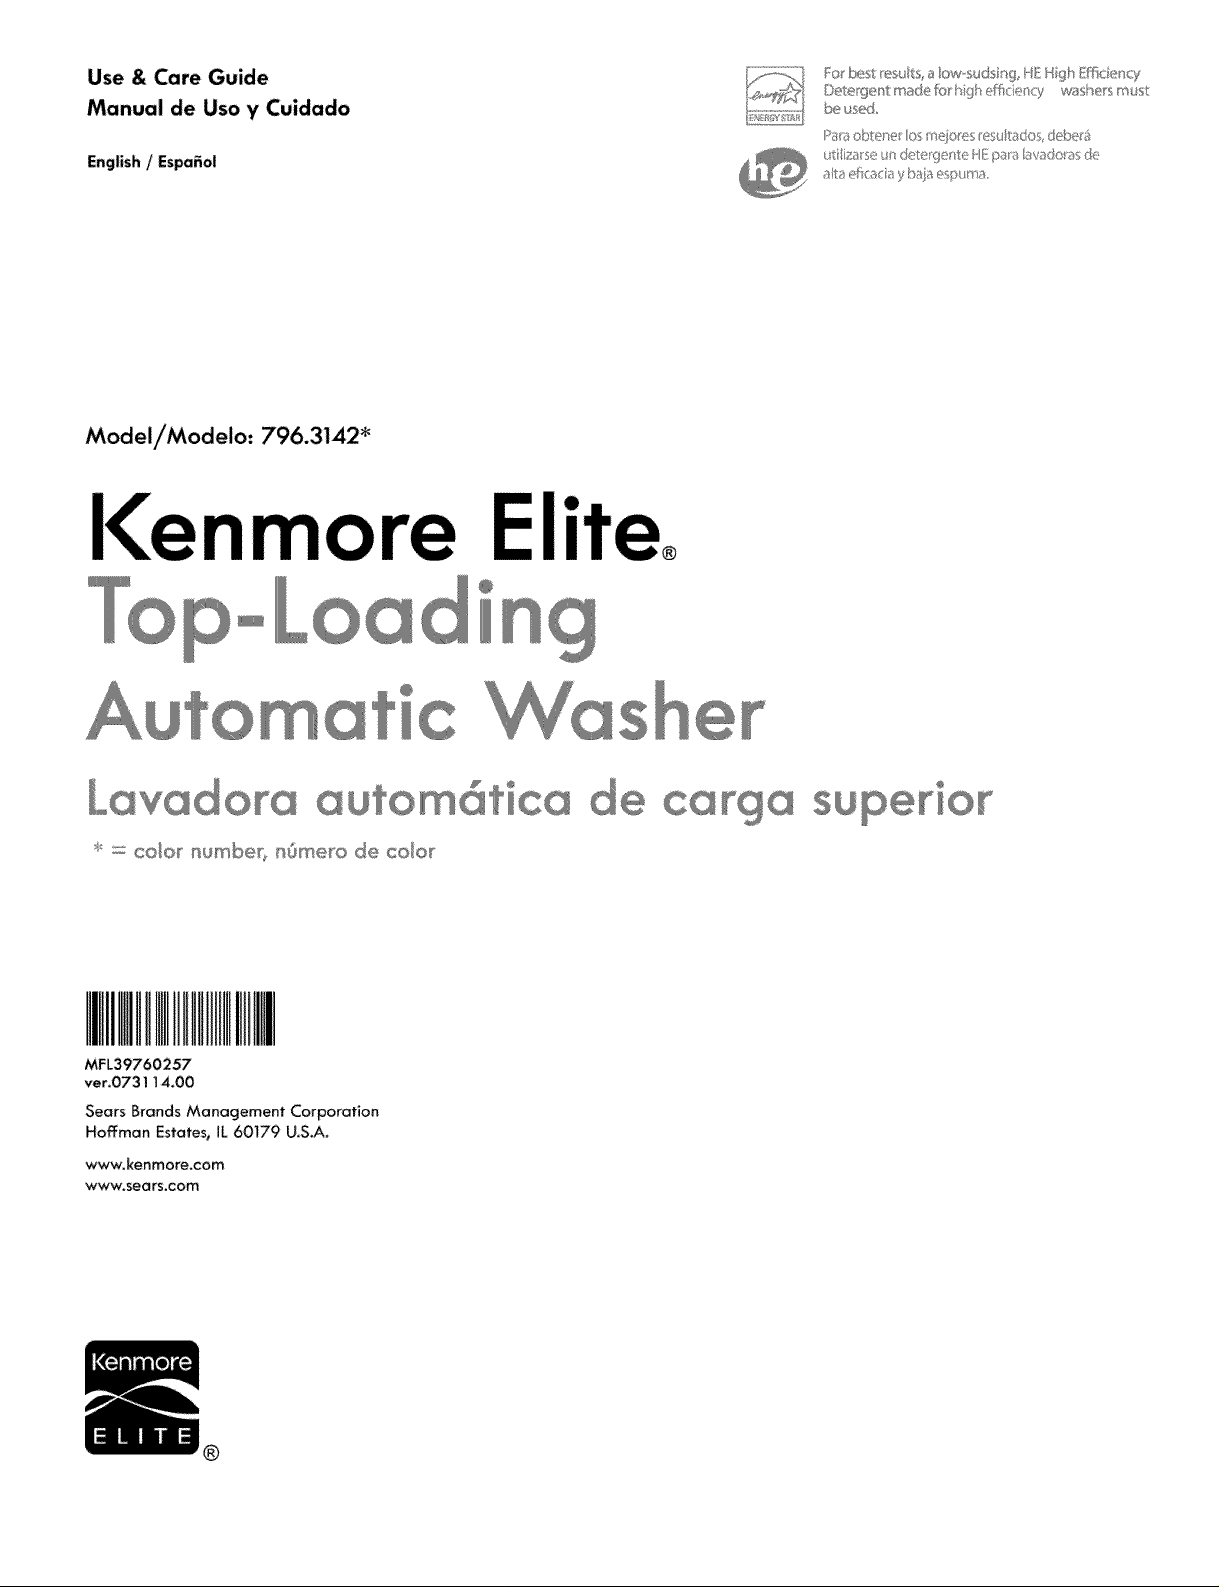
Use & Care Guide
Manual de Uso y Cuidado
English / Espa_ol
Model/Modelo: 796.3142 _
I<enmore Elite,
o oad °
Fo bes 'esu s,a Iow_.sud: '@HEtgh EMitency
Detel'gen:ma_ie L_ hghefflce c!/ ,_Jas_ei'sm_.s
besed
P;i} @>ere! os nej©_'es/'es@dos,¢ebe
UR / s_ IS(i_ p4}18 ;&sOS d@
mati_
®uto_@tic®
s,._c cokx_ numbe_} n@sero de co/o_
MFL39760257
ver.073114.00
Sears Brands Management Corporation
Hoffman Estates, IL 60179 U.S.A.
www.kenmore_com
www.sears.com
de
@
superior
®
IMPORTANT SAFETY INSTRUCTIONS ........................... 3-5
GROUNDING REQUIREMENTS ........................................... 5
FEATURES AND BENEFITS
Key Parts and Components ............................................... 6
Optional Accessories .......................................................... 6
Included Accessories ............................................................ 6
INSTALLATION REQUIREMENTS
Key Dimensions and Specifications .................................. 7
Choose the Proper Location ............................................. 7
Flooring .................................................................................. 7
Clearances ........................................................................... 7
INSTALLATION INSTRUCTIONS
Unpacking and Removing Shipping Material ................ 8
Connecting the \A/ater Lines............................................... 9
Connecting the Drain Hose ............................................. 10
Connect to the Power Supply .......................................... 10
Leveling the VCasher....................................................... 11
HOW TO USE
Control Panel Features ...................................................... 12
Operating the Vv'asher .......................................................13
Cycle Guide ................................................................. 14-15
Sorting Wash Loads ......................................................... 16
About the Dispensers ........................................................ 17
Detergent and Dispenser Use ......................................... 18
Time and Status Display ................................................. 19
Cycle Modifier Buttons..................................................... 20
Option Buttons ............................................................. 21-23
Accela Wash .................................................................. 2 i
Stain Boost ...................................................................... 21
Extra Rinse..................................................................... 2 ]
"_A/aterPlus....................................................................... 21
ADD A GARMENT ......................................................... 21
Chime ................................................................................ 21
Fabric Softener .............................................................. 22
My Cycle .......................................................................... 22
Soak ................................................................................. 22
Delay Wash ................................................................... 22
Rinse & Spin ................................................................... 22
Control Lock.................................................................... 22
Special Drain Feature ...................................................... 22
CARE AND CLEANING
Regular Cleaning .......................................................... 23
Maintenance ................................................................... 24
Using the Kenmore Connect TM System .......................... 26
TROUBLESHOOTING GUIDE
Normal Sounds "YouMay Hear ....................................... 27
Before CalJing for Service ........................................ 27-32
Error Codes ................................................................. 3t -32
WARRANTY ........................................................................... 33
SERVICE ................................................................. Back Cover
Inthe space below, record the date of purchase, model,
and serial number of your product. You will find the
model and serial number printed on an identification
plate located inside the washer lid. Have these items of
information available whenever you contact Sears
concerning your product.
Model No.
Date of Purchase
Serial No.
Save these instructions and your sales receipt for
future reference.
Master ProtectionAgreements
Congratulations onmaking a smartpurchase.Yournew
I<enmoreOproduct is designed and manufactured for years
of dependable operation. Butlikeall products, it may require
preventivemaintenanceor repair from time to time. That's
when having a Master ProtectionAgreement can save you
money and aggravation.
TheMaster ProtectionAgreement also helpsextend the life of
your new product. Here'swhat the Agreement_ includes:
• Parts and labor needed to help keep productsoperating
properlyundernormaluse,notjust defects.Ourcoveragegoes
well beyondthe productwarranty. No deductible,no functional
failure excludedfromcoverage- real protection.
• Expertservice by a force of morethan 10,000 authorized
Searsservicetechnicians,which meanssomeoneyoucantrust
will be working onyour product.
• Unlimitedservice callsand nationwideservice, as often as
you want us,wheneveryouwant us.
• "No-lemon" guarantee - replacement of your covered
product if four or more product failures occur within twelve
months.
• Productreplacement if your covered product can not
be fixed.
• Annual PreventiveMaintenanceCheckat your request- no
extra charge.
• Fasthelpby phone- we call it RapidResolution,Phone
supportfroma Searsrepresentativeonall products.Thinkof us
as a"talking owner'smanuaL"
"Power surgeprotectionagainstelectric damage due to
powerfluctuations.
• $250 food lossprotectionannuallyfor anyfood spoilagethat
isthe resultof mechanical failure of anycovered refrigerator
or freezer.
Rental reimbursement if repair of your covered product takes
longerthan promised.
•25% discountoff the regular priceof any non-coveredrepair
service and related installedparts.
Once you purchasethe Agreement,a simple phone call isall
that ittakesfor you to scheduleservlce."Youcan call at any
time day or night or schedulea serviceappointment online.
TheMaster ProtectionAgreement isa risk-free purchase.
If youcancel for any reasonduring the product warranty
period, we witt provide a full refund, or a prorated refund any
time after the product warranty period expires.Purchaseyour
Master ProtectionAgreementtoday!
Somelimitations and exclusionsapply.
Forpricesand additionalinformationin theU.S.A.
call 1-800-827-6655.
_Coverage inCanada varieson someitems.
Forfull details callSearsCanadaat 1-800-361-6665.
SearsInstallationService
For Searsprofessional installation of homeappliances,
garage door openers, water heaters, and other major home
items,inthe U.S.A.or Canada call: 1-800-4-MY-HOMEO.
Therearemanyimportantsafetymessagesin this manual and on your appliance. Always read and obey
all safety messages.
This is the safety alert symbol. This symbol alerts you to potential hazards that can result in prop-
erty damage andi!or serious bodily harm or death.
All safety messages will follow the safety alert symbol and either the word DANGER, _'¢¢ARNING
or CAUTION. These words mean:
Indicates a hazardous situation which, if not avoided, will result in death or seriousinjury.
Indicates a hazardous situation which, if not avoided, could result indeath or serious injury.
Indicates a hazardous situation which, if not avoided, could result in minor or moderate
injury.
All safety messages will tell you what the potential hazard is, tell you how to reduce the chance of injury, and tell
you what can happen if the instructions are not followed.
• Do not install or store the washer where it will be
exposed to the weather or freezing temperatures.
° Do not tamper with controls.
• Use this appliance only for its intended purpose as
described in this Use & Care Guide.
• Before use, the washer must be properly installed as
described in this manual.
• Do not wash articles that have been previously
cleaned in, washed in, soaked in, or spotted with
gasoline, dry cleaning solvents, or other flammable
or explosive substances,as they give off vapors that
could ignite or explode.
• Do not add gasoline, dry cleaning solvents, or other
flammable or explosive substances to the wash water.
These substances give off vapors that could ignite or
explode.
° Under certain conditions, hydrogen gas may be
produced in a hot water system that has not been
used for two weeks or more. HYDROGEN GAS IS
EXPLOSIVE. If the hot water system has not been used
for such a period, before using the washer, turn ON
all hot water faucets and let the water flow from each
for several minutes. This will release any accumulated
hydrogen gas. As the gas is flammable, do not smoke
or use an open flame during this time.
• Do not allow children to play on or in the washer.
Close supervision of children is necessary when the
washer is used near children.
• Before your washer is removed from service or
discarded, remove the lid to the washing compartment
to avoid the danger of children or small animals
getting trapped inside. Failure to do so can result in
serious personal iniury or death.
° Keep the area underneath and around your appliance
free of combustible materials (lint. paper, rags, etc.),
gasoline, chemicals and other flammable vapors and
liquids.
• Do not repair or replace any part of the washer or
attempt any servicing other than as described in this
manual. ',Ne strongly recommend that any service be
performed by a qualified technician.
°See Installation Instructions for grounding
requirements.
• ALWAYS follow the fabric care instructions supplied by
the garment manufacturer:
° Do not place items exposed to cooking oil in your
washer, items contaminated with cooking oils may
contribute to a chemical reaction that could cause a
load to catch fire.
° Use fabric softeners or products to eliminate static
only as recommended by the manufacturer.
° This washer is not designed for maritime use or for
mobile installations such as in RVs, aircraft, etc.
• Turn OFF the water faucets and unplug the washer if
the machine is to be left for an extended period of
time, such as during vacations.
from children.
• Always check the inside of the washer for foreign
objects before loading laundry: Keep the lid closed
when not in use.
WARNING: This product contains chemicals known
to the State of California to cause cancer and birth
defects or other reproductive harm. Wash hands after
• Unplugthe washerbeforecleaningto avoid the riskof
electricshock.
° Never useharshchemicals,abrasivecleaners,orsolventsto
cleanthewasher.Theywi[Idamagethe finish.
° Do notputoily orgreasyragsor clothingon topof the
washer.Thesesubstancesgive offvapors that could ignite
the materials.
• Do notwashitemsthat are soiledwithvegetable orcooking
oil. Theseitems may contain someoil after laundering and
may catch fire.
° Disconnectthisappliancefromthe powersupply before
attempting anyusermaintenance.Turningthe controlsto
theOFFpositiondoesnotdisconnectthisappliancefromthe
powersupply.Failureto follow thiswarningcan causeserious
injury,fire,electric shock,or death.
° Do notcombinedetergents,fabricsofteners,and/or other
laundryproductsfromdifferentmanufacturersfor usein a
load,unlessspecifiedonthe label.
• Do notmix chlorinebleachwith ammoniaor acidssuch
asvinegar.Followpackagedirectionswhen usinglaundry
products.Incorrectusagecan produce poisonousgas,resuffing
inseriousinjuryordeath.
• Do notreachintothe washerwhile partsare moving.Before
loading,unloading,or addingitems,pushinthecycleselector
knobandallow the tubtocoasttoa completestopbefore
reachinginside.Failuretofollow thiswarningcancauseserious
injury,fire, electricshockordeath.
• Referto INSTALLATIONINSTRUCTIONSfor detailed
grounding procedures,installationinstructionsare packedin
thewasherfor the installer'sreference.If thewasheris movedto
a new location,haveit checked and reinstalledby a qualified
servicetechnician.Failure to follow thiswarningcan cause
seriousinjury,fire, electric shock,ordeath.
• Do not, underany circumstances,cutor removethethird
(ground)prongfromthe powercord. Failuretofollowthis
warningcan causeseriousinjury,fire, electric shock,or death.
• Forpersonalsafety,thisappliance mustbe properly
grounded,Failureto follow this warning can causeserious
injury,fire, electric shock,or death.
• Thepower cord of this appfianceisequipped with a
3-prong(grounding)plugwhichmateswitha standard3-prong
(grounding)walloutlettominimizethepossibilityof electric
shockhazardfromthisappliance.
° Thiswasher must be pluggedintoa 120VAC,60Hz
grounded outlet.Failureto follow this warning can cause
seriousinjur_;fire, electric shock,or death.
• Have the wall outletand circuitcheckedby a qualified
electricianto makesuretheoutletisproperlygrounded.
Failureto follow this warning can causeseriousinjur'_;fire,
electric shock,or death.
• Where a standard2-prongwall outletisencountered,it
isyour personalresponsibilityandobligationto have it
replacedwith a properlygrounded3-prongwall outlet.
Failureto follow thiswarning can causeseriousinjury,fire,
electric shock,or death.
• Do notinstall on carpet.Install the washer on a solid floor.
Failureto follow thiswarning can causeseriousleak damage.
• Do notremove grounding prong.Do notusean adapteror
extensioncord.Plugintoa grounded3-prongoutlet.Failure
to follow thesewarnings cancauseseriousinjury,fire, electric
shock,ordeath.
• Do not,underany circumstances,cut orremove thethird
(ground)prongfromthepowercord.Faibreto followthis
warningcancauseseriousinjury,fire,electricshock,or death.
• Thewasher shouldalways be pluggedintoitsown
individual electricaloutletwhich hasa voltage rating
that matchesthe ratingplate. Thisprovidesthe best
performanceand also preventsoverloading housewiring
circuitswhich couldcausea fire hazard from overheated
wires.
• Neverunplug your washer by pullingon thepower cord.
injury, fire,electricshock, or death.
• Immediatelyrepair or replaceall power cordsthat have
becomefrayed or otherwisedamaged. Donot usea cord
that showscracksorabrasion damage along itslengthor
at eitherend. Consultwith a qualified servicetechnician.
Failureto follow this warning cancauseseriousinjury,fire,
electricshock,or death.
• Wheninstallingor movingthe washer, becareful notto
pinch,crush,ordamage the powercord.Failureto follow
thiswarning can causeseriousinjury,fire,electricshock,or
death.
• Thewasher mustbe installedand electricallygrounded
by a qualified service technicianinaccordancewith local
codesto preventshockhazard and assurestabilityduring
• Thewasher isheavy. Two or morepeoplewill be needed
to installand movethe appliance.Failureto do socan
resultin damage to propertyor seriousbodily injury.
• Storeand installthewasher where it will not beexposed
causeseriousleak damage.
• Toreduce the riskof electricshock,do notinstallthe
washer in humidspaces.Failuretofollow thiswarning can
causeseriousinjury, fire,electricshock,ordeath.
• Toreducetheriskof personalinjury,adhere toall industry
recommendedsafetyproceduresincludingthe useof long
sleevedglovesand safetyglasses.Failure tofollow all of
the safetywarnings in thismanual couldresultin property
damage, personalinjury or death.
• Neverattemptto operate thisapplianceif itis damaged,
malfunctioning,partially disassembledorhas missingor
brokenparts,includinga damaged cordor plug.
• Tominimize the possibilityof electricshock,unplugthis
appliancefrom the power supply or disconnectthe washer
at the householddistributionpanel by removingthe fuse
or switchingoff the circuitbreakerbeforeattemptingany
maintenanceor cleaning.
• Toreducetheriskof electricshock,do nottouchthe power
plug with wet hands.
• Do not allow children to play on or in the washer.
Close supervision of children is necessary when the
washer is used near children. As children grow, teach
them the proper, safe use of all appliances. Failure
to comply with these warnings could result in serious
personal injury.
• Destroy the carton, plastic bag, and other packing
materials after the washer is unpacked. Children
might use them for play. Cartons covered with rugs,
bedspreads, or plastic sheets can become airtight
chambers. Failure to comply with these warnings could
result in serious personal injury.
• Keep laundry products out of children's reach. To
prevent personal injury, observe all warnings on
product labels. Failure to comply with these warnings
could result in serious personal injury.
• Before your washer is removed from service or
discarded, remove the lid to the "washingcompartment to
avoid the danger of children or small animals getting
trapped inside. Failure to do so can result in serious
personal injury or death.
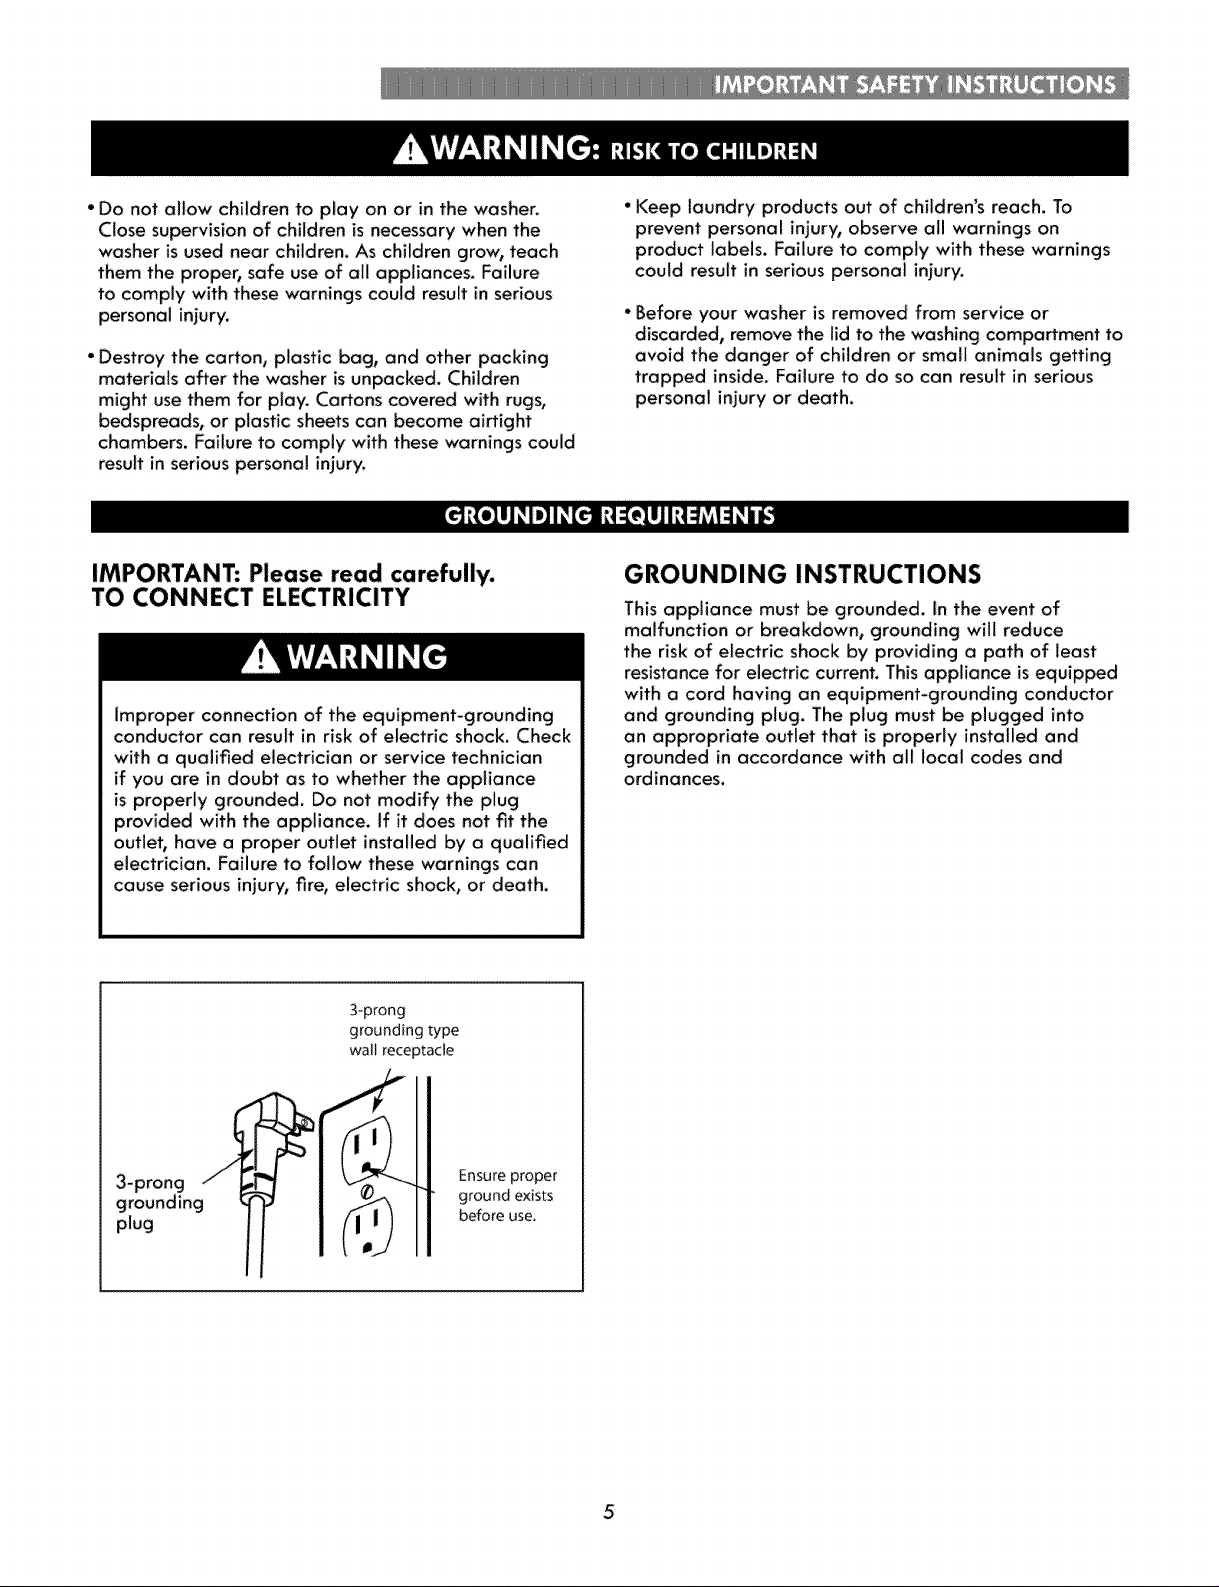
IMPORTANT: Please read carefully.
TO CONNECT ELECTRICITY
Improper connection of the equipment-grounding
conductor can result in risk of electric shock. Check
with a qualified electrician or service technician
if you are in doubt as to whether the appliance
is properly grounded. Do not modify the plug
provided with the appliance, if it does not fit the
outlet, have a proper outlet installed by a qualified
electrician. Failure to follow these warnings can
cause serious injury, fire, electric shock, or death.
3-prong
grounding type
wall receptacle
GROUNDING INSTRUCTIONS
This appliance must be grounded. In the event of
malfunction or breakdown, grounding will reduce
the risk of electric shock by providing a path of least
resistance for electric current. This appliance is equipped
with a cord having an equipment-grounding conductor
and grounding plug. The plug must be plugged into
an appropriate outlet that is properly installed and
grounded in accordance with all local codes and
ordinances.
Ensure proper
ground exists
before use,
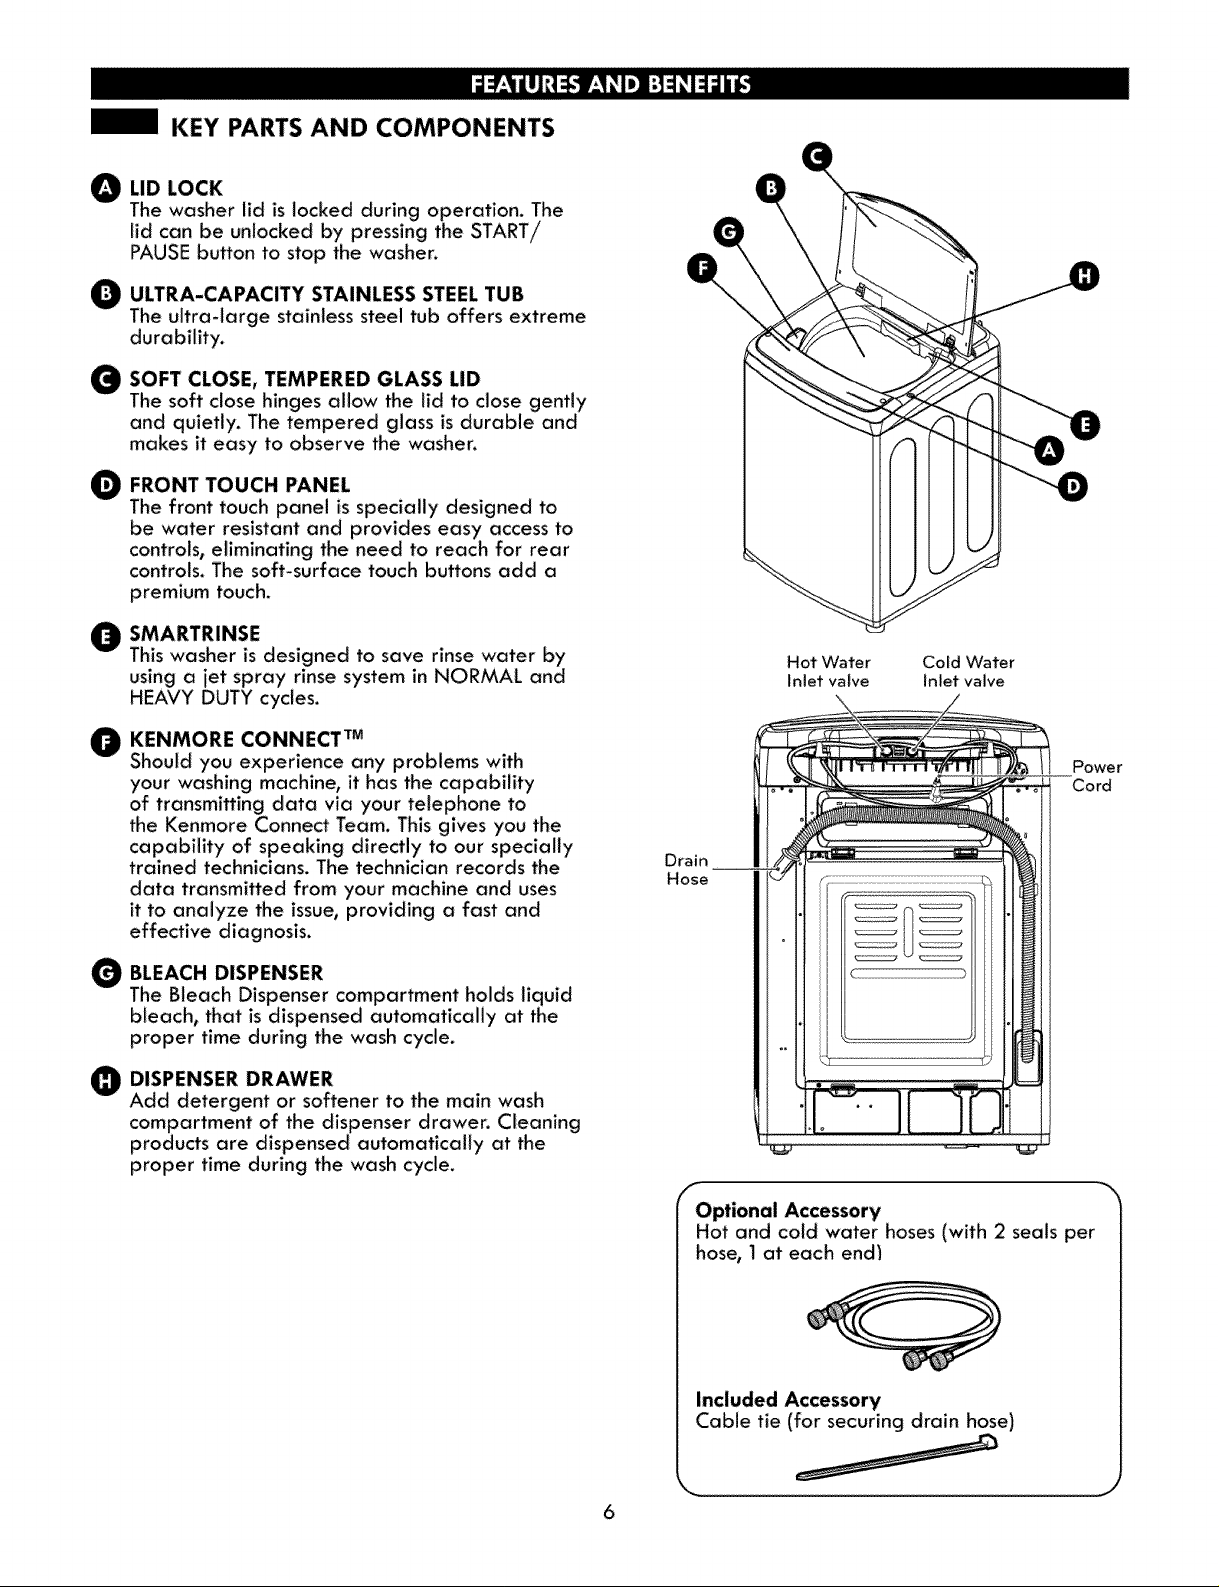
KEY PARTS AND COMPONENTS
LID LOCK
The washer lid is locked during operation. The
lid can be unlocked by pressing the START/
PAUSE button to stop the washer.
O ULTRA-CAPACITY STAINLESS STEEL TUB
The ultra-large stainless steel tub offers extreme
durability.
O OFT CLOSE, TEMPERED GLASS LID
The soft close hinges allow the lid to close gently
and quietly. The tempered glass is durable and
makes it easy to observe the washer.
FRONT TOUCH PANEL
The front touch panel is specially designed to
be water resistant and provides easy access to
controls, eliminating the need to reach for rear
controls. The soft-surface touch buttons add a
premium touch.
_l_ SMARTRINSE
This washer is designed to save rinse water by
using a jet spray rinse system in NORMAL and
HEAVY DUTY cycles.
Hot Water Cold Water
Inlet valve inlet valve
ij_ KENMORE CONNECT TM
Should you experience any problems with
your washing machine, it has the capability
of transmitting data via your telephone to
the Kenmore Connect Team. This gives you the
capability of speaking directly to our specially
trained technicians. The technician records the
data transmitted from your machine and uses
it to analyze the issue, providing a fast and
effective diagnosis.
O BLEACH DISPENSER
The Bleach Dispenser compartment holds liquid
bleach, that is dispensed automatically at the
proper time during the wash cycle.
DISPENSER DRAWER
Add detergent or softener to the main wash
compartment of the dispenser drawer, Cleaning
products are dispensed automatically at the
proper time during the wash cycle.
Drain
Hose
Optional Accessory
Hot and cold water hoses (-with 2 seals per
hose, 1 at each end1
Included Accessory
Cable tie (for securing drain hose)
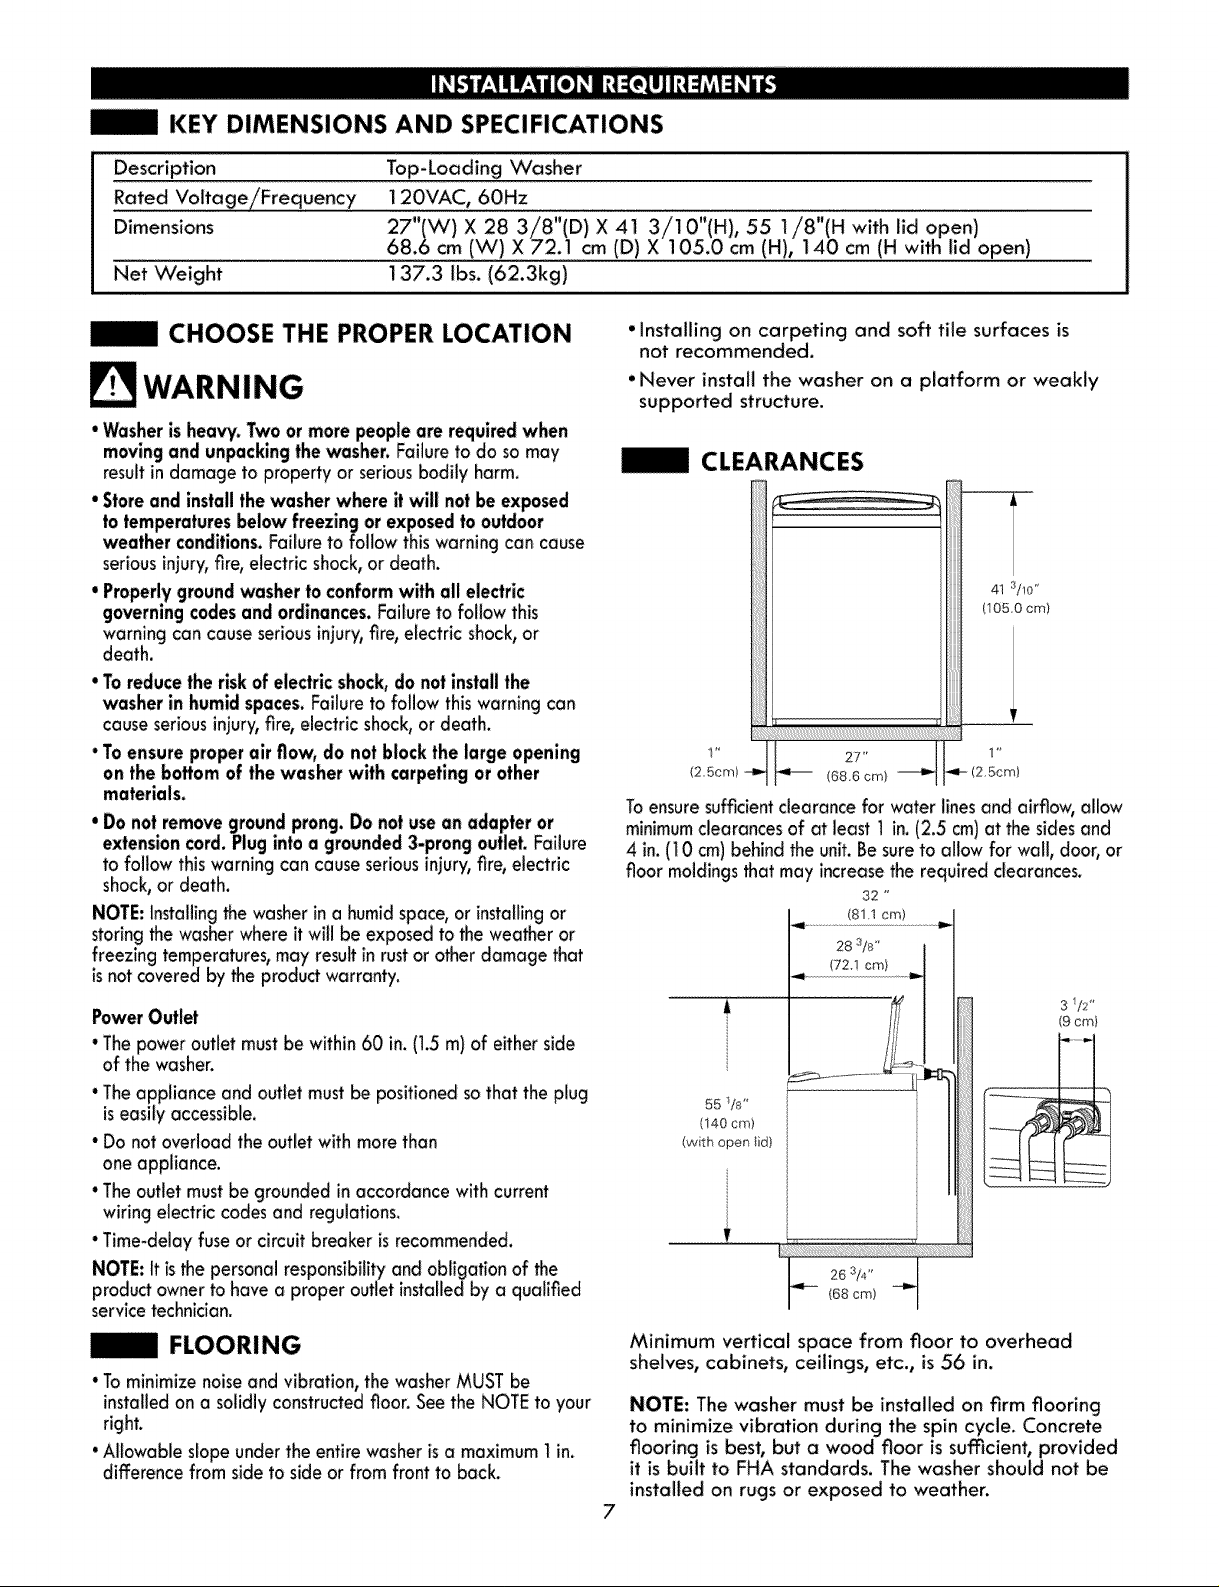
KEY DIMENSIONS AND SPECIFICATIONS
Description Top-Loading W'asher
Rated Voltage/Frequency 120VAC, 60Hz
Dimensions 27"(W) X 28 3/8"(D) X 4t 3/10"(H), 55 1/8"(H with lid open)
68.6 cm (W) X 72.1 cm (D) X 105.0 cm (H), 140 cm (H with lid open)
Net W'eight 137.3 Ibs. (62.3kg)
CHOOSE THE PROPER LOCATION
result indamage to property or seriousbodily harm.
seriousinjury,fire, electric shock,or death.
warning can cause seriousinjury, fire, electric shock,or
death.
• Toreducethe riskof electricshock, do notinstalithe
washer inhumidspaces.Failureto followthiswarning can
cause seriousinjury,fire, electric shock,or death.
• Toensure properair flow, do not blockthe large opening
on the bottom of the washer with carpetingor other
materials.
• Do not removegroundprong.Do notusean adapter or
extensioncord.Plug intoa grounded3-prongoutlet. Failure
to follow thiswarning can causeseriousinjury,fire, electric
shock,or death.
NOTE:Installingthe washerin a humidspace,or installingor
storingthewasherwhere it will be exposed to the weather or
freezing temperatures, mayresultin rustor other damage that
isnotcovered by the produd warranty.
PowerOutlet
• Thepower outlet mustbe within 60 in. (1.5m) of either side
of the washer.
•Theappliance and outlet mustbe positioned sothat the plug
iseasily accessible.
•Do not overload the outlet with more than
one appliance.
•Theoutlet mustbe grounded inaccordance with current
wiring electric codes and regulations.
•Time-delay fuseor circuit breaker isrecommended.
NOTE:It isthe personal responsibilityand obligation of the
product owner to have a proper outlet installedby a qualified
servicetechnician.
| FLOORING
• Tominimize noiseand vibration,thewasherMUST be
installedona solidlyconstructed floor. Seethe NOTE toyour
right.
•Allowable slopeunder the entire washerisa maximum 1in.
difference from side to side or from front to back.
• installing on carpeting and soft tile surfaces is
not recommended.
• Never install the washer on a platform or weakly
supported structure.
CLEARANCES
(2,5cm) (686 cm) _ (2.5cm)
Toensuresufficientclearance for water linesand airflov,; allow
minimumclearancesof at least 1 in. (2.5 cm)at the sides and
4 in.(10 cm) behind the unit.Be sureto allow for wall, door, or
floor moldingsthat may increasethe required clearances.
32 "
(811 cm)
28 sis"
(72,! cm}
3/2"
(9 cm}
55 _/s'*
(i40 cm)
(with open _id)
Minimum vertical space from floor to overhead
shelves, cabinets, ceilings, etc., is 56 in.
NOTE: The washer must be installed on firm flooring
to minimize vibration during the spin cycle. Concrete
flooring isbest, but a wood floor is sumcient, provided
it is built to FHA standards. The washer should not be
installed on rugs or exposed to weather.
7
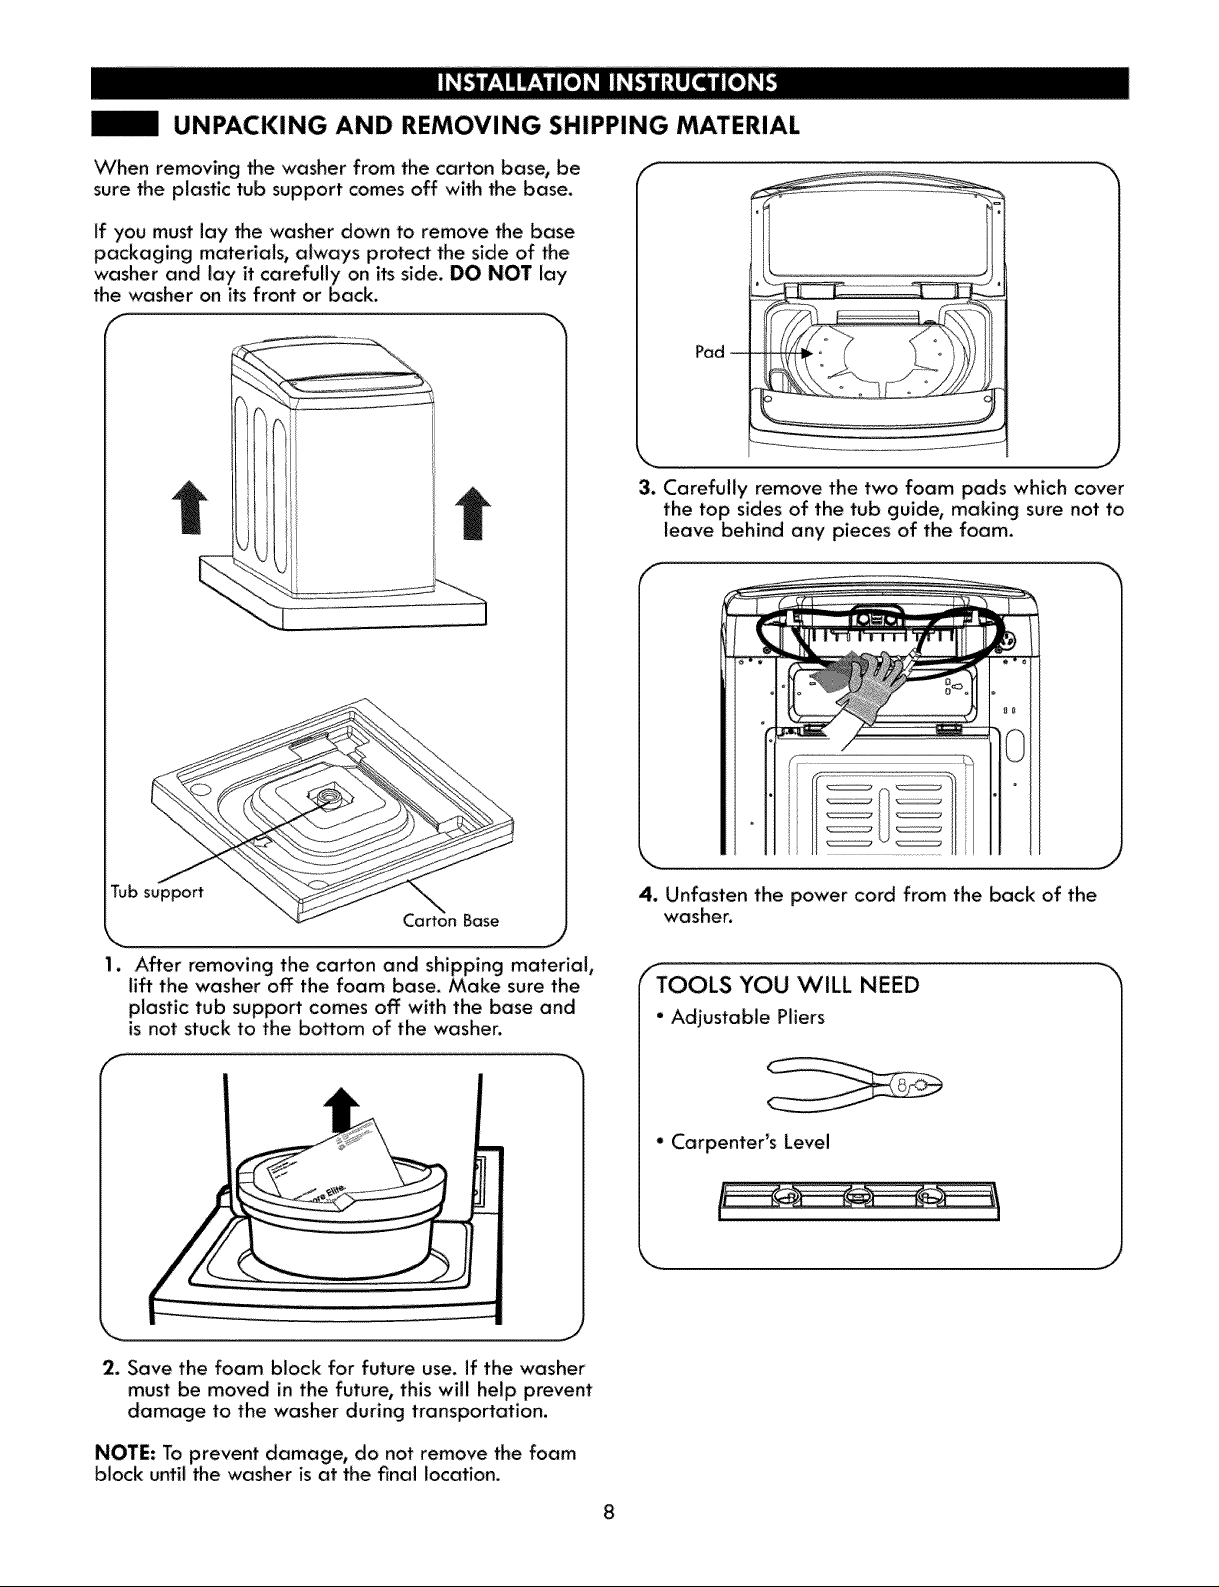
UNPACKING AND REMOVING SHIPPING MATERIAL
When removing the washer from the carton base, be
sure the plastic tub support comes off with the base.
If you must lay the washer down to remove the base
packaging materials, always protect the side of the
washer and lay it carefully on its side. DO NOT lay
the washer on its front or back.
r -h
\
f h
Pad
_%,, ,j
3. Carefully remove the two foam pads which cover
the top sides of the tub guide, making sure not to
leave behind any pieces of the foam.
Tub support
k_-_
1.
After removing the carton and shipping material,
,J
lift the washer off the foam base. Make sure the
plastic tub support comes off with the base and
is not stuck to the bottom of the washer.
2. Save the foam block for future use. If the washer
must be moved in the future, this will help prevent
damage to the washer during transportation.
NOTE: To prevent damage, do not remove the foam
block until the washer is at the final location.
4. Unfasten the power cord from the back of the
washer.
f
'TOOLS YOU WILL NEED
• Adjustable Pliers
• Carpenter's Level
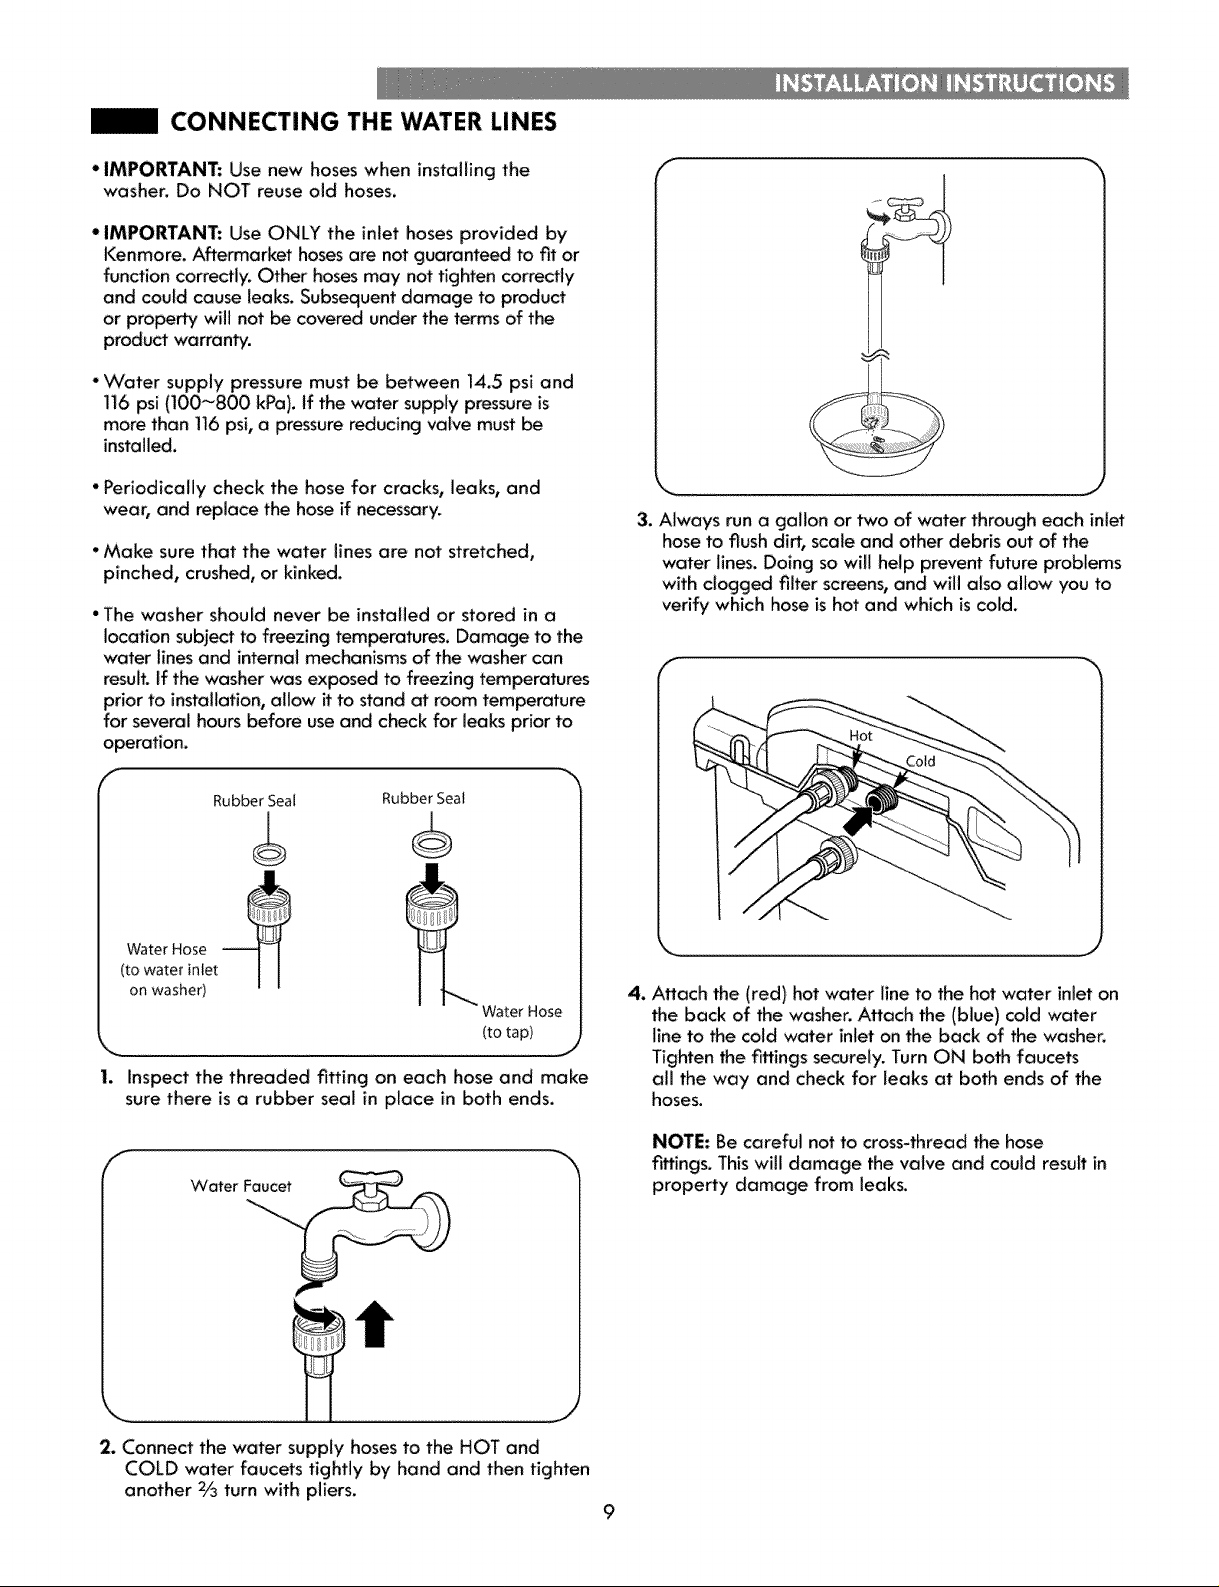
CONNECTING THE WATER LINES
* IMPORTANT: Use new hoseswhen installing the
washer. Do NOT reuse old hoses.
* IMPORTANT: Use ONLY the inlet hosesprovided by
Kenmore. Aflermarket hosesare not guaranteed to fit or
function correctly. Other hosesmay not tighten correctly
and could cause leaks. Subsequent damage to product
or property will not be covered under the terms of the
productwarranl_,.
• Water supply pressure must be between 14.5 psi and
116 psi {100~800 kPa). If the water supply pressureis
more than 116psi, a pressurereducing valve must be
installed.
• Periodically check the hose for cracks, leaks, and
wear, and replace the hoseif necessary.
°Make sure that the water lines are not stretched,
pinched, crushed, or kinked.
"The washer should never be installed or stored in a
location subject to freezing temperatures. Damage to the
water lines and internal mechanisms of the washer can
result, If the washer was expos_ to freezing temperatures
prior to installation, allow ff to stand at room temperature
for several hours before use and check for leaks prior to
operation.
f
RubberSeal
RubberSeal
3. Always run a gallon or two of "water through each inlet
hose to flush dirt, scale and other debris out of the
water lines. Doing so will help prevent future problems
with clogged filter screens,and will also allow "youto
verify which hose is hot and which is cold.
f
h
WaterHose
/towateri01et I I
on washer)
Water Hose
(to tap)
J
1. Inspect the threaded fitting on each hose and make
sure there is a rubber seal in place in both ends.
f
Water
jJ
2. Connect the water supply hoses to the HOT and
COLD water faucets tightly by hand and then tighten
another 2/3 turn with pliers.
J
4. Attach the (red) hot ,water line to the hot water inlet on
the back of the washer, Attach the (blue) cold water
llne to the cold water inlet on the back of the washer.
Tighten the fittings securely. Turn ON both faucets
all the way and check for leaks at bath ends of the
hoses.
NOTE: Be careful not to cross-thread the hose
fittings. This will damage the valve and could result in
property damage from leaks.
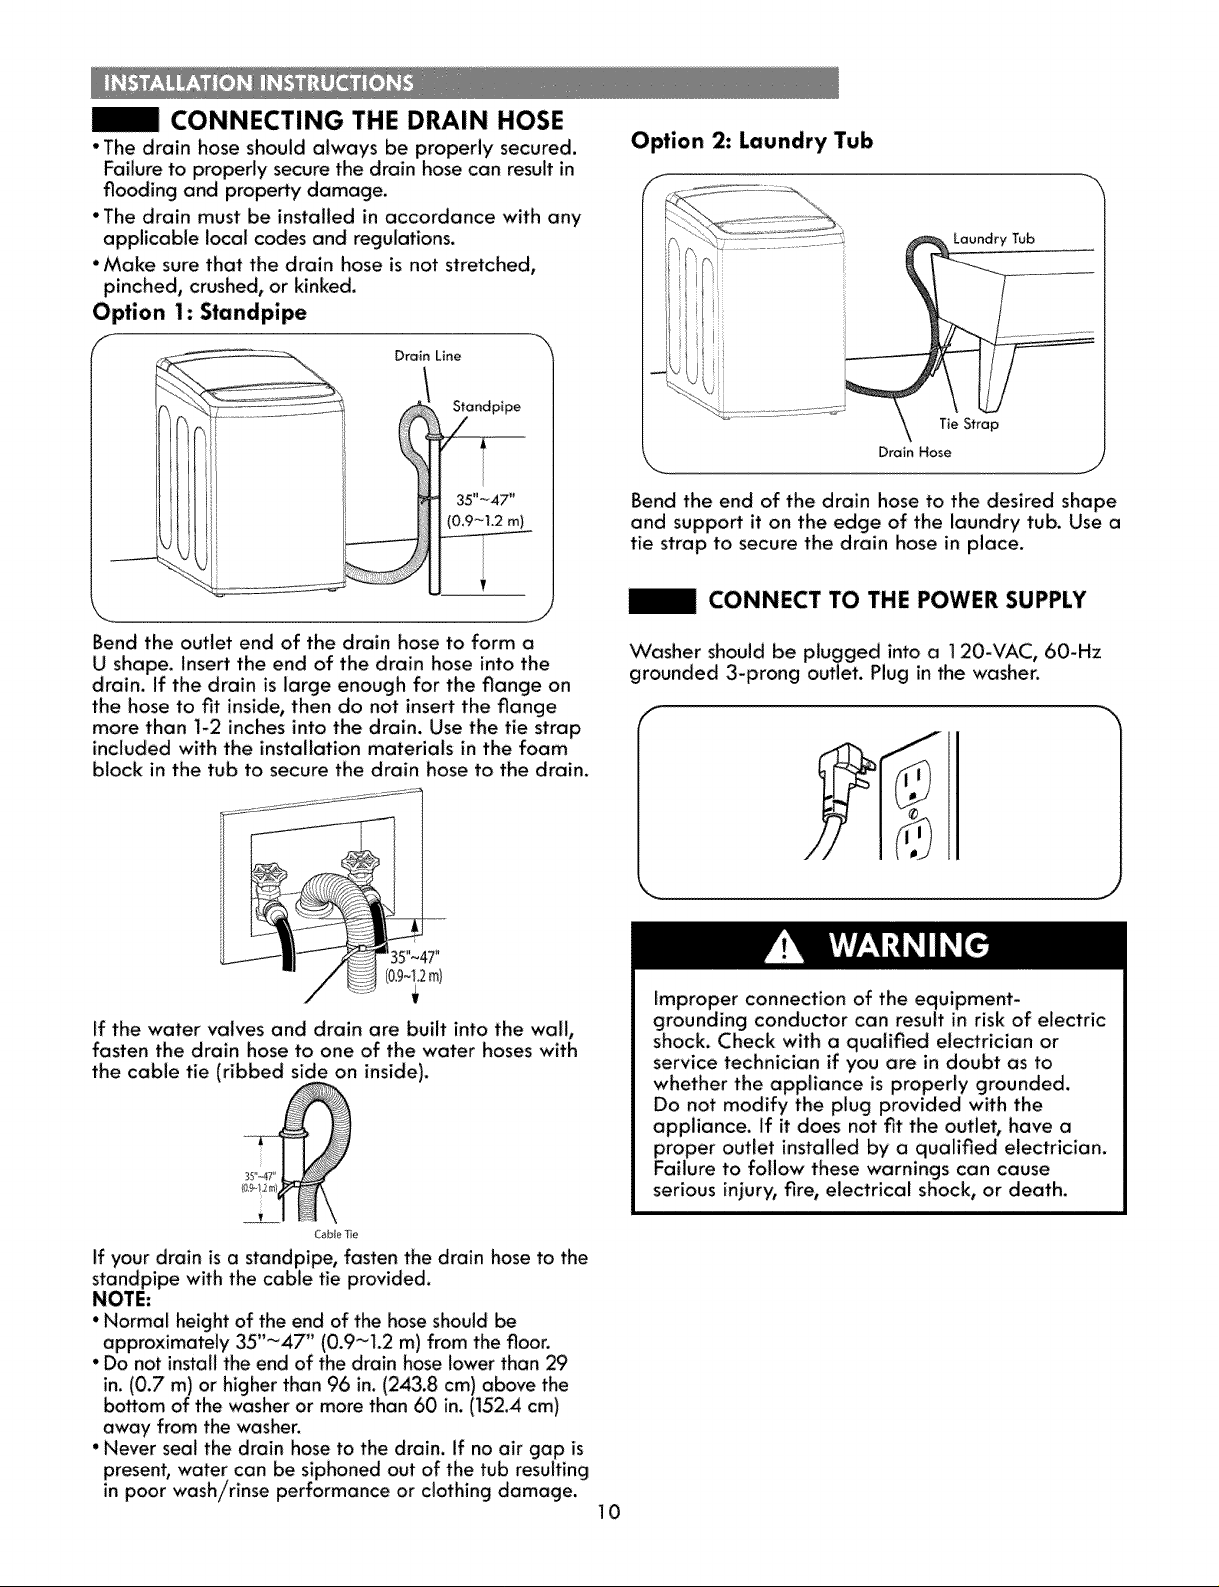
1 CONNECTING THE DRAIN HOSE
"The drain hose should always be properly secured.
Failure to properly secure the drain hose can result in
flooding and prope_y damage.
• The drain must be installed in accordance with any
applicable local codes and regulations.
•Make sure that the drain hose is not stretched,
pinched, crushed, or kinked.
Option 1: Standpipe
f Dra_n Line
Standpipe
35"~47 '_
(0,9_I.2 m)
Option 2: Laundry Tub
'\ Tie Strap
Drain Hose
J
Bend the end of the drain hose to the desired shape
and support it on the edge of the laundry tub, Use a
tie strap to secure the drain hose in place.
1 CONNECT TO THE POWER SUPPLY
Bend the outlet end of the drain hose to form a
U shape. Insert the end of the drain hose into the
drain. If the drain is large enough for the flange on
the hose to fit inside, then do not insert the flange
more than 1-2 inches into the drain. Use the tie strap
included with the installation materials in the foam
block in the tub to secure the drain hose to the drain.
35_'~4T_
i
If the water valves and drain are built into the wall,
fasten the drain hose to one of the water hoses with
the cable tie (ribbed side on inside).
Washer should be plugged into a 120-VAC, 60-Hz
grounded 3-prong outlet. Plug in the washer,
Improper connection of the equipment-
grounding conductor can result in risk of electric
shock. Check with a qualified electrician or
service technician if you are in doubt as to
whether the appliance is properly grounded.
Do not modify the plug provided with the
appliance. If it does not fit the outlet, have a
proper outlet installed by a qualified electrician.
Failure to follow these warnings can cause
serious injury, fire, electrical shock, or death.
Cable "Ee
If your drain is a standpipe, fasten the drain hose to the
standpipe with the cable tie provided.
NOTE:
• Normal height of the end of the hoseshould be
approximately 35"_47" (0.9_1.2 m) from the floor.
• Do not installthe end of the drain hose lower than 29
in. (0.7 m) or higher than 96 in. (243.8 cm) above the
bottom of the washer or more than 60 in. (152.4 cm)
away from the washer.
• Never seal the drain hose to the drain, if no air gap is
present, water can be siphoned out of the tub resulting
in poor wash/rinse performance or clothing damage.
10
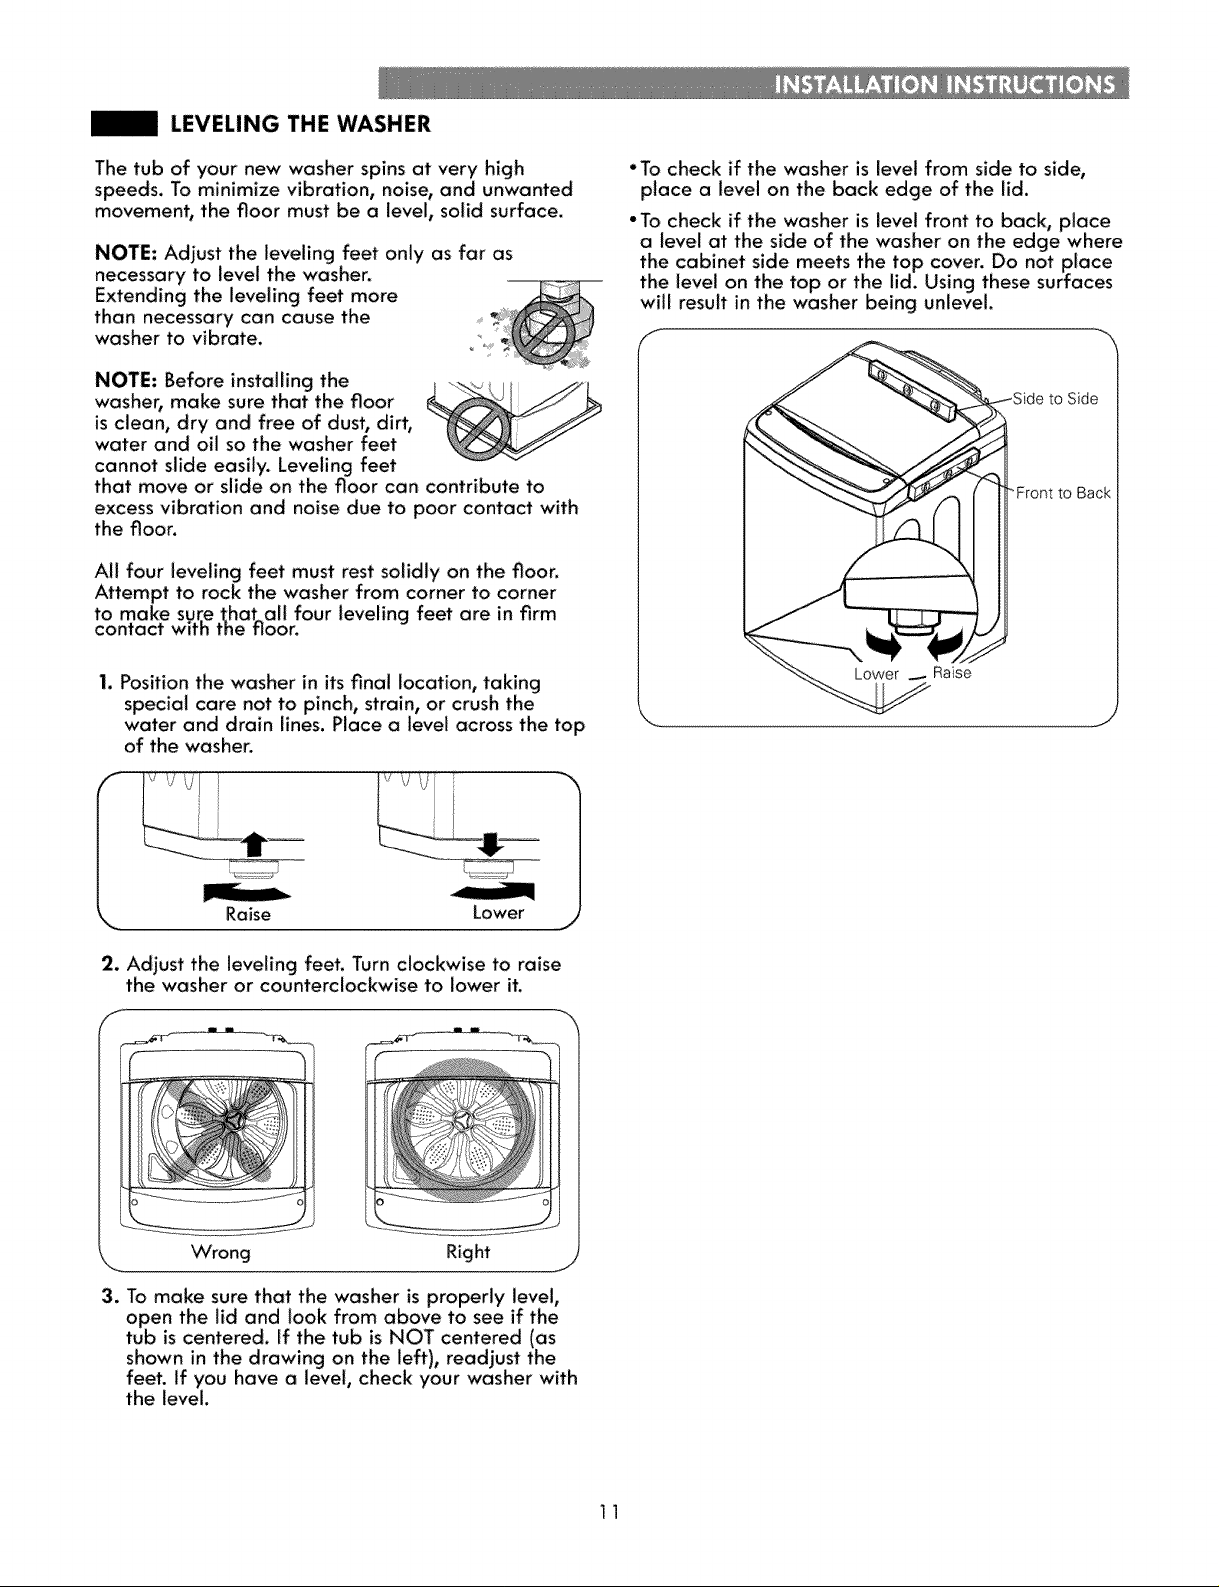
LEVELING THE WASHER
The tub of your new washer spins at very high
speeds. To minimize vibration, noise_ and unwanted
movement, the floor must be a level, solid surface.
NOTE: Adjust the leveling feet only as far as
necessary to level the washer.
Extending the leveling feet more
than necessary can cause the
washer to vibrate. "_
NOTE: Before installing the
-washer, make sure that the floor
is clean, dry and free of dust, dirt,
water and oil so the washer feet
cannot slide easily. Leveling feet
that move or slide on the floor can contribute to
excess vibration and noise due to poor contact with
the floor.
All four leveling feet must rest solidly on the floor.
Attempt to rock the washer from corner to corner
to make sure that all four leveling feet are in firm
contact with the floor.
1. Position the washer in its final location, taking
special care not to pinch, strain, or crush the
water and drain lines. Place a level across the top
of the washer.
• To check if the washer is level from side to side,
place a level on the back edge of the lid.
° To check if the washer is level front to back, place
a level at the side of the washer on the edge where
the cabinet side meets the top cover. Do not place
the level on the top or the lid. Using these surfaces
will result in the .washer being unlevel.
to Side
"Front to Back
Lower __ Raise
I I i!
Raise Lower
2. Adjust the leveling feet. Turn clock.vise to raise
the washer or counterclockwise to lower it.
\,ATrong Right
3. To make sure that the washer is properly level,
open the lid and look from above to see if the
tub is centered. If the tub is NOT centered (as
shown in the drawing on the left), readjust the
feet. If you have a level, check your washer with
the level.
11
WARNING: To reduce the risk of fire, electric shock,or injury to persons, read and follow this
entire Use & Care Guide, including the Important Safety Instructions, before operating this washer.
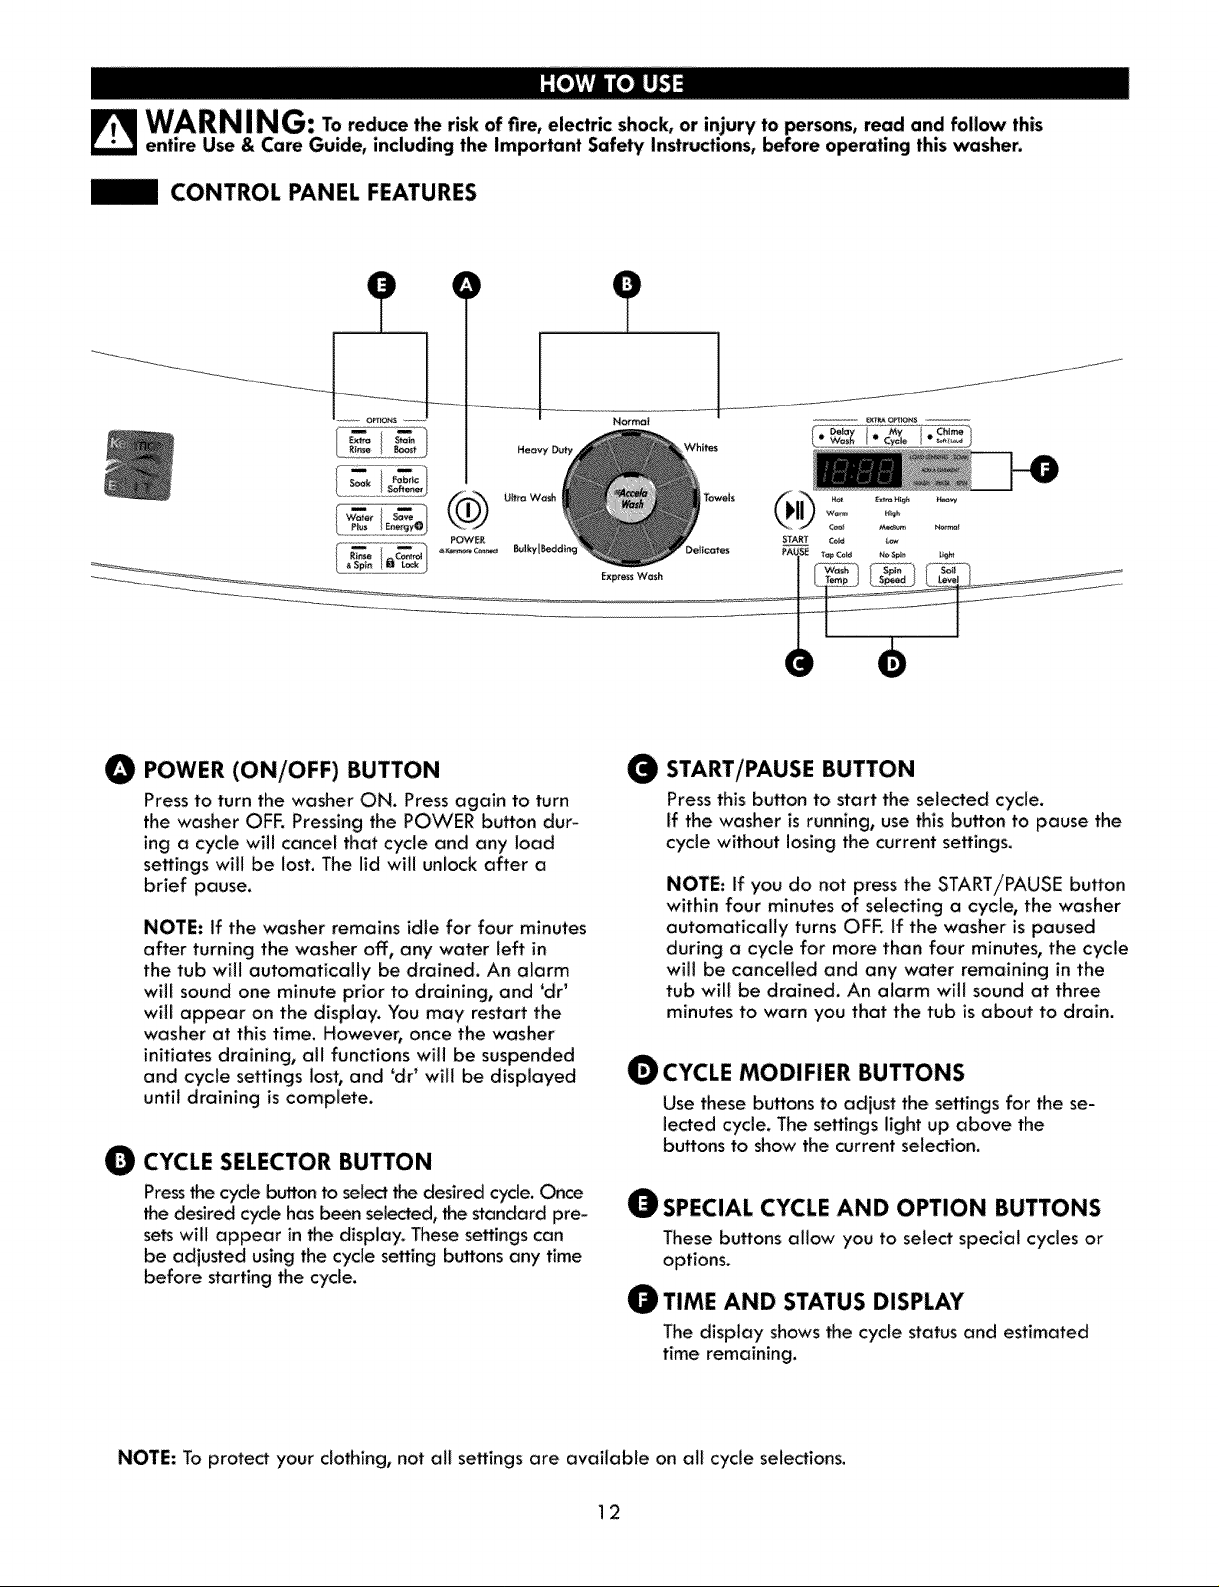
| CONTROL PANEL FEATURES
So_k F_c
_ftener
W_te_ _rgyO
Exp_e_sWash
0 POWER (ON/OFF) BUTTON
Press to turn the washer ON. Press again to turn
the washer OFF. Pressing the POWER button dur-
ing a cycle will cancel that cycle and any load
settings will be lost. The lid wll unlock after a
brief pause.
NOTE: If the washer remains idle for four minutes
after turning the washer ofF, any water left in
the tub will automatically be drained. An alarm
wtl sound one minute prior to draining, and 'dr'
wil appear on the display. You may restart the
washer at this time. However, once the washer
initiates draining, all functions will be suspended
and cycle settings lost,and 'dr_will be displayed
until draining is complete.
O CYCLE SELECTOR BUTTON
Pressthe cycle button to se_edthe desiredctc)e. Once
the desired cycle hasbeen selected, the standard pre-
setswilt appear inthe display. These settings can
be adiusted using the cycle setting buttons any time
before starting the cycle.
e START/PAUSE BUTTON
Press thisbutton to start the selected cycle.
If the washer is running, use this button to pause the
cycle without losing the current settings.
NOTE: if you do not press the START/PAUSE button
within four minutes of selecting a cycle, the washer
automatically turns OFF. If the washer ispaused
during a cycle for more than four minutes, the cycle
wil be canceled and any water remaining in the
tub wil be drained. An alarm will sound at three
minutes to warn you that the tub is about to drain.
CYCLE MODIFIER BUTTONS
Use these buttons to adjust the settingsfor the se-
lected cycle. The settings light up above the
buttons to showthe current selection.
A
SPECIAL CYCLE AND OPTION BUTTONS
These buttons allow you to select special cycles or
options.
TIME AND STATUS DISPLAY
The display shows the cycle status and estimated
time remaining.
NOTE: To protect your clothing, not all settings are available on all cycle selections.
12
OPERATING THE WASHER
SORT LAUNDRY AND LOAD WASHER
O
Sort laundry by fabric type, soil level, color and load size, as
needed. Open the door and load the items into the washer.
Detergent
POWER
No_
Celd k_
Bleach
ADD CLEANING PRODUCT
O
Add High-Emciency (HE) detergent to the detergent dispenser
drawer. For proper wash performance, always measure
the detergent using the measuring device provided by the
detergent manufacturer.
TURN ON THE WASHER
O
Press the PO'W'ERbutton to turn ON the washer. The lights
above the cycle buttons will illuminate and a chime will sound.
SELECTA CYCLE
O
Press the cycle button to select the desired cycle.
The preset VVashTemp, Spin Speed, Soil Level, and Option
settings for that cycle will be shown.
SELECT CYCLE MODIFIERS & OPTIONS (optional)
O
Default settings for the selected cycle can now be changed if
desired. Use the cycle modifier buttons.
NOTE: To protect your fabrics, not all modifiers are
available on all cycles. A different chime will sound and the
LEDwill not come on if the selection is not allowed. Cycle op-
tions can also be added by usingthe option buttons.
START
PAUSE
BEGIN CYCLE
O
Press the START/PAUSE button to begin the cycle. The door will
lock, and the washer will briefly tumble the load without water
to measure itsweight. Once the weight of the load ismea-
sured, the washer will begin the selected wash cycle.
ADD A GARMENT LIGHT
O
The ADD A GARMENT light will illuminate near the
beginning of the wash cycle to indicate when it issafe to add
itemsto the load. Press the START/PAUSE button to pause the
cycle and add any additional itemsto the load.
NOTE: It is not recommended to add items unless the ADD
A GARMENT light is illuminated, as this could result in poor
performance.
RESUME CYCLE
O
Press the START!PAUSEbutton to resume the wash cycle.
_IL CAUTION
Do not stand on top of the appliance or place obiects (such as
laundry, lighted candles, lighted cigarettes, dishes, chemicals,
metal objects, etc.) on the appliance.
Failure to follow these cautions can cause fire, electric shock,
problems with the product, or injury.
13
CYCLE GUIDE
Thecycle guide below shows the default settings, available options and recommended fabric
types for each cycle. Allowable modifier adjustments are shown below the default setting for
= Available Option
Default Setting
each cycle.
Normal
Whites
Cotton, shirts, jeans,
socks, pants
Heavily to normally
soiled white cottons
Hot
Cool
Cold
TapCold
Warm
Cool
Extra High
Medium
No Spin
Extra High
High
Low
Heavy
Light
Normal
Light
No Spin
Heavy
Duty
Bulky//
Bedding
Heavily soiled
cotton fabrics
Large items such
as blankets and
comforters
Hot
Cool
Cold
TapCold
Hot
Cool
Cold
TapCold
Extra High
Medium
Low
No Spin
Extra High
Medium
LOW
No Spin
Normal
Light
Heavy
Light
NOTE:
To protect your garments, not every wash temperature, spin speed, soil level, or option is available with every cycle.
A chime will sound and the LED will not light if the selection is not allowed.
*When a cycle is selected, the default time for that cycle is displayed. This time will change as modifiers or options
are selected. Once the START/PAUSE button is pressed, the washer will measure the size of the load. The estimated
time may change once the load size has been measured. The washer automatically adjusts the wash time for the
amount of laundry, water pressure, water and other operating conditions.
These cycles use various wash motions to enhance cleaning and/or fabric care performance. The wash motions may
sound different at different stages of the wash cycle. This isnormal.
14
CYCLE GUIDE
Thecycle guide below showsthe default settings,available options and recommended fabric
types for each cycle. Allowable modifier adjustments are shown below the default setting for
each cycle.
Express
Wash
Towels
Lightly soiled
clothing and small
loads
Towels
Cool
Cold
TapCold
Hot
Cool
Cold
Tap Cold
ExtraHigh
Medium
Low
No Spin
ExtraHigh
Medium
Low
No Spin
Heavy
Normal
Heavy
Light
ressshirts/
Delicates
Ultra
Wash
Iousestnylons,
sheer or lacy
garments
Heavily soiled
cotton fabrics
Warm
Cool
Cold
High
Medium
No Spin
ExtraHigh
Medium
Heavy
Normal
Low
No Spin
= Available Option
i: Default Setting
0
NOTE:
To protect your garments, not every wash temperature, spin speed, soil level, or option is available with every cycle.
A chime will sound and the LED will not light if the selection is not allowed.
_When a cycle is selected, the default time for that cycle isdisplayed. This time will change as modifiers or options
are selected. Once the START/PAUSE button is pressed, the washer will measure the size of the load. The estimated
time may change once the load size has been measured. The washer automatically adjusts the wash time for the
amount of laundry, water pressure, water and other operating conditions.
These cycles use various wash motions to enhance cleaning and/or fabric care performance. The wash motions may
sound different at different stages of the wash cycle. This is normal.
15
SORTING WASH LOADS
_'_ CAUTION
• Do not load items higher than the top edge of the tub.
Failure to follow this caution can result in leakage or
damage to fabrics.
• Use the BULKY/BEDDING cycle for buoyant or
nonabsorbent items such as pillows or comforters.
Failure to follow this caution can result in leakage.
• If possible, do not wash any water-resistant items.
If "you mustt please select the Bulky/Bedding cycle.
- Examples of water-proof or water-resistant items
include certain mattress pads, mattress covers, rain
gear, camping gear, skiing apparel, outdoor gear and
similar items.
Grouping Similar items
For the best washing results, and to reduce the possibility
of damage to clothing, care should be taken to sort the
clothing into loads that are made up of similar items.
Mixing different fabric types and//or soil levels can result
in poor "wash performance, color transfer or discoloration,
fabric damage or lintlng. Fabrics should be sorted into
groups as described below.
Colors
Sort articles by color. 'Wash dark clothes together in
aseparate load from light colors or whites. Mixing dark
clothes with light clothes can result in dye transfer or
discoloration of the lighter clothes.
Soil Level
Wash heavily soiled clothing together. 'vVashing lightly
soiled clothing in the same load with heavily soiled
clothing could result in poor wash performance for the
lightly soiled clothing.
Fabric Type
Delicate articles should not be mixed with heavier or
sturdier fabric types. Vv'ashing delicates in a load
with heavy fabrics can result in damage to the more
delicate fabrics. Washing heavier fabrics in a delicate
load can result in poor wash performance for the
heavier fabrics and possible damage to the delicates.
Fabric Care Labels
Many articles of clothing include a fabric care label.
Using the chart below, adjust the cycle and option
selections to care for your clothing according to the
manufacturer's recommendations.
F _-,_
Fabric Care Labels
wo,. UCI
Machine
cycle _a_
Water • • • O0 •
temperature _t w=_ c_
Bleach
symbols A A
\ J
Loading the Washer
• Check all pockets to make sure that they are empty.
Items such as clips, matches, pens, coins, and keys can
damage both your washer and your clothes.
• Close zippers, hooks, and drawstrings to prevent these
items from snagging or tangling on other clothes.
• Pretreat heavily stained areas for best results.
• Combine large and small items in a load. Load large
items first.
* Large items should not be more than half of the total
wash load.
"The washer can be fully loaded, but the tub should
not be tightly packed with items. The lid of the washer
should close easily.
• To prevent an out-of-balance load, do not "wash
single items. Add one or two similar items to the load.
Large, bulky items, such as a blanket, comforter, or
bedspread, should be washed individually.
• The washer will not fill or operate with the lid open.
Some fabrics attract and bind lint to them while others
give off lint in the laundry process. Avoid mixing these
lint collectors and lint producers in the same load. Mixing
these fabrics will result in pilling and linting on the lint
collectors. (For example, lint collector - knit sweater; lint
producer - terrycloth towels.)
I Sort Laundry,..
by Colors
Whites
Lights
Darks
by Soil
Heavy
Normal
Light
by Fabric
Delicates
Easy Care
Sturdy
by Lint
Lint Producer
Lint Collector
NOTE: Use the BULKY/BEDDING cycle for large or
bulky items such as poly-filled jackets, comforters,
pillows, etc. These items may not be as absorbent
as other laundry items and should be sorted into a
separate wash load for optimal results.
Bulky items should be placed as far down in the tub as
possible for optimal results. Always place buoyant items
at the bottom of the tub.
The washer will automatically detect the load size.
Because of the high-efflciency "washsystem, the water
level may not completely cover the load.
16
| ABOUT THE DISPENSERS
The automatic dispenser consists of two compartments
which hold:
• Liquid fabric softener.
"Liquid or powdered detergent for main wash.
Main _¢Vash Liquid Detergent
Powder Detergent
Compartment Compartment
Softener
Liquid Fabric "_\\
Compartment
,_ Dispenser Drawer
Main Wash
Insert
Main Wash Detergent Compartment
This compartment holds laundry detergent for the main
wash cycle. The detergent is added to the load at the
beginning of the cycle. Always use High-Emciency (HE)
detergent with your washing machine. Either powdered
or _iquid detergent may be used.
Never exceed the manufacturer's recommendations
when adding detergent. Using too much detergent can
result in detergent buildup in clothing and the washer.
When using liquid detergenb make sure the liquid
detergent cup and insert are in place. Do not exceed
the maximum fill mine.
When using powdered detergent, remove the liquid
detergent cup from the compartment. Powdered
detergent will not dispense with the liquid detergent
cup in place.
Fabric Softener Compartment
This compartment holds liquid fabric softener, which is
automatically dispensed during the flnal rinse cycle.
Never exceed the manufacturer's recommendations when
adding softener. Using too much fabric softener can result
in buildup in clothing and the washer.
• Always follow the manufacturer's recommendations
when adding fabric softener. Do not exceed the
maximum fill line. Using too much fabric softener may
stainclothes.
"Dilute concentrated fabric softeners with warm water.
Do not exceed the maximum fill line.
• Never pour fabric softener directly onto the load or
into thetub.
Liquid Bleach Compartment
The bleach dispenser is a separate compartment at
the left front of the tub opening. This compartment
holds liquid bleach, which is dispensed automatically
at the proper time during the wash cycle. Any liquid
remaining in the dispenser at the end of the cycle is
water, not bleach.
• Do not add powdered bleach to this compartment.
The bleach compartment is designed to dispense liquid
bleach only. Powdered or liquid color-safe bleach will
not dispense properly.
• Always follow the manufacturer's recommendations
when adding bleach. Never add more than one cup
and do not exceed the maximum fill line sincethis can
cause the bleach to be dispensed immediately,resulting in
damage to fabrics. Using too much bleach can damage
fabrics.
• Never pour undiluted liquid chlorine bleach directly
onto the load or into the tub. Fabric damage can occur.
• Do not use color-safe bleach or Oxi products in the
same cycle with liquid chlorine bleach.
Do NOT mix chlorine bleach with ammonia or
acids, such as vinegar or rust/scale remover.
Mixing chemicals like these can produce a lethal
gas, resulting in severe injury or death.
17
DETERGENT AND DISPENSER USE
A Word About Detergents
High-Efficiency (HE) detergents produce fewer suds,
dissolve more efficiently to improve washing and
rinsing performance, and help to keep the interior of
your washer clean Using detergent that is not HE may
cause oversudsing and unsatisfactory performance
which could result in error codes, cycle failure, and
machine damage,
Liquid Powdered
Detergent Detergent
For proper wash performance, always measure the
detergent using the measurements provided by the
detergent manufacturer.
The normal amount of HE detergent needed, for
average loads, is less than 1/2of the recommended
maximum. Use less detergent for soft water, light soil
or smaller loads. Never use more than the maximum
amount recommended by the detergent
manufacturer.
Using the Softener and Detergent Dispenser
To add detergent, bleach, and fabric softener to the
automatic dispenser:
O Open the dispenser drawer.
O Load the _aundry products into the
appropriate compartments.
Close the drawer before starting the cycle.
NOTE: it isnormal for a small amount of water to
remain in the bleach and softener compartments at the
end of the cycle.
IMPORTANT: Do not place or store laundry products,
such as detergent, bleach, or I_quidfabric softener, on
top of your washer or dryer. Wipe up any spills immedi-
ately. These products can damage the finish and controls.
Using the Liquid Bleach Dispenser
Thebleach dispenser automatically dilutes and dispenses
liquid bleach at the proper time in the wash cycle.
Designed to use only
High-Efflciency (HE) detergent
IMPORTANT:"1'ourwashing machine isdesigned for use
with only High-Efficiency (HE)detergents. HEdetergents
are formulated specifically for High-Effldency washers
and contain suds-reducing agents. Always look for the
HEsymbol when purchasing detergent.
IMPORTANT: Not all detergentsare the same. Pay
careful attention to the amount of detergent usedto avoid
overusing, poor rinsing and detergent buildup in clothing,
and residue buildup that can contribute to odors in the
machine. NEVER use a cup or scoop other than the one
supplied by the manufacturer of the detergent you
are using. Never use more than the maximum amount of
detergent recommended by the manufacturer.
Always measure the detergent amount. While HE
detergents are designed for this type of washing
machine, be careful when measuring the detergent. For
most normal loads, no more than 1/4 to 1/2 of cap or
scoop of HE detergent should be used.
NOTE: Extra care must be exercised when using 2X and
3X concentrated detergents because even a little bit extra
can contribute to the problems mentioned above.
NOTE: Detergents designated as HE compatible may not
provide optimal results.
Check clothing care labels for special instructions.
Measure liquid bleach carefully, following
instructionson the bottle. High-efficiency washers
use less water, so lessbleach is needed. One half
cup is enough for most loads.
O
Carefully pour the pre-measured amount of bleach
directly into the bleach dispenser. If you are using
powdered bleach of any kind, pour it directly into
the tub before adding the laundry. Never add
powdered bleach to the liquid bleach dispenser.
• Never pour undiluted liquid chlorine bleach directly
onto clothes or into the tub.
• Do not pour powdered bleach into bleach
dispenser
• Do not place laundry items on top of the bleach
dispenser when loading and unloading the washer
• Always measure and pour bleach carefully Avoid overfilling
or splashing when adding bleach to the dispenser The
maximum capacity of the bleach dispenser is one cup of
bleach per wash cycle Overfilling could result in bleach
being dispensed immediately
18
TIME AND STATUS DISPLAY
The time and status display shows the estimated time remaining and cycle progress.
ESTIMATED TIME REMAINING
CYCLE STATUS INDICATOR
These LEDswill illuminate when a cycle is selected
to indicate which stages wilJ run. When a cycle is
running, the LEDwill blink for the active stage. Once
a stage is complete, the LEDwill turn off. If a cycle
is paused, the active LEDwill stop blinking.
O
When a cycle is selected, the default time for
that cycle is displayed. This time will change as
modifiers or options are selected. Once the START/
PAUSEbutton is pressed, the washer will measure
the size of the load. The estimated time may
change once the load size has been measured.
NOTE: The time shown isonly an estimate. This time
isbased on normal operating conditions. Several
external factors (load size, room temperature,
incoming water temperature, etc.) can affect the
actual time.
19¸
CYCLE MODIFIER BUTTONS
Each cycle has default settings that are selected
automaticaDy. You may also customize these settings
using the cycle modifier buttons. Pressthe button far
the desired modifier until the indicator light for the
desired setting is lit. The washer automatically adjusts
the water level for the type and size of wash load far
best results and maximum emciency.
Due to the higMemciency nature of this product,
water levels may be much lower than expected. This is
normal and cleaning/rinsing performance will not be
compromised.
Hot
Warm
Extra High
Cool
Cold
Tap Cold
High
Medium
Low
No Spin
NOTE: To protect your garments_ not every wash/rinse
temperature, spin speed, soil level, or option is avaG
able with every cycle. A chime will sound and the LED
wff! not light if a selection is not allowed.
Heavy
Normal
Light
WASH TEMP
WASH TEMP selects the wash and rinse temperature
combination for the selected cycle. Press the \AZASH
TEMP button until the indicator light for the desired
setting is lit.
"Select the wash temperature suitable for the type
of load you are washing. Foliow the garment
fabric care labets for best results.
"Cold rinses use _ess energy. The actual cold rinse
temperature depends on the temperature of the
cold water at the faucet.
2O
SPIN SPEED
O
Higher spin speeds extract more water from clothes,
reducing drying time and saving energy.
Press the SPIN SPEEDbutton until the desired speed
is selected. Some fabrics, suchas delicates, require
a slower spin speed. To protect your clothing, not all
spin speeds are available for all cycles.
SOIL LEVEL
O
Adjusting the soil level setting will modify the
cycle times and/or wash actions. Pressthe SOIL
LEVELbutton until the desired soil level is selected.
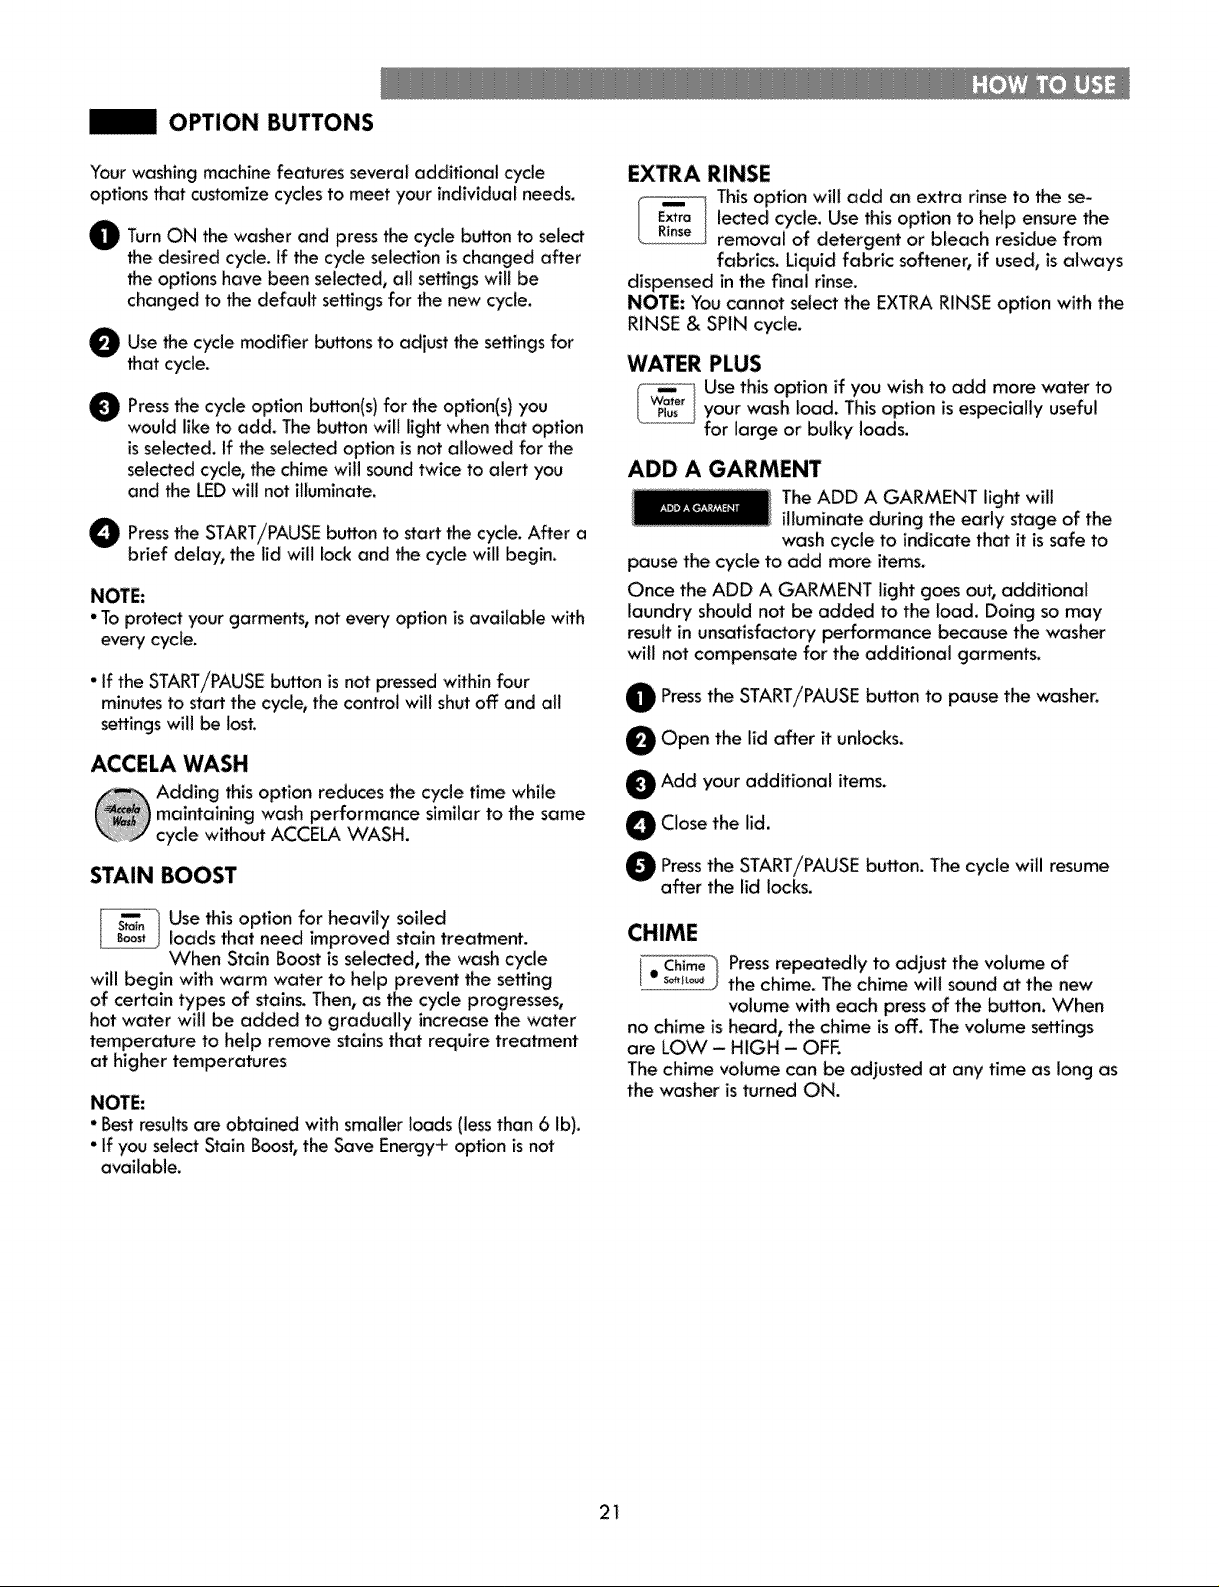
OPTION BUTTONS
Your washingmachine features several additional cycle
options that customizecyclesto meet your individualneeds.
O TurnON the washer and pressthe cycle button to select
the desired cycle. If the cycle selectionis changed after
the options have been selected, all settings will be
changed to the default settingsfor the new cycle.
g Use the modifier b_ons the for
that cycle.
O Press cycle option button(s) option(s) you
cycle
the for the
to
adiust settings
would llke to add. Thebutton will light when that option
is selected. If the selected option isnot allowed for the
selected cycle, the chime will soundtwice to alert you
and the LEDwill not illuminate.
O Pressthe START/PAUSEbutton to start the cycle. After a
brief delay, the lid will lock and the cycle will begin.
NOTE:
•Toprotect yourgarments, not every option isavailable with
every cycle.
• If the START/PAUSE button is not pressed within four
minutes to start the cycle, the control will shut off and all
settings well be lost.
ACCELA WASH
EXTRA RINSE
Thisoption will add an extra rinse to the se-
lected cycle. Use this option to help ensure the
removal of detergent or bleach residue from
fabrics. Liquid fabric softener, if used, is always
dispensed in the final rinse.
NOTE: You cannot select the EXTRARINSEoption with the
RINSE& SPIN cycle.
WATER PLUS
/xWo,o_ Usethisoption if you wish to add more water to
L___L your wash load. Thisoption is especially useful
for large or bulk'), loads.
ADD A GARMENT
The ADD A GARMENT light will
illuminate during the early stage of the
wash cycle to indicate that it is safe to
pause the cycle to add more items.
Once the ADD A GARMENT light goes out, additional
laundry shouldnot be added to the load. Doing so may
result in unsatisfactory performance because the washer
will not compensate for the additional garments.
O Pressthe START/PAUSEbutton to pause the washer.
O Open the lid after it unlocks_
O Add your additional items.
STAIN BOOST
I Sto_.7 Use this option for heavily soiled
loads that need improved stain treatment.
When Stain Boost isselected, the wash cycle
will begin with warm water to help prevent the setting
of certain types of stains. Then, as the cycle progresses,
hot water will be added to gradually increase the water
temperature to help remove stains that require treatment
at higher temperatures
NOTE:
• Bestresultsare obtained with smallerloads (lessthan 6 Ib).
• If you select Stain Boost,the SaveEnergy+ option isnot
available.
O Close the lid.
O Pressthe START/PAUSEbutton. The cycle will resume
after the lid locks.
CHIME
, Chime"l Press repeatedly to adjust the volume of
Loooooog't!_oJthe chime. The chime will sound at the new
volume with each press of the button. When
no chime is heard, the chime is off. The volume settings
are LOVv' - HIGH - OFE
The chime volume can be adjusted at any time as long as
the washer is turned ON.
21
 Loading...