

Page 1
E L I T
MICROWAVE / CONVECTION OVEN
Use and Care Guide
HORNO DE IVliCROONDAS/CONVECCION
Manual de uso y cuidado
Models/Modelos 721.67902
721.67903
721.67909
f
Sears, Roebuck and Co., Hoffman Estates, IL 60179 U.S.A.
MFL31663701 www.sears.com
Page 2
WARRANTY .............................................................. 2
SAFETY ................................................................ 3-4
Precautions to Avoid Possible Exposure
to Excessive Microwave Energy ............................. 3
Grounding Instructions ............................................ 3
Important Safety Instructions .................................. 4
UNDERSTANDING YOUR MICROWAVE OVEN.. 5-10
Specifications .......................................................... 5
Installation ............................................................... 5
Parts and Accessories ............................................ 6
Control Panel Features ........................................... 7
Cooking Comparison Guide ..................................... 8
Cookware Guide ..................................................... 9
How to Use Accessories .......................................... 9
Tips for Microwave Cooking .................................. 10
Cleaning ................................................................ 10
USING YOUR MICROWAVE OVEN .................. 11-19
Clock/Child Lock/Kitchen Timer ............................ 11
Option/Option Table/Timed Cooking/Add Minute.. 12
Warm Hold/More and Less ................................... 13
Multistage Cooking/Microwave Power Levels ....... 14
Sensor Cooking Operation Instruction .................. 15
Sensor Reheat/Sensor Reheat Table ................... 15
Sensor Popcorn/Sensor Cook .............................. 16
Sensor Cook Table ................................................ 17
Auto Defrost/Auto Defrost Table ........................... 18
Time Defrost/Express Defrost ............................... 19
USING YOUR CONVECTION OVEN ............... 20-26
Tips for Convection Cooking/Precautions ............. 20
Auto Bake/Auto Bake Table .................................. 21
Auto Roast/Auto Roast Table ................................ 22
Convection ............................................................ 23
Convection Cooking Guide ................................... 24
Convection Baking Table ........................................ 25
Meat Roasting Table for Convection Cooking ........ 26
USING YOUR COMBINATION OVEN ............. 27-28
Tips for Combination Cooking ................................ 27
Helpful Hints for Combination Cooking .................. 27
Combination .......................................................... 27
Combination Cooking Guide .................................. 27
HEATING/REHEATING GUIDE .............................. 28
FRESH VEGETABLE GUIDE .................................. 30
TROUBLESHOOTING ...................................... 31-33
Questions and Answers .................................. 31-32
Before Calling for Service ..................................... 33
MASTER PROTECTION AGREEMENTS .............. 66
One-YearLimitedWarranty
Wheninstalled,operatedand maintainedaccordingtoall
instructionssuppliedwith the product,if thisappliancefails due
to a defectin materialor workmanshipwithinone year from the
dateof purchase,call 1-800-4-MY-HOME®to arrangefor free
repair.
Five-YearLimitedWarrantyon the Magnetron
Forfive yearsfrom the date of purchase,if the magnetron
in this microwaveoven failsdue to adefect in materialor
workmanship,Sears will replacethe magnetron.Safety
regulationsrequirethe magnetronto be installedby Sears.
Afterthe firstyear, the customerassumesany laborcosts
associatedwith magnetronreplacement.
Ifthisapplianceis usedfor otherthan privatefamily purposes,
thiswarrantyappliesfor only 90days fromthe date of
3urchase.
Thiswarranty coversonlydefects in materialand
workmanship.Sears will NOT payfor:
1. Expendableitemsthat canwear outfrom normaluse,
includingbut notlimitedtofilters, belts,light bulbs, and bags.
2.A servicetechnicianto instructthe user in correctproduct
installation,operation,or maintenance.
31Aservicetechnicianto cleanor maintainthis product.
41Damageto orfailure ofthisproductif it is notinstalled,
operated,or maintainedaccordingto allinstructionssupplied
with the product.
51Damageto orfailureof this productresultingfrom accident,
abuse, misuse, or usefor other than itsintended purpose.
6. Damageto or failureofthis productcaused bythe use of
detergents,cleaners,chemicals,or utensilsother thanthose
recommendedin allinstructionssupplied withthe product.
71Damageto orfailureof partsor systemsresultingfrom
unauthorizedmodificationsmade to this product.
Disclaimerof impliedwarranties, limitationof remedies
Customer'ssole andexclusiveremedyunderthis limited
warrantyshall beproduct repairas providedherein.Implied
warranties,includingwarrantiesofmerchantabilityor fitness
fora particularpurpose,are limitedtoone yearor the shortest
periodallowed by law. Searsshallnot be liablefor incidental
or consequentialdamages.Somestates and provincesdo not
allowthe exclusion orlimitationof incidentalor consequential
damagesor limitationson the durationof impliedwarranties
of merchantabilityorfitness, so these exclusionsor limitations
may not applyto you.
This warranty appliesonlywhile this applianceis used in the
United States andCanada.
This warrantygivesyou specificlegalrights,andyou mayalso
haveother rightswhich vary fromstate tostate.
Sears,Roebuckand Co.,Dept. 817WA,HoffmanEstates,IL
60170
SearsCanadaInc.,Toronto,Ontario,CanadaM5B 2B8
2
Page 3
PRECAUTIONS TO AVOID POSSIBLE EXPOSURE
TO EXCESSIVE MICROWAVE ENERGY
• DO NOT attempt to operate this oven with
the door open, since open-door operation
can result in harmful exposure to microwave
energy. It is important not to defeat or
tamper with the safety interlocks.
• DO NOT operate the oven if it is damaged.
It is particularly important that the oven door
close properly and that there is no damage
to the:
1. door (bent).
2. hinges and latches (broken or loosened).
3. door seals and sealing surfaces.
• DO NOT place any object between the oven
front face and the door or allow soil or
cleaner residue to accumulate on sealing
surfaces.
• THE OVEN should not be adjusted or
repaired by anyone except properly qualified
service personnel.
GROUNDING INSTRUCTIONS
This appliance must be grounded! tf an electrical
short circuit occurs, grounding reduces the risk of
electric shock by providing an escape wire for the
electric current. This appliance is equipped with a
cord having a grounding wire with a grounding plug.
Put the plug into an outlet that is properly installed
and grounded.
&WARNING
If you use the grounding plug improperly, you risk electric shock.
Ask a qualified electrician or the Sears Service
Department if you do not understand the grounding
instructions or if you wonder whether the appliance is
properly grounded.
If you use an extension cord, be sure that:
• The extension cord has the same electrical rating
as the appliance.
• The marked rating of the extension cord shall be
equal to or greater than the electrical rating of
the appliance.
NOTE: This oven draws 13.0 amperes at 120 volts, 60 hz.
This appliance has a short power supply cord to
reduce the risk of anyone tripping over or becoming
entangled in the cord. You may use an extension
cord if you are careful.
• The extension cord is a grounding-type 3-wire cord.
• The extension cord does not drape over a
countertop or tabletop, where it can be pulled on
by children or tripped over accidentally.
• The electrical cord is dry and not pinched or
crushed in any way.
3
Page 4
IMPORTANT SAFETY INSTRUCTIONS
Thesafetyinstructionsbelowwilltellyouhowto useyourmicrowaveovento avoidharmtoyourselfordamageto your
oven.
_k WARN I NG - Toreduce the risk of burns, electric shock, fire, injury to persons, or exposureto
excessive microwave energy:
1. Read all the instructionsbefore using your
microwave oven.
2. Do not allow childrento usethis oven without
closesupervision!
3. Readand followthe specific PRECAUTIONS TO
AVOID POSSIBLE EXPOSURE TO EXCESSIVE
MICROWAVE ENERGY found on page 3,
4. Do not tamper with the built-in safety switches on
the oven door!The oven has several built-in safety
switchesto make sure thepower is off when the door
isopen.
5. When cleaning the door and the surfaces that
touch the door, use onlymild, nonabrasivesoaps
or detergents and a sponge or soft cloth.
6. If your oven is dropped or damaged, have it
thoroughly checked by a qualified servicetechnician
before using it again.
7. Toavoid afire hazard:
a) Do notseverely overcook foods. It can cause a
fire in the oven.
b) Do not use recycled paper products inyour
oven. Theycan contain particles that can cause
arcing ormay ignite.
c} Do not overcook potatoes. Overcooking could
cause a fire.
d} Do notstore combustible items (bread,cookies,
etc.)in the oven, because it lightning strikesthe
power lines, it maycause the oven to turn ON.
e) Do not usewire twist-ties in the oven. Be sure to
remove them before placing the item in theoven.
t) Do not use the cavity for storage purposes. Do
not leave paper products, cooking utensils, orfood in
the cavity when not in use.
8. If afire should start:
a) Keep the oven door closed.
b)Turnthe oven off.
c) Disconnect the power cord or shut off the
power at the fuse or circuit breaker panel.
g. Do notuse this oven for commercial purposes. This
microwave is madefor household use only.
10. Installor locate this appliance in accordance with the
provided installation instructions.
11.To avoid electric shock:
a) This appliance must begrounded! Connect itonly
to a properlygrounded outlet. (See theGrounding
Instructions on page 3.)
b) De not operate this appliance if it has a
damaged cord or plug, if it is notworking properly,
or if ithas beendamaged or dropped.
c) Do not immerse the electrical cord or plugin
water.
d)Keep the cord away from heated surfaces.
e) This appliance should beserviced only by qualified
servicepersonnel.
12. Liquids such aswater, coffee, ortea are ableto be
overheated beyond the boiling pointwithout appearing
to be boiling due to surface tension of the liquid. Visible
bubbling or boiling when the container isremoved from
the microwave oven is notalways present. This could
result invery hot liquids suddenly boiling over.
When the containeris disturbed or when a spoon or
other utensil is inserted intothe liquid. Toreducethe
riskof injuryto persons:
1) Do not overheatthe liquid.
2) Stir the liquidboth before and halfwaythrough
heating it.
3) Use extreme care when inserting a spoon or other
utensil into the container once heating has begun.
4) Do not use straight-sided containers with narrow
necks.
5) After heating, allow the container to stand in the
microwave oven for a short time before removing
the container.
13. Keepthe glass tray andthe turntable rollerrest in the
oven when you are cooking.
14. Do not use the oven outdoors. Do notstore the oven
outdoors. Do not usethis product nearwater.
- For example, near a kitchen sink, in a wet basement,
near a swimming pool or similarlocation.
15. Do not cover or block any openings inthe oven.
16. Do not runthe microwave oven empty.
17. Do not letthe cord hang overthe edge of a tableor
counter.
18. Do not heatglass turntable excessively.
- Donot cook bacon directly on the glass turntable.
- Donot allow the gray film on special microwave
cooking packagesto touch the glassturntable. Put
the package on a microwave-safe dish.
- Keep a browning dish at least3/16 in.(.5 cm) above
the glass turntable. Ifyou use the browning dish
incorrectly,you could break theglass turntable.
19. Becareful not to chip orscratch the edges of the
turntable. Chips orscratches may cause the turntable
to breakduring use.
20. Some produce such aswhole eggs and sealed
containers, for example, closed glass jars, are able to
explode and should not be heated inthis oven.
SAVE THESE INSTRUCTIONS!
Page 5
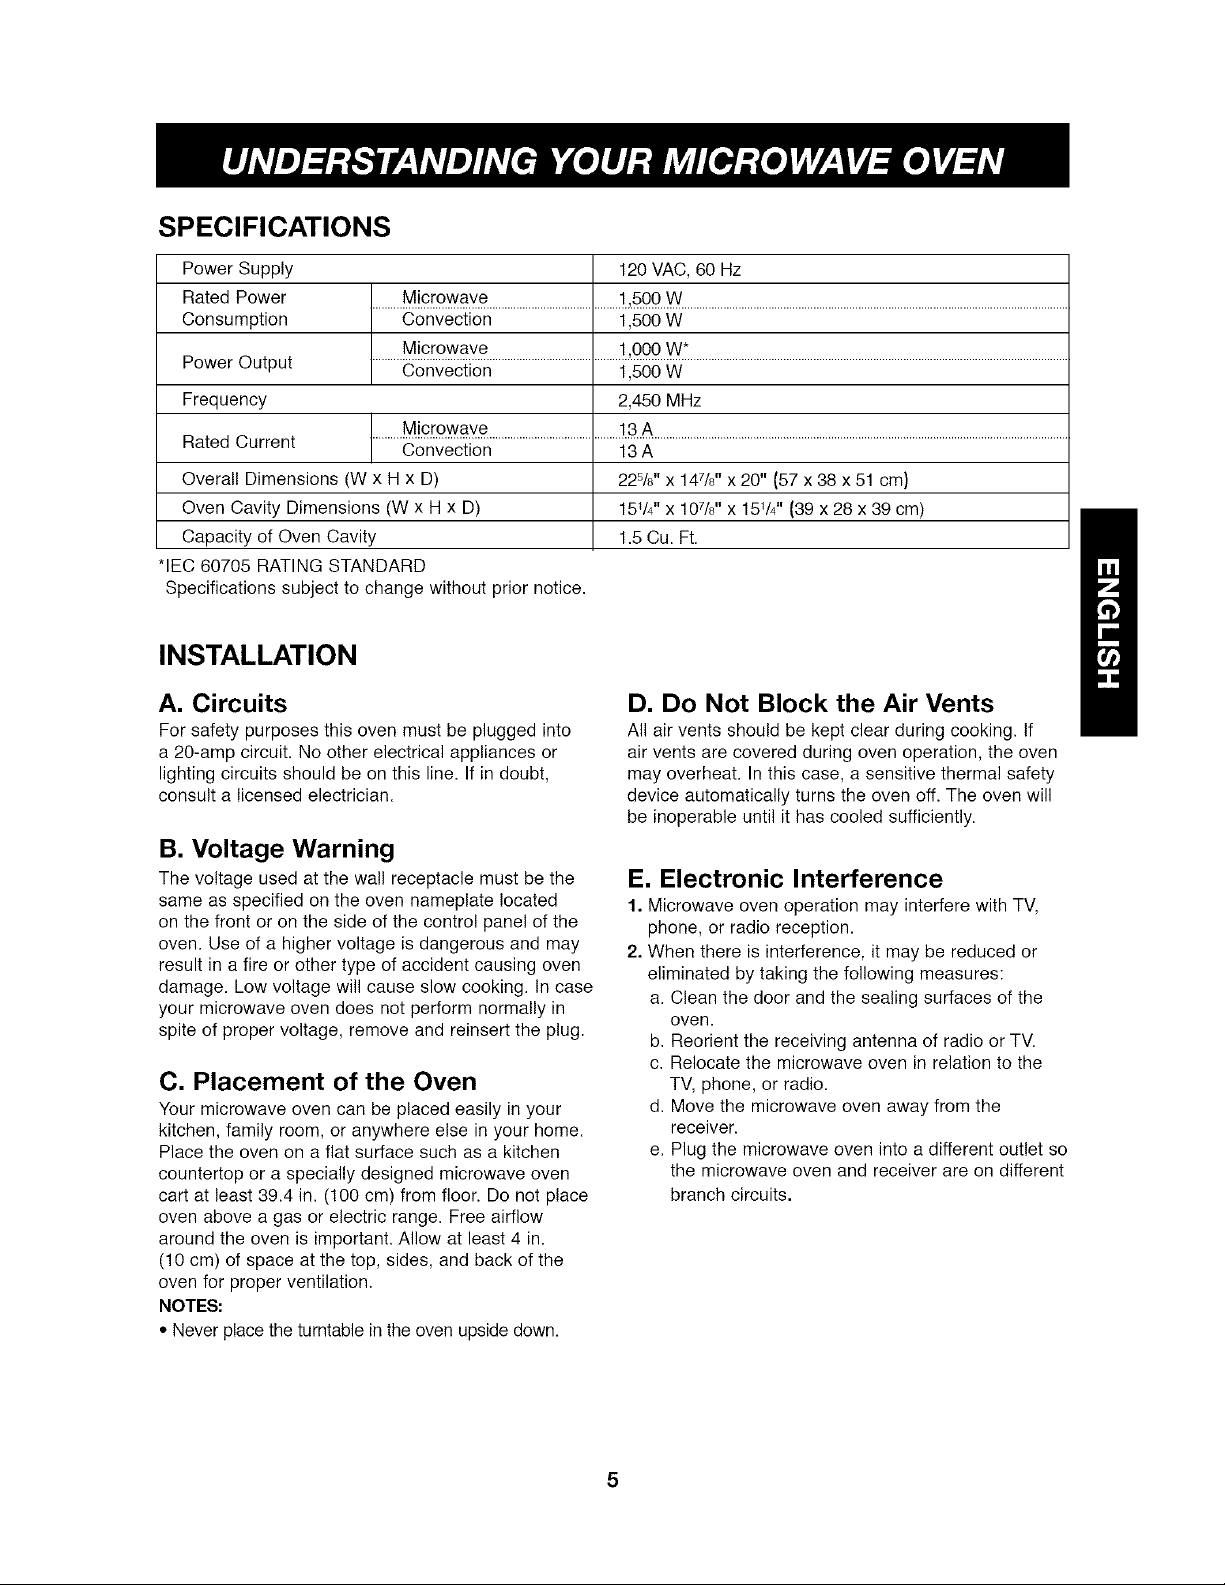
SPECIFICATIONS
Power Supply 120 VAC, 60 Hz
Rated Power ..........M!£[£.vvave.............................................!.,.50Q..W................................................................................................................................
Consumption Convection 1,500 W
..........M!cr£.w_e.............................................!..,.0QQ..V£.............................................................................................................................
Power Output Convection 1,500 W
Frequency 2,450 MHz
Rated Current Convection 13 A
Overall Dimensions (W x H x D) 225/8'' x 147/8" x 20" (57 x 38 x 51 cm)
Oven Cavity Dimensions (W x H x D) 151/4"x 107/6'' x 15d4" (39 x 28 x 39 cm)
Capacity of Oven Cavity 1.5 Cu. Ft.
*IEC 60705 RATING STANDARD
Specifications subject to change without prior notice.
..........N!£[#.w#_#.............................................!.3.&.........................................................................................................................................
INSTALLATION
A. Circuits
For safety purposes this oven must be plugged into
a 20-amp circuit. No other electrical appliances or
lighting circuits should be on this line. If in doubt,
consult a licensed electrician.
B. Voltage Warning
The voltage used at the wall receptacle must be the
same as specified on the oven nameplate located
on the front or on the side of the control panel of the
oven. Use of a higher voltage is dangerous and may
result in a fire or other type of accident causing oven
damage. Low voltage will cause slow cooking. In case
your microwave oven does not perform normally in
spite of proper voltage, remove and reinsert the plug.
C. Placement of the Oven
Your microwave oven can be placed easily in your
kitchen, family room, or anywhere else in your home.
Place the oven on a flat surface such as a kitchen
countertop or a specially designed microwave oven
cart at least 39.4 in. (100 cm) from floor. Do not place
oven above a gas or electric range. Free airflow
around the oven is important. Allow at least 4 in.
(10 cm) of space at the top, sides, and back of the
oven for proper ventilation.
NOTES:
• Never place the turntable in the oven upside down.
D. Do Not Block the Air Vents
All air vents should be kept clear during cooking, tf
air vents are covered during oven operation, the oven
may overheat. In this case, a sensitive thermal safety
device automatically turns the oven off. The oven will
be inoperable until it has cooled sufficiently.
E. Electronic Interference
1. Microwave oven operation may interfere with TV,
phone, or radio reception.
2. When there is interference, it may be reduced or
eliminated by taking the following measures:
a. Clean the door and the sealing surfaces of the
oven.
b. Reorient the receiving antenna of radio or TV.
c. Relocate the microwave oven in relation to the
TV, phone, or radio.
d. Move the microwave oven away from the
receiver.
e. Plug the microwave oven into a different outlet so
the microwave oven and receiver are on different
branch circuits.
Page 6
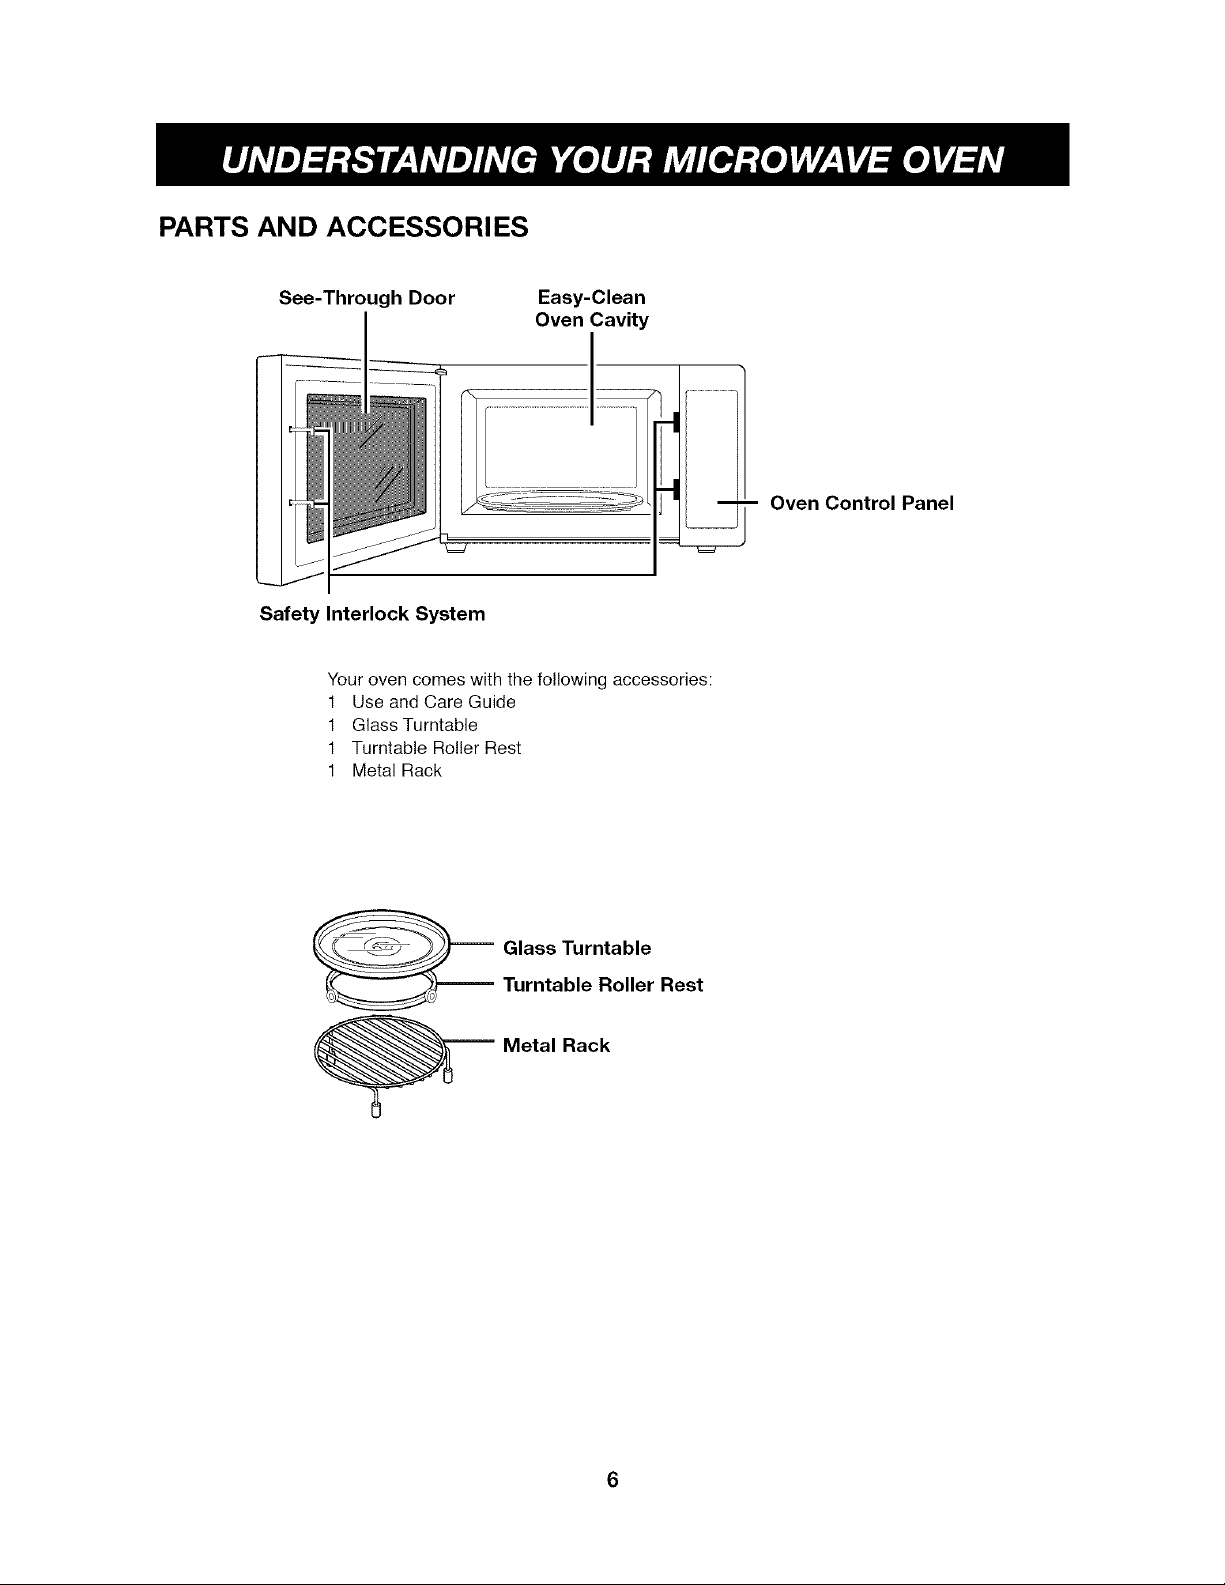
PARTS AND ACCESSORIES
See-Through Door Easy-Clean
Safety Interlock System
Your oven comes with the following accessories:
1 Use and Care Guide
1 Glass Turntable
1 Turntable Roller Rest
1 Metal Rack
Oven Cavity
Oven Control Panel
-- Glass Turntable
Turntable Roller Rest
Metal Rack
Page 7
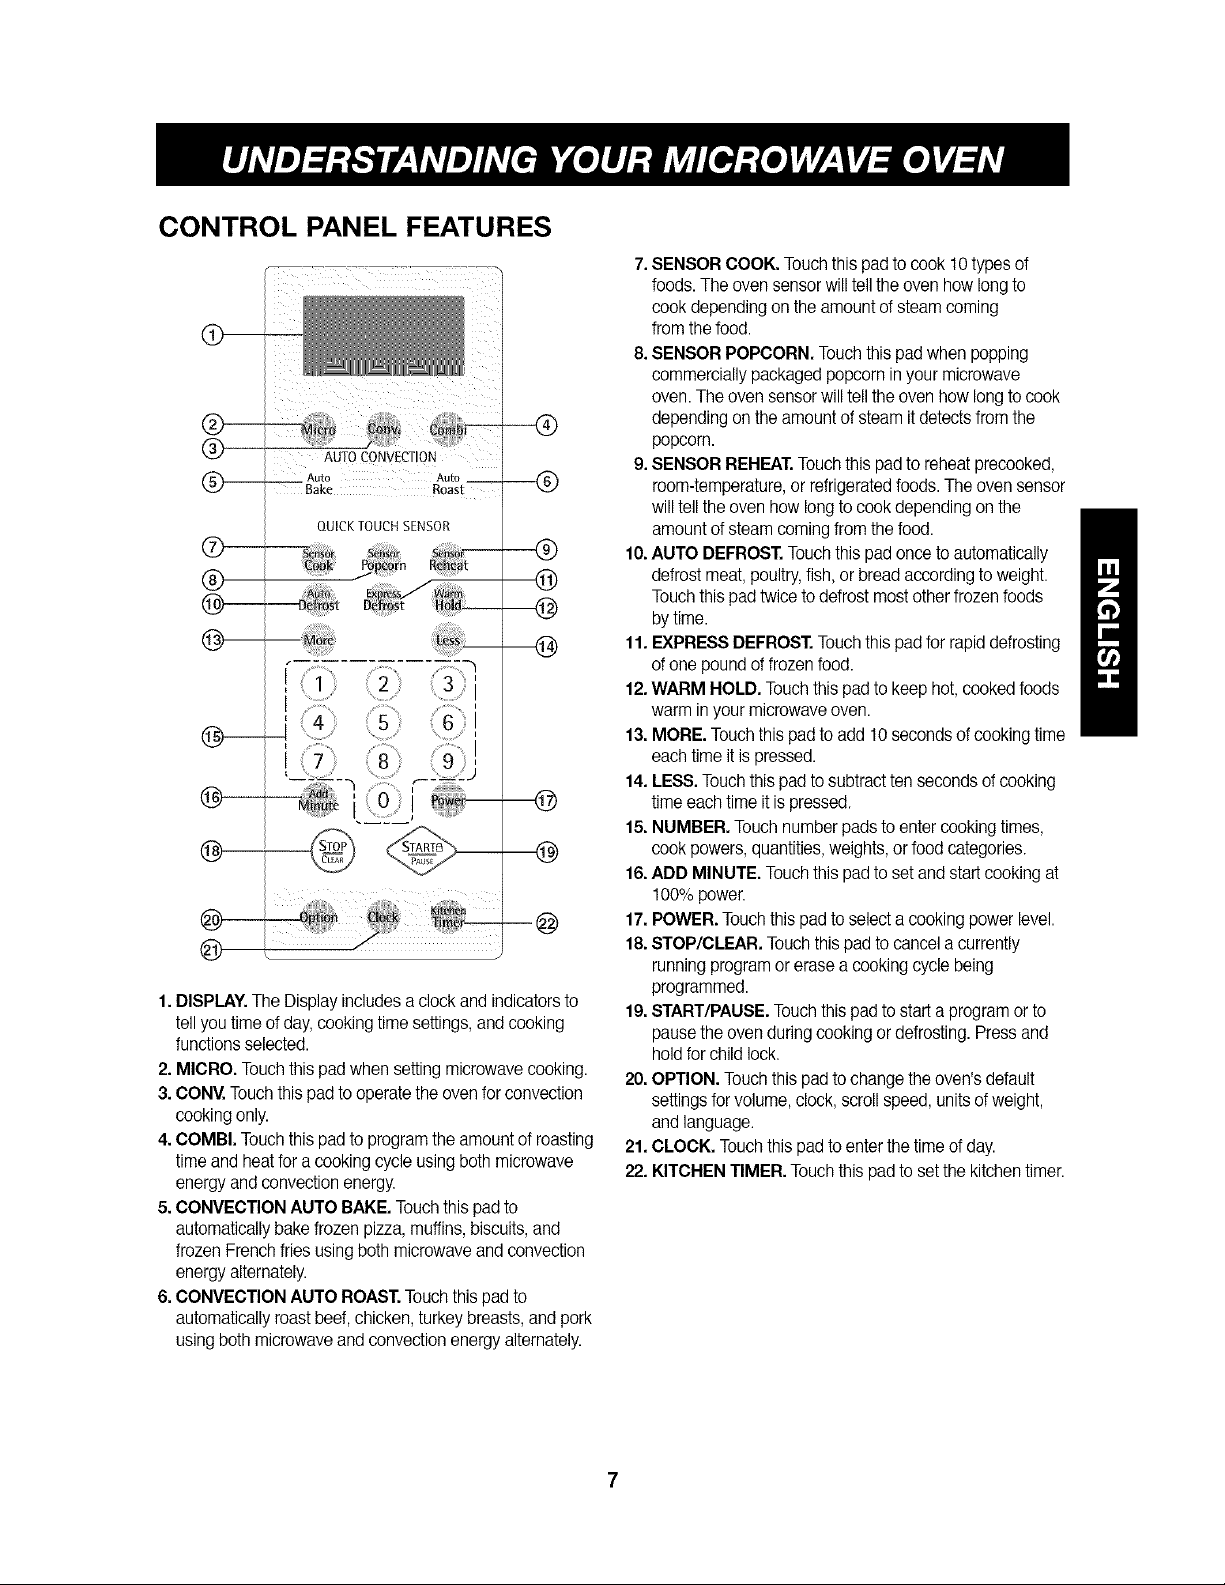
CONTROL PANEL FEATURES
AUTO CONVECTION
®
Auto Auto __
Bake Roast
QUICKTOUCH SENSOR
®
@
--@
1. DISPLAY.The Display includes a clock and indicators to
tell you timeof day, cooking time settings, and cooking
functions selected.
2. MICRO. Touch this pad when setting microwave cooking.
3. CONY.Touch this pad to operate the ovenfor convection
cooking only.
4. COMBI. Touch this pad to program the amount of roasting
time and heatfor a cooking cycle usingboth microwave
energy andconvection energy.
5. CONVECTION AUTO BAKE. Touch this pad to
automatically bakefrozen pizza, muffins, biscuits, and
frozen French fries usingboth microwave and convection
energy alternately.
6. CONVECTION AUTO ROAST. Touch this pad to
automatically roast beef, chicken, turkey breasts, and pork
using both microwave and convection energy alternately.
7.SENSOR COOK. Touch this padto cook 10types of
foods. The oven sensor will tellthe oven how longto
cook depending on the amount of steam coming
from the food.
8. SENSOR POPCORN. Touchthis pad when popping
commercially packaged popcorn in your microwave
oven. The oven sensor willtell the oven how long to cook
depending onthe amount of steam it detects from the
popcorn.
9. SENSOR REHEAT.Touch this pad to reheat precooked,
room-temperature, or refrigerated foods. The oven sensor
will tell the oven how long tocook depending on the
amount of steam coming from thefood.
10. AUTO DEFROST. Touch this pad once to automatically
defrost meat, poultry, fish, or bread according toweight.
Touch this pad twice to defrost mostother frozen foods
bytime.
11. EXPRESS DEFROST.Touch this pad for rapid defrosting
of one pound offrozen food.
12. WARM HOLD. Touch this pad to keep hot, cooked foods
warm inyour microwave oven.
13. MORE. Touch this pad to add 10 seconds of cooking time
each time it ispressed.
14. LESS.Touch this pad to subtract ten seconds of cooking
time each time it is pressed.
15. NUMBER. Touch number pads to enter cookingtimes,
cook powers, quantities, weights, orfood categories.
16. ADD MINUTE. Touchthis pad to set and startcooking at
100% power.
17. POWER. Touch this pad to select acooking power level.
18. STOP/CLEAR. Touchthis pad to cancel acurrently
running program or erase acooking cycle being
programmed.
19. START/PAUSE. Touch this pad to start a program or to
pausethe oven during cooking or defrosting. Press and
hold for child lock.
20. OPTION. Touchthis pad to change the oven's default
settings forvolume, clock, scroll speed,units ofweight,
and language.
21. CLOCK. Touch this pad to enter the time ofday.
22. KITCHEN TIMER. Touch this pad to set the kitchen timer.
Page 8
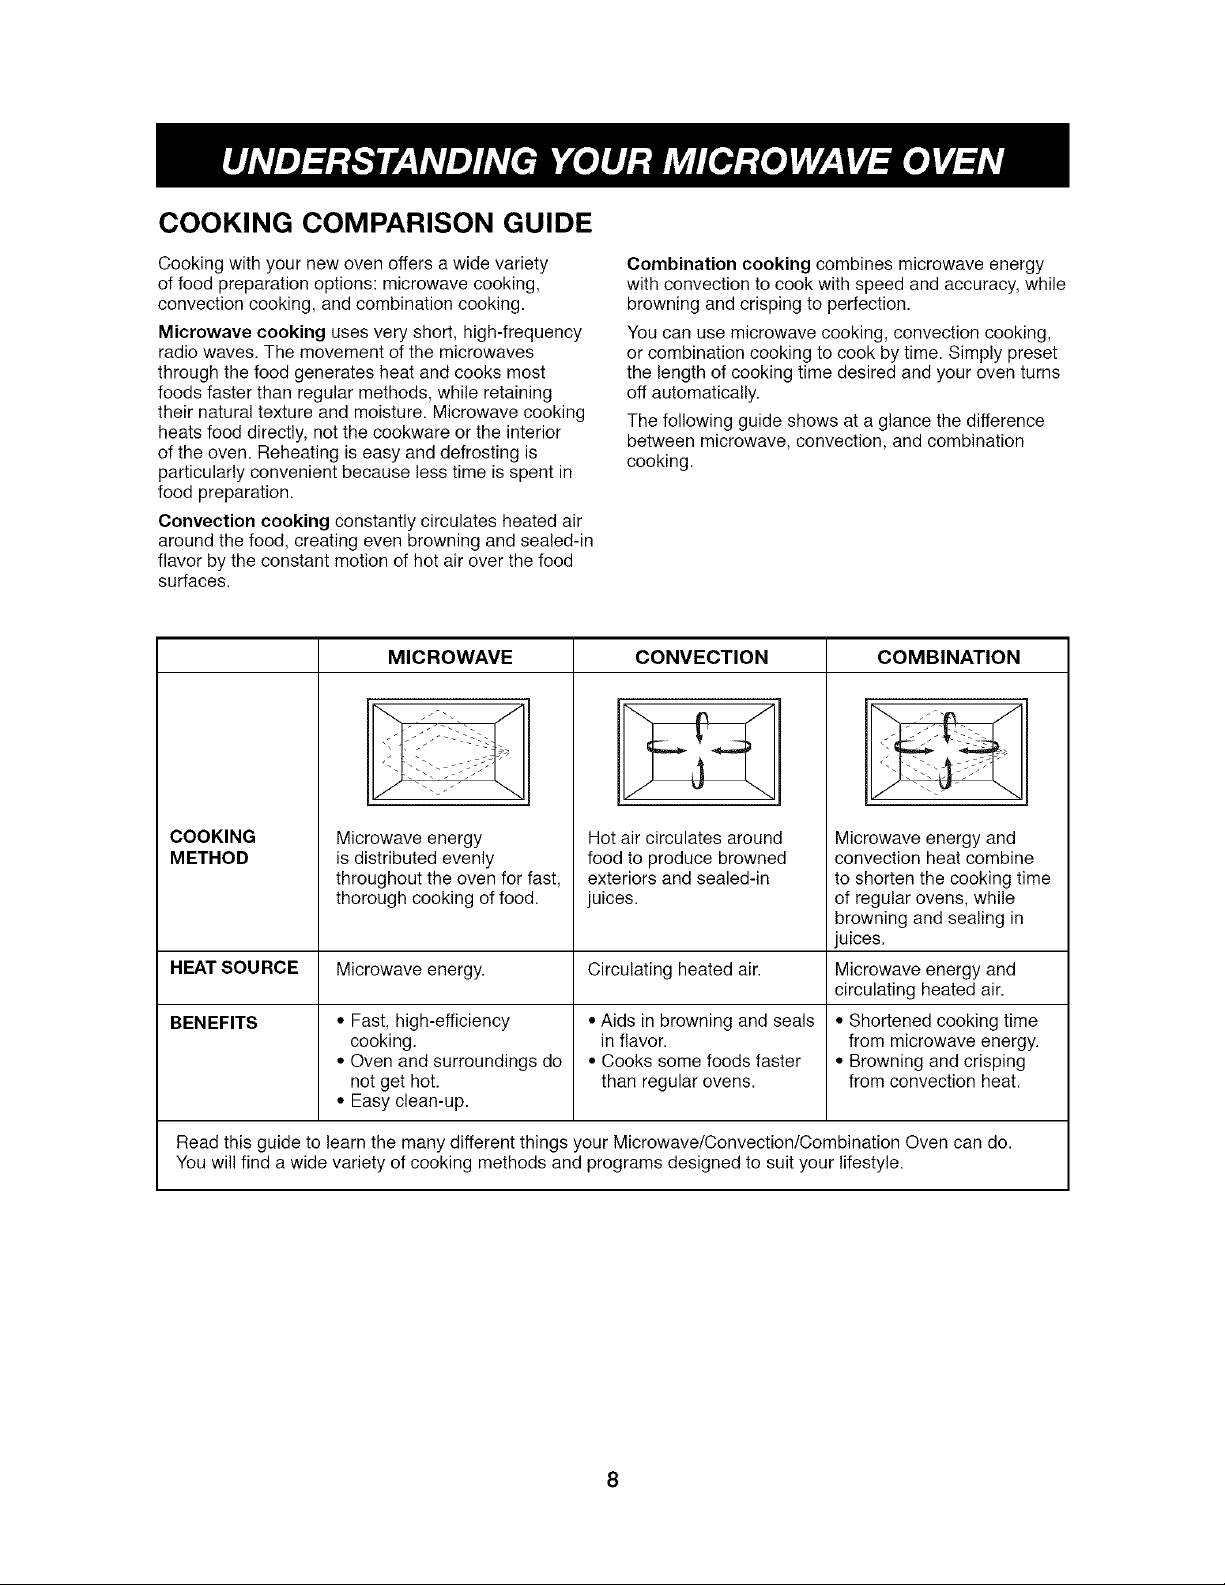
COOKING COMPARISON GUIDE
Cooking with your new oven offers a wide variety
of food preparation options: microwave cooking,
convection cooking, and combination cooking.
Microwave cooking uses very short, high-frequency
radio waves. The movement of the microwaves
through the food generates heat and cooks most
foods faster than regular methods, while retaining
their natural texture and moisture. Microwave cooking
heats food directly, not the cookware or the interior
of the oven. Reheating is easy and defrosting is
particularly convenient because less time is spent in
food preparation.
Convection cooking constantly circulates heated air
around the food, creating even browning and sealed-in
flavor by the constant motion of hot air over the food
surfaces.
Combination cooking combines microwave energy
with convection to cook with speed and accuracy, while
browning and crisping to perfection.
You can use microwave cooking, convection cooking,
or combination cooking to cook by time. Simply preset
the length of cooking time desired and your oven turns
off automatically.
The following guide shows at a glance the difference
between microwave, convection, and combination
cooking.
MICROWAVE CONVECTION COMBINATION
j *} \
COOKING
METHOD
HEAT SOURCE Microwave energy. Circulating heated air. Microwave energy and
BENEFITS • Fast, high-efficiency • Aids in browning and seals • Shortened cooking time
Microwave energy
is distributed evenly
throughout the oven for fast,
thorough cooking of food.
cooking, in flavor, from microwave energy.
• Oven and surroundings do • Cooks some foods faster • Browning and crisping
not get hot. than regular ovens, from convection heat.
• Easy clean-up.
Hot air circulates around
food to produce browned
exteriors and sealed-in
juices.
Microwave energy and
convection heat combine
to shorten the cooking time
of regular ovens, while
browning and sealing in
juices.
circulating heated air.
Read this guide to learn the many different things your Microwave/Convection/Combination Oven can do.
You will find a wide variety of cooking methods and programs designed to suit your lifestyle.
Page 9
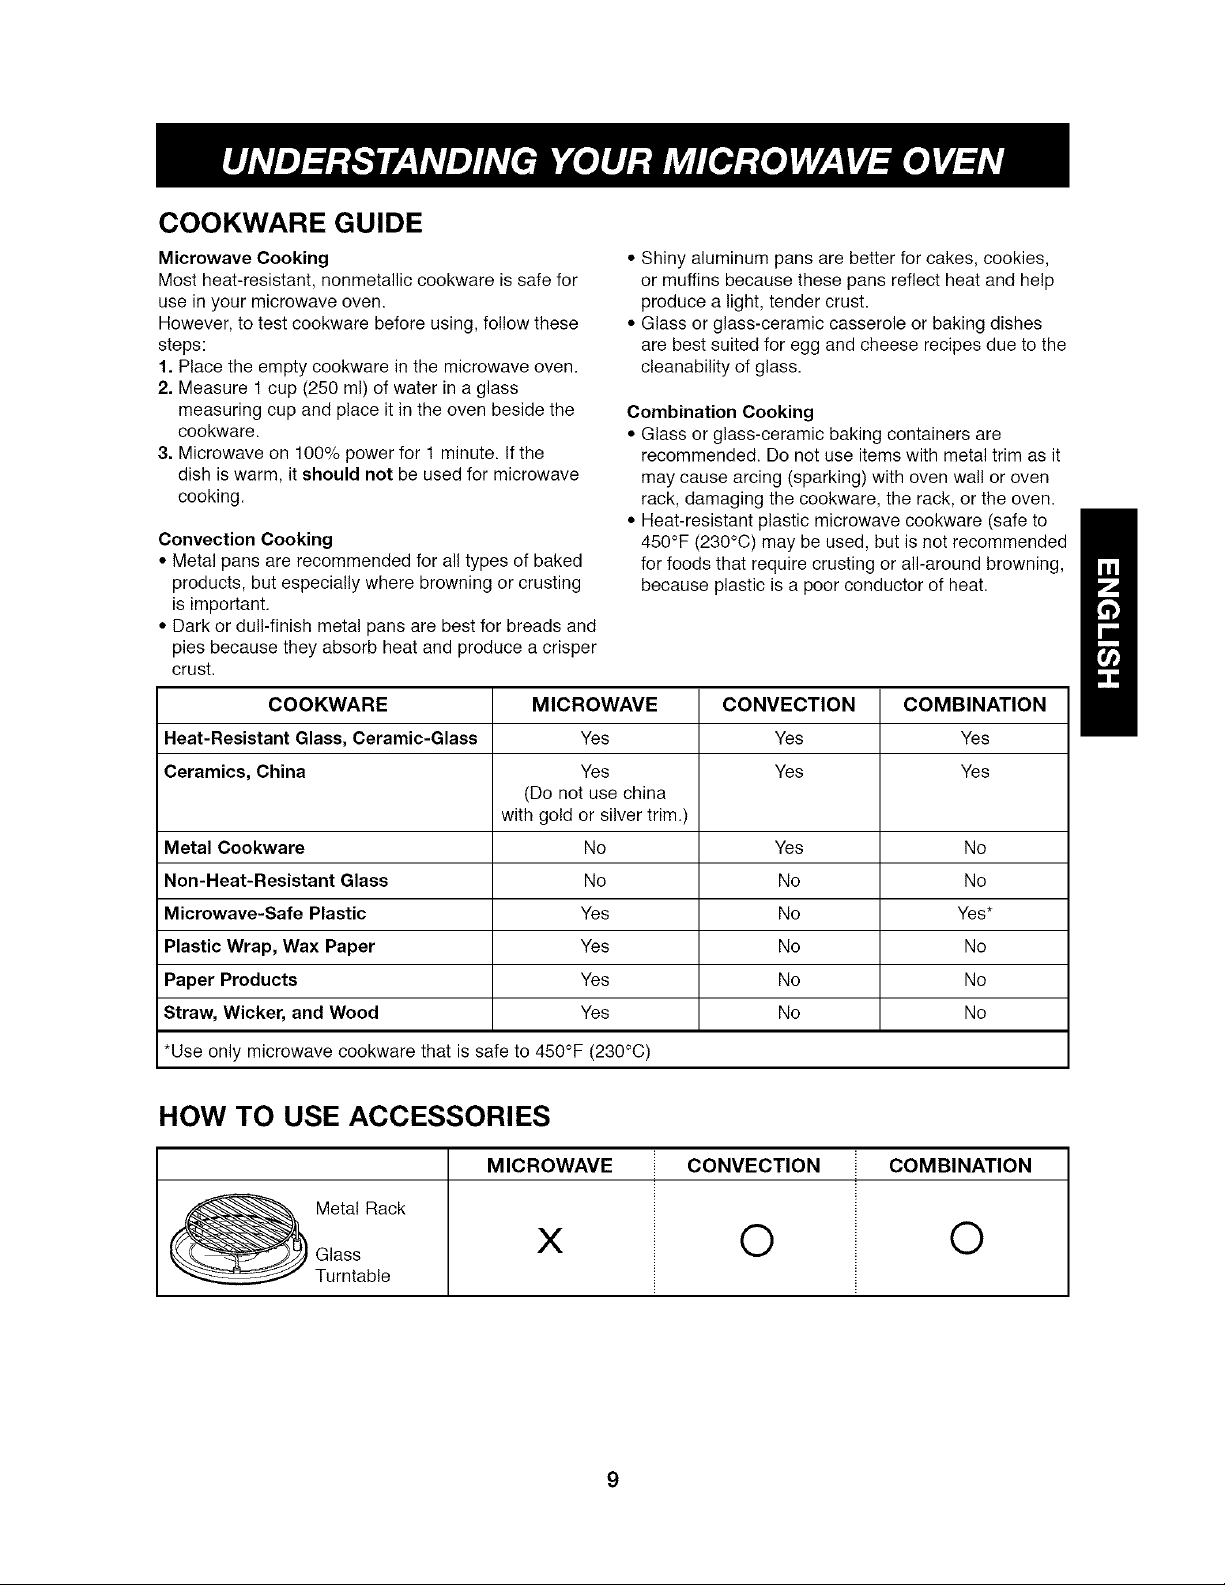
COOKWARE GUIDE
Microwave Cooking
Most heat-resistant, nonmetallic ceokware is safe for
use in your microwave oveR.
However, to test ceokware before using, follow these
steps:
1. Place the empty ceokware in the microwave oven.
2. Measure 1cup (250 ml) of water in a glass
measuring cup and place it in the oven beside the
cookware.
3. Microwave on 100% power for 1 minute. If the
dish is warm, it should not be used for microwave
cooking.
Convection Cooking
• Metal pans are recommended for all types of baked
products, but especially where browning or crusting
is important.
• Dark or dull-finish metal pans are best for breads and
pies because they absorb heat and produce a crisper
crust.
COOKWARE MICROWAVE CONVECTION COMBINATION
Heat-Resistant Glass, Ceramic-Glass Yes Yes Yes
Ceramics, China Yes Yes Yes
(Do not use china
with gold or silver trim.)
Metal Cookware No Yes No
Non-Heat-Resistant Glass No No No
Microwave-Safe Plastic Yes No Yes*
• Shiny aluminum pans are better for cakes, cookies,
or muffins because these pans reflect heat and help
produce a light, tender crust.
• Glass or glass-ceramic casserole or baking dishes
are best suited for egg and cheese recipes due to the
cleanability of glass.
Combination Cooking
• Glass or glass-ceramic baking containers are
recommended. De not use items with metal trim as it
may cause arcing (sparking) with oven wall or oven
rack, damaging the coekware, the rack, or the oven.
• Heat-resistant plastic microwave coekware (safe to
450°F (230°C) may be used, but is net recommended
for foods that require crusting or all-around browning,
because plastic is a poor conductor of heat.
Plastic Wrap, Wax Paper Yes No No
Paper Products Yes No No
Straw, Wicker, and Wood Yes No No
*Use only microwave ceokware that is safe to 450°F (230°C)
HOW TO USE ACCESSORIES
MICROWAVE ii CONVECTION ii COMBINATION
Glass
MetalRack © ©
Turntable i i
Y" i i
9
Page 10
TIPS FOR MICROWAVE COOKING
BROWNING
Meat and poultry with high fat content that are cooked
for 10 or 15 minutes or longer will brown lightly. Foods
cooked a shorter time can be brushed with a browning
agent, such as Worcestershire sauce, soy sauce, or
barbecue sauce.
COVERING
A cover traps heat and steam and causes the food to
cook more quickly. Use a lid or microwave-safe plastic
wrap with one corner folded back to vent the excess
steam. Lids on glass casseroles can become hot
during cooking. Handle carefully. Waxed paper will
prevent the food from splattering in the oven and help
retain heat. When warming bread items, use waxed
paper, napkins, or paper towels. To absorb extra
moisture, wrap sandwiches and fatty foods in paper
towels.
SPACING
Arrange individual foods, such as baked potatoes,
cupcakes, and hors d'oeuvres in a circle and at least
1 in. (2.5 cm) apart. This will help the food cook more
evenly.
STIRRING
Stirring blends flavors and redistributes the heat in
foods. Always stir from the outside toward the center
of the dish. Food at the outside of the dish heats first.
TURNING
Large foods, such as roasts and whole poultry, should
be turned so that the top and bottom cook evenly. Also
turn over chicken pieces and chops.
ARRANGEMENT
Do not stack food. Arrange in a single layer in the dish
for more even cooking. Because dense foods cook
more slowly, place thicker portions of meat, poultry,
fish, and vegetables toward the outside of the dish.
TESTING FOR DONENESS
Because foods cook quickly in a microwave oven, you
need to test frequently for doneness.
STANDING TIME
Depending on density, food often needs to stand from
2 to 15 minutes either in or outside of the oven after
cooking power shuts off. Outside of the oven, you
usually need to cover food during standing time to
retain heat. Remove most foods when they are slightly
undercooked and they will finish cooking during
standing time. The internal temperature of food will
rise about 10°F (6°C) during standing time.
SHIELDING
To prevent some portions of rectangular or square
dishes from overcooking, you may need to shield
them with small strips of aluminum foil to block the
microwaves. You can also cover poultry legs and
wing tips with foil to keep them from overcooking.
Always keep foil at least 1 in. (2.5 cm) from the
oven walls to prevent arcing.
PIERCING
Pierce the shell, skin, or membrane of foods before
cooking to prevent them from bursting. Foods that
require piercing include yolks and whites of eggs, hot
dogs, clams, oysters, and whole vegetables, such as
potatoes and squash.
CLEANING
Wipe the oven inside and outside with a soft cloth and
a mild detergent solution. Then rinse and wipe dry.
This should be done weekly or more often, if needed.
Never use cleaning powders or rough pads.
Excessive oil splatters on the inside top will be difficult
to remove if left for many days. Wipe splatters with a
wet paper towel, especially after cooking chicken or
bacon.
REMOVABLE PARTS
The metal rack, glass turntable and turntable roller
rest are removable. They should be hand-washed in
warm (not hot) water with a mild detergent and a soft
cloth. Once they are clean, rinse well and dry with a
soft cloth. Never use cleaning powders, stee! woo!, or
rough pads.
• Removable parts may be cleaned at the sink. Be
careful not to chip or scratch the edges as this may
cause them to break during use.
• The glass turntable may also be cleaned in a
dishwasher.
• The turntable roller rest should be cleaned regularly.
SPECIAL CARE
For best performance and safety, the inner door panel
and the oven front frame should be free of food or
grease buildup. Wipe often with a mild detergent; then
rinse and wipe dry. Never use cleaning powders or
rough pads.
After cleaning the control panel, touch STOP/CLEAR
to clear any entries that might have been entered
accidentally while cleaning the pane!.
10
Page 11
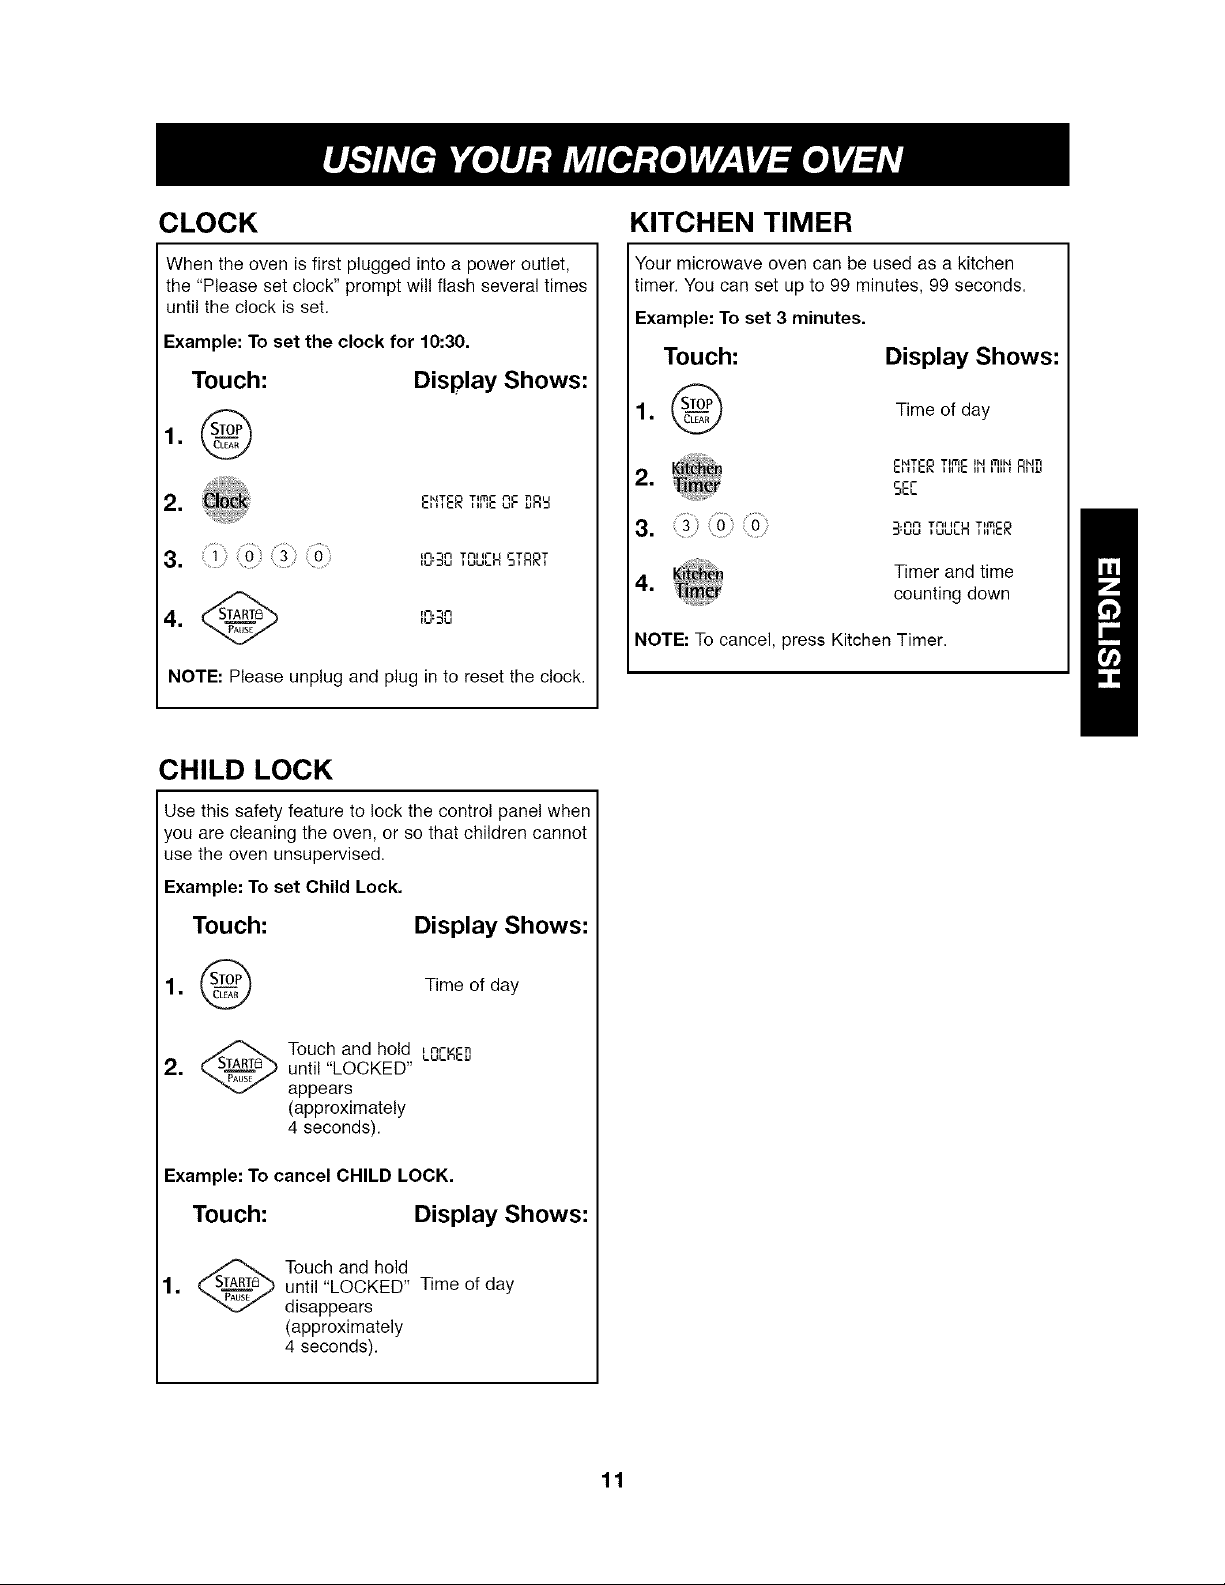
CLOCK
KITCHEN TIMER
When the oven is first plugged into a power outlet,
the "Please set clock" prompt will flash several times
until the clock is set.
Example: To set the clock for 10:30.
Touch: Display Shows:
1.@
2. E,,,ER ,,,,E_F _RS
3. : '_-'_"......
........................................,_-=_,_LH STRRT
4. @ '_-'_
NOTE: Please unplug and plug in to reset the clock.
CHILD LOCK
Use this safety feature to lock the control panel when
you are cleaning the oven, or so that children cannot
use the oven unsupervised.
Example: To set Child Lock.
-ktT - Tim rl n
IU*DU
Your microwave oven can be used as a kitchen
timer• You can set up to 99 minutes, 99 seconds.
Example: To set 3 minutes.
Touch: Display Shows:
1. @ Time of day
E,,,ER ,,,,c., ,,., R,,_
2. , SEC
3. (3)o o 3.L,...... H ,,,,_R
4.
NOTE: To cancel, press Kitchen Timer.
•_n Tml I¢" Tim-
Timer and time
counting down
Touch:
1.@
.
_ ouch and hold , _,- -,_
Example: To cancel CHILD LOCK.
until "LOCKED"
appears
(approximately
4 seconds).
Display Shows:
Time of day
Touch: Display Shows:
_ ouch and hold
until "LOCKED" Time of day
disappears
(approximately
4 seconds)•
11
Page 12
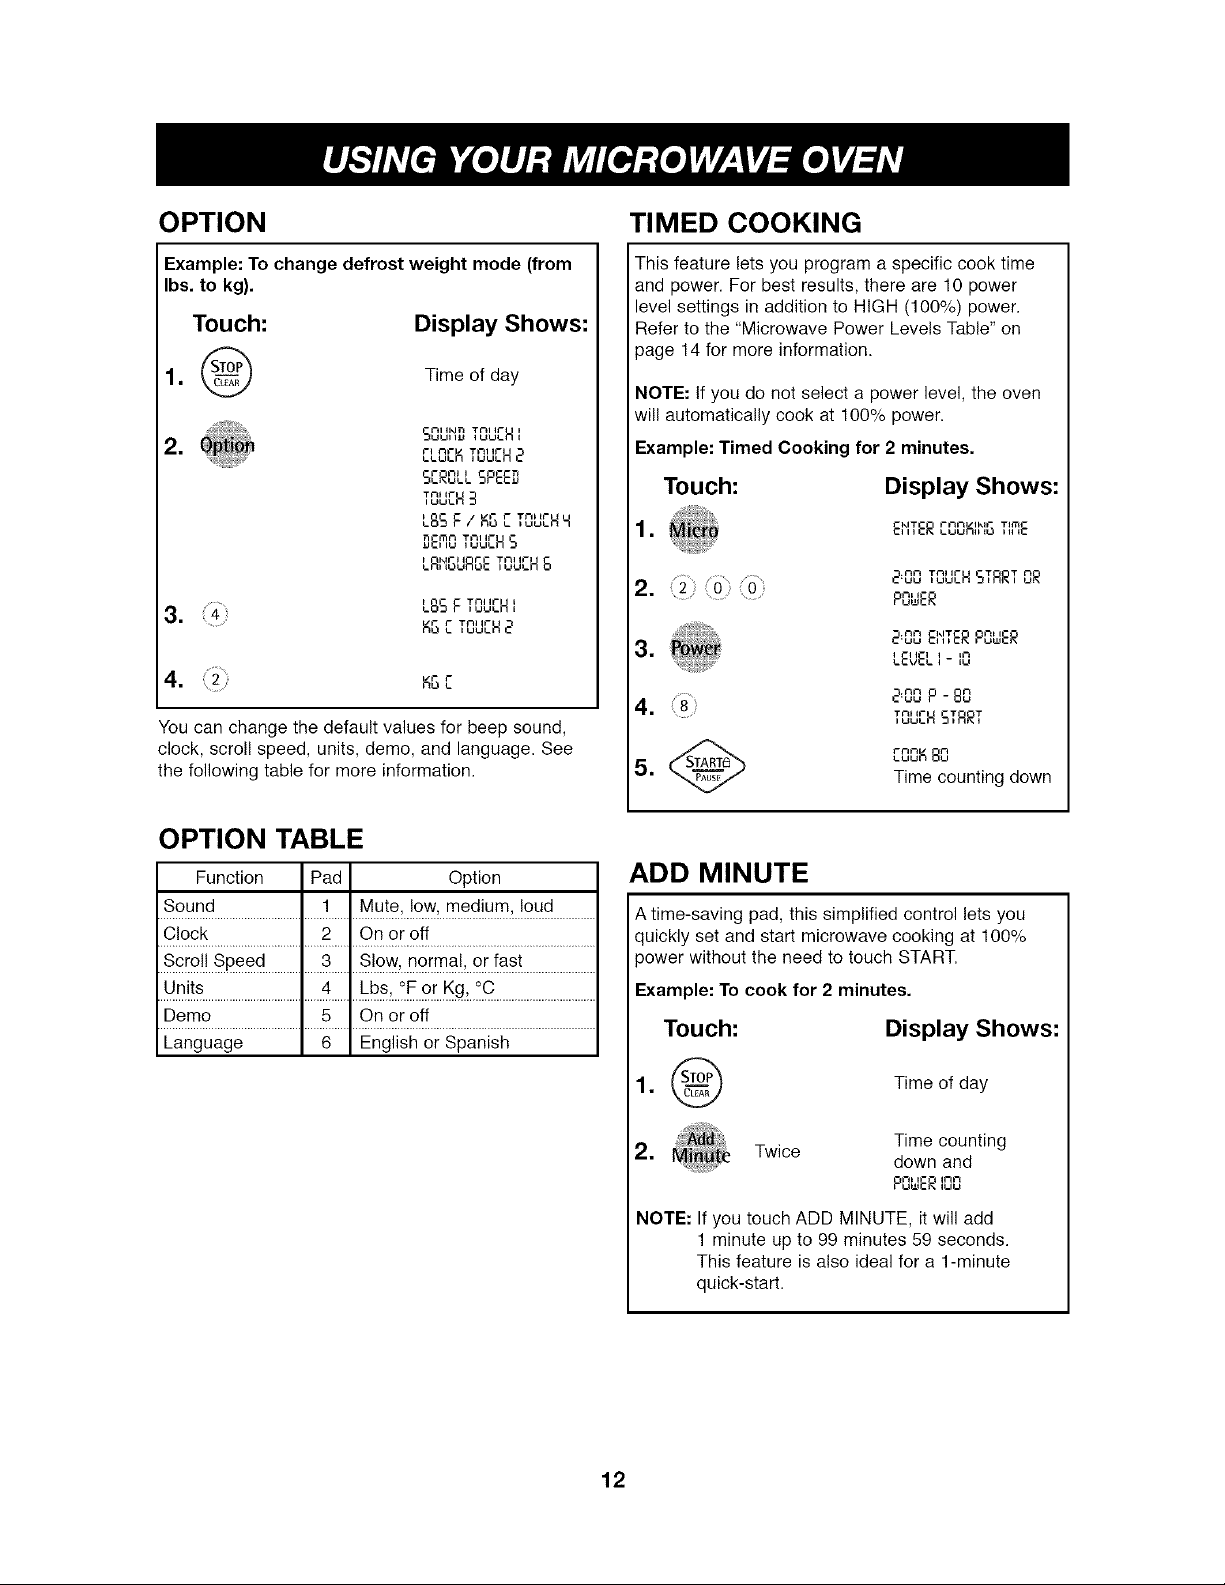
OPTION
TIMED COOKING
Example: To change defrost weight mode (from
Ibs. to kg).
Touch: Display Shows:
1. (_P_ Time of day
-t-it ll_in Tt-it i_'_ i
= t-i_t-/TITII_-
3. LSSF "_' 't-
.......... KGCTn.,_,H_t-' c7
4. K_C
You can change the default values for beep sound,
clock, scroll speed, units, demo, and language. See
the following table for more information.
....K ....H 2
SCROLLSPEEr,
TOUCH3
LSSF I KGC TOUCHH
DEI'70TOUCH5
LRIIC,URC,ETOUCH8
,_,HI
This feature lets you program a specific cook time
and power. For best results, there are 10 power
level settings in addition to HIGH (100%) power.
Refer to the "Microwave Power Levels Table" on
page 14 for more information.
NOTE: If you do not select a power level, the oven
will automatically cook at 100% power.
Example: Timed Cooking for 2 minutes.
Touch: Display Shows:
_-I_IT - t- t"ll't / i kit- TI_TIt-1. c,,,ER,._uK,,,o ,,,,:
Tnllt- I -T T
.... ,_H 5,RR, OR
C'UU
2. POL4_R
1 i _-i I i I i_l
4. _'_ P - 80
........ ,_H STRRT
5. Time counting down
2._ E._ERPO'ER
_.C\/_t. I - IL.I
7.1717
T_71 it" I
_K 80
t77n
OPTION TABLE
Function Pad Option
Sound 1 Mute, low, medium, loud
Clock 2 On or off
Scr°_.!..Spe_d...................3..........S_._w.,..r?.°_qa_.,..°.r..!as!........................
U.n!!s........................................4.........._bs,...tF..£r..Kg.,.iC..................................
Demo 5 On or off
Language 6 English or Spanish
ADD MINUTE
A time-saving pad, this simplified control lets you
quickly set and start microwave cooking at 100%
power without the need to touch START.
Example: To cook for 2 minutes.
Touch:
Display Shows:
=
@
2.
NOTE: If you touch ADD MINUTE, it will add
Twice
1 minute up to 99 minutes 59 seconds.
This feature is also ideal for a 1-minute
quick-start.
Time of day
Time counting
down and
POLLER,,_'_'_
12
Page 13
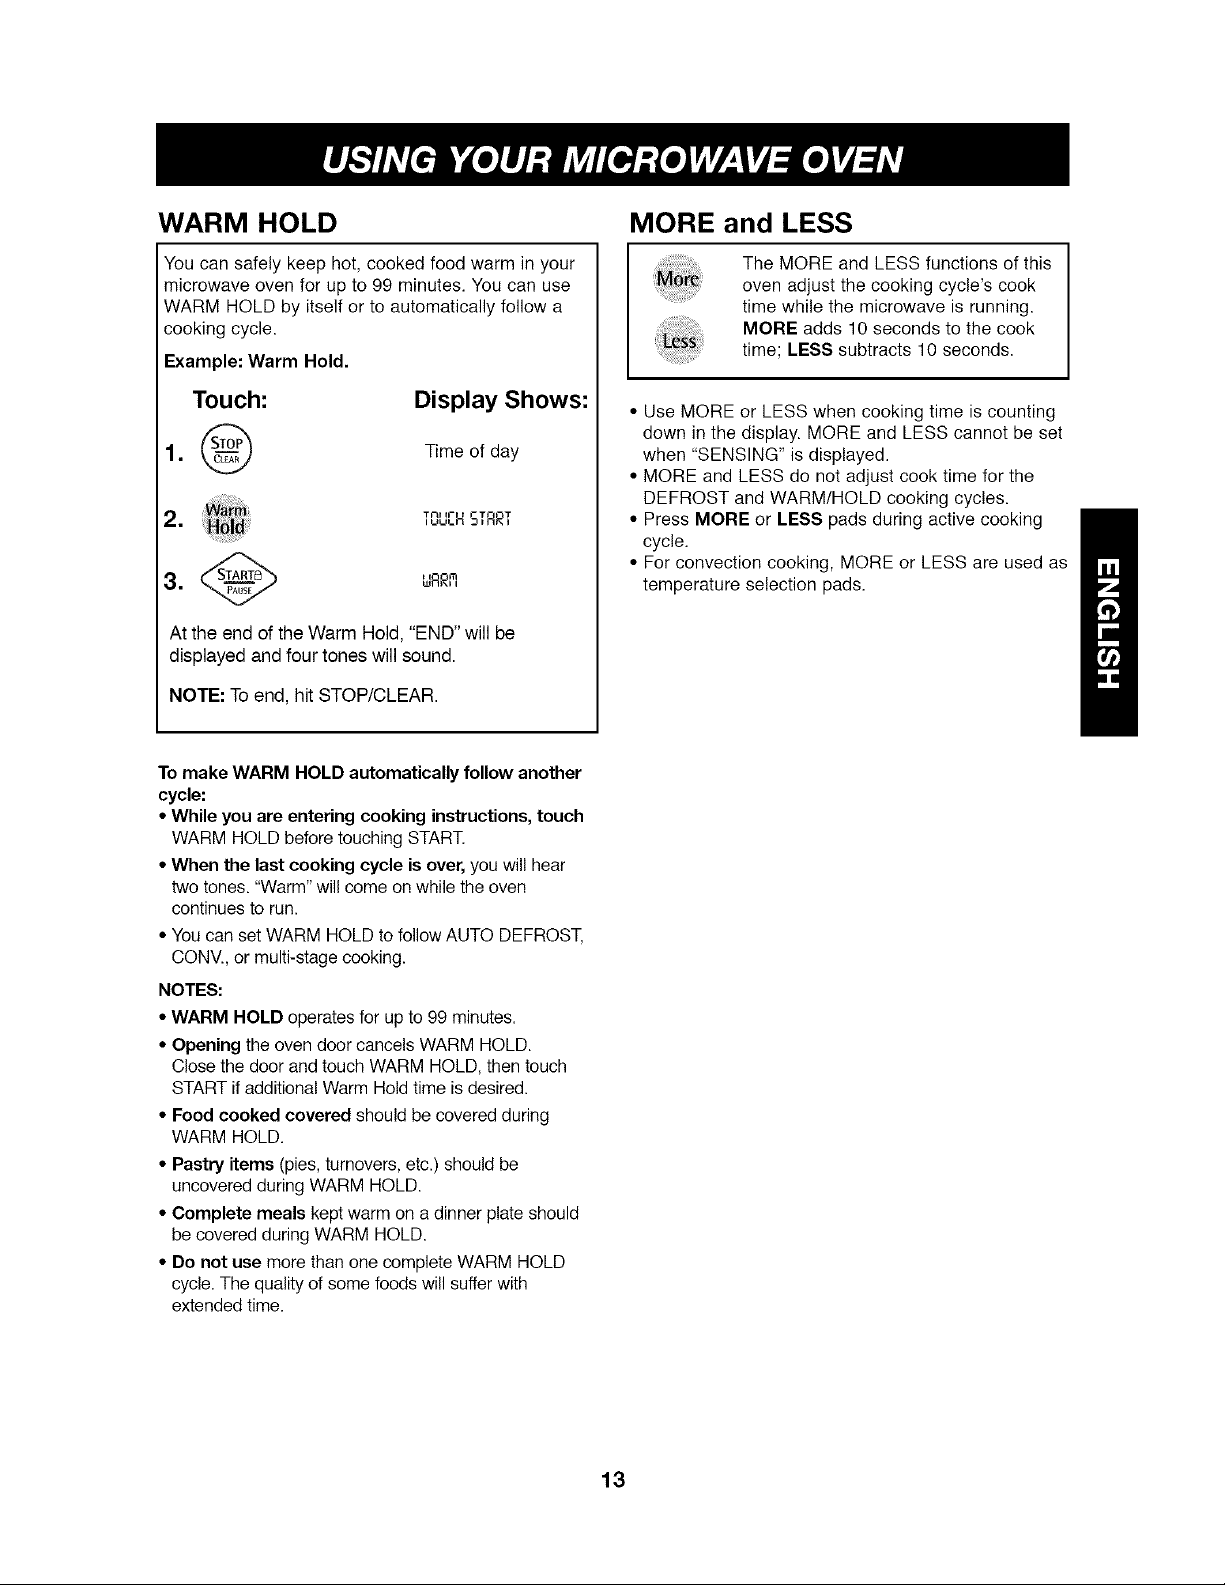
WARM HOLD
MORE and LESS
You can safely keep hot, cooked food warm in your
microwave oven for up to 99 minutes. You can use
WARM HOLD by itself or to automatically follow a
cooking cycle.
Example: Warm Hold.
Touch: Display Shows:
1. (SloP") Time of day
2. B61d TOUCH5TRRT
3. @ "R_m
At the end ofthe Warm Hold,"END" will be
displayed and four tones will sound.
NOTE: To end, hit STOP/CLEAR.
To make WARM HOLD automatically follow another
cycle:
• While you are entering cooking instructions, touch
WARM HOLD before touching START.
• When the last cooking cycle is over, you will hear
two tones. "Warm" will come on while the oven
continues to run.
• You can set WARM HOLD to follow AUTO DEFROST,
CONV., or multi-stage cooking.
NOTES:
• WARM HOLD operates for up to 99 minutes.
• Opening the oven door cancels WARM HOLD.
Close the door and touch WARM HOLD, then touch
START if additional Warm Hold time is desired.
• Food cooked covered should be covered during
WARM HOLD.
• Pastry items (pies, turnovers, etc.) should be
uncovered during WARM HOLD.
• Complete meals kept warm on a dinner plate should
be covered during WARM HOLD.
• Do not use more than one complete WARM HOLD
cycle. The quality of some foods will suffer with
extended time.
The MORE and LESS functions of this
oven adjust the cooking cycle's cook
time while the microwave is running.
MORE adds 10 seconds to the cook
time; LESS subtracts 10 seconds.
• Use MORE or LESS when cooking time is counting
down in the display. MORE and LESS cannot be set
when "SENSING" is displayed.
• MORE and LESS do not adjust cook time for the
DEFROST and WARM/HOLD cooking cycles.
• Press MORE or LESS pads during active cooking
cycle.
• For convection cooking, MORE or LESS are used as
temperature selection pads.
13
Page 14
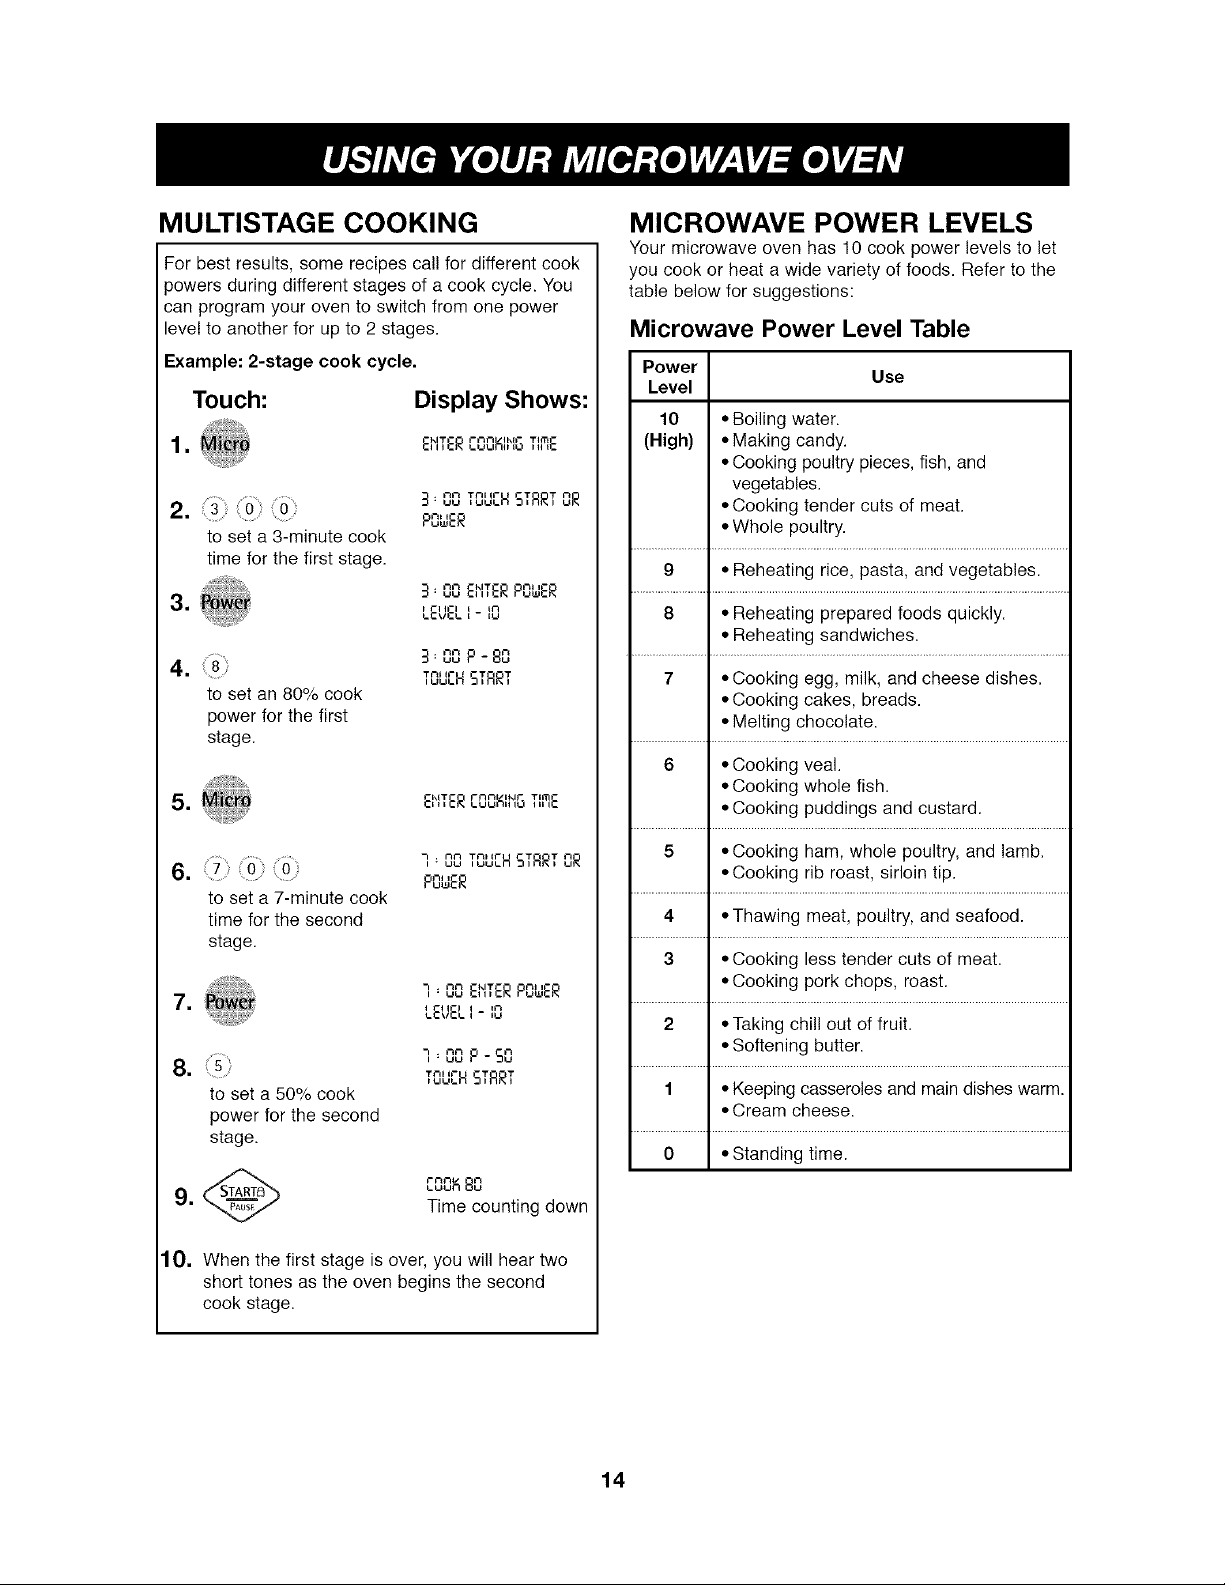
MULTISTAGE COOKING
For best results, some recipes call for different cook
powers during different stages of a cook cycle• You
can program your oven to switch from one power
level to another for up to 2 stages.
Example: 2-stage cook cycle.
Touch:
1.
2. "6 o:
to set a 3-minute cook
time for the first stage.
3. _!?_
4. 8
to set an 80% cook
power for the first
stage.
Display Shows:
-t,IT - t" t"l i"_ / i kt i- T itTI I'-
E,,,ER_K,,,o ,,,,c
3,O0 TOUCHSTRRTOR
POWEQ
3,O0 81TERPOWEQ
LEUELI-IO
3, _'_'_P - 80
,_H STRRT
EklT _'t"ltl ii_if" TIm-
,,,ER ...K,,,o ,.,E
MICROWAVE POWER LEVELS
Your microwave oven has 10 cook power levels to let
you cook or heat a wide variety of foods. Refer to the
table below for suggestions:
Microwave Power Level Table
Power
Level
10 • Boiling water.
(High) • Making candy.
• Cooking poultry pieces, fish, and
vegetables.
• Cooking tender cuts of meat.
• Whole poultry.
9 • Reheating rice, pasta, and vegetables.
8 • Reheating prepared foods quickly.
• Reheating sandwiches.
7 • Cooking egg, milk, and cheese dishes.
• Cooking cakes, breads.
• Melting chocolate.
6 • Cooking veal.
• Cooking whole fish.
• Cooking puddings and custard.
Use
6. 8
7 : mN Tnll_ _T T
POWER
to set a 7-minute cook
time for the second
stage.
• ¢3¢3 klTr"
= I t'll-I I 1¢3
8. _: q"" P
........ ,_,.H :,RR,
-I• _ E,,,:RPOWEQ
LCV_L. I - i_.1
..... 50
Tf_llr I t-T T
to set a 50% cook
power for the second
stage.
9. Time counting down
10. When the first stage is over, you will hear two
short tones as the oven begins the second
cook stage.
5 • Cooking ham, whole poultry, and lamb.
• Cooking rib roast, sirloin tip.
4 • Thawing meat, poultry, and seafood.
3 • Cooking less tender cuts of meat.
• Cooking pork chops, roast.
2 • Taking chill out of fruit.
• Softening butter.
1 • Keeping casseroles and main dishes warm.
• Cream cheese.
0 • Standing time.
14
Page 15
SENSOR COOKING OPERATION
INSTRUCTION
A sensor detects steam from the food and
automatically adjusts cook time for the best cooking
results. It's easy and convenient--the oven will guide
you, step-by-step, to cook or reheat foods. The
Sensor Menu, with many popular food choices, is
preprogrammed to cook or reheat food perfectly every
time.
For more information about Sensor Cooking
Programs, see the sensor reheat and cook tables
on pages 15 and 17. These tables provide specific
instructions for cooking and heating a variety of
foods.
• The Sensor Cooking system works by detecting a
buildup of vapor.
• Make sure the door remains closed.
• Once the vapor is detected, two beeps will sound.
• Opening the door or touching the STOP/CLEAR
before the vapor is detected will abort the process.
The oven will stop.
• Before using Sensor Cooking, make sure the glass
turntable is dry, to ensure the best results.
Categories:
Sensor Reheat
Sensor Popcorn
Sensor Cook
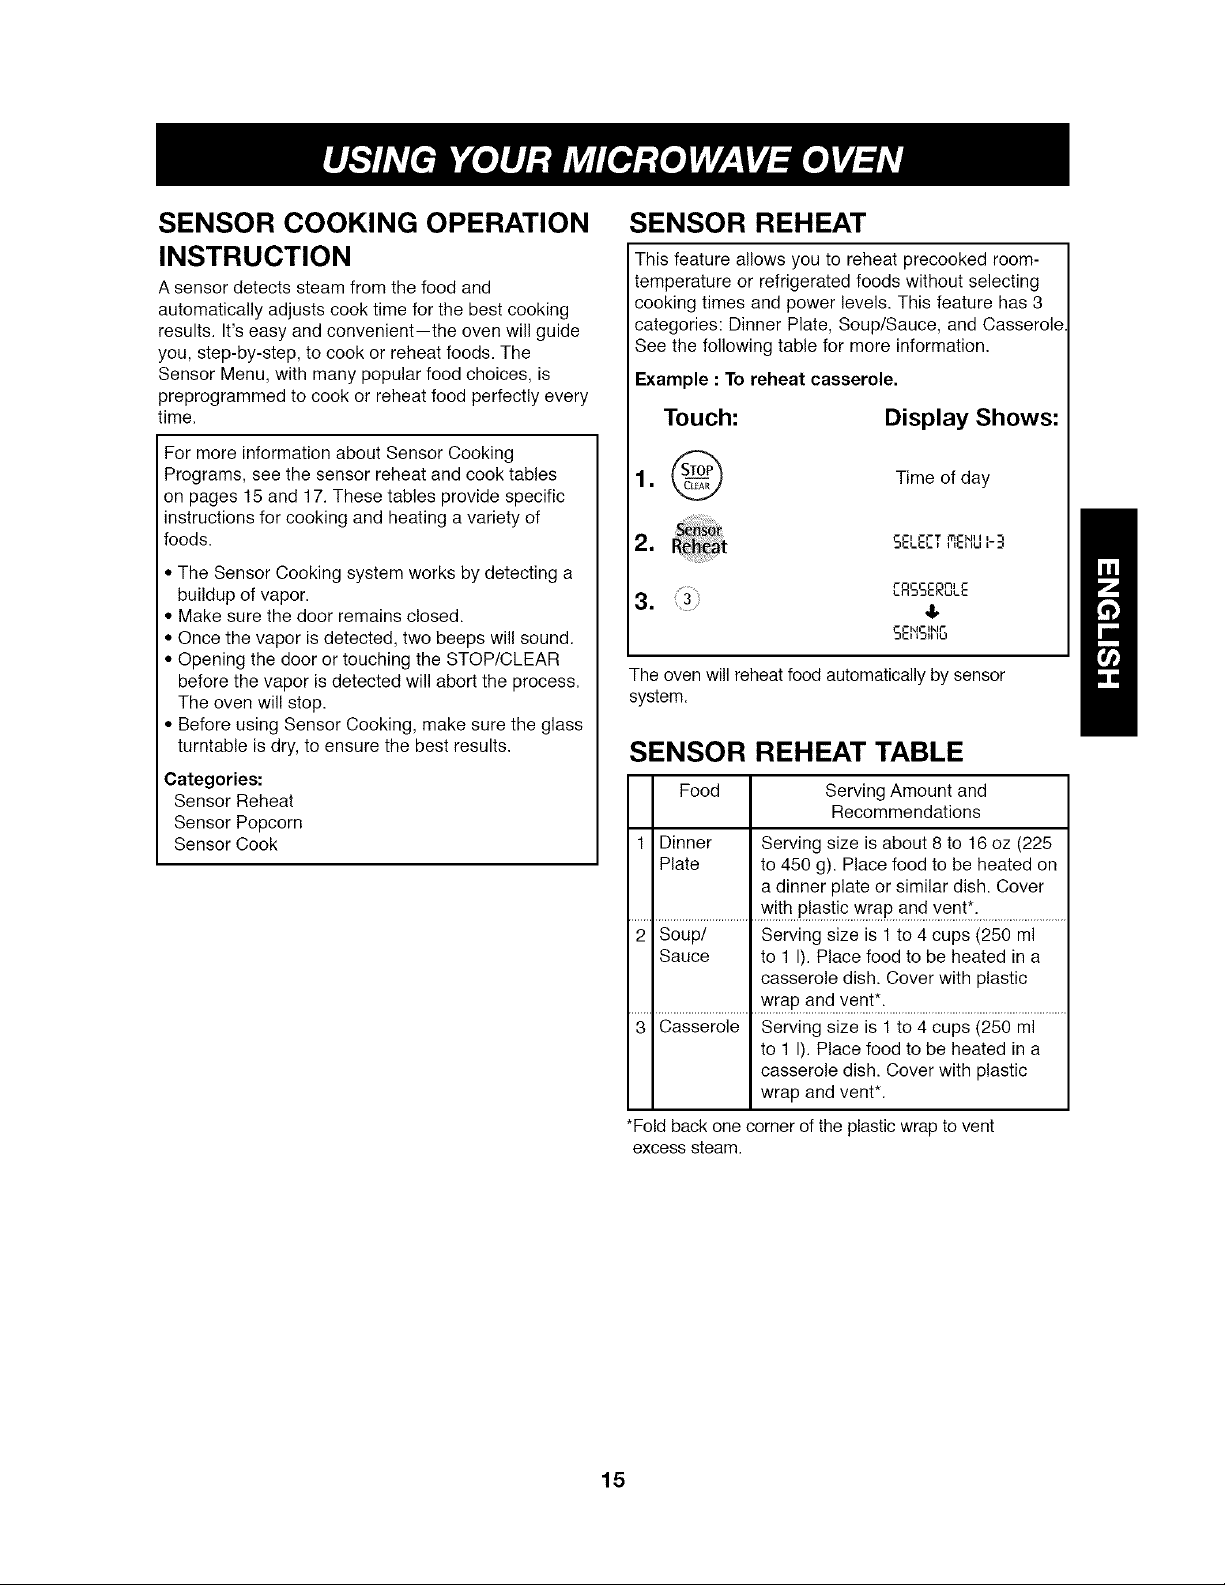
SENSOR REHEAT
This feature allows you to reheat precooked room-
temperature or refrigerated foods without selecting
cooking times and power levels. This feature has 3
categories: Dinner Plate, Soup/Sauce, and Casserole
See the following table for more information.
Example : To reheat casserole.
Touch:
Display Shows:
1. _ Time of day
2. R_t _-'_" " ""'
3. 3) ,.RSSER,.,,.c
The oven will reheat food automatically by sensor
system.
t- --- ml t_
5-kt-I1_1_
SENSOR REHEAT TABLE
Food Serving Amount and
1 Dinner Serving size is about 8 to 16 oz (225
Plate to 450 g). Place food to be heated on
a dinner plate or similar dish. Cover
Recommendations
..........................................W!t4.p!ast!c.w_aPand_en!T..............................
2 Soup/ Serving size is 1 to 4 cups (250 ml
Sauce to 1 I). Place food to be heated in a
casserole dish. Cover with plastic
wrap and vent*.
3 Casserole Serving size is 1 to 4 cups (250 ml
to 1 I). Place food to be heated in a
casserole dish. Cover with plastic
wrap and vent*.
*Fold back one corner of the plastic wrap to vent
excess steam.
15
Page 16
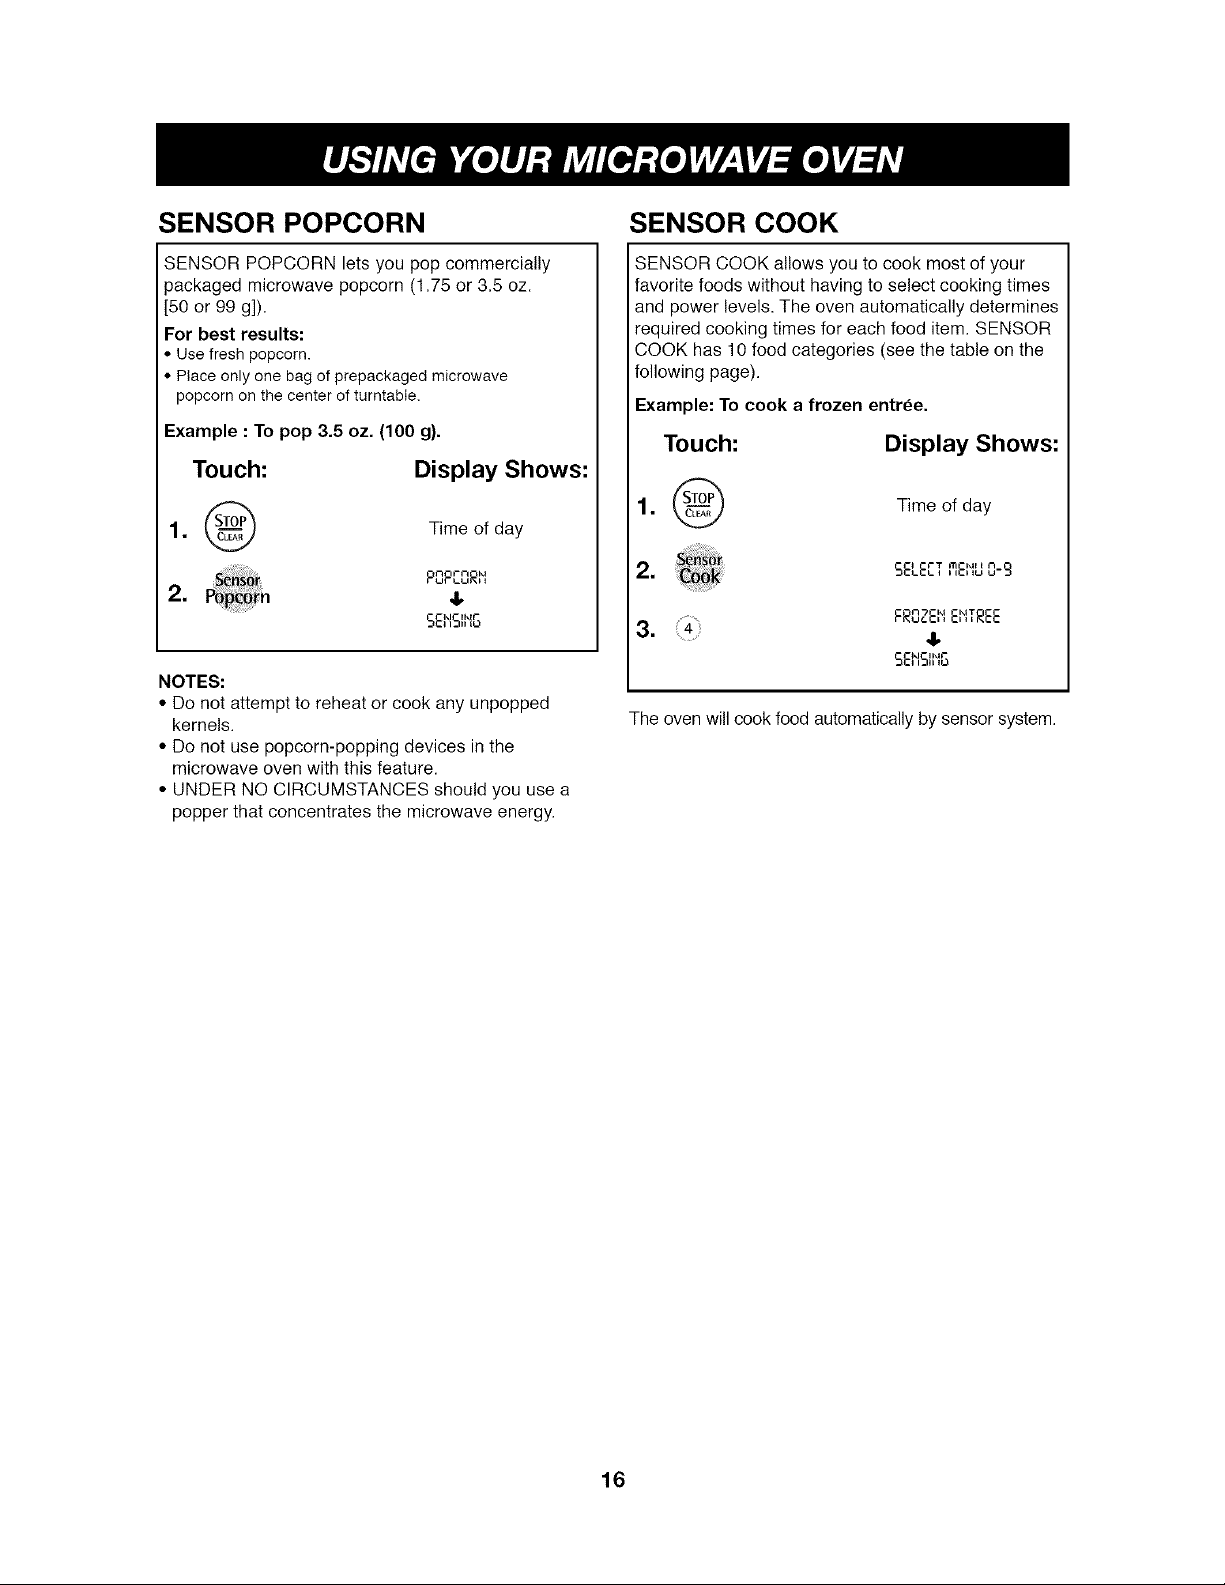
SENSOR POPCORN
SENSOR COOK
SENSOR POPCORN lets you pop commercially
packaged microwave popcorn (1.75 or 3.5 oz.
[50 or 99 g]).
For best results:
• Use fresh popcorn.
• Place only one bag of prepackaged microwave
popcorn on the center of turntable.
Example : To pop 3.5 oz. (100 g).
Touch:
2. Popcorn
NOTES:
• Do not attempt to reheat or cook any unpopped
kernels.
• Do not use popcorn-popping devices in the
microwave oven with this feature.
• UNDER NO CIRCUMSTANCES should you use a
popper that concentrates the microwave energy.
Display Shows:
Time of day
4,
- i-Np-- ikl¢-
SENSOR COOK allows you to cook most of your
favorite foods without having to select cooking times
and power levels. The oven automatically determines
required cooking times for each food item. SENSOR
COOK has 10 food categories (see the table on the
following page).
Example: To cook a frozen entree.
Touch:
Display Shows:
1. _ Time of day
2. S&E.... E,,o0-9
=
The oven will cook food automatically by sensor system.
- I -t'T I"N-ku I
FROZE,_IEIITREE
SE,,S,,,o
16
Page 17
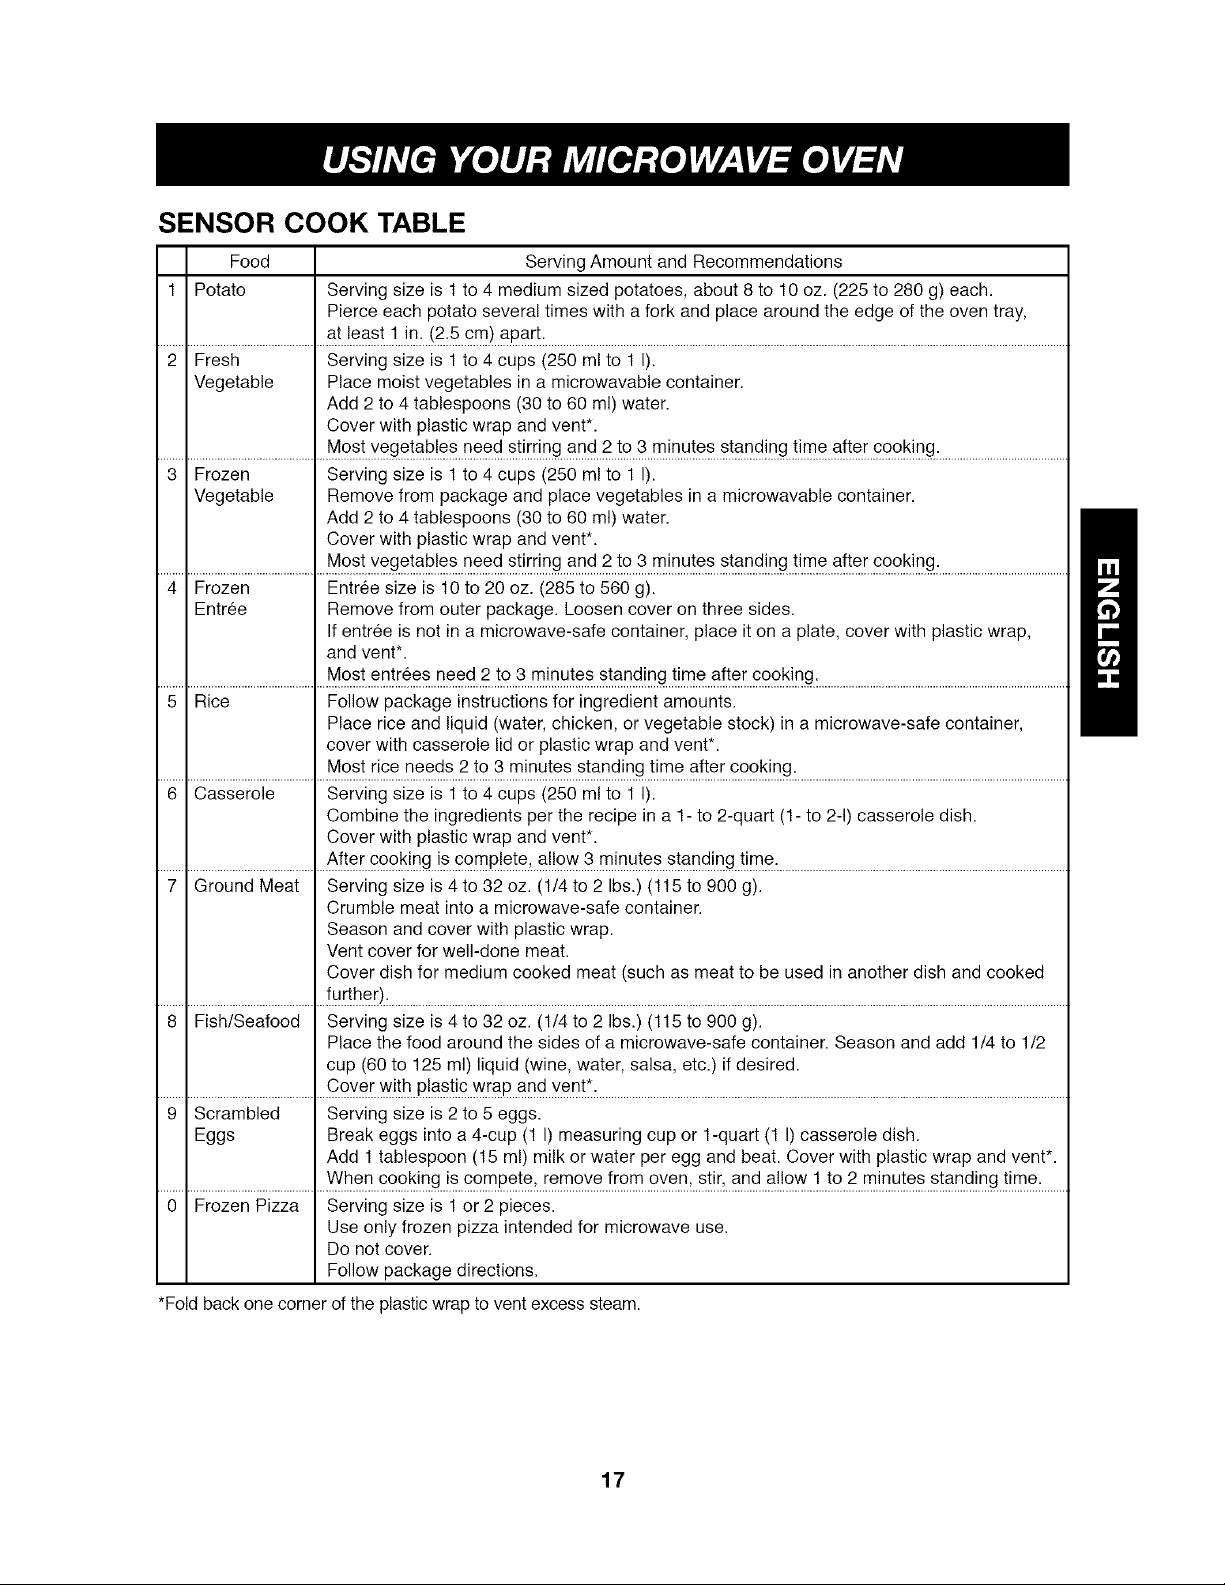
SENSOR COOK TABLE
Food Serving Amount and Recommendations
1 Potato Serving size is 1 to 4 medium sized potatoes, about 8 to 10 oz. (225 to 280 g) each.
Pierce each potato several times with a fork and place around the edge of the oven tray,
....................................................... .............................................................................................................................................................................
2 Fresh Serving size is 1 to 4 cups (250 ml to I I).
Vegetable Place moist vegetables in a microwavable container.
Add 2 to 4 tablespoons (30 to 60 ml) water.
Cover with plastic wrap and vent*.
.......................................................Mrs} vege!ablfifi _e2d s}i[[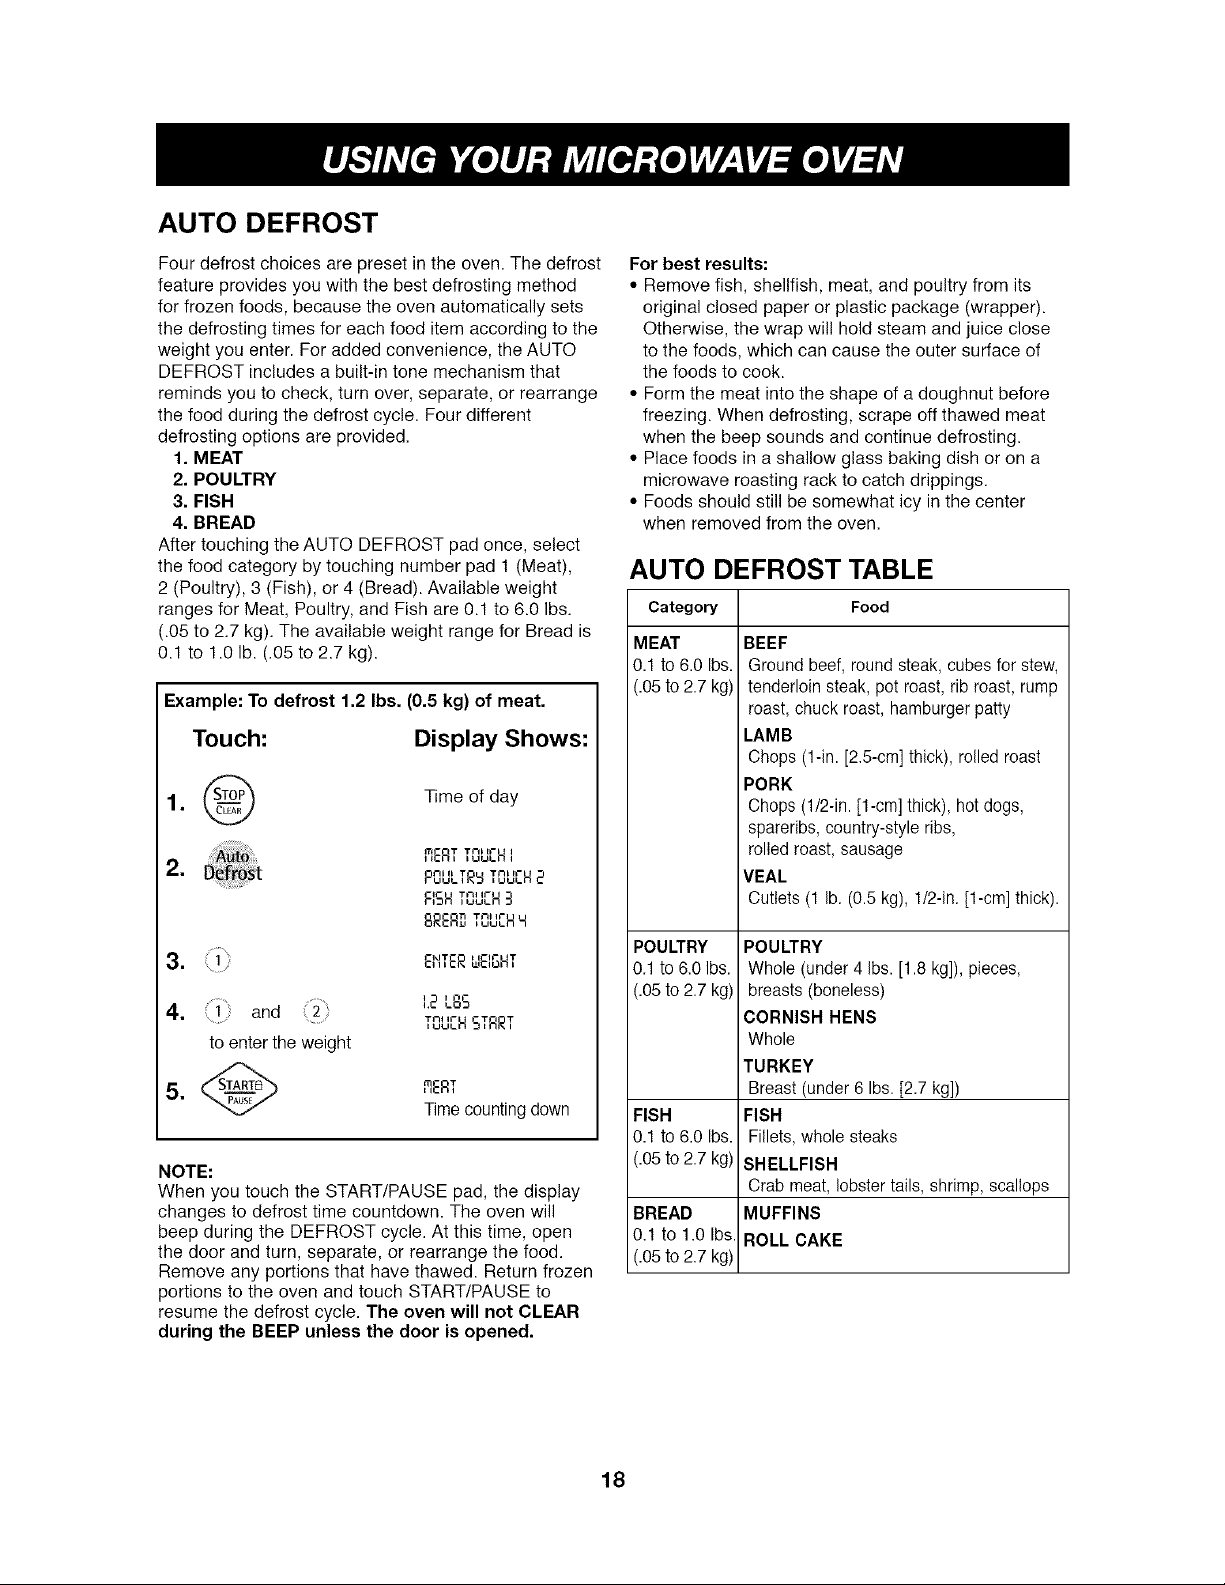
AUTO DEFROST
Four defrost choices are preset in the oven. The defrost
feature provides you with the best defrosting method
for frozen foods, because the oven automatically sets
the defrosting times for each food item according to the
weight you enter. For added convenience, the AUTO
DEFROST includes a built-in tone mechanism that
reminds you to check, turn over, separate, or rearrange
the food during the defrost cycle. Four different
defrosting options are provided.
1. MEAT
2. POULTRY
3. FISH
4. BREAD
After touching the AUTO DEFROST pad once, select
the food category by touching number pad 1 (Meat),
2 (Poultry), 3 (Fish), or 4 (Bread). Available weight
ranges for Meat, Poultry, and Fish are 0.1 to 6.0 Ibs.
(.05 to 2.7 kg). The available weight range for Bread is
0.1 to 1.0 lb. (.05 to 2.7 kg).
Example: To defrost 1.2 Ibs. (0.5 kg) of meat.
Touch: Display Shows:
,@
2. a_fro_t
3, I-lITERWEIGHT
4. and
to enterthe weight
5. _ RERT
NOTE:
When you touch the START/PAUSE pad, the display
changes to defrost time countdown. The oven will
beep during the DEFROST cycle. At this time, open
the door and turn, separate, or rearrange the food.
Remove any portions that have thawed. Return frozen
portions to the oven and touch START/PAUSE to
resume the defrost cycle. The oven will not CLEAR
during the BEEP unless the door is opened.
Time of day
RERTTOU[HI
POULTRWTOU[H2
RSH TOUCH3
BRERDTQU[HH
12LOS
TOUEHSTRRT
_me counting down
For best results:
• Remove fish, shellfish, meat, and poultry from its
original closed paper or plastic package (wrapper).
Otherwise, the wrap will hold steam and juice close
to the foods, which can cause the outer surface of
the foods to cook.
• Form the meat into the shape of a doughnut before
freezing. When defrosting, scrape off thawed meat
when the beep sounds and continue defrosting.
• Place foods in a shallow glass baking dish or on a
microwave roasting rack to catch drippings.
• Foods should still be somewhat icy in the center
when removed from the oven.
AUTO DEFROST TABLE
Category
MEAT
0.1 to 6.0 Ibs.
(.05 to 2.7 kg)
POULTRY
0.1 to 6.0 Ibs.
(.05 to 2.7 kg)
FISH
0.1 to 6.0 Ibs.
(.05 to 2.7 kg)
BREAD
0,1 to 1,0 Ibs
(.05 to 2.7 kg)
BEEF
Ground beef, round steak, cubes for stew,
tenderloin steak, pot roast, rib roast, rump
roast, chuck roast, hamburger patty
LAMB
Chops (1-in. [2.5-cm] thick), rolled roast
PORK
Chops (1/2-in. [1-cm] thick), hot dogs,
spareribs, country-style ribs,
rolled roast, sausage
VEAL
Cutlets (1 lb. (0.5 kg), 1/2-in. [1-cm] thick).
POULTRY
Whole (under 4 Ibs. [1.8 kg]), pieces,
breasts (boneless)
CORNISH HENS
Whole
TURKEY
Breast (under 6 Ibs. [2.7 kg])
FISH
Fillets, whole steaks
SHELLFISH
Crab meat, lobster tails, shrimp, scallops
MUFFINS
ROLL CAKE
Food
18
Page 19
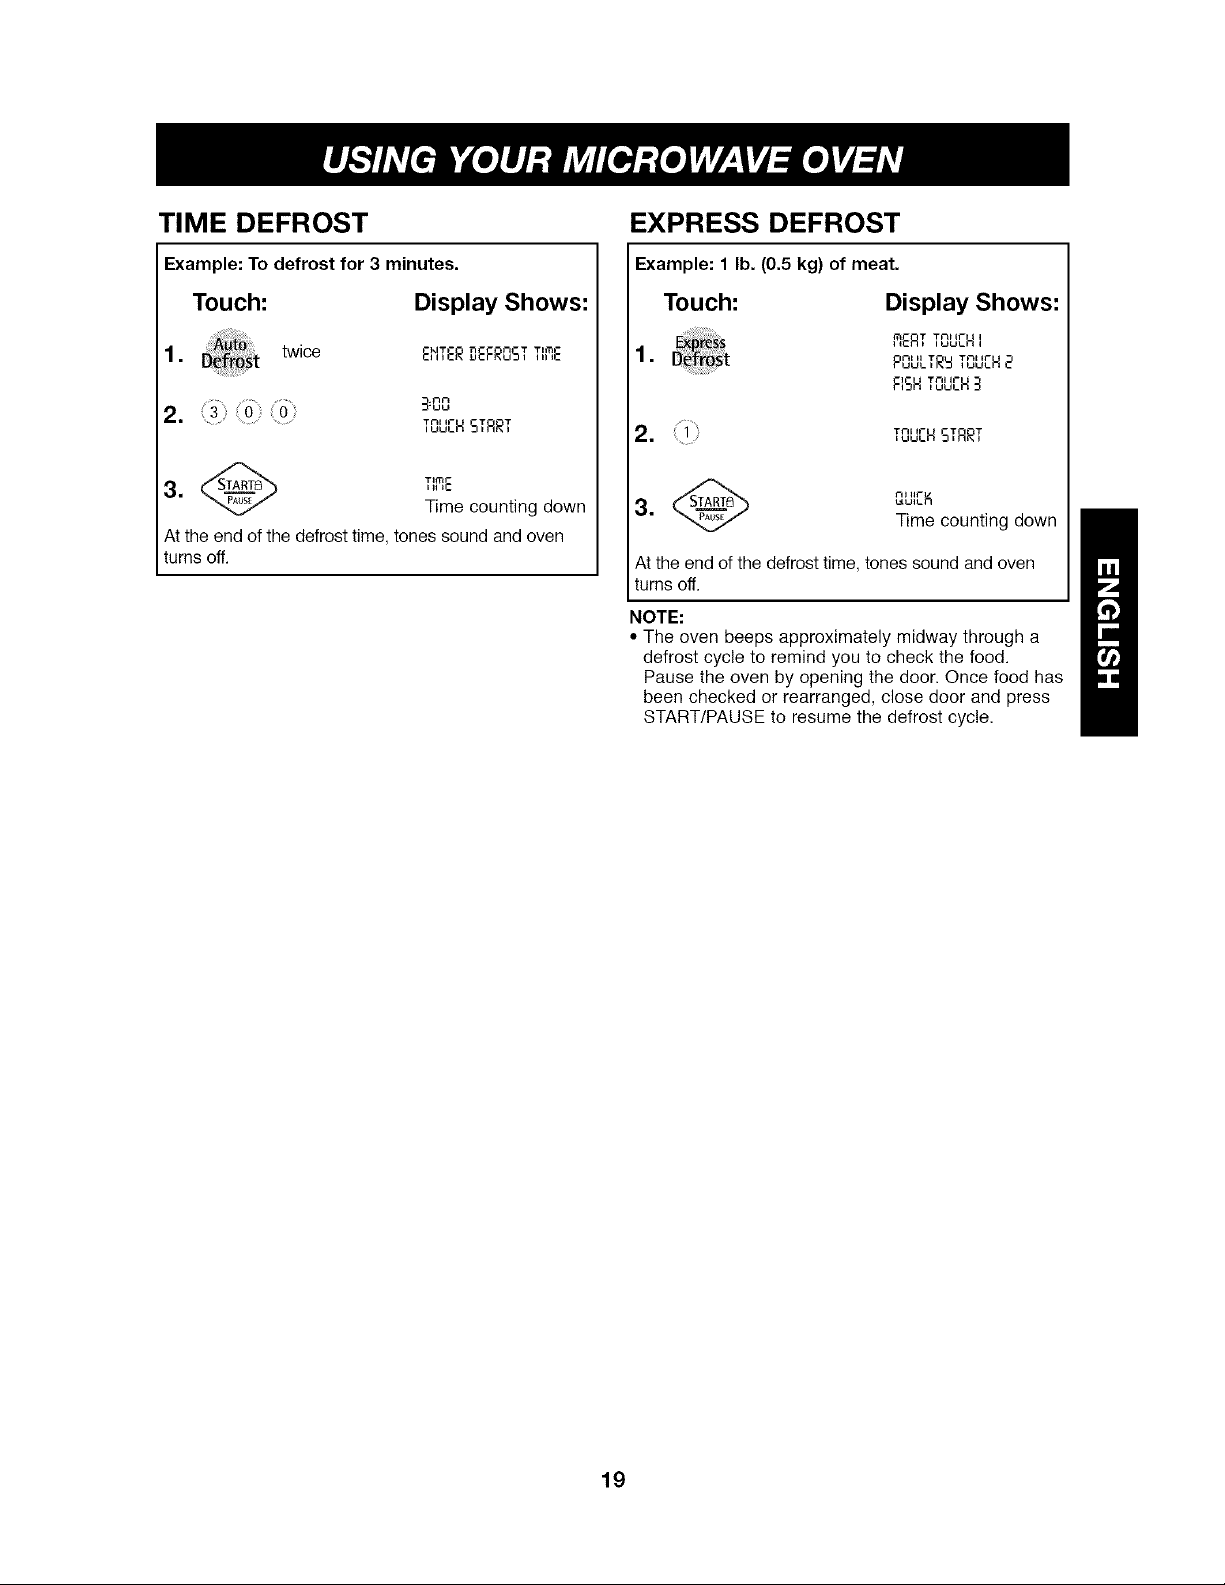
TIME DEFROST
EXPRESS DEFROST
Example: To defrost for 3 minutes.
Touch:
;to
1. B_gro_t twice
2.
At the end of the defrost time, tones sound and oven
turns off.
Display Shows:
81TERDEFROSTTIFIE
3:00
TOUCHSTRRT
Tirol-
Time counting down
Example: 1 lb. (0.5 kg) of meat.
Touch: Display Shows:
.
B_roi_t POULTRUTOUCH8
FISH_"_',o_H 3
1 T_I If- I,o_LHSTRRT
Time counting down
At the end of the defrost time, tones sound and oven
turns off.
NOTE:
• The oven beeps approximately midway through a
defrost cycle to remind you to check the food.
Pause the oven by opening the door. Once food has
been checked or rearranged, close door and press
START/PAUSE to resume the defrost cycle.
19
Page 20
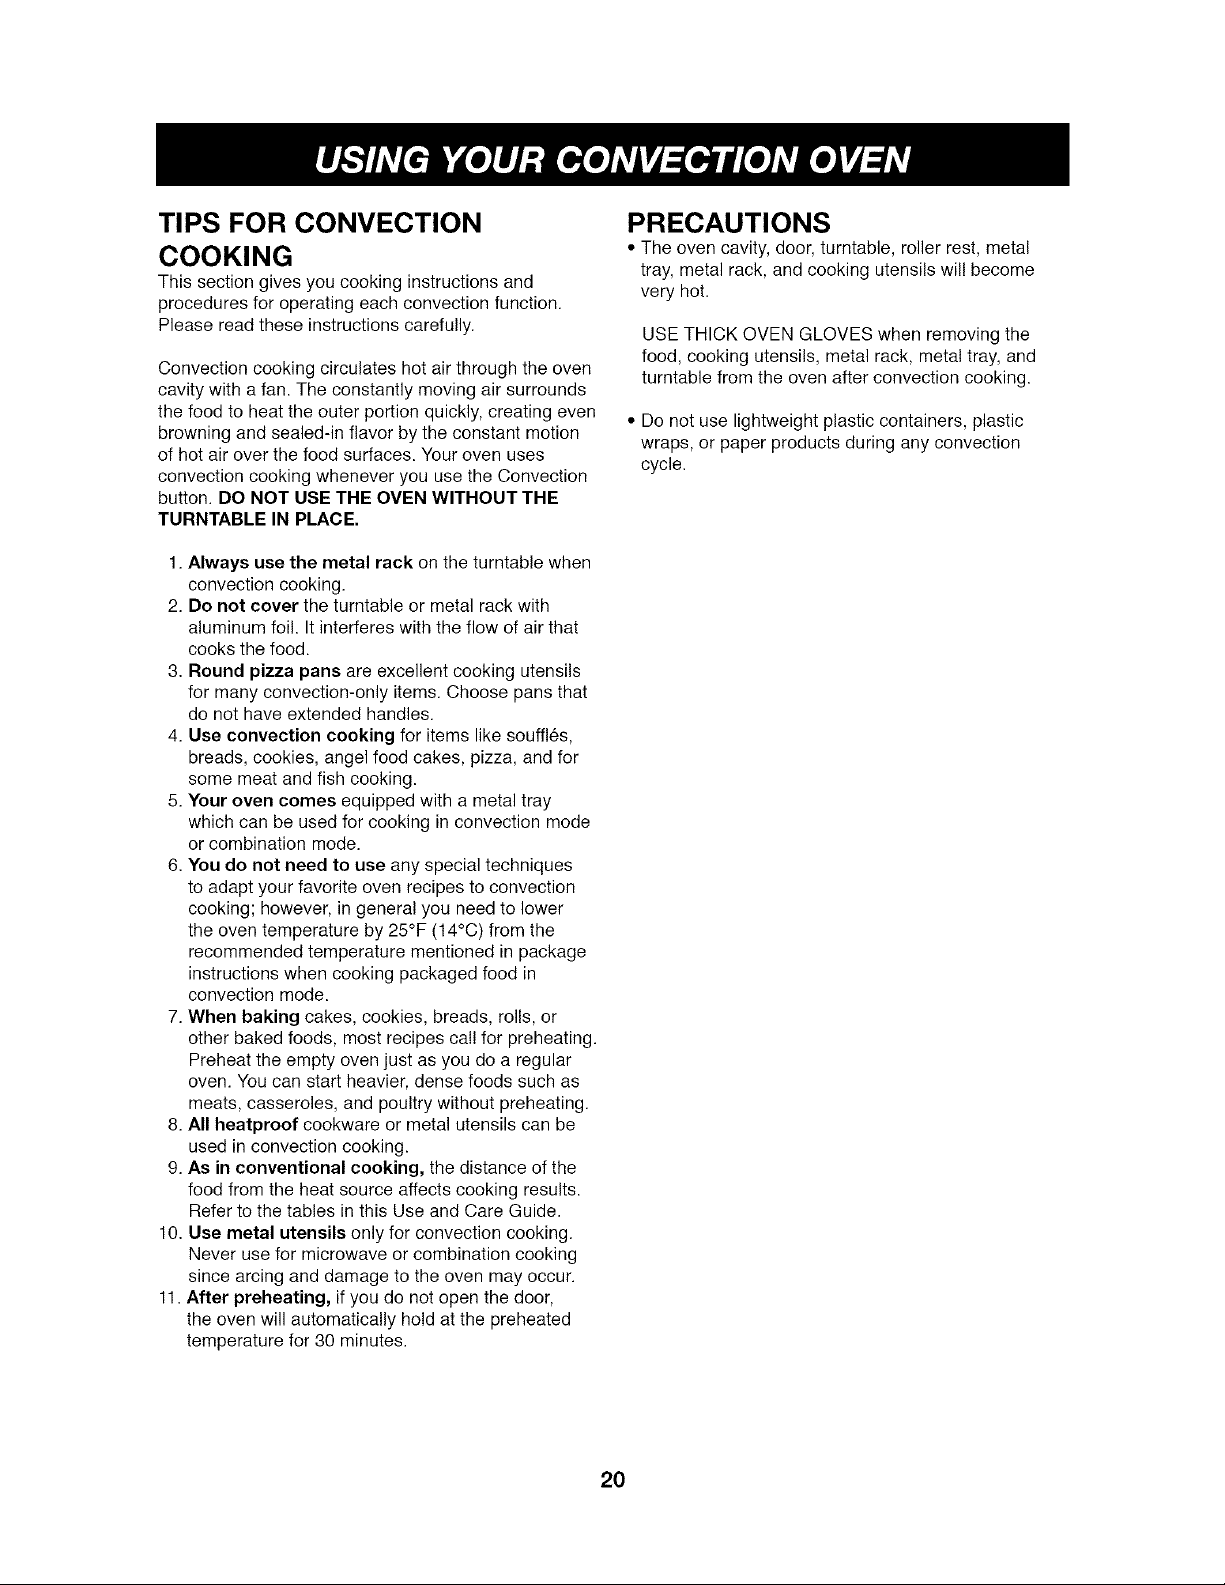
TIPS FOR CONVECTION
COOKING
This section gives you cooking instructions and
procedures for operating each convection function.
Please read these instructions carefully.
Convection cooking circulates hot air through the oven
cavity with a fan. The constantly moving air surrounds
the food to heat the outer portion quickly, creating even
browning and sealed-in flavor by the constant motion
of hot air over the food surfaces. Your oven uses
convection cooking whenever you use the Convection
button. DO NOT USE THE OVEN WITHOUT THE
TURNTABLE IN PLACE.
1. Always use the metal rack on the turntable when
convection cooking.
2. De net cover the turntable or metal rack with
aluminum foil. It interferes with the flow of air that
cooks the food.
3. Round pizza pans are excellent cooking utensils
for many convection-only items. Choose pans that
do not have extended handles.
4. Use convection cooking for items like souffles,
breads, cookies, angel food cakes, pizza, and for
some meat and fish cooking.
5. Your oven comes equipped with a metal tray
which can be used for cooking in convection mode
or combination mode.
6. You do not need to use any special techniques
to adapt your favorite oven recipes to convection
cooking; however, in general you need to lower
the oven temperature by 25°F (14°C) from the
recommended temperature mentioned in package
instructions when cooking packaged food in
convection mode.
7. When baking cakes, cookies, breads, rolls, or
other baked foods, most recipes ca!! for preheating.
Preheat the empty oven just as you do a regular
oven. You can start heavier, dense foods such as
meats, casseroles, and poultry without preheating.
8. All heatproof cookware or metal utensils can be
used in convection cooking.
9. As in conventional cooking, the distance of the
food from the heat source affects cooking results.
Refer to the tables in this Use and Care Guide.
10. Use metal utensils only for convection cooking.
Never use for microwave or combination cooking
since arcing and damage to the oven may occur.
11. After preheating, if you do not open the door,
the oven will automatically hold at the preheated
temperature for 30 minutes.
PRECAUTIONS
• The oven cavity, door, turntable, roller rest, metal
tray, metal rack, and cooking utensils will become
very hot.
USE THICK OVEN GLOVES when removing the
food, cooking utensils, metal rack, metal tray, and
turntable from the oven after convection cooking.
• Do not use lightweight plastic containers, plastic
wraps, or paper products during any convection
cycle.
20
Page 21
AUTO BAKE
AUTO BAKE TABLE
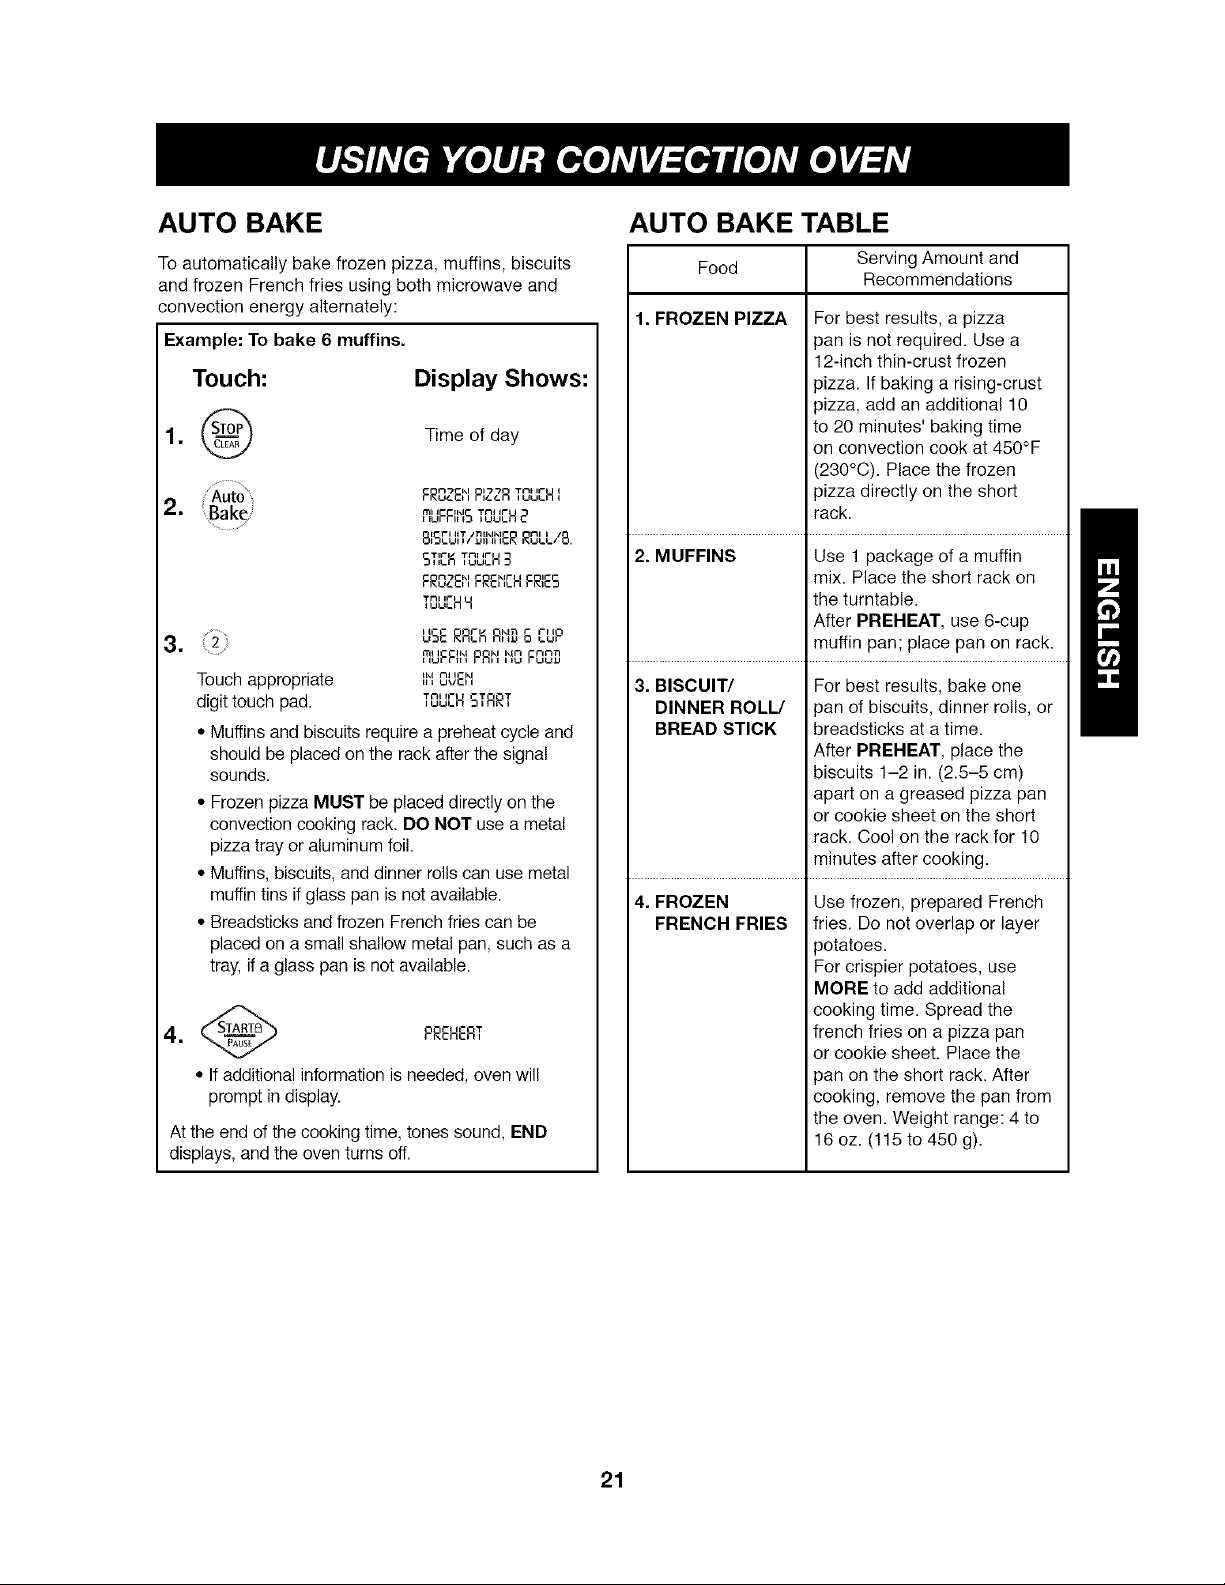
To automatically bake frozen pizza, muffins, biscuits
and frozen French fries using both microwave and
convection energy alternately:
Example: To bake 6 muffins.
Touch: Display Shows:
1. _ Time of day
Auto FROZEIIPIZZRTOUCHI
2. Bake ,%FFII'ISTOUCH2
81SEUITI?,IIIIIERROLLIO.
STICKTOUCH3
FROZEI'IFREIICHFRIES
TOUCHH
2 USERR,KR,,, o ,uP
=
Touch appropriate Ibl%EI'I
digit touch pad. TOUCHSTRRT
• Muffins and biscuits require a preheat cycle and
should be placed on the rack after the signal
sounds.
• Frozen pizza MUST be placed directly on the
convection cooking rack. DO NOT use a metal
pizza tray or aluminum foil.
• Muffins, biscuits, and dinner rolls can use metal
muffin tins if glass pan is not available.
• Breadsticks and frozen French fries can be
placed on a small shallow metal pan, such as a
tray, if a glass pan is not available.
.
• If additional information is needed, oven will
prompt in display.
At the end of the cooking time, tones sound, END
displays, and the oven turns off.
F/ kln t" €'ii
ml I -Ikl i II,I l-ln_
PREHERT
Food Serving Amount and
Recommendations
1. FROZEN PIZZA For best results, a pizza
pan is not required. Use a
12-inch thin-crust frozen
pizza. If baking a rising-crust
pizza, add an additional 10
to 20 minutes' baking time
on convection cook at 450°F
(230°C). Place the frozen
pizza directly on the short
rack.
2. MUFFINS Use 1 package of a muffin
mix. Place the short rack on
the turntable.
After PREHEAT, use 6-cup
muffin pan; place pan on rack.
3. BISCUIT/ For best results, bake one
DINNER ROLL/ pan of biscuits, dinner rolls, or
BREAD STICK breadsticks at a time.
After PREHEAT, place the
biscuits 1-2 in. (2.5-5 cm)
apart on a greased pizza pan
or cookie sheet on the short
rack. Cool on the rack for 10
minutes after cooking.
4. FROZEN Use frozen, prepared French
FRENCH FRIES fries. Do not overlap or layer
potatoes.
For crispier potatoes, use
MORE to add additional
cooking time. Spread the
french fries on a pizza pan
or cookie sheet. Place the
pan on the short rack. After
cooking, remove the pan from
the oven. Weight range: 4 to
16 oz. (115 to 450 g).
21
Page 22

AUTO ROAST
AUTO ROAST TABLE
Auto roast will automatically roast beef, whole chicken,
turkey breasts, and pork using both microwave and
convection energy alternately.
Example: To roast a whole chicken
(3 Ibs. [1.5 kg]).
Touch:
,.®
Auto
2. Boast
3. USERRCK
Display Shows:
Time of day
BEEFTOUCHi
WHOLE[HIEKEMTOUCH8
TURKEW8RERSTS
TOUCH3
POR_TOUEHH
EI_ITr r
,,,cRS._- S LBS
4. 3.0Lr_S
TOUCHSTRRT
5, Time counting down
• If additional information is needed, the oven wil!
prompt in the display.
At the end of the cooking time, tones sound, END
displays, and the oven turns off.
RORST
Food
1. BEEF
2. WHOLE Weigh whole chicken. Remove giblets
CHICKEN and neck and discard. Thoroughly
3. TURKEY Weigh turkey breast and pat dry
BREASTS with paper towels. Brush turkey
Serving Amount and Recommendations
Weigh roast and pat dry with paper
towels. Place a microwave-safe/heat-
proof plate on turntable to catch
drippings. Place roast on short rack.
After cooking, loosely tent roast beef
with aluminum foil and let stand for 5
to 10 minutes.
Weight range: 2 to 4 Ibs. (1 to 2 kg)
wash inside and outside of chicken
with cold water. Pat chicken dry
with paper towels. Secure the legs
with kitchen twine. Brush outside
of chicken with melted butter or
margarine. Place a microwave-
safe/heatproof plate on turntable
to catch drippings. Place chicken
breast side up on short rack. After
cooking, loosely tent roast chicken
with aluminum foil and let stand for 10
minutes.
Weight range: 2.5 to 6 Ibs. (1 to 3 kg)
breast with melted butter. Place a
microwave-safe/heatproof plate on
turntable to catch drippings. Place
turkey breast on short rack. After
cooking, loosely tent roast turkey with
aluminum foil and let stand for 5 to 10
minutes.
Weight range: 3 to 6 Ibs. (1 to 3 kg)
4. PORK Weigh roast and pat dry with paper
towels. Place a microwave-safe/
heatproof plate on turntable to catch
drippings. Place roast on short rack.
After cooking, loosely tent roast with
aluminum foil and let stand for 5 to 10
minutes.
Weight range: 2 to 4 Ibs. (1 to 2 kg)
22
Page 23

CONVECTION
During convection cooking, a heating element is used to raise the temperature of the air inside the oven.
Convection cooking temperature ranges from 225°F (t07°C) to 450°F (230°C); and 100°F (38°C) may be
programmed.
it is best to preheat the oven when convection cooking.
Example: To set the convection cooking at 325°F
(160°0) for 45 minutes with preheating.
Touch:
Display Shows:
Time of day
3S0 F TOUCHmOREOR
LESSFORTERPSET
DRSTRRTDR81TER
COOKIHGTInE
............. ,uuLHSTRRT
3. 32sF
FORPREHERTORE., ER
KI T -
uuuK.,,o,.,E
4. @ PREHERT3@SF
NOTES:
• After preheating, display scrolls "PLACE FOOD ON
RACK" with sound.
• Use thick oven gloves; oven interior will be hot.
• Open the door, place food on the rack, and close the
door. Display scrolls "ENTER COOKING TIME."
5. ..........0 %,00
........ ............................. T t,-ii iX
6.
,_,.H STRRT
[U92S F
Time counting down.
Example: To set the convection cooking at 375°F
(190°0) for 30 minutes without preheating.
Touch: Display Shows:
1. (_T?_ Time of day
LESSFuR ,E.,PSET
t_ t'T T -I_IT -
_R =,RR, OR E,,,ER
uuuK,,,o,.,E
..... ..... ,uu_.HSTRRT
3. _'s FT_"_
FORPREHERTOR o,, ER
uuuK,,,o,.,E
....... ¢%¢3¢3
T_II ir
,_,.H STRRT
5. @ [U_S F
Time counting down.
NOTES:
• The temperature range has 10 steps from 225°F
(107°C) to 450°F (230°C) including IO0°F (38°C)
(dough rising).
• Use MORE/LESS to increase/decrease the
temperature by 25°F (t4°C) after touching the
CONVECTION button. (The default temperature is
350°F [180°C].)
¢-I,IT -
NOTES:
• When the oven reaches the set preheat temperature,
five tones will sound and the oven will automatically
hold that temperature for 30 minutes.
• The oven temperature drops very quickly when the
door is opened; however, this should not prevent
food from being fully cooked during norma! cooking
time.
23
Page 24

CONVECTION COOKING Guide
1 Always use the metal rack when convection
baking.
2. Aluminum pans conduct heat quickly. For most
convection baking, light, shiny finishes give the best
results because they prevent overbrowning in the
time it takes to cook the center areas. Pans with dul!
(satinifinish) bottoms are recommended for cake
pans and pie pans for best bottom browning.
Oven
FOOD Temp. Comments
Breads 400°F (200°C) Canned refrigerated biscuits take 2 to
Cakes
Cookies
Biscuits
Corn Bread
Muffins
Popovers
Nut Bread or Fruit Bread 350°F
Yeast Bread 375°F
Plain or Sweet Rolls 350°F
Angel Food 350°F
Cheesecake 350°F
Coffee Cake 350°F
Cupcakes 350°F
Fruitcake (loaf) 350°F
Gingerbread 350°F
Butter Cakes, Cake Mixes 350°F
Fluted Tube Cake 350°F
Pound Cake 350°F
Bar 350°F
Drop or Sliced 375°F
400°F (200°C)
400°F (200°C)
350°F (180°C)
3. Dark or nonshiny finishes, glass, and pyroceram
absorb heat which may result in dry, crisp crusts.
4. Preheating the oven is recommended when baking
foods by convection.
5. To prevent uneven heating and save energy, open
the oven door to check food as little as possible.
Time,
Min.
10 to 12
4 minutes less time.
15 to 20
(180°0)
(190oc)
(18ooc)
(180°C)
(180°C)
(180°0)
(18ooc)
(18ooc)
(180°O)
(180°C)
(180°C)
(180°C)
(180°C)
(190°C)
18 to 24
30 to 40
55 to 65
18 to 25
13 to 16
40 to 50
60 to 65
25 to 30
15 to 20
80 to 90
35 to 40
30 to 40
40 to 50
60 to 70
35 to 45
10 to 14
Remove from pans immediately and
cool slightly on wire rack.
Pierce each popover with a fork after
removing from oven to allow steam to
escape.
Interiors will be moist and tender.
Lightly grease baking sheet.
Invert and cool inpan.
After cooking, turn oven off and let
cheesecake stand in oven 30 minutes
with door ajar.
Interior will be moist and tender.
Grease and flour pan.
Cool in pan 10 minutes before
inverting on wire rack.
Follow package instructions if using
a mix.
Follow package instructions if using
a mix.
NOTES:
• The oven temperature indicated in the table above is recommended over the package instruction temperature.
• The baking times in the table above are only guidelines for your reference, You need to adjust the baking time
according to the food condition or your preference.
24
Page 25

CONVECTION BAKING TABLE
FOOD Comments
Fruits,
Other
Desserts
Pies,
Pastries
Casseroles
Converience
Foods
Main
Dishes
Vegetables
NOTES:
• The oven temperatures indicated in the table above are recommended over the package instruction
temperature.
• The baking times in the table above are only guidelines for your reference. You need to adjust the baking time
according to the food condition or your preference.
Baked Apples or Pears
Bread Pudding
Cream Puffs
Custard (individual)
Meringue Shells
Frozen
Meringue-Topped
Two-Crust
Quiche
Pastry Shell
Meat, chicken, seafood
combinations
Pasta
Potatoes, Scalloped
Vegetable
Frozen Bread Dough
Frozen Entree
Frozen Pizza Rolls,
Egg Rolls
Pizza
Slice-and-Bake Cookies
Meat Loaf
Oven-Baked Stew
Swiss Steak
Stuffed Peppers
Acorn Squash Halves
Baked Potatoes
Twice-Baked Potatoes
Oven Temp.
350°F (180°C)
300°F(150°0)
400°F (200°0)
350°F (180°O)
300°F(150°C)
375°F (190°C)
325°F(160°C)
400°F (200°C)
350°F (180°O)
400°F (200°0)
350°F (180°C)
350°F (180°C)
350°F (180°C)
350°F (180°C)
350°F (180°C)
350°F (180°C)
400°F (200°C)
425°F (220°C)
375°F(190°C)
325°F(160°C)
325°F(160°C)
350°F (180°C)
350°F (180°C)
375°F(190°C)
425°F (220°C)
400°F (200°C)
Time, Min.
30 to 30
35 to 40
30 to 35
45 to 50
30 to 35
40 to 45
13 to 16
50 to 55
30 to 35
10 to 16
20 to 40
25 to 45
55 to 60
25 to 35
30 to 35
50 to 60
8to 10
15 to 25
13 to 15
55 to 60
80 to 90
60 to 70
40 to 45
55 to 60
50 to 60
25 to 30
Bake in cookware with shallow sides.
Pudding isdone when knife inserted near
center comes out clean.
Puncture puffs twice with toothpick to
release steam after 25 minutes of baking
time.
Set cups in baking dish. Pour boiling water
around cups to a depth of 1 in. (2.5 cm).
When done, turn oven off and let shells
stand in oven 1 hour to dry.
Follow package directions for preparation.
Follow package directions for preparation.
Follow package directions for preparation.
Let stand 5 minutes before cutting.
Pierce pastry with fork to prevent
shrinkage.
Cook times vary with casserole size and
ingredients.
Cook times vary with casserole size and
ingredients.
Let stand 5 minutes before serving.
Cook times vary with casserole size and
ingredients.
Follow package directions for preparation.
Follow package directions for preparation.
Follow package directions for preparation.
Follow package directions for preparation.
Let stand a few minutes before removing
from pan to cool.
Let stand 5 minutes after cooking.
Brown meat before combining with liquid
and vegetables.
Let stand 2 minutes after cooking.
Use green, red, or yellow peppers.
Pierce skin several places. Add 1/4 cup
(60 ml)water to dish. Turn squash halves
cut side up after 30 minutes of cook time
and cover.
Pierce skin with a fork before baking.
Pierce skin with fork before baking.
25
Page 26

MEAT ROASTING TABLE FOR CONVECTION COOKING
MEATS Oven Temp. Time, Min./Ib.
Beef
Rib (2 to 4 Ibs. [t to 2 kg])
Rare
Medium
Well
Boneless Rib, Top Sirloin
Rare
Medium
Well
325°F (160°C)
325°F (160°C)
325°F (160°C)
325°F (160°C)
325°F (160°C)
325°F (160°C)
21 to 26
26 to 31
3t to 36
25 to 30
30 to 35
35 to 40
Beef Tenderloin
Rare
Medium
325°F (160°C)
325°F (160°C)
12to 16
16 to 20
Pot Roast (2V2to 3 Ibs. [1 to 1.5 kg])
Chuck, Rump
Ham 325°F (160°C) 20 to 25
Canned (3-lb. [1.5 kg] fully cooked)
Butt (5-lb. [2.3 kg] fully cooked)
Shank (5-lb. [2.3 kg] fully cooked)
Lamb
Bone-In (2 to 4 Ibs. [1 to 2 kg])
Medium
Well
325°F (160°C) 45 to 50
325°F (160°C) 20 to 25
325°F (160°C) 17 to 20
325°F (160°C)
325°F (160°C)
21 to 26
26 to 31
Boneless (2 to 4 Ibs. [1 to 2 kg])
Pork
Medium
Well
Bone-In (2 to 4 Ibs. [1 to 2 kg])
Boneless (2 to 4 Ibs. [1 to 2 kg])
325°F (160°C)
325°F (160°C)
325°F (160°0)
325°F (160°0)
25 to 30
29 to 34
26 to 30
32 to 36
Pork Chops (1/2- to 1-inch [1- to 2.5-cm] thick)
12to 15
15 to 18
18 to 25
25 to 35
13to 16
Poultry
2 chops
4 chops
6 chops
Whole Chicken (2V2to 3_/_Ibs. [1 to 2 kg])
Chicken Pieces (2V_to 3V2 Ibs. [1 to 2 kg])
325°F (160°C)
325°F (160°C)
325°F (160°C)
375°F (190°C)
350°F (180°0)
Cornish Hens
10 to 15
15 to 20
19 to 21
21 to 25
10to 15
12 to 17
Seafood
Unstuffed (1 to 1V2Ibs. [0.5 to 0.7 kg])
Stuffed (1 to 1_/_Ibs. [0.5 to 0.7 kg])
Duckling (4 to 5 Ibs. [2 to 2.3 kg])
Turkey Breast (4 to 6 Ibs. [2 to 3 kg])
Fish, Whole (3 to 5 Ibs. [I .5 to 2.3 kg])
Lobster Tails (6 to 8 oz. [170 to 225 g] each)
375°F (190°C)
375°F (190°C)
375°F (190°C)
325°F (160°C)
400°F (200°0)
350°F (180°C)
NOTES:
• The roasting times in the table above are only guidelines for your reference. You need
to adjust the roasting time
according to the food condition or your preference.
26
Page 27

TIPS FOR COMBINATION COOKING
COMBINATION
This section gives you instructions to operate each
combination cooking function. Please read these
instructions carefully. Sometimes combination
microwave-convection cooking is suggested to get the
best cooking results since it shortens the cooking time
for foods that normally need a long time to cook. This
cooking process also leaves meats juicy on the inside
and crispy on the outside, in combination cooking,
the convection heat and microwave energy alternate
automatically. Your oven has two preprogrammed
settings that make it easy to use combination cooking.
HELPFUL HINTS FOR
COMBINATION COOKING
1. Meats may be roasted directly on the metal rack or
in a shallow roasting pan placed on the rack. When
using the metal rack, please check your cooking
guide for information on proper use.
2. Less tender cuts of beef can be roasted and
tenderized using oven cooking bags.
3. When baking, check for doneness after cooking
time is up. if not completely done, let stand in oven
for a few minutes to complete cooking.
PRECAUTIONS
1. All cookware used for combination cooking must be
BOTH microwave-safe and ovenproof.
2. During combination baking, some baking cookware
may cause arcing when it comes in contact with the
oven walls or metal accessory racks. Arcing is a
discharge of electricity that occurs when microwaves
come in contact with metal.
-- If arcing occurs when using the metal rack,
place a heatproof dish between the pan and the
metal rack.
-- If arcing occurs with other baking cookware, do
not use them for combination cooking.
Oven Microwave
Temperature Power
Combination Roast 350°F (t80°C) 40%
Example: To roast with combination cooking for
45 minutes.
Touch:
3. "s ....
4.
NOTES:
• The temperature can be adjusted; however, the
microwave power cannot.
• By using MORE/LESS in combination cooking,
you can adjust the temperature by 25°F (14°C) after
step 3. (The default temperature is 350°F [180°C].)
Display Shows:
Time of day
350 F ..... "_ _ OR,uuLH, ,uRc
LESSFuR ,c_,PSETOR
kiT- l-nn llkII- TIITI
T_I it"
,_H STRRT
C83S0F
Timecountingdown
27
Page 28

COMBINATION COOKING GUIDE
MEATS Oven Temp. Time, Min./Ib.
Beef
Ham
Lamb
Pork
Poultry
Seafood
Rib (2 to 4 Ibs. [1 to 2 kg])
Rare 300°F
Medium 300°F
Well 300°F
Boneless Rib, Top Sirloin
Rare 300°F
Medium
Well
Beef Tenderloin
Rare
Medium 300°F
Chuck, Rump, or Pot Roast (2V_to 3 Ibs. [I to 1.5 kg])
(Use cooking bag for best results.) 275°F
Turn over after half of the cooking time.
Canned (3-lb. [1.5 kg] fully cooked) 300°F
Butt (5-lb. [2.3 kg] fully cooked) 300°F
Shank (5-lb. [2.3 kg] fully cooked) 300°F
Turn over after half of the cooking time.
Bone-In (2 to 4 Ibs. [1 to 2 kg])
Medium 300°F
Well 300°F
Boneless (2 to 4 Ibs. [1 to 2 kg])
Medium 300°F
Well 300°F
Turn over after half of the cooking time.
Bone-tn (2 to 4 Ibs. [1 to 2 kg]) 300°F
Boneless (2 to 4 Ibs. [1 to 2 kg]) 300°F
Pork Chops (3/4- to 1-in. [2- to 2.5-cm] thick)
2 chops 350°F
4 chops 350°F
6 chops 350°F
Turn over after half of the cooking time.
Whole Chicken (2V_to 6 Ibs. [I to 3 kg]) 375°F
Chicken Pieces (2V2to 6 Ibs. [1 to 3 kg]) 375°F
Cornish Hens
Unstuffed 375°F
Stuffed 375°F
Duckling 375°F
Turkey Breast (4 to 6 Ibs. [2 to 3 kg]) 300°F
Turn breast side up after half of the cooking time.
Fish Fillets (l-lb. [0.5-kg]) 350°F
Lobster Tails (6 to 8 oz. [170 to 225 g] each) 350°F
Shrimp (1 to 2 Ibs. [0.5 to 1 kg]) 350°F
Scallops (1 to 2 Ibs. [0.5 to 1 kg]) 350°F
300°F (150°C)
300°F (150°C)
300°F (150°C)
(150°0)
(150oo)
(150°C)
(150°C)
(150°C)
(140°C)
(150°C)
(t50°C)
(150°O)
(150°C)
(150°C)
(150°C)
(150°C)
(150°C)
(150°C)
(180°C)
(180°O)
(180°C)
(190°C)
(190°C)
(190°C)
(190°O)
(190°C)
(150°O)
(180°C)
(180°O)
(180°O)
(180°C)
1t to 14
14 to 17
17 to 20
1t to 14
14 to 17
17 to 20
14 to 17
17 to 20
3O
to 40
15
to 18
15
to 18
15
to 18
13 to t8
18 to 23
14 to 19
19 to 24
13 to 16
18 to 23
10 to 13
13 to 16
16 to 19
18 to 20
15 to 18
18 to 25
23 to 30
15 to 18
11 to 15
7to 10
10 to 15
8to 13
8to 13
NOTE: The roasting times in the table above are only guidelines for your reference. You need to adjust the time
according to the food condition or your preference.
28
Page 29

To heat or reheat successfully in a microwave oven, it is important to follow several guidelines. Measure the
amount of food in order to determine the time needed to reheat. Arrange the food in a circular pattern for best
results. Room temperature food will heat faster than refrigerated food. Canned foods should be taken out of the
can and placed in a microwave-safe container. The food will heat more evenly if covered with a microwave-safe
lid or vented plastic wrap*. Remove cover carefully to prevent steam burns. Use the following table as a guide
for reheating cooked food.
Cook Time
ITEMS (at High) Special Instructions
Sliced Meat
3 slices
(1/4-inch thick [.63 cm])
Chicken Pieces
1 breast
1 leg and thigh
Fish Fillet 2-4 minutes Place fish on microwavable plate. Cover with plastic wrap and vent*.
(6-8 oz. [170-225 g])
Lasagna Place lasagna on microwavable plate.
1 serving (101/2 oz. [300 g]) 4-6 minutes Cover with plastic wrap and vent*.
Casserole COOK covered in microwavable casserole.
1 cup (250 ml) 1-31/2minutes Stir once halfway through cooking.
4 cups (11) 5-8 minutes
Casserole COOK covered in microwavable casserole.
- Cream or Cheese Stir once halfway through cooking.
1 cup (250 ml) 11/2-3minutes
4 cups (11) 31/2-51/2 minutes
Sloppy Joe or Barbecued Reheat filling and bun separately.
Beef Cook filling covered in microwavable casserole. Stir once.
1 sandwich 1-21/2minutes Heat bun as directed in table below.
(1/2 cup [125 ml] meat
filling) without bun
Mashed Potatoes COOK covered in microwavable casserole.
1 cup (250 ml) 1-3 minutes Stir once halfway through cooking.
4 cups (11) 5-8 minutes
Baked Beans COOK covered in microwavable casserole.
1 cup (250 ml) 11/2-3minutes Stir once halfway through cooking.
Ravioli or Pasta in Sauce COOK covered in microwavable casserole.
1 cup (250 ml) 21/2-4 minutes Stir once halfway through cooking.
4 cups (11) 71/2-11 minutes
Rice COOK covered in microwavable casserole.
1 cup (250 ml) 11/2-31/2minutes Stir once halfway through cooking.
4 cups (11) 4-61/2minutes
Sandwich Roll or Bun Wrap in paper towel and place on glass microwavable rack.
1 roll 15-30 seconds
Vegetables COOK covered in microwavable casserole.
1 cup (250 ml) 11/2-21/2minutes Stir once halfway through cooking.
4 cups (11) 4-6 minutes
Soup COOK covered in microwavable casserole.
1 serving (8 oz. (250 ml)) 11/2-21/2minutes Stir once halfway through cooking.
1-2 minutes
2-31/2 minutes
11/2-3minutes
Place sliced meat on microwavable plate.
Cover with plastic wrap and vent*.
Note: Gravy or sauce helps to keep meat juicy.
Place chicken pieces on microwavable plate.
Cover with plastic wrap and vent*.
*Fold back one corner of the plastic wrap to vent excess steam.
29
Page 30

VEGETABLE AMOUNT Instructions
Artichokes 2 medium 5-8 min. Trim. Add 2 tsp (10 ml) water and 2 tsp (10 ml) 2-3 min.
(8 oz. (225 g) each) 4 medium 10-13 min. juice. Cover.
Asparagus, Fresh, 1 lb. 3-6 min. Add 1/2cup (125 ml) water. Cover. 2-3 min.
Spears (0.5 kg)
Beans, Green and 1 lb. 7-tl min. Add 1/2cup (125 ml) water in 1l/2-qt. (t .5-1) 2-3 min.
Cook Time Standing
(at High) Time
yVax.......................................................!°:5kq!................................................. ...................................................................
Beets, Fresh 1 lb. 12-16 min. Add 1/2cup (125 ml) water in 11/2-qt. (1.5-1) 2-3 min.
...................................................................(9:5kg!................................................. ...............................................
Broccoli, Fresh, 1 lb. 4-8 min. Place broccoli in a baking dish. Add 1/2(125 ml) 2-3 min.
Spears (0.5 kg) cup water.
Cabbage, Fresh, 1 lb. 4-7 min. Add 1/2cup (125 ml) water in 11/2-qt. (1.5-1) 2-3 min.
cb%peg...........................................(9:5kq!................................................. }b gugh%£E!r)g:............................................
Carrots, Fresh, 2 cups 2-4 min. Add 1/4cup (60 ml) water in 1-qt. (1-1)covered 2-3 min.
Sliced (0.5 I) casserole. Stir halfway through cooking.
Cauliflower, Fresh, 1 lb. 7-tl min. Trim. Add 1/4cup (60 ml) water in 1-qt. (1-1) 2-3 min.
Whole (0.5 kg) covered casserole. Stir halfway through cooking.
FIowerettes, 2 cups (0.5 I) 21/2-4t/2 min. Slice. Add 1/2cup (125 ml) water in 11/2-qt. (1.5-1) 2-3 min.
Fresh Celery, 4 cups (1 I) 6-8 min. covered casserole. Stir halfway through cooking.
Fresh, Sliced
Corn, Fresh 2 ears 5-9 min. Husk. Add 2 tbsp (30 ml) water in 1l/2-qt. (1.5-1) 2-3 min.
baking dish. Cover.
Mushrooms, Fresh, 1/2 lb. 2-31/2 min. Place mushrooms in 11/2-qt. (1.5-1) covered 2-3 min.
Sliced (225 g) casserole. Stir halfway through cooking.
Parsnips, Fresh, 1 lb. 4-8 min. Add 1/2cup (125 ml) water in 11/2-qt. (1.5-1) 2-3 min.
Sliced (0.5 kg) covered casserole. Stir halfway through cooking.
Peas, Green, Fresh 4 cups 7-10 min. Add 1/2cup (t25 ml) water in 1l/2-qt. (1.5-1) 2-3 min.
(1 I) covered casserole. Stir halfway through cooking
Sweet Potatoes 2 medium 5-t0 min. Pierce potatoes several times with fork. 2-3 min.
Whole Baking (6-8 oz. 4 medium 7-13 min. Place on 2 paper towels. 2-3 min.
(170-225 g) each) Turn over halfway through cooking.
White Potatoes, 2 potatoes 5-8 min. Pierce potatoes several times with fork. 2-3 min.
Whole Baking (6-8 oz. 4 potatoes 10-14 min. Place on 2 paper towels. 2-3 min.
(170-225 g) each) Turn over halfway through cooking.
Spinach, Fresh, Leaf 1 lb. 4-7 min. Add 1/2cup (125 ml) water in 2-qt. (2-1)covered 2-3 min.
(0.5 kg) casserole.
Squash, Acorn or 1 medium 6-8 min. Cut squash in half. Remove seeds. Place in 2-3 min.
Butternut, Fresh 8-in. x 8-in. (20-cm x 20-cm) baking dish. Cover.
Zucchini, Fresh, 1 lb. 41/2-71/2min. Add 1/2cup (125 ml) water in 11/2-qt. (1.5-1) 2-3 min.
Sliced (0.5 kg) covered casserole. Stir halfway through cooking.
Zucchini, Fresh, 1 lb. 6-9 min. Pierce. Place on 2 paper towels. Turn over and 2-3 min.
Whole (0.5 kg) rearrange halfway through cooking.
30
Page 31

Questions and Answers
Operation
Question Answer
Why is the oven light not on during Bulb may be burned out, requiring replacement.
cooking?
Is there a clock display? Set a cook time. Touch START.
ts there no clock display? Check the house circuit safety device.
Why does steam come out of the air Steam is normally produced during cooking. The microwave oven
exhaust vent? has been designed to vent this steam.
Will the microwave oven be damaged if it Yes. Never operate the oven empty or without the glass turntable.
operates empty?
Does microwave energy pass through the No. The metal screen bounces the energy back to the oven cavity.
viewing screen in the door? The holes (or ports) allow only light to pass through. They do not
let microwave energy pass through.
Why does a tone sound when a pad on the The tone tells you that the setting has been entered.
control panel is touched?
Can the microwave oven be damaged if Like any other cooking appliance, it is possible to overcook food
food is cooked for too long? to the point that the food creates smoke and even possibly fire
and damage to the inside of the oven. It is always best to be near
the oven while you are cooking.
When the oven is plugged into the wall The microcomputer controlling your oven may temporarily become
outlet for the first time, it doesn't work scrambled and fail to function as programmed when you plug it in
properly. What is wrong? for the first time or when power resumes after a power interruption.
Unplug the oven from the 120-volt household outlet and then plug
it back in to reset the microcomputer by resetting the clock.
Why is there light reflection around the This light is from the oven light which is located between the
outer case? oven cavity and the outer wall of the oven.
What are the various sounds heard when
the microwave oven is operating?
The clicking sound is caused by a mechanical switch turning the
microwave oven's magnetron ON and OFR
The heavy hum and clunk is from the change in power the
magnetron draws as it is turned ON and OFF by a mechanical
switch. The change in blower speed is from the change in line
voltage caused by the magnetron being turned ON and OFF.
31
Page 32

Questions and Answers (continued)
Food
Question Answer
What is wrong when baked foods have a A hard, dry, brown spot indicates overcooking. Shorten the
hard, dry, brown spot? cooking or reheating time.
Why do eggs sometimes pop? When baking, frying, or poaching eggs, the yolk may pop due to
steam buildup inside the yolk membrane. To prevent this,
simply pierce the yolk with a wooden toothpick before cooking.
CAUTION: Never microwave eggs in the shel!.
Why are scrambled eggs sometimes a
little dry after cooking?
Why do baked apples sometimes burst
during cooking?
Why do baked potatoes sometimes
burn during cooking?
Why is a standing time recommended
after microwave cooking time is over?
Why is additional time required for
cooking food stored in the refrigerator?
Eggs will dry out when they are overcooked, even if the same
recipe is used each time. The cooking time may need to be varied
for one of these reasons:
• Eggs vary in size.
• Eggs are at room temperature one time and at refrigerator
temperature another time.
• Eggs continue cooking during standing time.
The peel has not been removed from the top half of each apple
to allow for expansion of the interior of the apple during cooking.
As in conventional cooking methods, the interior of the apple
expands during the cooking process.
If the cooking time is too long, fire could result. At the end of the
recommended cooking time, potatoes should be slightly firm.
CAUTION: Do not overcook.
Standing time allows foods to continue cooking evenly for a few
minutes after the actual microwave oven cooking cycle ends. The
amount of standing time depends upon the density of the foods.
As in conventional cooking, the initial temperature of food affects
total cooking time. You need more time to cook food taken out of
a refrigerator than for food at room temperature.
32
Page 33

BEFORE CALLING FOR SERVICE
You can often correct operating problems yourself, If your microwave oven fails to work properly, locate the
operating problem in the listbelow and try the solutions listed for each problem,
If the microwave oven still does not work properly, contact the nearest Sears Parts & Repair Center, which is fully
equipped to handle your service requirements. See warranty notice.
Problem Possible Causes
Oven does not start • ts the power cord plugged in?
Arcing or sparking • Are you using approved cookware?
Incorrect time of day • Have you tried to reset the time of day?
Unevenly cooked foods • Are you using approved cookware?
Overcooked foods • Was the time/cooking power level correct?
Undercooked foods • Are you using approved cookware?
Improper defrosting • Are you using approved cookware?
• Is the door closed?
• ts the cooking time set?
• Has the house circuit breaker tripped or blown?
• ts the oven empty?
• ts the glass turntable in the oven?
• Did you turn or stir the food while it was cooking?
• Were the foods completely defrosted?
• Was the time/cooking power level correct?
• Were the foods completely defrosted?
• Was the time/cooking power level correct?
• Are the ventilation ports clear?
• Was the time/cooking power level correct?
• Did you turn or stir the food during the defrosting cycle?
FEDERAL COMMUNICATIONS COMMISSION RADIO FREQUENCY INTERFERENCE
STATEMENT (U.S.A. ONLY)
WARNING:
This equipment generates and uses ISM frequency
energy and if not installed and used properly, that
is in strict accordance with the manufacturer's
instructions, may cause interference to radio and
television reception. It has been type-tested and
found to comply with limits for tSM Equipment
pursuant to part 18 of FCC Rules, which are
designed to provide reasonable protection against
such interference in a residential installation.
However, there is no guarantee that interference will
not occur in a particular installation. If this equipment
does cause interference to radio or television
reception, which can be determined by turning the
equipment off and on, the user is encouraged to
try to correct the interference by one or more of the
following:
• Reorient the receiving antenna of the radio or
television.
• Relocate the microwave oven with respect to the
receiver.
• Move the microwave oven away from the receiver.
• Plug the microwave oven into a different outlet so
that the microwave oven and the receiver are on
different branch circuits.
The manufacturer is not responsible for any radio
or TV interference caused by unauthorized
modification to this microwave oven. It is the
responsibility of the user to correct such interference.
33
Page 34

GARANTIA ........................................................................ 34
SEGURIDAD ............................................................... 35-36
Precauciones para evitar la posible exposicion
a excesiva energia de microondas ................................. 35
Instrucciones para conexi6n a tierra ............................. 35
Instrucciones Importantes de seguridad ......................... 36
COMPRENDIENDO SU HORNO
DE MICROONDAS ..................................................... 37-39
Especificaciones ............................................................. 37
Instataci6n ....................................................................... 37
Partes y accesorios ........................................................ 38
Panel de control .............................................................. 39
Gufa para ta comparacion de cocciones ......................... 40
Gufa de utensitios para cocinar ...................................... 41
Como usar tos accesorios ............................................... 41
Consejos para cocci6n con microondas ......................... 42
Limpieza .......................................................................... 42
COMO USAR SU HORNO DE MICROONDAS ......... 43-51
Reloj/Seguro para nifios/Cron6metro de cocina ............. 43
OpcionesfTabla de opciones/Cocci6n
Cronometrada/Agregar minuto ....................................... 44
Mantener Catiente/M&s y menos .................................... 45
Cocci6n en etapas multiples/
Niveles de intensidad de las microondas ....................... 46
Instrucciones Para Cocinar Con Sensor/
Volver a catentar con sensor/
Tabla para votver a calentar con sensor ......................... 47
Patomitas de maiz con sensor/Cocinar con sensor ....... 48
Tabla para cocinar con sensor ........................................ 49
Descongetaci6n autom&tica/
Tabla de descongelaci6n autom&tica ............................. 50
Tiempo de descongetaci6n/Descongetaci6n express ..... 51
COMO USAR SU HORNO DE CONVECCION .......... 52-58
Consejos para cocinar pot convecci6n/Precauciones.... 52
Horneado autom&tico/Guia de horneado automatico ..... 53
Asar Autom&ticamente/
Guia para asar automaticamente ................................... 54
Conveccion ..................................................................... 55
Gufa para cocinar por convecci6n .................................. 56
Tabla para hornear por conveccion ................................. 57
Tabla para asar came por conveccion ............................ 58
COMO USAR SU HORNO COMBINADO .................. 59-60
Consejos para la cocci6n en modo combinado ............... 59
Consejos Otiles para la coccion combinada .................... 59
Combinaci6n .................................................................... 59
Gu[a para ta cocci6n combinada ..................................... 60
GUIA PARA CALENTAR/RECALENTAR ......................... 61
GUIA PARA VERDURAS FRESCAS ............................... 62
LOCALIZACION DE PROBLEMAS ........................... 63-65
Preguntas y respuestas ........................................... 63-64
Antes de ttamar para solicitar eI servicio ........................ 65
ACUERDOS MAESTROS DE PROTECCION .................. 66
Garantia limitada de un aSo
Si, tras ser instalado, operado y mantenido segt]n todas las
instrucciones incluidas con el producto, este electrodomestico
sufriera averias debido a defectos de material o mane de obra,
dentro del periodo de un afio desde lafecha de compra, flame
al 1-800-4-MY-HOME_ para su reparaci6n gratuita.
Garantia limitada de cinco altos en el magnetr6n
Dentro det periodo de cinco arias desde lafecha de compra, si et
magnetron de este homo microondas sufriera averias debido a
defectos de material o mano de obra, Sears se responsabilizar&
de su sustitucion. Las normativas de seguridad requieren queet
magnetron sea instatado per Sears. Tras et primer aria de usa,
el ctiente asumir& cuaIquier coste resuttante de lastareas de
sustituci6n del magnetr6n.
Si este electrodomestico se utiliza con propositos distintos a los
fines privados de una familia, esta garantia solo ser& apIicable
durante 90 dias desde la fecha de compra.
Esta garantia cubre unicamente los defectos de material y
mano de obra. Sears NO cubrira:
1. Etementos consumibIes que pueden gastarse debido aI use
normal, inctuyendo de forma enunciativa pero no timitativa, los
fittros, correas, bombilIas ybolsas de la unidad.
2. Un tecnico de servicio para mostrar al usuario Ia instataci6n,
funcionamiento o mantenimiento correctos del product&
3. Un tecnico de servicio para reaIizar Iaboresde limpieza o
mantenimiento det producto.
4. Dafios o averias en case de no acatar las instrucciones de
instalaci6n, funcionamiento o mantenimiento inctuidas con
etproducto.
5. Dafios o averias en case de accidente, abuso, uso inadecuado
o uso con prop6sitos distintos a losfines para los que rue
disefiado.
6. Dafios o averias en caso de utilizar detergentes, limpiadores,
sustancias quimicas o utensilios distintos a los recomendados
en las instrucciones incluidas con el producto.
7. Dafios o averias en tas piezas o sistemas provocados por
modificaciones det producto no autorizadas.
Clausula de exencibn de responsabilidad o garantias
implicitas; limitacibn de recursos.
El t_nicoy exclusive recurso del cliente bajoesta garantia Iimitada
sera Ia reparacion del producto como se ha mencionado. Las
garantias implicitas, inctuyendo garantias de comerciabilidad
o idoneidad para un fin concreto, esta.ntimitadas a un afio o el
periodo de tiempo ma.sreducido permitido por laley. Sears no
sera responsabIe de los dafios incidentaIes o derivados. Ciertos
estados y provincias no permiten exclusiones o limitaciones
de dafios incidentaIes o derivados, o Iimitaciones en retaci6n
a Ia duracion de las garantias impticitas de comerciabilidad o
idoneidad, de tal forma que estas limitaciones o excepciones
pueden no ser pertinentes para usted.
Esta garantia sera apIicabIe Onicamente mientras este
electrodomestico sea utilizado dentro de los Estados Unidos y
Canad&
Esta garantia Ie otorga derechos Iegales especfficos, e incluso
puede conferirIe otros derechos distintos, dependiendo deI estado
en que se encuentre.
Sears, Roebuck and Co., Dept. 817WA, Hoffman Estates, IL
60179
Sears Canadzi Inc., Toronto, Ontario, Canad_i M5B 2B8
34
Page 35

PRECAUCIONES PARA EVITAR LA POSIBLE
EXPOSICION A EXCESIVA ENERGiA DE
MICROONDAS...
• NO intente operar este horno con la puerta
abierta, ya que esto puede resultar en
exposici6n nociva a la energia de microondas.
Es importante no forzar la traba de
seguridad.
• NO use el horno siesta dafiado. Es
particularmente importante que la puerta del
horno se pueda cerrar bien y que no haya
dafios en:
1. la puerta (torcida)
2. bisagras y seguros (rotos o flojos)
3. sellado de la puerta y superficies de sellado.
• NO coloque ningOn objeto entre la cara frontal
del homo y la puerta y evite que se acumule
polvo o residuos de limpiadores sobre las
superficies de sellado.
• EL HORNO no debe ser ajustado o reparado
por nadie, excepto por personal de servicio
calificado.
INSTRUCCIONES PARA CONEXION A TIERRA
iEste electrodomestico se debe conectar a tierra! En caso de cortocircuito, la conexion a tierra reduce el
riesgo de electrocuci6n, brindando un cable de salida para la corriente electrica. Este electrodomestico esta
equipado con un cable el cual posee un alambre para la conexi6n a tierra con un enchufe de conexion a
tierra. Inserte el enchufe en un tomacorriente que este correctamente instalado y conectado a tierra.
PRECAUCION
Si utiliza el enchufe con conexion a tierra de forma indebida, corre el riesgo de electrocutarse.
Consulte a un electricista calificado o al Este electrodomestico posee un cable corto para
Departamento de Servicios de Sears en caso de no reducir el riesgo de que alguien sufra un tropiezo
entender las instrucciones para realizar la conexi6n o enredo con el cable. Sea cuidadoso en caso de
a tierra, o si desea saber si el electrodomestico ester utilizar un cable de extensi6n.
conectado a tierra en forma correcta.
Si utiliza un cable de extension, asegt_rese de Io siguiente:
• La extensi6n debe ser para el mismo voltaje
que el electrodomestico.
• El voltaje que figura en el cable de extension debe
ser igual o mayor que el del electrodomestico.
• El cable de extension debe poseer un enchufe de
tres clavijas para la conexion a tierra.
NOTA: Este horno utiliza 13,0 amperios a 120 voltios, 60 Hz
• El cable de extension no debe colgar de una mesa
o de la cubierta de un gabinete donde un niflo
pueda tirar del mismo o pueda tropezar con este.
• El cable debe estar seco y no poseer cortes o estar
aplastado en ninguna parte.
35
Page 36

INSTRUCCIONES IMPORTANTES DE SEGURIDAD
Las instrucciones de seguridad que figuran mas abajo le informaran sobre como usar su homo de
microondas para evitar que sufra lastimaduras o que su homo sufra dafios.
ADVERTENCIA - Para reducir el riesgo de quemaduras, descarga electrica, incendio,
lesiones a personas o exposici6n a energia excesiva de microondas:
1. Leatodas lasinstruccionesantesde usarsu horno de
microondas.
2. iNo permitaque los ni_os utiliceneste hornoexcepto
bajosu vigilancia!
3. Leay siga estasPRECAUCIONESPARAEVITARUNA
POSIBLEEXPOSICIONA EXCESIVAENERGiADE
MICROONDAS,las cualesseencuentranenla pagina35.
4. iNofuerce interruptoresdeseguridad incorporados
sobre lapuertadel homo! El homoposeevarios
interruptoresincorporadosparaasegurarque la energia
este apagadaal abrirlapuerta.
5.AI limpiarla puertay lassuperficiesquetienencontacto
con las puertas,use s61ojabonessuavesy no
abrasivoso detergentesy una esponjao unpasosuave.
6. Sisu horno se hacaidooda_ado, pida aun tecnico
calificadoque realiceuncontrola rondo sobreel mismo
antesde usarlonuevamente.
7. Paraevitar riesgosde incendios:
a) No cocine alimentosen forma excesiva.Puede
provocarun incendioen el horno.
b) Nouse productosde papelrecicladoen su homo.
Losmismos puedencontener particulasque desprendan
chispasose incendien.
c) No recosalas papas.Una coccionexcesivapuede
causarun incendio.
d) No almacene elementos combustibles (pan,galletas,
etc.)en el homo,yaque si unrayogolpearalas lineas
decorriente,esto podriaprovocarque el hornose
ENClENDA.
e) No useatadurasretorcidasde alambreen el homo.
Aseguresede quitarlasantesde colocarel elemento
en elhorno.
f) No useel interiordel horno paraalmacenamiento.No
deje productosdepapel,utensiliosdecocina ocomidaen
el interiorcuando no Iouse.
8. Sise iniciaun incendio:
a) Mantengael hornocerrado.
b)Apague el homo.
c) Desconecteel cable ocierre laenergiaen elfusible
o paneldel disyuntor.
9. Nouse este homopara propositoscomerciales.Este
microondasruefabricadosolopara usohogarefio.
10. Instaleo coloqueesteartefactoconformea las
instruccionesde instalacionbrindadas.
11. Paraevitar descargaselectricas:
a) iEste artefactodebe estarconectadoa masa!
Conectelosolamentea untomacorrienteconectado a
masa (Lea lasInstruccionesparaconexiona tierra
en lap_.gina35.)
b)Noponga en funcionamiento este artefactositiene un
enchufeo cableda_ado, si no seencuentrafuncionando
correctamenteo siha sufridounacaidao dafios.
c) No sumerjael cable de alimentaci6nelectrica o el
enchufeen el agua.
d)Mantengaelcable lejosde superficiescalientes.
e) Elserviciopara esteartefactodebeser realizados61opor
personalcalificado.
12. Losliquidoscomoagua,care o te puedenset
sobrecalentadosmasall_.del puntode ebullici6nsin estar
hirviendoaparentemente,debidoa latensionsuperficial
del liquido.No siempre est,.presenteel burbujeoque se
vecuando el recipienteseretiradel homode microondas.
Estopuedecausarque liquidosmuycalientessevuelquen
en formarepentinaal introduciruna cucharau otro
utensilioen el liquido.Parareducirel riesgode lesiones
sobre personas:
1) No calienteen formaexcesivalos liquidos.
2) Revuelvael liquidoantes y a mitaddelcalentamiento.
3) Tengamuchocuidadocuando inserteunacuchara
uotroutensiliodentro del contenedorunavez que
comenzoel procesopara calentar.
4) No userecipientesde ladesrectosconcuellos angostos.
5) Despuesde calentar,dejeel recipienteen el homo de
microondaspor un tiempocorto antesde retirarlo.
13. Dejedescansaren el homola bandejade vidrioy elrodillo
de labandejagiratoriacuandoeste cocinando.
14. Nouse elhomoa la intemperie.No guarde el homoa la
intemperie.Nouseeste productocercadelagua.
- Perejemplo,cercade unapiletadecocina,enun sotano
hOmedo,cercade unapiscinao encualquierubicacion
similar.
15. Nocubrao trabeningunaaberturadel homo.
16. Nohagafuncionarel hornode microondassi se encuentra
vado.
17. Nodeje elcablecolgandosobre el bordede unamesa o
mostrador.
18. Nocaliente excesivamentela bandejagiratoriade vidrio.
- Nococinetocinodirectamentesobrela bandejagiratoria.
- Nopermitaque lapeliculagrisde lospaquetes
especialesparacocinade microondastengancontacto
con labandejagiratoria.Coloqueel paquetesobre un
platoaptopara microondas.
- Mantengaun platodorador por Io menosa 3/16
pulgadas(.5cm) por encimade la bandejagiratoriade
vidrio.Siusa incorrectamenteelplatodorador,podria
romperla bandejagiratoriade vidrio.
19.Tengacuidadode noastillaro rasparlosbordes de la
bandejagiratoria.Lasastillaso raspaduraspuedenhacer
quela bandejagiratoriadevidrio sequiebre durantesu uso.
20.Algunosproductostales come huevosenterosy envases
se!lados,como perejemplojarras cerradasdevidrio,
puedenexplotary nodeben sercalentadosen estehorno.
iCONSERVE ESTAS INSTRUCCIONES!
36
Page 37

ESPECIFICACIONES
Suministro de energia electrica 120 V AC, 60 Hz
Consumo nominal ..........M!£i[gqndo:_..........................................!.,5f30W................................................................................................................................
de energia Convecci6n 1,500 W
..........M!cr_?°ndas..........................................!..,000W:.............................................................................................................................
Energia de salida Convecci6n 1,500 W
Frecuencia 2,450 MHz
Microondas 13 A
Corriente nominal ...................................................................................i3A .........................................................................................................................................
Dimensiones totales (ancho x alto x fondo)
Dimensionesde lacavidaddelhomo (anchox altoxrondo)
Capacidad de la cavidad del homo
*ESTANDAR DE ESPECIFICACION IEC 60705
Especificaciones sujetas a cambio sin aviso previo.
Convecci6n
57 cm x 38 cm x 51 cm (225/8"x 147/8"x 20")
39 cm x 28 cm x 39 cm (15t/4'' x 107/8"x 161/4'')
1.5 pie cObico
INSTALACION
A. Circuitos
Con fines de seguridad este homo debe ser
enchufado en un circuito de 20 amperios. No debe
encontrarse en esta linea ningOn otro aparato electrico
ni circuitos de iluminaci6n. Si tiene dudas, consulte a
un electricista autorizado.
B. Advertencia del voltaje
El voltaje usado en el receptaculo de pared debe
ser igual al especificado en la placa situada al frente
o al lade del panel de control del homo. El uso de
un voltaje mas alto es peligroso y puede producir
como resultado un incendio u otro tipo de accidente
que puede dafiar el homo. Un bajo voltaje causara
una cocci6n lenta. En el caso de que su horno de
microondas no funcione normalmente a pesar de
tener un voltaje apropiado, retire y vuelva a conectar
e! enchufe.
C. Ubicacion del horno
Puede ubicar su horno de microondas f_tcilmente
en su cocina, sala de estar o en cualquier otra parte
de su casa. Coloque el homo sobre una superficie
plana como por ejemplo un mostrador de cocina o
en un carrito disefiado especialmente para este tipo
de hornos, que este por Io menos a 100cm (39.4)
del suelo. No coloque el homo arriba de una cocina
electrica o a gas. Es importante que el aire fluya
libremente alrededor del homo. Deje por Io menos
10cm (4 pulgadas) de espacio en la partes superior,
a los costados yen la parte posterior del horno para
permitir una ventilacion adecuada.
NOTA:
• Nunca coloque e! plato giratorio boca abajo dentro
del horno.
D. No Bloquee las salidas de aire
Todas las salidas de aire deben estar libres mientras
se cocina. El horno puede recalentarse si las salidas
estan cubiertas mientras este esta funcionando. En
este caso, un dispositivo de seguridad con sensor
termico apaga el homo automaticamente. El homo
no podra volver a funcionar hasta que no este Io
suficientemente frio.
E. Interferencia Electronica
1. El funcionamiento del horno de microondas puede
interferir con la recepci6n de la serial de TV,
telefono o radio.
2. En caso de interferencia, la misma se podra reducir
o eliminar tomando las siguientes medidas:
a. Limpie la puerta y las superficies de sellado de!
homo.
b. Cambie la orientaci6n de la antena receptora de
radio o TV.
c. Cambie la ubicaci6n del homo de microondas en
relacion con la TV, telefono o radio.
d. Aleje el horno microondas del receptor.
e. Enchufe el homo de microondas en otro
tomacorriente para que el horno y el receptor
esten en circuitos diferentes.
37
Page 38

PARTES Y ACCESORIOS
Puerta transparente
Cavidad del horno
de facil limpieza
Sistema de enclavamiento de seguridad
Su homo incluye los siguientes accesorios:
1 Guia para su uso y cuidado
1 Plato giratorio de cristal
1 Base de rodillos para el plato giratorio
1 Reji!la de metal
Panel de control del horno
-- Plato giratorio de cristal
Base de rodillos para el plato giratorio
Rejilla de metal
38
Page 39

PANEL DE CONTROL
CONVECTION
Auto Auto __
Bake Roast
QUICKTOUCH SENSOR
--@
®
@--
@
@
@
1.DISPLAY(Pantalla). La pantallaincluye un reloje indicadores
quemuestranla heradel dia, losajustesde tiempode coccion
y lasfuncionesde coccionseleccionadas.
2. MICRO(Microondas). Presioneestateela paraprogramarla
cocci6ncon microondas.
3. CONV.(Conveccibn). Presioneestateclaparaque elhomo
funcionecomohomo deconvecci6nsolamente.
4. COMBI.(Combinaei6n). Presioneestateclapara programar
el tiempode asadoy latemperaturapara unciclode coccion
usandoenergiade microondasy deconvecci6n.
5. CONVECTIONAUTO BAKE (Hornear automatieamente
pot convecci6n). Presioneestatecla parahornear
automaticamentepizzacongelada,panquecitos,bizcochos
y papas fritascongeladasusandoenergia de microondasy
energiade conveccionalternativamente.
6. CONVECTIONAUTO ROAST(Asar automatieamente por
eonvecci6n). Presioneestateclapara asarautomaticamente
camevacuna,polio, pechugasde pavoy cerdousando
altemativamenteenergiade microondasy deconveccion.
7.SENSOR COOK (Coccion por sensor).Presioneesta
teclapara cocinar10tiposde alimentos Elsensordelhomo
calcular_,el tiempode cocci6ndependiendode la cantidad
de vaporque despidael alimento
8.SENSOR POPCORN (Palomitas de Maizcon sensor).
Presioneestateclacuando prepareen suhomo de
microondaspalomitasde maiz envasadascomercialmente
Elsensordel homoindicaraal homocuanto tiemposedebe
cocinardependiendode lacantidadde vaporque detecteen
el maiz.
9.SENSOR REHEAT (Recalentamiento por sensor). Presione
estatecla pararecalentaralimentosprecocinados,que se
encuentrana temperaturade ambienteoreffigerados.El
sensordel homo indicar_,al homo cuantotiemposedebe
cocinardependiendode lacantidadde vaporque despida
el alimento.
10.AUTO DEFROST(Descongelar automatieamente).
Presioneestateclauna vez para descongelarenforma
autom_.tieacame, aves, pescadoo pan segQnel peso.
Presioneestateclados vecesparadescongelarlamayoda
de losotrosalimentoscongeladossegQneltiempo.
11.EXPRESSDEFROST(Descongelar rapido). Presioneesta
teclapara descongelarr_.pidamenteunalibra dealimentos
congelados.
12.WARM HOLD (Mantiene Caliente). Presioneestateelapara
mantenercalientesalimentoscocinadosen suhomo.
13. MORE(Mas). Presioneestateela paraagregar 10 segundos
altiempode cocci6ncada vezque oprime la misma.
14. LESS (Menos). Presioneestateela paraquitar 10segundos
altiempode coccioncada vezque oprime la misma.
15. NUMBER (Numericos). Presionelasteclas numericas
paraintroducirtiemposde coccion,potenciasde cocci6n,
cantidades,pesoso categoriasdecomidas
16.ADD MINUTE(Agregar minuto). Presioneestatecla para
programary comenzarla cocci6nusandoel 100%de la
potencia
17. POWER(Potencia). Presioneestatecla paraseleccionar
unnivel de potenciade cocci6n
18. STOP/CLEAR (Apagar/Anular). Presioneesta teclapara
cancelar unprogramaqueeste funcionandoactualmenteo
borrarun ciclo decocci6n que ha sidoprogramado
19. START/PAUSE(Comenzar/Pausa). Presioneesta tecla
paracomenzarun programao paradetener el homodurante
lacocci6no descongelacion Presioney mantengaoprimido
paraactivarel seguro para nifios.
20. OPTION(Opciones). Presioneesta teclaparacambiar
lasconfiguracionespreestablecidasdelhomo talescomo
volumen,reloj,velocidadde despliegue,unidadesde peso
e idiom&
21. CLOCK.(Reloj). Presioneestateclapara ingresarlahera
del dia.
22. KITCHENTIMER (Cronometro de cocina). Presioneesta
tecla paraajustarel temporizadorde lacocina.
39
Page 40

GU|A PARA LA COMPARACION DE COCCIONES
Cocinar con su nuevo homo le ofrece una amplia
variedad de opciones para preparar alimentos: cocci6n
con microondas, coccion por convecci6n y por cocci6n
combinada.
La coccion con microondas usa ondas de radio
muy cortas y de alta frecuencia. El movimiento de las
microondas a traves del alimento genera calory cocina
la mayoria de los alimentos mgts rapidamente que los
metodos regulares, mientras mantiene sus texturas
y humedad naturales. La cocci6n con microondas
calienta directamente el alimento, y no el utensilio de
cocina ni el interior de homo. Volver a calentar es muy
fgtcil, y descongelar es particularmente conveniente
porque se necesita menos tiempo para la preparacion
de los alimentos.
La coccion por conveccion hace circular aire caliente
alrededor del alimento en ferma constante, creando un
dorado parejo y sellande el sabor debido al censtante
mevimiento del aire caliente sobre la superficie de!
alimento.
La coccion combinada combina la energia de las
microondas con la conveccion para cocinar con
velecidad y exactitud, a la vez que produce un dorado
crujiente y perfecto.
Es posible determinar el tiempo de coccion con
micreondas, por convecci6n o a traves del mode
combinado. Simplemente configure previamente el
tiempo de coccion deseado y su homo se apagara
en ferma automatica.
La siguiente guia muestra rapidamente las diferencias
entre cocinar con microondas, por conveccion y a
traves del modo combinado.
CON MICROONDAS POR CONVECClON MODO COMBINADO
.. :.::-:::ip."
M#TODO DE
COClNADO
FUENTE DE Energia de microondas. Aire caliente que circula. Energia de microondas y
CALOR aire caliente que circula.
BENEFIClOS • Cocinade rapido, de alta • Ayuda a dorar y sella • Acerta el tiempo de
Lea esta guia para aprender las muchas cosas diferentes que su homo de Microondas/Convecci6n/
Combinado puede hacer. Usted encontrargt una amplia variedad de metodos para cocinar y de programas
diseflados para adaptarse a su estilo de vida.
La energia de microondas
es distribuida igualmente
per todo el homo para
cocinar el alimento de una
manera rapida y completa.
eficiencia, el saber, cocinado gracias a la
• El home y sus alredederes • Cecina ciertos alimentes • Alimentos dorados y
no se calientan, mas rapido que los homes crujientes debido a! calor
• Limpieza fgtcil, regulares, per conveccion.
El aire caliente circula
alrededor del alimento para
producir un dorado exterior
y para sellar los jugos.
La energia de las microondas
y el calor por convecci6n
se combinan para acortar
el tiempo de coccion de los
homes regulares, a la vez
que dora y sella los jugos.
energia de microendas.
4O
Page 41

GU|A DE UTENSILIOS PARA COCINAR
Cocinar con microondas
La mayoria de los utensilios de cocina no met_tlicos,
resistentes al calor, son adecuados para usar en su
horno de microondas.
Sin embargo, si desea probar un utensilio de cocina
antes de usarlo, siga estos pasos:
1. Coloque el utensilio vacio en el homo de
microondas.
2. Mida 1 taza (250ml) de agua en una taza de cristal
para medir y col6quela en el horno junto al utensilio.
3. Cocine con microondas a1100% de potencia
durante 1 minuto. Si el plato se ha calentado, no
debe ser usado para cocinar con microondas.
Coccion por conveccion
• Los recipientes metalicos son recomendados
para todos los tipos de productos horneados,
especialmente cuando es importante dorar o formar
una corteza.
• Los recipientes met&licos oscuros o de acabado
opaco son los mejores para hacer pan y pasteles
porque absorben el calory producen una corteza
m_ts crujiente.
UTENSlLIOS PARACOClNAR CON MICROONDAS POR CONVECClON MODO COMBINADO
De cristal resistente al calor, Si Si Si
cristal ceramico
• Los recipientes de aluminio brillante son los mejores
para pasteles, galletas o panecillos porque los
mismos reflejan el calory ayudan a producir una
corteza mas suave y ligera.
• Las cacerolas de cristal o de cristal ceramico o platos
para hornear son los mejores para las recetas de
huevos y queso debido a la facilidad con que se
limpia el cristal.
Coccion combinada
• Se recomiendan los recipientes o envases de cristal
o de cristal ceramico. AsegQrese de no usar articulos
con hordes metalicos, ya que esto puede causar la
formacion de arcos (chisporroteo) hacia la pared o
base del homo, dafiando el utensilio de cocina, la
base o el homo.
• Los utensilios de plastico resistentes al calor para
cocinar con microondas (seguros hasta 230 ° C
(450° F)) se pueden usar, pero no se recomiendan
con aquellos alimentos que requieren la formacion de
corteza o un dorado general, ya que e! plastico no es
un buen conductor de calor.
De ceramica, Ioza Si Si Si
(No use Ioza con
hordes de oro o plata)
Utensilios de metal No Si No
De cristal no resistente al calor No No No
De plastico adecuado para microondas Si No Si*
Envoltura de plastico, papel encerado Si No No
Productos de papel Si No No
De paja, mimbre y madera Si No No
* Use solo utensilios para cocinar con microondas que sean seguros hasta los 230°C (450°F)
COMO USAR LOS ACCESORIOS
CON MICROONDAS _POR CONVECCl0N _MODO COMBINADO
_ Reji!la de metal i i
_k._t._jgyj) Plato giratorio X
de crista! i i
0
41
©
Page 42

CONSEJOS PARA COCClON CON MICROONDAS
DORADO
La came y las aves con mucha grasa que se cocinan de 10
a 15 minutos o mas se doraran ligeramente. Los alimentos
cocinados durante menos tiempo se pueden pintar con una
sustancia para que se doren, tal como salsa Worcestershire,
salsa de soya o salsa de barbacoa.
TAPAS
Las tapas atrapan el calor y elvapor y los alimentos se
cocinan mas r@ido. Use una tapa o pelicula plastica para
microondas con una esquina doblada para dejar salid el
exceso de vapor. Las tapas de las cacerolas de vidrio se
pueden calentar durante la cocci6n. Uselas con cuidado.
El papel encerado evita que el alimento salpique el homo
y ayuda a mantener el calor. Cuando catiente articulos
de panaderia use papel encerado, servilletas de papelo
toallas de papel. Para absorber mas humedad envuelva los
emparedados y comidas grasosas con toallas de papel.
ESPAClAMIENTO
Coloque los alimentos individuales tales como papas, tortitas
y hors d'oeuvres formando un circulo y a una distancia de
por Io menos 2.5cm (1 pulgada)entre estos. Esto ayudara a
que la comida se cocine en forma m_.spareja.
AGITAClON
La agitaci6n mezcla los sabores y redistribuye el calor en los
atimentos. Siempre revuelva desde el borde hacia el centro
del plato. La parte externa se calienta primero.
ROTACION
Los alimentos voluminosos tales como asados o ayes
enteras deben darse vuelta para que tanto las partes de
arriba como las de abajo se cocinen en forma pareja.
Tambien se deben dar vuelta los trozos de polio y las
chuletas.
DISTRIBUCION
No apile los alimentos. Distribuya en una sola capa el
plato para que se cocine en forma pareja. Debido a que
los alimentos m_.sdensos se cocinan m_.slentamente, es
conveniente colocar las porciones m_.sgruesas de came,
aves, pescado y verduras en el borde del plato.
COMO PROBAR LACOCCION
Debido a que los alimentos se cocinan r_.pidoen un homo
de microondas, es necesario controlar en forma frecuente
si ya est_.ncocidos.
TIEMPO DE REPOSO
Dependiendo de la densidad, despues de que se termina
de cocinar, a menudoel alimento necesita reposar de 2
a 15 minutes ya sea dentro o fuera del homo. Fuera del
homo, para retener calor, normalmente se necesita tapar el
alimento durante el tiempo de reposo. Retire la mayor parte
de los alimentos un poco antes de queesten totalmente
cocidos y estos se terminar_.nde cocinar durante el tiempo
de reposo. La temperatura interna del alimento se elevar_.
unos 6° C (10° F) durante el tiempo de reposo.
PROTECCION
Para evitar el exceso de coccion de algunas porciones en
platos rectangulares o cuadrados, debe proteger los mismos
con pequehas tiras de papel de aluminio para bloquear
las microondas. Tambienpuede cubrir las patas de las
aves y las puntas de las alas con papel de aluminio para
evitar el exceso de coccion. Siempre mantenga el papel
de aluminio por Io menos a 2.5cm (1 pulgada) de las
paredes del horno para evitar chispas.
PERFORAClON
Perfore la cascara, piel o membrana de los alimentos
antes de cocinarlos para evitar que estallen. Los alimentos
que requieren perforacion son:yemas y claras de huevo,
salchichas, almejas, ostras y verduras enteras como papas
y calabacitas.
LIMPIEZA
Limpie el homo por dentro y per fuera con un paso suave y
detergente diluido. Luego enjuague y seque. Esto se debe
Raceruna vez per semana o m_.sa menudo si es necesario.
Nunca use polvos limpiadores o esponjas _.speras.
Las salpicaduras excesivas de aceite en el techo interior son
dificiles de quitar si se dejan per muchos dias. Limpie las
salpicaduras con una toalla de papel mojada, especialmente
despues de cocinar polio o tocino.
PARTES DESMONTABLES
La rejilla de metal, el plato giratorio de cristal y la base de
rodillos del plato giratorio son desmontables. Los mismos
se deben lavar a maney con agua tibia (nocaliente), con
un detergente diluido y un paso suave. Una vez que esten
limpios, enjuaguelos bien y sequelos con un paso blando.
Nunca use polvos limpiadores, lana de acero, ni estropajos.
• Las partes desmontables se pueden limpiar en la pileta
de cocina. Evite astillar o raspar los bordes, ya que esto
puede producir rotura durante el uso.
• El plato giratorio de cristal tambien se puede lavar en un
lavavajillas.
• La base de rodillos del plato giratorio se debe limpiar en
forma regular.
CUIDADO ESPECIAL
Para un mejor funcionamiento y seguridad, el panel interne
de la puerta y el marco frontal del homo deben estar
siempre libres de acumulaci6n de alimentos o grasa. Limpie
a menudo con detergente diluido; luego enjuague y seque.
Nunea utilice polvos limpiadores o esponjas _.speras.
Luego de limpiar el panel de controles, presione el boton
STOP/CLEAR (Apagar/Anular) para borrar cualquier
entrada de dates que se pudiera haber ingresado en forma
accidental durante la limpieza del panel.
42
Page 43

RELOJ
CRONOMETRO DE COClNA
AI conectar el homo en el enchufe por primera
vez, la funcion "Please set clock" (configurar
reloj) titilara varias veces hasta que dicha
configuraci6n sea realizada.
Ejemplo: Para ajustar el reloj a las 10:30.
Presione:
Lavisualizaci6nmuestra:
1.@
EklT Th_ -
2, _
3. .........,.........
4. ,_3c
NOTA: Desenchufe y enchufe la unidad para
establecer de nuevo e! reloj.
SEGURO PARA NII_IOS
Use esta caracteristica de seguridad para bloquear
el panel de control cuando este limpiando el homo,
o para que los niflos no puedan usar e! homo sin
supervision.
Ejemplo: Para activar el Seguro para Nifioe.
,,ER ,,,,EOFDR'_
,,.,3&,_,_,.HSTRRT
Su homo de microondas puede ser utilizado
como un temporizador de cocina. Puede
ingresar hasta 99 minutos, 99 segundos.
Ejemplo: Para ingresar 3 minutos.
Presione: Lavisualizaci6nmuestra:
1. _ Hora del dia.
2. _'"_£'"'_ "' R,w
3. o; __...... H ,,,,_
............................ "1"31"3 Tt"_] ir I TIlT*-
4. _ Temporizadory
....... cuenta regresiva.
NOTA: Para cancelar, presione Kitchen Timer
(Apagar/Anular)
-kiT- TI_TIf- IKI illHmlkt I_1_
£EC
Presione: Lavisualizaci6nmuestra:
Hora del dia.
,
_ resiona y , ,_r -n
Ejemplo: Para cancelar el SEGURO PARA NII_OS.
sostenga asegurado
hasta que aparezca
"LOCKED (ASEGURADO)"
(aproximadamente
4 segundos).
Presione: Lavisualizaci6nmuestra:
1. sostenga hasta Hora de! dia.
Presione y
que desaparezca
"LOCKED
(ASEGURADO)"
(aproximadamente
4 segundos).
43
Page 44

OPCIONES
COCCI(DN CRONOMETRADA
Ejemplo: Para cambiar la unidad de medida del
_eso de descongelacion (de libras a kg.)
Presione: Lavisualizaci6nmuestra:
1.
,
3. ,._: F .... H,
........ KSC T,_H.....2
Hora del dia.
SOUMDTOUCH/
CLOCKTOUCH2
SCROLLSPEED
TOUCH3
LBSF / MS C TOUCHV
DEFIOTOUCH5
LRMGURGETOUCH6
] _f" Tnll_ i
4. }_G:
Puede cambiar los valores implicitos del pitido, reloj,
velocidad de despliegue, unidades, demo e idioma.
Para mas informaci6n, lea la siguiente tabla.
TABLA DE OPCIONES
Esta funcion le permite programar un tiempo de
cocci6n y potencia especificos. Para obtener mejores
resultados, hay 10 niveles de graduaci6n de potencia
ademas de ALTA (100%). Para m_ts informaci6n,
refierase a la "Tabla de niveles de potencia de
microonda" en la pag. 46.
NOTA: Si no selecciona un nivel de potencia, el
horno automaticamente funcionara a1100% de su
)otencia.
Ejemplo: Coccion programada para 2 minutos
Presione:
1.
2.
4.
Lavisualizaci6nmuestra:
-kiT - _-i--ii-- I ii_lJ'- i II IEE,,,ER,.,_,_K.,o"r,m-
POWER
,/'tFl -NIT- ml I
i -i1-1 I
_.E,,EL,- IO
E,,.,,.,P - BO
T_I if-
,_,.H STRRT
Cuenta regresiva
de tiempo.
Funcion Tecla Opci6n
Reloj 2 Encendido y apagado
Velocidad de 3 Lento, normal o rapido
c)e.sR!ifigu.e.................................................................................................................
AGREGAR MINUTO
Se trata de una tecla que permite un ahorro de
tiempo, ya que este control le permite rapidamente
programar e iniciar la cocci6n por microonda a1100%
de potencia sin necesidad de presionar START (tniciar).
LJ.r_.!dadR.s............................4................!B,.:E....6......._%.?.C.....................
U_n_°.....................................S................Fnceng.!U°.Y.aPaga@.............
Idioma 6 Ingl@so espafiol
Ejemplo: Para cocinar durante 2 minutos
Presione: Lavisualizaci6nmuestra:
1. @ Hora de! dia.
_:!_ Cuenta regresiva
2. Mi_ Dos Veees de tiempo y
NOTA: Si presiona ADD MINUTE, esto agregara
1 minuto hasta 99 minutos y 59 segundos.
Esta funcion es tambien ideal para un inicio
rapido de 1 minuto.
44
POWER 100
Page 45

MANTENER CALIENTE
MAS Y MENOS
Puede mantener calientes y seguros los alimentos
cocinados, calentados en su horno de microondas
hasta 99 minutos. Puede usar WARM HOLD
(mantener caliente) por si mismo, o seguir
autom_tticamente un cic!o de cocci6n.
Ejemplo: WARM HOLD (mantener caliente)
Presione:
,
@
2.
AIfinalde lafunci6nWarm Hold (mantener¢aliente)
apareceraen lapantallaelmensa]e END (FIN)y se
escuchar&n cuatro tonos.
NOTA: Para finalizar, presione STOP/CLEAR.
Para que WARM HOLD (mantener caliente) siga
automaticamente a otro ciclo:
• Mientras sigue las instrucciones de cocci6n, presione
WARM HOLD (mantener caliente) antes de presionar
START (comenzar).
• AI concluir el t_ltimo ciclo de coccion oira dos
tonos. Warm (caliente) seguira mientras el homo
contint_a funcionando.
• Puede programar que WARM HOLD (mantener
caliente) siga a AUTO DEFROST (descongelacion
automatica), CONV. (convecci6n) o cocci6n en ciclos
mOltiples.
NOTAS:
• WARM HOLD (mantener caliente) opera hasta un
total de 99 minutos.
• Abrir el homo cancela la funcion WARM HOLD. Cierre
la puerta y presione WARM HOLD, luego presione
START (comenzar) si desea que WARM HOLD
funcione durante un tiempo adicional.
• Los alimentos ya cocinados se deben cubrir
mientras WARM HOLD esta en fundonamiento.
• Los platos de pasteleria (pasteles, tartas, etc.) no
deben estar cubiertos mientras WARM HOLD esta
en funcionamiento.
• Las comidas completas que se deseen mantener
calientes sobre un plato deben cubrirse mientras
WARM HOLD esta en funcionamiento.
• No utilice WARM HOLD durante mas de un ciclo
completo. La calidad de algunos alimentos podra
empeorar si esta funcbn se usa durante un periodo
de tiempo extendido.
Lavisualizacibnmuestra:
Hora de! dia.
TQUCHSTFIRT
Las funciones M#,S y MENOS de
este horno ajustan el tiempo para
cocinar del ciclo de cocci6n mientras
el horno de microondas se encuentra
en funcionamiento. M,_S agrega
10 segundos al tiempo de cocci6n;
MENOS quita 10 segundos.
• Use M,&S o MENOS cuando el tiempo de cocci6n
se encuentre realizando la cuenta regresiva en la
pantalla. MAS y MENOS no se pueden configurar
cuando la funcion SENSING (sensor) aparece en
la pantalla.
• MAS y MENOS no ajustan el tiempo de cocci6n para
los ciclos de DEFROST (descongelaci6n) y WARM/
HOLD (mantener caliente).
•Presione las teclas M,&,So MENOS durante e! ciclo
de cocci6n activo
• En la coccion por convecci6n, M#,S o MENOS se
utilizan como teclas de seleccion de temperatura
45
Page 46

COCCION EN ETAPAS
MOLTIPLES
Para obtener mejores resultados, atgunas recetas necesitan
un cicto de potencia para un perfodo de tiempo determinado y
otro ciclo de potencia para otro periodo de tiempo. Su homo
puede programarse para cambiar automaticamente de uno a
otro en un total de hasta dos ciclos.
Ejemplo para un ciclo de coccion en 2 etapas:
Presione: Lavisualizaci6nmuestra:
-kiT- f'nf_/Ikt¢" Th'nP
2. POWER
Para programar una
cocci6n de 3 minutos
para la 1° etapa.
3. '"_' -/L?
........... Tt311t- t _T T
Para programar un
80% de la potencia
de coccion.
5. E,,,ER_._K,,,o ,, ,c
,
Para programar una
coccion de 7 minutos
para la segunda etapa.
3, LTL7TOUEHSTRRTOR
3, i,)s,-) KIT
•,.,,.,E,,,ERPOWER
,.&,c_.I
,_,.H =,RR,
kit t- nn .,llqt- TI;T*_
7 • _1_ T_t IS -T T n•_ ,_H 5,RR, _R
POWER
NIVELES DE INTENSIDAD DE
LAS MICROONDAS
Su homo de microondas posee 10 niveles de
intensidad de coccion que le permiten cocinar o
calentar una variedad de alimentos• En la siguiente
tabla se dan algunas sugerencias:
Tabla de nivel de intensidad de
microondas
Nivelde
intensidad
10 • Hervir agua.
(alta) • Hacer caramelo.
• Cocinar trozos de aves, pescado y
verduras.
• Cocinar trozos tiernos de came•
• Cocinar aves enteras.
9 • Recalentar arroz, pastas y verduras•
8 • Recalentar comidas preparadas
rapidamente.
• Recalentar emparedados.
7 • Cocinar platos a base de huevos, leche
y queso.
• Cocinar pasteles, pan.
• Derretir chocolate•
6 • Cocinar temera.
• Cocinar un pescado entero.
• Cocinar budines y flanes.
5 • Cocinar jam6n, aves enteras y cordero.
• Cocinar asado de costilla, puntas de
filete.
Uso
• /'It') ktTt"
,
,
7" _ E,,,cRPOWER
It'll I -//7_c,,E_I
7. ,.,,.,P
Tf'311F t ¢'T T
,_,.X =,RR,
Para programar un 50%
de la potencia de coccion
para la segunda etapa.
9. Cuenta regresiva de
EOOK8J
tiempo.
10. Una vez concluida la primera etapa, oira dos
tonos cortos cuando el homo comience la
segunda etapa de cocci6n.
4 • Descongelar came, aves y mariscos.
3 • Cocinar cortes de came menos tiema.
• Cocinar chuletas de cerdo, asado.
2 • Quitarle el frio a las frutas.
• Ablandar mantequilla.
1 • Mantener guisados y platos principales
tibios.
• Queso crema.
0 • Tiempo de reposo•
46
Page 47

INSTRUCCIONES PARA
COCINAR CON SENSOR
El sensor detecta el vapor del alimento y
automaticamente ajusta el tiempo de coccion para
obtener el mejor resultado. Es facil y conveniente -
el horno Io guiara, paso a paso, para cocinar o
volver a calentar los alimentos. El MenO del Sensor,
con muchas opciones de alimentos populares, esta
preprogramado para cocinar o volver a calentar los
alimentos de una forma perfecta siempre.
Para mas informaci6n sobre los Programas para
Cocinar con Sensor, lea las "Tablas para volver a
calentar y cocinar con sensor" en las p_tginas 47 y
49. Las mismas brindan instrucciones especificas
oara cocinar y calentar una variedad de alimentos.
El sistema de coccion con sensor trabaja
detectando un aumento del vapor.
AsegOrese que la puerta este cerrada.
Una vez que el vapor se detecte, se oiran dos
pitidos cortos.
Si abre la puerta o presiona STOP/CLEAR antes
de que el ca!or se detecte, eso hara que se aborte
el proceso. El horno se detendra.
Para asegurarse de obtener los mejores
resultados, antes de usar la cocci6n con sensor,
asegOrese que el plato giratorio de cristal este seco.
;ategorias:
Volver a calentar con sensor
Cocinar con sensor
Pa!omitas de maiz con sensor
VOLVER A CALENTAR CON
SENSOR
Esta caracteristica le permite volver a calentar
alimentos cocidos previamente que se encuentran a
temperatura ambiente o congelados, sin tener que
seleccionar tiempos de cocci6n o niveles de energia.
Esta caracteristica posee 3 categorias: plato base,
sopa/salsa, cazuela. Para m_ts informacion, lea la
siguiente tabla.
Ejemplo: Para volver a calentar una cazuela.
Presione: Lavisualizaci6nmuestra:
=
®
2.
Re_t
3
3.
El homo volvera acalentar e!alimento automaticamente
con e! sistema de sensor.
Hora del dia.
SELECTREMU/-3
[RSSEROLE
4,
SE,"ISIMS
TABLA PARA VOLVER A
CALENTAR CON SENSOR
Alimentos Porciones y recomendaciones
1 Plato base La cantidad a servir es entre 225g
y 450g (8 y 16 oz.). Coloque los
alimentos en un plato o recipiente
similar. Cubra con una envoltura
plastica y perf6rela*.
2 Sopa/salsa La porcion es entre 250ml y 11
(1 y 4 tazas). Coloque los alimentos
en una oazuela. Cubra con una
envoltura plastica y perf6rela*.
3 Cazuela La porcion a servir es entre
250ml y 11(1 a 4 tazas). Coloque
los alimentos a calentar en una
cazuela. Cubra con una envoltura
plastica y perf6rela*.
*Doble una de las ountas de la envoltura plastica para
dejar escapar el vapor durante la cocci6n.
47
Page 48

PALOMITAS DE MA|Z CON
COCCION CON SENSOR
SENSOR
PALOMITAS DE MAJZ CON SENSOR le permite
hacer reventar las palomitas de maiz empaquetadas
comercialmente (de 1.75 6 3.5 oz. (50 6 100g).
Para un resultado optimo:
Use bolsas de palomitas de maiz frescas.
Coloque solo una bolsa de palomitas de maiz
preempacado para microondas en e! centro de!
plato giratorio.
"jemplo: Para hacer reventar 3.5 oz. (100g).
Presione: Lavisualizaci6nmuestra:
1. @ Hora del dia.
.... PoPco_,_
2. Popeo:_n 4.
NOTAS:
• No intente volver a calentar o a cocinar los granos
de maiz que no hayan reventado.
• No utilice utensilios con esta funci6n para hacer
reventar palomitas de maiz en el homo de
microondas.
• NUNCA se debe usar un utensilio para hacer
palomitas de maiz e! cua! concentre energia de
microondas.
- - kt - ]i,i _-
5_,,5,,o
La COCCION CON SENSOR le permite cocinar la
mayoria de sus alimentos preferidos sin tener que
seleccionar los tiempos de cocci6n ni los niveles de
energia. El homo determina en forma automa.tica los
tiempos de coccion requeridos para cada alimento.
La COCCION CON SENSOR posee 10 categorias
de alimentos. (lea la tabla que aparece en la pa.gina
siguiente).
Ejemplo: Para cocinar una comida congelada.
Presione: Lavisualizaci6nmuestra:
1. _ Hora del dia.
2. ,--, ,-T J-9
_11_i_ I I'-I_IT --
,
El homo cocinara, el alimento automaticamente con el
sistema de sensor.
FR_,-c. c.,REE
41.
E;,S,_o
48
Page 49

TABLA PARA COCINAR CON SENSOR
Alimentos Porciones y recomendaciones
1 Papas La cantidad a servir Ileva entre 1y 4 papas medianas, de entre 225g y 280g (8 a 10 onzas)
cada una. Perfore cada papa varias veces con un tenedor y coloque las mismas alrededor
......................................................de!b£ de.de. ha.rideJaq h°rn£,aun.af!!s!a.n !ade.P°r!° en°s.2:5°m.!! Pu. gada!:.................
2 Verduras La cantidad a servir Ileva entre 250ml y 1L (entre 1 y 4 tazas). Coloque las verduras
frescas hOmedas en un envase apto para e! microondas. Agregue entre 2 y 4 cucharas soperas
(entre 30 y 60ml) de agua. Cubra con una envoltura pl_tstica y ventile la misma*. La
mayoria de las verduras deben ser revueltas y necesitan un tiempo de reposo de 2 a 3
.......................................................r_i.nyt£s ]ueg£ ge !a.££29i.@_:..........................................................................................................................................................................
3 Verduras La cantidad a servir Ileva entre 250ml y 1L (entre 1 y 4 tazas). Retire el paquete y coloque
congeladas las verduras en un envase apto para el microondas. Agregue entre 2 y 4 cucharas soperas
(entre 30 y 60ml) de agua. Cubra con una envoltura plastica y ventile la misma*. La
mayoria de las verduras deben ser revueltas y necesitan un tiempo de reposo de 2 a 3
.......................................................mi.nut?s !ueg£ cle !a.£££_i.@_:..........................................................................................................................................................................
4 Platillo El tamaffo del platillo principal es de entre 28% y 560g (t0 a 20 onzas).
Principal Retire el envase exterior. Levante los tres lados de la tapa. Si el platillo principal no ester
Congelado en un envase apto para el microondas, coloquelo en un plato, cObralo con una envoltura
pl&stica y ventile la misma*.
La mayoria de los platillos principales necesitan de 2 a 3 minutos de repose luego de la
cocci6n.
5 Arroz Siga las instrucciones del envase para agregar las cantidades correspondientes a cada
ingrediente. Coloque el arroz y el agua (agua, caldo de polio o de verduras) en un envase
apto para el microondas, cubra con una tapa de cacerola o con una envoltura pl&stica y
ventile la misma*.
La mayoria de los arroces necesitan un tiempo de repose de 2 a 3 minutes luego de la
cocci6n.
6 Cacerola La cantidad a servir es de entre 250ml y 1L (1 a 4 tazas).
Combine los ingredientes segOn la receta en una cacerola de entre 1 y 2 L (1 a 2 cuartos
de gal6n).
Cubra con una envoltura pl&stica y ventile la misma*.
Una vez que ha terminado la cocci6n, deje reposar durante 3 minutes.
7 Came Picada La cantidad a servir es de entre 115g y 900g (4 a 32 onzas (t/4 a 2 libras)).
Desmenuce la came en un contenedor apto para el microondas.
Sazone y cubra con una envoltura pl_tstica. Ventile la envoltura para una buena coccion de
la came.
Cubra el plato para una cocci6n media de la came (para por ejemplo came que sera usada
en otro platillo y que recibira coccion adicional).
8 Pescado, El tamaffo de la porci6n es de entre 1t0g y 900g (4 a 32 onzas (1/4 a 2 libras)).
Mariscos Coloque la comida alrededor de los lados de un envase resistente al microondas.
Sazone y agregue entre 60 y 125ml (1/4 a 1/2 taza) de liquido (vino, agua, salsa, etc.) si asi
Io desea.
Cubra con una envoltura plastica y ventile la misma*.
9 Huevos La cantidad a servir Ileva entre 2 y 5 huevos.
Revueltos Vierta los huevos en un envase para medir con capacidad para 11(4 tazas) o una cazuela
de 1L (t cuarto de galon).
Agregue 15ml (1 cucharada) de leche o agua por cada huevo y bat& Cubra con una
envoltura plastica y ventile la misma*.
AI finalizar la coccion, retire de! homo, revuelva y deje reposar entre 1 y 2 minutos.
0 Pizza La cantidad a servir es de 1 a 2 pizzas.
Congelada Use solo pizza congelada destinada para uso en el microondas.
*Doble una de las puntas de la envoltura plastica para dejar escapar e! vapor durante la cocciSn.
No la cubra.
Siga las instrucciones que figuran en e! envase.
49
Page 50

DESCONGELACION AUTOMATICA
El homo posee cuatro opciones predeterminadas para
descongelar. La funcion de descongelar le proporciona
el mejor metodo para descongelar alimentos, ya
que el homo en forma automa.tica determina el
tiempo de descongelaciOn de cada alimento segun
el peso que usted ing.rese. Para su conveniencia,
la DESCONGELAClON AUTOMATICA incluye un
mecanismo que funciona con un tono incorporado el cual
ie recuerda cuando controlar, dar vueita, separar o volver
a ubicar el alimento durante el ciclo de descongelaciOn.
Se brindan cuatro opciones distintas de descongelacion:
1. CARNE
2. AVES
3. PESCADO
4. PAN
Luego de presionar el bot6n de DESCONGELAClON
AUTOMATICA una vez, seleccione ia categoria de
alimento presionando un boton numerico: 1 (CARNE), 2
(AVES), 3 (PESCADO) y 4 (PAN). Los rangos de peso
disponibles para carnes, aves y pescado son de .05 a 2.7
kg. (0,1 a 6,0 libras). El rango de peso disponibie para
pan es de .05 a 2.7 kg. (0.1 a 1.0 iibras).
Ejemplo: Para descongelar 0.5 kg. (1.2 libras de
carne).
Presione: Lavisualizaci6nmuestra:
,.@
::Auto
3. E,,,ER,,_E,oH,
_. i y 12 LSS
Para introducir e! peso
5, Cuenta regresiva de
NOTA: AI presionar la tecla START/PAUSE, la
pantalla cambia al comenzar la cuenta regresiva de
descongelacion. Sonara un p!tido en el homo durante
el ciclo de DESCONGELACION. En ese momento,
abra la puerta y de vuelta o vuelva a ubicar la comida.
Quite cualquier porcion que ya este descongelada.
Vuelva a colocar en el homo las porciones
congeladas y presione START/PAUSE para regresar
a! ciclo de descongelaci6n. El horno no se detendra
al presionar CLEAR durante el PITIDO a menos
que se abra la puerta.
Hora del dia.
MERTTOUCH/
POULTRWTOUCH2
RSH TOUCH3
8RERBTOUCH
-k_T- I #-If" T
TOUCH£TRRT
FIERT
tiempo.
Para un resultado optimo:
• Retire el pescado, los mariscos, la came y la
came de ave de su paquete de papel o plastice
(envoltura). De le contrario la enveltura retendra el
vapor y el jugo cerca de los alimentos, Io que puede
causar que la superficie exterior de los alimentos se
cocine.
• Ubique la came en forma de resca antes de
congelarla. AI descengelar, retire raspande la came
descongelada cuando suene el pitido y continQe e!
proceso de descengelaci6n.
• Coloque los alimentos en un recipiente de cristal
poco profundo para hornear o en una rejilla para
asar con microendas para receger el getee.
• Los alimentos todavia deben tener algo de hie!e en
el centro cuando se los retire del homo
TABLA DE DESCONGELACION
AUTOMATICA
Categoria Alimento
CARNE
.05 a 2.7 kg.
(0,1 a 6,0 Ibs
AVES
.05 a 2.7 kg.
(0,1 a 6,0 Ibs
PESCADO
.05 a 2.7 kg.
(0,1 a 6,0 Ibs
PAN
.05 a 2.7 kg.
(0,1 a 6,0 Ibs
5O
CARNE DE RES
Came de res picada, bistec redondo,
cubos para estofado, filete mifl6n, trozos
de came de res para guisar, bistec de
costilla, bistec de pulpa larga, pescuezo,
pastelillo para hamburguesa.
CORDERO
Chuletas (2.5cm (1 pulgada) de grueso),
asado enrollado
CERDO
Chuletas (lcm (1/2 pulgada) de grueso),
)erros calientes, costillas, costillas a la
campestre, asado enrollado, salchicha.
TERNERA
Chuletas (1 libra, 1/2 pulgada de grueso).
AVES
Entera(bajo4 libras),Presas,Pechugas
(deshuesadas)
GALLINITAS DE CORNUALLES
Enteras
PAVO
Pechuga (menos de 2,7 kg. [6 Ibs])
PESCADO
Filetes, bistes enteros
MOLUSCOS
Carne de cangrejo, colas de langosta,
camarones, escalopes
PANECILLOS
PASTEL ENROLLADO
Page 51

TIEMPO DE DESCONGELACION
DESCONGELAClON EXPRESS
Ejemplo: Para descongelar durante 3 minutos.
Presione: Lavisualizaci6nmuestra:
....;_to deux fois. 8'ITERDEFROSTTI,%
2. -%_
............... T_'ll i¢" i
......... ,_LH STRRT
iIII_
3, Cuenta regresiva
AIfinalizar el periodo de descongelaci6n, suenas los
tonos y e! homo se apaga.
Tlffl
de tiempe.
Ejemplo: 0.5 kg.(11b) de carne
Presione: Lavisualizaci6nmuestra:
RERTTOUCH/
I. POULTR_TOUCH2
FISHTOU[H3
, Tnll¢ I,_oLHSTRRT
L_UIL_
3. Cuenta regresiva
AI finalizar el periodo de descongelaci6n, suenas los
tonos y e! homo se apaga.
NOTA:
• El homo reproduce un pitido a mitad del ciclo de
descongelaci6n para recordarle que controle la
comida. Haga una pausa abriendo la puerta del
homo. Una vez que controlo y volvi6 a ubicar la
comida, cierre la puerta y presione START/PAUSE
para reanudar el cic!o de descongelaci6n.
i..li iii'-!
de tiempo.
51
Page 52

CONSEJOS PARA COCINAR
POR CONVECCION
En esta secci6n encontrara instrucciones para
cocinar y procedimientos para utilizar cada una
de las funciones de convecci6n. Por favor lea
cuidadosamente estas instrucciones.
El procedimiento de cocci6n por convecci6n hace
que circule aire a traves del interior del homo por
medio de un ventilador. El constante movimiento
del aire envuelve la comida calentando la parte
exterior, dorando y encerrando el sabor por medio
del constante movimiento de aire caliente sobre la
superficie de la comida. Su homo utiliza la cocci6n
por conveccion cada vez que presiona la tecla
Conveccion. NO UTILICE EL HORNO SI EL PLATO
GIRATORIO NO SE ENCUENTRA EN SU LUGAR.
1. Siempre utilice la rejilla de metal sobre el plato
giratorio cuando cocine por convecci6n.
2. No cubra el plato giratorio ni la rejilla de metal con
papel de aluminio. Esto obstaculiza el flujo de aire
que cocina la comida.
3. Los moldes redondos para pizza son excelentes
para usar con comidas que s61ose cocinan por
conveccion. Utilice moldes que no posean mangos
largos.
4. Cocine por convecci6n para hacer sufle, pan,
galletas, pasteles angel food y para algunas
cocciones con came y pescado.
5. Su horno est_ equipado con un molde metalico que
le permite cocinar por convecci6n o a traves
del modo combinado.
6. No necesita utilizar ninguna tecnica especial
para adaptar sus recetas preferidas de homo al
cocinar pot convecci6n. Sin embargo, en general es
necesario reducir la temperatura del homo a 14° C
(25° F) con relaci6n a la temperatura recomendada,
segOn se menciona en las instrucciones del paquete
para preparar comida empaquetada en el modo pot
convecci6n.
7. AI hornear pasteles, galletas, panes, panecillos u
otros tipos de comidas homeadas, la mayoria de las
recetas necesitan ser precalentadas. Precaliente
el homo vacio tal como Io hace con su homo
convencional. Puede comenzar a cocinar la comida
mas pesada y densa tal como carnes, cazuelas o
carne de ave sin precalentamiento.
8. Todos los utensilios de cocina resistentes al ca!or
se pueden usar a! cocinar por convecci6n.
9. AI igual que en la cocina convencional, la
distancia entre la comida y la fuente de calor afecta
los resultados de la cocci6n. Consulte las tablas
disponibles en esta Guia de Uso y Cuidado.
10. Utilice utensilios met_ilicos s61ocuando
cocine por convecci6n. Nunca utilice este tipo de
utensilios al cocinar pot microondas o en el modo
combinado, ya que se puede producir chisporroteo
y da_o sobre el homo.
11. Luego del precalentamiento, si no se abre la
puerta, el homo en forma automatica mantiene la
parte interior a la temperatura de precalentamiento
durante 30 minutos.
PRECAUClONES
• La cavidad, la puerta, la mesa giratoria, el reposa
rodillo, la bandeja metgtlica, la rejilla de metal del
homo y los utensilios de cocina alcanzargtn una
temperatura muy caliente.
UTILtCE GUANTES DELGADOS PARA EL HORNO
a! retirar la comida, los utensilios de cocina, la rejilla
de metal, la bandeja metalica y la mesa giratoria del
homo una vez finalizada la cocci6n.
• No utilice recipientes de plgtstico livianos, envolturas
plasticas ni productos de pape! durante ninguno de
los ciclos de convecci6n.
52
Page 53

HORNEADO AUTOMATICO
Para hornear automaticamente pizza congelada,
panecillos, galletas y papas fritas congeladas
usando energia de microondas y de convecci6n
alternativamente:
Ejemplo: Para hornear 6 panecillos.
Presione: Lavisualizaci6nmuestra:
1. _ Hera del dia.
Auto FROZ81RZZRTOUCH/
2. ,Bake FIUFFilISTOUCH2
81SCUIT/?JIIIIIERROLL/8,.
STICKTOUCH3
FROZEIIFREIICHFRIES
TOUCHV
3. USERR,_KR,,_,5 LoP
......... ,,,_FF,,,PR,,,,_'nF_,_,
Presione la tecla numerica IblOUO'I
adecuada. TOUCHSTRRT
• Las galletas y los panecillos requieren un ciclo
de precalentamiento y deben ser colocados en la
parrilla luego de que suene la sepal.
• La pizza congelada se DEBE colocar
directamente en la parrilla de cocci6n per
convecci6n. NO use una bandeja de metal para
pizza ni papel de aluminio.
• Para los panecillos, galletas y panes se puede
usar moldes de panecillos si no se dispone de
una bandeja de vidrio.
• Los palitos de pan y las papas fritas congeladas
se pueden colocar en una bandeja metalica
peque_a no muy profunda, si no se dispone de
una bandeja de vidrio.
3. _ PREHERT
• Si se necesita informaciOn adicional, e! homo Io
indicara en la pantalla.
AIfinalizar el tiempo de cocci6n, se escuchara una
alarma, en la pantalla aparecera END (fin) y el homo
se apagar&
it-., kin €-i I
ml I -Ikt I_I _7_7r7
GU|A DE HORNEADO
AUTOMATICO
Alimentos Porciones y recomendaciones
1. PIZZA Para unresultadooptimo, nose
CONGELADA requiereun recipienteespecialpara
pizza.Use unapizzacongelada
de masadeigaday de 24cm (12
pulgadas)de diametro.Siusara una
pizzaconpastade levadura,agregue
un tiempoal horneadode 10a 20
minutesen conveccion,a 230° C
(450° F).
Coloquela pizzacongelada
directamenteen laparrillacorta.
2. PANEClLLOS Use 1 paquetede panecillosmixtos.
Coloquela parrillacorta sobreel plato
giratorio.
Luego delPRECALENTAMIENTO,
use unmoidepara 6panecillos.
Coloqueel moldeen la parrilla.
3.GALLETAS/ Para un resultado0ptimo, horneeun
CENA solomolde de gailetas,paneso palitos
ENROLLADOS/ de panpot vez.
MOLDES Luego delPREOALENTAMIENTO,
LARGOS coloquelas galletasa unadistancia
de entre2.5 y 5cm (1 a2 pulgadas)
unade laotra en unmoldepara pizza
engrasadoo una laminaparagailetas,
sobre laparrillacorta.Deje enfriar en
la parrilladurante10 minutesluegode
cocinar.
4. HELADO/PAPAS Utilicepapas a la francesapreparadas
FRITAS y congeladas.No superpongalas
papasal ubicarlas.
Paraobtener papasmascrujientes,
use latuncion MASparaahadirtiempo
de cocci6n.Esparzalas papasen un
moldepara pizzao I_.minadegalletas.
Coloqueel moldesobrela parrilla
corta. Luegode lacoccion,retireel
moldedel homo. Rangode peso:115a
450g (4a 16oz.).
53
Page 54

ASAR AUTOMATICAM ENTE
La funcion asar automaticamente asa en forma
autom_ttica came de res, came de ave, pechugas de
pavo y cerdo usando alternativamente la energia de
microondas y la energia de conveccion.
Ejemplo: Para asar un polio entero.
Presione: Lavisualizaci6nmuestra:
,.@
Hora del dia.
GU|A PARA ASAR
AUTOMATICAMENTE
Alimentos Porciones y recomendaciones
1.CARNE Pesela camea asary sequeligeramente
con toallasdepapel. Coloqueun platoapto
paralas microondas/resistentealcalor
en elplatogiratoriopara recogeralgun
derrame.Coloquela came para asarenla
parrillacorta.Luego decocinar,envuelva
ligeramentelacame asadaconpapelde
aluminioy dejelareposarde 5a 10minutes.
Rangede pesode 1kg.a2 kg.(2 a 4 Ibs).
Auto
2. 'Roast
......... USERRD_
3. 2
4. :3 :o 3.SLSS
5. Cuenta regresiva
• Si se necesita informacion adicional, el homo Io
indicara en la pantalla.
AI finalizar el tiempo de cocci6n, se escuchara una
alarma, en la pantalla aparecera END (fin) y el homo
se apagar&
BEEFTOUEH/
WHOLEEHIEKEblTOUEH2
TURKENSRERSTS
TOUEH3
PORKTOUCHV
I_IT I I-
E,,,ER2,5- 5,.8=
Tnl I¢ J
,o,,,.HSTRRT
RCIRST
de tiempo.
2. POLLO Peseel polioentero.Desh_.gasede las
ENTERO menudenciasy del cuello. Lavelaparte
interiory exteriordelpoliocon aguafrfa.
Sequeel polioIigeramentecontoallas de
papel.Sujetelas patas del poliocon lazos
paracocinar.Barniceel exteriordel polio
con mantequilladerretidao margarina.
Coloqueun platoaptopara lasmieroondas/
resistentealcalor en el platogiratoriopara
recogeralgQnderrame.Coloque el polio con
lapechugahaciaarribaen laparrillacorta.
Luegode lacoccion, envuelvaligeramente
lacame asadaconpapel de aluminioy
dejelareposar10 minutes.
Rangede peso:1.5 kg.a 3 kg. (25 - 6 Ibs).
3. PECHUGA Peselas pechugasde pavoy seque
DEPAVO ligeramentecon toallasde papel.Barnice
lapechugacon mantequilladerretida.
Coloqueun platoaptopara lasmicroondas/
resistentealcalor en el platogiratoriopara
recogeralgunderrame.Coloquela pechuga
en laparrillacorta.Luegode lacoccion,
envuelvaligeramentela came asada con
papelde aluminioy dejela reposarde
5a10 minutos.
Rangede peso:1 kg. a 3 kg. (3- 6 Ibs).
4.CERDO Pesela camea asary sequeligeramente
con toallasdepapel. Coloqueun platoapto
paralas microondas/resistenteal calor
enel platogiratoriopara recogeralgun
derrame.Coloquela came a asaren la
parrillacorta. Luegode lacocci6n,envuelva
ligeramentelacame asadaconpapelde
aluminioy dejelareposarde 5a 10minutes.
Rangede peso:1 kg. a 2 kg. (2.0- 4.0 Ibs).
54
Page 55

CONVECCION
Durante la cocci6n por convecci6n, el elemento calentador se utiliza para elevar la temperatura del aire en el
interior del homo. La temperatura para cocinar per conveccion se puede programar en un range que va de 107°
C (225° F) a 230° C (450 ° F) 6 en 38° C (100° F).
Para cocinar per conveccion es conveniente precalentar e! horno.
Ejemplo: para cocinar per conveccion a 160 ° C
(325° F) durante 45 minutes con precalentamiento.
Presione:
1
G
2.
NOTAS:
• Luego de! precalentamiento, la pantalla muestra
PLACE FOOD ON RACK junto con un sonido.
• Use guantes de cocina gruesos; el interior del
homo se encontrar_ caliente.
• Abra la puerta, coloque lacomida en la reji!la y
cierre la puerta. La pantalla mostrara ENTER
COOKING TIME.
5. o) Y5,co
.............. .......... Tnl tO"
Lavisualizaci6nmuestra:
Hera del dia.
358 F TOUCHROREOR
LESSFORTEnPSET
ORSTRRTOR8'ITER
COOKIMGTInE
925 F _''_,_,.H STRRT
FORPREHERTORE._ER
t-i-ii"t i1_1_ TItTI-
uuuK,,,o,.,E
PRC-HERT325 F
,_,,,.HSTRRT
I_IT -
Ejemplo: Para cocinar per conveccion a 190° C
(375° F) durante 30 minutes con precalentamiento.
Presione: Lavisualizaci6nmuestra:
1. _ Hera del dia.
',-C_J
950 FTOUCHROREOR
LESSFORTERP SET
OR STRRTOR 81TER
COOKIIIGTIRE
3. Mre..... 375F Tn''r,uu_HSTRRT
FORPREHERTOR E,,,ER
uuuK.,,o,.,E
4. :6 6 35.,_,_
5. @ CU375F
NOTAS:
• El rango de temperatura posee 10 pasos, desde
107° C (225 ° F) a 230 ° C (450° F) incluyendo
38° C (100 ° F) (pasta con levadura).
• Use boton M_,S/MENOS para subir/bajar la
temperatura 14° C (25 ° F) luego de presionar la tecla
CONVECCtON. (Per defecto, la temperatura es de
180° C (350 ° F)).
,_H STRRT
Cuenta regresiva
de tiempo.
NIT -
6. Ouenta regresiva
NOTAS:
• Cuando el homo alcanza la temperatura de
precalentamiento, se activaran cinco pitidos y
el homo mantendra esa temperatura en forma
automatica durante 30 minutos.
• La temperatura interna del homo baja rapidamente
cuando se abre la puerta; sin embargo, esto
no deberia evitar que el alimento se cocine per
completo durante e! tiempo de cocci6n normal.
EU_'5 F
de tiempo.
55
Page 56

GUiA PARA COClNAR POR CONVECCION
1. Siempre utilice la rejilla de metal al hornear por
conveccion.
2. Los recipientes de aluminio conducen el calor
rapidamente. La mayoria de las veces que se hornea
por conveccion, los terminados claros y brillantes
dan los mejores resultados y evitan que se produzca
un dorado excesivo debido al tiempo de coccion
necesario para las partes centrales. Para hornear
tartas y pasteles con un mejor dorado en el fondo, se
recomiendan los recipientes que posean un acabado
opaco (satinado) en el fondo.
COMIDA Tiempo,
Panes 10 a 12
Pasteles
Galletas
Galletas (biscuits)
Pan de maiz
Panecillos (Muffins)
Panecillos (Popovers)
Pan con frutas o nueces
Pan de levadura
Panes simples o dulces
Galletas angel food
Pastel de queso
Pastel de cafe
Pastelillos
Pastel de frutas (hogaza)
Pan de jengibre
Pastel de mantequilla,
Mezcla para pasteles
(2 capas)
Pastel en forma de tubo
Ponque (Pound cake)
Barra
Por cucharadas o
rebanadas
Temp. del
horno
200° C (400 ° F)
200° C (400 ° F)
200° C (400 ° F)
180° C (350 ° F)
180° C (350 ° F)
190° C (375 ° F)
180° C (350 ° F)
180° C (350 ° F)
180° C (350 ° F)
180° C (350 ° F)
180° C (350 ° F)
180° C (350 ° F)
180° C (350 ° F)
180° C (350 ° F)
180° C (350 ° F)
180° C (350 ° F)
180° C (350 ° F)
190° C (375 ° F)
3. Los acabados obscuros o no brillantes, los recipientes
de vidrio y de pirocera.mico absorben el calory eso
puede producir como resultado cortezas secas y
crujientes.
4. Se recomienda precalentar el homo cuando hornee
comidas por conveccion.
5. Para evitar que se produzca un calentamiento
desparejo y para ahorrar energia, abra la puerta del
homo para verificar el estado de la comida con la
menor frecuencia posible.
mins.
15a20
18a24
30 a 40
55 a 65
18a25
13 a 16
40 a 50
60 a 65
25 a 30
15a20
80 a 90
35 a 40
30 a 40
40 a 50
60 a 70
35 a 45
10 a 14
Comentarios
Las gafletasenlatadas y refrigeradas toman
de 2 a 4 minutos menos.
Retire inmediatamente de los envases y
enfrielos en una rejillade alambre.
Luego de retirarlosdel homo, perfore
cada unocon un tenedor para permitir que
escape el calor.
El interior debe estar humedo y delicado.
Engrase ligeramente la cacerola al hornear.
Invierta y enfrie en el molde.
Luego de lacocci6n apague el homo y deje
reposar el pastel dentro del homo durante
30 minutoscon la puerta entreabierta.
El interior debe estar humedo y delicado.
Enharine y engrase el molde.
Enfrie en elsarten durante 10 minutos antes
de colocarloen la rejilla.
Siga las instrucciones del paquete si usara.
una mezcla.
Siga las instrucciones del paquete si usara.
una mezcla.
NOTAS:
• La temperatura del homo indicada en la tabla superior tiene prioridad sobre las instrucciones del paquete.
• El tiempo de coccion que se muestra en la tabla solo sirve como referencia. Debera ajustar el tiempo
dependiendo del estado de los alimentos o de sus preferencias personales.
56
Page 57

TABLA PARA HORNEAR POR CONVECCION
C0MIDA
Frutas
y ob'os
postTes
Tartas,
pastas
Cazuelas
Comida
precocida
Platos
principales
Verduras
Manzanas operas
horneadas
Budin de pan
Pastelillos de crema
Flan (individual)
Nidos de memngue
Congeladas
Con merengue en la
parte superior
De dos cortezas
Quiche
Nido de pasta
Combinaciones de
carne,patioymariscos
Pasta
Papas al escalope
Verduras
Pasta de masa
congelada
Entradas congeladas
Panescongeladosde
pizza,panesde huevo
Pizza
Gaiietasrebanadas y
horneadas
Pastel de came
Estofado homeado
Bistec suizo
Chiles rellenos
Mitadesde calabazas
tipo bellota
Papas horneadas
Papas con horneado
doble
Temp. Tiempo,
del homo mins.
180°0(350°F) 30 a 30
150°0(300°F) 35 a 40
200°0(400°F) 30 a 35
180°0(350°F) 45 a 50
150°0(300°F) 30 a 35
190°0(375°F) 40 a 45
160°O(325°F) 13 a 16
200°0(400°F) 50 a 55
180°0(350°F) 30 a 35
200°0(400°F) 10 a 16
180°0(350°F) 20 a 40
180°0(350°F) 25 a 45
180°0(350°F) 55 a 60
180°0(350°F) 25 a 35
180°0(350°F) 30 a 35
180°0(350°F) 50 a 60
200°0(400°F) 8 a 10
220°0(425°F) 15 a 25
190°O(375°F) 13 a 15
160°0(325°F) 55 a 60
160°0(325°F) 80 a 90
180°0(350°F) 60 a 70
180°0(350°F) 40 a 45
190°0(375°F) 55 a 60
220°0 (425°F) 50 a 60
200°0 (400°F) 25 a 30
Comentarios
Hornee en un moide poco profundo.
El bud[n esta.listo cuando al insertar un cuchillo cerca del centro
este sale limpio.
Luego de hornear durante 25 minutes, perfore los pastelillos dos
veces con un paliilo de dientes para dejar saiir el vapor.
Coloqueiastazasen unacacerolade hornear.Coloqueaguahirviendo
airededorde lastazasa una profundidadde 2.5cm(1 pulgada).
AIterminar ia coccion, apague el horno y dejelos reposar dentro
del mismo por 1 hora hasta que se sequen.
Siga las instrucciones del paquete para realizarla preparacion.
Siga las instrucciones del paquete para realizarla preparacion.
Siga las instrucciones del paquete para realizarla preparacion.
Deje reposar 5 minutos antes de cortar.
Perfore la pasta con untenedor para evitar que se reduzca.
El tiempo de cocciOnvaria de acuerdo al tamafio de lacazueia y
de los ingredientes.
El tiempo de cocciOnvaria de acuerdo al tamafio de lacazueia y
de los ingredientes.
Deje reposar 5 minutos antes de servir.
El tiempo de coccion varia de acuerdo con el tamaflo de lacazueia
y de los ingredientes.
Siga ias instrucciones del paquete para realizarla preparacion.
Siga las instrucciones del paquete para realizarla preparacion.
Siga las instrucciones del paquete para realizarla preparacion.
Siga las instrucciones del paquete para realizarla preparacion.
Deje reposar unos pocos minutos antes de retirardel recipiente
para que se enfrie.
Deje reposar 5 minutos iuego de lacocci6n.
Dore ia came antes de combinar con I[quidosy verduras.
Deje reposar 2 minutos iuego de lacocci6n.
Use chiies verdes, rojos o amarillos.
Perfore ia corteza envarios sitios.Afiada 60ml (1/4de taza)de agua
al plato. Luego de 30minutes del tiempo de cocci6n de vuelta las
mitades y queel lade cortado quede hacia arriba, y iuego ct]braias.
Perfore la corteza con un tenedor antes dehornear.
Perfore la corteza con un tenedor antes dehornear.
NOTAS:
• La temperatura del homo indicada en la tabla superior tiene prioridad sobre las instrucciones del paquete.
• El tiempo de cocci6n que se muestra en la tabla s61o sirve como referencia. Debera ajustar el tiempo
dependiendo del estado de los alimentos o de sus preferencias personales.
57
Page 58

TABLA PARA ASAR CARNE POR CONVECCION
CARNES
Carne de
res
Costilla (1 a 2 kg. (2 a 4 Ibs))
Casi cruda
Termino medio
Bien cocida
Temp. del horno Tiempo, min. / lb.
160° C (325 ° F)
160° C (325 ° F)
160° C (325 ° F)
21 a 26
26 a 31
31 a 36
Costilla sin hueso, Filete
Casi cruda 160°
Termino medio 160°
Bien cocida 160°
C (325 ° F)
C (325 ° F)
C (325 ° F)
25 a 30
30 a 35
35 a 40
Filete Miff6n
Casi crudo 160°
Termino medio 160°
C (325 ° F)
C (325 ° F)
12 a 16
16a20
Came para cazuela (1 a 1.5 kg. (21/2a 3 Ibs))
45 a 50
20 a 25
20 a 25
17a20
21 a 26
26 a 31
Jamon
Cordero
Espaldilla, rabadilla 160°
Enlatado (1.5 kg. (3 lb.) bien cocido) 160°
Rabadilla (2.3 kg. (5 lb.) bien cocido) 160°
Pierna (2.3 kg. (5 Ib.) bien cocido) 160°
Con hueso (1 a 2 kg. (2 a 4 Ibs))
Termino medio 160°
Bien cocido 160°
C (325 ° F)
C (325 ° F)
C (325 ° F)
C (325 ° F)
C (325 ° F)
C (325 ° F)
Sin hueso (1 a 2 kg. (2 a 4 Ibs))
25 a 30
29 a 34
26 a 30
32 a 36
Cerdo
Termino medio 160°
Bien cocido 160°
Con hueso (1 a 2 kg. (2 a 4 Ibs)) 160°
Sin hueso (1 a 2 kg. (2 a 4 Ibs)) 160°
C (325 ° F)
C (325 ° F)
C (325 ° F)
C (325 ° F)
Chuletas de cerdo
(t a 2.5cm (1/2a 1 pulg.) de grueso)
Ayes
2 chuletas 160°
4 chuletas 160°
6 chuletas 160°
Polio entero (1 a 2 (21/2a 31/2Ibs)) 190°
Presas de polio (t a 2 (21/2a 31/2Ibs)) 180°
C (325 ° F)
C (325 ° F)
C (325 ° F)
C (375 ° F)
C (350 ° F)
12 a 15
15 a 18
18a25
25 a 35
13 a 16
Gallinitas de Cornualles
Sin rellenar (0.5 a 0.7 kg. (1 a 11/2Ibs) 190°
Rellenas (0.5 a 0.7 kg. (1 a 11/2Ibs)) 190°
Patito (2 a 2.3 kg. (4 a 5 Ibs)) 190°
Pechuga de pavo (2 a 3 kg. (4 a 6 Ibs)) 160°
Pescado entero (1.5 a 2.3 kg. (3 a 5 libras)) 200 °
C (375 ° F)
C (375 ° F)
C (375 ° F)
C (325 ° F)
C (400 ° F)
10a15
15a20
19a21
21 a 25
10 a 15Mariscos
Colas de langosta
(170 a 225g (6 a 8 onzas) cada una) 180°
C (350 ° F) 12 a 17
NOTAS:
• El tiempo de asado que se muestra en la tabla s61osirve como referencia. Debera ajustar el tiempo
dependiendo del estado de los alimentos o de sus preferencias personales.
58
Page 59

CONSEJOS PARA LA COCCION EN
COMBINACION
MODO COMBINADO
En esta secci6n encontrara instrucciones para operar
cada funcion de coccion combinada. Por favor lea
estas instrucciones cuidadosamente. En ciertas
ocasiones se sugiere la combinaci6n microondas-
conveccion para Iograr mejores resultados de cocci6n,
ya que la misma acorta el tiempo para aquellos
alimentos que normalmente requieren de un periodo
largo de cocci6n. Este proceso de coccion deja las
carnes jugosas en la parte interior y crujientes en la
parte exterior. En el proceso de coccion combinada,
el calor de conveccion y la energia de microondas se
alternan automaticamente. Su horno posee dos modos
preprogramados que facilitan el uso de la cocci6n
combinada.
CONSEJOS UTILES PARA LA
COCCION COMBINADA
1. Las carnes se pueden asar directamente en la
rejilla metalica o en un recipiente poco profundo
para hornear, colocado sobre la rejilla. AI utilizar esta
Oltima, busque en su guia de cocci6n informaci6n
sobre la forma correcta de usar la misma.
2. Los cortes de carne menos blandos se pueden
asar y ablandar utilizando bolsas de coccion en el
homo.
3. AI homear, luego de haber concluido el tiempo de
cocci6n, verifique que el alimento este listo. Si no
esta completamente cocido, deje reposar el mismo
en el horno durante algunos minutos para que
finalice la cocci6n.
Temperatura Energia de
de! horno microondas
Combinacion Asar 180° C (350° F) 40%
Ejemplo: Para asar en la coccion combinada
durante 45 minutos.
Presione:
1. _ Hera del dia.
2. _1
4. ,o; Ys,m
5. Cuenta regresiva
NOTAS:
• La temperatura se puede ajustar; sin embargo, la
potencia del microondas no.
• Para usar More/Less durante la cocci6n combinada,
puede ajustar la temperatura hasta despues del paso
3 (la temperatura per defecto es de 180° C (350° F)).
Lavisualizaci6nmuestra:
358F ..... "_ "..... H, ,_RcDR
LESSFuR ,c,,PSETOR
kiT- Cnn llkl¢" TI_TI
T_I it"
,_,H STRRT
de tiempo,
PRECAUCIONES
1. Todos los utensilios de cocina utilizados en la
coccion combinada deben ser aptos TANTO para
hornos convencionales como para homos de
microondas.
2. Durante el horneado combinado, algunos utensilios
para hornear pueden provocar chisporroteo al entrar
en contacto con las paredes del homo o con las
rejillas metalicas accesorias. El chisporroteo es una
descarga de electricidad que se produce cuando las
microondas entran en contacto con el metal.
-- Si se produce un chisporroteo cuando utilizando
la rejilla de metal, coloque un plato resistente al
calor entre el recipiente y la rejilla de metal.
-- Si se produce un chisporroteo con otros
utensilios de cocina para hornear, no los utilice
para la coccion combinada.
59
Page 60

GU|A PARA LA COCCION COMBINADA
CARNES
Carne de
res
Jamon
Cordero
Cerdo
Ayes
Mariscos
NOTAS:
• El tiempo de asado que se muestra en la tabia solo sirve como referencia. Debera ajustar el tiempo
dependiendo del estado de los alimentos o de sus preferencias personales.
Costilla (1 a 2 kg. (2 a 4 Ibs))
Casi cruda
Termino medio
Bien cocida
Costilla sin hueso, Filete
Casi cruda
Termino medio
Bien cocida
Filete Mi_On
Casi crudo
Termino medio
Espaldilla, rabadilla o came para cazuela (1 a 1.5 kg. (21/2a 3 libras))
(Para obtener un mejor resultado utilice bolsas para cocinar)
De vuelta el alimento en la mitad de la coccion.
Enlatado (1.5 kg. (3 lb.) bien cocido)
Rabadilla (2.3 kg. (5 lb.) bien cocido)
Pata (2.3 kg. (5 lb.) bien cocido)
De vuelta el alimento en la mitad de la coccion.
Con hueso (1 a 2 kg. (2 a 4 Ibs))
Termino medio
Bien cocido
Sin hueso (I a 2 kg. (2 a 4 Ibs))
Termino medio
Bien cocido
De vuelta el alimento en la mitad de la coccion.
Con hueso (1 a 2 kg. (2 a 4 Ibs))
Sin hueso (1 a 2 kg. (2 a 4 Ibs))
Chuletas de cerdo (2 a 2.5cm (3/4a 1 puig.) de grueso)
2 chuletas
4 chuletas
6 chuletas
De vuelta el alimento en la mitad de la coccion.
Polio entero (1 a 3 kg. (21/2a 6 Ibs))
Presas de polio (1 a 3 kg. (2 1/2a 6 Ibs))
Gallinitas de Cornualles
Sin relleno
Rellenas
Patito
Pechuga de pavo (2 a 3 kg. (4 a 6 ibs)) De vuelta hacia arriba el
lado del pecho de la pechuga en la mitad de la coccion.
Pescado
Fiietes (0.5 kg. (t libra)
Colas de langosta (170 a 225g (6 a 8 onzas) cada una)
Camarones (0.5 a 1 kg. (1 a 2 libras))
Escalopes (0.5 a 1 kg. (I a 2 libras))
Temp. Tiempo,
del horno min. / lb.
150° C (300° F)
150° C (300° F)
150° C (300° F)
150° C (300° F)
150° C (300° F)
150° C (300° F)
150° C (300° F)
150° C (300° F)
135° C (275° F)
150° C (300° F)
150° C (300° F)
150° C (300° F)
150° C (300° F)
150° C (300° F)
150° C (300° F)
150° C (300° F)
150° C (300° F)
150° C (300° F)
180° C (350° F)
180° C (350° F)
180° C (350° F)
190° C (375° F)
190° C (375° F)
190° C (375° F)
190° C (375° F)
190° C (375° F)
150° C (300° F)
180° C (350° F)
180° C (350° F)
180° C (350° F)
180° C (350° F)
60
11 a 14
14 a 17
17a20
11 a 14
14 a 17
17a20
14 a 17
17a20
30 a 40
15 a 18
15 a 18
15 a 18
13 a 18
18 a 23
14 a 19
19 a 24
13 a 16
18 a 23
10 a 13
13 a 16
16 a 19
18 a 20
15 a 18
18 a 25
23 a 30
15 a 18
11 a 15
7a10
10a15
8a13
8a13
Page 61

Paracalentarorecalentarenformasatisfactoriaenunhomodemicroondas,esimportanteseguiralgunoslineamientos
generales.Midalacantidaddecomidaparadeterminareltiempoderecalentamientonecesario.Distribuyaelalimentoen
formacircularparaobtenerelmejorresultado.Lacomidaqueseencuentreatemperaturadeambientesecalentaram_.s
r_.pidoquelacomidacongelada.Losalimentosenlatadossedebenretirardelaslatasycolocarenunrecipienteadecuado
paramicroondas.Losalimentosenlatadossecalentar_.ndeunmodom_.suniformesiseencuentrancubiertosconunatapa
plasticaparamicroondasoconunaenvolturapl_.sticaconespaciospararespirar.Retirelatapaconcuidadoparaevitar
uemadurasacausadelva)or.Utilice la siguiente tabla como guia para recalentar comida cocida.
Tiempode cocci6n
COMIDA (a maximo) Instrucciones especiales
Came en rebanadas
3 tajadas (.63cm (1/4
pulgada de grueso))
Presas de polio Coloque las presas de polio enun plato paracocinar por microondas.
1pechuga 2 a 31/2minutos Cubra el mismo con unaenvoltura pla.sticacon espacios para respirar*.
1pierna y muslo 11/2a 3 minutos
Filetede pescado Coloque el pescado en un plato para cocinar por microondas.
(170 a 225g (6 a 8 onzas)) 2 a 4 minutos Cubra el mismo con una envoltura plastica con espacios para respirar*.
Lasa_a Coloque la lasa_a en un platopara cocinar por microondas.
1porciOn(30% (101/2oz.) 4 a 6 minutos Cubra el mismo con una envoltura pla.sticaconespacios para respirar*.
Cazuela COCINE en una cazuela para microondas.
1taza (250ml) 1 a 31/2minutos Revuelva una vez a mitad de la coccion.
4 tazas (IL) 5 a 8 minutos
Cazuela crema o queso COClNE en una cazuela para microondas.
1taza (250ml) 11/2a 3 minutos Revuelva una vez amitad de la coccion.
4 tazas (IL) 31/2a 51/2 minutos
Sloppy Joe o Came a la Recaliente el rellenoy el panpor separado.
barbacoa Cocineel relleno cubierto en unacazuela para microondas.
1emparedado 1 a 21/2minutos Revuelva una vez. Caliente el pan como se indica en la tabla que
(125ml (1/2taza) de aparece debajo.
relleno de came) sin pan
Pure de papa COCINE en una cazuela para microondas cubierta.
1taza (250ml) 1 a 3 minutos Revuelva una vez a mitad de la coccion
4 tazas (IL) 5 a 8 minutos
Frijoles horneados COClNE en una cazuela para microondas cubierta.
1taza (250ml) 11/2a 3 minutos Revuelva una vez amitad de la coccion.
Ravioles o pasta en salsa
1taza (250ml) 21/2a 4 minutos COCINE en una cazuela para microondas cubierta.
4 tazas (I L) 71/2a 11 minutos Revuelva una vez a mitad de la coccion.
Arroz
1taza(250ml) 11/2a31/2minutos COClNEenunacazuelaparamicr°°ndascubierta
4 tazas (I L) 4 a 61/2minutos Revuelva una vez amitad de la coccion.
Pan o panecillo para Envuelva en una toallade papel y coloquelo sobre la rejillagiratoria
emparedado de vidrio.
(1 pan) 15 a 30segundos
Verduras COClNE en una cazuela para microondas cubierta.
1taza (250ml) 11/2a 21/2minutos Revuelva una vez amitad de la coccion.
4 tazas (IL) 4 a 6 minutos
Sopa COCINE en una cazuela para microondas cubierta.
1porci6n(250ml(8onzas)) 11/2a 21/2minutos Revuelva una vez amitad de la coccion.
*Doble una de las puntas de la envoltura pla.stica para dejar escapar el vapor durante la cocci6n.
1a 2minutos
Coloque la came en rebanadas en un plato para microondas.
Cubra el mismo con unaenvoltura pla.sticacon espacios para respirar*.
Nota: el jugo de la came o la salsa ayudan amantener una came jugosa.
61
Page 62

Verdura Cantidad coccion Instrucciones
Alcachofas, 225g) 2 medJanas 5 a 8 min. Corte. Afiada 2 cucharaditas (10 ml) de agua y 2 2 a 3 min.
(8 oz.) cada una 4 medianas 10 a 13 min. cucharaditas (10 mi) de jugo. Cubra.
Esparragos frescos, 0.5 kg. (1 Ib) 3 a 6 min. Aflada media taza (125 ml) de agua. Cubra. 2 a 3 min.
Puntas
Frijoles, verdes y 0.5 kg. (1 Ib) 7 a 11 min. Aflada media taza (t25 ml) de agua en una cazueia de 2 a 3 min.
anna[i!!% ..................................................................................................................!.5 ! !! _/_q!.).:F_evue.I)(a(_n3!!ad_de!acobb!on:......................................................
Remolacha fresca 0.5 kg. (1 Ib) 12 a 16 min. Aflada media taza (125ml) de agua en una cazuela 2 a 3 min.
BrOcolifresco, puntas 0.5 kg. (1 Ib) 4 a 8 min. Coloque el brocoli en un plato para hornear. 2 a 3 min.
Col, fresca, picada 0.5 kg. (1 Ib) 4 a 7 min. Aflada media taza (125 ml) de agua en una cazuela de 2 a 3 min.
Zanahorias, frescas, 0.5 I (2 tazas) 2 a 4 min. Aflada 1/4 taza (60 ml) de agua en unacazuela de 2 a 3 min.
rebanadas 1 I(I qt.). Revuelva a mitad de la coccion.
Coliflor,fresca, 0.5 kg. (1 Ib) 7 a 11 min. Corte.Afiada 1/4taza (60ml)de agua enuna cazuelade 2 a 3 min.
entera 1I (1 qt.).Revuelvaa mitadde lacocciOn.
FIosculo apio fresco, 0.5 I (2 tazas) 21/2a 41/2min. Rebane. Aflada media taza (125 mi) de agua en una 2 a 3 min.
rebanado 1 I (4 tazas) 6 a 8 min. cazuela de 1.51 (11/2qt.). Revueiva a mitad de la
Mafz,fresco 2 elotes 5 a 9 min. Quite la cascara.Afiada dos cucharadas (30 mi)de 2 a 3 min.
Champiflones, frescos, 225g (½ Ib) 2 a 31/2min. Coloque los champiflones en una cazuela cubierta de 2 a 3 min.
rebanados 1.5 1(1%qt.). Revuelva a mitad de lacocci6n.
Chiriv[as,frescas, 0.5 kg. (1 Ib) 4 a 8 min. Corte.Aflada mediataza (125 ml)de agua enuna 2 a 3 min.
[6tl_a:[_da:s..............................................................................................................£a_;_u#!a:de.!...5.I (!_/2..gl_:):..Re_uel_'a..a:.m(faq.de !a.c?%i6[_:.............................
Ch[charos, verdes, 1 I (4 tazas) 7 a 10 min. Aflada media taza (125 ml) de agua en una cazuela de 2 a 3 min.
frescos 1.5 1(1½ qt.). Revuelva a mitad de lacocciOn.
Camotes, horneados 2 medianas 5 a 10 min. Perfore varias veces los camotes con un tenedor. 2 a 3 min.
enteros, 170 a 225g 4 medianas 7 a 13 min. Coloque los mismos entre dos toallasde papel.
(6 a 8 oz.) cada uno Devuelta a mitad de la cocci6n.
Papas blancas, 2 papas 5 a 8 min. Perfore varias veces las papas con un tenedor. 2 a 3 min.
horneadas enteras 4 papas 10 a 14 min. Coloque las mismas entre dos toallasde papel.
(6 a 8 oz. cada una) Devuelta a mitad de la coccion.
Espinaca, fresca, 0.5 kg. (1 Ib) 4 a 7 min. Aflada media taza (125 ml) de agua en una cazueia 2 a 3 min.
Tiempode Tiempo de
a maximo reposo
Aflada media taza (125 ml) de agua.
cocci6n.
agua en un plato de hornear de 1.51 (1%qt.). Cubrir.
h°!as...........................................................................................................................%b!e ade2!(2q!:):.................................................................................................................
Calabazas, bellota 1 mediana 6 a 8 min. Corte la calabaza en mitades y retire las semillas. 2 a 3 min.
o nuez vellosa, Coloque las mismas en un plato para hornear de 20 x
[!fis%s......................................................................................................................29qr (8x8Pu!%das)2ub a:...........................................................................................
Calabac[n, fresco, 0.5 kg. (1 Ib) 41/2a 71/2min. Aflada media taza (t25 ml) de agua en una cazuela de 2 a 3 min.
[6:ba[_af_£.................................................................................................................!..5 !.(!Y_.q!.).:F}exue.I)ta(_n3!!f_gg# !6%_!6q: ......................................................
Calabac[n, fresco, 0.5 kg. (1 Ib) 6 a 9 min. Perfore. Coloquelos entre dos toallas de papel. De 2 a 3 min.
entero vuelta y acomodelos a mitad de la coccion.
62
Page 63

Preguntas y respuestas
Operacibn
Pregunta
_,Por que no se enciende la luz del horno
durante la coccion?
),Posee una pantalia de reloj?
),No posee una pantalia de reloj?
Respuesta
La bombilla podria estar quemada, y sera necesario reemplazarla.
Programe un horario de cocci6n. Presione START (comenzar).
Controle e! dispositivo de seguridad para el circuito de la casa.
_,Por que sale vapor por la ventilacion?
),Se puede dafiar el homo de microondas Si, nunca opere el homo vacio o sin el plato giratorio de vidrio.
en caso de funcionar vacio?
),Pasa la energia de microondas a traves No. La pantalla metalica Ileva de regreso la energia hacia el
de la ventana transparente de la puerta? interior del homo. Los orificios (o puertos) s61o permiten el paso
),Por que suena un pitido cuando se toca El tono indica que el valor de la programacion fue ingresada.
una tecla del panel de controles?
_,Se puede dafiar mi homo de microondas AI igual que cualquier otro artefacto para cocinar, es posible
si ia comida es cocinada durante cocinar comida hasta el punto en que se produzca humo, con
demasiado tiempo? la posibilidad de que se produzca un incendio o se dafie el
AI conectar por primera vez el homo a un
tomacorriente de pared el homo, si este
no funciona correctamente.
),Que es Io que sucede?
),Por que puedo ver la reflexi6n de la luz Esta luz proviene de la luz interna del homo, que se encuentra
alrededor de la caja exterior? situada entre la cavidad del homo y la pared externa.
El vapor se produce normalmente durante la cocci6n. El homo
de microondas ha sido diseflado para eliminar este vapor.
de la luz. Estos no permiten e! paso de la energia de microondas.
interior del homo. Siempre es aconsejabie estar cerca del homo
mientras se ester cocinando.
El microcomputador que controla el homo se puede alterar
temporalmente y no funcionar del modo en que fue programado
cuando conecta el homo por primera vez o al retornar la
corriente luego de un corte de luz. Desconecte el horno de!
tomacorriente de 120VAC y luego conectelo nuevamente para
reiniciar el microcomputador y reconfigurar e! reloj.
),Que son los diferentes sonidos que se
escuchan cuando e! homo de microondas
estgtfuncionando?
Los "clics" son causados por un interruptor mecanico que cumple
la funcion de ENCENDER y APAGAR el magnetrdn del homo.
El zumbido fuerte y grave proviene del cambio de energia en el
magnetr6n al ENCENDER y APAGAR el homo a traves de un
interruptor mecanico. El cambio en la velocidad del ventilador
proviene de! cambio de voltaje en la linea, ocasionado a!
ENCENDER y APAGAR de! magnetron.
63
Page 64

Preguntas y respuestas (continuacion)
Comida
Pregunta
_,Qu6 se hizo mal cuando la comida
horneada posee una mancha seca, dura y
de color cafe?
Una mancha seca, dura y de color cafe indica que la coccion
se extendi6 demasiado. Reduzca el tiempo de coccion o de
recalentamiento.
Respuesta
_,Por que algunas veces los huevos
revientan?
gPor que los huevos revueltos estan un
poco resecos luego de cocinarlos?
_,Por que las manzanas horneadas a
veces revientan durante la coccion?
_,Por que las manzanas horneadas
algunas veces se queman durante la
cocci6n?
gPor que se recomienda un tiempo de
reposo luego de que el tiempo de coccion
por microondas ha finalizado?
AI hornear, freir o preparar huevos al vapor, la yema puede
reventar debido al calor acumulado dentro de la membrana de
la yema. Para evitar que esto ocurra, simplemente perfore la
membrana de la yema antes de cocinar.
PRECAUCION: Nunca cocine huevos con cAscara en un homo
de microondas.
Los huevos se resecan cuando estan demasiado cocidos, aunque
se utilice siempre la misma receta. Es posible que se deba variar
el tiempo de cocci6n por una de las siguientes razones:
• Los huevos varian en tamafio.
• Algunas veces los huevos se encuentran a temperatura de
ambiente, otras a la temperatura del refrigerador.
• Los huevos se siguen cocinando durante el tiempo de reposo.
No se pelo la cascara de la parte superior de cada manzana para
permitir la expansi6n del interior de la misma durante la cocci6n.
AI igual que con los metodos de coccion convencionales, el
interior de la manzana se expande durante el proceso de coccion.
Si el tiempo de coccion es muy extenso, se puede producir un
incendio. AI finalizar el tiempo de cocci6n recomendado, las
papas se deben encontrar ligeramente firmes.
PRECAUCION: No lae eocine demaeiado.
El tiempo de reposo permite que la comida se siga cocinando
aOn per varios minutos luego de que el ciclo de coccion por
microondas ha finalizado. El tiempo de reposo depende de la
densidad de los alimentos.
gPor que es necesario un tiempo de
cocci6n adicional para comida que ha
sido guardada en un refrigerador?
AI igual queen una cocina convencional, la temperatura inicial
de la comida afecta el tiempo total de cocci6n. Es necesario
mas tiempo para cocinar comida que estuvo en el refrigerador,
que para cocinar comida que se encuentra a temperatura de
ambiente.
64
Page 65

ANTES DE LLAMAR PARA SOLICITAR EL SERVICIO
Existen muchos problemas de funcionamiento que puede corregir usted mismo. Si su homo de microondas no funciona
correctamente, Iocalice el problema en la siguiente lista e intente las soluciones sugeridas para cada problema.
Si el homo de microondas aQn no funciona en forma correcta, comuniquese con el Centro de Reparaci6n y Piezas de
Sears mas cercano. Los centros de servicio de Sears est_tn totalmente equipados para brindarle el servicio requerido.
Problema Causas posibles
El homo no arranca • Z,Esta enchufado?
• z,La puerta esta cerrada?
• z,Program6 el tiempo de coccion?
• z,Se ha averiado o colapsado el circuito electrico de su casa?
Se producen chispas • Z,Esta usando vajilla aprobada?
• Z,EI horno esta vacio?
Hora incorrecta • z,lntent6 volver a porter en hora e! reloj?
Comidas cocidas en forma despareja • Z,Esta usando una vajilla aprobada?
• z,Se encuentra la bandeja giratoria en el homo?
• z,Dio vuelta o revolvi6 la comida mientras se cocinaba?
• Z,Estaban los alimentos completamente descongelados?
• z,Eran el tiempo y la intensidad de coccion los correctos?
Alimentos recocidos • z,Eran el tiempo y la intensidad de coccion los correctos?
Alimentos con cocci6n insuficiente • _,Esta usando una vajilla aprobada?
• Z,Estaban los alimentos completamente descongelados?
• z,Eran el tiempo y la intensidad de coccion los correctos?
• z,Se encuentran los orificios de ventilaci6n destapados?
Descongelacion incorrecta • Z,Esta usando una vajilla aprobada?
• z,Eran el tiempo y la intensidad de coccion los correctos?
• z,Dio vuelta o revolvi6 la comida mientras se descongelaba?
DECLARACION DE INTERFERENCIA DE RADIOFRECUENCIA DE LA COMISION
FEDERAL DE COMUNICACIONES (SOLO PARA ESTADOS UNIDOS)
AVISO:
Este aparato genera y usa energia de frecuencia
ISM y si no se Io instala y usa debidamente, es
decir, en estricto acuerdo con las instrucciones
del fabricante, puede causar interferencia en la
recepcion de radio y television. Se ha analizado
el tipo y se ha determinado que cumple con los
limites de los aparatos industriales, cientificos y
medicos (ISM) segQn la parte 18 de las reglas de la
Comision, las cuales estan disefladas para brindar
una protecci6n razonable contra dicha interferencia
en la instalaci6n residencial.
Sin embargo, no se garantiza que no habra
interferencia en una instalacion especifica. Si
este aparato causa interferencia en la recepci6n
de serial de radio o televisi6n, Io cual se puede
determinar encendiendo y apagando el aparato,
se recomienda que el usuario intente corregir
dicha interferencia mediante uno o mas de los
siguientes pasos:
• Cambie la orientacion de la antena de radio o
television.
• Cambie la posici6n del homo de microondas con
respecto al receptor.
• Aleje el horno de microondas del receptor.
• Enchufe el horno de microondas en otro
tomacorriente para que el homo y el receptor
esten en distintos circuitos.
El fabricante no se responsabiNza por la
interferencia de radio o televisi6n causada por la
modificaci6n sin autorizaci6n de este homo de
microendas. La correcci6n de la interferencia es
responsabiNdad de! usuario.
65
Page 66

Master ProtectionAgreements AcuerdosMaestrosde Proteccion
Congratulations on making a smart purchase.
Your new Kenmore®product is designed and
manufactured for years of dependable operation.
But like all products, it may require preventive
maintenance or repair from time to time.
That's when having a Master ProtectionAgreement
can save you money and aggravation.
Purchase a Master ProtectionAgreement now and
protect yourseff from unexpected hassle
and expense.
The Master Protection Agreement also helps extend
the life of your new product. Here's
what's included inthe Agreement:
Expert service by our 12,000 professional
repair specialists
Unlimited service and no charge for parts and
labor on all covered repairs
"No-lemon" guarantee - replacement of your
covered product if four or more product failures
occur within twelve months
Product replacement if your covered product
can't be fixed
E_ Annual Preventive Maintenance Check at your
request - noextra charge
Fast help by phone - phone support from a
Sears technician on products requiring in-home
repair, plus convenient repair scheduling
I_ Power surge protection against electrical
damage due to power fluctuations
Rental reimbursement if repair of your covered
product takes longer than promised
Once you purchase the Agreement, a simple phone
call is all that it takes for you to schedule service.
Youcan call anytime day or night, or schedule a
service appointment online.
Sears has over 12,000 professional repair
specialists, who have access to over 4.5 million
quality parts and accessories.That's the kind of
professionalism you can count on to help prolong
the life of your new purchase for years to come.
Purchase your Master Protection Agreementtoday!
Some limitations and exclusions apply, For
prices and additional information call 1-800-827-
6655.
Sears Installation Service
For Sears professional installation of home
appliances, garage door openers, water heaters, and
other major home items, in the U.S.A.call
1-800-4-MY-HOME®
Felicitacionespot haberrealizadounacomprainteligente.
Su nuevo productoKenmore®esterdisefiadoy fabricado
para afiosde buenfuncionamiento.Perocomotodo
producto,podra,necesitar mantenimientopreventivoo
reparacionesoadaciertoperiodode tiempo. Es entonces
cuandounAcuerdoMaestrode Proteccionle permitir_t
ahorrardineroo evitarque lafallaempeore.
AdquieraunAcuerdo Maestrode Proteccidnahoray
resguardesede cualquiermolestiaogastos inesperados.
El Contratode ProteccionMaestrole ayudar#,tambiena
extenderla vidade su nuevo producto.Estoses Ioque se
incluyeen elContrato:
I_ Servicio experte, realizadopor cualquierade
nuestrost2,000 profesionalesespecialistasen
reparaciones.
[_ Servicio ilimitadoy sincargo,por laspiezaso el
trabajoen todas lasreparacionescubiertaspor el
Acuerdo.
[_ Garantfa de "Non-lemon" - cambiode producto
cubiertosi se producencuatroo ma.sfaflasen el
producto,dentrode los primerosdoce meses.
[_ Reemplazodel producto, sisu productoasegurado
no se puede reparar.
r71 Control anual de mantenimiento preventivo a
pedidosuyosin cargo extra.
5_ Ayuda r_pida por tel_fono - soportetelefonicode un
tecnicode Sears sobrelosproductospara los cuales
serequierereparacionencasa, ma.slaprogramacion
convenientedel serviciode reparacion.
Proteccibn contra sobrecargaelectrica, debidoa
dafioselectricoscausadosporfluctuacionesde corriente.
Reembolso dealquiler si la reparacbn delproducto
aseguradotomama.stiempode Io acordado.
Unavez quehayacompradoelAcuerdo,solosera.neoesaria
unasimpleIlamadatelefonicaparaprogramarun servicio.
PuedeIlamara oualquierhoradeldia o de la noohe,o
programarunavisitade servicioatravesde Intemet.
Searscuenta conmb,s de12,000profesionales
especialistasenreparaciones,los oualesposeenacceso
a ma.sde 4,5 miflonesdepiezasy accesoriosdeoalidad.
Esaes laclasede profesionalismocon la cual usted
puedecontarpara prolongarla vida t_tildesu nueva
adquisicionen los proximosafios, iAdquieraya suAcuerdo
Maestrode Proteccion!
Algunaslimitacionesy exclusionessonaplicables.
Parapreciose informacibnadicional,Ilameal
1-800-827-6655.
Servicio de Instalaci6n Sears
Parasolicitarel serviciode instalacionprofesionalde
Searsde artefactoshogarefios,dispositivosde apertura
de puertasde garaje,calentadoresdeaguay otros items
importantesdel hogar,flameen los EstadosUnidosal
1-800-4-MY-HOME_.
66
Page 67

67
Page 68

Your Home
For repair-in your home-of all major brand appliances,
lawn and garden equipment, or heating and cooling systems,
no matter who made it, no matter who sold it!
For the replacement parts, accessories and
owner's manuals that you need to do-it-yourself.
For Sears professional installation of home appliances
and items like garage door openers and water heaters.
1-800-4-MY-HOME ® (1-800-469-4663)
Call anytime, day or night (U.S.A. and Canada)
www.sears.com www.sears.ca
Our Home
For repair of carry-in items like vacuums, lawn equipment,
and electronics, call or go on-line for the location of your nearest
Sears Parts & Repair Center.
1-800-488-1222
Call anytime, day or night (U.S.A. only)
www.sears.com
To purchase a protection agreement (U.S.A.)
or maintenance agreement (Canada) on a product serviced by Sears:
1-800-827-6655 (U.S.A.) 1-800-361-6665 (Canada)
Para pedir servicio de reparaci6n
a domicilio, y para ordenar piezas:
1-888-SU-HOGAR ®
(1-888-784-6427)
Au Canada pour service en fran(_ais:
1-800-LE-FOYER Mc
(1-800-533-6937)
www.sears.ca
Sea/F
® Registered Trademark / Trademark / Service Mark of Sears Brands, LLC
® Marca Registrada / Marca de Fabrica / Marca de Servicio de Sears Brands, LLC
MC MD
Marque de commerce / Marque depos6e de Sears Brands, LLC
TM SM
TM SM
® Sears Brands, LLC
 Loading...