

Kenmore Elite 66513633100 Owner’s Manual

E L I T E
Compactor
Use & Care Guide
Compactador
Manual de uso y cuidado
Compacteur
®
Guide d'utilisation et d'entretien
Models/Modelos/Mod_les 665.1363"
* = color number, nL_merode color, num6ro de couleur
m
F
9872188 Sears Canada Inc., Toronto, Ontario, Canada M5B 2B8 www.sears.ca
Sears Roebuck and Co., Hoffman Estates, IL 60179 U.S.A. www.sears.com
TABLEOF CONTENTS
PROTECTION AGREEMENTS ...................................................... .2
In the U.S.A. .................................................................................. 2
In Canada ..................................................................................... 3
Ascessorias.................................................................................. 3
WARRANTY ..................................................................................... 3
COMPACTOR SAFETY ................................................................. .4
INSTALLATION INSTRUCTIONS ................................................. .5
Unpacking .................................................................................... 5
Location Requirements................................................................ 5
ElectricalRequirements................................................................ 6
Underceunter Installation............................................................. 6
COMPACTOR USE........................................................................ .5
How Your Compactor Works....................................................... 8
Loading......................................................................................... 8
Starting Your Compactor ............................................................. 9
EXTRA PACTM Cycle ...................................................................... 9
Air Freshener................................................................................ 9
Removinga FilledBag................................................................. 9
Installinga New Bag .................................................................. 10
COMPACTOR CARE ................................................................... 11
Clasning..................................................................................... 11
TROUBLESHOOTING .................................................................. 12
SERVICE NUMBERS ............................................... BACK COVER
PROTECTION AGREEMENTS
Master Protection Agreements
Congratulations on making a smart purchase. Your new
Kenmore°product is designed and manufactured foryams of
dependable operation. But likeall products, it may require
preventive maintenance or repair from time to time. That's when
having a Master ProtectionAgreement can save you money and
aggravation.
Purchase a Master ProtecUon Agreement now andpro_ct
yoursefffrom unexpected hassleand expense.
The Master ProtectionAgreement also helps extend the lifeof
your new product. HeR's what's included inthe Agreement:
_' Expert service by our 12,000 professional repairspecialists
=/Unlimited service and no charge for parts and labor on all
covered repairs
_/=No-lemon" guarantee - replacement of your covered
product if four or more product failures occur within twelve
months
v' Product replacement if your covered product can't be fixed
_/Annual Preventive Maintenance Check at your request - no
extra charge
=/Fast help by phone - phone support from a Sears technician
on products requiring in-home repair, plusconvenient repair
scheduling
v' Power surge protection against electrical damage due to
power fluctuations
v' Rental reimbursement if repairof your covered product takes
longerthan promised
Once you purchase the Agreement, a simple phone call isall that
if takes for you to schedule service. You can call anytime day or
night, or schedule a service appointment online.
Sears has over 12,000 pmfassional repair specialists,who have
access to over 4.5 million quality partsand accessories. That's
the kind of professionalismyou can count on to help prolongthe
lifeof your new purchasefor years to come. Purchaseyour
Master Protection Agreement today!
Some limitations and exclusions apply. For prices and
additional information, call 1-800-827-6655.
Sears Installation Sen,ice
For Sears professionalinstallationof home appliances, garage
dooropeners, water heaters, and other major home items, inthe
U.S.A. call 1-800-4-MY-HOME =.
2

Maintenance Agreements
Your purchase has added value because you can depend on
Sears HomeCantraP for service. With over 2,400 Service
Technicians and mornthan a millionparts and accessories, we
have the tools, parts, knowledge and skillsto back our pledge:
We Service What We Sell,
Your Kenmore®product isdesigned, manufactured and tested to
provide years of dependable operation, But like all products, it
may requireservice from time to time. The Sears Maintenance
Agreement offers you an outstanding service program, affordably
priced.
TheSearsMaintenanceAgreement
• Is your way to buy tomorrow's service at today's price
• Eliminates repair bills resultingfrom normal wear and tear
a Provides phone support from a Sears technician on products
requiringin-home repair
• Even ifyou don't need repairs, provides an annual Preventive
Maintenance Check, st your request, to ensure that your
product is in proper running condition.
Some limitations apply. For more information about Sears
Canada Maintenance Agreements, call 1-800-361-6665.
Toensure proper functioning of your compactor, useSears
replacement parts only.To order replacement parts or
accessories, cell 1-800-4-MY-HOME =and ask for the
appropriate part number or contact your authorized Kanmore
dealer.
WARRANTY
ONE-YEAR FULL WARRANTY ON COMPACTOR
For one year from the first day of use in your home, Sears will
repair,free of charge, defects in materialsor workmanship.
If the compactor is subjected to otherthan private family use,the
above warranty coverage is effective for only ninetydays.
WARRANTY SERVICE
WARRANTY SERVICE IS AVAILABLEBY CONTACTING THE
NEAREST SEARS SERVICE CENTER IN THE UNITED STATES
OR CANADA. This warranty applies only whilethe product is in
use in the United States or Canada.
Thiswarranty gives you specific legal rights and you may also
have other rights which vary from state to state or province to
province.
Warrantyterms may vary in Canada.
For Sears warranty information inthe United States or Canada,
please referencethe service numbers located on the back page
ofthis manual.
Sears, Roebuck and Co.
D/81"i_/A, HoffTnan Estates, IL 60179
Sears Canada Inc.
Toronto, Ontario, Canada M5B 2B8
PRODUCT RECORD
In the space below, record your complete model number, sedai
number,and pumhase date. Youcan find this information on the
model and serial number label, located as shown in the Parts and
Features section of this book. Have this information available to
helpyou quickly obtain assistance or service when you contact
Sears concerning your appliance.
Model number 665.
Serial number
Purchase date
F
Save these instructions and your sales receipt for future
reference.
COMPACTOR SAFETY
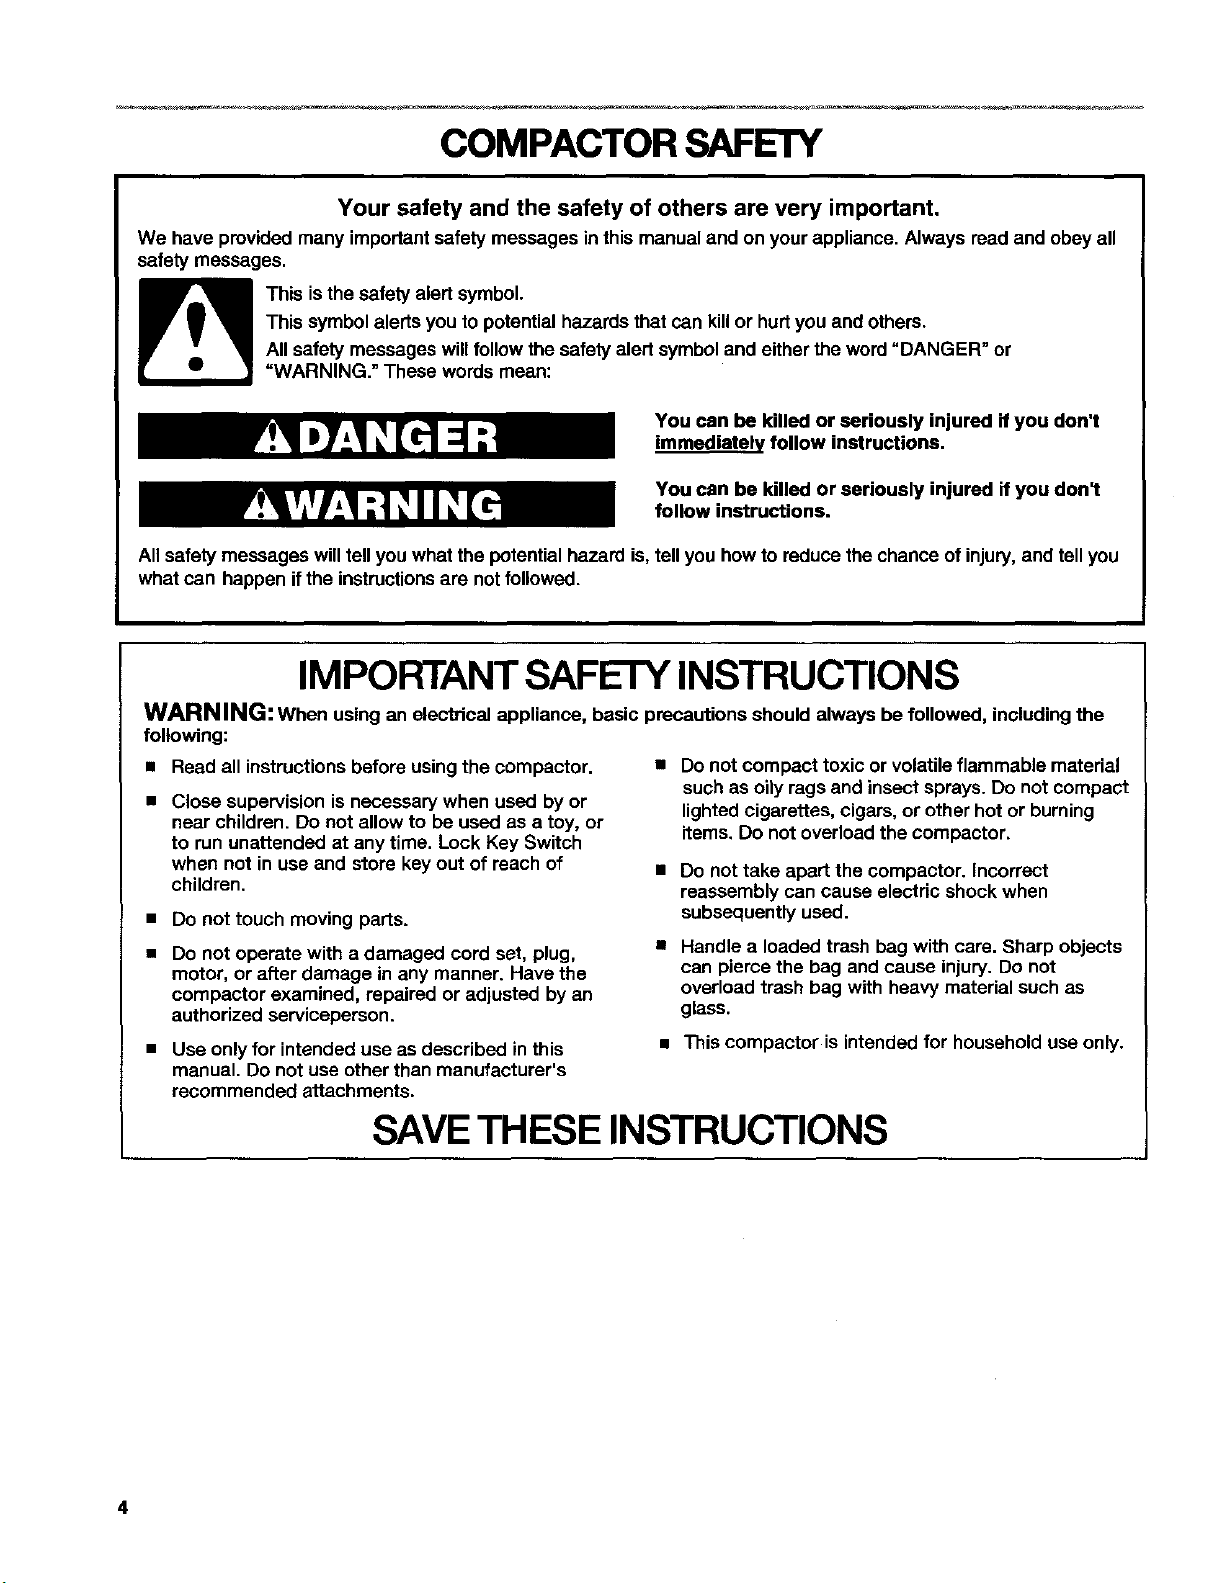
Your safety and the safety of others are very important.
We have provided many importantsafetymessages in this manualand on your appliance. Always read and obey all
safety messages,
This symbol alerts you to potential hazards that can kill or hurtyou and others.
All safety messages will followthe safety alert symboland either the word=DANGER" or
This isthe safety alert symbol.
=WARNING." These words mean:
You can be killed or seriously injured if you don't
immediately follow instructions.
You can be killed or seriously injured if you don't
follow instructions.
Allsafety messages will tell you what the potential hazard is, tell you how to reducethe chance of injury,and tell you
what can happen if the instructions are not followed.
IMPORTANT SAFETY INSTRUCTIONS
WARNING: When using an electrical appliance, basic precautions should always be followed, includingthe
following:
• Read all instructionsbefore usingthe compactor. •
• Close supervision is necessary when used by or
near children. Do not allow to be used as a toy, or
to run unattended at any time. Lock Key Switch
when not in use and store key out of reach of
children.
• Do not touch moving parts.
Do not operate with a damaged cord set, plug,
motor, or after damage in any manner. Have the
compactor examined, repaired or adjusted by an
authorized serviceperson.
Use only for intended use as described in this
manual. Do not use otherthan manufacturer's
recommended attachments.
Do not compact toxic or volatile flammable material
such as oily rags and insect sprays. Do not compact
lightedcigarettes, cigars, or other hot or burning
items. Do not overloadthe compactor.
Do not take apart the compactor, incorrect
reassembly can cause electric shock when
subsequently used.
Handle a loaded trash bag with care. Sharp objects
can pierce the bag and cause injury. Do not
overloadtrash bag with heavymaterial such as
glass.
= This compactor isintended for household use only.
SAVETHESE INSTRUCTIONS
4
INSTALLATIONINSTRUCTIONS
Installer:. Leave Use and Care Guide with the homeowner.
Homeowner:. Keep Use and Care Guide forfuture referenceand
for local electrical inspector's use, if required.
Excessive Weight Hazard
IMPORTANT: Begin in the room where the compactor will be
located.
1. Remove compactor from shipping carton. Remove all
protective packaging materials such as tape and shipping
pads. Use a mild detergent and warm water to remove waxy
residuecaused by protective shipping material. Dry
thoroughly with a soft cloth. For more information, sea
=Cleaning."
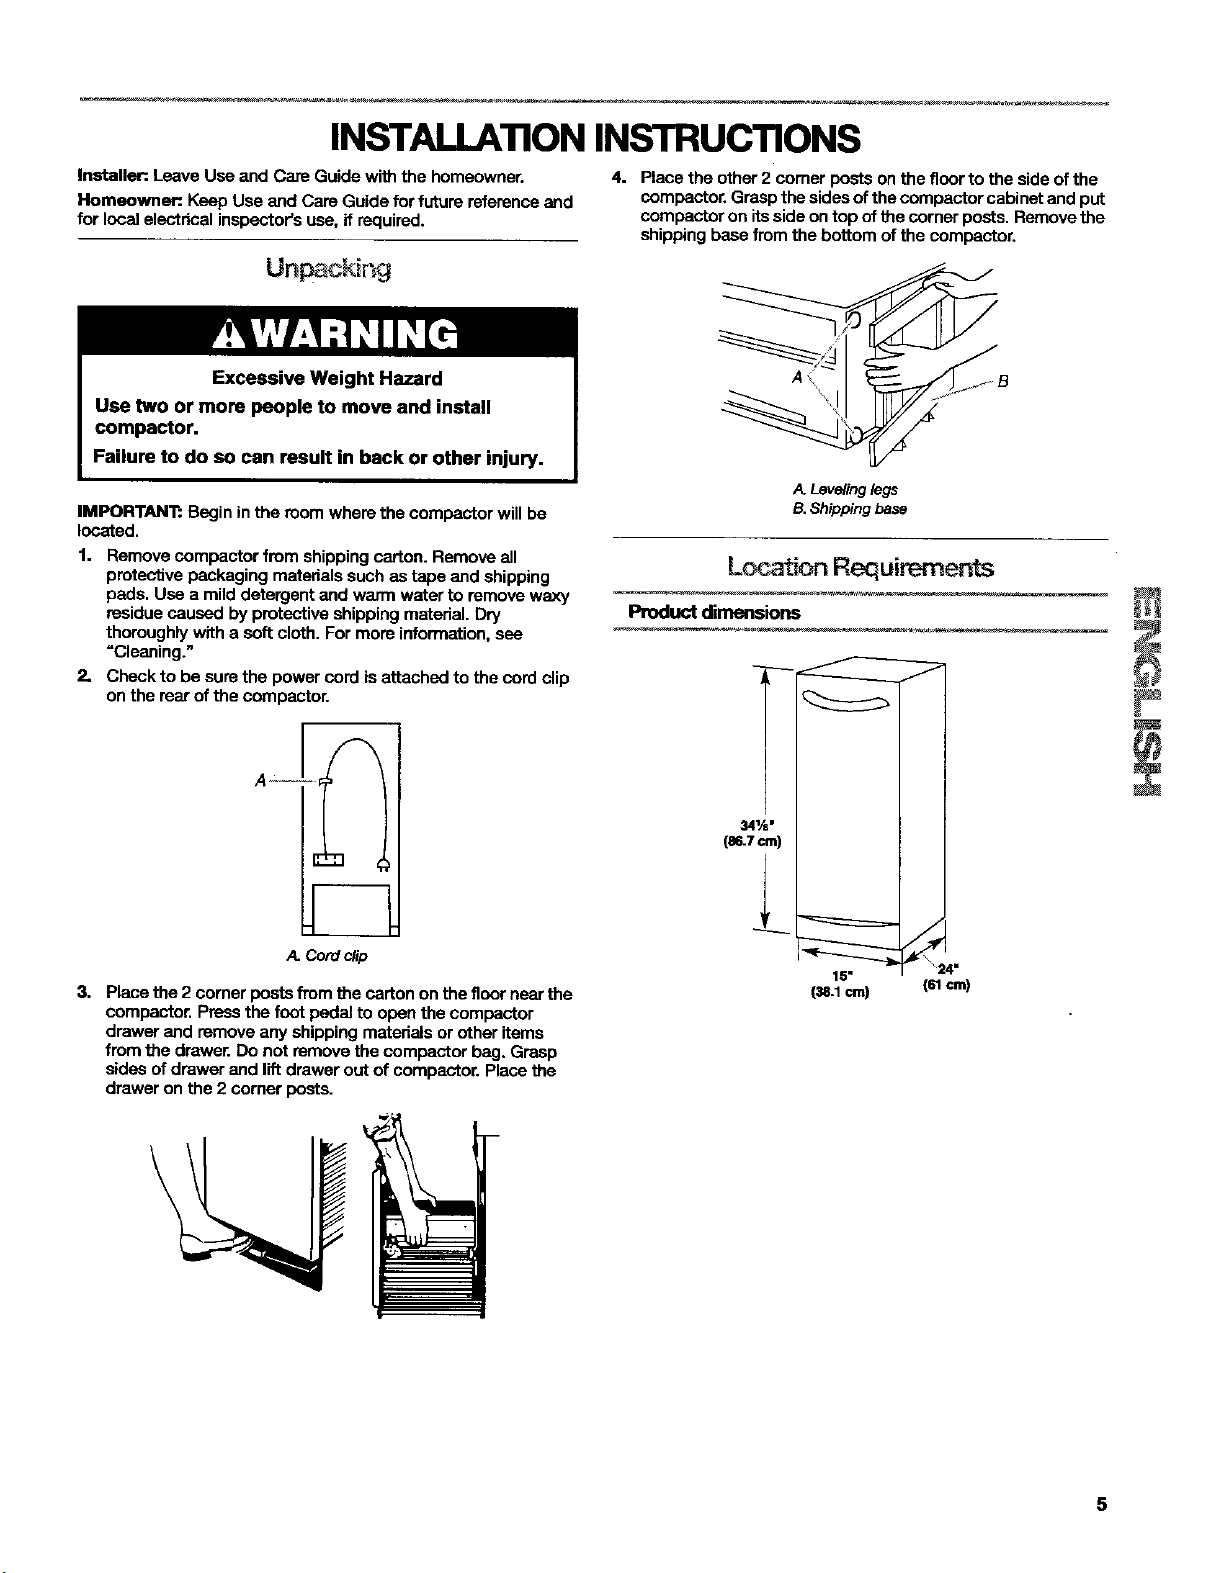
2. Checkto be sum the power cord is attached to the cord clip
on the rear of the compactor.
4. Place the other 2 comer posts on the floor to the side of the
compactor, Grasp the sides ofthe compactor cabinet and put
compactor on its side on top of the corner posts. Remove the
shipping base from the bottom of the compactor,
,4.Levelinglegs
B.Shipping base
L ion Requir m
Product dimensions
-4
A. Cordclip
3. Place the 2 corner posts from the carton on the floor near the
compactor. Press the foot pedal to open the compactor
drawer and removeany shipping materials or other items
from the drawer. Do not remove the compactor beg. Grasp
sides of drawer and lift drawer out of compactor. Place the
drawer on the 2 corner posts.
i
341,_•
(86.7cm)
15"
(38.1 cm) (61 cm)
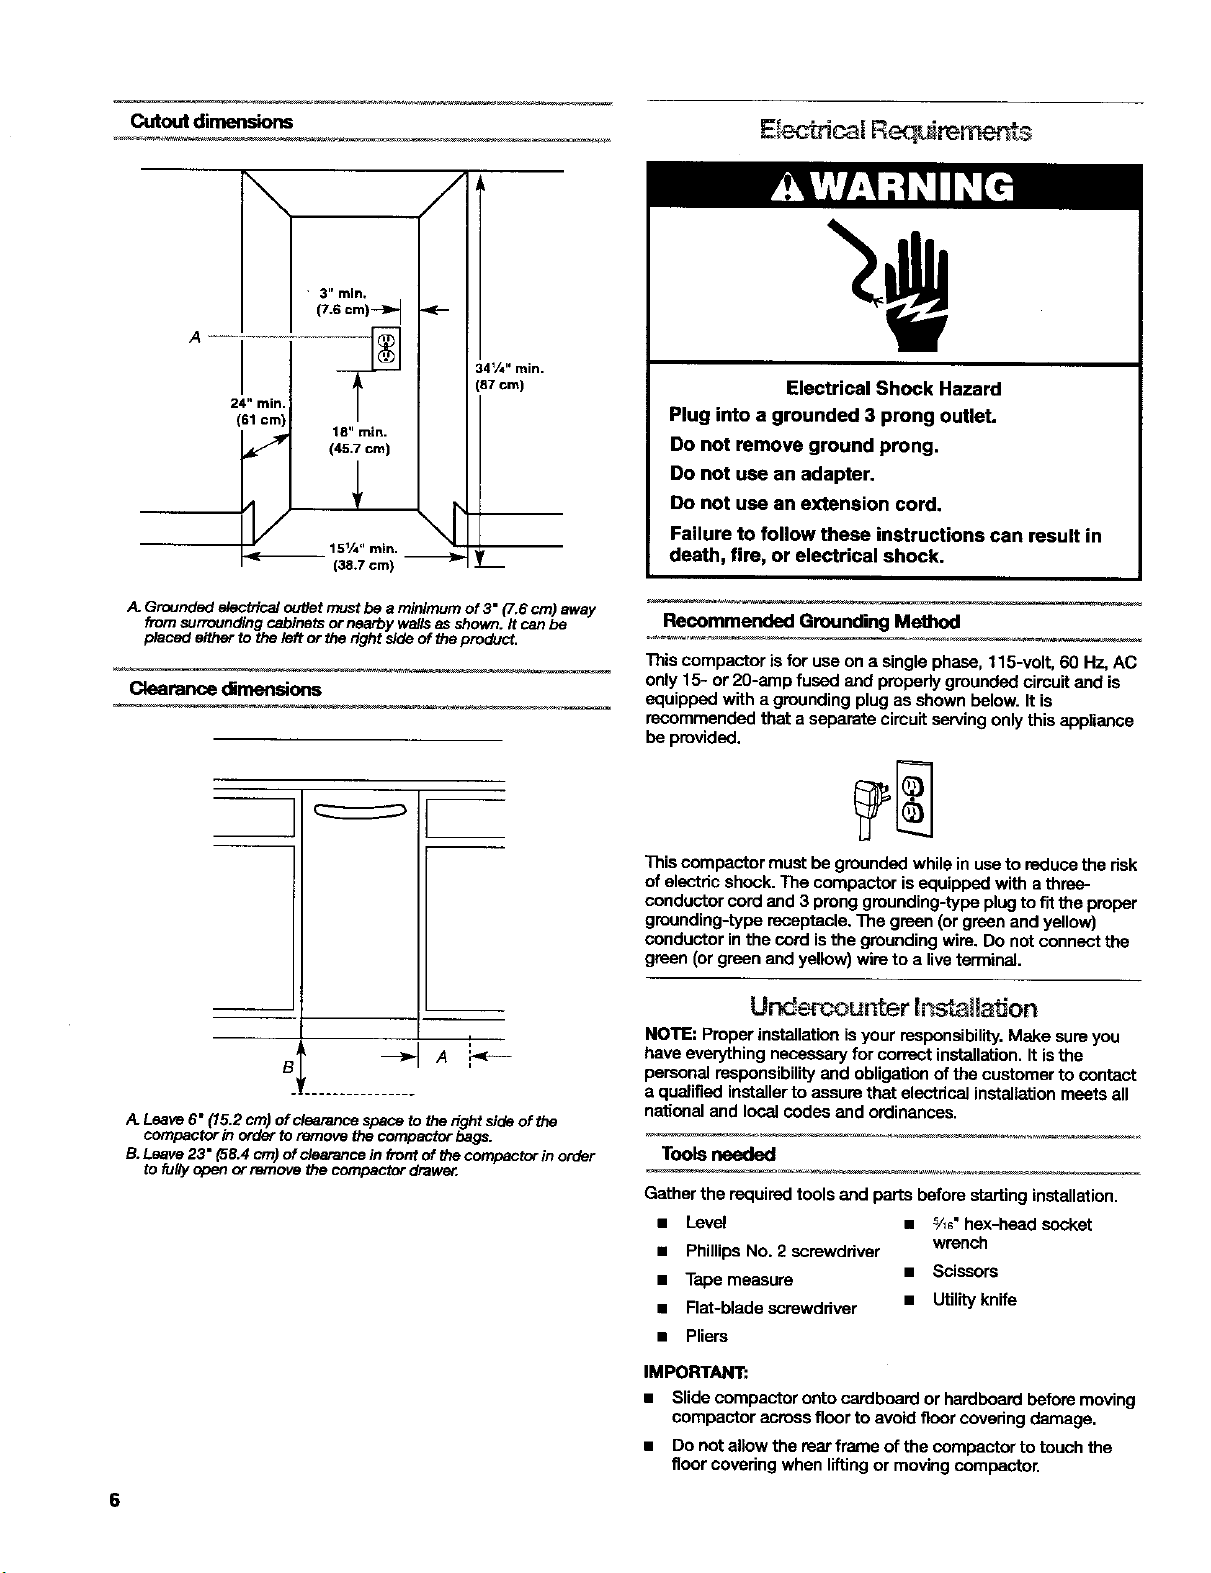
Cutout dimensions
\
A
24" rain.
(61 cm)
A, GreundBd electriceJ_Jt]et mustbe a minimum of 3" (7.6 cm) away
from surrounding cabinets or nearby wshs as shown. It can be
placed either to the left or the fight side of the product.
Clearerme dimer_ons
Electrical Shock Hazard
Plug into a grounded 3 prong outlet.
Do not remove ground prong.
Do not use an adapter.
Do not use an extension cord.
Failure to follow these instructions can result in
death, fire, or electrical shock.
Recommended Grounding Method
Thiscompactor is for useon a singlephase, 115-volt, 60 Hz, AC
only 15- or 20-amp fused and propedy grounded circuitand is
equipped with a grounding plug as shown below. It is
recommended that a separate circuit serving onlythis appliance
be provided.
This compactor must be grounded while in use to reduce the risk
of electric shock. The compactor is equipped with a three-
conductor cord and 3 pronggrounding-type plugto fit the proper
grounding-type receptacle. The green (or green and yellow)
conductor in the cord is the groundingwire. Do not connect the
green (or green and yellow) wireto a liveterminal.
,4.Leave 6" (15.2 cm) of clearance space to the fight side of the
compactor in order to remove the compactor begs.
B. Leave 23" (58.4 cm) of clearance in front of the compactor in order
to fully open or remove the compactor drawe_.
U c ounter In [ on
NOTE: Properinstallation is your responsibility.Make sureyou
have everything necessaryfor correct installaLion.It isthe
personal responsibilityand obligation of the customer to contact
a qualified installerto aseum that electrical installationmeets all
nationaland local codes and ordinances.
Tools needed
Gather the required tools and parts before starting installation.
• Level • _/_6"hex-head socket
• PhillipsNo. 2 screwdriver wrench
• Tape measure • Scissors
• Flat-blade screwdriver • Utilityknife
• Pliers
IMPORTANT:
• Slide compactor onto cardboard or hardboard before moving
compactor across floorto avoid floor covering damage.
• Do not allow the rear frame of the compactor to touch the
floor covering when liftingor moving compactor.
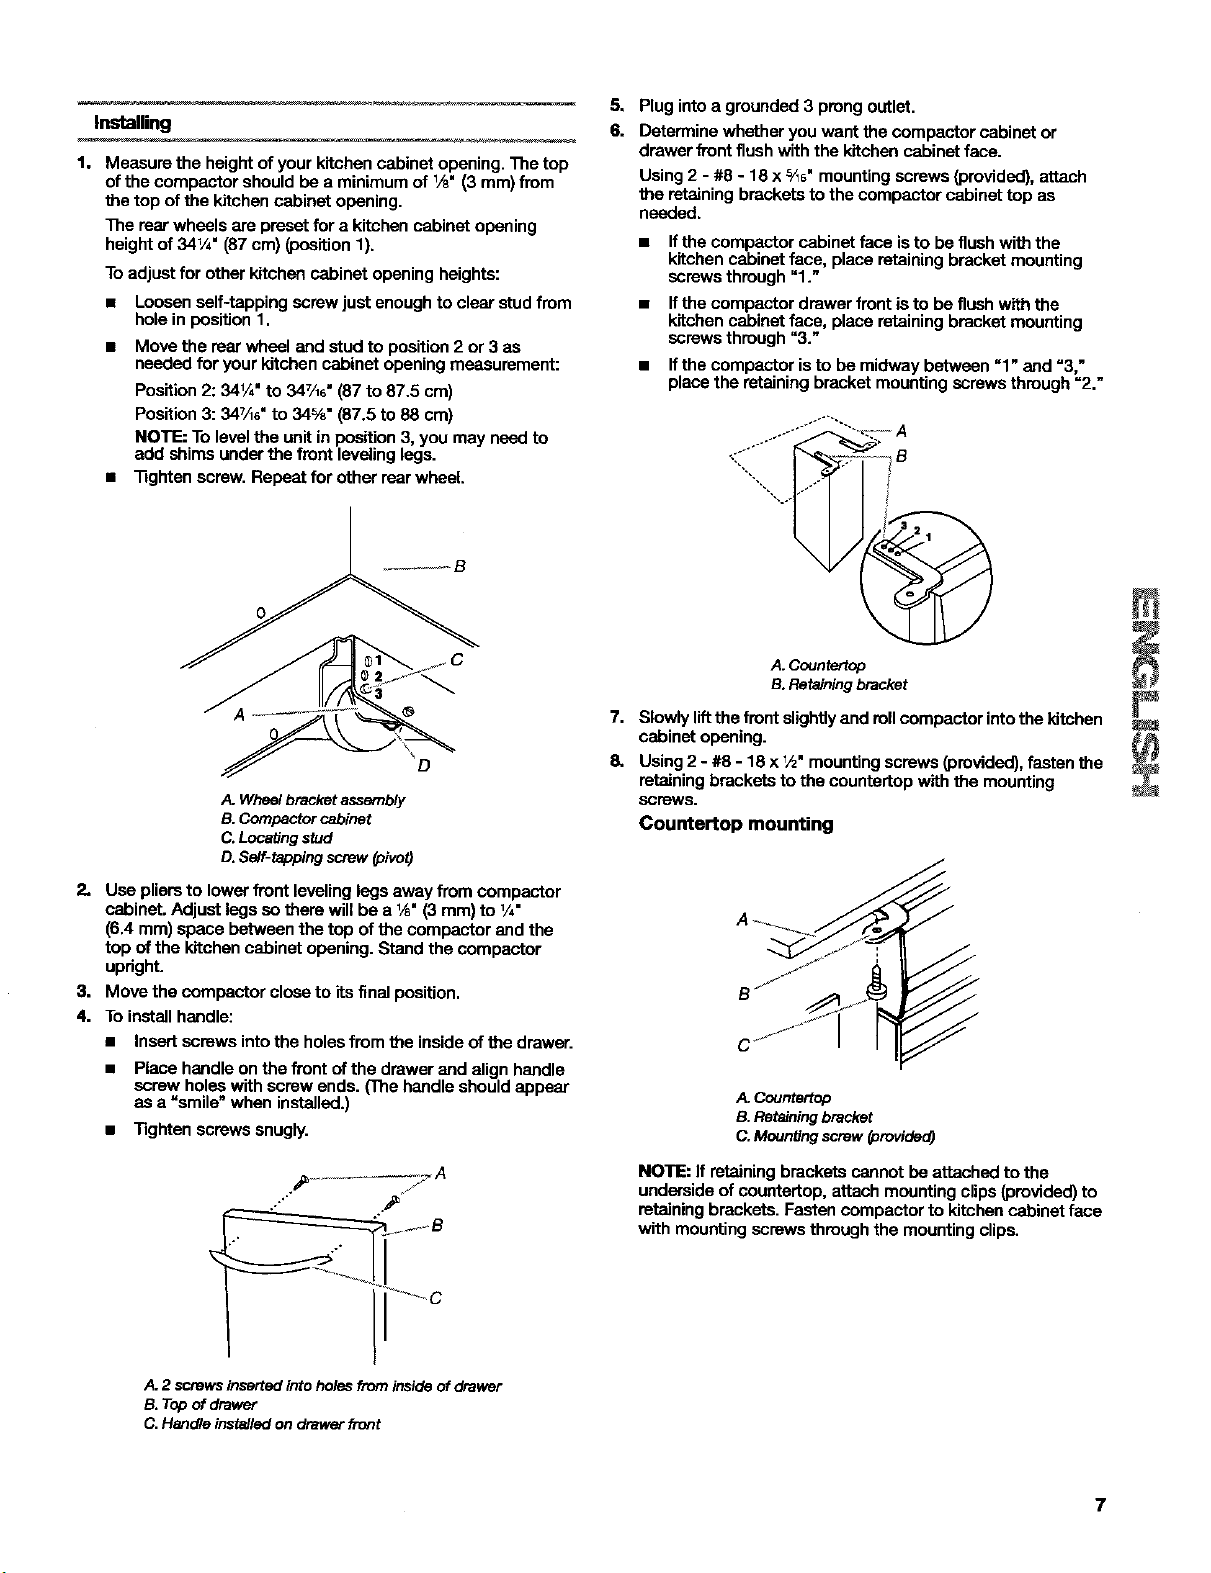
Installing
1. Measuretheheightofyourkitchencabinetopening.Thetop
ofthecompactorshouldbeaminimumofYs"(3 ram) from
the top of the kitchen cabinet opening.
The rear wheels are preset for a kitchen cabinet opening
height of 341/4. (87 cm) (position 1).
To adjust for other kitchen cabinet opening heights:
• Loosen self-tapping screw just enough to clear studfrom
hole in position 1,
• Move the rear wheel and stud to position2 or 3 as
needed for your kitchen cabinet opening measurement:
Position2: 34_/_"to 34%6"(87 to 87.5 cm)
Position3:347/_8"to 34%" (87.5 to 88 cm)
NOTE: To levelthe unit in position 3, you may need to
add shims under the front leveling legs.
• Tighten screw. Repeat for other rear wheel.
D
Whsel bracket asssmbly
B. Compactor cabinet
C. Locating stud
D. Serf-tapping screw (pivo_
2. Use pliersto lower front leveling legs away from compactor
cabinet. Adjust legs so there willbe a _" (3 mm) to 1/4"
(6,4 mm) space between the top of the compactor and the
top of the kitchen cabinet opening. Stand the compactor
upright.
3. Move the compactor close to its final position,
4. To installhandle:
• Insert screws intothe holes from the inside of the drawer.
• Place handle on the front of the drawer and align handle
screw holes with screw ends. (The handle should appear
as a %mile" when installed.)
• Tighten screws snugly.
5. Plug into a grounded 3 prong outlet.
6. Determine whether you want the compaetor cabinet or
drawer front flush with the kitchen cabinet face.
Using 2 - #8 - 18 x _6" mounting screws (provided), attach
the retaining brackets to the compactor cabinet top as
needed.
• If the compacter cabinet face is to be flush with the
kitchencabinet face, place retaining bracket mounting
screwsthrough "1."
• If the compactor drawer front is to be flushwith the
k3tchencabinet face, place retaining bracket mounting
screws through "3."
• If the compactor isto be midway between Ul" and "3,"
placethe retainingbracket mounting screws through =2."
\
A. Countertop
B. Retainingbracket
7. Slowlyliftthe frontslightlyand rellcompaetor intothe kitcben
cabinet opening.
8. Using2 - #8 - 18 x _h"mountingscrews (provided), fasten the
retainingbrackets to the countertop with the mounting
screWS.
Countertop mounting
A. Countertop
B. Retaining bracket
C. Mounting screw (orevide_
F
•*-...._.-_75 7 A
A. 2 screws inserted into holes from inside of drawer
B. Topof drawer
C,Handle installed on drawer front
NOTE: If retaining brackets cannot be attached to the
underside of countertop, attach mounting clips(provided)to
retainingbrackets. Fasten compactor to kitchencabinet face
with mounting screws through the mounting clips.
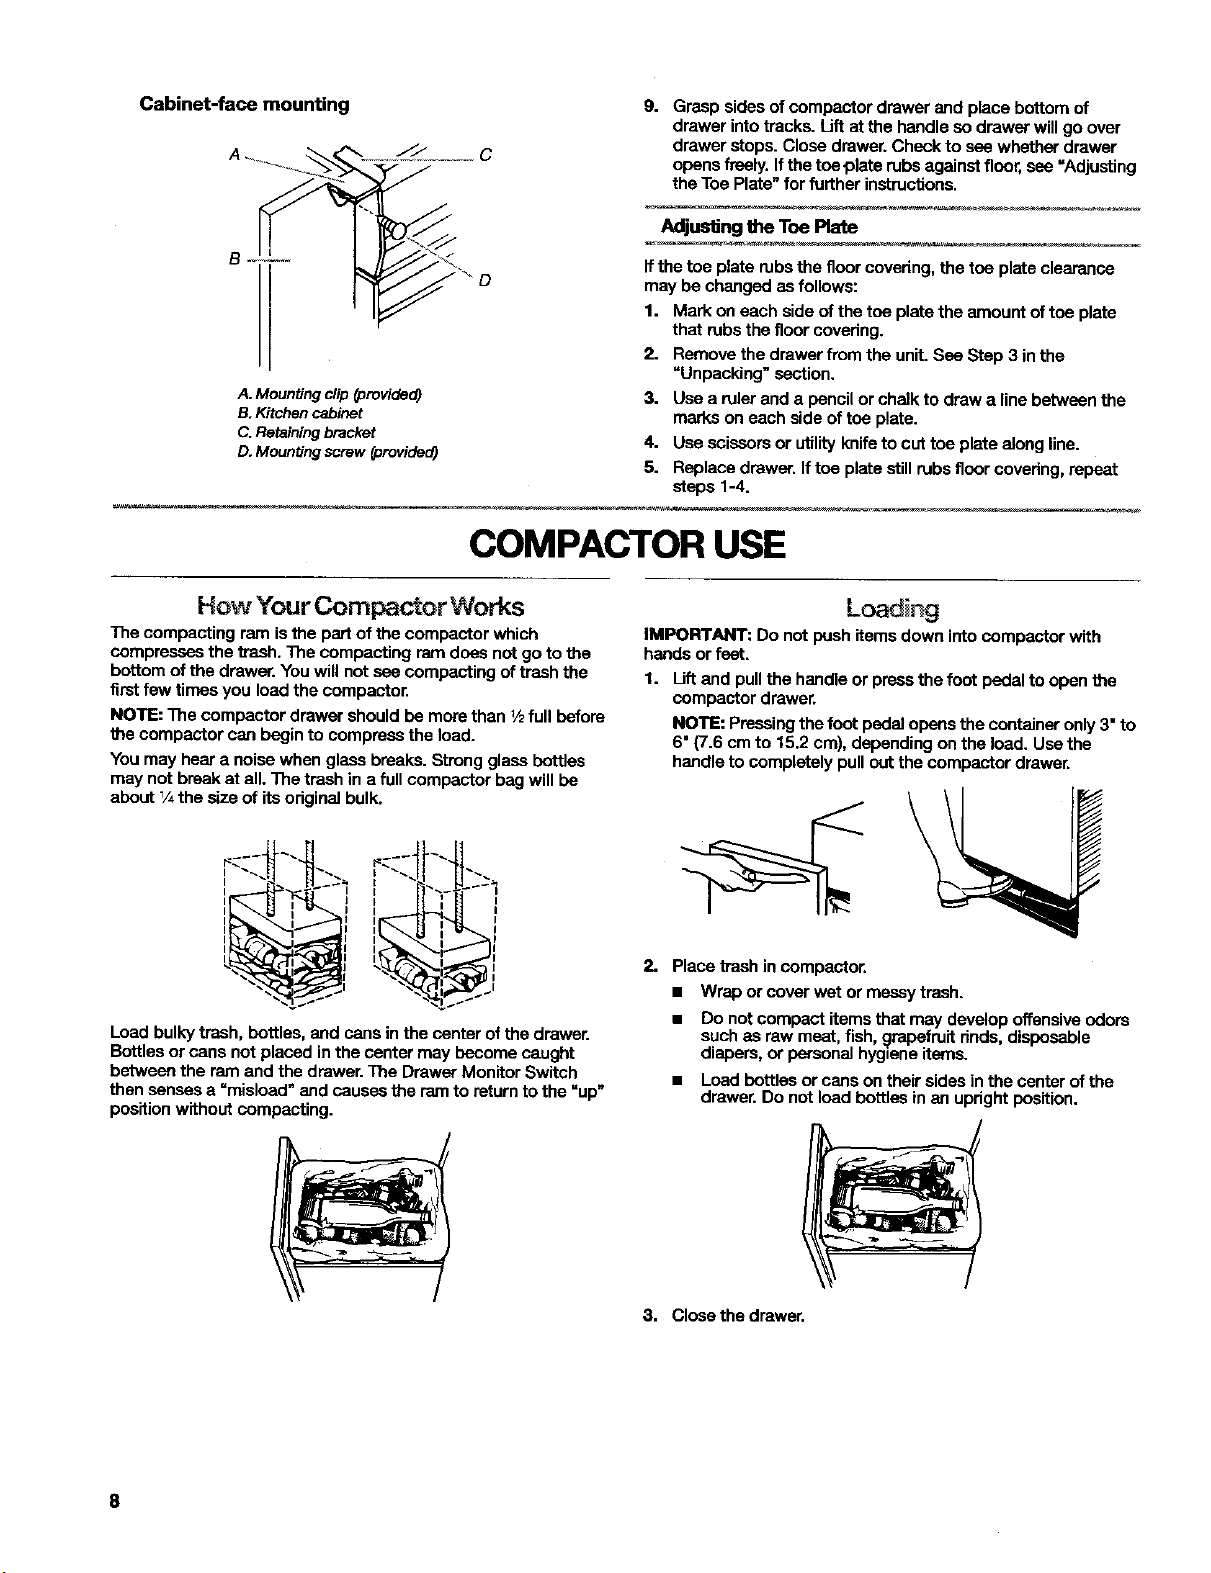
Cabinet-face mounting
A
A. Mountin 9 clip (provided)
B. Kitchen cabinet
C. Retaining bracket
D. Mounting screw (provided)
9. Grasp sides of compactor drawer and place bottom of
drawer intotracks. Lift at the handle so drawer will go over
drawer stops. Close drawer. Check to see whether drawer
opensfreely. Ifthe toe plate rubs againstfloor, see "Adjusting
the Toe Plate" for further instructions.
Adjusting the Toe Plate
Ifthe toe plate rubs the floor covering, the ton plate clearance
may be changed asfollows:
1. Mark on each side of the toe plate the amount of ton plate
that rubs the floorcovering.
2. Remove the drawer from the unit. See Step 3 in the
"Unpacking" section.
3. Use a ruler and a pencil or chalk to draw a line between the
marks on each side of ton plate.
4. Use scissorsor utility knifeto cut ton plate along line.
5. Replace drawer. If toe plate still rubs floorcovering, repeat
steps 1-4.
COMPACTOR USE
The compacting ram is the part of the compactor which
compresses the trash. The compacting ram dons not go to the
bottom of the drawer. Youwill not see compacting of trash the
firstfew times you load the compactor.
NOTE: The compactor drawer should be more than Y2full before
the compactor can begin to compress the load.
You may hear a noise when glass breaks. Strongglass bottles
may not break at all. The trash in a full compactor beg will be
about _/4the size of its originalbulk.
I I J
I I I
1 ' i I I I
I I
Load bulkytrash, bottles, and cans in the center of the drawer.
Bottles or cans not placed in the center may become caught
between the ram and the drawer. The Drawer Monitor Switch
then senses a =misload" and causes the ram to return to the "up"
positionwithout compacting.
I , 1
I I I
IMPORTANT: Do not push items down into compactor with
hands or feet.
1. Liftand pull the handle or press the foot pedal to open the
compactor drawer.
NOTE: Pressing the foot pedal opens the container only 3" to
6" (7.6 cm to 15.2 cm), depending on the load. Use the
handleto completely pull out the compactor drawer.
2. Place trash in compactor.
• Wrap or cover wet or messy trash.
• Do not compact items that may develop offensiveodors
such as raw meat, fish, c)rapefruit rinds, disposable
diapers, or personal hygiene items.
• Load bottles or cans on their sidesin the center of the
drawer.Do not load bottles in an upright position.
3. Close the drawer.

1. Uft and pull the handle or prose the foot pedal to open the
compactor drawer. Load trash.
2. Keep Key-Knob (located on the control panel) in the =ON"
position.
.4.Control panel
3. Set Cycle switch to Normal Pac.
3. Set Cycle switch to Extra Pan.
4. Close compactor.
5. Liftfoot pedal up to start the compacting cycle.
6. Duringthe compacting cycle, the compactor remains locked
untilyou lift up on the foot pedal.
NOTE: When the compacting cycle is done, open the drawer
and turn the Key-Knob to =OFF."Remove the Key-Knob and
storeit out of children's reach.
-Extra Pac
OFF
_Normal Pac
4. Close compactor.
5. Uft foot pedal up to start the compacting cycle.
NOTE: When the compacting cycle is completed, open the
drawer and turn the Key-Knob to =OFF."Remove the Key-Knob
and store it out of children's reach.
The EXTRA PACTM cycle extends the useof a bag by putting
constant pressure onthe trashto keep it from springing back.
Regular use of the EXTRA PAC" cycle can increasebag capacity
up to 25%.
During the EXTRA PAC" cycle, the ram willstay inthe down
position for extra compacting. The drawer is locked and cannot
be opened when the ram is down. For best results, use the
EXTRA PAC" cycle for at least 30 minutes at atime.
To use EXTRA PAC" cycle
1. Lift and pull the handle or pressthe foot pedal to open the
compactor drawer. Load trash.
2. Keep Key-Knob (located on the control panel) in the "ON"
position.
oN
J
The solidair fmshener system isdesigned to help controlodom
that mightdevelop inthe trash. An air freshener disc can be
purchased in department stores (notsold with compactor). Place
the disk-shaped solidair freshener into the air fresheaer
compartment. The air freshener should last4 to 6 weeks. It is
used more rapidly when the tamperetum ishigh orthe air is very
dry.
The compactor bag should be removed whentrash is compacted
almost to the top of the drawer. If bag is tee heavywhen full,
remove bag when weight is easier to lift and carry.
IMPORTANT: Do not push items down into compactor with
hands orfeet.
NOTE: Use paper or plastic bags made for use in a compactor.
These bags are designed to resist cuts, tears and leaks.
Compactor bags sized to fit compactor drawer make managing
compacted trash easier. Compactor bags ate available from your
Sears store or service center.
To remove a filled bag
1. Liftand pull the handle or press the foot pedal to open the
compactor drawer completely.
.4.Contr_pane/
9
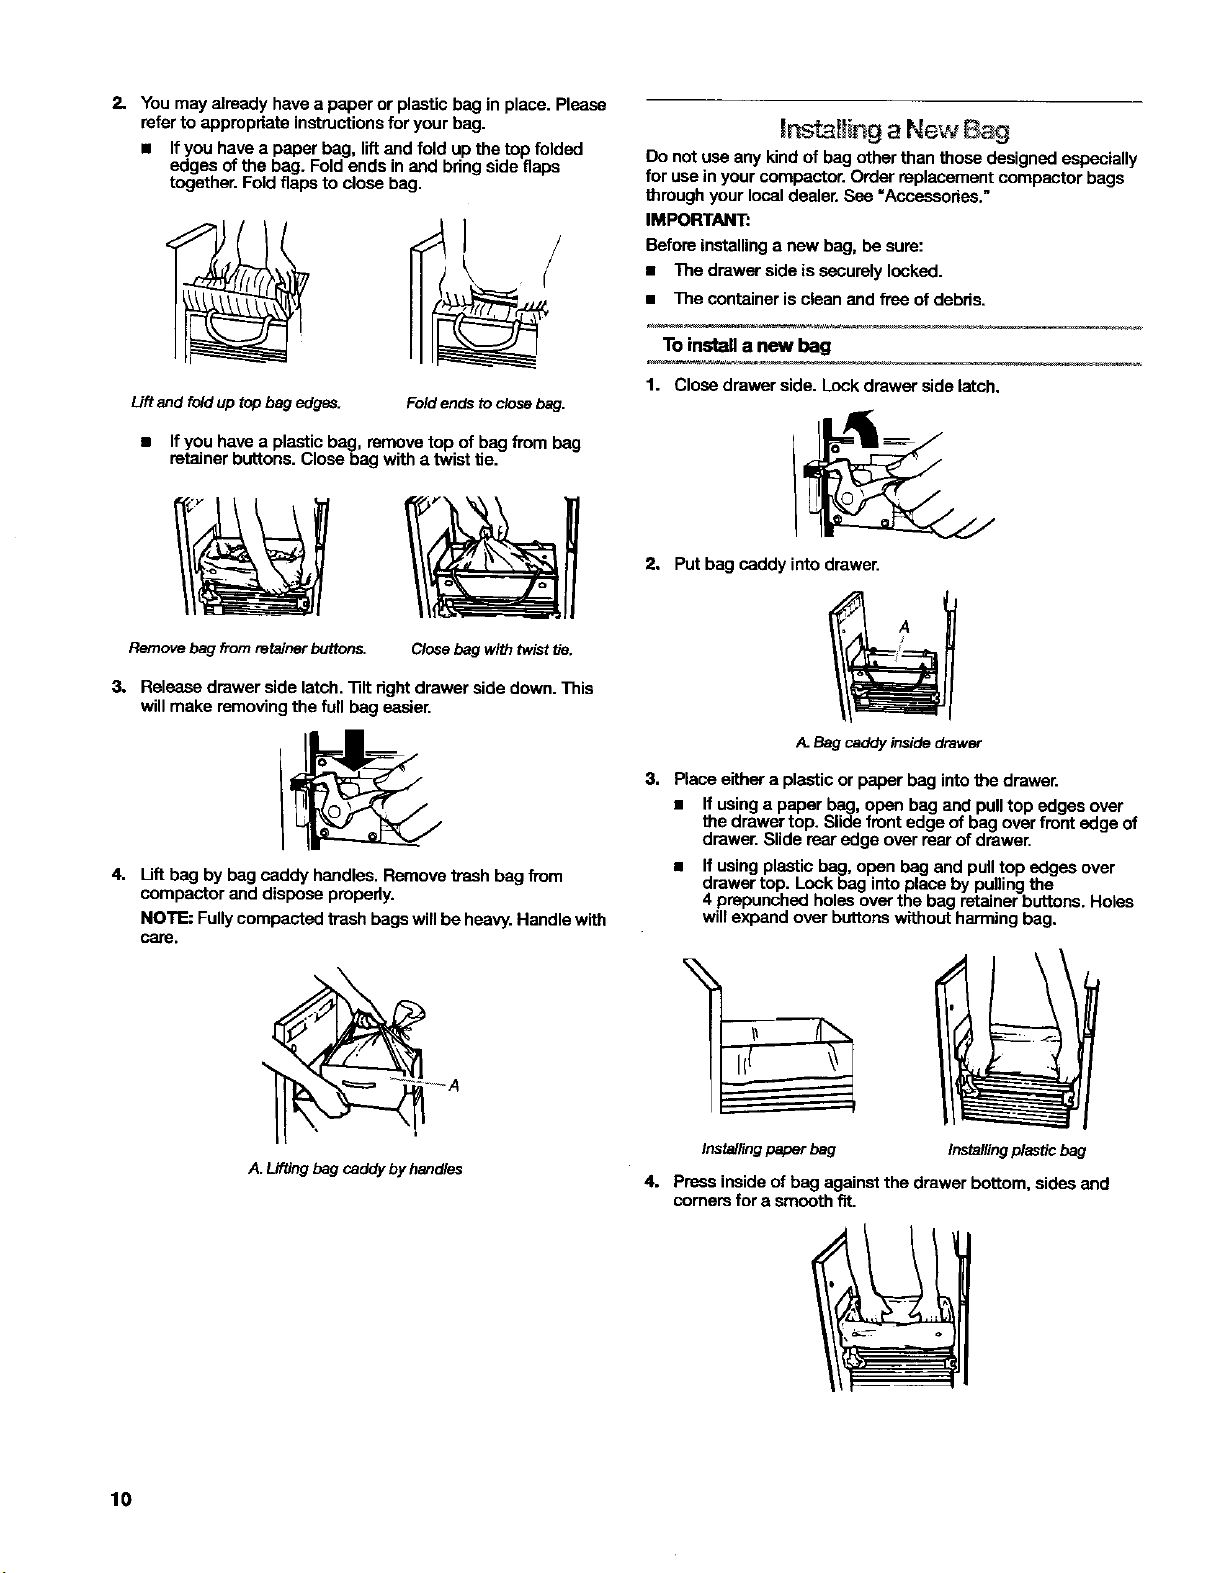
2. Youmay almedy have a paper or plastic bag in place. Please
refer to appropriate instructionsfor your bag.
• If you have a paper bag, liftand fold up the top folded
edges of the bag. Foldends in and bring side flaps
together. Fold flaps to close bag.
Liftandfolduptopbagedges. Foldendstoclosebag.
• If you have a plastic bag, remove top of bag from bag
retainer buttons. Close bag with a twist tie.
Remove bag from retainer buttons. Closebag with twist tie.
Do not use any kind of bag other than those designed especially
for use in your compactor. Order replacement compactor bags
through your localdealer. See "Accessories."
IMPORTANT:
Before installinga new bag, be sure:
• The drawer side is securely locked.
• The container is clean and free of debris.
To install a new bag
1. Close drawer side. Lockdrawer side latch.
2. Put bag caddy into drawer.
3. Release drawer side latch. _lt right drawer side down. This
willmake removing the full bag easier.
4. Lift bag by bag caddy handles. Remove _ash bag from
compactor and dispose properly.
NOTE: Fully compacted trash bags will be heavy. Handle with
care,
A. Liftingbag caddybyhandles
A.Bagcaddyinsidedrawer
3. Place either a plastic or paper bag intothe drawer.
• If using a paper bag, open bag and pull top edges over
the drawer top. Slide front edge of bag over front edge of
drawer.Slide rear edge over rear of drawer.
• If using plasticbag, open bag and pull top edges over
drawer top. Lock bag into place by pullingthe
4 prepunched holes over the bag retainer buttons. Holes
willexpand over buttons without harming bag.
Installingpaperbag Installingplasticbag
4. Pmas inside of bag against the drawer bottom, sides and
corners for a smooth fit.
10
COMPACTOR CARE
Your new compactor is designed to give you many years of dependable service. However,thereare a few things youare expected to do
in orderto propedy maintain your compactor. This section will tell you how to clean and care for your compactor.
Cl ing
Before cleaning the compactor, turn the Key-Knob (or Key-
Switch)to the OFF & LOCK position end remove it.
NOTE: Any services other than those outlined in this section
should be performed by a designated service representative.
Cleaning Exterior Surfaces
1. Washextedor surfaces 0ncluding stainlesssteel) with a clean
sponge or soft cloth end a mild detergent in warm water. Do
not use abrasive or harshcleaneR. Rinseand dry thoroughly
with a soft cloth.
2. Wipe up spills rightaway. Some foods can damage the finish
if left on the compactor surface,
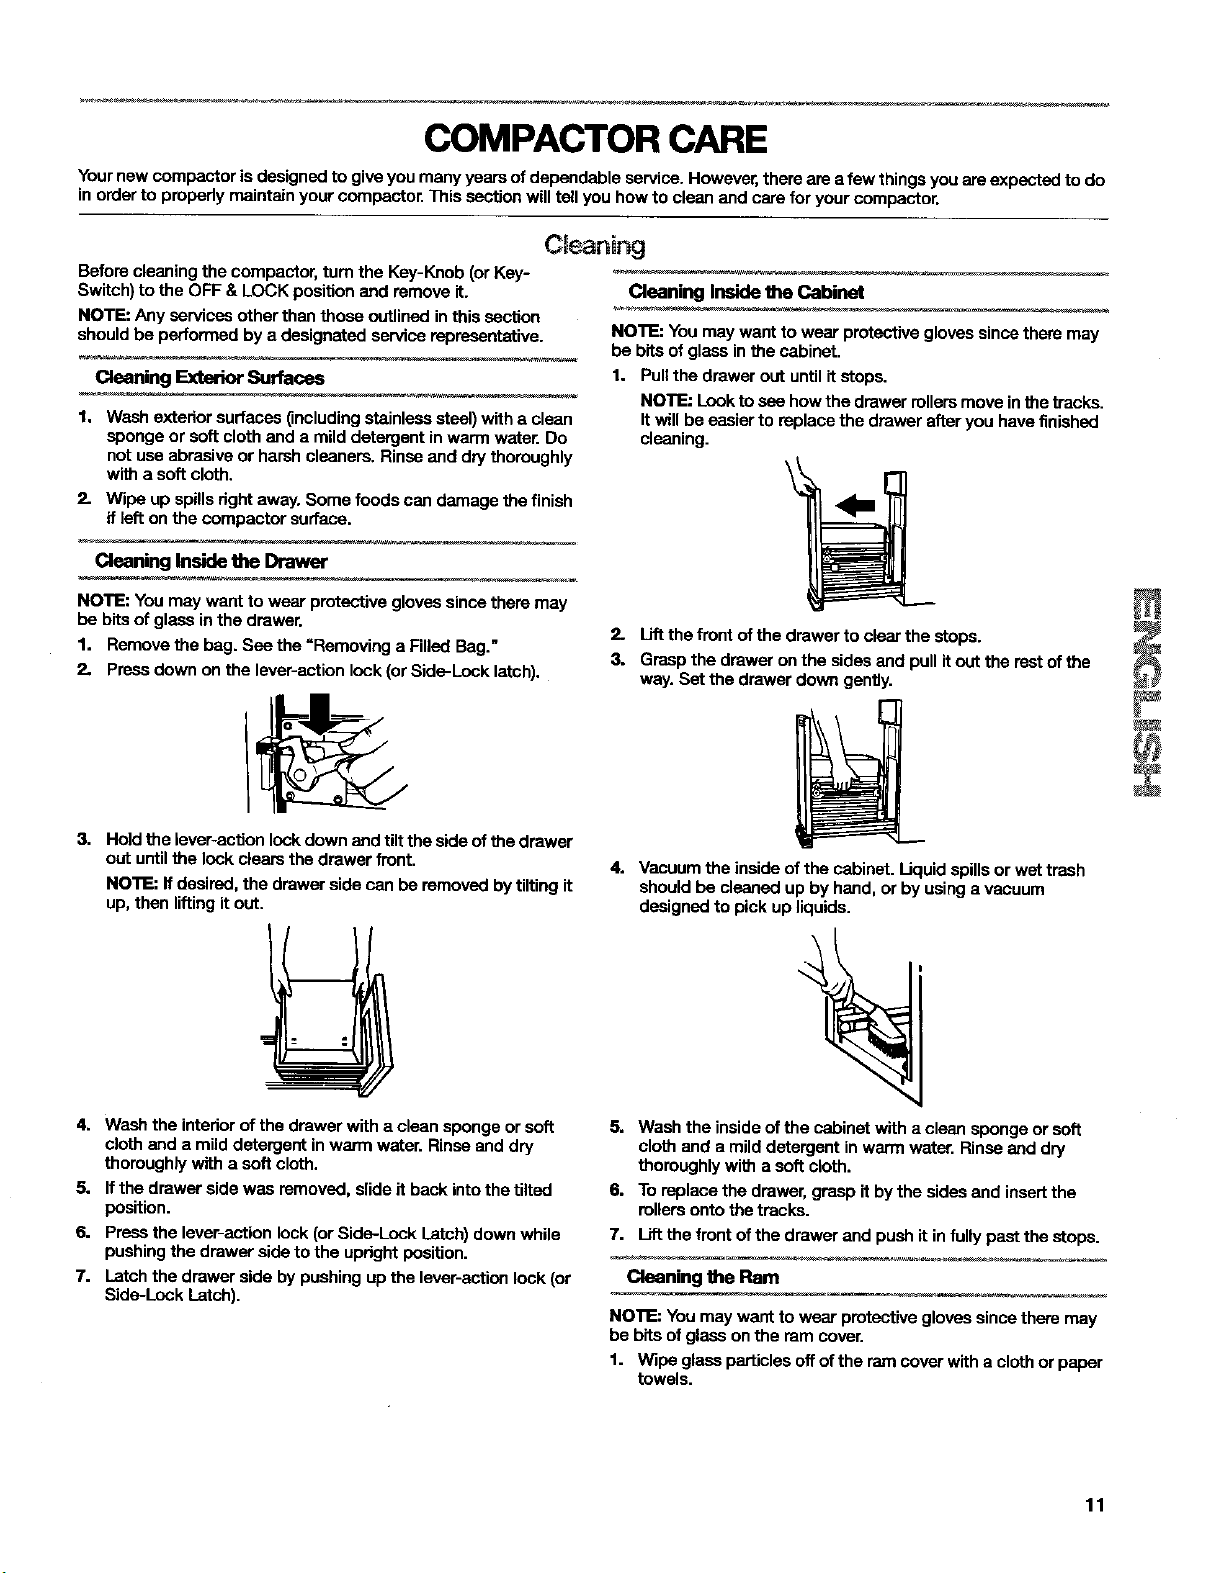
Cleaning Inside the Drawer
NOTE: You may want to wear protective gloves sincethere may
be bits of glass in the drawer.
1. Removethe bag. Son the "Removing a Filled Bag."
2. Press down on the lever-action look(orSide-Lock latch).
Cleaning In,de the Cabinet
NOTE; You may want to wear protective gloves since there may
be bits of glass inthe cabinet.
1. Pullthe drawer out until if stops.
NOTE; Lookto see howthe drawer rollersmove inthe tracks.
It willbe easier to replace the drawer after you have finished
cleaning.
2. Liftthe front ofthe drawer to clear the stops.
3. Grasp the drawer on the sides and pull it out the rest of the
way. Set the drawer down gently.
3. Holdthe lever-action lock down and tilt the side of the drawer
out untilthe lock clears the drawer front.
NOTE; If dasired, the drawer side can be removed by tilting it
up, than liftir_ itout.
===m_=
4. Washthe intedorof the drawer with a clean sponge or soft
cloth and a mild detergent in warm water, Rinse and dry
thoroughly with a soft cloth.
5. ifthe drawer side was removed, slide it back into the tilted
position.
6. Pressthe lever-action lock (or Side-Lock Latch) down while
pushingthe drawer side to the upright position.
7. Latchthe drawer side by pushing up the lever-action look (or
Side-Lock Latch).
4. Vacuumthe insideof the cabinet. Uquid spillsor wst trash
should be cleaned up by hand, or by usinga vacuum
designed to i_ck up liquids.
5. Wash the inside of the cabinet with a clean sponge or soft
cloth end a mild detergent inwarm water. Rinse and dry
thoroughlywith a soft cloth.
6. Toreplace the drawer, grasp it by the sides and insert the
rollersonto the tracks.
7. Liftthe front of the drawer and push it in fuel,/pastthe stops.
Cleaning the Ram
NOTE: You may want to wear protective g|ovessincethere may
be bits of glass on the ram cover.
1. Wipe glassparticles off ofthe ram cover with a clothor paper
towels.
11
 Loading...