

Page 1

OWNER'S MANUAL
SWA/RS
SEWING MACHINE
MODELS 10101/11101/12551/12621/14401
14501/14502/14571/14572
Part# 6027i9
Page 2
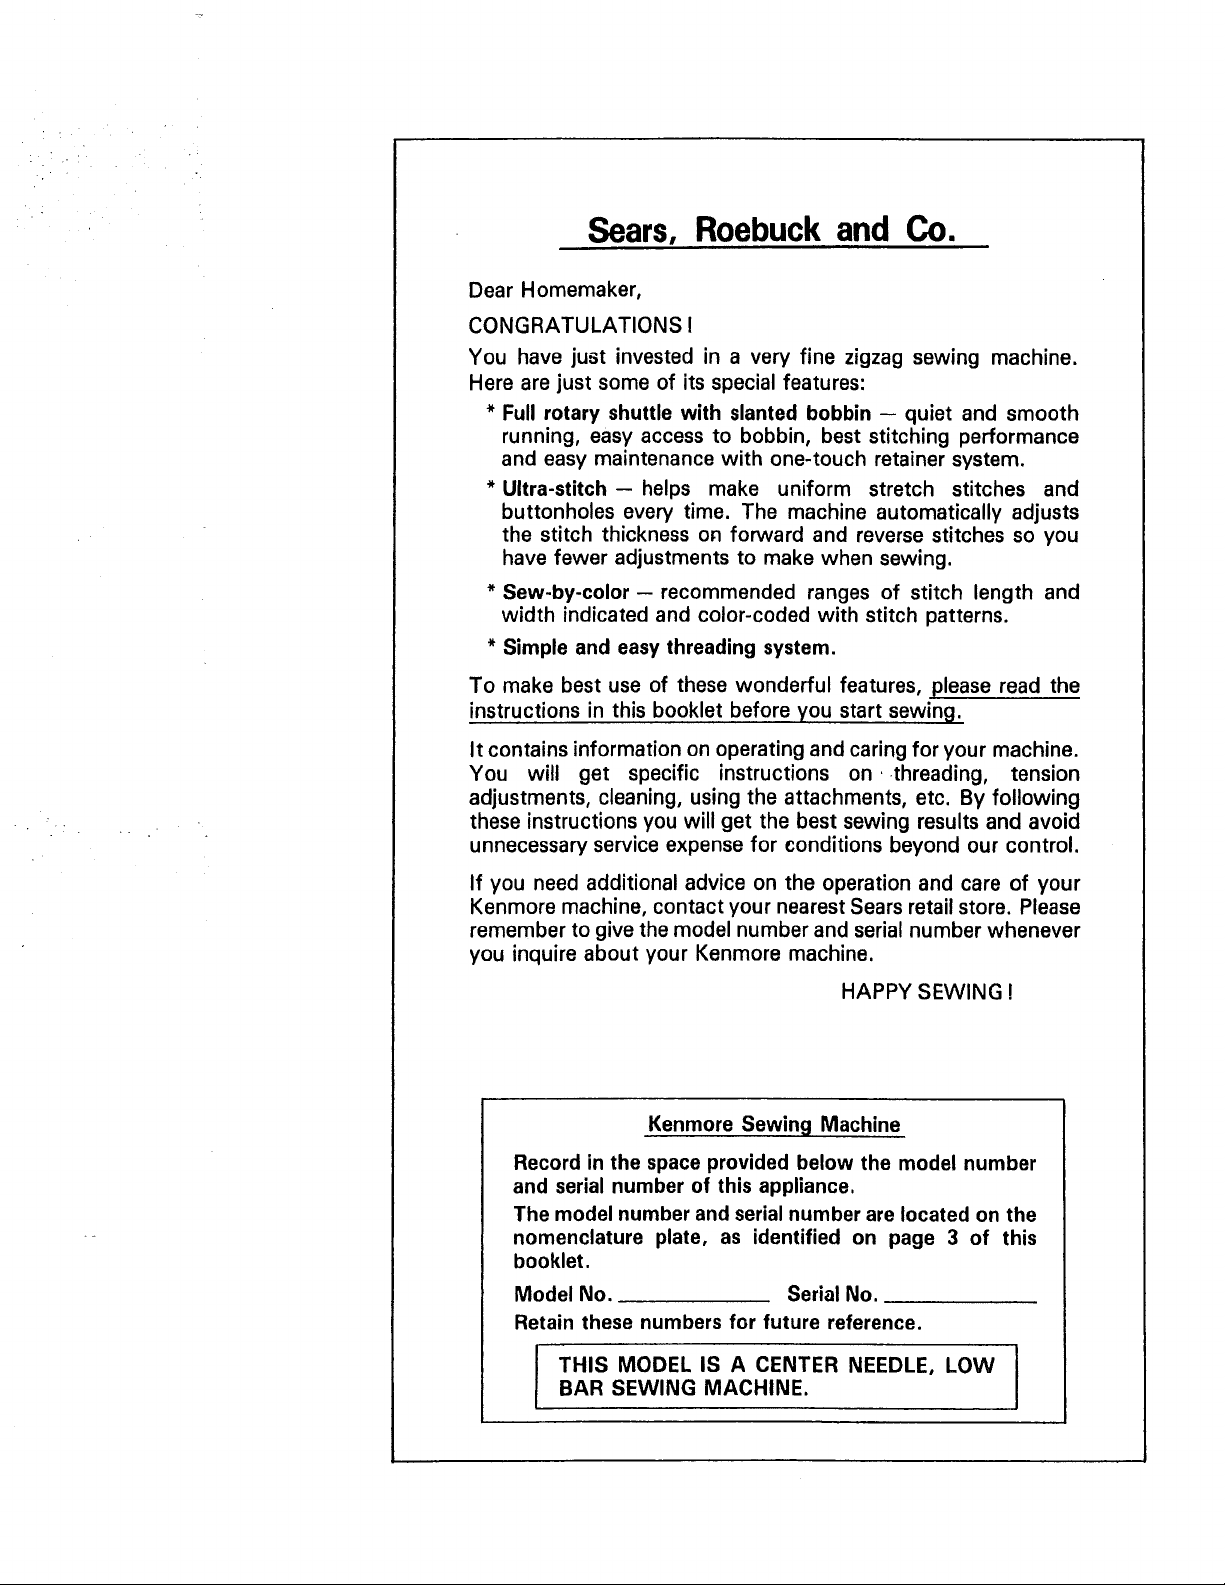
Sears, Roebuck and Co.
Dear Homemaker,
CONGRATULATIONS !
You have just invested in a very fine zigzag sewing machine.
Here are just some of its special features:
* Full rotary shuttle with slanted bobbin -- quiet and smooth
running, easy access to bobbin, best stitching performance
and easy maintenance with one-touch retainer system.
*Ultra-stitch- helps make uniform stretch stitches and
buttonholes every time. The machine automatically adjusts
the stitch thickness on forward and reverse stitches so you
have fewer adjustments to make when sewing.
Sew-by-color- recommended ranges of stitch length and
width indicated and color-coded with stitch patterns.
Simple and easy threading system.
To make best use of these wonderful features, please read the
instructions in this booklet before you start sewing.
It contains information on operating and caring for your machine.
You will get specific instructions on threading, tension
adjustments, cleaning, using the attachments, etc. By following
these instructions you will get the best sewing results and avoid
unnecessary service expense for conditions beyond our control.
If you need additional advice on the operation and care of your
Kenmore machine, contact your nearest Sears retail store. Please
remember to give the model number and serial number whenever
you inquire about your Kenmore machine.
HAPPY SEWING !
Kenmore Sewin 9 Machine
Record in the space provided below the model number
and serial number of this appliance.
The model number and serial number are located on the
nomenclature plate, as identified on page 3 of this
booklet.
Model No. Serial No.
Retain these numbers for future reference.
THIS MODEL IS A CENTER NEEDLE, LOW
BAR SEWING MACHINE.
Page 3
TABLE OF CONTENTS
III III I
1. KNOW YOUR MACHINE
Locate and identify the parts on
your machine ................................ 2 - 3
Locate and identify the accessories .... 4 - 6
2. PREPARE YOUR MACHINE FOR SEWING
Set up the machine ....................... 7 - 8
*Plug in the machine and switch
on the power .................................. 7
*Set the foot control ......................... 7
*Adjust the presser foot ..................... 7
*Put thread on th_spool pin ............... 8
*Convert to free-arm sewing ............... 8
Prepare the bobbin ...................... '9- 12
*Load thread on the bobbin ........... 9- 10
*Remove the bobbin case from the
shuttle ......................................... 11
*Insert the bobbin into the bobbin case.. 12
*Insert the bobbin case into the shuttle.. 12
Prepare the needle ...................... 13 - 14
*Change the needle .......................... 13
*Needle, thread, fabric and stitch
length chart ................................... 14
Prepare the top thread ................. 15 - 16
*Thread the needle ........................... 15
*Pick up the bobbin thread ................. 16
Check the thread tension ................... 17
Choose the right presser foot ......... 18 - 19
*Know what the presser foot will do ..... 18
*Change the presser foot ................... 19
Use the feed cover plate ..................... 20
3. LEARN TO USE THE CONTROLS
Stitch selector dial ............................ 21
Stitch length dial.............................. 21
Stitch width control .......................... 22
Reverse stitch lever ........................... 22
Seam guide lines.............................. 22
4. PRACTICE GOOD HABITS
Before you begin to sew .................... 23
When you begin to sew ..................... 23
5. LEARN TO USE THE STITCHES
Machinesetting chart ........................ 24
Straight stitches ......................... 25 - 28
*Sewing a straight seam .................... 25
*Square the corner ........................... 26
*Top-stitching ................................. 26
*Darning ........................................ 26
*Basting ........................................ 27
*Gathering ..................................... 27
*Attaching a zipper ........................... 28
*Cording ........................................ 28
Zigzag stitches ........................... 29 - 32
*Overcasting stitch ........................... 30
*Satin stitch ................................... 30
*Bar tacking ................................... 30
*Applique ...................................... 31
*Embroidery ................................... 31
*Monogramming ............................. 31
*Button sewing ............................... 32
Three-step zigzag ............................. 33
Blind hem ................................. 34 - 35
Box stitch ....................................... 36
Shell stitch ..................................... 37
Stretch stitch ............................. 38 - 43
*Adjusting stitch length ..................... 38
*Where to use which stretch stitch:
A check-chart ................................ 39
*Tips on sewing different fabrics .......... 40
*Straight stretch stitch ...................... 41
*Rick-rack stretch stitch .................... 41
*Smocking stretch stitch ................... 41
*Overcast stretch stitch ..................... 42
*Serging or pine leaf stretch stitch ........ 42
*Elastic stretch stitch ........................ 42
*Overlock stretch stitch ..................... 43
*Elastic edge stretch stitch ................. 43
6,
LEARN TO SEW BUTTONHOLES
Choose the buttonhole style ............... 44
Manual method ............................. 45 - 45
Built-in method .......................... 47 - 49
*Adjust the stitch width ..................... 47
*Adjust the stitch length .................... 47
*Corded buttonholes (a variation of
the built-in buttonhole) .................... 49
Buttonhole attachment system ...... 50 - 53
*Set up the machine .................... 51 - 52
*Make the buttonhole ....................... 53
7. CARE FOR YOUR MACHINE
Change the sewing light bulb .............. 54
Clean your machine ..................... 54 - 55
*Clean the feed dogs ......................... 54
*Clean the shuttle ............................ 55
8. CHECK CHART FOR PERFORMANCE
PROBLEMS
General problems ............................ 56
Stitching problems ...................... 56 - 57
Thread problems .............................. 57
Page 4

1. KNOW YOUR MACHINE
Locate and identify the parts on your machine
After you have unpacked
your new machine, set it on a
flat, sturdy surface. Study
the following diagram so that
you will know the working
parts of your machine.
You may need to refer to
these diagram often while
reading the instructions in
this manual.
Extensiontable
Thread guide
Take-up lever
Threading channel
Top thread tension control
=O
A_essory box/extensi
Thread cutter
_/_ Needle clamp screw
** Presser foot release lever _ _ - Thread guide
** Thread cutter ./_ !'_ _
Presser foot thumb screw /'_ _ Q_ ""%_ ClotN;e_;
Presser foot _ _ _ _ _,,.=.,_/_ _. sc,ew hore
"\ \ __"_'_"_ _ _ooddo.,
Needle plate _._"He, _'_ _--'f --
Seam guide lines _ __----------__ Cornering guides
I
NOTE: A detailed drawing which shows the parts of the shuttle and bobbin is on page 11.
2
Page 5

** Bobbin winder shaft
** Bobbin winder latch
** Stitch width control
Stitch selector
Stitch length control
"* Stitch length indicator
Reverse stitch lever
*Model 14571, 14572, only
**Model 14501, 14502, 14571,
14572 only
Bobbin winder stop
Handwheel
Clutch knob
. Hand wheel/push-pull
clutch
** Swing-away spool pin
Power/light switch
Foot control plug
receptacle
Nomenclature plate
Bobbin winder shaft
Spool
** Extra spool pin
Fold-away carrying
handle
Pull-down lever for
sewing light
Presser foot lever
Snap-in automatic
buttonhole attachment
I"
Foot
control .....__
Accessory box
3
Page 6
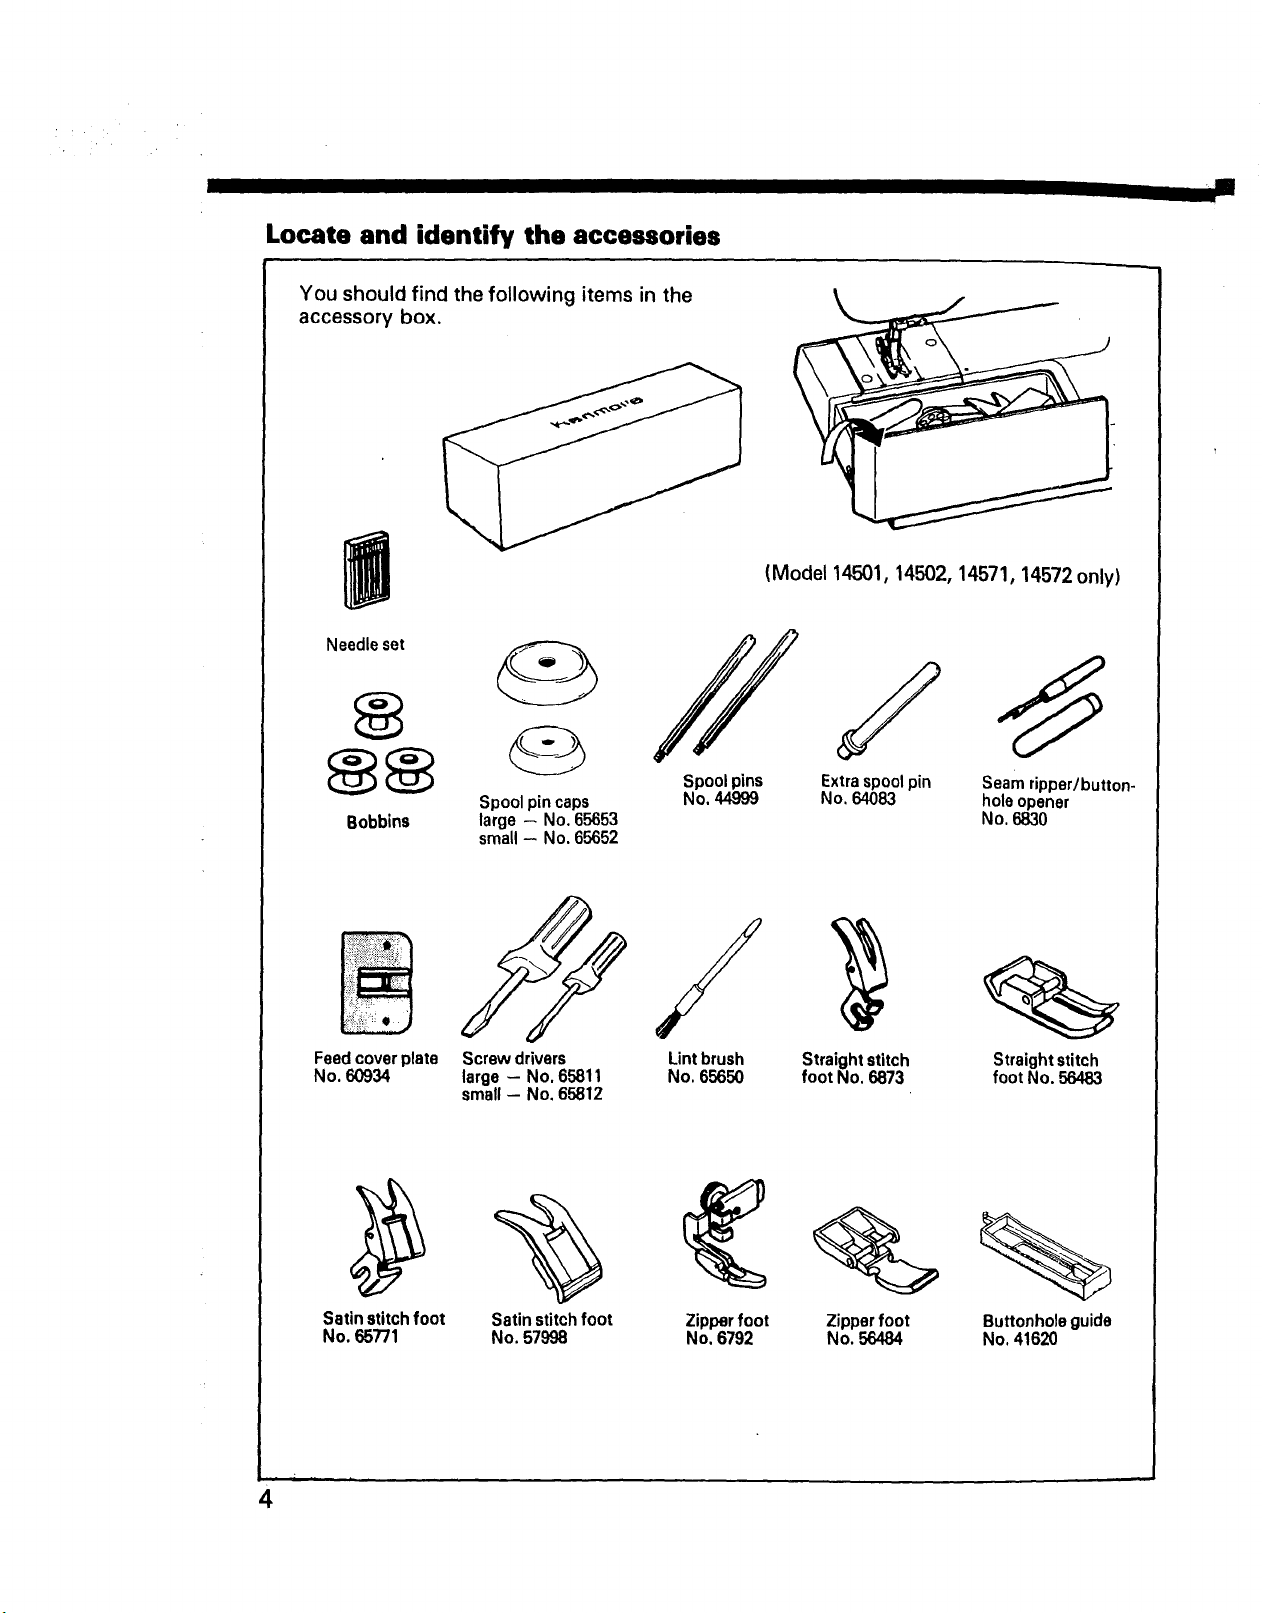
Locate and identify the accessories
You should find the following items in the
accessory box.
Needle set
II
(Model 14501, 14502, 14571, 14572 only)
S
Spool pins
Bobbins large - No. 65653
Feedcover plate
No. 60934
Satin stitch foot Satin stitch foot Zipper foot Zipper foot Buttonhole guide
No. 657"/1 No. 57998 No. 6792 No. 56484 No. 41620
Spool pin caps
small- No. 65652
Screw drivers
large - No. 65811
small- No. 65812
No, 44999
Lintbrush Straight stitch Straight stitch
No. 65650 foot No. 6873 foot No. 56483
Extra spoolpin Seam ripper/button-
No, 64083 hole opener
No, 6830
4
Page 7
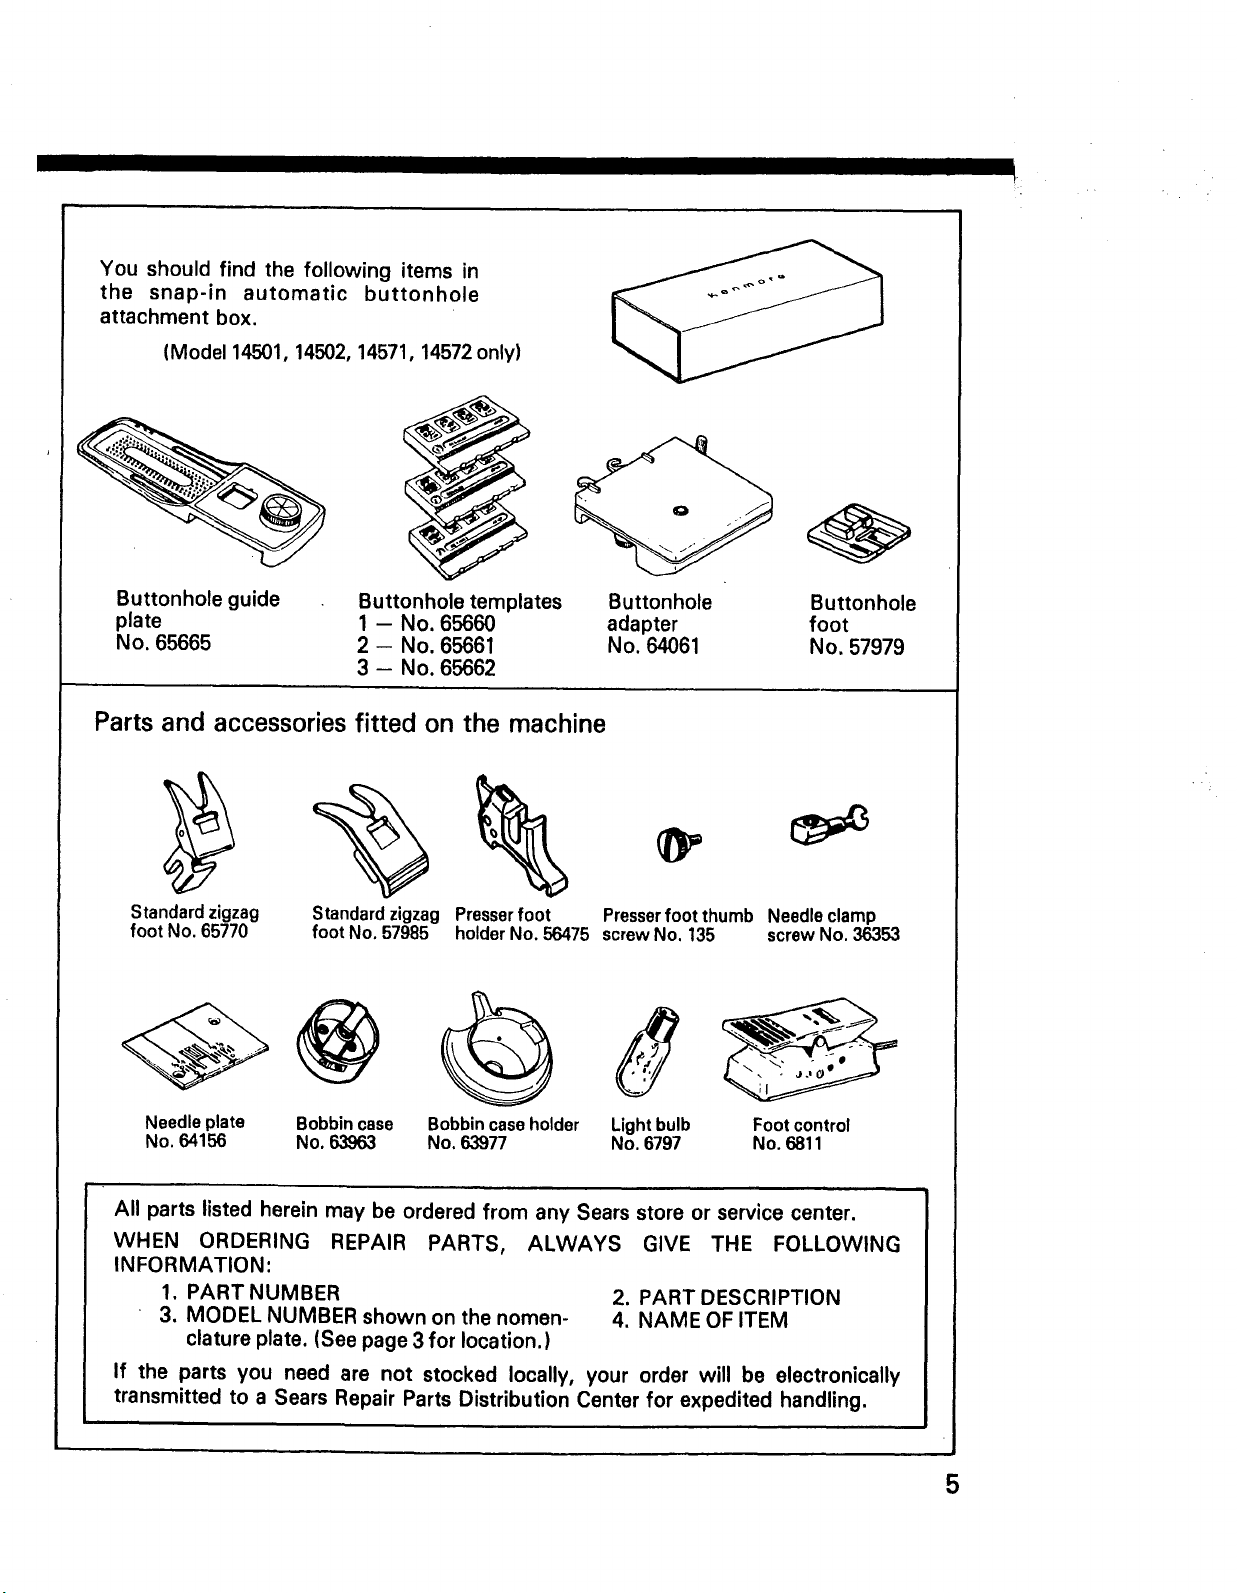
You should find the following items in
the snap-in automatic buttonhole
attachment box.
(Model 14501, 14502, 14571, 14572 only)
1
Buttonhole guide
plate
No. 65665
Buttonhole templates Buttonhole Buttonhole
1 -- No. 65660 adapter foot
2 - No. 65661 No. 64061 No. 57979
3 - No. 65662
Parts and accessoriesfitted on the machine
Standardzigzag
foot No.65770
Needleplate Bobbincase Bobbincaseholder
No. 64156 No.63963 No. 63977
Standardzigzag Presserfoot
foot No. 57985
holderNo. 56475 screwNo. 135 screwNo. 36353
Presserfootthumb Needleclamp
Light bulb Foot control
No.6797 No. 6811
All parts listed herein may be ordered from any Sears store or service center.
WHEN ORDERING REPAIR PARTS, ALWAYS GIVE THE FOLLOWING
INFORMATION:
1. PART NUMBER 2. PART DESCRIPTION
3. MODEL NUMBER shown on the nomen- 4. NAME OF ITEM
clature plate. (See page 3 for location.)
If the parts you need are not stocked locally, your order will be electronically
transmitted to a Sears Repair Parts Distribution Center for expedited handling.
5
Page 8
II I II I
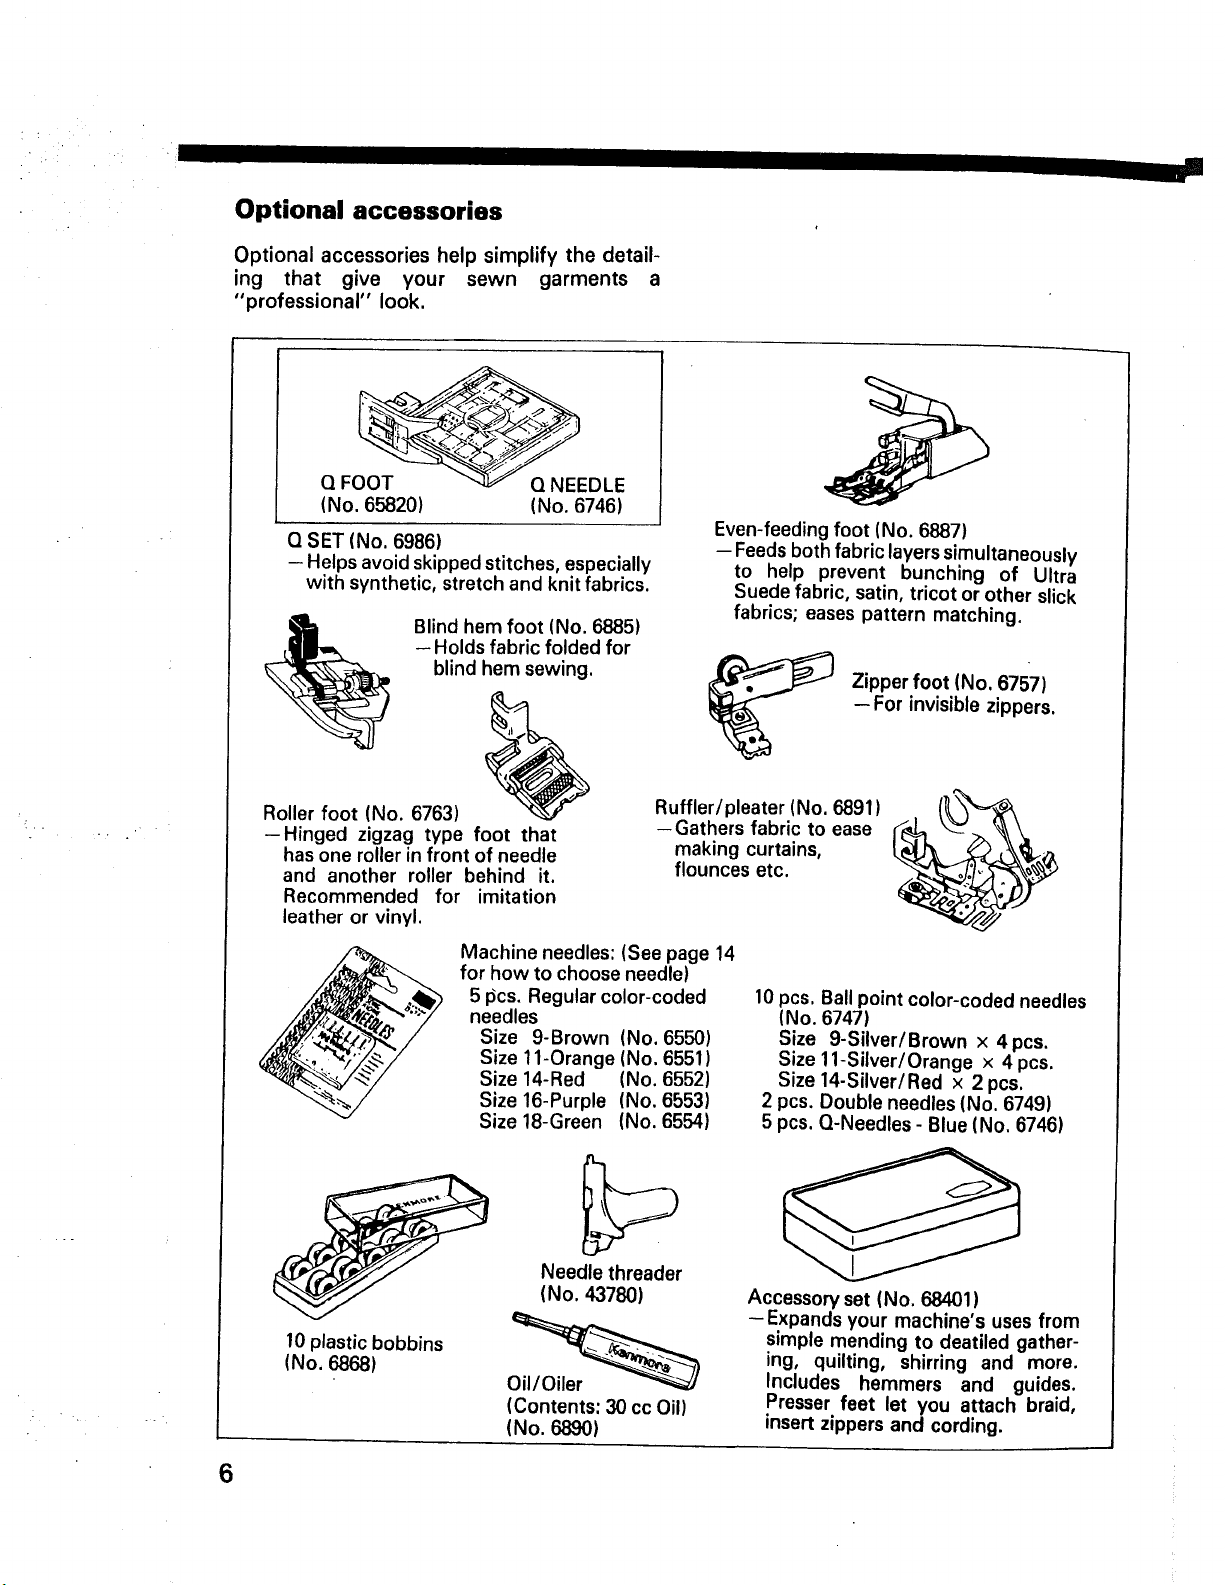
Optional accessories
Optional accessories help simplify the detail-
ing that give your sewn garments a
"professional" look.
Q FOOT Q NEEDLE
(No. 65820) (No. 6746)
Q SET (No. 6986)
- Helps avoid skipped stitches, especially
with synthetic, stretch and knit fabrics.
Blind hem foot (No. 6885)
- Holds fabric folded for
blind hem sewing.
Even-feeding foot (No. 6887)
-- Feedsboth fabric layers simultaneously
to help prevent bunching of Ultra
Suede fabric, satin, tricot or other slick
fabrics; eases pattern matching.
Zipper foot (No. 6757)
-For invisible zippers.
Roller foot (No. 6763)
--Hinged zigzag type foot that
has one roller in front of needle
and another roller behind it.
Recommended for imitation
leather or vinyl.
Machine needles: (See page 14
for how to choose needle)
5 pcs. Regular color-coded
needles
Size 9-Brown (No. 6550)
Size 11-Orange (No. 6551)
Size 14-Red (No. 6552)
Size 16-Purple (No. 6553)
Size 18-Green (No. 6554)
10 plastic bobbins
(No, 6868)
IContents: :30cc Oill
INo. 6890)
Ruffler/pleater (No. 6891)
-Gathers fabric to ease
Needle threader
(No. 43780)
making curtains,
flounces etc.
10 pcs. Ball point color-coded needles
(No. 6747)
Size 9-Silver/Brown x 4pcs.
Size 11-Silver/Orange x 4 pcs.
Size 14-Silver/Red × 2 pcs.
2 pcs. Double needles (No. 6749)
5 pcs. Q-Needles- Blue (No. 6746)
Accessory set (No. 68401)
-Expands your machine's uses from
simple mending to deatiled gather-
ing, quilting, shirring and more.
Includes hemmers and guides.
Presser feet let you attach braid,
insert zippers and cording.
6
Page 9
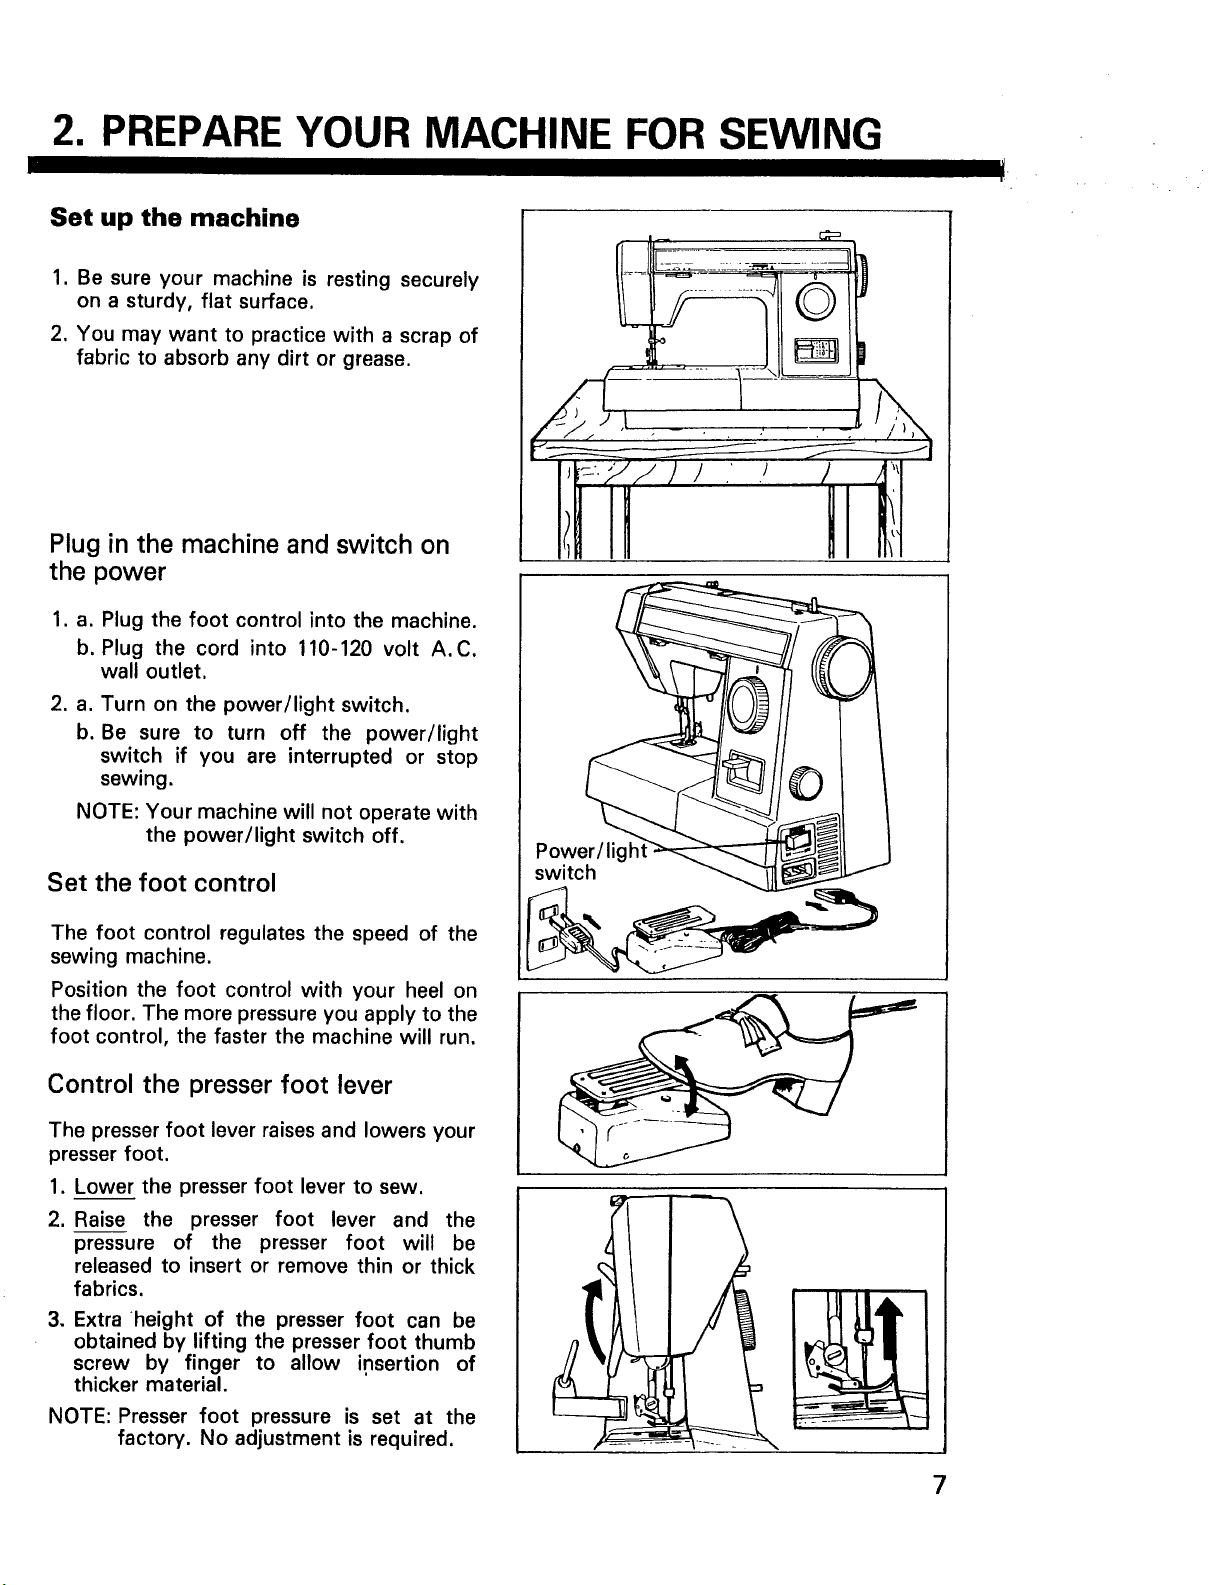
2. PREPARE YOUR MACHINE FOR SEWING
Set up the machine
1. Be sure your machine is resting securely
on a sturdy, flat surface.
2. You may want to practice with a scrap of
fabric to absorb any dirt or grease.
Plug in the machine and switch on
the power
1. a. Plug the foot control into the machine.
b. Plug the cord into 110-120 volt A.C.
wall outlet.
Turn on the power/light switch.
Be sure to turn off the power/light
switch if you are interrupted or stop
sewing.
NOTE: Your machine will not operate with
the power/light switch off.
Set the foot control
Power/ligh
switch
The foot control regulates the speed of the
sewing machine.
Position the foot control with your heel on
the floor. The more pressure you apply to the
foot control, the faster the machine will run.
Control the presser foot lever
The presser foot lever raises and lowers your
presser foot.
1. Lower the presser foot lever to sew.
,
Raise the presser foot lever and the
pressure of the presser foot will be
released to insert or remove thin or thick
fabrics.
.
Extra height of the presser foot can be
obtained by lifting the presser foot thumb
screw by finger to allow insertion of
thicker material.
NOTE: Presser foot pressure is set at the
factory. No adjustment is required.
7
Page 10
i
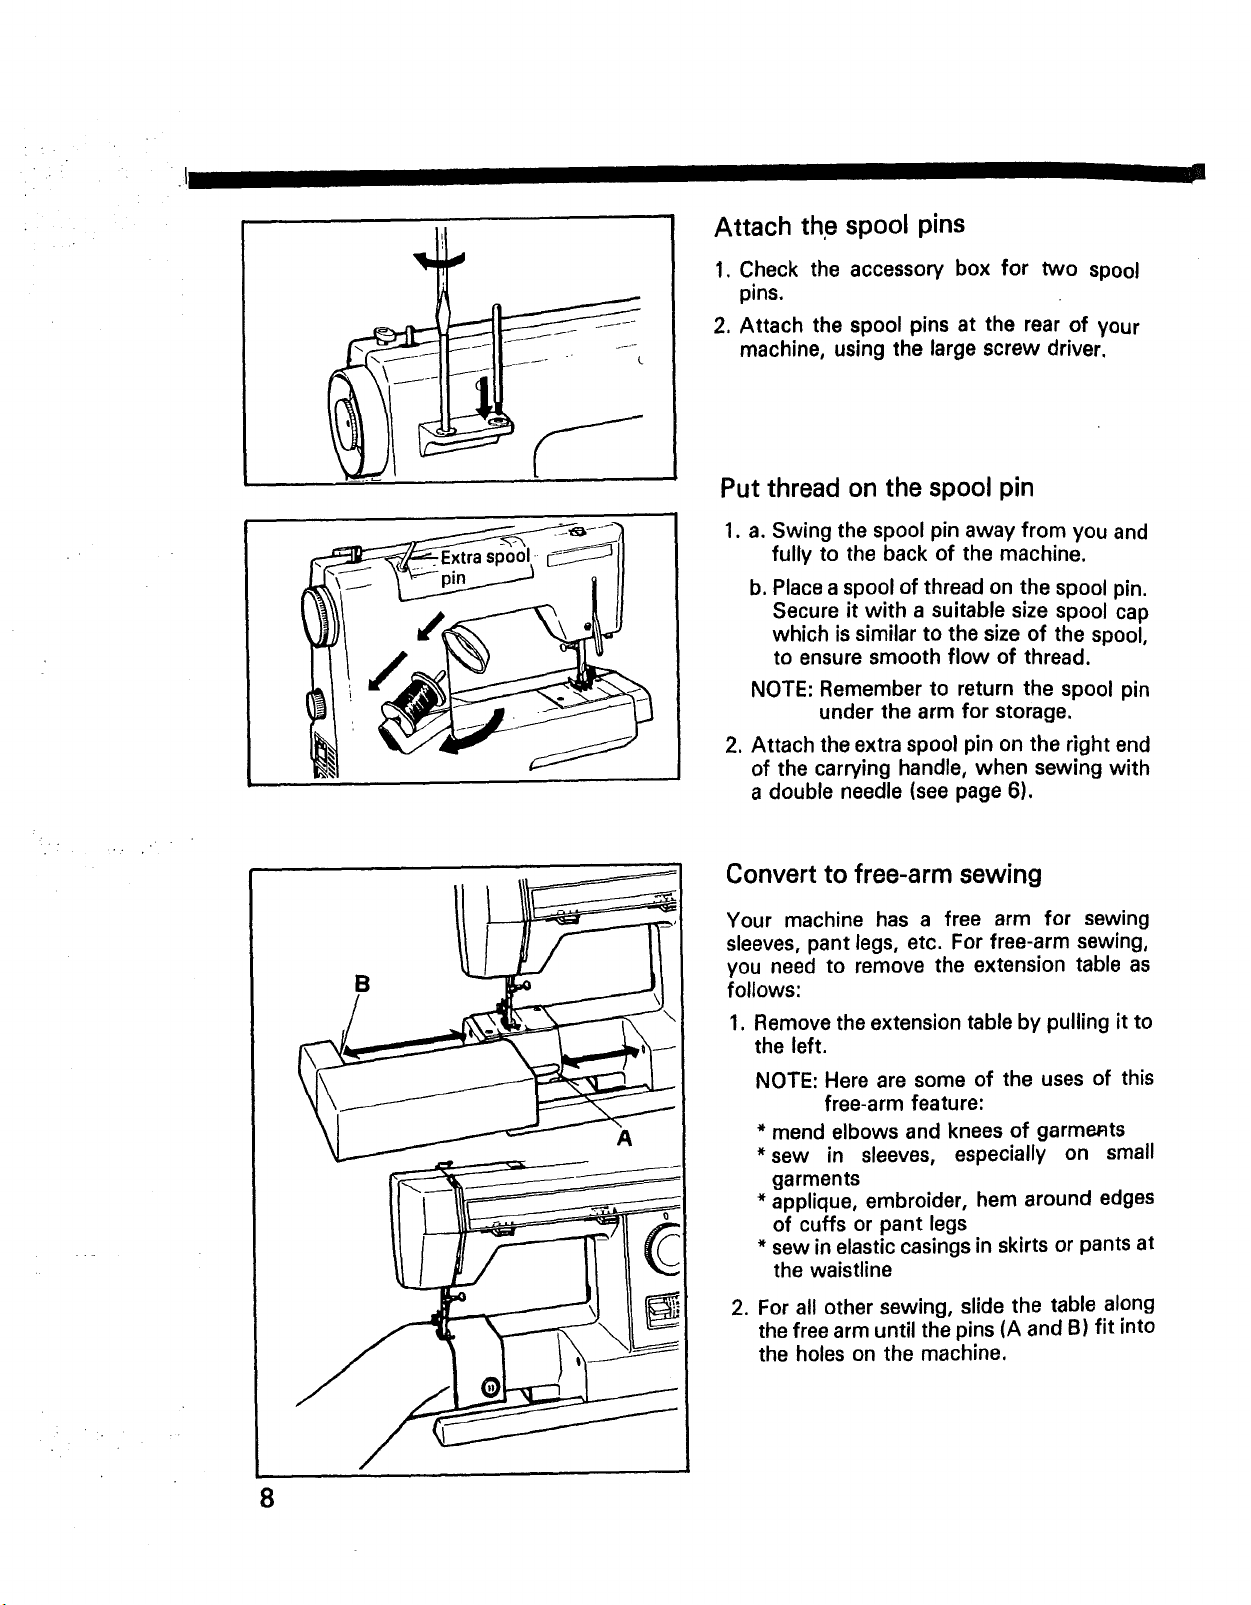
Attach th.e spool pins
1. Check the accessory box for two spool
pins.
2. Attach the spool pins at the rear of your
machine, using the large screw driver.
Put thread on the spool pin
1. a. Swing the spool pin away from you and
fully to the back of the machine.
b. Place a spool of thread on the spool pin.
Secure it with a suitable size spool cap
which is similar to the size of the spool,
to ensure smooth flow of thread.
NOTE: Remember to return the spool pin
under the arm for storage.
2. Attach the extra spool pin on the right end
of the carrying handle, when sewing with
a double needle (see page 6).
Convert to free-arm sewing
Your machine has a free arm for sewing
sleeves, pant legs, etc. For free-arm sewing,
B
A
you need to remove the extension table as
follows:
1. Remove the extension table by pulling it to
the left.
NOTE: Here are some of the uses of this
free-arm feature:
* mend elbows and knees of garmeRts
*sew in sleeves, especially on small
garments
* applique, embroider, hem around edges
of cuffs or pant legs
* sew in elastic casings in skirts or pants at
the waistline
2. For all other sewing, slide the table along
the free arm until the pins (A and B) fit into
the holes on the machine.
8
Page 11
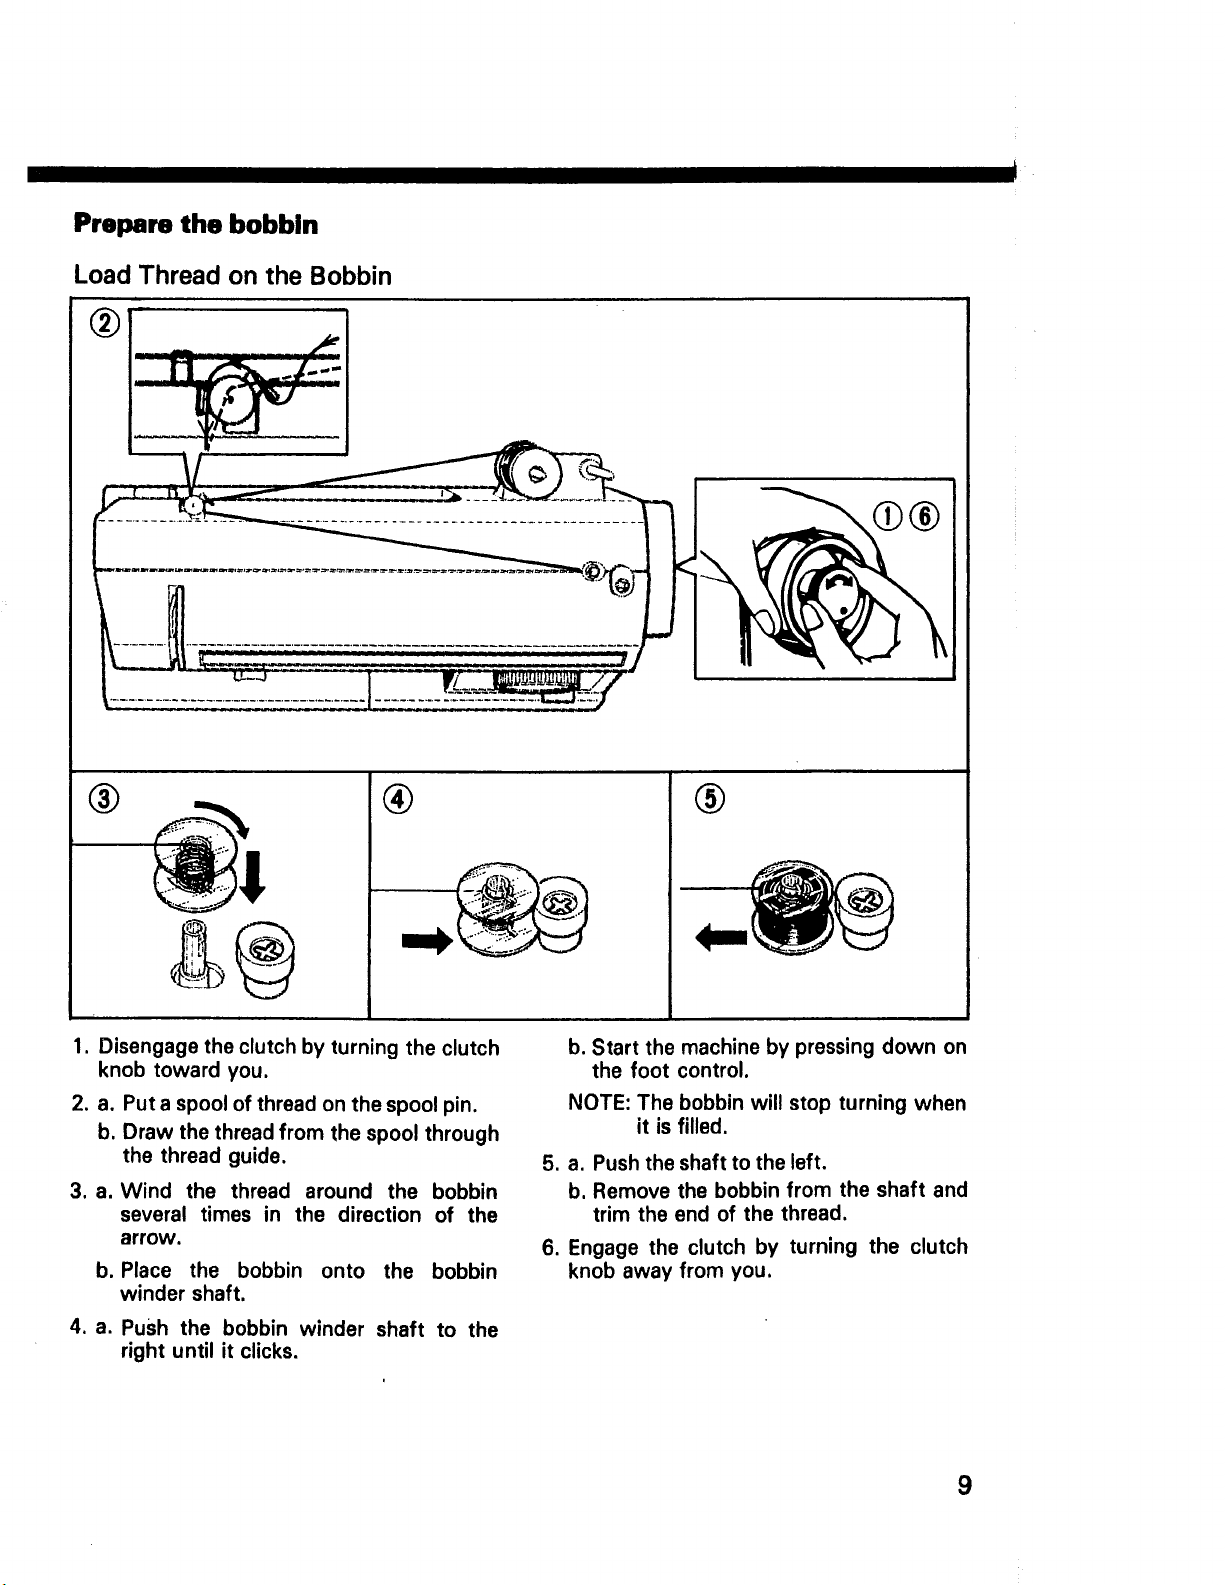
Prepare the bobbin
Load Thread on the Bobbin
®
i •
® ® ®
1. Disengage the clutch by turning the clutch
knob toward you.
2. a, Put a spool of thread on the spool pin.
b. Draw the thread from the spool through
the thread guide.
3. a. Wind the thread around the bobbin
several times in the direction of the
arrow.
b. Place the bobbin onto the bobbin
winder shaft.
4. a. Push the bobbin winder shaft to the
right until it clicks.
b. Start the machine by pressing down on
the foot control.
NOTE: The bobbin will stop turning when
it is filled.
5. a. Push the shaft to the left.
b. Remove the bobbin from the shaft and
trim the end of the thread.
6. Engage the clutch by turning the clutch
knob away from you.
9
Page 12
_!1 I III -
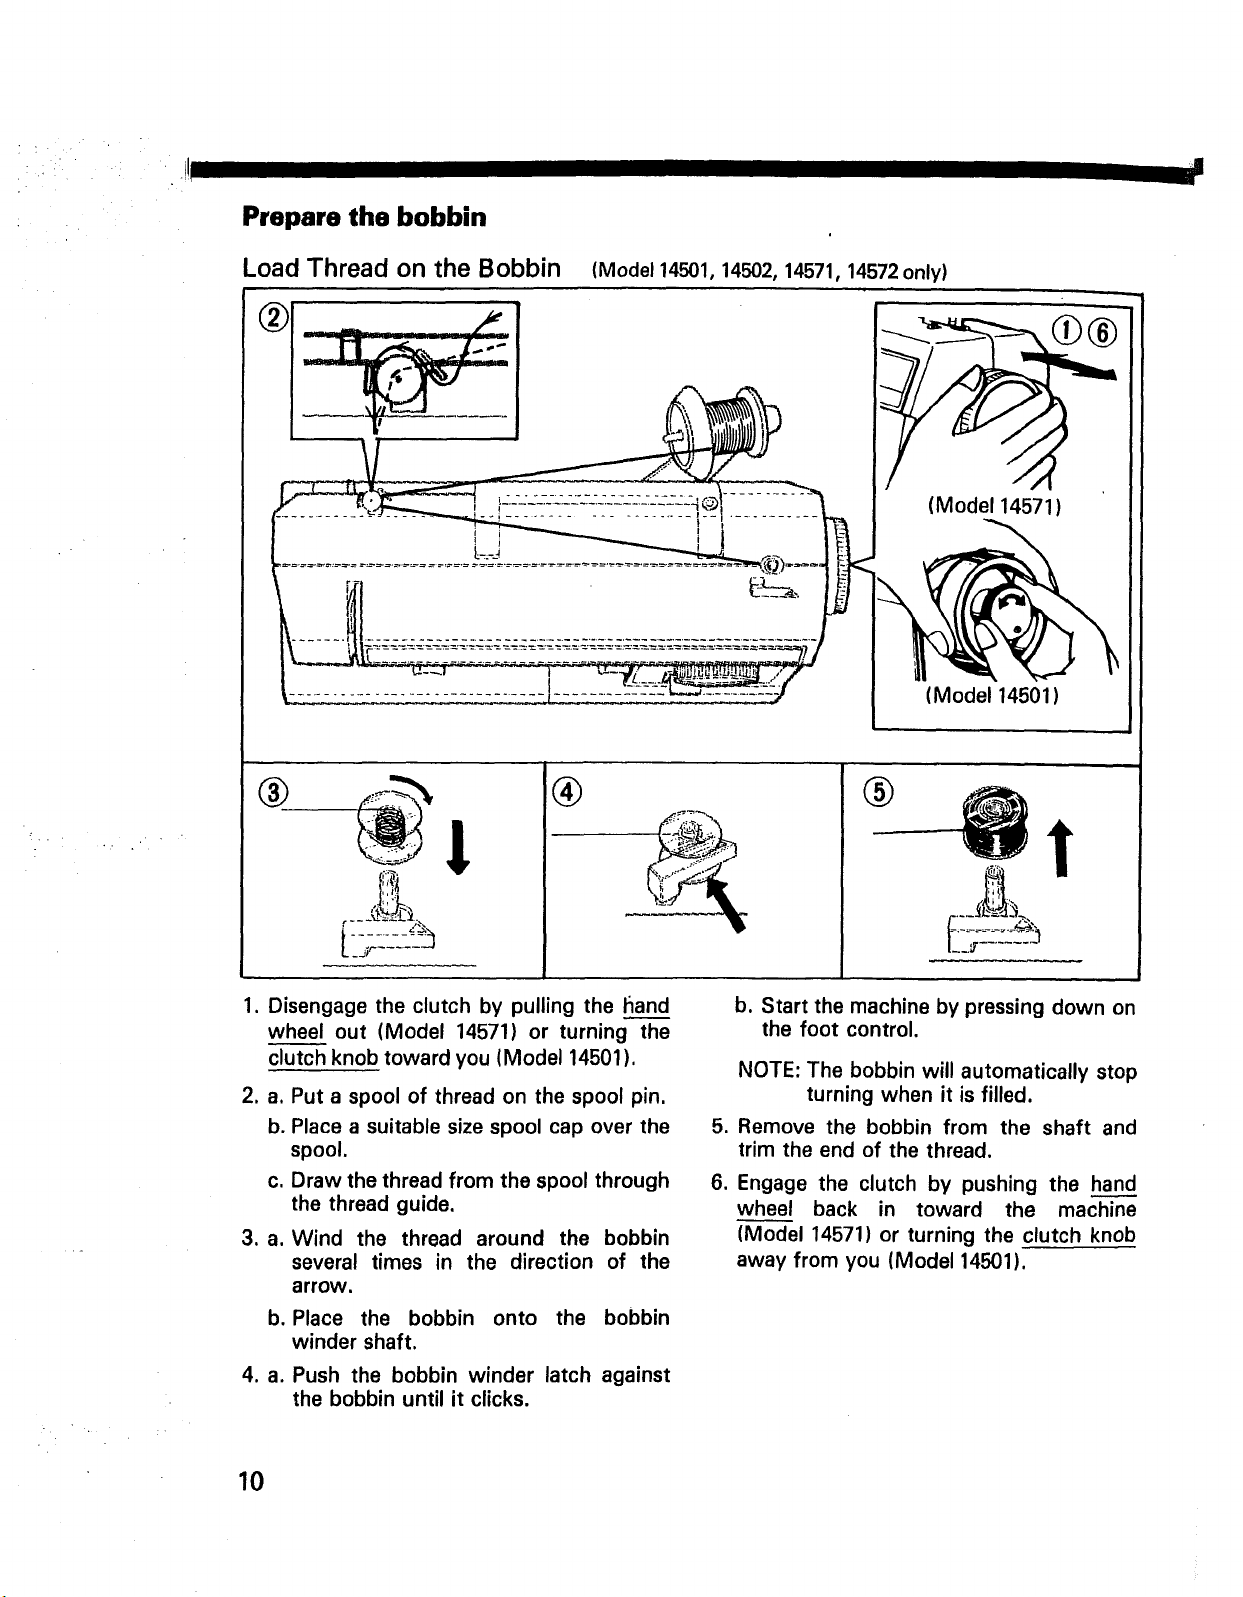
Prepare the bobbin
Load Thread on the Bobbin (Model 14501, 14502, 14571, 14572 only)
®
(Model 14571 )
(Model 14501 )
®
........ t.
1. Disengage the clutch by pulling the i_and
wheel out (Model 14571) or turning the
clutch knob toward you (Model 14501).
. a.
Put a spool of thread on the spool pin.
b.
Place a suitable size spool cap over the
spool.
c. Draw the thread from the spool through
the thread guide.
. a.
Wind the thread around the bobbin
several times in the direction of the
arrow.
b. Place the bobbin onto the bobbin
winder shaft.
4. a. Push the bobbin winder latch against
the bobbin until it clicks.
®
b. Start the machine by pressing down on
the foot control.
NOTE: The bobbin will automatically stop
turning when it is filled.
5. Remove the bobbin from the shaft and
trim the end of the thread.
6. Engage the clutch by pushing the hand
wheel back in toward the machine
(Model 14571) or turning the clutch knob
away from you (Model 14501).
10
Page 13
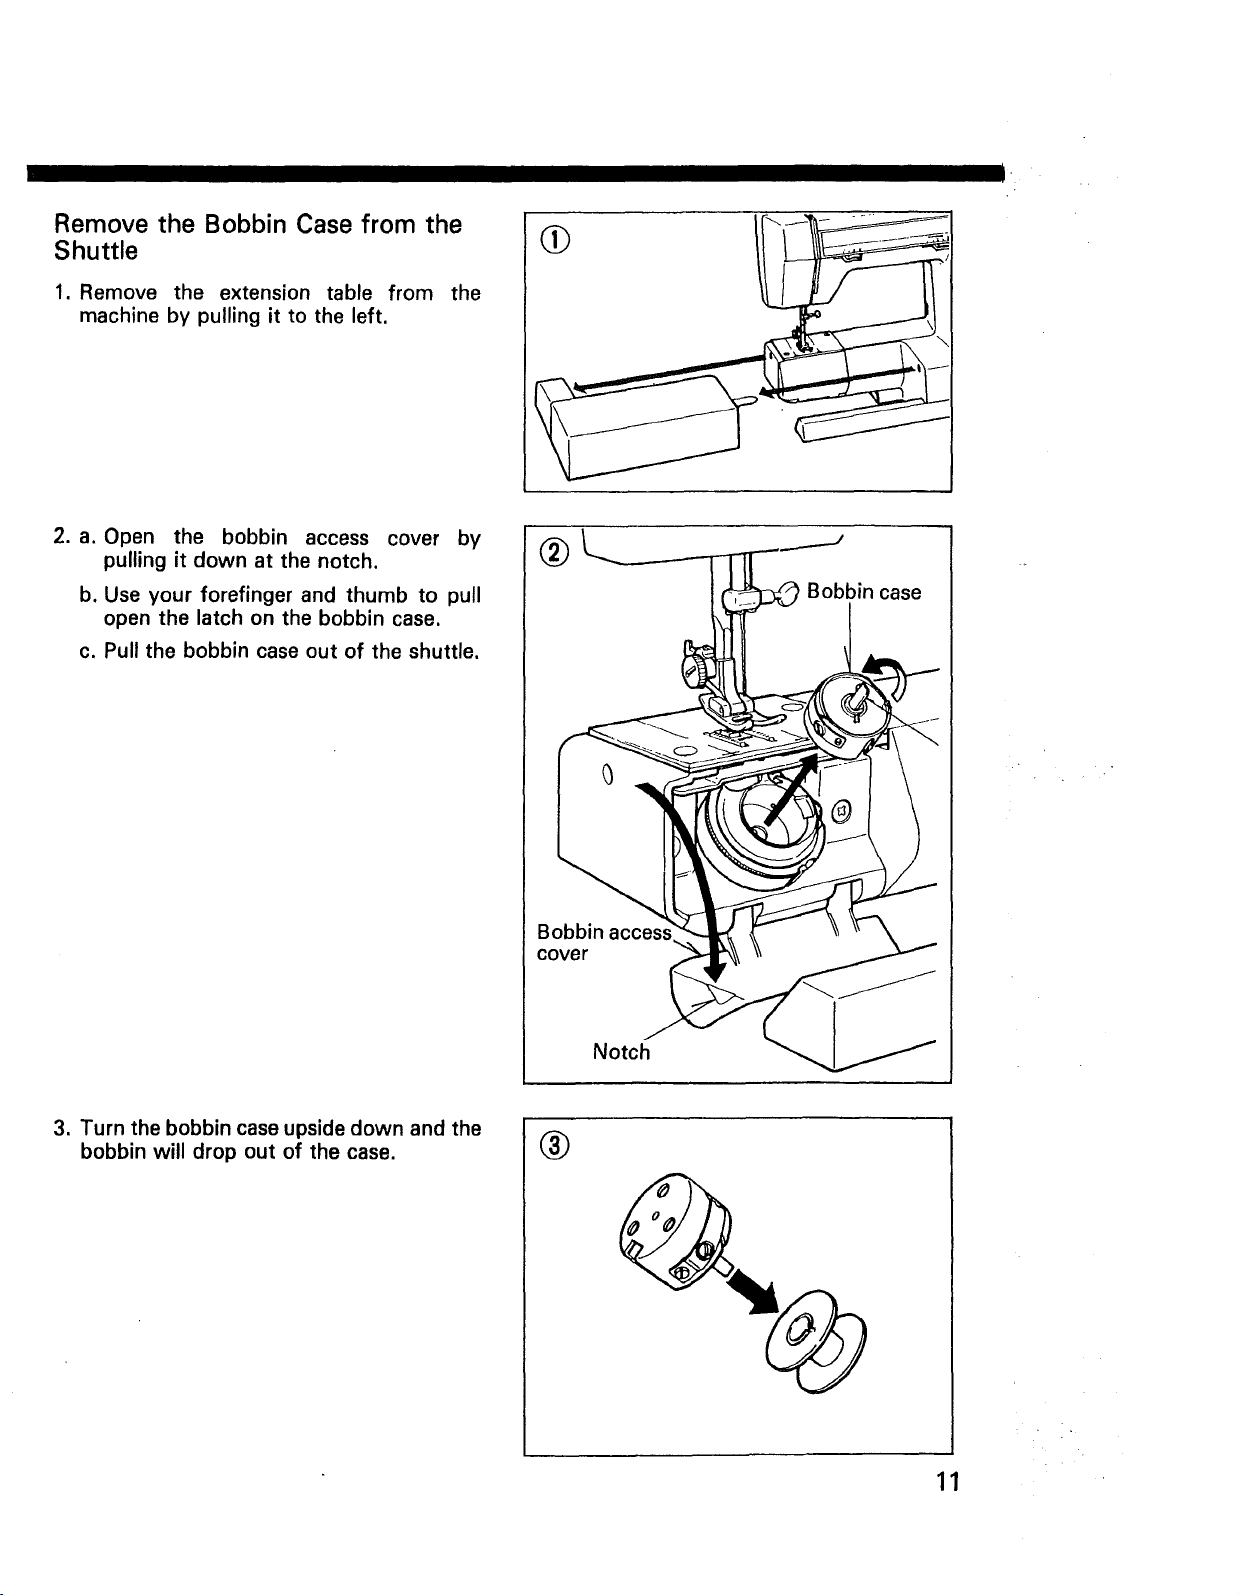
Remove the Bobbin Case from the
Shuttle
1. Remove the extension table from the
machine by pulling it to the left.
2. a. Open the bobbin access cover by
pulling it down at the notch.
b. Use your forefinger and thumb to pull
open the latch on the bobbin case.
c. Pull the bobbin case out of the shuttle.
®
Bobbin case
Bobbin access,
cover
Notch
3. Turn the bobbin case upside down and the
bobbin will drop out of the case.
®
11
Page 14
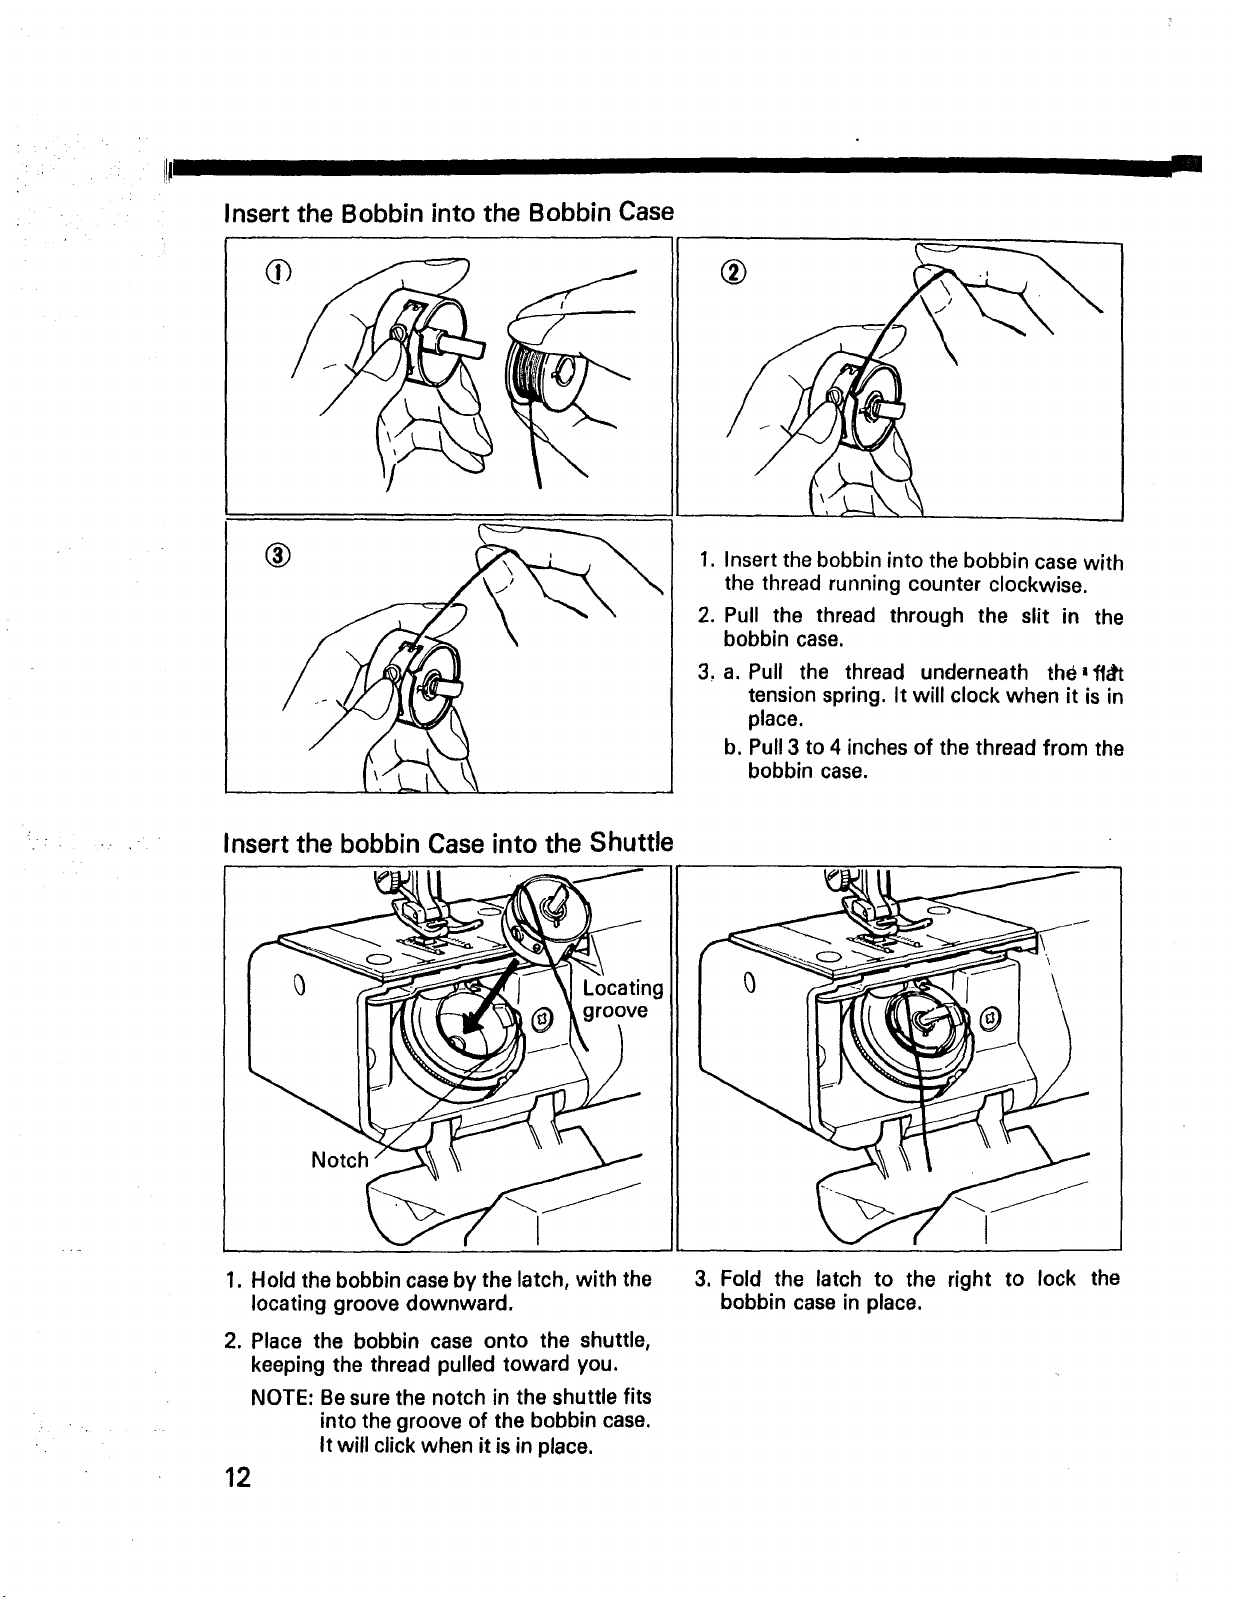
Insert the Bobbin into the Bobbin Case
®
®
Insert the bobbin Case into the Shuttle
Locating
groove
1. Insert the bobbin into the bobbin case with
the thread running counter clockwise.
2. Pull the thread through the slit in the
bobbin case.
3, a. Pull the thread underneath the lfl_
tension spring. It will clock when it is in
place.
bo Pull 3 to 4 inches of the thread from the
bobbin case.
\
\
\
Notch
1. Hold the bobbin case by the latch, with the
locating groove downward.
2. Place the bobbin case onto the shuttle,
keeping the thread pulled toward you.
NOTE: Be sure the notch in the shuttle fits
into the groove of the bobbin case.
It will click when it is in place.
12
3. Fold the latch to the right to lock the
bobbin case in place.
Page 15
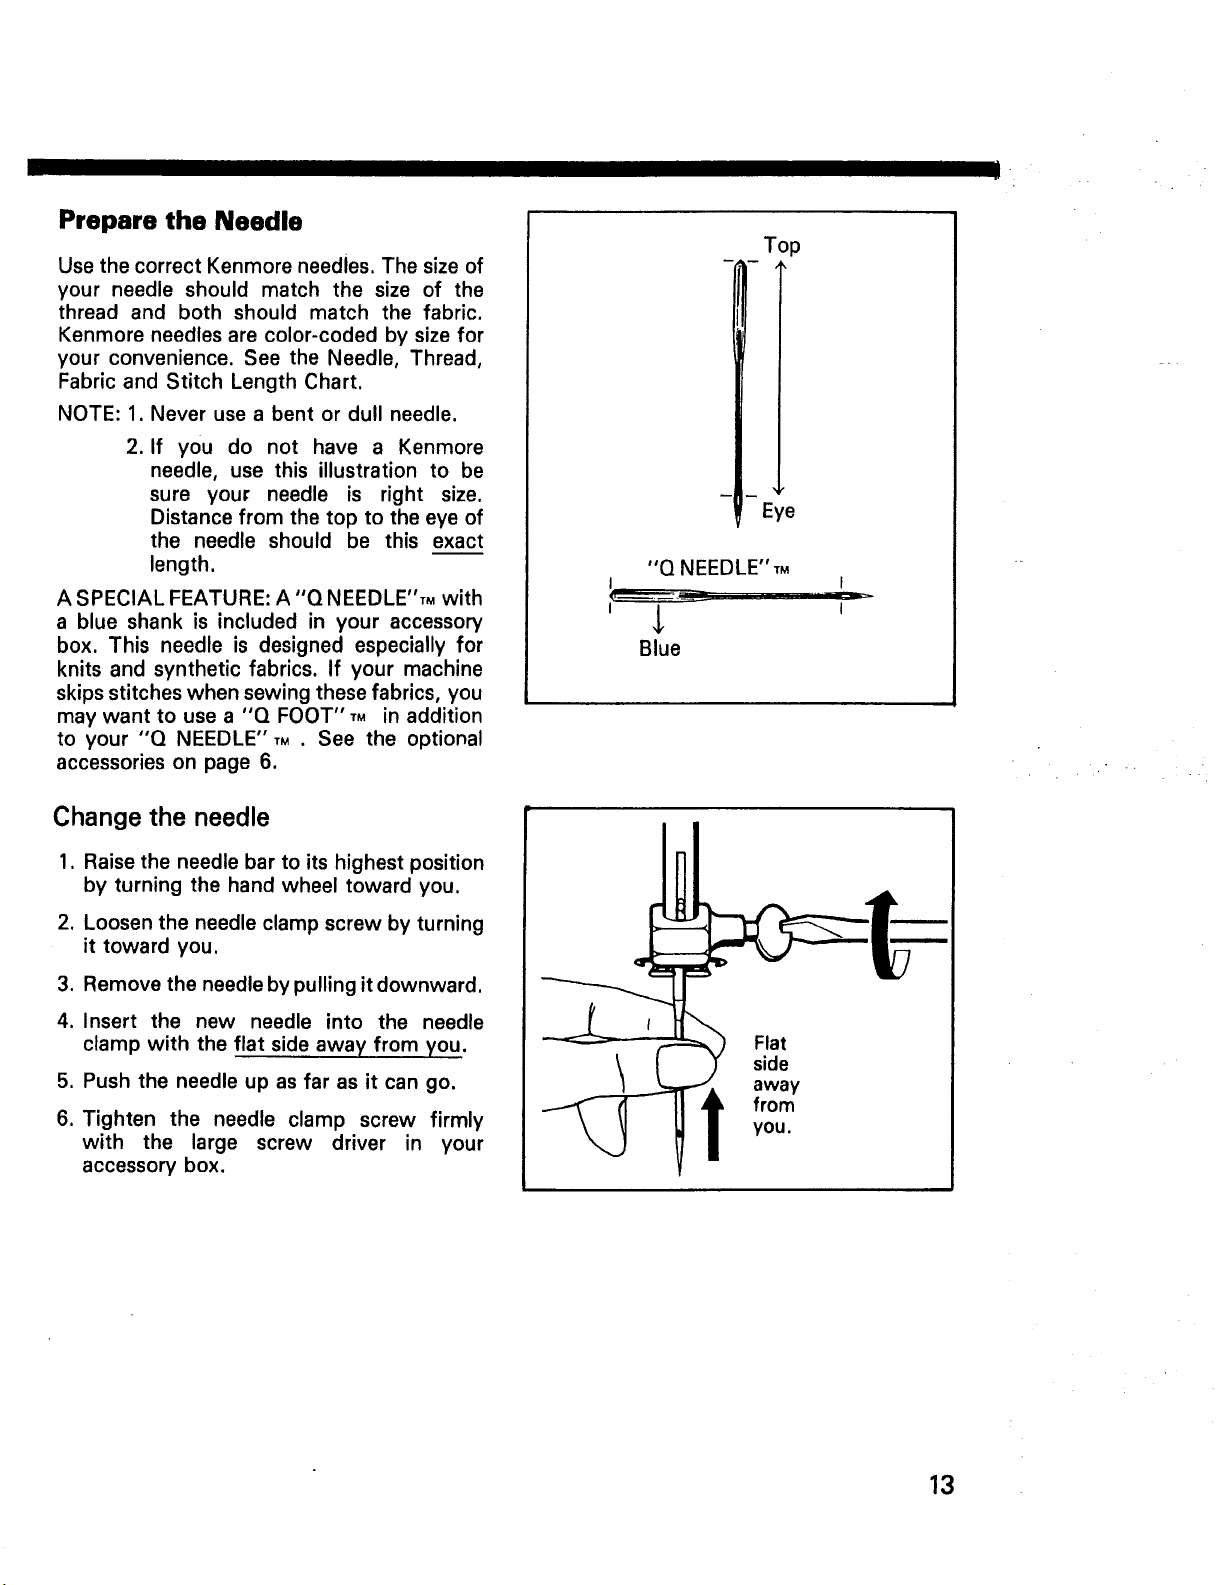
Prepare the Needle
Use the correct Kenmore needles. The size of
your needle should match the size of the
thread and both should match the fabric.
Kenmore needles are color-coded by size for
your convenience. See the Needle, Thread,
Fabric and Stitch Length Chart.
NOTE: 1. Never use a bent or dull needle.
2. If you do not have a Kenmore
needle, use this illustration to be
sure your needle is right size.
Distance from the top to the eye of
the needle should be this exact
length.
A SPECIAL FEATURE: A "Q NEEDLE"TM with
a blue shank is included in your accessory
box. This needle is designed especially for
knits and synthetic fabrics. If your machine
skips stitches when sewing these fabrics, you
may want to use a "Q FOOT" TM in addition
to your "Q NEEDLE" ,M . See the optional
accessories on page 6.
- - Eye
"Q NEEDLE"TM
Blue
Top
I
I
Change the needle
1. Raise the needle bar to its highest position
by turning the hand wheel toward you.
2. Loosen the needle clamp screw by turning
it toward you.
3. Remove the needle by pulling it downward.
4. Insert the new needle into the needle
clamp with the flat side away from you.
5. Push the needle up as far as it can go.
6. Tighten the needle clamp screw firmly
with the large screw driver in your
accessory box.
Flat
side
away
from
you.
13
Page 16
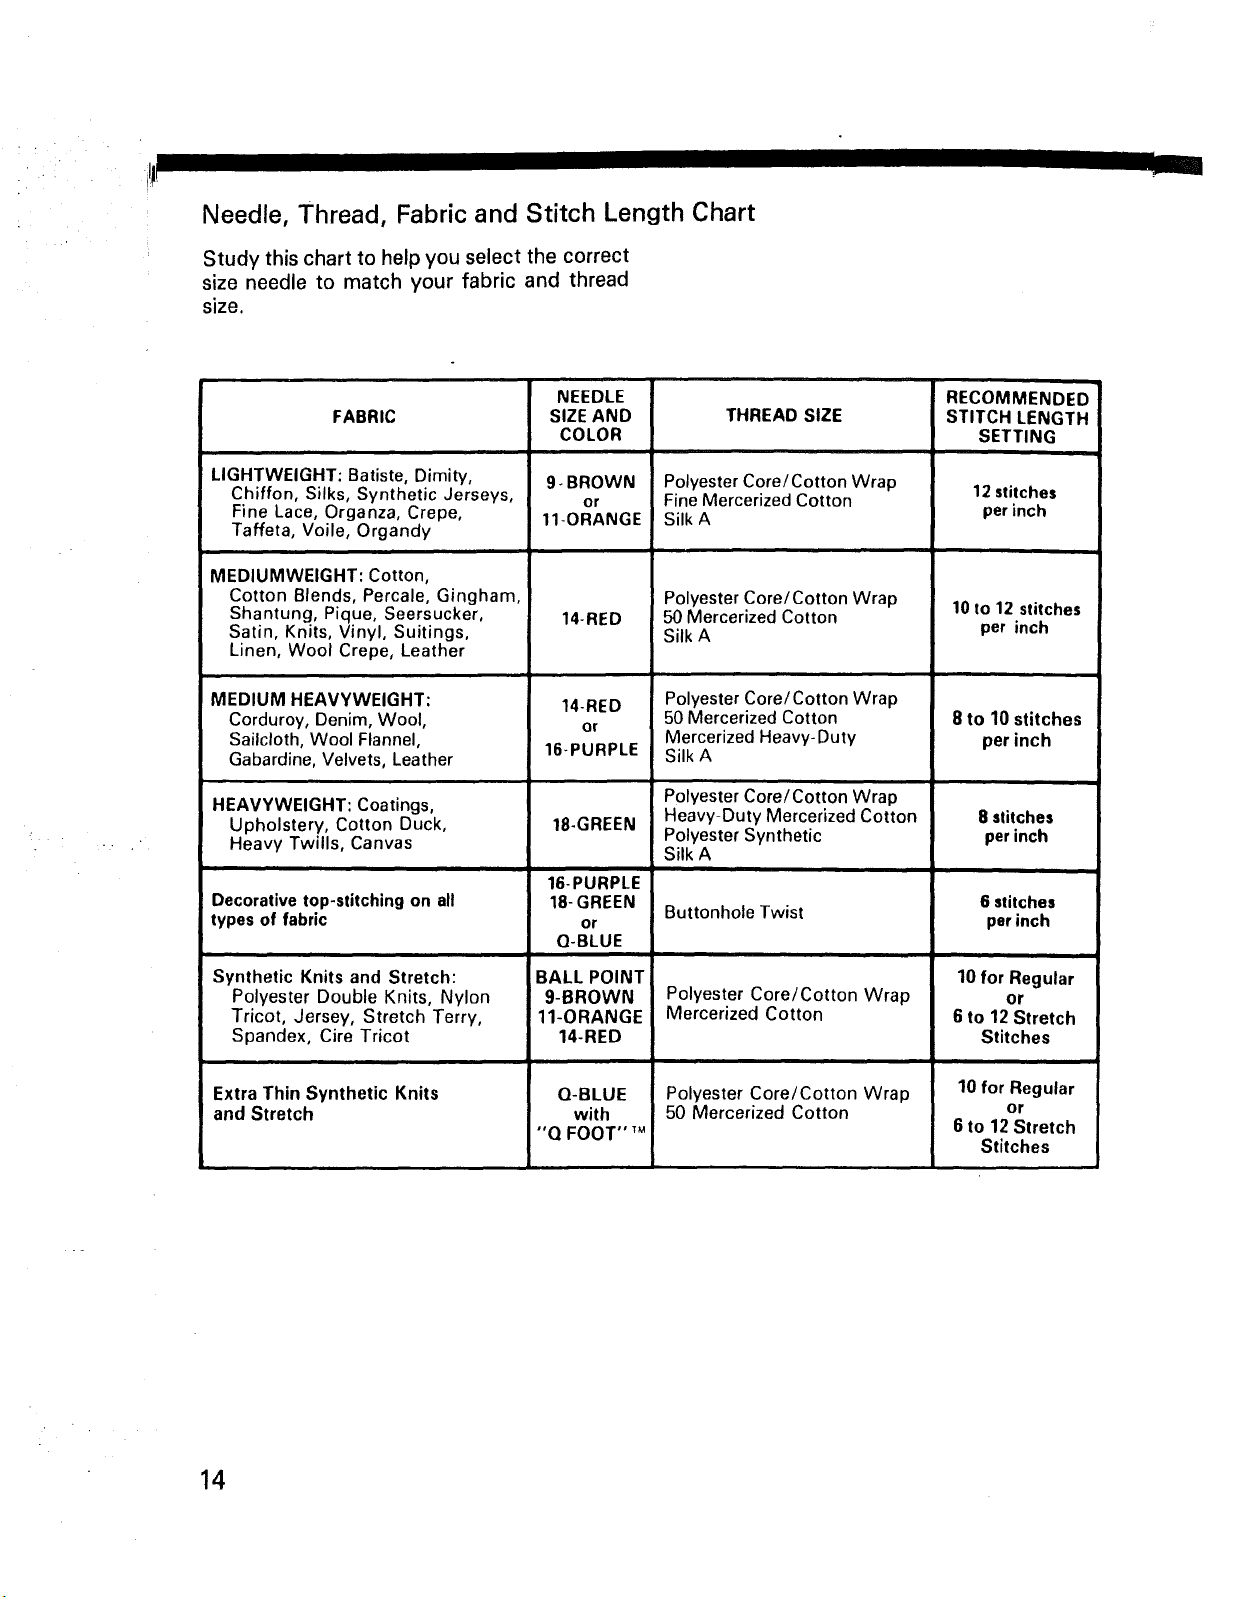
Needle, Thread, Fabric and Stitch Length Chart
Study this chart to help you select the correct
size needle to match your fabric and thread
size.
f
FABRIC
LIGHTWEIGHT: Batiste, Dimity,
Chiffon, Silks, Synthetic Jerseys,
Fine Lace, Organza, Crepe,
Taffeta, Voile, Organdy
MEDIUMWEIGHT: Cotton,
Cotton Blends, Percale, Gingham,
Shantung, Pique, Seersucker,
Satin, Knits, Vinyl, Suitings,
Linen, Wool Crepe, Leather
MEDIUM HEAVYWEIGHT:
Corduroy, Denim, Wool,
Sailcloth, Wool Flannel,
Gabardine, Velvets, Leather
HEAVYWEIGHT: Coatings,
Upholstery, Cotton Duck,
Heavy Twills, Canvas
Decorative top-stitching on all
types of fabric
NEEDLE
SIZE AND
COLOR
9- BROWN
or
11-ORANGE
14-RED
14-RED
or
16-PURPLE
18-GREEN
16-PURPLE
18-GREEN
or
Q-BLUE
THREAD SIZE
Polyester Core/Cotton Wrap
Fine Mercerized Cotton
Silk A
Polyester Core/Cotton Wrap
50 Mercerized Cotton
Silk A
Polyester Core/Cotton Wrap
50 Mercerized Cotton
Mercerized Heavy-Duty
Silk A
Polyester Core/Cotton Wrap
Heavy-Duty Mercerized Cotton
Polyester Synthetic
SilkA
ii,
Buttonhole Twist
RECOMMENDED
STITCH LENGTH
SETTING
12 stitches
per inch
10 to 12 stitches
per inch
8 to 10 stitches
per inch
8 stitches
per inch
6 stitches
perinch
Synthetic Knits and Stretch:
Polyester Double Knits, Nylon
Tricot, Jersey, Stretch Terry,
Spandex, Cire Tricot
Extra Thin Synthetic Knits
and Stretch
14
BALL POINT
9-BROWN
11-ORANGE
14-RED
Q-BLUE
with
"Q FOOT" _M
Polyester Core/Cotton Wrap
Mercerized Cotton
Polyester Core/Cotton Wrap
50 Mercerized Cotton
10 for Regular
or
6 to 12 Stretch
Stitches
10 for Regular
or
6 to 12 Stretch
Stitches
Page 17
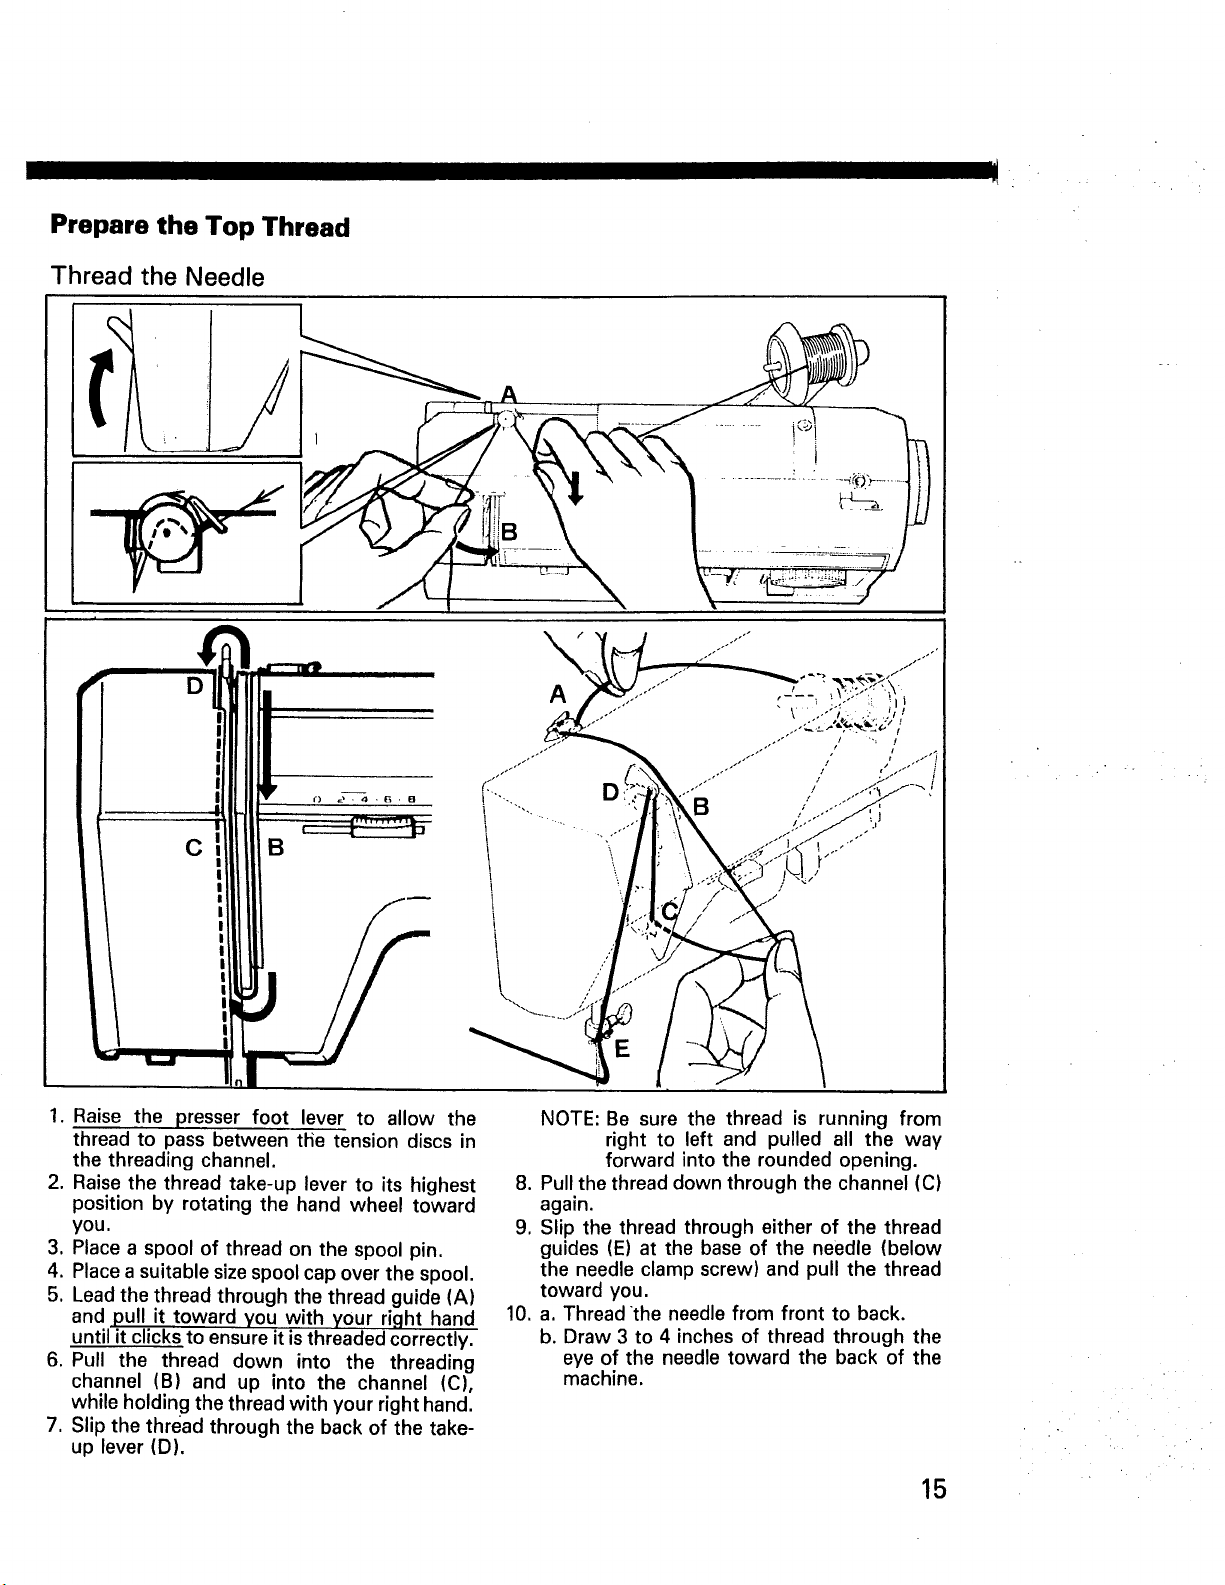
Prepare the Top Thread
Thread the Needle
D
\
A
C B
1. Raise the presser foot lever to allow the
thread to pass between the tension discs in
the threading channel.
2. Raise the thread take-up lever to its highest
position by rotating the hand wheel toward
you.
3. Place a spool of thread on the spool pin.
4. Place a suitable size spool cap over the spool.
5. Lead the thread through the thread guide (A)
and pull it toward you with your right hand
until it clicks.to ensure it is threaded correctly.
6. Pull the thread down into the threading
channel (B) and up into the channel (C),
while holding the thread with your right hand.
7. Slip the thread through the back of the take-
up lever (D).
NOTE: Be sure the thread is running from
right to left and pulled all the way
forward into the rounded opening.
8. Pull the thread down through the channel (C)
again.
9. Slip the thread through either of the thread
guides (E) at the base of the needle (below
the needle clamp screw) and pull the thread
toward you.
10. a. Threadthe needle from front to back.
b. Draw 3 to 4 inches of thread through the
eye of the needle toward the back of the
machine.
15
Page 18
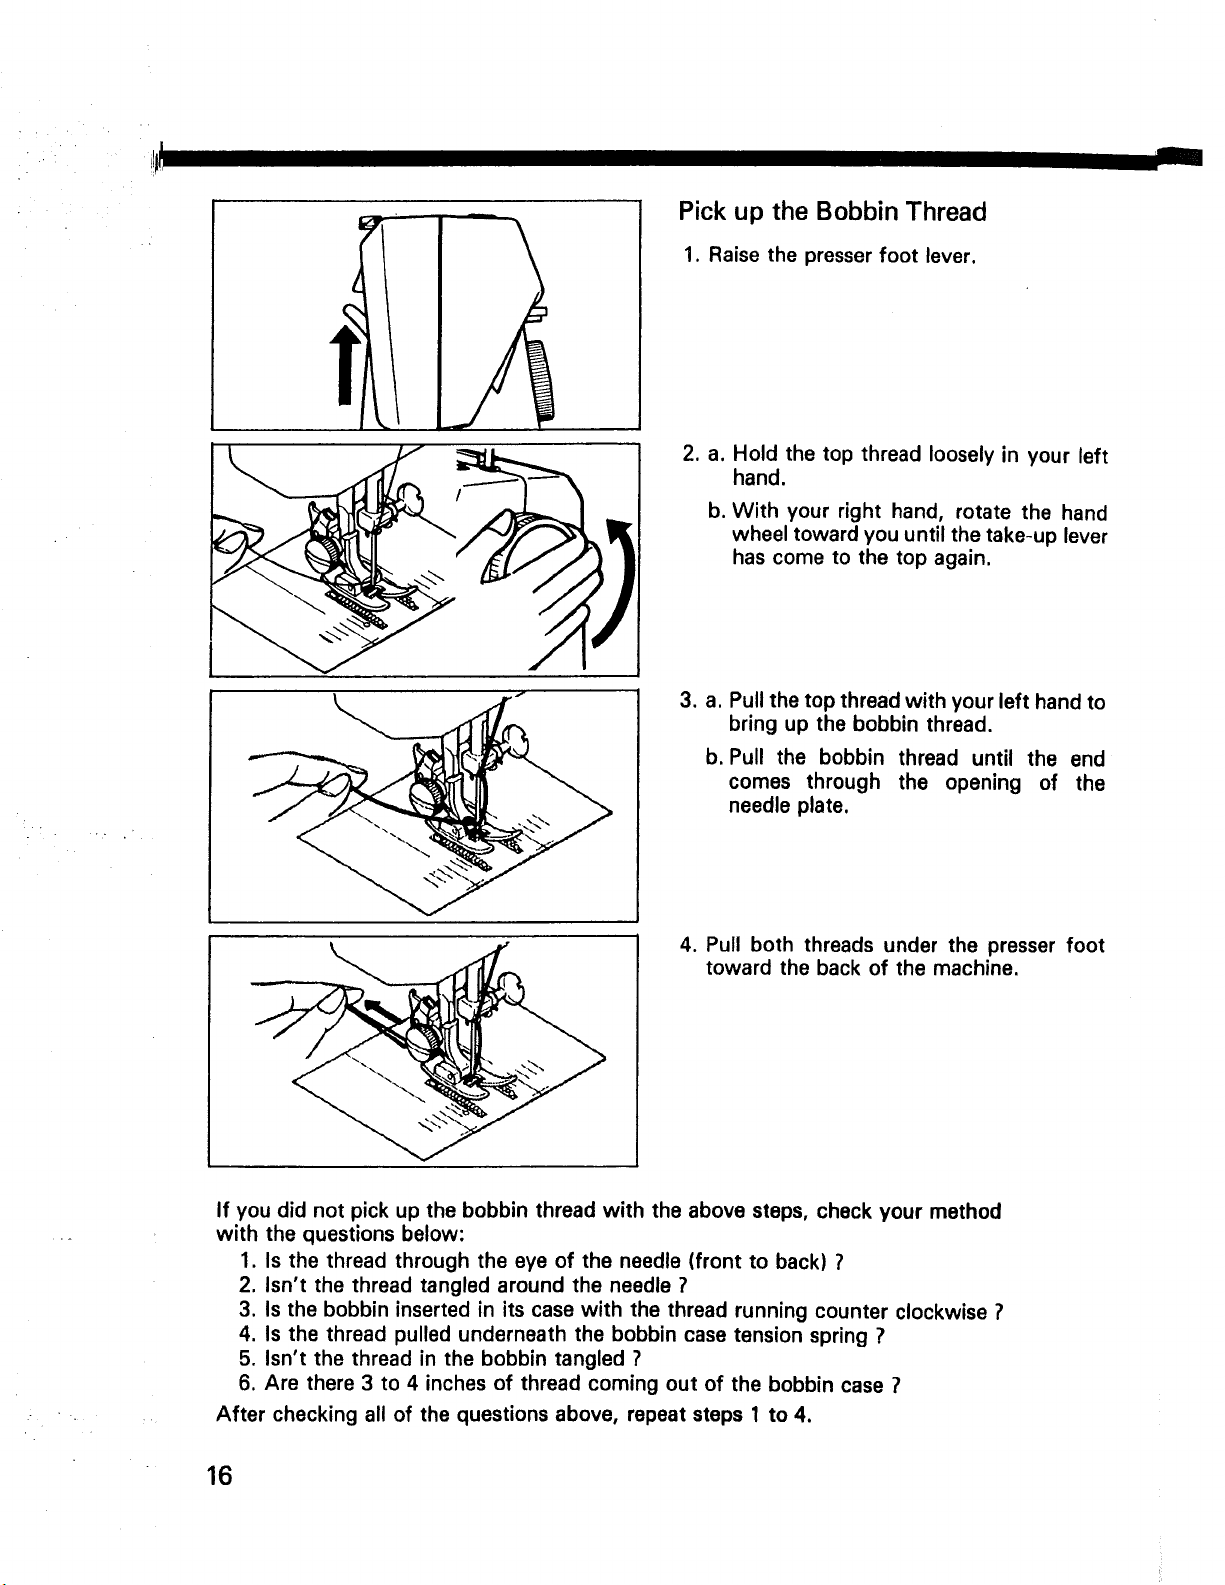
Pick up the Bobbin Thread
1. Raise the presser foot lever.
2. a. Hold the top thread loosely in your left
hand.
b. With your right hand, rotate the hand
wheel toward you until the take-up lever
has come to the top again.
3. a. Pull the top thread with your left hand to
bring up the bobbin thread.
b. Pull the bobbin thread until the end
comes through the opening of the
needle plate.
4. Pull both threads under the presser foot
toward the back of the machine.
If you did not pick up the bobbin thread with the above steps, check your method
with the questions below:
1. Is the thread through the eye of the needle (front to back) ?
2. Isn't the thread tangled around the needle ?
3. Is the bobbin inserted in its case with the thread running counter clockwise ?
4. Is the thread pulled underneath the bobbin case tension spring ?
5. Isn't the thread in the bobbin tangled ?
6. Are there 3 to 4 inches of thread coming out of the bobbin case ?
After checking all of the questions above, repeat steps 1 to 4.
16
Page 19

Check the Thread Tension
Adjust the top thread tension
STRAIGHT STITCHING
Straight stitching
The good looking appearance of your stitching
islargely determined by the balanced tension of
both top and bobbin threads. The tension is well
balanced when these two threads 'lock' in the
middle of layers of fabric you are sewing.
NOTE: For most fabric the top thread tension
should be balanced within the orange
zone between 2 and 4 on the thread
tension control.
If, when you start to sew, you find that the
stitching is irregular, you will need to adjust the
tension control.
1. Lower the presser foot lever.
2. a. If the threads are locking on the top
surface with the top thread lying flat, the
top thread is too tight. Slide the tension
control to the left (lower numbers).
b. If the reverse is happening with the threads
on the underside of the fabric, the top
thread is too loose. Slide the tension
control to the right (higher numbers).
Zigzag stitching
The top thread may appear on the underside
depending upon the thread, fabric, type of
stitch and sewing speed, but the bobbin thread
must NEVER appear on the top of the fabric.
Under_
Top _ __ Well balanced
sloe
op stitch Top stitch
too tight too loose
ZIGZAG STITCHING
Adjust the bobbin thread tension
NOTE: You will rarely need to adjust the bobbin
thread tension. Most adjustments should
be made on the top thread.
1. If the tension is well balanced, but the seam
puckers badly, loosen the bobbin and top
thread tension.
2. a. Insert the small screw dirver into the screw
on the side of the bobbin case.
b. Make only a small adjustment each time,
i.e. quarter to half a turn to the right to
increase tensionr or to the left to decrease
tension.
NOTE: Remember the original position of the
screw slot to put it back for normal
sewing.
Fabric
puckers
Increase
Decrease
17
Page 20

:lj_I
Choose the Right Presser Foot
You will need change your presser foot to
match the stitch you have chosen.
Know what the presser feet will do
Standard zigzag foot (Fitted on the machine)
Use this foot for the general sewing with both
striaght and zigzag stitching.
±
Satin stitch foot
This foot is grooved to permit dense
stitching to pass under it easily. Use it for
appliqueing, bar tacking, embroidery and
monogramming.
Straight stitch foot
Use this foot for straight stitch or straight
stretch stitch. The straight stitch foot will
give greater control of the fabric and more
even straight stitches.
Zipper foot
This foot allows you to sew to the right or left
of the zipper or close to the cord.
Buttonhole foot
Use with the snap-in automatic buttonhole
attachment.
18
Buttonhole guide
Use this special accessory with the zigzag
foot when making built-in buttonholes.
Mount it on to the zigzag foot. Reproducing
identical size buttonholes is made easier with
the aid of the graduations on theeguide.
Page 21

I
/
Change the presser foot
Snap-on presser feet
1. Bring the needle to the up position.
2. Raise the presser foot lever.
3. Push the foot release lever and the presser
foot will drop off.
4. Place the new foot on the needle plate
aligning needle holes.
5. Lower the presser foot lever so that the
presser foot holder snaps on the foot.
6. Push down the presser foot thumb screw
to engage the foot holder and the foot
securely.
Presser
foot
holder
Foot
release_,_
lever
I
!
Screw-type presser feet
To use some accessory feet (see page 6), you
may need to remove the presser foot holder.
1. Bring the needle to the up position.
2. Raise the presser foot lever.
3. Turn the presser foot thumb screw toward
the back of the machine using the large
screw driver.
4. Remove the presser foot holder.
5. Insert the new foot.
6. a. Lower the presser foot lever.
b. Tighten the thumb screw using the
screw driver to fit the foot securely.
Foot hold_
Foot
thumb
screw
19
Page 22

IIII
I I II I Er ,¸ IIII I
Use the Feed Cover Plate
The feed dogs automatically feed the fabric.
If you want to prevent the feed dogs from
feeding the fabric, use the Feed Cover Plate
which covers the feed dogs so that they do
not touch the fabric.
NOTE: Use the feed cover plate when sewing
on buttons, making buttonholes with
the snap-in automatic buttonholer
and darning.
1. Insert the two knobs on the feed cover
plate into the two holes on the fabric feed
area. The curved corners will be toward
you when it is in place.
Use the Double Needle*
Place the second spool of thread on the extra
spool pin, and thread the machine as you
would for a single needle except the double
thread guides provided below the needle
clamp screw. Draw one thread through each
of these and through each side of the needle
from front to back. Make certain threads are
not crossed.
L
* See the optional accessories on page 6.
/I
i1
l
2O
Page 23

3. LEARN TO USE THE CONTROLS
Your machine has many special features to make your sewing both easy and accurate. Take a
minute to look at the three controls that regulate your stitches.
Stitch Selector
I!¸
Your sewing machine can make a variety of
stitches. They are pictured on the Stitch
Selector Dial. In addtion, there are three
buttonhole steps pictured on the dial also.
Orange patterns_ Blue buttonhole steps
Green pattern __--- Orange pattern
Green patterns
Stitch Length Control
NOTE: Beginning on page 24, you will find
detailed instructins on the use of each
stitch.
Blue buttonhole
- Yellow patterns
To lenghten a stitch, turn the dial toward
you. To shorten a stitch, you turn the dial
away from you. You will see 5 numbers on
the dial. These tell you the number of stitches
per inch when you are sewing.
NOTE: Study the orange, green, yellow and
blue sections on this control. These
Orange pattern ran pattern range
Shorter
Blue buttonhole range
L°n;;:tern range i_ ! !_l_lll
are recommended ranges of stitch
length and color-coded to the stitches
pictured on the Stitch Selector.
The orange line between 0 and 24 is the
setting used for the shortest stitches such as
in satin stitching.
Yellow pattern range- X /
Green pattern range --/ \
Orangepattern range
_ Shorter
j_i! Longer
Bluebuttonhole range
21
Page 24

1 • 2 • 3 '--_" 5 -_
t
I III
Stitch Width Control
(Model 14501, 14502, 14571, 14572 only)
The width of all stitches produced on this
machine (except the straight stitch) can be
made narrower or wider by adjusting the
stitch width control.
To decrease or increase the width of a stitch,
slide the stitch width control from 1 - 5. The
higher the number the wider the stitch.
When straight stitching, set this control at
"1" to achieve uniform straight stitches.
NOTE: Study the colored sections on this
control. These are recommended
ranges of stitch width and color-
coded to the stitches pictured on the
Stitch Selector.
Besides these three controls, there are other
controls on your machine as follows:
I
Reverse stitch lever
Cornering Guides
Reverse Stitch Lever
Push down and hold the lever to reverse the
direction of your stitches. The machine will
go forward again when you release the lever.
BACKTACKING
Secure your seams by taking the first few
stitches in reverse. Then allow the machine
to go forward. This is called backtacking.
Reverse the machine at the end of your
seams as well.
Seam Guide Lines
The needle plate is marked with seam guide
lines to help you stitch straight seams.
The standard 5/8" lines are bolder for your
convenience.
The dimensions indicate the distance from
the straight stitch needle position.
The cross lines are cornering guides to help
you make square corners. See page 26 for
detailed cornering instructions.
22
Page 25

4. PRACTICE GOOD HABITS
-- Before you begin to sew
1. Check the needle:
a. Is it inserted properly ?
(See page 13)
b. Is it the correct size for your fabric ?
(See the chart on page 14)
c. Is it threaded properly ?
(See page 15)
d. Is it straight and sharp ?
NOTE: Many synthetic fabrics dull
your needle quickly. Be sure
to replace needles often.
2. Check the threads.
a. Are they both on top of the needle
plate surface ?
When you begin to sew
1. Test the machine on a scrap of
material.
a. Always begin your first stitches by
turning the hand wheel toward you
to lower the needle into the fabric.
b. Run the machine at a slow, even
speed. The more pressure you
apply to the foot control, the faster
the machine will stitch.
c. Adjust the tension control if
necessary. (See page 17)
b. Do you have 3-4 inches pulled
toward the back of the machine.
NOTE: Hold the threads for the first
3 to 4 stitches of the seam to
keep them from tangling under
the fabric.
3. Check the stitch controls and presser
foot.
a. Are the color codes on the controls
matched correctly ?
b. Do you have the correct presser
foot for the project and for the type
of stitch you have chosen ?
d. Backtack at the beginning and end
of each seam. (See page 22)
e. Finish sewing with the needle at its
highest position except cornering.
f. Guide the fabric gently. Do not
pull. The machine will feed the
material at its own speed.
g. Always turn the hand wheel toward
you, never away from you.
NOW YOU'REREADY TO LEARN THE
STITCHES. PLEASE TURN TO THE
NEXT PAGE.
i ,
23
Page 26

5. LEARN TO USE THE STITCHES
I I
Machine Setting Chart
The following pages will show you how to:
1. Set the Stitch Selector.
2. Set the Stitch Length Control.
3. Set the Stitch Width Control.
NOTE: Machine settings are graphically
shown for your quick reference.
Simply following the illustrated
Top thread tension control Stitch width control
f _, f
4. Use the stitch correctly.
NOTE: You may want to use fabric scraps
charts, select and sew a variety of
stitches shown below.
to experiment with these stitches.
This manual will show you the best
uses of these stitches.
Stitch selector
0
1 .2.3 4 5
1
Presser foot Stitch length control
f =-- " -L
i ,_ I _ I • ee 12-1-
J¢.... 1j - !J -i
Zigzag stitch
Three-step zigzag
Blind stitch
Shell stitch
Box stitch
rwo-point shell stitch
Elastic blind stitch
Elastic edge stretch
Overlock stretch
i
Straight stitch
Built-in buttonhole
Straight stre_tch
Rick-rack stretch
Smocking stretch
Overcast stretch
Serging stretch
Elasticstretch
24
Page 27

Straight Stitches
Top thread tension control
Stitch width control
Stitch selector
See page 17.
uniform stitches.
Presserfoot
f
*Straight or zigzag
_. foot
NOTE: Always beoin your first stitches by
turning the hand wheel toward you to
lower the needle into the fabric.
* Choose this stitch to perform the following
tasks:
straight foot will give you best control. You
_NOTE: For most straight stitching, the I
may use the zigzag foot if you prefer.
z
'1" to obtain
0
Stitch length control
12 or orange range ._
Sewing a Straight Seam
NOTE: Use the instructions that follow as
general rules for handling your
machine, regardless of the particular
stitch you are using.
1. Backtack (see page 22) by beginning
1/2 inch from the beggin!ng of the seam.
2. For 5/8 inch seam, line up the edge of the
fabric where the seam guide is marked.
3. Backtack at the end of each seam.
4. a. Turn the hand wheel to raise the needle
to its highest position.
b. Raise the presser foot by pushing the
presser foot lever up.
c. Pull the material toward the back or side
of the machine.
d. Use the thread cutter on the presser
foot release lever to cut off excess
threads.
25
Page 28

Cornering
guide
Square the Corner 5/8" from the
fabric edge
. a°
Stop stitching your 5/8 inch seam when
the fabric is even with the cornering
guide (cross marks).
b.
Leave the needle in the fabric.
2. a.
Lift the presser foot.
b.
Turn the fabric so that the unstitched
side is lined up with the seam guide.
Co
Lower the presser foot and stitch in the
new direction.
Top-stitching
Top-stitching improves the appearance of a
tailored garment and at the same time holds
facings in place.
You may want to stitch with a thread of
contrasting color to your fabric.
1. Set the stitch length at 8 - 6.
2. Stitch 3/8 inch from the edge on top of the
fabric.
26
Darning
1. a. Attach the feed cover plate (see
page 20).
b. Remove the presser foot holder (see
page 19).
c. Stretch the fabric with the hole in the
center between embroidery hoops as
shown.
2. Lower the presser foot lever and sew at a
slow speed.
3. Move the fabric back and forth with a
steady rhythm until you have covered the
darning area.
°
When the area is covered, turn the fabric
so that you can repeat the procedure
across the first stitches.
NOTE: If the garment is badly damaged, you
may want to put a separate piece of
fabric under the hole to reinforce it.
/
Page 29

IIII I _1
Basting
,
Set the stitch length control at 6.
2.
Set the top thread tension control at 1 - 2
to facilitate pulling out bobbin thread.
,
Insert pins at right angles to the seam line,
with the tip of pins just touching the seam
line.
NOTE: Pins must not come in contact with
the feed dogs. Never pin on the
underside of the fabric.
=
4. Sew over the tip of pins slowly.
NOTE: If in doubt about sewing over pins,
remove each pin as you approach
it.
Gathering
°
Set the stitch length control at 6.
2.
Set the top thread tension control at 1 - 2.
3.
Sew one or as many rows of parallel
stitches as required, but do not backtack
at the begginings and ends of the rows.
4,
Remove the fabric and draw up the bobbin
thread to gather the fabric to the required
length or fullness.
27
Page 30

Needle to left
of foot
Attaching a zipper
1. To sew down the right side of the zipper,
attach the left side of the zipper foot to the
presser foot holder so that the needle
passes through the opening on the left
side of the foot.
2. To sew down the left side, attach the right
side of the foot to the foot holder.
Needle to right
of foot
Cording
* Use the zipper foot to make cording for slip
covers, pillows etc.
1. Attach the right side of the zipper foot to
the presser foot holder.
2. Wrap the cord with a strip of true bias.
3. Stitch close to the cord.
28
Page 31

Zigzag stitches
Top thread tension control
f
w
0.2 4.6.8
Stitch width control Stitch selector
I II
See page 17.
resser,oot
Zigzag foot _-_ [-
Models with stitch width control
The simple zigzag stitching enables you to do
many exciting things with your sewing
machine. Beyond basics, you'll use this stitch
to applique, embroider and monogram.
Unlike the straight stitch, the zigzag stitches
have a side-to-side width as well as a stitch
ength. You will find ideas for many zigzag
operations on following pages. You can
create an exciting variety of zigzag stitches
by adjusting stitch width and length controls
(see the chart below).
1-5
Stitch length control
1 or orange rangej
Models without stitch width control
By rotating the stitch selector, it is possible to
choose six different widths of zigzag.
These are illustrated on the dial which will
produce the various zigzag widths as shown
in the diagram.
The stitch selector can be turned in
succession with ease within the zigzag stitch
'range. Use this feature to make decorative
patterns.
Extra wide zigzag for heavy fabrics or
those that fray -- set width at 5.
Wide zigzag for double layers, like
hemming -- set width at 4.
Medium zigzag for most construction
seams - set width at 2 - 3.
Narrow zigzag for light fabrics, barely
shows -- set width at 1.
==
l/Ill
29
Page 32

I0
Overcasting stitch
* Choose this stitch to keep seams or fabric
from raveling.
NOTE: To reinforce seams with overcasting,
it is recommended to use the three-
step zigzag (see page 33).
1. Stitch so that the point of the zigzag clears
the raw edge of the fabric.
Satin stitch
Closely spaced zigzag stitches are called satin
stitches.
* Choose this stitch for bar tacking, applique-
ing, embroidery and monogramming.
1. Set the stitch length control at the orange
line between 0 and 24.
Satin stitch
foot
!
!
I
2. Use the satin stitch foot which is grooved
to permit dense stitching to pass under it
easily.
NOTE: You may need to loosen the top
thread tension to prevent puckering.
The wider the stitch, the looser the
tension should be. (See page 17.)
Use tissue paper or interfacing beneath a soft
fabric to improve the appearance of this
stitch.
Practice the stitch on a piece of the fabric you
will use before actually stitching your sewing
project.
Bar tacking
* Choose this stitch to reinforce points of
strain such as corners of pockets and straps
I
I
I
I
l
I
I
on lingerie.
1. Set same as satin stitch.
2. Sew 4 to 6 zigzag stitches on top of the
fabric.
30
I
_1
Page 33

Applique
To applique a design on a sewing project or
garment:
1. Baste the applique to the top of your fabric.
2. Then use satin stitch to attach permanently.
You may want to use a contrasting color
thread.
NOTE: Forbest results, be sure your satin stitch
covers the bottom fabric and the top
fabric.
Embroidery and Monogramming
Satin stitch method
Satin stitch can be used to produce many
different designs and patterns.
1. Set controls the same as for satin stitch.
2. Back the fabric with paper or interfacing.
3. Draw the design on to the fabric with tailor's
chalk.
4. Satin stitch, adjusting the stitch width as
necessary to form each pattern.
5. If using paper, carefully remove it when you
have finished sewing.
Free hand method
1. a. Attach the feed cover plate (see page 20).
b. Remove the presser foot holder (see
page 19).
c. Set the stitch width at 1 to 5 as desired.
2. Draw the design on to the fabric with tailor's
chalk.
3. Stretch the fabric between embroidery hoops
and place under the needle.
4. Lower the presser foot lever to engage the
top thread tension.
5. a. Holding the top thread in your left hand,
rotate the hand wheel toward you one
complete turn.
b. Pull the top thread to draw the bobbin
thread through to the surface of the fabric.
6. Using a medium speed, stitch along the
marked outline, guiding the fabric carefully
by hands.
31
Page 34

Feed cover
Button sewing
1. Attach the feed cover plate (see page 20).
2. Use clear tape to fix the button on your
fabric before stitching.
NOTE: When sewing a flat button, place
a pin between the holes so your
button will be loose enough for
easy buttoning.
.
Align the two holes of the button with the
slot of the presser foot.
4.
Lower the presser foot.
5.
Turn the hand wheel by hand until the
needle point is just above the button.
6.
Adjust the stitch width control so the
needle will enter one hole of the button.
=
Turn the hand wheel again so the needle
will enter the second hole. Readjust the
stitch Width if necessary.
8. Stitch several times.
9. Leave 2 inches of thread after stitching.
10. Pull these threads under the fabric and tie
securely.
32
Page 35

I I il I I I
Three-step Zigzag
Top thread tension control
f-
S page 17. ___ _ 4-5 ,,
Presser foot = I = =
Stitch width control Stitch selector
i
f
gg ) ' L_ i
NOTE: Three-step zigzag takes three short
stitches, where regular zigzag takes
one.
! itch length control
I I ; ,-I
IIIn:l
t • • 12-1-'
' l!"il
\ 12 or green range ,,)
* Choose this stitch to mend a tear or to
overcast a raw edge.
To Mend:
1. Put a piece of fabric under the tear to be
mended.
2. Stitch so that the fabric on both sides of
the tear is caught by the points of the
stitch.
To Overcast:
NOTE: See the instructions on page 30 for
zigzag stitch overcasting. The three-
step overcasting stitch is stronger
than the regular zigzag overcast
stitch. Use this stitch to keep fabric
from puckering.
33
Page 36

Blind Hem
Top thread tension control
I
0 . 2,_ • 6 •B_ _r[_===_ I . 2 . 3 "-_'5__ t
See page 17. 2 - 5 (Green range)
f
Presser foot k I Stitch length control
Zigzag foot j I taFo°_eSe_s!h:__!_d _b._!6_ :!eieSp!ii_) m;t_ed
--V-V....V- -- Regular blind stitch for
normal fabrics
--Elastic blind stitch for
soft, stretchable fabrics
(Model 14571 only)
Stitch width control Stitch selector
12 or green range j
* Choose this stitch to use on garments and
especially on curtains and drapery hems so
that stitches need not show on the front of
the fabric.
IlUi
34
INSIDE
OF DRESS
FINISHED "
EDGE
1. Finish the raw edges, depending on what
you are sewing and the nature of fabric.
NOTE: For light weight fabrics, you may
need a double fold.
The hem should be pressed and pinned in
place.
FINAL
HEM
LENGTH
Page 37

2. a. Fold the garment away from the hem.
b. Leave1/8 inch of the hem edge exposed.
®
FINISHED
EDGE
3. a. With the wrong side up, place the fabric
under the foot.
b. Lower the presser foot.
c. Stitch so that the needle just pierces the
fold when the needle swings to the left.
4. Unfold the garment and press the hem
flat.
®
®
RIGHT SIDE OF
FINISHED HEM
35
Page 38

I1_ II I
Box Stitch
i
Top thread tension control
f
Stitch width control
1 .2 .3 4 5
3 -- 5 (Green range)
Stitch selector
0
1
Presser foot
Zigzag foot
Stitch length control
12 or green range
* Choose this stitch to sew flat overlapped
seams or to decorate a finished edge on
lingerie or nightwear.
To Sew Overlapped Seams:
1. a. Overlap the raw edges of two pieces of
fabric.
b. Stitch so that the stitches pierce both
pieces of fabric on the left and right
sides.
36
__ f
i I
I
f
I
r1"
¼'"
To Make a Decorative edge:
1. Stitch close to the folded edge of your
garment with a matching or contrasting
thread to create a bold look.
I
Page 39
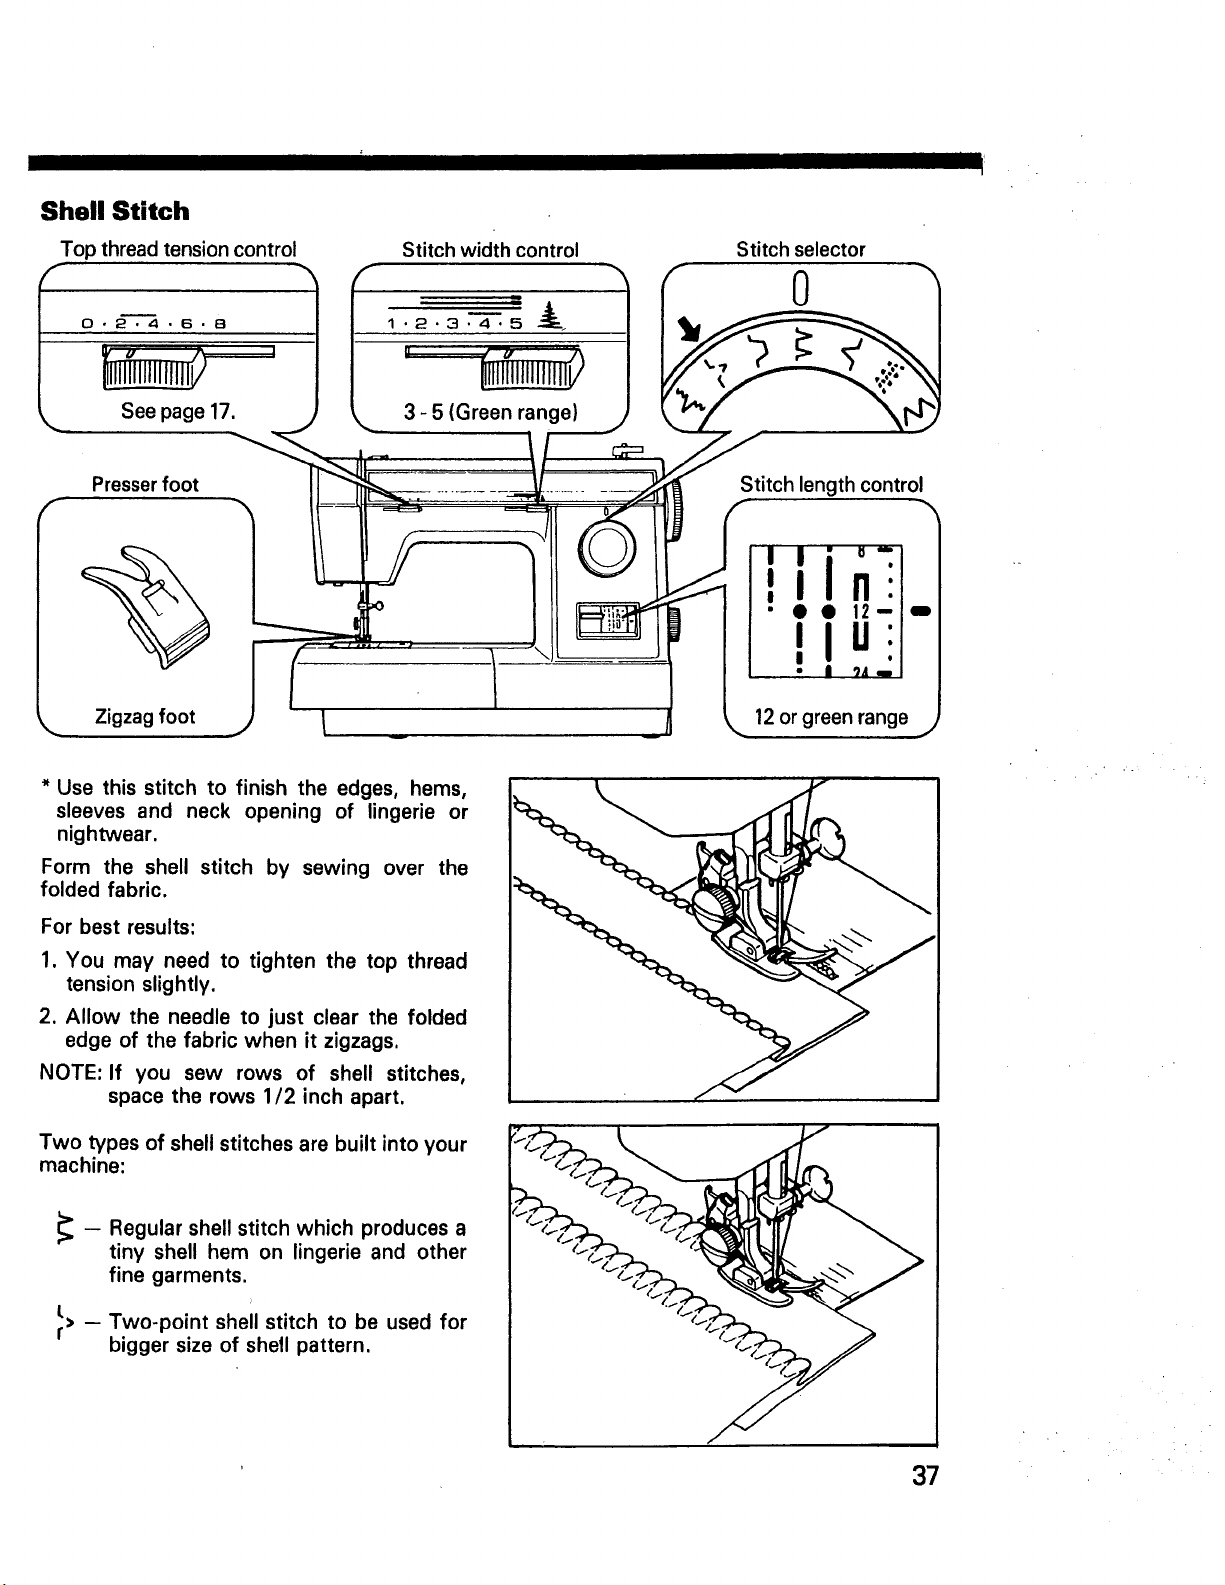
Shell Stitch
Top thread tension control Stitch width control Stitch selector
" "- _ , 7 1 0 -"
0 • 2--'_ • 6 • B __ 1 ' 2 ' 3 '--_' 5
S page17. _ _ 3-5<Greenr_n____ _._ _
I !
i
Presserfoot _ _ __St
itch length control_-_'4 --
7 It:-'_ --_ _'11 "-
I // /7 # (_)It' ,,io-.i
_\ I __ I __ llln:l
\\\,\ _ .,o I _ -" • • ll-I_
Zigzag foot J I _ _ 12 or green range i
* Use this stitch to finish the edges, hems,
sleeves and neck opening of lingerie or
nightwear.
Form the shell stitch by sewing over the
folded fabric.
For best results:
1. You may need to tighten the top thread
tension slightly.
2. Allow the needle to just clear the folded
edge of the fabric when it zigzags.
NOTE: If you sew rows of shell stitches,
space the rows 1/2 inch apart.
Two types of shell stitchesare built into your
machine:
_- Regular produces a
tiny shell hem on lingerie and other
fine garments.
r>_t Two-point shell stitch to be used for
bigger size of shell pattern.
shell stitch which
37
Page 40

Stretch Stitches
Top thread tension control
f
O, _'--_, 6 • 8
Stitch width control
1 " 2 ' 3 '-_" 5 --_
Stitch selector
1
See page 17.
Presser foot
f
Zigzag foot
{..
2 -- 5 (Yellow range)
These eight stitches are built into your
machine to use with stretch and knit fabrics:
Stitch length control
6-- 12
(Yellow range)
J
rx/
V_
v_
V_
V_
V_.
V_
v_
1. Straight stretch stitch
2. Rick-rack stretch
3. Smocking stretch
4. Overcast stretch
5. Serging or pine leaf stretch
6. Elastic stretch
7. Overlock stretch
8. Elastic edge stretch (model 14571 only)
NOTE: For best results, use the "Q
NEEDLE"T, and "Q FOOT"TM" for
sewing on knit and synthetic fabrics.
See the optional parts list on page 6.
Ultra Stitch
Depending upon your preference in stitch
patterns, Ultra Stitch feature enables you to
make stretch stitches closer together without
changing the balance of forward and reverse
motion stitches by turning the stitch length
control within the yellow range.
38
Page 41

_1 II
Where to Use Which Stretch Stitch: A Check-Chart
Some Stretchy Suggestions...
1. To keep loosely constructed knits from
catching on the toes of the presser foot,
wrap a short strip of transparent tape of
the presser foot encasing both toes.
2. To avoid tangled threads, start seams
carefully. Position your fabric and lower
your needle before lowering the presser
foot.
SUITABLE FOR STRETCH FABRICS
Use on stretch and knit fabrics and to repair ready made
garments at stress points. Basic stitch for all garment
seams requiring "give" (i. e. armholes, crotch area, etc.).
Use also to sew center seam of men's neck ties and seams
STRAIGHT STRETCH
/VVVV
RICK-RACK STRETCH
SMOCKING STRETCH
cut on the bios.
A basic multi-purpose stretch stitch with same usage as
zigzag stitch, especially for lightweight stretch fabrics.
A decorative stitch for use on children's clothing, lingerie,
yokes of blouses, dress bodice.
3. Test the thread tension and stitch on a
scrap of the same fabric you will use.
4. Knits contain more yarn (and more lint)
than woven fabrics. Check often and clean
the bobbin case area.
Use to apply elastic to lingerie or to repair readymade
lingerie and replace or restitch elastic.
ELASTIC STRETCH
VVVV 7 7 I /
OVERCAST OR ELASTIC
EDGE STRETCH
\/\/\/\/\/
Zh/'hZhZh,/h
OVERLOCK STRETCH
\\\\\\\
SERGING OR PINE LEAF
_I' II I_" / _"]|.i_.[t./t./t.A.I_I l\ 1_ l\ I_
STITCH
BASIC STITCHES
PLAIN ZIGZAG
_1\__1\__1 \__1\_
SHELL .STITCHES
Use on sportswear where 1,4" seams are required. Makes
and finishes seams at same time.
Use to overcast loosely constructed knits or woven
fabrics.
Use for overcasting fabrics that ravel or fray easily.., and
for seams that need a great deal of stretch (i.e.
swimwear, other sportswear, girdles). Also good-looking!
WITH STRETCH APPLICATIONS
Use for all-purpose stretch sewing, seam finishing, edge
finishing, or attaching stretch laces.
A good finishing stitch for nylon tricot lingerie.
39
Page 42
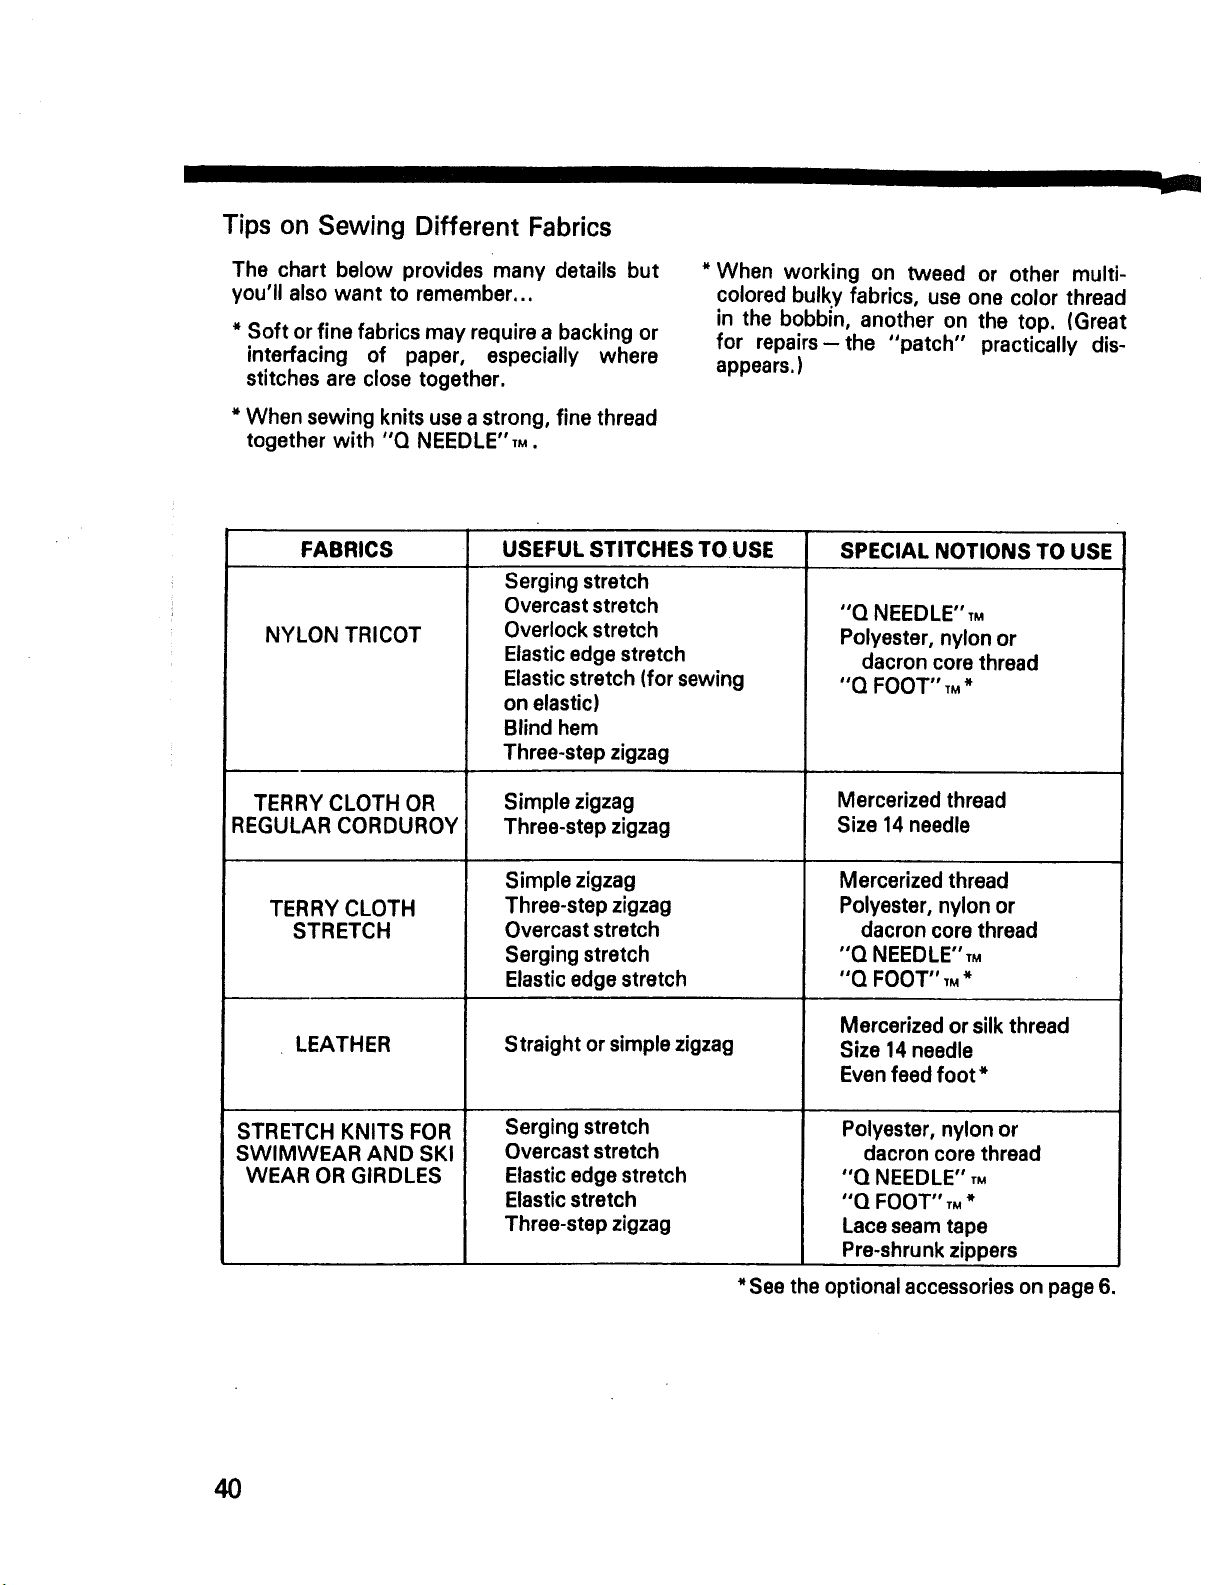
Tips on Sewing Different Fabrics
v --
The chart below provides many details but
you'll also want to remember...
* Soft or fine fabrics may require a backing or
interfacing of paper, especially where
stitches are close together.
* When sewing knits use a strong, fine thread
together with "Q NEEDLE"._.
FABRICS
NYLON TRICOT
TERRY CLOTH OR
REGULAR CORDUROY
USEFUL STITCHES TOUSE
Serging stretch
Overcast stretch
Overlock stretch
Elastic edge stretch
Elastic stretch (for sewing
on elastic)
Blind hem
Three-step zigzag
Simple zigzag
Three-step zigzag
* When working on tweed or other multi-
colored bulky fabrics, use one color thread
in the bobbin, another on the top. (Great
for repairs-the "patch" practically dis-
appears.)
SPECIAL NOTIONS TO USE
"Q NEEDLE" T.
Polyester, nylon or
dacron core thread
"Q FOOT" T. *
Mercerized thread
Size 14 needle
TERRY CLOTH
STRETCH
LEATHER
STRETCH KNITS FOR
SWlMWEAR AND SKI
WEAR OR GIRDLES
Simple zigzag
Three-step zigzag
Overcast stretch
Serging stretch
Elastic edge stretch
Straight or simple zigzag
Serging stretch
Overcast stretch
Elastic edge stretch
Elastic stretch
Three-step zigzag
Mercerized thread
Polyester, nylon or
dacron core thread
"Q NEEDLE"T.
"Q FOOT" T. *
Mercerized or silk thread
Size 14 needle
Even feed foot*
Polyester, nylon or
dacron core thread
"Q NEEDLE" T.
"Q FOOT" T. *
Lace seam tape
Pre-shrunk zippers
* See the optional accessories on page 6.
40
Page 43

Straight Stretch Stitch
* Choose this stitch to strengthen curved
seams on all fabrics or to do all straight
stitching on knit or synthetic fabrics.
1. Sew as you do with the regular straight
stitch.
Rick-Rack Stretch Stitch
* Choose this stitch for knits and synthetic
fabrics whenever you want a zigzag stitch.
Also use this stitch as a decorative top
stitch.
1. Sew as you do with the regular zigzag
stitches.
Smocking Stretch Stitch
* Use this stitch as a decorative stitch. Also
choose this stitch to bind gathers with a
smocking pattern,
NOTE: You should have the fabric gathered
before using this stitch.
1. Pin a narrow strip of fabric under the line
where you will bind gathers,
2, Stitch over the gathers through to the strip
of fabric beneath.
NOTE: Complete the smocking of your fabric
before sewing it to the garment.
41
Page 44

III
Overcast Stretch Stitch
* Choose this stitch to seam and finish the
raw edge at the same time. Choose this
stitch to repair raw or worn edges of older
garments.
I. To seam and overcast at the same time,
you must have the raw edges of your
fabric to the right of your needle.
NOTE: To achieve this same effect, the
serging stretch or overlock stretch
stitch can be used with the raw edges
on the left side of the needle.
Serging or Pine Leaf Stretch Stitch
* Choose this stitch to produce a narrow,
supple seam, particularly suited to swim-
wear, sportswear, T-shirts, babywear in
stretch fabrics and to seam or alter knitted
clothes.
Elastic Stretch Stitch
* Choose this stitch to attach elastic to
garments.
1. Mark the elastic into quarters and match
these to the center front, center back and
side seams.
2. Place the middle of the elastic under the
center of the presser foot and stitch into
place, making sure the elastic is evenly
distributed.
42
Page 45

Overlock Stretch Stitch
* Choose this stitch to overcast loosely
constructed knits or woven fabrics, because
threads lock in the middle to reinforce
seams for more durability.
Elastic Edge Stretch Stitch
* Choose this stitch in preference to the
overcast stretch stitch for overcasting
stretch or knit fabrics where strength and
flexibility are required.
1. Sew as you do with the overcast stretch
stitch.
43
Page 46

6. LEARNING TO SEW BUTTONHOLES
-,J
With your Kenmore sewing machine you
have two methods of making buttonholes.
You may use the built-in system or you may
Choose the buttonhole style
. Built-in or manual buttonholes (rectan-
gular) Choose this style for waistband,
cuffs, belt slots or where you will need
only one or two buttons.
2. Round end buttonholes (Template
No. 45195, 45196)
Choose this style for series of buttonholes
on dresses, blouses, vests, jackets or
coats.
3. Keyhole buttonholes (Template No. 45197)
Choose this style for tailored vests,
jackets, coats or any time you need more
room for button shank.
use the snap-in automatic buttonhole attach-
ment system.
Tips on buttonholing
Always make a practice buttonhole on a
scrap of fabric you plan to use. Try the
buttonhole with the button you will use.
Always use an interfacing in area of
garment where buttonholes are placed.
44
Tissue paper or regular interfacing can
be used. Tear paper away after stitch-
ing, if it is used.
For heavier weight fabrics, loosen your
top thread tension slightly.
Page 47

Manual Method
I II
Top thread tension control
O, 2 4 .6,8
See page 17.
Presser foot
1. a. Carefully mark the buttonhole length on
your garment.
b. Insert it under the presser foot with the
left side of buttonhole under the needle.
Stitch selector
t h control
-5
J
Q
2. a. Make sure the needle swings to the
right and pierce the fabric at point A.
b. Stitch to the end of the marking and
stop with the needle in the fabric on the
right side of stitching (point B).
Diameter
of button
plus 1/8".
0
®
45
Page 48

I III II
3. a. Raise the presser foot and turn the
fabric.
b. Turn the stitch selector to the fourth
narrow zigzag position.
c. Lower the presser foot and take one
stitch to the left (point B to C).
4. a. Raise the presser foot with the needle in
the fabric.
b. Turn the stitch selector to the widest
zigzag position.
c, Bartack about three stitches and stop
with the needle on the left side of
stitching (point D).
5. a. Raise the presser foot.
b. Return the stitch selector to the original
position.
c. Lower the presser foot and sew the
other side of buttonhole.
d. Stop with the needle in the fabric on the
left side of stitchincj (point E).
0
O.
0
|
®
®
®
46
/
6. a. Raise the presser foot and turn the
0
m
®
stitch selector to the widest zigzag
position.
b. Lower the presser foot and bartack
about three stitches.
c. Remove the fabric and cut the hole
open.
Page 49

Built-in Method
Top thread tension control
0-2 4 ,6, B
See page 17.
Presser foot
Zigzag foot plus
buttonhole guide
* Adjust the stitch width
(Model 14501, 14502, 14571, 14572 only)
You may adjust the width of the sides and the
space in the center within the blue range
(3.5 - 4.5) as shown, depending upon your
fabric and buttonhole length.
The space gets wider for wider buttonhole.
Stitch width control
1 .2.3 4 5
*3.5 -- 4.5(Blue range)
-1
Stitch selector
1
Stitch length control
HFI
I
\.!!
i
0
** Adjust the stitch density
Depending upon your fabric or your own
preference in buttonholes, you may alter the
buttonhole stitch density within the blue
buttonhole range on the stitch length control.
1. For more density, turn the control toward
"24".
2. For less density, turn the control toward
He,i"
1 .2.3.4 .5
-Ii,il,f ,IU
More density
®
Less density
47
Page 50

Buttonhole guide
Make the Buttonhole
1. a. Carefullymark the buttonholelength on
your garment.
b. Mount the buttonhole guide onto the
presser foot with the letter "F" at the
• front so thatthe rearedgeof the presser
foot is at the end of the guide.
c. Insertthegarment underthe guidewith
the buttonholemarkingrunning toward
you.
NOTE'.Line up the markings on the guide
with the length you have marked to
help you stitch accurately. Markings
are engravedin inches.
2. a. Set the stitch selectorat ,',' .
b. Sew 4 to 6 stitches.
c. Stop sewing at the left stitch.
3. a. Set the stitch selector at ]1] .
b. Sew forward until you reach the front
marking of your buttonhole.
c. Stop sewing at the left stitch,
I'I,
48
4. a. Set the stitch selectorat ,'.,'.
b. Sew 4 to 6 stitches.
c. Stop sewing at the right stitch.
5. a. Set the stitch selectorat lit .
b. Sew until you reach the back of the
buttonhole.
c. Remove the fabric and cut the hole
openwith the buttonholeopenerinyour
accessorybox.
Page 51

I I III I
Corded Buttonholes (a variation of
the built-in buttonhole)
Corded buttonholes are a stronger variation
of the regular buttonhole. You need to obtain
filler cord (crotchet thread or buttonhole
twist).
1. Cut a length of cord about twice the length
of the buttonhole guide.
2. Fold the cord in half.
3. Hook the cord at its mid point on the spur
Of the guide.
4. Pull both ends of the cord forward under
the guide.
5. Sew your buttonhole so that the stitching
covers the cord.
6. When stitching is complete, release the
cord from the spur, pull the ends of the
cord and snip off the extra length.
49
Page 52

Buttonhole Attachment System
For more varied and accurate buttonholes,
you will enjoy using the buttonhole attach-
ment and templates. Know the parts and
.._W
Guide ___Template advance
slots Lj" knob
Buttonhole guide plate
Hook
EL Density control
read carefully how to set up your machine
properly. You will need these items for the
buttonhole attachment system.
3 Templates
5O
Guide _Gear
blocks
Lock Buttonhole adapter
lever
Buttonhole foot
Feed cover
plate
Page 53

Set up the machine
Top thread tension control
; O, 2 4.6.8
See page 17.
i Buttonhole foot
Stitch width control
nlnn
Stitch selector
Stitch length control
Feed cover plate
k. on needle plate
I, ao
Remove the extension table.
b.
Raise the needle to its highest position.
C.
Remove the presser foot.
d.
Position the feed cover plate in place.
2,a.
Open the bobbin access cover.
b.
Make sure the lock lever of the
buttonhole adapter is at the right
released position.
C.
Pulling the density control knob toward
you, insert the two hooks of the
buttonhole adapter between the two
pins located under the needle plate.
d.
Push the lock lever away from you until
the adapter snaps into place.
Hook
Lock
lever
Not necessary to
adjust
Density control
knob
J
51
Page 54

Jl!
,_._.,--Guide plate
Te_ _
keomPlate advance_
Template _ -.,v v
, a,
When you have selected the template
with the size and style buttonhole you
need, slide the template into the guide
plate under the knob, so that the
stamped letters on the template point
up.
bo
Turn the template knob until the size
buttonhole you have chosen appears in
the winSow of the guide plate.
4. Slip the guide plate onto the machine so
that:
al the gear on top of the adapter fits into
the template arc, which shows in the
window of the guide plate, and
b. the guide blocks fit into the guide slots.
Attach the buttonhole foot.
o a,
b.
Pull the bobbin thread up through the
feed cover plate by turning the hand
wheel toward you.
52
IIIIF'II_{I I}iIIIltl..J..-Guide
IIIllmli!.LJilII1_f I slot
IllllII_i!i tlllll 11-Pien_On
J
Page 55

r Ill
Make the Buttonhole
1. a,
Mark your buttonhole position carefully
on the garment.
b.
Insert your garment between the guide
plate and the presser foot.
C.
Pierce the fabric with the needle at the
far end of the buttonhole.
d.
Line up your fabric edge with the
measurement markings on the far end
of the guide plate.
NOTE: If you want your buttonhole to be
1/2 inch from the garment edge, line
up the fabric with the 1/2 inch
markings each time you start to sew a
buttonhole.
2. a. Lower the presser foot.
b. Start sewing slowly.
c. Allow the machine to do the work by
itself. (Do not try to guide the fabric.)
d. Stop sewing when the needle returns to
the position where it begins.
['
3. Release the buttonhole adapter by pushing
down and pulling the lock lever.
You may alter the closeness of the stitches by turning the density control knob on
the buttonhole adapter.
a. Toward you for more density.
b. Away from you for less density. _,_w_.,t_t,w:.,t,,:,,t,.i__wt_"_;w;_w;A""'v'v_
More
Stitch density
control knob
density
53
Page 56

7. CARE FOR YOUR MACHINE
Chan_je the light bulb
1. Unplug the machine.
2. a. Using the screw driver, push down the
lever located behind the presser bar and
the bulb will come out.
b. Push the lever to the right to lock.
3. a. Push up the bulb and turn slightly to the
left.
b. Pull down to remove it.
4. a. Insert the new bulb and turn it with
some upward pressure until it stops.
b. Push up the bulb and turn to the right to
lock into place.
5. Push the lever back to the left and then up
into the machine.
54
Clean your machine
1:1
Factory lubricated parts will provide years of
household sewing without routine oiling.
To retain the high quality level built in your
machine, clean it regularly. Watch for lint
collecting around the needlebar, bobbin case
holder locating pin and feed dogs. Whenever
changing the bobbin or needle, "observe these
areas and clean as necessary. Sears service
technicians will routinely check for possible
lubrication needs whenever your machine
requires service.
Clean the feed dogs
1. Unplug the machine and remove the
presser foot.
2. Remove the needle plate by loosening the
two screws with the large screw driver.
3. Use the brush to remove the lint that
accumulates in and around the feed dogs
and shuttle area.
Page 57

Clean the shuttle
1. Unplug the machine.
2. a. Use your forefinger and thumb to pull
open the latch on the bobbin case.
b. Pull the bobbin case out of the shuttle.
(Fig. 1)
3, a. Turn the hand wheel until the open side
of the retainer is at the top.
b. Turn the retainer counter clockwise with
your forefinger and thumb while holding
the hand wheel, and it will be released.
(Fig. 2)
c. Remove the retainer and bobbin case
i holder from the shuttle. (Fig. 3)
J4. Clean the shuttle area with the lint brush.
NOTE: Put a drop of sewing machine oil*
on the shuttle raceway (see Fig. 3) occa-
sionally after thorough cleaning.
*See the optional accessories on page 6.
5. Turn the hand wheel until the open side of
the shuttle is at the top.
!6 Insert the bobbin case holder into the
I " shuttle so that the locating pin fits into the
locating groove.
!7. a. Replace the retainer aligning the two
latch springs of the shuttle with the
_ cut-out portions of the retainer.
b. Turn the retainer clockwise while hold-
ing the hand wheel, until it is secured by
the two latch springs.
8. Replace the bobbin case.
lib
Latch
\
Bobbin
case
/
Fig. 1
Fig. 2
Locating
groove
Shuttle
Locating
pin
Bobbin case/
holder
Retainer
Fig. 3
55
Page 58

8. CHECK CHART FOR PERFORMANCEPROBLEMS
Your sewing machine is a precision
instrument, designed to give you many years
of troublefree sewing with minumum
maintenance. If you have any performance
problem, check the list below and you'll be
able to solve the problem yourself.
GENERAL PROBLEMS
Machine does not sew.
*Hand wheel or clutch knob is not returned to
stitching position. - Push in or tighten clutch
(see page 10).
*Power line cord is not connected. -- Check
plug.
*Power/light switch turned off, -- Turn on the
switch.
Machine jams/knocks.
*Thread is caught in shuttle. -- Clean shuttle
(see page 55),
*Needle is damaged. -- Replace needle (see
page 13).
Fabric does not move.
*Presser foot not lowered. - Lower presser
foot.
*Stitch length control is set at 0. -- Set it at 24
to 6.
*Feed cover plate is attached. - Remove feed
cover plate.
*Thread is knotted under fabric.
56
STITCHING PROBLEMS
Machine skips stitches.
*Needle size isnot correct for thread and fabric,
-- See page 14.
*Fabric is a certain knit or synthetic. - Use
"Q NEEDLE" TMand "Q FOOT"TM.
*Needle is bent or blunt. -- Replace needle
(see page 13).
*Needle isnot all the way up into needle clamp.
- See page 13.
*Top thread tension is too tight. -- Decrease
top thread tension.
*Machine is not threaded correctly. - See
page 12 and 15.
*Thread is caught in shuttle, -- Clean shuttle
(see page 55).
Stitches are irregular.
*Needle size is not correct for thread and fabric.
-- See page 14.
*Machine is not threaded correctly. - See
page 12 and 15.
*Top thread tension is too loose. - Increase
top thread tension.
*Fabric is being pulled or pushed against
machine feeding action. -- Guide it gently.
*Bobbin has not been wound evenly, - Rewind
bobbin.
*There are nicks or burrs at needle plate
opening. - Replace needle plate or smooth
burrs with extra fine Emory cloth.
Page 59
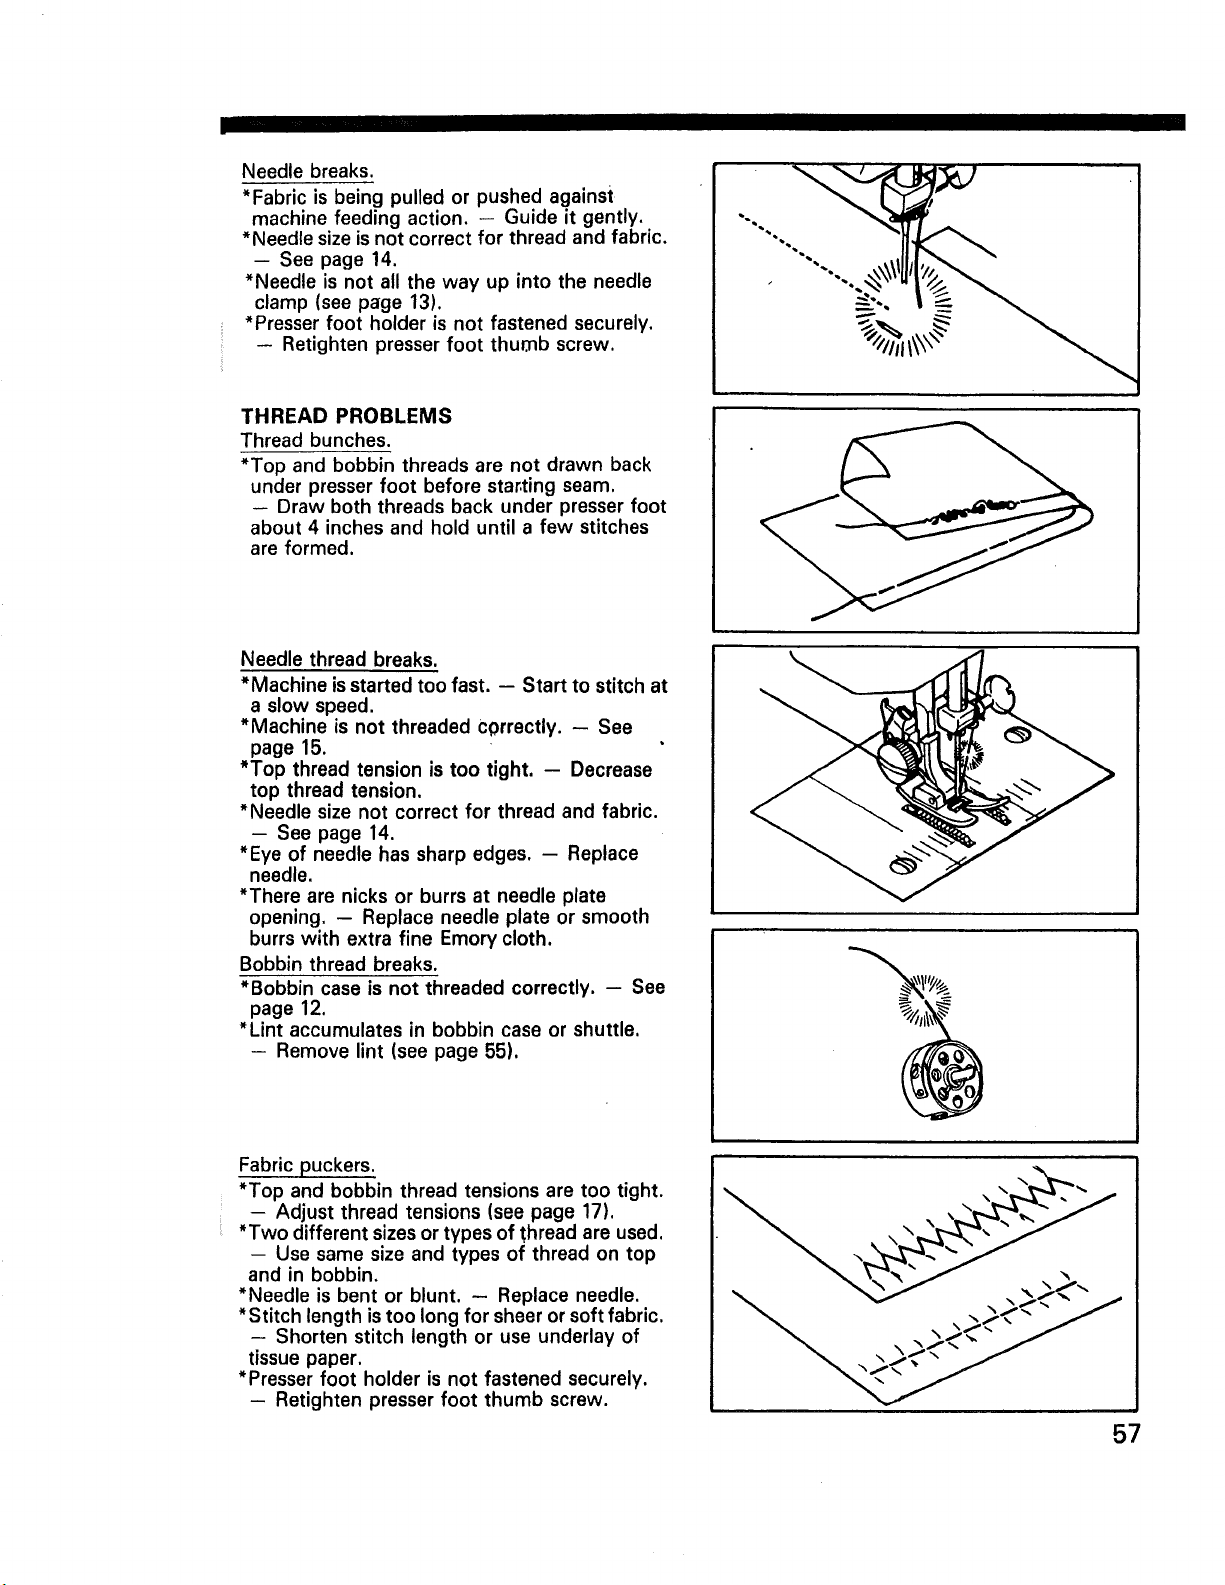
Needle breaks.
*Fabric is being pulled or pushed against
machine feeding action. - Guide it gently.
*Needle size is not correct for thread and fabric.
-- See page 14.
*Needle is not all the way up into the needle
clamp (see page 13).
*Presser foot holder is not fastened securely.
- Retighten presser foot thumb screw.
THREAD PROBLEMS
Thread bunches.
*Top and bobbin threads are not drawn back
under presser foot before star,ring seam,
- Draw both threads back under presser foot
about 4 inches and hold until a few stitches
are formed.
Needle thread breaks.
*Machine is started too fast. - Start to stitch at
a slow speed.
*Machine is not threaded Correctly. - See
page 15.
*Top thread tension is too tight. - Decrease
top thread tension.
*Needle size not correct for thread and fabric.
-- See page 14.
*Eye of needle has sharp edges. - Replace
needle.
*There are nicks or burrs at needle plate
opening. - Replace needle plate or smooth
burrs with extra fine Emory cloth.
Bobbin thread breaks.
*Bobbin case is not threaded correctly. -- See
page 12.
*Lint accumulates in bobbin case or shuttle.
- Remove lint (see page 55).
"_lhlI\\\
Fabric puckers.
*Top and bobbin thread tensions are too tight.
-- Adjust thread tensions (see page 17).
*Two different sizes or types of thread are used.
- Use same size and types of thread on top
and in bobbin.
*Needle is bent or blunt. - Replace needle.
*Stitch length is too long for sheer or softfabric.
-- Shorten stitch length or use underlay of
tissue paper.
*Presser foot holder is not fastened securely.
- Retighten presser foot thumb screw.
\
57
Page 60
SEWING MACHINE
Now that you have purchased your Kenmore Sewing Machine,
should a need ever exist for repair parts or service, simply contact
any Sears Service Center and most Sears, Roebuck and Co.
Stores. Be sure to provide all pertinent facts when you call or
visit.
The model number of your Sewing Machine will be shown on
your nomenclature plate on the back of your Sewing Machine.
See page 3 for location.
WHEN ORDERING REPAIR PARTS, ALWAYS GIVE THE
FOLLOWING INFORMATION •
*MODEL NUMBER *NAME OF ITEM *PART DESCRIPTION
If the parts you need are not stocked locally, your order will be
electronically transmitted to a Sears Repair Parts Distribution
Center for handling.
SEARS, ROEBUCK AND CO., Chicago, IL 60684 U.S.A.
S- 158 Part No. 60279 6/91
 Loading...