

Page 1

Date: 12/28/07
Parts & Repair Services
To Be Read During Regular Working Hours
Division 22, Source 790
Kenmore by EHP 24” Gas Self Clean Wall Ovens
Poor Combustion
SF22-804
Page 1 of 6
i Î
TYPE OF FLASH
ÎZ] Safety
M Credit
SPECIAL INSTRUCTIONS:
DO NOT ORDER PARTS. The kit will be shipped directly to the customer.
SPECIAL CALL CLOSE INSTRUCTIONS at end of Flash.
790.30472400 790.30473400 790.30473401 790.30474400 790.30479400
CONDITION:
Under certain conditions during prolonged or extended broiling times, gas may build up within the
oven cavity and escape as flames when the oven door is opened.
CORRECTION:
To correct this situation install Kit #628.903077-9010 which will reduce the cooling fan speed in bake
and broil modes. In the self-clean cycle the cooling fan will operate at high speed.
NOTES:
• Models with Serial #s NF61 Ixxxxx and above have incorporated the dual speed operation and do
not require this kit.
• Only THIS REPAIR is covered by this Service Flash.
- If you are on a call for another reason, and the unit falls within the models and serial numbers in
this flash, call the Pro-Team @1-888-549-4557 and request another Service Order be created.
Advise the customer not to use the broil function until the oven has the kit installed.
- If repairs other than the repair referenced in this flash are required, an additional Service Order
MUST be created.
PROC ID:
GPT-320
MAJOR HEADING
1 1
1 Built-In Wall Oven
Kenmore Model Numbers
SUB HEADING
General
1 JOB CODE & 1
1 DESCRIPTION
1 Repair Per Service [
Serial # Range
NF401XXXXX-
NF61ÛXXXXX
Parts included in Kit# 628.903077-9010
1 Switch
1 Screw
1 Speed Nut
1 Thermostat-120=
2 Screws
1 Resistor
#318120711
#73200-2080
#73204-1650
#318003613
#73201-2140
#73213-2350
Confidential Information -For Internal Use Only
DEPARTMENT 702HSX - Leo Steinys
DEPARTMENT 702PSO - Bob Vondale
1 Screw
1 Wire#1 8in .250/skinned
2 Wire #2&3 8in ,250/piggyback
2 Wire#4&5 8in .250/. 187
1 Wire Nut Connector
1 Instruction Sheet
#73201-2140
#318052584
#318052585
#318052586
#73213-2290
#318205012
Page 2
Date: 12/28/07
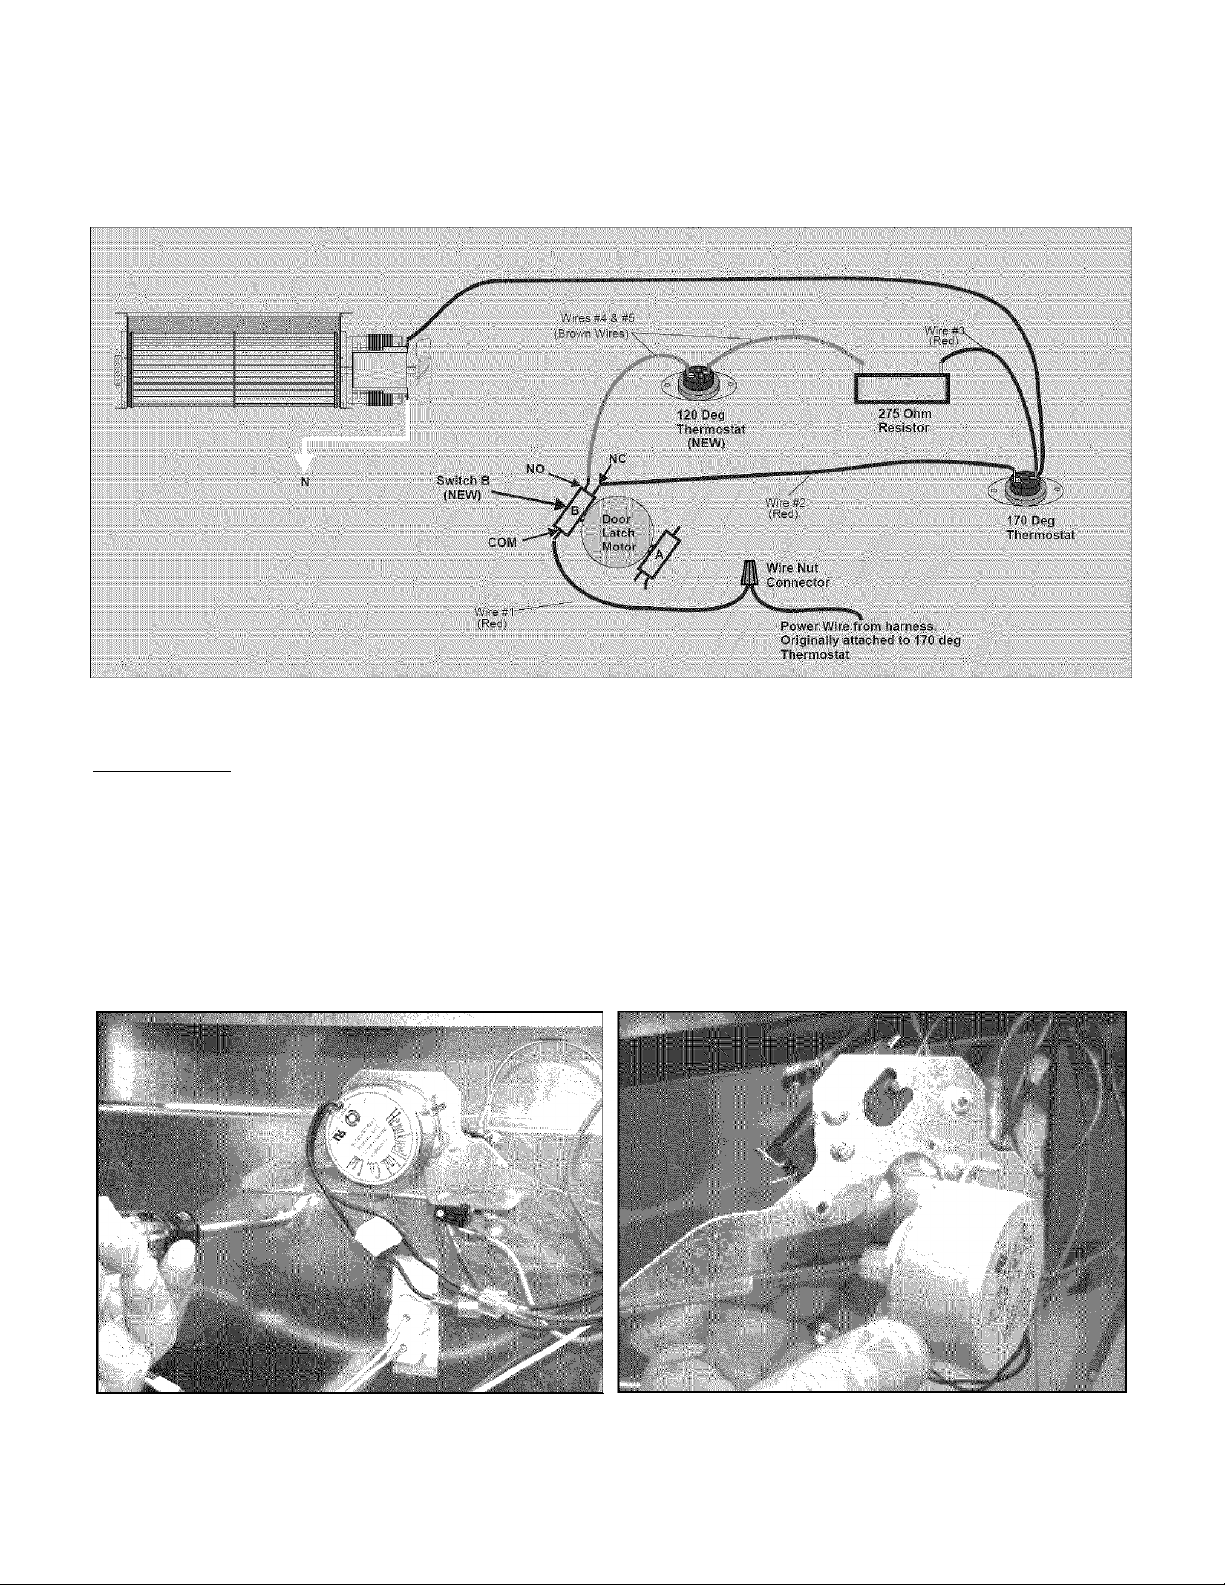
Illustration for the kit wiring,,.
Parts & Repair Services
SF22-804
Page 2 of 6
IMPORTANT: Before servicing always remove power from the unit and turn off the gas supply.
Remove the rear panel from the oven. It may also be helpful to remove the top cover for easier
access to the thermostat and wires. Follow the steps outlined below to install the kit
1, Remove the screws securing the lock
motor assembly and remove the
assembly from the chassis
2. Remove the 2 screws securing the door
lock motor and remove it from the
mounting bracket
Confidential Information -For Internal Use Only
DEPARTMENT 702HSX - Leo Steinys
DEPARTMENT 702PSO - Bob Vondale
Page 3

Date: 12/28/07
Parts & Repair Services
SF22-804
Page 3 of 6
3. Position the new switch as shown in the
photo. The new switch is held in place by a
single screw on one end and the tab from
the mounting bracket on the other end.
4. Secure the switch with the long screw and
speed nut.
DO NOT OVER TIGHTEN SCREW.
5. Reinstall the lock motor onto the bracket.
Make sure that the cam on the motor Is
pressing the plunger of the new switch.
6. Re install the lock motor assembly onto
the chassis. Take care to ensure the
latch rod is properly inserted into the
motor coupling.
Confidential Information -For Internal Use Only
DEPARTMENT 702HSX - Leo Steinys
DEPARTMENT 702PSO - Bob Vondale
Page 4

Date: 12/28/07
Parts & Repair Services
SF22-804
Page 4 of 6
7. Install the resistor on the rear wall as
shown in the photo. Carefully punch or
drill a starter hole for the screw if
necessary.
r
fc, ■" *
____________
_________
8. Use existing screw holes to install the
new 120° thermostat to the left of the
existing 170° thermostat. Mark the
chassis with an “X “or “120” to identify
the new thermostat.
■
9. Install wire # 1 (318052584) onto the
“C” terminal of the new switch. This
wire has a push on terminal on one
end and is stripped on the other end.
\ V ^ ^
.............
...
_
10. Disconnect the power wire from the
170° thermostat, cut off the terminal
connector and strip approx. 3/16 inch
of the insulation. The power wire is
the one that does not connect to the
fan motor.
Confidential Information -For Internal Use Only
DEPARTMENT 702HSX - Leo Steinys
DEPARTMENT 702PSO - Bob Vondale
Page 5

Date: 12/28/07
Parts & Repair Services
SF22-804
Page 5 of 6
11. Use the wire nut connector provided to
connect the power wire that was attached to
the 170° thermostat to the #1 wire from the
“C” terminal of the new switch.
■PFillell
___________
12. Install the #2 (318052585 - Red) wire
from the “NC” terminal of the new switch to
the open tenninal of the 170° thermostat that
the power wire previously attached to.
"NC" terminai of
new switch
13. Disconnect the wire from the fan to
the 170° thermostat. Connect this
wire to the piggyback terminai on the
#3 (318052585 - Red) wire. Connect
these two wires onto the open
terminal of the 170° thermostat.
14. Connect the other end of the red #3
wire to the resistor. Connect the #4
(318052586-Brown) wire to one
terminal of the 120° thermostat.
Connect the other end to the
resistor.
IB
' " 91
Confidential Information -For Internal Use Only
DEPARTMENT 702HSX - Leo Steinys
DEPARTMENT 702PSO - Bob Vondale
Page 6

Date: 12/28/07
15. Connect the #5 (318052586 - Brown)
wire to the remaining terminal of the
120° thermostat. Connect the other end
to the “NO” terminal of the new switch
Parts & Repair Services
SF22-804
Page 6 of 6
PARTS: Order parts using the normal ordering procedure.
Division 22, Source 628, Part number #903077-9010
H] Truck Stock Not Recommended
iE\ Order Part (see below)
SPECIAL SERVICE ORDER CLOSE INFORMATION:
In Order for the Service Unit to receive proper credit, the service order MUST contain the following
information.
• Complete model and serial numbers
. Close the call using “PAYROLL TRANSFER” (50/950)
• Type “Repair per Service Flash” in Tech Comments field
• Always include the part number on each Service Order
Confidential Information -For Internal Use Only
DEPARTMENT 702HSX - Leo Steinys
DEPARTMENT 702PSO - Bob Vondale
 Loading...