

Page 1
SEARS
Owner's Manual
Manual de Instrucciones
Manuel d'lnstructions
SCAN 19000
Model 385. 93000
CAUTION:
Before using the SCAN 19000,
read this manual and follow
all its Safety Rules and
Operating Instructions.
• Safety Instructions
• Warranty
• Specifications
• Operation
• Maintenance
Sears, Roebuck and Co., Hoffman Estates, IL 60179 U.S.A.
Page 2
SAFETY INSTRUCTIONS
Read this manual carefully before using the SCAN 19000,
WARNING: To reduce the risk of electrical shock, fire or injury to persons:
Turn off the power switch and disconnect AC adapter:
* after using the SCAN 19000.
* when leaving the SCAN 19000 unattended.
Do not attempt to disassemble any parts of the SCAN 19000.
IMPORTANT: To protect the SCAN 19000 from damage or to prevent a malfunction:
Do not use any AC adapter other than the one provided with the SCAN 19000.
Do not spill any liquids on the SCAN 19000 or the Memory Card.
Never insert metal objects such as sewing needles or wires into any slot of the SCAN 19000 or the Memory Card.
Do not put heavy objects on the top of the SCAN 19000.
INSTRUCCIONES DE SEGURIDAD
Lea este manual cuidadosamente. Antes de utilizar el SCAN 19000,
ADVERTENCIA: Para reducir el riesgo de descarga el_ctdca, fuego y accidentes:
Apague el interruptor de la m&quina y desconecte el transformador:
• despu_s de usar el SCAN 19000.
• cuando deje el escdner desatendido.
No intente desmontar ninguna pieza del SCAN 19000.
IMPORTANTE," Para proteger el SCAN 19000 de aver_as y mal funcionarniento:
Use tan s61o el transformador eldctrico incluido con su SCAN 19000.
No derrame liquidos en la tarjeta de memoria del SCAN 19000.
No introduzca objetos metdlicos, como agujas de coser o alambres, en la ranura de la tarjeta de rnemoria del SCAN 19000.
No coloque objetos pesados sobre el SCAN 19000.
CONSIGNES DE SECURITI e
Avant d'utiliser le SCAN 19000, lisez ce manuel avec soin.
AVERTISSEMENT: Afin de r_duire le dsque de choc _lectrique, d'incendie et de blessure:
Basculez I'interrupteur secteur et d_branchez l'adaptateur CA:
• Apr_s avoir utilis_ le SCAN 19000.
• Si vous vous _loignez du SCAN 19000.
N'essayez pas de ddmonter et remonter cet appareiL
IMPORTANT: Pour _viter d'erldommager le SCAN 19000 et evi+er tout mauvais fonctionnement:
Assurez-vous que vous n'utilisez que I'adaptateur CA fourni avec le SCAN 19000.
Ne renversez aucun liquide sur le scanner ou la carte a rnemoire,
Ne enfilez jamais d'objets metalliques tefs que des aiguilies a tricoter ou du fil de fer dans les ouvertures du scanner ou clans la carte
rn_moire.
Ne placez aucun objet {ourd sur la machine.
Page 3
SPECIFICATIONS
Model:
Power Source:
AC Adapter:
Memory Card:
Max. embroidery size:
Dimensions :
Weight (net):
385.93000
DC 9 V, 0.6A
Input: AC 120 V,60Hz, 15 W
4 M bit, up to 6 designs
3.19"(81mm) x 4.37"(11 lmm)
Width: 12.4"(315mm) x High: 2.36"(60m) x Depth: 9.65"(245mm)
3.44 Ibs.(1.56 kg)
Specifications subject to change without notice.
ESPECIFICACIONES
Modelo:
Toma de corriente:
Adaptador de corriente CA:
Tarjeta de memoria:
Dimensiones del bordado (M_lxima):
Dimensiones de la m_quina:
Peso:
385.93000
9V DC
120V 15W
4M bit, 6 diseSos maximo
3.19"(81mm) x 4.37-(111ram)
Ancho: 12.4"(315mm) x Profundidad: 2.36"(60mm) x Altura: 9.65"(245mm)
3.44 Ibs.(1.56kg)
Especificaciones sujetas a cambios sin previo aviso.
CARACT#RISTIQUES
ModUle:
Alimentation:
Adaptateur CA:
Carte & memoire:
Dimensions de la broderb (MaXimum):
Dimensions de la machine:
Poids de la machine:
385.93000
9V D.C.
120V 15W
4M bit, 6 motifs maximum
3.19"(81mm) x 4.3T(lllmm)
Largeur:l 2.4-(315mm) x Profondeur: 2.36"(60mm) x Hauteur: 9.65-(245mm)
3.44 Ibs.(1.56 kg)
Les caract_ristiques peuvent _tre modifi_es sans pr_avis.
Page 4
WARRANTY
FULL FIVE YEAR WARRANTY ON SCANNER
For five years from the date of purchase, Sears will, free of charge repair defects in material or workmanship which
appear in the scanner unit, excluding the accessories and AC adapter.
FULL TWO YEAR WARRANTY ON ELECTRICAL OR ELECTRONIC COMPONENTS
For two years from the date of purchase, Sears will, free .of charge repair defects in material or workmanship which
appear in the electrical or electronic components, including wiring, switch and printed circuit boards.
FULL 90 DAYS WARRANTY ON ALL PARTS AND MECHANICAL ADJUSTMENTS
For 90 days from the date of purchase, Sears will, free of charge, replace any parts and provide mechanical service
necessary for proper operation of the SCAN 19000.
WARRANTY SERVICE IS AVAILABLE BY RETURNING THE SCAN 19000 TO THE NEAREST SEARS SERVICE
CENTER IN THE UNITED STATES.
If the SCAN 19000 used for commercial or rental purposes, the above warranty coverage applies for only 90 days from
the date of purchase.
This warranty gives you specific rights, and you may also have other rights which vary from state to state.
Sears, Roebuck and Co., Dept. 817 WA, Hoffman Estates, IL 60179
GARANTIA
5 ANOS COMPLETOS DE GARANTIA EN EL ESCANER
Sears reparara, gratis, defectos en materiales o mano de obra, que aparezcan en el esc_ner, sin incluir baterias o transformador
erectrico, hasta 5 a£_osdespu_s de [a fecha en que fue comprado.
2 ANOS COMPLETOS DE GARANTIA EN EL EQUIPO ELEGTRICO DEL ESCANER
Sears reparara, gratis, cualquier defecto en el equipo el_ctrico y electrbnico del esc&ner, incluyendo circuitos e[ectricos, interruptores
y circuitos electrbnicos impresos. Hasta 2 a_os despu_s de ]a fecha en que rue comprado.
90 DIAS DE GARANTIA EN TODAS LAS PIEZAS Y AJUSTES MECANICOS
Sears cambiar& coalquier pieza y proveerd servicio mec_nico necesario, gratis, para la adecuada operaci6n del esc_ner hasta 90 d{as
despu_s de la fecha en que fue comprado. (Mantenimiento normal excluido.)
SERVICIOS DE GARANTIA SERAN DISPONIBLES, DEVOLVIENDO EL ESCANER AL CENTRO DE SERVICIO SEARS MAS
CERCANO (EN EE.UU)
Siesta m_quina es usada comercialmente o para ser alquifada, las garantias precedentes en esta m_quina ser&n aplicadas sSIo por
90 d_as despu_s de la fecha en que rue comprada. Eata garantia le ofrece especfficos derechos legale3, y usted podra tenet otros
derechos adicionales, los cuales cambian de un estado a otro.
Sears, Roebuck and Co., Dept. 817WA Hoffman Estates, IL 60179
GARANTIE
GARANTIE TOTALE DE 5 ANS SUR LE SCANNER
Pendant 5 ans& partir cle la date d'achat, Sears reparera, sans frais, tout d_.faut de mat_riau ou de fabrication qui appara'_tront sur le
scanner, a I'exceptior_ des piles et de I'adaptateur CA.
GARANTIE TOTALE DE 2 ANS SUR UEQUIPEMENT _=LECTRIQUE DU SCANNER
Pendant 2 ans & partin de la date d'achat, Sears reparera, sans frais, tout d_faut de materiau ou de construction qui appara_tront dans
requipement _lectrique ou _lectronique du scanner, y compris le c&blage des composants _lectroniques, rinterrupteur et les circuits
imprim_s.
GARANTIE TOTALE DE 90 JOURS SUR TOUTES LES pIIECES ET LES RI_GLAGES MECANIQUES
Pendant 90 jours & partir de la date d'achat, SearS,.remplacera sans frais toute piece et fournira les r_parations n_=cessalres au
fonctionnement correct du scanner, & I'exception de I'entretien non'hal.
MOUS OBTIENDREZ L'ENTRETIEN SOUS GARANTIE EN RENVOYANT LE SCANNER AU SERVICE DE REPARATION SEARS LE
PLUS PROCHE AUX ETATS UNIS.
Si cette machine est-utilisee & des fins commerciales ou en location, les garanties ci-dessus ne s'appliquent que pendant 90 jours
partir de la date d'achat. Cette garantie vous donne des droits 16gaux particuliers, et vous pouvez aussi beneficier d'autres droits qui
varient selon I'etat ou vous _tes.
Sears, Roebuck and Co., Dept. 817 WA, Hoffman Estates, IL 60179
11
Page 5
SCAN 19000 - TABLE OF CONTENTS
NAMES OF PARTS AND ACCESSORIES ...................................................................................................... 2
Parts ........................................................................................................................................................ 2
Accessories ...................................................................................................................................................... 2
PARTS LIST ............................................... :..................................................................................................... 4
OPERATING INSTRUCTIONS ........................................................................................................................ 6
Connecting Power Supply ................................................................................................................................ 6
Inserting the Memory Card ............................................................................................................................... 6
Power Switch .................................................................................................................................................... 6
Ejecting the Memory Card ................................................................................................................................ 6
Selecting language ........................................................................................................................................... 8
Display Screen .................................................................................................................................................. 8
• Display adjustment dial ................................................................................................................ 8
Function Keys ................................................................................................................................................. 10
Scanning the Designs ..................................................................................................................................... 12
• Securing the design sheet .......................................................................................................... 12
• Scanning the designs ................................................................................................................. 12
• Scanner sensitivity dial ............................................................................................................... 12
• Using the scanner guide frame .................................................................................................. 14
Selecting the Size and Mode .......................................................................................................................... 16
• Selecting the embroidery size .................................................................................................... 16
• Selecting the scanning mode ..................................................................................................... 16
Selecting the Stitch Types .............................................................................................................................. 16
Checking the Scanned Image ........................................................................................................................ 18
Selecting the Colors for Designs .................................................................................................................... 18
Storing the Designs in the Memory Card ....................................................................................................... 20
Checking the Designs Stored in the Memory Card ........................................................................................ 22
Deleting the Designs Stored in the Memory Card .......................................................................................... 22
SCANNING THE DESIGNS ........................................................................................................................... 24
Mono-color Mode Scanning .......................................................................................................................... 24
Negative Mode Scanning ............................................................................................................................... 24
Multi-color Mode Scanning ............................................................................................................................ 26
Line Stitches ................................................................................................................................................... 26
Weaving Stitches ............................................................................................................................................ 26
Cross Stitch .................................................................................................................................................... 26
DRAWING YOUR OWN DESIGN .................................................................................................................. 28
Drawing Papers .............................................................................................................................................. 28
Mono-color Designs ....................................................................................................................................... 28
Multi-color Designs .................................................................................................................................. 30, 32
Negative image Designs ................................................................................................................................. 34
Cross Stitch Designs ...................................................................................................................................... 34
Line Stitch Designs ......................................................................................................................................... 34
Combination of Line Stitch and Weaving Stitch ............................................................................................. 34
Making Your Own Design Sheet ..................................................................................................................... 36
SEWING THE SCANNED DESIGN ............................................................................................................... 38
MAINTENANCE ............................................................................................................................................. 40
Cleaning ...................................................................................................................................................... 40
TROUBLESHOOTING GUIDE ....................................................................................................................... 40
Ill
Page 6
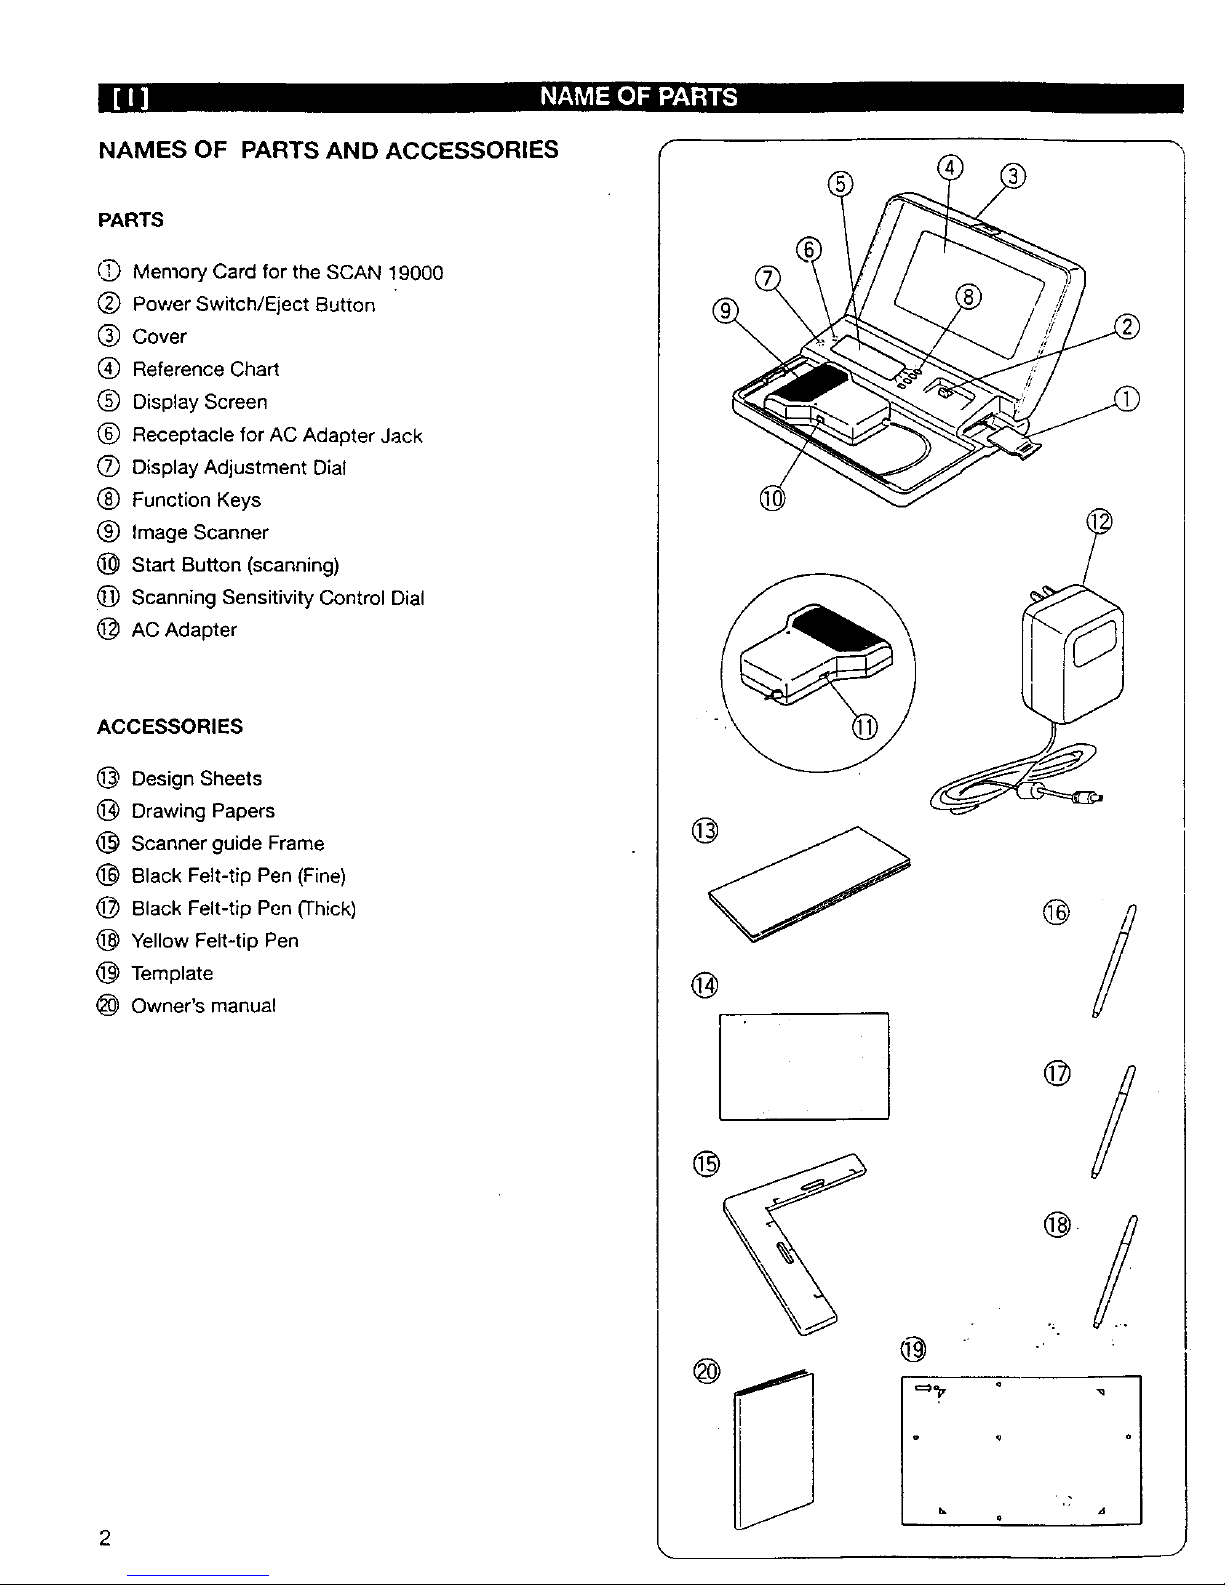
NAMES OF PARTS AND ACCESSORIES
PARTS
('I_ Memory Card for the SCAN 19000
(_) Power Switch/Eject Button
(_) Cover
(_ Reference Chart
(_) Display Screen
(_ Receptacle for AC Adapter Jack
(_ Display Adjustment Dial
(_) Function Keys
(_) Image Scanner
(_ Start Button (scanning)
(_) Scanning Sensitivity Control Dial
@ AC Adapter
ACCESSORIES
1@ Design Sheets
@ Drawing Papers
@ Scanner guide Frame
@ Black Felt-tip Pen (Fine)
(_ Black Felt-tip Pen (Thick)
@ Yellow Felt-tip Pen
@ Template
(_ Owner's manual
2
%
®
@
@
@
@
@
Page 7
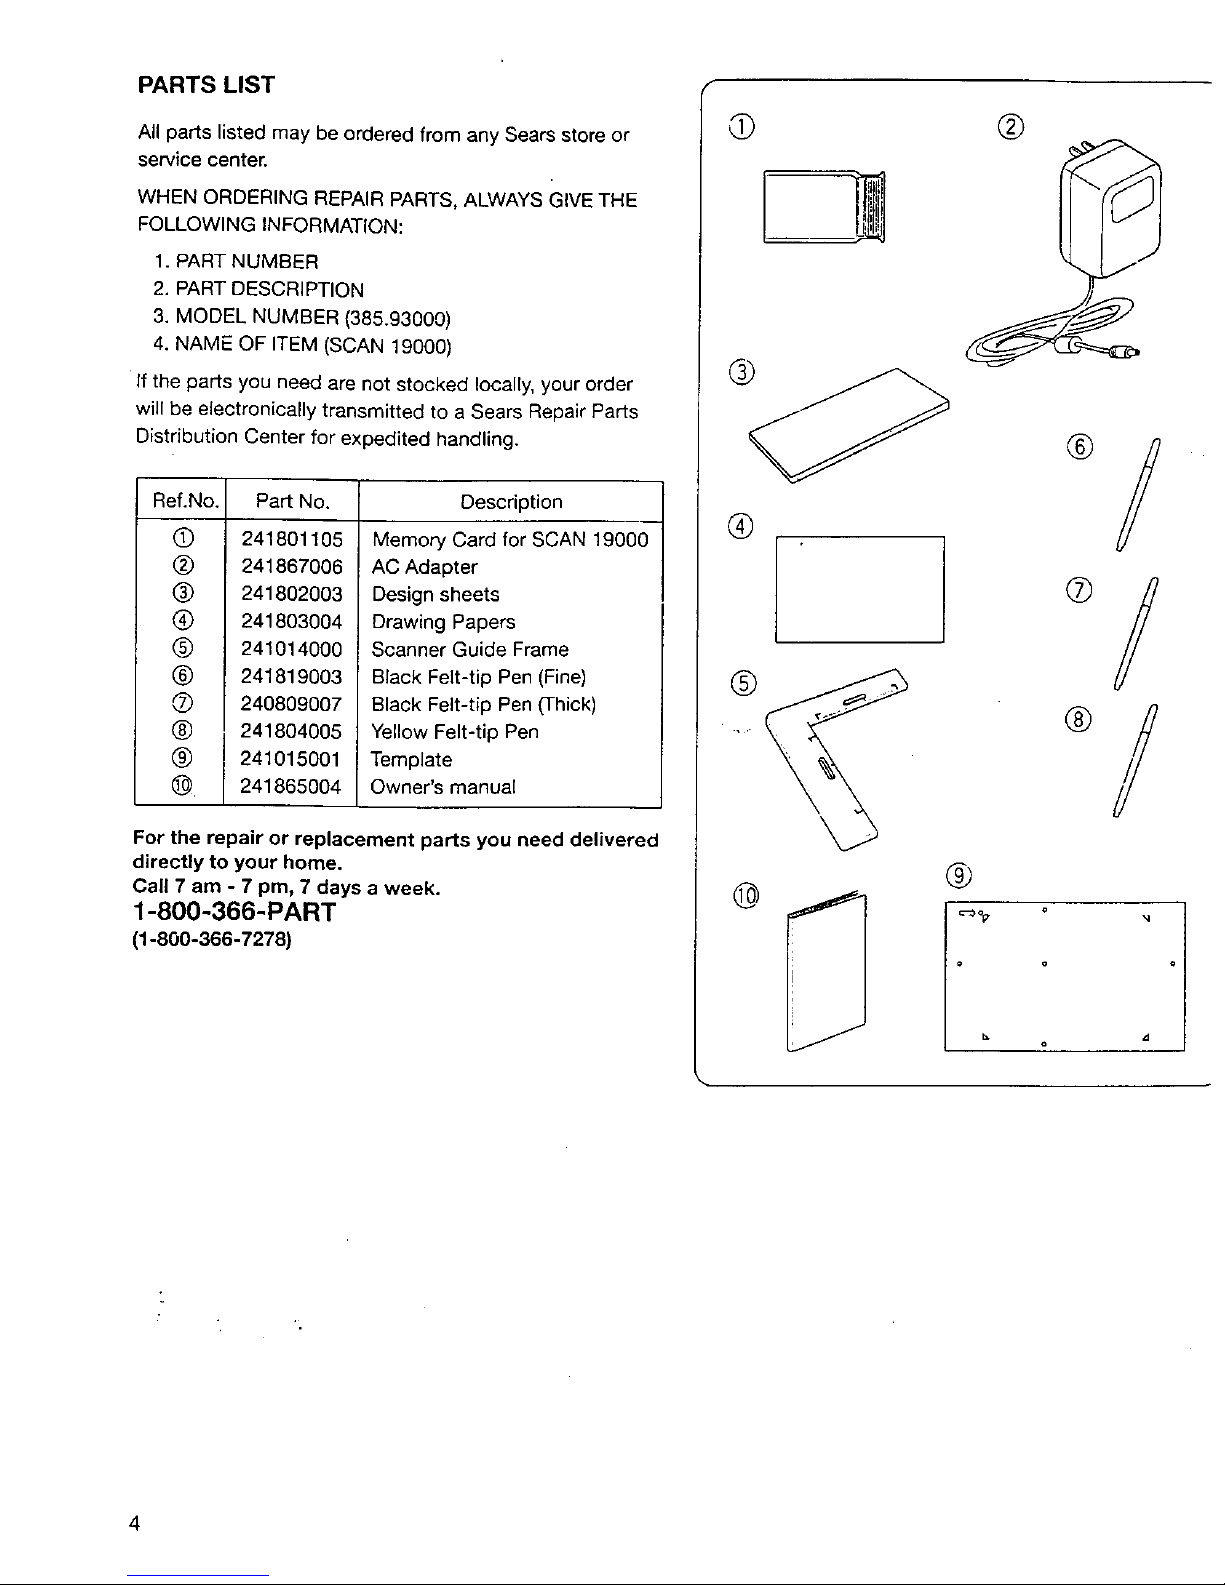
PARTS LIST
All parts listed may be ordered from any Sears store or
service center.
WHEN ORDERING REPAIR PARTS, ALWAYS GIVE THE
FOLLOWING INFORMATION:
1. PART NUMBER
2. PART DESCRIPTION
3. MODEL NUMBER (385.93000)
4. NAME OF ITEM (SCAN 19000)
If the parts you need are not stocked locally, your order
will be electronically transmitted to a Sears Repair Parts
Distribution Center for expedited handling.
Ref.No. Description
©
®
®
@
@
®
®
®
®
®.
Part No.
2418O11O5
241867006
241802003
241803004
241014000
241819003
24O809OO7
241804005
241015001
241865004
Memory Card for SCAN 19000
AC Adapter
Design sheets
Drawing Papers
Scanner Guide Frame
Black Felt-tip Pen (Fine)
Black Felt-tip Pen (Thick)
Yellow Felt-tip Pen
Template
Owner's manual
For the repair or replacement parts you need delivered
directly to your home.
Call 7 am - 7 pm, 7 days a week.
1-800-366-PART
(1-800-366-7278)
O
®
®
I
@
@
®
®
o/
®/
-q
4
Page 8
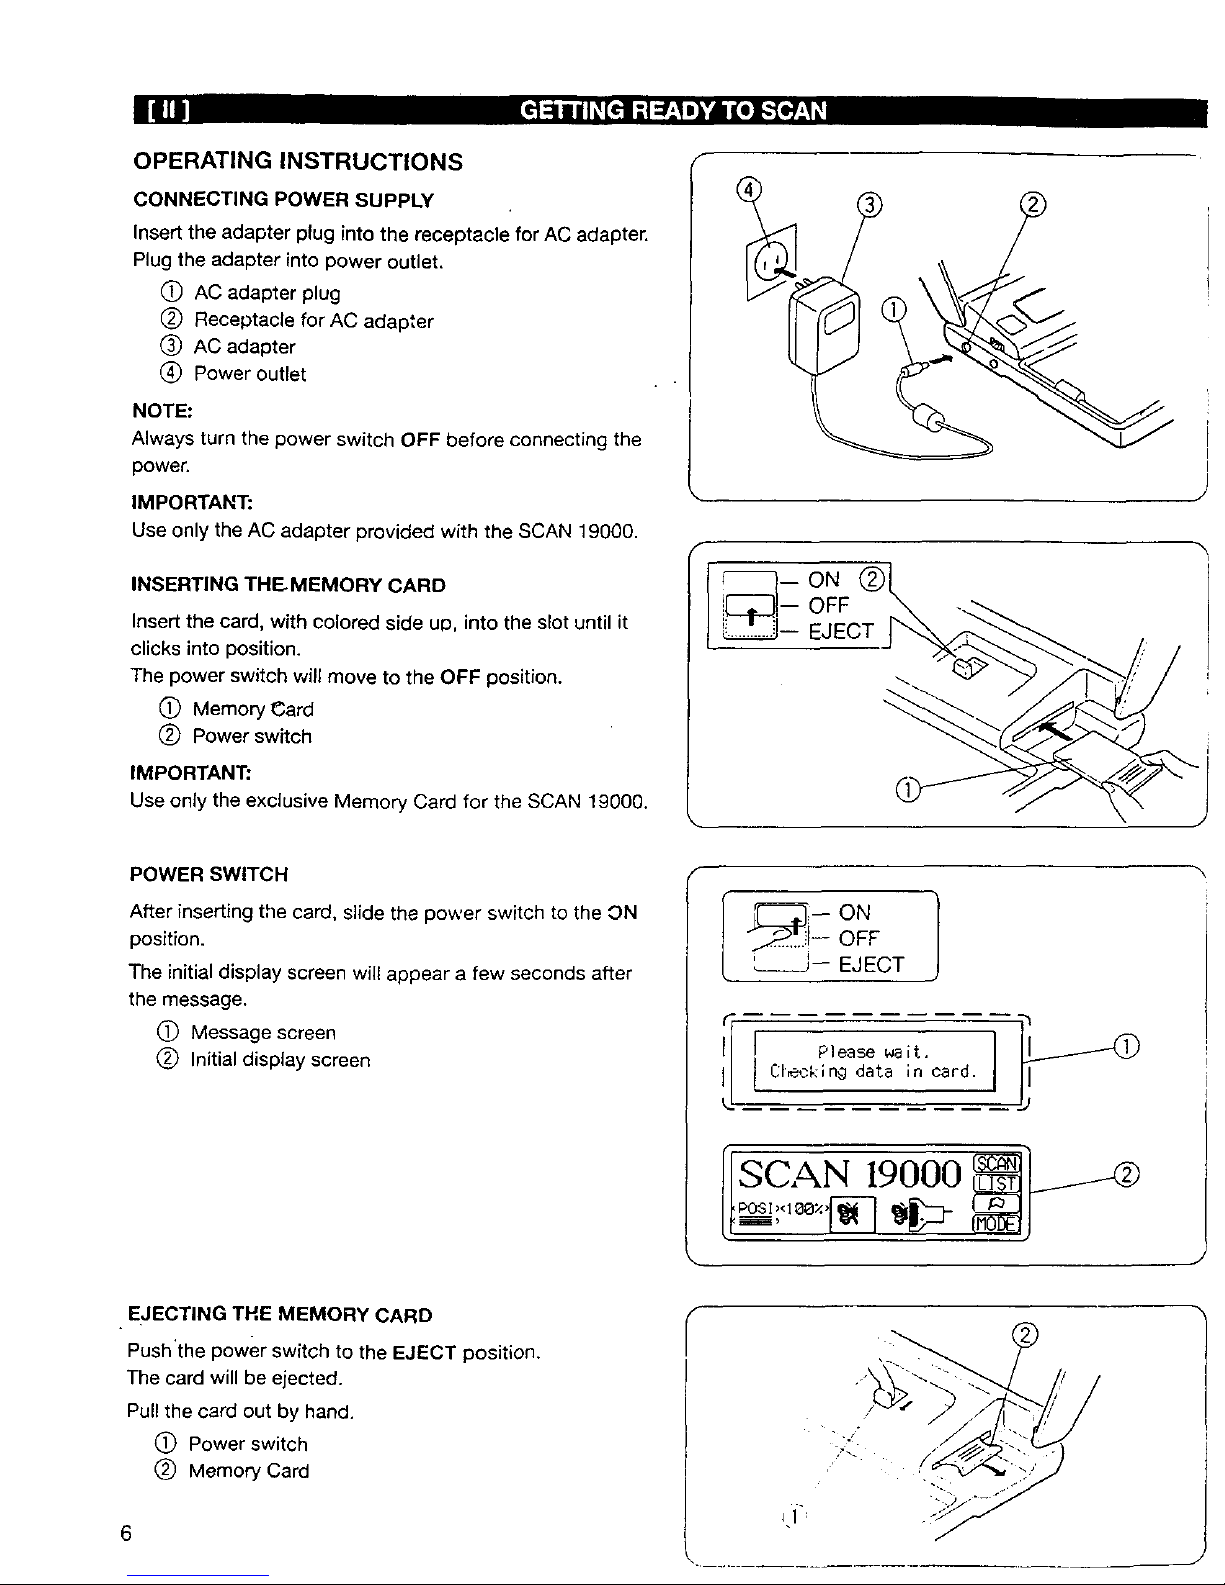
OPERATING INSTRUCTIONS
CONNECTING POWER SUPPLY
Insert the adapter plug into the receptacle for AC adapter.
Plug the adapter into power outlet.
C) AC adapter plug
(_) Receptacle for AC adapter
(_ AC adapter
(_) Power outlet
NOTE:
Always turn the power switch OFF before connecting the
power.
IMPORTANT:
Use only the AC adapter provided with the SCAN 19000.
INSERTING THE MEMORY CARD
Insert the card, with colored side up, into the slot until it
clicks into position.
The power switch will move to the OFF position.
(_ Memory Card
(_) Power switch
IMPORTANT;
Use only the exclusive Memory Card for the SCAN 19000.
F
POWER SWITCH
After inserting tile card, slide the power switch to the ON
position.
The initial display screen will appear a few seconds after
the message.
(_ Message screen
(_ Initial display screen
OFF
L___J-- EJECT
[ Please wait.
Cleckin9 data in card.
[SCAN 19000
EJECTING THE MEMORY CARD
Push'the power switch to the EJECT position.
The card will be ejected.
Pull the card out by hand.
(_ Power switch
(_) Memory Card
6
Page 9

SELECTING A LANGUAGE
Press _ key.
Select the language you need by pressing _ or
key.
Press _ key to change the display to that language.
]SCAN 19000
[ ESPANOL I
[ FRANCA[S I
[ ENGLISH } _(_
B
[ FRnNCnIS )
DISPLAY SCREEN
The display screen gives information on the scanning
process and other helpful information.
(_ Function keys
Allocated functions
f
J
• Display Adjustment Dial
You can adjust the brightness of the screen with the
display adjustment dial.
(_ Display screen
(_'J Display adjusting dial
raTrrrn_
J
8
Page 10

FUNCTION KEYS
The functions of each key will snow on the screen next to
the key.
Press one of the keys to choose that function.
(_ Press to scan the design sheet or drawing.
To select the modes or items from the display screen.
_) To store the scanned images.
(_ To select the languages or to scroll up or down the
scanned image on the display screen.
To go to the top or bottom end of the scanned image
on the display screen.
_) To show the designs stored in the memory card.
C) Press to respond to the screen message.
(_) To show the scanned image in enlarged form,
_) To confirm your selection.
(_ Press to show each part of multi-color design.
(_) Press to go to DESIGN SIZE menu.
(_ Press to go to the next menu.
(_ Press to go back to the previous menu.
_) Press to go to SELECT STITCH menu.
(_ Press to rescan the image.
(_ Press to delete a design memorized in the memory
card.
(_ Press to return to the previous screen display.
(_ Press to return to the initial screen display.
(_ Press to stop scanning.
Press to go to language selection menu.
_J) Press to display the selected language.
10
k
® ISCAN}
@ [SELECT]
® _IEI'IORYJ
i ,l-I
®[e_}
® (LIST}
® I','ES13
(NO
® (CHECK}
@ ( SET]
@ _ART$}
® {MOOE}
® ir'.EXT)
@ (PREU.}
@ (STITC_
®_,ESC@
@1 z, ]
@ ._INISH]
® pC___
Page 11

Scanning the designs
• Securing the design sheet
The SCAN 19000 has a convenient integral scanner guide
tray with paper ctip,
Place a design sheet or drawing paper on the guide tray,
Lift the clip and insert the end of the design sheet under it.
C) Clip (_ Scanner guide tray
O Design sheet _ Starting position
• Scanning the designs
Place the image scanner on the left side of the design
sheet.
Press the _ key.
Press the START button on the left side of the image
scanner,
The red light turns on to show the scanner is ready for
scanning.
Slowly slide the scanner on the design sheet from left to
right until beep sounds once.
When scanning is completed, the red light will go off.
(_ Red light (_ Start button
You can finish scanning by pressing the _ key.
When the complete design image appears on the screen,
stop scanning and press the _ key.
(You de not need to scan the remaining blank area.)
NOTE:
Make sure to keep the scanner flat on the scanner guide
tray. Do not tilt it up at an angle while scanning.
If the scanning speed is too fast, the screen displays
"Slide the scanner slower.".
Press the start button and scan again more slowly.
If the scanning speed is too slow, the screen displays
"Time is over ! Start from the beginning.",
Press the start button and scan again more quickly.
NOTES:
You have 30 seconds to complete the scan.
Slide the scanner straight from left to right.
The best scanning speed is about 1/2 "(1 cm) per second.
Remove any dust from the underside of the scanner with
a soft cloth,
• Scanner sensitivity dial
The result of the scanning varies depending on the
darkness of the drawing and the color of the drawing paper.
If the scanned image is not clear enough, adjust it by
turning the sensitivity dial and rescan.
If the scanned image is too dark:
Turn the dial in the direction A.
If the scanned image is too faint:
Turn the dial in the direction B.
Q j; Scanner sensitivity dial
12
__,_=Sli_e the scanner
s]oNer.
_ ime is over !
Start from
the beg inni ng.
Q
J
Page 12

• Using the scanner guide frame
The scanner guide frame is used to scan images on
paper which are too large to fit into the scanner guide tray
or pictures clipped from magazines, etc.
Place the template on the paper as illustrated, making
sure the picture fits inside the scanning area on the
template.
Mark five spots and four corners on the paper with yellow
felt-tip pen through the ho_es on the template.
C) Holes
1_) Template
=='W
,d
Draw the aligning lines and frame lines by connecting the
markings.
(_) Aligning lines
(_ Frame lines for scanning area
NOTE:
Draw the aligning lines beyond the marked spots, so that
you can align the guide frame with the lines correctly.
Place the scanner guide frame on the paper matching the
aligning lines with the aligning marks on the scanner guide
frame. The guide frame has slots in it so that you can see
the aligning lines through it for exact positioning.
(_) Aligning marks
(_) Slots
(Z_ Scanner guide frame
/
J
Move the scanner from left to right along the guide frame,
while holding the guide frame with your hand.
NOTE:
Make sure to place the paper on a flat surface for better
scanning results.
14
Page 13

SELECTING THE SiZE AND MODE
• Selecting the embroidery size
Three different sizes of embroidery design are available.
(_ 100%: Actual size
(_ 75%: Three-quarter size
(_) 50%: Half size
Press the _ key to go to the DESIGN StZE menu.
Select the desired size of embroidery by pressing the
key. The circled number of selected size is
highlighted.
• Selecting the scanning mode
You can sew a reversed image of the design by selecting
NEGATIVE mode.
Press the _ key to go to the SCANNING MODE
menu.
Select POSITIVE or NEGATIVE by pressing the
key.
o
To return to the DESIGN SIZE menu, press the _ key.
To return to Initial screen, press F-_---/key.
C) The selected mode and size are shown on the
screen.
ISCAN 19000
{
I] SCP_ININGMODE
OPOSITIUE
_NEGnTIUE
SCANNINGMODE
(_)POSIT[UE
_NEGATIUE
j
%
SELECTING THE STITCH TYPES
Three different stitch types are available.
1 Fill stitches (three kinds):
(_ Horizontal weaving stitch
(_) Vertical weaving stitch
(_ Diagonal weaving stitch
2 Line stitches (three kinds):
(_) Straight stitch
1_) Narrow zigzag stitch (3 mm wide)
1_ Wide zigzag stitch (5 mm wide)
3 Cross stitch:
(_) Cross stitch (2.5 mm)
Press _ key, then press _ key.
Select desired stitch type by pressing _ key.
Press _ key to confirm your selection.
Press _ key to choose one of the three kinds.
Press _ key to confirm your selection.
16
SIide scanner .,._ _
after pressing
button.
III¢_GE <po_;I><IL_RX><_ >
{ ..
I SELECT STITCH __
@ ....@--
_Y
Page 14

CHECKING THE SCANNED IMAGE
Press _ key, to enlarge the scanned image and
check the scanning result.
Press _ key to scroll the image downward.
Press _ key to scroll the image upward.
Press _ key to go to the top or bottom end of the
image.
Press [_--_'), key to return to the previous display screen.
If the result is not satisfactory, adjust the scanner
sensitivity dial and rescan.
SELECTING THE COLORS FOR DESIGNS
In multi-color embroidery, the color for each part of the
design can be shown on the screen of the sewing
machine.
Press _ key to go to COLOR SELECT menu.
Select the desired color from the menu by continually
pressing _ key.
Press _ key to confirm your choice.
-Fhedisplay screen shows (A) for a few seconds, then
changes to (B).
Press _ key, then scan the next part of the design.
After scanning the desired parts, press _ key.
Then, follow the steps described above to select the color
for the second part.
NOTE:
Up to 12 colors can be memorized.
After the display screen shows (C), the.screen returns to
the initial display.
]
p IPross.E.0 Y °
/to memorize _ _- _--_
__ Jlst color image. _I------CD
$
_I# Ito memorize _I
J1st color image._T-_
[--_-G E {pQ£Tx188Zx_ > LI_F_ILLLI_
I ISELECTCOLORr_r_r_I_q__4SEL[SELE_-_'_"
J IVELLOUIISKY ,BROWN I _ I
[-H_-GE IORAN6EIIPURPLEIIBLUE I (LHmLLL_ _ 0
(A)
Please wait. O
Converting image into
stitch data. _ C)
CD
(8) I
I! IPress SOqN key I-_PT_-N-I_
_._ /to read 2nd color_L---
Nq
/image,or MEMORY _/
Jke_ to store. _1-_
I-M_-GE ,POSI,<I_OX,,_, ICAI'ICEUJ_-.._
(c)
[ [_I_JM_G St°red in space N°'(_) _g i
I "2020St itches
:fop j oo.
18
Page 15

STORING THE DESIGNS IN THE MEMORY
CARD
Set any design sheet on the scanner guide tray.
Insert the memory card into the SCAN 19000.
C) Design sheet
(_) Memory card
Turn the power switch on.
Select the desired mode and size.
Example: (A) POSITIVE mode
(B) Actual size
Press _ key to select the stitch type.
Example: (C) Horizontal weaving stitch
Press _ key and scan the design•
After scanning, the display screen shows (D) while data is
being sent to the memory card.
(_ Waiting sign is flashing.
Then the screen Changes to (E).
oN
OFF
EJECT
SCAN 19000
i
I IIAGE
S1 ide scanner
after" pres$ing
button.
(A) (B) (C)
(D)
/[ •
_ Please Wait.
IMAGE
(E) {
[
IMAGE
Press MEMORY ke_ _ _ C__D
to memorize _ _0
!st. color image. _ _ 0
2O
Page 16

CHECKING THE DESIGNS STORED IN THE
MEMORY CARD
Press (_key.
Press _ key continually to select one of the
designs.
The circled number of the selected design ishighlighted
and the image is shown on the screen.
Each part of the multi- color design will be shown by
pressing _ key continually.
(A): The assigned color for the displayed part.
(8): Number of stitches of the displayed part.
(C): Type of stitch of the displayed part.
Press I_1 key to return to the initial display.
88_St-[COLOR]ARL_
916St[Nvw_][. _ ] _-.__
\
(A)
(_) ( )
1178st.[__1
DELETING THE DESIGNS STORED IN THE
MEMORY CARD
Press[-_ key.
Select the design you wish to delete by pressing
key continually.
Press _ key.
Press _ key to confirm deletion.
If _ key is pressed, the screen returns to the
previous display.
SCAN 19000
88est.[COLOR]AP__ t__
1178st.r_]_f----(::_
If the memory card holds six designs, you need to delete
one of them to make space for a new design.
The message appears when the memory card is full and
out of space.
Out-of memor9 sr_oe.
oe ect a design
to be erased.
0
22
Page 17

SCANNING THE DESIGNS
MONO-COLOR MODE SCANNING
Insert the memory card and turn on the power switch.
Press _ key,
Scan the design.
Press _ key.
f
ISCAN 19000 _--_'
POSI>'q00Z.>
-t-
°O_ !
,'4,
J
NEGATIVE MODE SCANNING
Insert the memory card and turn on the power switch.
Press _ key and select NEGATIVE mode.
Scan the design,
Press _ key.
NOTE:
You can only use weaving stitch in NEGATIVE mode.
An inverted pattern of the design can be sewn.
This mode is especially useful to make designs Bkethe
illustrated example.
24
/SCAN 19000 __
Page 18

MULTI-COLOR MODE SCANNING
Insert the memory card and turn the power switch on.
Set a design sheet on the scanner guide tray.
Select the mode and size of your choice.
Press _ key, and select the stitch type.
Scan the first part of the design.
Press _ key and select the color of your choice.
Repeat the above steps until you finish the last part of the
design.
* After scanning, the display screen shows O.
LINE STITCHES
Line stitches are useful for outlining of multi-color designs
Press _ key, then press _ key.
Select one of the line stitches by pressing _ key to
choose line stitches.
Select one of the stitches and press _ key.
Then, scan the design in the same way as mono-color
(see page 24) or multi-color scanning.
* After scanning, the display screen shows _).
NOTE:
Line stitches are not suitable to fill-in a large area. In this
case, use weaving stitches.
WEAVING STITCHES
You can make a professional style embroidery by using
weaving stitches in different directions for various parts of
the design.
Press _ key, then press _ key.
Select one of the weaving stitches by pressingJ_ key
to choose weaving stitches.
Select one of the stitches and press _ key.
Then, scan the design in the same way as mono-color
(see page 24) or multi-color scanning.
* After scanning, the display screen shows (_).
CROSS STITCH
Cross stitch embroidery is easy with the SCAN 19000.
Press _ key, then press [_ key.
Select cross stitch by pressing _ key to choose
cross stitch and press _ key.
Then, scan the design in the same way as mono-color
(see page 24) or multi-color scanning.
* After scanning, the display screen shows 0.
26
.J
,J
Page 19

DRAWING YOUR OWN DESIGNS
DRAWING PAPERS
C) The maximum scanning size is inside of the yellow
frame tines.
Aligning lines for setting the guide frame in correct
position.
(_ Positioning dot for multi-color designs.
NOTES:
* The scanner automatically identifies that the drawing
is multi-color if it has a positioning dot.
• For best results, use a black felt-tip pen.
* When you wish to scan an image from magazines or
other printed materials, please note that the scanner
cannot read orange or yellow colors.
* Beautiful embroidery requires a clear drawing.
• Do not use a stained or speckled drawing, otherwise
the scanner reads stains or specks as parts of the
design.
IMPORTANT:
Using ariy image or design from published materials may
infringe upon copyright laws.
Draw the design clearly using a thick feEt-tip pen.
The black part will be sewn.
For your rough draft, use a yellow felt-tip pen or yellow
pencil.
NOTE:
A few tips that will make the best results of your original
design.
O Draw lines thicker than 1 mm.
(_) Leave a gap larger than 2 mm between adjacent
parts of the design, otherwise the scanner reads
them as continuous part.
Avoid sharp angles.
Be sure to fill in parts completely, when choosing
weaving stitches or cross stitch. Do not leave any
white area where you wish to fill in with stitches.
MONO-COLOR DESIGNS
Place a piece of drawing paper on the design.
Trace the design with a black felt-tip pen.
Drawing paper
(_ Black felt-tip pen
@
28 ,-
Page 20

MULTI-COLOR DESIGNS
Make a basic drawing as a mono-color design.
(_D Basic design
Place a piece of drawing paper over your original drawing,
The drawing should fit inside of the scanning area,
Make sure to put the black positioning dot on the drawing
paper in the upper left corner.
(_ Drawing paper
(_) Frame lines for scanning area
Mark the four aligning positions on the original design,
(_) Aligning positions.
Trace the area for the first color, using the black felt-tip
pen.
NOTE:
Fill in the area completely with the black felt-tip pen.
Write the sewing step, color, and type of stitch outside of
the scanning area with the yellow felt-tip pen so that you
can identify them easily. Remove the drawing paper from
original design.
(_) Sewing step
_) Color
(_) Type of stitch
3O
!
*. r v J
1 BLUE ////I
?
!
I
J
Page 21

Place the drawing paper for the second part on the
original design, matching aligning lines with the marks.
(_ Drawing paper
(_) Aligning position marks
(_ Aligning lines
Trace the area for the second color and fill in with the
black felt-tip pen.
Write the sewing step, color and type of stitch, then
remove the drawing paper.
Trace the area for the third color and fill in with the black
felt-tip pen.
Write the sewing step, color and type of stitch, then
remove the drawing paper.
To make the next color sheet, repeat the steps described
above.
I
I
I
• 2 RED --
M
I
• 3 _3REEN IIIII
X
32
Page 22

NEGATIVE IMAGE DESIGNS
Put your original design in the white part of the negative
design sheet, as illustrated, so that you get an inverted
design.
C) White part of design sheet
(_) Original design
(_) Tape
CROSS STITCH DESIGNS
Make sure to fill in the design completely with black felt-tip
pen, so that your original design turns into an attractive
cross stitch embroidery.
NOTE:
Try a sample sewing before sewing on the actual fabric to
check the sewing results.
LINE STITCH DESIGNS
Line stitch is useful to embroider a simple design like the
example as illustrated.
(_ Original design
(_) Variation of sewing results by different stitch width.
COMBINATION OF LINE STITCH AND WEAVING
STITCH
Line stitch is also used to outline a multi-color design,
combined with the weaving stitch.
NOTE:
Line stitch is not suitable for filling in larger area.
(_ Drawing for line stitch
L._ Drawing for weaving stitch
®
• ...... (3ram)
• (Bmm)
@
34
Page 23

MAKING YOUR OWN DESIGN SHEET
If you run out of drawing papers, you may use plain
drawing paper (tracing paper).
Use the template to make additional drawing papers.
Place the template on tracing paper or copier paper.
Use the yellow felt-tip pen to:
(A) Draw lines around and along the outer edges of the
template.
(B) Mark five dots through the holes of the template.
(C) Mark four corners for frame lines'.
C) Tracing paper
(_ Yellow felt-tip pen
(_ Template
For multi-color drawings, mark the positioning dot with the
black felt-tip pen through the hole of template indicated by
an arrow.
(_) Positioning dot
_) Black felt-tip pen
(_) Markings
NOTE:
You do not need a positioning dot for mono-color design.
Draw frame lines and aligning lines. Connect the dots and
corners with the yellow felt-tip pen.
(_ Yellow felt-tip pen
Cut the paper to template size.
Cut the drawing paper along the outlines
36
/
J
(B)
L
l_ I'I
4
q _ J
_j, _,_L -I i I i I I I i I _'i* I •
! _!
J
Page 24

SEWING THE SCANNED DESIGN
Insert the memory card into the sewing machine,
Place the drawing paper with the design on the fabric to
determine the position where you wish to sew.
Mark the four aligning dots on the fabric and draw aligning
lines connecting the dots.
(_) Fabric
_) Drawing paper
Place the fabric on the outer hoop and match the aligning
lines on the fabric with the template of the hoop, so that
you can sew the design in the desired position.
J
f
I
Insert the memory card into the sewing machine.
Attach the hoop with fabric to the sewing machine and
sew.
The sewing procedure is exactly the same as standard
Kenmore memory cards.
Refer to the instructions of the sewing machine.
C) Display screen of Kenmore Sewing Machine
Model 1g000
O
RED
I
,_jJ
38
Page 25

MAINTENANCE
CLEANING
Wipe the SCAN 19000 with a soft cloth and a mild soap.
Do not store the SCAN 19000 in a high-humidity area,
near a heat radiator or in direct sun light,
TROUBLESHOOTING GUIDE
Use the exclusive memory card for the SGAN-19000.
Power supplp unusua]!
+ +
Use the AC adapter supplied with the SCAN 19000.
Put the black dot in the left upper corner and redraw the
design. Then rescan it.
IMAGE
No positioning mark
is found at the top
left corner.
Scan it again.
4O
 Loading...