

Page 1
Use & Care Guide
Cleaner
Models 85150 ° 85300. 85450 j
85150 85300 85450
CAUTION'o
Read and follow all safety rulesand
instructionsbefore operating this
equipment.
ADVERTENCIA:
Lea y siga todas las reglas e instrucciones
de seguridad antes de operar este equipo_
Sears Brand Management Corporation Hoffman Estates, IL 60179 U.S_s..
www.sears.com
Printed in Korea
Page 2
in order to be able make the best
possible use of your air cleaner,
we recommend that you begin by
reading through the instructions
and that you keep the instrdction
manua! for future reference.
Warranty' ...................................................... 3
Package Contents ..................................... 3
Safety instructions ....................................... 4
Air Cleaner Features ................................... 5
Product Specifications .................................. 6
Air Cleaner Set-Up ..................................... 7
Control Panel ............................................. 8
Operation .................................................... 8
Care and Maintenance ................................. 9
Filter Replacement ............................. 10-11
Remote Control ........................................... 12
Troubleshooting ........................................... 13
Get it Fixed ............................................... 14
KENMORE FULL WARRANT'(
if this Kenmore product fails due to a defect in material or workmanship within one year
from the date of purchase, call l o.800-4-MY-HOME(r) to arrange for free repair
(or replacement if repair is unavailable or not possible).
This warranty does not cover the air cleaner filters, which are expendable parts.
This warranty applies for only 90 days from the date of purchase if this product is ever
used for other than private household purposes.
This warranty applies only while this product is used in the United States.
This warranty gives you specific legal rights, and you may also have other rights which
vary from state to state,
Sears, Roebuck and Co., Hoffman Estates, IL 60179
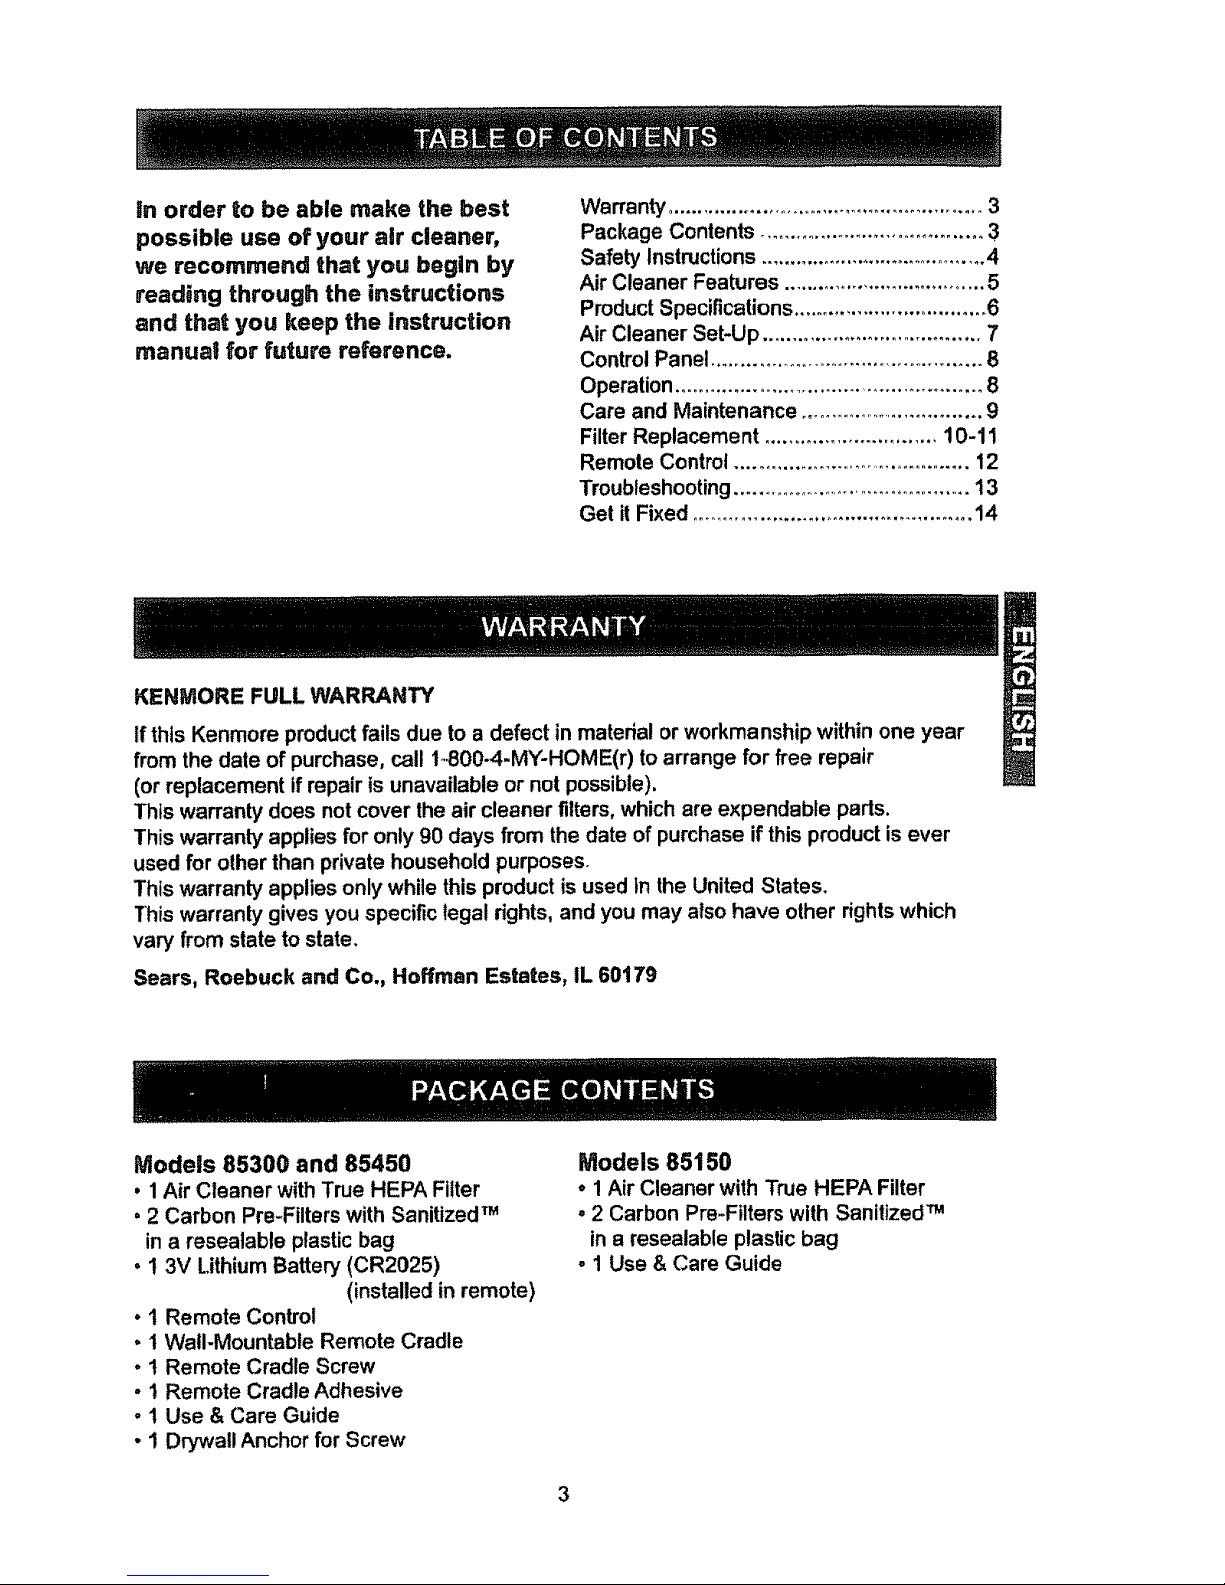
Models 85300 and 85450
,1 Air Cleaner with True HEPA Filter
,2 Carbon Pre-Fllters with Sanitized TM
in a resealable plastic bag
• ! 3V Lithium Battery (CR2025)
(installed in remote)
° 1 Remote Control
° 1 Wall-Mountable Remote Cradle
• t Remote Cradle Screw
• t Remote Cradle Adhesive
° 1 Use & Care Guide
• 1 Drywall Anchor for Screw
Models 85150
* 1Air Cleaner with True HEPA Filter
.2 Carbon Pre-Filters with Sanitized TM
in a resealable plastic bag
- 1 Use & Care Guide
3
Page 3

Thank you for purchasing a Kenmore air cleaner. Please read this manual carefully before
using, This product is for household use only_
IMPORTANT CAUTIONS FOR USING
YOUR AIR CLEANER
WARNING: Follow the instructions in this
manual to reduce the risk of electric shock,
short circuit, andtor fire:
• Do not repair or modify the unit unless
specifically recommended in this manual
All other repairs should be completed by a
qualified technician.
• The plug for this unit is polarized with one
blade wider than the other. Do not force
the plug into an electrical outlet, Do not
alter the plug in any way. If the plug does
not fit into the outlet, reverse the plug. if it
still does not fit, contact a qualified techni-
cian to instal! a proper outlet.
o Do not use if the power cord or plug is
damaged or the connection to the wall
outlet Is loose°
, Use AC 120V only.
o Do not damage, break, forcefully bend,
pull, twist, bundle, coat, pinch, or place
heavy objects on the power cord.
° Periodically remove dust from the power
plug. This will reduce the risk of shock due
to humidity build up.
° tf the power plug is damaged, it must be
replaced by the manufacturer or a quali-
fied technician°
• Remove the power plug from the outlet
before cleaning the unit. When removing
the power plug, grasp by holding the plug
itself, never hold by the cord.
° Remove the power plug from the outlet
when not in use.
• Do not handle the power plug with wet
hands_
• Do not operate the unit when using indoor
smoke-generating insecticides.
, Do not clean unit with benzene or paint
thinner. Do not spray insecticides on the
unit.
• Do not use the unit where it is humid or
where the unit may become wet, such as
in a bathroom.
• Do not insert fingers or foreign objects
into the air intake or outlet.
° Do not use the unit near flammable
gases. Do not use near cigarettes, in-
cense, or other spark-creating items.
° Unit will not remove carbon monoxide
emitted from heating appliances or other
sources.
IMPORTANT PRECAUTIONS FOR USING
YOUR AIR CLEANER
° Do not block the intake or outlet vents_
• Do not use near hot objects, such as a
stove.
° Do not use where the unit may come into
contact with steam.
° Do not use the unit on its side.
• Keep away from products that generate
oily residue, such as a deep fryer.
° Do not use detergent to clean the uniL
° Do not operate without a filter.
° Do not wash and reuse the True HEPA
Filter or the Carbon Pre-Filter.
° Hold the handle on the back of the unit to
transport°
• Do not hold by the front panel.
4
Page 4

,_ CAUTION: Fully assemble air filter before using (See Air Cleaner Set-Up on
following page)° Note: Features vary according to model
. Quiet Operation
This Kenmore air cleaner has a four-
speed fan with quiet operation that is
ideal for nighttime.
, Air Quality Sensor
This Kenmore air cleaner has an AIR
QUALITY sensor that detects the presence
of various pollutants in the air. The unit
automatically increases fan speed to
clean more air volume and remove the
impurities quickly.
- Light Sensor
The built-in light sensor detects when the
room is dark and automatically dims the
lights of the control panel and lowers the
fan speed for quiet and energy-efficient
operation_ Once the room is dark, the light
sensor will keep the lights dim, and not
allow the fan to increase speed despite
what the AIR QUALITY sensor detects.
• Multi-Stage Cleaning
The air passes through multiple stages of
cleaning before returning to the room.
• PlasmaWave TM Technology
PlasmaWave TM Technology uses a strong
corona discharge to attack pollutants at
the molecular level.
• Sanitized TM Treated Carbon Pro-Filter
The Carbon Pro-Filter collects large
particles, such as dust, pet hair, and lint.
it absorbs odor-causing gases, such as
those caused by cigarette
smoke, organic decay, and
cooking, and is treated with
Sanitize TM to effectively
reduce the development of
bacteria and fungi° For
best performance, replace
every three months,
True HEPA Filter
Captures 99.99% of parlicles
and impurities as small as
0.3 microns, including
smoke, dust, pollen, and
other allergens. Replace
when the CHECK FILTER
indicator light turns on.
Advanced PlasmaWave TM Technology
PlasmaWave TM uses a strong corona discharge tobreak apartairbornepollutantsat the
molecular level
In a fraction of a second,PtasmaWave TM combineswithnaturally occurringwater molecules in the
air (H20) tocreate blltions ofHydroxylRadk_l molecules (OH).
OH isan unstablemoleculethatseeks equilibriumbystealinghydrogenatoms from adjacent
moleculescontaininghydrogen(thepollutants),therebyreformingthem intoharmless molecules of
water,carbondioxide,and otheracceptablemolecules.
The resul!is a measurable reductionof pollutants alter the airpassesthroughthe Plasma
Generator(PlasmaWaveT"_).
By reformingmolecules,PlasmaWave TM technology can reduceodors, as well as VOCs (chemical
vapors). It is also effectlve at reductngairbornemicroorganisms--bacteria and viruses.
The PtasmaWaveTM technologyisharmless and theOH molecule only lives for a nanosecond
whineit reforms surrounding molecules. Most importantly--unlike old styleiontechnology--
PlasmaWave TM does not produce high levels of ozone as a by-product.
When combinedwith a fan-and-filter air-cleaning system, PtasmaWaveTM offers an effective and
efficientway of cleaning the air of unwanted pollutantsincludingdust, smoke, and pollen, aswell
asVOCs, allergens,micro-organisms, and odors°
Page 5
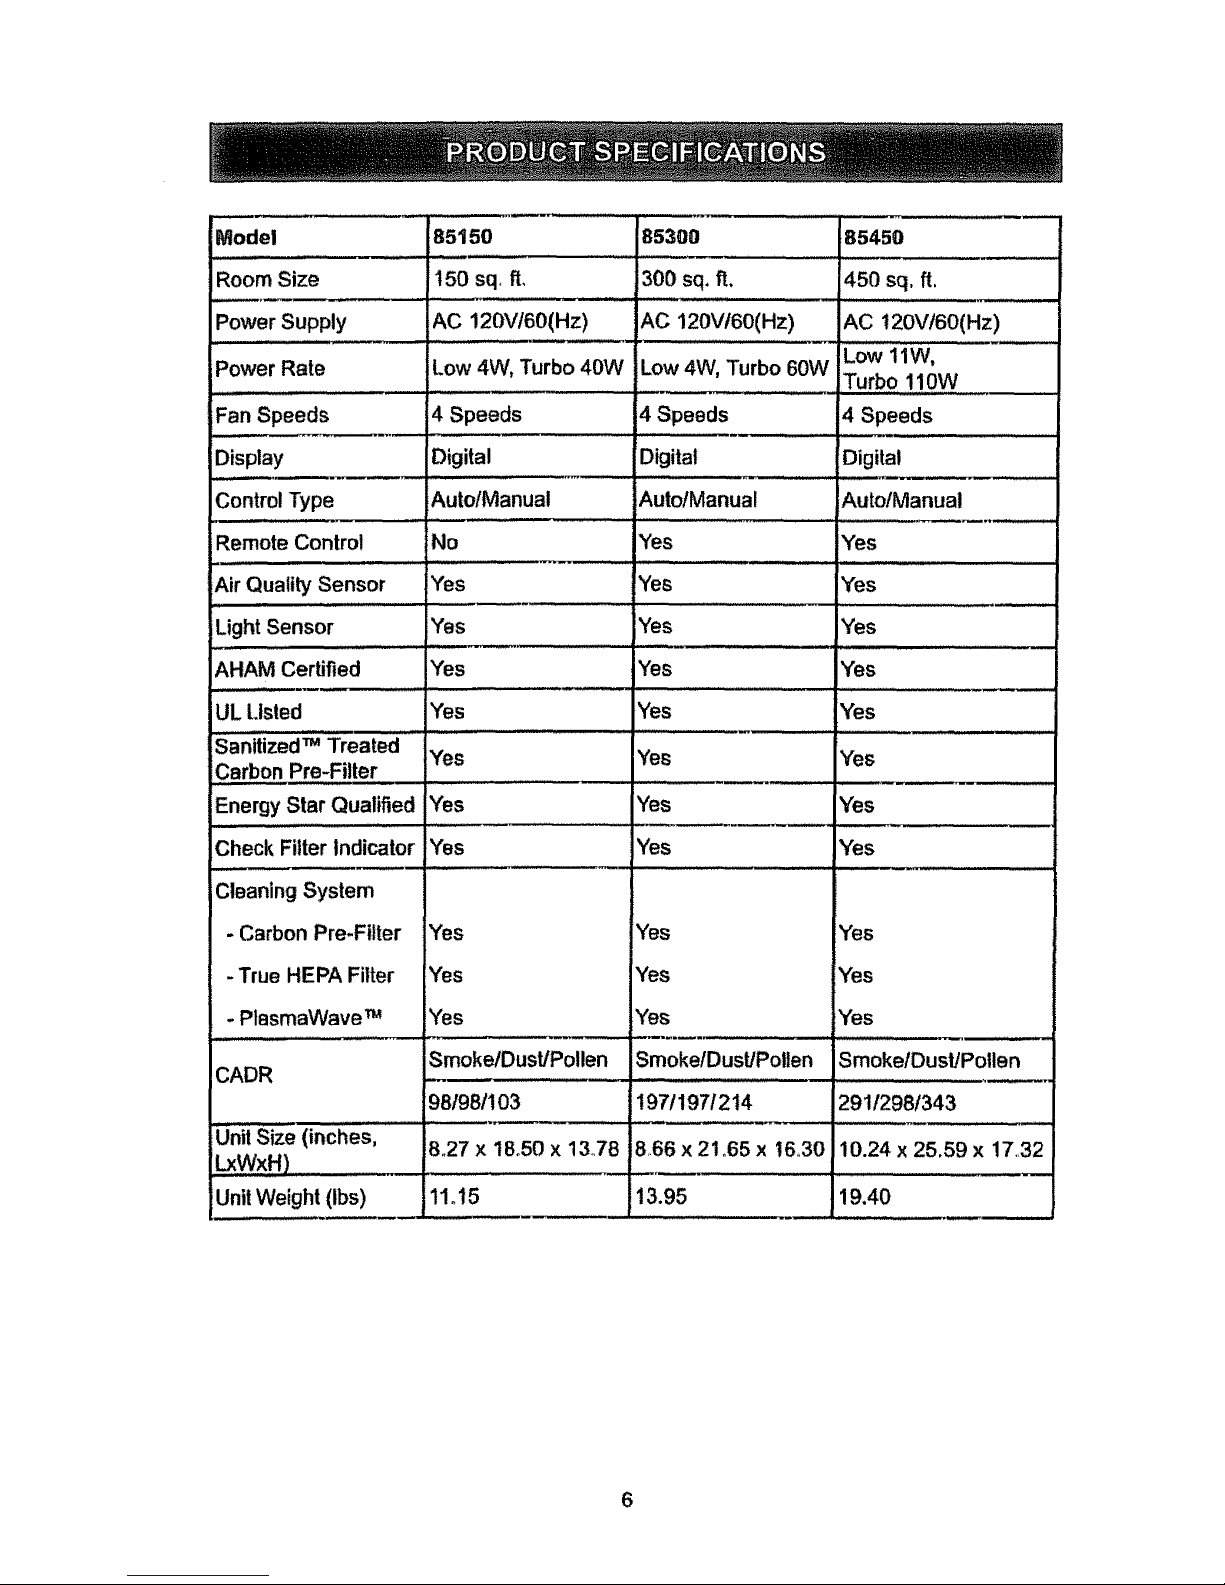
Model
RoomSize
PowerSupply
Power Rate
,L, .........
Fan Speeds
Display
Control Type
Remote Control
Air Quality Sensor
, ,,, , H ,i,,,,,,i
Light Sensor
85150
150 sq, ft,
AC 120V!60(Hz)
Low 4W, Turbo 40W
4 Speeds
Digital
AutofManua!
No
Yes
,,, ,, , ,
Yes
85300
1300 sq, ft. i450 sq, fl,
AC 120VI60(Hz) AC 120Vt60(Hz)
Low 11W,
Low 4W, Turbo 60W
Turbo 110W
..... _,,,,,,,....
4 Speeds 4 Speeds
Digital Digital
AutotManual Auto/Manual
Yes Yes
Yes Yes
....... L , ,'1,, " .... '"'' Z ....... _-_
AHAM Certified Yes
85450
Yes
Yes
Yes
IYes
Yes
Yes
..... i lll,i .......................
Yes
UL Listed Yes Yes
............................ . =
Sanitized m Treated
Yes Yes
I
Energy Star Qualified Yes Yes
Yes Yes YesCheck Filter Indicator
Cleaning System
- Carbon Pre-Filter
- True HEPA Filter
. PlasmaWave m
Yes
Yes
Yes
Yes
Yes
Yes
Yes
Yes
Yes
CADR
Unit Size (inches,
WxH)
Unit Weight (tbs)
.....,,,_. , ....
Smoke/Dust/Pollen
981981103
8,27 x 18o50 x 13.78
11.15
r_' J,=
SmoketDust/Potten
197/197/214
866 x 21o65 x t6.,30
13.95 19.40
SmokelDust/Pollen
29!/298!343
10.24 x 25.59 x 17.,32
Page 6

Set-Up Procedure
1.Remove protective film from the control
panel.
2. Remove the front panel by pulling gently
from the lower portion of the panel, Do
not force; the panel should remove easily,
3_Remove the plastic frame from the unit.
4, Remove the True HEPA Filter and re-
move the plastic wrapper from the filter,_
5. Install the True HEPA Filter with the
arrow showing °air flow" pointing in
toward the back of the air cleaner; the
white tabs at the top and bottom of the
HEPA filler will poini out to the front of
the uniL
6_Open the resealable plastic bag con-
taining the Carbon Pre-Filters and
remove one filter. Reseal the plastic
bag to maintain the freshness of the
remaining filter.
7Anstall the Carbon Pre-Filter onto the
plastic frame by pushing against six
=hook and loop" squares on the back of
the frame. (Diag_ 7A)
8,Install the plastic frame by inserting tabs _)
up into the air cleaner and gently
pushing in at the bottom tab until the
frame fits into place snuggly,
9.Replace the front panel by hooking
the panel on the top of the unit, Swing
the panel in by pushing gently on each
side of the unit and then lock it into place.
10. Plug the power cord into a wall outleL
11. Press and hold the POWER button until
a short =beep" sounds_
12oThe air cleaner will take 3-4 minutes to
calibrate the AIR QUALITY sensor, During
this time the sensor lights will flash on
and off. Once the sensor has calibrated,
the lights will stop flashing and the unit
will begin in AUTO mode.
!3,Remove tab from remote control
(85450185300 only)_
Note: For best results and to maximize air
flow:
• Place unit at least 2 feet away from the wall
• Place the unit away from drafty areas, as
the sensors may not react accurately,
• Do not place near curtains, furniture, or
other items that might inhibit air flow_
• Place the unit on a stable surfacer
@
O
7
@
O
O
O
Page 7
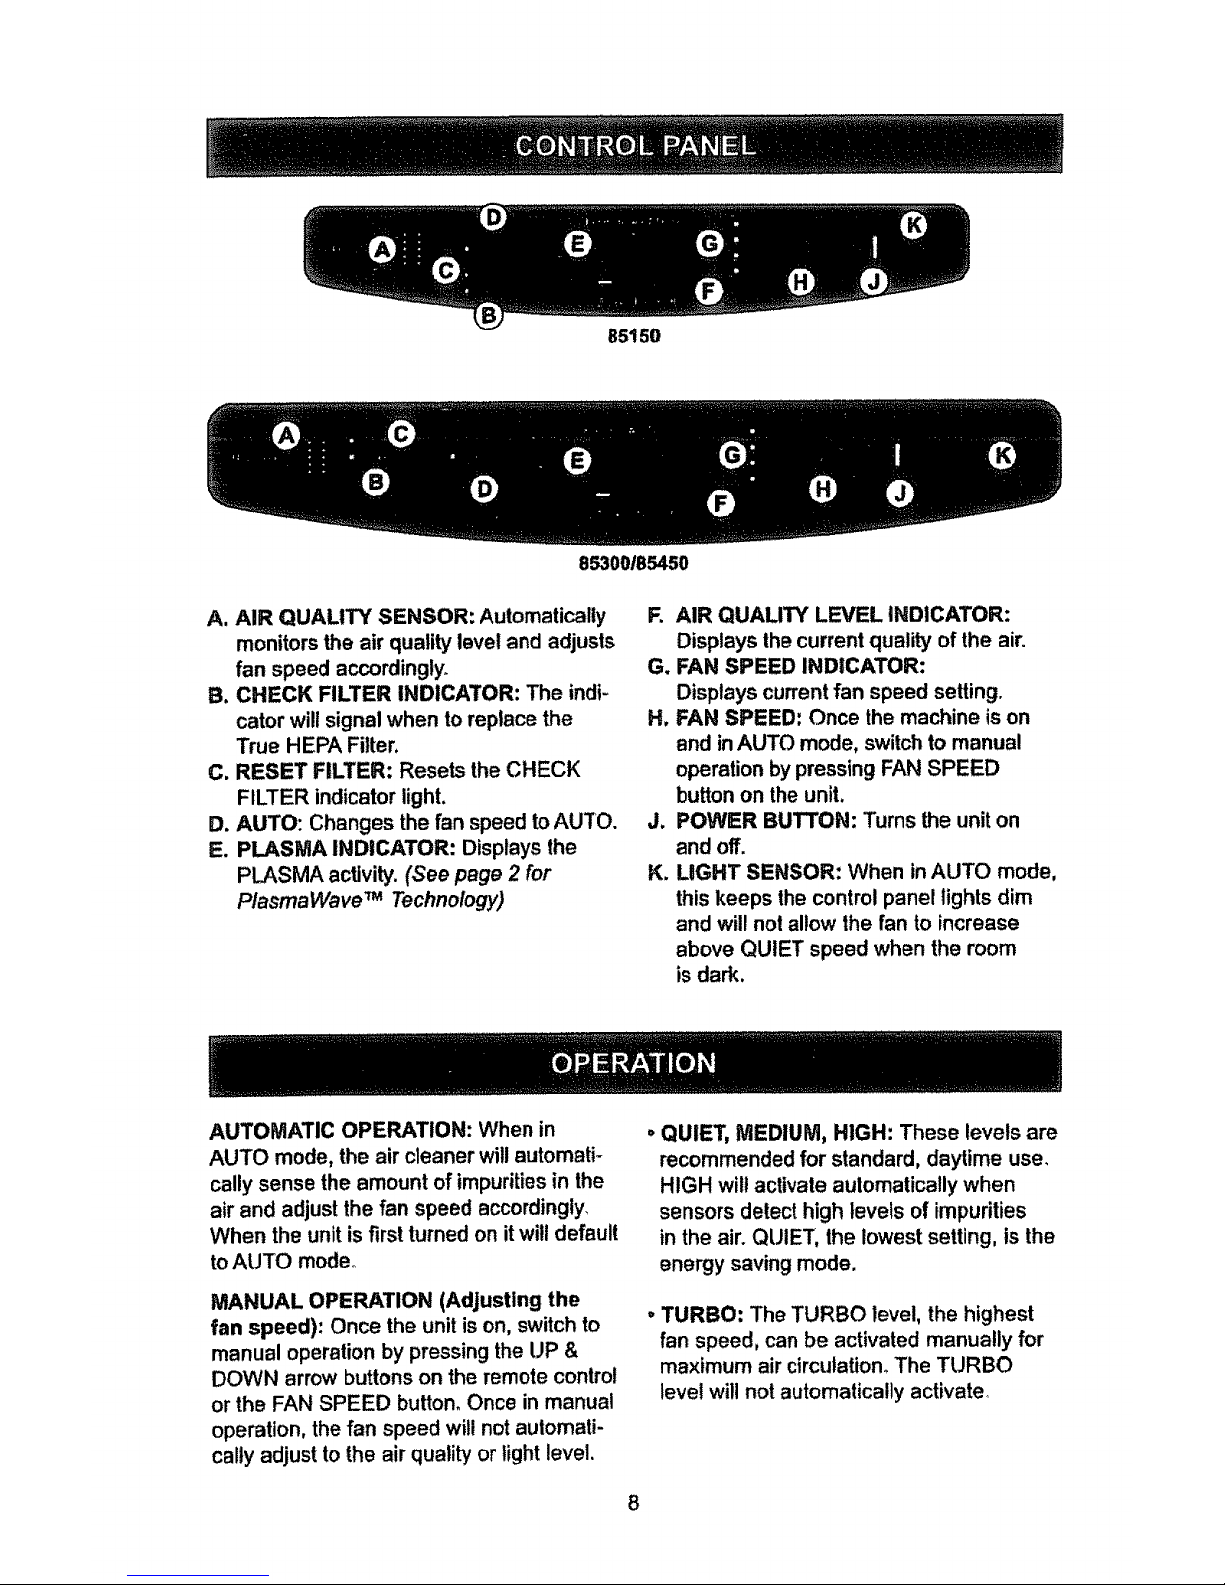
B5150
85300185450
A, AIR QUALITY SENSOR: Automatically
monitors the air quality level and adjusts
fan speed accordingly+
B. CHECK FILTER INDICATOR: The indi-
cator will signal when to replace the
True HEPA Filter,
C. RESET FILTER: Resets the CHECK
FILTER indicator light.
D. AUTO: Changes the fan speed to AUTO.
E. PLASMA INDICATOR: Displays the
PLASMA activity. (See page 2 for
PtasmaWave TM Technology)
R AIR QUALITY LEVEL INDICATOR:
Displays the current quality of the air.
G. FAN SPEED INDICATOR:
Displays current fan speed setting.
H, FAN SPEED: Once the machine is on
and inAUTO mode, switch to manual
operation by pressing FAN SPEED
button on the unit.
J. POWER BUTTON: Turns the unit on
and off.
K. LIGHT SENSOR: When in AUTO mode,
this keeps the control panel lights dim
and will not allow the fan to increase
above QUIET speed when the room
is dark.
AUTOMATIC OPERATION: When in
AUTO mode, the air cleaner will automati +
cally sense the amount of impurities in the
air and adjust the fan speed accordingly_
When the unit is first turned on itwill default
to AUTO mode°
MANUAL OPERATION (Adjusting the
fan speed): Once the unit is on, switch to
manual operation by pressing the UP &
DOWN arrow buttons on the remote control
or the FAN SPEED button_ Once in manual
operation, the fan speed will not aulomati-
calty adjust to the air quality or light level.
, QUIET, MEDIUM, HIGH: These levels are
recommended for standard, daytime use.
HIGH wilt activate aulomatically when
sensors detect high levels of impurities
in the air. QUIET, the lowest setting, is the
energy saving mode.
oTURBO: The TURBO level, the highest
fan speed, can be activated manua!ly for
maximum air circulation+ The TURBO
tevel will not automatically activate+
8
Page 8

AIR QUALITYSENSOR:Theair quality
sensor displays five levels of impurities
in the air_If the unit is set to automatic
operation, the air quality sensor will adjust
fan speeds according to the air quality; fan
speed will decrease as air quality improves_
The AIR QUALITY sensor responds to
cigarette smoke and pet odors, as well as
other contaminants, such as insecticides,
cosmelics, and alcohol or aerosol sprays°
The AIR QUALITY LEVEL indicator shows
three colors: blue, orange, and red° The
blue light indicates clean air, the orange
light indicates unclean air, and the red light
indicates very unclean air. If the unit is set
to automatic operation, it will change fan
speeds to compensate for different levels
of air pollution°
Note: This equipment has been tested and
found to comply with the limits for a Class
B digital device, pursuant to 15 of the FCC
rules. These limits are designed to provide
reasonable protection against harmful
interference in a residential installation.
This equipment generates, uses, and can
radiate radio frequency energy and, if not
installed and used in accordance with the
instructions, may cause harmful interfer-
ence to radio communications. However,
there is no guarantee that interference will
not occur in a particular instatlation. If this
equipment does cause harmful Interference
to radio or television reception, which can
be determined by turning the equipment
off and on, the user is encouraged to try
to correct the interference through one or
more of the following:
, Reorient or relocate the receiving
antenna.
• Increase the distance between the
equipment and the air cteaner:
, Connect the air cleaner to an outlet on
a circuit different from that to which the
equipment is connected.
• Consult an experienced te{evision/
radio technician_
CAUTION: Turn off the air cleaner and unplug the electrical cord before performing
l any maintenance°
Cleaning
• Clean unit as necessary by wiping with a
dry, soft cloth; for stubborn stains, use a
warm, damp cloth.
, Do not use volatile fluids such as ben-
zene, paint thinner, or scouring powder,
as they may damage the surface°
. Keep the unit dry.
• Lightly vacuum the AIR QUALITY sensor
every three months.
AIR QUALITY SENSOR
1
Page 9

Filter Replacement
• There are two separate filters:
True HEPA Filter and Carbon Pre-Filter_
• The CHECK FILTER indicator will signal
when to replace the True HEPA Filter_The
replacement period will vary depending on
the hours of usage, air quality, and location
of the unit. However, in most cases of
normal use the filter will need to be
replaced annually
- Change the True HEPA Filter when
the CHECK FILTER indicator is on.
- For best performance, change the
Carbon Pre-Fitter every three months.
This filter should be disposed of when
changed.
Carbon Pre-Fitter Replacement
1. Turn off the air cleaner and unplug the
electrical cord.
2. Remove the front panel by pulling gently
from the lower portion of the panel. Do
not force, the panel should remove easily.
3o Remove the Carbon Pre-Filter and
plastic frame by gently pulling out from
the bottom and down from the top°
4. Remove the Carbon Pre-Filter from the
plastic frame and dispose of iL
5o Remove a replacement Carbon Pre-
Filter from the resealable plastic bag
and reseal to maintain the freshness of
the remaining filter_
6. Install the Carbon Pre_Fitter onto the
plastic frame by pushing against six
"hook and loop" squares on the back of
the frame. (Diago 6A)
7oInstall the plastic frame by inseding tabs
up into the air cleaner and gently pushing
in at the bottom tab until the frame fits
into place snuggly.
8oReplace the front panel by hooking the
panel on the top of the unit. Swing the
panel in by pushing gently on each side
of the unit and then lock it into place,
9oPlug in air cleaner and press POWER
button until short "beep" sounds
I AUTION: Do not wash and reuse the
True HEPA Filter or the Carbon Pre-Filter
as they will not work effectively,
O
O
\
@
O
10
Page 10

TrueHEPAFilterReplacement
1.Turnofftheaircleanerandunplugthe
electrical cord.
2. Remove the front panel by pulling gently
from the lower portion of the panel. Do
not force, the panel should remove easily.
3_ Remove the Carbon Pre-Filter and
plastic frame by gently pulling out from
the bottom and down from the top.
4_ Remove the True HEPA Filter and
dispose of it.
5. Remove the plastic wrap from the new
True HEPA Filter and insert it with the
arrow showing =air flow" pointing in
toward the back of the air cleaner. The
white tabs at the top and bottom of the
True HEPA Filter will point out to the front
of the unit.
6. Reinstall the plastic frame and Carbon
Pre=Filter by inserting tabs up into the air
cleaner and gently pushing in at the
bottom tab until the frame fits into place
snuggly,
7. Replace the front panel by hooking the
panel on the top of the unit. Swing the
panel in by pushing gently on each side
of the unit and then lock it into place.
8. Plug in air cleaner and press POWER
button until short "beep" sounds.
9. Press the RESET FILTER button by
gently inserting a paperclip into the
RESET FILTER hole on the control
panel. The light will flash 5 times before
a =beep" sounds to indicate the filter has
been reset. See figure C on page 8 or
Diag_ 9 to the right.
The air cleaner will take 3-4 minutes to
calibrate the AIR QUALITY sensor. During
this time the sensor lights wilt flash on
and off. Once the sensor has calibrated,
the lights will stop flashing and the unit
will begin in AUTO mode.
O
@
@
O
O
@
@
tl
Page 11

BATTERY REPLACEMENT
1_Squeeze tab of battery covert
2_At the same time pull cover out of remote°
3. insert battery as shown.
4. Close the battery cover_
O
O
CRADLE: The remote control
has a separate walt.mountable
storage cradle that can
be conveniently attached to
any wall using a screw,
BATTERY USE
oInsert 3V lithium battery CR2025 into the
remote control
° Incorrect battery usage may cause battery
fluid leakage andlor damage.
° When not using remote control for an ex-
tended period, remove the battery.
° Avoid dropping or damaging the remote
control° Keep remote control away from
direct sunlight or heaters.
PROPER OPERATING CONDITIONS
• Operate the remote control facing the air
cleaner.
• Operate within 20 feel of the air cleaner.
IMPROPER OPERATING CONDITIONS
° Any location where there is inverter light-
ing equipment or electronic spontaneous
lighting equipmenL
• When objects or furniture are located
between the remote and the air cleaner,
• When air cleaner unit is located in direct
sunlight, as sunlight may interfere with the
infrared sensor.
° in areas where fluorescent lighting is
flickering due to worn-out bulbs.
At
B_
C_
Dr
POWER: Use the power button to turn
the power on and off° A short "beep" will
sound when the unlt turns on or off.
AUTO: When in AUTO mode, the air
cleaner will automatically sense the
amount of impurities in the air and adjust
the fan speed accordingly. When the
unit is first turned on it wilt default to
AUTO mode.
FAN SPEED
oUP: Use this button to switch from
automatic operation and increase the
fan speed.
• DOWN: Use this button to switch from
automatic operation and decrease the
fan speed.
TURBO: Use this button to switch from
automatic operation and begin the
maximum amount of room air cleaning
and air movement.
12
Page 12

Before You Caii
Solutions to Common Problems
Before you cell for service, review the list below,, This list covers problems that are not the
result of defective materials or workmanship_
OCCURRENCE
The remote control
does not work.
The unit has slopped
removing odors
effectively, or seems
to be emitting an odor.
The AIR QUALITY
LEVEL indicator is
orange or red, but the
air seems clean.
Unit interferes with
radio or television
reception.
The CHECK FILTER
indicator remains tit
after replacing the
True HEPA Filter.
POSSIBLE CAUSE/SOLUTION
• Make sure the remote control battery is tnseded correctly.
, Replace a worn-out battery.
, Make sure that the remote control has a clear line of sight to
the air cleaner.
, Make sure the AIR QUALITY sensor is not blocked or
clogged.
• Move the unit closer to the offending odors°
• Replace the filters as they may have reached their
capacity' to absorb pollutants. You may need to replace filters
more frequently.
Clear the AIR QUALITY sensor with a vacuum cleaner as it
may be blockedor clogged,
Because this unit radiates radio frequency energy, try one or
more of the following suggestions:
, Reorient or relocate the receiving antenna.
• Increase the distance between the equipment and the air
cleaner.
• Connect the air cleaner to an outlet on a circuit different from
that to which the equipment is connected_
• Consult an experienced tetevisiontradio technician.
Press the RESET FILTER button by gently inserting a paper-
clip into the RESET FILTER button hole. Hold for 3-5 seconds
until a "beep" sounds to indicate the unit has been reseL
13
Page 13

Guia de Uso y Mantenimiento
aWave '°
Limpiador de Aire
Modelos 85150 o85300 ° 85450
85150 85300 85450
CAUTION:
Read and follow all safety rules and
instructionsbefore operating this
equipment.
ADVERTENCIA:
Lea y siga todas las reglas e instrucciones
de seguridad antes de operar este equipo,
Sears Brand Management Corporation Hoffman Estates, IL 60179 U.S.A.
www.sears.com
Pnnted in Korea
Page 14

A fin de ser capaz de hacer el mejor
uso postble de su limpiador de aire,
recomendamos que usted comlence
pot leer r&pidamente las instruc-
clones y que usted conserve el
manual de instrucciones para futura
referencia.
Garantia ................................................... 17
Contenido del paquete ............................ t7
Instrucciones de seguridad ....................... !8
Caracterislicas del filtro de aire .................. !9
Especificaciones de producto ................... 20
Sistema de filtro de aire ............................ 2 !
Panel de tnstrumentos ............................. 22
Operaci6n ................................................ 22
Cuidado y mantenimiento ........................ 23
Reemplazo del fillro ............................. 24-25
Mando a distancia ................................... 26
Soluci6n de probfemas ............................. 27
Rep_relo .................................................. 28
GARANTIA COWtPLETA DE KENMORE
Si este producto Kenmore fallase debido a un defecto en los matedales o en la mano de
obra en el periodo correspondiente a un aSo a partir de la fecha de compra, rogamos Io
devuetva cualquier tienda de Sears u otra tienda de Kenmore en los Estados Untdos, para
su reemplazo gmtuito.
Esta garantia no cubre los filtros de los 5mpiadores aire, ya que son pades prescindibleso
Esta garanlia s61o catificard durante 90 d|as a partlr de ta fecha de la compra en caso de
que este producto sea usado alguna vez para objetivos que no sean otros que el menaje
privado del hogar.
Esta garantta califica s61o mientras este pmducto sea usado en los Estados Unidos
Esta garantia le da derechos legales especiflcos, y usted tambi_n puede calificar para
otros derechos que vadan de estado a estadoo
Sears, Roebuck and Co., Hoffman Estates, IL 60179
Modelos 85300 y 85450
• 1 Filtro de Aire con Filtro True HEPA
- 2 Prefiltros de Carbono con Sanitized TM
en una bolsa de pldstico resellable
• 1 Baterla de Litio de 3V (CR2025)
o1 Mando a Distancia
- 1 Abrazadera Remota de Instalaci6n en
Pared
o1 Tornillo de Abrazadera Remoto
o ! Adhesivo de Abrazadera Remoto
• i Guia de Uso y Mantenimiento
Modelos 85150
• ! Filtro de Aire con Filtro True HEPA
• 2 Prefiltros de Carbono con Sanitized TM
en una bolsa de pldstico resetlable
,1 Gufa de Uso y Mantenimiento
Page 15

Graciaspor comprar un ltmpiador de aire Kenmore. Por favor, lea este manual con deten-
imiento antes de su utilizaci6n. Esle producto es de uso dom_stico _nicamenle.
PRECAUCIONES IMPORTANTES AL
USAR SU FILTRO DE AIRE
ADVERTENCIA: Siga las instrucciones de
este manual para reducir el riesgo de des-
carga eldctrica, cortocircuito, ylo fuego:
• No repare o modifique la unidad a menos
que expresamente sea recomendado en
este manual. Cualquier otra reparaci6n
debe ser completada por personal t_cnico
cualificado.
• La clavija de esta unidad est_
potadzada medtante una patilla m_s
ancha que la otra. No fuerce la clavija en
la toma el_ctrica_ No modifique ta clavija
de ningDn modo. Si la clavija no cabe en
la toma, invierta la ctavija. Si a_3nno cabe,
pbngase en contacto con personal t6cnico
cualificado pare instalar una toma apm-
piada.
, No user en case de que el cable de
corriente o la clavija se encontraran
daSados o la conexi6n a la tome de pared
fuera d_bit.
° Uso de corriente altema de 120V
0nicamente.
. No daSe, ni quiebre, nl doble
en_rgicamenle, ni tire, ni enrosque, ni ate
un fardo, ni cubra, ni pellizque, ni coloque
ning_n objeto pesado en el cable de
corriente.
• Eiimine perl6dicamente el polvo de la
clavija de corriente. Esto reducir_ e!
riesgo de descarga debido a un aumento
de humedad.
• Si se dafia la clavija de corriente, debe
ser sustiluida por el fabricante o por
personal t_cnico cualificado.
• Extraiga la clavija de corrJente de la tome
antes de limpiar la unidad. AI extraer la
clavija de corriente, agarre de la misma
clavija, y nunca del cable.
• Extraiga la clavija de corriente de ta tome
cuando no est_ en uso.
, No manipule la clavija de cordente con
las manos mojadas,
- No haga uso de la unidad mtentras use
insecticidas de interior que generen humo.
• No iimpie la unidad con el benceno ni
disolvente pare pintura, No rocie la unidad
de insecticida.
• No use la unidad en sitios h0medos, o en
sltios en los que la unidad corra el rlesgo
de, caso de un cuarto de bafio.
• No inserte sus dedos u ni objetos
extraf_os en la toma de aira o tome.
• No use la unidad cerca de gases inflam-
ables. No la use cerca de cigarrillos,
incienso, u otros articulos que generen
chispa.
=La unidad no eliminard el mon6×ido de
carbono emitido por calentadores u otras
fuenteso
PRECAUCIONES IMPORTANTES PAPA
USAR SU FILTRO DE AIRIE
"No bloquear las tomas de entrada ni de
salida.
'. No usar cerca de objetos caltentes, como
una estufa.
- No usar all_ donde la unidad pueda entrar
en contacto con et vapor.
• No usar la unidad recostada sobre un
lado.
• Mantener la unidad alejada de productos
que generen residuos aceitosos, caso de
una freidora_
° No usar detergente pare limpiar la unidad.
• No user la unidad sin un filtm,
° No laver ni reutilizar su Filtm True HEPA ni
su Prefillro de Carbonoo
° Agarrar del mango en la perte posterior de
la unidad pare su transpode.
. No agarrar pot el panel delantero,
Page 16

PRECAUCION: Ensemble totatmenteel limpiador de aire antes de usar (Veret Configuracl6n
del Filtrode Airs en la pSginasigulente),Nots:Lascaracterfstlcasvarlan segun el modelo_
• Operaci6n Tranquila
Esle limplador de sire Kenmore liensuna
h_licede cuatrovelocidades con una
opersci6ntranquilaqua es ideal para la
noche.
• Sensor de Calidad de Airs
Este limpladorde airs Kenmore tteneun sen-
sor de Calidad de Aire que detecla la presencta
de vados egenles contamlnantesen el airs La
unidadaumenlar_ autombticamente la veloci
dad de hdflce pars limpiarm_s volumende aim
y quilar las tmpurezas rdpldamente,
. Sensor de Luz
E!sensorde luz tncorporado detecla e! mo
monte sn qua una sata se encuentre oscuray
aulomdticamente aten6a las luces del panel de
tnstrumentosy baja la velocidadde hdlicepars
una operaci6ntranqullay ahorradora de
energfa._Una vez qua la sala se oscurezca, e!
sensorde luz mantendr_ sus luces ddbiles, y
no permitir_qua la hdliceaumenle de veloci-
dad, fndependientemente de Io detectado porel
sensor de Calidad deAirs.
, Llmpteza Gradual
El aim pasa por etapas multiples de
limpiezaantes de se devuettoa la sala..
Tecnologla PlasmaWave TM
La Tecnologl'aPlasmaWaveTM usa una
descargade corona fuerte pars atacar a los
agonies contaminantes en el nivet molecular
Preflltro Tratado de Carbono
Sanitized TM
El Prefiltmde Carbono colecciona
padlculasgrandes como polvo,
polode mascots, e hilos,
Tambi_nabsorbsel olor qua
causan gases como aquellos
causadosporel humode
cigarrlllos,decatmiento orgbnico
y productodet coctnado;y el olor
es lratado con SanitizedTM pars
reducircon eficacia el desarrollo
de bacterlas y hongos. Para un
rendimientoeflcaz, sustttufr
cada tresmeses_
, Filtro True HEPA
Capturael9999 % de partfcu-
lase tmpurezastan pequeSas
como0.3 micrones,inctuso
humo,polvo,poleny otros
atdrgenos. Sustituircuando
eltndicadorde luz de
CHECK FILTER se active.
TecnologlaAvanzadaPlasmaWaveTM
PlasmaWaveTM usauna descargadecoronafuerteparsdestruiragentesconlaminantesaarotransportados
ene_nivelmolecular,.
Enunafraccibnde un segundo,PlasmaWaveTM el secombineconmoleculesde aguenaturaleaqua
ocurrenenelaim (H20) parscrearrollmfllonesdemoleculesRadicalesdeHidr6xylo(OH).
OHesunamol_culainestabtequa buscael equilibriorobando&tomosde hidr6genode molecules
adyacentesque contlenenethldr_jeno(losagoniescontaminantes),convirtiendoa aquellasde esamanera
enmol_cutasInocuasde ague,di6xidodecarbono,yotrasmoleculesaceptables,
Elresultadoesunareducci6nmensurablede agentesconlaminantesdespu_s dequa ela[repasaporel
GeneradorPlasma(PlasmaWaveTM),
AIconvertirtasmolecules,latecnologiaPlasmaWaveTM puedereducirolores,astcomoVOCs(vapores
qulmicos),Estambf_neflcazen lareduccl6nde bacteriasdemicroorganismosaerotransportadosyde virus.
La tecnolog[aPtasmaWaveTM esfnocuay la moi_culaOHtan s6!ovtveun nanosegundomientrasconvierte
alas moleculescircundanles_Y,Ioquaesm_simportanle-- a diferenciadefaobsoletatecnologla ionizante
PlasmaWaveTM no producenivelesaltosdelozonocomounsubpmductoqua as.
Atcombinarseconunah_licey unsistemadefiltrolimptadordeairs,PlasmaWaveTM ofreceunmodo eficaz
yeficientede limpiare!airsdeagentescontamlnantesnodeseados,comopolvo,humoy polenas_como
VOCs,al_rgenos,micmorganismosy olores
Page 17

Modeto
TamaSo de la Sala
Alimentaci6n
Tasa de Corrienie
Velocidades de la
Helice
Demostraci6n
Tipo de Control
Mando a distancia
Sensor de Calidad
de Aire
Sensor de Luz
iCerBficado por la
_zAHAM
Publicado en la UL
Prefiltro Tratado de
Carbono Sanitized TM
Calificado para
Comprobar Indicador
de Filtm
Configuraci6n
Limpiador
- Prefiltro de
Carbono
- Filtro True HEPA
. PlasmaWave TM
CADR
TamaSo de la
Unldad (pulgadas,
LargoxAnchoxAito)
Peso de ta Unidad (en
libras)
85150
150 pies cuadrados
AC 120V/60(Hz)
Baja 4W, Turbo 40W
4 Velocidades
Digital
AutolManual
Mo
SI
Si
SI
S_
SI
Si
SI
SI
Si
Humo/Potvo/Polen
981981103
827 x 18.50 x !3.78
85300
300 pies cuadrados
ACt 20V!60(Hz)
Beja 4W, Turbo 60W
4 Velocidades
Digital
Auto/Manual
st
S!
S!
Sf
St
Sf
S[
SI
Sf
S{
Humo/PolvolPolen
! 97/1971214
8°66 x 21.65 x 16.30
85450
450 pies cuadrados
AC 120VI60(Hz)
Baja 11W,
Turbo 110W
4 Velocidades
Digital
Auto/Manual
Si
SI
S|
si
Si
Si
SÁ
Si
Si
sI
HumoIPolvolPolen
29112981343
1024 x 25,,59 x !7,32
19,4011.!5 !3.95
Page 18

Procedimiento de Conflguraci6n
1, Extratga la petfcula protectoradel panel
de instrumentos,
2_Extratga el panel delanterotirando
suavemente de ta parte inferiordet
panel. No Io fuerce: et panel deberla
poder salirfdcilmente_
3. Extraiga e! marco de pldsticode Is unidad.
4. Extratga el Filtm True HEPA y ta envoltura
de pldsticodel fillm,
5oInstate el FiltroTrue HEPA con ta flecha
qua indicael =flujo de aira"apuntando a
la parte posteriordei limpiadorde aire; tas
pestaSasblancas apuntando hacla ardba
y el fondo delf!ltrode HEPA apuntando O
hacla el frente de la unldado
6, Abra la bolsade pldsticoresellable que
contlene los Prefillrosde Carbono y extratga
un flltro,Reselle la bolsade pt_sttco
pare mantaner la frescura del fittro_
7 Instaleel Prefi]trode Carbono en el marco
de pl_sticoempujbndo!ocontrasets
cuadradosde "gancho y lazo"en el dorso
del marco, (Diag 7A)
8. Instale el marco pldsttcoInsedando las
pestaSas hacia ardba en e! limpiadorde
aim y empuje suavemente an ta pestafia _)
de rondo hasta que el marco quepa en el
lugar cOmodamenteo
9oSustituya el panel detantero enganchando
et panel ala parte superiorde la unidad.
Vuelva a colocar el panel en empujando
suavemente a cada lado de la unidad y
luego bloqudelofijamenter
10, Enchufe el cable de corrlente a una tome
de pared°
1!o Presione y mantenga el bot6n de POWER
haste qua suene un °btp" brevemente
12, El limpiador de aire tardar_ de 3 a 4 @
minutosen caflbrarel sensor de Air
Quality (catidadde aire) Durante este
tiempo, las lutes de sensor deste!lardn de
forma intermitente, Una vez catibradoel
sensor, las luces dejardn de destellar y la
unidad se iniciarden modo AUTO.
@
O
O
@
Note: Pare mejores resultados y pare maximizer
et flujode atre:
• Coloquela unidadal menos a 2 pies dedistancia
de la pared.
. Coloque ta unidadtejosde _reas flenas de cor-
dentes de aire, ya que lossensores podrfan no
reaccionar con exactttud
. No lacoloque cerca de cortinas,mobiliado u
otrosartfcutosquapuedan inhibitet fluJode aire
• Coloque la unidad sobre una superficie estable.
O
O
Page 19

85150
85300/85450
A. SENSOR DE CALIDAD DE AIRE: Suparvtsa
de manera automdttcael nivel de calidaddel
aire y ajusla ta velocidad de h_ltce en con
secuencia.
B. INDICADOR DE CHECK FILTER
(COMPROBAR FILTRO): El indicador
seSalar_ cu_ndo hay que sustituir el Filtro
True HEPA
C. RESET FILTER (RESETEO DE FILTRO):
Reinicializala luz de tndicadorade CHECK
FILTER°
D. AUTO: Cambla lavelocidad de h_ltcea modo
AUTO.
E, INDICADOR DE PLASMA:
Muestrata actividad PLASMA. (Consultar
Pdgina 2para la tecnologiBPlasmaWave_)
R INDICADOR DEL NIVEL DE CALIDAD DE
AtRE: Muestra lacalidad actual del alre,
G. INDICADOR DE VELOCIDAD DE HI'LICE:
Muesira elajuste de vetocidadde h_lice
actual.
H. VELOCIDAD DE HI'LICE: Una vez qua
ta m_quina esl_conectadayen modo AUTO,
cambtea operaci6nmanualpresionandoel
bot6nde FANSPEED (VELOCIDAD DE
HI_LtCE)de launidad,
J. BOTON DE POWER: Enciendey apaga la
unidado
K. SENSOR DE LUZ: Estando en modoAUTO,
_ste mantienelas lucesde panal de instru-
mentos con cardcier ddbfly no perrnlteque
ta h_liceaumente pot enc!made la veloci-
dad QUIET (TRANQUILA) cuandola sala
est_ oscura.
OPERACI0N AUTOMATICA: Estando an modo
AUTO, ellimpiadorde airedetectar_ autom_ti-
camente la cantldadde tmpurezasdel aim y
ajustar_la veloctdadde h_liceen consecuencla_
Cuandota unldadse enciendapor vez pdmara,
_sta pasar_ pot defecto a! modoAUTO.
OPERACION MANUAL (AJuste de la velocldad
de h61tce):Unavez qua la untdadest_ conecta-
da. cambiaa ia oparacibnmanualapretandolos
botonasde flechasde UPy DOWN en e! mando
a distanciao el botbndBFAN SPEED (VE-
LOCIDAD DE HI_LICE)_Unavez en operaci6n
manua!,la velocidadde h_lice no se adaptar_
autom_ticamentea la calidadde aire.
. QUIET (TRANQUILO], MEDIUM (MEDIO),
HIGH (ALTO): Estosnivelesson recomendados
un usonorma! duranteet dla_HIGH se actlvar&
autom_ttcamantecuandolossenseresdetecten
nivelesaltosde impurezas en el aim.,QUIET, el
ajustem_s bajo,esel modode ahorrode energla_
. TURBO: E! nivslde TURBO, ta velocidadde
h_lice ross alia, puede set actlvado a mano
para una mdxlma ctrculaclbnde atre_El nlvel
de TURBO no activar_autombticamante,
Page 20

SENSORDECALIDADDEA|RE:Elsensor
decalidaddeairemuestraclncontvelesde
impurezasenelaire_Silaunidadespuestaa
Isopemci6nautomdUca,elsensordecalldad
desireajustar& las velocidadesde h_lice segun
la calidad de aim; la velocidad de h_llce se
disminuirdcuando ts calidadde atre majors. El
sensorde AIR QUALITY (CALIDAD DE AIRE)
responde a humode cigarrillosy olores de
mascotas, asf como olms contamtnantes,como
insecticidas,cosmdticos,y aerosoles o alcohol
El indicadorde AIR QUALITY LEVEL (NIVEL DE
CALIDAD DELAIRE) muestra tres colores:azul,
de naranja, y rojo. La luzazul indlcasire ltmpto,
la luz de naranja tndlcaairs sucio, yla luz roja
Indicaairs muy sucio_SIIs unidad es puesla
en operaci6nautomdlica, esto cambiarb las ve-
Iocldadesde hdlicepare compensar los nlveles
diferentesde contaminacl6nde aire_
Nots: Este equipoha sidopmbado y apmbado
porcumpllrconlos iimitesde un apamto digital
de Clase B, de acuerdo a 15 de las reglas
de FCC. Estos !|mitesson disefiadospara
pmporcionarunaprotecci6n razonable con-
tra tnterferenciasdafiinasen una tnstalact6n
residencia!,Esteequipo genera, usa, y puede
irradlarenergta de radiofrecuencia y, sino
se tnstalani se usa de acuerdo alas fnstruc-
clones,puede causer interferenclas dafiinas a
tascomunicacionespot radio. Sin embargo, no
hay ningunagarantla de qua no vayan a ocurrir
tnterferenciasen una Instalaci6n en particular.
Sieste equipocause reatmente tnterferencias
dafitnasa la emisibn de radio o a la recepci6n
de televtsi6n,Io cual puede ser determlnado
apagandoy encendiendoel equipo, el usuario
debe tralar de corregirla interferencia por medio
de unoo varios de lossigutentes:
- Reorientso trasladar la antena de recepci6n,
. Aumenlar la distanciaentre el equfpo y el
ilmpiadorde afre.
• Conectarel limpiadorde airs a una tome de un
circuitodiferentede aquel al cual el equipo
estdconectadoo
*Consulter conpersonal cualiflcadode
teievisi6nI de radio_
i PRECAUClON: Apague el tlmpiadorde aim y desenchufeel cable sl_ctrtco antes de realizar cual-
quietmantenfmiento. , ....
LImpleza
. Limpiela unldadseg_3nsea necesado con
unpaf_ode tela seco y suave; para manchas
diflciles, use un patio caliente y hOmedo,
• No use flutdosvol_titescomo benceno,
dlsolventede pintura,o polvo de fregado, ya
que podriandafterla superficie.
• Mantenga la unidadseca.
. Aspireel potvodel sensorde CALIDAD DE
AIRE cada tres meseso
SENSOR DE CALIDAD DE AIRE
Page 21

Reemplazo del Filtro
• Hay dos filtrosdlstlntos:
FtltroTrue HEPA y Prefiltrode Carbono.
• Ettndicadorde CHECK FILTER sefialarb
cu&ndohay qua sustituirel FiltroTrueHEPA,
El perlodo de reemplazovariar_ seg_3nlas
horas de uso, calidadde atre,y poslcf6nde
la unidad, Sin embargo, en la mayorparts
de casos de uso normal,et nitro tendr_qua set
suslttuido anualmente.
• Cambie el FiitroTrue HEPA cuandoel
indicadorde CHECK FILTER esl6 conectado.
•Para un rendimientoeficaz, cambleel Prefiltro
de Carbono cadaIres mesas. Este fitlrodebe
desecharse at sercambiado..
la'var Filtro
e HEPA ni suPr_filtrode Carbono, ya qua
ncionar&de manera eficaz.
O
O
Reemplazo de Prefiltre de Carbono
Io Apague el limpiadorde airs y desenchufe el
cable el_ctrico_
2. Exlraiga el panel detanterotirando
suavemente de la parle inferiordetpanel. No
io fuerce, el panel debe salir f_cilmenteo
3. Extraigael Prefillro de Carbono y el marco de
pl_islicottrandosuavemente del rondo y hacla
abajo desde arriba.
4 Extralgael Pretillrode Carbono delmarco
pldsltcoy elimlnelo.
5, Saque Prefiitrode Carbono de laboisede
pl_slicoresellabley res_llela pare mantener
la frescura del filtrorestante.
6, Instaleel Preflllrode Carbono en el marco
pl&sUcoempuJando hacia loscuadradosde
"gancho y lazo"al dorso dal marco, (Dtag,,6A)
7. Instalsel marcopl_slicoinsertandolas
pestafias hacia arriba en el timpiador de aire
y empuje suavemente en la pestaSaderondo
hastequa el marcoquepa en el lugarc6mo
damente.
8, Suslituyael paneldelantero enganchandoel
panelala parle superiorde la unidad.Vuelva
a colocarel panelen empujandosuavemente
a cada lado de ta unidady luego bloqu_elo
fijamente_
9. Enchufeel !tmpiador de aim y presioneel
bot6n de POWER haste que se escuche
breves sontdosde "bip".
@
O
Page 22

Reemplazo de Filtro True HEPA
1. Apague el limpiadorde aire y desenchufe el
cable eldctrico.
2. Exlralga el paneldelanterottrando
suavemente de laparle inferiordel panel° No
Io fuerce:el paneldebe salirfdcilmente,
3. Exlmtga el Prefiltmde Carbono y el marco de
pldslico tirandosuavemente del rondo y hacia
abajo desde arriba.
4. Extraiga el FiltroTrue HEPAy eliminelo_
5. E×lratga la envolturade pldsttcode su
nuevo Fillm True HEPA e ins_delo con la
flecha apuntandohacta"atrflow",apuntando
hacia la parle posteriordel limpiadorde 8treo
Las pestafias blancaspot encima y pot
debajo del Ftitm True HEPAapuntardn hacia
ta parte frontalde la unidad.
6. Instale de nuevo el marco pldsticoy et
Prefiliro de Carbono tnsedandotaspesta_as
hacia arriba en el timpiadorde sire y
empujando suavementehacla adenlm en la
peslatia de rondohasta que et marco quepa
en et lugsr c6modamente,
7, Sustituyae! panel delanteroenganchandoel
panel a la parte superior de la unidadoVuelva
a colocarel panelen empujando suavemente
acada lado de ta untdady tuegobloqu6elo
flJamente.
8oEnchufeel limpiadorde sire y presione
elbol(_nde POWER haste que se escuche
breves sonidos de "bip",.
9o Presione el bot6n de RESET FILTER
(RESETEO DE FILTRO) Insertandosuave
mente clipen e! agujero de RESET FILTER
del panelde inslmmentos°Le tuz parpadear_
5 veces hasta que suene un "hip" que indicard
que e! fittmhabr_ sidoreseleado_Ver la figura
C de la P_gina 8 6 el Diag, 9 ala derecha.
El limpiador de sire tardar_de 3 a 4 minutos en
calibrar el sensor de AIR QUALITY (calidad de
aim).,Dumnte este tiempo, las lucesde sensor
desteltardnde forma tntermttente.,Unavez
catibradoel sensor,las luces dejardn de
destellar y la unidad se lnlciar&en modoAUTO°
@
O
@
O
@
O
@
Page 23

PREPARACtON
1.,Aprtete la pestafiade la cubtertade IBbaterta_
2 A! mismotiempo,retirela tapa del remotoo
3_tnsertela bateda como se mueslra.
4_Cierre tatape de labateria,
ABRAZADERA: Elmando a
distBnciatieneuna abrazadera
independientede almacenaje/
instatact6nquepuedeinstalarse
c6modamenteencualquier
pared usandountomilio_
USO DE LA BATERIA
• Inserte una bateria de Ilttode 3V CR2025 en el
mandoa distancia,
• Elusotncorrectode la bateria podriacauserun
demamedefluidode baterlaylo dafioala mlsma.
• Cuando novaya a user el mandoa distancia
duranteunperIodoampliode tiempo,extraIga
la baterla,
• Evitedejar caer o dafiaret mandoa distancia_
Mantengael mandoa dlstancfatejosde ta luz
del soldireclao de calentadores_
CONDIClONES DE FUNCtONAMIENTO
APROPIADAS
• Use e! mandoadistanciaapuntandohacla
el ltmpiador de elre.
=Useren unradiode 20pies alrededordel limpla-
dorde aim.
CONDIClONES DE FUNCIONAMIENTO
IMPROP/AS
• Cualqulerlugardondehaya un equipoinversor
deluz o unequtpode iluminaci6nespont_nea
electr6nicao
• Cuanclohayaobjetosomobiliartoentre et
remoioyel limpiadorde elre.
• Cuando launidadde timptador de aim seen
cuentreen contacloconla luz del sol directa,
ya que la luz del sot podrlatnterferir con el sen-
sorinfrarrojo.
• En _reas dondeia iluminact6nde nebn
perpadea debidoa bombfllasdesgasladas.
A_
B_
C_
D°
POWER: Use el bot6nde corriente pare
encendery apagar la corriente.Un
breve "hip"sonar_cuandola unidad se
en ciendao se apague.
AUTO: Estandoen modoAUTO, el
limpiadorde sire detectara
aulom_ticamente ta cantidad de
impurezasen el aim y ajustarbla
velocidadde h_ttceen consecuencia_
Cuandota unidadse enctenda por vez
prirnera,la unidadpasarb pordefecto al
modoAUTO.
VELOClDAD DE HI'LICE
• UP (ARRIBA): Use este botbnpara
cambiarla operaci6nautombttcay au-
mentar la veloctdadde la h_lice
- DOWN (ABAJO): Use este bot6n para
camblarla operactbnautom_tlcay dis-
mlnuirlevelocidadde h_lice.
TURBO: Use este bot6n pare cambiar
laoperacibnautombtica y comenzar a
abarcarla centidadmbximade limpieza
y movtmientode aire de la sale.
Page 24

Antes de Que Usted Llama
Soluciones pare Problemas Comunes
Antes de que usted |lame a un serviciode reperaci6n de averias, revisela fistade abajo. Esta itsta
cubreprobtemasque no son resultado de mater|ales defectuososni mano de obra defectuosa.
EVENTO
El mando s distanclano
functona..
La unidad ha parado de
quitar oloms con eflcacia,
o parece emtltrunoloro
i ill ii iii lit,,,,, .............
E! tndicadorde AIR
QUALITY LEVEL es
naranja o roJo,pero el
airs parece iimpioo
POSIBLE CAUSA/SOLUCION
i, iuilll l lllll ,JL, .........
• AsegOrese de que Ia baterfa del mando a distancla est_ tnsertada
correctamente
, Sustituya una batefla agotada._
• AsegQresede qua e! mando a dtstanciatenga una I[nea clara de
vtsi6nhaciaet limpiadorde aim,
• Asegt3rese que el sensor deAIR QUALITY no se encuentre blo,-
queado nt obstrufdo.
. Acerque la untdada los otores ofenstvos,
, Sustituya losfiltms,ya qua puede qua hayan alcanzado su capactdad
para absorber agentes contaminantes.Puede qua usted puede tenga
que sustituirsus flltroscon m_s frecuencia_
,, ...... i .'Ill / llll HI I I= ll= .U/=H H =l II ill I'll'H I
DespeJeel sensor de AIR QUALITY conuna aspiredora ya qua puede
!legar a btoquearse u obstruirse,
La unldad tnlerfierecon
la emtsi6n de radioo la
recepci6n de televfsiSno
El Indlcadorde CHECK
FILTER permanece
encendJdodespudsde
sustituirel Filtro True
HEPAo
Ya que esta unidad irradiaenerg_rade radlofrecuencia,pruebe con una
o varies de las sugerenciassiguientes:
• Reortenta o trasladar la antena de recepci6n.
• Aumentar la distanciaentre etequtpoyel limpiadorde aireo
- Conectar el ttmpladorde airs a una tome de un circuitodiferente de
aquet at cual el equtpoestd conectado_
• Consults a un t_cnicode televisl6n/radiocualificado_
Presione el botbn con RESET FILTER insertando suavemente clipde
papal en el agujero def bot6nde RESET FILTER, MantOngalopulsado
de 3 a 5 segundos haste que suene un"hip"tndicadorde que la unidsd
fue reseleada.
Page 25

SU _Sa
Para consejo se soluci6n de expertos y soluciones caseras:
manage home
www,managemyhome.com
Para ta reparacibn- en su case - de rodeelectrodomdstlcode
lasprinctpalesmarcas,de aparatos de cdsped yjardinerla,o de
sistemas de catefacci6ny de refrigeraci6n,isin tmportarquiOnlos
fabric& ni qui_nlosvendi61
Para repuestos, accesortosy manuales de use qua usbd necesita pare
arreglarla aveda per su cuentao
Para la instataci6nprofestonal per parle de Sears de
electrodom_sticesde casa y de adicutos come abridoresde puedas de
garajey calentadoresde aguao
1-800"44VIY=HOMEAE o.aJq. e,momento,dedlaO
(t-B00..469-4663) denoche(USAyCanada)
www.sears,com www.sears.ca
Nuestra Cas_
Para la reparaci6nde adicutosport, tilescome aspiradoras,
equtpos de c_sped, y articuloselectr6nicos,Ilame en cuatquter
memento paresaber acerca detstilerues cercanode
SearsPads & Repair Service Center
1-800.488-1222 (Uo&A_) t ..800.469-4663 (Canada)
wv_,v,sears.com www.seam.ca
Parecomprarunacuerdodoprotecci6npareun productoaser InspecclonadoperSears:
1.800-827-6655 (UoS.A.)
Pare pedir servicio de reparadL_h
a dom_'lio, y para ordenar piezas:
1.888.SU,HOGAR_
(t-888-784-6427)
1,.800-36t-6665 (_)
AtJ Canada pour service en frar_is:
1,,8004_E=FOYERMc
(1_37)
www.sears.ca
©SeePsBrands,l 1C
/ERegtstemd Trademark t TM Trademark/ s_ Service Mark of Sears Brands. LLC
,tEMarca Regtslradai T_Maresde Ff.bdca/ s_ Merca de Servlclode Seers Brands, LLC
uc Marque de commercet _ Marque d_:_s_:e de Seers Brands,LLC
 Loading...