

Page 1
USE & CARE
MANUAL
STOCK NO.
86951
KNOW YOUR UNIT
Read this booklet so
you will be able to
enjoy all the features in
your Kenmore
Micro/Convection
Oven.
Record in space
provided below the
Model No. and the
Serial No. found on
the label on cabinet
back.
MICRO/CONVECTION
Model No..
Serial No. .
Retain this information
for future reference.
Sears, Roebuck and Co., Chicago, IL. 60684, U.S.A.
OVEN
Use and Care
12808
Page 2

YOUR SAFETY FIRST
The Sears Kenmore Microwave/Convection Oven, though simple to use, is not a toy. Respect it as an electric cooking
appliance. Become familiar with microwave energy, its uses, and limitations.
PRECAUTIONS TO AVOID POSSIBLE EXPOSURE TO EXCESSIVE MICROWAVE ENERGY
(a) DO NOT ATTEMPT to operate this oven with the door open since open-door operation can result in
harmful exposure to microwave energy. It is important not to "defeat or tamper with the safety interlocks.
(b) DO NOT PLACE any object between the oven front face and the door or allow soil or cleaner residue to
accumulate on sealing surfaces.
(c) DO NOT OPERATE the oven if it is damaged. It is particularly important that the oven door close properly
and that there is no damage to the: •
(1) DOOR (bent) .
(2) HINGES AND LATCHES (broken or loosened)
(3) DOOR SEALS AND SEALING SURFACES:
(d) THE OVEN SHOULD NOT BE ADJUSTED OR REPAIRED BY ANYONE EXCEPT PROPERLY
QUALIFIED SERVICE PERSONNEL.
IMPORTANT-FOR PROPER AND SAFE USE OF YOUR OVEN
The oven must be level.
The ceramic tray must be in the oven during cooking.
The metal rack must be removed from oven when rack is not used for cooking.
The oven should be throughly checked by a trained service technician, should it be dropped or damaged,
before it is operated again.
The electrical power cord must be kept dry and must not be pinched or crushed in any way.
The oven has several built-in safety switches to make sure the power remains off when the door is open.
DO NOT try to defeat these switches.
Place the cookware gently on the ceramic tray and handle the tray carefully to avoid breakage.
Use only Sears Browning dish on the ceramic tray. Carefully read and follow the instructions for the browning
dish. Incorrect usage may cause the ceramic tray to break.
DONTS
DO NOT attempt to operate this oven with the door open.
DO NOT run the oven empty without food in it.
DO NOT operate the oven empty with the temperature probe plugged in.
DO NOT allow the temperature probe sensor to touch the sides, bottom or door of the oven when it is in use.
DO NOT use the temperature probe in a regular oven.
DO NOT run the oven empty with the metal rack in it.
DO NOT use browning dishes on metal rack.
DO NOT use metal baking pan for microwave or micro/convec cooking.
* DO NOT cook bacon directly on the ceramic tray to avoid excessive local heating on the ceramic tray.
® DO NOT store burnable material, such as food, in your microwave/convection oven.
* DO NOT use this microwave/convection oven for commercial purpose. This Sears Kenmore
Microwave/Convection Oven is made for household use only.
SAFETY CERTIFICATION
The Sears Kenmore Microwave/Convection Oven is designed and throughlii tested to meet exacting safety standards.
It meets UL andFCC requirements and complies with safety performance standards of the U.S. Department of Health
and Human Services.
Page 3

IMPORTANT SAFETY INSTRUCTIONS
When using electrical appliances basic safety precautions should be followed, including the following:
WARNING — To reduce the risk of burns,
electric shock, fire, injury to persons or exposure to
excessive microwave energy:
1. Read all instructions before using the appliance.
2. Read and follow the specific “PRECAUTIONS
TO AVOID POSSIBLE EXPOSURE TO EX
CESSIVE MICROWAVE ENERGY” found on
Page 2.
3. This appliance must be grounded. Connect only
to properly grounded outlet. See “GROUNDING
INSTRUCTIONS” found on Page 6.
4. Install or locate this appliance only in accordance
with the provided installation instructions.
5. Some products such as whole eggs and sealed
containers —for example, closed glass jars —may
explode and should not be heated in this oven.
6. Use this appliance only for its intended use as
described in this manual.
10.
Do not cover or block any openings on the
appliance.
11. Do not use outdoors.
12.
Do not immerse cord or plug in water.
13.
Keep cord away from heated surfaces.
14.
Do not let cord hang over edge of table or
counter.
15. When cleaning surfaces of door and oven that
comes together on closing the door, use only
mild, non-abrasive soaps or detergents applied
with a sponge or soft cloth. (See “Care and
Cleaning” instructions on Page 56.)
16. To reduce the risk of fire in the oven cavity:
a. Do not overcook food. Carefully attend appli
ance if paper, plastic, or other combustible
materials are placed inside the oven to
facilitate cooking.
7. As with any appliance, close supervision is nec
essary when used by children.
8. Do not operate this appliance if it has a damaged
cord or plug, if it is not working properly, or if it
has been damaged or dropped.
9. This appliance should be serviced only by qualified
service personnel. Contact nearest authorized
service facility for examination, repair or adjust
ment.
SAVE THESE INSTRUCTIONS
b. Remove wire twist-ties from paper or plastic
bags before placing bag in oven.
c. If materials inside the oven should ignite,
keep oven door closed, turn oven off, and
disconnect the.power cord, or shut off power
at the fuse or circuit breaker panel.
Page 4

TABLE OF CONTENTS
General Instructions
■ Location of Model Number Label.............................................................................................................. ' 5
■ IMPORTANT — Electrical Grounding Instructions............................................................................................ 6
■ Installation.............................................................................................................................................................. 7
■ Setting “Time of Day” .............................................................................................................................. 7
H Names of Oven Parts.............................................................................................................................................. 8
H Oven Control Panel...................................................................................................................................... 9 ~ 10
H How The Microwave/Convection Oven Works.......................................................................................... 11
Use Instructions .
■ Use Instructions — Cooking Guide............................................................................................................ 12 ~ 13
■ Easy Use Chart..........................................................................................;
■ Recall and Change of Settings.............................................................................................................................. 17
■ Pause between Stages........................................................................................................................................... 17
■ Regular Timer....................................................................................................................................................... 17
■ Hold Warm .......................................................................................................................................................... 18
Detailed Directions
■ Microwave Cooking
• HI Power Cooking.............................................................................................................................................. 19
• Cooking Guide for Multi-Power Settings................................................................................................. 20
• Multi-Power Cooking.........................................................................................;..................................... 21
• Temperature Controlled Cooking
• Temperature Controlled HI Power Cooking............................................................................................. 25
•Temperature Controlled Multi-Power Cooking.................................................................................................. 26
•Two, Three or Four-Stage Cooking........................................................................................................... 27 ~ 28
•Whole Meal Cooking.......................................................................................................................................... 29
• Automatic Defrost..................................................................................................................................... 30 33
■ Convection Cooking.................................................................................................................................... 34 ~ 49
• Convection Cooking with Automatic Pre-Heat............................................................................................... 35
• Temperature Probe Convection Cooking.......................................................................................................... 37
• Micro/Convec Cooking...................................................................................................................................... 38
• Temperature Probe Micro/Convec Cooking...................................................................................................... 40
• Two, Three or Four-Stage Cooking.......................................................................................................... 41 ~ 42
• Dehydration Cooking.............................................................................................................................. 42 ~ 49
■ Delay Start Cooking............................................................................................................................................. 50
n Preset Recipe Cooking — Auto Recipe 300................................................................................................ 51 ~ 53
•Use of Quantity key............................................................................................................................................ 53
■ Programming New Recipes.................................................................................................................................. 54
Oven Utensils Guide................................................................................................................................................. 55
Care and Cleaning..................................................................................................................................................... 56
Questions and Answers.................................................................................................................................... 57 ~ 58
Sears Service............................................................................................................................................................. 59
Sears Warranty............................................................................................................................................Back Cover
...........
......................................................................................................................... 19 ~ 33
................................................... .........................................................
................................................
14 ~ 16
22 ~ 24
Page 5
SEARS KENMORE MICROWAVE/CONVECTION OVEN
ÖSE AND CARE MANUAL’^—
MICROWAVE/CONVECTION OVEN USE INSTRUCTIONS
Enjoy a new cooking experience from Sears. Please read this booklet.
It takes only a few minutes — time well spent to learn how to use all of the
features.
Advice on the use and care of Sears appliances is always available at
your nearest Sears store. When seeking information, be sure you have
the complete model number which is located on the plastic label. .
See below for its location.
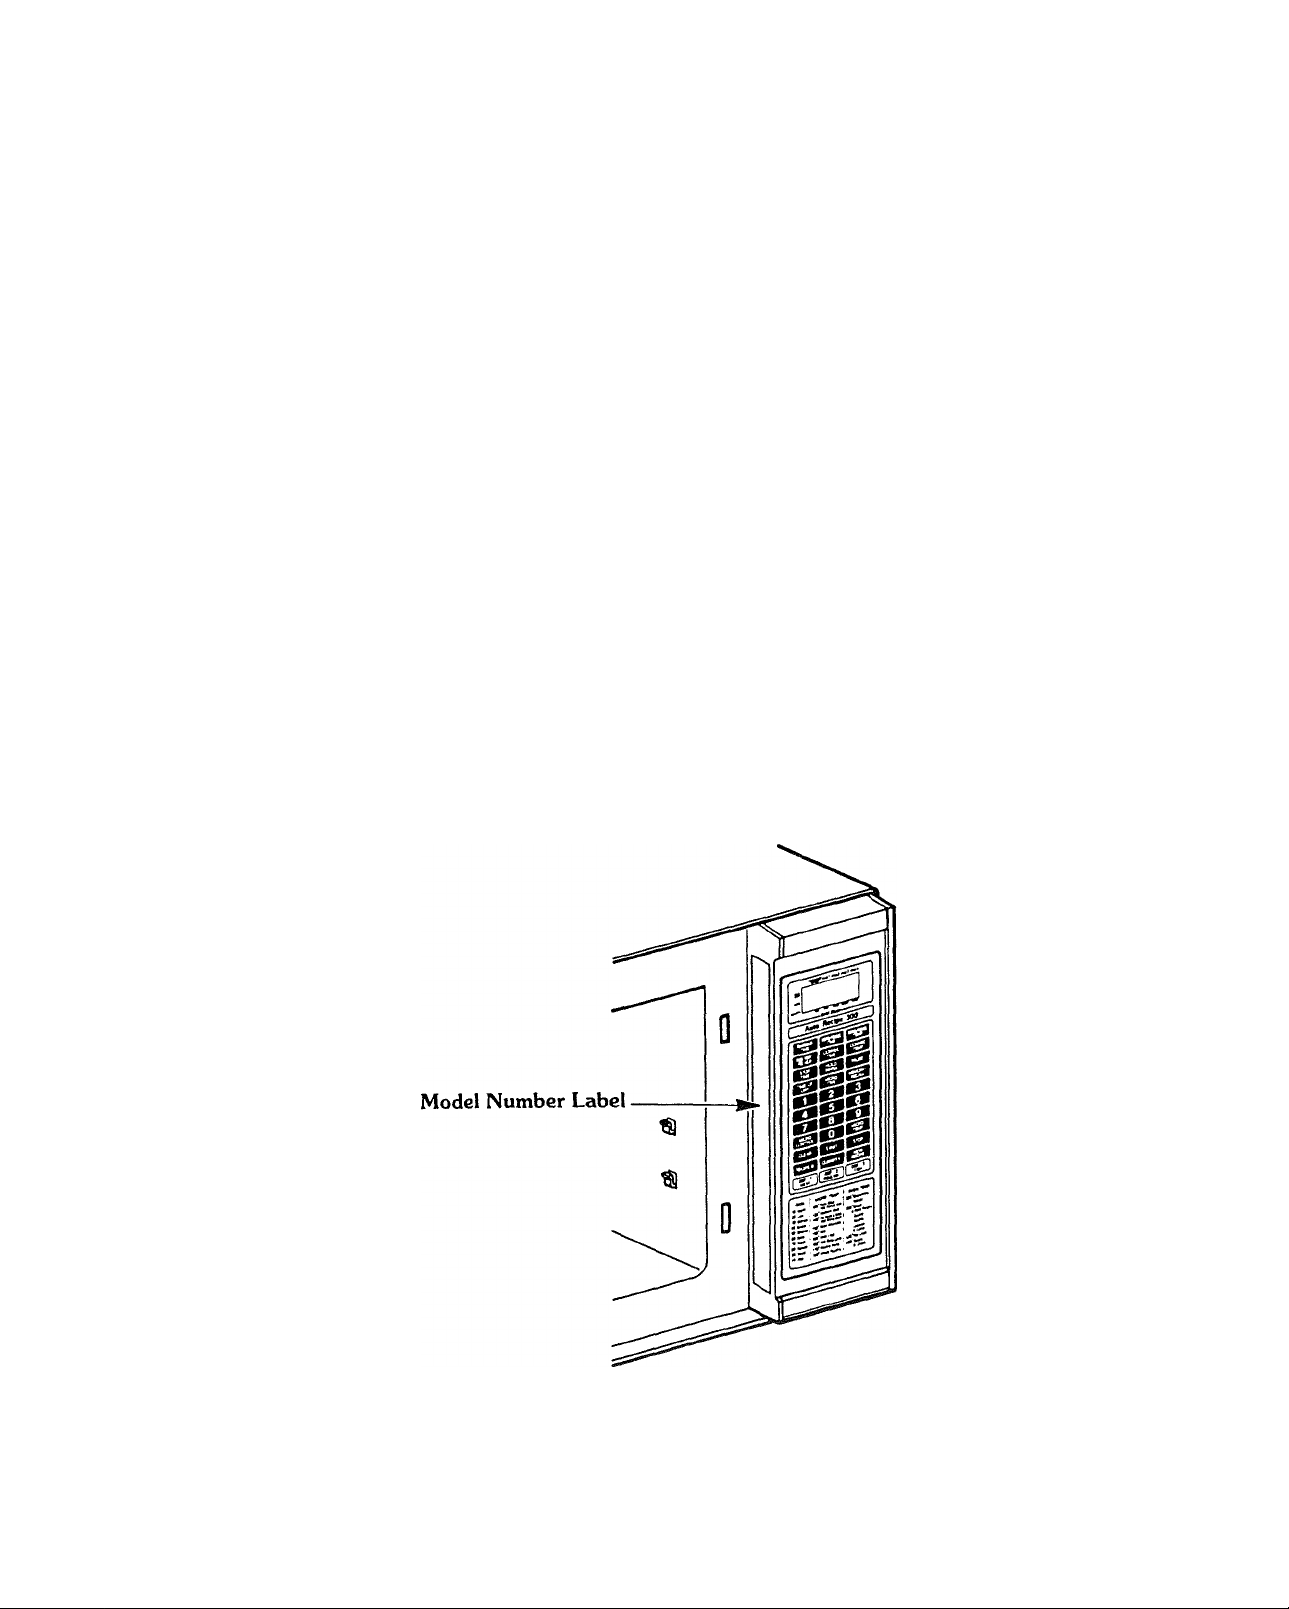
MODEL NUMBER
To make a request for service, information or replacement of parts, Sears will require the complete model
number of you microwave/convection oven. The number is on the inner left side of the control panel. (You
must open the door to see the number). The model number is also located on the back of the cabinet.
The number will look like this: 564.8000000.
Page 6

important-
electrical GROUNDING INSTRUCTIONS
This appliance must be grounded. In the event of an electrical short circuit, grounding reduces the risk
of electric shock by providing an escape wire for the electric current. This appliance is equipped with a
cord having a grounding wire with a grounding plug. The plug must be plugged into an outlet that is
properly installed and grounded.
WARNING — Improper use of the grounding plug can result in a risk of electric shock.
Consult a qualified electrician or Sears Service Department if the grounding instructions are not
completely understood, or if doubt exists as to whether the appliance is properly grounded.
A short power-supply cord is provided to reduce the risks resulting from becoming entangled in or
tripping over a longer cord.
Longer cord sets or extension cords are available and may be used if care is exercised in their use.
If a long cord or extension cord is used, (1) the marked electrical rating of the cord set or extension
cord should be at least as great as the electrical rating of the appliance, (2) the extension cord must be
a grounding-type 3 wire cord, and (3) the longer cord should be arranged so that it will not drape over
the countertop or tabletop, where it can be pulled on by children or tripped over accidentally. The
electrical power cord must be kept dry and must not be pinched or crushed in any way.
PROPERLY POLARIZED AND
Page 7
INSTALLATION
Install your oven by following these four simple steps;
Step 1: Remove all packing material and accessories.
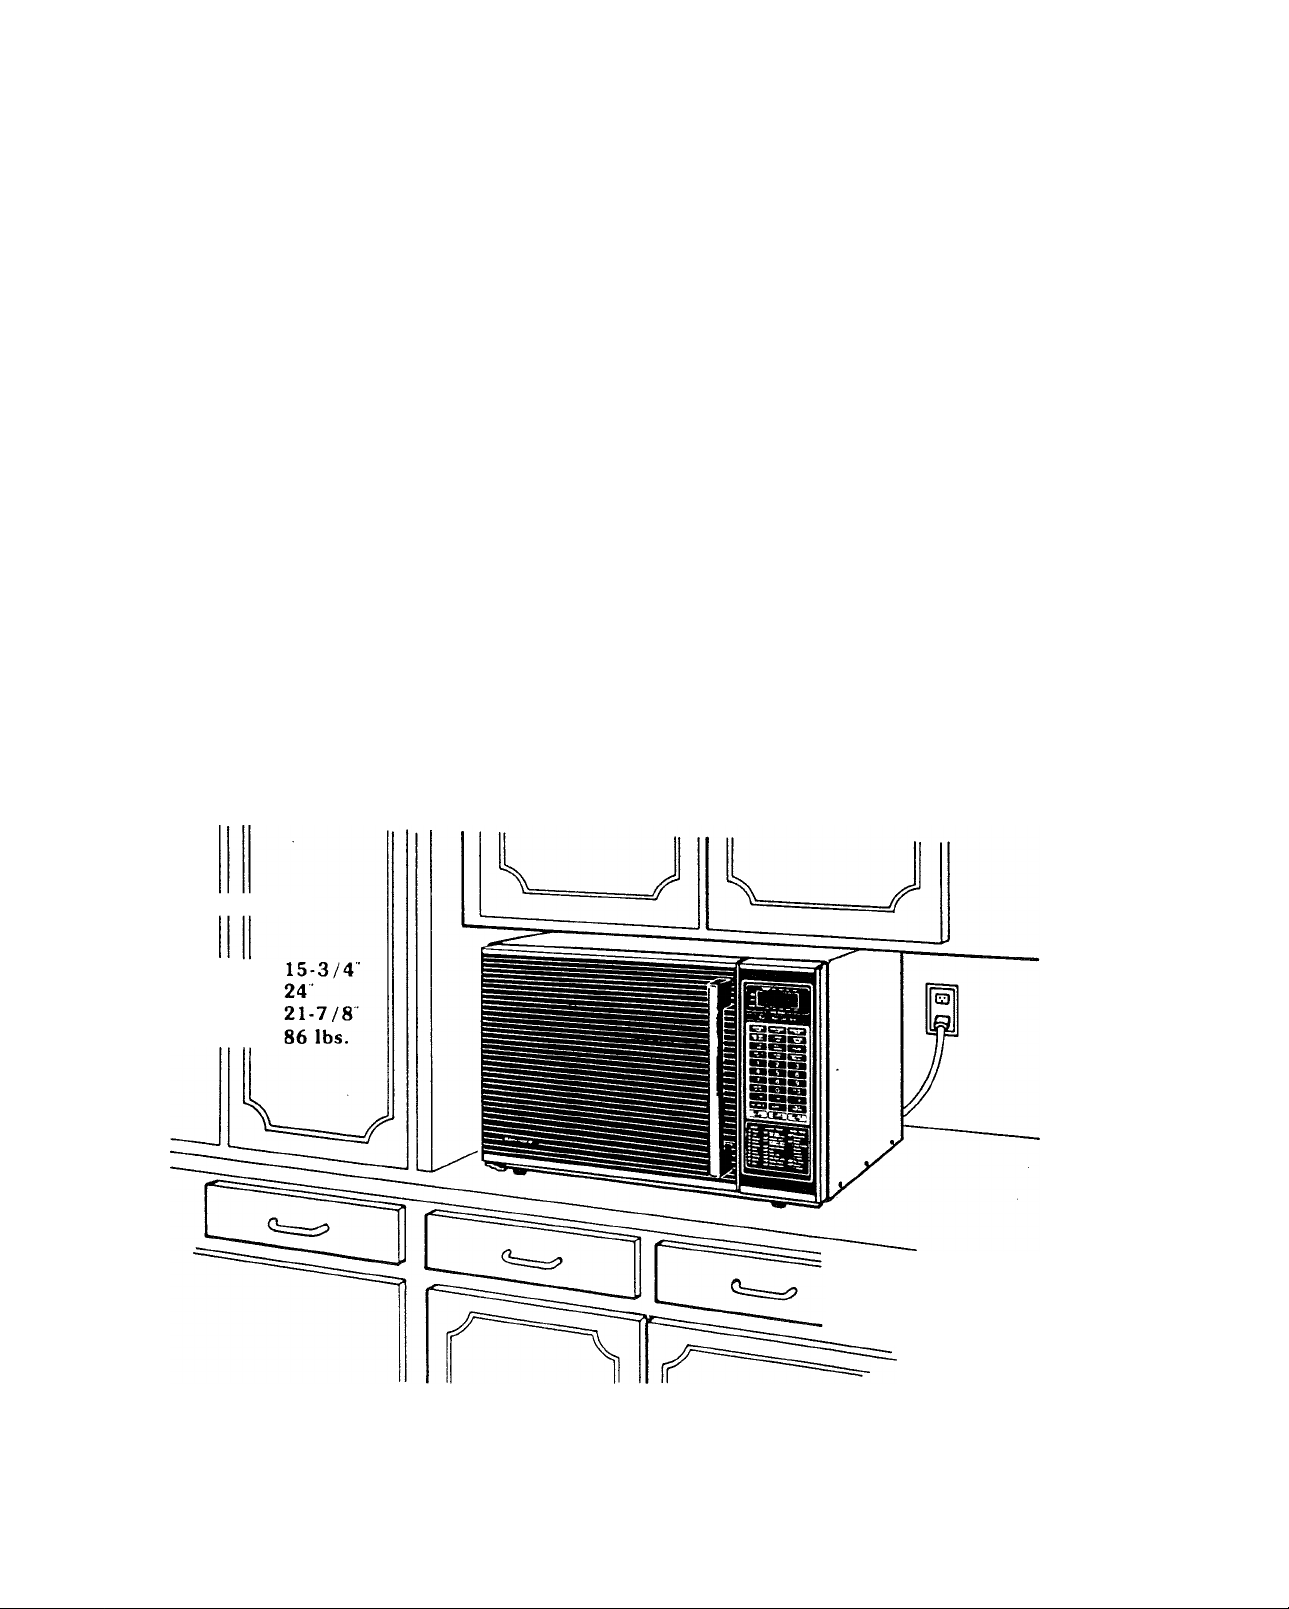
Step 2: Place the oven in the level location of your choice, but make sure there is at least one inch of
space on the top and at the rear for proper ventilation. The top of the oven should be kept clear
and the plastic feet must be kept on the oven so there is air flow ventilation. An exhaust outlet
is at the rear of the oven. Blocking the outlet can damage the oven.
Step 3: Plug your oven into a Standard 120 volt household outlet. Be sure the electrical circuit is at least
15 amp and that your microwave/convection oven is the only appliance on the circuit.
Step 4; When your microwave/convection oven is plugged in for the first time or when power resumes
after a power interruption, the numbers in the display window will show “0:00” plus the hours
and minutes that have elapsed since the oven was plugged in or the power was restored. This
means that the TIME OF DAY clock must be set. Refer to “Setting Time of Day” below. .
Note: If your oven does not operate properly, unplug the oven from the 120-volt household outlet and
then plug it back in.
SETTING TIME OF DAY
• Touch CLEAR.
• Touch TIME OF DAY.
• Touch numbers indicating the correct time.
• Touch TIME OF DAY.
(This is also explained in the “Easy Use Chart” Time of Day Section on Page 14.)
DIMENSIONS
Height
Width
Depth
Weight
When One Side is
installed Flush To
The Wall, The Opposite
Side or Top Must Be Open.
NOTE: If you want this oven “build-in”, a Sears Kenmore built-in trim kit. Stock No. 22-84092 is
available. Contact your nearest Sears store or the catalog.
Page 8
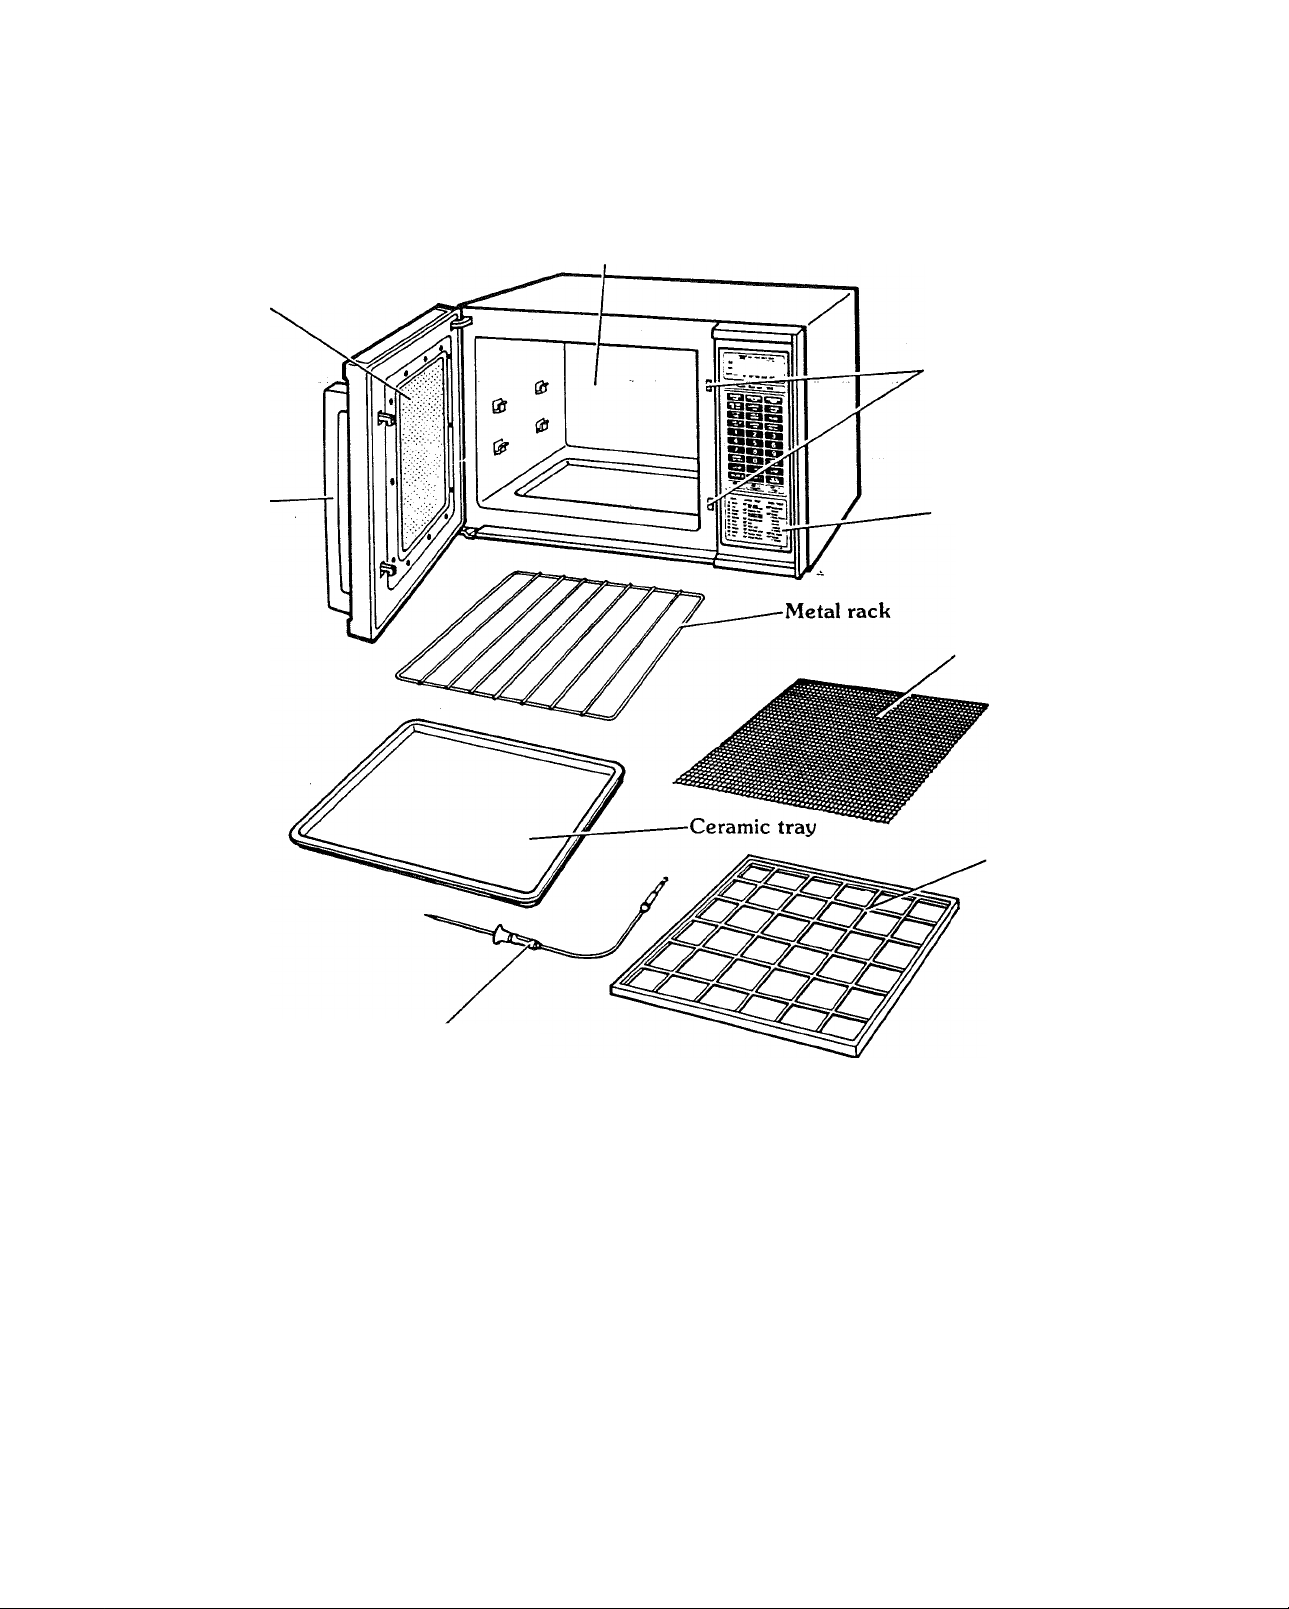
NAMES OF OVEN PARTS
Easy-clean
stainless steel
See-through
door
Safety
interlock system
Oven door
handle
Oven control panel
Dehydration net
Dehydration rack
Temperature probe
Remove your Sears Kenmore Microwave/Convection Oven and all items from the shipping carton. Your
oven will be packed with the following items:
Ceramic Tray................................................................................................................................1
Metal Rack.....................................................................................................................................1 each
Temperature Probe.........................................................................................................................1 each
Dehydration Rack*........................................................................................................................2 each
Dehydration Net*...........................................................................................................................2 each
“Use and Care Manual”.................................................................................................................1 each
“Easy Use Chart” Card...................................................................................................................1 each
*Use the Dehydration Rack and Net for only dehydration cooking. Do not use them for
microwave, micro/convec or convection cooking.
Do not use this Sears Kenmore Microwave/Convection Oven for commercial purposes. This
microwave/convection oven is made for household use only.
Page 9
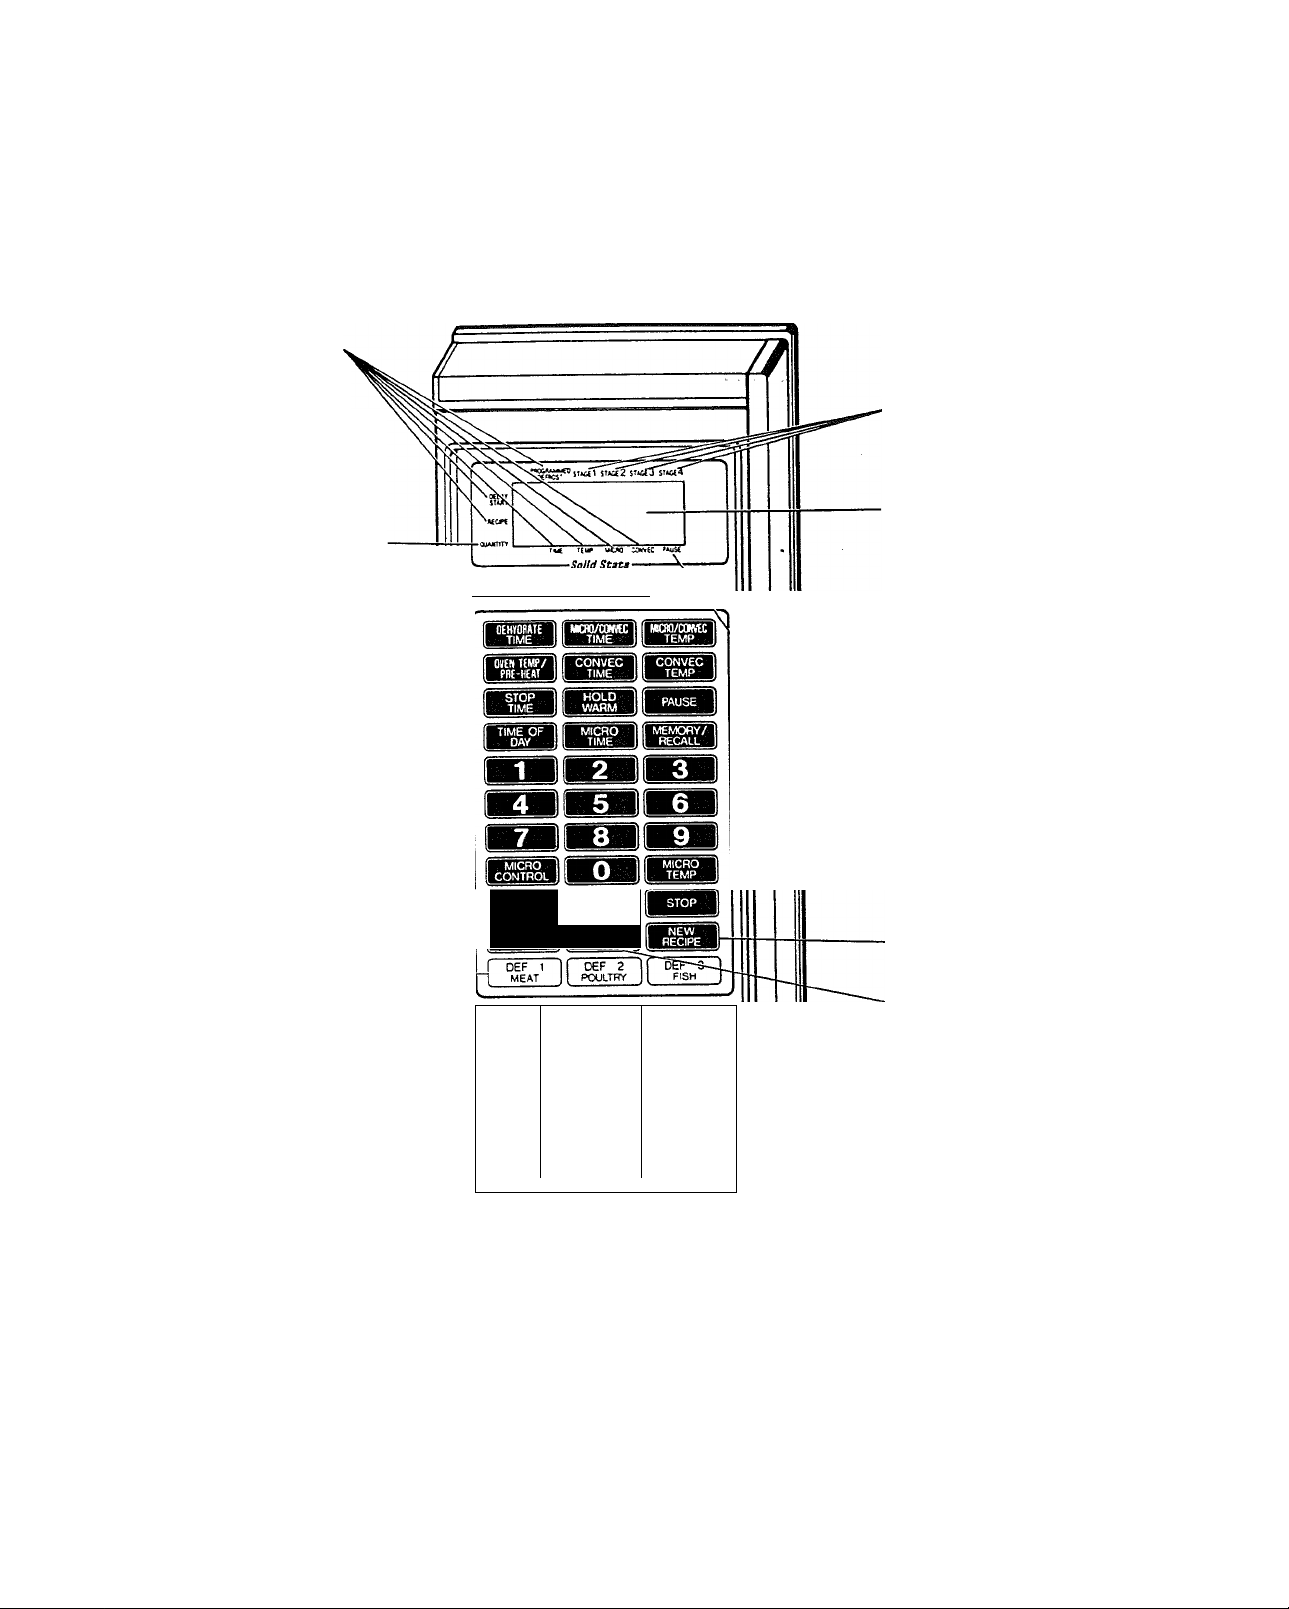
OVEN CONTROL PANEL
Indicator Lights — Time,
Temp, Micro, Convec, Recipe,
Delay Start and Programmed
Defrost lights indicate which
cooking operation is being used.
Quantity Light — When preset -
cooking is set, light indicates
that multiplication can be used
in the recipe or not.
Recipe # — Used in preset •
recipe cooking.
[ Auto Recipe 300 \ )
'Stage Lights — When cooking
stages are set, lights will go on
indicating the stage in which
your oven is cooking.
-Display Window — Used to
show;
•Time of Day
• Cooking Time
• Microwave Cooking Power
Level
• Cooking Probe Temperature.
• Oven Temperature
\
\
• Defrost (dEFl, dEF2, dEF3)
• Recipe #, Quantity #
• Hold, End, Pause (PAUS),
Probe (Prob).
It also functions as countdown
timer or temperature indicator
when cooking.
Automatic Defrost
--------------------
Selection — Used in setting
auto defrost.
Cook Guide — Lists the Typesof Cooking that most often
occur at these Microwave
Cooking Power Levels.
CLEAR 1
RECIPE #
CCOK
40 BraiM
50 &mmer
60 Bake 155* veal
70 Roast
80 Reneat
90 Sauté
HI Max
- --
JÍ QUANTITY
1
MICRO TEMP
120* Rare Beet.
130 MeOium Beet
140* R* Siuo & Pam,
150* Sovoi-Caisenj«
160* Meat Loal
165* Weé Done laro
170* Rouitry Parts
180* Who* Poultry
Fwty Comm каш
WH Done Beet
OVEN TEMP
320*C«as trotas
Rental
350* Bread
& Rolls Poutlry
QuiCM
& Cakes
420*Pie Crust
450*Steak$
& Chops
''Pause Light — Shows Oven
has been set to pause between
two Cooking Stages.
■New Recipe — Used in
programming new recipes.
■Quantity — Used in multiplying
base quantity of preset recipes.
'Oven Temp Guide — Lists
examples of Oven Temperature
for .Convection Cooking.
'Micro Temp Guide — Lists
examples of food that are best
/
cooked to these Microwave
Cooking Temperatures.
Page 10
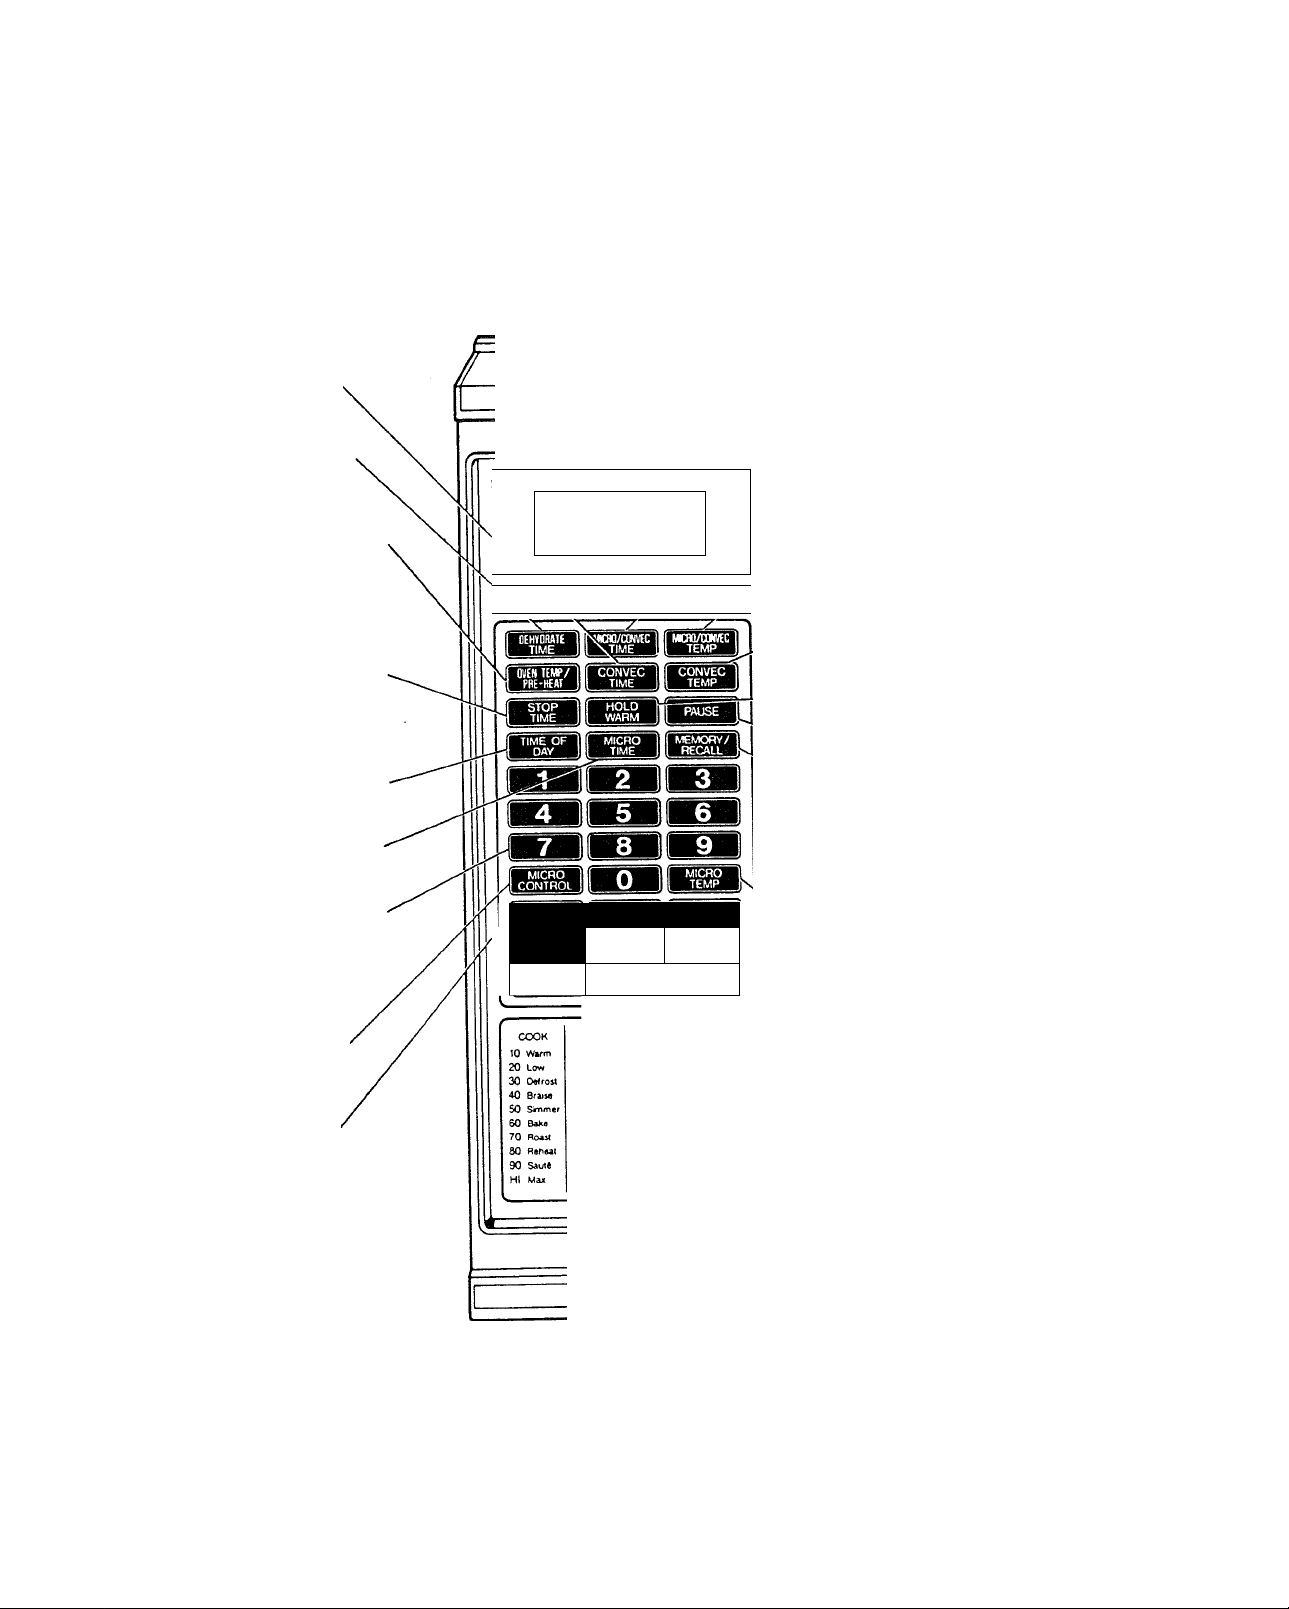
OVEN CONTROL PANEL
Convec Time — Used in
setting Convection Cooking
Time.
Dehydrate Time — Used in
setting Dehydration Cooking
Time.
Oven Temp/Pre-Heat — Used
in setting the desired Oven
Temperature, Pre-heat
Temperature or Dehydration
Temperature.
Stop Time — Used in setting a
Delay Start Cooking. Cooking
can be finished at the preset
stop time.
Time of Day
Used in setting
Time of Day.
Micro Time — Used in setting
Microwave Cooking Time.
Numbers — Used to enter the
Time of Day, Delay Start Time,
Cooking Times, Cooking
Powers and Cooking
Temperatures.
Micro Control — Used to
select Microwave Cooking
Power Levels.
Clear — Clears all entries'
except Time of Day. Once
cooking has begun, however.
Clear will function only after
Stop has been touched.
«1«
STMt
wen
®«ITn
Xpto Recip^SOO
K
, CLEAR 1 1 START 1
RECIPE # 1
r DBF 1 1
1 MEAT_______J
MICRO TEMP
120" Rvt BmI.
130* Medium Be«f
150* SovciCauefo*«
155* Veai
160* Meat Lost
165* WH Done LamO
170* Poultry Part»
180* Wno» Pouilry
jT«i2 ST*tf3 si«t4
ra« rti* UC« CC»rtC
1 STOP
'mrnm
DEF 2 K OEF 3
POULTRY J l\ FISH
320*C*M»roier
CookM Ham
350* Bread
420*Pie Crust
450*Sleaks
OVEN
Peheat
& Polls Poultry
Ouiche
SoulH«
Cookies
A Cakes
A Chops
,Micro/Convec Time —
Used
in setting Micro/Convec
Cooking Time.
, Micro/Convec Temp
'
in setting the desired
Used
Micro/Convec C,ooking
Temperature with Temperature
Probe.
,
• Convec Temp Used in
setting the desired Convection
Cooking Temperature with
Temperature Probe.
-Hold Warm — Used in setting
a Hold Warm. Cooked food can
be kept warm.
■ Pause — Used to stop Oven
between Cooking Stages.
'Memory/Recall — Used in
setting Cooking Time. Power
Level and Temperature for Two
or Three-Stage Cooking. Also
used to recall each memory
stage in a multiple stage
program.
'Micro Temp — Used in setting
the desired Microwave Cooking
Temperature. Temperature
Controlled Cooking can be done
only when the Temperature
Probe is plugged into the socket
inside the Oven.
'stop — Stops Oven.
' Start — Starts Oven.
10
'JOTE; A “beep tone” sounds when a “pad” on
the control panel is touched, to indicate
a setting has been entered.
Page 11
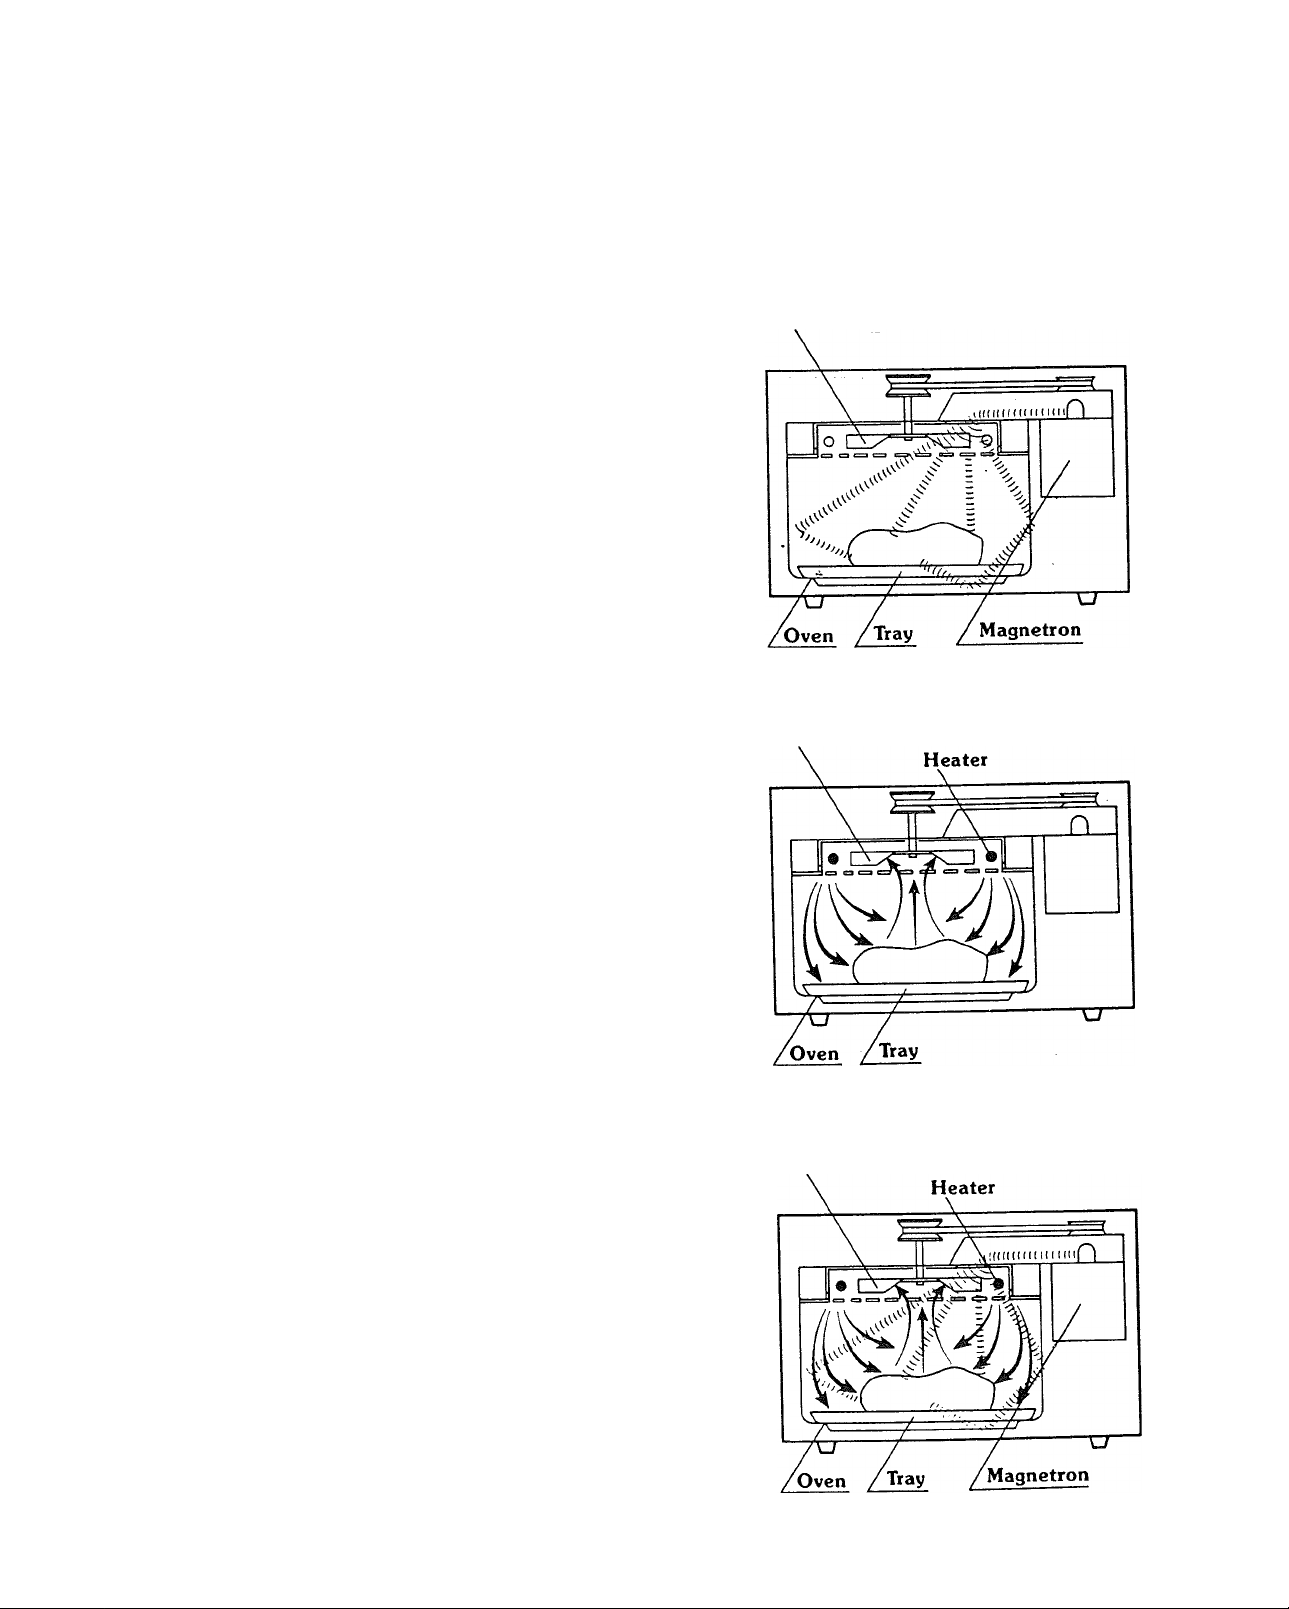
HOW THE MICROWAVE/CONVECTION OVEN WORKS
Microwave Cooking
Using the energy of microwaves only, food is heated quickly without
altering the color or shape. Microwaves generated by a magnetron are
uniformly distributed by the fan so that the food in the oven is heated
and cooked. Microwave power can be adjusted in 99 steps, enabling
the various kinds of foods to cook at most desirable cooking power
for the best results.
Convection Cooking
This is a way of cooking with hot air alone that heats and cooks food
from the outside. This method allows food to be browned evenly
without losing any of the juices. Air heated by the heater is uniformly
circulated in the oven by a fan to enable the heating and cooking of
food. Since hot air remains in the oven as it circulates, cooking is vpy
efficient. The temperature inside the oven can be controlled according
to the type of food being cooked.
Stirrer/Convection Fan
Stirrer/Convection Fan
Micro/Convec Cooking
With both microwave energy and hot air utilized, this method cooks
food much more quickly than any conventional method. The solidstate control alternates cooking energy between microwave and hot
air cycles to provide efficient cooking fully utilizing the advantages of
both microwave and hot air cooking systems.
The dehydration cooking is performed in the same mode.
Stirrer/Convection Fan
11
Page 12

USE INSTRUCTIONS
MICROWAVE COOKING
COOKING GUIDE
“HI” POWER COOKING
“HI" gives highest power and is a recommended setting
for cooking foods with high moisture content or for foods
that need fast cooking to keep natural flavor and texture. •
Your Kenmore Microwave Convection Cookbook will tell
you which foods are cooked best using highest microwave
power or “HI". For detailed directions on “HI” (max
power) cooking, see page 19.
MULTI-POWER COOKING
Many foods need slower cooking at less than full power in
order to give you the best results. In addition to “HI”,
there are ninety-nine multi-power settings. Detailed
directions for multi-power cooking are on pages 20 and
21.
TEMPERATURE CONTROLLED HI
POWER COOKING
“HI” power with Temperature Control lets you cook food
to a preset temperature using maximum speed. Follow the
directions on page 25 and you will be able to preset the
temperature you desire with the aid of the Temperature
Control Cooking Guide.
FOUR-STAGE COOKING
Some recipes need more than one cooking stage. Many
food will cook better when cooked for a period of time at
one power setting and then cooked for another period of
time at a different power setting. With a cake, for
example, the cookbook may recommend cooking at the
“60 (Bake)” setting, followed by a period of cooking time
at the “HI” setting. “Bake” allows .the cake to rise gently,
and then “HI” finishes the cooking cycle. You can preset
up to four stages at the beginning, start the oven, and
then the oven will change .automatically into the second
stage at the preset time. “Two, Three or Four-Stage
Cooking” withdDoth TIME and TEMP CONTROL can also
be set. For detailed directions on “Two, Three or FourStage Cooking”, see Pages 27 and 28.
WHOLE MEAL COOKING
The Metal Rack increases the oven cooking space. To
cook two or more different foods at one time, choose
their proper places inside the oven by following the
Cookbook directions. See page 29 in this manual.
TEMPERATURE CONTROLLED MULTI-POWER COOKING
Multi-power with Temperature Control allows you to cook
more sensitive foods to a preset temperature using slower
microwave speeds. See page 26 for detailed directions.
“HOLD WARM”
After completing your cooking, the oven switches into
"Hold Warm" to keep the food warm. “Hold” will show in
the display window and will continue to show for up to
100 minutes or until the door has been opened or STOP
has been touched. See Page 18.
12
AUTOMATIC DEFROST
Power level will automatically change for proper thawing
of dense food items. See pages 30 thru 33 for detailed
directions.
Page 13

USE INSTRUCTIONS
CONVECTION COOKING
COOKING GUIDE
CONVECTION COOKING
With cooking time controlled, this is the most common
way of cooking. Many foods can be cooked using this
method in which the oven temperature is set according to
the type of food. The oven is usually preheated before
using.
AUTOMATIC PRE-HEAT
Preheating required before convection or rhicro/convec
cooking can be performed automatically. See page 35.
TEMPERATURE PROBE
CONVECTION COOKING
This function enables a type of convection cooking in
which the temperature of the food is controlled by a
temperature probe. See page 37.
This cooking mode is suitable for cooking meat.
MICRO/CONVEC COOKING
Since both microwaves and hot air are used, food can be
cooked very quickly. Cooking this way utilizes the
features of both the microwave and hot air systems and
finishes food nicely. See page 38.
TEMPERATURE PROBE MICRO/CONVEC COOKING
The temperature probe is used to control the temperature
of the food in the combination of microwave and
convection cookings. This method is useful when cooking
meat. See page 40.
FOUR-STAGE COOKING
With the memory feature that controls four different
stages of cooking, four-stage cooking can be performed
automatically.
For example, the first stage can be set for preheating, the
second for convection cooking, third for micro/convec
cooking and fourth for convection cooking.
Just start the oven for automatic sequential cooking.
It is also possible to set a combination of microwave and
convection cooking in each stage. See pages 41 and 42.
DEHYDRATION COOKING
This function enables apples, peaches, berries and any
other seasonal fruit as well as meats to be dried.
To get efficient dehydration cooking, the Oven has been
programmed itself to alternate cooking energy between
microwave and hot air cycles.
This method can dehydrate food much more quickly than
any conventionally dehydrated cooking. See pages 43 thru
49 for detailed directions.
13
Page 14

,1'" "j" .*'»
EASY USE CHART — MICROWAVE COOKING
Your new Solid State Control allows you to use your microwave/convection oven in many ways.
TIME OF DAY
To Set
1. Touch CLEAR
2. Touch TIME OF DAY
3. Touch Numbers for Correct
Time
4. Touch TIME OF DAY*
*This “locks” in the time and starts
the clock running.
TEMPERATURE CONTROLLED
HI POWER COOKING
To Set
1. Plug in Temperature Probe
2. Touch CLEAR
3. Touch MICRO TEMP '
4. Touch Numbers for Cooking
Temperature
5. Touch START
(See page 25 for more instructions.)
__________
HI POWER COOKING
To Set
1. Touch CLEAR
2. Touch MICRO TIME
3. Touch Numbers for Cooking
Time
4. Touch START
(See page 19 for more instructions.’
TEMPERATURE CONTROLLED
MULTI-POWER COOKING
To Set
1. Plug in Temperature Probe
2. Touch CLEAR
3. Touch MICRO TEMP
4. Touch Numbers for Cooking
Temperature
5. Touch MICRO CONTROL
6. Touch Numbers for Cooking
Power level
7. Touch START
(See page 26 for more instructions.)
MULTI-POWER COOKING
To Set
1. Touch CLEAR
2. Touch MICRO TIME
3. Touch Numbers for Cooking
Time
4. Touch MICRO CONTROL
5. Touch Numbers for Cooking
Power level .
6. Touch START ,
(See page 21 for more instructions.)
FOUR-STAGE COOKING
To Set
1. Touch CLEAR
2. Touch MICRO TIME or MICRO
TEMP
3. Touch Numbers for Cooking
Time or Temperature
4. Touch MICRO CONTROL
5. Touch Numbers for Cooking
Power level
6. Touch MEMORY/RECALL or
PAUSE and repeat steps 2-5 to
set 2nd cooking stage.
7. Touch MEMORY/RECALL or
PAUSE and repeat steps 2-5 to
set 3rd cooking stage.
8. Touch MEMORY/RECALL or
PAUSE and repeat steps 2-5 to
set 4th cooking stage.
9. Touch START
(See Pages 27 and 28 for more
detailed instructions.)
AUTOMATIC DEFROST
To Set
1. Touch CLEAR.
2. Touch an Auto Defrost Course
key DEFl, DEF2 or DEF3.
3. Touch numbers to enter the
weight of your food.
4. Touch START.
(See pages 30 thru 33 for more
detailed instructions.)
14
Page 15

EASY USE CHART - CONVECTION COOKING
CONVECTION COOKING
To Set
1. Touch CLEAR
2. Touch CONVEC TIME
3. Touch Numbers for Cooking
Time
4. Touch OVEN TEMP PRE-HEAT
5. Touch Numbers for Oven
Temperature
6. Touch START
(See page 35 for more instructions.)
MICRO/CONVEC COOKING
To Set
1. Touch CLEAR
2. Touch MICRO/CONVEC TIME
3. Touch Numbers for Cooking
Time ■
4. Touch START
(See page 38 for more instructions.)
—------------------------------------------------
AUTOMATIC PRE-HEAT i
To Set
1. Touch CLEAR ;
2. Touch OVEN TEMP PRE-HEAT |
3. Touch Numbers for Oven |
Temperature
4. Touch START
(See page 35 for more instructions.)
TEMPERATURE PROBE
MICRO/CONVEC COOKING
To Set
1. Plug in Temperature Probe
2. Touch CLEAR
3. Touch MICRO. CONVEC TEMP
4. Touch Numbers for Cooking
Temperature
5. Touch START
(See page 40 for more instructions.)
■ I
TEMPERATURE PROBE
CONVECTION COOKING
To Set
1. Plug in Temperature Probe
2. Touch CLEAR
3. Touch CONVEC TEMP
4. .Touch Numbers for Cooking
Temperature
5. Touch OVEN TEMP/PRE-HEAT
6. Touch Numbers for Oven
Temperature
7. Touch START ‘
(See page 37 for more instructions.)
" DEHYDRATION COOKING
To Set
1. Touch CLEAR
2. Touch DEHYDRATE TIME
3. Touch Numbers for Cooking
Time
4. Touch OVEN TEMP/PRE-HEAT
5. Touch Numbers for Oven
Temperature
' 6. Touch START
FOUR-STAGE COOKING
To Set
1. Touch CLEAR
2. Touch OVEN TEMP PRE-HEAT
3. Touch Numbers for Oven
Temperature
4. Touch PAUSE
5. Touch CONVEC TIME
6. Touch Numbers for Cooking
Time
7. Touch MEMORY RECALL
8. Touch MICRO/CONVEC
TIME
9. Touch Numbers for Cooking
Time
10. Touch PAUSE
11. Touch CONVEC TIME
12. Touch Numbers for Cooking
13. Touch START
! Note:
The dehydration oven temperature
is set itself at 150° F unless a
; different temperature is chosen by
Steps 4 and 5.
! (See page 49 for more instructions.)
Note:
Any combination is possible in
four-stage cooking.
(See pages 41 and 42 for more
instructions.)
15
Page 16
DELAY START COOKING
For those times when you must be away from the kitchen, but want dinner ready when you return,
cooking can be started and finished at the time of day selected. See page 50 for detailed directions.
EASY USE CHART
To Set
1. Touch CLEAR
Touch STOP TIME
2.
Touch Numbers for Time of
3.
Day to finish Cooking
Touch MICRO TIME
*4.
5. Touch Numbers for Cooking
Time
6. Touch MICRO CONTROL
7. Touch Numbers for Cooking
Power level
8. Touch START
* Four-Stage Cooking can be used
with Delay Start.
After step 3 above, follow
instructions for Four-Stage '
Cooking beginning with step 2.
(See page 50 for more instructions.]
PRESET RECIPE COOKING — “Auto Recipe 300” and “3 Customer Programmable Recipes”
300 Recipes were developed by our cooking experts and have been preset into this oven for automatic
cooking. To use "AUTO RECIPE 300” cooking, touch RECIPE #, the numbers corresponding with the
desired Recipe(s) shown in the cook-book and then START.
See pages 51 thru 53 of this Manual, as well as your Kenmore Microwave Cookbook for detailed
directions.
In addition to AUTO RECIPE 300, 3 more recipes (Recipe # 301 — 303) can be programmed by yourself
for preset recipe cooking. See page 54 of this manual for detailed directions.
EASY USE CHART
. i
PRESET RECIPE COOKING
(Auto Recipe 300 & 3 Customer
Programmable Recipes)
To Set To Set
1. Touch CLEAR
, 2. Touch RECIPE
3. Touch Numbers for
Preprogrammed Recipe it
4. Touch START
(See pages 51 thru 53 for more
detailed instructions)
; !
' PROGRAMMING NEW RECIPES ;
1. Touch CLEAR
2. Touch NEW RECIPE
3. Touch RECIPE #
4. Touch Numbers for New Recipe
#
5. Program Recipe following
suitable operating instructions
6. Touch NEW RECIPE
(See Page 54 for more detailed
instructions)
16
Page 17

\ ■< A V '* l•-’•i \ ’ i *■ ' ? i ^ '
MICROWAVE
RECALL AND CHANGE OF SETTINGS
To Recall a Setting
To check the Setting for a given stage, touch MEMORY/RECALL once or more until the correct Stage
Light and Indicator Light turn on. The set Time, Temperature or Oven Temperature for that stage will
show in the Display Window.
To check the Microwave Cooking Power level, touch MICRO CONTROL.
To check the Oven Temperature, touch OVEN TEMP/PRE-HEAT.
And so on.
To check Settings while the Oven is running, touch desired pad to recall Setting for operating stage.
To recall a future stage, touch STOP, follow directions above, and touch START to continue cooking.
To recall Time of Day during cooking, touch TIME OF DAY, and it will show in the Display Window.
To Change a Setting
Recall the Setting to be changed by following directions above and make the change as follows: ^
YIME.....................................................................................................Touch “0” until only one “0" shows in the
(MICRO TIME, CÒNVEC TIME, MICRO/CONVEC TIME) Display Window. Set Cooking Time.
TEMPERATURE CONTROL..............................................................Set Cooking Probe Temperature.
(MICRO TEMP, CONVEC TEMP, MICRO/CONVEC TEMP)
MICRO CONTROL
OVEN TEMP/PRE-HEAT
.............................................................................
...................................................................
Set Microwave Cooking Power level.
To reset to “HI”, set “99”.
Set Oven Temperature.
PAUSE BETWEEN STAGES
Some recipes require stirring, turning and adding or removing of foods between stages. To set the oven to
stop between stages, touch PAUSE rather than MEMORY/RECALL when setting the oven. After the
pause, to restart the oven, touch START.
REGULAR TIMER
Your Oven also has a timer that can be used for non-cooking functions. When used as a regular timer,
the Oven is not running, the timer is simply counting down. ■
For detailed instructions on using this timer, see below.
To use the Regular Timer feature:
1. Touch CLEAR.
2. Touch MICRO TIME.
3. Touch numbers for the time.
4. Touch MICRO CONTROL.
5. Touch "0” (power level 0). , .
6. Touch START. The time will begin counting down in the display window with no cooking or heating in
the oven.
A tone will sound and the word “End” will show in the display window for 2 seconds when the time is
over.
17
Page 18

MIGROWAVE
“HOLD WARM”
Your oven has “Hold Warm” feature that keeps the food warm after the cooking is done.
To use the “Hold Warm” feature:
1. Touch CLEAR. ' _
2. Set the desired cooking cycle following suitable operating instructions on pages 19 through 54 in this
manual.
3. Touch HOLD WARM.
4. Touch START.
When the cooking is over, the oven will switch into “Hold Warm” to keep the food warm. “Hold” will
show in the Display Window. The cook control setting changes to Power Level 1.
The “Hold Warm” will continue for up to 100 minutes or until the door has been opened dr STOP has
been touched. •
If you want to keep your cooked food warm, the “Hold Warm" feature can be used independently without
setting the cooking cycle.
To use the “Hold Warm” feature independently:
1. Touch CLEAR.
2. Touch HOLD WARM.
3. Touch START. ,
The oven will begin to keep the food warm with microwave power level 1 for up to 100 minutes or until
the door has been opened or STOP has been touched.
NOTE: Do not use metal utensils when operating with “Hold Warm” feature since arcing may happen
and damage to the oven may result.
18
Page 19

MICROWAVE
“Hl-POWER” COOKING
I. Touch CLEAR, and a beep tone will be heard. The
CLEAR erases all previous settings. ■
J. Touch MICRO TIME. Lights above TIME and MICRO,
below STAGE 1 will go on.
("0” will show in the Display Window.)
3. Touch Numbers for Cooking Time.
Set the cook time by touching the suitable numbers on
the Control Panel. For example, to set 30 seconds, you
would touch “3" and then “0”. For 3 minutes, touch “3”
and then touch "O" twice. For 3-1. 2 minutes, touch “3”,
“3” and “0”. (Note: Remember, the timer is a digital
clock that is divided into 60 seconds. So 1/2 minute is
equal to 30 seconds. Touch 30 not 50 as with a
calculator.) The time set will show in the Display
Window at the top of the Control Panel.
NOTE: It is not needed to touch MICRO CONTROL
when cooking with highest power ("HI”). However, if
MICRO CONTROL is touched, the word “HI” will
show in the Display Window. This is to tell you that the
oven will be running on "HI” power unless a different
power setting is chosen, .
Example: Fresh fish can be quick-cooked on “HI”
(max power) for 6 minutes. Here is the procedure:
1. Touch CLEAR.
2. Touch MICRO TIME.
3. Set 6 minutes by touching
“6”, then “0” twice. “600” will
show in the Display Window.
4. Touch START. The oven will begin cooking, and the
Display Window will show the time counting down in
seconds.
A tone will sound and the word "End" will show in the
display window for two seconds when the cooking time
is completed. Then the oven will shut itself off.
NOTE: To stir food during cooking: open the oven
door: stir or turn the food; close the oven door; and
touch START. The oven will automatically continue to
count down the amount of time left on the timer.
4. Touch START. The oven will
begin to cook and the time will
begin to count down in the
display window. A tone will
sound and the word “End” will
show in the display window for 2
seconds when the 6 minutes are
over. Then the oven will shut
itself off.
NOTE: If you want to keep the
food warm after finishing the set
cooking, you can use “Hold
Warm” feature. For detailed
instructions on using “Hold
Warm” feature. See page 18.
19
Page 20

MIGRÒWA^
COOKING GUIDE FOR “MULTI-POWER” SETTINGS
The “Multi-Power” feature lets you cook at the best power level for the food being cooked. Cooking
directions can be found in the cookbook.
POWER
LEVEL
10 WARM
20
30 DEFROST
40 BRAISE
50 SIMMER
60 BAKE .
70
SETTINGS
LOW
MED LOW
ROAST
MED HIGH
POWER
EXAMPLES
•
Softening cream cheese.
•
Keeping casseroles and main dishes warm. „
•
Softening chocolate.
•
Heating breads, rolls, pancakes, tacos, tortillas and French toast.
•
Clarifying butter.
•
Taking the chill out of fruit.
•
Heating small amounts of food.
•
Thawing meat, poultry and seafood.
' •
Completing the cooking cycle of casseroles, stews and some sauces.
•
Cooking small quantities of most food.
•
Cooking less tender cuts of meat in liquid or slow cooking dishes.
•
Completing the cooking cycle of less tender roasts.
•
Cooking stews and soups after bringing to a boil.
•
Cooking baked custards and pasta.
•
Cooking scrambled eggs.
•
Cooking cakes.
•
Cooking rump roast, ham, veal, and lamb.
•
Cooking cheese dishes.
•
Cooking eggs and milk.
•
Cooking quick breads and cereal products.
80
90
100
As you get to know your microwave oven, you may find that a particular setting is too low or too high for
the results you desire.
Multiple-power control gives you the means to obtain greater precision in setting power levels. For
instance, if you want a power level between ROAST and REHEAT, you would set the time as usual: touch
COOK CONTROL, and then touch “7” and “5”. The display window will show "75”, indicating that your
oven is set to run at power level 75 — halfway between ROAST and REHEAT.
REHEAT
SAUTÉ
MAX POWER
HIGH
•
Reheating precooked or prepared food quickly.
•
Heating sandwiches.
•
Cooking onions, celery and green peppers quickly.
•
Reheating meat slices quickly.
•
Cooking tender cuts of meat.
•
Cooking poultry, fish, vegetables and most casseroles.
•
Preheating the browning dish. ,
•
Boiling water.
•
Thickening some sauces.
20
Page 21

: . -i'.-
“MULTI-POWER” COOKING
Many foods need slower cooking (at less than full power) in order to give you the best results. In addition
to “HI” there are ninety-nine multi-power settings. The cookbook tells you which power setting is
recommended for the food being cooked.
To Cook with Multi-Power
1. To CLEAR.
2. Touch MICRO TIME. The Lights above TIME and
MICRO, below STAGE 1 will go on. (“0” will show in
the Display Window.)
3. Touch Numbers for Cooking Time.
Set the cook time by touching the suitable numbers.
The time set will show in the Display Window.
4. Touch MICRO CONTROL.
The word “HI” will show in the Display Window until a
lower power setting is entered. This tells that the Oven
will always run at highest power unless a lower power
is set.
4. Touch MICRO CONTROL
“HI” will show in the Display
Window.
5. Touch Numbers for Cooking Power level.
Choose the cook control setting desired and touch
numbers corresponding to it. For example, if the recipe
calls for cooking at the 20 (LOW) setting, you would
touch “2” then “0” (the number that is next to LOW
on the Cook Guide). When you touch “20”, the Display
Window will read “20”. This means that in the LOW
setting, the Oven is at power level 20.
6. Touch START. The oven begins to cook and the
display window will show the time counting down. A
tone will sound and the word “End" will show in the
display window for two seconds when the cooking time
is completed. Then the oven will shut itself off.
EXAMPLE: To warm 6 doughnuts, you would cook at
power level 80 or “80 (REHEAT)” for 1-1/2 minutes.
To do this, follow these six steps:
1. Touch CLEAR. Si:
3. Set 1-1/2 minutes by
touching “1” then “3”, and
2. Touch MICRO TIME.
then “0”. “130” will show
in the Display Window.
[ Auto Recipe 300 j
'3^'
-'iV,.
1 2 3
4 5 6
7 8 9
■isn 0
at«»
1 ;
3
0
5. Choose the 80 (REHEAT)
setting by touching the number
"8” then “0” (the number next
to REHEAT on the Cook
Guide). The Display Window
will read “80”, meaning the
Oven is at an power level 80.
6. Touch START. The
oven begins to cook and
the time will begin to count
down in the display
window. A tone will sound
and the word “End” will
show in the display
window for 2 seconds
when the 1-1/2 minutes are
over. Then the oven will
shut itself off.
NOTE: If you want to keep the
food warm after finishing the
set cooking, you can use “Hold
Warm" feature. For detailed
instructions on using “Hold
Warm” feature. See page 18.
ZC
TST"— -7
,
Auto Recipe
2
5 6
’8,
0
St»».
Ì 1
1
J ;
300
iS;-
3
9
*5:
.—.
; l 1
” 1
•t?
1
4
7
21
Page 22

“TEMPERATURE CONTROLLED” COOKING
The temperature probe is used to judge doneness when
cooking or reheating food. Set the desired food
temperature with the MICRO TEMP and the desired
power level with the MICRO CONTROL. When “Hold
Warm” is set, after completing the set cooking the oven
will hold the food warm up to 100 minutes.
TEMPERATURE SETTING & DISPLAY
TEMPERATURE
Temperatures from 90° F to 200° F can be chosen and set
in the oven. The temperature should be set in one-degree
increments.
The display window will show the rise in food temperature
in one-degree increments.
The display window will not accurately show food
temperature below 90° F.
Plug
MEATS
■ Choose only fresh, completely thawed meat.
■ Place meat fat side down on the microwave roasting
rack in a glass baking dish.
■ Microwave cook on the first “multi-power” setting for
half of the total cooking time. (See “Temperature
...
Controlled” Meat Cooking Guide on Page 23.)
H Turn meat to fat side up and:
1. Place the temperature probe sensor into the meat
with the first inch of the sensor in the center of the
meat. The sensor should not touch the bone or fat
pocket. The sensor should be put in from the side or
from the front — it should not be put in from the
top of the meat.
2. Plug the temperature probe into the socket on the
side of tfie oven wall.
3. Choose the doneness temperature' from the chart on
Page 23. Set the temperature with the MICRO
TEMP.
4. Microwave cook the meat on the second “multi
power” setting. The microwave oven will turn itself
off when the preset temperature is reached. Take
the food out of the oven as soon as the display
window shows “End”.
5. Remove the temperature sensor. Let the meat stand,
covered with foil for about 10 minutes before
serving. The temperature will rise about 15° F during
standing time.
NOTE; It is normal for meats to become slightly over
cooked in a small circular area in the immediate vicinity of
the hole made by the meat probe.
DEFINITIONS
TEMPERATURE PROBE SENSOR: The pointed metal
portion of the probe which is placed into the food.
SENSITIVE AREA OF SENSOR: The first inch, or tip,
of the temperature probe sensor.
PLUG: The end of the temperature probe that is plugged
into the oven socket.
SOCKET; The outlet on the side of the oven wall.
CAUTION; Do not plug the pointed end of the
temperature probe into the socket.
SLIDE GROMMET: Adjust the length of the
temperature probe by sliding the grommet before inserting
it into food so that the sensitive area of the probe can
always be placed in the center of the food.
DISPLAY WINDOW: Shows the cooking temperature
rising as the food is cooking. Chosen temperature may be
seen during cooking by touching MICRO TEMP. When
“Hold Warm” is set, after completing the set cooking the
Display will show "Hold" for 100 minutes or until the door
is opened or STOP is touched.
Temperature Probe
22
Page 23

MICROWAVE
“TEMPERATURE CONTROL” POINTS TO REMEMBER
DO
• Place the temperature probe sensor into the thickest part of
the meat or in the center of the food to be reheated. Avoid
touching bone or fat. '
• Check that the first inch of the sensor is in the densest part of
the food to be cooked.
• Remove the temperature probe from the oven after use.
• Be sure to turn meat between first and second settings.
• Refer to cookbook for other information.
DO NOT
• Do not operate the oven with the temperature probe plugged
in while it is empty.
• Do not leave the temperature probe unplugged in the cavity
when operating the oven.
• Do not let the temperature probe touch the side walls,
glass tray or door of the cavity when in use. '
• Do not plug the pointed end of the temperature probe
into the socket inside the cavity.
• Do not use the temperature probe in a regular oven. This
probe is designed for micro/convec oven only.
“TEMPERATURE CONTROLLED” MEAT COOKING GUIDE
Refer to “Meats" section on Page 22.
TEMPERATURE
PROBE AND COOK
CONTROL SETTING
HI (Max. Power)
1600 F
70 (Roast)
120° F
140° F
MEAT
BEEF
Meat Loaf
2 lbs.
Rib Roast, boneless
FIRST SETTING
AND TIME
HI (Max. Power)
12—14 min.
HI (Max. Power)
Rare 4—5 min. per lb.
Medium 5—6 min. per lb.
Well done 6—7 min. per lb
SECOND SETir
AND TIME
70 (Roast)
Rare 3—4 min. per lb.
Medium 5—6 min. per lb. 130° F 10 min.
Well done 6—7 min. per lb.
STANDING
TIME
5—10 min.
10 min.
10 min.
Rib Roast, with bone
LAMB’
Lamb Leg or
Shoulder Roast.
with bone
Lamb Roast, Boneless
VEAL
Shoulder or Rump Roast,
boneless
2—5 lbs.
PORK
Pork Loin Roast, bonelss
3—5 lbs.
Pork Loin, center cut
4-5 lbs.
Ham, boneless, precooked
Center Cut Ham Slice
1—1/2 lbs.
HI (Max. Power)
Rare 3—4 min. per lb.
Medium 4—5 min. per lb.
Well done 5—6 min. per lb.
70 (Roast)
Medium 4—5 min. per lb.
Well done 5—6 min. per lb.
70 (Roast)
5—6 min. per lb.
70 (Roast)
9 min. per lb.
HI (Max. Power)
6 min. per lb.
HI (Max. Power)
5—6 min. per lb.
70 (Roast)
5—7 min. per lb.
70 (Roast)
5 min. per lb.
70 (Roast) 70 (Roast)
Rare 3—4 min. per lb. 120° F
Medium 3—5 min. per lb. 130° F 10 min.
Well done 5—6 min. per lb.
70 (Roast) 70 (Roast)
Medium 4—5 min. per lb. 145° F
Well done 5—6 min. per lb.
70 (Roast)
5—6 min. per lb. 155° F
70 (Roast) 70 (Roast)
9—10 min. per lb.
70 (Roast) 70 (Roast)
5—6 min. per lb. 160° F
70 (Roast) 70 (Roast)
4—5 min. per lb.
70 (Roast)
5—7 min. per lb.
70 (Roast)
5—6 min. per lb.
140° F
165° F
70 (Roast)
155° F
160° F
70 (Roast)
120° F
70 (Roast)
120° F
10 min.
10 min.
5 min.
10 min.
10 min.
10 min.
10 min.
10 min.
10 min.
10 min.
Smoked Ham Shank
Canned Ham
3 lbs.
5 lbs.
70 (Roast)
4—5 min. per lb.
70 (Roast)
5—6 min. per lb.
70 (Roast)
4—5 min. per lb.
70 (Roast)
4—5 min. per lb.
70 (Roast)
5—6 min. per lb. 120° F
70 (Roast)
4—5 min. per lb.
70 (Roast)
120° F
70 (Roast)
70 (Roast)
120° F
10 min.
10 min.
10 min.
23
Page 24

,i--:.ii^..î?^.v>.^-.'...
MICROWAVE
REHEATING FOODS
• Place the temperature probe sensor into the food to
be reheated with the first inch of the sensor in the
center of the food.
• Plug the temperature probe into the socket on the
side of the oven wall.
• Cover the food if desired.
• Set the temperature of the desired doneness. (See
chart below.)
TEMPERATURE CONTROLLED” REHEATING GUIDE
• Select “multi-power” setting as shown below.
•The microwave oven will stop cooking when the set
temperature is reached.
• Remove the temperature probe from the oven after
use.
FOOD
Beverages
Soups
Precooked
Casseroles
Canned
Vegetables
Leftovers
Meat Sandwiches
(Thick)
Baked Foods
SETTING
HI (MAX POWER)'
80 (REHEAT)
80 (REHEAT)
80 (REHEAT)
80 (REHEAT)
80 (REHEAT)
80 (REHEAT)
DONENESS
150° F
150° F
150° F
150° F
150° F
120° F
120°F
INSTRUCTIONS
Place the temperature probe sensor in the center of the
beverage glass. _
Place the temperature probe sensor into the center of the
soup. Cover with casserole lid, waxed paper, or plastic
wrap.
Place the temperature probe sensor into the center of the
food. Cover with a casserole lid, waxed paper, or plastic
wrap.
Place the temperature probe sensor into the center of the
food to be reheated. The sensitive area of the sensor
should rest in the middle of the food.
Place the temperature probe sensor in the densest or
largest amount of food.
Place the temperature probe sensor into the thickest part
of the sandwich to be warmed. The sensitive area of the
sensor should be located in the sandwich filling.
Place the temperature probe sensor into the center of the
food to be reheated. The sensitive area of the sensor
should rest in the middle of the food. ,
Syrup
CAUTION: From time to time, the same kind of
foods may vary in shape, form and density, and,
therefore will not produce the same results each
time. For this reason, we do not recommend using
the temperature controlled settings for thin food
24
70 (ROAST)
150° F
Place the temperature probe sensor into the center of the
container.
items or for foods that require tenderizing by
simmering. Also, in some cases the microwave
oven may shut off prematurely. This means that
either the temperature probe is not placed properly
or that it should not be used with this type of food.
Page 25

MICROWAVE
TEMPERATURE CONTROLLED “HLPOWER”
COOKING
The “Temperature Controlled Meat Cooking Guide” and “Reheating Guide" on Pages 23 and 24 will show
you which multi-power setting and doneness temperature are recommended for the food you are cooking.
When cooking with the temperature control settings, the timer is not used.
1. Place the temperature probe into the food with the first
inch of the sensor in the center of the food. Adjust the
length of the temperature probe by sliding the grommet
before inserting it into food so that the sensitive area of
the probe can always be placed in the center of the meat.
The probe should be in a level direction or on an angle as
shown. It should not be put in from the top.
2. Plug the temperature probe
into the socket on the side of
the oven.
CAUTION: Do not plug the
pointed end of the temperature
probe into the socket.
3. Touch CLEAR.
NOTE: It is not necessary to touch MICRO CONTROL
when you are cooking with “HI (MAX POWER)”.
However, if you touch MICRO CONTROL the light above
COOK will go on and the word “HI” will show in the
display window. This is to remind you that the oven will
work at “HI (MAX POWER)” unless a different power
setting is chosen.
6. Touch START. The oven will
begin to cook and you will be
able to see the temperature of
the food rising in 4he display
window.
4. Touch MICRO TEMP. The
lights above TEMP and MICRO,
below STAGE 1 will go on, and
“F” will show in the display
window.
5. Choose the food temperature
and touch the corresponding
numbers. For example, if the
recipe calls for doneness at
120° F, you would touch the
numbers “1", “2” and “0”. When
you touch “120” the display
window will show “120F”. If the
temperature probe is not
plugged into the socket, the
probe light will flash and the
oven will not work.
7. A tone will sound and the
word “End” will show in the
Display Window for 2 seconds
when the desired temperature is
reached.
NOTE: If you want to keep the food warm after finishing
the set cooking.you can use “Hold Warm" feature. For
detailed instructions on using “Hold Warm" feature. See
page 18.
The highest temperature that can be set is 200° F.
The temperature is displayed in 1°F increments.
25
Page 26

MICROWAVE
TEMPERATURE CONTROLLED “MULTI-POWER”
COOKING
The “Temperature Controlled Meat Cooking Guide" and “Reheating Guide” on Pages 23 and 24 will show
you which multi-power setting and temperature setting are recommended for the food you are cooking.
1. Place the temperature probe into the food with the first
inch of the sensor in the center of the food. See step 1 on page
25.
2. Plug the temperature probe into the socket on the side
of the oven. See step 2 on page 25.
CAUTION: Do not plug the pointed end of
the temperature probe into the socket.
3. Touch CLEAR.
4. Touch MICRO TEMP.
The Lights above TEMP and
«I 7? rT
-I ! 3 Ù •-
MICRO, below STAGE 1 will go
on, and “F” will show in the
I Amo Recipg 300 1
display window.
5. Choose the food temperature
and touch the corresponding
numbers. For example, if the
recipe calls for doneness at
155° F, you would touch
numbers “1” “5" and “5”. When
you touch “155". the display
window will show 'T55F”. If the
temperature probe is not
plugged into the socket, the
probe light will flash and the
oven will not work. "j“ “j'"-
8. Touch START. The oven will
begin to cook and you will be
able to see the temperature of
the food rising in the display
window.
9. A tone will sound and the
word “End” will show in the
Display Window for 2 seconds
when the desired temperature is
reached.
} Auto Rgcip« 300 1
^y.rr
2. 3
6
.5
8 3
Ó
6. Touch MICRO CONTROL.
The word “HI” will show in the
display window until you enter a
lower power setting. This is to
remind you that the oven will
always operate at full power
unless you set a lower power.
7. Choose the cook control
setting you desire and touch the
corresponding numbers. For
example, if the recipe should call
for cooking at the “70
(ROAST)” setting, you would
touch numbers "7” and “0”.
When you touch “7” and “0”,
the display window will show
“70”. This means that in the “70
(ROAST)” setting, the oven is at
power level 70.
26
* r
wTjir
.2 3
8
ZOT
' —
'">1
‘-'I
9
NOTE: If you want to keep the food warm after finishing
the set cooking, you can use “Hold Warm” feature. For
»!
Auto Recip« 300
4 5 6
—TOW
detailed instructions on using “Hold Warm” feature. See
page 18.
The highest temperature that can be set is 200° F.
The temperature is displayed in 1°F increments.
7
Page 27

MICROWAVE
TWO, THREE OR FOUR-STAGE COOKING
Four-stage cooking lets you cook in four cooking stages each at a different power setting for a chosen
time or temperature. Set all stages before cooking and start the oven. Simply follow these steps:
1. Touch CLEAR.
2. Touch MICRO TIME or MICRO TEMP. The lights
above TIME or TEMP, above MICRO and below
STAGE 1 will go on. The display window will show “0”
or “F”.
3. Touch the correct numbers for the time or
temperature of the first cooking stage.
4. Touch MICRO CONTROL.
Display Window will read “HI”.
5. Touch the correct numbers for the cooking power
level of the first cooking stage (if other than “HI”).
6. Touch MEMORY/RECALL or PAUSE. The light
below STAGE 2 will go on. The display window will
show “0”.
7. Touch MICRO TIME or MICRO TEMP.
8. Touch the correct numbers for the time or
temperature of the second cooking stage.
9. Touch MICRO CONTROL. The display window will
show “HI”. ■
EXAMPLE: (Four-stage cooking)
All-American Meat Balls
(10 minutes, power level 70) (PAUSE)
(3 minutes, power level 70) (PAUSE)
(2 minutes, power level 70)
(MEMORY/RECALL)
(5 minutes, power level 0)
The following steps e,xplain how to set the oven.
First Stage (10 minutes; power level 70).
1. Touch CLEAR.
2. Touch MICRO TIME. ^
3. Set 10 minutes by touching
“1”, “0”, “0” and “0”. “1000” will
show in the display window.
10. Touch the correct numbers for the cooking power
level in the second cooking stage (if other than “HI”).
IIA. Touch START for two-stage cooking.
IIB. If three-stage or four-stage cooking is desired, touch
MEMORY/RECALL or PAUSE. The light below
STAGE 3 will go on. The display window will show
“0”.
Repeat steps 7-10 above to set the third cooking stage at
the same or a different power level for a chosen time or
temperature.
12A. Touch START for three-stage cooking.
12B. If four-stage cooking is desired, touch
MEMORY/RECALL or PAUSE. The light below
STAGE 4 will go on. The display window will show
“0”.
Repeat steps 7-10 above to set the fourth cooking
stage at the same or a different power level for a
chosen time or temperature.
13. Touch START.
4. Touch MICRO CONTROL.
“HI” will show in the display
window to remind you that the
oven will operate at highest
power unless you enter a lower
power setting.
5. Touch numbers “7” and “0”.
“70” will show in the display
window (indicating that you
have set the oven to operate at
power level 70).
The first stage has been set.
27
Page 28

MICROWAVE
TWO, THREE OR FOUR-STAGE COOKING (Cont’d)
Second Stage (3 minutes;
power level 70)
6. Touch PAUSE. The light
below STAGE 2 will go on. The
display window will show “0”.
7. Touch MICRO TIME.
8. Set 3 minutes by touching
“3”, “0" and “0”. "300” will show
in the display window.
9. Touch MICRO CONTROL
and numbers “7” and “0”.
“70” will show in the display
window. .
The second stage has been set.
Third Stage (2 minutes;
power level 70)
10. Touch PAUSE. The light
below STAGE 3 will go on.
The display window will show
“0”.
11. Touch MICRO TIME.
LQ.;:
::oZ
:x:
L'Ol
17. Touch MICRO CONTROL
and number “0”.
“0” will show in the display
window.
The fourth stage has been set.
18. Touch START. The first
stage will begin cooking.
“1000” will show in the display
window. The oven will begin to
cook at power level 70 and the
time will begin to count down in
the display window. When the
10 minutes are over, a tone will
sound and the oven will stop.
“PAUSE” will show in the
display window.
After the pause, to restart the
oven, touch START for second
cooking stage. “300” will show in
the display window. The oven
will begin to cook at “70” power
level. When the 3 minutes are
over, a tone will sound and the
oven will stop. “PAUSE” will
show in the display window.
12. Set 2 minutes by touching
“2”, “0” and “0”.
“200” will show in the display
window.
13. Touch MICRO CONTROL
and numbers “7" and “0”.
“70” will show in the display
window.
The third stage has been set.
Fourth Stage (5 minutes;
power level 0)
14. Touch MEMORY/RECALL.
The light below STAGE 4 will go
on.
The display window will show
"0”.
15. Touch MICRO TIME.
16. Sets minutes by touching
“5". “O’* and “0".
■‘500” will show in the display
window. The fourth stage has
been set. '
-.J~S
rr:
j^z
Tze
zee
zt
After the pause, to restart the
oven, touch START for third
cooking stage. "200” will show
in the display window. The
oven will begin to cook at “70"
power level. When 2 minutes
are over, a tone will sound and
the oven will change itself into
the fourth stage. "500” will
show the display window.
When 5 minutes as “Standing
time” are over, a tone will
sound and the word “End" will
show in the display window for
2 seconds.
The oven would have finished
four stage.
NOTE: If you want to keep
the food warm after finishing
the set cooking, you can use
“Hold Warm” feature. For
detailed instructions on using
"Hold Warm" feature. See
page 18,
28
’ "Standing time” allows the
food to finish cooking and the
heat to be uniform throughout.
See the cookbook for detailed
e.xplanation.
Page 29

MU5KUyV/\vn.
WHOLE MEAL COOKING
(See Cookbook for detailed explanation)
Whole Meal cooking lets you cook two or more different foods at the same time. Foods need not be
placed in the oven at the same time, nor be removed at the same time, unless, needed. By using PAUbh
rather than MEMORY/RECALL, the oven will stop between stages for time to add or remove food.
1. Place the Metal Rack in guides on the side wall of oven cavity.
2. Place food into the oven.
3. Set the oven following the instructions given in the cookbook.
METAL RACK
a Remove Metal Rack from oven when not being used for whole meal cooking. •
a Do not run the oven empty with the Metal Rack in it. n , í i ■
a The Metal Rack may get hot during cooking. Pot holders may be needed to remove Rack after cooking.
a Do not use browning dishes on Metal Rack,
a Do not use foil or metal containers on the Metal Rack.
29
Page 30

MICROWAVE
AUTOMATIC DEFROST
Three defrost courses are preset in the oven. The “Auto Defrost” feature provides you with the best defrosting method
for frozen foods.
Auto defrosting chart on pages 31 through 33 will show you which defrost course is recommended for the food you are
defrosting. ^
AUTO DEFROST COURSE LIST
COURSE n
DEFROST 1
(DEF 1)
DEFROST 2
(DEF 2)
DEFROST 3
(DEF 3)
FOOD
CATEGORY
MEAT
POULTRY
FISH
FOOD
Beef, Lamb, Pork, Veal,
Variety meat
Chicken, Turkey, Duck,
Cornish hens
Fish, Lobster, Crab, Shrimp
1. Touch CLEAR.
2. Touch an auto defrost course key DEF 1 (MEAT),
DEF 2 (POULTRY) or DEF 3 (FISH) to select the
appropriate defrosting course.
The light below PROGRAMMED DEFROST will go
on and the auto defrost course# (dEF 1, dEF 2 or dEF
3) will show in the display window.
For e.xample, when you touch “DEF 1 (MEAT)” to
defrost ground beef, the word “dEF 1” shows in the
display window.
3. Touch the number keys to enter the weight of your
food by pound. For example, when you defrost 2
pounds ground beef, you would touch numbers “2”
and ”0”. When you touch “2” and “0”, the display
window will show “2.0”.
NOTE: It is not necessary to enter the food weight when
you are defrosting one pound food.
The “Auto Defrost" feature allows defrosting from 0.1 to
9.9 lbs. in increments of 0.1 lbs.
4. Touch START. The oven will begin defrosting and the
display window will show the time counting down.
A tone will sound and the word “End” will show in the
display window for 2 seconds. Then the oven will shut
itself off.
NOTE: If you plan to use additional cooking stages
immediately following the Auto Defrost cycle, you must
allow for standing time as recommended on the Auto
Defrosting Charts on pages 31 through 33.
This can be accomplished as follows:
1. Touch DEF and enter weight of food.
2. Touch MEMORY. RECALL.
3. .Touch MICRO TIME.
4. Enter standing time per charts (pages 31 thru 33).
5. Touch MICRO CONTROL.
6. Enter “0”.
7. Touch MEMORY RECALL.
8. Set the next cooking stage(s) per cookbook or USE
and CARE INSTRUCTIONS.
The cooking process can be set for up to 5 stages when
Auto Defrost is one of the stages.
BASE
QUANTITY
1 lb.
1 lb.
1 lb.
BASE QUANTITY
DEFROST TIME
4 min.
5 min.
8 min.
MIN./MAX. FOOD
0.1/9.9 lbs.
, 0.1/9.9 lbs.
0.1/9.9 lbs.
EXAMPLE: To defrost 2 pounds of Ground Beef
1. Touch CLEAR.
2.
Touch “DEF 1 (Meat)”.
The light below PRO
GRAMMED DEFROST
will
go on and “dEF 1” will show in
the display window.
3. Enter the weight of the ground
beef by touching “2” and then
“0”.
“2.0” will show’in the display
1 I
window. jjT'
0
4. Touch START.
Your oven calculates total
r:tf
1
4
7
.'S'
zol:
defrosting time automatically.
The total defrosting time will
show in the dispay window.
SH.-
Then the oven will begin to
defrost and the total defrost
ing time will begin to count
down in the display window.
A tone will sound and the word
“End” will show in the display
window for 2 seconds. Then
the oven will shut itself off.
3
5 6
8 9
— /ffi.
30
Page 31

MICROWAVE
AUTO DEFROSTING CHART
This chart shows which defrost course is recommended for your foods and some special directions for use with the
"Auto Defrost” feature.
AUTO DEFROSTING INSTRUCTIONS.
• For best results, remove fish/seafood meat/poultry
from its original paper or plastic closed package
(wrapper).
Otherwise, the wrap will hold steam and juice close to
the foods which can cause the outer surface of the
foods to cook.
• When it is difficult to remove the wrap from the foods,
defrost the wrapped food for about a quarter of the
total defrost time, which is displayed at the beginning
of the defrost cycle. Remove the foods from oven and
remove the wrap from foods.
• Place foods in a flat glass baking dish or microwave
roasing rack to catch drippings.
• Food should still be somewhat icy in the center when
removed from the oven.
COURSE
DEFROST 1
(DEFI, MEAT)
BEEF
Ground beef
FOOD
Turn over once.
Remove thawed portions with fork.
Return remainder into oven to defrost.
Turn over twice for large quantity.
• For best results, turn foods over often as instructed
by directions of ‘‘Auto Defrosting Chart”.
When the directions require “turn over once”, half-
• way the total defrosting time turn foods over.
When the directions require “turn over twice”, turn
foods over one-third and two-thirds of the total
defrosting time. The defrosting time shows in the
display window when START key is touched.
• The chart gives you standing times and standing
techniques needed to complete the thawing process.
IMPORTANT NOTE: The defrosting power setting
(power level 30 DEFROST) should not be confused with
this “Auto Defrost” feature. The defrost cooking level is a
low-energy setting used to cook foods that need slow,
gentle cooking. Use the defrost cooking level to reheat
many frozen convenience foods and also to defrost small
bread items.
DIRECTIONS
STANDING
TIME
10 min., lb.
Pot roast, chuck
Rib roast, rolled
Rump roast
Round steak
Flank steak
Sirloin steak
Tenderloin steak
Stew beef
Use a microwave roasting rack.
Turn over twice.
Cover warm areas with aluminum foil.
Use a microwave roasting rack.
Turn over twice.
Cover warm areas with aluminum foil.
Use a microwave roasting rack.
Turn over twice.
Cover warm areas with aluminum foil.
Use a microwave roasting rack.
Turn over once.
Use a microwave roasting rack.
Turn over once.
Use a microwave roasting rack.
Turn over once.
Use a microwave roasting rack.
Turn over once.
Turn over once. Separate.
5 min./ lb.
10 min ./lb.
10 min. lb.
5 min. lb.
5 min., lb.
5 min./lb.
5 min., lb.
5 min./lb.
31
Page 32

AUTO DEFROSTING CHART (Cont’d)
MICROWAVE
COURSE
DEFROST 1
(DEFI, MEAT)
FOOD
LAMB
Cubed for stew
Ground lamb
Chops
1 inch thick
Leg
PORK
Chops
1/2 inch thick
Spareribs
Country-style ribs
Roast
Bacon
DIRECTIONS
Turn over once. Separate.
Turn over once.
Remove thawed portions with fork.
Return remainder into oven to defrost.
Turn over twice.
Turn over twice.
Separate chops halfway through defrosting time.
Use a microwave roasting rack.
Turn over once.
Use a microwave roasting rack.
Turn over twice.
Cover warm areas with aluminum foil.
Use a microwave roasting rack.
Defrost until strips separate.
STANDING
TIME
5 min./lb.
10 min./lb.
5 min./lb.
5 min./lb.
5 min./lb.
5 min./lb.
10 min./lb.
5 min./lb.
Sausage, bulk
Sausage, links
VEAL
Roast
Chops
1/2 inch thick
VARIETY MEAT
Liver
Tongue
Turn over once.
Remove thawed portions with fork.
Return remainder into oven to defrost.
Turn over once.
Defrost until pieces can be separated.
Use a microwave roasting rack.
Turn over twice.
Cover warm areas with aluminum foil.
Use a microwave roasting rack.
Turn over once.
Separate chops halfway through defrosting time.
Turn over once.
Turn over once.
5 min.,'lb.
5 min.,'lb.
10 min./lb.
5 min./lb.
5 min..ib.
5 min., lb.
32
Page 33

MICROWAVE
AUTO DEFROSTING CHART (Cont’d)
COURSE
DEFROST 2
(DEF 2,
POULTRY)
FOOD
CHICKEN
Whole
Cut up
TURKEY
Whole
Breast
Drumsticks
Roast, boneless
DIRECTIONS
Use a microwave roasting rack. 10 min./lb.
Turn over twice.
Cover warm areas with aluminum foil.
Use a microwave roasting rack. 5 min./lb.
Turn over twice.
Separate pieces when partially thawed.
Cover warm areas with aluminum foil.
Use a microwave roasting rack. -10 min.'lb.
Turn over four times. ,
Cover warm areas with aluminum foil.
Immerse in cold water for standing time.
Use a microwave roasting rack. 5 min./lb.
Turn over twice.
Cover warm areas with aluminum foil.
Use a microwave roasting rack. 5 min./lb.
Turn over once.
Separate pieces when partially thawed.
Use a microwave roasting rack. 5 min./lb.
Remove from foil pan.
Cover with waxed paper.
STANDING
TIME
CORNISH HENS
Whole
DEFROST 3 FISH
(DEF 3, FISH) Fish fillets
Fish steak
Whole fish
SEAFOOD
Lobster tails
Crab legs
Crabmeat
Use a microwave roasting rack. 20 min.
Turn over once.
Cover warm areas with aluminum foil.
Immerse in cold water for standing time.
Use a microwave roasting rack. 5 min.
Turn over once.
Carefully separate fillets under cold water.
Use a microwave roasting rack. 5 min.
Turn over once.
Carefully separate steaks under cold running ■
water.
Use a microwave roasting rack. 5 min.
Should be icy when removed.
Cover head and tail with aluminum foil.
Turn over once.
Remove from package to baking dish. 5 min.
Use a glass baking dish. 5 min.
Break the legs apart.
Turn over once.
Use a glass baking dish. 5 min.
Break apart.
Turn over once.
Shrimp
Remove from package to dish. 5 min.
Spread loosely in baking dish and rearrange during
thawing as necessary.
33
Page 34

CONVECTION COOKING
The convection cooking will be best used for items like souffles, breads, angel food cakes, pizza, and for
broiling meat and fish.
No special techniques are required to adapt your favorite oven recipes to convection cooking, although
you may need to use some lower temperature by 25°F ~ 35° F than in a conventional oven cooking.
Because the convection cooking method is identical to a conventional oven except for increased efficiency
of fan-circulated hot air.
When baking cakes, cookies, breads, rolls or other baked foods, some recipes occassionally call for
preheating. Preheat the empty oven just as you do in the conventional oven. But heavier dense foods
such as meats, casseroles, poultry can be started without preheating.
All heatproof cookware or metal utensils may be used in convection cooking.
BAKING PAN/METAL UTENSILS
Any baking pan less than 13” X 13” can be used with this
oven.
The Baking Pan and metal utensils, should be placed on
the Metal Rack as shown.
The Baking Pan and metal utensils should only be
used for convection cooking. Never use for
microwave or micro/convec cooking since arcing
may happen and damage to the Oven may result.
34
Page 35

CONVECTION COOKING WITH AUTOMATIC PRE- HEAT
An Automatic preheating temperature of 350° F for
convection cooking has been factory set into the Oven.
(See step 3 below.)
1. Touch CLEAR.
2. Touch OVEN TEMP/PRE-HEAT.
The Light below STAGE 1 will -S3
go on and “F” shows in the
Display Window.
3. If you do not touch the
numbers for the oven
temperature, the Oven starts
preheating to the 350° F when
the START is touched.
If you want to preheat the Oven
to the temperature other than
the 350° F, touch the desired
numbers, or example, to
preheat the Oven to 400° F,
touch 4, 0 and 0. The “400F”
will show in the Display Window.
4. Touch PAUSE. 35
Light below STAGE 2 will go on
and "0" shows in the Display Window
5. Touch CONVEC TIME. m
Lights above TIME and
CONVEC will go on and “0”
shows in the Display Window.
6. Set the convection cooking
time by touching the
corresponding Numbers as
instructed in the Cookbook.
For example, set 45 minutes by
touching the numbers for “4”.
“5”, “0” and “0”. "4500” then
shows in the Display Window.
' T~
ix: Tp : ip;,
NOTE; During convection
cooking, the Oven keeps the
same temperature in Stage 2 as
for preheating. If. however.
Stage 3 is used, and a
temperature other than 350° is
desired, the Oven temperature
must be set in Stage 3.
7. Touch START. .5“
The oven is working when the
oven light is on. Lights below
STAGE 1, above PAUSE and
CONVEC will go on. and
“200F" is shown in the Display
Window.
As the oven temperature rises
above 200° F, the display
temperature increases in 10° F
(210F, 220F, 230F etc.). When
the temperature in the oven
reaches the preheat
temperature, “350F or the set
temperature is displayed and a
pulsating beep tone will sound
to tell that the preheating is
over.
8. WARNING: The temperature
in the oven is quite high. Never
touch the tray or flatware with
bare hands. Open the door, the
beep sound will stop and the
temperature display will change
to “PAUS”.
Place the food inside the Oven
as quickly as possible. While the
door is open, the warmed air
will escape from the Oven and
the oven temperature will drop.
9. Touch START again.
The Oven restarts, the oven
light and the lights below
STAGE 2, above TIME and
CONVEC are on. The “PAUS”
display switches to the time
display. The time in the Display
Window counts down.
A tone will sound and the word
“End” will show in the display
window for 2 seconds when the
45 minutes are over.
Then the oven will shut itself off.
NOTES: To know the
temperature of the Oven during
cooking, touch OVEN
TEMP/PRE-HEAT to get “350F”
or the other set temperature in
the Display Window.
After preheating is over, the
beep tone will last until either
the door is opened or 30
minutes have elapsed.
The oven temperature should be
chosen in ten-degree
increments.
For example, when a
temperature of 368° F is set, you
can enter the 368°F. The Oven
will, however, stop at the
temperature of 360° F, omitting
the last digit 8°.
Avoid opening the door during the cooking often since the
hot air will escape from the Oven and the oven
temperature drops very quickly, adversely affecting the
cooking results.
*Use Pot holders to remove the Metal Rack after cooking
as the Rack may get hot during cooking.
NOTE: If you want to keep the food warm after finishing
the set cooking, you can use "Hold Warm" feature. But
metal utensils can not be used for “Hold Warm" operation
since acring may happen and damage to the oven may
result. For detailed instructions on using "Hold Warm”
features. See page 18.
35
Page 36

TEMPERATURE CONTROLLED COOKING GUIDE FOR
CONVECTION COOKING
FOOD
BEEF
Meat Loaf
M/2-1-3/4 lbs.
Ground beef
patties, 1—4,
4 oz. each
Beef rib roast.
. bone in, 5 lbs.
Rib eye or
strip steak
LAMB
Lamp leg or
shoulder roast,
bone in,
6-1/2 lbs.
Lamb chops,
3/4” thick
OVEN
TEMP
400° F 25 min. rotate
450° F Rare: 4 min.
330° F
450° F Rare: 4 min.
330° F
450° F Rare: 4 min.
FIRST STAGE
Med: 5 min.
Well: 5 min.
10—15 min. per lb.
fat side down
turn over
Med. 5 min.
Well: 6 min.
turn over
15—20 min. per
lb. ■
fat side down
turn over
Med: 5 min.
Well: 7 min.
SECOND STAGE
25 min.
3—4 min.
4 min.
5—6 min.
10—15 min. per lb.
4— 5 min.
5— 6 min.
6— 7 min.
15—20 min. per lb. Rare: 145° F
3— 4 min.
4— 5 min.
4—5 min.
PROBE
TEMP
160° F Let stand 5—10 min.
Rare: 120° F
Med: 130° F
Well: 140° F.
Med: 155° F
Well: 165 °F
SPECIAL NOTES
Preheat. Use broiling pan or aluminum
tray.
Let stand 10—15 min.
On ceramic tray. In glass or ceramic
dish.
Let stand 10—15 min.
"Upper guides. Preheat.
Metal pan or foil tray
Let stand 10—15 min.
On ceramic tray in glass or ceramic dish
with trivet.
Let stand 10—15 min.
Upper guides. Preheat.
Metal pan or foil tray '
Let stand 10—15 min.
BAKERY
Cake mix, 18 oz.
Butterflake rolls,
refrigerated,
8 oz.
350° F
350° F
28 min.
10—12 min.
10-cup bundt pan.
Let stand 15 minutes.
Upper guides. Preheat.
6-cup metal muffin pan.
36
Page 37

TEMPERATURE PROBE CONVECTION COOKING
Before starting Temperature Probe Convection Cooking,
choose the correct temperature by consulting with the
“Temperature Controlled Cooking Guide” on page 36 and
the “Oven Temperature Guide” on page 34 in this manual
or in the Cookbook.
The following directions show “One-Stage Cooking only.
“Pre-heating” and “Four-Stage Cooking” can be set as the
directions on pages 35 thru 42 respectively.
1. Put in the Temperature Probe
food, with the first inch of the
Sensor in center of food.
Adjust the length of
Temperature Probe by sliding
the Grommet, so that the
Sensitive Area of the Probe can
always be placed in the center
of meat. Probe should be in a
level direction or on an angle as
shown.
2. Plug Temperature Probe into
socket on side of oven.
CAUTION; Do not plug the
Pointed End of the Temperature
Probe into the socket.
7. Set the temperature for
Temperature Probe by touching
the corresponding Numbers.
For instance, if 185° F is desired
touch the numbers “1”, “8” and
“5”.
“185F” then shows in the
Display Window.
CO CO m
8. Touch START.
The Oven is working when the
oven light is on, and the Lights
below STAGE 1, above TEMP
and CONVEC will go on. The
temperature of the food will be
shown in the Display Window.
When the temperature of the
food reaches 185° F while the
oven temperature is
programmed for 390° F, a tone
will sound and the word “End”
will show in the Display Window
for 2 seconds and the cooking is
over.
3. Touch CLEAR.
4. Touch OVEN TEMP/PREHEAT.
The Light below STAGE 1 will
go on and “F” shows in the
Display Window.
5. Set the oven temperature by
touching the corresponding
Numbers.
For example 390° is set by ^
touching the numbers for “3”,
“9” and “0”, “390F” then shows
in the Display Window.
6. Touch CONVEC TEMP.
Lights below STAGE 1, above
TEMP and CONVEC will go on
and “F” shows in the Display
Window.
NOTES: The CONVEC TEMP
means that the cooking is done
by measuring and controlling the
food temperature with the
Temperature Probe.
The OVEN TEMP means that
the cooking is done by
measuring and controlling the
oven room temperature.
________
I Auto Recipe 300 1
NOTES; See the explanation of
“Temperature Controlled
Cooking Guide” on page 36.
The oven temperature of 350° F
is memorized in the Oven.
This means that if the desired
oven temperature is 350° F, you
need not touch OVEN
TEMP/PRE-HEAT or the
Numbers. Skip steps 4 and 5.
Avoid opening the door during
the cooking often since the hot
air will escape from the Oven
and the oven temperature drops
very quickly, adversely affecting
the cooking results.
*Use Pot holders to remove the
Metal Rack after cooking as the
Rack may get hot during
cooking.
NOTE: If you want to keep the
food warm after finishing the set
cooking, you can use “Hold
Warm” feature. But metal
utensils can not be used for
“Hold Warm” operation since
acring may happen and damage
to the oven may result. For
detailed instructions on using
“Hold Warm” features. See page
18.
37
Page 38

MICRO/CONVEC COOKING
Cooking is done by both microwave and hot air.
Micro/Convec cooking is fast and efficient.
The following directions show “One-Stage Cooking” only.
“Pre-heating” and “Four-Stage Cooking” can be set as the
directions on pages 35 thru 42 respectively.
1. Touch CLEAR.
2. Touch MICRO/CONVEC
TIME.
Lights below STAGE 1, above
TIME and MICRO and
CONVEC will go on, and “0”
shows in the Display Window.
3. Set the desired cooking time
by touching the corresponding
Numbers. For example, to set
16 minutes and 30 seconds,
touch numbers “1”, “6”, “3” and
“0”. “1630” then shows in the
Display Window.
m
I è I r~g~i L_Q.
4. Touch OVEN TEMP/PREHEAT.
“F” shows in the Display
Window.
5. Set the desired oven
temperature by touching the
corresponding Numbers. For
example, 400°F is set by
touching the numbers “4”, “0”
and “0”.
“400F” will then show in the
Display Window.
1 T~'i f~5~l r~5~~
nnri
6. Touch START.
The Oven is working when the
oven light is on and the time in
the Display Window begins
counting down. When the figure
in the Display Window counts
down to “0” while the oven
temperature is programmed for
400° F a tone will sound and the
word “End” will show in the
Display Window for 2 seconds
and the cooking is over.
NOTES: The oven temperature
of 350° F is memorized in the
Oven. This means that if the
desired oven temperature is
350° F, you need not touch
OVEN TEMP/PRE-HEAT or the
Numbers.
Skip steps 4 and 5.
Avoid opening the door during
the cooking often since the hot
air will escape from the Oven
and the oven temperature drops
very quickly, adversely affecting
the cooking results.
*Use Pot holders to remove the
Metal Rack after cooking as the
Rack may get hot during
cooking.
NOTE: If you want to keep the
food warm after finishing the set
cooking, you can use “Hold
Warm” feature. But metal
utensils can not be used for
“Hold Warm” operation since
acring may happen and damage
to the oven may result. For
detailed instructions on using
“Hold Warm” features. See page
18.
38
Page 39

TEMPERATURE CONTROLLED COOKING GUIDE FOR
MICRO/CONVEC COOKING
FOOD
BEEF
Meat Loaf
1-1/2—1-3/4 lbs.
Beef rib roast,
boneless
Beef rib roast,
bone in. 5 lbs.
Beef round, rump,
or chuck,
boneless, 3 lbs.
LAMB
Lamb leg or
shoulder roast,
bone in.
6-1/2 lbs.
Lamb roast,
boneless,
3—4 lbs.
VEAL
Shoulder or rump
roast, boneless,
3—3-1/2 lbs.
OVEN
TEMP
400“ F
330“ F
330“ F
330“ F
330“ F
330“ F
330“ F
FIRST STAGE
25 min. roate
4 min per Ib.
turn over
4 min per lb.
fat side down
turn over
15 min. per lb.
turn over
3 min. per lb.
fat side down
turn over
4 min. per lb.
fat side down
turn over
3—5 min. per lb.
turn over
SECOND STAGE
5 min.
4 min. per lb.
4 min. per lb.
15 min. per lb.
5—5-1/2 min. per
lb.
4—4-1/2 min. per
lb.
8—10 min. per lb.
PROBE
METHOD
160“ F Let stand 5—10 min.
Rare: 120“ F
Med: 130“ F
Rare: 120“ F
Med: 130“ F
Well: 140“ F
Med: 130“ F
Well: 140“ F '
Rare: 145“F
Med: 155“ F
Well: 165“ F
150“ F
155“ F
On ceramic tray in glass dish with trivet
On ceramic tray. In glass or ceramic
dish.
On ceramic tray. Casserole with tight
cover or cooking bag.
On ceramic tray in glass or ceramic dish
with trivet.
On ceramic tray. Glass or ceramic dish
with trivet.
On ceramic tray. Glass or ceramic dish
with trivet.
SPECIAL NOTES
PORK
Pork loin roast,
boneless, 4—5 lbs.
Pork loin, center
cut, 4—5 lbs.
320“ F
320“ F
5—6 min. per lb.
turn over
5—6 min. per lb.
turn over
5—6 min. per lb.
5—6 min. per lb.
165“ F
165“ F
On ceramic tray. Glass or ceramic
baking dish.
On ceramic tray. Glass or ceramic
baking dish.
39
Page 40

TEMPERATURE PROBE MICRO/CONVEC COOKING
Consult the “Temperature controlled Cooking Guide’
page 39 before you start Temperature Probe
Micro/Convec Cooking. The following directions show
“One-Stage Cooking” only. “Pre-heating” and “Four-Stage
Cooking” can be set as the directions on pages 35 thru 42
respectively.
1. Put in the Temperature Probe
in food, with the first inch of the
Sensor in center of food.
Adjust the length of
Temperature Probe by sliding
the Grommet, so that the
Sensitive Area of the Probe can
always be placed in the center
of meat. Probe should be in a
level direction or on an angle as
shown.
2. Plug Temperature Probe into
socket on side of oven.
CAUTION: Do not plug the
Pointed End of the Temperature
Probe into the socket.
on
6. Touch MICRO CONVEC
TEMP.
Lights below STAGE 1, above
TEMP and MICRO and
CONVEC will go on and “F”
shows in the Display Window.
7. Set the desired temperature
for Temperature Probe by
touching the corresponding
Numbers. If 185° F is desired,
for example, touch numbers “1”,
“8” and “5”. “185F” then shows
in the Display Window.
• cu m m
8. Touch START.
The Oven is working when the
oven light is on. Lights below
STAGE 1, above TEMP and
MICRO and CONVEC will go
on and the food temperature is
shown in the Display Window.
When the temperature of the
food reaches 185° F while the
oven temperature is
programmed for 390° F, a tone
will sound and the word “End”
will show in the display window
for 2 seconds and the cooking is
over.
___
3. Touch CLEAR.
4. Touch OVEN TEMP/PREHEAT.
The Light below STAGE 1 will
go on and “F” shows in the
Display Window.
5. Set the oven temperature by
touching the corresponding
Numbers.
For example, set 390° F by
touching numbers “3”, “9” and
“0”. ■
“390F” then shows in the
Display Window.
.-sz: .lE ctt
1
. . . . . . .
[HD
NOTES: The oven temperature
of 350° F is memorized in the
Oven. This means that if the
desired oven temperature is
350° F, you need not touch
OVEN TEMP PRE-HEAT or the
I
Numbers. Skip steps 4 and 5.
Avoid opening the door during
the cooking often since the hot
air will escape from the Oven
and the oven temperature drops
very quickly, adversely affecting
the cooking results.
*Use Pot holders to remove the
Metal Rack after cooking as the
Rack may get hot during
cooking.
NOTE: If you want to keep the food warm after finishing
the set cooking, you can use “Hold Warm” feature. But
metal utensils can not be used for “Hold Warm operatior
since acring may happen and damage to the oven may
result. ,,
For detailed instructions on using “Hold Warm features.
See page 18.
40
Page 41

TWO. THREE OR FOUR-STAGE COOKING
In four-stage cooking, different modes of cooking can be combined for sequential cooking. I o make
Lemon Chiffon Cake, for example. Preheating in the 1st stage. Convection Cooking in the 2nd stage,
Micro/Convec Cooking in the 3rd stage, and Microwave cooking in the 4th stage can be combined to get
best cooking result.®
First Stage
1. Touch CLEAR.
2. Touch OVEN TEMP/PREHEAT. Light below STAGE 1
will go on and “F” shows in the
Display Window.
NOTE: Since the oven
temperature is 350° F in this
case, the temperature need not
be pre-set since this
temperature is memorized in the
Oven.
1 J
Third Stage
6. Touch MEMORY/RECALL.
Light below STAGE 3 and “0”
shows in the Display Window.
7. Touch MICRO/CONVEC
TIME. "
Lights above TIME, MICRO and
CONVEC will go on and “0”
shows in the Display Window.
8. Set the desired time for 3rd
stage cooking, 5 minutes, by
touching numbers “5”, “0” and
“0”, “500” then shows in the
Display Window.
___
CXD on UO
I ■ Auto R*cip€ 300 I
-OULCi"
3Z!E53^0
rT~imr~5~i
OiMi tujn ;[
~^l 1 °¿T|
'^'1
Second Stage
3. Touch PAUSE.
Light below STAGE 2 will go on
and “0” shows in the Display
Window.
4. Touch CONVEC TIME.
Light below STAGE 2, TIME
and CONVEC will go on and
“0” shows in the Display
Window.
5. §€t the desired time for 2nd
stage cooking, 30 minutes, by
touching numbers “3”, “0”, “0”
and “0”. “3000” then shows in
the Display Window.
□□ raz:
Auto Rttp« 300
Pir3nP^R3n
—rmm
~5~if~S~
LÍULS
riiTl ¡ÍJ. II %T]
DCSa
i~~? )C3~~lt .9 J
Fourth Stage
9. Touch MEMORY/RECALL.
Light below STAGE 4 and “0”
shows in the Display Window.
10. Touch MICRO TIME, go on
Lights above TIME and MICRO
will go on and “0” shows in the
Display Window.
11. Set the desired time for 4th
stage cooking, 5 minutes, by
touching numbers “5”, “0” and
“0”. “500” then shows in the
Display Window. LJO , OZ
12. Touch MICRO CONTROL
and number “0”.
“0” will show in the display
C3Z
window.
41
Page 42

TWO, THREE ÒR FOUR-ST/VGEiCCR)KlHGlCbri^
13. Touch START.
The Oven is working when the
oven light is on.
Lights below STAGE 1, above
PAUSE and CONVEC will go
on and the oven temperature is
shown in the Display Window.
As the oven temperature rises,
the increasing temperature will
be shown in the Display
Window. When the temperature
reaches 350° F, “350F” shows in
the Display Window and a beep
tone will sound to tell that the
preheating time is over. •
14. The beep sound stops when
the door is opened. Place the
food in the Oven and close the
door quickly. The “PAUS”
shows in the Display Window.
NOTE: If you want to keep the food warm after finishing
the set cooking, you can use “Hold Warm” feature. But
metal utensils can not be used for “Hold Warm” operation
since arcing may happen and damage to the oven may
result.
For detailed instructions on using “Hold Warm” features,
See page 18.
When programmed defrost is used in the 1 stage, up to 5stage cooking is possible.
*Use Pot holders to remove the food and/or the Metal
Rack after cooking as the utensil and the Rack may get
hot during cooking.
‘“Standing time”, allows the food to finish cooking and the
heat to be uniforni throughout. See the cookbook for
detailed explanation.
15. Touch START. C
The oven starts working when
the oven light is on. Lights
below STAGE 2, above TIME
and CONVEC will go on and
the figure in the Display Window
counts to “0” and the 2nd
cooking stage is over. The beep
tone sounds as it advances to
the 3rd stage of cooking. Lights
below STAGE 3, above TIME
and MICRO and CONVEC will
go on and the figure in the
Display Window counts to “0”
and the 3rd stage of cooking is
over. The beep tone sounds as
it advances to the 4th stage of
copking. Lights below STAGE 4,
above TIME and MICRO will go
on and the figure in the Display
Window starts counting down
again. When 5 minutes as
“Standing time” are over, a tone
will sound and the word “End”
will show in the display window
for 2 seconds.
The oven would have finished
four stages.
42
Page 43

DEHYDRATION COOKING
DEHYDRATION
Dehydrated foods require little storage space and no special containers. You cari store them in tightly
sealed plastic bags or any other clean, air-tight container. This makes them readily available as a source of
food any time there is a need. Drying foods while they are in plentiful supply and less expensive is money
saving. Not only does it save you money but gives a greater variety of foods all year round.
For campers or hikers, it is a convenient way to take food for outdoor trail eating or camper cooking.
Dried foods, properly stored, will keep up to a year.
WHAT TO DEHYDRATE?
Almost anything! Fruit can be used to make some of the fruit “leathers” that are such nutritious snacks.
Apples, peaches, berries or any other seasonal fruit can be dried for year round snacking. Almost
anything that suits your taste can be dehydrated.
Vegetables can be dried and packed singly or in combinations to add to soups and stews. Use vegetables
from your garden or from a local farm stand. Herbs from your garden should be dehydrated and packed
singly or in combinations for spaghetti sauce, stews, chicken dishes. What a wonderful gift a jar of your
own home grown and dried herbs would make! , , r ■
There are also craft items that can be dried. Flowers from your spring garden! The use of this feature in
this oven is practically limitless. , , , , ^ n
There is no mystery about drying foods. In fact most of us eat dried foods every day. Generally, pasta,
beans, spices, raisins and even coffee are dried when you buy them.
GENERAL INSTRUCTIONS
Dry only good quality fruits and vegetables. If there is a blemish, it will appear in the finished product.
The one exception to this is in making fruit leathers. Here you can cut away pieces of the fruit that are
spoiled, use up fruits from the freezer that have overstayed their time, even canned fruits that have been
around too long.
The thinner the slices, the faster the drying. . . ■
Place food one layer thick on the trays. Different kinds of foods can be dried at the same time, but it is
wise not to mix onion and onion products with less pungent foods, such as fruits. i j ui •
During the drying period, check food for doneness. When moisture appears on top of the food, blotting _
with a paper towel will speed dehydration. Timing will depend on the amount of moisture in the food.
Removing moisture by pressing the food may shorten the drying time, but it will also remove natural
vitamins in the moisture. It is best for this to remain in the food and dry out slowly for best quality of
color and content. , , r- • i u i j
Generally, vegetables are dried when they have become leathery or brittle. Fruits should be leathery and
pliable and should not exhibit any moisture when squeezed. Meats will be dark in color when properly
dried and from sharp points when bent. Herbs and leaf-type plants will become brittle and crumble easily
when fully dried. It is better to overdry than to underdry. •
Drying times on some products like apricots and grapes are quite long. If you wish to use these, use both
racks for maximum results. If you wish to use the oven for some other cooking, remove the food on the
drying racks to a place where they will be kept clean and away from moisture. When the other cooking is
finished, allow the oven to return to low heat and continue the drying. Don’t interrupt drying process for
too long.
...........................
43
Page 44

DEHYDRATION Si
PREPARATION OF FRUITS AND VEGETABLES FOR DRYING
Fruits may or may not be treated with an ascorbic acid solution before drying. However, it will hold its
color better if treated. If a fruit such as apples or bananas has a tendency to darken, dip it in a solution of
1 teaspoon ascorbic acid to 1 quart water. (Ascorbic acid, otherwise known as Vitamin C, can be
purchased at drugstores or markets where freezing supplies are sold) If you prefer, you can brush the
fruit with lemon juice. Some berries, such as blueberries, will dry faster if steamed just long enough to
break the skin. Vegetables, with the exception of onions, garlic, peppers, tomatoes and mushrooms,
should be blanched (see Blanching Guide on page in your Kenmore MICRO/CONVECTION Cookbook)
before dehydration. Drain the blanched vegetables well and put on trays to dry. This blanching will stop
enzymatic action and means that the dried vegetables will be of better quality and will keep longer.
DRYING HERBS
All herbs leaves should be dried on the stem, when possible. There is no special preparation, except if the
herbs are dusty. Then they should be rinsed in cold water and dried well. Drying time will vary with
amount of herbs and moisture. Herbs should be dried at a lower setting than the automatic Dehydration
setting, which is 150° F. Dry at 120° F to preserve flavor oils and vitamins. Here is an example of how to
program for a lower oven dehydration setting.
TO PROGRAM DEHYDRATION AT 120° F. For 1 Hour of dehydration.
1. Touch DEHYDRATE TIME.
2. Touch the numbers for “1”, “0” and “0”.
3. Touch OVEN TEMP/PRE-HEAT.
4. Touch the numbers for “1”, “2” and “0”.
5. Touch START. .
The oven is now set to dehydrate for 1 hour at 120F degrees. You may adjust the dehydration oven
setting from 100° F to 180° F at any time it is needed.
FRUIT LEATHERS
Fruit leathers are one of the most enjoyable things for snacking you can easily make. They are a
combination of fruits, nuts, and if desired, honey or corn syrup to sweeten slightly. Most fruits have
enough sugar to give enough sweetness to the leather. Try this with fruit leathers. Remove leather from
plastic wrap and spread with soft cream cheese, then roll up and refrigerate. This can then be sliced
crosswise to provide a delicious, wholesome snack, or hors d’oeuvre.
Fruit leathers can be a good way to use up fruit that may be a little too ripe for slicing uniformly or eating
whole. Just use your imagination and use your own combinations of fruits. Not usually suitable, are
grapefruit, lemons, persimmons.
TO PREPARE
Place chunks of fruit in a blender and puree the mixture. The fruit should be ripe. Underripe fruit will not
improve with dehydrating. To yellow or light colored fruit add 1 tablespoon of lemon or lime juice for each
quart of fruit.
Line tray with plastic warp, tape it to all four sides with masking tape. Use about 2-1/2 cups of puree for a
leather about 18” X 14” X 1/4”. Pour the puree onto the prepared drying trays. Slightly tilt the tray to
spread mixture evenly. Leave at least a 1” border to allow for spreading during drying. Dry until it feels
leather-like and is pliable. There should be no sticky spots in the center.
It is easier to roll the leather while it is still warm. Remove while warm and roll it up. The Dehydration
timing will vary. For best results begin testing for doneness after 4—5 hours. Leathers may take 6 hours.
If you enjoy spices, you can add a pinch of spice or flavoring to the puree. Taste before adding too much.
Spices and flavorings tend to concentrate when dried, use sparingly.. .you can always add more.
While leathers are still quite moist, you might like to sprinkle with shredded coconut, or chopped nuts and
raisins. They will dry onto the leather and provide an attractive garnish as well as good taste.
44
Page 45

• -f*u’ A*;..'
DEHYDRATION»
BEEF JERKY
It is important in making beef jerky to select lean cuts of meat and to remove any far around the edges.
Flank steak, brisket, round steak, can all be used. For greatest tenderness, slice very thinly against the
grain and cut into strips. Pieces of meat may be sprinkled with sea salt, according to individual taste, or
marinating for several hours, then draining well, will add tenderness and flavor.
BEEF JERKY MARINADE RECIPE
Marinate for about 1-1/2 hours before drying. Blot dry on paper towels before Dehydrating.
EXAMPLE #1 EXAMPLE #2
2-1/2 Tablespoons soy sauce
1-1/2 Tablespoons white wine
1-1/2 Tablespoons Honey
2 Cloves minced garlic
1 teaspoon fresh ginger
1-1/2 teaspoons Sesame Oil
1/4 teaspoon Cayenne Pepper
Just a pinch — White pepper
Combine all ingredients, blend well.
Add sliced beef, stir once during marinating.
3 Tablespoons dry white wine
2 Tablespoons Soy sauce
2 Tablespoons Worcestershire Sauce
1 Tablespoon sugar
3/4 teaspoon salt
1/2 teaspoon pepper .
1/4 teaspoon garlic powder
1/8 teaspoon Cayenne Pepper
Combine all ingredients, blend well.
Add sliced beef, stir once during marinating.
HOW TO STORE YOUR DEHYDRATED FOODS
Clean, airtight jars may be used for storing. Jars should be placed in a cool area and protected from light.
Using plastic bags is also a convenient method. Since heat and light affect the quality and shelf-life of dried
foods, these bags may be kept in cartons in a cool place. We suggest that you store your dried foods in
the approximate size portions, you will be using. This eliminates frequent exposure to air and the resultant
absorption of moisture. Plastic ziploc bags available in different sizes are ideal for the purpose. Label all
packages so you can identify the contents.
HOW TO USE DEHYDRATED FOODS
Uses for dehydrated foods can be as varied as the imagination of the cook. Most of the fruits you
dehydrate are deliciously eaten just “as is” for snacks. This is also true of fruit leathers and beef-jerky.
A wonderful substitute for “junk” foods for children. Banana slices, apple slices, cherries, pineapple, pears,
apricots and peaches are all appetizing tidbits to eat.
Soak dried foods in water or juice and beat in a blender to make a nutritious drink.
Dried fruits may also be “rehydrated” by soaking in water or fruit juice and simmered by microwave to
provide a delicious dessert or side dish. Instead of serving potato chips with dips, be different and serve
dried cucumber chips. Sprinkle 1/8” slices with a little salt and dehydrate. Serve them for a different flavor
with variety of dips.
Dehydrated soup ingredients can be heated with water on the microwave cycle. Dried vegetables can
added to stews and casseroles as needed. They may also be simmered in water until tender and served as
you would a fresh vegetable.
ALL ABOUT TIMING
All suggested timing are approximate. It is not possible to be absolutely accurate in predicting the time to
the minute for dehydration. It all depends upon the thickness of the food, the moisture content, and the
quality of the food being dehydrated. It is always up to you.. .The Cook to determine when the trays
should be removed. Two trays of apples which may have a suggested timing of 5—6 hours, when sliced in
rings, may only take 4—4-1/2 hours when the rings are cut in half, and sliced a bit thinner.
For even results foods should be approximately the same size and thickness. If both racks are used,
reverse rack position after half the predicted dehydration time.
Timings may change with even the same variety of foods used before. Look for the clues described in the
dryness test and do taste. For chewy fruits, you may wish to use less time. Experiment for texture until
you discover your taste for desired doneness. Above all, try whatever foods are in season and in
abundance, since that is always the best time to “put away” foods. That is when flavors are at their best
and the food least expensive. That is what dehydration is all about.
45
Page 46

DEHYDR%!Pl!g)^,
DEHYDRATION CHART — SUGGESTED PREPARATION AND TIMING
FOOD
FRUIT
APPLES
3 pounds
APPLE LEATHER
5 Pippin apples
1-1/2 lbs
Makes about 2-1/2
cups when pureed
BANANAS
3-1/2 lbs
before
peedling
COCONUT
3-1/2 to
4 cups
GRAPES
4 bunches
PEARS
3 lbs
PEACHES
3 pounds
PREPARATION
Peel, core and slice
1/4 to 3/8' thick.
Core & slice apples,
place 2 tsp Ascorbic ■
Acid in 6 cups water.
Soak apples. Drain
water. Cook covered
Microwave on HIGH
10 min. Puree in
blender. Add 1 tsp
lemon juice and 1/4 tsp
cinnamon.
Peel and slice 1/4 to
3/8' thick crosswise
or lengthwise.
Drain milk. Crack
shell to remove meat.
Trim dark outer skin.
Grate or slice thin in
processor.
Tear off whole.
Remove stems. Dip in
boiling water 1—2 min.
to "craze” the skins
and eliminate natural
wax. Drain and dry.
Peel, core and slice
1/4 to 3/8' thick.
Peel, core and slice
3/8' thick.
1
PRETREATMENT
Dip in lemon juice —
or soak 15—20 min.
in solution of 6 cups
water, 1 tsp Honey,
3 tsp Ascorbic Acid.
Drain and dry.
Line tray with plastic
wrap. Tape all four
sides. Pour puree on
plastic. Tilt to spread.
Leave at least 1/2'
border.
Dip in lemon juice —
or soak 15—20 min.
in solution of 6 cups
water, 3 tsp Ascorbic
Acid, and 2 tsp ground
cinnamon (optional).
Drain and dry.
None. Can be sprinkled 1-1/2—2 hrs.
with powdered sugar. Both racks
None.
Dip in lemon juice or
in solution of 6 cups
water, 3 tsp Ascorbic
Acid. 1 tsp ground
cloves (optional). Drain
and dry.
Dip in lemon juice.
Drain and dry.
DRYING TIME
(approximate)
4-4-1/2 hrs.
(5 — 6 hrs. if in
rings)
Both racks
About 4 hrs. Pliable and ■
5-5-1/2 hrs.
Both racks
5 — 5 hrs.
4—5 hrs.
Both racks
5 — 6 hrs.
Both racks
DRYNESS TEST
(when cool)
Leathery
No moisture when
cut and squeezed.
leathery.
Pliable
Leathery to
crisp.
Leathery
No pockets of
moisture.
Pliable and
leathery.
No moisture
when cut and
squeezed.
Pliable and
leathery.
No moisture.
SPECIAL NOTES
Sprinkle with cinnamon.
Switch racks 1/2 way.
By cutting apple slices
in half you can shorten
dehydration time.
1 rack-upper position.
Roll while still warm.
Sprinkle with cinnamon
or ground cloves. Top
with finely chopped
nuts or coconut.
Switch racks 1/2 way.
Drying will take 1/2 hr.
more.
Switch racks 1/2 way.
Use in cakes, desserts,
granola. Garnish fruit
leathers, banana and
apple slices. Use
plastic wrap on rack if
coconut is grated.
1 rack —upper position.
Timing will be shorter
with some varieties.
Test for moisture.
Switch racks 1/2 way.
Timing will increase
if pears are thick and
in quarters.
Switch racks 1/2 way.
By cutting peach
slices 1/2 you can
shorten time.
' MEAT
BEEF JERKY
2 Ibs-round steak.
Flank steak or
brisket of beef
46
Trim all fat. Partially
freeze, cut into long
narrow strips-across
the grain, no more
than 1/4' thick.
Use marinade such
as a prepared Teriyaki
Sauce. Or marinade
suggested ingredients
for Beef Jerky.
3 hrs.
Both racks
No moist spots.
Will crack when
bent, but not
break.
Switch racks 1/2 way.
Blot meat with towel
to remove oil and
moisture from surface.
Page 47

DEH^RXTI©
_ _.V
FOOD
VEGETABLE
CARROTS
3 pounds
CORN-CUT-FROZEN Rinse with cold water
2 pounds & drain well.
CUCUMBERS
2-8'
MUSHROOMS
1-1/2 pounds
ONIONS
1-1/2 pounds
PEACH LEATHER
1-1/4 lbs defrosted
frozen peaches
About 2-1/2 cups
when pureed
PARSLEY
1 bunch
PEAS
4 cups
PEPPERS
GREEN or RED
4 medium
PEPPERS CHILI
PUMPKIN
1 pound
PUMPKIN
LEATHER
about 1-1/2 lb
TOMATOES
4 medium
PREPARATION
Peel, slice 1/8—1/4
thick or cubed 3/8"
Peel & slice 1/8'
Clean and trim
woody pieces from
stem. Slice lengthwise
1/4—3/8' thick.
Remove root, trip top
skin. Slice 1/8'—3/8'
thick.
Puree in blender.
Add 1/4 cup apricot
preserves. 1/8 tsp
each cinnamon,
cloves and ginger.
Wash under cold
water. Separate
clusters. Discard long
or tough stems.
Shell.
Cut in strips.
Remove seeds and
ribs (May cut in rings—
will increase drying
time).
Wash. Dice or dry
whole. Don’t remove
seeds.
Make pieces. Remove
seeds. Cut slices
1/8' thick. Heat by
microwave on HIGH
until soft. Dry.
Make pieces. Remove
seeds. Heat by
microwave on HIGH
until soft. Scrape
pulp from skin and
puree in blender.
Measure puree.
Use 2—2-1/2 cups.
Remove skins.
Immerse in boiling
water 30 — 45 sec.
then in cold water.
Remove stems. Slice
1/4' thick.
Blanch-See Chart
Page 134. May soak
in solution of 2 tsp
Ascorbic Acid, 2 tbls
Corn starch and
4 cups water for
15 min.
None.
Sprinkle with seasoned
salt (Optional).
None.
None.
Line tray with plastic
wrap. Tape all four
sides. Pour puree on
plastic. Tilt to spread.
Leave at least 1/2'
border.
None
(pat dry after washing)
Blanch See Chart Page 2-1/2—3 hrs.
134. Rinse with cold Both racks
water.
None.
None.
None.
wrap. Tape all four
PRETREATMENT
Line tray with plastic
sides. Pour puree on
plastic. Tilt to spread.
Leave at least 1/2'
border.
Dry well.
DRYING TIME
2-1/2-3 hrs.
Both racks
1-1/2-2 hrs.
Both racks
1-1/2—2 hrs. or
until very brittle
for chips.
Both racks
l-l/2-2hrs. .
Both racks
1-1/2—3 hrs. at
140°
Both racks
About 4 hrs.
1-1/3 hrs.
at 120°
Both racks
1-1/2-2 hrs.
Both racks
Diced, 1-1/2 hrs.
Whole, 2-
2-1/2 hrs.
Both racks
3-3-1/2 hrs.
Both racks
4 hrs. or until
ready.
3-3-1/2 hrs.
1 or 2 racks as
needed. Use
upper rack for
1 rack.
DRYNESS TEST
Very tough and
leathery.
Dry and brittle
Dry, brittle and
crisp.
Very dry and
Jeathery.
Very dry, but
pliable.
Feels like paper.
Pliable and
leathery.
Brittle, flaky
Brittle and
wrinkled.
Tough to brittle.
Tough to brittle.
Dry and leathery.
Pliable and
leathery.
3-1/2-4-1/2 hrs.
SPECIAL NOTES
Switch racks 1/2 way.
Turn pieces over at
1/2 way point to
assure more uniform
drying. But not req.
Switch racks 1/2 way.
Switch racks 1/2 way.
Seedless, or young
cucumbers are best.
Does not rehydrate
Well, use for chips,
or sprinkle on salads
and soups.
Switch racks 1/2 way.
Switch racks 1/2 way.
Dry to brittle to make
flakes and powder.
1 rack-upper position.
Roll while still warm.
Switch racks 1/2 way.
Switch racks 1/2 way.
Switch racks 1/2 way.
Make flakes for salads
and soups.
Switch racks 1/2 way.
Wear gloves while
handling hot peppers.
Switch racks 1/2 way.
Sprinkle with
cinnamon if desired.
1 rack-upper position.
Roll while still warm.
Switch racks 1/2 way.
Chop in blender for
salads or soups.
Or use the same as
steamed tomatoes.
47
Page 48

■mm
DEHYDRATION COOKING TIME AND OVEN
TEMPERATURE
The dehydration cooking time can be chosen and set up to 9 hours 99 minutes by touching DEHYDRATE
TIME in the oven.
The dehydration cooking temperature from 100° F to 180° F with one-degree increment can be chosen and
set if you want to adjust the dehydration oven temperature from preprogrammed temperature setting,
150°F.
When START is touched, the Display Window flashes “ : The Oven begins operating and show the
time counting down by minutes.
DEHYDRATION RACKS AND NETS
Two sets of the Dehydration Rack and Net come with the oven. The Ceramic Tray should be placed with
them in the Oven during the dehydration cooking as shown below.
Put the Dehydration Rack and Net in top guides if a single set of them is used.
The Dehydration Rack and Net should be used for only dehydration cooking. Do not use them for
microwave, micro/convec or convection cookings. It may cause them to melt or deform.
48
Dehydration Net
Dehydration Rack
Ceramic Tray
Page 49

DEH^RATION
DEHYDRATION COOKING
Before starting Dehydration Cooking, choose a
dehydration time by consulting with the “Dehydration
Chart” on pages 46 and 47, and the instructions on pages
43 to 45 in this manual.
1. Place the Dehydration Net on
the Dehydration Rack in the
Oven and after putting food on
it evenly as shown.
If a single set of the Dehydration
Rack and Net is used, it should
be placed in top guides.
NOTE: The Dehydration Rack
and the Dehydration Net should
be used for only dehydration
cooking.
Do not use them for microwave,
micro/convec or convection
cookings. It may cause them to
melt or deform.
2. Touch CLEAR.
3. Touch DEHYDRATE TIME.
The Light below STAGE 1 will
go on and “H:0” shows in the
Display Window.
5. The dehydration oven CSS
temperature is set itself at 150° F
unless a different temperature is
chosen.
If you want to set the
dehydration oven temperature
at other than 150° F, touch
OVEN TEMP PRE-HEAT and
then touch the desired numbers.
“F” shows in the Display
Window and then the Display
Window shows the chosen
temperature.
For example, if the oven
temperature-is set at 130°,
touch OVEN TEMP/PRE-HEAT
and then touch “1” “3” and “0”.
The Display Window shows
“130F”. □□ rn
The dehydration oven
temperature from 100° F to
180° F with one-degree
increment setting can be chosen
and set in the oven.
6. Touch START. .
The Oven begins operating, and
the Display Window will show
the time counting down by
minutes. A tone will sound for 2
seconds when the time is up.
Then the Oven shuts itself off.
4. Touch Numbers for the
Dehydration Time following the
instructions given in this manual.
For example, if the dehydration
time sets for 6 hours 30
minutes, you would touch
nurribers “6”, “3” and “0”. Then
“H6:30” shows in the Display
Window.
NOTE: If you set the
dehydration oven temperature
at other than from 100° F to
180° F, the Oven will not
operate and the Display Window
flashes the chosen temperature
to tell that it is a wrong
temperature for dehydration.
The dehydration oven
temperature must be chosen
from 100° F to 180° F.
For dehydrating cooking, do not
use Temperature probe.
If Temperature probe is plugged
into socket on side oven. “Prob”
flashes in the Display Window.
49
Page 50

DELAY START COOKING
Delay Start Cooking can be done by starting the cooking
automatically and finishing at a presetting delay time for the
chosen cooking time on Microwave. Micro/Convec and
Convection or any combination cooking.
1. Touch CLEAR.
2. Touch STOP TIME.
Light below DELAY START
goes on. Display Window will
read “0:00”.
3. Touch numbers for the Time
of Day to finish cooking. For
example, touch numbers “7”,
“3” then “0” for the cooking to
be finished at “7:30”, and “7:30”
will show in the Display
Window.
1 .1
CSD
CO OC CSD
4. Touch MICRO TIME.
5. Touch numbers for Cooking
Time.
For example, set 12 minutes by
touching “1” then “2” then “0”
twice.
“200” will show in the display
window.
Lie
OC oc
6. Touch MICRO CONTROL.
7. Touch numbers for Cooking
Power level.
For example, touch numbers
“5” then “0”, “50” will show in
the display window.
C3C oc
8. Touch START.
The Time of Day will show in
the Display Window and Light
below DELAY START goes on.
As soon as the clock shows the
Cook Start Time which has
been subtracted from the Cook
Finish Time, the Oven will start
cooking and the cooking time
counts down in the Display
Window. When the Cook Finish
Time (or “7:30”) comes, the
Oven will shut itself off.
NOTE: A preset delay time
must be less than 12 hours.
* Four-Stage Cooking can be
used with Delay Start. After
step 3 above, follow
instructions for Four-Stage
Cooking beginning with step 2.
*The Delay Start Cooking is
controlled by time.
When Temperature Control
Cooking is set in a stage.
Cooking may be finished at the
setting time with a slight time
difference.
The display shows
the time of day.
For example:
a half past two.
50
* Fresh food should not stand at
room temperature over four
hours prior to cooking.
Page 51

PRESET RECIPE COOKING
Auto Recipe 300 plus 3 Customer Programmable Recipes
300 recipes shown in the cookbook have been stored in this oven. By touching the recipe number corresponding
to preset recipe, cooking can be done. These 300 recipes have been preset, so you can not erase or substitute
them.
Yo can program 3 more favorite recipes in Recipes #301-303.
See page 54 in this manual for programming new recipes.
*To cook one of 303 preset recipes, simply following the
steps below.
1. Touch CLEAR.
2. Touch RECIPE #.
“0” will show in the display window. .
3. Touch the correct numbers of Recipe found in your
Kenmore Microwave Cookbook.
EXAMPLE: If you cook “Hearty Cheese and Frank Soup of
Recipe #25”, touch “2” and then “5”.
The display window shows “25”.
NOTE: When you touch the numbers of Recipe #301-303,
the display window may flash, it means that no
preset recipe has been stored in the oven for that
recipe number.
4. Touch START.
The oven will begin cooking, and the display window
will show the time counting down.
Some preset cookings of “AUTO RECIPE 300” can
cook up to 4th stage.
NOTES:
• If “PAUSE” shows in the display window between stages,
a special requirement (i.e. stirring, turning over, rotating
and covering by following instructions in the cookbook)
is needed.
EXAMPLE: Hearty Cheese and
Frank Soup of Recipe #25.
The following program has
been stored into the oven.
(Stage 1; HI, 4 minutes)
(PAUSE)
(Stage 2; HI. 4 minutes)
(PAUSE)
(Stage 3; HI. 10 minutes)
(PAUSE) •
(Stage 50; 58-minutes)
1. Touch RECIPE #, “2” and
“5”.
The light at the right of
RECIPE in the display
window will go on, “25” will
show in the display window.
2. Touch START.
The first stage will begin. The
light below STAGE 1 will go
on and “400” will show in the
display window. The oven will
begin to cook at “HI” power
level and the time will begin
to count down in the display
window. When the 6 minutes
are over, a tone will sound
and the oven will stop.
P S
Auto Rcclp* 300 I
CXjCECXD
E^cx:-cs
( Auto R«clpc 300 1
CSZ1CH3
gcsucSD
• If “PAUSE” does not show in the display window,
cooking in the stage cooking will start itself or the
cooking has been completed.
3. “PAUSE” will show in the
display window.
At pause, stir by following the
instructions in the cookbook.
Auto Recipe 300
;siD
51
Page 52

PRESET RECIPE COOKING (Cont’d)
Touch START.
The second stage will begin.
“400” will show in the display
window. The oven will begin
to cook at “HI” power level
and the time will begin to
count down in the display
window. When the 6 minutes
are over, a tone will sound
and the oven will stop.
“PAUSE” will show in the
display window.
At pause, add flour by
following the instructions in
the cookbook.
CED
7. “PAUSE” will show in the
display window.
At pause, stir in broth, wine,
salt and pepper. Cover by
following the instructions in
the cookbook.
Touch START.
The fourth stage will begin.
“500” will show in the display
window. The oven will begin
cooking. When the 5 minutes
are over, a tone will sound and
the word “End” will show in
display window for 2 seconds
and the oven will stop.
op I » C
— - • n u
Auto Rwipe 300 ]
rnnpsnrssn
“li ¿si 11 i
List
Lsii
_ _ _ _ _ _
il
rr
~rr~
•1 5
4
:
7
J:_i_\ 9 1
__U _
;
s*»a'
cu*«
t
^ounatr
«tc«
1 1!
m fern
s£r~
1 4 i
i
4 !
( Tfs ;
J SIC» ;
LaietJ
6. Touch START.
The third stage will begin.
“1000” will show in the
display window.
The oven will begin cooking.
When the 1 minute is over, a
tone will sound and the oven
will stop.
52
Page 53

PRESET RECIPE COOKING (Cont’d)
Use of Quantity Key
•To increase Quantity of Preset Recipes
The times or temperature arc power levels for the 300 preset recipe cooking can not be changed. How.ever the
amount of food cooked in sc.i'.e preset recipes can be increased up to 5.9 times the Base Quantity which is preset
in the oven. The light at the right of QUANTrTY will turn on to indicate that you can use the QUANTITY key for
that particular recipe.
To increase the quantity in these recipes, follow the steps
below:
1. Touch CLEAR.
2. Touch RECIPE #. _
3. Touch Numbers for the Preset Recipe.
4. Touch QUANTITY.
The light at the right of QUANTITY and “00” will show
in the Display Window.
5. Touch numbers for the multiplication factor.
To double the recipe, touch “2” and “0”.
To triple the recipe, touch “3” and “0”.
6. Touch START.
NOTES: The range of multiplication is 1.1 times to 5.9
times of the Base Quantity. Increment within the
above range is 0.1.
Multiplication can be used in Recipes #, where
the light at the right of QUANTITY shows in the
display window.
. When you set the multiplication of Base ■
Quantity beyond the range of 1.1—5.9, the oven
will not start even if you touch START.
Example; To cook three hot dogs per Recipe #51.
1. Touch CLEAR.
2. Touch RECIPE #. ■
3. Touch “5” and “1”.
4. Touch QUANTITY.
5. Touch "3” and “0”.
6. Touch START.
53
Page 54

PROGRAMMING NEW RECIPES
In addition to the 300 preset recipes, you can program 3 more favorite recipes.
To store the desired recipes in the oven, follow these
steps:
1. Touch CLEAR.
2. Touch NEW RECIPE. NOTE
“0” will show in the display window.
3. Tpuch RECIPE #.
4. Touch suitable numbers from 301-303.
EXAMPLE: Touch “3”, “0" and then “2”.
“302” will show in the display window.
5. Program your new recipe following use instructions.
6. Touch NEW RECIPE.
New recipe is now preset and the time of day will show
in the display window.
A recipe which has been stored in this manner,
can be changed to a new recipe. If you want to
change to a new recipe, the previously stored
recipe is erased when a new recipe is entered
over the old recipe.
Make a list of the recipe numbers and their
recipes which are stored in this manner so that
you can have easy reference for a later time.
54
NEW RECIPES
Recipe # Name
301
302
303
Directions
Page 55

OVEN UTENSILS GUIDE
A variety of Utensils and Materials may be used for cooking in your microwave/convection oven. For
your safety and to prevent damaging utensils and your oven, choose appropriate utensils and materials for
each cooking method. The list below is a general guide for you to select utensils and materials.
Material
Ceramic & Glass
China ,
Pottery ! ’
Plastic
Metal
Paper
Waxed Paper
Wood
OK: Utensils to use
NO: Utensils to avoid
NOTE: METAL RACK is provided for whole meal, Convection or. Micro/Convec cooking. Remove Metal
Rack from oven when not being used for the cooking.-
Kenmore Ceramic Tray
Corning Ware
Heat resistant Glass Ware
Glass Ware with metal decoration
Lead Glass
Without metal decoration
Régulât Oven Heat-proof Ware
Plastic Wrap
Kenmore Baking Pan
Metal Baking Pan
Aluminum Foil
Cups, Plates, Towels
Utensils
Microwave Micro/Convec .
Cooking ,
OK
OK
OK
NO
NO
OK
OK .
OK -X
OK
NO
NO
OK
OK
OK
NO
Cooking ^ ,
OK
OK
OK
NO . NO
NO OK
OK
OK
NO
NO
NO
OK
NO
NO
NO
¡ií-Convection
Cooking
OK
OK
OK
NO
OK
OK
' OK
NO
OK
OK
OK
NO
NO
NO
55
Page 56

CARE AND CLEANING
The oven cavity is made of stainless steel and should be cleaned with a detergent specially formulated for
stainless steel.
After convection cooking in particular, the interior of the oven tends to be stained with spattered oil. It is
recommended that the oven be cleaned each time after use before the oil spatters harden and become difficult
to remove.
For best performance and safety, the inner door panel should be free of food or grease buildup Wipe both often
with a mild detergent, rinse, and wipe dry. Never use rough powders or pads.
After cleaning the control panel, touch CLEAR. This will clear any entries that might have been entered
accidentally while cleaning the panel.
After dehydrating foods such as onions and marinated beef jerky, it is normal to have some odor
retention in the oven for a few days.
For cleaning of the Dehydration Rack and Net, it is recommended that a mild detergent, soft cloth or
nylon brush for stubborn stains such as beef jerky marinade can be used. .
REMOVABLE PARTS
After each use of the Temperature Probe, it must be removed from the socket. Use pot holder, as the
wire, plug and sensor sections may be hot. Wipe food or liquid from sensor with damp cloth.
The Ceramic Tray and Metal Rack can be removed for cleaning at the sink. Wipe up spillovers with paper
towel or cloth before removal of tray.
Wash in warm soapy water and dry. Do not use rough cleaning powders, steel wood, or rough cleaning
pads.
The fan cover (inside oven top) can be gently wiped in place or removed for washing with detergent in a
sink. Handle with care when washing in a sink. The fan cover can be removed by taking out the two
screws used to hold it in place and pulling off the cover carefully. Avoid hitting or bending the metal
stirrer blade, as this cause uneven cooking or microwave power loss. To replace, set the cover in the rails
at the rear of the oven and secure it using the two screws at front.
CAUTION: Wipe the fan cover after each use to keep the food soils from falling onto the cooking
tray. The fan cover is coated with Teflon* for easy cleaning. Do not apply abrasive powders, metal or
nylon wash pads, nor any metal objects such as knives and forks to the fan cover. Hard objects and
abrasive cleaners may scratch the coating. To clean, use only a foam sponge or wash cloth with a mild
kitchen cleaner.
NOTE: Should the Teflon coating be scratched off, the oven function will not be affected.
SPECIAL CARE
For best performance and safety, the inner door panel and the oven front frame should be free of food or
grease buildup. Wipe both often with a mild detergent. Then rinse and wipe dry. Never use rough
powders or pads.
After cleaning the control panel, touch CLEAR. This will clear any entries that might have been entered
accidentally while cleaning the panel.
56
Page 57

QUESTIONS AND ANSWERS
OPERATION
Q. What’s wrong when the oven light will not glow during cooking or when the oven door is opened?
A. There mai> be several reasons why the oven light will not glow.
B Timer has not been set.
B Light bulb is burned out.
B START has not been touched.
Q. Why is steam coming out of the air exhaust vent?
A. Steam is normally produced during cooking operations. The microwave oven has been made to
vent this steam out the rear vent.
Q. Will the microwave oven be damaged if it operates empty?
A. Yes. Never run it empty and without the ceramic tray.
Q. Does microwave energy pass through the viewing screen in the door?
A. No. The metal screen bounces back the energy to the oven cavity. The holes, or ports, are made
to allow light to pass: they do not let microwave energy through.
Q. Why does the beep tone sound when a pad on the Control Panel is touched?
A. The beep tone sounds, to assure that the setting is being properly entered.
Q. Why does the Display Window flash?
A. Flashing numbers indicate there has been a loss of electrical power to the Oven and the Time of
Day must be reset.
Prolonged loss of power can also result in loss of programmable recipes. Be sure they are
recorded.
Q. Why does the smoke come out of the exhaust duct at the back of oven?
A. It is normal that the smoke may come out of the duct during convection cooking.
The smoke will be produced when the food is over-cooked, and will be led to the duct.
Q. Why does it take so long to pre-heat sometimes?
A. When the oven door is opened during the preheating, the hot air will escape from the oven and
the oven temperature will drop, making the preheating time longer.
Avoid opening the oven door during preheating, convection cooking or micro/convec cooking,
whenever possible.
Q. Why do I see light reflection around the outer case?
A. This light is from the oven light which is located outside the oven cavity.
57
Page 58

FOODS
Q. What is wrong when baked foods have a hard, dry, brown spot?
A. A brown, hard spot shows overcooking. Shorten the cooking or reheating time.
Q. Why do eggs sometimes pop?
A. When baking, frying, or poaching eggs, the yolk may pop due to steam built up inside the yolk
membrane. To prevent this, simply pierce the yolk with a toothpick before cooking.
Never microwave cook eggs in the shell.
Q. Why are scrambled eggs sometimes a little dry?
A. Eggs dry out if they are overcooked. Though the same recipe is used each time, you may need to
vary the cooking time for one of these reasons.
■ Eggs vary in size.
H Eggs are at room temperature one time and refrigerator temperature another.
■ The shapes of utensils vary, which makes it necessary to vary the cooking time.
B Eggs keep on cooking during standing time.
Q. Can I cook popcorn in my microwave oven?
A. Cooking popcorn in a microwave oven is not recommended.
Microwaves pop too few kernels to make the technique successful. Longer cooking does not
yield more popped corn, but can cause fire or make the cooking dish too hot to handle and even
break.
Microwave popping devices are available. While safe to use, they usually do not give results
equal to regular-popping^ methods. If used, carefully follow the instructions which come with the
popping product and never leave the oven unattended while popping com.
Never use a paper bag for popping corn.
Q. What is wrong when three potatoes bake throughly and the fourth is still not cooked?
A. The fourth potato may be slightly heavier than the others and will need to cook 30 to 60 seconds
longer. Remember to allow space around each potato when baking.
For more even cooking, put potatoes in a circle.
Q. Why do baked apples sometimes burst during cooking?
A. The peel should be removed from the top half of each apple to allow for expansion of the interior
of the apple during cooking, as in regular cooking.
Q. How are boilovers avoided?
A. For foods that tend to boil over, use a larger utensil. If you open the oven door or touch STOP
the food will stop boiling. (Remember to touch START again after closing the door, to restart
cooking.)
Q. Why is a standing time recommended after microwave cooking is over?
A. After microwave cooking is finished, foods keep on cooking during standing time.
This standing time finishes cooking evenly throughout the food. The amount of standing time
depends on the density of the food.
Q. Why is an additional time required for cooking food stored in refrigerator?
A. As in conventional cooking, the initial temperature of food affects total cooking time. More time
is needed to cook the food just taken out of a refrigerator than food at a room temperature.
58
Page 59

SEARS SERVICE
WE SERVICE WHAT WE SELL
“We Service What We Sell” is our assurance to you that you can depend on Sears for service because
Sears service is nationwide.
Your Kenmore Microwave/Convection Oven has added value when you consider that Sears has a service
unit near you, staffed by Sears Trained Technicians — professional technicians specifically trained on
Kenmore Microwave/Convection Ovens, having the parts, tools and equipment to ensure that we meet
our pledge to you — “We Service What We Sell!”
TO FURTHER ADD TO THE VALUE OF YOUR MICROWAVE/CONVECTION OVEN, BUY A
SEARS MAINTENANCE AGREEMENT.
Sears Microwave/Convection Ovens are designed,
manufactured, and tested for years of dependable
operation. Yet any modem appliance may require service
from time to time. A Sears Maintenance Agreement is
more than an extension of the Warranty.
It provides complete protection from unexpected repair
bills and undue inconvenience. It assures you of maximum
efficiency from your Microwave/Convection Oven.
Here’s a comparative Warranty and Maintenance
Agreement chart showing you the benefits of a Sears
Microwave/Convection Oven Maintenance Agreement.
YEARS OF OWNERSHIP
COVERAGE
1. Replacement of
defective parts other
than magnetron
2. Replacement of
magnetron
3. Annual preventative
maintenance check at
your request
W—WARRANTY
MA-MAINTENANCE AGREEMENT
1st Yr.
MA MA
W
W
Contact your Sears salesperson or local Sears Service Center today and purchase a Sears Maintenance
Agreement.
2nd Yr.
thru
5th Yr.
MA
W
59
Page 60

Sears
USE & CARE
MANUAL
STOCK NO.
86951
MICRO/CONVECTION
OVEN
WARRANTY
FULL ONE YEAR WARRANTY ON MICROWAVE OVEN
FOR ONE YEAR FROM THE DATE OF PURCHASE, IF THIS KENMORE
MICROWAVE OVEN FAILS DUE TO A DEFECT IN MATERIAL OR
WORKMANSHIP, SEARS WILL REPAIR IT, FREE OF CHARGE.
FULL FIVE YEAR WARRANTY OF THE MAGNETRON
FOR FIVE YEARS FROM THE DATE OF PURCHASE, IF THE
MAGNETRON IN THIS KENMORE MICROWAVE OVEN FAILS DUE TO A
DEFECT IN MATERIAL OR WORKMANSHIP, SEARS WILL REPAIR IT,
FREE OF CHARGE.
THE ABOVE WARRANTY COVERAGE APPLIES ONLY TQ
MICROWAVE OVENS WHICH ARE USED FOR PRIVATE HOUSEHOLD
PURPOSES.
Part No. 12808
WARRANTY SERVICE IS AVAILABLE BY SIMPLY
CONTACTING THE NEAREST SEARS STORE OR
SERVICE CENTER IN THE UNITED STATES.
THIS WARRANTY APPLIES ONLY WHILE THIS PRODUCT IS IN USE IN
THE UNITED STATES.
THIS WARRANTY GIVES YOU SPECIFIC LEGAL RIGHTS, AND YOU
MAY ALSO HAVE OTHER RIGHTS WHICH VARY FROM STATE TO
STATE.
SEARS, ROEBUCK AND CO.
DEPT. 698/731A, SEARS TOWER, CHICAGO, IL. 60684
Sears, Roebuck and Co., Chicago, IL 60684 U.S.A.
Revised 5/'84 Printed in Japan
 Loading...