

Page 1
®
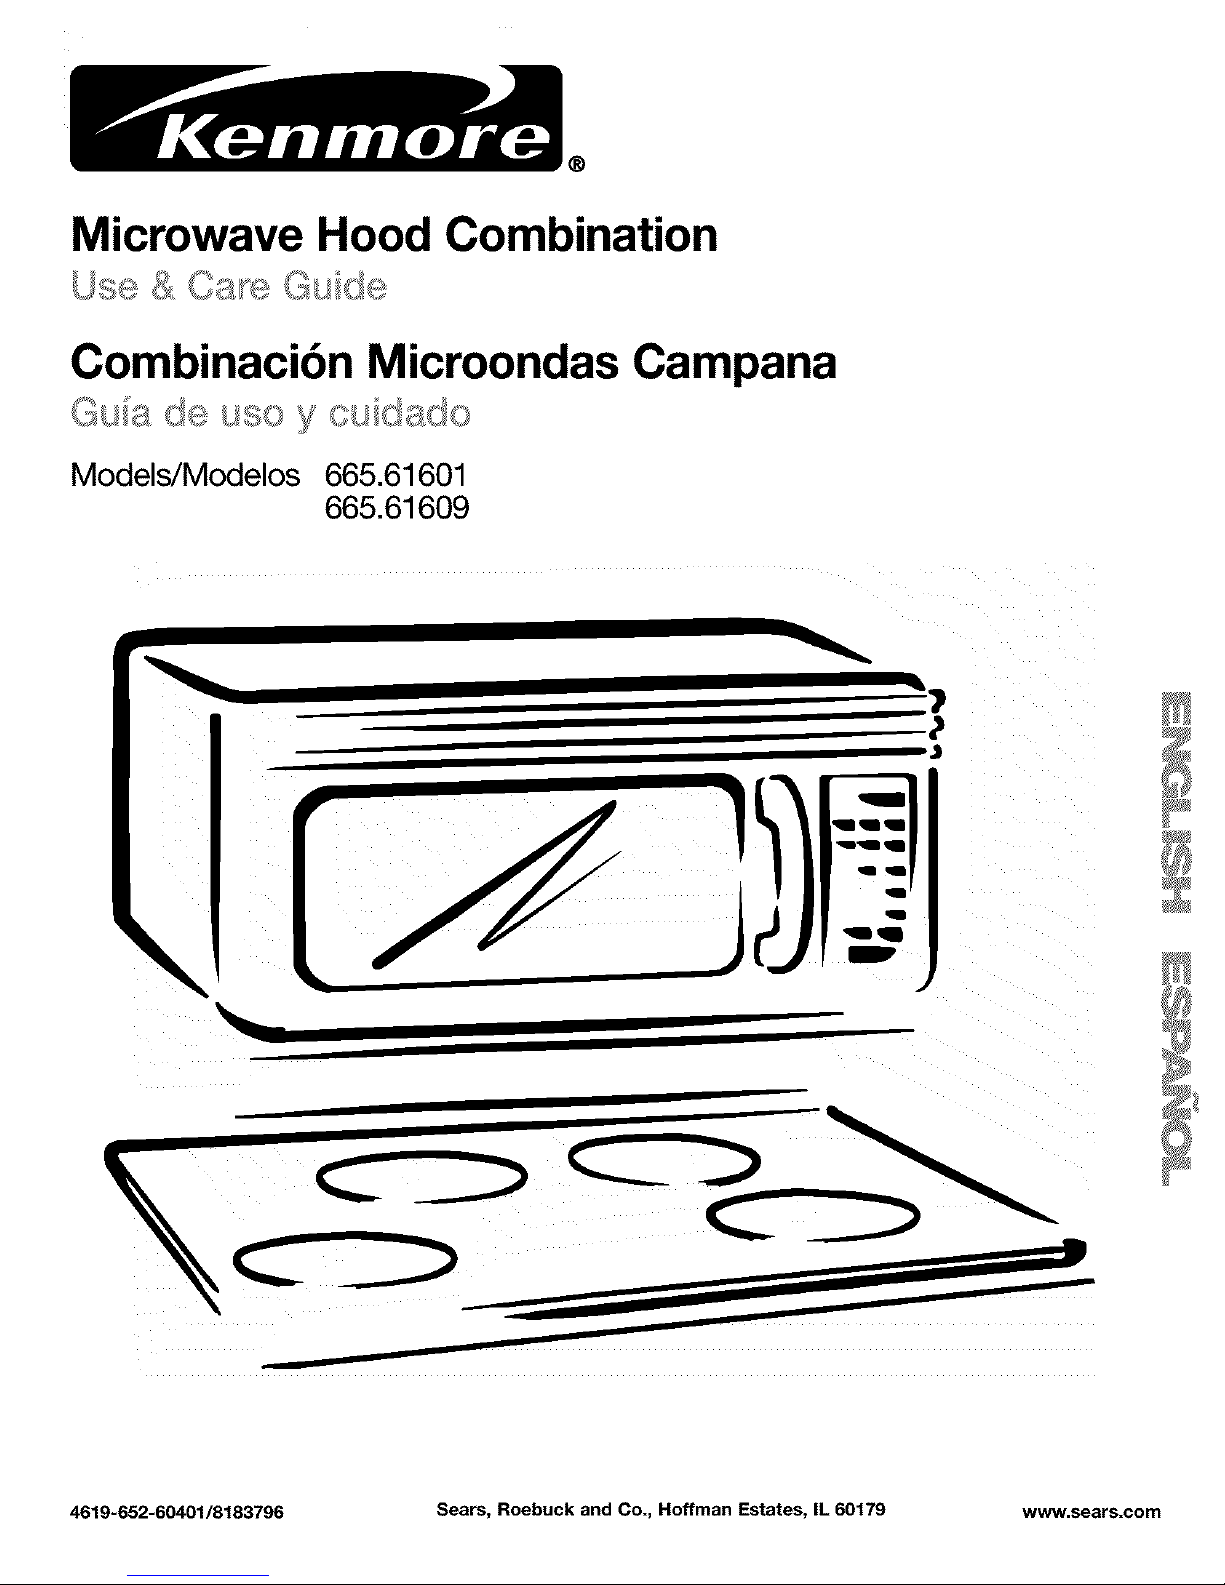
Microwave Hood Combination
Combinacibn Microondas Campana
Models/Modelos 665.61601
665.61609
4619-652-60401/8183796 Sears, Roebuck and Co., Hoffman Estates, IL 60179 www.sears.com
Page 2
Table of
Contents
Warranty .............................................................. 2
Sears Service ..................................................... 3
Microwave Oven Safety .................................... 4
Installation Instructions ..................................... 7
Getting to Know Your
Microwave Oven ................................................ 8
How your microwave oven works ................... 8
Radio interference ........................................... 8
Testing your microwave oven .......................... 8
Testing your dinnerware or cookware ............. 9
Operating tips .................................................. 9
Electrical connection ....................................... 9
Microwave oven features .............................. 10
Control panel features ................................... 11
Using the exhaust fan ................................... 13
Using the cooktop/countertop light .............. 13
Setting the clock ........................................... 14
Using the kitchen timer ................................. 15
Using ADD ONE MINUTE .............................. 16
Changing preset cooking times .................... 16
Using Your Microwave Oven .......................... 17
Cooking at high cook power ......................... 17
Cooking at different cook powers ................. 18
Cooking in stages ......................................... 20
Using AUTO COOK ....................................... 22
Using AUTO REHEAT .................................... 23
Using AUTO DEFROST ................................. 24
AUTO DEFROST chart .................................. 25
Defrosting tips ............................................... 26
Using POPCORN .......................................... 27
Caring for Your Microwave Oven ................... 28
Installing and caring for filters ....................... 29
Replacing the cooktop and oven lights ........ 30
Cooking Guide ................................................. 31
Questions and Answers .................................. 33
Troubleshooting ............................................... 34
Index .................................................................. 36
Service .............................................. Back Cover
Microwave
Oven
Warranty,
FULL ONE-YEAR WARRANTY ON
MICROWAVE OVEN
For one year from the date of purchase, if this
Kenmore Microwave Oven fails due to a defect in
material or workmanship, Sears will repair it free of
charge.
FULL FIVE-YEAR WARRANTY ON THE
MAGNETRON
For five years from the date of purchase, if the
magnetron in this Kenmore Microwave Oven fails
due to a defect in material or workmanship, Sears
will repair it free of charge.
The above warranty coverage applies only to
Microwave Ovens which are used for private
household purposes.
WARRANTY SERVICE IS AVAILABLE BY SIMPLY
CONTACTING THE NEAREST SEARS STORE OR
SERVICE CENTER IN THE UNITED STATES.
This warranty applies 0nly while this produc t is in use
in the United States.
This warranty gives you specific legal rights, and you
may also have other rights which vary from state to
state.
Sears, Roebuck and Co.,
Dept. 817WA,
Hoffman Estates, IL 60179
For service call:
1-800-4-MY-HOME®
(1-800-469-4663)
Please record your model's
information.
Whenever you call to request service for your appli-
ance, you need to know your complete model number
and serial number. You can find this information on
the model and serial number label/plate (see
"Microwave oven features" in the "Getting to Know
Your Microwave Oven" section). Also, record the other
information shown below.
Model Number
Serial Number
Purchase Date
2
Page 3
Sears Service
"We service what we sell"
Your purchase has added value because you can depend on Sears HomeCentral®, for service. With over
12,000 trained repair specialists and access to over 4.2 million parts and accessories, we have the tools,
parts, knowledge and skills to ensure our pledge: We Service What We Sell.
Sears Maintenance Agreements
Your Kenmore appliance is designed, manufactured and tested to provide years of dependable operation. Yet
any major appliance may require service from time to time. The Sears Maintenance Agreement offers you an
outstanding service program, affordably priced.
The Sears Maintenance Agreement
• Is your way to buy tomorrow's service at today's price.
• Eliminates repair bills resulting from normal wear and tear.
• Provides for non-technical and instructional assistance.
• Even if you don't need repairs, provides an annual Preventive Maintenance Check, at your request, to ensure
that your appliance is in proper running condition.
Some limitations apply. For more information, call 1-800-827-6655
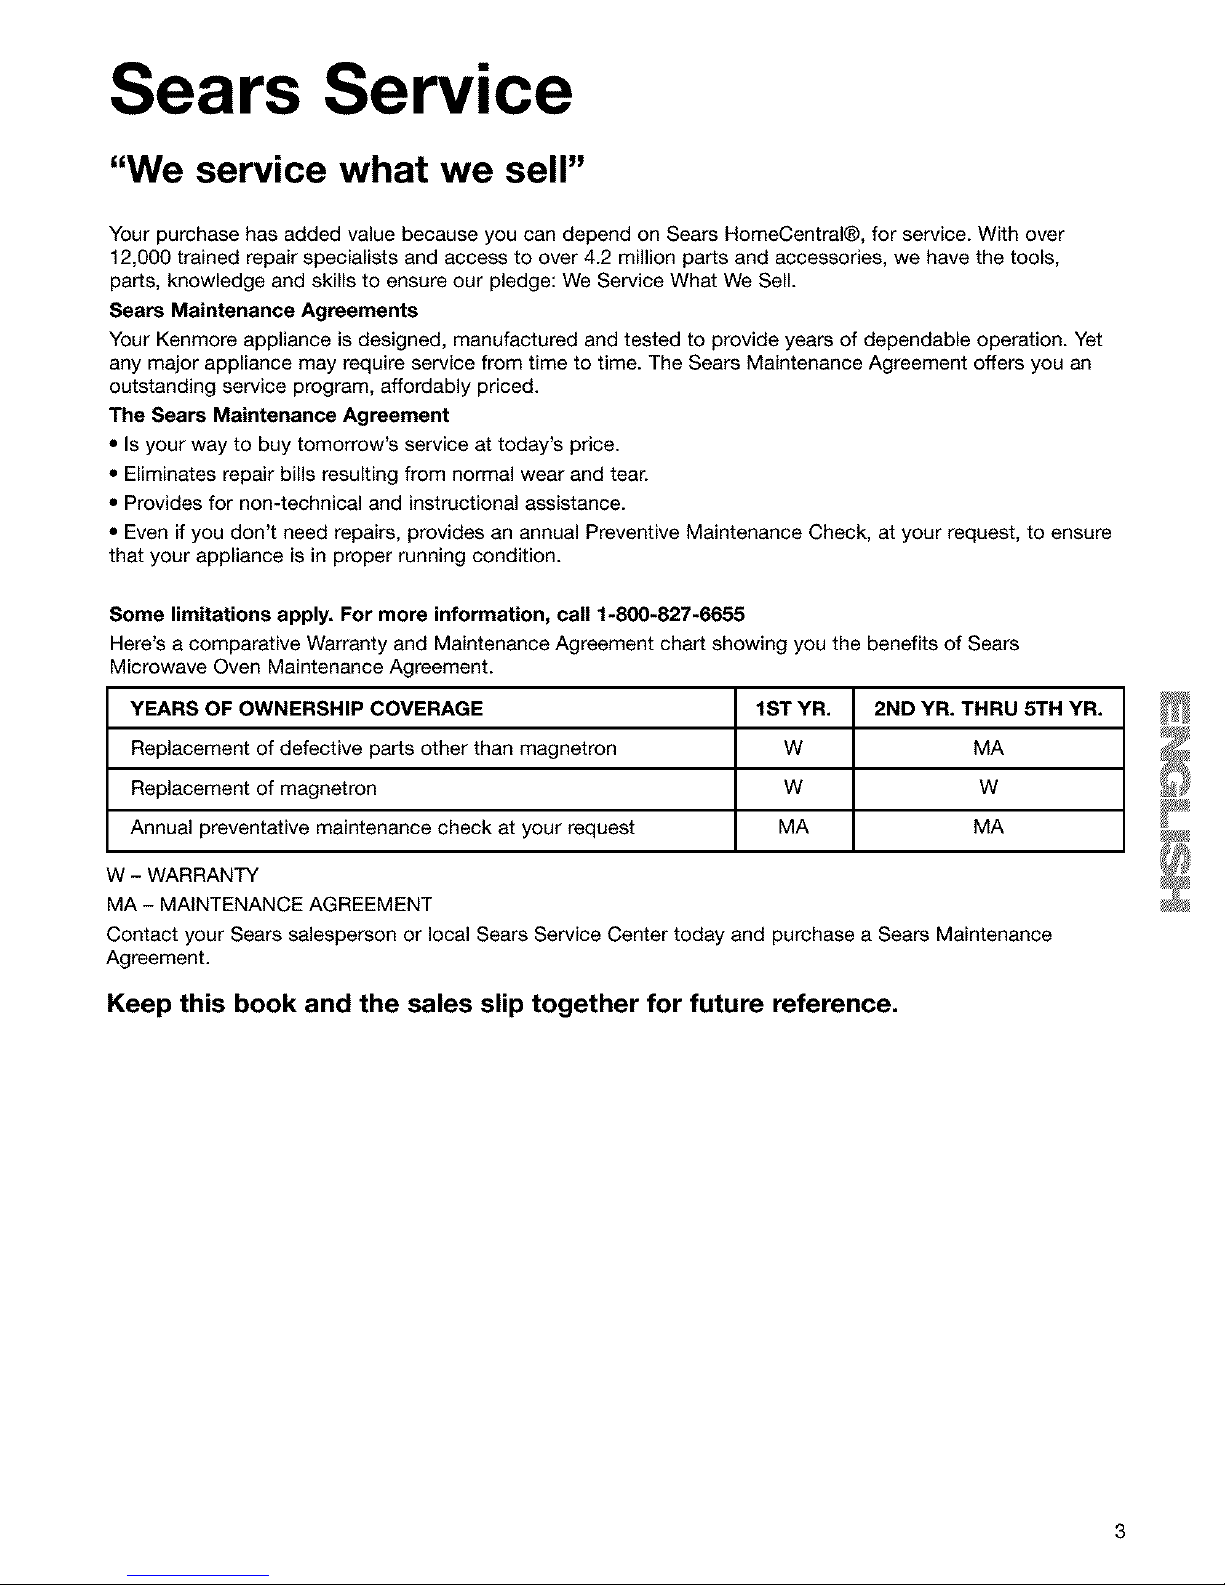
Here's a comparative Warranty and Maintenance Agreement chart showing you the benefits of Sears
Microwave Oven Maintenance Agreement.
YEARS OF OWNERSHIP COVERAGE 1ST YR.
Replacement of defective parts other than magnetron W MA
Replacement of magnetron W W
Annual preventative maintenance check at your request MA MA
W - WARRANTY
MA - MAINTENANCE AGREEMENT
Contact your Sears salesperson or local Sears Service Center today and purchase a Sears Maintenance
Agreement.
Keep this book and the sales slip together for future reference.
2ND YR. THRU 5TH YR.
Page 4
Microwave Oven Safety
Your safety and the safety of others are very important.
We have provided many important safety messages in this manual and on your appliance. Always read and
obey all safety messages.
This is the safety alert symbol.
This symbol alerts you to potential hazards that can killor hurt you and others.
All safety messages willfollow the safety alert symbol and either the word "DANGER" or
"WARNING." These words mean:
You can be killed or seriously injured if you don't
immediately follow instructions.
You can be killed or seriously injured if you don't
follow instructions.
All safety messages will tell you what the potential hazard is, tell you how to reduce the chance of injury,
and tell you what can happen if the instructionsare not followed.
IMPORTANT SAFETY INSTRUCTIONS
When using electrical appliances basic safety precautions should be followed, including the following:
WARNING: To reduce the risk of burns, electric
shock, fire, injury to persons, or exposure to
excessive microwave energy:
• Read ait instructions before using the microwave
oven.
• Read and follow the specific "PRECAUTIONS TO
AVOID POSSIBLE EXPOSURE TO EXCESSIVE
MICROWAVE ENERGY" found in this section.
• The microwave oven must be grounded. Connect
only to propedy grounded outlet. See
"GROUNDING INSTRUCTIONS" found in this
section and in the provided installation instructions.
• Install or locate the microwave oven only in
accordance with the provided Installation
Instructions.
• Some products such as whole eggs in the shell
and sealed containers - for example, closed glass
jars - may explode and should not be heated in
the microwave oven.
• Use the microwave oven only for its intended use
as described in this manual. Do not use corrosive
chemicals or vapors in the microwave oven. This
type of oven is specifically designed to heat, cook,
or dry food. It is not designed for industrial or
laboratory use.
• As with any appliance, close supervision is
necessary when used by children.
• Do not operate the microwave oven if it has a
damaged cord or plug, if it is not working properly,
or if it has been damaged or dropped.
• The microwave oven should be serviced only by
qualified service personnel. Call an authorized
service company for examination, repair, or
adjustment.
• See door surface cleaning instructions in the
"Caring for Your Microwave Oven" section.
• To reduce the risk of fire in the oven cavity:
- Do not overcook food. Carefully attend the
microwave oven if paper, plastic, or other
combustible materials are placed inside the oven
to facilitate cooking.
- Remove wire twist-ties from paper or plastic bags
before placing bags in oven.
- If materials inside the oven should ignite, keep
oven door closed, turn oven off, and disconnect
the power cord, or shut off power at the fuse or
circuit breaker panel.
- Do not use the cavity for storage purposes. Do
not leave paper products, cooking utensils, or
food in the cavity when not in use.
• Suitable for use above both gas and electric
cooking equipment.
SAVE THESE INSTRUCTIONS
4
Page 5
IMPORTANT SAFETY INSTRUCTIONS
• Intended to be used above ranges with maximum
width of 36 inches.
• Clean Ventilating Hoods Frequently - Grease
should not be allowed to accumulate on hood or
filter.
• Oversized foods or oversized metal utensils
should not be inserted in the microwave oven as
they may create a fire or risk of electric shock.
• Do not clean with metal scouring pads. Pieces can
burn off the pad and touch electrical parts involv-
ing a risk of electric shock.
• Do not use paper products when appliance is
operated in the "PAN BROWN" mode.
• Do not store any materials other than manufactur-
er's recommended accessories in this oven when
not in use.
• Do not store anything directly on top of the
microwave oven when the microwave oven is
in operation.
• When flaming foods under the hood, turn the fan on.
• Use care when cleaning the vent-hood filter.
Corrosive cleaning agents, such as lye-based oven
cleaners, may damage the filter.
• Do not cover or block any openings on the
microwave oven.
• Do not store this microwave oven outdoors.
Do not use the microwave oven near water - for
example, near a kitchen sink, in a wet basement, or
near a swimming pool, and the like.
• Do not immerse cord or plug in water.
• Keep cord away from heated surfaces.
• Do not let cord hang over edge of table or counter.
• Do not mount over a sink.
• Do not cover racks or any other part of the oven with
metal foil. This will cause overheating of the oven.
SAVE THESE INSTRUCTIONS
PRECAUTIONS TO AVOID POSSIBLE EXPOSURE TO
EXCESSIVE MICROWAVE ENERGY
(a) Do not attempt to operate this oven with the
door open since open-door operation can result
in harmful exposure to microwave energy. It is
important not to defeat or tamper with the safety
interlocks.
(b) Do not place any object between the oven front
face and the door or allow soil or cleaner residue
to accumulate on sealing surfaces.
(c) Do not operate the oven if it is damaged. It is
particularly important that the oven door close
properly and that there is no damage to the:
(1) Door (bent),
(2) Hinges and latches (broken or loosened),
(3) Door seals and sealing surfaces.
(d) The oven should not be adjusted or repaired by
anyone except properly qualified service
personnel.
Page 6
ELECTRICAL REQUIREMENTS
Observe all governing codes and ordinances. A
120 Volt, 60 Hz, AC only, 15- or 20-amp fused
electrical supply is required. (A time-delay fuse or
circuit breaker is recommended.) It is recommend-
ed that a separate circuit serving only this appli-
ance be provided.
Electrical Shock Hazard
Plug into a grounded 3 prong outlet.
Do not remove ground prong.
Do not use an adapter.
Do not use an extension cord.
Failure to follow these instructions can
result in death, fire, or electrical shock.
GROUNDING INSTRUCTIONS
• For all cord connected appliances:
The microwave oven must be grounded. In the
event of an electrical short circuit, grounding
reduces the risk of electric shock by providing an
escape wire for the electric current. The microwave
oven is equipped with a cord having a grounding
wire with a grounding plug. The plug must be
plugged into an outlet that is properly installed and
grounded.
WARNING: Improper use of the grounding plug
can result in a risk of electric shock.
Consult a qualified electrician or serviceman if the
grounding instructions are not completely under-
stood, or if doubt exists as to whether the microwave
oven is properly grounded.
Do not use an extension cord. If the power supply
cord is too short, have a qualified electrician or
serviceman install an outlet near the microwave oven.
• For a permanently connected appliance:
The microwave oven must be connected to a
grounded, metallic, permanent wiring system, or an
equipment grounding conductor should be run with
the circuitconductors and connected to the
equipment grounding terminal or lead on the
microwave oven.
SAVE THESE INSTRUCTIONS
6
Page 7
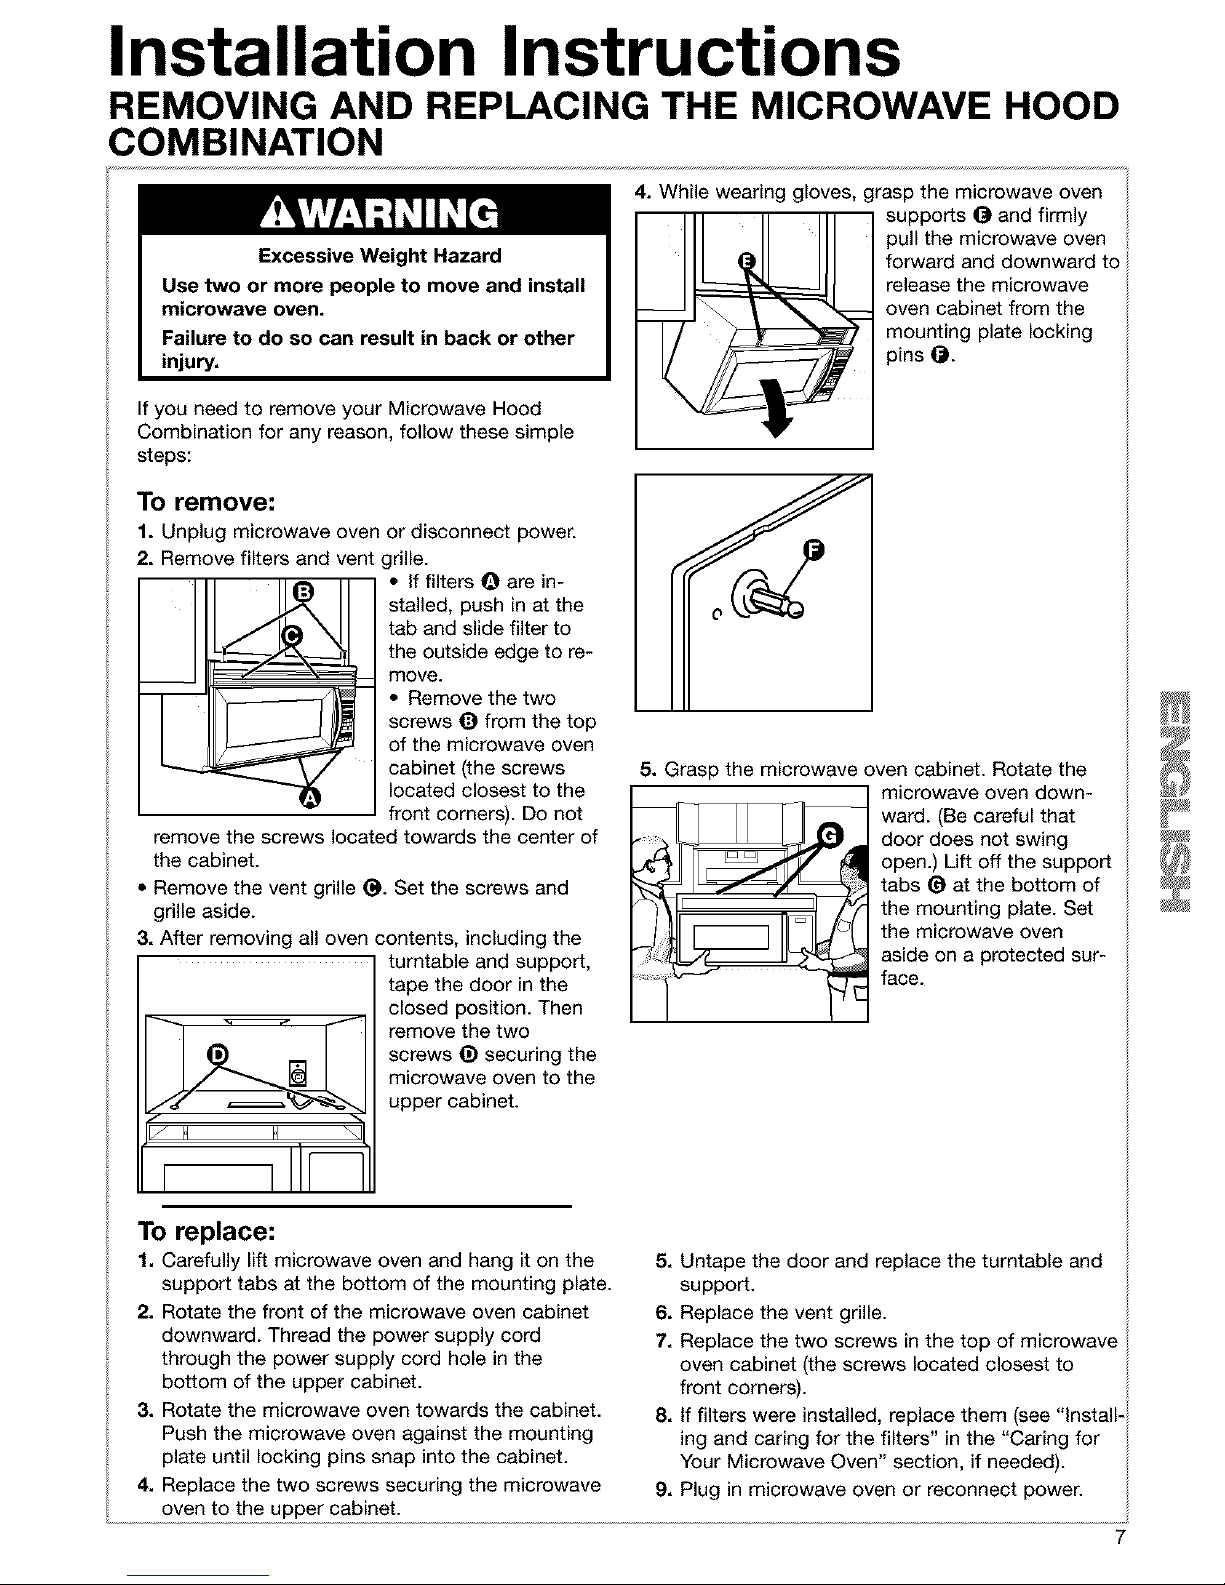
Installation Instructions
REMOVING AND REPLACING THE MICROWAVE HOOD
COMBINATION
Excessive Weight Hazard
Use two or more people to move and install
microwave oven.
Failure to do so can result in back or other
injury.
If you need to remove your Microwave Hood
Combination for any reason, follow these simple
steps:
To remove:
1. Unplug microwave oven
2. Remove filters and vent
or disconnect power.
rille.
• If filters Q are in-
stalled, push in at the
tab and slide filter to
the outside edge to re-
move.
• Remove the two
screws Q from the top
of the microwave oven
cabinet (the screws
located closest to the
front corners). Do not
remove the screws located towards the center of
the cabinet.
• Remove the vent grille (_. Set the screws and
grille aside.
3. After removing all oven contents, including the
turntable and support,
tape the door in the
closed position. Then
remove the two
screws _) securing the
microwave oven to the
upper cabinet.
4. While wearing gloves, grasp the microwave oven
supports @ and firmly
pull the microwave oven
forward and downward to
release the microwave
oven cabinet from the
mounting plate locking
pins _1.
5. Grasp the microwave oven cabinet. Rotate the
microwave oven down-
ward. (Be careful that
door does not swing
open.) Lift off the support
tabs 0 at the bottom of
the mounting plate. Set
the microwave oven
aside on a protected sur-
face.
To replace:
1. Carefully lift microwave oven and hang it on the
support tabs at the bottom of the mounting plate.
2. Rotate the front of the microwave oven cabinet
downward. Thread the power supply cord
through the power supply cord hole in the
bottom of the upper cabinet.
3. Rotate the microwave oven towards the cabinet.
Push the microwave oven against the mounting
plate until locking pins snap into the cabinet.
4. Replace the two screws securing the microwave
5. Untape the door and replace the turntable and
support.
6. Replace the vent grille.
7. Replace the two screws in the top of microwave
oven cabinet (the screws located closest to
front corners).
8. If filters were installed, replace them (see "install-
ing and caring for the filters" in the "Caring for /
Your Microwave Oven' section, if needed).
9. Plug in microwave oven or reconnect power.
Page 8
Getting to Know Your
Microwave Oven
This section discusses the concepts behind microwave cooking. It also shows you the basics you need
to know to operate your microwave oven. Please read this information before you use your oven.
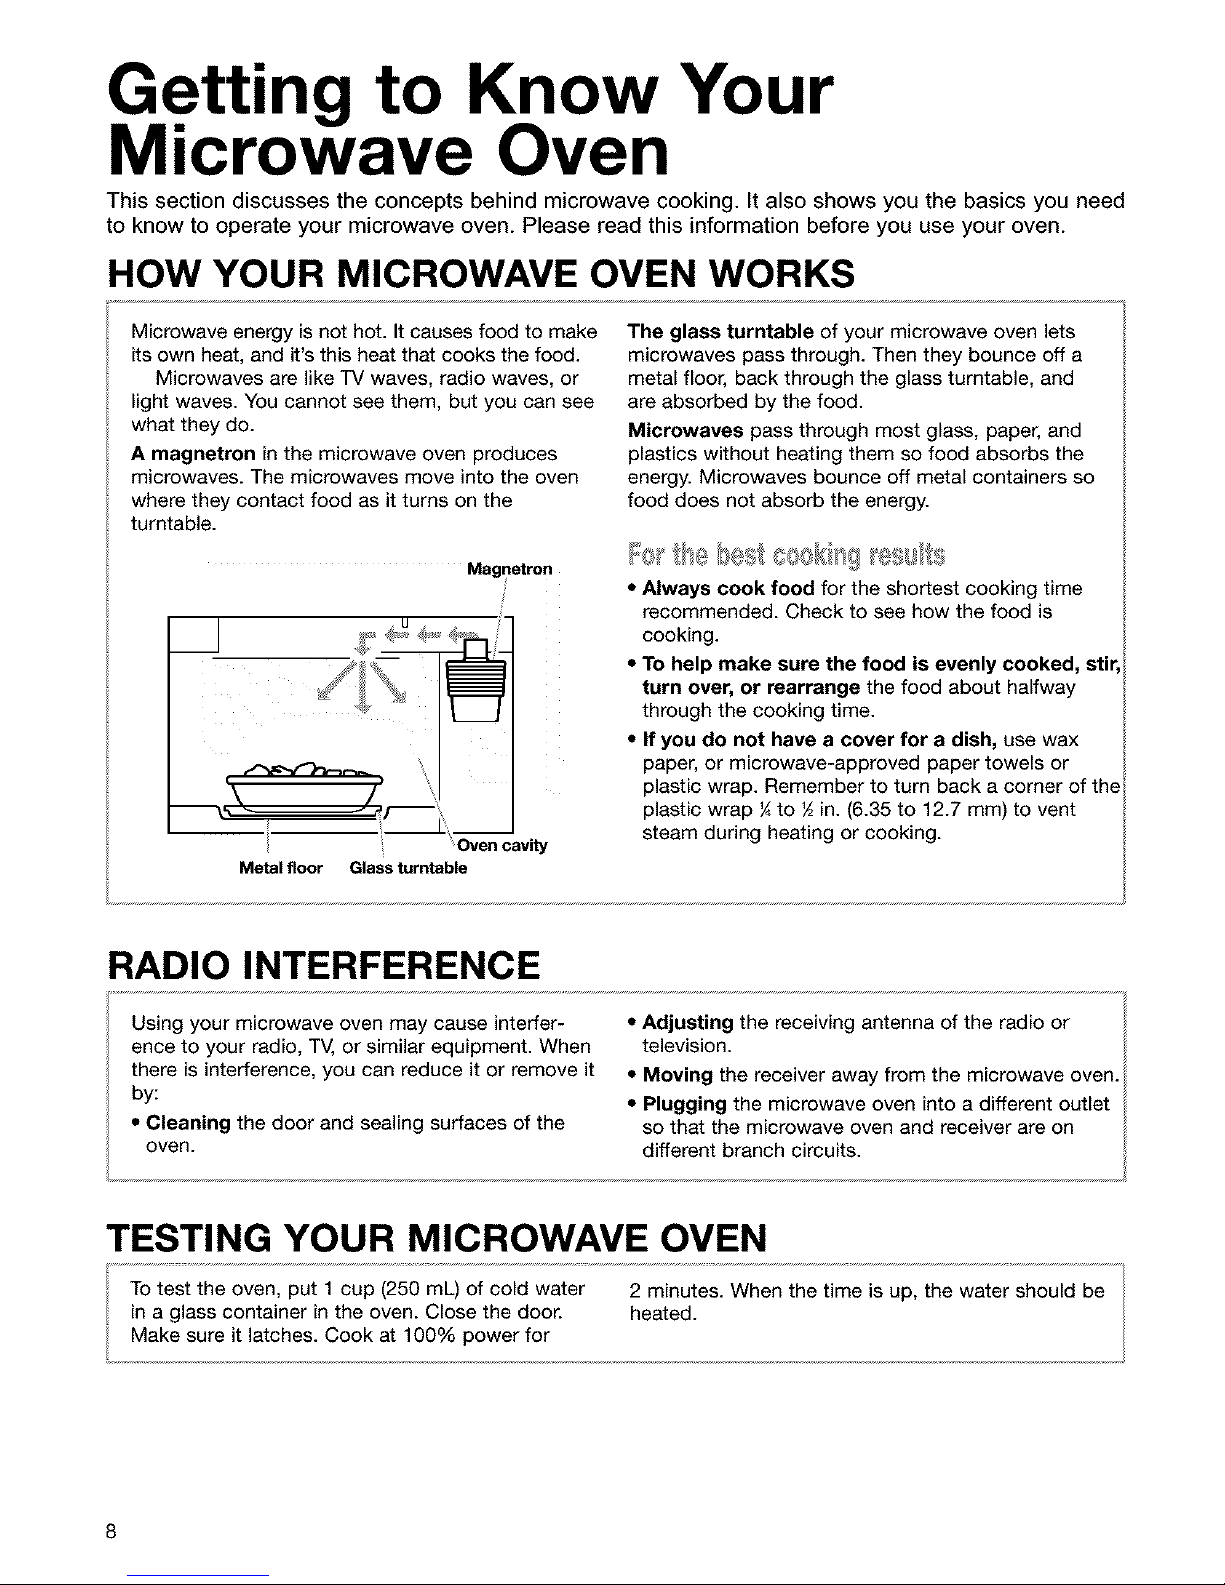
HOW YOUR MICROWAVE OVEN WORKS
Microwave energy is not hot. Itcauses food to make
its own heat, and it's this heat that cooks the food.
Microwaves are like TV waves, radio waves, or
light waves. You cannot see them, but you can see
what they do.
A magnetron in the microwave oven produces
microwaves. The microwaves move into the oven
where they contact food as it turns on the
turntable.
Magnetron
\ /
Metal floor
Oven cavity
Glassturntable
The glass turntable of your microwave oven lets
microwaves pass through. Then they bounce off a
metal floor, back through the glass turntable, and
are absorbed by the food.
Microwaves pass through most glass, paper, and
plastics without heating them so food absorbs the
energy. Microwaves bounce off metal containers so
food does not absorb the energy.
[1!silts
• Always cook food for the shortest cooking time
recommended. Check to see how the food is
cooking.
• To help make sure the food is evenly cooked, stir,
turn over, or rearrange the food about halfway
through the cooking time.
• If you do not have a cover for a dish, use wax
paper, or microwave-approved paper towels or
plastic wrap. Remember to turn back a corner of the
plastic wrap ¼to _ in. (6.35 to 12.7 mm) to vent
steam during heating or cooking.
RADIO INTERFERENCE
• Adjusting the receiving antenna of the radio or
television.
• Moving the receiver away from the microwave oven.
• Plugging the microwave oven into a different outlet
so that the microwave oven and receiver are on
Using your microwave oven may cause interfer-
ence to your radio, TV, or similar equipment. When
there is interference, you can reduce it or remove it
by:
• Cleaning the door and sealing surfaces of the
oven. different branch circuits.
TESTING YOUR MICROWAVE OVEN
To test the oven, put 1 cup (250 mL) of cold water 2 minutes. When the time is up, the water should be
in a glass container in the oven. Close the door. heated.
Make sure it latches. Cook at 100% power for
8
Page 9
TESTING YOUR DINNERWARE OR COOKWARE
Test dinnerware or cookware before using.
To test a dish, put it into the oven with 1 cup
(250 mL) of water beside it. Cook at 100% cook
power for one minute. If the dish gets hot and
water stays cool, do not use it. Some dishes
(melamine, some ceramic dinnerware, etc.)
absorb microwave energy, and may become too hot
to handle or may slow cooking times. Cooking in
metal containers not designed for microwave use
could damage the oven, as could containers with
hidden metal (twist-ties, foil lining, staples, metallic
glaze or trim).
OPERATING TIPS
• Never lean on the door or allow a child to swing
on it when the door is open.
• Use hot pads. Microwave energy does not heat
containers, but the heat from the food can make
the container hot.
• Do not use newspaper or other printed paper in
the oven.
• Do not dry flowers, fruit, herbs, wood, paper,
gourds, or clothes in the oven.
• Do not start a microwave oven when it is empty.
Product life may be shortened. If you practice
programming the oven, put a container of water in
the oven. It is normal for the oven door to look
wavy after the oven has been running for a while.
• Do not try to melt paraffin wax in the oven.
Paraffin wax will not melt in a microwave oven
because it allows microwaves to pass through it.
• Do not operate the microwave oven unless the
glass turntable is securely in place and can rotate
freely. The turntable can rotate in either direction.
Make sure the turntable is correct-side up in the
oven. Handle your turntable with care when
removing it from the oven to avoid possibly
breaking it. If your turntable cracks or breaks,
contact your dealer for a replacement.
• When you use a browning dish, the browning
dish bottom must be at least _ in. (5 mm) above
the turntable. Follow the directions supplied with
the browning dish.
• Never cook or reheat a whole egg inside the
shell. Steam buildup in whole eggs may cause
them to burst, and possibly damage the oven.
Slice hard-boiled eggs before heating. In rare
cases, poached eggs have been known to
explode. Cover poached eggs and allow a stand-
ing time of one minute before cutting into them.
• For best results, stir any liquid several times
during heating or reheating. Liquids heated in
certain containers (especially containers shaped
like cylinders) may become overheated. The liquid
may splash out with a loud noise during or after
heating or when adding ingredients (coffee
granules, tea bags, etc.). This can damage the oven.
• Microwaves may not reach the center of a roast.
The heat spreads to the center from the outer,
cooked areas just as in regular oven cooking. This
is one of the reasons for letting some foods (for
example, roasts or baked potatoes) stand for a
while after cooking, or for stirring some foods
during the cooking time.
• Do not deep fry in the oven. Microwavable
utensils are not suitable and it is difficult to
maintain appropriate deep-frying temperatures.
• Do not overcook potatoes. At the end of the
recommended cooking time, potatoes should be
slightly firm because they will continue cooking
during standing time. After microwaving, let
potatoes stand for 5 minutes. They will finish
cooking while standing.
ELECTRICAL CONNECTION
If your electric power line or outlet voltage is less
than 110 volts, cooking times may be longer. Have a
qualified electrician check your electrical system.
Page 10
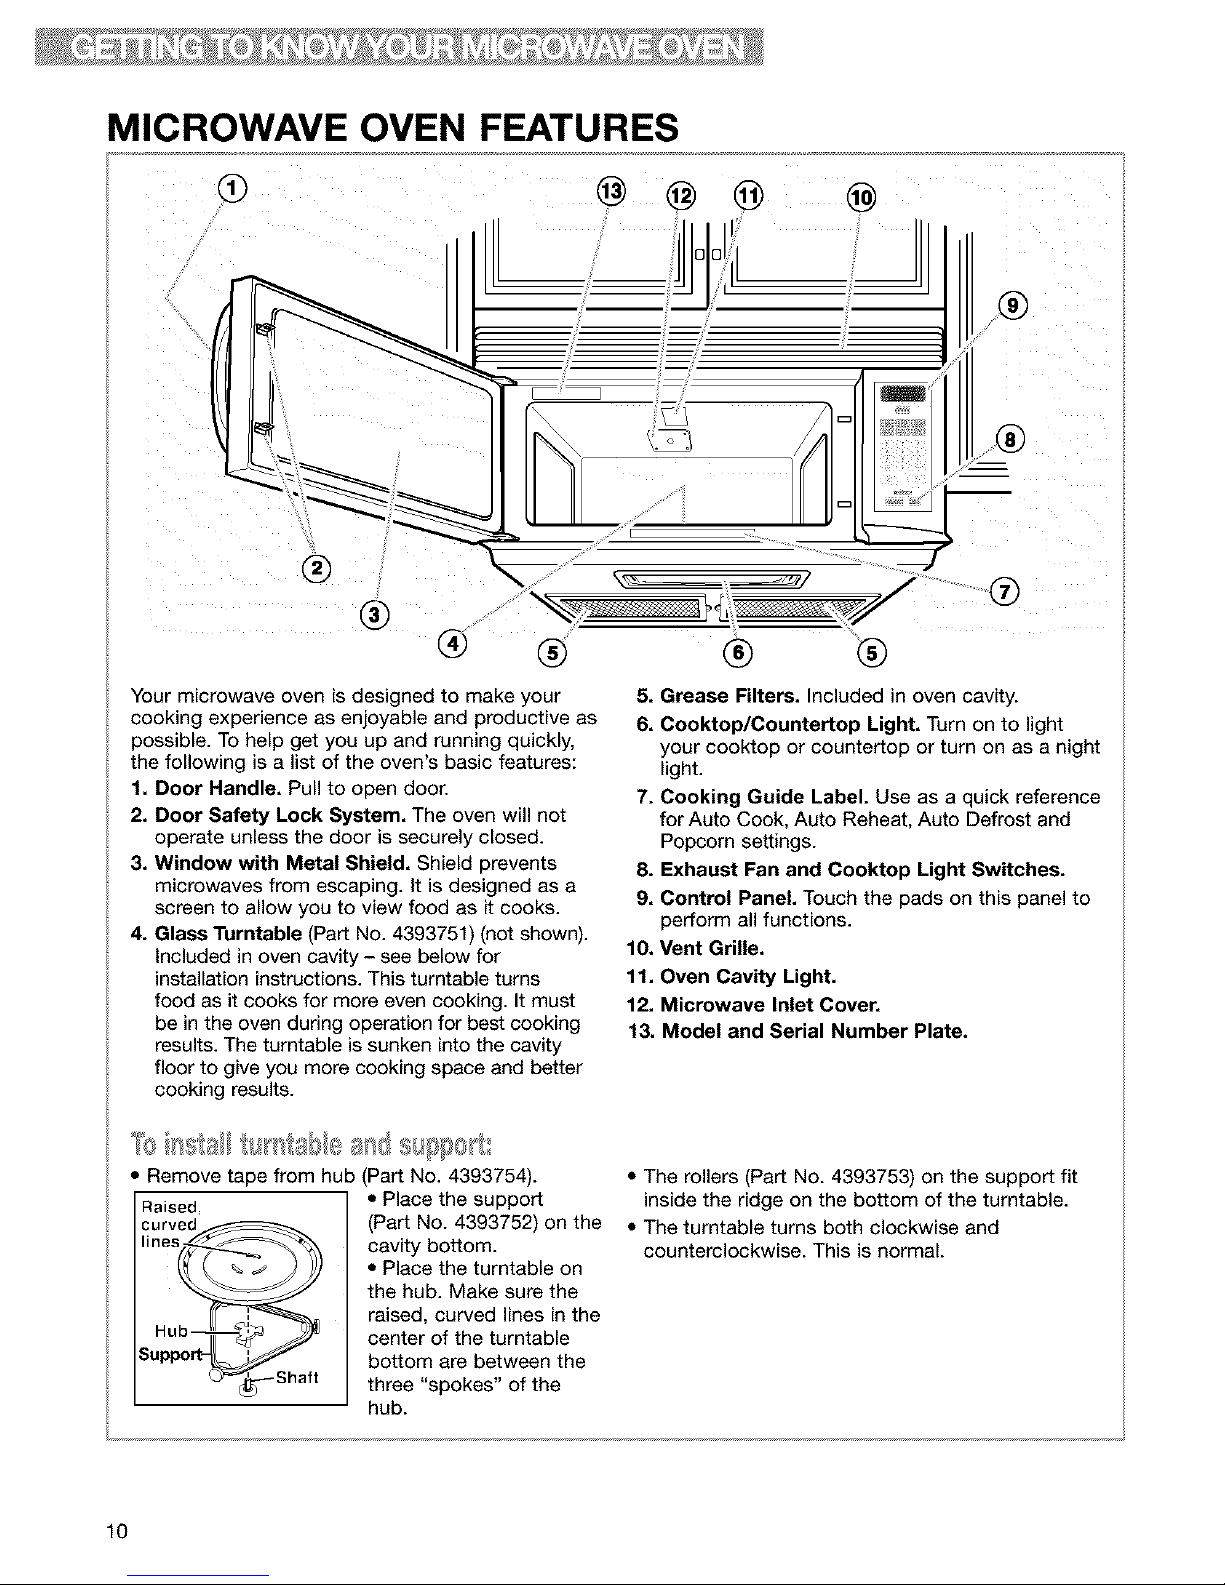
MICROWAVE OVEN FEATURES
®
®
®
.........iiiiI i
® ® ®
Your microwave oven is designed to make your
cooking experience as enjoyable and productive as
possible. To help get you up and running quickly,
the following is a list of the oven's basic features:
1. Door Handle. Pull to open door.
2. Door Safety Lock System. The oven will not
operate unless the door is securely closed.
3. Window with Metal Shield. Shield prevents
microwaves from escaping. It is designed as a
screen to allow you to view food as it cooks.
4. Glass Turntable (Part No. 4393751) (not shown).
Included in oven cavity - see below for
installation instructions. This turntable turns
food as it cooks for more even cooking. It must
be in the oven during operation for best cooking
results. The turntable is sunken into the cavity
floor to give you more cooking space and better
cooking results.
5. Grease Filters. Included in oven cavity.
6. Cooktop/Countertop Light. Turn on to light
your cooktop or countertop or turn on as a night
light.
7. Cooking Guide Label. Use as a quick reference
for Auto Cook, Auto Reheat, Auto Defrost and
Popcorn settings.
8. Exhaust Fan and Cooktop Light Switches.
9. Control Panel. Touch the pads on this panel to
perform all functions.
10. Vent Grille.
11. Oven Cavity Light.
12. Microwave Inlet Cover.
13. Model and Serial Number Plate.
_ _ ._ _ _', _ ,
Remove tape from hub (Part No. 4393754).
Raised,
curved_
lines_%_
Hub
=up
Lb_(_ Shaft
• Place the support
(Part No. 4393752) on the
cavity bottom.
• Place the turntable on
the hub. Make sure the
raised, curved lines in the
center of the turntable
bottom are between the
three "spokes" of the
hub.
• The rollers (Part No. 4393753) on the support fit
inside the ridge on the bottom of the turntable.
• The turntable turns both clockwise and
counterclockwise. This is normal.
10
Page 11

CONTROL PANEL FEATURES
1. Display. This display includes a clock and
indicators to tell you the time of day, cooking
time settings, and cooking functions you chose.
2. POPCORN. Touch this pad when popping
popcorn in your microwave oven.
3. AUTO COOK. Touch this pad to cook
microwavable foods without entering times and
cook powers.
4. AUTO DEFROST. Touch this pad to defrost
frozen foods without entering times and cook
powers.
5. AUTO REHEAT. Touch this pad to reheat
microwavable foods without entering times and
cook powers.
6. ADD ONE MINUTE. Touch this pad to cook for
one minute, at 100% cook power, or to add an
extra minute to your cooking cycle at the set
cook power.
7. CLOCK. Touch this pad to enter the correct
time of day.
8. KITCHEN TIMER. Touch this pad to set the
Kitchen Timer.
9. Number pads. Touch Number pads to enter
cooking times, cook powers, quantities, weights,
or food categories.
10. COOK TIME. Touch this pad followed by
Number pads to set a cooking time.
11. POWER. Touch this pad after the cooking time
has been set, followed by a Number pad to set
the amount of microwave energy released to
cook the food. Also touch this pad to lengthen
or shorten a preset cooking time.
12. START/ENTER. Touch this pad to start a func-
tion.
13. OFF/CANCEL Touch this pad to erase an
incorrect command, cancel a program during
cooking, or to clear the display.
14. EXHAUST FAN HIGH/LOW/OFF. Touch this
pad to turn on the fan at high or low speed. Also
use it to turn the fan off.
®
-@
--@
15. LIGHT ON/NIGHT/OFF. Touch this pad to turn
the light or night light on or off.
NOTES:
• If you have entered all settings for a function but
do not touch START/ENTER in 5 seconds, the
START? indicator light will show.
• If you open the door while the oven is on and then
shut the door, the START? indicator light will show.
Touch START/ENTER to continue.
• If you choose a function but do not touch another
command pad within 1 minute, the display returns
to the time of day and you have to start over.
11
Page 12

CONTROL PANEL FEATURES (CONT.)
Audible signals
Your microwave oven comes with audible
signals that can guide you when setting and
using your oven:
• L_J A programming tone will sound each
time you touch a pad.
• [_ One long tone signals the end of a
Kitchen Timer countdown.
• I1" 1)IFour tones signal the end
of a cooking cycle.
• [_J[_J Two quick, short tones sound once
every minute for the first 15 minutes after an
end-of-cooking signal as a reminder if the
food has not been removed from the oven.
• [_[_ Two quick, short tones will sound
while entering and exiting from a hidden fea-
ture (for example, Child Lock) or time of day.
• IThree tones sound if you have
made an incorrect entry.
Interrupting cooking
You can stop the oven during a cycle by opening
the door. The oven stops heating and the fan stops,
but the light stays on. To restart cooking, close the
door and
TOUCH
If you do not want to continue cooking:
• Close the door and the light goes off.
OR
• TOUCH
NOTE: Before setting a function, touch
OFF/CANCEL to make sure no other
function is on.
To disable the programming tone:
TOUCH
1
and hold for 4 seconds
To turn the programming tone back on:
TOUCH
1
and hold for 4 seconds
To disable all audible signals except the
end-of-timer signal:
TOUCH
2
and hold for 4 seconds
To turn signals back on:
TOUCH
2
and hold for 4 seconds
Using the child lock
The Child Lock locks the control panel so
children cannot use the microwave oven when
you do not want them to. This will work only when
the oven is not performing some other function.
To lock the control panel:
TOUCH
START
ENFER i°l
and hold for 4 seconds
Two tones will sound and _1 will appear on
the display. When the control panel is locked,
3 tones will sound and LOCK will appear when
you touch any pad except for EXHAUST FAN and
LIGHT, Number pads 1 and 2, and START/ENTER.
To unlock the control panel:
TOUCH
START
and hold for 4 seconds
Two tones will sound and f'_ will be cleared from
the display.
NOTE: Two tones will sound when audible signals
are turned on or off. This will work only when the
oven is not performing some other function.
12
Page 13
CONTROL PANEL FEATURES (CONT.)
Using the demo/learning feature To cancel the demo/learning feature:
YOUcan set your microwave oven to display your corn- TOUCH
mands as you enter them without turning the magnetron
on. This feature helps you learnto use your oven without
actually cooking food. This will work only when the oven
is not performing some other function, and hold for 4 seconds
To set the demo/learning feature:
TOUCH
Two tones will sound and the small "d" will
disappear from the display.
and hold for 4 seconds
Two tones will sound and a small "d" will appear
on the display.
USING THE EXHAUST FAN
The pad on the bottom left of the control panel
controls the 2-speed exhaust fan.
1. Choose fan speed.
NOTE: If the temperature from the range or
cooktop below the oven gets too hot, the
exhaust fan in the vent hood will automatically
turn on at the HIGH setting to protect the oven.
It may stay on up to an hour to cool the oven.
When this occurs, the EXHAUST FAN pad will
not turn the fan off.
TOUCH
(once for high speed, twice for low speed)
2. Turn off fan when desired. TOUCH
(1 or 2 more times, depending on fan speed)
USING THE COOKTOP/COUNTERTOP LIGHT
The pad on the bottom right of the control panel
controls the cooktop/countertop light.
1. Turn on light.
TOUCH
2. Turn off light when desired.
(once for regular light, twice for night light)
TOUCH
(1 or 2 times, depending on light setting)
13
Page 14
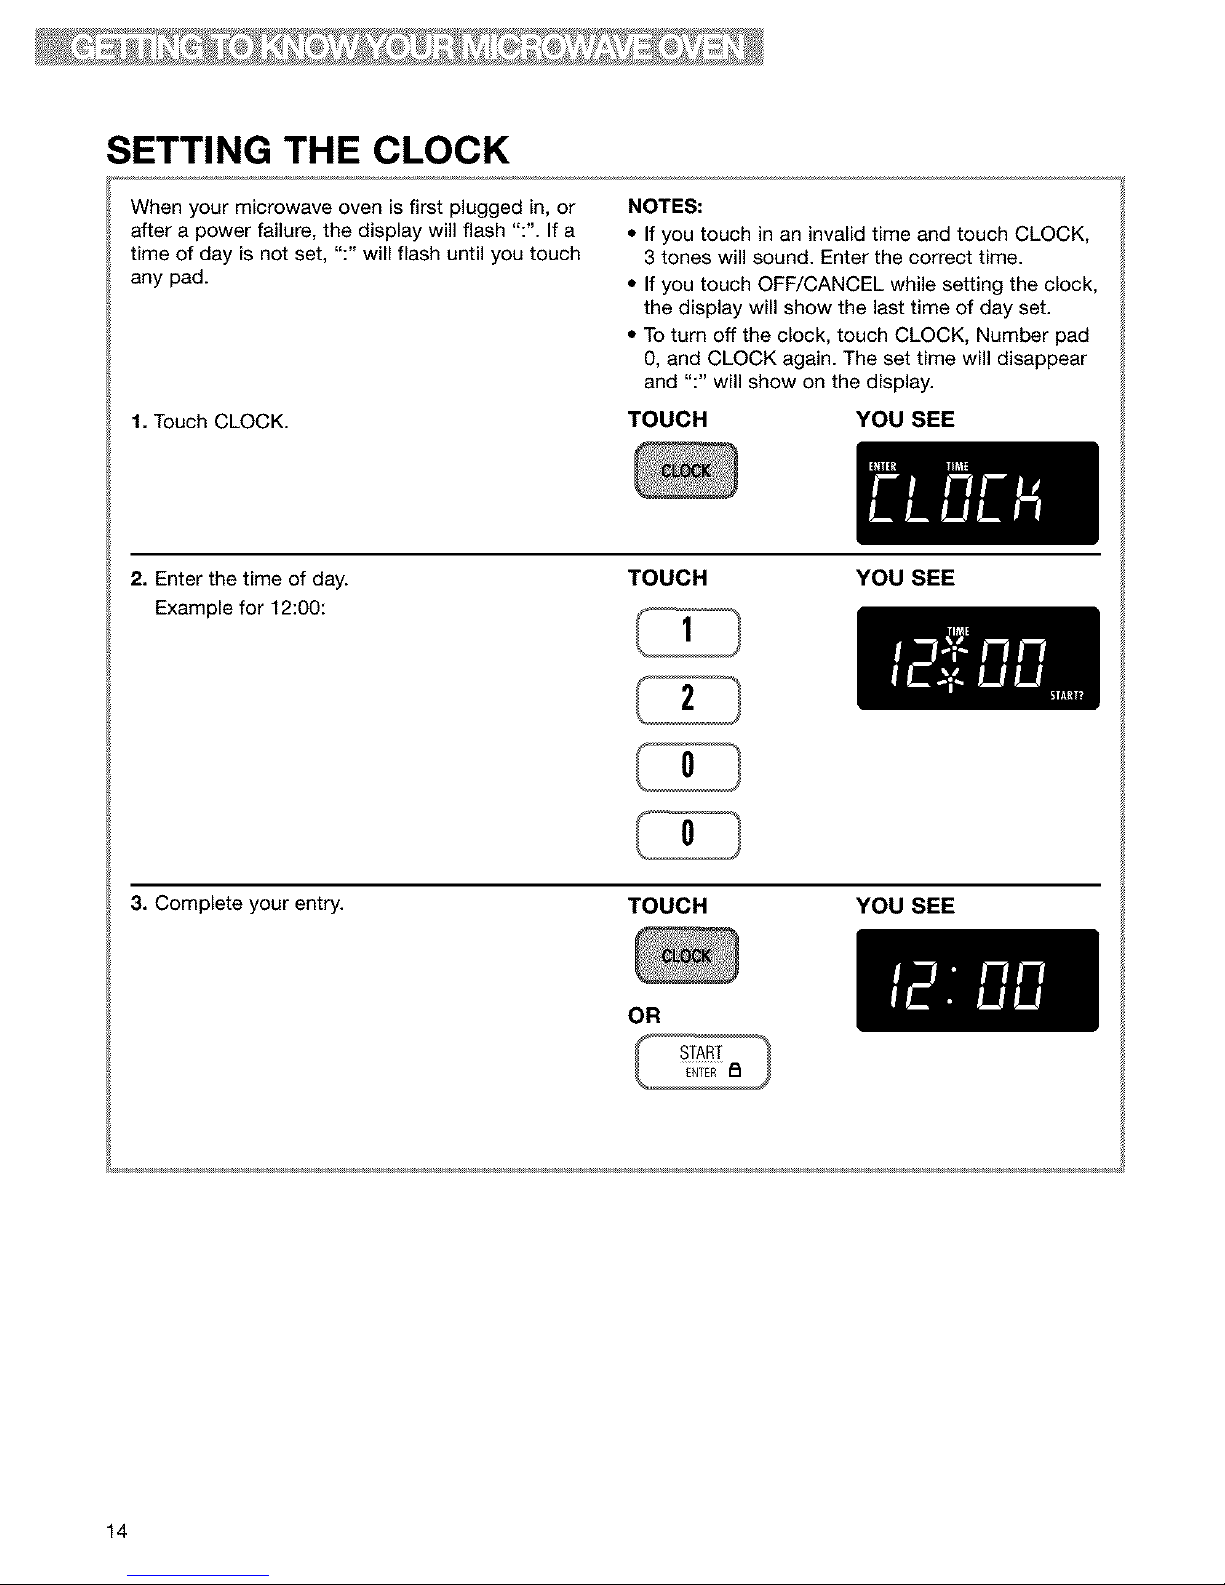
SETTING THE CLOCK
When your microwave oven is first plugged in, or
after a power failure, the display will flash ":". If a
time of day is not set, ":" will flash until you touch
any pad.
NOTES:
• If you touch in an invalid time and touch CLOCK,
3 tones will sound. Enter the correct time.
• If you touch OFF/CANCEL while setting the clock,
the display will show the last time of day set.
• To turn off the clock, touch CLOCK, Number pad
0, and CLOCK again. The set time will disappear
and ":" will show on the display.
1. Touch CLOCK.
TOUCH YOU SEE
2. Enter the time of day.
Example for 12:00:
TOUCH
1
YOU SEE
2
0
0
3. Complete your entry. TOUCH YOU SEE
OR
14
Page 15
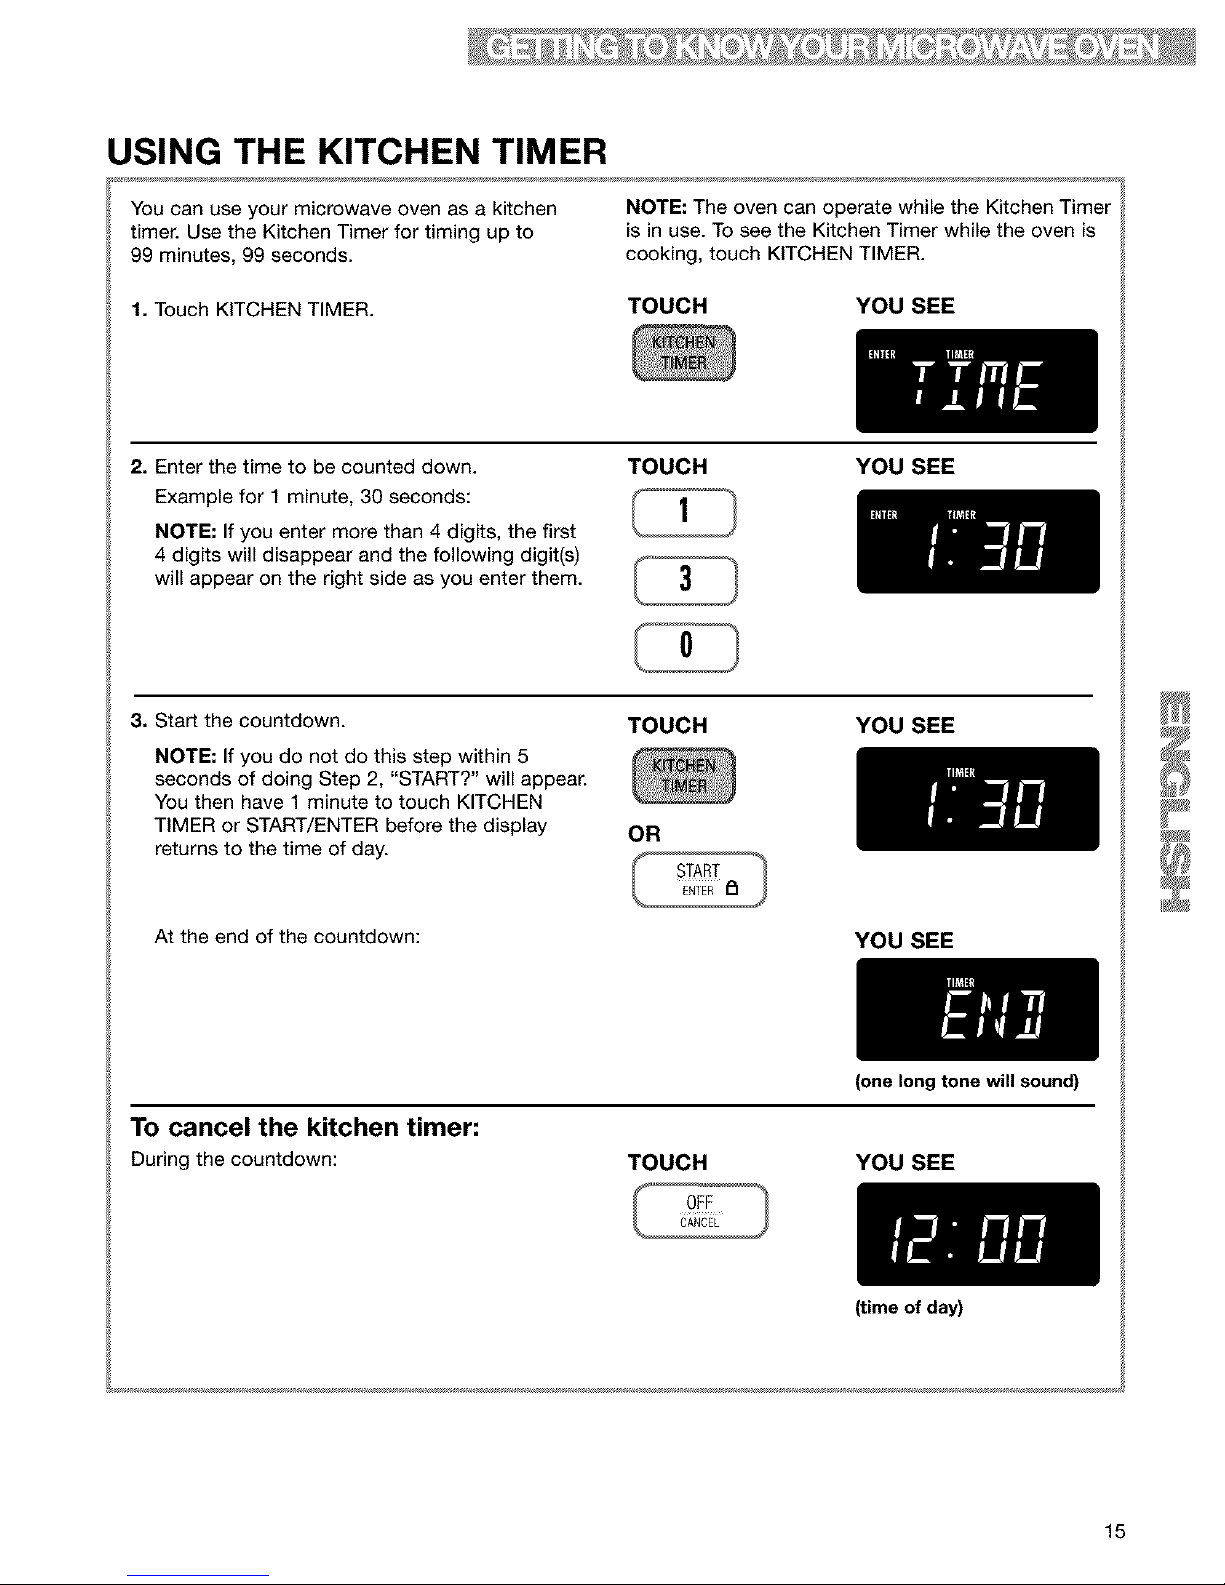
USING THE KITCHEN TIMER
You can use your microwave oven as a kitchen
timer. Use the Kitchen Timer for timing up to
99 minutes, 99 seconds.
NOTE: The oven can operate while the Kitchen Timer
is in use. To see the Kitchen Timer while the oven is
cooking, touch KITCHEN TIMER.
1. Touch KITCHEN TIMER.
TOUCH YOU SEE
2. Enter the time to be counted down.
Example for 1 minute, 30 seconds:
NOTE: If you enter more than 4 digits, the first
4 digits will disappear and the following digit(s)
will appear on the right side as you enter them.
TOUCH
1
YOU SEE
0
3. Start the countdown.
NOTE: If you do not do this step within 5
seconds of doing Step 2, "START?" will appear.
You then have 1 minute to touch KITCHEN
TIMER or START/ENTER before the display
returns to the time of day.
At the end of the countdown:
TOUCH YOU SEE
OR
START
YOU SEE
To cancel the kitchen timer:
During the countdown:
(one long tone will sound)
TOUCH YOU SEE
(time of day)
15
Page 16

USING ADD ONE MINUTE
ADD ONE MINUTE lets you cook food for 1 minute
at 100% cook power or add an extra minute to your
cooking time cycle. You can also use it to extend
cooking time cycles in multiples of 1 minute, up to
99 minutes.
NOTES:
• To extend cooking time cycles in multiples of
1 minute, touch ADD ONE MINUTE repeatedly
during cooking.
• After closing the door, you can enter ADD ONE
MINUTE without having to touch START/ENTER.
• If you touch ADD ONE MINUTE during cooking,
the oven will cook at the currently selected cook
power. If you touch ADD ONE MINUTE after
cooking is over, the oven will cook at 100%
cook power. You can also change the cook power
after you touch ADD ONE MINUTE by touching
POWER, Number pads for the new cook power,
and START/ENTER.
• You can use ADD ONE MINUTE only for the
cooking time function.
1. Make sure the food is in the oven.
2. Touch ADD ONE MINUTE.
Example for cooking for 1 minute:
TOUCH YOU SEE
CHANGING PRESET COOKING TIMES
If a preset cooking time is too long or too short, you
can lengthen or shorten the cooking time after
choosing AUTO COOK, AUTO REHEAT or AUTO
DEFROST. You can only change cooking times before
cooking starts.
For example, in AUTO REHEAT, after choosing the
type of food and entering the quantity:
To lengthen cooking time:
TOUCH YOU SEE
POWER
once
To shorten cooking time:
TOUCH
POWER
twice
To reset to the original cooking time: TOUCH
POWER
three times
(example for auto reheat)
YOU SEE
YOU SEE
16
Page 17
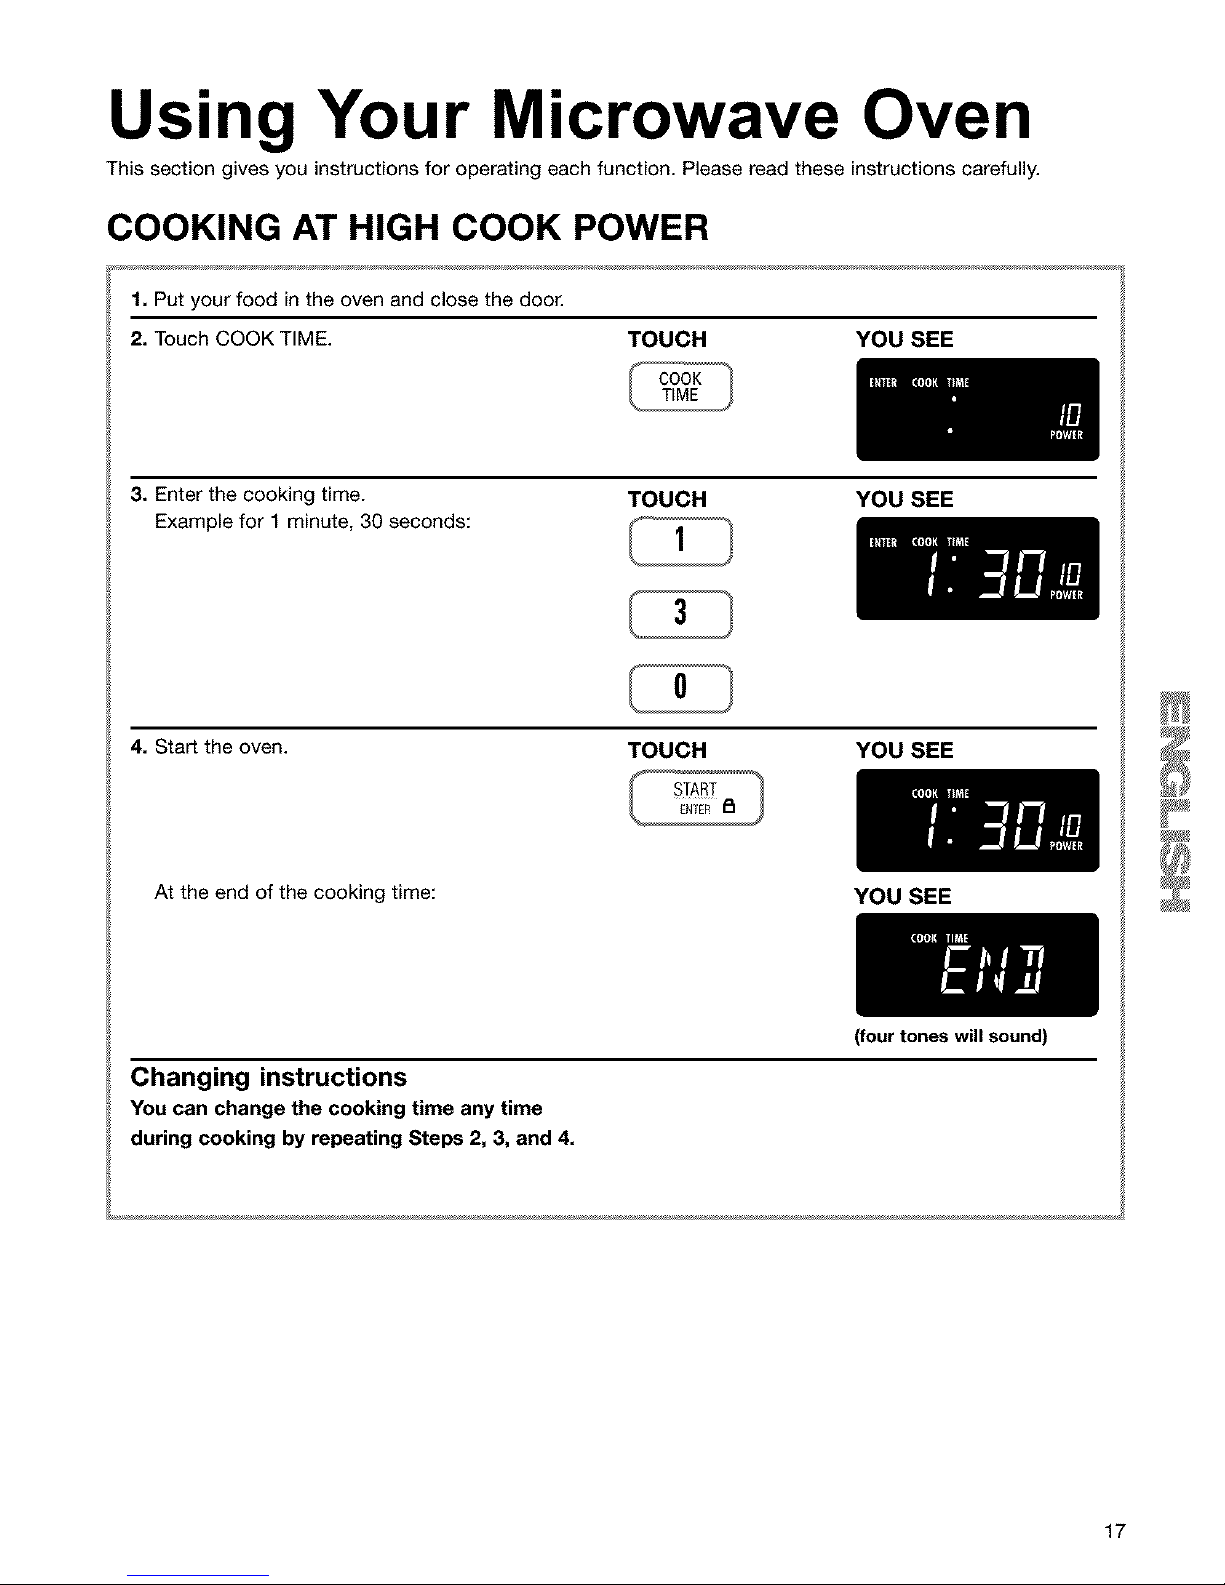
Using Your Microwave Oven
This section gives you instructions for operating each function. Please read these instructions carefully.
COOKING AT HIGH COOK POWER
1. Put your food in the oven and close the door.
2. Touch COOK TIME. TOUCH YOU SEE
COOK
TIME
3. Enter the cooking time.
Example for 1 minute, 30 seconds:
TOUCH
1
YOU SEE
3
4. Start the oven.
0
TOUCH YOU SEE
At the end of the cooking time:
Changing instructions
You can change the cooking time any time
during cooking by repeating Steps 2, 3, and 4.
YOU SEE
(four tones will sound)
17
Page 18
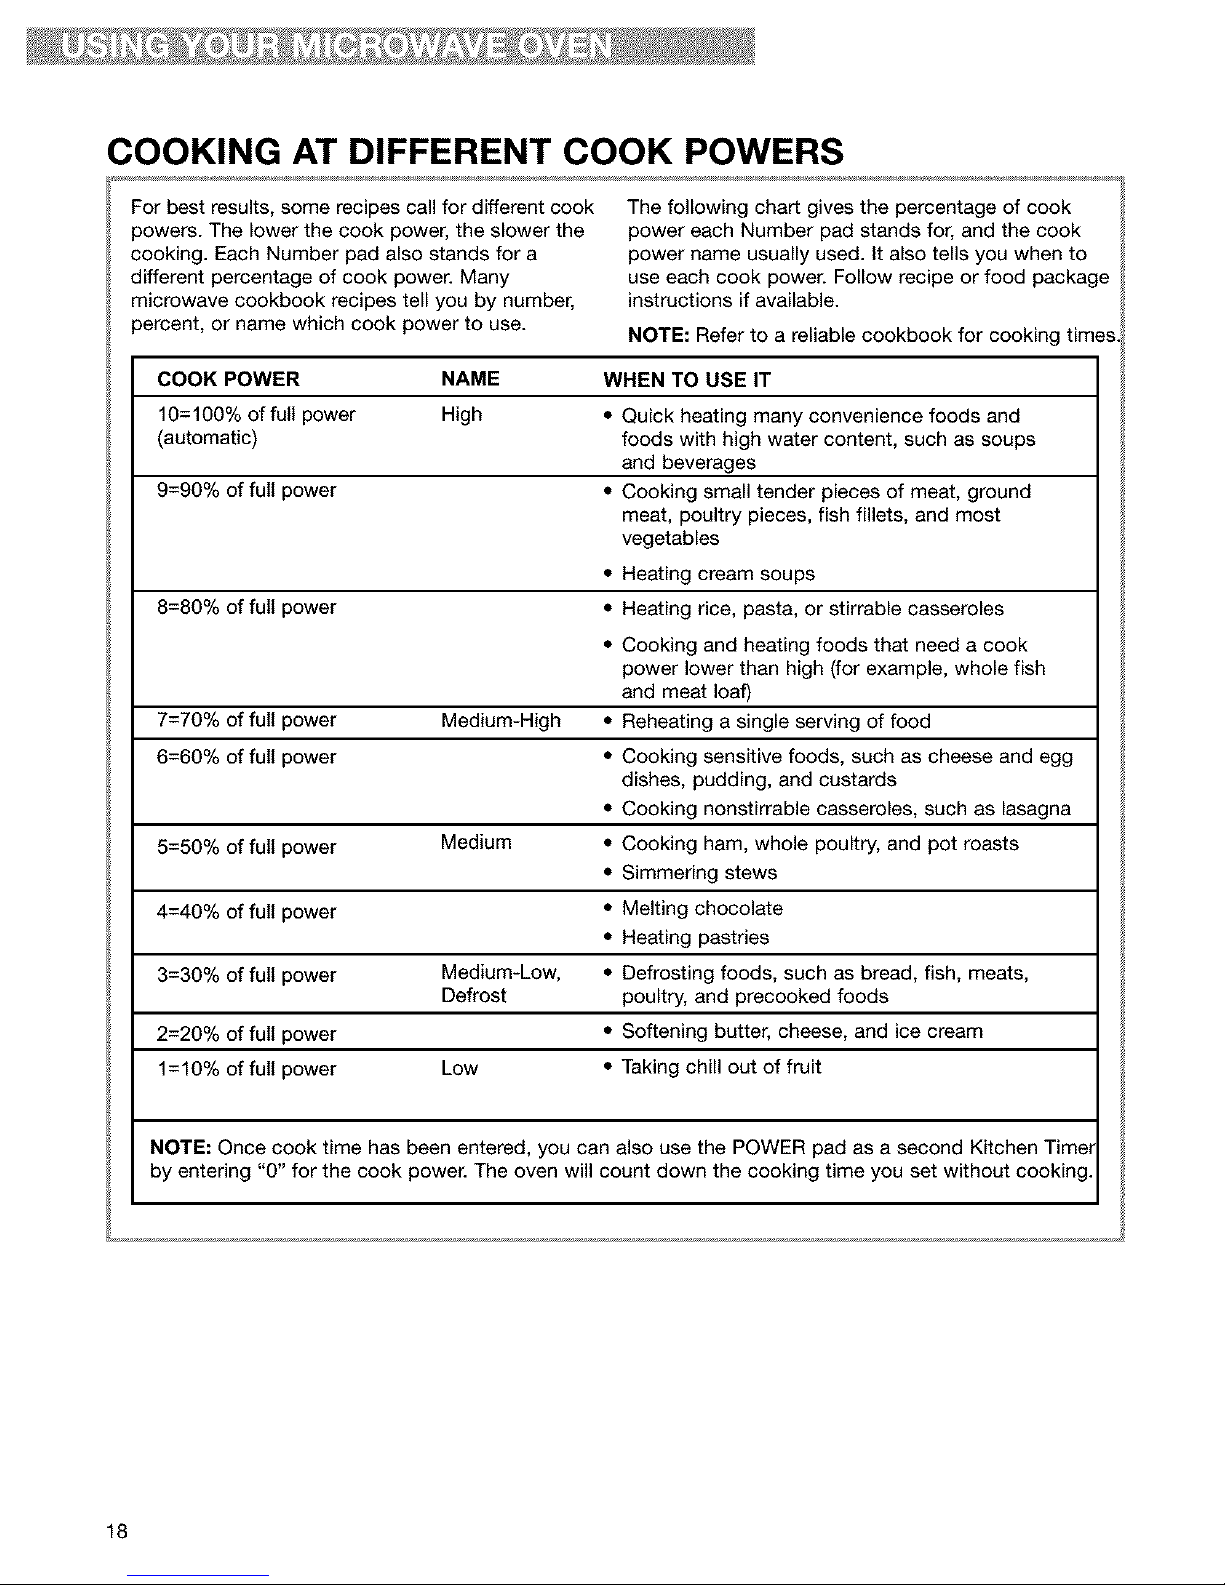
COOKING AT DIFFERENT COOK POWERS
For best results, some recipes call for different cook
powers. The lower the cook power, the slower the
cooking. Each Number pad also stands for a
different percentage of cook power. Many
microwave cookbook recipes tell you by number,
percent, or name which cook power to use.
The following chart gives the percentage of cook
power each Number pad stands for, and the cook
power name usually used. It also tells you when to
use each cook power. Follow recipe or food package
instructions if available.
NOTE: Refer to a reliable cookbook for cooking times.
COOK POWER NAME WHEN TO USE IT
10=100% of futl power High ,, Quick heating many convenience foods and
(automatic) foods with high water content, such as soups
and beverages
9=90% of full power • Cooking small tender pieces of meat, ground
meat, poultry pieces, fish fillets, and most
vegetables
• Heating cream soups
8=80% of full power • Heating rice, pasta, or stirrable casseroles
• Cooking and heating foods that need a cook
power lower than high (for example, whole fish
and meat loaf)
7=70% of full power Medium-High • Reheating a single serving of food
6=60% of full power • Cooking sensitive foods, such as cheese and egg
dishes, pudding, and custards
• Cooking nonstirrable casseroles, such as lasagna
5=50% of full power Medium • Cooking ham, whole poultry, and pot roasts
• Simmering stews
4=40% of full power • Melting chocolate
• Heating pastries
3=30% of full power Medium-Low, • Defrosting foods, such as bread, fish, meats,
Defrost poultry, and precooked foods
2=20% of full power • Softening butter, cheese, and ice cream
1=10% of full power Low • Taking chill out of fruit
NOTE: Once cook time has been entered, you can also use the POWER pad as a second Kitchen Timer
by entering "0" for the cook power. The oven will count down the cooking time you set without cooking.
18
Page 19
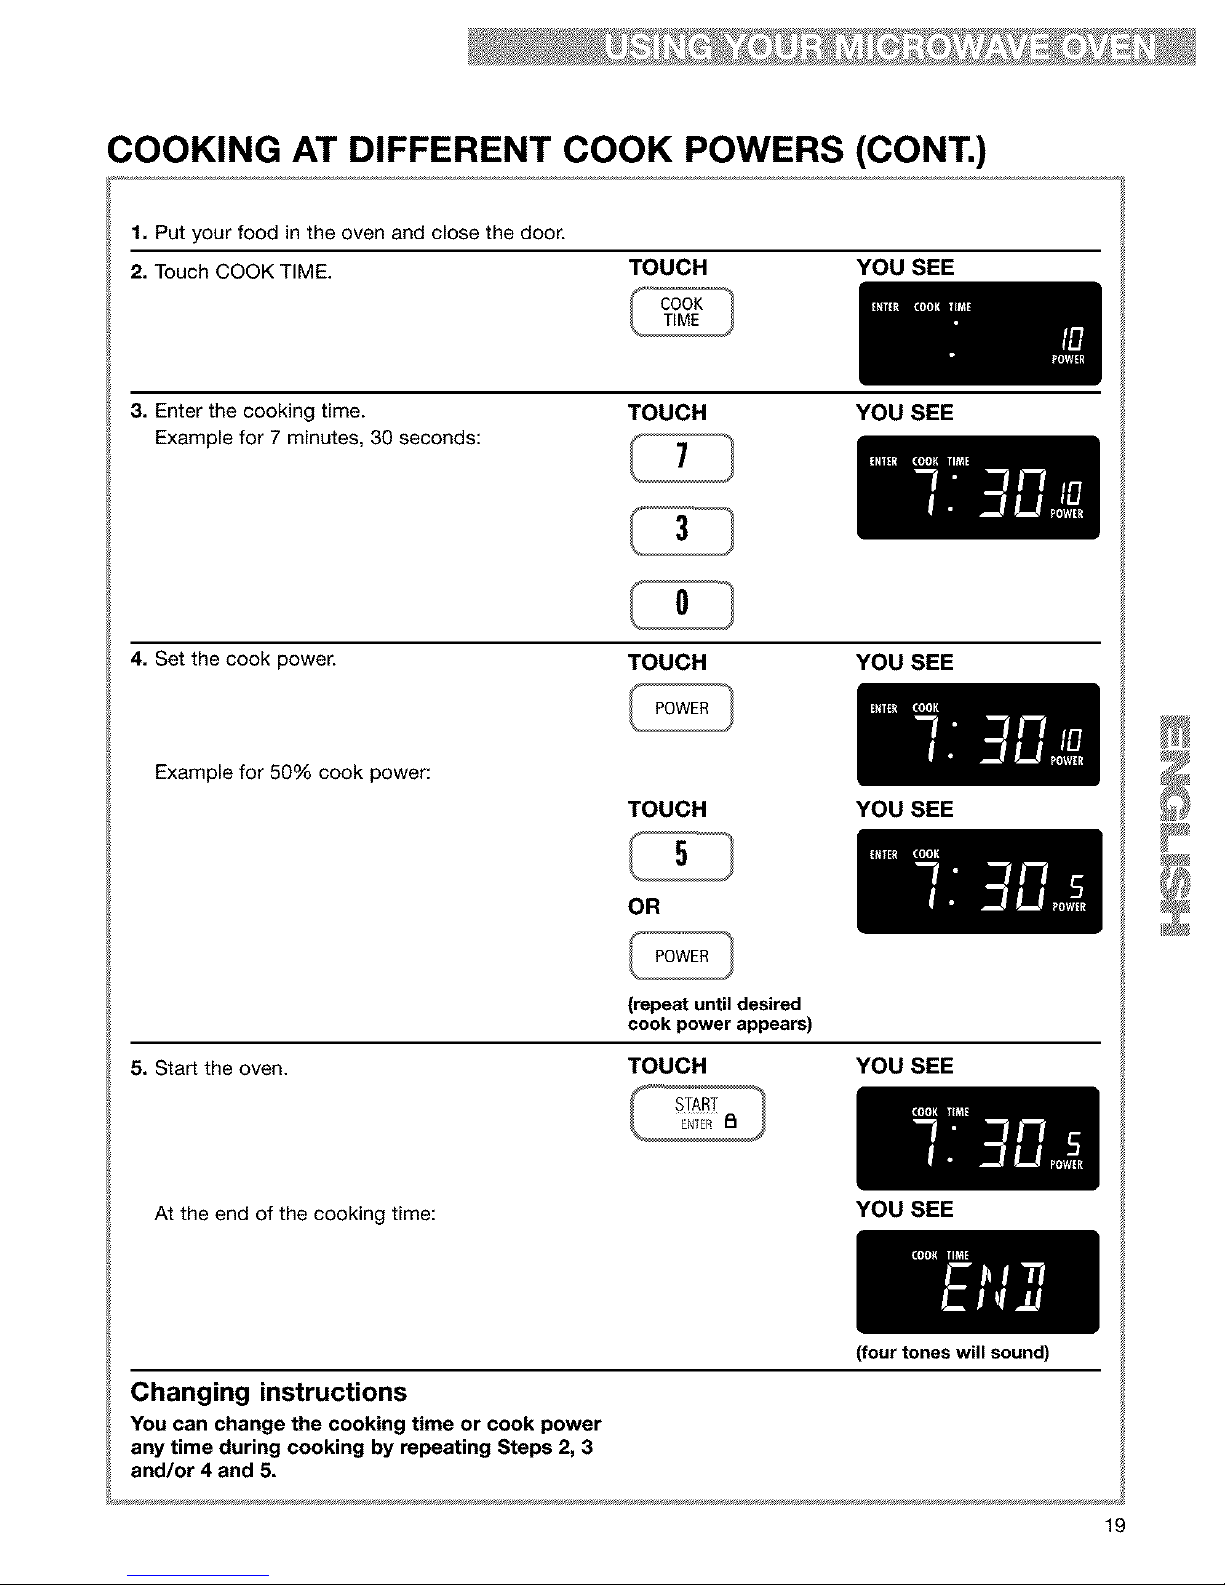
COOKING AT DIFFERENT COOK POWERS (CONT,)
1. Put your food in the oven and close the door.
2. Touch COOK TIME.
TOUCH
COOK
TIME
YOU SEE
3. Enter the cooking time.
Example for 7 minutes, 30 seconds:
TOUCH
7
YOU SEE
3
0
4. Set the cook power. TOUCH
POWER
YOU SEE
Example for 50% cook power:
TOUCH YOU SEE
5
OR
POWER
5. Start the oven.
(repeat until desired
cook power appears)
TOUCH YOU SEE
At the end of the cooking time:
Changing instructions
You can change the cooking time or cook power
any time during cooking by repeating Steps 2, 3
and/or 4 and 5.
YOU SEE
(four tones will sound)
19
Page 20

COOKING IN STAGES
For best results, some recipes call for one cook
power for a certain length of time, and another
cook power for another length of time. Your oven
can be set to change from one to another
automatically, for up to 3 stages.
You can set your chosen cook functions in any
order. However, if you use AUTO DEFROST it must
be the first stage.
1. Put your food in the oven and close the door.
2. Touch COOK TIME. TOUCH YOU SEE
3. Enter the cooking time for the first stage. TOUCH YOU SEE
Example for 7 minutes, 30 seconds:
7
3
0
4. Set the cook power for the first stage.
TOUCH YOU SEE
Example for 50% cook power:
TOUCH YOU SEE
5
OR
POWER
(repeat until desired
cook power appears)
5. Repeat Steps 2, 3, and 4 to set the cooking time
and cook power for each additional stage.
2O
Page 21
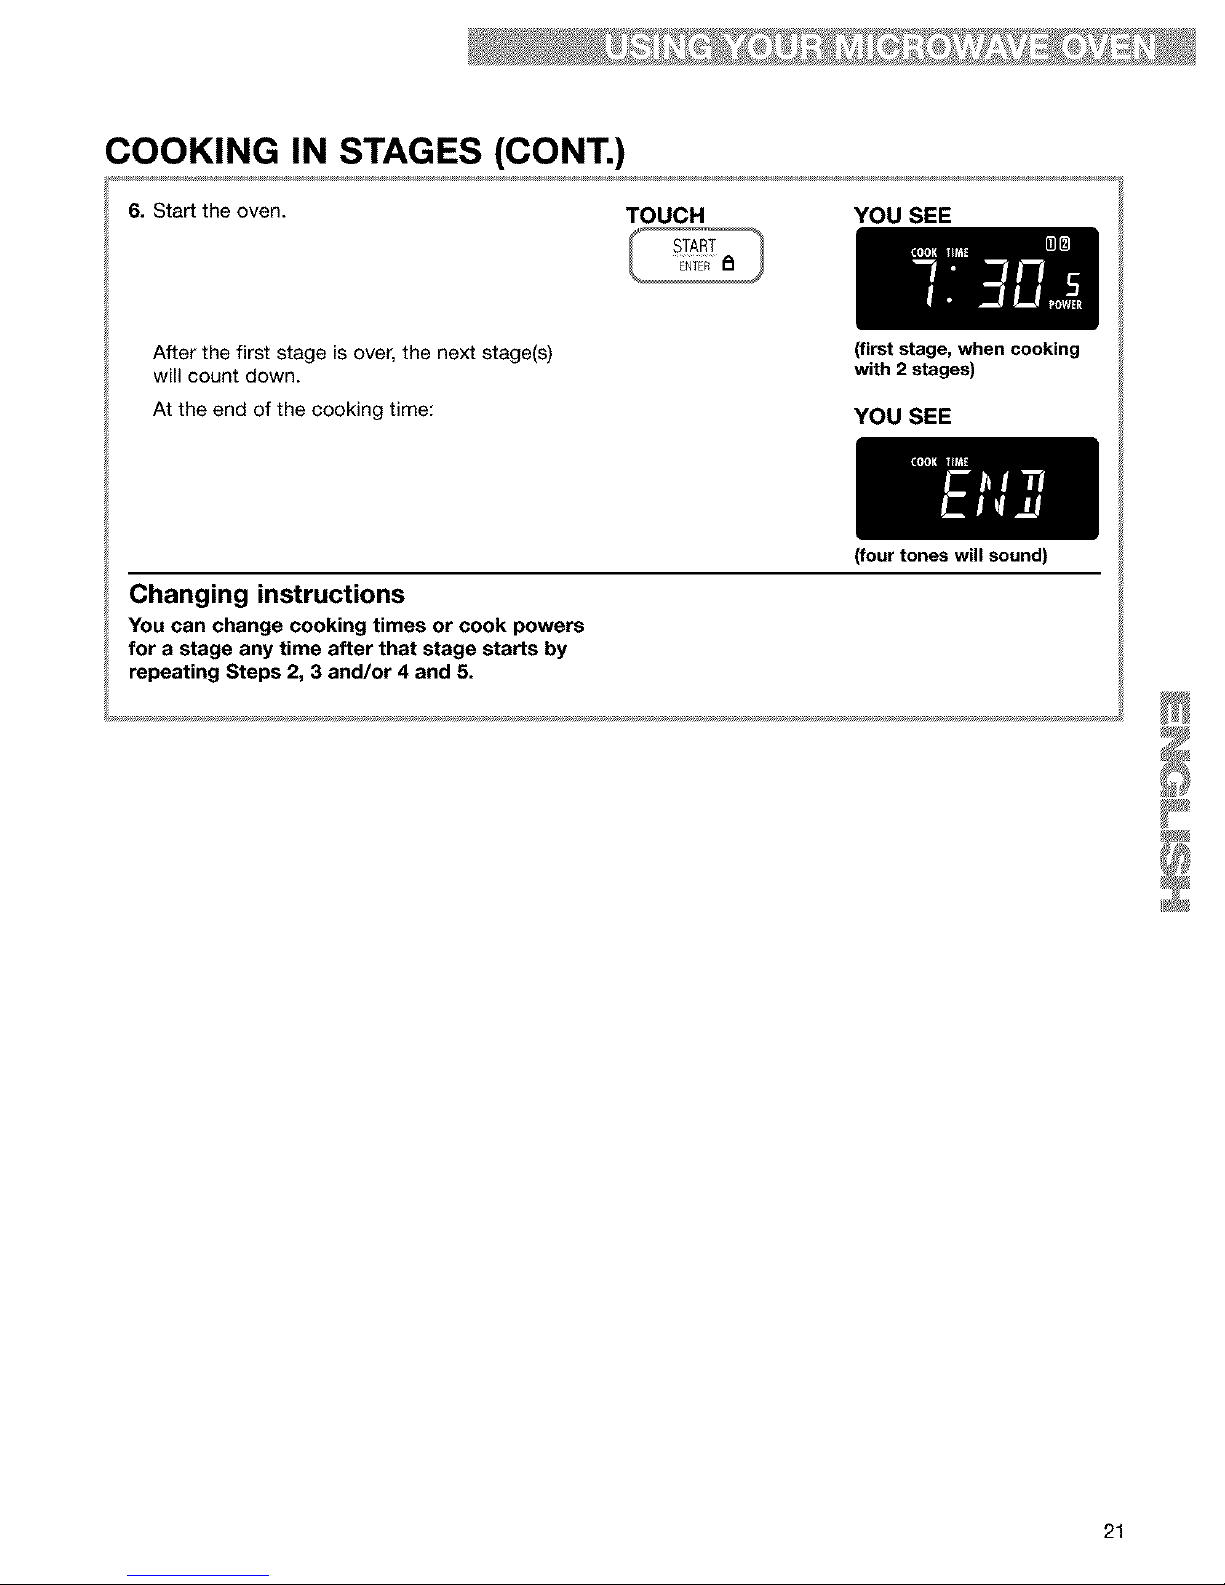
COOKING IN STAGES (CONT.)
6. Start the oven.
TOUCH YOU SEE
After the first stage is over, the next stage(s)
will count down.
At the end of the cooking time:
(first stage, when cooking
with 2 stages)
YOU SEE
Changing instructions
You can change cooking times or cook powers
for a stage any time after that stage starts by
repeating Steps 2, 3 and/or 4 and 5.
(four tones will sound)
21
Page 22
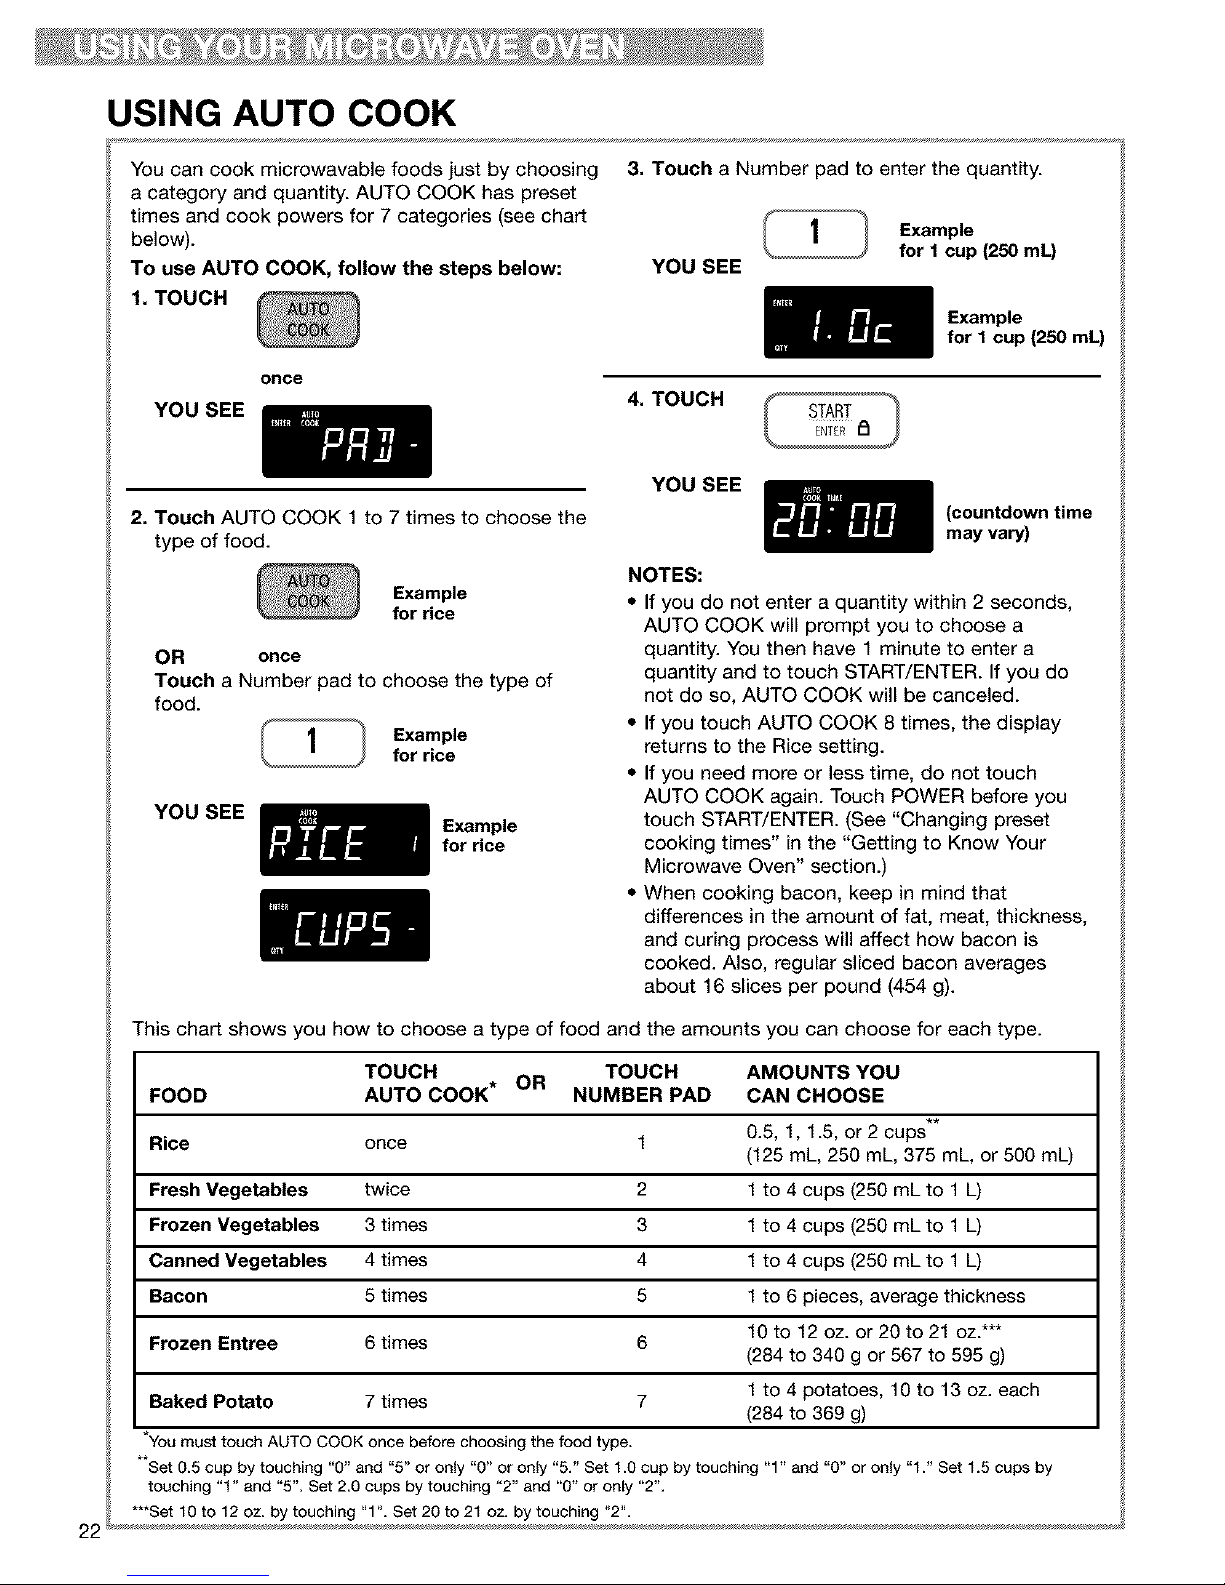
USING AUTO COOK
You can cook microwavable foods just by choosing
a category and quantity. AUTO COOK has preset
times and cook powers for 7 categories (see chart
below).
To use AUTO COOK, follow the steps below:
1. TOUCH
3. Touch a Number pad to enter the quantity.
YOU SEE
1 Example
for 1 cup (250 mL)
Example
for 1 cup (250 mL)
once
YOU SEE
2. Touch AUTO COOK 1 to 7 times to choose the
type of food.
Example
for rice
OR once
Touch a Number pad to choose the type of
food.
1 Example
for rice
YOU SEE
Example
for rice
4"TOUCH _ START _
YOU SEE
(countdown time
may vary)
NOTES:
• If you do not enter a quantity within 2 seconds,
AUTO COOK will prompt you to choose a
quantity. You then have 1 minute to enter a
quantity and to touch START/ENTER. If you do
not do so, AUTO COOK will be canceled.
• If you touch AUTO COOK 8 times, the display
returns to the Rice setting.
• If you need more or less time, do not touch
AUTO COOK again. Touch POWER before you
touch START/ENTER. (See "Changing preset
cooking times" in the "Getting to Know Your
Microwave Oven" section.)
• When cooking bacon, keep in mind that
differences in the amount of fat, meat, thickness,
and curing process will affect how bacon is
cooked. Also, regular sliced bacon averages
about 16 slices per pound (454 g).
This chart shows you how to choose a type of food and the amounts you can choose for each type.
TOUCH OR TOUCH AMOUNTS YOU
FOOD AUTO COOK* NUMBER PAD CAN CHOOSE
Rice once 1 0.5, 1, 1.5, or 2 cups
(125 mL, 250 mL, 375 mL, or 500 mL)
Fresh Vegetables twice 2 1 to 4 cups (250 mL to 1 L)
Frozen Vegetables 3 times 3 1 to 4 cups (250 mL to 1 L)
Canned Vegetables 4 times 4 1 to 4 cups (250 mL to 1 L)
Bacon 5 times 5 1 to 6 pieces, average thickness
10 to 12 oz. or 20 to 21 oz.***
Frozen Entree 6 times 6
(284 to 340 g or 567 to 595 g)
Baked Potato 7 times 7 1 to 4 potatoes, 10 to 13 oz. each
(284 to 369 g)
You must touch AUTO COOK once before choosing the food type,
9.
Set 0.5 cup by touching "0" and "5" or only "0" or only "5." Set 1.0 cup by touching "1" and "0" or only "f." Set f.5 cups by
touching "1" and "5". Set 2,0 cups by touching "2" and "O" or only "2".
***Set 10 to 12 oz, by touching "1% Set 20 to 21 oz. by touching "2".
22_
Page 23
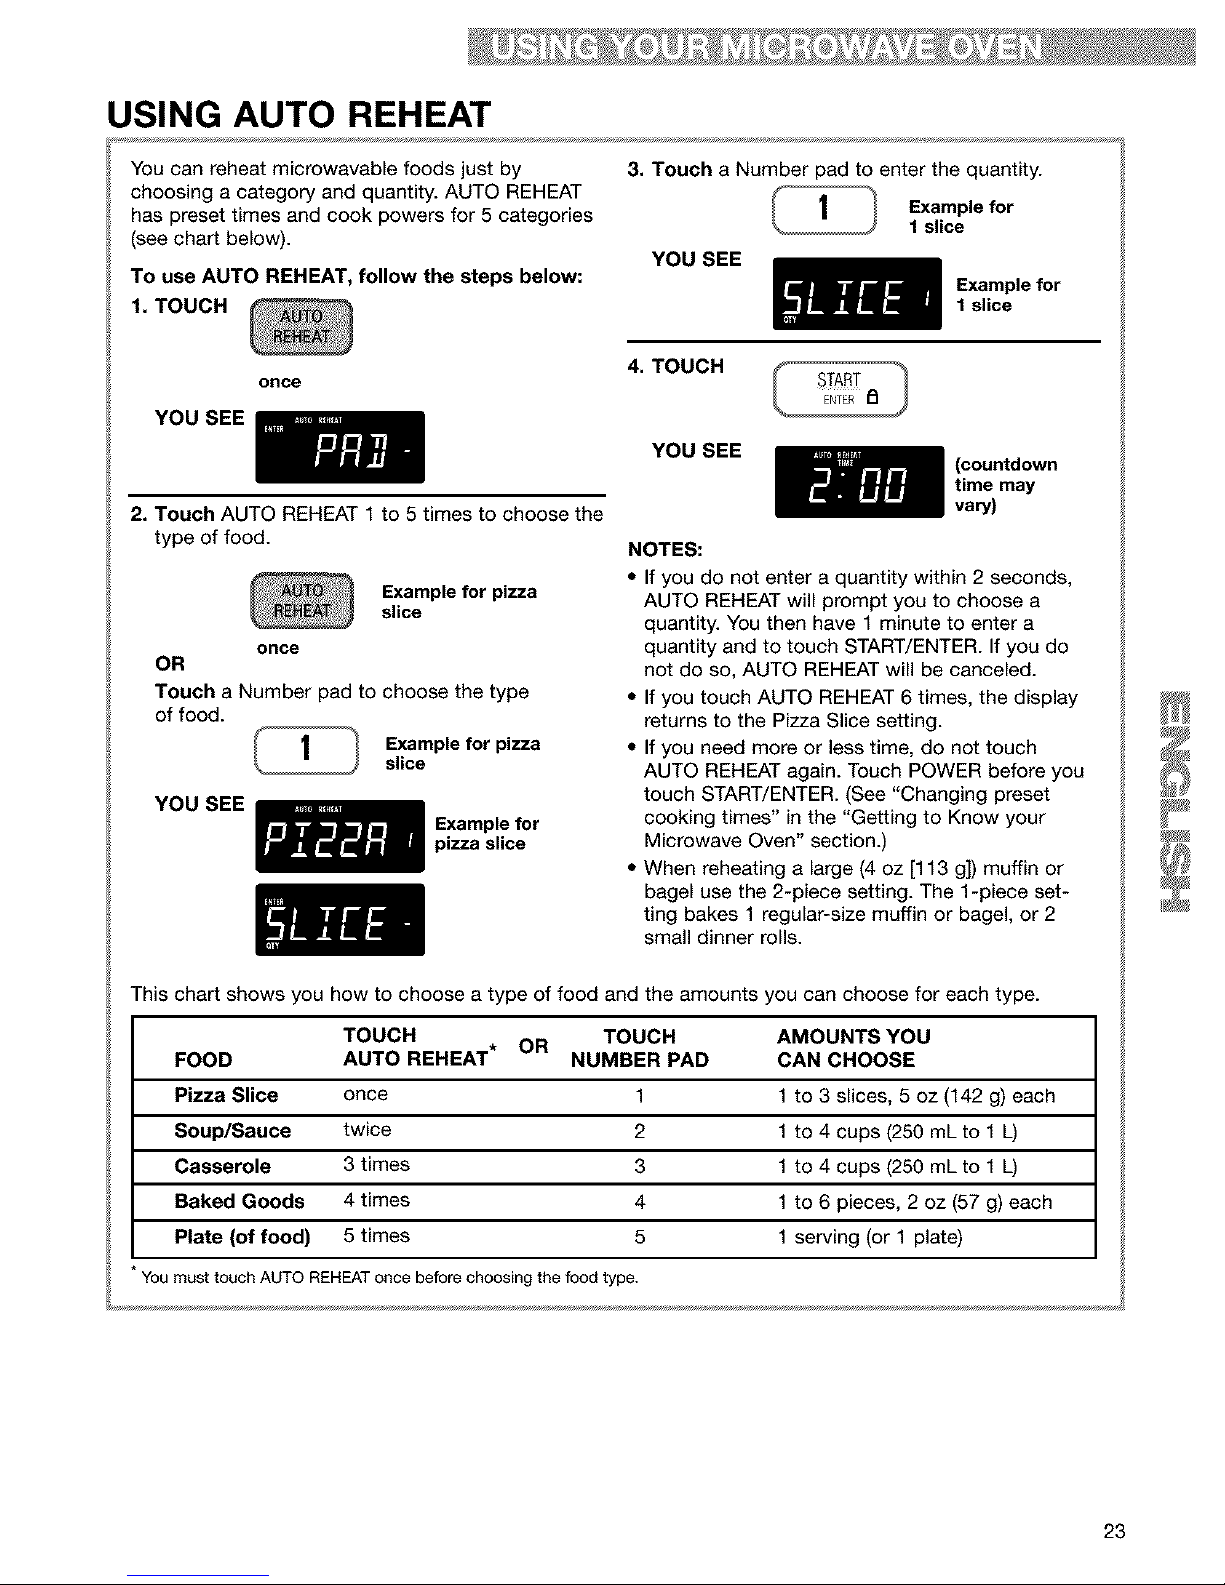
USING AUTO REHEAT
You can reheat microwavable foods just by
choosing a category and quantity. AUTO REHEAT
has preset times and cook powers for 5 categories
(see chart below).
To use AUTO REHEAT, follow the steps below:
1. TOUCH
3. Touch a Number pad to enter the quantity.
Example for
1 slice
YOU SEE
Example for
1 slice
once
YOU SEE
2. Touch AUTO REHEAT 1 to 5 times to choose the
type of food.
Example for pizza
slice
once
OR
Touch a Number pad to choose the type
of food.
Example for pizza
slice
YOU SEE
Example for
pizza slice
4"TOUCH _ START _
YOU SEE
(countdown
time may
vary)
NOTES:
• If you do not enter a quantity within 2 seconds,
AUTO REHEAT will prompt you to choose a
quantity. You then have 1 minute to enter a
quantity and to touch START/ENTER. If you do
not do so, AUTO REHEAT will be canceled.
• If you touch AUTO REHEAT 6 times, the display
returns to the Pizza Slice setting.
• If you need more or less time, do not touch
AUTO REHEAT again. Touch POWER before you
touch START/ENTER. (See "Changing preset
cooking times" in the "Getting to Know your
Microwave Oven" section.)
• When reheating a large (4 oz [113 g]) muffin or
bagel use the 2-piece setting. The 1-piece set-
ting bakes 1 regular-size muffin or bagel, or 2
small dinner rolls.
This chart shows you how to choose a type of food and the amounts you can choose for each type.
TOUCH OR TOUCH AMOUNTS YOU
FOOD AUTO REHEAT* NUMBER PAD CAN CHOOSE
Pizza Slice once 1 1 to 3 slices, 5 oz (142 g) each
Soup/Sauce twice 2 1 to 4 cups (250 mL to 1 L)
Casserole 3 times 3 1 to 4 cups (250 mL to 1 L)
Baked Goods 4 times 4 1 to 6 pieces, 2 oz (57 g) each
Plate (of food) 5 times 5 1 serving (or 1 plate)
You must touch AUTO REHEAT once before choosing the food type.
23
Page 24

USING AUTO DEFROST
You can defrost food by choosing a category and
setting a weight. AUTO DEFROST has preset times
and cook powers for 3 categories (see chart below).
To use AUTO DEFROST, follow the steps below:
1. TOUCH
4. TOUCH
YOU SEE
START
(countdown
time may vary)
once
YOU SEE NOTES:
2. Touch AUTO DEFROST 1 to 3 times to choose
the type of food.
Example for meats
once
OR
Touch a Number pad to choose the type
of food.
Example for meats
YOU SEE
Example
for meats
• If you do not enter a weight within 2 seconds,
AUTO DEFROST will prompt you to enter a weight.
You then have 1 minute to enter a weight and to
touch START/ENTER. If you do not do so, AUTO
DEFROST will be canceled.
• If you enter a weight higher than the highest weight
allowed for your food setting, 3 tones will sound
and "RETRY" will appear on the display when you
touch START/ENTER.
• If you touch AUTO DEFROST 4 times, the display
returns to the Meats setting.
• If you need more or less defrosting time, do not
touch AUTO DEFROST again. Touch POWER
before you touch START/ENTER. (See "Changing
preset cooking times" in the "Getting to Know Your
Microwave Oven" section.)
• See the "Auto defrost chart" later in this section
for defrosting directions for each food.
• To defrost items not listed in the "Auto defrost
chart," use 30% cook power. Refer to a reliable
cookbook for defrosting information.
3. Touch Number pad(s) to enter the weight.
Example for
1.1 Ibs (500 g)
twice
YOU SEE
Example
for 1.1 Ibs
(500 g)
For even, complete defrosting
• The shape of the package affects how quickly food
will defrost. Shallow packages will defrost more
quickly than a deep block.
• As food begins to defrost, separate the pieces.
Separated pieces defrost more evenly.
• Use small pieces of aluminum foil to shield parts
of food such as chicken wings, leg tips, fish tails,
or areas that start to get warm. Make sure the foil
does not touch the sides, top, or bottom of
the oven.
This chart shows you how to choose a type of food and the weights you can set for each type.
TOUCH OR TOUCH WEIGHTS YOU CAN SET
FOOD AUTO DEFROST* NUMBER PAD (tenths of a pound)
Meats once 1 .1 to 6.6 (45 g to 2994 g)
Poultry twice 2 .1 to 6.6 (45 g to 2994 g)
Fish 3 times 3 .1 to 4.4 (45 g to 1998 g)
You must touch AUTO DEFROST once before choosing the food type.
24
Page 25

AUTO DEFROST CHART
Ground Beef, Bulk
Ground Beef, Patties
Round Steak, Tenderloin Steak,
Pot Roast, Chuck Roast, Rib
Roast, Rolled Rump Roast
Stew Beef
Meat setting
FOOD SPECIAL INSTRUCTIONS
Beef Meat of irregular shape and large, fatty cuts of meat should have the
narrow or fatty areas shielded with foil at the beginning of a defrost cycle.
Do not defrost less than ¼ Ib (113 g).
Do not defrost less than two 4 oz (113 g) patties.
Place on a microwavable roasting rack.
Place in a microwavable baking dish.
Lamb
Cubes for Stew Place in a microwavable baking dish.
Chops (1 in. [2.5 cm] thick) Place on a microwavable roasting rack.
Pork
Chops (½ in. [13 mm] thick), Place on a microwavable roasting rack.
Hot Dogs, Spareribs, Country-
Style Ribs, Loin Roast (Boneless),
Sausage, Links
Sausage, Bulk Place in a microwavable baking dish.
Poultry setting
Chicken
Whole Place chicken breast-side up on a microwavable roasting rack. Finish defrosting
(up to 9-¼ Ibs [4.3 kgD by immersing in cold water. Remove giblets when chicken is partially defrosted.
Cut Up Place on a microwavable roasting rack.
Finish defrosting by immersing in cold water.
Cornish Hens
Whole Place on a microwavable roasting rack. Finish defrosting by immersing in cold water.
Turkey
Breast Place on a microwavable roasting rack. Finish defrosting by immersing in cold water.
(under 6 Ibs [2.7 kg])
continued on next page
25
Page 26

AUTO DEFROST CHART (CONT.)
Fish setting
FOOD SPECIAL INSTRUCTIONS
Fish
Fillets Place in a microwavable baking dish. Carefully separate fillets under
cold water.
Steaks Place in a microwavable baking dish. Run cold water over to finish defrosting.
Whole Place in a microwavable baking dish. Cover head and tail with foil; do
not let foil touch sides of microwave oven. Finish defrosting by
immersing in cold water.
Shell Fish
Crabmeat, Place in a microwavable baking dish.
Lobster Tails,
Shrimp, Scallops
DEFROSTING TIPS
When using AUTO DEFROST, you need to enter _ For better results, a preset standing time is
the net weight (the weight of the food minus included in the defrosting time. This may make the
ili
the container). Enter the weight to the nearest defrosting time seem longer than expected. (For
N0Ib (45 g). more information on standing time, see the
ili
Only use AUTO DEFROST for raw food. "Microwave cooking tips" in the "Cooking Guide"
AUTO DEFROST gives best results when the section.)
ili
food to be thawed is completely frozen. If the
food is partially defrosted, always set a lower
ili
food weight (for a shorter defrosting time) to
prevent cooking the food.
ili
Weight conversion chart
You are probably used to food weights as being in If the weight on the food package is in fractions of a
pounds and ounces that are fractions of a pound pound, you can use the following chart to convert the
(for example 4 ounces equals ¼pound). However, in weight to decimals.
ili
order to enter food weight in AUTO DEFROST, you
must specify pounds and tenths of a pound.
ili
DECIMAL WEIGHT EQ_iVA _ EQUIVALENT GRAM WEIGHT
.10 45
.20 91
.25 113
.30 136
.40 181
.50 227
.60 272
.70 318
.75 340
.80 363
.90 408
1.00 454
One-Quarter Pound
One-Half Pound
Three-Quarters Pound
One Pound
26
Page 27

USING POPCORN
You can pop commercially packaged microwave
popcorn by touching just one pad. The number of
times you touch this pad determines which size
bag of popcorn your oven will pop.
For best results:
• Pop only 1 package at a time.
• If you are using a microwave popcorn popper,
follow manufacturer's instructions.
To use POPCORN, follow the steps below:
1. Place the bag in the center of the turntable.
2. Touch POPCORN 1 to 3 times to choose the
bag size.
Example for
3.5 oz (100 g)
NOTES:
• If you touch POPCORN 4 times, the display
returns to the 3.5 oz. (100 g) setting.
• You do not need to touch START/ENTER to start
the oven. The oven will start in 5 seconds.
Popcorn brands make a difference
How well your popcorn cooks will depend on the
brand of popcorn and how much fat it has in it.
Try several brands to decide which pops the best.
For best results, use fresh bags of popcorn.
once
YOU SEE
Example for
3.5 oz (100 g)
(countdown
time may
vary)
This chart shows you how to choose a bag size.
BAG SIZE TOUCH
(ounces) POPCORN
3.5 (100 g) once
3.0 (85 g) twice
1.75 (50 g) 3 times
27
Page 28

Caring for Your Microwave
ven
To make sure your microwave oven looks good and works well for a long time, you should
maintain it properly. For proper care, please follow these instructions carefully.
For interior surfaces: Wash often with warm,
sudsy water and a
sponge or soft cloth.
Use only mild,
nonabrasive soaps or a
mild detergent. Be sure
to keep the areas
clean where the door
and oven frame touch
when closed. Wipe
well with clean water.
Over time, stains can
occur on the surfaces as the result of food particles
spattering during cooking. This is normal.
For stubborn soil, boil a cup of water in the oven
for 2 to 3 minutes.
Steam will soften the
soil. To get rid of odors
inside the oven, boil a
cup of water with some
lemon juice or vinegar
in it.
For exterior surfaces and control panel: Use a
soft cloth with spray
glass cleaner. Apply the
spray glass cleaner to
the soft cloth; do not
spray directly on the
oven.
NOTE: Abrasive
cleansers, steel-wool
pads, gritty wash
cloths, some paper
towels, etc., can dam-
age the control panel and the interior and exterior
oven surfaces.
To clean turntable and turntable support, wash in
mild, sudsy water; for
Glass turntable heavily soiled areas use
a mild cleanser and
scouring sponge. The
turntable and turntable
support are dishwasher
safe.
Turntable
support
28
Page 29

INSTALLING AND CARING FOR FILTERS
Electrical Shock Hazard
Disconnect power before removing filters.
Replace all panels before operating.
Failure to do so can result in death or
electrical shock.
The grease (aluminum) filters should be removed
and cleaned often, at least once a month.
You can order replacements (Part No. 4393862)
from your nearest Sears Service Center.
NOTE: If you install the microwave hood combina-
tion in Recirculation mode, it is recommended that
you install a charcoal filter to maximize odor filtra-
tion performance. Your microwave hood combina-
tion does not come with charcoal filters installed.
You can order the charcoal filters (Part No.
8169645) from your nearest Sear Service Center.
The charcoal filter cannot be cleaned and should
be replaced every 6 to 12 months.
p. # ¢
1, Unplug microwave oven or disconnect power.
2, To remove the grease filters (aluminum), push
each filter up on the
side opposite the tab.
Grasp the tab and slide
the filter to the side.
Pull the filter down-
ward. It will drop out.
up
3. To remove the charcoal filters, push the back
of each filter away from
(\\,_ you. This will slide the
L
front of the filter off the
lower lip. Swing the
front of the filter down
and slide the filter out.
Lower
lip
4. Soak grease filters in hot water and a mild deter-
gent. Scrub and swish to
remove embedded dirt
and grease. Rinsewell and
shake to dry. Do not use
ammonia, corrosive
cleaning agents such as
lye-based oven cleaners,
or place ina dishwasher.
The filterwill tum black
or could be damaged.
5. To replace the charcoal filters, push each filter
to the back of the
opening, between the
upper and lower lips
against the springs.
Swing the front of the
filter up against the
upper lip. Slide the fil-
ter forward while
pushing it up against
the upper lip. The filter
will now be held in
position between the
lips by the spring.
6. To replace the grease filters, slide each filter
into the outer side of
the filter opening. Make
sure you are sliding in
the side of the filter that
does not have the tab.
Hold the tab with your
other hand. Push up
the tab side of the filter
and slide the filter to
the other side of the
opening to lock into
place.
7. Plug in microwave oven or reconnect power.
NOTE: Do not operate the vent fan without the
grease filters in place.
29
Page 30

REPLACING THE COOKTOP AND OVEN LIGHTS
1, Unplug microwave oven or disconnect power.
3, Tip the grille forward, then lift out to remove.
I 1
2, Remove the bulb cover mounting screw and
carefully remove the
cover.
screw
4. Lift up the bulb cover.
3, Replace bulb(s) with candelabra-base 30-watt
bulb(s) (Part No. 4393681) available from your
Sears Service Center.
4, Replace the bulb cover and mounting screw.
5, Plug in microwave oven or reconnect power.
1, Unplug microwave oven or disconnect power.
2, Remove the two vent grille mounting screws
located above the cover
(the two outer screws).
5, Replace the bulb with a candelabra-base 30-
watt bulb (Part No. 4393681) available from your
Sears Service Center.
6, Close the bulb cover.
7. Slide the top of the vent grille into place. Push
I the bottom until it snaps
into place. Replace the
mounting screws.
8, Plug in microwave oven or reconnect power.
30
Page 31

Cooking Guide
MICROWAVE COOKING TIPS
• If you increase or decrease the amount of food
you prepare, the time it takes to cook that food
will also change. For example, if you double a
recipe, add a little more than half the original
cooking time. Check for doneness and, if
necessary, add more time in small increments.
• The lower the temperature of the food being
put into the microwave oven, the longer it takes
to cook. Food at room temperature will be re-
heated more quickly than food at refrigerator
temperature.
• Food with a lot of fat and sugar will be heated
faster than food containing a lot of water. Fat and
sugar will also reach a higher temperature than
water in the cooking process.
• The more dense the food, the longer it takes to
heat. "Very dense" food like meat takes longer to
reheat than lighter, more porous food like sponge
cakes.
• Smaller pieces of food will cook faster than
larger pieces. Also, same-shaped pieces cook
more evenly than different-shaped pieces.
• With foods that have different thicknesses, the
thinner parts will cook faster than the thicker
parts. Place the thinner parts of chicken wings
and legs in the center of the dish.
Itl[[l[l_] IIi_[III!I fOOlS
• Stirring and turning foods spreads heat quickly
to the center of the dish and avoids overcooking
at the outer edges of the food.
Cover food to:
• Reduce spattering
• Shorten cooking times
• Keep food moist
You can use any covering that lets microwaves
pass through. See "Getting to Know Your
Microwave Oven" for materials that microwaves will
pass through.
Several foods (for example: baked potatoes,
sausages, egg yolks, and some fruits) are tightly
covered by a skin or membrane. Steam can
build up under the membrane during cooking,
causing the food to burst. To relieve the pressure
and to prevent bursting, pierce these foods
before cooking with a fork, cocktail pick, or
toothpick.
Always allow food to stand after cooking.
Standing time after defrosting and cooking allows
the temperature to spread evenly throughout the
food, improving the cooking results.
The length of the standing time depends on
how much food you are cooking and how dense
it is. Sometimes it can be as short as the time it
takes you to remove the food from the oven and
take it to the serving table. However, with larger,
denser food, the standing time may be as long as
10 minutes.
For best results, place food evenly on the plate. You
can do this in several ways:
• If you are cooking several items of the same
food, such as baked potatoes, place them in a
ring pattern for uniform cooking.
• When cooking foods of uneven shapes or
thickness, such as chicken breasts, place the
smaller or thinner area of the food toward the
center of the dish where it will be heated last.
• Layer thin slices of meat on top of each other.
• When you cook or reheat whole fish, score the
skin - this prevents cracking.
• Do not let food or a container touch the top or
sides of the oven. This will prevent possible arcing.
, I = I@I
I=111[ 811]"@(@[I
Metal containers should not be used in a micro-
wave oven. There are, however, some exceptions.
If you have purchased food which is prepackaged
in an aluminum foil container, refer to the
instructions on the package. When using aluminum
foil containers, cooking times may be longer
because microwaves will only penetrate the top of
the food. If you use aluminum containers without
package instructions, follow these guidelines:
31
Page 32

MICROWAVE COOKING TIPS (CONT.)
• Place the container in a glass bowl and add
some water so that it covers the bottom of the
container, not more than ¼in. (.64 cm) high. This
ensures even heating of the container bottom.
• Always remove the lid to avoid damage to the
oven.
• Reheating food in aluminum foil containers usually
takes up to double the time compared to reheating
in plastic, glass, china, or paper containers. The
time when food is ready will vary depending upon
the type of container you use.
• Let food stand for 2 to 3 minutes after heating so
that heat is spread evenly throughout container.
• Use only undamaged containers.
• DO not use containers taller than s/4in. (1.9 cm). (_'_@{}__=_}I@1_,_{!i!I@_1[} _{}! _f_} (} _¢'_*_:,_
• Container must be at least half filled.
• To avoid arcing, there must be a minimum ¼ in.
(.64 cm) between the aluminum container and the
walls of the oven and also between two alu-
minum containers.
• Always place the container on the turntable.
• Do not do canning of foods in the oven. Closed
glass jars may explode, resulting in damage to the
oven.
• Do not use the microwave oven to sterilize objects
(baby bottles, etc.). It is difficult to keep the oven at
the high temperature needed for sterilization.
32
Page 33

Questions and Answers
QUESTIONS ANSWERS
Can I operate my microwave oven without the No. If you remove or turn over the turntable, you
turntable or turn the turntable over to hold a will get poor cooking results. Dishes used in
large dish? your oven must fit on the turntable.
Can I use a rack in my microwave oven so that I You can use a rack only if the rack is supplied
may reheat or cook on two levels at a time? with your microwave oven. If you use a rack not
supplied with the microwave oven, you can get
poor cooking performance and/or arcing.
Can I use either metal or aluminum pans in my You can use aluminum foil for shielding (use small,
microwave oven? flat pieces), small skewers, and shallow foil trays
(if tray is not taller than %in. [1.9 cm] deep and half
filled with food to absorb microwave energy).
Never allow metal to touch walls or door.
Is it normal for the turntable to turn in Yes. The turntable rotates clockwise or counter-
either direction? clockwise, depending on the rotation of the
Sometimes the door of my microwave oven ap- This appearance is normal and does not affect the
pears wavy. Is this normal? operation of your oven.
What are the humming noises that I hear when my You may hear the sound of the transformer when
microwave oven is operating? the magnetron tube cycles on.
Why does the dish become hot when I microwave As the food becomes hot it will conduct the heat
food in it? I thought that this should not happen, to the dish. Be prepared to use hot pads to
remove food after cooking.
What does standing time mean? Standing time means that food should be
removed from the oven and covered for additional
time to allow it to finish cooking. This frees the
oven for other cooking.
Why does steam come out of the air exhaust vent? Steam is normally produced during cooking. The
microwave oven has been designed to vent this
steam out the vents.
Can I pop popcorn in my microwave oven? Yes. Pop packaged microwave popcorn
How do I get the best results? following manufacturer's guidelines or use the pre-
set POPCORN pad. Do not use regular paper
bags. Use the "listening test" by stopping the oven
as soon as the popping slows to a "pop" every 1
to 2 seconds. Do not repop unpopped kernels. Do
not pop popcorn in glass cookware.
33
Page 34

Troubleshooting
Most cooking problems often are caused by little things you can find and fix without tools of any kind. Check
the lists below and on the next page before calling for assistance or service. If you still need help, see the
Sears toll-free numbers on the back cover.
MICROWAVE OVEN DOES NOT WORK
PROBLEM CAUSE
Nothing works. • The power supply cord is not plugged into a grounded 3 prong outlet.
(See the "Electrical requirements" section on Page 6 and the "Electrical
connection" section on Page 9.)
• A household fuse has blown or a circuit breaker has tripped.
• The electric company has had a power failure.
The microwave oven • You are using the oven as a timer. Touch OFF/CANCEL to cancel the
will not run. Kitchen Timer.
• The door is not firmly closed and latched.
• You did not touch START/ENTER.
• You did not follow directions exactly.
• An operation that you set earlier is still running. Touch OFF/CANCEL to
cancel that operation.
COOKING TIMES
PROBLEM CAUSE
Food is not cooked
enough.
• The electric supply to your home or wall outlets is low or lower than normal.
Your electric company can tell you if the line voltage is low. Your electrician
or service technician can tell you if the outlet voltage is low.
• The cook power is not at the recommended setting. Check the chart on
Page 18.
• You have not allowed enough cooking time for the amount of food being
cooked. Larger amounts of food need longer cooking times.
The display shows a time • The oven door is not closed completely.
counting down but the • You have set the controls as a kitchen timer. Touch OFF/CANCEL to cancel
oven is not cooking, the Kitchen Timer.
34
Page 35

TURNTABLE
PROBLEM CAUSE
The turntable will • The turntable is not correctly in place. It should be correct-side up and
not turn. sitting firmly on the center shaft.
• The support is not operating correctly. Remove the turntable and restart the
oven. If the support still does not move, call an authorized service technician
for repair. Cooking without the turntable can give you poor results.
TONES
PROBLEM CAUSE
You do not hear the • You have not entered the correct command.
programming or • You have turned off the tone. See the "Audible signals" section on Page 12.
end-of-cycle tone.
DISPLAY MESSAGES
PROBLEM CAUSE
The display is flashing ":". • There has been a power interruption. Reset the clock. (See the "Setting the
clock" section on Page 14.)
If none of these items are causing your problem, see the "Sears Toll-Free Numbers" section on Back Cover.
35
Page 36

Index
This index is alphabetical. It contains all the topics included in this manual, along with the page(s) on which
you can find each topic.
TOPIC PAGE TOPIC PAGE
ALUMINUM FOIL .................................................. 31-32 FILTERS .................................................................... 29
AUDIBLE SIGNALS .................................................. 12 HOW YOUR MICROWAVE OVEN WORKS ................ 8
CARING FOR YOUR MICROWAVE OVEN ........ 28-30 INSTALLATION INSTRUCTIONS ................................ 7
CHARTS
Auto cook ................................................................ 22
Auto defrost .................................................... 24-26
Auto reheat .......................................................... 23
Cook powers ........................................................ 18
Popcom ................................................................ 27
Weight conversion ................................................ 26
CONTROL PANEL .............................................. 11-13
ADD ONE MINUTE ................................................ 16
AUTO COOK .......................................................... 22
AUTO DEFROST .................................................. 24
AUTO REHEAT ...................................................... 23
Changing preset cooking times ............................ 16
Child lock ................................................................ 12
CLOCK .................................................................... 14
Cooking at high cook power ................................ 17
Cooking at different cook powers .................. 18, 19
COOK TIM E .................................................... 17-20
Demo/learning feature .......................................... 13
Display .................................................................. 11
Fan ........................................................................ 13
Interrupting cooking .............................................. 12
Kitchen timer ........................................................ 15
Light ...................................................................... 13
Number pads ........................................................ 11
OFF/CANCEL .......................................................... 11
POPCORN ............................................................ 27
POWER .................................................... 16, 18-20
Stage cooking ................................................ 20, 21
START/ENTER ...................................................... 11
ELECTRICAL REQUIREMENTS .......................... 6, 9
EXHAUST FAN ........................................................ 13
LIGHTS
Replacing .............................................................. 30
Using .................................................................... 13
PARTS AND FEATURES
Cooking guide label .............................................. 10
Door handle .......................................................... 10
Door safety lock system ........................................ 10
Magnetron ................................................ 2, 3, 8, 33
Model and serial number plate ............................ 10
Turntable .............................. 7-10, 27, 28, 32, 33, 35
Vent grille .............................................................. 10
Window ................................................................ 10
QUESTIONS AND ANSWERS ................................ 33
RADIO INTERFERENCE ............................................ 8
REPLACING COOKTOP AND OVEN LIGHTS ........ 30
SAFETY .................................................................. 4-6
SERVICE .................................................................... 3
STANDING TIME .......................................... 26, 31, 33
TESTING YOUR DINNERWARE
OR COOKWARE .......................................................... 9
TESTING YOUR MICROWAVE OVEN ........................ 8
TIPS
Cooking ............................................................ 31-32
Defrosting .............................................................. 26
Operating .................................................................. 9
TOLL-FREE NUMBERS ............................ Back Cover
TROUBLESHOOTING ........................................ 34-35
WARRANTY ................................................................ 2
36
Page 37

f •
Ind=ce de
materias
Garantia .................................................................... 37
Servicio de Sears ..................................................... 38
Seguridad del horno de microondas ..................... 39
Instrucciones para la instalacibn ........................... 42
Conozca su homo de microondas ......................... 44
C6mo funciona su homo de microondas ............. 44
Interferencia electromagn_tica ............................. 44
C6mo probar su homo de microondas ................ 44
C6mo probar su vajilla o sus utensilios de cocina..45
Consejos para la operaci6n .................................. 45
Conexi6n el6ctrica ................................................ 45
Caracterlsticas del homo de microondas ............ 46
PaRes del panel de control ................................... 47
C6mo utilizar el extractor de aire ......................... 50
C6mo utilizar la luz para la superficie
de alimentos/encimera ......................................... 50
C6mo programar el reloj ....................................... 51
C6mo utilizar el cron6metro ................................. 52
C6mo utilizar ADD ONE MINUTE (un minuto m&s)..53
C6mo cambiar los tiempos prefijados de cocci6n...53
Cbmo utilizar su homo de microondas ................. 54
C6mo cocinar a un nivel alto de energia .............. 54
Cocci6n a distintas intensidades .......................... 55
C6mo cocinar por pasos ...................................... 57
C6mo utilizar AUTO COOK
(cocci6n automAtica) ............................................... 59
C6mo utilizar AUTO REHEAT
(recalentado automatico) ...................................... 61
C6mo utilizar AUTO DEFROST
(descongelado automatico) .................................. 62
Tabla de AUTO DEFROST
(descongelado automatico) .................................. 63
Consejos de descongelado .................................. 65
C6mo utilizar POPCORN (palomitas de maiz)......66
Cbmo cuidar su homo de microondas .................. 67
C6mo instalar y cuidar los filtros .......................... 68
C6mo cambiar las luces del homo y
de la superficie para preparaci6n de alimentos...69
Guia para cocinar .................................................... 70
Preguntas y respuestas .......................................... 72
Diagn6stico y soluci6n de problemas ................... 73
indice ......................................................................... 75
Garantia del
horno de
microondas
GARANT|A COMPLETA DE UN AI_IO
PARA EL HORNO DE MICROONDAS
Durante un a_o a partir de la fecha de compra, si este
horno de microondas Kenmore fallara debido a defec-
tos en el material o la mano de obra, Sears Io
reparar& sin costo alguno.
GARANT|A COMPLETA DE CINCO
AI_IOS PARA EL MAGNETRON
Durante cinco ados a partir de la fecha de compra, si
el magnetr6n de este homo de microondas Kenmore
fallara debido a defectos en el material o la mano de
obra, Sears Io reparar_t sin costo alguno.
La cobertura de la garantia antes citada corresponde
s61oa hornos de microondas cuyo uso es para fines
dom6sticos privados.
EL SERVICIO DE LA GARANT|A ESTA A
SU DISPOSICI6N CON TAN SOLO PONERSE EN
CONTACTO CON LA TIENDA O EL CENTRO DE
SERVICIO SEARS MAS CERCANO EN LOS
ESTADOS UNIDOS.
Esta garantia tiene vigor Qnicamente mientras este
producto sea utilizado en los Estados Unidos.
Esta garantia le otorga derechos legales especificos y
quiz&s usted tenga tambi6n otros derechos, los
cuales pueden variar de un estado a otto.
Sears, Roebuck and Co.,
Dept. 817WA,
Hoffman Estates, IL 60179
Para pedir servicio tdcnico Ilame ah
1-888-SU-HOGAR ®
(1-888-784,6427)
Por favor anote la informacibn acerca
del modelo de su electrodom_stico.
Siempre que Ilame para solicitar servicio t6cnico para
su electrodom_stico, usted necesitar& saber los
nL_meros completos del modelo y de la serie. Usted
podr& encontrar esta informaci6n en la placaJetiqueta
con los nQmeros del modelo y de la serie (vea
"Caracterlsticas del homo de microondas" en la sec-
ci6n "Conozca su homo de microondas"). Asimismo,
anote !a informaci6n que se indica a continuaci6n.
Nt_mero del modelo
Nt_mero de la serie
Fecha de compra
37
Page 38

Servicio de Sears
"Reparamos Io que vendemos"
Su compra adquiere un nuevo valor ya que usted puede confiar en Sears HomeCentral® para obtener servicio
de reparaci6n. Con m&s de 12,000 especialistas capacitados en reparaciones y acceso a m&s de 4.2 millones
de piezas de repuesto y accesorios, contamos con las herramientas, piezas, conocimiento y la destreza para
asegurarnos de cumplir nuestra promesa de que: Reparamos Io que vendemos.
Contratos de mantenimiento Sears
Su electrodom6stico Kenmore esta dise_ado, fabricado y sometido a prueba para proporcionarle a_os de fun-
cionamiento confiable. No obstante, cualquier electrodomestico moderno puede necesitar servicio t6cnico de
vez en cuando. El Contrato de mantenimiento Sears le ofrece un programa de servicio excepcional, a un precio
accesible.
El contrato de mantenimiento Sears
• Es la manera de adquirir el servicio tecnico del maSana a precios de hoy.
• Elimina las facturas de reparaci6n producidas por el uso normal y el desgaste.
• Proporciona asistencia no tecnica y educativa.
• Ann cuando no necesite reparaciones, le proporciona una Revisi6n anual de mantenimiento preventivo a
solicitud suya, para asegurarse de que su electrodomestico esta en condiciones apropiadas de
funcionamiento.
Se aplican ciertas restricciones. Para obtener m_s informacibn, Ilame al 1-888-784-6427.
He aquf un cuadro comparativo de la Garantia y el Contrato de Mantenimiento, que le muestra los beneficios de
un contrato de mantenimiento Sears para su homo de microondas.
AI_IOS DE COBERTURA PARA EL PROPIETARIO
Reemplazo de piezas defectuosas, a excepci6n del magnetr6n
Reemplazo del magnetr6n
Revisi6n anual de mantenimiento preventivo a solicitud suya
G - GARANTiA
CM - CONTRATO DE MANTENIMIENTO
P6ngase en contacto con el representante de Sears o el Centro de Servicio Sears de su Iocalidad y adquiera
un Contrato de mantenimiento Sears.
1° AI_IO 2° AL 5° AI_IO
G CM
G G
CM CM
Guarde este manual y el comprobante de ventas juntos para referencia en el futuro.
38
Page 39

Seguridad del horno de
microondas
Su seguridad y la seguridad de los demos es muy importante.
Hemos incluido muchos mensajes importantes de seguridad en este manual yen su etectrodomestico.
Lea y obedezca siempre todos los mensajes de seguridad.
Este es el simboto de advertencia de seguridad.
Este simbolo te llama ta atenci6n sobre peligros potenciales que pueden ocasionar la muerte
o una lesi6n a usted y a los demas.
Todos los mensajes de seguridad iron a continuaci6n del simbolo de advertencia de
seguddad y de la palabra "PELIGRO" o "ADVERTENCIA". Estas palabras significan:
Si no sigue las instrucciones de inmediato,
usted puede morir o sufrir una lesibn grave.
Si no sigue las instrucciones, usted puede
morir o sufrir una lesibn grave.
Todos los mensajes de seguddad le diran el peligro potencial, te diran c6mo reducir las posibilidades de
sufrir una lesi6n y Io que puede suceder si no se siguen las instrucciones.
INSTRUCCIONES IMPORTANTES DE SEGURIDAD
Cuando se usan aparatos etectrodomesticos, deben tomarse precauciones de seguridad, incluyendo las
siguientes:
ADVERTENCIA: Para reducir el riesgo de
quemaduras, choques electricos, fuego, dafios per-
sonales o exposici6n a energia excesiva de
microondas:
•' Lea todas las instrucciones antes de usar et homo
de microondas.
• Lea y siga las "PRECAUCIONES PARA EVITAR
LA POSIBLE EXPOSICION A ENERGfA
EXCESIVA DE MICROONDAS" especificas que
se encuentran en esta secci6n.
• El homo de microondas debe estar conectado a
tierra. El enchufe se debe conectar a un tomaco-
rriente con conexi6n a tierra. Vea "INSTRUC-
CLONES PARA CONEXION A TIERRA" en esta
secci6n yen las instrucciones de instalaci6n pro-
porcionadas.
• Instale o ubique et homo de microondas s6to de
acuerdo alas instrucciones para instalaci6n
proporcionadas.
• Atgunos productos tales como huevos enteros con
la cascara y recipientes herm6ticos - por ejemplo,
frascos de vidrio cerrados - pueden explotar y no
deben calentarse en el homo de microondas.
Use et homo de microondas solamente como se
describe en este manual. No use productos
quimicos o vapores corrosivos en el horno de
microondas. Este tipo de homo est_ especifica-
mente diseSado para calentar, cocinar o
deshidratar alimentos. No esta diseSado para uso
industrial o de laboratorio.
Lo mismo que con cualquier aparato
electrodomestico, es necesario supervisar de
cerca si 1ousan los niSos.
No opere et horno de microondas si el cable o el
enchufe est_n daSados, si el homo no funciona
correctamente o si se ha daSado o caido.
El homo de microondas debe ser revisado y
reparado s61opor personal tecnico calificado.
Llame a una compa_ia de servicio autorizada para
el examen, reparaci6n y ajuste.
Vea las instrucciones para limpieza de la puerta en
la secciSn "CSmo cuidar su horno de microondas".
GUARDE ESTAS INSTRUCCIONES
39
Page 40

INSTRUCCIONES IMPORTANTES DE SEGURIDAD
• Para reducir el riesgo de incendio en la cavidad
del homo:
- No recocine los alimentos. Preste cuidadosa
atenci6n al homo si usa papet, plastico u otro
material combustible dentro del homo para
facilitar la cocci6n.
- Quite las ataduras de alambre de las bolsas de
papel o plAstico antes de ponerlas en et homo.
- Si algQn elemento se prende fuego dentro del
homo, mantenga la puerta cerrada, apague el
homo y desenchOfelo o corte la corriente con los
fusibles o el disyuntor.
- No use la cavidad para guardar cosas. No deje
productos de papel, utensilios de cocina o
alimentos en la cavidad cuando no estA en uso.
• Se adapta para el uso tanto sobre cocinas a gas
como electricas.
• Destinado para usarse sobre cocinas de una
anchura maxima de 36 pulgadas (91 cm).
• Limpie con frecuencia las salidas de aire de la
campana extractora - no permita que se acumule
grasa en la campana o en el filtro.
• No hay que introducir alimentos o utensilios de
metal demasiado grandes en el homo de
microondas debido a que pueden ocasionar un
incendio o riesgo de choque el6ctrico.
• No limpie con esponjas de lana de acero. Las
fibras de la esponja pueden desprenderse y tocar
las piezas el6ctricas originando un riesgo de
choque el6ctrico.
• No use articulos de papel mientras la operaci6n
del homo esta en el modo "PAN BROWN" (Dorado
en la sart_n).
• No almacene ningOn material en el homo cuando
no est6 en uso, salvo los accesorios
recomendados por el fabricante.
• No ponga nada directamente sobre el homo de
microondas cuando 6ste esta funcionando.
• Cuando flamee alimentos debajo de la campana,
encienda el ventilador.
• Tenga cuidado al limpiar el filtro de la campana
extractora. Los agentes de limpieza corrosivos,
tales como productos para limpieza de hornos con
lejfa, pueden dadar el filtro.
• No cubra o bloquee ninguna abertura en el homo
de microondas.
• No guarde el homo de microondas a ta
intemperie. No use el horno de microondas cerca
del agua - por ejemplo, cerca det fregadero en la
cocina, en un s6tano hOmedo o cerca de una
alberca o lugares similares.
• No sumerja el cable o el enchufe en agua.
• Mantenga el cable alejado de superficies calientes.
• No deje que el cable cuelgue del borde de una
mesa o mostrador.
• No monte el horno sobre un fregadero.
• Nunca cubra las parrillas o cualquier otro accesorio
con papel metAlico. Esto puede recalentar el horno.
GUARDE ESTAS INSTRUCCIONES
PRECAUCIONES PARA EVITAR LA POSIBLE
EXPOSlClON A ENERGiA EXCESlVA DE
MICROONDAS
(a) No intente operar este homo con la puerta abier-
ta ya que esto puede resultar en exposici6n
nociva a energfa de microondas. Es importante
no forzar o tocar las trabas de seguridad.
(b) No ponga ningOn objeto entre la cara frontal det
homo y la puerta y no permita que se acumule
suciedad o residues de limpiadores en las
superficies de sellado.
(c) No opere el homo si este estA daSado. Es par-
ticularmente importante que la puerta det homo
cierre correctamente y que no haya daSo en:
(1) La puerta (torcida),
(2) Bisagras y seguros (rotos o flojos),
(3) Sellado de la puerta y superficies de sella-
do.
(d) El homo no debe ser ajustado o reparado por
nadie, excepto personal de servicio calificado.
40
Page 41

REQUERIMIENTOS ELI=CTRICOS
Cumpla con todos los c6digos y 6rdenes vigentes.
Se requiere un suministro de electricidad de
120 voltios, 60 Hz, Onicamente CA de 15- 6 20-
amperios a fusible. (Se recomienda un fusible de
acci6n retardada o un disyuntor.) Se recomienda
que se use un circuito dedicado exctusivamente
para este aparato etectrodomestico.
Peligro de Choque Eldctrico
Conecte a un contacto de pared de conexibn
a tierra de 3 terminales.
No quite el terminal de conexibn a tierra,
No use un adaptador.
No use un cable eldctrico de extensibn.
No seguir estas instrucciones puede
ocasionar la muerte, incendio o
choque el_ctrico.
INSTRUCCIONES PARA LA CONEXION A TIERRA
• Para todos los aparatos electrodom_sticos
de conexibn con cable:
El homo de microondas debe estar conectado a
tierra. En caso de que se produzca un corto
circuito, la conexi6n a tierra reduce et riesgo de
choque el6ctrico por medio de un alambre de
escape para la corriente electrica. El homo de
microondas esta equipado con un cable que tiene
un alambre de conexi6n a tierra con un enchufe
para conexi6n a tierra. El enchufe debe estar
conectado a un tomacordente que esta
correctamente instalado y conectado a tierra.
ADVERTENCIA: El uso incorrecto de la
conexi6n a tierra puede resuttar en desgo de
choque etectrico.
Consulte con un electdcista o tecnico calificado si las
instrucciones para conexi6n a tierra no se entienden
bien o si hay alguna duda con respecto a la correcta
conexi6n a tierra del homo de microondas.
No use un cable de extensi6n. Si el cable es muy
corto, haga que un electdcista o tecnico calificado
instale un tomacordente cerca del homo de
microondas.
Para aparatos electrodomdsticos de conexibn
permanente:
Este aparato etectrodom6stico debe conectarse a
un sistema de alambrado metalico permanente
con cenexi6n a tierra o un conductor de conexi6n
a tierra para equipos debe funcionar con los
conductores del circuito y estar conectado a la
terminal o conductor de la conexi6n a tierra para
equipos en el aparato etectrodomestico.
GUARDE ESTAS INSTRUCCIONES
41
Page 42

Instrucciones para la instalacibn
DESMONTAR Y REINSTALAR LA COMBINACION
DE MICROONDES CAMPANA
Peligro de Peso Excesivo
Use dos o m_s personas para mover e instalar
el horno de microondas.
No seguir esta instruccibn puede ocasionar
una lesibn en la espalda u otro tipo de lesiones.
Si necesita desmontar su combinaciSn Microondas
Campana por aigQn motivo, siga estos sencillos
pasos:
Para desmontar:
1. Desenchufe el homo de microondas o
desconecte el suministro de energia.
2. Quite los filtros y la rejilla de ventilaci6n.
L_ • Si los filtros Q est&n
instalados, presione
hacia dentro, empuje
ia lengLieta y desiice
-- el filtro a la orilla para
-- quitarlo.
• Quite los dos tornillos
Q de la parte superior
del gabinete del homo
de microondas (los tor-
nillos ubicados mas
cerca de ias esquinas del frente). No quite los
tornillos que se encuentran mAs hacia el centro
del gabinete.
• Quite la rejilla de ventilaci6n (_. Ponga a un lado
los tornillos y la rejilla.
3. Despu_s de vaciar completamente el interior del
homo, incluyendo el
plato giratorio y el
soporte, selle la puerta
con cinta adhesiva.
Quite los dos tornillos
_) que aseguran el
homo de microondas a
ia parte superior del
gabinete.
4. Con un par de guantes puestos, tome los
soportes del homo de
microondas @ y jale
firmemente el homo de
microondas hacia ade-
lante y abajo para liberar
el gabinete del homo de
microondas de los per-
nos de seguridad de la
placa _ donde se
monta.
5. Tome el gabinete del homo de microondas. Gire
el horno de microondas
hacia abajo. (Tenga cuida-
do para evitar que la puer-
ta se abra de golpe.)
Levante ias lengLietas de
soporte (_ en ia parte de
abajo de la placa donde
se monta. Ponga el homo
de microondas en una
superficie protegida.
42
Page 43

DESMONTAR Y REINSTALAR LA COMBINACION DE
MICROONDAS CAMPANA (CONT.)
1. Levante cuidadosamente el homo de
microondas y cu61guelo en las lengL)etas de
soporte ubicadas en la parte inferior de la
plancha de montaje.
2. Gire hacia abajo la parte frontal del gabinete
para el homo de microondas. Pase el cable
electrico a trav6s del orificio Iocalizado en la
parte inferior del gabinete superior.
3, Gire el homo de microondas hacia el gabinete.
Empuje el homo contra la placa de montaje
hasta que los pestillos de sujeci6n se acoplen en
el gabinete.
4. Reponga los dos pemos que sirven para
asegurar el homo de microondas al gabinete
superior.
5. Retire la cinta adhesiva de la puerta y vuelva a
colocar en su sitio la bandeja giratoria y el
soporte.
6. Reemplace la rejilla de ventilaci6n.
7. Reponga los dos tornillos en la parte superior del
gabinete para el homo de microondas (los
tomillos situados m&s pr6ximos alas esquinas
frontales).
5. Si se instalaron filtros, reemplacelos (de ser
necesario, vea "C6mo instalar y cuidar los filtros"
en la secci6n "C6mo cuidar su homo de
microondas').
. Enchufe el homo de microondas o conecte
nuevamente el suministro electrico.
43
Page 44

Conozca su horno de
microondas
Esta seccibn habla de los conceptos de coccibn a microondas. Tambi6n le muestra los elementos
basicos que usted debe conocer para operar el homo de microondas. Por favor lea esta informa-
cibn antes de usar su homo.
COMO FUNCIONA SU HORNO DE MICROONDAS
La energla de microondas no produce calor. Esta
energia hace que los alimentos generen calory
6ste a su vez hace que los alimentos se cocinen.
Las microondas son como las ondas de TV,
radio o luz. Usted no las puede vet, pero puede ver
Io que hacen.
Un magnetrbn produce las microondas en un homo
de microondas. Las microondas se mueven dentro
del homo donde se ponen en contacto con los ali-
mentos cuando giran sobre la bandeja giratoria.
Magnetr6n
7"
Cavidad del homo
Pisode metal Bandeja giratoria de vidrio
La bandeja giratoria de vidrio de su homo de
microondas permite que las microondas pasen.
Luego, estas rebotan en el piso de metal, atraviesan
la bandeja giratoria de vidrio y son absorbidas por
los alimentos.
Las microondas pasan a trav6s de la mayoria de
los tipos de vidrio, papel y pl&stico sin calentarlos,
de manera que el alimento absorbe la energla. Las
microondas rebotan en los recipientes de metal, por
Io tanto los alimentos no absorben la energla.
* Siempre cocine los alimentos por el tiempo m&s
corto recomendado. Verifique c6mo se est&n
cocinando los alimentos.
* Para ayudar a asegurarse de que los alimentos
estdn cocinados de forma pareja, revuelva, rote
o redistribuya los alimentos que se est&n
cocinando a la mitad del tiempo de cocci6n.
• Si usted no tiene una tapa para un plato, use
papel encerado o toallas de papel aprobadas para
uso con microondas o pelicula de pl&stico.
Recuerde doblar una esquina de la pellcula de
pl&stico de ¼ a _ pulg (6.35 a 12.7 mm) para que el
vapor salga durante la cocci6n.
INTERFERENCIA ELECTROMAGNI TICA
El uso de su homo de microondas puede causar
interferencia con su radio, TV o equipos similares.
Si hay interferencia, usted puede reducirla o elimi-
narla:
• Limpiando la puerta y las superficies sellantes
del horno.
• Ajustando la antena receptora de radio o televisi6n.
• Moviendo la radio/televisi6n para que est6n
alejadas del homo de microondas.
• Enchufando el homo de microondas en otro toma-
corriente para que el homo de microondas y el
radio/TV est6n en distintos circuitos electricos.
COMO PROBAR SU HORNO DE MICROONDAS
Para probar el homo ponga 1 taza (250 mL) asegurada. Cocine a 100% de intensidad durante 2
de agua fria en un recipiente de vidrio dentro del minutos. Cuando el tiempo se cumple, el agua debe
homo. Cierre la puerta. Verifique que est6 estar caliente.
44
Page 45

COMO PROBAR SU VAJILLA O SUS UTENSILIOS
DE COCINA
Pruebe la vajilla de mesa o de cocina antes de
usarla. Para saber si un plato se puede usar en
forma segura, col6quelo dentro del homo junto a 1
taza (250 mL) con agua. Cocine a 100% de intensi-
dad durante un minuto. Si el plato se calienta y el
agua est_ fria, no Io use. Atgunos platos (melami-
na, alguna vajilla ceramica, etc.) absorben energfa
de microondas, calent_ndose demasiado para agarrar-
los y hace mas lentos los tiempos de cocci6n. La coc-
ci6n en recipientes de metal que no est_n diseSados
para uso con microondas puede daSar el horno, Io
mismo que recipientes con metal escondido (ataduras
de alambre revestido, revestimiento de aluminio,
broches metalicos, esmalte o adomos metalicos).
CONSEJOS PARA LA OPERACION
• Nunca se apoye sobre la puerta o permita que los
niSos se columpien con ella mientras esta abierta.
• Use guantes para horno. La energfa de microon-
das no calienta los recipientes, pero el calor de los
alimentos puede hacer que et recipiente se
caliente.
• No use peri6dicos u otros papeles impresos en el
homo.
• No seque flores, frutas, hierbas, madera, papel,
calabazas o ropa en et homo.
• No encienda et horno cuando esta vacio. La
duraci6n del producto se puede acortar. Si practica
con la programacf6n del horno, coloque un reck
piente con agua en et homo. Es normal que la
puerta parezca ondulada cuando et homo ha esta-
do funcionando por un tiempo.
• No trate de fundir parafina en el homo. La parafina
no se fundira en un homo de microondas porque
permite que las microondas la atraviesen.
• No opere et homo de microondas a menos que la
bandeja giratoria est6 asegurada en su lugar y
pueda rotar con libertad. La bandeja giratoria
puede rotar en ambas direcciones. Asegerese que
et lado correcto de la bandeja giratoria esta hacia
arriba. Maneje su bandeja giratoria con cuidado
para sacarla del horno para evitar que se rompa.
Si su bandeja giratoria se quiebra o se astilta,
Ilame a su distribuidor para reemplazarla.
• Cuando usa un plato para dorar alimentos, et
rondo del plato debe quedar a una distancia de per
Io menos _ de pulg (5 mm) por arriba de la bande-
ja giratoria. Siga las instrucciones provistas con el
plato para dorar alimentos.
• Nunca cocine o caliente un huevo entero con la
cbscara. La acumulaci6n de vapor en el huevo
entero puede hacer que explote y posiblemente et
homo se dafie. Corte los huevos duros antes de
calentarlos. En raras ocasiones ha ocurrido que
los huevos poche han explotado. Cubra los
huevos poche y deje reposar durante un minuto
antes de cortarlos.
• Para bptimos resultados, revuelva los liquidos
varias veces mientras los calienta o recalienta.
Los liquidos calentados en algunos recipientes
(especialmente recipientes con forma citindrica) se
pueden calentar excesivamente. El liquido puede
salpicar haciendo un ruido fuerte durante o
despu6s det calentamiento o cuando se agregan
ingredientes (granulos de car6, bolsitas de te, etc.).
Esto puede daSar el homo.
• Las microondas pueden no Ilegar al centro de un
asado. El calor se extiende al centro desde la
parte de afuera cocinada, Io mismo que cuando se
cocina en un homo com_n. Esta es una de las
razones para dejar que algunos alimentos (per
ejemplo asado o papas horneadas) reposen por un
tiempo luego de cocinar, o para revolver algunos
alimentos mientras se est_n cocinando.
• No haga frituras en el homo. La vajilla para cock
nar a microondas no es apropiada yes dificil man-
tener las temperaturas apropiadas para frefr.
• No recocine las papas. AI final del tiempo de
cocci6n recomendado, las papas deben estar ligera-
mente firmes porque se seguir_n cocinando durante
el tiempo de reposo. Luego de cocinar a microon-
das, ddjelas reposar por 5 minutos. €:stas se ter-
minaran de cocinar durante el tiempo de reposo.
CONEXION ELI=CTRICA
Los tiempos de cocci6n ser_n prolongados en
caso de que su suministro de energia el_ctrica
o el voltaje de salida sea menor de 110 vottios.
Haga que un electricista calificado compruebe su
sistema electrico.
45
Page 46

CARACTER|STICAS DEL HORNO DE MICROONDAS
®
@ @ @ @
/,/
®
®
® ® ® "@
Su homo de microondas ha sido diseSado para que
su experiencia culinaria sea de Io mas amena y pro-
ductiva posible. Para ayudarle a familiadzarse con
rapidez, a continuaci6n tiene una lista de las carac-
teristicas basicas del homo:
1. Manija de la puerta. Jalela para abrir la puerta.
2. Sistema de traba de seguridad de la puerta. El
homo no funcionara a menos que la puerta est6
bien cerrada.
3. Ventana con protecci6n metdlica. La protecci6n
impide el escape de las microondas. Ha sido
diseSada como pantalla para permitirle ver los
alimentos mientras 6stos se cocinan.
4. Bandeja giratoria de vidrio (Nt_mero de parte
4393751) (no se ilustra). Est& incluida en la cavidad
del homo -vea las instrucciones para la instalaci6n
que se ilustran a continuaci6n. Esta bandeja girato-
ria hace girar los alimentos a medida que 6stos se
cocinan para Iograr una cocci6n mas uniforme.
Debe estar en el homo durante el funcionamiento
para Iograr 6ptimos resultados de cocci6n. La ban-
deja giratoria esta empotrada en la cavidad del
piso para darle m&s espacio para cocinar y obten-
er mejores resultados de cocci6n.
• Quite la cinta adhesiva del cento (N_mero de parte
4393754).
Curvas
alzadas_
Centroi'_-_ _)_
Sop; e
__-_ Eje
46
• Coloque el soporte
(Nt_mero de parte
4393752) en el fondo
de la cavidad.
• Coloque la bandeja girato-
da en el centre. AsegQrese
de que las curvas alzadas,
ubicadas en el centre del
fondo de la bandeja gira-
toria, est6n entre lastres
protuberancias del eje.
5. Filtros para grasa. Est&n incluidos en la cavidad
del homo.
6. Luz de la superficie/mostrador de coccibn.
Enci6ndala para alumbrar la superficie de cocci6n o
el mostrador o enci6ndala como luz nocturna.
7. Etiqueta con guia para cocinar. 0sela como con-
sulta rapida para los ajustes de Auto Cook (coc-
ci6n autom&tica), Auto Reheat (recalentado
automatico), Auto Defrost (descongelaci6n
automatico) y Popcorn (palomitas de maiz).
8. Interruptores de las luces del extractor de aire y
de la superficie de cocci6n.
9. Panel de control. Toque los botones que estan en
este panel para realizar todas ias funciones.
10. Rejilla de ventilacibn.
11. Luz de la cavidad del homo.
12. Cubierta de admisi6n de microondas.
13. Placa con el ndmero del modelo y de la serie.
• Los rodillos (Nt_mero de parte 4393753) en el
soporte encajan dentro de la ranura en la parte
inferior de la bandeja giratoria.
• La bandeja giratoria gira tanto a la izquierda como
a la derecha. Esto es normal.
Page 47

PARTES DEL PANEL DE CONTROL
1. Pantalla. Esta pantalta incluye un reloj e indi-
cadores que le permiten saber la hora, la pro-
gramaci6n del tiempo de cocci6n y las funciones
de cocci6n que usted elige.
2. POPCORN (Palomitas de maiz). Toque este
botSn para preparar palomitas de maiz.
3. AUTO COOK (Coccibn autom_tica). Toque
este bot6n para cocinar alimentos especiales
para microondas sin necesidad de introducir
tiempos o intensidades de cocci6n.
4. AUTO DEFROST (Descongelado autom_tico).
Toque este bot6n para descongelar alimentos sin
necesidad de introducir tiempos o intensidades
de cocci6n.
5. AUTO REHEAT (Recalentado autom_tico).
Toque este bot6n para recalentar alimentos
especiales para microondas sin necesidad de
introducir tiempos o intensidades de cocci6n.
6. ADD ONE MINUTE (Un minuto mds). Oprima
este bot6n para cocinar por un minuto, a una
intensidades de cocciSn de1100% o para agre-
gar un minuto extra a un ciclo de cocci6n al
nivel de poder que estableciS.
7. CLOCK (Reloj). Toque este bot6n para
introducir la hora correcta.
8. KITCHEN TIMER (Cron6metro de cocina).
Toque este bot6n para activar o cancelar el
cron6metro de cocina.
9. Botones num_ricos. Toque los botones
numericos para introducir tiempos de cocci6n,
intensidades de cocci6n, cantidades, pesos o
categorias de alimentos.
10. COOK TIME (Tiempo de coccibn). Toque este
bot6n seguido per los botones numericos para
programar un tiempo de cocci6n.
11. POWER (Intensidad). Toque este bot6n despues
de que el tiempo de cocci6n haya sido estableci-
do, seguido de un bot6n num6rico para estable-
cer la cantidad de energia de microondas liber-
adas para cocinar los alimentos. Tambi6n pre-
sione este bot6n para aumentar o disminuir un
tiempo de cocci6n preestablecido.
12. START/ENTER (Encendedintroducir). Toque
este bot6n para iniciar una funci6n.
13. OFF/CANCEL (Apagadcancelar). Toque este
bot6n para borrar una instrucci6n incorrecta,
cancelar un programa durante la cocci6n o para
borrar la pantalla.
14. EXHAUST FAN HIGH/LOW/OFF. (Extractor de
aire -- altolbajolapagado). Toque este bot6n
para encender et extractor a velocidad alta o
baja y para apagar et extractor.
®
@-
15. LIGHT ON/NIGHT/OFF (Luz --
encendido/noche/apagado de luz y luz
nocturna). Toque este bot6n para encender o
apagar la luz y la luz nectuma.
NOTAS:
• Si introdujo los valores para una funci6n pero
no ha tocado START/ENTER en 5 segundos,
aparecera el indicador START? (_,INICIAR?).
• Si abre la puerta mientras el homo est&
funcionando y luego la cierra aparecer& el
indicador START? Toque START/ENTER para
continuar.
• Si elige una funci6n pero no toca otro bot6n
de comando en un minuto, la pantalla regre-
sara a la hora del dlay tendr& que empezar
de nuevo.
47
Page 48

PARTES DEL PANEL DE CONTROL (CONT,)
Sefiales audibles
Su homo de microondas emite se_ales audibles
que le pueden guiar al programar o utilizar su
homo:
• [_ Un tono de programaci6n sonar& cada vez
que toque un bot6n.
• [_ Un tono largo indica que termin6 la cuenta
regresiva del cron6metro de la cocina.
• [_[_-II'_))} I Cuatro tonos indican que
termin6 el ciclo de cocci6n.
" _J_ Dos tonos cortos y r_.pidos suenan
cada minuto durante los primeros 15 minutos
despu6s de la sepal de fin de ciclo de cocci6n
como recordatorlo si no se hart sacado los ali-
mentos del homo.
• [_[_ Dos tonos cortos y r_pidos sonar_n
al entrar y salir de una funci6n no visible (por
ejemplo, seguro para ni_os) o la hora del dla.
• _;_-II °_)))I Sonar_n tres tones si hizo una
entrada err6nea.
Para desactivar el sonido de programaci6n:
TOQUE
y sost6ngalo durante 4 segundos
Para activar nuevamente el sonidode programaci6n:
TOQUE
1
y sost6ngalo durante 4 segundos
Para desactivar todas las seSales audibles,
excepto la de fin del cronbmetro:
TOQUE
y sost_ngalo durante 4 segundos
Para volver a activar las se_ales:
TOQUE
2
y sost6ngalo durante 4 segundos
NOTA:Dos sonidos se oir_lncuando se enciendan o se
apaguen las se_ales audibles. Estofunciona solamente
cuando el horno no esta activando ningunaotra funci6n.
48
Page 49

PARTES DEL PANEL DE CONTROL (CONT,)
Cbmo interrumpir la coccibn
Puede detener el funcionamiento del homo
durante un ciclo si abre la puerta. El homo deja
de calentar y se detiene el extractor pero la luz
permanece encendida. Para reiniciar la cocci6n
cierre la puerta y
TOQUE
START
Si no desea continuar cocinando:
• Cierre la puerta y se apagar& la luz.
O
• TOQUE
Cbmo utilizar la funcibn
demostracibn/aprendizaje
Puede programar su homo de microondas para
visualizar las instrucciones conforme las vaya
introduciendo sin tener que encender el magnetr6n.
Esta funci6n le ayudar& a aprender c6mo utilizar
su homo sin necesidad de cocinar alimentos
realmente. Esto funciona solamente cuando el
homo no est& activando ninguna otra funci6n.
Para programar la funci6n demostracibn/
aprendizaje:
TOQUE
y sost_ngalo durante 4 segundos
NOTA: Antes de programar una funci6n toque
OFF/CANCEL para asegurarse de que no est6
activa ninguna otra funci6n.
Cbmo utilizar el seguro para nihos
El seguro para nidos bloquea el panel de control
para que los nidos no puedan utilizar el homo de
microondas si usted no desea que Io hagan.
Esto funciona solamente cuando el homo no
est& activando ninguna otra funci6n.
Para bloquear el panel de control:
Sonar&n dos tonos y aparecer& una "d" peque_a
en la pantalla.
Para cancelar la funcibn demostraci6n/apren-
dizaje:
TOQUE
y sost_ngalo durante 4 segundos
Se escuchar&n dos tonos y desaparecerA la "d"
de la pantalla.
TOQUE
y sostdngalodurante 4 segundos
Se escuchar&n dos tonos y PI aparecer& en la
pantalla. Cuando se haya bloqueado el panel,
se escucharan 3 tonos y aparecer& LOCK
(BLOQUEAR) cuando toque cualesquiera de los
botones a excepci6n de EXHAUST FAN y LIGHT,
los botones num_ricos 1 y 2 y START/ENTER.
Para desbloquear el panel de control:
TOQUE
START
y sostdngalodurante 4 segundos
Se escucharAn dos tonos y PI se eliminar& de
la pantalla.
49
Page 50

COMO UTILIZAR EL EXTRACTOR DE AIRE
El bot6n en la parte inferior izquierda del panel de
control sirve para manejar el extractor de 2
velocidades.
1. Seleccione la velocidad del extractor.
NOTA: Si la temperatura procedente de las
hornillas o la superficie para preparar los
alimentos sube demasiado, debajo del homo,
el extractor de aire en el conducto de ventilaci6n
se encenderA automAticamente en estado HIGH
(Alto) para proteger el horno. El extractor de
aire puede seguir trabajando hasta por una
hora para enfriar el horno. Cuando esto suce-
da, el extractor no podra apagarse con el
botbn EXHAUST FAN.
TOQUE
(una vez para velocidad alta y dos
veces para velocidad baja)
2. Apague el extractor de aire cuando Io desee. TOQUE
(1 6 2 veces mds, dependiendo de la
velocidad del extractor de aire)
COMO UTILIZAR LA LUZ PARA LA SUPERFICIE DE
ALIMENTOS/ENCIMERA
El bot6n en la parte inferior derecha del panel
de control regula la luz para la superficie de
preparaci6n de alimentos/encimera.
1. Encienda la luz. TOQUE
(una vez para luz regular y dos
veces para luz nocturna)
2. Apague la luz cuando Io desee. TOQUE
(1 b 2 veces, dependiendo de la
programacibn de la luz)
50
Page 51

COMO PROGRAMAR EL RELOJ
Cuando conecte por primera vez su horno de
microondas o despu6s de una falla el6ctrica, la
pantalla desplegara el signo ":" de manera intermi-
tente. Si no se programa una hora, el signo ":"
destellar& hasta que presione algQn bot6n.
NOTAS:
• Si selecciona una hora no v&lida y toca CLOCK,
se escuchar&n 3 tonos. Introduzca la hora co-
rrecta.
• Si usted toca OFF/CANCEL al programar el reloj,
la pantalla desplegara la Qltima hora que se pro-
gram6 del dla.
• Para apagar el reloj, toque CLOCK, el n0mero 0
y CLOCK nuevamente. La hora que se habia
programado desaparecer& y aparecer& el signo
":" en la pantalla.
1. Toque CLOCK.
TOQUE USTED VE
2. Introduzca la hora del dla.
Ejemplo para las 12:00:
TOQUE
1
USTED VE
2
0
0
3. Termine la programaci6n.
TOQUE USTED VE
O
51
Page 52

COMO UTILIZAR EL CRONOMETRO
Puede utilizar su homo de microondas como un NOTA: El homo puede funcionar mientras se utiliza
cron6metro. Utilice el cron6metro para cronometrar el cron6metro. Para ver el cron6metro mientras fun-
hasta 99 minutos y 99 segundos, ciona el homo, toque KITCHEN TIMER.
1. Toque KITCHEN TIMER.
TOQUE USTED ME
2. Programe el tiempo a contar en forma regresiva.
Por ejemplo, para 1 minuto, 30 segundos:
NOTA: Si programa mas de 4 digitos, desapare-
ceran los primeros 4 y aparecer&n los siguentes
dlgitos a la derecha a medida que usted los va
introduciendo.
TOQUE
1
3
0
USTED ME
3. Inicie la cuenta regresiva.
NOTA: Si no realiza este paso dentro de los 5
segundos despu6s de realizar el paso 2, apare-
cer& "START? (&INCIAR?)". Despu6s tendr& 1
minuto para tocar KITCHEN TIMER o para tocar
START/ENTER antes de que la pantalla vuelva a
la hora del dla.
TOQUE USTED ME
O
AI final de la cuenta regresiva:
USTED ME
Para cancelar el cronbmetro:
Durante la cuenta regresiva:
(se escuchar_i un tono largo)
TOQUE USTED ME
(hora del dia)
52
Page 53

COMO UTILIZAR ADD ONE MINUTE (UNMINUTOMAS)
ADD ONE MINUTE permite cocinar los alimentos
durante 1 minuto a un nivel de energia de cocci6n
de 100%, o bien, agregar un minuto extra al ciclo
de cocci6n. Tambi6n Io puede utilizar para prolon-
gar los ciclos de cocci6n en mQltiplos de
1 minuto, hasta 99 minutos.
OBSERVACIONES:
* Para prolongar los ciclos de cocci6n en mQItiplos
de 1 minuto, oprima ADD ONE MINUTE repetida-
mente durante la cocci6n.
* Despu6s de cerrar la puerta, puede introducir
ADD ONE MINUTE sin tener que oprimir
START/ENTER (INICIAR/INTRODUCIR).
1. Cerci6rese de que la comida est6 dentro del homo.
• Si oprime ADD ONE MINUTE durante la cocci6n,
el homo cocinar& al nivel de energia de cocci6n
seleccionada previamente. Si oprime ADD ONE
MINUTE despu6s de haber terminado la cocci6n,
el homo cocinara al nivel de energia de cocci6n
del 100%. Puede cambiar la intensidad de cocci6n
si oprime POWER (ENERGiA), despu6s de haber
oprimido el bot6n ADD ONE MINUTE, y luego
oprimir los botones numericos para determinar la
nueva intensidad de cocci6n, y finalmente
START/ENTER (INIClAR/INTRODUClR).
• Puede utilizar ADD ONE MINUTE s61o para la fun-
ci6n de ciclo de cocci6n.
2. Oprima ADD ONE MINUTE.
Ejemplo, para cocinar durante 1 minuto:
OPRIMA USTED VERA
COMO CAMBIAR LOS TIEMPOS PREFUADOS DE COCClON
Si el tiempo de cocci6n preestablecido es
demasiado largo o corto, puede aumentarlo o
disminuirlo despu_s de seleccionar AUTO COOK,
AUTO REHEAT o AUTO DEFROST. Usted s61o puede
cambiar el tiempo de cocci6n antes de que inicie la
cocci6n.
Por ejemplo, en AUTO REHEAT, despu6s de
seleccionar el tipo de alimento e introducir la
cantidad:
Para prolongar el tiempo de cocci6n:
TOQUE
POWER
USTED VE
Para reducir el tiempo de cocci6n:
una vez
TOQUE
POWER
(ejemplo para recalentar
automdticamente)
USTED VE
dos veces
Para restablecer el tiempo de cocci6n original:
TOQUE
POWER
USTED VE
tres veces
53
Page 54

Cbmo utilizar su horno de
microondas
Esta secci6n le proporciona las instrucciones para operar cada funci6n. Por favor, lea cuidadosamente estas
instrucciones.
COMO COClNAR A UN NIVEL ALTO DE ENERG|A
1. Coloque la comida dentro del homo y cierre
la puerta.
2. Toque COOK TIME. TOQUE
COOK
TIME
USTED VE
3. Introduzca el tiempo de cocci6n.
Ejemplo para 1 minuto, 30 segundos:
TOQUE
1
USTED VE
0
4. Encienda el homo. TOQUE USTED VE
AI terminar el tiempo de cocci6n:
C6mo cambiar las instrucciones
Puede cambiar el tiempo de cocci6n en
cualquier momento durante la coccibn si
repite los pasos 2, 3 y 4.
USTED VE
(se escuchar_in cuatro
sonidos)
54
Page 55

COCClON A DISTINTAS INTENSIDADES
Para obtener 6ptimos resultados, algunas recetas
necesitan distintas intensidades de cocci6n.
Cuanto m&s baja es la intensidad, m&s lenta es la
cocciSn. Cada bot6n numerado tambi_n representa
un porcentaje distinto de intensidad de cocciSn.
Muchas recetas de libros de cocina para microon-
das le indican mediante un nQmero, porcentaje o
nombre, la intensidad de cocciSn que debe utilizar.
El siguiente cuadro le da el porcentaje de intensi-
dad de cocci6n que cada bot6n numerado repre-
senta y el nombre de la intensidad de cocciSn que
por Io general se utiliza. Tambi_n le indica cu&ndo
usar cada intensidad de cocciSn. Siga las instruc-
clones de la receta o del paquete de alimentos si
dispone de elias.
NOTA: Consulte un libro de cocina confiable para
obtener los tiempos de cocci6n.
NOMBRE CUANDO USAR
10 = 100% de intensidad Alta • Calentar rapidamente alimentos preparados y con alto
total (autom&tica) contenido de agua, como sopas y bebidas
9 = 90% de intensidad • Cocinar pequedos trozos tiernos de carne, carne moll-
total da, trozos de ave, filetes de pescado y la mayoria de
las verduras
• Calentar sopas cremosas
8 = 80% de intensidad • Calentar arroz, pasta o guisados
total • Cocinar y calentar alimentos que necesitan una intensi-
dad de cocci6n menor que la alta (por ejemplo, pesca-
do entero y rollo de came molida)
7 = 70% de intensidad Media-Alta • Recalentar una sola porciSn de alimentos
total
6 = 60% de intensidad • Cocinar alimentos delicados como platos con queso y
total huevo, budines y natillas
• Cocinar guisados que no pueden revolverse, como la
lasa5a
5 = 50% de intensidad Media • Cocinar jam6n, ave entera y cazuelas
total • Cocci6n lenta de estofados
4 = 40% de intensidad • Derretir chocolate
total • Calentar pan y pasteles
3 = 30% de Media-Baja, • Descongelar alimentos como panes, pescado, carnes,
intensidad total Descongelar aves y alimentos precocidos
2 = 20% de intensidad • Ablandar mantequilla, queso y helado
total
1 = 10% de Baja • Colocar las frutas a temperatura ambiente
intensidad total
NOTA: Una vez que haya ingresado el tiempo de cocci6n, usted puede usar tambi6n el bot6n POWER
como un segundo temporizador de cocina ingresando "0" para la intensidad de cocci6n. El homo harA
la cuenta regresiva del tiempo de cocciSn que usted fija sin cocinar.
55
Page 56

COCCION A DISTINTAS INTENSIDADES (CONT.)
1. Coloque su comida en el homo y cierre la puerta.
2. Toque COOK TIME. TOQUE USTED VE
COOK
TIME
3. Introduzca el tiempo de cocci6n. TOQUE
Por ejemplo, para 7 minutos, 30 segundos: 7
USTED VE
0
4. Establezca la intensidad de cocci6n.
TOQUE USTED VE
Por ejemplo, para una intensidad de
cocci6n de150%:
TOQUE USTED VE
O
POWER
(repita esta operaci6n
hasta que aparezca el
nivel de la intensidad de
coccibn deseada)
56
Page 57

COCCION A DISTINTAS INTENSIDADES (CONT.)
5. Encienda el horno.
TOQUE
USTED VE
AI terminar el tiempo de cocci6n:
USTED ME
Cbmo cambiar las instrucciones
Puede cambiar el tiempo o la intensidad de coccibn
en cualquier momento si repite los pasos 2, 3
y/b 4y 5.
(se escuchar_n cuatro
tonos)
COMO COCINAR POR PASOS
Para mejores resultados, algunas recetas requieren
una intensidad de cocci6n para un determinado
lapso de tiempo y otra intensidad de cocci6n para
otro lapso de tiempo. Puede programar su homo
para cambiar de una intensidad de cocci6n a otro
automAticamente hasta tres pasos diferentes.
Puede programar sus funciones de cocci6n en
cualquier orden. Sin embargo, si utiliza AUTO
DEFROST, este deberA ser el primer paso a realizar.
1. Coloque la comida en el homo y cierre la puerta.
2. Toque COOK TIME. TOQUE
USTED VE
3. Introduzca el tiempo de cocci6n para el
primer paso.
Por ejemplo, para 7 minutos, 30 segundos:
TOQUE USTED VE
57
Page 58

COMO COCINAR POR PASOS (CONT.)
4. Establezca la intensidad de cocci6n para el TOQUE
primer paso.
POWER
USTED VE
Ejemplo, para un nivel de energla de cocci6n TOQUE
del 50%:
5
O
POWER
USTED VE
(repita la operacibn hasta
que aparezca la intensidad
de coccibn deseada)
5. Repita los pasos 2, 3 y 4 para programar el tiempo
y la intensidad de cocci6n para cada paso adicionaL
6. Encienda el homo. TOQUE USTED VE
Despu6s de haber completado el primer paso,
los siguientes se contar&n de manera regresiva.
AI terminar el tiempo de cocci6n:
(el primer paso si cocina en
dos pasos)
USTED VE
(se escuchardn 4 tonos)
Cbmo cambiar las instrucciones
Puede cambiar los tiempos de cocci6n o las
intensidades de coccibn de un paso en cualquier
momento despuds de que se inicie el proceso,
si repite los pasos 2, 3 y/6 4 y 5.
58
Page 59

COMO UTILIZAR AUTO COOK (COCCION AUTOMATICA)
Puede cocinar alimentos preparados para homos
de microondas seleccionando simplemente una
cantidad y categorla. AUTO COOK tiene tiempos y
niveles de energla de cocci6n preestablecidos para
7 categoHas (vea el esquema siguiente).
Para utilizar AUTO COOK, siga estos pasos:
1. Toque
3. Toque uno o mAs nQmeros del panel para intro-
ducir la cantidad.
1 Ejemplo para
1 taza (250 mL)
USTED
ME
Ejemplo para
1 taza (250 mL)
USTED
ME
una vez
4. Toque
2. Toque AUTO COOK de 1 a 7 veces para
seleccionar el tipo de alimento.
Ejemplo para
arroz
una vez
0
Toque un nt3mero del panel para seleccionar
el tipo de alimento.
Ejemplo para
arroz
USTED
VE
Ejemplopara
arroz
USTED
ME
(la cuenta
regresiva
puede variar)
NOTAS:
Si no introduce una cantidad en 2 segundos,
AUTO COOK le solicitara que elija una cantidad.
TendrA 1 minuto para introducir la cantidad y para
tocar START/ENTER. De no ser asi, AUTO COOK
se cancelar&.
• Si toca AUTO COOK 8 veces, la pantalla volver&
al programa para arroz.
• Si necesita mas o menos tiempo de cocciSn, no
toque el bot6n AUTO COOK nuevamente. Toque
el bot6n POWER antes de tocar START/ENTER.
(Vea "C6mo cambiar los tiempos prefijados de
cocci6n" en la secci6n "Conozca su homo de
microondas").
• Cuando cocine tocino, tenga en cuenta que las
diferencias de grasa, came, espesor y procesos
de curado afectar&n la cocci6n del tocino.
Generalmente los trozos regulares de tocino
promedian aproximadamente 16 rebanadas
por libra (454 g).
59
Page 60

COMO UTILIZAR AUTO COOK (COCCION AUTOMATICA) (CONT.)
Esta tabla le muestra c6mo seleccionar un tipo de alimento y las cantidades que puede elegir para cada tipo.
TOQUE TOQUE EL NUMERO
ALIMENTO AUTO COOK* O DEL PANEL CANTIDADES QUE PUEDE ELEGIR
Arroz 1 vez 1 0.5, 1, 1.5 6 2 tazas**
(125 mL,250 mL, 375 mL 6 500 mL)
Verduras frescas 2 veces 2 1 a 4 tazas (250 mL a 1 L)
Verduras congeladas 3 veces 3 1 a 4 tazas (250 mL a 1 L)
Verduras enlatadas 4 veces 4 1 a 4 tazas (250 mL a 1 L)
Tocino 5 veces 5 1 a 6 piezas, espesor normal
Comidas congeladas 6 veces 6 10 a 12 oz. 6 20 a 21 oz. ***
(284 a340 g 6 567a 595 g)
Papas al homo 7 veces 7 1 a 4 papas, 10 a 13 oz. c/u
(284 a369 g)
* Debe tocar AUTO COOK una vez antes de elegir el tipo de comida.
** Programe 0.5 taza presionando "0" y "5" o s61o "0" o s61o "5". Programe 1 taza presionando "1" y "0" o solo "1". Programe 1.5
taza presionando "1" y "5". Programe 2 tazas presionando "2" y "0" o s61o "2".
*** Programe 10 a 12 oz. presionando "1% Programe 20 a 21 oz. presionando "2".
60
Page 61

COMO UTILIZAR AUTO REHEAT (RECALENTADOAUTOMATICO)
Puede volver a calentar alimentos preparados
para hornos de microondas simplemente
seleccionando una cantidad y categorla. AUTO
REHEAT tiene tiempos y niveles de energia de
cocci6n preestablecidos para 5 categorlas (vea la
tabla siguiente).
Para utilizar AUTO REHEAT, siga estos pasos:
1. TOQUE
3. TOQUE un nQmero del panel para introducir
la cantidad.
1 Ejemplo para
1 rebanada
USTED
VE Ejemplo para
1 rebanada
4. TOQUE
USTED
VE
1 vez
USTED
VE
(la cuenta
regresiva puede
variar)
2. TOQUE AUTO REHEAT de 1 a 5 veces para
elegir el tipo de comida.
Ejemplo para
rebanada de pizza
1 vez
O
TOQUE un nQmero del panel para elegir el tipo
de comida.
1 Ejemplo para
rebanada de pizza
USTED
VE
Ejemplo para
rebanada de
pizza
NOTAS:
• Si no introduce una cantidad en 2 segundos,
AUTO REHEAT le solicitar& que elija una
cantidad. Tendr& 1 minuto para introducir una
cantidad y tocar START/ENTER. De no ser asl,
AUTO REHEAT se cancelar&
• Si toca AUTO REHEAT 6 veces, la pantalla
volver& al programa para rebanada de pizza.
• Si necesita m&s, o menos tiempo de cocci6n, no
toque AUTO REHEAT nuevamente. Toque el
bot6n de POWER antes de tocar START/ENTER.
(Vea "C6mo cambiar los tiempos prefijados de
cocci6n" en la secci6n "Oonozca su homo de
microondas").
• Cuando caliente nuevamente un muffin o bagel
grande (4 onzas [113 g]), utilice el programa para
2 piezas. El programa para 1 pieza calienta
1 muffin o bagel de tama_o regular, 6 2 panes
de cenar pequedos.
Esta tabla le mostrar_ cSmo elegir eltipo de comida y las cantidades que puede seleccionar para cada tipo.
TOQUE O TOQUE UN NUMERO CANTIDADES QUE PUEDE
COMIDA AUTO REHEAT* DEL PANEL ELEGIR
Rebanada de pizza 1 vez 1 1 a 3 rebanadas, 5 onzas
(142 g) cada una
Sopa/Salsa 2 veces 2 1 a 4 tazas (250 mL a 1 L)
Guiaados 3 veces 3 1 a 4 tazas (250 mL a 1 L)
Alimentos horneados 4 veces 4 1 a 6 piezas, 2 onzas (57 g)
cada una
Plato (de comida) 5 veces 5 1 servida (6 1 plato)
* Debe tocar AUTO REHEAT una vez antes de elegir el tipo de comida,
61
Page 62

COMO UTILIZAR AUTO DEFROST (DESCONGELADOAUTOMATICO)
Puede descongelar alimentos si elige una cate-
gorla y establece un peso. AUTO DEFROST tiene
tiempos y niveles de energla de cocci6n
preestablecidos para 3 categorfas (vea la tabla
siguiente).
Para utilizar AUTO DEFROST, realice los
siguientes pasos:
1. TOQUE
una vez
USTED
VE
2. TOQUE AUTO DEFROST de 1 a 3 veces para
seleccionar el tipo de comida.
Ejemplo para
carnes
1 vez
O
TOQUE un nQmero del panel para elegir el tipo
de comida.
Ejemplo para carnes
USTED
VE
Ejemplo para
carnes
4. TOQUE
USTED
VE
(cuenta regresiva
puede variar)
NOTAS:
• Si no introduce un peso en 2 segundos, AUTO
DEFROST le solicitara que introduzca un peso.
TendrA 1 minuto para introducir el peso y para
tocar START/ENTER. De no ser asl, AUTO
DEFROST se cancelara.
• Si introduce un peso mayor que el peso mas alto
permitido para su programaci6n de alimentos, se
escucharan 3 tonos y aparecera en la pantalla
"RETRY" (Intente de nuevo) cuando toque
START/ENTER.
• Si toca AUTO DEFROST 4 veces, la pantalla
volverA al programa para Carnes.
• Si necesita mas o menos tiempo de
descongelado, no toque AUTO DEFROST
nuevamente. Toque el bot6n de POWER antes de
tocar START/ENTER. (Vea "C6mo cambiar los
tiempos prefijados de cocci6n" en la secci6n
"Conozca su homo de microondas").
• Vea la "Tabla de descongelado automAtico"
mas adelante en esta secci6n para ver las
instrucciones para descongelar cada alimento.
• Para descongelar los articulos que no se
encuentren en la "Tabla de descongelado
automatico," utilice el 30% de la energla
de cocci6n. Consulte un recetario confiable
para obtener informaci6n acerca de la
descongelaci6n.
3. TOQUE el(los) nQmero(s) de botSn para
introducir el peso.
USTED
ME
2 veces
Ejemplopara
%11bs (500 g)
Ejemplopara
%11bs (500 g)
Para un descongelado parejo y
completo
• La forma del empaque afecta la rapidez con la
que se descongelarAn los alimentos. Los
empaques con poca profundidad se
descongelarAn mas rapido que un envase
profundo.
• Separe las piezas conforme empiecen a
descongelarse los alimentos. Las piezas
separadas se descongelan de manera mAs uni-
forme.
• Utilice pequedos pedazos de papel aluminio para
proteger partes de los alimentos tales como alas
de polio, los extremos de las patas, colas de
pescado o las Areas que empiecen a calentarse.
Cerci6rese de que el papel aluminio no toque los
lados, el fondo o la parte superior del homo.
62
Page 63

COMO UTILIZAR AUTO DEFROST (DESCONGELADO
AUTOMATICO) (CONT.)
Esta tabla le indica la manera de elegir el tipo de comida y los pesos que puede establecer para cada tipo.
TOQUE O TOQUE EL NUMERO PESOS QUE PUEDE ESTABLECER
COMIDA AUTO DEFROST* DEL PANEL (en d_cimas de libra)
Carnes 1 vez 1 0.1 a 6.6 (45 g a 2994 g)
Ayes 2 veces 2 0.1 a 6.6 (45 g a 2994 g)
Pescado 3 veces 3 0.1 a 4.4 (45 g a 1998 g)
* DebetocarAUTODEFROSTunavezantesdeelegir el tipo de comida.
TABLA DE DESCONGELADO AUTOMATICO
Programacibn para carnes
ALIMENTO INSTRUCClONES ESPEClALES
Came de res
Came molida
Came molida, Tortitas
Medallones, Lomo en bisteces,
Estofado al homo, Estofado de
espaldilla, Estofado de came de
costillas, Estofado de folios
de came
Estofado
Cordero
Cubos para estofado
Chuletas (1 pulg [2.5 cm]
de grueso)
Cerdo
Chuletas (_ pulg [13 mm] de
grueso), Hot Dogs, Costillas de
cerdo, Costillas estilo campestre,
Estofado de Iomo (sin hueso),
Salchicha
Salchich6n
Se deben cubrir con papel aluminio las partes grasosas o angostas de
carnes grandes de forma irregular y cortes de came grasosa al inicio de
los ciclos de descongelado.
No descongele menos de ¼de libra (113 g).
No descongele menos de dos tortitas de 4 onzas (113 g).
Coloque en una parrilla para rostizar en microondas.
Coloque en un plat6n para homear en microondas.
Coloque en un platSn para homear en microondas.
Coloque en una parrilla para rostizar en microondas.
Coloque en una parrilla para rostizar en microondas.
Coloque en un plat6n para hornear en microondas.
Contint_a en la pdginasiguiente
63
Page 64

TABLA DE DESCONGELADO AUTOMATICO (CONT.)
Programacibn para aves
AMMENTO INDICACIONES ESPECIALES
Polio
Entero
(hasta 9-_ Ibs (4.3 kg)
Coloque el polio con la pechuga hacia arriba en una parrilla especial
para rostizar para microondas. Termine de descongelarlo
sumergi6ndolo en agua fria. Retire las menudencias cuando el polio
est6 parcialmente descongelado.
En piezas ColSquelo en una parrilla para rostizar en microondas.
Termine de descongelarlo sumergi6ndolo en agua frfa.
Codornices
Enteras ColSquelas en una parrilla para rostizar en microondas. Termine de
descongelarlas sumergiendolas en agua frfa.
Pavo
Pecho Col6quelo en una parrilla para rostizar en microondas. Termine de
(menos de 6 Ibs [2.7 kg]) descongelarlo sumergiendolo en agua frfa.
Programacibn para pescados
AMMENTO INSTRUCCIONES ESPECIALES
Pescados
Filetes
Bisteces
Entero
Mariscos
Cangrejo, Colas
de langosta,
Camar6n, Carlo
de hacha
Coloque en un plat6n para homear en microondas. Separe
cuidadosamente los filetes bajo agua frla.
Coloque en un platSn para homear en microondas. Haga correr
agua frfa sobre el pescado para terminar de descongelar.
Coloque en un platSn para homear en microondas. Cubra la cabeza
y la cola con papel aluminio. No deje que el papel toque los lados
del homo. Para terminar de descongelar sumerja en agua frfa.
Coloque en un plat6n para homear en microondas.
64
Page 65

CONSEJOS DE DESCONGELADO
• Cuando utilice AUTO DEFROST,
(Descongelado Autom&tico), necesita introducir el
peso neto (el peso del alimento menos el del
recipiente). Introduzca el peso Io m&s cercano a
¼oIb (45 g).
• $61o utilice el AUTO DEFROST para alimentos
crudos. AUTO DEFROST le brinda los mejores
resultados cuando el alimento a descongelar estA
completamente congelado. Si el alimento est&
parcialmente descongelado, siempre programe
un peso menor (para un perlodo de desconge-
lamiento menor), para evitar que el alimento se
cueza.
• Para obtener mejores resultados, se incluye un
tiempo de reposo preestablecido en el perlodo
de descongelamiento. Esto pudiera hacer que el
tiempo de descongelamiento parezca m&s largo
de Io esperado. (Para mayor informaci6n acerca
del perlodo de reposo, consulte la secci6n
"Consejos para cocinar con microondas," en la
seccion "Gula para cocinar").
Tabla de conversibn de peso
Probablemente est6 usted acostumbrado a que el
peso de los alimentos se describa en libras y onzas
que son fracciones de 1 libra (por ejemplo 4 onzas
equivalen a ¼ de libra). Sin embargo, para poder
programar el peso del alimento en el AUTO
DEFROST, debe especificarlo en libras y d_cimas
de libra.
Si el peso en el empaque del alimento se expresa
en fracciones de libra, usted puede utilizar la
siguiente tabla para convertir el peso a d_cimas.
PESO EN DI=CIMAS
0.10
0.20
0.25 Un cuarto de libra
0.30
0.40
0.50 Media libra
0.60
0.70
0.75 Tres cuartos de libra
0.80
0.90
1.00 Una libra
iil;iiiiiii_iiii_UIVA_i_!iiii_iiiii!i_iii!iii! PESOEQUIVALENTEENGRAMOS
45
91
113
136
181
227
272
318
34O
363
4O8
454
65
Page 66

COMO UTILIZAR POPCORN (PALOMITASDE MA|Z)
Usted puede preparar palomitas de mafz
empacadas comercialmente para homo de
microondas con s61o oprimir un bot6n. La
cantidad de veces que toque el bot6n determina
el tamafio de la bolsa de palomitas que su homo
cocinar&
Para obtener mejores resultados:
• Cocine s61o una bolsa a la vez.
• Si est& usando un recipiente especial para
preparar palomitas de mafz en microondas, siga
las instrucciones del fabricante.
Para utilizar el bot6n POPCORN siga los
siguientes pasos:
1. Coloque la bolsa en el centro del plato
giratorio.
2. Toque el bot6n POPCORN de 1 a 3 veces para
seleccionar el tamafio de la bolsa.
NOTAS:
• Si toca el bot6n POPCORN 4 veces, la pantalla
regresar& al programa de 3.5 onzas (100 gr).
• No necesita tocar START/ENTER para iniciar
la operaci6n del horno. El homo iniciarA la
operaci6n en 5 segundos.
Existen diferencias entre las disti
tas marcas de palomitas de maiz
Qu_ tan bien se cocinen sus palomitas, depender_
de la marca y de la cantidad de grasa que tengan.
Pruebe con varias marcas para decidir cuM se
cocina mejor. Para obtener mejores resultados use
bolsas nuevas de palomitas de mafz.
USTED
VE
1 vez
Ejemplo para
3.5 onzas (100 g)
Ejemplo para
3.5 onzas
(100 g)
(la cuenta
regresiva
puede variar)
Esta tabla le muestra c6mo seleccionar un
tamafio de bolsa.
TAMAI_IO DE LA BOLSA TOQUE EL BOT6N
(onzas) POPCORN
3.5 (100 g) 1 vez
3.0 (85 g) 2 veces
1.75 (50 g) 3 veces
66
Page 67

Cbmo cuidar su horno de
microondas
Para asegurarse de que su horno de microondas se vea y funcione bien por mucho tiempo, debe darle el
mantenimiento apropiado. Para un cuidado adecuado, por favor siga cuidadosamente estas instrucciones.
Para las superficies
interiores: Lave
frecuentemente con
agua tibia jabonosa y
una esponja o lienzo
suave. Utilice sola-
mente jabones suaves,
no abrasivos o un
detergente suave.
Asegt_rese de
mantener limpias las
dreas donde la puerta y el marco del horno
convergen cuando estd cerrado. Limpie bien con
agua limpia. Con el tiempo pueden aparecer
manchas en las superficies debido a particulas de
comida salpicadas al cocinar. Esto es normal.
Para manchas dificiles,
hierva una taza de agua
en el homo durante 2 6
3 minutos. El vapor
suavizar& las manchas.
Para eliminar olores
dentro del homo, hierva
una taza de agua con
unas gotas de jugo de
lim6n o vinagre.
Para las superficies
exteriores y el panel
de control: Utilice un
lienzo suave con
limpiador de cristales
en aerosol. Aplique el
limpiador de cristales
en aerosol en el lienzo
suave; no Io aplique
directamente en el
horno.
NOTA: Los limpiadores abrasivos, fibras de
acero o lana, trapos viejos, algunas toallas de
papel, etc., pueden dadar el panel de control y las
superficies interiores y exteriores del horno.
Bandejagiratoda
devldrlo
=porte del
plato giratori(
Para limpiar la bandeja
giratoria y el soporte de
la bandeja giratoria, lave
con agua suave jabonosa;
para &reas muy man-
chadas, utilice un
limpiador suave y una
esponja para tallar. El
plato giratorio y el
soporte del plato giratorio
son resistentes a
lavavajillas.
67
Page 68

COMO INSTALAR Y CUIDAR LOS FILTROS
Peligro de Choque El_ctrico
Desconecte el suministro de energia antes
de quitar los filtros.
Vuelva a colocar todos los paneles antes
de hacer funcionar.
No seguir estas instrucciones puede
ocasionar la muerte o choque el_ctrico.
Se deben quitar con frecuencia los filtros de grasa
(aluminio) para limpiarlos, al menos una vez al rues.
Puede ordenar refacciones (N0mero de parte
4393862) disponibles en el centro de servicio
Sears mAs cercano.
NOTA: Si usted instala la combinaci6n microondas
campana en la modadlidad Recirculaci6n, se
recomienda que instale un filtro de carb6n para
maximizar el rendimiento de la filtraci6n de oloers.
Su combinaci6n microondes campana no viene
con filtros de carb6n instalados. Puede ordenar
los filtros de carb6n (N0mero de parte 8169645) en
su centro de servicio Sears mas cerano. El filtro de
carb6n no puede limpiarse y debe reemplazarse
cada 6 a 12 meses.
1. Desenchufe el homo de microondas o
desconecte el suministro de energia electrica.
2. Para quitar los filtros de grasa (aluminio), empuje
cada filtro hacia arriba,
en lado opuesta a la
lengQeta. Sujete la
lengQeta y jale el filtro
hacia el lado opuesto.
\,_ Jale el filtro hacia abajo
para quitarlo.
Empuje
hacia arriba
3. Para quitar los filtros de carbbn, empuje la parte
de atr&s de cada filtro.
_\,_ Esto liberar& la parte
frontal del filtro, del
borde inferior. Haga
girar la parte frontal del
filtro hacia abajo y
desllcelo hacia afuera.
Borde
inferior
4. Remoje los filtros de grasa en agua caliente y un
detergente suave.
Restri6guelos y agltelos
para eliminar la
suciedad y grasa
incrustada. Enju&guelos
bien y sac0dalos para
que se sequen. No use
amoniaco, agentes de
limpieza corrosivos
como limpiadoresde
homo con base de lejJa
ni los coloque en lalavavajillas. Elfllbo se pondra
negro o podria de£tarse.
5. Para cambiar los filtros de carbbn, empuje
cada filtro hacia la
parte de atr&s de la
abertura, entre los bor-
des de arriba y de
abajo, contra los
resortes. Haga girar la
parte frontal del filtro
hacia arriba contra el
borde superior. Deslice
el filtro hacia adelante
mientras Io empuja
contra el borde superior. El filtro quedarA
sostenido por el resorte entre los bordes.
6. Para volver a colocar los filtros de grasa,
deslice cada filtro dentro
del lado exterior del orifi
cio para filtros.
Aseg0rese de deslizar el
lado del filtro que no
tiene la leng0eta. Sujete
la lengQeta con la otra
mano. Empuje hacia
arriba el lado del filtro
con la leng0eta y
deslice el filtro hacia el
otto lado del orificio para que encaje en su lugar.
7. Vuelva a conectar el suministro de energia o
enchufe el homo de microondas.
NOTA: No haga funcionar el extractor sin que los
filtros de grasa est6n en su lugar.
68
Page 69

COMO CAMBIAR LAS LUCES DEL HORNO Y DE LA
SUPERFICIE PARA PREPARACION DE ALIMENTOS
La _z de
s supe'fc e }_a_a_.....
ISI[.=II_l[IC=l.)II ,:_
I. Desenchufe el homo de mioroondas o
desconecte el suministro de energia.
2. Quite el tornillo de
montaje de la cubierta
del foco y retrela con
cuidado.
Tornillo
de montaje
3. Cambie el(los) foco(s) por uno(s) de 30 watts con
portalamparas (NQmero de parle 4393681),
el cual puede conseguir en su centro de servicio
Sears.
4. Vuelva a colocar la cubierta del foco y el tornillo
de montaje.
5. Enchufe el homo de microondas o reconecte el
suministro de energla.
Ls luz del
I0[II0
1. Desenchufe el homo de microondas o
desconecte el suministro de energia.
2. Quite los dos
torniilos de montaje
de las rejillas de
ventilaci6n que se
encuentran
arriba de la cubierta
(los dos tornillos
exteriores).
4. Levante la cubierta
del foco.
5. Cambie el foco por uno de 30 watts con
portalamparas (NQmero de parte 4393681),
el cual puede conseguir en su centro de
servicio Sears.
6. Cierre la cubierta del foco.
3. Recorra la rejilla
hacia adelante y
lev&ntela para
quitarla.
I
7.
Deslice la parte
superior de la rejilla de
ventilaci6n a su iugar.
Toque la parte inferior
hasta que quede
perfectamente
colocada. Vueiva a
colocar los tomillos de
montaje.
8. Enchufe el homo de microondas o reconecte el
suministro de energla.
69
Page 70

Guia para cocinar
CONSEJOS PARA COCINAR CON EL HORNO DE
MICROONDAS
• Si usted aumenta o disminuye la cantidad de
alimentos que prepara, el tiempo requerido para
cocinarlos tambi6n cambiar&. Por ejemplo, si
usted usa el doble de una receta, agregue un
poco m&s de la mitad del tiempo de cocci6n
original. Verifique si est& cocido y, si es nece-
sario, agregue m&s tiempo en incrementos
pequedos.
[_C/a c_e/a Ise_sto
• Cuanto menor es la temperatura del alimento
que usted coloca en el homo de microondas,
mayor serA el tiempo requerido para su cocci6n.
Los alimentos a temperatura ambiente se reca-
lentarAn m&s r&pido que los alimentos que estAn
a la temperatura del refrigerador.
Oo spos @o de/afs esQ
• Los alimentos con mucha grasa o azt_car se
calentar_n m&s r_pido que los alimentos con alto
contenido de agua. La grasa y el azScar alcanzan
una temperatura m&s alta que el agua durante el
proceso de cocci6n.
• Cuanto m&s denso es el alimento, mayor es el
tiempo requerido para calentarlo. Alimentos "muy
densos" como las carnes necesitan m&s tiempo
para recalentarse que los alimentos mas livianos
o m&s porosos como pasteles esponjosos.
• Las piezas mds peque_as de alimento se coci-
nar_n m&s r&pido que las piezas mas grandes y
piezas con la misma forma se cocinar&n en
forma mAs pareja que los alimentos con forma
irregular.
• En los alimentos con grosores diferentes, las
partes m&s delgadas se cocinar&n m&s rapido
que las partes mAs gruesas. Coloque las partes
m&s delgadas de las alas y patas de polo en el
centro del plato.
Rs/;ac@y af ta=e de
• Cuando usted rota o revuelve los alimentos, el
calor se distribuye rapidamente al centro del
plato y evita que los bordes del alimento se
recocinen.
0,= IllllellI@;_,
Tape los alimentos para:
• Reducir salpicaduras
• Acortar los tiempos de cocci6n
• Retener la humedad de los alimentos
Todas las tapas que permiten pasar las microondas
son adecuadas. Para m&s informaci6n acerca de
los materiales que permiten el paso de las
microondas, vea la secci6n "Conozca su homo de
microondas".
• Muchos alimentos (por ejemplo: papas al
homo, salchichas, yemas de huevo y algunas
frutas) est&n cubiertos por una piel o membrana
apretada. Esto puede causar que los alimentos
estallen por la acumulaci6n de vapor bajo la
membrana mientras se cocinan. Para aliviar la
presi6n y prevenir los estallidos, trinche estos
alimentos con un tenedor, palillo de c6ctel o un
palillo de dientes antes de cocinarlos.
'XeF x@ :fe '@es0
• Siempre deje reposar los alimentos por un
rato despu6s de cocinar. El perlodo de reposo
despu_s de cocinar y descongelar siempre
mejora el resultado ya que la temperatura se
distribuye en forma pareja a trav6s del alimento.
El intervalo del tiempo de reposo depende del
volumen y la densidad del alimento. A veces
puede ser tan corto como el tiempo que le Ileva
sacar los alimentos del homo y servirlos en la
mesa. Sin embargo, con alimentos mAs volumi-
nosos y m&s densos, el intervalo de tiempo de
reposo puede ser tan largo como de 10 minutos.
{}ist il ¢ @ @ bs alisse tes
Para resultados 6ptimos, distribuya los alimentos
en forma pareja sobre el plato. Usted puede hacer
esto de varias maneras:
• Si usted estb cocinando varias piezas del
mismo tipo de alimento, como papas al homo,
colbquelas en forma de anillo para una cocci6n
uniforme.
• Cuando cocina alimentos con forma o espe-
7O
Page 71

CONSEJOS PARA COClNAR CON EL HORNO DE
MICROONDAS (CONT.)
sot irregular, tales como pechugas de polio,
coloque las partes m&s peque5as y delgadas
hacia el centro del plato donde se calentar&n en
@timo lugar.
• Apile las rodajas delgadas de came una sobre
otra.
• Cuando usted cocina o recalienta pescados
enteros, haga un corte en la piel - esto evita
que se quiebre.
• No deje que los alimentos o los recipientes
toquen el techo o los costados del homo. Esto
evitar& la posible formaci6n de chispas.
No deben usarse recipientes de metal in el homo
de microondas. Sin embargo, hay algunas excep-
ciones. Si usted ha comprado alimentos que est&n
pre-empaquetados en un recipiente de papel de
aluminio, siga las instrucciones del paquete. Si usa •
recipientes de papel de aluminio, los tiempos de
cocci6n pueden ser m&s largos porque las
microondas penetraran s61o la parte superior del
se dade.
• Use s61o recipientes que no est&n da_ados.
• No use recipientes m&s altos de ¾de pulg
(19 mm).
• El recipiente debe estar Ileno por Io menos hasta
la mitad.
• Para evitar que se formen chispas, debe haber
como minimo ¼de pulg (.64 cm) entre el recipiente
de aluminio y las paredes del horno Io mismo que
entre dos recipientes de aluminio.
• Siempre coloque el recipiente sobre la bandeja
giratoria.
• El recalentamiento de alimentos en recipientes
de papel de aluminio Ileva el doble de tiempo que
recalentarlos en recipientes de pl&stico, vidrio,
porcelana o papel. El tiempo requerido para que
los alimentos est6n listos depende del tipo de
recipiente que usted usa.
Deje reposar los alimentos por 2 a 3 minutos
despu_s de calentar para que el calor se distribuya
en forma pareja a traves del recipiente.
alimento. Si usted usa recipientes de aluminio que _t_ ,_
no tienen instrucciones en el paquete, siga las L q[_@ $/H_(5_ [10 f_(_/oe c;o_ F@ e_ 8,_ l_0 /%0
siguientes indicaciones:
• Coloque el recipiente en un taz6n de vidrio y
agregue un poco de agua para que cubra la
base del recipiente, a no m&s de '/44de pulg
(.64 cm) de alto. Esto asegura un calentamiento
parejo en la base del recipiente.
• Siempre quite la tapa para evitar que el homo
• No envase alimentos en el horno. Los frascos de
vidrio cerrados pueden explotar, resultando en
da_os al homo.
• No use el horno de microondas para esterilizar
objetos (mamaderas, etc.). Es dificil mantener el
homo a la temperatura alta requerida para una
esterilizaci6n segura.
71
Page 72

Preguntas y Respuestas
PREGUNTAS RESPUESTAS
6Puedo poner en operaci6n mi homo de microon-
das sin el plato giratorio o voltear este
para colocar un plato mas grande?
6Puedo utilizar una rejilla en mi homo de microon-
das para poder recalentar o cocinar en
dos niveles al mismo tiempo?
6Puedo utilizar sartenes de metal o aluminio indis-
tintamente en mi homo de microondas?
No. Si quita o voltea el plato giratorio obtendr&
resultados poco satisfactorios. Los platos utilizados
en su homo deben ajustarse a la medida del plato
giratorio.
Puede utilizar una rejilla s61o si 6sta forma parte de
su homo de microondas. Si utiliza una rejilla ajena a
su homo de microondas podria obtener resultados
poco satisfactorios y/o provocar la formaci6n de
chipas.
Puede utilizar papel aluminio para protecci6n (utilice
pedazos pequedos y sin arrugas), alambres para
brochetas y charolas de papel aluminio poco pro-
fundas (si la charola tiene _ de pulgada [19mm] de
profundidad o menos, debe Ilenarse al menos hasta
la mitad con alimentos para absorber la energla de
las microondas). Nunca permita que metal alguno
toque las paredes o la puerta.
6Es normal que el plato giratorio se mueva en Si. El plato giratorio se mueve en el sentido de las
cualquier direcci6n? manecillas del reloj o en direcci6n contraria, esto
depende de la rotaci6n del motor al momento de
iniciarse el ciclo de cocci6n.
Algunas veces la puerta de mi homo de microon- Esta apariencia es normal y no afecta el fun-
das se ve ondulada. _,Esesto normal? cionamiento de su homo.
6Qu6 son esos zumbidos que se oyen cuando mi Lo que usted escucha es el ruido del transformador
homo de microondas estA funcionando? cuando el tubo magnetr6n estA en movimiento.
_,Por qu_ se calienta el plato cuando cocino en 61? AI calentarse los alimentos estos conduciran el
Pens6 que esto no deber[a suceder, calor al plato. Tenga a la mano guantes o almohadi-
Ilas aislantes para sacar los alimentos despu6s de
cocinados.
6Qu6 significa "tiempo de reposo"? "Tiempo de reposo" significa que los alimentos
deben retirarse del horno y cubrirse durante un
tiempo adicional para permitir que la cocci6n ter-
mine. Esto deja libre al horno para seguir cocinan-
do.
6Por qu6 sale vapor por la salida del extractor? Es normal que se produzca vapor al cocinar. El
horno de microondas ha sido disedado para sacar
este vapor por la salida del extractor.
6Puedo hacer palomitas de malz en mi homo de
microondas? 6C6mo puedo obtener los mejores
resultados?
Si. Haga palomitas de ma[z especiales para horno
de microondas siguiendo las instrucciones del fabri-
cante o utilizando el bot6n POPCORN
(PALOMITAS). No utilice bolsas de papel normales.
Utilice la "prueba de o[do" deteniendo la operaci6n
del horno tan pronto como el sonido de los granos
reventando decrezca a un "pop" cada 16 2 segun-
dos. No vuelva a cocinar los granos que no hayan
reventado. No haga palomitas en recipientes de
vidrio.
72
Page 73

Diagnbstico y solucibn de
problemas
La mayorfa de los problemas al cocinar a menudo son causados per pequeSas cosas que usted puede
encontrar y arreglar sin herramientas de ningQn tipo. Revise las siguientes listas detaltadas a continuaci6n yen
la pr6xima pagina antes de pedir ayuda o servicio. Si usted aQn necesita ayuda, vea los nQmeros tetef6nicos
gratuitos de Sears, que se encuentran en la contraportada.
EL HORNO DE MICROONDAS NO FUNCIONA
PROBLEMA CAUSA
Nada funciona. • El cable de alimentaci6n no est& enchufado en un contacto de tres terminales
con conexi6n a tierra. (Vea la secciSn "Requerimientos el6ctricos" en la p&gi-
na 41 y la secciSn "ConexiSn electrica" en la p&gina 45.)
• Se ha quemado algQn fusible en la casa o se ha disparado el disyuntor.
• La empresa de servicios electricos ha tenido una interrupciSn en el suministro
de electricidad.
El homo de microondas
no funciona.
• Usted est& usando el horno como temporizador. Toque OFF/CANCEL para
anular el temporizador de cocina.
• La puerta no estA bien cerrada o asegurada.
• Usted no toc5 START/ENTER.
• Usted no sigui5 las instrucciones con exactitud.
• Una funciSn que usted fij5 anteriormente todavfa estA funcionando. Toque
OFF/CANCEL para anular dicha selecci6n.
TIEMPOS DE COCClON
PROBLEMA CAUSA
Los alimentos no est&n
bien cocidos.
• El suministro electrico de su casa o los contactos de pared son bajos o m&s
bajos de Io normal. La empresa de servicios electricos puede indicarle si el
voltaje del contacto es bajo. El electricista o t6cnico de servicio puede
indicarle si el voltaje del contacto es bajo.
• La intensidad de cocciSn no est& en el ajuste recomendado. Revise el cuadro
en la pAgina 55.
• Usted no ha dejado suficiente tiempo de cocci6n para la cantidad de alimen-
tos que estA cocinando. Las cantidades m&s grandes de alimentos necesitan
tiempos de cocci6n mAs prolongados.
La pantalla muestra un
tiempo de cuenta
regresiva pero el horno
no est& cocinando.
• La puerta del homo no est& completamente cerrada.
• Usted ha fijado los controles como un temporizador de cocina. Toque
OFF/CANCEL para anular el temporizador de cocina.
73
Page 74

BANDEJA GIRATORIA
PROBLEMA CAUSA
La bandeja giratoria no
funciona.
• La bandeja giratoria no esta en su debido lugar. Su posici6n correcta debe
ser con el lado piano hacia arriba y bien asentada en el eje central.
• El soporte no esta funcionando correctamente. Saque la bandeja giratoria y
ponga el homo a funcionar de nuevo. Si el soporte todavia no se mueve,
Ilame a un t_cnico autorizado para que Io repare. Los resultados de cocci6n
sin la bandeja giratoria pueden ser insatisfactorios.
SONIDOS
PROBLEMA CAUSA
Usted no escucha • Usted no ha ingresado el comando correcto.
el sonido de • Usted ha apagado el sonido. (Vea la secci6n "Sedales audibles" en la
programaci6n o p&gina 48.)
de fin de ciclo.
MENSAJES EN LA PANTALLA
PROBLEMA CAUSA
La pantalla muestra • Ha habido una interrupci6n en el suministro electrico. Vuelva a programar el
intermitentemente":", reloj. (Vea la secci6n "C6mo programar el reloj" en la pAgina 51.)
Si ninguna de 6stas es la causa del problema, vea la secci6n "NQmeros telef6nicos gratuitos de Sears" en la
contraportada.
74
Page 75

f •
Indlce
Este fndice est& en orden alfab6tico. Contiene todos los temas incluidos en este manual al igual que la(s)
p&gina(s) donde puede encontrar cada tema.
TEMA PAGINA TEMA PAGINA
CAMBIO DE LAS LUCES DEL HORNO
Y DE LA SUPERFICIE DE COCCION ...................... 69
COMO PROBAR SU HORNO DE MICROONDAS...44
COMO PROBAR SU VAJILLA O
SUS UTENSILIOS DE COCINA ................................ 45
CONSEJOS
Cocci6n ............................................................ 70, 71
Descongelaci6n ..................................................... 65
Operaci6n .............................................................. 45
CUADROS
Auto defrost (descongelaci6n automatico) ............ 63
Cocci6n automatica ............................................... 60
Conversi6n de peso ............................................... 65
Intensidades de cocci6n ........................................ 55
Popcorn (palomitas de maiz) ................................. 66
Recalentado autom_tico ........................................ 61
CUIDADO DE SU HORNO DE MICROONDAS ........67
DIAGNOSTICO Y SOLUCION DE PROBLEMAS ..73, 74
EXTRACTOR DE AIRE ............................................. 50
FILTROS .................................................................... 68
COMO FUNCIONA SU HORNO
DE MICROONDAS .................................................... 44
GARANTiA ................................................................. 37
INSTRUCCIONES PARA LA INSTALACION ......42, 43
INTERFERENCIA ELECTROMAGNg:TICA ............... 44
LUCES
C6mo cambiarlas ................................................... 69
C6mo usadas ......................................................... 50
NOMEROS TELEFONICOS GRATUITOS..Contraportada
PANEL DE CONTROL ......................................... 47, 48
ADD ONE MINUTE (un minute m_s) .................... 53
AUTO COOK (cocci6n autom_tica) ................. 59, 60
AUTO DEFROST
(descongelaci6n automatica) ........................... 62, 63
AUTO REHEAT (recalentado autom_tico) ............... 61
Botones numerados ............................................... 47
Cambio de los tiempos prefijados de cocci6n ....... 53
Caracteristica de demostraci6n/aprendizaje .........49
CLOCK (reloj) ........................................................ 51
Cocci6n a intensidad alta ...................................... 54
Cocci6n a distintas intensidades ...................... 55-57
Cocci6n por etapas .......................................... 57, 58
Cron6metro ............................................................ 52
Extractor de aire .................................................... 50
Interrupci6n de la cocci6n ...................................... 49
Luz ......................................................................... 50
OFF/CANCEL (apagar/cancelar) ........................... 47
Pantalta .................................................................. 47
POPCORN (palomitas de maiz) ............................ 66
POWER (intensidad) .................................. 53, 55-57
Seguro para niSos ................................................. 49
START/ENTER (encender/introducir) .................... 47
TIEMPO DE COCCION ......................................... 53
PAPEL DE ALUMINIO ......................................... 71, 72
PARTES Y CARACTERiSTICAS
Bandeja giratoria ..................... 43, 44, 45, 46, 71, 74
Etiqueta con guia para cocinar .............................. 46
Magnetr6n ........................................... 37, 38, 44, 72
Manija de la puerta ................................................ 46
Placa con et nQmero del modelo y de la serie ......46
Rejilla de ventilaci6n .............................................. 46
Sistema de traba de seguridad de la puerta ......... 46
Ventana .................................................................. 46
PREGUNTAS Y RESPUESTAS ................................ 72
REQUERIMIENTOS ELC:CTRICOS .......................... 41
SEGURIDAD ........................................................ 39-41
SENALES AUDIBLES ................................................ 48
SERVICIO DE SEARS ............................................. 38
TIEMPO DE REPOSO ............................ 45, 65, 70, 72
75
Page 76

For repairof major brand appliances in your own home...
no matterwho made it, no matterwho soldit!
1-800-4-MY-HOME ® AnyUrne,dayornight
(1-800-469-4663)
www.sears.com
For repairof carry-inproducts like vacuums, lawn equipment,
and electronics,callfor the locationof your nearest
Sears Parts and Repair Center.
1-800-488-1222 AnyUme,dayornight
www.sears.com
For the replacement parts, accessoriesand owner's manuals
that you need to do-it-yourself,call Sears PartsDirect_!
1-800-366-PART 6a.m.-11 p.m.CST,
(1-800-366-7278) 7 daysa week
www.sears.com/partsdirect
To purchase or inquireabout a Sears Service Agreement
or Sears Maintenance Agreement:
1-800-827-6655
7 a.m.- 5 _}.m.CST, Mon.-Sat.
Para pedirservicio de reparacibn a
domicilio,y 10amordenar piezas:
1-888-SU-HOGARsv
(1-888-784-6427)
SEARS
HomeCentral ®
Au Canada pour service en fTan_;ais:
1-877-LE-FOYER e
(1-877-533-6937)
v_Nw.sears.ca
4619-652-60401/8183796 1/01
© Sears, Roebuck and Co. © RegisteredTrademark/£M Trademarkof Sears, Roebuck and Co Printed in China
© Marca Registrada/TM Marca de comercio de Sears, Roebuckand Co trnpreso en China
 Loading...