

Kenmore Lavadora de Platos, Lave Vaisselle, 630.1390 Series, 630.1391 Series Use & Care Manual
Page 1

Use & Care Guide
Manual de Uso y Cuidado
Guide d’Utilisation et d’Entretien
English / Español / Français
Models/Modelos/Modèles: 630.1390*, 630.1391*
Kenmore ®
Dishwasher
Lavadora de Platos
Lave Vaisselle
* = color number, número de color, le numéro de la couleur
P/N 9000501543 Rev. A
Sears Brands Management Corporation
Hoffman Estates ,
www.kenmore.com
www.sears.com
Sear s Canad a Inc.
Toro nto, On tario, Canad a M5B 2 B8
www.sears.ca
IL 60179 U.S.A.
™
Page 2

TABLE OF CONTENTS
Warranty Information .............................................................................3
Important Safety Instructions ................................................. 4-5
Dishwasher Components .........................................................................6
Dishwasher Features ................................................................................7
Dishware Materials ..................................................................................7
Loading the Dishwasher ..........................................................................8
Loading the Silverware ...........................................................................9
Rack Features and Accessories ...........................................................10
Detergent................................................................................................11
Rinse Aid ................................................................................................. 12
Dishwasher Cycles and Options .................................................. 13-14
Operating the Dishwasher ........................................................... 15-16
Care and Maintenance ................................................................. 17-18
Troubleshooting .............................................................................. 19-21
PRODUCT RECORD
In the space below, record the date of purchase, model, and
serial number of your product. You will nd the model and serial
number printed on an identication label inside the dishwasher.
Have this information available whenever you contact Sears about
your product.
Model No.
Date of Purchase
Serial No.
Save this information and your sales receipt for future reference!
PROTECTION AGREEMENTS
Master Protection Agreements
Congratulations on making a smart purchase. Your new
Kenmore® product is designed and manufactured for years
of dependable operation. But like all products, it may require
preventive maintenance or repair from time to time. That’s when
having a Master Protection Agreement can save your money and
aggravation. The Master Protection Agreement also helps extend
the life of your new product. Here’s what the Agreement includes:
Parts and labor needed to help keep products operating properly
under normal use, not just defects.
Our coverage goes well beyond the product warranty. No
deductible, no functional failure excluded from coverage - real
protection.
• Expert service by a force of more than 10,000 authorized
Sears service technicians, which means someone you can trust
will be working on your product.
• Unlimited service calls and nationwide service, as often as
you want us, whenever you want us.
• “No-lemon” guarantee - replacement of your covered
product if four or more product failures occur within twelve
months.
• Product replacement if your covered product can’t be xed.
• Annual Preventive Maintenance Check at your request - no
extra charge,
• Fast help by phone - we call it Rapid Resolution. Phone
support from a Sears representative on all products, Think of
us as a “talking owner’s manual.”
• Power surge protection against electrical damage due to
power uctuations.
• $250 food loss protection annually for any food spoilage
that is the result of mechanical failure of any covered
refrigerator or freezer,
• Rental reimbursement if repair of your covered product takes
longer than promised.
• 10% discount off the regular price of any non-covered
repair service and related installed parts Once you purchase
the Agreement, a simple phone call is all that it takes for
you to schedule service. You can call anytime day or night or
schedule a service appointment online.
The Master Protection Agreement is a risk-free purchase. If you
cancel for any reason during the product warranty period, we
will provide a full refund, or a prorated refund anytime after the
product warranty period expires.
Purchase your Master Protection Agreement today!
Some limitations and exclusions apply.
For prices and additional information in the U.S.A.
call 1-800-827-6655.
•Coverage in Canada varies on some items.
For full details call Sears Canada at 1-800-361-6665.
Sears Installation Service
For Sears professional installation of home appliances, garage
door openers, water heaters, and other major home items, in the
U.S.A. or Canada call
1-800-4-MY-HOME®.
2
Page 3

WARRANTY INFORMATION
One Year Limited Warranty
When installed, operated and maintained according
to all instructions supplied with the product, if this
appliance fails due to a defect in material or
workmanship within one year from the date of purchase,
call 1-800-4-MY-HOME
®
to arrange for free repair.
This warranty applies for only 90 days from the date
of purchase if this appliance is ever used for other than
private family purposes.
THIS WARRANTY COVERS ONLY DEFECTS IN MATERIAL
AND WORKMANSHIP. SEARS WILL NOT PAY FOR:
1. Expendable items that can wear out from normal use,
including but not limited to lters, belts, light bulbs, and
bags.
2. A service technician to instruct the user in correct
product installation, operation or maintenance.
3. A service technician to clean or maintain this product.
4. Damage to or failure of this product if it is not installed,
operated or maintained according to the all instructions
supplied with the product.
5. Damage to or failure of this product resulting from
accident, abuse, misuse or use for other than its intended
purpose.
6. Damage to or failure of this product caused by the use
of detergents, cleaners, chemicals or utensils other than
those recommended in all instructions supplied with the
product.
7. Damage to or failure of parts or systems resulting from
unauthorized modications made to this product.
Disclaimer of implied warranties; limitation of remedies
Customer’s sole and exclusive remedy under this limited
warranty shall be product repair as provided herein.
Implied warranties, including warranties of merchantability
or tness for a particular purpose, are limited to one year
or the shortest period allowed by law. Sears shall not be
liable for incidental or consequential damages. Some states
and provinces do not allow the exclusion or limitation of
incidental or consequential damages, or limitation on the
duration of implied warranties of merchantability or tness,
so these exclusions or limitations may not apply to you.
This warranty applies only while this appliance is used in the
United States or Canada.
This warranty gives you specic legal rights, and you may
also have other rights which vary from state to state.
Sears Brands Management Corporation
Hoffman Estates, IL 60179
Sears Canada Inc.
Toronto, Ontario, Canada M5B 2B8
3
Page 4

SAFETY MESSAGES - Please READ & SAVE this information
We have provided many important safety messages in this manual and on your appliance. Always read and obey all
safety messages.
WARNING
• Misuse of the dishwasher can result in serious injury or
death. Do not use the dishwasher in any way not covered
in this manual or for any purpose other than those
explained in the following pages.
• Severe product damage and/or injury could result from
the use of unqualied service technicians or non-original
replacement parts. All repairs must be performed
by a qualied service technician using only original
equipment factory replacement parts.
• Electrical shock or re could result if the electrical
supply for the dishwasher covered in this manual is
incorrectly installed or if the dishwasher has been
improperly grounded. Do not use the dishwasher
covered in this manual unless you are certain the
electrical supply has been correctly installed or the
dishwasher has been properly grounded.
• Never use harsh chemicals to clean your dishwasher.
Some chloride-containing products can damage your
dishwasher and may present health hazards!
NOTICE
• It is highly recommended for the end user to become
familiar with the procedure to shut off the incoming
water supply and the procedure to shut off the incoming
power supply. See the installation Instructions or contact
your installer for more information.
• Never use steam cleaning products to clean your
dishwasher. The manufacturer will not be liable for the
possible damages or consequences.
4
Page 5

IMPORTANT SAFETY INSTRUCTIONS - Please READ & SAVE this information
WARNING: To reduce the risk of re, electrical shock, or serious injury, observe the following:
• This dishwasher is provided with Installation Instructions
and this Use and Care Manual. Read and understand
all instructions before installing or using the dishwasher.
• This appliance must be grounded to a metal, permanent
wiring system, or an equipment grounding conductor
must be run with the circuit conductors and connected
to the equipment grounding terminal or lead on the
dishwasher. See the Installation Instructions included
with this dishwasher for more information on electrical
requirements.
• Use this dishwasher only for its intended function, which
is the washing of household dishware and kitchenware.
• Use only detergents or rinsing agents recommended for
use in a dishwasher, and keep them out of the reach of
children.
• When loading items to be washed:
a. Locate sharp items so that they are not likely to
damage the door seal.
b. Load knives and other sharp utensils with their
HANDLES UP to reduce the risk of cut-type
injuries.
c. Do not wash plastic items unless they are
marked “dishwasher safe” or the equivalent. For
plastic items not so marked, check the
manufacturer’s recommendations.
d. Do not operate your dishwasher unless all
enclosure Panels are in place.
e. Do not tamper with or override controls and
interlocks
• To reduce the risk of injury, do not allow children to
play in or on the dishwasher.
• When children become old enough to operate the
appliance, it is the legal responsibility of the parents
or legal guardians to ensure that they are instructed in
safe practices by qualied persons.
• Under certain conditions, hydrogen gas may be
produced in a hot water system that has not been used
for two weeks or more. Hydrogen gas is explosive.
Before using a dishwasher that is connected to a hot
water system that has been unused for two weeks or
longer, turn on all hot water faucets and let the water
ow from each for several minutes, open windows to
ventilate the house. This will release any accumulated
hydrogen gas. As the gas is explosive, do not smoke or
use an open ame during this time.
• Remove the dishwasher door to the washing
compartment when removing an old dishwasher from
service or discarding.
• To avoid oor damage and possible mold growth, do
not allow wet areas to remain around or under the
dishwasher.
• Protect your dishwasher from the elements. Protect
against freezing to avoid possible damage to the ll
valve. Damage caused by freezing is not covered by
the warranty.
• Do not abuse, sit on, or stand on the door or dish racks
of the dishwasher.
5
Page 6

Door Gasket
Top Rack
DISHWASHER COMPONENTS
Vent
Silverware
Basket
Bottom Rack
Detergent
Dispenser
Filter System
Rinse Agent
Dispenser
Serial Number
Label
Features vary by model
Large Object Trap
Fine Filter
FILTER SYSTEM
Cylinder Filter
6
Page 7

DISHWASHER FEATURES
QuietGuard™: A two-pump motor system, the Suspended
Motor, and triple insulation make this dishwasher one of the
quietest in North America.
Stainless Steel Giant Tub: A rust-free, hygienic interior
surface.
Nylon Coated Racks: Greatly reduces cuts and nicks.
Concealed Heating Element: Heats water up to a sanitizing
temperature.
EcoDry: A high temperature nal rinse, a low temperature
stainless steel tub, and the sheeting action of a rinse agent
result in drying that is hygienic, energy efcient, and economical.
SmartSensor: Checks water condition and decides whether
a second fresh water ll is necessary.
Triple Filtration System: Multiple lters ensure distribution of
clean water and protect the main pump and the drain pump
from foreign material.
Water Shut-O: A safety feature that stops the ow of
incoming water, if water is detected in the base of the
dishwasher.
* Upper & Lower Rack Flip Tines: Increase the rack
exibility to accommodate larger/taller items.
* Dry Assist: Raises the temperature of the rinse water
and increases the drying time which will result in improved
drying.
* Adjustable Racks: The top rack can be raised or lowered
to accommodate tall items in the top and bottom racks.
* SmartWash™ HE: Takes the guesswork out of cycle
selection. The sensors in the dishwasher automatically adjust
the cycle length, temperature and water changes based on
the soil load.
* TurboClean™: Tackles hard-to-clean dishes in the lower
rack, eliminating the need to soak and scrub heavily soiled
dishes.
AquaGuard™: Leak protection system that cuts off the
water supply in the event of a leak.
* model dependant
DISHWASHER MATERIALS
NOTE: Before using your dishwasher for the rst time, check the information in this section. Some items are not dishwasher
safe and should be handwashed; others require special loading.
RECOMMENDED
Aluminum: Colored anodized aluminum may fade over
time. Minerals in your water may cause the aluminum to
darken or spot. This can usually be removed with a soaplled steel wool pad.
China, Crystal, Stoneware: Some hand-painted utensils
may discolor, fade, or spot. Hand-wash these utensils.
Position fragile glassware so that it will not topple over or
come in contact with other utensils during the wash cycle.
Glass: Milk glass may discolor or become yellow.
Non-stick Coatings: Apply a light coating of vegetable oil
to non-stick surfaces after drying.
Plastics: Make sure the plasticware is dishwasher safe.
Stainless Steel, Sterling Silver, and Silver Plates: Load
these utensils in a way that they do not come in contact with
other metals.
NOT RECOMMENDED
Acrylic: Crazing (small cracks throughout the acrylic) may
occur.
Adhesive-Joined Pieces: Adhesives that join materials such
as plastic, wood, bone, steel copper, tin, etc. may loosen.
Bone-Handled Utensils: Handles may separate.
Iron, Cast Iron: Iron will rust. Hand-wash and dry
immediately.
Non-Dishware Items: Your dishwasher is intended for
use in cleaning ONLY standard household dishware and
kitchenware.
Pewter, Brass, Bronze: Pewter will tarnish. Hand-wash and
dry immediately.
Tin: Tin will stain. Hand-wash and dry immediately.
Wood: Wooden bowls, wooden utensils, and utensils with
wooden handles can crack, warp, and lose their nish.
Gold: Gold will discolor.
7
Page 8
LOADING THE DISHWASHER
Do not pre-wash items that have loosely attached soiling.
Remove large food particles, bones, seeds, toothpicks, and
excessive grease. Items having burned-on, baked-on or
starchy soils may require pre-treatment.
Refer to the Dishware Materials section for more information
about dishware suitability.
• Load only dishwasher-safe items into the dishwasher.
• Load dishes in the dishwasher racks so that the insides
of bowls, pots and pans are facing the spray arms.
• Avoid nesting and contact points between dishes.
• Separate items of dissimilar metals.
• Load dishes and glasses at an angle to avoid puddling
and improve drying performance.
NOTICE
To avoid dishwasher damage, do not load the
dishwasher with paper products, plastic bags, packing
materials, or anything other than normal, dishwashersafe dishware and kitchenware.
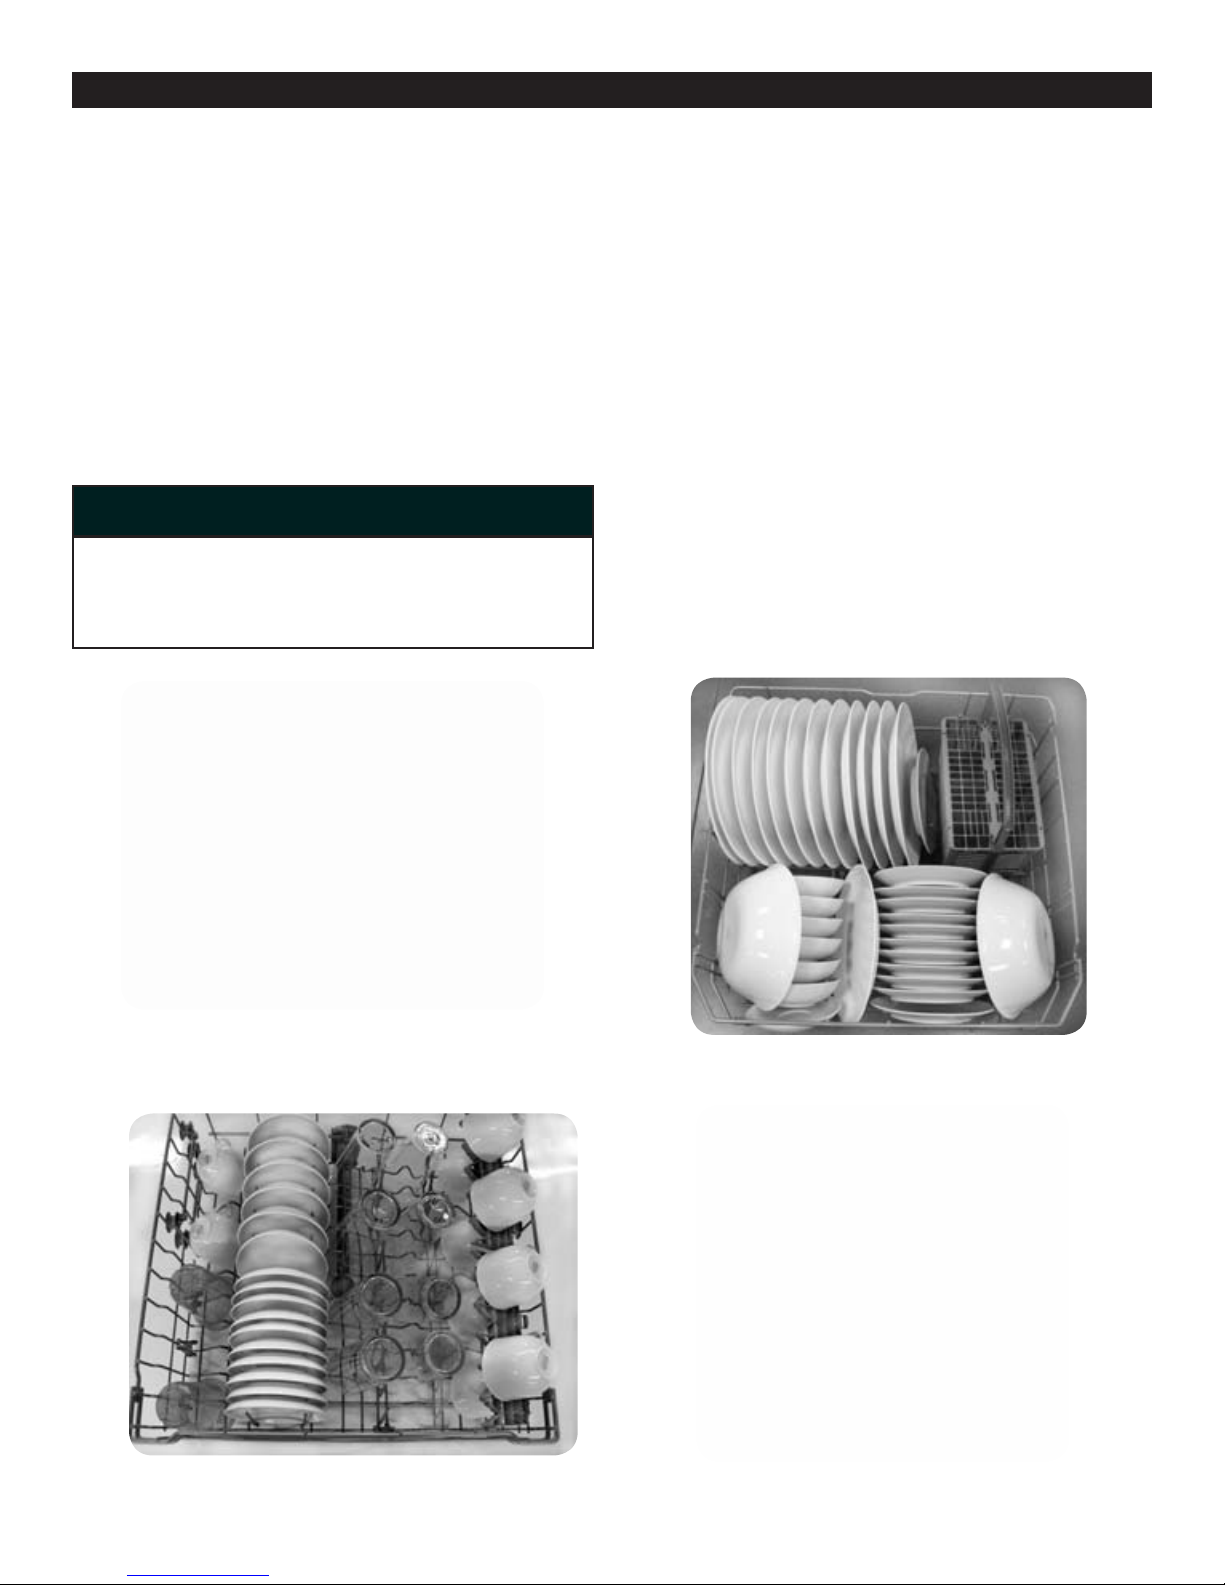
TOP RACK -SUGGESTED LOADING PATTERN
Loading the Top Rack
NOTE: Ensure items do not protrude through the bottom of
the racks and block the spray arms.
NOTE: When pushing the top rack into the dishwasher, push
it until it stops against the back of the tub so the top rack
spray arm will connect to the water supply at the back of
the tub. Do not push the top rack with the door.
Loading the Bottom Rack
Place large items in the bottom rack. Load pots, pans and
bowls with the dirty surfaces facing the spray arms.
Unloading Sequence
• Unload the bottom rack rst.
• Unload the silverware basket.
• Unload the top rack.
NOTE: Do not use rubber bands (to hold items in place
in the racks) or any other after market parts in your
dishwasher. The use of such items could potentially damage
the drain pump.
BOTTOM RACK -SUGGESTED LOADING PATTERN
NOTE: Load cups and glasses between tines. Loading over
the tines can cause breakage or water spots.
TOP RACK - ADDITIONAL LOADING PATTERN
BOTTOM RACK - ADDITIONAL LOADING PATTERN
8
Page 9
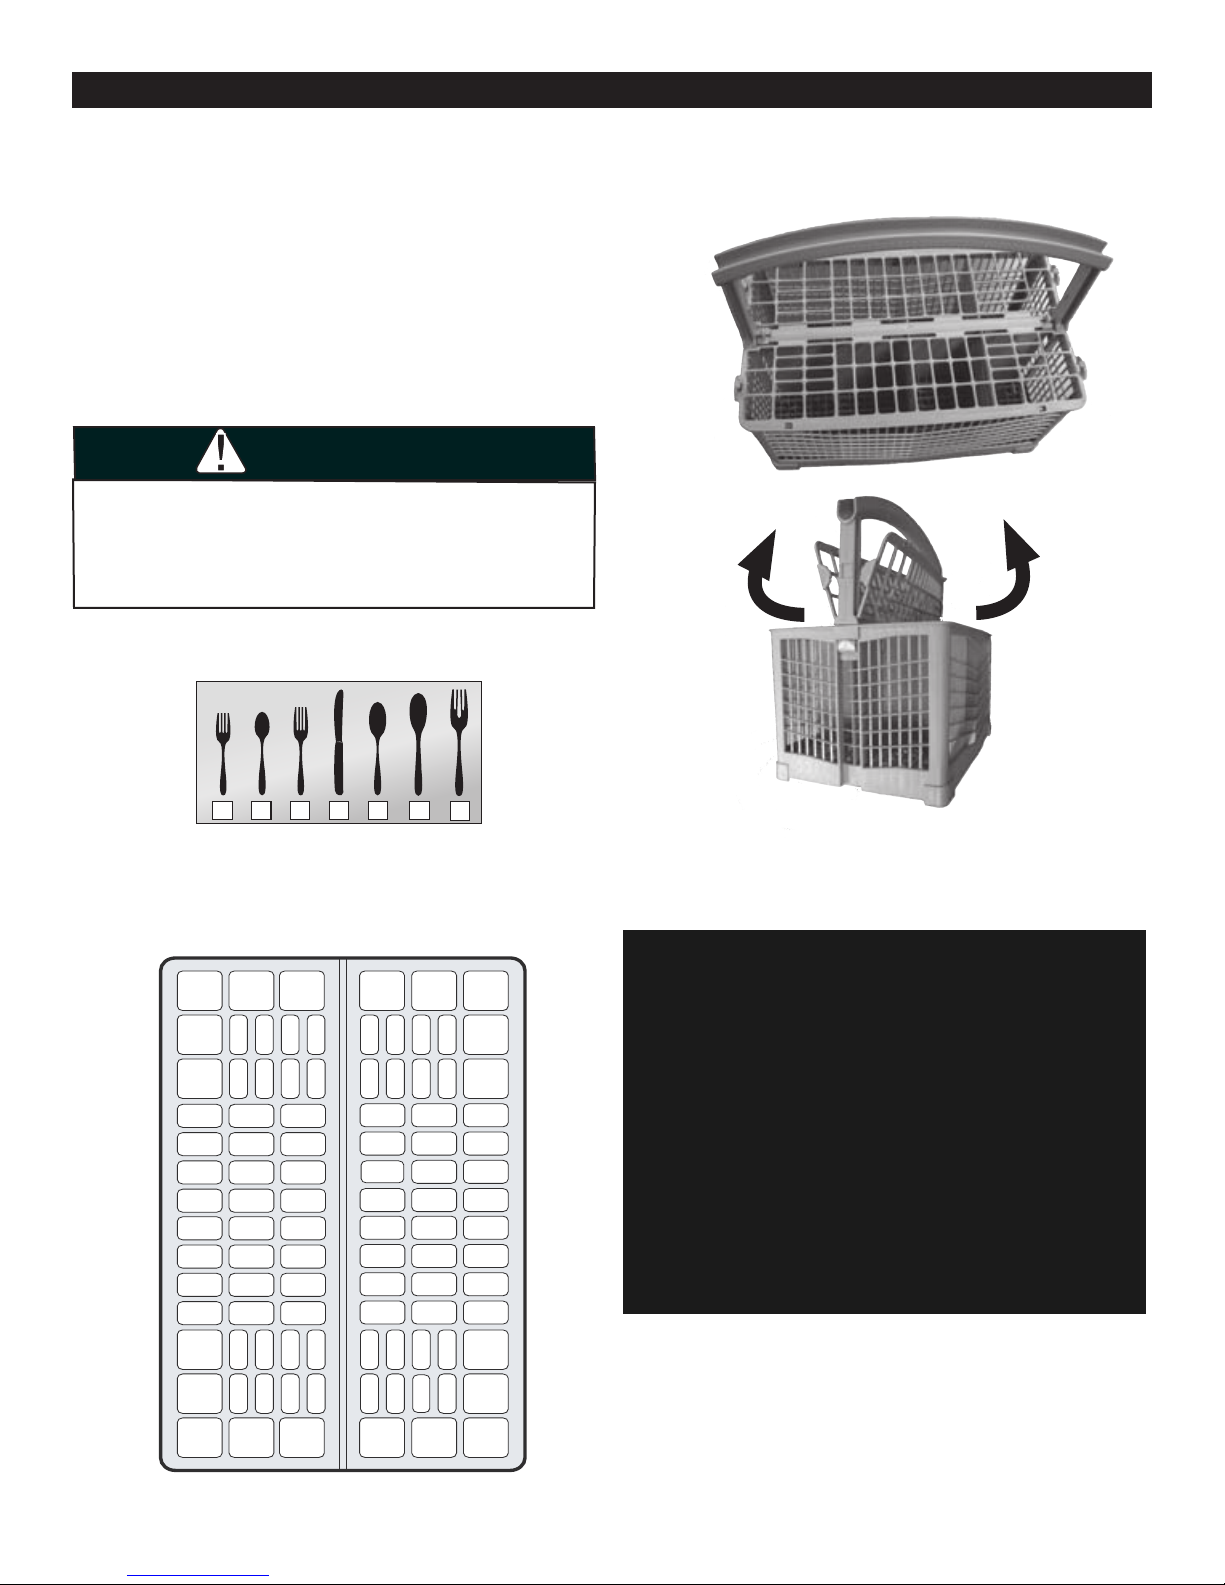
LOADING THE SILVERWARE
1 2 3 4 5
6
7
4
5
5
5 1 1
1 1
1
1
111
1
1
1
5
5
5
2
2
2
2
2
2
2
2
2
2
2
2
5
5
5
5
5
5
4 4
4
3 3
3 3
3
3 3 3 6
3
3 3
4
4 44 4
4
4 4
3
6
7
NOTE: The silverware basket tops can be folded up to
accommodate large or oddly-shaped items.
With the silverware basket tops down, load the silverware
basket following the patterns suggested below.
Place knives and sharp utensils with their handles up, and
forks and spoons with their handles down. If large or
oddly-shaped items are to be loaded into the silverware
basket with the tops up, load the items so that they do not
nest together.
Use suggested loading pattern for best results.
WARNING
The sharp points and edges of knives and other sharp
utensils can cause serious injuries. Load knives and other
sharp utensils with edges down. Do not allow children to
handle or play near knives and sharp utensils.
THE FLEXIBLE SILVERWARE BASKET
The standard silverware basket ts in the back of the lower
rack. The basket lid can be snapped to the handle to
leave the basket open.
1 - Salad Fork
2 - Teaspoon
3 - Dinner Fork
4 - Knife
5 - Tablespoon
6 - Serving Spoon
7 - Serving Fork
Basket Placement Option
9
Page 10
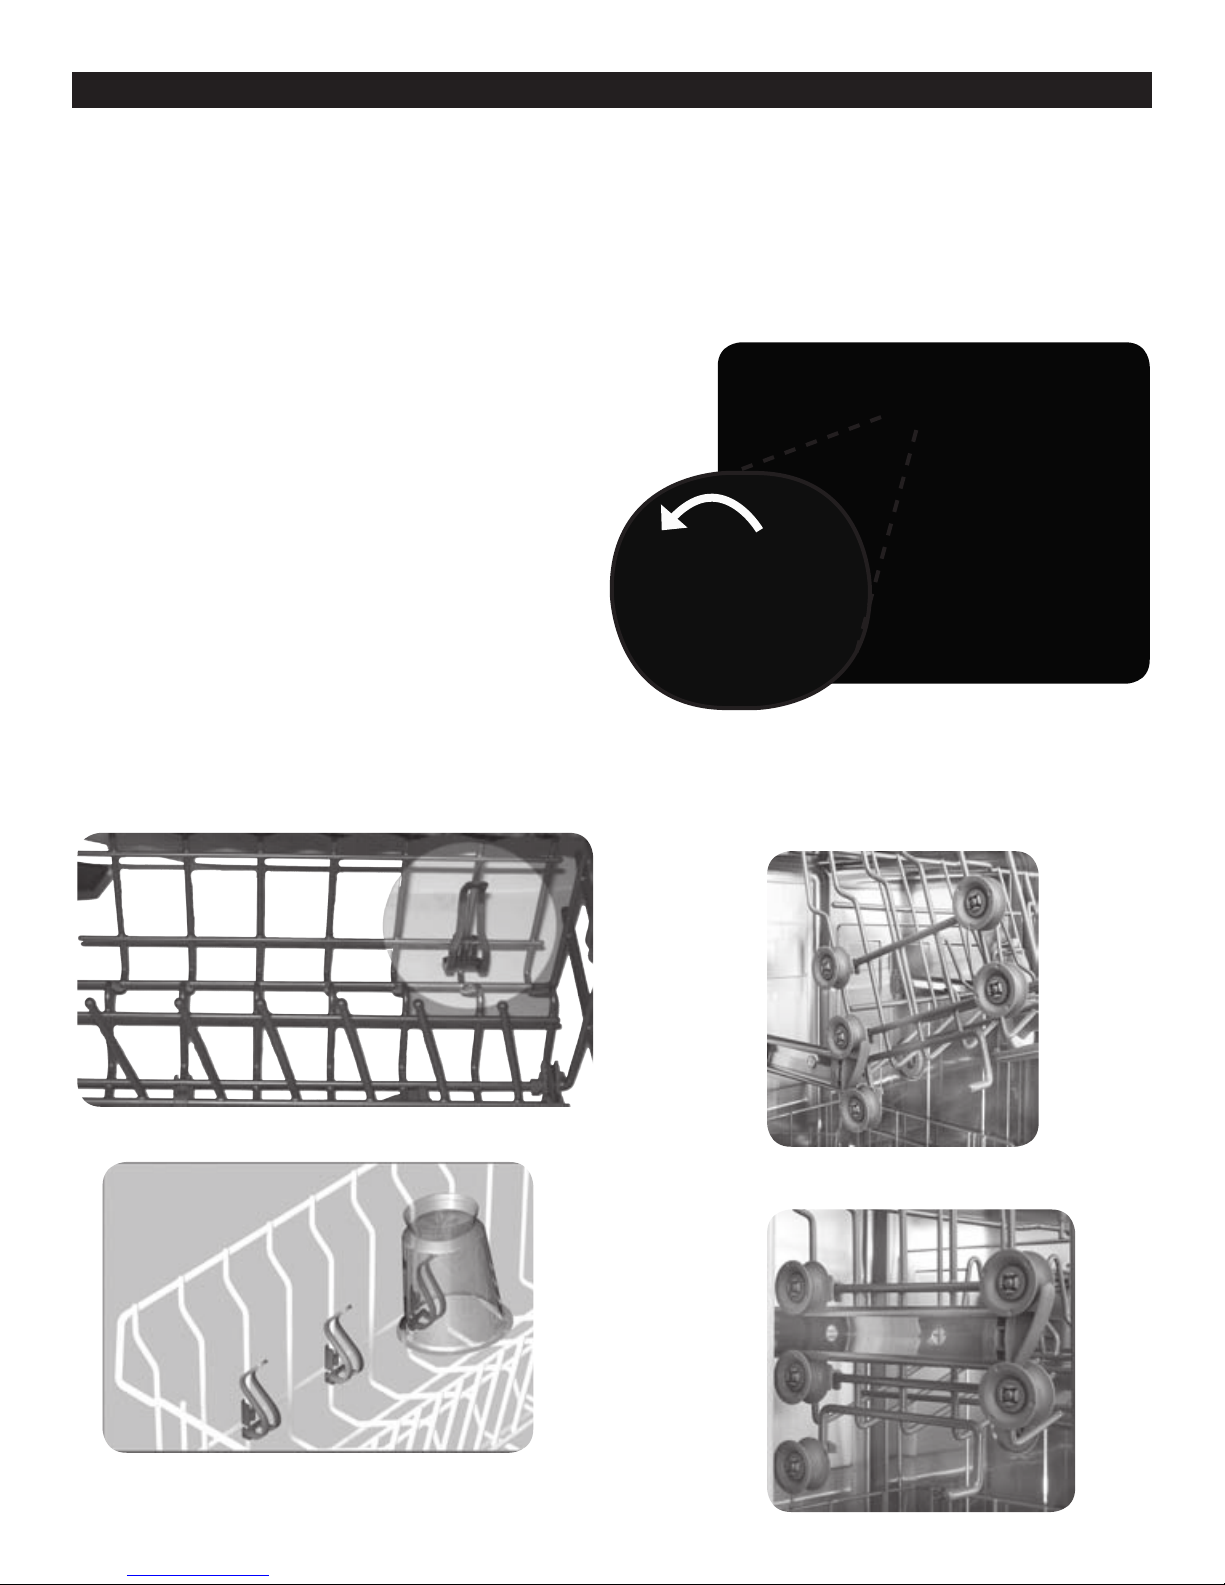
RACK FEATURES & ACCESSORIES
CUP SHELVES
Cup shelves are used to hold cups and other large items
such as ladles and serving spoons. To use the cup shelves,
fold them downwards so that they are positioned as shown
below. Place cups and other items upside down on the
shelves.
SMALL ITEM CLIPS
The small item clips keep lightweight items and plastic
containers from tipping over and lling up with water
during the wash cycle.
FLIP TINES
The racks on select models consist of tines that you can fold
down or raise, depending on what you need to load in the
rack.
To fold down:
• Grasp the tine near the locking mechanism.
• Release from notch.
• Push downwards.
MANUAL RACK HEIGHT ADJUSTMENT
Remove the empty rack by pulling it out of the dishwasher
to the point that it can be lifted upward, as shown above.
Pull the rack outward and up until the rollers are completely
free of the roller guides.
Re-insert the rack with the other set of rollers on the roller
guides, as shown below.
10
Page 11
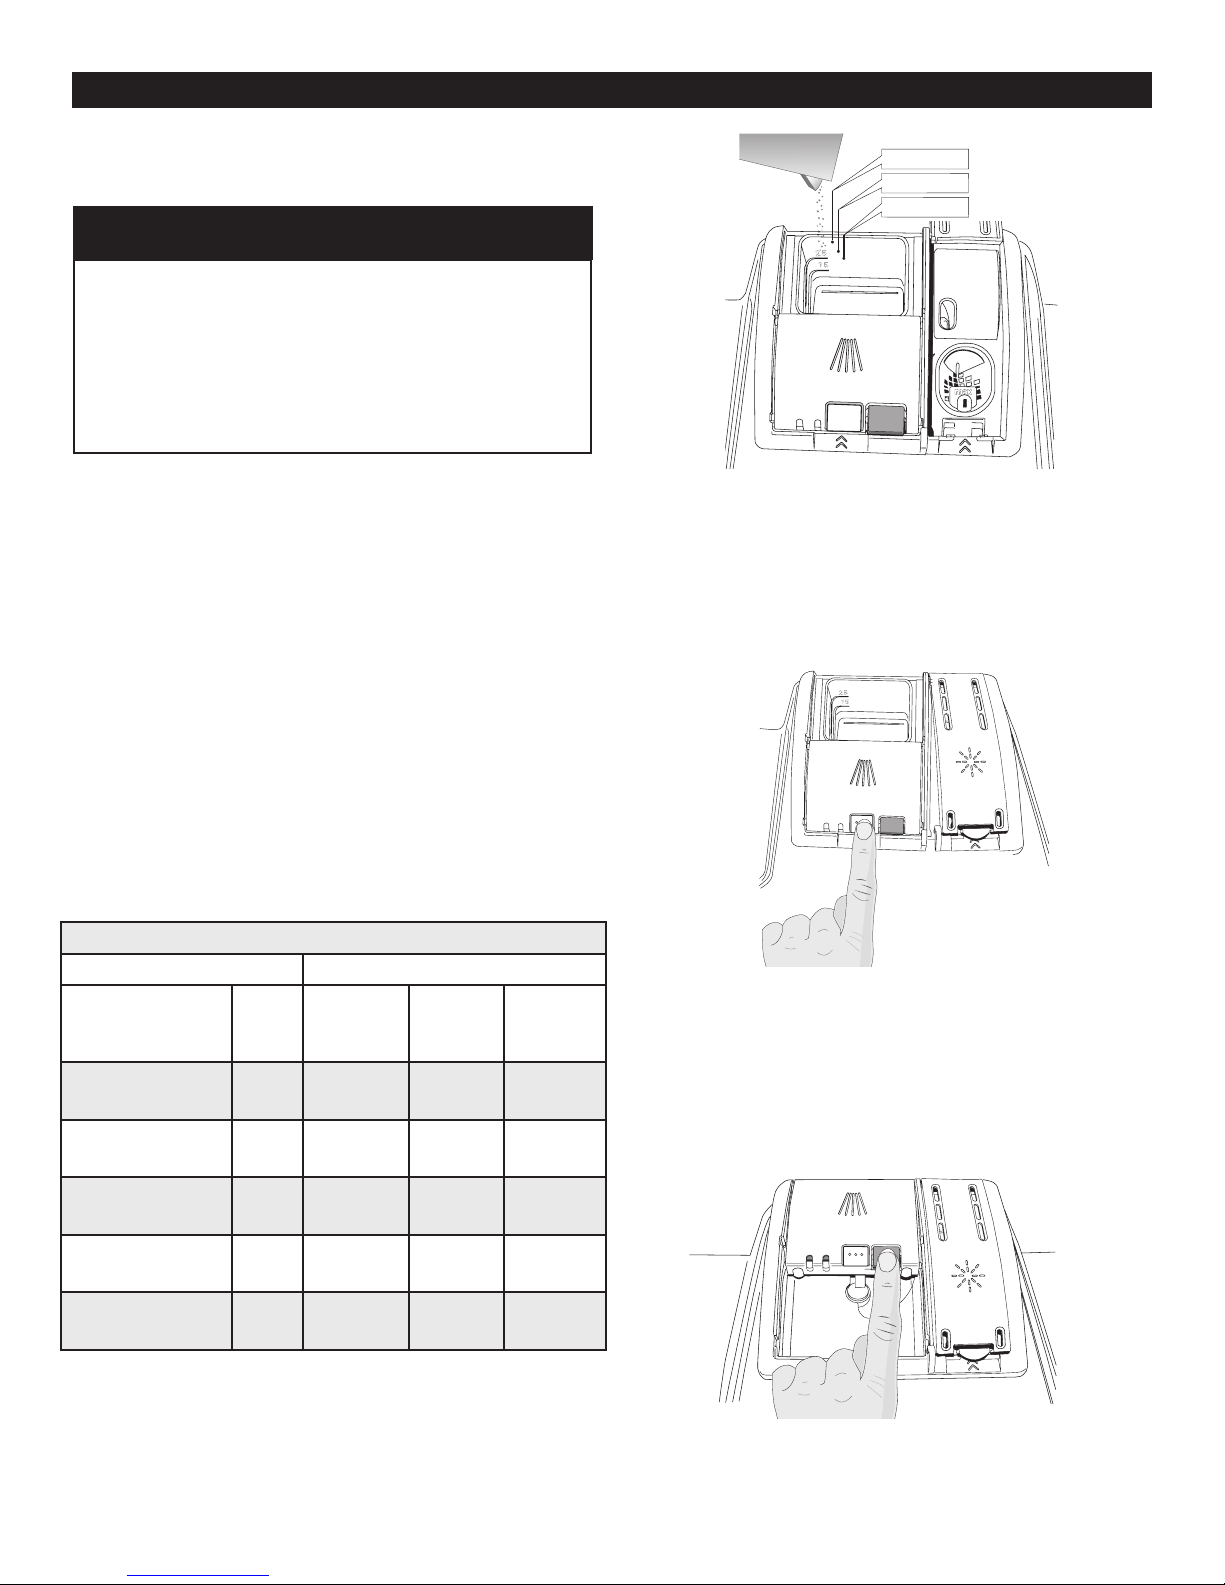
DETERGENT
TBS (25 ML)
TBS (15 ML)
Detergent
Use only detergent specically designed for dishwashers.
For best results, use fresh powdered dishwashing detergent.
NOTICE
To avoid dishwasher damage, do not use hand
dishwashing products in your dishwasher.
■
To avoid dishwasher damage, do not use too much
detergent if your water is soft, it may cause etching in
glassware.
Adding Detergent
3 TBS MAX
2
1
The dishwasher uses less water so you need to use less
detergent. With soft water, 1 tbsp. (15ml) of detergent will
clean most loads. The detergent dispenser cup has lines that
measure detergent to:
• 1 tablespoon (15ml)
• 1.75 tablespoons (25ml)
3 tablespoons (45ml) of detergent will completely ll the
detergent dispenser cup.
NOTE: If you do not know the hardness of your water
supply, use 1 Tbsp.(15ml) of detergent. Increase the
amount, if necessary, to the least amount required to get
your kitchenware clean.
Use the measuring lines in the detergent dispenser cup to
measure the amount of detergent recommended in the
Table.
Recommended Detergent Amount
Water Type
Wash Cycle Unit
SmartWash™ HE Tbsp
ml
Pots & Pans Tbsp
ml
Normal
Tbspml1.75-3
Wash
China Gentle Tbsp
ml
Fast
Wash
Tbsp
ml
Hard
7.0gr/gal
or more
3
25-45
3
45
25-45
1.75
25
1.75
25
Medium
7.0 -1.0
gr/gal
3
45
3
45
1.75
25
1-1.75
15-25
1-1.75
15-25
Soft
less than
1.0 gr/gal
1-1.75
15-25
1.75-3
25-45
1-1.75
15-25
1
15
1
15
• Use fresh powdered detergent for best results.
• 1 tablespoon will clean most loads.
• Do not use more than 3 tablespoons. Do not overll.
• When using detergent tabs, lay them at to avoid
contact with the cover.
TO CLOSE
• Place nger as shown above
• Slide door forward and press down rmly until you
hear a click.
TO OPEN
NOTE: When using gel packs, tablets or other dishwasher
detergents, refer to the manufacturers instructions
(normally 1 tab/dose).
• To open the cover, push the button as shown above.
11
Page 12
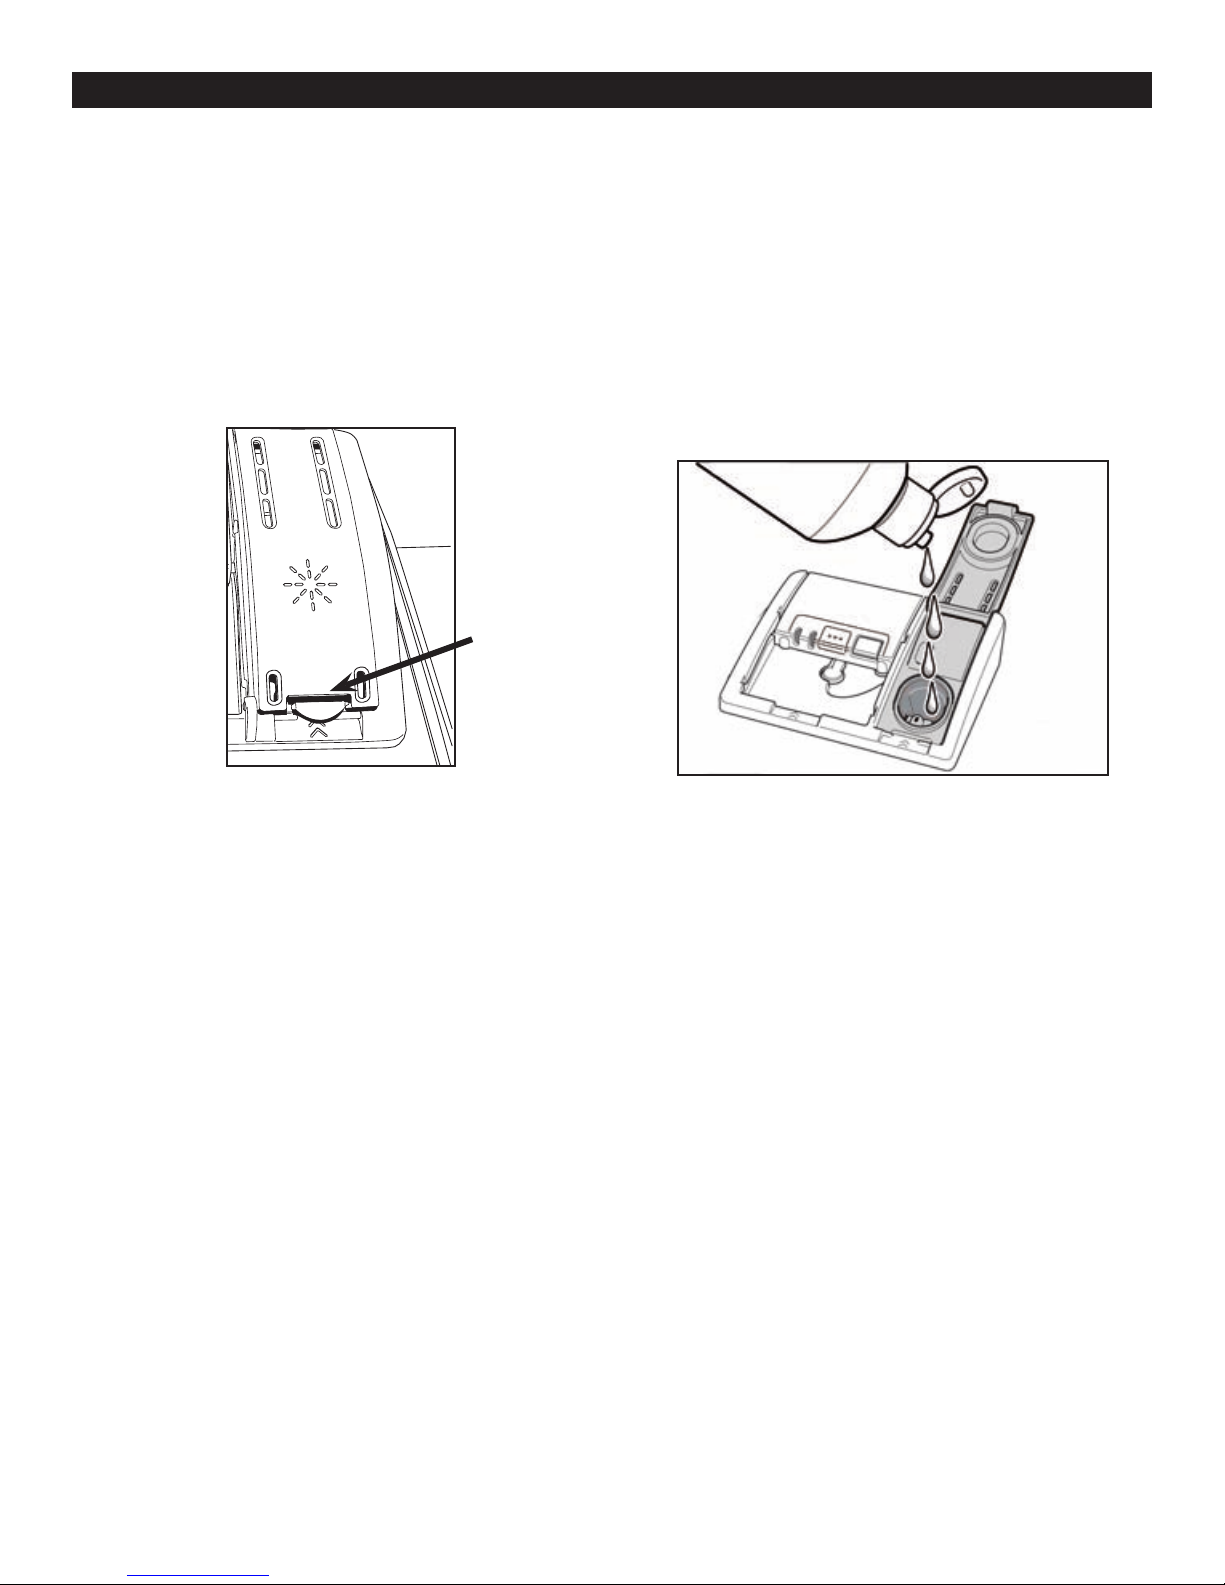
RINSE AGENT
Rinse Agent
To achieve proper drying, always use a liquid rinse agent,
even if your detergent contains a rinse agent or drying
additive.
NOTE: The Rinse Agent LED that illuminates when the Rinse
Agent is low.
The LED will not illuminate if there is enough rinse agent in
the dishwasher.
Filling the dispenser
Lift tab to
open
• Make sure the dishwasher door is completely open.
• Add liquid rinse agent to the dispenser as shown below
until the rinse agent reservoir is full.
Wipe up any excess rinse agent that puddles when the
dispenser reservoir is full to prevent oversudsing.
After lling the rinse agent dispenser, the indicator light will
go out in a few minutes after the dishwasher door is shut
(select models only).
• Always use Rinse Agent even if your detergent contains
rinse agent.
• Add rinse agent when the Rinse Agent Indicator Light
on the control panel illuminates.
12
Page 13
DISHWASHER CYCLES AND OPTIONS
CYCLES SOIL LEVEL
SmartWash™ HE
Takes the guesswork out of cycle selection. The sensors
in the dishwasher automatically adjust the cycle length,
temperature and water changes based on the soil
load. This cycle contains additional sensor decisions
when compared to other cycles.
Pots & Pans *
Cleans items having baked-on or hard dried food soils.
These items may require soaking or hand scouring.
Normal Wash
Thoroughly cleans normal loads having loosely
attached normal soiling.
China Gentle
Designed to be used with your fragile china and
glassware, allowing you to get it perfectly clean
without the hassle of hand washing or worry of
damage in the dishwasher.
TIME (mins.)
Without options
Typical Maximum
Water Usage
Gallons Liters
Light 105 110 3.6 13.6
Medium 110 115 4.5 17.0
Heavy 115 120 6.0 22.6
130
All Soil Levels
130 6.8 25.6
Light 105 120 2.3 8.7
Medium 120 135 5.0 19.0
Heavy 135 155 7.1 26.7
All Soil Levels 80 80 3 11.3
Fast Wash
Cleans lightly soiled dishes and reduces overall wash
time. Use this cycle to clean glasses and dessert dishes
that may need to be re-used at the same event
Adding options will increase or decrease the cycle time. See “Options” information section.
* The cycle is NSF certied.
NSF INFORMATION
A dishwasher or dishwasher cycle that is certied by the NSF
international meets very strict requirements of wash time
and water temperature to ensure dishware and kitchenware
sanitization. These requirements are explained in the
document NSF/ANSI 184, Residential Dishwashers. More
information on NSF Certication is available at the NSF
website,
http://www.nsfconsumer.org/home/appliances.asp.
Your dishwasher is NSF certied. The dishwasher cycles
that are NSF certied are shown in the chart above. When
these cycles are complete, the “Sanitized” indicator on your
All Soil Levels 59 59 3.9 14.9
dishwasher control panel will illuminate. However, if your
household water supply is too hot your dishwasher’s heating
time may be reduced, and the Sanitized indicator may not
illuminate.
The cycle times listed in the Use and Care Manual are based
on normal soil loads and 120°F incoming water and will vary
based on your actual conditions.
NOTE: Only sanitizing cycles have been designed to meet the
requirements of 6 for soil removal and sanitization efcacy.
There is no intention, either directly or indirectly, that all
cycles on a certied machine have passed the sanitization
performance test.
13
Page 14

OPTIONS
Can be selected
with:
China Gentle
Added time to cycle Added Water
Typical Maximum Gallons Liters
1.1G 4L
TurboClean™
Tackles hard-to-clean dishes in the lower rack,
eliminating the need to soak and scrub heavily
soiled dishes.
Normal Wash
Pots & Pans
SmartWash™ HE
adds
20 min
adds
20 min
0 0
0.2G 1.2L
0.2G 1.2L
Sanitized Indicator
When the “Sanitized” indicator light illuminates on the control panel, it means that the dishware and kitchenware that were
just washed have been sanitized according to the requirements of the National Sanitation Foundation (NSF). For more
information on NSF certication, refer to the tables in this section.
NOTE: The indicator light will come on for the cycles marked with an asterisk in the cycles and options tables.
14
Page 15

OPERATING THE DISHWASHER
If your unit has a display window similar to the one shown
above, follow the instructions below.
CANCELING A CYCLE
• Hold down the CANCEL button until the display shows
“0:01”. Wait for the end of cycle indicator.
• Press “POWER” button to turn the unit off. Then press
the “POWER” button again to turn the unit back on.
• One of the cycle LEDs will ash. This indicates that the
unit has been reset.
CHANGING A CYCLE
If you need to change the running cycle to a new cycle:
• Hold down the CANCEL button until the display shows
“0:01”
• Press POWER button to turn the unit off. Then press the
“POWER” button again to turn the unit back on
• You can now select a new cycle.
Control Lock
• After pressing the “START” button you can activate the
Control Lock feature.
• Press and hold down the “CHINA GENTLE” button until
“CL” appears in the display window. Now any button
you press (except POWER) will not function and “CL”
will display each time.
• To deactivate, press and hold the “CHINA GENTLE”
button until the “CL” disappears from the display
window.
To enter the options mode:
(rinse aid setting, dry assist)
• Door must be closed. Press the “POWER” button to turn
the unit on.
• The countdown display and one of the Wash Cycle LEDs
will be ashing.
• Press and hold the “NORMAL WASH” button, then
press and release the “START” button. Now release the
“NORMAL WASH” button.
• The display will show either “d:00 - d:01” or
“r:00 - r :06”. You are now in the options setup mode.
• Press “NORMAL WASH” to select the option you would
like to adjust.
If the display shows “d:00” or “d:01” you can turn the Dry
Assist ON or OFF.
If the display shows between “r:00” to “r:06” you can adjust
the amount of rinse agent dispensed.
To set the amount of Rinse Aid:
NOTE: If your glasses have spots on them, you need more
rinse agent. If your glasses have streaks, you need less
Rinse Agent.
Follow the instructions to enter "options" mode. With the
display showing between "r:00" - "r:06":
• Press the “-” or “+” button to change the amount of
rinse agent dispensed.
r:00 → Rinse Agent OFF
r:03 → Medium amount of rinse agent dispensed
r:06 → Highest amount of rinse agent
• Press “START” to save.
Dry Assist
With this option you can raise the temperature of the
rinse water and increase the drying time for improved
drying.
Follow the instructions to enter “options” mode. With the
display showing “d:00” or “d:01”:
• Press the “-” or “+” button to activate or deactivate dry
assist.
d:00 → Dry Assist OFF
d:01 → Dry Assist ON
Press “START” to save.
•
Delay Start
This option allows you to delay the start time of your cycle.
To select this feature:
• First select the desired cycle.
• Then press the “-” or “+” button until you see the
desired delay time.
The cycle will start once the displayed time elapses.
•
WARNING
You could be seriously scalded if you allow hot water
to splash out of the dishwasher. OPEN THE DOOR
CAREFULLY during any wash or rinse cycle. Do not fully
open the door until water noises have stopped.
15
Page 16

OPERATING THE DISHWASHER
If your unit has a display similar to the one shown above,
follow the instructions below.
CANCELING A CYCLE
• Open the door.
• Hold down the CANCEL button until the “WASHING”
LED goes out. Close the door.
• Wait for about 1 minute until the dishwasher drains.
• The “COMPLETE” LED will illuminate. This indicates that
the unit has been reset.
CHANGING A CYCLE
If you need to change the running cycle to a new cycle:
• Open the door.
• Hold down the CANCEL button until the “WASHING”
LED goes out.
• Wait for about 1 minute until the dishwasher drains.
• The “COMPLETE” LED will illuminate. This indicates that
the unit has been reset.
• Press “POWER” button to turn the unit off. Then press
the “POWER” button again to turn the unit back on.
• You can now select a new cycle.
To enter the options mode:
(rinse aid setting, dry assist)
• Door must be open. Press the “POWER” button to turn
the unit on.
• One of the wash cycle LEDs will be ashing.
• Press and hold the “>” button, then press and release
the “START” button. Now release the “>” button.
• The “Sanitized” and one other LED will be ashing. You
are now in the options setup mode.
• Press “>” to select the option you would like to adjust.
If the “COMPLETE” and “RINSE AID” LEDs are ashing, you
are in the “Rinse Aid” mode. You can adjust the amount of
Rinse Aid dispensed.
If the “COMPLETE” and “SANITIZED” LEDs are ashing,
you are in the “Dry Assist” mode. You can now activate or
deactivate Dry Assist.
If the “COMPLETE”, “SANITIZED”, and “RINSE AID” LEDs
are ashing, you are in the “Cycle Completion Signal”
mode. You can now increase or decrease the tone or
deactivate the signal.
16
To set the amount of Rinse Aid:
NOTE: If your glasses have spots on them, you need more
rinse agent. If your glasses have streaks, you need less Rinse
Agent.
Follow the instructions to enter "options" mode. With the
“COMPLETE” and “RINSE AID” LEDs ashing :
• Press the "<" button to change the amount of rinse
agent dispensed.
0 LEDs lit → rinse aid dispenser is OFF
1 LED lit → Lowest amount of rinse aid dispensed
2 LEDs lit → Medium amount of rinse aid dispensed
3 LEDs lit → Highest amount of rinse aid dispensed
• Press “START” to save your settings.
Dry Assist
With this option you can raise the temperature of the
rinse water and increase the drying time for improved
drying.
Follow the instructions to enter “options” mode. With the
“COMPLETE” and “SANITIZED” LEDs ashing:
• Press the “<” button to activate or deactivate dry assist.
0 LEDs lit → extra dry heat is OFF
1 LED lit → extra dry heat is ON
• Press “START” to save your settings.
Cycle Completion Signal (select models)
The cycle completion signal alerts you when a cycle
completes and the dishwasher has washed and dried the
dishes. You can choose to disable the tone or adjust the
volume.
Follow the instructions to enter “options” mode. With the
“COMPLETE” and “RINSE AID” LEDs ashing:
• Press the “<” button to adjust or deactivate the cycle
completion signal.
0 LEDs lit → cycle completion signal is OFF
1 LED lit → Lowest tone level
2 LEDs lit → Medium tone level
3 LEDs lit → Highest tone level
• Press “START” to save your settings.
Time Delay
This option allows you to delay the start time of your cycle.
To activate:
• Turn the dishwasher on.
• Select the desired wash cycle.
• Press the Delay Start button until the desired delay time
illuminates in the “3Hr”, “6Hr”, “9Hr” LED.
• Press “START” to save your settings.
Page 17
CARE AND MAINTENANCE
MAINTENANCE TASKS
Certain areas of your dishwasher require occasional
maintenance. The maintenance tasks are easy to do and
will ensure continued superior performance from your
dishwasher:
• Wiping up Spills and Splash-outs
Water may occasionally splash out of your dishwasher,
especially if you interrupt a cycle or open the dishwasher
door during a cycle. To avoid oor damage and possible
mold growth, do not allow wet areas to remain around or
under the dishwasher.
• Clean the Stainless Steel Inner Door and Tub
Clean the outer edges of the inside door panel regularly
to remove debris that might collect from normal loading.
If spots begin to appear on the stainless steel tub or inner
door, make sure the rinse agent reservoir is full.
• Clean the drain air gap
Clean the drain air gap periodically to ensure proper
drainage of your dishwasher. With most types you lift off
the chrome cover. Unscrew the plastic cap. Then check for
any soil buildup. Clean if necessary.
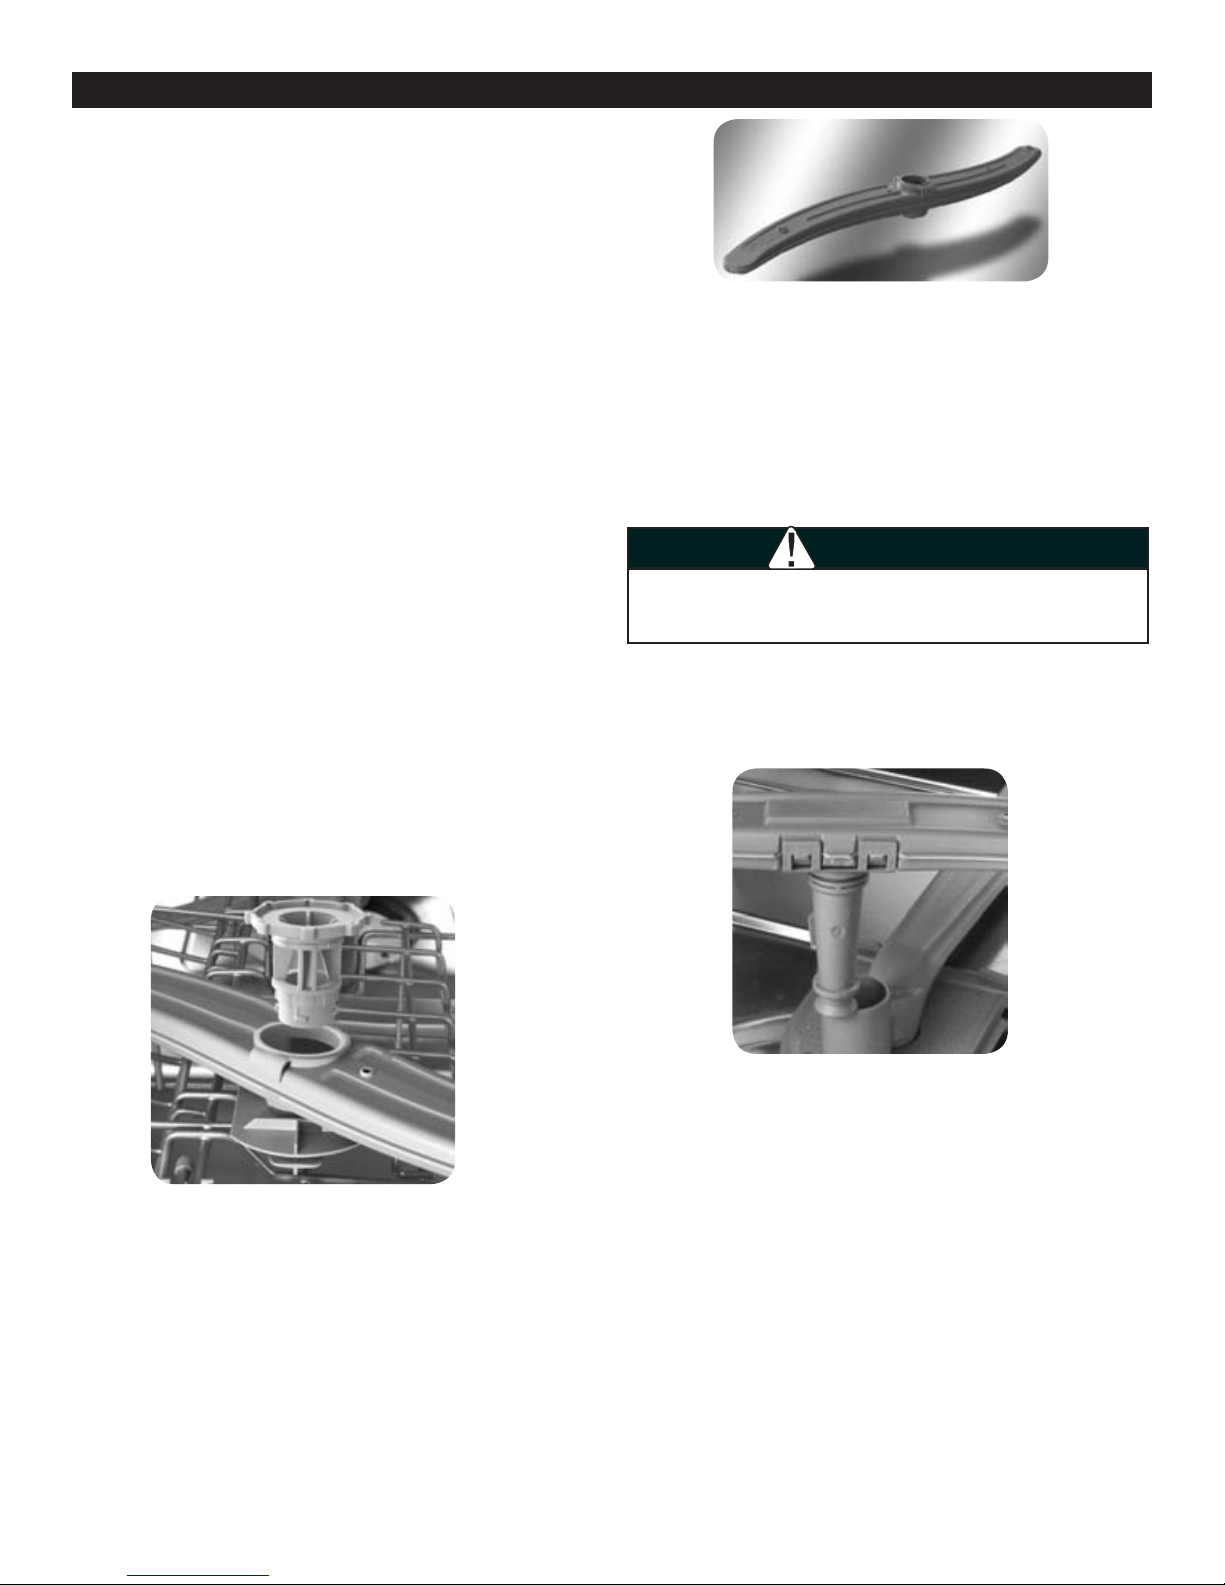
• Check and clean the Spray arm nozzles
Occasionally check the spray arms to ensure that the spray
arm nozzles (holes) are unobstructed. You must remove the
spray arms to check them for obstruction.
3. Remove the spray arm as shown above.
4. Look for obstruction in the spray nozzles.
5. If the spray nozzles need cleaning, ush them under
running water.
To reinstall the top spray arm:
1. Return the top spray arm to its installed position.
2. Return the locking nut to its installed position and turn it
1/8 turn clockwise.
3. Return the top rack to the top rack roller guides.
CAUTION
To avoid injury, do not reach into the large object trap
with your ngers. The large object trap could contain sharp
objects.
To remove the bottom spray arm:
1. Remove the empty bottom rack from the dishwasher
tub.
2. Grasp and lift the bottom spray arm as shown below.
To remove the top spray arm:
1. Remove the empty top rack from the dishwasher.
2. Turn the rack upside down. The top spray arm is held
in position by a locking nut as shown above. Turn the
locking nut counter-clockwise and remove it as shown
above to release the spray arm.
3. Look for obstruction in the spray nozzles.
4. If the spray nozzles need cleaning, ush them under
running water.
To reinstall the bottom spray arm:
1. Return the bottom spray arm to its installed position and
press it so that it snaps into place.
2. Return the bottom rack to its installed position.
• Check and clean the lter system
This dishwasher has a lter system that consists of a Large
Object Trap/Cylinder Filter assembly and a Fine Filter.
Select models have an additional Micro Filter.
The lter system is located on the inside of your dishwasher
under the lower rack and is easily accessible. During normal
use, the lter system is self-cleaning. You should occasionally
inspect it for foreign objects and clean it when necessary.
17
Page 18

To remove the Large Object Trap/ Cylinder Filter
Assembly:
1. Remove the bottom rack.
2. Grasp the assembly and turn it counterclockwise
- ¼ turn as shown below.
3. Lift out the assembly as shown below.
4. Carefully examine the assembly. If you nd debris in
the Large Object Trap, turn it upside-down and gently
tap it on a surface such as a countertop to dislodge
and remove the debris.
• Clean the Exterior Door Panel
Colored Doors
Use only a soft cloth that is lightly dampened with soapy
water.
Stainless Steel Doors
Use a soft cloth with a non-abrasive cleaner (preferably a
liquid spray) made for cleaning stainless steel. For the best
results, apply the stainless steel cleaner to the cloth, then
wipe the surface.
• Clean the Interior
Hard water minerals can cause a white lm to build up on
the inside surfaces, especially just beneath the door area.
Do not clean the dishwasher interior until it has cooled.
Wear rubber gloves. Do not use any type of cleanser other
than dishwasher detergent because it may cause foaming or
sudsing.
• Make a paste with powdered dishwasher detergent on
a damp sponge and clean.
OR
• Use liquid automatic dishwasher detergent and clean
with a damp sponge
5. Flush the Cylinder Filter clean by holding it under running
water.
To reinstall the lter system:
1. Return the ne lter to its originally installed position.
2. Place the Large Object Trap/Cylinder Filter Assembly
into its installed position in the dishwasher oor.
3. Turn the ring handle clockwise 1/4 turn until it is locked.
4. Gently pull the ring handle to ensure that the assembly
is locked into place.
• Clean the Door Gasket
Regularly clean the door gasket with a damp cloth to
remove food particles and other debris. Also clean the door
seal, located inside the dishwasher at the bottom of the
door.
• Winterizing Your Dishwasher
If your dishwasher will be unused for an extended period
of time in a location that experiences freezing temperatures
(e.g., in a holiday home or through a vacation period), have
your dishwasher winterized by an authorized service center.
Fine
Filter
18
Page 19

TROUBLESHOOTING
Dishwashers may occasionally exhibit problems that are unrelated to a malfunction of the dishwasher itself. The following information
may help you with a dishwasher problem without involving a repair professional. The Items listed in the following charts may
not be covered by your product warranty.
Problem Cause Action
Dishwasher
does not start
Dishwasher
beeping
(end of cycle
signal)
Display does
not illuminate
or console
lights are not
on
Dishwasher
seems to run
a long time
Dishes aren’t
getting clean
enough
Dishes are
not getting
dry enough
1. Door may not be properly latched.
2. Unit may not be turned on.
3. Unit not reset or previous cycle not completed.
4. Delay start engaged.
5. Interruption of electrical power supply to
dishwasher or blown fuse.
6. Child lock activated (select models).
7. The door may have been closed without rst
selecting a cycle.
8. Water supply may not be turned on.
Default factory settings alert the customer that
the cycle has completed by beeping. This feature
can be deactivated if so desired.
1. A fuse may have been blown or circuit breaker tripped.
2. Door not closed or latched.
Note: For models with controls on the top portion
of the door, the display only illuminates when the door
is opened and controls are visible.
1. Incoming water is not warm enough.
2. Cycle time can vary due to soil and water
conditions.
3. Rinse agent dispenser is empty.
4. Dishwasher connected to cold water supply.
5. The type of cycle options selected may add
time to the cycle.
Note: For typical cycle length refer to the wash
cycles table in the Dishwasher Cycles and Options
section.
1. Spray arm movement is obstructed.
2. Spray arm nozzles clogged.
3. Improper use of detergents.
4. Filters could be clogged.
5. Dishes are nested or loaded too close together.
6. Selected wash cycle is not suitable for food
soil condtions.
7. Make sure incoming water is at 120°F.
1. Rinse agent dispenser is empty. (Rinse agent
indicator is activated).
2. Improper loading of dishes.
3. Selected cycle does not include drying.
4. Dry Assist
Note: Plastic or Teon do not typically dry as
completely as other items due to their inherent
properties.
1. Shut the door completely.
2. Press the main power switch to turn unit on.
3. To reset, refer to “Canceling or changing the cycle” section in
this manual.
4. To reset, refer to “Delay Start” section in this manual.
5. Check circuit breaker.
6. Deactivate the child lock. Refer to “Child Lock” section in this
manual if applicable.
7. Select a cycle and close the door.
8. Check and turn on water supply.
To adjust the volume or deactivate, refer to “Cycle Completion
Signal” section in this manual.
1. Check the fuse or circuit breaker box and replace the fuse or
reset the breaker if necessary.
2. Ensure that door is properly latched and completely closed.
1. Before starting a cycle, run hot water faucet at the sink nearest
to the dishwasher. Incoming water should be at 120°F.
2. Sensors in the dishwasher automatically increase the cycle time
to ensure a good wash when heavy soil is detected.
3. Add rinse agent.
4. Verify dishwasher is connected to hot water supply plumbing.
1. Ensure that spray arm movement is not blocked by hand rotating
spray arms.
2. Remove the spray arms and clean according to “Check/Clean
the Spray Arm Nozzles” in Care and Maintenance section of
this manual.
3. Increase or decrease detergent depending on the water hardness. Refer to Table under “Adding Detergent and Rinse Agent”.
4. Clean the lter. Refer to “Check/Clean the Filter System” under
Care and Maintenance section of this manual.
5. Rearrange load such that water spray can reach all items in the
dishwasher. See also “Preparing and Loading” section of this
manual.
6. Refer to “Wash Cycle” section in Operating the Dishwasher section of this manual.
1. Add rinse agent. The use of rinse agent improves drying.
2. Rearrange load to ensure items are not nested. Refer also to
the “Preparing and Loading” section of this manual.
3. Certain settings does not include drying cycle.
4. Activate Dry Assist as per instructions in Operating the Dishwasher section.
Note: Select models offer an extra heating options to improve
drying performance. Refer to “Wash Cycle options” under the
Operating the Dishwasher section of this manual.
19
Page 20

Problem Cause Action
Odor 1. Food debris is present at the bottom of the dish-
washer.
2. Food particles are present near the door seal.
3. Residual water is present at the bottom of the
dishwasher.
4. Drain hose is obstructed.
Dishwasher not
lling with water
1. Restriction in the water supply system.
2. Previous wash cycle was not completed.
3. Delay-start is active.
1. Remove the lters and clean according to the “Check/
Clean the Filter System” section of this manual.
2. Refer to “Clean the Door Gasket and Door Seal” in the
Care and Maintenance section of this manual .
3. Ensure the unit has completely drained from the last
cycle. Refer to the “Canceling or changing the cycle”
section of this manual.
4. Remove any obstructions from the drain hose by calling
qualied personnel.
Note: If odor still persists, run the Normal Wash cycle until
it ushes and interrupt the cycle and place an 8 oz. cup of
distilled white vinegar solution on the top rack and then nish
the cycle.
1. Ensure that the water supply valve (typically located under
kitchen sink) is open and check that the water supply line
has no kinks and clogs.
2. Refer to the “Canceling the cycle” section of this manual.
3. Cancel the delay-start or wait until delay-start time
completes (times out). Refer to the “Delay Start” section
of this manual.
Water Leaks
Tub stains
Spots and
streaks on
glassware or
residue on the
dishes
Fascia panel
discolored or
marked
Noise during
wash cycle
1. Suds
2. Door seal could be pulled away from track.
3. Condensation vent is blocked.
4. Improper installation.
1. Stains on the dishwasher interior are due to
hardness of water.
2. Silverware in contact with tub.
Incorrect rinse agent setting. Depending on the hardness of water, adjust the rinse agent
Abrasive cleaner used. Use mild detergents with soft damp cloth.
The dishes may not be arranged properly. Water circulation sound is normal, but if you suspect items are
1. Wrong type of detergent results in suds and leaks. Use
only dishwasher detergents. If suds still persist, then add
one tablespoon of vegetable oil at the bottom of the
dishwasher and run the desired cycle. Also wipe up
excess rinse agent to prevent sudsing.
2. Ensure that door seal is in the track.
3. Ensure that condensation vent is not blocked. Refer to
“Loading Extra Tall Items” in the Preparing and Loading
the Dishwasher section of this manual.
4. Have proper installation veried by qualied personnel
(water supply, drain system, leveling, plumbing).
1. Concentrated Lemon juice can reduce the build up of
hard water stains. Run a normal cycle until it ushes and
interrupt the cycle and then place an 8 oz. cup of the
concentrated lemon solution on the top rack and nish the
cycle. This can be done periodically to avoid build up.
2. Ensure that the silverware does not make contact with the
tub while running a cycle.
dispenser. Refer to “Rinse Agent” section in this manual for
adjustment.
banging into each other or into the spray arms, refer to the
“Preparing and Loading” section of this manual for optimal
arrangement.
Detergent
dispenser cover
will not shut
Unable to select
desired cycle
1. Improper operation of detergent cover.
2. Previous cycle has not been nished, reset, or
cycle was interrupted.
Previous cycle has not nished. Refer to the “Changing the cycle” section of this manual.
1. Refer to “Detergent” section of this manual for instructions
on opening and closing the dispenser.
2. Refer to the “Canceling the cycle” section of this
manual.
20
Page 21

Dishwasher did
not sanitize
1. Did not run a sanitizing cycle
2. Opened door mid-cycle
1. Select a cycle that is intended to sanitize. See
Dishwasher cycles and options section for more
information.
2. Do not open the door while the wash cycle is running.
Dishwasher not
draining
Etching
(permanent
cloudiness)
“Sudsing”
1. Kinked or Crushed Drain Hose
2. No high Loop in Drain Hose
3. Food Disposer plug not removed
4. The airgap may need cleaning
5. A home plumbing issue.
1. Type of glass - some glassware is sensitive to
temperature
2. Too much detergent
3. Too much detergent and/or wrong type of
detergent and/or wrong brand of detergent.
1. Check Drain Hose for proper installation. Note: In the
Installation Process, do not rotate the Drain Hose after
it is attached to the dishwasher. Refer to Installation
Instructions for details.
2. Make sure that a portion of the Drain Hose is at least
20” from the oor. Refer to Installation Instructions for
details.
3. If your Drain Hose is attached to the Food Disposer
make sure the plug in the Food Disposer was removed.
4. Clean the air gap periodically to ensure proper
drainage of the dishwasher. With most types, you lift
off the chrome cover. Unscrew the plastic cap. then
check for any soil buildup. Clean if necessary.
5. In this case, a certied plumber would need to check.
1. Make sure that glasses are Dishwasher safe. Select a
cycle that does not get as hot. Do not use the Heated
Dry option.
2. The amount of detergent is based on the hardness of
the water deliveried to your dishwasher and the amount
of food soil present. If you pre-rinse your dishes and/
or have soft water you should reduce the amount of
detergent. See Owners manual for details.
3. Reduce or change the type/brand of detergent you are
using. Note: Do not pre-rinse dishes. Scraping excess
food soils is all that is required.
21
Page 22

Page 23

TABLE DES MATIÈRES
Informations concernant la garantie ...................................................3
Importantes consignes de sécurité......................................... 4-5
Composants du lave-vaisselle ................................................................6
Caractéristiques du lave-vaisselle ........................................................7
Matériaux de la vaisselle .......................................................................7
Chargement du lave-vaisselle ...............................................................8
Chargement des couverts .......................................................................9
Caractéristiques des paniers et accessoires ....................................10
Détergent................................................................................................11
Produit de rinçage ................................................................................ 12
Cycles et options du lave-vaisselle ............................................. 13-14
Fonctionnement du lave-vaisselle ............................................... 15-16
Nettoyage et entretien ................................................................. 17-18
Dépannage ..................................................................................... 19-21
ENREGISTREMENT DU PRODUIT
Veuillez inscrire les numéros de modèle et de série et la date
d'achat de votre produit dans l'espace ci-dessous. Vous trouverez
les numéros de modèle et de série sur l'étiquette d'identication
située à l'intérieur du lave-vaisselle. Conservez ces renseignements
à proximité au cas où vous auriez besoin de communiquer avec
Sears à propos de votre produit.
Numéro de modèle
Date d'achat
Numéro de série
Conservez ces informations ainsi que votre ticket de caisse pour
consultation future !
CONTRATS DE PROTECTION
Contrats de protection principaux
Félicitations ! Vous avez fait un achat judicieux. Votre nouveau
produit Kenmore® est conçu et fabriqué pour fournir des années
de service able. Cependant, comme tout produit, il peut
nécessiter un entretien préventif ou des réparations occasionnelles.
C'est pourquoi un contrat de protection principal peut vous
permettre de faire des économies et vous éviter des tracas. Le
contrat de protection principal contribue également à prolonger
la durée de vie de votre nouveau produit. Voici ce que couvre le
contrat* :
Les pièces et la main-d'œuvre requises pour assure le bon
fonctionnement du produit dans des conditions d'utilisation
normales, et non pas seulement les défauts.
Notre couverture va bien au-delà de la garantie du produit.
Aucune franchise, aucune exclusion de défaillance fonctionnelle :
autrement dit, une véritable protection.
• Un service professionnel offert par plus de 10 000 tech-
niciens de service Sears autorisés, ce qui signie que votre
produit sera coné à une personne de conance.
• Des appels de service illimités et un service sur l'ensemble du
territoire, autant qu'il est nécessaire, aussi souvent que vous le
désirez.
• La garantie « anti-citron », vous assurant le remplacement
du produit couvert si quatre défaillances ou plus surviennent
dans un délai de douze mois.
• Le remplacement du produit couvert s'il ne peut pas être
réparé.
• Un contrôle d'entretien préventif annuel sur demande, sans
frais supplémentaires.
• Un service d'aide téléphonique rapide appelé « Résolution
rapide ». Le soutien téléphonique d'un représentant de Sears
pour tous les produits. Considérez-nous comme votre « Guide
d'utilisation parlant ».
• Une protection contre les surcharges électriques et les
dommages électriques causés par des variations de courant.
• Une couverture annuelle de 250 $ pour les pertes
alimentaires à la suite d'une altération des aliments résultant
d'une défaillance mécanique d'un réfrigérateur ou d'un
congélateur couvert.
• Le remboursement de la location, si la réparation du produit
couvert prend plus de temps que prévu.
• Un rabais de 10 % sur le prix courant de tout service de
réparation non couvert et les pièces installées connexes. Une
fois le Contrat acheté, un simple appel téléphonique suft
pour prendre rendez-vous avec le service de réparation.
Vous pouvez téléphoner à toute heure du jour ou de la nuit ou
prendre rendez-vous avec le service de réparation en ligne.
Le contrat de protection principal est un achat sans risque. Si pour
quelque raison que ce soit, vous annulez le contrat durant la période de garantie du produit, vous serez remboursé intégralement.
En cas d'annulation après l'expiration de la période de garantie
du produit, vous recevrez un remboursement calculé au prorata.
Procurez-vous votre contrat de protection principal dès
aujourd'hui !
Certaines limitations et exclusions s'appliquent.
Si vous êtes aux États-Unis et désirez connaître les prix et obtenir de plus amples renseignements,
téléphonez au 1-800-827-6655.
•Au Canada, la couverture de certains articles peut varier.
Pour connaître tous les détails, communiquez avec Sears
Canada au 1-800-361-6665.
Service d'installation Sears
Pour bénécier du service d'installation professionnel de Sears
pour appareils électroménagers, ouvre-portes de garages,
chauffe-eau et autres appareils domestiques majeurs, aux ÉtatsUnis ou au Canada, téléphonez au
1-800-4-MY-HOME®.
2
Page 24

INFORMATIONS CONCERNANT LA GARANTIE
Garantie limitée pendant une année
Lorsque cet appareil est installé, utilisé et entretenu
conformément à toute les instructions fournies, la couverture
de garantie suivante s'applique pendant une année. Pour
bénécier de la garantie, téléphonez au
1-800-4-MY-HOME® (1-800-469-4663).
Cette garantie s'applique uniquement pendant 90 jours à
compter de la date d'achat si cet appareil électroménager
est utilisé à d'autres ns que pour un usage familial privé.
Cette garantie couvre uniquement les vices de matériaux et
de fabrication et NE paiera PAS pour :
1 Les articles courants sujets à une usure normale, y
compris mais non de façon limitative les ltres, les
courroies, les ampoules et les sacs.
2 Les visites d'un technicien d'entretien pour expliquer
à l'utilisateur les procédures d'installation, de
fonctionnement et d'entretien corrects du produit.
3 La visite d'un technicien en entretien et en réparation
pour nettoyer ou effectuer l'entretien du produit.
4 Les dommages au produit ou la défaillance de ce
produit s'il n'est pas installé, utilisé ou entretenu
conformément à toutes les instructions fournies avec le
produit.
5 Les dommages au produit ou la défaillance de ce
produit résultant d'un accident, d'un abus, d'une
utilisation abusive ou d'une utilisation à d'autres ns que
celles pour lesquelles le produit a été conçu.
6 Les dommages au produit ou la défaillance de ce
produit résultant de l'utilisation de détergents, produits
nettoyants, produits chimiques ou ustensiles autres que
ceux recommandés dans toutes les instructions fournies
avec le produit.
7 Les dommages aux pièces ou aux systèmes ou la défail-
lance des pièces ou des systèmes résultant de modications non autorisées apportées à ce produit.
Stipulation d'exonération de garanties implicites ; limitation
des recours
Le recours exclusif du client aux termes de la présente
garantie limitée consiste en la réparation du produit comme
stipulé aux présentes. Les garanties implicites, y compris
les garanties de qualité marchande ou de convenance
précise, sont limitées à un an ou à la période la plus
courte autorisée par la loi. Sears ne sera pas responsable
des dommages accessoires ou indirects. Certains États et
provinces n'autorisent pas les exclusions ou limitations des
dommages accessoires ou indirects, ou les limitations de la
durée d'une garantie implicite de qualité marchande ou de
convenance, et donc ces exclusions ou limitations peuvent ne
pas s'appliquer à votre cas.
Cette garantie s'applique uniquement lorsque cet appareil
est utilisé aux États-Unis ou au Canada.
La présente garantie vous confère des droits légaux
spéciques et vous pouvez également avoir d'autres droits
qui varient d'un État à l'autre.
Sears Brands Management Corporation,
Hoffman Estates, IL 60179
Sears Canada Inc.
Toronto, Ontario, Canada M5B 2B8
3
Page 25

MESSAGES DE SÉCURITÉ - Veuillez LIRE et CONSERVER ces informations
De nombreux messages de sécurité importants gurent dans ce guide et sur votre appareil. Veillez à lire et à respecter
systématiquement tous les messages de sécurité.
AVERTISSEMENT
• Une mauvaise utilisation du lave-vaisselle peut entraîner
des blessures graves ou la mort. Ne pas utiliser le lavevaisselle d'une façon autre que celle décrite dans le
présent guide ou à d'autres ns que celles précisées dans
les pages qui suivent.
• Des dommages au produit et/ou des blessures graves
peuvent survenir par suite de l'emploi de techniciens en
entretien et en réparation non qualiés ou de pièces
de remplacement qui ne sont pas d'origine. Toute
réparation doit être effectuée par un technicien en
entretien et en réparation compétent à l'aide de pièces
de rechange d'origine.
• Le mauvais branchement de l'alimentation électrique
du lave-vaisselle décrit dans le présent guide ou la
mise à la terre inadéquate du lave-vaisselle peut
provoquer une décharge électrique ou un incendie. Ne
pas utiliser le lave-vaisselle décrit dans le présent guide
à moins d'être certain que l'alimentation électrique
est correctement branchée ou que le lave-vaisselle est
correctement mis à la terre.
• Ne jamais utiliser de produits chimiques puissants pour
nettoyer votre lave-vaisselle. Certains produits contenant des chlorures peuvent endommager votre lave-vaisselle et poser un risque pour la santé !
AVIS
• Il est vivement recommandé à l'utilisateur de se
familiariser avec les procédures de fermeture de
l'alimentation d'eau entrante et de coupure de
l'alimentation électrique entrante. Voir la notice
d'installation ou communiquez avec votre installateur
pour des informations supplémentaires.
• Ne jamais utiliser de produits de nettoyage à la vapeur
pour nettoyer votre lave-vaisselle. Le fabricant n'assume
aucune responsabilité pour d'éventuels dommages ou
conséquences.
4
Page 26

IMPORTANTES CONSIGNES DE SÉCURITÉ - Veuillez LIRE et CONSERVER ces informations
AVERTISSEMENT Pour réduire le risque d'incendie, de décharge électrique ou de blessure grave,
observez les consignes suivantes :
• Ce lave-vaisselle est fourni avec la notice d'installation
et le présent guide d'utilisation et d'entretien. Lire et
comprendre toutes les instructions avant d'installer ou
d'utiliser le lave-vaisselle.
• Cet appareil doit être mis à la terre sur une installation
de ls à demeure en métal ou un conducteur de
protection doit être relié aux ls conducteurs et
raccordé à la borne ou au l de mise à la terre du
lave-vaisselle. Voir la notice d'installation fournie avec
le lave-vaisselle pour des informations supplémentaires
sur les spécications en matière d'électricité.
• Utiliser uniquement ce lave-vaisselle conformément à
l'usage auquel il est destiné, à savoir pour laver la vaisselle et la batterie de cuisine à usage domestique.
• Utiliser des détergents ou des produits de rinçage
recommandés pour l'usage au lave-vaisselle et les
conserver hors de la portée des enfants.
• Lors du chargement des articles dans le lave-vaisselle :
a. Disposer les objets tranchants de manière à ce qu'ils
ne puissent pas abîmer le joint d'étanchéité de la
porte.
b. Charger les couteaux et autres ustensiles tranchants
LE MANCHE VERS LE HAUT an de réduire le risque
de blessures par coupure.
c. Ne pas laver d'articles en plastique dans le lave-
vaisselle à moins qu'ils ne portent la mention
« lavable au lave-vaisselle » ou mention équivalente. Pour les articles en plastique ne comportant
pas cette mention, vérier les recommandations du
fabricant.
d. Ne pas utiliser votre lave-vaisselle à moins que tous
les panneaux protecteurs soient en place.
e. Ne pas altérer ni neutraliser les commandes ni les
dispositifs de verrouillage des commandes.
• Ne pas utiliser abusivement, s'asseoir ou se tenir debout
sur la porte ou les paniers à vaisselle du lave-vaisselle.
• Pour réduire le risque de blessures, empêcher les enfants de jouer à l'intérieur ou sur le lave-vaisselle.
• Quand les enfants sont en âge d'utiliser l'appareil, les
parents ou tuteurs légaux ont la responsabilité légale
de veiller à ce que des personnes compétentes leur
enseignent à respecter les règles de sécurité.
• Dans certaines circonstances, de l'hydrogène peut
s'accumuler dans une installation d'eau chaude lorsque
celle-ci demeure inutilisée pendant deux semaines ou
plus. L'hydrogène est un gaz explosif. Avant d'utiliser
un lave-vaisselle connecté à un chauffe-eau qui n'a
pas servi depuis deux semaines ou plus, ouvrir tous les
robinets d'eau chaude et laisser couler l'eau pendant
quelques minutes. Ouvrir les fenêtres pour aérer la
résidence. De cette façon, toute trace d'hydrogène
sera purgée. L'hydrogène étant un gaz explosif, ne pas
fumer ni utiliser de amme nue pendant cette période.
• Retirer la porte du compartiment de lavage du lavevaisselle si vous voulez mettre celui-ci hors service ou
vous en débarrasser.
• Pour éviter des dommages au plancher et la formation
éventuelle de moisissure, essuyer les zones d'eau
stagnante pouvant demeurer autour ou sous le lavevaisselle.
• Protégez votre lave-vaisselle contre les éléments.
Protégez votre lave-vaisselle contre le gel pour
éviter d'éventuels dommages au niveau du robinet de
remplissage. Les dommages causés par le gel ne sont
pas couverts par la garantie.
5
Page 27

Joint de porte
Panier supérieur
COMPOSANTS DU LAVE-VAISSELLE
Évent
Panier à
couverts
Panier inférieur
Distributeur
de produit de
rinçage
Système de
ltration
Distributeur
de détergent
Numéro de série
Étiquette
Les caractéristiques varient d'un modèle à l'autre
Crépine
pour gros déchets
Filtre n
SYSTÈME DE FILTRATION
Filtre cylin-
drique
6
Page 28

CARACTÉRISTIQUES DU LAVE-VAISSELLE
QuietGuard™: le système de moteur à deux pompes,
le moteur suspendu et la triple isolation dont dispose ce
lave-vaisselle en font l'un des plus silencieux d'Amérique du
Nord.
Cuve géante en acier inoxydable : surface intérieure
hygiénique inoxydable, assortie d'une garantie à vie.
Paniers recouverts de nylon : réduit grandement les coupures et entailles. Les paniers sont assortis d'une garantie
de cinq ans.
Élément chauant dissimulé : chauffe l'eau à une température de désinfection.
Séchage par condensation : le rinçage nal à haute température, la cuve en acier inoxydable à basse température
et l'action mouillante du produit de rinçage permettent
d'obtenir un séchage hygiénique, écoénergétique et
économique.
SmartSensor : contrôle la qualité de l'eau et décide si un
deuxième remplissage d'eau fraîche est nécessaire.
Système de ltration triple : plusieurs ltres assurent une
distribution d'eau propre et protègent la pompe principale
et la pompe de vidange des corps étrangers.
Dispositif d'arrêt de l'eau : dispositif de sécurité qui
interrompt le débit d'eau si la présence d'eau est détectée
au niveau de la base du lave-vaisselle.
* Picots rabattables pour paniers supérieur et inférieur :
améliorent la souplesse d'utilisation des paniers an qu'ils
puissent recevoir des ustensiles surdimensionnés.
* Dry Assist (Aide au séchage) : augmente la température
de l'eau de rinçage et la durée de séchage pour assurer
une meilleure performance de séchage.
* Paniers réglables : vous pouvez relever ou abaisser le panier supérieur pour laisser davantage d'espace aux articles
surdimensionnés dans les paniers supérieur et inférieur.
SmartWash™ HE : cette option vous évite de sélectionner
un cycle au jugé. Les capteurs du lave-vaisselle ajustent
automatiquement la durée du cycle, la température et les
changements d'eau en fonction du degré de saleté de la
vaisselle.
* TurboClean™ : s'attaque à la vaisselle du panier inférieur difcile à nettoyer, éliminant le besoin de faire tremper
et de récurer préalablement la vaisselle très sale.
AquaGuard™ : système de protection contre les fuites qui
coupe l'alimentation d'eau dans l'éventualité d'une fuite.
* en fonction du modèle de lave-vaisselle
MATÉRIAUX DE LA VAISSELLE
REMARQUE : avant la première utilisation de votre lave-vaisselle, vériez les informations contenues dans cette section.
Certains articles ne sont pas lavables au lave-vaisselle et doivent être lavés à la main ; d'autres exigent un chargement
spécial.
RECOMMANDÉ
Aluminium : l'aluminium anodisé coloré peut s'altérer au l
du temps. Les minéraux contenus dans l'eau sont susceptibles
de noircir ou de tacher l'aluminium. En général, ces taches
peuvent être nettoyées à l'aide d'un tampon métallique à
récurer.
Porcelaine, cristal, faïence : certains ustensiles peints à la
main peuvent se décolorer, s'altérer ou se tacher. Laver ces
ustensiles à la main. Positionner les articles en verre fragiles
de façon à ce qu'ils ne basculent pas ou ne s'entrechoquent
pas avec les autres ustensiles pendant le déroulement du
cycle de lavage.
Verrerie : le verre laiteux risque de se décolorer ou de
jaunir.
Finis anti-adhésifs : appliquer une petite quantité d'huile
végétale sur les surfaces anti-adhésives après le séchage.
Plastique : s'assurer que les articles en plastique sont
lavables au lave-vaisselle.
Acier inoxydable, argent n et métaux argentés : charger
les ustensiles composés de ces métaux de manière à ce
qu'ils n'entrent pas en contact avec d'autres métaux.
NON RECOMMANDÉS
Acrylique : des craquelures (petits ssures) peuvent
apparaître sur l'acrylique.
Pièces collées : les adhésifs qui servent à coller les joints
des matériaux comme le plastique, le bois, l'os, l'acier, le
cuivre, le fer blanc, etc. peuvent fondre.
Ustensiles avec manches en os : les manches risquent de
se partager.
Fer, fonte : le fer rouille. Laver à la main et sécher
immédiatement.
Articles autres que la vaisselle : votre lave-vaisselle est
conçu UNIQUEMENT pour le lavage de la vaisselle et de la
batterie de cuisine de maison standard.
Étain, laiton, bronze : l'étain se ternit. Laver à la main et
sécher immédiatement.
Fer blanc : le fer blanc se tache. Laver à la main et sécher
immédiatement.
Bois : les bols et les ustensiles en bois et les ustensiles avec
manches en bois peuvent se ssurer, se déformer et perdre
leur ni.
Or : L'or se décolore.
7
Page 29

CHARGEMENT DU LAVE-VAISSELLE
Ne pas prélaver les pièces de vaisselle comportant des résidus
d'aliments non tenaces. Retirer les grosses particules alimentaires,
les os, les pépins, les cure-dents et la graisse excessive. Les articles
comportant des dépôts de nourriture brûlés, collés ou farineux
peuvent nécessiter un prélavage.
Se reporter à la section intitulée Matériaux de la vaisselle pour
des informations supplémentaires sur la vaisselle adaptée à la
machine.
• Charger uniquement les articles lavables au lave-vaisselle.
• Charger la vaisselle dans les paniers an que les bols,
marmites et casseroles soient face aux bras d'aspersion.
• Éviter d'imbriquer les pièces de vaisselle les unes dans les
autres et veiller à ce qu'elles ne se touchent pas.
• Séparer les articles en métaux dissemblables.
• Charger la vaisselle et les verres en les inclinant pour éviter
la formation de aques et obtenir une meilleure performance
de séchage.
AVIS
Pour éviter d'endommager le lave-vaisselle, ne pas
charger d'articles en papier, sacs en plastique, matériaux
d'emballage ou d'articles autres que la vaisselle et les
ustensiles de cuisine normaux lavables au lave-vaisselle.
PANIER SUPÉRIEUR - CONFIGURATION DE CHARGEMENT SUGGÉRÉE
Chargement du panier supérieur
REMARQUE : s'assurer que les articles ne dépassent pas du fond
des paniers et qu'ils ne bloquent pas les bras d'aspersion.
REMARQUE : lorsque vous poussez le panier supérieur à
l'intérieur du lave-vaisselle, faites en sorte qu'il bute contre la
paroi arrière de la cuve an que le bras d'aspersion du panier
supérieur se branche sur la conduite d'alimentation d'eau à
l'arrière de la cuve. Ne pas pousser le panier supérieur en
rabattant la porte.
Chargement du panier inférieur
Placer les ustensiles surdimensionnés dans le panier inférieur.
Disposer les marmites, casseroles et saladiers, face sale orientée
vers les bras d'aspersion.
Ordre de déchargement
• Vider le panier inférieur en premier.
• Vider le panier à couverts.
• Vider le panier supérieur.
REMARQUE : ne pas utiliser de ruban élastique dans le lave-
vaisselle (pour maintenir les articles en place dans les paniers) ou
toute autre pièce qui n'est pas d'origine. L'usage de tels articles
risque d'endommager la pompe de vidange.
PANIER INFÉRIEUR - CONFIGURATION DE
CHARGEMENT SUGGÉRÉE
REMARQUE : charger les tasses et les verres entre les picots. Ne
pas charger la vaisselle par dessus les picots pour éviter les cassures ou l'apparition de taches d'eau sur la vaisselle.
PANIER SUPÉRIEUR - CONFIGURATION DE
CHARGEMENT SUPPLÉMENTAIRE
PANIER INFÉRIEUR - CONFIGURATION DE
CHARGEMENT SUPPLÉMENTAIRE
8
Page 30

CHARGEMENT DES COUVERTS
1 2 3 4 5
6
7
4
5
5
5 1 1
1 1
1
1
111
1
1
1
5
5
5
2
2
2
2
2
2
2
2
2
2
2
2
5
5
5
5
5
5
4 4
4
3 3
3 3
3
3 3 3 6
3
3 3
4
4 44 4
4
4 4
3
6
7
REMARQUE : les couvercles du panier à couverts peuvent être
relevés pour faire place aux articles surdimensionnés ou de
forme irrégulière.
Fermer les couvercles du panier à couverts et placer celui-ci
conformément aux modèles suggérés ci-dessous.
Positionner les couteaux et ustensiles pointus en orientant le
manche vers le haut, et les fourchettes et cuillères, le manche vers
le bas. Si vous avez des ustensiles surdimensionnés ou de forme
irrégulière à mettre dans le panier à couverts, positionnez les
articles de façon à ce qu'ils ne s'imbriquent pas les uns dans les
autres .
Pour de meilleurs résultats, suivre la conguration suggérée pour le
chargement des ustensiles.
AVERTISSEMENT
Les pointes de couteaux et lames tranchantes et autres types
d'ustensiles tranchants peuvent occasionner des blessures
graves. Charger les couteaux et autres ustensiles tranchants
la lame vers le bas. Empêcher les enfants de manipuler ou de
jouer à proximité des couteaux et des ustensiles tranchants.
LE PANIER à COUVERTS FLEXIBLE
Le panier à couverts standard s'adapte à l'arrière du panier
inférieur. Le couvercle du panier peut être enclenché par
pression sur l'anse ou le panier peut rester ouvert.
1 - Fourchette à
salade
2 - Cuillère à thé
3 - Fourchette de
table
4 - Couteau
5 - Cuiller à soupe
6 - Cuillère à servir
7 - Fourchette à servir
Option de disposition du panier
9
Page 31

CARACTÉRISTIQUES DES PANIERS ET ACCESSOIRES
TABLETTES à TASSES
Les tablettes à tasses sont utilisées pour maintenir les tasses et
autres ustensiles surdimensionnés telles que les louches et les cuillères à servir. Pour utiliser les tablettes à tasses, les replier tout
d'abord vers le bas an qu'elles soient placées conformément
à l'illustration ci-dessous. Disposer les tasses et autres articles à
l'envers sur les tablettes.
ATTACHES POUR PETITS ARTICLES
Les attaches destinées aux petits articles empêchent les ustensiles
légers de basculer et de se remplir d'eau pendant le cycle de
lavage.
PICOTS RABATTABLES
Certains modèles sont dotés de paniers comportant des picots
que vous pouvez rabattre ou relever en fonction de vos besoins
de chargement de vaisselle.
Pour rabattre les picots :
• Saisir le picot situé près du mécanisme de verrouillage.
• Dégager le picot de la rainure.
• Pousser vers le bas.
RÉGLAGE MANUEL DE LA HAUTEUR DE PANIER
Retirez le panier vide en le tirant hors du lave-vaisselle jusqu'à
ce que vous puissiez le relever, comme illustré ci-dessus. Tirez le
panier vers l'extérieur et vers le haut jusqu'à ce que les roulettes
se dégagent complètement des guides à roulettes.
Remettez en place le panier comportant l'autre jeu de roulettes
sur les guides à roulettes comme illustré ci-dessous.
10
Page 32

DÉTERGENT
TBS (25 ML)
TBS (15 ML)
Distributeur
Utiliser seulement du détergent conçu pour les lave-vaisselle. Pour
de meilleurs résultats, utilisez du détergent vaisselle en poudre
frais.
AVIS
Pour éviter d'endommager le lave-vaisselle, ne pas utiliser de
détergent pour le lavage de la vaisselle à la main.
■
Pour éviter d'endommager le lave-vaisselle et protéger
les articles en verre de la corrosion, ne pas utiliser trop de
détergent si vous disposez d'une eau douce.
Ajout de détergent
3 TBS MAX
2
1
Ce lave-vaisselle utilise moins d'eau. Vous devez donc utiliser
moins de détergent. Avec de l'eau douce, 1 c. à soupe (15
ml) de détergent nettoie la plupart des charges. Le godet du
distributeur de détergent comporte des lignes graduées pour
mesurer le détergent comme suit :
• 1 cuillerée à soupe (15 ml)
• 1 cuillerée à soupe 3/4 (25 ml)
3 cuillerées à soupe (45 ml) de détergent rempliront
complètement le godet du distributeur de détergent.
REMARQUE : si vous ne connaissez pas la dureté de votre
réseau d'alimentation en eau, utilisez 1 cuillerée à soupe (15 ml)
de détergent. Augmenter la quantité de détergent au besoin
pour atteindre la quantité minimale nécessaire an de laver
correctement votre vaisselle.
Utiliser les lignes graduées du godet du distributeur de détergent
pour mesurer la quantité de détergent recommandée dans le
tableau.
Quantité de détergent recommandée
Type d'eau
Unité
Cycle de lavage
SmartWash™ HE C. à
Ports & Pans
(Marmites et casseroles)
Lavage
normal
China Gentle
(Porcelaine - Lavage délicat)
Lavage
rapide
de
mesure
soupe
ml
C. à
soupe
ml
C. à
soupe
ml
C. à
soupe
ml
C. à
soupe
ml
Dure
7,0 g/gal
ou plus
3
25-45
3
45
1 3/4-3
25-45
1 3/4
25
1 3/4
25
Moyenne
7,0-1,0 g/
gal
3
45
3
45
1 3/4
25
1-1 3/4
15-25
1-1 3/4
15-25
Douce
moins de
1,0 g/gal
1-1 3/4
15-25
1 3/4-3
25-45
1-1 3/4
15-25
1
15
1
15
• Pour de meilleurs résultats, utiliser du détergent en poudre
frais.
• 1 c. à soupe nettoie la plupart des charges.
• Ne pas utiliser plus de 3 c. à soupe. Ne pas faire déborder
le godet.
• Si vous utilisez des pastilles de détergent, les poser à plat
pour éviter qu'elles n'entrent en contact avec le couvercle.
FERMETURE
• Placer le doigt comme indiqué ci-dessus.
• Faire coulisser la porte vers l'avant et appuyer fermement
jusqu'à ce qu'un déclic soit
perceptible.
OUVERTURE
REMARQUE : lors de l'utilisation de sachets de gel, pastilles ou
autres détergents pour lave-vaisselle, vérier les instructions du
fabricant (en règle générale : 1 pastille/dose).
• Pour ouvrir le couvercle, appuyer sur le bouton comme illustré
ci-dessus.
11
Page 33

PRODUIT DE RINÇAGE
Distributeur
Pour obtenir un séchage adéquat, toujours utiliser un produit
de rinçage liquide, même si votre détergent contient un
produit de rinçage ou un adjuvant de séchage.
REMARQUE : la DEL dédiée au produit de rinçage s'allume
lorsque la quantité de produit est insufsante.
La DEL ne s'allume pas s'il y a sufsamment de produit de
rinçage dans le lave-vaisselle.
Remplissage du distributeur
Pour ouvrir,
soulevez la
languette
• S'assurer que la porte du lave-vaisselle est
complètement fermée.
• Verser le produit de rinçage dans le distributeur comme
indiqué ci-dessous jusqu'à ce que le réservoir soit plein.
Essuyer tout produit de rinçage renversé une fois le
distributeur plein pour éviter la production excessive de
mousse.
Une fois le distributeur plein, le témoin s'éteint au bout de
quelques minutes, après la fermeture de la porte du lavevaisselle (certains modèles uniquement).
• Toujours utiliser un produit de rinçage même si votre
détergent en contient un.
• Verser le produit de rinçage lorsque le témoin lumineux
Rinse Agent (Produit de rinçage) s'allume sur le panneau de commande.
12
Page 34

CYCLES ET OPTIONS DU LAVE-VAISSELLE
CYCLES
SmartWash™ HE
Cette option vous évite de sélectionner un cycle au jugé.
Les capteurs du lave-vaisselle ajustent automatiquement la
durée du cycle, la température et les changements d'eau
en fonction du degré de saleté de la vaisselle. Ce cycle
comporte des modes de détection supplémentaires que les
autres cycles n'ont pas.
Pots & Pans * (Marmites et casseroles)
Nettoie les débris alimentaires collés, durcis ou séchés demeurant sur les ustensiles. Il faudra peut-être faire tremper
ces ustensiles ou les récurer à la main.
Normal Wash (Lavage normal)
Nettoyage efcace des charges de vaisselle normales
comportant des résidus d'aliments normaux non tenaces.
China Gentle (Porcelaine - Lavage délicat)
Conçu pour le lavage de la vaisselle en porcelaine et des
articles en verre fragiles, ce cycle vous permet de nettoyer
votre vaisselle à la perfection tout en vous évitant les tracas
du lavage à la main ou la crainte d'abîmer la vaisselle.
NIVEAU DE
SALISSURES
Léger 105 110 3,6 13,6
Moyenne 110 115 4,5 17,0
Important 115 120 6,0 22,6
Tous niveaux de
salissures
Léger 105 120 2,3 8,7
Moyenne 120 135 5,0 19,0
Important 135 155 7,1 26,7
Tous niveaux de
salissures
*DURÉE (en min.)
Sans options
Type Maximum
130
130 6,8 25,6
80 80 3 11,3
Quantité d'eau utilisée
En gallons En litres
Fast Wash (Lavage rapide)
Permet de laver la vaisselle légèrement sale et réduit la
durée de lavage totale. Utiliser ce cycle pour nettoyer les
verres et les assiettes à dessert que l'on doit réutiliser le jour
même.
L'ajout d'options augmentera ou diminuera la durée du cycle. Se reporter à la section d'informations intitulée « Options ».
Les durées sont basées sur une température d'entrée d'eau de 120°F (49°C).
* Le cycle est certié par la NSF.
INFORMATIONS CONCERNANT L'HOMOLOGATION NSF
Un lave-vaisselle ou un cycle de lave-vaisselle qui est certié par
la National Sanitation Foundation (NSF ou Fondation nationale
d'hygiène) doit satisfaire à des critères internationaux très stricts
en ce qui concerne la durée de lavage et la température de l'eau
an d'assurer l'assainissement de la vaisselle et de la batterie de
cuisine. Ces critères sont expliqués dans le document NSF/ANSI 184
: Lave-vaisselle résidentiels. Pour des informations supplémentaires
concernant l'homologation NSF, veuillez visiter le site Web de la
NSF à l'adresse,
http://www.nsfconsumer.org/home/appliances.asp.
Votre lave-vaisselle est certié par la NSF. Les cycles du lavevaisselle certiés par la NSF sont indiqués dans le tableau ci-dessus.
Lorsque ces cycles de lavage sont terminés, le témoin lumineux «
Tous niveaux de
salissures
Sanitized » (Aseptisé) du panneau de commande de votre lavevaisselle s'allume. Toutefois, si l'eau du réseau de distribution de
votre résidence est trop chaude, la durée de mise en température
du lave-vaisselle peut être écourtée et le témoin lumineux Sanitized
(Aseptisé) peut ne pas s'allumer.
Les durées de cycle répertoriées dans le Guide d'utilisation et
d'entretien sont basées sur des charges de vaisselle normalement
sales et sur une eau entrante d'une température de 120°F, et
varient en fonction de votre situation particulière.
REMARQUE : seuls les cycles hygiéniques ont été conçus pour
satisfaire aux exigences 6 d'efcacité de lavage et de désinfection.
L'intention n'est pas, directement ou indirectement, de donner à
entendre que tous les cycles d'une machine certiée ont passé avec
succès le test d'efcacité de désinfection.
13
59 59 3,9 14,9
Page 35

OPTIONS
Peut être
sélectionnée
avec :
China Gentle
(Porcelaine -
Lavage délicat)
Durée ajoutée au cycle Eau ajoutée
Type Maximum En gallons En litres
1,1 gal 4 l
Turbo Clean (Propreté Turbo)
s'attaque à la vaisselle du panier inférieur
difcile à nettoyer, éliminant le besoin de
faire tremper et de récurer préalablement la
vaisselle très sale.
Normal Wash
(Lavage normal) 0 0
Ports & Pans
(Marmites et casseroles)
SmartWash™ HE
ajoute
20 min
ajoute
20 min
0,2 gal 1,2 l
0,2 gal 1,2 l
Témoin lumineux Sanitized (Aseptisé)
Lorsque le voyant lumineux « Sanitized » (Aseptisé) s'allume sur le panneau de contrôle, la vaisselle et les ustensiles qui
viennent d'être nettoyés ont été aseptisés conformément aux conditions de la National Sanitation Foundation (NSF). Pour
plus d'informations sur l'homologation NSF, se reporter aux tableaux de cette section.
REMARQUE : ce témoin lumineux est allumé pour les cycles marqués d'un astérisque dans les tableaux des cycles et options.
14
Page 36

FONCTIONNEMENT DU LAVE-VAISSELLE
Si votre machine comporte une fenêtre d'afchage semblable à
celle qui est représentée ci-dessus, suivre les instructions suivantes.
ANNULATION D'UN CYCLE
• Maintenir la touche CANCEL (Annuler) enfoncée jusqu'à ce
que l'afchage indique « 0:01 ».
• Appuyer sur la touche « POWER » (Alimentation) pour étein-
dre la machine. Rallumer ensuite la machine.
• L'une des DEL de cycle clignotera. Ceci indique que l'appareil
a été réinitialisé.
CHANGEMENT DE CYCLE
Si vous devez changer le cycle en cours de fonctionnement :
• Maintenir la touche CANCEL (Annuler) enfoncée jusqu'à ce
que l'afchage indique « 0:01 ».
• Appuyer sur la touche « POWER » (Alimentation) pour étein-
dre la machine. Ralllumer ensuite la machine.
• Vous pouvez sélectionner à présent le nouveau cycle.
Verrouillage des commandes
• Après avoir appuyé sur la touche « START » (Démarrer),
vous pouvez activer la fonction Control Lock (Verrouillage des
commandes).
• Appuyer et maintenir la pression sur la touche « CHINA
GENTLE » (Porcelaine - Lavage délicat) jusqu'à ce que «
CL » apparaisse sur la fenêtre d'afchage. Les touches ne
répondent plus (à l'exception de « POWER ») et « CL » sera
afché à chaque tentative.
• Pour désactiver le verrouillage des commandes, appuyer
et maintenir la pression sur la touche « CHINA GENTLE
» (Porcelaine - Lavage délicat) jusqu'à ce que « CL »
disparaisse de l'écran.
Pour entrer le mode Options :
(réglage du produit de rinçage, aide au séchage)
• La porte doit être fermée. Appuyer sur la touche « POWER »
(Alimentation) pour allumer la machine.
• L'afchage du décompte et l'un des voyants DEL des cycles
de lavage clignoteront.
• Appuyer et maintenir la pression sur la touche « NORMAL
WASH » (Lavage normal) puis appuyer et relâcher la touche
« START » (Démarrer). Relâcher à présent la touche « NORMAL WASH » (Lavage normal).
• La DEL « Sanitized » (Aseptisé) clignotera. Vous êtes à
présent dans le mode de conguration des options.
• Appuyer sur la touche « NORMAL WASH » (Lavage normal)
pour sélectionner l'option que vous voulez régler.
Si l'afchage indique « d:00 » ou « d:01 », vous pouvez activer
ou désactiver l'option « Extra Dry Heat » (Chaleur de séchage
additionnelle).
Si l'afchage indique une valeur comprise entre « r:00 » et
« r:06 », vous pouvez régler la quantité de produit de rinçage
libérée.
Pour régler la quantité de produit de rinçage :
REMARQUE : si vos verres comportent des taches blanches, vous
devez augmenter la quantité de produit de rinçage. Si vos verres
comportent des traînées blanches, vous devez diminuer la quantité de produit de rinçage.
Suivre les instructions pour entrer le mode « options ». Si
l'afchage indique une valeur comprise entre « r:00 » et
« r:06 » :
• appuyer sur la touche « NORMAL WASH » (Lavage normal)
pour modier la quantité de produit de rinçage pouvant être
libérée.
r:00 → Produit de rinçage Activé
r:03 → Quantité moyenne de produit de rinçage libérée
r:06 → Quantité maximale de produit de rinçage libérée
Dry Assist (Aide au séchage)
Cette option vous permet d'augmenter la température de l'eau
de rinçage et de prolonger la durée de séchage pour assurer
une meilleure performance de séchage.
Suivre les instructions pour entrer le mode « options ». Si une valeur comprise entre « d:00 » et « d:01 » est afchée :
• appuyer sur la touche « NORMAL WASH » (Lavage normal)
pour activer ou désactiver la fonction Dry Assist (Aide au
séchage).
d:00 → Aide au séchage Désactivée
d:01 → Aide au séchage Activée
Mise en marche diérée
Cette option vous permet de différer la mise en marche d'un
cycle.
Pour sélectionner cette fonction :
• sélectionner tout d'abord le cycle souhaité.
• appuyer ensuite sur la touche + ou - jusqu'à ce que la durée
différée voulue soit afchée.
AVERTISSEMENT
Les projections d'eau chaude qui jaillissent du lave-vaisselle
peuvent occasionner des brûlures graves. SOYEZ PRUDENT
EN OUVRANT LA PORTE pendant le déroulement d'un cycle
de lavage ou de rinçage. Éviter d'ouvrir complètement la
porte tant que vous percevez des bruits d'eau.
15
Page 37

FONCTIONNEMENT DU LAVE-VAISSELLE
Si votre machine comporte une fenêtre d'afchage semblable à
celle qui est représentée ci-dessus, suivre les instructions suivantes.
ANNULATION D'UN CYCLE
• Ouvrir la porte.
• Maintenir la pression sur la touche « CANCEL » (Annuler)
jusqu'à ce que la DEL « WASHING » (Lavage en cours)
s'éteigne.
• Patienter environ 1 minute pour que le lave-vaisselle puisse se
vidanger.
• La DEL « COMPLETE » (Terminé) s'allumera. Ceci indique que
l'appareil a été réinitialisé.
CHANGEMENT DE CYCLE
Si vous devez changer un cycle en cours de fonctionnement et en
choisir un autre :
• Ouvrir la porte.
• Maintenir la pression sur la touche « CANCEL » (Annuler)
jusqu'à ce que la DEL « WASHING » (Lavage en cours)
s'éteigne.
• Patienter environ 1 minute pour que le lave-vaisselle puisse se
vidanger.
• La DEL « COMPLETE » (Terminé) s'allumera. Ceci indique que
l'appareil a été réinitialisé.
• Appuyer sur la touche « POWER » (Alimentation) pour étein-
dre la machine. Ralllumer ensuite la machine.
• Vous pouvez sélectionner à présent le nouveau cycle.
Pour entrer le mode Options :
(réglage du produit de rinçage, aide au séchage)
• La porte doit être ouverte. Appuyer sur la touche
« POWER » (Alimentation) pour allumer la machine.
• L'un des voyants DEL Wash Cycle (Cycle de lavage) clignote.
• Appuyer et maintenir la pression sur la touche « > » puis ap-
puyer et relâcher la touche « START » (Démarrer). Relâcher à
présent la touche « > ».
• La DEL « Sanitized » (Aseptisé) et une autre DEL se mettront à
clignoter. Vous êtes à présent dans le mode de conguration
des options.
• Appuyer sur la touche « > » pour sélectionner l'option que
vous voulez régler.
Si les DEL « COMPLETE » (Terminé) et « RINSE AID » (Produit de
rinçage) clignotent, cela signie que vous êtes en mode « Rinse
Aid » (Produit de rinçage). Vous pouvez régler la quantité de
produit de rinçage libérée.
Si les DEL « COMPLETE » (Terminé) et « SANITIZED » (Aseptisé)
clignotent, cela signie que vous êtes en mode « Extra Dry Heat »
(Chaleur de séchage additionnelle). Vous pouvez à présent activer ou désactiver la chaleur de séchage additionnelle.
Si les DEL « COMPLETE » (Terminé) et « SANITIZED » (Aseptisé)
clignotent, cela signie que vous êtes en mode « Cycle Completion
Signal » (Signal de n de cycle). Vous pouvez à présent
augmenter ou diminuer la tonalité du signal ou désactiver celui-ci
complètement.
16
Pour régler la quantité de produit de rinçage :
REMARQUE : si vos verres comportent des taches blanches, vous
devez augmenter la quantité de produit de rinçage. Si vos verres
comportent des traînées blanches, vous devez diminuer la quantité
de produit de rinçage.
Suivre les instructions pour entrer le mode « options ». Lorsque
les DEL « COMPLETE » (Terminé) et « RINSE AID » (Produit de
rinçage) clignotent :
• appuyer sur la touche « < » pour modier la quantité de
produit de rinçage libérée.
0 DEL allumée en continu → Distributeur de produit de rin
çage Désactivé
1 DEL allumée en continu → Quantité minimale de produit
de rinçage libérée.
2 DEL allumées en continu → Quantité moyenne de produit de
rinçage libérée
3 DEL allumées en continu → Quantité maximale de produit
de rinçage libérée
• Appuyer sur « START » (Marche) pour enregistrer vos
paramètres.
Dry Assist (Aide au séchage)
Cette option vous permet d'augmenter la température de l'eau
de rinçage et de prolonger la durée de séchage pour assurer
une meilleure performance de séchage.
Suivre les instructions pour entrer le mode « options ». Lorsque les
DEL « COMPLETE » (Terminé) et « SANITIZED » (Aseptisé) clignotent :
• appuyer sur la touche « < » pour activer ou désactiver la
fonction Dry Assist (Aide au séchage).
0 DEL allumée en continu → Extra Dry Heat (Chaleur de
séchage additionnelle) est désactivée
1 DEL allumée en continu → Extra Dry Heat (Chaleur de
séchage additionnelle) est activée
• Appuyer sur « START » (Marche) pour enregistrer vos
paramètres.
Signal de n de cycle (certains modèles)
Le signal de n de cycle vous indique que le cycle est terminé et
que la vaisselle est propre et sèche. Vous pouvez désactiver le
signal sonore ou ajuster le volume de ce signal.
Suivre les instructions pour entrer le mode « options ». Lorsque
les DEL « COMPLETE » (Terminé) et « RINSE AID » (Produit de
rinçage) clignotent :
• Appuyer sur la touche « < » pour régler ou désactiver le
signal de n de cycle.
0 DEL allumée en continu → Signal de n de cycle Désactivé
1 DEL allumée en continu → Niveau de tonalité minimum
2 DEL allumées en continu → Niveau de tonalité moyen
3 DEL allumées en continu → Niveau de tonalité maximum
• Appuyer sur « START » (Marche) pour enregistrer vos
paramètres.
Fonction de temporisation
Cette option vous permet de différer la mise en marche d'un cycle.
Pour activer :
• Allumez le lave-vaisselle.
• Sélectionnez le cycle de lavage souhaité.
• Appuyer sur la touche Delay Start (Mise en marche différée)
jusqu'à ce que la DEL de la durée différée voulue « 3Hr » (3 h),
« 6Hr » (6 h) ou « 9Hr » (9 h) s'allume.
Page 38

NETTOYAGE ET ENTRETIEN
TRAVAUX D'ENTRETIEN
Certaines parties de votre lave-vaisselle nécessitent un entretien
périodique. Les travaux d'entretien sont faciles et permettent
d'obtenir en permanence un excellent rendement de votre lavevaisselle :
• Essuyage des débordements et des éclaboussures
L'eau risque parfois de jaillir de votre lave-vaisselle surtout
si vous interrompez un cycle ou si vous ouvrez la porte de la
machine pendant le déroulement d'un cycle. Pour éviter des
dommages au plancher et la formation éventuelle de moisissure,
essuyer les zones d'eau stagnante pouvant demeurer autour ou
sous le lave-vaisselle.
• Nettoyage de l'intérieur de la cuve et de la porte
intérieure en acier inoxydable
Nettoyer régulièrement les rebords extérieurs du panneau de
porte intérieur pour éliminer les déchets s'y étant accumulés au
fur et à mesure des remplissages de la machine. Si des taches
apparaissent sur la cuve en acier inoxydable, vérier que le
réservoir du produit de rinçage est plein.
• Nettoyer le dispositif anti-refoulement
Nettoyer le dispositif anti-refoulement périodiquement pour
assurer l'évacuation adéquate de votre lave-vaisselle. Dans la
plupart des cas, soulever simplement le couvercle en chrome.
Dévisser le capuchon de plastique. Puis, vérier l'accumulation de
saletés. Nettoyer au besoin.
• Inspection et nettoyage des gicleurs des bras
d'aspersion
Vérier les bras d'aspersion de temps à autre pour vous assurer
que les gicleurs (orices) ne sont pas obstrués. Pour vérier si
les gicleurs ne sont pas obstrués, vous devez extraire les bras
d'aspersion de la machine.
Pour retirer le bras d'aspersion supérieur :
3 Retirer le bras d'aspersion comme représenté ci-dessus.
4 Vérier toute obstruction des gicleurs des bras d'aspersion.
5 Si les gicleurs des bras d'aspersion ont besoin d'être nettoyés,
les laver abondamment à l'eau courante.
Pour remonter le bras d'aspersion supérieur à l'intérieur du lavevaisselle :
1 Remettre le bras d'aspersion supérieur en place.
2 Remettre l'écrou de blocage en place et le faire pivoter de
1/8 de tour dans le sens des aiguilles d'une montre.
3 Remettre le panier supérieur en place sur les guides à
roulettes correspondants.
MISE EN GARDE
Pour éviter toute blessure, ne pas glisser les doigts dans la
crépine pour gros déchets. La crépine pour gros déchets peut
contenir des objets tranchants.
Pour retirer le bras d'aspersion inférieur :
1 Retirer le panier inférieur vide de la cuve du lave-vaisselle.
2 Saisir et soulever le bras d'aspersion inférieur comme
représenté ci-dessous.
1 Retirer le panier supérieur vide du lave-vaisselle.
2 Tourner le panier à l'envers. Le bras d'aspersion supérieur est
maintenu en position au moyen d'un écrou de blocage comme
représenté ci-dessus. Faire tourner l'écrou de blocage dans
le sens inverse des aiguilles d'une montre et le retirer comme
indiqué pour libérer le bras d'aspersion.
3 Vérier toute obstruction des gicleurs des bras d'aspersion.
4 Si les gicleurs des bras d'aspersion ont besoin d'être nettoyés,
les laver abondamment à l'eau courante.
Pour remonter le bras d'aspersion inférieur à l'intérieur du lavevaisselle :
1 Remettre le bras d'aspersion inférieur en place et appuyer
dessus pour l'enclencher an de le mettre en place.
2 Remettre le panier inférieur en place.
• Inspection et nettoyage du système de ltration
Ce lave-vaisselle est équipé d'un système de ltration composé
d'un ensemble Filtre cylindrique/Crépine pour gros déchets et
d'un ltre n. Certains modèles sont également équipés d'un
microltre.
Le système de ltration se trouve à l'intérieur du lave-vaisselle
sous le panier inférieur et il est facile d'y accéder. Lors d'une
utilisation normale du lave-vaisselle, le système de ltration se
nettoie automatiquement. Inspecter le système de ltration de
temps en temps pour déceler la présence de corps étrangers et,
au besoin, le nettoyer.
17
Page 39

Pour extraire l'ensemble Filtre cylindrique/Crépine pour
gros déchets :
1 Retirer le panier inférieur
2 Saisir l'ensemble de ltration et le faire tourner en sens in-
verse des aiguilles d'une montre de ¼ de tour comme illustré
ci-dessous.
• Nettoyage du panneau de porte extérieur
Portes avec panneau de couleur
Utiliser uniquement un chiffon doux légèrement humecté d'eau
savonneuse.
Portes en acier inoxydable
Utiliser un chiffon doux et un produit d'entretien non abrasif (un
vaporisateur liquide de préférence) spécialement conçu pour
le nettoyage de l'acier inoxydable. Pour de meilleurs résultats,
vaporiser le produit d'entretien pour acier inoxydable sur le
chiffon puis essuyer la surface à nettoyer.
• Nettoyer l'intérieur
Les sédiments d'eau dure peuvent laisser un lm blanc sur les
surfaces intérieures, surtout au-dessous de la porte.
Ne pas nettoyer l'intérieur du lave-vaisselle tant qu'il n'a pas
refroidi. Porter des gants de caoutchouc. Ne pas utiliser de
produit nettoyant autre que le détergent pour lave-vaisselle car il
risquerait d'augmenter la production de mousse.
3 Soulever l'ensemble de ltration comme illustré ci-dessous.
4 Examiner soigneusement l'ensemble de ltration. Si vous
apercevez des corps étrangers dans la crépine pour gros
déchets, retournez-la au-dessus d'une surface telle qu'un
comptoir et secouez-la pour en faire tomber les déchets.
5 Laver abondamment le ltre cylindrique en le tenant sous un
jet d'eau courante.
Pour remonter le système de ltration :
1 Remettre le ltre n en place comme à l'origine.
2 Remettre l'ensemble Filtre cylindrique/Crépine pour gros
déchets en place au bas du lave-vaisselle.
3 Faire pivoter la poignée annulaire de 1/4 de tour, dans le
sens des aiguilles d'une montre, jusqu'à son verrouillage.
4 Tirer doucement sur la poignée annulaire pour vérier que le
dispositif est en position de verrouillage.
• Faire une pâte avec un détergent pour lave-vaisselle en
poudre et nettoyer avec une éponge humide OU
OU
• Utiliser un détergent liquide pour lave-vaisselle automatique
et nettoyer avec une éponge humide.
• Nettoyage du joint de porte
Nettoyer régulièrement le joint de porte à l'aide d'un chiffon
humide an d'éliminer les particules alimentaires et autres
déchets. Nettoyer également le joint d'étanchéité situé à l'intérieur
du lave-vaisselle, au bas de la porte.
• Entretien préhivernal du lave-vaisselle
Si votre lave-vaisselle n'est pas utilisé pendant une longue
période à un endroit où sévissent des températures glaciales (p.
ex. une maison de vacances ou lors d'une période de congés),
demandez à un centre de service après-vente agréé d'assurer
l'entretien préhivernal de l'appareil.
Filtre
n
18
Page 40

DÉPANNAGE
Les lave-vaisselle peuvent parfois poser des problèmes qui ne sont pas liés à un mauvais fonctionnement de l'appareil lui-même. Les informations
suivantes peuvent vous aider à résoudre les problèmes que vous pose le lave-vaisselle sans qu'il faille faire appel à un réparateur professionnel. Les
éléments répertoriés dans les tableaux suivants peuvent ne pas être couverts par la garantie de votre produit.
Problème Cause Action
Le lave-vaisselle ne se met
pas en marche.
Le lavevaisselle émet
un bip sonore
(signal de n
de cycle)
L'afchage ne
s'allume pas ou
l'éclairage de
la console est
éteint.
Le cycle de
lavage semble
durer trop
longtemps.
La vaisselle est
mal lavée.
1. La porte est peut-être mal verrouillée.
2. L'appareil n'est peut-être pas allumé.
3. La machine n'a pas été réinitialisée ou le cycle
précédent n'est pas terminé.
4. La mise en marche différée est activée.
5. Interruption de l'alimentation électrique du lavevaisselle ou fusible ayant sauté.
6. Verrou enfants engagé (certains modèles).
7. La porte a peut-être été fermée avant d'avoir
choisi le cycle.
8. Le robinet d'alimentation en eau n'est peut-être
pas ouvert.
Les paramètres usine par défaut avertissent l'utilisateur
que le cycle de lavage est terminé en émettant un bip
sonore. Cette fonction peut être désactivée au besoin.
1. Un fusible a peut-être sauté ou le disjoncteur s'est
déclenché.
2. La porte est mal fermée ou mal enclenchée.
Remarque : pour les modèles équipés de commandes
situées sur la partie supérieure de la porte, l'afchage ne
s'allume que lorsque la porte est ouverte et que les commandes
sont visibles.
1. L'eau qui alimente le lave-vaisselle n'est pas assez
chaude.
2. La durée du cycle peut varier en fonction de la
saleté de la vaisselle et de la qualité de l'eau.
3. Le distributeur de produit de rinçage est vide.
4. Le lave-vaisselle est branché sur une conduite
d'eau froide.
5. Le type d'options du cycle sélectionné peut prolonger la durée du cycle en question.
Remarque : pour une longueur de cycle type, se reporter
au tableau relatif aux cycles de lavage dans la section
« Cycles et options du lave-vaisselle ».
1. Les bras d'aspersion sont bloqués.
2. Les gicleurs des bras d'aspersion sont bouchés.
3. Mauvaise utilisation des détergents.
4. Les ltres sont peut-être bouchés.
5. Les pièces de vaisselle sont imbriquées les unes
dans les autres ou disposées trop près les unes
des autres.
6. Le cycle de lavage choisi ne convient pas aux
conditions de saleté de la vaisselle.
7. Vérier que la température de l'eau entrante est
de 120 °F.
1. Fermer complètement la porte.
2. Appuyer sur le bouton d'alimentation principale pour allumer la machine.
3. Pour réinitialiser la machine, se reporter à la section « Annulation ou
modication d'un cycle » dans le présent guide.
4. Pour réinitialiser la machine, se reporter à la section « Mise en marche
différée » dans le présent guide.
5. Vérier le disjoncteur.
6. Désactiver le verrou enfants. Le cas échéant, se reporter à la section de
ce guide intitulée « Verrou enfants ».
7. Sélectionner un cycle et fermer la porte.
8. Vérier et ouvrir le robinet d'alimentation en eau.
Pour régler le volume sonore ou désactiver cette fonction, se reporter à la
section « Signal de n de cycle » dans le présent guide.
1. Vérier le fusible ou le boîtier de disjoncteurs et remplacer le fusible
ou réarmer le disjoncteur le cas échéant.
2. S'assurer que la porte est correctement verrouillée et complètement
fermée.
1. Avant de démarrer un cycle, faire couler le robinet d'eau chaude
de l'évier le plus proche du lave-vaisselle. La température de l'eau
entrante doit être de 120 °F.
2. Les capteurs du lave-vaisselle augmentent automatiquement la durée
du cycle pour assurer un lavage optimal en cas de détection d'une
quantité importante de saletés sur la vaisselle.
3. Ajouter du produit de rinçage.
4. Vérier que le lave-vaisselle est bien raccordé à la tuyauterie d'arrivée
d'eau chaude.
1. Assurez-vous que le mouvement de rotation des bras d'aspersion n'est
pas bloqué en faisant pivoter ces derniers à la main.
2. Retirer les bras d'aspersion et les nettoyer en suivant les consignes
de la rubrique « Inspection et nettoyage des gicleurs des bras
d'aspersion » dans la section « Nettoyage et entretien » du présent
guide.
3. Augmenter ou diminuer la quantité de détergent selon la dureté de
l'eau. Se reporter au tableau dans la section « Ajout de détergent et
de produit de rinçage ».
4. Nettoyer le ltre. Se reporter à « Inspection et nettoyage du système
de ltration » dans la section « Nettoyage et entretien » du présent
guide.
5. Changer la disposition de la vaisselle an que le jet d'eau puisse asperger correctement toutes les pièces. Se reporter également à la section « Préparation et chargement de la vaisselle » du présent guide.
6. Se reporter à la rubrique « Cycle de lavage » dans la section de ce
guide intitulée « Fonctionnement du lave-vaisselle ».
La vaisselle
n'est pas bien
sèche.
1. Le distributeur de produit de rinçage est vide. (Le
voyant du produit de rinçage est activé).
2. Mauvais chargement de la vaisselle.
3. Le cycle choisi ne comprend pas le séchage.
4. Dry Assist (Aide au séchage)
Remarque : en général, les ustensiles en plastique et en
Téon ne sèchent pas aussi bien que d'autres ustensiles
en raison des propriétés inhérentes à ces types de
matériaux.
1. Ajouter du produit de rinçage. L'utilisation d'un produit de rinçage
améliore le séchage.
2. Changer la disposition de la vaisselle pour veiller à ce que les
articles ne soient pas imbriqués les uns dans les autres. Se reporter
également à la section « Préparation et chargement de la
vaisselle » du présent guide.
3. Certains paramètres ne comportent pas un cycle de séchage.
4. Activer la fonction « Dry Assist » (Aide au séchage) en suivant les
instructions fournies dans la section « Fonctionnement du
lave-vaisselle ».
Remarque : certains modèles offrent des options de séchage supplémentaires pour assurer une meilleure performance de séchage. Se reporter
à la rubrique « Options des cycles de lavage » dans la section de ce
guide intitulée « Fonctionnement du lave-vaisselle ».
19
Page 41

Problème Cause Action
Odeur 1. Des déchets alimentaires se sont accumulés au fond
Le lave-vaisselle
ne se remplit pas
d'eau.
Fuites d'eau 1. Mousse
Taches apparaissant dans la cuve.
du lave-vaisselle.
2. Des particules alimentaires se sont accumulées près
du joint d'étanchéité de la porte.
3. De l'eau résiduelle s'est accumulée au fond du lavevaisselle.
4. Le tuyau de vidange est obstrué.
1. Obstruction au niveau du réseau d'alimentation en
eau.
2. Le cycle de lavage précédent n'est pas terminé.
3. La fonction de mise en marche différée est activée.
2. Le joint d'étanchéité de la porte a pu sortir de la
rainure.
3. L'évent de condensation est bloqué.
4. Mauvaise installation.
1. Les taches qui se forment à l'intérieur du lave-vaisselle
sont dues à la dureté de l'eau.
2. Les couverts sont en contact avec les parois de la cuve.
1. Retirer les ltres et les nettoyer conformément à la section «
Inspection et nettoyage du système de ltration » du présent
guide.
2. Se reporter à « Nettoyage du joint de porte et du joint
d'étanchéité » dans la section « Nettoyage et entretien » du
présent guide.
3. S'assurer que l'opération de vidange du cycle précédent est
complètement terminée. Se reporter à la section « Annulation
ou modication d'un cycle » du présent guide.
4. Pour éliminer les objets pouvant obstruer le tuyau de vidange,
faites appel à un personnel qualié.
Remarque : si l'odeur persiste, exécuter le cycle Normal Wash (Lavage normal) jusqu'à ce que la vidange débute et interrompre le
cycle pour ajouter une tasse de 250 ml (8 oz) d'une solution de vinaigre blanc distillé au-dessus du panier supérieur. Terminer ensuite
le cycle.
1. S'assurer que le robinet d'arrivée d'eau (en général situé
sous l'évier de la cuisine) est ouvert et vérier que la conduite
d'alimentation n'est ni tordue ni bouchée.
2. Se reporter à la section « Annulation d'un cycle » du présent
guide.
3. Annuler la mise en marche différée ou attendre que la période
de mise en marche différée soit terminée ou que ce délai
expire. Se reporter à la section « Mise en marche différée »
du présent guide.
1. Les détergents inadéquats ont tendance à produire de la
mousse et à provoquer des fuites. Utiliser uniquement des
détergents pour lave-vaisselle. Si le problème de mousse
persiste, mettre une cuillère à soupe d'huile végétale au fond
du lave-vaisselle et lancer le cycle voulu. Essuyer également
tout excédent de produit de rinçage répandu pour éviter la
production de mousse.
2. S'assurer que le joint d'étanchéité est bien calé dans la rainure.
3. S'assurer que l'évent de condensation n'est pas bloqué. Se reporter à la rubrique « Chargement des articles très grands »
dans la section « Préparation et chargement de la vaisselle »
du présent guide.
4. Faire vérier l'installation par un personnel qualié (alimentation en eau, système de vidange, mise à niveau, tuyauterie).
1. L'emploi de jus de citron concentré peut réduire l'accumulation
de taches d'eau dure. Lancer un cycle de lavage normal
jusqu'au rinçage puis interrompre le cycle et verser une tasse
de 250 ml (8 oz. liq.) d'une solution de citron concentré sur le
panier supérieur. Terminer le cycle. Ceci peut être fait périodiquement pour prévenir l'accumulation de taches.
2. S'assurer que les couverts n'entrent pas en contact avec les parois de la cuve pendant le déroulement d'un cycle.
Taches et traînées
blanches sur les
articles en verre
ou résidus sur la
vaisselle.
Le panneau avant
est décoloré ou
rayé.
Fonctionnement
bruyant pendant
le déroulement du
cycle de lavage.
Le couvercle du
distributeur de
détergent ne se
ferme pas.
Impossible de sélectionner le cycle
voulu.
Mauvais dosage du produit de rinçage. Régler le distributeur du produit de rinçage en fonction de la dureté
Vous avez utilisé un produit d'entretien abrasif. Utiliser des détergents non abrasifs et un linge humide doux.
La vaisselle est peut-être mal disposée. Les bruits de circulation d'eau sont normaux, mais si vous soupçonnez
1. Mauvaise manipulation du couvercle du distributeur
de détergent.
2. Le cycle précédent n'est pas terminé ; réinitialisation
ou interruption du cycle.
Le cycle précédent n'est pas terminé. Se reporter à la section « Modication d'un cycle » du présent
de l'eau. Pour des informations à ce sujet, se reporter à la section
« Produit de rinçage » gurant dans le présent manuel.
que des pièces de vaisselle se cognent entre elles ou sont en contact
avec les bras d'aspersion, se reporter à la section « Préparation
et chargement de la vaisselle » du présent guide pour connaître la
disposition optimale de la vaisselle.
1. Se reporter à la section « Détergent » du présent guide pour
des instructions sur l'ouverture et la fermeture du distributeur.
2. Se reporter à la section « Annulation d'un cycle » du présent
guide.
guide.
20
Page 42

Le lave-vaisselle
n'a pas aseptisé
la vaisselle.
1. Le cycle d'aseptisation n'a pas été exécuté.
2. La porte a été ouverte à mi-cycle.
1. Sélectionner un cycle qui comporte une phase d'aseptisation.
Pour plus d'informations, consulter les cycles et options du
lave-vaisselle.
2. Ne pas ouvrir la porte pendant l'exécution du cycle de
lavage.
Le lave-vaisselle
ne se vidange
pas.
Corrosion
(voile permanent)
« Production de
mousse »
1. Le tuyau de vidange est tordu ou affaissé.
2. Le tuyau de vidange n'est pas surélevé.
3. Le bouchon du broyeur de déchets n'a pas été
enlevé.
4. Le dispositif anti-refoulement a peut-être besoin
d'être nettoyé.
5. Problème de tuyauterie.
1. Type de verre - certains articles en verre sont sensibles à la température.
2. Trop de détergent.
3. Trop de détergent et/ou mauvais type de détergent
et/ou mauvaise marque de détergent.
1. Vérier le tuyau de vidange pour voir s'il est correctement
installé. Remarque : au cours du processus d'installation, ne
pas faire pivoter le tuyau de vidange après l'avoir branché
sur le lave-vaisselle. Se reporter à la notice d'installation pour
obtenir des détails supplémentaires.
2. S'assurer qu'une partie du tuyau de vidange est au moins à
20 po de hauteur du sol. Se reporter à la notice d'installation
pour obtenir des détails supplémentaires.
3. Si le tuyau de vidange est branché sur le broyeur de déchets,
vérier que le bouchon du broyeur de déchets a été retiré.
4. Nettoyer le dispositif anti-refoulement périodiquement pour
assurer l'évacuation adéquate du lave-vaisselle. Dans la
plupart des cas, soulever simplement le couvercle en chrome.
Dévisser le capuchon de plastique, puis vérier l'accumulation
de saletés. Nettoyer au besoin.
5. Dans ce cas, faire appel à un plombier agréé.
1. S'assurer que les verres sont lavables au lave-vaisselle. Choisir
un cycle à basse température. Ne pas utiliser l'option Heated
Dry (Séchage à l'air chaud).
2. La quantité de détergent est fonction de la dureté de l'eau
qui alimente le lave-vaisselle et de la quantité de salissures
présentes. Si vous effectuez un pré-rinçage de la vaisselle et/
ou si l'eau de votre habitation est douce, vous devez diminuer
la quantité de détergent utilisée. Consulter le manuel du propriétaire pour obtenir des détails supplémentaires.
3. Réduire ou modier le type ou la marque de détergent utilisé.
Remarque : ne pas effectuer un pré-rinçage de la vaisselle.
Débarrasser la vaisselle des restes de nourriture doit sufre.
21
Page 43

Page 44

Índice
Información sobre la garantía...............................................................3
Instrucciones de seguridad importantes ................................ 4-5
Componentes de la lavadora de platos .............................................6
Funciones de la lavadora de platos.....................................................7
Materiales de vajilla ...............................................................................7
Cómo cargar la lavadora de platos....................................................8
Cómo cargar los cubiertos .....................................................................9
Funciones y accesorios de la rejilla ...................................................10
Detergente .............................................................................................11
Agente de enjuague .............................................................................12
Ciclos y opciones de la lavadora de platos ............................. 13-14
Cómo operar la lavadora de platos ......................................... 15-16
Cuidado y mantenimiento ............................................................ 17-18
Resolución de problemas .............................................................. 19-21
REGISTRO DEL PRODUCTO
En el espacio que gura a continuación, registre la fecha de compra, el número de modelo y el número de serie de su producto.
Encontrará el número de modelo y el número de serie impresos
en una etiqueta de identicación en el interior de la lavadora de
platos. Tenga a la mano esta información cuando se comunique
con Sears respecto de su producto.
N.° de modelo
Fecha de compra
N.° de serie
¡Guarde esta información y su recibo de ventas para referencia
futura!
ACUERDOS DE PROTECCIÓN
Acuerdos de Protección Integrales
Felicitaciones por haber realizado una compra inteligente. Su
nuevo producto Kenmore® está diseñado y fabricado para
proporcionar años de funcionamiento conable. Sin embargo,
como todos los productos, es posible que requiera mantenimiento
preventivo o reparaciones ocasionalmente. En esas ocasiones, un
Acuerdo de Protección Integral puede hacerle ahorrar dinero y
preocupaciones. El Acuerdo de Protección Integral también ayuda
a prolongar la vida útil de su nuevo producto. A continuación, se
reproduce lo que incluye el Acuerdo:
Las piezas y la mano de obra necesarias para ayudar a
mantener el funcionamiento adecuado de los productos en
condiciones de uso normal, no solamente defectos.
Nuestra cobertura va mucho más allá de la garantía del producto. Sin deducibles que pagar, sin fallas funcionales que se
excluyan de la cobertura: protección real.
• Servicio técnico especializado proporcionado por una fuerza
de más de 10,000 técnicos autorizados de servicio de Sears,
lo que implica que trabajarán en su producto personas en las
que usted puede conar.
• Llamadas ilimitadas al servicio técnico y servicio técnico en
todo el país, con la frecuencia que usted nos necesite, siempre que nos necesite.
• Garantía contra defectos de fabricación (“No-lemon”):
reemplazo de su producto cubierto si se producen cuatro o
más fallas en el término de doce meses.
• Reemplazo del producto si su producto cubierto no puede
repararse.
• Revisión anual de mantenimiento preventivo cuando usted la
solicita, sin cargo adicional.
• Ayuda rápida por teléfono. Nosotros la llamamos Resolución
Rápida. Asistencia telefónica por parte de un representante
de Sears para todos los productos. Considérenos un “manual
parlante del propietario”.
• Protección contra daño eléctrico en caso de sobrecarga
eléctrica, debido a las oscilaciones eléctricas.
• $250 al año en concepto de protección contra la pérdida
de alimentos por cualquier desperdicio de alimentos que
se produzca como consecuencia de una falla mecánica de
cualquier refrigerador o congelador cubierto.
• Reembolso por alquiler si la reparación de su producto cubi-
erto lleva más tiempo del que le prometieron.
• 10% de descuento del precio regular en cualquier servicio
de reparación no cubierto y en las piezas instaladas relacionadas. Una vez que usted compra el Acuerdo, una simple
llamada telefónica es todo lo que necesita para programar
el servicio técnico. Usted puede llamar en cualquier momento,
del día o de la noche, o programar una cita con el servicio
técnico por Internet.
El Acuerdo de Protección Integral es una compra sin riesgos. Si
usted lo cancela por cualquier motivo durante el período de garantía del producto, le proporcionaremos un reembolso completo
o prorrateado en cualquier momento después del vencimiento del
período de garantía del producto.
¡Compre su Acuerdo de Protección Integral hoy mismo!
Se aplican algunas limitaciones y exclusiones.
Para obtener información sobre precios e información adicional en los EE. UU.,
llame al 1-800-827-6655.
•Para algunos artículos, la cobertura en Canadá es diferente.
Para obtener información bien detallada, llame a Sears
Canada al 1-800-361-6665.
Servicio de instalación de Sears
Para obtener instalación profesional de Sears para los electrodomésticos de su hogar, dispositivos para abrir puertas de garajes,
calentadores de agua y otros artículos importantes para el hogar,
en los EE. UU. o en Canadá, llame al
1-800-4-MY-HOME®.
2
Page 45

INFORMACIÓN SOBRE LA GARANTÍA
Garantía limitada por UN año
Cuando se instala, se opera y se mantiene este
electrodoméstico de acuerdo con todas las instrucciones
incluidas, se aplica la siguiente cobertura de garantía. Para
solicitar servicio técnico de la garantía,
llame al 1-800-4-MY-HOME® (1-800-469-4663).
Esta garantía se aplica únicamente para los 90 días
posteriores a la fecha de compra si este electrodoméstico
en algún momento se usa con nes que no sean familiares y
particulares.
Esta garantía cubre únicamente defectos en los materiales y
la mano de obra, y NO pagará:
1. Artículos consumibles que se desgasten por el uso
normal, incluidos, entre otros, ltros, correas, focos y
bolsas.
2. Un técnico de servicio que le indique al usuario cómo
llevar a cabo una instalación, una operación o un
mantenimiento correctos del producto.
3. Un técnico de servicio que realice la limpieza o el
mantenimiento de este producto.
4. Daños o fallas de este producto si no se instala,
se opera o se mantiene de acuerdo con todas las
instrucciones incluidas con el producto.
5. Daños o fallas de este producto como resultado de un
accidente, del uso indebido o incorrecto, o del uso para
un n distinto de aquel para el que fue diseñado.
6. Daños o fallas de este producto provocados por el
uso de detergentes, limpiadores, productos químicos o
utensilios distintos de los recomendados en todas las
instrucciones incluidas con el producto.
7. Daños o fallas de piezas o de sistemas como resultado
de modicaciones no autorizadas que se realicen en
este producto.
Renuncia a las garantías implícitas; limitación de recursos
El único recurso exclusivo disponible para el cliente en virtud
de esta garantía limitada es la reparación del producto
según se indica en este manual. Las garantías implícitas,
incluidas las garantías de comerciabilidad o de aptitud
para un n determinado, se limitan a un año o al período
más corto permitido por la ley. Sears no será responsable
de daños incidentales ni consecuentes. Algunos estados y
algunas provincias no permiten la exclusión ni la limitación
de daños incidentales o consecuentes, ni la limitación de la
duración de las garantías implícitas de comerciabilidad o
de aptitud; por lo tanto, es posible que estas exclusiones o
limitaciones no se apliquen a su caso.
Esta garantía se aplica únicamente mientras este
electrodoméstico se use en los Estados Unidos o en Canadá.
ESTA GARANTÍA LE OTORGA DERECHOS LEGALES
ESPECÍFICOS, Y TAMBIÉN PUEDEN CORRESPONDERLE
OTROS DERECHOS QUE PUEDEN VARIAR SEGÚN EL
ESTADO.
Sears Brands Management Corporation,
Hoffman Estates, IL 60179
Sears Canada Inc.
Toronto, Ontario, Canada M5B 2B8
3
Page 46

MENSAJES DE SEGURIDAD: LEA y GUARDE esta información
Hemos proporcionado muchos mensajes de seguridad importantes en este manual y en su electrodoméstico. Siempre lea y
obedezca todos los mensajes de seguridad.
ADVERTENCIA
• El uso indebido de la lavadora de platos puede ocasionar
lesiones graves o la muerte. No utilice la lavadora de
platos de ninguna manera que no se encuentre cubierta
en este manual ni para ningún n distinto de los nes que
se explican en las páginas siguientes.
• El uso de técnicos de servicio que no estén capacitados
o de piezas de repuesto que no sean originales podría
ocasionar daños en el producto y/o lesiones graves.
Todas las reparaciones deben ser realizadas por un
técnico de servicio calicado que utilice únicamente
piezas de repuesto originales de fábrica para el
equipo.
• Si el suministro eléctrico para la lavadora de platos
cubierta en este manual se instala de manera incorrecta
o si la lavadora de platos no ha sido conectada a
tierra de manera adecuada, podría ocasionarse
una descarga eléctrica o un incendio. No utilice la
lavadora de platos cubierta en este manual, a menos
que esté seguro de que el suministro eléctrico haya
sido instalado correctamente o de que la lavadora
de platos haya sido conectada a tierra de manera
adecuada.
AVISO
• Es especialmente recomendable que el usuario nal se
familiarice con el procedimiento de corte del suministro
de entrada de agua y con el procedimiento de corte
de la fuente de alimentación eléctrica de entrada.
Consulte las instrucciones de instalación o comuníquese
con su instalador para obtener más información.
• Nunca utilice productos de limpieza por vapor para
limpiar su lavadora de platos. El fabricante no será
responsable de los posibles daños o consecuencias.
• Nunca utilice productos químicos abrasivos para limpiar
su lavadora de platos. ¡Algunos productos que contienen cloruros pueden dañar su lavadora de platos y
pueden presentar peligros para la salud!
4
Page 47

INSTRUCCIONES DE SEGURIDAD IMPORTANTES: LEA y GUARDE esta información
ADVERTENCIA: Para reducir el riesgo de incendio, descarga eléctrica o lesiones graves, siga estas
indicaciones:
• Esta lavadora de platos se entrega con Instrucciones de
instalación y con este Manual de uso y cuidado. Lea y
comprenda todas las instrucciones antes de instalar o
usar la lavadora de platos.
• Este electrodoméstico debe conectarse a un sistema de
cableado metálico y permanente, con conexión a tierra,
o se debe instalar un conductor de conexión a tierra
para equipos junto con los conductores de circuitos
y conectarlo al terminal de conexión a tierra para
equipos o al hilo de conexión a tierra de la lavadora
de platos. Consulte las Instrucciones de instalación que
se incluyen con esta lavadora de platos para obtener
más información sobre los requisitos eléctricos.
• Utilice esta lavadora de platos únicamente para la
función para la cual fue diseñada, que consiste en lavar
la vajilla doméstica y los utensilios de cocina.
• Utilice únicamente detergentes o agentes de enjuague
recomendados para uso en una lavadora de platos y
manténgalos fuera del alcance de los niños.
• Al cargar los artículos que desea lavar:
a. Coloque los artículos losos de manera tal que no
puedan dañar el sello de la puerta.
b. Cargue los cuchillos y otros utensilios losos con los
MANGOS HACIA ARRIBA para reducir el riesgo de
heridas cortantes.
c. No lave artículos de plástico, a menos que estén
marcados como “apto para lavadora de platos” o
una leyenda equivalente. En el caso de los artículos
de plástico que no estén marcados de esa manera,
consulte las recomendaciones del fabricante.
d. No opere su lavadora de platos, a menos que todos
los paneles de cierre estén colocados en su lugar.
e. No trate de forzar los controles ni de pasar por alto
los sistemas de traba.
• No use la puerta ni las rejillas para platos de la lavadora de platos de manera indebida, ni se siente ni se
pare sobre estas.
• Para reducir el riesgo de lesiones, no permita que los
niños jueguen dentro de la lavadora de platos ni encima de esta.
• Cuando los niños tienen la edad adecuada para
operar el electrodoméstico, es responsabilidad legal de
los padres o tutores legales asegurarse de que reciban
las instrucciones sobre prácticas seguras por parte de
personas calicadas.
• En ciertas condiciones, es posible que se produzca gas
hidrógeno en un sistema de agua caliente que no ha
sido utilizado durante 2 semanas o más tiempo. El gas
hidrógeno es explosivo. Antes de usar una lavadora
de platos que esté conectada a un sistema de agua
caliente que ha permanecido sin uso durante dos
semanas o más tiempo, abra todos los grifos de agua
caliente y deje que uya el agua de cada uno de los
grifos durante varios minutos y abra las ventanas para
ventilar el hogar. De este modo, se eliminará el gas
hidrógeno que se haya acumulado. Dado que el gas
es explosivo, no fume ni use una llama abierta durante
este tiempo.
• Al retirar una lavadora de platos vieja para realizar el
servicio técnico o para desecharla, retire la puerta de
la lavadora de platos que cierra el compartimento de
lavado.
• Para evitar daños en el piso y la posible aparición de
moho, no permita que las áreas alrededor o debajo de
la lavadora de platos permanezcan mojadas.
• Proteja su lavadora de platos de los elementos
climáticos. Protéjala contra el congelamiento para
evitar posibles daños en la válvula de llenado.
Los daños causados por el congelamiento no están
cubiertos por la garantía.
5
Page 48

Empaque de la
puerta
Rejilla superior
COMPONENTES DE LA LAVADORA DE PLATOS
Abertura de
ventilación
Canasta para
cubiertos
Rejilla inferior
Dispensador de
agente de
enjuague
Sistema de ltros
Dispensador de
detergente
Etiqueta con
el número de serie
Las funciones varían según el modelo
Trampa para
objetos grandes
Filtro no
SISTEMA DE FILTROS
Filtro cilíndrico
6
Page 49

FUNCIONES DE LA LAVADORA DE PLATOS
QuietGuard™: Un sistema motorizado por dos bombas,
el Suspended Motor, y el aislamiento triple hacen que
esta lavadora de platos sea una de las más silenciosas de
América del Norte.
Tina gigante de acero inoxidable: Una supercie interior
antioxidante e higiénica con garantía de por vida.
Rejillas recubiertas con nylon: Reduce, considerablemente,
los cortes y las hendiduras. Las rejillas tienen una garantía
de cinco años.
Elemento oculto de calentamiento: Calienta el agua hasta
alcanzar una temperatura que hace posible la desinfección.
Secado por condensación: Un enjuague nal realizado a
alta temperatura, una tina de acero inoxidable de baja
temperatura y la acción de escurrido de agua en forma de
capas de un agente de enjuague brindan un secado higiénico, eciente en el consumo de energía y económico.
SmartSensor: Verica las condiciones del agua y detecta si
es necesario realizar una segunda carga de agua fría.
Sistema de triple ltrado: Múltiples ltros aseguran la
distribución de agua limpia y protegen la bomba principal
y la bomba de drenaje contra el ingreso de materiales
externos.
Corte de agua: Una función de seguridad que detiene el
ujo del agua de entrada en caso de que se detecte agua
en la base de la lavadora de platos.
* Púas abatibles de las rejillas superior e inferior:
Aumentan la exibilidad de las rejillas para que quepan
artículos más largos/más altos.
* Dry Assist (Asistente de secado): Eleva la temperatura del
agua de enjuague y aumenta el tiempo de secado, lo que
da como resultado un mejor secado.
* Rejillas ajustables: La rejilla superior puede subirse o bajarse para que quepan artículos altos en las rejillas superior
e inferior.
SmartWash™ HE: Le permite no tener que adivinar cuál es
el ciclo adecuado. Los sensores de la lavadora de platos
ajustan automáticamente la duración del ciclo, la temperatura y los cambios en el agua, en función de la cantidad de
suciedad.
* TurboClean™: Este ciclo se encarga de los platos difíciles
de lavar de la rejilla inferior, lo que elimina la necesidad
de sumergir y fregar platos muy sucios.
AquaGuard™: Sistema de protección contra pérdidas que
corta el suministro de agua en caso de pérdida.
* depende del modelo
MATERIALES DE VAJILLA
NOTA: Antes de usar su lavadora de platos por primera vez, consulte la información incluida en esta sección. Algunos
artículos no son aptos para lavadora de platos y deben lavarse a mano; otros requieren una carga especial.
RECOMENDADOS
Aluminio: Es posible que el aluminio de color anodizado
se opaque con el tiempo. Los minerales del agua pueden
hacer que el aluminio se oscurezca o se manche. Por lo
general, estas manchas pueden quitarse con una esponja
de lana de acero con jabón.
Porcelana, cristal, cerámica de gres: Algunos utensilios
pintados a mano pueden descolorarse, opacarse o
mancharse. Lave a mano estos utensilios. Coloque los
utensilios de vidrio frágiles de manera tal que no se caigan
ni entren en contacto con otros utensilios durante el ciclo de
lavado.
Vidrio: El vidrio opalino puede descolorarse o ponerse
amarillo.
Recubrimientos antiadherentes: Aplique una capa na de
aceite vegetal en las supercies antiadherentes después del
secado.
Plásticos: Asegúrese de que los utensilios de plástico sean
aptos para lavadora de platos.
Acero inoxidable, plata esterlina y objetos bañados en
plata: Cargue estos utensilios de manera que no entren en
contacto con otros metales.
NO RECOMENDADOS
Acrílico: Puede producirse un agrietamiento (pequeñas
rajaduras a lo largo del acrílico).
Piezas pegadas con adhesivos: Los adhesivos que pegan
materiales como plástico, madera, hueso, acero, cobre,
estaño, etc. pueden aojarse.
Utensilios con mango de hueso: Los mangos pueden
separarse.
Hierro, hierro fundido: El hierro se oxida. Lave a mano y
seque inmediatamente.
Artículos que no sean vajilla: Su lavadora de platos está
diseñada para limpiar ÚNICAMENTE vajilla doméstica y
utensilios de cocina estándares.
Peltre, latón, bronce: El peltre pierde lustre. Lave a mano y
seque inmediatamente.
Estaño: El estaño se mancha. Lave a mano y seque
inmediatamente.
Madera: Los tazones de madera, los utensilios de madera
y los utensilios con mango de madera pueden rajarse,
combarse y perder su acabado.
Oro: El oro se descolora.
7
Page 50

CÓMO CARGAR LA LAVADORA DE PLATOS
No prelave artículos que tengan suciedad poco adherida. Retire
partículas grandes de alimentos, huesos, semillas, palillos y el
exceso de grasa. Los artículos que tienen suciedad quemada,
pegada después de hornear o endurecida pueden requerir un
tratamiento previo.
Consulte la sección Materiales de vajilla para obtener más
información sobre la vajilla apta para este electrodoméstico.
• Cargue la lavadora de platos únicamente con artículos aptos
para lavadora de platos.
• Cargue platos en las rejillas de la lavadora de platos de
manera tal que el interior de los tazones, las cacerolas y las
ollas quede mirando hacia los brazos rociadores.
• Evite que los platos queden uno dentro de otro y con puntos
de contacto entre sí.
• Separe los artículos de metales que no sean similares.
• Cargue los platos y los vasos en ángulo, para evitar la
acumulación y mejorar el rendimiento del secado.
AVISO
Para evitar daños en la lavadora de platos, no cargue
la lavadora de platos con productos de papel, bolsas de
plástico, material de embalaje ni ningún otro elemento que
no sea vajilla ni utensilios de cocina normales, aptos para
lavadora de platos.
REJILLA SUPERIOR. Patrón de carga sugerido
Cómo cargar la rejilla superior
NOTA: Asegúrese de que los artículos no sobresalgan a través de
la parte inferior de las rejillas y de que no bloqueen los brazos
rociadores.
NOTA: Al empujar la rejilla superior dentro de la lavadora de
platos, empújela hasta que se detenga contra la parte trasera de
la tina de modo tal que el brazo rociador de la rejilla superior se
conecte al suministro de agua de la parte trasera de la tina. No
empuje la rejilla superior con la puerta.
Cómo cargar la rejilla inferior
Coloque los artículos grandes en la rejilla inferior. Cargue
cacerolas, ollas y tazones con las supercies sucias mirando hacia
los brazos rociadores.
Secuencia de descarga
• Descargue primero la rejilla inferior.
• Descargue la canasta para cubiertos.
• Descargue la rejilla superior.
NOTA: No utilice bandas elásticas (para mantener artículos en
su lugar en las rejillas) ni ninguna otra pieza de posventa en su
lavadora de platos. El uso de ese tipo de artículos podría dañar
la bomba de drenaje.
REJILLA INFERIOR. Patrón de carga sugerido
NOTA: Cargue las tazas y los vasos entre las púas. Cargarlos
sobre las púas puede provocar rupturas o manchas de agua.
REJILLA SUPERIOR. Patrón de carga adicional
REJILLA INFERIOR. Patrón de carga adicional
8
Page 51

CÓMO CARGAR LOS CUBIERTOS
1 2 3 4 5
6
7
4
5
5
5 1 1
1 1
1
1
111
1
1
1
5
5
5
2
2
2
2
2
2
2
2
2
2
2
2
5
5
5
5
5
5
4 4
4
3 3
3 3
3
3 3 3 6
3
3 3
4
4 44 4
4
4 4
3
6
7
NOTA: Las tapas de la canasta para cubiertos pueden plegarse
hacia arriba para que quepan artículos grandes o de forma
irregular.
Con las tapas de la canasta para cubiertos hacia abajo, cargue
la canasta para cubiertos siguiendo los patrones sugeridos a
continuación.
Coloque los cuchillos y los utensilios losos con los mangos hacia
arriba, y los tenedores y las cucharas con los mangos hacia
abajo. Si es necesario cargar artículos grandes o de forma
irregular en la canasta para cubiertos con las tapas hacia
arriba, cargue los artículos de manera tal que no queden uno
dentro del otro.
Utilice el patrón de carga sugerido para obtener los mejores
resultados.
ADVERTENCIA
Las puntas y los bordes losos de los cuchillos y otros utensilios
losos pueden ocasionar lesiones graves. Cargue los cuchillos
y otros utensilios losos con los bordes hacia abajo. No
permita que los niños manipulen cuchillos y utensilios losos ni
que jueguen cerca de estos.
CANASTA PARA CUBIERTOS FLEXIBLE
La canasta para cubiertos estándar cabe en la parte trasera de
la rejilla inferior. La tapa de la canasta puede engancharse a
presión en el mango para dejar la canasta abierta.
1 - Tenedor para
ensalada
2 - Cuchara de té
3 - Tenedor
4 - Cuchillo
5 - Cuchara de servir
6 - Cuchara para servir
7 - Tenedor para servir
Opciones para colocar la canasta
9
Page 52

FUNCIONES Y ACCESORIOS DE LA REJILLA
Estantes para tazas
Los estantes para tazas se utilizan para sujetar tazas y otros
artículos grandes, como cucharones y cucharas para servir.
Para utilizar los estantes para tazas, pliéguelos hacia abajo de
manera tal que queden ubicados como se muestra a continuación.
Coloque las tazas y otros artículos boca abajo sobre los estantes.
Sujetadores para artículos pequeños
Los sujetadores para artículos pequeños evitan que los artículos
livianos y los recipientes de plástico se vuelquen y se llenen con
agua durante el ciclo de lavado.
Púas abatibles
Las rejillas de algunos modelos constan de púas que pueden
plegarse hacia abajo o elevarse, según los artículos que tenga
que cargar en la rejilla.
Para plegarlas hacia abajo:
• Tome la púa cerca del mecanismo de traba.
• Extráigala de la muesca.
• Empújela hacia abajo.
AJUSTE MANUAL DE LA ALTURA DE LA REJILLA
Retire la rejilla vacía jalándola hacia afuera de la lavadora de
platos hasta el punto en que pueda levantarse, como se muestra
en la imagen anterior. Jale la rejilla hacia afuera y hacia arriba,
hasta que los rodillos queden completamente fuera de las guías
de los rodillos.
Vuelva a insertar la rejilla con el otro juego de rodillos sobre las
guías de los rodillos, como se muestra a continuación.
10
Page 53

DETERGENTE
TBS (25 ML)
TBS (15 ML)
Detergente
Utilice solo detergente diseñado especícamente para lavadoras
de platos. Para obtener los mejores resultados, utilice detergente
en polvo para lavadoras de platos recién comprado.
AVISO
Para evitar daños en la lavadora de platos, no utilice productos
para lavar platos a mano en su lavadora de platos.
■
Para evitar daños en la lavadora de platos, no use demasiado
detergente si el agua de su hogar es blanda, ya que puede
ocasionar que los utensilios de vidrio queden marcados.
Cómo agregar detergente
3 TBS MAX
2
1
La lavadora de platos utiliza menos agua; por eso, debe utilizar
menos detergente. En agua blanda, 1 cda. (15 ml) de detergente
limpia prácticamente todos los tipos de cargas. El recipiente del
dispensador de detergente tiene líneas que miden la cantidad
de detergente para:
• 1 cucharada (15 ml)
• 1.75 cucharadas (25 ml)
3 cucharadas (45 ml) de detergente llenan completamente el
recipiente del dispensador de detergente.
NOTA: Si no sabe cuál es el nivel de dureza de su suministro de
agua, utilice 1 cda. (15 ml) de detergente. Aumente la cantidad,
si es necesario, a la cantidad mínima necesaria para que sus
utensilios de cocina queden limpios.
Utilice las líneas medidoras marcadas en el recipiente del
dispensador de detergente para medir la cantidad de
detergente recomendada en la tabla.
Cantidad recomendada de detergente
Tipo de agua
Ciclo de lavado
SmartWash™ HE Cdas.
Pots & Pans (Cacerolas y ollas)
Normal Wash
(Lavado normal)
China Gentle
(Delicado para
porcelana)
Fast Wash
(Lavado rápido)
Unidad
ml
Cdas.
ml
Cdas.ml1.75-3
Cdas.
ml
Cdas.
ml
Dura
7.0 g/gal
o más
3
25-45
3
45
25-45
1.75
25
1.75
25
Intermedia
7.0-1.0 g/
gal
3
45
3
45
1.75
25
1-1.75
15-25
1-1.75
15-25
Blanda
menos de
1.0 g/gal
1-1.75
15-25
1.75-3
25-45
1-1.75
15-25
1
15
1
15
• Para obtener los mejores resultados, utilice detergente en
polvo recién comprado.
• 1 cucharada limpia prácticamente todos los tipos de cargas.
• No utilice más de 3 cucharadas. No llene el recipiente en
exceso.
• Al utilizar pastillas de detergente, colóquelas de manera
horizontal para evitar que entren en contacto con la cubierta.
PARA CERRAR
• Coloque el dedo como se muestra en la imagen anterior.
• Deslice la puerta hacia adelante y presione hacia abajo
rmemente hasta que escuche un clic.
PARA ABRIR
NOTA: Cuando use paquetes de gel, tabletas u otros
detergentes para lavadora de platos, consulte las instrucciones
del fabricante (normalmente 1 pastilla/dosis).
• Para abrir la cubierta, empuje el botón como se muestra en
la imagen anterior.
11
Page 54

AGENTE DE ENJUAGUE
Agente de enjuague
Para lograr un secado adecuado, utilice siempre un agente
de enjuague líquido, aun si su detergente contiene un
agente de enjuague o un aditivo de secado.
NOTA: El LED del agente de enjuague se ilumina cuando
tiene poco agente de enjuague.
El LED no se ilumina si hay suciente agente de enjuague en
la lavadora de platos.
Cómo llenar el dispensador
Levante la
pestaña
para abrir.
• Asegúrese de que la puerta de la lavadora de platos
esté completamente abierta.
• Agregue agente de enjuague líquido al dispensador
como se muestra a continuación hasta que el depósito
para el agente de enjuague esté lleno.
Limpie cualquier exceso de agente de enjuague que se
acumule cuando el depósito del dispensador esté lleno, a
n de evitar el exceso de espuma.
Una vez que llene el dispensador de agente de enjuague,
la luz indicadora se apagará algunos minutos después de
que se cierre la puerta de la lavadora de platos (solo en
algunos modelos).
• Utilice siempre agente de enjuague, aun si su detergente contiene agente de enjuague.
• Agregue agente de enjuague cuando se ilumine la luz
indicadora de agente de enjuague que se encuentra
en el panel de control.
• Para agregar agente de enjuague, viértalo en el oricio ovalado.
12
Page 55

CICLOS Y OPCIONES DE LA LAVADORA DE PLATOS
CICLOS
SmartWash™ HE
Le permite no tener que adivinar cuál es el ciclo
adecuado. Los sensores de la lavadora de platos ajustan
automáticamente la duración del ciclo, la temperatura y los
cambios en el agua, en función de la cantidad de suciedad.
Este ciclo tiene más opciones de decisión para los sensores
en comparación con otros ciclos.
Pots & Pans (Cacerolas y ollas) *
Limpia artículos que tienen suciedad que queda pegada
después de hornear o residuos secos y endurecidos de
alimentos. Para limpiar estos artículos, puede ser necesario
dejarlos en remojo o fregarlos a mano.
Normal Wash (Lavado normal)
Limpia en profundidad cargas normales que tienen suciedad
normal poco adherida.
China Gentle (Delicado para porcelana)
Diseñado para ser utilizado con porcelana frágil y
utensilios de vidrio, ya que le permite lavar perfectamente
sin las complicaciones de tener que lavar a mano ni la
preocupación de que se dañe la lavadora de platos.
NIVEL DE
SUCIEDAD
Leve 105 110 3.6 13.6
Intermedio 110 115 4.5 17.0
Alto 115 120 6.0 22.6
Todos los niveles
de suciedad
Leve 105 120 2.3 8.7
Intermedio 120 135 5.0 19.0
Alto 135 155 7.1 26.7
Todos los niveles
de suciedad
*TIEMPO (min)
Sin opciones
Típico Máximo
130 130 6.8 25.6
80 80 3 11.3
Consumo de agua
Galones Litros
Fast Wash (Lavado rápido)
Limpia platos levemente sucios y reduce el tiempo de lavado
total. Utilice este ciclo para limpiar vasos y platos de postre
que posiblemente necesite volver a usar en el mismo evento.
Al agregar opciones, el tiempo del ciclo aumentará o disminuirá. Consulte la información que gura en la sección “Opciones”.
Todos los tiempos están calculados sobre la base de una temperatura del agua de entrada de 120 °F (49 °C).
* El ciclo está certicado por la Fundación Nacional de Salubridad (National Sanitation Foundation, NSF).
INFORMACIÓN SOBRE LA NSF
Una lavadora de platos o un ciclo de una lavadora de platos que
está certicado por la NSF internacional cumple con requisitos muy
estrictos con respecto al tiempo de lavado y a la temperatura del
agua para garantizar la salubridad de la vajilla y los utensilios
de cocina. Estos requisitos se explican en el documento NSF/ANSI
184, Lavadoras de platos para uso residencial. Puede encontrar
más información sobre la certicación de la NSF en el sitio web de
la NSF,
http://www.nsfconsumer.org/home/appliances.asp.
Su lavadora de platos está certicada por la NSF. En el cuadro
anterior, se presentan los ciclos de la lavadora de platos que
están certicados por la NSF. Cuando se completen estos ciclos,
se iluminará el indicador “Sanitized” (Desinfectado) en el panel
Todos los niveles
de suciedad
de control de su lavadora de platos. Sin embargo, si el suministro
de agua de su hogar es demasiado caliente, el tiempo de
calentamiento de su lavadora de platos puede reducirse, y es
posible que el indicador Sanitized (Desinfectado) no se ilumine.
Los tiempos de los ciclos que se enumeran en el Manual de uso y
cuidado están calculados sobre la base de cargas con suciedad
normal y de agua de entrada de 120 °F y varían en función de las
condiciones reales en que opere su lavadora.
NOTA: Únicamente los ciclos desinfectantes han sido diseñados
para cumplir los requisitos para el grado 6 respecto de la ecacia
de la remoción de la suciedad y de la desinfección. No existe
intención alguna, directa ni indirecta, de que todos los ciclos de
una máquina certicada aprueben la prueba de rendimiento de
desinfección.
13
59 59 3.9 14.9
Page 56

OPCIONES
Puede
seleccionarse
para:
China Gentle
(Delicado para
porcelana)
Tiempo adicional al ciclo Agua adicional
Típico Máximo Galones Litros
1.1 G 4 l
TurboClean™ (Limpieza turbo)
Este ciclo se encarga de los platos difíciles de
lavar de la rejilla inferior, lo que elimina la
necesidad de sumergir y fregar los platos muy
sucios.
Normal Wash
(Lavado normal) 0 0
agrega
20 min
agrega
20 min
Pots & Pans (Cacerolas y ollas) 0.2 G 1.2 l
SmartWash™ HE
0.2 G 1.2 l
Indicador Sanitized (Desinfectado)
Cuando se ilumina la luz indicadora “Sanitized” (Desinfectado) en el panel de control signica que la vajilla y los utensilios
de cocina que acaban de lavarse han sido desinfectados de acuerdo con los requisitos de la Fundación Nacional de
Salubridad (NSF). Para obtener más información sobre la certicación de la NSF, consulte las tablas en esta sección.
NOTA: La luz indicadora se encenderá para los ciclos marcados con un asterisco en las tablas de ciclos y opciones.
14
Page 57

CÓMO OPERAR LA LAVADORA DE PLATOS
Si su unidad tiene una ventana de pantalla similar a la que se
muestra en la imagen anterior, siga las instrucciones que se detallan a continuación.
CÓMO CANCELAR UN CICLO
• Mantenga presionado el botón CANCEL (Cancelar) hasta que
la pantalla muestre “0:01”.
• Presione el botón POWER (Encendido) para apagar la uni-
dad. Luego vuelva a encenderla.
• Uno de los LED de los ciclos titilará. Esto indica que la unidad
ha sido reprogramada.
CÓMO CAMBIAR UN CICLO
Si desea cambiar el ciclo de funcionamiento a un nuevo ciclo:
• Mantenga presionado el botón CANCEL (Cancelar) hasta que
la pantalla muestre “0:01”.
• Presione el botón POWER (Encendido) para apagar la uni-
dad. Luego vuelva a encenderla.
• Ahora puede seleccionar un nuevo ciclo.
Control de bloqueo
• Después de presionar el botón “START” (Inicio) puede activar
la función Control Lock (Control de bloqueo).
• Presione y mantenga presionado el botón “CHINA GENTLE”
(Delicado para porcelana) hasta que “CL” aparezca en
la ventana de la pantalla. En este momento, no funcionará
ningún botón que presione (excepto POWER [Encendido]) y
“CL” aparecerá en la pantalla todo el tiempo.
• Para desactivar, presione y mantenga presionado el botón
“CHINA GENTLE” (Delicado para porcelana) hasta que “CL”
desaparezca de la ventana de la pantalla.
Para programar la cantidad de agente de enjuague:
NOTA: Si sus vasos tienen manchas, necesita una mayor cantidad
de agente de enjuague. Si sus vasos tienen vetas, necesita una
menor cantidad de agente de enjuague.
Siga las instrucciones para ingresar al modo de las “opciones”.
Cuando la pantalla muestre entre “r:00” y “r:06”:
• Presione el botón “NORMAL WASH” (Lavado normal) para
cambiar la cantidad de agente de enjuague que se dis-
pensa.
r:00 → Agente de enjuague APAGADO
r:03 → Se dispensa una cantidad intermedia de agente de
enjuague
r:06 → La mayor cantidad de agente de enjuague
Dry Assist (Asistente de secado)
Con esta opción, usted puede elevar la temperatura del agua
de enjuague y aumentar el tiempo de secado para lograr un
mejor secado.
Siga las instrucciones para ingresar al modo de las “opciones”.
Cuando la pantalla muestre “d:00” o “d:01”:
• Presione el botón “NORMAL WASH” (Lavado normal) para
activar o desactivar el asistente de secado.
d:00 → Asistente de secado APAGADO
d:01 → Asistente de secado ENCENDIDO
Para ingresar al modo de las opciones:
(programación del agente de enjuague, asistente de
secado)
• La puerta debe estar cerrada. Presione el botón POWER
(Encendido) para encender la unidad.
• La pantalla de cuenta regresiva y uno de los LED de los ciclos
de lavado titilarán.
• Presione y mantenga presionado el botón “NORMAL WASH”
(Lavado normal), luego presione y suelte el botón “START”
(Inicio). Ahora suelte el botón “NORMAL WASH” (Lavado
normal).
• El LED “Sanitized” (Desinfectado) titilará. Ahora está en el
modo de programación de opciones.
• Presione “NORMAL WASH” (Lavado normal) para seleccio-
nar la opción que desee ajustar.
Si la pantalla muestra “d:00” o “d:01” puede ENCENDER o
APAGAR el calor para secado adicional.
Si la pantalla muestra de “r:00” a “r:06” puede ajustar la cantidad de agente de enjuague que se dispensa.
Delay Start (Inicio con retraso)
Esta opción le permite retrasar el tiempo de inicio de su ciclo.
Para seleccionar esta función:
• Primero seleccione el ciclo deseado.
• Luego presione el botón + o - hasta que vea el tiempo de
retraso deseado.
ADVERTENCIA
Si permite que el agua caliente salpique fuera de la
lavadora de platos, podría quemarse gravemente con el
agua. ABRA LA PUERTA CON CUIDADO durante cualquier
ciclo de lavado o enjuague. Hasta que no haya cesado el
ruido de agua, no abra la puerta completamente.
15
Page 58

CÓMO OPERAR LA LAVADORA DE PLATOS
Si su unidad tiene una pantalla similar a la que se muestra en la
imagen anterior, siga las instrucciones que se detallan a continuación.
CÓMO CANCELAR UN CICLO
• Abra la puerta.
• Mantenga presionado el botón CANCEL (Cancelar) hasta que
el LED “WASHING” (Lavando) se apague.
• Espere alrededor de 1 minuto hasta que la lavadora de
platos drene.
• El LED “COMPLETE” (Completado) se iluminará. Esto indica
que la unidad ha sido reprogramada.
CÓMO CAMBIAR UN CICLO
Si desea cambiar el ciclo de funcionamiento a un nuevo ciclo:
• Abra la puerta.
• Mantenga presionado el botón CANCEL (Cancelar) hasta que
el LED “WASHING” (Lavando) se apague.
• Espere alrededor de 1 minuto hasta que la lavadora de
platos drene.
• El LED “COMPLETE” (Completado) se iluminará. Esto indica
que la unidad ha sido reprogramada.
• Presione el botón POWER (Encendido) para apagar la uni-
dad. Luego vuelva a encenderla.
• Ahora puede seleccionar un nuevo ciclo.
Para ingresar al modo de las opciones:
(programación del agente de enjuague, asistente de
secado)
• La puerta debe estar abierta. Presione el botón POWER
(Encendido) para encender la unidad.
• Uno de los LED de los ciclos de lavado titilará.
• Presione y mantenga presionado el botón “>”, luego pre-
sione y suelte el botón “START” (Inicio). Ahora suelte el botón
“>”.
• El LED “Sanitized” (Desinfectado) y otro LED titilarán. Ahora
está en el modo de programación de opciones.
• Presione “>” para seleccionar la opción que desee ajustar.
Si los LED “COMPLETE” (Completado) y “RINSE AID” (Agente de
enjuague) titilan, usted está en el modo “Rinse Aid” (Agente de
enjuague). Puede ajustar la cantidad de agente de enjuague que
se dispensa.
Si los LED “COMPLETE” (Completado) y “SANITIZED” (Desinfectado) titilan, usted está en el modo “Extra Dry Heat” (Calor para
secado adicional). Ahora puede activar o desactivar el calor
para secado adicional.
Si los LED “COMPLETE” (Completado), “SANITIZED” (Desinfectado)
y “RINSE AID” (Agente de enjuague) titilan, usted está en el modo
“Cycle Completion Signal” (Señal de ciclo completado). Ahora
puede aumentar o disminuir el tono, o desactivar la señal.
16
Para programar la cantidad de agente de enjuague:
NOTA: Si sus vasos tienen manchas, necesita una mayor cantidad
de agente de enjuague. Si sus vasos tienen vetas, necesita una
menor cantidad de agente de enjuague.
Siga las instrucciones para ingresar al modo de las “opciones”.
Con los LED “COMPLETE” (Completado) y “RINSE AID” (Agente de
enjuague) titilando:
• Presione el botón “<” para cambiar la cantidad de agente
de enjuague que se dispensa.
0 LED jo→ El dispensador de agente de enjuague está
APAGADO.
1 LED jo→ Se dispensa la menor cantidad de agente de
enjuague
2 LED jos→ Se dispensa una cantidad intermedia de agente
de enjuague
3 LED jos→ Se dispensa la mayor cantidad de agente de
enjuague
• Presione “START” (Inicio) para guardar sus programaciones.
Dry Assist (Asistente de secado)
Con esta opción, usted puede elevar la temperatura del agua
de enjuague y aumentar el tiempo de secado para lograr un
mejor secado.
Siga las instrucciones para ingresar al modo de las “opciones”.
Con los LED “COMPLETE” (Completado) y “SANITIZED” (Desinfectado) titilando:
• Presione el botón “<” para activar o desactivar el asistente
de secado.
0 LED jos → el calor para secado adicional está APAGADO
1 LED jo→ el calor para secado adicional está
ENCENDIDO
• Presione “START” (Inicio) para guardar sus programaciones.
Señal de ciclo completado (solo en algunos modelos)
La señal de ciclo completado le avisa cuando se completa un ciclo
y la lavadora de platos ha lavado y secado los platos. Puede
optar por inhabilitar el tono o ajustar el volumen.
Siga las instrucciones para ingresar al modo de las “opciones”.
Con los LED “COMPLETE” (Completado) y “RINSE AID” (Agente de
enjuague) titilando:
• Presione el botón “<” para ajustar o desactivar la señal de
ciclo completado.
0 LED jos → La señal de ciclo completado está APAGADA
1 LED jo → Nivel de tono bajo
2 LED jos → Nivel de tono medio
3 LED jos → Nivel de tono más alto
• Presione “START” (Inicio) para guardar sus programaciones.
Time Delay (Retraso)
Esta opción le permite retrasar el tiempo de inicio de su ciclo.
Para activar:
• Encienda la lavadora de platos.
• Seleccione el ciclo de lavado deseado.
• Presione el botón de Delay Start (Inicio con retraso) hasta que
el tiempo de retraso deseado se ilumine en los LED de “3Hr”,
“6Hr”, “9Hr”.
Page 59

CUIDADO Y MANTENIMIENTO
TAREAS DE MANTENIMIENTO
Determinadas áreas de su lavadora de platos requieren
mantenimiento de vez en cuando. Las tareas de mantenimiento
son fáciles de realizar y asegurarán la continuidad del
rendimiento superior de su lavadora de platos:
• Limpiar derrames y salpicaduras
Ocasionalmente, el agua puede salpicar hacia afuera de su
lavadora de platos, en especial si interrumpe un ciclo o abre la
puerta de la lavadora de platos durante un ciclo. Para evitar
daños en el piso y la posible aparición de moho, no permita
que las áreas alrededor o debajo de la lavadora de platos
permanezcan mojadas.
• Limpiar el lado interno de la puerta y la tina de acero
inoxidable
Limpie los bordes externos del panel interior de la puerta con
regularidad para retirar los desechos que posiblemente se
acumulen como resultado de la carga normal. Si empiezan a
aparecer manchas en el lado interno de la puerta o en la tina de
acero inoxidable, asegúrese de que el depósito para el agente
de enjuague esté lleno.
• Limpiar el espacio de aire de drenaje.
Limpie el espacio de aire de drenaje periódicamente para
asegurar el drenaje adecuado de su lavadora de platos. En
la mayoría de las lavadoras de platos, se levanta la cubierta
de cromo. Destornille la tapa de plástico. Luego, verique si se
acumula cualquier tipo de suciedad. Limpie si es necesario.
• Vericar y limpiar las boquillas de los brazos
rociadores
De vez en cuando, verique los brazos rociadores para
asegurarse de que las boquillas (oricios) de los brazos
rociadores no estén obstruidas. Debe retirar los brazos
rociadores para vericar que no tengan obstrucciones.
Para retirar el brazo rociador superior:
3. Retire el brazo rociador, como se muestra en la imagen
anterior.
4. Revise las boquillas rociadoras para detectar obstrucciones.
5. Si es necesario limpiar las boquillas rociadoras, enjuáguelas
debajo del agua del grifo.
Para volver a instalar el brazo rociador superior:
1. Vuelva a colocar el brazo rociador superior en el lugar de
instalación.
2. Vuelva a colocar la tuerca de retención en el lugar de
instalación y gírela 1/8 de vuelta hacia la derecha.
3. Vuelva a colocar la rejilla superior en las guías de los
rodillos de la rejilla superior.
PRECAUCIÓN
Para evitar lesiones, no introduzca los dedos en la trampa para
objetos grandes. La trampa para objetos grandes podría contener objetos losos.
Para retirar el brazo rociador inferior:
1. Retire la rejilla inferior vacía de la tina de la lavadora de
platos.
2. Tome el brazo rociador inferior y levántelo, como se muestra
a continuación.
1. Retire la rejilla superior vacía de la lavadora de platos.
2. Coloque la rejilla boca abajo. Una tuerca de retención
mantiene el brazo rociador superior en su lugar, como se
muestra en la imagen anterior. Gire la tuerca de retención
hacia la izquierda y retírela, como se muestra en la imagen
anterior, para soltar el brazo rociador.
3. Revise las boquillas rociadoras para detectar obstrucciones.
4. Si es necesario limpiar las boquillas rociadoras, enjuáguelas
debajo del agua del grifo.
Para volver a instalar el brazo rociador inferior:
1. Vuelva a colocar el brazo rociador inferior en el lugar de
instalación y presiónelo para que calce a presión en su lugar.
2. Vuelva a colocar la rejilla inferior en el lugar de instalación.
• Vericar y limpiar el sistema de ltros
Esta lavadora de platos cuenta con un sistema de ltros que
consta de un conjunto de trampa para objetos grandes/ltro
cilíndrico y un ltro no. Solo algunos modelos tienen un microltro
adicional.
El sistema de ltros está ubicado en el interior de su lavadora de
platos debajo de la rejilla inferior, un área fácilmente accesible.
Durante el uso normal, el sistema de ltros se limpia solo. Puede
inspeccionarlo de vez en cuando para detectar objetos extraños
y limpiarlo cuando sea necesario.
17
Page 60

Para retirar el conjunto de la trampa para objetos grandes/
ltro cilíndrico:
1. Retire la rejilla inferior.
2. Tome el conjunto y gírelo hacia la izquierda
- ¼ de vuelta, como se muestra a continuación.
3. Levante el conjunto, como se muestra a continuación.
4. Examine el conjunto con cuidado. Si encuentra desechos en la
trampa para objetos grandes, colóquela boca abajo y golpéela suavemente sobre una supercie como una encimera
para remover y retirar los desechos.
• Limpiar el panel exterior de la puerta
Puertas de color
Utilice únicamente un paño suave humedecido levemente con
agua con jabón.
Puertas de acero inoxidable
Utilice un paño suave con un limpiador no abrasivo
(preferentemente, un rociador líquido) fabricado para limpiar
acero inoxidable. Para obtener los mejores resultados, aplique
el limpiador para acero inoxidable en el paño y, luego, limpie la
supercie.
• Limpiar el interior.
Los minerales del agua dura pueden provocar que se acumule
una película blanca en las supercies interiores, especialmente,
apenas por debajo del área de la puerta.
No limpie el interior de la lavadora de platos hasta que se haya
enfriado. Use guantes de hule. No use ningún tipo de limpiador
que no sea detergente para lavadora de platos, porque puede
provocar espuma.
• Haga una pasta con detergente en polvo para lavadora de
platos en una esponja húmeda y limpie.
O
• Use detergente líquido para lavadora de platos automática
y limpie con una esponja húmeda.
5. Enjuague el ltro cilíndrico colocándolo debajo del agua del
grifo hasta que quede limpio.
Para volver a instalar el sistema de ltros:
1. Vuelva a colocar el ltro no en el lugar donde viene
instalado originalmente.
2. Coloque el conjunto de la trampa para objetos grandes/ltro
cilíndrico en el lugar de instalación, en el piso de la lavadora
de platos.
3. Gire el borde del aro hacia la derecha 1/4 de vuelta hasta
que quede trabado.
4. Jale suavemente del borde del aro para garantizar que el
conjunto esté trabado en su lugar.
• Limpiar el empaque de la puerta
Limpie con regularidad el empaque de la puerta con un paño
húmedo para retirar las partículas de alimentos y otros desechos.
Limpie también el sello de la puerta, ubicado en el interior de la
lavadora de platos, en la parte inferior de la puerta.
• Acondicionar su lavadora de platos para el invierno
Si su lavadora de platos permanecerá sin uso durante un período
prolongado en un lugar donde suele haber temperaturas bajo
cero (p. ej., en una casa de vacaciones o durante un período de
vacaciones), solicite en un centro de servicio técnico autorizado
que acondicionen su lavadora de platos para el invierno.
Filtro
no
18
Page 61

RESOLUCIÓN DE PROBLEMAS
En ocasiones, las lavadoras de platos pueden presentar problemas que no están relacionados con una falla de la lavadora de platos en sí. La
siguiente información puede ayudarlo a resolver un problema de la lavadora de platos sin tener que acudir a un experto en reparaciones. Es posible
que los artículos que se enumeran en las siguientes tablas no estén cubiertos por la garantía de su producto.
Problema Causa Acción
La lavadora
de platos no
se pone en
funcionamiento
La lavadora de platos
emite un pitido
(señal de
nalización del
ciclo)
La pantalla
no se ilumina,
o las luces de
la consola no
están encendidas
La lavadora
de platos parece funcionar
durante un
tiempo prolongado
Los platos
no están lo
sucientemente
limpios
1. Es posible que la puerta no esté bien trabada.
2. Es posible que la unidad no esté encendida.
3. Es posible que la unidad no se haya reprogramado o que un ciclo anterior no se haya completado.
4. Está activada la opción de inicio con retraso.
5. La fuente de alimentación eléctrica de la lavadora
de platos está interrumpida, o se ha quemado un
fusible.
6. Child lock (Bloqueo para niños) está activado (solo
en algunos modelos).
7. Es posible que la puerta se haya cerrado sin antes
seleccionar un ciclo.
8. Es posible que el suministro de agua no esté abierto.
Las programaciones preconguradas de fábrica le
avisan al cliente que el ciclo se ha completado emitiendo un pitido. Esta función se puede desactivar si lo
desea.
1. Es posible que se haya quemado un fusible o que
se haya desconectado el disyuntor.
2. La puerta no está cerrada o trabada.
NOTA: En el caso de los modelos con controles en la
parte superior de la puerta, la pantalla únicamente se
ilumina cuando la puerta se abre y los controles están visibles.
1. El agua de entrada no es lo sucientemente caliente.
2. El tiempo del ciclo puede variar debido a la
suciedad y a las condiciones del agua.
3. El dispensador de agente de enjuague está vacío.
4. La lavadora de platos está conectada a un suministro de agua fría.
5. El tipo de opciones de los ciclos seleccionado
puede agregar tiempo al ciclo.
NOTA: Para conocer la duración típica de los ciclos, consulte la tabla de Ciclos de lavado en la sección Ciclos y
opciones de la lavadora de platos.
1. El movimiento de los brazos rociadores está
obstruido.
2. Las boquillas de los brazos rociadores están
tapadas.
3. Uso inadecuado de detergentes.
4. Los ltros podrían estar tapados.
5. Los platos están unos dentro de otros o cargados
con muy poca distancia entre sí.
6. El ciclo de lavado seleccionado no es adecuado
para las condiciones de los residuos de alimentos.
7. Asegúrese de que el agua de entrada esté en
120 °F.
1. Cierre la puerta por completo.
2. Accione el interruptor de alimentación eléctrica principal para encender la unidad.
3. Para reprogramar, consulte la sección “Cómo cancelar o cambiar el
ciclo” incluida en este manual.
4. Para reprogramar, consulte la sección “Inicio con retraso” incluida en
este manual.
5. Verique el disyuntor.
6. Desactive el bloqueo para niños. Consulte la sección “Bloqueo para
niños” incluida en este manual, si corresponde.
7. Seleccione un ciclo y cierre la puerta.
8. Verique el suministro de agua y ábralo.
Para ajustar el volumen o desactivarlo, consulte la sección “Señal de ciclo
completado” incluida en este manual.
1. Verique el fusible o la caja de disyuntores y reemplace el fusible o
restablezca el disyuntor, si fuera necesario.
2. Asegúrese de que la puerta esté bien trabada y completamente
cerrada.
1. Antes de iniciar un ciclo, deje correr el grifo de agua caliente del
fregadero más cercano a la lavadora de platos. El agua de entrada
debe estar en 120 °F.
2. Los sensores que se encuentran en la lavadora de platos aumentan
automáticamente el tiempo del ciclo para asegurar un buen lavado
cuando se detecta mucha suciedad.
3. Agregue agente de enjuague.
4. Verique si la lavadora de platos está conectada a la tubería del suministro de agua caliente.
1. Asegúrese de que el movimiento de los brazos rociadores no esté bloqueado girándolos a mano.
2. Retire los brazos rociadores y límpielos de acuerdo con el punto “Vericar y limpiar las boquillas de los brazos rociadores” de la sección
Cuidado y mantenimiento de este manual.
3. Aumente o disminuya la cantidad de detergente, según el nivel de dureza del agua. Consulte la tabla incluida en la sección “Cómo agregar
detergente y agente de enjuague”.
4. Limpie el ltro. Consulte “Vericar y limpiar el sistema de ltros” en la
sección Cuidado y mantenimiento de este manual.
5. Reacomode la carga de manera tal que el rocío del agua pueda alcanzar todos los artículos que están en la lavadora de platos. Consulte
también la sección “Cómo preparar y cargar la lavadora de platos”
de este manual.
6. Consulte la sección “Ciclo de lavado” incluida en la sección Cómo operar la lavadora de platos de este manual.
Los platos
no están
quedando lo
sucientemente
secos
1. El dispensador de agente de enjuague está
vacío. (El indicador de agente de enjuague está
activado).
2. Carga incorrecta de platos.
3. El ciclo seleccionado no incluye secado.
4. Dry Assist (Asistente de secado)
NOTA: Por lo general, el plástico o el teón no se secan
tan bien como otros artículos, debido a sus propiedades
inherentes.
1. Agregue agente de enjuague. El uso de agente de enjuague mejora
el secado.
2. Reacomode la carga para asegurarse de que los artículos no estén
unos dentro de otros. Consulte también la sección “Cómo preparar y
cargar la lavadora de platos” de este manual.
3. Determinadas programaciones no incluyen un ciclo de secado.
4. Active el asistente de secado según las instrucciones que aparecen
en la sección Cómo operar la lavadora de platos.
NOTA: Algunos modelos brindan opciones de calentamiento adicional
para mejorar el rendimiento de secado. Consulte “Opciones de los ciclos
de lavado” en la sección Cómo operar la lavadora de platos de este
manual.
19
Page 62

Problema Causa Acción
Olor 1. Hay desechos de alimentos en la parte inferior de la
La lavadora de
platos no se está
llenando con agua
lavadora de platos.
2. Hay partículas de alimentos cerca del sello de la
puerta.
3. Hay agua residual en la parte inferior de la lavadora de platos.
4. La manguera de drenaje está obstruida.
1. Hay una restricción en el sistema de suministro de
agua.
2. El ciclo de lavado anterior no se completó.
3. Está activada la opción de inicio con retraso.
1. Retire los ltros y límpielos de acuerdo con la sección “Vericar
y limpiar el sistema de ltros” de este manual.
2. Consulte “Limpiar el empaque de la puerta y el sello de la
puerta” en la sección Cuidado y mantenimiento de este manual.
3. Asegúrese de que la unidad haya drenado completamente
después del último ciclo. Consulte la sección “Cómo cancelar o
cambiar el ciclo” de este manual.
4. Llame a personal calicado para que retire cualquier obstrucción en la manguera de drenaje.
NOTA: Si el olor aún persiste, haga funcionar el ciclo Normal Wash
(Lavado normal) hasta que llegue al ciclo de enjuague, interrumpa
el ciclo y coloque una taza de 8 oz con una solución de vinagre
blanco destilado en la rejilla superior y, luego, deje que el ciclo
termine.
1. Asegúrese de que la válvula de suministro de agua (por lo general, ubicada debajo del fregadero de la cocina) esté abierta y
verique que la línea de suministro de agua no esté plegada ni
tapada.
2. Consulte la sección “Cómo cancelar el ciclo” de este manual.
3. Cancele la opción de inicio con retraso o espere hasta que se
complete (nalice) el tiempo de retraso del inicio. Consulte la
sección “Inicio con retraso” de este manual.
Pérdidas de agua
Manchas en la
tina
Manchas y vetas
en los utensilios de
vidrio o residuos
en los platos
El panel con
botones está
descolorado o
marcado.
Ruido durante el
ciclo de lavado
1. Espuma
2. Es posible que el sello de la puerta se haya salido
de su lugar.
3. La abertura de ventilación anticondensación está
bloqueada.
4. Instalación incorrecta.
1. Las manchas en el interior de la lavadora de platos
se deben al nivel de dureza del agua.
2. Los cubiertos entran en contacto con la tina.
Programación incorrecta del agente de enjuague. Según el nivel de dureza del agua, ajuste el dispensador de agente
Se usó un limpiador abrasivo. Utilice detergentes suaves con un paño suave humedecido.
Es posible que los platos no estén acomodados correctamente.
1. Usar un tipo inadecuado de detergente produce espuma y
pérdidas. Utilice únicamente detergentes para lavadoras de
platos. Si la espuma aún persiste, agregue una cucharada de
aceite vegetal a la parte inferior de la lavadora de platos y
haga funcionar el ciclo deseado. También limpie el exceso de
agente de enjuague para evitar la presencia de espuma.
2. Asegúrese de que el sello de la puerta esté en su lugar.
3. Asegúrese de que la abertura de ventilación anticondensación
no esté bloqueada. Consulte “Cómo cargar artículos extraaltos” en la sección Cómo preparar y cargar la lavadora de
platos de este manual.
4. Solicite a personal calicado que verique que la instalación
sea adecuada (suministro de agua, sistema de drenaje, nivelación, plomería).
1. El jugo de limón concentrado puede reducir la acumulación de
manchas causadas por el agua dura. Haga funcionar un ciclo
normal hasta el ciclo de enjuague, interrumpa el ciclo y, luego,
coloque una taza de 8 oz con una solución de jugo de limón
concentrado en la rejilla superior y deje que el ciclo termine.
Esto puede hacerse periódicamente para evitar la acumulación.
2. Asegúrese de que los cubiertos no entren en contacto con la
tina mientras está funcionando un ciclo.
de enjuague. Consulte la sección “Agente de enjuague” incluida en
este manual para realizar ajustes.
Si el sonido de la circulación del agua es normal, pero sospecha que
los artículos se están chocando entre sí o contra los brazos rociadores, consulte la sección “Cómo preparar y cargar la lavadora de
platos” de este manual para conocer cuál es la disposición óptima.
La cubierta del
dispensador de
detergente no
cierra
No se puede
seleccionar el ciclo
deseado
1. Uso incorrecto de la cubierta del detergente.
2. El ciclo anterior no ha terminado, se ha reprogramado o fue interrumpido.
El ciclo anterior no ha nalizado. Consulte la sección “Cómo cambiar el ciclo” de este manual.
1. Consulte la sección “Detergente” de este manual para obtener
instrucciones sobre cómo abrir y cerrar el dispensador.
2. Consulte la sección “Cómo cancelar el ciclo” de este manual.
20
Page 63

La lavadora de
platos no
desinfectó
1. No puso en funcionamiento el ciclo de desinfección.
2. Abrió la puerta en la mitad del ciclo.
1. Seleccionó un ciclo que está destinado a la desinfección.
Consulte la sección Ciclos y opciones de la lavadora de platos
para obtener más información.
2. No abra la puerta mientras el ciclo de lavado está
funcionando.
La lavadora de
platos no está
drenando.
Marcas
(turbiedad permanente)
“Espuma”
1. Manguera de drenaje plegada o aplastada.
2. No hay bucles altos en la manguera de drenaje
3. No se ha retirado el tapón del triturador de
desechos.
4. El espacio de aire puede necesitar limpieza.
5. Un problema de tubería del hogar.
1. Tipo de vidrio: algunos utensilios de vidrio son sensibles a las temperaturas.
2. Demasiado detergente
3. Demasiado detergente y/o tipo equivocado de
detergente y/o marca equivocada de detergente.
1. Verique la manguera de drenaje para saber si se ha instalado correctamente. NOTA: En el proceso de instalación, no
gire la manguera de drenaje después de haberla conectado
a la lavadora de platos. Consulte las Instrucciones de instalación para obtener más detalles.
2. Asegúrese de que una parte de la manguera de drenaje se
encuentre, al menos, a 20" del piso. Consulte las Instrucciones
de instalación para obtener más detalles.
3. Si su manguera de drenaje está conectada al triturador de
desechos, asegúrese de que se haya retirado el tapón del
triturador de desechos.
4. Limpie el espacio de aire periódicamente para asegurar el
drenaje adecuado de su lavadora de platos. En la mayoría
de las lavadoras de platos, se levanta la cubierta de cromo.
Destornille la tapa de plástico. Luego, verique si hay
acumulación de suciedad. Limpie si es necesario.
5. En este caso, un plomero certicado tendría que vericarlo.
1. Asegúrese de que los vidrios sean aptos para lavadora de
platos. Seleccione un ciclo que no se caliente tanto. No use la
opción Heated Dry (Seco y caliente).
2. La cantidad de detergente se basa en el nivel de dureza
del agua proporcionada a su lavadora de platos y en la
cantidad de residuos de alimentos presentes. Si enjuaga previamente los platos y/o tiene agua blanda, debe reducir la
cantidad de detergente. Consulte el Manual del propietario
para obtener detalles.
3. Reduzca o cambie el tipo/la marca de detergente que está
usando. NOTA: No enjuague los platos previamente. Solo
debe remover los residuos de alimentos.
21
 Loading...