

Page 1

InstallationGuide
®
NaturalGas
ConversionKit
PartNo.L3018S-KIT
• Read andfollow all Safety,Assembly,
and Use and Care Instructionsin this
Guide beforeassemblingandcooking
with this grill.
• Failureto follow all instructions in this
Use and Care Guidemay leadto fire or
explosion,which could result in property
damage, personalinjury or death.
• Safety
• Parts
• Useand Care
• Assembly
GrillInformationCenter
MissingParts?Assembly Questions?
OperationProblems?Beforereturning
grill to store, call 1-800-482-0131
Toolsneededfor assembly:
Nozzle ChangeTool(provided)
Flatheadscrewdriver (provided)
Adjustable wrench (not provided)
SAVETHESEINSTRUCTIONS!
See our extensiveassortmentof outdoorlivingproductson-lineat
www.sears.comandwww.kmart.com
SearsBrandsManagementCorporation,HoffmanEstates,IL 60179,U.S.A.
© 2010SearsBrands,LLC PrintedinChina L3018S-KITManuaE
Page 2

TABLE OF CONTENTS
Package Contents ................................................................................................. 3
Conversion Instructions ...................................................................................... 4
Use & Care ....................................................................................... 9
Troubleshooting .............................................................................................. 10
Warranty .......................................................................................................... 11
PREPARATION
Before beginning conversion, make sure all parts are present. Compare parts with package
contents list. If any part is missing or damaged, do not attempt to convert. Contact customer
service for replacement parts at 1-800-482-0131.
WARNING: Place the grill on a flat, level surface before starting the conversion.
We strongly recommend that you hire a professionally trained technician to install
this Natural Gas Conversion Kit.
2
Page 3
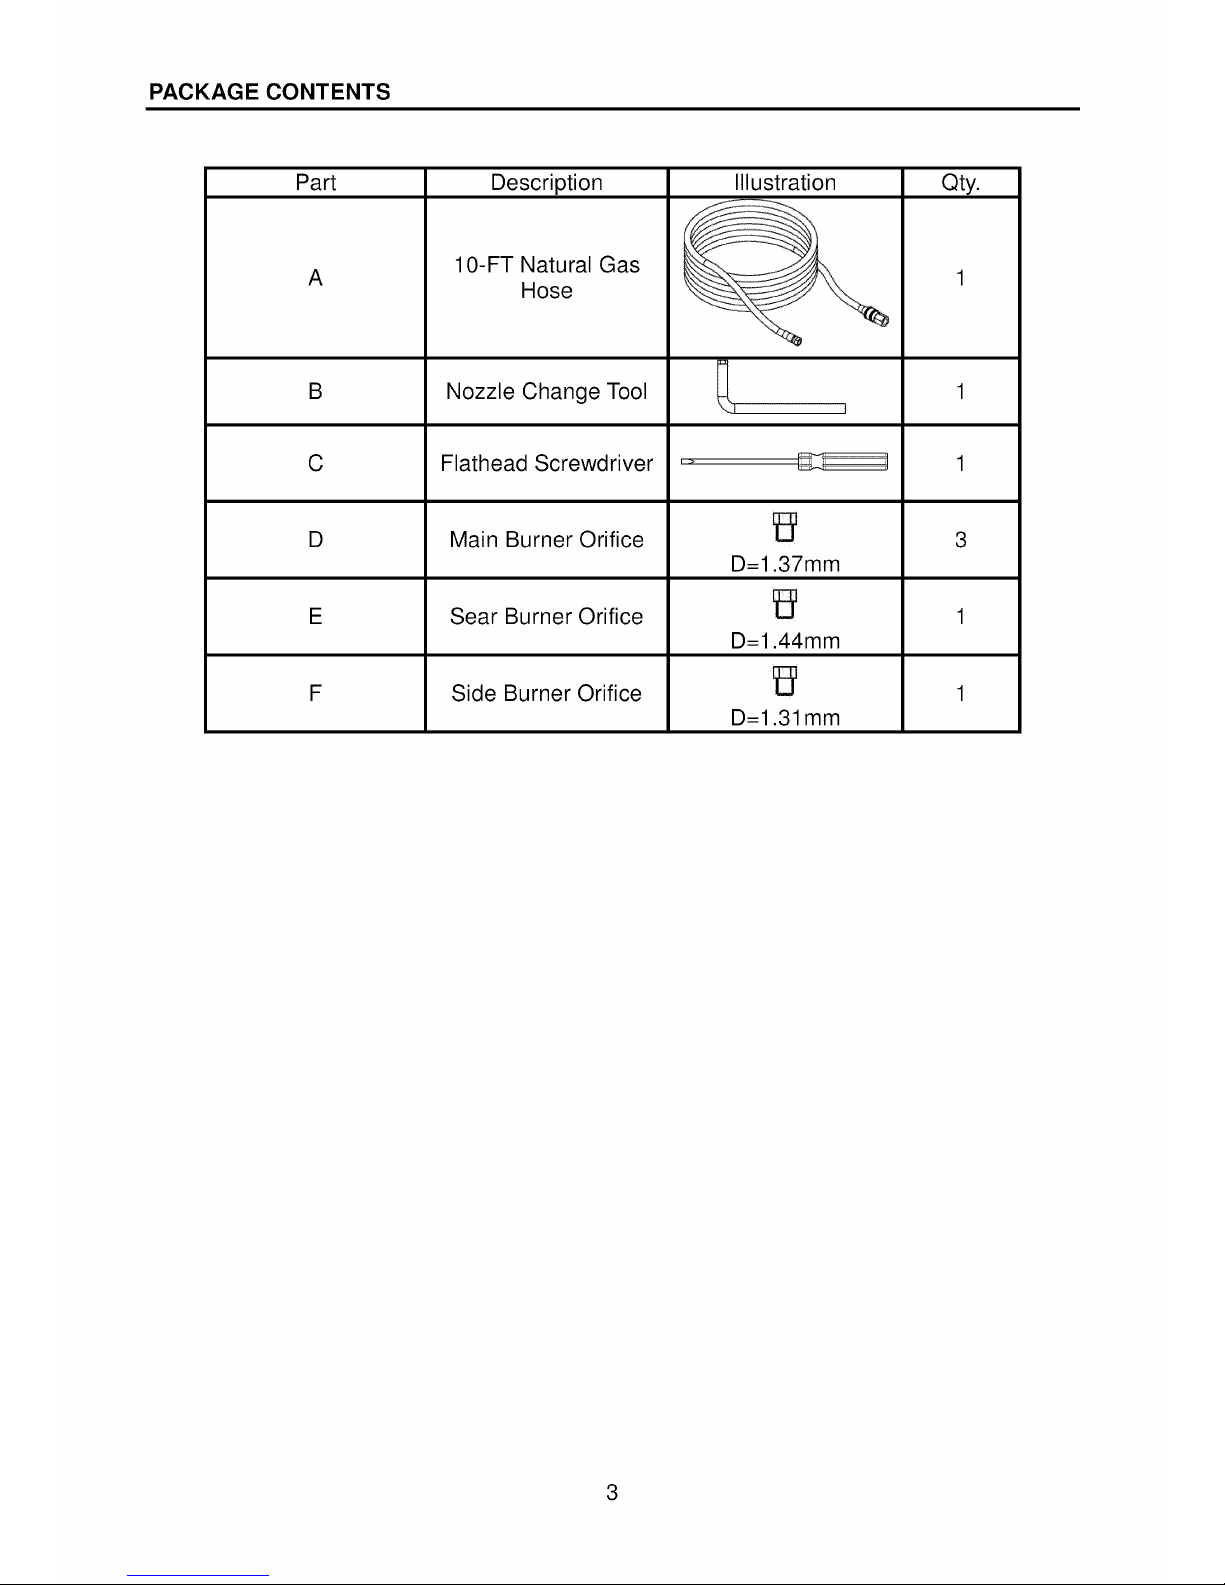
PACKAGE CONTENTS
Part
A
B
C
D
E
F
Description
10-FT Natural Gas
Hose
Nozzle Change Tool
Flathead Screwdriver
Main Burner Orifice
Sear Burner Orifice
Side Burner Orifice
Illustration
D=1.37mm
D=1.44ram
D=l.almm
Qty.
3
Page 4

CONVERSION INSTRUCTIONS
Before starting the conversion, make sure all co
knobs are in the OFF position, LP tank valve
is closed, and tank is disconnected from
regulator and removed from grill.
Next, open all lids and remove warming racks,
cooking grids, and heat diffusers.(Fig. 1)
heat
grids
rack
Fig. 1
Main Burner Conversion
2. Remove the R pins at the back of main
burners to detach burners from bracket.
(Fig. 2)
R pin
Back of Firebox
Fig. 2
3. Lift back of main burners while sliding
burners out of firebox, disengaging main
burners from valves. (Fig. 3)
Front of Firebox main burner Fig. 3
4
Page 5

CONVERSION INSTRUCTIONS
4. Insert the provided orifice removal tool (B)
into burner openings and unscrew orifices
from ends of valves. (Fig. 4)
-- orifice
5. Put the new orifice into the orifice
removal tool (B), and then insert the tool
into the burner opening and tighten the new
orifice to the valve.
Repeat this step for all three burners.
Make sure you are using the correct orifice,
which is marked "1.37". (Fig. 5)
1.37
Fig. 5
6. Adjust main burners' air shutter by loosening
the air shutter screw, the settings are:
1/4 in. open for LP gas.
1/16 in. - 1/8 in. open for NG gas.
(Fig. 6)
air shutter
Fig. 6
5
Page 6

CONVERSION INSTRUCTIONS
Sear Burner Conversion
7. Remove screws at the back of burner to
detach burner from bracket. Then lift back
of the sear burner while sliding burner out
of firebox. (Fig. 7)
8. Insert the provided orifice removal tool (B)
into the burner opening and unscrew orifice
from end of valve.
9. Put the new orifice into the orifice
removal tool (B), and then insert the tool
into the burner opening and tighten the new
orifice to the valve.
Make sure you are using the correct orifice,
which is marked "1.44". (Fig. 9)
1.44
Fig. 9
Side Burner Conversion
10. Loosen the side burner screws to expose
the side burner nozzle for changing.
Insert the tool into the valve and unscrew orifice
from end of valve. Put the new orifice into the
orifice removal tool and tighten the new orifice
into the valve.
Make sure you are using the correct orifice,
which is marked "1.31". (Fig. 10)
6
Page 7

CONVERSION INSTRUCTIONS
11. After these steps, return the burners to
the valves. Make sure burners engage valves
and secure the burners. (Fig. 11)
the main burner the sear burner
the side burner
Fig. 11
Natural Gas Hose Connection
12. Remove the LP gas hose and regulator
using a wrench, and attach the natural
gas hose. Use a wrench to tighten.
(Fig. 12)
LP gas hose and regulator
Fig. 12
7
Page 8

CONVERSION INSTRUCTIONS
Adjust valve model control screw
13. Pull all the knobs off of valve stems.
(Fig. 13)
Fig. 13
14. Adjust the screw in the valve hole using the
flathead screwdriver (C).
Turn the screw clockwise until it is tightened.
(Fig. 14)
valve hole Fig. 14
15. To complete adjustment, press all the knobs onto valve stems. After all of the conversions,
return heat tents to burner box, followed by the grid and warming rack.
8
Page 9

USE ANDCARE
WARNING: Please remember this is an outdoor gas grill. Many areas of the grill
generate extreme heat. We have taken every precaution to protect you from the contact
areas. However, it is impossible to isolate all high-temperature areas. Therefore, use
good judgment and a certain degree of caution when grilling on this product. We
suggest a covered, protected hand during operation of grill. Do not move your grill
when it is in operation or hot to the touch. Wait until your unit is turned off and
properly cooled down before moving it. Failure to follow this warning could result in
personal injury.
Do not operate the gas grill indoors or in any enclosed area. If the gas grill is not in use, the
gas must be turned off at the supply tank. If the grill is to be stored indoors, disconnect the
gas supply hose.
When checking for gas leaks, do not use an open flame. Use a soapy water solution and
apply it to the pipe joints and fittings with a brush and check for bubbles. Check flexible hoses
for cuts and wear that may affect the safe operation of the grill. Only the factory supplied hose
must be used. Use only replacement hose assemblies specified by manufacturer.
Checking Gas Leaks
Before operating your grill, after refueling, check carefully to be certain that all connections
are tight and there are no gas leaks.
1. Make 2-3 ounces of leak solution by mixing liquid dishwashing soap with water.
2. Make certain all control knobs are in the "OFF" position.
3. Brush small amounts of the leak solution on all the fittings and turn the gas on.
4. If bubbles appear, there is a leak. Proceed to step 5.
5. Turn the gas off and tighten all connections.
6. Go back to step 1 to retest the fittings.
7. If bubbles continue to appear, turn the gas off. Contact customer service.
WARNING: Never use a match or open flame for leak detection. Use of an open flame
could result in a fire, explosion and bodily harm.
IMPORTANT: When connecting or replacing any gas pipe or fittings, all joints must be
sealed with approved leak-proof sealing compound or plumber's tape.
Never store a spare tank under or near your grill.
IMPORTANT: When connecting or replacing gas pipe or fittings, all joints must be
sealed with approved leak-proof sealing compound or plumber's tape. After making
connections, check all joints for leaks using a soapy water solution and a brush.
WARNING: Never use an open flame to test for gas leaks. Use of an open flame could
result in a fire, explosion and bodily harm.
9
Page 10

TROUBLESHOOTING
Many solutions given here can make your grilling experience safer and more enjoyable.
Problem
Grill or side burner
will not light
Burnerflame is
yellow and gas
odor can be
smelled
Low heat with the
Possible Cause
1. The ignition system is not
properly installed.
2. Other possible causes are
described in the Use and
Care Guide.
1. The air shutter opening is
not properly set.
Corrective Action
1. Reinstallthe ignition system and
make sure the sparks are
produced close to the burner
ports or close to the infrared
burner ceramic surface.
2. Please refer to the Use and Care
Guide for more details.
1. Loosen the air shutter and adjust
the opening to have blue flames.
1/16 in. to 1/8 in. opening for NG.
2. Clean blockages.
.
knob in "HI"
position
Low heat,
natural gas
2. Spiders or insects block the
air shutter.
1. Natural gas pressure is low.
2. Installed with the wrong
nozzles.
3. Burner ports are blocked.
Gas pressure is significantly
affected by gas line and
length of gas line from house
gas line.
.
.
This model is set for 7 in. natural
gas usage. Please check your
natural gas supply system to
have correct gas pressure.
Regulator is not needed after NG
conversion.
Check the orifice to make sure
you installed the correct NG
nozzles.
(see the nozzle size on page 2.)
Clear burner ports of any
obstructions.
Check your gas line and make
corrections by following the chart
below.
From House to Grill
Distance
Up to 25 ft.
26 ft.-50 ft.
51 ft.-100 ft.
Tubing Size
3/8 in. diameter
1/2 in. diameter
2/3 of run 3/4 in.
1/3 of run 1/2 in.
10
Page 11

WARRANTY
Kenmore Full Warranty
If this Kenmore product fails due to a defect in material or workmanship within one year from
the date of purchase, call 1-800-4-MY-HOME for a free replacement.
This warranty is void if this product is ever used for commercial or rental purposes.
This warranty gives you specific legal rights, and you may also have other rights which vary
from state to state.
Sears, Roebuck and Co.,
Hoffman Estates, IL 60179
11
Page 12

Your Home
For expert troubleshooting and home solutions advice:
anage
www.managemyhome.com
For repair- in your home - of all major brand appliances,
lawn and garden equipment, or heating and cooling systems,
no matter who made it, no matter who sold it!
For the replacement parts, accessories and
owner's manuals that you need to do-it-yourself.
For Sears professional installation of home appliances
and items like garage door openers and water heaters.
1-800-4-MY-HOME ® (1-800-469-4683)
Call anytime, day or night (U.S.A. and Canada)
www.sears.com www.sears.ca
Our Home
For repair of carry-in items like vacuums, lawn equipment,
and electronics, call anytime for the location of your nearest
Sears Parts & Repair Service Center
1-800-482-0131 (U.S.A.) 1-800-482-0131 (Canada)
www.sears.com www.sears.ca
To purchase a protection agreement on a product serviced by Sears:
1-800-827-6655 (U.S.A.) 1-800-361-6665 (Canada)
Para pedir servicio de reparaci6n
a domicilio, y para ordenar piezas:
1-888-SU-HOGAR ®
(1-888-784-6427)
Au Canada pour service en frangais:
1-800-LE-FOYER Mc
(1-800-533-6937)
www. sea rs. ca
® Registered Trademark / TM Trademark / SMService Mark of Sears Brands, LLC
SM
® Marca Registrada / TM Marca de Fabrica / Marca de Servicio de Sears Brands, LLC
MCMarque de commerce / MDMarque deposee de Sears Brands, LLC © Sears Brands, LLC
12
 Loading...