

Page 1

owners
manya!
CUAJ^y
CAUTION:
Bead Rules for
Safe Operaticjn,
Operating
Instructions,
and installation
Carefully.
KENMORE
ELECTRIC RANGE
Record in space provided
below the Serial and
Model Numbers of this
appliance. The Serial and
Mode! Numbers are
located on the plate above
the top left corner of the
oven
Serial No.
Kenmore
electric
modyiar
indoor°gril©r
(sllde-in, drop-in)
Model No.
Purchase Date
Retain these numbers tor
future reference.
V
Kenmore, Solid as
Sears
Sold by SEARS, ROEBUCK AND CO. Chicago, IL 60684
Part No 5010913 Rev A
Page 2

before using your new range
Please take a few minutes to read this manual and learn about the modern world of Kenmore coQking.-T'he
progress and changes on your new range will make cooking faster, easier and more enjoyable. It has been
designed for greater safety, ease of use and performance. This manual will explain how to use your range so
that you can get the best results.
When asking for inforniation about your Kenmore range, be sure to give the complete Model Number. It is on
the plate on the front ofthedven above the left corner. Open the oven door to find it. More advice on the use and
care of your Kenmore range is always available at your nearest Sears store.
V safety tips
1. PROPER INSTALLATION ^ Be sure your range is
properly installed and electrically grounded by a skilled
technician
2. NEVER use your range for warming or heating the
room,
3. DO NOT TOUCH HEATING ELEMENTS OR AREAS
NEAR ELEMENTS — Heating elements may be hot even
though they are dark in color Areas near heating
elements may become hot enough to cause burns,.
During and right after use, do not touch or let clothing
touch heating elements or areas near heating elements.
For example: Oven vent opening and areas near these
openings, oven doors, windows of oven doors, etc,
4. DO NOT LEAVE CHILDREN ALONE - Chiidren
should not be left alone in the area where range is in
use. Never allow them to sit or stand on any part of the
range,
5. WEAR PROPER APPAREL - Don’t wear loose fit
ting Of hanging garments while using the range. They
may get in the way and catch on fire.
6. USER SERVICING — Do not repair or replace any
part of the range unless It tells you to in this manual.
Refer servicing to a skilled technician,
7. STORAGE IN OR ON RANGE - Don't store flam
mable materials in or near your range
8. DO NOT USE WATER ON GREASE FIRES Smother fire or flame with pan lid or use baking soda or
foam type extinguisher
9. USE ONLY DRY POTHOLDER — Moist or damp
potholders on hot surfaces may result in burns from
steam. Do not let potholder touch heating elements Do
not use a towel or bulky cloth
10. CAUTION DO NOT — store items of interest to
children in cabinets above a range or on the back of a
range, Children climbing on the range to reach items
could be seriously injured.
2. NEVER LEAVE SURFACE UNITS UNATTENDED AT
HIGH HEAT SETTINGS ~ Boilover causes smoking and
greasy spillovers that may catch fire
3. MAKE SURE REFLECTOR PANS OR DRIP BOWLS
ARE IN PLACE — Absence of these pans or bowls dur
ing cooking may cause damage to wiring or com
ponents underneath
4. PROTECTIVE LINERS - Do not use aluminum foil
to line surface unit drip bowls
5. GLAZED COOKING UTENSILS - Only certain types
of glass, glass/ceramics, ceramics, earthenware, or
other glazed utensils are suitable for range-top use
without breaking due to the sudden change in
temperature,
6. UTENSIL HANDLES — should be turned in and not
extend over other surface units. This will prevent burns,
flamable materials catching on fire and spills due to ac
cidental contact with the utensil,
7. DO NOT SOAK REMOVABLE SURFACE UNITS -
Unit will clean itself when heated during normal
cooking use
OVENS
1. USE CARE WHEN OPENING DOOR - Let hot air
escape before removing or replacing food
2. DO NOT HEAT UNOPENED FOOD CONTAINERS -
Build up of pressure may cause container to explode
and result in injury,
3. KEEP OVEN VENT DUCTS UNCOVERED.
4. PLACEMENT OF OVEN RACKS — Only move oven
racks when the oven is cool (f rack must be moved
while oven is hot do not let potholder touch oven
heating element
5. PROTECTIVE LINERS — Use aluminum foil liners in
the oven and bottom only as suggested in this manual
See page 11
SURFACE UNITS
1. USE PROPER PAN SIZE - This range has one or
more surface units of a different size Select utensils
having flat bottoms large enough to cover the surface
unit The use of undersized utensils will expose a por
tion of the heating element to direct contact and may
result in clothing catching on fire. Proper fit of utensil to
the unit will allow the unit to do a better job of heating
your utensil and saving energy
SELF ■ CLEAN OVENS
1. DO NOT CLEAN DOOR GASKET — The door gasket
is important for a good seal, Take care not to rub,
damage or move the gasket
2. DO NOT USE OVEN CLEANERS - Never use com
mercial oven cleaner or oven liner protective coating of
any kind in or around any part of the oven.
3. CLEAN only parts listed in manual
4. BEFORE SELF-CLEANING THE OVEN - Remove
oven racks, broiler pan and other utensiis
Page 3
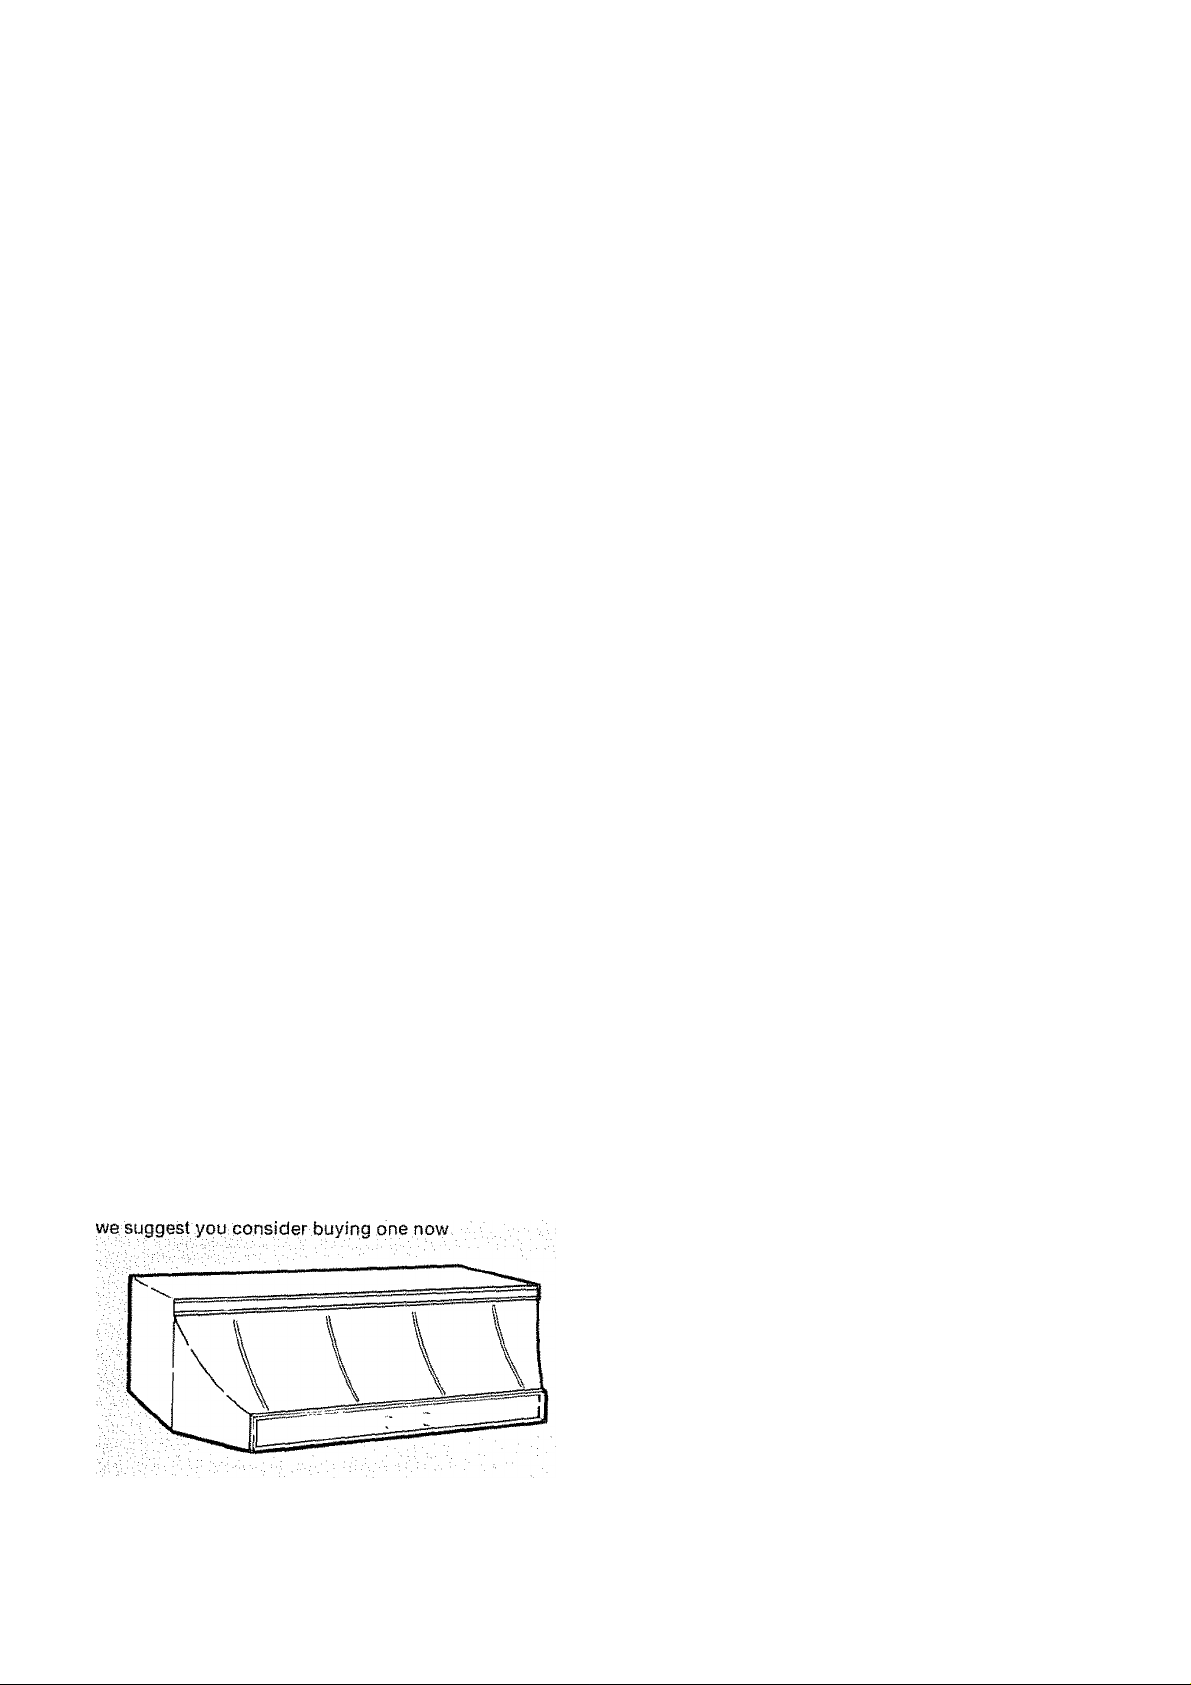
table of contents
Before Using Your New Range
Safety Tips
Know Your Kenmore Range ,
The Module Accessories
I. HOW TO USE YOUR RANGE TOP
......................
.........
............
. , .2
^ .2
4. 5
,10
IV. CLEANING AND
MAINTENANCE FEATURES
Oven Door Removal ................................................18
Replacing Oven Light,
Removing Oven Rack ........................................... 18
...
..........................................18
Setting the Controls ,
Control Setting Guide
Coil Module Removal , ,
Surface Unit Removal , . ,
Installing and Removing
Plug-in Steak Grill .
Grill Cooking Time
.......................
.................................................
..............................................
......................
....................
................................................ , , 9
...........................
.................
.. ..................
[|. HOW TO USE YOUR OVEN
Setting the Controls
Timing the Oven
..............................
...................
,
..............
HI. HELPFUL COOKING INFORMATION
Using Your Oven
Rack and Pan Placement
Oven Utensils
Hold-Warm............................
Baking Tips
..................
.......................
...................
.6
7
.8
-, 12
.12
13 14
, 14
,15
11
11
6
7
V. MODULE ACCESSORIES
Installing and Removing
Plug-in Griddle .....................................................19
Cooking with the Teflon* Griddle
Griddle Control Setting Guide , , , ............................19
Installing Rôtisserie
installing Shish Kebab...................................... , 21
Rôtisserie Cooking Timetable
..................................................
..............................
...........................
19
20
, 22
VI. CARING FOR YOUR RANGE
How to Clean Your Range........................................23
Set Self Clean Oven.................................................24
Before Calling Service , , , . , , 25
INSTALLATION INSTRUCTIONS
SEARS WARRANTY
SEARS SERVICE
.........................................
...........................................
.............
, 26 27 28
29, 30
Back Cover
Back Cover
Roasting Tips
Broiling Tips
...................
.........................
, ,16
, .17
About a hooci...
iif.your kitchen is currently equipped with a range hood,
you are ; familiar with the benefits provided by. this
appliance. If your kitchen does not include a range hood,
RANGE HOOD (Model 553 Series)
StainlessSteel/ Range Hood provides the necessary
ventilation for use with this model. Automatic Heat Sensor
turns hood to Hi from a LO or OFF position in case of high
heat during cooking
Why buy a range hood?
A range hood is a kitchen appliance that cleans the air in
order to provide a cleaner and more pleasant indoor
environment for the whole family Cooking odors especially those generated by fish, cabbage, onions, etc saturate the entire living quarters of a home This is
particularly true today, since due to the high cost of
energy, homes are tighter and better insulated
As you know, heat rises and with it also the grease, odors,
smoke, and moisture generated by your cooking A vented
hood would remove these pollutants and prevent them
from spreading and settling in your walls, ceilings, drapes,
cabinets and furniture,.
Your Sears Store - Retail or Catalog - carries a complete
line of vented and ventless range hoods in wide choice of
styles, colors and finishes including stainless steel to
match your decorating needs
Page 4
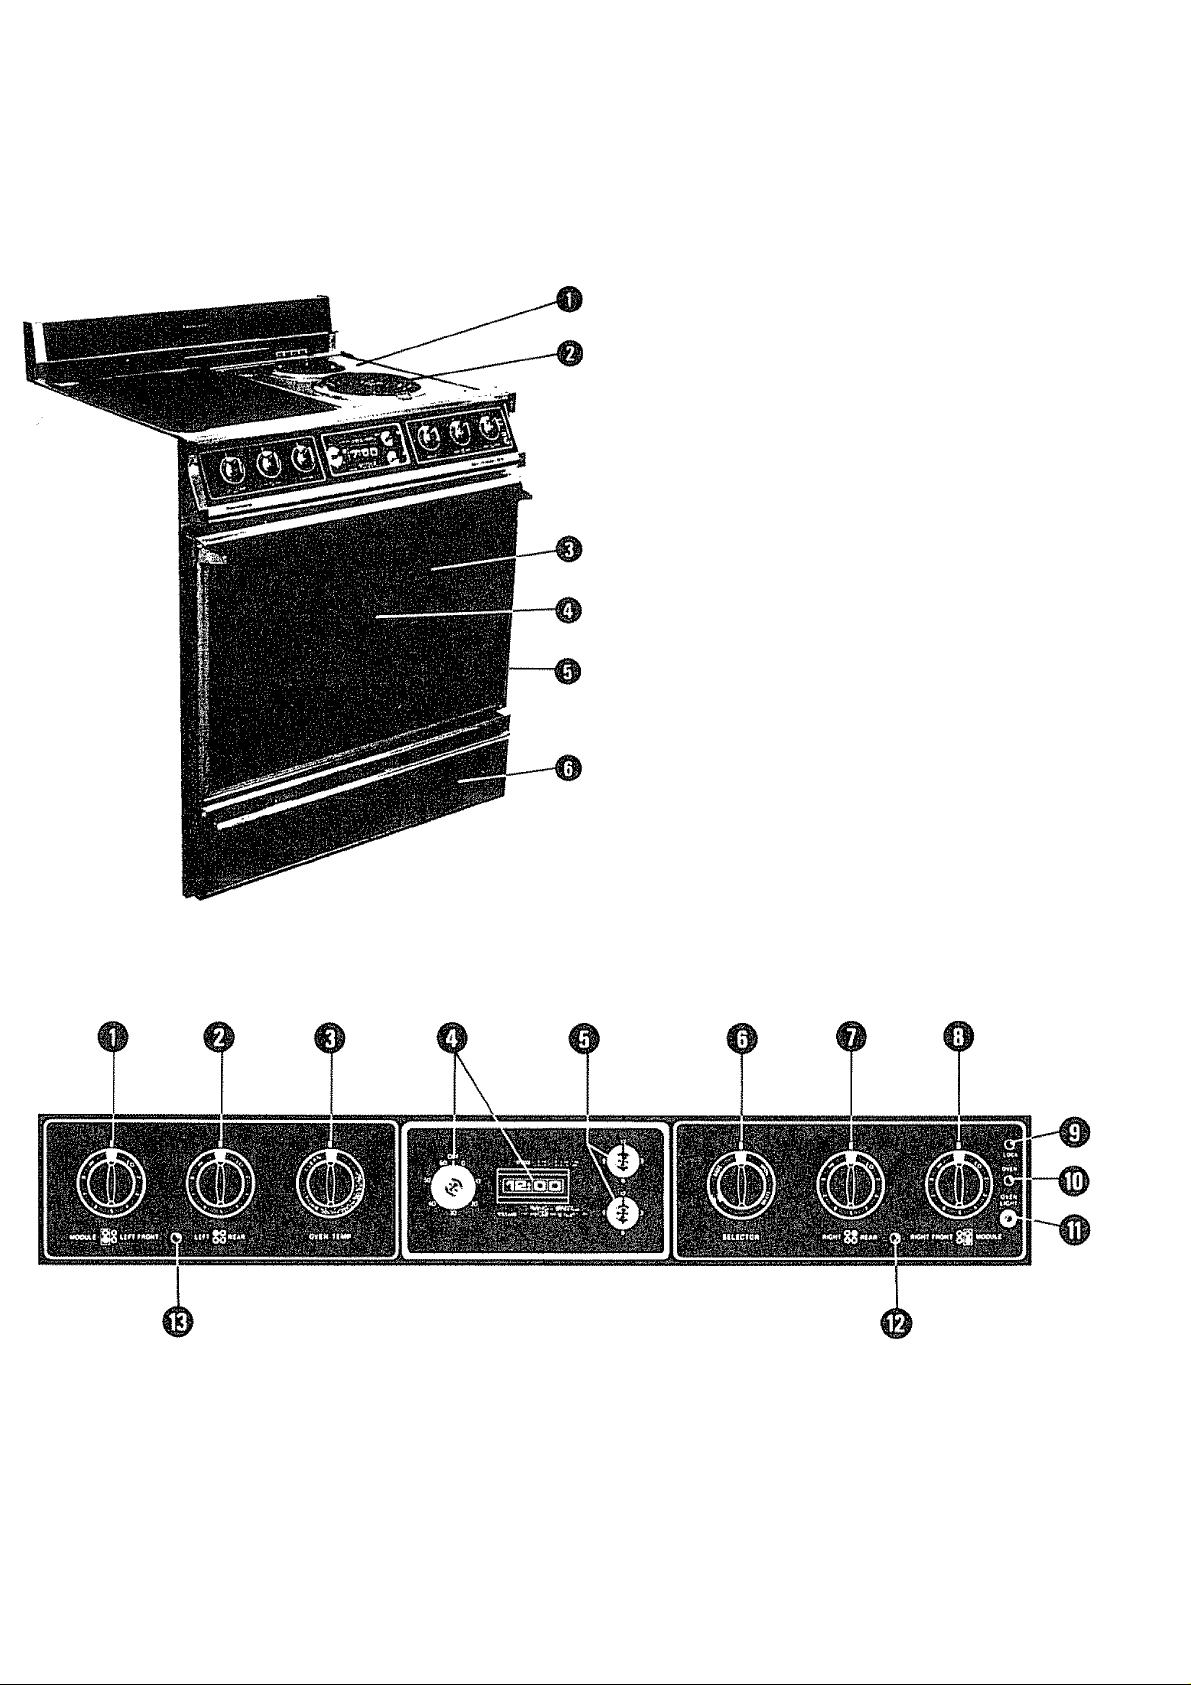
know your kenmore slide-in range
939 SERIES
1. FIXED CHROME COOKTOP FRAME
2. PLUG-IN SURFACE UNIT MODULES
INTERCHANGEABLE WITH OTHER MODULES
а, REMOVABLE BLACK GLASS DOOR WITH
VISA-BAKE'^' WINDOW
4,. NICKEL PLATED OVEN RACKS
5, PAINTED SIDE PANELS
б. PAINTED STORAGE DRAWER
1. SURFACE UNIT CONTROL — LEFT FRONT AND
GRIDDLE MODULE
2. SURFACE UNIT CONTROL — LEFT REAR
3. OVEN TEMPERATURE CONTROL
4. DIGITAL CLOCK WITH ONE HOUR TIMER
5. START AND STOP KNOBS
6. OVEN SELECTOR SWITCH
7. SURFACE UNIT CONTROL — RIGHT REAR
8. SURFACE UNIT CONTROL — RIGHT FRONT
AND GRIDDLE MODULE
9. OVEN LOCK LIGHT
10. OVEN SIGNAL LIGHT
11. OVEN LIGHT SWITCH
12. RIGHT MODULE SIGNAL LIGHT
13. LEFT MODULE SIGNAL LIGHT
Page 5
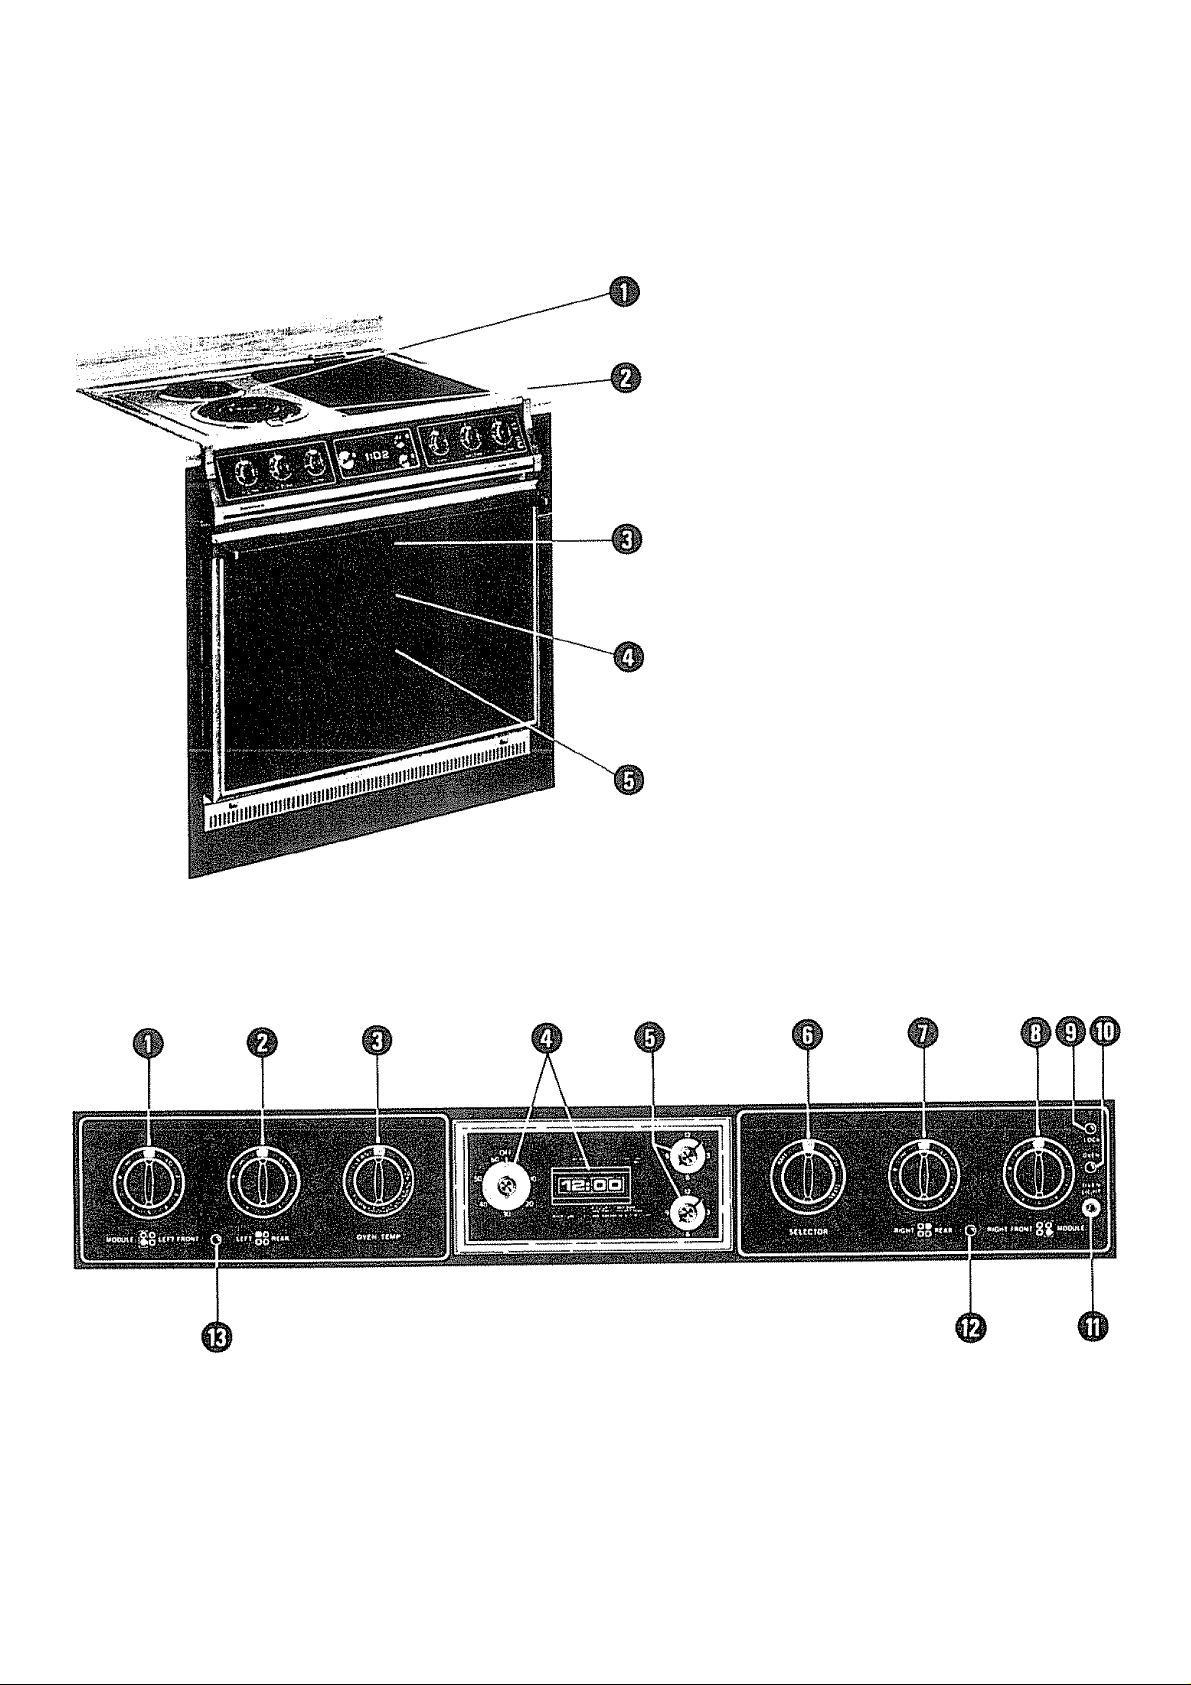
know your ken mo re drop-in range
458 SERÍES
1. FIXED CHROME COOKTOP FRAME
2. PLUG-IN SURFACE UNIT MOD
ULES INTERCHANGEABLE
WITH OTHER MODULES.
3. BLACK GLASS DOOR WITH
CONVERTIBLE COLOR PANELS.
4. NICKEL PLATED OVEN RACKS
5. PORCELAIN SELF-CLEANING
OVEN
1. SURFACE UNIT CONTROL — LEFT FRONT AND 8.
MODULE.
2. SURFACE UNIT CONTROL — LEFT REAR 9.
3. OVEN TEMPERATURE CONTROL 10.
4. DIGITAL CLOCK WITH ONE HOUR TIMER. 11
5. START AND STOP KNOBS 12.
6. OVEN SELECTOR SWITCH. 13
7. SURFACE UNIT CONTROL -- RIGHT REAR
SURFACE UNIT CONTROL — RIGHT FRONT AND
GRIDDLE MODULE.
OVEN LOCK LIGHT,
OVEN SIGNAL LIGHT.
OVEN LIGHT SWITCH.
RIGHT MODULE SIGNAL LIGHT
LEFT MODULE SIGNAL LIGHT.
Page 6
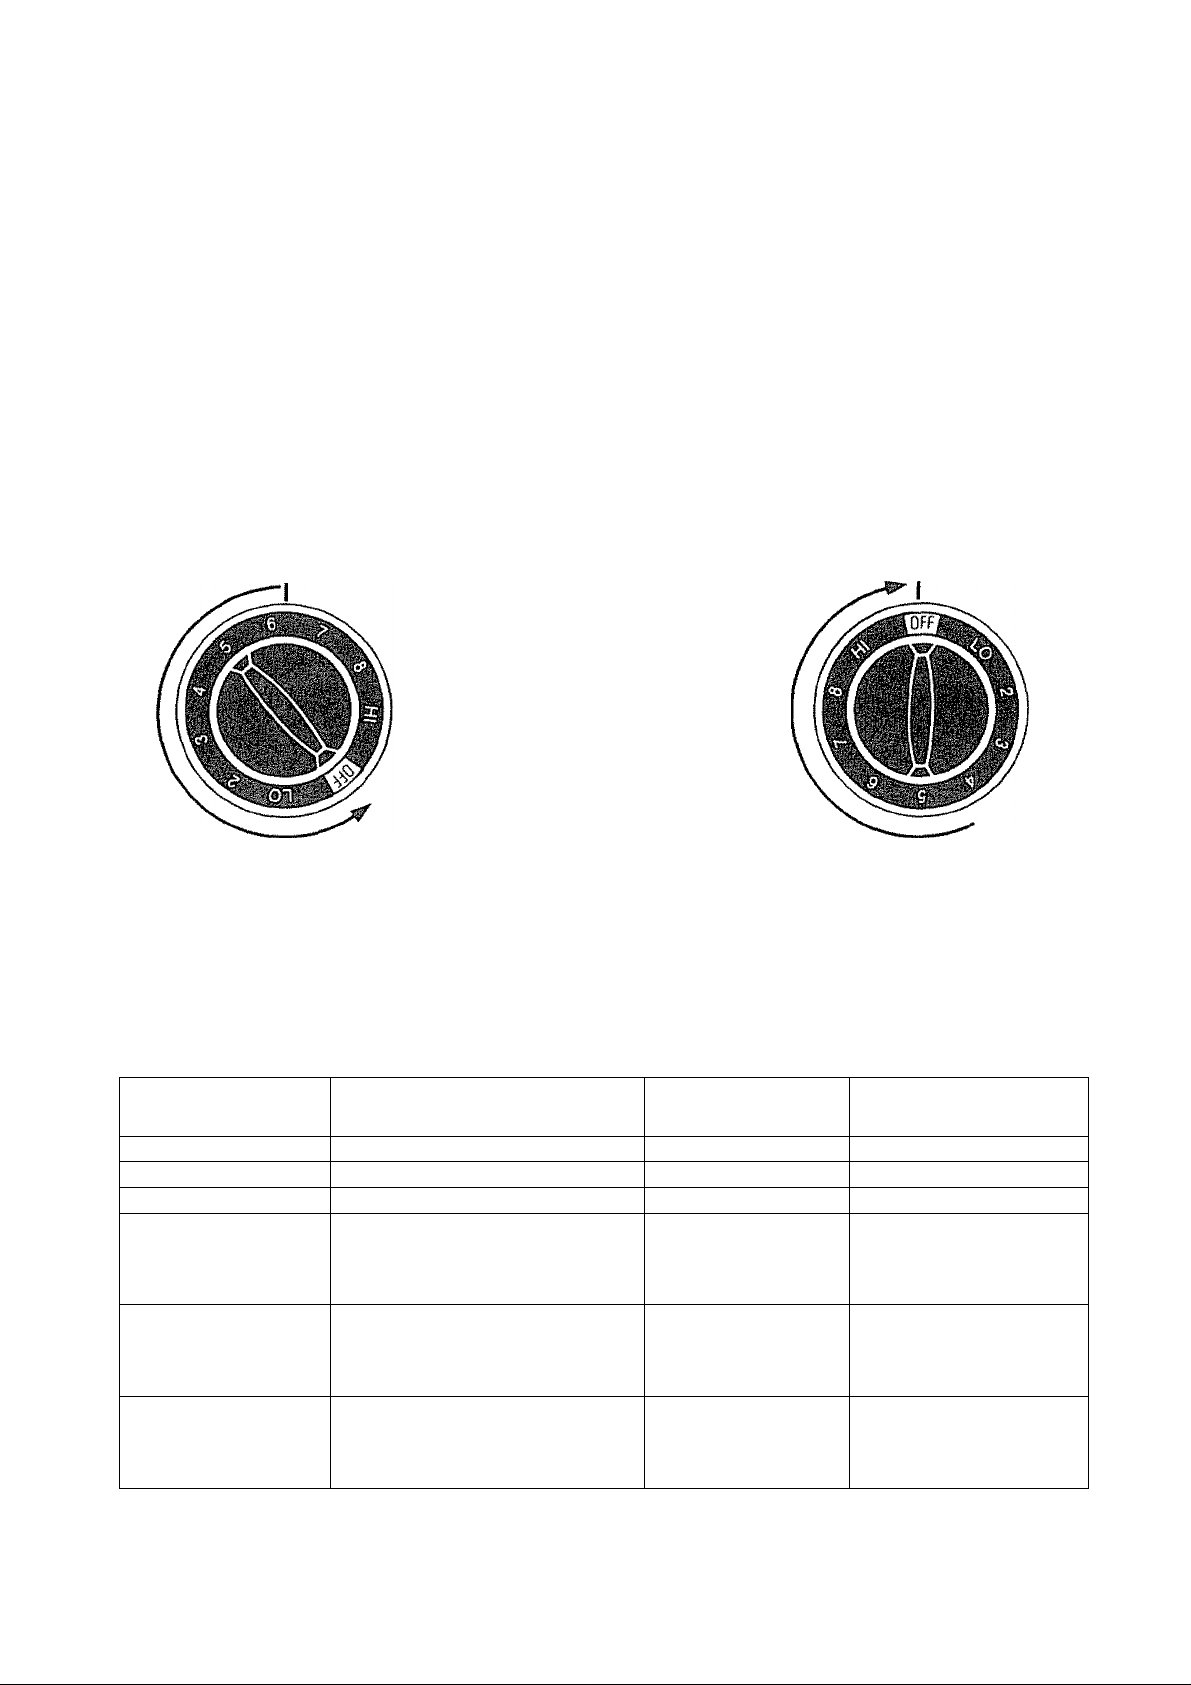
how to use
your range top (all models)
SETTING THE CONTROLS
Push and turn the control to any position to provide the exact heat required. Lowest heat can be obtained
between the OFF and LO reference on the knob The same amount of heat will be consistently provided at
a given setting The selection of heat desired is infinite Refer to control guide for suggested settings
When using
o
SURFACE UNIT/MODULE
SIGNAL LIGHT
This light on your control
panel will glow red whenever
any Surface Unit/Module is on
UNIT CONTROL
SELECT DESIRED SETTING
CONTROL SETTING GUIDE
Setting to Start
Operation Food
BOILING Macaroni Products
BRAISING Meats ■., . 5...
BROWNING
FRYING Bacon......'Ls'.
SIMMERING
.V MELTING'■ V- '. ■■
, Meats. r- ■ ■;^ .
'■>' Meats-'
. Eggs"':' . ' ''' 5"','.^ 2
Deep Fat T . ’ . '
Eggs, , Hi , 4'. .
Vegetables ; ' . ■ ■
Gravies
Stews ' :: :■
Butter. .. :
Cheese" . ' 2. ■
. Chocolate.'^
Cooking Action
. Hi
. . 5:',;.-.,:'.; : .
' , 6. ^
.'.-T
■ 3 ' ■ :
■ Lo'' ■
When finished ..
UNIT CONTROL
8 '
Hi
6
Hi
TURN TO OFF
Setting to
Complete Cooking
'L ■ 3 , ..-.-.L;'.,'
5'.
T-4
3
"' '■' 6^-r
. ■'■' 4
4
■■ . ' 5.
' 2
Lo
Page 7
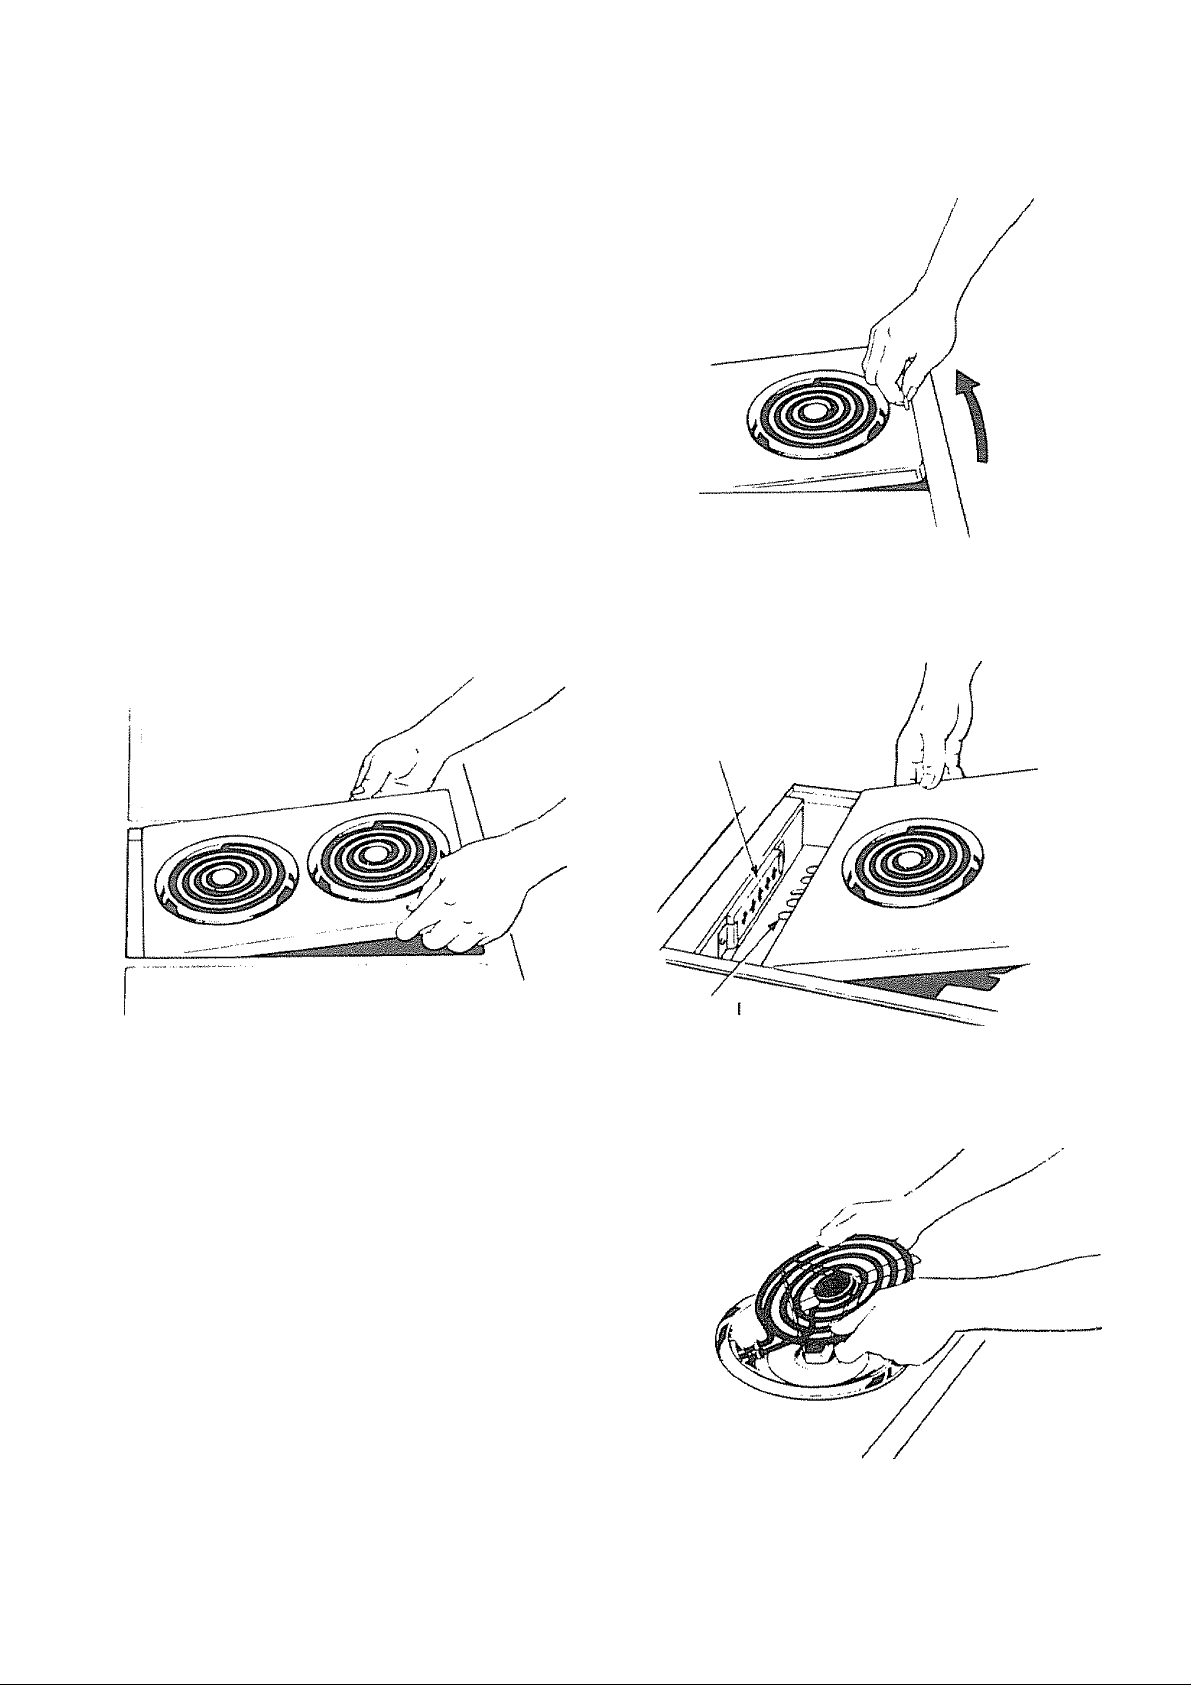
how to yse yoyr cook top module
COIL MODULE REMOVAL ÄND REPLACEMENT
Make sure all Surface Unit Control Knobs are in
the “OFF” position and the modules are cool
before removing or replacing.
To remove or replace Surface Unit Modules
1. To remove:
• Lift module using the handle at the front (See
Step 1 ) Raise front just high enough to grasp at
front edge
• Ease module toward you using both hands to
unplug it (See Step 2 )
• Lift module out of cooktop All modules may be
used in either cooktop position (left or right)
2. To replace;
• Grasp module with both hands (See Step 2 )
• Ease It into place, align the module terminal with
the receptacle on the cooktop (See Step 3.)
• Lower the module, using the handle on the front
(See Step l )
Step1
Step 2
SURFACE UNIT REMOVAL FOR CLEANING
CAUTION: Be sure the switch is turned off and the
element is cool before removing element
The surface units can be unplugged and removed for
easier cleaning of the cooktop
When removing, tilt surface unit upward slightly to clear
reflector bowl and put! away from terminal block Sur
face unit will not sit level, when replaced, if it is forced
too far upward when removing DO NOT put unit in
water to clean it! It will clean itself when heated during
normal cooking use Lift out the chrome reflector bowls
for cleaning.
Receptacle
Terminai
steps
Place clean reflector bowls into cooktop making sure
the terminal block is open and showing Slide surface
unit into terminal block and lower into reflector bowl
CAUTION: Do not attempt to operate surface elements unless reflector bowls are in place Failure to do this will
cause scorching of cooktop, burning of wiring insulation and loss of energy
Page 8
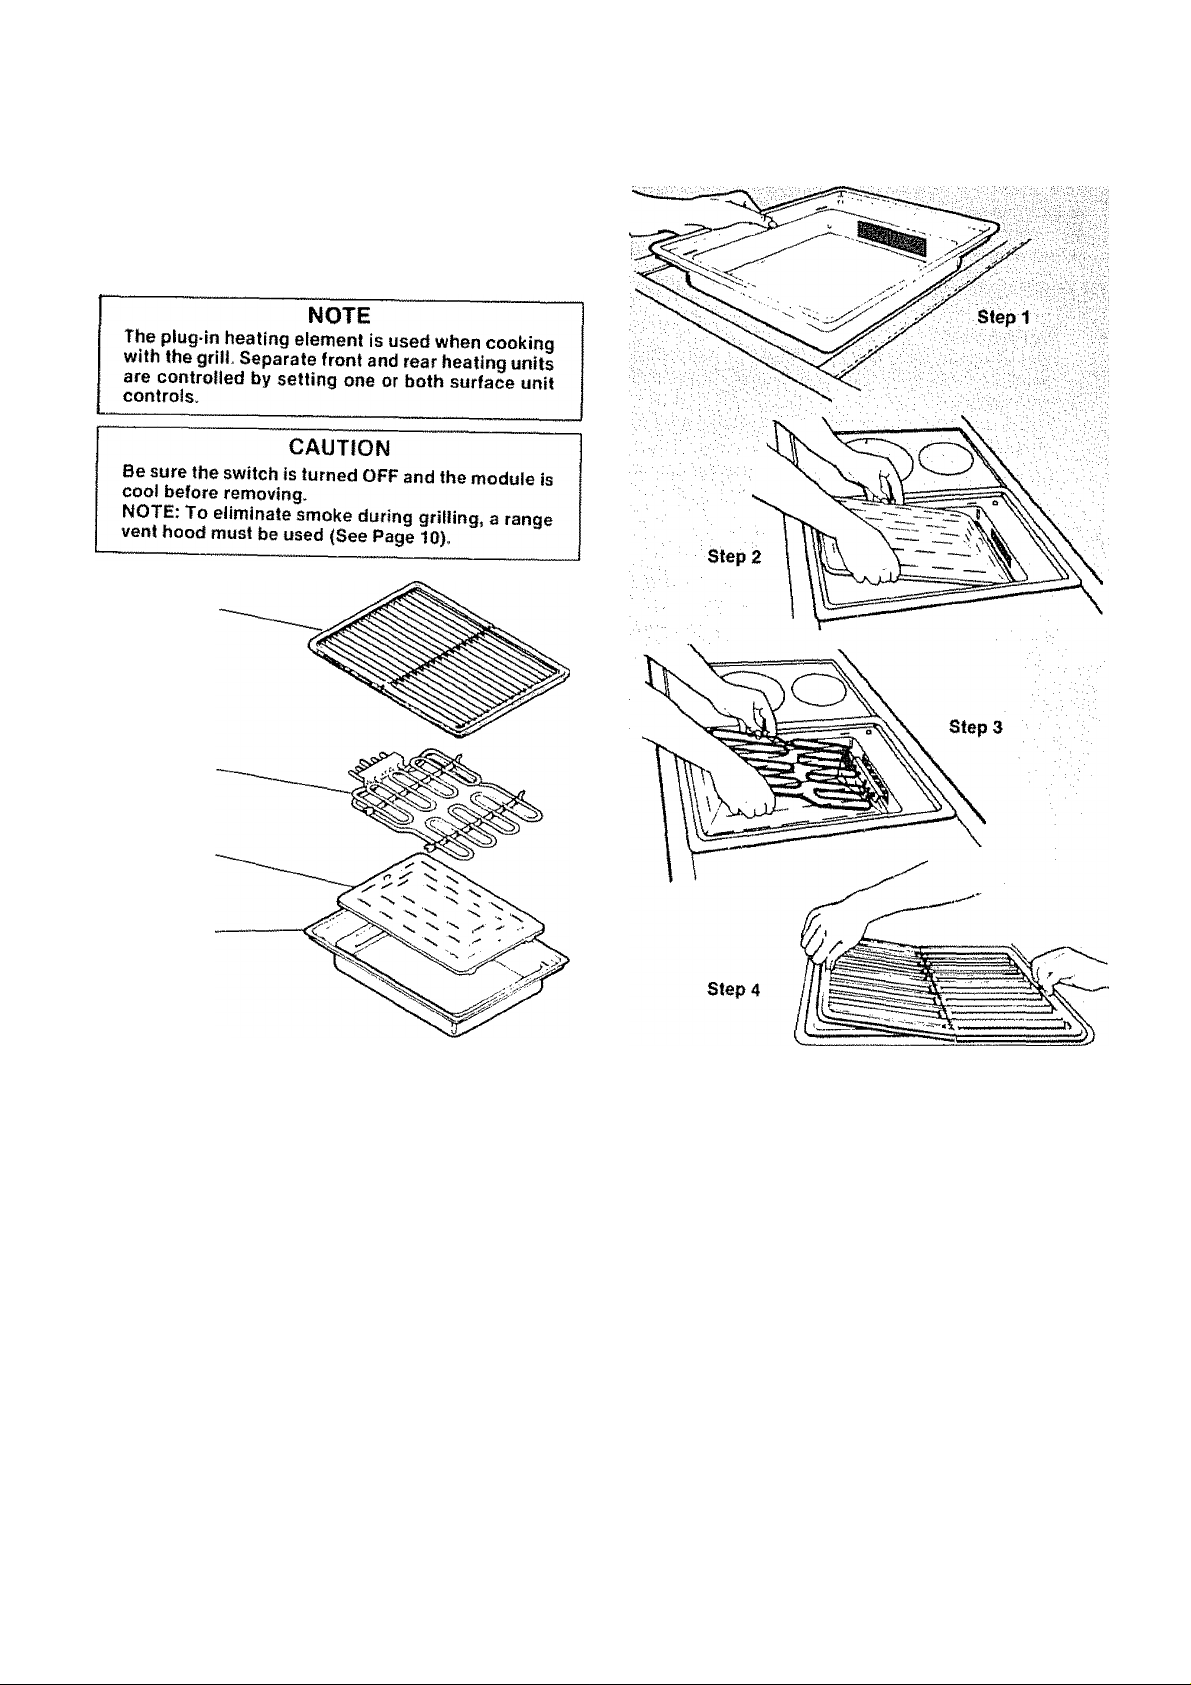
cooking on top of the range
STEAK GRILL NO. 49924
INSTALLING AND REMOVING PLUG-IN STEAK GRILL
The steak grill module can be used on either side or you
can use two steak grills.
Grill
Grates
Heating
Element
Grease
Shield
Module
Pan
TO INSTALL
1. Place module pan into the empty well with the
opening towards the terminal block {See Step 1)
2.
Next, place the grease shield inside the module
pan (See Step 2),
Grasp the heating element with both hands and
plug into receptacle {See Step 3), Lower into
place Make sure cross member supports of
heating element rest on ledges of module pan
4,
Place the two grill grates on top (See Step 4)
TO REMOVE
1.
Lift the grill grates off the top (See Step 4),
2,
Grasp the heating element with both hands, lifting
slightly. Pull toward you to unplug the heating ele
ment (See Step 3),
3.
Lift grease shield from module pan (See Step 2),
4.
Lift module pan out of the cooktop. Remove as
directed to avoid spills of fat drippings. Clean all
parts after each use,
TO CLEAN STEAK GRILL
DO NOT PUT GRILL COMPONENTS IN THE OVEN FOR
SELF-CLEAN. COMPONENTS WILL DISTORT AT THE
HIGH TEMPERATURE Wash the module pan and
grease shield in warm, soapy water with a plastic scour
ing pad. Clean after each use Wash grill grates in
warm, soapy water. For tough spots use a mild abrasive
cleaner. Be careful not to damage,
STEAK GRILL HINTS AND TIPS
1. Cooking on the grill can produce spattering. It is
important to clean all parts after each use If not
cleaned, fat drippings can become rancid
2. The heating element for the grill, like the surface
units, cleans itself It must not be immersed in
water
3. Take grill apart to clean and to remove and store.
4.. To help eliminate smoke during grilling, a hood is
recommended
5.. Most utensils which are safe for use on an out-door
grill may be used with your Grill Module
NOTE; Some flare-ups may occur while you are cooking
Flare-ups are caused by the juices hitting the heating
element Flare-ups and resulting smoke give foods their
delicious flavor and appearance Should excess flaring
occur remove food from grill and turn Control Knob to
OFF Never spray water on a flare-up
Page 9

cooking on top ©f the range (all models)
Cooking Timetable
Approximate grill cooking times.
(NOTE: Preheat grill for five minutes at suggested control setting. Your grill element
radiates heat but does not change color.)
GRILL
FOOD Temperature Thickness Setting Side 1
BEEF STEAK
Rare
Medium
Well-Done
STEAK
Rare
Medium
Well-Done
HAMBURGERS
Rare 3" X r Thick
Medium 3" X I " Thick
Well-Done
FISH
Whole 120°F 2 Vi lbs Hi
Fillets
Lobster Tails
CHICKEN
Quarters or
Pieces
PORK
Loin or
Rib Chops
Well-Done 15 Min
Spareribs
Ham Slice
Fully cooked
Sausage
Patties 170“F
Links
OTHER
Frankfurters
Internal
140“F
140'’F 1%- Hi
160°F
170“F
Weight or
r Hi
r 7 Min
r
1 '/2 ■
3‘' X r Thick
1 lb, 4 Min
120“F 2 tails
'íBÍ9pTFí|iT
170°F
TB50“F#|í
150°F 8 Franks :;:;;8;Min.Total Turn frequently
2^2 lbs.
2’/2 lbs
1 lb
Mt lb ~ ’/2“ thick
10 02 Med Hi
Control Approximate Cooking Time
6 Min
■ Hi
Hi 10 Min
Hi 12 Min
Hi
ssBsss®®
10 Min
8 Min
8 Min
9 Min Te®,LT,:vB Min.',-
10 Min
15 Min
5 Min 5 Min;;';
illiiiill
10 Min
6 Min
4 Min
Side 2
miLLT,i7:MinL'' doneness, cut near
TTT,:;o;;i0..Min,:i
iL.L;Tv.L:L7:Win.^'
B,,:LL:i-.T0,MirL-
TL&LLvLTMin.:
Ep;TT::l2:MinEi
ELiE'Ey:Ei5,Min:,E Do not overcook fish
TyEEE:': ■ .'■ 4 Min.';:
BsiMinLTofai:;
12 Min.
;;T ip Min. ;
;;7,Min.
Min.
6 Min. Total
Comments
To test steak for
center with
sharp knife
When fish flakes
easily it is done
Cook all fish on
aluminum foil.
Turn every few
minutes
Sandwiches
foil wrapped
Corn on the
cob wrapped
in foil
NOTE: This chart is for grilis operating on 240 volt circuit If grill is operating on less than 240 volts, grilling times will be
increased by 3-5 min
150°F 4 ears
6 Sandwiches
Hi
IBM
30 Min. Total
Page 10
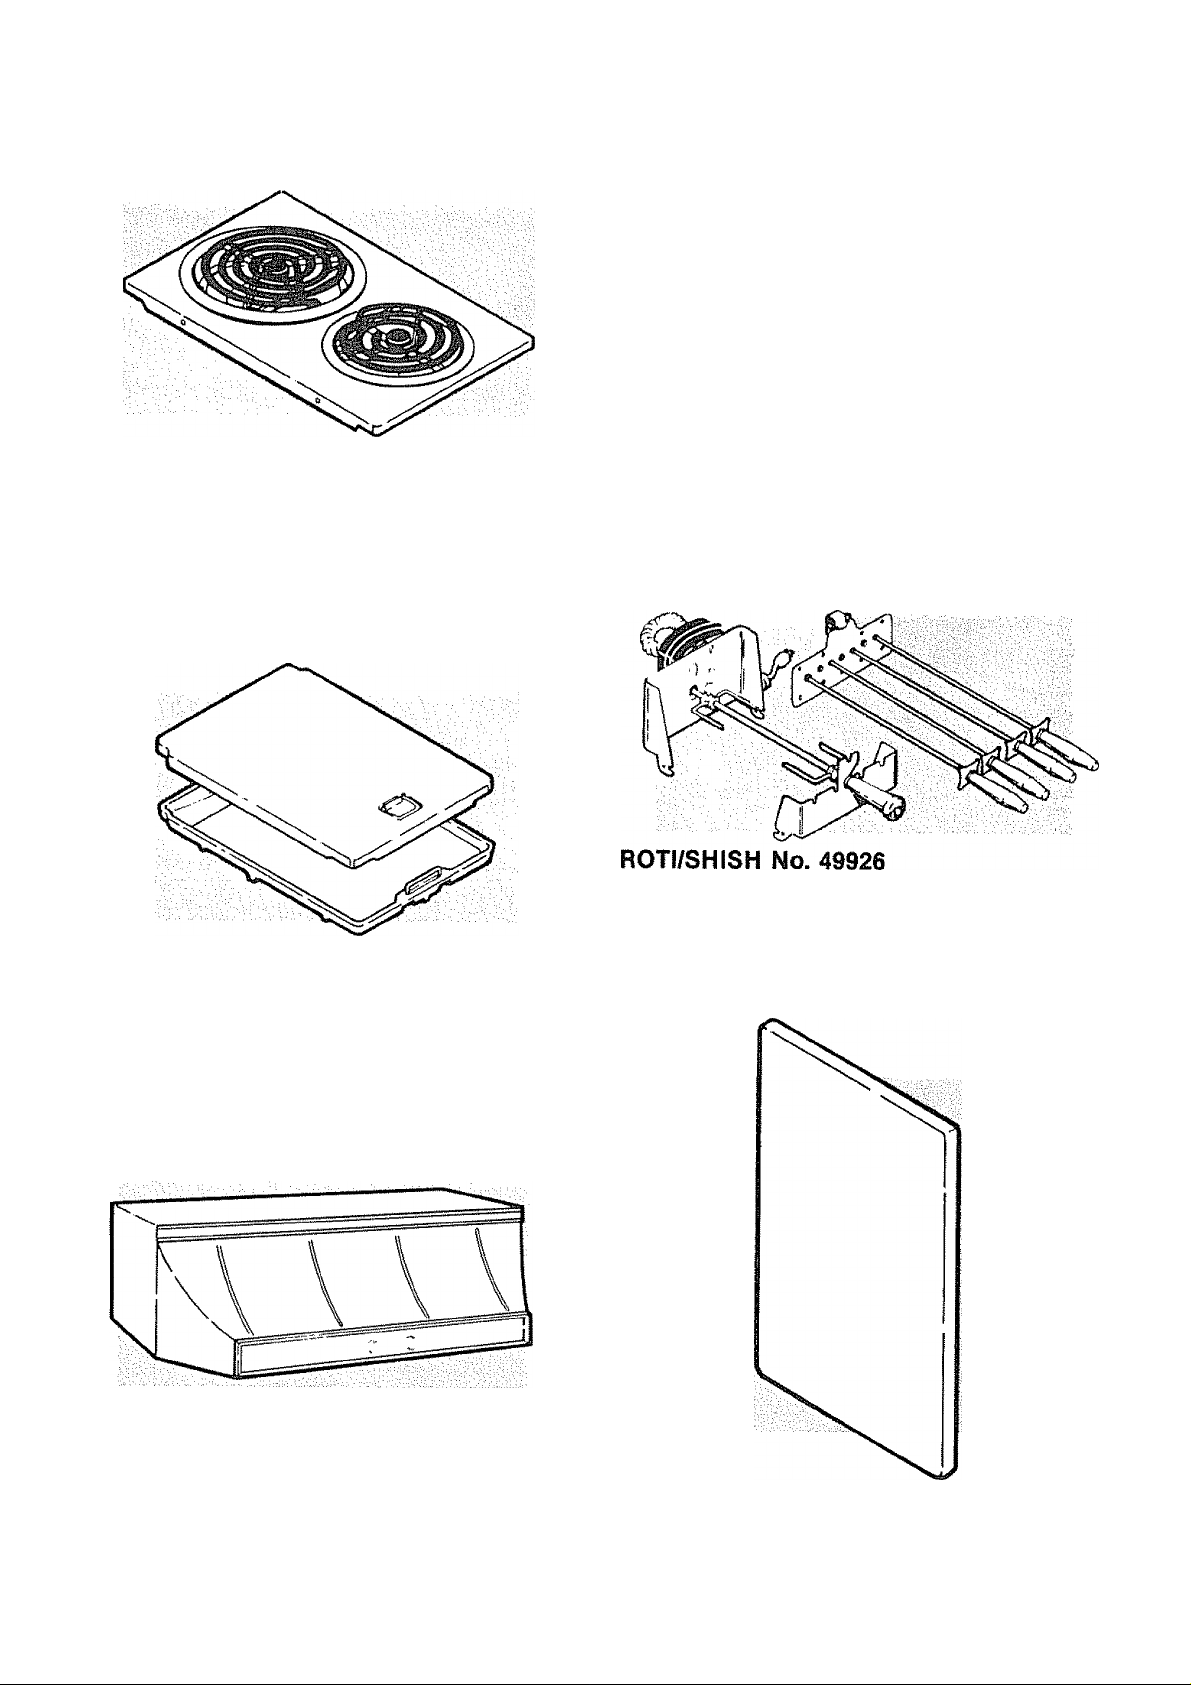
the module accessories (all models)
All accessories are available from your Sears Catalog or Retail Store,
SURFACE UNIT No. 49902
A 6” and 8" surface unit lets you fit the unit size to the
pan size. Easy to install in either side.
GRIDDLE No. 49905
Griddle and cover makes fixing pancakes, bacon and
eggs fun and easy
The built-in heating element plugs into either side
RANGE HOOD (Model 553 Series)
Stainless Steel Range Hood provides the necessary
ventilation for use with this model. Automatic Heat Sen
sor turns hood to HI from a LO or OFF position in case
of high heat during cooking
To be used with Steak Grill Rôtisserie has two position
cooking and offers large roasts or small game hens the
right amount of room Shish-Kebab gives meats and
vegetables flavor that only grilling can,
SIDE PANELS No. 80351 (slide-in only)
Optional side panels may be ordered in white,,
10
Page 11

how to use your oven
OVEN COOKING
HOW THE OVEN WORKS
The air within the oven is heated by a bake eiement
(oven bottom) and/or a broil element {oven top). The
bake element will heat when the oven selector is turned
to BAKE The broil element will heat when the selector
is turned to BROIL
The heated air moves around the oven heating the pans
and cooking the food within For even cooking or brown
ing, each pan needs enough space on all sides to allow
tho the free movement of heated air throughout the
oven. Pans too close to each other, to oven walls or to
oven bottom will not allow the free movement of air im
proper air movement will cause uneven browning and
cooking
BAKING/ROASTING
The bake selection is used for baking and roasting The
oven signal light will glow when the oven is in use. turn
ing off and on to indicate that the selected temperature
is being kept
To Set
1. TURN OVEN SELECTOR TO BAKE
2. SELECT TEMPERATURE SETTING YOU WANT
When Finished
1„ TURN TEMPERATURE CONTROL OFF
2. TURN OVEN SELECTOR OFF
BROILING
1. TURN OVEN SELECTOR TO BROIL
2. TEMPERATURE CONTROL SET AT BROIL
3. WHEN FINISHED, TURN TEMPERATURE CON
TROL AND OVEN SELECTOR OFF
CLOCK AND ONE<HOUR TIMER
Clock can be set to correct time of day by pushing in the
center of clock knob and turning knob until clock shows
correct time Timer hand will also turn
The one-hour timer can be set to time anything from 1 to
60 minutes When the time is up, a buzzer will sound un
til you turn the knob to OFF
To set the timer, turn the timer knob (do not push in) to
the desired number of minutes
NOTE: Your Minute Timer is only a reminder and will not
turn the oven on or off
ONE HOUR
TIMER HAND
TIMER
KNOB
TEMPERATURE CONTROL OVEN SELECTOR
TIME OF
DAY
ONE HOUR
TIMER DIAL
START AND STOP
TIME KNOBS
To Set
1. Clock should show correct time of day If not set
clock to correct time (Push in and turn timer knob)
Reset timer hand to the OFF position
2. Turn Oven Selector to TIMED BAKE
3„ Select desired temperature setting
4. Select Start Time (Push in and turn knob)
5, Select Stop Time (Push in and turn knob)
NOTE: Step four is necessary only lor a delayed
start operation The oven will turn on at once as
long as the start time is the same as the time of
day
When Finished
1, TURN TERMPERATURE CONTROL OFF
2. TURN OVEN SELECTOR OFF
CAUTION: When setting your oven for a delayed start
never allow your food to sit for more than four hours
before cooking begins Room temperature will provide
an ideal condition tor the grov/th of harmful bacteria Be
sure the oven light is turned off since heat from the
bulb will speed up bacteria growth
TIMED OPERATION
Your range is equipped with a Kenmore ' Delay Start,
Cook and Oft" oven This modern feature allows you to
prepare a roast and let your oven do the cooking while
you attend to other things You can even leave your
home to run errands, confident your oven will cook the
roast just right Oven cooking, using this feature, is con
trolled by the clock Prepare your food as you would nor
mally and place in the oven Set the controls and let
your oven do the rest. The oven will come on at the
selected start time, heat to the selected termperature
and maintain that temperature until the selected stop
time has been reached The oven will then turn off
ENERGY CONSERVING TIPS
1. Turn off all controls when cooking is complete
unless holding foods at a "keep warm“ setting
2 Keep oven door closed when using oven This
prevents heat loss and lowers energy use Turn on
your oven light and use the VISI-BAKE‘ window
for viewing food
3. Plan meal menus in advance Take advantage of
available oven heat by cooking two foods at the
same time
4, Thaw frozen foods before cooking whenever
possible
11
Page 12

helpful cooking
information
HOW TO USE YOUR OVEN
RACK ARRANGEMENTS
The rack{s) should be arranged before fixing foods or
turning on the oven. The oven has two four-position rack
guides Rack position No 1 is the lowest position while
position No, 4 is the highest, In general, when using one
rack, place it at the No. 2 position When using two
racks, place one rack at the No 2 position and the other
at the No, 4 position,
PAN PLACEMENT
Normally, 1 'h to 2 inches of air space should be allowed
on all sides of each pan in the oven The following place
ment tips will prove helpful:
When baking a sponge or angel food cake {Fig 1),
center on rack.
When using a large, flat pan that covers most of
thes rack (Fig. 2), center on rack.
When using two racks and several pans, stagger
them so no pan Is directly above another (Fig, 3).
The pan or pans using the least amount of rack area
should be placed on the lower of the two racks (Fig,
OFFSET RACK
The offset rack is designed to provide extra handling
space away from Ihe element when pulling the rack
In and out of the lowest position. It can also be used
In position 4 to place food closer to the upper ele
ment. Always install so the offset Is up.
——
.................—...
Angel Food or
Spongecake
—7......................
.............
,^c:z:
Fig. 1
\ ' :
1 _ _ _ __ ____ I ^
If you wish to use foil for possible spillovers, cut a piece of foil slightly larger than
novfIS edges. Place the foil on the oven rack below the pan. NEVER
M^TRiirr wnRMA. ul^T BOTTOM WITH FOIL THE FOIL CAN
OVEN INTERIOR,,
COOKING FAILURES, AND DAMAGE
12
Page 13

helpfyl cooking information
ELECTRIC COOKING
Cooking on an electric counter unit is cooking with
■‘invisible" heat The surface healing units may look the
same whether hot or cold Utensils of proper size and
design will cover the heating coil and absorb the full
heat output An undersized utensil will not cover the
heating coll The uncovered portion will then glow red
This indicates a waste“ of heat and energy Heat and
energy may be wasted“ and/or cooking results
affected when:
• Your cooking utensils are warped and do not sit flat
against the surface element
* You leave an empty utensil on a hot unit This can
damage the range cooktop, reflector bowls and your
utensils
» Your pan Is much smaller than the surface unit
Always center pan on unit so heat is evenly
distributed Be sure pan handles are not over another
surface unit or extending past the front of the range
Upon initial use of your surface units a burning odor
may be delected This is merely soil on the units
being burned away
SELECTING COOKING UTENSILS
Many easy-care, colorful finishes, materials and
designs have been developed for pots and pans to make
cooking easier The materials under the finish and
design of the pan, will determine how well a pan heats
CONSIDER THE MATERIAL
Glass Ceramic cookware is slow to change tempera
ture. It works best for long, low heat cooking with a li
quid
Aluminum is a metal that spreads heat quickly and
evenly This cookware is best tor frying, braising and
pot roasts. The inside of an aluminum utensil may be a
natural finish, a "satin” finish or a non-stick coating
Stainless Steel, in cookware, is usually combined with
other metals such as aluminum, copper or carbon steel
These other metais make the cookware heat up more
quickly while the stainless steel makes this cookware
exceptionally strong and long lasting Stainless steel
cookware is used for frying, sauces, soups, vegetables
and egg cooking.
Cast Iron is slow to change temperature and holds heat
This makes good cookware for browning, frying, stew
ing and other "top of the range” cooking,. Today you can
buy cast iron cookware that is plain or you can buy it
with a colorful porcelain finish
Copper, Tinlined cookware is great for gourmet cook
ing, wine sauces and egg cookery It is quick to change
temperature. Remember that tin lining will wear thin
with continued use It must be retinned to avoid a
poisonous reaction between the copper, the heat and
the food.
Porcelain Enamel over steel gives you long lasting
cookware that is stain and scratch resistant How well it
heats depends upon the type of steel used Enamelware
works best for cooking soups and other liquids
You will find a complete line of glass/ceramic and metal
cookware in larger Sears stores
CONSIDER THE DESIGN
The design of the pan is as Important as the basic material. For efficiency and best results, use pots and pans,
'with the,right features.\
Right
o Flat bottom and straight sides , ,
» Tight-fitting lid
o Weight of handle does not tilt pan
: « Pan and element about the same size
o Pan material should be a good heat conductor
Wrong
Pan smaller
than element
Curved and Warped
pan bottoms
Heavy handle
that tilts pan
13
Page 14

helpful cooking
information
HOW TO CHOOSE OVEN
COOKING UTENSILS
CASSEROLE
Ovenproof Gfass
The correct pan makes baking easier and wilt give you She
best results. Use the pan size shown in the recipe Warped
or darkened pans won t give you even browning results or
level baked goods
Ovenware comes in a number of materials and finishes.
Understanding how these materiais react to oven heat will
help you get the browning and crusts you wish
Aluminum is best for cakes, muffins some quick breads,
cookies and roasting Aluminum is ideal for a lightly
browned, tender crust It absorbs heat more slowly than
You can find a comple‘e line of glass/ceramic and metal cookware in larger Sears Stores and in the Sears Catalog.
PIE PAN
Ovenproof Glass
BEAN POT
Pottery,
Ceramic Cookware
steel or glass For roasting it will spatter less than
porcelain or steel pans
The ovenware, shown above will give your food deep,
crusty brown surfaces They absorb heat quickly and hold
it When baking in these kinds of cookware, lower oven
temperature 25°
Teflon-5 dull or darkened cookware are good for pies and
other food baked in pastry shells They absorb heat more
rapidly than bright shiny pans
HOLDING AND WARMING
OVEN-COOKED MEALS
Cooking all or part of a meal In the oven at one time
makes serving the meal a relaxed and easy effort,
especially when you’re having guests. Some cooked
foods can safley be held at “keep warm" temperatures
for 2 to 3 hours after cooking is finished
Oven Temperature
setting (degrees F)
170—190
190-200
200 — 225
HOLD-WARM CHART
Uses
Keep cooked roasts warm {uncovered, whole) , , : ,
Warm baked products, such as pies and pastries, to serving temperatures ,
Warm or hold-warm biscuits, muffins, rolls (loosely wrapped in foil) ; \
Fish and seafood, baked or broiled (loosely covered) , T
French fried food (loosely covered) :, ^
Casseroles, vegetables (covered) : :
Baked potatoes (foil wrapped)
Bacon, pancakes, waffles, pizza (loosely covered) , '
Mashed potatoes (covered) , , ,
14
Page 15

helpful cooking
information
BAKING TIPS
RECIPE Follow recipe or package instructions Use sug
gested pan size for best results The suggested cooking
times may need to be changed in high altitude areas
Contact your local library for information about high
altitude cooking
COOLING TIME After removing a cake from the oven,
allow it to cool on a rack for 10 to 15 minutes before
removing the cake from the pan. This cooling helps to
avoid cracking or tearing the cake, A cake should not be
frosted (unless recipe states otherwise) until cake has
cooled
BAKING TIME Set range controls before placing pans in
the oven Do not open and close the oven door to
check on foods. This can cause poor results. Wait until
the shortest baking time allowed is up. A cake is done
when the top springs back after a light finger tap, or
when an inserted toothpick comes out clean. There
should be little if any shrinkage from the edge of the
pan. Made sure oven controls are turned off when you
are done.
BAKING PROBLEMS, CAUSES, CORRECTIONS
PROBLEM
Cookies and biscuits
burn on the bottom.
Cakes not done in
the center
Cakes not level
PROBABLE CAUSES
o Oven preheating
time too short
» Oven rack over
crowded
o Pan absorbs heat
too fast
Oven too hot
« incorrect pan size
» Pan not centered
in oven
o Range or oven rack
not level
CORRECTION
0 Let oven preheat to the temperature you want
before placing food in oven’
0 Select pan sizes that leave the suggested amount
of air space on all sides of each pan Refer to baking
information for suggestions
e Use a light colored, aluminum baking sheet or a
dark pan wrapped in aluminum foil
® Set Oven Thermostat 25° lower than temperature
given and bake the time given in your recipe
» Use pan size suggested in recipe
» Use rack position 2 or 3 and place pan so at least
1-1 r/j inches of rack can be seen on each side of the
pan
Place a marked glass measuring cup on the center
of the oven rack in use and fill with water to one of
the markings If the water level is uneven, check the
racks to be sure they have been put in the correct
position
Foods not done after
cooking time has elapsed
« Pan too close to
oven wall or rack
overcrowded
Pan warped
® Oven too coo!
o Vent clogged
® improper use of toil
o Oven crowded
e Oven door opened
too frequently
Be sure to give at least 1-1' ^ inches of space on all
sides of each pan in the oven
® Use pans that are not denied or warped.
» Set Oven Thermostat 25° higher than suggested
and bake suggested time
® Your oven is vented through the backguard Be sure
vent opening is not covered by anything Do not
cover oven vent
» Foil should not be used over complete oven bottom,
over an entire oven rack or over the thermostat bulb
o Be sure to take all pans from the oven except the
ones to be used for baking
® Open oven door only after shortest suggested
baking time is over
15
Page 16

helpful cooking
ROASTING
Roasting is dry heat cooking (as opposed to boiling, for
example). It is suggested for poultry and tender cuts of
beef, lamb, pork and veal,. Always place the meat with
the fat side up for self-basting.
OVEN ROASTING TIPS
RACK ARRANGEMENT — Before fixing your meat, ar
range the oven racks
ROASTING PAN — Use a shallow, open pan with the
meat on a rack that fits the size of the roast, A pan
that’s too small will allow your roast to drip over the
edge. Too large a pan results in more oven spatter. You
can cut down spatter by lining the bottom of the
roasting pan with lightly crushed aluminum foil
ROASTING WITH FOIL — A foil “tent" can be used to
slow surface browning. This is good on a large turkey
Place tent-shaped foil loosely over the meal This
allows oven air to move around under foil Sealing the
foil will tend to steam the meat,
OVEN TEMPERATURE — For the best flavor and
tenderness, see the chart for suggested oven tempertures
MEAT THERMOMETER - An accurate meat ther
mometer tells when your meat is roasted the way you
like it Put thermometer into the center of the largest
muscle of meat or in the inner thigh or breast of poultry
For a correct temperature reading, the tip of the ther
mometer should not touch fat layers, bone or gristle
Approx.
Kind of Meat
BEEF
Standing rib
rolled rump
sirloin tip
VEAL
leg 5-8
rolled shoulder 4 - 6
PORK, FRESH
picnic shoulder
leg 7- 10
PORK, SMOKED
Ham, to cook before
eating - whole
HAM
fully cooked
Canadian bacon
LAMB leg 5-8
POULTRY
chicken
Cornish hen
duck 5-6
turkey
Weight
(lbs.)
6-8 325
4-6
3'/?-4
5-8
10-14
5-7 325
2-4
1
6-8 325
JUDGING DONENESS — To get a correct reading when
using a meat thermometer move it up and down 'A” or
so (see illust.). Roasts will be easier to carve it you let
them set for 10 to 20 minutes after removing from oven
For standing roasts, remove from the oven when the
thermometer registers 5“ to 10° lower that the preferred
doneness as meat will continue to cook after removal
ROASTING CHART
Oven
Temperature
(degrees F.)
140 (rare), 160 (med). 170 (well) 23-35
325 140 (rare). 160 (med), 170 (well)
325
325 170
325
350
350
325 160
325
325
350 - 375 180- 185
350 180-185
350 180-185
140 (rare). 160 (med), 170 (well) 35-40
Suggested
internal
Temperature
(degrees F.)
170
170 30-35
170 25-30
140
160 35-40
175- 180 35-40
180-185
Cooking
Time Per Lb.
(minutes)
(rare to weli)
25-30
25-35
40-45
18-20
18-24
30-35
45-60
20-25
20-25
16
Page 17

helpful eooking
information
BROILING
Broiling quick cooks food so that you have brown outsides, with moist and juicy insides. Broiling takes only minutes
and is very easy to do..
Broiling is done in the oven. Heat is given off by the broil element at the top of the oven cavity, How the food broils will
depend on the distance between the food and the broil element.
FOOD PREPARATION
Trim the outer layer of fat from steaks and chops Slit
the fatty edges to stop the meat from curling. For
juiciest meat, salt the first side just before meat is turn
ed, Salt second side just before the meat is served.
Brush chicken and fish with butter several times as they
broil When broiling fish, grease the grid to prevent
sticking
BROILING TIME
For even broiling on both sides, always start the food on
a cold pan. Allow a iittle more than half the suggested
time for the first side, then turn food, using tongs if you
pierce meat with a fork, the juices will escape.
When broiling frozen meat, use one rack position lower
than given below as welt as up to IV2 times the sug
gested broiling time
FOIL USE
DO NOT COVER THE BROILER GRID WITH FOIL. POOR
DRAINAGE OF HOT FAT MAY RESULT IN A BROILER
BROILING CHART
Food
Rack Position
FIRE, [f foil must be used, make sure slots are cut In foil
to match all the openings in broiler grid. Fat can then
drip away from meat and be cooled in pan.
POSITIONING BROILER PAN
After placing food on broiler pan, slide pan into the pro
per rack position.. NOTE: Rack positions are numbered
from lowest to highest, 1 to 4 Our suggested position,
temperature and cooking time can be found in the chart
below.
Leave the door open when broiling to the first stop posi
tion. If the door is closed, the food will roast and not
broil
BROILER FIRE
Close the oven door and turn controls off. If fire con
tinues, throw baking soda on the fire. DON’T put water
or flour on the fire Flour may be EXPLOSIVE,
Oven Temperature
Setting
Approximate Total
Time (Minutes)
Steak - T' Thick
Rare
Medium
Well Done
Ground Beef Patties - T’ thick
Rare
Medium
Well Done
Lamb Chops - 1" Thick
Pork Chops -1" Thick
Pork Shoulder Steaks
Ham Slice - T‘ Thick
Fish (Fillets)
Chicken (Halves)
Frankfurters
4
4
4
4
4
4
4
3
3
4
4
1
4
17
Broil
Broil
Broil
Broil
Broil
Broil
400“
Broil
Broil
500“
Broil
350“
400“
10 -12
12-14
14- 16
9-11
11 - 13
13-15
16-20
20-25
15-20
14-16
15-20
40-60
8-10
Page 18

cleaning and maintenance features
OVEN DOOR REMOVAL
Open oven door to first stop
position. Hold the door firmly at
sides, lift up and away from the
range To replace, slip hinge arms
into door slots, and with hand or
knee push door in at bottom until it
clicks Then close door
{for those models with a light)
HOW TO USE THE OVEN LIGHT SWITCH
The oven light can be turned OFF by a control button
located on the right end of the control panel Press in to
turn light on and off
REPLACING THE OVEN LIGHT (some models)
Do not touch the oven bulb when hot, with wet hands or
wipe oven light area with wet cloth Unscrew the bulb
and replace with a 40 watt, 130 volt appliance bulb An
appliance bulb is smaller than a standard 40 watt
household bulb The130voltbulbismadetowithstand
high oven temperatures and gives you a much longer
bulb life A 120 volt bulb may be used, but life
expectancy is much shorter
To change the bulb, on models having a glass lens held
in place with a spring wire to protect the oven bulb frorn
heat
8 Swing the wire all the way to the side and hold it so
glass tens can be lifted off
8 Unscrew bulb and replace with a 40 watt appliance
bulb
8 Place glass lens over socket and swing wire back up
over lens
8 The glass lens must be in place whenever the oven is
in use
STORAGE DRAWER (slide-ins)
This drawer gives you extra space
cookware and bakeware
Do not keep plastics and flammable materials
drawer
for keeping
in this
REMOVABLE OVEN RACKS
The oven racks can be removed for easy cleaning Pull
the rack out and up. in one motion to remove
Make sure your racks are inserted correctly The
straight racks should have the back bar curved up and
facing the rear of the oven The offset rack (666 Series)
has the offset facing up with the two wire tabs to the
rear
18
Page 19

modyie accessories (ail models)
All accessories are available from your Sears Catalog or Retail Store.
GRIDDLE NO. 49905
INSTALLING AND REMOVING PLUG IN GRIDDLE
The griddle can be used on either side,
Two griddles can be used.
CAUTION
Be sure the switch is turned OFF and the plug-in
griddle or surface unit module is cool before
removing.
When removing module, lift the front Just high
enough to clear the front of the cooktop, to pre
vent damage to the module terminals.
To remove module, lift up the front of module and pul
forward to unplug it at rear.
COOKING WITH
THE TEFLON® GRIDDLE
BEFORE USING THE GRIDDLE FOR THE FIRST TIME
1 Wash it with hot sudsy water, using a sponge or
dishcloth Do not immerse terminals in water
2 Rinse and wipe it dry
3 Brush with a light coating of cooking oil it is not
necessary to grease the Teflon® finish each time
the griddle is used However, oil, fat or butter
will add flavor to food and is an aid in browning
TO USE THE GRIDDLE
Lift and remove the griddle cover before and during
cooking.
Preheat the griddle for about five minutes. The griddle is
preheated when a few drops of water sprinkled on the
surface will dance in little round beads, or when a bit of
butter begins to brown.
To fry eggs, preheat only until fat melts
Add the food to be cooked
When the food has cooked, turn the unit off. If the unit
under the griddle remains on after the food is cooked,
the heat may damage the Teflon'^ finish
Replace the module by lining up the terminals on the
module with receptacle in the range Push the module
into position then lower the front into place.
TO REPLACE
TO CLEAN GRIDDLE
Let the griddle cool before removing if to clean.
Wash the griddle in hot water and detergent Be careful
not to immerse the terminals in water.
Do not scour it with steel wool, metal scouring pads or
cleansers which will scratch the Teflon"' finish.
Rinse and dry the griddle.
CONTROL SETTING GUIDE-GRIDDLE
Use this table as a guide for cooking on the griddle
Increase or decrease the settings to fit your recipes
You will find better cooking results if you preheat the
griddle five minutes before cooking
FOOD
Eggs
Hamburgers
Bacon
Grilled Sandwiches
Pancakes
SETTING
4-5
7-HI
8- HI
8-HI
8-HI
19
Page 20

module accessories (all models)
Optional Accessory
ROTI/SHISH NO. 49926
The rotl/shish accessories are to be used with the steak
grill (No. 49924).
Skewers
5. The spit handle is removable, if necessary, Leave
the handle in place for easier handling on the spit
and meat
6. Take apart and clean after each use when parts
are cool
Caution; The end supports can become hot
TahQ \
fiiiiii
/ o™ X
Motor
Low Position
Front End Support'
TO INSTALL ROTISSERIE
1. Grasp the rear end support with two hands (See
Step 1), The end support with five holes fits Into
the rear grill frame and the end support with
skewer support positions fits into the front
Fit the tabs on the end supports into the opening
in the grill frame. Slide forward Push top of the
rear end supports back until bottom is level on the
grill frame (See Step 2).
The motor fits on the back of the rear end support
irr the low position the motor is mounted vertically.
In the high position the mounting is horizontal.
The spit rests in a slot in the front end support.
Push the end of the spit firmly into the motor
socket at the rear of the cooktop Both the spit
and motor must be placed in the same position,
either high or low (See Step 4).
liil
20
Page 21

module accessories (ail models)
TO INSTALL SHISH KEBAB
1. Install end supports and motor as described in the
rôtisserie installation Instructions in low position
2. Fix the gear bracket to the rear end support by fit
ting the 2 tabs on the bottom of the bracket
through the 2 slots at the bottom of the rear end
support (See Step 1), This gear bracket turns the
Kebab
3. The shaft on the gear bracket should fit into the
motor through the low position hole on the rear
end support, Turn the knob on the front of the gear
bracket until it does (See Step 2),,
4. Flip the top clip of the gear bracket down The
Shish Kebab gear bracket is now in place,
5. Push the ends of the skewers into the holes on the
gear bracket and rest skewers on front end sup
ports (See Step 3},
TO USE THE SHISH KEBAB
1 . Balance food on the skewers. Insert on assembled
Shish Kebab kit. Baste with butter or favorite
seasoning
2. Use HI control setting,. Brush frequently with but
ter or seasoning. Allow 20 to 30 minutes for grill
ing, Test for doneness by cutting a slit in meat and
note internal color
3. The Kebab in the 2 center positions may cook
faster. Toward the end of grilling you may want to
switch positions with the inner and outer skewers
TO USE THE ROTISSERIE
1. Put the griîl and rôtisserie together as directed.
2. Place one rôtisserie fork on the spit and push back
toward the handle, insert spit through the food and
center so that the weight is distributed evenly as the
ROASTS •— Insert the spit lengthwise through the center
of roasts and test for balance by rotating Fasten the
: ;' / meat securely with the forks,
RIBS — Weave the spit in and out of the ribs forming
accordion folds, keeping the ribs in balance for
smooth turning and even cooking
POULTRY — Place the spit through the cavity of the bird
Use the rôtisserie forks to hold the legs close to the
body of the bird. Tie the wings with cord, if needed
Turkeys larger than 8 to 10 pounds should be roasted
rather than rotissed.
: spit turns Place the second rôtisserie fork on the
: spit, push both forks into the food and tighten
3. Place the spit with the food on the front end support
4., Push the end of the spit firmly into the motor socket
: at the rear of the cooktop
5. See the chart for approximate cooking times
21
Page 22

module accessories (all models)
Cooking Timetable
Approximate rôtisserie cooking times:
Internai
FOOD
QCTIir
DllCr
Roiled rib
(rare)
Rolled rump
PORK
Rolled
loin roast
Spareribs
Canadian
bacon
LAMB
Rolled leg
POULTRY
Chicken 190®F
Turkey
Duck
Cornish hen
Temperature
- 140®F. ' 3Y4 lbs.
;170®F ,
160® F
' 190®F
Weight Setting
140°F SVa lbs
5 ibs
170°F
175“F 5 Ibs
190°F 3% Ibs
190®F
1 '/4 lbs
2 lbs
2‘/4 Ibs
6V4 Ibs,
2 -1 ib
hens
Control
Hi
Hi
Hi
Hi
spit
Position
High
High 2 hrs.
High
High
High
High
High 1 hr.Y; Y ■
High
High 2 hrs.
High
Time
1 hr.
55 min.
3 hrs
15 min.
50 mm.
1 hr
10 min.
.SOrnin.;'
, 45 min.:
2 hrs.
45 min.
15 min.
2 hrs.
Comments
Meat with an outer
layer of fat may take
longer to cook
Truss poultry tightly
Run spit in at the
base of the tail and
diagonally through
the cavity to the fork
of the wishbone If
wing tips brown too
rapidly, cover them
with foil.
NOTE: Spit position: anything over two inches in diameter should be rotissed in the "High' position
22
Page 23

how t@ clean y©yr range
CLEANING PROCEDURES
All cooking produces soil on the range Even when the spatter is not seen, droplets of grease and moisture
carried by the cooking vapors get on the surfaces in and around the range If you let the soil collect, it will be
difficult to remove A few minutes of quick clean-up after you use the range will save hours of scouring later
After oven or broiler use, wait until oven is cool, then wipe the oven racks broiler pan and grid with hot detergent
water Rinse with a damp cloth and wipe dry For each type of material in your range, follow the cleaning
procedures below. Refer to "Know Your Range" to find out what material a part is made of Do not use large
amonts of water when cleaning the range, it can get into the wiring and cause damage If practical, unplug the
range before cleaning Use only a damp cloth, not a wet one
ALUMINUM
Heavy or cooked-on soil
Light soli
Other Instructions
GLASS, PAINT AND PLASTIC
Light soil Wash with hot detergent water Rinse and dry
Heavy or cooked-on sol! If grease has built up, make a detergent and water paste Apply to soil for 30 to 60
Other instructions These finishes are used where soiling should not be severe.
PORCELAIN ENAMEL
Light soil
Heavy or cooked-on soil
Other instructions
Wash with hot detergent water Rinse and dry
Rub with detergent on a damp cloth to clean range trim
Do not scour or use all-purpose cleaners, ammonia, powder cleansers or com
mercial oven cleaners They scratch or discolor aluminum
minutes, then wipe away soli with a dry paper towel Rinse and dry. Lightly scour
glass with very wet and soapy plastic scouring pad.
Wash with hot detergent water, Rinse and dry
Use gentle scouring with soapy plastic scouring pad and water for stubborn
spots. Cover spots with ammonia-soaked paper towel or cloth for 30-40 minutes,
Then scour gently with soapy plastic scouring pad. After this, rinse with clean
water with a little vinegar Wipe dry.
For stains on the outside of the range, a cream or paste non-spray appliance
cleaner may be used. Remove ALL the cleaner or porcelain may be damaged dur
ing further heatings., DO NOT use spray oven cleaners,
STAINLESS STEEL, CHROME, NICKEL AND COPPER
Light soil Wash with hot detergent water. Rinse and dry
Heavy or cooked on soli
Other Instructions
Cover spots with ammonia-soaked paper towel or cloth for 30-40 minutes
Bluish stains on these materials are from oven-heating and cannot be removed
Use soapy plastic scouring pad gently. Never use on mirror finish. Stainless
steel, chrome or copper cleaners may be used.
REFLECTOR BOWLS
If reflector bowls turn blue or brown this is an indication that the utensil used is not flat or is too large for the
surface unit Use of these utensils will trap the heat in the reflector bowl causing them to discolor
23
Page 24

how to clean your range
SELF CLEANING OVEN
BEFORE A CLEANING CYCLE
A. DO NOT PUT MODULES OR COMPONENTS IN THE
OVEN FOR SELF-CLEAN, COMPONENTS WILL
DISTORT AT THE HIGH TEMPERATURE Remove
all items from the oven which are not a part of the
range {pots pans etc ) Also remove the oven racks
and the broiler pan and grid Oven racks will
discolor if left in during clean cycle
B, , Soil on the oven front frame under the front edge of
the cooktop and on the door liner outside the seal
wlli not be cleaned during a cleaning cycle This soil
will become baked on if not removed before the cy
cle Use detergent and hot water with a soap-filied
steel wool pad to remove this soil before starting
the cleaning cycle Rinse well with a vinegar and
water mixture When cleaning the door seal wipe
carefully with damp cloth only the door seal is
made of a glass fiber and can be easily damaged
DO NOT let cleaning materials get on or touch the
door seal The materials will cause the seal to crack
and become brittle
C Wipe out the bottom of the oven if there is a large
amount of food or puddles of grease Large
amounts of soil may result in smoke from the oven
vent
TO SET A CLEAN CYCLE
STOP TIME
5. When the oven is set for a CLEAN cycle, the OVEN
signal light will come on and stay on until the oven
has reached clean temperature Once the CLEAN
temperature has been reached, the OVEN signal
light will go on and off to show the temperature is
being kept
6. The LOCK light wilt come on to show that the oven
door can not be opened until the lock light goes out
and the Selector and Temperature Controls are
turned to OFF
TO STOP A CLEAN CYCLE
7, CAUTION: After setting the oven for a CLEAN cycle,
DO NOT try to open the oven door as this can
damage the automatic door-locking system
Should the oven door become locked accidentally,
to open the door, turn the Selector to CLEAN, push
in and advance stop time knob past the time of day,
wait one minute Then turn the Oven Selector to
OFF wait a few seconds and the door may be open
ed
If the door latch finger becomes positioned so as to
keep the oven door from closing alt the way this can
be corrected as follows:
a Make sure oven is cool!
b Open oven door turn Oven Selector to CLEAN,
push in oven interlock button (button is at right
top of the oven door opening) and hold button
in lor about 15 seconds
c Next turn Oven Selector to OFF and again
push in the oven interlock button for about
15 seconds
The latch finger being motor driven, will turn so
the oven door may be closed
B. If you want to use the oven any time before a
CLEAN cycle is done, turn Selector and
Temperature Controls to OFF. WAIT UNTIL LOCK
LIGHT GOES OUT BEFORE OPENING DOOR
SELECTOR
Close the oven door
The range clock should be set for the correct time
of day
Turn Oven Selector to CLEAN Turn Temperature
Control knob to CLEAN.
Push in and advance STOP knob past the time of
day for the number of hours to clean the oven {This
automatically locks the door ) For the first cleaning,
advance STOP knob 2 Vi hours past the time of day
If your oven is not satisfactorily clean, then in
crease the time for future cleanings
TEMPERATURE
CONTROL
WHEN CLEAN CYCLE IS COMPLETED
9, Turn Oven Selector and Temperature Controls to
OFF
10. As soon as the oven has cooled the oven door will
unlock and the LOCK light will go out The oven
door can then be opened
11. Do not use commercia! oven cleaners or oven pro
tectors in or near the oven. These products plus the
high temperature of the CLEAN cycle may damage
the porcelain finish
12. After a CLEAN cycle, you may see some white ash
in the oven Simply wipe out with damp cloth The
amount of ash will depend on the amount and type
of soil
13. If white spots remain they should be removed with
soap-filled steel woo! pad These deposits are
usually salt that cannot be removed by the self
cleaning cycle
24
Page 25

BEFORE CALLING THE SERVICE TECHNICIAN
PROBLEM
Nothing works
Oven doesn't work
Oven light doesn't work
Oven door doesn't work
POSSIBLE CAUSE
Range electric cord not connected
to service outlet.
Fuse blown or circuit breaker tripped.
No electricity to range,.
Oven temperature control may be set
to "OFF"
Clock knobs may be set wrong.
Selector may be set to “OFF" or
“TIMED BAKE’:
Bulb burned out or loose.
Accidentally locked for clean cycle.
DON'T CALL TECHNICIAN
UNTIL YOU CHECK
Connect service cord to outlet (wall plug).
Check fuse in house fuse box or reset
circuit breaker.
Check main power switch
Check oven temperature control setting.
Check clock controls
Check selector setting,
Replace bulb or tighten
Read self clean instructions.
ADJUSTING OVEN TEMP KNOB
The temperature in your new oven has been set cor
rectly at the factory, so be sure to follow the recipe
temperatures and times the first few times you bake in
your new oven
If you think the oven should be hotter or cooler, you
can adjust it yourself. To decide how much to change
the temperature, set the OVEN TEMP knob 20°F higher
or lower than the temperature in your recipe, then
bake . The results of this "test” should give you an idea
of how much the temperature should be changed.
To adjust oven temperature:
1. Turn OVEN TEMP knob to OFF and pull knob
straight off to remove.
2. Look at the back of the knob, The arrow pointing to
the center of one of the screws indicates the
original factory setting. The knob can be adjusted
up to 50° hotter or 50° cooler, in 10° increments.
3. Use a screwdriver to loosen the two screws about
1 turn each
Hold the knob handle (A on illustration) while turn
ing the knob skirt IB on illustration) in the desired
direction As you turn you should be able to hear
clicks and feel notches or teeth. Each click or notch
is 10°. You can turn up to 5 clicks or notches in
either direction.
5.
When you reach the desired adjustment, retighten
both screws and replace the knob
MAKES OVEN COOLER MAKES OVEN HOTTER
25
Page 26

Kenmope
CAUTION
Read thefollowing information carefully Failureto
do so could cause a malfunction of the range and
result in death, serious bodily injury and/or
property damage
ELECTRICAL SUPPLY
1 You must provide an adequate electrical supply
outlet as required for your range Check with
local utility for governing electrical codes and
ordinances. In the absence of local electrical
codes, the National Electrical Code, NFPA No.
70, governing electric range installations must
be followed A copy of the National Electrical
Code, NFPA No 70, can be obtained by writing
to: National Fire Protection Association, 470
Atlantic Avenue. Boston, Mass 02210.
2 Have the electrical wiring and hookup done by a
competent electrician A three-wire, single
phase, A C. 120/240 volt (or 120/208 volt for dual
rated models),60 Hertz electrical system {properly
t ■
fused to meet NFPA No. 70) must be provided
Range curcuit should be fused with a 40 amp
fuse,
3, Use size No 8 copper wire (min )for making the
range line connections DO NOT USE ALUMINUM
WIRE if smaller wire sizes are used the range
efficiency will be reduced and a fire hazard may
be created
4 If the electrical supply system must have an
ungrounded neutral, remove the ground strap
from the neutral of the junction block Fasten the
neutral to the junction block neutr al and use the
screw from the ground strap to fasten the separ ate
ground wire to the unit. The ground wire should
be a No 10 gauge wire secured to the range
ground screw and to a cold water pipe or other
suitable ground
5 Unplug the range from wail outlet or otherwise
inter rupt the source of electricity when attempt
ing to repair or service the range Failure to do
this could result in a fatal shock
RANGE INSTALLATION
POWER —“ Power is connected to the junction
block located at the lower back of range
Junction Block — Remove three screws from
bottom wire cover and remove cover showing
junction block.
Terminal Leads — Connections to the range
can be made with a three-wire range cord or
with wires enclosed in a flexible or rigid conduit
Right under the junction block is the entrance
hole for connection of flexible conduit
REMOVE CLIPS AND TAPE — Remove
the shipping clips holding the surface units in
place.
CAUTION — Before using your oven be sure
cardboard and tape are removed. The four
screws used to anchor the range to the wood
shipping base must be removed. These screws
must be replaced to be used later for leveling
your range Destroy all cartoning materials like
cardboard and plastic bags Such materials,
when used by small children, can become air
tight chambers if placed over their heads
26
Page 27

FREESTANDtNG INSTALLATION
Install base cabinets SO'/j" min apart and be sure
they are plumb and level
If the backguard is to be installed, see instructions
on page 3 If ordering a backguard. order kit no
80492 from your Sears catalog
If changing or installing end panels, see instructions
on page 4 If ordering end panels, order kit nos
80351 (white), 80338 (almond) from your Sears
catalog
Adjust leveler legs, so the dimensions from the floor
to the top of the cooktop is the same as the
countertop height {36")
Slide range into opening
30 MIN TO BOTTOM OF
CABINET ABOVE RANGE
ta Mm TO BOTTOM of
CASiNETS ON EITHER SIDE
OF RANGE
24 WfTH
: BACKGUARD
COUNTERTOP
OVERHANG
3S MJN TO BOTTOM DF-
CABINET ABOVE RANGE
-zz:
----
29
----
COUNTERTOP
CUTOUT
-V-3 NOTCH
- SMOOTH CUT•
— 30 EXACT ™
“30 BETWEEN-
CAOINETS
-------------------------
r~
.............
36
i
BUILT-IN INSTALLATION (Slide-ins)
-
-IB MiN TO BOTTOM OF
WiTHOUT
I BACKGUARD
Kill!
_
in
FRONT OF
CABINET
CABINETSONEfTHER SIDE
OF RANGE
This type of installation requires that the end panels
be removed (if equipped) and two toe protectors,
part no 1325189. be installed (if not equipped) The
toe protectors are listed in the repair parts book and
can be ordered through the Sears Service Center
See instructions on page
The range cooktop overlaps the countertop at the
sides and the range rests on the floor
Install base cabinet 30" apart and be sure they are
plumb and level before attaching countertop
Cutout countertop exactly as shown Note the
countertop cutout dimensions, for installation with
or without backguard
If the backguard is to be installed, see instructions
on page 3 if ordering a backguard order kit no's
80491 or 80492 from your Sears catalog
Remove drawer Adjust leveler legs, so that the
underside of the cooktop is %" higher than the
height of your countertop
Slide range into opening Adjust leveler legs until
underside of cooktop rests on top of countertop
——~ JsVe WIN
BETWEEN CABmCTS
7 \ 0 ^
* 4- . MAX
------------
3 WIRE WALU
RECEBTACLE
—
- FLOOR
r
4Vi MAX
3 WIRE WAU
RECEPTACLE
27
Page 28

Built-in Installation (drop-ins)
18” TO BOTTOM OF
CABINETS ON EITHER
SIDE OF RANGE
GROUNDED
OUTLET
IN ADJOINING CABINET
MOUNTING SCREWS
2 EACH SIDE
Before using your oven be sure cardboard and tape are taken off Destroy all cartoning materials like cardboard
and plastic bags Such materials can become airtight chambers if children place them over their heads
Remove the 4 shipping clips holding the surfaces in place
28
Page 29

BACKGUARD ATTACHMENT INSTRUCTIONS
WARNING — Disconnect electrical power to range before beginning installation
Adjust the width of the backguard to fit inside the countertop cutout
TO ADJUST WIDTH OF BACKGUARD:
A, Loosen screws holding end caps to back guard supports (Screws A)
B Slide end caps in or out
C. Retighten screws
TO ATTACH TO RANGE.
FASTEN THE BACKGUARD MOUNTING BRACKETS TO
THE UPPER SIDE PANELS, USING EXISTING SCREWS ON
RANGE, (Screws B)
TO ADJUST THE FRONT TO BACK POSITION OF THE BACKGUARD:
(After attached to range)
A Loosen screws holding backguard to mounting brackets,,
B, Position backguard as desired,
C Retighten screws, (Screws C)
REMOVE PROTECTIVE COVERING
FROM BACKGUARD PANEL BEFORE
OPERATING RANGE
TO ADJUST END CAP, LOOSEN
SCREWS A
TO ADJUST BACKGUARD
POSITION, LOOSEN SCREWS C
SCREWS B
MOUNTING BRACKET
Page 30

RANGE END PANEL REMOVAL OR INSTALLATION
WARNING - Disconnect electrical power to range before beginning installation
The end panel kit consists of;
Two End Panels (R.H & LH.)
Two End Panel Brackets
Eight Screws
Installation instruction sheet
MODULAR RANGES
TO REMOVE END PANEL:
Remove both modules from range top
T
From inside of modular opening remove the
2
screw (circle A)
Remove the two screws from the back of end
panel
Move the end panel out at the rear and slide out
4
from behind the front trim
FOR BUILT-IN INSTALLATION ONLY;
This type of installation requires that the end panels be
removed (if equipped) and two toe protectors, part no
1325189, be installed (if not equipped) The toe
protectors are listed in the repair parts book and can be
ordered through the Sears service center
1 Remove end panels as shown above
2, Install toe protectors as shown, using existing
screws on range ^
COIL TOP RANGES
TO REMOVE END PANEL;
1 Raise cooktop and securely support or have it
held, remove screw B
2 Remove the two screws from the back of end
Panel.
3, Move the end panel out at the rear and slide out
from behind the front trim
FOR BUILT-IN INSTALLATION ONLY:
1 Remove end panels as shown above
2 Install toe protectors as shown, using existing
screws on range
-B
FRONT TRIM.
BRACKET ON END PANEL-
FRONT TRIM
INSTALL TOE PROTECTORS
FOR BUILT-IN
INSTALLATION ONLY
TO INSTALL END PANEL:
Attach end panel bracket to end panel with
1
screw provided.
Position the end panel behind the front trim
2.
and tight to the underside of the cooktop
frame
Align the two holes in the back of end panel
with holes in range back and attach with
screws provided.
From inside of modular opening, drive a
screw into bracket. (Circle A)
INSTALL TOE PROTECTORS
FOR BUILT-IN
INSTALLATION ONLY
TO INSTALL END PANEL:
1, Remove toe protectors and replace mounting
screws
2 Position the end panel behind the front trim and
tight to the underside of upper side panel.
3. Align the two holes in the back of end panel with
holes in range back and attach with screws
provided.
4. Raise cooktop and securely support or have it
held, drive a screw through upper side panel into
end panel.
Ö»'
Page 31

NOTES
31
Page 32

Kenmore
owners
manual
FULL ONE YEAR WARRANTY ON THE FUNCTIONING OF
ALL PARTS EXCEPT GLASS PARTS
If, within one year from the date of installation, any part, other than a glass
part, fails to function properly due to a defect in material or workmanship,
Sears will repair or replace it, free of charge
FULL 30-DAY WARRANTY ON GLASS PARTS AND FINISH OF
PORCELAIN ENAMEL, PAINTED OR BRIGHT METAL
FINISHED PARTS
If, within 30 days from the date of installation, any glass part or the finish on
any porcelain enamel, painted or bright metal part is defective in material or
workmanship. Sears will replace the part, free of charge
FULL 90-DAY WARRANTY ON MECHANICAL ADJUSTMENTS
For 90 days from the date of installation. Sears will provide, free of charge,
any mechanical adjustments necessary for proper operation of the range,
except for normal maintenance
WARRANTY SERVICE IS AVAILABLE BY CONTACTING THE NEAREST
SEARS SERVICE CENTER/DEPARTMENT
IN THE UNITED STATES
This warranty applies only while this product is in use in the United States
This warranty gives you specific legal rights, and you may also have other
rights which vary from state to state
SEARS, ROEBUCK and CO., Dept. 698/731 A, Sears Tower, Chicago, IL 60684
WE SERVICE WHAT WE SELL
“We Service What We Sell" is our assurance to you that you can depend on Sears for
service because Sears service is nationwide.
Your Kenmore Electric Range has added value when you consider that Sears has a
service unit near you staffed by Sears trained technicians.,, professional
specifically trained on Sears appliances, having the parls, tools and equipmer^M
insure that we meet our pledge to you — "We Service What We Sell!" TO FURTHcW]
ADD TO THE VALUE OF YOUR RANGE, BUY A SEARS MAINTENANCE AGREE
MENT.
Kenmore Electric Ranges are designed, manufactured arid tested for years of depen
dable operation Yet, any modern appliance may require service from time to time. The
Sears warranty plus the Sears Maintenance Agreement provides protection from
unexpected repair bills and assures you of enjoying maximum oven efficiency,
Here's a comparative warranty and maintenance agreement chart showing you the
benefits of a Sears Maintenance Agreement
J
Kenmore, Solid as
Years of Ownership Coverage
Replacement of defective parts otfier than glass
and parts having porcelairi enamel, paint or bright
1
metal finishes
Replacement of delective glass parts and parts
Dnished In porcelain enamel paint or bright metal
2
Mechanical Adjijslments
3
Parts and service necessary for proper operation,
even tor non technical items such as replacement
4
of a blown fuse
Annual preventive maintenance check-up at your
5
request
W — Warranty MA — Maintenance Agreement
CONTACT YOUR SEARS SALESPERSON OR LOCAL SEARS SERVICE CENTEF^ft
DAY AND PURCHASE A SEARS MAINTENANCE AGREEMENT
Sold by SEARS, ROEBUCK AND CO., Chicago, tL 60684
1st Year
W
30-Dav
Warranty
/V\A
900ay
Warranty
MA
MA
MA
2nd Year
MA
MA
MA
MA
MA
3rd Year
MA
MA
MA
AAA
MA
printed in U,S A
 Loading...