

Kenmore 233.5534559, KENMORE 233.5554559, KENMORE 233.5544559, 233.55345590, 233.55445590 Owner's Manual
...
8EAR8
OWNER'S
MANUAL
Model Nos.
233.55345590
233.55445590
233.55545590
Ca.dom
Read and follow
all Safety Rulesand
Operating Imm'ucdom
before first useorris
Product.
, illl
Kenmore
RANGE
HOOD
Safety Instructions
Warranty
Operation
Care and Maintenance
Wiring Diag
. Parts List
Sears, Roebuck and Co., Hoffman Estates, IL 60179 U.S.A.
SAFETY INSTRUCTIONS
WARNING
TO R_DUC_ Th_ R_K OF FIi_, EL_Cr_¢AL _I-IO_K, OR IN.
jURY TO P_q,qONS, OaSERVE _ FOLLOWING:
1. Use this unit only in the manner In_endcd by the manufac-
m_r. lfyou haw quesfiom, contact the marmfaCtUX_rat the
adch_e_og €_JcphoneRtunber listedinthe waxx'anty,
2. Be,tore _rvidng or clea,'xin8 unit, switch power Offat ser-
vice ptn_! and lock SClwict: panel to prevent l>Ow_ from
being switched o/1 accidentally.
3. Iostalladon work and electrical wirinB must be doneby a
quaa_ per_n_s) in accor_ace withanapplicablecod_
and StandardS,
4. Saf_€ient mr is _ [or proper combustion and exhaust.
ing of gas_ t.hx_agh the ftlte (chtmney) offucl burning e_ui1>
merit to _t backdr_ln8. Follow the l_tting equipment
manufacturer s guideline and_a_Wstandardssuch as those
published by the Natioaal Fire l_rotcctioa Assocltion (N]z]PA),
zOd the American SOCk'Wfor Hcatlng, Refrigeration and Air
Coadkioaing Hnl_x'ers (_HRA£), _ the local ¢od_au-
thorities.
5. Wh_a cutting o rd_lling into wail or ceiling, do not damage
electrical wiring and otherhidden utilities,
6, Dueled fans muse always be vented m the outdoors,
7. To _uc¢ the risk of fi_, use only metal, ductwork.
"_. Tllis unit must be ground,.d.
i'O REDUCE _ RISK OF A RANGE TOP GREASE l:Dd_:
1. Ke_ fan. tilers az_l fg,mse laden mt_g_s €lean.
2.Always turnItoodON when cooking a_ hish heat,
_. Use high rang_ se_rJr_ On range onlywhea ne_e,_h_ry. Heat
oil slowly on low tomedium setting.
4. Don't l_ave range unattended when cookLqg,
5. Always use ¢ookware and utensils apl_opriatc for the type
and _mount of food being prepared.
TO REDUCE TI_ I_K OF IN.Rm_TO PER_O_$ IN TI_ EVEI_
OF A RANGE TOP GR£ASEFIRE. OBS]_;_rE THE FOLLOWING:"
l, SMOT'rl_R FLAMES with a cIosc-fittlng lid, cooKS," sheet, or
metal tray, then mrs off th_ burner. BE CA_ TO PRE.
V_d¢1" BU'/_S. If the flames do not 8o out immediately,
EVACUATE AND CALL _ FIRE DEPARTMI_'¢r.
2. _ PICK UP A FLAMING PAN - You may be btu'n_d.
3, DO NOr USE WATER, includhl 8 wet dJ_hdoth_ or towelS- 1
violef, t steam explosion will result,
_i,Use an _a[_.,_Wls/mrONLY if:
A. You kuow you h2ve a CI,_s ABC _fln_l_"g' and you
already know how to operate iC
B. The fire ls _II and €o_qmined in _.e age_ wl2crc R starm_
C, The fire delmrtment is being e'alkxL
D. You can _t _1_ fire with your back to an
* Based on "Kitchen _-Itesal_ty Tips" publlsh_l I:7 NFPA.
CAUTION
1. For general ventllatin 8 use only.Do not use m egha_tst haz-
a_dmmor e_plo_ve mate_ais and vapora.
2. TOavoid motor be_ dalx_q_elind noi_" and/or I_I;_Ic_L
Impelle_keep dryw_ spray, €onstructiondust,_tc.off
pow_ unit.
5."thispma'uctiscqulplxxlwi_atlmmmsazwhichmay ram
hn automgtiFall_. To t_luce _ risker Injury, Switch power
off at service panel and lock =tervi_ pancl to pze_egg
beta# Switch_ on _dd_ntally.
4. YOUrhood mor_ la_ a _ overlo=d which wiE attto-
mnticaUy shut off the _ i{ ir b_comes ovcth_ted. 'The
motor will restart wl_cn it cools dow_ If the motor cOnfin-
ugs to _ off aod restart, haw tl_ iaaod s_wvic_
_;, _ best _.pn_ of' cookin_ impm_ties, your _taS_ hood
should be mounted 1&24" _bo,m the cooking, _ld_'_.
6, Pl_t,sc _ad specification hhel on productforfurthcrin£or-
marion and _¢qnirem_nts,
WARRANTY
@ULLTHBEEVEARWARRANT_ ON PARTS
Ifw_hin3yearsfromthe_ of ir_lallat_% Imy pi_ of_is ran_
fails10|u_l_do_p[0_l_ doetOtldBh_ inr_lRer__ _msn_l[p, S_IrB
willrepair_n ps_ or"furnish_ _ns_lla newpart,free0i chwge.
r4./LL $_UAYW_gR_IVY ON FINISH ON PAINTED OR IRIGHT
PARTS
Ifw_lln 30 ¢_aW from the et,*a of im_allatkxl, the finishon _ p_ted _'
bright metfil i_J_ of _i_ ntn_o hood isdshtetlve in martial _" wodm_i_,
•_ll=, _lar8 Wiglumi_ w_d mstaJtIt new perl. frle of _har_*,
WAI_I_NI'Y SERVI¢IE IS A'VAII.ARLE ItY CONTACTING TI'IE
NEAREST SEARS S:E_'IGE _ENTERIDI_PARTMENT IN THE
UNITED S'l_Tii_.
This _ api:diu _'_lyw_l_ thiS _0dU_ iS_1uai Lq_'_ Unite_l_ates,
This _arranty _va¢ y_ q)e_i_¢_ dgt,_and you may hsve oli_t
wh_e_va_ Imm s_te t_ sta_.
Roebu,d_ and Ca., Dep_ I I _¢A, HoE_I_ _ IL 601 T9
2
OPERATING INSTRUCTIONS
Always turn youl hood on bet'on: yuu hegin cooking to c_mb-
_"'n air flow in the kitchen. Let the hood run for a few min-
eDc]€3r tt1€ ;fit"lit(:1" _U L*_z'nthe ran_= off. _ will l'mlp
' k_p the whole klt¢htmcleanerand brighter_
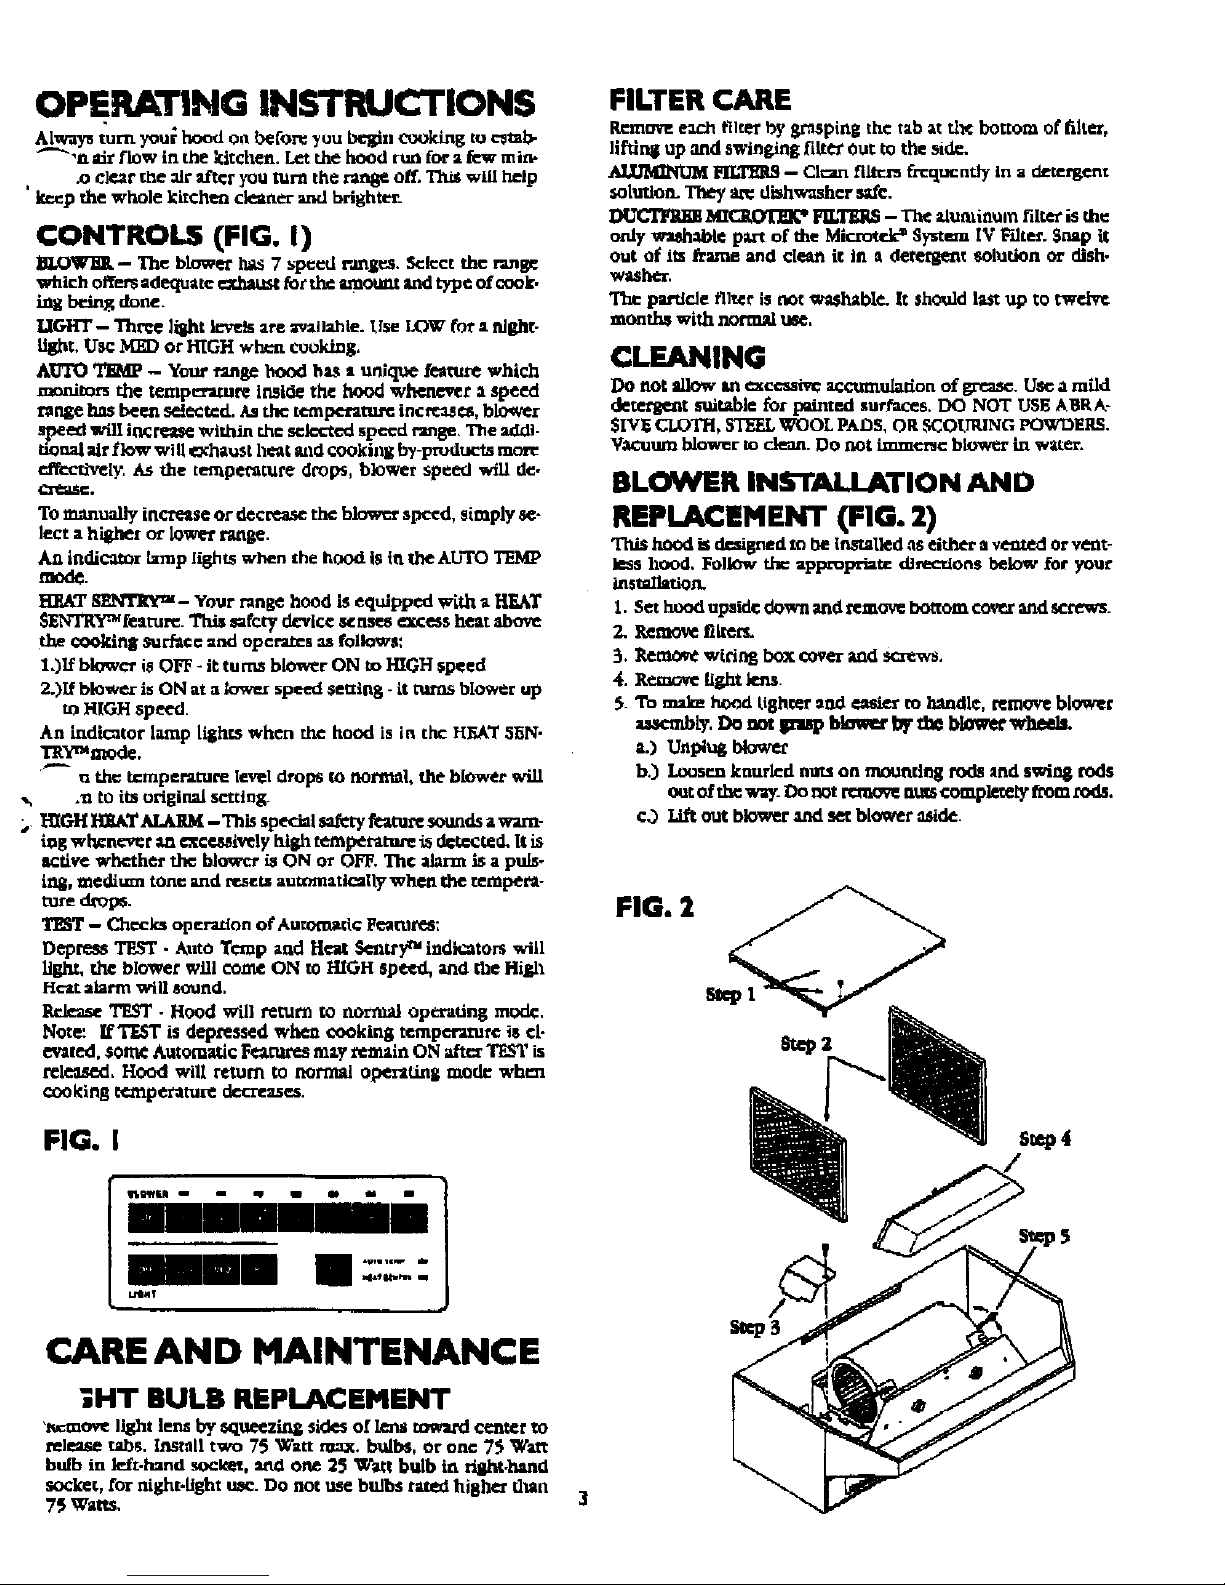
CONTROLS (FIG. I)
- The blower lkas 7 speed ranges. _:lcet the ran_:
w_hich Offers adequate _ for th_ glno_ _ld typ_ Of tOOk,
ing bring done.
-- ThrOe ]il_ht IL'vets are mllah|e, Use LOW for g 9JlIh[-
tight, Use MJ_Dor HIGH wtma cuoking.
AUTO TK_P - Your range hood has t unique feature which
monitors the teaxlperamr¢ Inside the hood whenever a speed
range has been sdi_ted. As the t_npcratus_ incrcas¢_, bio.g'(:r
speed will in_rca_ within r.h=seloctcd specd range. The addl-
raonal air flow wi Uexhaust heat arid €ookil_ by-products more
€ffecu'vely, As the terapemture drops, blower speed wiU de-
_easc.
To manually increase or decrease the blower speed, simply se-
lect a higher or lower range,
An indicator lamp lighLs when the hood is tn tl_ AUTO TEMP
mode.
HI,AT SENTIk'Ym - Your range hood is equippcxi with a l-l_&T
_D_'KY_/eamre. Tim safety device xnses excessheat above
the ¢ookinl_ surface aad operates as follows:
101f blower is OFF - Rturns blower ON to HIGH speed
2.)If blower i_ ON at a lower speed setting - it turns blower up
to HIGH speed.
An indicator lamp lights when the hood is in the HFtAT5]iN.
TRYmmode.
" u th_ tcmptnmre level drops tO norln_l, the blower wiU
•_ Aa to its original setting.
_. I-RGHE0i_T AI.ARM- TMsspecial ta_'ty fcatta'esotmds a wam-
iag w_ncv_r aa cxce.e_ively hl_ temperature is detected. It ks
active crhethcr tlm blowcr is ON or OFF. The alarm is a puiso
ins, medium tom: and t't.sem autom:LtlC_lly when the tempera-
rare d_ps.
TEST - Checks opcradon of Auroraad¢ Features:
Depress TEST - Auto Temp a_l Heat Sentry m indictors will
light, the blower will come ON m HIGH spa'd, and the HiEh
Heat alar_ will sound.
Rr.lea.se TEST - Hood will ratllr11 to normal operating mock:.
Note: IfTF.ST is depraved when €ookin 8 ttmpctatur© is €l-
orated, sofa€ Automatic Features mzy remain ONafter TI_' is
released,Hood will return to normal operatingmode whoa
cooking temperature decreases.
FIG. I
CARE AND MAINTENANCE
;HT BULB REPLACEMENT
'ttcmov_ light lens by so tteczin_ sides of lens toward €¢11tcr to
release tabs, Install two 75 Watt max. b_bs, or one 75 Watt
bulb in left.hand .u3cket, arid one 2_ Watt bulb in dllht.hand
socket, for night-light nsc. DO not nse bulbs rated hishet titan
7_ Watts,
FILTER CARE
Remmm each filter by grasping the tab at d_ bottom of filter,
]iftinlJ up and swinging fitter out to the side.
HLT2BRS-- Clt=m flltt:_ frequently In a detergent
_oluttom T1my an: dishwasher safe.
DUCrleg_ MK_O'['J_k _ _ - Tt_ alunxinum filter is the
only w-athable part of the Microte.k "_Systema IV F_dter.Snap it
out of its frame and clean it in a detergetat solution or dish-
washer.
The particle filter is not _.shabl¢. It should last up to tw(:lv¢
moed_ with normal us_,
CLEANING
Do not allow _n czccssive accumulation of grease. Use a m;Id
deterS_t suitable for painted surfaces. DO NOT USE ABRA-
$1V_ _a.OTH, STEELWOOL PADS, OR SCO(rRING POWDERS.
Vacuum blower to clean. DO not immerse blower in water.
BLOWER INSTALLATION AND
REPLACEMENT (FIG. 2)
This hood is d,mi[gnedto he lnstaUed as either a vettted orvent-
less hood. Follow the appropriate directions belo_ for your
i_staI1atlon.
1. Set hood upside down and ttmov¢ bottom cover and sct_"ws.
2. Remove filters.
3. P.emove wiring box o_ver and screws.
4. Remove light kin.
5- To mak_ hood tighter and easier to handle, remove blower
a_acmbiy, Donor _ blm_er by the blower wheels.
a.) Onp_uSblower
b.) Loosen krmrled nuts on mounting rods and swing rods
out of the way_Do not ttttto_ nutscompletely from rods.
€0 Lift out blowerandsetblower _side.
FIG. 2

VERTICALLY VENTED INSTALLA-
_I'IONS (FIG. 3)
die sm'e that t'_ blow_ dlscha_e lines up with the duct
.,pcning in thc top of tbc hood. Uft up the blower, _ip the
blower mounting rods into hrackcl:l On blares" and tiShtcn
knurled nuis securely Plug in blower.
FIG. 3
I _ "_tmm_.8 _x t
L___--'_-____ i l
CONVEIUING TO VENTLESS (FIG. 6
& FIG. ?)
Oz_r a V_tless Elm" Kit #50185 - Connthis two (2) Cle2n
Cooking System IV t"dters.
1. Rm_uve kmvt-r cover. Pry off €over _t_ _-wdrtwr ot kni!e '
_6. 6).
, ,, NO_ , , '
Dir_it'(I dilmpertduct coma:ctor, 1/4" black lhc¢[ metal
sct_s, and louwr covi_.
FIG. 6 _.ffi c_
\
HORIZON1_LLY VENTED
INSTALLATIONS (FIG. 4)
Make m_: that the blower di_htrge _ up _ the duct
opouiag [atheIxtt,_oflhe heed. Lift up the blower, slip die
blower llil_llitillig rods h3tob_'lckeis on bluwcr _ fiSli_ll
knude_l nuts _tecufely,PlUll In blow_:r.
FIG. 4
....... .
FILTER INSTAI.LATION -
VENTED INSTALLATIONS (FIG. 1)
PliiSll fillers Up llito r!:i_'_ ',il top o£ lio_d. Swing t lit lind
pull cklwn, Make sure thac tab on filte_ i_ toivird ounlk/lad
bottom of hood-
2. Instill blower, bl_ bk)we_ moullttng rods to _olit l',31clin
supporl chluulels, l_ifiou blower so rl_t bkl_n'r
up with kluveled opcnillg on hood t_nt (I_IG.7).
FIG. 7
_ M ov_ Rod m i_roatRole
5, Slip blower m_lntinli _ iill.o brackets on blow'cr and,
lightea knurk_l ..is se_a-ely,
FIG, $
4

FILTER INSTALLATION - VENTLESS
INSTALLATIONS (FIG. 8)
t/'" Ltumlntml f_1=r pm_d_ with hood into fron[ of Claim
• _ _g System IV mtc_. Ma_ su_ _t tab on _duminum £d-
Ibles up _ i'_er pull on Ck_tn Cookln 8 Sys_:rn I V flJ.t,€_,
Push filter M_la up U1to hood, FI-pS oll filter will M
top sld_ of opc'aiaB, Push aucmblies up until botZom
ofllssembly €_x's lip on bottom cover. Insert bottom, of filter
imo openlag and puE _a_m_bty down, coUap6ing flr_,er putt
aS_r_t _ niter.
FIG. 8
Clean Cookin 8
sr_m _ Rlmt
Al_numFUmr
froml-lood
up fo__-_t s_
In Hood •
D
l_p 1;o_ Dowa
_am ELI_ Is
Pmh_ Elm Hood
Fll_er
_ Cl_a_l m }food
_b
WIRING DIAGRAM
NOTE: If _ny of tim ori_in_l wire on the hood has to be re-
pk_ed, use win: having _luiv'_mt LosuL_zion_mdtemprr_tur_
_dng ¢105'C'I'hermoptm_ AwM, U.L Listed.
TOUCHPAD CONTROL
1L_OVAG
LINE IN
|
€ONTI_L BOARD
5 (SYbI_QLIC)

MooJ_
233.SS345590
233.$544SS90
233.SSS4SS90
$
32

PARTS LIST
KEY
NO.
ii •
1
2
3
4
S
6
7
8
10
11
12
13
14
15
18
17
19
19
2O
21
22
23
24
25
26
27
3O
31
32
i,t
PART
NUMBER
970Q_078
99005221
99100_"/'9
99170245
90110620
99110847
99111038
99090949
g9090948
99090950
99271119
99271118
!_9271120
97012388
97012391
970t 2394
97012389
9701239'2
97O12395
97012390
g'/012393
97012396
97O09092
97_09093
97010323
97012938
97009094
9700909S
97010324
97012939
97009096
97009097
97010325
97012940
_r{007894
97007eS6
9_.70754
97009091
9_00042
99150471
97010324
99250945
97O09089
98007237
991106O5
98006546
97007895
97007899
97O07631
97011974
99150478
99260476
99420464
971007314
gg020138
980O5212
99100491
97010736
99020139
97010327
99042171
99042173
DE'_CRIPTION
DamperApsembly(IncludesKeyNos.2& 3)
OamperI-taD
DamperBurning(2 Required)
#6-15 x 3,'8 Hex Head5heet Metal,gorew$(18 Required)"
LouverCover- B_
LouverCover- Wh_
LouverCovet"- Almond
KenmoreMedallion-BlaCk
KenrnamMedallion•White
KenrnomMedallion-Almond
ToUO'_Pad Switch- Black
Touch Pad _itch - While
TouchPadSwitch- Almorld
ControlP_el Assembly- Black(30"W_deHoods)(qr_ludesKey No.7)
ControlPanelAssembly- White(30"wloe Hoods)(InoludssKey No.7)
ControlPanelAJssambly- Almond(30"Wide Hoods)(Ind,JdesKeyNo. 7}
ControlPanelAssembly- Black (_I_'Wide Hoods)(InoiudesKeyNo. 7)
ControlPanelAssembly- White(36"Wide I-teode)(includesKeyNo.'/)
ControlPanelAssembly- Almond(36"WideHoods)(InciudssKeyNo. 7)
Cont_l PanelAesembly- Black(42"Wide Hoods)(InckJdesKeyNo.7)
ControlPanelAssembly- White (42" WtdQHoods)(InckJdeaKeyNo.7)
Control PanelAssembly- Almond(42"WideHoode)(Include,=Key No,7)
Canopy- 30"White (233,55345690)
Canopy- 30"Almond
Canopy-3O"StainlessSteel
Canopy- 30"Blank
Canopy- 36' White(233_5_45_90)
Canopy•36_Almond
Canopy- 36"S_inT_ St=el
Canopy-38' Btack
Canopy- 42"White(233.555455Q0}
Canopy. 42"Almond
C_nopy-44 St=rtlessSteel
Canopy- 42"Black
ALuminumR_lerKit(Cont=irw 2 Filtrate)
CleanCookingSystemIV FiitarKit (Conf_]i'l_ 2 Rltens)
BulbHolder(2 Required)
WireHarm.s withIAmp Holders
StrainReliefBushing
#1032 x 1/2 Green_tound _rew' (4 Required)
ControlBoardAssembly
We-her
WidngBoxCover
AccessCover
LightLens
t_ulbHolder Cover
BottomCover-White
BottomCover-Almond
BottomCover- SteirCMsSteel
BottomCover- Bleak
#8-18 x 3/8 PhilliDsTrus_Head_crow$ (4 Required)'
BlowerMountingRodNut(2 RKluired)
BlowerMounting Rod (2 F_u_red)
BlowerScrollHousing
BlowerWheel,Clockwise
MotorRetainingRing(2 Required)
RubberMOtOrMoUttt(4 Rsq_Jlmd)
Motor
BlowerWheel, Counte_o,=kwisa
(_owerA.s.semi01y(NotincludingKay No=.24 & 25)
paratln9 Insl_-uctionsand PlufsList
InstallationInetmotlons
LightBulb,75WattMax, (2 Required)Notsuppliedwithhood. .....
• StandardHardware.Maybe l:x._'cha_edIo=ally.
"* Not Illustmted.
7
 Loading...