

Kenmore Power-Mate KC50XBZRZU01, Power-Mate KC50XCMWZU01, Power-Mate KC50XBZTZU01, KC01ZCNTZ000 Owner's Manual

Owner'sManual
ManualDe/Propietario
ManuelDeL'utih'sateur
Power-Mate_ PowerNozzle
Model, Modelo, Modble KC50XBZRZU01
KC50XBZTZU01
KC50XCMWZU01
CAUTION:
Read and follow all
safety and operating
instructions before first
use of this product.
CUlDADO:
Leay siga todas las
instruccionesde operacidn
y seguridadantesdel usode
esteproducto.
AVERTISSEMENT:
Lisezet suiveztoutesles
instructionsde s_curit_et
d'op_rationavantde vous
servir de ce produit,
Sears, Roebuckand Co., Hoffman Estates, IL 60179 U.S.A.
www.sears.com
SearsCanada,Inc.,Toronto,M5B2B8
www.sears.ca
Part No, C_IZCNTO_O(_-KC_IZCNTZ_O_
Printed in U.S.A.
Impresoen EUA
Imprim_ aux Etats-Unis

Before UsingYour NewVacuum ....... 2
Kenmore Vacuum Cleaner Warranty .., 2
Important Safety Instructions ......... 3
Parts and Features .................. 4
Assembly Instructions ............... 5
Use ................................ 5
VacuumingTips..................... 6
SuggestedPileHeightSettings ......... 6
Attachments........................ 7
AttachmentUseChart ................ 7
PerformanceFeatures................ 8
Power-Mate ®Care ................... 9
Dirt Sensore ........................ 9
Belt Changing and Agitator Cleaning ., 10-I 1
Light Bulb Changing ................. 11
Agitator Servicing ................... 12
Troubleshooting .................... 13
Requesting Assistance
Or Service .................. BackCover
Please readthis guide. It will help you assemble and operateyour new Kenmorevacuum in
the safest and most effective way.
For more informationabout vacuum cleaner care and operation, call your nearestSears store.
You willneedthe complete model and serial numberswhen requesting information.Yourvacu-
um's model and serial numbers are located on the Model and Serial Number Plate.

WARNING
Your safety is important to us. To reduce the risk of fire, electrical shock,
injury to persons or damage when usin_l your vacuum cleaner, follow basic
safety precautions including the following:
Read all intstructionsinthis manual before
assembling or using your vacuum cleaner.
Use your cleaner only as described in this
manual. Use only with Sears recommended
attachments.
Disconnect electrical supply before
servicing or cleaning out brush area.
Failure to do so could result in electrical
shock or brush suddenly starting.
Do not leave cleaner when plugged in.
Unplug from outletwhen not in use and
before sewicing.
To reduce the risk of electrical shock - Do
not use outdoorsor on wet surfaces.
Do not allow to be used as a toy. Close
attention isnecessary when used by or
near children.
Do not use with damaged cord or plug. If
cleaner is not working as it should, has
been dropped, damaged, left outdoors, or
dropped into water, return it to a Sears
Service Centre.
Do not pull or carry by cord, use cord as a
handle, close door on cord, or pull cord
aroundsharp edges or corners. Do not run
cleaner over cord. Keep cord away from
heated surfaces.
Do not unplug by pulling on cord. To
unplug,grasp the piug, notthe cord.
Do not handleplug or cleaner with wet
hands.
Do not putany objects into openings.
Do not usewith any opening blocked; keep
free of dust, lint, hair and anything thatmay
reduce air flow.
Keep hair, loose c[othing, fingers, and all
partsof body away from openings and
moving parts.
SAVE THESE
Turn off all controls before unplugging.
Use extra care when cleaning on stairs. Do
not put on chairs, tables, etc. Keep on
floor.
Do not use cleaner to pick up flammable or
combustible liquids (gasoline, cleaning
fluids, perfumes, etc.), or use inareas
where they may be present. The fumes
from these substances can create a fire
hazard or explosion.
Do not pick up anything that is burning or
smoking, such as cigarettes, matches, or
hot ashes,
Do not use cleaner without dust bag and/or
filters in place.
Always change the dust bag after
vacuuming carpet cleaners or freshener,
powders and fine dust. These productsclog
the bag, reduce airflow and can cause the
bag to burst. Failure to change bag could
cause permanent damage to the cleaner.
Do not use the cleaner to pick up sharp
hard objects, small toys, pins, paper clips,
etc. They may damage the cleaner or dust
bag.
Do not operate cleaner without the exhaust
filter or exhaust filter door in place (If
applicable),
The hose contains electrical wires. Do not
use when damaged, cut, or punctured.
Replace if cut or worn. Do not pick up
sharp objects.
Always turn off and unplug lhe cleaner
before connecting or disconnecting either
hose, Handi-Mate Jr.® (if applicable), or
nozzle.
Hold plug when rewinding onto cord reel.
Do not allow plug to whip when rewinding,
You are responsible for making sure that
your vacuum cleaner is not used by anyone
unable to operate it properly.
INSTRUCTIONS
Proper assembly and safe use of your vacuum cleaner are your responsibilities.
Your cleaner isintendedforhousehold use. Read this Owner's Manual carefully for
important use and safety information. This guide contains safety statements under
warning and caution symbols. Please pay special attention to these boxes and
follow any instructions given. WARNINGs{atements alert you tosuch dangers as
fire electi'ical shock, burns and personal injury. CAUTION statements alert-you to
such dangers aspersona njury and/or property,damage.
3

It is important to knowyour vacuum cleaner's partsand features to ensure its proper and safe
use. Review these beforeusing your cleaner.
Item Part No. Part No.
In U.S. In Canada
Headlight Bulb 20-5240 596181
Belt 2o-52182o-s218C
Belt
Wand Quick
Release Pedal
(Not Shown)
Pile __,
HeightPedal__
Handle _
Release Pedal __
Protector
Reset Button
Dirt Sensor
(Some Models )
Cleaner
(Not Shown)
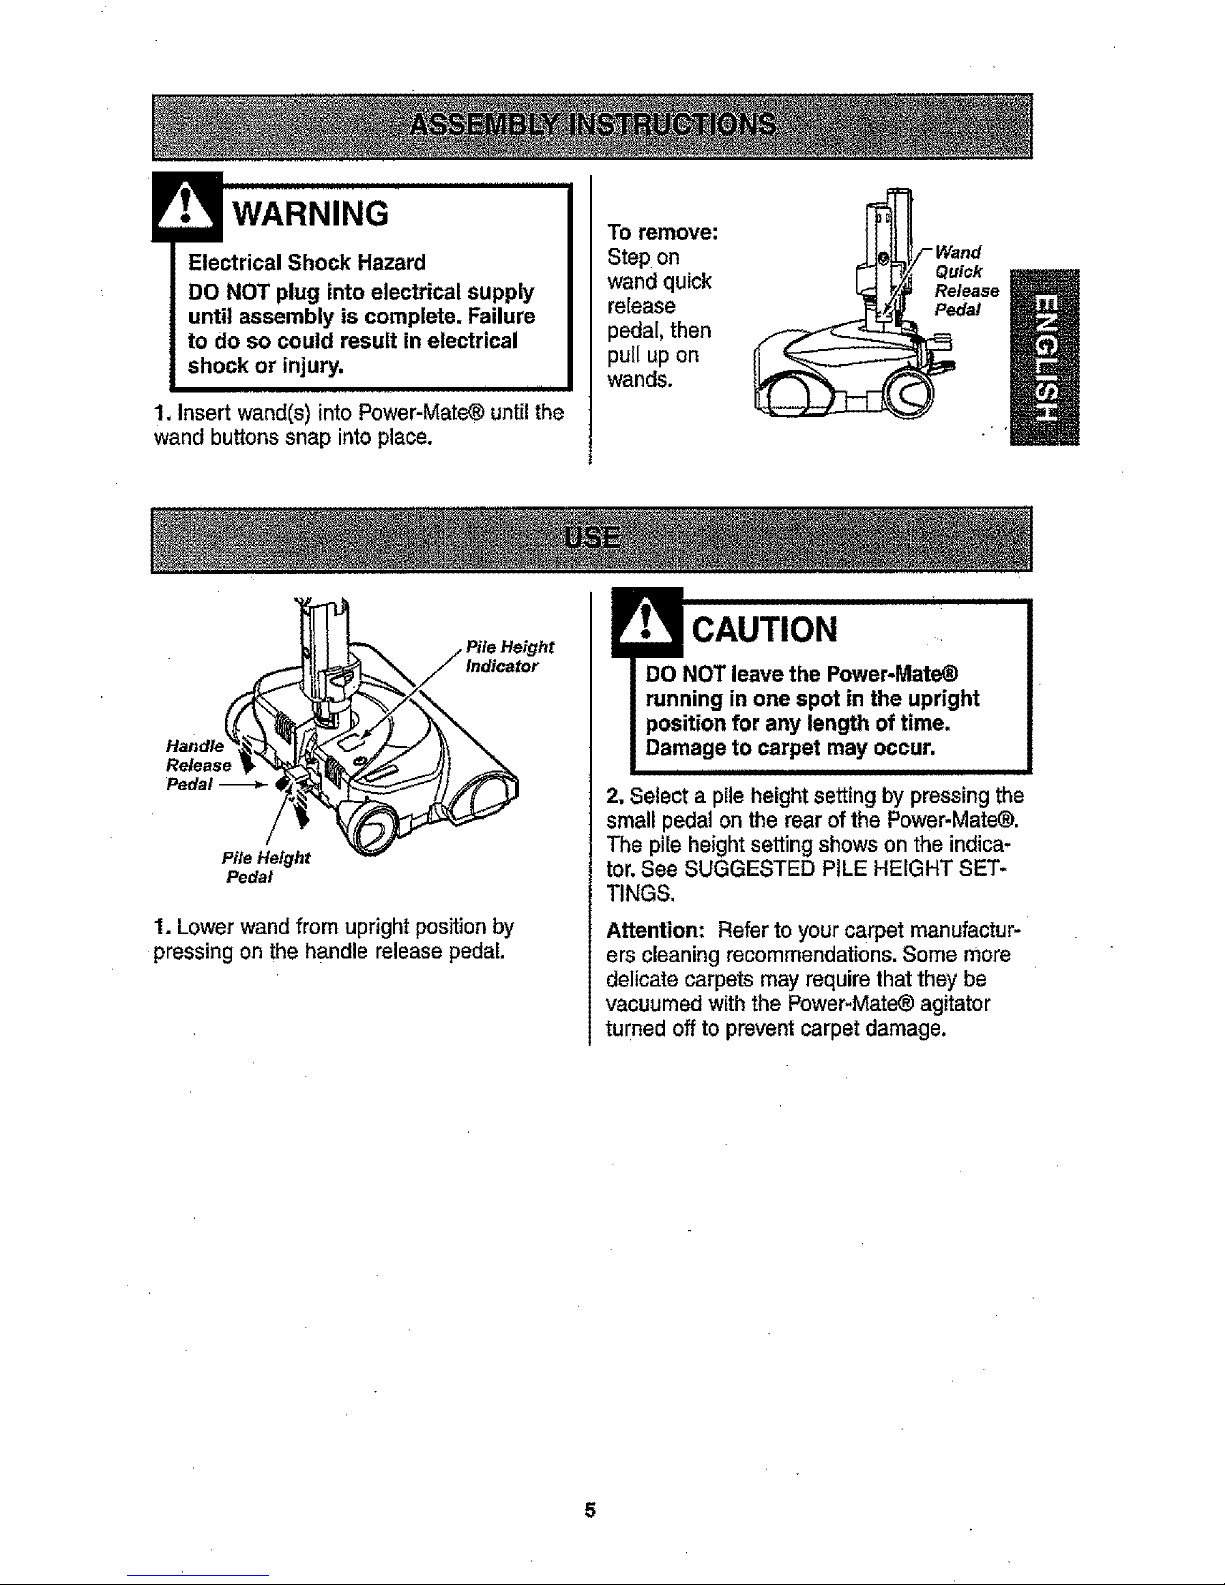
Electrical Shock Hazard
DO NOT plug into electrical supply
until assembly is complete. Failure
to do so could result in electrical
shock or injury,
i i ill l
1. Insertwand(s)intoPower-Mate®untilthe
wandbuttonssnap intoplace.
To remove:
Step on
wandquick
release
pedal, then
pull up on
wands.
_,_/ Wand
Quick
Relealse
/ Pile Height
Pile Height "_
Pedal
1. Lowerwandfrom upright position by
pressing on the handle releasepedal.
CAUTION
DO NOT leave the Power-Mate®
running in one spot in the upright
position for any length of time.
Damage to carpet may occur.
i i ==ll=,=,=,=l=,
2, Select a pile heightsetting by pressing the
small pedal on the rear ofthe Power-Mate®.
The pile height setting shows on the indica-
tor.See SUGGESTED PILE HEIGHTSET-
TINGS.
Attention: Referto your carpet manufactur-
ers cleaning recommendations. Some more
delicate carpets mayrequire that they be
vacuumed withthe Power-Mate®agitator
turned off to prevent carpet damage.

Suggested sweeping pattern.
For best cleaning action, the Power-Mate®
should be pushed straight away from you
and pulled straight back.At the end of each
pull stroke, the direction of the Power-Mate_
should be changed to point into the next
section to be cleaned. This pattern should
be continued across the carpet with slow,
gliding motions.
NOTE: Fast,
jerky strokes do
not provide
complete clean-
ing.
CAUTION
Product Damage Hazard
Usecare ifthe Power.Mate®and
wand isleft inthe upright position as
it may tip over easily.Property
damage can occur if tipped.
J WARNING
Personal Injury and ProductDamage
Hazard
• DO NOT runover powercord with
Power-Mate®. Personal injury or
damage could result.
• DO NOT pull plug from wall by
the power cord. if there is damage
to the cord or plug,personal injury
or property damage could result.
For best deep down cleaning, use the XLO
setting. However,youmay need to raisethe
height to make somejobseasier, such as
scatter rugs and some deep pile carpets,
and to prevent the vacuumcleaner from
shutting off. Suggested settings are:
HI- Shag, deep pile, or scatter rugs.
MED - Mediumto deep pile.
LO - Lowto medium pile.
XLO - Most carpets and bare floors.
CAUTION
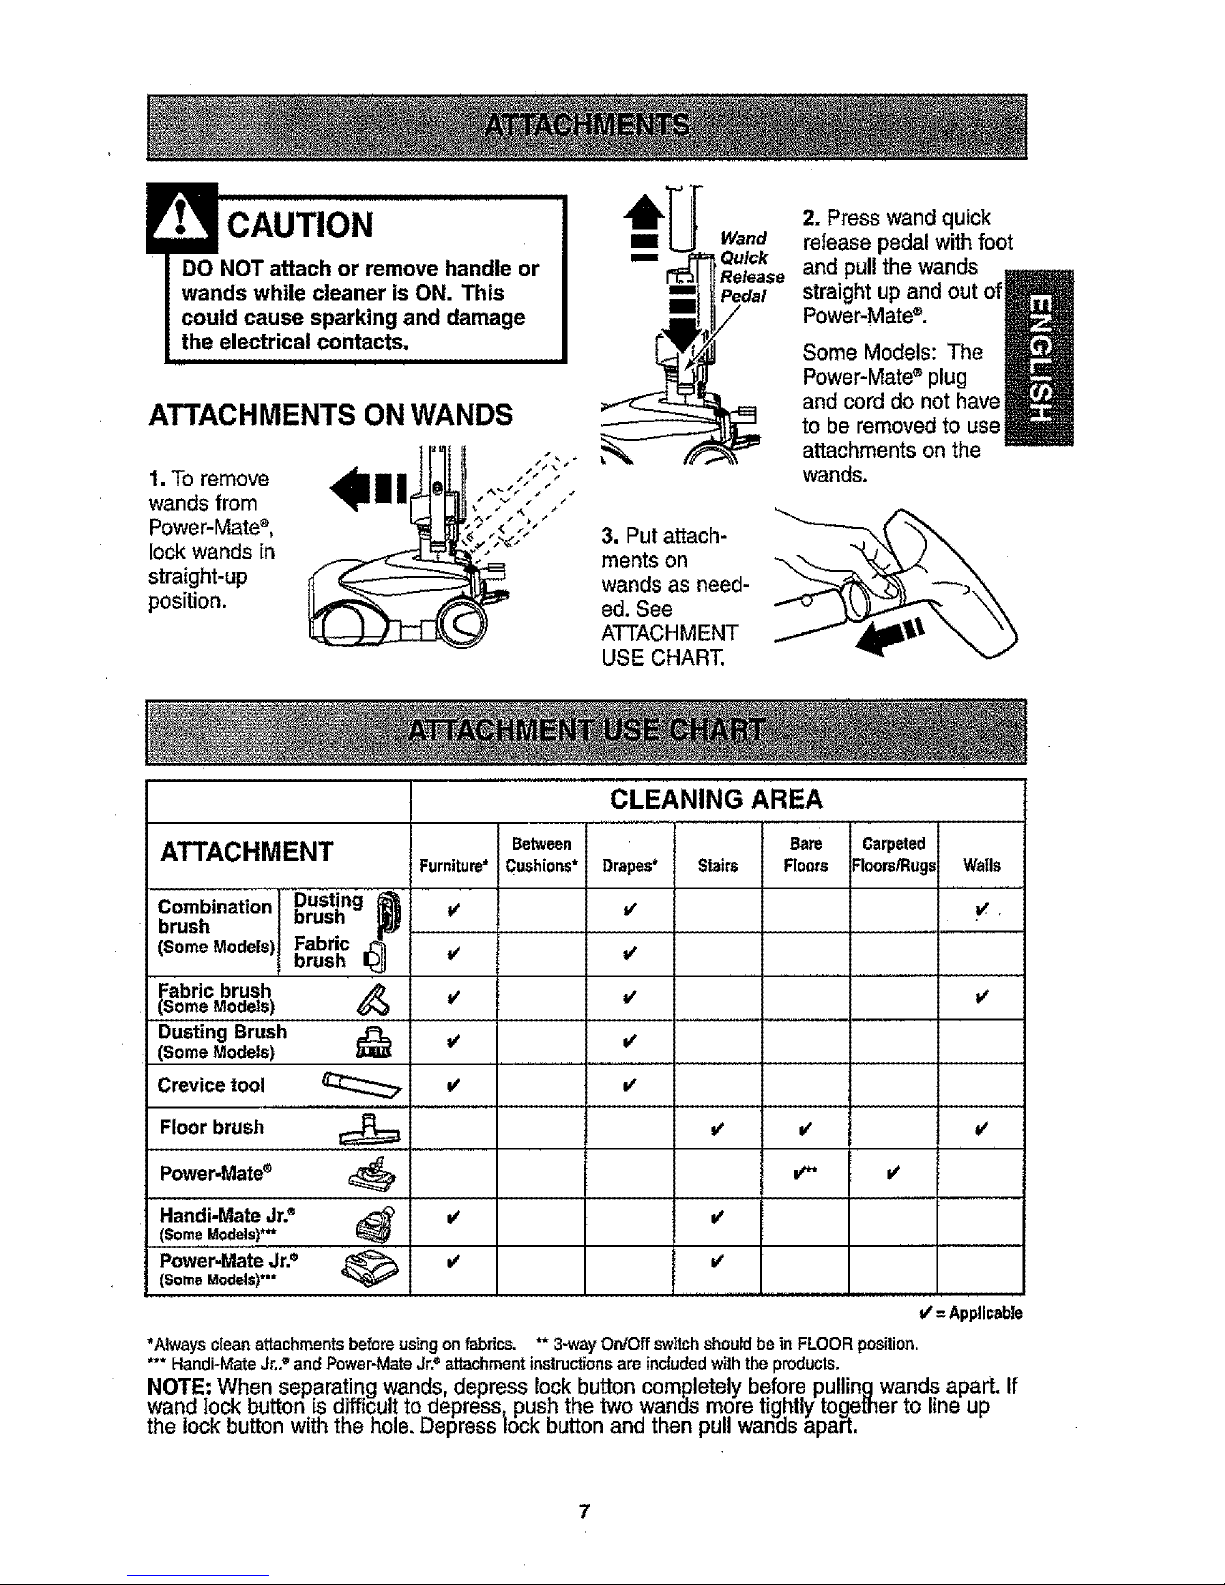
ATTACHMENTS ON WANDS
1. To remove
wands from
Power-Mate ®,
look wands in
straight-up
position.
_1 Wand
m _ Quick
Release
Pedal
BB /
3. Putattach-
ments on
wands as need-
ed. See
ATTACHMENT
USE CHART.
2. Presswand quick
release pedal with foot
and pull the wands
straight up and out of
Power-Mate®.
Some Models: The
Power-Mate®plug
and cord do nothave
to be removed to use
attachments on the
wands.
ATTACHMENT
Combination
brush
(Some Models
Fabric brush
(Some Models)
Dusting Brush
(Some Models)
Crevice tool
Floor brush
Power.Mate®
Handi-MateJr.e
(Some,Mo_els)*"
Power-Mate Jr.•
(Some ModelS)*'*
DustincI__
brush"
Fabric
brush
CLEANING AREA
Between Bare
Furniture* Cushions* Drapes* Stairs Roors
v v
v' v"
v' it
V it
Carpeted
Floors/Rug= Walls
it
*" Handi-Mate Jr.. and Power-Mete Jr. ettachment instructionsam included withthe products.
NOTE: When separatingwands, depress lock button completely before pullingwandsapart, If
wand lockbutton is difficult todepress_ pushthe two wands moretightly togemer to line up
the _ockbut[on with the no_s.uepresslOCKDU[ZOnand _nenpull wanas apart,
"Always clean attachmentsbeforeusingon fabrics.
V'=Appli_abie
3-way On/Off sw_tchshouldbe in FLOOR position.
v v'
v_ v_
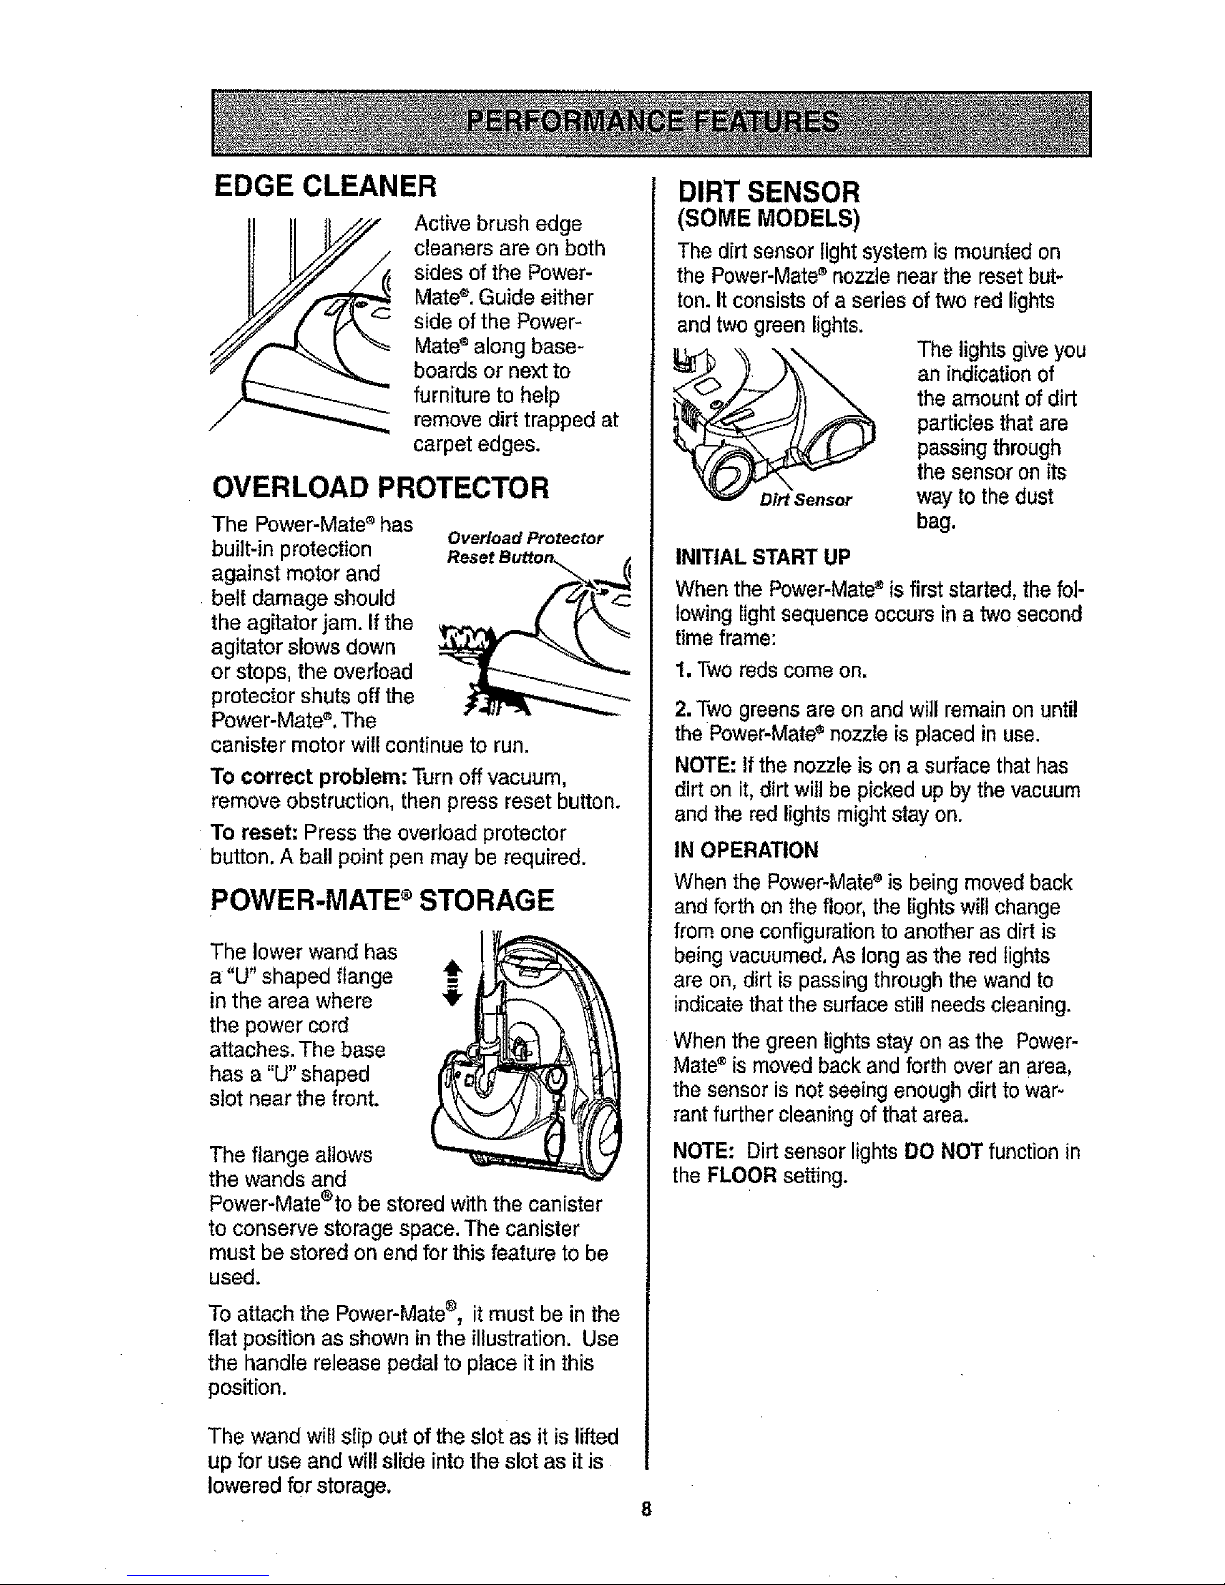
EDGE CLEANER
Active brush edge
cleaners are on both
sides of the Power-
Mate®. Guide either
side ofthe Power-
Mate®along base-
boardsor next to
furniture to help
removedirt trapped at
carpet edges.
OVERLOAD PROTECTOR
The Power-Mate®has
Overload Protector
built-in protection
against motor and
belt damage should
the agitator jam. Ifthe
agitator slows down
or stops, the overload
protector shuts off the
Power-Mate®.The
canister motor will continue to run.
To correct problem; Turnoff vacuum,
remove obstruction, then press reset button.
To reset: Pressthe overload protector
button.A ball pointpen may be required.
POWER-MATE ®STORAGE
The lowerwand has
a"U" shaped flange
in the areawhere
the power cord
attaches.The base
has a"U" shaped
slot near the front.
The flange allows
the wands and
Power-Mateeto be stored withthe canister
to conserve storage space.The canister
mustbe stored on end for this feature to be
used.
Toattach the Power-Mate®, itmust be in the
flat position as shown in the illustration. Use
the handle release pedalto place it in this
position.
The wandwillslip out of theslot as it is lifted
up for use and will slide intothe slot as it is
lowered forstorage,
DIRT SENSOR
(SOME MODELS)
The dirt sensor lightsystem is mountedon
the Power-Mate®nozzlenear the resetbut-
ton.It consists of a series of two red lights
andtwo green lights.
The lights giveyou
an indicationof
the amount of dirt
particles that are
passingthrough
the sensor on its
way to the dust
bag.
INITIAL STARTUP
When the Power-Mate®isfirst started, thefol-
lowinglight sequenceoccurs in a two second
time frame:
1, Two reds come on,
2. Two greens are on and will remain on until
the Power-Mate ®nozzle is placed in use.
NOTE: If the nozzle is on a surface that has
dirt on it, dirt wilt be picked up by the vacuum
and the red lights might stay on.
IN OPERATION
Whenthe Power-Mate®is beingmoved back
andforth on the floor,the lightswill change
from oneconfigurationto another as dirt is
beingvacuumed,As long as the red lights
areon, dirt is passingthroughthe wandto
indicatethat the surface stillneedscleaning.
Whenthe greenlightsstayon as the Power-
Mate®is movedback and forth over an area,
the sensoris not seeingenough dirt towar-
rantfurther cleaningof that area.
NOTE: Dirtsensor lightsDO NOTfunctionin
the FLOORsetting.
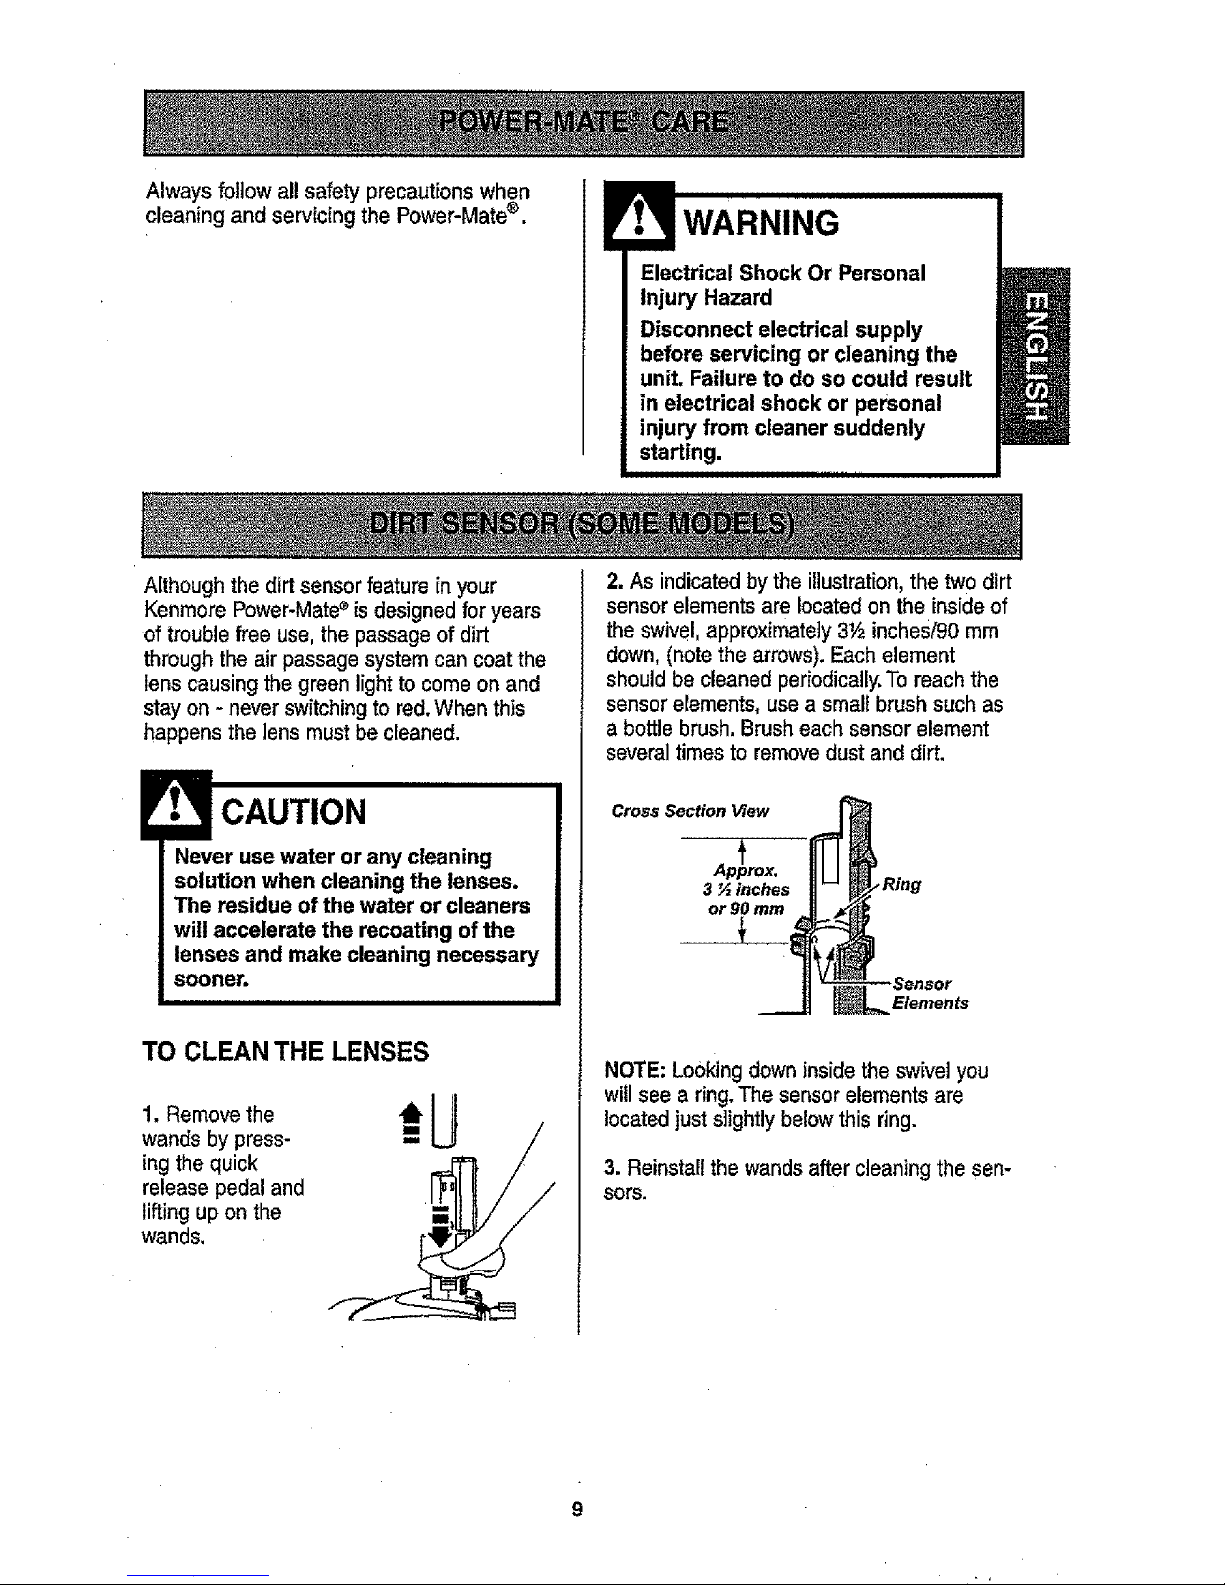
Alwaysfoltowallsafetyprecautionswhen
cleaningandservicingthePower-Mate®.
WARNING
Electrical Shock Or Personal
Injury Hazard
Disconnect electrical supply
beforeservicing or cleaning the
unit. Failure to do so could result
in electrical shock or personal
injury from cleaner suddenly
starting.
Althoughthe dirt sensorfeature in your
KenmorePower-Mate®isdesignedfor years
of trouble free use, the passageof dirt
through the air passage system can coatthe
lens causing thegreen light to comeon and
stayon - never switchingto red.When this
happensthelensmust be cleaned.
CAUTION
Never usewater or any cleaning
solution when cleaning the lenses.
The residue of the water or cleaners
will accelerate the recoating ofthe
lenses and make cleaning necessary
sooner.
TO CLEANTHE LENSES
1. Removethe ._-
wandsby press-
ing thequick .=J
release pedal and
lifting up on the
wands.
2. As indicatedbythe illustration,thetwo dirt
sensor elementsare locatedon the insideof
theswivel,approximately3Y2inches/90 mm
down,(notethe arrows).Each element
shouldbe cleaned periodically.To reach the
sensorelements, usea smallbrush such as
abottle brush.Brush eachsensor element
severaltimes to removedust and dirt.
Cross Section View
Ap_prox.
3 P_,inches
or 90 mm
• i
NOTE:Lookingdowninside the swivelyou
willsee a ring.The sensor elementsare
locatedjust slightly belowthis ring.
3. Reinstallthe wandsaftercleaning the sen-
sors.

TO REMOVE BELT
1. Turn Power-
Mate® upside
down.
2. Unscrew the
two (2) Power-
Mate® cover
screws.
3, Turn Power-
Mate® right side
up. Press handle
release pedal
and lower the
swivel, Lift rear
latches up.
Latch Latches
4. To remove cover,
graspthe sides and
pullout.
5. Lift agitator
assembly out
and remove
worn belt.
'<------- Base
End Cap
6. Check and clean endcap areas. See
AGITATORASSEMBLYforpictureof
complete agitatorassembly.
TO CLEAN AGITATOR:
NOTE: in order to keep cieaning efficiency
high and to prevent damage to your vacu-
um,the agitator must be cleaned every_time
the belt ischanged.
The agitator must also be cleaned accord-
ingto the followingschedule:
Vacuum Use Clean Agitator
HEAVY - everyweek
(used daily)
MODERATE - every month
(used2-3 times/week)
LIGHT - every 2 months
(used 1 time/week)
IMPORTANT
Disconnect cleaner from electrical outlet.
Checkand removehair, string and tint buiJd-
upfrequently inthe Power-Mate® agitator
and end cap areas.
Remove any dirt or debris in the belt path
area or in the brush roller area.
Carefully remove any string or debris
located on the agitator, or end caps.
Agitator Assembly
Belt Pulley_
Brush Unit
1o

TO REPLACE BELT
1. Installnew
belt over
motor drive,
then over
brush
sprocket.
e
\ --- \\ Sprocket
Agitator End Cap
NOTE: See PARTSAND FEATURESfor
belt number,
3. Line up
front of
cover and
base. Rest
cover on
front edge
of base as
shown.
2. Place agitator
assembly back into
Power.Mate®.
Cover Base
4. NOTE: On dirt sensor models be sure
that the board is upright and the wires are
tucked back as shown.
Rear
Latch Latches
4. Rotate cover
back. Press
cover firmly until
side and rear
tabs snap into
place.
Makesure there is no gap between the
coverand base.
5. Turn Power-Mate®upside down and
replace two (2) coverscrews.
1. Remove Power-Matee cover as shown in
BELT CHANGING AND AGITATORCLEAN-
ING section.
2. Pushin and turn
bulb counterclock-
wise, thenpull out
to remove.
3. Pushin and turn
bulb clockwise,to
replace. Bulb must
not be higher than
15Watts (130 Volts).
4. Reinstall Power-Matee cover as shown in
BELT CHANGING AND AGITATORCLEAN-
ING section.
NOTE: See PARTSAND FEATURESfor
bulb number.
11

_WARNING
Electrical Shock Or Personal Injury
Hazard
Disconnect electrical supply before
servicing or cleaning the unit.
Failure to do so could result in elec-
trical shock or personal injury from
cleaner suddenly starting.
iiilll, ii
TO CHECK AGITATOR
ASSEMBLY
__ When brushes
are worn to the
levelof the base
support bars,
replace the
agitator
assembly.
TO REPLACE AGITATOR
ASSEMBLY
1. RemovePower-Mate®cover, belt and
agitator assembly.See "To Remove Belt"in
BELTCHANGING AND AGITATOR
CLEANING.
2. Replace Agitator.
3. Replace belt, agitatorassembly and
Power-Mate®cover.See "Toreplace belt"in
BELT CHANGINGAND AGITATOR
CLEANING.
12
 Loading...