

IH470 series
instructions
istruzioni
instrucciones
Bedienungsanleitungen
gebruiksaanwijzing
English 2 - 9
Nederlands 10 - 19
Français 20 - 29
Deutsch 30 - 39
Italiano 40 - 49
Português 50 - 60
Español 61 - 71
Dansk 72 - 81
Svenska 82 - 90
Norsk 91 - 99
Suomi 100 - 108
Türkçe 109 - 117
HEAD OFFICE: Kenwood Limited, 1-3 Kenwood Business Park, New Lane, Havant, Hampshire PO9 2NH
41164/6
Ïesky 118 - 127
Magyar 128 - 137
Polski 138 - 149
Ekkgmij 150 - 161
Slovenčina 162 - 171
Українська 172 - 182
´¸∂w
381 - 191
A
B
C
DEFGHIJ
English
´d°w
safety
G
Read these instructions carefully and retain
for future reference.
G
Remove all packaging and any labels.
important note - medical implants
G
The induction hob generates short-range
magnetic fields. If any user or person in
close proximity has a pacemaker or other
active implants, please consult a doctor
before use concerning any possible
incompatibility to prevent any risk to health.
G
Do not immerse the appliance, supply cord
or plug in water or other liquid.
G
Never use a damaged appliance. Get it
checked or repaired: see ‘service and
customer care’.
G
Do not leave the appliance unattended
when in use.
G
Do not let the cord hang over the edge of
the table or worksurface or touch hot
surfaces.
G
Always unplug the appliance when not in
use or before cleaning.
G
Make sure that electrical cords connecting
other appliances in the proximity cannot
come into contact with the induction hob.
G
During and after use of the induction hob,
certain parts will become very hot. The hob
plate will remain hot from residual heat. Do
not touch hot parts.
G
The pan and contents will remain hot after
Æ∂q «∞Id«¡…, «∞d§U¡ ÆKV «∞BH∫W «_Ë∞v ∞Fd÷ «∞Bu¸
∞ºö±∑p
G
«Ædzw «∞∑FKOLU‹ «∞∑U∞OW Ë«•∑HEw °NU ≠w «∞L∑MUˉ
∞öß∑ªb«±U‹ «∞Lº∑I∂KOW «∞Ld§FOW.
G
√“¥Kw ±Ju≤U‹ «∞∑GKOn Ë√¥W ±KBIU‹.
±ö•EW ≥U±W - °U∞Mº∂W ∞Lº∑ªb±w «_§Ne…
«∞D∂OW «∞Le¸Ë´W
GG
¥u∞b ±uÆb «∞∫Y ±πUô‹ ±GMU©OºOW ÆBOd… «∞LbÈ.
≠w •U∞W ¢u«§b √Í ±º∑ªb ∞KπNU“ √Ë ®ªh ´Kv
±Id°W ±s «∞πNU“ Ë≥c« «∞Lº∑ªb √Ë «∞Aªh ∞b¥t
§NU“ ¢MEOr {d°U‹ «∞IKV √Ë ¨Od≥U ±s «_§Ne…
«∞D∂OW «∞Le¸Ë´W «∞MADW, ≠Od§v «ß∑AU¸… «∞D∂OV
Æ∂q «ß∑ªb«Â ≥c« «∞πNU“ Ë–∞p °AQÊ «•∑LU∞OW ´bÂ
«∞∑u«≠o ∞LMl •bËÀ √Í ±ªU©d ´Kv «∞B∫W.
GG
ô ¢GLdÍ «∞πNU“ √Ë «∞ºKp «∞JNd°w √Ë «∞IU°f ≠w
«∞LU¡ √Ë √Í ßUzq ¬îd.
GG
¥∫c¸ «ß∑ªb«Â «∞πNU“ √Ë «∞ºKp «∞JNd°w √Ë ÆU°f
≠w •U∞W «∞∑Kn. ≠w ±∏q ≥cÁ «∞∫U∞W ¥πV ≠∫h
«∞πNU“ √Ë ≈Åö•t: ¸«§Fw ƺr "«∞BOU≤W Ëîb±W
«∞FLö¡".
GG
¥∫c¸ ¢d„ «∞πNU“ œËÊ ±d«Æ∂W √£MU¡ «ß∑ªb«±t.
GG
ô ¢ºL∫w °∑b∞w «∞ºKp «∞JNd°w «∞e«zb ´s ©UË∞W
«∞FLq Ëô ¢ºL∫w ∞t √¥CUÎ °U∞∑ö±f ±l ßD`
ßUîs.
GG
«≠BKw «∞πNU“ œ«zLUÎ ´s ±Bb¸ «∞∑OU¸ «∞JNd°w ≠w
•U∞W ´b «ß∑ªb«±t √Ë Æ∂q ¢MEOHt.
GG
°U∞Mº∂W ∞úßö„ «∞JNd°OW «∞ªUÅW °Q§Ne… √îdÈ
±u{u´W ≠w ±∫Oj ±uÆb «∞∫Y, ¢QØbÍ ±s ´bÂ
«Æ∑d«°NU √Ë ¢ö±ºNU ±l ±uÆb «∞∫Y.
use.
G
After removing the pan from the induction
hob, place on a heat resistant surface.
2
381

l
Do not scratch the hob plate with sharp
objects.
l
Don’t use the hob plate as a worksurface.
l
Never use the hob plate for storage.
l
Do not use the induction hob if the hob
plate is broken or cracked in anyway.
l
Do not put hot or sharp implements or
pans onto the controls.
l
Never put paper, aluminium foil, cloth,
plastic materials or other unrelated objects
on the hob plate when the induction hob is
in use or is hot. Foil used to cover items
during cooking should not be allowed to
come in direct contact with the hob plate.
l
For safety, never leave the handle of your
pan sticking out over the worksurface.
l
Make sure the underside of the cooking
pan and the hob plate are clear from water,
grease or other dirt before cooking.
l
Do not use pans with rough bases as
these may scratch the hob plate.
l
Do not allow the air entry or air vents to be
covered or blocked in any way. Always
ensure that there is adequate ventilation
around the induction hob during operation.
l
The induction hob should not be used near
or below curtains and other compustible
materials.
l
Never unplug the induction hob during
operation before switching it off first.
l
Never use the appliance on a gas stove or
on stainless steel or iron worktops/
surfaces.
l
Do not place this appliance on or near a
naked flame, hot plate or in a heated oven.
l
To not use this appliance as a hot plate.
3

l
Do not use the induction hob to heat
anything other than food in suitable pans.
l
Never use with pans that are empty.
l
In the unlikely event of the contents of the
pan catching fire: turn off the appliance at
the wall socket, smother the pan with a
damp cloth and leave to cool completely
prior to handling the pan.
l
As with all hobs, in the event that
cookware is accidentally overheated and
allowed to boil dry, it is important that
before moving from the induction hob the
heat source be turned off at the wall
socket and the pan allowed to cool.
l
Overheating should be avoided at all times.
Persistent overheating can cause
permanent damage to your cookware.
l
Metal objects, such as knives, forks,
spoons and lids, should not be put on the
surface of the cooking area, since they can
become heated.
l
Do not place credit cards, magnetic media
or sensitive electronic equipment near to
the appliance when in use.
l
Do not use the appliance outdoors.
l
During operation, the induction hob should
be placed horizontally, on a flat heat
resistant surface, at least 10cm away from
all sides of the wall.
l
Children from 8 years and above can use,
clean and perform user maintenance on
this appliance in accordance with the User
Instructions provided they are supervised
by a person responsible for their safety and
have been given instruction concerning the
use of the appliance and are aware of the
4

hazards.
l
Persons with reduced physical, sensory or
mental capabilities or lack of knowledge
using this appliance must have been given
supervision or instruction on its safe use
and are aware of the hazards.
l
Children must not play with the appliance
and both appliance and cord must be out
of reach of children less than 8 years.
l
Only use the appliance for its intended
domestic use. Kenwood will not accept
any liability if the appliance is subject to
improper use, or failure to comply with
these instructions.
l
This appliance is not intended to be
operated by means of an external timer or
separate remote-control system.
suitable cookware
l
Only use flat bottomed pans that are
suitable for induction hob use. If in doubt,
check with the manufacturer of your pans.
If they are unsuitable the induction hob will
not detect the pan.
l
The induction hob is suitable for pans with
a base diameter of 12 – 22cm.
l
Metal cooking utensils are not
recommended since they can be heated
through the induction hob if left in the pan
before plugging in
• Make sure your electricity supply is
the same as the one shown on the
underside of your induction hob.
• This appliance conforms to EC
Regulation 1935/2004 on
materials and articles intended to
come into contact with food.
before using your induction
hob for the first time
Wipe over the hob plate see ‘care &
cleaning’.
5

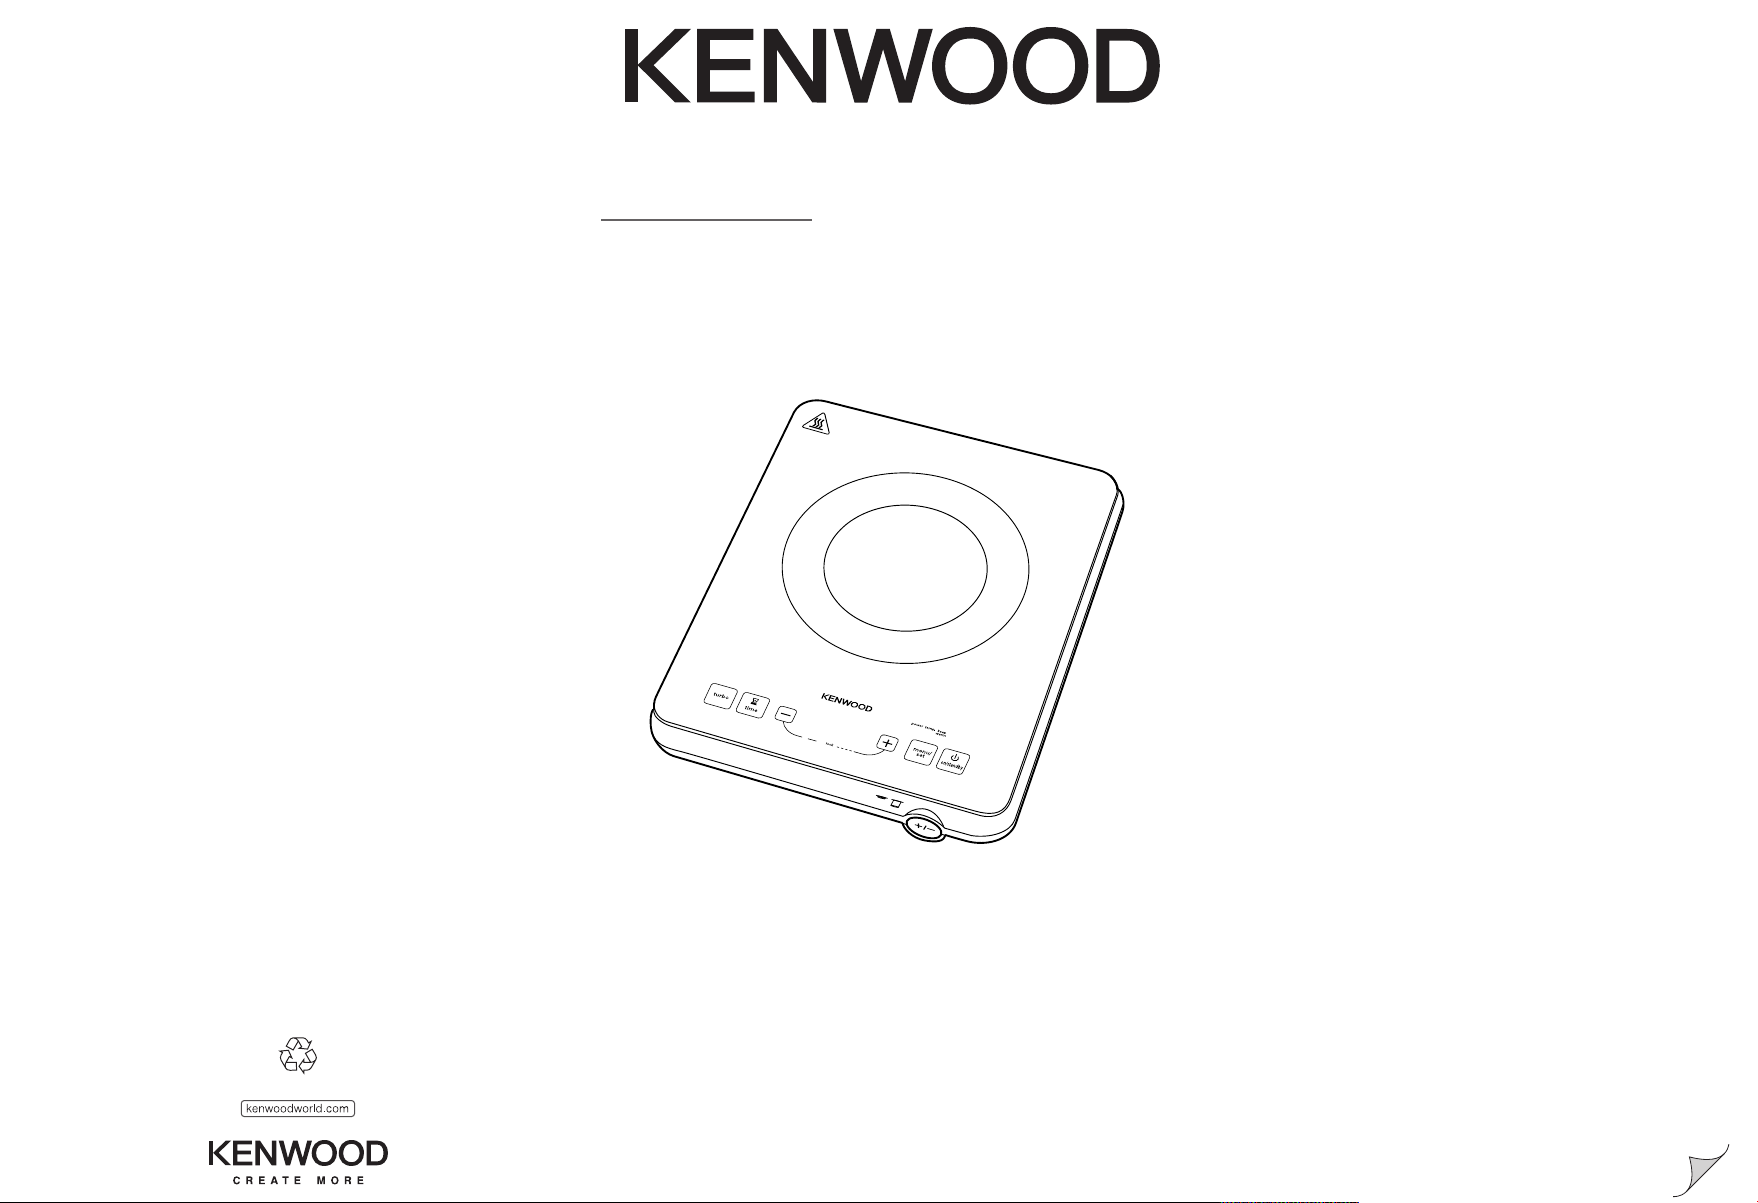
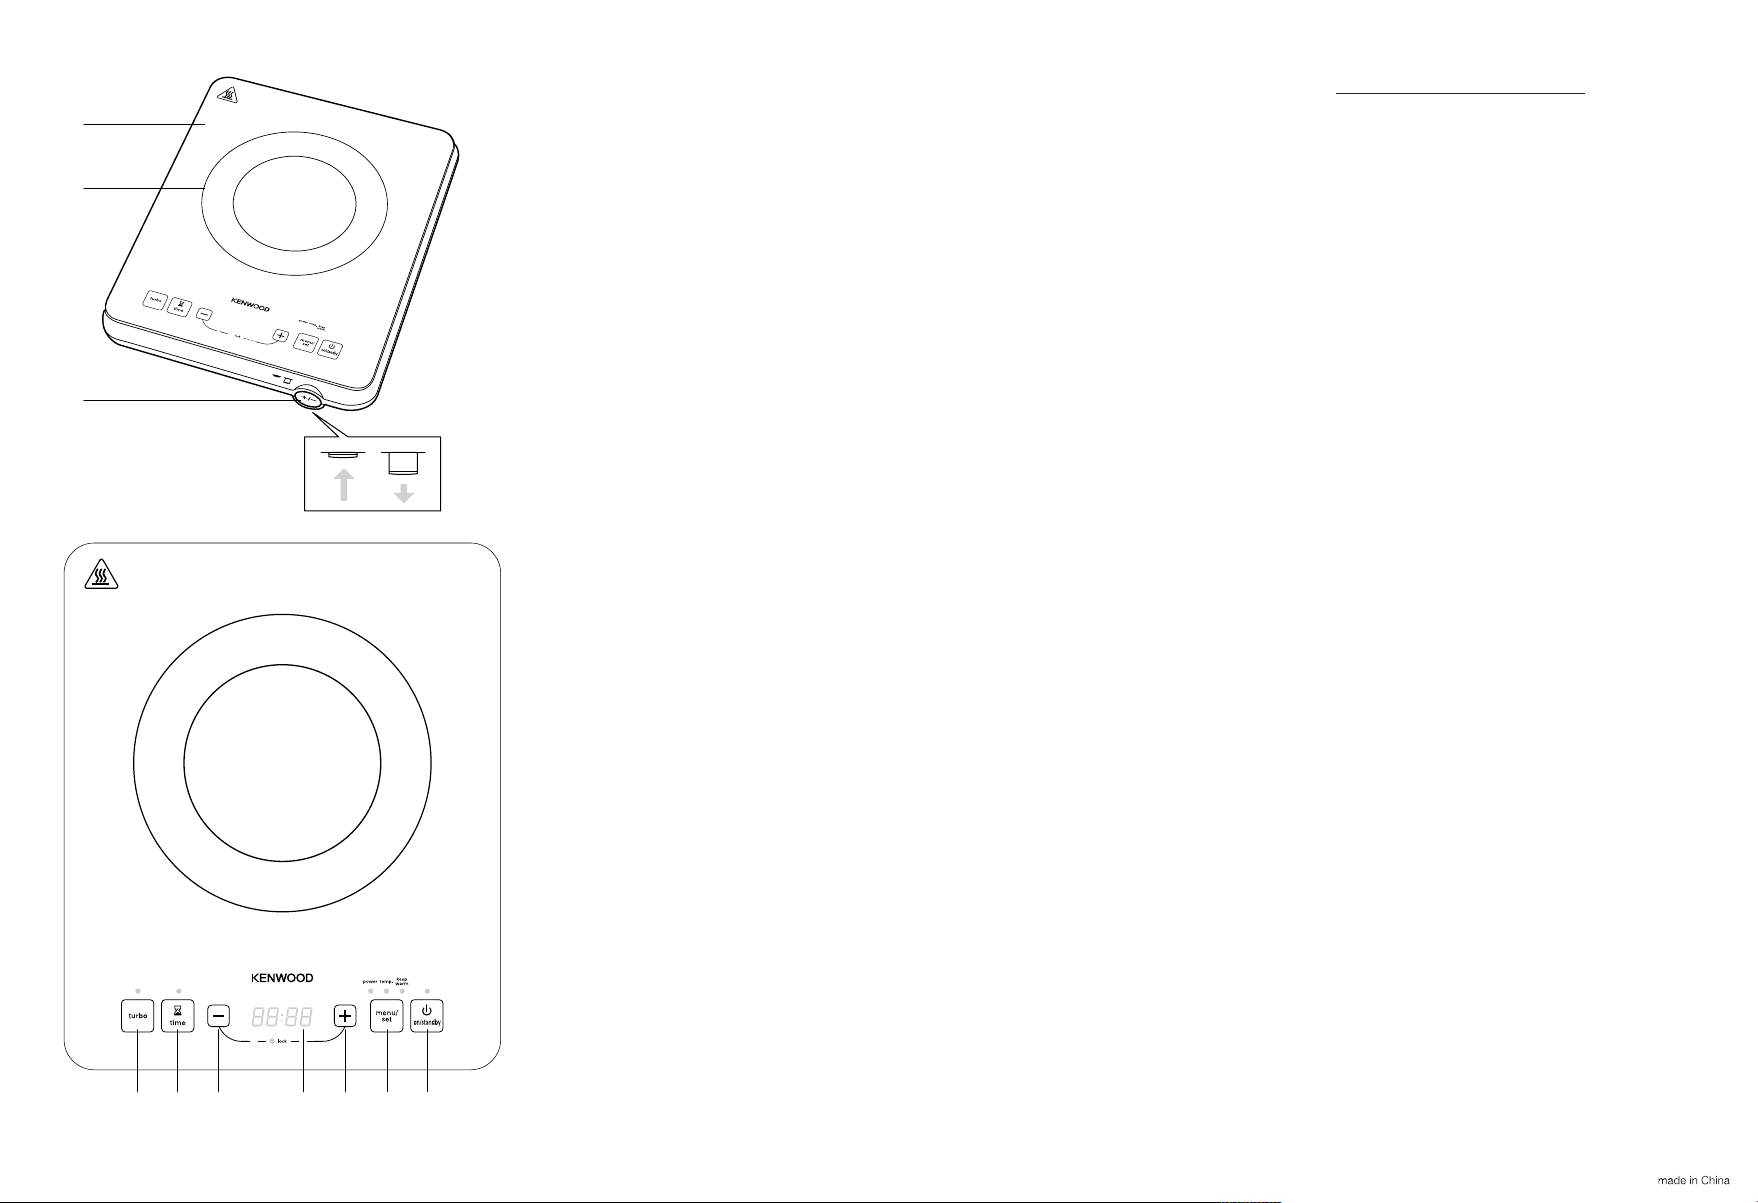
key
hob plate
A
B pan guide
C control knob
on/standby button
D
E menu/set button
F menu/time increase button
LED display
G
H menu/time decrease button
I time button
J turbo button
using your induction
hob
Note : the buttons on the hob are
temperature-touch sensitive; they are
operated by placing the pad of the
finger
on them. Do not tap with finger nail.
1 Plug in the induction hob. The
appliance will beep once, the LED
display flashes and shows “L”.
The appliance is now in standby
mode.
2 Press the on/standby button D,
the on/standby indicator light will
flash and the fan is on. The
appliance is now in standby ready
for heating.
3 Place the pan centrally onto the
induction hob, within the pan guide
shown by the graphic on the hob
plate B.
Note : the power level or
temperature and the cooking time
can be adjusted using either the
control knob C or the increase /
decrease ( + / - ) buttons F and H.
To use the control knob, push it in
until it clicks and then release C.
It can then be turned clockwise to
increase or anticlockwise to
decrease.
If the hob is turned on but no pot
is placed on it, the hob will
change to standby ready for
heating after 1 minute.
If no menu is set/selected the hob
will change to standby mode after
0 seconds.
1
4 Select the desired menu setting
with the menu / set button E
ower - press ‘menu/set’ once
P
and the default power level of
1600 watts is selected, the display
hows ‘1600’ and the power
s
indicator light is on.
The normal power range is from
120w to 2000w in the following
steps :
120w - 400w - 500w - 800w 1000w - 1200w - 1400w - 1600w
- 1800w - 2000w
Increase or decrease to the
desired power.
Cooking will start. If no other
button is pressed, cooking will
continue for 2 hours and will then
automatically change to standby
mode.
Temperature - press ‘menu/set’
twice and the default temperature
of 140°C is selected, the display
shows ‘140’ and the temp.
indicator light is on. The
temperature range is 60°C to
240°C in steps of 20°C; increase
or decrease to the desired
temperature. Cooking will start. If
no other button is pressed, cooking
will continue for 2 hours and will
then automatically change to
standby mode.
Keep warm - press ‘menu/set’
three times and the induction hob
will be at keep warm setting and the
keep warm indicator light is on.
Keep warm is at around 60°C ; the
display is “ ----”. If no other button
is pressed, the hob will stay at keep
warm for 2 hours and then
automatically change to standby
mode.
5 Cooking time.
The hob can be set to cook for a
fixed time. After selecting the menu
as above, press the “time” button;
the display will flash “0:00” four
times and the time indicator light will
be on. Turn the control knob or
press the + / - buttons to select
the desired cooking time. Holding
the finger on the buttons will
increase / decrease the time in
6

hen the time has been set, it will
W
flash four times and then the
display will remain steady,
onfirming that is set. Alternatively
c
just press ‘time’ again to confirm.
After that the clock will count
own; and the display will show
d
alternately the remaining time and
the set power or temperature.
The maximum cooking time which
can be set is 3 hours.
Once the cooking time has been
set, the timer will begin counting
down after 5 seconds.
During set-time cooking, pressing
+ or - or turning the control knob
will change the power or
temperature and will cancel the set
time.
After fixed time cooking has
been completed, the “on/off”
button needs to be pushed
before more cooking can be
done.
6 Turbo function.
Pressing ‘turbo’ during cooking
boosts the cooking power to 2100
watts for 30 seconds ; after which
the hob changes back to the
earlier set power or temperature.
Notes: When the induction hob is
working, there will be a high
frequency intermittent sound and
the fan will operate. This is normal.
Once the pan is taken off the hob,
the hob stops heating immediately
and a beep will sound every 2
seconds.
The existing display/settings will
flash.
If the pan is not put back within 60
seconds, the hob will turn off
automatically and will be on
standby mode.
7 Press the on/standby button when
you have finished cooking, the
cooker will stop heating and return
to standby mode. LED is flashing
and shows “H” while the plate is
still hot and then shows “L” while
the hob is cooling down.
As this induction hob operates
•
lightly differently to a traditional
s
hob, some adjustments to the
expected cooking
times and temperatures may be
ecessary to achieve the desired
n
esults.
r
ints
h
• To reduce the cooking time, you
can turn the power control to the
max position when you turn the
appliance on. After a short time
you can set the power control to
the required position.
• After a short period of use,
experience will teach you which
setting is the right one for your
needs.
• Pan contents heat more quickly
with an induction hob.
timer mode
Note: if the timer is not set, the
hob will operate for a maximum
of 2 hours continuously and will
then change to standby mode.
The timer can only be set after an
initial power level has been selected.
Using the touch control buttons touch the button firmly with the
flat part of the fingertip. To
change the time by several
minutes touch the button for
each minute of adjustment.
1 To set the timer press the ‘+’ or ‘-’
button. The timer display will show
‘0:00’ and flash. To amend the
time press the ‘+’ or ‘-’ to change
the time by 1 minute per press. To
quickly adjust the time in 10 minutes
increments, hold your finger on the
‘+’ or ’-’. The timer range is 1
minute to 3 hours.
• The timer can be adjusted at any
time by pressing the ‘+’ or ‘-’
buttons and then adjusting the
time.
• The timer function can be cancelled
at any stage by re-setting the time
to ‘0’ or by pushing the menu
button.
2 Once the cooking time has been
set, the timer will begin counting
down after 5 seconds.
7

When the set time is complete, the
3
eep will sound and the power will
b
change to standby mode.
4 After the timer cooking has
been completed; the hob will
urn off automatically and will
t
e on standby mode.
b
safety features
• The induction hob will change to
standby mode if it is not operated
within one minute.
• In use, unless a suitable pan of at
least 12cm diameter is used a
beep will sound for approximately
1 minute. If an appropiate pan is
not placed onto the surface in this
time the induction hob
automatically change to standby
mode.
• If the appliance overheats or pans
boil dry, the induction hob
automatically enters a protective
condition where its heating is then
regulated. If the overheating
continues, the appliance may
display a protection code (see
troubleshooting guide).
• During use if there are problems
with the mains supply, induction
hob automatically enters a
protective state and displays a
protection code.
• Unplug the appliance and wait for
supply to return to normal (see
troubleshooting guide).
• If the induction hob is cooking and
no button is pressed after 2 hours
it will automatically change to
standby mode.
• Once the pan is moved away, the
hob stops cooking.
safety lock/child lock
The induction hob has a safety
lock which prevents the hob from
being operated.
• To lock the hob – press the ‘+’
and ‘-’ buttons at the same time. In
this mode only the On/Standby
button will work.
• To unlock the hob – press and
hold the ‘+’ and ‘-’ buttons for 3
seconds.
8

care & cleaning
Switch off, unplug and allow the
•
appliance to cool down completely
before cleaning.
Never immerse the induction hob in
•
water.
ob plate, body and control
H
panel:
• Wipe with a soft damp cloth or
non– abrasive cleaner and dry
thoroughly. Ensure all traces of
cleaner are removed. Do not use
abrasive or scouring
detergents/powders, scouring
pads or steel wool as they will
damage or crack the hob plate or
damage the control panel.
• Dust, fat and liquids from food that
has boiled over must be removed
as soon as possible. If they are
allowed to harden they become
increasingly difficult to remove. Do
not use a knife or other sharp
utensil as these may damage the
ob plate or control panel.
h
Air entry and air vent:
• After long periods of use dirt and
ust may accumulate in the air
d
entry or air vent. Clean with a soft
flexible brush. Never wash using
ater.
w
service and customer
care
l
If the cord is damaged it must, for
safety reasons, be replaced by
KENWOOD or an authorised
KENWOOD repairer.
l
If you experience any problems
with the operation of your
appliance, before requesting
assistance refer to the
“troubleshooting guide” section in
the manual or visit
www.kenwoodworld.com.
l
Please note that your product is
covered by a warranty, which
complies with all legal provisions
problems suggestions
After the appliance is plugged • Check that the plug is inserted correctly
in and the power button is and that the power is switched on.
turned on
no indicators are lit • Where fitted check the plug fuse.
The LED display light up, but • Check that pan is present.
heating does not start when • Check suitability of the pan.
power control is adjusted • Check that pan is centrally located.
Heating stops suddenly •Check power supply to the appliance.
during operation •Check the air entry or the air vent is
Failure codes occur: • Appliance may have overheated/boiled
E3, E6 dry. Unplug the appliance, allow to cool
E7, E8 • Fluctuation in mains supply. Unplug the
E1, E2, E4, E5, Eb • Send it to a service facility for repair.
not blocked.
• Check the timing period has not ended.
• Check the appliance has not overheated
or entered error mode – unplug, allow to
cool and try again later.
and try again later.
appliance and wait until the power
supply is stable.
9

Nederlands
ouw de voorpagina a.u.b. uit voordat u begint te lezen. Op deze
V
anier zijn de afbeeldingen zichtbaar
m
veiligheid
l
Lees deze instructies zorgvuldig door en
bewaar ze voor toekomstig gebruik.
l
Verwijder alle verpakking en labels.
belangrijke opmerking - medische
implantaten
l
De inductieplaat genereert magnetische
velden met kort bereik. Gebruikers of
andere personen met een pacemaker of
ander actief implantaat dienen vóór gebruik
een arts te raadplegen over eventuele
incompatibiliteit zodat eventueel gevaar
voor de gezondheid voorkomen kan
worden.
l
Dompel het apparaat, het snoer of de
stekker niet in water of een andere
vloeistof onder.
l
Gebruik nooit een beschadigd apparaat,
snoer of stekker. Laat het nakijken of
repareren: zie Onderhoud en
klantenservice.
l
Laat het apparaat niet zonder toezicht
wanneer het in gebruik is.
l
Laat het snoer niet over de rand van de
tafel of het werkoppervlak hangen en laat
het niet in contact komen met hete
oppervlakken.
l
Haal de stekker van het apparaat uit het
stopcontact als u het niet gebruikt of vóór
u het reinigt.
l
Zorg dat de elektrische snoeren van
andere apparaten in de buurt niet in
contact kunnen komen met de
10

inductieplaat.
l
Sommige delen zijn tijdens en na gebruik
van de inductieplaat erg heet. De
inductieplaat blijft heet door de restwarmte.
Hete delen niet aanraken.
l
De pan en inhoud blijven na gebruik heet.
l
Plaats de pan na verwijdering van de
inductieplaat op een hittebestendig
oppervlak.
l
Maak geen krassen op de inductieplaat
met scherpe objecten.
l
Gebruik de inductieplaat niet als
werkoppervlak.
l
Gebruik de inductieplaat nooit voor opslag.
l
Gebruik de inductieplaat niet als deze
gebroken of gebarsten is.
l
Plaats geen hete of scherpe werktuigen of
pannen op de bedieningselementen.
l
Leg nooit papier, aluminiumfolie, textiel,
plastic of andere niet verwante objecten op
de inductieplaat als deze in gebruik of heet
is. Het folie waarmee voedsel tijdens het
koken afgedekt is, mag niet direct met de
inductieplaat in contact komen.
l
Laat het handvat van uw pan voor de
veiligheid nooit over het werkoppervlak
steken.
l
Zorg vóór u gaat koken dat de onderkant
van de pan en de inductieplaat geen water,
vet of ander vuil bevatten.
l
Gebruik geen pannen met ruwe onderkant;
deze kunnen de inductieplaat krassen.
l
Zorg dat de luchtinlaten of ventilatiegaten
niet afgedekt of geblokkeerd zijn. Zorg dat
er altijd genoeg ventilatie is rond de
inductieplaat wanneer deze in gebruik is.
11

12

l
De inductieplaat mag niet gebruikt worden
onder gordijnen en ander brandbaar
materiaal.
l
Haal tijdens het gebruik nooit de stekker
van de inductieplaat uit het stopcontact,
zonder het apparaat eerst uit te schakelen.
l
Gebruik het apparaat nooit op een
gasfornuis of op een
aanrecht/werkoppervlak van roestvrij staal
of ijzer.
l
Plaats dit apparaat niet op of in de buurt
van een open vlam, hete plaat of in een
hete oven.
l
Gebruik dit apparaat niet als een
warmhoudplaatje.
l
Gebruik de inductieplaat uitsluitend om
voedsel in geschikte pannen te verwarmen
en nergens anders voor.
l
Gebruik geen pannen die leeg zijn.
l
In het onwaarschijnlijke geval dat de
inhoud van de pan vlam vat: schakelt u het
apparaat uit, dooft u het vuur in de pan
met een vochtige doek en laat u de pan
volledig afkoelen voor u hem vastpakt.
l
Net als met andere inductieplaten, is het
belangrijk dat u de hittebron bij het
stopcontact uitschakelt en de pan laat
afkoelen voor u een pan verwijdert die per
ongeluk oververhit is geraakt en
drooggekookt is.
l
Oververhitting dient te allen tijde vermeden
te worden. Herhaalde oververhitting kan
uw pannen permanent beschadigen.
l
Metalen objecten zoals messen, vorken,
lepels en deksels mogen niet op het
kookoppervlak worden gelegd, omdat ze
13

l
Dit apparaat is niet bedoeld voor
bediening door een externe timer of een
afzonderlijk afstandsbedieningssysteem.
geschikte pannen
l
Gebruik uitsluitend pannen met een
gladde bodem die geschikt zijn voor
gebruik op een inductieplaat. Als u twijfelt
aan de geschiktheid, kunt u contact
opnemen met de fabrikant van uw
pannen. Als de pannen niet geschikt zijn,
worden ze niet door de inductieplaat
gedetecteerd.
l
De inductieplaat is geschikt voor pannen
met een bodem met een doorsnede van
12 – 22 cm.
l
Het gebruik van metalen kookgerei wordt
afgeraden, omdat dit door de inductieplaat
verhit kan worden als het tijdens het koken
dan heet kunnen
worden.
l
Plaats geen
creditcards,
magnetische
media of gevoelige
elektronische
apparatuur in de
buurt van het
apparaat wanneer
dit in gebruik is.
l
Gebruik het
apparaat niet
buiten.
l
De inductieplaat
moet tijdens het
gebruik horizontaal
geplaatst zijn op
een vlakke,
hittebestendige
ondergrond, ten
minste 10 cm
verwijderd van alle
muuroppervlakken.
l
Kinderen van 8
jaar en ouder
mogen dit
apparaat reinigen
en
gebruikersonderho
ud uitvoeren in
overeenstemming
14

met de
gebruikersinstructie
s, mits ze onder
toezicht staan van
iemand die
verantwoordelijk is
voor hun veiligheid
en instructies
hebben gekregen
over het gebruik
van het apparaat
en zich bewust zijn
van de gevaren.
l
Personen met
verminderde
lichamelijke,
sensorische of
geestelijke
capaciteiten of
gebrek aan kennis
die dit apparaat
gebruiken, moeten
onder toezicht
staan of instructie
hebben gekregen
over het veilig
gebruik van het
apparaat en de
betrokken zich
bewust zijn van de
gevaren.
l
Kinderen mogen
niet met het
apparaat spelen,
en het apparaat en
snoer moeten
buiten het bereik
van kinderen
worden gehouden
die jonger zijn dan
8 jaar.
l
Gebruik het
apparaat alleen
voor het
huishoudelijke
gebruik waarvoor
het is bedoeld.
Kenwood kan niet
aansprakelijk
worden gesteld in
het geval dat het
apparaat niet
correct is gebruikt,
of waar deze
instructies niet
worden opgevolgd.
15

óór u de stekker in het
v
stopcontact steekt
l
org dat u hetzelfde voltage
Z
ebruikt als op de onderzijde van
g
uw inductieplaat is aangegeven.
l
it apparaat voldoet aan EG
D
erordening 1935/2004 inzake
V
materialen en voorwerpen bestemd
m met levensmiddelen in contact
o
e komen.
t
vóór u de inductieplaat voor de
eerste keer gebruikt
Veeg de inductieplaat af (zie
onderhoud en reiniging).
legenda
nductieplaat
A i
B panraster
C regeltoets
an/stand-bytoets
D a
E menu/insteltoets
F menu/timertoets omhoog
ED-display
G L
H menu/timertoets omlaag
I tijdtoets
J turbotoets
gebruik van uw
inductieplaat
NB: De toetsen op de inductieplaats
zijn temperatuurgevoelig; ze worden
bediend door er een vingerkussen op
te plaatsen. Niet met een vingernagel
aantikken.
16

Steek de stekker in het
1
stopcontact. Het apparaat geeft
één pieptoon, het LED-display
nippert en geeft een "L" weer. Het
k
apparaat staat nu in de
wachtstand.
Druk op de aan/standby-knop D.
2
Het aan/standby-lampje begint te
nipperen en de ventilator gaat
k
aan. Het apparaat staat nu in de
wachtstand en is klaar om te
verwarmen.
3 Zet de pan in het midden van de
inductieplaat, binnen het panraster
– zoals aangegeven door de lijnen
op de inductieplaat B.
NB: Het vermogensniveau of
de temperatuur en de kooktijd
kunnen worden ingesteld met
de regeltoets (C) of de toetsen
omhoog / omlaag ( + / - ) (F en
H). Om de regeltoets (C) te
kunnen gebruiken, drukt u
hem in tot hij klikt en laat hem
vervolgens los. U kunt de toets
vervolgens rechtsom draaien
om het vermogen hoger in te
stellen of linksom om het
vermogen lager in te stellen.
Als de inductieplaat is
ingeschakeld terwijl er geen
pan op staat, schakelt de plaat
na 1 minuut over op de standbymodus en is klaar om te
verwarmen.
Als geen menu is
ingesteld/geselecteerd,
schakelt de plaat na 10
seconden over op de standbymodus.
4 Selecteer de gewenste menu-
instelling met de menu/insteltoets
E.
Vermogen – druk één keer op
‘menu/instellen' en het standaard
vermogenniveau van 1600 watt
wordt geselecteerd; op het display
wordt 1600 weergegeven en het
vermogenslampje gaat branden.
Het normale vermogensbereik is
van 120 W tot 2000 W in de
volgende stappen:
20 W - 400 W - 500 W - 800 W -
1
1000 W - 1200 W - 1400 W 1600 W - 1800 W - 2000 W
erhoog of verlaag tot het
V
gewenste vermogen
De plaat begint te verhitten Als
een andere toets wordt ingedrukt,
g
blijft de plaat gedurende 2 uur
verhitten; daarna wordt
automatisch overgeschakeld op de
stand-bymodus.
Temperatuur – druk één keer op
‘menu/instellen' en de standaard
temperatuur van 140 °C wordt
geselecteerd; op het display wordt
140 weergegeven en het
temperatuurlampje gaat branden. Het
temperatuurbereik is 60 °C tot 240
°C in stappen van 20 °C; verhoog of
verlaag tot de gewenste temperatuur.
De plaat begint te verhitten Als geen
andere toets wordt ingedrukt, blijft de
plaat gedurende 2 uur verhitten;
daarna wordt automatisch
overgeschakeld op de standbymodus.
Warm houden – druk driemaal op
‘menu/instellen' en de inductieplaat
schakelt naar de stand Warm
houden; het lampje Warm houden
gaat branden.
De warmhoudtemperatuur is
ongeveer 60 °C; op het display wordt
" ----" weergegeven. Als geen andere
toets wordt ingedrukt, blijft de plaat
gedurende 2 uur op de
warmhoudtemperatuur; daarna wordt
automatisch overgeschakeld op de
stand-bymodus.
5 Kooktijd.
De inductieplaat kan worden
ingesteld op een vaste kooktijd.
Nadat de menukeuzes zijn
ingesteld zoals hierboven
beschreven, drukt u op de
tijdtoets; op het display knippert
vier keer "0:00" en het tijdlampje
gaat branden. Draai de regeltoets
of druk op de + / - toetsen om de
gewenste kooktijd te selecteren.
Door uw vinger op de toetsen te
houden neemt de tijd steeds met
10 minuten toe of af.
17

l
tof, vet en vloeistoffen van voedsel
S
dat overgekookt is, moet zo vlug
mogelijk worden verwijderd. Als deze
ard worden, is het steeds moeilijker
h
ze te verwijderen. Gebruik
geen mes
of ander scherp gereedschap,
angezien deze de inductieplaat of
a
het bedieningspaneel kunnen
beschadigen.
Luchtinlaat en ventilatiegaten:
l
Nadat het apparaat langere tijd
gebruikt is, kunnen zich vuil en stof
in de luchtinlaat of ventilatiegaten
ophopen. Met een zachte flexibele
borstel reinigen. Nooit met water
wassen.
onderhoud en
klantenservice
l
Als het snoer beschadigd is, moet
het om veiligheidsredenen door
KENWOOD of een door KENWOOD
geautoriseerd reparatiebedrijf
vervangen worden.
l
Als u problemen ondervindt met de
werking van de machine, raadpleegt
u de informatie onder 'problemen
oplossen' in deze handleiding of
gaat u naar
www.kenwoodworld.com.
l
Dit product is gedekt door een
garantie die voldoet aan alle
wettelijke regels voor bestaande
garanties en consumentenrechten
die gelden in het land waar het
product is gekocht.
l
Als uw Kenwood product niet goed
functioneert of als u defecten
opmerkt, kunt u het naar een erkend
Service Center van KENWOOD
sturen of brengen. Voor informatie
over het KENWOOD Service Center
in uw buurt gaat u naar
www.kenwoodworld.com of naar de
specifieke website in uw land.
ELANGRIJKE INFORMATIE
B
OOR DE JUISTE
V
VERWIJDERING VAN HET
RODUCT VOLGENS DE
P
UROPESE RICHTLIJN
E
BETREFFENDE AFGEDANKTE
ELEKTRISCHE EN
ELEKTRONISCHE APPARATUUR
(AEEA)
Aan het einde van de levensduur van
het product mag het niet samen met
het gewone huishoudelijke afval
worden verwerkt. Het moet naar een
speciaal centrum voor gescheiden
afvalinzameling van de gemeente
worden gebracht, of naar een
verkooppunt dat deze service
verschaft. Het apart verwerken van een
huishoudelijk apparaat voorkomt
mogelijke gevolgen voor het milieu en
de gezondheid die door een
ongeschikte verwerking ontstaan en
zorgt ervoor dat de materialen waaruit
het apparaat bestaat, teruggewonnen
kunnen worden om een aanmerkelijke
besparing van energie en grondstoffen
te verkrijgen. Om op de verplichting tot
gescheiden verwerking van elektrische
huishoudelijke apparatuur te wijzen, is
op het product het symbool van een
doorgekruiste vuilnisbak aangebracht.
18

probleemoplossingsgids
roblemen suggesties
p
Nadat de stekker in het • Controleer of de stekker op de juiste
stopcontact is gestoken en manier in het stopcontact gestoken
e aan/uittoets is is en dat het apparaat is
d
ingeschakeld, gaan geen ingeschakeld
indicatielampjes branden • Controleer de zekering als het apparaat er
en heeft
e
Het LED-display gaat branden, • Controleer of er een pan op de plaat
maar het apparaat begint staat
niet te verwarmen als de • Controleer of de pan geschikt is
intensiteit is ingesteld. • Controleer of de pan midden op de plaat
staat
De plaat houdt tijdens het • Controleer de stroomtoevoer naar
gebruik plotseling op met het apparaat
verwarmen • Controleer of de luchtinlaat of de
Er worden foutcodes • Het apparaat kan oververhit zijn of is
weergegeven: E3, E6 droog gekookt. Haal de stekker uit het
E7, E8 • De stroomvoorziening fluctueert.
E1, E2, E4, E5, Eb • Stuur het apparaat naar een
ventilatiegaten geblokkeerd zijn
• Controleer of de ingestelde tijd verlopen is
• Controleer of het apparaat oververhit is of
zich in foutmodus bevindt – haal de
stekker uit het stopcontact, laat het
apparaat afkoelen en probeer opnieuw
stopcontact, laat het apparaat afkoelen en
probeer opnieuw
Haal de stekker uit het stopcontact en
wacht tot de stroomvoorziening stabiel is.
onderhoudsbedrijf voor reparatie
19

Français
vant de lire, veuillez déplier la première page contenant les
A
llustrations
i
sécurité
l
Lisez et conservez soigneusement ces
instructions pour pouvoir vous y référer
ultérieurement.
l
Retirez tous les éléments d’emballage et
les étiquettes.
Avis important - implants médicaux
l
La plaque à induction génère des champs
magnétiques à courte portée. Si l'utilisateur
ou une personne à proximité possède un
pacemaker ou tout autre implant actif,
veuillez consulter un médecin avant toute
utilisation pour obtenir des informations sur
les questions d'incompatibilté éventuelle
ceci afin d'éviter tout problème de santé.
l
Veuillez ne pas plonger l'appareil, le cordon
d'alimentation ou la prise dans l'eau ou
dans tout autre liquide.
l
N'utilisez jamais un appareil endommagé ni
un cordon ou une prise abîmés. Faites-les
vérifier ou réparer : reportez-vous à la
rubrique " service clients et service aprèsvente ".
l
Ne laissez jamais l'appareil sans
surveillance lorsque vous l'utilisez.
l
Ne laissez pas le cordon pendre par
dessus le bord de la table ou de la surface
de travail, ni toucher des surfaces
chaudes.
l
Débranchez toujours l'appareil lorsqu'il
n'est pas utilisé ou avant de le nettoyer.
l
Assurez-vous que les cordons électriques
raccordés à d'autres appareils à proximité
ne sont pas en contact avec la plaque à
20

induction.
l
Pendant et après l'utilisation de la plaque à
induction certaines pièces peuvent devenir
très chaudes. Le plan de cuisson
demeurera chaud du fait de la chaleur
résiduelle.
l
Ne touchez pas les pièces chaudes.
l
La poêle et son contenu demeureront
chauds après utilisation. Lorsque vous
retirez la poêle de la plaque à induction,
posez-la sur une surface résistante à la
chaleur.
l
Ne frottez pas la plaque chaude avec des
objets tranchants.
l
N'utilisez pas le plan de cuisson comme
surface de travail.
l
N'utilisez jamais le plan de cuisson pour
entreposer des affaires.
l
N'utilisez pas la plaque à induction si le
plan de cuisson est brisé ou fissuré d'une
quelconque manière.
l
Ne posez pas des poêles ou des
ustensiles tranchants ou chauds sur les
commandes.
l
Ne posez jamais du papier, des feuilles
d'aluminium, un torchon ou des matières
plastiques, ou tout autre objet inapproprié
sur la plaque à induction lorsque celle-ci
est en cours d'utilisation ou chaude. Les
feuilles utilisées pour recouvrir les éléments
lors de la cuisson ne doivent pas entrer en
contact direct avec le plan de cuisson.
l
Pour des raisons de sécurité, ne laissez
jamais le manche de votre poêle dépasser
par dessus la surface de travail.
l
Veillez à ce que le dessous de la poêle de
21

cuisson et le plan de cuisson ne
comportent aucune trace d'eau, de graisse
ou toute autre impureté avant de lancer la
cuisson.
l
N'utilisez pas de poêles à fond épais car
vous pourriez rayer le plan de cuisson.
l
Veillez à ce que l'arrivée d'air ou les
aérations ne soient en aucune façon
obstruées ni recouvertes. Assurez-vous
que la ventilation autour de plaque à
induction fonctionne correctement
lorsqu'elle est en service.
l
La plaque à induction ne doit jamais être
placée à proximité ou en-dessous de
rideaux ou autres matériaux combustibles.
l
Ne débranchez jamais la plaque à
induction lorsqu'elle fonctionne sans l'avoir
au préalable éteinte.
l
N'utilisez jamais l'appareil sur une gazinière
ou sur des surface de travail / plans de
travail en acier inoxydable ou en fer.
l
Ne posez pas cet appareil sur ou à
proximité d'un brûleur à gaz, une plaque
chauffante, ni dans un four chaud.
l
N'utilisez pas cet appareil comme plaque
chauffante.
l
N'utilisez pas la plaque à induction pour
réchauffer autre chose que des aliments
dans des poêles adaptées.
l
Ne l'utilisez jamais avec des poêles vides.
l
Dans l'éventualité peu probable que le
contenu de la poêle prenne feu : mettez
l'appareil hors tension au niveau de la prise
murale, recouvrez la poêle d'un chiffon
humide et laissez refroidir complètement
avant de poursuivre.
22

l
Comme avec toutes les plaques, en cas
de surchauffe accidentelle de la casserole
et si le contenu est arrivé à évaporation
complète vous devez dès lors éteindre la
source de chaleur à partir la prise murale
avant de retirer la casserole de la plaque à
induction, et laisser ensuite la casserole
refroidir.
l
Il est impératif d'éviter de trop faire
chauffer. Le fait de trop faire chauffer de
manière répétée peut endommager votre
casserole.
l
Des objets en métal, tels que des
couteaux, des fourchettes, des cuillères ou
des couvercles, ne doivent pas être posés
sur la plaque de cuisson car ils pourraient
chauffer.
l
Ne mettez pas à proximité des cartes de
crédit, des supports magnétiques ou des
équipements électroniques sensibles
lorsque l'appareil est en cours d'utilisation.
l
N'utilisez pas l'appareil à l'extérieur.
l
Lorsqu'elle fonctionne, la plaque à
induction doit être placée horizontalement,
sur une surface plane, résistante à la
chaleur, à au moins 10 cm des parois du
mur.
l
Les enfants âgés de 8 ans et plus peuvent
utiliser, nettoyer et effectuer la maintenance
utilisateur de cet appareil conformément au
Mode d'emploi Utilisateur, à condition
qu'ils se trouvent sous la surveillance d'une
personne responsable de leur sécurité et
qu'ils aient reçu les instructions relatives à
l'utilisation de l'appareil, et eu
connaissance des risques potentiels.
l
Les personnes dont les capacités
23

physiques, sensorielles ou mentales sont
diminuées, ou qui ne disposent pas de
connaissances quant à l'utilisation de cet
appareil, doivent avoir été formées ou
encadrées pour son utilisation en toute
sécurité et avoir connaissance des risques
potentiels.
l
Les enfants ne doivent pas jouer avec cet
appareil ; le cordon et l'appareil doivent
être tous deux tenus hors de portée des
enfants de moins de 8 ans.
l
N’employez l’appareil qu’à la fin
domestique prévue. Kenwood décline
toute responsabilité dans les cas où
l’appareil est utilisé incorrectement ou que
les présentes instructions ne sont pas
respectées.
l
Cet appareil n’est pas destiné à être utilisé
à l’aide d’un minuteur externe ou d’un
système de télécommande séparé.
batterie de cuisine adaptée
l
Utilisez uniquement des poêles à font plat
qui conviennent pour une utilisation sur
une plaque à induction. Si vous avez un
doute, vérifiez auprès du fabricant de vos
poêles. Si les poêles ne conviennent pas,
la plaque à induction ne détectera pas la
poêle utilisée.
l
La plaque à induction convient pour les
poêles ayant à la base un diamètre de 12
à 22 cm.
l
Il est déconseillé d'utiliser des ustensiles
avant de brancher la plaque
l
Assurez-vous que l'alimentation
électrique correspond à celle
indiquée sous votre plaque à
induction.
l
Cet appareil est conforme au
règlement 1935/2004 de la CE sur
les matériaux et les articles
destinés au contact alimentaire.
24

vant d'utiliser votre plaque à
a
induction pour la première
ois,
f
ssuyez à l'aide d'un chiffon la
E
plaque - reportez-vous à la section "
ntretien et nettoyage ".
e
légende
A plan de cuisson
B repère pour poser les casseroles
C bouton de commande
D bouton marche / arrêt
E bouton menu / réglage
F bouton monter temps de cuisson
/ menu
G affichage DEL
H bouton baisser temps de cuisson
/ menu
I bouton temps de cuisson
J bouton turbo
euvent être réglès à l'aide du
p
bouton de commande C ou des
u des boutons F et H monter
o
baisser ( + / - ). Pour utiliser
/
le bouton de commande C,
ppuyez dessus jusqu'à
a
ntendre un clic, puis
e
relâchez-le. Il peut être tourné
ans le sens des aiguilles
d
'une montre pour monter, ou
d
dans le sens inverse des
aiguilles d'une montre pour
baisser.
Si la plaque est allumée mais
sans casserole posée dessus,
la plaque passera alors en
mode pause, prête à chauffer,
au bout d'1 minute.
Si aucun menu n'est réglé /
sélectionné, la plaque passera
en mode pause au bout de 10
secondes.
utilisation de votre
plaque à induction
Remarque : les boutons sur la
plaque sont sensibles à la chaleur ;
pour les faire fonctionner, il faut
appuyer dessus du bout des doigts.
Ne tapez pas dessus avec l'ongle.
1 Branchez la plaque à induction.
L'appareil émet alors un seul bip,
l'affiche DEL clignote et indique “ L
”. L'appareil est désormais en
mode pause.
2 Appuyez sur le bouton marche /
arrêt D, le témoin lumineux marche
/ pause clignote et le ventilateur
est enclenché. L'appareil est
désormais en mode pause, prêt à
chauffer.
3 Posez la poêle au centre sur la
plaque à induction, à l'intérieur du
cercle, en vous aidant du repère
comme le montre le schéma B, sur
le plan de cuisson.
Remarque : le niveau de
puissance ou de température
et le temps de cuisson
4 Sélectionnez le réglage du menu
souhaité à l'aide du bouton E
menu / réglage.
Puissance - appuyez une fois
sur
" menu / réglage " et le niveau de
puissance par défaut de 1 600
watts est dès lors sélectionné,
l'affichage indique " 1 600 " et le
témoin lumineux de puissance est
allumé. L'échelle de puissance
normale va de 120 w à 2 000 w
par phases suivantes :
120 w - 400 w - 500 w - 800 w 1 000 w - 1 200 w - 1 400 w - 1
600 w - 1 800 w - 2 000 w
Augmenter ou dimunuer la
puissance souhaitée. La cuisson
débute. Si aucun autre bouton
n'est appuyé, la cuisson
continuera pendant 2 heures et
passera automatiquement en
mode pause.
Température - appuyez deux
fois sur ‘menu / réglage’ et la
température par défaut de 140°C
est sélectionnée, l'affichage indique
‘140’ et le témoin lumineux de
température est allumé. L'échelle
de température va de 60°C à
240°C par phases de 20°C ;
25

ugmentez ou diminuez selon la
a
température souhaitée. La cuisson
débute. Si aucun autre bouton
'est appuyé, la cuisson
n
continuera pendant 2 heures et
passera automatiquement en
ode pause.
m
Conserver au chaud - appuyez
trois fois sur ‘menu / réglage’ et la
plaque à induction passe en mode
de maintien au chaud, et le témoin
lumineux correspondant s'affiche.
Conservez au chaud sur environ
60° C ; l'affichage indique " ----".
Si aucun autre bouton n'est
appuyé, la cuisson continuera
pendant 2 heures et passera
automatiquement en mode pause.
5 Temps de cuisson.
La plaque peut être utilisée pour
cuire pendant une période
déterminée. Après avoir
sélectionné le menu comme
indiqué ci-dessus, appuyez sur le
bouton " temps de cuisson" ;
l'affichage clignote quatre fois avec
" 0:00 " et le témoin lumineux du
temps de cuisson s'allume.
Tournez le bouton de commande
ou appuyez sur les boutons + / pour sélectionner le temps de
cuisson souhaité. En mettant le
doigt sur les boutons, vous pouvez
monter / baisser le temps par
phases de 10 minutes.
Une fois le temps sélectionné, il
clignote quatre fois et l'affichage
demeure ensuite fixe, confirmant
ainsi que le temps a été enregistré.
Vous pouvez également juste
appuyer une nouvelle fois sur "
temps "pour confirmer. Après cela,
l'horloge va commencer le
décompte ; et l'affichage indiquera
alternativement le temps restant et
la puissance ou la température
réglée.
La durée maximale de cuisson
pouvant être réglée est de 3
heures.
Une fois le temps de cuisson réglé,
le minuteur va commencer le
décompte au bout de 5 secondes.
urant la cuisson à durée
D
déterminée, le fait d'appuyer sur +
ou - ou de tourner le bouton de
ommande permet de changer la
c
puissance ou la température et
d'annuler le temps de cuisson
rédéfini.
p
Une fois la durée de cuisson
sélectionnée, il faut appuyer
sur le bouton " marche / arrêt
" avant de poursuivre la
cuisson.
6 Fonction Turbo.
Le fait d'appuyer sur ‘turbo’
pendant la cuisson fait passer la
puissance de cuisson sur 2 100
watts pendant 30 secondes ;
après quoi la plaque revient à la
puissance ou la température réglée
antérieurement.
remarques : lorsque la plaque à
induction fonctionne, un son
intermittent haute fréquence est
émis et le ventilateur se met en
marche. C'est normal.
Une fois la casserole retirée de la
plaque, cette dernière arrête
immédiatement de chauffer et un
bip retentit toutes les 2 secondes.
Les réglages / affichages existants
clignotent. Si la casserole n'est pas
remise sur la plaque dans les 60
secondes, cette dernière arrête
automatiquement de chauffer et
passe en mode pause.
7 Appuyez sur le bouton marche /
pause lorsque vous avez fini la
cuisson, le cuiseur arrête dès lors
de chauffer et repasse en mode
pause. Le voyant DEL clignote et
indique “ H ” tant que la plaque
demeure chaude, puis il indique “ L
” lorsque la plaque refroidit.
l
Dans la mesure où le
fonctionnement de cette plaque à
induction différe légèrement d'une
plaque classique, certains
ajustements peuvent s'avérer
nécessaires concernant les temps
de cuisson et les seuils de
température pour obtenir les
résultats escomptés.
26

stuces
a
l
Pour réduire le temps de cuisson,
ous pouvez tourner la commande
v
e puissance sur la position max
d
lorsque vous allumez l'appareil.
près une courte période, vous
A
ouvez régler la commande de
p
puissance sur la position
ouhaitée.
s
l
près une courte période
A
d'utilisation, avec l'expérience,
vous saurez quel réglage convient
le mieux à vos besoins.
l
Le contenu des casseroles est plus
vite réchauffé avec la plaque à
induction.
mode minuteur
Remarque : si le minuteur
n'est pas réglé, la plaque
fonctionnera pendant une
durée maximale de 2 heures
en continu et passera ensuite
en mode pause.
Le minuteur ne peut être réglé qu'une
fois un niveau de puissance ayant été
sélectionné.
À l'aide des boutons de
commande tactiles, - touchez
fermement le bouton d'une
bout des doigts. Pour modifier
l'heure de plusieurs minutes,
touchez le bouton pour chaque
minute de réglage souhaitée.
1 Pour régler le minuteur, appuyez
sur le bouton ‘+’ ou ‘-’.
L'affichage du minuteur indique
‘0:00’ et clignote. Pour changer le
temps, appuyez sur ‘+’ ou ‘-’ pour
changer le temps d'une (1) minute
par pression. Pour régler
rapidement le temps par
incréments de 10 minutes,
maintenez votre doigt sur ‘+’ ou ’’. Le minuteur varie de 1 minute à
3 heures.
l
Le minuteur peut être réglé à tout
moment en appuyant sur les
boutons ‘+’ ou ‘-’ et en réglant
l'heure.
l
La fonction du minuteur peut être
annulée à tout moment en
reparamétrant l'heure sur ‘0’ ou en
27

errouillage de sécurité /
v
verrouillage enfants
a plaque à induction est équipée
L
'un verrouillage de sécurité qui
d
permet d'empêcher la plaque de
onctionner.
f
l
our verrouiller la plaque –
P
appuyez simultanément sur les
outons ‘+’ ‘-’. Dans ce mode-ci,
b
eul le bouton Allumé / Pause
s
fonctionne.
l
Pour déverrouiller la plaque
– appuyez sur les boutons ‘+’ et ‘-’
et maintenez-les ainsi pendant 3
secondes.
nettoyagte et entretien
l
Éteignez, débranchez et laissez
l'appareil refroidir complètement
avant de le nettoyer.
l
Ne plongez jamais la plaque à
induction dans l'eau.
Plan de cuisson, corps et
panneau de commandes :
l
Essuyez avec un chiffon doux,
humide ou un nettoyant non
abrasif, et séchez soigneusement.
Veillez à qu'il n'y ait plus de trace
de produit nettoyant. N'utilisez pas
de poudres ni de détergents
abrasifs, de tampons à récurer ou
de paille de fer car cela pourrait
rayer le plan de cuisson ou
endommager le panneau de
commande.
l
La poussière, le gras et les liquides
provenant des aliments qui se sont
déversés en cours de cuisson
doivent être retirés au plus vite. Si
vous laissez ces éléments durcir,
vous aurez ensuite beaucoup de
difficulté à les supprimer. N'utilisez
pas un couteau ou tout autre
ustensile tranchant car cela
pourrait endommager le plan de
cuisson ou le panneau de
commande.
Arrivée d'air et ventilations :
l
Après de longues périodes sans
utilisation, la poussière et la saleté
peuvent s'accumuler dans l'arrivée
d'air ou la ventilation. Nettoyez à
l'aide d'une brosse douce et
ouple. N'utilisez jamais d'eau.
s
service après-vente
l
Si le cordon est endommagé, pour
des raisons de sécurité, il doit être
emplacé par KENWOOD ou un
r
représentant KENWOOD agréée
l
Si vous rencontrez des problèmes
lors de l’utilisation de votre
appareil, reportez-vous à la section
« guide de dépannage » de ce
manuel ou consultez la page
www.kenwoodworld.com avant de
contacter le service après-vente.
l
N’oubliez pas que votre appareil
est couvert par une garantie, qui
respecte toutes les dispositions
légales concernant les garanties
existantes et les droits du
consommateur dans le pays où
vous avez acheté le produit.
l
Si votre appareil Kenwood
fonctionne mal ou si vous trouvez
un quelconque défaut, veuillez
l’envoyer ou l’apporter à un centre
de réparation KENWOOD autorisé.
Pour trouver des détails actualisés
sur votre centre de réparation
KENWOOD le plus proche, veuillez
consultez
www.kenwoodworld.com ou le site
internet spécifique à votre pays.
28
uprès des revendeurs assurant ce
a
ervice.
s
Éliminer séparément un appareil
lectroménager permet d'éviter les
é
etombées négatives pour
AVERTISSEMENTS POUR
'ÉLIMINATION CORRECTE DU
L
RODUIT CONFORMÉMENT
P
AUX TERMES DE LA
DIRECTIVE EUROPÉENNE
RELATIVE AUX DÉCHETS
D'ÉQUIPEMENTS
ÉLECTRIQUES ET
ÉLECTRONIQUES (DEEE).
Au terme de son utilisation, le produit
ne doit pas être éliminé avec les
déchets urbains.
Le produit doit être remis à l'un des
centres de collecte sélective prévus
par l'administration communale ou
r
l'environnement et la santé dérivant
'une élimination incorrecte, et
d
ermet de récupérer les matériaux
p
qui le composent dans le but d'une
économie importante en termes
d'énergie et de ressources. Pour
rappeler l'obligation d'éliminer
séparément les appareils
électroménagers, le produit porte le
symbole d'un caisson à ordures
barré.
guide de dépannage
problèmes suggestions
Une fois l'appareil branché et • Vérifiez que la prise est
le bouton d'alimentation allumé, correctement insérée et que
aucun indicateur ne s'affiche l'appareil est mis sous tension
L'affichage DEL s'allume mais • Vérifiez qu'il y a bien une casserole
l'appareil ne commence pas à sur la plaque
chauffer lorque la commande • Vérifiez que la casserole va bien sur
de puissance est ajustée la plaque
L'appareil arrête soudainement • Vérifiez l'alimentation éléctrique de
de chauffer en cours de l'appareil
fonctionnement • Vérifiez l'arrivée d'air ou vérifiez que la
Codes échec apparaissent • L'appareil peut avoir surchauffé /
suivants : E3, E6 être arrivé à évaporation complète.
E7, E8 • Variations de courant. Débranchez
E1, E2, E4, E5, Eb • Envoyez l'appareil à un setvice
• Au niveau de l'installation, vérifiez les
plombs
• Vérifiez que la casserole est bien posée
au centre de la plaque
ventilation n'est pas obstruée
• Vérifiez si la période du minuteur n'est
pas terminée
•Vérifiez que l'appareil n'a pas surchauffé
ou qu'il n'est pas passé en mode erreur –
débranchez, laissez refroidir et essayez
une nouvelle fois ultérieurement
Débranchez l'appareil, laissez refroidir et
essayez une nouvelle fois ultérieurement.
l'appareil et attendez que la tension se
stabilise.
29

Deutsch
or dem Lesen bitte die Titelseite mit den Illustrationen
V
useinanderfalten
a
Sicherheit
l
Lesen Sie diese Anleitungen sorgfältig
durch und bewahren Sie sie zur späteren
Bezugnahme auf.
l
Entfernen Sie sämtliche Verpackungen und
Aufkleber.
Wichtiger Hinweis: medizinische
Implantate
l
Der Induktionskocher erzeugt Magnetfelder
in seiner unmittelbaren Umgebung.
Benutzer oder Personen mit
Herzschrittmachern oder anderen aktiven
Implantaten sollten ärztlichen Rat einholen,
bevor sie in Berührung mit dem Gerät
kommen, um etwaige Gesundheitsrisiken
aufgrund von Unverträglichkeit zu
verhindern.
l
Gerät, Netzkabel oder Stecker nicht in
Wasser oder andere Flüssigkeiten tauchen.
l
Niemals ein defektes Gerät oder ein Gerät
mit defektem Netzkabel oder Stecker
benutzen. Überprüfen oder reparieren
lassen: Siehe „Service und Kundendienst“.
l
Gerät bei Gebrauch nicht unbeaufsichtigt
lassen.
l
Netzkabel nicht über die Tischkante oder
Arbeitsplatte herabhängen oder mit heißen
Oberflächen in Berührung kommen lassen.
l
Das Gerät bei Nichtgebrauch oder vor dem
Reinigen stets vom Netzstrom abtrennen.
l
Sicherstellen, dass Netzkabel von anderen
Geräten in unmittelbarer Nähe den
Induktionskocher nicht berühren.
30

l
Während oder nach Gebrauch des
Induktionskochers werden gewisse Teile
sehr heiß. Das Kochfeld bleibt aufgrund
seiner Nachwärme eine gewisse Zeit heiß.
Heiße Teile nicht berühren.
l
Topf und Inhalt bleiben nach Gebrauch
noch eine gewisse Zeit heiß.
l
Topf nach dem Entfernen vom
Induktionskochfeld auf eine
hitzebeständige Oberfläche stellen.
l
Kochfeld nicht mit scharfen Gegenständen
zerkratzen.
l
Induktionskochfeld nicht als Arbeitsfläche
benutzen.
l
Induktionskochfeld niemals als
Abstellfläche benutzen.
l
Induktionskocher nicht benutzen, wenn
das Kochfeld in irgendeiner Form
beschädigt oder gesprungen ist.
l
Keine heißen oder scharfen Utensilien und
keine Töpfe auf die Bedienungstasten
stellen.
l
Niemals Papier, Alufolie, Stoff und
Kunststoff oder sonstige nicht mit dem
Kochen verbundene Gegenstände auf das
eingeschaltete oder heiße Kochfeld legen.
Alufolie, die zum Abdecken von Speisen
beim Kochen verwendet wird, nicht in
direkten Kontakt mit dem Kochfeld
kommen lassen.
l
Aus Sicherheitsgründen den Topfgriff
niemals über die Arbeitsplatte herausragen
lassen.
l
Vor dem Kochen sicherstellen, dass die
Unterseite des Kochtopfs und das
Kochfeld frei von Wasser, Fett und
31

Schmutz sind.
l
Keine Töpfe mit rauem Boden benutzen,
da diese das Kochfeld zerkratzen könnten.
l
Luftzufuhr oder Lüftungsschlitze nicht
abdecken oder blockieren. Immer
sicherstellen, dass während des Betriebs
um den Induktionskocher herum genügend
Luftzufuhr besteht.
l
Den Induktionskocher nicht in unmittelbarer
Umgebung von Vorhängen oder anderen
flammbaren Materialien benutzen.
l
Den Induktionskocher während des
Betriebs stets zunächst abschalten und
dann vom Netzstrom trennen.
l
Das Gerät niemals auf einem Gasherd oder
auf Arbeitsplatten/Oberflächen aus
Edelstahl oder Eisen benutzen.
l
Dieses Gerät niemals auf oder in die Nähe
von offenen Flammen, Heizplatten oder in
einen heißen Ofen stellen.
l
Dieses Gerät niemals als Heizplatte
verwenden.
l
Den Induktionskocher nur zum Kochen von
Speisen in geeigneten Töpfen verwenden.
l
Niemals einen leeren Topf auf das
eingeschaltete Gerät stellen.
l
In dem unwahrscheinlichen Fall, dass der
Topfinhalt Feuer fängt: Den Netzstecker
ziehen, die Flammen im Topf mit einem
feuchten Tuch ersticken und den Topf vor
dem Berühren komplett abkühlen lassen.
l
Sollte (wie bei allen Kochern) das
Kochgeschirr versehentlich überhitzt
werden oder trockenkochen, den
Netzstecker ziehen und das Kochgeschirr
vor dem Entfernen abkühlen lassen.
32

33

l
Überhitzung grundsätzlich vermeiden.
Mehrmaliges Überhitzen kann Ihr
Kochgeschirr permanent beschädigen.
l
Metallgegenstände wie Messer, Gabeln,
Löffel und Deckel sollten nicht auf den
Kochbereich gelegt werden, da sie erhitzt
werden könnten.
l
Während des Gebrauchs keine
Kreditkarten, magnetischen Medien oder
empfindlichen elektronischen Geräte in der
Nähe des Kochers platzieren.
l
Das Gerät nicht im Freien benutzen.
l
Den Induktionskocher zum Betrieb
horizontal auf eine flache, hitzebeständige
Fläche in rundum mindestens 10 cm
Abstand zu Wandflächen aufstellen.
l
Kinder ab 8 Jahren können dieses Gerät
gemäß den bereitgestellten
Benutzeranleitungen verwenden, reinigen
und warten, solange sie dabei von einer für
ihre Sicherheit verantwortlichen Person
Vor dem Netzanschluss
l
Sicherstellen, dass die
Netzspannung mit den Angaben
auf der Unterseite des
Induktionskochers übereinstimmt.
l
Das Gerät entspricht der EGVerordnung Nr. 1935/2004 über
Materialien und Gegenstände, die
dazu bestimmt sind, mit
Lebensmitteln in Berührung zu
kommen.
Vor erstmaligem Gebrauch des
Induktionskochers
Wischen Sie das Kochfeld sauber
(siehe „Pflege und Reinigung“).
Schlüssel
A Kochfeld
B Topfmarkierung
C Regler
D Ein/Standby-Taste
E Menü-/Einstellungstaste
F Menü-/Zeitschaltuhr-Taste - Plus
G LED-Anzeige
H Menü-/Zeitschaltuhr-Taste -
Minus
I Zeittaste
J Turbo-Taste
34

Verwendung Ihres
Induktionskochers
Hinweis: Die Tasten des
Induktionskochers sind temperatur/berührungsempfindlich, sie werden
per Fingerdruck bedient. Nicht mit
dem Fingernagel drücken.
1 Stecken Sie das Netzkabel des
Induktionskochers ein. Es ertönt
ein Piepton. Die LED-Anzeige blinkt
und zeigt „L“. Das Gerät befindet
sich nun im Standby-Modus.
2 Drücken Sie die Ein/Standby-Taste
D. Die Ein/Standby-Anzeige blinkt
und der Ventilator läuft. Das Gerät
befindet sich nun im StandbyModus und ist betriebsbereit.
3 Setzen Sie den Topf mittig auf das
Induktionskochfeld B innerhalb der
Topfmarkierung (siehe Diagramm).
Hinweis: Die
Leistungsstufe/Temperatur und
die Kochzeit können über den
Regler C oder die
Zeitschaltuhr-Tasten ( + / - ) F
und H eingestellt werden.
Zur Bedienung des Reglers C
diesen nach innen drücken, bis
er einrastet, und dann wieder
freigeben.
Nun kann er zum Erhöhen und
Senken von
Leistung/Temperatur im oder
gegen den Uhrzeigersinn
gedreht werden.
Wurde der Induktionskocher
eingeschaltet, aber kein Topf
auf das Kochfeld gesetzt, geht
das Gerät nach einer Minute in
den betriebsbereiten StandbyModus über.
Wurde kein Menü eingestellt/
ausgewählt, geht das Gerät
nach 10 Sekunden in den
Standby-Modus über.
Wählen Sie die gewünschte
4
Menüeinstellung mit der Menü/Einstellungstaste E aus.
eistung – drücken Sie die
L
Menü-/Einstellungstaste ein Mal.
Es wird die Standardleistungsstufe
on 1600 Watt eingeschaltet, auf
v
der Anzeige erscheint „1600“ und
die Leistungs-LED leuchtet auf.
Der normale Leistungsbereich liegt
zwischen 120 W und 2000 W und
kann in folgenden Schritten
eingestellt werden:
120 W - 400 W - 500 W – 800 W
– 1000 W - 1200 W - 1400 W 1600 W - 1800 W - 2000 W
Erhöhen oder senken Sie die
Leistung je nach Bedarf.
Der Kochvorgang startet. Wenn
Sie keine andere Taste drücken,
wird der Kochvorgang zwei
Stunden lang fortgesetzt. Danach
geht das Gerät automatisch in den
Standby-Modus über.
Temperatur – drücken Sie die
Menü-/Einstellungstaste zwei Mal.
Es wird die Standardtemperatur
von 140°C eingeschaltet, auf der
Anzeige erscheint „140“ und die
Temperatur-LED leuchtet auf. Der
Temperaturbereich liegt zwischen
60°C und 240°C in Schritten von
jeweils 20°C; erhöhen oder senken
Sie die Temperatur je nach Bedarf.
Der Kochvorgang startet. Wenn
Sie keine andere Taste drücken,
wird der Kochvorgang zwei
Stunden lang fortgesetzt. Danach
geht das Gerät automatisch in den
Standby-Modus über.
Warmhalten – drücken Sie die
Menü-/Einstellungstaste drei Mal.
Die Warmhalte-Einstellung wird
eingeschaltet und die WarmhalteLED leuchtet auf.
Die Warmhalte-Temperatur liegt um
60°C; auf der Anzeige erscheint „ -
---“. Wenn Sie keine andere Taste
drücken, bleibt die WarmhalteFunktion zwei Stunden
eingeschaltet. Danach geht das
Gerät automatisch in den StandbyModus über.
35

Kochzeit
5
Sie können eine bestimmte
Kochzeit einstellen. Wählen Sie das
enü wie oben beschrieben aus,
M
drücken Sie die Zeittaste (Time);
auf der Anzeige blinkt „0:00“ vier
al und die Zeit-LED leuchtet auf.
M
Drehen Sie den Regler oder
drücken Sie die Plus- und
Minustasten ( + / - ), um die
gewünschte Kochzeit zu wählen.
Wenn Sie die Finger auf einer der
Tasten gedrückt halten, wird die
Zeit in 10-Minuten-Schritten erhöht
oder gesenkt.
Nachdem Sie die Zeit eingestellt
haben, blinkt die Anzeige vier Mal
auf und leuchtet dann stetig, um
die Einstellung zu bestätigen. Sie
können zur Bestätigung auch die
Zeittaste erneut drücken. Daraufhin
läuft die Uhr und auf der Anzeige
erscheinen abwechselnd die
verbleibende Zeit und die
eingestellte Leistung oder
Temperatur.
Die maximal einstellbare Kochzeit
beträgt drei Stunden.
Die Zeitschaltuhr setzt fünf
Sekunden nach eingestellter
Kochzeit ein.
Wenn Sie bei eingestellter Kochzeit
die Plus- oder Minustaste ( + / - )
drücken bzw. den Regler drehen,
werden Leistung oder Temperatur
geändert und die eingestellte
Kochzeit gestoppt.
Nach Abschluss der
eingestellten Kochzeit
müssen Sie die Ein/StandbyTaste drücken, um weiter
kochen zu können.
6 Turbo-Funktion
Wenn Sie während des
Kochvorgangs „Turbo“ drücken,
wird die Kochleistung 30
Sekunden lang auf 2100 Watt
erhöht; danach kehrt der Kocher
zu der zuvor eingestellten Leistung
oder Temperatur zurück.
Hinweise: Wenn der
Induktionskocher in Betrieb ist,
hören Sie gelegentlich einen
ochfrequenzton und der
H
Ventilator läuft. Das ist normal.
Sobald der Topf vom Kochfeld
enommen wird, deaktiviert es sich
g
und ein Piepsignal ertönt alle 2
Sekunden.
ie derzeitigen Anzeigen/
D
Einstellungen blinken. Wird der
Topf nicht innerhalb von 60
Sekunden wieder auf das Kochfeld
gesetzt, schaltet sich das Kochfeld
aus und das Gerät geht
automatisch in den StandbyModus über.
7 Drücken Sie die Ein/Standby-Taste,
wenn Sie mit dem Kochen fertig
sind. Das Erhitzen wird gestoppt
und das Gerät kehrt in den
Standby-Modus zurück. Die LEDAnzeige blinkt; sie zeigt „H“ an,
während das Kochfeld noch heiß
ist, und dann „L“, während das
Kochfeld abkühlt.
l
Da dieser Induktionskocher etwas
anders funktioniert als ein
herkömmlicher Kochherd, müssen
Sie die Kochzeiten und temperaturen evtl. entsprechend
abändern, um die gewünschten
Ergebnisse zu erzielen.
Hinweise:
l
Zum Reduzieren der Kochzeit nach
dem Einschalten des Geräts
zunächst den Leistungsregler auf
die höchste Stufe stellen. Dann
nach kurzer Zeit die gewünschte
Leistungsstufe wählen.
l
Sie werden schnell lernen, welche
Einstellung Ihren Bedürfnissen
entspricht.
l
Bei Induktionskochern wird der
Topfinhalt schneller erhitzt.
Zeitschaltuhr-Modus
Hinweis: Bei nicht eingestellter
Zeitschaltuhr wird der
Induktionskocher maximal
zwei Stunden betrieben und
geht dann in den StandbyModus über.
Die Zeitschaltuhr kann erst nach der
Auswahl einer Leistungsstufe
36

ingestellt werden.
e
edienung der Touch-Control-
B
Tasten – mit der Fingerkuppe
uf die Taste tippen. Zum
a
erstellen der Zeit um mehrere
V
Minuten die Taste für jede
ewünschte Minute antippen.
g
1 Drücken Sie zum Einstellen der
eitschaltuhr die Plus oder
Z
Minustaste (+/-). Auf der Anzeige
erscheint „0:00“ und die LED
blinkt. Zum Einstellen der Zeit in 1Minute-Schritten drücken Sie kurz
auf die Plus- oder Minustaste (+/-).
Wenn Sie die Zeit schnell in 10Minuten-Schritten einstellen
möchten, halten Sie die Plus- oder
Minustaste gedrückt. Die
Zeitschaltuhr ist zwischen 1 Minute
und 3 Stunden einstellbar.
l
Die Zeitschaltuhr lässt sich
jederzeit anders einstellen, indem
Sie die Plus- oder Minustaste (+ / ) drücken und dann die
gewünschte Zeit einstellen.
l
Die Zeitschaltuhr kann jederzeit
gestoppt werden, indem Sie die
Zeit auf „0“ setzen oder die
Menütaste drücken.
2 Die Zeitschaltuhr setzt fünf
Sekunden nach eingestellter
Kochzeit ein.
3 Wenn die eingestellte Zeit
abgelaufen ist, ertönt ein
Piepsignal und das Gerät geht in
den Standby-Modus über.
4 Nach Ablauf der
voreingestellten Kochzeit
schaltet sich das Gerät
automatisch aus und geht in
den Standby-Modus über.
Sicherheitsfunktionen
l
Bei Nichtbetrieb des
Induktionskochers innerhalb einer
Minute geht er in den StandbyModus über.
l
Wenn bei Gebrauch ein Topf von
weniger als 12 cm Durchmesser
verwendet wird, ertönt circa eine
Minute lang ein Warnsignal. Wird in
dieser Zeit kein geeigneter Topf auf
das Kochfeld gestellt, geht der
37

nduktionskocher automatisch in
I
den Standby-Modus über.
l
Wenn sich das Gerät überhitzt
der ein Topf trockenkocht,
o
schaltet der Induktionskocher
automatisch eine Schutzfunktion
ur Regulierung der Hitze ein. Wird
z
das Überhitzen nicht gestoppt,
zeigt das Gerät u. U. einen
Schutzcode an (siehe
Fehlerbehebung).
l
Sollten beim Gebrauch
Netzstörungen auftreten, schaltet
der Induktionskocher automatisch
eine Schutzfunktion ein und zeigt
einen Schutzcode an.
l
Das Gerät vom Netzstrom trennen
und warten, bis die Störung
behoben wurde (siehe
Fehlerbehebung).
l
Wenn der Kochvorgang des
Geräts läuft und innerhalb von zwei
Stunden keine Taste gedrückt wird,
geht der Induktionskocher
automatisch in den StandbyModus über.
l
Sobald der Topf vom Kochfeld
genommen wird, stellt das Gerät
den Kochvorgang ein.
Sicherheits-/Kindersperre
Der Induktionskocher verfügt über
eine Sicherheitssperre, die seinen
Betrieb verhindert.
l
Induktionskocher sperren –
Plus- und Minustasten (+/-)
gleichzeitig drücken. In diesem
Modus funktioniert nur der
Ein/Standby-Taste.
l
Induktionskocher entsperren
– Plus- und Minustasten (+/-) 3
Sekunden lang gleichzeitig
drücken.
Pflege und Reinigung
l
Das Gerät vor dem Reinigen
ausschalten, vom Netzstrom
trennen und komplett abkühlen
lassen.
l
Den Induktionskocher niemals in
Wasser tauchen.
Kochfeld, Gehäuse und
Bedienfeld:
l
it einem weichen feuchten Tuch
M
oder nicht scheuernden
Reinigungsmittel abwischen und
ründlich abtrocknen.
g
Sicherstellen, dass alle Spuren des
Reinigungsmittels beseitigt wurden.
eine Scheuermittel,
K
Scheuerschwämme oder
Stahlwolle benutzen, da sie das
Koch- oder Bedienfeld
beschädigen oder Sprünge
verursachen können.
l
Staub, Fett oder übergekochte
Flüssigkeiten so bald wie möglich
entfernen. Sobald sie verhärten,
lassen sie sich weniger leicht
beseitigen. Keine Messer oder
anderen scharfen Gegenstände
benutzen, da diese das Kochoder Bedienfeld beschädigen
können.
Luftzufuhr und
Entlüftungsschlitz:
l
Nach langzeitigem Gebrauch
können sich Schmutz und Staub in
der Luftzufuhr oder dem
Lüftungsschlitz ansammeln. Mit
einer weichen, flexiblen Bürste
reinigen. Niemals Wasser
benutzen.
Kundendienst und
Service
l
Ein beschädigtes Netzkabel muss
aus Sicherheitsgründen von
KENWOOD oder einer autorisierten
KENWOOD-Kundendienststelle
ausgetauscht werden.
l
Sollten Sie irgendwelche Probleme
mit dem Betrieb Ihres Geräts
haben, ziehen Sie bitte den
Abschnitt „Fehlerbehebung“ zu
Rate oder besuchen Sie
www.kenwoodworld.com, bevor
Sie Hilfe anfordern.
l
Bitte beachten Sie, dass Ihr
Produkt durch eine Garantie
abgedeckt ist – diese erfüllt alle
gesetzlichen Anforderungen
hinsichtlich geltender Garantie- und
Verbraucherrechte in dem Land, in
dem das Produkt gekauft wurde.
38

Fehlerbehebung
roblem Lösungsvorschläge
P
as Gerät ist angeschlossen • Überprüfen, dass der Stecker richtig
D
nd eingeschaltet, doch keine eingesteckt und der Strom
u
der Anzeigen leuchten. eingeschaltet ist.
Die LED-Anzeige leuchtet, • Überprüfen, dass ein Topf aufgesetzt
doch bei Bedienung des wurde.
Leistungsreglers wird das • Eignung des Topfes überprüfen.
Kochfeld nicht erhitzt. • Sicherstellen, dass der Topf mittig steht.
Während des Betriebs wird • Die Stromzufuhr zum Gerät
der Heizvorgang plötzlich überprüfen.
unterbrochen. • Überprüfen, ob Luftzufuhr oder
Es werden Fehlercodes • Gerät u. U. überhitzt/Topf
angezeigt: E3, E6 trockengekocht. Vom Netzstrom trennen,
E7, E8 • Schwankungen in der
E1, E2, E4, E5, Eb, • An einen Kundendienst zur
Wenn vorhanden, die Steckersicherung
•
berprüfen.
ü
Lüftungsschlitz blockiert ist.
• Überprüfen, ob die eingestellte Zeit
abgelaufen ist.
• Überprüfen, dass sich das Gerät nicht
überhitzt hat oder in einen Fehlermodus
versetzt wurde; vom Netzstrom trennen,
abkühlen lassen und später erneut
versuchen.
abkühlen lassen und später erneut
versuchen.
Stromversorgung. Gerät vom Netzstrom
trennen und warten, bis sich die
Stromversorgung stabilisiert hat.
Reparatur schicken
39

Italiano
rima di leggere questo manuale si prega di aprire la prima pagina,
P
al cui interno troverete le illustrazioni
sicurezza
l
Leggere attentamente le presenti istruzioni
e conservarle come futuro riferimento.
l
Rimuovere la confezione e le etichette.
nota importante – impianti medici
l
La piastra a induzione genera campi
magnetici a corto raggio. Per coloro che
portano un pacemaker o altri impianti attivi,
consultare un medico prima di operare o
avvicinarsi, per verificare eventuali
incompatibilità ed evitare rischi alla salute.
l
Non immergere l’apparecchio, il cavo
d’alimentazione o la spina in acqua o altro
liquido.
l
Mai utilizzare un apparecchio, un cavo o
una spina danneggiati. Farli controllare o
riparare: si rimanda alla sezione
‘manutenzione e servizio clienti’.
l
Non lasciare l’apparecchio incustodito
quando non viene utilizzato.
l
Non lasciare penzolare il cavo dal bordo
del tavolo o dal piano di lavoro, né lasciare
che entri in contatto con superfici calde.
l
Scollegare sempre l’apparecchio dalla
spina elettrica quando non viene utilizzato
o prima di pulire.
l
Assicurarsi che i cavi elettrici che collegano
altri apparecchi nelle vicinanze non entrino
in contatto con la piastra a induzione.
l
Durante e dopo l’utilizzo della piastra a
induzione, alcune parti possono
surriscaldarsi. La piastra rimarrà calda per
via del calore accumulato. Non toccare le
40

parti calde.
l
Le pentole e il loro contenuto resteranno
caldi dopo l’utilizzo.
l
Dopo aver rimosso la pentola dalla piastra
a induzione, collocarla su una superficie
resistente al calore.
l
Non graffiare il piatto della piastra con
oggetti appuntiti.
l
Non usare il piatto della piastra come
piano di lavoro.
l
Non usare mai il piatto della piastra per
poggiarvi altri oggetti.
l
Non utilizzare la piastra a induzione se il
piatto è rotto o ha delle crepe.
l
Non mettere strumenti appuntiti o pentole
sui tasti di controllo.
l
Non mettere mai carta, alluminio, stracci,
materiali plastici o altro materiale o oggetti
non necessari sul piatto della piastra
quando la piastra è accesa o calda. La
pellicola di plastica utilizzata per coprire gli
alimenti durante la cottura non deve
entrare in contatto diretto con la piastra
calda.
l
Per motivi di sicurezza, non lasciare mai
che la maniglia della padella/pentola
fuoriesca dallo spazio del piano di lavoro.
l
Assicurarsi che la parte sottostante della
pentola di cottura e del piatto della piastra
siano asciutti, senz’acqua, grasso o altra
sporcizia prima di cucinare.
l
Non utilizzare padelle con basi ruvide, per
evitare di graffiare il piatto della piastra.
l
Non lasciare che le entrate d’aria o le
bocche d’aerazione siano ostruite o chiuse
in qualsiasi modo. Assicurarsi sempre che
41

ci sia sufficiente ventilazione intorno alla
piastra a induzione durante il suo
funzionamento.
l
La piastra a induzione non deve essere
utilizzata accanto o sotto tende ed altri
materiali combustibili.
l
Non togliere mai la spina della piastra dalla
presa durante il suo funzionamento, senza
averla prima spenta.
l
Non usare mai l’apparecchio su un fornello
a gas o su superfici/piani di lavoro in ferro
o acciaio inox.
l
Non collocare quest’apparecchio sopra o
accanto una fiamma libera, una piastra
elettrica o dentro un forno riscaldato.
l
Non utilizzare quest’apparecchio come una
piastra elettrica.
l
Non utilizzare la piastra a induzione per
riscaldare cose diverse dagli alimenti
contenuti in pentole adeguate.
l
Non utilizzare mai con pentole vuote.
l
Nell’improbabile eventualità che il
contenuto della pentola prenda fuoco:
spegnere l’apparecchio arrestando
l’alimentazione elettrica con l’apposito
interruttore, coprire completamente la
pentola con un panno umido e lasciare
raffreddare del tutto prima di toccare
l
Come con tutte le piastre, qualora le
pentole si surriscaldino accidentalmente e
si secchino completamente, è importante
che, prima di toglierle dalla piastra a
induzione, la fonte di calore sia stata
spenta a partire dalla presa elettrica e che
la padella/pentola sia lasciata raffreddare.
42

l
Evitare sempre di surriscaldare. Il
surriscaldamento persistente può
provocare danni permanenti
all’apparecchio.
l
Mai mettere oggetti metallici come coltelli,
forchette, cucchiai e coperchi sulla
superficie dell’area di cottura, poiché
potrebbero surriscaldarsi.
l
Non mettere carte di credito, dispositivi
magnetici o apparecchiature elettroniche
sensibili accanto all’apparecchio in
funzione.
l
Non utilizzare l’apparecchio in esterno.
l
Durante il funzionamento, la piastra a
induzione deve essere in posizione
orizzontale, su una superficie piana e
resistente al calore, ad una distanza
minima di 10cm da qualsiasi parete.
l
I bambini dagli 8 anni in su possono
utilizzare, lavare & svolgere la
manutenzione di questo apparecchio
seguendo le indicazioni del Manuale d’uso,
a condizione che lo facciano con la
supervisione di un adulto responsabile
della loro sicurezza, che abbia ricevuto
istruzioni su come utilizzare l’apparecchio e
sia a conoscenza dei rischi potenziali.
l
Le persone con capacità fisiche, sensoriali
o mentali ridotte o che non siano a
conoscenza di come si utilizza
l’apparecchio devono farlo sotto
supervisione oppure ricevere istruzioni sul
suo uso in sicurezza, nonché sui rischi
potenziali.
43

l
I bambini non devono giocare con
l’apparecchio & quest’ultimo, insieme al
cavo, devono essere sempre fuori dalla
portata di bambini di età inferiore agli 8
anni.
l
Utilizzare l'apparecchio solo per l'uso
domestico per cui è stato realizzato.
Kenwood non si assumerà alcuna
responsabilità se l'apparecchio viene
utilizzato in modo improprio o senza
seguire le presenti istruzioni.
l
Questo apparecchio non deve essere
azionato mediante un timer esterno o un
sistema separato di controllo a distanza.
pentolame adatto
l
Utilizzare solo ed esclusivamente
padelle/pentole con il fondo piano adatte
alla cottura su una piastra a induzione. In
caso di dubbio, verificare con il produttore
delle padelle/pentole. Qualora non siano
adatte, la piastra a induzione non le
rileverà.
l
La piastra a induzione è adatta per essere
utilizzata con padelle/pentole con una base
di diametro 12 – 22cm.
l
Gli utensili di cottura in metallo non sono
consigliati, poiché potrebbero surriscaldarsi
se lasciati nelle padelle/pentole sulla
prima di inserire la spina
l
Assicurarsi che l’alimentazione
elettrica in casa corrisponda a
quella indicata nella parte
sottostante della piastra a
induzione.
l
Questo apparecchio è conforme al
regolamento (CE) No. 1935/2004
sui materiali e articoli in contatto
con alimenti.
prima del primo utilizzo
Strofinare la piastra, si rimanda alla
sezione ‘manutenzione & pulizia’.
44

legenda
iatto della piastra
A p
B guida per la padella
C interruttore di controllo
asto on/standby
D t
E tasto menù/impostazione
F tasto menù/aumento del tempo
isplay a LED
G D
H tasto menù/diminuzione del
tempo
I tasto per impostare il tempo
J tasto turbo
come utilizzare la
piastra a induzione
NB: i tasti sulla piastra sono sensibili
alla temperature ed entrano in
funzione con un semplice tocco del
polpastrello delle dita. Non toccare
con le unghie.
1 Collegare la spina della piastra a
induzione. L’apparecchio emetterà
un “bip”, lo schermo LED
lampeggerà indicando una “L”. A
questo punto l’apparecchio è in
modalità standby.
2 Premere il tasto on/standby D, la
luce d’indicazione di on/standby
lampeggia e la ventola si accende.
A questo punto l’apparecchio è in
standby, pronto per riscaldare.
3 Collocare la pentola centralmente
sulla piastra, con l’ausilio della
guida indicato dai disegni sulla
piastra B.
NB: il livello di potenza o la
temperatura e il tempo di
cottura possono essere
modificati con l’interruttore di
controllo C o con i tasti di
aumento/diminuzione ( + / - ) F
e H. Per utilizzare l’interruttore
di controllo, premerlo fino a
quando si sente un “clic” e poi
rilasciare C. L’interruttore può
essere girato in senso orario
per aumentare o in senso
antiorario per diminuire.
e la piastra è accesa e nel
S
giro di 1 minuto non vi si
olloca nessuna pentola, essa
c
asserà automaticamente in
p
modalità standby pronta per
iscaldare.
r
e non viene
S
selezionato/impostato nessun
enu nel giro di 10 secondi, la
m
iastra passerà
p
automaticamente in modalità
standby.
4 Selezionare l’impostazione di menù
desiderata con il tasto
menù/impostazione E
Accensione - premere una sola
volta ‘menù/impostazione’ per
scegliere il livello di alimentazione
standard di 1600 watt, il display
mostra ‘1600’ e si accende la luce
d’indicazione dell’alimentazione.
La normale gamma di
alimentazione va da 120w a
2000w, con le seguenti fasi:
120w - 400w - 500w - 800w 1000w - 1200w - 1400w - 1600w
- 1800w - 2000w
Aumentare o diminuire per ottenere
l’alimentazione desiderata
Inizia la cottura. Se non vengono
premuti altri tasti, la cottura
continuerà per 2 ore, poi la piastra
passerà automaticamente in
modalità standby.
Temperatura – premere due
volte ‘menù/impostazione’ per
impostare la temperatura standard
di 140°C, il display indica ‘140’ e la
luce d’indicazione della
temperatura si accende. La
temperatura varia da 60°C a
240°C in fasi da 20°C per volta;
aumentare o diminuire per
raggiungere la temperatura
desiderata. Inizia la cottura. Se non
vengono premuti altri tasti, la
cottura continuerà per 2 ore, poi la
piastra passerà automaticamente
in modalità standby.
45

enere in caldo – premere tre
T
volte il tasto ‘menù/impostazione’ e
la piastra sarà impostata nella
odalità “tenere in caldo”, con
m
l’apposita luce accesa. La
temperatura in questa modalità si
ggira intorno ai 60°C; il display
a
indica “ ----”. Se non si preme
nessun altro tasto, la piastra
resterà calda per 2 ore e poi
passerà automaticamente in
modalità standby.
5 Tempo di cottura.
La piastra può essere impostata
per cucinare per un determinato
lasso di tempo. Dopo aver
selezionato il menù come sopra,
premere il tasto “tempo”; il display
lampeggia “0:00” quattro volte e la
luce d’indicazione del tempo si
accende. Girare l’interruttore di
controllo o premere i tasti + / - per
selezionare il tempo di cottura
desiderato. Tenendo il dito sui tasti
si aumenta/diminuisce il tempo di
10 minuti per volta
Una volta impostato il tempo, il
display lampeggerà quattro volte e
poi rimarrà fisso, a conferma
dell’impostazione. Oppure, basta
premere ancora una volta ‘time’
(tempo) per confermare.
Dopodiché il timer inizierà il conto
alla rovescia e il display mostrerà in
alternanza il tempo rimanente e la
potenza o la temperatura
selezionate.
Il tempo massimo di cottura che è
possibile impostare è di 3 ore.
Una volta impostato il tempo di
cottura, nel giro di 5 secondi il
timer inizierà il conto alla rovescia.
Durante la cottura a tempo,
premendo + o – o girando
l’interruttore di controllo, si
cambiano la potenza o la
temperatura e la durata di tempo
impostata sarà annullata.
Una volta completata la
cottura a tempo impostato,
occorre premere il tasto
“on/off”, prima di poter
procedere ad un’altra
cottura.
Funzione turbo.
6
Premendo il tasto ‘turbo’ durante
la cottura, si aumenta la potenza di
ottura a 2100 watt per 30
c
secondi, dopodiché la piastra
ritorna alla temperatura o alla
otenza impostate in precedenza.
p
NB: quando la piastra a induzione
è in funzione, emette un suono
intermittente ad alta frequenza e la
ventola è attiva. Tutto questo è
normale.
Dopo aver tolto la pentola dalla
piastra, quest’ultima smette
immediatamente di scaldare e ogni
2 secondi si sente un “bip”.
Il display/le impostazioni del display
lampeggeranno. Qualora la padella
non sia ricollocata sulla piastra nel
giro di 60 secondi, la piastra si
spegne automaticamente e rimane
in standby.
7 A fine cottura, premere il tasto
on/standby, e la piastra smetterà di
riscaldare e tornerà in modalità
standby. Lo schermo LED
lampeggia e indica “H” quando la
piastra è ancora calda, poi mostra
“L” quando la piastra si sta
raffreddando.
l
Poiché questa piastra a induzione
funziona in modo leggermente
diverso da quelle tradizionali,
potrebbero essere necessarie
alcune modifiche ai tempi di
cottura previsti e alle temperature,
per poter ottenere i risultati
desiderati.
Consigli utili
l
Per ridurre il tempo di cottura, al
momento dell’accensione
dell’apparecchio è possibile
impostare al massimo il controllo
della potenza. Dopo un breve
periodo di tempo, è possibile
impostare il controllo della potenza
nella posizione desiderata.
l
Dopo un breve periodo di utilizzo,
l’esperienza v’insegnerà a trovare
le giuste impostazioni per le vostre
esigenze.
46

l
l contenuto di pentole e padelle si
I
scalda molto più rapidamente con
una piastra a induzione.
modalità timer
NB: se non s’imposta il timer,
la piastra riscalderà
ontinuamente per un
c
massimo di 2 ore, per poi
passare alla modalità standby.
Il timer può essere impostato solo
dopo aver selezionato un livello di
potenza iniziale.
Tasti di controllo – toccare i
tasti in modo deciso, con la
parte finale delle dita. Per
modificare il tempo di alcuni
minuti, toccare il tasto per
ogni minuto di modifica.
1 Per impostare il timer, premere il
tasto ‘+’ o ‘-’. Sul display appare la
scritta lampeggiante ‘0:00’. Per
cambiare questa durata, premere il
tasto ‘+’ o ‘-’ in modo da
aumentare o diminuire di 1 minuto
per volta. Per modificare
rapidamente la durata di 10 minuti
per volta, tenere premuto il tasto
‘+’ or ’-’. La gamma di tempo del
timer va da 1 minuto a 3 ore.
l
Il timer può essere modificato in
qualsiasi momento premendo i
tasti ‘+’ o ‘-’ e poi cambiando il
tempo.
l
La funzione timer può essere
cancellata in qualsiasi momento
reimpostando il tempo a ‘0’ o
premendo il tasto menù.
2 5 secondi dopo aver impostato il
tempo di cottura, il timer inizierà il
conto alla rovescia.
3 Una volta finito il tempo impostato,
si sentirà suonare un ‘bip’ e
l’apparecchio passerà in modalità
standby.
4 Dopo la fine del tempo di
cottura impostato, la piastra
si spegne automaticamente
e passa in modalità standby.
sicurezza
l
a piastra a induzione passerà in
L
modalità standby se non viene
utilizzata entro un minuto.
l
urante l’utilizzo, a meno che non
D
vi sia collocata sopra una
pentola/padella idonea di almeno
2cm di diametro, si udirà un “bip”
1
continuo per circa 1 minuto.
Qualora durante questo lasso di
tempo non venga collocata una
pentola/padella idonea sul piatto
della piastra, questa passerà
automaticamente in modalità
standby.
l
Se l’apparecchio si surriscalda o il
contenuto della pentola/padella si
prosciuga, la piastra adotta
automaticamente uno stato
protettivo in cui si autoregola il
riscaldamento. Se il
surriscaldamento continua,
l’apparecchio potrebbe indicare un
codice d’errore (si rimanda alla
sezione di risoluzione dei problemi).
l
Qualora durante l’utilizzo si
dovessero verificare problemi con
l’alimentazione elettrica, la piastra a
induzione entrerà automaticamente
in stato protettivo e mostrerà un
codice d’errore.
l
Scollegare l’apparecchio e
attendere che l’alimentazione ritorni
alla normalità (si rimanda alla
sezione di risoluzione dei problemi).
l
Qualora si stia cuocendo e non
venga toccato nessun tasto per 2
ore, la piastra passerà
automaticamente in modalità
standby.
l
Una volta tolta la padella/pentola,
la piastra smette di riscaldare.
blocco di sicurezza/sicura
per bambini
La piastra a induzione è dotata di
un blocco di sicurezza che le
impedisce di funzionare.
l
Per bloccare la piastra –
premere contemporaneamente i
tasti ‘+’ e ‘-'. In questa modalità
funziona solamente il tasto
On/Standby.
47

l
er sbloccare la piastra –
P
premere e tenere premuti i tasti ‘+’
e ‘-’ per 3 secondi.
manutenzione & pulizia
l
Spegnere, togliere la spina dalla
presa e lasciare raffreddare
’apparecchio completamente
l
prima di pulirlo.
l
Non immergere mai la piastra a
induzione nell’acqua.
Piatto della piastra, struttura
e pannello di controllo:
l
Passare sulla piastra con un panno
morbido umido o con un prodotto
pulente non abrasivo e asciugare
con cura. Assicurarsi di aver pulito
via tutte le tracce di detergente.
Non utilizzare detergenti/polveri
abrasive o spugnette d’alluminio o
in lana d’acciaio che graffiano,
poiché potrebbero danneggiare o
incrinare il piatto della piastra o
danneggiare il pannello di controllo.
l
Residui, grasso e liquidi di alimenti
bolliti devono essere rimossi non
appena possibile. Se li si lascia
indurire ulteriormente diventano
ancora più difficili da rimuovere.
Non utilizzare coltelli, né altri
oggetti taglienti, poiché potrebbero
danneggiare la piastra o il pannello
di controllo.
entrate d’aria e bocche
d’aerazione:
l
Dopo lunghi periodi di utilizzo, si
possono accumulare polvere e
sporcizia nelle entrate d’aria e nelle
bocche d’aerazione. Si consiglia di
pulirle con una spazzola morbida
flessibile. Non lavare mai con
acqua.
l
n caso di qualsiasi problema
I
relativo al funzionamento
dell'apparecchio, prima di
ontattare il servizio assistenza si
c
consiglia di consultare la sezione
"guida alla risoluzione problemi", o
i visitare il sito
d
www.kenwoodworld.com.
l
NB L'apparecchio è coperto da
garanzia, nel rispetto di tutte le
disposizioni di legge relative a
garanzie preesistenti e ai diritti dei
consumatori vigenti nel Paese ove
l'apparecchio è stato acquistato.
l
In caso di guasto o cattivo
funzionamento di un apparecchio
Kenwood, si prega di inviare o
consegnare di persona
l'apparecchio a uno dei centri
assistenza KENWOOD. Per
individuare il centro assistenza
KENWOOD più vicino, visitare il
sito www.kenwoodworld.com o il
sito specifico del Paese di
residenza.
assistenza e servizio
clienti
l
Se il cavo è danneggiato, per
motivi di sicurezza deve essere
sostituito da KENWOOD o da un
riparatore autorizzato da
KENWOOD
48

mministrazioni comunali, oppure
a
resso i rivenditori che offrono
p
questo servizio.
maltire separatamente un
S
lettrodomestico consente di evitare
e
MPORTANTI AVVERTENZE PER
I
L CORRETTO SMALTIMENTO
I
DEL PRODOTTO AI SENSI DELLA
DIRETTIVA EUROPEA SUI RIFIUTI
DI APPARECCHIATURE
ELETTRICHE ED ELETTRONICHE
(RAEE)
Alla fine della sua vita utile il prodotto
non deve essere smaltito insieme ai
rifiuti urbani.
Deve essere consegnato presso gli
appositi centri di raccolta
differenziata predisposti dalle
Problemi Suggerimenti
Dopo aver collegato la spina • Verificare che la spina sia inserita
dell’apparecchio e aver premuto correttamente e che l’indicatore di
il tasto “on”, non si accende accensione sia illuminato
nessuna luce. • Qualora sia montato, verificare il fuso
La luce LED del display si • Verificare che ci sia una pentola sulla
accende, ma la piastra non riscalda piastra
quando si regola il controllo • Verificare che si tratti di una pentola
Durante il funzionamento la • Verificare l’alimentazione elettrica
piastra smette improvvisamente dell’apparecchio
di scaldare • Verificare che le entrate d’aria o le
Compaiono i codici d’errore: • L’apparecchio potrebbe essersi
E3, E6 surriscaldato/gli alimenti potrebbero
E7, E8 • Fluttuazioni nell’alimentazione
E1, E2, E4, E5, Eb • Fare riparare l’apparecchio
possibili conseguenze negative per
’ambiente e per la salute derivanti da
l
n suo smaltimento inadeguato e
u
permette di recuperare i materiali di
cui è composto al fine di ottenere
notevoli risparmi in termini di energia
e di risorse.
Per rimarcare l’obbligo di smaltire
separatamente gli elettrodomestici,
sul prodotto è riportato il simbolo del
bidone a rotelle barrato.
della spina
idonea
• Verificare che la pentola sia collocata
al centro della piastra
bocchette non siano bloccate
• Verificare che il periodo di cottura
impostato non sia concluso
• Verificare che l’apparecchio non sia
surriscaldato o sia entrato in modalità
errore – togliere la spina, lasciare
raffreddare e riprovare più tardi
essere evaporati. Togliere la spina e
lasciare raffreddare, poi riprovare
elettrica. Togliere la spina dalla presa e
attendere fino a quando l’elettricità si
stabilizza
49

Português
ntes de ler, por favor desdobre a primeira página, que contém as
A
lustrações
i
segurança
l
Leia atentamente estas instruções e
guarde-as para consulta futura.
l
Retire todas as embalagens e eventuais
etiquetas.
nota importante – implantes
médicos
l
A placa de indução gera campos
magnéticos de curto alcance. Se algum
utilizador ou pessoa que esteja próximo
tem um pacemaker ou outros implantes
activos, deve consultar um médico antes
de utilizar este aparelho, para se informar
de alguma possível incompatibilidade e
poder prevenir qualquer risco para a
saúde.
l
Não imergir o aparelho, o cabo eléctrico
ou a ficha de ligação em água ou outro
líquido.
l
Nunca utilize um aparelho, cabo eléctrico
ou ficha de ligação danificado. Mande-o
examinar ou reparar: ver “assistência
técnica e serviços ao cliente”.
l
Não deixe o aparelho a funcionar sem
vigilância.
l
Não deixe o cabo eléctrico suspenso da
mesa ou bancada ou tocar em superfícies
quentes.
l
Desligue sempre o cabo eléctrico da
tomada quando não estiver em uso e
antes de limpar.
50

l
Certifique-se de que os cabos eléctricos
que ligam outros aparelhos na proximidade
não entram em contacto com a placa de
indução.
l
Durante e depois de utilizar a placa de
indução, determinadas partes ficam muito
quentes. A placa continuará quente devido
ao calor residual. Não toque nas partes
quentes.
l
A panela e seu conteúdo continuarão
quentes depois de utilizar.
l
Após retirar a panela da placa de indução,
coloque-a numa superfície resistente ao
calor.
l
Não raspe a placa com objectos afiados.
l
Não utilize a placa como superfície de
trabalho.
l
Nunca utilize a placa para armazenar
coisas.
l
Não utilize a placa de indução se estiver
partida ou rachada, mesmo que
ligeiramente.
l
Não coloque utensílios quentes ou afiados
ou loiça de fogão por cima dos controlos
da placa.
l
Nunca coloque papel, folha de alumínio,
materiais em pano ou plástico ou outro
tipo de material por cima da placa quando
esta está a funcionar ou ainda quente. As
folhas de alumínio usadas para cobrir
recipientes durante a cozedura nunca
devem entrar em contacto directo com a
placa.
l
Por razões de segurança, nunca deixe as
pegas da loiça de fogão (panela, tacho ou
outro) ultrapassar os limites da superfície
51

de trabalho.
l
Certifique-se de que por baixo da panela e
da placa não existe água, gordura ou outro
tipo de sujidade antes de cozinhar.
l
Não utilize loiça de fogão com base áspera
uma vez que pode arranhar a placa.
l
Não deixe que as entradas de ar ou
ventoinhas fiquem cobertas ou bloqueadas
seja de que forma for. Assegure-se sempre
que existe ventilação adequada em torno
de toda a placa de indução enquanto esta
está a funcionar.
l
A placa de indução não deve ser usada
perto ou por baixo de materiais
inflamáveis, como por exemplo cortinas.
l
Nunca retire a ficha da tomada da placa
de indução enquanto esta está a funcionar
sem antes a desligar primeiro no controlo.
l
Nunca use o aparelho por cima de um
forno a gás ou superfície/mesa em aço
inoxidável ou em ferro.
l
Não coloque o aparelho por cima ou perto
de uma chama, aquecedor ou forno
quente.
l
Não utilize este aparelho como chapa
eléctrica.
l
Não utilize a placa por indução para
aquecer seja o que for que não seja em
loiça de fogão apropriada para este tipo de
aparelho.
l
Nunca utilize com recipientes vazios.
l
Na eventualidade pouco provável do
conteúdo da panela se incendiar: retire a
ficha da tomada eléctrica, abafe a panela
com um pano molhado e deixe arrefecer
completamente antes de lhe mexer.
52

53

l
À semelhança de todas as placas de
fogão, na eventualidade da loiça de fogão
acidentalmente sobreaquecer e ferver até
todo o líquido evaporar, é importante que
antes de retirar a panela da placa de
indução, desligue a placa, retire o cabo da
tomada eléctrica e deixe a panela arrefecer
totalmente.
l
O sobreaquecimento deve ser SEMPRE
evitado. O sobreaquecimento recorrente
pode causar danos permanentes à sua
loiça de fogão.
l
Objectos metálicos, tais como facas,
garfos, colheres e testos não devem ser
colocados na área de cozedura uma vez
que podem ficar quentes.
l
Não coloque cartões de crédito, aparelhos
magnéticos ou equipamento electrónico
sensível, perto do aparelho quando está a
ser utilizado.
l
Não utilize o aparelho ao ar livre.
l
Durante o funcionamento, a placa de
indução deve estar na posição horizontal,
em cima de uma superfície resistente ao
calor e a pelo menos 10 cm de distância
de paredes.
l
Crianças com 8 ou mais anos de idade
podem utilizar, limpar e manter este
electrodoméstico de acordo com as
Instruções do Utilizador desde que sejam
supervisionadas por pessoa responsável
relativamente à sua segurança e que
tenham recebido instrução sobre a forma
de utilizar o electrodoméstico e estejam
conscientes dos riscos.
54

l
Pessoas com
capacidades
mentais, sensoriais
ou físicas
reduzidas, ou com
falta de experiência
ou conhecimento,
devem ter
supervisão ou
serem instruídas
sobre o uso em
segurança do
electrodoméstico e
estar conscientes
dos riscos.
l
As crianças não
devem brincar com
o electrodoméstico
e com o respectivo
fio eléctrico e
ambos devem ser
mantidos fora do
alcance de
crianças menores
de 8 anos de
idade.
l
Use o aparelho
apenas para o fim
doméstico a que
se destina. A
Kenwood não se
responsabiliza
caso o aparelho
seja utilizado de
forma inadequada,
ou caso estas
instruções não
sejam respeitadas.
l
Este aparelho não
foi concebido para
operar com
temporizadores
externos nem por
sistema de
controlo remoto
separado.
loiça de fogão
apropriada
l
Utilize apenas
panelas, tachos ou
outra loiça de
fogão que tenham
base totalmente
plana, apropriados
para usar em
placas de indução.
Em caso de
dúvida, consulte o
fornecedor da sua
loiça de fogão. Se
a sua loiça de
fogão não for
apropriada a placa
de indução não
detectará a sua
panela, tacho,
frigideira, caçarola,
etc.
l
A placa de indução
é apropriada para
loiça de fogão cuja
base tem diâmetro
55

entre 12 a 22 cm.
l
Os utensílios de
cozinha em metal
não são
aconselhados uma
vez que podem
aquecer se forem
deixados dentro da
loiça durante a
cozedura.
antes de ligar à corrente
eléctrica
l
Certifique-se de que a sua
corrente eléctrica tem a mesma
potência que a mostrada na parte
de baixo da placa de indução.
l
Este aparelho está conforme com
a Directiva n.º 1935/2004 da
Comunidade Europeia sobre
materiais concebidos para estarem
em contacto com alimentos.
antes de utilizar a sua placa
de indução pela primeira vez
Limpe a placa, ver “cuidados e
limpeza”.
emperatura; são accionados
t
colocando a almofada do seu dedo
por cima deles. Não bata com a
nha.
u
Ligue o fogão de indução à
1
corrente eléctrica. O aparelho
mite um aviso sonoro (bip), o ecrã
e
LED pisca e mostra “L”. O
aparelho está agora no modo
“standby” (de espera).
legenda
A placa
B linhas de guia de colocação de
loiça de fogão
C botão de comando
D controlo do on/standby
(ligar/espera)
E controlo do menu/regulação
F controlo do menu/aumento do
tempo
G ecrã LED
H controlo do menu/diminuição do
tempo
I controlo do tempo
J controlo do turbo
utilizar a sua placa de
indução
Nota: os controlos da placa são
comandados por toque sensível à
56

Pressione o controlo on/standby
2
D, a luz do controlo pisca e a
ventoinha liga-se. O aparelho está
gora no modo “standby” (espera)
a
pronto para aquecer.
3 Coloque a panela ou outra
propriada na placa de indução,
a
respeitando as linhas de guia de
colocação desenhadas na placa
B.
Nota: o nível de potência ou
temperatura e o tempo de
cozedura podem ser ajustados
usando quer o botão de
comando (C), quer o controlo
aumentar “+” (F) ou o controlo
diminuir “-” (H). Para usar o
botão de comando (C),
pressione-o até ouvir um
clique e depois largue-o. Pode
depois rodá-lo no sentido dos
ponteiros do relógio para
aumentar ou no sentido
inverso dos ponteiros do
relógio para diminuir.
Se o botão de comando for
ligado mas não for colocado
nada por cima da placa, o
botão muda para “standby”
(espera) pronto para aquecer
após 1 minuto.
Se no controlo de “menu” não
for escolhida nenhuma
“regulação/selecção, o botão
de comando muda para o
modo “standby” após 10
segundos.
4 Seleccione a regulação desejada
no controlo de “menu/ regulação”
(E).
Potência – pressione uma vez o
controlo de “menu/regulação” e é
seleccionado o nível de potência
por defeito de 1600 watts, o ecrã
LED mostra “1600” e o indicador
luminoso de potência ilumina-se.
A variação normal de potência vai
de 120W a 2000W de acordo com
as etapas seguintes:
120W – 400W – 500W – 800W –
1000W 1200W – 1400W – 1600W
– 1800W - 2000W
Aumente ou diminua de acordo
om a potência desejada
c
A cozedura começa. Se não
pressionar mais nenhum comando
u controlo, a cozedura continua
o
durante 2 horas e no final deste
tempo muda automaticamente
ara o modo “standby” (espera).
p
Temperatura – pressione duas
vezes o controlo de
“menu/regulação” e é
seleccionado o nível de
temperatura por defeito de 140 °C,
o ecrã LED mostra “140” e o
indicador luminoso de temperatura
ilumina-se. A variação de
temperatura vai de 60°C a 240°C
em saltos de 20°C; aumente ou
diminua a temperatura como
desejar. A cozedura começa. Se
não pressionar mais nenhum
comando ou controlo, a cozedura
continua durante 2 horas e no final
deste tempo muda
automaticamente para o modo
“standby” (espera).
Manter Quente – pressione três
vezes o controlo de
“menu/regulação” e a placa de
indução selecciona a regulação
Manter Quente e o respectivo
indicador luminoso de manter
quente ilumina-se.
A função Manter Quente situa-se
pelos 60°C; o ecrã mostra “----”.
Se não pressionar mais nenhum
comando ou controlo, a função
Manter Quente continua durante 2
horas e no final deste tempo muda
automaticamente para o modo
“standby” (espera).
5 empo de cozedura.
A placa pode ser regulada para
um tempo fixo de cozedura. Após
seleccionar o “menu” como acima
descrito, pressione o controlo de
“tempo” (I); o ecrã pisca “0:00”
quatro vezes e a luz indicadora de
tempo ilumina-se. Rode o botão
de comando ou pressione os
controlos “+” ou “-” para
seleccionar o tempo de cozedura
desejado. Manter pressionado
estes controlos (F) e (H) aumenta
57

u diminui o tempo em saltos de
o
10 minutos.
Quando o tempo foi seleccionado,
ste pisca quatro vezes e depois o
e
ecrã mantem-se fixo, confirmando
assim que o tempo foi
stabelecido. Em alternativa pode
e
simplesmente pressionar outra vez
o controlo de “tempo” (I) para
confirmar. Depois desta acção o
relógio começa a contagem
regressiva; e o ecrã mostra
alternadamente o tempo restante,
a potência ou a temperatura
estabelecida.
O tempo máximo de cozedura que
pode estabelecer é de 3 horas.
Depois de estabelecido o tempo
de cozedura, o temporizador
começa a contagem decrescente
após 5 segundos.
Se durante o tempo de cozedura
que foi estabelecido, pressionar
um dos controlos “+” (F) ou “-” (H)
ou rodar o botão de comando (C)
a temperatura ou a potência
mudam e isto cancela o tempo
estabelecido anteriormente.
Após o tempo de cozedura
estabelecido ter decorrido, o
controlo “on/off” precisa de
ser pressionado antes de
poder cozinhar mais tempo.
róximos 60 segundos, a placa
p
desliga-se automaticamente e fica
em modo “standby” (espera).
7 Pressione o botão on/standby
uando acabar de cozinhar, o
q
fogão pára de aquecer e regressa
o modo de espera. O LED pisca
a
e mostra “H” enquanto o fogão
estiver quente e depois mostra “L”
enquanto estiver a arrefecer.
l
Como esta placa de indução
funciona de uma forma
ligeiramente diferente dos fogões
tradicionais, podem ser
necessários alguns ajustes no
tempo e/ou na temperatura para
poder atingir os resultados
desejados.
dicas
l
Para reduzir o tempo de cozedura,
pode rodar o controlo de potência
para a posição máxima quando
liga o aparelho. Após um curto
tempo pode repor o controlo de
potência para a posição desejada.
l
Após um curto período de
utilização, a experiência vai
ensinar-lhe as regulações mais
apropriadas às suas necessidades.
l
O conteúdo da panela aquece
mais depressa numa placa de
indução.
6 Função Turbo
Pressionar o controlo “turbo”
durante a cozedura aumenta a
potência para 2100 W durante 30
segundos; após esse tempo a
placa volta para a temperatura ou
potência estabelecida
anteriormente.
Observações: Quando a placa
de indução está a funcionar, ouvese um som intermitente de
frequência elevada e a ventoinha
começa a trabalhar. Isto é normal.
Quando retira a panela da placa,
esta deixa imediatamente de
aquecer e ouve-se um bipe a cada
2 segundos.
As luzes indicadoras/ecrã piscam.
Se a panela não voltar a ser
colocada em cima da placa nos
modo de temporizador
Nota: se o temporizador não
for configurado, a placa opera
continuamente um máximo de
2 horas e no final desse tempo
muda automaticamente para o
modo “standby” (espera).
O temporizador pode apenas ser
usado após ter seleccionado um nível
de potência inicial.
Usar os controlos por toque –
toque nos controlos
firmemente com a almofada da
ponta dos dedos. Para mudar o
tempo em vários minutos
toque no controlo por cada
minuto de ajuste.
58

assistência técnica e
serviços ao cliente
l
Se o cabo eléctrico estiver
danificado, por razões de
segurança deve ser substituído
pela KENWOOD ou por um
reparador KENWOOD autorizado.
l
Se tiver qualquer problema ao
utilizar o seu aparelho, antes de
telefonar para a Assistência
consulte a secção “guia de
avarias” do Manual ou visite o site
da Kenwood em
www.kenwoodworld.com
l
Salientamos que o seu produto
está abrangido por uma garantia,
em total conformidade com todas
as disposições legais relativas a
quaisquer disposições sobre
garantias e com os direitos do
consumidor existentes no país
onde o produto foi adquirido.
l
Se o seu produto Kenwood
funcionar mal ou lhe encontrar
algum defeito, agradecemos que o
envie ou entregue num Centro de
Assistência Kenwood autorizado.
Para encontrar informações
actualizadas sobre o Centro de
Assistência Kenwood autorizado
mais próximo de si, visite por favor
o site www.kenwoodworld.com ou
o website específico do seu país.
DVERTÊNCIAS PARA A
A
ELIMINAÇÃO CORRECTA DO
RODUTO NOS TERMOS DA
P
IRECTIVA EUROPEIA
D
2002/96/CE RELATIVA AOS
RESÍDUOS DE EQUIPAMENTOS
ELÉCTRICOS E
ELECTRÓNICOS (REEE)
No final da sua vida útil, o produto não
deve ser eliminado conjuntamente com
os resíduos urbanos.
Pode ser depositado nos centros
especializados de recolha diferenciada
das autoridades locais, ou junto dos
revendedores que prestem esse
serviço. Eliminar separadamente um
electrodomésticos permite evitar as
possíveis consequências negativas
para o ambiente e para a saúde
pública resultantes da sua eliminação
inadequada, além de permitir reciclar
os materiais componentes, para, assim
se obter uma importante economia de
energia e de recursos.
Para assinalar a obrigação de
eliminar os electrodomésticos
separadamente, o produto apresenta
a marca de um contentor de lixo com
uma cruz por cima.
59

roblemas Sugestões
P
epois do aparelho ser ligado à • Verifique que o cabo eléctrico está
D
omada eléctrica e o controlo correctamente inserido na tomada e
t
ON de ligar a placa ser ligado: que o controlo ON está ligado
enhuma luz indicadora se • Verifique no quadro eléctrico se o
n
cende fusível da tomada está ligado
a
O ecrã LED ilumina-se, mas a • Confirme que tem uma panela na
placa não começa a aquecer placa
quando se ajusta o controlo • Confirme que a panela é apropriada
de potência • Confirme que tem a panela está bem
centralizada na placa
O aquecimento pára • Verifique se o aparelho tem corrente
subitamente durante o eléctrica
funcionamento • Verifique que a entrada de ar ou as
Códigos de erro: • O aparelho sobreaqueceu/ferveu até
E3, E6 secar: desligue, retire o cabo eléctrico da
E7, E8 • Flutuação na corrente eléctrica.
E1, E2, E4, E5, Eb • Leve o aparelho a um reparador
ventoinhas estão desimpedidas
• Confirme se o tempo de cozedura não
acabou
• Confirme se o aparelho não
sobreaqueceu ou está em modo de erro –
retire-o da tomada eléctrica, deixe-o
arrefecer e tente mais tarde
tomada, deixe arrefecer e tente mais
tarde.
Retire o aparelho da tomada e espere até
que a corrente eléctrica esteja estável.
60

Español
ntes de leer, por favor despliegue la portada que muestra las
A
lustraciones
i
seguridad
l
Lea estas instrucciones atentamente y
guárdelas para poder utilizarlas en el
futuro.
l
Quite todo el embalaje y las etiquetas.
nota importante - implantes
médicos
l
La placa de inducción genera campos
magnéticos de corto alcance. Si cualquier
usuario o persona cerca del aparato lleva
un marcapasos u otros implantes activos,
debe consultar con un médico antes de su
uso, por si existe alguna incompatibilidad,
a fin de evitar cualquier riesgo para la
salud.
l
No sumerja el aparato, el cable o el
enchufe en agua ni en ningún otro líquido.
l
Nunca utilice un aparato, un cable o un
enchufe dañados. Para solicitar que lo
revisen o lo reparen: consulte “servicio
técnico y atención al cliente”.
l
No deje el aparato desatendido cuando
esté en marcha.
l
No deje que el cable cuelgue de la mesa o
de la superficie de trabajo ni que esté en
contacto con superficies calientes.
l
Desenchufe siempre el aparato cuando no
lo utilice o antes de limpiarlo.
l
Compruebe que los cables eléctricos que
conecten otros aparatos que estén cerca
de la placa de inducción no puedan entrar
en contacto con esta.
61

l
Durante el uso de la placa de inducción y
después del mismo, algunas partes
estarán muy calientes. El plato de la placa
de inducción permanecerá caliente debido
al calor residual. No toque las partes
calientes.
l
La cacerola y el contenido permanecerán
calientes después de su uso.
l
Después de retirar la cacerola de la placa
de inducción, colóquela sobre una
superficie resistente al calor.
l
No raye el plato de la placa con objetos
afilados.
l
No utilice el plato de la placa como
superficie de trabajo.
l
Nunca utilice el plato de la placa para
guardar cosas.
l
No utilice la placa de inducción si el plato
de la placa está roto o agrietado de algún
modo.
l
No ponga cacerolas ni utensilios afilados o
calientes sobre los controles.
l
Nunca ponga papel, papel de aluminio,
tela, materiales de plástico ni otros objetos
no relacionados sobre el plato de la placa
cuando la placa de inducción esté en
marcha o cuando esté caliente. No se
debe dejar que el papel de aluminio
utilizado para cubrir los alimentos durante
la cocción entre en contacto directo con el
plato de la placa.
l
Por seguridad, nunca deje que el mango
de su cacerola sobresalga de la superficie
de trabajo.
62

l
Compruebe que la parte inferior de la
cacerola y el plato de la placa no tengan
restos de agua, grasa u otro tipo de
suciedad antes de empezar la cocción.
l
No utilice cacerolas con bases ásperas ya
que pueden rayar el plato de la placa.
l
No deje que la entrada de aire o las salidas
de aire estén cubiertas o bloqueadas de
ninguna forma. Asegúrese siempre de que
haya una ventilación adecuada alrededor
de la placa de inducción durante el
funcionamiento.
l
No utilice la placa de inducción cerca o
debajo de cortinas u otros materiales
combustibles.
l
Nunca desenchufe la placa de inducción
durante el funcionamiento sin apagarla
antes primero.
l
Nunca utilice el aparato en una cocina de
gas o sobre encimeras/superficies de
acero inoxidable o hierro.
l
No coloque este aparato encima o cerca
de una llama desnuda, plancha caliente o
en un horno caliente.
l
No utilice este aparato como una plancha
caliente.
l
No utilice la placa de inducción para
calentar otra cosa que no sea comida en
cacerolas adecuadas.
l
No la utilice nunca con cacerolas que
estén vacías.
63

l
En el caso improbable de que el contenido
de la cacerola empiece a arder:
desenchufe el aparato de la toma de
corriente de la pared, sofoque la cacerola
con un paño húmedo y deje que se enfríe
completamente antes de manipular la
cacerola.
l
Al igual que con todos los aparatos de
inducción, en el caso de que un utensilio
de cocina se sobrecaliente por accidente y
se quede sin agua, es importante
desenchufar la fuente de calor de la toma
de corriente de la pared antes de retirarlo
de la placa de inducción y dejar enfriar la
cacerola.
l
El sobrecalentamiento se debe evitar en
todo momento. El sobrecalentamiento
persistente puede provocar daños
permanentes a sus utensilios de cocina.
l
Los objetos de metal, como cuchillos,
tenedores, cucharas y tapas, no deben
ponerse sobre la superficie de la zona de
cocción ya que pueden calentarse.
l
No coloque tarjetas de crédito, soportes
magnéticos ni equipo electrónico sensible
cerca del aparato cuando esté en marcha.
l
No utilice el aparato en el exterior.
l
Durante el funcionamiento, la placa de
inducción se debe colocar
horizontalmente, sobre una superficie
plana resistente al calor, a 10 cm como
mínimo de todos los lados de la pared.
64

l
Los niños a partir de los 8 años de edad
pueden utilizar, limpiar y realizar el
mantenimiento de este aparato de
acuerdo con las Instrucciones del usuario
siempre que sean supervisados por una
persona responsable de su seguridad,
reciban instrucciones relativas al uso del
aparato y sean conscientes de los
peligros.
l
Las personas con capacidades físicas,
sensoriales o mentales disminuidas o con
falta de experiencia o conocimientos que
utilicen este aparato deben haber recibido
instrucciones o supervisión en relación con
su uso seguro y ser conscientes de los
peligros.
l
Los niños no deben jugar con el aparato,
y tanto el aparato como el cable deben
estar fuera del alcance de los niños
menores de 8 años de edad.
l
Utilice este aparato únicamente para el
uso doméstico al que está destinado.
Kenwood no se hará cargo de
responsabilidad alguna si el aparato se
somete a un uso inadecuado o si no se
siguen estas instrucciones.
l
Este aparato no está pensado para ser
manejado mediante un temporizador
externo o un sistema de control remoto
separado.
65

utensilios de cocina adecuados
l
Utilice solamente cacerolas de fondo
plano adecuadas para el uso con placas
de inducción. En caso de duda, consulte
al fabricante de sus cacerolas. Si no son
adecuadas, la placa de inducción no
detectará la cacerola.
l
La placa de inducción es adecuada para
cacerolas con un diámetro de base de
12 – 22 cm.
l
No se recomienda utilizar utensilios de
cocina de metal ya que pueden calentarse
a través de la placa de inducción si se
dejan en la cacerola durante la cocción.
antes de enchufar el aparato
l
Compruebe que el suministro de
energía eléctrica sea el mismo que
el que aparece en la parte inferior
de la placa de inducción.
l
Este dispositivo cumple con el
reglamento (CE) n.º 1935/2004
sobre los materiales y objetos
destinados a entrar en contacto
con alimentos.
antes de utilizar su placa de
inducción por primera vez
Limpie la placa de inducción
(consulte “cuidado y limpieza”).
descripción del aparato
A plato de la placa
B guía de la cacerola
C botón de control
D botón de encendido/en espera
E botón menú/ajuste
F botón para aumentar el
tiempo/menú
G pantalla LED
H botón para reducir el
tiempo/menú
I botón tiempo
J botón turbo
uso de la placa de
inducción
Nota: los botones de la placa de
inducción son sensibles al tactotemperatura; se ponen en marcha
poniendo la yema del dedo sobre
ellos. No pulse con la uña del dedo.
1 Enchufe la placa de inducción. El
aparato pitará una vez, la pantalla
LED parpadeará y mostrará “L”. El
aparato está ahora en modo
espera.
2 Pulse el botón de encendido/en
espera D , la luz indicadora de
encendido/en espera parpadeará y
el ventilador se pondrá en marcha.
El aparato está ahora en modo
espera listo para el proceso de
calentamiento.
3 Coloque la cacerola bien centrada
sobre la placa de inducción, dentro
de la guía de la cacerola que se
muestra en el gráfico en el plato de
la placa B.
66

ota: el nivel de potencia o
N
temperatura y el tiempo de
occión se pueden ajustar con
c
l botón de control C o con los
e
botones para aumentar /
educir ( + / - ) F y H. Para usar
r
l botón de control C, apriételo
e
hasta que haga clic y luego
uéltelo. Se puede girar en el
s
entido de las agujas del reloj
s
para aumentar o en sentido
contrario a las agujas del reloj
para reducir.
Si la placa de inducción se
enciende pero no se coloca
ninguna cacerola sobre ella,
cambiará al modo espera listo
para el proceso de
calentamiento después de 1
minuto.
Si no se configura/selecciona
ningún menú, la placa de
inducción cambiará al modo
espera después de 10
segundos.
4 Seleccione el ajuste del menú que
desee con el botón menú/ajuste E
Potencia – pulse el botón
“menú/ajuste” una vez y se
seleccionará por defecto el nivel de
potencia de 1600 vatios; la
pantalla mostrará “1600” y la luz
del indicador de potencia se
encenderá.
El rango de potencia normal va
desde 120 w hasta 2000 w según
los intervalos siguientes:
120w - 400w - 500w - 800w 1000w - 1200w - 1400w - 1600w
- 1800w - 2000w
Aumente o reduzca a la potencia
deseada
El proceso de cocción comenzará.
Si no se pulsa ningún otro botón,
la cocción continuará durante 2
horas y entonces cambiará
automáticamente al modo espera.
Temperatura – pulse el botón
“menú/ajuste” dos veces y se
seleccionará por defecto la
temperatura de 140ºC, la pantalla
mostrará “140” y la luz indicadora
de temperatura se encenderá. El
ango de temperatura es de 60°C
r
a 240°C en intervalos de
20°C; aumente o reduzca a la
emperatura deseada. El proceso
t
de cocción comenzará. Si no se
pulsa ningún otro botón, la
occión continuará durante 2
c
horas y entonces cambiará
automáticamente al modo espera.
Mantener caliente - pulse el
botón “menú/ajuste” tres veces y
la placa de inducción estará en el
ajuste “mantener caliente”, y la luz
indicadora de “mantener caliente”
se encenderá. El ajuste “mantener
caliente” está a unos 60°C; la
pantalla muestra “ ----”. Si no se
pulsa ningún otro botón, la placa
se mantendrá en el ajuste
“mantener caliente” durante 2
horas y entonces cambiará
automáticamente al modo espera.
5 Tiempo de cocción.
La placa de inducción se puede
ajustar al modo cocción durante
un tiempo determinado. Después
de seleccionar el menú como se
indica arriba, pulse el botón
“tiempo”; la pantalla parpadeará
“0:00” cuatro veces y la luz
indicadora del tiempo se
encenderá. Gire el botón de
control o pulse los botones + / para seleccionar el tiempo de
cocción deseado. Mantener el
dedo sobre los botones aumentará
/ reducirá el tiempo en intervalos
de 10 minutos
Cuando se haya configurado el
tiempo, la pantalla parpadeará
cuatro veces y entonces
permanecerá constante,
confirmando que está configurada.
También se puede pulsar el botón
“tiempo” otra vez para confirmar.
Después de eso, el reloj empezará
la cuenta atrás y la pantalla
mostrará alternativamente el
tiempo restante y la potencia o la
temperatura configuradas.
El tiempo máximo de cocción que
se puede configurar es de 3 horas.
Una vez que el tiempo de cocción
67

e haya configurado, el
s
temporizador empezará a contar
hacia atrás después de 5
egundos.
s
Durante la cocción en el tiempo
fijado, pulsar + o - o girar el botón
e control cambiará la potencia o
d
la temperatura y cancelará el
tiempo configurado.
Después de que se haya
completado el tiempo de
cocción fijado, se debe
apretar el botón de
“encendido/apagado” antes
de poder iniciar más
procesos de cocción.
6 Función turbo.
Pulsar el botón “turbo” durante la
cocción incrementa la potencia a
2100 vatios durante 30 segundos,
después de lo cual la placa de
inducción vuelve a la potencia o la
temperatura configuradas
previamente.
Notas: cuando la placa de
inducción esté en funcionamiento,
habrá un sonido intermitente de
alta frecuencia y el ventilador se
pondrá en marcha. Esto es
normal.
Cuando la cacerola se quita de la
placa, esta deja de calentar
inmediatamente y sonará un pitido
cada 2 segundos.
La pantalla/ajustes actuales
parpadearán. Si la cacerola no se
vuelve a poner en los 60 segundos
siguientes, la placa se apagará
automáticamente y permanecerá
en modo espera.
7 Apriete el botón de encendido/en
espera cuando haya terminado de
cocinar, la cocina dejará de
calentar y volverá al modo espera.
La pantalla LED parpadea y
muestra “H” mientras el plato de la
placa todavía está caliente, y luego
muestra “L” mientras la placa de
inducción se enfría.
l
Como la placa de inducción
funciona de manera algo diferente
a una placa de cocina tradicional,
puede que sea necesario realizar
algunos ajustes a las temperaturas
los tiempos de cocción previstos
y
para lograr los resultados
deseados.
onsejos
c
l
Para reducir el tiempo de cocción,
puede girar el control de potencia
acia la posición máxima cuando
h
encienda el aparato. Después de
un corto período de tiempo, puede
ajustar el control de potencia a la
posición que desee.
l
Después de un corto período de
uso, la experiencia le enseñará
cuál es el ajuste correcto para sus
necesidades.
l
El contenido de la cacerola se
calienta más rápidamente con una
placa de inducción.
modo temporizador
Nota: si el temporizador no
está ajustado, la placa
funcionará durante un máximo
de 2 horas de forma
continuada y entonces
cambiará al modo espera.
El temporizador solo se puede ajustar
después de que se haya
seleccionado un nivel de potencia
inicial.
Con los botones de control de
tacto, toque el botón
firmemente con la parte plana
de la yema del dedo. Para
cambiar el tiempo en varios
minutos, toque el botón por
cada minuto de ajuste.
1 Para ajustar el temporizador, pulse
el botón “+” o “-”. La pantalla del
temporizador mostrará “0:00” y
parpadeará. Para modificar el
tiempo, pulse el botón “+” o “-”
para cambiar el tiempo en 1
minuto por pulsación. Para ajustar
el tiempo rápidamente en
incrementos de 10 minutos,
mantenga el dedo sobre el botón
“+” o “-”. El rango del
temporizador es de 1 minuto hasta
3 horas.
l
El temporizador se puede ajustar
en cualquier momento pulsando
los botones “+” o “-” y luego
68

justando el tiempo.
a
l
La función del temporizador se
puede cancelar en cualquier fase
olviendo a configurar el tiempo a
v
“0” o pulsando el botón menú.
2 Una vez que el tiempo de cocción
e haya configurado, el
s
temporizador empezará a contar
hacia atrás después de 5
segundos.
3 Cuando se haya completado el
tiempo establecido, sonará el
pitido y la potencia cambiará al
modo espera.
4 Después de que se haya
completado el temporizador
de cocción, la placa se
apagará automáticamente y
permanecerá en modo
espera.
funciones de seguridad
l
La placa de inducción cambiará al
modo espera si no se utiliza en un
minuto.
l
Durante el uso, a menos que se
utilice una cacerola con un
diámetro de 12 cm como mínimo,
sonará un pitido durante 1 minuto
aproximadamente. Si no se coloca
una cacerola adecuada sobre la
superficie en este tiempo, la placa
de inducción cambiará
automáticamente al modo espera.
l
Si el aparato se sobrecalienta o las
cacerolas se quedan sin agua, la
placa de inducción entra
automáticamente en un estado de
protección donde su calentamiento
queda regulado. Si el
sobrecalentamiento continúa,
puede que el aparato muestre un
código de protección (consulte la
guía de solución de problemas).
l
Si durante el uso hay problemas
con el suministro de energía
eléctrica, la placa de inducción
entra automáticamente en un
estado de protección y muestra un
código de protección.
l
Desenchufe el aparato y espere a
que el suministro de energía
eléctrica vuelva a la normalidad
consulte la guía de solución de
(
problemas).
l
Si la placa de inducción está
ocinando y no se pulsa ningún
c
botón después de 2 horas,
cambiará automáticamente al
odo espera.
m
l
Cuando la cacerola se retire, la
placa dejará de cocinar.
cierre de seguridad/bloqueo
para niños
La placa de inducción tiene un
cierre de seguridad que impide
que la placa se pueda poner en
funcionamiento.
l
Para bloquear la placa – pulse
los botones “+” y “-” al mismo
tiempo. De este modo, solo
funcionará el botón de
encendido/en espera.
l
Para desbloquear la placa –
mantenga pulsados los botones
“+” y “-” durante 3 segundos.
cuidado y limpieza
l
Apague, desenchufe y deje que el
aparato se enfríe completamente
antes de limpiarlo.
l
Nunca sumerja la placa de
inducción en agua.
Plato de la placa, cuerpo y
panel de control:
l
Límpielos con un paño húmedo
suave o un limpiador no abrasivo y
séquelos bien. Compruebe que no
queden rastros del limpiador. No
utilice detergentes abrasivos,
estropajos abrasivos ni estropajos
de aluminio ya que dañarán o
agrietarán el plato de la placa o
dañarán el panel de control.
l
El polvo, la grasa y los líquidos de
la comida que se hayan
derramado deben limpiarse lo
antes posible. Si se deja que se
endurezcan, cada vez será más
difícil quitarlos. No utilice un
cuchillo ni ningún utensilio afilado
ya que pueden dañar el plato de la
placa o el panel de control.
69

ntrada y salida de aire:
E
l
Después de períodos largos de uso,
a suciedad y el polvo pueden
l
cumularse en la entrada o la salida
a
de aire. Límpielas con un cepillo
uave y flexible. Nunca se deben
s
avar con agua.
l
servicio y atención al
cliente
l
Si el cable está dañado, por razones
de seguridad, debe ser sustituido
por KENWOOD o por un técnico
autorizado por KENWOOD
l
Si tiene problemas con el
funcionamiento del aparato, antes
de solicitar ayuda, consulte la
sección “guía de solución de
problemas” en el manual o visite
www.kenwoodworld.com.
l
Tenga en cuenta que su producto
está cubierto por una garantía que
cumple con todas las disposiciones
legales relativas a cualquier garantía
existente y a los derechos de los
consumidores vigentes en el país
donde se adquirió el producto.
l
Si su producto Kenwood funciona
mal o si encuentra algún defecto,
envíelo o llévelo a un centro de
servicios KENWOOD autorizado.
Para encontrar información
actualizada sobre su centro de
servicios KENWOOD autorizado más
cercano, visite
www.kenwoodworld.com o la página
web específica de su país.
DVERTENCIAS PARA LA
A
CORRECTA ELIMINACIÓN DEL
RODUCTO SEGÚN ESTABLECE
P
A DIRECTIVA EUROPEA SOBRE
L
RESIDUOS DE APARATOS
ELÉCTRICOS Y ELECTRÓNICOS
(RAEE)
Al final de su vida útil, el producto no
debe eliminarse junto a los desechos
urbanos.
Puede entregarse a centros específicos
de recogida diferenciada dispuestos por
las administraciones municipales, o a
distribuidores que faciliten este servicio.
Eliminar por separado un
electrodoméstico significa evitar posibles
consecuencias negativas para el medio
ambiente y la salud derivadas de una
eliminación inadecuada, y permite
reciclar los materiales que lo componen,
obteniendo así un ahorro importante de
energía y recursos. Para subrayar la
obligación de eliminar por separado los
electrodomésticos, en el producto
aparece un contenedor de basura móvil
tachado.
70

problemas sugerencias
roblemas Sugerencias
P
espués de enchufar el aparato y de • Compruebe que el enchufe esté
D
onectar el botón de encendido, introducido correctamente y que el
c
no se enciende ningún indicador suministro de energía eléctrica esté
La pantalla LED se enciende pero la • Compruebe que haya una cacerola
placa no empieza a calentar cuando se • Compruebe que la cacerola sea del
ajusta el control de potencia tipo adecuado
El calentamiento de la placa se detiene • Compruebe el suministro de
repentinamente durante el electricidad al aparato
funcionamiento • Compruebe que la entrada de aire o
Aparecen códigos de fallos: • Puede que el aparato se hay
E3, E6 sobrecalentado/quedado sin agua.
E7, E8 • Fluctuación en el suministro de
E1, E2, E4, E5, Eb • Envíelo a un servicio de asistencia
onectado
c
Donde se acople, compruebe el
•
fusible del enchufe
• Compruebe que la cacerola esté
bien centrada
la salida de aire no estén bloqueadas
• Compruebe que el período de
tiempo configurado no haya
terminado
• Compruebe que el aparato no se
haya sobrecalentado o haya entrado
en modo error; desenchúfelo, deje
que se enfríe y vuelva a probar más
tarde
Desenchufe el aparato, deje que se
enfríe y vuelva a probar más tarde
energía eléctrica. Desenchufe el
aparato y espere hasta que el
suministro de electricidad vuelva a
estar estable.
71

Dansk
nden brugsanvisningen læses, foldes forsiden med
I
llustrationerne ud
i
sikkerhed
l
Læs denne brugervejledning nøje og
opbevar den i tilfælde af, at du får brug for
at slå noget op i den.
l
Fjern al emballage og mærkater.
vigtig note – medicinske
implantater
l
Induktionskogepladen genererer
kortrækkende magnetiske felter. Hvis
bruger eller personer i nærheden har
pacemaker eller et andet aktivt implantat,
skal man rådspørge en læge, før enheden
tages i brug mht. evt. uforligelighed,
således at man forebygger risiko for
sundhedsfare.
l
Apparat, ledning og stik må ikke
nedsænkes i vand eller anden væske.
l
Brug aldrig et beskadiget apparat, ledning
eller stik. Få det efterset eller repareret: Se
‘service og kundepleje’.
l
Efterlad aldrig apparatet uden opsyn, når
det er i drift.
l
Lad ikke ledningen hænge ud over en
bordkant o.l. eller berøre varme flader.
l
Tag altid stikket ud af apparatet, når det
ikke er i brug eller før rengøring.
l
Sørg for, at elektriske ledninger, der
tilslutter andre apparater i nærheden, ikke
kan komme i berøring med
induktionskogepladen.
72

l
Under og efter brug af
induktionskogepladen, vil visse dele blive
meget varme. Kogepladen vil forblive varm
pga. eftervarme. Undlad at berøre varme
dele.
l
Gryden og indholdet vil forblive varmt efter
brug.
l
Når gryden er taget af
induktionskogepladen, skal den anbringes
på en overflade, der kan tåle varmen.
l
Pas på ikke at ridse kogepladen med
skarpe genstande.
l
Kogepladen må ikke bruges som
arbejdsflade.
l
Kogepladen må aldrig bruges til
opbevaring.
l
Undlad at bruge induktionskogepladen,
hvis selve kogepladen er i stykker eller
revnet på nogen måde.
l
Undlad at lægge varme eller skarpe
genstande eller gryder på
kontrolknapperne.
l
Læg aldrig papir, aluminiumsfolie, klude,
plastmaterialer eller andre uvedkommende
genstande på kogepladen, når den er i
brug eller stadig er varm. Folie anvendt til
at tildække mad under tilberedning må ikke
komme i direkte berøring med kogepladen.
l
Af sikkerhedshensyn må håndtaget på
gryden aldrig rage ud over arbejdsfladen.
l
Sørg for, at grydens underside og
kogepladen er fri for vand, fedt eller andet
snavs før madlavning.
l
Undlad at bruge gryder med grove
undersider, da de kan ridse kogepladen.
73

l
Sørg for, at luftindgange og –udgange ikke
tildækkes eller blokeres på nogen måde.
Sørg for, at der altid er tilstrækkelig
ventilation omkring induktionskogepladen
under brug.
l
Induktionskogepladen må ikke anvendes i
nærheden af eller under gardiner og andre
brændbare materialer.
l
Tag aldrig induktionskogepladens stik ud
under brug uden at slukke for apparatet
først.
l
Apparatet må aldrig bruges på et
gaskomfur eller på borde eller flader af
rustfrit stål eller jern.
l
Dette apparat må ikke anbringes på eller i
nærheden af åben ild, en varmeplade eller i
en opvarmet ovn.
l
Dette apparat må ikke bruges som
varmeplade.
l
Induktionskogepladen må ikke bruges til at
opvarme andet end mad i egnede gryder.
l
Må aldrig bruges med gryder, der er
tomme.
l
I det usandsynlige tilfælde at indholdet af
gryden bryder i brand: Sluk for apparatet
på vægkontakten, tildæk gryden med en
fugtig klud, og lad den køle helt af før
håndtering.
l
Som med alle kogeplader i det tilfælde, at
kogegrejer overophedes utilsigtet og får lov
til at koge tør, er det vigtigt, at slukke for
induktionskogepladen på vægkontakten og
lade gryden køle af.
l
Overophedning bør altid undgås.
Vedvarende overophedning kan beskadige
kogegrejerne permanent.
74

75

l
Metalgenstande som f.eks. knive, gafler,
skeer og låg, må ikke lægges på
kogeområdets flade, da de kan blive
meget varme.
l
Undlad at lægge kreditkort, magnetiske
medier eller følsomt elektronisk udstyr i
nærheden af apparatet, mens det er i
brug.
l
Undlad at bruge apparatet udendørs.
l
Når induktionskogepladen er i brug, skal
den anbringes vandret på en flad
varmebestandig flade med en afstand til
væggen på mindst 10 cm til alle sider.
l
Børn, der er mindst 8 kan bruge, rengøre
og foretage brugervedligeholdelse på dette
apparat iht. til den medleverede
før stikket sættes i
stikkontakten
l
Sørg for, at elforsyningen svarer til
den, der står på undersiden af
induktionskogepladen.
l
Dette apparat overholder EFforordning 1935/2004 om
materialer og genstande, der
kommer i kontakt med
levnedsmidler.
før induktionskogepladen
anvendes første gang
Aftør kogepladen som beskrevet
under ‘vedligeholdelse og rengøring’.
forklaring
A kogeplade
B ringe til angivelse af hvor gryden
skal placeres
C kontrolknap
D tænd/standbyknap
E menu/indstillingsknap
F knap til menu/forøgelse af tid
G lysdisplay
H knap til menu/reduktion af tid
I tidknap
J turboknap
brug af
induktionskogepladen
Bemærk: Knapperne på
kogepladen er
temperaturberøringsfølsomme. Dvs.
de betjenes ved at lægge en
fingerspids på dem. Brug ikke en
negl til at tappe på pladen.
1 Sæt induktionskogepladens stik i.
Apparatet vil bippe én gang.
Lysdisplayet Blinker og viser “L”.
Apparatet er nu i standbytilstand.
76

Tryk på tænd/standbyknappen D.
2
tændt/standbylampen vil blinke, og
blæseren tændes. Apparatet er nu
standbytilstand, klar til
i
varmeafgivelse.
3 Anbring gryden midt på
nduktionskogepladen inden for
i
ringene, der kan ses på
kogepladen B.
Bemærk: Strømniveauet eller
temperatur og kogetid kan
indstilles ved brug af enten
kontrolknappen C eller op/ned
( + / - ) knapperne F og H.
Kontrolknappen C bruges ved
at skubbe den ind, indtil den
siger klik, og så slippe den.
Den kan så drejes med uret for
at skrue op eller mod uret for
at skrue ned.
Hvis kogepladen tændes, men
der ikke stilles en gryde på
den, vil kogepladen skifte til
standby, klar til varmeafgivelse
efter 1 minut.
Hvis der ikke er indstillet/valgt
en menu skifter kogepladen til
standbytilstand eter 10
sekunder.
4 Vælg den ønskede menuindstilling
med menu/indstillingsknappen E
Strøm – tryk på ‘menu/set’ én
gang for at vælge strømniveauet
1600 Watt. Displayet viser ‘1600’
og strømlampen tændes.
Normalt strømområde ligger
mellem 120 W og 2000 W i
følgende trin:
120 W – 400 W – 500 W – 800 W
– 1000 W - 1200 W – 1400 W –
1600 W – 1800 W - 2000 W
Skru op eller ned til den ønskede
strømstyrke.
Tilberedningen begynder. Hvis der
ikke trykkes på andre knapper, vil
tilberedning fortsætte i 2 timer og
derpå automatisk skifte til
standbytilstand.
77

emperatur – tryk på ‘menu/set’
T
to gange for at vælge
standardtemperaturen på 140° C.
isplayet viser ‘140’ og
D
temperaturlampen tændes.
Temperaturområdet er 60° C til
40° C i trin på 20° C. Skru op
2
eller ned til den ønskede
temperatur. Tilberedningen
begynder. Hvis der ikke trykkes på
andre knapper, vil tilberedning
fortsætte i 2 timer og derpå
automatisk skifte til
standbytilstand.
år tilberedningstiden er indstillet,
N
begynder timeren at tælle ned efter
5 sekunder.
år der tilberedes mad med
N
indstillet tid, vil tryk på + eller -,
eller drejning af kontrolknappen
ndre strømstyrken eller
æ
temperaturen og annullere den
indstillede tidsperiode.
Efter udløb af den indstillede
tilberedningstid, skal
“on/standby”-knappen
trykkes, før der kan ske
yderligere tilberedning.
Hold varm – tryk på ‘menu/set’
tre gange, hvorpå
induktionskogepladen vil være på
indstillingen til at holde maden
varm. Lampen for at holde maden
varm tændes.
Temperaturen for at holde varm er
ca. 60° C. Displayet viser “ ----”.
Hvis der ikke trykkes på andre
knapper, vil kogepladen forblive på
denne indstilling i 2 timer og derpå
automatisk skifte til
standbytilstand.
5 Tilberedningstid.
Kogepladen kan indstilles til en
bestemt tid. Når menuen er valgt
som herover, skal der trykkes på
“time”-knappen. Displayet vil blinke
“0:00” fire gange, og lampen vil
være tændt. Drej kontrolknappen,
eller tryk på + / - knapperne for at
vælge den ønskede
tilberedningstid. Hvis man holder
fingeren på knappen, øges eller
reduceres tidsperioden i trin på 10
minutter
Når tidsperioden er indstillet,
blinker den fire gange, hvorpå
displayet holder op med at blinke
og således bekræfter indstillingen.
Man kan også blot trykke på ‘time’
igen for at bekræfte. Derefter
begynder uret at tælle ned, og
displayet viser skiftevis den
resterende tid, og den indstillede
strømstyrke eller temperatur.
Man kan indstille tilberedningstiden
til maksimalt 3 timer.
6 Turbofunktion.
Hvis der trykkes på ‘turbo’ under
tilberedning, øges
strømindstillingen til 2100 Watt i 30
sekunder. Derefter skifter
kogepladen tilbage til den tidligere
indstillede strømstyrke eller
temperatur.
Bemærkninger: Når
induktionskogepladen er i gang, vil
der fra tid til anden lyde en
højfrekvent lyd, og blæseren vil
køre. Dette er helt normalt.
Når først gryden tages af
kogepladen, holder kogepladen
øjeblikkelig op med at afgive
varme, og der lyder et bip for hver
2 sekunder.
Den eksisterende visning/indstilling
vil blinke. Hvis gryden ikke sættes
tilbage på kogepladen inden for 60
sekunder, vil apparatet automatisk
slukke og gå i standbytilstand.
7 Tryk på on/standby-knappen, når
du er færdig med at lave mad.
Kogepladen vil standse
varmeafgivelse og vende tilbage til
standbytilstand. Lysdisplayet
blinker og viser “H”, mens pladen
stadig er varm, og viser så “L”,
mens pladen køles af.
l
Da denne induktionskogeplade
fungerer lidt anderledes end en
almindelig kogeplade, kan det blive
nødvendigt at justere de
forventede kogetider og
–temperaturer lidt for at opnå det
ønskede resultat.
78

ips
t
l
Du kan reducere tilberedningstiden
ed at dreje strømknappen til
v
aks. indstilling, når du tænder for
m
apparatet. Kort efter kan du
ndstille strømknappen til den
i
nskede indstilling.
ø
l
Efter kort tids brug vil erfaring lære
ig, hvilken indstilling der er den
d
ette til dine behov.
r
l
Indholdet i gryden opvarmes
hurtigere med en
induktionskogeplade.
timertilstand
Bemærk: Hvis timeren ikke
indstilles, vil kogepladen blive
ved med at koge i maksimalt 2
timer, hvorpå den vil skifte til
standbytilstand.
Timeren kan kun indstilles, når det
første strømniveau er valgt.
Brug
berøringskontrolknapperne.
Berør knappen med et bestemt
tryk med en fingerspids.
Tidsindstillingen kan ændres
med flere minutter ved at
berøre knappen én gang for
hvert minut.
1 Timeren indstilles ved at trykke på
‘+’ eller ‘-’ knappen. Timerdisplayet
vil vise ‘0:00’ og blinke.
Tidsindstillingen kan ændres ved at
trykke på ‘+’ eller ‘-’ for at ændre
med 1 minut pr. tryk. Hurtig
justering af tiden i trin på 10
minutter opnås ved at holde
fingeren på ‘+’ eller ’-’. Timeren
kan indstilles fra 1 minut til 3 timer.
l
Timeren kan indstilles når som
helst ved at trykke på ‘+’ eller ‘-’
knapperne, og derpå indstille
tidsperioden.
l
Timerfunktionen kan annulleres når
som helst ved at genindstille
tidsperioden til ‘0’ eller ved at
trykke på menuknappen.
2 Når tilberedningstiden er indstillet,
begynder timeren at tælle ned efter
5 sekunder.
3 Når tidsindstillingen er fuldført, vil
der lyde et bip, og apparatet vil
79

kifte til standbytilstand.
s
4 Når den indstillede
tilberedningstid er færdig, vil
ogepladen automatisk slukke
k
og gå i standbytilstand.
sikkerhedsfunktioner
l
nduktionskogepladen vil skifte til
I
standbytilstand, hvis den ikke
betjenes inden for et minut.
l
Hvis apparatet er i brug, og der ikke
anbringes en gryde med en
diameter på mindst 12 cm på
kogeplade, vil der lyde et bip i ca. 1
minut. Hvis der stadig ikke
anbringes en passende gryde på
kogepladen i det tidsrum, skifter
induktionskogepladen automatisk til
standbytilstand.
l
Hvis apparatet overophedes eller
gryden koger tør, går
induktionskogepladen automatisk i
beskyttelsestilstand, hvor
varmeafgivelsen vil blive reguleret.
Hvis overophedningen fortsætter, vil
apparatet evt. vise en
beskyttelseskode (se
fejlfindingsvejledningen).
l
Hvis der opstår problemer under
brug, går induktionskogepladen
automatisk i beskyttelsestilstand og
viser en beskyttelseskode.
l
Tag apparatets stik ud, og vent på,
at strømtilførslen bliver normal igen
(se fejlfindingsvejledningen).
l
Hvis induktionskogepladen er i brug,
og der ikke trykkes på en knap i en
periode på 2 timer, vil apparatet
automatisk skifte til standbytilstand.
l
Når først gryden er taget af, holder
kogepladen op med at koge.
Sikkerhedslås/børnelås
Induktionskogepladen har en
sikkerhedslås, som forhindrer
kogepladen i at blive brugt.
l
Låsning af kogepladen – tryk på
‘+’ og ‘-’ knapperne samtidig. I
denne tilstand fungerer kun
On/Standby-knappen.
l
Oplåsning af kogepladen – hold
‘+’ og ‘-’ knapperne trykket ned i 3
sekunder.
vedligeholdelse og
rengøring
l
Sluk for apparatet, tag stikket ud, og
lad apparatet køle helt af før
rengøring.
l
Nedsænk aldrig
induktionskogepladen i vand.
Kogeplade, legeme og
kontrolpanel:
l
Aftør alt med en blød, fugtig klud
eller et rensemiddel, der ikke sliber,
og eftertør grundigt. Sørg for, at alle
spor af rensemiddel fjernes. Undlad
at bruge slibende eller skurende
rensemiddel/-pulvere, skuresvamp
eller ståluld, da de vil skade eller
ridse kogepladen eller
kontrolpanelet.
l
Støv, fedt og væsker fra mad, der er
kogt over, skal fjernes så hurtigt som
muligt. Hvis de får lov til at tørre ud,
vil de blive stadig vanskeligere at
fjerne. Der må ikke bruges kniv eller
andre skarpe genstande, da disse
kan beskadige kogepladen eller
kontrolpanelet.
Luftindgang og -udgang:
l
Efter lang tids brug kan snavs og
støv akkumuleres i luftindgang eller udgang. Rengør med en blød,
bøjelig børste. Vask aldrig med
vand.
80

roblem forslag
p
pparatets stik sidder i • Se efter, om stikket er sat helt i, og
A
ægkontakten, og der er tændt der er tændt for strømmen.
v
på strømknappen, men • Hvis stikket har en sikring, skal
ngen lamper lyser. denne tjekkes
i
ysdisplayet lyser, men der • Se efter, at der er en gryde på
L
sker ingen opvarmning, når kogepladen
kontrolknappen reguleres • Tjek om gryden er egnet til brug på
Varmeafgivelse standser • Tjek strømtilførslen til apparatet
pludseligt, mens kogepladen • Se efter, at luftindgang eller
er i brug –udgang ikke er tilstoppet
Fejlkoder: • Apparatet kan være
E3, E6 overophedet/gryden kogt tør. Tag
E7, E8 • Udsving i strømtilførslen. Tag
E1, E2, E4, E5, Eb • Send apparatet til et
kogepladen
• Se efter, at gryden stå midt på
kogepladen
• Se efter, om tidsindstillingen er udløbet
• Tjek, om apparatet er overophedet eller
gået i fejltilstand. Tag stikket ud, lad
apparatet køle af, og prøv igen senere
apparatets stik ud, lad apparatet køle af,
og prøv igen.
apparatets stik ud, og vent til
størmtilførslen er stabil.
81

Svenska
ik ut framsidan med illustrationerna innan du börjar läsa
V
säkerhet
l
Läs bruksanvisningen noggrant och spara
den för framtida bruk.
l
Avlägsna allt emballage och alla etiketter.
viktig information – medicinska
implantat
l
Induktionsvärmaren genererar kortvågiga
magnetfält. Personer med pacemaker eller
andra aktiva implantat ska kontakta en
läkare före användning och säkerställa att
inga hälsorisker föreligger.
l
Doppa in ned apparaten, nätkabeln eller
stickkontakten i vatten eller annan vätska.
l
Använd aldrig en apparat, kabel eller
stickkontakt som är skadad. Lämna för
kontroll eller reparation. Se ‘service och
kundtjänst.
l
Lämna aldrig apparaten utan uppsikt när
den används.
l
Låt inte kabeln hänga över kanten på
bordet eller arbetsytan, och låt den inte
komma i kontakt med varma ytor.
l
Dra alltid ut stickproppen till apparaten när
den inte används.
l
Kontrollera att kablarna för andra apparater
i närheten inte kan komma i kontakt med
induktionsvärmaren.
l
Vissa delar blir mycket varma under och
efter användningen av induktionsvärmaren.
Värmeplattan förblir varm. Rör inte vid
varma delar.
l
Pannan och innehållet förblir varma efter
användningen.
82

83

l
När du har tagit bort pannan från
induktionsvärmaren placerar du den på ett
värmetåligt underlag.
l
Repa inte värmeplattan med vassa
föremål.
l
Använd inte värmeplattan som arbetsyta.
l
Använd aldrig värmeplattan för förvaring.
l
Använd inte värmeplattan om den är trasig
eller sprucken.
l
Placera inte varma eller vassa föremål eller
kastruller på kontrollerna.
l
Placera aldrig papper, aluminiumfolie, tyg,
plast eller andra främmande föremål på
värmeplattan när induktionsvärmaren
används eller är varm. Folie som används
för att täcka objekt under tillagningen får
inte komma i direktkontakt med
värmeplattan.
l
Av säkerhetsskäl får kastrummens handtag
inte sticka ut över arbetsytan.
l
Se till att kastrullen och värmeplattans
undersida är fria från vatten, fett eller
annan smuts innan du tillagar något.
l
Använd inte kastruller med grov undersida.
De kan repa värmeplattan.
l
Luftintagen och ventilerna får inte
blockeras. Sörj alltid för adekvat ventilation
runt induktionsvärmaren under användning.
l
Induktionsvärmaren får inte användas i
närheten av eller under gardiner eller andra
brännbara material.
l
Dra aldrig ur stickkontakten till
värmeplattan under användning utan att
först stänga av den.
l
Använd aldrig apparaten på en gasspis
eller på rostfritt stål eller bänkar/ytor av
84

järn.
85

l
Placera inte någon
del av apparaten
på eller i närheten
av en öppen låga
eller i en uppvärmd
ugn.
l
Använd inte
apparaten som
värmeplatta.
l
Använd inte
induktionsvärmaren
för att värma annat
än livsmedel i
lämpliga kastruller.
l
Använd aldrig med
tomma kastruller.
l
Om innehållet i
kastrullen mot
förmodan skulle
fatta eld: stäng av
apparaten genom
att dra ut
stickkontakten,
täck kastrullen
med en fuktig trasa
och låt svalna helt
innan du tar i den
l
Liksom med alla
värmare är det
viktigt att
apparaten ska
stängas av via
vägguttaget och
kastrullen få svalna
vid en eventuell
torrkokning.
l
Överhettning ska
alltid undvikas.
Långvarig
överhettning kan
orsaka permanenta
skador på
kastrullen.
l
Metallföremål, som
knivar, gafflar,
skedar och lock,
får inte placeras på
tillagningsområdet
eftersom de kan bli
varma..
l
Placera inte
kreditkort,
magnetiska media
eller känslig
elektronisk
utrustning i
närheten av
apparaten medan
den används.
l
Använd inte
apparaten
utomhus.
l
Under användning
ska
induktionsvärmaren
placeras
horisontellt, på en
plan värmetålig yta,
på minst 10 cm
avstånd från
väggen.
l
Barn från 8-års
86

ålder får använda,
rengöra och utföra
användarunderhåll
på denna apparat i
enlighet med
användaravnisning
arna, under
förutsättning att de
övervakas av en
person som
ansvarar för deras
säkerhet och att
de har fått
anvisningarna om
hur apparaten ska
användas och
känner till riskerna.
l
Personer med
försämrad fysisk,
sensorisk eller
mental förmåga
eller bristande
kunskap som
använder denna
apparat måste
övervakas eller få
instruktioner om
säker användning
och de måste
känna till riskerna.
l
Barn får inte leka
med apparaten.
Både apparat och
sladd måste
förvaras utom
räckhåll för barn
under 8 år.
l
Använd apparaten
endast för avsett
ändamål i hemmet.
Kenwood tar inte
på sig något
ansvar om
apparaten används
på felaktigt sätt
eller om dessa
instruktioner inte
följs.
l
Denna apparat är
inte avsedd att
drivas med hjälp av
en extern timer
eller ett separat
fjärrkontrollsystem.
lämpliga
kastruller
l
Använd enbart
kastruller med platt
botten som är
lämpliga för
induktionsvärmare.
Kontakta
tillverkaren av
kastrullerna om du
är osäker. Om de
inte är lämpliga
känner
induktionsvärmaren
inte av dem.
l
Induktionsvärmare
n är lämplig för
87

kastruller med en
basdiameter på
12–22 cm.
l
Köksredskap av
metall
rekommenderas
inte eftersom de
kan värmas upp av
induktionsvärmaren
om de lämnas i
kastrullen medan
den kokar.
nnan du sätter i
i
stickkontakten
l
ontrollera att nätspänningen
K
otsvarar den som visas på
m
induktionsvärmarens undersida.
l
en här apparaten uppfyller EG
D
örordning 1935/2004 om material
f
och produkter avsedda att komma
kontakt med livsmedel.
i
innan du använder
induktionsvärmaren för första
gången
Torka av värmeplattan, se ‘skötsel
och rengöring.
översikt
A värmeplatta
B kastrullguide
C kontrollvred
D on/standby-knapp
(på/vänteläge)
E menu/set-knapp
(meny/inställning)
F menu/time increase-knapp
(meny/ökning av tid)
G LED-display
H menu/time decrease-knapp
(meny/minskning av tid)
I tidsknapp
J turbo-knapp
använda
induktionsvärmaren
Obs! Knapparna på värmaren är
temperatur-touch-känsliga. De
justeras genom att användaren håller
fingret mot dem. Tryck inte med
fingernageln.
1 Sätt i induktionshällens
stickkontakt. Apparaten piper en
gång, LED-displayen blinkar och
visar "L". Apparaten befinner sig nu
i vänteläge.
2 Tryck på på-/väntelägesknappen
D. Indikatorlampan för
på/vänteläge och fläkten går.
Apparaten befinner sig nu i
vänteläge och är redo för
88

ppvärmning.
u
Placera kastrullen mitt på
3
nduktionsvärmaren inom
i
markeringen på värmeplattan B.
Obs! Effekten eller
temperaturen och
illagningstiden kan justeras
t
med kontrollvred C eller knapp
F och H för ökning/minskning (
+ / - ). Använd kontrollvredet
och tryck tills det klickar.
Släpp sedan C. Det kan sedan
vridas medurs för att öka eller
moturs för att minska.
Om induktonshällen slås på
men ingen kastrull placeras på
den övergår den till vänteläge
och är redo för uppvärmning
efter 1 minut.
Om ingen meny har
angetts/valts övergår
induktionshällen till vänteläge
efter 10 sekunder.
4 Välj önskad menyinställning med
menu/set-knappen E
Effekt - tryck på menu/set en
gång så väljs standardeffekten 1
600 W, på displayen visas 1600
och effektindikatorn tänds.
Det normala effektintervallet
sträcker sig från 120-2 000 W i
följande steg:
120 W - 400 W - 500 W - 800 W 1 000 W - 1 200 W - 1 400 W - 1
600 W - 1 800 W - 2 000 W
Öka eller minska till önskad effekt
Tillagningen startar. Om ingen
annan knapp trycks in pågår
tillagningen i 2 timmar och övergår
sedan till vänteläge.
Temperatur - tryck på menu/set
två gånger så väljs
standardtemperaturen 140°C, på
displayen visas 140 och
temperaturindikatorn tänds.
Temperaturintervallet är 60°C till
240°C i steg om 20°C; öka eller
minska till önskad temperatur.
Tillagningen startar. Om ingen
annan knapp trycks in pågår
tillagningen i 2 timmar och övergår
sedan till vänteläge.
89

roblem rekommendationer
p
är apparaten har anslutits • Kontrollera att stickkontakten är i
N
ch effektknappen slagits och att strömmen är påslagen
o
på. inga indikatorer lyser • Kontrollera säkringen för stickkontakten i
ED-displayen tänds, men • Kontrollera att det står en kastrull på
L
värmningen startar inte när värmaren
effektkontrollen justeras • Kontrollera att kastrullen är lämplig
Uppvärmningen avbryts • Kontrollera strömförsörjningen till
plötsligt underanvändningen apparaten
Felkoder visas: • Apparaten kan ha överhettats/kokat
E3, E6 torrt. Dra ut stickkontakten, låt svalna och
E7, E8 • Fluktuerande strömförsörjning. Dra
E1, E2, E4, E5, Eb • Skicka på service för reparation
örekommande fall
f
• Kontrollera att kastrullen står mitt på värmaren
• Kontrollera att luftintaget eller ventilen inte är
blockerade
• Kontrollera att timerperioden inte har löpt ut
• Kontrollera att apparaten inte har överhettats
eller övergått till felläge – dra ut stickkontakten,
låt svalna och försök igen
försök igen senare
ut apparatens stickkontakt och vänta tills
strömförsörjningen är stabil.
90

Norsk
ør du leser dette, brett ut framsiden som viser illustrasjonene
F
sikkerhet
l
Les nøye gjennom denne bruksanvisningen
og ta vare på den slik at du kan slå opp i
den senere.
l
Fjern all emballasje og eventuelle
merkesedler.
Viktig merknad – medisinske
implanter
l
Induksjonshoben skaper magnetiske felt
med kort rekkevidde. Hvis en bruker eller
person i nærheten har en pacemaker eller
andre aktive implanter, vennligst oppsøk en
lege før bruk angående mulig uforenbarhet
for å forhindre enhver helserisiko.
l
Senk ikke apparatet, strømledningen eller
pluggen ned i vann eller annen væske.
l
Bruk aldri skadet apparat, ledning eller
plugg. Sjekk eller få de reparert; se
‘service- og kundeservice’.
l
Etterlat aldri apparatet tilkoblet ved bruk.
l
La aldri ledning henge over kanten på
bordet eller arbeidsoverflaten eller berøre
varme overflater.
l
Plugg alltid fra apparatet når det ikke er i
bruk eller før rengjøring.
l
Sørg for at elektriske ledninger som er
koblet til andre apparater ikke kommer i
kontakt med induksjonshoben.
l
Pannen og innhold vil forbli varmt etter
bruk.
l
I løpet av og etter bruk av induksjonshoben
vil visse deler bli veldig varme. Ta ikke på
de varme delene.
91

l
Etter fjerning av pannen fra
induksjonshoben, plasser den på en
varmemotstandsdyktig overflate.
l
Skrap ikke hobplaten med skarpe
gjenstander.
l
Bruk ikke hobplaten som en
arbeidsoverflate.
l
Bruk aldri hobplaten for oppbevaring.
l
Bruk ikke induksjonshoben hvis hobplaten
er ødelagt eller har sprekt på noe vis.
l
Putt aldri varme eller skarpe gjenstander
eller panner på kontrollene.
l
Putt aldri papir, aluminium papir, håndkle,
plastikkmaterialer eller andre urelaterte
gjenstander på hobplaten når
induksjonshoben er i bruk eller er varm.
Aluminium brukt for å dekke til gjenstander
i løpet av koking skal aldri komme i direkte
kontakt med hobplaten.
l
For sikkerhetsårsaker, etterlat aldri
håndtaket til din panne i retning utover
arbeidsoverflaten.
l
Sørg for at undersiden til kokepannen og
hobplaten ikke har vann, fett eller annet
smuss på seg i forkant av koking.
l
Bruk ikke panner med røffe underlag
ettersom de kan skrape hobplaten.
l
La ikke luftinnløpet eller luftventilene bli
tildekt på noe vis. Sørg alltid for at det er
tilstrekkelig ventilasjon rundt
induksjonshoben ved bruk.
l
Induksjonshoben skal aldri bli brukt når
eller under gardiner eller andre tennbare
materialer.
l
Plugg aldri induksjonshoben fra i løpet av
bruk uten å skru den av først.
92

l
Bruk aldri apparatet på gassovn eller på
arbeidstopper/overflater i rustfritt stål eller
jern.
l
Plasser aldri dette apparatet på eller nær
åpen flamme, varm plate eller i en
oppvarmet ovn.
l
Bruk aldri dette apparatet som en varm
plate.
l
Bruk ikke induksjonshoben for å varme
opp annet enn mat i passende panner.
l
Bruk aldri med panner som er tomme.
l
I det usannsynlige tilfellet at innholdet tar
fyr; skru apparatet ut fra vegguttaket,
tildekk pannen med en våt klut og la den
kjøle seg fullstendig ned i forkant av
håndtering
l
Som med alle hober, i tilfelle
kokegjenstanden uheldigvis blir
overoppvarmet eller den koker tørr er det
viktig at varmekilden er skrudd av i forkant
av å fjerne den fra induksjonhoben og at
varmekilden er frakoblet vegguttaket og at
pannen har fått kjølt seg ned.
l
Overvarming skal hele tiden unngås.
Vedvarende overvarming kan forårsake
permanent skade på ditt kokeutstyr.
l
Metallgjenstander slik som kniver, gafler,
skjeer og lokk skal ikke legges på
overflaten til kokeområdet, ettersom de
kan varmes opp.
l
Plasser ikke kredittkort, magnetiske striper
eller følsomt elektronisk utstyr nær
apparatet når det er i bruk.
l
Bruk ikke apparatet utendørs.
93

l
I løpet av bruk skal induksjonshoben være
horisontalt plassert, på en
varmemotstandsdykti overflate, minst 10
cm vekk fra alle veggsider.
l
Barn fra 8 år og oppover kan bruke,
rengjøre og vedlikeholde dette apparatet i
samsvar med brukerinstruksjonene som
fulgte med, gitt at de overvåkes av en
person som er ansvarlig for deres sikkerhet
og at de har fått opplæring i bruk av
apparatet og er klar over farene.
l
Personer med reduserte fysiske eller
psykiske evner eller mangel på kunnskap
om bruk av apparatet må ha fått opplæring
i trygg bruk og være klar over farene.
l
Barn må ikke leke med apparatet, og både
apparatet og ledningen må være utenfor
rekkevidde for barn under 8 år.
l
Bruk bare apparatet til dets tiltenkte
hjemlige bruk. Kenwood frasier seg ethvert
ansvar ved feilaktig bruk eller dersom
apparatet ikke er brukt i henhold til denne
bruksanvisningen.
l
Dette apparatet er ikke ment å skulle
brukes med en ekstern tidtaker eller et
separat fjernkontrollsystem.
passende kokeredskap
l
Bruk kun flatbunnede panner som passer
for bruk på induksjonshob. Ved tvil sjekk
med fabrikanten av dine panner. Hvis de
ikke passer vil induksjonshoben ikke
oppdage pannen.
l
Induksjonshoben passer for panner med
en basediameter på 12–22 cm.
l
Metalkokeredkskap anbefales ikke
ettersom de kan varmes via
induksjonshoben i løpet av koking.
94

ør plugget inn
f
l
Sørg for at din elektriske
trømforsyning er som vist ovenfor
s
å underside av din
p
induksjonshob.
l
ette apparatet overholder EC-
D
orordning 1935/2004 om
f
materialer og gjenstander som er
estemt å komme i kontakt med
b
æringsmidler.
n
I forkant av bruk av din
induksjonshob for første gang
Sveip over hobplaten se «pleie og
rengjøring».
deler
A hobplate
B panveiviser
C kontrollknapp
D på-/beredsskapsknapp
E meny-/innstillingsknapp
F meny-/tidtakerøkningsknapp
G LED-display
H meny-/tidtakerminskningsknapp
I tidtakerknapp
J turboknapp
bruk av din
induksjonshob
merknad: knappene på hoben er
følsomme for temperaturberøring, de
styres ved å plassere fingeren på
dem. Tapp ikke med fingerneglen.
1 Plugg inn induksjonstoppen.
Apparatet vil pipe en gang, LEDdisplayet vil blinke og vise “L”.
Apparatet er nå i
beredskapsmodus.
2 Trykk på på-/beredskapsknappen
D, på-/beredskapsindikatorlyset vil
blinke og viften er på. Apparatet er
nå klart for varming.
3 Plasser pannen sentralt på
induksjonshoben, innen
panneveiviser vist med grafikk på
hobplaten B.
erknad: strømnivået eller
M
temperaturen og koketiden
an justeres ved bruk av enten
k
ontrollknappen C eller
k
øknings-/minskings- (+ / - )
nappene F og H.
k
or å bruke kontrollknappen,
F
trykk på den inntil den klikker
g frigjør C.
o
en kan deretter bli skrudd
D
med klokka for å øke og mot
klokka for å minske.
Hvis komfyrtoppen er skrudd
på, men ingen kasserolle er
plassert på den, vil
komfyrtoppen endres til
beredskap og være klar for
varming etter 1 minutt.
Hvis ingen meny er stilt
inn/valgt vil komfyrtoppen
endres til beredskapsmodus
etter 10 sekunder.
4 Velg ønsket menyinnstilling med
men-/innstillingsknappen E
Strøm – trykk på ‘meny/innstilling’
en gang og standardstrømnivået
på 1600 watt velges, displayet
viser ‘1600’ og strømindikatorlyset
er på.
Normal strømrekkevidde er fra
120w til 2000w ved følgende trinn:
120w - 400w - 500w - 800w 1000w - 1200w - 1400w - 1600w
- 1800w - 2000w
Øk eller minsk til ønsket strøm
Koking vil starte. Hvis ingen knapp
trykkes ned vil koking fortsette i 2
timer og automatisk endres til
beredskapsmodus.
Temperatur – trykk på
‘meny/innstilling’ to ganger og
standard temperatur på 140 °C
velges, displayet viser ‘140’ og
temp. indikatorlyset er på.
Temperaturrekkevidden er 60 °C til
240 °C i trinn på 20 °C; øk eller
minsk for å nå ønsket temperatur.
Koking vil starte. Hvis ingen annen
knapp trykkes på vil kokingen
fortsette i 2 timer og deretter skrus
automatisk til beredskapsmodus.
95

olde varm – trykk på
H
‘meny/innstilling’ tre ganger og
induksjonshoben vil holde
armeinnstillingen og holde varm-
v
indikatorlyset vil være på.
Holde varm er på rundt 60 °C;
isplayet er “ ----”. Hvis ingen
d
annen knapp trykkes på vil hoben
holde varm i 2 timer og deretter
automatisk gå til
beredskapsmodus.
5 Koketid.
Hoben kan bli stilt inn til å koke for
en fastsatt periode. Etter å ha valgt
menyen som ovenfor, trykk på
“tid”-knappen, displayet vil blinke
“0:00” fire ganger og
tidindikatorlyset vil bli skrudd på.
Skru kontrollknappen eller trykk på
+ / - knappene for å velge ønsket
koketid. Hold en finger på
knappene for å øke/minske tiden i
trinn på 10 minutter
Når tiden har blitt stilt inn vil den
blinke fire ganger og deretter vil
displayet forbli stabilt og bekrefte
at tiden har blitt innstilt. Alternativt
kan du trykke på ‘tid’ en gang til
for å bekrefte. Etter at klokken vil
telle ned vil displayet bytte på å
vise den gjenstående tiden og stille
inn strøm eller temperatur.
Maksimal koketid som kan bli stilt
inn vil være 3 timer.
Når koketiden har blitt stilt inn vil
tidtakeren begynne å telle ned etter
5 sekunder.
I løpet av den innstilte koketiden
kan du endre strøm eller
temperatur eller annullere innstilt tid
ved å trykke på + eller – eller skru
kontrollknappen for.
Etter fastsatt koketid som
har blitt fullført må du trykke
på “på/av” knappen før mer
koking kan bli utført.
6 Turbofunksjon.
Ved å trykke på ‘turbo’ i løpet av
koking så økes strømnivået til
2100 watt i 30 sekunder; hvoretter
hoben går tilbake til tidligere innstilt
strømstyrke eller temperatur.
erknader: Når
M
induksjonshoben er i drift vil det
høres en høy lyd og viften vil
ungere. Dette er vanlig.
f
Når pannen er tatt av plata slutter
denne å varme øyeblikkelig og et
ip vil høres hvert 2 sekund.
p
Eksisterende display/innstillinger vil
blinke. Hvis viften ikke stilles tilbake
innen 60 sekunder vilhoben
automatisk skrus av og vil være i
beredskapsmodus.
7 Trykk på på-/beredskapsknappen
når du er ferdig med å koke,
kokeren vil stoppe å varme og gå
tilbake til beredskapsmodus. LED
blinker og viser «H» samtidig som
at platen fremdeles er varm og
deretter viser den «L» når
komfyrtoppen kjøles ned.
l
Ettersom denne induksjonshoben
styres litt annerledes enn en
tradisjonell hob kan noen
justeringer forventes for koketiden
og temperaturene som kreves for å
oppnå ønskede resultater
hint
l
For å redusere koketiden kan du
skru strømkontrollen på maks
stilling når du skrur på apparatet.
Etter en kort tid kan du stille
strømkontrollen på ønsket
posisjon.
l
Etter en kort bruksperiode vil du
oppleve hvilken innstilling som er
den du trenger.
l
Panneinnhold varmer raskere med
en induksjonshob.
Tidtakermodus
Merknad: hvis tidtakeren
ikke blir stilt inn vil hoben
fungere maksimalt 2 timer
kontinuerlig og vil deretter
endres til beredskapsmodus.
Tidtakeren kan kun bli stilt inn etter
at et innledende strømnivå har blitt
valgt.
96

ruk av
B
berøringskontrollknapper –
erør knappen bestemt med
b
en ytterste delen av
d
fingertuppen. For å endre
idspunkt med flere
t
inutter, berør knappen for
m
hvert minutt av justeringen.
1 For å stille inn tidtakeren trykk på
“+” eller “-“-knappen. Tidtakeren vil
vise “0:00” og blinke. For å endre
tiden, trykk på “+” eller “-“ for å
endre tid ved å trykke på 1 minutt
per trykk. Den vil raskt justere tiden
hvert 10+ minutt med økende
grad, hold fingrene på “+” eller “-“.
Tidtakerens rekkevidde er 1 minutt
til 3 timer.
l
Tidtakeren kan bli justert når som
helst ved å trykke på ‘+’ eller ‘-’
knappene og deretter justere tiden.
l
Tidtakerfunksjonen kan bli annullert
når som helst ved å tilbakestille
tiden til ‘0’ eller ved å trykke på
menyknappen.
2 Når koketiden har blitt stilt inn vil
tidtakeren begynne å telle ned etter
5 sekunder.
3 Når den innstilte tiden er fullført vil
et pip høres og strømmen vil
endres til beredskapsmoduse.
4 Etter at koketiden har blitt
fullført vil hoben automatisk
skrus av og vil stå i
beredskapsmoduse.
sikkerhetsfunksjoner
l
Induksjonshoben vil gå til
beredskapsmodus hvis den ikke
blir brukt innen ett minutt.
l
Ved bruk, hvis ikke en passende
panne på minst 12 cm i diamater
blir brukt, vil et pip høres i omtrent
1 minutt. Hvis en riktig panne ikke
blir plassert på overflaten i løpet av
denne tiden vil induksjonshoben
automatisk gå til
beredskapsmoduse.
l
Hvis apparatet overvarmes eller
pannen koker tørr vil
induksjonshoben automatisk gå inn
i en beskyttende modus hvor
armen deretter blir justert. Hvis
v
overvarming fortsetter kan
apparatet vise en beskyttelseskode
se feilsøkingsveiviseren).
(
l
I løpet av bruk hvis problemer
oppstår med
ovedstrømforsyningen vil
h
induksjonshoben automatisk gå inn
i en beskyttende tilstand og vise en
beskyttelseskode.
l
Plugg fra apparatet og vent for at
forsyningen går tilbake til normal
(se feilsøkingsveiviseren).
l
Hvis induksjonshoben koker og
ingen knapp blir trykket på etter 2
timer vil den automatisk gå til
beredskapsmodus.
l
Når pannen fjernes vil hoben
stoppe å koke.
sikkerhetslåsen/barnelåsen
Induksjonsplate har en
sikkerhetslås som forhindrer at den
blir styrt.
l
For å låse plata – trykk på “+”
og “-“-knappene samtidig. I denne
modusen kan kun
på/beredskapsknappen fungere.
l
For å låse plata – trykk og hold
nede “+” og “-“-knappene i 3
sekunder.
vedlikehold og
rengjøring
l
Skru av, plugg fra og la apparatet
kjøle seg ned fullstendig før
rengjøring.
l
Senk aldri induksjonshoben ned i
vann.
hobplate, enhet og
kontrollpanel:
l
Tørk av med en fuktig, myk klut
eller ikke-skadelig rengjører og tørk
grundig. Sørg for at alt spor av
rengjøringsmiddel er fjernet. Bruk
ikke skadelige eller skrapeende
rengjørere/pudder, skrubbeputer
eller stålull ettersom de vil skade
eller skrape hobplaten eller skade
kontrollpanelet.
97

l
tøv, fett og væsker fra mat som
S
har kokt over må fjernes så fort
som mulig. Hvis de stivner kan det
li vanskelig å fjerne dem. Bruk
b
ikke kniv eller andre skarpe
redskaper ettersom de kan skade
obplaten eller kontrollpanelet.
h
luftinnløp og luftventil:
l
Etter lange bruksperioder kan skitt
og støv samle seg i luftinnløpet
eller luftventilen. Rengjør med en
myk, fleksible børste. Bruk aldri
vann for å vaske.
service og
kundetjeneste
l
Hvis ledningen er skadet må den,
på grunn av sikkerhetsårsaker, bli
skiftet ut av KENWOOD eller en
autorisert KENWOOD-reparatør
l
Hvis du har problemer med å
bruke apparatet ditt, må du sjekke
«feilsøkingsveiledningen» i
håndboken eller gå til
www.kenwoodworld.com før du
kontakter oss for hjelp.
l
Vennligst merk at produktet ditt
dekkes av en garanti som
overholder alle lovforskrifter
angående eksisterende garanti- og
forbrukerrettigheter i landet der
produktet ble kjøpt.
l
Hvis Kenwood-produktet ditt har
funksjonssvikt eller du finner
defekter på det, må du sende eller
ta det med til et autorisert
KENWOOD-servicesenter. Du
finner oppdatert informasjon om
hvor ditt nærmeste autoriserte
KENWOOD-servicesenter er, på
www.kenwoodworld.com eller på
nettstedet for landet ditt.
IKTIG INFORMASJON OM
V
KORREKT KASTING AV
RODUKTET I HENHOLD TIL
P
U-DIREKTIVET OM
E
ELEKTRISK OG ELEKTRONISK
UTSTYR SOM AVFALL (WEEE)
På slutten av levetiden må ikke
produktet kastes som vanlig avfall.
Det må tas med til et lokalt
kildesorteringssted eller til en
forhandler som tilbyr tjenesten. Ved å
avhende husholdningsapparater
separat unngås mulige negative
konsekvenser for miljø og helse som
oppstår som en følge av feil
avhending, og gjør at de forskjellige
materialene kan gjenvinnes. Dermed
blir det betydelige besparelser på
energi og ressurser. Som en
påminnelse om behovet for å kaste
husholdningsapparater separat, er
produktet merket med en
søppelkasse med kryss over.
98

feilsøkingsveiviser
roblemer forslag
p
tter at apparatet har blitt plugget • Sjekk at pluggen har blitt riktig satt I
E
og strømknappen skrudd og at strømmen er koblet på
i
på. Ingen indikatorer lyser • Hvor passende sjekk pluggledningen
LED-displayet lyser opp, men • Sjekk at pan er tilstede
arming starter ikke når • Sjekk at pan passer
v
strømkontroll har blitt justert •1Sjekk at pan er sentralt plassert
Varme stopper plutselig i • Sjekk strømforsyning til apparat
løpet av bruk • Sjekk at luftinngang til luftventilen ikke er
Feilkoder oppstår: • Apparatet kan ha blitt
E3, E6 overoppvarmet/kokt tørt. Plugg fra
E7, E8 • Fluktuering i hovedstrømforsyning.
E1, E2, E4, E5, Eb • Send det til reparasjonsanlegg for
blokkert
• Sjekk at tidsperioden ikke er avsluttet
• Sjekk at apparatet ikke er
overoppvarmet eller har gått inn i
feilmodus – plugg fra, la kjøle ned og
prøv igjen senere
apparatet og la kjøle ned og prøv igjen
senere
Plugg fra apparatet og vent inntil
strømforsyningen er stabil.
99

Suomi
nnen ohjeiden lukemista taita etusivu auki, jotta näet kuvitukset
E
turvallisuus
l
Lue nämä ohjeet huolella ja säilytä ne
myöhempää tarvetta varten.
l
Poista pakkauksen osat ja mahdolliset
tarrat.
tärkeä huomautus vartaloon
implanttina asetetun laitteen
käyttäjille
l
Induktiokeittolevy saa aikaan lyhyellä
etäisyydellä vaikuttavan magneettikentän.
Jos käyttäjällä on sydämentahdistin tai
muu aktiivinen implantti, kysy lääkäriltä
ennen käyttämistä, vaarantaako
käyttäminen terveyden.
l
Älä upota laitetta, virtajohtoa tai pistoketta
veteen tai muuhun nesteeseen.
l
Älä käytä laitetta, jos se, virtajohto tai
pistoke on vaurioitunut. Toimita se
tarkistettavaksi tai korjattavaksi. Lisätietoja
on huolto ja asiakaspalvelu -kohdassa.
l
Älä jätä laitetta ilman valvontaa käyttämisen
aikana.
l
Älä anna virtajohdon roikkua työpöydän
reunan yli tai koskettaa kuumia pintoja.
l
Irrota laitteen pistoke sähköpistorasiasta
ennen puhdistamista tai kun laitetta ei
käytetä.
l
Varmista, että muiden sähkölaitteiden
virtajohdot eivät kosketa
induktiokeittolevyä.
l
Tietyt osat ovat erittäin kuumia
induktiokeittolevyn käyttämisen aikana ja
käyttämisen jälkeen. Keittolevy kuumenee.
100
 Loading...