

Page 1
Front-Loading Automatic Washer
Use & Care Guide
Lavadora automática de carga frontal
Manual de uso y cuidado
Laveuse automatique à chargement frontal
Guide d’utilisation et d’entretien
Models/Modelos/Modèles 110.4751✼, 4753✼
✼ = color number, número de color, numéro de couleur
Designed to use only
HE High Efficiency Detergent
Diseñado para utilizar solamente
detergente de alto rendimiento
Conçu pour l'utilisation d'un détergent
haute efficacité seulement
Sears Roebuck and Co., Hoffman Estates, IL 60179, U.S.A. www.sears.com
W10117769A Sears Canada Inc., Toronto, Ontario, Canada M5B 2B8 www.sears.ca
Page 2

TABLE OF CONTENTS
PROTECTION AGREEMENTS
PROTECTION AGREEMENTS.......................................................2
WARRANTY.....................................................................................3
WASHER SAFETY ..........................................................................4
INSTALLATION REQUIREMENTS ................................................5
Tools and Parts ............................................................................5
Options .........................................................................................5
Location Requirements ................................................................6
Drain System ................................................................................7
Electrical Requirements................................................................8
INSTALLATION INSTRUCTIONS ..................................................9
Remove Transport System...........................................................9
Connect the Inlet Hoses...............................................................9
Route the Drain Hose ................................................................ 10
Secure the Drain Hose .............................................................. 10
Level the Washer....................................................................... 11
Complete Installation................................................................. 11
FEATURES AND BENEFITS ....................................................... 12
WASHER USE .............................................................................. 13
Starting Your Washer ................................................................ 13
Using the Proper Detergent ...................................................... 13
Using the Dispenser .................................................................. 14
Pausing or Restarting................................................................ 15
Changing Cycles, Options and Modifiers ................................. 15
Status Lights.............................................................................. 15
Cycles........................................................................................ 16
Normal Sounds.......................................................................... 17
Options ...................................................................................... 17
Modifiers.................................................................................... 17
Laundry Guide........................................................................... 18
LAUNDRY TIPS............................................................................ 19
Loading...................................................................................... 19
Stain Removal Guide................................................................. 20
WASHER CARE ........................................................................... 21
Cleaning Your Washer............................................................... 21
Water Inlet Hoses ...................................................................... 22
Vacation, Storage, and Moving Care........................................ 22
TROUBLESHOOTING.................................................................. 23
Washer and Components ......................................................... 23
Washer Operation...................................................................... 24
Clothes Care.............................................................................. 26
SERVICE NUMBERS ............................................... BACK COVER
Master Protection Agreements
Congratulations on making a smart purchase. Your new
Kenmore® product is designed and manufactured for years of
dependable operation. But like all products, it may require
preventive maintenance or repair from time to time. That’s when
having a Master Protection Agreement can save you money and
aggravation.
The Master Protection Agreement also helps extend the life of
your new product. Here’s what the Agreement* includes:
✔ Parts and labor needed to help keep products operating
properly under normal use, not just defects. Our coverage
goes well beyond the product warranty. No deductibles, no
functional failure excluded from coverage— real protection.
✔ Expert service by a force of more than 10,000 authorized
Sears service technicians, which means someone you can
trust will be working on your product.
✔ Unlimited service calls and nationwide service, as often as
you want us, whenever you want us.
✔ “No-lemon” guarantee – replacement of your covered
product if four or more product failures occur within twelve
months.
✔ Product replacement if your covered product can’t be fixed.
✔ Annual Preventive Maintenance Check at your request – no
extra charge.
✔ Fast help by phone – we call it Rapid Resolution – phone
support from a Sears representative on all products. Think of
us as a “talking owner’s manual.”
✔ Power surge protection against electrical damage due to
power fluctuations.
✔ $250 Food Loss Protection annually for any food spoilage
that is the result of mechanical failure of any covered
refrigerator or freezer.
✔ Rental reimbursement if repair of your covered product takes
longer than promised.
✔ 10% discount off the regular price of any non-covered repair
service and related installed parts.
Once you purchase the Agreement, a simple phone call is all that
it takes for you to schedule service. You can call anytime day or
night, or schedule a service appointment online.
The Master Protection Agreement is a risk free purchase. If you
cancel for any reason during the product warranty period, we will
provide a full refund. Or, a prorated refund anytime after the
product warranty period expires. Purchase your Master
Protection Agreement today!
Some limitations and exclusions apply. For prices and
additional information in the U.S.A. call 1-800-827-6655.
*Coverage in Canada varies on some items. For full details
call Sears Canada at 1-800-361-6665.
Sears Installation Service
For Sears professional installation of home appliances, garage
door openers, water heaters, and other major home items, in the
U.S.A. or Canada call 1-800-4-MY-HOME
®
.
2
Page 3

KENMORE APPLIANCE AND OPTIONAL PEDESTAL
WARRANTY
ONE YEAR LIMITED WARRANTY
When installed, operated and maintained according to all
instructions supplied with the product, if this appliance fails due
to a defect in material or workmanship within one year from the
date of purchase, call 1-800-4-MY-HOME
repair.
If this appliance is used for other than private family purposes,
this warranty applies for only 90 days from the date of purchase.
THIS WARRANTY COVERS ONLY DEFECTS IN MATERIAL
AND WORKMANSHIP. SEARS WILL NOT PAY FOR:
1. Expendable items that can wear out from normal use,
including but not limited to filters, belts, light bulbs, and bags.
2. A service technician to instruct the user in correct product
installation, operation or maintenance.
3. A service technician to clean or maintain this product.
4. Damage to or failure of this product if it is not installed,
operated or maintained according to all instructions supplied
with the product.
5. Damage to or failure of this product resulting from accident,
abuse, misuse or use for other than its intended purpose.
6. Damage to or failure of this product caused by the use of
detergents, cleaners, chemicals or utensils other than those
recommended in all instructions supplied with the product.
7. Damage to or failure of parts or systems resulting from
unauthorized modifications made to this product.
DISCLAIMER OF IMPLIED WARRANTIES; LIMITATION OF
REMEDIES
Customer’s sole and exclusive remedy under this limited
warranty shall be product repair as provided herein. Implied
warranties, including warranties of merchantability or fitness for a
particular purpose, are limited to one year or the shortest period
allowed by law. Sears shall not be liable for incidental or
consequential damages. Some states and provinces do not allow
the exclusion or limitation of incidental or consequential
damages, or limitations on the duration of implied warranties of
merchantability or fitness, so these exclusions or limitations may
not apply to you.
This warranty applies only while this appliance is used in the
United States and Canada.
This warranty gives you specific legal rights, and you may also
have other rights which vary from state to state.
Sears, Roebuck and Co.
Dept. 817WA, Hoffman Estates, IL 60179
Sears Canada Inc.
Toronto, Ontario, Canada M5B 2B8
®
to arrange for free
PRODUCT RECORD
In the space below, record your complete model number, serial
number, and purchase date. You can find this information on the
model and serial number label located on the product.
Have this information available to help you obtain assistance or
service more quickly whenever you contact Sears concerning
your appliance.
Model number __ __ __. __________________________________________
Serial number___________________________________________________
Purchase date __________________________________________________
Save these instructions and your sales receipt for future
reference.
PEDESTAL PRODUCT RECORD
In the space below, record your complete model number, serial
number, and purchase date. You can find this information on the
model and serial number label located on the product.
Have this information available to help you obtain assistance or
service more quickly whenever you contact Sears concerning
your pedestal.
Model number __ __ __. __________________________________________
Serial number___________________________________________________
Purchase date __________________________________________________
Save these instructions and your sales receipt for future
reference.
3
Page 4
WASHER SAFETY
Your safety and the safety of others are very important.
We have provided many important safety messages in this manual and on your appliance. Always read and obey all safety
messages.
This is the safety alert symbol.
This symbol alerts you to potential hazards that can kill or hurt you and others.
All safety messages will follow the safety alert symbol and either the word “DANGER” or “WARNING.”
These words mean:
You can be killed or seriously injured if you don't immediately
DANGER
WARNING
All safety messages will tell you what the potential hazard is, tell you how to reduce the chance of injury, and tell you what can
happen if the instructions are not followed.
IMPORTANT SAFETY INSTRUCTIONS
WARNING: To reduce the risk of fire, electric shock, or injury to persons when using the washer, follow basic precautions,
including the following:
follow instructions.
can be killed or seriously injured if you don't
You
instructions.
follow
■ Read all instructions before using the washer.
■ Do not wash articles that have been previously cleaned
in, washed in, soaked in, or spotted with gasoline,
dry-cleaning solvents, other flammable, or explosive
substances as they give off vapors that could ignite or
explode.
■ Do not add gasoline, dry-cleaning solvents, or other
flammable, or explosive substances to the wash water.
These substances give off vapors that could ignite or
explode.
■ Under certain conditions, hydrogen gas may be
produced in a hot water system that has not been used
for 2 weeks or more. HYDROGEN GAS IS
EXPLOSIVE. If the hot water system has not been
used for such a period, before using the washing
machine, turn on all hot water faucets and let the water
flow from each for several minutes. This will release
any accumulated hydrogen gas. As the gas is
flammable, do not smoke or use an open flame during
this time.
SAVE THESE INSTRUCTIONS
■ Do not allow children to play on or in the washer. Close
supervision of children is necessary when the washer is used
near children.
■ Before the washer is removed from service or discarded,
remove the door or lid.
■ Do not reach into the washer if the drum, tub or agitator is
moving.
■ Do not install or store the washer where it will be exposed to
the weather.
■ Do not tamper with controls.
■ Do not repair or replace any part of the washer or attempt any
servicing unless specifically recommended in this manual or in
published user-repair instructions that you understand and
have the skills to carry out.
■ See “Electrical Requirements” for grounding instructions.
4
Page 5
INSTALLATION REQUIREMENTS
Tools and Parts
Gather the required tools and parts before starting installation.
The parts supplied are in the washer drum.
Tools needed for connecting the water inlet hoses
■ Pliers (that open to 1⁹⁄₁₆" [39.5 mm])
■ Flashlight (optional)
Tools needed for installation
■ Open end wrenches 14 mm and 13 mm
■ Level
■ Wood block
■ Ruler or measuring tape
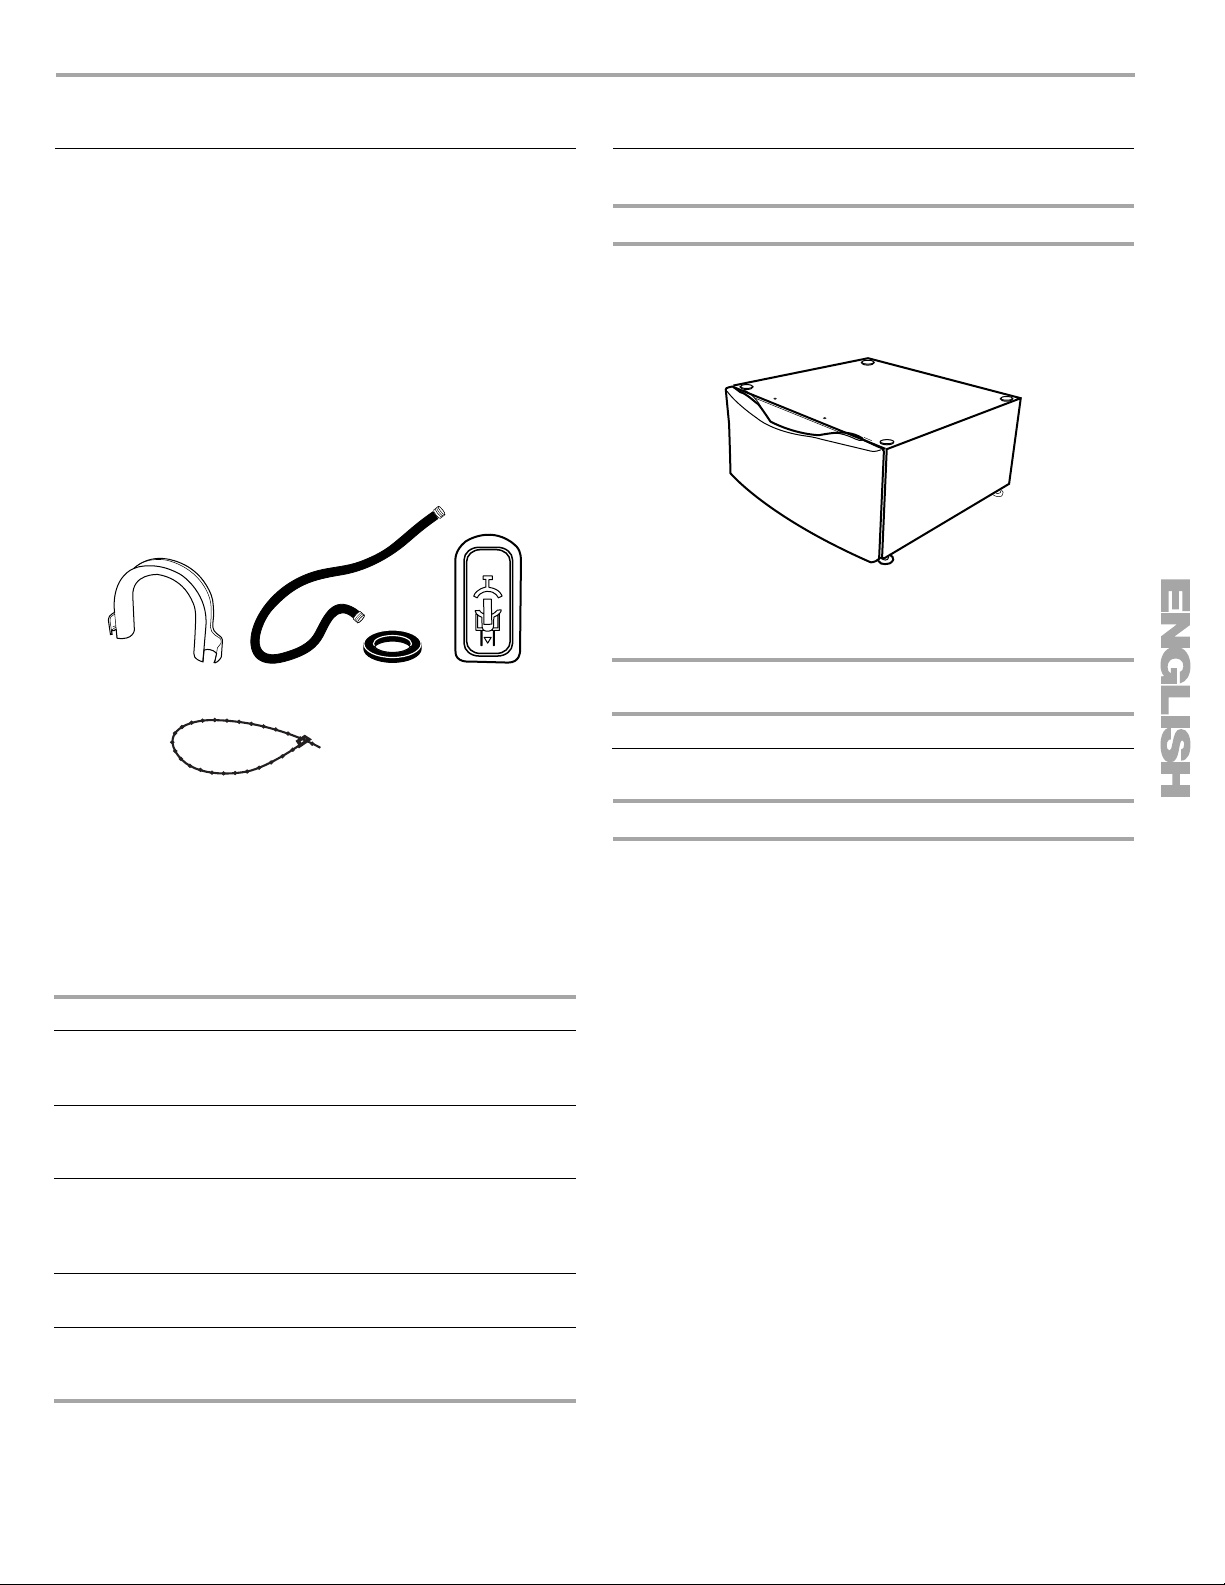
Parts supplied
AB C
E
A. U-shaped hose form
B. Water inlet hoses (2)
C. Inlet hose washers (4)
D. Transit bolt hole plug (4)
E. Beaded tie strap
Alternate Parts
Parts listed are available from your local Sears store or Sears
Service Center. For further information, please call
1-800-4-MY-HOME
If You H ave You Wil l N eed to B uy
®
(1-800-469-4663).
D
Options
Pedestal
You have the option of purchasing pedestals of different heights
separately for this washer. You may select a 10" (25.4 cm) or a
15.5" (39.4 cm) pedestal. The pedestal will add to the total height
of the washer.
Optional pedestal
To order, call your local Sears store. For further information,
please call 1-800-4-MY-HOME
Pedestal Height Approximate height
with washer
10" (25.4 cm) 46" (116.8 cm) White 46822
15.5" (39.4 cm) 51.5" (130.8 cm) White 57822
Stack Kit
Are you planning to stack your washer and dryer? To do so, you
will need to purchase a Stack Kit.
To order, call your local Sears store. Ask for the stack kit (Part
Number 8572546). For further information, please call
1-800-4-MY-HOME
included with the kit. See “Location Requirements.”
®
(1-800-469-4663). Follow instructions
®
(1-800-469-4663).
Color Model
Number
Laundry tub or
standpipe taller
Sump pump system (if not already
available)
than 96" (2.4 m)
Overhead sewer Standard 20 gal. (76 L), 30" (76.2 cm) tall
drain tub or utility sink and sump pump
(available from local plumbing suppliers)
Floor drain Siphon break, Part Number 285834;
additional drain hose, Part
Number 8318155; and connector kit, Part
Number 285835
Drain hose too
short
Water faucets
beyond reach of fill
hoses
4 ft (1.2 m) drain hose extension kit, Part
Number 285863
2 longer water fill hoses:
6 ft (1.8 m) Part Number 76314
10 ft (3.0 m) Part Number 350008
5
Page 6

Location Requirements
Selecting the proper location for your washer improves
performance and minimizes noise and possible washer “walk.”
Your washer can be installed under a custom counter, or in a
basement, laundry room, closet, or recessed area. See “Drain
System.”
Companion appliance location requirements should also be
considered. Proper installation is your responsibility.
You will need
■ A water heater set to deliver 120°F (49°C) water to the
washer.
■ A grounded electrical outlet located within 6 ft (1.8 m) of
where the power cord is attached to the back of the washer.
See “Electrical Requirements.”
■ Hot and cold water faucets located within 4 ft (1.2 m) of the
hot and cold water fill valves, and water pressure of
20-100 psi (137.9-689.6 kPa).
■ A level floor with a maximum slope of 1" (2.5 cm) under entire
washer. Installing the washer on soft floor surfaces, such as
carpets or surfaces with foam backing, is not recommended.
■ A sturdy and solid floor to support the washer with a total
weight (water and load) of 400 lbs (180 kg).
Do not operate your washer in temperatures below 32°F (0°C).
Some water can remain in the washer and can cause damage in
low temperatures.
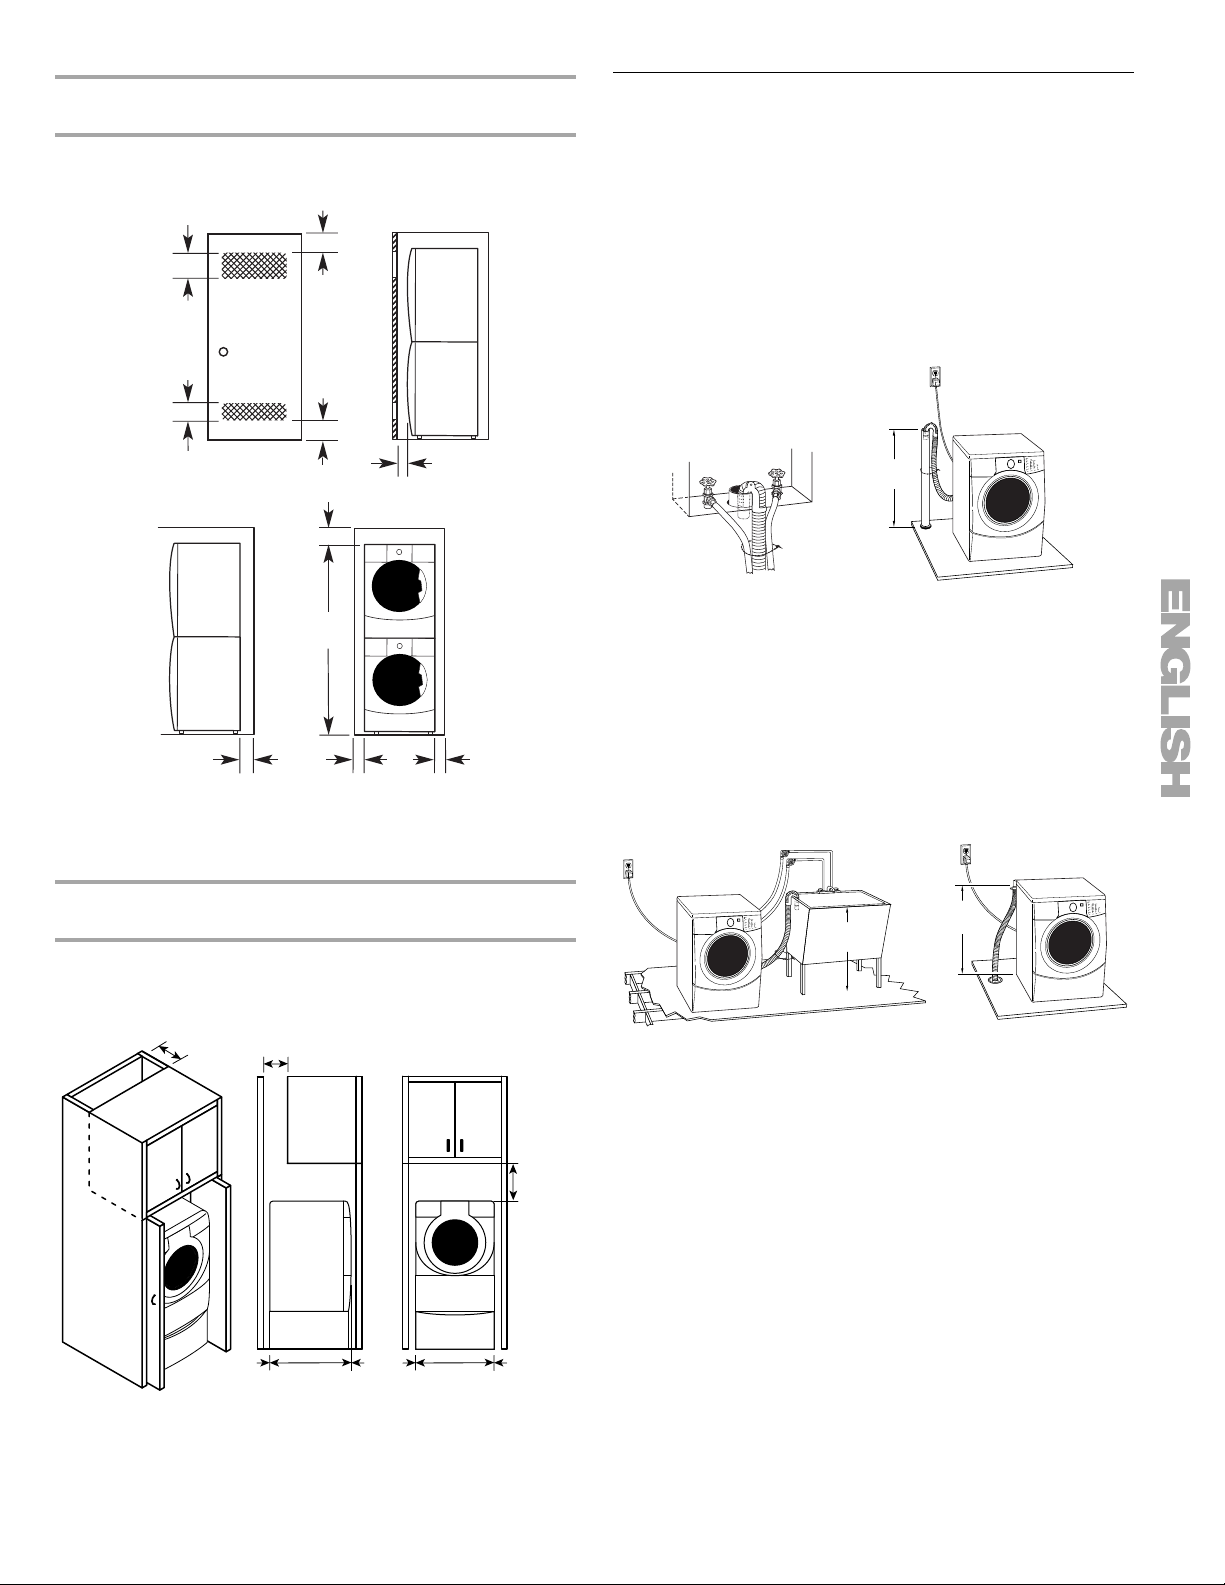
Recommended installation spacing for custom
undercounter installation
The dimensions shown are for the recommended spacing.
Custom undercounter installation - Washer only
37" min.
(93.9 cm)
1"
(2.5 cm)
27"
(68.6 cm)
1"
(2.5 cm)
Recommended installation spacing for recessed or
closet installation, with or without a pedestal
The dimensions shown are for the recommended spacing.
Recessed area or closet installation
14"* max.
(35.6 cm)
2
48 in.
(310 cm
*
2
)
3"
(7.6 cm)
Installation clearances
■ The location must be large enough to allow the washer door
to be fully opened.
■ Additional spacing should be considered for ease of
installation and servicing. The door opens more than 90°, and
it is not reversible.
■ Additional clearances might be required for wall, door, and
floor moldings.
■ Additional spacing of 1" (2.5 cm) on all sides of the washer is
recommended to reduce noise transfer.
■ Companion appliance spacing should also be considered.
Washer Dimensions
27"
50
¹⁄₄"
(127.6 cm)
Door is not reversible.
(68.6 cm)
30
(77.5 cm)
¹⁄₂"
36"
(91.4 cm)
2
*
24 in.
2
(155 cm
)
1"
30
¹⁄₂"
(2.5 cm)
(77.5 cm)
A
4"
(10.2 cm)
B
A. Side view - closet or confined area
B. Closet door with vents
*Min. top and bottom air openings for closet door.
Recessed or closet installation - Washer on pedestal
14"* max.
(35.6 cm)
1"
(2.5 cm)
27"
(68.6 cm)
1"
(2.5 cm)
1"
(2.5 cm)
30
¹⁄₂"
(77.5 cm)
(10.2 cm)
AB
A. Recessed area
B. Side view - closet or confined area
3"
(7.6 cm)
4"
6
Page 7
Recommended installation spacing for recessed or
closet installation, with stacked washer and dryer
The dimensions shown are for the recommended spacing.
48 in.2 *
2
)
(310 cm
3" (7.6 cm)
3" (7.6 cm)
2
24 in.
(155 cm2)
*
12" (30.5 cm)
1" (2.5 cm)
Drain System
The washer can be installed using the standpipe drain system
(floor or wall), the laundry tub drain system, or the floor drain
system. Select the drain hose installation method you need. See
“Tools and Parts.”
Standpipe drain system - wall or floor (views A & B)
The standpipe drain requires a minimum diameter standpipe of
2" (5 cm). The minimum carry-away capacity can be no less than
17 gal. (64 L) per minute.
The top of the standpipe must be at least 30" (76.2 cm) high and
no higher than 96" (2.4 m) from the bottom of the washer.
30" min.
(76.2 cm)
72"
(182.9 cm)
5 ¹⁄₄"**
(13.3 cm)
1"***
(2.5 cm)
27"
(68.6 cm)
1"***
(2.5 cm)
*Min. top and bottom air openings for closet door.
**External exhaust elbow requires additional space.
***Wall, door and floor molding may require additional spacing.
Recommended installation spacing for cabinet
installation
The dimensions shown are for the recommended spacing.
For cabinet installation, with a door, the minimum ventilation
openings in the top are required.
7" (17.8 cm)
7" (17.8 cm)
9"
(22.9 cm)
A
B
Laundry tub drain system (view C)
The laundry tub needs a minimum 20 gal. (76 L) capacity. The top
of the laundry tub must be at least 30" (76.2 cm) above the floor.
Floor drain system (view D)
The floor drain system requires a siphon break that may be
purchased separately. See “Tools and Parts.”
The siphon break must be a minimum of 28" (71 cm) from the
bottom of the washer. Additional hoses might be needed.
26" min.
30" min.
(76.2 cm)
CD
(66 cm)
4"
(10.2 cm)
31½"
(80 cm)
1"
(2.5 cm)1"(2.5 cm)
27"
(68.6 cm)
1"
(2.5 cm)
7
Page 8
Electrical Requirements
WARNING
Electrical Shock Hazard
Plug into a grounded 3 prong outlet.
Do not remove ground prong.
Do not use an adapter.
Do not use an extension cord.
Failure to follow these instructions can result in death,
fire, or electrical shock.
■ A 120 volt, 60 Hz., AC only, 15- or 20-amp, fused electrical
supply is required. A time-delay fuse or circuit breaker is
recommended. It is recommended that a separate circuit
serving only this appliance be provided.
■ This washer is equipped with a power supply cord having a
3 prong grounding plug.
■ To minimize possible shock hazard, the cord must be
plugged into a mating, 3 prong, grounding-type outlet,
grounded in accordance with local codes and ordinances. If a
mating outlet is not available, it is the personal responsibility
and obligation of the customer to have the properly grounded
outlet installed by a qualified electrician.
■ If codes permit and a separate ground wire is used, it is
recommended that a qualified electrician determine that the
ground path is adequate.
■ Do not ground to a gas pipe.
■ Check with a qualified electrician if you are not sure the
washer is properly grounded.
■ Do not have a fuse in the neutral or ground circuit.
GROUNDING INSTRUCTIONS
For a grounded, cord-connected washer:
This washer must be grounded. In the event of a malfunction
or breakdown, grounding will reduce the risk of electrical
shock by providing a path of least resistance for electric
current. This washer is equipped with a cord having an
equipment-grounding conductor and a grounding plug. The
plug must be plugged into an appropriate outlet that is
properly installed and grounded in accordance with all local
codes and ordinances.
WARNING:
grounding conductor can result in a risk of electric shock.
Check with a qualified electrician or serviceman if you are in
doubt as to whether the appliance is properly grounded.
Do not modify the plug provided with the appliance – if it will
not fit the outlet, have a proper outlet installed by a qualified
electrician.
For a permanently connected washer:
This washer must be connected to a grounded metal,
permanent wiring system, or an equipment grounding
conductor must be run with the circuit conductors and
connected to the equipment-grounding terminal or lead on
the appliance.
Improper connection of the equipment-
8
Page 9
INSTALLATION INSTRUCTIONS
Remove Transport System
WARNING
Excessive Weight Hazard
Use two or more people to move and install washer.
Failure to do so can result in back or other injury.
IMPORTANT: Position the washer so that the rear of the washer
is within approximately 3 ft (90 cm) of its final location.
There are 4 blue bolts in the rear panel of the washer that support
the suspension system during transportation. These bolts also
retain the power cord inside the washer until the bolts are
removed.
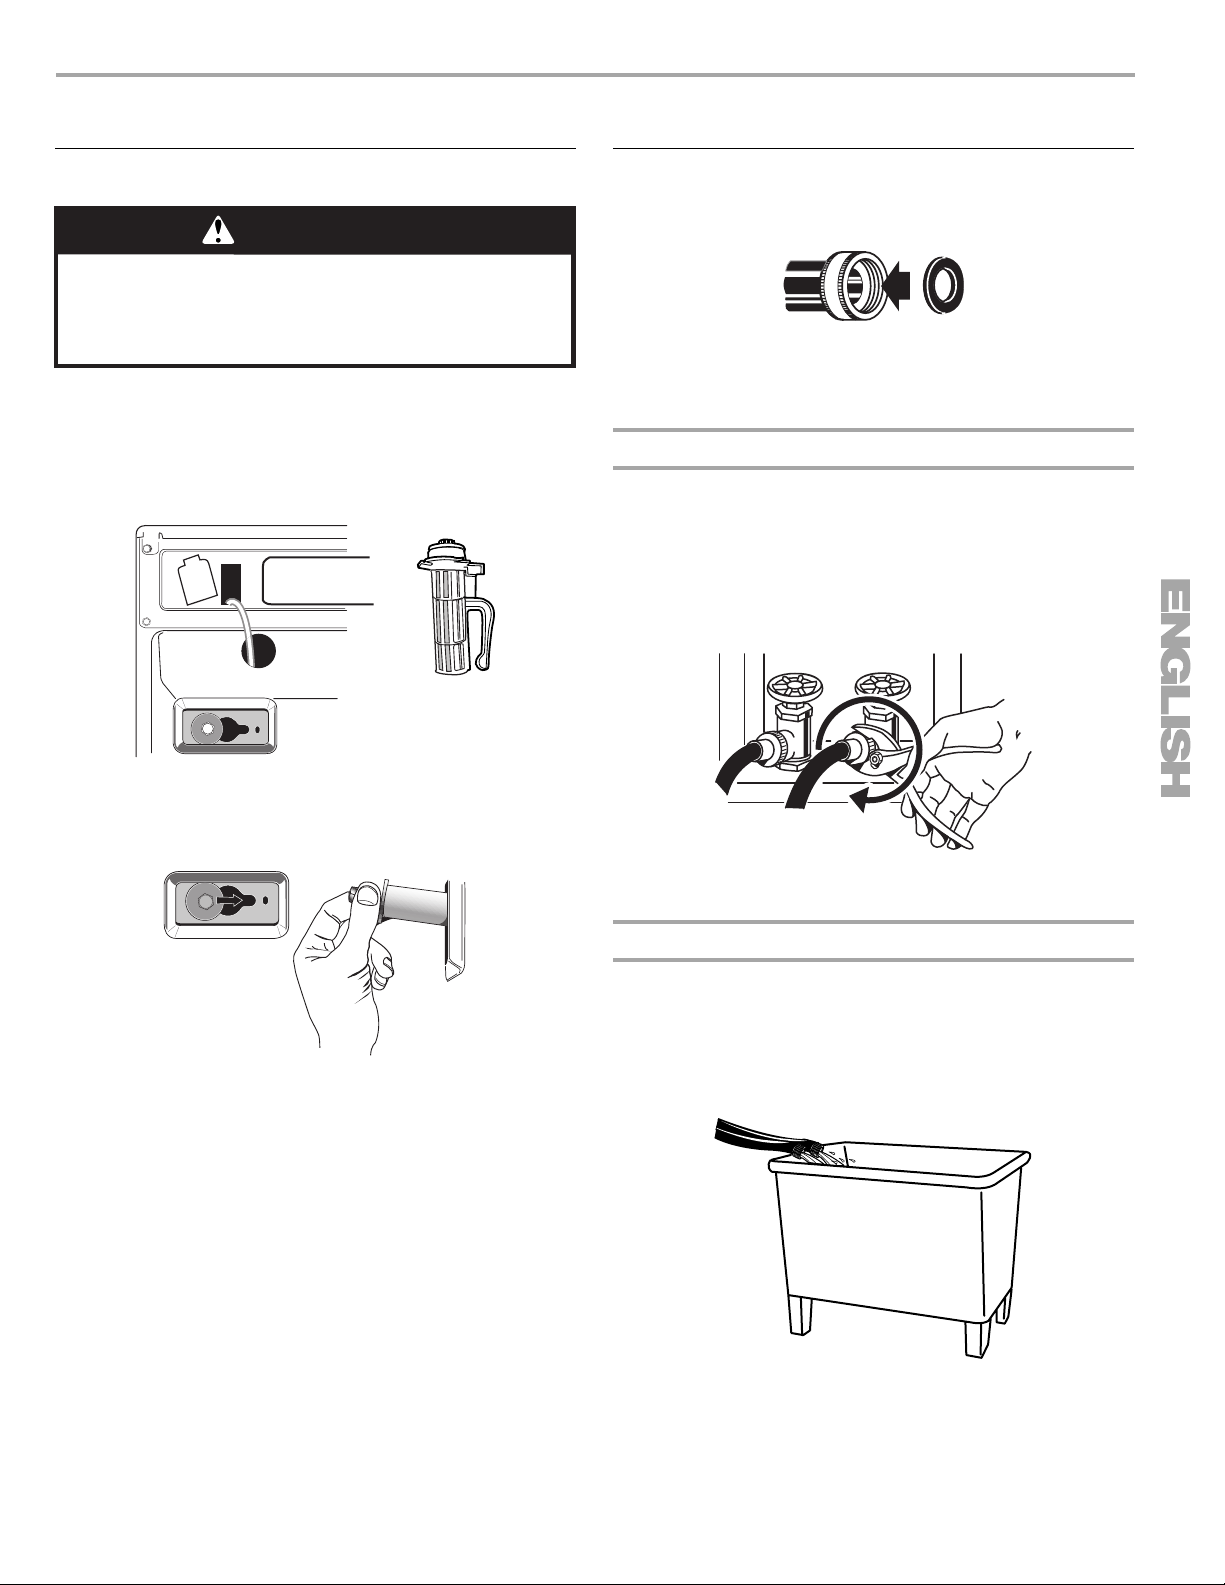
Connect the Inlet Hoses
Insert new flat washers (supplied) into each end of the inlet
hoses. Firmly seat the washers in the couplings.
AB
A. Coupling
B. Washer
Connect the inlet hoses to the water faucets
Make sure the washer drum is empty.
1. Attach a hose to the hot water faucet. Screw on coupling by
hand until it is seated on the washer.
2. Attach a hose to the cold water faucet. Screw on coupling by
hand until it is seated on the washer.
3. Using pliers, tighten the couplings with an additional
two-thirds turn.
1. Using a 13 mm wrench, loosen each of the bolts.
2. Once the bolt is loose, move it to the center of the hole and
completely pull out the bolt, including the plastic spacer
covering the bolt.
3. Once all 4 bolts are removed, discard the bolts and spacers.
Then pull the power cord through the opening of the rear
panel and close the hole with the attached cap.
4. Close the bolt holes with the 4 transport bolt hole plugs.
NOTE: If the washer is to be transported at a later date, call your
local service center. To avoid suspension and structural damage,
your machine must be properly set up for relocation by a certified
technician.
NOTE: Do not overtighten or use tape or sealants on the valve.
Damage to the valves can result.
Clear water lines
■ Run water through both faucets and inlet hoses, into a
laundry tub, drainpipe or bucket, to get rid of particles in the
water lines that might clog the inlet valve screens.
■ Check the temperature of the water to make sure that the hot
water hose is connected to the hot water faucet and that the
cold water hose is connected to the cold water faucet.
9
Page 10
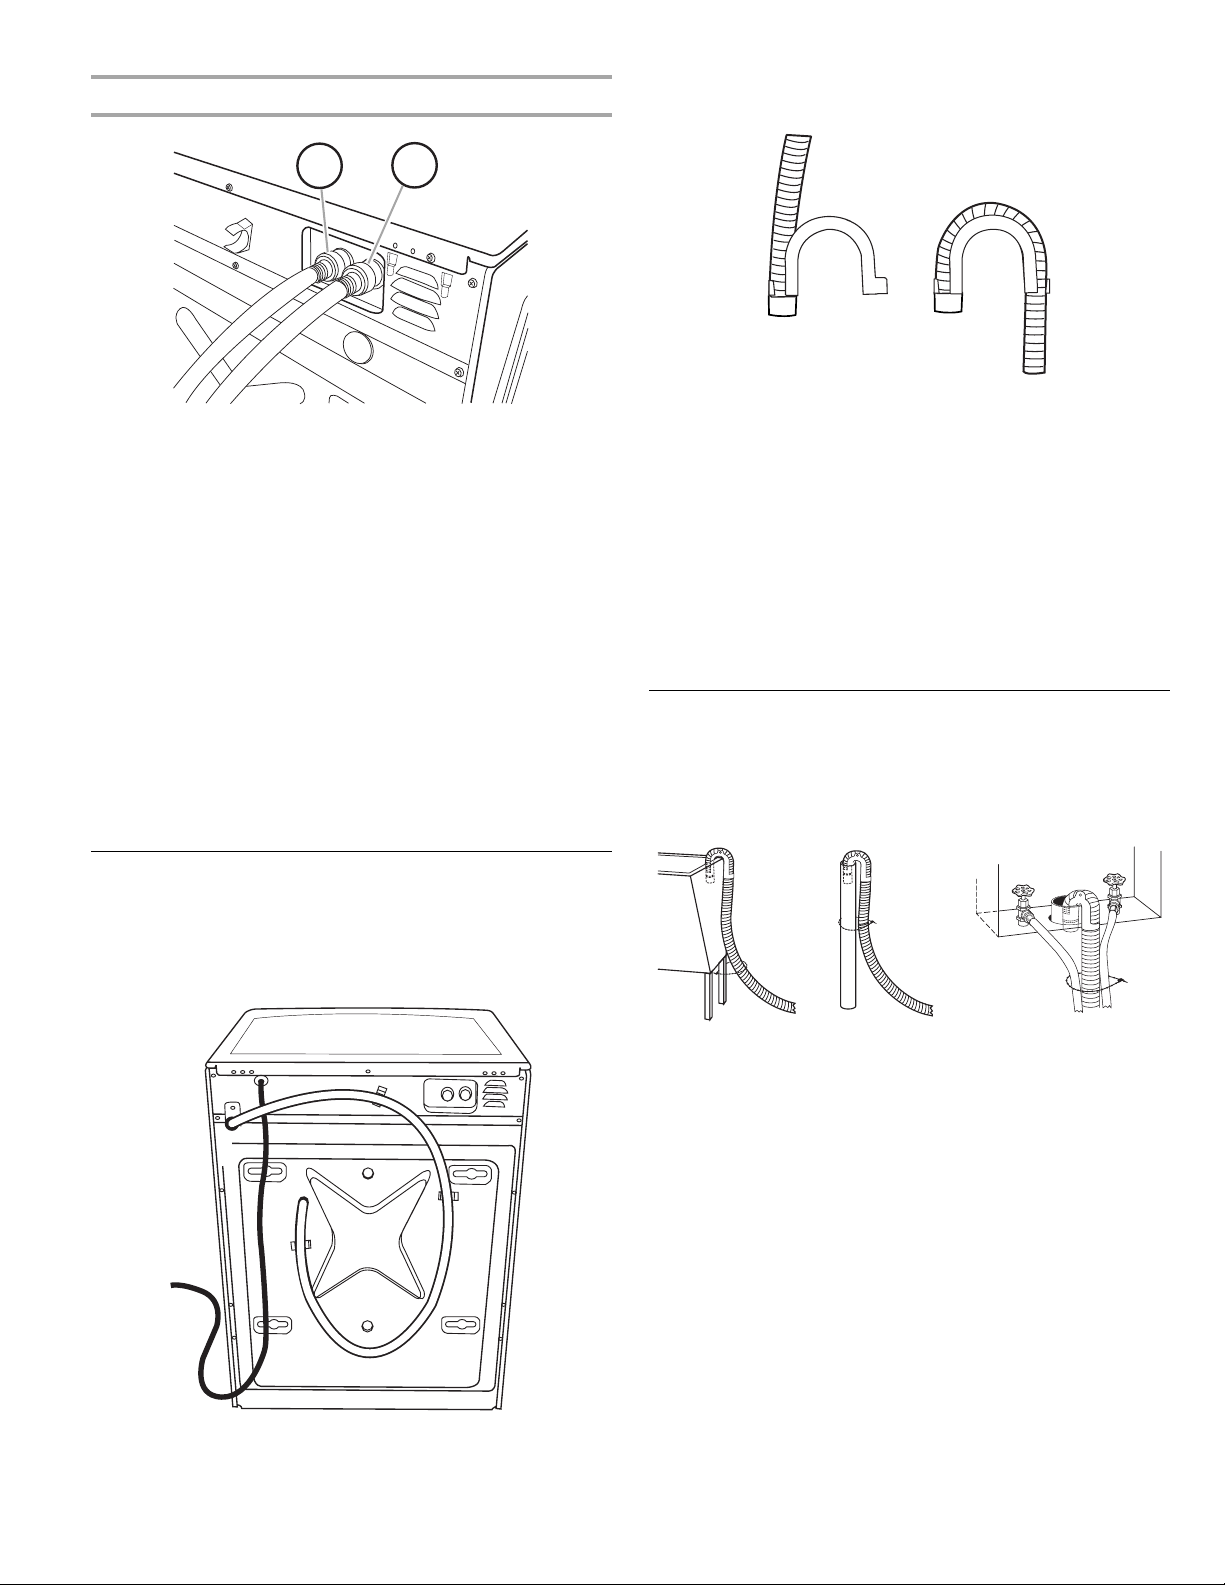
Connect the inlet hoses to the washer
Laundry tub drain or standpipe drain
Connect the drain hose form to the corrugated drain hose.
H
H. Hot water inlet
C. Cold water inlet
C
1. Attach the hot water hose to the washer’s hot (H) water inlet
valve. Screw on coupling by hand until it is seated on the
washer.
2. Attach the cold water hose to the washer’s cold (C) water
faucet. Screw on coupling by hand until it is seated on the
washer.
3. Using pliers, tighten the couplings with an additional
two-thirds turn.
NOTE: Do not overtighten. Damage to the coupling can
result.
4. Turn on the water faucets completely and check for leaks.
NOTE: Replace inlet hoses after 5 years of use to reduce the
risk of hose failure. Record hose installation or replacement
dates on the hoses for future reference.
Periodically inspect and replace hoses if bulges, kinks, cuts,
wear, or leaks are found.
AB
A. Snap either end of the drain hose form to the drain hose at
the point where the corrugation begins.
B. Bend drain hose over drain hose form and snap into place.
To keep drain water from going back into the washer:
■ Do not straighten the drain hose, and do not force excess
drain hose into standpipe. Hose should be secure, but loose
enough to provide a gap for air.
■ Do not lay excess hose on the bottom of the laundry tub.
Floor drain
You may need additional parts. See Floor drain under “Tools and
Parts.”
Secure the Drain Hose
1. Drape the power cord over the washer top.
2. Move the washer to its final location.
3. Place the drain hose in the laundry tub or standpipe as
shown. See illustrations A and B.
Route the Drain Hose
Proper routing of the drain hose protects your floor from damage
due to water leakage. Read and follow these instructions.
Remove drain hose from the washer
Gently pull the corrugated drain hose from the shipping clips.
AB C
4. If the washer faucets and the drain standpipe are recessed,
put the hooked end of the drain hose in the standpipe as
shown. See illustration C.
NOTES:
■ Do not force excess drain hose back into the rear of the
washer.
■ To avoid siphoning, do not seal the drain hose into the
standpipe.
10
Page 11
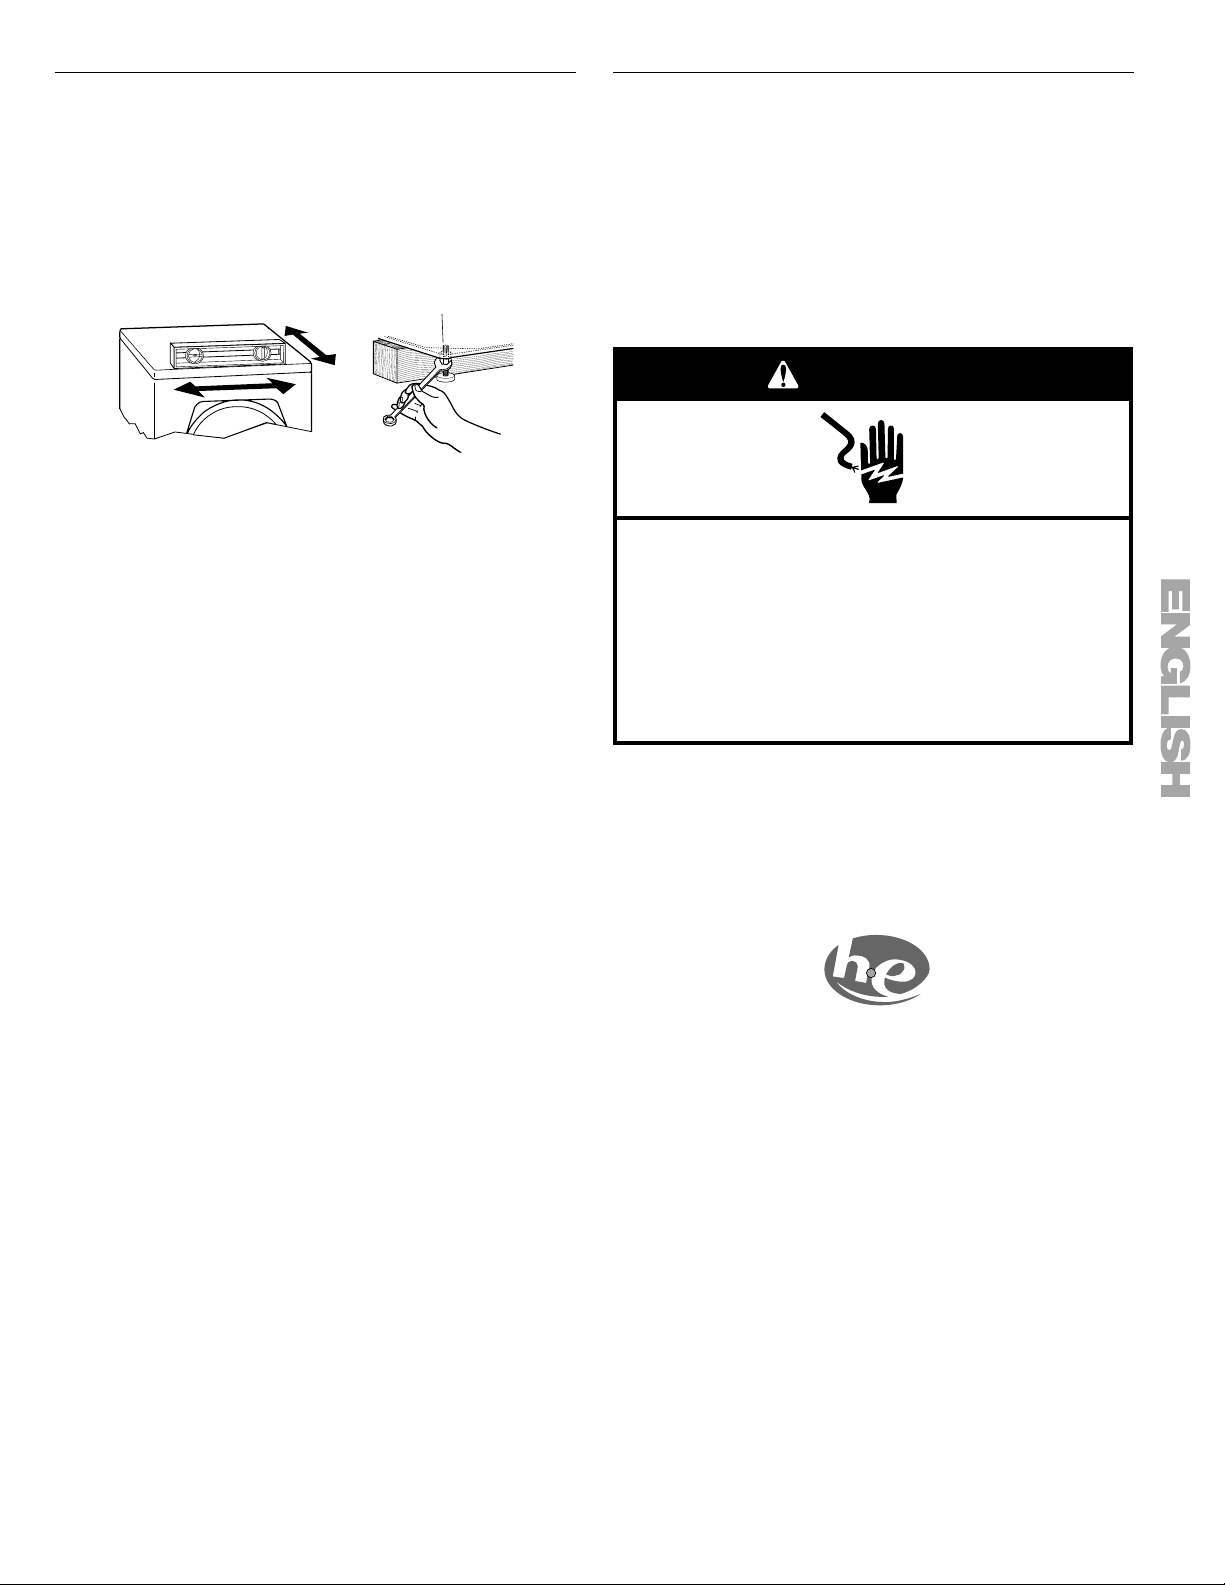
Level the Washer
Properly leveling and locking the feet on your washer avoids
excessive noise and vibration.
1. Check that the four locknuts on the washer feet are tightened
against the washer cabinet using a 14 mm open-end wrench.
2. Place the washer in its final location and check the levelness
of the washer. The washer should not move front to back,
side to side, or diagonally when pushed on its top edges.
Make sure all four feet are stable and resting on the floor.
3. If the washer is not level, move the washer out slightly before
tipping back. First prop the front with a wood block, loosen
the locknuts and adjust the feet as necessary; then prop the
back and adjust feet as necessary. Repeat steps 1-3 until the
washer is level.
IMPORTANT: All four feet must be tightened. If the locknuts are
not tight against the washer cabinet, the washer may vibrate.
Complete Installation
1. Check the electrical requirements. Be sure that you have the
correct electrical supply and the recommended grounding
method. See “Electrical Requirements.”
2. Check that all parts are now installed. If there is an extra part,
go back through the steps to see which step was skipped.
3. Check that you have all of your tools.
4. Dispose of/recycle all packaging materials.
5. Check that the water faucets are on.
6. Check for leaks around faucets and inlet hoses.
WARNING
Electrical Shock Hazard
Plug into a grounded 3 prong outlet.
Do not remove ground prong.
Do not use an adapter.
Do not use an extension cord.
Failure to follow these instructions can result in death,
fire, or electrical shock.
7. Plug into a grounded 3 prong outlet.
8. Read “Washer Use.”
9. To test and to clean your washer, measure ¹⁄₂ the detergent
manufacturer’s recommended amount of HE High Efficiency
detergent for a medium-size load. Pour the detergent into the
detergent dispenser. Select NORMAL/CASUAL, and then
select START. Allow the washer to complete one whole cycle.
Use only HE High Efficiency detergent.
11
Page 12

FEATURES AND BENEFITS
Your new front-loading high efficiency washer, was designed to
conserve resources and lower your water and energy bills. The
washer is designed to determine and then provide the amount of
water needed for the best performance. The time of operation
may be greater for this new system than for a conventional
washer.
Electronic Controls
Flexible electronic controls are easy to use whether you are a
beginner or an expert.
Auto Water Level
Adjusting to the size of the load, this feature allows the washer to
use the minimal amount of water needed to clean and rinse the
clothes. With a low water level, you can obtain the same results
with smaller amounts of laundry products. Because only the
required amount of water is used, the washer saves energy, too.
You can obtain the same washing results for small and large load
size.
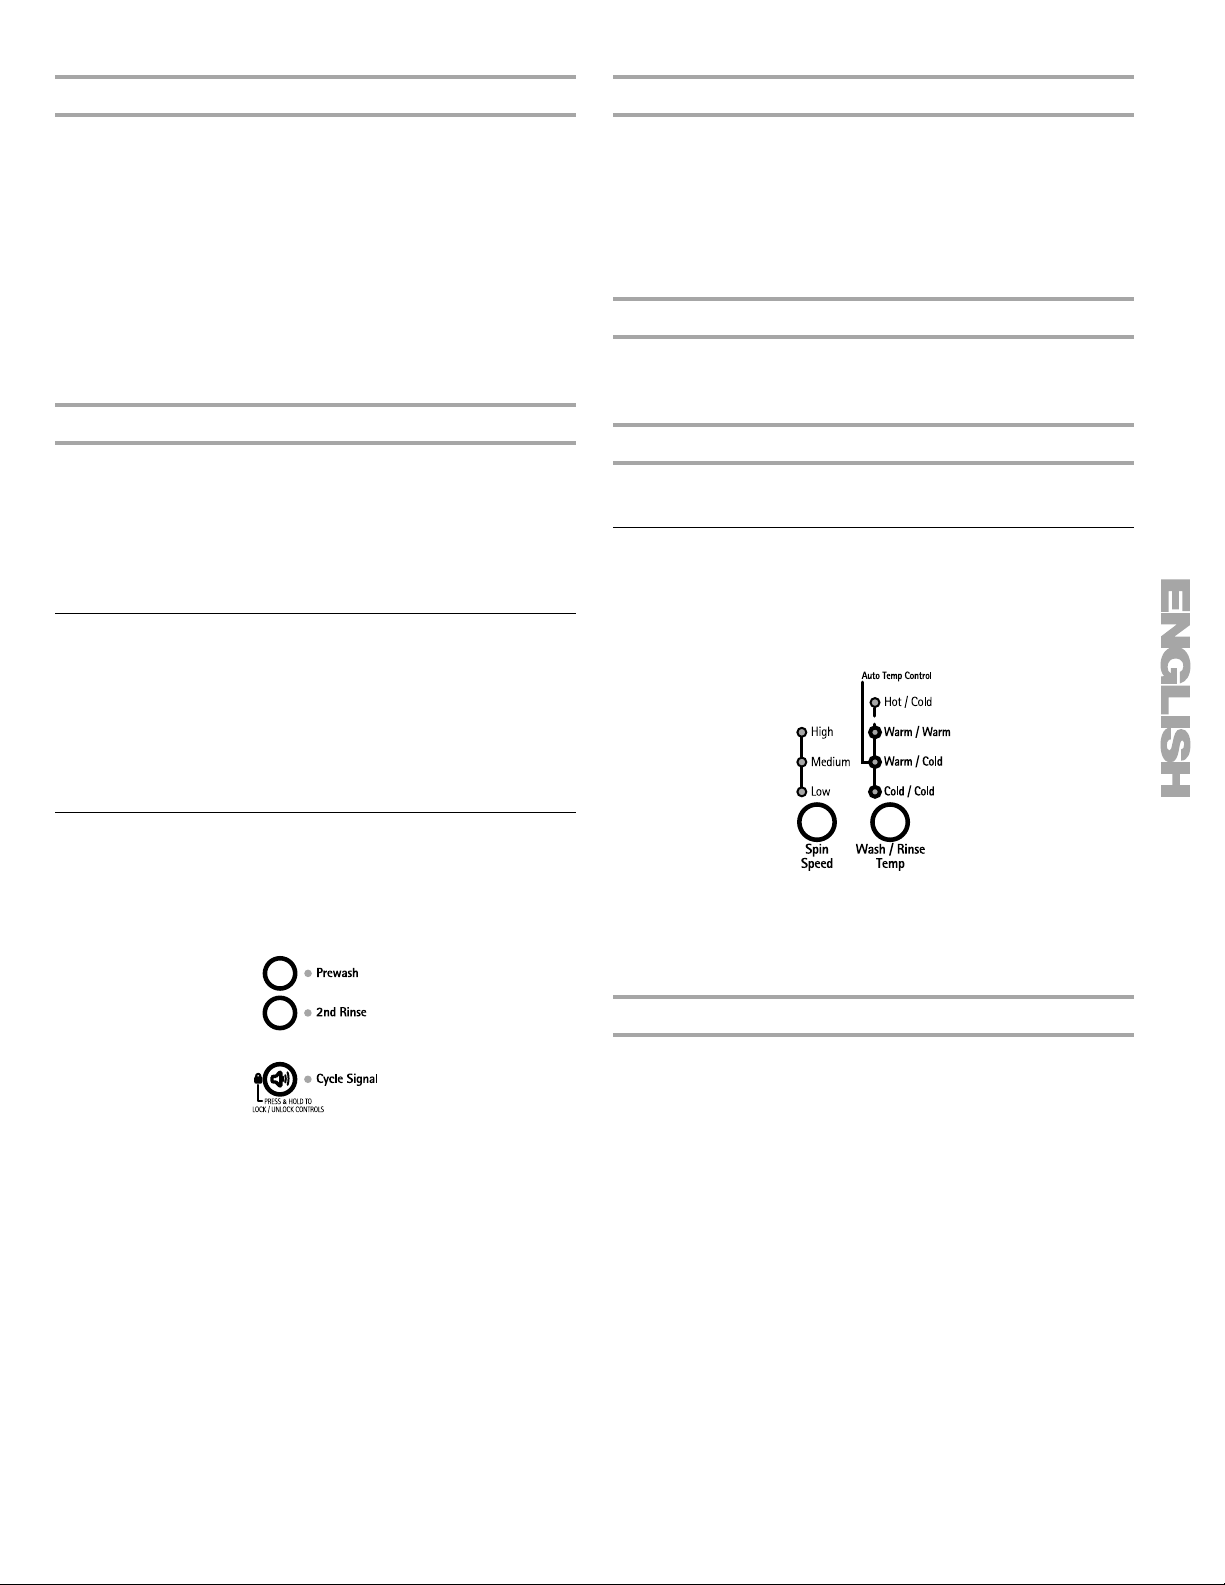
Spin Speeds
This washer automatically selects the spin speed based on the
cycle selected. This factory setting can be changed, however.
This washer offers up to three different spin speed choices.
Add A Garment
This option is available in all wash cycles except Rinse & Spin,
Drain & Spin, and Clean Washer. When this option is available at
the beginning of the cycle, the Add A Garment status light will
illuminate for the first 7 minutes. This washer allows a 7-minute
period in which other garments may be added to a load.
Dynamic Balance
A precision balancing system that allows the washer to reach
high-speed spins. The washer spins faster so that clothes
coming out of the washer will have less moisture than with
traditional top load machines. In addition, if the Dynamic Balance
system detects off-balance loads during spinning, it redistributes
the clothes so that they are evenly balanced.
Larger Load Size
Since there is no agitator, you can wash larger, bulkier items such
as an average size sleeping bag. You are also able to wash more
clothes at one time, which means fewer loads. You can wash a
pillow or a large stuffed teddy bear.
Suspension System
To reduce washer “walk” and “off-balance” conditions, your new
washer combines:
■ 2 Springs to isolate vibration
■ 4 Shock absorbers at the washer base to minimize
movement
Stainless Steel Drum
The stainless steel drum eliminates corrosion and enables higher
spin speeds for more water extraction, reducing drying time.
Adaptive Variable Speed Motor
The motor adapts to the load size and to the cycle selected to
give the optimum cleaning, rinsing, and spinning conditions. The
motor can handle slow speeds needed for delicate items and is
powerful enough to drive an average clothes load up to highspeed spin.
Detergent Advantage System Dispenser
The three compartments in the dispenser allow loading of all
laundry products before the washer is started. The products will
be dispensed into the wash at the optimal time for highperformance cleaning. The bleach release system is included in
the detergent advantage system. The detergent is added at the
beginning of the cycle, and the bleach is added after the
enzymes have had a chance to do their cleaning. The fabric
softener is dispensed in the rinse cycle or in the 2ND RINSE, if
selected. The Detergent Advantage System Dispenser tray can
be easily removed for cleaning.
Use only HE High Efficiency detergent.
12
Page 13
WASHER USE
Starting Your Washer
WARNING
Fire Hazard
Never place items in the washer that are dampened
with gasoline or other flammable fluids.
No washer can completely remove oil.
Do not dry anything that has ever had any type of oil on
it (including cooking oils).
Doing so can result in death, explosion, or fire.
WARNING: To reduce the risk of fire, electric shock, or injury to
persons, read the IMPORTANT SAFETY INSTRUCTIONS before
operating this appliance.
The following is a guide to using your washer. Please refer to
specific sections of this manual for more detailed information.
Do not store laundry products on the top surface of this washer.
Vibration is normal during operation.
Using the Proper Detergent
Use only High Efficiency detergents. The package for this type of
detergent will be marked “HE” or “High Efficiency.” This wash
system, along with less water, will create too much sudsing with a
regular non-HE detergent. Using regular detergent will likely result
in washer errors, longer cycle times and reduced rinsing
performance. It may also result in component failures and
noticeable mold or mildew. HE detergents are made to produce
the right amount of suds for the best performance. Follow the
manufacturer's instructions to determine the amount of detergent
to use.
Use only HE High Efficiency detergent.
First Wash Cycle Without Laundry
Before washing clothes for the first time, if not completed during
the final installation step, choose the Normal/Casual cycle and
run it without clothes. Use only HE High Efficiency detergent. Use
¹⁄₂ the manufacturer’s recommended amount for a medium-size
load. This initial cycle serves to ensure the interior is clean before
washing clothes.
For All Wash Cycles
1. To load washer
Open the washer door by pulling on the handle.
Sort laundry according to color and type of fabric. Place a
load of sorted clothes in the washer. Do not overload washer.
Overloading can cause poor cleaning.
■ The washer can be fully loaded, but not tightly packed.
Washer door should close easily.
■ Mix large and small items. Avoid washing a single item.
Load evenly.
■ Wash small items such as infant socks in mesh garment
bags. It is recommended that more than one garment bag
be used and that each garment bag be filled with equal
amounts of material.
■ When unloading garments, occasionally check under the
gray colored seal/bellow rim at the front of the tub for
small items.
2. Close the washer door by pushing it firmly until the lock
clicks. The washer door will remain locked during the wash
cycle.
NOTE: After any wash cycle is completed, the door must be
opened and then closed before a new cycle can begin. The
door can be opened only if STOP is selected while the ADD A
GARMENT light is illuminating or if the cycle has been
canceled. See “To cancel a cycle” in the “Changing Cycles,
Options and Modifiers” section.
3. Open the dispenser drawer and add laundry products to the
detergent, bleach, or fabric softener compartments. Close
drawer slowly to avoid spills. See “Using the Dispenser.”
NOTE: Use only HE High Efficiency detergent.
4. Turn on the washer by selecting POWER. Select one of the
cycles by turning the cycle selector. The indicator light for the
selected cycle will illuminate. When selecting a Wash Cycle,
the preset Modifiers and Options, Water Temp, and Spin
Speed for the selected cycle will illuminate. The preset
settings provide the recommended fabric care for the
selected cycle. See “Cycles.”
13
Page 14
5. Select the desired OPTIONS. Not all Options are available
C
D
with all cycles. See “Options.”
6. Select the desired MODIFIERS. Not all Modifiers are available
with all Cycles and Options. See “Modifiers.”
7. If desired, select the CYCLE SIGNAL. The signal is helpful
when you are washing items that should be removed from the
washer as soon as it stops. Press CYCLE SIGNAL once to
turn it on. The indicator light will illuminate. Press again to
turn it off.
8. To begin the wash cycle immediately
Select and hold START (for approximately 1 second).
■ If you do not select START within 5 minutes of choosing a
cycle, the washer automatically shuts off.
■ When the wash cycle is complete, the CLOTHES CLEAN
status light illuminates, the door unlocks, and the wash
load can be removed from the washer. The washer
powers down automatically 5 minutes after the cycle is
complete and the CLOTHES CLEAN light goes off. To
power down the washer manually after the wash cycle is
complete, select STOP once.
9. To begin the wash cycle later
Select DELAY START until the desired delay time (in hours)
shows in the Estimated Time Remaining display. Select
START. The countdown to the wash cycle will show in the
display window.
IMPORTANT: When delaying a cycle, use only powdered
detergents in the main wash compartment since liquid
detergents may seep out of the compartment during Delay,
before the wash cycle begins.
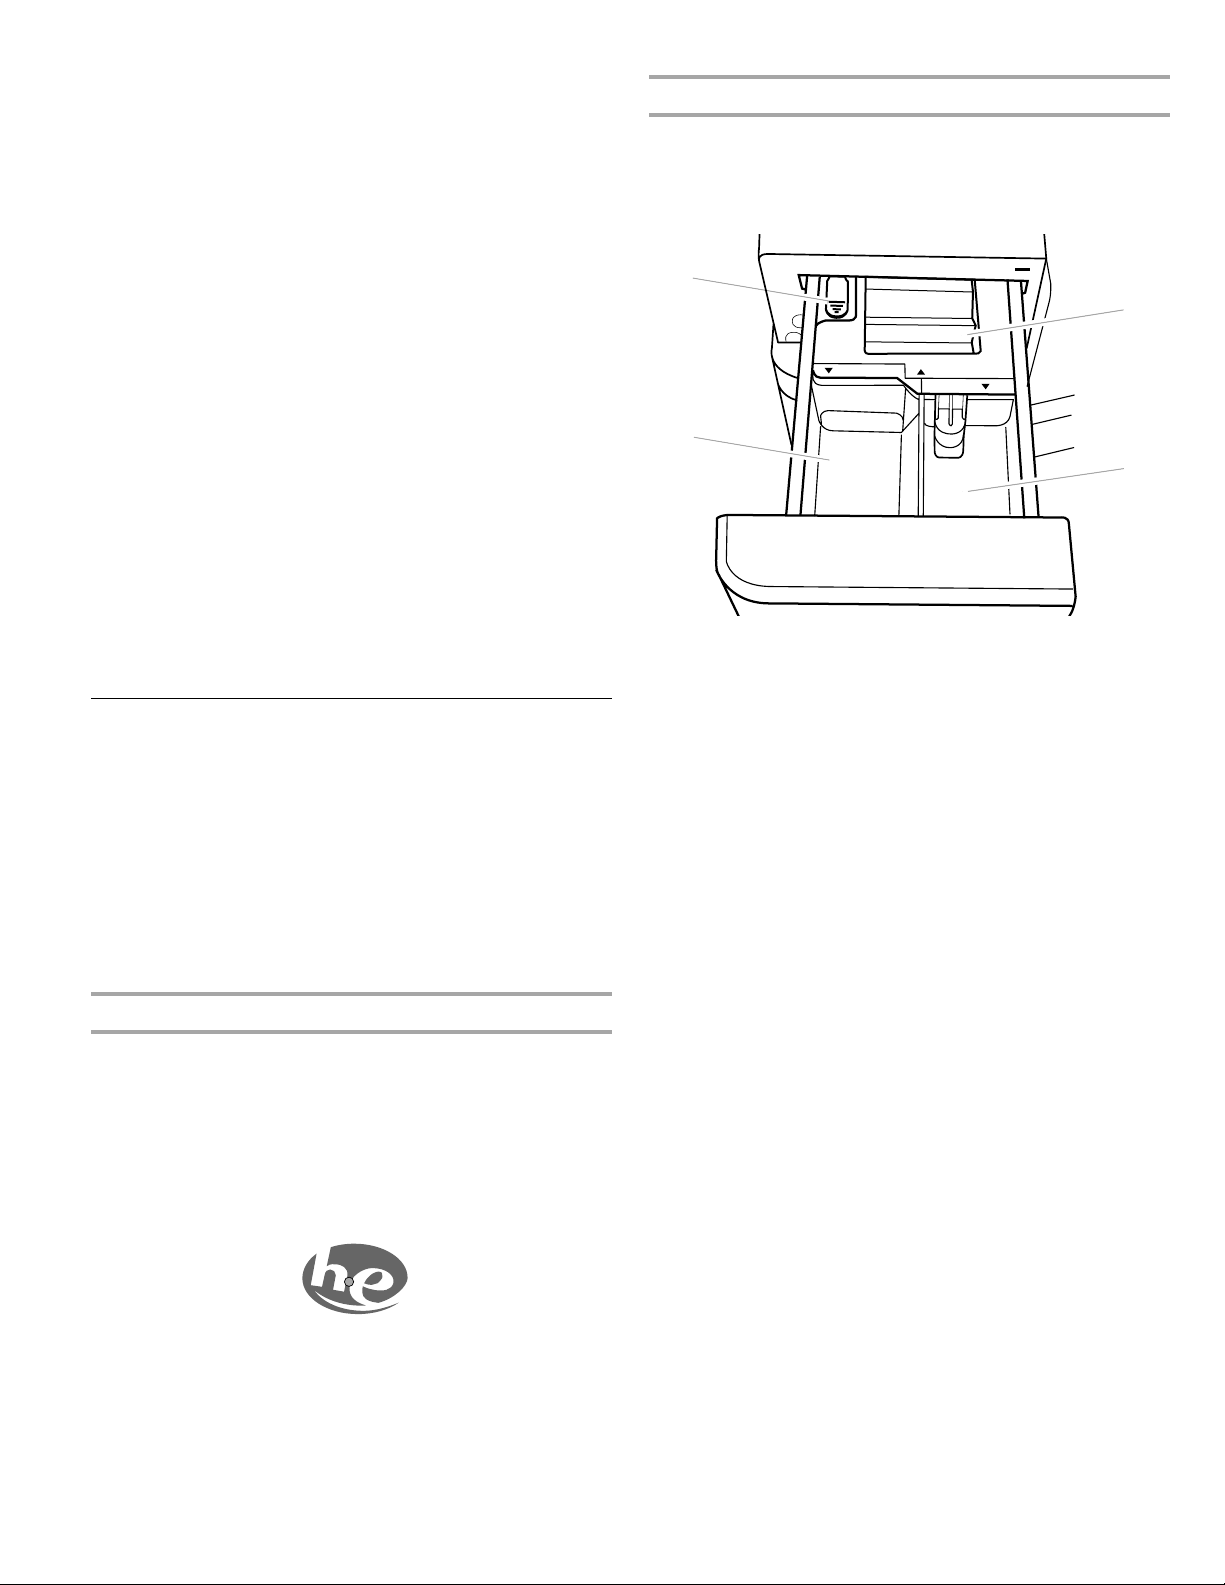
Using the Dispenser
Your new washer has a dispenser drawer with three separate
compartments for your laundry products—one is for detergent,
one is for liquid chlorine bleach, and one is for liquid fabric
softener. Laundry products are diluted and dispensed
automatically at the proper time during the wash cycle, making it
unnecessary for you to return to the washer during the cycle to
add them.
It is normal for small amounts of water to remain in the
dispensers when the wash cycle is complete.
Do not put laundry products directly into the wash tub. Always
use the proper dispensers when adding laundry products.
Choosing the Right Detergent
Use only High Efficiency detergents. The package for this type of
detergent will be marked “HE” or “High Efficiency.”
system, along with less water, will create too much sudsing with a
regular non-HE detergent. Using regular detergent will likely result in
washer errors, longer cycle times, and reduced rinsing performance.
It may also result in component failures and noticeable mold or
HE detergents are made to produce the right amount of
mildew.
suds for the best performance. Follow the manufacturer's
instructions to determine the amount of detergent to use.
Use only HE High Efficiency detergent.
This wash
To fill dispenser compartments
1. Pull out the dispenser drawer.
2. Add the desired laundry product to the proper compartment.
3. Push in the dispenser drawer slowly and completely (to avoid
a spill).
A
MAX
DETERGENT
B
Dispenser
A. Dispenser release lever
B. Main Wash detergent compartment
C. Liquid chlorine bleach compartment
D. Fabric softener compartment
LIQUID BLEACH
SOFTENER
MAX
Main Wash detergent compartment
(Letter B in Dispenser Illustration)
Add liquid or powdered HE detergent to this compartment for
your main wash cycle.
■ Powdered color-safe bleach may be added to the Main Wash
compartment along with the powdered detergent.
■ Use the measurement device which comes with the
detergent. Add no more than the manufacturer’s
recommended amount.
NOTE: Overfilling could cause an oversudsing condition.
Chlorine bleach compartment
(Letter C in Dispenser Illustration)
Add NO MORE THAN ²⁄₃ cup (160 mL) liquid chlorine bleach to
this compartment. The bleach will be automatically diluted and
dispensed at the best time during the first rinse after the wash
cycle. This compartment cannot dilute powdered bleach.
■ Use only liquid chlorine bleach in this dispenser. Do not use
this dispenser to add powdered chlorine or any form of colorsafe bleach to your load.
■ Always measure liquid chlorine bleach. Use a measuring cup
with a pour spout; do not guess. Follow the manufacturer’s
directions for proper use.
■ Do not fill beyond the “MAX” level.
NOTE: Overfilling could cause garment damage.
14
Page 15
Fabric softener compartment
(Letter D in Dispenser Illustration)
Add ¼ cup (60 mL) liquid fabric softener to this compartment.
Fabric softener will be automatically dispensed in the final rinse
or in the 2ND RINSE, if selected.
■ Do not fill beyond the “MAX” level.
Pausing or Restarting
1. To pause the washer at any time, select STOP.
2. To continue the cycle, select and hold START (for
approximately 1 second).
Changing Cycles, Options and Modifiers
Not all Options and Modifiers are available with all Cycles.
Cycles, Options and Modifiers can be changed anytime before
START is selected.
To stop a cycle and select a new cycle
1. Select STOP once.
2. Select desired cycle.
3. Select the desired MODIFIERS &OPTIONS.
4. Select and hold START (for approximately 1 second) to restart
the washer at the beginning of the new cycle.
To cancel a cycle
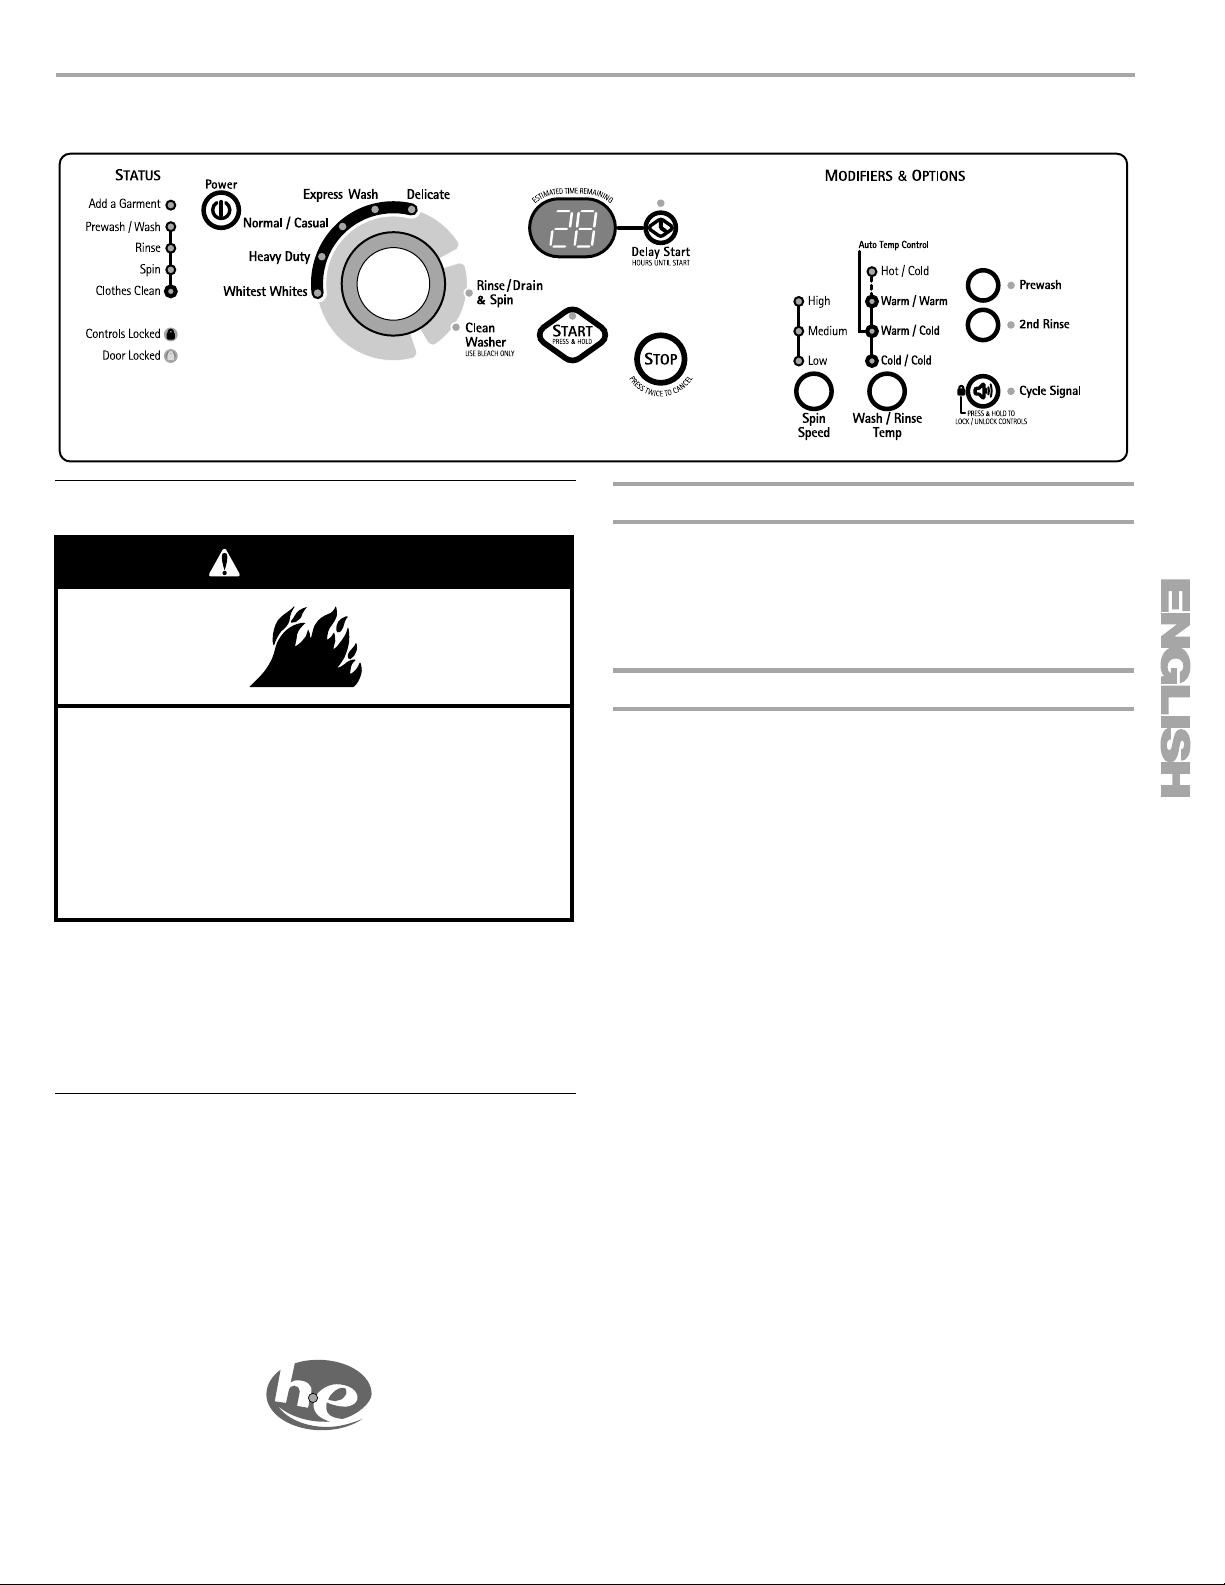
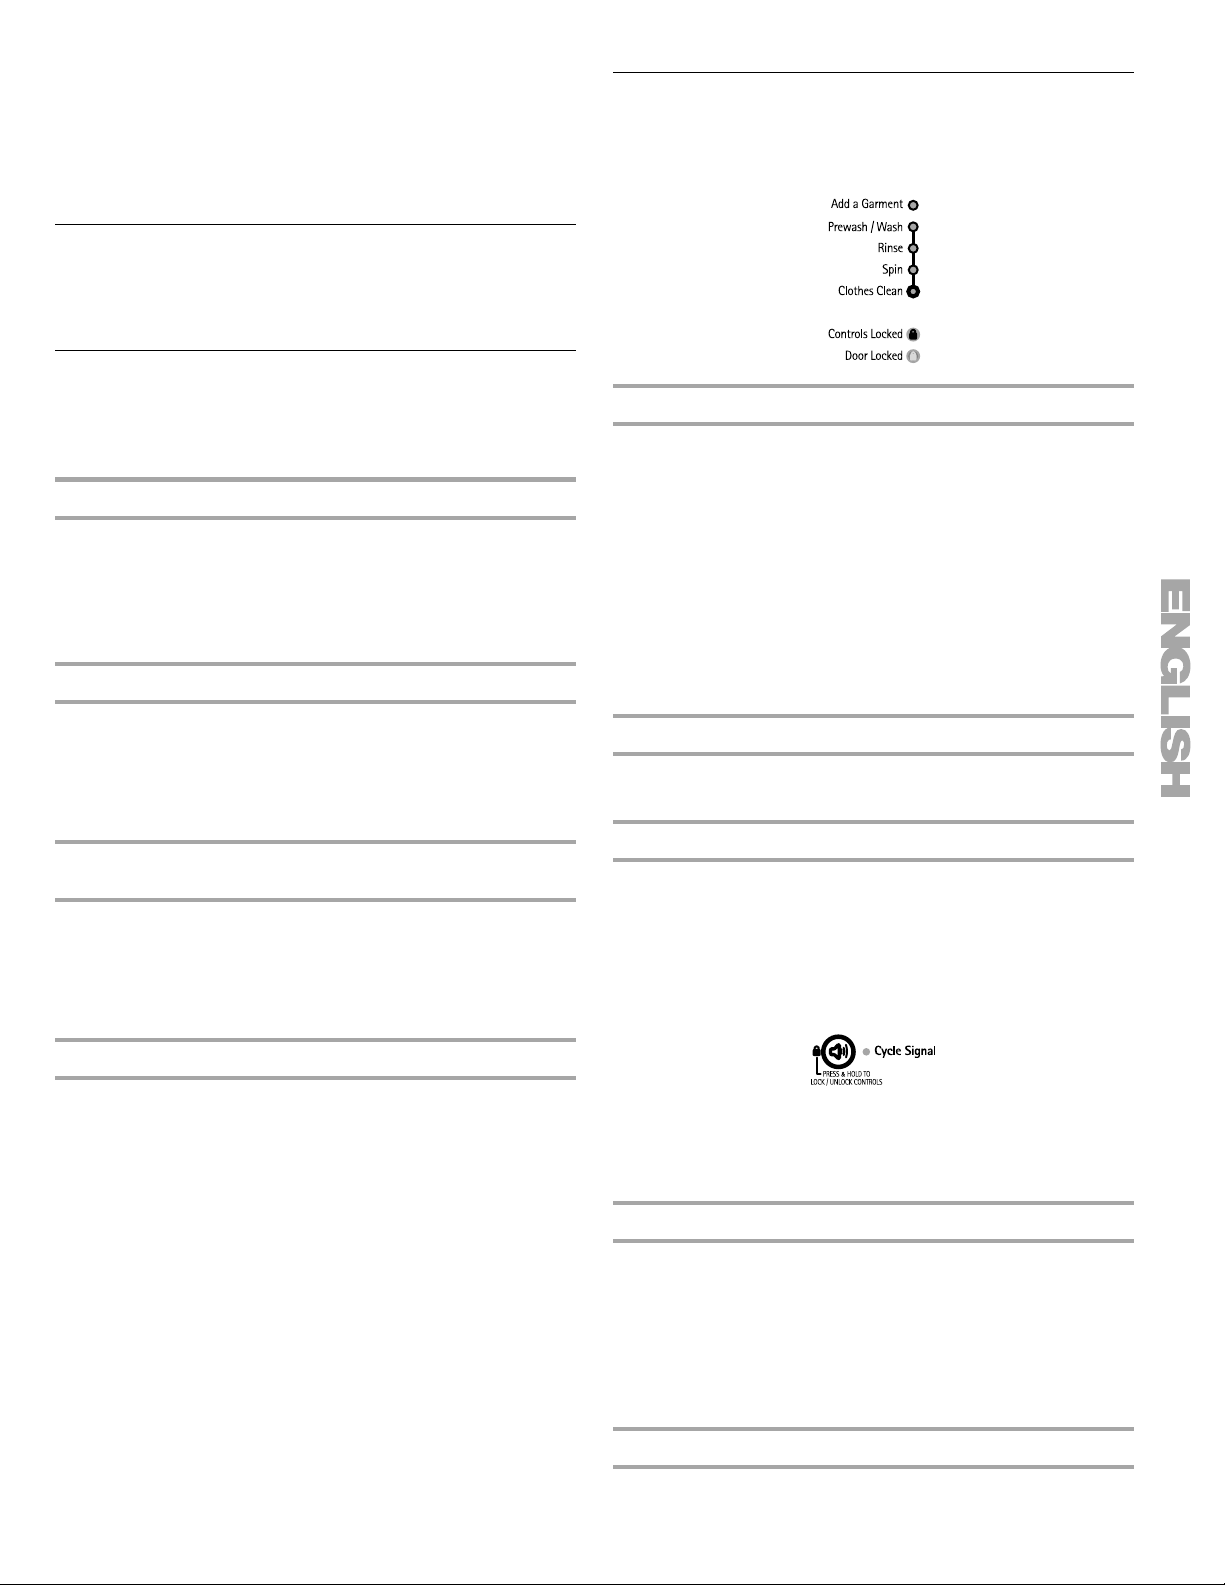
Status Lights
These lights show which portion of the cycle the washer is
operating. They also indicate when you can add an additional
item to the wash cycle and when the controls are locked.
Adding items
You can add items to the washer after the wash cycle has
started, if the ADD A GARMENT status light is illuminating. All
cycles have this feature except Rinse/Spin, Drain/Spin, and
Clean Washer.
To add items
1. Select STOP. The washer door unlocks, and items can be
added.
2. To continue the cycle, close the door and select and hold
START (for approximately 1 second).
NOTE: To add garments after the ADD A GARMENT period is
over, the wash cycle needs to be canceled, the items added, and
a new wash cycle started.
1. Select STOP twice.
2. The washer powers down, the door unlocks, and clothes can
be removed.
NOTE: If the water level or the temperature is too high, the
washer will drain automatically before the door unlocks.
To change Options or Modifiers after the cycle has
started
1. Select STOP.
2. Select the desired MODIFIERS &OPTIONS. If the option or
modifier are not available, the machine will beep.
3. Select and hold START (for approximately 1 second) to
continue the cycle.
To drain the washer manually
1. Select STOP.
2. Select RINSE/DRAIN & SPIN.
3. Press the 2ND RINSE button to deselect the 2nd Rinse
option.
4. Select and hold START (for approximately 1 second) to begin
the drain.
5. When the spin is complete, the door unlocks. Items can be
removed from the washer.
Clothes Clean
The Clothes Clean light comes on when the cycle is complete.
Light will stay on until door is opened.
Locking controls
The Control Lock avoids unintended use of the washer. You can
also use the control lock feature to avoid unintended cycle or
option changes during a cycle. When CONTROLS LOCKED is lit,
all buttons are disabled except for STOP and POWER. You can
lock the controls while the washer is operating.
To lock the controls
Select and hold CYCLE SIGNAL for 3 seconds.
The CONTROLS LOCKED status light illuminates.
To unlock the controls
Select and hold CYCLE SIGNAL for 3 seconds until the
CONTROLS LOCKED Status light turns off.
Estimated Time Remaining
The cycle times vary automatically based on your water pressure,
water temperature, detergent, and clothes load. The cycle time
will be extended if oversudsing occurs or the load is unbalanced.
The SUDs routine removes extra suds and assures proper rinsing
of your garments. The options you select will also affect the cycle
times that are shown in the Preset Cycle Settings table. The
Estimated Time Remaining can change up to 30 minutes under
extreme conditions.
Door Locked
When the status light illuminates, the door is locked.
15
Page 16
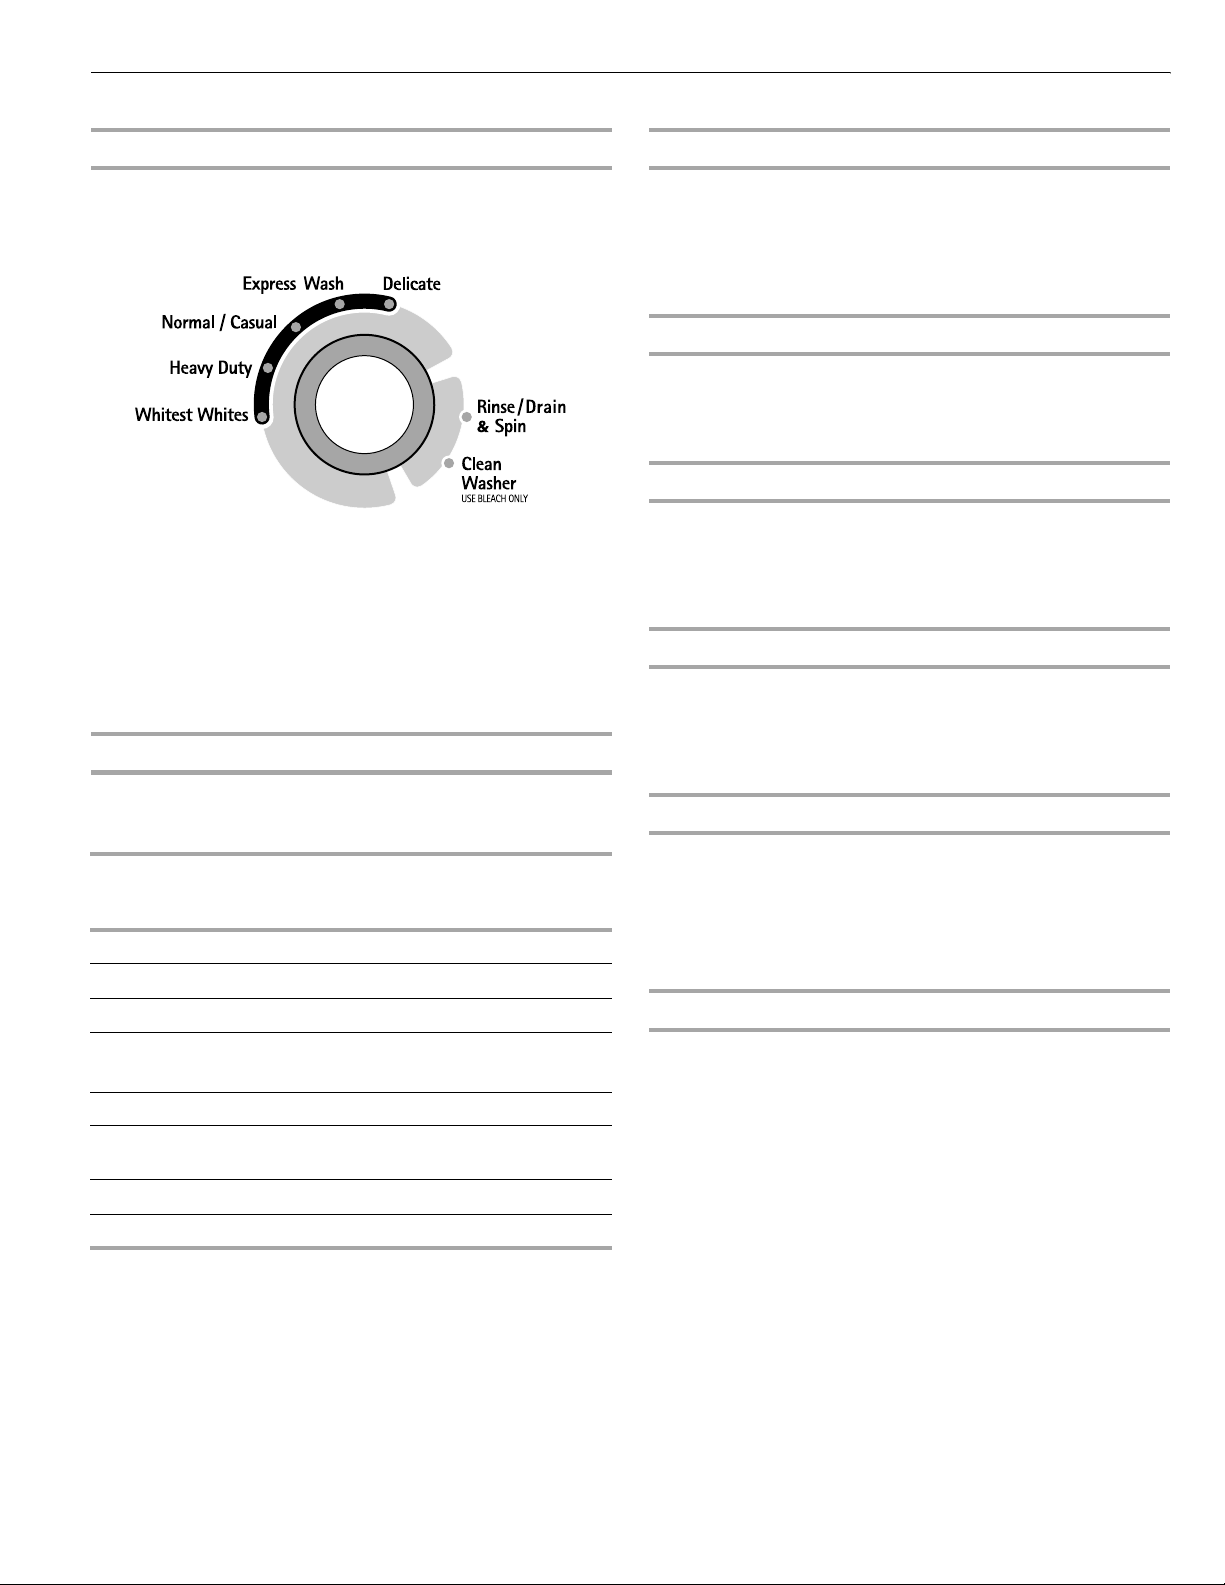
Cycles
Wash Cycles
Choose Wash Cycle by rotating the Cycle selector knob to the
desired cycle. The indicator light for the cycle selected will
illuminate. Each cycle is designed for different types of fabric and
soil levels.
■ Each cycle has a preset cycle time, WASH/RINSE TEMP,
SPIN SPEED and may have preset Options and Modifiers.
The preset settings provide the recommended fabric care for
the selected cycle.
■ The preset settings can be changed anytime before START is
selected. Not all Options and Modifiers are available with all
Cycles. To change settings after the cycle has started, select
STOP, then select the desired settings. Select and hold
START (for approximately 1 second) to continue the cycle.
Preset Cycle Settings
Each cycle has a preset Cycle Time, Water Temp, and Spin
Speed. The preset settings provide the recommended fabric care
for the selected cycle. See chart.
Cycle
Estimated
Time*
Wash/Rinse
Te m p
Spin Speed
(hr:min)
Whitest Whites 0:85 Hot/Cold High
Heavy Duty 0:71 Hot/Cold High
Normal/Casual 0:54 Warm/Cold High
Express Wash
(2-3 items)
Delicate 0:37 Warm/Cold Medium
Rinse/Drain &
Spin
Drain & Spin 0:15 N/A High
Clean Washer 0:54 N/A High
*The cycle times vary automatically based on your water
pressure, water temperature, detergent, and clothes load. The
cycle time will be extended if oversudsing occurs or the load is
unbalanced.
0:30 Warm/Cold High
0:25 Cold/Cold High
Whitest Whites
This cycle is especially designed for cleaning loads of soiled
white fabrics with the addition of bleach. Hot washing
temperatures assure optimal bleach activity. An additional rinse
provides optimal rinse performance to avoid chlorine residue on
your laundry. This cycle combines fast-speed tumbling, longer
wash time, and high-speed spin to shorten drying time.
Heavy Duty
Use this cycle to wash loads of sturdy, colorfast fabrics and
Heavy soiled garments. This cycle combines fast-speed
tumbling, longer wash time, and high speed spin to shorten
drying times.
Normal/Casual
Use this cycle to wash loads of no-iron fabrics such as sport
shirts, blouses, casual business clothes, permanent press
blends, cottons and linens, and synthetic fabrics. This cycle
combines medium-speed tumbling, high-speed spin, and a load
cooling process to reduce wrinkling.
Express Wash
Use this cycle to wash small loads of 2-3 lightly soiled garments
that are needed in a hurry. This cycle combines fast-speed
tumbling, a shortened wash time, and extra high speed spin to
shorten drying time. Large wash loads will result in the machine
increasing the wash time.
Delicate
Use this cycle to wash sheer fabrics and lingerie. This cycle
combines low-speed tumbling and medium-speed spin for gentle
fabric care.
■ Use mesh garment bags to wash undergarments such as
underwire bras, items with strings, and small items such as
socks.
Rinse/Drain & Spin
Use this cycle to rinse, drain, and spin your wash load. This cycle
combines fast-speed tumbling and high-speed spin. If desired,
you can reduce the spin speed by selecting the speed you want
from the SPIN SPEED modifier.
Rinse/Drain & Spin is useful for
■ Loads that need rinsing only.
■ Adding fabric softener to a load using the fabric softener
dispenser.
16
Page 17
Drain & Spin
Prewash
Use this cycle to drain your washer or to drain and spin your
wash load. The spin speed is preset to high. If desired, you can
reduce the spin speed by selecting the speed you want from the
SPIN SPEED modifier.
NOTE: Loads of synthetics, delicate fabrics, handwashables, and
woolens should be drained with no spin or low spin to avoid
fabric stress.
To use Drain & Spin setting
■ Select RINSE/DRAIN & SPIN cycle.
■ Press the 2ND RINSE button to deselect the rinse option.
■ Press START.
Clean Washer
Use the Clean Washer cycle once a month to keep the inside of
your washer fresh and clean. This cycle uses a higher water level
in combination with liquid chlorine bleach to thoroughly clean the
inside of your washing machine. See “Cleaning Your Washer.”
IMPORTANT: Do not place garments or other items in the washer
during the Clean Washer cycle. Use this cycle with an empty
wash drum.
Normal Sounds
As with any new product, you will hear sounds that you are not
accustomed to. You may hear various sounds when the door is
locked or unlocked, and during the washing, rinsing, or spinning
process. Between changes in wash actions, there will be
momentary pauses. You will hear water spraying and splashing
during the wash and rinse cycles. These new sounds and pauses
are part of normal washer operation. See “Troubleshooting.”
Use this option for loads of heavily soiled garments that need
pretreatment.
■ Add detergent to the Main Wash Compartment of the
dispenser drawer.
This option adds tumbling time prior to the selected main cycle.
The washer continues automatically from prewash into the main
wash cycle.
2nd Rinse
A second rinse can be used to aid in the removal of detergent or
bleach residue from garments. This option provides an additional
rinse with the same water temperature as the Normal rinse.
Cycle Signal
This signal is helpful when you are removing items from the
washer as soon as it stops. Select ON or OFF.
Modifiers
Preset cycle settings of Water Temperature, Spin Speed, and
Rinse Options can be changed. You can change a modifier after
starting a cycle anytime before the selected Modifier begins. Not
all Modifiers are available with all options and cycles.
Options
You can customize your wash by adding Options to your cycle
selections. You can add or change an option after starting a cycle
anytime before the selected option begins. Not all Options are
available with all cycles.
■ See the “Laundry Guide” section for an overview of possible
options for each Wash Cycle selection.
■ If an option is available with a selected cycle, the light for that
option will illuminate when selected.
■ If an option is unavailable with a selected cycle, there will be a
short tone and the light for that option will not illuminate when
selected.
■ To change the spin speed, select the SPIN SPEED button
until the desired setting illuminates.
■ To change the water temperature, select the WASH/RINSE
TEMP button until the desired setting illuminates.
Wash/Rinse Temp
Select a water temperature based on the type of load you are
washing. Use the warmest wash water safe for fabrics. Follow
garment label instructions.
Warm rinses leave the loads dryer than cold rinses. Warm rinses
increase wrinkling. In cold climates, a warm rinse makes the load
more comfortable to handle. Cold rinses save energy.
17
Page 18

Temperature Guide
Wash Water Temperature Suggested Fabrics
HOT Whites and pastels
Heavy soils
WARM Bright colors
Moderate to light soils
COLD Colors that bleed or fade
Light soils
In wash water temperatures colder than 60°F (15.6°C),
detergents do not dissolve well. Soils may be difficult to remove.
Auto Temp Control
ATC (Auto Temp Control) electronically senses and maintains a
uniform water temperature. ATC regulates incoming hot and cold
water. The ATC is automatically turned ON when a cycle is
selected. See Preset Cycle Settings table in “Cycles.”
■ ATC works for the wash temperature with Warm/Warm,
Warm/Cold, and Cold/Cold settings.
■ ATC works for the rinse temperature with the Warm/Warm
setting.
■ The Cold rinse temperatures depend on the cold water at
your faucet.
Laundry Guide
Refer to this chart for suggested load types and their corresponding cycles. Listed to the right are the options available to each of these
washer cycles.
CYCLE SUGGESTED LOAD TYPE AVAILABLE OPTIONS
Delay Start Prewash 2nd Rinse Cycle Signal
Whitest Whites Soiled white fabrics ✔✔✔ ✔
Heavy Duty Heavily soiled underwear, towels, shirts, etc., made
of cotton
Normal/Casual Normally soiled blouses, shirts, overalls, etc., made
of polyester, nylon, cotton, linen, or cotton blends
Express Wash Small loads of 2-3 lightly soiled cotton, polyester,
nylon, and cotton blends.
Delicate Curtains and delicate clothing, dresses, skirts, shirts
and blouses
Rinse/Drain & Spin All loads ✔✔✔
✔✔✔ ✔
✔✔✔ ✔
✔✔✔
✔✔✔
Clean Washer No clothes ✔✔
18
Page 19
LAUNDRY TIPS
Preparing clothes for washing
Follow these recommendations to help you prolong the life of
your garments.
■ Use only High Efficiency detergents. The package for this type
of detergent will be marked “HE” or “High Efficiency.” This
wash system, along with less water, will create too much
sudsing with a regular non-HE detergent. Using regular
detergent will likely result in washer errors, longer cycle times
and reduced rinsing performance. It may also result in
component failures and noticeable mold or mildew. HE
detergents are made to produce the right amount of suds for
the best performance. Follow the manufacturer's instructions
to determine the amount of detergent to use.
Use only HE High Efficiency detergent.
■ Close zippers, snaps, and hooks to avoid snagging other
items. Remove pins, buckles, and other hard objects to avoid
scratching the washer interior. Remove non-washable trim
and ornaments.
■ Empty pockets and turn them inside-out.
■ Turn down cuffs; brush away lint and dirt.
■ Turn synthetic knits inside-out to avoid pilling.
■ Tie strings and sashes so they will not tangle.
■ Mend tears, loose hems, and seams.
■ Treat spots and stains.
■ Stained or wet garments should be washed promptly for best
results.
■ Mix large and small items, avoid washing single items, and
load evenly.
■ Wash small items, such as infant socks, in a mesh garment
bag. To create a balanced load it is recommended that more
than one garment bag be used, and that each garment bag
be filled with equal amounts of material.
NOTE: If you are washing only small items, it is
recommended that more than one mesh garment bag be
used, and that each garment bag be filled with equal
amounts of material.
Sorting
■ Separate heavily soiled items from lightly soiled ones, even if
they would normally be washed together. Separate lint-givers
(towels, chenille) from lint-takers (corduroy, synthetics,
permanent press). When possible, turn lint-givers inside-out.
■ Separate dark colors from light colors, colorfast items from
noncolorfast items.
■ Sort by fabric and construction (sturdy cottons, knits, delicate
items).
Unloading
■ Remove clothes from washer after the cycle is completed.
Metal objects such as zippers, snaps, and buckles may rust if
left in the washer basket for a long time.
■ When unloading garments, occasionally check under the gray
colored seal at the front of the tub for small items.
Loading
Loading suggestions
Heavy Work Clothes
2pair pants
3shirts
Mixed Load
2 double sheets or
1 king size sheet
4 pillowcases
6T-shirts
Towels
8bath towels
8hand towels
Delicates
3 camisoles
4slips
4 panties
EXPRESS WASH cycle
(2-3 garments)
3pair jeans
1coverall
6pair shorts
2shirts
2blouses
6 handkerchiefs
10 washcloths
1bath mat
2bras
2 nighties
2 dress shirts
1 pair dress pants
19
Page 20
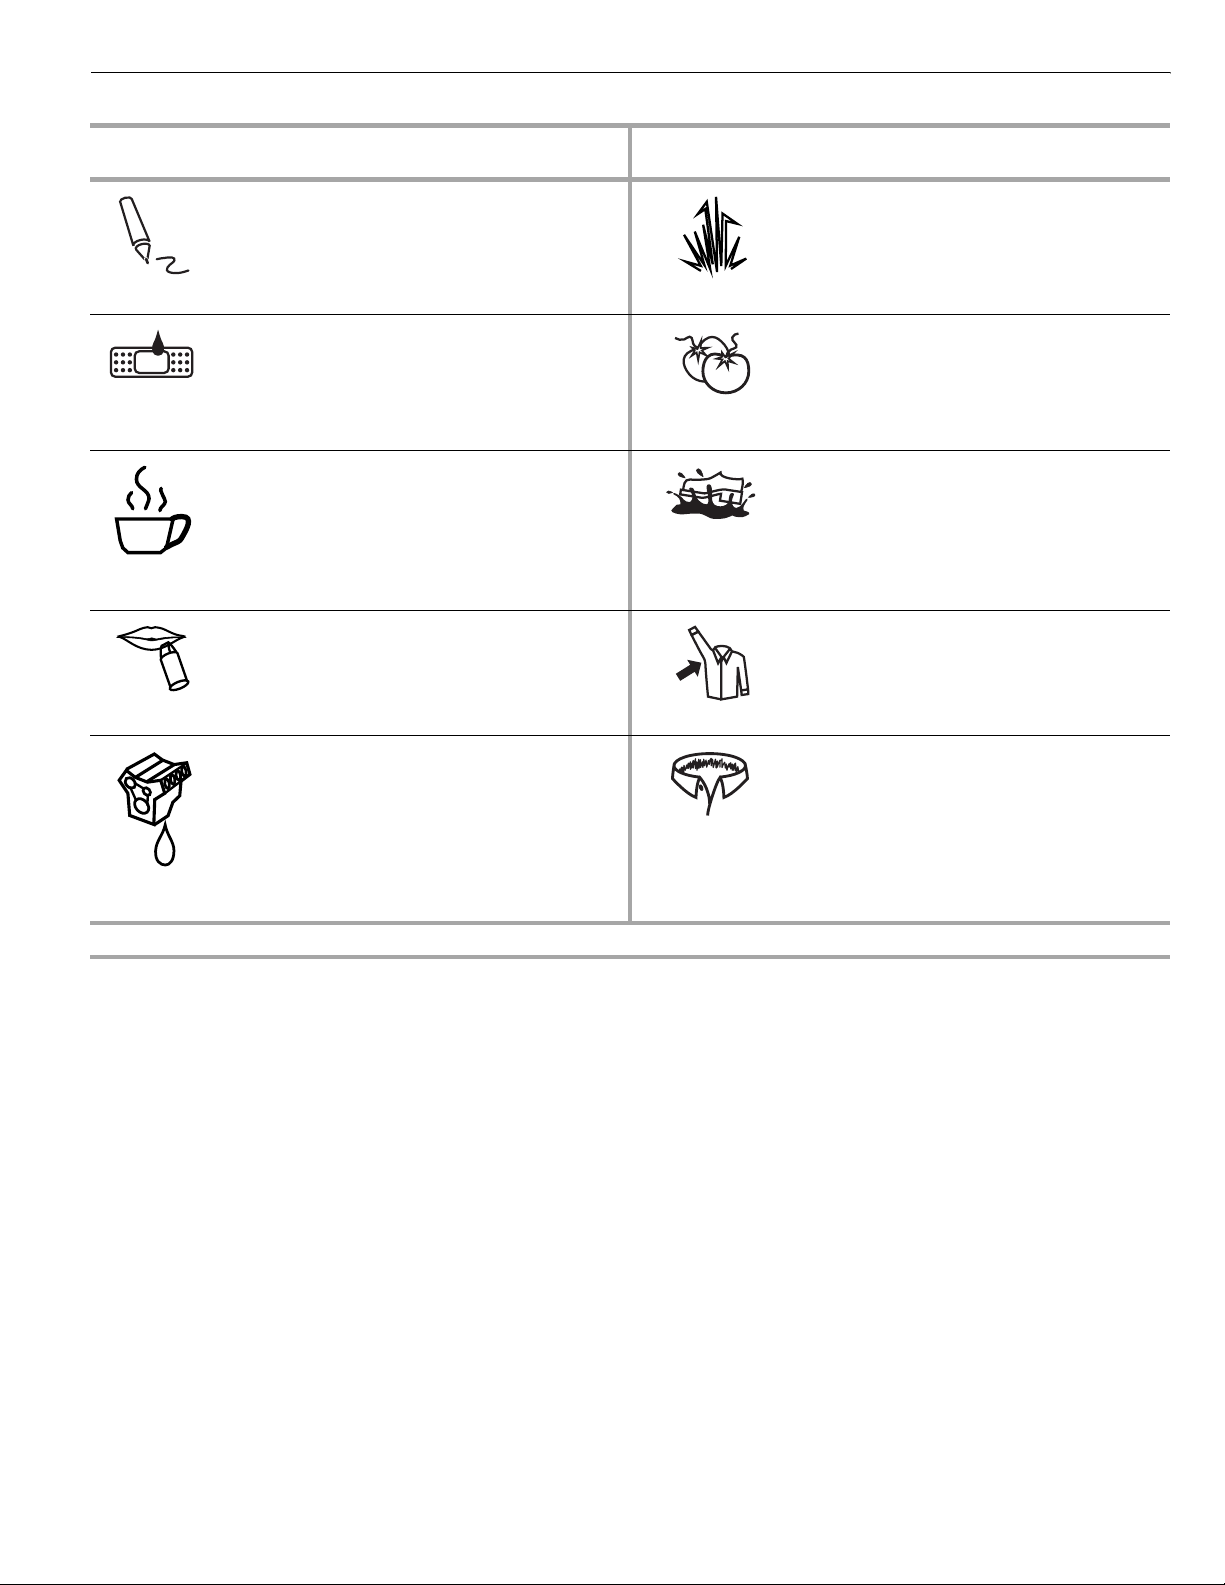
Stain Removal Guide
Stain Use Liquid Chlorine or
Color-Safe Bleach
✔
Ink
✔
Blood
✔
Coffee/
Chocolate
Cosmetics
Use suggested
Wash Cycle
Whitest Whites
Cold or Warm
Prewash
Normal/Casual
Warm
Prewash
Whitest Whites
Heavy Duty
Stain Use Liquid Chlorine or
Color-Safe Bleach
✔
Grass
✔
To ma to
Products
✔
Mud
Deodorants
Use suggested
Wash Cycle
Whitest Whites
Whitest Whites
Warm/
Prewash
Whitest Whites
Heavy Duty
Warm
Prewash
Heavy Duty
Ring around
the Collar
Dirty
Motor Oil
Do not tumble dry soiled or stained items. Heat may permanently set stains.
✔
Normal/Casual
20
Page 21
WASHER CARE
Cleaning Your Washer
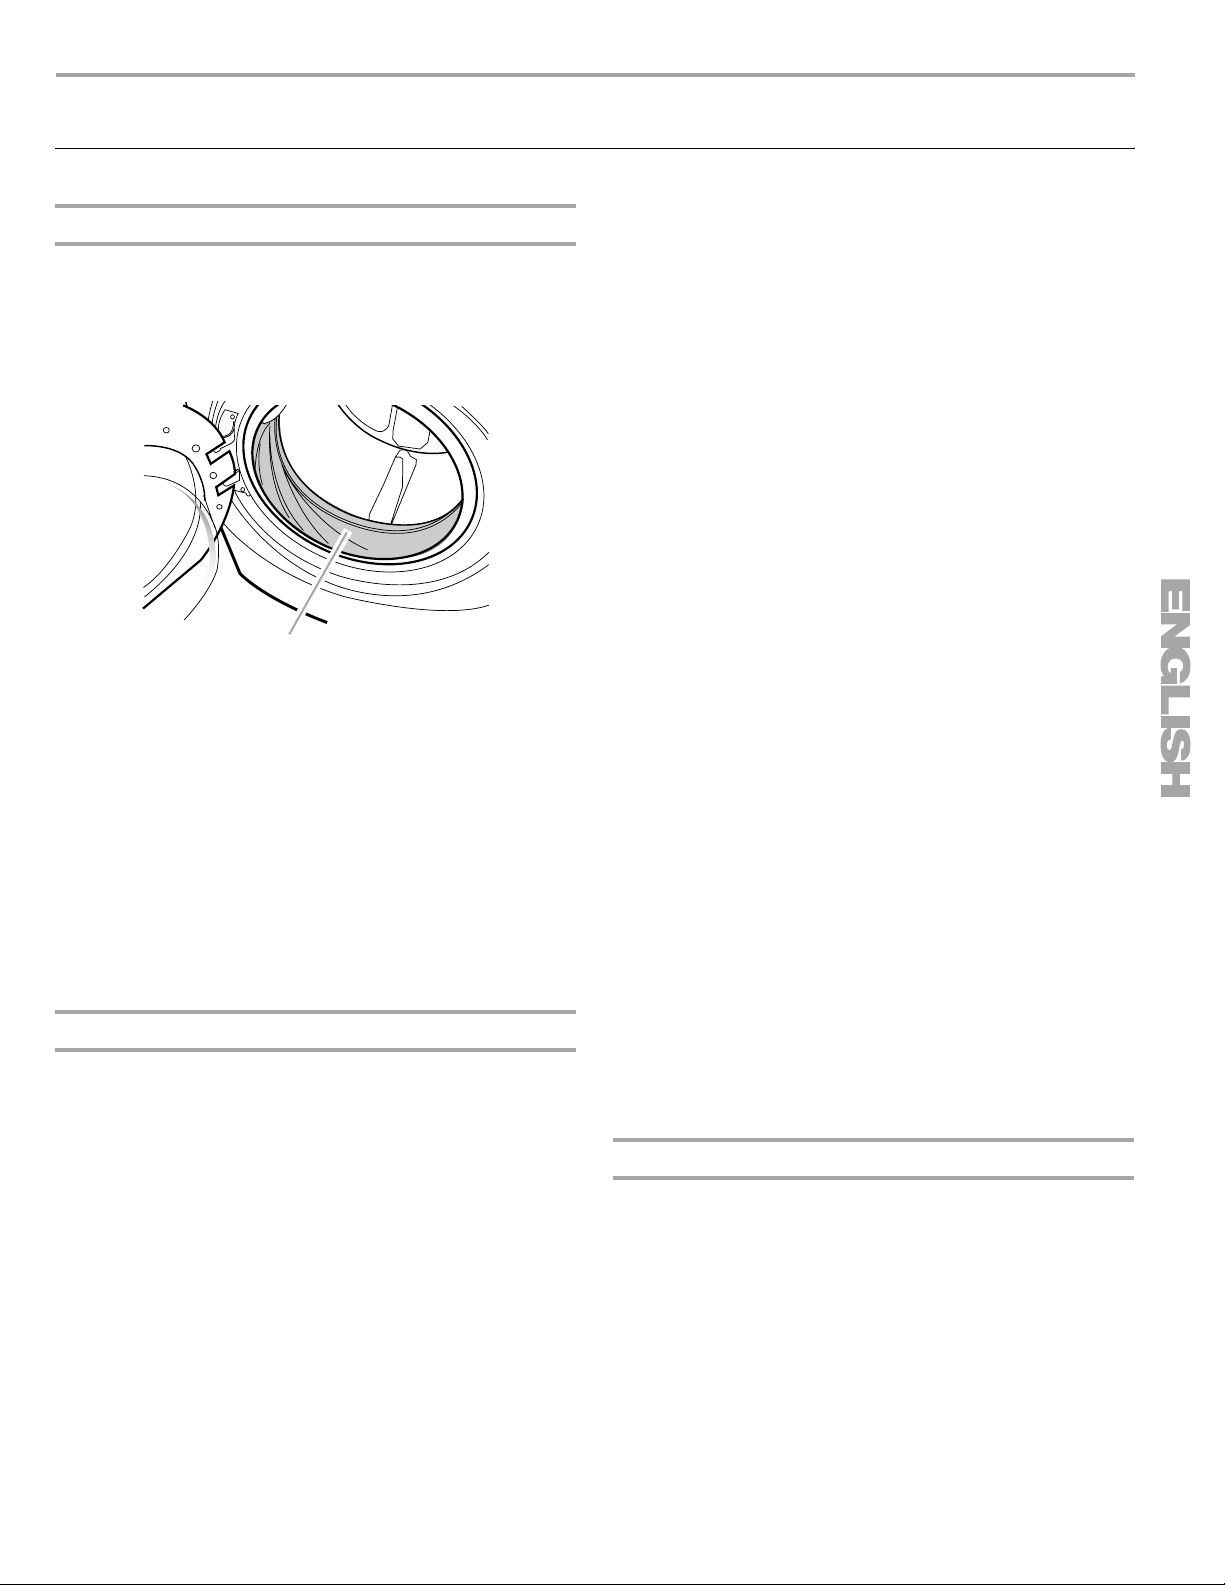
Cleaning the Door Seal/Bellow
1. Open the washer door and remove any clothing or items from
the washer.
2. Inspect the gray colored seal/bellow between the door
opening and the basket for stained areas. Pull back the seal/
bellow to inspect all areas under the seal/bellow and to check
for foreign objects.
A
A. Seal/Bellow
3. If stained areas are found, wipe down these areas of the seal/
bellow, using the procedure that follows.
a) Mix a dilute solution, using ³₄ cup (177 mL) of liquid
chlorine bleach, and 1 gal. (3.8 L) of warm tap water.
b) Wipe the seal/bellow area with the dilute solution, using a
damp cloth.
c) Let stand 5 minutes.
d) Wipe down area thoroughly with a dry cloth and let the
washer interior air dry with door open.
IMPORTANT:
■ Wear rubber gloves when cleaning for prolonged periods.
■ Refer to the bleach manufacturer’s instructions for proper
use.
Washer Maintenance Procedure
This washer has a special cycle that uses higher water volumes in
combination with liquid chlorine bleach to thoroughly clean the
inside of the washer.
NOTES:
■ Read these instructions completely before beginning the
cleaning process.
■ If necessary, the cleaning cycle may be interrupted by
pressing the STOP button. This will stop the cycle. A RINSE/
DRAIN & SPIN cycle must then be run to thoroughly rinse the
remaining bleach from the washer. Failure to do so will cause
damage to the washer and clothing added to the next cycle.
Begin procedure
1. Open the washer door and remove any clothing or items from
the washer.
2. Be sure the door is closed.
3. Open the dispenser drawer and immediately add ²⁄₃ cup
(160 mL) of liquid chlorine bleach to the bleach compartment.
NOTE: Do not add any detergent to this cycle. Use of more
than ²⁄₃ cup (160 mL) of bleach will cause product damage
over time.
4. Be sure the dispenser drawer is closed.
5. Select the CLEAN WASHER cycle.
6. Press START.
NOTE: The basket will rotate, then the door will unlock, lock
again, and then the cycle will continue.
■ The machine will not fill, but the basket will rotate while
the washer runs a short sensing cycle. This will take
approximately 3 minutes.
7. The cycle will determine whether clothing or other items are
in the washer.
a)b)If no items are detected in the washer, it will proceed to
Step 8.
If any items are detected in the washer, all the Cycle
lights will flash, “rL” or “F-34” will be displayed, and the
WASH and CONTROLS LOCKED lights will remain lit.
The door will unlock.
■ Press STOP to cancel the failure code. Then repeat
steps 1, 2 and 6 to start the cycle again.
8. Once the cycle has begun, allow the cycle to complete.
9. After the cycle is complete, leave the door open slightly, to
allow for better ventilation and drying of washer interior.
Always do the following to maintain washer freshness
■ Use only HE High Efficiency detergent.
■ Leave the door slightly open after each cycle to allow for
better ventilation and drying of washer interior.
■ Repeat the cleaning procedure monthly, using ²⁄₃ cup
(160 mL) of liquid chlorine bleach.
■ If the procedure does not sufficiently improve the machine
freshness, please evaluate your installation and usage
conditions for other causes.
Cleaning the exterior
Use a soft damp cloth or sponge to wipe up any spills.
Occasionally wipe the outside of your washer to keep it looking
new. Use mild soap and water. Do not use abrasive products.
21
Page 22

Cleaning the dispenser drawer
To use washer again:
The dispenser drawer can be removed for easy cleaning.
1. Unlock the dispenser drawer by pressing the Release Lever.
See “Using the Dispenser.” Remove the drawer.
2. Remove the inserts (the siphon from the softener and bleach
compartments).
3. Wash the parts under running water.
NOTE: Do not wash components in the dishwasher.
4. Replace the inserts and return the dispenser to the drawer.
Water Inlet Hoses
Replace inlet hoses after 5 years of use to reduce the risk of hose
failure. Periodically inspect and replace inlet hoses if bulges,
kinks, cuts, wear or leaks are found.
When replacing your inlet hoses, record the date of replacement.
Vacation, Storage, and Moving Care
Install and store your washer where it will not freeze. Because
some water may stay in the hoses, freezing can damage your
washer. If storing or moving your washer during freezing weather,
winterize it.
Non-use or vacation care:
Operate your washer only when you are at home. If you will be on
vacation or not using your washer for an extended period of time,
you should:
■ Unplug washer or disconnect power.
■ Turn off the water supply to the washer. This helps avoid
accidental flooding (due to a water pressure surge) while you
are away.
■ Slightly open door to provide ventilation.
To winterize washer:
1. Put 1 qt (1 L) of R.V.-type antifreeze in the drum.
2. Run washer on a Drain & Spin cycle.
3. Unplug washer or disconnect power.
4. Shut off both water faucets.
5. Disconnect water inlet hoses from faucets and drain.
1. Flush water pipes.
2. Reconnect water inlet hoses to faucets.
3. Turn on both water faucets.
WARNING
Electrical Shock Hazard
Plug into a grounded 3 prong outlet.
Do not remove ground prong.
Do not use an adapter.
Do not use an extension cord.
Failure to follow these instructions can result in death,
fire, or electrical shock.
4. Plug in washer or reconnect power.
5. Run the washer through the Normal/Casual cycle with ¹₂ the
manufacturer’s recommended amount of HE detergent for a
medium-size load, to clean the washer and remove the
antifreeze, if used.
To transport the washer:
1. If washer will be moved during freezing weather, put in 1 qt
(1 L) of R.V.-type antifreeze in the drum. Run washer on a
Drain & Spin cycle.
2. Unplug the power cord.
3. Disconnect the drain hose from the drain system and attach
to rear panel clips.
4. Shut off both water faucets.
5. Disconnect the water inlet hoses from faucets, then drain the
hoses and clip them to the rear panel of the washer.
6. IMPORTANT: Call service. Do not reuse transport bolts.
Washer must be transported in the upright position. To avoid
suspension and structural damage, your machine must be
properly set up for relocation by a certified technician.
22
Reinstalling the washer
1. Follow the “Installation Instructions” to locate, level and
connect the washer.
2. Run the washer through the Normal/Casual cycle with ¹₂ the
manufacturer’s recommended amount of HE detergent for a
medium-size load, to clean the washer and remove the
antifreeze, if used.
Page 23
TROUBLESHOOTING
First try the solutions suggested here to possibly avoid the cost of a service call...
Washer and Components
Error codes
An error code may be shown in the Estimated Time Remaining
display. Check the list below for potential problem and
troubleshooting checks.
■ “F20” on display (Water Inlet Problem—no water or
insufficient water supply)
Select STOP twice to cancel the cycle. Unplug washer or
disconnect power.
Check the following:
Are water faucets completely turned on?
Are screens at inlet hose connection to washer clogged? Are
water inlet hoses kinked?
Are water inlet hoses frozen?
WARNING
Electrical Shock Hazard
Plug into a grounded 3 prong outlet.
Do not remove ground prong.
Do not use an adapter.
Do not use an extension cord.
Failure to follow these instructions can result in death,
fire, or electrical shock.
Plug in washer or reconnect power. Re-select cycle and press
START. If the problem remains, call for service.
■ “F21” on display (Drain Problem)
Select STOP twice to cancel the cycle. Unplug washer or
disconnect power.
Check the following:
Is the drain hose kinked?
Is the drain hose frozen?
Is the drain hose clogged?
Is the drain hose more than 96" (2.4 m) above the floor?
■ “SD” (Suds Routine)
When excessive suds are detected, a suds routine
automatically starts. This routine removes extra suds and
assures proper rinsing of your garments. “SD” is displayed
during rinsing and at the end of the cycle to inform you that
the Suds Routine was activated. Use only HE (High
Efficiency) detergents.
■ “F” Variables [F01 - F34] (Electrical Problem)
Select STOP twice to cancel the cycle. Select RINSE/DRAIN
& SPIN, and then select 2ND RINSE (to turn off the rinse
option) if there is excessive water in the washer.
Re-select cycle and press START. If the problem remains, call
for service.
Noisy, vibrating, off-balance
■ Is the washer level?
The washer must be level. The four feet should be properly
installed, and the nuts should be tightened against the
washer cabinet.
All four feet of the washer must be in firm contact with the
floor. If the washer is on a pedestal, the washer must be
secured to the pedestal and all four pedestal feet must be in
firm contact with the floor.
■ Washer making a different noise?
As with any new product, you will hear sounds that you are
not accustomed to. You may hear various sounds when the
door is locked or unlocked, and during the washing, rinsing,
or spinning process. Between changes in wash actions, there
will be momentary pauses. You will hear water spraying and
splashing during the wash and rinse cycles. These new
sounds and pauses are part of normal washer operation.
■ Is washer installed on a sturdy and solid floor?
Refer to the “Installation Instructions” for flooring
requirements. Noise and vibration may be reduced by placing
a piece of ¾" (19.1 mm) plywood underneath your washer.
The plywood may extend underneath both washer and dryer
to keep them at equal heights.
■ Is the washer gurgling or humming?
As water is drained from the washer, you may hear air being
pulled through the pump. This happens during the end of
draining. It is normal.
■ Are you washing items with metal snaps, buckles or
zippers?
You may hear metal items touching the washer drum. This is
normal.
■ Were the 4 shipping bolts in the back of the machine
removed?
See “Remove Transport System.”
23
Page 24

Leaking
Door won't unlock
■ Was the door opened during “Add a garment”?
Water can drip off the inside of the door, when the door is
opened after the start of a cycle.
■ Is HE detergent being used?
The non-High Efficiency detergents can cause oversudsing
which can leak from the rear of the washer.
■ Are the fill hoses tight?
■
Are the fill hose gaskets properly seated?
Check both ends of each hose. See “Connect the Inlet Hoses.”
■ Is the drain hose properly installed?
The drain hose should be secured to the drainpipe or laundry
tub. See “Secure the Drain Hose.”
■ Is the sink or drain clogged?
Sink and drainpipe must be able to carry away 17 gal. (64 L)
of water per minute. If clogged or slow, water can back up
out of drainpipe or sink. Check household plumbing (laundry
tubs, faucets, drainpipe, water pipes) for leaks.
Dispenser operation
■ Did you follow the manufacturer’s directions when adding
detergent and fabric softener to the dispensers?
Measure detergent and fabric softener. Slowly pour into the
dispensers. Wipe up all spills. Dilute fabric softener in the
fabric softener dispenser.
■ Did you put powdered or liquid color-safe bleach into the
liquid chlorine bleach dispenser (on some models)?
Add powdered or liquid color-safe bleach to the Main Wash
compartment. Do not use the chlorine bleach dispenser for
color-safe bleach.
■ Is the fabric softener dispenser clogged?
Clean the fabric softener dispenser. See “Washer Care” for
details.
■
Are the laundry products in the correct dispenser
compartment?
Add the correct amounts of detergent, fabric softener or liquid
chlorine bleach to the correct compartments. Add powdered or
liquid color-safe bleach to the Main Wash compartment.
■ Is there water in the dispenser at the end of the cycle?
A small amount of water will remain in the dispenser
compartment. This is normal.
Washer odor
■ See “Cleaning Your Washer.”
■ Are you using HE detergent?
Use of non-HE detergent can cause a film residue which can
result in odor.
■ Did you leave the door open after use?
This washer has a tight seal to avoid water leaks. To avoid
odors leave the door open to allow the washer to dry
between uses.
■
Did all of the water drain out of the washer during the spin?
Select RINSE/DRAIN & SPIN, and then select 2ND RINSE (to
turn off the rinse option) to remove any water remaining in the
washer. The washer door will unlock at the end of the drain.
■ Is the door locked and is the “Add a garment” light on?
Press STOP once. The door will unlock.
Washer Operation
Washer won't run, fill, rinse or tumble; washer stops
WARNING
Electrical Shock Hazard
Plug into a grounded 3 prong outlet.
Do not remove ground prong.
Do not use an adapter.
Do not use an extension cord.
Failure to follow these instructions can result in death,
fire, or electrical shock.
■ Is the power cord plugged into a grounded 3 prong
outlet?
Plug power cord into a grounded 3 prong outlet.
■ Are you using an extension cord?
Do not use an extension cord.
■ Has a household fuse blown, or has a circuit breaker
tripped?
Replace the fuse, or reset the circuit breaker. If the problem
continues, call an electrician.
■ Are both the hot and cold water faucets turned on?
Turn on the water.
■ Is the water inlet hose kinked?
Straighten the hoses.
■ Are the water inlet valve screens clogged?
Turn off the water and remove inlet hoses from the washer.
Remove any accumulated film or particles. Reinstall hoses,
turn on water and check for leaks.
■ Is the washer in a normal pause in the cycle?
The washer pauses for about 2 minutes during certain cycles.
Allow the cycle to continue. Some cycles feature periods of
tumbling and soak.
■ Is the washer overloaded?
Wash smaller loads.
■ Is the washer door firmly shut?
The door must be closed during operation.
24
Page 25

■ Are the shipping bolts removed?
All four shipping bolts must be removed for proper operation
of the washer.
■ Has a cycle been selected, but START has not been
selected and held for 1 second?
Press and hold START, for 1 second.
■ Was the door open after completion of last cycle?
The door must be opened and closed again to start a new
cycle.
Not enough water/Not enough suds
■ Low water?
This washer uses very little water to provide good cleaning
results. You will see little or no water splashing in this washer.
This is normal.
■ Are you using HE detergent?
HE detergent is a low sudsing detergent. This is normal and
will not affect cleaning performance.
Washer continues to fill or drain, cycle seems stuck
■ Is the top of drain hose lower than 30" (76 cm) on
washer?
The top of the drain hose must be at least 30" (76 cm) above
the floor. See “Drain System.”
■ Does the drain hose fit too tightly in the standpipe, or is it
taped to the standpipe?
The drain hose should be loose yet fit securely. Do not seal
the drain hose with tape. The hose needs an air gap. See
“Secure the Drain Hose.”
Washer won’t drain or spin, water remains in washer
■ Is the drain hose clogged, or the end of the drain hose
more than 96" (2.4 m) above the floor?
■ Is your voltage low?
Check electrical source or call electrician.
■ Excessive suds?
When excessive suds are detected, a special suds routine
automatically starts. Cycle will complete once extra suds are
removed. This will occur more frequently when a non-HE
detergent is used.
■ Is the load balanced?
A single or bulky item may cause imbalance. Add more items
or redistribute the load.
Wash/Rinse temperature
■ Are the hot and cold water inlet hoses reversed?
See “Connect the Inlet Hoses.”
■ Are you washing many loads?
As your frequency of loads washed increases, the water
temperature may decrease for hot and warm temperatures.
This is normal.
Cycle time changes/Cycle too long
■ Estimated cycle time?
The cycle times vary automatically based on your water
pressure, water temperature, detergent, and clothes load.
The cycle time will be extended if oversudsing occurs or the
load is unbalanced. The SUDs routine removes extra suds
and assures proper rinsing of your garments. The options you
select will also affect the cycle times that are shown in the
Preset Cycle Settings table.
■ Excessive suds?
When excessive suds are detected, a special suds routine
automatically starts. This routine will add time to the original
cycle.
■ Did the load cause imbalance?
When too much imbalance occurs, an imbalance routine will
start to redistribute the load. During the imbalance routine the
time displayed may pause until this activity is complete, then
resume with the remainder of the cycle.
■ Are you washing a single item or bulky load?
Spin time is added if an unbalanced load is detected. The
washer will attempt to redistribute the load with additional
tumbling.
■ Did you wash a large load on the Express Wash cycle?
The Express Wash cycle is designed for smaller load sizes
(2-3 items) of lightly soiled garments. If larger loads are
washed in this cycle, wash time will be increased.
■ Did you wash a large load in a gentle or Delicate cycle?
When using the Express Wash, or Delicate wash cycles you
should use small loads. This ensures a gentle wash for your
garments without increasing cycle times.
25
Page 26

Clothes Care
Load too wet
■ Did you use the right cycle for the load being washed?
Select a cycle with a higher spin speed.
■ Did you wash a single item or bulky items or have you
overloaded the washer?
A single item, bulky items, or overloading may cause
imbalance. Add items or try to evenly distribute your wet
laundry in the drum. Select RINSE/DRAIN & SPIN, and then
select 2ND RINSE (to turn off the rinse option), to drain the
washer. If the laundry is still wet, take half of the load out of
the washer and try again.
■ Did you use HE detergent?
Suds during rinse and spin cycles can reduce spin speed.
Use HE detergent.
Residue, lint, stains on load; gray whites, dingy colors
■ Did you add detergent to the dispenser?
For best results, add detergent to the detergent
compartment. Do not add detergent to the washer drum.
■ Did you sort properly?
Sort lint givers (towels, chenille) from lint takers (corduroy,
synthetics). Dye transfer can occur when mixing whites and
colors in a load. Sort dark clothes from whites and lights.
■ Did you overload the washer?
Do not overload the washer. The washer can be fully loaded,
but not tightly packed. The wash load must be balanced. Lint
can be trapped in the load if overloaded.
■ Check the following:
Was paper or tissue left in pockets?
■ Did you use enough HE detergent?
Follow manufacturer’s recommendations for the type of load
you are washing. For best performance, use only High
Efficiency detergent.
hold it in suspension.
Use enough detergent to remove soil and
■ Do you have hard water?
Use more detergent for washing heavy soils in cold or hard
water.
■ Is your water colder than 60°F (15.6°C)?
Wash water colder than 60°F (15.6°C) may not completely
dissolve the detergent. Use hot or warm washes if safe for the
fabric load. Make sure your hot water system is adequate to
provide a hot water wash.
■ Are you using a low speed wash cycle?
Powdered detergents may not dissolve well in a slow-speed
cycle. For best results, use liquid detergent for slow-speed
cycles such as Delicates.
■ Did you unload the washer promptly?
To avoid dye transfer, unload the washer as soon as it stops.
■ Did you use a fabric softener dispensing ball?
Dispensing balls will not operate correctly with this washer.
Add liquid fabric softener to the fabric softener compartment.
■ Did you use powdered detergent in a low-speed cycle?
Consider using liquid detergent.
■ Did you use Express Wash on a large load?
For best results, use Express Wash for small, lightly soiled
loads.
Load is wrinkled, twisted, tangled
■ Did you unload the washer promptly?
Unload the washer as soon as it stops.
■ Did you use the right cycle for the load being washed?
Use the Delicates cycle or another cycle with a low spin
speed to reduce wrinkling.
■ Did you overload the washer?
The wash load must be balanced and not overloaded. Loads
should tumble freely during washing.
■ Was the wash water warm enough to relax wrinkles?
If safe for load, use warm or hot wash water.
■ Are the hot and cold water hoses reversed?
Check that the hot and cold water hoses are connected to
the right faucets. A hot rinse followed by spin will cause
wrinkling. See “Connect the Inlet Hoses.”
26
Page 27

Notes
27
Page 28

ÍNDICE
CONTRATOS DE PROTECCIÓN................................................ 28
GARANTÍA.................................................................................... 29
SEGURIDAD DE LA LAVADORA................................................ 30
REQUISITOS DE INSTALACIÓN................................................ 31
Piezas y herramientas ............................................................... 31
Opciones ................................................................................... 31
Requisitos de ubicación............................................................ 32
Sistema de desagüe.................................................................. 33
Requisitos eléctricos ................................................................. 34
INSTRUCCIONES DE INSTALACIÓN........................................ 35
Eliminación del sistema de transporte...................................... 35
Conexión de las mangueras de entrada................................... 35
Tendido de la manguera de desagüe ....................................... 36
Fijación de la manguera de desagüe........................................ 36
Nivelación de la lavadora .......................................................... 37
Complete la instalación............................................................. 37
CARACTERÍSTICAS Y BENEFICIOS ......................................... 38
USO DE LA LAVADORA.............................................................. 39
Puesta en marcha de la lavadora.............................................. 39
Uso del detergente adecuado................................................... 39
Uso del depósito ....................................................................... 40
Pausa o reanudación de la marcha .......................................... 41
Cambio de ciclos, opciones y modificadores........................... 41
Luces de estado........................................................................ 42
Ciclos......................................................................................... 42
Sonidos normales...................................................................... 44
Opciones ................................................................................... 44
Modificadores............................................................................ 44
Guía para el lavado.................................................................... 45
CONSEJOS DE LAVANDERÍA.................................................... 46
Cómo cargar.............................................................................. 46
Guía para la eliminación de manchas....................................... 47
CUIDADO DE LA LAVADORA .................................................... 48
Cómo limpiar su lavadora ......................................................... 48
Mangueras de admisión de agua.............................................. 49
Cuidado para las vacaciones,
el almacenaje o en caso de mudanza....................................... 49
SOLUCIÓN DE PROBLEMAS..................................................... 50
Lavadora y componentes.......................................................... 50
Funcionamiento de la lavadora................................................. 51
Cuidado de las prendas ............................................................ 53
NÚMEROS DE SERVICIO ..............................CONTRAPORTADA
CONTRATOS DE
PROTECCIÓN
Contratos maestros de protección
¡Felicitaciones por su inteligente adquisición! Su nuevo producto
Kenmore® está diseñado y fabricado para proporcionarle años de
funcionamiento confiable. Pero al igual que todos los productos,
puede necesitar mantenimiento preventivo o reparación de vez
en cuando. Es allí donde el Contrato maestro de protección
puede ahorrarle dinero e inconvenientes.
El Contrato maestro de protección también ayuda a prolongar la
vida de su nuevo producto. He aquí lo que se incluye en el
Contrato*:
✔ Piezas y mano de obra necesarios para ayudar a mantener
los productos funcionando correctamente bajo uso normal,
no sólo en caso de defectos. Nuestra cobertura va mucho
más allá de la garantía del producto. No existen deducibles
ni fallas de funcionamiento que estén excluidas de la
cobertura — protección verdadera.
✔ Servicio experto a cargo de un personal de más de 10.000
técnicos de servicio autorizados por Sears, lo que significa
que su producto será reparado por alguien en quien usted
puede confiar.
✔ Llamadas de servicio ilimitado y servicio en todo el país,
con la frecuencia que usted desee, cuando usted desee.
✔ Garantía “sin disgustos” – reemplazo de su producto
protegido si ocurren cuatro fallas o más del producto en el
transcurso de doce meses.
✔ Reemplazo del producto si su producto protegido no puede
ser reparado.
✔ Revisión anual de mantenimiento preventivo a solicitud
suya – sin costo adicional.
Ayuda rápida por teléfono
✔
rápida
– apoyo por teléfono a cargo de un representante de
Sears para todos los productos. Piense en nosotros como si
fuéramos un "manual parlante para el propietario".
✔ Protección de sobrevoltaje contra daños eléctricos debido a
fluctuaciones de electricidad.
✔ Protección por pérdida de comida, por un valor anual de
$250, por cualquier pérdida de comida que sea como
resultado de fallas mecánicas de cualquier refrigerador o
congelador cubierto bajo la garantía.
✔ Reembolso de la renta si la reparación de su producto
protegido tarda más de lo prometido.
✔ 10% de descuento sobre el precio común por el servicio de
reparación que no esté bajo protección, así como también las
piezas relacionadas con el mismo que se hayan instalado.
Una vez adquirido el Contrato, tan sólo tiene que llamar para fijar
la visita de servicio técnico. Usted puede llamar a cualquier hora,
de día o de noche, o fijar una visita técnica en Internet.
El Contrato maestro de protección es una compra sin riesgo. Si
por algún motivo usted lo cancela durante el período de la
garantía del producto, le proveeremos un reembolso total. O un
reembolso proporcional en cualquier momento posterior a la
expiración del período de la garantía. ¡Adquiera hoy su Contrato
maestro de protección!
Se aplican algunas limitaciones y exclusiones. Para obtener
precios e información adicional en EE.UU., llame al
1-800-827-6655.
*La cobertura en Canadá varía en algunos artículos. Para
obtener los detalles completos, llame a Sears Canada al
1-800-361-6665.
– lo que nosotros llamamos
Solución
Servicio de Instalación de Sears
Para la instalación profesional de Sears de aparatos
electrodomésticos, abridores de puertas de garaje, calentadores
de agua y otros artículos principales del hogar, en los EE.UU. o
en Canadá llame a 1-800-4-MY-HOME
®
.
28
Page 29

GARANTÍA DE LOS ELECTRODOMÉSTICOS Y LOS
PEDESTALES OPCIONALES KENMORE
GARANTÍA LIMITADA DE UN AÑO
Cuando este electrodoméstico haya sido instalado, operado y
mantenido según las instrucciones provistas con el producto, si
este electrodoméstico falla por defectos de material o de mano
de obra dentro de un año a partir de la fecha de compra, llame al
1-800-4-MY-HOME
Si este electrodoméstico es empleado para algún otro uso que
no sea el doméstico familiar, esta garantía sólo tiene vigencia por
90 días a partir de la fecha de compra.
ESTA GARANTÍA CUBRE SOLAMENTE LOS DEFECTOS DE
MATERIAL Y MANO DE OBRA. SEARS NO PAGARÁ POR LO
SIGUIENTE:
1. Los artículos no reutilizables que pueden gastarse por el uso
normal, incluyendo, pero sin limitación, filtros, correas, focos
y bolsas.
2. Un técnico de servicio para enseñarle al usuario cómo
instalar, operar o mantener el producto adecuadamente.
3. Un técnico de servicio para limpiar o mantener este
producto.
4. Daños a este producto o fallas del mismo en caso de no ser
instalado, operado o mantenido conforme a todas las
instrucciones provistas con el producto.
5. Daños a este producto o fallas del mismo como resultado de
accidente, abuso, uso indebido o un uso diferente de aquel
para el cual fue creado.
6. Daños a este producto o fallas del mismo causados por el
uso de detergentes, limpiadores, productos químicos o
utensilios diferentes de los recomendados en todas las
instrucciones provistas con el producto.
7. Daños a piezas o sistemas o fallas de los mismos como
resultado de modificaciones no autorizadas que se hayan
efectuado en este producto.
EXCLUSIÓN DE GARANTÍAS IMPLÍCITAS; LIMITACIÓN DE
RECURSOS
El único y exclusivo recurso del cliente según los términos de
esta garantía limitada será el de reparar el producto según se
estipula en la presente. Las garantías implícitas, incluyendo las
garantías de comerciabilidad o de capacidad para un propósito
particular, serán limitadas a un año o al período más corto
permitido por ley. Sears no se hará responsable por daños
incidentales o consecuentes. Algunos estados y provincias no
permiten la exclusión o limitación de daños incidentales o
consecuentes, o limitaciones acerca de cuánto debe durar una
garantía implícita de comerciabilidad o capacidad, de modo que
las limitaciones o exclusiones arriba mencionadas pueden no
aplicarse en su caso.
Esta garantía se aplica sólo mientras este electrodoméstico se
usa en los Estados Unidos y Canadá.
Esta garantía le otorga derechos legales específicos, y es posible
que usted tenga también otros derechos, los cuales varían de un
estado a otro.
Dept. 817WA, Hoffman Estates, IL 60179
®
para gestionar la reparación libre de cargo.
Sears, Roebuck and Co.
Toronto, Ontario, Canada M5B 2B8
Sears Canada Inc.
REGISTRO DEL PRODUCTO
En el espacio a continuación, anote el número completo de
modelo y serie así como la fecha de compra. Usted puede
encontrar esta información en la etiqueta con el número de
modelo y de serie ubicada en el producto.
Tenga esta información disponible para facilitarle la obtención de
asistencia o servicio con prontitud siempre que llame a Sears
con respecto a su electrodoméstico.
Número de modelo __ __ __. _____________________________________
Número de serie ________________________________________________
Fecha de compra _______________________________________________
Guarde estas instrucciones y su comprobante de compra
para referencia futura.
REGISTRO DE PRODUCTO DEL PEDESTAL
En el espacio a continuación, anote el número completo de
modelo y serie así como la fecha de compra. Usted puede
encontrar esta información en la etiqueta con el número de
modelo y de serie ubicada en el producto.
Tenga esta información disponible para facilitarle la obtención de
asistencia o servicio con prontitud siempre que llame a Sears
con respecto a su pedestal.
Número de modelo __ __ __. _____________________________________
Número de serie ________________________________________________
Fecha de compra _______________________________________________
Guarde estas instrucciones y su comprobante de compra
para referencia futura.
29
Page 30

SEGURIDAD DE LA LAVADORA
Su seguridad y la seguridad de los demás es muy importante.
Hemos incluido muchos mensajes importantes de seguridad en este manual y en su electrodoméstico. Lea y obedezca siempre
todos los mensajes de seguridad.
Este es el símbolo de advertencia de seguridad.
Este símbolo le llama la atención sobre peligros potenciales que pueden ocasionar la muerte o una lesión a
usted y a los demás.
Todos los mensajes de seguridad irán a continuación del símbolo de advertencia de seguridad y de la palabra
“PELIGRO” o “ADVERTENCIA”. Estas palabras significan:
PELIGRO
ADVERTENCIA
Todos los mensajes de seguridad le dirán el peligro potencial, le dirán cómo reducir las posibilidades de sufrir una lesión y lo que
puede suceder si no se siguen las instrucciones.
Si no sigue las instrucciones de inmediato, usted puede
morir o sufrir una lesión grave.
Si no sigue las instrucciones, usted puede morir o sufrir
una lesión grave.
INSTRUCCIONES IMPORTANTES DE SEGURIDAD
ADVERTENCIA: Para reducir el riesgo de incendio, choque eléctrico o lesiones a personas al usar su lavadora, siga las
precauciones básicas, incluyendo las siguientes:
■
Lea todas las instrucciones antes de usar la
lavadora.
■
No lave artículos que hayan sido previamente
limpiados, lavados, remojados o humedecidos con
gasolina, solventes para lavar en seco, u otras
sustancias inflamables o explosivas ya que éstas
emanan vapores que podrían encenderse o causar
una explosión.
■
No agregue gasolina, solventes para lavar en seco,
u otras sustancias inflamables o explosivas al agua
de lavado. Estas sustancias emanan vapores que
podrían encenderse o causar una explosión.
■
En ciertas condiciones, puede generarse gas
hidrógeno en un sistema de agua caliente que no se
haya usado por dos semanas o un período mayor.
EL GAS HIDRÓGENO ES EXPLOSIVO. Si no se ha
usado el agua caliente durante dicho período, antes
de usar la lavadora, abra todos los grifos de agua
caliente y deje que corra el agua por varios minutos.
Esto liberará todo el gas hidrógeno que se haya
acumulado. Debido a la inflamabilidad de dicho gas,
no fume ni use una llama abierta durante este lapso.
■
No permita que los niños jueguen encima o dentro de la
lavadora. Es necesario una supervisión cuidadosa de los
niños toda vez que se use la lavadora cerca de ellos.
■
Antes de poner la lavadora fuera de servicio o desecharla,
quítele la puerta o la tapa.
■
No introduzca las manos en la lavadora si el tambor, la
tina, o el agitador están funcionando.
■
No instale ni almacene esta lavadora donde pudiese estar
sometida a la intemperie.
■
No trate de forzar los controles.
■
No repare ni cambie pieza alguna de la lavadora ni intente
realizar tarea alguna de servicio técnico, excepto cuando
así se le indique específicamente en este manual o en
instrucciones de reparación para el usuario publicadas,
que usted entienda y para cuya ejecución cuente con la
habilidad necesaria.
■
Para obtener información respecto a los requisitos de
conexión a tierra, refiérase a los “Requisitos Eléctricos”.
30
GUARDE ESTAS INSTRUCCIONES
Page 31

REQUISITOS DE INSTALACIÓN
Piezas y herramientas
Reúna las herramientas y piezas necesarias antes de comenzar
la instalación. Las piezas provistas con la lavadora están en el
tambor de la lavadora.
Herramientas necesarias para la conexión de las
mangueras de entrada del agua
■ Alicates (que se abran a 1⁹⁄₁₆" [39,5 mm])
■ Linterna (opcional)
Herramientas necesarias para la instalación
■ Llaves de boca de 14 mm y 13 mm
■ Nivel
■ Bloque de madera
■ Regla o cinta para medir
Piezas suministradas
AB C
D
Si tiene Necesitará adquirir
Una manguera de
desagüe muy corta
Grifos del agua
fuera del alcance
de las mangueras
de llenado
Juego de extensión para manguera de
4 pies (1,2 m) Pieza número 285863
2 mangueras de llenado del agua más
largas:
6 pies (1,8 m) Pieza número 76314
10 pies (3,0 m) Pieza número 350008
Opciones
Pedestal
Usted tiene la opción de comprar por separado pedestales de
alturas diferentes para esta lavadora. Puede seleccionar un
pedestal de 10" (25,4 cm) o 15,5" (39,4 cm). El pedestal se
agregará al peso total de la lavadora.
E
A. Molde de la manguera de
desagüe en forma de "U"
B. Mangueras de entrada (2)
C. Arandelas de las
mangueras de entrada (4)
D. Tapón de orificio para
perno de transporte (4)
E. Fleje rebordeado
Piezas alternativas
Las piezas aquí enumeradas se pueden adquirir en la tienda
Sears o en el Centro de Servicio Sears de su localidad. Para
obtener más información, sírvase llamar al
1-800-4-MY-HOME
Si tiene Necesitará adquirir
Un lavadero o tubo
vertical a una altura
mayor de 96"
(2,4 m)
Una alcantarilla
suspendida
Desagüe por el
piso
®
(1-800-469-4663).
Sistema de bomba de sumidero (si no
está disponible aún)
Un tubo de desagüe estándar de 20 gal.
(76 L), 30" (76,2 cm) de altura o un
fregadero de uso general y una bomba
de sumidero (en venta en
establecimientos de plomería locales)
Desviación de sifón, pieza
número 285834; manguera de desagüe
adicional, pieza número 8318155; y juego
de conectores, pieza número 285835
Pedestal opcional
Para hacer su pedido, llame a la tienda local de Sears. Para
obtener más información, sírvase llamar al 1-800-4-MY-HOME
®
(1-800-469-4663).
Altura del
pedestal
Altura aproximada
con la lavadora
Color Número
de
modelo
10" (25,4 cm) 46" (116,8 cm) Blanco 46822
15,5" (39,4 cm) 51,5" (130,8 cm) Blanco 57822
Juego para apilar
¿Está usted planeando apilar la lavadora y secadora? Para hacer
eso, necesitará comprar un juego para apilar.
Para hacer su pedido, llame a la tienda local de Sears. Pida el
juego para apilar (Pieza número 8572546). Para obtener más
información, sírvase llamar al 1-800-4-MY-HOME
(1-800-469-4663). Siga las instrucciones que se incluyen con el
juego. Vea “Requisitos de ubicación”.
®
31
Page 32

Requisitos de ubicación
La selección de una ubicación apropiada para su lavadora realza
el rendimiento y reduce al mínimo el ruido y la posible "caminata"
de la lavadora.
Su lavadora se puede instalar debajo de un mostrador a la
medida, o en un sótano, cuarto para lavar, clóset o un lugar
empotrado. Vea “Sistema de desagüe”.
Deberá tenerse en cuenta también los requisitos para la
ubicación de otro electrodoméstico acompañante. La instalación
correcta es su responsabilidad.
Usted necesitará
■ Un calentador de agua fijado para suministrar a la lavadora el
agua a 120ºF (49ºC).
■ Un contacto eléctrico con conexión a tierra ubicado a una
distancia de no más de 6 pies (1,8 m) del lugar donde el
cable eléctrico está fijado a la parte posterior de la lavadora.
Vea “Requisitos eléctricos”.
■ Los grifos de agua caliente y de agua fría ubicados a una
distancia de 4 pies (1,2 m) de las válvulas de llenado del agua
caliente y fría y una presión de agua de 20-100 lbs/pulg²
(137,9-689,6 kPa).
■ Un piso nivelado con un declive máximo de 1" (2,5 cm)
debajo de la lavadora completa. No se recomienda instalar la
lavadora sobre superficies blandas del piso, tales como
alfombras o superficies con reverso de espuma.
■ Un piso resistente y firme que soporte la lavadora con un
peso total (del agua y de la carga) de 400 libras (180 kg).
No ponga a funcionar su lavadora a temperaturas inferiores a
32ºF (0ºC). El agua que quede en la lavadora puede ocasionar
daños a bajas temperaturas.
Espacio recomendado para la instalación a medida
debajo del mostrador
Las dimensiones que se ilustran son para el espacio
recomendado.
Instalación a medida debajo del mostrador - Sólo para la
lavadora
37" mín.
(93,9 cm)
1"
(2,5 cm)
27"
(68,6 cm)
1"
(2,5 cm)
Espacio recomendado para la instalación en un lugar
empotrado o en un clóset, con o sin pedestal
Las dimensiones que se ilustran son para el espacio
recomendado.
Instalación en zona empotrada o en un clóset
3"
14"* máx.
(35,6 cm)
48 pulg.
(310 cm2)
2
*
(7,6 cm)
Espacios libres para la instalación
■ El lugar debe ser lo suficientemente grande para permitir que
la puerta de la lavadora se abra completamente.
■ Debe considerarse espacio adicional para facilitar la
instalación y el servicio técnico. La puerta se abre a más de
90° y no es reversible.
■ Se podrían necesitar espacios libres adicionales para las
molduras de la pared, de la puerta y del piso.
■ Se recomienda un espacio adicional de 1" (2,5 cm) en todos
los lados de la lavadora para reducir la transferencia de ruido.
■ También se debe considerar espacio adicional para otro
electrodoméstico que le acompañe.
Dimensiones de la lavadora
27"
50
¹⁄₄"
(127,6 cm)
(68,6 cm)
30
(77,5 cm)
¹⁄₂"
36"
(91,4 cm)
2
*
24 pulg.
(155 cm2)
1"
30
¹⁄₂"
(2,5 cm)
(77,5 cm)
4"
(10,2 cm)
A
A. Vista lateral - clóset o lugar confinado
B. Puerta de clóset con orificios de ventilación
B
3"
(7,6 cm)
*Aberturas de aire mínimas de la parte superior e inferior para la
puerta del clóset.
Instalación en un clóset o lugar empotrado - Lavadora sobre
un pedestal
14"* máx.
(35,6 cm)
1"
(2,5 cm)
27"
(68,6 cm)
1"
(2,5 cm)
1"
(2,5 cm)
30
¹⁄₂"
(77,5 cm)
4"
(10,2 cm)
AB
32
La puerta no es reversible.
A. Lugar empotrado
B. Vista lateral - clóset o lugar confinado
Page 33

Espacio recomendado para la instalación en un lugar
empotrado o en un clóset, con lavadora y secadora
apiladas
Las dimensiones que se ilustran son para el espacio
recomendado.
2
48 pulg.
*
(310 cm2)
3" (7,6 cm)
3" (7,6 cm)
2
*
24 pulg.
(155 cm
2
)
12" (30,5 cm)
1" (2,5 cm)
Sistema de desagüe
Se puede instalar la lavadora utilizando el sistema de desagüe
por tubo vertical (en el piso o en la pared), el sistema de desagüe
por el lavadero, o el sistema de desagüe por el piso. Seleccione
el método de instalación de la manguera de desagüe que usted
necesite. Vea “Piezas y herramientas”.
Sistema de desagüe por tubo vertical - en la pared o en el
piso (vistas A y B)
El desagüe por tubo vertical necesita un tubo vertical con un
diámetro mínimo de 2" (5 cm). La capacidad mínima de desagüe
no puede ser menor de 17 gal. (64 L) por minuto.
La parte superior del tubo vertical debe tener una altura mínima
de 30" (76,2 cm) y máxima de 96" (2,4 m) desde la parte inferior
de la lavadora.
30" mín.
(76,2 cm)
72"
(182,9 cm)
5 ¹⁄₄"**
(13,3 cm)
1"***
(2,5 cm)
27"
(68,6 cm)
1"***
(2,5 cm)
*Aberturas de aire mínimas de la parte superior e inferior para la
puerta del clóset.
**El codo externo de ventilación requiere espacio adicional.
***La pared, puerta y molduras del piso pueden requerir espacios
adicionales.
Espacio recomendado para la instalación en un armario
Las dimensiones que se ilustran son para el espacio
recomendado.
Para la instalación en un armario, con una puerta, se
requieren aberturas de ventilación mínimas en la parte
superior.
7" (17,8 cm)
7" (17,8 cm)
A
B
Sistema de desagüe por el lavadero (vista C)
El lavadero necesita una capacidad mínima de 20 gal. (76 L). La
parte superior del lavadero debe estar a una altura mínima de 30"
(76,2 cm) del piso.
Sistema de desagüe por el piso (vista D)
El sistema de desagüe por el piso necesita una desviación del
sifón que puede adquirirse por separado. Vea “Piezas y
herramientas”.
La desviación del sifón debe estar a una distancia mínima de 28"
(71 cm) de la parte inferior de la lavadora. Se pueden necesitar
mangueras adicionales.
26" mín.
30" mín.
(76,2 cm)
CD
(66 cm)
4"
(10,2 cm)
31½"
(80 cm)
1"
(2,5 cm)1"(2,5 cm)
27"
(68,6 cm)
9"
(22,9 cm)
1"
(2,5 cm)
33
Page 34

Requisitos eléctricos
ADVERTENCIA
Peligro de Choque Eléctrico
Conecte a un contacto de pared de conexión a tierra de
3 terminales.
No quite la terminal de conexión a tierra.
No use un adaptador.
No use un cable eléctrico de extensión.
No seguir estas instrucciones puede ocasionar
la muerte, incendio o choque eléctrico.
■ Se necesita un suministro eléctrico de 120 voltios,
60 hertzios, CA solamente, de 15 ó 20 amperios y protegido
con fusible. Se recomienda un fusible retardador o un
cortacircuitos. Asimismo se recomienda el uso de un circuito
independiente que preste servicio únicamente a este aparato.
■ Esta lavadora viene equipada con un cable eléctrico dotado
de un enchufe de 3 terminales con conexión a tierra.
■ Para reducir al mínimo el peligro de posibles choques
eléctricos, el cable debe ser enchufado en un contacto
apropiado de pared de 3 terminales, conectado a tierra de
acuerdo con los códigos y normas locales. Si no hay
disponible una salida equivalente, es responsabilidad y
obligación personal del cliente de tener un contacto
apropiado con conexión a tierra instalado por un electricista
calificado.
■ Si los códigos lo permiten y se emplea un alambre de
conexión a tierra separado, es recomendable que un
electricista calificado determine si la trayectoria de conexión
a tierra es adecuada.
■ No conecte a tierra a un tubo de gas.
■ Si no está seguro de que la conexión a tierra de la lavadora
sea la adecuada, verifíquela con un electricista competente.
■ No tenga un fusible en el circuito neutro o de conexión a
tierra.
INSTRUCCIONES PARA LA CONEXIÓN
A TIERRA
Para una lavadora conectada a tierra con cable
eléctrico:
Esta lavadora debe conectarse a tierra. En caso de
funcionamiento defectuoso o avería, la conexión a tierra
reducirá el riesgo de choque eléctrico al proporcionar una
vía de menor resistencia para la corriente eléctrica. Esta
lavadora viene equipada con un cable eléctrico que tiene un
conductor de conexión a tierra del equipo y un enchufe con
conexión a tierra. El enchufe debe conectarse en un
contacto de pared apropiado que haya sido debidamente
instalado y conectado a tierra de conformidad con todos los
códigos y ordenanzas locales.
ADVERTENCIA: La conexión incorrecta de la terminal
de conexión a tierra del equipo puede ocasionar un riesgo
de choque eléctrico. Consulte con un electricista o técnico
en reparaciones calificado si tiene duda alguna en cuanto a
la conexión a tierra correcta del electrodoméstico.
No modifique el enchufe provisto con el electrodoméstico. Si
éste no encaja en el contacto de pared, pida a un
electricista calificado que le instale un contacto de pared
apropiado.
Para una lavadora con contacto eléctrico permanente:
Esta lavadora debe conectarse a un metal puesta a tierra,
un sistema con cableado permanente a tierra o conectarse
a un equipo cuyo suministro incluya una terminal de tierra.
34
Page 35

INSTRUCCIONES DE INSTALACIÓN
Eliminación del sistema de transporte
ADVERTENCIA
Peligro de Peso Excesivo
Use dos o más personas para mover e instalar
la lavadora.
No seguir esta instrucción puede ocasionar una lesión
en la espalda u otro tipo de lesiones.
IMPORTANTE: Coloque la lavadora de modo que la parte
posterior de la misma esté aproximadamente a 3 pies (90 cm) de
distancia de su ubicación final.
Hay 4 pernos azules en el panel posterior de la lavadora que
sostienen el sistema de suspensión durante el transporte. Estos
pernos también retienen el cable de suministro de energía dentro
de la lavadora hasta que se quiten los pernos.
Conexión de las mangueras de entrada
Inserte nuevas arandelas planas (suministradas) en cada extremo
de las mangueras de entrada. Asiente firmemente las arandelas
en los acoplamientos.
AB
A. Acoplamiento
B. Arandela
Conecte las mangueras de entrada a los grifos de agua
Asegúrese de que el tambor de la lavadora esté vacío.
1. Sujete una manguera al grifo de agua caliente. Atornille el
acoplamiento con la mano hasta que se asiente en la
arandela.
2. Sujete una manguera al grifo de agua fría. Atornille el
acoplamiento con la mano hasta que se asiente en la
arandela.
3. Usando los alicates, apriete los acoplamientos dos tercios de
vuelta adicional.
1. Utilice una llave de tuercas de 13 mm para aflojar cada uno
de los pernos.
2. Una vez que el perno esté flojo, muévalo hacia el centro del
orificio y jálelo hacia fuera por completo, incluyendo el
espaciador de plástico que cubre el perno.
3. Una vez que se hayan quitado los 4 pernos, descarte los
pernos y los espaciadores. Luego retire el cable de
suministro de energía por la abertura del panel trasero y
cierre el orificio con la tapa adjunta.
4. Cierre los orificios de los pernos con los 4 tapones para
orificios de pernos de transporte.
NOTA: Llame a su centro de servicio más cercano si la lavadora
se va a transportar unos días más tarde. Para prevenir daños
estructurales y de suspensión, su máquina debe estar
debidamente preparada para ser nuevamente ubicada por un
técnico certificado.
NOTA: No apriete demasiado ni use cinta o selladores en la
válvula. Se pueden dañar las válvulas.
Despeje las líneas de agua
■ Deje correr el agua por los grifos y las mangueras de entrada
en un lavadero, tubo de desagüe o cubeta para eliminar las
partículas que se encuentran en las tuberías del agua, las
cuales podrían obstruir los filtros de la válvula de entrada.
■ Verifique la temperatura del agua para asegurarse de que la
manguera de agua caliente esté conectada al grifo de agua
caliente y que la manguera de agua fría esté conectada al
grifo de agua fría.
35
Page 36

Conecte las mangueras de entrada a la lavadora
Desagüe de la tina de lavadero o desagüe de tubo vertical
Conecte el molde de la manguera de desagüe a la manguera de
desagüe corrugada.
H
H. Entrada de agua caliente
C. Entrada de agua fría
C
1. Fije la manguera de agua caliente a la válvula de entrada de
agua caliente (H) de la lavadora. Atornille el acoplamiento con
la mano hasta que se asiente en la arandela.
2. Fije la manguera de agua fría al grifo de agua fría (C) de la
lavadora. Atornille el acoplamiento con la mano hasta que se
asiente en la arandela.
3. Usando los alicates, apriete los acoplamientos dos tercios de
vuelta adicional.
NOTA: No apriete demasiado. Se pueden dañar los
acoplamientos.
4. Abra por completo los grifos del agua y revise si hay fugas.
NOTA: Reemplace las mangueras de entrada después de
5 años de uso para reducir el riesgo de que fallen. Para
consulta en el futuro, anote en las mangueras la fecha de
instalación o la fecha de reposición de las mismas.
Inspeccione periódicamente y reemplace las mangueras si
aparecen bultos, arrugas, cortaduras, desgaste o filtraciones
de agua.
Tendido de la manguera de desagüe
El tendido apropiado de la manguera de desagüe protege sus
pisos contra daños ocasionados por filtraciones de agua. Lea y
siga estas instrucciones.
Retire la manguera de desagüe de la lavadora
Jale suavemente la manguera de desagüe corrugada para
sacarla de los sujetadores de embalaje.
AB
A. Encaje cualquiera de los extremos del molde a la
manguera de desagüe en el lugar donde comienza
el corrugado.
B. Doble la manguera de desagüe sobre el molde y
trábela en su lugar.
Para evitar que el agua de desagüe vuelva a su lavadora:
■ No enderece la manguera de desagüe, y no fuerce el exceso
de la manguera de desagüe dentro del tubo vertical. La
manguera debe quedar asegurada pero lo suficientemente
floja que permita un espacio para el aire.
■ No tienda el exceso de la manguera en el fondo de la tina del
lavadero.
Desagüe por el piso
Quizás necesite piezas adicionales. Vea Desagüe por el piso en
“Piezas y herramientas”.
Fijación de la manguera de desagüe
1. Coloque el cable eléctrico encima de la lavadora.
2. Mueva la lavadora a su ubicación final.
3. Ubique la manguera de desagüe en la tina del fregadero o
tubo vertical, como se muestra. Vea las ilustraciones A y B.
36
AB C
4. Si los grifos de suministro de la lavadora y el tubo vertical de
desagüe están empotrados, ponga el extremo en forma de
gancho de la manguera de desagüe en el tubo vertical, como
se muestra. Vea la ilustración C.
NOTAS:
■ No fuerce el exceso de la manguera de desagüe dentro de la
parte posterior de la lavadora.
■ Para evitar el sifonaje de agua, no selle la manguera de
desagüe en el tubo vertical.
Page 37

Nivelación de la lavadora
La nivelación apropiada y el trabar las patas de su lavadora
evitan el ruido y la vibración excesivos.
1. Verifique que las cuatro contratuercas de la lavadora estén
apretadas con firmeza contra el gabinete de la lavadora,
usando una llave de boca de 14 mm.
2. Coloque la lavadora en su ubicación final y verifique la
nivelación de la misma. La lavadora no deberá moverse del
frente hacia atrás, de lado a lado o diagonalmente cuando se
la empuje sobre sus bordes superiores. Asegúrese de que las
cuatro patas estén estables y descansando sobre el suelo.
3. Si la lavadora no está nivelada, muévala ligeramente hacia
afuera antes de inclinarla hacia atrás. Primero apuntale la
parte frontal con un bloque de madera, afloje las
contratuercas y regule las patas según sea necesario;
después apuntale la parte de atrás y regule las patas según
sea necesario. Repita los pasos 1 a 3 hasta que la lavadora
quede nivelada.
IMPORTANTE: Se deben ajustar las cuatro patas. Si no se
aprietan las contratuercas contra el gabinete de la lavadora, la
misma podría vibrar.
Complete la instalación
1. Revise los requisitos eléctricos. Asegúrese de contar con la
fuente de electricidad correcta y el método recomendado de
conexión a tierra. Vea “Requisitos eléctricos”.
2. Revise para cerciorarse de que todas las piezas estén
instaladas. Si hay alguna pieza extra, vuelva a revisar todos
los pasos para ver cuál se omitió.
3. Verifique si tiene todas las herramientas.
4. Deshágase de todos los materiales de embalaje o recíclelos.
5. Cerciórese de que los grifos del agua estén abiertos.
6. Verifique si hay fugas alrededor de los grifos y de las
mangueras de entrada.
ADVERTENCIA
Peligro de Choque Eléctrico
Conecte a un contacto de pared de conexión a tierra de
3 terminales.
No quite la terminal de conexión a tierra.
No use un adaptador.
No use un cable eléctrico de extensión.
No seguir estas instrucciones puede ocasionar
la muerte, incendio o choque eléctrico.
7. Conecte a un contacto de pared de conexión a tierra de
3 terminales.
8. Lea “Uso de la lavadora”.
9. Para probar la lavadora y limpiarla, mida ¹⁄₂ de la cantidad
recomendada por el fabricante de detergente de alto
rendimiento “HE” para una carga de tamaño mediano. Vierta
el detergente en el depósito del detergente. Seleccione
Normal/Informal (NORMAL/CASUAL) y luego seleccione
Inicio (START.) Deje que la lavadora funcione durante el ciclo
completo.
Use solamente un detergente de alto rendimiento (HE).
37
Page 38

CARACTERÍSTICAS Y BENEFICIOS
Su nueva lavadora de carga frontal de alto rendimiento fue
diseñada para conservar los recursos y reducir las facturas de
agua y electricidad. La lavadora ha sido diseñada para
determinar cuál es la cantidad de agua necesaria para el mejor
funcionamiento, y proveerla. El tiempo de funcionamiento puede
ser mayor para este nuevo sistema que para una lavadora
convencional.
Controles electrónicos
Los controles electrónicos flexibles son fáciles de usar tanto sea
usted principiante o experto.
Nivel automático del agua
Al ajustarse al tamaño de la carga, esta característica permite a la
lavadora usar la cantidad mínima de agua que necesita para
lavar y enjuagar la ropa. Con un bajo nivel de agua, usted podrá
obtener los mismos resultados con cantidades más pequeñas de
productos de lavandería. Al usarse solamente la cantidad de
agua requerida, la lavadora también ahorra energía. Podrá
obtener los mismos resultados en el lavado para cargas de
tamaño pequeño y grande.
Cargas más voluminosas
Debido a que no tiene agitador, usted puede lavar artículos más
voluminosos y más grandes, como una bolsa de dormir de
tamaño promedio.También puede lavar más prendas a la vez, lo
que significa menor cantidad de lavados. Usted puede lavar una
almohada o un oso de peluche grande.
Sistema de suspensión
Para reducir los problemas de la “caminata” y el “desequilibrio”
de la lavadora, su nueva lavadora cuenta con:
■ 2 resortes para aislar la vibración
■ 4 amortiguadores en la base de la lavadora para minimizar el
movimiento.
Tambor de acero inoxidable
El tambor de acero inoxidable elimina la corrosión y permite
velocidades más altas de exprimido, logrando mayor extracción
del agua, que a su vez reduce el tiempo de secado.
Velocidades de exprimido
Esta lavadora selecciona automáticamente la velocidad de
exprimido según el ciclo seleccionado. Sin embargo, se puede
modificar este ajuste de fábrica. Esta lavadora ofrece hasta tres
opciones distintas de velocidad de exprimido.
Agregado de prendas
Esta opción está disponible en todos los ciclos de lavado,
excepto en los de enjuague y exprimido (Rinse & Spin), desagüe
y exprimido (Drain & Spin), y Limpiar la lavadora (Clean Washer).
Cuando esta opción esté disponible al comienzo del ciclo, la luz
de estado de agregar prendas (Add A Garment) se iluminará
durante los primeros 7 minutos. Esta lavadora permite que
durante un período de 7 minutos se puedan agregar otras
prendas a una carga.
Equilibrio dinámico
Un sistema preciso de equilibrio que permite a la lavadora
alcanzar altas velocidades de exprimido. La lavadora exprime
más rápido de manera que las prendas que salen de la misma
estén menos húmedas que las de las máquinas tradicionales de
carga superior. Además, si el Sistema de equilibrio dinámico
detecta las cargas desequilibradas durante el exprimido,
redistribuye las prendas para que queden uniformemente
equilibradas.
Depósito con sistema ventajoso para el detergente
Los tres compartimientos en el depósito permiten cargar todos
los productos para el lavado antes de poner la lavadora en
marcha. Los productos serán agregados dentro del lavado en el
tiempo óptimo para una limpieza de alto rendimiento. El sistema
ventajoso para el detergente incluye el sistema de liberación de
blanqueador. El detergente se agrega en el comienzo del ciclo, y
el blanqueador se agrega después de que las enzimas hayan
tenido la posibilidad de hacer su limpieza. El suavizante de telas
se dispensa automáticamente en el ciclo de enjuague o en el
segundo enjuague (2ND RINSE), si se ha seleccionado. Se puede
remover fácilmente la bandeja del Depósito con sistema
ventajoso para el detergente para su limpieza.
Motor adaptable a velocidad variable
El motor se adapta al tamaño de la carga de ropa y al ciclo
seleccionado, para proporcionar las condiciones óptimas de
limpieza, enjuague y escurrido. El motor puede proporcionar
velocidades lentas para artículos delicados, y es lo
suficientemente poderoso como para escurrir una carga
promedio de ropa en un exprimido a alta velocidad.
38
Use solamente un detergente de alto rendimiento (HE).
Page 39

USO DE LA LAVADORA
Puesta en marcha de la lavadora
ADVERTENCIA
Peligro de Incendio
Nunca coloque en la lavadora artículos que estén
humedecidos con gasolina o cualquier otro
líquido inflamable.
Ninguna lavadora puede eliminar completamente
el aceite.
No seque ningún artículo que haya tenido alguna vez
cualquier tipo de aceite (incluyendo aceites de cocina).
No seguir estas instrucciones puede ocasionar
la muerte, explosión o incendio.
ADVERTENCIA: A fin de reducir el riesgo de incendio, de
choque eléctrico o de daños personales, lea las
INSTRUCCIONES IMPORTANTES DE SEGURIDAD antes de
operar este aparato.
La siguiente es una guía para el empleo de su lavadora. Consulte
las secciones específicas de este manual para obtener
información detallada.
No almacene productos de lavandería encima de esta lavadora.
La vibración es normal durante el funcionamiento.
Uso del detergente adecuado
Use solamente detergentes de alto rendimiento. El paquete para
este tipo de detergente incluye la indicación “HE” o “Alto
Rendimiento”. Este sistema de lavado, junto con menos agua,
creará demasiada espuma con un detergente común que no sea
de alto rendimiento (HE). El uso de un detergente común
probablemente derive en errores de la lavadora, tiempos de
lavado más prolongados y menor rendimiento de enjuague.
También puede ocasionar fallas en los componentes y moho
evidente. Los detergentes de alto rendimiento HE están hechos
para producir la cantidad adecuada de espuma para el mejor
rendimiento. Siga las instrucciones del fabricante para
determinar la cantidad de detergente que debe usar.
Use solamente un detergente de alto rendimiento (HE).
Primer ciclo de lavado sin ropa
Antes de lavar la ropa por primera vez, elija el ciclo Normal/
Informal (Normal/Casual) y póngalo a funcionar sin ropa, si esto
no se ha completado durante el paso final de la instalación. Use
solamente un detergente de alto rendimiento (HE). Use ¹⁄₂ de la
cantidad recomendada por el fabricante para una carga de
tamaño mediano. Este ciclo inicial sirve para asegurar la limpieza
del interior de la lavadora antes de lavar la ropa.
39
Page 40

Para todos los ciclos de lavado
1. Para cargar la lavadora
Abra la puerta de la lavadora jalando la manija. Separe la
ropa por color y tipo de tela. Coloque una carga de ropa
separada en la lavadora. No sobrecargue la lavadora. El
sobrecargar la lavadora puede causar una limpieza
insatisfactoria.
■ La lavadora puede llenarse por completo, pero sin
apretujar la ropa. La puerta de la lavadora debe cerrarse
con facilidad.
■ Mezcle artículos grandes con artículos pequeños. Evite
lavar de a un solo artículo. Coloque la carga
uniformemente.
■ Lave los artículos pequeños, tales como calcetines de
niños, en bolsas de malla para prendas. Se recomienda
usar más de una bolsa para prendas y que cada una de
ellas se llene con la misma cantidad de material.
■ Al sacar las prendas de la lavadora, de vez en cuando
revise si no han quedado pequeños artículos debajo del
sello/fuelle de color gris que está al frente de la tina.
2. Cierre la puerta de la lavadora empujándola con firmeza
hasta que escuche el chasquido de la traba. La puerta de la
lavadora permanecerá con seguro durante el ciclo de lavado.
NOTA: Al cabo de cualquier ciclo de lavado, se debe abrir la
puerta y luego cerrarla para que pueda iniciar un nuevo ciclo.
La puerta puede abrirse únicamente si se ha seleccionado
parada (STOP), mientras la luz de agregado de prendas (ADD
A GARMENT) está encendida o si se ha anulado el ciclo. Vea
“Para anular un ciclo” en la sección “Cambio de ciclos,
opciones y modificadores”.
3. Abra la gaveta de depósito y agregue los productos de
lavandería en los compartimientos de detergente,
blanqueador, o suavizante de telas. Cierre la gaveta
lentamente para evitar derrames. Vea “Uso del depósito”.
NOTA: Use solamente detergentes de alto rendimiento (HE).
4. Encienda la lavadora seleccionando encendido (POWER).
Seleccione uno de los ciclos girando el selector de ciclos. La
luz indicadora del ciclo seleccionado se iluminará. Al
seleccionar un ciclo de lavado, los modificadores y opciones,
temperatura del agua y velocidad de exprimido prefijados
para el ciclo seleccionado se encenderán. Los ajustes
prefijados proporcionan el cuidado recomendado de las telas
en el ciclo seleccionado. Vea “Ciclos”.
5. Seleccione las opciones (OPTIONS) deseadas. No todas las
opciones están disponibles con todos los ciclos. Vea
“Opciones”.
6. Seleccione los modificadores (MODIFIERS) deseados. No
todos los modificadores están disponibles con todos los
ciclos y opciones. Vea “Modificadores”.
7. Si lo desea, seleccione la señal de ciclo (CYCLE SIGNAL).
Esta señal es útil cuando tiene que lavar artículos que deben
quitarse de la lavadora tan pronto ésta se detenga. Presione
CYCLE SIGNAL una vez para encenderla. La luz indicadora
se encenderá. Presiónela nuevamente para apagarla.
8. Para comenzar el ciclo de lavado de inmediato
Seleccione y sostenga Inicio (START) (durante 1 segundo
aproximadamente).
■ Si no selecciona Inicio (START) dentro de 5 minutos de
haber elegido el ciclo, la lavadora se apaga
automáticamente.
■ Al cabo del ciclo de lavado, la luz de estado de ropa
limpia (CLOTHES CLEAN) se ilumina, la puerta se
destraba y se puede descargar la lavadora. La lavadora
se apaga automáticamente 5 minutos después que el
ciclo se complete y se apague la luz de ropa limpia
(CLOTHES CLEAN). Para apagar la lavadora
manualmente al cabo de un ciclo de lavado, seleccione
parada (STOP) una vez.
9. Para el inicio diferido del ciclo de lavado
Seleccione inicio diferido (DELAY START) hasta que el tiempo
diferido deseado (en horas) aparezca en la pantalla de
Tiempo aproximado restante (Estimated Time Remaining).
Seleccione Inicio (START). La cuenta regresiva del ciclo de
lavado aparecerá en la pantalla.
IMPORTANTE: Al diferir un ciclo, use sólo detergentes en
polvo en el compartimiento para el lavado principal, ya que
los detergentes líquidos se pueden filtrar fuera del
compartimiento durante el ciclo Diferido antes de que
comience el ciclo.
Uso del depósito
Su nueva lavadora tiene una gaveta de depósito con tres
compartimientos separados para sus productos de lavandería uno es para el detergente, otro es para el blanqueador líquido
con cloro y el otro es para el suavizante líquido de telas. Los
productos de lavandería se diluyen y se distribuyen
automáticamente en el momento oportuno durante el ciclo de
lavado, sin que usted tenga que regresar en el transcurso del
ciclo de lavado para agregarlos.
Es normal que quede un poco de agua en los depósitos al
término del ciclo de lavado.
No ponga productos de lavandería directamente en la tina de
lavado. Siempre use los depósitos apropiados al agregar
productos de lavandería.
Selección del detergente adecuado
Use solamente detergentes de alto rendimiento. El paquete para
este tipo de detergente incluye la indicación “HE” o “Alto
Rendimiento”. Este sistema de lavado, junto con menos agua,
creará demasiada espuma con un detergente común que no sea
de alto rendimiento (HE). El uso de un detergente común
probablemente derive en errores de la lavadora, tiempos de
lavado más prolongados y menor rendimiento de enjuague.
También puede ocasionar fallas en los componentes y moho
evidente. Los detergentes de alto rendimiento HE están hechos
para producir la cantidad adecuada de espuma para el mejor
rendimiento. Siga las instrucciones del fabricante para determinar
la cantidad de detergente que debe usar.
40
Use solamente un detergente de alto rendimiento (HE).
Para llenar los compartimientos del depósito
1. Jale la gaveta del depósito.
2. Agregue el producto de lavandería deseado en el
compartimiento apropiado.
Page 41

3. Empuje la gaveta del depósito despacio y completamente
C
D
hacia adentro (para evitar derrames).
A
MAX
DETERGENT
B
A. Palanca de desenganche del depósito
B. Compartimiento del detergente para el
lavado principal
C. Compartimiento del blanqueador
líquido con cloro
D. Compartimiento del suavizante de telas
SOFTENER
Depósito
LIQUID BLEACH
MAX
Compartimiento del detergente para el lavado principal
(Letra B en la ilustración del depósito)
Agregue detergente líquido o en polvo de alto rendimiento (HE)
en este compartimiento para su ciclo de lavado principal.
■ El blanqueador no decolorante en polvo puede agregarse al
compartimiento de lavado principal junto con el detergente
en polvo.
■ Use el dispositivo para medir que viene con el detergente. No
agregue más de la cantidad recomendada por el fabricante.
NOTA: El llenar en exceso podría causar una condición de
espuma excesiva.
Compartimiento del blanqueador con cloro
(Letra C en la ilustración del depósito)
Agregue NO MÁS DE ²⁄₃ de taza (160 mL) del blanqueador líquido
con cloro en este compartimiento. El blanqueador se diluirá y
distribuirá automáticamente en el mejor momento durante el
primer enjuague después del ciclo de lavado. Este
compartimiento no puede diluir blanqueador en polvo.
■ Use solamente blanqueador líquido con cloro en este
depósito. No use este depósito para agregar blanqueador en
polvo con cloro o cualquier tipo de blanqueador no
decolorante a su carga de lavado.
■ Siempre mida el blanqueador líquido con cloro. Use una taza
medidora con pico vertedor; no lo haga al cálculo. Siga las
instrucciones del fabricante para un uso seguro.
■ No llene encima del nivel máximo “MAX”.
NOTA: El sobrellenado puede ocasionar daños en las
prendas.
Compartimiento del suavizante de telas
(Letra D en la ilustración del depósito)
Agregue ¹⁄₄ de taza (60 mL) del suavizante líquido de telas en este
compartimiento. El suavizante líquido de telas se dispensará
automáticamente en el enjuague final o en el segundo enjuague
(2ND RINSE), si se ha seleccionado.
■ No llene encima del nivel máximo “MAX”.
Pausa o reanudación de la marcha
1. Para detener la lavadora en cualquier momento, seleccione
parada (STOP).
2. Para reanudar el ciclo, seleccione y sostenga Inicio (START)
(durante 1 segundo aproximadamente).
Cambio de ciclos, opciones y
modificadores
No todas las Opciones y Modificadores están disponibles con
todos los ciclos.
Los Ciclos, Opciones y Modificadores se pueden cambiar en
cualquier momento antes de seleccionar Inicio (START).
Para detener un ciclo y seleccionar uno nuevo
1. Presione Parada (STOP) una vez.
2. Seleccione el ciclo deseado.
3. Seleccione las opciones (OPTIONS) y modificadores
(MODIFIERS) deseados.
4. Seleccione y sostenga Inicio (START) (durante 1 segundo
aproximadamente) para reanudar la marcha de la lavadora al
inicio de un nuevo ciclo.
Para anular un ciclo
1. Presione Parada (STOP) dos veces.
2. La lavadora se apaga, la puerta se destraba y se puede sacar
la ropa.
NOTA: Si el nivel del agua o la temperatura están demasiado
altos, la lavadora desaguará automáticamente antes de que la
puerta se destrabe.
Para cambiar Opciones o Modificadores después de
que haya comenzado el ciclo
1. Seleccione STOP.
2. Seleccione las OPCIONES o MODIFICADORES deseados. Si
la opción o modificador no está disponible, la máquina
sonará.
3. Seleccione y sostenga START (durante 1 segundo
aproximadamente) para continuar el ciclo.
Para escurrir la lavadora manualmente
1. Seleccione STOP.
2. Seleccione Enjuague/Desagüe y Exprimido (RINSE/DRAIN &
SPIN).
3. Presione el botón de segundo enjuague (2ND RINSE) para
borrar la selección de la opción de segundo enjuague.
4. Seleccione y sostenga START (durante un segundo
aproximadamente) para comenzar el desagüe.
5. Al cabo del exprimido, la puerta se destraba. Se puede
descargar la lavadora.
41
Page 42

Luces de estado
Estas luces muestran en qué porción del ciclo está funcionando
la lavadora. También indican cuándo puede agregar un artículo
en el ciclo de lavado y cuándo los controles están bloqueados.
Agregado de artículos (Add a Garment)
Usted puede agregar artículos en la lavadora después de que el
ciclo haya empezado, si la luz de estado ADD A GARMENT
(Agregado de prendas) está encendida. Todos los ciclos tienen
esta característica, excepto enjuague/exprimido (Rinse/Spin),
desagüe/exprimido (Drain/Spin), y Limpiar la lavadora (Clean
Washer).
Para agregar artículos
1. Seleccione Parada (STOP). La puerta de la lavadora se
destraba y se puede añadir artículos.
2. Para continuar el ciclo, cierre la puerta y seleccione y
sostenga Inicio (START) (durante 1 segundo
aproximadamente).
NOTA: Para agregar prendas después de que se haya terminado
el período de agregar prendas (ADD A GARMENT), deberá anular
el ciclo de la lavadora, agregar las prendas y comenzar un nuevo
ciclo de lavado.
Tiempo estimado restante (Estimated Time Remaining)
Los tiempos del ciclo varían automáticamente según la presión
de agua, temperatura del agua, detergente y carga de ropa. El
tiempo del ciclo se alargará si hay demasiada espuma o si la
carga no está balanceada. La rutina de espuma quita la espuma
excedente y asegura el enjuague apropiado de sus prendas. Las
opciones que usted seleccionó también afectarán los tiempos
del ciclo que se muestran en la tabla de los Ajustes prefijados de
ciclos. En condiciones extremas, el tiempo estimado restante
puede cambiar hasta en 30 minutos.
Bloqueo de la puerta (Door Locked)
Cuando la luz de estado se enciende, la puerta está bloqueada.
Ciclos
Ciclos de lavado
Elija los ciclos de lavado girando la perilla del selector de ciclos
hacia el ciclo deseado. La luz indicadora del ciclo seleccionado
se iluminará. Cada ciclo fue diseñado para distintos tipos de tela
y niveles de suciedad.
Ropa limpia
La luz de ropa limpia se enciende cuando el ciclo se ha
terminado. La luz permanecerá encendida hasta que se abra la
puerta.
Cómo bloquear los controles
El Bloqueo de controles (Controls Locked) evita el uso accidental
de la lavadora. También puede usar la función de bloqueo de
controles para evitar cambios accidentales del ciclo o de
opciones durante un ciclo. Cuando Bloqueo de controles
(CONTROLS LOCKED) está encendido, ningún botón podrá
usarse con excepción de parada (STOP) y encendido (POWER).
Usted puede bloquear los controles mientras la lavadora se
encuentre en funcionamiento.
Para bloquear los controles
Seleccione y sostenga la señal de ciclo (CYCLE SIGNAL) durante
3 segundos.
La luz de Bloqueo de controles (CONTROLS LOCKED) se
ilumina.
Para desbloquear los controles
Seleccione y sostenga CYCLE SIGNAL durante 3 segundos
hasta que la luz de estado de Bloqueo de controles (CONTROLS
LOCKED) se apague.
■ Cada ciclo tiene un tiempo de ciclo, temperatura de lavado/
enjuague (WASH/RINSE TEMP), velocidad de exprimido
(SPIN SPEED) prefijados y puede tener opciones y
modificadores prefijados. Los ajustes prefijados
proporcionan el cuidado recomendado de las telas en el ciclo
seleccionado.
■ Los ajustes prefijados pueden cambiarse en cualquier
momento antes de seleccionar Inicio (START). No todas las
Opciones y Modificadores están disponibles con todos los
ciclos. Para cambiar los ajustes después de que haya
comenzado el ciclo, seleccione Parada (STOP), luego
seleccione los ajustes deseados. Seleccione y sostenga
START (durante un segundo aproximadamente) para
continuar el ciclo.
42
Page 43

Ajustes prefijados de ciclos
Normal/Informal (Normal/Casual)
Cada ciclo tiene los siguientes ajustes prefijados: Tiempo del
ciclo (Cycle Time), Temperatura del agua (Water Temp) y
Velocidad de exprimido (Spin Speed). Los ajustes prefijados
proporcionan el cuidado recomendado de las telas en el ciclo
seleccionado. Vea el cuadro.
Ciclo
Blancos
blanquísimos
(Whitest
Whites)
Intenso
(Heavy Duty)
Normal/
Informal
(Normal/
Casual)
Lavado expreso
(Express Wash)
(2 a 3 artículos)
Ropa delicada
(Delicate)
Enjuague/
Desagüe y
exprimido
(Rinse/Drain &
Spin)
Desagüe y
exprimido
(Drain & Spin)
Limpiar la
lavadora (Clean
Washer)
Tiempo
estimado*
(hora:min)
0:85 Caliente/Fría
0:71 Caliente/Fría Alta
0:54 Tibia/Fría
0:30 Tibia/Fría Alta
0:37 Tibia/Fría Media
0:25 Fría/Fría
0:15 N/A Alta
0:54 N/A Alta
Temperatura
de Lavado/
Enjuague
(Hot/Cold)
(Warm/Cold)
(Cold/Cold)
Velocidad
de
exprimido
Alta (High)
Alta
(Medium)
Alta
Use este ciclo para lavar telas inarrugables como camisas
deportivas, blusas, ropa de negocios informal, fibras mixtas de
planchado permanente, fibras de algodón y de lino y fibras
sintéticas. Este ciclo combina una agitación a velocidad media,
exprimido a alta velocidad y un proceso de enfriamiento de la
ropa para reducir la formación de arrugas.
Lavado expreso (Express Wash)
Use este ciclo para lavar cargas pequeñas de 2 a 3 prendas con
suciedad ligera que necesite de prisa. Este ciclo combina una
agitación veloz, un tiempo de lavado corto y un exprimido a
velocidad extra alta para acortar el tiempo de secado. El lavar
cargas grandes dará como resultado que la máquina aumente el
tiempo de lavado.
Ropa delicada (Delicate)
Use este ciclo para lavar telas y lencería muy fina. Este ciclo
combina una agitación a baja velocidad y exprimido medio para
el cuidado especial de la tela.
■ Use bolsas de malla para prendas al lavar ropa interior tales
como sostenes con alambre, artículos con cordeles y
artículos pequeños como calcetines.
Enjuague/Desagüe y exprimido (Rinse/Drain & Spin)
Use este ciclo para enjuagar, desaguar y exprimir su carga de
ropa. Este ciclo combina una agitación veloz y un exprimido a
velocidad alta. Si lo desea, puede reducir la velocidad de
exprimido seleccionando la velocidad que desee del modificador
SPIN SPEED (Velocidad de exprimido).
El ciclo de Enjuague/Desagüe y exprimido (Rinse/Drain &
Spin) es útil para
■ Cargas que necesitan únicamente enjuague.
■ Agregar suavizante de telas a una carga utilizando el
depósito del suavizante de telas.
Desagüe y exprimido (Drain & Spin)
*Los tiempos del ciclo varían automáticamente basado en la
presión de agua, temperatura del agua, detergente y carga de
ropa. El tiempo del ciclo se alargará si hay demasiada espuma
o si la carga no está balanceada.
Blancos blanquísimos (Whitest Whites)
Este ciclo ha sido diseñado especialmente para el lavado de
telas blancas sucias con el agregado del blanqueador. Las
temperaturas calientes de lavado aseguran la óptima acción del
blanqueador. El enjuague adicional proporciona un rendimiento
óptimo de enjuague para evitar residuos de cloro en su ropa.
Este ciclo combina una agitación veloz, un tiempo de lavado más
prolongado y un exprimido a velocidad alta para acortar el
tiempo de secado.
Intenso (Heavy Duty)
Use este ciclo para lavar telas resistentes que no destiñen y
prendas con suciedad intensa. Este ciclo combina una agitación
veloz, un tiempo de lavado más prolongado y un exprimido a
velocidad alta para acortar los tiempos de secado.
Use este ciclo para vaciar el agua de la lavadora o para escurrir y
exprimir la ropa. La velocidad de exprimido ha sido prefijada en
alta. Si lo desea, puede reducir la velocidad de exprimido
seleccionando la velocidad que desee del modificador SPIN
SPEED (Velocidad de exprimido).
NOTA:
Las cargas de telas sintéticas, fibras delicadas, de lavado a
mano y de lana se deben escurrir sin exprimir o con un exprimido
a baja velocidad para evitar deformaciones de las telas.
Para usar el ajuste de desagüe y exprimido (DRAIN & SPIN)
■ Seleccione el ciclo de Enjuague/Desagüe y exprimido
(RINSE/DRAIN & SPIN).
■ Presione el botón de segundo enjuague (2ND RINSE) para
borrar la selección de la opción de enjuague.
■ Presione Inicio (START).
Limpiar la lavadora (Clean Washer)
Use el ciclo de limpiar la lavadora (Clean Washer) una vez por
mes para mantener el interior de su lavadora fresco y limpio. Este
ciclo utiliza un nivel más alto de agua junto con blanqueador
líquido con cloro para limpiar meticulosamente el interior de su
lavadora. Vea “Cómo limpiar su lavadora”.
IMPORTANTE: No coloque prendas ni otros artículos en la
lavadora durante el ciclo de limpieza de la lavadora. Use este
ciclo con el tambor de lavado vacío.
43
Page 44

Sonidos normales
Como ocurre con cualquier producto nuevo, usted escuchará
sonidos a los cuales no está acostumbrado. Podrá oír varios
sonidos al trabar o destrabar la puerta, y durante el proceso de
lavado, enjuague o exprimido. Durante los intervalos entre las
etapas de lavado, habrá pausas momentáneas. Usted escuchará
el rociado y chapoteo del agua durante los ciclos de lavado y
enjuague. Estos nuevos sonidos y pausas son parte del
funcionamiento normal de la lavadora. Vea “Solución de
problemas”.
Opciones
Usted puede personalizar su lavado al agregar opciones a sus
selecciones de ciclo. Puede agregar o cambiar una opción
después del inicio del ciclo en cualquier momento antes de que
comience la opción seleccionada. No todas las opciones están
disponibles con todos los ciclos.
■ Vea la sección “Guía para el lavado” para obtener un cuadro
global de las opciones posibles en cada selección de ciclo de
lavado.
■ Si una determinada opción está disponible en el ciclo
seleccionado, la luz de esa opción se iluminará al ser
seleccionada.
■ Si una determinada opción no está disponible en el ciclo
seleccionado, se escuchará una señal audible corta y la luz
para esa opción no se iluminará al ser seleccionada.
Prelavado (Prewash)
Use esta opción para cargas de prendas con suciedad profunda
que necesitan tratamiento previo.
■ Agregue el detergente en el compartimiento de lavado
principal (Main Wash) de la gaveta del depósito.
Esta opción añade tiempo de rotación antes de seleccionar el
ciclo principal. La lavadora continúa automáticamente del
prelavado al ciclo de lavado principal.
Segundo enjuague (2nd Rinse)
Se puede utilizar un segundo enjuague para ayudar en la
eliminación de residuos del detergente o del blanqueador que
haya quedado en las prendas. Esta opción proporciona un
enjuague adicional con la misma temperatura del agua del
enjuague normal.
Señal de ciclo
Esta señal es útil cuando tiene que quitar artículos de la lavadora
tan pronto como ésta se detenga. Seleccione encendido (ON) o
apagado (OFF).
Modificadores
Los ajustes prefijados de los ciclos de temperatura del agua
(Water Temperature), velocidad de exprimido (Spin Speed) y
opciones de enjuague (Rinse Options) pueden modificarse.
Usted puede cambiar el modificador después del inicio del ciclo
en cualquier momento antes de que comience el modificador
seleccionado. No todos los modificadores están disponibles con
todos los ciclos y opciones.
■ Para cambiar la velocidad de exprimido, seleccione el botón
de velocidad de exprimido (SPIN SPEED) hasta que el ajuste
deseado se ilumine.
■ Para cambiar la temperatura del agua, seleccione el botón de
temperatura de lavado/enjuague (WATER/RINSE TEMP)
hasta que el ajuste deseado se ilumine.
Temperatura de Lavado/Enjuague
Seleccione una temperatura de agua basado en el tipo de carga
que esté lavando. Use el agua de lavado más caliente que las
telas puedan resistir. Siga las instrucciones de la etiqueta de las
prendas.
Los enjuagues tibios dejan las cargas más secas que los
enjuagues fríos. Los enjuagues tibios aumentan la formación de
arrugas. En climas fríos, el enjuague tibio hace que la ropa sea
más cómoda para manejar. Los enjuagues fríos ahorran energía.
44
Page 45

Guía de la temperatura
Temperatura del agua
de lavado
Caliente (HOT) Ropa blanca y de color pastel
Tibia (WARM) Colores brillantes
Fría (COLD) Colores que destiñen o que se
En temperaturas de agua inferiores a 60ºF (15,6ºC), los
detergentes no se disuelven bien. Además puede resultar difícil
quitar la suciedad.
Telas sugeridas
Suciedad profunda
Suciedad entre moderada y ligera
opacan
Suciedad ligera
Control automático de temperatura
El CAT (Control automático de la temperatura) detecta y
mantiene electrónicamente una temperatura de agua uniforme. El
CAT regula el agua fría y caliente que ingresa. El CAT se enciende
automáticamente (ON) al seleccionar un ciclo. Vea Ajustes
prefijados de ciclos en la sección “Ciclos”.
■ El CAT funciona en la temperatura de lavado con los ajustes
Tibia/Tibia (Warm/Warm), Tibia/Fría (Warm/Cold) y Fría/Fría
(Cold/Cold).
■ El CAT funciona para la temperatura de enjuague con el
ajuste Tibia/tibia (Warm/Warm).
■ Las temperaturas de los enjuagues con agua fría dependen
de la temperatura del agua fría de su grifo.
Guía para el lavado
Consulte este cuadro para obtener sugerencias sobre tipos de cargas y sus ciclos correspondientes. A la derecha se detallan las
opciones disponibles para cada uno de estos ciclos de lavado.
CICLO TIPO DE CARGA SUGERIDA OPCIONES DISPONIBLES
Blancos
blanquísimos
(Whitest Whites)
Intenso (Heavy
Duty)
Normal/Informal
(Normal/Casual)
Lavado expreso
(Express Wash)
Ropa delicada
(Delicate)
Enjuague/Desagüe
y exprimido (Rinse/
Drain & Spin)
Limpiar la lavadora
(Clean Washer)
Inicio
diferido
(Delay
Start)
Telas blancas sucias ✔✔ ✔ ✔
Ropa interior, toallas, camisas, etc. de algodón con
suciedad intensa
Blusas, camisas, overols, etc. de poliéster, náilon,
algodón, lino o mezclas de algodón con suciedad
normal
Cargas pequeñas de 2 a 3 prendas de algodón y
mezclas de poliéster, nylon y algodón con suciedad
ligera.
Cortinas y ropa delicada, vestidos, faldas, camisas y
blusas
Todas las cargas ✔✔✔
Sin ropa ✔✔
✔✔ ✔ ✔
✔✔ ✔ ✔
✔✔✔
✔✔✔
Prelavado
(Prewash)
Segundo
Enjuague
(2nd
Rinse)
Señal de
ciclo
(Cycle
Signal)
45
Page 46

CONSEJOS DE LAVANDERÍA
Preparación de la ropa para lavar
Siga estas recomendaciones para ayudarle a prolongar la vida de
sus prendas.
■ Use solamente detergentes de alto rendimiento. El paquete
para este tipo de detergente incluye la indicación “HE” o
“Alto rendimiento”. Con este sistema de lavado y el menor
uso de agua, se formará demasiada espuma si se utiliza un
detergente común que no sea de Alto rendimiento. El uso de
un detergente común probablemente derive en errores de la
lavadora, tiempos de ciclo más prolongados, menor
rendimiento de enjuague, así como también en fallas de los
componentes y evidente formación de moho. Los
detergentes de Alto rendimiento HE están hechos para
producir la cantidad adecuada de espuma para el mejor
rendimiento. Siga las instrucciones del fabricante para
determinar la cantidad de detergente que debe usar.
Use solamente un detergente de alto rendimiento (HE).
■ Cierre los zípers, broches de presión y corchetes para evitar
que enganchen otros artículos. Quite alfileres, hebillas y
demás objetos duros para evitar que rayen el interior de la
lavadora. Quite todo adorno y ornamento que no sea lavable.
■ Vacíe los bolsillos y vuélvalos al revés.
■ Doble los puños y limpie con un cepillo la pelusa y la
suciedad.
■ Vuelva al revés las prendas de tejido sintético para evitar que
se llenen de pelusas.
■ Ate los cordones y fajas de modo que no se enreden.
■ Remiende lo que esté roto así como las costuras y
dobladillos flojos.
■ Trate las manchas y suciedades.
■ Las prendas manchadas o mojadas deberán lavarse con
prontitud para obtener mejores resultados.
■ Mezcle artículos grandes y pequeños, evite lavar artículos
separados y cargue de modo uniforme.
■ Lave los artículos pequeños, tales como calcetines de niños,
en bolsas de malla para prendas. Para crear una carga
balanceada, se recomienda usar más de una bolsa para
prendas y que cada una de ellas se llene con la misma
cantidad de material.
NOTA: Si solamente va a lavar prendas pequeñas, se
recomienda usar más de una bolsa para prendas y que cada
una de ellas se llene con la misma cantidad de material.
Selección de la ropa
■ Separe las prendas con suciedad profunda de las que están
ligeramente sucias, aún cuando éstas normalmente se
lavarían juntas. Separe las prendas que sueltan pelusa
(toallas, felpilla) de las que atraen pelusa (pana, artículos
sintéticos y de planchado permanente). Siempre que sea
posible, vuelva al revés las prendas que sueltan pelusa.
■ Separe los colores oscuros de los colores claros, los artículos
no desteñibles de los que sí lo son.
■ Separe por tipo de tela y estructura (prendas fuertes de
algodón, tejidos de punto y prendas finas).
Cómo descargar
■ Saque la ropa de la lavadora después de que se haya
completado el ciclo. Los objetos metálicos como zípers,
broches a presión y hebillas pueden herrumbrarse si se dejan
en la lavadora por largo tiempo.
■ Al sacar las prendas de la lavadora, de vez en cuando revise
si no han quedado pequeños artículos debajo del sello de
color gris que está al frente de la tina.
Cómo cargar
Sugerencias para cargar
Ropa pesada de trabajo
2pantalones
3 camisas
Carga mixta
2 sábanas dobles o
1 sábana tamaño extra
4fundas
6 camisetas
Toa ll as
8 toallas de baño
8 toallas de mano
Artículos delicados
3 camisolas
4fondos
4pantaletas
Ciclo de lavado expreso
(EXPRESS WASH)
(de 2 a 3 prendas)
3 pantalones de tela de
mezclilla
1 overol
6pantalones cortos
2 camisas
2blusas
6pañuelos de mano
10 toallas faciales
1 tapete de baño
2sostenes
2 camisones
2 camisas de vestir
1 par de pantalones de vestir
46
Page 47

Guía para la eliminación de manchas
Mancha Use blanqueador
líquido con cloro o no
decolorante
✔
Tinta
✔
Sangre
✔
Café/
Chocolate
Use en el ciclo de
lavado sugerido
Blancos
blanquísimos
(Whitest Whites)
Fría (Cold) o tibia
(Warm)
Prelavado
(Prewash)
Normal/Informal
(Normal/Casual)
Tibia (Warm)
Prelavado
(Prewash)
Blancos
blanquísimos
(Whitest Whites)
Intenso
(Heavy Duty)
Mancha Use blanqueador
líquido con cloro o no
decolorante
✔
Pasto
✔
Productos
derivados de
tomate
✔
Barro
Use en el ciclo de
lavado sugerido
Blancos
blanquísimos
(Whitest Whites)
Blancos
blanquísimos
(Whitest Whites)
Tibia (Warm)
Prelavado
(Prewash)
Blancos
blanquísimos
(Whitest Whites)
Intenso
(Heavy Duty)
Cosméticos
Tibia (Warm)
Prelavado
(Prewash)
Intenso (Heavy
Duty) Marcas
Aceite de
motor sucio
No seque con rotación los artículos con suciedad o manchas. El calor puede fijar las manchas permanentemente.
Desodorantes
✔
alrededor del
cuello
Normal/Informal
(Normal/Casual)
47
Page 48

CUIDADO DE LA LAVADORA
Cómo limpiar su lavadora
Limpieza del sello/fuelle de la puerta
1. Abra la puerta de la lavadora y quite cualquier ropa o artículo
que estuviera dentro de la misma.
2. Inspeccione el sello/fuelle gris que se encuentra entre la
abertura de la puerta y la canasta para detectar si hay áreas
manchadas. Empuje el sello/fuelle hacia atrás para
inspeccionar todas las áreas debajo del mismo y controle si
hay objetos extraños.
A
A. Sello/Fuelle
3. Si se encuentran áreas manchadas en el sello/fuelle, límpielas
usando el siguiente procedimiento.
a) Mezcle una solución diluida utilizando ³₄ de taza (177 mL)
de blanqueador líquido con cloro y 1 gal. (3,8 L) de agua
tibia del grifo.
b) Limpie el área del sello/fuelle con la solución diluida y un
paño húmedo.
c) Déjelas reposar durante 5 minutos.
d) Limpie el área meticulosamente con un paño seco y deje
que el interior de la lavadora se seque al aire con la
puerta abierta.
IMPORTANTE:
■ Use guantes de goma cuando limpie por períodos
prolongados.
■ Vea las instrucciones de uso adecuado provistas por el
fabricante del blanqueador.
Procedimiento para el mantenimiento de la lavadora
Esta lavadora tiene un ciclo especial que utiliza mayores
volúmenes de agua junto con blanqueador líquido con cloro para
limpiar meticulosamente el interior de su lavadora.
NOTAS:
■ Lea estas instrucciones completamente antes de comenzar
el proceso de limpieza.
■ Si fuera necesario, el ciclo de limpieza puede ser
interrumpido al presionar el botón de parada (STOP). Esto
detendrá el ciclo. Se debe poner en un ciclo de Enjuague/
Desagüe y exprimido (RINSE/DRAIN & SPIN) para enjuagar
meticulosamente el blanqueador que haya quedado en la
lavadora. No seguir esta instrucción causará daños a la
lavadora y a la ropa que agregue en el próximo ciclo.
Comience el procedimiento
1. Abra la puerta de la lavadora y quite cualquier ropa o artículo
que estuviera dentro de la misma.
2. Cerciórese de que la puerta esté cerrada.
3. Abra la gaveta del depósito y agregue inmediatamente
²⁄₃ taza (160 mL) de blanqueador líquido con cloro en el
compartimiento del blanqueador.
NOTA: No agregue ningún detergente a este ciclo. Si usa
más de ²⁄₃ taza (160 mL) de blanqueador el producto podrá
dañarse con el tiempo.
4. Cerciórese de que el cajón del depósito esté cerrado.
5. Seleccione el ciclo de limpiar la lavadora (CLEAN WASHER).
6. Presione Inicio (START).
NOTA: La canasta rotará, después la puerta se destrabará,
se trabará nuevamente y después continuará el ciclo.
■ La máquina no se llenará pero la canasta rotará mientras
la lavadora hace un ciclo corto de detección. Esto tardará
aproximadamente 3 minutos.
7. El ciclo determinará si hay ropa u otros artículos en la
lavadora.
a)b)Si no se detectan artículos en la lavadora, ésta
procederá al paso 8.
Si se detecta algún artículo en la lavadora, todas las
luces de ciclo destellarán, aparecerán en la pantalla “rL”
o “F-34” y las luces de lavado (WASH) y Bloqueo de
controles (CONTROLS LOCKED) permanecerán
encendidas. La puerta se desbloqueará.
■ Presione parada (STOP) para anular el código de
falla. Después repita los pasos 1, 2 y 6 para
comenzar nuevamente el ciclo.
8. Una vez que haya comenzado el ciclo, deje que finalice.
9. Una vez que haya finalizado el ciclo, deje la puerta levemente
abierta para que haya una mejor ventilación y secado del
interior de la lavadora.
Siempre haga lo siguiente para mantener la frescura de la
lavadora
■ Use solamente un detergente de alto rendimiento (HE).
■ Deje la puerta levemente abierta después de cada ciclo para
permitir una mejor ventilación y secado del interior de la
lavadora.
■ Repita mensualmente el procedimiento de limpieza usando
²⁄₃ de taza (160 mL) de blanqueador líquido con cloro.
■ Si el procedimiento no mejora suficientemente la frescura de
la máquina, sírvase evaluar su instalación y las condiciones
de uso para detectar otras causas.
Limpieza externa
Use un paño suave y húmedo o una esponja para limpiar
cualquier derrame. De vez en cuando, limpie el exterior de su
lavadora para que se vea como nueva. Use jabón suave y agua.
No use productos abrasivos.
48
Page 49

Limpieza de la gaveta del depósito
Para volver a usar la lavadora:
La gaveta del depósito es desmontable para facilitar la limpieza.
1. Destrabe la gaveta del depósito presionando la palanca de
desenganche. Vea “Uso del depósito”. Quite la gaveta.
2. Quite los insertos (el sifón de los compartimientos del
suavizante y del blanqueador).
3. Lave las piezas en el agua del grifo.
NOTA: No lave los componentes en la lavavajillas.
4. Vuelva a colocar los insertos y coloque nuevamente el
depósito en la gaveta.
Mangueras de admisión de agua
Reemplace las mangueras de entrada después de cinco años
para reducir el riesgo de fallas de las mismas. Revise
periódicamente y cambie las mangueras de entrada si se hallan
protuberancias, torceduras, cortes, desgaste o pérdidas de
agua.
Cuando reemplace las mangueras de entrada del agua, anote la
fecha de reposición.
Cuidado para las vacaciones, el almacenaje
o en caso de mudanza
Instale y guarde su lavadora en un lugar donde no se congele.
Debido a que queda un poco de agua en las mangueras, el
congelamiento de la misma podría dañar su lavadora. Si va a
guardar o trasladar su lavadora durante una temporada de
invierno riguroso, acondiciónela para el invierno.
Cuidado durante las vacaciones y períodos sin uso:
Ponga a funcionar su lavadora únicamente cuando esté en casa.
Si va a salir de vacaciones o no va a usar la lavadora durante un
período prolongado de tiempo usted debe:
■ Desenchufar la lavadora o desconectar el suministro de
energía.
■ Interrumpir el suministro de agua a la lavadora. Esto ayuda a
evitar inundaciones accidentales (debido a aumentos en la
presión del agua) en ausencia suya.
■ Abra ligeramente la puerta para proporcionar ventilación.
Para acondicionar la lavadora para el invierno:
1. Vierta 1 cuarto (1 L) de anticongelante tipo R.V. en el tambor.
2. Ponga la lavadora en un ciclo de desagüe y exprimido (Drain
& Spin).
3. Desenchufe la lavadora o desconecte el suministro de
energía.
4. Cierre ambos grifos de agua.
5. Desconecte las mangueras de entrada del agua de los grifos
y elimine el agua.
1. Deje correr agua por las tuberías.
2. Vuelva a conectar las mangueras de entrada del agua a los
grifos.
3. Abra ambos grifos de agua.
ADVERTENCIA
Peligro de Choque Eléctrico
Conecte a un contacto de pared de conexión a tierra de
3 terminales.
No quite la terminal de conexión a tierra.
No use un adaptador.
No use un cable eléctrico de extensión.
No seguir estas instrucciones puede ocasionar
la muerte, incendio o choque eléctrico.
4. Enchufe la lavadora o reconecte el suministro de energía.
5. Ponga la lavadora a funcionar en el ciclo normal/informal
(Normal/Casual) con un ½ de la cantidad de detergente de
alto rendimiento HE recomendada por el fabricante para una
carga de tamaño mediano, para limpiar la lavadora y eliminar
el anticongelante, de haberlo usado.
Para transportar la lavadora:
1. Si va a mover la lavadora durante una temporada de invierno
riguroso, coloque 1 cuarto (1 L) de anticongelante tipo R.V. en
el tambor. Ponga la lavadora en un ciclo de desagüe y
exprimido (Drain & Spin).
2. Desenchufe el cable eléctrico.
3. Desconecte la manguera de desagüe del sistema de desagüe
y fíjela a los ganchos del panel posterior.
4. Cierre ambos grifos de agua.
5. Desconecte las mangueras de entrada del agua de los grifos,
luego elimine el agua de las mangueras y fíjelas al panel
posterior de la lavadora.
6. IMPORTANTE: Llame para solicitar servicio. No vuelva a usar
los pernos de transporte. La unidad debe ser transportada en
la posición vertical. Para prevenir daños estructurales y de
suspensión, su máquina debe estar debidamente preparada
para ser nuevamente ubicada por un técnico certificado.
Para volver a instalar la lavadora
1. Siga las “Instrucciones de instalación” para ubicar, nivelar y
conectar la lavadora.
2. Ponga la lavadora a funcionar en el ciclo normal/informal
(Normal/Casual) con un ½ de la cantidad de detergente de
alto rendimiento HE recomendada por el fabricante para una
carga de tamaño mediano, para limpiar la lavadora y eliminar
el anticongelante, de haberlo usado.
49
Page 50

SOLUCIÓN DE PROBLEMAS
Pruebe primero las soluciones aquí sugeridas y posiblemente se evite el costo de una visita de servicio técnico...
Lavadora y componentes
Códigos de error
Es posible que se vea un código de error en la pantalla de tiempo
estimado restante (Estimated Time Remaining). Verifique la
siguiente lista para fijarse en problemas potenciales y la solución
de los mismos.
■ “F20” aparece en la pantalla (problema de entrada de
agua - no hay suministro de agua o hay un suministro de
agua insuficiente)
Seleccione Parada (STOP) dos veces para anular el ciclo.
Desenchufe la lavadora o desconecte el suministro de
energía.
Verifique lo siguiente:
¿Están completamente abiertos los grifos del agua?
¿Están obstruidos los filtros en la conexión de la manguera
de entrada con la lavadora? ¿Están retorcidas las mangueras
de entrada del agua?
¿Se han congelado las mangueras de entrada del agua?
ADVERTENCIA
Peligro de Choque Eléctrico
Conecte a un contacto de pared de conexión a tierra de
3 terminales.
No quite la terminal de conexión a tierra.
No use un adaptador.
No use un cable eléctrico de extensión.
No seguir estas instrucciones puede ocasionar
la muerte, incendio o choque eléctrico.
Enchufe la lavadora o reconecte el suministro de energía.
Vuelva a seleccionar el ciclo y presione START. Si el problema
persiste, llame al servicio técnico.
■ “F21” aparece en la pantalla (problema de desagüe)
Seleccione Parada (STOP) dos veces para anular el ciclo.
Desenchufe la lavadora o desconecte el suministro de
energía.
Verifique lo siguiente:
¿Está retorcida la manguera de desagüe?
¿Se ha congelado la manguera de desagüe?
¿Está obstruida la manguera de desagüe?
¿Está la manguera de desagüe a una altura mayor de 96"
(2,4 m) del piso?
■ “SD” (Rutina de espuma)
Cuando se detecta el exceso de espuma, la rutina de
espuma comienza automáticamente. Esta rutina quita la
espuma excedente y asegura el enjuague apropiado de sus
prendas. “SD” aparece en la pantalla durante el enjuague y al
final del ciclo para informarle que la Rutina de espuma ha
sido activada. Utilice solamente detergentes HE (alto
rendimiento).
■ Variables “F” [F01 - F34] (problema eléctrico)
Seleccione Parada (STOP) dos veces para anular el ciclo.
Seleccione Enjuague/Desagüe y exprimido (RINSE/DRAIN &
SPIN), luego seleccione segundo enjuague (2ND RINSE)
(para apagar la opción de enjuague) si hay exceso de agua en
la lavadora.
Vuelva a seleccionar el ciclo y presione START. Si el problema
persiste, llame al servicio técnico.
Ruidosos, vibrantes, desequilibrados
■ ¿Está nivelada la lavadora?
La lavadora debe estar nivelada. Las cuatro patas deben
instalarse correctamente, y las tuercas deben apretarse
contra el gabinete de la lavadora.
Las cuatro patas de la lavadora deben estar firmemente
apoyadas en el piso. Si la lavadora está en un pedestal,
deberá asegurarse al mismo y las cuatro patas del pedestal
deberán estar firmemente apoyadas en el piso.
■ ¿Está la lavadora haciendo un ruido diferente?
Como ocurre con cualquier producto nuevo, usted escuchará
sonidos a los cuales no está acostumbrado. Podrá oír varios
sonidos al trabar o destrabar la puerta, y durante el proceso
de lavado, enjuague o exprimido. Durante los intervalos entre
las etapas de lavado, habrá pausas momentáneas. Usted
escuchará el rociado y chapoteo del agua durante los ciclos
de lavado y enjuague. Estos nuevos sonidos y pausas son
parte del funcionamiento normal de la lavadora.
■ ¿Se ha instalado la lavadora sobre un piso resistente y
firme?
Consulte la sección “Instrucciones de instalación” para
informarse respecto a los requisitos del piso. El ruido y la
vibración pueden reducirse colocando un pedazo de madera
laminada de ³⁄₄" (19,1 mm) debajo de su lavadora. La madera
laminada puede extenderse debajo de la lavadora y la
secadora para mantenerlas a la misma altura.
■ ¿La lavadora produce un gorgoteo o zumbido?
Mientras se escurre el agua de la lavadora, usted podrá oír el
aire que se succiona a través de la bomba. Esto ocurre
durante la fase final del desagüe. Es normal.
■ ¿Está lavando artículos con broches metálicos a presión,
hebillas o zípers?
Usted podrá escuchar el ruido producido por estos artículos
al tocar el tambor de la lavadora. Esto es normal.
■ ¿Se han quitado los 4 pernos de transporte de la parte
posterior de la máquina?
Vea “Eliminación del sistema de transporte”.
50
Page 51

Pierde agua
Olores de la lavadora
■ ¿Se abrió la puerta durante el agregado de prendas “Add
a garment”?
Es posible que gotee agua del interior de la puerta cuando se
ha abierto después del comienzo de un ciclo.
■ ¿Se está usando un detergente de alto rendimiento HE?
Los detergentes que no son de alto rendimiento pueden
causar espuma en exceso, la que puede salirse de la parte
posterior de la lavadora.
■ ¿Están ajustadas las mangueras de llenado?
■ ¿Están debidamente colocadas las empaquetaduras de
las mangueras de llenado?
Controle ambos extremos de cada manguera. Vea “Conexión
de las mangueras de entrada”.
■ ¿Se ha instalado debidamente la manguera de desagüe?
Se debe fijar la manguera de desagüe al tubo de desagüe o a
la tina de lavadero. Vea “Fijación de la manguera de
desagüe”.
■ ¿Está obstruido el lavadero o el desagüe?
El lavadero y el tubo de desagüe deben tener la capacidad
para desplazar 17 gal. (64 L) de agua por minuto. Si están
obstruidos o lentos, el agua puede subir y salir por el tubo de
desagüe o el lavadero. Revise la plomería de la casa (tinas de
lavadero, grifos, tubo de desagüe, tuberías de agua) y fíjese
si hay fugas de agua.
Funcionamiento del depósito
■ ¿Ha seguido las instrucciones del fabricante cuando
agregó el detergente y el suavizante de telas en los
depósitos?
Mida el detergente y el suavizante de telas. Viértalos
lentamente en el depósito. Limpie todos los derrames. Diluya
el suavizante de telas en el depósito del suavizante de
telas.
■ ¿Ha puesto blanqueador en polvo o blanqueador no
decolorante líquido en el depósito del blanqueador con
cloro líquido (en algunos modelos)?
Agregue el blanqueador en polvo o líquido que no decolora
en el compartimiento del lavado principal. No use el depósito
del blanqueador líquido con cloro para el blanqueador no
decolorante.
■ ¿Está el depósito del suavizante de telas obstruido?
Limpie el depósito del suavizante de telas. Vea “Cuidado de
la lavadora” para obtener información más detallada.
■ ¿Se han colocado los productos de lavandería en el
compartimiento apropiado del depósito?
Agregue las cantidades adecuadas de detergente, suavizante
de telas o blanqueador líquido con cloro en los
compartimientos apropiados. Agregue el blanqueador en
polvo o líquido que no decolora en el compartimiento del
lavado principal.
■ ¿Hay agua en el depósito al final del ciclo?
Una pequeña cantidad de agua permanecerá en el
compartimiento del depósito. Esto es normal.
■ Vea “Cómo limpiar su lavadora”.
■ ¿Está usando detergente de alto rendimiento (HE)?
Si se usa detergente que no es de alto rendimiento, se
pueden generar residuos de películas los que a su vez
pueden producir olor.
■ ¿Dejó la puerta abierta después del uso?
Esta lavadora tiene un sello hermético que evita las fugas de
agua. Para evitar olores, deje la puerta abierta para permitir
que la lavadora se seque entre cada uso.
La puerta no se destraba
■ ¿Se ha escurrido toda el agua de la lavadora durante el
período de exprimido?
Seleccione Enjuague/Desagüe y exprimido (RINSE/DRAIN &
SPIN), luego seleccione segundo enjuague (2ND RINSE)
(para apagar la opción de enjuague) para sacar el agua que
quede en la lavadora. La puerta de la lavadora se destrabará
al término del desagüe.
■ ¿Está cerrada la puerta y está encendida la luz de
agregar prendas “Add a garment”?
Presione Parada (STOP) una vez. La puerta se desbloqueará.
Funcionamiento de la lavadora
La lavadora no se pone en marcha, no llena, no enjuaga
o no da vueltas; la lavadora se detiene
ADVERTENCIA
Peligro de Choque Eléctrico
Conecte a un contacto de pared de conexión a tierra de
3 terminales.
No quite la terminal de conexión a tierra.
No use un adaptador.
No use un cable eléctrico de extensión.
No seguir estas instrucciones puede ocasionar
la muerte, incendio o choque eléctrico.
■ ¿Está el cable eléctrico enchufado en un tomacorriente
de 3 terminales con conexión a tierra?
Conecte a un contacto de pared de conexión a tierra de
3 terminales.
■ ¿Está usando un cable eléctrico de extensión?
No use un cable eléctrico de extensión.
■ ¿Hay un fusible de la casa fundido o se disparó el
cortacircuitos?
Reemplace el fusible o reposicione el cortacircuitos. Si el
problema continúa, llame a un electricista.
■ ¿Están abiertos los grifos del agua caliente y del agua
fría?
Abra el agua.
51
Page 52

■ ¿Está retorcida la manguera de entrada del agua?
Enderece las mangueras.
■ ¿Están obstruidos los filtros de la válvula de entrada del
agua?
Cierre el agua y quite las mangueras de entrada de la
lavadora. Saque cualquier película o partículas que se hayan
acumulado. Reinstale las mangueras, abra el agua y revise si
hay fugas de agua.
■ ¿Está la lavadora en una pausa normal en el ciclo?
La lavadora hace una pausa por unos 2 minutos durante
ciertos ciclos. Deje continuar el ciclo. Algunos ciclos
presentan períodos de rotación y remojo.
■ ¿Está sobrecargada la lavadora?
Lave cargas más pequeñas.
■ ¿Se ha cerrado bien la puerta de la lavadora?
La puerta debe estar cerrada durante el funcionamiento.
■ ¿Se han quitado los pernos de transporte?
Para el funcionamiento adecuado de la lavadora, deberán
sacarse los cuatro pernos de transporte.
■ ¿ Se ha seleccionado un ciclo, pero no se ha
seleccionado START sosteniéndolo durante 1 segundo?
Oprima y sostenga Inicio (START) durante 1 segundo.
■ ¿Se ha abierto la puerta después de haberse terminado el
ciclo anterior?
Para comenzar un nuevo ciclo, la puerta deberá abrirse y
cerrarse nuevamente.
La lavadora continúa llenando o desaguando, el ciclo
parece estar atascado
■ ¿Está la parte superior de la manguera de desagüe más
baja de 30" (76 cm) en la lavadora?
La parte superior de la manguera de desagüe debe estar a
una altura mínima de 30" (76 cm) del piso. Vea “Sistema de
desagüe”.
■ ¿La manguera de desagüe encaja de manera forzada en
el tubo vertical o está adherida con cinta al tubo vertical?
La manguera de desagüe debe estar floja pero debe encajar
bien. No selle la manguera de desagüe con cinta adhesiva.
La manguera necesita una abertura para el flujo de aire. Vea
“Fijación de la manguera de desagüe”.
La lavadora no desagua ni exprime, el agua queda en la
lavadora
■ ¿Está obstruida la manguera de desagüe, o el extremo de
la manguera de desagüe está a más de 96" (2,4 m) por
encima del piso?
■ ¿Está bajo el voltaje?
Revise la fuente de electricidad o llame a un electricista.
■ ¿Hay espuma en exceso?
Cuando el sistema detecta la presencia de exceso de
espuma, una rutina especial de espuma comienza
automáticamente. El ciclo concluirá una vez que se haya
eliminado el exceso de espuma. Esto ocurrirá con más
frecuencia cuando se usa un detergente que no es de alto
rendimiento (HE).
■ ¿Está balanceada la carga?
Un solo artículo o uno que sea voluminoso puede causar
desequilibrio. Agregue más artículos o redistribuya la carga.
No hay agua suficiente/No hay espuma suficiente
■ ¿Está bajo el nivel de agua?
Esta lavadora usa muy poca agua para proporcionarle
buenos resultados de limpieza. Verá muy poca agua o tal vez
nada de agua salpicando en esta lavadora. Esto es normal.
■ ¿Está usando detergente de alto rendimiento (HE)?
El detergente de alto rendimiento HE hace poca espuma.
Esto es normal y no afecta el desempeño de limpieza.
Temperatura de lavado/enjuague
■ ¿Se han invertido las mangueras de entrada del agua
caliente y del agua fría?
Vea “Conexión de las mangueras de entrada”.
■ ¿Está lavando muchas cargas?
A medida que aumente la frecuencia de lavado de las cargas,
es posible que disminuya la temperatura de agua caliente y
tibia. Esto es normal.
Cambios en el tiempo del ciclo/Ciclo demasiado
prolongado
■ ¿El tiempo estimado restante?
Los tiempos del ciclo varían automáticamente basado en la
presión de agua, temperatura del agua, detergente y carga
de ropa. El tiempo del ciclo se alargará si hay demasiada
espuma o si la carga no está balanceada. La rutina de
espuma (SUDs) quita la espuma excedente y asegura el
enjuague apropiado de sus prendas. Las opciones que usted
seleccionó también afectarán los tiempos del ciclo que se
muestran en la tabla de los Ajustes prefijados de ciclos.
■ ¿Hay espuma en exceso?
Cuando el sistema detecta la presencia de exceso de
espuma, una rutina especial de espuma comienza
automáticamente. Esta rutina añadirá tiempo adicional al
ciclo original.
■ ¿Ha sido la carga lo que causa un desequilibrio?
Cuando hay demasiado desequilibrio, una rutina de
desequilibrio comenzará a redistribuir la carga. Durante la
rutina de desequilibrio, el tiempo en la pantalla puede hacer
una pausa hasta que se complete esta actividad; luego
reanudará el resto del ciclo.
■ ¿Está lavando un solo artículo o una carga voluminosa?
Si se ha detectado una carga desequilibrada, se agregará
tiempo al ciclo de exprimido. La lavadora intentará volver a
distribuir la carga con rotación adicional.
■ ¿Ha lavado una carga grande usando el ciclo de lavado
expreso (Express Wash)?
El ciclo de lavado expreso está diseñado para cargas de
tamaño más pequeño (de 2 a 3 artículos) de prendas con
suciedad ligera. Si se lavan cargas más grandes en este
ciclo, aumentará el tiempo de lavado.
■ ¿Ha lavado una carga grande en un ciclo suave o
delicado?
Cuando use los ciclos expreso, o de ropa delicada, debe
poner cargas pequeñas. Esto le asegura un lavado delicado
para sus prendas sin aumentar los tiempos del ciclo.
52
Page 53

Cuidado de las prendas
Ropa demasiado mojada
■ ¿Ha empleado el ciclo correcto para la carga que está
lavando?
Seleccione un ciclo con un exprimido más rápido.
■ ¿Ha lavado sólo un artículo o artículos voluminosos o ha
sobrecargado la lavadora?
Un solo artículo, artículos voluminosos, o sobrecargar
pueden causar desequilibrio. Agregue artículos o pruebe
distribuir uniformemente la ropa mojada en el tambor.
Seleccione Enjuague/Desagüe y exprimido (RINSE/DRAIN &
SPIN), luego seleccione segundo enjuague (2ND RINSE)
(para apagar la opción de enjuague) para desaguar la
lavadora. Si la ropa continúa mojada, saque la mitad de la
carga de la lavadora e inténtelo de nuevo.
■ ¿Ha usado detergente HE?
Si hay espuma durante los ciclos de enjuague y exprimido, se
reducirá la velocidad de exprimido. Use detergente de alto
rendimiento (HE).
Residuos, pelusa, manchas en la carga; blancos
grisáceos, colores opacos
■ ¿Ha agregado detergente en el depósito?
Para obtener óptimos resultados, agregue detergente en el
compartimiento del detergente. No agregue detergente en el
tambor de la lavadora.
■ ¿Ha separado la ropa adecuadamente?
Separe las prendas que sueltan pelusa (toallas, felpilla) de las
que atraen pelusa (pana, artículos sintéticos). Siempre que
mezcle ropa blanca y de color en una carga puede ocurrir
una transferencia de tintes. Separe las prendas de color
oscuro de las blancas y claras.
■ ¿Ha sobrecargado la lavadora?
No sobrecargue la lavadora. La lavadora puede llenarse por
completo, pero sin apretujar la ropa. La carga debe estar
equilibrada. Si la lavadora está sobrecargada, la pelusa
puede quedar adherida a las prendas.
■ Verifique lo siguiente:
¿Se dejó papel o pañuelo de papel en los bolsillos?
■ ¿Ha usado suficiente detergente de alto rendimiento
(HE)?
Siga las recomendaciones del fabricante para el tipo de ropa
que está lavando. Para lograr un óptimo rendimiento, use
solamente un detergente de alto rendimiento (HE). Use
suficiente detergente para quitar la suciedad y mantenerla en
suspensión.
■ ¿Tiene agua dura?
Use más detergente cuando lave prendas con suciedad
rebelde en agua fría o dura.
■ ¿Está la temperatura del agua por debajo de los 60°F
(15,6ºC)?
El agua de lavado con una temperatura inferior a 60°F
(15,6°C) quizás no disuelva por completo el detergente. Para
lavar use agua caliente o tibia que no afecte las telas de la
carga. Cerciórese de que el sistema de agua caliente sea el
adecuado para proveer un lavado con agua caliente.
■ ¿Está usando un ciclo de lavado de baja velocidad?
Los detergentes en polvo quizás no se disuelvan bien en los
ciclos de velocidad baja. Para obtener óptimos resultados,
use detergente líquido para los ciclos con velocidad lenta,
tales como el de ropa delicada (Delicates).
■ ¿Ha descargado la lavadora con rapidez?
Para evitar la transferencia de tintes, descargue la lavadora
tan pronto como se detenga.
■ ¿Ha usado una bola con suavizante de telas?
Las bolas que distribuyen suavizante de telas no funcionan
correctamente en esta lavadora. Agregue el suavizante
líquido de telas en el compartimiento del suavizante de telas.
■ ¿Ha usado detergente en polvo en un ciclo de baja
velocidad?
Considere el empleo de un detergente líquido.
■ ¿Ha usado el ciclo de lavado expreso (Express Wash)
para una carga voluminosa?
Para obtener óptimos resultados, use el ciclo de lavado
expreso para cargas pequeñas con suciedad ligera.
La ropa está arrugada, enroscada o enredada
■ ¿Ha descargado la lavadora con rapidez?
Descargue la lavadora tan pronto como se detenga.
■ ¿Ha empleado el ciclo correcto para la carga que está
lavando?
Utilice el ciclo de ropa delicada (Delicates) u otro ciclo con
velocidad baja de exprimido para reducir la formación de
arrugas.
■ ¿Ha sobrecargado la lavadora?
La carga de lavado debe estar equilibrada y sin sobrecarga.
Las cargas deben moverse con libertad durante el lavado.
■ ¿Estaba el agua de lavado lo suficientemente tibia para
suavizar las arrugas?
Si no va a afectar las prendas, use agua tibia o caliente para
el lavado.
■ ¿Se han invertido las mangueras del agua caliente y del
agua fría?
Cerciórese de que las mangueras del agua caliente y del
agua fría estén conectadas a los grifos correctos. Un
enjuague caliente seguido de un exprimido producirá
arrugas. Vea “Conexión de las mangueras de entrada”.
53
Page 54

TABLE DES MATIÈRES
CONTRATS DE PROTECTION ................................................... 54
GARANTIE.................................................................................... 55
SÉCURITÉ DE LA LAVEUSE....................................................... 56
EXIGENCES D'INSTALLATION.................................................. 57
Outillage et pièces..................................................................... 57
Options ...................................................................................... 57
Exigences d'emplacement........................................................ 58
Système de vidange.................................................................. 59
Spécifications électriques ......................................................... 60
INSTRUCTIONS D'INSTALLATION............................................ 61
Élimination des accessoires de transport................................. 61
Raccordement des tuyaux d'alimentation................................ 61
Acheminement du tuyau de vidange ........................................ 62
Immobilisation du tuyau de vidange......................................... 62
Réglage de l'aplomb de la laveuse........................................... 63
Achever l'installation.................................................................. 63
CARACTÉRISTIQUES ET AVANTAGES .................................... 64
UTILISATION DE LA LAVEUSE.................................................. 65
Mise en marche de la laveuse................................................... 65
Utilisation du détergent approprié ............................................ 65
Utilisation du distributeur .......................................................... 66
Pause ou remise en marche...................................................... 67
Changement des programmes, options et modificateurs........ 67
Témoins lumineux ..................................................................... 68
Programmes .............................................................................. 68
Sons normaux ........................................................................... 70
Options ...................................................................................... 70
Modificateurs............................................................................. 70
Guide de lessivage .................................................................... 71
CONSEILS DE LESSIVAGE......................................................... 72
Chargement............................................................................... 72
Guide pour l'élimination des taches.......................................... 73
ENTRETIEN DE LA LAVEUSE .................................................... 74
Nettoyage de la laveuse............................................................ 74
Robinets d'arrivée d'eau ........................................................... 75
Précautions à prendre avant les vacances,
un entreposage ou un déménagement..................................... 75
DÉPANNAGE................................................................................ 76
La laveuse et ses composants.................................................. 76
Fonctionnement de la laveuse .................................................. 77
Entretien des vêtements............................................................ 79
NUMÉROS DE SERVICE.......................COUVERTURE ARRIÈRE
CONTRATS DE PROTECTION
Le Contrat principal de protection contribue aussi à prolonger la
vie utile de votre nouvel appareil ménager. Le Contrat* inclut :
✔ Pièces et main d'œuvre nécessaires pour conserver les
appareils en état de fonctionnement correct pendant une
utilisation normale, pas uniquement les défaillances. Notre
couverture s'adapte à la garantie du produit. Aucune
franchise, aucune anomalie de fonctionnement ne sont
exclues de ce contrat - protection réelle.
✔ Un service d'expert proposé par plus de 10 000 techniciens
d'entretien Sears autorisés, ce qui signifie que quelqu'un de
confiance prendra soin de votre produit.
✔ Appels de service illimités et service national, aussi souvent
que vous en avez besoin et quand vous en avez besoin.
✔ Garantie “Anti-citron” - remplacement de votre produit
couvert si plus de quatre pannes se produisent en deçà de
douze mois.
✔ Remplacement du produit si votre produit couvert ne peut
être réparé.
✔ Vérification annuelle d'entretien préventif sur demande -
sans frais supplémentaires.
✔ Aide rapide par téléphone - nous appelons cela Résolution
rapide - support téléphonique d'un agent de Sears sur tous
les produits. Considérez nous comme un "manuel d'utilisateur
parlant".
Protection contre les sautes de puissance
✔
dommages électriques attribuables aux fluctuations de courant.
✔ Couverture pour la perte de nourriture de 250 $ par an sur
tout aliment altéré en raison d'une défaillance mécanique sur
tout réfrigérateur ou congélateur couvert.
✔ Remboursement de location si la réparation du produit
couvert prend plus de temps que promis.
✔ 10 % de réduction sur le prix courant de toute intervention de
réparation non-couverte et pièces de rechange.
Dès que vous achetez le Contrat, il suffit d'un appel téléphonique
pour obtenir un rendez-vous de service. Vous pouvez appeler en tout
temps jour et nuit ou prendre un rendez-vous de service en direct.
Le contrat principal de protection constitue un investissement
sans risque. Si vous annulez pour une quelconque raison
pendant la période de garantie du produit, nous vous
rembourserons intégralement ou nous vous verserons un
remboursement au prorata après l'expiration de la période de
garantie. Achetez votre Contrat principal de protection
aujourd'hui même!
Certaines limitations et exclusions s'appliquent. Pour des
prix et renseignements supplémentaires aux États-Unis,
composez le 1-800-827-6655.
*Le contrat de couverture au Canada varie pour certains
articles. Pour des informations détaillées, appelez Sears
Canada au 1-800-361-6665.
pour prévenir les
Contrats principaux de protection
Nous vous félicitons d'avoir fait un achat judicieux. Votre nouvel
appareil Kenmore
années de fonctionnement fiable. Mais comme pour tous les
produits, il pourra à l'occasion nécessiter un entretien préventif
ou une réparation. Le cas échéant, un Contrat principal de
protection peut vous épargner de l'argent et des soucis.
®
est conçu et fabriqué pour vous procurer des
54
Service d'installation Sears
Pour l'installation professionnelle garantie par Sears d'appareils
ménagers et d'articles tels que les ouvre-portes de garage,
chauffe-eau, et autres gros appareils ménagers, aux É.-U. ou au
Canada, composez le 1-800-4-MY-HOME
®
.
Page 55

GARANTIE DES APPAREILS MÉNAGERS ET PIÉDESTAUX
FACULTATIFS KENMORE
GARANTIE LIMITÉE DE UN AN
Lorsqu'il est installé, utilisé et entretenu conformément à toutes
les instructions fournies avec le produit, si cet appareil ménager
fait défaut par suite d'un vice de matériau ou de fabrication au
cours de l'année qui suit la date d'achat, composer le
1-800-4-MY-HOME
Si cet appareil ménager fonctionne à toute autre fin que
l'utilisation familiale privée, la présente garantie ne s'appliquera
que pendant 90 jours à partir de la date d'achat.
LA PRÉSENTE GARANTIE COUVRE UNIQUEMENT LES
VICES DE MATÉRIAUX ET DE FABRICATION. SEARS NE
PAIERA PAS POUR :
1. Les pièces courantes qui peuvent s'user suite à une
utilisation normale, notamment les filtres, courroies,
ampoules et sacs.
2. L'intervention d'un technicien pour montrer à l'utilisateur
comment installer, utiliser et entretenir correctement le
produit.
3. L'intervention d'un technicien pour nettoyer ou entretenir ce
produit.
4. L'endommagement ou les défauts du produit si celui-ci n'est
pas installé, utilisé ou entretenu conformément à toutes les
instructions fournies avec le produit.
5. L'endommagement ou les défauts du produit résultant
d'accident, usage impropre ou abusif ou utilisation autre que
pour laquelle il est destiné.
6. L'endommagement ou les défauts du produit causés par
l'utilisation de détergents, agents de nettoyage, produits
chimiques ou ustensiles autres que ceux recommandés dans
toutes les instructions fournies avec le produit.
7. L'endommagement ou les défauts des pièces ou systèmes
résultant d'une modification non autorisée faite au produit.
®
pour obtenir une réparation gratuite.
CLAUSE D'EXONÉRATION DE RESPONSABILITÉ AU TITRE
DES GARANTIES IMPLICITES; LIMITATION DES RECOURS
Le seul et exclusif recours du client dans le cadre de la présente
garantie limitée consiste en la réparation prévue ci-dessus. Les
garanties implicites, y compris les garanties applicables de
qualité marchande et d'aptitude à un usage particulier, sont
limitées à un an ou à la plus courte période autorisée par la loi.
Sears n'assume aucune responsabilité pour les dommages
fortuits ou indirects. Certains États ou certaines provinces ne
permettent pas l'exclusion ou la limitation des dommages fortuits
ou indirects, ou la limitation de la durée des garanties implicites
de qualité marchande ou d'aptitude à un usage particulier, de
sorte que cette exclusion ou limitation peut ne pas être
applicable dans votre cas.
Cette garantie s'applique seulement lorsque cet appareil
ménager est utilisé aux États-Unis et au Canada.
Cette garantie vous confère des droits juridiques spécifiques et
vous pouvez également jouir d'autres droits qui peuvent varier
d'un État à l'autre.
Sears, Roebuck and Co.
Dept. 817WA, Hoffman Estates, IL 60179
Sears Canada Inc.
Toronto, Ontario, Canada M5B 2B8
ENREGISTREMENT DU PRODUIT
Dans l'espace ci-dessous, inscrire les numéros de modèle et de
série complets et la date d'achat. Vous trouverez ces
renseignements sur la plaque signalétique située sur le produit.
Gardez ces renseignements à disposition pour obtenir plus
rapidement assistance ou service lorsque vous communiquez
avec Sears au sujet de votre appareil ménager.
Numéro de modèle __ __ __.______________________________________
Numéro de série ________________________________________________
Date d'achat ____________________________________________________
Conservez ces instructions et votre reçu de vente pour
référence ultérieure.
ENREGISTREMENT DU PIÉDESTAL
Dans l'espace ci-dessous, inscrire les numéros de modèle et de
série complets et la date d'achat. Vous trouverez ces
renseignements sur la plaque signalétique située sur le produit.
Gardez ces renseignements à disposition pour obtenir plus
rapidement assistance ou service lorsque vous communiquez
avec Sears au sujet de votre piédestal.
Numéro de modèle __ __ __.______________________________________
Numéro de série ________________________________________________
Date d'achat ____________________________________________________
Conservez ces instructions et votre reçu de vente pour
référence ultérieure.
55
Page 56

SÉCURITÉ DE LA LAVEUSE
Votre sécurité et celle des autres est très importante.
Nous donnons de nombreux messages de sécurité importants dans ce manuel et sur votre appareil ménager. Assurez-vous de
toujours lire tous les messages de sécurité et de vous y conformer.
Voici le symbole d’alerte de sécurité.
Ce symbole d’alerte de sécurité vous signale les dangers potentiels de décès et de blessures graves à vous
et à d’autres.
Tous les messages de sécurité suivront le symbole d’alerte de sécurité et le mot “DANGER” ou
“AVERTISSEMENT”. Ces mots signifient :
Risque possible de décès ou de blessure grave si vous ne
DANGER
AVERTISSEMENT
Tous les messages de sécurité vous diront quel est le danger potentiel et vous disent comment réduire le risque de blessure et
ce qui peut se produire en cas de non-respect des instructions.
IMPORTANTES INSTRUCTIONS DE SÉCURITÉ
AVERTISSEMENT :
laveuse, suivre les précautions fondamentales dont les suivantes :
Pour réduire les risques d’incendie, de choc électrique ou de blessures lors de l’utilisation de la
suivez pas immédiatement les instructions.
Risque possible de décès ou de blessure grave si vous
ne suivez pas les instructions.
■
Lire toutes les instructions avant d’utiliser la laveuse.
■
Ne pas laver des articles qui ont été nettoyés ou
lavés avec de l’essence ou imbibés d’essence,
solvants de nettoyage à sec, ou autres substances
inflammables ou explosives; ces substances
peuvent émettre des vapeurs susceptibles de
s’enflammer ou d’exploser.
■
Ne pas ajouter d’essence, solvant de nettoyage à
sec ou autre produit inflammable ou explosif dans
l’eau de lavage. Ces substances peuvent émettre
des vapeurs susceptibles de s’enflammer ou
d’exploser.
■
Dans certaines conditions, de l’hydrogène gazeux
peut se former dans un circuit d’eau chaude qui n’a
pas été utilisé pendant 2 semaines ou plus. LE GAZ
HYDROGÈNE EST EXPLOSIBLE. Si le circuit d’eau
chaude n’a pas été utilisé pendant une telle période,
avant d’utiliser la laveuse, ouvrir tous les robinets
d’eau chaude et laisser l’eau s’écouler pendant
plusieurs minutes par chaque robinet. Ceci
permettra l’évacuation de l’hydrogène gazeux
accumulé. Comme ce gaz est inflammable, ne pas
fumer ou utiliser une flamme nue au cours de cette
période.
CONSERVEZ CES INSTRUCTIONS
■
Ne pas laisser des enfants jouer sur ou à l’intérieur de la
laveuse. Bien surveiller les enfants lorsque la laveuse est
utilisée à proximité d’enfants.
■
Avant de mettre la laveuse au rebut ou hors de service,
enlever la porte ou le couvercle.
■
Ne pas tenter d’atteindre un article à l’intérieur de la cuve de
la laveuse lorsque le tambour, la cuve ou l’agitateur est en
mouvement.
■
Ne pas installer ou remiser cette laveuse à un endroit où elle
serait exposée aux intempéries.
■
Ne pas modifier les organes de commande.
■
Ne pas réparer ou remplacer un composant quelconque de
la laveuse, ni entreprendre une opération de service, si ce
n’est spécifiquement recommandé dans ce manuel ou dans
un manuel d’instructions de réparations destiné à l’utilisateur;
il est alors essentiel que la personne concernée comprenne
ces instructions et soit compétente pour les exécuter.
■
Voir “Spécifications électriques” pour les instructions de
liaison à la terre.
56
Page 57

EXIGENCES D'INSTALLATION
Outillage et pièces
Rassembler les outils et pièces nécessaires avant de commencer
l'installation. Les pièces fournies se trouvent dans le tambour de
la laveuse.
Outils nécessaires au raccordement des tuyaux d'arrivée
d'eau
■ Pince (ouverture jusqu'à 1⁹⁄₁₆" [39,5 mm])
■ Lampe de poche (facultative)
Outils nécessaires à l'installation
■ Clés plates de 14 mm et 13 mm
■ Niveau
■ Cale en bois
■ Règle ou mètre ruban
Pièces fournies
AB C
D
Si vous avez Vous devrez acheter
Tuyau de vidange
trop court
Robinets d'eau
hors d'atteinte des
tuyaux d'admission
Trousse de rallonge du tuyau de vidange
de 4 pi (1,2 m), pièce n° 285863
2 tuyaux d'admission d'eau plus longs :
6 pi (1,8 m), pièce n° 76314
10 pi (3,0 m), pièce n° 350008
Options
Piédestal
Vous pouvez acheter séparément des piédestaux de différentes
hauteurs pour cette laveuse. Vous pouvez choisir un piédestal de
10" (25,4 cm) ou un piédestal de 15,5" (39,4 cm). Le piédestal
augmentera la hauteur totale de la laveuse.
Piédestal facultatif
E
A. Bride de retenue pour
tuyau de vidange (en
forme de U)
B. Tuyau d'alimentation (2)
C. Rondelle pour tuyau
d'alimentation (4)
D. Bouchon pour les trous
des boulons de
transport (4)
E. Courroie perlée
Autres pièces
Les pièces énumérées sont disponibles au magasin Sears local
ou au centre de service Sears. Pour obtenir plus de
renseignements, composer le
1-800-4-MY-HOME
Si vous avez Vous devrez acheter
Évier de buanderie
ou tuyau de rejet à
l'égout plus haut
que 96" (2,4 m)
Égout surélevé Évier de vidange standard de 20 gal.
Égout au plancher Brise-siphon, pièce n° 285834; tuyau de
®
(1-800-469-4663).
Système de pompe de puisard (si non
déjà disponible)
(76 L) de 30" (76,2 cm) de hauteur ou
évier utilitaire et pompe de puisard
(disponibles chez votre fournisseur local
d'articles de plomberie)
vidange additionnel, pièce n° 8318155; et
trousse de connexion, pièce n° 285835
Pour commander, appeler votre magasin Sears local. Pour de
plus amples renseignements, veuillez composer le
1-800-4-MY-HOME
Hauteur du
piédestal
®
(1-800-469-4663).
Hauteur
approximative avec
laveuse
Couleur Numéro
de
modèle
10" (25,4 cm) 46" (116,8 cm) Blanc 46822
15,5" (39,4 cm) 51,5" (130,8 cm) Blanc 57822
Ensemble de superposition
Prévoyez-vous de superposer votre laveuse et votre sécheuse?
Pour ce faire, vous devrez acheter un ensemble de superposition.
Pour commander, appeler votre magasin Sears local. Demander
le nécessaire de superposition (pièce n° 8572546). Pour de plus
amples renseignements, veuillez composer le
1-800-4-MY-HOME
fournies avec l'ensemble. Voir “Exigences d'emplacement”.
®
(1-800-469-4663). Suivre les instructions
57
Page 58

Exigences d'emplacement
Le choix d'un emplacement approprié pour la laveuse en
améliore le rendement et réduit au minimum le bruit et le
“déplacement” possible de la laveuse.
La laveuse peut être installée sous un comptoir personnalisé,
dans un sous-sol, une salle de buanderie, un placard ou un
encastrement. Voir “Système de vidange”.
Il faut aussi prendre en compte les exigences d'emplacement
des appareils voisins. C'est à l'utilisateur qu'incombe la
responsabilité de réaliser une installation correcte.
Il vous faudra
■
Un chauffe-eau pour fournir de l'eau à 120°F (49°C) à la laveuse.
■ Une prise électrique reliée à la terre située à moins de 6 pi
(1,8 m) de la prise du cordon électrique se trouvant à l'arrière
de la laveuse. Voir “Spécifications électriques”.
■ Des robinets d'eau chaude et d'eau froide situés à moins de
4 pi (1,2 m) des robinets d'admission d'eau chaude et d'eau
froide, et une pression d'eau de 20-100 lb/po²
(137,9-689,6 kPa).
■
Un plancher de niveau ayant une pente maximale de 1" (2,5 cm)
sous l'ensemble de la laveuse. L'installation de la laveuse sur
des surfaces de sol molles, telles que tapis ou surfaces avec
sous-couche en mousse n'est pas recommandée.
■ Un plancher robuste et solide capable de soutenir le poids
total de la laveuse (eau et charge) de 400 lb (180 kg).
Ne pas faire fonctionner la laveuse à des températures inférieures
à 32ºF (0ºC). Une quantité d'eau peut demeurer dans la laveuse
et causer des dommages à des températures basses.
Espacement recommandé pour une installation
personnalisée sous un comptoir
Les dimensions indiquées sont pour l'espacement recommandé.
Installation personnalisée sous un comptoir - laveuse
seulement
37" min.
(93,9 cm)
1"
(2,5 cm)
27"
(68,6 cm)
1"
(2,5 cm)
Espacement recommandé pour une installation dans un
encastrement ou dans un placard, avec ou sans
piédestal
Les dimensions indiquées sont pour l'espacement recommandé.
Installation dans un encastrement ou placard
3"
14"* max.
(35,6 cm)
2
48 po
(310 cm2)
*
(7,6 cm)
Dégagements de séparation à respecter
■ L'emplacement doit être assez grand pour permettre d'ouvrir
complètement la porte de la laveuse.
■
Prévoir davantage d'espace pour faciliter l'installation et
l'entretien. La porte s'ouvre à plus de 90° et n'est pas réversible.
■ Un espace supplémentaire peut être requis pour les moulures
de porte et de plancher et pour les plinthes.
■ Un espace supplémentaire de 1" (2,5 cm) de tous les côtés de
la laveuse est recommandé pour réduire le transfert du bruit.
■ Il faut aussi prendre en compte l'espace requis entre les
appareils voisins.
Dimensions de la laveuse
27"
50
¹⁄₄"
(127,6 cm)
(68,6 cm)
30
(77,5 cm)
¹⁄₂"
36"
(91,4 cm)
2
*
24 po
(155 cm2)
1"
30
¹⁄₂"
(2,5 cm)
(77,5 cm)
4"
(10,2 cm)
A
A. Vue latérale - placard ou endroit exigu
B. Porte de placard avec orifices d'entrée
d'air
B
3"
(7,6 cm)
*Ouvertures minimums en haut et en bas pour la porte du
placard.
Installation dans un encastrement ou placard - laveuse sur
piédestal
14"* max.
(35,6 cm)
1"
(2,5 cm)
27"
(68,6 cm)
1"
(2,5 cm)
1"
(2,5 cm)
30
¹⁄₂"
(77,5 cm)
4"
(10,2 cm)
58
La porte n'est pas réversible.
AB
A. Encastrement
B. Vue latérale - placard ou endroit exigu
Page 59

Espacement recommandé pour une installation dans un
encastrement ou dans un placard, avec laveuse et
sécheuse superposées
Les dimensions indiquées sont pour l'espacement recommandé.
48 po.2 *
2
)
(310 cm
3" (7,6 cm)
3" (7,6 cm)
2
24 po.
(155 cm
*
2
)
12" (30,5 cm)
72"
(182,9 cm)
1" (2,5 cm)
Système de vidange
La laveuse peut être installée en utilisant le système de rejet à
l'égout (au plancher ou mural), le système de vidange de l'évier
de buanderie, ou le système de vidange au plancher.
Sélectionner la méthode d'installation du tuyau de vidange selon
les besoins. Voir “Outillage et pièces”.
Système de vidange avec tuyau de rejet à l'égout - mural
ou au plancher (vues A et B)
Le système de rejet à l'égout nécessite un tuyau de diamètre
minimum de 2" (5 cm). La capacité minimale d'acheminement ne
doit pas être inférieure à 17 gal. (64 L) par minute.
Le sommet du tuyau de rejet à l'égout doit être au moins à 30"
(76,2 cm) de hauteur et au maximum à 96" (2,4 m) de la base de
la laveuse.
30" min.
(76,2 cm)
A
B
5 ¹⁄₄"**
(13,3 cm)
1"***
(2,5 cm)
27"
(68,6 cm)
1"***
(2,5 cm)
*Ouvertures minimums en haut et en bas pour la porte du
placard.
**Le coude d'évacuation externe nécessite davantage d'espace.
***Les moulures de porte et de plancher et les plinthes peuvent
nécessiter un espace supplémentaire.
Espacement recommandé pour l’installation dans un
placard
Les dimensions indiquées sont pour l'espacement recommandé.
Pour l'installation dans un placard avec porte, on doit prévoir
des ouvertures minimums d’entrée d’air au sommet du
placard.
7" (17,8 cm)
7" (17,8 cm)
9"
(22,9 cm)
Système de vidange avec évier de buanderie (vue C)
L'évier de buanderie doit avoir une capacité minimale de 20 gal.
(76 L). La partie supérieure de l'évier de buanderie doit être à au
moins 30" (76,2 cm) au-dessus du plancher.
Système de vidange au plancher (vue D)
Le système de vidange au plancher nécessite un brise-siphon qui
peut être acheté séparément. Voir “Outillage et pièces”.
Le brise-siphon doit être au moins à 28" (71 cm) de la base de la
laveuse. Des tuyaux supplémentaires peuvent être requis.
26" min.
30" min.
(76,2 cm)
CD
(66 cm)
4"
(10,2 cm)
31½"
(80 cm)
1"
(2,5 cm)1"(2,5 cm)
27"
(68,6 cm)
1"
(2,5 cm)
59
Page 60

Spécifications électriques
AVERTISSEMENT
■ Ne pas utiliser une tuyauterie de gaz pour le raccordement à
la terre.
■ En cas de doute quant à la qualité de la liaison à la terre de la
laveuse, consulter un électricien qualifié.
■ Ne pas installer un fusible dans le conducteur neutre ou le
conducteur de liaison à la terre.
Risque de choc électrique
Brancher sur une prise à 3 alvéoles reliée à la terre.
Ne pas enlever la broche de liaison à la terre.
Ne pas utiliser un adaptateur.
Ne pas utiliser un câble de rallonge.
Le non-respect de ces instructions peut causer
un décès, un incendie ou un choc électrique.
■ Une alimentation de 120 volts, 60 Hz, CA seulement, de
15 ou 20 ampères, protégée par un fusible est requise. On
recommande d'utiliser un fusible ou un disjoncteur
temporisé. Il est recommandé de raccorder l'appareil sur un
circuit distinct exclusif à cet appareil.
■ Cette laveuse comporte un cordon d'alimentation électrique
à trois broches pour liaison à la terre.
■ Pour minimiser les risques de choc électrique, on doit
brancher le cordon sur une prise de courant de configuration
correspondante, à 3 alvéoles, reliée à la terre et installée
conformément aux codes et règlements locaux. Si une prise
de courant de configuration correspondante n'est pas
disponible, le client a la responsabilité et l'obligation de faire
installer par un électricien qualifié une prise de courant
correctement reliée à la terre.
■ Si les codes le permettent et si on utilise un conducteur
distinct de liaison à la terre, il est recommandé qu'un
électricien qualifié vérifie la qualité de la liaison à la terre.
INSTRUCTIONS DE LIAISON À LA TERRE
Pour une laveuse reliée à la terre et connectée par
un cordon :
Cette laveuse doit être reliée à la terre. En cas d’anomalie
de fonctionnement ou de panne, la liaison à la terre réduira
le risque de choc électrique en offrant au courant électrique
un itinéraire d’évacuation de moindre résistance. Cette
laveuse est alimentée par un cordon électrique comportant
un conducteur relié à la terre et une fiche de branchement
munie d’une broche de liaison à la terre. La fiche doit être
branchée sur une prise de courant appropriée qui est bien
installée et reliée à la terre conformément à tous les codes
et règlements locaux.
AVERTISSEMENT : Le raccordement incorrect de cet
appareil au conducteur de liaison à la terre peut susciter un
risque de choc électrique. En cas de doute quant à la qualité
de la liaison à la terre de l’appareil, consulter un électricien
ou technicien d’entretien qualifié.
Ne pas modifier la fiche de branchement fournie avec
l’appareil – si la fiche ne correspond pas à la configuration
de la prise de courant, demander à un électricien qualifié
d’installer une prise de courant convenable.
Pour une laveuse raccordée en permanence :
Cette laveuse doit être raccordée à un système de câblage
permanent en métal relié à la terre ou un conducteur relié à
la terre doit être en fonction avec les conducteurs de circuit
et raccordés à la borne de liaison à la terre ou la borne sur
l’appareil ménager.
60
Page 61

INSTRUCTIONS D'INSTALLATION
Élimination des accessoires de transport
AVERTISSEMENT
Risque du poids excessif
Utiliser deux ou plus de personnes pour déplacer et
installer la laveuse.
Le non-respect de cette instruction peut causer une
blessure au dos ou d'autre blessure.
IMPORTANT : Positionner la laveuse de sorte que l'arrière de la
laveuse soit à environ 3 pi (90 cm) de son emplacement final.
On trouve sur le panneau arrière de la laveuse 4 boulons bleus
qui supportent le système de suspension durant le transport. Ces
boulons retiennent aussi le cordon d'alimentation à l'intérieur de
la laveuse jusqu'à ce que les boulons soient retirés.
Raccordement des tuyaux d'alimentation
Insérer les rondelles plates neuves (fournies) dans chaque
extrémité des tuyaux d'arrivée d'eau. Insérer fermement les
rondelles dans les raccords.
AB
A. Raccord
B. Rondelle
Connecter les tuyaux d'alimentation aux robinets d'eau
S'assurer que le tambour de la laveuse est vide.
1. Fixer un tuyau au robinet d'eau chaude. Visser complètement
le raccord à la main pour qu'il comprime le joint.
2. Fixer un tuyau au robinet d'eau froide. Visser complètement
le raccord à la main pour qu'il comprime le joint.
3. À l'aide d'une pince, serrer les raccords en effectuant deux
tiers de tour supplémentaires.
1. Au moyen d'une clé de 13 mm, desserrer chacun des
boulons.
2. Une fois le boulon desserré, le déplacer au centre du trou et
retirer complètement le boulon, y compris la cale
d'espacement en plastique couvrant le boulon.
3. Une fois que les 4 boulons ont été retirés, jeter les boulons et
les cales d'espacement. Puis tirer le cordon d'alimentation à
travers l'ouverture du panneau arrière et obturer le trou avec
le bouchon fourni.
4. Obturer les trous des boulons avec les 4 bouchons pour les
trous des boulons de transport.
REMARQUE : Si la laveuse doit être transportée à une date
ultérieure, appeler le centre de service local. Pour éviter des
dommages concernant la suspension et la structure, votre
appareil doit être correctement monté pour réinstallation
ultérieure par un technicien certifié.
REMARQUE : Ne pas serrer excessivement ou utiliser du ruban
adhésif ou un calfeutrant sur la valve. Les valves risquent d'être
endommagées.
Purger les canalisations d'eau
■ Laisser s’écouler l'eau des deux robinets et des tuyaux
d'alimentation, dans un évier de buanderie, un tuyau de rejet
à l'égout ou un seau, pour éliminer les particules se trouvant
dans les canalisations d'eau qui pourraient obstruer les tamis
de la valve d'arrivée d'eau.
■ Vérifier la température de l'eau pour s'assurer que le tuyau
d'eau chaude est connecté au robinet d'eau chaude et que le
tuyau d'eau froide est connecté au robinet d'eau froide.
61
Page 62

Connecter les tuyaux d'alimentation à la laveuse
H
C
Décharge de l'eau de lavage dans un évier de buanderie ou
tuyau de rejet à l'égout
Connecter la bride de retenue pour tuyau de vidange sur le tuyau
de vidange ondulé.
H. Tuyau d'eau chaude C.Tuyau d’eau froide
1. Fixer le tuyau d'eau chaude à la valve du tuyau d'alimentation
d'eau chaude (H) de la laveuse. Visser complètement le
raccord à la main pour qu'il comprime le joint.
2. Fixer le tuyau d'eau froide au robinet d'eau froide (C) de la
laveuse. Visser complètement le raccord à la main pour qu'il
comprime le joint.
3. À l'aide d'une pince, serrer les raccords en effectuant ²⁄₃ de
tour supplémentaires.
REMARQUE : Ne pas serrer excessivement. Le raccord
risque d'être endommagé.
4. Ouvrir les robinets d'eau complètement et vérifier s'il y a des
fuites.
REMARQUE :
Remplacer les tuyaux d'arrivée d'eau après 5 ans
d'utilisation pour réduire le risque de défaillance intempestive.
Prendre note de la date d'installation ou de remplacement des
tuyaux d'arrivée d'eau, pour référence ultérieure.
Inspecter périodiquement les tuyaux; les remplacer en cas de
renflement, de déformation, de coupure, d'usure ou si une
fuite se manifeste.
Acheminement du tuyau de vidange
Le bon acheminement du tuyau de vidange protège vos
planchers contre les dommages imputables à une fuite d'eau.
Lire et suivre ces instructions.
Retirer le tuyau de vidange de la laveuse
Tirer doucement pour dégager le tuyau d'évacuation (matériau
ondulé) des agrafes d'arrimage.
AB
A. Emboîter une extrémité ou l'autre de la bride de retenue
pour tuyau de vidange sur le tuyau de vidange, au point de
commencement des ondulations.
B. Plier le tuyau de vidange pour le mettre au contact de la
bride de retenue du tuyau de vidange, et emboîter l'autre
extrémité de la bride sur le tuyau.
Pour empêcher l'eau de vidange de refluer dans la laveuse :
■ Ne pas redresser le tuyau de vidange ni forcer l'excédent de
tuyau dans le tuyau de rejet à l'égout. Le tuyau doit être bien
immobilisé, tout en permettant le passage d'air.
■ Ne pas mettre l'excédent du tuyau de vidange dans l'évier de
buanderie.
Égout au plancher
Il vous faudra peut-être des pièces supplémentaires. Voir Égout
au plancher dans “Outillage et pièces”.
Immobilisation du tuyau de vidange
1. Faire passer le cordon d'alimentation par-dessus la laveuse.
2. Déplacer la laveuse à son emplacement final.
3. Placer le tuyau de vidange dans l'évier de buanderie ou le
tuyau de rejet à l'égout - voir l'illustration. Voir les illustrations
A et B.
62
AB C
4. Si les robinets d'eau et le tuyau rigide de rejet à l'égout sont
placés en retrait, introduire l'extrémité en crochet du tuyau de
vidange dans le tuyau rigide de rejet à l'égout. Voir
l'illustration C.
REMARQUES :
■ Ne pas forcer l'excédent de tuyau de vidange dans l'arrière
de la laveuse.
■ Pour éviter un effet de siphon, ne pas assurer l'étanchéité à la
jonction entre le tuyau de vidange et le tuyau de rejet à
l'égout.
Page 63

Réglage de l'aplomb de la laveuse
Un bon réglage de l’aplomb et l’immobilisation des pieds de la
laveuse éviteront les bruits excessifs et les vibrations.
1. Vérifier que les quatre écrous de blocage sur les pieds de la
laveuse sont serrés contre la caisse de la laveuse, en utilisant
une clé plate de 14 mm.
2. Placer la laveuse à son emplacement final et vérifier l’aplomb
de la laveuse. La laveuse ne doit pas bouger d’avant en
arrière, latéralement ou transversalement lorsqu’on appuie
sur les bords supérieurs. Vérifier que les quatre pieds sont
stables et reposent sur le sol.
3. Si la laveuse n’est pas d’aplomb, la tirer légèrement vers
l’extérieur avant de l’incliner vers l’arrière. Soulever d’abord
l’avant avec un bloc de bois, desserrer les écrous de blocage
et ajuster les pieds au besoin; soulever ensuite l’arrière et
ajuster les pieds au besoin. Répéter les étapes 1 à 3 jusqu'à
ce que la laveuse soit d’aplomb.
IMPORTANT : Les quatre pieds doivent être bien serrés. Si les
écrous de blocage ne sont pas serrés contre la caisse de la
laveuse, celle-ci risque de vibrer.
Achever l'installation
1. Consulter les spécifications électriques. Vérifier que la
tension électrique disponible est correcte et que la prise de
courant est convenablement reliée à la terre. Voir
“Spécifications électriques”.
2. Vérifier que toutes les pièces sont maintenant installées. S'il
reste une pièce, passer en revue les différentes étapes pour
découvrir laquelle aurait été oubliée.
3. S'assurer d'avoir récupéré tous vos outils.
4. Jeter ou recycler tous les matériaux d'emballage.
5. Vérifier que chaque robinet d'arrivée d'eau est ouvert.
6. Vérifier s'il y a des fuites autour des robinets et des tuyaux
d'arrivée d'eau.
AVERTISSEMENT
Risque de choc électrique
Brancher sur une prise à 3 alvéoles reliée à la terre.
Ne pas enlever la broche de liaison à la terre.
Ne pas utiliser un adaptateur.
Ne pas utiliser un câble de rallonge.
Le non-respect de ces instructions peut causer
un décès, un incendie ou un choc électrique.
7. Brancher sur une prise à 3 alvéoles reliée à la terre.
8. Lire “Utilisation de la laveuse”.
9. Pour tester et nettoyer la laveuse, mesurer la moitié de la
quantité de détergent HE Haute efficacité recommandée par
le fabricant pour une charge de taille moyenne. Verser le
détergent dans le distributeur de détergent. Sélectionner
NORMAL/CASUAL (normal/tout-aller), puis START. Laisser la
machine exécuter le programme complet.
Utiliser uniquement un détergent HE Haute efficacité.
63
Page 64

CARACTÉRISTIQUES ET AVANTAGES
Votre nouvelle laveuse haute efficacité à chargement frontal a été
conçue pour préserver les ressources et diminuer vos factures
d'eau et d'énergie. La laveuse est conçue pour déterminer puis
fournir la quantité d'eau nécessaire à une performance optimale.
Avec ce nouveau système, la durée de fonctionnement peut être
supérieure à celle d'une laveuse conventionnelle.
Commandes électroniques
Les commandes électroniques flexibles sont faciles à utiliser, que
vous soyez un débutant ou un expert.
Niveau d'eau automatique
En s'ajustant au volume de la charge, cette caractéristique
permet à la laveuse d'utiliser la quantité d'eau minimum
nécessaire au nettoyage et au rinçage des vêtements. Un faible
niveau d'eau vous permet d'obtenir les mêmes résultats avec de
plus petites quantités de produits. Étant donné que seule la
quantité nécessaire d'eau est utilisée, la laveuse vous fait aussi
économiser de l'énergie. Vous pouvez obtenir les mêmes
résultats de lavage pour les petites charges et les charges dont le
volume est plus important.
Volume de charge plus important
L'absence d'agitateur permet de laver des articles plus grands et
plus encombrants tels qu'un sac de couchage de taille moyenne.
Vous pouvez aussi laver davantage de vêtements à la fois, ce qui
signifie moins de charges. Vous pouvez laver un oreiller ou un
gros ours en peluche.
Système de suspension
Pour réduire le “déplacement” ou le “déséquilibre” de la laveuse,
celle-ci combine :
■ 2 ressorts pour isoler les vibrations
■ 4 amortisseurs à la base de la laveuse pour minimiser le
mouvement
Tambour en acier inoxydable
Le tambour en acier inoxydable élimine la corrosion et permet
des vitesses d'essorage plus élevées pour une meilleure
extraction de l'eau et une réduction de la durée de séchage.
Moteur adaptatif à vitesse variable
Le moteur s'adapte au volume de la charge et au programme
sélectionné pour délivrer les meilleures conditions de nettoyage,
de rinçage et d'essorage. Le moteur peut gérer les vitesses
lentes nécessaires pour les articles délicats et est assez puissant
pour amener une charge moyenne de vêtements à une vitesse
d’essorage élevée.
Vitesses d'essorage
Cette laveuse sélectionne automatiquement la vitesse
d'essorage en fonction du programme sélectionné. Ce réglage
effectué à l'usine peut toutefois être modifié. Cette laveuse offre
jusqu'à trois choix de vitesses d'essorage différentes.
Add A Garment (ajouter un vêtement)
Cette option est disponible avec tous les programmes de lavage
sauf Rinse & Spin (rinçage et essorage), Drain & Spin (vidange et
essorage), et Clean Washer (nettoyage de la laveuse). Lorsque
cette option est disponible au début du programme, le témoin
lumineux de l'état de l'élément “Ajouter un vêtement” s'allume
pendant les 7 premières minutes. Cette laveuse octroie une
période de 7 minutes pendant laquelle d'autres vêtements
peuvent être ajoutés à la charge.
Équilibre dynamique
Un système d'équilibrage de précision qui permet à la laveuse
d'atteindre des vitesses d'essorage élevées. La laveuse essore
plus vite pour que les vêtements sortant de la laveuse soient
moins humides qu’avec les machines traditionnelles à
chargement par le dessus. De plus, si le système d'équilibre
dynamique détecte des charges déséquilibrées durant
l'essorage, il redistribue les vêtements de façon à ce qu'ils soient
répartis uniformément.
Système supérieur de distribution de détergent
Les trois compartiments du distributeur permettent le
chargement de tous les produits de lessive avant la mise en
marche de la laveuse. Les produits seront distribués dans la
laveuse au moment opportun pour un nettoyage performant. Le
système de libération de l'agent de blanchiment est inclus dans
le système supérieur de distribution de détergent. Le détergent
est ajouté au début du programme et l'agent de blanchiment est
ajouté une fois que les enzymes ont pu effectuer leur nettoyage.
L'assouplissant de tissu sera distribué lors du programme de
rinçage ou du deuxième rinçage, le cas échéant. Le plateau du
système supérieur de distribution de détergent peut être retiré
facilement pour le nettoyage.
64
Utiliser uniquement un détergent HE Haute efficacité.
Page 65

UTILISATION DE LA LAVEUSE
Mise en marche de la laveuse
AVERTISSEMENT
Risque d’incendie
Ne jamais mettre des articles humectés d’essence ou
d’autres fluides inflammables dans la laveuse.
Aucune laveuse ne peut complètement enlever l’huile.
Ne pas faire sécher des articles qui ont été salis par
tout genre d’huile (y compris les huiles de cuisson).
Le non-respect de ces instructions peut causer un
décès, une explosion ou un incendie.
AVERTISSEMENT : Pour réduire le risque d'incendie, de choc
électrique ou de blessures corporelles, lire les INSTRUCTIONS
IMPORTANTES DE SÉCURITÉ avant de faire fonctionner cet
appareil.
Le texte suivant est un guide pour l'utilisation de la laveuse. Se
référer aux sections spécifiques de ce manuel pour obtenir des
renseignements plus détaillés.
Ne pas remiser des produits de lessive sur le dessus de cette
laveuse. La vibration est normale durant le fonctionnement.
Utilisation du détergent approprié
Utiliser uniquement des détergents Haute efficacité. Pour ce type
de détergent, “HE” ou “Haute efficacité” sera mentionné sur
l'emballage. Ce système de lavage, utilisant moins d'eau,
provoquera trop de mousse avec un détergent ordinaire non-HE.
L'utilisation d'un détergent ordinaire est susceptible
d'occasionner des erreurs de la part de la laveuse, des durées de
programmes plus longues et une performance de rinçage
réduite. Ceci peut aussi entraîner des défaillances des
composants et une moisissure perceptible. Les détergents HE
sont conçus pour produire la quantité de mousse adéquate pour
le meilleur rendement. Suivre les recommandations du fabricant
pour déterminer la quantité de détergent à utiliser.
Utiliser uniquement un détergent HE Haute efficacité.
Premier programme de lavage sans linge à laver
Avant de laver les vêtements pour la première fois, si cela n'a pas
déjà été fait au moment de l'étape d'installation finale, choisir le
programme Normal/Casual (normal/tout-aller) et l'exécuter sans
linge. Utiliser uniquement un détergent HE Haute efficacité.
Utiliser la moitié de la quantité recommandée par le fabricant
pour une charge de taille moyenne. Ce programme préalable sert
à garantir que l'intérieur est propre avant de laver des vêtements.
65
Page 66

Pour tous les programmes de lavage
1. Pour charger la laveuse
Ouvrir la porte de la laveuse en tirant sur la poignée.
Trier le linge d'après la couleur et le type de tissu. Placer une
charge de linge trié dans la laveuse. Ne pas surcharger la
laveuse. Une surcharge peut causer un nettoyage médiocre.
■ La laveuse peut être bien remplie mais le linge ne doit pas
être tassé. La porte de la laveuse doit fermer facilement.
■ Mélanger les gros et les petits articles. Éviter de laver un
article seul. Charger la laveuse uniformément.
■ Laver les petits articles tels que les chaussettes d'enfants
dans un sac en filet pour le linge. Il est recommandé
d'utiliser plus d'un sac pour le linge et de remplir chaque
sac avec des quantités similaires.
■ Lorsqu'on retire le linge, vérifier de temps en temps sous
le joint/soufflet de couleur grise à l’avant de la cuve qu'il
n'y ait pas de petits articles coincés.
2. Fermer la porte de la laveuse en la poussant fermement
jusqu'à ce que le verrou s'enclenche. La porte de la laveuse
demeurera verrouillée durant le programme de lavage.
REMARQUE : Lorsqu'un programme de lavage est terminé,
la porte doit être ouverte puis refermée avant qu'un nouveau
programme puisse commencer. La porte peut être ouverte
seulement si STOP (arrêt) a été sélectionné alors que le
témoin ADD A GARMENT (ajouter un vêtement) était allumé
ou si le programme a été annulé. Voir “Pour annuler un
programme” dans la section “Changement des programmes,
options et modificateurs”.
3. Ouvrir le tiroir distributeur et verser les produits de lessive
dans les compartiments de détergent, d'agent de
blanchiment ou d'assouplissant de tissu. Fermer le tiroir
lentement pour éviter les renversements. Voir “Utilisation du
distributeur”.
REMARQUE : Utiliser uniquement des détergents HE Haute
efficacité.
4. Mettre la laveuse en marche en sélectionnant POWER
(alimentation). Sélectionner un des programmes en tournant
le sélecteur de programme. Le témoin lumineux
correspondant au programme sélectionné s'allumera. Lors de
la sélection d'un programme de lavage, les préréglages des
modificateurs, options, température de l'eau et vitesse
d'essorage pour le programme sélectionné seront allumés.
Les préréglages procurent les soins aux tissus recommandés
pour le programme sélectionné. Voir “Programmes”.
5. Sélectionner les OPTIONS désirées. Toutes les options ne
sont pas disponibles avec tous les programmes. Voir
“Options”.
6. Sélectionner les MODIFICATEURS désirés. Tous les
modificateurs ne sont pas disponibles avec tous les
programmes et toutes les options. Voir “Modificateurs”.
7. Si désiré, sélectionner le CYCLE SIGNAL (signal de
programme). Le signal est utile lorsque vous lavez des
articles qui doivent être enlevés de la laveuse aussitôt qu'elle
s'arrête. Appuyer une fois sur CYCLE SIGNAL (signal de
programme) pour l'activer. Le témoin lumineux s'allumera.
Appuyer à nouveau pour le désactiver.
8. Pour commencer le programme de lavage
immédiatement
Sélectionner START (pendant 1 seconde environ).
■ Si vous n'appuyez pas sur START (mise en marche) dans
les 5 minutes qui suivent le choix d'un programme, la
laveuse s'éteint automatiquement.
■ Lorsque le programme de lavage est terminé, le témoin
de l'état d'avancement CLOTHES CLEAN (linge propre)
s'allume, la porte se déverrouille et la charge peut être
retirée de la laveuse. La laveuse s'éteint
automatiquement 5 minutes après la fin du programme et
le témoin CLOTHES CLEAN (linge propre) s'éteint. Pour
éteindre manuellement la laveuse après la fin d'un
programme de lavage, sélectionner STOP (arrêt) une fois.
9. Pour commencer le programme de lavage ultérieurement
Sélectionner DELAY START (mise en marche différée) jusqu'à
ce que la durée de délai désirée (en heures) soit indiquée sur
l'afficheur de la durée résiduelle estimée. Sélectionner START
(mise en marche). La fenêtre d'affichage indique le compte à
rebours jusqu'au programme de lavage.
IMPORTANT : En cas de mise en marche différée d'un
programme, utiliser seulement des détergents en poudre
dans le compartiment de lavage principal car les détergents
liquides risquent de suinter hors du compartiment avant le
début du programme de lavage.
Utilisation du distributeur
Votre nouvelle laveuse comporte un tiroir distributeur avec trois
compartiments séparés pour les produits de lessive - un pour le
détergent, un pour l'agent de blanchiment liquide et un pour
l'assouplissant de tissu liquide. Les produits de lessive sont
dilués et distribués automatiquement au moment approprié
durant le programme de lavage, ce qui évite à l'utilisateur de
retourner à la laveuse durant le programme pour ajouter ces
produits.
Il est normal que de petites quantités d'eau demeurent dans les
distributeurs lorsque le programme de lavage est achevé.
Ne pas placer les produits de lessive directement dans la cuve de
lavage. Toujours utiliser les distributeurs appropriés lors de l'ajout
des produits de lessive.
Choix du détergent approprié
Utiliser uniquement des détergents Haute efficacité. Pour ce type
de détergent, “HE” ou “Haute efficacité” sera mentionné sur
l'emballage. Ce système de lavage, utilisant moins d'eau,
provoquera trop de mousse avec un détergent ordinaire non-HE.
L'utilisation d'un détergent ordinaire est susceptible
d'occasionner des erreurs de la part de la laveuse, des durées de
programmes plus longues et une performance de rinçage réduite.
Ceci peut aussi entraîner des défaillances des composants et une
moisissure perceptible. Les détergents HE sont conçus pour
produire la quantité de mousse adéquate pour le meilleur
rendement. Suivre les recommandations du fabricant pour
déterminer la quantité de détergent à utiliser.
66
Utiliser uniquement un détergent HE Haute efficacité.
Pour remplir les compartiments du distributeur
1. Tirer le tiroir distributeur.
2. Ajouter le produit de lessive désiré dans le compartiment
approprié.
Page 67

3. Enfoncer le tiroir distributeur lentement et complètement
C
D
(pour éviter les renversements).
A
MAX
DETERGENT
B
Distributeur
A. Levier de dégagement du distributeur
B. Compartiment pour détergent du lavage principal
C. Compartiment pour agent de blanchiment liquide
D. Compartiment pour assouplissant de tissu
LIQUID BLEACH
SOFTENER
MAX
Compartiment pour assouplissant de tissu
(Lettre D dans l'illustration du distributeur)
■ Ajouter ¹⁄₄ de tasse (60 mL) d'assouplissant de tissu liquide
dans ce compartiment. L'assouplissant de tissu sera
automatiquement distribué lors du rinçage final ou du
deuxième rinçage, le cas échéant.
■ Ne pas remplir au-delà du niveau “MAX”.
Pause ou remise en marche
1. Pour faire faire une pause à la laveuse à tout moment,
sélectionner STOP (arrêt).
2. Pour poursuivre le programme, sélectionner START (pendant
environ 1 seconde).
Changement des programmes, options et
modificateurs
Toutes les options et tous les modificateurs ne sont pas
disponibles avec tous les programmes.
Les programmes, options et modificateurs peuvent être changés
à tout moment tant que START (mise en marche) n'a pas été
sélectionné.
Pour arrêter un programme et en sélectionner un autre
Compartiment pour détergent du lavage principal
(Lettre B dans l'illustration du distributeur)
Verser le détergent HE liquide ou en poudre dans ce
compartiment pour le programme de lavage principal.
■ L'agent de blanchiment en poudre sans danger pour les
couleurs peut être ajouté au compartiment du lavage
principal avec le détergent en poudre.
■ Utiliser le dispositif de mesure fourni avec le détergent. Ne
pas verser davantage que la quantité recommandée par le
fabricant.
REMARQUE : Un remplissage excessif pourrait causer un excès
de mousse.
Compartiment de l'agent de blanchiment
(Lettre C dans l'illustration du distributeur)
Ne pas verser PLUS de ²⁄₃ de tasse (160 mL) d'agent de
blanchiment liquide dans ce compartiment. L'agent de
blanchiment sera automatiquement dilué et distribué au moment
approprié au cours du premier rinçage après le programme de
lavage. Ce compartiment ne peut diluer un agent de blanchiment
en poudre.
■ Utiliser seulement un agent de blanchiment liquide dans ce
distributeur. Ne pas utiliser ce distributeur pour ajouter un
agent de blanchiment en poudre ou tout agent de
blanchiment sans danger pour les couleurs à votre charge de
lavage.
■ Toujours mesurer l'agent de blanchiment liquide. Utiliser une
tasse à mesurer avec un bec verseur; ne pas utiliser une
quantité approximative. Suivre les instructions du fabricant
pour une utilisation en toute sécurité.
■ Ne pas remplir au-delà du niveau “MAX”.
REMARQUE : Un remplissage excessif pourrait causer des
dommages aux vêtements.
1. Sélectionner une fois STOP (arrêt).
2. Sélectionner le programme désiré.
3. Sélectionner les OPTIONS et MODIFICATEURS désirés.
4. Sélectionner START (pendant environ 1 seconde) pour
remettre la laveuse en marche au début du nouveau
programme.
Pour annuler un programme
1. Sélectionner deux fois STOP (arrêt).
2. La laveuse s'éteint, la porte se déverrouille et les vêtements
peuvent être retirés.
REMARQUE : Si le niveau d'eau ou la température est trop
élevé(e), la laveuse effectuera automatiquement une vidange
avant le déverrouillage de la porte.
Pour changer les options ou les modificateurs lorsque le
programme a commencé
1. Sélectionner STOP (arrêt).
2. Sélectionner les OPTIONS ou MODIFICATEURS désirés. Si
l'option ou le modificateur n'est pas disponible, la machine
émet un bip.
3. Appuyer sur la touche START (pendant environ 1 seconde)
pour poursuivre le programme.
Pour vidanger la laveuse manuellement
1. Sélectionner STOP (arrêt).
2. Sélectionner RINSE/DRAIN & SPIN (rinçage/vidange et
essorage).
3. Appuyer sur le bouton 2ND RINSE (2nd rinçage) pour
désactiver l’option de second rinçage.
4. Sélectionner START (pendant environ 1 seconde) pour
commencer la vidange.
5. Lorsque l'essorage est terminé, la porte se déverrouille. Les
articles peuvent être retirés de la laveuse.
67
Page 68

Témoins lumineux
Ces témoins lumineux indiquent quelle portion du programme la
laveuse est en train d'effectuer. Ils peuvent aussi indiquer à quel
moment vous pouvez ajouter un article additionnel et à quel
moment les commandes sont verrouillées.
Durée résiduelle estimée
Les durées de programme varient automatiquement en fonction
de la pression et de la température de l'eau, du détergent et de la
charge de linge. La durée du programme sera prolongée en cas
d'excès de mousse ou si la charge est déséquilibrée. La
procédure contre la mousse élimine l'excès de mousse et permet
un rinçage correct de vos vêtements. Les options sélectionnées
affectent aussi les durées de programme qui sont mentionnées
dans le tableau des préréglages de programme. La durée
résiduelle estimée peut changer jusqu'à 30 minutes dans des
conditions extrêmes.
Door Locked (porte verrouillée)
Ajout d'articles
Vous pouvez ajouter des articles dans la laveuse lorsque le
programme de lavage a commencé si le témoin lumineux ADD A
GARMENT (ajouter un vêtement) est allumé. Tous les
programmes comportent cette caractéristique sauf Rinse/Spin
(rinçage/essorage), Drain/Spin (vidange/essorage), et Clean
Washer (nettoyage de la laveuse).
Pour ajouter des articles
1. Sélectionner STOP (arrêt). La porte de la laveuse se
déverrouille et les articles peuvent être ajoutés.
2. Pour poursuivre le programme, fermer la porte et sélectionner
START (pendant environ 1 seconde).
REMARQUE : Pour ajouter des articles une fois que la période
ADD A GARMENT est terminée, il est nécessaire d’annuler le
programme de lavage, d’ajouter les articles et de commencer un
nouveau programme de lavage.
Clothes Clean (linge propre)
Le témoin Clothes Clean (linge propre) s'allume lorsque le
programme est terminé. Le témoin reste allumé jusqu'à ce que la
porte soit ouverte.
Verrouillage des commandes
La fonction Control Lock (verrouillage des commandes) empêche
l'utilisation involontaire de la laveuse. Vous pouvez aussi utiliser
la caractéristique de verrouillage des commandes pour
empêcher des changements involontaires de programme ou
d'option durant un programme. Lorsque CONTROLS LOCKED
(commandes verrouillées) est allumé, tous les boutons sont
désactivés à l'exception de STOP (arrêt) et POWER
(alimentation). Vous pouvez verrouiller les commandes alors que
la laveuse est en marche.
Pour verrouiller les commandes
Sélectionner CYCLE SIGNAL (signal de programme) pendant
3 secondes.
Lorsque le témoin lumineux s'allume, la porte est verrouillée.
Programmes
Programmes de lavage
Choisir le programme de lavage en tournant le bouton de
sélection de programme au programme désiré. Le témoin
lumineux correspondant au programme sélectionné s'allumera.
Chaque programme est conçu pour différents types de tissu et
niveaux de saleté.
■ Chaque programme comporte une durée de programme, une
température de lavage/rinçage et une vitesse d'essorage
préréglées et peut comporter des options et modificateurs
préréglés. Les préréglages procurent les soins aux tissus
recommandés pour le programme sélectionné.
■ Les préréglages peuvent être modifiés à tout moment tant
que START (mise en marche) n'a pas été sélectionné. Toutes
les options et tous les modificateurs ne sont pas disponibles
avec tous les programmes. Pour modifier les réglages après
le début d'un programme, sélectionner STOP (arrêt) puis
sélectionner les réglages désirés. Appuyer sur la touche
START [pendant environ 1 seconde] pour poursuivre le
programme.
Le témoin lumineux CONTROLS LOCKED (commandes
verrouillées) s'allume.
Pour déverrouiller les commandes
Sélectionner CYCLE SIGNAL (signal de programme) pendant
3 secondes jusqu'à ce que le témoin lumineux CONTROLS
LOCKED (commandes verrouillées) s'éteigne.
68
Page 69

Préréglages de programme
Normal/Casual (normal/tout-aller)
Chaque programme comporte une durée de programme, une
température de l'eau et une vitesse d'essorage préétablies. Les
réglages préétablis procurent les soins aux tissus recommandés
pour le programme sélectionné. Voir le tableau.
Programme
Whitest Whites
(blancs les plus
Durée
estimée*
(hr:min)
0:85 Chaude/
Température
de lavage/
rinçage
Froide
Vitesse
d'essorage
High
(élevée)
blancs)
Heavy Duty
(service intense)
Normal/Casual
(normal/tout-
0:71 Chaude/
Froide
High
(élevée)
0:54 Tiède/Froide High
(élevée)
aller)
Express Wash
(lavage rapide)
0:30 Tiède/Froide High
(élevée)
(2-3 articles)
Delicate
(articles
0:37 Tiède/Froide Medium
(moyenne)
délicats)
Rinse/Drain &
Spin (rinçage/
0:25 Froide/Froide High
(élevée)
vidange et
essorage)
Drain & Spin
(vidange et
0:15 N/A High
(élevée)
essorage)
Clean Washer
(nettoyage de la
0:54 N/A High
(élevée)
laveuse)
*Les durées de programme varient automatiquement en
fonction de la pression et de la température de l'eau, du
détergent et de la charge de linge. La durée du programme
sera prolongée en cas d'excès de mousse ou si la charge est
déséquilibrée.
Whitest Whites (blancs les plus blancs)
Ce programme est spécialement conçu pour le nettoyage de
charges de linge blanc sale avec ajout d'agent de blanchiment.
Les températures de lavage élevées assurent un fonctionnement
optimal de l'agent de blanchiment. Un rinçage additionnel fournit
une performance de rinçage optimale pour éviter les résidus de
chlore sur votre lessive. Ce programme combine un culbutage à
vitesse rapide, une durée de lavage prolongée et un essorage à
vitesse élevée pour réduire la durée de séchage.
Heavy Duty (service intense)
Utiliser ce programme pour laver des charges de vêtements
robustes, aux couleurs grand teint et très sales. Ce programme
combine un culbutage à vitesse rapide, une durée de lavage
prolongée et un essorage à vitesse élevée pour réduire les durées
de séchage.
Utiliser ce programme pour laver des charges de tissus qui ne se
repassent pas tels que chemises de sport, chemisiers, vêtements
de travail tout-aller, mélanges à pressage permanent, coton et
linge de maison et tissus synthétiques. Ce programme combine
un culbutage à vitesse moyenne, un essorage à vitesse élevée et
un processus de refroidissement de la charge pour réduire le
froissement.
Express Wash (lavage rapide)
Utiliser ce programme pour laver des petites charges de
2-3 articles légèrement sales dont on a besoin rapidement. Ce
programme combine un culbutage à vitesse rapide, une durée de
lavage plus courte et un essorage à vitesse très élevée pour
réduire la durée de séchage. Les grandes charges prolongent la
durée de lavage.
Delicate (articles délicats)
Utiliser ce programme pour laver les tissus fragiles et la lingerie.
Ce programme combine un culbutage à basse vitesse et un
essorage à vitesse moyenne pour assurer un soin délicat des
tissus.
■ Utiliser des sacs en filet pour laver les sous-vêtements tels
que les soutiens-gorge à armature, les articles avec cordons
et les articles de petite taille tels que les chaussettes.
Rinse/Drain & Spin (rinçage/vidange et essorage)
Utiliser ce programme pour rincer, vidanger et essorer la charge
de lavage. Ce programme combine un culbutage à vitesse élevée
et un essorage à vitesse élevée. Si désiré, on peut réduire la
vitesse d'essorage en sélectionnant la vitesse souhaitée à partir
du modificateur SPIN SPEED (vitesse d'essorage).
Le programme Rinse/Drain & Spin est utile pour
■ Les charges qui nécessitent un rinçage uniquement.
■ Ajouter de l'assouplissant de tissu à une charge en utilisant le
distributeur d'assouplissant de tissu.
Drain & Spin (vidange et essorage)
Utiliser ce programme pour vidanger la laveuse ou pour vidanger
et essorer la charge de lavage. La vitesse d'essorage est
préréglée à High (élevée). Si désiré, on peut réduire la vitesse
d'essorage en sélectionnant la vitesse souhaitée à partir du
modificateur SPIN SPEED (vitesse d'essorage).
REMARQUE : Les charges de vêtements synthétiques, tissus
délicats, articles lavables à la main et lainages doivent être
vidangés sans essorage ou avec essorage à basse vitesse pour
ne pas déformer les tissus.
Utilisation du réglage DRAIN & SPIN
■ Sélectionner le programme RINSE/DRAIN & SPIN (rinçage/
vidange et essorage).
■ Appuyer sur le bouton 2ND RINSE (2nd rinçage) pour
désactiver l’option de rinçage.
■ Appuyer sur START (mise en marche).
69
Page 70

Clean Washer (nettoyage de la laveuse)
2nd Rinse (2nd rinçage)
Utiliser le programme Clean Washer une fois par mois pour
conserver l'intérieur de la laveuse frais et propre. Ce programme
utilise un niveau d'eau plus élevé en combinaison avec l'agent de
blanchiment liquide pour nettoyer à fond l'intérieur de la machine
à laver. Voir “Nettoyage de la laveuse”.
IMPORTANT : Ne pas placer de vêtements ou autres articles
dans la laveuse pendant le programme Clean Washer. Utiliser ce
programme avec un tambour de lavage vide.
Sons normaux
Comme avec tout nouveau produit, vous entendrez des sons
auxquels vous n'êtes pas habitués. Vous pouvez entendre
différents sons lors du verrouillage/déverrouillage de la porte et
durant le processus de lavage, rinçage ou essorage. Entre les
changements dans les actions de lavage, la laveuse fera des
pauses momentanées. Vous entendrez le bruit de la pulvérisation
et de l’éclaboussement de l'eau pendant les programmes de
lavage et de rinçage. Ces nouveaux sons et pauses font partie du
fonctionnement normal de la laveuse. Voir “Dépannage”.
Options
Vous pouvez personnaliser votre lavage en ajoutant des options à
vos sélections de programme. Vous pouvez ajouter ou modifier
une option après le début d'un programme à tout moment avant
la mise en marche de l'option sélectionnée. Toutes les options
ne sont pas disponibles avec tous les programmes.
Un second rinçage peut être effectué pour favoriser l'élimination
des résidus de détergent ou d'agent de blanchiment sur les
vêtements. Cette option fournit un rinçage additionnel avec une
eau à la même température que pour le rinçage normal.
Signal de programme
Ce signal est utile lorsque vous retirez les articles de la laveuse
aussitôt qu'elle s'arrête. Sélectionner ON (marche) ou OFF (arrêt).
Modificateurs
Les préréglages pour la température de l'eau, la vitesse
d'essorage et les options de rinçage peuvent être modifiés. Vous
pouvez changer un modificateur après le début d'un programme
à tout moment avant la mise en marche du modificateur
sélectionné. Tous les modificateurs ne sont pas disponibles avec
toutes les options et tous les programmes.
■ Consulter la section “Guide de lessivage” pour un aperçu des
options possibles pour chaque sélection de programme de
lavage.
■ Si une option est disponible avec un programme sélectionné,
le témoin lumineux pour cette option s'allume au moment de
la sélection.
■ Si une option n'est pas disponible avec un programme
sélectionné, un bref signal sonore est émis et le témoin
lumineux pour cette option ne s'allume pas au moment de la
sélection.
Prewash (prélavage)
Utiliser cette option pour des charges de vêtements très sales qui
nécessitent un prétraitement.
■ Ajouter du détergent dans le compartiment de lavage
principal du tiroir distributeur.
Cette option ajoute un temps de culbutage avant le programme
principal sélectionné. La laveuse enchaîne automatiquement du
programme de prélavage au programme de lavage principal.
■ Pour modifier la vitesse d'essorage, sélectionner le bouton
SPIN SPEED (vitesse d'essorage) jusqu'à ce que le réglage
désiré s'allume.
■ Pour modifier la température de l'eau, sélectionner le bouton
WASH/RINSE TEMP (température de lavage/rinçage), jusqu'à
ce que le réglage désiré s'allume.
Température de lavage/rinçage
Sélectionner une température de l'eau selon le type de charge à
laver. Utiliser l'eau de lavage la plus chaude sans danger pour les
tissus. Suivre les instructions sur l'étiquette des vêtements.
Les rinçages à l'eau tiède permettent un meilleur séchage que les
rinçages à froid. Les rinçages à l'eau tiède augmentent le
froissement. Dans les climats froids, un rinçage à l'eau tiède
facilite la manipulation de la charge. Les rinçages à froid
économisent de l'énergie.
70
Page 71

Guide de température
Température de l'eau de
lavage
HOT (chaude) Blancs et couleurs claires
WARM (tiède) Couleurs vives
COLD (froide) Couleurs qui déteignent ou
Dans les températures d'eau de lavage inférieures à 60ºF
(15,6ºC), les détergents ne se dissolvent pas bien. Les saletés
peuvent être difficiles à enlever.
Tissus suggérés
Saleté intense
Saletés modérées à légères
s'atténuent
Saletés légères
Commande automatique de la température
La Commande automatique de la température (CAT) détecte et
maintient électroniquement une température uniforme de l'eau.
La CAT régule l'arrivée d'eau chaude et d'eau froide. La fonction
CAT est automatiquement activée lorsqu'un programme est
sélectionné. Voir le tableau des préréglages de programme dans
“Programmes”.
■ La fonction CAT fonctionne pour la température de lavage
avec les réglages Warm/Warm (tiède/tiède), Warm/Cold
(tiède/froide) et Cold/Cold (froide/froide).
■ La fonction CAT fonctionne pour la température de rinçage
avec le réglage Warm/Warm (tiède/tiède).
■ Les températures de rinçage à froid dépendent de la
température de l'eau froide au robinet.
Guide de lessivage
Consulter ce tableau pour les types de charges suggérés et le programme correspondant. Pour chacun des programmes de la laveuse,
les options disponibles sont indiquées à droite.
PROGRAMME TYPE DE CHARGE SUGGÉRÉ OPTIONS DISPONIBLES
Whitest Whites
(blancs les plus
blancs)
Heavy Duty (service
intense)
Normal/Casual
(normal/tout-aller)
Express Wash
(lavage rapide)
Delicate
(articles délicats)
Rinse/Drain & Spin
(rinçage/vidange et
essorage)
Clean Washer
(nettoyage de la
laveuse)
Delay Start
(mise en
marche
différée)
Tissus blancs sales ✔✔✔✔
Sous-vêtements, serviettes, chemises, etc, en
coton et très sales
Chemisiers, chemises, salopettes, etc. en polyester,
nylon, coton, lin ou mélanges de coton et
normalement sales
Petites charges de 2-3 articles en coton, polyester,
nylon, et mélanges de coton légèrement sales
Rideaux et vêtements délicats, robes, jupes,
chemises et chemisiers
Toutes les charges ✔✔✔
Pas de vêtement ✔✔
✔✔✔✔
✔✔✔✔
✔✔✔
✔✔✔
Prewash
(Prélavage)
2nd
Rinse
(2nd
rinçage)
Cycle Signal
(signal de
programme)
71
Page 72

CONSEILS DE LESSIVAGE
Préparation des vêtements pour le lavage
Suivre les recommandations suivantes pour prolonger la vie de
vos vêtements.
■ Utiliser uniquement des détergents Haute efficacité. Pour ce
type de détergent, “HE” ou “Haute efficacité” sera mentionné
sur l'emballage. Ce système de lavage, utilisant moins d'eau,
provoquera trop de mousse avec un détergent ordinaire nonHE. L'utilisation d'un détergent ordinaire est susceptible
d'occasionner des erreurs de la part de la laveuse, des durées
de programmes plus longues et une performance de rinçage
réduite. Ceci peut aussi entraîner des défaillances des
composants et une moisissure perceptible. Les détergents HE
sont conçus pour produire la quantité de mousse adéquate
pour le meilleur rendement. Suivre les recommandations du
fabricant pour déterminer la quantité de détergent à utiliser.
Utiliser uniquement un détergent HE Haute efficacité.
■ Fermer les fermetures à glissière, les boutons pression et les
crochets pour éviter d'accrocher d'autres articles. Retirer les
épingles, boucles et autres objets durs pour éviter
d'égratigner l'intérieur de la laveuse. Ôter les garnitures et les
ornements non lavables.
■ Vider les poches et les retourner.
■ Retourner les revers et enlever la charpie et la poussière avec
une brosse.
■ Retourner les tricots synthétiques pour éviter le boulochage.
■ Attacher les cordons et les ceintures pour empêcher
l'emmêlement.
■ Raccommoder les déchirures, les ourlets défaits et les
coutures.
■ Traiter les taches.
■ Les vêtements tachés ou mouillés doivent être lavés sans
délai pour obtenir les meilleurs résultats.
■ Mélanger les petits articles avec les gros, éviter de laver un
article seul et répartir la charge de façon égale dans la
laveuse.
■ Laver les petits articles tels que les chaussettes d'enfants
dans un sac en filet pour le linge. Pour obtenir une charge
équilibrée, on recommande d'utiliser plus d'un sac et de
remplir chaque sac avec des quantités similaires.
REMARQUE : Si vous lavez uniquement des petits articles, il
est recommandé d'utiliser plus d'un sac et de remplir chaque
sac avec des quantités similaires.
Tri
■ Séparer les articles très sales des articles légèrement sales,
même si on les lave normalement ensemble. Séparer les
articles qui forment de la charpie (serviettes, chenille) des
articles qui retiennent la charpie (velours côtelé, synthétiques,
pressage permanent). Dans la mesure du possible, retourner
les articles qui forment de la charpie.
■ Séparer les couleurs foncées des couleurs claires et les
articles grand teint des articles qui déteignent.
■ Trier en fonction des tissus et de la confection (cotons
solides, tricots, articles délicats).
Déchargement
■ Retirer les vêtements de la laveuse une fois que le
programme est terminé. Des objets en métal comme les
fermetures à glissière, les boutons-pression et les boucles
peuvent rouiller si on les laisse longtemps dans le panier de la
laveuse.
■ Lorsqu'on retire le linge, vérifier de temps en temps sous le
joint de couleur grise à l'avant de la cuve qu'il n'y ait pas de
petits articles coincés.
Chargement
Suggestions de chargement
Vêtements de travail lourds
2pantalons
3chemises
Charge mixte
2draps doubles ou
1 drap de très grande taille
4 taies d’oreiller
6tee-shirts
Serviettes
8 serviettes de bain
8 serviettes à main
Articles délicats
3 camisoles
4jupons
4culottes
Programme EXPRESS WASH
(lavage rapide)
(2-3 vêtements)
3 jeans
1 salopette
6shorts
2chemises
2chemisiers
6 mouchoirs
10 débarbouillettes
1 tapis de bain
2 soutiens-gorge
2 chemises de nuit
2 chemises habillées
1 pantalon habillé
72
Page 73

Guide pour l'élimination des taches
Tache Utiliser un agent de
blanchiment au chlore
liquide ou sans danger
pour les couleurs
✔
Encre
✔
Sang
✔
Café/
chocolat
Utiliser le
programme de
lavage suggéré
Whitest Whites
(blancs les plus
blancs)
Cold (froide) ou
Warm (tiède)
Prewash (prélavage)
Normal/Casual
(normal/tout-aller)
Warm (tiède)
Prewash (prélavage)
Whitest Whites
(blancs les plus
blancs)
Heavy Duty (service
intense)
Tache Utiliser un agent de
blanchiment au chlore
liquide ou sans danger
pour les couleurs
✔
Herbe
✔
Produits à
base de
tomate
✔
Boue
Utiliser le
programme de
lavage suggéré
Whitest Whites
(blancs les plus
blancs)
Whitest Whites
(blancs les plus
blancs)
Warm (tiède)
Prewash (prélavage)
Whitest Whites
(blancs les plus
blancs)
Heavy Duty (service
intense)
Produits de
beauté
Warm (tiède)
Prewash (prélavage)
Heavy Duty (service
intense)
Huile de
moteur
usagée
Ne pas faire culbuter des articles secs sales ou tachés. La chaleur risque de fixer les taches de façon permanente.
Déodorants
Anneau
autour du
col
✔
Normal/Casual
(normal/tout-aller)
73
Page 74

ENTRETIEN DE LA LAVEUSE
Nettoyage de la laveuse
Nettoyage du joint/soufflet de la porte
1. Ouvrir la porte de la laveuse et retirer tout vêtement ou article
de la laveuse.
2. Examiner le joint/soufflet de couleur grise entre l'ouverture de
la porte et le panier pour déceler des zones tachées. Tirer sur
le joint/soufflet pour examiner toutes les zones sous le joint/
soufflet et voir s'il n'y a pas d'objets étrangers.
A
A. Joint/soufflet
3. Si des zones tachées sont décelées, essuyer ces zones en
respectant la procédure indiquée ci-dessous.
a) Mélanger une solution diluée en utilisant ¾ de tasse
(177 mL) d'agent de blanchiment liquide et 1 gal. (3,8 L)
d'eau tiède du robinet.
b) Essuyer la zone du joint/soufflet avec la solution diluée,
en utilisant un chiffon humide.
c) Laisser agir pendant 5 minutes.
d) Essuyer la zone complètement avec un chiffon sec et
laisser l'intérieur de la laveuse sécher avec la porte
ouverte.
IMPORTANT :
■ Porter des gants en caoutchouc en cas de nettoyage
pendant une période prolongée.
■ Consulter les instructions du fabricant de l'agent de
blanchiment pour une utilisation correcte.
Procédure d'entretien de la laveuse
Cette laveuse comporte un programme spécial qui utilise des
volumes d'eau plus importants en combinaison avec l'agent de
blanchiment liquide pour nettoyer à fond l'intérieur de la laveuse.
REMARQUES :
■ Lire ces instructions complètement avant de débuter la
procédure de nettoyage.
■ Si nécessaire, le programme de nettoyage peut être
interrompu en appuyant sur le bouton STOP (arrêt). Ceci
arrêtera le programme. Un programme RINSE/DRAIN & SPIN
(rinçage/vidange et essorage) doit alors être effectué afin
d'éliminer complètement l'agent de blanchiment de la
laveuse. Le non-respect de cette procédure peut causer des
dommages à la laveuse et aux vêtements ajoutés lors du
programme suivant.
Début de la procédure
1. Ouvrir la porte de la laveuse et retirer tout vêtement ou article
de la laveuse.
2. Vérifier que la porte est fermée.
3. Ouvrir le tiroir distributeur et ajouter immédiatement
²⁄₃ de tasse (160 mL) d'agent de blanchiment au chlore liquide
au compartiment d'agent de blanchiment.
REMARQUE : Ne pas verser de détergent pour ce
programme. L'utilisation de plus de ²⁄₃ de tasse (160 mL)
d'agent de blanchiment occasionnera, avec le temps, des
dommages au produit.
4. S'assurer que le tiroir distributeur est fermé.
5. Sélectionner le programme CLEAN WASHER (nettoyage de la
laveuse).
6. Appuyer sur START (mise en marche).
REMARQUE : Le panier pivotera, la porte se déverrouillera,
se verrouillera à nouveau et enfin le programme se
poursuivra.
■ La machine ne se remplira pas mais le panier pivotera
alors que la laveuse effectuera un court programme de
détection. Ceci prendra environ 3 minutes.
7. Le programme déterminera si des vêtements ou autres
articles se trouvent dans la laveuse.
a)b)Si aucun article n'est détecté dans la laveuse, il passera
à l'étape 8.
Si des articles sont détectés dans la laveuse, tous les
témoins lumineux clignoteront, “rL” ou “F-34” s’affichera
et les témoins WASH (lavage) et CONTROLS LOCKED
(commandes verrouillées) resteront allumés. La porte se
déverrouillera.
■ Appuyer sur STOP (arrêt) pour annuler le code
d'échec. Puis répéter les étapes 1, 2 et 6 pour
remettre le programme en marche.
8. Une fois que le programme a commencé, laisser le
programme s'achever.
9. À la fin du programme, laisser la porte légèrement ouverte,
pour permettre une meilleure ventilation et le séchage de
l'intérieur de la laveuse.
Toujours suivre la procédure qui suit pour préserver la
fraîcheur de la laveuse
■ Utiliser uniquement un détergent HE Haute efficacité.
■ Laisser la porte légèrement ouverte après chaque
programme pour permettre une meilleure ventilation et le
séchage de l'intérieur de la laveuse.
■ Répéter la procédure d'entretien chaque mois, en utilisant
²⁄₃ de tasse (160 mL) d'agent de blanchiment au chlore
liquide.
■ Si la procédure ne permet pas de remédier suffisamment aux
problèmes de fraîcheur de la machine, veuillez examiner les
conditions d'installation et d'utilisation pour déceler d'autres
causes.
74
Page 75

Nettoyage de l'extérieur
Remise en marche de la laveuse :
Utiliser une éponge ou un linge doux humide pour essuyer les
renversements. Essuyer occasionnellement les surfaces externes
de la laveuse pour maintenir son apparence d'appareil neuf.
Utiliser un savon doux et de l'eau. Ne pas utiliser des produits
abrasifs.
Nettoyage du tiroir distributeur
Le tiroir distributeur est amovible pour faciliter le nettoyage.
1. Déverrouiller le tiroir distributeur en appuyant sur le levier de
dégagement. Voir “Utilisation du distributeur”. Retirer le tiroir.
2. Ôter les inserts (le siphon des compartiments de
l'assouplissant de tissu et de l'agent de blanchiment).
3. Laver les pièces sous l'eau du robinet.
REMARQUE : Ne pas laver les composants au lave-vaisselle.
4. Réinstaller les inserts et remettre le distributeur dans le tiroir.
Robinets d'arrivée d'eau
Remplacer les tuyaux d'arrivée d'eau après cinq ans d'utilisation
pour réduire le risque de défaillance intempestive. Inspecter
périodiquement les tuyaux; les remplacer en cas de renflement,
de déformation, de coupure et d'usure ou si une fuite se
manifeste.
Lors du remplacement des tuyaux d'arrivée d'eau, inscrire la date
du remplacement.
Précautions à prendre avant les vacances,
un entreposage ou un déménagement
Installer et ranger la laveuse à l'abri du gel. L'eau qui peut rester
dans les tuyaux risque d'abîmer la laveuse en temps de gel. Si la
laveuse doit faire l'objet d'un déménagement ou de remisage au
cours d'une période de gel, préparer l'appareil pour l'hiver.
Entretien en cas de non-utilisation ou de période de
vacances :
Faire fonctionner la laveuse seulement lorsqu'on est présent. Si
vous devez partir en vacances ou ne pas utiliser la laveuse
pendant une période prolongée, vous devez exécuter les
opérations suivantes :
■ Débrancher la laveuse ou déconnecter la source de courant
électrique.
■ Fermer l'alimentation d'eau de la laveuse. Ceci aide à éviter
les inondations accidentelles (dues à une augmentation de la
pression) quand vous êtes absent.
■ Ouvrir légèrement la porte pour fournir une ventilation.
Préparation de la laveuse pour l'hiver :
1. Vidanger les canalisations d'eau.
2. Reconnecter les tuyaux d'arrivée d'eau aux robinets.
3. Ouvrir les deux robinets d'eau.
AVERTISSEMENT
Risque de choc électrique
Brancher sur une prise à 3 alvéoles reliée à la terre.
Ne pas enlever la broche de liaison à la terre.
Ne pas utiliser un adaptateur.
Ne pas utiliser un câble de rallonge.
Le non-respect de ces instructions peut causer
un décès, un incendie ou un choc électrique.
4. Brancher la laveuse ou reconnecter la source de courant
électrique.
5. Faire exécuter à la laveuse un programme Normal/Casual
(normal/tout-aller) avec la moitié de la quantité normale
recommandée de détergent HE pour une charge moyenne,
afin de nettoyer la laveuse et enlever l'antigel, le cas échéant.
Transport de la laveuse :
1. Si la laveuse doit être déplacée en temps de gel, verser
une pinte (1 L) d'antigel pour véhicule récréatif dans le
tambour. Faire exécuter à la laveuse un programme Drain &
Spin (vidange et essorage).
2. Débrancher le cordon d'alimentation.
3. Débrancher le tuyau de vidange du système de vidange et le
fixer aux pinces du panneau arrière.
4. Fermer les deux robinets d'eau.
5. Déconnecter les tuyaux d'arrivée d'eau des robinets puis
vidanger les tuyaux et les fixer au panneau arrière de la
laveuse.
6. IMPORTANT : Faire un appel de service. Ne pas réutiliser les
vis de calage. La laveuse doit être transportée en position
verticale. Pour éviter des dommages concernant la
suspension et la structure, votre appareil doit être
correctement monté pour une réinstallation ultérieure par un
technicien certifié.
1. Verser 1 pinte (1 L) d'antigel pour véhicule récréatif dans le
tambour.
2. Faire exécuter à la laveuse un programme Drain & Spin
(vidange et essorage).
3. Débrancher la laveuse ou déconnecter la source de courant
électrique.
4. Fermer les deux robinets d'eau.
5. Débrancher les tuyaux d'arrivée d'eau des robinets et les
vider.
Réinstallation de la laveuse
1. Suivre les “Instructions d'installation” pour choisir
l'emplacement, régler l'aplomb de la laveuse et la raccorder.
2. Faire exécuter à la laveuse un programme Normal/Casual
(normal/tout-aller) avec la moitié de la quantité normale
recommandée de détergent HE pour une charge moyenne,
afin de nettoyer la laveuse et enlever l'antigel, le cas échéant.
75
Page 76

DÉPANNAGE
Essayer d'abord les solutions suggérées ici pour éviter possiblement le coût d'une visite de service....
La laveuse et ses composants
Codes d'erreur
Un code d'erreur peut apparaître sur l'afficheur de la durée
résiduelle estimée. Consulter la liste ci-dessous pour identifier le
problème éventuel et effectuer les vérifications nécessaires.
■ “F20” affiché (problème d'admission d'eau - absence
d'eau ou alimentation insuffisante en eau)
Sélectionner deux fois STOP (arrêt) pour annuler le
programme. Débrancher la laveuse ou déconnecter la source
de courant électrique.
Vérifier ce qui suit :
Les robinets d'eau sont-ils complètement ouverts?
Les tamis au point de raccordement des tuyaux d'arrivée
d'eau à la laveuse sont-ils obstrués? Les tuyaux d'arrivée
d'eau sont-ils déformés?
Les tuyaux d'arrivée d'eau sont-ils gelés?
AVERTISSEMENT
Risque de choc électrique
Brancher sur une prise à 3 alvéoles reliée à la terre.
Ne pas enlever la broche de liaison à la terre.
Ne pas utiliser un adaptateur.
Ne pas utiliser un câble de rallonge.
Le non-respect de ces instructions peut causer
un décès, un incendie ou un choc électrique.
Brancher la laveuse ou reconnecter la source de courant
électrique. Sélectionner à nouveau un programme et appuyer
sur START (mise en marche). Si le problème persiste, faire un
appel de service.
■ “F21” affiché (problème de vidange)
Sélectionner deux fois STOP (arrêt) pour annuler le
programme. Débrancher la laveuse ou déconnecter la source
de courant électrique.
Vérifier ce qui suit :
Le tuyau de vidange est-il déformé?
Le tuyau de vidange est-il gelé?
Le tuyau de vidange est-il obstrué?
Le tuyau de vidange est-il à plus de 96" (2,4 m) au-dessus du
plancher?
■ “SD” (mousse savonneuse)
Lorsque de la mousse savonneuse excessive est détectée,
cette fonction se met en marche automatiquement. Cette
action enlève l’excès de mousse et assure le rinçage
approprié de votre linge. “SD” est affiché durant le rinçage et
à la fin du programme pour vous informer que l’action
corrective pour la mousse a été activée. Utiliser seulement
des détergents HE (haute efficacité).
■ Variables “F” [F01 - F34] (problème électrique)
Sélectionner deux fois STOP (arrêt) pour annuler le
programme. Sélectionner RINSE/DRAIN & SPIN (rinçage/
vidange et essorage) puis sélectionner 2ND RINSE (pour
désactiver l’option de rinçage) en cas d’excès d’eau dans la
laveuse.
Sélectionner à nouveau un programme et appuyer sur START
(mise en marche). Si le problème persiste, faire un appel de
service.
Bruit, vibrations, déséquilibre
■ La laveuse est-elle d'aplomb?
La laveuse doit être d'aplomb. Les quatre pieds doivent être
installés correctement et les écrous doivent être serrés contre
la caisse de la laveuse.
Les quatre pieds de la laveuse doivent être bien en contact
avec le plancher. Si la laveuse est sur un piédestal, elle doit
être fixée au piédestal et les quatre pieds du piédestal
doivent être bien en contact avec le plancher.
■ La laveuse fait-elle un bruit différent?
Comme avec tout nouveau produit, vous entendrez des sons
auxquels vous n'êtes pas habitués. Vous pouvez entendre
différents sons lors du verrouillage/déverrouillage de la porte
et durant le processus de lavage, rinçage ou essorage. Entre
les changements dans les actions de lavage, la laveuse fera
des pauses momentanées. Vous entendrez le bruit de la
pulvérisation et de l'éclaboussement de l'eau pendant les
programmes de lavage et de rinçage. Ces nouveaux sons et
pauses font partie du fonctionnement normal de la laveuse.
■ La laveuse est-elle installée sur un plancher robuste et
solide?
Se référer aux “Instructions d'installation” pour les exigences
relatives au plancher. Le bruit et les vibrations peuvent être
réduits en plaçant une planche de contreplaqué de ¾"
(19,1 mm) sous la laveuse. Le contreplaqué peut se prolonger
en-dessous de la laveuse et de la sécheuse pour les
maintenir à des hauteurs égales.
■ La laveuse fait-elle un bruit de gargouillement ou de
bourdonnement?
Lorsque l'eau est vidangée de la laveuse, on peut entendre le
bruit de la succion de l'air par la pompe. Ceci se produit à la
fin de la vidange. Ceci est normal.
■ Lavez-vous des articles avec agrafes en métal, boucles
ou fermetures à glissière?
Vous pouvez entendre le bruit des articles métalliques
touchant le tambour de la laveuse. Ceci est normal.
■ Les 4 vis de calage à l'arrière de la machine ont-elles été
retirées?
Voir “Élimination des accessoires de transport”.
76
Page 77

Fuites d'eau de la laveuse
Mauvaises odeurs de la laveuse
■ La porte a-t-elle été ouverte pendant “Add a garment”
(ajouter un vêtement)?
De l'eau peut suinter de l'intérieur de la porte si celle-ci a été
ouverte après le début d'un programme.
■ Un détergent HE est-il utilisé?
Les détergents non identifiés Haute efficacité peuvent causer
un excès de mousse qui peut créer des fuites à l'arrière de la
laveuse.
■ Les tuyaux de remplissage sont-ils serrés?
■ Les joints de tuyaux de remplissage d'eau sont-ils
correctement installés?
Vérifier les deux extrémités de chaque tuyau. Voir
“Raccordement des tuyaux d'alimentation”.
■ Le tuyau de vidange est-il correctement installé?
Le tuyau de vidange doit être bien fixé au conduit
d'évacuation ou à l'évier de buanderie. Voir “Immobilisation
du tuyau de vidange”.
■ L'évier ou le conduit d'évacuation est-il obstrué?
L'évier et le conduit d'évacuation doivent pouvoir drainer
17 gal. (64 L) d'eau par minute. Si le débit d'eau est obstrué
ou ralenti, l'eau peut refouler du conduit d'évacuation ou de
l'évier. Vérifier la plomberie du domicile (éviers de buanderie,
robinets, conduit d'évacuation, conduites d'eau) pour voir s'il
y a des fuites.
Fonctionnement des distributeurs
■ Avez-vous suivi les directives du fabricant pour l'addition
de détergent et d'assouplissant dans les distributeurs?
Mesurer la quantité de détergent et d'assouplissant de tissu.
Verser lentement dans les distributeurs. Essuyer tout
renversement. Diluer l'assouplissant dans le distributeur
d'assouplissant.
■ Avez-vous placé un agent de blanchiment en poudre ou
liquide sans danger pour les couleurs dans le distributeur
d'agent de blanchiment au chlore liquide (sur certains
modèles)?
Verser l'agent de blanchiment en poudre ou liquide sans
danger pour les couleurs dans le compartiment du détergent
principal. Ne pas utiliser le distributeur d'agent de
blanchiment au chlore liquide pour l'agent de blanchiment
sans danger pour les couleurs.
■ Le distributeur d'assouplissant de tissu est-il obstrué?
Nettoyer le distributeur d'assouplissant de tissu. Voir
“Entretien de la laveuse” pour les détails.
■ Les produits de lessive sont-ils dans le bon compartiment
du distributeur?
Verser les quantités appropriées de détergent,
d'assouplissant de tissu ou d'agent de blanchiment au chlore
liquide dans le compartiment approprié. Verser l'agent de
blanchiment en poudre ou liquide sans danger pour les
couleurs dans le compartiment du détergent principal.
■ Y a-t-il de l'eau dans le distributeur à la fin du
programme?
Une petite quantité d'eau restera dans le compartiment du
distributeur. Ceci est normal.
■ Voir “Nettoyage de la laveuse”.
■ Utilisez-vous un détergent HE?
L'utilisation d'un détergent non HE peut provoquer un film
résiduel à l'origine d'odeurs.
■ Avez-vous laissé la porte ouverte après utilisation?
Cette laveuse dispose d'une fermeture étanche pour éviter
les fuites d'eau. Pour éviter la formation d'odeurs, laisser la
porte ouverte afin de permettre à la laveuse de sécher entre
les utilisations.
La porte ne se déverrouille pas
■ Toute l'eau s'est-elle écoulée de la laveuse durant
l'essorage?
Sélectionner RINSE/DRAIN & SPIN (rinçage/vidange et
essorage) puis sélectionner 2ND RINSE (pour désactiver
l’option de rinçage) pour évacuer toute eau restée dans la
laveuse. La porte de la laveuse se déverrouillera à la fin de la
vidange.
■ La porte est-elle verrouillée et le témoin “Add a garment”
(ajouter un vêtement) est-il allumé?
Appuyer une fois sur STOP (arrêt). La porte se déverrouillera.
Fonctionnement de la laveuse
La laveuse ne fonctionne pas, ne se remplit pas, ne rince
pas, ne culbute pas; la laveuse s'arrête
AVERTISSEMENT
Risque de choc électrique
Brancher sur une prise à 3 alvéoles reliée à la terre.
Ne pas enlever la broche de liaison à la terre.
Ne pas utiliser un adaptateur.
Ne pas utiliser un câble de rallonge.
Le non-respect de ces instructions peut causer
un décès, un incendie ou un choc électrique.
■ Le cordon d'alimentation est-il branché dans une prise à
3 alvéoles reliée à la terre?
Brancher le cordon d'alimentation dans une prise à 3 alvéoles
reliée à la terre.
■ Utilisez-vous un câble de rallonge?
Ne pas utiliser un câble de rallonge.
■ Un fusible est-il grillé ou le disjoncteur s'est-il déclenché?
Remplacer le fusible ou réenclencher le disjoncteur. Si le
problème persiste, appeler un électricien.
■ Les deux robinets d'eau (chaude et froide) sont-ils
ouverts?
Ouvrir l'arrivée d'eau.
■ Le tuyau d'arrivée d'eau est-il déformé?
Redresser les tuyaux.
77
Page 78

■ Les tamis de la valve d'arrivée d'eau sont-ils obstrués?
Couper l'arrivée d'eau et retirer les tuyaux d'arrivée d'eau de
la laveuse. Ôter toute pellicule ou particules accumulées.
Réinstaller les tuyaux, ouvrir l'arrivée d'eau et vérifier s'il y a
des fuites.
■ La laveuse est-elle en pause normale du programme?
La laveuse fait une pause d'environ 2 minutes dans certains
programmes. Laisser le programme se poursuivre. Certains
programmes comprennent des périodes de culbutage et de
trempage.
■ La laveuse est-elle surchargée?
Laver des charges plus petites.
■ La porte de la laveuse est-elle bien fermée?
La porte doit être fermée lorsque la laveuse est en marche.
■ Les vis de calage ont-elles été retirées?
Les quatre vis de calage doivent être retirées pour un
fonctionnement correct de la laveuse.
■ Un programme a-t-il été sélectionné sans que START ait
été sélectionné pendant 1 seconde?
Appuyer sur START (mise en marche) pendant 1 seconde.
■ La porte a-t-elle été ouverte après l'achèvement du
dernier programme?
La porte doit être ouverte et fermée à nouveau pour mettre en
marche un nouveau programme.
La laveuse continue de se remplir ou la vidange se
poursuit, le programme semble bloqué
■ Le haut du tuyau de vidange est-il plus bas que 30"
(76 cm) sur la laveuse?
Le dessus du tuyau de vidange doit être au moins à 30"
(76 cm) au-dessus du plancher. Voir “Système de vidange”.
■ Le tuyau de vidange est-il trop serré dans le conduit
d'évacuation, ou est-il fixé au conduit d'évacuation avec
du ruban adhésif?
Le tuyau de vidange doit être lâche mais bien fixé. Ne pas
sceller le tuyau de vidange avec du ruban adhésif. Le tuyau a
besoin d'une ouverture pour l'air. Voir “Immobilisation du
tuyau de vidange”.
La laveuse n'effectue pas de vidange ni d'essorage,
l'eau reste dans la laveuse
■ Le tuyau de vidange est-il obstrué ou l'extrémité du tuyau
de vidange se trouve-t-elle à plus de 96" (2,4 m) audessus du plancher?
■
La tension est-elle basse?
Vérifier la source de courant électrique ou appeler un électricien.
■ Excès de mousse?
Lorsqu'un excès de mousse est détecté, une procédure
spéciale contre la mousse se met en marche
automatiquement. Le programme se terminera une fois que
l'excès de mousse sera éliminé. Ceci survient plus
fréquemment lorsqu'un détergent non-HE est utilisé.
■ La charge est-elle équilibrée?
Le lavage d’un seul article ou d’un article encombrant peut
provoquer un déséquilibre. Ajouter des articles ou redistribuer
la charge.
Pas assez d'eau/pas assez de mousse
■ Faible niveau d'eau?
Cette laveuse utilise un faible niveau d'eau afin de fournir des
résultats de nettoyage satisfaisants. Vous verrez peu ou pas
d'éclaboussures d'eau avec cette laveuse. Ceci est normal.
■ Utilisez-vous un détergent HE?
Le détergent HE est un détergent qui provoque peu de
mousse. Ceci est normal et n'affecte pas la performance de
nettoyage.
Température de lavage/rinçage
■ Les robinets d'arrivée d'eau chaude et froide ont-ils été
inversés?
Voir “Raccordement des tuyaux d'alimentation”.
■ Lavez-vous un nombre important de charges?
Lorsque la fréquence de charges lavées augmente, la
température de l'eau peut baisser lorsqu'on choisit une
température chaude ou tiède. Ceci est normal.
Changements dans la durée du programme/programme
trop long
■ Durée de programme estimée?
Les durées de programme varient automatiquement en
fonction de la pression et de la température de l'eau, du
détergent et de la charge de linge. La durée du programme
sera prolongée en cas d'excès de mousse ou si la charge est
déséquilibrée. La procédure contre la mousse élimine l'excès
de mousse et permet un rinçage correct de vos vêtements.
Les options sélectionnées affectent aussi les durées de
programme qui sont mentionnées dans le tableau des
préréglages de programme.
■ Excès de mousse?
Lorsqu'un excès de mousse est détecté, une procédure
spéciale contre la mousse se met en marche
automatiquement. Cette procédure prolongera la durée
initiale du programme.
■ La charge a-t-elle causé un déséquilibre?
Lorsqu'il y a un trop grand déséquilibre, une procédure de
rééquilibrage se met en marche pour redistribuer la charge.
L'affichage de la durée se mettra en pause jusqu'à ce que
cette activité soit terminée, puis se réactivera pour le reste du
programme.
■ Lavez-vous un article seul ou une charge encombrante?
La durée d'essorage est ajoutée si une charge déséquilibrée
est détectée. La laveuse tentera de redistribuer la charge
avec un culbutage supplémentaire.
■ Avez-vous lavé une grande charge avec le programme
Express Wash (lavage rapide)?
Le programme Express Wash (lavage rapide) est conçu pour
les plus petites charges (2-3 articles) de vêtements
légèrement sales. Si des charges plus grandes sont lavées
avec ce programme, la durée de lavage augmentera.
■ Avez-vous lavé une grande charge en utilisant un
programme doux ou le programme Delicate (articles
délicats)?
Avec les programmes de lavage Express Wash (lavage
rapide), ou Delicate (articles délicats), vous devez laver des
petites charges. Ceci assure un lavage délicat de vos
vêtements sans augmenter les durées de programme.
78
Page 79

Entretien des vêtements
Charge trop mouillée
■ Avez-vous utilisé le bon programme pour la charge à
laver?
Choisir un programme avec une vitesse d'essorage plus
élevée.
■ Avez-vous lavé un article seul, des articles encombrants
ou avez-vous surchargé la laveuse?
Le lavage d'un seul article ou d'un article encombrant, ou une
charge excessive peuvent provoquer un déséquilibre. Ajouter
des articles ou essayer de répartir uniformément la lessive
mouillée dans le tambour. Sélectionner RINSE/DRAIN & SPIN
(rinçage/vidange et essorage) puis sélectionner 2ND RINSE
(pour désactiver l’option de rinçage) pour vidanger la laveuse.
Si la lessive est encore mouillée, retirer la moitié de la charge
de la laveuse et essayer de nouveau.
■ Avez-vous utilisé un détergent HE?
La présence de mousse durant les programmes de rinçage et
d'essorage peut réduire la vitesse d'essorage. Utiliser un
détergent HE.
Résidus, charpie, taches sur la charge; blancs grisâtres,
couleurs défraîchies
■ Avez-vous ajouté du détergent au distributeur?
Pour des résultats optimaux, ajouter du détergent au
compartiment de détergent. Ne pas verser le détergent dans
le tambour de la laveuse.
■ Avez-vous effectué le tri correctement?
Trier les articles causant la charpie (serviettes, chenille) des
articles qui retiennent la charpie (velours côtelé,
synthétiques). Le transfert de teinture peut se produire lors du
mélange d'articles blancs et de couleur dans une même
charge. Séparer les articles de teinte foncée des articles
blancs ou clairs.
■ Avez-vous surchargé la laveuse?
Ne pas surcharger la laveuse. La laveuse peut être bien
remplie mais le linge ne doit pas être tassé. La charge de
lavage doit être équilibrée. De la charpie peut être coincée
dans la charge s'il y a surcharge.
■ Vérifier ce qui suit :
Avez-vous laissé du papier ou des mouchoirs en papier dans
les poches?
■ Avez-vous utilisé suffisamment de détergent HE?
Suivre les recommandations du fabricant pour le type de
charge à laver. Pour des résultats optimaux, utiliser
uniquement un détergent Haute efficacité. Utiliser
suffisamment de détergent pour enlever la saleté et la
maintenir en suspension.
■ Avez-vous une eau dure?
Utiliser plus de détergent pour laver la saleté intense à l'eau
froide ou dure.
■ La température de l'eau est-elle inférieure à 60°F
(15,6°C)?
Une eau de lavage plus froide que 60°F (15,6°C) peut ne pas
dissoudre complètement le détergent. Utiliser les lavages à
l'eau chaude ou tiède si celles-ci sont sans danger pour les
tissus de la charge. S'assurer que le système d'eau chaude
est adéquat pour fournir un lavage à l'eau chaude.
■ Utilisez-vous un programme de lavage à basse vitesse?
Les détergents en poudre peuvent ne pas se dissoudre
correctement durant un programme à basse vitesse. Pour
des résultats optimaux, utiliser un détergent liquide pour les
programmes à basse vitesse tels que Delicates (articles
délicats).
■ Avez-vous déchargé la laveuse immédiatement?
Pour éviter le transfert de teinture, décharger la laveuse dès
qu'elle s'arrête.
■ Avez-vous utilisé une boule distributrice d'assouplissant
de tissu?
Les boules distributrices ne fonctionnent pas correctement
avec cette laveuse. Verser un assouplissant de tissu liquide
dans le compartiment d'assouplissant de tissu.
■ Avez-vous utilisé un détergent en poudre pour un
programme à vitesse faible?
Envisager l'utilisation d'un détergent liquide.
■ Avez-vous utilisé le programme Express Wash (lavage
rapide) pour une grande charge?
Pour des résultats optimaux, utiliser le programme Express
Wash (lavage rapide) pour les petites charges de linge
légèrement sale.
La charge est froissée, entortillée, enchevêtrée
■ Avez-vous déchargé la laveuse immédiatement?
Décharger la laveuse dès qu'elle s'arrête.
■ Avez-vous utilisé le bon programme pour la charge à
laver?
Utiliser le programme Delicates (articles délicats) ou un autre
programme avec basse vitesse d'essorage pour réduire le
froissement.
■ Avez-vous surchargé la laveuse?
La charge de lavage doit être équilibrée et pas surchargée.
Les charges doivent pouvoir se déplacer librement durant le
lavage.
■ L'eau de lavage était-elle suffisamment chaude pour
réduire le froissement?
Si c'est sans danger pour la charge, utiliser une eau de
lavage tiède ou chaude.
■ Les robinets d'eau chaude et froide ont-ils été inversés?
Vérifier que les tuyaux d'eau chaude et d'eau froide sont
connectés aux bons robinets. Un rinçage à l'eau chaude suivi
d'un essorage provoquera un froissement. Voir
“Raccordement des tuyaux d'alimentation”.
79
Page 80

W10117769A
© 2007 Sears Brands LLC
®Registered Trademark/
®Marca registrada/
TM
TM
Marca de comercio/
Trademark/
®Marque déposée/
SM
Service Mark of Sears Brands LLC, under licensee by Sears Canada.
SM
Marca de servicio de Sears Brands LLC, usada bajo licencia por Sears Canada.
TM
Marque de commerce/
en vertu d’un porteur de licence par Sears Canada.
SM
Marque de service de Sears Brands LLC,
Printed in Mexico
1/07
Impreso en México
Imprimé au Mexique
 Loading...