

Page 1
No regrese este proclucto a kl tienckl
Si t_e_÷ ¢_g_ prob_em_ ¢o_ es_e prodgcto, par fervor ¢ont_¢te el "Centro _e Servklo _
Co.sure,dot _e H_er" _ ]=_77=337=3639 (Vat,do solo e_ E°UoA)_
NECESITA U_A P_UEBA DE COMPPJ_ FEC_ADA PARA EL SE_V_C_Q DE LA GARAhmA
_15_ 60Hz
PA_de i_ Ch_
@ @ 0 0
What The World Comes Hom_ To TM
Hoier A_erico
Hew York, HY ] 0018
HBFO5OE-2 part #RF-9999-]] 7
Page 2

@ • @ 0
What The World Comes Home To =
l lis?eH
Fo i Bi
Model#
f_fffu_f_o_W_stdf_ff°o_-
Mod61e#
Modelo#
Page 3
ReadaHof the instructions before using this appJiance° When
using this appJiance, aJways exercise basic safe_
precautiens, incJuding the foHewing:
1. Use this appliance only for its intended purpose as described in this operation
manuaI,
2. Thisappliancemustbe properly installedin accordancewith theinstallation
instructionsbeforeit is used_Seethe installationsectionfor moredetails.
3_
4_
5_
6_
7.
8.
9.
Thisappliancemustbe connectedto a proper electricaloutletwith the correct
electricalsupply.
Proper grounding must be ensured to reduce the risk of shock and fire. Do not
cut or remove the grounding plug! Ifyou do not have a three-prong electric
receptacle outlet in the wd!, have a certified electrician install the proper outlet.
The waJJreceptacle must be properly grounded.
Never unplugyour applianceby pulling on thepower cord. Always graspthe
plug firmly and puJJstraightout from theoufleL
Immediately replace worn power cords, loose plugs and power outlets.
Toreducetheriskof electricshockor fire, do not useextensioncordsor
adaptersto connecttheunitto an electricalpower source.
Unplug your appliance before cleaning or making any repairs.
\'Ve suggest that a certified technician perform the service if for any reason this
product requires service.
10. if your old appliance is being discarded, we recommend that you remove the
door and leave the shelves in pJace.This wiJJ reduce the possibiJib,"of danger to
children.
11.Thisapplianceshould notbe recessedor built intoan endosedcabinet. It is
designedfor freestandinginstallationonly.
12. Donot operate),'ourappliancein thepresenceof explosivefumes,
13_Do nottamperwith thecontroJs_
14_Do notoperatethisappliance unlessaJJenclosurepanelsare properly in place.
15. Do notoperatethisappliance when partsare missingor broken,
1& Do notusethisappliancefor commerdaJuse_
17.Thisapplianceis designedfor indoor useonly and shouldnot be usedoutdoors,
18.Toreducetherisk of iniury, do not allow childrento play in or on theappliance.
Closesupervisionisnecessarywhentheappliance is usednear children.
19.Theappliancedoor mustbe dosedduring operation. Do notleavethedoor
open whenchildren are near the dispensen
Page 4
Important Safe,/Precautions of ¢02 (Carbon Dioxide) Gas
1. CO2 gas can be dangerous! CO2 cylinders contain high-pressure
compressed gas, which can be hazardous if not handled properly. Make sure
you read and understand all the procedures for the CO2 cylinders before
instdJation.
2. Always connect the CO2 cylinder to a regulator! Failure to do so may cause an
explosion res@ing in possible death or iniury when the cylinder vdve is
opene&
3. Never connect the CO2 cylinder directly to the product container.
4_ Always follow the correct procedures when changing cylinders.
5. Never drop or throw a C02 cylinden
6. Always keep C02 cylinders away from heat. Store extra cylinders in a cod
place (preferably 70 ° F). Securely fasten with a chain in an upright position
when storing.
7. Always ventilate and leave the area immediately if C02 leakage has occurred!
8. Always check the D.QT. (Department of Transport) test date on the cylinder
neck before installation, if it has been over 5 years, do not use. Return the
cylinder to ),'our gas suppJien
9. Never connect a product container unless there are at least two safety devices
in the pressure system; one on the C02 regulator and the other on the product
container or in the pressure gas line.
SAVETHESEiNSI"RU(I"iONS
ForFutureUse
J]AN@ER!
Riskd childentrapment!BnJ0rnthrowingawayy0nrdd appJiancn,
rem0ve the dear se that dliJdrenmay net easily becometrappedinsideo
Thank you for purchasing our Haier
producL Thiseasy-to-use manual will
guide you in getting the best use of
your beer dispensen
Remember to record the model and
serial numben They are on a label in
back of the uniL
Model number
Serial number
Date of purchase
Page 5
PAGE
$AFr:YYPRECAUTIONS 1-2
GeneralSafety 1
CO2(CarbonDioxide/Gas Safety ................................................................ 2.
UNPACKmNG AND ACCESSORmESiNVENTORY ..................................4
PARTS AND FEAYUR_:$............................................................................ 5
PROPI:R LOCATION ................................................................................ 6
ASSI:MBLY JNSTRUCTmON$ 7° 10
Installing the Casters .................................................................................... 7
Installing the Beer Tap .................................................................................. 7'
Installing the GuardraiJ .................................................................................. 8
Installing the C02 ReguJator and C02 CyJinder .............................................. 8
Tapping the Beer Keg (Single-Valve Type Barrel) ............................................ @
Important Safety Message for Draft Beer Dispensing .................................... 10
OPERATING YOUR BI:_:R DmSPI:NSER .................................. 10 o1:2
Dispensing the Beer 11
Understanding Beer Temperature ............................................................. 11
Understanding the Temperature Control Setting ............................................ 11
Automatic Defrosting .................................................................................. 1 1
NormaJ Operating Sounds .......................................................................... 1:2
ENERGY SAVING YJPS .......................................................................... 14
WARRAN'LrY............................................................................................ :2:2
Page 6
U pocki g oHd A essoFies
1. Remove aJJpacking rnateriaJs_This indudes the foam base and aJJadhesive
tape holding the accessories both inside and outside. Slide out and remove the
plastic or foam guard used to secure the compressor during shipping.
2. hspect and remove any remaining packaging, tape or printed materials before
turning on the beer dispensen
N@te: Allow the beer dispenser to stand in an upright position for 2 hours before
turning on the powen
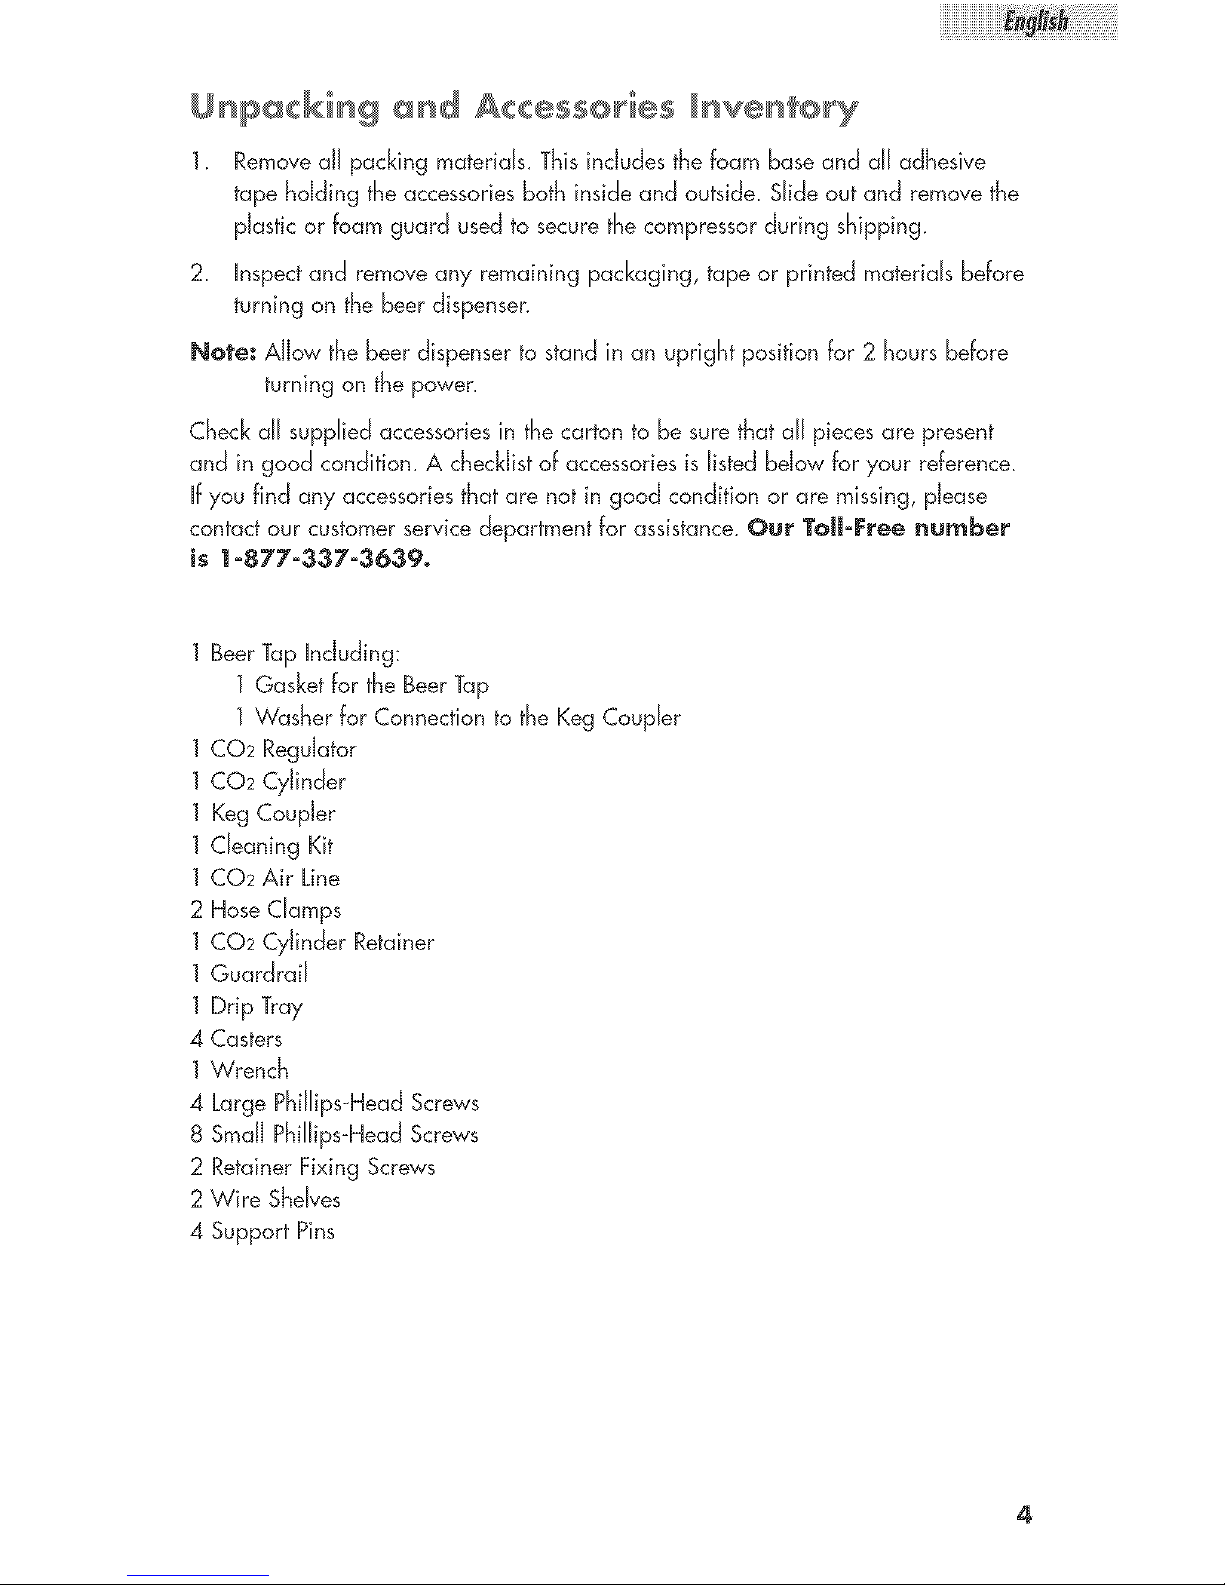
Check all supplied accessories in the carton to be sure that all pieces are present
and in good condition. A checklist of accessories is listed bdow for your reference.
Hfyou find any accessories that are not in good condition or are missing, please
contact our customer service department for assistance. Our ToH-J:ree number
is J-877-337-3639.
1 Beer Tap HncJuding:
1 Gasket for the Beer Tap
1 VV'asherfor Connection to the Keg Coupler
1 C02 Regulator
1 C02 Cylinder
1 Keg Coupler
1 Cleaning Kit
1 COz Air Line
2 Hose Clamps
1 C02 Cylinder Retainer
1 GuardraiJ
1 Drip Tray
4 Casters
1Wrench
4 Large Phillips-Head Screws
8 Small Phillips-Head Screws
2 Retainer Fixing Screws
2 Wire Shelves
4 Support Pins
Page 7
iiiiiiiiiiiiiiiiiiiiiiiiiiiiiiiiiiiiiiiiiiiiiiiiiiiiii_@_i_i_i_i_i_i_i_i_i_i_i_i_i_i_i_i_i_i_i_i_i_i_i_i_i_i_i!_
_ts _d Features
© ©
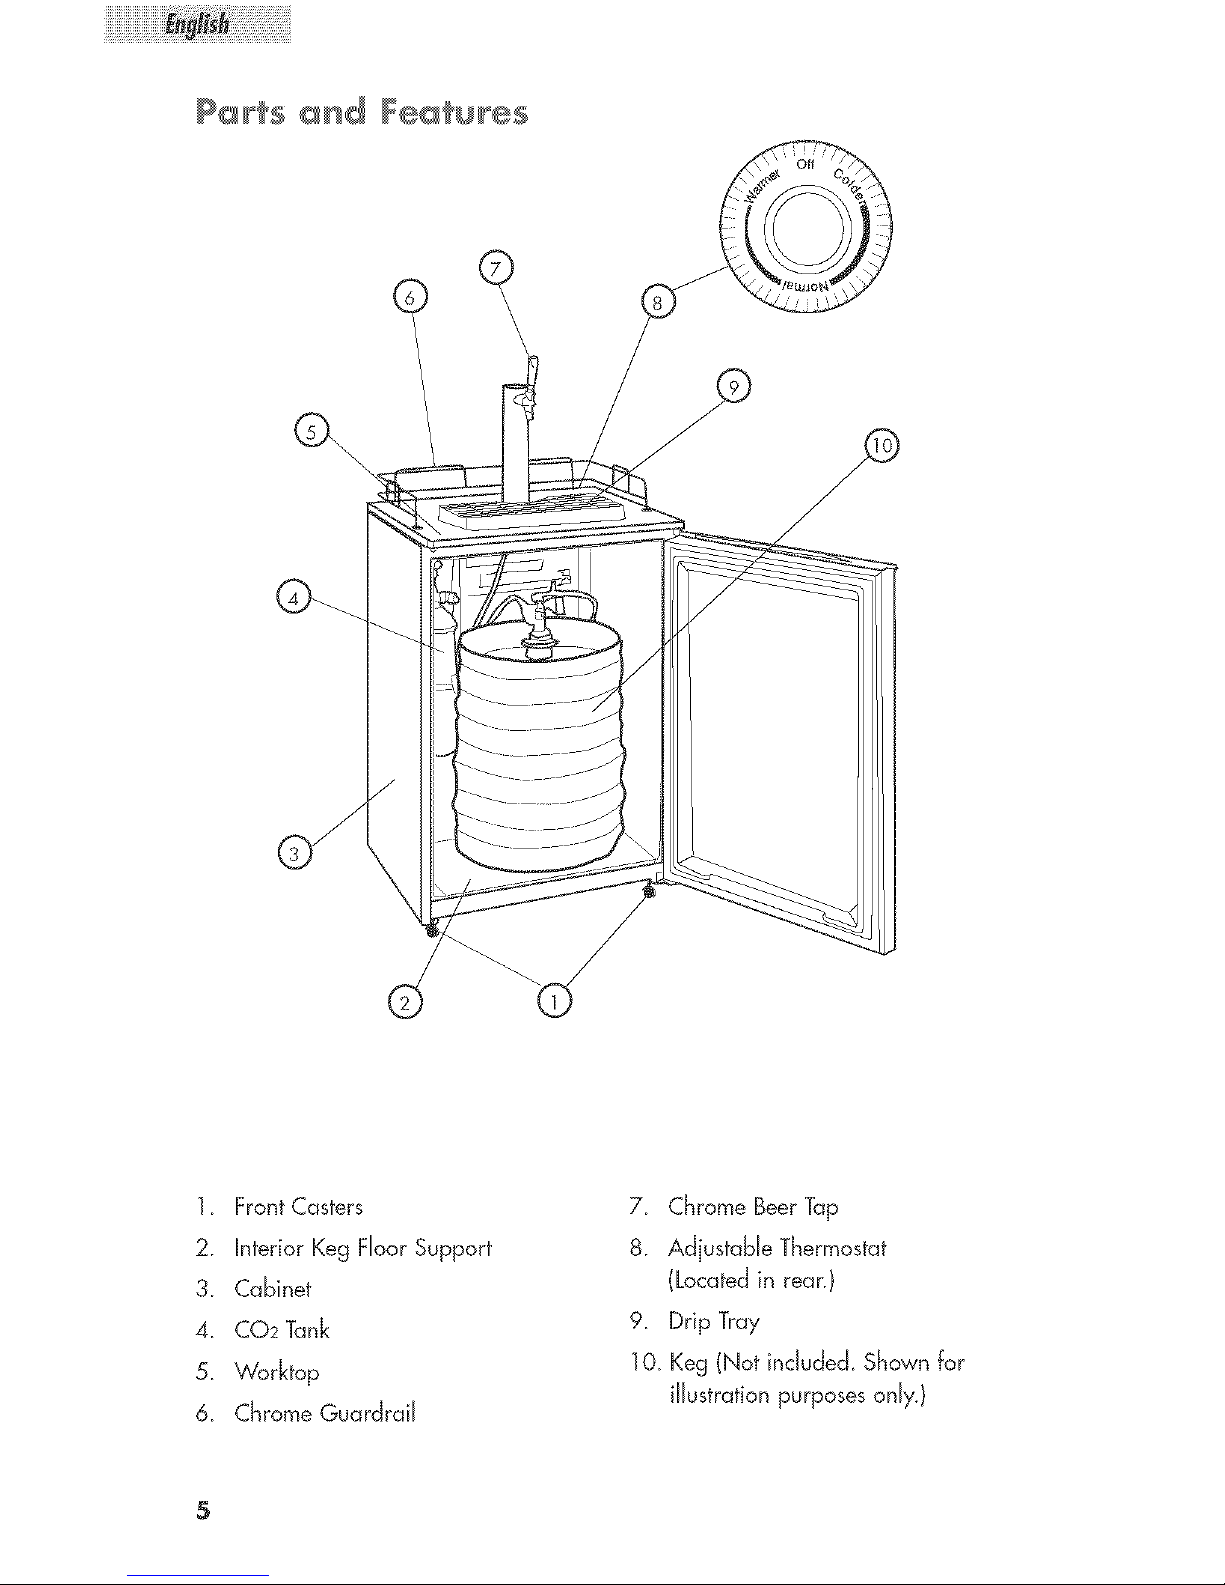
1_ Front Casters
2. Interior Keg FJoorSupport
3_ Cabinet
4. CO2 Tank
5. \'Vorktop
& Chrome GuardraiJ
7_ Chrome Beer Tap
8. AdjustabJe Thermostat
(Located in rean}
9. Drip Tray
10_Keg (Not incJudecLShown for
iJJustrationpurposes onJ,v.}
Page 8
r@per B@c ti@
Toensure that ),'our beer dispenser works at the maximum efficiency it was
designed for, instal[ it in a location where there is proper air circulation, plumbing
and electrical connections.
Choose a location where the beer dispenser wiJJbe away from heat and wiJJnot
be exposed to direct sunlight.
®Thisbeer dispenseris designedfor indoor use only and shouldnot be used
outdoors.
" This beer dispenser is a freestanding design and should not be placed in a built-in
or"recessed area.
® The following dimensions are the recommended clearances around the beer
dispensen
Sides ........................ 3/4" (19mm}
Top.............................. 1" (25ram}
Back............................ 1" (25ram}
Page 9

Assembly str cti@ s
ReadcarefulJyand understandaJJinstallationinstructionsbeforeinstallingthebeer
dispensenHfafter completingtheprocessyou are still unsurewhetherthe beer
dispenserhasbeenproperly installed,we recommendthat you contacta qualified
installer.
installing the Casters
Followthestepsbdow to install thecasters.
Nut
\
\
1. Emptytheinsideof the cabinetcompletelyand
Jaythebeerdispenserdown sideways.\'Ve
recommendthatyou placea pieceof
cardboard or cloth underneaththecabinetto
preventdentsor scratchestothe cabineL
Caster
2. hsert the casters into the holes on the boffom corners of the cabinet. Tighten
eachcasterbyturning the nutcJockwisewith thewrench provided,
3. Once all four castershavebeentightenedevenly,standthecabinet in an upright
position.
installing the Beer Tap
Followthestepsbdow to install thebeertap.
1_First,removethecabinetplug locatedon the
worktop_Firmlygrasp thecabinet plug, twist
and pull upward_
Note: Store thisplug in a safeplaceas it wiJJ
be requiredwhenconvertingthebeer
dispenserinto a refrigeraton
2. Placethegasketover thewing nuton the
bottomof the beertap_
3. Passthebeer tubethroughthegasketto the
baseof the beertap.
4_Pushboththewing nutand the beerduct
throughthehole in theworktop untilthe beer
tap isrestingon topof thecabinet.
Handle
Draft Arm Assembly
Small Phillips Head
Guard Rai_
5. Align theholesof thebeer tap with thegasketand pilot holeson the worktop of
cabinet.
6. Secure the beer tap to the cabinet by inserting four large Phillips-Head screws
into the holes and tightening,
Page 10
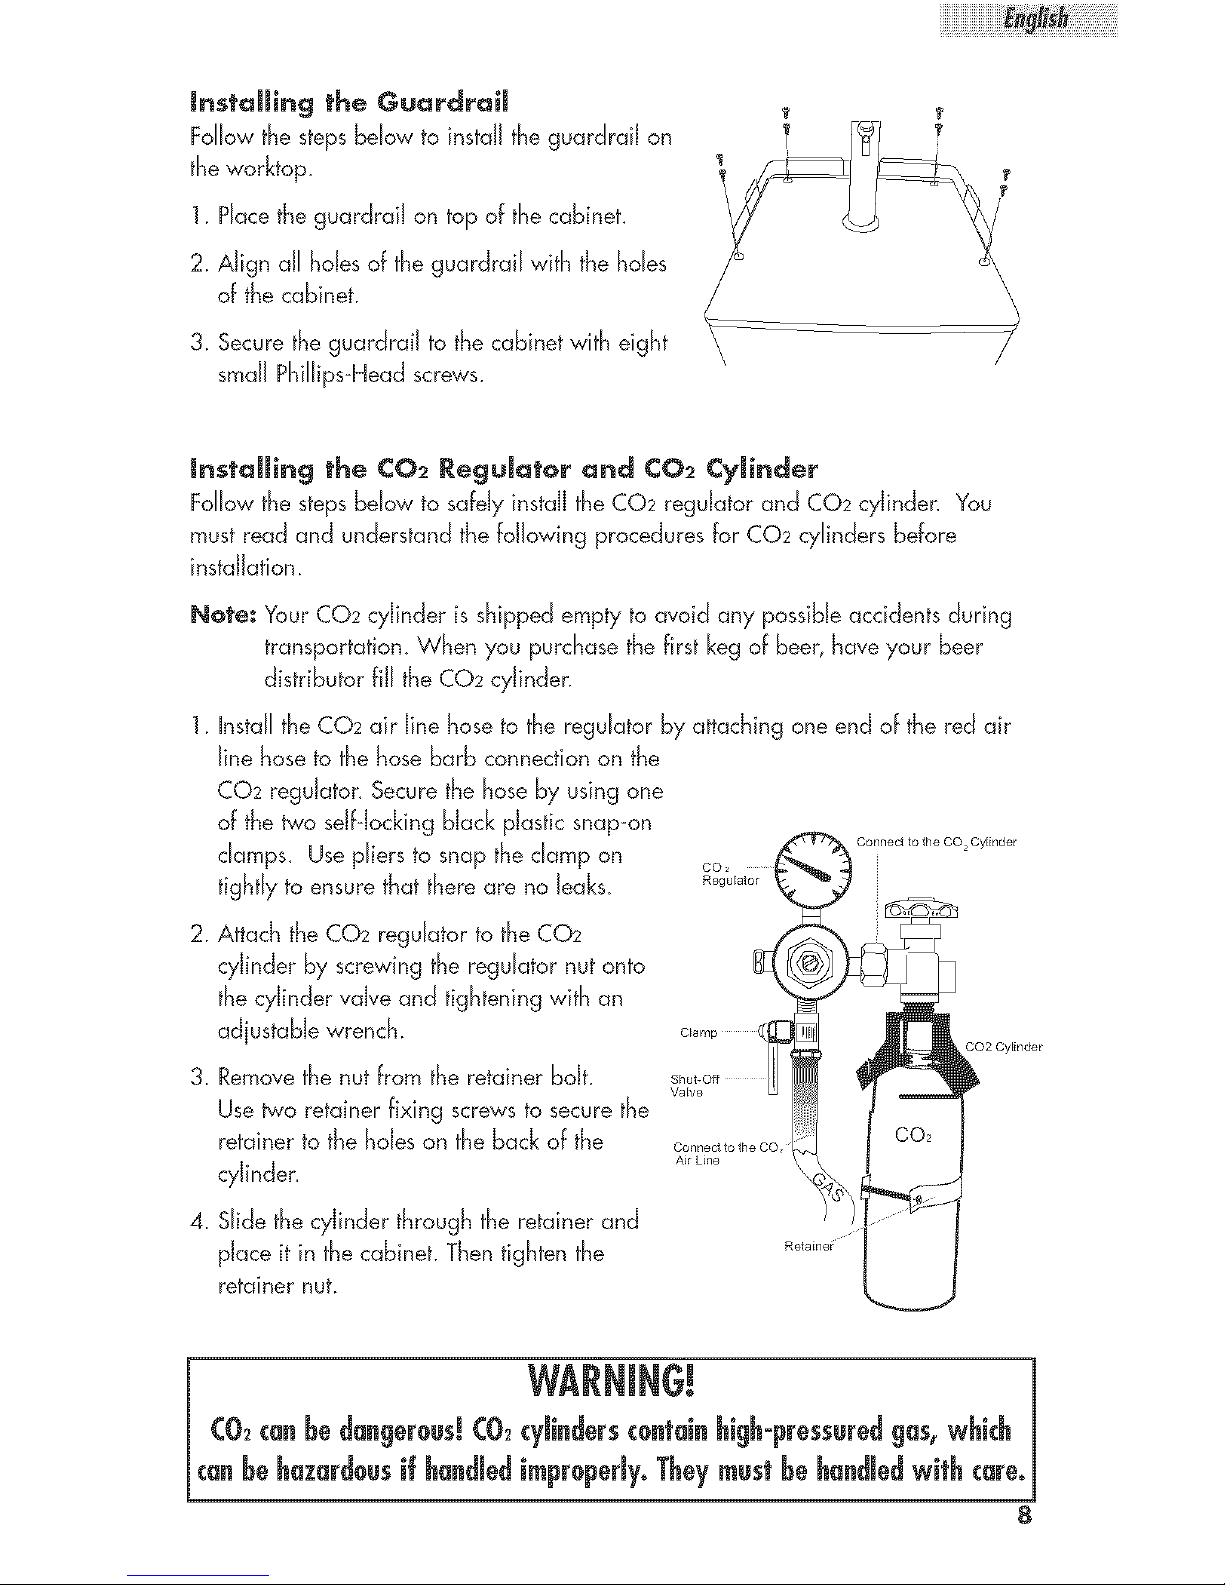
InstaJJing the GuardraiJ
Followthestepsbdow to install theguardraiJon
theworktoF
1. PlacetheguardraiJon top of thecabinet.
2. Align aJJholesof theguardrd with thehales
of thecabinet.
3. Secure the guardraiJ to the cabinet with eight
smdJ Phillips-Head screws.
Installing the ¢02 Regulator and ¢O2 Cylinder
Followthestepsbdow to safelyinstalltheCO2 regulatorand CO2cyJindenYou
mustread and understandthefollowing proceduresfor CO2cylindersbefore
installation.
Note: YourCO2cylinder isshippedemptytoavoid any possibleaccidentsduring
transportation_When you purchasethefirst kegof beer,haveyour beer
distributorfill theCO2cylinder.
1. InstalltheCO2air line hoseto the regulatorby attachingone end of thered air
line hoseto the hosebarb connectionon the
CO2reguJatonSecurethe hoseby usingone
of thetwo self-lockingblack plasticsnap-on
damps. Usepliers to snapthedamp on C°nnec4t°theC°2Cy[inder
tightlyto ensurethatthereare no Jeaks.
2. Attach theCO2regulatorto theCO2
cylinder by screwingtheregulatornutonto
thecylinder valveand tighteningwith an
adjustablewrench. Clamp (
3. Removethenutfrom the retainerbolt. Shut-Off
Valve
Usetwo retainerfixing screwsto securethe
retainertothe holeson theback of the 0........ _o_heCO
cyJinder_ AirLin_
4_Slidethecylinder throughtheretainer and
placeit in thecabinet.Thentightenthe
retainernut.
Retaine_
CO2 Cylinder
Page 11

iiiiiiiiiiiiiiiiiiiiiiiiiiiiiiiiiiiiiiiiiiiiiiiiiiiiii @ i i i i i i i i i i i i i i i i i i i i i i i i i i i!
Tapping the Beer Keg
(SingieoVdve Type Barrel)
Yourbeer"dispensercomeswith an American SankeyTapmade by theBanner
EquipmentCompany Thisbrand nameisthe mostwiddy usedin the UnitedStates.
Beforepurchasinga keg,checkwith your beerdistributor tomake surethat a
SankeyTapcan be used.
Not÷: ForEuropeandraft beer,a EuropeanSankeyis required_Pleasecall the
BannerEquipmentCompanyToll-Freeat (800) 621-4625 for more
information.
Followthestepsbelowto tap the kegof been
1_Make suretheblack pull handleof the kegcoupler
isin theclosed(up}position beforeinstallingit on
thebeer keg. Insertthe kegcouplerinto thelocking
neckof thebeer kegand turnclock,vise1/4-turn to
lockit into position.(seefig. 1)
2. Attach theopenend of thered air line hoseto the
hosebarb connectionon thekegcouplen Next,
securethehoseby usingtheremainingself-locking
plasticsnap-on damp to ensurethat thereare no
leaks.Securetheclamp tightlywith pliers.
(seefig. 2)
3_It isvery important that theblack rubberwasher be
installedinsidethewing nutbefore connectingthe
beerline tothe kegcouplen Removetheblack
rubber protectivecap locatedon top of the keg
couplerand screwthe wing nutwith the rubber
washeronto thekegcouplenHand-tightenfirmly.
(seefig. 3)
4_Make surethebeer tower faucetis in theclosed
(faucethandlepointing straightback! positionbefore
connectingthe kegcouplerand thebeer keg. To
fig. 1 K_goouu_
fig. 2
fig. 4
securethetank connection,puJJthekegcoupler ,4"/ _
handleoutand pushdown until it locksinto position.
Listenfor the "dick" of the pull handlewhen it shifts
intothefind downward position.(seefig. 4}
Page 12

5. Carefully tilt the beer keg and rest the edge on the stainless steel keg floor
support on the bottom of the interior cabineL Slide the beer keg in slowly,
ensuring that it is properly Iocated.(see fig. 5}
BeerKeg
Lift Upright
important ,Safety Message f@r' Dr'aft Beer' Dispensing
HfCO2is usedfor draft beer dispensing,the systemmustbe adequatdy protected
againstexcessivepressurebuild-up. Thiscanbe accomplishedby installingat least
two safetydeviceswithadequate reliefcapacity in thesystem.
Safetydevicesshouldbe installedin thefollowing places:
A. On or immediatelydownstreamfrom theCO2regulaton
B_On thetapping deviceitself.
C_h-line in the pressuresystem.
Note: LocationsA and Bnotedaboveare preferable, Hfpossible,theyshouldbe
built into theCO2regulatorand tapping devicesothat the>"cannotbe
removedor by-passed.
@per@tiHg Your Beer ©is_e_ser
Dispensing Beer
Followthestepsbelowto dispensebeer.
1.Make surethatthebeer dispenserisplugged in properly toa 120V,60Hz,
15Amp groundedAC outlet.
2. Placethedrip tray under thebeer faucet.
3. Open thebeer faucetby pulling the tap towardsyou quicklyand completelyto
dispensethebeen
Note: If for any reasonthebeer doesnot comeout of thetap, referto the
trouble-shootingguide on page 17.
4. Increasethepressureif thebeer runstoo slowly. At thecorrectpressureand
temperature,a 10oz. glassshouldbe filled in 4 seconds_
5. Holdtheglasssteadyat a 45° angJe_When it is 2/3 fuji, startstraighteningthe
glass.Properfoam should bea tight creamyhead and the collar on an average
glassshouldbe 3/4" to 1" high.
Note: It isnormal to seecondensationforming on the outer surfaceof thefaucet.It
is causedby thedifferencein temperaturebetweenthecold beer and the
inner surfacesof thefaucetwhen beer isflowing throughtheline.
]0
Page 13
iiiiiiiiiiiiiiiiiiiiiiiiiiiiiiiiiiiiiiiiiiiiiiiiiii!i!@@!!_i!ii!ii!ii!ii!ii!ii!ii!ii!ii!ii!ii!ii!ii!ii!ii!ii!ii!ii!ii!ii!ii!ii!ii!!__!_f
Understanding Beer Temperature
®The recommended temperature for serving chiJJedbeer is between 34 ° and 38°E
Tomaintain this temperature in average room conditions of 70°F, set the
thermostat to _NormaJ/_
Note: During the summertime when temperatures are warmeB we recommend
that you adiust the controJ to a coder setting accordingJy.
Sdect and maintain the proper temperature inside the refrigerator cabinet. This
is necessary for maintaining the flavor freshness of been
®The best temperature for storing a keg is between 38 ° and 40°F.
®Excessivdy coJdor warm temperatures inside the refrigerator cabinet may cause
a Jossof flavon
Note: Sour beer is produced as a resuJtof secondary fermentation above 45°F.
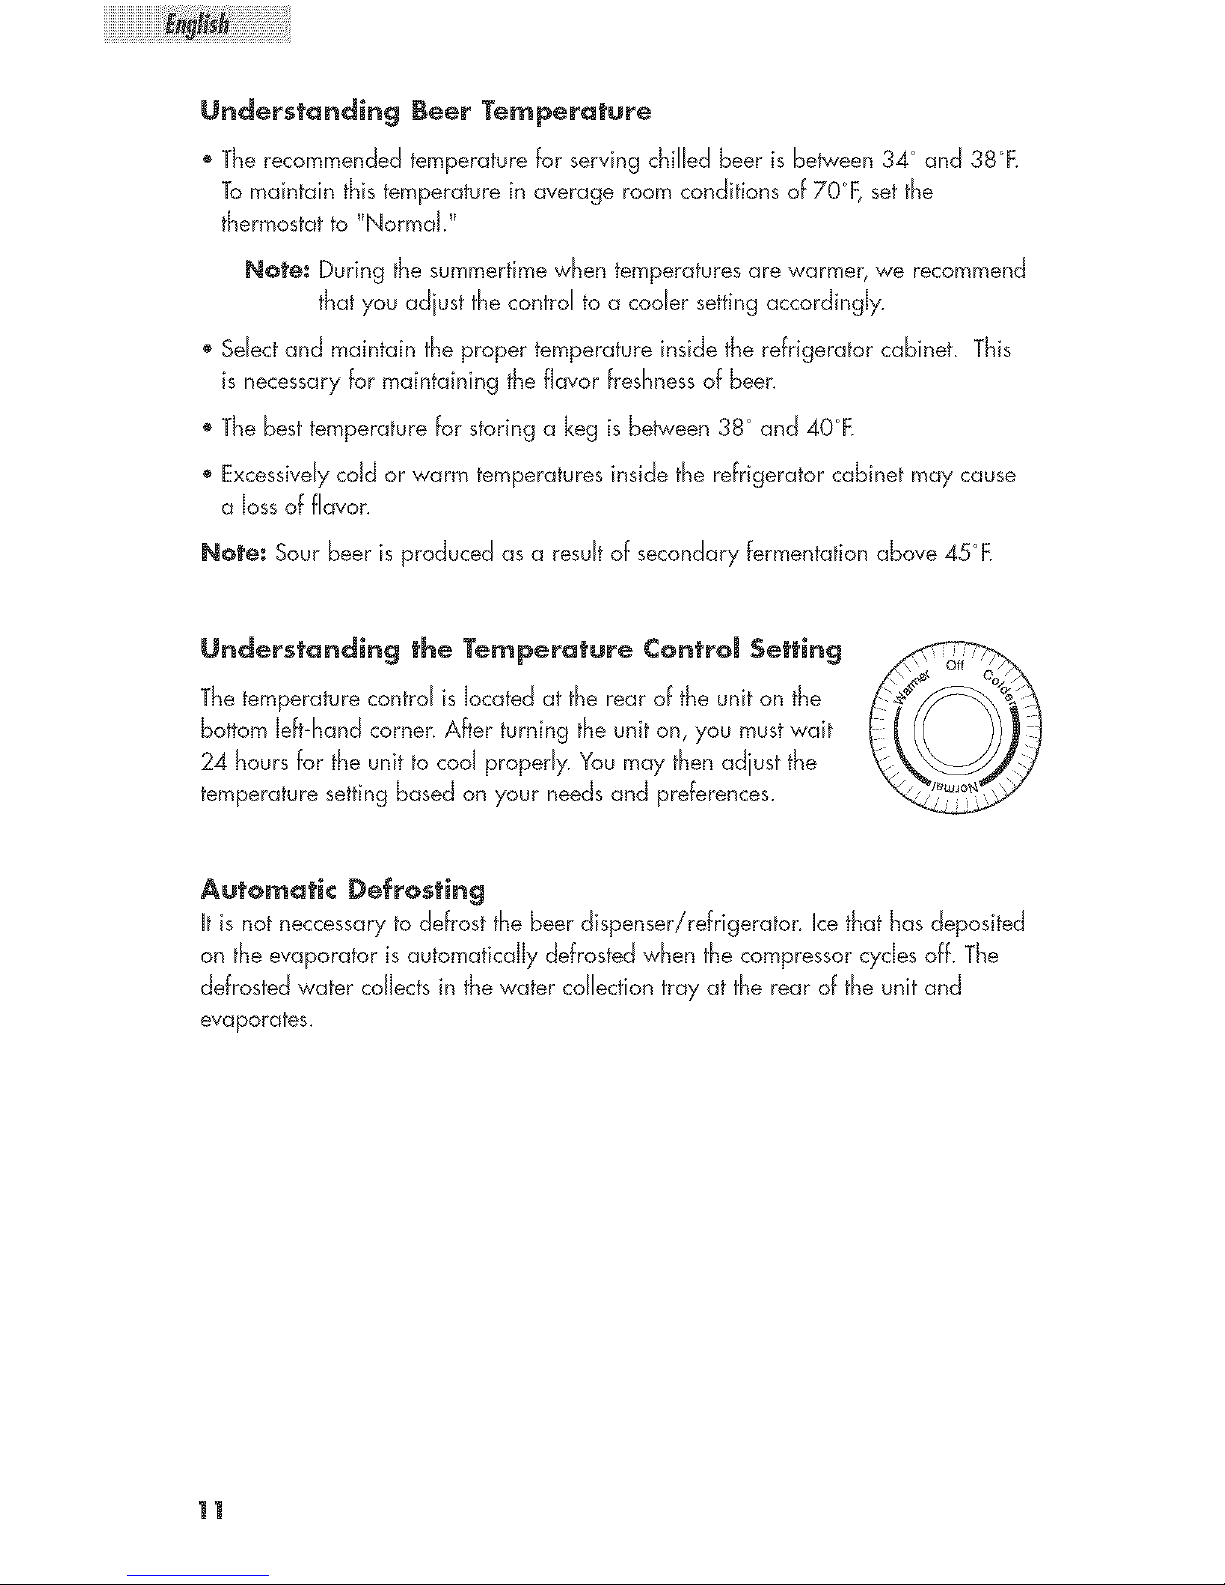
Ur_derstanding the Temperature ¢ontroJ Setting
The temperature contrd isJocated at therear of the uniton the
bottomJeff-handcornen After turning theuniton, you mustwait
24 hoursfor theunit to cod properJy.Youmay thenadiust the
temperaturesettingbased on your needsand preferences.
Automatic Defrosting
it is notneccessaryto defrostthe beerdispenserirefrigeraton icethat has deposited
on theevaporator isautomaticaJJydefrostedwhenthe compressorcyclesoff. The
defrostedwater coJJectsin thewater coJJectiontray at the rear of theunitand
evaporates.
11
Page 14
Understanding Nor_aJ Operating Sounds
®BubbJingor gurgJingsoundsand dight vibrations are theresuJtof therefrigerant
circuJatingthroughthecoding coiJs.
SizzJingor popping soundsoccurduring theautomaticdefrostcycJe.
®Dripping soundsoccuras icemeJtsfrom theevaporator and flowsinto thewater
coJJectiontray during theautomaticdefrostcycJe_
Crackingor popping soundsare causedby theexpanding and/or contractingof
thecoding coiJsduring theautomaticdefrost cycJe.
Beer Serving Guide
Beer Serving Tips
ThefoJJowingtipswiJJheJpyou servethe perfectbeen
Toservebeerfrom the tap theway it Jeffthevat, checkfor the fdJowing:
CJeanJiness ®Temperature
®Pressure ®UseC02 wheneverpossibJe
What a ] i2oJ(eg af Beer Gives Yau
Thisbeer dispensercanhdd up to a 1i2-keg_ Foryour convenience,thefoJJowing
tabJeshowshow many servingsa 1/2-keg provides.
No_ of GJasses GJassSize
192 12 oz.
236 10 oz.
264 9 oz.
290 8 oz.
353 7 oz.
1/2-Keg = 15-1/2 GdJons
= 1984 FJuidOunces
1/2-Keg = 6-3/4 Cases of 12 ounce BoffJes
417 6 oz_
12
Page 15
iiiiiiiiiiiiiiiiiiiiiiiiiiiiiiiiiiiiiiiiiiiiiiiiiiUi_i__i__i__i__i__i__i__i__i__i__i__i__i__i__i__i__i__i__i__i__i__i__i__!__!__i__!_
Tips for ¢Jeaning Beer GJc_sses
Forthefreshestflavor,it isimportantto servebeer in cleanglasses.Foryour
convenience,thefollowing tips explain how toproperly dean beer glassesbefore
servingbeer:
Do notwash beerglassestogetherwith glassesthat havecontained milk or any
otherfatty"substance.
®An excessiveamountof germicide build-up will alsoleavea fatty film on the
glasses,which may causefiat beer
Washglasses thoroughlywith a good detergent to remove alJ fatty substances
(i.e. lipstick}.
® Do not use soap.
'p Do not wipe glasses dry. Allow glasses to air-dry by placing them on a wire rack
or on corrugated metal.
® Rinse in fresh cold water justbefore serving beer It is best to serve beer in a wet
glass.
Two Simple Tests Jot Clean Bee_ @lasses
1_Wash theglassesusingyour usualmethod.Immersetheglassheel firstin clean
waten Emptytheglass_If water dropletscling to the glassor if spotsappearon
theglasswhile pouring, theglasshas not beencleanedproperly.A dean glass
shouldair-dry crystalclean
2. Again, wash theglassusingyour usual method.Pourout thewater and then
shakesalt intothewet glass.If salt doesnot cling to the entireinsidewall of the
glassand dear unsaltedspotsremain,theglassis notclean.
CoHvertiHg the Beer DispeHser to
AHoRefriger tor ARp ic tioH
Foryour convenience,thisbeer dispensercanbe convertedto an all-refrigerator
application.Simply follow the stepsbelowfor a quick and easyconversion.
Note: When usingasa refrigerator,we do notrecommendtheuseof casters,as
storeditemsmay faJJoff the shriveswhenthe unit is in motion.
2.
3_
4_
13
Close the main valve on the CO2 cylinden
Close the connection between the beer keg and the keg coupler by pulling and
lifting the handle of the keg coupler into an upright position.
Disconnect both the beer line and the CO2 air line from the keg couplen
Remove the beer keg from the cabinet.
Page 16
5. Disconnect the air line fl_m the C02 cylinden
6. Remove the C02 cylinder from the cabinet.
7_ Remove the beer tower from the cabinet by grasping the center of the towen
Turncounterclockwise and Jifl_
8. PuI[ the beer line through the top of the cabinet,
9_ hstaJJthe cabinet plug on the worktop_
10_ Lay the unit down sideways_ We recommend that you place a piece of
cardboard or cloth underneath the cabinet to avoid dents or scratches to the
cabinet. Remove the casters and install leveling legs.
11_ hstaJJthe two wire shelves.
A, hsert one end of each support pin into the holes on the right side of the
cabinet.
B. Place one end of the wire shelf into the left side of the cabinet and rest the
other end onto the exposed support pins on the right side.
C. Repeat the same with the second shelf.
12. The conversion process is now complete. Store all the removed accessories in a
safe place for future use_
13. Adiust the temperature of the unit as required for food storage.
EHergy S viHg Tips
Follow the energy-saving tips bdow for optimum efficiency.
Limit the opening and dosing of the door on hot and humid days. When you
open the door, dose it quickly to prevent hot air from entering_
® Check regularly for proper air circulation around the unit to make sure that the
unit receives sufficient airflow.
Keepthedoor gasketdean andpliable to ensurea proper seakIf thedoor gasket
is notsealedproperly, hotair may easilyenterinto theunit, making theinterior
temperaturewarmen The compressormustthenrun continuouslyto keeptheunit
cool, thusmaking the energyconsumptionvery high and inefficient.
Note_ Replacea damaged door gasketto restoreenergyefficiency.
®DO NOT storehot food in the unit. Letthe food cool Beforerefrigerating it.
14
Page 17
iiiiiiiiiiiiiiiiiiiiiiiiiiiiiiiiiiiiiiiiiiiiiiiiiiUi_i__i__i__i__i__i__i__i__i__i__i__i__i__i__i__i__i__i__i__i__i__i__i__!__!__i__!_
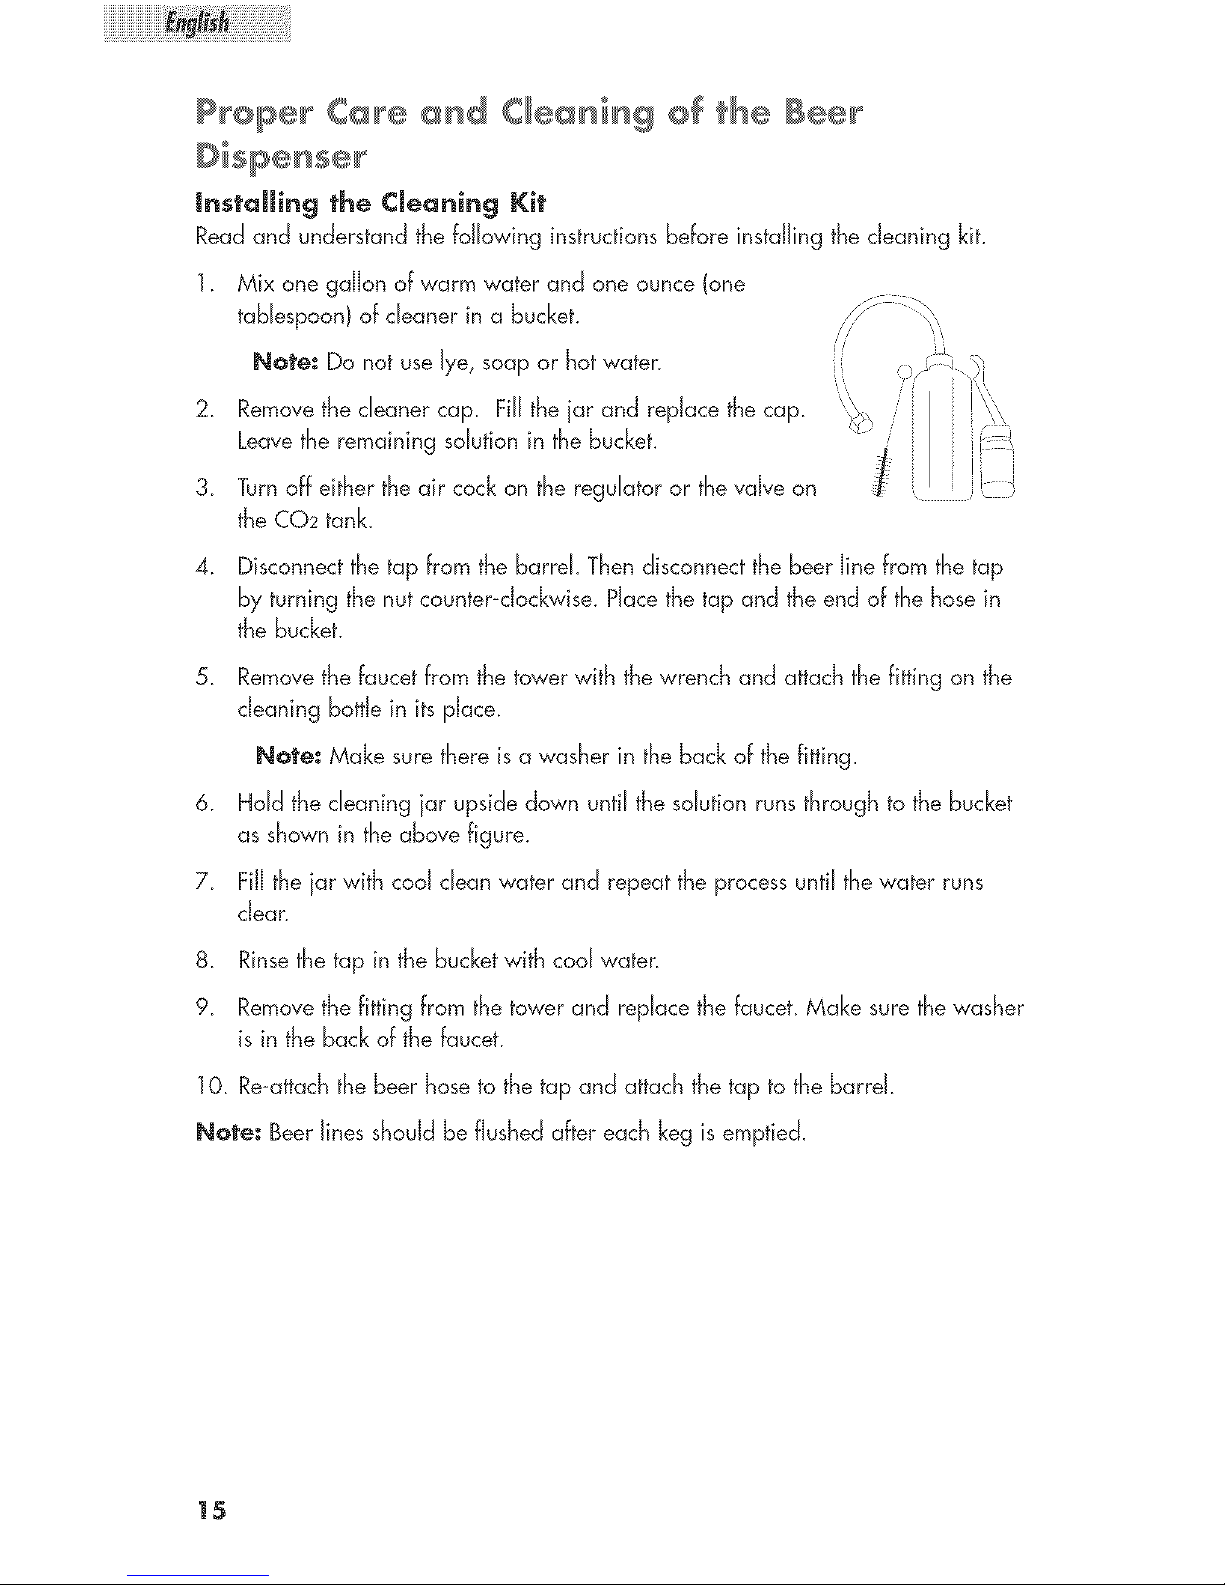
In,taJJing the CJeaning Kit
Readand understandthefollowing instructionsbeforeinstallingthe cleaningkit.
1. Mix one gallon of warm water and one ounce (one
tablespoon) of cleaner in a bucket.
Note: Do not use lye, soap or hot water.
2. Remove the cleaner cap. Fill the jar and replace the cap. '_
Leave the remaining solution in the bucket.
3. Turnoff either the air cock on the regulator or the valve on
the C02 tank_
4. Disconnect the tap from the barrel Then disconnect the beer line from the tap
by turning the nut counter-clockwise. Place the tap and the end of the hose in
the bucket.
5. Remove the faucet from the tower with the wrench and attach the fitting on the
cleaning bottle in its place.
Note: Make sure there is a washer in the back of the fitting_
6. Hold the cleaning iar upside down until the solution runs through to the bucket
as shown in the above figure.
7. FiJJthe iar with cod clean water and repeat the process until the water runs
clea[L
8. Rinse the tap in the bucket with cool water.
9. Remove the fitting from the tower and replace the fauceL Make sure the washer
is in the back of the fauceL
10. Re-attachthebeer hose tothetap and attachthetap to the barrel
Not÷: Beerlinesshouldbe flushedafter eachkeg is emptid.
15
Page 18
€meaning and Generam Maintenance
General hterior and Exterior"Cabinet Cleaning
1_Prepare a cleaning soJutionof 3-4 tablespoons of baking soda mixed with warm
w'ater_Use a sponge or soft cloth dampened with the cieaning solution to wipe
dow'n the interior and exterior surfaces of the cabineL
2. Rinse with clean, w'arm water and dry w'ith a soft cloth.
Note: Do not use harsh chemicals, abrasives, ammonia, chlorine bJeach,
concentrated detergents, solvents or metaJ scouring pads. Some of these
products may dissolve, damage and/or discolor the cabinet finish.
Door Gasket CJeaning
1. Clean the door gasket with a damp cloth ever,,!three months. The gasket must be
kept dean and pliaNe to ensure a proper seal.
2. Petroleum ielly applied lightl',/to the hinge side of the gaskets wiJl keep the gasket
pliable and ensure a good seal.
Cleaning Behind the Beer Dispenser
1_\'Ve recommend that you clean the rear of the refrigerator at Jeasttwice a yean
Note: Some operating environments may require more frequent cJeaning.
2. Use a vacuum or a brush to cJean the coils.
16
Page 19
iiiiiiiiiiiiiiiiiiiiiiiiiiiiiiiiiiiiiiiiiiiiiiiiiiUi_i__i__i__i__i__i__i__i__i__i__i__i__i__i__i__i__i__i__i__i__i__i__i__!__!__i__!_
Tr@ub es @@ti g Guide
When dispensing beer into the glass, if you find that the beer is Cloudy, Flat,
Bubbly, Off-Taste, Sour, Wild or Tail-End Beer, refer to some of the following hints.
Beer Condition: Cloudy Beer
Thebeer in the glassappearshazy,and not clear.
Cause I
Excessivelylow temperaturesmay causehazy or cloudy beer,particularlywhenthe
beer liesin thecold coil for long periodsof time.
Correction
®Make certain thatthe linesare thoroughlycleanedand thenraisethetemperature
slightly.
Cause 2
Thebeer faucetwas only openedpartially.
Correction
®Open thefaucet quicklyand completely
®Replaceany worn washersand partsin thefaucetwhen necessaryto dJow the
faucetto be fully opened.
Beer Condition: Flat Beer
Beerlacksits usualbrewery-freshflavor.Thefoamy head disappearsquickly.
Co,use 1
The glass is greasy.
Correction
®Do not wash beer glasses together with glasses that have contained milk or any
other fatty substance. An excessive amount of germicide build-up may also leave
a fatty film, which will cause beer to go flak
®It is preferable to steam and sterilize glasses where health Jawspermik
,, Wash glasses thoroughly with a good detergent to remove oJJfatty substances
(ke. iipstick}_
®Do not use soap.
®Do not wipe the glasses dr),'. Permit glasses to air-dry by placing them on a wire
rack or on corrugated metal.
®Rinse the glasses in fresh cold water just before serving been It is best to serve
beer in a wet glass.
17
Page 20
Cause 2
improperdrawing of beer into theglass.
Correction
®Open the faucetquicklyand completely_
Properfoam shouldbe a tight creamyhead. Thecollar on theaverageglass
shouldbe 3/4" to 1" high. Beerdrawn without head hasthe appearanceof
being flat.
C_use
Not enough pressure.
Correction
increase the pressure if beer runs too slowly. The correct flow shodd fiJJa 10oz.
glass in 4 seconds_(Approx. 8oz_ of liquid)
® Check the pressure source to determine whether there are obstructions in the air
line.
Replace a sluggish air source or the CO2 regulator and gauge_
® The tank pressure must always be higher than the pressure used on the keg_
Always apply pressure to the keg before drawing been
Beer Condition: Loose Foam
Large soap-like bubbles that settle quickly.
Cause 1
This is generally the same as the Flat Beer condition. See the Hat Beer
causes above.
Beer Condition: Off°Taste Beer
Often bitter and bitey; sometimes completely Jacking in flavor and zest. May
also have an oily or foul odor, which carries an unpleasant taste_
Cause 1
Improper cleaning of the tap.
Correction
Brush and clean the tap properly, it should be scoured using a detergent, then
rinsed cJean.
Cause 2
Contaminated air Jine_
Correction
Air line should be examined, if contaminated, it shodd be replaced.
18
Page 21
iiiiiiiiiiiiiiiiiiiiiiiiiiiiiiiiiiiiiiiiiiiiiiiiiii!i!@@!!_i!ii!ii!ii!ii!ii!ii!ii!ii!ii!ii!ii!ii!ii!ii!ii!ii!ii!ii!ii!ii!ii!ii!ii!!__!_f
C_USe 3
Improper type of air line
Correction
®A rubber hose wiJJabsorb and retain odors. Try using a plastic or copper hose
instead.
General Recommendationsfor Off-TasteBeer:
Beerlinesshouldbe flushedafter each kegisempfied_Maintain fresh,clean,
sanitaryconditionsaround the dispenser.Smoke,cookingodorsand disinfectants
wiJJharm the tasteand flavor of beer.Theseconditions,as described,may come
from an air sourceor fl_m actual contactwith the glasswhendrawing beer.
Beer Condition: Sonr Beer
Beertastesand smellsextremelyyeastyor moldy.
Canse 'l
Impropertransportingof beer kegs_Beerthat isdelivered on an open truck
during high summertemperaturesmay start a secondaryfermentationprocess.
Correction
* if possible,havebeer kegsdeliveredin a dosed, refrigerated truck_if an open
truckisused,cover beer kegswith tarpaulinfor protectionagainst summerheat
and warm air:
Beer Condition: WiJd Beer
Beer that is either aJJfoam, or too much foam and not enough liquid.
Cause 1
Improper drawing of beerinto the glass,
Correction
Open the faucet quickly and completely.
®Proper foam should be a tight, creamy head, and the collar on the average glass
should be 3/4 _ to 1_ high.
Canse 2
Yeastgrowth or otherobstructionsin thefaucet,which isusuallycausedby
a non-refrigeratedfaucet. Worn faucetparts and worn faucetwashers.
Correction
®Checkfor, and replaceany kinked,dented,or twistedlines from thebarrd to the
faucet.
Examinefor frayed coupling washersbehindthefaucetthat may causean
obstruction_
19
Page 22
COUSe 3
The beer was stored in an area that is not cdd enough and has thus become warm_
Correction
® Keep kegs of beer refrigerated at aJJtimes at 40°F aJJyear round[
Cause 4
Toomuchair pressure.
Correction
®First,checkthesourceof pressureto makesureit isworking Thenadiustthe
pressureto suita properlybaJancedsystem_Thecorrect beer flow shouJdfiJJa
10oz. gJassin 4 secondsat the proper temperature.
Cause 5
Excessiveamountsof CO2.
Correction
Adiustthe CO2pressureto aslow as possibJe_However, theapplied pressure
mustremain sJightJyhigher thanthe internalpressureof thebeen No morethan
18 Jbs.shouJdbe appJied_Theproper amountshouJdbe between 10-12psiiJbs.
®Thecolderthebeer and thehigher theappJiedCO2pressure,themore rapid the
absorptionof CO2by the beenThisover-carbonatesthe beer,causingWiJdBeen
®CheckthepressurereguJatorsperiodicdJyto ensurethat theoperatingpressures
remainconstanL
Cous÷ 6
Not enoughpressureor no pressureat all.
Correction
Checkfor defectiveair vents.
®Alwaysturn thepressureon beforedrawing been
Couse 7
An oJd keg of beer which has not been stored in cod temperatures has been used_
Correction
If beer has been aJJowedto stand in warm temperatures beyond 45°F for an
excessive Jengthof time, it may begin a secondary fermentation. Store beer at
40% aJJ),'ear round.
:20
Page 23

iiiiiiiiiiiiiiiiiiiiiiiiiiiiiiiiiiiiiiiiiiiiiiiiiii!i!@@!!_i!ii!ii!ii!ii!ii!ii!ii!ii!ii!ii!ii!ii!ii!ii!ii!ii!ii!ii!ii!ii!ii!ii!ii!!__!_f
Beer ¢onditlon: TailoEnd Beer
Beer draws well at the beginning of the keg. Towards the bottom, it becomes
flat. This is more likely to occur when beer turnover is slow.
Cause 1
Where air is used as a pressure source, air replaces the CO2 in beer, causing flat
beer. This problem is not evident when beer is being drawn rapidly.
Correction
®Whenever possibJe, use CO2 Gas as a pressure source.
21
Page 24

Jn°Ho_e Service
What is covered and for how
_ong?
This warranty cover's all defects in work-
manship or materials for a period oft
] 2 _onths labor
12 _onths parts
5 years seated syste_(p_r_ o_my)
Thewarranty commences on the date
the item was purchased and the original
purchase receipt must be presented to
the authorized service center before
warranty repairs are rendered_
EXCEPTIONS: ¢o_mercla_ or
Rer_tam Use warranty
90 days labor (carry°in onJy)
90 days parts
No other warranty appJies
What is covered.
1. The mechanical and electrical parts,
which serve as a functiona!, purpose
of this appliance for a [period of 12
months. This includes all parts except
finish, and trim.
2. The components of the sealed system
e_g. hermetic compressor, condenser
and evaporator from manufacturing
defects for a period of 5 years from
the date of purchase. Any damages
to such components caused by
mechanical abuse or improper
handling or shipping wiJJnot be
covered.
What wiI_ be done?
1. We will repair or"replace, at our dis-
cretion any mechanical or electrical
part which proves to be defective in
normal usage during the warranty
period so specified,
2. There will be no charge to the
purchaser for parts and labor on an)`"
covered items during the initial 12
month period. Beyond this period
only parts are covered in the
remaining warranty. Labor is not
provided and must be paid by the
customer,
3. Contact your nearest authorized
service center. For the name of the
nearest service center please visit our
website at wwwHaierAmerica,com or
call 1-877-337-3639 for more
information.
THiS WARRANTY COVERS
APPLIANCES WiTHiN THE
CONTINENTAL UNITED STATES,
PUERTO RmCOAND CANADA_
JT DOES NOT COVER
THE FOLLOWING:
Damages from improper instaJJation,
Damages in shipping,
Defects other than manufacturing,
Damage from misuse, abuse, accident,
aJteration, Jack of proper care and
maintenance or incorrect current or
vdtage.
Damage from other than household use.
Damage from service by other than an
authorized dealer or service center.
Decorative trims
Transportation and shipping.
Labor (after the initial 12 months).
THIS LIMITEDWARRANTY ISGIVEN IN
LIEUOF ALL OTHER WARRANTIES,
EXPRESSEDOR, INCLUDING THE
WARRANTIES OF MERCHANTABILITY
AND FITNESSFOR A PARTICULAR
PURPOSE
The remedy provided in this warranty- is
exclusive and is granted in lieu of all
other remedies.
This warrant),- does not cover incidental
or consequential damages, so the above
limitations may not apply to you. Some
States do not allow limitations on how
long an implied warranty lasts, so the
above limitations may not apply to you.
This warranty gives you specific Je!_aJ
rights, and you may have other rights,
which vary, from state to state.
Haier America
New York, NY 10018
:22
Page 25

], Ufihsezcet&quipementuniquementpourI'usageauquelilestdesfin&comme
indiqu&dunscemanuek
2,
3,
4,
5,
Cet &quipement install& correctement et conform&ment instructions d'installafion
ufiJisafion. Consultez la section hnstdJafion pour de pJusamples d&taiJs.
Cet &quipement doit &tre branch& sur une &Jectrique d'une tension ad&quate,
Cet &quipement dolt &tre mis a Jamasse (terra) afin d'&viter tout risque
d'&Jectrocution et d'incendie. Ne pas couper ni retirer Ja broche de masse! Si
votre prise de courant murde ne peut accueiJJir une fiche @trois broches,
veuiJJezfake &Jectricien quaJifi@en instdJe une. La doit &tre reli&e @Jaterra.
Ne d&branchez iamais cet &quipement en firant sur Jecordon d'dimentation.
Saisissez fermement Ja fiche et firez tout droit sur cette derni&re.
6,
7.
RempJacezimm&diatement tout cordon, toute fiche ou prise us&(e}, desserr&(e).
Afin de r&duire tout risque d'&Jectrocution et d'incendie, n'utiJisez pas de
raJJongesni d'adaptateurs afin de raccorder J'&quipement a une source de
couranL
8, D&branchez I'&quipement avant de le nettoyer ou de le r&parer,
9. Nous vous recommandons de contacter un technicien r@arateur brevet& si cet
&quipement tombe en panne.
1O, Si vous comptez later votre ancien &quipement, nous vous recommandons de
refirer Japorte et de JaisserJes&tag&resen pJace. Vous r&duirez ainsi tout risque
de danger pour Jesenfants.
11, Cet &quipement ne doit pas atre pJac6 dans un renfoncement ni encastr6 en
aucune fa¢on. IJa &t&concu afin d'&tre pJac&seuJ sans J'int&grer a un espace
dos,
Page 26

] 2. Ne faites pas fonctionner cet &quipement en pr&sence de vapeurs explosives.
] 3, Ne iouez pas avec Jescommandes,
14. N'ufilisez pas cet &quipement 6 moins que toutes Jescldsons soient bien en
place.
15_N_utilisez pas J'6quipement Iorsque des pi@cess_av@rentd@fectueuses.
16. N_utilisez pas votre @quipement 6 cJesfins commercides ou industrieJles.
17_Cet _quipement a @t@concu afin d_tre utiJis_6 J_int4_rieuret ne doit en aucun
cas @re utiJis_6 I_ext_rieun
18. Afin cJer_duire tout risque de bJessures,ne laissez pas Jesenfants jouer sur ou
6 J_int_rieurde cet _quipement. Hest n_cessaire de surveiJJerattentivement Jes
enfants Jorsque vous utilisez cet _quipement 6 proximit4_des enfants.
19_La porte de J'_quipement doit @re ferm6e Iorsqu_il fonctionne. Ne laissez pas la
porte ouverte Iorsque des enfants se trouvent 6 proximit@ cJeJafontaine 6 hi,re.
Consignes de s_curit_ importantes pour Je C@_.
(gaz carboniclue)
"1_Legaz carbonique ou dioxyde de carbone peut _tre dangereux! LesbouteiJlesde
CO2 contiennent cJugaz sous pression qui peut &tre cJangereux si vous ne Je
manipuJez pas correctemenL VeuiJJezlire et comprendre toutes les consignes
concernant les bouteilles cJeCOz avant de proc6der 6 I_installation.
2. Veuillez toujours raccorder la bouteille de CO2 6 un r&gulateur! Lenon-respect
de cette consigne risque de provoquer une explosion et d'entraTner cJesblessures
graves voire mortelles Iorsque vous ouvrez Javalve de Ja bouteilJe.
3, Ne raccorcJez jamais JabouteiJJede CO2 directement sur Jecontenant, tonnelet,
baril ou f0t de hi,re.
4. Respecteztouiours Ja marche 6 suivre Jorsque vous changez de bouteiJJe.
5. Ne jamais lancer ou laisser tomber une bouteiJJede CO2.
& Conservez touiours les bouteiJlesde CO2 loin des sources de chaJeunStockez les
bouteiJlesde rechange dans un endroit frais (de pr&f&rence 70°F ou 21°C). Fixez
soJicJementJa bouteiJJeen place avec une cha?ne, en JapJacant droite.
7_Assurez-vous que J'encJroitposs_de une bonne ventilation et quittez
imm&diatement cet encJroiten cas cJefuite cJeCO2!
Page 27

8.V6rifieztoujoursladate_laqueJJeJabouteillea6t_ test_e par Je D.OT
(Minist_re des transports am_ricain) figurant sur le col de la bouteiJle avant
J'installation. Si cette date est ant6rieure _ 5 ans, n'utilisez pas la bouteiJle.
Ramenez la bouteille 6 votre fournisseur.
9. Ne raccordez jamds un tonnelet, f0t ou autre contenant de biSre 6 moins qu'il
existe au moins cJeuxdispositifs cJes_curit@au niveau cJucircuit de pression.
(ONSERVEZ(ESiNSTRU(TiONS
afirt depouvoir JesconsuJteruJt_rieureMent
Nous vous remercions d'avoir fair
utiliser au mieux votre fontaine @
hi,re.
N_ouNiez pas de noter le md@le et
le num@o de s@ie. Ces derniers se
trouvent sur une 6tiquette au dos de
Pappareik
Num6ro du modg*b
Num6ro de s6rie
Dab d' achat
Page 28

CHOJSmRUN BON EMPBACEMENY........................................................ 7
JNSYRUCTJON$ DE MONYAGE 8ol 1
Montage des roulettes ................................................................... 8
Montage du robinet de bi@e ........................................................... 8
Montage de Ja barre c_es_curit_ 9
Montage du r6guJateur et de JabouteiJJede CO2 .......................................... 9
Mise en perce du f0t de hi&re (bariJ @valve unique} .................................... 10
Consigne de s&curit_ importante pour Jefirage de Ja hi&re............................ ] O
UYJLJSATJON DE J_ FONTAJNE A JBJERE...................................... 'J'J-J3
Servir Ja bi@e ............................................................................................ 11
ComprencJre Ja temp@raturecJeJabi@e ...................................................... J2
ComprencJre Ja commancJede r@gJagede temp&rature ................................ J2
D_givrage automatique .............................................................................. J2
Bruits de fonctionnement normaux .............................................................. 13
GUIDE POUR $ERVJR LA BJERE 13o14
ConsdJs pour tirer la hi&re .......................................................................... J3
EquiJencepour ]/2 f0t de hi&re .................................................................. 13
ConsdJs pour nettoyer Jesverres de hi&re .................................................... 'J4
2 testsfadJes pour nettoyer Jesverres @hi@re.............................................. J4
CONVERTJR LA FONYAJNE A BJERE EN Ri:FRJGi:RATEUR .......... 14oJg
CONSEJLSPOUR FAmRi:DES ECONOMmE$D'ENERGJI:...................... J5
GARANTJE.............................................................................................. 23
4
Page 29

iiiiiiiiiiiiiiiiiiiiiiiil¸ i ii ii ii ii ii ii ii ii ii ii ii ii ii ii ii iiiiiiiiiiiiiiiii!iiiiil
©6bd_ege et _ve_t_ire des Accessei_°es
1. Retirez tous Jesmat6riaux ?embaJJage y compris Jesode en mousse et Jeruban
adh6sif retenant Jesaccessdres _ J'int_rieur et B J_ext_rieunSortez J_6quipement
en JegJissant et retirez JepJastique ou Jamousse de protection prot6geant Je
compresseur Jorsdu transport.
2. Inspectez J_quipement et retirez tout mat6riau d'embaJJage restant, ruban
adh6sif ou documentation avant de mettre sous tension Jafontaine @bi@re_
Re_arque: PJacezJa fontaine @bi6re debout afin qddJe salt drdte pendant 2
heures avant de Ja mettre en marche.
V6rifiez tous Jesaccessoires fournis avec Jecarton et assurez-vous que toutes Jes
pi@cessont en bon 6tat. Reportez-vous @JaJistecidessous_ Si un des accessdres est
en mauvds 6tat ou s'av6re manquant, veuiJJezcontacter notre service _ Ja cJient6Je.
Notre num_ro d'assistan¢÷ sans frais est b 1o877o337o3639o
1 robinetde hi,re avec:
1 joint pour Jerobinetde blare
1 rondeJJepour Jeraccordementdu manchondu forde hi@re
1 r_guJateurde C02
1 cyJindredeC02
1 manchonde raccordementpour f6t de hi,re
1 kit de nettoyage
1 conduitepour C02
2 coJJiersde serragepour tuyaux
1 _trierde fixation pour boutdJJede C02
1 barre de protection
1 bac ramasse-gouttes
4 rouJettes
1 d6
4 vis cruciforme Phillips
8 petitesviscruciformePhillips
2 visde fixation
2 _tag_resm_taJJiques
4 chMJJesde support
Page 30

Pig_es e_ C_s_c_6sistiq_es
\
1. RouJettesavant
2. Support int@ieur du soJpour for de
bi@e
3. HabiJJageicaisson
4. Boutei[[e cJe602
5. Surface de travaiJ
6. Barre
7. Robinet de bi@e en chrome
& Thermostat r_gJabJe
(situ6 _ l'arri_re}
9. Ramasse-gouttes
10. FOtde hi,re (non fourni. Montr6 ici
titre d'iJJustration uniquement.)
Page 31

CB@isir uH b@H Emp ¢emeH
Afin 8'@re certain que votre fontaine a hi,re foncfionne a son rendement
maximum, montez-Ja dans un empJacement pr6sentant une bonne circuJafion
d'air, des points de raccorcJement ad&quats pour Ja pJomberie et J'_Jectricit_.
Choisissez J'empJacemento0 vous comptez monter Ja fontaine 6 bi_re en vdJJant
qu'iJ salt Joinde toute source de chaJeur et qu'iJ ne soit pas en pJein soJeiJ.
®Cette fontaine a bi@e a _t_ concue afin d'6tre utiJis_e a Hnt_rJeur
uniquement et ne doit en aucun cas @re utiJis_e6 J%xt@ieuren pJeinain
" Cette fontaine a bi@e ne cJoitpas @re pJac6eclans un renfoncement ni encastr6e
en aucune facon. EJJea _t_ concue afin d'@re pJac@eseuJesans J'int_grer 6 un
queJconque syst@me.
Lesdimensions suivantes sont Jesdistances de d_gagement et de s_curit6 autour
de Ja fontaine 6 bi@e:
C6t&s.................. 3/4 po. (19 ram}
Dessus.................... 1 po. (25 ram}
Derriare .................. 1 po. (25 mm}
Page 32

HStr Cti@HS de M@H g÷
VeuiJlez Jireattentivement et comprendre routes les instructions cJ'instaJlafion cJeJa
fontdne a hi&re. Si apr&s avoir termin_ Jemontage, vous n'&tes pas certain que Ja
fontaine a hi,re a _t_ correctement instdl6e, nous vous recommancJons de contader
un installateur qualifi6.
Montage des Roulettes
Noix
Suivez les &tapes suivantes pour monter les roues,
1. Videz compl&tement i_int_rieur de la caisse et
pJacezIa fontaine _ hi&re _ plat, sur le c6t&.
Nous vous conseiJJonsde placer un morceau cJe cle plate
carton ou de chiffon sous le caisson afin
d'&viter de rayer ce cJernier. Roulette
2. Introduisez Jesrodeffes dans Jestrous cJescoins inf_rieurs du caisson. Serrez
chaque roue en tournant I'_crou dons Jesens des aiguilles cJ'unemontre avec Ja
d6 fournie.
3. Apr@savoir serf6 les quatre roues, placez le caisson cJebout.
Montage du Robinet de J}i_re
Suivez Jes&tapes d-dessous pour monter Jerobinet cJebi@e.
1_Tout d'abord, retirez le bouchon du caisson
situ@sur la surface de travail. Saisissez Je
bouchon, tournezde puis tirez vers Jehaul
Re_arcjue. _ Rangez ce bouchon dons un
endroit s0r car vous en aurez
besoin afin de convertir la
fontaine @hi,re r_frig_rateun
2. Hacez [e joint sur J'_crou @oreiJJesen bas du
robinet de hi&re.
Esquisser
FAssembl6e de Br
Garder la Barre
3_ Faites passer le tube de hi,re dons Jeioint
iusqu'au bas du robinet de hi&re.
4. PoussezJ'_crou _ oreiJJeset Jeconduit de hi&re
dons le trou de la surface de travail iusqu'@ce
que le robinet repose sur JecJessusdu caisson.
5. AJignez Jestrous du robinet de hi,re sur Jestrous cJujoint et de guicJage situ&s
sur Jedessus cJucaisson.
Poign6e
etite Vis
t6te phillips
6_ Fixez le robinet de hi&re au caisson en introcJuisant quatre grancJes vis
cruciformes PihJJipsdons Jestrous puis serrez. 8
Page 33

Montage de JaBarre de $&¢urit&
SuivezJes&tapesci-dessousafind'instaJlerJa
barredes&curit&sur Jasurface de travaik
1_Posifionnez Jabarre sur Jedessus du caissom
2. AJignez tous les trous de la barre sur ceux du
dessus du caisson.
3_ Fixez la barre sur le caisson en utiJisant huit
petites vis cruciforme Phillips.
Installation du r_guJateur de C02 et de Ja bouteiHe de ¢02
Suivez Jes@tapesci-dessous afin cJ'instaJJerJer_guJateur de C02 et Ja bouteiJJecJe
C02 en route s_curit_. 'v'euiJJezJireet comprendre Jesinstructions suivantes
concernant JesbouteiJJescJeC02 avant de proc_der 6 J'instaHation_
Remarque: Votre bouteiJJede C02 estexp_di6e vide afin d'_viter tout risque
d'accicJent Jarsdu transport. Lorsque vous achetez Je premier fot de
bi_re, demancJez B ce votre revendeur rempJisseJa bouteiJJede C02.
1. Raccordez Ja conduite d'air du C02 au r@guJateuren branchant un bout de Ja
conduite d'air rouge au manchon de raccordement pour tuyau sur Jer6guJateur
de C02. Fixez Jetuyau 6 J'aicJed'un des deux serre-cBbJes noirs en pJastique
pression autoNoquants_ UtiJisez Jes
pinces pour fixer fermement serre-cBbJe
afin qu'iJ n'y air pas cJefuite.
du CO
2. RaccorcJezJer6gdateur de C02 @ la
bouteiJJede C02 en vissant J%croucJu
r&guJateur sur Javalve de JabouteiJJeet
en serrant avec une cJ&r&gJabJe.
3. Refirez J'_crou cJubouJon de retenue.
UtiJisezcJeuxvis cJefixation afin de
fixer J'_trier de retenue sur Jestrous au
dos de Ja bouteiHe_
4. GJissez JabouteiJJedans J'6trier cJe
retenue et pJacez J'ensembJecaisson.
Ensuite, serrez J'_crou de retenue.
Raccordez a _a
condurte d'air CO_
Etr_er de retenue
Page 34

Mise en perce du for de bier÷
(barim a vane unique)
Votre fontaine a hi&re est fournie avec un robinet American Sankey Tap fabriqu6
par Banner Equipment Company. Cette marque est la pJusutilis_e aux Etats-Unis.
Avant 8'acheter un f0t de hi@e, v&rifiez la fontaine a bi@e afin de vous assurer
qu'dJe peut accueillir un robinet Sankey Tap.
Remarque: Pour la bi&re pression europ4_enne,Ja pose c_'unrobinet Sankey c_e
calibre europ6en est oNigatoire. VeuiHezcontacter Banner Equipment
Company en composant sans frais Je(800} 621-4625 pour plus
c_'informations.
Suivez Jes@apes ci-dessous pour Jaraise en perce du f0r cJebi_re:
La pcdgn6e nolre de
"l, Assurez-vous que Japdgn&e noire du .....,_L°_(_'_d_"_/
manchon de raccordement est ferm&e (vers Jehaut} R_ooo_d_'_oondu_2"d_bi_°_.L-?-_avant de le brancher sur Jedessusdu f0t de hi&re.
Introduisez Jemanchon de raccordement cJansJecoJ 0%_°f(4%%!{;!_co._/d_
de verrouiJJage du f0t de bi&re et tournez dans le
sensdes aiguiJJes8'une montre 1/4 de tour afin de
fig. 1 M_,_oho_,deracoordement
poul fQt de biere
le verrouiJlen (volt figure 1}
2. Branchez l'extr6mit_ ouverte c_e la conSuite cJ'air
rouge au raccord cJestin&au tuyau situ_ sur le
manchon de raccordement. Ensuite, fixez Jetuyau
autobJoquant e pression afin de vous assurer qu'iJ
ne pr6sente aucune fuite. UtiJisez Jespinces pour
fixer fermement le serre-cabJe afin qu'iJ n'y ait pas
de fuite. (voir figure 2}
3. IJest tr&s important que la ronSeJlenoire en
fig. 2
caoutchouc soit insta%e a J'int6rieur de J'_crou a _/ /_
oreiJJesavant cJeraccorder Ja conc_uitecJebi@'eau
manchon de raccordemenL Retirez la capuchon de
protection noir en caoutchouc situ@sur JecJessusdu
manchon de raccordement et vissez J'_crou a orei%s
avec JaroncJeJJeen caoutchouc sur Jemanchon de
raccorSement. Serrez fermement a Ja main.
(vdr figure 3) fi 3
4. Assurez-vous que Ierobinet de bi&re,estferm& (la _
po gn ero inetestor ent evers arri re avant \
de brancher [e manchon de raccordement et[e f0t cJe( , /k_.._/i /
bi@'e.Pour effectuer 'e raccordement, firez sur 'a @_'_}_'/_ _k_
pdgn@e du manchonde ra,ccorclernentpour la sortir _ _II[i___.-d_\
puis appuyez dessus iusq0aceq0elemanchonse _. _ _
bJoque en place La poign_e cJevrait6mettre un cJ_clic_
Iorsqu'eJJese bJoque en pJace. (vdr figure 4} fig. 4
IO
Page 35

5. En faisant preuve d'une grande precaution, penchez Jef0t de bi@e afin que Je
bord du f0t repose sur Jesupport en acier inoxydabJe du fond du caisson.
GJissez Jef0t Jentementen pJace,en veiJJant@JecorrectemenL (voir figure 5)
fig. 5
F_t de Biere
\
Support du f(]t
Sou;evez le F_
Consigne de S_curit_ |mportante pour Je Tirage de Ja Bi&r÷
Si vous utiJisezJeCO2 pour tirer Ja hi&re pression, Je syst@medevra _tre
correctement prot_g_ contre toute accumuJation excessive de pression_Ceci peut
_tre effectu_ en montant au minimum deux disposififs de s_curit_ capabJes de g_rer
route surpression au sdn du circuit.
Ces dispositifs de s_curit@doivent 8tre instaH@sdans JesempJacementssuivants:
A. Sur Je r_guJateur de CO2 ou imm_diatement en avd de ce dernien
B_Sur Jedispositif de firage Jui-m&me_
C. Sur Ja conduite du circuit de pression_
Remarque: Lesemplacements Aet B indiqu&s ci-dessus, sont pr6f@ables. Si
possibJe,ces dispositifs doivent &tre int&gr&s au r&guJateur de C02 et
au disposifif de firage afin qu'iJ ne soit pas possibJede les retirer ou
de fdre une derivation afin d'&viter de les empJoyer
Servir Ja Bi&re
Suivez Jes&tapes ci-dessous pour"servir Jabi&re.
1_Assurez-vous que Ja fontaine _ hi&re est branch6e sur une prise de courant
aJternatif reJi&e_ Jaterre de 120 Vdts, 60 Hz et de 15 amp&res.
2. PJacezJeramasse-gouttes sous Je robinet de hi&re.
3_Quvrez Jerobinet de bi@e en firant Jemanche vers vous franchement et
compJ&tementafin de firer Jabi@e.
Remarque: Si pour une raison queJconque Jahi&re ne sort pas, r&f_rez-vous
au guide de d&pannage de Ja page 17.
4_Augmentez Japression si Jabi&re sort du robinet trop JentemenL,_ Japression
adequate et @Ja bonne temperature, un verre de 10 onces Jiquides (29 mJ}
devrait se rempJir en 4 secondes.
11
Page 36

5. Tenez le verre 6 un angle de 45°. Lorsque le verre est pJein aux 2/3, commencez
redresser Jeverre. La mousse devrait &tre fine et compacte et Jecd de mousse
devrait mesurer 1,9 cm @2,5 cm d'&paisseun
Rel_arqu÷: HIest normaJ de voir apparattre de Ja mousse de condensation sur la
surface ext&rieure du robinet. Ceci est dO_ Ja difference de
temp6rature entre Jahi@refroide et la surface int&rieure du robinet
Iorsque Jahi,re parcoure Ja conduite.
¢o_prendr÷ Ja T÷_p_rature de Ja Bier÷
La temp@ature recommand&e pour servir Jablare est entre 34°F (1 °C) et 38°F
(3°C). Pour maintenir cette temp&rature dans une sdJe pr6sentant une
temp&rature moyennne de 70°F (21 'C}, r6gJez le thermostat sur "Normal".
Remarque: En &t_, Iorsque Ja temp@ature ext6rieure est pJuschaude, nous
vous recommandons de r_gJer Jacommande sur une temp6rature
inf&rieure en fonction des conditions.
" Choisissez et maintenez Jatemp@ature ad6quate _ I'int@rieur du r&frig@ateur
Ceci est indispensabJe afin de conserver la fra_cheur de la bi&re.
® La meiJJeuretemp6rature pour stocker un f0t de hi,re est entre 38 ° (3°C) et 40°F
(40c).
Toutetemp6rature excessivement chaude ou froide _ I'int6rieur du r6frig@ateur
risque de nuire au go0t de la hi&re.
Rel_arque: Une hi,re aigre peut r6sulter d'une seconde fermentation au-dessus
de 45°F (7°C).
¢o_prendre meR_gJage de Ja Cow.and÷ de T÷_perature
La commande de temperature se trouve au dos de I'unit@dans
Jecoin inf_rieur gauche. Apr@savoir mis en marche I'unit@,
vous devrez attendre 24 heures pour que cette derni_re
refroidisse suffisamment. Vous pourrez ensuite r_gJer Ja
commande de temp6rature en fonction de vos besoins et
pr6f@ences.
D_giwage A_ti_e
IJest inutile de d_givrer Jafontaine 6 bi_re / r_frig6rateun Legivre apparaissant
sur J'@vaporateurest automatiquement _Jimin6e Jorsque Jecompresseur s'_teint.
L'eau du d6givrage aboutira dans Jebac de r_cuperation situ_ _ J'arri@e de J'unit_
et s'_vaporera.
Page 37

iiiiiiiiiiiiiiiiiiiiiiiil¸ i ii ii ii ii ii ii ii ii ii ii ii ii ii ii ii iiiiiiiiiiiiiiiii!iiiiil
Coterie@re Jes Bruits de Fortctiortr_e_ent Nor_au×
Lesbruits de gargouiJJiscomme de l'eau qui bout ainsi que les 16g_resvibrations
sonores peuvent se faire entendre Jorsque JeJiquide r_frigerant circuJe dans Jes
serpentins de refroidissemenk
Des diquetis et bruits de gr@siHementsJorsdu cycJede d@givrage.
Lesbruits d'eau qui goutte Jorsque JagJace fond @partir de J'_vaporateur s'_code
dans Jebac de r_cup@ation d'eau Jotsdu cycle de d@givrage automatique_
®Lescraquements r6suJtantde J'expansion et ou de Jacontraction des serpentins de
refroidissement Jorsdu cycJede d@givrage automatique.
Guide pa r Servir Bi@÷
¢@ns÷iJs p@ur tirer Ja hi,re
LesconseiJssuivants vous dderont 6 servir une bi@reparfaite.
Pour servir une bi@e 6 partir du robinet de Jam_me quaJit@que cdJe tire
di_ctement des cuves de J'usine, verifies Jespoints suivants:
®Propret_ ®Temperature
®Pression ®UtiJisez JeCO2 6 chaque fois que c'est possibb.
EquiwJence Pour 1/2 fOt de Bi_re
Cette fontaine @bi@e peut accueiJJir 1/2 bariJ (mini-f0t)_ Pour faciJiter
Jeschoses, JetabJeau suivant indique Jes@quivaJencesen nombre de verres.
Nombre de Verres TaiJJedu Verre
192 12 oz.
236 10 oz.
264 9 oz.
290 8 oz.
353 7 oz.
417 6 oz.
1/2 F0t = 15 1/2 gaJJons (58,6 iitres)
= 1984 onces Jiquides (58,6 Jitres)
172BariJ = 6 3/4 caisses de boutei%s de
12 onces (35 mJ)
13
Page 38

ConseHs pour Nettoyer Jes Verres de Bi_re
Pour une fra_cheur optirnde, iJest important de servir la biare dans cJesverres
propres. Pour faciliter Jeschoses, les conseils suivants vous expJiquent comment
nettoyer corr_ctement Jesverres avant de servir la biare.
® Ne lavez pas Jesverres de biare en m_me temps que Jesverres at,ant contenu du
Jaitou toute autre substance grasse.
Touteaccumulation excessive d'agent antisepfique et de germicide dans laissera
une pdJicule grasse sur les verres et risque d'_venter Ja biare et de rendre plate.
® Lavez les verres attentivement en utilisant un bon liquide-vaisseJJeafin de retirer
route trace de corps gras (par ex: rouge 6 lavres, etc.}
N'utiJisez pas de savon.
® N'essuyez pas les verres. Laissez Jesverres sacher 6 J'air Jibre en les pJacant sur
un agouttoir ou une tale ondul_e.
Rincez les verres avec de I'eau propre iuste avant de servir Jabiare. II est
recommancJa de servir Jabiare clans un verre mouiH_.
Deux tests ladles pour nettoyer Jes verres de hi,re
1. Lavez Jesverres en utiJisant votre mathode habitueJJe.Trempez toujours Jepied du
verre en premier clans I'eau propre. VicJezle verre. Si des gouttes cJ'eau collent
au verre ou si des traces appardssent sur Jeverre Iorsque vous videz son
contenu, le verre n'a pas at& lave correctement. Un verre propre devrait sacher
sans Jdsser de traces.
2. Lavez 6 nouveau le verre en ufiJisant votre mathocJehabitueJle_Versez l'eau
contenu dans Jeverre et saupoucJrez du seJdans Jeverre mouiJJ& Si JeseJne
coJJepas 6 toute Japaroi int@ieure cJuverre et des endroits dairs non-saJas
demeurent, le verre n'est pas propre.
Pour faciliter les choses, cette fontaine 6 bi@e peut @re transformae en rafrig@ateun
Suivez simpJement Jesatapes ci-dessous pour transformer rapidement et faciJement
J'unit&
Re_arqu÷: Lorsque vous utilisez J'unita en tant que rafrigarateur, il estdaconseiJla
d'utiliser des roulettes car les articles 6 J'intarieur cJurafrigarateur
risquent cJetomber des @tagaressi vous cJaplacez I'unit&
1. Fermez Jacommande principde cJeJabouteiJJecJeCO2.
2. Fermez Jeraccordement entre Jef0t de bi@e et Jemanchon de raccordement en
firant et en relevant la poignae du manchon cJeraccordement afin cJeJamettre
cJroite_
3. Dabranchez la concJuitede bi@e et la concJuitecJ'airdu C02 cJu
manchon c_eraccorcJement. ] 4
Page 39

4. Retirez[e for de hi&re du caisson.
5. D6branchez la conduite cJ'air de la bouteille c_eC02.
& Retirez Ja bouteiJJede C02 du caisson.
7. Refirez [a co[anne cJehi,re cJucaisson en saisissant [e centre de [a co[anne.
Tournez clans [e sens des aigui[[es d'une montre et sou[evez.
8. Tirez sur Ja conduite de hi&re afin cJe[a faire passer par le dessuscJucaisson.
9. hsta[[ez le bouchon du caisson sur [a surface cJetravaik
10. PJacez['unit& _ terre, sur sa partie [at&rde. Nous vous recommancJonsde
placer un morceau cJecarton ou cJechiffon sous le caisson afin d'&viter de
rayer ou d'encJommager ce cJernier. Refirez Jesroulettes et montez Jespieds de
raise 6 niveau.
] ]. Montez [esc_eux6tag&res:
A. IntrocJuisezune extr&mit& cJechacune des chevi[[es cJesupport dans Jestrous
c_uc6t& droit cJucaisson.
B. Placez un cBt@de I'@tag_redans Japard gaucho de J'unit_ et laissez reposer
J'autre c6t_ de I'_tag@resur JescheviJJesde Ja pard cJroite cJeJ'unit_.
C. R@_tez J'op_ration avec JacJeuxi@me6tag_re.
12. Letransformation est 6 present termin6e. Rangez tous[es accessoires que vous
venez de retirer dans un endroit sOrafin de pouvoir Jesr_utiliser pJustarck
13. R_gJez[a temperature cJeJ'unit_ comme iJconvient afin de stocker des aliments.
y,h
C@ sei s des @@r' @mies d eHerg ÷
Suivez [es conseiJs d'@conomies d'@nergie ci-dessous pour un rendement optimal.
®Ouvrez et fermez la porte le moins possibJe JorscJesiours chauds et humicJes.
Lorsque vous ouvrez Ja porte, fermez-ia rapidement afin cJ'6viterque J'air chaud
p_n@re 6 ['int_rieun
®V&rifiez r&guli@ement que le p&rim&tre autour cJeJ'unit_ pr&sente une bonne
drcuJation d'air afin que cette derni@e salt bien ventil6e.
Veillez ace que le ioint de porte cJemeurepropre et soupJeafin que [e ioint assure
une bonne @tanchait_. Si le joint de la porte n'est pas compl_tement 6tanche, I'air
chad ext_rieur risquera de p_n_trer facilement a ['int@ieur de I'unit_. Le
compresseur devra par consequent fonctionner en continu afin que I'unita
demeure froide ce qui entra?nera une forte consommation d'anergie.
Rel'tl!_rcj_e: Remplaceztoutioint de porteencJommag&afin de restaurer
J'efficacit_&nerg@tiquede ['&quipement.
NE PAS ranger cJ'diments chauds clans le r&frig@ateun Laissez la nourriture
refroicJir avant de [a placer au r6frig&rateur.
Page 40

£ tretie et MeIey%ge de le Ie I i e @ Bi@re
Mentage du kit de netteyage
Veuillez Jireet comprenclre Jesinstructions suivantes avant cl'instdJer Jekit de
nettoyage.
1. M_Jangez un gallon (3,78 litres) cl'eau chaude et une
cuiJJ_re6 soupe de nettoyant clans un seau.
2_
RemcH'que: N'utiJisezpasde lessivede quaJit6
inf@ieure,de savonni d'eau chaude,
Refirez la capuchon clu nettoyanL Remplissez Jeflacon et
repJacez Jecapuchon. Laissez Jereste cle Jasolution dans
Je seau.
3, Fermez le robinet cl'air du r_guJateur ou Ja valve de Ja boutei% de C02.
4. D@branchez le robinet clu fot de hi@re. Ensuite, cl_branchez la conduite de hi,re
clu robinet en tournant I_@crou dans Ie sens inverse a celui des aiguiJJes cl'une
montre. Placez le robinet au bout clu tuyau et clans le seau.
5. Refirez le robinet de la colonne en ufiJisant Ja cJ@qui est fournie et fixez Ja piece
cl_emmanchement sur la bouteille cle nettoyant comme il se cloiL
R@m_rqu@_ Assurez-vous quail existe une _nclelJe au clos I_emmanchemenL
6. Tenez Ie flacon de netto_age 6 I'envers iusqd6 ce que Ja solution couJe clans le
seau comme illustr_. Voir figure ci-clessus.
7. RempJissez le flacon avec cle I_eau propre et r6p6tez I_op_ration jusqu_6 ce que
I'eau qui s'@coule soit claire,
8, Rincez le robinet clans Je seau 6 I'eau froicle.
9. Retirez l'emmanchement de la cdonne et remettez le robinet en place.
Assurez-vous que JaroncleJJese trouve au dos du robinet.
1O. Rebranchez le tuyau cle bi@e sur le robinet et fixez Jerobinet au lot cle bi@e.
Remarq_e," Lesconduites de hi,re doivent &tre rinc&es apr&s chaque fin de fot.
16
Page 41

bJettoyage et Entretien G_n_raJ
Nettoyage de J_habiJlageint_rieur et ext@ieur
1_Pr@arez une solution de 3 6 4 cuiH@esde bicarbonate de soude avec de J_eau
ti_de_Utilisez une 6ponge ou un chiffon humidifi_ de solution afin d_essuyerles
surfaces int@ieures et ext_rieures du caisson.
2. Rincez avec de I_eaupropre tilde et s_chez avec un chiffon doux_
Remcirque: N_utiJisez pas de produits chimiques puissants, de produits de
nettoyage abrasifs, de J_eaude Javel, de la Jessiveau chore, des
d@ergents concentr6s, de solvants ou des tampons r_cureurs_Certains
de ces prduits risquent de dissoudre, d_endommager et de d_colorer
Jefini de J_habiJJage.
Nettoyage du ioint de porte
1_Nettoyez Jejoint de porte avec un chiffon humide tous Jestrois mois_Le oint doit
demeurer propre et soupJe afin d'assurer J_@tanch6it_de Japorte.
2. AppJiquez une fine couche de vaseJine (p_troJatum) sur Jec6t_ du ioint o0 se
trouve Jescharni@es afin que ce dernier demeure soupJeet assure une bonne
_tanch@it_.
Nettoyage du dos de la fontaine
1. Nous vous consdJJonsde nettoyer I'arri@e du r_frig@rateur au moins deux fois
par an.
Remarqu÷: Certains environnements d_expJoitation risquent de devoir _tre
nettoy6s pJusfr@quemment.
2. UtiJisez un aspirateur ou une brosse afin de nettoyer Jesserpentins_.
17
Page 42

@ ide de
Lorsque vous tirez Ja hi&re dans un verre, si vous trouvez que la hi&re est trouble,
plate, aigre, incontr6Jable, p&tille ou a un faux-go0t, reportez-vous aux conseils
suivants.
Etat de Ja blare: Ja blare est trouble
La bi&re dans Jeverre parait trouble, eJJen'est pas claire.
Cause no. ]
Toutetemp&rature excessivement basse risque de rendre la bi&re trouble, surtout
Jorsquecette cJerni&redemeure dans un serpentin fro@ pendant Jongue p&riode..
Mesure Corrective
* Nettoyez compJ_tement Jesconduites et augmentez J_g_rernentJa temp@ature.
Cause ha°2
Le robinet de bi@e n_tait pas cornpl_ternent ouvert.
Mesure ¢orrectiv÷
® Ouvrez rapidernent et compJ_tement [e robineL
® Remplacez route roncJeJJeus_e ainsi que les pi_ces a I_int_rieur du robinet Iorsque
cda s%v_re n6cessaire afin que Je robinet puisse s%uvrir complatement.
Et_t de J_ hi,re: J_ hi,re est plate
La blare n% pas son bon goOt habitual, son goOt n%st pas cdui d%ne bi@e
qui provient cJirectementcJeJabrasserie.
Leverre est sale et graisseux._
_esure ¢_rrective
* Ne lavez pas les verres cJebi&res avec cJ'autresverres car iJspeuvent avoir
contenu du lair ou toute autre substance grasse.
® Toute accumulation excessive cJ'agent antiseptique et de germicide clans I'eau
Jaissera une pellicule grasse sur Jesverres et risque cJ'6venter Jahi,re et cJeJa
rencJreplate.
® IJest preferable de nettoyer Jesverres au jet cJevapeur (ou clans une autoclave
vapeur) ou de st_riliser lesverres Jorsque la r6gJementation le permeL
Lavez les verres attentivement en utilisant un bon liquicJe-vaisseJJeafin de retirer
route trace de mati_re grasse (par ex: rouge a J@vres,etc_}
® N'utilisez pas de savon_
N'essuyez pas lesverres. Laissez Jesverres s_cher a J'air libre en les pJacant sur
un _gouttoir ou une t6Jeondul_e.
® Rincez les verres avec de I'eau propre juste avant de servir Ja bi@re_II est
recommancJ@de servir la bi@e clans un verre mouiJl6.
]8
Page 43

Cause noo2
La bi@e n'a pas &t& tir@ecorrectement dans Jeverre.
Mesure Corrective
®Ouvrez rapidement et compl&tement JerobineL
®La mousse devrait &tre fine et compacte et le col de mousse devrait mesurer ] ,9
cm 6 2,5 cm d'&paisseur: Une hi&re tir&e sans chapeau de mousse donne
J'impression que cette derni&re est plate.
IJn'y a pas suffisamment de pression.
Mesure Corrective
Augmentez Japression si la bi&re coule trop Jentement. Leflux de hi&re devrait
pouvoir rempJir un verre de 29 mJen 4 secondes. (environ 23 mJ de hi&re}.
®V&rifiez Jasource de pression afin de d@terminer si Jaconduite d'air est bouch6e
ou obstru&e.
®RempJacez route source de pression trop Jenteou Je r&guJateur de C02 et Je
manom&tre.
La pression de Ja boutei% doit toujours &tre sup&deure 6 ceJJeutiJis_eavec Jefot
de hi,re.
®Mettez toujours Jefor sous pression avant de tirer Ja hi&re.
i:tat de Ja bi_,re: Ja l_ousse se d_tad_e
La mousse estcaract&ris&e par des grosses buJJessembJabJes6 des buiJesde savon
et eJJetombe rapidement.
Cause nooJ
Ce cas est g&n6raJement sembJabJe6 celui de Jabi@e plate. Voir Jesraisons et
causes de Ja bi@e plate.
i:tat de Ia biBre: Ja biBre a un fau×-_
La hi&re peut avoir un goOtamer ou fade. EJlepeut &gaJement avoir un goOt
huileux ou un mauvaise odeur et un goOt d@laisant.
Cause no. 1
Le roJoinetn'a pas &t&neffo',i&correctement.
Mesure ¢errectJve
®Brossez et nettoyez correctement Je robinet. R&curez-leen utilisant un d&tergent,
puis rincez-le 6 I'eau claire.
19
Page 44

Cause no.2
La conc_uite?dr estcontamin6e.
Mesure Corrective
® La conduite ?air c_dt _tre examinee. Si ale est contarnin&e, die ddt 6tre
imp&r_tivement remplac&e.
C_USe nO.3
La conc_uited'dr estd'un type erron&.
Mesure Corrective
® Un tuyau en caoutchouc absorbera et conservera les odeurs. Ufilisez un tuyau en
pJastique ou en cuivre.
Recommanclations G&n&rales en cos de Faux-goOt:
Lesconduites de bi&re cldvent 6tre rinc&es apr&s chaque fin c_efoL VdJlez 6 ce que
Jep6rim&tre autour de la fontdne 6 bi&re demeure propre, La fum6e, Jesodeurs de
cuisine et Jesd6sinfectants nuiront au goOt et 6 Ja saveur c_eJabi&re, Ces conditions
peuvent _tre caus_es par la source ?air ou par le contact c_irectavec le verre
Jorsquevous servez Ja bi&re.
Etat de Ja hi&re: _a bi@e est ai_re
La bi&re a un fort goOt c_eJevureet une forte odeur c_eJevure ou de mdsi.
Lestots n'ont pas &t&transporf&s correctement, La hi&re qui est livr&e sur un camion
ouvert pendant les chauds rods d'&t& risque c_eprovoquer seconc_efermentation.
_es_re C_rrective
Si possiNe, fdtes-vous Jivrer c_estots de hi,re par camion frigorifique term&. Si la
Jivrdson est effectu&e par un camion ouvert, couvrez Jestots de hi&re avec une
b@he afin de les prot&ger contre la chdeur de J'6t_.
Et_t de Ja hi@e: bi@e incontr6J_b_e.
La hi&re est soit constitute exclusivement de mousse, sat presque uniquement de
mousse avec tr&s peu c_eJiqui&.
C_use no. 1
La blare a 6t& md tir&e dans Jeverre.
Mesgre Corrective
® Ouverte rapi&ment et compJ&tement Je robinet.
® La mousse devrdt &tre fine et compacte et Jecd de mousse cJevrdt mesurer 1,9
cm 6 2,5 cm ?@aisseun
Page 45

Cause no.2
Le robinet est bouch6par des r&siclusde levure ce qui est souvent dOau fait que Ie
robinet n_estpas r6frig@6_ Lespi_ces cJurobinet et les rondelles sont us_es.
Mesure Corrective
®Assurez-vous que Jesconduites allant cJuf0t c_ehi&re au r_binet ne sont pas pli&es
ni endommag6es et rempJacez-Jessi n6cessaire.
®V&rifiez que les ronddles cJumanchon de raccorcJement situ&es cJerri&rele robinet
ne s'&ffiJochent pas car cela risquerait d'obstruer Je robinet.
_USe nO,3
Cette blare a _t@stock_e dans un endroit qui n'est pas suffisamment froicJ et Jabi&re
est 6 present ti&de.
Mesure Corrective
®Conservez les f0ts cJehi&re dans un local r&frig&r6 cJ'unetemp&rature cJe40%
(4.4°C} route I'ann&e!
Cause no.4
La pression est trop forte.
Mesure Corrective
- Toutd'abord, v&rifiez la source c_epression afin cJevous assurer qu'dle
fonctionne. Ensuite, r&glez Japression afin qu'dJe corresponde 6 la faille et 6
J'6quiJibre cJucircuit. LecJ&bitde hi&re devrait pouvoir rempJir un verre de 29 ml
en 4 seconc_es_l la _onne temp&rature.
Cause no.5
Trop de CO2.
Mesure Corrective
®R6gJezla pression de Co2 Jeplus has possible. CepencJant, Ja pression doit &tre
J&g@ementsup&rieure 6 ceJJede Ja pression interne de Ja hi&re. Ne d@assez pas
une pression de 18 Jivres(8 kg}. La pression acJ&quatedevrait &tre entre
10 et 12 psiilb.
®PJusJahi&re est froide et pJusJapression cJeCo2 est forte, et par cons&quent pJus
vite Ja hi,re absorbera JeCo2. Cette gaz_ification excessivecJeJa bi&re donnera
une hi@reincontr6JabJe.
®V&rifiez r&guJi@ementJesr&guJateurs cJepression afin de vous assurer que Ja
pression de foncfionnement est constante.
Cause no.6
IJn'y a pas suffisamment de pression ou pas du tout.
Mesure Corrective
®V&rifiez que Jesouvertures d'a&rations ne sont pas endommagaes.
®Ouvrez toujours Japression avant cJeservir une bi@e.
:2]
Page 46

¢_us÷ r,o.7
Vous venez d'ufiJiser un vieux for de bi@'e qui n'a pas _t6 stock_ dune temp6rature
suffisamment froide.
Mesure Corrective
Si vous avez laiss& la hi,re reposer trop Iongtemps dans un local d une
temp&rature sup&rieure d 45°F (7°C}, la bi@e risque de fermenter d nouveau.
Conservez les fOtsde hi&re dans un Iocd r&frig&r6 d 40% (4.4°C} toute I'ann&e.
Etat 4e Ja hi,re: hi,re de fin de {Oto
La hi&re est faciJe d firer au d&but du lot. Vers Jafin du lot, est devient pJate.Ceci
arrivera pJussouvent si Jaconsommation de bi@e est faibJe.
Cause no, 1
Lorsque J'air est utiJis_en rant que source de pression, J'air rempJace JeC02 dans Ja
bi&re et Jarend pJate.Ce probJ&men'est pas touiours &vident Jorsque Jabi&re est
tir6e rapidement
Mesure Corrective
,L,chaque fois que ceJaest possibJe,utiJisez JeCOzen rant que source de
pression.
:22
Page 47

Darts Je Service de Maison
Elements sous garantie et dur_e
de ta garantie:
Cette qarantie couvre tous Jesd6fauts de
mdn-_'ceuvre et de mat@iaux pour une
p6riode de:
] 2 mois pour la main d'oeuvre
] 2 tools pour les pi_ces
5 arts pour _e systole
d'_tanch_it_
La cd,arantie prend effet Je our de I'achat
de ]_artide. [e t'cket de cdsse d or'g'ne
doit @trepr_sent_ au centre de
r@aration agr_@pour route r@aration
sous garantie.
EXCEPTIONS: Garantie pour
usage ¢o_ercia_ ou _ocation°
90 _urs pour la _ain d'_uvre
(service en atelier uniquement)
90 j@urs p@ur les pi_¢es
Aucune autre garantie n'est
appJicab_e
Couverture.
1. Lespi_ces _Jectriques et m@caniques
servant au fonctionnement de
J'appareiJ, pour une p_riode de 12
mois_Ceci, comprendJ ensembb des
Ri_ces,6 Jexception de Ja finition et
_Jesgarnitures_
2. Lescomposants du syst@me
d _tancJ_@it@,teJsque Jecompresseur
herm_tique, Jecondenseur et
J%vaporateur, contre tous d_fauts de
fabrication, pour une p_riode de 5
ans 6 compter de Jadate d achat.
Tout dommage concernant ces
comRosants et r_suJtant d_unabus
d orcJrem@canique, d une utiJisation
incorrecte, ou de re@rhodes
d expadition inad_quates, ne sera
pas cornpris dans Jagarantie.
R_j_r_tior, s q_i seror, t
e_Ject_@es:
1_Nous nous engageons 6 r@arer ou
remplacer; 6 notre discr6tion, route
pi&ce &lectrique ou m&canique
s'av_rant d&Fectueusedans des
conditions normales d'utiJisation, au
cours de Ja p6riode de
_arantie sp@cifi_e.
2. L'acheteur ne subira aucun frais pour
Jespi@ceset Ja main-d'aeuvre
couvertes par Jagarantie, au cours
de Ja_premi@ep@riode de 12 mois_
Au-deJ6 de cette p@iode, seuJesJes
23
pi&ces seront couvertes par Ja dur6e
restante de la ga,rantie. La
main-d ceuvre nest pas pourvue et
est 6 Ja charge du client.
3. Contacter le centre de r¶tions
agr&@JeRJusproche. Pour obtenir Jes
nora et acJressedu centre lepJus
proche, appeler le 1-877-3_7-3639
LES APPAREJLS SO_T ¢OUVETR$
PAR BA GARA_TJE $UR LE
TERR_TOJRI: CONTiNEnTAL DES
ETATS°UNI$, A PUERTO RiCO ET
AU CANADA:
Lesdommacies r_suJtantd'une instaJJatio
incorrecte. ['es dommages survenus
pendant JetransporL Lesd@fautsne
r@suJtantpas de Ja fabrication&es
dommages r_suJtant_ un usaae
incorrect ou abu,sif, d un accident, de
modifications, dun manq_,ued entretien
ou de maintenance, ou dune tension
incorrecte. Lesdo,rnmages r_suJtantd'un
usage autre que Jusaae m6nagen Les
dommages r_suJtantc_un entretien ou de
r@arations par quiconque autre qu un
distributeur ou centre de r6parafions
agr_& Garnitures d_coratives ou
ampouJes pouvant _tre rempJac@es_
Transport et Frais d envoi. Main d aeuvre
(apr@sJap@iode initide de 12 mois)
CETTEGARANTIE LIMITEEREMPLACE
TOUTE AUTRE GARANTIE EXPRESSE
OU IMPLICITE,Y COMPRIS LES
GARANTIES DE VALEUR
MARCHANDE OU D'ADEQUATION A
UN USAGE PRECIS
Le recours offert darts cette garantie est
excJusifet est accord@6 J'excJusionde
tout autre_
La garantie ne couvrant pas Jes
dommages directs et indl_rects,Jes
Jirnitations d-dessus peuvent ne pas
s'appJiquer 6 tous Jescas_Certains _tats
ne permettant pas JaJirnitation de Ja
dur_e des garanfies impJicites, Jes
Ji,mitationsci-dessus peuvent ne pas
s appJiquer 6 tous Jescas_
Cette garantie conf@e 6 J'acheteur des
droits sp6cifiques et ceJui-ci _eut
b_n6flc%r d autres dro'ts qdvar'ent
salon Jes_tats.
Haier America
New York, NY 10018
Page 48

Lea todas Jas instruc¢iones antes de utiJizar este productoo
Si÷_pre tenga en cuenta Jas precau¢iones basicas seguridad
cuando utiJice eJ dispenser, induyendo Jas siguientes:
"1_ UtiJice _ste producto s6Jopara su uso entendido como se describe este manuak
2,
3,
4_
Estearfefacto debe estar correctamente instaldo de acuerdo alas
instrucciones provistas por este manual antes de ufiJizarse. Vea Ja secci6n de
Instataci6n para mayor detatle.
Este artefacto debe ser conectdo a Ja toma de corriente adecuda con eJ
adecudo voltage.
Debe reaJizarse Jaconexi6n a fierra para rducir el riesgo de shock eJ&ctricoy
fuego. No corte o retire eJcane de Ja conexi6n a tierra!! Si usted no posee
una entrda o toma para 3 patas JJamea un eJectricista para que haga Ja
instdaci6n adecuada. La toma de corriente de Japared debe estar conectada
a fierra.
5. Nunca desenchufe Jaunidd tirando dei came. Siempre agarre eJenchufe
firmemente y retire hacia fuera.
& Inmdiatamente reempJace Joscanes peJados o desgastdos, enchufe fJojo o
toma de corriente fJoia.
7. Para rducir el riesgo de shock eJ&ctrico no utiJicedargues o adaptadores
para conectar Jaunidad a una fuente de energla.
8. Desenchufe siempre antes de JaJimpieza o de reparad6n.
9. Sugerimos que un t@cnicoespecidizado reaJiceeJservice de Jaunidad en caso
de que el producto Jorequiera.
10. En caso de que estuviese desechando eJartefacto vieio recomendamos que
retire Japuerta deJ mismo y deje Josestantes en eJJugan Esto reduce eJdesgo
de daBos en presencia de ni_os_
11. Esteartefacto no debe instaiarse o ubicarse en un Jugar o gabinete cerrado.
Est6diseBado soJamente para JainstaJaci6n en Jugares Jibres.
12. No opere esta unidad en presencia de gases expJosivos.
13, No fuerze JoscontroJes,
14_ No opere Jaunidad a menos que trios Joscerramientos y paneJesest_n en su
Jugar.
15_ No opere esta unidad cuando haya partes rotas o que faJten.
Page 49

]6. Noufiliceparausacomercial.
]7_ Esteartefacto est6 cJiseBacJopara uso inferno soJamentey no cJebeope_arse aJ
aire Jibre.
] 8_ Para reducir el riesgo a lesiones no permita que los chicos iueguen con este
artefado, Se necesita cJeextrema supervisi6n cuando Ja unidacJse ufiliza cerca
de los ni_os.
19, La puerta del dispenser debe estar cerracJamientras esteen usa. No deje la
puerta abierta mientras seencuentren niBos cerca.
I_portantes mnstru¢¢iones de Seguridad deJ Dio×ido de
¢arbono (¢@2)
1. E! di6xk]o de carbono ( CO2} puec_eser pdigroso! Los dJindros c_e CO2 fienen
gas comprimido de aJta presi6n, el cud puede set peligroso si no est6 suieto
correctamenfe, Aseg0rese de leer y entenc_ertoc_osJospasos para Ja correcta
insfalad6n cJelciJindro,
2. Siempre conecte eJcilindro cJeCO2 a un reguJador de gas! Si esto no se tiene
en cuenta existe el riesgo cJedaBos o muerte en caso de que ocurra una
explosi6n cuando seabra Jav61vula.
3. Nunca conecte el ciJindro cJeCO2 cJirectamenteaJ contenedor cJeJproducto.
4, Siempre siga las instrucciones corresponcJientes antes cJecambiar un ciJindro.
5. Nunca cJeiecaer o arroie un dlincJro de CO2.
6 Siempre mantenga el ciJindro deido deJcaJor AJmacene cilincJros extras en
lugares frescos (preferentemente 70 ° F}. Mantenga los cilincJros de forma
vertical, boca ardba, amarrados para evitar que se caigan.
7. Siempre ventiJey deie el @readespeiada en caso de que haya ocurrido una
p&rdida dd gas.
Page 50

8_
9_
Siempre chequee el test DOT (departamento de transporte) y la fecha en el
ciJindro antes de la instaJaci6n. Si la fecha fuera mayor a 5 a_os atr6s no
utiJiceese ciJindro. Devu_lvalo a su proveedor cJegas.
Nunca conecte el contenecJor cJeJprducto a menos que haya m_nimo dos
mecanismos de seguridacJ en el sistema cJepresi6n, uno en el reguJdor cJeJ
C02 y el otto en eJcontenedor cJeiproducto o en JaJ_neade presi6n del gas.
GUARDEESl'ASmNSl'RI,I(GGNES
PARAU$OFUTURO
Gracias por comprar nuestro
No. de modelo
No. de serie
Fecha de compra
Dispensen
Recuerde de tomar nora dd moddo
y nOmerode serie. Estosse
en la parte
Page 51

PAGE
PRECAUCmONES DE SEGURIDAD 1-2
Precaudones generales 1°2
Di6xido de carbono .................................................................................. 2°3
JNVENTARJO DE A¢CESOR_OS.............................................................. 5
PAR]rESY ¢ARACT_:RJSTJCAS................................................................ 6
UB_¢ACmONAPROPJADA ...................................................................... 7
JNSTRU¢CJONES DE ENSAMBLAJE .......................................... 8-1 1
Instalando ias ruec_as 8
Instalaci6n c_eJgrifo 8
Instalaci6n c_eJaguia 9
InstaJaci6n deJ regulador de CO2 y el dJindro ................................................ 9
Colocando eJbarril o tanque de cerveza ] 0
Importante memsaje cJeprecauci6n ............................................................. ] 'J
UTILIZANDO EL DISPENSER 11-13
Sirvienc_ocerveza ................................................................................ 11
Ternperaturade la cep,,eza................................................................. 12
ControJde Jatemperatura I '_
Descongddo autom6tico ................................................................... 12
Sonidosde Jaoperatoria normal ................................................................ 13
GUIA PAPA SERVIR ........................................................ 13o14
Conseios para servir .......................................................................... 'J3
RencJimientode medio tanque de cerveza .................................................... ] 3
Conseios para Jimpiar Josvasos .................................................................. 'J4
2 pruebas simpJes para Javar los vasos........................................................ 14
¢OVIRTIENDO ELDISPENSER EN UN REFRIGERADOR .............. J4- J5
¢ONSEJOS DE AHORRO DE ENERG°JA .............................................. J5
GARANTIA ............................................................................................ 25
Page 52

©ese_peq_e e _ve_t_ri@ de Acceserios
1. Retire todos Josmaferides c_elembaJaie. Esb incJuye Jabase de telgopor o
goma espurna )/bdas las dntas ac_hesivas que contienen Jos accesorios fuera y
por dentro. Deslice y retire Jaguarda pJ_stica utiJizada para asegurar eJ
compresor durante eJ enqbarque yio transporte.
2. hspecdone y retire cuaJquier afro materid c_elembdaje como cintas y materid
irnpreso antes hacer andar d c_ispenser,
Not_ Deie que eJdispenser haya esfac_opor Jo menos 2 horas en Japosici6n
vertical antes c_e encender,
ControJe todos los accesorios para asegurarse c_eque todas Jaspartes est_n
presentes yen buena condici6n. A continuaci6n hay una Jista de trios los
accesorios para referencia. Si fdtara alguna pieza o estuviese rota, por favor,
contacte nuestro departamento de servicio para asistencia. E_n@m÷ro
÷s I 877 22.7 3659°
1 Grifo o can@a, induyenc_o:
1 junta o arandda para el grifo
1 arandela para la conexi6n aJ barriJ
1 reguldor del CO2
1 cilin&_ de C02
1 sistema de acopJe
1 kit de Jimpieza
1 cable conductor de aire C02
2 predntos
1 soporte de cilindro
1 guia de cromo
1 bandeja de goteo
4 rueditas
1 JJave
4 torniJlos cabeza phillips largos
8 torniJlos cabeza phillips cortes
2 Soporte
2 canes
4 pins cJesoporte
Page 53

_tes V C_r_¢_eristi¢_s
© ©
1. Ruditas frontales
2. Piso sopore de[ barriJ o tone[
3. Cabina
4. CiJindro cJeCO2
5. Superficie de trabaio
6. Guia de cromo
7. Canilla de cerveza cromada
8. Termostato ajustab[e
9. Bandeja de goteo
10. BarriJi tanque ( no induldo, soJo
se muestra en i[ustraci6n}
Page 54

Adec @d
'PPara asegurar que su dispenser de cerveza opere al maximo de eficiencia instale
el mismo en un lugar donde haya circulad6n de aire, instdaci6n de tuberias y
conexiones d&ctricas.
EJiiauna ubicaci6n donde el dispenser est6 leios dd cdory no est&expuesto a la
luz dd sok
® Este Dispenser esta diseBado solamente para uti_izar en interiores, no debe
ser ufiJizado aJ aire Jibre_
EJdispenser no debe coJocarse sobre superficies edificadas o en 6reas cerradas.
Las siguientes dimensiones son eJespacio recomendado aJrededor deJ dispenser:
Laterdes .................. 3/4" (19ram)
Arriba .......................... 1" (25ram}
Atras ............................ 1" (25ram}
Page 55

strucdeHes de
Leacuidadosamente y trate de comprender todas Jasinstrucciones antes de
comenzar con JainstaJaci6n deJdispensen Si Juego de terminado usted no estuviese
seguro de haber instaJado correctamente eJdispenser, nosotros recomendamos que
contacte a un t6cnico especiaJizado.
JnstaJe Jas Rueditas
Siga Jossiguientespasos.
La nuez
1_Vacie eJinterior de Ja cabina compJetamente y
recueste eJdispenser en eJpiso. Recomendamos
que utiJiceun cart6n o tda para apoyar eJ
dispenser y prevenir raspones o aboJJaduras.
2. Inserte Jasrueditas en los hoyos a los extremos LaruedecHla
de Jabase. Aiuste Jastuercas de cada ruedita utiJizando Ja Haveprovista.
3. Una vez colocadas las cuatro ruedas coloque el dispenser de pie.
La Ilave inglesa
InstaJad6n deJ grifo
Siga Jossiguientespasos.
1. PrimeroretireeJenchufeque seencuentrasobreJasuperfidede trabajo.
SostengafirmementeeJenchufe,gire y tire hada arriba.
Nora: Guarde este enchufe en un
lugar seguro ya que usted Io
necesitar6 cuando quiera
converfir eJ dispenser en un
refrigerador,
2. Cdoque Ja arandela en la parte inferior
deJ grifo o caniJJa.
3_ PaseeJtubo conductor de cerveza a
trav6s de JaarandeJa y basra eJborde
deJ grifo.
4. Inserte eJtubo por eJaguiero que se
encuentra en Jasuperficie de manera
que eJ gdfo quede apoyado sobre Ja
misma,
R
Redactela Asamblea L/ El asidero
de Brazo
_ Tornil_o grande de la
_l Tornil_o pequelio
de la Cabeza de Phillips
2
de culata
El conducto de
la cerveza
Proteja Barand
5. AJinee los aguieros del grifo con Ja arandeJa y agujeros en Ja superficie_
6_Aiuste ufiJizando 4 torniJJosphilJips largos_
Page 56

Instala¢i6n de la Gui=
Siga lossiguientes pasos_
1_Coloque laguiaen Iasuperficiede lacabina
coma se muestraen eI cliBuio.
2. AJinee Josaguieros de Jagu_a con Josde Ja
superficie.
3. Aiuste con 8 torniJJospequeBos phiJJJips,
Instaiaci6n del reguJador de CO2 y eJ ¢iJindr@ de CO2
Siga Jossiguientes pasos, UstecJdebe entender tdas Jasinstrucdones antes cJe
redizar Ja instdaci6n.
Nota: Su ciJindro de CO2 es provisto vado para evitar cudquier accidente durante
eJtrandacJo deJ aparato, CuancJoustecJcompre eJprimer barriJitanque de
cerveza haga JJenareJciJindro de C02.
1. Conecte d extremo cJeJamanguera de aire
aJ regulador de C02 Aiuste ufiJizando uno
de los precintos pJ4mticosnegros. UtiJice una
tenaza para ajustar firmemente el precinto
para asegurar qua no haya p@cJicJas.
2. Conecte el reguJacJorde C02 aJ cilincJro de
C02 ajustando firmemente Jatuerca deJ
regulacJor.
3_ Retire la tuerca cJelsoporte de ciJindro y uti _av_u_a
ice JOSdos tornillos provistos para asegurar
eJsoporte en Japarte trasera c_eJciJindro. Con_0_EaUn_
deI Aire CO
4_ DesJiceeJcilindro dentro del soporte y
aiuste la tuerca nuevamente.
La iguala
Page 57

iiiiiiiiiiiiiiiiiiiiiiiiiiiiiiiiiiiiiiiiiiiiiiiiiii!i!i!!i!!i!!i!!i!!i!!i!!i!!i!!i!!i!!i!!i!!i!!i!!i!!i!!i!!i!!i!!i!!i!!i!ili
¢oJocando ÷J barriJ o tanqu÷ de cerveza
Su dispenser de cerveza viene con un grifo arnericano de marca reconocida en los
EstacJosUnicJos.Antes cJecomprar el tanque o barril controle y verifique con el
8istribuidor que el grifo provisto puecJaufilizarse.
Nota: Para Ja cerveza cJegiro de europeo, un Sankey europeo se requiere. Llame
pot favor el Peaie Sobresdiente de la
Compafiia 8el Equipo Liberta en
(800} 621-4625 para mas informaci6n.
Siga los siguientes pasos:
1_Aseg0rese que la maniia negra cJelsistema de
acople est&en posici6n de cerracJo (hacia arriba}
antes de Ja instdaci6n cJeJtanque. Inserte eJacopJe fig. I .......................
en el cuello dd tanque o barriJ y gire en cJirecd6n
aJ reloi para cerrar y ajustar. (vet figura 1}
2. Coloque d extremo de la rnanguera de circuJaci6n
de aire en la boca deJextremo superior cJelsistema
de acopJe. Luego asegure la rnanguera utilizancJo
uno de los precintos plasticos de modo que no
haya p&rcJidas. (ver figura 2}
3_ Esde surna importancia que la arancJeJade goma
negra sea colocada dentro de la tuerca antes de
conectar la manguera de cerveza al acople. RetireeJ
soporte protector negro ubicacJoen Japarte superior
del sistema de acopJe y enrosque la tuerca con la
arandela de goma. Aiuste firmemente (ver figura 3}
x
4_AsegOrese de que JaHave de paso de Ja cerveza este
cerrada (hacia atr6s) antes cJeredizar Ja conexi6n fig. 3
con eJtanque de cerveza. Para que Jaconexi6n sea
Negro estira el asidero (hacia arriba)
segura tire cJeia manija deJacopJe hacia fuera y _'_- _
Juegopresione hacia abaio hasta que encaje en Ja
posici6n. (ver figura 4}
5. Cuiddosamente incJine eJtanque de cerveza y
apoye el borde sabre la superficie soporte de acero
inoxidabJe en eJ piso interior deJgabinete. Luego
dedice cuidadosamente eJ tanque de cerveza hada
el interior, asegurandose cJeque este en suJugar fig. 4
(ver figura 5}
10
fig. 5
El Barlil de la cerveza
\
El Apoyo c_elbalril
Levante Vertical
Page 58

[_portante Mensaie de Precau¢i6n
Si se utiJiza C02 cuando se tira cerveza de barriJ d sistema de_e estar
adecuadamenfe proteg@o en contra de una excesiva concentraci6n de presi6m
Esto puede ser [ogrado a trav6s de [a instdad6n de por [o menos dos mecanismos
de seguridad con un adecuado sistema de descanso.
Los mecanismos de seguridad deben ser instdados en Jos siguientes Jugares:
A Sobre o inmediatamente debajo deJreguJador de CO2
B, En eJ sistema de [a can@a,
C, En Ja JineadeJ sistema de presi6n,
Nota: Las ubicadones en A y Bson Jas preferibJes.
_ti_iz_d@ d Dispe_ser
Sirviendo Cerveza
Siga los pasos siguientes:
1_Aseg0rese de que eJ dispenser este correctamente conectado a un enchufe de
120V, 60Hz y 15 amp.
2. Cdoque Ja bandeia de goteo sobre Jasuperficie debaio de Ja can@a.
3_Abra Jacan@a tirando repidamente y compJetamente de Ja pdanca hacia uno
para servin
Nc,ta: Si per dguna raz6n Ja cerveza no sdiera [ea Jasecci6n de probJemas
frecuentes de este manuak
4. ReguJeo suba [a presi6n en caso de que Jacerveza bajara muy despacio. En
condiciones de ternperatura y presi6n correctas un vaso de 10oz debe JJenarse
en 4 segundos,
5. Sostenga e[ vase con una incJinaci6n de 45 grados, Cuando este 2/3 JJeno
comience a enderezar e[ vase
Nota: EsnormaJ ver que se forme condensaci6n en Ja superficie de Ja can@a. Esto
se debe a Jasdiferentes temperaturas.
11
Page 59

iiiiiiiiiiiiiiiiiiiiiiiiiiiiiiiiiiiiiiiiiiiiiiiiU!{!i!ii!ii!ii!ii!ii!ii!ii!ii!ii!ii!ii!ii!ii!ii!ii!ii!ii!ii!ii!ii!ii!ii!i!!i!i!iii
Te_peratura de Ja Cerveza
®La temperatura recoraencJada para servir cerveza tiracla es entre los 34° )/ 38' F
Para mantener esta temperatura en un ambiente con promedio 70°F sdeccione Ja
opci6n "Normd" del termostato_
Nora: Durante @ocas c_everano cuando hace mucho cdor recomendamos
que ajuste el termostato a un nivel mas alto,
Sdeccione Y mantenga la temperatura correcta dentro cJeJgabinete. Estoes
esencid para no percler Jafrescura y eJ sabor c_eJa cerveza.
®La temperatura recomendac_a para guardar un tanque o barriJ de cerveza es
entre 38 ° y 40°F,
EJtrio excesivo o temperaturas baias excesivas pueden hacer que Ja cerveza
piercJa sabon
Nota: A temperaturas mayores a 45°F la cerveza puede
pasarse o vdverse agria mofivo de una fermentaci6n
secunclaria.
ControJ de Te_peratura
La periJla de contrd 8e temperatura se encuentra en la parte trasera 8e Ja unicJacJ
end rondo en Ja esquina izquierda_ Luego de encender JaunidacJ usted debera
esperar aproximadamente 24 horas para que enfrie correctamente_ Deber@ajustar
eJnivd cJetemperatura cJesea8ode acuer8o a sus necesiSacJesy preferencias.
Des¢ongeJad@ Auto_atico
No es necesario descongeJar eJdispenser- refrigerdon EJhido que se acumuJa en
eJevaporador es autom@icamente cJescongdado cada vez que eJcompresor se
detiene_ EJagua dd hieJo va hacia Jabandeja de descongdado en Japarte trasera
de Ja unidad y se evapora.
12
Page 60

Entendiendo Jos $onidos de Ja Operatorio Nor_aJ
* Sonido de burbujeo y leves vibraciones son comunes a la circdaci6n de la
refrigeraci6m
® Soniclo de chisporroteo o pequer'ios gripes ocurren durante el cido de
descongeldo_
o Sonido de goteo es atribuible d agua que cae en Ja bandeia de 9oteo durante
el per_do de descongelado.
® Un cruiido puede escucharse debido a la contracci6n y expansi6n de las bobinas
de enfriamiento duranfe el ddo de c_escongelado.
Servi Cervez
Conseios para $ervir
Los siguientes conseios le ayudar6n para servir la cerveza perfectamenfe.
AI servir cerveza controJe Jo siguiente:
® Limpieza ® Temperatura
" Presi6n ® Uso de CO2 cuanc_oes posible.
Rendi_iento de Medio Tanque de Cerveza
Estec_ispenserde cerveza puede soportor basra 172tanque_ Para so convenienda,
la siguiente tabla le muestra cuantos vasos pueden servirse con 172tanque.
No. de Vasos Tamafio
192 12oz.
236 10 oz. 1i2-Tanque
264 9 oz.
290 8 oz. 1i2-Tanque
353 7 oz.
= 15-1/2 GaJones
= 1984 Onzas
= 6-3/4 de BotdJas de 12 Onza
417 6 oz.
13
Page 61

¢onseios pare Li_piar Jos Vasos de Cerveza
Para que el sabor no tenga alteraciones Io mas conveniente es servir la cerveza en
vasos Jimpios. Lossiguientes conseios Jeservir6n para Jimpiar decuadamente los
vasos y servir Jacerveza.
No Javelos vasos para la cerveza conjuntamente con otros que contengan leche
u otra sustancia grasosa.
®Un excesivo uso de detergente puede deiar una pelicda en Josvasos y dterar el
SabO[_
UfiJice un buen detergente de modo que puda eliminar todo fipo de sustancias
grasas (por eiemplo: 16piz de Jabio).
®No utilice jab6n
Deie que los vasos se sequen con le aire, no utilice repasador.
Lave Josvasos con agua fresca antes de servir. Es recomendable servir la cerveza
en un vaso h0medo.
Dos Pruebas $i_pJes pare Laver Jos Vasos
]. Lave los vasos de! mo_o usuaI_Inmersa primero el vaso en agua Iirnpia_ Vade el
vaso_Si gotas de agua quedaran en el vaso dejando rastros o manchas es
porque el vaso no ha sido lavabo ¢orredamente.
2. Nuevamente lave d vaso de modo usuak Llenecon agua y un poco de saI y
agite de manera que saJganlas manchas o rastros de Jas paredes del vaso.
Co wi tie do Dispe s÷ Refriger dor
Para su conveniencia su Dispenser puede convertirse en un refrigerador.
SimpJemente siga Jos pasos siguientes.
Nota: Cuando utiJicemos la unidad como un refrigerador no es necesario eJuso de
Jasrueditas, ya queen el movimiento pueden caerse Jascosas almacenadas
en los estantes.
1. Cierre la v6lvuJa principal del ciJindro de CO2_
2. Cierre la conexi6n entre eJ tanque o barriJ de cerveza y el sistema de acople
Ilevando la Ilave o palanca de este 0Jtimo hacia arriba.
3. Desconecte ambos: Jamanguera de cerveza y el tubo de corriente de CO2 deJ
sistema de acople.
4_ Retire eJtanque de cerveza del gabinete_
14
Page 62

5. Desconecte el tubo de aire de CO2 dd cilindro.
6. Reti_ e[ ciJindro de[ gabinete
7. Jde cJeJamanguera cJecerveza cJesdearriba cJe[gabinete.
8. hstaJe el cane y enchufe en Ja superficie de trabaio.
9. Recueste[a unidacJ, uti[izancJo un par'_oo pieza de cart6n para no rayar eJ
piso, para poder retirar [as rueditas.
10. Co[ocar Jospies nive[adores.
11. hstaJe Josdos estantes.
12. E[proceso de conversi6n se encuentra ahora ya reaJizdo. Guarde los
accesorios restantes en alg0n Jugar seguro para su futuro uso_
13. Ajuste e[ nive[ cJetemperatura cJeseadopara conservar dimentos.
Co seios de Ahorro de
Siga los siguientes conseios para el ahorro de energia y una 6ptima eficiencia.
® Limitese a abrir y cerrar[a puerta de[ refrigeracJor s61o[o necesario en cJiascJe
mucho cdor y humedad.
* ControJe regu[armente que drecJedor haya una acJecuada corriente o circuJaci6n
de aire.
Mantenga los borcJesy contornos de la puerta Jimpios para asegurar que la
puerta se selle a[ cerrar. Si no se[[ara correctamente puecJefi[trarse aire c_Jido
aumentando [a temperatura interna cJe[mismo. De esa manera e[ compresor
deber6 trabaiar continuamente para mantener el frlo hadencJo mayor el consumo
de energia.
Nora: Reempiace una iunta de cu[ata cJaBada c_epuerta para restaurar [a
efidenda cJe[a energia.
NO GUARDE comidas caJientesen e[ refrigerador; deie primero que seenfrlen
Josdimentos y [uego dmacene.
15
Page 63

iiiiiiiiiiiiiiiiiiiiiiiiiiiiiiiiiiiiiiiiiiiiiiiiiUii!ii!ii!ii!ii!ii!ii!ii!ii!ii!ii!ii!ii!ii!ii!ii!ii!ii!ii!ii!ii!ii!i!!i!!i
C_id_d@ y M_e_i_ie_t@ de_ Dispe_ser de
Instdando eJ Kit de Ji_pieza
Lea las siguientes instrucciones antes de comenzar con la instdaci6n dd kit de
Jimpieza.
1. Mezde un 9d6n de agua tibia con una cucharada c_e
Jimpiador en un bdcJe.
Not_:DonotuseI>'e,soapo_hotwater'. _'_
2. Retire Ja tapa, Ilene Ja iarra con Jasduci6n anterior Y
4
tape nuevamente. Deje d resto c_eJamisma en d _oalde.
3. Cierre Ja Havede paso c_eaire c_eJregulador o Jav61vda
end tanque c_eC02.
4_ Desconecte d griFo cJeJbarril. Luego desconecte la manguera de cerveza c_ela
canilJa girando la tuerca en c_irecci6n contraria al reJoj. Coloque el grifo y Ja
punta c_eJa manguera en el bride.
5. Retire Ja canilla con la Jlave y cdoque el extremo deJenvase limpiador en ese
Jugan
Nora: Cerci6rese hay una arandda en Jaespdda dd apropiado.
6. Sostenga eJ jarro o envase de Jimpieza incJindo hacia debaio de manera que
Jasdud6n corra hasta eJbaJdo corno muestra Jafigura de arriba.
7_ LJeneJuegoJa jarra con agua fria y repita eJproceso hasta que eJagua sdga
Jimpia.
8_ Lave Jacan@a con agua Jimpia._
9_ Desconecte eJextremo dd kit cJeJimpieza y cdoque eJgrifo en su Jugan
10. Reubique Ja manguera de cerveza y aiuste nuevamente eJgrifo d barrik
Biota: Las llneas de Ja cerveza se deben Jimpiar despu@sque cada bamJ se
vada.
16
Page 64

Bi_pieza y Manteni_i÷nto GeneraJ
Limpieza general interna y externa deJgabinete
1_Prepare una soJuci6n de aproximadamente 3 o 4 cucharadas de bicarbonato de
sosa mezcJadas con agua tibia. UtiJice una esponia o un paBo suave para
repasar eJinterior y Ja parte externa dd gabinete.
2. Repase son agua Jimpia y tibia y seque con un paBo suave.
Nota: No utiJice quimicos, abrasivos, amoniaco, detergentes concentrados, cJoro,
sdventes o esponias de metak AJgunos de estos productos pueden daF_aro
decoJorar eJacabado de Ja unidad_
Limpieza de Jasiuntas de Japuerta
1. Limpie Jasjuntas de Jas puertas con un paBo hOmedo cada 3 meses
aproximadamente. Estasdeben mantenerse Jimpias para que Japuerta seJJe
correctamente aJcerrarse.
2. Puede utiJizar parafina para apJicar a Joscostados de Ja junta y mantener eJ
seJJadocorrecto.
Limpieza por detrSs deJdispenser
1_Nosotros recomendamos que redice una Jimpieza pot detrSs deJdispenser pot
Jomenos dos veces aJ aBo.
Nora: AJgunos ambientes _querir@n de una Jimp_ezaconstante.
2. UtiJiceuna aspiradora o un cepiJJopara Jimpiar Jas bobinas.
AntesdeutiJizarpr0duct0sdeJimpinzasinmpreJnay sigaJas
instrucci0nnsdeus0dd pr0duct0.
17
Page 65

r@b em s Frecue s
En caso de que est6 sirviendo cerveza y 6sta e4uviese turbia, o de color apagado,
con burbujas, sin gu4o, o agria, refi6rase a algunos de los siguientes puntos.
¢orldi¢i6n de cerveza: Turbia
La cerveza en el vaso fiene un color nublado, pareciera no limpia.
¢ausa]
Excesivastemperaturasbaiaspuden causarestoseFectosa la cerveza,
espeddmenfesiJacervezapermanecieraen Jacadenade frio pot un periodo.
Correction
®Aseg0reseque lasJineasy tubosest_nlirnpiosy luego suBadea pocoJa
temperatura.
¢ausa 2
LacaniJJade cervezarues6Joabierta parcidmente..
¢orr÷¢¢ion
®Abra r6pidamentey compJetamenteJacaniJJa.
®ReempJacearandeJaso cudquier accesorionecesariopara permitir que JacaniJJa
abra compJetamente.
18
Page 66

iiiiiiiiiiiiiiiiiiiiiiiiiiiiiiiiiiiiiiiiiiiiiiiiiiiiiill
Condici6n de cerveza: Pasada_ de co,or a_ado
La cerveza carece C]eSUfrescura y sabot original. La capa c_eespuma cJesaparece
r6pic_amente.
Causa 1
El vaso presenta suciecJac]o grasa.
Correction
No lave el vaso iunto a afros que haTan contenido Jecheu otra sustancia grasa.
EspreferiNe esterilizar los vasos cuanc_o sea necesario
® Lave los vasos ufilizanc!o un buen cietergente c_emodo cJeeJiminar todas las
sustancias grasas.
No utilice iab6n.
® No seque los vasos con un paso o repasador. Permitan que se sequen con el
dire.
® Eniuague los vasos con agua fresca antes de servir la cervexa.
19
Page 67

¢ausa 2
[a cerveza no se sirve de modo adecuac_o.
¢errec¢ien
®Abra la caniJJar6pidamente y de forma completa,
La espuma de Jacerveza debe ser una capa espesa de aproximdamente de
3/4"a 1"de espeson La cerveza tirada sin espuma da Jaapariencia cJeestar
pasada,
C_US_ 3
No hay demasida presi6n.
Coffee€ion
®Aumente Ja presi6n si Jacerveza cayese muy despacio, Lo normal es JJenarun
vaso de 10oz. en 4 seguncJos,
ControJe Ja fuente de presi6n para determinar si estuviese obstrulda.
ReempJaceJa fuente de aire inactiva o eJ reguJacJorde CO2.
®La presi6n deJtanque debe set siempre m6s dta que Japresi6n utiJizada en un
barrik
Siempre apJique Ja presi6n aJbarriJ antes de dibujar cerveza.
¢ondid6n 4e cerveza: Sabot maJo
Generalmentecuandoest6amarga, a vecescarececJesabor y frescura.
Causa 'l
LimpiezainadecuacJac_eJgrifo.
:2O
Page 68

Condici6n de _a cerveza: Sabot malo
Generalmente cuando e4_ amarga, a vec÷s ca_ce de sabot )/frescura. Puede
tenet dor extraBo o grasoso, Io que le confiere un gusto no pJacentero.
Causa ]
LimpiezainadecuadadeJgrifo.
Coffee€ion
CepiJJey JaveeJgrifo y caniJJaadecuadamente.EsnecesarioutiJizardetergentey
Juegoenjuagar con agua Jimpia.
¢ausa 2
Conductode aire contaminado_
¢orreccion
* E!conductoro i_neade aire debe serexaminado. Si estuviesecontaminadodebe
serreempJazado.
¢ausa 3
Tipode manguerao conductorde aire impropio.
¢@rreccion
®Unconductorde gorna puedeabsorvery retenerolores. Pruebeutilizar una
manguerapJ_sticao de cobre_
Recomendaciones generdes para Jacerveza de maJsabot:
La manguera conductora de cerveza debe Jimpiarse con agua coda vez que eJ
tanque o barriJ es reempJazado_ Mantenga Jascondiciones sanitarias adecuadas
aJrededor deJ dispensen Humo, dores de la cocina o desinfectantes pueden
interferir en el gusto y oJor de cerveza. Estosfactores nombrados pueden provenir
dd aire o deJcontacto con eJvaso.
:21
Page 69

¢ondi¢i6n de _a cerveza:
La cerveza hueJey sabe extremocJamente o JevacJuray a humecJocL
¢ausa ]
Transporte indecudo c_eJbarril o tanque de cerveza. La cerveza que fuese
entregada en un cami6n abierto cJurantedias cJedtas temperaturas pude
comenzar en un proceso cJefermentaci6n secundaria.
Correccion
®Si es posibJe trate cJeque Jascervezas Jessea entregda en un cami6n cerrado
con refrigeraci6n. De otro modo cubra con una Jona los tanques o barriles cJe
cerveza para protegerlos deJ cdon
¢ondid6n 4e la ¢erveza: Salvaje
Lacervezaposeemuch_simaespumay poco J_quido.
Causa 1
La cervezo no se sirve de modo acJecuacJo.
torte€don
Abra el grifo rapicJarnente y de forma compJeta
La espuma de la cerveza debe ser una ca pa espesa de aproximacJamente cJe
,3/4"a 1"de espesor.
C_usa 2
Se crea alguna obstrucci6n en el grifo pro causa c_eJalevadura c_eJa cerveza y la
no refrigeraci6n cJeJgrifo y caniJJa.
Corre¢cion
* ControJe que no hayo ninguna rnanguera o conducto desde el tanque o barril a
Jacanilla que est&abdldo, torcido o enroscacJo.
®La prueba para cJeshiJach6arancUas que seemparejan atres eJgrifo que puede
causar una obstrucci6n.
Causa ,3
La cerveza ha estado aJrnacenada en algOn Jugar no Io sufidentemente fresco.
:22
Page 70

iiiiiiiiiiiiiiiiiiiiiiiiiiiiiiiiiiiiiiiiiiiiiiiiiiiiiill
_orre¢¢ion
Mantenga la cerveza refrigerada a una temperatura de 40°F cJurantetodo el
a_o.
Causa 4
DemasiacJa presi6n del aire.
Correccion
* Primero controle que Ia fuente de presi6n este trabaiancJo correctamente. Luego
aiuste la presi6n a un nivel baJanceacJocJeseacJo.Con la corriente normal cJe
cerveza a Ja temperatura adecuada c_ebepoder Ilenarse un vaso de 10oz. en 4
seguncJos.
¢aus¢_ 5
Excesiva canticJacJcJeCO2.
¢arre¢cion
® Ajuste la presi6n de CO2 a la menor mecJicJaposibJe. De tocJosmocJosla presi6n
aplicacJa debe mantenerse un poco m6s aJta que la presi6n de Ja misma cerveza.
M6s cJe18 Jbs_cJebenaplicarse_
® Cuanto m6s frla est_ la cerveza y cuanto mayor sea la presi6n cJeCO2 apJicada,
m6s r_picJa es la absorsi6n cJeJCO2 par parte cJeJa cerveza. Esto hace que el
estado de la cerveza sea m6s saJvaje_
® ControJe JosregulacJores de presi6n periocJicamente para asegurarse que los
niveJescJepresi6n sean constantes.
Causa 6
No hay suficiente presi6n o no hay presi6n <]elfacto.
Correction
* ControIe si hay entradas de aire defectuosas.
® Siempre encienda Ja presi6n antes de tirar Ja cerveza
:23
Page 71

¢_usa 7
Se utiliz6 un tanque de cerveza o barril viejo que no ha sido guardado en Jas
condiciones correctas_
Correction
* Si [a cerveza estuvo en [ugares donde [a temperatura es mayor a 45°F par un
largo periodo de tiempo pude que se haya producido una fermentaci6n
secundaria,
Condi¢i6n de [a Cerveza:
A[ cornienzo deJtanque o barriJ [a cerveza se sirve sin incanvenientes.
Cuando se va acabando el barri[ la cerveza se convierte en.
Causa 1
Cuando se utiJiza aire coma fuente de presi6n _ste reemp[aza e[ CO2 en [a cerveza
y [a misma setorna apagda. Este probJema no es evidente cuando Ja cerveza se
tira r6pidamente.
Correction
* Cuando sea posiNe es meior utiJizar e[ CO2 coma fuente de presi6n.
24
Page 72

Servido en su casa
Qu_ ¢ubre y pot cuanto tie_po?
Esta garantia cubre trios los defectos
en eJfuncionamiento y Josmaterides
pot un periodo de tiempo de:
] 2 meses
12 _÷ses parts
5 a_@s (part÷s unicament÷)
La garantia comienza a partir de Ja
fecha en que el producto fue comprdo,
Jafactura originaJ de compra debe
presentarse ante eJCentro de servidos_
E×CEPTJONES:Garantias
com÷r¢iaJ @de uso rentado
9@ alias lab@r (part unica_ente)
9G alias partes
N@ @ter÷s warrantJ@s appJi@s
L@qu÷ cubre Ja garantlao
1. Laspartes mec4_nicasy d_ctricas en
un per_odo de 12 meses. Esto incJuye
tdas Jaspartes menos eJ acabdo y
otros arregJos.
2. Loscomponentes deJ sistema pot
ejempJo compresor, concJensador y
evapordob que posean defectos de
manufactura por un perido de 5
a_4osdesde Jafecha cJecompra_
Cudquier daBo a dichas partes
provenientes de transJado
inadecuado o abuso no son
dcanzados pot Jagarantia_
Qu_ se Bar@?
1. Nosotros repararernos o reern-
plazaremos cuaJquier parte mec_nica
o el@ctricaque se compruebe est&
cJefectuosaen eJfuncionamiento
normaJ y mientras se est@en eJperio-
cJode garantla antes especificacJo.
2. No habra cargos d comprdor par
Jareparaci6n cJeJaspartes especifi-
cacJasy por eJperloc]o inicid de ! 2
meses. Luego de este perlodo JaJabor
cJeberaabonarse.
3. Contacte e! Centro cJeservico
autorizado m6s cercano Para
conocer eJcentro m4_scercano visite
website wwwHaierAmerica com.
Jamed 1-877-337-3639 para
mayor informaci6n_
ESYA GARANTJA ¢UBRE A LOS
PRODUCTOS DI:NTRO D_: LOS
ESTADOS UNiDOS, PUERTO RiCO
Y CANADA° NO SJGUJI_NTI=:
Da_or por instalaci6n inacJecuada_
DaBos en el transJacJo.
Defectos que no sean cJemanufactura.
DaBos por cJesuso,abuso, accicJente,
aJteraci6n, faJtade cuidado y
mantenimiento o uso deJincorrecto.
DaBos causados par otro uso que no
sea eJcJom@stico.
DaBos causados por reparaciones que
no hayan sicJoredizdaspor un service
autorizdo o fuera entro de servcio.
Decoraci6n o arregJos.
Embarque y transporte.
Labor ([uego de Jos 12 meses inicides).
ESTAGARANTIA LIMITADA ESTA
DADA EN LUGAR DE TODA OTRA
GARANTIA, INCLUYENDO LA
GARANTIA DE COMERCIALIZACIQN
POR PROPQSITQS PARTICULARES.
La soJuci6n provista en esta garantia es
exdusiva y est@otorgacJa en Jugar de
tocJaotra garantia.
Esta garantla no cubre cJaBos
ocaciondes o incidentaJes, es por eHo
que JasJimitaciones anteriores pueden
no ser apJicabJesen su caso.
Esta garantla Je da derechos especificos
y usted tendra otros derechos que
puecJenvariar de EstacJoa Estado.
Haier America
New York, NY 10018
25
 Loading...