

Page 1
®
Gas & Electric Dryer
Installation Instructions
Secadora a gas y eléctrica
Instrucciones para la instalación
P/N 134199600H (0804) Sears, Roebuck and Co., Hoffman Estates, IL 60179 U.S.A. www.sears.com
Page 2
CONTENTS
Pre-Installation Requirements..........................................................................................................................................2
Electrical Requirements..................................................................................................................................................3
Exhaust System Requirements......................................................................................................................................3-4
Gas Supply Requirements............................................................................................................................................4-5
Location of Your Dryer....................................................................................................................................................5
Rough-In Dimensions.....................................................................................................................................................6
Mobile Home Installation...............................................................................................................................................7
Unpacking ...................................................................................................................................................................7
Reversing Door Swing.................................................................................................................................................8
Electrical Installation....................................................................................................................................................9
Grounding Requirements..............................................................................................................................................9
Electrical Connections—3-wire.......................................................................................................................................9
Electrical Connections—4-wire........................................................................................................................................10
Gas Connection............................................................................................................................................................10
General Installation.......................................................................................................................................................10
Replacement Parts........................................................................................................................................................10
Español..................................................................................................................................11-20
SAFETY INSTRUCTIONS
Clothes dryer installation and service must be performed by a qualified installer, service agency or the gas supplier.
Install the clothes dryer according to the manufacturer's instructions and local codes.
Before beginning installation, carefully read these instructions. This will simplify the installation and ensure the dryer is
installed correctly and safely. Leave these instructions near the Dryer after installation for future reference.
NOTE: The electrical service to the Dryer must conform with local codes and ordinances and the latest edition of the National Electrical
Code, ANSI/NFPA 70, or in Canada, the Canadian electrical code C22.1 part 1.
NOTE: The gas service to the Dryer must conform with local codes and ordinances and the latest edition of the National Fuel Gas Code
ANSI Z223.1, or in Canada, CAN/ACG B149.1-2000
NOTE: The Dryer is designed under ANSI Z 21.5.1 or ANSI/UL 2158 - CAN/CSA C22.2 No. 112 (latest editions) for HOME USE only.
This Dryer is not recommended for commercial applications such as restaurants or beauty salons, etc.
Your safety and the safety of others is very important.
We have provided many important safety messages in the Use & Care Guide, Operating Instructions, Installation Instructions and on
your appliance. Always read and obey all safety messages.
This is the safety alert symbol. This symbol alerts you to hazards that can kill or hurt you or others. All safety messages
will be preceded by the safety alert symbol and the word "DANGER" or "WARNING". These words mean:
DANGER
All safety messages will identify the hazard, tell you how to reduce the chance of injury, and tell you what can happen if the
instructions are not followed.
RISK OF FIRE. For your safety the information in this manual must be followed to minimize the risk of fire or
explosion or to prevent property damage, personal injury or loss of life. SAVE THESE INSTRUCTIONS.
- Do not store or use gasoline or other flammable vapors and liquid in the vicinity of this or any other appliance.
- WHAT TO DO IF YOU SMELL GAS
· Do not try to light any appliance.
· Do not touch any electrical switch; do not use any phone in your building.
· Clear the room, building or area of all occupants.
· Immediately call your gas supplier from a neighbor’s phone. Follow the gas supplier's instructions.
· If you cannot reach your gas supplier, call the fire department.
Installation and service must be performed by a qualified installer, service agency or the gas supplier.
will be killed or seriously injured if you don't follow instructions.
You
You
can be killed or seriously injured if you don't follow instructions.
PRE-INSTALLATION REQUIREMENTS
Tools and Materials Required for Installation:
1. Phillips head screwdriver.
2. Channel-lock adjustable pliers.
3. Carpenter's level.
4. Flat or straight blade screwdriver.
5. Duct tape.
6. Rigid or flexible metal 4 inch (10.2 cm) duct.
7. Vent hood.
8. Pipe thread sealer (Gas).
9. Plastic knife.
2
2
Page 3

ELECTRICAL REQUIREMENTS
ELECTRIC Dryer
CIRCUIT - Individual 30 amp. branch circuit fused with 30
amp. time delay fuses or circuit breakers.
Use separately fused circuits for washers and dryers, and DO
NOT operate a washer and a dryer on the same circuit.
POWER SUPPLY - 3 wire or 4-wire, 240 volt, single phase, 60
Hz, Alternating Current.
POWER SUPPLY CORD KIT - 3 wire - the dryer MUST employ
a 3-conductor power supply cord NEMA 10-30 type SRDT rated
at 240 volt AC minimum, 30 amp., with 3 open end spade lug
connectors with upturned ends or closed loop connectors and
marked for use with clothes dryers. See ELECTRICAL
CONNECTIONS FOR A 3-WIRE SYSTEM.
4 wire - The dryer MUST employ a 4-conductor power supply
cord NEMA 14-30 type SRDT or ST (as required) rated at 240
volt AC minimum, 30 amp., with 4 open end spade lug
connectors with upturned ends or closed loop connectors and
marked for use with clothes dryers. See ELECTRICAL
CONNECTIONS FOR A 4-WIRE SYSTEM.
(Canada - 4-wire power supply cord is installed on dryer.)
WARNING – Risk of Shock. Appliance grounded to neutral
conductor through a link. Grounding through the neutral link is
prohibited for (1) New branch circuit installations (2) mobile
homes; (3) recreational vehicles; and (4) areas where local codes
do not permit grounding through the neutral, (1) disconnect the
link from the neutral, (2) use grounding terminal or lead to
ground appliance in accordance with local codes and (3) connect
neutral terminal or lead to branch circuit neutral in usual manner
(if the appliance is to be connected by means of a cord kit, use
4-conductor cord for this purpose). USE COPPER CONDUCTOR
ONLY.
EXHAUST SYSTEM REQUIREMENTS
Use only 4 inch (10.2 cm) diameter (minimum) rigid or flexible
metal duct and approved vent hood which has a swing-out
damper(s) that open when the dryer is in operation. When the
dryer stops, the dampers automatically close to prevent drafts
and the entrance of insects and rodents. To avoid restricting the
outlet, maintain a minimum of 12 inches (30.5 cm) clearance
between the vent hood and the ground or any other obstruction.
The following are specific requirements for
proper and safe operation of your dryer. Failure to follow
these instructions can create excessive drying times and
fire hazards.
Do not install a clothes dryer with flexible
plastic venting materials. If your present system is made up
of plastic duct or metal foil duct, replace it with a rigid or semirigid metal duct. In Canada and the United States if metal (foil
type) duct is installed, it must be of a specific type identified by
the appliance manufacturer as suitable for use with clothes dryers
and in the United States must also comply with the Outline for
Clothes Dryer Transition Duct, UL standard 2158A. Flexible
venting materials are known to collapse, be easily crushed and
trap lint. These conditions will obstruct clothes dryer airflow and
increase the risk of fire. Ensure the present duct is free of
any lint prior to installing dryer duct.
OUTLET RECEPTACLE - NEMA 10-30R receptacle to be located
so the power supply cord is accessible when the dryer is in the
installed position. (Canada - NEMA 14-30R receptacle.)
NEMA 10-30R NEMA 14-30R
GAS Dryer
CIRCUIT - Individual 15 amp. branch circuit fused with a 15
amp. maximum time delay fuse or circuit breaker.
POWER SUPPLY - 3 wire, 120 volt single phase, 60 Hz,
Alternating Current.
POWER SUPPLY CORD - The dryer is equipped with a 120 volt
3-wire power cord.
NOTE: Do not under any
circumstances remove
grounding prong from
.
plug
GROUNDING PRONG
- Risk of Fire - A clothes dryer must be
exhausted outdoors. Do not exhaust dryer into a chimney, a
wall, a ceiling, an attic, a crawl space or any concealed space
of a building. A clothes dryer produces combustible lint. If the
dryer is not exhausted outdoors, some fine lint will be expelled
into the laundry area. An accumulation of lint in any area of the
home can create a health and fire hazard. The dryer must be
connected to an exhaust outdoors. Regularly inspect the
outdoor exhaust opening and remove any accumulation of lint
around the outdoor exhaust opening and in the surrounding
area.
3
Page 4
Do not allow combustible materials (for
example: clothing, draperies/curtains, paper) to come in
contact with exhaust system. The dryer MUST NOT be
exhausted into a chimney, a wall, a ceiling, or any concealed
space of a building which can accumulate lint, resulting in a fire
hazard.
Exceeding the length of duct pipe or number
of elbows allowed in the "MAXIMUM LENGTH" charts can
cause an accumulation of lint in the exhaust system. Plugging
the system could create a fire hazard, as well as increase drying
times.
Do not screen the exhaust ends of the vent
system, nor use any screws, rivets or other fastening means
that extend into the duct and catch lint to assemble the
exhaust system. Lint can become caught in the screen, on the
screws or rivets, clogging the duct work and creating a fire hazard
as well as increasing drying times. Use an approved vent hood
to terminate the duct outdoors, and seal all joints with duct tape.
All male duct pipe fittings MUST be installed downstream with
the flow of air.
Explosion hazard. Do not install the dryer
where gasoline or other flammables are kept or stored. If
the dryer is installed in a garage, it must be a minimum of 18
inches (45.7 cm) above the floor. Failure to do so can result in
death, explosion, fire or burns.
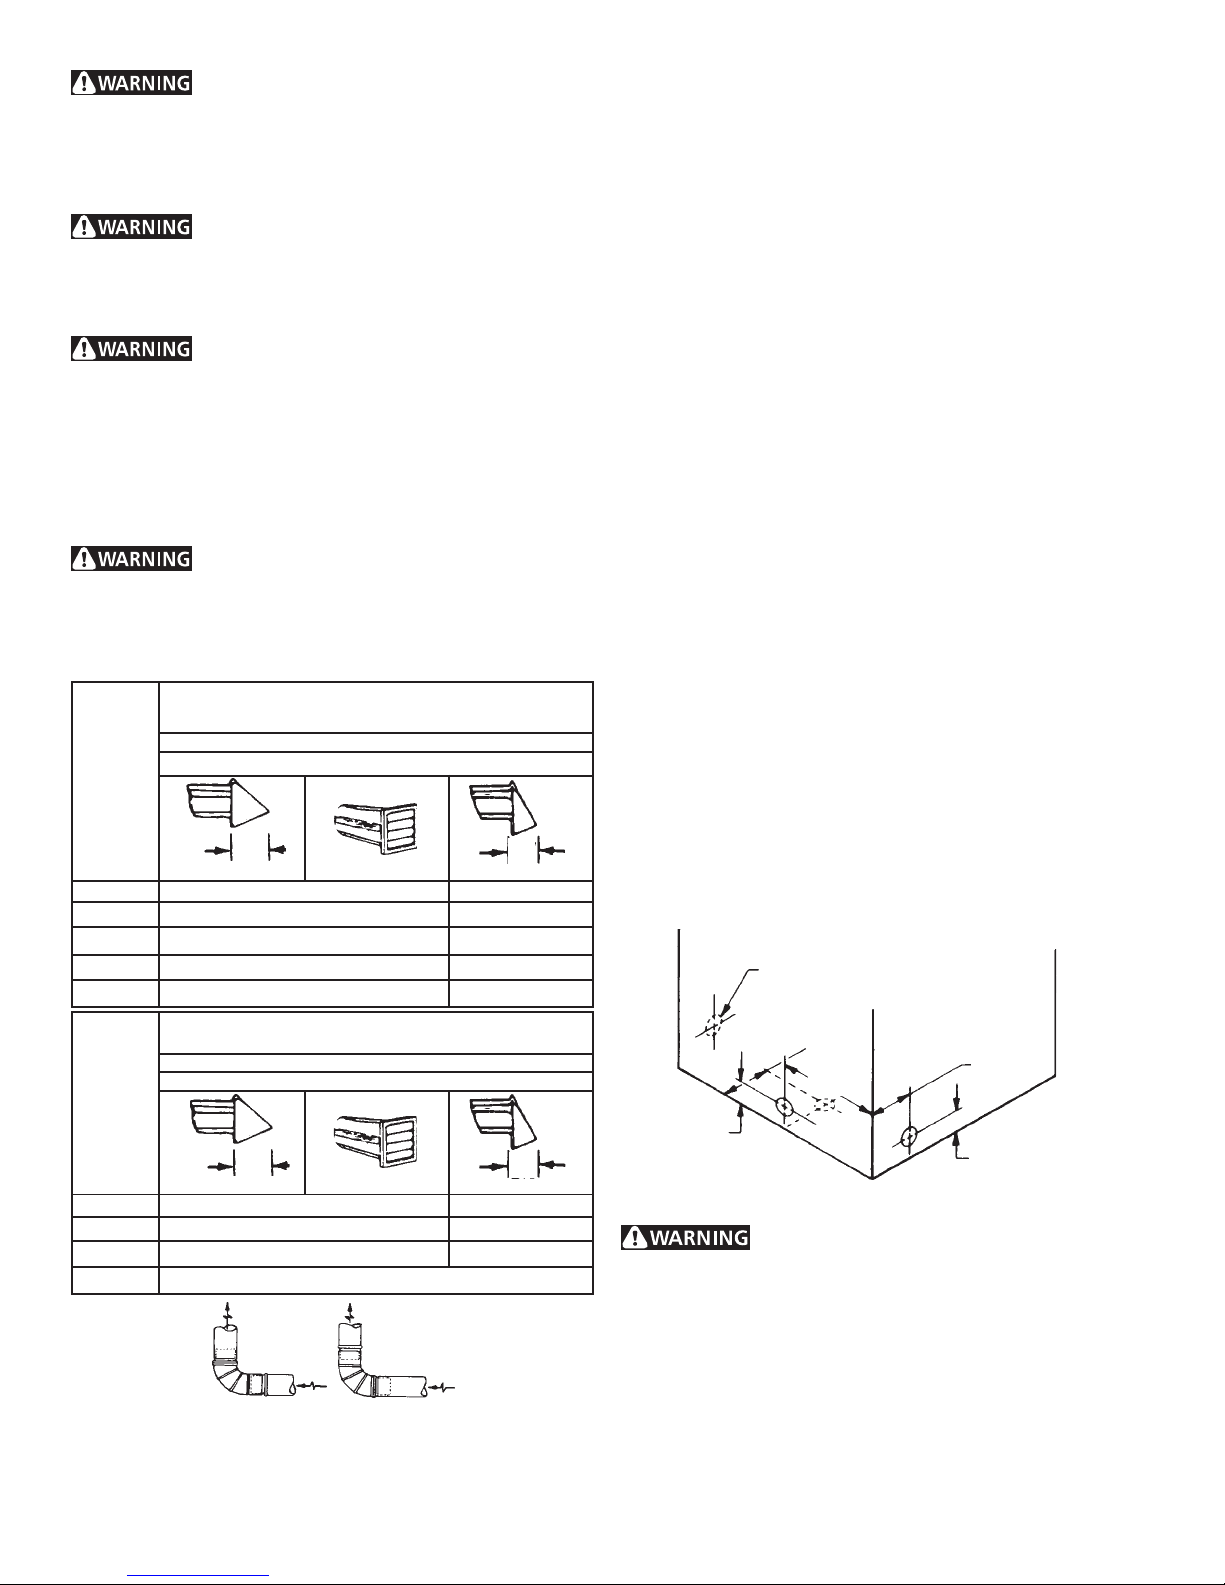
MAXIMUM LENGTH
of 4” (10.2 cm) Dia. Rigid Metal Duct
VENT HOOD TYPE
Number
of
90°
Turns
0 60 ft.(18.28 m) 48 ft.(14.63 m)
1 52 ft.(15.84 m) 40 ft.(12.19 m)
2 44 ft.(13.41 m) 32 ft. (9.75 m)
3 32 ft.(9.75 m) 24 ft. (7.31 m)
4 28 ft.(8.53 m) 16 ft. (4.87 m)
Number
of
90°
Turns
0 30 ft. (9.14 m) 18 ft. (5.49 m)
1 22 ft. (6.71 m) 14 ft. (4.27 m)
2 14 ft. (4.27 m) 10 ft. (3.05 m)
3 NOT RECOMMENDED
INSTALL MALE FITTINGS IN CORRECT DIRECTION
(Preferred)
Louvered
4”
(10.2 cm)
MAXIMUM LENGTH
of 4” (10.2 cm) Dia. Flexible Metal Duct
VENT HOOD TYPE
(Preferred)
Louvered
4”
(10.2 cm)
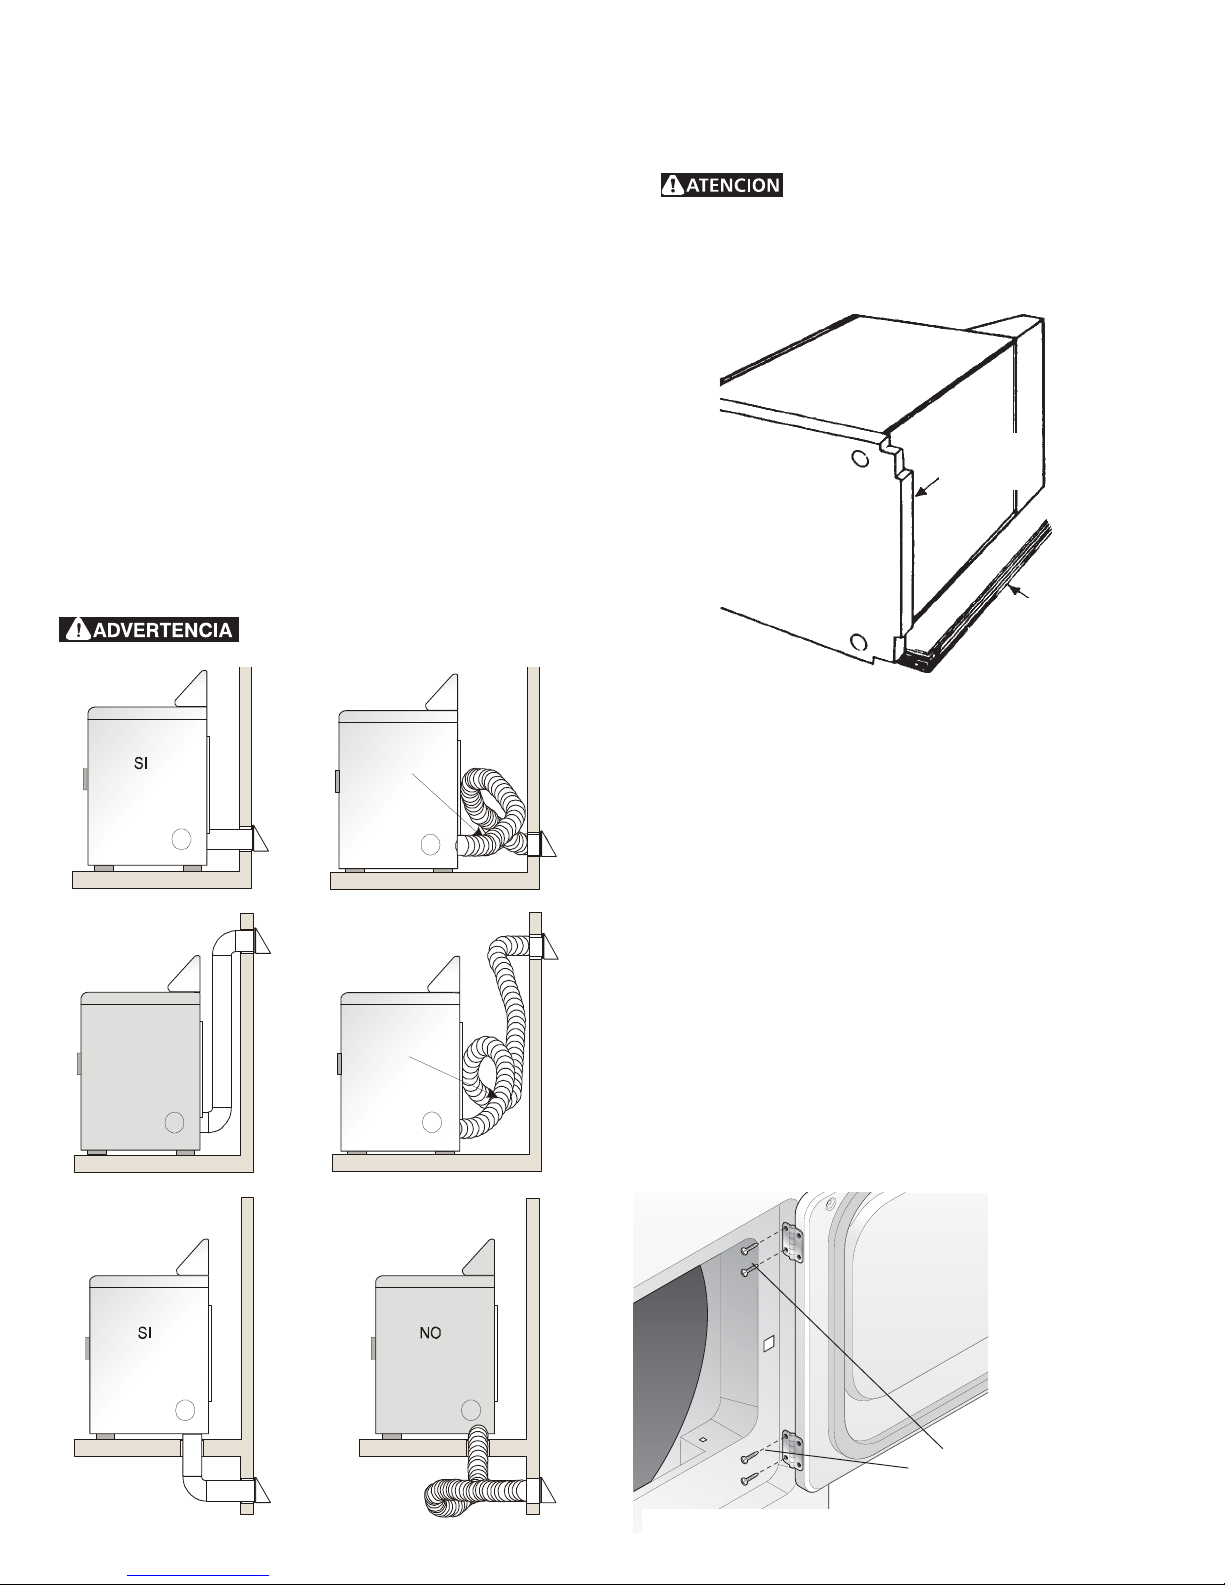
CORRECT INCORRECT
2½"
(6.35 cm)
2½"
(6.35 cm)
In installations where the exhaust system is not described in the
charts, the following method must be used to determine if the
exhaust system is acceptable:
1. Connect an inclined or digital manometer between the
dryer and the point the exhaust connects to the dryer.
2. Set the dryer timer and temperature to air fluff (cool down)
and start the dryer.
3. Read the measurement on the manometer.
4. The system back pressure MUST NOT be higher than 0.75
inches of water column. If the system back pressure is less
than 0.75 inches of water column, the system is acceptable.
If the manometer reading is higher than 0.75 inches of water
column, the system is too restrictive and the installation is
unacceptable.
Although vertical orientation of the exhaust system is acceptable,
certain extenuating circumstances could affect the performance
of the dryer:
• Only the rigid metal duct work should be used.
• Venting vertical through a roof may expose the exhaust system
to down drafts causing an increase in vent restriction.
• Running the exhaust system through an uninsulated area may
cause condensation and faster accumulation of lint.
• Compression or crimping of the exhaust system will cause an
increase in vent restriction.
The exhaust system should be inspected and cleaned a minimum
of every 18 months with normal usage. The more the dryer is
used, the more often you should check the exhaust system and
vent hood for proper operation.
EXHAUST DIRECTION
All dryers shipped from the factory are set up for rear exhausting.
However, on electric dryers, exhausting can be to the right or left
side of the cabinet or the bottom of the dryer. On gas dryers,
exhausting can be to the right side of the cabinet or the bottom of
the dryer. Directional exhausting can be accomplished by installing
Exhaust Kit, P/N 131456800, available through your parts
distributor. Follow the instructions supplied with the kit.
EXHAUST DUCT LOCATING DIMENSIONS
SAME AS OTHER SIDESAME AS OTHER SIDE
SAME AS OTHER SIDE
SAME AS OTHER SIDESAME AS OTHER SIDE
5 7/8"5 7/8"
5 7/8"
5 7/8"5 7/8"
4 3/8"4 3/8"
4 3/8"
4 3/8"4 3/8"
3 3/4"3 3/4"
3 3/4"
3 3/4"3 3/4"
(9.5 cm)(9.5 cm)
(9.5 cm)
(9.5 cm)(9.5 cm)
3 3/4"3 3/4"
3 3/4"
3 3/4"3 3/4"
13 1/2"13 1/2"
13 1/2"
13 1/2"13 1/2"
GAS SUPPLY REQUIREMENTS
Replace copper connecting pipe that is not
plastic-coated. Stainless steel or plastic-coated brass MUST
be used.
1. Installation MUST conform with local codes, or in the absence
of local codes, with the National Fuel Gas Code, ANSI Z223.1
(latest edition).
2. The gas supply line should be of 1/2 inch (1.27 cm) pipe.
3. If codes allow, flexible metal tubing may be used to connect
your dryer to the gas supply line. The tubing MUST be
constructed of stainless steel or plastic-coated brass.
4. The gas supply line MUST have an individual shutoff valve.
4
Page 5
5. A 1/8 inch (0.32 cm) N.P.T. plugged
tapping, accessible for test gauge
connection, MUST be installed immediately
upstream of the gas supply connection to
the dryer.
6. The dryer MUST be disconnected from the
gas supply piping system during any
pressure testing of the gas supply piping
system at test pressures in excess of 1/2
psig (3.45 kPa).
7. The dryer MUST be isolated from the gas
supply piping system during any pressure
testing of the gas supply piping system at
test pressures equal to or less than
1/2 psig (3.45 kPa).
LOCATION OF YOUR DRYER
DO NOT INSTALL YOUR DRYER:
1. In an area exposed to dripping water or
outside weather conditions.
2. In an area where it will come in contact
with curtains, drapes, or anything that will
obstruct the flow of combustion and
ventilation air.
3. On carpet. Floor MUST be solid with a
maximum slope of 1 inch (2.54 cm).
0" (0 cm)0" (0 cm)
0" (0 cm)
0" (0 cm)0" (0 cm)
CLOSET DOORCLOSET DOOR
CLOSET DOOR
CLOSET DOORCLOSET DOOR
15" (38.1 cm)15" (38.1 cm)
15" (38.1 cm)
15" (38.1 cm)15" (38.1 cm)
60 SQ. IN.60 SQ. IN.
60 SQ. IN.
60 SQ. IN.60 SQ. IN.
(387.1 SQ. CM)(387.1 SQ. CM)
(387.1 SQ. CM)
(387.1 SQ. CM)(387.1 SQ. CM)
60 SQ. IN.60 SQ. IN.
60 SQ. IN.
60 SQ. IN.60 SQ. IN.
(387.1 SQ. CM)(387.1 SQ. CM)
(387.1 SQ. CM)
(387.1 SQ. CM)(387.1 SQ. CM)
1" (2.54 cm)1" (2.54 cm)
1" (2.54 cm)
1" (2.54 cm)1" (2.54 cm)
0" (0 cm)0" (0 cm)
0" (0 cm)
0" (0 cm)0" (0 cm)
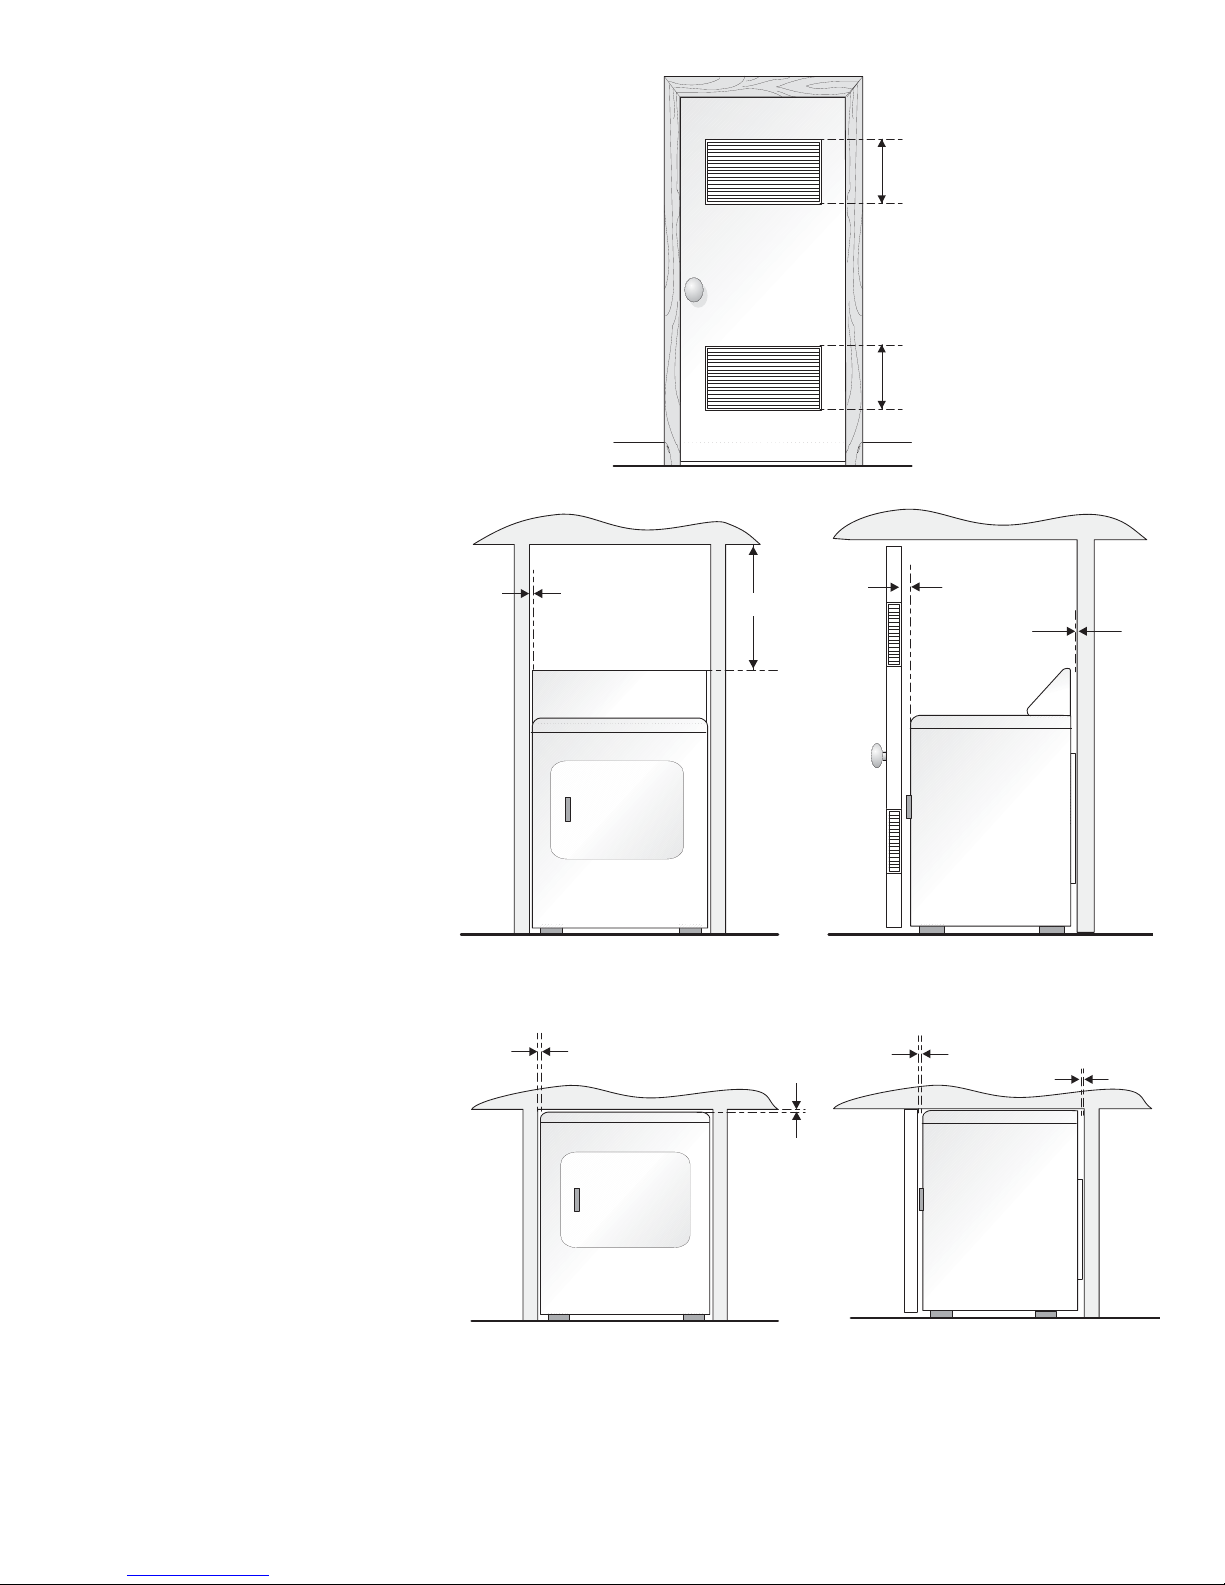
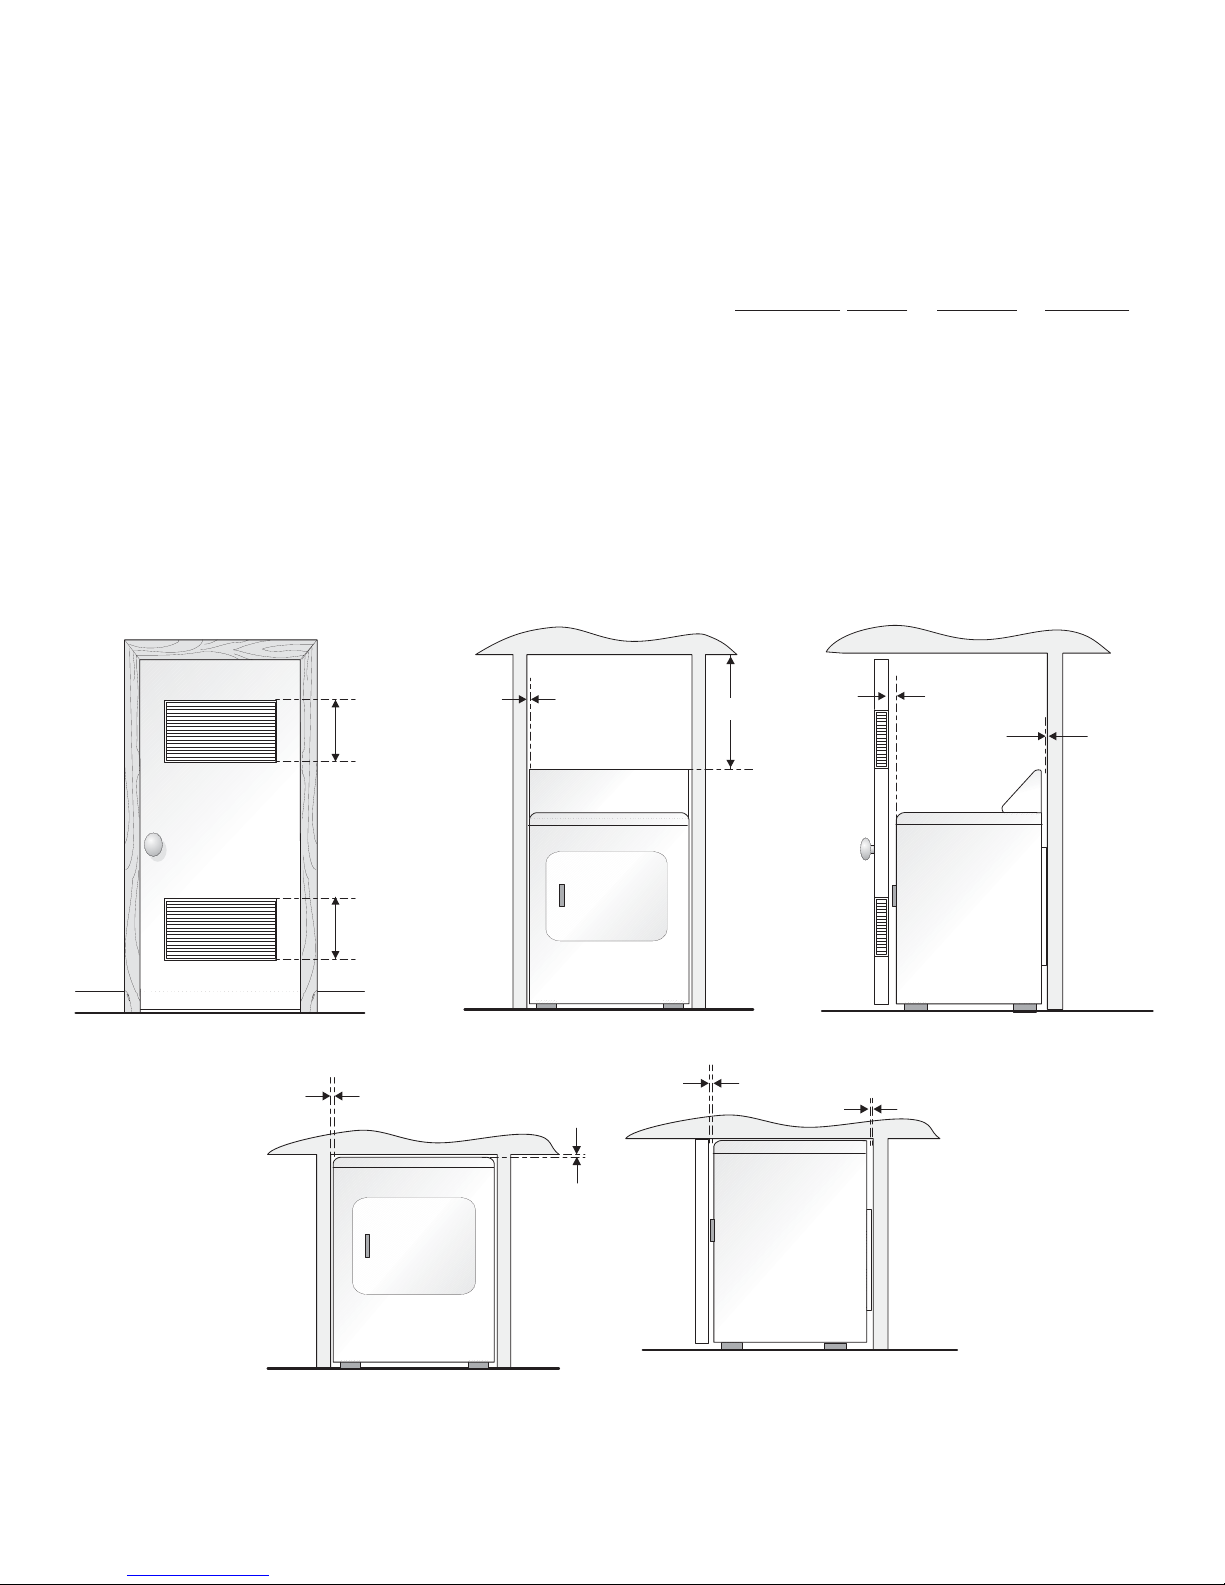
INSTALLATION IN RECESS OR CLOSET
1. A dryer installed in a bedroom, bathroom,
recess or closet, MUST be exhausted
outdoors.
2. No other fuel burning appliance shall be
installed in the same closet as the Gas dryer.
3. Your dryer needs the space around it for
proper ventilation.
DO NOT install your dryer in a closet with
a solid door.
4. A minimum of 120 square inches (774.2
square cm) of opening, equally divided at
the top and bottom of the door, is required.
Air openings are required to be unobstructed
when a door is installed. A louvered door
with equivalent air openings for the full
length of the door is acceptable.
MINIMUM INSTALLATION CLEARANCES -
Inches (cm)
SIDES REAR TOP FRONT
Alcove 0 (0 cm) 0 (0 cm)
Closet 0 (0 cm) 0 (0 cm) 1 (2.54 cm)
Closet door ventilation required: 2 louvered
openings each 60 square inches (387 square
centimeters) — 3 inches (7.6 cm) from bottom
and top of door.
This dryer MUST be exhausted outdoors.
5. The following illustrations show minimum
clearance dimensions for proper operation
in a recess or closet installation.
NOTE: Under counter and stack models - 0 inches (0 cm) for sides, rear,
and top.
1" (2.54 cm)1" (2.54 cm)
1" (2.54 cm)
0" (0 cm)0" (0 cm)
0" (0 cm)
0" (0 cm)0" (0 cm)
1" (2.54 cm)1" (2.54 cm)
0" (0 cm)0" (0 cm)
0" (0 cm)
0" (0 cm)0" (0 cm)
0" (0 cm)0" (0 cm)
0" (0 cm)
0" (0 cm)0" (0 cm)
UNDER COUNTER INSTALLATION
If an under counter* installation is desired, the dryer MUST have a top sheet
kit installed, P/N 131629100. Kit is available from an authorized parts
distributor.
*Custom-sized countertop is required.
5
Page 6
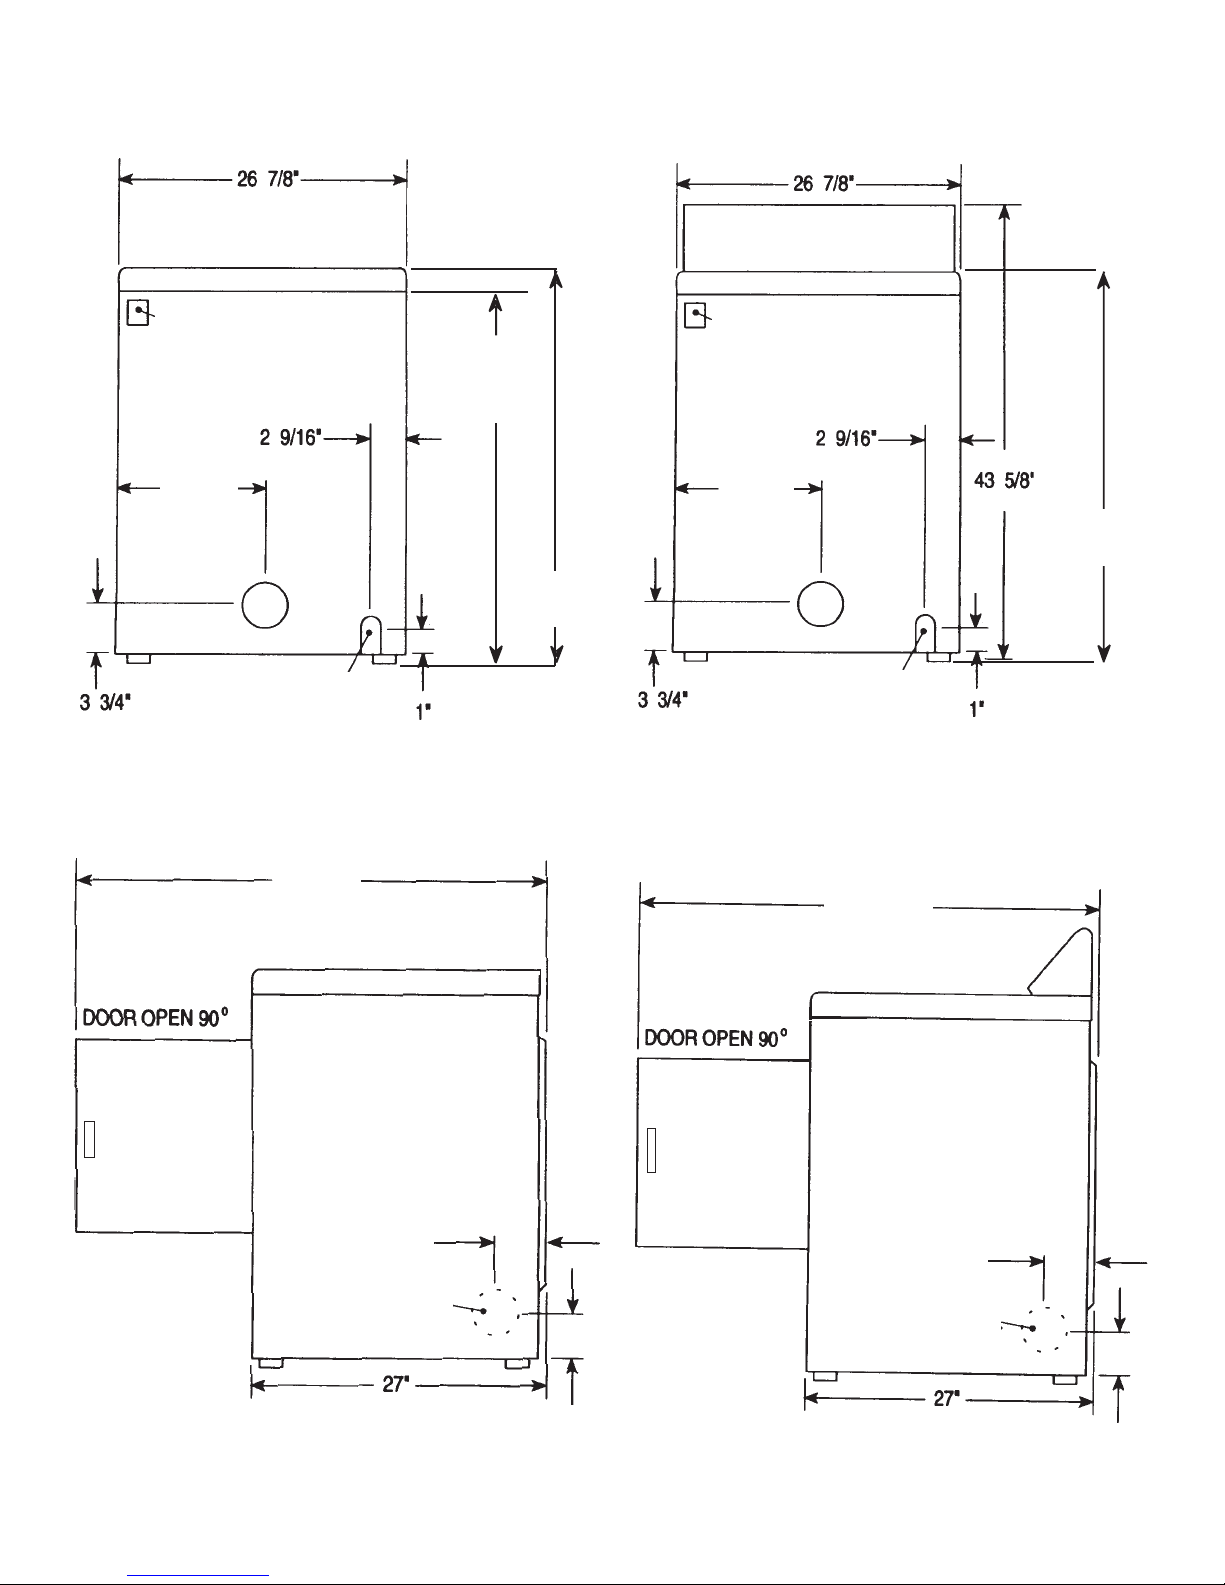
UNDER COUNTER & STACK MODELS
ROUGH-IN DIMENSIONS
(68.3 cm)(68.3 cm)
(68.3 cm)
(68.3 cm)(68.3 cm)
ELECTRIC CONNECTIONELECTRIC CONNECTION
ELECTRIC CONNECTION
ELECTRIC CONNECTIONELECTRIC CONNECTION
UNDERUNDER
UNDER
UNDERUNDER
COUNTERCOUNTER
COUNTER
COUNTERCOUNTER
34 5/8"34 5/8"
34 5/8"
34 5/8"34 5/8"
(87.9 cm)(87.9 cm)
(87.9 cm)
(87.9 cm)(87.9 cm)
(6.5 cm)(6.5 cm)
(6.5 cm)
(6.5 cm)(6.5 cm)
13 1/2"13 1/2"
13 1/2"
13 1/2"13 1/2"
(34.4 cm)(34.4 cm)
(34.4 cm)
(34.4 cm)(34.4 cm)
(91.5 cm)(91.5 cm)
(91.5 cm)
(91.5 cm)(91.5 cm)
36"36"
36"
36"36"
TOP CONSOLE MODELS
ROUGH-IN DIMENSIONS
(68.3 cm)(68.3 cm)
(68.3 cm)
(68.3 cm)(68.3 cm)
ELECTRIC CONNECTIONELECTRIC CONNECTION
ELECTRIC CONNECTION
ELECTRIC CONNECTIONELECTRIC CONNECTION
(6.5 cm)(6.5 cm)
(6.5 cm)
(6.5 cm)(6.5 cm)
13 1/2"13 1/2"
13 1/2"
13 1/2"13 1/2"
(34.4 cm)(34.4 cm)
(34.4 cm)
(34.4 cm)(34.4 cm)
(110.7 cm)(110.7 cm)
(110.7 cm)
(110.7 cm)(110.7 cm)
36"36"
36"
36"36"
(91.5 cm)(91.5 cm)
(91.5 cm)
(91.5 cm)(91.5 cm)
(9.5 cm)(9.5 cm)
(9.5 cm)
(9.5 cm)(9.5 cm)
3/4"3/4"
3/4"
3/4"3/4"
(1.9 cm)(1.9 cm)
(1.9 cm)
(1.9 cm)(1.9 cm)
3/8" (0.96 cm) DIA.3/8" (0.96 cm) DIA.
3/8" (0.96 cm) DIA.
3/8" (0.96 cm) DIA.3/8" (0.96 cm) DIA.
GAS PIPEGAS PIPE
GAS PIPE
GAS PIPEGAS PIPE
REAR VIEW
47 1/2"47 1/2"
47 1/2"
47 1/2"47 1/2"
(120.7 cm)(120.7 cm)
(120.7 cm)
(120.7 cm)(120.7 cm)
4 3/8"4 3/8"
4 3/8"
4 3/8"4 3/8"
(11.1 cm)(11.1 cm)
(11.1 cm)
(11.1 cm)(11.1 cm)
OPTIONALOPTIONAL
OPTIONAL
OPTIONALOPTIONAL
VENT KNOCKOUTVENT KNOCKOUT
VENT KNOCKOUT
VENT KNOCKOUTVENT KNOCKOUT
(2.54 cm)(2.54 cm)
(2.54 cm)
(2.54 cm)(2.54 cm)
(9.5 cm)(9.5 cm)
(9.5 cm)
(9.5 cm)(9.5 cm)
3/8" (0.96 cm) DIA.3/8" (0.96 cm) DIA.
3/8" (0.96 cm) DIA.
3/8" (0.96 cm) DIA.3/8" (0.96 cm) DIA.
GAS PIPEGAS PIPE
GAS PIPE
GAS PIPEGAS PIPE
REAR VIEW
47 1/2"47 1/2"
47 1/2"
47 1/2"47 1/2"
(120.7 cm)(120.7 cm)
(120.7 cm)
(120.7 cm)(120.7 cm)
4 3/8"4 3/8"
4 3/8"
4 3/8"4 3/8"
(11.1 cm)(11.1 cm)
(11.1 cm)
(11.1 cm)(11.1 cm)
OPTIONALOPTIONAL
OPTIONAL
OPTIONALOPTIONAL
VENT KNOCKOUTVENT KNOCKOUT
VENT KNOCKOUT
VENT KNOCKOUTVENT KNOCKOUT
(2.54 cm)(2.54 cm)
(2.54 cm)
(2.54 cm)(2.54 cm)
(68.6 cm)(68.6 cm)
(68.6 cm)
(68.6 cm)(68.6 cm)
SIDE VIEW
3 3/4"3 3/4"
3 3/4"
3 3/4"3 3/4"
(9.5 cm)(9.5 cm)
(9.5 cm)
(9.5 cm)(9.5 cm)
(68.6 cm)(68.6 cm)
(68.6 cm)
(68.6 cm)(68.6 cm)
SIDE VIEW
3 3/4"3 3/4"
3 3/4"
3 3/4"3 3/4"
(9.5 cm)(9.5 cm)
(9.5 cm)
(9.5 cm)(9.5 cm)
6
Page 7
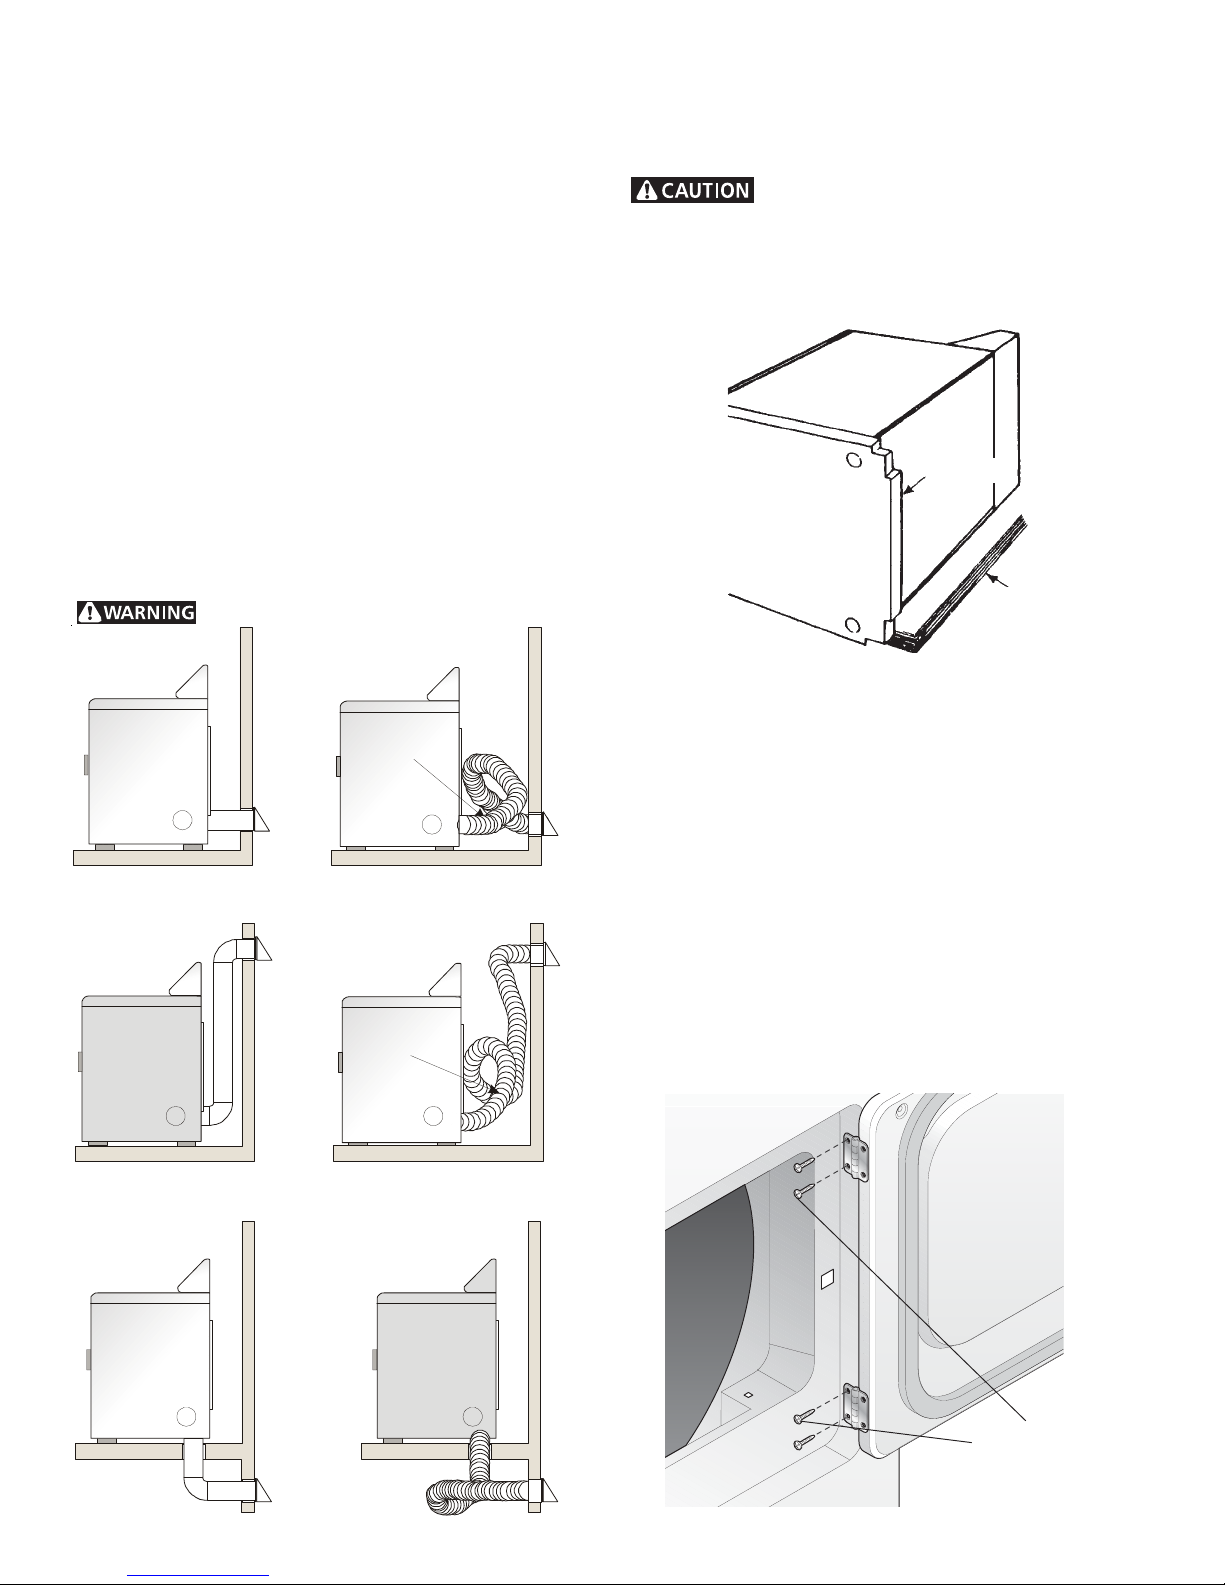
MOBILE HOME INSTALLATION
1. Dryer MUST be exhausted outside (outdoors, not beneath
the mobile home) using metal ducting that will not support
combustion. Metal ducting must be 4 inches (10.16 cm) in
diameter with no obstructions. Rigid metal duct is preferred.
2. If dryer is exhausted through the floor and area beneath
the mobile home is enclosed, the exhaust system MUST
terminate outside the enclosure with the termination
securely fastened to the mobile home structure.
3. When installing a gas dryer into a mobile home, a provision
must be made for outside make up air. This provision is to
be not less than twice the area of the dryer exhaust outlet.
4. This dryer MUST be fastened to the floor. Mobile Home
Installation Kit No. 169840 is available from your dealer.
5. Refer to pages 2 and 3 for other important venting
requirements.
6. Installation MUST conform to current Manufactured Home
Construction & Safety Standard (which is a Federal
Regulation Title 24 CFR-Part 32-80) or when such standard
is not applicable, with American National Standard for
Mobile Homes. In Canada, the CSA Z240 is applicable.
The dryer is designed under ANSI Z 21.5.1 for
HOME USE only.
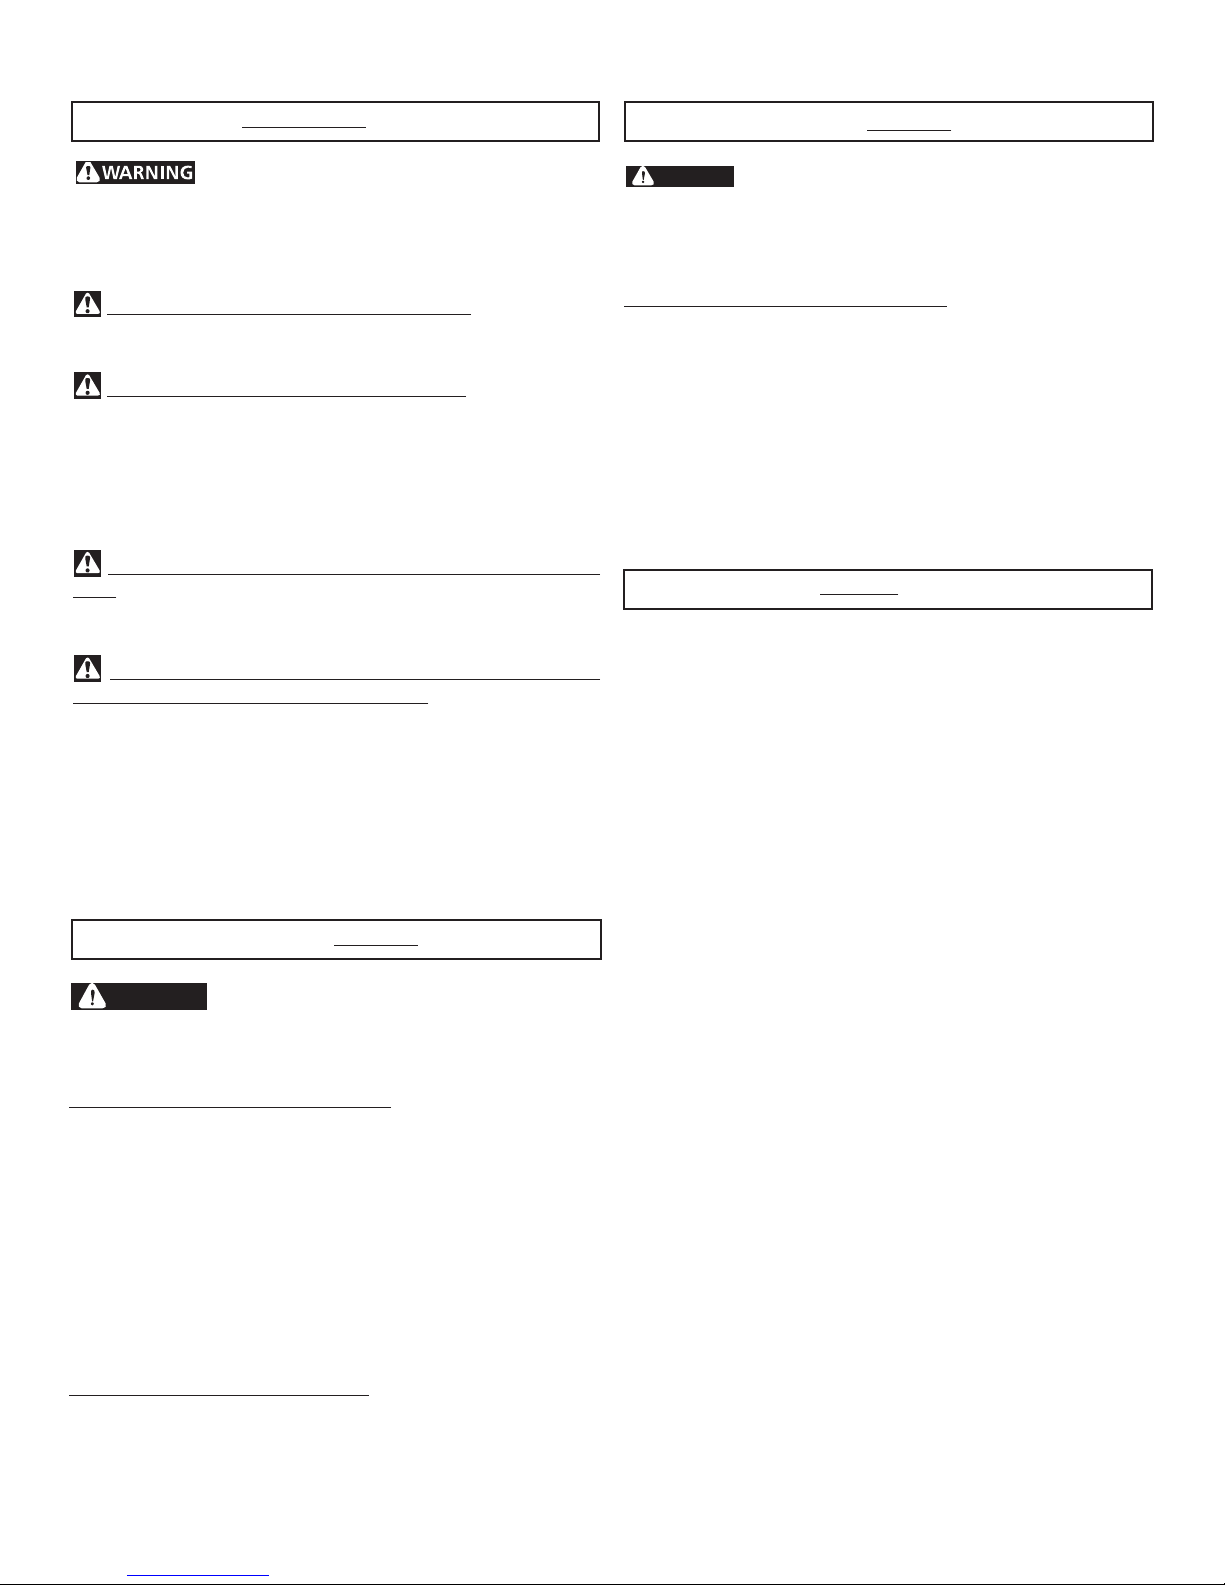
UNPACKING
1. Using the four shipping carton corner posts (two on each
side), carefully lay the dryer on its left side and remove foam
shipping base.
To prevent damage, do not use the control panel
as a means to pick up or move the dryer.
NOTE: On under counter model clothes dryers, the top panel
may be removed for installation.
2. Return the dryer to an upright position.
FOAM
SHIPPING
PACKING
Correct
Correct
OK
OK
DON’T
Incorrect
DON’T
Incorrect
REVERSING DOOR SWING
Your dryer is designed so the door swing may be reversed at
any time without additional parts. Conversion is accomplished
by transferring hinges to the opposite side of the cabinet.
To change the direction of the door opening:
1. Open the dryer door. Remove the four hinge hole plugs from
the left side of the door opening. Place nearby for future
installation. NOTE: You may need a plastic knife to help pull
out the plugs. Be careful not to scratch the paint.
2. Remove the four screws that secure the door hinges to the
dryer front panel (see below). NOTE: Remove one screw
from each of the two hinges first. Hold the door firmly before
removing the last two screws.
3. Rotate the door 180° and reinstall the door hinges to the
dryer front panel with the four screws.
4. Install the four hinge hole plugs in the open screw holes on
the right side of the door opening.
OK
Correct
Incorrect
DON’T
REMOVE 4 SCREWS
(ONE FROM EACH
HINGE FIRST)
7
Page 8
ELECTRICAL INSTALLATION
ALL ELECTRIC Dryers
The following are specific requirements for
proper and safe electrical installation of your dryer. Failure
to follow these instructions can create electrical shock and/
or a fire hazard.
This appliance MUST be properly grounded. Electrical shock
can result if the dryer is not properly grounded. Follow the
instructions in this manual for proper grounding.
Do not use an extension cord with this dryer. Some extension
cords are not designed to withstand the amounts of electrical
current this dryer utilizes and can melt, creating electrical shock
and/or fire hazard. Locate the dryer within reach of the receptacle
for the length power cord to be purchased, allowing some slack
in the cord. Refer to the pre-installation requirements in this
manual for the proper power cord to be purchased.
A U.L. approved strain relief must be installed onto power
cord. If the strain relief is not attached, the cord can be pulled
out of the dryer and can be cut by any movement of the cord,
resulting in electrical shock.
Do not use an aluminum wired receptacle with a copper
wired power cord and plug (or vice versa). A chemical reaction
occurs between copper and aluminum and can cause electrical
shorts. The proper wiring and receptacle is a copper wired
power cord with a copper wired receptacle.
Canadian ELECTRIC Dryer
DANGER
conductor can result in a risk of electrical shock. Check with a
licensed electrician if you are in doubt as to whether the appliance
is properly grounded.
For a grounded, cord-connected dryer:
1. The dryer must be grounded. In the event of a malfunction or
breakdown, grounding will reduce the risk of electrical shock
by a path of least resistance for electrical current.
2. Since your dryer is equipped with a power supply cord having
an equipment-grounding conductor and a grounding plug, the
plug must be plugged into an appropriate outlet that is properly
installed and grounded in accordance with all local codes and
ordinances. If in doubt, call a licensed electrician.Do not
modify plug provided with the appliance.
Improper connection of the equipment grounding
ALL GAS Dryers
1. The dryer is equipped with a three-prong (grounding) plug for
your protection against shock hazard and should be plugged
directly into a properly grounded three-prong receptacle. Do
not cut or remove the grounding prong from the plug.
NOTE: Dryers operating on 208 volt power supply will have
longer drying times than operating on 240 volt power supply.
GROUNDING REQUIREMENTS
Non-Canadian ELECTRIC Dryer
DANGER
grounding conductor can result in a risk of electrical shock. Check
with a licensed electrician if you are in doubt as to whether the
appliance is properly grounded.
For a grounded, cord-connected dryer:
1. The dryer MUST be grounded. In the event of a malfunction
or breakdown, grounding will reduce the risk of electrical shock
by a path of least resistance for electrical current.
2. If your dryer is equipped with a power supply cord having an
equipment-grounding conductor and a grounding plug, the
plug MUST be plugged into an appropriate, copper wired
receptacle that is properly installed and grounded in
accordance with all local codes and ordinances. If in doubt,
call a licensed electrician. Do not modify plug provided
with the appliance.
For a permanently connected dryer:
1. The dryer MUST be connected to a grounded metal, permanent
wiring system; or an equipment grounding conductor must be
run with the circuit conductors and connected to the
equipment-grounding terminal or lead on the appliance.
Improper connection of the equipment
8
Page 9
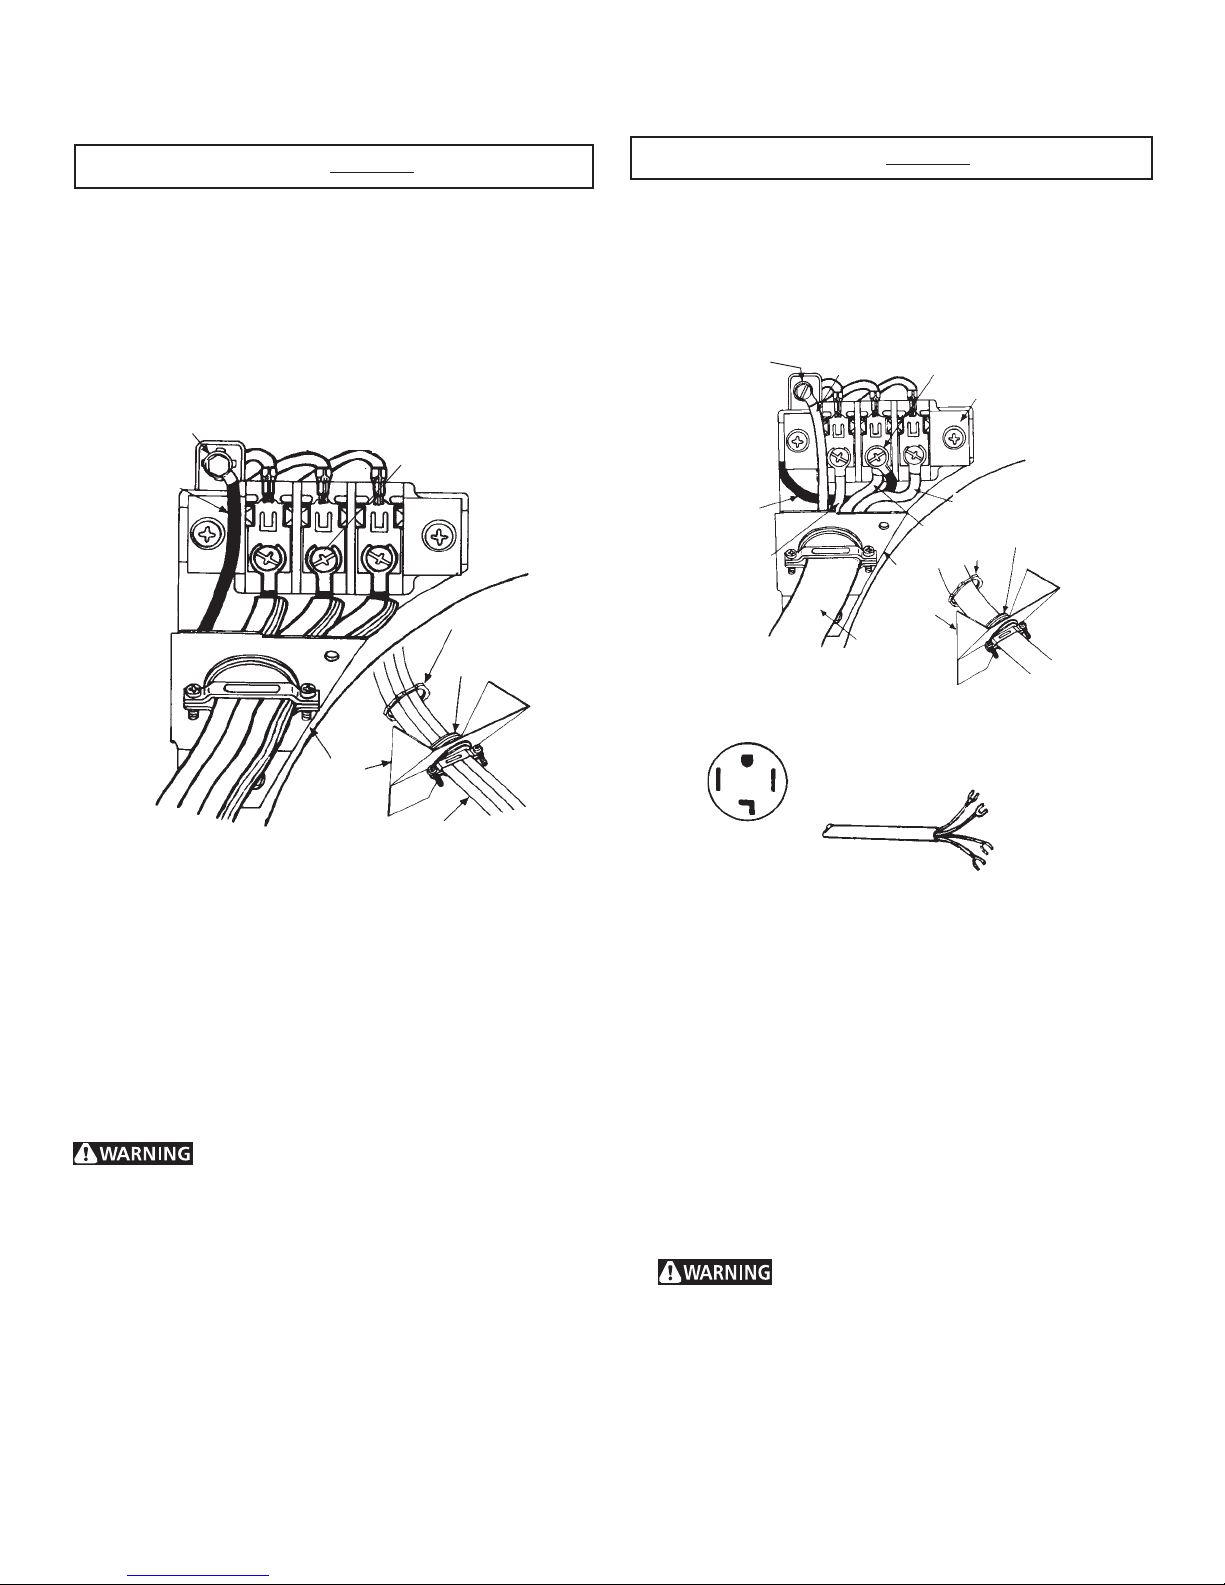
ELECTRICAL CONNECTIONS
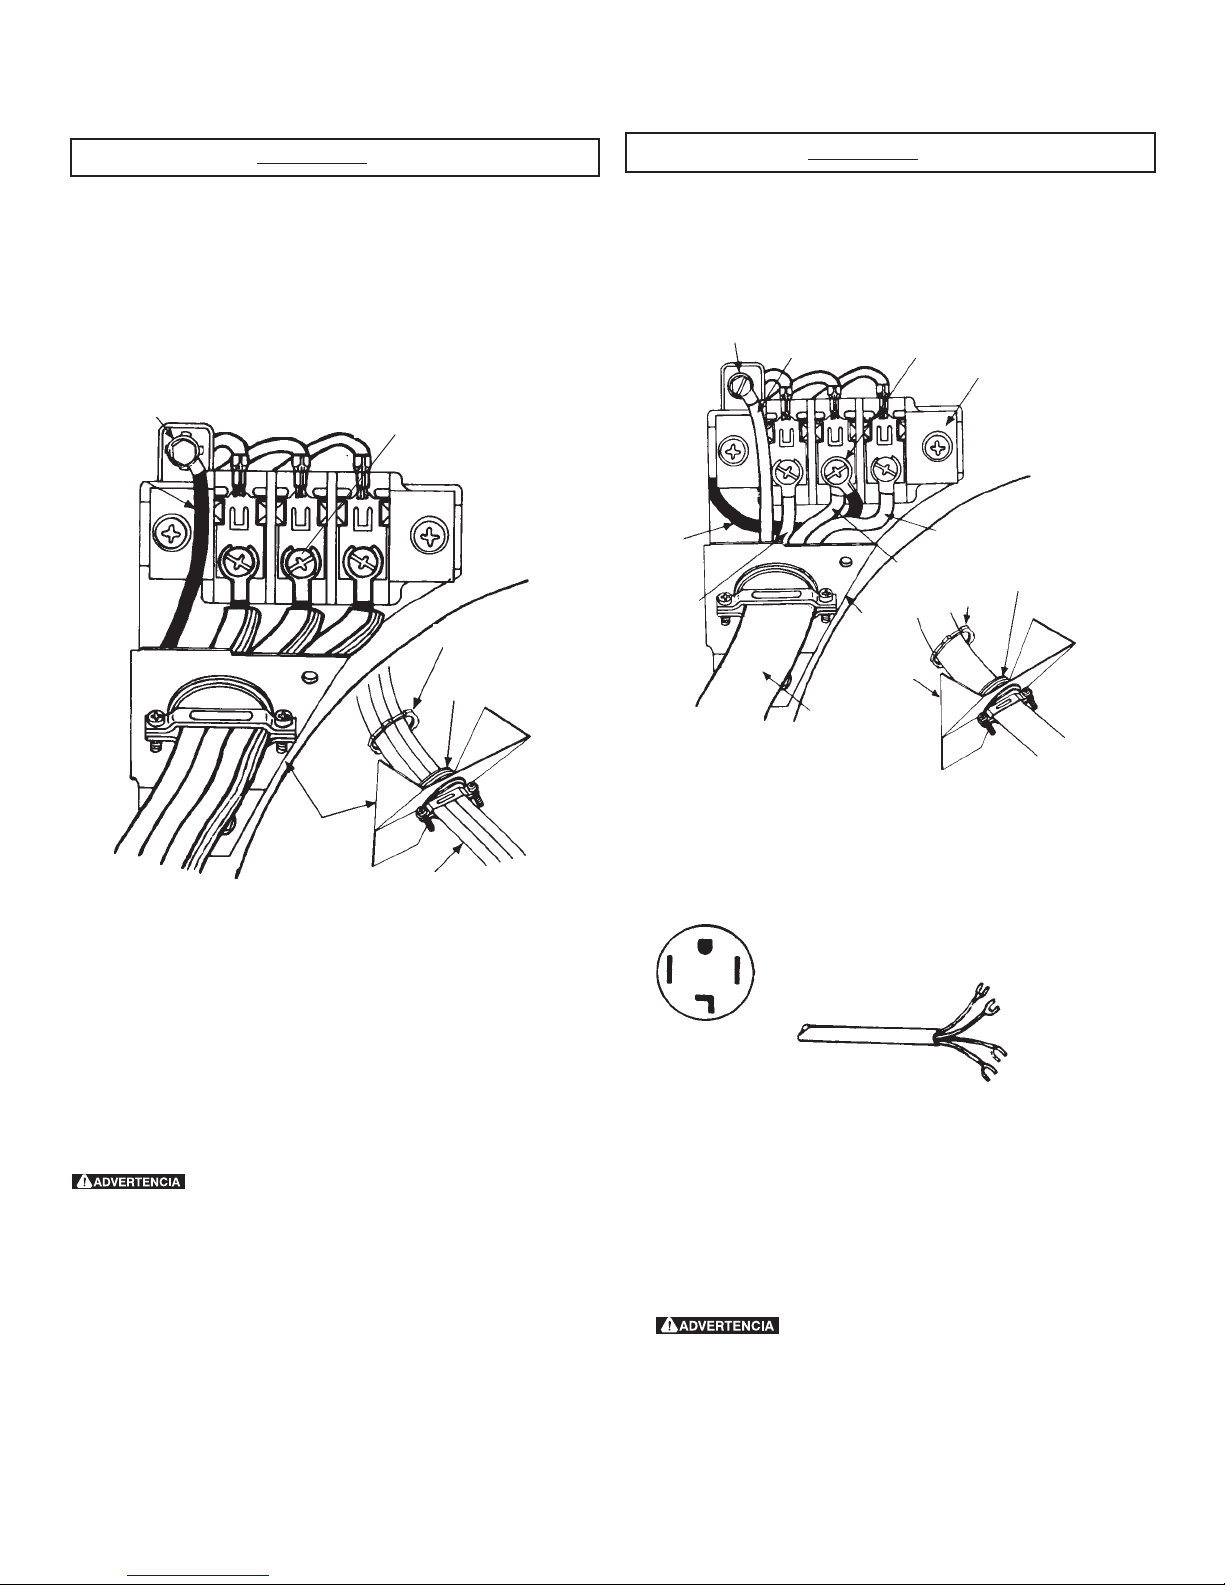
FOR 3-WIRE SYSTEM
ELECTRICAL CONNECTIONS
FOR 4-WIRE SYSTEM
Non-Canadian ELECTRIC Dryer
1. Remove the screws securing the terminal block access cover
and the strain relief mounting bracket located on the
back of the dryer upper corner.
2. Install a U.L. approved strain relief into the power cord entry
hole of the mounting bracket. Finger tighten the nut only at
this time.
GREEN GROUND SCREW
NEUTRAL
GROUND
WIRE
SILVER TERMINAL
NUT
TIGHTEN NUT TO
THESE THREADS
Non-Canadian ELECTRIC Dryer
1. Remove the screws securing the terminal block access cover
and the strain relief mounting bracket located on the back of
the dryer upper corner.
2. Install a U.L. approved strain relief in the entry hole of the
mounting bracket. Finger tighten the nut only at this time.
GREEN
GROUND
SCREW
NEUTRAL
GROUND
WIRE
GREEN POWERCORD
GROUND WIRE
RED
STRAIN
RELIEF
MOUNTING
BRACKET
POWER
CORD
SILVER TERMINAL
TERMINAL
BLOCK
BLACK
TIGHTEN NUT
NUT
TO THESE
THREADS
WHITE
3. Remove the ground wire from the green ground screw located
above the terminal block.
STRAIN
RELIEF
MOUNTING
BRACKET
POWER CORD
3. Thread a U.L. approved 30 amp. power cord, NEMA 10-30
Type SRDT, through the strain relief.
4. Attach the power cord neutral (center wire) conductor to
the silver colored center terminal on the terminal block.
Tighten the screw securely.
5. Attach the remaining two power cord outer conductors to
the outer brass colored terminals on the terminal block.
Tighten both screws securely.
Do not make a sharp bend or crimp wiring/
conductor at connections.
6. Reattach the strain relief mounting bracket to the back of
the dryer with two screws. Tighten screws securely.
7. Tighten the screws securing the cord restraint firmly against
the power cord.
8. Tighten the strain relief nut securely so that the strain relief
does not turn.
9. Reinstall the terminal block cover.
TYPICAL 4
CONDUCTOR
TYPICAL 4
CONDUCTOR
30 AMP NEMA 14-30 TYPE SRDT OR30 AMP NEMA 14-30 TYPE SRDT OR
30 AMP NEMA 14-30 TYPE SRDT OR
30 AMP NEMA 14-30 TYPE SRDT OR30 AMP NEMA 14-30 TYPE SRDT OR
BLACK
WHITE
RED 240V
GREEN
4. Thread a U.L. approved 30 amp power cord, NEMA 14-30
type ST or SRDT through the strain relief.
5. Attach the green power cord ground wire to the cabinet with
the green ground screw.
6. Attach the white (neutral) power cord conductor from the
power cord and the neutral ground wire from the dryer harness
to the silver-colored center terminal on the terminal block.
Tighten the screw securely.
7. Attach the red and black power cord conductors to the outer
brass-colored terminals on the terminal block.
Do not make a sharp bend or crimp wiring/
conductor at the connections.
8. Tighten the screws securing the cord restraint firmly against
the power cord.
9. Tighten the strain relief nut securely so the strain relief does
not turn.
10. Reinstall the terminal block access cover.
9
Page 10
INSTALLATION
1. GAS CONNECTION (Gas dryers only)
a. Remove the shipping cap from gas pipe at the rear of
the dryer.
NOTE: DO NOT connect the dryer to L.P. gas service without
converting the gas valve. An L.P. conversion kit must
be installed by a qualified gas technician.
b. Connect a 1/2 inch (1.27 cm) I.D. semi-rigid or approved
pipe from gas supply line to the 3/8 inch (0.96 cm) pipe
located on the back of the dryer. Use a 1/2 inch to 3/8
inch (1.27 cm to 0.96 cm) reducer for a connection.
Apply an approved thread sealer that is resistant to the
corrosive action of liquefied gases on all pipe connections.
c. Open the shutoff valve in the gas supply line.
d. Test all connections by brushing on a soapy water solution.
NEVER TEST FOR GAS LEAKS WITH AN OPEN FLAME.
2. Connect the exhaust duct to outside exhaust system. Use
duct tape to seal all joints.
3. With the dryer in its final position, adjust one or more of the
legs until the dryer is resting solid on all four legs. Place a
level on top of the dryer. THE DRYER MUST BE LEVEL
AND RESTING SOLID ON ALL FOUR LEGS.
4. Plug the power cord into a grounded outlet.
NOTE: Check to ensure the power is off at circuit breaker/
fuse box before plugging the power cord into the outlet.
5. Turn on the power at the circuit breaker/fuse box.
Before operating the dryer, make sure the
dryer area is clear and free from combustible materials,
gasoline, and other flammable vapors. Also see that
nothing (such as boxes, clothing, etc.) obstructs the flow
of combustion and ventilation air.
7. If your dryer does not operate, please review the "Avoid
Service Checklist" located in your Owner's Guide before
calling for service.
8. Place these instructions in a location near the dryer for future
reference.
9.
To stack your dryer on a compatible washer call your local
dealer to find your local distributor to purchase a stacking
kit accessory part number 5303937141.
NOTE: A wiring diagram is located inside the dryer console or
behind the right side panel.
REPLACEMENT PARTS
If replacement parts are needed for your dryer, call Sears
Parts and Service Toll Free Number 1-800-366-PART (1-
800-366-7278).
Label all wires prior to disconnection when
servicing controls. Wiring errors can cause improper and
dangerous operation. Verify proper operation after servicing.
Destroy the carton and plastic bags after the
dryer is unpacked. Children might use them for play. Cartons
covered with rugs, bedspreads, or plastic sheets can become
airtight chambers causing suffocation. Place all materials in a
garbage container or make materials inaccessible to children.
The instructions in this manual and all other
literature included with this dryer are not meant to cover every
possible condition and situation that may occur. Good safe
practice and caution MUST be applied when installing, operating
and maintaining any appliance.
6. Run the dryer through a cycle check for proper
operation.
NOTE: On gas dryers, before the burner will light, it is
necessary for the gas line to be bled of air. If the burner
does not light within 45 seconds the first time the dryer is
turned on, the safety switch will shut the burner off. If this
happens, turn the timer to "OFF" and wait 5 minutes before
making another attempt to light.
10
Page 11
Tabla de Materias
Requerimientos de instalación preliminares...........................................................................................................................12
Requerimientos eléctricos...................................................................................................................................................12
Requerimientos del sistema de escape..............................................................................................................................12-13
Requerimientos del suministro de gas....................................................................................................................................13
Ubicación de su secadora.....................................................................................................................................................14
Dimensiones para la instalación...........................................................................................................................................15
Instalación en casas móviles.................................................................................................................................................16
Desembalaje....................................................................................................................................................................16
Puerta reversible................................................................................................................................................................16
Instalación eléctrica...........................................................................................................................................................17
Requerimientos para la puesta a tierra..................................................................................................................................17
Conexiónes eléctricas - trifilares..........................................................................................................................................18
Conexiónes eléctricas - tetrafilares.......................................................................................................................................18
Instalación.......................................................................................................................................................................19
Piezas de recambio............................................................................................................................................................19
SEGURIDAD de SECADORA
La instalación y el servicio de la Secadora de ropa se deben realizar por un instalador calificado, la agencia de servicio o el
surtidor de gas.
Instale la Secadora de ropa según las instrucciones del fabricante y los códigos locales. Antes de comenzar la instalación,
lea cuidadosamente estas instrucciones. Esto simplificará la instalación y asegurará que la secadora se instale correctamente
y de manera segura. Después de completar la instalación, coloque estas instrucciones cerca de la secadora para referencia
futura.
NOTA: La alimentación eléctrica para la secadora deberá cumplir con los códigos y reglamentos locales y con la última edición
del Código Eléctrico Nacional, ANSI/NFPA 70 o en Canadá CSA C22.1 Código Eléctrico Canadiense, Parte 1.
NOTA: La alimentación de gas para la secadora deberá cumplir con los códigos y reglamentos locales y con la última edición
del Código Nacional para Gases Combustibles, ANSI Z223.1 o en Canadá CAN/CGA B149.12.
NOTA: La secadora está clasificada para USO DOMESTICO solamente, de acuerdo con la norma ANSI Z 21.5.1 o ANSI/UL 2158 CAN/CSA C22.2 No. 112 (las últimas ediciónes). Esta secadora no se recomienda para uso commercial tal como en restaurantes,
salones de belleza, etc.
Su seguridad y la seguridad de terceros son muy importantes.
Hemos proporcionado muchos mensajes importantes para la seguridad en las Instrucciones de Operación del Manual de Uso y
Mantenimiento, las Instrucciones de Instalación y en el mismo aparato. Siempre lea y obedezca todos los mensajes para seguridad.
Este símbolo significa alerta. Este símbolo lo alerta acerca de peligros que pueden matar o lesionar, tanto a usted como a otras
personas. Todos los mensajes de seguridad serán precedidos por el símbolo de alerta para su seguridad y la palabra "PELIGRO o
ADVERTENCIA" (DANGER” o WARNING). Estas palabras significan:
PELIGRO (DANGER) Usted morirá o resultará seriamente lesionado si no sigue las instrucciones siguientes.
ADVERTENCIA (WARNING) Usted puede morir o resultar seriamente lesionado si no sigue las instrucciones
siguientes.
Todos los mensajes de seguridad identificarán el peligro, le dirán a usted cómo reducir la posibilidad de lesión y también
qué puede suceder si no se siguen las instrucciones.
RIESGO DE INCENDIO. Para su seguridad, siga las instrucciones contenidas en este manual a fin de reducir a un
mínimo los riesgos de incendio o explosión o para evitar daños materiales, lesiones personales o la muerte. GUARDE ESTAS
INSTRUCCIONES.
- No almacene ni utilice gasolina u otros vapores y líquidos inflamables en la proximidad de éste o de cualquier otro artefacto eléctrico.
- QUE DEBE HACER SI PERCIBE OLOR A GAS
· No trate de encender ningún artefacto eléctrico.
· No toque ningún interruptor eléctrico; no use ningún teléfono en su edificio.
· Haga salir a todos los ocupantes de la habitación, del edificio y del lugar.
· Llame a su proveedor de gas desde el teléfono de un vecino. Siga las instrucciones del proveedor de gas.
· Si no logra comunicarse con su proveedor de gas, llame al departamento de bomberos.
La instalación y el servicio de mantenimiento debe de realizarlos un instalador calificado, la agencia de servicios o el proveedor de gas.
REQUERIMIENTOS DE INSTALACIÓN PRELIMINARES
Herramientas y materiales necesarios para la instalación:
1. Destornillador Phillips
2. Alicates universales
3. Nivel de carpintero
4. Destornillador para tornillo de cabeza plana o recta
5. Cinta para ductos
6. Ducto metálico rígido o flexible de 4"(10,2 cm)
7. Caperuza de salida
8. Sellador de tuberías (gas)
9. Un cuchillo de plástico
11
Page 12
REQUERIMIENTOS ELÉCTRICOS
Secadoras ELÉCTRICAS
CIRCUITO: circuito independiente individual de 30 A con fusibles
de acción retardada o disyuntores.
Use circuitos con fusibles separados para las lavadoras y secadoras
y NO haga funcionar una lavadora y una secadora en el mismo
circuito.
SUMINISTRO ELÉCTRICO: trifilar o tetrafilar, 240 V, 1 fase, 60
Hz, corriente alterna.
CABLE DE ALIMENTACIÓN ELÉCTRICA: Trifilar: la secadora DEBE
emplear un cable de alimentación eléctrica de 3 conductores tipo
NEMA 10-30, SRDT calificado para CA mínima de 240 voltios, 30
A., con 3 conectores de terminal horquilla con extremos doblados
hacia arriba o de bucle cerrado y calificados para uso en secadoras
de ropa. Vea CONEXIONES ELÉCTRICAS PARA UN SISTEMA
TRIFILAR.
Tetrafilar: la secadora DEBE emplear un cable de alimentación
eléctrica de 4 conductores tipo NEMA 14-30, SRDT o ST (según se
especifique) calificado para CA mínima de 240 voltios, 30 amp.,
con 4 conectores de terminal horquilla con extremos doblados
hacia arriba o de bucle cerrado y calificados para uso en secadoras
de ropa. Vea CONEXIONES ELÉCTRICAS PARA UN SISTEMA
TETRAFILAR.
(Canadá - cable de alimentación eléctrica de 4 cables instalado
en la secadora.)
ADVERTENCIA: riesgo de choque eléctrico Electrodoméstico
puesto a tierra a través de un enlace al conductor neutro. La
puesta a tierra a través del neutro está prohibida para (1)
instalaciones de circuitos de bifurcación nuevos (2) casas rodantes;
(3) vehículos recreativos; y (4) áreas cuyas leyes locales no permiten
la puesta a tierra a través del neutro; (1) desconecte el enlace al
neutro; (2) use un terminal o cable de puesta a tierra para realizar
la conexión según las leyes locales; y (3) conecte el terminal o
cable del neutro al neutro del circuito de bifurcación como se
hace normalmente (si el electrodoméstico se va a conectar a través
de un kit de cordón eléctrico, use un cable tetrafilar). SÓLO USE
CABLES DE COBRE.
RECEPTÁCULO DEL TOMACORRIENTE: receptáculo NEMA 1030 R que debe estar ubicado en un lugar al que el cable de
alimentación eléctrica pueda acceder cuando la secadora esté
instalada. (Canadá: receptáculo NEMA 14-30R.)
ALIMENTACIÓN
ELÉCTRICA
TOMACORRIENTE
(COBRE)
INSTALACIÓN SUJETA A LOS
REGLAMENTOS LOCALES
CIRCUITO - Circuito individual derivado de 15 amp, con fusibles de
15 amp. de retardo máximo o disyuntor.
ALIMENTACIÓN ELÉCTRICA - Corriente
alterna, monofásica, 60 Hz,
120 voltios, trifilar.
CORDÓN ELÉCTRICO - La secadora
está equipada con
un cordón eléctrico
trifilarpara
120 voltios.
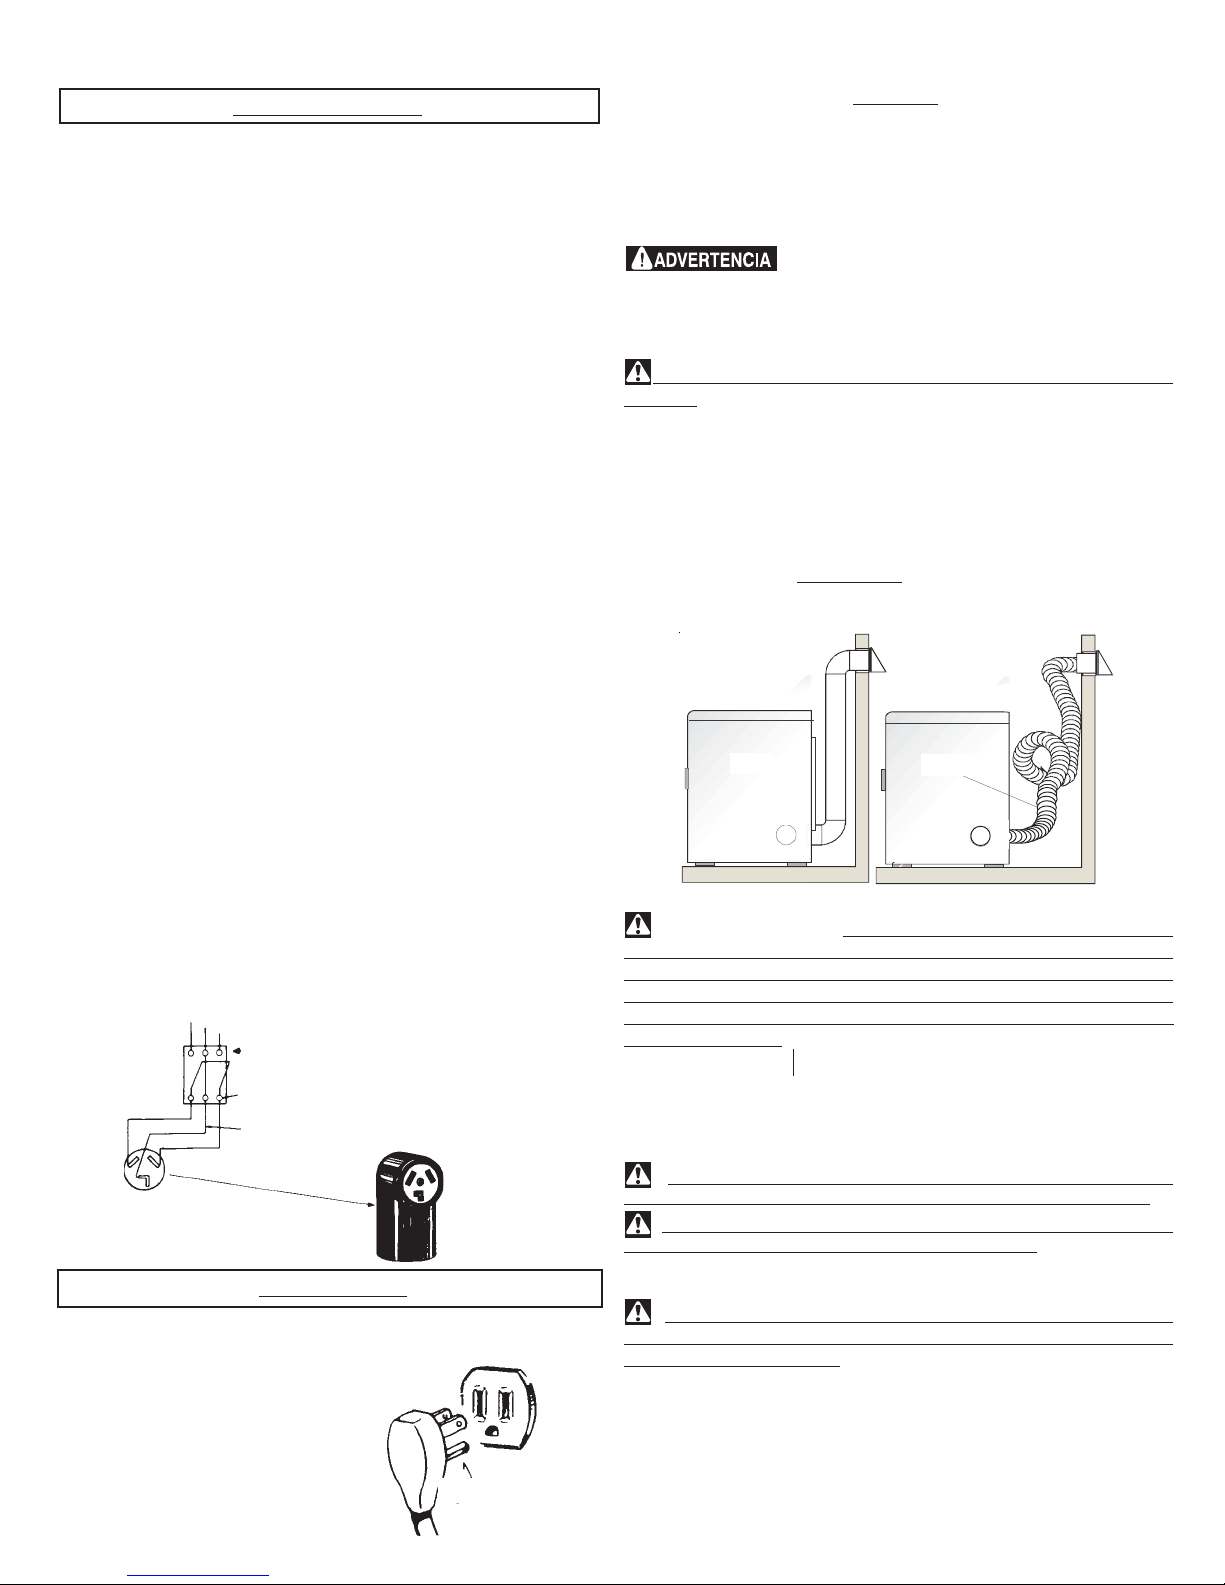
CAJA PRINCIPAL DE FUSIBLES CON CONDUCTOR NEUTRO
PUESTO A TIERRA, TRIFILAR, 120-240 VOLTIOS 60
CICLOS
FUSIBLES DE ACCIÓN RETARDADA
DE 30 AMP O DISYUNTOR
CONDUCTOR NEUTRO
NEMA 10-30R (COBRE)
Secadoras a GAS
NOTA: No saque
por ningún
motivo la espiga
de puesta a tierra
del enchufe.
ESPIGA DE PUESTA
A TIERRA
REQUERIMIENTOS DEL SISTEMA DE ESCAPE
Utilice solamente ductos metálicos, rígidos o flexibles de 4"
(10,2 cm) de diámetro (mínimo) y una caperuza de salida de uso
aprobado, con registros que giren hacia afuera que se abren cuando
la secadora se encuentra en funcionamiento. Cuando la secadora
se detiene, los registros se cierran automáticamente para evitar las
corrientes de aire y la entrada de insectos y roedores. Para evitar
obstruir la salida, mantenga una altura libre mínima de 12"(30,5 cm)
entre la caperuza de salida y el piso o entre cualquier otra obstrucción.
Los siguientes requerimientos son
específicos para el funcionamiento correcto y seguro de su
secadora. El incumplimiento de estas instrucciones puede
causar prolongación excesiva del tiempo de secado y riesgos
de incendio.
No instale la Secadora con materiales de ventilación plásticos
flexibles. En Canadá y los Estados Unidos si el conducto es de metal
(tipo hoja de aluminio), éste debe ser de un tipo específico identificado
por el fabricante, recomendado para el uso con Secadoras; y en los
Estados Unidos debe además cumplir con la norma UL 2158A. Los
materiales de ventilación flexibles se pueden colapsar o apachurrar
fácilmente y atrapar pelusa. Estas condiciones obstruirán la circulación
de aire de la Secadora de ropa y aumentarán el riesgo de incendio.
Si su sistema de escape actual tiene ductos de plástico o de láminas
metálicas delgadas, reemplácelo con un ducto metálico rígido o
flexible. Asegúrese de que los ductos existentes no tengan
pelusas antes de instalar el ducto de la secadora.
SI
CORRECTO
NO
INCORRECTO
Riesgo de incendio - La secadora debe ser ventilada al exterior
de la vivienda. No ventile la secadora a una chimenea, pared, techo,
ático, pasajes entre pisos o cualquier espacio oculto de la vivienda.
Las secadoras de ropa producen pelusa combustible. Si no se ventila
la secadora al exterior, algunas pelusas finas se acumularán en el
área de lavandería. La acumulación de pelusa en cualquier área de
la vivienda puede constituir un peligro sanitario y un riesgo de incendio.
La secadora debe estar conectada a un sistema de escape que
termine en el exterior de la vivienda. Inspeccione la abertura de
escape al exterior con frecuencia y elimine cualquier acumulación
de pelusa en tal abertura y en el área que la rodea.
No permita que los materiales combustibles (por ejemplo: la
ropa, cortinas/cortinajes, papel) tengan contacto con los ductos.
Exceder la longitud del conducto rigido o los números de codos
permitidos en los diagramas "LARGO MÁXIMO" puede disminuir
la capacidad de exhaustación del sistema. Obstruir el conducto puede
provocar peligro de incendio, así como aumentar el tiempo de secado.
No obstruya los extremos del tubo de ventilacion, ni utilice
tornillos, remaches u otros medios de fijación que puedan obstruir el
conducto y atrapar pelusa. Las pelusas podrían quedar atrapadas en
los filtros, en los tornillos o en los remaches, lo cual obstruiría el sistema
de escape y crearía un riesgo de incendio, así como también
prolongaría el tiempo de secado. Use una caperuza de salida
adecuada para el extremo del ducto que salga al exterior de la vivienda
y selle todas las juntas con cinta adhesiva para ductos. Todos los
accesorios de tubería machos, DEBEN ser instalados aguas abajo del
flujo de aire.
12
Page 13
Riesgo de explosión. No instale la secadora
donde se guarda gasolina u otros materiales inflamables. Si la
secadora se instala en un garage, ella debe estar por lo menos 18
pulgadas (45,7 cm) por encima del suelo. El incumplimiento puede
resultar en la muerte, explosión, incendio, o quemaduras.
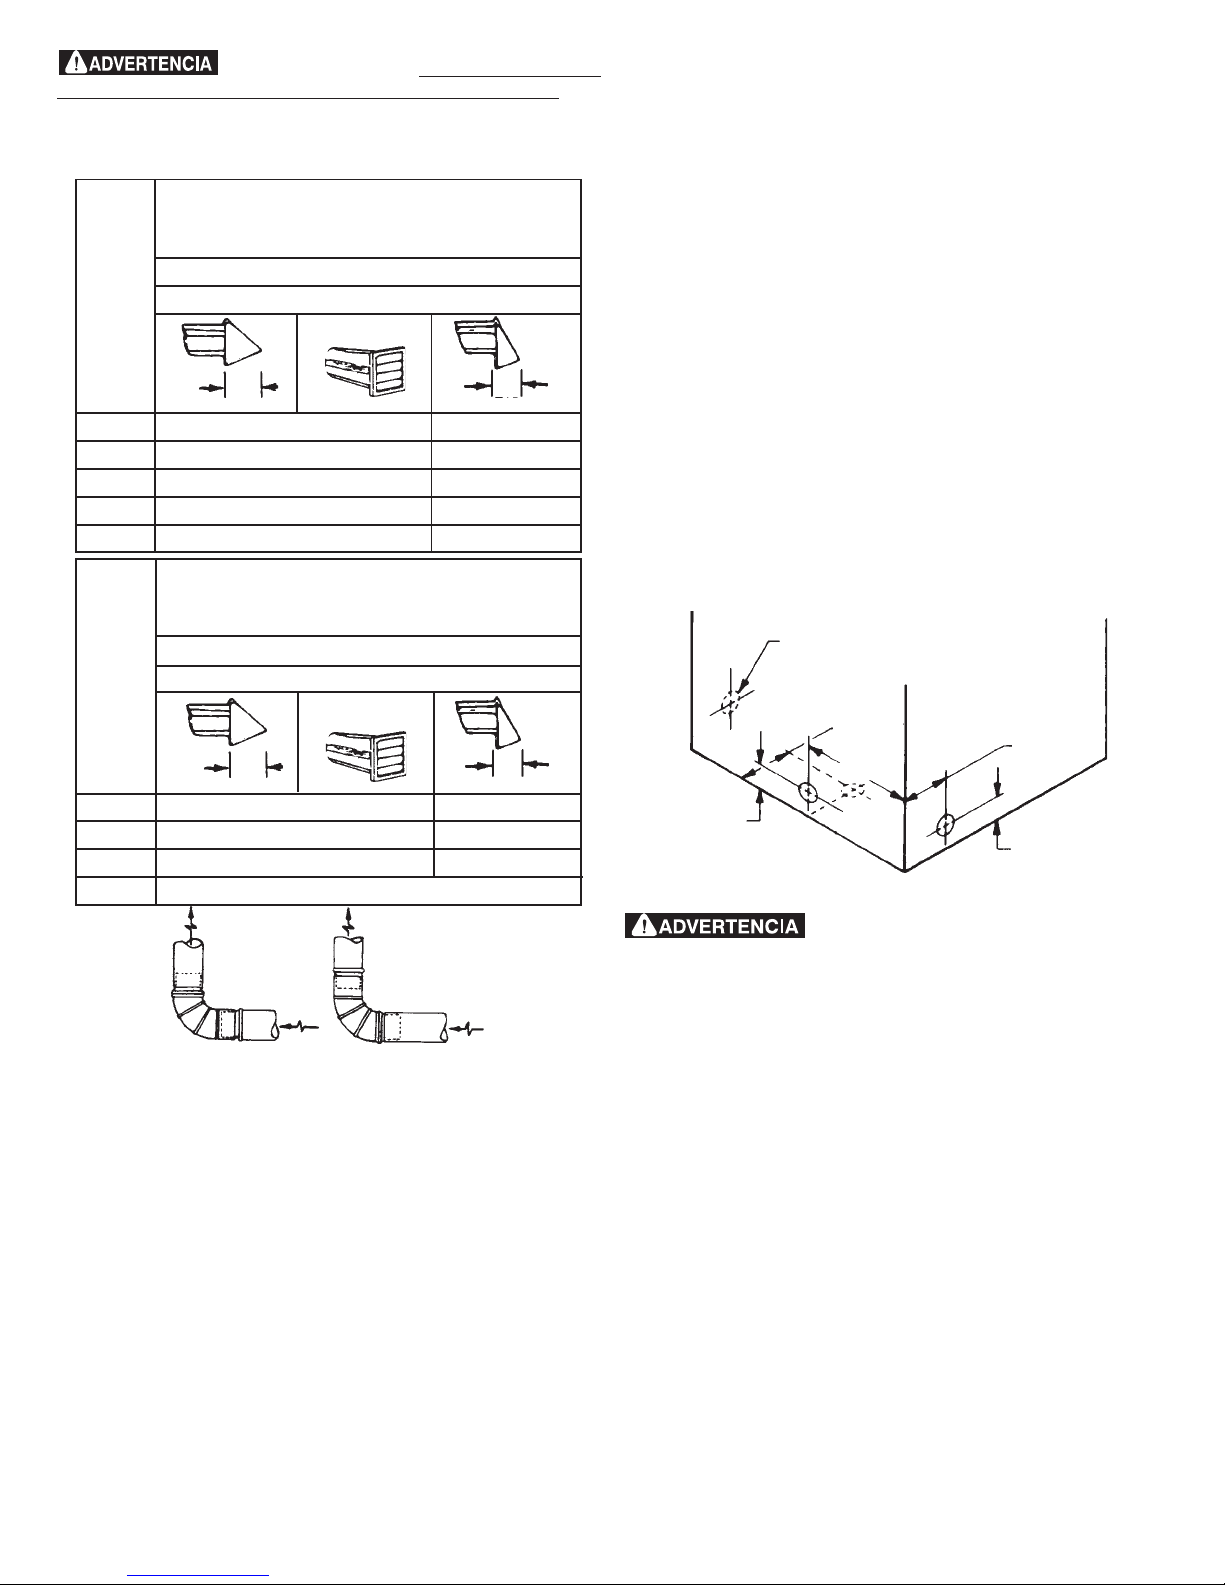
LARGO MÁXIMO
del Conducto Metálico Rigido
de 4” (10,2 cm) de Diámetro
TIPO DE CAPERUZA DE SALIDA
(Preferido)
Número
de Codos
a 90°
4”
(10,2 cm)
0 60 pies (18,28 m) 48 pies(14,63 m)
1 52 pies (15,84 m) 40 pies(12,19 m)
2 44 pies (13,41 m) 32 pies (9,75 m)
3 32 pies (9,75 m) 24 pies (7,31 m)
4 28 pies (8,53 m) 16 pies (4,87 m)
Apersianada
2½"
(6.35 cm)
LARGO MÁXIMO
del Conducto Metálico Flexible
de 4” (10,2 cm) de Diámetro
TIPO DE CAPERUZA DE SALIDA
(Preferido)
Número
de Codos
a 90°
4”
(10,2 cm)
0 30 pies (9,14 m) 18 pies (5,49 m)
1 22 pies (6,71 m) 14 pies (4,27 m)
2 14 pies (4,27 m) 10 pies (3,05 m)
3 NO RECOMENDADO
Apersianada
2½"
(6.35 cm)
• Se debe utilizar solamente conductos metalicos rigidos.
• Una salida del sistema vertical en el techo, puede exponerle
a un corriente de aire descendente y disminuir así su capacidad
de exhaustación.
• El aislante que debe atravesar el sistema puede causar
condensación y disminuir así la capacidad de exhaustación
del sistema.
• La capacidad de exhaustación de un sistema de exhaustación
comprimido o ondulado puede disminuirse.
El sistema de exhaustación debe de ser inspeccionado y limpiado
por lo menos cada 18 meses de uso normal. Cuanto más la secadora
está utilizada, más debe verificar el buen funcionamiento del sistema
de exhaustación y de la tapa del orificio de ventilación.
UBICACIÓN DEL ESCAPE
Todas las secadoras vienen de fábrica equipadas con escape trasero.
Sin embargo, en las secadoras eléctricas, el escape puede hacerse
al lado derecho o izquierdo del gabinete o en la parte inferior de la
secadora. En las secadoras a gas, el escape del aire puede estar en
el lado derecho del gabinete o en la parte inferior de la secadora. El
escape direccional puede efectuarse instalando un Juego de Escape,
P/N 131456800, disponible a través de su distribuidor de repuestos.
Siga las instrucciones que se suministran con el juego.
DIMENSIONES PARA LA UBICACIÓN DEL DUCTO DE ESCAPE
IGUAL QUE EL OTRO LADOIGUAL QUE EL OTRO LADO
IGUAL QUE EL OTRO LADO
IGUAL QUE EL OTRO LADOIGUAL QUE EL OTRO LADO
5 7/8"5 7/8"
5 7/8"
5 7/8"5 7/8"
(15 cm)(15 cm)
(15 cm)
3 3/4"3 3/4"
3 3/4"
3 3/4"3 3/4"
(9,5 cm)(9,5 cm)
(9,5 cm)
(9,5 cm)(9,5 cm)
(15 cm)(15 cm)
13 1/2"13 1/2"
13 1/2"
13 1/2"13 1/2"
(34 cm)(34 cm)
(34 cm)
(34 cm)(34 cm)
4 3/8"4 3/8"
4 3/8"
4 3/8"4 3/8"
(11 cm)(11 cm)
(11 cm)
(11 cm)(11 cm)
3 3/4"3 3/4"
3 3/4"
3 3/4"3 3/4"
(9,5 cm)(9,5 cm)
(9,5 cm)
(9,5 cm)(9,5 cm)
REQUERIMIENTOS DEL SUMINISTRO DE GAS
CORRECTOCORRECTO
CORRECTO
CORRECTOCORRECTO
INSTALE LOS ACCESORIOS MACHOS EN LA DIRECCIÓN CORRECTA
INCORRECTOINCORRECTO
INCORRECTO
INCORRECTOINCORRECTO
Para las instalaciónes cuyas sistema de exhaustación no se encuentre
en el diagrama, se puede utilizar el metodo a continuación para
determinar si el sistema de exhaustación es apropiado.
1. Conecte un manómetro a tubo inclinado o digital entre la
secadora y el unión de exhaustación de la secadora.
2. Ponga el contador de tiempo de la secadora y la temperatura
a aire frío (enfiriamiento), y la secadora en la posición de
marcha.
3. Lea la medida indicada en el manómetro.
4. La baja presión NO DEBE exceder 0.75 pulgada de la columna
de agua. Si la baja presión es inferior a 0.75" de la columna
de agua, el sistema es aceptable. Si la lectura indica una
presión superior a 0.75" de la columna de agua, la capacidad
del circuito es insuficiente y la instalación es inaceptable.
Aungue un sistema vertical sea aceptable, algunas circunstancias
atenuantes pueden afectar el funcionamiento de la secadora:
Reemplace la tubería de conexión de
cobre que no está recubrida con plástico. El latón inoxidable
o recubrido con plástico DEBE SER utilizado.
1. La instalación DEBE hacerse cumplir con los códigos locales o en
ausencia de los mismos, de acuerdo con los estandares del National
Fuel Gas Code (Código Nacional para Gases Combustibles), ANSI
Z223.1 (la última editión). Para Canadá, el Estandar CAN/CGA
B149 que esté en vigor.
2. La tubería de alimentación de gas debe ser de 1/2 pulgada
(1,27 cm) de diámetro.
3. Si está permitido por los códigos locales, se puede usar tubería de
metal para conectar su secadora a la línea de suministro de gas.
La tubería DEBE ser fabricada de acero inoxidable o cobre
recubierto de plástico.
4. La tubería de alimentación de gas DEBE tener una llave de cierre
individual.
5. Una toma de 1/8 de pulgada (0,32 cm) N.P.T. accesible para
conexión del manómetro de prueba, DEBE ser instalada
inmediatamente aguas arriba de la conexión de la tubería de
alimentación de gas a la secadora.
6. La secadora DEBE ser desconectada del sistema de tuberías de
alimentación de gas durante cualquier ensayo de presión del
sistema de tuberías de alimentación de gas realizado a presiones
de prueba de más de 1/2 lbs/pulg.
2
(3,45 kPa).
7. La secadora DEBE aislarse del sistema de tuberías de alimentación
de gas durante cualquier ensayo de presión del sistema de tuberías
de alimentación de gas realizado en ensayos de presión iguales o
inferiores a 1/2 lbs/pulg.
2
(3,45 kPa).
13
Page 14
UBICACIÓN DE SU SECADORA
NO INSTALE SU SECADORA:
1. En un lugar donde puede haber goteos de agua o quede
expuesta a las inclemencias del tiempo.
2. En un área donde pueda entrar en contacto con cortinas,
cortinajes o cualquier otra cosa que obstruya el flujo de
combustión y ventilación de aire.
3. Sobre alfombras. El piso DEBE ser firme con un desnivel
máximo de 1 pulgada (2,54 cm).
INSTALACIÓN DENTRO DE UN NICHO O ARMARIO
1. Si la secadora es instalada en un dormitorio, cuarto de baño,
nicho o armario, el tubo del escape DEBE ser instalado hacia
el exterior.
2. No se debe instalar ningún otro artefacto que queme
combustible en el mismo armario en que está instalada la
secadora a Gas.
3. La secadora necesita espacio a su alrededor para una
ventilación adecuada.
NO INSTALE LA SECADORA EN UN ARMARIO CON PUERTA
MACIZA.
4. Se requiere como mínimo una abertura de 120 pulgadas cuadradas (774,2 cm
2
), dividida equitativamente para la parte
superior e inferior de la puerta. Cuando se instala una puerta,
es necesario proveer aberturas para el aire. Una puerta
apersianada con aberturas para el aire en todo el largo de la
puerta es aceptable.
DESPEJES MÍNIMOS DE INSTALACIÓN (Pulgadas)
PARTE PARTE PARTE
DELANTERA LADOS TRASERA SUPERIOR
Alcoba o
encastradas 0 (0 cm) 0 (0 cm) 0 (0 cm) 15 (38,1 cm)
Armario 1 (2,54 cm) 0 (0 cm) 0 (0 cm) 15 (38,1 cm)
Ventilación requirida en la puerta del armario: dos aberturas
rejilladas cada 60 pulg.
2
(387 cm2) — 3" (7,6 cm) desde la
parte inferior y superior de la puetra.
EL TUBO DEL ESCAPE DE LA SECADORA DEBE SER
INSTALADO HACIA EL EXTERIOR.
5. Las siguientes ilustraciónes muestran las dimensiónes mínimas
de espacio libre que debe existir para el buen funcionamiento
de la secadora cuando se instala en un nicho o en un armario.
1" (2,54 cm)1" (2,54 cm)
1" (2,54 cm)
1" (2,54 cm)1" (2,54 cm)
0" (0 cm)0" (0 cm)
0" (0 cm)
0" (0 cm)0" (0 cm)
PUERPUER
TT
A DEL ARMARIOA DEL ARMARIO
PUER
T
A DEL ARMARIO
PUERPUER
TT
A DEL ARMARIOA DEL ARMARIO
60 Pulg.²60 Pulg.²
60 Pulg.²
60 Pulg.²60 Pulg.²
(387,1 cm(387,1 cm
(387,1 cm
(387,1 cm(387,1 cm
60 Pulg.²60 Pulg.²
60 Pulg.²
60 Pulg.²60 Pulg.²
(387,1 cm(387,1 cm
(387,1 cm
(387,1 cm(387,1 cm
0" (0 cm)0" (0 cm)
0" (0 cm)
0" (0 cm)0" (0 cm)
22
2
22
))
)
))
22
2
22
))
)
))
15" (38,1 cm)15" (38,1 cm)
15" (38,1 cm)
15" (38,1 cm)15" (38,1 cm)
NOTA: Secadoras encastradas o superpuestas — 0 pulgada (0 cm) para los lados, parte trasera y en la parte superior.
1" (2,54 cm)1" (2,54 cm)
1" (2,54 cm)
0" (0 cm)0" (0 cm)
0" (0 cm)
0" (0 cm)0" (0 cm)
0" (0 cm)0" (0 cm)
0" (0 cm)
0" (0 cm)0" (0 cm)
1" (2,54 cm)1" (2,54 cm)
0" (0 cm)0" (0 cm)
0" (0 cm)
0" (0 cm)0" (0 cm)
Si se desea una instalación debajo de un mostrador*, ES IMPRESCINDIBLE instalar un conjunto de hoja superior en la
lavadora, número de parte
131629100. Este conjunto es disponible de un distribuidor de partes autorizado.
* Se requiere un mostrador hecho a medida.
INSTALACIÓN DEBAJO DE UN MOSTRADOR
14
Page 15
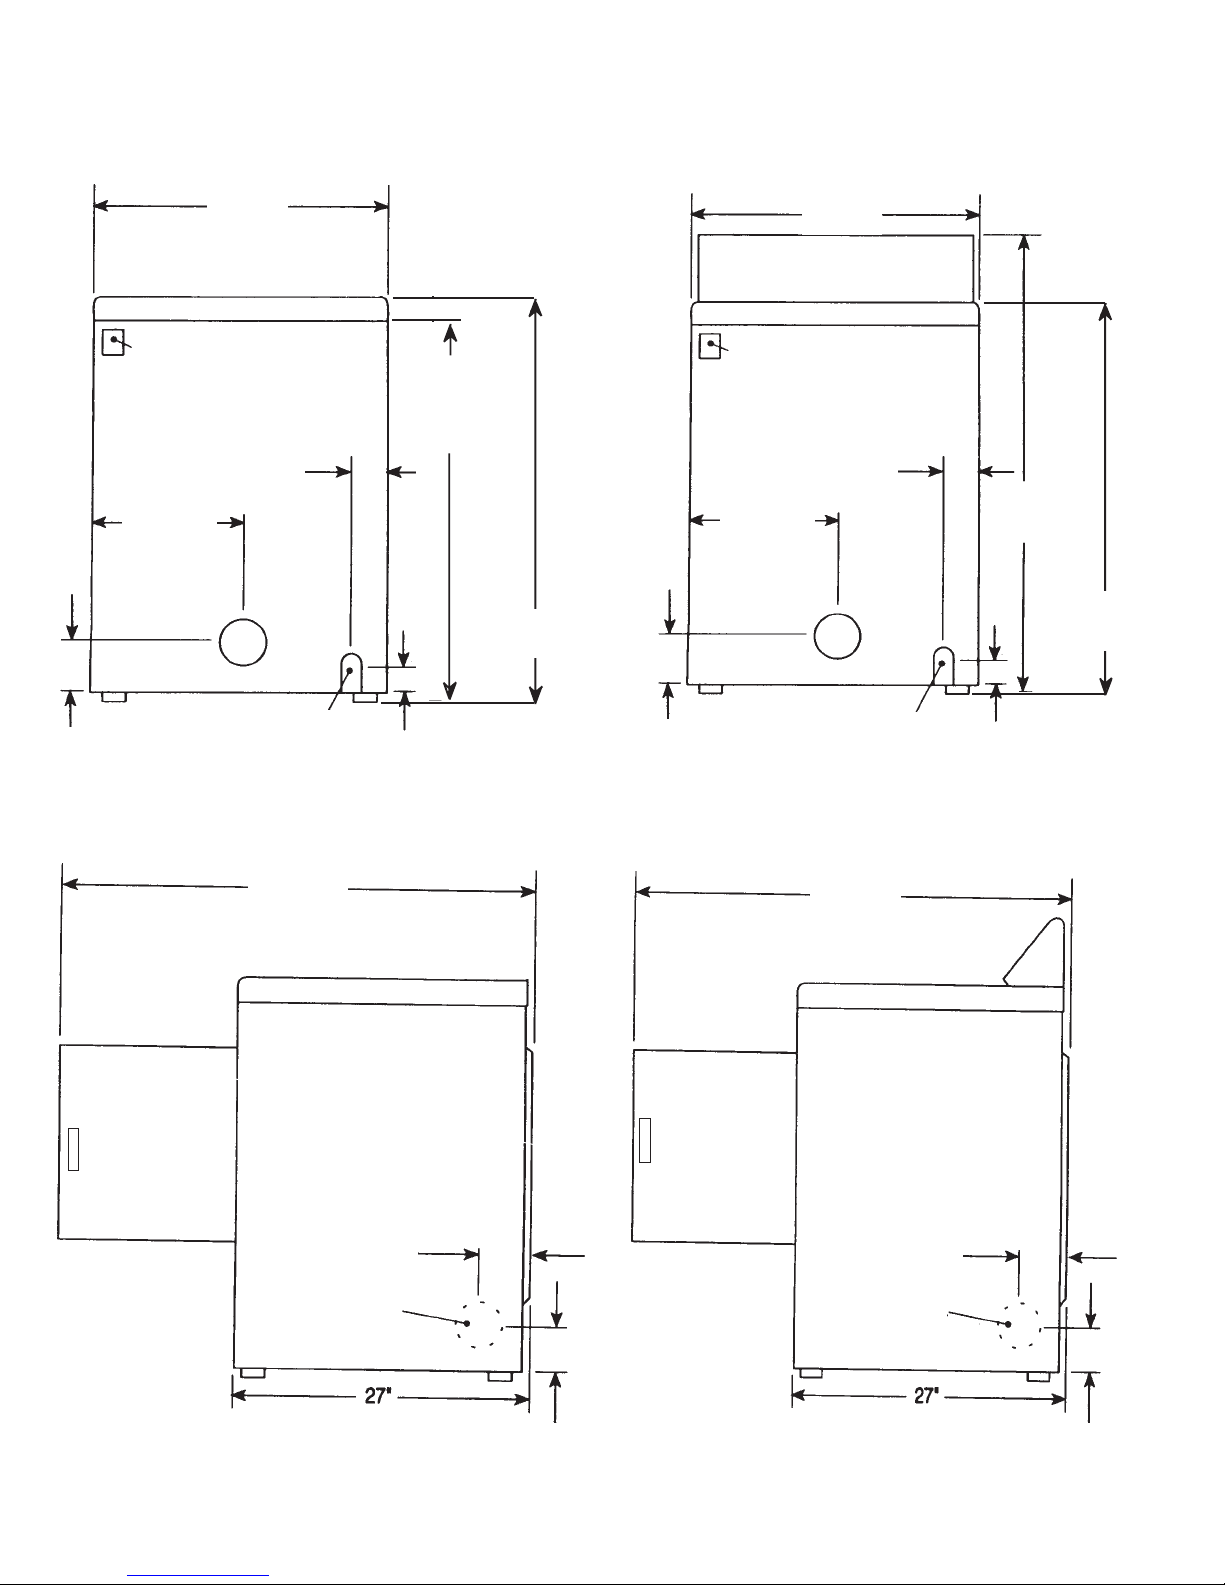
MODELOS DE DEBAJO
DE MOSTRADOR Y APILADORES
DIMENSIONES PARA LA INSTALACIÓN
MODELOS AUTÓNOMOS
CON CONSOLA SUPERIOR
DIMENSIONES PARA LA INSTALACIÓN
3 3/4"
(9,5 cm)
26 7/8"
(68,3 cm)
CONEXIÓN ELÉCTRICA
2 9/16" (6,5 cm)
13 1/2"
(34,4 cm)
CONEXIÓN DE LA
TUBERÍA DE GAS
DE 3/8" (0,96 cm)
VISTA POSTERIOR
BAJO DEL
MOSTRADOR
34 5/8"
(87,9 cm)
1" (2,54 cm)
36"
(91,5 cm)
CONEXIÓN ELÉCTRICA
2 9/16" (6,5 cm)
13 1/2"
(34,4 cm)
3 3/4" (9,5 cm)
26 7/8"
(68,3 cm)
43 5/8"
(110,7 cm)(110,7 cm)
(110,7 cm)
(110,7 cm)(110,7 cm)
CONEXIÓN DE LA
TUBERÍA DE GAS
DE 3/8" (0,96cm)
1" (2,54 cm)
VISTA POSTERIOR
36"
(91,5 cm)
PUERTA
ABIERTA A 90°
47 1/2"
(120,7 cm)
4 3/8" (11,1 cm)
DISCO OPCIÓNAL
REMOVIBLE
PARA
VENTILACIÓN
(68,6 cm)
3 3/4" (9,5 cm)
47 1/2"
(120,7 cm)
PUERTA
ABIERTA A 90°
4 3/8" (11,1 cm)
DISCO OPCIÓNAL
REMOVIBLE PARA
VENTILACIÓN
(68,6 cm)
3 3/4" (9,5 cm)
VISTA LATERAL
VISTA LATERAL
15
Page 16
INSTALACIÓN EN CASAS MÓVILES
1. El tubo de escape de la secadora DEBE ser instalado hacia el exterior
(El escape debe colocarse en la parte exterior y no debajo de la casa
móvil.) Debe usarse ducto de metal que no sea combustible. El ducto
de metal debe tener cuatro pulgadas (10,16 cm) de diámetro y no
tener obstrucciones. Es preferible usar ducto de metal que sea rígido.
2. Si el tubo de escape de la secadora corre a través del piso y el área
debajo de la casa móvil es cerrada, el ducto de escape DEBE terminar
fuera del recinto, con el extremo final asegurado en contra de la
estructura de la casa móvil.
3. Al instalar una secadora de gas en una casa móvil, hay que instalar
una provisión de aire fresco suplementario. La provisión tiene que
ser más grande que dos veces el espacio del escape de la secadora.
4. Esta secadora DEBE asegurarse al piso. El juego para instalación
en la casa móvil es el No. 169840 y lo puede adquirir con su
distribuidor.
5. Vea las páginas 2 y 3 para otros requísitos importantes de ventilación.
6. La instalación DEBE cumplir con las estándares aplicables de la
Manufactured Home Construction & Safety Standard - Estándares
de Seguridad y Construcción de Casas Prefabricadas (Título 24 CFR
- Parte 32-80 del Reglamento Federal) o cuando dichos estándares
no sean aplicables, se deben complir con los estándares de la
American National Standard for Mobile Homes (Estándares
Nacionales Americanas para Viviendas Móviles). En Canadá se
aplica el Estándar CSA Z240.
Esta secadora ha sido diseñada PARA USO
DOMESTICO solamente, de acuerdo con la norma ANSI Z 21.5.1.
DESEMBALAJE
1. Utilizando las cuatro esquineras de embarque de la caja
de cartón (dos a cada lado), coloque cuidadosamente la
secadora sobre el costado izquierdo y saque la base de
espuma de embarque.
Para evitar daños, no use el panel de control
como un medio para levantar o mover la secadora.
NOTA: En los modelos de secadoras encastradas, el panel
superior puede ser removido para la instalación.
2. Vuelva la secadora a su posición vertical.
PLACA DE
ESPUMA DE
EMBARQUE
EMPAQUE
Correct
Correct
SI
NO
Incorrect
NO
Incorrect
PUERTA REVERSIBLE
Su secadora ha sido diseñada para que la puerta pueda ser
cambiada de lado en cualquier momento sin necesidad de
piezas adicionales. La conversión se hace transfiriendo las
bisagras al lado opuesto del gabinete.
Cómo cambiar la dirección de apertura de la puerta:
1. Abra la puerta de la secadora. Quite los cuatro receptores
del agujero de la bisagra del lado izquierdo de la apertura de
la puerta. Colóquelos en un lugar cercano para futura
instalación. NOTA: Puede que se necesite un cuchillo de
plástico para poder sacar los receptores. Tenga cuidado de
no rayar la pintura.
2. Quite los cuatro tornillos que aseguranlas bisagras de la puerta
al panel frontal de la secadora (ver figura abajo). NOTA:
Primero quite un tornillo de cada una de las bisagras.
Mantenga la puerta sujetada firmemente antes de quitar
los dos últimos tornillos.
3. Gire la puerta 180° y vuelva a colocar las bisagras de la puerta
en el panel frontal con los cuatro tornillos.
4. Instale los cuatro receptores de los agujeros de las bisagras
en los agujeros abiertos en el lado derecho de la apertura de
la puerta.
Correct
Incorrect
QUITE LOS CUATRO
TORNILLOS (PRIMERO QUITE
UNO DE CADA BISAGRA )
16
Page 17
INSTALACIÓN ELÉCTRICA
TODAS las secadoras ELÉCTRICAS
Los siguientes requerimientos son específicos
para el funcionamiento correcto y seguro de su secadora.
El incumplimiento de estas instrucciones puede causar
prolongación excesiva del tiempo de secado y riesgos de
incendio.
Para una secadora conectada permanentemente:
1. La secadora DEBE ser conectada a un sistema de cableado
metálico permanente, puesto a tierra; o se debe instalar un
conductor de puesta a tierra de equipo junto con los conductores
del circuito y conectarse al borne de puesta a tierra del equipo
o al cable del artefacto.
Secadoras ELÉCTRICAS canadienses
Este artefacto DEBE ser puesto a tierra de manera correcta. Si
la secadora no está debidamente puesta a tierra se puede producir
un choque eléctrico. Siga las instrucciones indicadas en este
manual para la puesta a tierra en forma correcta.
No use un cordón de extensión con esta secadora. Algunos
cordones de extensión no pueden soportar la cantidad de corriente
eléctrica que utiliza esta secadora y pueden fundirse, creando un
peligro de choque eléctrico y/o incendio. Ubique la secadora de
manera que el cordón eléctrico llegue hasta el tomacorriente que
se va a usar, dejando un poco de holgura para el cordón. Consulte
los requerimientos de instalación preliminares indicados en este
manual para el cordón eléctrico que debe ser adquirido.
Se debe instalar un anclaje aprobado por el U.L. para el cordón
eléctrico. Si no se utiliza un anclaje para sujetar el cordón eléctrico,
éste puede salirse de la secadora y cortarse con cualquier
movimiento, resultando en un choque eléctrico.
No utilice un tomacorriente con cables de aluminio con un
cordón y un enchufe de cobre (o viceversa). Se produce una
reacción química entre el cobre y el aluminio que puede causar
cortacircuitos. El cableado y tomacorriente apropiado es un
cordón eléctrico equipado con conductores de cobre con un
tomacorriente con conductores de cobre.
NOTA: Las secadoras que operan con un suministro de energía
de 208 voltios usarán más tiempo de secado que aquellas que
operan con un suministro de energía de 240 voltios.
La conexión indebida del conductor de puesta a tierra
del equipo puede ocasionar un riesgo de choque eléctrico. Consulte
con un electricista profesional si tiene alguna duda respecto a la
puesta a tierra correcta del artefacto.
Para una secadora puesta a tierra, con cordón eléctrico:
1. La secadora DEBE ser puesta a tierra. En caso de
malfuncionamiento o falla, la puesta a tierra reducirá el riesgo
de choque eléctrico proporcionando un trayecto de menor
resistencia a la corriente eléctrica.
2. Si su secadora está equipada con un cordón eléctrico que posee
un conductor de puesta a tierra del equipo y un enchufe de
puesta a tierra, dicho enchufe DEBE ser conectado a un
tomacorriente adecuado, debidamente instalado y puesto a
tierra de acuerdo con todos los códigos y reglamentos locales.
Si tiene alguna duda consulte a un electricista profesional. No
modifique el enchufe proporcionado la aplicación.
TODAS las secadoras a GAS
Esta secadora está equipada con un enchufe de tres espigas (de
puesta a tierra) para protección en contra de choques eléctricos y
debe ser conectada directamenta en un receptáculo para tres
espigas el cual debe estar puesto a tierra. No corte ni elimine la
espiga de puesta a tierra de este enchufe.
REQUERIMIENTOS PARA LA PUESTA A TIERRA
Secadoras ELÉCTRICAS No canadienses
La conexión indebida del conductor de puesta a tierra
del equipo puede ocasionar un riesgo de choque eléctrico. Consulte
con un electricista profesional si tiene alguna duda respecto a la
puesta a tierra correcta del artefacto.
Para una secadora puesta a tierra, con cordón eléctrico:
1. La secadora DEBE ser puesta a tierra. En caso de
malfuncionamiento o falla, la puesta a tierra reducirá el riesgo
de choque eléctrico proporcionando un trayecto de menor
resistencia a la corriente eléctrica.
2. Si su secadora está equipada con un cordón eléctrico que posee
un conductor de puesta a tierra del equipo y un enchufe de
puesta a tierra, dicho enchufe DEBE ser conectado a un
tomacorriente adecuado, debidamente instalado y puesto a
tierra de acuerdo con todos los códigos y reglamentos locales.
Si tiene alguna duda consulte a un electricista profesional. No
modifique el enchufe proporcionado la aplicación.
17
Page 18
CONEXIÓNES ELÉCTRICAS PARA
UN SISTEMA TRIFILAR
CONEXIÓNES ELÉCTRICAS PARA
UN SISTEMA TETRAFILAR
Secadoras ELÉCTRICAS No canadienses
1. Saque los tornillos que sujetan la cubierta de acceso del tablero
de bornes y el soporte de montaje del anclaje del cordón,
situado en la esquina superior de la parte trasera de la secadora.
2. Instale un anclaje de cable aprobado por el U.L., en el orificio
de entrada del cordón eléctrico en el soporte de montaje. Luego
apriete la tuerca con los dedos solamente.
TORNILLO
VERDE DE
PUESTA A
TIERRA
CABLE DE
PUESTA
A TIERRA
NEUTRAL
BORNE PLATEADO
TUERCA
ATORNILLE LA TUERCA EN
ESTAS ROSCAS
Secadoras ELÉCTRICAS No canadienses
1. Saque los tornillos que sujetan la cubierta de acceso del tablero
de bornes y el soporte de montaje del anclaje de cable situado
en la esquina superior en la parte trasera de la secadora.
2. Instale un anclaje de cable aprobado por el U.L., en el orificio
de entrada del cordón eléctrico en el soporte de montaje. Luego
apriete la tuerca con los dedos solamente.
TORNILLO VERDE
DE PUESTA
A TIERRA
CABLE DE
PUESTA A
TIERRA
NEUTRAL
ROJO
CONDUCTOR VERDE DE
CORDÓN ELÉCTRICO
SOPORTE
DE MONTAJE
DEL ANCLAJE
DE CABLE
CORDÓN
ELÉCTRICO
BORNE PLATEADO
NEGRO
BLANCO
TUERCA
TABLERO DE BORNES
ATORNILLE LA
TUERCA EN ESTAS
ROSCAS
SOPORTE DE
MONTAJE DEL
ANCLAJE DE
CABLE
CORDÓN ELÉCTRICO
3. Inserte un cordón eléctrico de 30 amp, NEMA 10-30 Tipo SRDT,
aprobado por el U.L., a través del anclaje de cable.
4. Conecte el conductor neutro del cordón eléctrico (cable central)
al borne central plateado del tablero de bornes. Apriete
firmemente el tornillo.
5. Conecte los dos conductores externos restantes del cordón
eléctrico a los bornes bronceados externos del tablero de bornes.
Apriete firmemente los tornillos.
No doble en forma pronunciada ni engarce los cables/
conductores en las conexiones.
6. Coloque nuevamente el soporte de montaje del anclaje de
cable en la parte trasera de la secadora con dos tornillos. Apriete
firmemente los tornillos.
7. Apriete firmemente los tornillos del anclaje de cable contra el
cordón eléctrico.
8. Apriete la tuerca del anclaje de cable a fin de que el anclaje no
gire.
9. Coloque nuevamente la cubierta del tablero de bornes.
3. Desconecte el cable de puesta a tierra neutral del tornillo verde
de puesta a tierra situado en la parte superior del tablero de
bornes.
4. Inserte un cordón eléctrico tetrafilar de 30 amp, NEMA 10-30
Tipo ST o SRDT, aprobado por el U.L., a través del anclaje de
cable.
TOMACORRIENTE
TETRAFILAR TIPICO
CORDÓN ELÉCTRICO
TETRAFILAR TIPICO
CORDÓN ELÉCTRICO DE 30 AMP NEMA 14-30 TIPO SRDT O STCORDÓN ELÉCTRICO DE 30 AMP NEMA 14-30 TIPO SRDT O ST
CORDÓN ELÉCTRICO DE 30 AMP NEMA 14-30 TIPO SRDT O ST
CORDÓN ELÉCTRICO DE 30 AMP NEMA 14-30 TIPO SRDT O STCORDÓN ELÉCTRICO DE 30 AMP NEMA 14-30 TIPO SRDT O ST
240 V NEGRO
NEUTRO BLANCO
240 V ROJO
PUESTA A TIERRA VERDE
5. Conecte el cable verde de puesta a tierra del cordón eléctrico
al gabinete mediante el tornillo verde de puesta a tierra.
6. Conecte el conductor blanco (neutro) del cordón eléctrico y el
cable de puesta a tierra neutro del mazo de cables de la
secadora al borne plateado central del tablero de bornes.
7. Conecte los conductores rojo y negro del cordón eléctrico a los
bornes bronceados externos del tablero de bornes.
No doble en forma pronunciada ni engarce los
cables/conductores en las conexiónes.
8. Apriete firmemente los tornillos del anclaje de cable contra el
cordón eléctrico.
9. Apriete la tuerca del anclaje de cable a fin de que el anclaje no
gire.
10. Coloque nuevamente la cubierta del tablero de bornes.
18
Page 19
INSTALACIÓN
1. CONEXIÓN DEL GAS (Secadoras a gas solamente)
a. Saque la tapa de embarque de la tubería de gas de la
secadora situada en la parte trasera.
NOTA: NO conecte la secadora al suministro de propano, sin
primeroinstalar el juego de conversión a propano. El juego de
conversión a propano debe ser instalado por un técnico de gas
calificado.
b. Conecte una tubería semirígida de 1/2" (1,27 cm) D.I. o
una tubería aprobada, desde la línea de suministro de gas
a la tubería de 3/8" (0,96 cm) ubicada en la parte trasera
de la secadora. Utilice un reductor de 1/2" (1,27 cm) a 3/
8" (0,96 cm) para la conexión. Aplique un sellador de
roscas de uso aprobado, resistente a la corrosión de los
gases licuados, en todas las uniones de la tubería.
c. Abra la válvula de cierre en la tubería de suministro de
gas.
d. Pruebe todas las conexiones aplicando con una escobilla
una solución jabonosa. NUNCA UTILICE UNA LLAMA
ABIERTA PARA DETECTAR FUGAS DE GAS.
2. Conecte el ducto de escape al sistema de escape exterior.
Utilice cinta para obturar todas las uniones.
3. Con la secadora en su posición definitiva, regule uno o más
tornillos niveladores, hasta que la secadora repose
firmemente sobre los cuatro tornillos. Coloque un nivel sobre
la parte superior de la secadora. LA SECADORA DEBE ESTAR
A NIVEL Y REPOSAR SOLIDA Y FIRMEMENTE SOBRE LOS
CUATRO TORNILLOS NIVELADORES.
4. Conecte el cordón eléctrico a un tomacorriente puesto a
tierra. NOTA: Asegúrese de que la corriente esté desconectada
en el disyuntor/caja de fusibles, antes de conectar el cordón
eléctrico en el tomacorriente.
7. Si su secadora no funciona, consulte la sección "Lista de
Control de Averías" que se encuentra en su Manual del
Usuario, antes de llamar para obtener servicio.
8. Conserve estas instrucciones cerca de la secadora para
referencia futura.
9. Para apilar su Secador en una Lavadora compatible llame a su
distribuidor local para encontrar su distribuidor local y comprar
el número de parte
NOTA: Dentro de la consola de la secadora o debajo del panel
superior se encuentra un diagrama del cableado.
5303937141 - accesorio de montaje.
PIEZAS DE RECAMBIO
Si necesita piezas de recambio para su secadora, llame al
número gratis de Sears Piezas y Servicio 1-800-366-PART
(1-800-366-7278).
Cuando se reparan los controles, marque todos
los cables con etiquetas antes de desconectarlos. Cualquier error
de cableado puede causar una operación inadecuada y peligrosa.
Asegúrese de que la secadora funcione adecuadamente después
de repararla.
Destruya la caja de cartón, las bolsas de
plástico y la banda metálica después de haber desempacado el
centro de lavandería. Los niños pueden ponerse a jugar con
ellos. Las cajas de cartón cubiertas con alfombras, colchas o
pedazos de plástico pueden convertirse en cámaras sin aire y
causar asfixia. Elimine todos los materiales poniéndolos en la
basura o fuera del alcance de los niños.
5. Conecte la corriente en el disyuntor/caja de fusibles.
Antes de poner en funcionamiento la
secadora, asegúrese de que no haya materiales
combustibles, gasolina y otros vapores inflamables cerca
de la secadora. Además asegúrese de que no haya nada
(tal como cajas, ropas, etc.) que obstruya el flujo del aire
de combustión y ventilación.
6. Haga funcionar la secadora durante un ciclo completo para
comprobar su buen funcionamiento.
NOTA: En las secadoras a gas, antes de encender el
quemador es necesario purgar el aire de la tubería del gas.
Si el quemador no enciende dentro de 45 segundos, cuando
la secadora se enciende por primera vez, el interruptor de
seguridad apagará el quemador. Si ésto sucede, gire el
contador de tiempo a la posición "OFF" (apagado) y espere
5 minutos antes de intentar encender la secadora
nuevamente.
Las instrucciones incluidas en este manual y
en el resto de la documentación que se entrega con la secadora
no pueden cubrir todas las situaciones o condiciones posibles que
puedan presentarse. Por lo tanto, se DEBEN seguir prácticas
seguras y tener cuidado cuando se instala cualquier artefacto
doméstico.
19
Page 20

Notes
______________________________________________________________
______________________________________________________________
______________________________________________________________
______________________________________________________________
______________________________________________________________
______________________________________________________________
______________________________________________________________
______________________________________________________________
______________________________________________________________
______________________________________________________________
______________________________________________________________
______________________________________________________________
______________________________________________________________
______________________________________________________________
______________________________________________________________
______________________________________________________________
______________________________________________________________
______________________________________________________________
______________________________________________________________
11
 Loading...