

E L I T E
H_3t
Front-Loading Automatic Washer
Laveuse automatique _ chargement frontal
C
4619 7020 7341 Sears Canada, Inc., Toronto, Ontario, Canada M5B 2B8 www.sears.ca
TABLE OF CONTENTS
MAINTENANCE AGREEMENTS ................................................... 2
WARRANTY .................................................................................... 3
PEDESTAL OPTION WARRANTY ................................................. 3
WASHER SAFETY ...................................................................... 4
INSTALLATION REQUIREMENTS ................................................ 5
Tools and Parts ............................................................................ 5
Alternate Parts .............................................................................. 5
Optional Pedestal ......................................................................... 5
Location Requirements ................................................................ 5
Drain System ................................................................................ 6
Electrical Requirements ............................................................... 7
INSTALLATION INSTRUCTIONS .................................................. 8
Remove Transport System .......................................................... 8
Connect the Inlet Hoses ............................................................... 8
Route the Drain Hose ................................................................... 8
Secure the Drain Hose ................................................................. 9
Level the Washer .......................................................................... 9
Complete Installation ................................................................... 9
FEATURES AN D BENEFITS ........................................................ 10
WASHER USE ........................................................................... 11
Starting Your Washer ................................................................. 1t
Using the Dispenser ................................................................... 12
Pausing or Restarting ................................................................. 13
Changing Cycles, Options and Modifiers .................................. 13
Status Lights .............................................................................. 13
Cycles ......................................................................................... 14
Normal Sounds .......................................................................... 15
Options ....................................................................................... 15
Modifiers ..................................................................................... 16
Laundry Guide ............................................................................ 17
LAUN DRY TIPS ............................................................................ 17
Loading ..................................................................................... 18
WASHER CARE ............................................................................ 18
Cleaning Your Washer ............................................................... 18
Water Inlet Hoses ....................................................................... 18
Vacation, Storage, and Moving Care ......................................... 18
TROUBLESHOOTING .................................................................. lg
SERVICE NUMBERS ............................................... BACK COVER
MAINTENANCE
AGREEMENTS
Your purchase has added value because you can depend on
Sears HomeCentral ®for service. With over 2,400 Service
Technicians and access to over 900,000 parts and accessories,
we have the tools, parts, knowledge and skills to back our
pledge: We Service What We Sell.
Sears Maintenance Agreements
Your Kenmore ®appliance is designed, manufactured and tested
to provide years of dependable operation. Yet any major
appliance may require service from time to time. The Sears
Maintenance Agreement offers you an outstanding service
program, affordably priced.
The Sears Maintenance Agreement
• Guarantees tomorrow's service at today's price.
• Eliminates repair bills resulting from normal wear and tear.
• Covers non-technical and instructional service calls.
• Provides an annual Preventive Maintenance Check, at your
request, to ensure that your appliance is in proper running
condition.
Some limitations apply. For information concerning Sears
Home Central ®Maintenance Agreements, call
1-800-361-6665.
KENMORE ELITE
WASHER WARRANTY
Limited Lifetime Warranty on Stainless Steel Drum
For the lifetime of the washer from the date of purchase, Sears
will replace the Stainless Steel wash drum due to defective
material or workmanship. After the first year, you will be charged
for labor.
Limited 10-Year Warranty on Plastic Tub*
For the second through tenth year from the date of purchase,
Sears will replace the plastic tub if it is defective in material or
workmanship. After the first year, you will be charged for labor.
Limited 5-Year Warranty on Gearcase Parts*
For the second through fifth year from the date of purchase,
Sears will replace any gearcase parts that are defective in
material or workmanship. After the first year, you will be charged
for labor.
Limited 2-Year Warranty on SENSOR SMART TM
Control Board
For two years from the date of purchase, Sears will replace the
SENSOR SMART TM control board if it is defective in material or
workmanship. You will be charged for labor after the first year.
Full 1-Year Warranty on Mechanical and Electrical Parts
For one year from the date of purchase, when this washer is
installed and operated according to the instructions that come
with it, Sears will repair or replace any of its mechanical or
electrical parts if they are defective in material or workmanship.
Service must be provided by a Sears Service Department in the
United States or Canada or an authorized agent.
Warranty Restriction
If this washer is operated for any purpose other than private
family use, all warranty coverage is restricted to 90 days from the
date of purchase.
Travel or transportation expenses for customers who reside in
remote areas are not covered by this warranty.
Warranty Service
Warranty service is available by contacting the nearest Sears
Service Center in the United States or Canada. This warranty
applies only while the product is in use in the United States or
Canada.
This warranty gives you specific legal rights and you may also
have other rights which vary from state to state or province to
province.
For Sears warranty information or to contact a Sears Service
Center, please reference the service numbers located on the
back page of this manual.
Sears, Roebuck and Co.
D/817WA, Hoffman Estates, IL 60179
Sears Canada Inc.
Toronto, Ontario, Canada M5B 2B8
* In Canada a different warranty may apply.
Product Record
In the space below, record your complete model number, serial
number, and purchase date. You can find this information on the
model and serial number label, as shown.
Have this information available to help you quickly obtain
assistance or service when you contact Sears concerning your
appliance.
Model number 110
Serialnumber
Purchase date
Save these instructions and your sales receipt for future
reference.
PEDESTAL OPTION
WARRANTY
Full One-Year Warranty on Mechanical Parts
For one year from the date of purchase, supplier will repair or
replace any of its mechanical parts if defective in material or
workmanship. This Pedestal must be installed with this washer
according to the instructions provided in the Pedestal Installation
Instructions.
Warranty Restriction
If the pedestal is subject to other than private family use and or if
the pedestal is used with any other product than those listed in
the installation instructions, the above warranty coverage is null
and void.
Product Record
In the space below, record your complete model number, serial
number, and purchase date. You can find this information on the
model and serial number label.
Have this information available to help you quickly obtain
assistance or service when you contact Sears concerning your
washer.
Model number 110.
Serial number
Purchase date
Save these instructions and your sales receipt for future
reference.
WASHER SAFETY
Your safety and the safety of others are very important.
We have provided many important safety messages in this manual and on your appliance. Always read and obey all
safety messages.
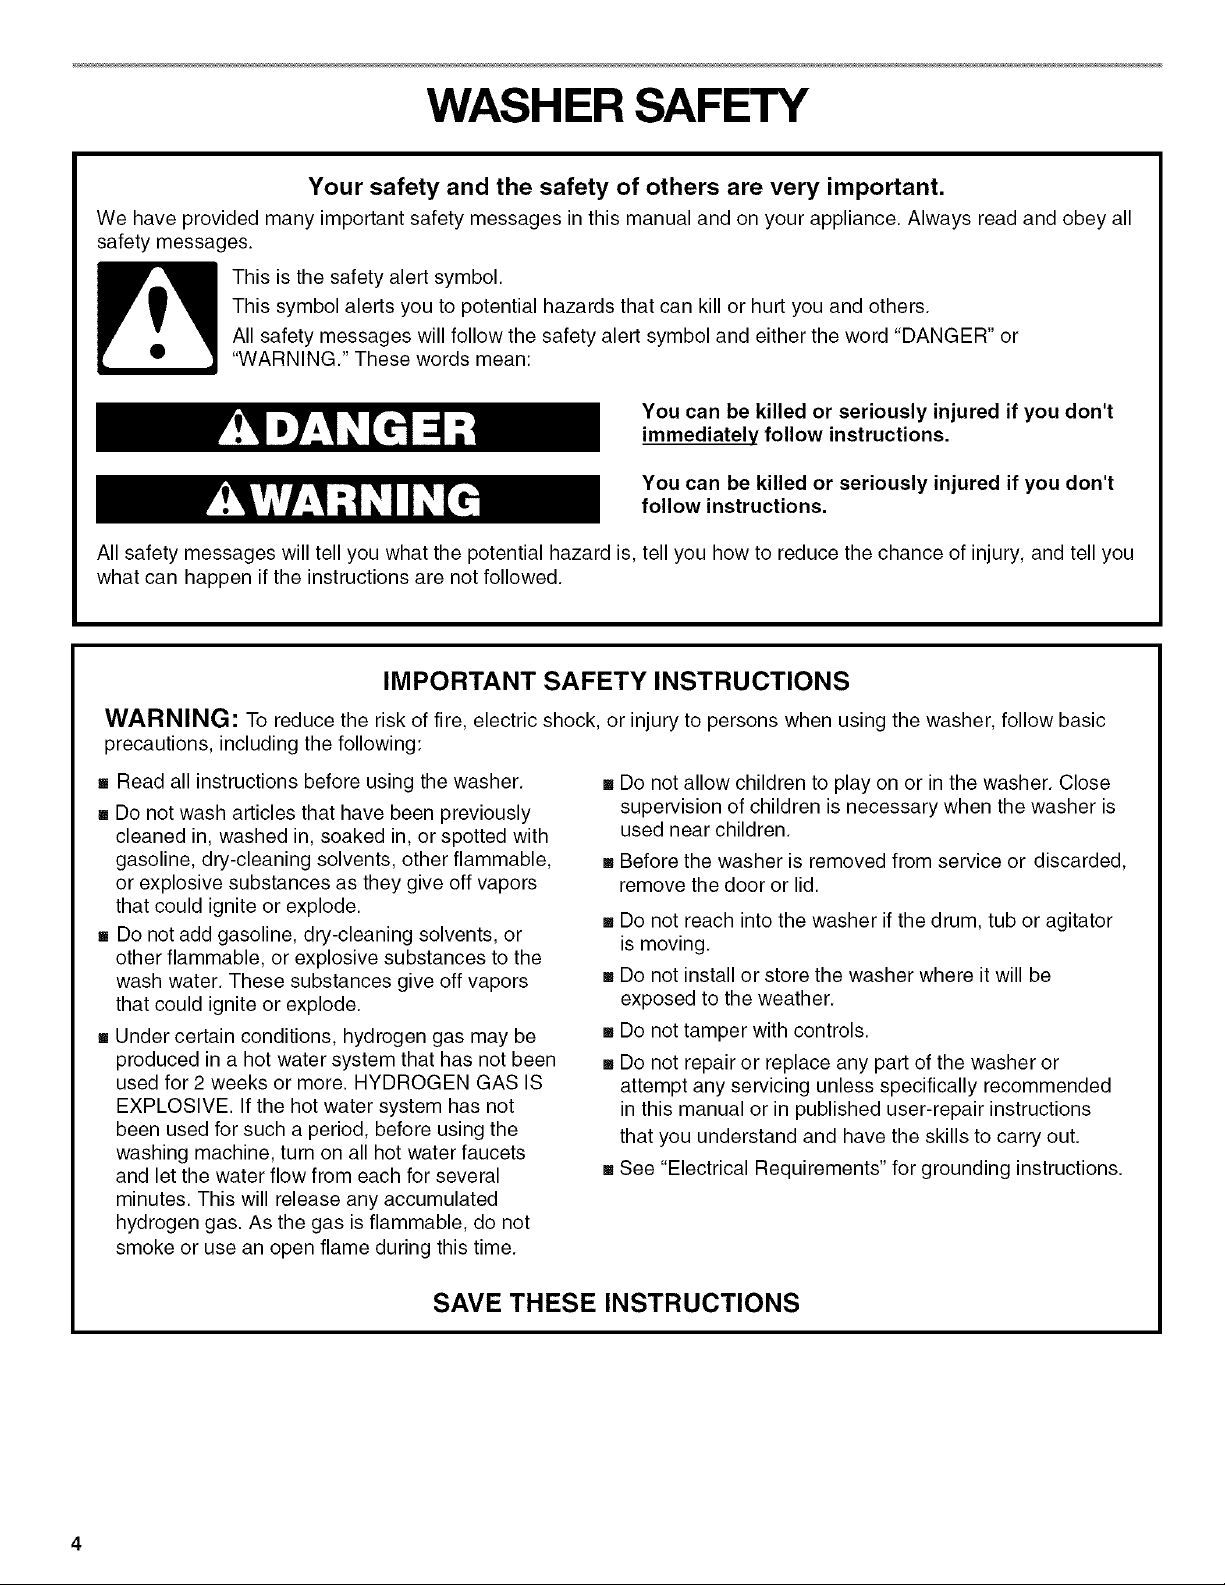
This is the safety alert symbol.
This symbol alerts you to potential hazards that can kill or hurt you and others.
All safety messages will follow the safety alert symbol and either the word "DANGER" or
"WARNING." These words mean:
You can be killed or seriously injured if you don't
immediately follow instructions.
You can be killed or seriously injured if you don't
follow instructions.
All safety messages will tell you what the potential hazard is, tell you how to reduce the chance of injury, and tell you
what can happen if the instructions are not followed.
IMPORTANT SAFETY INSTRUCTIONS
WARNING: To reduce the risk of fire, electric shock, or injury to persons when using the washer, follow basic
precautions, including the following:
,, Read all instructions before using the washer.
,, Do not wash articles that have been previously
cleaned in, washed in, soaked in, or spotted with
gasoline, dry-cleaning solvents, other flammable,
or explosive substances as they give off vapors
that could ignite or explode.
,, Do not add gasoline, dry-cleaning solvents, or
other flammable, or explosive substances to the
wash water. These substances give off vapors
that could ignite or explode.
,, Under certain conditions, hydrogen gas may be
produced in a hot water system that has not been
used for 2 weeks or more. HYDROGEN GAS IS
EXPLOSIVE. If the hot water system has not
been used for such a period, before using the
washing machine, turn on all hot water faucets
and let the water flow from each for several
minutes. This will release any accumulated
hydrogen gas. As the gas is flammable, do not
smoke or use an open flame during this time.
[] Do not allow children to play on or in the washer. Close
supervision of children is necessary when the washer is
used near children.
[] Before the washer is removed from service or discarded,
remove the door or lid.
[] Do not reach into the washer if the drum, tub or agitator
is moving.
[] Do not install or store the washer where it will be
exposed to the weather.
[] Do not tamper with controls.
[] Do not repair or replace any part of the washer or
attempt any servicing unless specifically recommended
in this manual or in published user-repair instructions
that you understand and have the skills to carry out.
[] See "Electrical Requirements" for grounding instructions.
SAVE THESE INSTRUCTIONS
INSTALLATION
REQUIREMENTS
0'£ ®ha
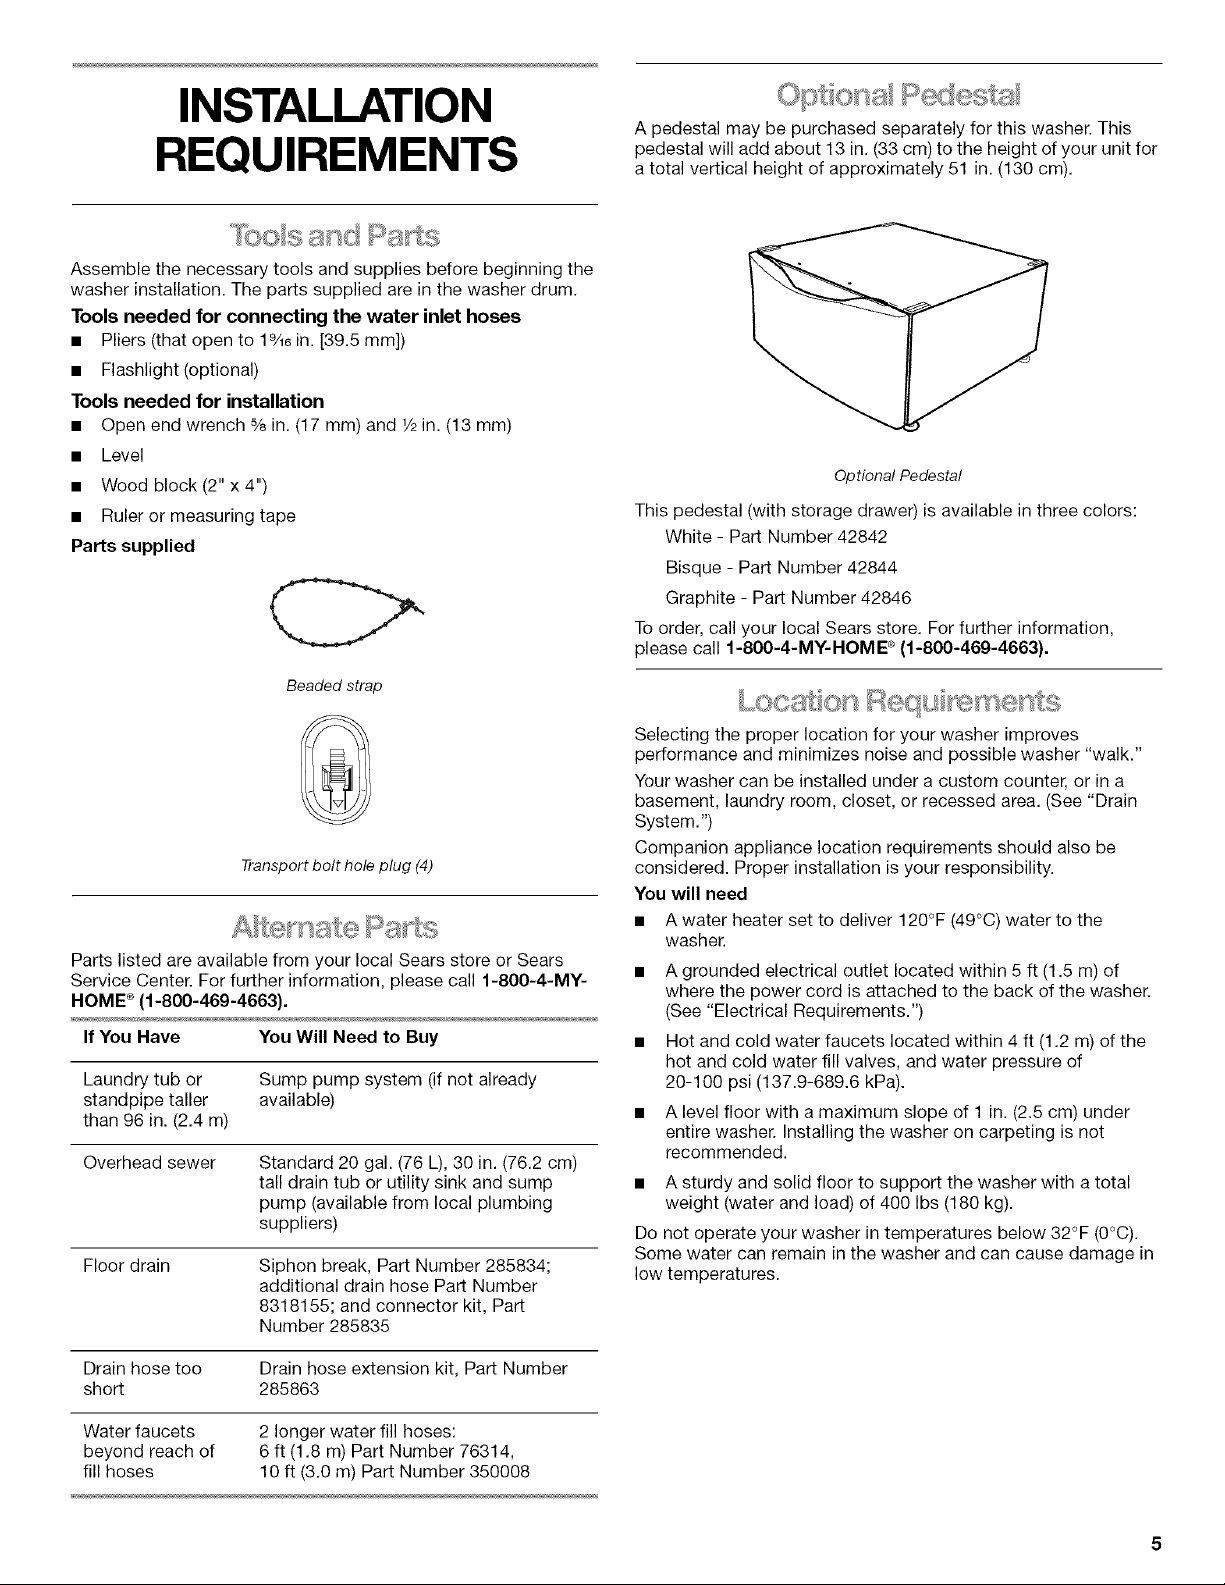
A pedestal may be purchased separately for this washer. This
pedestal will add about 13 in. (33 cm) to the height of your unit for
a total vertical height of approximately 51 in. (130 cm).
Assemble the necessary tools and supplies before beginning the
washer installation. The parts supplied are in the washer drum.
Tools needed for connecting the water inlet hoses
• Pliers (that open to 1%6 in. [39.5 mm])
• Flashlight (optional)
Tools needed for installation
• Open end wrench % in. (17 mm) and 1/2in. (13 mm)
• Level
• Wood block (2" x 4")
• Ruler or measuring tape
Parts supplied
C>
Beaded strap
Transport bolt hole plug (4)
Parts listed are available from your local Sears store or Sears
Service Center. For further information, please call 1-800-4-MY-
HOME ®(1-800-469-4663).
If You Have You Will Need to Buy
Laundry tub or Sump pump system (if not already
standpipe taller available)
than 96 in. (2.4 m)
Overhead sewer
Standard 20 gal. (76 L), 30 in. (76.2 cm)
tall drain tub or utility sink and sump
pump (available from local plumbing
suppliers)
Floor drain Siphon break, Part Number 285834;
additional drain hose Part Number
8318155; and connector kit, Part
Number 285835
Drain hose too Drain hose extension kit, Part Number
short 285863
Water faucets 2 longer water fill hoses:
beyond reach of 6 ft (1.8 m) Part Number 76314,
fill hoses 10 ft (3.0 m) Part Number 350008
Optional Pedestal
This pedestal (with storage drawer) is available in three colors:
White- Part Number 42842
Bisque - Part Number 42844
Graphite - Part Number 42846
Toorder, call your local Sears store. For further information,
please call 1-800-4-MY-HOME ®(1-800-469-4663}.
Selecting the proper location for your washer improves
performance and minimizes noise and possible washer "walk."
Your washer can be installed under a custom counter, or in a
basement, laundry room, closet, or recessed area. (See "Drain
System.")
Companion appliance location requirements should also be
considered. Proper installation is your responsibility.
You will need
• A water heater set to deliver 120°F (49°C) water to the
washer.
• A grounded electrical outlet located within 5 ft (1.5 m) of
where the power cord is attached to the back of the washer.
(See "Electrical Requirements.")
• Hot and cold water faucets located within 4 ft (1.2 m) of the
hot and cold water fill valves, and water pressure of
20-100 psi (137.9-689.6 kPa).
• A level floor with a maximum slope of 1 in. (2.5 cm) under
entire washer. Installing the washer on carpeting is not
recommended.
• A sturdy and solid floor to support the washer with a total
weight (water and load) of 400 Ibs (180 kg).
Do not operate your washer in temperatures below 32°F (0°C).
Some water can remain in the washer and can cause damage in
low temperatures.
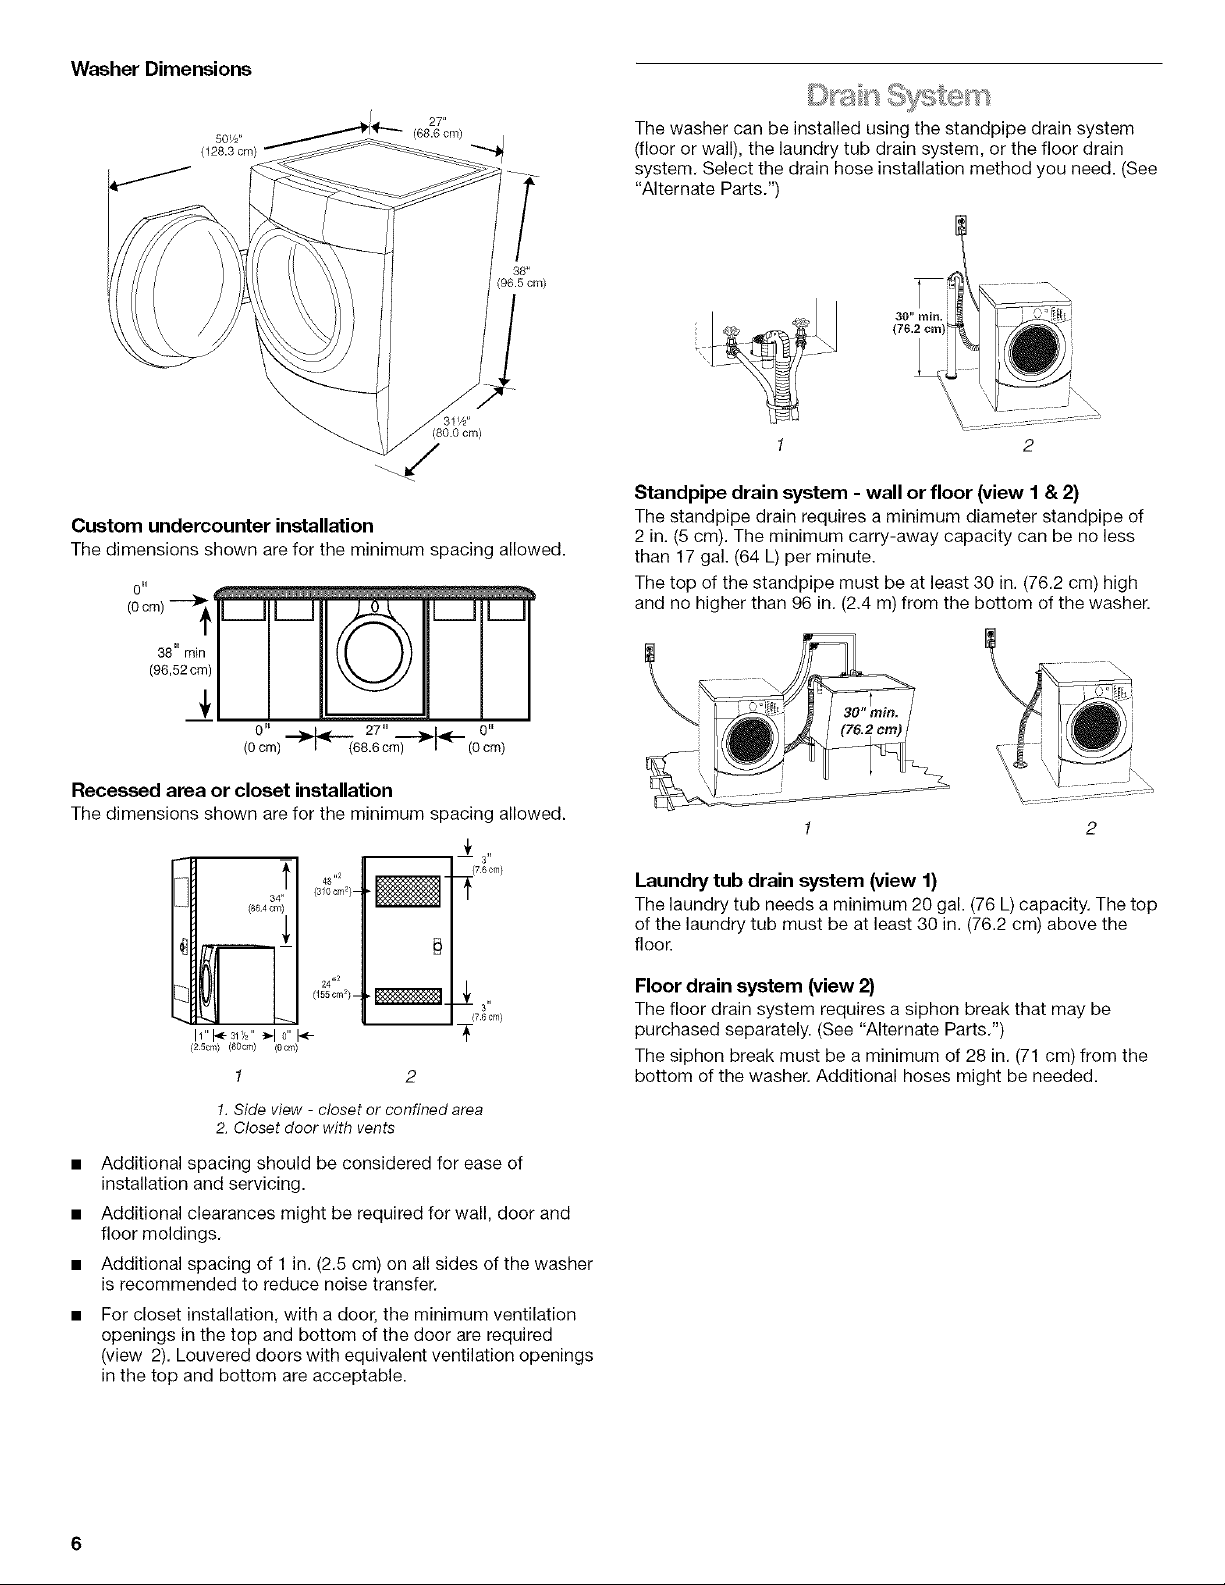
Washer Dimensions
50W'
(128.3 cm)
27"
(68.8 cm)
The washer can be installed using the standpipe drain system
(floor or wall), the laundry tub drain system, or the floor drain
system. Select the drain hose installation method you need. (See
"Alternate Parts.")
98"
(96.5 cm)
30" rain.
Custom undercounter installation
The dimensions shown arefor the minimum spacing allowed.
38"rainI I I
O" 27" O"
Recessed area or closet installation
The dimensions shown arefor the minimum spacing allowed.
I'_ 34! 48"2
(864 (310 cm2) -
_ 24" 2
(155 cm2).
I1"1_ 31'/2' _ 0"
(25om) (8Ocm) (0crn)
'_t 3"
(76ore)
f
3"
(76 cm)
7
1 2
!. Side view - closet or confined area
2. Closet door with vents
Additional spacing should be considered for ease of
installation and servicing.
Additional clearances might be required for wall, door and
floor moldings.
Additional spacing of I in. (2.5 cm) on all sides of the washer
is recommended to reduce noise transfer.
For closet installation, with a door, the minimum ventilation
openings in the top and bottom of the door are required
(view 2). Louvered doors with equivalent ventilation openings
in the top and bottom are acceptable.
Standpipe drain system - wall or floor (view 1 & 2)
The standpipe drain requires a minimum diameter standpipe of
2 in. (5 cm). The minimum carry-away capacity can be no less
than 17 gal. (64 L) per minute.
The top of the standpipe must be at least 30 in. (76.2 cm) high
and no higher than 96 in. (2.4 m)from the bottom of the washer.
1
Laundry tub drain system (view 1)
The laundry tub needs a minimum 20 gal. (76 L)capacity. The top
of the laundry tub must be at least 30 in. (76.2 cm) above the
floor.
Floor drain system (view 2)
The floor drain system requires a siphon break that may be
purchased separately. (See '<Alternate Parts.")
The siphon break must be a minimum of 28 in. (71 cm) from the
bottom of the washer. Additional hoses might be needed.
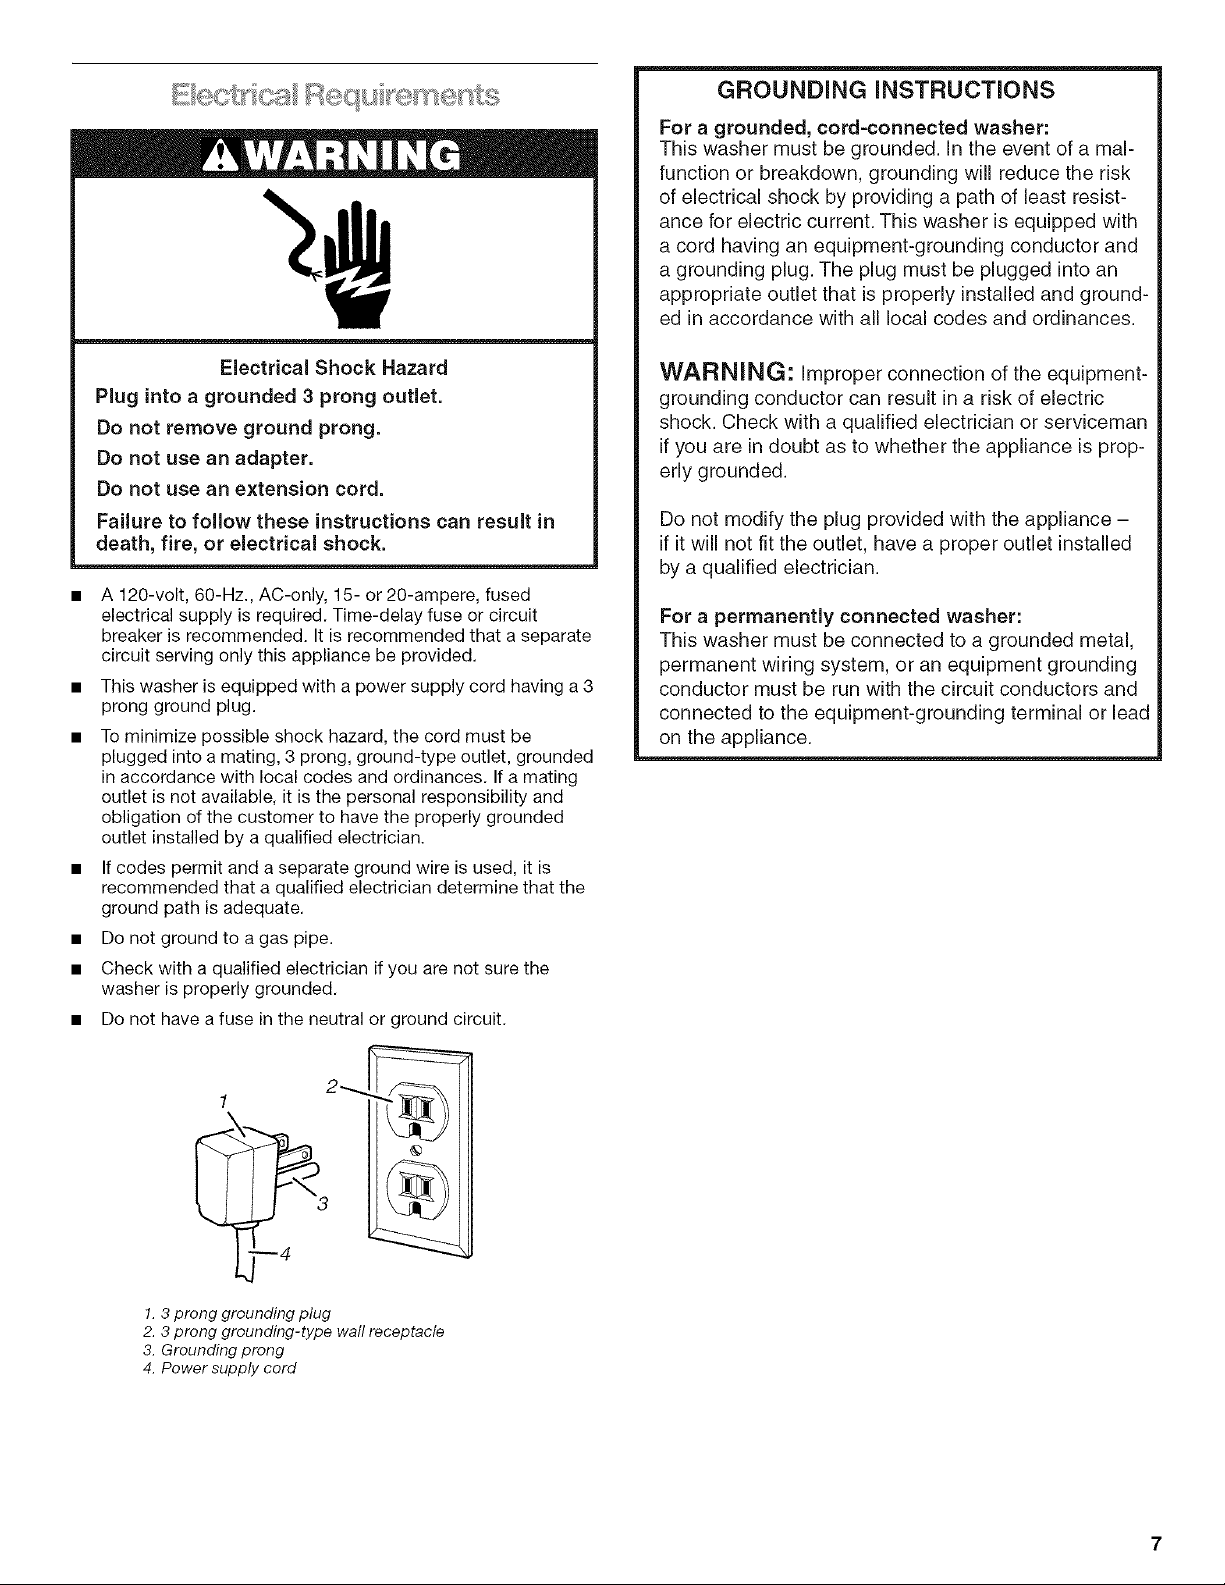
Electrical Shock Hazard
Plug into a grounded 3 prong outlet.
Do not remove ground prong.
Do not use an adapter.
Do not use an extension cord.
Failure to follow these instructions can result in
death, fire, or electrical shock.
A 120-volt, 60-Hz., AC-only, 15- or 20-ampere, fused
electrical supply is required. Time-delay fuse or circuit
breaker is recommended. It is recommended that a separate
circuit serving only this appliance be provided.
This washer is equipped with a power supply cord having a 3
prong ground plug.
To minimize possible shock hazard, the cord must be
plugged into a mating, 3 prong, ground-type outlet, grounded
in accordance with local codes and ordinances. If a mating
outlet is not available, it is the personal responsibility and
obligation of the customer to have the properly grounded
outlet installed by a qualified electrician.
If codes permit and a separate ground wire is used, it is
recommended that a qualified electrician determine that the
ground path is adequate.
Do not ground to a gas pipe.
Check with a qualified electrician if you are not sure the
washer is properly grounded.
• Do not have a fuse in the neutral or ground circuit.
!. 3 prong grounding plug
2. 3 prong grounding-type waft receptacle
3. Grounding prong
4. Power supply cord
GROUNDING INSTRUCTIONS
For a grounded, cord=connected washer:
This washer must be grounded, in the event of a mal-
function or breakdown, grounding will reduce the risk
of electrical shock by providing a path of least resist-
ance for electric current. This washer is equipped with
a cord having an equipment-grounding conductor and
a grounding plug. The plug must be plugged into an
appropriate outbt that is properly installed and ground-
ed in accordance with all local codes and ordinances.
WARNING: improper connection of the equipment-
grounding conductor can result in a risk of electric
shock. Check with a qualified electrician or serviceman
if you are in doubt as to whether the appliance is prop-
erly grounded.
Do not modify the plug provided with the appliance -
if itwill not fit the outlet, have a proper outlet installed
by a qualified electrician.
For a permanently connected washer:
This washer must be connected to a grounded metal,
permanent wiring system, or an equipment grounding
conductor must be run with the circuit conductors and
connected to the equipment-grounding terminal or lead
on the appliance.
INSTALLATION
INSTRUCTIONS
Excessive Weight Hazard
Use two or more people to move and install
washer.
Failure to do so can result in back or other injury.
IMPORTANT: Position the washer so that the rear of the unit is
within approximately 3 ft (90 cm) of the final location.
There are 4 bolts in the rear panel of the washer that support the
suspension system during transportation.
1.
2.
Using a 1/2in. (13 mm) wrench, loosen each of the bolts.
Once the bolt is loose, move it to the center of the hole and
completely pull out the bolt, including the plastic spacer
covering the bolt and the cable attached to the bolt. The
power cord will be attached to all 4 bolts.
3. Once all 4 bolts are removed, remove the power cord from
each bolt holder, and discard bolts, plastic spacers, and
cables.
4. Close the holes with the transport bolt hole plugs.
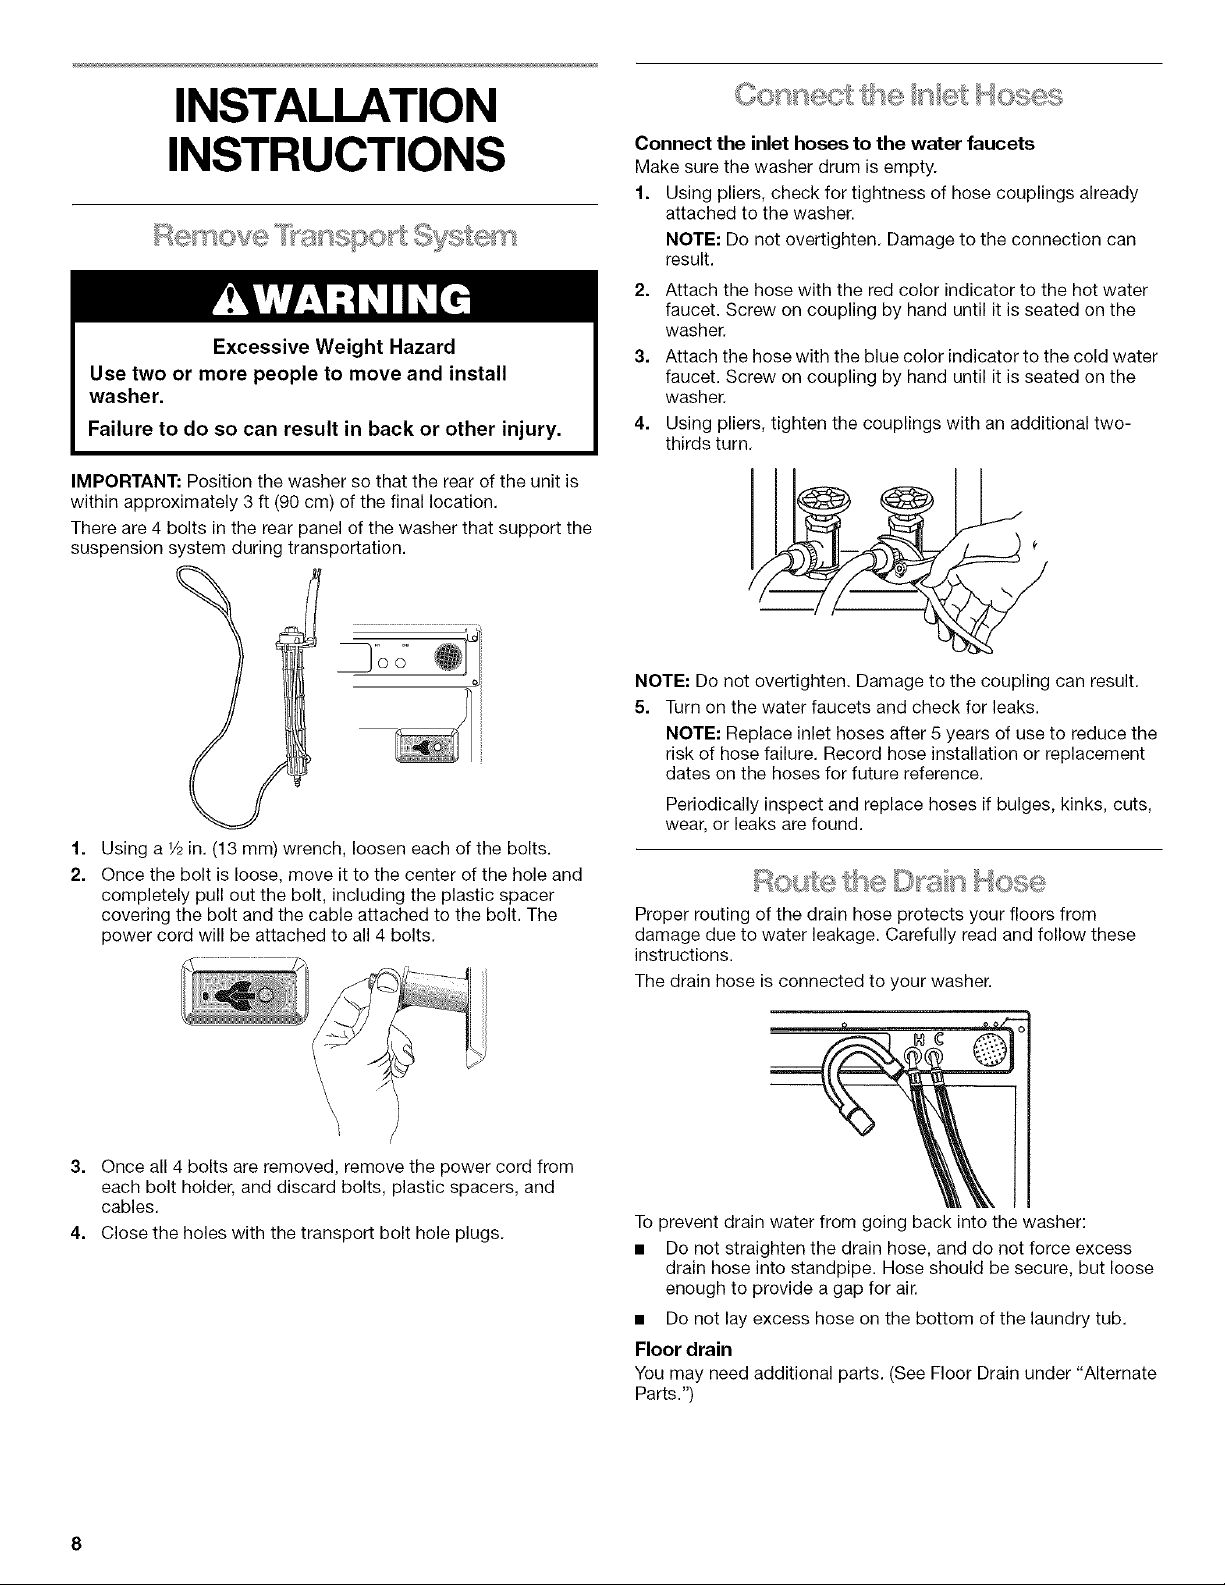
Connect the inlet hoses to the water faucets
Make sure the washer drum is empty.
1. Using pliers, check for tightness of hose couplings already
attached to the washer.
NOTE: Do not overtighten, Damage to the connection can
result.
2. Attach the hose with the red color indicator to the hot water
faucet. Screw on coupling by hand until it is seated on the
washer.
3. Attach the hose with the blue color indicator to the cold water
faucet. Screw on coupling by hand until it is seated on the
washer.
4. Using pliers, tighten the couplings with an additional two-
thirds turn,
NOTE: Do not overtighten. Damage to the coupling can result,
5. Turn on the water faucets and check for leaks.
NOTE: Replace inlet hoses after 5 years of use to reduce the
risk of hose failure. Record hose installation or replacement
dates on the hoses for future reference.
Periodically inspect and replace hoses if bulges, kinks, cuts,
wear, or leaks are found.
Proper routing of the drain hose protects your floors from
damage due to water leakage. Carefully read and follow these
instructions.
The drain hose is connected to your washer.
To prevent drain water from going back into the washer:
• Do not straighten the drain hose, and do not force excess
drain hose into standpipe. Hose should be secure, but loose
enough to provide a gap for air.
• Do not lay excess hose on the bottom of the laundry tub.
Floor drain
You may need additional parts. (See Floor Drain under "Alternate
Parts.")
1.
2.
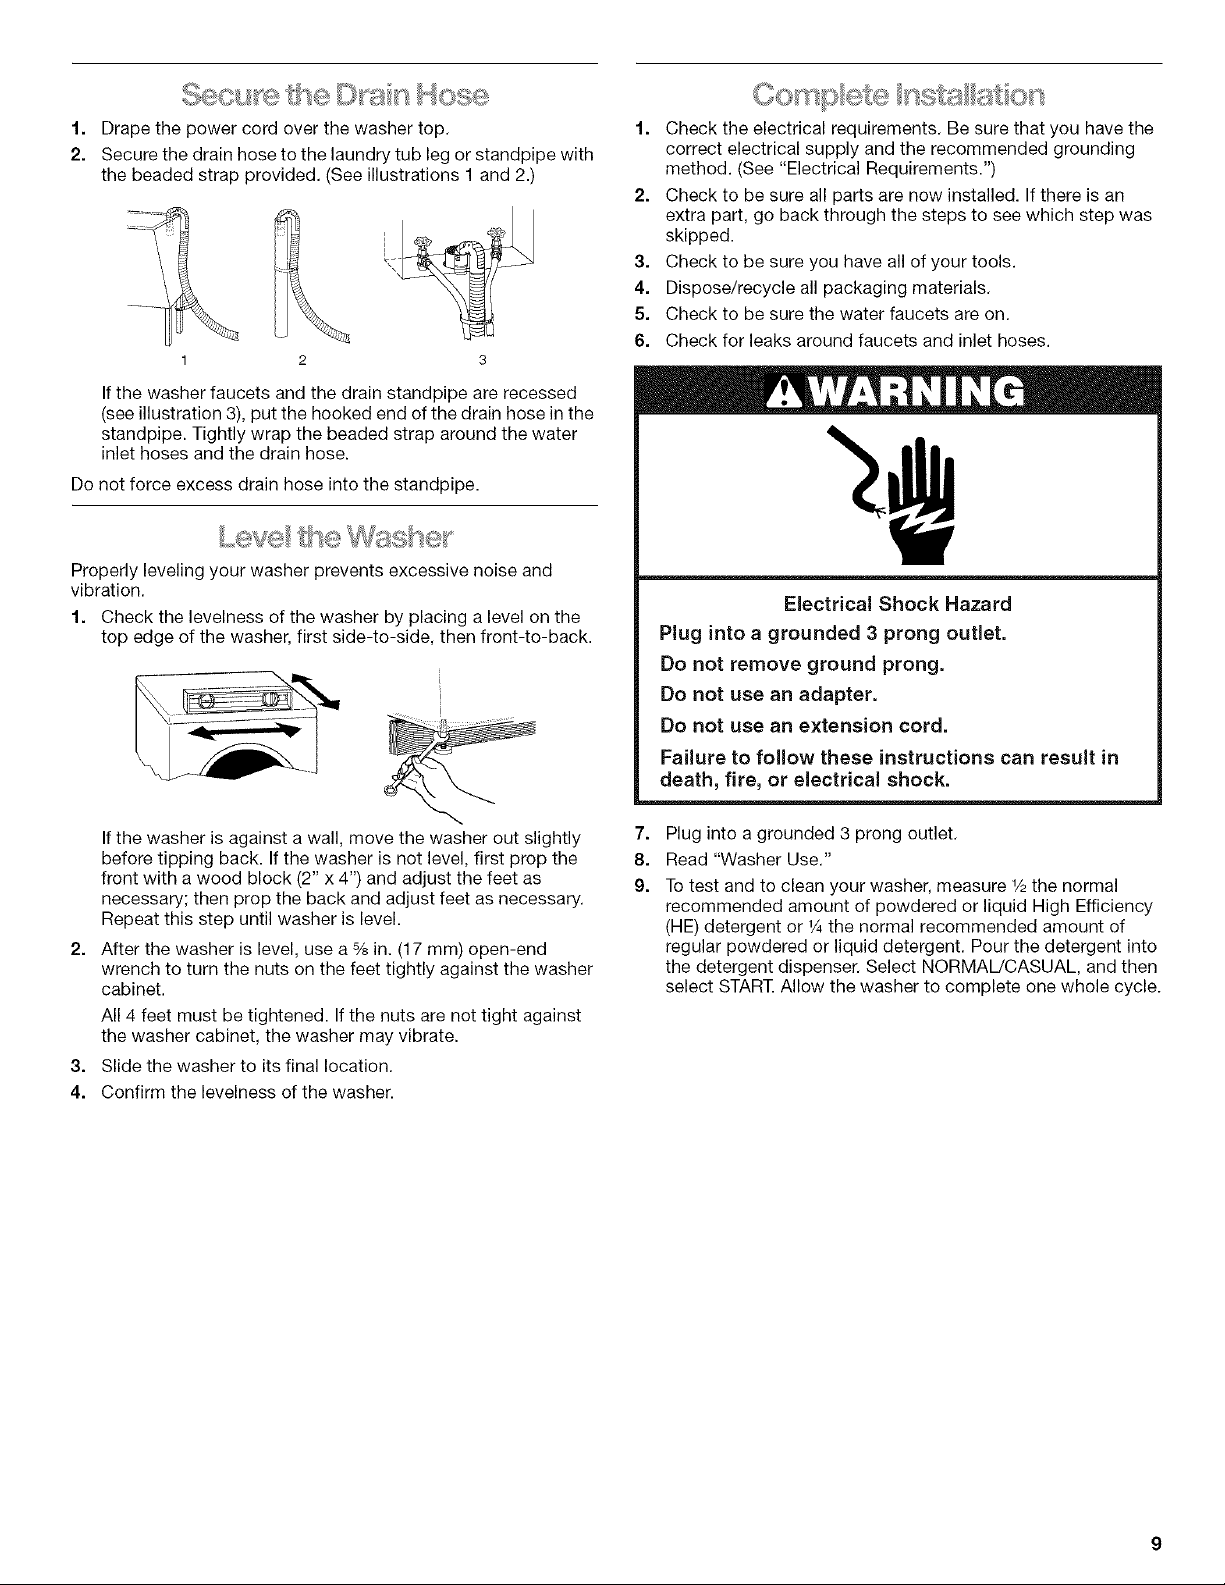
Secs he s Hose
Drape the power cord over the washer top,
Secure the drain hose to the laundry tub leg or standpipe with
the beaded strap provided, (See illustrations 1 and 2.)
3
If the washer faucets and the drain standpipe are recessed
(see illustration 3), put the hooked end of the drain hose in the
standpipe. Tightly wrap the beaded strap around the water
inlet hoses and the drain hose.
Do not force excess drain hose into the standpipe.
Leve
Properly leveling your washer prevents excessive noise and
vibration,
1. Check the levelness of the washer by placing a leveJ on the
top edge of the washer, first side-to-side, then front-to-back.
2.
If the washer is against a wall, move the washer out slightly
before tipping back. If the washer is not level, first prop the
front with a wood block (2" x 4") and adjust the feet as
necessary; then prop the back and adjust feet as necessary.
Repeat this step until washer is level.
After the washer is level, use a % in. (17 mm) open-end
wrench to turn the nuts on the feet tightly against the washer
cabinet.
All 4 feet must be tightened. If the nuts are not tight against
the washer cabinet, the washer may vibrate.
3. Slide the washer to its final location.
4. Confirm the levelness of the washer.
1. Check the electrical requirements. Be sure that you have the
correct electrical supply and the recommended grounding
method. (See <<ElectricalRequirements.")
2. Check to be sure all parts are now installed. If there is an
extra part, go back through the steps to see which step was
skipped.
3. Check to be sure you have all of your tools.
4. Dispose/recycle all packaging materials,
5. Check to be sure the water faucets are on.
6. Check for leaks around faucets and inlet hoses.
Electrical Shock Hazard
Plug into a grounded 3 prong outlet,
Do not remove ground prong.
Do not use an adapter.
Do not use an extension cord.
Failure to follow these instructions can result in
death, fire, or electrical shock.
7. Plug into a grounded 3 prong outlet.
8. Read "Washer Use."
9. To test and to clean your washer, measure 1/2the normal
recommended amount of powdered or liquid High Efficiency
(HE) detergent or _Athe normal recommended amount of
regular powdered or liquid detergent. Pour the detergent into
the detergent dispenser. Select NORMAL/CASUAL, and then
select START. Allow the washer to complete one whole cycle.
FEATURES AND
BENEFITS
SENSOR SMART TM Electronic Controls
Flexible electronic controls are easy to use whether you are a
beginner or an expert.
Detergent Advantage System Dispenser
The four compartments in the dispenser allow loading of all
laundry additives before the washer is started. The additives will
be dispensed into the wash at the optimal time for high
performance cleaning. TIMED BLEACH TM release is included in
the detergent advantage system. The detergent is added at the
beginning of the cycle and the bleach is added after the enzymes
have had a chance to do their cleaning. The fabric softener is
dispensed in the rinse cycle. The Detergent Advantage System
Dispenser tray is easily removed for cleaning.
Auto Water Level
Adjusting to the size of the load, this feature allows the washer to
use the minimal amount of water needed to clean and rinse the
clothes. With a low water level, you can obtain the same results
with smaller amounts of additives. Because only the required
amount of water is used, the washer saves energy, too.
Larger Load Size
Since there is no agitator, you can wash larger, bulkier items like
an average size sleeping bag. You are also able to wash more
clothes at one time, which means fewer loads. You can wash a
pillow or a large stuffed teddy bear.
Suspension System
To reduce washer "walk" and "off-balance" conditions, your new
washer combines:
• 2 Springs to isolate vibration
• 4 Shock absorbers at the washer base to minimize movement
Stainless Steel Drum
The Stainless Steel drum eliminates corrosion and enables higher
spin speeds for more water extraction, reducing drying time.
Adaptive Variable Speed Motor
The motor adapts to the load size and to the cycle selected to
give the optimum cleaning, rinsing, and spinning conditions. The
motor can handle slow speeds needed for wool and delicate
items and is powerful enough to drive a large clothes load into a
1,200 rpm spin.
High-Efficiency Wash System
Your new front-loading, high-efficiency washer saves time with
fewer, larger loads, conserves resources and lowers your water
and energy bills too.
Spin Speeds
This washer automatically selects the spin speed based on the
cycle selected. This factory setting can be changed, however.
This washer offers up to six different spin speed choices.
Thermal Optimizer
The heating system ensures that the wash water is heated to the
preset temperature for Heavy Duty, Whitest Whites, Sanitary, and
the Stain Treat option. It also provides "stepped cleaning" when
using the sanitary cycle or the stain treat option. "Stepped
cleaning" starts the wash cycle with warm water to remove stains
(such as blood or grass). The water continues heating in order to
remove stains such as dirty mechanical oil. During the sanitary
cycle, the thermal optimizer can heat the water to temperatures
that will destroy 99.999% of three common types of bacteria
found in soiled laundry.
Add A Garment
When lighted, Express Wash, Normal/Casual, Heavy Duty,
Whitest Whites, and Sanitary can be paused and the door
unlocked so you can add a garment that may have been
forgotten when loading the washer. The ADD A GARMENT status
light will stay lit for the first 8 minutes of a cycle.
CATALYST _ Cleaning Action with Direct Injection
A concentrated detergent solution is sprayed onto the clothes at
the beginning of the cycle to ensure that the detergent comes
into contact with the clothes as quickly as possible, removing
stains from your clothes without pre-treating.
Dynamic Balance
A precision balancing system that allows the washer to reach
spin speeds of 1,200 rpm. The washer spins faster so that
clothes coming out of the washer will dry faster. In addition, if the
Dynamic Balance system detects off balance loads during
spinning, it redistributes the clothes so that they are evenly
balanced.
10
WASHER USE
_t
STATUS
ADD A GARMENT •
SO^K/ PRW_,S •
WASH® _
RINS£ 0 RINS£ / SPIN
CLOT _SC_E/_I • DRAIN [ SPIN
P_Fss& iFot_ _
SECO_,OSTOLOC_/
CO4TaOtLOCK_O• U_OCKCOm_OL
WASH CYCLES
EXPRESS WASH
NORMAL / =
CAS X i ORL'CATE
SANITARY NANDWASH
EStIMAte0
• HEAVY
® NORMAL
i LIGHT
SOIL LEVEL
DELAY
J
s
Fire Hazard
Never place items in the washer that are
dampened with gasoline or other flammable
fluids.
No washer can completely remove oil.
Do not dry anything that has ever had any type of
oil on it (including cooking oils).
Doing so can result in death, explosion, or fire.
WARNING: To reduce the risk of fire, electric shock, or injury to
persons, read the IMPORTANT SAFETY INSTRUCTIONS before
operating this appliance.
The following is a guide to using your washer. Please refer to
specific sections of this manual for more detailed information.
Do not store laundry products on the top surface of this washer.
Vibration is normal during operation.
First Wash Cycle Without Laundry
Before washing clothes for the first time, choose NORMAL/
CASUAL cycle and run it without clothes. After installation, if a
complete cycle has not been run without clothes, use _/_the
normal recommended amount of powdered or liquid High
Efficiency (HE) detergent or _Athe normal recommended amount
of regular powdered or liquid detergent. This initial cycle serves
to ensure the interior is clean before washing clothes.
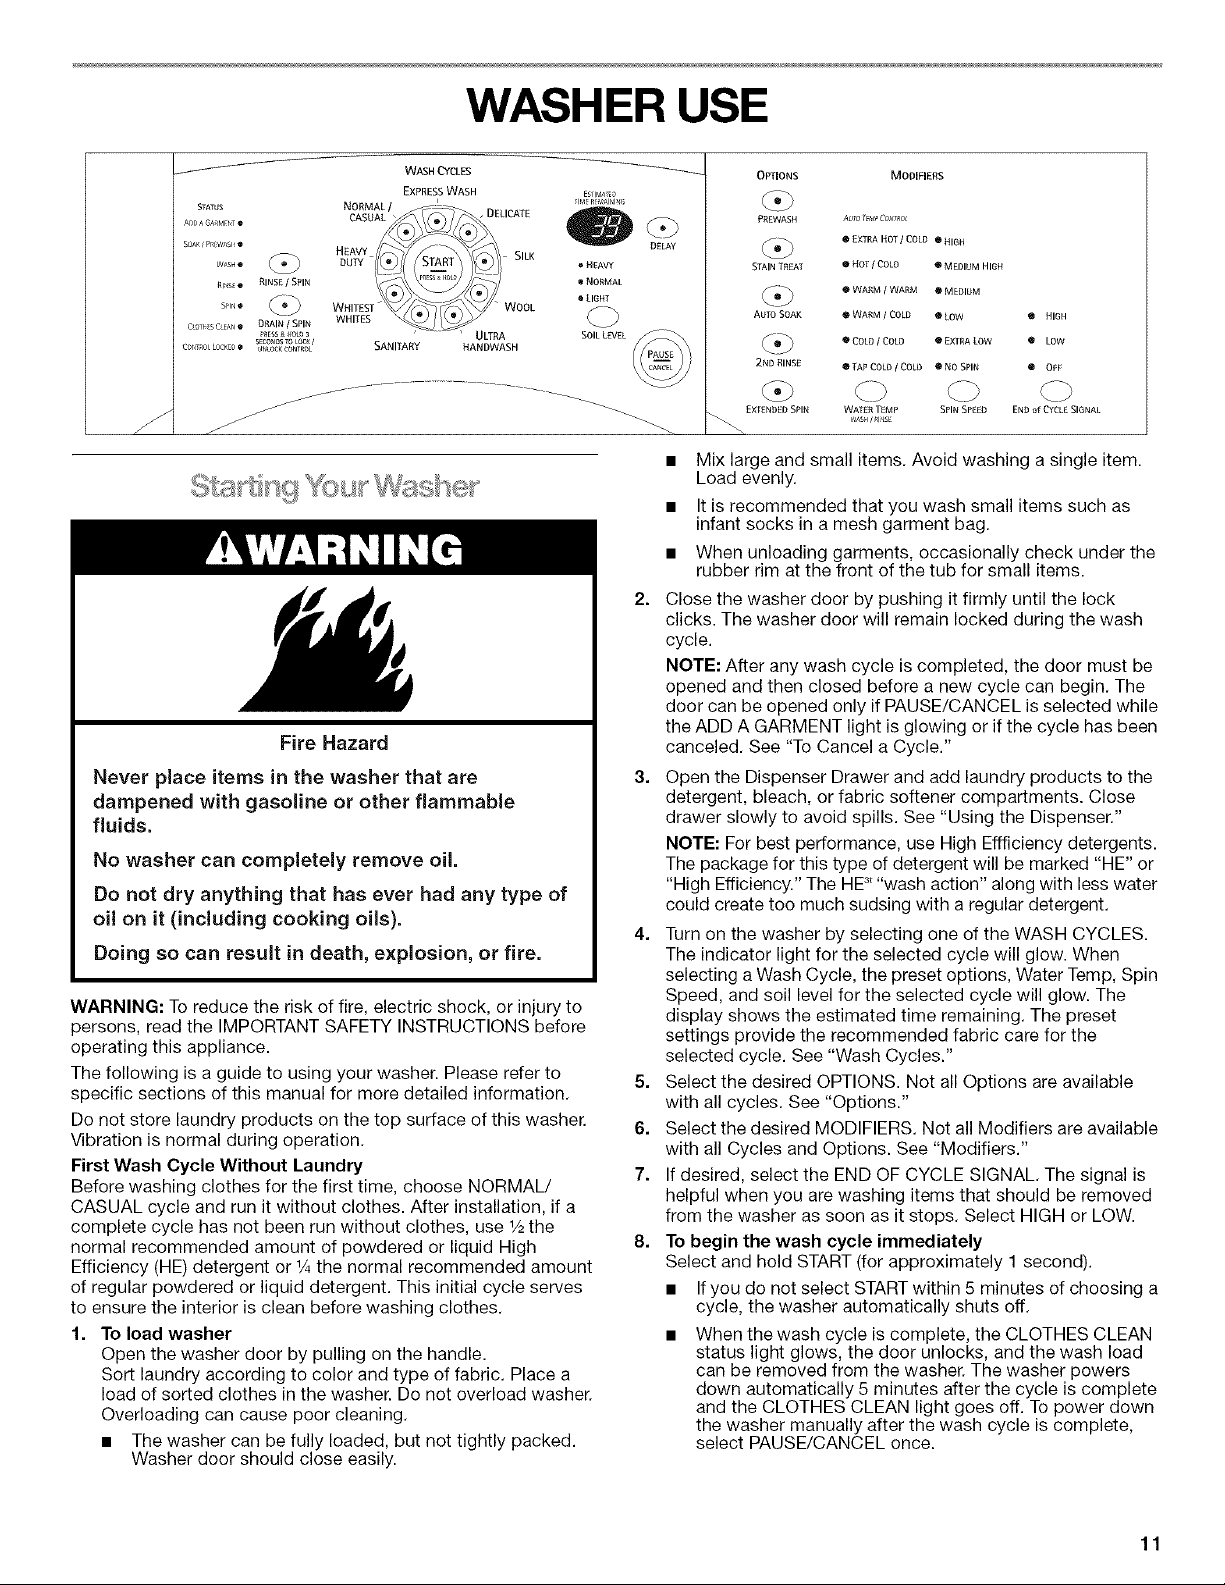
1. To load washer
Open the washer door by pulling on the handle.
Sort laundry according to color and type of fabric. Place a
load of sorted clothes in the washer. Do not overload washer.
Overloading can cause poor cleaning.
• The washer can be fully loaded, but not tightly packed.
Washer door should close easily.
2.
OPTIONS MODIFERS
PR£WASH AUTO7E_¢PCO_T,_OL
EXTRA HOT/ COLD _ NI6H
STAIN T££AT ® HOT / COLD 0 MEDIUM HIGH
• WA£M / WARM • MEDIUM
AUTO SOAK • WARM / COLD • LOW
® COLD ! COLD • EXIRA LOW
2ND RINSE OTAP COLD / COLD @NO SPIN
HIGH
LOW
OFF
_×rENDED SPIN WATER TEMP SPIN SPEED END of CYCLE SIGNAL
• Mix large and small items. Avoid washing a single item.
Load evenly.
• It is recommended that you wash small items such as
infant socks in a mesh garment bag.
• When unloading garments, occasionally check under the
rubber rim at the front of the tub for small items.
Close the washer door by pushing it firmly until the lock
clicks. The washer door will remain locked during the wash
cycle.
NOTE: After any wash cycle is completed, the door must be
opened and then closed before a new cycle can begin. The
door can be opened only if PAUSE/CANCEL is selected while
the ADD A GARMENT light is glowing or if the cycle has been
canceled. See "To Cancel a Cycle."
3. Open the Dispenser Drawer and add laundry products to the
detergent, bleach, or fabric softener compartments. Close
drawer slowly to avoid spills. See "Using the Dispenser."
NOTE: For best performance, use High Effficiency detergents.
The package for this type of detergent will be marked "HE" or
"High Efficiency." The HF' "wash action" along with less water
could create too much sudsing with a regular detergent.
4. Turn on the washer by selecting one of the WASH CYCLES.
The indicator light for the selected cycle will glow. When
selecting a Wash Cycle, the preset options, Water Temp, Spin
Speed, and soil level for the selected cycle will glow. The
display shows the estimated time remaining. The preset
settings provide the recommended fabric care for the
selected cycle. See "Wash Cycles."
5. Select the desired OPTIONS. Not all Options are available
with all cycles. See "Options."
6. Select the desired MODIFIERS. Not all Modifiers are available
with all Cycles and Options. See "Modifiers."
7. If desired, select the END OF CYCLE SIGNAL. The signal is
helpful when you are washing items that should be removed
from the washer as soon as it stops. Select HIGH or LOW.
8. To begin the wash cycle immediately
Select and hold START (for approximately 1 second).
• If you do not select START within 5 minutes of choosing a
cycle, the washer automatically shuts off.
• When the wash cycle is complete, the CLOTHES CLEAN
status light glows, the door unlocks, and the wash load
can be removed from the washer. The washer powers
down automatically 5 minutes after the cycle is complete
and the CLOTHES CLEAN light goes off. To power down
the washer manually after the wash cycle is complete,
select PAUSE/CANCEL once.
11
9.
To begin the wash cycle later
Select DELAY until the desired delay time (in hours) shows in
the Estimated Time Remaining display. Select START. The
countdown to the wash cycle will show in the display window.
F }9he Dspe s@
.... s_ " '
Your new washer has a dispenser drawer with four separate
compartments for your laundry products--two are for detergent,
one is for liquid chlorine bleach, and one is for liquid fabric
softener. Laundry products are diluted and dispensed
automatically at the proper time during the wash cycle, making it
unnecessary for you to return to the washer during the cycle to
add them,
It is normal for small amounts of water to remain in the
dispensers when the wash cycle is complete.
Do not put laundry additives directly into the wash tub. Always
use the proper dispensers when adding laundry products.
Choosing the Right Detergent
For best washing performance, use a High Efficiency (HE), or
low-sudsing, detergent. Regular detergents may cause
oversudsing in the washer. If a High Efficiency detergent is
unavailable, use 1/2the recommended amount of regular
detergent. Use of Regular detergent will lead to unsatisfactory
performance over time.
Most detergents formulated for hand-washing are not meant for
front-loading washers and may cause oversudsing. Start with 1/4
the recommended amount. Ifoversudsing occurs, try a detergent
formulated for high efficiency washers.
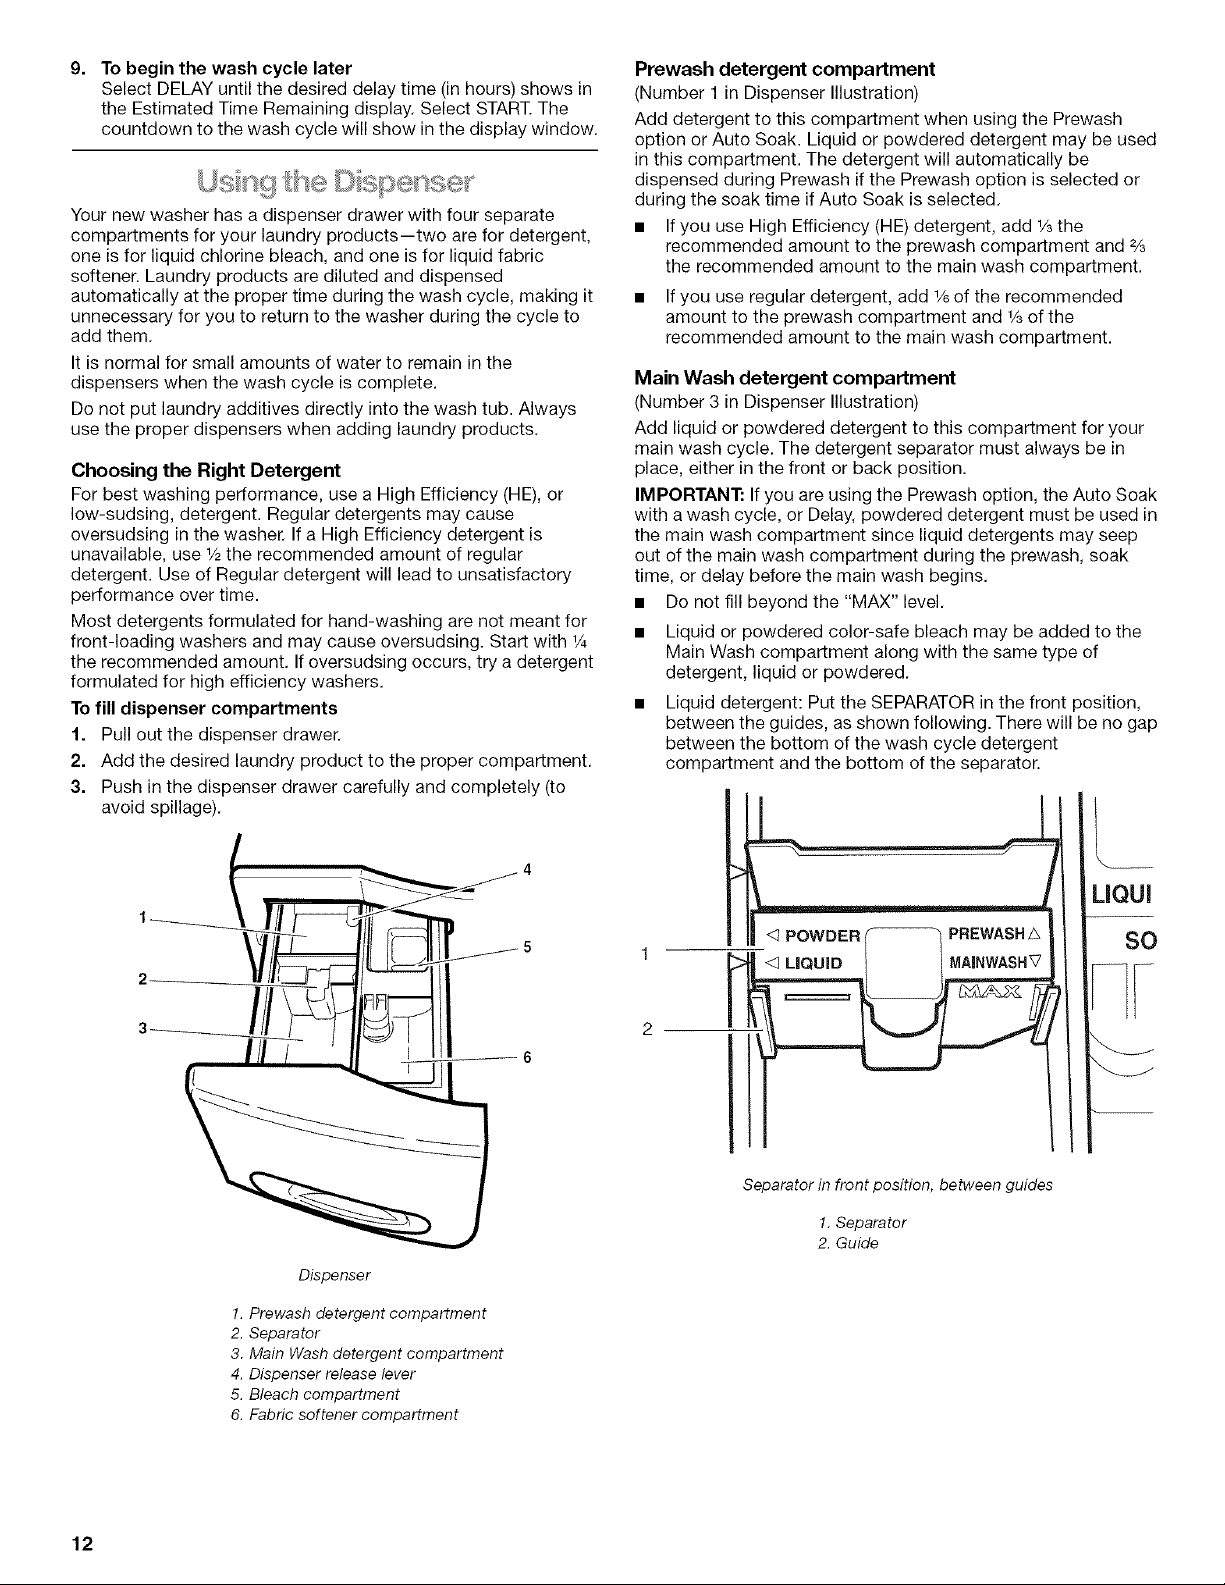
To fill dispenser compartments
1. Pull out the dispenser drawer.
2. Add the desired laundry product to the proper compartment.
3. Push in the dispenser drawer carefully and completely (to
avoid spillage).
Prewash detergent compartment
(Number 1 in Dispenser Illustration)
Add detergent to this compartment when using the Prewash
option or Auto Soak. Liquid or powdered detergent may be used
in this compartment. The detergent will automatically be
dispensed during Prewash if the Prewash option is selected or
during the soak time if Auto Soak is selected.
• If you use High Efficiency (HE) detergent, add 1/3the
recommended amount to the prewash compartment and 2/3
the recommended amount to the main wash compartment.
• If you use regular detergent, add 1/6of the recommended
amount to the prewash compartment and 1/sof the
recommended amount to the main wash compartment.
Main Wash detergent compartment
(Number 3 in Dispenser Illustration)
Add liquid or powdered detergent to this compartment for your
main wash cycle. The detergent separator must always be in
place, either in the front or back position.
IMPORTANT: If you are using the Prewash option, the Auto Soak
with awash cycle, or Delay, powdered detergent must be used in
the main wash compartment since liquid detergents may seep
out of the main wash compartment during the prewash, soak
time, or delay before the main wash begins.
• Do not fill beyond the "MAX" level.
• Liquid or powdered color-safe bleach may be added to the
Main Wash compartment along with the same type of
detergent, liquid or powdered.
Liquid detergent: Put the SEPARATOR in the front position,
between the guides, as shown following. There will be no gap
between the bottom of the wash cycle detergent
compartment and the bottom of the separator.
<_POWDER PREWASHA
<_LiQUiD MAINWASHV
SO
D_penser
1. Prewash detergent compartment
2. Separator
3. Main Wash detergent compartment
4. Dispenser release lever
5. Bleach compartment
6. Fabric softener compartment
Separator in front position, between guides
1. Separator
2. Guide
12
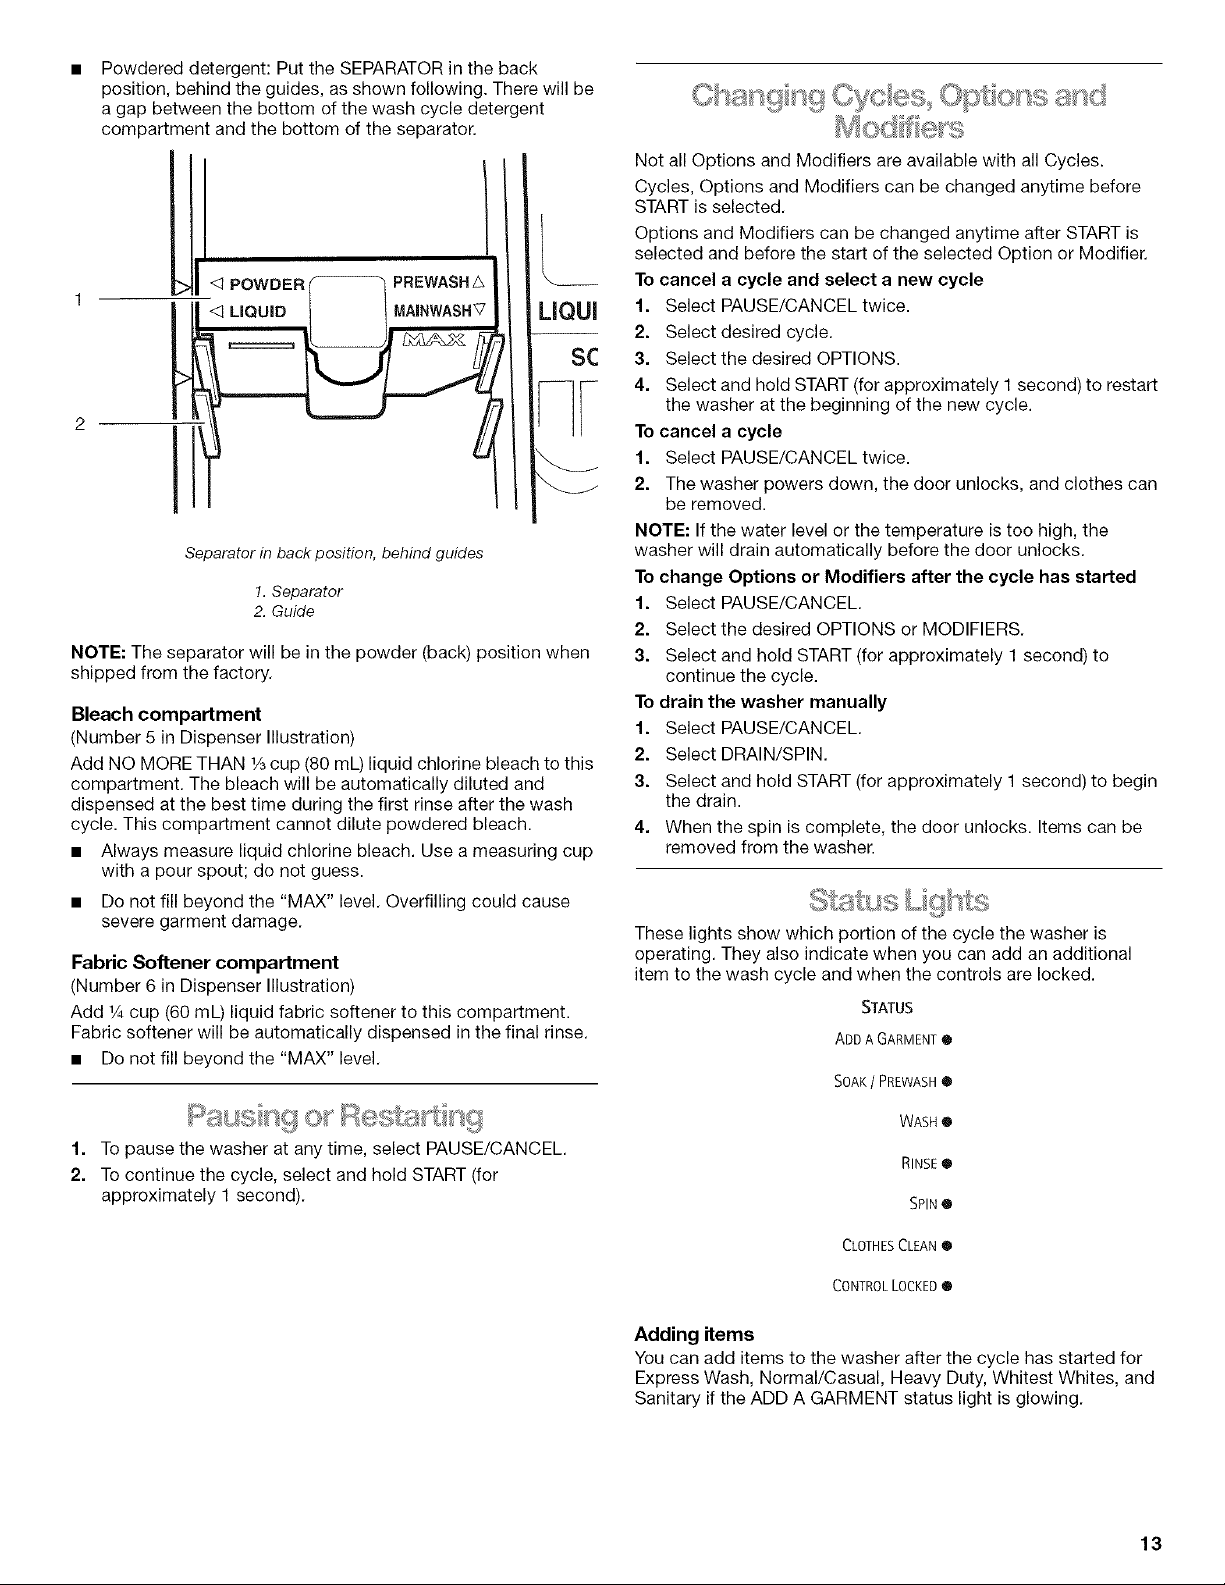
Powdered detergent: Put the SEPARATOR in the back
position, behind the guides, as shown following. There will be
a gap between the bottom of the wash cycle detergent
compartment and the bottom of the separator.
LIOUI
SC
Separator in back position, behind guides
!. Separator
2. Guide
NOTE: The separator will be in the powder (back) position when
shipped from the factory.
Bleach compartment
(Number 5 in Dispenser Illustration)
Add NO MORE THAN 1/3cup (80 mL) liquid chlorine bleach to this
compartment. The bleach will be automatically diluted and
dispensed at the best time during the first rinse after the wash
cycle. This compartment cannot dilute powdered bleach.
• Always measure liquid chlorine bleach. Use a measuring cup
with a pour spout; do not guess.
• Do not fill beyond the "MAX" level. Overfilling could cause
severe garment damage.
Fabric Softener compartment
(Number 6 in Dispenser Illustration)
Add 1/4cup (60 mL) liquid fabric softener to this compartment.
Fabric softener will be automatically dispensed in the final rinse.
• Do not fill beyond the "MAX" level.
1.
2.
Dss @ s@
To pause the washer at any time, select PAUSE/CANCEL.
To continue the cycle, select and hold START (for
approximately 1 second).
Not all Options and Modifiers are available with all Cycles.
Cycles, Options and Modifiers can be changed anytime before
START is selected.
Options and Modifiers can be changed anytime after START is
selected and before the start of the selected Option or Modifier.
To cancel a cycle and select a new cycle
1. Select PAUSE/CANCEL twice.
2. Select desired cycle.
3. Select the desired OPTIONS.
4. Select and hold START (for approximately I second) to restart
the washer at the beginning of the new cycle.
To cancel a cycle
1. Select PAUSE/CANCEL twice.
2. The washer powers down, the door unlocks, and clothes can
be removed.
NOTE: If the water level or the temperature is too high, the
washer will drain automatically before the door unlocks.
To change Options or Modifiers after the cycle has started
1. Select PAUSE/CANCEL.
2. Select the desired OPTIONS or MODIFIERS.
3. Select and hold START (for approximately 1 second) to
continue the cycle.
To drain the washer manually
f. Select PAUSE/CANCEL.
2. Select DRAIN/SPIN.
3. Select and hold START (for approximately 1 second) to begin
the drain.
4. When the spin is complete, the door unlocks. Items can be
removed from the washer.
THese lights show which portion of the cycle the washer is
operating. They also indicate when you can add an additional
item to the wash cycle and when the controls are locked.
STATUS
ADD A GARMENT®
SOAK / PREWASH•
WASH @
RINSE•
SPINO
CLOTHESCLEAN®
CONTROLLOCKED0
Adding items
You can add items to the washer after the cycle has started for
Express Wash, Normal/Casual, Heavy Duty, Whitest Whites, and
Sanitary if the ADD A GARMENT status light is glowing.
13
To add items
1. Select PAUSE/CANCEL. The washer door unlocks, and items
can be added.
2. To continue the cycle, close the door and select and hold
START (for approximately 1 second).
Clothes Clean
The Clothes Clean light stays on for 5 minutes after the cycle is
complete. The washer will then power down.
Locking controls
The Control Lock prevents unintended use of the washer. You
can also use the control lock feature to prevent unintended cycle
or option changes during a cycle. When CONTROL LOCKED is
lit, all buttons are disabled except for Pause/Cancel and Start.
You can lock the controls while the washer is operating.
To lock the controls
Select and hold DRAIN/SPIN for 3 seconds.
DRAIN / SPiN
PRESS & HOLD 3
SECONDS TO LOCK/
UNLOCK CONTROL
The CONTROL LOCKED status light glows.
To unlock the controls
Select and hold DRAIN/SPIN for 3 seconds until the CONTROL
LOCKED Status light turns off.
Estimated Time Remaining
The cycle times vary automatically based on your water pressure,
water temperature, detergent, and clothes load. The cycle time
will be extended if oversudsing occurs or the load is unbalanced.
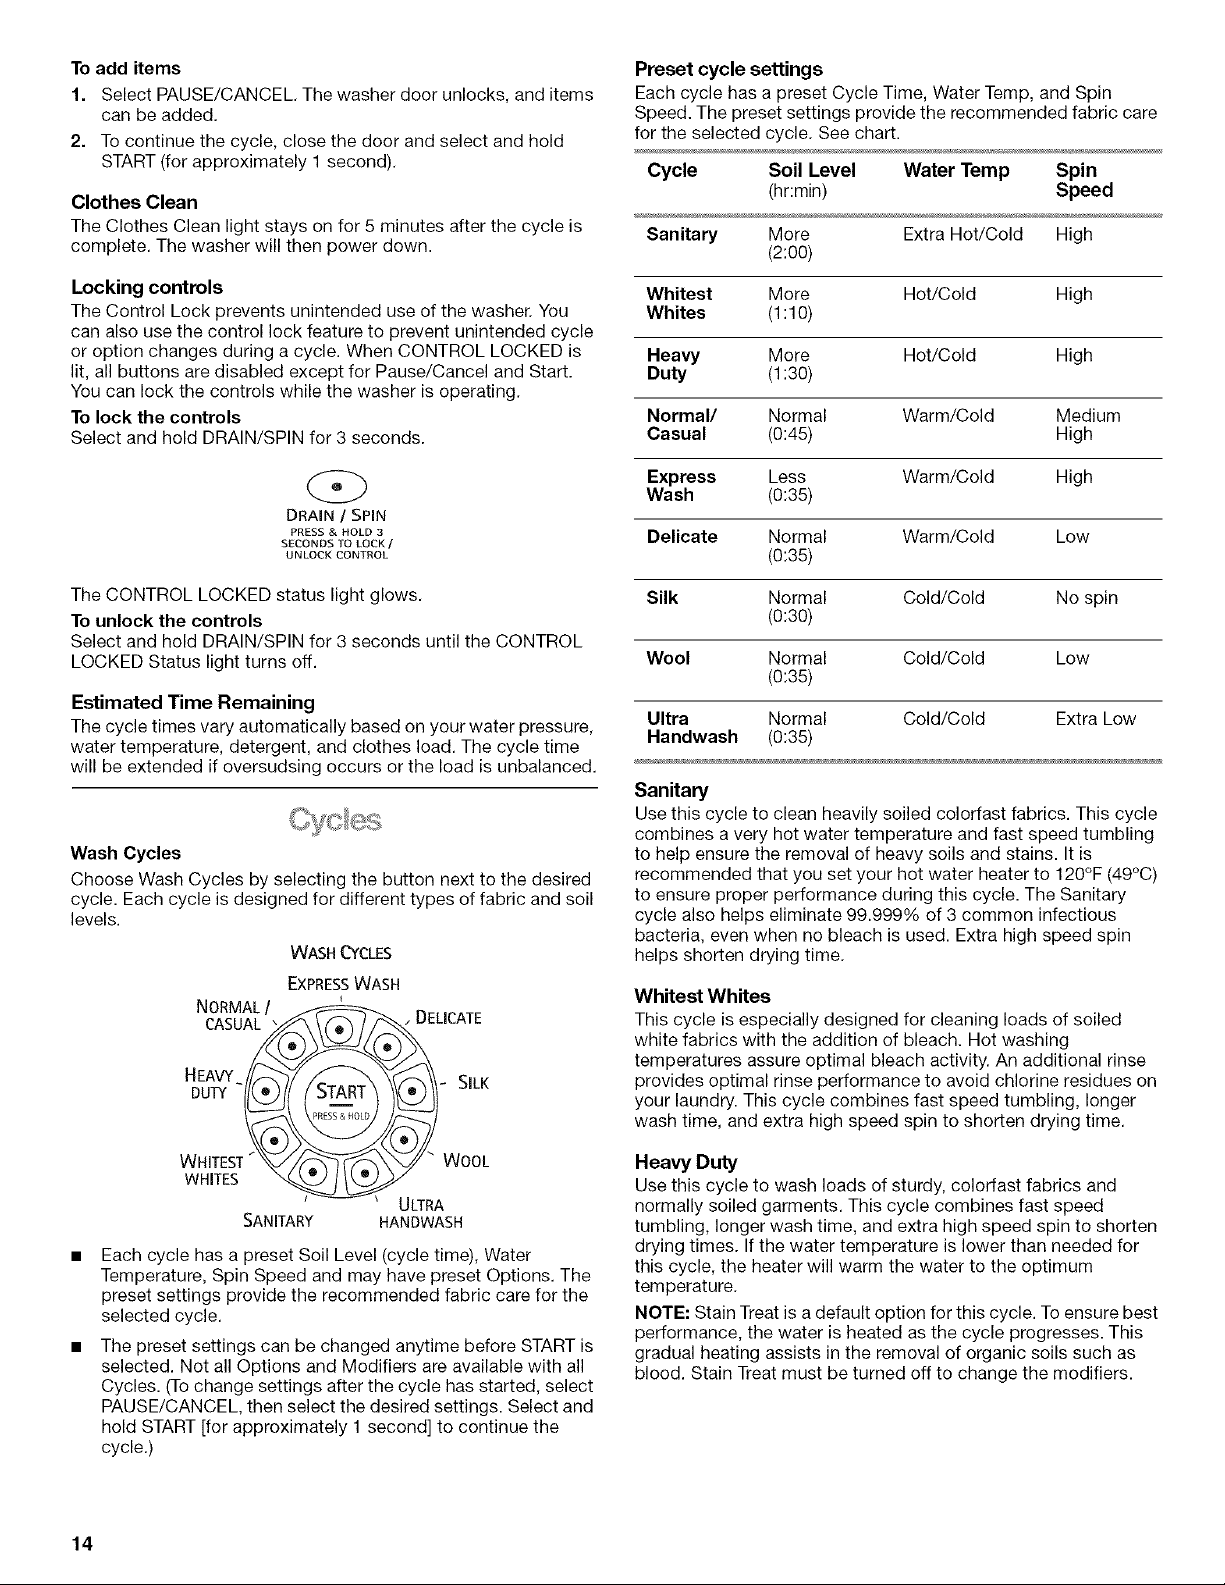
Wash Cycles
Choose Wash Cycles by selecting the button next to the desired
cycle. Each cycle is designed for different types of fabric and soil
levels.
WASHO!CLES
EXPRESSWASH
NORMAL/
CASUAL
T
WHITES
DELICATE
SILK
WOOL
ULTRA
SANITARY HANDWASH
Each cycle has a preset Soil Level (cycle time), Water
Temperature, Spin Speed and may have preset Options. The
preset settings provide the recommended fabric care for the
selected cycle.
The preset settings can be changed anytime before START is
selected. Not all Options and Modifiers are available with all
Cycles. (To change settings after the cycle has started, select
PAUSE/CANCEL, then select the desired settings. Select and
hold START [for approximately 1 second] to continue the
cycle.)
Preset cycle settings
Each cycle has a preset Cycle Time, Water Temp, and Spin
Speed. The preset settings provide the recommended fabric care
for the selected cycle. See chart.
Cycle Soil Level Water Temp Spin
(hr:min) Speed
Sanitary More Extra Hot/Cold High
(2:0o)
Whitest More Hot/Cold High
Whites (1:10)
Heavy More Hot/Cold High
Duty (1:30)
Normal/ Normal Warm/Cold Medium
Casual (0:45) High
Express Less Warm/Cold High
Wash (0:35)
Delicate Normal Warm/Cold Low
(0:35)
Silk Normal Cold/Cold No spin
(0:30)
Wool Normal Cold/Cold Low
(0:35)
Ultra Normal Cold/Cold Extra Low
Handwash (0:35)
Sanitary
Use this cycle to clean heavily soiled colorfast fabrics. This cycle
combines a very hot water temperature and fast speed tumbling
to help ensure the removal of heavy soils and stains. It is
recommended that you set your hot water heater to 120°F (49°C)
to ensure proper performance during this cycle. The Sanitary
cycle also helps eliminate 99.999% of 3 common infectious
bacteria, even when no bleach is used. Extra high speed spin
helps shorten drying time.
Whitest Whites
This cycle is especially designed for cleaning loads of soiled
white fabrics with the addition of bleach. Hot washing
temperatures assure optimal bleach activity. An additional rinse
provides optimal rinse performance to avoid chlorine residues on
your laundry. This cycle combines fast speed tumbling, longer
wash time, and extra high speed spin to shorten drying time.
Heavy Duty
Use this cycle to wash loads of sturdy, colorfast fabrics and
normally soiled garments. This cycle combines fast speed
tumbling, longer wash time, and extra high speed spin to shorten
drying times. If the water temperature is lower than needed for
this cycle, the heater will warm the water to the optimum
temperature.
NOTE: Stain Treat is a default option for this cycle. To ensure best
performance, the water is heated as the cycle progresses. This
gradual heating assists in the removal of organic soils such as
blood. Stain Treat must be turned off to change the modifiers.
14

Normal/Casual
Use this cycle to wash loads of no-iron fabrics such as sport
shirts, blouses, casual business clothes, permanent press
blends, cottons and linens, and synthetic fabrics. This cycle
combines medium speed tumbling, high speed spin, and a load
cooling process to reduce wrinkling.
Express Wash
Use this cycle to wash small loads of lightly soiled garments that
are needed in a hurry. This cycle combines fast speed tumbling, a
shortened wash time, and extra high speed spin to shorten
drying time.
As with any new product, you will hear sounds that you are not
accustomed to. You may hear various sounds when the door is
locked or unlocked, and during the washing, rinsing, or spinning
process. Between changes in wash actions, there will be
momentary pauses. You will hear water spraying and splashing
during the wash and rinse cycles. These new sounds and pauses
are part of normal washer operation. (See "Troubleshooting.")
Delicate
Use this cycle to wash sheer fabrics and lingerie. This cycle
combines low speed tumbling and low speed spin for gentle
fabric care.
Silk
Use this cycle to clean washable silk garments. (Check label
instructions to make sure that garment is washable.) This cycle
gently tumbles and drains without spinning to gently clean
garments and minimize wrinkling. Because there is no spinning
action, garments will contain a higher amount of water at the end
of this cycle.
Wool
Use this cycle to clean washable woolen garments. (Check label
instructions to make sure that garment is washable.) This cycle
features gentle tumbling and low speed spin to minimize creasing
and shrinkage.
Ultra Handwash
Use this cycle to clean hand washable and special-care
garments. Similar to the way garments are hand washed in a
sink, the wash action of this cycle combines periods of extra low •
speed tumbling and soaking. Extra low speed spin reduces
wrinkling.
Extra Cycles •
Extra Cycles can be chosen by selecting the button above the
desired cycle.
@ "
RINSE / SPIN •
@
DRAIN / SPIN
You can change the selection anytime before START is selected.
Rinse/Spin
Use this cycle to get a rinse and spin only. This cycle combines
fast speed tumbling and extra high speed spin. If desired, you
can reduce the spin speed by selecting the speed you want from
the SPIN SPEED modifier.
Rinse/Spin is useful for
• Loads that need rinsing only.
• Adding fabric softener to a load using the fabric softener
dispenser.
Drain/Spin
Use this cycle to drain your washer or to drain and spin your
wash load. The spin speed is preset to extra high. If desired, you
can reduce the spin speed by selecting the speed you want from
the SPIN SPEED modifier.
NOTE: Loads of synthetics, delicate fabrics, handwashables, and
woolens should be drained with no spin or low spin to avoid
fabric stress.
You can customize your wash by adding OPTIONS to your cycle
selections. You can add or change an option after starting acycle
anytime before the selected option begins. Not all Options are
available with all cycles.
OPTIONS
PREWASH
STAIN TREAT
AUTO SOAK
2ND RINSE
EXTENDED SPIN
See the "Laundry Guide" section for an overview of possible
options for each Wash Cycle selection.
You can select more than one option for a cycle. Some
options cannot be added to some cycles, for example, Stain
Treat cannot be added to the Express Wash cycle.
If an option is available with a selected cycle, the light for that
option will glow when selected.
If an option is unavailable with a selected cycle, there will be a
short tone and the light for that option will not glow when
selected.
Prewash
Use this option for loads of heavily soiled items that need
pretreatment. This option adds a 15 minute prewash and drain to
the main wash cycle.
• Add detergent to the Prewash and Main Wash compartments
of the Dispenser Drawer.
• When using Prewash, do not use liquid detergent in the Main
Wash compartment. Use powdered detergent for the main
wash cycle.
NOTE: The Prewash and Auto Soak options cannot be selected
in the same cycle.
Stain Treat
Use this option for heavily soiled loads that need improved stain
treatment. When Stain Treat is selected, the water temperature of
the selected wash cycle is automatically set to warm. The water
will then be heated to a hot water temperature to aid in stain
removal. This option will provide optimal removal of organic
stains such as blood.
NOTE: If Stain Treat is selected with the Sanitary cycle, the water
will be heated to a very hot temperature.
15

Auto Soak
Use the Auto Soak option for loads of heavily soiled cotton, linen,
polyester or nylon with set-in stains. During Auto Soak, water will
be added to the drum and the laundry will be equally distributed
by a short tumbling phase. Laundry will then be soaked by
phases without drum movement. After soaking, the washer
drains without spinning.
Added to a Wash Cycle: A 30 minute soak time is added to the
main wash cycle to improve removal of set-in stains.
1. Add detergent to both the Prewash and Main Wash
compartments of the Dispenser Drawer.
NOTE: The Auto Soak and Prewash options cannot be
selected in the same cycle. Use powdered detergent for the
main wash cycle because liquid detergent will seep into the
washer during Auto Soak.
2,
3.
Select a Wash Cycle.
Select AUTO SOAK.
NOTE: For cycles with hot wash temperatures, the soak
temperature will be set to warm; otherwise, the soak
temperature will be the same as the wash temperature.
4. Select and hold START (approximately 1 second). After
soaking, the washer drains and the wash cycle starts.
Without a Wash Cycle: Provides a soak time with warm or cold
water followed by drain.
1. Add detergent only to the Prewash compartment of the
Dispenser Drawer.
2. Select DRAIN/SPIN or RINSE/SPIN first, then AUTO SOAK.
3. Choose the desired soak temperature.
4. Select and hold START (approximately 1 second).
2nd Rinse
A second rinse can be used to ensure the removal of detergent or
bleach residue from garments. This option provides an additional
rinse with the same water temperature as the first rinse.
Extended Spin
Use this option to add an additional spin to any cycle to improve
the "fluff" of your laundry, to reduce drying time, and to save
energy.
Preset cycle settings of Water Temperature, Wash/Rinse, and
Spin Speed can be changed. You can change a modifier after
starting a cycle anytime before the selected Modifier begins. Not
all Modifiers are available with all options and cycles.
MODIFIERS
AuToTPMPCON7ROL
0 EXTRA HOT/COLD 0 HiGH
• HOT/COLD ® MEDIUM HIGH
® WARM / WARM ® MEDIUM
• WARM / COLD • LOW • HIGH
0 COLD / COLD • EXTRA LOW ® LOW
• TAP COLD / COLD 0 NO SPIN • OFF
C) C) C)
WATER TEMP SPIN SPEED END of CYCLE SIGNAL
WASH / RINSE
To change the water temperature, select the WATER TEMP
button until the desired setting glows.
• To change the spin speed, select the SPIN SPEED button
until the desired setting glows.
• HEAVY
® NORMAL
• LIGHT
C)
SOIL LEVEL
• To change cycle time, select SOIL LEVEL button.
• To change the loudness of the End of Cycle Signal, select
END of CYCLE SIGNAL.
Wash/Rinse Temp
Select a water temperature based on the type of load you are
washing. Use the warmest water safe for fabrics. Follow garment
label instructions.
Warm rinses leave the loads dryer than cold rinses. Warm rinses
increase wrinkling. In cold climates, a warm rinse makes the load
more comfortable to handle. Cold rinses save energy.
Temperature Guide
Wash Water Temperature Suggested Fabrics
HOT Whites and pastels
122°F (50°C) or above Heavy soils
WARM Bright colors
104°F (40°C) Moderate to light soils
COLD Colors that bleed or fade
77°F (25°C) Light soils
In wash water temperatures colder than 70°F (21°C), detergents
do not dissolve well. Soils may be difficult to remove.
Auto Temp Control
ATC (Auto Temp Control) electronically senses and maintains a
uniform water temperature. ATC regulates incoming hot and cold
water. The ATC is automatically turned ON when a cycle is
selected. (See "Preset Cycle Settings" in "Cycles.")
• ATC ensures consistent cleaning.
• ATC works for the wash temperature with Extra Hot/Cold,
Hot/Cold, Warm/Warm, Warm/Cold, and Cold/Cold settings.
• The Cold rinse temperatures depend on the cold water at
your faucet.
• For the Tap Cold/Cold setting, both wash and rinse
temperatures depend on the cold water at your faucet.
• The Warm rinse setting regulates the water temperature at
approximately 104°F (40°C).
16
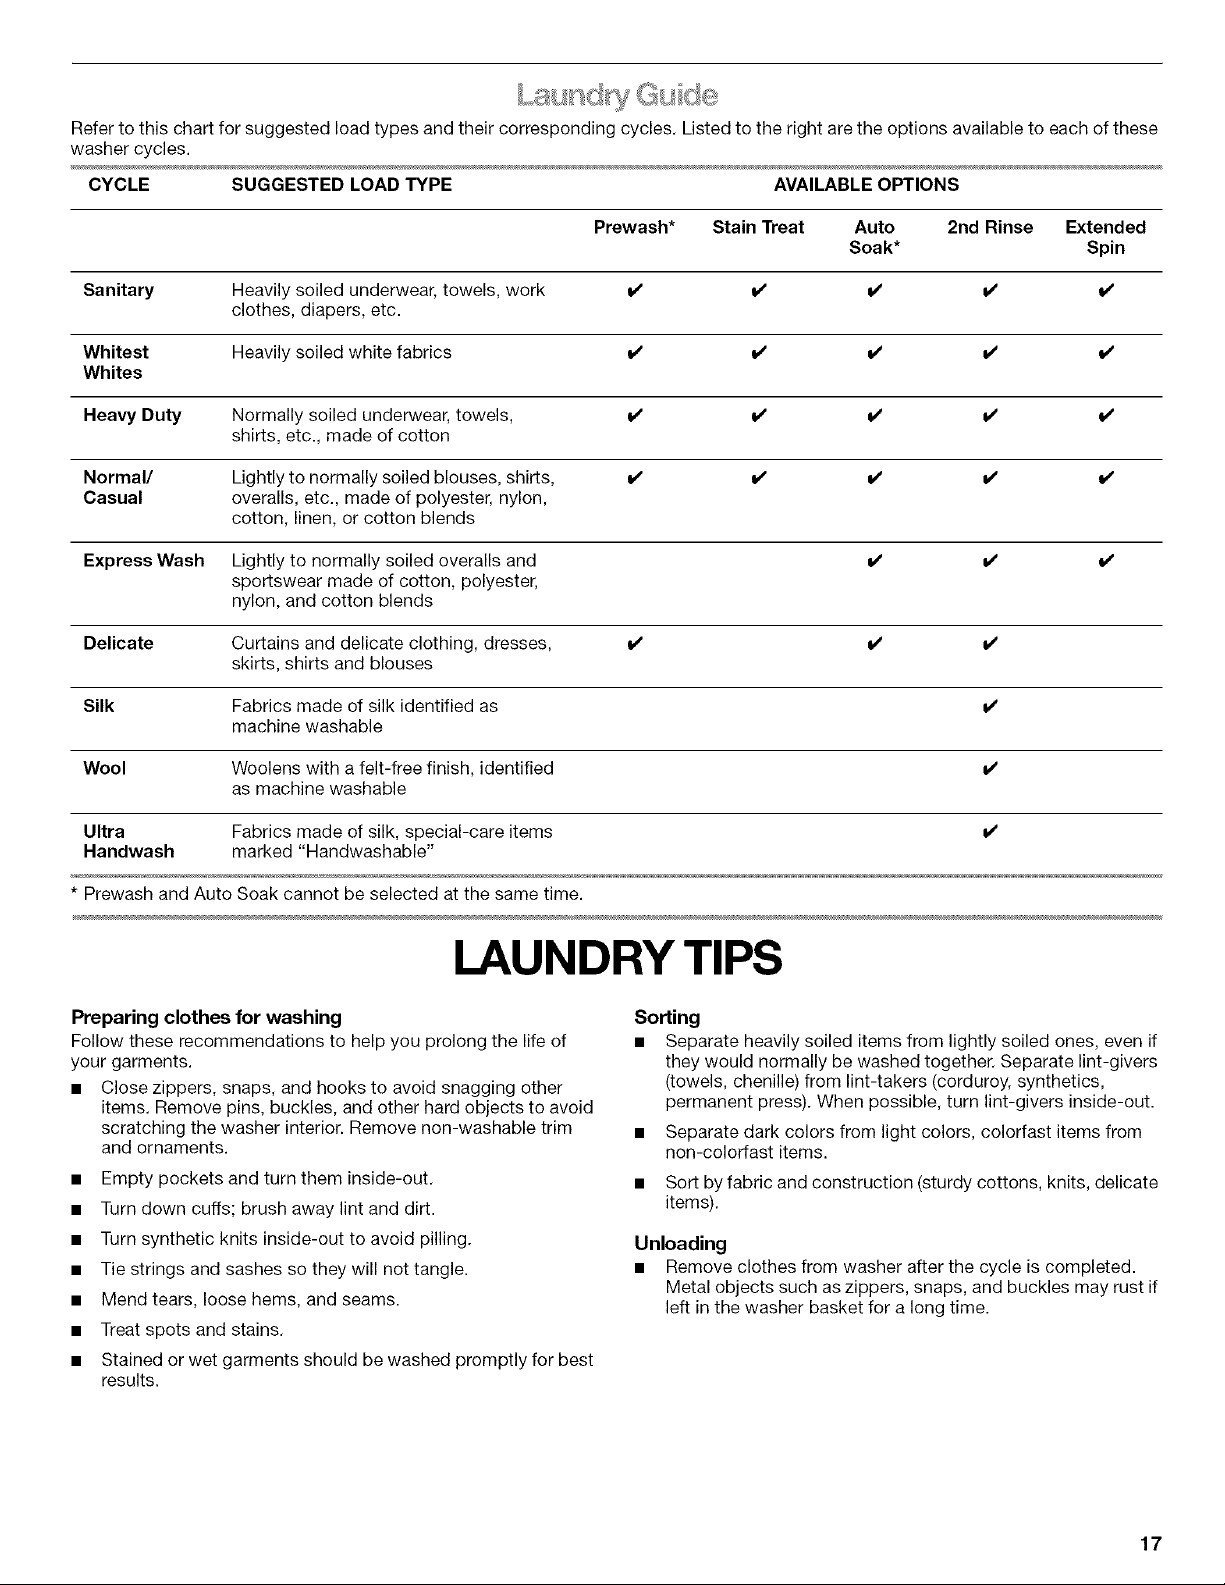
Refer to this chart for suggested load types and their corresponding cycles. Listed to the right are the options available to each of these
washer cycles.
CYCLE SUGGESTED LOAD TYPE AVAILABLE OPTIONS
Prewash* Stain Treat Auto 2nd Rinse Extended
Soak* Spin
Sanitary Heavily soiled underwear, towels, work V V V' V' V
clothes, diapers, etc.
Whitest Heavily soiled white fabrics i/ i/ v' v' i/
Whites
Heavy Duty Normally soiled underwear, towels, i/ i/ v' v' i/
shirts, etc., made of cotton
Normal/ Lightly to normally soiled blouses, shirts, V V V V V
Casual overalls, etc., made of polyester, nylon,
cotton, linen, or cotton blends
Express Wash Lightly to normally soiled overalls and v' v' i/
sportswear made of cotton, polyester,
nylon, and cotton blends
Delicate Curtains and delicate clothing, dresses, i/ v' v'
skirts, shirts and blouses
Silk Fabrics made of silk identified as v'
machine washable
Wool Woolens with a felt-free finish, identified v'
as machine washable
Ultra Fabrics made of silk, special-care items v'
Handwash marked "Handwashable"
* Prewash and Auto Soak cannot be selected at the same time.
LAUNDRY TIPS
Preparing clothes for washing
Follow these recommendations to help you prolong the life of
your garments.
• Close zippers, snaps, and hooks to avoid snagging other
items. Remove pins, buckles, and other hard objects to avoid
scratching the washer interior. Remove non-washable trim
and ornaments.
• Empty pockets and turn them inside-out.
• Turn down cuffs; brush away lint and dirt.
• Turn synthetic knits inside-out to avoid pilling.
• Tie strings and sashes so they will not tangle.
• Mend tears, loose hems, and seams.
• Treat spots and stains.
• Stained or wet garments should be washed promptly for best
results.
Sorting
• Separate heavily soiled items from lightly soiled ones, even if
they would normally be washed together. Separate lint-givers
(towels, chenille) from lint-takers (corduroy, synthetics,
permanent press). When possible, turn lint-givers inside-out.
• Separate dark colors from light colors, colorfast items from
non-colorfast items.
• Sort by fabric and construction (sturdy cottons, knits, delicate
items).
Unloading
• Remove clothes from washer after the cycle is completed.
Metal objects such as zippers, snaps, and buckles may rust if
left in the washer basket for a long time.
17

Loading suggestions (maximum size loads).
Heavy Work Clothes
4 jeans 2 sweatpants
4 workpants 2 sweatshirts
4 workshirts
Towels
10 bath towels
10 hand towels
14 washcloths
Mixed Load
3 sheets (1 king, 2 twin) 9 T-shirts
4 pillowcases 9 shorts
3 shirts 10 handkerchiefs
3 blouses
WASHER CARE
Cleaning the exterior
Use a soft damp cloth or sponge to wipe up any spills,
Occasionally wipe the outside of your washer to keep it looking
new. Use mild soap and water. Do not use abrasive products.
Cleaning the interior
Use a soft damp cloth or sponge to occasionally wipe the inner
door to remove any detergent residue. Use mild soap and water.
Do not use abrasive products.
Cleaning the door seal
Use a soft damp cloth or sponge when necessary. Check the fold
of the seal periodically for any foreign objects.
Cleaning the dispenser drawer
The dispenser drawer is removable for easy cleaning.
1. Unlock the dispenser drawer by pressing the Release Lever in
the Prewash compartment, See "Using the Dispenser."
Remove the drawer.
2. Remove the inserts (the siphon from the softener and bleach
compartments and the separator).
3. Wash the parts under running water.
4. Replace the inserts and return the dispenser to the drawer.
Install and store your washer where it will not freeze. Because
some water may stay in the hoses, freezing can damage your
washer. If storing or moving your washer during freezing weather,
winterize it.
Non-use or vacation care:
Operate your washer only when you are at home. If you will be on
vacation or not using your washer for an extended period of time,
you should:
• Unplug washer or disconnect power.
• Turn off the water supply to the washer. This helps avoid
accidental flooding (due to a water pressure surge) while you
are away.
• Slightly open door to provide ventilation.
To winterize washer:
1. Put 1 qt (1 L) of R.V.-type antifreeze in the drum.
2. Run washer on a DRAIN/SPIN cycle.
3. Unplug washer or disconnect power.
4. Shut off both water faucets.
5. Disconnect water inlet hoses from faucets and drain.
To use washer again:
1. Flush water pipes.
2. Reconnect water inlet hoses to faucets.
3. Turn on both water faucets.
4. Plug in washer or reconnect power.
5. Run the washer through the NORMAL/CASUAL cycle with _A
the normal recommended amount of detergent to clean out
antifreeze.
To transport the washer:
1. If washer will be moved during freezing weather, put in 1 qt
(1 L) of R.V.-type antifreeze in the drum. Run washer on a
DRAIN/SPIN cycle.
2. Unplug the power cord.
3. Disconnect the drain hose from the drain system and attach
to rear panel clips.
4. Shut off both water faucets.
5. Disconnect the water inlet hoses from faucets, then drain the
hoses and clip them to the rear panel of the washer.
6. Do not reuse transport bolts. Unit must be transported in the
upright position.
Re-installing the washer
1. Follow the "Installation Instructions" to locate, level and
connect the washer.
2. Run the washer through the NORMAL!CASUAL cycle with _A
the normal recommended amount of detergent to clean the
washer and remove the antifreeze, if used.
Replace inlet hoses after five years of use to reduce the risk of
hose failure. Periodically inspect and replace inlet hoses if
bulges, kinks, cuts, wear or leaks are found.
When replacing your inlet hoses, record the date of replacement.
18

TROUBLESHOOTING
Firsttry the solutions suggested here to possibly avoid the
cost of a service call...
Washer displaying code message and tone sounds
"HF" (Water Inlet Problem--no water or insufficient water
supply)
Select PAUSE/CANCEL twice to cancel the cycle. Unplug
washer or disconnect power.
Check the following:
Are water faucets completely turned on?
Are screens at inlet hose connection to washer clogged?
Are water inlet hoses kinked?
Are water inlet hoses frozen?
Plug in washer or reconnect power. Re-select cycle and press
START. If the problem remains, call for service.
"F02" (Drain Problem)
Select PAUSE/CANCEL twice to cancel the cycle. Unplug
washer or disconnect power.
Check the following:
Is the drain hose kinked?
Is the drain hose frozen?
Is the drain hose clogged?
Is the drain hose more than 96 in. (2.4 m) above the floor?
"SUD" (Suds Routine)
When excessive suds are detected, a suds routine
automatically starts. This routine removes extra suds and
assures proper rinsing of your garments. "SUD" is displayed
during rinsing and at the end of the cycle to inform you that
Suds Routine was activated. To avoid excessive sudsing,
reduce detergent amounts or use HE detergents.
"F" Variables [F4 to F16] (Electrical Problem)
Select PAUSE/CANCEL twice to cancel the cycle. Select
DRAIN/SPIN if there is excessive water in the washer.
Re-select cycle and press START. If the problem remains, call
for service.
Washer won't start
• Checkthe following:
Is the power cord plugged into a grounded 3 prong outlet?
Is the washer door firmly shut?
Has a cycle been selected, but START has not been selected
and held for one second?
Was the door open after completion of last cycle?
Washer won't fill, wash or rinse
• Checkthe following:
Is the power cord plugged into a grounded 3 prong outlet?
Is there power at the plug? Check electrical source or call
electrician.
Are the hot and cold water faucets turned on?
Is the water inlet hose kinked?
Are the water inlet valve screens clogged?
Washer stops
• Checkthe following:
Is the power cord plugged into a grounded 3 prong outlet?
Is there power at the plug?
Check electrical source or call electrician.
Has afuse blown or has the circuit breaker tripped?
If problem continues, call electrician.
Are you using an extension cord?
Do not use an extension cord.
Washer won't drain or spin
• Is the drain hose clogged, or the end of the drain hose
more than 96 in. (2.4 m) above the floor?
• Is your voltage low?
Check electrical source or call electrician. Do not use an
extension cord.
• Is the "SUD" routine active?
Cycle will complete once extra suds are removed.
• Isthe load balanced?
A single or bulky item may cause imbalance. Add more items
or redistribute the load.
Washer makes noise or vibrates
Is the washer level?
The washer must be level. The four feet should be properly
installed, and the nuts should be tightened against the
washer cabinet.
As water is drained from the washer, you may hear air being
pulled through the pump. This happens during the end of
draining. It is normal.
Are you washing items with metal snaps, buckles or
zippers?
You may hear metal items touching the washer drum. This is
normal.
Is washer installed on a sturdy and solid floor?
Refer to the "Installation Instructions" for flooring
requirements. Noise and vibration may be reduced by placing
a piece of 3Ain. (19.1 ram) plywood underneath your washer.
The plywood may extend underneath both washer and dryer
to keep them at equal heights.
Water near washer
Check household plumbing for leaks.
Dispensers clogged or leaking
Are the laundry products in the correct dispenser
compartment?
Add the correct amounts of detergent, fabric softener or
liquid chlorine bleach to the correct compartments. Add
powdered or color-safe bleach to the Main Wash
compartment.
Is the detergent separator in the correct position?
Separator should be in the front position when using liquid
detergent and in the back position when using powdered
detergent.
19

Load too wet
• Did you use the right cycle for the load being washed?
Select a cycle with a higher spin speed.
Did you wash a single item or bulky items or have you
overloaded the washer?
A single item, bulky items, or overloading may cause
imbalance. Add items or try to evenly distribute your wet
laundry in the drum, and start a DRAIN/SPIN cycle. If the
laundry is still wet, take half of the load out of the washer and
try again.
Residue or lint on load
• Did you add detergent to the dispenser?
For best results, add detergent to the detergent
compartment. Do not add detergent to the washer drum.
• Did you sort properly?
Sort lint givers (towels, chenille) from lint takers (corduroy,
synthetics). Also sort by color.
Did you overload the washer?
Do not overload the washer. The washer can be fully loaded,
but not tightly packed. The wash load must be balanced. Lint
can be trapped in the load if overloaded.
• Checkthe following:
Was paper or tissue left in pockets?
• Did you use enough detergent?
Follow manufacturer's directions. Use enough detergent to
hold the lint in the water.
• Is your water colder than 70°F (21°0)?
Wash water colder than 70°F (21°C) may not completely
dissolve the detergent.
Are you using a low speed wash cycle?
Powdered detergents may not dissolve well in a slow speed
cycle. For best results, use liquid detergent for slow speed
cycles like Delicate, Silk, Wool and Ultra Handwash.
Stains on load
• Did you add detergent to the dispenser?
For best results, add detergent to the detergent
compartment. Do not add detergent to the washer drum.
Did you use enough detergent?
Use enough detergent to remove soil and hold it insuspension.
For best performance, use a High Efficiency detergent. Follow
manufacturer's recommendations for the type of load you are
washing.
• Is there above average iron (rust) in water?
You may need to install an iron filter.
• Did you properly sort the load?
Sort dark clothes from whites and lights.
• Did you unload the washer promptly?
To avoid dye transfer, unload the washer as soon as it stops.
• Did you use a fabric softener dispensing ball?
Dispensing balls will not operate correctly with this washer.
Add liquid fabric softener to the fabric softener compartment.
• Did you use powdered detergent in a low speed cycle?
Consider using liquid detergent.
• Did you use Express Wash on a large load?
For best results, use Express Wash for small, lightly soiled
loads.
Load iswrinkled
Did you unload the washer promptly?
Unload the washer as soon as it stops.
Did you use the right cycle for the load being washed?
Use the Delicate cycle or another cycle with a low spin speed
to reduce wrinkling.
Did you overload the washer?
The wash load must be balanced and not overloaded. Loads
should tumble freely during washing.
Gray whites, dingy colors
• Did you properly sort the load?
Dye transfer can occur when mixing whites and colors in a
load. Sort dark clothes from whites and lights.
• Was the wash temperature too low?
Use hot or warm washes if safe for the load. Hot water should
be at least 120°F (49°C) to clean heavy soils.
Did you use enough detergent, or do you have hard
water?
Use more detergent for washing heavy soils in cold or hard
water.
Cycle too long
Did you choose the Sanitary cycle or Stain Treat option?
In both cases the heater will be activated to provide
maximum cleaning performance. Additional time will be
added to the regular cycle to heat the water. This additional
time will depend on the load size and the hot water inlet
temperature.
Is "SUD" shown in the display?
Excessive sudsing has been detected and a suds routine has
been started to destroy excessive suds. This routine will add
time to the original cycle.
Did the load cause imbalance?
When too much imbalance occurs, an imbalance routine will
start to redistribute the load. This routine will add time to your
original cycle.
Door locked at end of wash cycle
Did all of the water drain out of the washer during the
spin?
Select DRAIN/SPIN to remove any water remaining in the
washer. The washer door will unlock at the end of the drain.
20
21


TABLE DES MATII RES
CONTRATS D'ENTRETIEN .......................................................... 22
GARANTIE .................................................................................... 23
GARANTIE DE L'OPTION DE SUPPORT ................................... 23
SI_CURITI_ DE LA LAVEUSE .................................................... 24
EXIGENCES D'INSTALLATION ................................................... 25
Outils et pieces ........................................................................... 25
Pieces alternatives ..................................................................... 25
Support facultatif ........................................................................ 25
Exigences d'emplacement ......................................................... 25
Systeme de vidange ................................................................... 26
Specifications electriques .......................................................... 27
INSTRUCTIONS D'INSTALLATION ............................................ 28
Enlevement du systeme de transport ........................................ 28
Raccordement des tuyaux d'alimentation ................................. 28
Acheminement du tuyau de vidange ......................................... 29
Immobilisation du tuyau de vidange .......................................... 29
Reglage de I'aplomb de la laveuse ............................................ 29
Achever I'installation .................................................................. 29
CARACTI_RISTIQUES ET AVANTAGES ..................................... 30
UTILISATION DE LA LAVEUSE ............................................... 31
Mise en marche de la laveuse ................................................... 31
Utilisation du distributeur ........................................................... 32
Pause ou remise en marche ...................................................... 33
Changement de programmes, options et modificateurs .......... 33
Temoins lumineux ...................................................................... 34
Programmes ............................................................................... 34
Sons normaux ............................................................................ 36
Options ....................................................................................... 36
Modificateurs .............................................................................. 37
Guide de lessivage ..................................................................... 38
CONSEILS DE LESSIVAGE ......................................................... 39
Chargement ................................................................................ 39
ENTRETIEN DE LA LAVEUSE ..................................................... 39
Nettoyage de la laveuse ............................................................. 39
Tuyaux flexibles d'alimentation de la laveuse ........................... 40
Preparation avant les vacances,
un entreposage ou un demenagement ..................................... 40
DI_PANNAGE ................................................................................ 40
NUMI_ROS DE SERVICE ...................... COUVERTURE ARRII_RE
CONTRATS
D'ENTRETIEN
Votre achat a plus de valeur parce que vous pouvez compter sur
Sears HomeCentral r_pour le service. Avec plus de 2400
specialistes formes et I'acc_s a plus de 900 000 pieces et
accessoires, nous avons les outils et les pieces ainsi que les
connaissances et competences pour remplir cette promesse que
nous vous faisons : Nous assurons le service de nos produits.
Contrats d'entretien Sears
Votre appareil Kenmore _>est congu, fabrique et verifi6 pour qu'il
puisse vous fournir de nombreuses annees de service en toute
confiance. Cependant, tout appareil menager moderne peut
necessiter des interventions de service de temps a autre. Le
contrat d'entretien Sears vous offre un programme de service
remarquable a un prix abordable.
Le contrat d'entretien Sears
• Garantit les prix d'aujourd'hui pour les services que vous
utiliserez plus tard.
• 121imineles factures pour les reparations imputables a I'usure
normale.
• Couvre les appels de service pour une aide non technique et
pratique.
• Comprend une inspection annuelle d'entretien preventif (sur
votre demande) pour maintenir votre appareil en ben etat de
fonctionnement.
Certaines limitations s'appliquent. Pour des renseignements
concernant les contrats d'entretien de Sears Home Central ®,
composer le 1-800-533-6937.
22

GARANTIE DE
LA LAVEUSE
KENMORE ELITE
Garantie limit_e &vie sur le tambour en acier inoxydable
Pour la duree de vie de la laveuse a partir de la date d'achat,
Sears remplacera le tambour de lavage en acier inoxydable par
suite de vice de materiau ou de fabrication. Les coots de main-
d'oeuvre vous seront imputes apres la premiere annee.
Garantie limit_e de 10 ans sur la cuve de plastique*
,_,partir de la deuxi_me jusqu'& la dixieme annee inclusivement &
compter de la date d'achat, Sears remplacera la cuve de
plastique s'il existe un vice de materiau ou de fabrication. Apres
un an, les frais de main-d'oeuvre vous seront factures.
Garantie limit_e de 5 ans sur les composants de la boite
d'engrenages*
,&,partir de la deuxieme jusqu'a la cinquieme annee inclusivement
compter de la date d'achat, Sears remplacera toute piece de la
bofte d'engrenages qui s'averera ddectueuse a cause d'un vice
de materiau ou de fabrication. Apres un an, les frais de main-
d'oeuvre vous seront factures.
Garantie limit_e de 2 ans sur le tableau de commande
SENSOR SMART TM
Pour une periode de deux ans a compter de la date d'achat,
Sears remplacera le tableau de commande SENSOR SMART TM
s'il comporte un vice de materiau ou de fabrication. Les frais de
main-d'oeuvre vous seront factures apres la premiere annee.
Garantie complete de 1 an sur les composants
m_caniques et _lectriques
Pendant un an, a compter de la date d'achat, si la laveuse est
installee et utilisee conformement aux instructions qui
I'accompagnent, Sears reparera ou remplacera tout composant
mecanique ou electrique qui s'averera defectueux a cause d'un
vice de materiau ou de main-d'oeuvre.
Le service dolt _tre fourni par un service d'entretien Sears aux
12tats-Unis ou au Canada ou par un agent autorise.
Restriction des garanties
Si la laveuse est utilisee autrement que dans une utilisation
familiale, la garantie ci-dessus ne demeure en vigueur que
pendant 90 jours a compter de la date d'achat.
Les frais de deplacement ou de transport pour les clients qui
habitent dans des regions eloign6es ne sent pas couverts par
cette garantie.
Service sous garantie
Pour obtenir le service sous garantie, contacter le Centre de
service Sears le plus proche aux 12tats-Unis ou au Canada. La
presente garantie n'est valide que pendant que cette laveuse est
utilisee aux Ctats-Unis ou au Canada.
Cette garantie vous donne des droits juridiques specifiques et
vous pourriez avoir d'autres droits qui pourraient varier d'un €tat
un autre ou d'une province a une autre.
Pour obtenir des informations sur la garantie Sears ou pour
contacter un Centre de service Sears, veuillez consulter les
numeros de service indiques au dos de la couverture de ce
manuel.
Sears, Roebuck and Co.,
D/817WA,
Hoffman Estates, IL 60179
Sears Canada Inc.,
Toronto, Ontario,
Canada M5B 2B8
*Une garantie differente peut _tre offerte au Canada.
Enregistrement du produit
Dans I'espace ci-dessous, inscrire vos numeros de modele et de
serie complets et la date d'achat. Vous trouverez ces numeros
sur la plaque signaletique tel qu'indique.
Ayez ces renseignements a la portee de la main pour obtenir une
assistance ou un service rapide Iorsque vous contactez Sears
propos de votre appareil menager.
Num_ro de mod_le 110.
Num_ro de s_rie
Date d'achat
Conservez ces instructions et le re(;u de vente pour reference
ulterieure.
GARANTIE DE L'OPTION
DE SUPPORT
Garantie de un an sur les pi_ces m_caniques
Pendant une annee a partir de la date d'achat, le fournisseur
reparera ou remplacera toute piece mecanique qui devient
defectueuse a cause d'un vice de materiau ou de main-d'oeuvre.
Ce support dolt _tre installe avec cette laveuse conformement
aux instructions fournies dans le guide d'installation du support.
Restriction de la garantie
Si le support est soumis a tout autre usage que pour I'usage
prive d'une famille et/ou si le support est utilise avec tout autre
produit que ceux qui sent indiques dans les instructions
d'installation, la garantie ci-dessus est nulle et sans valeur.
Enregistrement du produit
Dans I'espace ci-dessous, inscrivez le numero de modele, le
numero de serie et la date d'achat au complet. Vous pouvez
trouver ces renseignements sur I'etiquette des numeros de
modele et de serie.
Carder ces renseignements disponibles pour vous aider a obtenir
rapidement une assistance ou un service Iorsque vous contactez
Sears au sujet de votre laveuse.
Num_ro de mod_le 110.
Num_ro de s_rie
Date d'achat
Conservez ces instructions et votre regu de vente pour
r_f_rence future.
23

SI CURITI DE LA LAVEUSE
Votre sdcurit6 et celle des autres est trbs importante.
Nous donnons de nombreux messages de securit6 importants dans ce manuel et sur votre appareil menager.
Assurez-vous de toujours lire tousles messages de securit6 et de vous y conformer.
_ oici le symbole d'alerte de securit&
Ce symbole d'alerte de securit6 vous signale les dangers potentiels de deces et de blessures graves
& vous et & d'autres.
Tous les messages de securit6 suivront le symbole d'alerte de securit6 et le mot "DANGER" ou
"AVERTISSEMENT". Ces mots signifient :
Risque possible de ddcbs ou de blessure grave si
vous ne suivez pas immddiatement les instructions.
Risque possible de ddcbs ou de blessure grave
si vous ne suivez pas les instructions.
Tousles messages de securit6 vous diront quel est le danger potentiel et vous disent comment reduire le risque de
blessure et ce qui peut se produire en cas de non-respect des instructions.
IMPORTANTES INSTRUCTIONS DE SI=CURITI=
AVERTISSEMENT : Pour reduire les risques d'incendie, de choc electrique ou de blessures Iors de
I'utilisation de la laveuse, suivre les precautions fondamentales dont les suivantes :
[] Lire toutes les instructions avant d'utiliser la
laveuse.
[] Ne pas laver des articles qui ont et6 nettoyes ou
laves avec de I'essence ou imbibes d'essence,
solvants de nettoyage & sec, ou autres
substances inflammables ou explosives; ces
substances peuvent emettre des vapeurs
susceptibles de s'enflammer ou d'exploser.
[] Ne pas ajouter d'essence, solvant de nettoyage &
sec ou autre produit inflammable ou explosif dans
I'eau de lavage. Ces substances peuvent emettre
des vapeurs susceptibles de s'enflammer ou
d'exploser.
[] Dans certaines conditions, de I'hydrogene gazeux
peut se former dans un circuit d'eau chaude qui
n'a pas et6 utilise pendant 2 semaines ou plus.
LE GAZ HYDROGENE EST EXPLOSIBLE. Si le
circuit d'eau chaude n'a pas et6 utilise pendant
une telle periode, avant d'utiliser la laveuse,
ouvrir tousles robinets d'eau chaude et laisser
I'eau s'ecouler pendant plusieurs minutes par
chaque robinet. Ceci permettra I'evacuation de
I'hydrogene gazeux accumul& Comme ce gaz
est inflammable, ne pas fumer ou utiliser une
flamme nue au cours de cette periode.
[] Ne pas laisser des enfants jouer sur ou & I'interieur de
la laveuse. Bien surveiller les enfants Iorsque la
laveuse est utilisee & proximite d'enfants.
[] Avant de mettre la laveuse au rebut ou hors de service,
enlever la porte ou le couvercle.
[] Ne pas tenter d'atteindre un article A I'interieur de la
cuve de la laveuse Iorsque le tambour, la cuve ou
I'agitateur est en mouvement.
[] Ne pas installer ou remiser cette laveuse A un endroit
ou elle serait exposee aux intemperies.
[] Ne pas modifier les organes de commande.
[] Ne pas reparer ou remplacer un composant
quelconque de la laveuse, ni entreprendre une
operation de service, si ce n'est specifiquement
recommande dans ce manuel ou dans un manuel
d'instructions de reparations destine A I'utilisateur; il
est alors essentiel que la personne concernee
comprenne ces instructions et soit competente pour
les executer.
[] Voir "Specifications electriques" pour les instructions de
liaison & la terre.
CONSERVEZ CES INSTRUCTIONS
24

EXIGENCES
D'INSTALLATION
Assembler les outils et les fournitures necessaires avant de
commencer I'installation de la laveuse. Les pieces fournies se
trouvent dans le tambour de la laveuse.
Outils n_cessaires pour raccorder les tuyaux d'arriv_e
d'eau
• Pinces (ouverture jusqu'a 1 °A6po [39,5 mm])
• Lampe de poche (facultative)
Outils n_cessaires pour rinstallation
• Cle plate de % po (17 mm) et de 1/2po (13 mm)
• Niveau
• Bloc de bois (2 po x 4 po)
• Metre ou ruban a mesurer
Pi_ces fournies
C>
Courroiepetite
Si vous avez II faudra acheter
Evier de buanderie
ou tuyau de rejet
I'egout plus haut
que 96 po (2,4 m)
Systeme de pompe de puisard (si non
deja disponible)
12goutsureleve Cvier de vidange standard de 20 gal
(76 L), de 30 po (76,2 cm) ou evier
utilitaire et pompe de puisard
(disponibles de votre fournisseur local
d'articles de plomberie)
Vidange au Brise-siphon, piece n° 285834; tuyau de
plancher vidange additionnel piece n° 8318155; et
trousse de connexion, piece n° 285835
Tuyau de vidange Trousse de rallonge de tuyau
trop court d'ecoulement, piece n° 285863
Robinets d'eau 2 tuyaux plus longs de remplissage
eloign6s du tuyau d'eau :
d'entree d'eau 6 pi (1,8 m) piece n°76314,
10 pi (3,0 m) piece n° 350008
Un support peut _tre achete separement pour cette laveuse. Ce
support ajoutera environ 13 po (33 cm) a la hauteur de votre
appareil pour une hauteur verticale totale d'environ 51 po (130
cm).
Bouchon du trou du boulon de transport (4)
Les pieces indiquees sont disponibles & votre magasin Sears
local ou du centre de service Sears. Pour obtenir plus de
renseignements, veuillez composer le 1-800-4-MY-HOME ®(1-
800-469-4663).
Support facultatff
Ce support (avec tiroir de rangement) est disponible en trois
couleurs :
Blanc - num@o de piece 42842
Bisque - num@o de piece 42844
Graphite - numero de piece 42846
Pour soumettre une commande, contacter votre magasin Sears
local. Pour obtenir plus de renseignements, veuillez composer le
1-800-4-MY-HOME ®(1-800-469-4663).
Le ahoix d'un emplacement appropri@ pour la laveuse en
am@liorele rendement et r@duitau minimum le bruit et le
"d@lacement" possible de la laveuse.
La laveuse peut _tre install@e dans un sous-sol, une salle de
buanderie, placard, un enaastrement ou sous un aomptoir sur
mesure. (Voir "Syst@me de vidange'.)
Les exigenoes d'emplacement pour les appareils connexes
doivent _tre @galement consid@r@es. Une installation appropriee
est votre responsabilit@.
25

II vous faudra
• Un chauffe-eau pour fournir de I'eau & 120°F (49°C) & la
laveuse.
Une prise electrique reliee & la terre situee & moins de 5 pi
(1,5 m) de la prise du cordon electrique se trouvant a I'arriere
de la laveuse. (Voir "Specifications electriques".)
Des robinets d'eau chaude et d'eau froide situes & moins de
4 pi (1,2 m) des robinets de remplissage d'eau chaude et
d'eau froide, et une pression d'eau de 20-100 psi (137,9-
689,6 kPa).
Un plancher a niveau ayant une pente maximale de 1 po (2,5
cm) sous toute la laveuse. L'installation de la laveuse sur du
tapis n'est pas recommandee.
Un plancher robuste et solide pour supporter la laveuse dont
le poids total (eau et charge) est de 400 Ib (180 kg).
Ne pas faire fonctionner la laveuse a des temp@atures au-
dessous de 32°F (O°C). Une quantite d'eau peut demeurer dans
la laveuse et causer des dommages a des temperatures basses.
Dimensions de la laveuse
........._ 27"
(68,6 cm)
801/2, /
(128,3 cm)
38"
(96,5 cm)
Installation sur mesure sous un comptoir
Les dimensions indiquees sont pour I'espace minimal accord&
0"
(0cm) ---_
38" rain
(96,52 cm)
0" 27" -_,-)P-4[-- 0"
(0ore>-_(68,_om> J (00m>
Installation dans un encastrement ou un placard
Les dimensions indiquees sont pour I'espace minimal accord&
C
34"
(86,4c_n)
48"_ _ -
(310 cm2} - .
#
24''z
(155 cm2) - -__
If'_ a'Jx'_'10"I*-
(2,5cm) (80cmi (Ocm)
_r 3"
(7,6cm)
]
3
(7,6 era)
1 2
1. Vue lat_rale - placard
ou espace confin_
2. Porte de placard avec jalousies
Un espace additionnel devrait 6tre considere pour faciliter
I'installation et I'entretien.
Un degagement additionnel peut 6tre requis pour les
moulures de mur, de porte et de plancher.
Un espace additionnel de 1po (2,5 cm) sur tousles c6tes de
la laveuse est recommande pour reduire le transfert du bruit.
Pour I'installation dans un placard avec porte, les ouvertures
minimales de ventilation dans les parties superieure et
inferieure de la porte sont requises (vue 2). Les portes
jalousies avec ouvertures equivalentes de ventilation au dans
les parties superieure et inf@ieure sont acceptables.
La laveuse peut _tre installee en utilisant le systeme de rejet
I'egout (au plancher ou mural), le systeme de vidange de I'evier
ou le systeme de vidange au plancher. Selectionner la methode
d'installation du tuyau de vidange selon les besoins. (Voir "Pieces
alternatives".)
36" mJnl
(76,2 cm))
i \,
\
Syst_me de rejet & I'_gout - mural ou au plancher (Vues 1
et2)
Le systeme de rejet & I'egout necessite un tuyau de diametre
minimum de 2 po (5 cm). La capacite minimale d'acheminement
ne doit pas @re de moins de 17 gal (64 L) par minute.
26

La partie superieure du tuyau de vidange doit _tre situee a au
moins 30 po (76,2 cm) et au plus haut a 96 po (2,4 m) de la base
de la laveuse.
= .... _ oo_i,_ •
1 2
Syst_me de vidange de I'_vier de buanderie (Vue 1)
L'evier de buanderie doit avoir une capacite minimale de 20 gal
(76 L). Le sommet de I'evier doit _tre situe a au moins 30 po (76,2
cm) au-dessus du plancher.
Syst_me de vidange au plancher (Vue 2)
Le systeme de vidange au plancher exige un brise-siphon qui
peut _tre achete separement. (Voir "Pieces alternatives".)
Le brise-siphon doit _tre situe aun minimum de 28 po (71 cm) de
la base de la laveuse. D'autres tuyaux peuvent _tre requis.
Si les codes le permettent et si un conducteur distinct de
mise a la terre est utilise, il est recommande qu'un electricien
qualifie determine que la liaison a la terre est adequate.
Ne pas effectuer de liaison a la terre sur une canalisation de
gaz.
En cas de doute concernant la qualite de la liaison a la terre
de la laveuse, verifier aupres d'un electricien qualifi&
Ne pas utiliser un fusible dans le circuit neutre ou de liaison
la terre.
1.Fiche a 3 broches reli_e a la terre
2. Prise murale a 3 alv#oles reli_e a la terre
3. Tige de liaison a la terre
4. Cordon d'alimentation _lectrique
Risque de choc _lectrique
Brancher sur une prise _ 3 alv_oles reli_e
la terre.
Ne pas enlever la broche de liaison _ la terre.
Ne pas utiliser un adaptateur.
Ne pas utiliser un c_ble de rallonge.
Le non-respect de ces instructions peut causer
un d_c_s, un incendie ou un choc _lectrique.
Une alimentation electrique de 120 volts, 60-Hz, CA
seulement, de 15 ou 20 amperes, protegee par un fusible est
requise. Un fusible temporise ou disjoncteur est
recommand& II est recommande d'utiliser un circuit distinct
pour alimenter seulement cet appareil.
Cette laveuse est dotee d'un cordon d'alimentation avec
fiche de branchement a 3 trois broches pour liaison a la terre.
Pour minimiser le risque de choc electrique, le cordon doit
_tre branche sur une prise de courant de configuration
correspondante (3 alveoles) reliee a la terre, conformement
aux codes et reglements Iocaux. Siune prise de configuration
correspondante n'est pas disponible, c'est au client
qu'incombe la responsabilite et I'obligation personnelle de
faire installer par un electricien qualifie une prise
convenablement mise a la terre.
INSTRUCTIONS DE LIAISON
A LATERRE
Pour une laveuse reli_e _ la terre et connect_e par
un cordon :
Cette laveuse doit _tre reliee b. la terre. En cas d'ano-
marie de fonctionnement ou de panne, la liaison & la
terre reduira le risque de choc electrique en offrant au
courant electrique un itineraire d'evacuation de moindre
resistance. Cette laveuse est alimentee par un cordon
electrique comportant un conducteur relie b, la terre et
une fiche de branchement munie d'une broche de
liaison & la terre. La fiche doit 8tre branchee sur une
prise de courant appropriee qui est bien installee et
reliee & la terre conformement & tous les codes et
reglements Iocaux.
AVERTISSEMENT : Le raccordement incorrect
de cet appareil au conducteur de liaison & la terre peut
susciter un risque de choc electrique. En cas de doute
quant & la qualite de la liaison b, la terre de I'appareil,
consulter un electricien ou technicien d'entretien
qualifi&
Ne pas modifier la fiche de branchement fournie avec
I'appareil - si la fiche ne correspond pas b. la configu-
ration de la prise de courant, demander b, un electricien
qualifie d'installer une prise de courant convenable.
Pour une laveuse raccord_e en permanence :
Cette laveuse dolt 8tre raccordee b. un systeme de
c&blage permanent en metal relie b, la terre ou un con-
ducteur relie & la terre doit 8tre en fonction avec les
conducteurs de circuit et raccordes b,la borne de liai-
son & la terre ou la borne sur I'appareil menager.
27

INSTRUCTIONS
D'INSTALLATION
Risque du poids excessif
Utiliser deux ou plus de personnes pour d_placer
et installer la laveuse.
Le non-respect de cette instruction peut causer
une blessure au dos ou d'autre blessure.
IMPORTANT : Positionner la laveuse de sorte que I'arriere de la
machine soit & environ 3 pi (90 cm) de I'emplacement final.
On trouve sur le panneau arriere de la laveuse 4 boulons qui
supportent le systeme de suspension durant le transport.
7
1.
2.
Au moyen d'une cle de 1/2po (13 mm), desserrer chacun des
boulons.
Une fois le boulon desserre, le deplacer au centre du trou et
retirer completement le boulon, y compris la cale
d'espacement en plastique couvrant le boulon et le c&ble fixe
au boulon. Le cordon d'alimentation sera fixe aux 4 boulons.
3. Lorsque les 4 boulons sent retires, enlever le cordon
d'alimentation de chaque porte-boulon et jeter les boulons,
cales d'espacement en plastique et les c&bles.
4. Obturer les trous avec les bouchons des boulons de
transport.
Connecter les tuyaux d'alimentation aux robinets
S'assurer que le tambour de la laveuse est vide.
1. A I'aide d'une pince, verifier que les raccords qui sont deja
fixes sur la laveuse soient bien serres.
REMARQUE : Ne pas serrer excessivement. Cela pourrait
provoquer des dommages.
2. Raccorder le tuyau a indicateur rouge au robinet d'eau
chaude. Visser completement le raccord a la main pour qu'il
comprime le joint.
3. Raccorder le tuyau a indicateur bleu au robinet d'eau froide.
Visser completement le raccord a la main pour qu'il
comprime le joint.
4. Terminer le serrage des raccords - deux tiers de tour avec
une pince.
REMARQUE : Ne pas serrer excessivement. Le raccord risque
d'etre endommag&
5. Ouvrir les robinets d'eau et verifier s'il y a des fuites.
REMARQUE : Remplacer les tuyaux d'arrivee d'eau apres 5
ans d'utilisation pour reduire le risque de defaillance
intempestive. Prendre note de la date d'installation ou de
remplacement des tuyaux d'arrivee d'eau, pour reference
ult@ieure.
Inspecter p@iodiquement les tuyaux; les remplacer en cas de
renflement, de deformations, de coupures, d'usure ou si une
fuite se manifeste.
Le ben acheminement du tuyau de vidange protege vos
planchers contre les dommages imputables a une fuite d'eau.
Lire et suivre attentivement ces instructions.
Le tuyau de vidange est raccorde a la laveuse.
Pour emp_cher I'eau de vidange de refluer dans la laveuse :
• Ne pas redresser le tuyau de vidange ni forcer I'excedent de
tuyau dans le tuyau de rejet a I'egout. Le tuyau doit _tre bien
immobilise, tout en permettant le passage d'air.
28

• Ne pas mettre I'excedent du tuyau de vidange au fond de
I'evier de buanderie.
I_gout au plancher
IIvous faudra peut-_tre des pieces supplementaires. (Voir 12gout
au plancher dans "Pieces alternatives".)
1.
2.
Faire passer le cordon d'alimentation par-dessus la laveuse.
Fixer le tuyau de vidange au pied de I'evier de buanderie ou
au tuyau rigide de rejet a I'egout avec la courroie perlee. (Voir
les illustrations 1 et 2.)
3
Si les robinets d'eau et le tuyau rigide de rejet a I'egout sont
places en retrait (volt I'illustration 3), introduire I'extremit6 en
col de cygne du tuyau de vidange dans le tuyau rigide de
rejet a I'egout. Attacher fermement les tuyaux d'arrivee d'eau
et le tuyau de vidange ensemble, avec la courroie perlee.
Ne pas forcer I'excedent du tuyau de vidange dans le tuyau rigide
de rejet a I'egout.
8 8v'euses eue
Un ben aplomb de la laveuse minimisera le bruit et les vibrations.
1. V@ifier I'aplomb en plagant un niveau sur le bord sup@ieur
de la laveuse, transversalement, puis dans le sens avant
arriere.
\ i
i
2.
Si la laveuse est contre un mur, la deplacer legerement avant
de I'incliner vers I'arriere. Si la laveuse n'est pas d'aplomb,
so@ever d'abord I'avant avec un bloc de bois (2 x 4 pc) et
ajuster le deploiement des pieds selon le besoin, puis
so@ever I'arriere et ajuster le deploiement des pieds selon le
besoin. Repeter ceci jusqu'a I'aplomb parfait de la laveuse.
Apres avoir regl6 I'aplomb de la laveuse, utiliser une cle plate
de % pc (17 mm) pour visser les ecrous sur les pieds
fermement contre la caisse de la laveuse.
Les 4 pieds doivent _tre bien serres. Si les ecrous ne sont pas
bloques contre la caisse de la laveuse, la laveuse peut vibrer.
3. Faire glisser la laveuse a son emplacement final.
4. Confirmer I'aplomb de la laveuse.
1. Consulter les specifications electriques. Verifier que la
tension electrique disponible est correcte et que la prise de
courant est convenablement reliee a la terre. (Volt
"Specifications electriques".)
2. Verifier que toutes les pieces sont installees. S'il reste une
piece, passer en revue les differentes etapes pour decouvrir
laquelle aurait ete oubliee.
3. S'assurer d'avoir tout I'outillage necessaire.
4. Jeter ou recycler tout le materiel d'emballage.
5. V@ifier que chaque robinet d'arrivee d'eau est ouvert.
6. V@ifier s'il y a des fuites autour des robinets et des tuyaux
d'arrivee d'eau.
Risque de choc _lectrique
Brancher sur une prise a 3 aiv_oies reii_e
la terre.
Ne pas enlever la broche de liaison _ la terre.
Ne pas utiliser un adaptateur.
Ne pas utiliser un c_ble de rallonge.
Le non-respect de ces instructions peut causer
un d_c_s, un incendie ou un choc _lectrique.
7. Brancher sur une prise a 3 alveoles reliee a la terre.
8. Lire "Utilisation de la laveuse".
9. Pour tester et nettoyer la laveuse, mesurer la moitie de la
quantite normale recommandee de detergent en poudre ou
liquide Haute efficacite (HE) ou 1/4de la quantite normale
recommandee de detergent ordinaire en poudre ou liquide.
Verser le detergent darts le distributeur de detergent
Selectionner NORMAL/CASUAL (Normal/tout-aller), puis
START (Mise en marche). Laisser la machine executer un
programme complet
29

CARACTI RISTIQUES ET
AVANTAGES
Commandes _lectroniques SENSOR SMART TM
Les commandes electroniques flexibles sont faciles a utiliser que
vous soyez un novice ou un expert.
Syst_me Avantage de distribution du d_tergent
Les quatre compartiments dans le distributeur permettent d'y
verser tousles additifs avant la mise en marche de la laveuse.
Les additifs seront distribues dans I'eau de lavage au meilleur
moment pour un lavage tres efficace. La distribution de TIMED
BLEACW u est incluse dans le systeme Avantage de detergent.
Le detergent est ajoute au debut du programme et I'eau de Javel
est ajoutee au programme de lavage apres que les enzymes de
nettoyage ont pu faire effet. L'assouplissant de tissu est distribue
durant le programme de rin(;age. Le plateau du distributeur du
systeme Avantage de detergent s'enleve facilement pour le
nettoyage.
Niveau d'eau automatique
Cette caracteristique qui s'ajuste en fonction du volume de la
charge, permet & la laveuse d'utiliser la quantite d'eau minimale
necessaire pour nettoyer et rincer les v_tements. Avec un niveau
d'eau bas, vous pouvez obtenir les m6mes resultats avec de plus
petites quantites d'additifs. Parce qu'elle n'utilise que la quantite
d'eau requise, la laveuse economise aussi de I'energie.
Charges plus grosses
Comme il n'y a pas d'agitateur, vous pouvez laver des articles
plus gros et plus epais tel qu'un sac de couchage de grandeur
moyenne. Vous pouvez aussi laver plus de v_tements & la fois, ce
qui veut dire moins de charges. Vous pouvez laver un oreiller ou
un gros ourson rembourr&
Syst_me de suspension
Pour reduire le "deplacement" de la laveuse et les conditions de
"des6quilibre", votre nouvelle laveuse combine :
• 2 ressorts pour isoler la vibration
• 4 amortisseurs de choc & la base de la laveuse pour
minimiser le mouvement.
Tambour en acier inoxydable
Le tambour en acier inoxydable elimine la corrosion et permet
des vitesses d'essorage plus elevees pour une extraction plus
forte de I'eau, ce qui reduit le temps de sechage.
Moteur adapatatif & vitesse variable
Le moteur s'adapte au volume de la charge et au programme
choisi pour donner les meilleures conditions de nettoyage,
rincage et essorage. Le moteur peut tourner aux vitesses lentes
necessaires pour les lainages et articles delicats, mais il est assez
puissant pour essorer une charge volumineuse a 1200 tr/min.
Syst_me de lavage haute efficacit6
Votre nouvelle laveuse haute efficacite a chargement & I'avant fait
economiser du temps gr&ce &des charges moins nombreuses et
plus grosses, conserve les ressources et diminue vos frais d'eau
et d'energie aussi.
Vitesses d'essorage
Cette laveuse choisit automatiquement la vitesse d'essorage en
fonction du programme choisi. Toutefois, ce reglage en usine
peut _tre chang& Cette laveuse offre jusqu'a six choix de
vitesses differentes d'essorage.
Optimiseur thermique
Le systeme de chauffage assure le chauffage de I'eau a la
temperature prereglee pour le programme "Heavy Duty",
"Whitest/Whites", "Sanitary" et I'option "Stain Treat". II procure
egalement le "nettoyage par etapes" Iors de I'utilisation du
programme d'assainissement ou de I'option de traitement des
taches. Le "nettoyage par etapes" fait commencer le programme
de lavage avec de I'eau tiede pour enlever les taches (telles que
le sang ou I'herbe). L'eau continue de chauffer pour enlever les
taches telles que I'huile mecanique sale. Le "nettoyage par
etapes" est con(_u pour enlever les taches avant qu'elles soient
fixees. Durant le programme d'assainissement, I'optimiseur
thermique peut chauffer I'eau a des temperatures qui detruiront
99,999 % des trois types communs de bacteries que I'on trouve
dans le linge sale.
Ajouter un v6tement (Add A Garment)
Lorsque ce temoin est allume le programmes "Express Wash",
"Normal/Casual", "Heavy Duty", Whitest Whited" ou "Sanitary"
peuvent _tre interrompus et la porte deverrouillee pour ajouter un
v_tement oublie Iors du chargement de la laveuse. Le temoin
ADD A GARMENT (Ajouter un v_tement) reste allume durant les 8
premieres minutes d'un programme.
Action de nettoyage CATALYST _ & injection directe
Une solution concentree de detergent est aspergee sur les
v_tements au debut du programme de telle sorte que le
detergent entre en contact avec les v_tements le plus rapidement
possible et enleve les taches de vos v_tements sans
pretraitement.
I_quilibre dynamique
Un syst_me d'equilibrage de precision permet & la laveuse
d'atteindre une vitesse d'essorage de 1200 tr/min. La laveuse
tourne plus rapidement de telle sorte que les v_tements essores
secheront plus rapidement. De plus, si le Syst_me d'equilibre
dynamique detecte une charge desequilibree durant I'essorage, il
redistribue les v6tements pour retablir I'equilibre.
30

UTILISATION DE LA LAVEUSE
_t
STATUS
ADD A GARMENT •
SO^K/ PRW_,S •
WASH® _
RINSE 0 RINSE / SPIN
CLOT _SC_E/_I • DRAIN [ SPIN
_Fss & iFot_s
SECO_,OSTOLOC_/
CO4TaOtLOCK_O• U_OCKCOm_OL
WASH CYCLES
EXPRESS WASH
NORMAL / =
CAS X i ORL'CATE
SANITARY NANDWASH
EStIMAte0
• HEAVY
® NORMAL
i LIGHT
SOIL LEVEL
DELAY
J
s
Risque d'incendie
Ne jamais mettre des articles humect_s
d'essence ou d'autres fluides inflammables dans
la laveuse.
Aucune laveuse ne peut compl_tement enlever
I'huile.
2,
3,
Ne pas faire s_cher des articles qui ont _t_ salis
par tout genre d'huile (y compris les huiles
de cuisson).
Le non-respect de ces instructions peut causer
un d_c_s, une explosion ou un incendie.
AVERTISSEMENT : Pour reduire le risque d'incendie, de choc
electrique ou de bless ures corporelles, lire les INSTRUCTIONS
IMPORTANTES DE SECURITE avant de faire fonctionner cet
appareil.
Le texte suivant est un guide pour I'utilisation de votre laveuse.
Se ref6rer aux sections specifiques de ce manuel pour des
renseignements plus detaill6s.
Ne pas remiser des produits de lessive sur le dessus de cette
laveuse. La vibration est normale au cours du fonctionnement.
Premier programme de lavage sans linge a laver
Avant de laver le linge pour la premiere fois, choisir le programme
NORMAL/CASUAL (normal/tout-aller) et I'executer sans linge.
Apres I'installation, si un programme complet n'a pas 6te execut6
sans linge, utiliser la moitie de la quantite normale recommandee
de detergent a haute efficacite (HE) en poudre ou liquide ou _ de
la quantite normale recommandee de detergent ordinaire en
poudre ou liquide. Le programme initial sert a assurer que
I'interieur est propre avant de laver le linge.
1. Pour charger la laveuse
Ouvrir la porte de la laveuse en tirant sur la poignee. Trier le
OPTIONS MODIFERS
PR£WASH AUTO7E_¢PCOnTrOL
EXTRA HOT/ COLD €_ NI6H
STAIN T££AT ® HOT / COLD 0 MEDIUM HIGH
• WA£M ! WARM • MEDIUM
AUTO SOAK • WARM / COLD • LOW
® COLD ! COLD • EXIRA LOW
2ND RINSE OTAP COLD ! COLD @NO SPIN
HIGH
LOW
OFF
_×rENDED SPIN WATER TEMP SPIN SPEED END of CYCLE SIGNAL
linge d'apres la couleur et le type de tissu. Placer une charge
de linge trie darts la laveuse. Ne pas surcharger la laveuse.
Une charge excessive peut causer un pietre nettoyage.
• La laveuse peut 6tre bien remplie mais le lingene dolt pas
6tre tasse. La porte de la laveuse devrait se fermer
facilement.
• Melanger les gros articles avec les petits articles. Cvitez
de laver un seul article. Charger la laveuse uniformement.
• II est recommande de laver de petits articles tels que les
chaussettes d'enfants dans un sac en filet pour le linge.
• Lorsqu'on enleve le linge, verifier occasionnellement sous
le rebord en caoutchouc a I'avant de la cuve pour les
petits articles.
Fermer la porte de la laveuse en la poussant fermement
jusqu'a I'enclenchement qui verrouille la porte. La porte de la
laveuse demeurera verrouillee durant le programme de
lavage.
REMARQUE : Lorsque tout programme de lavage est
acheve, la porte dolt 6tre ouverte et ensuite fermee avant
qu'un nouveau programme puisse commencer. La porte peut
6tre ouverte seulement si la touche PAUSE/CANCEL (pause/
annulation) est choisie Iorsque le temoin lumineux ADD A
GARMENT (ajouter un v6tement) s'illumine ou si le
programme a et6 annul& Voir "Pour annulet un programme".
Ouvrir le tiroir distributeur et ajouter les produits de lessive au
compartiment de detergent, d'eau de Javel ou
d'assouplissant de tissu. Fermer le tiroir lentement pour eviter
les renversements. Voir "Utilisation du distributeur".
REMARQUE : Pour le meilleur rendement, utiliser des
detergents a haute efficacite. Le contenant pour ce type de
detergent sera marque "HE" ou "Haute efficacite". "L'action
de lavage" HFt en plus d'une quantite moindre d'eau pourra
creer une mousse savonneuse excessive avec un detergent
ordinaire.
4. Mettre la laveuse en marche en choisissant I'un des
programmes de lavage. Le temoin lumineux pour le
programme choisi s'illuminera. Lors de la selection d'un
programme de lavage, le programme prer6gl6, la temperature
de I'eau, la vitesse d'essorage et le niveau de salete
s'illumineront. L'affichage montre le temps estime qui reste.
Les reglages pr6r6gles fournissent le soin recommande pour
les tissus pour le programme selectionn6. Voir "Programmes
de lavage".
5. Choisir les OPTIONS desir6es. Toutes les options ne sont pas
disponibles avec tous les programmes. Voir "Options".
6. Choisir les MODIFIERS (modificateurs) desir6s. Tousles
modificateurs ne sent pas disponibles avec tous les
programmes et options. Voir "Modificateurs".
31
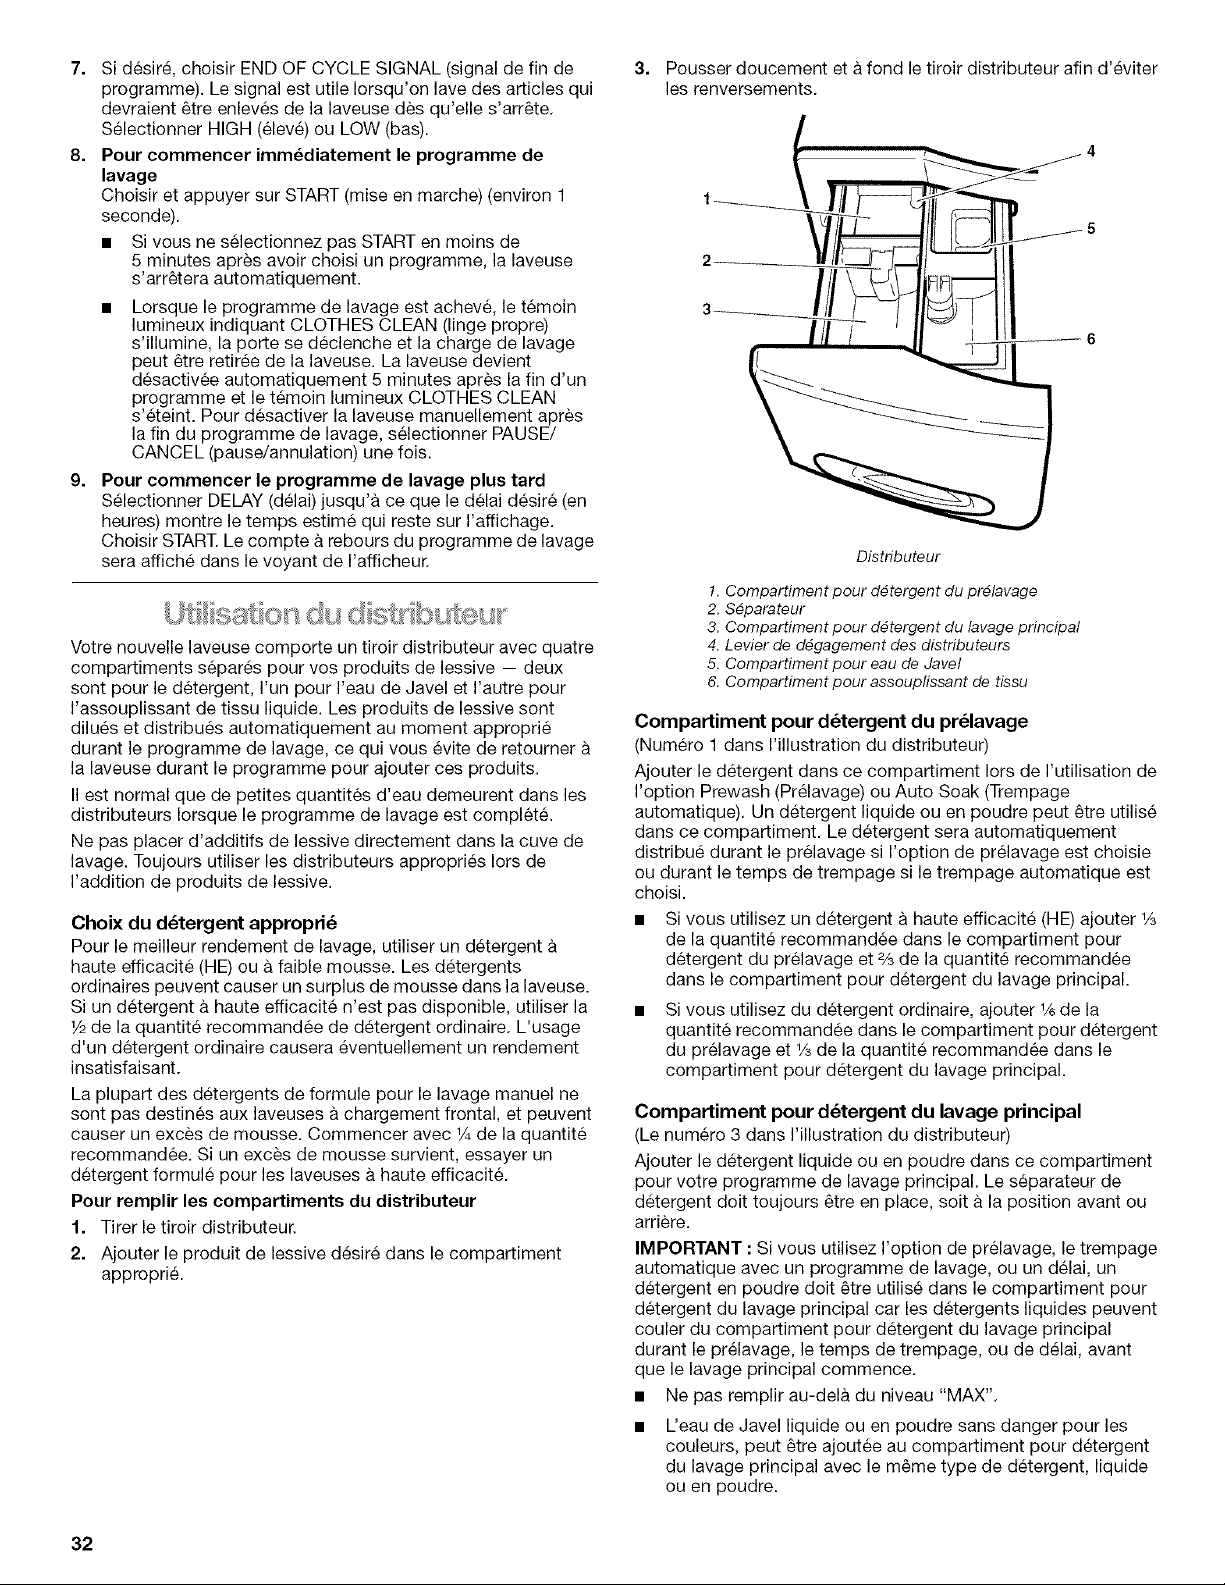
7. Si desire, choisir END OF CYCLE SIGNAL (signal de fin de
programme). Le signal est utile Iorsqu'on lave des articles qui
devraient _tre enleves de la laveuse des qu'elle s'arr_te.
Selectionner HIGH (eleve) ou LOW (bas).
8. Pour commencer imm_diatement le programme de
lavage
Choisir et appuyer sur START (mise en marche) (environ 1
seconde).
• Si vous ne selectionnez pas START en moins de
5 minutes apres avoir choisi un programme, la laveuse
s'arr_tera automatiquement.
• Lorsque le programme de lavage est acheve, le temoin
lumineux indiquant CLOTHES CLEAN (linge propre)
s'illumine, la porte se declenche et la charge de lavage
peut _tre retiree de la laveuse. La laveuse devient
d6sactivee automatiquement 5 minutes apres la fin d'un
programme et le temoin lumineux CLOTHES CLEAN
s'eteint. Pour desactiver la laveuse manuellement apres
la fin du programme de lavage, selectionner PAUSE/
CANCEL (pause/annulation) une fois.
9. Pour commencer le programme de lavage plus tard
Selectionner DELAY (delai) jusqu'a ce que le delai desire (en
heures) montre le temps estime qui reste sur I'affichage.
Choisir START. Le compte &rebours du programme de lavage
sera affiche dans le voyant de I'afficheur.
Votre nouvelle laveuse comporte un tiroir distributeur avec quatre
compartiments separes pour vos produits de lessive -- deux
sont pour le detergent, I'un pour I'eau de Javel et I'autre pour
I'assouplissant de tissu liquide. Les produits de lessive sont
dilues et distribues automatiquement au moment approprie
durant le programme de lavage, ce qui vous evite de retourner
la laveuse durant le programme pour ajouter ces produits.
II est normal que de petites quantites d'eau demeurent dans les
distributeurs Iorsque le programme de lavage est complet&
Ne pas placer d'additifs de lessive directement dans la cuve de
lavage. Toujours utiliser les distributeurs appropries lots de
I'addition de produits de lessive.
Choix du d_tergent appropri_
Pour le meilleur rendement de lavage, utiliser un detergent
haute efficacite (HE) ou a faible mousse. Les detergents
ordinaires peuvent causer un surplus de mousse dans la laveuse.
Si un detergent a haute efficacite n'est pas disponible, utiliser la
_/_de la quantite recommandee de detergent ordinaire. L'usage
d'un detergent ordinaire causera eventuellement un rendement
insatisfaisant.
La plupart des detergents de formule pour le lavage manuel ne
sont pas destines aux laveuses a chargement frontal, et peuvent
causer un exces de mousse. Commencer avec V4 de la quantite
recommandee. Si un exc_s de mousse survient, essayer un
detergent formule pour les laveuses &haute efficacit&
Pour remplir les compartiments du distributeur
1. Tirer le tiroir distributeur.
2. Ajouter le produit de lessive desire dans le compartiment
appropri&
3. Pousser doucement eta fond le tiroir distributeur afin d'eviter
les renversements.
Distributeur
1. Compartiment pour d_tergent du pr_lavage
2. S_parateur
3. Compartiment pour d_tergent du lavage principal
4. Levier de d_gagement des distributeurs
5. Compartiment pour eau de Javel
6. Compartiment pour assouplissant de tissu
Compartiment pour d_tergent du pr_lavage
(Numero 1 dans I'illustration du distributeur)
Ajouter le detergent dans ce compartiment Iors de I'utilisation de
I'option Prewash (Prelavage) ou Auto Soak (Trempage
automatique). Un detergent liquide ou en poudre peut _tre utilise
dans ce compartiment. Le detergent sera automatiquement
distribue durant le prelavage si I'option de prelavage est choisie
ou durant le temps de trempage si le trempage automatique est
choisi.
• Si vous utilisez un detergent a haute efficacite (HE) ajouter %
de la quantite recommandee dans le compartiment pour
detergent du prelavage et % de la quantite recommandee
dans le compartiment pour detergent du lavage principal.
Si vous utilisez du detergent ordinaire, ajouter %de la
quantite recommandee dans le compartiment pour detergent
du prelavage et Vsde la quantite recommandee dans le
compartiment pour detergent du lavage principal.
Compartiment pour d_tergent du lavage principal
(Le numero 3 dans I'illustration du distributeur)
Ajouter le detergent liquide ou en poudre dans ce compartiment
pour votre programme de lavage principal. Le separateur de
detergent dolt toujours _tre en place, soit a la position avant ou
arriere.
IMPORTANT : Si vous utilisez I'option de prelavage, le trempage
automatique avec un programme de lavage, ou un delai, un
detergent en poudre dolt _tre utilise dans le compartiment pour
detergent du lavage principal car les detergents liquides peuvent
couler du compartiment pour detergent du lavage principal
durant le prelavage, le temps de trempage, ou de delai, avant
que le lavage principal commence.
• Ne pas remplir au-dela du niveau "MAX".
L'eau de Javel liquide ou en poudre sans danger pour les
couleurs, peut _tre ajoutee au compartiment pour detergent
du lavage principal avec le m_me type de detergent, liquide
ou en poudre.
32

Detergent liquide : Placer le SCPARATEUR &la position avant,
entre les guides, tel qu'illustre ci-apres. II n'y aura pas d'ecart
entre le fond du compartiment pour detergent du cycle de
lavage et la base du separateur.
POWDER
PREWASHz_
MAINWASHV
LIQUI
SO
S_parateur en position avant, entre les guides
1. Separateur
2. Guide
Detergent en poudre : Placer le SEPARATEUR a la position
arriere, derriere les guides, tel qu'illustre ci-apres. II y aura un
ecart entre le fond du compartiment pour detergent du cycle
de lavage et le fond du separateur.
LIQUI
SC
S_parateur a la position arriere, derriere les guides
1. Separateur
2. Guide
REMARQUE : Le separateur est expedie de I'usine en position
poudre (arriere).
Compartiment d'eau de Javel
(Numero 5 dans I'illustration des distributeurs)
Ne pas ajouter PLUS DE 1/3tasse (80 mL) d'eau de javel liquide
dans ce compartiment. L'eau de Javel sera automatiquement
diluee et distribuee au moment approprie durant le premier
ringage, apres le programme de lavage. Ce compartiment ne
peut pas diluer un agent de blanchiment en poudre.
• Toujours mesurer I'eau de Javel. Utiliser une tasse a mesurer
avec un bec verseur, et eviter I'a-peu-pres.
• Ne pas remplir au-dela du niveau "MAX". Le remplissage
excessif pourrait causer de serieux dommages aux
v_tements.
Compartiment d'assouplissant de tissu
(Numero 6 dans I'illustration des distributeurs)
Ajouter 1Ade tasse (60 mL) d'assouplissant de tissu liquide dans
ce compartiment. L'assouplissant sera automatiquement
distribue dans le ringage final.
• Ne pas remplir au-dela du niveau "MAX".
1. Pour faire une pause de la laveuse a tout moment, choisir
PAUSE/CANCEL (pause/annulation).
2. Pour continuer le programme, choisir et appuyer sur START
(environ 1 seconde).
Les options et modificateurs ne sont pas tous disponibles avec
tousles programmes.
Les programmes, options et modificateurs peuvent _tre changes
tout moment avant que START soit selectionne.
Les options et les modificateurs peuvent _tre changes a tout
moment apres que START soit selectionne et avant la mise en
marche de I'option ou du modificateur selectionne.
Pour annuler un programme et s_lectionner un nouveau
programme
1. Selectionner PAUSE/CANCEL deux fois.
2. Selectionner le programme desire.
3. Selectionner les OPTIONS desirees.
4. Selectionner et appuyer sur START (environ 1 seconde) pour
remettre la laveuse en marche au commencement d'un
nouveau programme.
Pour annuler un programme
1. Selectionner PAUSE/CANCEL deux fois.
2. La laveuse devient desactivee, la porte se declenche et le
linge peut @re enleve.
REMARQUE : Si le niveau d'eau ou la temperature sont trop
eleves, la laveuse se vidangera automatiquement avant que la
porte se declenche.
Pour changer les options ou modificateurs apr_s le
commencement d'un programme
1. Selectionner PAUSE/CANCEL.
2. Selectionner les OPTIONS ou MODIFIERS (modificateurs)
desires.
3. Selectionner et appuyer sur START (environ 1 seconde) pour
continuer le programme.
33

Pour vidanger la laveuse manuellement
1. Selectionner PAUSE/CANCEL
2. Selectionner DRAIN/SPIN (vidange/essorage).
3. Selectionner et appuyer sur START (environ 1 secende) pour
commencer la vidange.
4. Lorsque I'essorage est acheve, la porte se declenche. Le
linge peut _tre enleve de la laveuse.
Ces temoins lumineux montrent quelle portion du programme de
la laveuse est en fonctionnement. IIs indiquent aussi quand vous
pouvez ajouter un autre article au programme de lavage et quand
les commandes sont verrouillees.
STATUS
ADD A GARMENT ®
SOAK/PREWASH •
WASH ®
RINSE®
SPIN •
CLOTHESCLEANQ
CONTROLLOCKED•
Ajouter des articles
Vous pouvez ajouter des articles a la laveuse apres que le
programme a commence pour Express Wash (lavage rapide),
Normal/Casual (normal, tout-aller), Heavy Duty (service intense),
Whitest Whites (blancs les plus blancs) et Sanitary
(assainissement) si le temein lumineux ADD A GARMENT (ajouter
un v_tement) s'illumine.
Pour ajouter des articles
1. Selectionner PAUSE/CANCEL La porte de la laveuse se
declenche et des articles peuvent _tre ajeutes.
2. Pour continuer le programme, fermer la porte et selectionner
et appuyer sur START (environ 1 seconde).
Linge propre
Le temoin lumineux Clothes Clean (linge propre) reste allume
pendant 5 minutes apres la fin du programme. La laveuse se
mettra alers hers-circuit.
Commandes de verrouillage
La commande de verrouillage emp_che I'utilisation non
intentionnelle de la laveuse. Vous pouvez aussi utiliser la
caracteristique de commande de verrouillage pour emp_cher un
programme non desire ou des changements d'option au cours
d'un programme. Lersque CONTROL LOCKED (commande
verreuillee) est allume, tousles beutens sent desactiv6s, sauf
Pause/Cancel (pause/annulation) et Start (mise en marche). Vous
pouvez verrouiller les commandes pendant que la laveuse est en
fonctionnement.
Pour verrouiller les commandes
Selectionner et appuyer sur DRAIN/SPIN (vidange/essorage)
pendant 3 secondes.
@
DRAIN / SPIN
PRESS & HOLD 3
SECONDS TO LOCK /
UNLOCK CONTROL
Le temoin lumineux CONTROL LOCKED s'illumine.
Pour deverrouiller les commandes
Selectionner et appuyer sur DRAIN/SPIN pendant 3 secondes
jusqu'a ce que le temoin lumineux CONTROL LOCKED s'eteigne.
Temps restant estim_
Les durees des programmes varient automatiquement selon la
pression de I'eau, la temperature de I'eau, le detergent et la
charge de v_tements. La duree du programme sera allongee en
cas d'exces de mousse ou de desequilibre de la charge.
Programmes de lavage
Choisir les programmes de lavage en selectionnant le bouton &
c6te du programme desir& Chaque programme est con(_u pour
des types differents de tissus et de niveaux de salet&
WASH CYCLES
EXPRESSWASH
NORMAL/
CASUAL../L/L//_
DELICATE
SILK
WOOL
ULTRA
SANITARY HANDWASH
Chaque programme comporte un niveau de salete (temps du
programme), une temperature de I'eau, une vitesse
d'essorage preregles et peut aussi avoir dez options
prereglees. Les reglages preregles fournissent les soins
recommandes des tissus pour le programme choisi.
Les reglages prer6gles peuvent 6tre changes en tout temps
avant que START (Mise en marche) ne soit choisi. Toutes les
options et les modificateurs ne sont pas disponibles avec
tousles programmes. (Pour changer les reglages apres que
le programme a ete mis en marche, choisir PAUSE/CANCEL
(Pause/annulation), ensuite choisir les reglages desires.
Selectionner et appuyer sur START [environ 1 seconde] pour
continuer le programme.
34

Pr_r_glages des programmes
Chaque programme a un temps de programme, une temp@ature
de I'eau, et une vitesse d'essorage pr@egl6s. Les reglages
preregles fournissent les soins recommandes des tissus pour le
programme choisi. Voir le tableau.
Program- Niveau de Temperature de Vitesse
me salet_ I'eau d'esso-
(hr:min) rage
Sanitary Plus Extra Hot/Cold High
(Sanitaire) (2:00) (Extra chaude/ (12levee)
Froide)
Whitest Plus Hot/Cold High
Whites (1:10) (Chaude/ (Plevee)
(Blancs les Froide)
plus
blancs)
Heavy Plus Hot/Cold High
Duty (1:30) (Chaude/ (12levee)
(Service Froide)
intense)
Normal/ Normal Warm/Cold Medium
Casual (0:45) (Tiede/Froide) High
(Normal/ (12levee)
Tout-aller)
Express Moins Warm/Cold High
Wash (0:35) (Tiede/Froide) (Plevee)
(Lavage
rapide)
Delicate Normal Warm/Cold Low
(Tissus (0:35) (Tiede/Froide) (Basse)
d_licats)
Silk Normal Cold/Cold No Spin
(Sole} (0:30) (Froide/Froide) (Pas d'es-
sorage)
Wool Normal Cold/Cold Low
(Laine) (0:35) (Froide/Froide) (Basse)
Ultra Normal Cold/Cold Extra Low
Handwash (0:35) (Froide/Froide) (Extra
(Lavage a Basse)
la main
Ultra)
Sanitary (Sanitaire)
Utiliser ce programme pour nettoyer les tissus grand teint tres
sales. Ce programme combine une temperature d'eau tres
chaude et un culbutage & vitesse rapide pour aider a assurer
I'elimination des saletes intenses et des taches. II est
recommande de regler votre chauffe-eau a 120°F (49°C) pour
assurer un rendement approprie durant ce programme. Le
programme sanitaire aide egalement a eliminer 99,999% de 3
bacteries infectieuses communes, m_ne sans utilisation d'eau de
Javel. Un essorage & vitesse extra elevee aide a diminuer le
temps de sechage.
Whitest Whites (Blancs les plus blancs)
Ce programme est specialement con_u pour nettoyer des
charges de tissus blancs sales, avec I'addition d'eau de Javel.
Les temperatures de lavage a I'eau chaude assurent I'utilisation
optimale de I'eau de Javel. Un ringage additionnel fournit un
rendement ideal de ringage pour eviter les residus de chlore sur
votre linge. Ce programme combine un culbutage a haute
vitesse, un temps de lavage prolonge, et un essorage a vitesse
extra elevee pour raccourcir le temps de sechage.
Heavy Duty (Service intense)
Utiliser ce programme pour laver des charges de tissus epais
grand teint, et les v6tements normalement sales. Ce programme
combine un culbutage a vitesse rapide, un temps de lavage
prolonge, et un essorage a vitesse extra elev6e pour raccourcir
les temps de sechage. Si la temperature de I'eau est moindre que
celle requise pour ce programme, le chauffe-eau rechauffera
I'eau a la temp@ature ideale.
REMARQUE : Stain Treat (Traitement des taches) est une option
defaut pour ce programme. Pour assurer le meilleur rendement,
I'eau est chauffee a mesure que le programme avance. Ce
chauffage graduel aide & enlever les saletes organiques telles que
le sang. Stain Treat dolt @re eteint pour changer les
modificateurs.
Normal/Casual (Normal/Tout-aller)
Utiliser ce programme pour laver des charges de tissus
n'exigeant pas de repassage tels que chemises sports,
chemisiers, v_tements tout-aller pour le bureau, melanges de
textures a pressage permanent, cotons et toiles, ainsi que tissus
synthetiques. Ce programme combine un culbutage a vitesse
moyenne, I'essorage a haute vitesse, et un procede de
refroidissement de la charge pour reduire le froissement.
Express Wash (Lavage rapide)
Utiliser ce programme pour de petites charges de v_tements
legerement sales qui sont requis sans delai. Ce programme
combine un culbutage a vitesse rapide, un temps de lavage
raccourci, et un essorage a vitesse extra elevee pour raccourcir le
temps de sechage.
Delicate (Tissus d_licats)
Utiliser ce programme pour laver les tissus transparents et la
lingerie. Ce programme combine un culbutage a basse vitesse et
un essorage a basse vitesse pour le soin des tissus delicats.
Silk (Sole)
Utiliser ce programme pour nettoyer les v_tements lavables en
sole. (Verifier les instructions de I'etiquette pour vous assurer que
le v_tement est lavable). Ce programme culbute delicatement et
vide I'eau sans essorage pour nettoyer delicatement les
v@ements et reduire le froissement au minimum. Comme
I'essorage est omis, les v_tements contiennent une quantite plus
elevee d'eau a la fin de ce programme.
Wool (Laine)
Utiliser ce programme pour nettoyer les v_tements lavables en
laine. (Verifier les instructions sur I'etiquette pour vous assurer
que le v_tement est lavable.) Ce programme presente un
culbutage delicat et un essorage a basse vitesse pour reduire au
minimum le froissement et le retrecissement.
Ultra Handwash (Lavage & la main ultra)
Utiliser ce programme pour nettoyer les v_tements lavables & la
main et demandant un soin special. L'action de ce programme,
semblable & la fagon dont les v_tements sont laves a la main
darts un evier, combine les periodes de culbutage & vitesse extra
basse et le trempage. Un essorage a vitesse extra basse reduit le
froissement.
35

Extra Cycles (Programmes additionnels)
Les programmes additionnels peuvent _tre choisis en
selectionnant le bouton au-dessus du programme desir&
@
RINSE/ SPIN
@
DRAIN / SPIN
Toutes les options ne sont pas disponibles avec chaque
programme.
OPTIONS
@
PREWASH
STAIN TREAT
On peut changer la selection n'importe quand avant la selection
de START (Mise en marche).
AUTO SOAK
Rinse/Spin (Rin_age/essorage)
Utiliser ce programme pour obtenir un rin_age et un essorage
seulement. Ce programme combine un culbutage a vitesse
elevee et un essorage a vitesse extra elev6e. Si desire, vous
pouvez reduire la vitesse d'essorage en choisissant la vitesse
que vous desirez du modificateur SPIN SPEED (Vitesse
d'essorage).
Rinse/Spin (Rin_:age/essorage) est utile pour
• Les charges necessitant un rint_age seulement.
• L'addition d'assouplissant de tissu a une charge en utilisant le
distributeur d'assouplissant.
Drain/Spin (Vidange/essorage)
Utiliser ce programme pour vidanger votre laveuse ou pour
vidanger et essorer votre charge de linge. La vitesse d'essorage
est preregl6e & elevee. Si vous le desirez, vous pouvez reduire la
vitesse d'essorage en choisissant la vitesse que vous desirez du
modificateur SPIN SPEED (Vitesse d'essorage).
REMARQUE: Les charges de tissus synthetiques, tissus delicats,
articles lavables a la main, et lainages, doivent _tre vidangees
sans essorage ou a essorage faible pour eviter d'etirer les tissus.
Comme pour tout produit neuf, vous entendrez des sons qui ne
vous sont pas familiers. Vous pouvez entendre divers sons
Iorsque la porte est verrouillee ou deverrouillee, et durant le
lavage, le rin9age et I'essorage. Entre les changements des
actions de lavage, il y aura des pauses momentanees. Vous
entendrez I'aspersion et I'eclaboussement de I'eau durant les
programmes de lavage et de rin(_age. Ces nouveaux sons et
pauses font partie du fonctionnement normal de la laveuse. (Voir
"Depannage".)
2ND RINSE
EXTENDED SPIN
Voir section "Guide de lessivage" pour un apergu des options
possibles pour chaque selection de programme de lavage.
Vous pouvez choisir plus d'une option pour un programme.
Certaines options ne peuvent pas _tre ajoutees a certains
programmes, par exemple, Stain Treat (Traitement des
taches) ne peut pas _tre ajoute au programme Express Wash
(Lavage rapide).
Si une option est disponible avec un programme selectionne,
le temoin lumineux pour cette option s'illuminera Iorsqu'il est
selectionn&
Si une option n'est pas disponible avec un programme
selectionne, il y aura un bref signal sonore et le temoin
lumineux pour cette option ne s'allumera pas Iorsqu'il est
selectionn&
Prewash (Pr_lavage)
Utiliser cette option pour les articles tr_s sales qui ont besoin de
pretraitement. Cette option ajoute un prelavage et une vidange
de 15 minutes au programme de lavage principal.
• Ajouter le detergent aux compartiments de prelavage et du
lavage principal dans le tiroir distributeur.
• Lors de I'utilisation de prelavage, ne pas utiliser de detergent
liquide dans le compartiment du lavage principal. Utiliser un
detergent en poudre pour le programme de lavage principal.
REMARQUE : Les options de prelavage et de trempage
automatiques ne peuvent pas _tre choisies dans le m_me
programme.
Vous pouvez personnaliser votre lavage en ajoutant des
OPTIONS & vos selections de programme. Vous pouvez ajouter
ou changer I'option apres avoir commence un programme
n'importe quand avant que I'option selectionn6e commence.
Stain Treat (Traitement des taches)
Utiliser cette option pour les charges tres sales qui ont besoin
d'un meilleur traitement pour les taches. Lorsque le traitement
pour les taches est choisi, la temperature de I'eau du programme
de lavage selectionne est automatiquement reglee a tiede. L'eau
sera alors chauffee a une temperature d'eau chaude pour aider
enlever la tache. Cette option fournira le meilleur enlevement de
taches organiques comme le sang.
REMARQUE :Si le Traitement des taches est selectionne avec le
programme Sanitaire, I'eau sera chauffee a une temperature tres
chaude.
36
Auto Soak (Trempage automatique)
Utiliser I'option de Auto Soak (Trempage automatique) pour les
charges de coton, toile, polyester ou nylon tres sales avec taches
incrustees. Au cours du trempage automatique, I'eau sera
ajoutee au tambour et le linge sera egalement distribue par une
phase breve de culbutage. Le linge sera ensuite trempe par
phases sans mouvement du tambour. Apres le trempage, la
laveuse se vide sans essorage.

Addition a un programme de lavage : Un temps de trempage
de 30 minutes est ajoute au programme de lavage principal pour
ameliorer I'elimination des taches incrustees.
Ajouter du detergent aux deux compartiments de prelavage
et de lavage principal du tiroir distributeur.
REMARQUE : Les options de trempage automatique et de
prelavage ne peuvent pas 6tre selectionnees dans le m6me
programme. Utiliser du detergent en poudre pour le
programme de lavage principal parce que le detergent liquide
coulera dans la laveuse durant le trempage automatique.
2.
3.
Choisir un programme de lavage.
Selectionner AUTO SOAK (Trempage automatique).
REMARQUE : Pour les programmes avec temperatures de
lavage chaudes, la temperature de trempage sera reglee
tiede; autrement, la temperature de trempage sera la m_me
que la temperature de lavage.
4. Selectionner et appuyer sur START (Mise en marche) (environ
1 seconde). Apres le trempage, la laveuse se vide et le
programme de lavage commence.
Sans un programme de lavage : Fournit un temps de trempage
avec eau tiede ou eau froide suivi par une vidange.
1. Ajouter du detergent seulement au compartiment de
prelavage du tiroir distributeur.
2. Selectionner DRAIN/SPIN (Vidange/essorage) ou RINSE/
SPIN (Rin(_age/essorage) en premier, ensuite AUTO SOAK
(Trempage automatique).
3. Selectionner la temperature de trempage desiree.
4. Selectionner et appuyer sur START (Mise en marche) (environ
1 seconde).
2nd Rinse (2° rin£age)
Un deuxieme ringage peut 6tre utilise pour assurer I'elimination
des residus de detergent ou des residus d'eau de Javel des
vGtements. Cette option fournit un ringage additionnel avec la
mGme temperature d'eau que le premier rin(_age.
Extended Spin (Essorage prolongS)
Utiliser cette option pour ajouter un essorage additionnel a tout
programme pour ameliorer le "duvetage" de votre linge, pour
reduire le temps de sechage et pour economiser de I'energie.
Les reglages prer6gl6s de programme de temperature d'eau, de
lavage/rint_age et de vitesse d'essorage peuvent 6tre changes.
Vous pouvez changer un modificateur apres la mise en marche
d'un programme a tout moment avant que le modificateur choisi
commence. Tousles modificateurs ne sont pas disponibles avec
chaque option et programme.
MODIFIERS
AI!_ T/_P Com_ot
®EXTRA HOT/COLD ®HIGH
@ HOT/COLD ® MEDIUM HIGH
0 WARM / WARM • MEDIUM
• WARM / COLD • LOW
O COLD / COLD • EXTRA LOW
0 TAP COLD / COLD 0 NO SPIN
C) C)
WATER TEMP SPIN SPEED
WASI4 [ RINSE
• HIGH
• LOW
® OFF
C)
END of CYCLE SIGNAL
Pour changer la temperature de I'eau, selectionner le bouton
WATER TEMP (Temperature de I'eau) jusqu'a ce que le
reglage desire s'illumine.
Pour changer la vitesse d'essorage, selectionner le bouton
SPIN SPEED (Vitesse d'essorage) jusqu'a ce que le reglage
desire s'illumine.
• HEAVY
• NORMAL
e LIGHT
C)
SOIL LEVEL
Pour changer le temps du programme, selectionner le bouton
SOIL LEVEL (Niveau de salete).
Pour changer le volume du signal de fin de programme,
selectionner END OF CYCLE SIGNAL (Signal de fin de
programme).
Wash/Rinse Temp (Temperature de lavage/rin£age)
Selectionner une temperature d'eau en fonction du type de
charge que vous lavez. Utiliser latemperature d'eau la plus
chaude convenant au tissu. Suivre les instructions sur I'etiquette
du v_tement.
Les rin£ages tiedes laissent les charges plus seches que les
ringages froids. Les rin(_ages tiedes augmentent le froissement.
Dans les climats froids, un ringage tiede rend la charge plus
confortable a manipuler. Les rint_ages froids economisent
I'energie.
Guide de temperature
Temperature de I'eau de Tissus sugger_s
lavage
HOT (Chaude) Blancs et pastels
122°F (50°C) ou plus Saletes intenses
WARM (Tilde) Couleurs vives
104°F (40°C) Saletes de moderees Alegeres
COLD (Froide) Couleurs qui deteignent ou
77OF(25oc) s'attenuent
Saletes legeres
Dans les temperatures d'eau de lavage plus froides que 70°F
(21°C), /es d#tergents ne se diluent pas bien. Les salet_s peuvent
#tre difficiles a enlever.
Auto Temp Control (Commande automatique de
temperature)
La CAT (Commande automatique de temperature) detecte
electroniquement et maintient une temperature d'eau uniforme.
La CAT regle I'eau chaude et I'eau froide d'entree. La CAT est
automatiquement activee Iorsqu'un programme est selectionn&
(Voir "Reglage d'un programme preregle" dans "Programmes".)
• La CAT assure un nettoyage consistant.
La CAT agit pour le reglage de temperature de lavage avec
Extra Hot/Cold (Extra chaude/Froide), Hot/Cold (Chaude/
Froide), Warm/Warm (Tiede/Tiede), Warm/Cold (Tiede/Froide)
et Cold/Cold (Froide/Froide).
• Les temperatures de rint_age froides dependent de I'eau
froide a votre robinet.
• Pour le reglage de temperature Tap Cold/Cold (Froide du
robinet/Froide), les temperatures de lavage et de rin(_age
dependent de I'eau froide &votre robinet.
• Le reglage de ringage a Warm (Tiede) regle la temperature de
I'eau a environ 104°F (40°C).
37

Se r@f@rerace tableau pour des types de charges sugger@s et leurs programmes correspondants. A droite se trouvent les options
disponibles pour chacun de ces programmes.
PROGRAMME TYPE DE CHARGE SUGGERE OPTIONS DISPONIBLES
Prewash Stain Treat Auto 2nd Rinse Extended
(Prela- (Traite- Soak (2° Spin
vage*) ment des (Trem- rin_:age) (Essorage
taches) page prolongS)
auto-
matique*)
Sanitary Linge tr_s sale : sous-v@ements, i/ i/ v' v' i/
(Sanitaire) serviettes, v_tements de travail,
couches tres sales, etc.
Whitest Tissus blancs tres sales v' v' v' v' v'
Whites
(Blancs les
plus blancs)
Heavy Duty Sous-v_tements, serviettes, chemises, v' v' v' v' v'
(Service etc. en coton, normalement sales
intense)
Normal/ Chemisiers, chemises, salopettes, etc. i/ v' _ _
Casual de legerement & normalement sales,
(Normal/ fabriques de polyester, nylon, coton,
Tout-aller) toile ou melanges de coton
Express Wash Salopettes et v_tements de sport en v' v' v'
(Lavage coton, polyester, nylon et melanges de
rapide) coton de legerement a normalement
sales
Delicate Rideaux et v_tements delicats, robes, V' v' v'
(Articles jupes, chemises et chemisiers
d_licats)
Silk Tissus fabriques de sole identifies
(Sole} comme lavables a la machine
Wool Lainages avec un fini non feutre,
(Laine) identifies comme lavables & la machine
Ultra Tissus fabriques de soie, articles _'
Handwash demandant un soin special et marques
(Lavage a la "Lavable a la main"
main Ultra)
* Les programmes Prelavage et Trempage automatique ne peuvent pas _tre choisis en m_me temps.
38

CONSEILS DE
LESSIVAGE
Preparation des v_tements pour le lavage
Suivre les recommandations suivantes pour prolonger la vie de
vos v_tements.
• Fermer les fermetures a glissiere, les boutons pression et les
crochets pour eviter d'accrocher d'autres articles. Enlever les
@ingles, les boucles et autres objets durs pour eviter
d'egratigner I'interieur de la laveuse. Oter les garnitures et les
ornements non lavables.
• Vider les poches et les retourner.
• Retourner les revers et enlever la charpie et la poussiere avec
une brosse.
• Retourner les tricots synthetiques pour eviter le boulochage.
• Attacher les cordons et les ceintures-echarpes pour
emp_cher I'emm_lement.
• R@arer les dechirures, les outlets et coutures decousus.
• Traiter lestaches.
• Les v_tements taches ou mouilles devraient _tre laves sans
delai pour obtenir les meilleurs resultats.
"rri
S@arer les articles tres sales des articles legerement sales,
m_me si on les laverait normalement ensemble. Separer les
articles qui forment de la charpie (serviettes, chenille) des
articles qui attrapent la charpie (velours c6tele, synthetique,
pressage permanent). Dans la mesure du possible, retourner
les articles qui forment de la charpie.
Separer les couleurs foncees et les articles grand teint des
articles qui deteignent.
Trier en fonction des tissus et de la confection (cotons
solides, tricots, articles delicats).
D_chargement
• Retirer les v_tements de la laveuse une fois que le
programme est termine. Des objets en metal comme les
fermetures eclair, les boutons pressions et les boucles
peuvent rouiller si on les laisse Iongtemps dans le panier de la
laveuse.
Suggestions de chargement (capacit_ maximale de
charge).
V_tements de travail
4 jeans 2 surv_tements (bas)
4 pantalons 2 surv_tements (haut)
4 chemises
Serviettes
10 serviettes de bain 14 debarbouillettes
10 serviettes &main
Charges mixtes
3 draps (1 tres grand, 2
simples)
4 taies d'oreiller
3 chemises
3 chemisiers
9 t-shirts
9 shorts
10 mouchoirs de poche
ENTRETIEN DE LA
LAVEUSE
Nettoyage de I'ext_rieur
Utiliser une eponge ou un linge doux humide pour essuyer les
renversements. Essuyer occasionnellement les surfaces externes
de la laveuse pour maintenir son apparence d'appareil neuf.
Utiliser un savon doux et de I'eau. Ne pas utiliser de produits
abrasifs.
Nettoyage de I'int_rieur
Utiliser une eponge ou un linge doux humide pour essuyer de
temps a autre I'interieur de la porte pour enlever tout residu de
detergent. Utiliser un savon doux et de I'eau. Ne pas utiliser de
produits abrasifs.
Nettoyage du joint de porte
Utiliser une @onge ou un linge doux humide au besoin. Verifier le
pli du joint periodiquement pour tout objet etranger.
Nettoyage du tiroir distributeur
Le tiroir distributeur est amovible pour faciliter le nettoyage.
1. Degager le tiroir distributeur en appuyant sur le levier de
degagement dans le compartiment de pr_lavage. Voir
"Utilisation du distributeur". Retirer le tiroir.
2. Enlever les pieces incluses (le siphon des compartiments de
I'assouplissant et de I'eau de Javel et le separateur).
3. Laver les pieces sous I'eau du robinet.
4. Remettre les pieces incluses et remettre le distributeur dans
le tiroir.
39

Remplacer les tuyaux d'alimentation apres cinq ans d'utilisation
afin de reduire le risque de probleme avec le tuyau. Inspecter
p@iodiquement et remplacer les tuyaux d'alimentation
comportant des renfiements, ecrasements, coupures, signes
d'usure ou fuites.
Lors du remplacement des tuyaux d'alimentation, inscrire la date
de remplacement.
Installer et remiser la laveuse a un emplacement o@elle ne sera
pas exposee au gel. Comme il peut rester un residu d'eau dans
les tuyaux, le gel pourrait endommager la laveuse. Si la laveuse
doit faire I'objet d'un demenagement ou de remisage au cours
d'une periode o(4la temperature cause un gel, preparer I'appareil
pour I'hiver.
P_riode d'inutilisation ou de vacanees :
Faire fonctionner la laveuse seulement Iorsqu'on est present. Si
vous devez partir en vacances ou si vous n'utilisez pas votre
laveuse pendant une periode prolongee, vous devez :
• Debrancher le cordon electrique ou deconnecter le courant.
• Fermer les robinets d'arrivee d'eau. Ceci evitera le risque
d'inondation accidentelle (a I'occasion d'une surpression
d'eau) au cours de la p@iode d'absence.
• Ouvrir legerement la porte pour fournir une ventilation.
Preparation de la laveuse pour I'hiver : •
1. Verser 1 pte (1 L) d'antigel de type pour vehicule recreatif,
dans le tambour.
2. Faire executer a la laveuse un programme DRAIN/SPIN
(Vidange/essorage).
3. Debrancher le cordon electrique ou deconnecter le courant.
4. Fermer les deux robinets d'arrivee d'eau.
5. Deconnecter et vider les tuyaux flexibles d'alimentation
d'eau.
Avant la r_utilisation :
1. Rincer les tuyaux d'arrivee d'eau.
2. Reconnecter les tuyaux flexibles d'alimentation d'eau aux •
robinets.
3. Ouvrir les deux robinets d'arrivee d'eau.
4. Brancher la laveuse ou retablir le courant electrique.
5. Faire executer a la laveuse un programme complet NORMAL/
CASUAL (Normal/Tout-aller) avec '_ de la quantite normale
recommandee de detergent pour eliminer I'antigel.
Transport de la laveuse :
1. Si la laveuse sera demenagee pendant une periode de gel, •
verser dans le tambour 1 pte (1 L) d'antigel pour vehicule
recreatif. Faire executer a la laveuse un programme DRAIN/
SPIN.
2. Debrancher le cordon electrique.
3. Deconnecter le tuyau de vidange du systeme de vidange et le
fixer aux pinces du panneau arriere.
4. Fermer les deux robinets d'arrivee d'eau.
5. Deconnecter les tuyaux d'arrivee d'eau des robinets, ensuite
vider les tuyaux et les fixer au panneau arriere de la laveuse.
6. Ne pas r_utiliser les boulons de transport. Uappareil doit @re
transporte dans la position verticale.
R_installation de la laveuse
1. Suivre les "Instructions d'installation" pour choisir
I'emplacement, mettre la laveuse d'aplomb et la connecter.
2. Faire executer ala laveuse un programme NORMAL!CASUAL
avec V_de la quantite normale recommandee de detergent
pour nettoyer la laveuse et enlever I'antigel, le cas echeant.
DI PANNAGE
Essayer d'abord les solutions sugg_r_es ici pour _viter
possiblement le co_t d'une visite de service...
La laveuse affiche un message par code et un signal
sonore est _mis
"HF" (probleme d'entree d'eau - approvisionnement nul
ou insuffisant d'eau)
Appuyer deux fois sur PAUSE/CANCEL pour annuler le
programme. Debrancher la laveuse ou deconnecter le
courant electrique.
V_rifier ce qui suit :
Les robinets sont-ils completement ouverts?
Les tamis a la connexion des tuyaux d'entree d'eau a la
laveuse sont-ils obstrues?
Les tuyaux d'entree d'eau sont-ils deformes?
Les tuyaux d'entree d'eau sont-ils geles?
Brancher la laveuse ou reconnecter le courant electrique.
Selectionner de nouveau le programme et appuyer sur
START. Si le probleme persiste, faire un appel de service.
"F02" (probl_me de vidange)
Appuyer deux fois sur PAUSE/CANCEL pour annulet le
programme. Debrancher la laveuse ou deconnecter le
courant electrique.
V_rifier ce qui suit :
Le tuyau de vidange est-il deforme?
Le tuyau de vidange est-il gele?
Le tuyau de vidange est-il obstrue?
Le tuyau de vidange est-il a plus de 96 po (2,4 m) au-dessus
du plancher?
"SUD" (mousse savonneuse)
Lorsque de la mousse savonneuse excessive est detectee,
une action agit automatiquement pour corriger I'exces de
mousse. Cette action enleve I'exc_s de mousse et assure le
rin(_age approprie de votre linge. "SUD" est affiche durant le
ringage et a la fin du programme pour vous informer que
I'action corrective pour la mousse a ete activee. Pour eviter
une mousse excessive, reduire la quantite de detergent ou
utiliser des detergents HE.
"F" variables [F4 a F16] (problbme _lectrique)
Appuyer deux fois sur PAUSE/CANCEL pour annuler le
programme. Appuyer sur DRAIN/SPIN s'il y a un exc_s d'eau
dans la laveuse.
Selectionner de nouveau le programme et appuyer sur
START. Si le probleme persiste, faire un appel de service.
40

La laveuse ne se met pas en marche
• V_rifier ce qui suit :
Le cordon d'alimentation est-il branche sur une prise & 3
alveoles reliee a la terre? •
La porte de la laveuse est-elle bien fermee?
Un programme a-t-il ete choisi mais START n'a-t-il pas ete
selectionne et enfonce pendant une seconde?
La porte a-t-elle ete ouverte apres I'achevement du dernier
programme?
Absence de remplissage, lavage ou rin_age
• V_rifier ce qui suit :
Le cordon d'alimentation est-il branche sur une prise a 3
alveoles reliee a la terre?
La prise de courant est-elle alimentee?
Verifier la source d'electricite ou faire venir un electricien. •
Les robinets d'eau froide et d'eau chaude sont-ils ouverts?
Le tuyau d'entree d'eau est-il deforme?
Les tamis de la valve d'entree d'eau sont-ils obstrues?
La laveuse s'arr_te •
• V_rifier ce qui suit :
Le cordon d'alimentation est-il branche sur une prise a 3
alveoles reliee a la terre?
La prise de courant est-elle activee?
Verifier la source d'alimentation electrique ou faire venir un •
electricien.
Un fusible est-il grille ou le disjoncteur est-il ouvert?
Si le probleme persiste, faire venir un electricien.
Un cordon de rallonge est-il employe? •
Ne pas utiliser un cordon de rallonge.
Absence de vidange ou d'essorage de la laveuse
• Le tuyau d'_vacuation est-il obstru_, ou I'extremite du
tuyau d'_vacuation se trouve-t-elle _ plus de 96 po (2,4 m)
au-dessus du plancher?
• La tension est-elle basse?
Verifier la source d'electricite ou faire venir un electricien. Ne
pas utiliser un cordon de rallonge. •
• L'action de mousse savonneuse "SUD" est-elle active?
Le programme se completera Iorsque la mousse excessive
est enlevee.
• La charge est-elle _quilibr_e? •
Un seul article ou un article encombrant peut provoquer un
desequilibre. Ajouter des articles ou redistribuer la charge.
La laveuse fait du bruit ou vibre •
• La laveuse est-elled'aplomb?
La laveuse dolt _tre d'aplomb. Les quatre pieds doivent 6tre
bien installes et les ecrous doivent _tre serres contre la caisse
de la laveuse.
Lorsque I'eau est vidangee de la laveuse, vous pouvez
entendre le bruit de la succion de I'air par la pompe. Ceci se
produit a la fin de la vidange. Ceci est normal.
Lavez-vous des articles avec agrafes en m_tal, boucles
ou fermetures a glissibre?
Vous pouvez entendre le bruit d'articles metalliques touchant
le tambour de la laveuse. Ceci est normal.
La laveuse est-elle install_e sur un plancher robuste et
solide?
Se referer aux "Instructions d'installation" pour les exigences
de plancher. Le bruit et la vibration peuvent _tre reduits en
plagant une piece de 3Apc (19,1 mm) de contreplaque sous
votre laveuse. Le contreplaque peut se prolonger en-dessous
de la laveuse et de la secheuse pour les maintenir a des
hauteurs egales.
Eau pros de la laveuse
Verifier la plomberie du domicile pour des fuites.
Obstruction ou fuite des distributeurs
Les produits de lessive sont-ils dans le compartiment
correct du distributeur?
Ajouter les quantites correctes de detergent, d'assouplissant
de tissu ou d'eau de Javel aux compartiments corrects.
Ajouter I'agent de blanchiment en poudre ou sans danger
pour les couleurs au compartiment du lavage principal.
Le separateur de d_tergent est-il a la position correcte?
Le separateur devrait _tre a la position a I'avant Iors de
I'utilisation de detergent liquide eta la position a I'arriere Iors
de I'utilisation de detergent en poudre.
Charge trop mouill_e
Avez-vous utilis_ le bon programme pour la charge
laver?
Choisir un programme avec une vitesse d'essorage plus
elevee.
Avez-vous lave un article seul cu des articles _pais ou
avez-vous surcharg_ la laveuse?
Les articles laves seuls ou epais, ou une charge excessive
peuvent causer un desequilibre. Premierement, essayer de
distribuer egalement votre lessive mouillee dans le tambour,
et commencer le programme DRAIN/SPIN (Vidange/
Essorage). Si le linge est encore mouille, retirer la moitie de la
charge de la laveuse et essayer de nouveau.
R_sidu ou charpie sur le linge
Avez-vous ajoute du detergent au distributeur?
Pour obtenir de meilleurs resultats, ajouter du detergent au
compartiment de detergent. Ne pas ajouter de detergent au
tambour de la laveuse.
Avez vous effectu_ le tri correctement?
Separer les articles qui forment la charpie (serviettes, chenille)
des articles qui attrapent la charpie (velours c6tele, tissus
synthetiques). Assortir aussi les couleurs.
Avez-vous surcharg_ la laveuse?
Ne pas surcharger la laveuse. La laveuse peut _tre remplie
completement mais le linge ne doit pas _tre tass& La charge
de lavage doit _tre equilibree. Les particules de charpie
peuvent _tre emprisonnees dans la charge s'il y a surcharge.
• V_rifier ce qui suit :
A-t-on laisse du papier ou un mouchoir de papier dans les
poches?
• Avez-vous utilis_ suffisamment de d_tergent?
Suivre les directions du fabricant. Utiliser suffisamment de
detergent pour maintenir la charpie en suspension dans I'eau.
41

L'eau de lavage est-elle plus froide que 70°F (21°C)?
L'eau de lavage plus froide que 70°F (21°C) peut ne pas
dissoudre completement le detergent.
Utilisez-vous un programme de lavage a basse vitesse?
Les detergents en poudre peuvent ne pas bien se dissoudre
dans un programme a basse vitesse. Pour les meilleurs
resultats, utiliser un detergent liquide pour les programmes
basse vitesse comme les tissus delicats, la sole, la laine et les
articles de lavage a la main.
Presence de taches sur le linge
Avez-vous ajout_ du d_tergent au distributeur?
Pour les meilleurs resultats, ajouter du detergent au
compartiment de detergent. Ne pas ajouter de detergent au
tambour de la laveuse.
Avez-vous utilis_ suffisamment de d_tergent?
Utiliser suffisamment de detergent pour enlever la salete et la
tenir en suspension. Pour le meilleur rendement, utiliser le
detergent a haute efficacite. Suivre les recommandations du
fabricant en fonction du type de charge que vous lavez.
• La presence de fer (rouille) dans I'eau est-elle sup_rieure
la moyenne?
II vous faudra peut-_tre faire installer un filtre &fer.
• Avez-vous bien trie la charge?
Separer les articles de teinte foncee des articles blancs ou
clairs.
Avez-vous d_charge la laveuse promptement?
Pour eviter le transfert de teinture, decharger la laveuse des
qu'elle s'arr_te.
Avez-vous utilis_ une boule distributrice d'assouplissant
de tissu?
Les boules distributrices ne fonctionnent pas correctement
avec cette laveuse. Ajouter un assouplissant pour tissu
liquide darts le compartiment d'assouplissant de tissu.
• Avez-vous utilis_ du detergent en poudre dans un
programme a basse vitesse?
Considerer I'utilisation d'un detergent liquide.
Avez-vous utilis_ le lavage rapide sur une grosse charge?
Pour de meilleurs resultats, utiliser Express Wash (lavage
rapide) pour des charges petites ou des charges legerement
sales.
Linge froiss_
Avez-vous d_charge la laveuse promptement?
Decharger la laveuse des qu'elle s'arr_te.
Avez-vous utilis_ le bon programme pour la charge
laver?
Utiliser le programme Delicate (Tissus delicats) ou un autre
programme avec une vitesse d'essorage basse pour reduire
le froissement.
Avez-vous surcharg_ la laveuse?
La charge dolt _tre equilibree et la laveuse ne dolt pas _tre
surchargee. Les charges doivent pouvoir culbuter librement
durant le lavage.
Blanc gris&tre,couleurs d_fraichies
Avez-vous bien tri_ la charge?
Le transfert de teinture peut se produire Iors du melange
d'articles blancs et de couleur dans une m6me charge.
Separer le linge de teinte foncee des articles blancs ou claim.
La temperature de lavage est-elle trop basse?
Utiliser les lavages a I'eau chaude ou tiede si sans danger
pour le tissu. L'eau chaude devrait 6tre au moins a 120°F
(49°C) pour nettoyer la salete intense.
Avez-vous utilis_ suffisamment de d_tergent, ou avez-
vous de reau dure?
Utiliser plus de detergent pour laver la salete intense a I'eau
froide ou a I'eau dure.
Programme trop long
Avez-vous choisi le programme Sanitary (Sanitaire) ou
roption Stain Treat (Traitement des taches)?
Dans les deux cas, le chauffe-eau sera active pour fournir le
rendement de nettoyage maximal. Un temps additionnel sera
ajoute au programme regulier pour chauffer I'eau. Ce temps
additionnel dependra de la taille de la charge et de la
temperature a I'entree d'eau chaude.
Le mot "SUD" apparait-il sur I'affichage?
Un exces de mousse savonneuse a ete detecte et une action
corrective pour la mousse a ete mise en marche pour eliminer
I'exces de mousse. Cette action ajoutera du temps au
programme original.
La charge a-t-elle provoqu_ un d_s_quilibre?
Lorsqu'il y a un trop grand desequilibre, une caracteristique
speciale se mettra en marche pour redistribuer la charge.
Cette caracteristique augmentera la duree de votre
programme original.
Porte verrouill_e & lafin du programme de lavage
Est-ce que toute I'eau s'est ecoulee de la laveuse durant
ressorage?
Choisir DRAIN/SPIN (Vidange/essorage) pour enlever toute
I'eau qui reste dans la laveuse. La porte de la laveuse se
declenchera a la fin de la vidange.
42
43


Just Call:
1-800-4-MY-HOME ®
(1-800-469-4663)
24 hours a day, 7 days a week
For the repair of major brand appliances in your own home...
no matter who made it, no matter who sold it!
For your nearest Sears Parts and Service location,
to bring in products like vacuums, lawn equipment and electronics.
For Sears Parts & Service, to order the replacement parts,
accessories and owner's manuals that you need to do-it-yourself.
www,sears,ca
To purchase or inquire about a Sears Maintenance Agreement, call:
1-800-361-6665
9 a.m. - 8 p.m. EST, Mon.- Fri., 4 p.m. Sat.
Pour service en fran£ais:
1-800-LE-FOYER Mc
(1-800-533-6937)
www.sears.ca
461970207341
© Sears, Roebuck and Co.
TM SM ,
@ Registered Trademark / Trademark / Service Mark of Sears, Roebuck and Co.
MC MD . .
Marque de commerce / Marque deposee de Sears, Roebuck and Co.
10/02
Printed in U.S.A,
Imprime aux E.-U.
 Loading...