

Page 1
KENMORE ELITE LIMITED WARRANTY
FOR FIVE YEARS from the date of sale this appliance is warranted against defects
in material or workmanship.
WITH PROOF OF SALE a defective product will be replaced free of charge.
For warranty coverage details to obtain free replacement,
visit the web page: www.kenmore.com/warranty
This warranty does not cover any accessories or the glass bowl, which are
expendable parts that can wear out from normal use within the warranty period.
This warranty is void if this appliance is ever used for other than private
household purposes.
This warranty gives you specific legal rights, and you may also have other
rights which vary from state to state.
Sears Brands Management Corporation,
Hoffman Estates, IL 60179
KENMORE ELITE GARANTIA LIMITADA
Este aparato cuenta con una garantía contra defectos en materiales y manufactura
DURANTE CINCO AÑOS a partir de la fecha de compra.
CON EL COMPROBANTE DE COMPRA se reemplazará un producto defectuoso sin
cargo.
Según los detalles de la garantía, se puede obtener la sustitución gratuita, visite la
página web: www.kenmore.com/warranty
Esta garantía no incluye ningún accesorio o la taza de vidrio porque son piezas
fungibles que se desgastan por el uso normal dentro del periodo de garantía.
Esta garantía es inválida si este producto es utilizado para propósitos que no sean
de uso doméstico.
Esta garantía le da derechos legales específicos, y usted puede también tener otros
derechos que varían de estado a estado.
Sears Brands Management Corporation,
Hoffman Estates, IL 60179
Use & Care Guide
Manual de Uso y Cuidado
English / Español
5-Quart Stand Mixer
Batidora con Pedestal de 5 Cuartos de Galón
Models / Modelos:
100.49803 - Burgundy / Vinotinto
100.49090 - Metallic Gray / Gris Metálico
KENMORE ELITE GARANTIA LIMITADA
Spanish reqd.
Customer Assistance/Asistencia al Cliente
1-855-438-7899
Sears Brands Management Corporation
Hoffman Estates, IL 60179 U.S.A.
www.kenmore.com
Help us help you! / ¡Ayúdenos a ayudarle!
Please register your appliance: /
Por favor registre su electrodoméstico:
www.kenmore.com/registration
Page 2
IMPORTANT SAFEGUARDS
PARTS AND FEATURES
When using electrical appliances, basic safety precautions should always be
followed, including the following:
1. READ all instructions. KEEP these instructions for future use.
2. To protect against fire, electric shock and injury to persons,
DO NOT immerse cord, plug, or the Stand Mixer in water or other liquids.
3. NEVER pour boiling water into the glass mixer bowl or use the bowl for cooking
or heating purposes. Extreme temperatures can cause the glass bowl to break
or shatter.
4. Close supervision is necessary when any appliance is used by or near children.
5. UNPLUG Stand Mixer from outlet when not in use, before putting on or taking
off parts and before cleaning.
6. Avoid contacting moving parts. Keep hands, hair, clothing, as well as spatulas
and other utensils away from beater during operation to reduce the risk of
injury to persons or damage to the Mixer.
7. DO NOT operate any appliance with a damaged cord or plug, or after the
appliance malfunctions or has been dropped or damaged in any manner.
Take appliance to a qualified service dealer for examination and possible repair.
8. The use of accessories or attachments not recommended by the appliance
manufacturer may result in fire, electric shock or injury to persons.
9. DO NOT use accessories or attachments other than those referenced in this
Use & Care Guide.
10. DO NOT use outdoors.
11. NEVER let the cord hang over the edge of table or counter, or touch hot surfaces.
12. Remove mixing bowl, flat beater, wire whisk or dough hook from Stand Mixer
before washing them.
13. DO NOT use this appliance for anything other than its intended use.
14. To protect against electrical shock, this appliance is equipped with a cord having a
3-prong grounding-type plug for insertion into a proper grounding-type receptacle.
DO NOT alter the plug for use in a 2-prong receptacle. If the plug will not fit into
a receptacle, have the proper receptacle installed by a qualified electrician.
15. This product is designed for household use only.
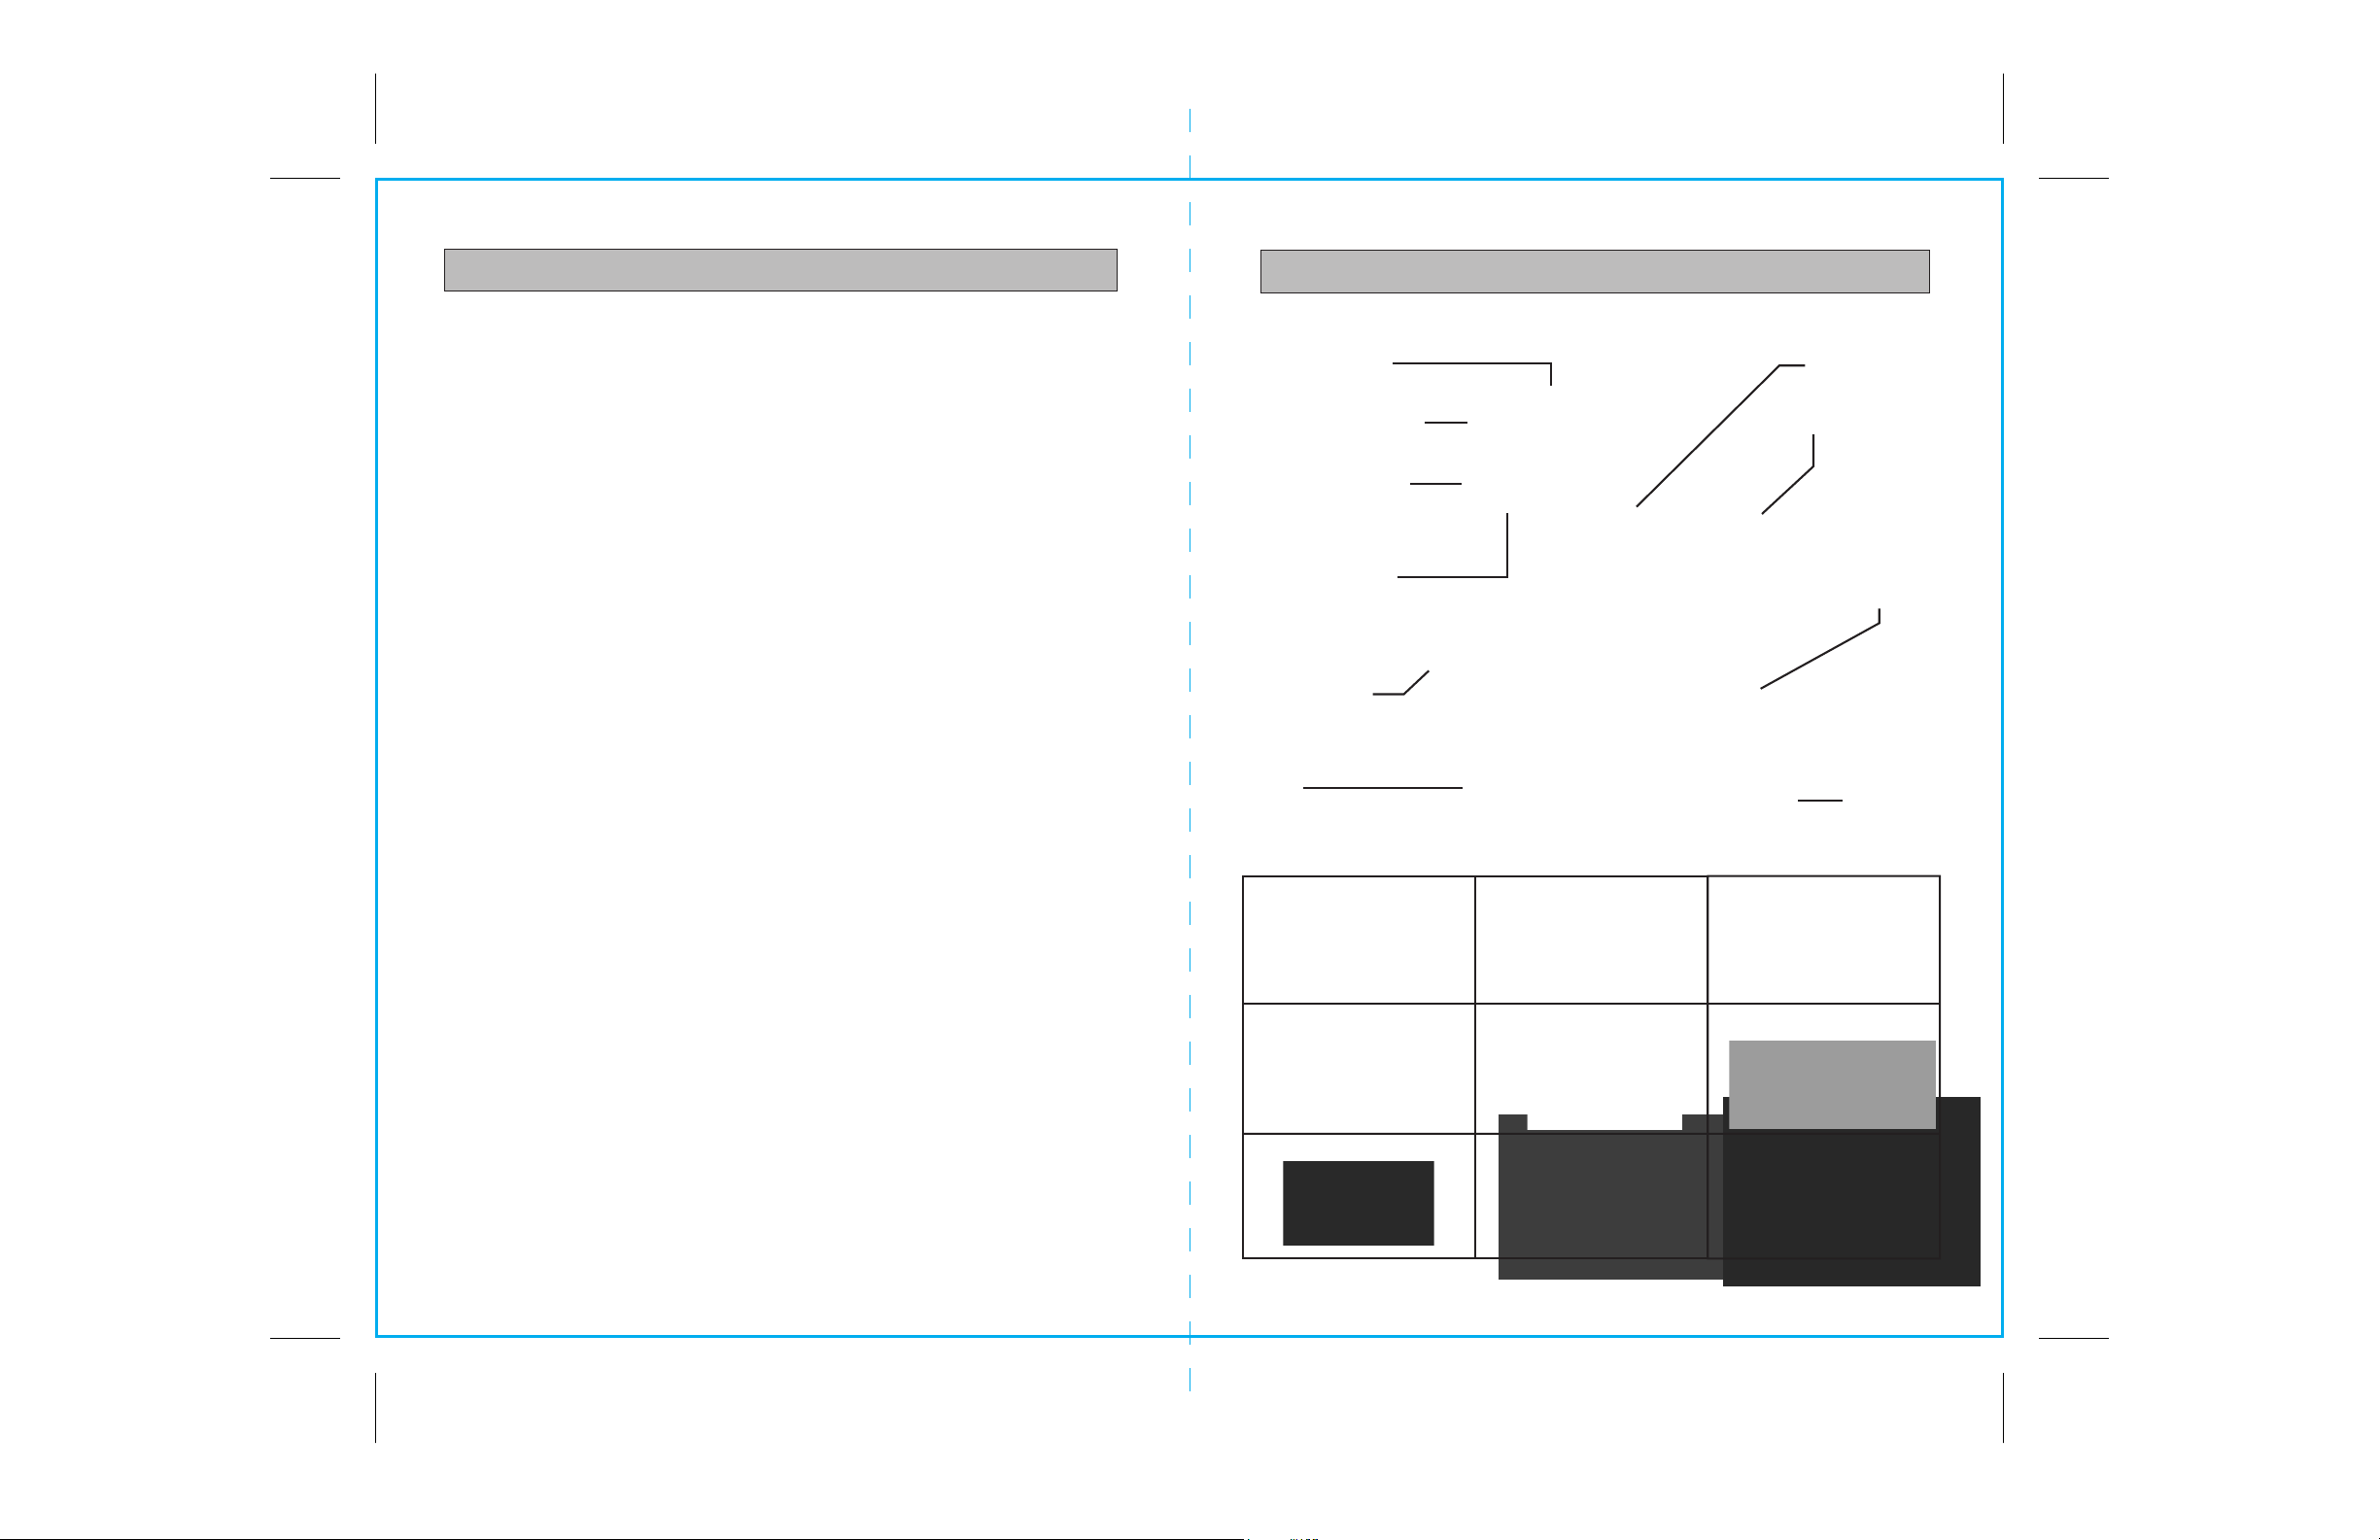
Fig. 1
Easy Pour Funnel
Tilt Head Lift Handle
0
360
Splash Guard
Accessory
Attachment Shaft
5 Quart Bowl
Bowl
Clamping Plate
Included Accessories
These pictured accessories are
described in the Accessories
and Their Uses table in the
Operation section of this
Use & Care Guide.
Dough
Hook
Flat Beater
Easy
Pour
Funnel
Work Light
Speed Control Dial
Tilt Head
Release Lever
Cord Storage
(not shown)
Tilt and Glide
Whisk
Bowl Lid
SAVE THESE INSTRUCTIONS!
CUSTOMER ASSISTANCE
If any parts are missing or damaged after unpacking product box, or to order
replacement parts after product use, call the following number: 1-855-438-7899.
NOTE: Your call will be answered only in English.
2
0
Splash Guard
360
Egg Separator
Grater
3
Page 3
PREPARATION
OPERATION
BEFORE FIRST USE
• Remove packing material, plastic, labels, stickers or tags that are attached to the
mixer, bowl or accessories.
• Hand wash the Glass Bowl, Bowl Lid, Bowl Clamping Plate, Splash Guard, Easy Pour
Funnel Insert, Flat Beater, Wire Whisk, Dough Hook, Egg Separator and Grater in
warm, sudsy water. Thoroughly rinse and dry all items.
• Clean the outside of the Stand Mixer only with a soft damp cloth, then use dry
soft cloth to wipe dry.
CAUTION
damaged. NEVER use abrasive cleaning agents or scouring pads to clean
mixer surfaces. They will be permanently scratched.
• Rest the Mixer on a level and stable dry countertop or table surface.
Also, be sure that the Mixer is at a safe distance from the surface edge to prevent
it from falling off. There must also be enough room around the back of the Mixer
for sufficient air flow through the Mixer motor air vents.
: NEVER submerge the Mixer in water. It will be permanently
OPERATION
TILT HEAD (See Fig. 1)
• To attach and remove accessories and bowl you must tilt back the Mixer Head by
means of the release lever on the right side of the mixer (with the front facing you).
• To unlock the Head from operation position, press lever down with one hand,
then with other hand guide spring loaded Head up to lock into raised position.
• To unlock Head from raised position, press lever down with one hand and push
Head down until it locks into operation position.
WARNING: To avoid serious injury, keep fingers and hands away from
hinge area when raising or lowering Tilt Head.
WORK LIGHT The work light is an LED that shines continuously during mixer
operation to help illuminate mixer bowl contents. It also flashes to alert you of
operational errors or motor overheating. See Operation Safety Features section.
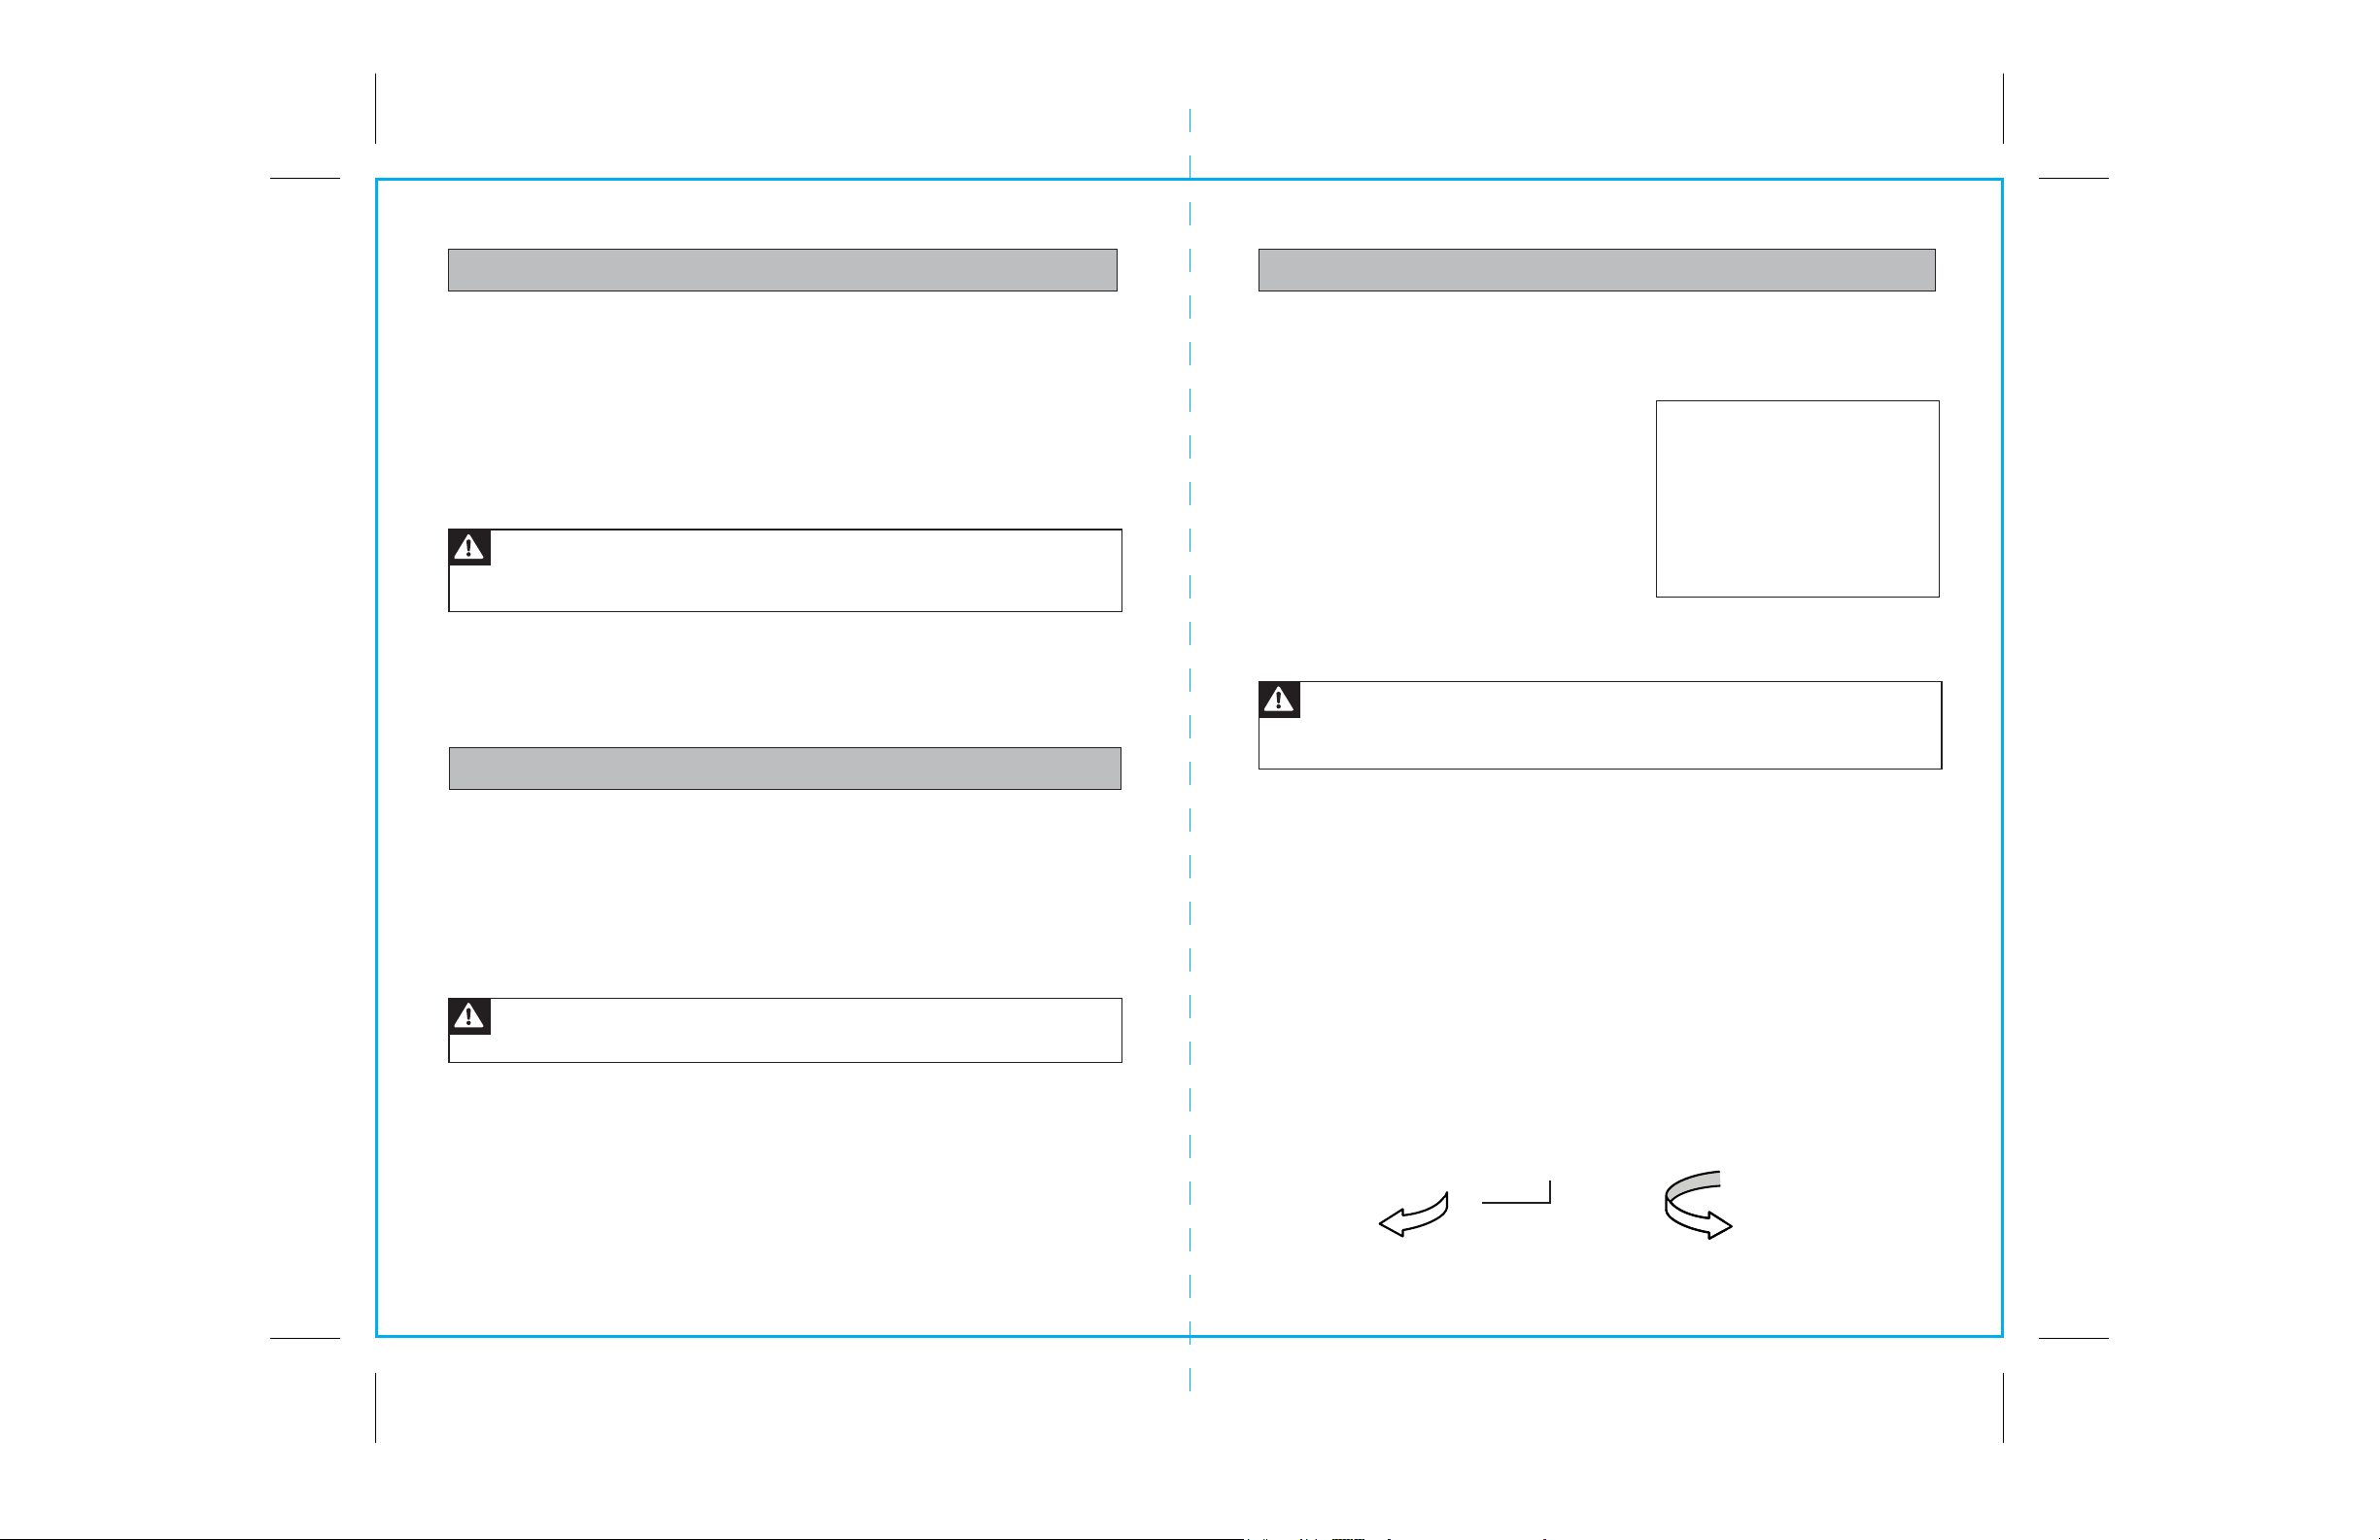
CORD STORAGE The power cord is stored in
the base of the mixer. Grasp cord by plug and
raise out of slot. Carefully pull the cord out of
the mixer and secure it by pressing it down into
the slot. The cord is 3-1/2 feet long.
Be careful not to overextend the cord.
Push the cord all the way back into the
base when finished using mixer.
EASY POUR FUNNEL The Easy Pour Funnel allows you to add ingredients directly
into the mixing bowl from the top of the mixer.
Cord Storage
WARNING: To prevent injury to persons or product damage, NEVER pour
boiling water into the glass mixer bowl or use the bowl for heating or cooking
purposes. Extreme temperatures can cause the glass bowl to break or shatter.
ATTACHING BOWL TO MIXER (See Fig. 2)
1. Turn speed dial to 0.
2. Unplug mixer from electrical outlet.
3. Press down release lever to tilt head back.
REMOVING BOWL FROM MIXER (See Fig. 3)
1. Turn speed dial to 0.
2. Unplug mixer from electrical outlet.
3. Press down release lever to tilt head back.
4. Turn bowl counterclockwise until loosened and pull up and out of Bowl Clamping Plate.
Fig. 2
4. Place bowl in Bowl Clamping Plate.
5. Turn bowl clockwise until snug.
Fig. 3
TILT AND GLIDE
Glides are built into the bottom of the Mixer to allow easy movement from one
location to another across the same surface. To use, first lower Tilt Head into locked
position. With one hand lift up on Tilt Head Lift Handle to tilt Mixer back onto glides.
With other hand grasp Mixer base at front and push to new location.
Lower Mixer back into operation position.
4
Tilt Head
Release
Lever
5
Page 4
OPERATION
OPERATION
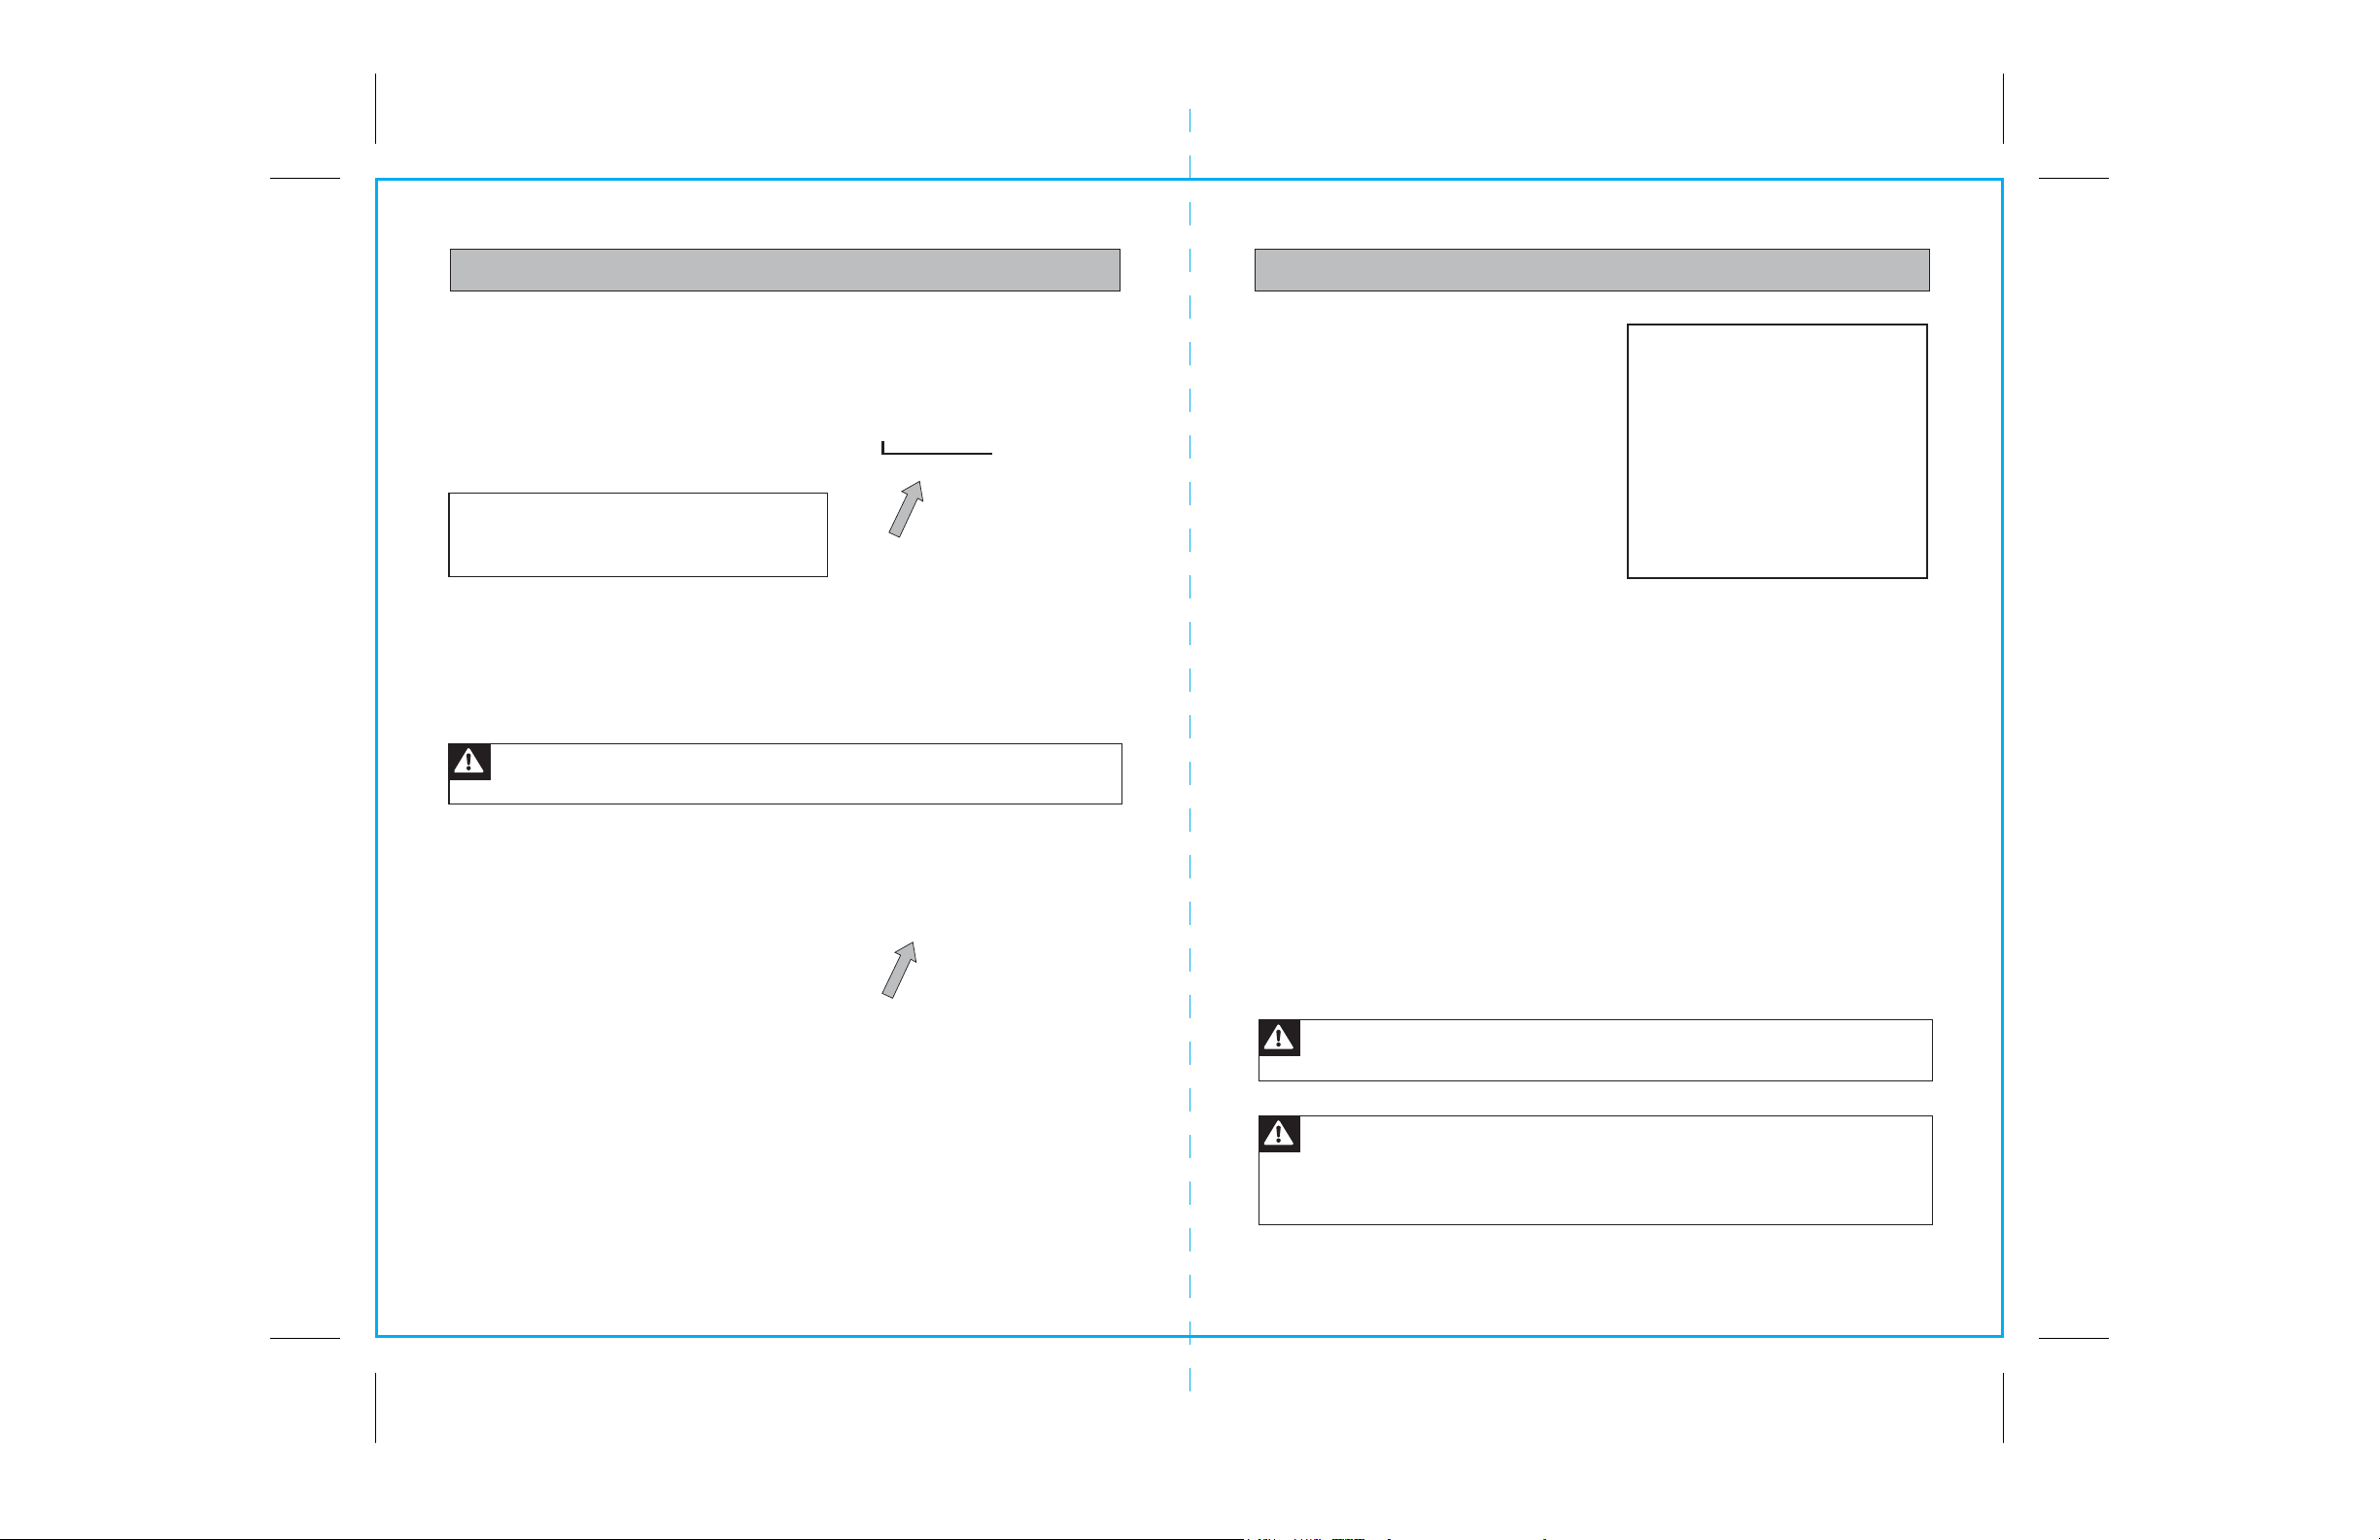
ATTACHING 3600 SPLASH GUARD (See Fig. 4)
1. Turn speed dial to 0.
2. Unplug mixer from electrical outlet.
3. Press down release lever to tilt head back.
4. Push the splash guard up to fit onto the
seating ring on the underside of the Tilt Head.
Fig. 4
Seating
Ring
NOTE: As an optional attachment method,
lay the splash guard on top of the bowl and
lower the Tilt Head onto it.
REMOVING 3600 SPLASH GUARD
1. Turn speed dial to 0.
2. Unplug mixer from electrical outlet.
3. Press down release lever to tilt head back.
4. Pull off the splash guard.
WARNING: Never turn on Mixer with accessories attached unless the
Bowl is in place.
ATTACHING MIXING ACCESSORIES
(See Fig. 5)
1. Turn speed dial to 0.
2. Unplug mixer from electrical outlet.
3. Press down release lever to tilt head back.
4. Align slot at the top of accessory with pin
on Tilt Head shaft. Push accessory up onto
shaft and turn counterclockwise until pin moves
all the way into the slot.
Fig. 5
SPEED CONTROL DIAL (See Fig. 6)
The Speed Control Dial is located on the
right side of the Mixer, and is scaled in
digits from 0 to 10 (0 equals OFF).
To start the Mixer, turn the Speed Control
Dial clockwise from 0.
When using the Splash Guard, you may
immediately turn the dial to the optimum
speed of your recipe.
If not using the Splash Guard, start the mixer on the slowest possible speed and
gradually raise to optimum speed to avoid splashing ingredients out of the bowl.
OPERATION SAFETY FEATURES
- If the mixer is plugged into an outlet when the speed dial is turned to a speed setting,
the mixer will not start and the work light will flash. Unplug the cord and turn the speed
dial to 0 before plugging it back in.
- If you attempt to lift the tilt head while the mixer is running, the mixer will shut off and
the work light will go out. When you lower the head back into place, the work light will
flash. Turn speed dial to 0 and then to a speed setting to restart mixer.
- If the mixer motor becomes overheated, the mixer will shut off and the work light will
flash. Turn the speed dial to 0 and allow mixer motor to cool down before restarting.
Speed digit
Fig. 6
CAUTION: When you are finished mixing, turn the speed dial to 0
and unplug Mixer from the electrical outlet to prevent accidental starting.
REMOVING MIXING ACCESSORIES
1. Turn speed dial to 0.
2. Unplug mixer from electrical outlet.
3. Press down release lever to tilt head back.
4. Turn Accessory clockwise on shaft until pin on shaft lines up with slot on accessory.
Pull accessory off shaft.
6
CAUTION: Do not scrape the bowl while the Mixer is operating.
The bowl and beater are designed to provide thorough mixing without
frequent scraping. Scraping the bowl once or twice during mixing is usually
sufficient. Turn the Mixer off (Speed Dial to 0) before scraping.
7
Page 5

OPERATION
OPERATION
SPEED SETTINGS
Slow Stirring
1
Slow Mixing,
2-3
Faster Stirring
Medium Mixing,
4-5
Medium Beating
Creaming
6-7
(Medium Fast
Beating)
Whipping
8-9
(Rapid Beating)
- Stirring slowly
- Combining or mashing
- Starting all mixing procedures if Splash Guard
is not in place
- Adding flour and dry or solid ingredients to batter
- Adding liquids to dry ingredients
- Combining heavy mixtures
- Slow mixing, mashing, faster stirring
- Mix heavy batters and candies
- Start mashing potatoes, other vegetables
- Cut shortening into flour
- Mix thin or splashy batters
- Mix and knead yeast dough
- Mixing semi-heavy batter (cookies)
- Combine sugar and shortening
- Add sugar to egg whites for meringues
- Medium cake mix speed
- Medium fast beating (creaming) or whipping
- Finish mixing cake, doughnut, or other batters
- High cake mix speed
- Whipping cream, egg whites, and broiled frostings
ACCESSORIES AND THEIR USES
FLAT BEATER – For normal to heavy mixtures such as
cakes, cookies, quick breads, creamed frostings, pie pastry,
meat loaf, candies, biscuits, mashed potatoes.
WIRE WHISK – For mixtures that need to have air
incorporated such as eggs, boiled frostings, egg whites,
sponge cakes, heavy cream, angel food cakes.
DOUGH HOOK – For mixing and kneading yeast doughs
to make breads, coffee cakes cookies, rolls, buns.
The recommended speed setting for kneading dough is
4 or below.
EGG SEPARATOR – For separating egg yolks and whites.
Lay the cupped base of the separator into the Easy Pour
funnel. Steady separator by holding onto handle.
Pour egg through separator to allow egg white to pass into
mixer bowl.
GRATER – For grating items like vegetables, spices or
chocolate into mixer. Lay the cupped base of the grater
into the Easy Pour funnel. Steady grater by holding handle.
Grate carrot across top of grater into mixer bowl.
10
Rapid Whipping
- Whipping small amounts of cream or egg whites
NOTICE
- Under heavy load the Mixer may not maintain fast speeds.
- Excessive speed when preparing yeast dough may damage Mixer.
8
BOWL LID – Fits snugly onto top of bowl to secure
contents after mixing.
SPLASH GUARD – When used, completely encloses
360
0
bowl rim to prevent ingredients from splashing out during
mixer operation.
EASY POUR FUNNEL – Inserts into the Mixer Funnel on the
top of the mixer. The Easy Pour Funnel is removable for
convenient cleaning, and using it helps keep the Mixer
Funnel surfaces free of ingredient residue.
9
Page 6

OPERATION OPERATION
WIRE WHISK ADJUSTMENT (See Fig. 7)
The Wire Whisk may be adjusted to a lower position to reach a low level of
ingredients in the bowl. Adjust as follows:
1. Turn speed dial to 0.
2. Unplug Mixer from electrical outlet.
3. Press down release lever to tilt head back and lock in place.
4. Remove the whisk from the shaft.
5. Use a flat blade screwdriver to turn the adjustment set screw in the top of the whisk.
- To raise the whisk in the bowl, lower the set screw by turning clockwise.
- To lower the whisk in the bowl, raise the set screw by turning counterclockwise.
6. Reattach the whisk to the mixer shaft.
CAUTION: Be careful not to turn
set screw too far down or up or it
may fall out. Also, if turned too far
down, the screw may obstruct
attaching whisk to shaft.
Adjustment
Set Screw
Fig. 7
HOW TO USE THE MIXER FUNNEL
NOTE:
The accessory inserts into the Mixer Funnel, is removable for convenient cleaning,
and using it helps keep Mixer Funnel surfaces free of ingredient residue.
Using one ingredient at a time, slowly add into pour funnel.
Mixer can be operating at low speed when ingredients are being added as long as
the Splash Guard is in place.
Gradually continue to add remaining ingredients through the pour funnel.
If you need to scrape down sides of bowl, first turn speed dial to 0 and raise
up tilt head.
When pouring liquids through funnel make sure to place speed setting
on 0 or low number to keep ingredients from splashing.
Course ingredients such as nuts, dried fruits, or morsels should be folded into the
mixture at the final stage of mixing.
Tip: Lightly dust coarse ingredients with all-purpose flour to keep them from
retreating to the bottom of the bowl.
Once all ingredients are well-combined, raise up tilt head and twist mixing bowl
counterclockwise to remove bowl from clamping plate.
Regular use of the Easy Pour Funnel accessory is highly recommended.
MIXING TIPS
• Observe the batter or dough in bowl while mixing. Mix only until contents achieve
the appearance called for in recipe, such as “smooth” or “creamy.”
• Follow recipe guidelines when adding nuts, raisins or candied fruits to a mixture.
Fold such solid ingredients into the bowl in the last few seconds of
slow stirring (speed 1), when batter is sufficiently thick to prevent them from sinking
to the bottom of baking pan. Dust sticky, candied fruits with flour for equal distribution
throughout the batter.
• If not using Splash Guard, mixtures containing large amounts of liquid ingredients
should be initially mixed at lower speeds to avoid splashing. Once mixture thickens
increase speed.
10
After finished using mixer, clean exterior surfaces by wiping with a damp cloth.
Use dry cloth to wipe thoroughly free of moisture before putting mixer away.
11
Page 7

OPERATION OPERATION
CLEANING
WARNING: Unplug Mixer before touching beaters or other accessories.
Failure to do so can result in broken bones, cuts or bruises.
• Always unplug Mixer before cleaning. NEVER immerse Mixer in water.
The exterior of the Mixer should only be cleaned with a soft damp cloth.
• Do not use abrasive cleansers or scouring pads when cleaning Mixer.
• Always remove accessories before cleaning Mixer. If washing accessories by hand,
rinse and dry completely. Most accessories and the glass bowl are dishwasher safe.
Only place the bowl lid in the upper dishwasher rack. Only hand wash the Wire Whisk.
• Wash accessories and bowl as soon as possible after use to keep food from
drying on them.
TROUBLESHOOTING
Mixer will not start
Position of wire
whisk in bowl is too
low or high
Work Light
Blinking
• Make sure mixer is plugged in.
• Verify that there is 120V from outlet to mixer.
• Verify that Tilt Head is locked into down position.
Set speed dial to 0. Then turn dial to a low speed setting.
• If Tilt Head is hot to touch, allow 15 minutes for motor to
cool, then try starting again.
• If above solutions do not work,
call Customer Assistance at 1-855-438-7899
• To raise whisk: Remove whisk from mixer shaft.
Lower the set screw on top of whisk by turning clockwise.
Attach whisk to shaft. Be careful not to turn set screw too
far down or it may obstruct attaching whisk to shaft.
• To lower whisk: Remove whisk from mixer shaft.
Raise the set screw on top of whisk by turning counter clockwise. Attach whisk to shaft. Do not raise screw too
far or it may fall out.
• Beater and dough hook are adjusted at factory for optimum
efficiency, so there are no further adjustments necessary.
• Lock Tilt Head in down position.
• Set speed dial to 0 position.
• If blinking does not stop, and unit is hot to touch,
unplug and wait 15 minutes for motor overheat condition
to clear.
• If unit cools and still does not operate,
call Customer Assistance at 855-438-7899
Surface Area Hot
12 13
• Mixer may warm up during use. You may not be able to
comfortably touch the top of the Mixer. This is normal.
• Under heavy loads with extended period of mixing time
the surface area of mixer may become hot. This is normal.
• Mixer is equipped with safety thermal shut off to protect
motor and user from operating in too hot condition.
Allow unit to cool for period no less than 15 minutes
before operating again.
Page 8

ADVERTENCIAS DE SEGURIDAD
PARTES Y CARACTERÍSTICAS
Cuando se utilizan aparatos eléctricos, siempre deben observarse las precauciones
básicas de seguridad, incluyendo las siguientes:
1. LEA todas las instrucciones. CONSERVE estas instrucciones para uso futuro.
2. Para protegerlos del fuego, shock eléctrico y daños a personas, NO sumerja el
cable, enchufe o la Batidora con Pedestal en agua u otros líquidos.
3. NUNCA vierta agua hirviendo en la taza de vidrio de la batidora ni utilice la
taza para cocinar o con el propósito de calentar. Las temperaturas extremas
pueden hacer que la taza de vidrio se rompa.
4. Se requiere supervisión estrecha cuando cualquier aparato es utilizado por o
cerca de niños.
5. DESCONECTE la Batidora con Pedestal del contacto cuando no se use, antes de
poner o de quitar partes o antes de limpiarlo.
6. Evite entrar en contacto con partes móviles. Mantenga las manos, el pelo, la ropa, así
como espátulas u otros utensilios lejos de las aspas mientras estén en funcionamiento
para reducir el riesgo de lesiones a las personas o daño a la batidora.
7. NO use ningún aparato con un cable o con un enchufe dañado, o después de
que el aparato no funcione correctamente, se haya caído o se haya dañado de
alguna manera. Lleve la batidora a una agencia calificada de servicio para su
revisión y posible reparación.
8. El uso de los accesorios no recomendados por el fabricante del aparato puede
ocasionar incendio, descarga eléctrica o lesiones a las personas.
9. NO use accesorios o conexiones distintas a las que se indican en esta Guía de
Uso y Cuidados.
10. NO se utilice al aire libre.
11. NUNCA permita que el cable cuelgue por el borde de la mesa o de la barra, o
que toque superficies calientes.
12. Retire la taza de mezclado, el batidor plano, el batidor francés o el gancho de
amasar de la Batidora con Pedestal antes de lavarlos.
13. NO use este aparato para cualquier otra cosa que no sea su uso previsto.
14. Para proteger este aparato contra una descarga eléctrica, está equipado con
un cable que tiene un enchufe a tierra de 3 puntas, para su inserción en un
adecuado contacto a tierra. NO altere el enchufe para ser usado en un
contacto de 2 puntas. Si el enchufe no embona en un contacto, haga que el
receptáculo apropiado sea instalado por un electricista calificado.
15. ¡Este aparato está diseñado ÚNICAMENTE para USO DOMÉSTICO!
Fig. 1
Embudo de
Vertido Fácil
Mango de Elevación
del Cabezal Inclinable
Protección contra
Salpicaduras 360°
Eje para Acoplar
Accesorios
Taza de 5
Cuartos de
Galón
Plato de
Sujeción de la
Taza
Accesorios Incluidos
Los accesorios mostrados en
las imágenes se describen en
la tabla Accesorios y Sus Usos
en la sección de Operación de
esta Guía de Uso y Cuidados.
Gancho de
Amasar
Batidor
Plano
Embudo de
Vertido
Fácil
Luz de Trabajo
Selector para Control
de Velocidad
Palanca para
Liberar el
Cabezal
Inclinable
Sistema para
Guardar el Cable
(no se muestra)
Inclinación y
Deslizamiento
Batidor
Francés
Tapa de la Taza
¡GUARDE ESTAS INSTRUCCIONES!
ASISTENCIA AL USUARIO
Si faltan partes o algunas de ellas están dañadas después de desembalar la caja
del producto, o para pedir piezas de repuesto después de usar el producto, llame al
siguiente número: 1-855-438-7899. NOTA: Su llamada será atendida solamente en
Inglés.
14
Protección Contra
Salpicaduras 360°
Separador de
Yemas
Rallo
15
Page 9

PREPARACIÓN
OPERACIÓN
ANTES DEL PRIMER USO
• Retire el material de empaque, plásticos, etiquetas o rótulos que estén adheridos
a la batidora, a la taza o a los accesorios.
• Lave a mano la Taza de Vidrio, la Tapa de la Taza, el Plato de Sujeción de la Taza, la
Protección Contra Salpicaduras, el Inserto del Embudo de Vertido Fácil, el Batidor
Plano, el Batidor Francés, el Gancho de Amasar, el Separador de Yemas y el Rallo con
agua espumosa tibia. Enjuague completamente y seque todos los elementos.
• Limpie el exterior de la Batidora con Pedestal solamente con un paño suave húmedo,
luego use un paño suave y seco para secarlo.
PRECAUCION:
permanente. NUNCA use agentes de limpieza abrasivos o esponjas metálicas para
limpiar las superficies de la batidora. Se rayarán de forma permanente.
• Coloque la Batidora en una encimera o superficie de mesa nivelada y estable. Además,
asegúrese de que la Batidora está a una distancia segura del borde de la superficie
para evitar que se caiga. También debe haber suficiente espacio alrededor de la parte
trasera de la Batidora para que haya suficiente flujo de aire a través de las ranuras de
ventilación de la Batidora.
NUNCA sumerja la Batidora en el agua. Se dañará de forma
OPERACIÓN
CABEZAL INCLINABLE (Ver Fig. 1)
• Para acoplar y remover los accesorios y la taza, usted debe inclinar el Cabezal de la
Batidora hacia atrás por medio de la palanca para liberar el cabezal inclinable
ubicado en el lado derecho de la batidora (con el frente mirando hacia usted).
• Para desbloquear el Cabezal de la posición de operación, presione la palanca hacia
abajo con una mano, luego, con la otra, guíe el Cabezal con resorte hacia arriba para
bloquear el la posición elevada.
• Para desbloquear el Cabezal de la posición elevada, presione la palanca hacia abajo
con una mano y empuje el Cabezal hacia abajo hasta que quede bloqueado en la
posición de operación.
ADVERTENCIA: Para evitar daños graves, mantenga los dedos y manos
lejos del área de las bisagras cuando suba o baje el Cabezal Inclinable.
LUZ DE TRABAJO La luz de trabajo es una luz LED que brilla continuamente durante
la operación de la batidora para ayudar a iluminar el contenido de la taza.
También parpadea para alertarle acerca de errores de operación o recalentamiento
del motor. Vea la sección de Características de Operación Segura.
SISTEMA PARA GUARDAR EL CABLE El cable
de alimentación se guarda en la base de la
batidora. Sujete el cable por el enchufe y
sáquelo de la ranura. Cuidadosamente, hale el
cable fuera de la batidora y asegúrelo
presionándolo contra la ranura. El cable tiene
una longitud de 3 pies y medio. Tenga cuidado
de no extender demasiado el cable. Empuje
completamente el cable hacia la base cuando
termine de usar la batidora.
EMBUDO DE VERTIDO FÁCIL El Embudo de Vertido Fácil le permite agregar
ingredientes a la taza desde la parte superior de la batidora.
Cord Storage
ADVERTENCIA: Para evitar daños a personas o al producto, NUNCA vierta
agua hirviendo en la taza de vidrio de la batidora ni utilice la taza con el
propósito de calentar o cocinar. Las temperaturas extremas pueden hacer que
la taza de vidrio se rompa.
ACOPLAR LA TAZA A LA BATIDORA (Ver Fig. 2)
1. Coloque el selector de velocidad en 0.
2. Desconecte la batidora del contacto.
3. Presione la palanca de liberación hacia
abajo para inclinar el cabezal hacia atrás.
RETIRAR LA TAZA DE LA BATIDORA (Ver Fig. 3)
1. Coloque el selector de velocidad en 0.
2. Desconecte la batidora del contacto.
3. Presione la palanca de liberación hacia abajo para inclinar el cabezal hacia atrás.
4. Gire la taza en sentido anti horario hasta que esté floja y hale hacia arriba y
afuera del Plato de Sujeción de la Taza.
Fig. 2
4. Coloque la taza en el Plato de
Sujeción de la Taza.
5. Gire la taza en sentido horario
hasta que quede ajustada.
Fig. 3
IINCLINACIÓN Y DESLIZAMIENTO
La Batidora posee tacos de deslizamiento en la parte inferior que permiten un fácil
movimiento desde una ubicación a otra a través de la misma superficie. Para usarlos,
primero baje el Cabezal Inclinable hasta que se bloquee. Con una mano levante el Mango
de Elevación del Cabezal Inclinable para que la Batidora se incline sobre los tacos. Con la
otra mano, sujete la base de la Batidora por el frente y empuje hacia la nueva ubicación.
Baje la Batidora de nuevo hacia la posición de operación.
16
Palanca para
Liberar el
Cabezal
Inclinable
17
Page 10

OPERACIÓN
OPERACIÓN
ACOPLAR LA PROTECCIÓN CONTRA SALPICADURAS 360° (Ver Fig. 4)
1. Coloque el selector de velocidad en 0.
2. Desconecte la batidora del contacto.
3. Presione la palanca de liberación hacia abajo
para inclinar el cabezal hacia atrás.
4. Empuje la protección contra salpicaduras hacia
arriba hacia el anillo de montaje ubicado en la
parte inferior del Cabezal Inclinable.
Fig. 4
Anillo de
Montaje
NOTA: Como un método opcional de acople,
coloque la protección contra salpicaduras encima
de la taza y baje el Cabezal Inclinable hacia ella.
RETIRAR LA PROTECCIÓN CONTRA
SALPICADURAS 360°
1. Coloque el selector de velocidad en 0.
2. Desconecte la batidora del contacto.
3. Presione la palanca de liberación hacia abajo para inclinar el cabezal hacia atrás.
4. Hale la protección contra salpicaduras.
ADVERTENCIA: Nunca encienda la Batidora con los accesorios
acoplados a menos que la Taza esté en su lugar.
ACOPLAR ACCESORIOS DE BATIDO
(Ver Fig. 5.)
1. Coloque el selector de velocidad en 0.
2. Desconecte la batidora del contacto.
3. Presione la palanca de liberación hacia
abajo para inclinar el cabezal hacia atrás.
4. Alinee la ranura ubicada en la parte superior
del accesorio con la clavija del eje del
Cabezal Inclinable. Empuje el accesorio
hacia el eje y gire en sentido anti horario
hasta que la clavija se mueva completamente
hacia la ranura.
RETIRAR ACCESORIOS DE BATIDO
1. Coloque el selector de velocidad en 0.
2. Desconecte la batidora del contacto.
3. Presione la palanca de liberación hacia abajo para inclinar el cabezal hacia atrás.
4. Gire el accesorio en sentido horario en el eje hasta que la clavija del eje se alinee
con la clavija del accesorio. Hale el accesorio para sacarlo del eje.
Fig. 5
SELECTOR DE CONTROL DE VELOCIDAD
(Ver Fig. 6)
El Selector de Control de Velocidad está
ubicado en la parte derecha de la Batidora,
y posee una escala con números del 1 al 10
(0 significa APAGADO).
Para encender la Batidora, gire el Selector
de Control de Velocidad en sentido horario
desde 0. Cuando use la Protección contra
Salpicaduras, usted puede girar
inmediatamente el selector hasta la
velocidad óptima de su receta.
Si no usa la Protección contra Salpicaduras, encienda la batidora en la velocidad
mínima posible e incremente gradualmente hasta la velocidad óptima para evitar
salpicar los ingredientes hacia afuera de la taza.
CARACTERÍSTICAS DE OPERACIÓN SEGURA
- Si la batidora está conectada a un contacto cuando el selector está fijado a cierta
velocidad, la batidora no encenderá y la luz de trabajo parpadeará. Desconecte el
cable y gire el selector hasta 0 antes de volverlo a enchufar.
- Si usted intenta elevar el cabezal inclinable mientras la batidora está funcionando,
la batidora se apagará y la luz de trabajo desparecerá. Cuando baje el cabezal a
su posición correcta, la luz de trabajo parpadeará. Gire el selector de velocidad a
0 y luego a una velocidad específica para reiniciar la batidora.
- Si la el motor de la batidora se recalienta, la batidora se apagará y la luz de
trabajo parpadeará. Gire el selector de velocidad hasta 0 y permita que el motor
de la batidora se enfríe antes de reiniciarla.
Dígito de
velocidad
Fig. 6
PRECAUCION: Cuando haya terminado de batir, gire el selector de
velocidad a 0 y desconecte la Batidora del contacto para evitar un arranque
accidental.
PRECAUCION: No raspe la taza mientras la Batidora está en
funcionamiento. La taza y el batidor están diseñados para proporcionar un
mezclado completo son raspados frecuentes. Raspar la taza una o dos veces
durante el mezclado usualmente es suficiente. Apague la Batidora (Selector
de Velocidad en 0) antes de raspar.
18
19
Page 11

OPERACIÓN
OPERACIÓN
CONFIGURACIONES DEL VELOCIDAD
Agitado Suave
1
- Agitar suavemente
- Combinar o triturar
- Comenzar todos los procedimientos de batido si la
Protección contra Salpicaduras no está en su lugar
- Agregar harina e ingredientes secos o sólidos a la masa
- Agregar líquidos a los ingredientes secos
- Combinar mezclas pesadas
Mezclado Suave,
2-3
Agitado Más
Rápido
- Mezclar suavemente, triturar, agitado más rápido
- Mezclar masas y dulces pesados
- Comenzar a triturar papas, otros vegetales
- Incorporar la manteca a la harina
- Mezclar masas finas o que salpican
- Mezclar y amasar masa fermentada
Mezclado Medio,
4-5
Agitado Medio
- Mezclar masas semi-pesadas (galletas)
- Combinar azúcar y manteca
- Agregar azúcar a las claras de huevo para merengues
- Velocidad media para mezcla de pasteles
Cremas (Batido
6-7
Medio Rápido)
- Batir a velocidad media-rápida (para hacer cremas) o
nata montada
- Terminar de batir masa de pasteles, donas y otras
- Velocidad alta para mezcla de pasteles
Nata montada
8-9
- Batir cremas, claras de huevo y glaseados
(Batido Rápido)
10
Batido Rápido
- Batir pequeñas cantidades de crema o claras de huevo
ACCESORIOS Y SUS USOS
BATIDOR PLANO – Para mezclas que van desde normales
a pesadas tales como pasteles, galletas, panes rápidos,
glaseados con crema, masa para tartas, pastel de carne,
dulces, bollos, puré de papas.
BATIDOR FRANCÉS – Para mezclas que necesitan tener
aire incorporado tales como huevos, glaseados, claras de
huevo, pasteles esponjosos, cremas pesadas y pasteles de
cabello de ángel.
GANCHO DE AMASAR – Para mezclar y amasar masas
con levadura para hacer panes, pasteles de café, rollos o
panecillos.
La configuración de velocidad recomendada para amasar
es de 4 o inferior.
SEPARADOR DE YEMAS - Para separar las yemas de las
claras. Coloque la base en forma de taza del separador en
el embudo de Vertido Fácil. Mantenga el separador firme
sujetándolo del mango.
Vierta el huevo en el separador para permitir que la clara
pase hacia la taza de la batidora.
RALLO - Para rallar ingredientes como vegetales, especias
o chocolate. Coloque la base en forma de taza del rallo en
el embudo de Vertido Fácil. Mantenga el rallo firme
sujetándolo del mango. Ralle zanahoria a lo largo de la
parte superior del rallo.
TAPA DE LA TAZA - Se ajusta con precisión a la parte
superior de la taza para asegurar los contenidos después
de batir.
AVISO
- Bajo cargas pesadas, la Batidora probablemente no mantenga velocidades
rápidas.
- Una velocidad excesiva al preparar masa con levadura puede dañar la
Batidora.
20
PROTECCIÓN CONTRA SALPICADURAS 360° - Cuando
se usa, encierra por completo el borde de la taza para
evitar que los ingredientes salpiquen durante la operación
de la batidora.
EMBUDO DE VERTIDO FÁCIL - Se inserta en el Embudo de
la Batidora en la parte superior de la misma. El Embudo de
Vertido Rápido se puede remover para una limpieza más
conveniente y usarlo ayuda a mantener las superficies del
Embudo de la Batidora libres de residuos de ingredientes.
21
Page 12

OPERACIÓN OPERACIÓN
AJUSTE DEL BATIDOR FRANCÉS (Ver Fig. 7)
El Batidor Francés puede ser ajustado a una posición más baja para alcanzar un
nivel bajo de ingredientes en la taza. Se ajusta como sigue:
1. Coloque el selector de velocidad en 0.
2. Desconecte la Batidora del contacto.
3. Presione la palanca de liberación para inclinar el cabezal hacia atrás y
bloquee en la posición correcta.
4. Retire el batidor francés del eje.
5. Use un destornillador de pala para girar el tornillo de ajuste del conjunto en la
parte superior del batidor.
- Para subir el batidor en la taza, baje el tornillo del conjunto girándolo en
sentido horario.
- Para bajar el batidor en la taza, suba el tornillo del conjunto girándolo en
sentido anti horario.
6. Vuelva a acoplar el batidor al eje de la batidora.
PRECAUCION: Tenga cuidado
de no girar el tornillo del conjunto
muy hacia abajo o hacia arriba o
puede caerse. Además, si se gira
muy hacia abajo, el tornillo puede
obstruir el acople del batidor al eje.
Tornillo de Ajuste
del Conjunto
Fig. 7
CÓMO UTILIZAR EL EMBUDO DE LA BATIDORA
NOTA:
El accesorio se inserta en el Embudo de la Batidora, se puede remover para una
limpieza más conveniente y usarlo ayuda a mantener las superficies del Embudo
de la Batidora libres de residuos de ingredientes.
Usando un ingrediente a la vez, agregue lentamente al embudo de vertido. La Batidora
puede estar operando a baja velocidad cuando los ingredientes estén siendo
agregados siempre y cuando la Protección contra Salpicaduras esté puesta.
Gradualmente, siga agregando los ingredientes que queden a través del embudo de
vertido. Si necesita raspar los lados de la taza, primero gire el selector de velocidad a
0 y suba el cabezal inclinable.
Al verter líquidos a través del embudo de vertido, asegúrese de colocar el selector de
velocidad en 0 o un número menor para evitar que los ingredientes salpiquen.
Los ingredientes tales como nueces, frutos secos o en trozos deberían ser incorporados
a la mezclas en la etapa final del batido.
Consejo: Espolvoree ligeramente los ingredientes gruesos con harina todo uso para
evitar que se vayan al fondo de la taza.
Una vez que todos los ingredientes estén bien combinados, suba el cabezal inclinable y
gire la taza en sentido anti horario para retirar la taza del plato de sujeción.
El uso regular del Embudo de Vertido Rápido es altamente recomendado.
CONSEJOS DE MEZCLADO
• Observe la masa o pasta en la taza durante el batido. Mezcle solamente hasta que el
contenido alcance la apariencia deseada según la receta, tal como «suave» o
«cremosa».
• Siga las orientaciones de la receta cuando agregue nueces, pasas o frutas confitadas a
una mezcla. Incorpore ingredientes sólidos como estos en la taza en los últimos segundos
del Agitado lento (velocidad 1), cuando la pasta esté lo suficientemente gruesa como
para evitar que se hunda al fondo del molde para hornear. Espolvoree las frutas
confitadas pegajosas con harina para una distribución equitativa a lo largo de la masa.
• Si no está usando la Protección contra Salpicaduras, las mezclas que contengan grandes
cantidades de ingredientes líquidos deberían ser mezcladas inicialmente a velocidades
menores para evitar salpicaduras, Una vez que la mezcla espese, aumente la velocidad.
22
Después de terminar de usar la batidora, limpie las superficies exteriores usando un
paño húmedo. Use un paño seco para eliminar la humedad antes de guardar la
batidora.
23
Page 13

OPERACIÓN OPERACIÓN
LIMPIEZA
ADVERTENCIA: Desconecte la Batidora antes de tocar los batidores u
otros accesorios. Si este paso no se realiza, existe riesgo de huesos rotos,
cortaduras o moretones.
• Siempre desconecte la Batidora antes de limpiarla. NUNCA sumerja la Batidora
en el agua. El exterior de la Batidora sólo debería limpiarse con un paño húmedo
suave.
• No utilice limpiadores abrasivos o fibra metálica cuando limpie la Batidora.
• Siempre retire los accesorios antes de limpiar la Batidora. Si lava los accesorios a
mano, enjuague y seque completamente. La mayoría de los accesorios y la taza
de vidrio pueden lavarse en el lavavajillas. Solo coloque la tapa de la taza en la
rejilla superior del lavavajillas. Solo lave a mano el Batidor Francés.
• Lave los accesorios y la taza lo más pronto posible después de usarlos para
evitar que los restos de ingredientes se sequen sobre ellos.
SOLUCION DE PROBLEMAS
La Batidora no
enciende
La posición del
batidor francés en
la taza es muy
baja o muy alta
La Luz de Trabajo
Parpadea
El Área de la
Superficie está
Caliente
• Asegúrese de que la batidora está conectada.
• Verifique que hay 120V desde el contacto hasta la batidora.
• Verifique que el Cabezal Inclinable está bloqueada en la
posición inferior.
Coloque el selector de velocidad en 0. Luego gire el selector
de velocidad a una configuración de velocidad baja.
• Si el Cabezal Inclinable está muy caliente para tocarlo, espere
15 minutos mientras se enfría el motor, luego intente
encenderla de nuevo.
• Si las soluciones anteriores no funcionan,
Llame a Atención al Usuario al 1-855-438-7899
• Para subir el batidor francés: Retire el batidor francés del eje
de la batidora.
Baje el tornillo del conjunto situado encima del batidor
girándolo en sentido horario. Acople el batidor al eje. Tenga
cuidado de no girar el tornillo del conjunto muy hacia abajo o
puede obstruir el acople del batidor al eje.
• Para bajar el batidor francés: Retire el batidor francés del eje
de la batidora.
Suba el tornillo del conjunto situado encima del batidor
girándolo en sentido anti ¬horario. Acople el batidor al eje.
No suba demasiado el tornillo o puede caerse.
• El batidor y el gancho de amasar se ajustan en la fábrica
para óptima eficiencia, así que no se necesitan más ajustes.
• Bloquee el Cabezal Inclinable en la posición inferior.
• Coloque el selector de velocidad en 0.
• Si el parpadeo no de detiene y la unidad está muy caliente
para tocarla, desconéctela y espere 15 minutos para que la
condición de recalentamiento del motor desaparezca.
• Si la unidad se enfría y aún así no funciona, llame a Atención
al Usuario al 855-438-7899
• La batidora puede calentarse durante el uso. Probablemente
usted no sea capaz de tocar cómodamente la parte superior
de la Batidora. Esto es normal.
• Bajo cargas pesadas con períodos largos de mezclado, el
área de la superficie de la batidora puede calentarse.. Esto es
normal.
• La batidora está equipada con un apagado térmico de
seguridad para proteger el motor y al usuario de la operación
en condiciones demasiado calientes.
Deje que la unidad se enfríe por un período no menor de 15
minutos antes de usarla de nuevo.
24 25
 Loading...