

Kenmore 790.9720 Series, Elite 790.9720 Series Use & Care Manual
Use & Care Guide
Gufa de uso y cuidada
English / Espafiol
Model/Modelos: 790. 9720 _
I(enmore Elite
@
UCCI@B
:::::::::::::collop nur_'_llge_,c6di'_go de coHo_
P/N 316902019
Sears Brands Management Corporation
Hoffman Estates, IL 60179 U.S.A.
www.kenmore.com
www.sears.com
I= III IIi/I:
Table of Contents
Warranty ............................................................................................................ 2
Important Safety Instructions ..................................................................... 3-6
Product Record/Serial Plate Location ........................................................... 6
Range Features .................................................................................................. 7
Before Setting Oven Controls.......................................................................... 8
Before Setting Surface Controls .................................................................. 9-11
Induction cooking zones .............................................................................. 9
Cooktop display windows .......................................................................... 10
Cooktop Lockout feature ............................................................................ 11
Cooktop operational noises ....................................................................... 11
Surface Cookware Recommendations .......................................................... 12
Induction Cooking Zones........................................................................... 13-15
Pan sensing ................................................................................................... 13
Cooking zone minimum and maximum cookware sizes ....................... 14
Power sharing ............................................................................................... 15
Setting Surface Controls ............................................................................ 16-17
Setting induction cooking zones ......................................................... 16-17
Oven Control Functions ................................................................................... 18
Setting Oven Controls ................................................................................ 19-33
Setting clock ................................................................................................. 19
Setting timer ................................................................................................. 19
Add 1 minute ................................................................................................. 19
Setting 12 or 24 hour display mode ......................................................... 19
Changing between continuous bake setting or 12-Hour
Energy Saving feature ................................................................................ 19
Changing oven temperature display mode ........................................... 20
Setting silent or audible control mode ................................................... 20
Oven Lockout ............................................................................................... 20
Setting Preheat ............................................................................................. 21
Setting Bake .................................................................................................. 21
Setting Cook Time ...................................................................................... 22
Setting Delay Start ..................................................................................... 22
Conv Bake .................................................................................................... 23
Conv Roast ................................................................................................... 24
Conv Convert ............................................................................................... 24
Broil ............................................................................................................... 25
Cakes Breads ............................................................................................... 26
Meat probe ............................................................................................ 26-27
Slow Cook .................................................................................................... 28
Warm & Hold TM ......................................................................................... 29
Recipe Recall ............................................................................................... 29
Using AirGuard TM feature ......................................................................... 30
Accent light .................................................................................................. 30
Adjusting oven temperature ....................................................................... 31
Restoring factory default settings ............................................................. 31
Sabbath feature .................................................................................... 32-33
Warmer Drawer ........................................................................................ 34-36
Proof Bread .................................................................................................. 36
Humidity controller ..................................................................................... 36
Flex Clean ................................................................................................... 37-38
Care & Cleaning ........................................................................................ 39-42
Cleaning recommendation table ............................................................. 39
Cooktop maintenance and cleaning ................................................. 40-41
Removing and replacing lift-off oven door ........................................... 42
Before You Call - Solutions to common problems ............................... 43-45
Master Protection Agreements ..................................................................... 47
Sears Service ..................................................................................... back cover
Kenmore Elite Limited Warranty
When installed, operated and maintained according to all instructions supplied with the product, if this appliance fails due to a defect
in material and workmanship within one year from the date of purchase, call 1-800-4-MY-HOME® to arrange for free repair.
For five years from the date of purchase, if the cooktop glass fails due to thermal shock or the cooktop elements are defective, call
1-800-4-MY-HOME® to arrange for free repair. After the first year from purchase date, you must pay the labor cost of part installation. This
warranty applies for only 90 days from the date of purchase if this appliance is ever used for other than private family purposes.
Thiswarranty covers only defects in material and workmanship. Sears will NOT pay for:
1. Cracks in a ceramic glass cooktop that are not a result of thermal shock.
2. Stains and scratches on a ceramic glass cooktop resulting from failure to maintain it properly according to all instructions supplied with the
product.
3. Expendable items that can wear out from normal use, including but not limited to filters, belts, light bulbs, and bags.
4. A service technician to instruct the user in correct product installation, operation or maintenance.
5. A service technician to clean or maintain this product.
6. Damage to or failure of this product if it is not installed, operated or maintained according to all instructions supplied with the product.
7. Damage to or failure of this product resulting from accident, abuse, misuse or use for other than its intended purpose.
8. Damage to or failure of this product caused by the use of detergents, cleaners, chemicals or utensils other than those recommended in all
instructions supplied with the product.
9. Damage to or failure of parts or systems resulting from unauthorized modifications made to this product.
Disclaimer of implied warranties; limitation of remedies
Customer's sole and exclusive remedy under this limited warranty shall be product repair as provided herein. Implied warranties,
including warranties of merchantability or fitness for a particular purpose, are limited to one year or the shortest period allowed by law.
Sears shall not be liable for incidental or consequential damages. Some states and provinces do not allow the exclusion or limitation of
incidental or consequential damages, or limitation on the duration of implied warranties of merchantability or fitness, so these
exclusions or limitations may not apply to you.
This warranty applies only while this appliance is used in the United States or Canada.
This warranty gives you specific legal rights, and you may also have other rights which vary from state to state.
Sears Brands Management Corporation, Hoffman Estates, IL 60179 U.S.A.
Sears Canada Inc., Toronto, Ontario, Canada M5B 2B8
All rights reserved. Printed in the USA.
2
Important Safety Instructions
Read all instructions before using this appliance.
This manual contains important safety symbols and
instructions. Please pay attention to these symbols and
follow all instructions given.
Definitions
_This is the alert It is used to alert to
potential personal injury hazards. Obey all safety
messages that follow this symbol to avoid possible injury or
death.
Do not attempt to install or operate your appliance until
you have read the safety precautions in this manual. Safety
items throughout this manual are labeled with a
WARNING or CAUTION statement based on the risk type.
situation which, if not avoided, may result in death or
serious injury.
situation which, if not avoided, may result in minor or
moderate injury.
medical device should exercise caution using or standing
near an induction unit while it is in operation, as the
electromagnetic field may affect the working of the
pacemaker or similar medical device. It would be
advisable to consult your Doctor or the pacemaker or
similar medical device manufacturer about your
particular situation.
This appliance has been tested and found to comply with
the limits for a class B digital device, pursuant to Part 18 of
the FCC rules. These limits are designed to provide
reasonable protection against harmful interference in a
residential installation. This unit generates, uses and can
radiate radio frequency energy and, if not installed and
used in accordance with the instructions, may cause
harmful interference to radio communications. However
there is no guarantee that interference will not occur in a
particular installation. If this unit does cause harmful
interference to radio or television reception, which can be
determined by turning the unit off and on, the user is
encouraged to try to correct the interference by one or
more of the following measures:
• Reorient or relocate the receiving antennae.
• Increase the distance between the unit and receiver.
• Connect the unit into an outlet or a circuit different from
that to which the receiver is connected.
safety symbol.
- indicates a potentially hazardous
- indicates a potentially hazardous
Persons with a pacemaker or similar
you
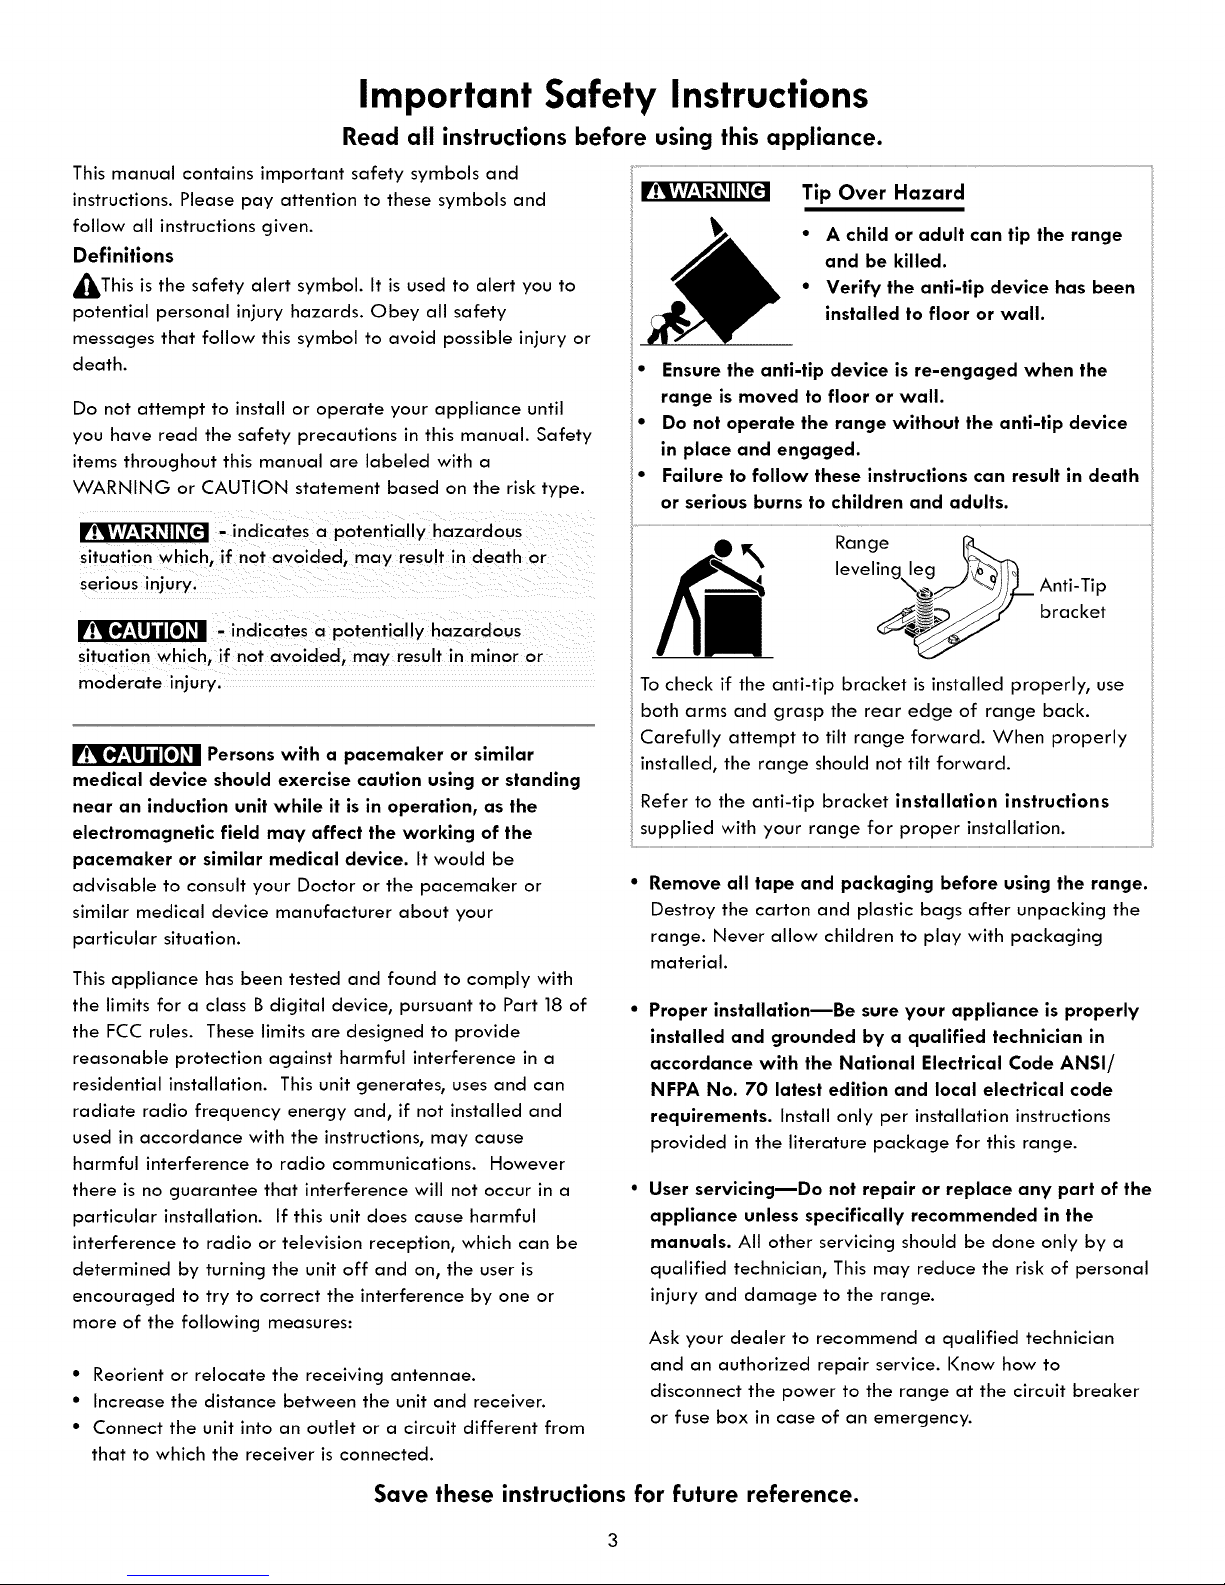
Tip Over Hazard
• A child or adult can tip the range
and be killed.
• Verify the anti-tip device has been
installed to floor or wall.
• Ensure the anti-tip device is re-engaged when the
range is moved to floor or wall.
• Do not operate the range without the anti-tip device
in place and engaged.
• Failure to follow these instructions can result in death
or serious burns to children and adults.
leveling leg _,_TI_
_" _)____ Anti-Tip
___..._._ bracket
Range __
To check if the anti-tip bracket is installed properly, use
both arms and grasp the rear edge of range back.
Carefully attempt to tilt range forward. When properly
installed, the range should not tilt forward.
Refer to the anti-tip bracket installation instructions
supplied with your range for proper installation.
Remove all tape and packaging before using the range.
Destroy the carton and plastic bags after unpacking the
range. Never allow children to play with packaging
material.
Proper installation--Be sure your appliance is properly
installed and grounded by a qualified technician in
accordance with the National Electrical Code ANSI/
NFPA No. 70 latest edition and local electrical code
requirements. Install only per installation instructions
provided in the literature package for this range.
User servicingmDo not repair or replace any part of the
appliance unless specifically recommended in the
manuals. All other servicing should be done only by a
qualified technician, This may reduce the risk of personal
injury and damage to the range.
Ask your dealer to recommend a qualified technician
and an authorized repair service. Know how to
disconnect the power to the range at the circuit breaker
or fuse box in case of an emergency.
Save these instructions for future reference.
Important Safety Instructions
• Never modify or alter the construction of a range by
removing the leveling legs, panels, wire covers, anti-tip
brackets/screws, or any other part of the range.
• Remove the oven door from any unused range if it is to
be stored or discarded.
Do not attempt to operate the range during a power
failure. If the power fails, always turn off the range. If
the range is not turned off and the power resumes, the
range will begin to operate again. Once the power
resumes, reset the clock and oven function.
Stepping, leaning or sitting on the door or
drawers of a range can result in serious injuries and also
cause damage to the appliance. DO NOT allow children
to climb or play around the range. The weight of a child on
an open oven door may cause the range to tip, resulting in
serious burns or other injury.
Storage in or on appliance m flammable
materials should not be stored in an oven, near surface
units or in the storage drawer, warmer drawer or lower
oven. This includes paper, plastic and cloth items, such as
cookbooks, plasticware and towels, as well as flammable
liquids. Do not store explosives, such as aerosol cans, on or
near the range.
NEVER cover any slots, holes or passages in
the oven bottom or cover an entire oven rack with materials
such as aluminum foil. Aluminum foil linings may trap heat,
causing a fire hazard.
DO NOT TOUCH SURFACE HEATING
UNITS, OR SURFACE COOKING ELEMENTS, AREAS
NEAR THESE SURFACE HEATING UNITS, OR INTERIOR
SURFACE OF THE OVEN. Both surface units and oven
heating elements may be hot even though they are dark in
color. Areas near surface cooking units may become hot
enough to cause burns. During and after use, do not touch,
or let clothing or other flammable materials touch these
areas until they have had sufficient time to cool. Among
these areas are the cook top, surfaces facing the cook top,
the oven vent openings and surfaces near these openings,
oven door and oven door window.
Wear proper apparel -- loose-fitting or
hanging garments should never be worn while using the
appliance. Do not let clothing or other flammable
materials contact hot surfaces.
DO NOT USE WATER OR FLOUR on grease
fires -- smother the fire with a pan lid, or use baking
soda, a dry chemical or foam-type extinguisher.
When heating fat or grease, watch it
closely. Fat or grease may catch fire if allowed to become
too hot.
Use dry potholders m moist or damp
potholders on hot surfaces may result in burns from
steam. Do not let potholders touch hot heating elements.
Do not use a towel or other bulky cloth instead of a
potholder.
DO NOT LEAVE CHILDREN ALONE
children should not be left alone or unattended in the
area where appliance is in use. They should never be
allowed to sit or stand on any part of the appliance,
including the storage drawer, lower broiler drawer, warmer
drawer or lower double oven.
Do not store items of interest to children in
the cabinets above a range or on the backguard of the
range. Children climbing on the range to reach items
could be seriously injured.
Save these instructions for future reference.
Do not heat unopened food containers
buildup of pressure may cause container to burst and
result in injury.
Important Safety Notice
The California Safe Drinking Water and Toxic Enforcement
Act requires the Governor of California to publish a list of
substances known to the state to cause cancer, birth
defects or other reproductive harm, and requires businesses
to warn customers of potential exposure to such substances.

Important Safety Instructions
IMPORTANT INSTRUCTIONS FOR USING YOUR
OVEN
Protective Liners m DO NOT USE
ALUMINUM FOIL to line the oven bottom. Only use
aluminum foil as recommended in this manual. Improper
installation of these liners may result in risk of electric
shock, or fire.
• Use care when opening oven door, warmer drawer or
lower oven door m Stand to the side of the range when
opening the door of a hot oven. Let hot air or steam
escape before you remove or replace food in the oven.
• Keep oven vent ducts unobstructed. The oven vent is
located below the backguard. Touching the surfaces in
this area when the oven is operating may cause severe
burns. Also, do not place plastic or heat-sensitive items
on or near the oven vent. These items could melt or
ignite.
• Placement of interior oven racks. Always place oven
racks in desired location while oven is cool. If rack must
be moved while oven is hot use extreme caution. Use
potholders and grasp the rack with both hands to
reposition. Do not let potholders contact the hot heating
elements in the oven. Remove all utensils from the rack
before moving.
• Do not use the broiler pan without its insert. The broiler
pan and its insert allow dripping fat to drain and be kept
away from the high heat of the broiler.
• Do not cover the broiler insert with aluminum foil.
Exposed fat and grease could ignite.
IMPORTANT INSTRUCTIONS FOR CERAMIC-
GLASS COOl( TOP MODELS
• Do not cook on broken cook top--If cook top should
break, cleaning solutions and spillovers may penetrate
the broken cook top and create a risk of electric shock.
Contact a qualified technician immediately.
IMPORTANT INSTRUCTIONS FOR USING YOUR
COOl(TOP
Know which knob or keypad controls each surface
heating unit. Place a pan of food on the surface element
or heating unit before turning it on, and turn the element
or heating unit off before removing the pan.
Use proper pan size for induction cooking zones --This
appliance is equipped with one or more induction
cooking zones of different sizes. Select utensils
specifically manufactured and approved for induction
cooking that have flat bottoms that match the induction
cooking zone size. Proper relationship of utensil to
cooking zone will also improve efficiency.
Utensil handles should be turned inward and not extend
over adjacent surface elements or cooking zones -- To
reduce the risk of burns, ignition of flammable materials,
and spillage due to unintentional contact with the utensil,
the handle of the utensil should be positioned so that it is
turned inward, and does not extend over adjacent
surface units.
Never leave surface elements or cooking zones at high
heat settings or with active power level settings
unattended _ Boilovers cause smoking and greasy
spillovers that may ignite, or a pan that has boiled dry
may melt.
Glazed cooking utensils _ Only certain types of glass,
glass/ceramic, ceramic, earthenware, or other glazed
utensils are suitable for cook top service without breaking
clue to the sudden change in temperature. Check the
manufacturer's recommendations for cook top use.
• When flaming foods under a ventilating hood, turn the
fan on.
• Clean cook top with caution--If a wet sponge or cloth is
used to wipe spills on a hot cooking area, be careful to
avoid a steam burn. Some cleaners can produce noxious
fumes if applied to a hot surface.
Save these instructions for future reference.
Important Safety Instructions
IMPORTANT INSTRUCTIONS FOR CLEANING IMPORTANT INSTRUCTIONS FOR SELF-
YOUR RANGE CLEANING OVENS
Before manually cleaning any part of the
range, be sure all controls are turned OFF and the range is
COOL. The range may be hot and can cause burns.
• Clean the range regularly to keep all parts free of
grease that could catch fire. Pay particular attention to
the area around each surface element. Do not allow
grease to accumulate.
• Kitchen cleaners and aerosols m Always follow the
manufacturer's recommended directions for use. Be
aware that excess residue from cleaners and aerosols
may ignite causing damage and iniury.
• Clean ventilating hoods frequently m Grease should not
be allowed to accumulate on the hood or filter. Follow
the manufacturer's instructions for cleaning hoods.
Clean in the self-cleaning cycle only the parts listed in
this Use & Care Manual. Before self-cleaning the oven,
remove the oven racks, broil pan, broil pan insert and
any cookware, cooking utensils or food from the oven.
• Do Not Use Oven Cleaners -- No commercial oven
cleaner or oven liner protective coating of any kind
should be used in or around any part of the oven.
• Do Not Clean Door Gasket -- The door gasket is
essential for a good seal. Care should be taken not to
rub, damage or move the gasket.
The health of some birds is extremely sensitive to the
fumes given off during the self-cleaning cycle of any
range. Move birds to another well-ventilated room.
Save these instructions for future reference.
Product Record
In this space below, record the date of purchase, model
and serial number of your product. You will find the model
and serial number printed on an identification plate. See
bottom of this page for serial plate location.
Model No. 790.
Serial No.
Date of Purchase
Save sales receipt for future reference.
Serial Plate Location
To locate the serial plate open warmer
drawer. The serial plate is attached to the
lower right oven frame.
Range Features
S_t/Of f I I
......%o .....80 ......°,o.0,
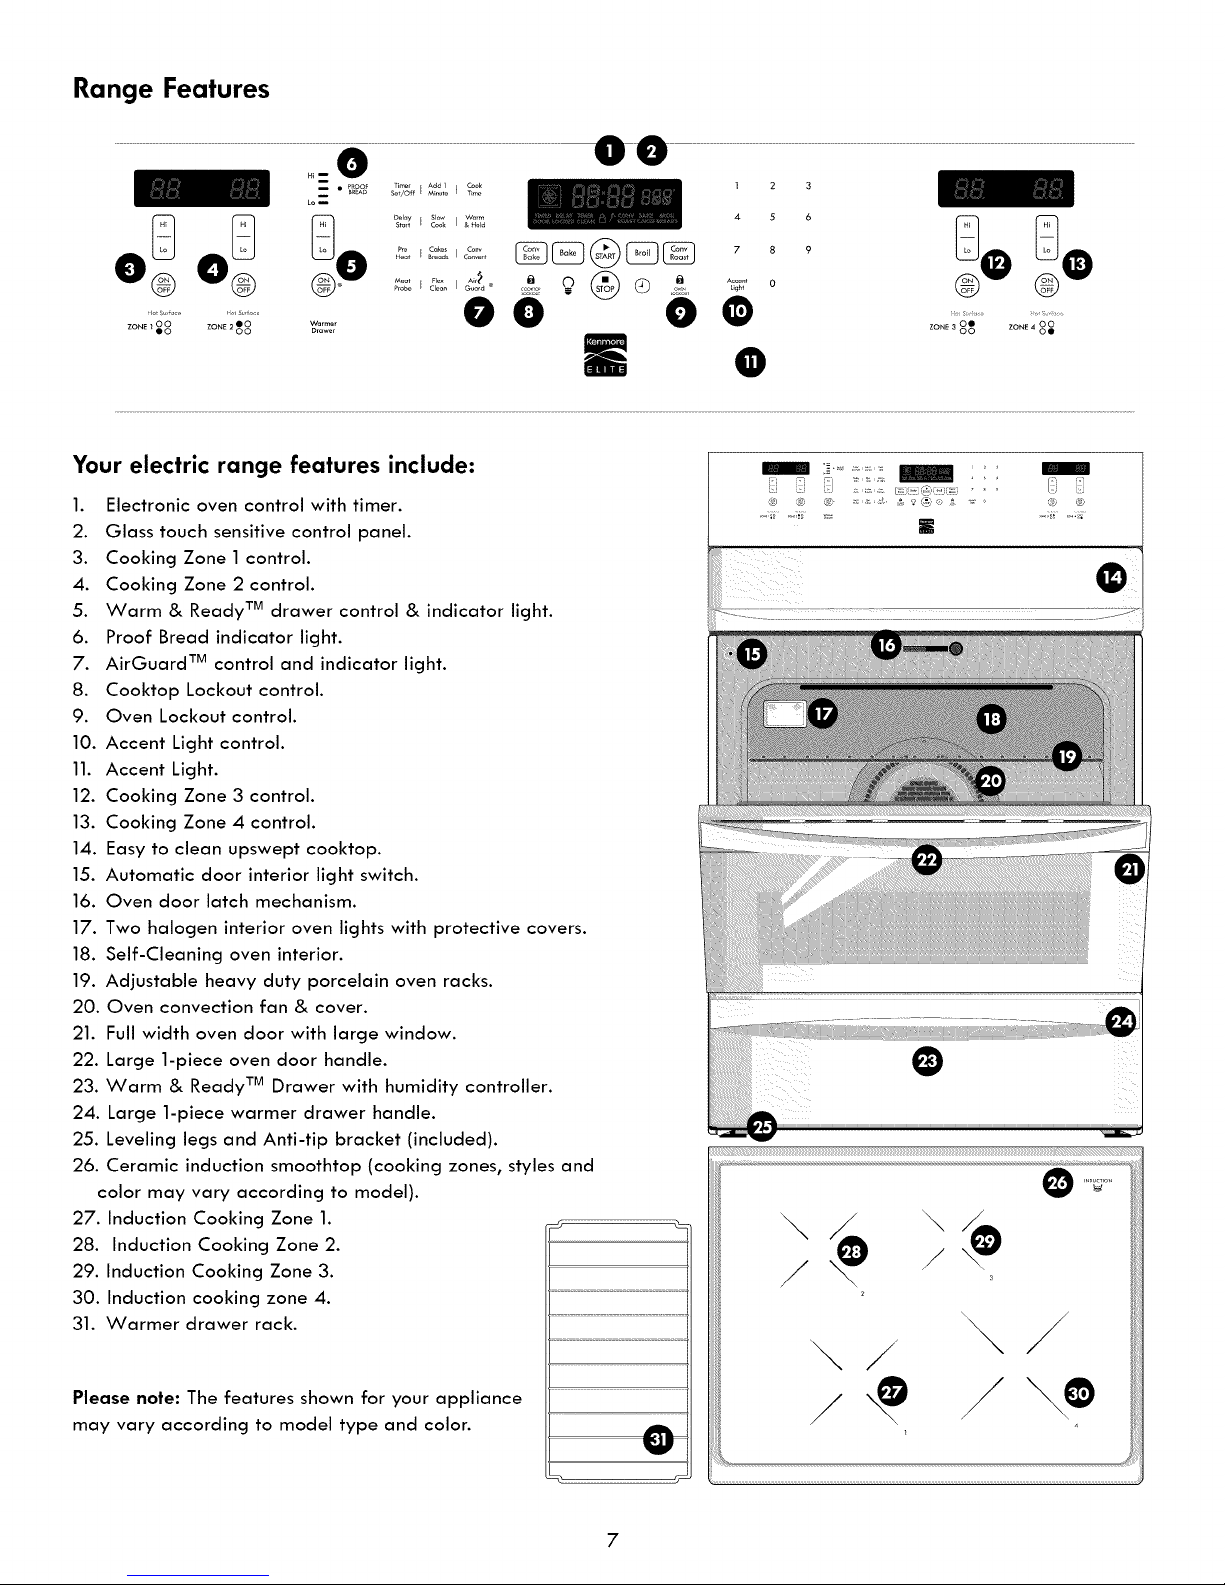
Your electric range features include:
1. Electronic oven control with timer.
2. Glass touch sensitive control panel.
3. Cooking Zone 1 control.
4. Cooking Zone 2 control.
5. Warm & Ready TMdrawer control & indicator light.
6. Proof Bread indicator light.
7. AirGuard TM control and indicator light.
8. Cooktop Lockout control.
9. Oven Lockout control.
10. Accent Light control.
11. Accent Light.
12. Cooking Zone 3 control.
13. Cooking Zone 4 control.
14. Easy to clean upswept cooktop.
15. Automatic door interior light switch.
16. Oven door latch mechanism.
17. Two halogen interior oven lights with protective covers.
18. Self-Cleaning oven interior.
19. Adjustable heavy duty porcelain oven racks.
20. Oven convection fan & cover.
21. Full width oven door with large window.
22. Large 1-piece oven door handle.
23. Warm & Ready TM Drawer with humidity controller.
24. Large 1-piece warmer drawer handle.
25. Leveling legs and Anti-tip bracket (included).
26. Ceramic induction smoothtop (cooking zones, styles and
color may vary according to model).
27. Induction Cooking Zone 1.
28. Induction Cooking Zone 2.
29. Induction Cooking Zone 3.
30. Induction cooking zone 4.
31. Warmer drawer rack.
1 2 3
4 5 6
7 8 9
' _: !:) ......... [;;[
I
\
/
Please note: The features shown for your appliance
may vary according to model type and color.
O
,, j
Before Setting Oven Controls
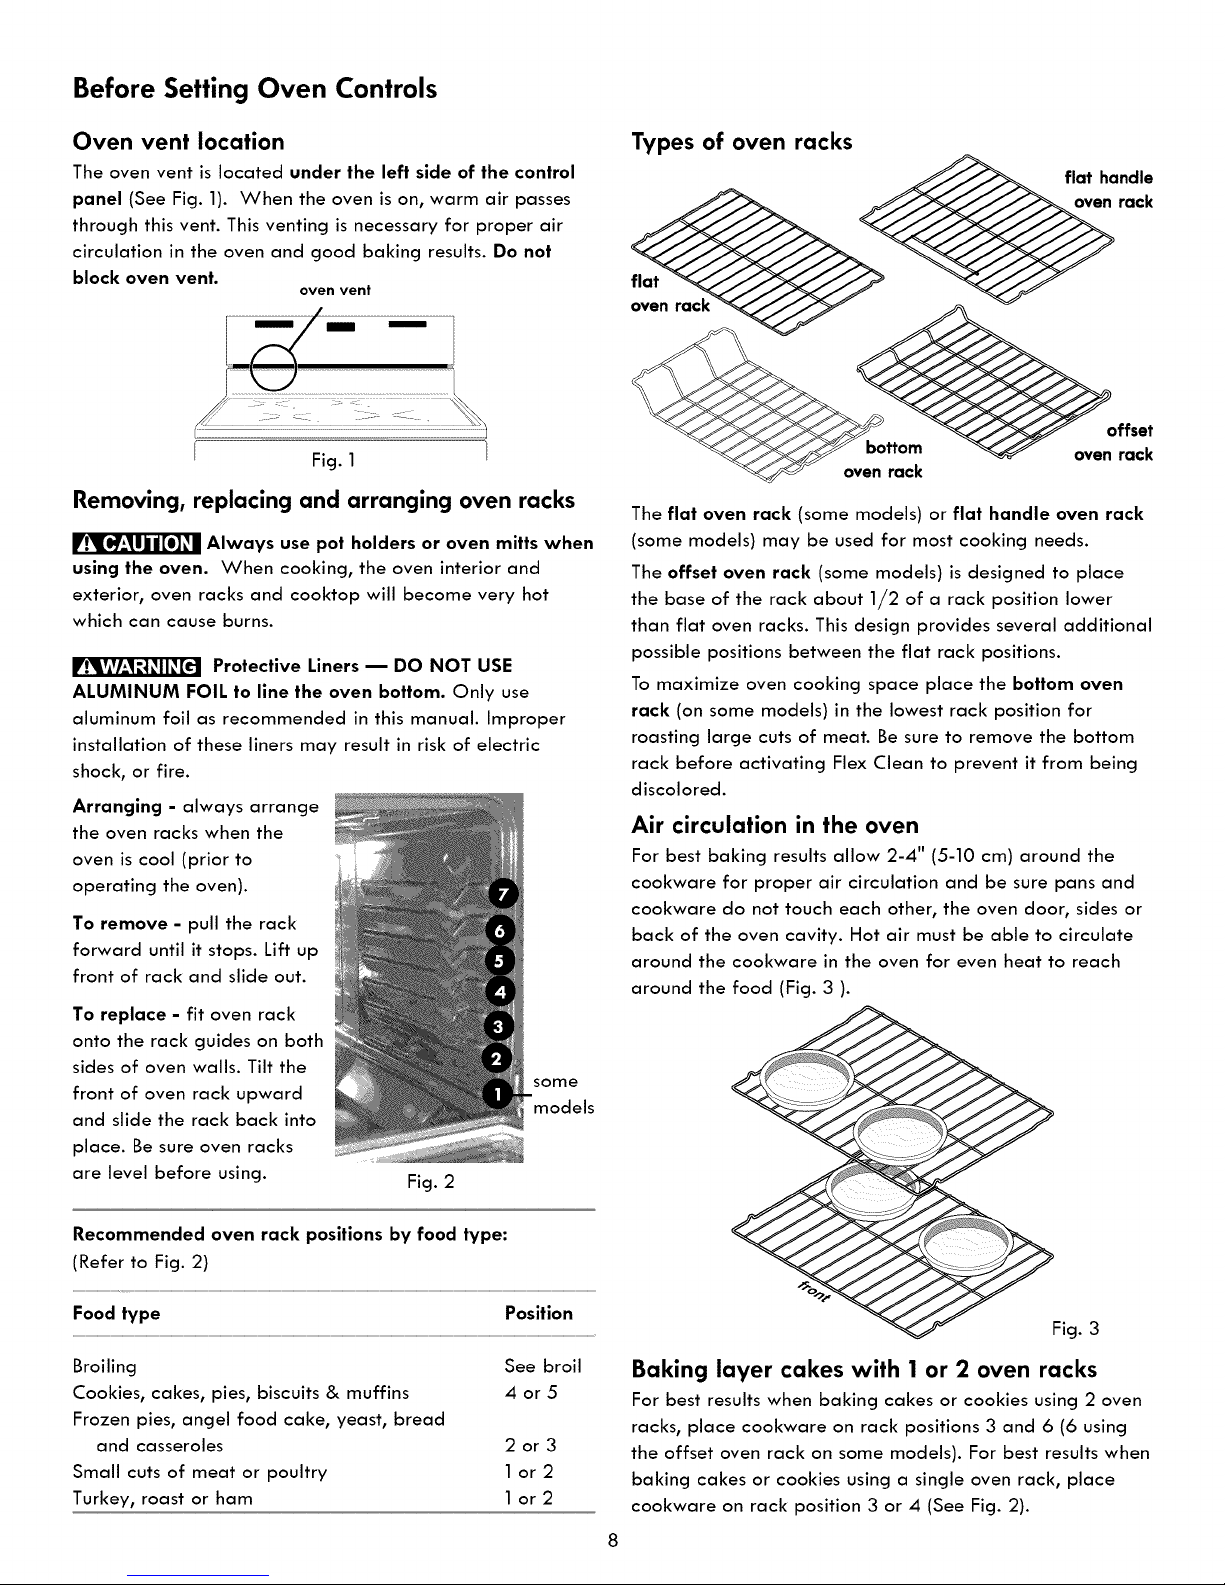
Oven vent location
The oven vent is located under the left side of the control
panel (See Fig. 1). When the oven is on, warm air passes
through this vent. This venting is necessary for proper air
circulation in the oven and good baking results. Do not
block oven vent.
I Fig. 1 /
ovenvent
Removing, replacing and arranging oven racks
Always use pot holders or oven mitts when
using the oven. When cooking, the oven interior and
exterior, oven racks and cooktop will become very hot
which can cause burns.
Protective Liners m DO NOT USE
ALUMINUM FOIL to line the oven bottom. Only use
aluminum foil as recommended in this manual. Improper
installation of these liners may result in risk of electric
shock, or fire.
Arranging - always arrange
the oven racks when the
oven is cool (prior to
operating the oven).
To remove - pull the rack
forward until it stops. Lift up
front of rack and slide out.
To replace - fit oven rack
onto the rack guides on both
sides of oven walls. Tilt the
front of oven rack upward
and slide the rack back into
place. Be sure oven racks
are level before using.
Fig. 2
some
models
Types of oven racks
flat handle
_ rack
_v b° ttta°ck _ oven rack
The flat oven rack (some models) or flat handle oven rack
(some models) may be used for most cooking needs.
The offset oven rack (some models) is designed to place
the base of the rack about 1/2 of a rack position lower
than flat oven racks. This design provides several additional
possible positions between the flat rack positions.
To maximize oven cooking space place the bottom oven
rack (on some models) in the lowest rack position for
roasting large cuts of meat. Be sure to remove the bottom
rack before activating Flex Clean to prevent it from being
discolored.
Air circulation in the oven
For best baking results allow 2-4" (5-10 cm) around the
cookware for proper air circulation and be sure pans and
cookware do not touch each other, the oven door, sides or
back of the oven cavity. Hot air must be able to circulate
around the cookware in the oven for even heat to reach
around the food (Fig. 3 ).
Recommended oven rack positions by food type:
(Refer to Fig. 2)
Food type Position
Broiling
Cookies, cakes, pies, biscuits & muffins
Frozen pies, angel food cake, yeast, bread
and casseroles
Small cuts of meat or poultry
Turkey, roast or ham
See broil
4or5
2or3
lor2
lor2
Fig. 3
Baking layer cakes with 1 or 2 oven racks
For best results when baking cakes or cookies using 2 oven
racks, place cookware on rack positions 3 and 6 (6 using
the offset oven rack on some models). For best results when
baking cakes or cookies using a single oven rack, place
cookware on rack position 3 or 4 (See Fig. 2).
Before Setting Surface Controls
Induction cooking zones
Benefits of induction cooking zones:
Fast and efficient - The induction cooking zones heat faster
while using less energy. Induction power levels are quick to
boil and efficient when simmering.
A cooler cooktop - A unique feature of the induction
cooking zones are whether turned on or off, the cooking
zones remain cooler than radiant elements. Virtually no
wasted heat is produced since the heat begins with the
presence of cookware.
Easy cleanups - The cooler cooking zone makes cleanups
easier. Spills resist sticking or burning so they wipe up
easier.
Magnetic detector - The cooking zone has a sensor that
automatically detects whether cookware is magnetic. This
will reduce accidental "turn-ons" and help avoid setting
utensils on hot elements like spatulas or spoons.
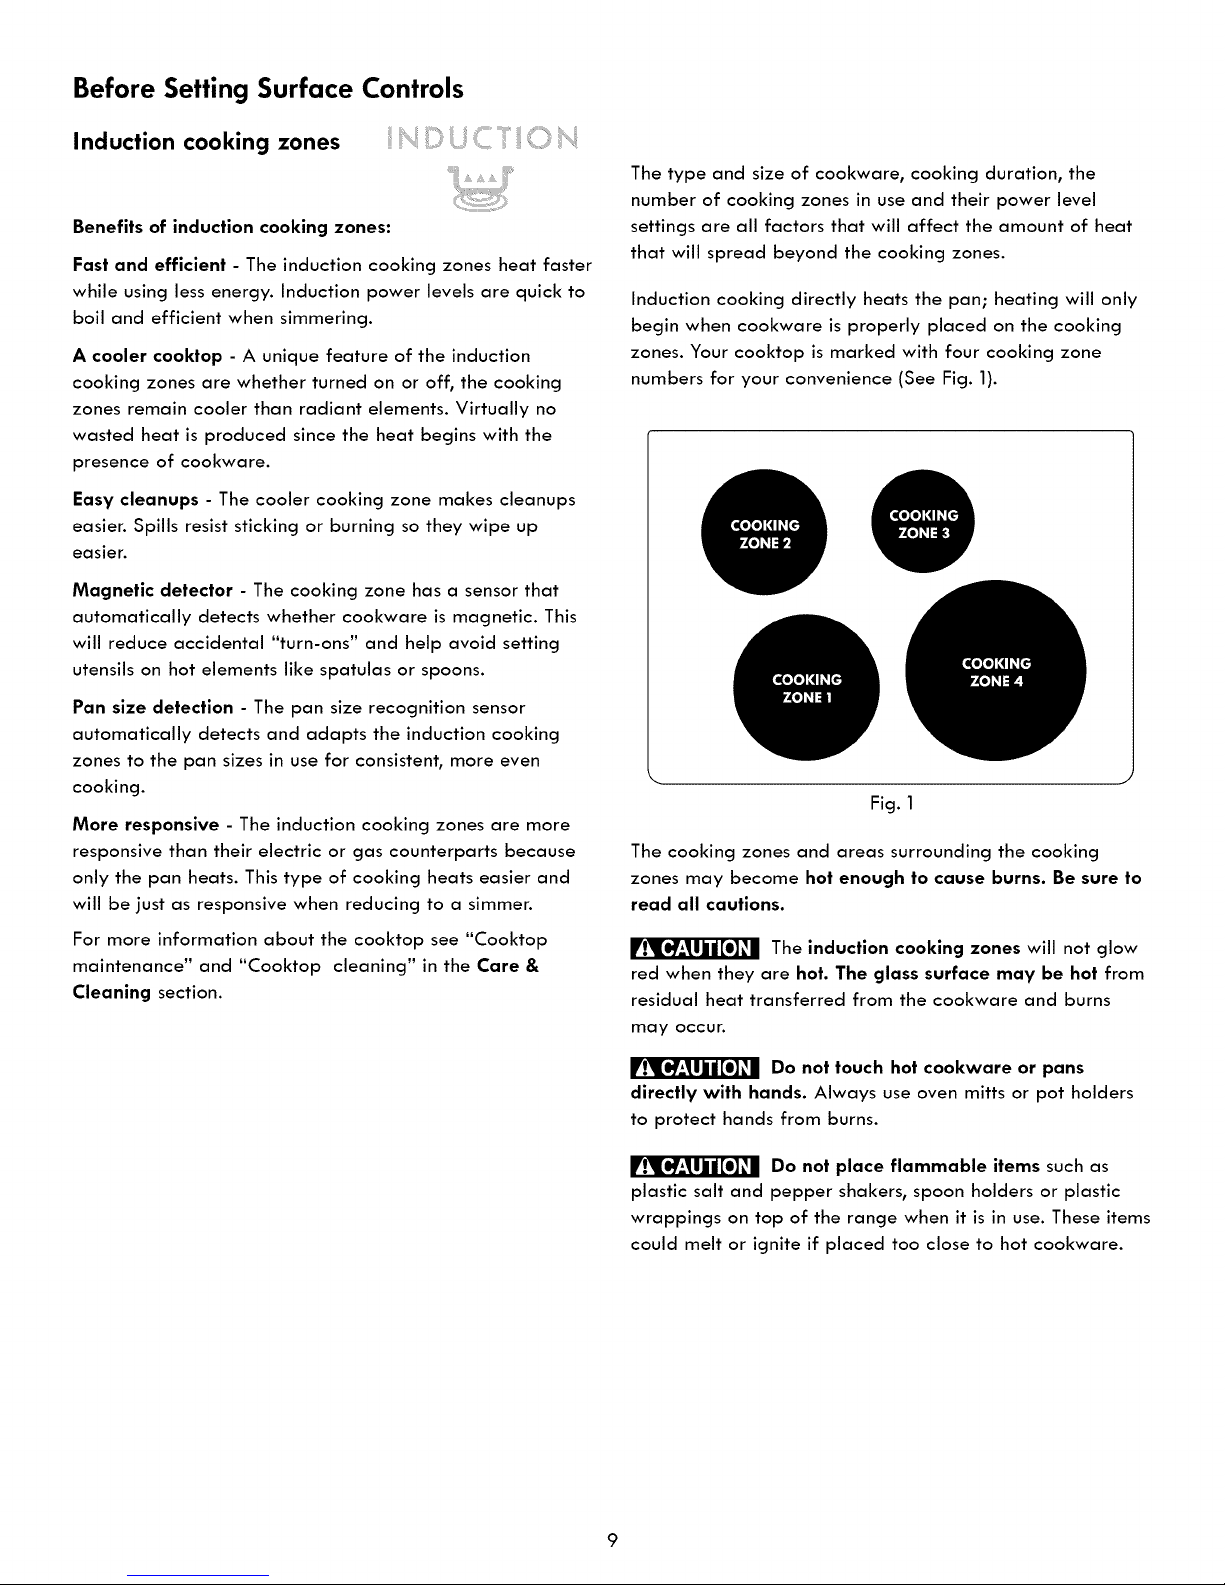
The type and size of cookware, cooking duration, the
number of cooking zones in use and their power level
settings are all factors that will affect the amount of heat
that will spread beyond the cooking zones.
Induction cooking directly heats the pan; heating will only
begin when cookware is properly placed on the cooking
zones. Your cooktop is marked with four cooking zone
numbers for your convenience (See Fig. 1).
Pan size detection - The pan size recognition sensor
automatically detects and adapts the induction cooking
zones to the pan sizes in use for consistent, more even
cooking.
More responsive - The induction cooking zones are more
responsive than their electric or gas counterparts because
only the pan heats. This type of cooking heats easier and
will be just as responsive when reducing to a simmer.
For more information about the cooktop see "Cooktop
maintenance" and "Cooktop cleaning" in the Care &
Cleaning section.
Fig. 1
The cooking zones and areas surrounding the cooking
zones may become hot enough to cause burns. Be sure to
read all cautions.
The induction cooking zones will not glow
red when they are hot. The glass surface may be hot from
residual heat transferred from the cookware and burns
may occur.
Do not touch hot cookware or pans
directly with hands. Always use oven mitts or pot holders
to protect hands from burns.
Do not place flammable items such as
plastic salt and pepper shakers, spoon holders or plastic
wrappings on top of the range when it is in use. These items
could melt or ignite if placed too close to hot cookware.
Before Setting Surface Controls
Cooktop display windows
The oven backguard provides a digital window for each of
the cooking zones located on the cooktop. Power levels and
messages are easily monitored and controlled using the
window displays in combination with the corresponding
control keypads.
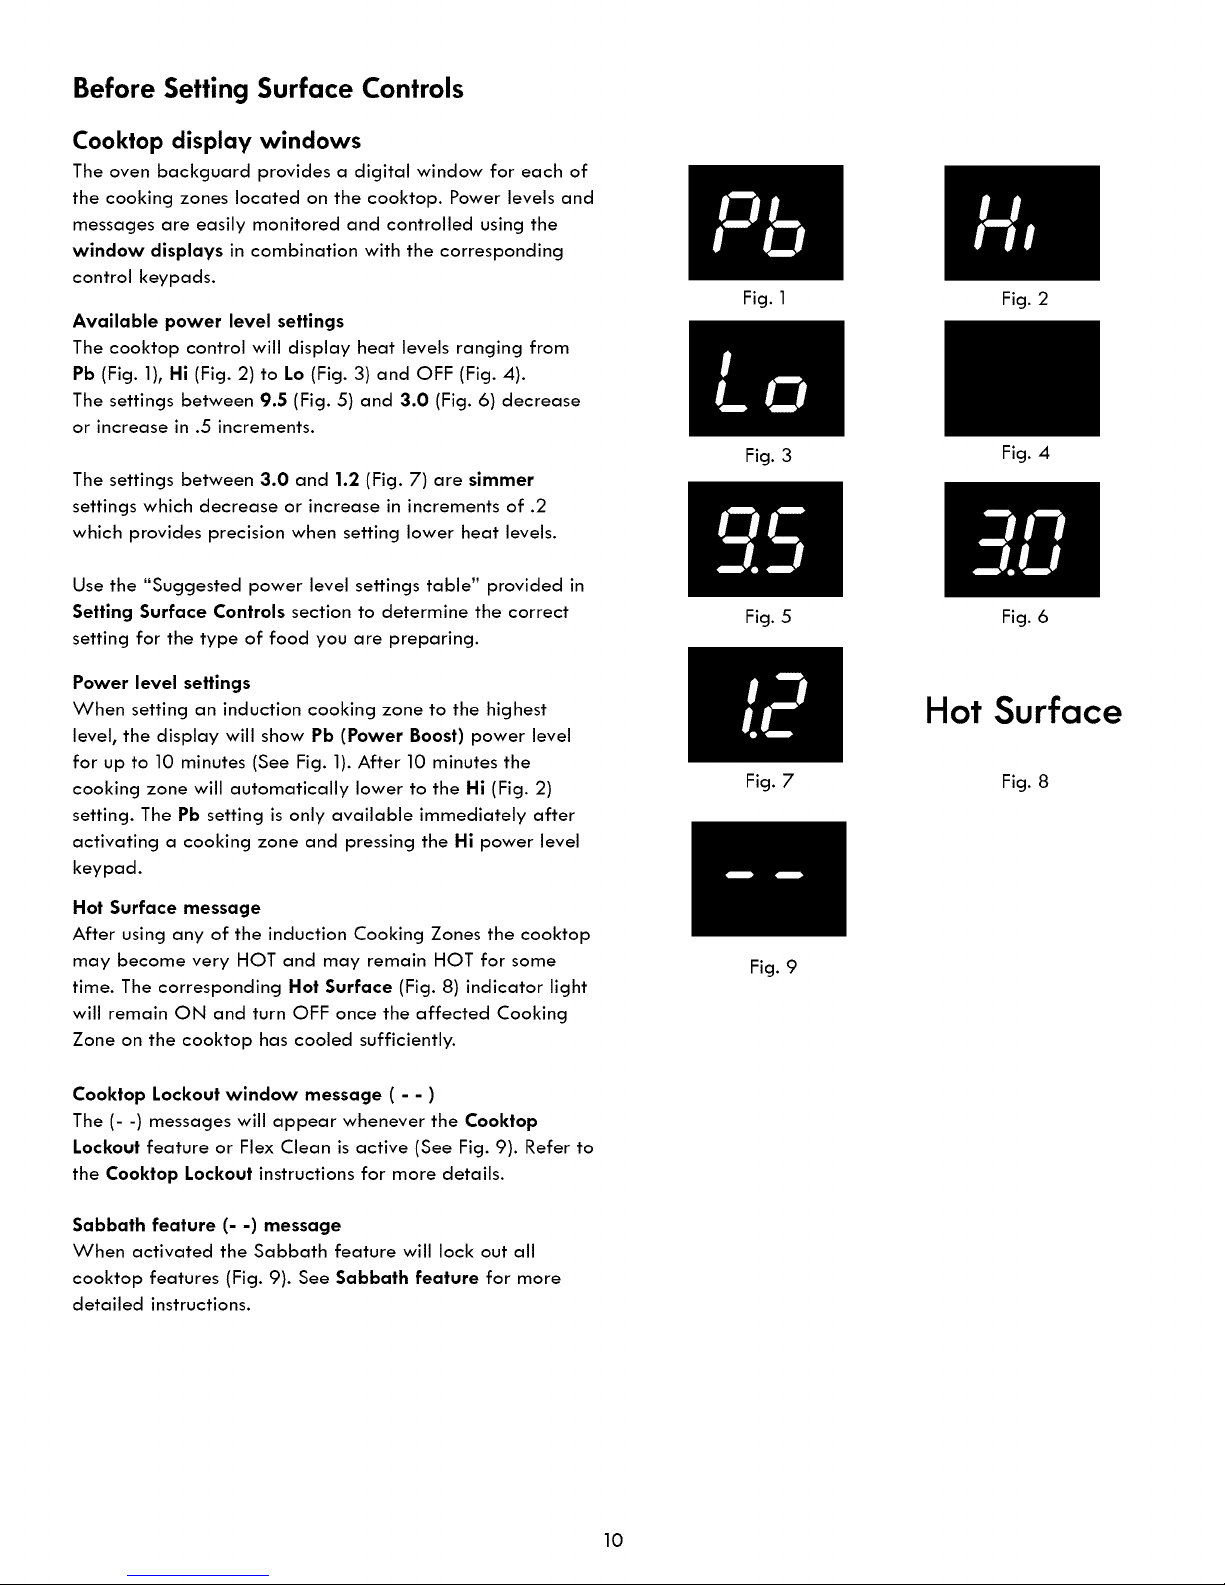
Available power level settings
The cooktop control will display heat levels ranging from
Pb (Fig. 1), Hi (Fig. 2) to Lo (Fig. 3) and OFF (Fig. 4).
The settings between 9.5 (Fig. 5) and 3.0 (Fig. 6) decrease
or increase in .5 increments.
The settings between 3.0 and 1.2 (Fig. 7) are simmer
settings which decrease or increase in increments of .2
which provides precision when setting lower heat levels.
Use the "Suggested power level settings table" provided in
Setting Surface Controls section to determine the correct
setting for the type of food you are preparing.
Fig. 1
Fig. 3
Fig. 5
Fig. 2
Fig. 4
Fig. 6
Power level settings
When setting an induction cooking zone to the highest
level, the display will show Pb (Power Boost) power level
for up to 10 minutes (See Fig. 1). After 10 minutes the
cooking zone will automatically lower to the Hi (Fig. 2)
setting. The Pb setting is only available immediately after
activating a cooking zone and pressing the Hi power level
keypad.
Hot Surface message
After using any of the induction Cooking Zones the cooktop
may become very HOT and may remain HOT for some
time. The corresponding Hot Surface (Fig. 8) indicator light
will remain ON and turn OFF once the affected Cooking
Zone on the cooktop has cooled sufficiently.
Cooktop Lockout window message ( - - )
The (- -) messages will appear whenever the Cooktop
Lockout feature or Flex Clean is active (See Fig. 9). Refer to
the Cooktop Lockout instructions for more details.
Sabbath feature (- -) message
When activated the Sabbath feature will lock out all
cooktop features (Fig. 9). See Sabbath feature for more
detailed instructions.
Fig. 7
Fig. 9
Hot Surface
Fig. 8
10

Before Setting Surface Controls
Cooktop Lockout feature
This feature will lock all Cooking Zones from
being accidentally turned ON. This feature will
only lockout the cooktop controls.
To turn Cooktop Lockout feature ON:
1. Be sure all cooking zones are set to the OFF position.
2.Press and hold Cooktop Lockout keypad until a 2nd beep
sounds. If a triple beep sounds instead, check all cooking
zones and turn them OFF and repeat this step. Once
activated the Cooktop Lockout indicator icon will appear
in the oven control (See Fig. 1) and all the cooktop
display windows will show the locked message (Fig. 2).
The cooktop controls and functions are locked out until
the cooktop is unlocked.
Fig. 1
To turn Cooktop Lockout feature OFF:
1. Be sure all cooking zone controls are set to the OFF
position.
2.Press and hold Cooktop Lockout keypad until a 2nd beep
sounds (after 3 seconds). The Cooktop Lockout indicator
icon and the surface window displays will no longer show
lockout messages. The cooktop may now be used for
normal cooking operations.
COOKTOP
LOCKOUT
Fig. 2
Cooktop operational noises
The electronic processes involved with induction cooking
may create some unusual background noises. You could
hear a slight "buzz" sound when using the induction
cooking zones. These noises are normal and are a part of
the induction cooking process.
Some cookware may "buzz" louder depending on the
cookware base material and cookware contents. The
"buzz" sound may be more noticeable if the contents of
the pan are cold. As the cookware heats up, the sound will
decrease. If the power level setting is reduced, the sound
level will also decrease.
Important note:
When using the induction cooktop, operational noises
are more noticeable while cooking at the Pb level. Very
loud noises are not part of normal induction cooking.
Important notes:
• Starting a Flex Clean cycle will automatically turn ON
the Cooktop Lockout feature. The cooktop will remain
locked until the Flex Clean cycle is finished and the oven
door has unlocked.
• If the Cooktop Lockout is active when a power failure
occurs, once power is restored, you must turn the
Cooktop Lockout feature OFF before the cooktop
features will be available again.
• Setting the Sabbath feature will automatically turn the
Cooktop Lockout ON. Once the Sabbath feature is
cancelled the cooktop features will be available again.
11
Surface Cookware Recommendations
Induction cookware
When purchasing pans for use on the induction cooktop,
look for cookware specifically identified by the
manufacturer for induction cooking, marked as "induction
ready" or "induction capable."
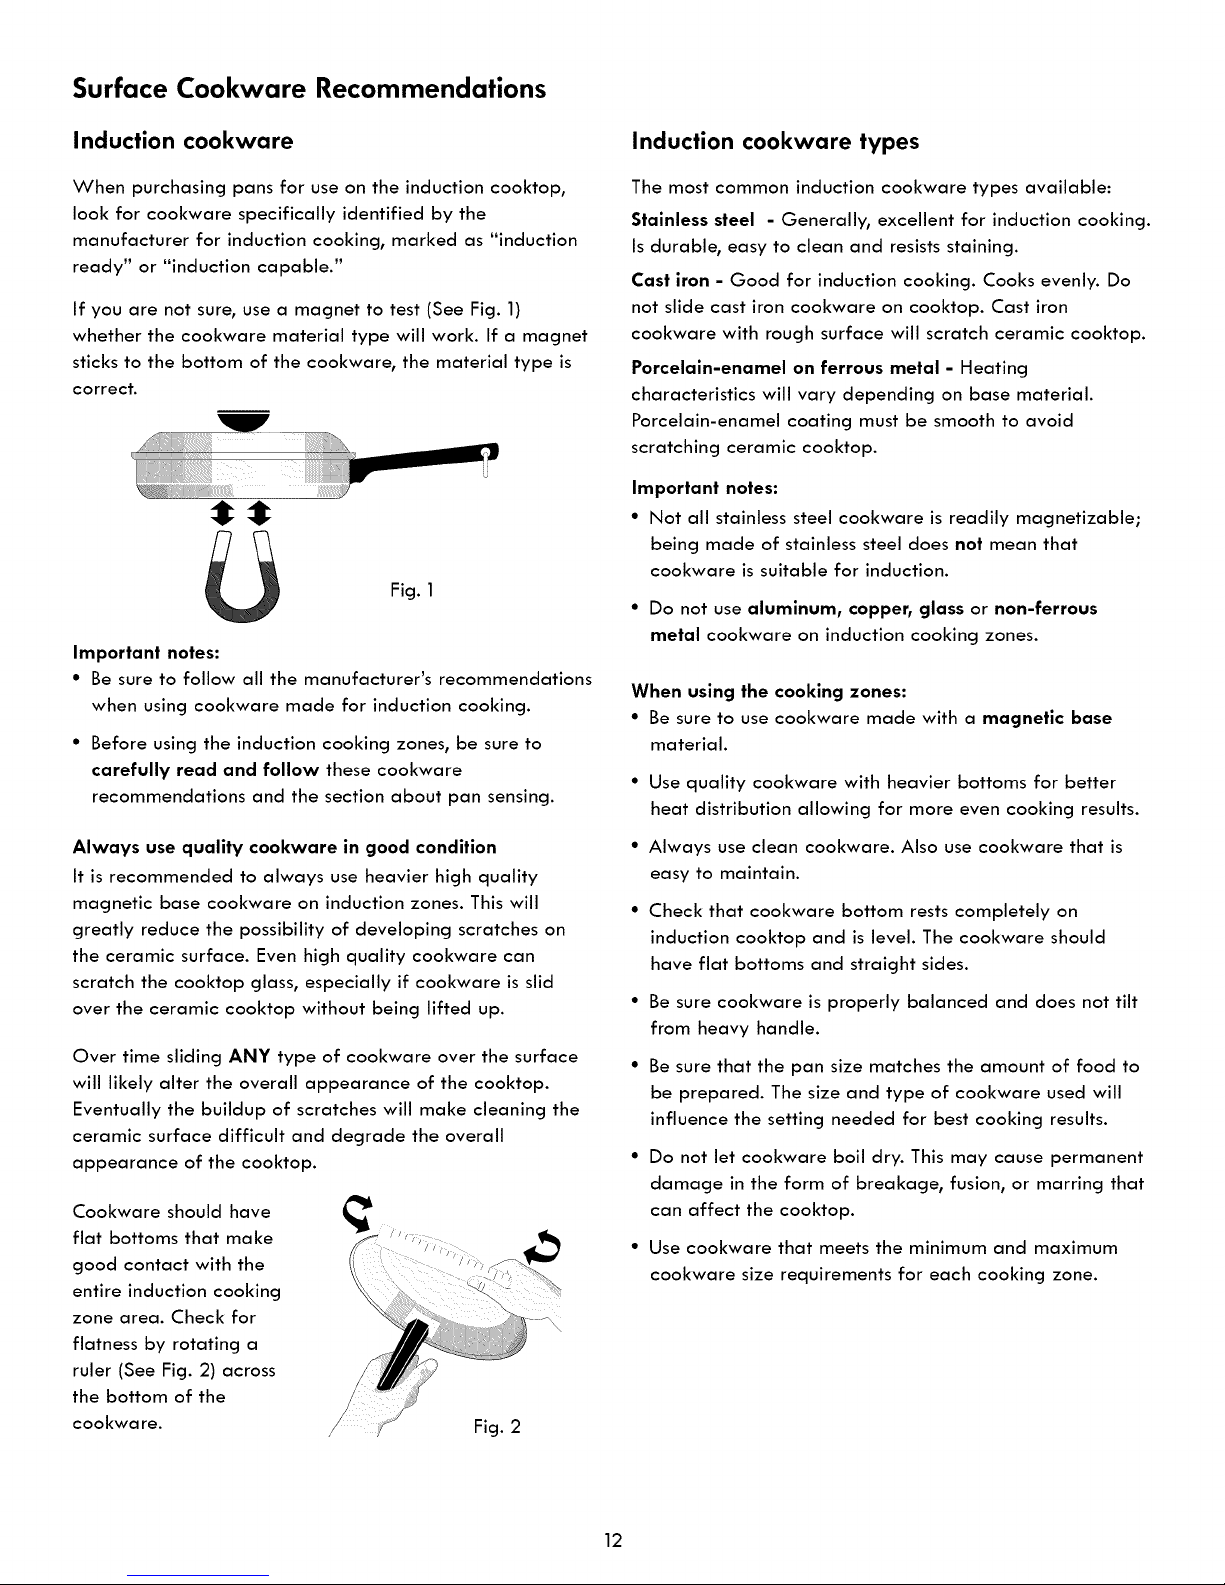
If you are not sure, use a magnet to test (See Fig. 1)
whether the cookware material type will work. If a magnet
sticks to the bottom of the cookware, the material type is
correct.
Fig. 1
Important notes:
• Be sure to follow all the manufacturer's recommendations
when using cookware made for induction cooking.
• Before using the induction cooking zones, be sure to
carefully read and follow these cookware
recommendations and the section about pan sensing.
Induction cookware types
The most common induction cookware types available:
Stainless steel - Generally, excellent for induction cooking.
Is durable, easy to clean and resists staining.
Cast iron - Good for induction cooking. Cooks evenly. Do
not slide cast iron cookware on cooktop. Cast iron
cookware with rough surface will scratch ceramic cooktop.
Porcelain-enamel on ferrous metal - Heating
characteristics will vary depending on base material.
Porcelain-enamel coating must be smooth to avoid
scratching ceramic cooktop.
Important notes:
• Not all stainless steel cookware is readily magnetizable;
being made of stainless steel does not mean that
cookware is suitable for induction.
• Do not use aluminum, copper, glass or non-ferrous
metal cookware on induction cooking zones.
When using the cooking zones:
• Be sure to use cookware made with a magnetic base
material.
Use quality cookware with heavier bottoms for better
heat distribution allowing for more even cooking results.
Always use quality cookware in good condition
It is recommended to always use heavier high quality
magnetic base cookware on induction zones. This will
greatly reduce the possibility of developing scratches on
the ceramic surface. Even high quality cookware can
scratch the cooktop glass, especially if cookware is slid
over the ceramic cooktop without being lifted up.
Over time sliding ANY type of cookware over the surface
will likely alter the overall appearance of the cooktop.
Eventually the buildup of scratches will make cleaning the
ceramic surface difficult and degrade the overall
appearance of the cooktop.
Cookware should have
flat bottoms that make
good contact with the
entire induction cooking
zone area. Check for
flatness by rotating a
ruler (See Fig. 2) across
the bottom of the
cookware.
Fig. 2
Always use clean cookware. Also use cookware that is
easy to maintain.
Check that cookware bottom rests completely on
induction cooktop and is level. The cookware should
have flat bottoms and straight sides.
Be sure cookware is properly balanced and does not tilt
from heavy handle.
Be sure that the pan size matches the amount of food to
be prepared. The size and type of cookware used will
influence the setting needed for best cooking results.
Do not let cookware boil dry. This may cause permanent
damage in the form of breakage, fusion, or marring that
can affect the cooktop.
Use cookware that meets the minimum and maximum
cookware size requirements for each cooking zone.
12
Induction Cooking Zones
Pan sensing
The cooking zone sensors located below the cooktop
surface require that certain cookware conditions are met
before the induction cooking zones can operate.
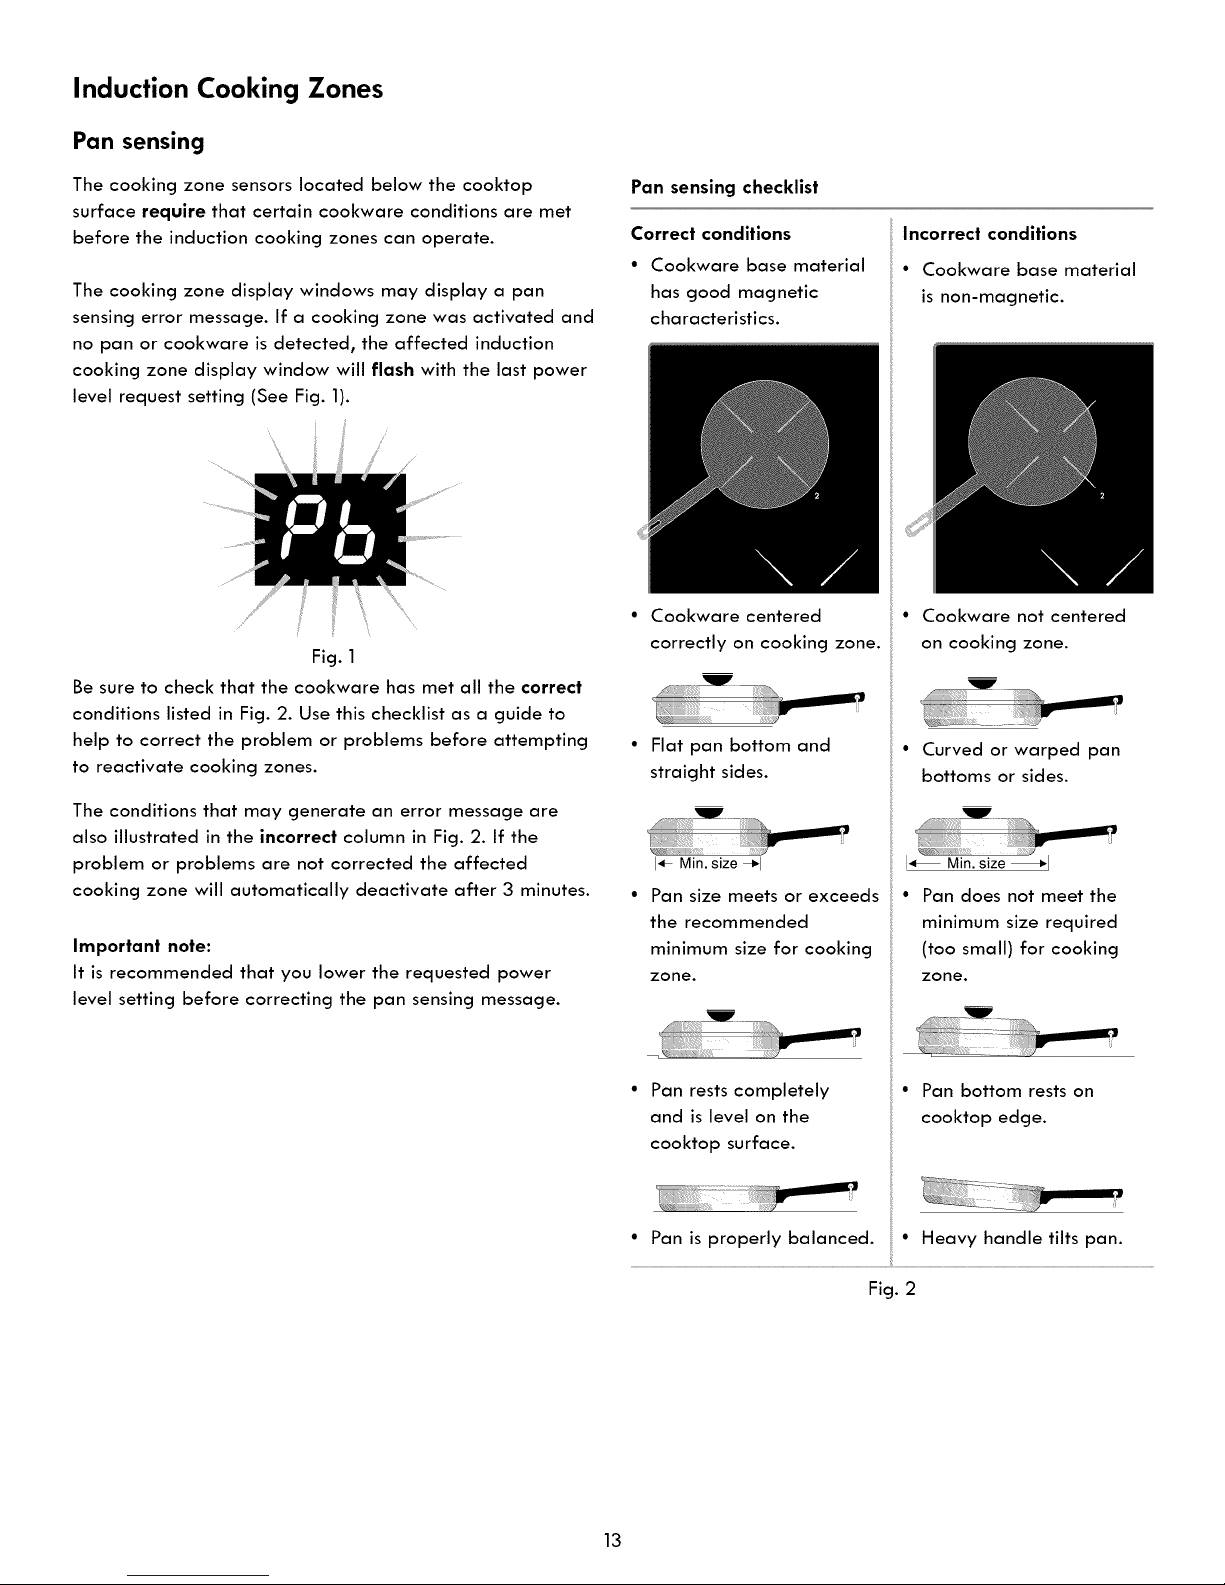
The cooking zone display windows may display a pan
sensing error message. If a cooking zone was activated and
no pan or cookware is detected, the affected induction
cooking zone display window will flash with the last power
level request setting (See Fig. 1).
J
Fig. 1
Be sure to check that the cookware has met all the correct
conditions listed in Fig. 2. Use this checklist as a guide to
help to correct the problem or problems before attempting
to reactivate cooking zones.
Pan sensing checklist
Correct conditions
• Cookware base material
has good magnetic
characteristics.
Cookware centered
correctly on cooking zone.
Flat pan bottom and
straight sides.
Incorrect conditions
• Cookware base material
is non-magnetic.
Cookware not centered
on cooking zone.
_j
Curved or warped pan
bottoms or sides.
---"1
The conditions that may generate an error message are
also illustrated in the incorrect column in Fig. 2. If the
problem or problems are not corrected the affected
cooking zone will automatically deactivate after 3 minutes.
Important note:
It is recommended that you lower the requested power
level setting before correcting the pan sensing message.
I÷ Min.size_1
Pan size meets or exceeds
the recommended
minimum size for cooking
zone.
Pan rests completely
and is level on the
cooktop surface.
Pan is properly balanced.
I_ Min.size_J
• Pan does not meet the
minimum size required
(too small) for cooking
zone.
• Pan bottom rests on
cooktop edge.
• Heavy handle tilts pan.
Fig. 2
13
Induction Cooking Zones
Induction cooking zone minimum and
maximum cookware sizes
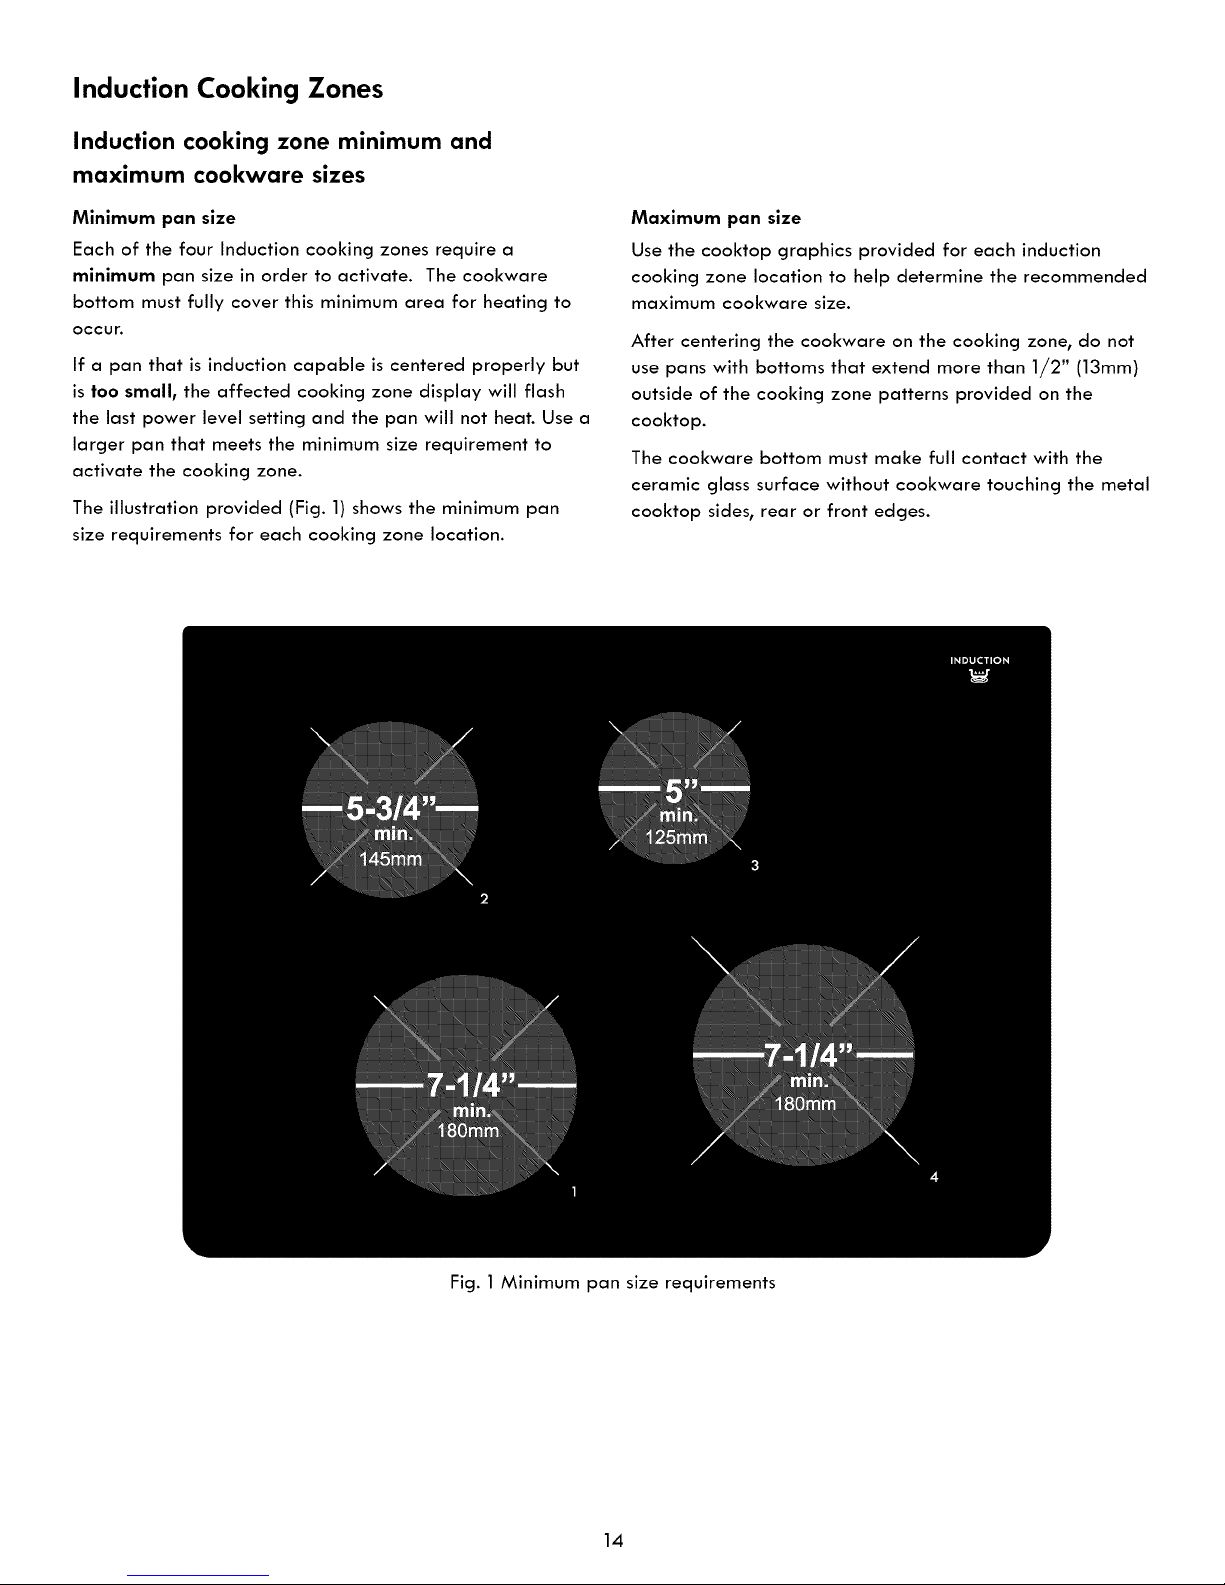
Minimum pan size
Each of the four Induction cooking zones require a
minimum pan size in order to activate. The cookware
bottom must fully cover this minimum area for heating to
occur.
If a pan that is induction capable is centered properly but
is too small, the affected cooking zone display will flash
the last power level setting and the pan will not heat. Use a
larger pan that meets the minimum size requirement to
activate the cooking zone.
The illustration provided (Fig. 1) shows the minimum pan
size requirements for each cooking zone location.
Maximum pan size
Use the cooktop graphics provided for each induction
cooking zone location to help determine the recommended
maximum cookware size.
After centering the cookware on the cooking zone, do not
use pans with bottoms that extend more than 1/2" (13ram)
outside of the cooking zone patterns provided on the
cooktop.
The cookware bottom must make full contact with the
ceramic glass surface without cookware touching the metal
cooktop sides, rear or front edges.
Fig. 1 Minimum pan size requirements
14
Induction Cooking Zones
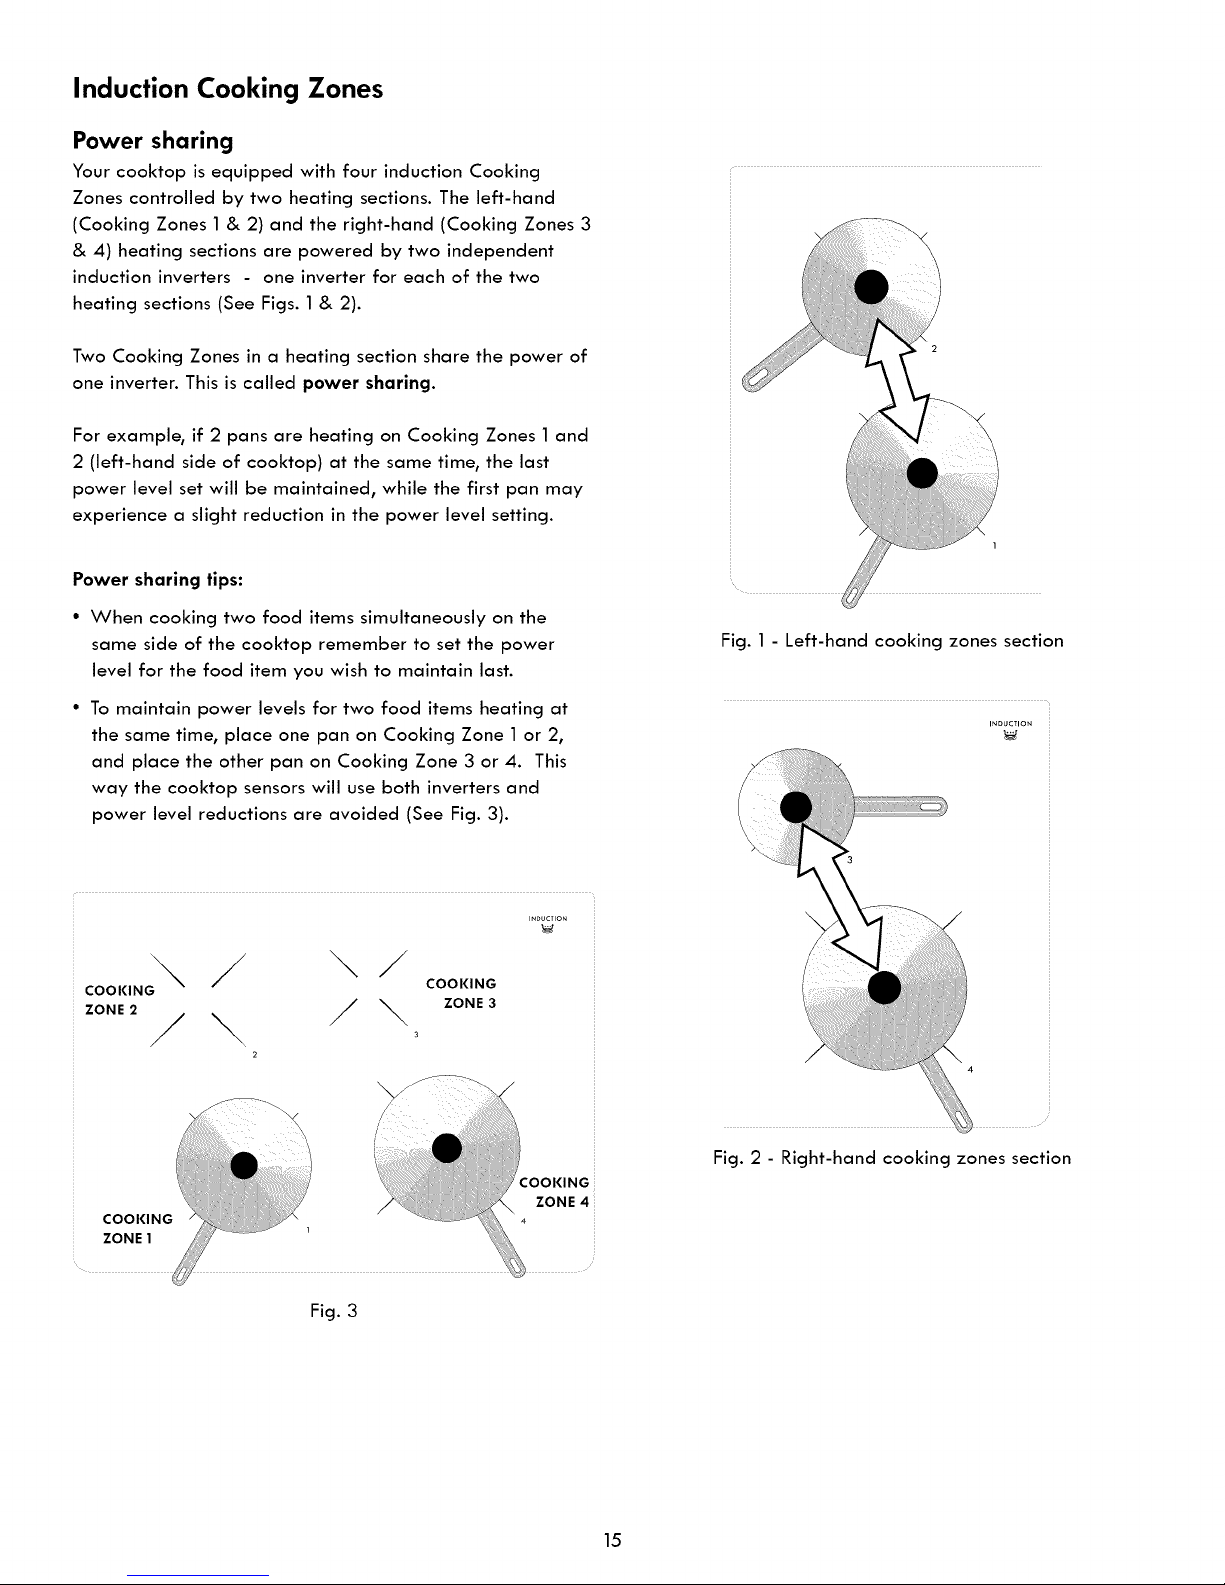
Power sharing
Your cooktop is equipped with four induction Cooking
Zones controlled by two heating sections. The left-hand
(Cooking Zones 1 & 2) and the right-hand (Cooking Zones 3
& 4) heating sections are powered by two independent
induction inverters - one inverter for each of the two
heating sections (See Figs. 1 & 2).
Two Cooking Zones in a heating section share the power of
one inverter. This is called power sharing.
For example, if 2 pans are heating on Cooking Zones 1 and
2 (left-hand side of cooktop) at the same time, the last
power level set will be maintained, while the first pan may
experience a slight reduction in the power level setting.
Power sharing tips:
• When cooking two food items simultaneously on the
same side of the cooktop remember to set the power
level for the food item you wish to maintain last.
Fig. 1 - Left-hand cooking zones section
• To maintain power levels for two food items heating at
the same time, place one pan on Cooking Zone 1 or 2,
and place the other pan on Cooking Zone 3 or 4. This
way the cooktop sensors will use both inverters and
power level reductions are avoided (See Fig. 3).
INDUCTION
COOKING
\/ \/
COOKING
ZONE 3
ZO.E ! \ /\
_OOI(ING
COOKING
ZONE 1
ZONE 4
INDUCTION
Fig. 2 - Right-hand cooking zones section
Fig. 3
15
 Loading...