

Page 1

L I T E
, ®
C
Slide-in models
GE
Modelos deslizables
Mode_s, ModeMos 790. 4637_
_- co,or number, nQmero de co,or
!'%i
,ilJiiiiD
0
0
Sears Roebuck and Co., Hoffman Estates, IL 60179 U.S.A.
www, sears,com
PfN 318200845 Rev. B (0402)
Page 2
Table of Contents
Slideqn Range Warranty ........................................................... 2
Product Record ......................................................................... 2
Seriam Pmate Location ................................................................. 2
IMPORTANT SAFETY INSTRUCTIONS ................................. 3-5
Protection Agreements ............................................................ 6
Range Features ......................................................................... 7
Setting Surface Controls ..................................................... 8-10
General Cooktop Information .............................................. 8
Operating Single Radiant Surface Elements ...................... 9
Operating Dual Radiant Surface Element ........................ 10
Surface Cooking ................................................................. 10-11
Use correct cookware ....................................................... 10
Setting Warmer Zone Controls .......................................... 11
Before Setting Oven Controls ................................................ 12
Air Circulation in the Oven ..................................................... 12
Setting Warmer Drawer Controls ...................................... 13o14
Control Pad Features .............................................................. 15
Minimum and Maximum Control Pad Settings ...................... 15
Setting the Clock ................................................................ 16-17
Setting the Clock ............................................................... 16
Changing between 12 or 24 Hour Display ....................... 16
Continuous Bake or "Ra/elve Hour Energy Saving Mode .. 17
Kitchen Timer ..................................................................... 17
Consumer Defined Control Feature ................................. 18-19
Oven Lockout .................................................................... 18
Temperature Display ......................................................... 19
Silent Control Operation .................................................... 19
Setting Oven Controls ........................................................ 20°27
Preheat .............................................................................. 20
Bake .................................................................................. 21
Convection Bake ............................................................... 22
Timed Bake ....................................................................... 23
Delayed Time Bake ........................................................... 24
Setting Serve Warm Feature ............................................. 25
Broil & Searing Gdl ............................................................ 26
Food Categories (Meats, Cakes & Breads) ...................... 27
Oven Cmeaning .................................................................... 28o31
Preparing for the Self-Clean Cycle ................................... 28
Self-Clean Cycle ............................................................... 29
Delayed Self-Clean Cycle ............................................ 30-31
Adjusting Oven Temperature ................................................. 31
General Cleaning ................................................................ 32°35
Oven Lights .............................................................................. 36
Cooking Tables ........................................................................ 36
Before You Call for Service ............................................... 37-38
EspaSol .................................................................................... 39
Sears Service .......................................................... Back Dover
S ide-in Range Warranty
FULL ONE YEAR WARRANTY ON ALL PARTS
If, within one year from the date of installation, any part fails to function properly due to a defect in material or
workmanship, Sears will repair or replace it, at our option, free of charge.
Your ceramic glass smoothtop is covered by an additional 2nd through 5th year limited warranty. This warranty
provides for replacement for any defective surface heating element, deteriorated rubberized-silicone seal, or
glass smoothtop that cracks due to thermal breakage. Damage or breakage due to customer abuse is not covered
by this warranty.
If the product is subjected to other than private residential use, the above warranty is effective for only 90 days.
WARRANTY SERVICE IS AVAILABLE BY CONTACTING SEARS AT !o800o4oMYoHOME®.
This warranty gives you specific legal rights, and you may also have other rights which vary from state to state.
Sears Roebuck and Co., Dept. 817WA Hoffman Estates, IL 60179
Product Record
(See Seria_ P_ate Location below)
Model No. 790.
Serial No.
Date of Purchase
READ AND SAVE THESE INSTRUCTIONS.
Save your sales receipt for future reference.
Serial Plate Location
You will find the model and serial number printed on the serial
plate. The serial plate is located on the left side of the oven
front frame behind the even door.
Please see the illustration for exact location. Remember to
record the serial number for future reference (See Product
Record above).
Open the door.
Seria_ ptate is
located here.
Page 3

Important Safety instructions
Read aH instructions before using this appliance.
Save these instructions for future reference.
This manual contains important safety symbols and instructions. Please pay attention to these symbols and foJ]ow al! instructions
given.
This Symbol will help alert Y0U to Situatl0n s that may cause seriou s bodily harm, death Or property damage
This Symbol Will help alert you to SitUations that may Cause b0dlly injury or property damage.
, All ranges can tip.
° Injury to persons could result.
, Install anti-tip device packed w{th range.
See Installation Instruct{ons.
To reduce the risk of tipping, the
range must be secured by properly
installed anti-tip bracket(s) provided
with the range. To check if the
bracket(s) is installed properly,
remove the lower paneg or storage
drawer and verify that the antFtip
bracket(s) is engaged. Refer to the
Installation Instructions for proper
anti4ip bracket(s) instaHat{on.
Remove aH tape and packaging before using the range.
Destroy the carton and plastic bags after unpacking the
range. Never allow children to play with packaging material.
Proper InstaHationoBe sure your appliance is properly
installed and grounded by a qualified technician in
accordance with the National Electricam Code ANSl/NFPA
No. 70--latest edition, and local code requirements. Install
only per installation instructions provided in the literature
package for this range.
Ask your dealer to recommend a qualified technician and an
authorized repair service. Know how to disconnect the
power to the range at the circuit breaker or fuse box in case
of an emergency.
User servicing--Do not repair or repJace any part of the
appliance unless specifically recommended in the
manuals. Al! other servicing should be done only by a
qualified technician, This may reduce the risk of personal
injury and damage to the range.
Never modify or alter the construction of a range by
removing Beveling legs, panems, wire covers, anti-tip
brackets/screws, or any other part of the product.
Stepping, leaning or sitting on the door or
drawer of this range can result in serious injuries and also
cause damage to the range. Do not allow children to climb or
play around the range. The weight of a child on an open door
may cause the range to tip, resulting in serious burns or other
injury, An open drawer, when hot, may cause burns.
Do not use the oven or warmer drawer (if
equipped) for storage.
Do not store items of interest to children in
the cabinets above a range. Children climbing on the range to
reach items could be seriously injured.
Never use your appliance for warming up or
heating up the room.
Storage in or on appliance--Flammable materials should
not be stored in an oven, near surface units or in the
drawer (if equipped). This includes paper, plastic and cloth ........
items, such as cookbooks, plasticware and towels, as well ::
as flammable liquids. Do not store explosives, such as
aerosol cans, on or near the appliance. Flammable materi-
als may explode and result in fire or property damage.
Do not leave children amone--ChHdren should not be left
alone or unattended in the area where appliance is in use.
They should never be allowed to sit or stand on any part of
the appliance.
DO NOT TOUCH SURFACE UNmTS,AREAS NEAR THESE
UNITS, OVEN NEATmNGELE_,_ENTS OR BNTERIOR
SURFACES OF THE OVEN OR WARMER DRAWER (if
equipped). Both surface and oven heating elements may be
hot even though they are dark in color. Areas near surface
units may become hot enough to cause burns. During and
after use, do not touch, or let clothing or other flammable
materials touch these areas until they have had sufficient
time to cool. Among these areas are the cooktop, surfaces
facing the cooktop, the oven vent openings and surfaces
near these openings, oven door and window,
Wear proper appareJ--Looseofitting or hanging garments
should never be worn while using the appliance. Do not
let clothing or other flammable materials contact hot sur-
faces.
• Do not use water or flour on grease fires--Smother the
fire with a pan lid, or use baking soda, a dry chemical or
foamotype extinguisher.
• When heating fat or grease, watch it closely. Fat or grease
may catch fire if allowed to become too hot.
Use only dry potholders--Moist or damp potholders on
hot surfaces may result in burns from steam. Do not let
potholders touch hot heating elements. Do not use a towel
or other bulky cloth instead of a potholder.
Page 4

Important Safety Instructions
, Do not heat unopened food containers--Buildup of
pressure may cause container to burst and result in
injury.
Remove the oven door from any unused range if it is to
be stored or discarded.
IMPORTANT--Do not attempt to operate the oven during a
power failure. If the power fails, always turn the oven off. If the
oven is not turns off and the power resumes, the oven may
begin to operate again. Food left unattended could catch fire or
spoil Once the power resumes, reset the clock and oven
function.
_ Electronic controllers can be damaged by
cold temperatures. When you use your appliance for the first
time, or if it has not been used for a long period of time, make
sure that it has been exposed to a temperature above O°C/
32°F for at least 3 hours before connecting it to the power
supply.
_MPORTANT _NSTRUCT_ONS FOR USING
YOUR COOKTOP
Know which knob controls each surface heating unit.
Use proper pan size. This appliance is equipped with one
or more surface units of different sizes. Select utensils
having flat bottoms large enough to cover the surface unit.
The use of undersized utensils will expose a portion of the
surface heating unit to direct contact and may result in
ignition of clothing, Proper relationship of utensil to the
surface unit will also improve efficiency.
Utensil handles should be turned inward and not extend
over adjacent surface units--To reduce the risk of burns,
ignition of flammable materials, and spillage due to uninteno
tional contact with the utensil. The handle of the utensil
should be positioned so that it is turned inward, and does
not extend over adjacent surface unit.
FOR GLASS COOKTOPS ONLY
Do not clean or operate a broken cooktop--lf cooktop
should break, cleaning solutions and spillovers may
penetrate the broken cooktop and create a risk of electric
shock. Contact a qualified technician immediately,
Clean cooktop gmass with caution--If a wet sponge or cloth
is used to wipe spills on a hot cooking area, be careful to
avoid a steam burn. Some cleaners can produce harmful
fumes if applied to a hot surface.
, Avoid scratching the cooktop glass with sharp objects.
_MPORTANT _NSTRUCT_ONS FOR USING
YOUR OVEN
Use care when opening oven door or warmer drawer (if
equipped)--Stand to the side of the range when opening
the door of a hot oven. Let hot air or steam escape before
you remove or replace food in the oven / warmer drawer.
Keep oven vent ducts unobstructed. The oven vent is
located at front above the oven door. Touching the surfaces
in this area when the oven is operating may cause severe
burns. Also, do not place plastic or heat-sensitive items on
or near the oven vent. These items could melt or ignite.
Placement of oven/warmer drawer (if equipped) Racks.
Always place oven racks in desired location while oven/
warmer drawer (if equipped) is coo!. If rack must be moved
while oven is hot use extreme caution. Use potholders and
grasp the rack with both hands to reposition. Do not let
potholders contact the hot heating elements in the oven/
warmer drawer (if equipped). Remove all utensils from the
rack before moving.
, Do not use the broiler pan without its insert. The broiler
pan and its insert allow dripping fat to drain and be kept
away from the high heat of the broiler.
Never leave surface burners unattended at high heat
settings--Boilovers cause smoking and greasy spillovers
that may ignite, or a pan that has boiled dry may melt.
Protective liners--Do not use aluminum foi! to line oven
bottom or any other part of the appliance. Only use alumi-
num foi! as recommended for baking if used as a cover
placed on the food. Any other use of protective liners or
aluminum foil may result in a risk of electric shock or fire or
short circuit.
, Do not cover the broiler insert with aluminum foil. Ex-
posed fat and grease could ignite.
Do not touch a hot might bulb with a damp cloth. Doing so
could cause the bulb to break. Disconnect the appliance or
turn off the power to the appliance before removing and
replacing light bulb.
Glazed cooking utensils--Only certain types of glass, glass/
ceramic, ceramic, earthenware, or other glazed utensils are
suitable for rangetop service without breaking due to the
sudden change in temperature. Check the manufacturer's
recommendations for cooktop use.
Do not use decorative surface element covers. If an
element is accidentally turned on, the decorative cover will
become hot and possibly melt. Burns will occur if the hot
covers are touched. Damage may also be done to the
cooktop.
Page 5
Important Safety Instructions
[i'ViPORTANT iNSTRUCTiONS FOR CLEAN-
iNG YOUR RANGE
Clean the range regularly to keep a[[ parts free of grease
that could catch fire. Exhaust fan ventilation hoods and
grease filters should be kept clean. Do not al!ow grease to
accumulate on hood or filter. Greasy deposits in the fan
could catch fire. When you are flaming food under the hood,
turn the fan on. Refer to the hood manufacturer's instructions
for cleaning.
Kitchen cleaners and aerosols--Always follow the
manufacturer's recommended directions for use. Be aware
that excess residue from cleaners and aerosols may ignite
causing damage and injury.
SELF CLEANmNG OVENS
In the self°cleaning cycle, only clean the parts listed in
this Use and Care Guide. Before self cleaning the oven,
remove the broiler pan and any utensils or foods from the
oveR.
Do not clean door gasket--The door gasket is essential for a
good seal Care should be taken not to rub, damage or move
the gasket.
Remove oven racks. Oven racks color will change if left in
the oven during a self-cleaning cycle.
The health of some birds is extremely sensitive to
the fumes given off during the self-cleaning cycle of any range.
Move birds to another well ventilated room.
iMPORTANT SAFETY NOTICE
The California Safe Drinking Water and Toxic Enforcement Act
requires the Governor of California to publish a list of
substances known to the state to cause cancer, birth defects or
other reproductive harm, and requires businesses to warn
customers of potential exposure to such substances.
Do not use oven cleaners--No commercial oven cleaner or
oven liner protective coating of any kind should be used in
or around any part of the oven.
Z
ii:??
Page 6
PROTECTION AGREEMENTS
_n the U.S.A.
Master Protection Agreements
Congratulations on making asmart purchase. Your new
Kenmore ®product is designed and manufactured for years
of dependable operation. But like all products, it may require
preventive maintenance or repair from time to time. That's
when having a Master Protection Agreement can save you
money and aggravation.
Purchase a Master Protection Agreement now and protect
yourself from unexpected hassle and expense.
The Master Protection Agreement also helps extend the life
of your new product. Here's what's included in the
Agreement:
Expert service by our 12,000 professional repair
specialists
Unlimited service and no charge for parts and labor on
all covered repairs
"No-lemon" guarantee- replacement
of your covered product if four or more product failures
occur within twelve months
Product replacement if your covered product can't be
fixed
Annuam Preventive Maintenance Check at your request
= no extra charge
[_ Fast heJp by phone - phone support from a Sears
technician on products requiring in-home repair, plus
convenient repairscheduling
Power surge protection against electrical damage due
to power fluctuations
Rental reimbursement if repair of your covered product
takes longer than promised
_n Canada
Maintenance Agreements
Your purchase has added value because you can depend
on Sears HomeCentral®for service. With over 2400
Service Technicians and more than a million parts and
accessories, we have the tools, parts, knowledge and
skills to ensure our pledge: We Service What We Sell.
Your Kenmore<_)productis designed, manufactured
and tested to provide years of dependable operation. But
like all products, it may require service from time to time.
The Sears Maintenance Agreement offers you an
outstanding service program, affordably priced.
The Sears Maintenance Agreement:
Is your way to buy tomorrow's service at today's price
Eliminates repair bills resulting from normal wear and
tear
Provides phone support from a Sears technician on
products requiring in-home repair
Even if you don't need repairs, provides an annual
Preventive Maintenance Check, at your request, to
ensure that your product is in proper running condition.
Some Hmitations apply. For more information about
Sears Canada Maintenance Agreements,
call 1o800o361o6665
Once you purchase the Agreement, a simple phone call is
all that it takes for you to schedule service. You can call
anytime day or night, or schedule a service appointment
online.
Sears has over 12,000 professional repair specialists, who
have access to over 4.5 million quality parts and
accessories. That's the kind of professionalism you can
count on to help prolong the life of your new purchase for
years to come. Purchase your Master Protection Agreement
today!
Some limitations and exclusions appJy.
For prices and additional information call
1o800-827o6688.
Sears _nstaHation Service
For Sears professional installation of home
appliances, garage door openers, water heaters,
and other major home items, in the U.S.A. call
1-800=4=MY=HOME®
REV. 030509
Page 7

Your
Electric
Slide°in
Range
Features
At a G_ance
Range Features
Note: The features of your range witi vary according to model.
Electronic Oven
Controls with Clock
and Kitchen Timer ElectronicWarmer
Electronic Warmer Drawer Control Zone Control
Dual interior
Oven Lights
-\
Surface Element
Controls
Vent
ug
Oven
Adjustable
Oven Racks
1 Piece
Door Handle
ii_i_ii!!iiil
(1) Broil Pan
(1) insert
(1) Searing Grill
6" 1,200W Radiant
Surface Element
Warmer Zone Element
\
/
6"/9" 1,000W / 2,500W
DuaJ Radiant Surface
Element
(
Q
,%
\
Hot Surface
indicator Lights
Front Oven
Door with Large
Window Opening
6" 1,200W Radiant
Surface Element
9"/12"
1,700W / 2,700W
Surface Element
Ceramic Glass Cooktop
Page 8
Setting Surface Controls
Cooktop Appearance Cooktop radiant areas that heat
ooo
oo
ooooo@
t
Figure 1
(
oc
Figure 2
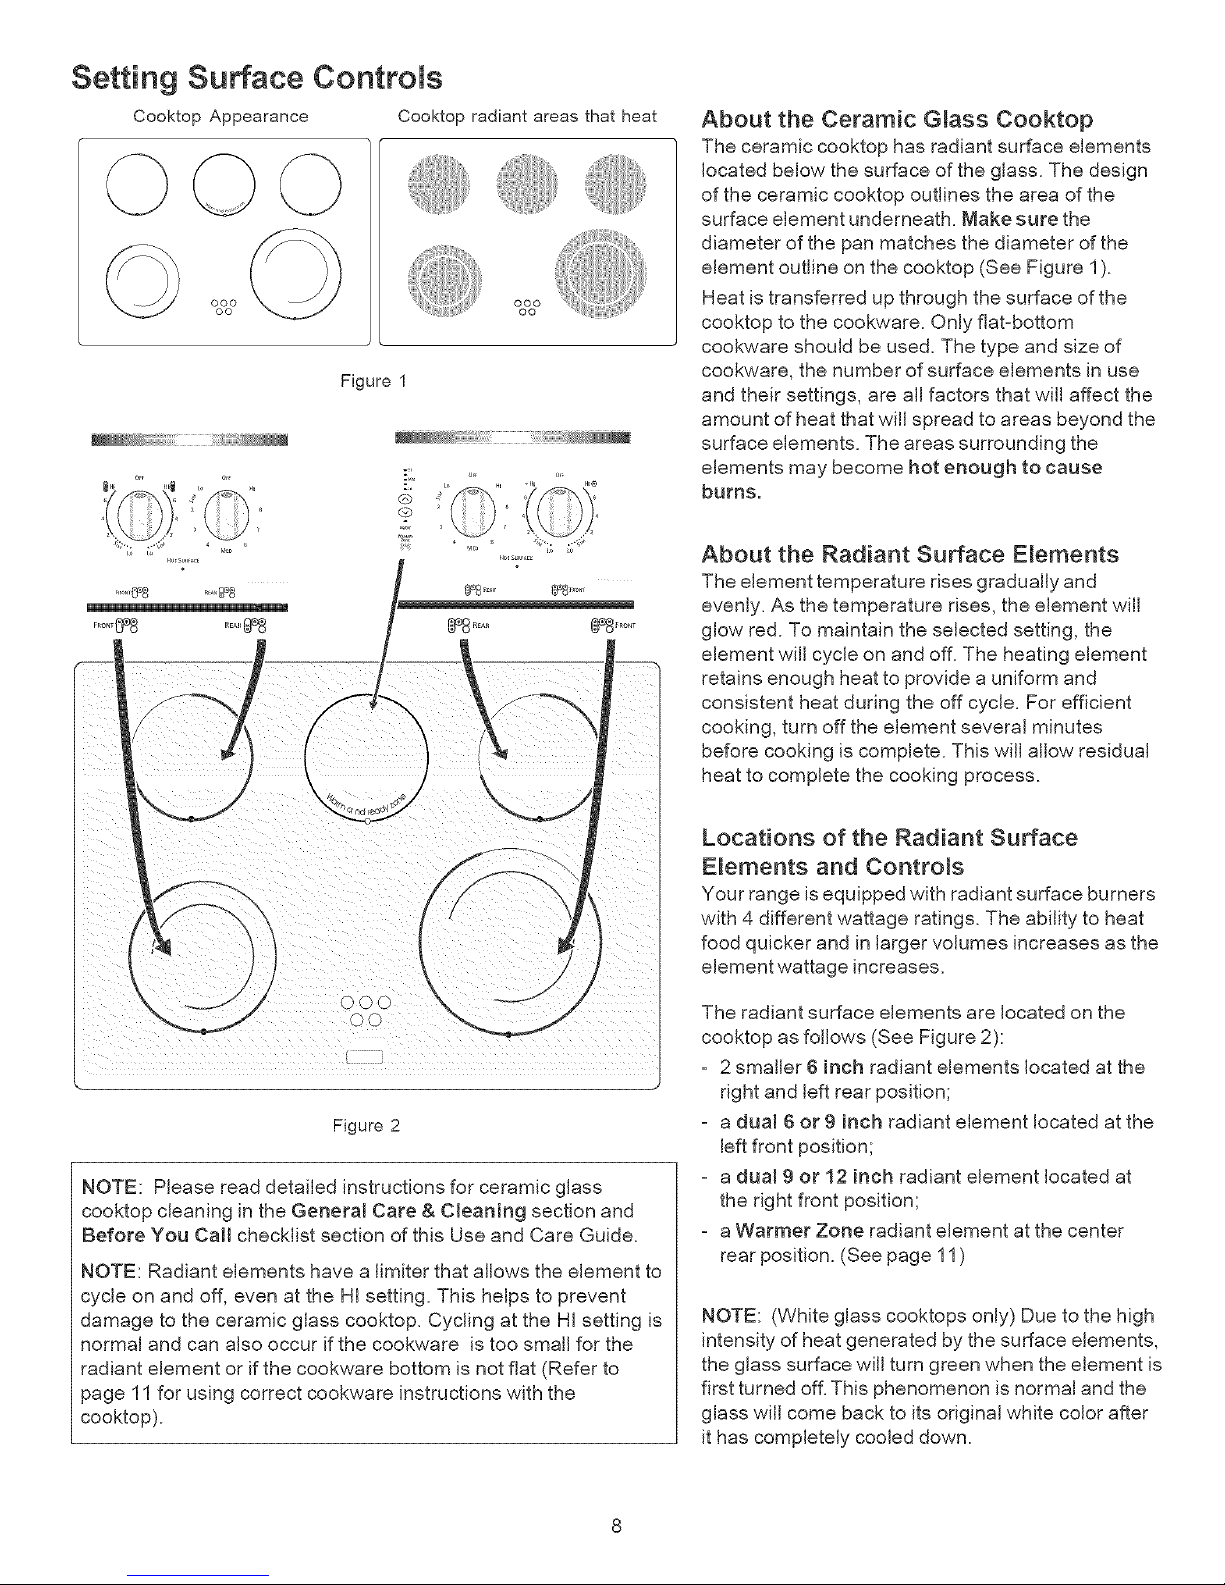
NOTE: Please read detailed instructions for ceramic glass
cooktop cleaning in the Generam Care & Cleaning section and
Before You Call checklist section of this Use and Care Guide.
NOTE: Radiant elements have a limiter that allows the element to
cycle on and off, even at the HI setting. This helps to prevent
damage to the ceramic glass cooktop. Cycling at the HI setting is
normal and can also occur if the cookware is too small for the
radiant element or if the cookware bottom is not flat (Refer to
page 11 for using correct cookware instructions with the
cooktop).
About the Ceramic Gmass Cooktop
The ceramic cooktop has radiant surface elements
located below the surface of the glass. The design
of the ceramic cooktop outlines the area of the
surface element underneath. Make sure the
diameter of the pan matches the diameter of the
element outline on the cooktop (See Figure 1).
Heat is transferred up through the surface of the
cooktop to the cookware. Only flat-bottom
cookware should be used. The type and size of
cookware, the number of surface elements in use
and their settings, are all factors that will affect the
amount of heat that will spread to areas beyond the
surface elements. The areas surrounding the
elements may become hot enough to cause
burns.
About the Radiant Surface E_ements
The element temperature rises gradually and
evenly. As the temperature rises, the element will
glow red. To maintain the selected setting, the
element will cycle on and off. The heating element
retains enough heat to provide a uniform and
consistent heat during the off cycle. For efficient
cooking, turn off the element several minutes
before cooking is complete. This will allow residual
heat to complete the cooking process.
Locations of the Radiant Surface
E_ements and Controls
Your range is equipped with radiant surface burners
with 4 different wattage ratings. The ability to heat
food quicker and in larger volumes increases as the
element wattage increases.
The radiant surface elements are located on the
cooktop as follows (See Figure 2):
2 smaller 6 inch radiant elements located at the
right and left rear position;
a duam6 or 9 inch radiant element located at the
left front position;
a dual 9 or 12 inch radiant element located at
the right front position;
a Warmer Zone radiant element at the center
rear position. (See page 11)
NOTE: (White glass cooktops only) Due to the high
intensity of heat generated by the surface elements,
the glass surface will turn green when the element is
first turned off. This phenomenon is normal and the
glass will come back to its original white color after
it has completely cooled down.
Page 9

Setting Surface Controls
Surface Cooking Settings
Use the chart (Figure 1) to determine the correct setting for the kind of food you are
preparing. The Simmer settings are used to simmer and keep larger quantities of foods
warm such as stews and soups. The lower Simmer settings are idea[ for delicate foods
and melting chocolate or butter.
Note: The size and type of cookware used will influence the setting needed for best
cooking results.
Recommended Settings for S{ngIe and
Duat Surface Elements
HIGH(Hi)
MEDIUM HIGH (5-8)
MEDIUM (5)
MEDIUM LOW (2 z4)
LOW (Lo-2)
Start most foods, bring water to a boil, pan broiling
Continue a rapid boil, fry, deep fat fry
Maintain a slow boil, thicken sauces and gravies, steam
vegetables
Keep foods cooking, poach, stew
Keep warm, melt, simmer
Figure 1
Operating Single Radiant Surface Elements
The cooktop has single radiant surface elements at 2 locations; the right rear and left rear
(Figure 2)element positions.
To Operate the Single Surface Elements:
1. Place correctly sized cookware on the radiant surface element.
.
Push in and turn the surface control knob in either direction to the desired setting
(Figure 3). Turn the knob to adjust the setting if desired. Start most cooking
operations on a higher setting and then turn to a lower setting to finish cooking. Each
surface element provides a constant amount of heat at each setting. A glowing red
surface heating area extending beyond the bottom edge of the cookware indicates the
cookware is too small for the surface heating area.
When cooking has completed, turn the surface control knob to OFF before removing Lo
the cookware. Note: The Hot Surface Indicator light wiI[ come on when the control
knob is turned on and will continue to glow until the glass cooktop has cooled down to G-_
a moderate level. The light may remain on even though the controls are turned OFF. 2
Note: See above, Figure 1for recommended control settings.
_Radiant
surface elements may
appear to have cooled after
they have been turned off. A
hot surface indicator light
will come on and will
continue to glow until the
glass cooktop has cooled
down to a moderate level.
The glass surface may
still be hot and burns may
occur if the glass surface is
touched before the indicator
light has turned off.
Do not place
pmastic items such as salt
and pepper shakers,
spoon holders or plastic
wrappings on top of the [
range when it is in use.
iiii
These items could melt or ........
}
ignite. Pothoiders, towels or ::
wooden spoons could catch ::::11
fire if placed too close to the
surface elements.
Figure 2
Right Rear & Left Rear
Elements
OFF
HI
8
\
7
4 6
MED
Figure 3
Page 10
Setting Surface Controls
[
Figure 1 Figure 4
OFF OFF
oHI Hm(_ o HI H,®
$ 4
2
Lo Lo LO LO
Figure 2 Figure 5
%%°
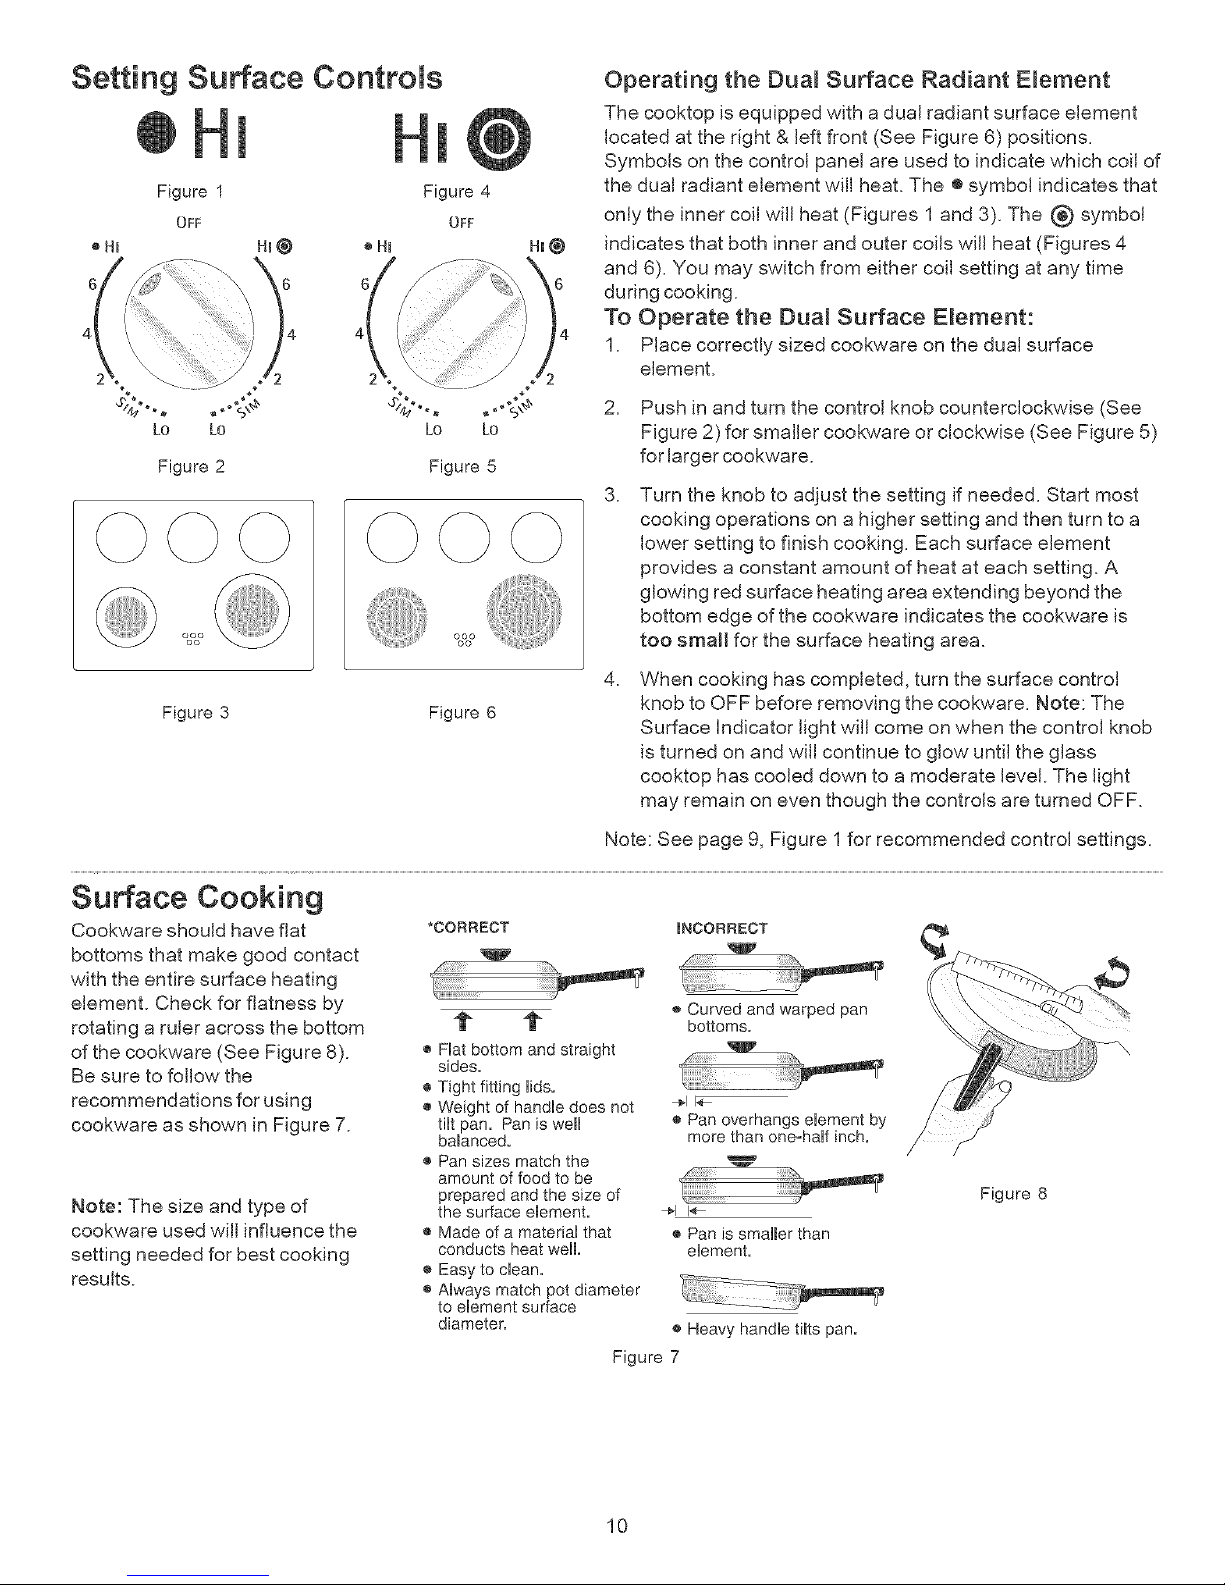
Operating the Dual Surface Radiant Element
The cooktop is equipped with a dual radiant surface element
located at the right & left front (See Figure 6) positions.
Symbols on the control panel are used to indicate which coil of
the dual radiant element wifl heat. The •symbo[ indicates that
only the inner coil will heat (Figures 1 and 3). The (_ symbol
indicates that both inner and outer coils will heat (Figures 4
and 6). You may switch from either coil setting at any time
during cooking.
To Operate the Dual Surface Element:
1. Place correctly sized cookware on the dual surface
element.
.
.
Push in and turn the control knob counterclockwise (See
Figure 2) for smaller cookware or clockwise (See Figure 5)
for larger cookware.
Turn the knob to adjust the setting if needed. Start most
cooking operations on a higher setting and then turn to a
lower setting to finish cooking. Each surface element
provides a constant amount of heat at each setting. A
glowing red surface heating area extending beyond the
bottom edge of the cookware indicates the cookware is
too small for the surface heating area.
Figure 3 Figure 6
.
When cooking has completed, turn the surface control
knob to OFF before removing the cookware. Note: The
Surface Indicator light will come on when the control knob
is turned on and will continue to glow until the glass
cooktop has cooled down to a moderate level. The light
may remain on even though the controls are turned OFF.
Note: See page g, Figure 1for recommended control settings.
Surface Cooking
Cookware should have flat
bottoms that make good contact
with the entire surface heating
element. Check for flatness by
rotating a ruler across the bottom
of the cookware (See Figure 8).
Be sure to follow the
recommendations for using
cookware as shown in Figure 7.
Note: The size and type of
cookware used wi[[ influence the
setting needed for best cooking
results.
*CORRECT INCORRECT
t
o Fiat bottom and straight
sides.
® Tight fitting lids°
® Weight of handle does not
tilt pan. Pan is weml
bamanced°
® Pan sizes match the
amount of food to be
prepared and the size of
the surface emement.
® Made of a material that
conducts heat well
® Easy to clean.
o Always match pot diameter
to element surface
diameter.
® Curved and warped pan
bottoms.
® Pan overhangs element by
more than one-half inch.
÷1 I_-
o Pan is smalmer than
element.
® Heavy handle ti_ts pan.
Figure 7
Figure 8
10
Page 11

Surface Cooking
Operating the Warmer (Warm & Ready TM ) Zone
The purpose of the Warmer Zone is to keep hot cooked foods at
serving temperature. Use the Warmer Zone to keep cooked foods hot
such as: vegetables, gravies, casseroles, soups, stews, breads,
pastries and ovemsafe dinner plates. Always start with hot food. it is
not recommended to heat cold food on the Warmer Zone.
Aft food placed on the warmer zone should be covered with a lid to
maintain quality. For best results, when warming pastries or breads,
the cover should have an opening to allow moisture to escape. Do not
use plastic wrap or aluminum foit to cover food. Plastic or
atuminum may memtonto the surface.
Use only plates, utensils and cookware recommended for oven and
cooktop use on the Warmer Zone.
Warmer Zone Temperature Selection
Refer to the Warmer Zone table for recommended heating levels
(Figure 1). if a particular food is not listed, start with the medium level,
and adjust as needed. Most foods can be kept at serving temperatures
by using the medium level.
Warmer Zone Recommended Food
Settings Table
Food item Heating Level
Hot Beverages HJ
Fried Foods HI
Vegetables MED
Soups (Cream) MED
Stews MED
Sauces MED
Meats MED
Gravies LO
Eggs LO
Dinner Plates with Food LO
Casseroles LO
Breads/Pasteries LO
Figure I
To Set the Warmer Zone Control:
The control and indicator lights are located on the control panel.
1. Touch the ON/OFFpad at the Warmer Zone control position. The Warmer Zone indicator light
will flash. Note: ]f no further pads are touched within 25 seconds the request to power the
Warmer Zone ON will clear.
.
.
At the Warmer Zone controls position touch _ once to turn ON the power level for Hi
(see Figure 2) or Q to turn ON the power level for LO (see Figure 5). The Warmer Zone
Indicator light located above the ON/OFF pad will turn on steady and the Hot Surface
indicator light will turn ON when the Warmer Zone becomes hot.
Each touch _ or _ will increase or decrease the power levels. The Warmer Zone
has 5 power levels from HI (see Figure 2) through MED (see Figure 4) to LO (see Figure 5).
The power level may be adjusted at any time while the Warmer Zone is ON.
When it is time to serve food, touch the ON/OFFpad once to turn the Warmer Zone OFF.
The Warmer Zone indicator light will turn OFF.
Note: The Hot Surface indicator light will remain ON if the cooktop is still hot and will
remain ON until the heating surface area has cooled sufficiently (see Figure 3).
o HI o HI
o MEI) o MED
qlD 0
o LO o Lo
Q Q
(2) (2)
o c_D
ON/OFF ON/OFF
WARMER WARMEIt
ZONE ZONE
Figure 2 Figure 3
oHI oHI
o o
qID MED o MED
O 0
i, LO Go LO
Figure 4 Figure 5
if??
Radiant surface elements may appear to have cooled after they have been turned off. The glass surface
may still be hot and burns may occur if the glass surface is touched before it has cooled sufficiently.
Do not place aluminum foil or plastic items such as salt and pepper shakers, spoon holders or
plastic wrappings on top of the range when it is in use. These items could melt or ignite. Potholders, towels or
wooden spoons could catch fire if placed too close to the surface elements or burners.
The Warmer Zone will not glow red when it is hot, but becomes hot enough to cause burns. Avoid placing
hands on or near the Warmer Zone until the Warmer Zone Hot Surface indicator light is OFF. Always use potholders or
oven mitts when removing food from the warmer zone as cookware and plates will be hot.
11
Page 12
Before Setting Oven Controls
Some models are equipped with a blower which runs in baking and self-clean ing mode to keep aH
internal components at a cool temperature, Itis possibme that the blower keeps running even if the range has been
turned off, until the components have coomed down.
Arranging Oven Racks
ALWAYS ARRANGE OVEN RACKS WHEN THE OVEN iS COOL (PRIOR TO OPERATING THE OVEN). Always use
oven mitts when the oven is hot.
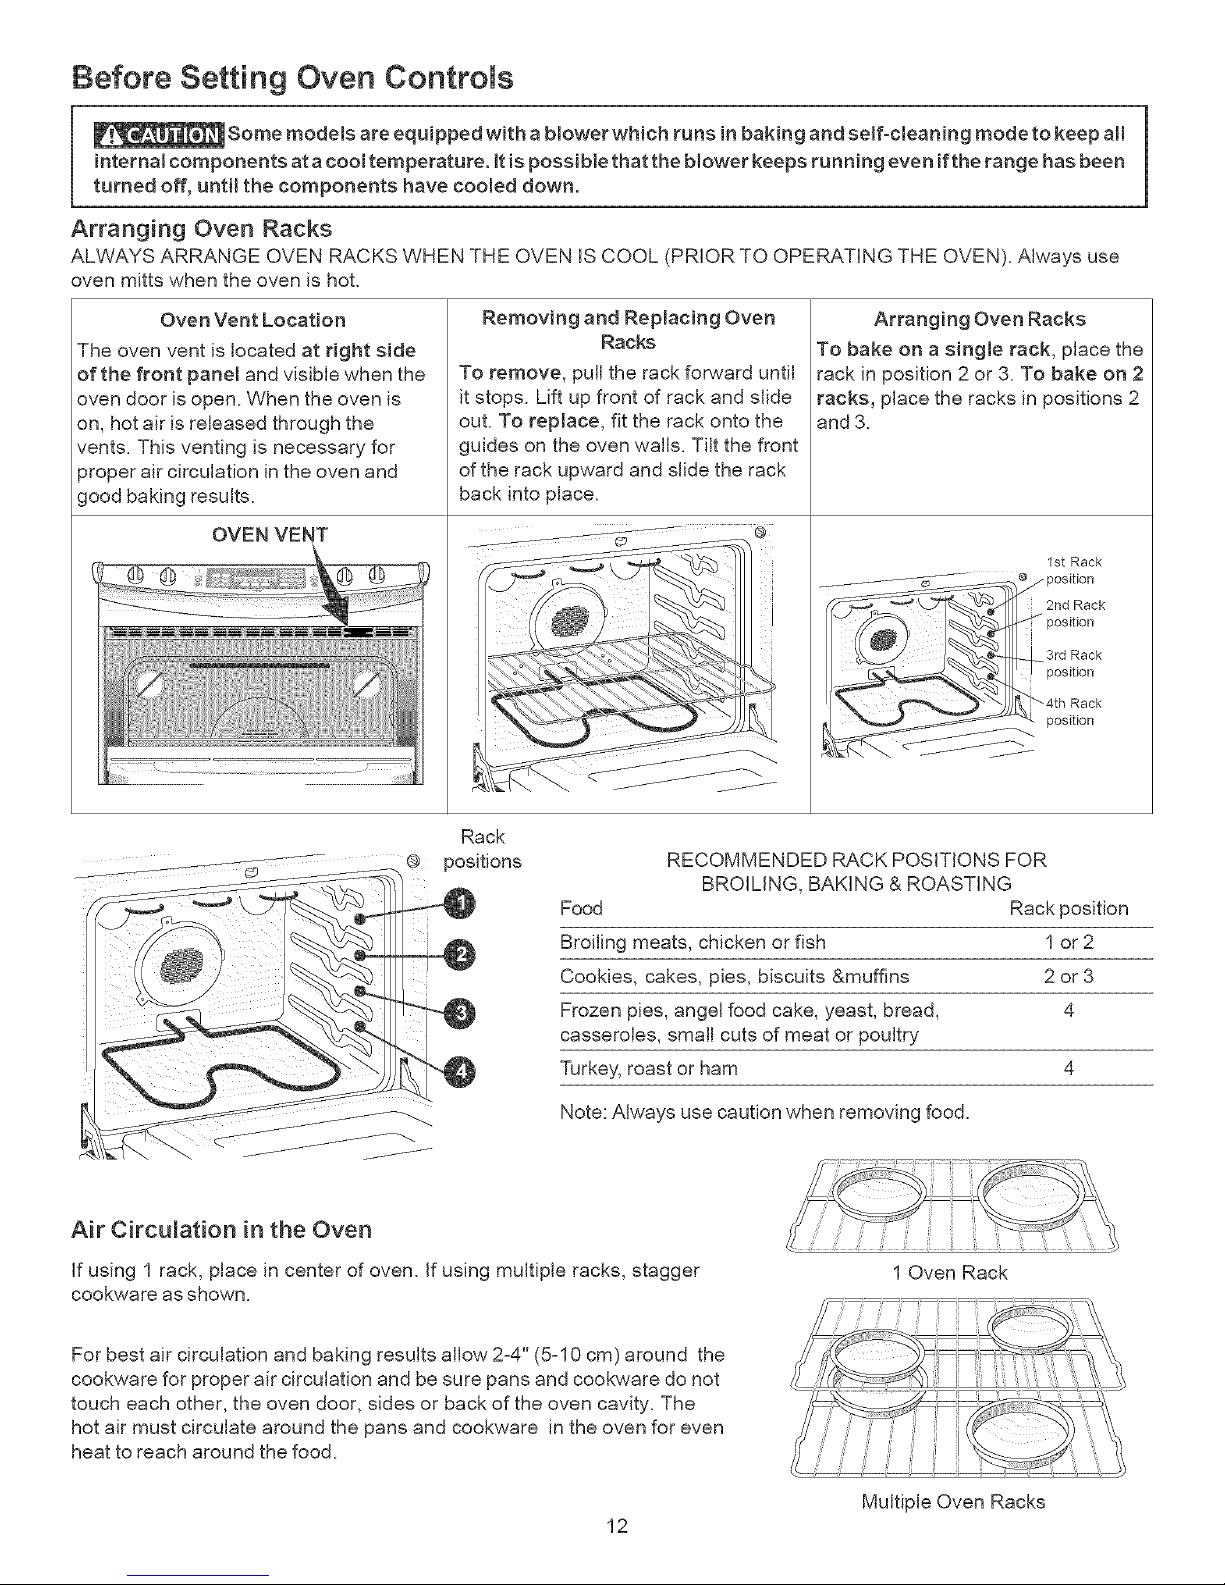
Oven Vent Location
The oven vent is located at right side
of the front pane[ and visible when the
oven door is open. When the oven is
on, hot air is released through the
vents. This venting is necessary for
proper air circulation in the oven and
good baking results.
OVEN VENT
)
Removing and Replacing Oven
Racks
To remove, pull the rack forward until
it stops. Lift up front of rack and slide
out. To replace, fit the rack onto the
guides on the oven walls. Tilt the front
of the rack upward and slide the rack
back into place.
@
Arranging Oven Racks
To bake on a single rack, place the
rack in position 2 or 3. To bake on 2
racks, place the racks in positions 2
and 3.
f
1st Rack
_ _-posit,or,
2nd Rack
z pos,t,on
J_ _ _"_" _."_4thRack
__ pos,t,oo
Rack
_: @ positions
i
RECOMMENDED RACK POSITIONS FOR
BROILING, BAKING & ROASTING
Food Rack position
Broiling meats, chicken or fish 1 or 2
Cookies, cakes, pies, biscuits &muffins 2 or 3
Frozen pies, angel food cake, yeast, bread, 4
casseroles, small cuts of meat or poultry
Turkey, roast or ham 4
Note: Always use caution when removing food.
Air Circulation in the Oven
If using 1 rack, place in center of oven. If using multiple racks, stagger
cookware as shown.
1 Oven Rack
For best air circulation and baking results allow 2z4'' (5zl 0 cm) around the
cookware for proper air circulation and be sure pans and cookware do not
touch each other, the oven door, sides or back of the oven cavity. The
hot air must circulate around the pans and cookware in the oven for even
heat to reach around the food.
Multiple Oven Racks
12
Page 13
Setting Warmer Drawer ControLs
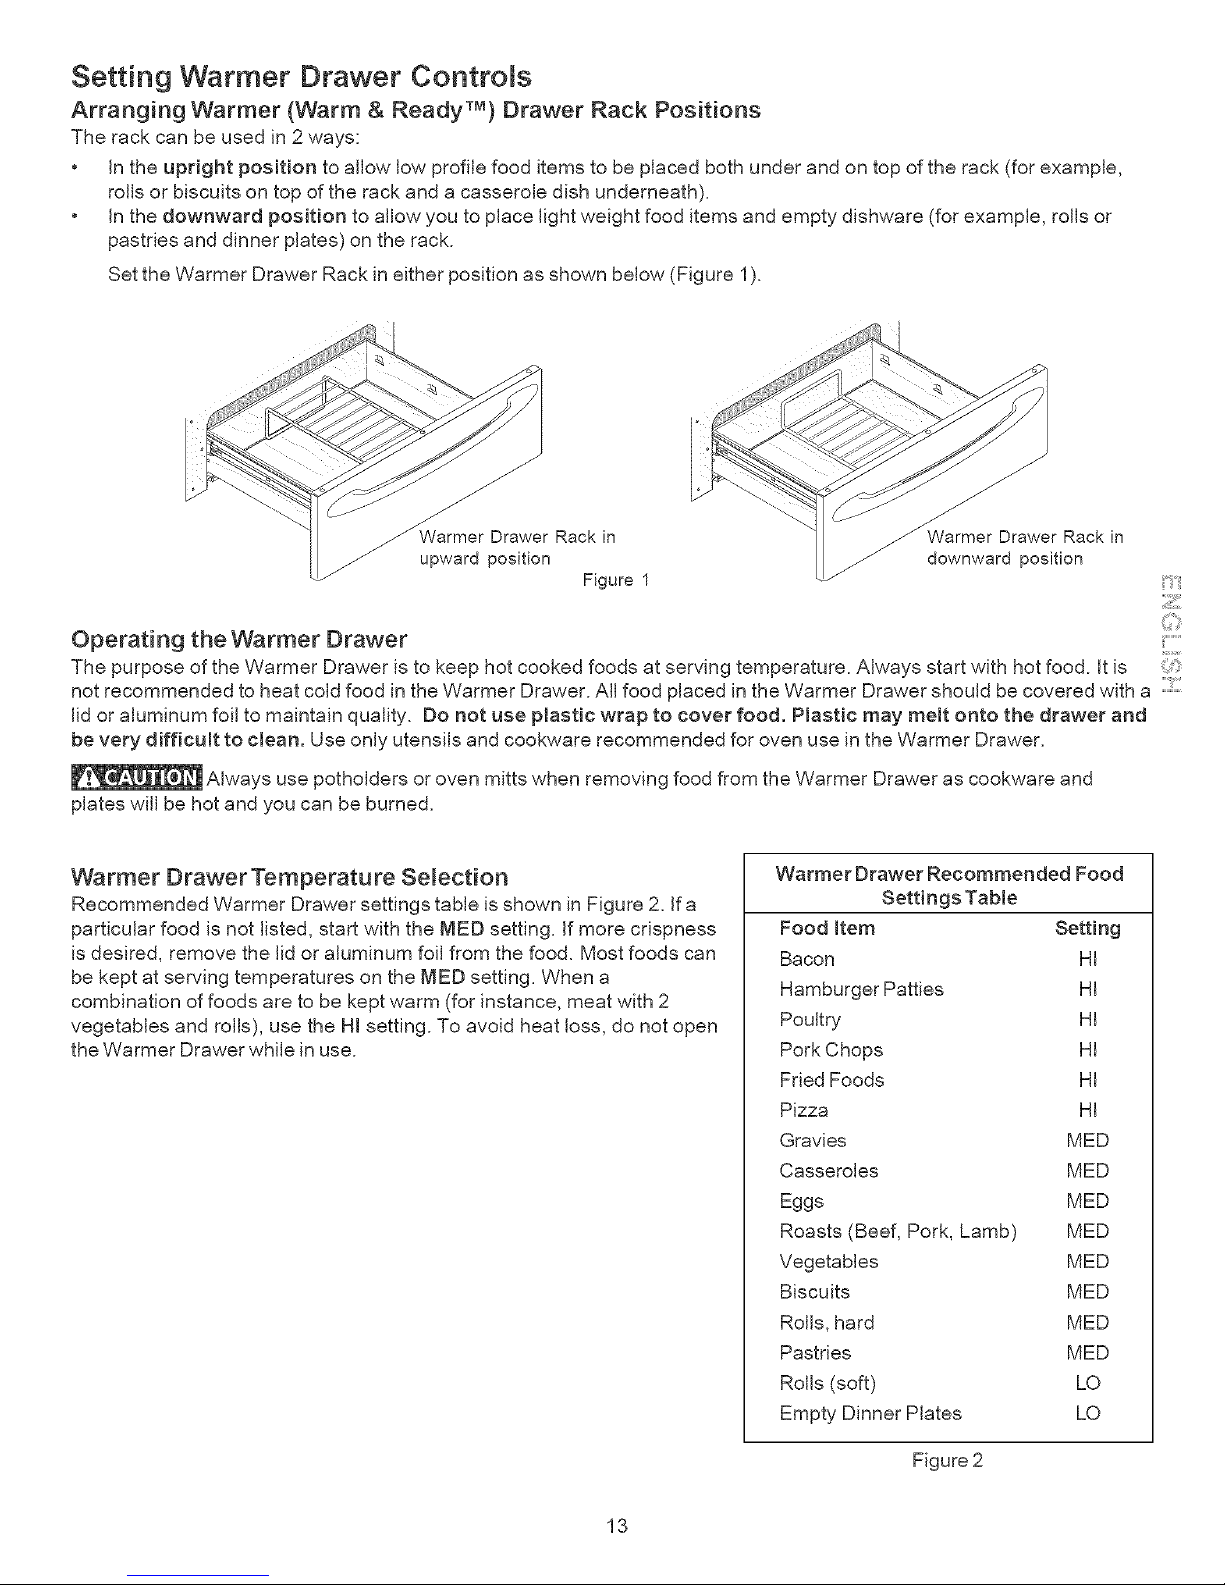
Arranging Warmer (Warm & Ready TM) Drawer Rack Positions
The rack can be used in 2 ways:
• in the upright position to allow low profile food items to be placed both under and on top of the rack (for example,
rolls or biscuits on top of the rack and a casserole dish underneath).
• in the downward position to allow you to place light weight food items and empty dishware (for example, rolls or
pastries and dinner plates) on the rack.
Set the Warmer Drawer Rack in either position as shown below (Figure 1).
J
.__uWarmer Drawer Rack in
pward position
Figure 1
_armer Drawer Rack in
//" downward position
Z
Operating the Warmer Drawer
The purpose of the Warmer Drawer is to keep hot cooked foods at serving temperature. Always start with hot food. it is
not recommended to heat cold food in the Warmer Drawer. AJJfood placed in the Warmer Drawer should be covered with a ::::1
lid or aluminum foil to maintain quality. Do not use plastic wrap to cover food. PJastic may melt onto the drawer and
be very difficult to clean. Use only utensils and cookware recommended for oven use in the Warmer Drawer.
Always use potholders or oven mitts when removing food from the Warmer Drawer as cookware and
plates will be hot and you can be burned.
Warmer Drawer Temperature Selection
Recommended Warmer Drawer settings table is shown in Figure 2. Jfa
particular food is not listed, start with the MED setting. If more crispness
is desired, remove the lid or aluminum foil from the food. Most foods can
be kept at serving temperatures on the ['#lEDsetting. When a
combination of foods are to be kept warm (for instance, meat with 2
vegetables and rolls), use the Hi setting. To avoid heat loss, do not open
the Warmer Drawer while in use.
Warmer Drawer Recommended Food
Settings Table
Food item Setting
Bacon HI
Hamburger Patties HI
Poultry HI
Pork Chops HI
Fried Foods HI
Pizza HI
Gravies MED
Casseroles MED
Eggs MED
Roasts (Beef, Pork, Lamb) MED
Vegetables MED
Biscuits MED
Rolls, hard MED
Pastries MED
Rolls (soft) LO
Empty Dinner Plates LO
Figure 2
13
Page 14
Setting Warmer Drawer Controls
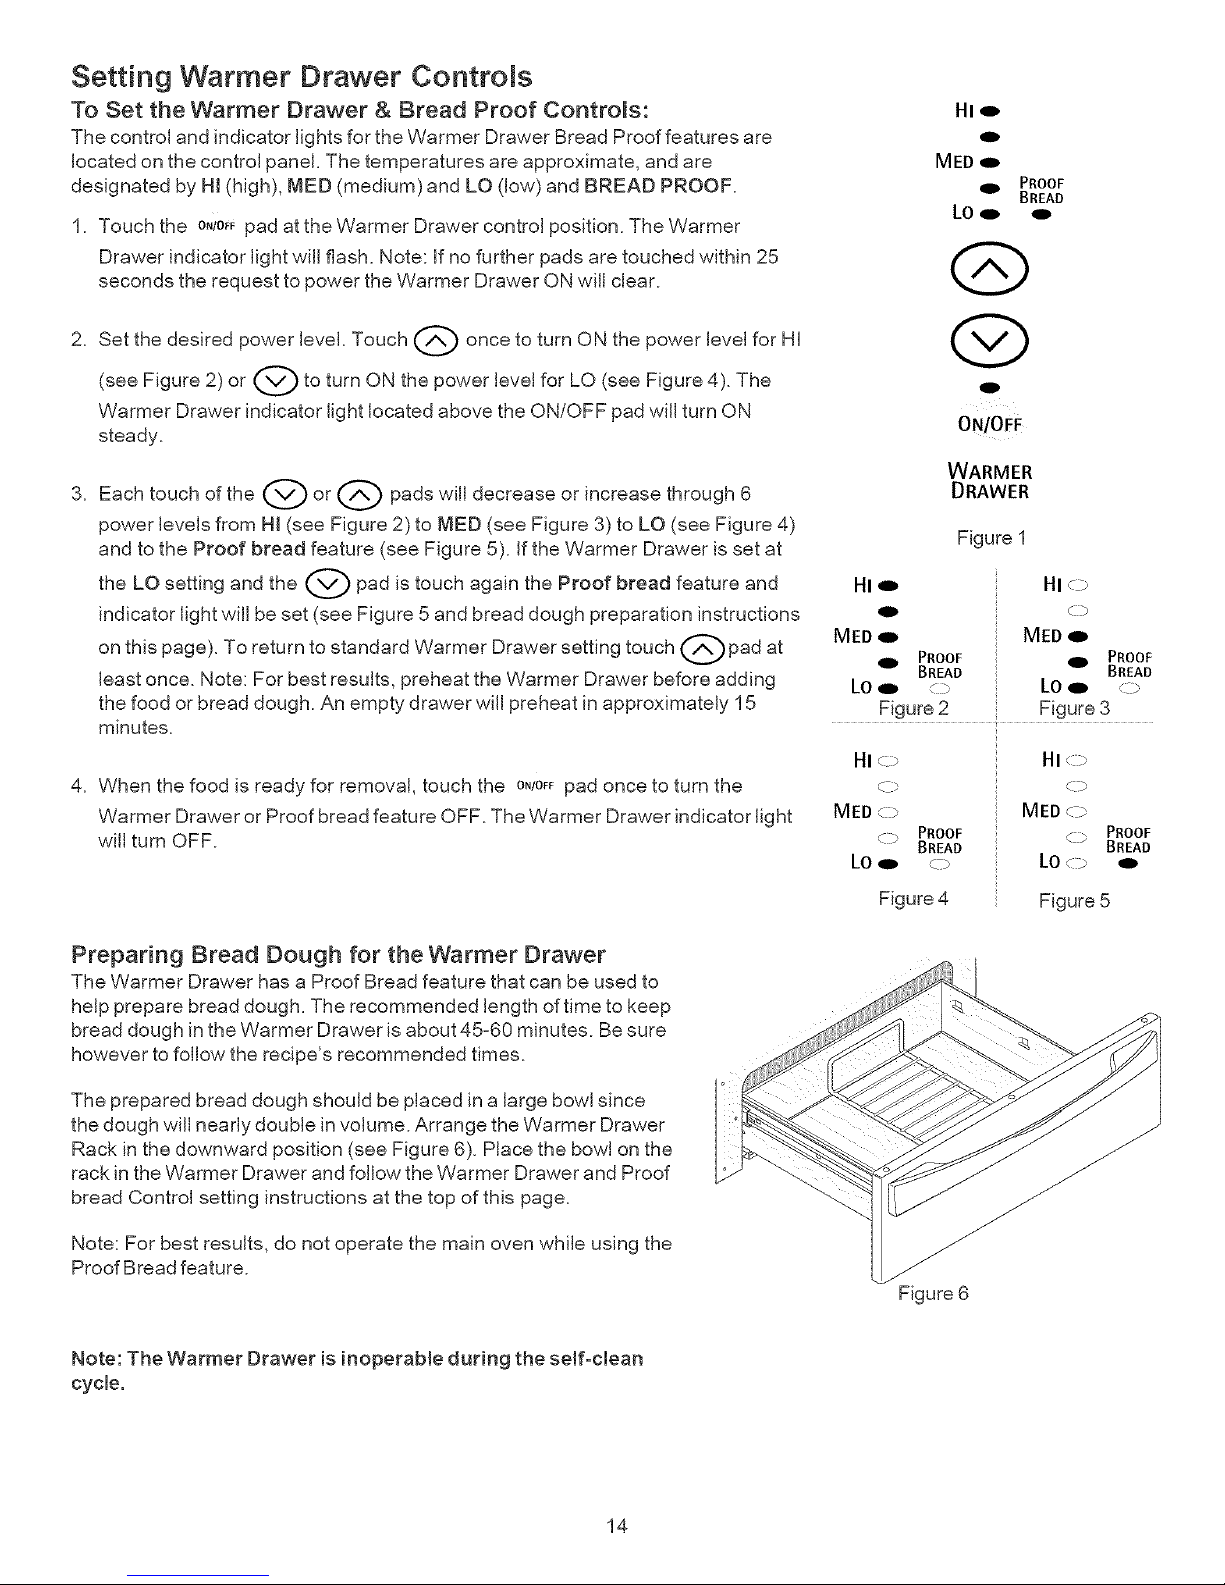
To Set the Warmer Drawer & Bread Proof Controls:
The contro[ and indicator lights for the Warmer Drawer Bread Proof features are
located on the control panel. The temperatures are approximate, and are
designated by H[ (high), MED (medium) and LO (low) and BREAD PROOF.
1. Touch the o.jo_ pad at the Warmer Drawer centre[ position. The Warmer
Drawer indicator light will flash. Note: If no further pads are touched within 25
seconds the request to power the Warmer Drawer ON will clear.
2. Set the desired power level. Touch Q once to turn ON the power level for HI
(see Figure 2) or @ to turn ON the power level for LO (see Figure 4).
The
Warmer Drawer indicator light located above the ON/OFF pad will turn ON
steady.
Each touch of the (_ or _ pads will decrease or increase through 6
power levels from Hi (see Figure 2) to rvlED (see Figure 3) to LO (see Figure 4)
and to the Proof bread feature (see Figure 5). If the Warmer Drawer is set at
the LO setting and the @ pad is touch again the Proof bread feature and
indicator light will be set (see Figure 5 and bread dough preparation instructions
on this page). To return to standard Warmer Drawer setting touch Qpad at
least once. Note: For best results, preheat the Warmer Drawer before adding
the food or bread dough. An empty drawer will preheat in approximately 15
minutes.
4. When the food is ready for removal, touch the O,/OFFpad once to turn the
Warmer Drawer or Proof bread feature OFF. The Warmer Drawer indicator light
will turn OFF.
Preparing Bread Dough for the Warmer Drawer
The Warmer Drawer has a Proof Bread feature that can be used to
help prepare bread dough. The recommended length of time to keep
bread dough in the Warmer Drawer is about 45-60 minutes. Be sure
however to follow the recipe's recommended times.
The prepared bread dough should be placed in a large bowl since
the dough will nearly double in volume. Arrange the Warmer Drawer
Rack in the downward position (see Figure 6). Place the bowl on the
rack in the Warmer Drawer and follow the Warmer Drawer and Proof
bread Control setting instructions at the top of this page.
Note: For best results, do not operate the main oven while using the
Proof Bread feature.
HIo
o
MEDo
91, PROOF
BREAD
LO_
o
ON/OFF
WARMER
DRAWER
Figure I
HI_ HIo
91D (Z>
MED o MED t,
PROOF
PROOF 41D BREAD
BREAD
LOi, .q:_ LO,D __,--_-
Figure 2 Figure 3
HI_-_ HI<::>
f _ f_
MED _D MED(-5
_-_ PROOF _:b PROOF
.... BREAD BREAD
LOe, (5 LO(::b
Figure 4 Figure 5
Figure 6
Note: The Warmer Drawer is inoperab{e during the self-clean
cycle.
14
Page 15

Contro Pad Features
READ THE INSTRUCTIONS CAREFULLY BEFORE USING THE OVEN, For satisfactory use of your oven, become
familiar with the various features and functions of the oven as described below. Detailed instructions for each feature
and function follow later in this Use & Care Guide.
START TIME= Use with
BAKE, OVEN COOK TIME,
and CLEAN to program a
delayed baking or delayed
self-cleaning cycle start time,
START -- Use to start
all oven features (not
used with Oven Light).
OVEN COOK TIME--
Use to enter the length
the baking time.
SERVE WARM-- Use to
select the Oven Serve
Warm feature.
BROIL-- Use to select
variable Broil feature.
0 THRU 9 NUMBER
PADS -- Use to
PREHEAT-- Use with enter temperature
normal bake pad. and times.
CLEAN-- Use to select
the self-cleaning feature.
OVEN UGHT--Use to
turn the oven light
off.
KITCHEN TIMER ON/
OFF-- Use to set or
cancel the kitchen timer,
The kitchen timer does
not start or stop cooking.
BAKE-- Use to
select the
Convection
Bake feature.
BAKE-- MEATS, CAKES CLOCK--
Use to & BREADS-- Use to set the
enter the Use to select the time of day.
normal Meats, Cakes
baking and Breads
feature, cooking feature.
Z
STOP!CLEAR -- Use to cancel ::::::::::::
any oven mode previously
entered except the time of day ::::11::
and minute timer. Press STOP/
CLEAR to stop cooking. Press
STOP/CLEAR and hold for 3
seconds to activate the Oven
Lockout feature. Press and hold
again for 3 seconds to disable the
Oven Lockout,
Minimum and
Maximum
Contro Pad
Settings
FEATURE
PREHEAT TEMP.
BAKE TEMP.
BROIL TEMP.
KFCHEN TIMER
CLOCKTIME
All of the features listed below have minimum and maximum time or temperature settings
that may be entered into the control. An ENTRY acceptance beep will sound each time a
control pad is touched (the Oven Lockout pad is delayed 3 seconds).
An ENTRY ERROR tone (3 short beeps) will sound if the entry of the temperature or time is
below the minimum or above the maximum settings for the feature.
12Hr.
24 Hr.
12Hr.
24 Hr.
OVEN COOK TIME 12Hr.
24 Hr.
CLEAN TIME
CONVECTION BAKE
MINIMUM TEMP./TIME
170°F/77°C
170°F/77°C
400°F/205°C
0:01 Min.
0:01 Min.
1:00 Hr./Min.
0:00 Hr/Min.
0:01 Min.
0:01 Min.
2 hours
300°F/149°C
MAXIMUM TEMP./TIME
550°F/288°C
550°F/288°C
HF550°F!288°C
11:59 Hr./Min.
23:59 Hr./Min.
12:59 Hr./Min.
23:59 Hr./Min.
11:59 Hr./Min.
23:59 Hr/Min.
4 hours
550°F/288°C
15
Page 16
Setting the C ock
Setting the C_ock
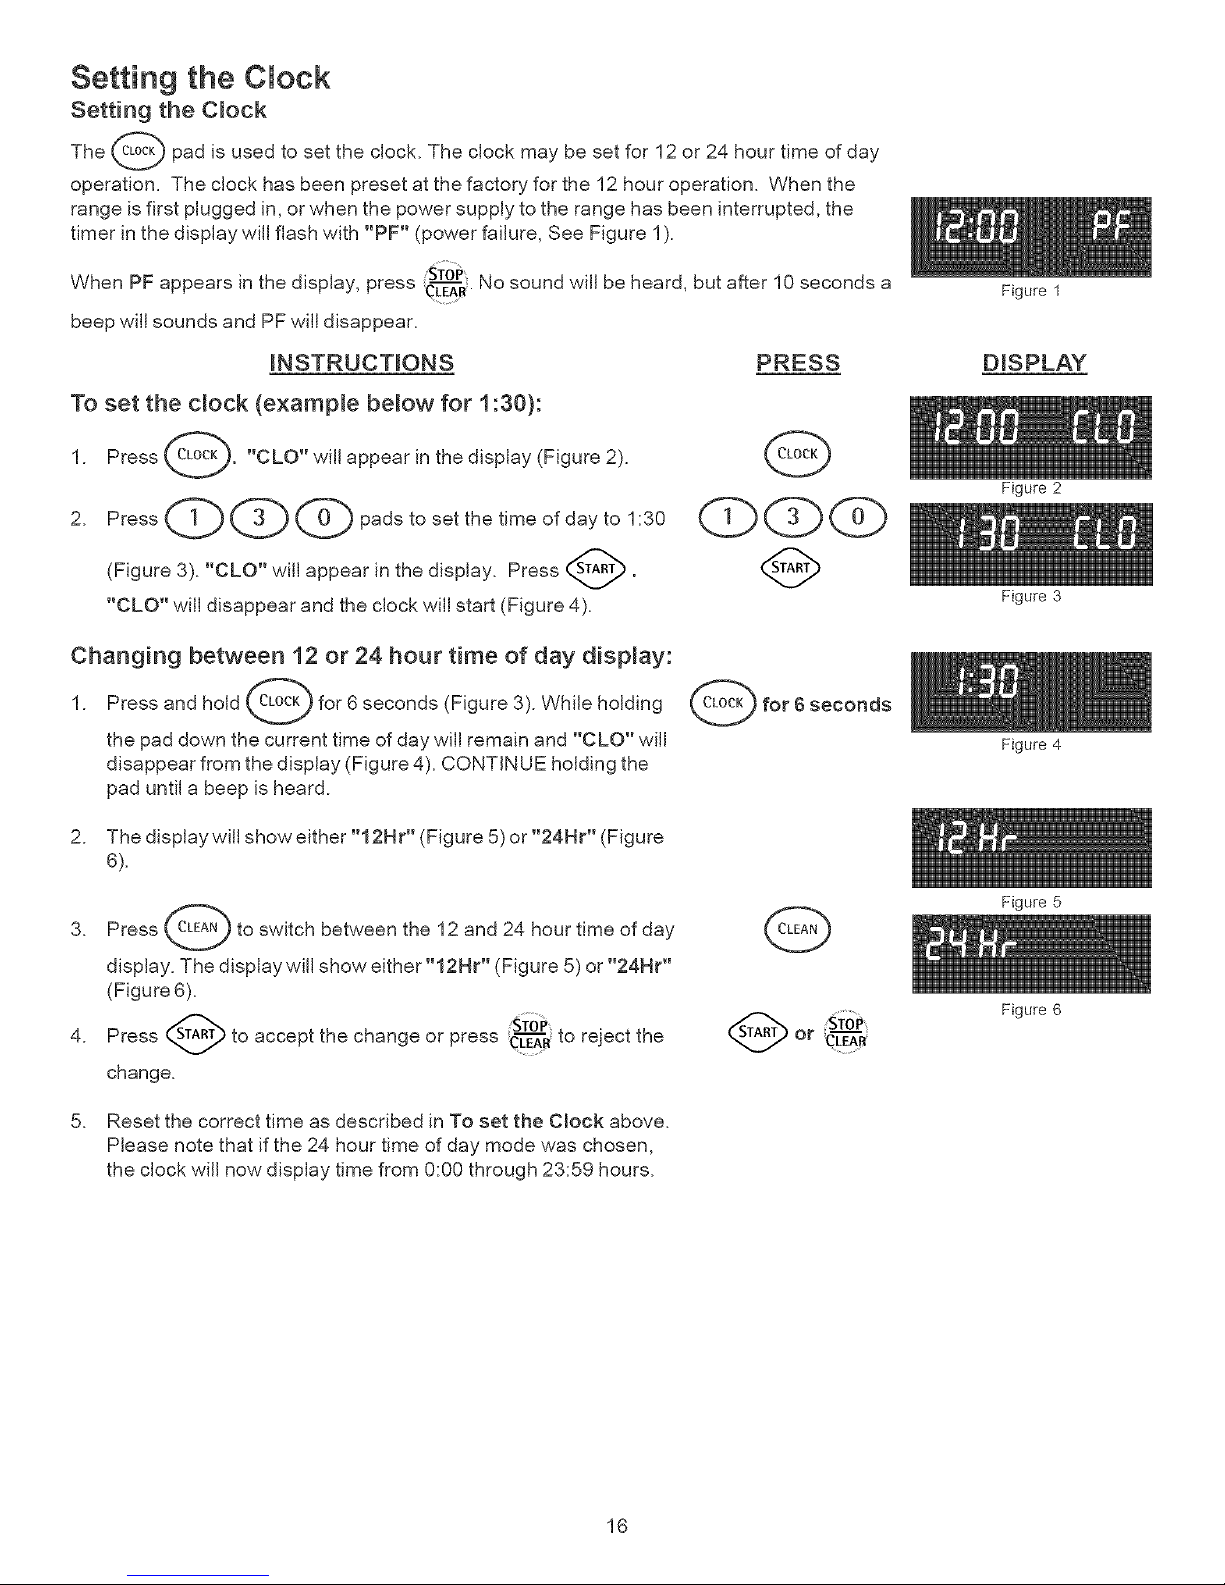
The _ pad is used to set the clock. The clock may be set for 12 or 24 hour time of day
operation. The clock has been preset at the factory for the 12 hour operation. When the
range is first plugged in, or when the power supply to the range has been interrupted, the
timer in the display wiJJflash with "PF" (power failure, See Figure 1).
When PF appears in the display, press CL-EE_R•No sound wilJbe heard, but after 10 seconds a
beep wilJsounds and PF wilJ disappear.
iNSTRUCTiONS PRESS
To set the dock (example be_ow for 1:30):
1. Press _. "CLO" wiJJappear in the display (Figure 2).
2. Press _ _ @ pads to set the time of day to 1:30
(Figure 3). "CLO" wiJJappear in the display. Press (_.
"CLO" wilJ disappear and the clock wilJstart (Figure 4).
G
CbQdZ>
Changing between 12 or 24 hour time of day display:
1. Press and hold _,LOCK_for 6 seconds (Figure 3). While holding
the pad down the current time of day wiJJremain and "CLO" wiJJ
disappear from the display (Figure 4). CONTINUE holding the
pad until a beep is heard.
_for 6 seconds
2. The display will show either "12Hr" (Figure 5) or "24Hr" (Figure
6).
3. Press _,_LFA_)to switch between the 12 and 24 hour time of day
display. The display will show either "12Hr" (Figure 5) or "24Hr"
(Figure 6).
STO P
4. Press to accept the change or press _CL--'_"rto reject the
change.
Or CL---_R
5. Reset the correct time as described in To set the Clock above.
Please note that if the 24 hour time of day mode was chosen,
the clock will now display time from 0:00 through 23:59 hours.
Figure 1
DISPLAY
16
Figure 2
Figure 3
Figure 4
Figure 5
Figure 6
Page 17
Setting the C ock
Setting Continuous Bake or 12 Hour Energy Saving
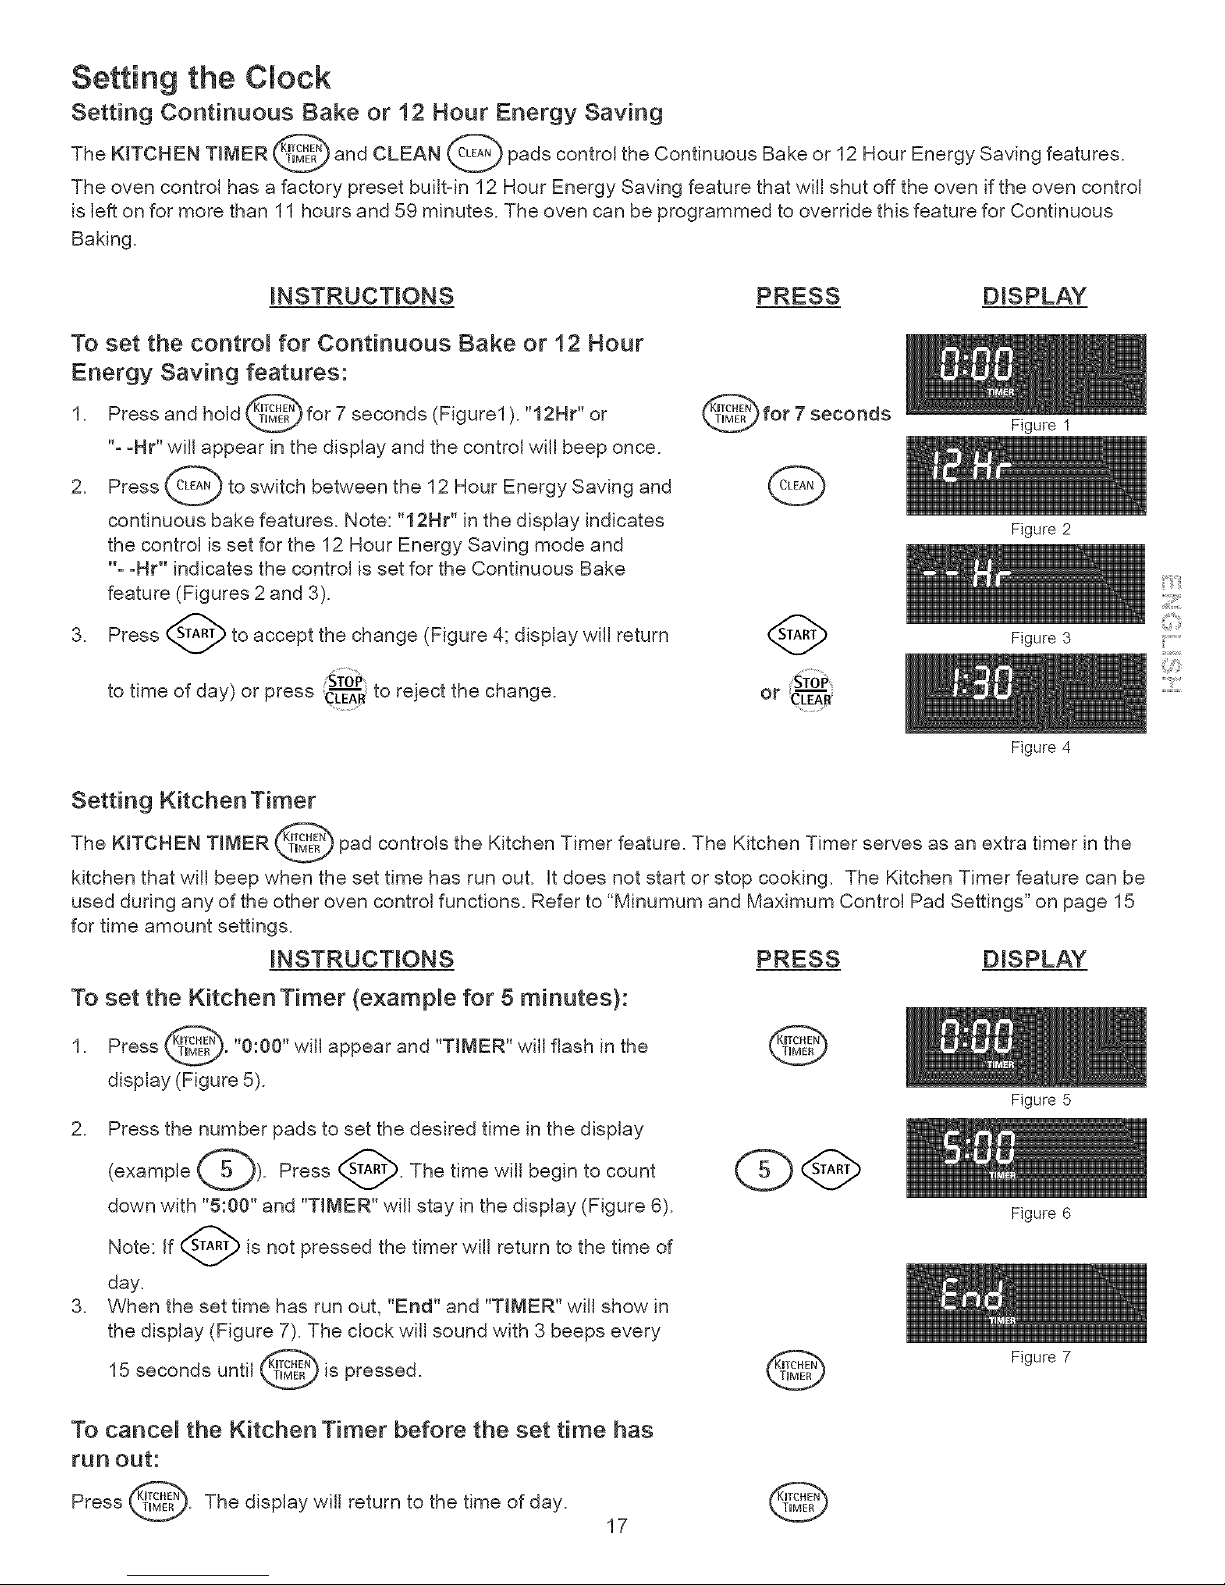
The KITCHEN TIMER ____ and CLEAN ______AN[_pads control the Continuous Bake or 12 Hour Energy Saving features.
The oven control has afactory preset builtqn 12 Hour Energy Saving feature that will shut off the oven if the oven control
is left on for more than 11 hours and 59 minutes. The oven can be programmed to override this feature for Continuous
Baking.
_NSTRUCT_ONS
To set the controm for Continuous Bake or 12 Hour
Energy Saving features:
1. Press and hold _"_ for 7 seconds (Figure1). "12H€'
or
%-He' will appear in the display and the control will beep once.
2. Press c_ to switch between the 12 Hour Energy Saving and
continuous bake features. Note: "12Hr" in the display indicates
the control is set for the 12 Hour Energy Saving mode and
% -Hr" indicates the control is set for the Continuous Bake
feature (Figures 2 and 3).
3. Press _ to accept the change (Figure 4; display will return
to time of day) or press (?_ to reject the change.
PRESS D_SPLAY
for 7 seconds
Q
Or 'CL"E_"R
Figure 1
Figure 2
Figure 3
Figure 4
ii_;ii!!iiil
Setting Kitchen Timer
The KITCHEN TIMER _"E_ pad controls the Kitchen Timer feature. The Kitchen Timer serves as an extra timer in the
kitchen that will beep when the set time has run out. It does not start or stop cooking. The Kitchen Timer feature can be
used during any of the other oven control functions. Refer to "Minumum and Maximum Control Pad Settings" on page 15
for time amount settings.
_NSTRUCT_ONS PRESS D_SPLAY
To set the Kitchen Timer (exampme for 5 minutes):
1. Press _. "0:00" will appear and "TIMER" will flash in the
display (Figure 5).
2. Press the number pads to set the desired time in the display
(example _). Press _. The time wi,, begin to count
down with "5:00" and "TIMER" will stay in the display (Figure 6).
Note: If _ is not pressed the timer will return to the time of
day.
3. When the set time has run out. "End" and "TIMER" will show in
the display (Figure 7). The clock will sound with 3 beeps every
15 seconds until (_ERN_)iS pressed.
To cance_ the Kitchen Timer before the set time has
run out:
Press _. The display will return to the time of
day.
17
Figure 5
Figure 6
Figure 7
Page 18
Consumer Defined Contro
Note: The Consumer Defined Control features are adjustments to the control that will not affect cooking results. These
include the Oven Lockout, Temperature DispJay and Silent Control Operation features
Setting Oven Lockout Feature
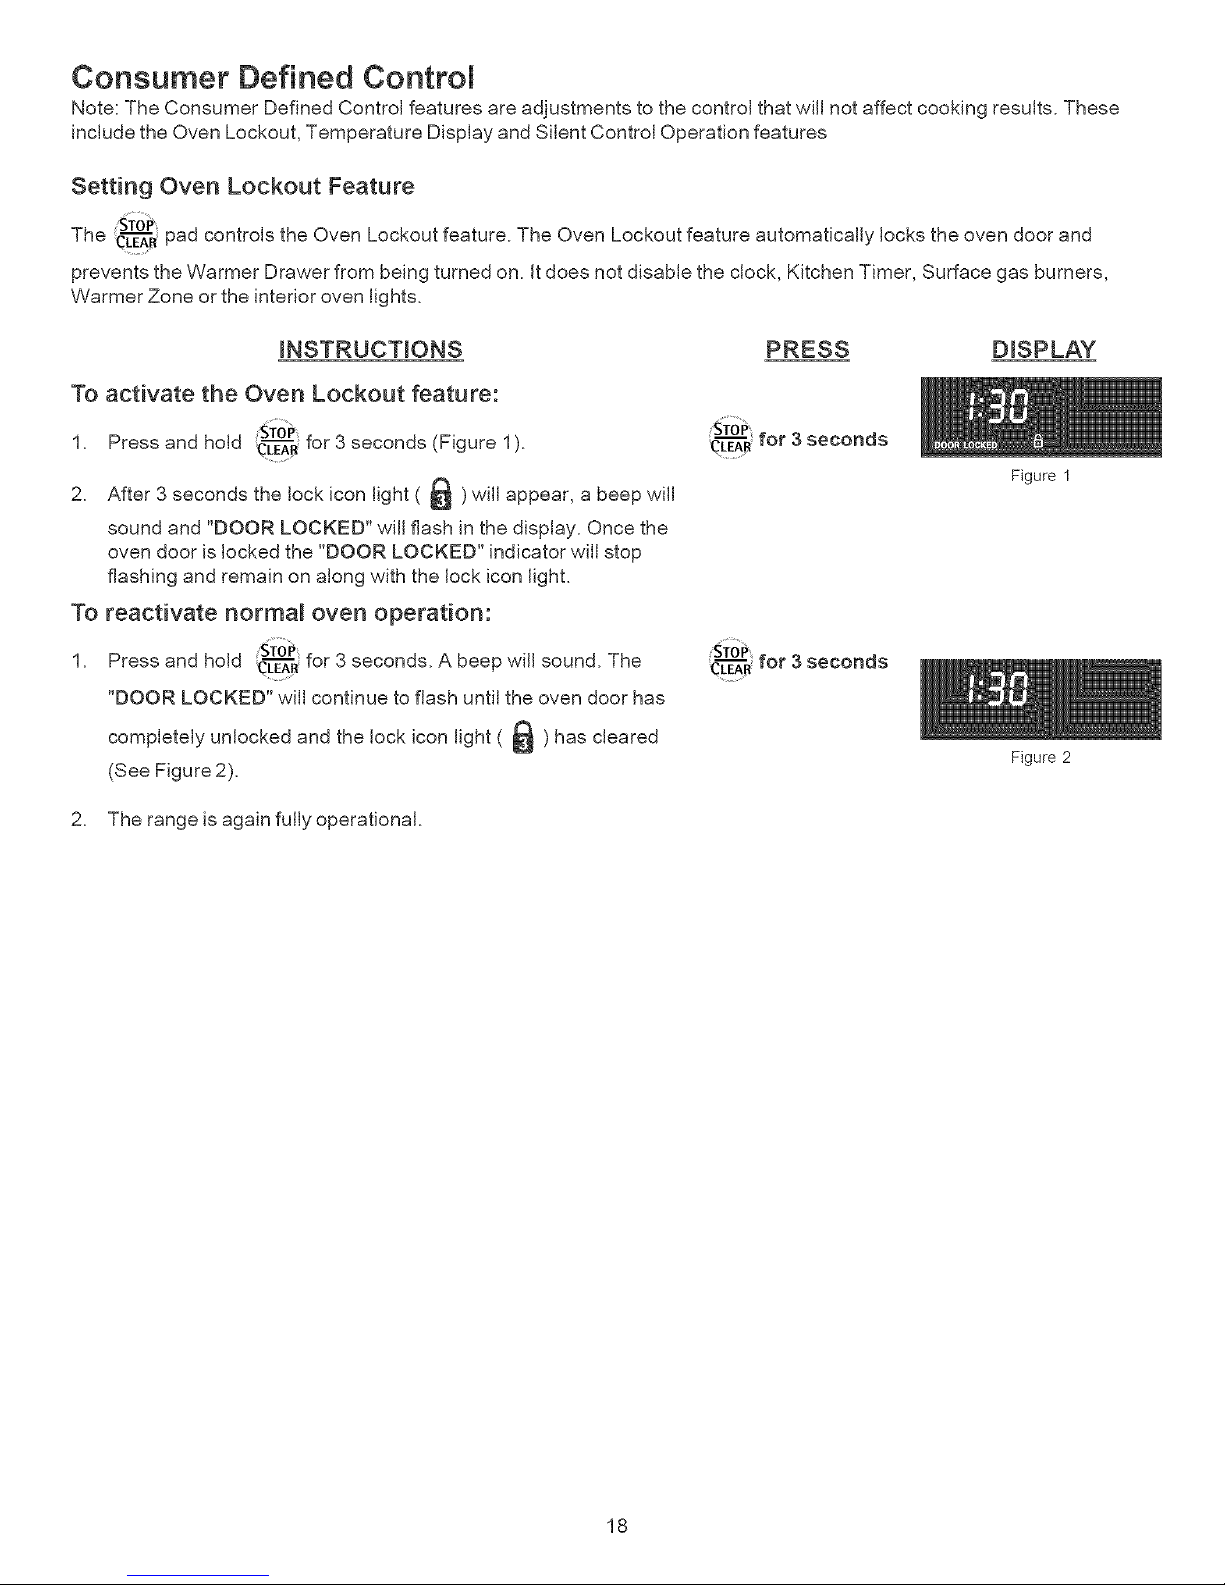
The CL--'E#Rpad controls the Oven Lockout feature. The Oven Lockout feature automaticalJy locks the oven door and
prevents the Warmer Drawer from being turned on. it does not disable the clock, Kitchen Timer, Surface gas burners,
Warmer Zone or the interior oven lights.
iNSTRUCTiONS
To activate the Oven Lockout feature:
1. Press and hold _CL-'L_-Rfor 3seconds (Figure 1).
2. After 3 seconds the lock icon light ( _ ) will appear, a beep will
sound and "DOOR LOCKED" will flash in the display. Once the
oven door is locked the "DOOR LOCKED" indicator will stop
flashing and remain on along with the lock icon light.
To reactivate normai oven operation:
....STOP'
1. Press and hold CL"_"rfor 3 seconds. A beep will sound. The
"DOOR LOCKED" will continue to flash until the oven door has
unlocked and the lock icon light ( _ ) has cleared
completely
(See Figure 2).
PRESS
CT_"R TOt ,.I seconds
STOP
_dk--'_rfor 3 seconds
2. The range is again fully operational.
18
Figure 1
Figure 2
Page 19
Consumer Defined ControM Features
Setting Temperature Display -- Fahrenheit or Celsius:
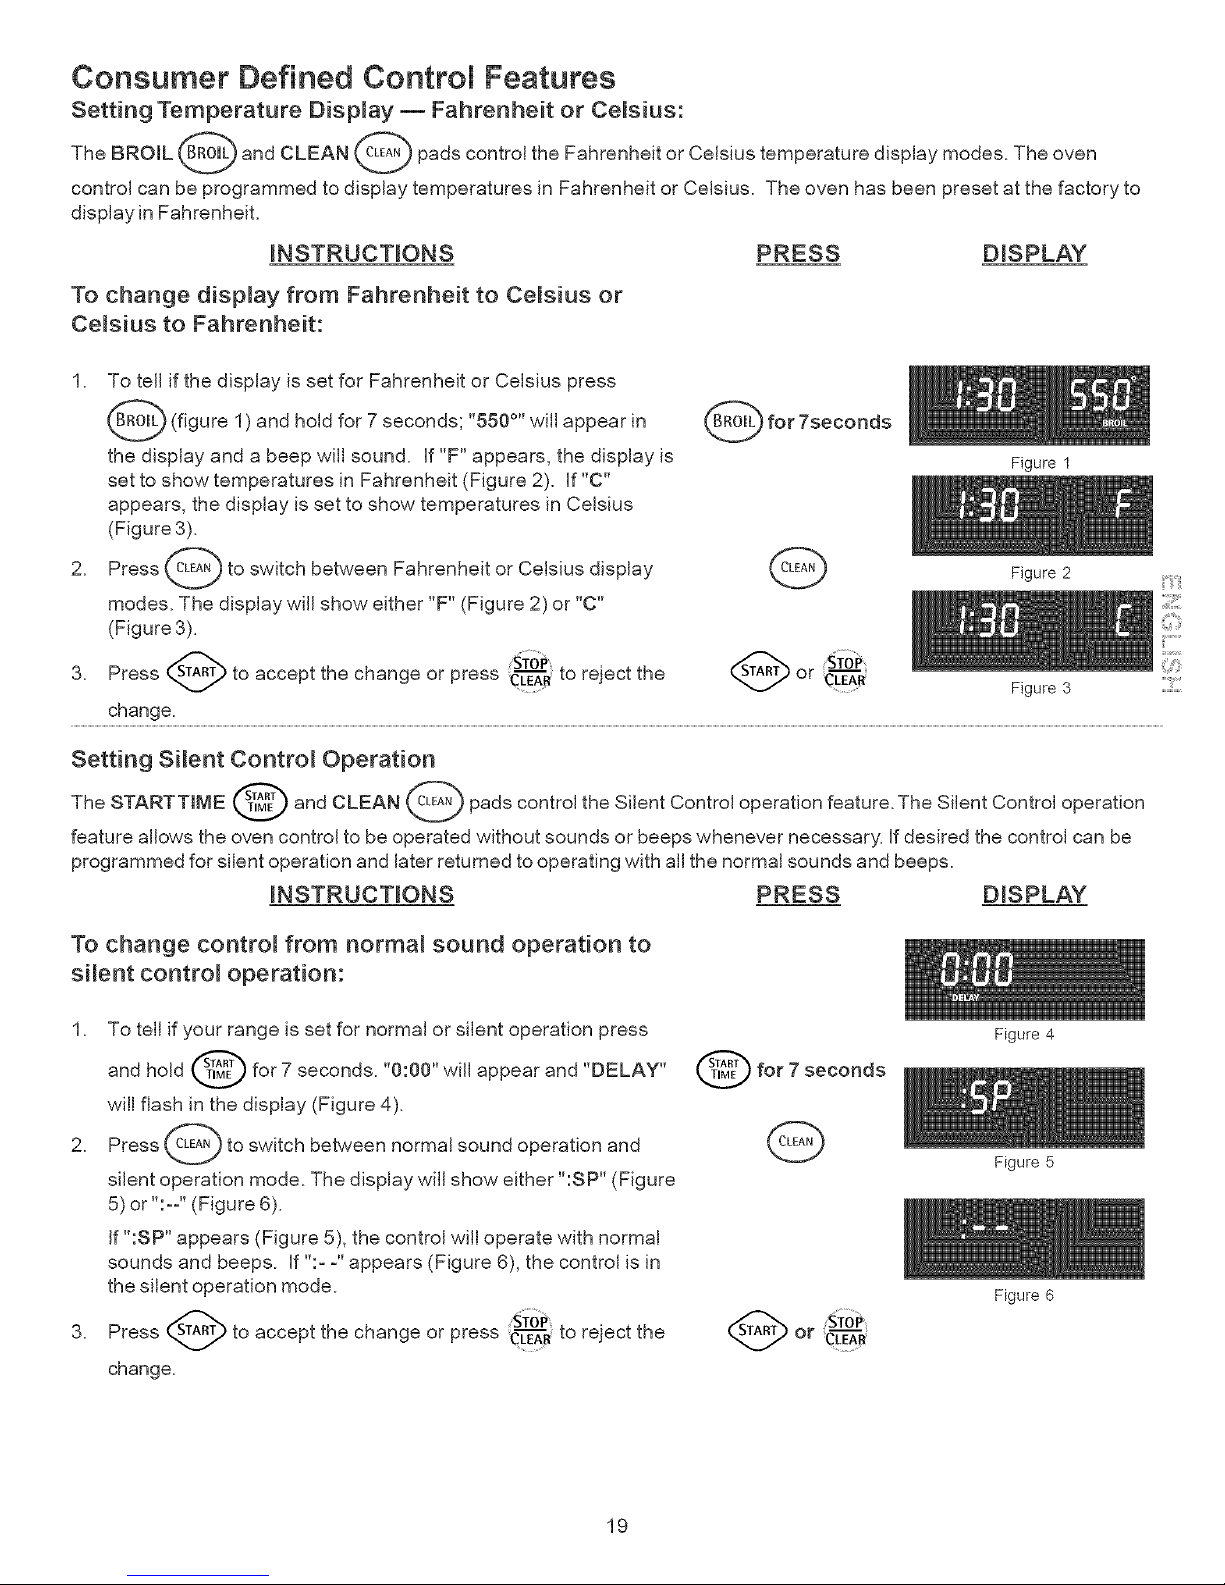
The BROIL _o_ and CLEAN _'_EAN_pads control the Fahrenheit or Celsius temperature display modes. The
oven
control can be programmed to display temperatures in Fahrenheit or Celsius. The oven has been preset at the factory to
display in Fahrenheit.
INSTRUCTIONS PRESS D_SPLAY
To change dispJay from Fahrenheit to Celsius or
Celsius to Fahrenheit:
1. To tell if the display is set for Fahrenheit or Celsius press
_(figure 1 and hold for 7 "550°'' will in
) seconds;
appear
the display and a beep will sound. If"F" appears, the display is
set to show temperatures in Fahrenheit (Figure 2). If "C"
appears, the display is set to show temperatures in Celsius
(Figure 3).
2. Press _LEAN-_to switch between Fahrenheit or Celsius
display
modes. The display will show either "F" (Figure 2) or "C"
(Figure 3).
ST;_.....
3. Press to accept the change or press ;CL"E'_"R_o rejec_ the
change.
_forTseconds
Figure 1
Figure 2
or CLEA'_R
Figure 3
Setting Silent Contro_ Operation
The STARTTIME _ and CLEAN (LEAN_pads control the Silent Control operation feature.The Silent Control operation
feature allows the oven control to be operated without sounds or beeps whenever necessary. If desired the control can be
programmed for silent operation and later returned to operating with all the normal sounds and beeps.
_NSTRUCT_ONS PRESS
To change controm from normal sound operation to
silent contro_ operation:
1. To tell if your range is set for normal or silent operation press
and hold _ for 7 seconds. "0:00" will appear and "DELAY"
will flash in the display (Figure 4).
2. Press _E_ to switch between normal sound operation and
silent operation mode. The display will show either ":SP" (Figure
5) or ":--" (Figure 6).
If ":SP" appears (Figure 5), the control will operate with normal
sounds and beeps. If ":- -" appears (Figure 6), the control is in
the silent operation mode.
3. Press to accept the change or press _CL"E'_'R_o rejec_ the
change.
for 7 seconds
G
Or CL-['_'I_
19
Figure 4
Figure 5
Figure 6
Page 20

Setting Oven Controls
Setting Preheat
The PREHEAT (_RAET_pad controls the Preheat feature. The Preheat feature will bring the oven up to temperature and then
indicate when to place the food in the oven. Use this feature in combination with the Bake pad when recipes call for
preheating. Preheating is not necessary when roasting or cooking casseroles. The oven can be programmed to preheat at
any temperature between 170°F to 550°F.
INSTRUCTIONS
To set the Preheat temperature for 350°F:
1. Arrange the interior oven racks.
2. Press ___ERAET_.% - - °" and "BAKE" will appear in the display
(FigureI ).
3. Press_,3_L5 2_,0 _. "350°"and "BAKE"w,,,appear,nthe
display (Figure 2).
4. Press _. "PRE" and "BAKE" will appear in the display as the
v
oven heats and reaches 350°F (Figure 3).
Note: After the oven has reached the desired temperature (this
example, 350°F) the control will beep and the "PRE" light will turn off
and oven temperature will be displayed (Figure 4). If the beep was
missed, a quick glance at the display with oven temperature showing
in the oven display is a good way to check that the oven has already
reached the preheat temperature. Once the oven has preheated,
PLACE FOOD IN THE OVEN. The "BAKE" light will stay on.
when
Press CLEA_ baking is complete or to cancel the preheat feature.
PRESS DISPLAY
QQ(0db
To change Preheat temperature while oven is
preheating (example changing from 350 to 425°F):
if it is necessary to change the preheat temperature while the oven is
preheating to the original temperature:
1. While preheating, press _. %- -°" and "BAKE" will appear in
the display (Figure 5)
2. Enter the new preheat temperature. Press (4_2 ]_5_.
"428°'' and "BAKE" will appear in the display (Figure 6).
3. Press sT_. "PRE" and "BAKE" will appear in the display as the
oven heats and to 425°F (Figure 7). A beep will sound once the
oven temperature reaches 425°F and the display will show "425°"
and "BAKE" (Figure 8).
_To_
4. VVhen baking is complete press _.
(Z)C)Q
'CTFTRi_
2O
Figure 1
Figure 2
Figure 3
Figure 4
Figure 5
Figure 6
Figure 7
Figure 8
Page 21
Setting Oven Controls
Setting Bake
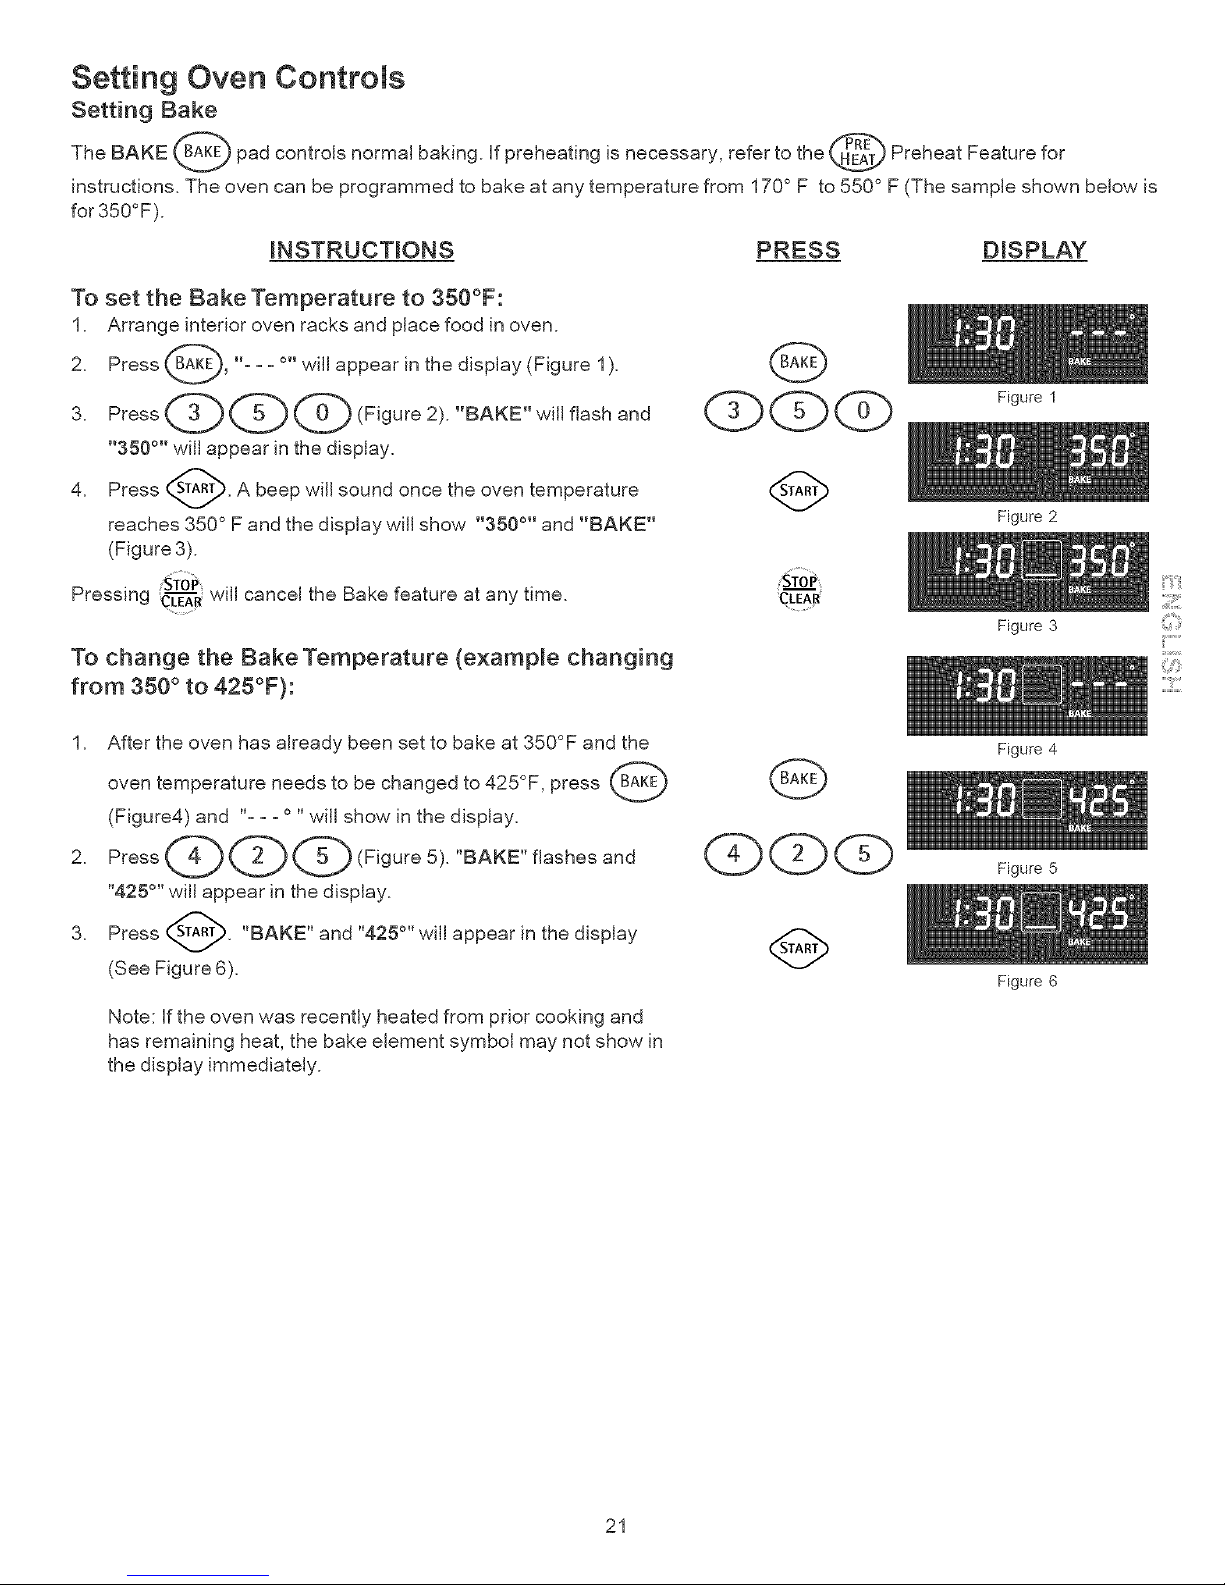
The BAKE _ pad controls normal baking, if preheating is necessary, refer to the _ Preheat Feature for
instructions. The oven can be programmed to bake at any temperature from 170 ° F to 550° F (The sample shown below is
for 350°F).
INSTRUCTIONS PRESS DISPLAY
To set the Bake Temperature to 350°F:
1. Arrange interior oven racks and place food in oven.
2. Press _AK_, "- - - °" will appear in the display (Figure 1
).
"350 °" will appear in the display.
4. Press _. A beep will sound once the oven temperature
reaches 350 ° F and the display will show "350 °" and "BAKE"
(Figure 3).
Pressing _CL--'E_Rwm cancel the Bake feature at any time.
CLEAR
To change the Bake Temperature {example changing
from 350 ° to 425°F):
1. After the oven has already been set to bake at 350°F and the
oven temperature needs to be changed to 425°F, press ___K_
(Figure4) and "- - - ° "will show in the display.
2. Press(4)(2)(5-_(Figure 5). "BAKE" flashes and
"425°" will appear in the display.
3. Press _. "BAKE" and "428 °'' will appear in the display
(See Figure 6).
Note: If the oven was recently heated from prior cooking and
has remaining heat, the bake element symbol may not show in
the display immediately.
Figure 1
Figure 2
Figure 3
Figure 4
Figure 5
Figure 6
ii_;ii!!iiil
%
21
Page 22
Setting Oven Controls
Setting Convection Bake
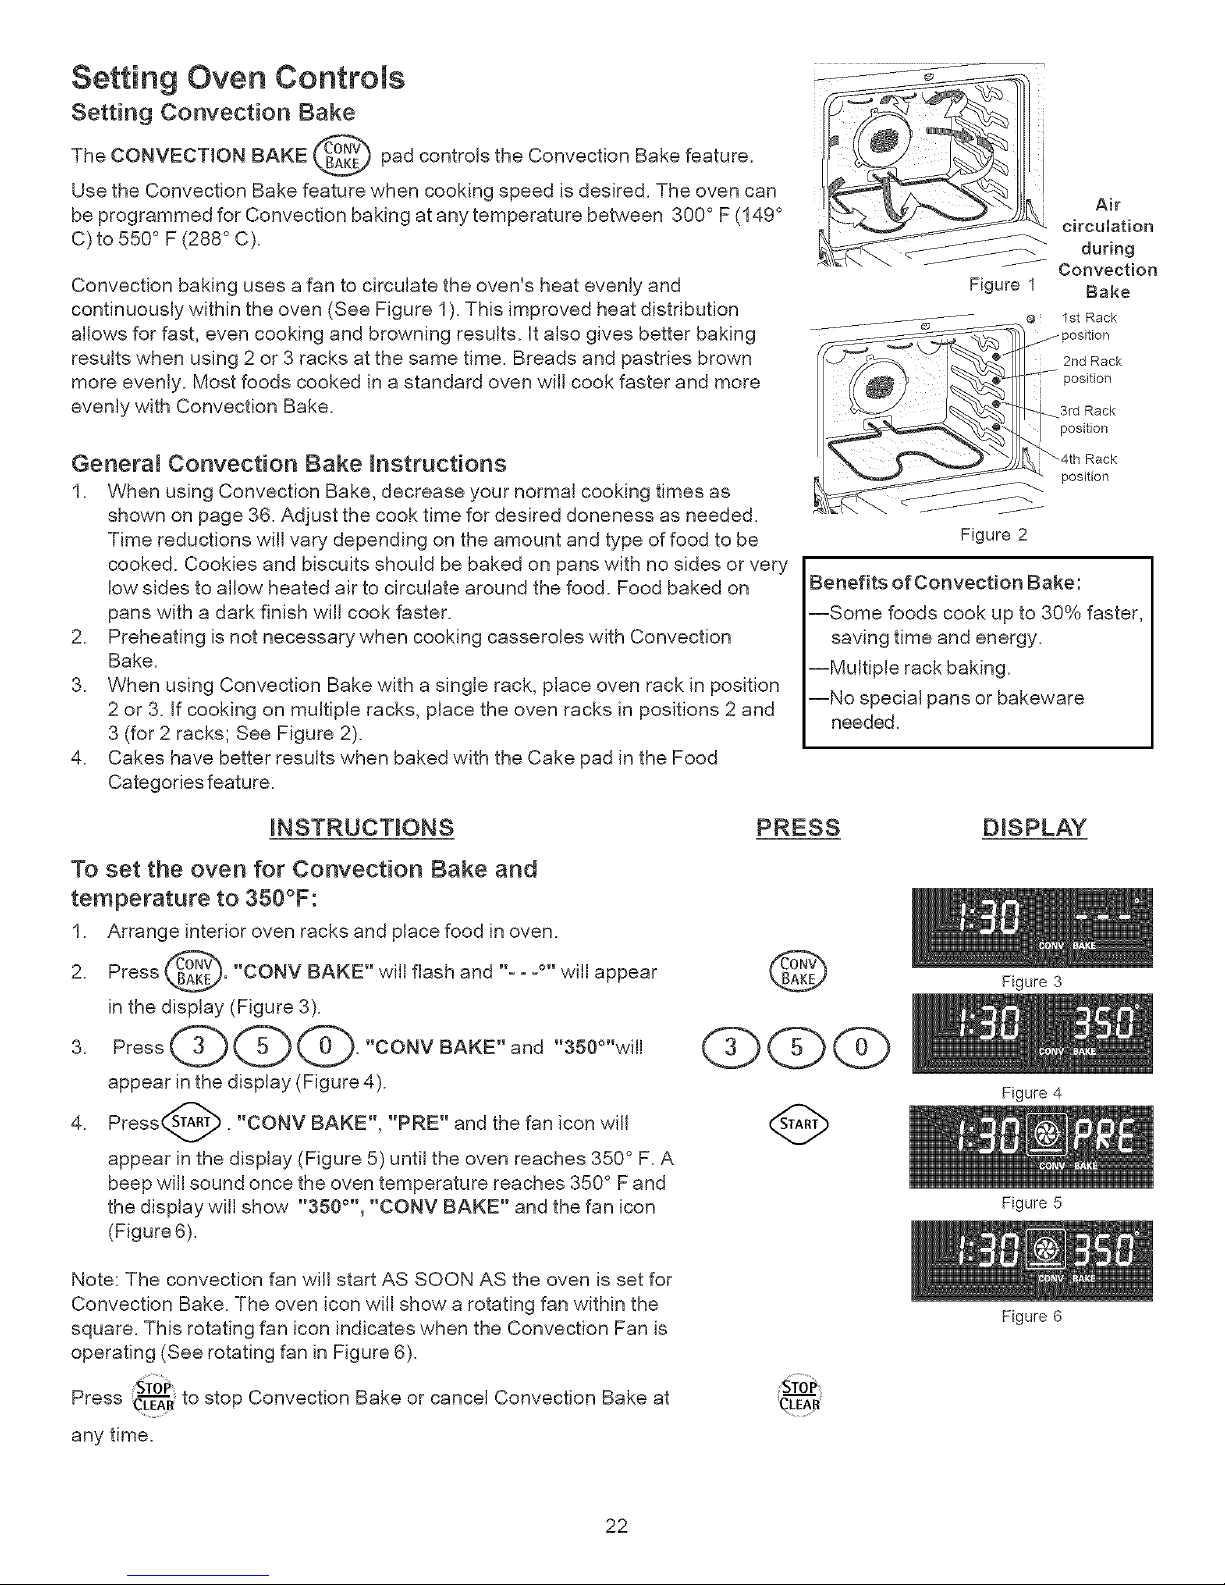
The CONVECTION BAKE _B°_b pad controls the Convection Bake feature.
Use the Convection Bake feature when cooking speed is desired, The oven can
be programmed for Convection baking at any temperature between 300° F (149 °
C) to 550 ° F (288 ° C).
Convection baking uses a fan to circulate the oven's heat evenly and
continuously within the oven (See Figure 1). This improved heat distribution
allows for fast, even cooking and browning results. It also gives better baking
results when using 2 or 3 racks at the same time. Breads and pastries brown
more evenly. Most foods cooked in a standard oven will cook faster and more
evenly with Convection Bake.
GeneraR Convection Bake _nstructions
1. When using Convection Bake, decrease your normal cooking times as
shown on page 36. Adjust the cook time for desired doneness as needed.
Time reductions will vary depending on the amount and type of food to be
cooked. Cookies and biscuits should be baked on pans with no sides or very
low sides to allow heated air to circulate around the food. Food baked on
pans with a dark finish will cook faster.
2. Preheating is not necessary when cooking casseroles with Convection
Bake.
3. When using Convection Bake with a single rack, place oven rack in position
2 or 3. If cooking on multiple racks, place the oven racks in positions 2 and
3 (for 2 racks; See Figure 2).
4. Cakes have better results when baked with the Cake pad in the Food
Categories feature.
Air
circulation
during
Convection
Figure 1 Bake
@ 1st Rack
._ position
//o2 pos,tion
½t-2.. poston
_, _"-__L._ \4th Rack
/ "" position
Figure 2
Benefits of Convection Sake:
--Some foods cook up to 30% faster,
saving time and energy.
--Multiple rack baking.
--No special pans or bakeware
needed.
_NSTRUCT_ONS PRESS D_SPLAY
To set the oven for Convection Bake and
temperature to 350°F:
1. Arrange interior oven racks and place food in oven.
2. Press _o_. "CONV SAKE" will flash and "- - -°" will appear
in the display (Figure 3).
3. Press___."CONVBAKE"and "350°"will
appear in the display (Figure 4).
4. Press_. "CONV SAKE", "PRE" and the fan icon will
appear in the display (Figure 5) until the oven reaches 350 ° F. A
beep will sound once the oven temperature reaches 350° F and
the display will show "380 °", "CONV SAKE" and the fan icon
(Figure6).
©
C)C)Q )
Note: The convection fan will start AS SOON AS the oven is set for
Convection Bake. The oven icon will show a rotating fan within the
square. This rotating fan icon indicates when the Convection Fan is
operating (See rotating fan in Figure 6).
Press _C[-'E_'R_os_op Convection Bake or cancel Convection Bake at
any time.
CLEAR
22
Figure 3
Figure 4
Figure 5
Figure 6
Page 23
Setting Oven ControMs
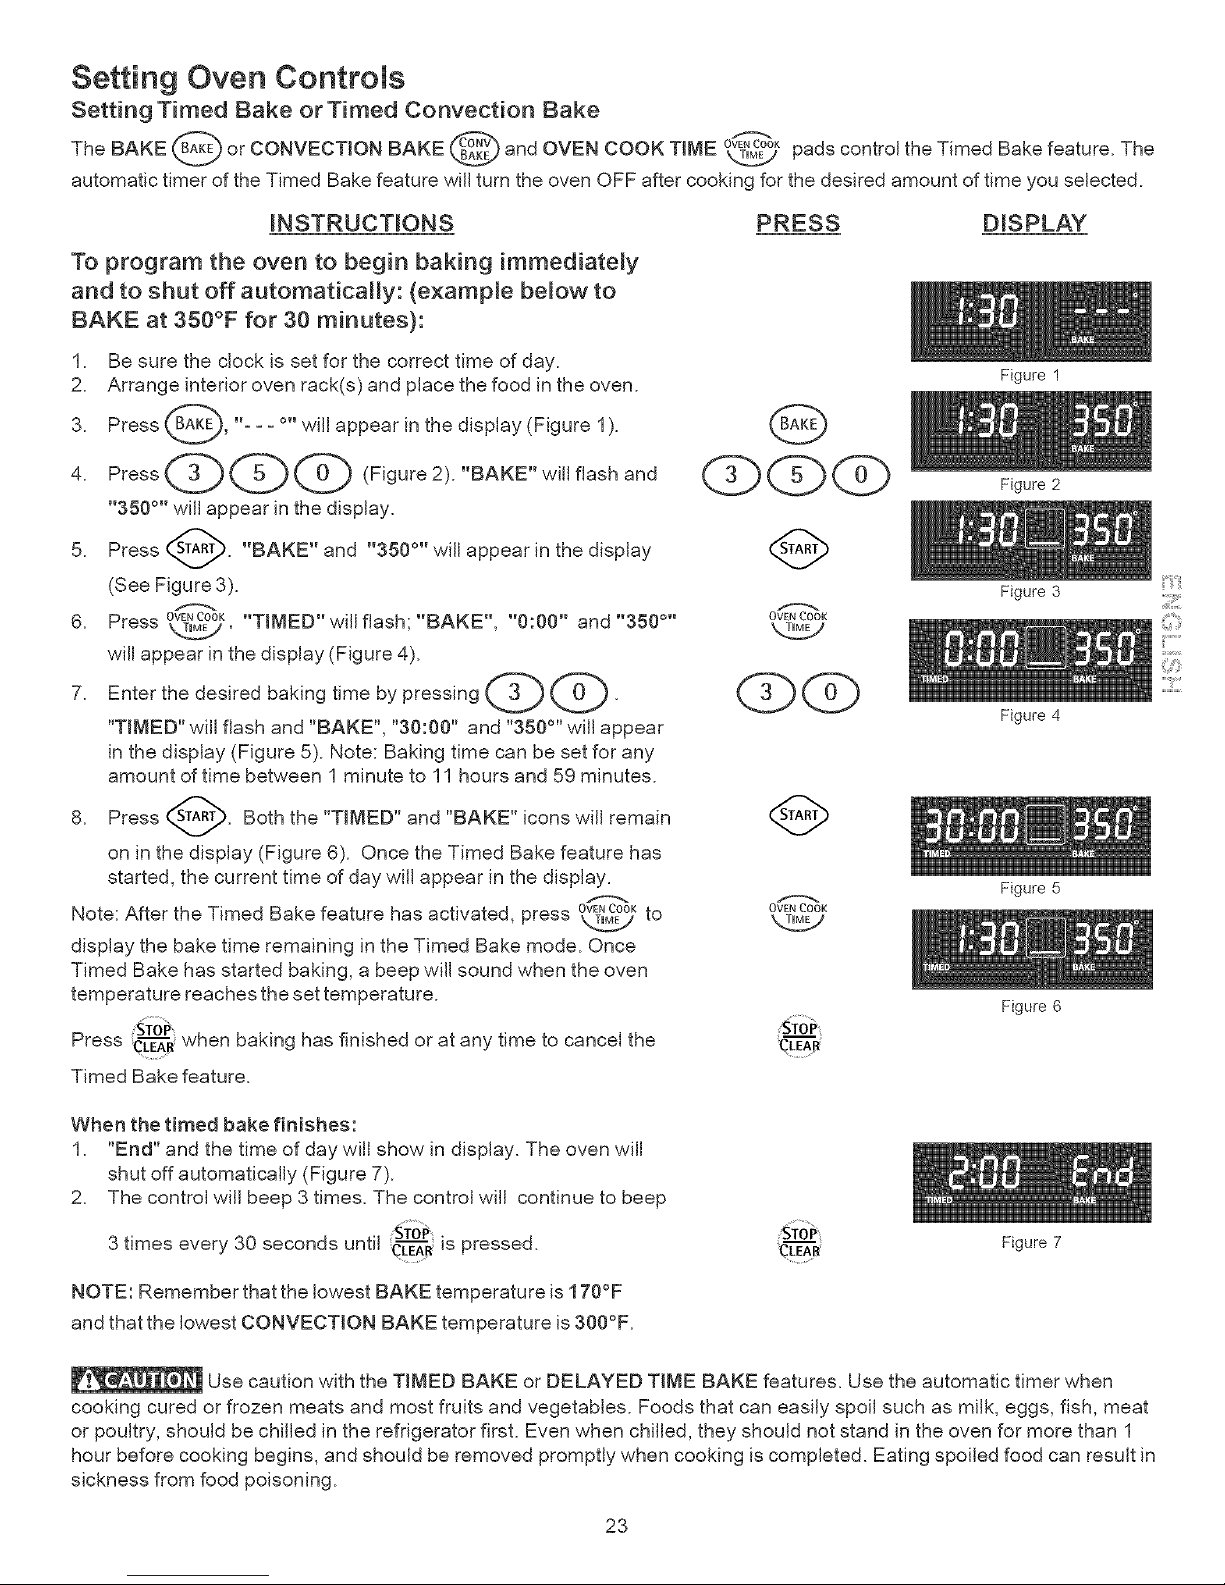
Setting Timed Bake orTimed Convection Bake
The BAKE or CONVECTION BAKE and OVEN COOK TINE OVENCookpads control the Timed Bake feature. The
automatic timer of the Timed Bake feature will turn the oven OFF after cooking for the desired amount of time you selected.
INSTRUCTIONS
To program the oven to begin baking immediately
and to shut off automatically: {example below to
BAKE at 350°F for 30 minutes}:
1. Be sure the clock is set for the correct time of day.
2. Arrange interior oven rack(s) and place the food in the oven.
3. Press _, % - - °" will appear in the display (Figure 1).
"350 °" will appear in the display.
5. Press _. "BAKE" and "380 °" will appear in the display
(See Figure 3).
6. Press OVENCOOK ,, ,,
. "TIMED '°will flash; BAKE , "0:00" and "350 °"
will appear in the display (Figure 4).
7. Enter the desired baking time by pressing _-3_ (_0-_.
"TIMED" will flash and "BAKE", "30:00" and "350 °'' will appear
in the display (Figure 5). Note: Baking time can be set for any
amount of time between 1 minute to 11 hours and 59 minutes.
8. Press _'_. Both the "TIMED" and "BAKE" icons will remain
on in the display (Figure 6). Once the Timed Bake feature has
started, the current time of day will appear in the display.
Note: After the Timed Bake feature has activated, press OV_NCOOKto
display the bake time remaining in the Timed Bake mode. Once
Timed Bake has started baking, a beep will sound when the oven
temperature reaches the set temperature.
_p ,
Press Ct-'L-_'Rwhen baking has finished or at any time to cancel the
Timed Bake feature.
PRESS DISPLAY
O
QQQ
A
OVENCOOK
QQ
OVEN COOK
Figure 1
Figure 2
Figure 3
Figure 4
Figure 5
Figure 6
ii_:_ii!!iill
if??
When the timed bake finishes:
1. "End" and the time of day will show in display. The oven will
shut off automatically (Figure 7).
2. The control will beep 3 times. The control will continue to beep
STOP
3 times every 30 seconds until _¢t-'_'R;is pressed.
NOTE: Remember that the lowest BAKE temperature is 170°F
and that the lowest CONVECTION BAKE temperature is 300°F.
Figure7
Use caution with the TIMED BAKE or DELAYED TIME BAKE features. Use the automatic timer when
cooking cured or frozen meats and most fruits and vegetables. Foods that can easily spoil such as milk, eggs, fish, meat
or poultry, should be chilled in the refrigerator first. Even when chilled, they should not stand in the oven for more than 1
hour before cooking begins, and should be removed promptly when cooking is completed. Eating spoiled food can result in
sickness from food poisoning.
23
Page 24

Setting Oven Controls
Setting Delayed Timed Bake or Delayed Timed Convection Bake
@ @ !-- @
0VEN COOK
The BAKE or CONVECTION BAKE , OVEN COOK TIME _ and START TIME pads control the Delayed
Time Bake feature. The automatic timer of the Delayed Time Bake will turn the oven on and off at the time you select in advance,
Note: If your clock is set for normal 12 hour display mode the Delayed Timed Bake or Delayed TimedConvection Bake cycle can
never be set to start more than 12 hours in advance, To set for Delayed Timed Bake or Delayed Timed Convection Bake 12-24
hours in advance see page 17 for instructions to set the control for the 24 hour time of day display mode.
INSTRUCTIONS PRESS
TO program the oven for a delayed BAKE start time
and to shut off automatically (example for baking at
350°F, starting at 5:30 and baking for 30 minutes):
1. Be sure that the clock is set with the correct time of day.
2. Arrange interior oven rack(s) and place the food in the oven.
3. Press _. % - -°" will appear in the display (Figure 1).
"350°" will appear in the display.
5. Press _. "BAKE" and "350°" will appear in the display. (See
Figure 3).
6. Press 0VENC00K
_° "TIMED" will flash; "BAKE", "0:00" and "350°" will
appear in the display (Figure 4).
7. Enter the desired baking time using the number pads by pressing
__."T,MED"w[IIfIash;"BAKE","30:00" and"350°"w[[[
appear in the display (Figure 5). Note: Baking time can be set for
any amount of time from 1 minute to 11 hours and 59 minutes.
8 Press ST_. "TMMED","BAKE" and "380°" will show (Figure 6).
9. Press @. Enter the desired start time using the number pads
_ _ _ (Figure 7).
10. Press ST_. When Delayed Time Bake starts, the set oven
temperature will disappear, "TIMED DELAY", "BAKE" and the
current time of day will appear in the display (Figure 8).
11. When the desired start time is reached, "380°" appears in display
and "DELAY" disappears. Oven starts to bake at the previously
selected temperature (Figure 9).
OVENCOOK
Note: Once Delayed Time Bake has started, press \m_j to display
the bake time remaining . Once the Delayed Timed Bake has started
baking, a beep will sound when the oven temperature reaches the set
temperature.
Press when baking has completed or at any time to cancel the
Delayed Time Bake feature.
O
C (Z)db
OVEN COOK
@
QQdb
OVENCOOK
When the set bake time runs out:
1. "End" will appear in the display and the oven will shut off
automatically (Figure 10).
2. The control will beep 3 times. The control will continue to beep 3
times every 30 seconds until CL'-EE_ris pressed. 24
CLEAR
Figure 1
Figure 2
Figure 3
Figure 4
Figure 5
Figure 6
Figure 7
Figure 8
Figure 9
Figure 10
Page 25

Setting Oven Controls
Setting Serve Warm Feature
The SERVE WARM @ pad turns ON the Serve Warm feature and will maintain an oven temperature of 170°F. The
SERVE WARM feature will keep oven baked foods warm for serving up to 3 hours after cooking has finished. After 3 hours
the Serve Warm feature will shut the oven OFF. The Serve Warm feature may be used without any other cooking
operations or can be used after cooking has finished using BAKE CONVECTION BAKE or MEATS.
The Serve Warm feature may be used with TIMED BAKE or DELAYED TIMED BAKE if you wish to have the Serve Warm
feature turn ON automatically when cooking has finished. The Timed Bake features require you to set start time and the
amount of cooking time. With this information the control can calculate the time when cooking will complete and can then
start the Serve Warm feature automatically.
INSTRUCTIONS PRESS
To set Serve Warm:
1. Arrange interior oven racks and place food in oven. if the food is
already in the oven go to step 2.
2. Press @. The Serve Warm indicator Light will flash.
Note: [f further pads are touched within 25 seconds the request to
turn ON Serve Warm will be cleared.
3. Press (_. The Serve Warm indicator Light will turn ON steady (_
indicating Serve Warm is ON (Figure 1).
4. To turn the Serve Warm OFF at any time press _w_ again. @
The Serve Warm Indicator Light will turn OFF (see Figure 2). Note:
The Serve Warm feature will automatically turn OFF after 3 hours.
SERW
WARM
Figure 1
To set ServeWarm to turn ON automatically:
1. Arrange interior oven racks and place food in oven. Set the oven
properly for Timed Bake or Delayed Timed Bake.
2. Press @. The Serve Warm Indicator Light will flash.
Note: If further pads are touched within 25 seconds the request to @
turn ON Serve Warm will be cleared.
3. Press (_. The Serve Warm Indicator light will glow steady
indicating Serve Warm is set to turn ON automatically after Timed (_
Bake or Delayed Timed Bake has finished (See Figure 1).
4. To turn the Serve Warm OFF at any time press @ again.
The Serve Warm Indicator Light wi[[ turn OFF (See Figure 2). Note: @
The Serve Warm feature will automatically turn OFF after 3 hours.
Pressing a[ any lime will stop all oven baking operations.
CLEAR
WARM
Figure 2
25
Page 26

Setting Oven Controls
Setting Broil - The _ pad controls the Broil feature. When broiling, heat radiates downward from the oven broiler for
even coverage. The Broil feature is preset to start broiling at 550°F; however, the Broil feature temperature may be set
between 400°F and 550°F. This range includes a Searing Grill for searing meats (Figure 6).
The broil pan and broil pan insert used together allow dripping grease to drain and be kept away from the high heat of the
oven broiler. DO NOT use the broil pan without the insert (See Figure 5). DO NOT cover the broil pan insert with foil.
The exposed grease could catch fire.
Should an oven fire occur, leave the oven door closed and turn off the oven. if the fire continues, throw
baking soda on the fire or use afire extinguisher. DO NOT put water or flour on the fire. Flour may be explosive and water
can cause a grease fire to spread and cause personal injury.
INSTRUCTIONS
To set the oven to broil at the default setting (550°F):
1. Place the broiler pan insert on the broiler pan. Then place the
food on the broiler pan insert. DO NOT use the broiler pan
without the insert. DO NOT cover the broiler insert with foil. The
exposed grease could ignite.
2. Arrange the interior oven rack and place the broiler pan on the
rack. Be sure to center the broiler pan directly under the broiler
element. Make sure the oven door is in the broit stop
position (See Figure 4).
3. Press _Ro_. "BROIL" will flash and "SS0°'' will appear
V
(Figure 1).
4. If a lower broil temperature is desired (minimum broil
temperature setting is 400°F), press the desired temperature
before continuing to step 5.
5. Press _. The oven will begin to broil. "BROIL" and "850 °''
will appear in the display (Figure 2).
6. Broil on one side until food is browned; turn and cook on the
second side. Season and serve. Note: Always pull the rack out
to the stop position before turning or removing food.
7. To cancel broiling or if finished broiling press (Figure 3).
PRESS DISPLAY
STOP
CL"_'A'R
Figure 1
Figure 2
Figure 3
Broil Stop Position
Figure 4
Broiling Times and Searing Grill
Use the following table for approximate broiling times. Increase or decrease broiling times, or
move the broiling pan to a different rack position to suit for doneness. If the food you are
broiling is not listed in the table, follow the instructions provided in your cookbook and watch
the item closely. Use the Searing Grill for meats and steaks if desired. Before placing the
meat, be sure to heat the Searing Grill using Broil for 10 minutes. Cook times should be
reduced 1=2 minutes per side when cooking with the Searing Grill. Place Searing Grill on top
of Broiler Pan and insert for meats and steaks (See Figure 6).
Electric Range Broiling Table Recommendations
Food Rack Temp Cook Time
Item Position Setting 1st side 2ndside Doneness
Steak 1" thick 2nd 550 ° F 6:00 4:00 Rare
2nd 550 ° F 7:00 5:00 Medium
Pork Chops 3/4" thick 2nd 550 ° F 8:00 6:00 Well
Chicken o Bone in 3rd 450 ° F 20:00 10:00 Well
Chicken o Boneless 2nd 450 ° F 8:00 6:00 Well
Fish 2nd 500 ° F 13:00 n/a Well
Shrimp 3rd 550 ° F 5:00 n/a Well
Hamburger 1" thick 2nd 550 ° F 9:00 7:00 Medium
3rd 550 ° F 10:00 8:00 Well
26
Searing
GrHI
Broil Pan
& insert
Figure 5
Figure 6
Page 27

Setting Oven Controls
Setting the Food Categories Feature:
The MEATS _, CAKES _ and BREADS _ pads in the Food Categories feature is used when
v
cooking certain food items. These pads have been designed to give optimum cook performance for the foods selected in
each category.
The MEATS pad combines a cook c Icle with the convection fan and element to roast meats and poultry. Preheating is not
necessary for meats and poultry. Heated air circulates around the food from all sides, sealing in juices and flavors. Foods
are crispy brown on the outside while staying moist on the inside.
The CAKES pad provides a preheat with a gentle cycling of heat giving cakes more volume and allowing delicate foods to
cook more evenly.
The BREADS pad adds a preheat feature to the bake cycle to thoroughly heat the oven from top to bottom to give more
evenly browned foods. Refer to (Figure 4) for foods to cook in each category
_NSTRUCT_ONS
To set the Food Categories feature (exampme for
Meats to cook at 350°F):
1. Arrange interior oven racks and place food in oven.
2. Press _,EAI_S. '°MEATS" will flash and %°°°" will be displayed
(See Figure 1).
3. Press@@@. "MEATS"wil, fiashand"350°"wil,
appear in the display (See Figure 2).
4. Press sT_. '°MEATS"and "350 °" will appear in the display
(See Figure 3). The convection fan icon will come.
Press t_L-_'Rto stop cooking Meats, Cakes or Breads, or to cancel
cooking Meats, Cakes or Breads at any time.
PRESS
QQdb
STOP
CLEAR
Figure 1
Figure 2
Figure 3
Recommended Meats Cakes Breads
foods to be ..........................................................................................................
cooked in each Meat
category Poultry
Figure 4 Pies (fresh & frozen)
Baked Custards Muffins
Cheescake Combread
Roasting _nstructions for Meat Pad:
When using the Meat pad for roasting, use the broiler pan and insert along with the
roasting rack. The broiler pan will catch grease spills and the insert will help prevent
grease spatters. The roasting rack will allow the heat to circulate around the meat.
To prevent food from contacting the broil element and to prevent grease
spattering, DO NOT use the roasting rack when broiling.
.
2.
.
4.
Place oven rack on bottom or next to the bottom rack position. See Arranging
Oven Racks in this Use & Care Guide.
Place the insert in the broiler pan. The roasting rack fits on the insert allowing the
heated air to circulate under the food for even cooking and helps to increase
browning on the underside. Make sure the roasting rack is securely seated on the
insert in the broiler pan. DO NOT use the broiler pan without the insert or cover the
insert with aluminum foil.
Position food (fat side up) on the roasting rack (See Figure 5).
Place the broiler pan on the oven rack.
27
Figure 5
Page 28

Oven C eaning
Preparing for the Se_f°C_ean Cycle:
A self-cleaning oven cleans itself with high temperatures which eliminate soil completely or reduce it to a fine powdered
ash you can wipe away with a damp cloth. These temperatures are well above normal cooking temperatures.
1. Adhere to the following cleaning precautions:
Allow the oven to cool before prezcleaning.
Wear rubber gloves when precleaning and while wiping up the residue after the
selffclean cycle.
DO NOT use oven cleaners or oven protective coatings in or around any part of
the selffcleaning oven.
DO NOT clean the oven door gasket. The woven material of the oven door gasket
DOHAND iS essential for a good seal. Care should be taken not to rub, damage or remove
CLEANDOOR the gasket.
DO NOT use any cleaning materials on the oven door gasket. Doing so could
cause damage.
The health
of some birds is extremely
sensitive to the fumes
given off during the self-
cleaning cycle of any
range. Move birds to
anotherwell ventilated
room.
Figure 1
.
.
Remove the Searing Grill, Broiler Pan and Broiler Pan Insert, aH utens{Is and
any aluminum foil These items cannot withstand high cleaning temperatures.
DO NOT line the oven walls, racks, bottom or any other part of the
range with aluminum foil. Doing so will destroy heat distribution, produce poor baking
results and cause permanent damage to the oven interior (aluminum foil will melt to
the interior surface of the oven).
This oven comes with lubricated porcelain oven racks, which can remain in the oven
during the selffclean cycle. Do not clean this vegetable oil lubrication off the racks. It
is important that the sides of the oven racks always have a light coating of vegetable
oil. To maintain optimal rack performance, re-apply a thin layer of vegetable oil to the
sides of the rack after every selffclean cycle or when the rack becomes difficult to
slide.
.
Remove any excess spillovers in the oven cavity before starting the selffcleaning
cycle. To clean, use hot, soapy water and a cloth. Large spillovers can cause heavy
smoke or fire when subjected to high temperatures. DO NOT allow food spills with a
high sugar or acid content (such as milk, tomatoes, sauerkraut, fruit juices or pie
filling) to remain on the surface as they may cause a dull spot even after cleaning.
5. Clean any soil from the oven frame, the door liner outside the oven door gasket, and
the small area at the front center of the oven bottom. These areas heat sufficiently to
burn soil on. Clean with soap and water.
If at any time when setting the oven for the Self-Cleaning feature, the oven control
continuously beeps and the display shows "dr"; close the oven door (See Figure 1).
NOTE: Prior to setting the SelffClean cycle, any spills remaining on the oven bottom
should be removed. The bake element is designed to be tilted up using your hand from
the front of the bake element (See Figure 2). This will allow easier access to the oven
bottom for cleaning. Be careful not to raise the element more than 4 or 5 inches from the
resting position.
Figure 2
J
The bake element may
be tilted about 4 or 5
inches to ctean oven
bottom.
28
Page 29

Oven C eaning
To Start the Seff-C_ean Cyde
The CLEAN _._EA_ pad controls the Self-Cleaning feature, if you are planning to use the oven directly after a self-clean
cycle remember to allow time for the oven to cool down and the oven door to unlock. This normally takes about one hour.
So to self-clean for 3 hours will actually take about 4 hours to complete.
*It is recommend to use a 2 hour self-clean cycle for light soils, a 3 hour cycle for average soils, and a 4 hour cycle for
heavy soils (to assure satisfactory results).
During the self-cleaning cycle, the outside of the range can become very hot to the touch. DO NOT leave
small children unattended near the appliance; they may be burned if they touch the hot oven door surfaces.
DO NOT force the oven door open. This can damage the automatic door locking system. Use care when
opening the oven door after the self-cleaning cycle. Stand to the side of the oven when opening the door to allow hot air or
steam to escape. The oven may still be VERY HOT.
iNSTRUCTiONS PRESS DISPLAY
To set the controls for a 3 hour Seff-C_eaning cycle
to start immediately and shut off automatically:
1. Be sure the clock is set with the correct time of day and the
oven door is closed.
2. Press _. "CLEAN" will flash and %:00" HR will show in
the display (Figure 1).The control will automatically clean for a
3 hour period (default self-cleaning cycle time). Note: If a 2 or 4
hour clean time is desired, press _for 2 hour or press
(_for a 4 hour clean time. Set the cleaning time based on
the amount of soil; light, medium or heavy (* See above).
3. Press _ .The "DOOR LOCKED" icon will flash; "CLEAN"
icon and the letters "CLn" will remain on in the display
(Figure2).
4. As soon as the control is set, the motor driven oven door lock
will begin to close automatically. Once the door has been
locked the "DOOR LOCKED" indicator light wiJJstop flashing
and remain on. Also, the oven icon will appear in the display
(Figure 3).
Note: Allow about 15 seconds for the oven door lock to close.
Figure 1
(_ Figure 2
Figure 3
Figure 4
Figure 5
if??
When the Seff-C_ean Cycme is Compmeted:
1. The time of day, the "DOOR LOCKED" and "CLEAN" icon will
remain in the display (Figure 4).
2. Once the oven has cooled down for approximately I HOUR, and
the "DOOR LOCKED" icon is no longer displayed, the oven
door can then be opened (Figure 5).
Stopping or interrupting a Serf-Cleaning Cycle:
If it becomes necessary to stop or interrupt a self-cleaning cycle
due to excessive smoke or fire in the oven:
.
2.
STOP
Press CL--'_'R'
Once the oven has cooled down for approximately 1 HOUR and
the "DOOR LOCKED" icon is no longer displayed,the oven door
can then be opened (Figure 5).
29
CT_-R_
Page 30

Oven C eaning
To Start the delayed Self-Clean Cycle
The CLEAN ____EA,_,START TI_,_E @ pads and length of clean cycle, controls the Delayed Self-Clean operation. The
automatic timer will turn the oven on and off at the time you select in advance. Be sure to review TO START THE SELF-
CLEAN CYCLE for recommended clean times.
During the self-cleaning cycle, the outside of the range can become very hot to the touch. DO NOT leave
smalJchildren unattended near the appliance.
DO NOT force the oven door open. This can damage the automatic door locking system. Use care when
opening the oven door after the self-cleaning cycle. Stand to the side of the oven when opening the door to allow hot air or
steam to escape. The oven may still be VERY HOT.
iNSTRUCTiONS
To set the control for the Self-Cleaning Cycle to start at a
delayed time and shut off automatically (example: 3 hour self=
clean cycle to start at 4:30):
1. Be sure the clock is set with the correct time of day and the
oven door is closed.
2. Press _. "CLEAN" will flash and "3:00" HR will show in
the display (Figure 1).The control will automatically clean for a
3 hour period (default self-cleaning cycle time). Note: if a 2 or 4
hour clean time isdesired, press _,,_for 2 hour or press
(_for a 4 hour clean time. Set the cleaning time based on
the amount of soil--light, medium or heavy (*See previous
page).
3. Press _ .The "DOOR LOCKED" iconwilJflash; "CLEAN"
icon and the letters "CLn" wilJ remain on in the display (Figure
2).
4. Press @. Enter the desired start time using the number
5. Press sT_________.The "CLn" icon will turn off; "DELAY", "DOOR
LOCKED" and "CLEAN" icons will remain on (Figure 3).
6. As soon as the control is set, the motor driven oven door lock
will begin to close automatically and once the door has been
locked the "DOOR LOCKED" indicator light will quit flashing
and remain on.
7. The control will start the self-cleaning at the setted start time,
for the period of time previously selected. At that time, the icon
"DELAY" will go out; "CLn" and oven icon will appear in the
display (Figure 5).
PRESS DISPLAY
@
QQdD
When the Self-Clean Cycle is Completed:
1. The time of day, the "DOOR LOCKED" and "CLEAN" icon will
remain in the display (Figure 6).
2. Once the oven has cooled down for approximately I HOUR, and
the "DOOR LOCKED" icon is no longer displayed, the oven
door can then be opened (Figure 7).
Figure 1
Figure 2
Figure 3
Figure 4
Figure 5
Figure 6
Figure 7
30
Page 31

Oven C eaning
INSTRUCTIONS PRESS
Stopping or Interrupting a Serf-Cleaning Cycle:
if it becomes necessary to stop or interrupt a self-cleaning cycle
due to excessive smoke or fire in the oven:
1. Press CL-L_-R' CL-L_-_R
2. Once the oven has cooled down for approximately 1HOUR and Figure1
the "DOOR LOCKED" icon is no longer displayed, the oven
door can then be opened (Figure 1).
Note: If your clock is set for normal 12 hour display mode the Delayed Timed Bake or Delayed TimedConvection Bake
cycle can never be set to start more than 12 hours in advance. To set for Delayed Timed Bake or Delayed Timed
Convection Bake 12-24 hours in advance see page 17 for instructions to set the control for the 24 hour time of day display
mode.
Adjusting Oven Temperature
The temperature in the oven has been pre-set at the factory. When first using the oven, be
sure to follow recipe times and temperatures. If you think the oven is too hot or too cool, the
temperature in the oven can be adjusted. Before adjusting, test a recipe by using a
temperature setting that is higher or lower than the recommended temperature. The baking
results should help you to decide how much of an adjustment is needed.
INSTRUCTIONS
To adjust the oven temperature higher:
1. Press _ for 6 seconds (Figure 2).
2. To increase the temperature use the number pads to enter the
desired change. (Example 30°F) _) (_ (Figure 3). The
temperature may be increased as much as 35°F (17°C).
3. Press (_ to accept the temperature change and the display
will return to the time of day (Figure 4). Press to reject the
change if necessary.
To adjust the oven temperature lower:
1. Press _ for 6 seconds (Figure 5).
2. To decrease the temperature use the number pads to enter the
desired change. (Example-30°F) (_) (_) and then
press _ (Figure 6). The temperature may be decreased
as much as 35°F (17°C).
3. Press (_ to accept the temperature change and the display
will return to the time of day (Figure 7). Press _CL-'L-_'Rto reject the
change if necessary.
PRESS
G
QC)
or
(Z)C)
G
or
Note: The oven
temperature adjustments :;
made with this feature will
not change the Self-Clean
cycle temperature.
31
Figure 2
Figure 3
Figure 4
Figure 5
Figure 6
Figure 7
Page 32

Genera Care & C eaning
Surfaces How to C_ean
Aluminum & Vinyl Use hot, soapy water and a cloth. Dry with a clean cloth.
Painted and Plastic
Control Knobs, Body
Parts, and Decorative
Trim
Stainless Steel, Chrome
Control Panel, Decorative
Trim
Porcelain Enamel Broiler
Pan and insert, Door
Liner, Body Parts, Warmer
Drawer
Oven Racks
Oven door
DONOTHAND
DO HAND _ _
CLEAN DOOR
For general cleaning, use hot, soapy water and a cloth. For more difficult soils and built-
up grease, apply a liquid detergent directly onto the soil. Leave on soil for 30 to 60
minutes. Rinse with a damp cloth and dry. DO NOT use abrasive cleaners on any of
these materials; they can scratch. To remove control knobs, turn to the OFF position;
grasp firmly and pull straight off the shaft. To replace knobs after cleaning, line up the fiat
sides of both the knob and the shaft; then push the knob into place.
Before cleaning the controlpanel, turn all controls to OFF and remove the control knobs.
To remove, pull each knob straight off the shaft. Clean using hot, soapy water and a
dishcloth. Rinse with a clean water using a dishcloth. Be sure to squeeze excess water
from the cloth before wiping the panel; especially when wiping around the controls.
Excess water in or around the controls may cause damage to the appliance. To replace
knobs after cleaning, line up the flat sides of both the knob and the shaft; then push the
knob into place.
Clean stainless steemwith hot, soapy water and a dishcloth. Rinse with clean water and a
cloth. Do not use c{eaners with high concentrations of chlorides or chBorines. Do not
use harsh scrubbing cleaners. Only use kitchen cleaners that are especially made for
cleaning stainless steel. Always be sure to rinse the cleaners from the surface as bluish
stains may occur during heating that cannot be removed.
Gentle scouring with a soapy scouring pad wiJJremove most spots. Rinse with a 1:1
solution of clear water and ammonia, ffnecessary, cover difficult spots with an ammonia z
soaked paper towel for 30 to 40 minutes. Rinse with clean water and a damp cloth, and
then scrub with a soapzfilled scouring pad. Rinse and wipe dry with a clean cloth. Remove
all cleaners or the porcelain may become damaged during future heating. DO NOT use
spray oven cleaners on the cooktop.
Oven racks should be removed from the oven during the self-clean cycle for cleaning.
When removed, clean by using a mild, abrasive cleaner following manufacturer's
instructions. Rinse with clean water and dry.
If the racks are cleaned in the self-clean cycle, their color will turn slightly blue and the
finish will be dull. After the self-clean cycle is complete, and the oven has cooled, rub the
sides of the racks with wax paper or a cloth containing a small amount of baby oil or
salad oil (this wiJJmake the racks glide easier into the rack positions).
To clean oven door, wash with hot, soapy water and a clean cloth. DO NOT immerse the
door in water.
DO NOT clean the oven door gasket. The oven door gasket is made of a woven material,
on self cleaning models, which is essential for a good seal. Care should be taken not to
rub, damage or remove the gasket.
32
Page 33

GeneraM Care & C eaning
Cooktop Cleaning and Maintenance
Consistent and proper cleaning is essential to maintaining your ceramic glass ceektop
Prior to using your cooktop for the first time, apply the recommended CookTop® Cleaning Creme (P/N 22=40079) to the
ceramic surface. Clean and buffwith a paper towel or a 3M Scotch=Bdte® Blue Multi=Purpose No Scratch Scrub Sponge
(see instructionsbelow). This will make cleaning easier when soiled from cooking. The special cooktop cleaning cream
leaves a protective finish on the glass to help prevent scratches and abrasions.
Sliding aluminum or copper clad bottom pans on the cooktop can cause metal
markings on the cooktop surface. These marks should be removed immediately
after the cooktop has cooled using the cooktop cleaning cream. Metal marks can
become permanent if not removed prior to future use.
Cookware (cast iron, metal, ceramic or glass) with rough bottoms can mark or
scratch the cooktop surface. Do not slide anything metal or glass across the
cooktop. Do not use your cooktop as a cutting board or work surface inthe
kitchen. Do not cook foods directly on the cooktop surface without a pan. Do not
drop heavy or hard objects on the glass cooktop, they may cause it to crack.
C_eaning Recommendations for the Ceramic G_ass Cooktop
Before cleaning the cooktop, be sure the controls are turned to OFF and the cooktop is COOL.
DO NOT use a cooktop cleaner on a hot cooktop. The fumes can be hazardous to your health, and can
chemically damage the ceramic=glass surface.
For light to moderate soil:
Apply a few drops of CookTop® Cleaning Creme directly to the cooktop. Use a paper towel or a 3M Scotch=Bdte® Blue
Multi-Purpose No Scratch Scrub Sponge to clean the entire cooktop surface. Make sure the cooktop is cleaned thoroughly,
leaving no residue. Do not use the sponge you use to clean the cooktop for any other purpose.
For heavy, burned on soil:
First, clean the surface as described above. Then, if soils remain, carefully scrape soils with a metal razor blade scraper,
holding scraper at a 30 degree angle to the surface. Remove loosened soils with cooktop cleaning cream and buff surface
clean.
Damage to the ceramic glass cooktop may occur if you use
any scrub pad other than a 3M Scotch=Brite® Blue Multi-Purpose No Scratch
Scrub Sponge.
Plastic or foods with a high sugar content:
These types of soils need be removed immediately if spilled or melted onto
the ceramic cooktop surface. Permanent damage (such as pitting of the
cooktop surface) may occur if not removed immediately. After turning the
surface elements OFF, use a razor blade scraper or a metal spatula with a
mitt and scrape the soil from the hot surface (as illustrated). Allow the
cooktop to cool, and use the same method for heavy or burned on soils.
ii_;ii!!iiil
33
Page 34

GeneraM Care & Cleaning
Do not use abrasive cteaners and scouring pads, such as metal and some
nylon pads. They may scratch the cooktop, making it more difficult to clean.
Do not use harsh cleaners, such as chlorine bleach, ammonia or oven
cleaners, as they may etch or discolor the cooktop.
Do not use dirty sponges, cloths or paper towels, as they can leave soil or
lint on the cooktop which can burn and cause discoloration.
Care and Cleaning of Stainless Steel (Stainless Steel models only)
Some models are equipped with stainless steel exterior parts. Special care and cleaning
are required for maintaining the appearance of stainless parts. Please refer to the table
provided at the beginning of the General Care & Cleaning section in this Use & Care
Manual.
Lock engaged
for door removat
Figure I
HINGE SLOT
Special Caution for Aluminum Foil and Aluminum Cooking Utensils
1) Aluminum foil
Use of aluminum foil will damage the cooktop. Do not use under any circumstances.
2) Aluminum utensils
The melting point of aluminum being much lower than that of other metals, care must be
taken when aluminum pots or pans are used. if allowed to boil dry, not only will the
utensil be ruined, but it may permanently damage the cooktop surface by fusing to,
marking or breaking it.
Removing and Replacing the Oven Door
The door is heavy. For safe, temporary storage, lay the door flat with the
inside of the door facing down.
Boorremovedfromthe range
Lock in normal
position
Figure 3
To Remove Oven Door:
1. Open the door to the fully opened position.
2. Pull up the lock located on both hinge supports and engage it in the hinge levers (Figure
1).You may have to apply a little downward pressure on the door to pull the locks fully
over the hooks.
3. Grab the door by the sides, pull the bottom of the door up and toward you to disengage
the hinge supports. Keep pulling the bottom of the door toward you while rotating the top
of the door toward the range to completely disengage the hinge levers (Figure 2).
4. To clean oven door, follow the instructions provided inthe General Care & Cleaning
table.
To Replace Oven Door:
1. Grab the door by the sides; place the hinge supports in the hinge slots. Open the door
to the fully opened position.
2. Disengage the lock from the hinge levers on both sides (Figure 3).
Note: Make sure the hinge supports are fully engaged before unlocking the hinge
levers.
3. Close the oven door.
34
Page 35

Genera Care & C eaning
Removing and Replacing the Externam Door G_ass Pane_
Applicable only to models with an external glass panel not held with frame. This design allows you to clean the inside
face of the exterior door panel as well as the hidden face of the door inner glass.
To Remove the External Door Glass Panel:
1. Remove the door as described in Removing and Replacing the Oven Door section and lay the door flat.
2. Using a screwdriver, remove the 5 screws fastening the glass & molding assembly.
3. Grasp both sides of the glass panel and slowly pull it out of the door upper molding. Lay the glass flat.
To Replace the External Door Glass Panel:
1. Grasp the sides of the glass panel carefully insert the glass into the door top molding.
2. Replace the 5 locking screws.
3. Replace the door onto the range.
Handle the glass panel with care. When dropped on a corner, the glass panel may shatter. This can cause
severe personal injury.
Left Glide
Pull up latch
with finger
Push down latch Right GNide
with finger
Figure 1
Figure 2
Removing and Replacing Warmer (Warm & Ready TM) Drawer
To Remove Warmer Drawer:
1. _ Turn power off before removing the warmer drawer.
2. Open the drawer to the fully opened position. ::::1
3. Locate glide lever on each side of drawer, pull up on the left glide lever
and push down on the right glide lever (See Figure 1).
5. Pull the drawer away from the range.
To Replace Warmer (Warm & Ready TM)Drawer:
1. Pall the bearing glides to the front of the chassis glide (See Figure 2).
2. Align the glide on each side of the drawer with the glide slots on the
range.
3. Push the drawer into the range until levers "click" (approximately 2"). Pull
the drawer open again to seat bearing glides into position. If you do not
hear the levers "click" or the bearing glides do not fee! seated
remove the drawer and repeat steps 1 thru 3. This will minimize
possible damage to the bearing glides.
NOTE: The Warmer Drawer will NOToperate while in the "Self-Clean" and "Oven
Lockout" modes
Electrical Shock Hazard can occur and result
in serious injury or death. Disconnect appliance from electric
power before cleaning and servicing the warmer drawer.
35
Page 36

Oven Lights
Be sure the range is unplugged and all parts are COOL before replacing oven light(s). Wear a leather-faced
glove for protection against possible broken glass.
To Operate the Oven Lights
Both of the interior oven lights automatically turn on when the oven
door is opened. Press _L0_V_to turn the lights ON and OFF when
the oven door is closed. Each oven light is located at the rear wall of
the oven interior and is covered with a glass shield held by a wire
holder (See Figure 1). The Glass Shields must be in place whenever
the oven is in use.
Figure 1
To Replace the Oven Light:
1. Turn electrical power off at the main source and unplug the
range.
2. Press Wire Holder to one side to release the glass shield.
3. Replace the old bulb with a new 40 watt appliance bulb.
4. Replace Glass Shield over bulb and snap Wire Holder into place.
5. Turn power back on again at the main source (or plug in the
range).
6. The clock will then need to be reset. To reset, see Setting the
Clock in this Use & Care Guide.
Cooking Tables
Foods for _) CONVECTION
BAKE pad
*Decrease normam cook time by:
Frozen foods, pies, 15-25 %
pastries and pizza
Refrigerator cookies 15-35 %
Refrigerator biscuits 15-30 %
Rolls & Breads 20-25%
Fresh Pies/Pastries 10-20 %
Begin with the maximum reduction in
cook times and adjust as needed.
*Recommended reduction in cook
times based on brands of food items
tested. Cook times may vary with your
specific brand of food item.
Foods for _9 MEATS pad in
Food Categories
*Decrease normam cook time by:
Meats 15-30 %
Poultry (unstuffed) 20-30 %
Begin with the maximum reduction in
cook times and adjust as needed.
*Recommended reduction in cook
times based on brands of food items
tested. Cook times may vary with your
specific brand of food item.
36
Page 37

Before You Call
Solutions to Common Problems
Before you call for service, review this list. it may save you time and expense. The list includes common occurrences
that are not the result of defective workmanship or materials in this appliance.
OCCURRENCE POSSIBLE CAUSE/SOLUTION
Range is not level. Poor installation. Place oven rack in center of oven. Place a level on the oven
rack. Adjust leveling legs at base of range until the rack is level. When range is
level, cooktop may appear out of alignment if countertop is not level.
Weak, unstable floor. Be sure floor is level and can adequately support range.
Contact a carpenter to correct sagging or sloping floor.
Kitchen cabinet misalignment may make range appear to be unlevel. Be sure
cabinets are square and have sufficient room for range clearance.
Cannot move appliance easily.
Appliance must be accessible for
service.
Cabinets not square or are built in too tight. Contact a cabinet maker to correct
the problem.
Contact builder or installer to make appliance accessible.
Carpeting interferes with range. Provide sufficient space so range can be lifted
over carpet.
Entire range or oven does not
operate.
Z
* Oven control beeps and displays F1,
F2, F3 or F9
Make sure cord/plug is tightly into outlet.
Service wiring is not complete. Call 1=800=4=MY=HOME® (See back cover).
Power outage. Check house lights to be sure. Call your local electric company ::::i
for service.
This oven is equipped with a state of the art electronic oven controller. Among
the many features is a full time oven circuit diagnostics system. The controller
constantly monitors the internal circuitry as well as several crucial oven
circuits to insure they are all operating correctly. If at any time one of these
systems fails, the controller will immediately stop the current operation and
beep continuously (flashing an error code of"F1, F2, F3", or "F9" in the
controller displaywindow).
Oven light does not work.
Electronic control has detected a fault condition. Press STOP/CLEAR to clear
the display and stop the beeping. Reprogram oven. If fault remains, record fault
number. Press STOPICLEAR and call 1-800-4-MY-HOME® (See back cover).
Surface unit does not heat.
Replace or tighten bulb. See Changing Oven Light in this owner's Guide for
instructions.
Scratches or abrasions on cooktop
surface.
No power to the appliance. Check steps under "Entire Range or Oven Does Not
Operate" in this Avoid Service Checklist.
Incorrect control setting. Make sure the correct control is on for the surface
unit to be used.
Coarse particles such as salt or sand between cooktop and utensils can cause
scratches. Be sure cooktop surface and bottoms of utensils are clean before
usage. Small scratches do not affect cooking and will become less visible with
time.
Cleaning materials not recommended for ceramic-glass cooktop have been
used. See "To Clean the Cooktop Glass" section under General Cleaning.
Cookware with rough bottom has been used. Use smooth, flat-bottomed
cookware.
37
Page 38

Before You Call
Solutions to Common Problems
OCCURRENCE
Metaimarks.
POSSIBLE CAUSE/SOLUTiON
Sliding or scraping of metal utensils on cooktop surface. Do not slide metal
utensils on cooktop surface. Use a ceramic-glass cooktop cleaning cream to
remove the marks. See "To Clean the Cooktop Glass" section under General
Cleaning.
Brown streaks orspecks. Boilovers are cooked onto surface. Use razor blade scraper to remove soil. See
"To Clean the Cooktop Glass" section under General Cleaning.
Areas of discoloration with metaltic Mineral deposits from water and food. Remove using a ceramic-glass cooktop
sheen, cleaning cream. Use cookware with clean, dry bottoms.
Poor baking results. Many factors affect baking results. Make sure the proper rack position is used.
Center food in the oven and space pans to allow air to circulate. Allow the oven
to preheat to the set temperature before placing food in the oven. Try adjusting
the recipe's recommended temperature or baking time. If you feel the oven is too
hot or cool, see "Adjusting Oven Temperature" in this Owner's Guide.
Fan noise during cooking A cooling fan may automatically turn on and off to cool internal parts, it is
operation, normal, and the fan may continue to run even after oven is turned off.
Flames inside oven or smoking Excessive spillovers in oven. Set self-clean cycle for a longer cleaning time.
from vent. Excessive spillovers in oven. This is normal, especially for pie spillovers or large
amounts of grease on the oven bottom. Wipe up excessive spillovers before
starting the self=clean cycle. If flames or excessive smoke are present, stop the
self=clean cycle and follow the steps under "Stopping or Interrupting the Self=
Cleaning Cycle".
Oven smokes excessively during
broiling.
Control(s) not set properly. Follow instructions under "Setting Oven Controls'.
Make sure oven is opened to Broil Stop Position.
Meat too close to the element. Reposition the rack to provide proper clearance
between the meat and the element. Preheat broil element. Preheat broil element
for searing.
Grid on broiler pan wrong side up and grease not draining. Always place grid on
the broiler pan with ribs up and slots down to allow grease to drip into pan.
Grease has built up on oven surfaces. Regular cleaning is necessary when
broiling frequently. Old grease or food spatters cause excessive smoking.
Selfocleaning cycle does not work. Control(s) not set properly. Follow instructions under "Oven Cleaning" in the
Electronic Oven Control Guide.
Self=cleaning cycle was interrupted. Stop time must be 3 to 4 hours past the start
time. Follow steps under "Stopping or Interrupting the Self=Cleaning Cycle" inthe
Electronic Oven Control Guide.
Soil not completely removed after
self=cleaning cycle.
Failure to clean bottom, front top or oven, flame or door area outside oven seal.
These areas are not in the self=cleaning area, but get hot enough to burn on
residue. Clean these areas before the self-cleaning cycle is started. Burned=on
residue can be cleaned with a stiff nylon brush and water or nylon scrubber. Be
careful not to damage the oven seal.
38
Page 39

TabJa de materias
Garant_a de Jaeetufa desHzabie ............................................. 39
Registro deBPreducto ............................................................. 39
Ubicaci6n de la placa de serie ............................................... 39
IMPORTANTES INSTRUCCJONES DE SEGURJDAD ........ 40-42
Acuredes de Proteeeion ......................................................... 43
Caracteristicas de la estufa ................................................... 44
Ajuste de BosContromes Superioree ................................. 45-47
, Informaci6n General sobre la Cabierta ............................ 45
o Funcionamiento de los Elementos Superiores
Radiantes SenciIIos .......................................................... 46
, Funcionamlento deI Control Superior
del Elemento Radiante Doble ........................................... 47
Cocinando en la Estufa ...................................................... 47-48
, Use el Utensilio Correcto .................................................. 47
, Empleo del Area Calentadora .......................................... 48
Antes de Ajustar los Contromes deBHomo ............................ 49
CJrcuBaciCn det Aire en el Homo ............................................ 49
Ajuste de ruesControles de JaGaveta Calentadora ......... 50-51
Funciones de macTecmas de Control ....................................... 52
Ajustes Maximoe y _,,1_nimosde JosCentro]ee ..................... 52
Programaci6n deBRemoj ..................................................... 53-54
, Programaci6n del Reloj .................................................... 53
, Cambio entre Despliegue de 12 o 24 Horas .................... 53
,, Homeado Continue o Mode de Ahorro de
Energia de 12 Horas ......................................................... 54
, Contador de Tiempo .......................................................... 54
Caracteristieas de controJ
definidas per eBconeurnidor .............................................. 55°56
o Bloqueo del Homo ............................................................ 55
, Depliegue de JaTemperatura ........................................... 56
, Funcionamiento Silencioso de los Controles ................... 56
Ajuste de JoeControtes del Homo .................................... 57-64
o Precalantar ........................................................................ 57
" Hornear ............................................................................. 58
,, Horneado per Convecci6n ................................................ 59
o Homeado Programado ..................................................... 60
o Horneado Programado Diferido ....................................... 61
, Aiuste de! dispositivo Servir Tibio ..................................... 62
, Asar a Ia Parrllla ................................................................ 63
o Categor[as de Alimentos (Carnes/Pasteles/Panes) ......... 64
Limpieza demhomo ............................................................. 65-68
,, Preparaci6n para el Cicio de Autolimpieza ...................... 65
, Ciclo de Autolimpieza ....................................................... 66
o Ciclo de Autolimpieza Diferido .................................... 67-68
Ajuste de laTemperatura del Homo ...................................... 68
Cuidado y Limpieza General ............................................. 69-72
Luces del Homo ...................................................................... 73
Tablas de Cecinar ................................................................... 73
Antes de Solieitar Servic]e ................................................ 74°75
Servicio Sears ................................................. Cubierta trasera
Garantia de Ja Estufa DesJizabJe
GARANTJA COMPLETA DE UN ANO PARA TODAS LAS PJEZAS
Si dentro de un abe desde la fecha de instalaci6n, aJguna de las piezas no funciona en forma adecuada debido a un defecto de material o
fabricaci6n, Sears Jareemplazara_o reparara, a nuestra opci6n, gratuitamente.
Su cubierta de vidrio ceramico esta protegida per una garantia limitada adicional desde el 2d°al 5t° aPio. Esta garantia le proporciona
reempJazo de cualquiera de los eJementos caJefactores superiores que resulte defectuoso, de Jajunta de siJiconacauchotada deteriorada o
de la cubierta de vidrio que se agriete debido a rotura termica. Esta garantia no cubre el dar_oo rotura debido a real use del diente.
Si este producto se usa para otros prop6sitos que no sean los normales del hogar, la garantia anterior es s6Jo vaJida durante 90 dias.
ELSERVICIOBAJO LA GARANTIA ESTADISPONIBLEPONIENDOSEENCONTACTO SEARSAL 1-888-SU-HOGAR s_ ,
Esta garantia le otorga ciertos derechos JegaJesespecificos y usted tambien puede tener otros derechos que varian de un estado a otro,
Sears Roebuck and Co., Dept 817WA Hoffman Estates, IL 60179
Registro deJ Producto
Yea ubicaciCn de Ja p_aca de serie.
No. de Modeb 790.
No. de Serie
Fecha de Compra
Conserve estas instrucciones y su recibo
de compra para referencia futura.
UbioaoiCn de _a pJaca de serie°
Encontrara. el modelo y el n0mero de serie imprimado en la
placa de serie. La placa est,. ubicada al lade izquierdo de la
parte trasera de la puerta del homo.
Yea la ilustraci6n para la ubicaci6n exacta, Aseg@ese de
tomar nota del n0mero de serie para futura referencia (vea
aqui arriba, Registro del Producto),
Abra la puerta,
La plata de seHe
est_ ubicada aH_.
%?
39
Page 40

lmportantes lnstrucciones de Seguridad
Lea todas [as instrucciones antes de uti[izar e[ aparato
Guarde estas instrucciones para futura consuitaci6n
Este manual contiene importantes mensajes de seguridad, Simpre lea y obedezca todo mensaje de seguridad.
daS0s a[ pr0ducte soiamentel
, Toda eetufa puede inc[[naree.
oHeridae a [as personae pueden ocurdr.
, lneta[e [afijaci6n que viene con [aeetufa.
, Vea [as inetruccionee de ineta[aci6n.
Para reducir e[ rieego de incHnaci6n,
[a eetufa debe set aeegurada con [a
ineta[aci6n de [as fijacionee que
vienen con [a eetufa. Para ver[ficar ei
[as fijacionee hart eido ineta[adae correctamente,
retire e[ paneJ inferior o gaveta de a[macenamiento y
ver[fique que [as fijacionee eeten bien co[ocadae.
Coneu[te [as instrucc[onee de ineta[ac[6n para una
buena ineta[aci6n.
Retire toda cinta adhesiva y empaquetado antes de usar
maestufa. Destruya el cart6n y las bolsas de plastico
despues de haber desenvuelto Ia estufa. No permita que los
ni_ios juegen con el material de empaquetado.
[nsta[aci6n apropiada- Asegurese que su aparato este
bien instamadado y puesto a tierra pot un t_cnico
ca[ificado de acuerdo con e[ Natioa[ Emectrica[ Code ANSI!
NFPA No 70- umtima edicici6n y Ios requisitos Iocales.
Instab solamente con las instrucciones provistas con el
empaquetado de la estafa.
Pregunte en su concesionario por un t6cnico calificado y un
servicio autorizado. Aprenda como desconectar la estufa del
cortacircuito o de la caja de fusibles en caso de
emergencia.
Servicio a[ usuarie- No repare o rempiace ninguna pieza
de su aparato a reenos que se Io recorniende Ice
manua[es especfficamente. CuIaquier type de servicio
debe ser hecho por un tecnico calificado. Esto reducirb, el
riesgo de heridas personales o de daSos al aparato.
Nunca modifique o aitere la constituci6n de una estafa
moviende Baparas niveladoras, ni ema[ambrado, ni [as
fijaciones de anti-inc[inaci6n u otra parte de[ aparato,
puerta abierta puede hacer que 6sta se incline, causando
graves quemaduras u otto tipo de heridas. Una gaveta abierta
cuando esta caliente puede ocasionar graves quemaduras.
No use e[ homo o [a gaveta de entibiar
(si equipada) para almacenamientoo
_No amamacene de interns Bes
objetos
para
niffos en Ice armarios que estan sobre macocina. El niSo que
trata de subir sobre la estufa para abanzar[os podria
lastimarse.
Nunca utHice su aparato para
calenrtar o entibiar [a piezao
A[macenamiento sobre o dentro det aparato- Los
matedales inflamabies no deberian set ammacenados ni
en un homo, ni sobre [a unidad, ni en masgavetas (si
equipada)o Esto induye el papeI, ei plastico y la ropa come:
Iibros de cocina, recipientes de plAstico o toallas, asi como
liquidos infiamabIes. No almacene explosives como latas de
aeros61 sobre o dentro deI aparato. Los materibs
infiamabIes pueden explotar y ocasionar fuego o daSos a
la propiedad.
No deje a los niSos solos- Los niSos no deben set
dejados solos o sin atencion deride e[ aparato este
funcionando. No bs permita sentarse o pararse sobre
niguna parte del aparato.
NO TOQUE NINGUNA PARFtTE DE LA SUPERFIC[E DEL
APARATO, AREAS CERCA DE ESTAS UN[DADES,
ELEMENTOS CAUENTE$ O LAS PARTES INTERNAS DEL
HORNO O DE LA GAVETA DE ENTIB[AR (Sl EQUIPADA)°
Las superficies o Ios elementos del horno pueden estar
calientes aOn que esten de color oscuro. Las areas cerca de
la superficie pueden estar Io suficientemente caiientes para
causar quemaduras. Despu6s o antes del uso, no permita
que la ropa u otros materiabs inflamabbs esten en
contacto con estas areas hasta que hallan enfriado. Estas
areas son: Ia plancha de cocinar, Ias areas frente a la
plancha de cocinar, Ias ranuras de ventilaci6n del homo y
las areas cercanas a ellas, la puerta del homo y la
ventanilla.
El apoyarse, pisar o sentarse en [a
puerta o en [a gaveta de esta estufa puede ocasionar graves
heridas y tambien daffos a[ aparato. No permita que Ios niSos
juegen o se saban sobre la estafa. El peso de un ni_io sobre la
Use una vestimenta apropiada- No use ropa que es
suemta u hoigada cuando uti[ice el aparato, No ponga la
ropa u otros materiaIes infiamabbs en contacto con las
areas calientes.
40
Page 41

lmportantes lnstrucciones de Seguridad
No utilice agua o harina para apagar un fuego- Apague em
fuego con la tape de una sarten o use soda c;_ustica, un
qu[mico seco o un exfinguidor en aeros6L
Cuando caHente substancias grasosas, tenga cuidado=
Puede ocasionar un fuego si es calentado per macho
tiempo.
Utilice unicamente los soportes para recipientes que
esten secos- Los soportes que esten humedos o
mojados puden ocasionar quemaduras a cause del vapor.
No permits que los soportes estSn en contacto con las
superficies calientes. No utilice ana toalla o an papel para
remplazar al soporte.
No caliente recipientes de comida que estan cerrados-
La presi6n a{ interior de estos puede hacedos expmotar y
ocasionar betides.
Retire la puerta del homo de toda estufa inutHizada si
esta va set ammacenada o destruida.
_MPORTANTE- No trate de utHizar eBhomo durante un carte
de eiectricidad. Si no hay e_ectdcidad, apaga su estufa. Si no
apaga el hornoy que Ia electricidad es restablecida, el homo
puede seguir funcionando. La comida que de]a sin cuidado
puede quemarse o deteriorarse.
_,__ Los contromes eBectricos pueden set
da6ados con fries temperatures. Cuando utiHce su estufa
per la primera vez, o si no ha side utHizada per macho
tiempo asegurese que no haya side expuestas a
temperaturas mas aBtas que 0°0/32°F per mas de 3 hares
antes de conectar su estufa al suministro e_ectrico.
mNSTRUCCmONES mMPORTANTES PARA
UTmUZAR SU PLANCHA DE COCmNAR°
Saber que perHias contro_an cada una de los
quemadores.
Utilice una sart_n de tamaSo apropiado= Este aparato esta
equipado con qaemadores de diferentes tamafios= Elija
utensilios con las bases aplanadas y Io suficientemente
grandes pare cubrir todo el area deI quemador. Utilizar
utensilios ross pequeF_os puede exporter parte det
quemador y ocasionar quemaduras de las prendas que
Ileva puesta.
Los mangos de ruesutensilios deben set comocados hacia
eBinterior y no sabre otras unidades de superficie- Para
reducir el riesgo de quemaduras, el encendido de
materiales infiamables y los derrames ocasionados de
casualidad. El mango del utensilio debe ser colocado hacia
el interior y no sabre otras unidades de superficie.
Nunca deje ruesquemadoreas con alta temperature sin
cuidado- Los derrames ocasionan humo y derrames
grasosos que pueden encenderse, o una sart_n que ha
calentado per macho tiempo puede derretirse.
DeHneadores protectores- No utilice pelicula de aluminium
a Ia base del homo u otra parte del aparato. S61o utilizela
pare cubrir la comida cuando este cociendoIa. Cualquier
otra utilizaci6n puede ocasionar un incendio, una
electrocaci6n o un cortocircuito.
Utensilios de cocina envidriados- $6to algunos tipos de
atensilios de vidrio, de vidrio/ceramica, de ceramica pueden
resistir la temperatura del quemador de su plancha de
cocinar. Verifique Ias recomendaciones del fabricante sabre
el use con las planchas de cocinar.
No utHice cubiertas decorativas- Si un quemador es
encendido accidentalmente, Ia cubierta decorative se
calentara y podria derretirse. Las cubiertas catientes podrAn
ocasionar quemaduras si las toca. La plancha de cocinar
tambi6n podria set decade.
PARA PLANCHAS DE COCmNAR
SOLAIVIENTE
No limpie o utHice una pBancha de cocinar que esta rota-
Si Ia plancha de cocinar se rompe, los productos de
limpieza o los derrames pueden penetrar en ella y prodacir
an riesgo de electrocaci6n= Llame a an tecnico calificado
inmediatamente=
Limpie el vidrio de maplancha de cocinar con cuidado- Si
utilize ana esponja mojada pare Iimpiar derrames en una
superficie caliente, tenga cuidado de no quemarse con el
vapor. Algunos productos de limpieza puden producir
peligrosas emanaciones si se les usa sabre areas may
calientes.
Evite de raspar emvidrio de la plancha de cocinar con
objetos may fHados.
mNSTRUCCIONES mMPORTANTES PARA
UTmUZAR SU HORNO.
Tenga cuidado cuando abra la puerta demhomo o Ba
gaveta de entibiar (si equipada), Parese aI Iado de la
estufa cuando abra Ia puerta de un homo caliente. Permita
que eI humoy el vapor se escapen antes de retirar o de
colocar comida en el horno/gaveta de entibiar.
Mantenga e_conducto de ventHaeibn de_ homo sin
obstrueei6n= La re]ilia del homo est5 ubicada deI Iade
derecho dei panel anterior yes visible al abrir Ia puerta del
homo. Tocar estas areas cuando el homo esta encendido
puede ocasionar graves quemaduras. No coIoque objetos
de plastico o sensibles al calor cerca deI conducto de
ventilaci6n. Estos pueden derretirse o encenderse.
Colocaci6n de las rejiHas del horno/gaveta de entibiar (si
equipada). Siempre coloque las re]illas del homo en Ia
posici6n deseada cuando el homo o Ia gaveta esten fries= Si
la rejilla debe set desplazada cuando el homo este
funcionando tenga bastante cuidado. Utilice unos soportes
pare recipientes y coja Ia rejilla con ambas manes hasta
recolocarta. No permita que estos soportes esten en
contacto con los eIementos calientes dei homo o de la
gaveta de entibiar. Retire todo utensilio de la rejilla antes de
moveda.
;iiiiii!i!!ii?
%?
i'i..............
41
Page 42

lmportantes lntrucciones de seguridad
o No utHiee la cubeta parrHlera sin su accesorio= La cubeta
parrilIera y su accesorio permiten que la grasa gotee y este
lejos del calor de la parrilla=
,, No cubra emaccesorio de la parriHa con pel_cula de
aluminio= La grasa que queda fuera podda encenderse=
No toque la bombiHa de luz caliente con una tela mojada=
Esto puede romper la bombiila= Antes de retirar o remplazar
la bombiila desconecte el aparato o carte el suministro
electrico=
IMPORTANTES INSTRUCCIONES PARA
LIMPmAR SU COCINA.
Limpie la eetufa regularmente para mantener todas las
partes sin grasa que puede encenderee y causar un
incendio= La cubierta del escape de ventilaci6n y los filtros
de grasa deben estar Iimpios= No permita que la grasa se
acumule en la cubierta o en el filtro= Los dep6sitos grasosos
pueden encenderse y causar un incendio= Cuando caliente
comida bajo Ia cubierta, encienda el ventiIador= ConsuIte las
instrucciones del fabricante para la limpieza=
Limpiadores de estufa y aeroso[es- Siempre siga las
instrucciones del fabricante para su uso=Tenga en cuenta
que Ios residues de los Iimpiadores y aerosoles pueden
encenderse ocasionando daSos y heridas=
No Hmpie las ernpaquetaduras del homo- Las
empaquetaduras del homo son importantes para un buen
sellado= Tenga cuidado de no frotar, daSar o desplazar las
empaquetaduras=
Retire masrejHmasdel homo- El color de [as rejillas del
homo cambiara sise [es deja en el homo durante el ciclo
de autoqimpieza=
La satud de algunos pajaros esta
muy
sensitiva a Boahumos que proveen deI cicto de auto°
mimpieza de cualquier cocina. Despiace los pajaros en otra
habitaci6n bien ventHada.
ADVERTENCIA DE SEGURIDAD IMPORTANTE
El CaIifornia Safe Drinking Water y Toxic Enforcement Act
requiere al Gobiemo de CaIifornia de publicar una lista de
sustancias conocidas per el estado coma causa de cancer,
defectos de nacimiento u otros daC_osreproductivos, y
requiere que se avisen !os usuados sabre la exposici6n
eventual a sustancias.
HORNO CON AUTO-UMPIEZA
Limpie en emciclo de autoqimpieza unicamente Baspartes
que estan en la lista del "Manual deBusuario'L Antes de
auto-Iimpiar el homo, retire la cubeta parrillera y cualquier
otto utensilio o comida del homo.
- No utHice [impiadores de homo- NingOn limpiador de
horno comerciaI o de capa protectora de ninguna clase
debe ser utilizada en en homo.
42
Page 43

ACUERDOS DE PROTECCI6N
En los EU.
Acuerdos Maestro de Protecci6n
FeHcitaciones por haber hecho una compra inteHgente. Su
nuevo producto Kenmord _es dise_ado y manufacturado
para muchos a_os de servicio confiabUe. Pero como todo
producto, pod ria reque rir mantenimiento preventivo o
reparaci6n entre tiempo. Ahi es cuando eUtener un Acuerdo
Maestro de Protecci6n Uepodria ahorrar dinero y moUestias.
Compre ya un Acuerdo Maestro de ProtecciSn y pretejase
de gastos y frustraciones inesperadas.
EUAcuerdo Maestro de Protecci6n tambi6n ayuda a extender
Uavida de su nuevo producto. Esto es Uoque se incUuye en
eUAcuerdo.
[_ Servicio ProfesionaJ por nuestros 12,000 especiaHstas
profesionales en reparaci6n.
5_ Servicio iHmitado sin cargo por piezas y servicio en
[_ Garantia de"Nodim6n'- reemplaza su producto
cubierto si ocurren cuatro o m_.sdesperfectos dentro de
doce meses.
[_ ReempJazo de Producto si el producto cubierto no
puede ser reparado.
5_ Verificaci6n de Mantenimiento Preventivo AnuaJ a su
petici6n sin cargos adicionales.
[_ Pronta ayuda pot telefono- apoyo por tel6fono por un
t6cnico de Sears en los productos que requieran
reparaci6n en casa, m_.sla conveniencia de hacer cita
para reparaci6n.
[_ Protecci6n contra picos de energ_a o daSos el6ctricos
causados por fiuctuaciones en energia.
[_ Reembotso de aJquHer si la reparaci6n de su producto
cubierto toma m_.s tiempo de Io prometido.
Una vez compres el Acuerdo, una simple Ilamada telef6nica
es todo Io que necesitas para hacer cita para su servicio.
Puedes Ilamar a cualquier hora, dia o noche o concertar una
cita para servicio via computadora.
En Canada
Acuerdos de Mar_ter_imiento
Su compra tiene valor mayor porque puedes depender de
Sears HomeCentraF _ para servicio. Con sobre 2,400
Tecnicos de Servicios y m_.s de un mill6n de piezas y
accesorios, tenemos las herramientas, piezas,
conocimiento y destrezas para asegurar nuestro
compromiso: Ledamos servicio a Io que vendemos.
Su producto Kenmord_es dise_ado y puesto a prueba para
proveer muchos a_os de operaci6n confiable. Pero como
todo producto, podria requerir servicio entre tiempo. El
Acuerdo de Mantenimiento Sears le ofrece un programa de
servicio incomparable a un precio m6dico.
El Acuerdo de Mantenimiento Sears:
Es su manera de comprar servicio para el manana a
precio de hoy
Elimina facturas por reparaci6n como resultado de uso y
desgaste normal
Provee apoyo via tel6fono de un tecnico de Sears en
productos que requieran reparaci6n en casa
. Aunque no necesite reparaci6n, provee Verificaci6n de
Mantenimiento Preventivo anual, a su petici6n, para
asegurar que su producto est,. en condiciones apropiadas.
Atgunas Hmitaciones podrian aplicar. Para rn_s
informaci6n sobre et Acuerdo de Mantenimiento de
Sears Canada,
ttame aJ1-800-361-8885.
;]iiiii!i!!ii?
%?
Sears tiene sobre 12,000 especialistas profesionales de
reparaci6n, con acceso a sobre 4.5 millones de piezas y
accesorios de calidad. Esa es la clase de profesionalismo
con la que puedes contar para ayudar a prolongar la vida de
su nueva compra por muchos aFios, iCompre su Acuerdo
Maestro de Protecci6n hoy!
AIgunas Hmitaciones y excJusiones podr_an aplicar.
Para precios e informaci6n adicionaJ, Itame aJ1-800-827-
8655.
Servicio de lnstaJaci6n Sears
Para instalacidn profesional de Sears en enseres del hogar,
abridores de puertas de garaje, calentadores de agua y otros
articulos mayores del hogar, en EU. Ilame al
1-800°4°MY°HOME®
43
Page 44

Caracteristicas
Generales
de la Estufa
a Gas
Caracteristicas de la estufa
Nota: Las caracteristicas de su estufa variar_n seg_n el modeJo.
Controles Controles Ebctr6nbos del
Electr6nico de Homo con Reloj y Contadorde
la Gaveta Tiempo Controles Electr6nico
Calentadora de zona de entibiado
Luces Interiores
Dobbs del Homo
(1) Cubetta parillera
(1) Pieza adjunta de cubeta parillera
(1) Parilla para grillar
ii;i%iiiiiiiii!iiiii!iiiiiii!i!iiiiiii!i!iiiiiii!i!iiiiiii!i!iiiiiii!i!iiiiiii!i!iiiiiii!i%!!i!!ii!!!!!iii!i!i!!i!!i!i!!!i!i!ii{ii@ii!i{{_ii!ii!i{ii!iiiil;ilili!!iiii_!ii
Controles de los
Quemadores
Superiores
Ventilaci6n
Elemento
de Asar
Homo
piante
(3) Rejillas
Homo
Adjustables
Manijas
la
Puerta de una
Sola Pieza
Puerta
Delantera de
Vidrio del
Homo con
Ventanilla de
Vidrio Grande
Gaveta Calentadora
con rejilla Zona de entibiado
Elemento Superior
Radiante de
1,200W de 6"
Nota: Las
caracteristicas de su
estufa variar_n segQn
et modeto.
Elemento superior doble de
1,000W / 2,500W de 6"/9"
Luces Indicadoras
44
\
\
Elemento Superior
Radiante de
1,200W de 6"
Elemento superior
done de
1,700W / 2,700W
de9"/12"
Cubierta de Vidriado
Page 45

Ajuste de los ControJes Superiores
Areas radiantes de la cubierta
Vista de la Cubierta
que se calientan
ooo
oo
Figura 1
ilililililililiiiiiiiiiiiiiiiii_i!!iii!_;ii!iiiiiii!ii!i!i!i!i!i!i!i!i!i!iii
Figura 2
%
\
NOTA: Por favor lea las instrucciones detalladas sobre la limpieza
de la cubierta de vidrio ceramico en las secciones Cuidado y
Limpieza y Antes de Somicitar Servicio de este Manual del
Usuario.
NOTA: Los elementos radiantes tienen un limitador que Ies permite
pasar por un ciclo 'ON' (encendido) y un cicto 'OFF' (apagado), aOn
cuando est6n en et ajuste 'Hi' (Alto). Esto ayuda a evitar que se
da_e Ia cubierta de vidrio cerb.mico. El funcionamiento c[clico en el
ajuste 'Hi' es normal y puede ocurrir si el utensilio es demasiado
peque_o para el eJemento radiante o si el fondo del utensilio no es
piano. (Consulte Ia p_gina 10 para Ias instrucciones sobre el uso de
los utensilios correctos en Ia cubierta).
Generalidades sobre la Cubierta de Vidrio
Ceramico
La cubierta de vidrio ceramico tiene elementos radiantes
superiores situados debajo de la superficie de vidrio. El
diseSo de la cubierta de vidrio ceramico deiinea el
contorno dei elemento superior que esta debajo.
Asegureee de queet diametro deI utensilio coincJda con
el diametro deI eJemento en la cubierta (Ver Figura 1).
EI calor es transferido hacia arriba a traves de Ia
superficie de la cubierta hacia el utensilio. Se deben usar
soIamente utensilios de rondo piano. El tipo y tama5o de
los utensilios, eI nOmero de elementos superiores que
esten en uso y eI ajuste de cada uno de ellos son
factores que afectaran la cantidad de calor que se
esparcira alas Areas que rodean a los elementos
superiores. Las Areas que rodean a los eIementos
pueden calentarse Io suficiente como para causar
quemaduras.
GeneraJJdades sobre los Elementos
Radlantes Superiores
La temperatura del elemento aumenta gradual y
uniformemente. A medida que la temperatura va
aumentando, el elemento se iIuminara de rojo. Para
mantener et ajuste seleccionado, el eIemento pasara por
cicJos de encendido y apagado. EI eIemento calefactor
retiene suficiente calor para proporcionar un calor
uniforme y consistente durante el ciclo de apagado. El
dispositivo de cer#tmica aisla t@micamente al elemento
catefactor, concentrando el cator en el area calefactora.
Para cocci6n eficiente, apague el elemento varios
mJnutos antes de terminar de cocinar. Esto permitira que
el caIor residual termine el proceso de cocci6n.
Ubicaci6n de los Elementos Superiores
Radiantes y de los Controles
Su estufa esta equipada con quemadores superiores
radiantes con 4 wattajes nominales diferentes. La '............
habilidad de calentar atimentos mas rapidamente y en
voIQmenes mayores aumenta a medida que aumenta el
wattaje del elemento.
Los elementos radiantes superiores estan ubicados en la
cubierta como sigue (Vet Figura 2); 2 elemento radiante
mas pequeiio de 6 pulgadas se encuentra en Ia posici6n
trasera derecha y izquierdo; el elemento radiante doble
de 6 o 9 pulgadas se encuentra en Ia posici6n delantera
izquierdo; el elemento radiante doble de 9 o 12 pulgadas
se encuentra en la posici6n delantera derecho; el
elemento radiante de! Area Calentadora est4 en Ja
posici6n trasera central (Ver pagina 50).
NOTA: El vidrio volvera verde cuando los elementos de
superficie estan en Ia posici6n de apagado despues de
haber sido utilizados a agrande intensidad. Este
fen6meno es normaJ y el vidrio voIvera a su color bIanco
inicial despues de haberse completamente enfriado.
(Vidrio blanco solamente).
45
Page 46

Ajuste de [os ControRes Superiores
Ajustes Recomendados para Cocinar en la Cubierta
Use la tabla (Figura 1} para determinar el ajuste correcto para la dase de alimento que este
preparando= Los ajustes de 'Simmer' se usan para cocinar a fuego lento y mantener
calientes cantidades grandes de atimentos tales come estofados y sopas. Los ajustes mas
bajos de cocci6n a fuego lento son ideales para alimentos delicados y derretir chocolate o
mantequilla=
Nota: Et tamaSo y el tipo del utensilio usado influirdt en el ajuste necesario para obtener los
mejores resultados.
Tipo de Cocei6n
ALTO (Hi) Paracomenzar la mayoffa de los alimentos, para hacer hervir agua y para
asar a la parrilla
MEDIANO ALTO (5 - 8) Para continuar un hervor r&pido, frefr y freir en la sart_n
MEDIANO (5) Mantener un hervor lento, espesar salsas y }ugos de came y cocer
verduras a! vapor
MEDIANO BAJO (2 - 4) Mantener los afimentos cocindtndose,cocer a fuego lento y estofados
BAJO ('Lo' - 2) Para mantener caliente, derretir o cocinar a fuego lento
Figura 1
elementos irradiantes
parecieran haberse enfriado
ana vez que se hart apagado.
Un indicador luminoso se
encendera y se mantendrdt
encendido hasta que la
superficie de la cocina halla
enfriado a un nivel moderado.
La superficie podffa estar
caliente y causar quemaduras
si es tocada antes que el
indicador iuminoso se haIla
apagado=
_No coloque
objetos de pi&stico tales
corno sameros y pimenteros,
apoyacucharaa o envoitorios
de pmastico sobre [a estufa
cuando [a este usando, Estos
objetos se pueden derretir o
encender= Los tomaollas, las
toallas o cucharas de madera
se pueden prender fuego si se
colocan may cerca de los
elementos superiores=
Funcionamiento de los Eiementos Superiores Radiantes Sencilios
La cubierta tiene eiementos superiores radiantes sencillos en 2 ubicaciones: eI elemento en la
posici6n derecha trasera y el elemento en la posici6n izquierda trasera (Figura 2)=
Uso de los E[ementos Superiores Radiantes SenciHos:
1= Coloqae el atensiIio de tamaffo correcto en el elemento superior radiante=
2.
Oprima y gire la perilla de control superior en cualquier direcci6n ei ajuste deseado (Figura 3)=
Gire la perilla para regular el a]uste, si 1odesea= Comience la mayor[a de [as operaciones de
cocci6n en an a]uste mdts elevado y luego gire a an ajuste mas bajo para terminar de cocinar.
Cada elemento superior proporciona una cantidad constante de calor en cada a]uste= Si e! area
de calor de color rojo radiante se extiende mdts all& del borde inferior deI utensilio significa que
ese utensilio es dernasiado pequeSo para el area de calefacci6n del elemento=
3.
Cuando termine de cocinar, gire [a perilla de control a 'OFF' antes de retirar el utensilio= Nota: El
indicador [uminoso de superficie se encendera cuando la periIla de controi sea encendida y,
seguirb, encendido hasta que la superficie de la plancha de cocinar halia enfriado= La laz
seguirb, encendida a0n cuando los controles hallan side APAGADOS=
Nota: Vet Figura 1 para los ajustes recomendados de los controles=
%%°
Figura 2
Elemento Trasero Derecho
y Izquierdo
OFF
LO
2
Hi
3 7
4 6
MED
Figura 3
46
Page 47

Ajuste de Jos ControJes Superiores
1
Figura 1
OFF
Hi
Figura 4
OFF
eHI®HI Hm@
Funcionamiento de Jos Etementos Radiantes Dobles
La cubierta esta equipada con un elemento superior radiante
doble situado en la posici6n delantera derecha y izquierda (Vet
Figura 6). Los s[mbolos en el panel de control se usan para
indicar que serpent[n deI elemento radiante doble se catentara. El
s[mbolo • indica que solamente el serpent[n interior se calentarb.
(Figuras 1 y 3). El s[mbolo (_) indica que se catentaran tanto el
serpentin exterior come el interior (Figuras 4 y 6). Usted puede
cambiar cualquiera de estos dos ajustes en cualquier memento
mientras este cocinando.
Lo Lo
Figura 2
%%°
Figura 3
FJgura 5
%00
Figura 6
Funcionamiento del Elemento Superior Dobte:
1, Coloque eJ utensilio de tamaBo correcto en eJelemento
superior doble,
2. Optima y gire la perilla de control a Ia izquierda (Ver Figura 2)
para un utensilio de cocina mas pequedo o a Ja derecha (Vet
Figura 5) para un utensilio m_s grande.
Gire la perllla para regular el ajuste, sl Io desea. Comience la
mayoria de las operaciones de cocci6n en un ajuste mas
elevado y luego gire a un ajuste mb.s bajo para terminar de
coclnar. Cada elemento superior proporciona una cantidad
constante de calor en cada ajuste. Si ei area de calor de color
roio radiante se extiende mas alia del borde inferior deI utensillo
slgnifica que ese utenslllo es dernasiado peque_o para el area
de calefacci6n del elemento.
4. Cuando termlne de cocinar, gire JaperJlla de control a 'OFF' antes de retirar el utensiJJo.Nota: El indJcador Juminoso de
superficie se encender_ cuando Ia perilla de control sea encendlda y, seguira encendido hasta que Ia superficie de Ja plancha
de cocinar halla enfriado. La Juz seguira encendida a0n cuando los controles hallan side APAGADOS.
Cocinando en
Estufa
Use el utensilio correcto:
Use utensillos de fondo plane para
que tengan buen contacto con toda la
superficie det elemento calefactor.
Verifique si etfondo es plane pasando
una regla a traves deI fondo del
utensilio (Ver Figura 8). Aseg0rese de
seguir Jasrecomendaciones para usar
utensilios come se muestra en la
Figura 9.
Nota: El tamaSo y e! tipo deJutensilio
usado infiuir4 en e! ajuste necesario
para obtener los mejores resultados.
*CORRECTO
Fondo piano y lados rectos.
Tapas queaprieten bien.
E!pesodel mango que no
vuelque elsart6n. Elutensilio
debe estar bienequilibrado.
Los tamahos de los
utensilios son apropiados
para la cantidad dealimento
que se preparar& y par ael
tamaSode!elemente
superior.
Fabricado de unmaterial que
sea buen conductor de!
calor.
F&cildelimpiar.
Siempre haga coincidir el
di_metro delutensilio con e!
diametro delelemento
superior.
INCORRECTO
Fondos curvos y
combados de losutensilios
÷1 I_
Elutensilio sobresale m&s de
mediapulgada de!elemento.
÷1 I_,
Elutensil[o es m_s
pequeSoque e!elemento.
Elmango pesado hace
volcare! utensil[o.
Figura 7
:iiiiiii!!D
FJgura 8
47
Page 48

Cocinando en [a Estufa
Emp[eo de[ Area Ca[entadora (Warm & Ready uR)
El prop6sit0 deI _,reaeabntadora es mantener 10saliment0s ealientes para
servirl0s. Use ei area calentadora para mantener eatientes 10s alimentos
cocinados, tales come: verduras, saIsas, guises, sopas, estofados, panes,
pasteIes y piatos de servir que se pueden usar en el homo. Antes de
ponerla, Ia comida debe estar caIiente. No se recomienda calentar comida
fffa en el area.
Todos los aIimentos que se coIocan en ei b,rea calentadora se deben cubrir
con una tapa o con papel de aluminio para mantener Ia caiidad. Para
obtener mejores, resuItados cuando catiente pasteIes o panes, Ia cubierta
debe tener una abertura para que de]e escapar la humedad. No use
p[astico para cubrir Beealimentos. EBp[astico se puede derretir en ma
superfieie y ser may difieim de mimpiar.
En ei area calentadora use s6to vajiiia y utensilios de cocina recomendados
para usar en el homo y en la cubierta de la estufa.
Tab[a de Ajustes Recomendados
para e[ Area Ca[entadora
Tipo de Alimento
Panes/Pastebs
Guises al Homo
Plates de Servir con Alimentos
Huevos
Salsas
Carnes
Salsas
Sopas (crema)
Estofados
Verduras
Alimentos Fritos
Bebidas Caiientes
Se[ecci6n de [aTemperatura
Consulte Ia tabIa para los ajustes de temperatura recomendados para los alimentos en el Area
Cabntadora (Figura 1) para los niveles de cabntamiento recomendados. Si no figura el alimento que
desea, comience con el a]uste de temperatura mediana y regule despu6s come sea necesario. La
mayoria de los alimentos se pueden mantener a la temperatura a adecuada para servir usando el ajuste
de temperatura mediana.
Ajuste de[ Control de [a Zona de Ca[entar
1. Presione ON/OFFel bot6n en la posici6n Zona de Calentar. El indicador luminoso se
encendera. Nota: Si ning0n bot6n es presionado en 25 segundos, la funci6n ON se anular_..
2. Para controlar la Zona de Cabntar, presione @ una vez para ENCENDER el nivel en "HI"
(ver Figura 2) o @ el nivel "LO" (ver Figura 5). El indicador luminoso que se encuentra
arriba dei bot6n ON/OFF se encendera constantemente y et indicador luminoso de la Superficie
Caiiente se encenderA una vez que la Zona de Cabntar se caliente.
3. Cada (_ o @ toque aumentara o disminuira el nivel de intensidad. La Zona de
CaIentar tiene 5 niveles de intensidad desde HJ (vet Figura 2), MED (ver Figura 4) hasta LO (ver
Figura 5). El nivei de intensidad puede ser ajustado en todo memento mientras que la Zona de
Caientar este encendida.
Ajuete de Temperatura
%O' (BAJA)
%O' (BAJA)
%O' (BAJA)
%O' (BAJA)
%O' (BAJA)
'NED' (MEDIANA)
'NED' (MEDIANA)
'NED' (MEDIANA)
'MED' (MEDIANA)
'MED' (MEDIANA)
'HI' (ALTA)
'HI' (ALTA)
Figura 1
oHI oHI
91D 0
qD MED 0 MED
0 0
LO o LO
@ @
@ @
_ o
ONIOFF ONIOFF
WARMER WARMER
ZONE ZONE
Figura 2 Figura 3
oHI oHI
o o
o MED o MED
o
LO G, LO
Figura 4 Figura 5
4. Cuando los atimentos esten listos para servir, presione ON/OFFel bot6n una vez para apagar la
Zona de Calentar. El indicador Iuminoso se apagar4.
Nota: Et indicador luminoso de Ia Zona de Calentar seguira encendido si Ia plancha de cocina se
encuentra aQn caliente y seguira encendido hasta que la superficie de calentamiento halla enfriado
suficientemente.
_Los elementos radiantes haber enfriado de La de vidrio ann
pareceffan luego
set
apagados. superficie podda
estar caliente Io que podria causar quemaduras si esta es tocada antes de que se enfrie suficientemente.
_No co[oque pe[icumas u objetos pBasticos come envasee y pimiento,
de a[uminio de 8a[ sostenedoree de
uteneilio o envomturas de plastieo sobre [a eoeina euando este en USOoEstos podr[an derretirse u encenderse. Los porta-ollas,
paffos utensNios de madera podrian encenderse sise colocan may cerca de los ebmentos o quemadores.
__1 La Zona de Cabntar al vivo cuando este caliente, calienta suficiente
no se
pondra roio pero
se
para
causar
quemaduras. Evite de eolocar sus manes cerea o sobre la Zona de CaIentar hasta que eI indicador Iuminoso se apague. Siempre
utilice an porta-ollas o guantes para retirar los aIimentos de la Zona de CaIentar pues se eneuentran caIientes.
48
Page 49

Antes de Ajustar Contro es Homo
_J_l Algunos modelos vienen equipade con un ventilador trabaja baje emcicmode horneade auto-limpieza
que Y
I para mantener todos los componentes a una temperatura fda. Es posibme que este ventilador continue trabajando aun si ma
l estufa este apagada y trabajara hasta que la estufa est totalmente fria.
Disposici6n de masParrHmas demHomo -
COLOQUE SIEMPRE LAS PARRILLAS CUANDO EL HORNO ESTE FRIO (ANTES DE ENCENDERLO). Use siempre guantes de
cocina cuando use el homo.
Ubicaci6n del Respiradero deB Homo
El respiradero del homo se encuentra dem
lado derecho deBpaneB anterior y es
visible al abrir Ia puerta del homo.
Cuando el homo esta encendido, sate
aire tibio a traves de este respiradero.
Esta ventilaci6n es necesaria para una
circulaci6n adecuada deI aire en el homo
y para obtener buenos resultados del
horneado.
Respiradero del Homo
Para Quitar y Co{ocar masParriHas
de[ Homo
Data quitar, tire de la parrilla hacia
adeiante hasta el tope. Levante [a parte
delantera de [a parriiia y desi[cela hacia
afuera. Para co[ocar, inserte [a parrilla en
las gu[as de ias paredes del homo.
Levante [a parte deiantera de la parriIla y
deslicela a su lugar.
f
Disposici6n de masparriHas del
homo
Para hornear en una parrilla,
col6quela en Ia posici6n 2 o 3. Para
homear en 2 parriHas, coloque Ias
parrillas en las posiciones 2 y 3.
, _ 3_ posici6n de la
reiilla
__ t_p°sici6n de la
N rejilla
Posiciones
de las Parrillas
POSICIONES RECOMENDADAS DE LAS PARRILLAS
PARA ASAR A LA PARRILLA, HORNEAR Y ASAR
Alimento
Asar a la parriIIa cames, polio o pescado
Galletas, pasteles, tartas, bizcochos y panquecitos
Posici6n de la Parrilla : :
1 o 2
203
Tartas congeladas, pastel esponjoso, levadura, 4
pan, caserolas, trozos de came peque[_os o polio
Pave, asado o iam6n 4
Nota: Siempre tenga cuidado cuando retire alimentos que esten en las parrillas
inferiores.
Circu aci6n Aire en Homo
Si se usa 1 parrilla, col6quela en el centro del homo. Si se usan varias parrillas,
alternelas como se muestra en la ilustraci6n.
1 Parrilla del Homo
Para mejor circulaci6n deI aire y obtener mejores resultados del horneado deje
airededor de 2" a 4" (5 a 10 cm) alrededor del utensilio para circulaci6n
adecuada del aire y asegOrese de que Ias fuentes no se toquen entre si, no
toquen Ia puerta dei homo, ni Ios Iados o Ia parte trasera de Ia cavidad del homo.
El aire catiente debe circular alrededor de Ias fuentes en el homo para que
Ilegue calor uniforme airededor de todo el aiimento.
49 Varias Parrillas del Homo
Page 50

Ajuste de Ros Contro es de Gaveta CaRentadora
Ubicaci6n de _aParrH_a de la Gaveta Ca_entadora ("Warm & Ready MR")
La parriIla se puede usar de 2 formas:
,, En posici6n mevantada para alimentos de tama_o peque_o que se puedan colocar tanto debajo come sobre la parrilla (per
ejemplo, panecillos o bizcochos sobre la parrilla y un guise al homo debajo de ella)=
- En la posicion acostada le permite colocar alimentos Wianos y vajiIla vacia en la parrilla (per eiemplo, panecillos o pasteles
y plates de servir)=
Coloque la parrilla de la gaveta calentadora en cuaIquiera de las posiciones indicadas a continuaci6n (Figura 1)=
arrilla de la Gaveta
arm & ReadyMR
en posici6n levantada
Figura 1
Parrilla de la Gaveta
Warm & Ready MR
en posici6n acostada
Emp_eo de _a Gaveta Ca_entadora
El prop6sito de Ia gaveta calentadora es mantener los alimentos calientes para servirlos= La comida debe estar caliente, antes de
ponerla en la gaveta calentadora= No se recomienda caIentar comida que este fr[a en Ia gaveta calentadora=
Todos Ios alimentos que se colocan en la gaveta caIentadora se deben cubrir con una tapa o con papei de aluminio para
mantener Ia calidad= No use pmastico para cubrir los alimentos. El plastico se puede derretir en magaveta y ser dificim de
mimpiar=
En la gaveta calentadora use solamente vajilIas y utensilios de cocina recomendados para usar en el homo=
_Use tomaollas de cocJna cuando retire los alimentos de la caIentadora, los
siempre
o
guantes gaveta ya que
plates o los utensilios pueden estar calientes y usted puede quemarse=
Se_ecci6n de _aTemperatura
La tabla de ajustes recomendados para la gaveta calentadora se muestra
en la Figura 2= Si no figura eI alimento que desea, comience con el ajuste
"MED" (MEDIANO)= Si se desea que el alimento quede mas crocante
saque Ia tapa o el papel de aluminio del alimento=
La mayoria de los aIimentos se pueden mantener a la temperatura
adecuada para servir usando el ajuste "MED" (MEDIANO)=
Cuando se debe mantener caliente una combinaci6n de aIimentos (per
ejemplo, came con dos tipos de verduras y panecillos), use el ajuste "HI"
(ALTO)=
Para evitar perdida de calor, no abra la gaveta caIentadora mientras est6
en uso.
Tabta de Ajustee Recomendados para
Alimentos en maGaveta Camentadora
Tipo de Alimento Ajuete de
Temperatura
Asados (Res, Cerdo,
Cordero) "MED" (MEDIANA
Chuletas de Cerdo "Hi" (ALTA)
Tocino "Hi" (ALTA)
Hamburguesas "Hi" (ALTA)
Aves "Hi" (ALTA)
Salsas "MED" (MEDIANA
Guises al Homo "MED" (MEDIANA
Huevos "MED" (MEDIANA
Aiimentos Fritos "Hi" (ALTA)
Verduras "MED" (MEDIANA
Pizza "Hi" (ALTA)
Bizcochos "MED" (MEDIANA
Panecillos, blandos '%0" (BAJA)
Panecillos, dares "MED" (MEDIANA
Pasteles "MED" (MEDIANA
Plates de Servir Vacios "LO" (BAJA)
Figura 2
5O
Page 51

Ajuste de Ros Contro es de Gaveta
Ca entadora
Ajuste de _os contro_es de_ dispositivo de _apanera de _agaveta
de entibiamiento
HIo
0
MED o
LO
PROOF
BREAD
91P
El control y el indicador luminoso del dispositivo de la Panera de la Gaveta de
Entibiamiento se encuentran en el panel de control, Las temperaturas est_.n
aproximadas, y estb,n identificadas pot Hi (alto), MF:D (media) y LO (baja) y
PANERA,
1, Presione ON!OFFel bot6n de control de la gaveta de entibiamiento, El indicador
luminoso se encendera, Nota: Si ning_n bot6n es presionado en 25 segundos, o
la funci6n ON se anulara, ON/OFF
2, Ajuste el nivel de intensidad, Presione Q una vez para poner el nivel en Hi
(vet Figura 2) o Q LO (vet Figura 4), El indicador luminoso de la gaveta de
entibiamiento Iocalizado encima del bot6n ON/OFF, se encendera Figura 1
constantemente,
3, Cada toque Q o Q el nivel de intensidad en 6 niveles, desde Hi (vet HIo HI <
Figura 2), MED (ver Figura 3) hasta LO (ver Figura 4) y el dispositivo de la _ <>
Panera (ver Figura 5), Si la gaveta de entibiamiento se ajusta en posici6n LO y MED_ MED
PROOF
Q 91P PROOF _ BREAD
BREAD
que el bot6n es presionado una vez mas, el dispositivo de Panera y el Lo _ <:> LO_ <-s
indicador luminoso estar_.n ajustados (vet Figura 5 e instrucciones de Figura 2 Figura 3
preparaci6n de la masa de pan en esta p_.gina), Para regresar al ajuste normal
de la gaveta de entibiamiento, presione Q el bot6n aunque sea una vez, HI ,_> HI ,Is
Nota : Para mejores resultados, precaliente la gaveta de entibiamiento antes de <> _
colocar los alimentos o la masa de pan, Una gaveta vacia toma 15 minutos para MED,_:s MED <::_
precalentar, c-> PROOF _-_ PROOF
- BREAD "-_ BREAD
LO _ __ LO<7
4, Cuando los alimentos esten listos para set retirados, presione ON_OF_el bot6n una
vez para apagar el dispositivo de la gaveta de entibiamiento o de la panera, El Figura 4 Figura 5
indicador luminoso de la gaveta de entibiamiento se apagar_., (}
WARMER
DRAWER
Preparaci6n de _amasa de pan para _agaveta de
entibiamiento
La gaveta de entibiamiento posee un dispositivo de Panera que
puede set utilizado para preparar la masa, Eltiempo recomendado
para mantener la masa en la gaveta de entibiamiento es de unos
45 a 60 minutos, Sin embargo, asegOrese de seguir eltiempo
recomendado en lareceta,
La masa de pan preparada debe set colocada en una fuente grande
pues casi se duplicate, su volumen, Coloque la parrilla de la gaveta
calentadora en la posici6n acostada (Vet Figura 6), Coloque lafuente
en la parrilla y siga las instrucciones de ajuste del control de la gaveta
calentadora y del esponjamiento de masa indicadas al comienzo de
esta p6.gina,
Nota: Para mejores resultados no use el homo mientras usa el
dispositivo de panera,
Nota : La gaveta de entibiamiento no puede funcionar dutante
et cicto de auto-timpieza.
51
Page 52

Funciones de Tec as de Contro
LEA CUmDADOSAMENTE LAS mNSTRUCCmONESANTES DE USAR EL HORNO. Para uso satisfactorio de su homo
aprenda a utHizar Uasdiversas funciones que se describen a continuaci6n, Las instrucciones detaltadas para cada
caracteristica y funci6n hart sido incluidas m_s adetante en este Manua! del Usuario.
START TIME (INICIO)-- Se usa
con BAKE, OVEN COOK TIME
y CLEAN para programar un
homeado diferido o un tiempo de
parada diferido del ciclo de
autolimpieza,
START (PUESTA EN BROIL (ASAR A LA
MARCBA)-- Se usa para PARRILLA)-- Se usa
porter en marcha todas para seleccionar la
Ms funciones de! homo caracterfstica variable
(no se usa con Oven de asar
Light (Luz de! Homo), a M parrilla,
PREHEAT
(PRECALENTAR)--
Seusaconlatecla
dehomeadonormaL
0 THRU 9 (TECLAS
NUMERICAS DEL
0 AL 9)-- Se usan para
seleccionar la temperatura y
las horas,
OVEN COOK TIME (T(EMPO
BE COCOION DEL HORNO)--
Se usa para programar M
duraci6n del tiempo de
SERVIR TIBIO = Utilizado
para seleccionar el dis
de Servir Tibio del homo.
CLEAN (LIMPIEZA)-- Se usa
para
autolimpieza,
OVEN UGHT (LUZ DEL HORNO)
-- Se usa para encender y apagar
la luz de! homo,
KITCHEN TIMER
(CONTADOR BE
TIEMPO)-- Se usa para
programar o cancelar el
contador de tiempo, El
contador
de tiempo no comienza ni
detiene
la cocci6n,
CONVECTION BAKE BAKE (HORNEAR) MEATS, CAKES CLOCK
(HORNEADO POP -- Se usa para & BREADS (RELOJ)--
CONVECOION)-- Se seleccionar e! mode (CARNES, Se usa para
usa para seleccionar de homeado normal, PASTELES Y porter la
la caracteristica de PANES}-- Se usa hera del dia,
horneado per para seleccionar
conveccibn, la caracteristica
de cocci6n de
cames, pasteles
y panes,
TERMINAR / ANULAR -
Utilizado para anular cualquier
programaci6n a excepci6n de la
hera y del cron6metro, Presione
STOP/CLEAR para terminar la
cocci6n, Presione STOP/
CLEAR para 3 segundos para
activar el dispositNo, Presione
STOP/CLEAR otros 3 segundos
para desactNar e! dispositNo,
Ajustes M ×imos y
Minimos de
Contro es
Todas las caracteristicas indicadas a continuaci6n tienen un tiempo o ajuste de
temperatura m_.ximo y minimo que puede ser programado en el control, Se escuchara
una serial sonora de aceptaci6n de la ENTRADA cada vez que se toca una tecla de
control (la tecla del Cierre de Seguridad del homo se retrasa 3 segundos),
Se oir_.n tres sonidos cortos de ERROR DE ENTRADA si la temperatura o el tiempo
entrado es inferior al minimo o superior al ajuste m_.ximo para esa caracteristica,
CARACTERISTICA
TEMP, DE PRECALENTAR
TEMP, DE HORNEAR
TEMP, DE ASAR A LA PARRILLA
CONTADOR DE TIEMPO
HORA DEL RELOJ
TEMPO DE COCCION DEL HORNO
12 Hr,
24 Hr,
12 Hr,
24 Hr,
12 Hr,
24 Hr,
TEMPO DE LIMPEZA
HORNEADO POR CONVECCION
TIEMPO/TEMP. MINIMA
170°F/77°C
170°F/77°C
400°F/205°C
0:01 Min,
0:01 Min,
1:00 Hr,/Min,
0:00 Hr,/Min,
0:01 Min,
0:01 Min,
2 horas
250°F/122°C
TIEMPO/TEMP. MAXIMA
550°F/288°C
550°F/288°C
HF550°F/288°C
11:59 Hr,/Min,
23:59 Hr,/Min,
12:59 Hr,/Min,
23:59 Hr,/Min,
11:59 Hr,/Min,
23:59 Hr,/Min,
4 horas
550°F/288°C
52
Page 53

Reg aje re oj
Re_oj
_c_ se usa para programar e[ re[q, E[reloj puede ser programado para 12
La teda RELOJ
o 24 horas de operaci6n, E[ reUojha sido preajustado en [a f#,brica para funcionamiento de 12
horas, Cuando [a estufa se enchufa por primera vez o cuando se ha interrumpido e[
suministro de energia a [a estufa, e[contador de tiempo en [a pantaUUadesteUUar_.Las [etras
"PF" (faU[ode energia, Ver Figura 1),
STOP
Cuando PF aparezca en la pantalla, presione _CL-'L-£_'R' NO escuchar_, nada, pero a los 10
segundos una seSal sonora se escuchar_, y PF desaparecer&
mNSTRUCCIONES OPRIMA
Programaci6n de_ Re_oj :(ejemp_o 1:30)
1, Oprima_o_, "CLO" aparecer_.en
el indicador visual
(Rgura2),
2, Oprima las tecias (_) (_ (_ para poner la hora del
dia a la 1:30, (Figura 3), "CLO" aparecer_, en el indicador
visual, Oprima _."CLO" desaparecera y el reloj
comenzara a funcionar (Figura 4),
G
QQQ
Cambio de_ despHegue de _a hora de_ d_'aentre 12 o
24 horas:
1, Oprima y mantenga oprimida la teda _ durante 6 segundos
(Figura 3), Mientras la teda est,. oprimida, la hora correcta del
dia permanecera, despbgada y la palabra "CLO" desaparecer_.
del indicador visual (Figura 4), CONTINUE oprimiendo la teda
hasta que se escuche una sepal sonora,
2, El indicadorvisual mostrar_. "12Nr" (Figura 5) o "24Nr"
(Figura 6),
3, Oprima @ para cambiar el despliegue de la hora del dia
entre 12 y 24 horas. El indicador mostrarA ya sea "12Hr"
(Figura 5) o "24Nr" (Figura 6).
4, Oprima para aceptar el cambio u oprima CL"_!_para
rechazar el cambio.
& Coloque la hora correcta como se describe arriba en
Programacidn deJ Re!oj. S[rvase notar que si se eligi6 el
modo de 24 horas, el reloj ahora desplegar6, la hora desde 0:00
hasta 23:59 horas,
_ durante 6
segundos
mNDICADOR
53
Page 54

Reg aje redo]
Homeado Continuo o Ahorro de Energia de 12 Horas
Las tecHasCONTADOR DETIEMPO _H_--'_ y LIMPIEZA __E_ controHan Hascaracterist[cas de homeado cont[nuo o de
ahorro de energia de 12 horas. EHcontroHdellhomo ha s[do preajustado en Hafabr[ca para Hacaracterist[ca de ahorro de
energia de 12 horas que apagar_, eHhorno s[ eHcontroHdellhorno es dejado encend[do durante m_.s de 11 horas y 59
m[nutos. EHhomo puede ser programado para anuHaresta caracterist[ca para Horneado Cont[nuo.
mNSTRUCCmONES OPRIMA
Programaci6n de_ contro_ para _as caracteristicas de
Homeado Continuo o Ahorro de Energi'a de 12 horas:
1, Opr[ma y mantenga opr[m[do _ durante 7 segundos (F[gura 1), _ Figura1
"12H¢' o "- -He' aparecer6, en eHindicador visuaHyeHcontroHemitira.
una seSaHsonora,
para cambiar entreHascaracteristicas de ahorco de2.
OFima
g
energ ia de 12horas y homeado continuo. Nota: "12Hc" en eHindicador Figura2
visuaHindica que eHcontroHesta,programado para modo de ahorro de
energia de 12 horas y "- -Hr" indica que eHcontroHha sido programado
para Hacaracteristica de homeado continuo (Figuras 2 y 3).
3. Oprima _ para aceptar eHcambio (Figura 4; eHindicador visuaH
Figura
3
voHver_,a despHegarHahora delldia) uoprima _ ..... sT°_....
CL-'E_-RpararechazareH CLEAR
cambio, Figura 4
Contador de Tiempo
La tecHaCONTADOR DETIEMPO _r[_ controHaHacaracteristica dell contador de tiempo. EHcontador de tiempo sirve
como un contador de tiempo adicionaH en Hacocina que emitir6, seSaHescuando eHtiempo que ha sido programado haya
expirado. No comienza ni detiene Hacocci6n. La caracteristica dellcontador de tiempo de Hacocina puede ser usada
durante cuaHquiera de Hasotras funciones de controHdell homo, ConsuHte HosAjustes Maximos y Minimos de HasTecHasde
ControHen Hap_.gina 57 para Hosajustes de Hascantidades de tiempo.
mNSTRUCCmONES OPRIMA mNDICADOR
Programaci6n de_ Contador de Tiempo (ejemp_o para
5 minutos}:
1. Optima _r_[_. "0:00" aparecera y "TIMER" desteHHar6,en eH
indicador visuaH(Figura 5).
2. Oprima HastecHasnum6ricas para programar eHtiempo deseado en
eHindicador visuaH(ejempHo_5-'_). Oprima S_ART_.EHtiempo
comenzar6, a disminuir "5:00" y "TIMER" aparecera en el indicador
visual (Figura 6). Nota: Si no se oprime _ el contadorde
tiempo volvera a Hahora del dia.
3. Cuando el tiempo programado haya expirado, "End" y "TIMER"
aparecera, en el indicador visual (Figura 7) y se escucharan 3
se_ales sonoras cada 15 segundos hasta que se optima d_[_N-_, d_,_H_N_)
Para cancelar el contador de t[empo de la cocina antes de
que haya expirado el tiempo pcogramado:
_9 EHindicador visuaHvoHver6,a despHegar Hahora dell dia.
Oprima
54
Figura 5
Figura 6
Figura 7
Page 55

Caracteristicas de Contro Definidas pot Consumidor
Nota: Las caracteristicas de controU definidas por eUconsumidor son soUamente ajustes aUcontroU que no afectan Uos
resuUtados de Uacocci6n, Estas incUuyeneUbUoqueodeUhomo, despliegue de la temperatura y funcionamiento silencioso de
los controles,
B_oqueo del Homo
"STOP
La tecla _CL-'£'_Rcontrola la caracteristica de bloqueo del homo, La caracteristica de bloqueo del homo bloquea
automaticamente la puerta del homo y evita que la gaveta calentadora sea encendida accidentalmente, No desactiva el
reloj ni el contador de tiempo ni los quemadores de gas, el Area calentadora ni las luces interiores del homo,
mNSTRUCCIONES OPRIMA mNDICADOR
Para activar _acaracteristica de b_oqueo de_ homo:
Oprima y mantenga oprimida _L-_EAPRdurante 3 segundos
1,
(Figura 1),
2, Despues de 3 segundos la luz del icono de bloqueo (
)
aparecera, se emitirA una serial sonora y "DOOR LOCKED"
(PUERTA BLOQUEADA} destellarA en el indicador, Una vez que
la puerta del homo es bloqueada el indicador "DOOR LOCKED"
dejara de destellar y permanecera encendido junto con la luz del
icono de bloqueo,
t_L-_Rdurante 3
segundos
Para reactivar e[ funcionamiento normal de[ homo:
1, Oprima y mantenga oprimida durante 3 segundos, Se
emitira una seSal sonora, "DOOR LOCKED" continuara
destellando hasta que la puerta del homo se abra
completamente y la luz del icono de bloqueo (_) se apagar&
(Ver Figura 2),
2, La estufa ahora esta en funcionamiento normal,
'(_R durante 3
segundos
Figura 1
Figura 2
;iiiiii!i!!ii?
%?
55
Page 56

Caracteristicas de Contro Definidas pot Consumidor
DespHegue de _aTemperatura - Fahrenheit o Celsius:
Las tecias ASAR A LA PARRILLA _ y LIMPIEZA _'_EA_ controlan ios modes de despHegue de Ha
temperatura
en
grades Fahrenheit o Ceisius, EHcontroi dell homo puede ser programado para despiegar Hastemperaturas en Fahrenheit o
Ceisius, EHhomo ha sido preajustado en Haf_.brba para despiegar Hastemperaturas en grades Fahrenheit,
mNSTRUCCmONES OPRIMA mNDICADOR
Cambio de_ despHegue de _atemperatura de
Fahrenheit a Celsius o de Celsius a Fahrenheit:
1, Para saber si Hapantalla esta programada para Fahrenheit o
Ceisius, puise y mantenga ei bot6n _'_ROR_),"BROIL",
_550 o}_
apareceran en Hapantalla (vea Figuraura 1) y continu6, de
PULSAR per7 segundos, Un sonido se escuchar& Si "F"
aparece, Hapantalla mostrara temperaturas en Fahrenheit (Figura
2), Si "C" aparece, Hapantalla mostrar#, temperaturas en Ceisius
(Figura3),
2, Oprima _ para cambiar entre eimode de despiiegue de
Fahrenheit o Ceisius, EHindicador mostrar_, ya sea "F" (Figura
2) o "C" (Figura 3),
3, Oprima para aceptar ei cambio u oprima CL"E_'_para
rechazar ei cambio,
Figura I
pot 7
segundos
Figura 2
Fur_cior_amiento SHencioso de los Contro_es
Las tecias TIEMPO DE PARADA @ y LIMPIEZA @ controlan Hacaracteristica de funcionamiento silencioso de
ios controles, La caracteristica de funcionamiento silencioso de ios controles permite que eicontroi dell homo sea
operado sin sonidos o seSales sonoras cuando sea necesario, Si se desea eicontroi puede ser programado para
funcionamiento silencioso y m6,starde voiver a funcionamiento con todos ios sonidos y seSales sonoras normales,
mNSTRUCCmONES OPRIMA
Cambio de_ funcionamiento con sonidos norma_es
de _os contro_es a funcionamiento si_encioso de _os
contro_es:
Para verificar si su estufa est,. programada para funcionamiento
o silencioso oprima y mantenga oprimida Hatecia @
normai
durante 7 segundos, En ei indicador "0:00" aparecer6, y
"DELAY" destellar_. (Figura 4),
2, con sonido
normal y funcionamiento silencioso. El indicador mostrar_, ya
sea ":SP" (Figura 5) o ":- J' (Figura 6).
pot 7
segundos
Si aparece ":SP" (Figura 5), el control funcionar6, con los
sonidos y se_ales sonoras normales. Si aparece ":- -" (Figura
6), el control est,. programado para funcionamiento silencioso.
3. Oprima para aceptar el cambio u oprima CL--'_'Rpara
rechazar el cambio.
56
Figura 4
Figura 5
Figura 6
Page 57

Ajuste de Contro es Homo
Preheat (Preca_entar)
La tecUaPRECALENTAR _HP_AET_controUaUacaracteristica de precaUentamiento, La caracteristica de precaUentar eUevar_.Ua
temperatura deUhomo y UuegoUeindicar_, cuando debe colocar el alimento en el homo, Use esta caracteristica en
combinaci6n con la tecla Bake (Hornear) cuando las recetas indican precalentamiento, El precalentamiento no es necesario
cuando hace asados o cocina guisos, El homo puede ser programado para precalentar a cualquiera temperatura entre
170°F a 550°R
mNSTRUCCIONES OPRIMA mNDICADOR
Programaci6n de _atemperatura de preca_entar a
350°F:
1, Arregle las parrillas interiores del homo,
2, Oprima ___AET_,"- - - °" y "BAKE" aparecera en
el indicador
(Figura 1),
3, Oprima(___, "350°"y"PRE"aparecer6.nene,
indicador (Figura 2),
4, Oprima _, "PRE" y"BAKE" apareceran en
el indicador a
medida que el homo se cafienta y Ilega a 350°F (Figura 3),
@
@Qdb
Nota: Despues de que el homo ha alcanzado la temperatura
deseada (en este ejemplo, 350°F) el control emitira una seSal sonora
y la luz "PRE" se apagara y se desplegara la temperatura del homo
(Figura 4), Si no se escucha la seSal sonora, una mirada rapida al
indicador con la temperatura del homo mostrada en elindicador del
homo es una buena manera de verificar que el homo ya ha
alcanzado la temperatura de precalentamiento, Una vez que el homo
se ha precalentado, COLOQUE EL AUMENTO EN EL HORNO. La
luz "BAKE" permanecer6, encendida,
Oprima CL--'_'Rcuando se haya completado el horneado o para
cancelar la caracteristica de precalentar,
Para cambiar _a temperatura de precalentar cuando
e_ homo est_ preca_entando (ejemp_o: para cambiar
de 350 ° a 425°F}:
Si es necesario cambiar la temperatura de precalentar a la
temperatura original cuando el homo esta precalentando:
Cuando est,, precalentando oprima _ER_, "- --°" y "BAKE"
1,
aparecer_.n en el indicador visual (Figura 5),
2, Programe la nueva temperatura de precalentar, Oprima
(___, y apareceran en
H4_250 II HBAKE_I el
indicador (Figura 6),
3, Oprima _, "PRE" y"BAKE" apareceran en
el indicador a
medida que el homo se calienta y llega a 425°F (Figura 7), Se
escuchara, una seSal sonora una vez que el homo haya
alcanzado 425°F y el indicador mostrar_. "425 °'' y "BAKE",
4, Cuando haya terminado de hornear oprima _CL-'L-_R'
Figura 1
Figura 2
Figura 3
Figura 4
Figura 8
::iiii!i!il
57
Page 58

Ajuste de Contro es Homo
Bake (Hornea 0
La tecUaHORNEAR _AKE_ controUaeUhorneado normal Si es necesario precaUentar, consuUteUacaracteristica precaUentar
para obtener Uasinstrucciones, EUhomo puede ser programado para homear a cuaUquiertemperatura desde 170°F a 550°F
(EUejempUoque se muestra a continuaci6n es para 350°F),
mNSTRUCCmONES OPRIMA mNDICADOR
Programaci6n de _atemperatura de hornear a 350°F:
1, ArregUeUasparrHUasinteriores deUhomo,
2, Oprima _, "--- °" aparecera en eUindicador (Figura 1),
3, Opr.ma_3__(F.gura2), "BAKE" deste..aray
"350 °'' aparecera, en el indicador visual,
4, Oprima _, Se escuchar6, una seSal sonora una vez que la
temperatura del homo haya Ilegado a350°F y el indicador
mostrar_. "350 °'' y "BAKE" (Figura 3),
Oprima CL--'EERpara cancelar la caracteristica de hornear en cualquier
momento,
Figura 1
Para cambiar _atemperatura de hornear (ejemp_o:
cambiar de 350°F a 425°F):
1, Despues deque el homo ha sido programado para hornear a
350°F y la temperatura necesita ser cambiada a 425°E oprima
_(Figura 4) y -- aparecera en
o
,i
el indicador visual,
2, Oprima _ _ _ (Figura 5), "BAKE" desteHara y
"425 °'' aparecer_, en el indicador visual,
3, Oprima _, "BAKE" y"425 °'' aparecer_.n en
el indicador
(Ver Figura 6),
Figura 2
Nota: Si el homo ha sido utilizado recientemente y est,. aOn
caliente, el simbolo del elemento de horneo no aparecera
inmediatamente en la pantalla.
58
Figura 3
Figura 4
Figura 5
Figura 6
Page 59

Ajuste de los Contro[es de[ Homo
Horneado por Conveccion
La tecIa BORNEADO POR CONVECCION _ON_ controla la caracteristica de homeado
v
pot convecci6n= Use [a caracter(stica de horneado per convecci6n cuando desea cocinar
en forma rapida= EI homo puede set programado para homear per convecci6n a
cuaiquier temperatura entre 300°F (149°C) a 550°F (288°C)=
El homeado pot convecci6n usa un ventiiador para circular el caior uniforme y
continuamente dentro del homo (Vet Figura 1). Esta distdbuci6n mejorada del calor
permite que la cocci6n sea uniforme y rapida y que [os alimentos queden dorados=
Ademas mejora el homeado cuando se usan dos (2) o tres (3) parrillas al mismo tiempo=
Los panes y pasteles se doran mas uniformemente= La mayor[a de los alimentos
cocinados en un homo est_ndar se cocinaran mas rapido y mas uniformemente con el
horneado per convecci6n=
CircuIaci6n
de[ aire
durante e[
homeado
pot
convecci6n
Figura 1
[nstrucciones Generales para el Horneado pot Convecci6n:
1= Cuando use Convection Bake, disminuya [as betas de cocci6n normales de
acuerdo con las indicadas en [a p&gina 71= Ajuste el tiempo de cocci6n de acuerdo
con su preferencia seg0n sea necesario= Las reducciones de tiempo variar&n
dependiendo de la cantidad y tipo de alimento que vaya a ser cocinado= Las
galietas y bizcochos deben set homeados en bandejas que no tengan lades o
cuyos lades sean muy bajos para permitir que el aire ca[iente circu[e airededor de[
alimento. Los alimentos cocinados en bandejas con acabado obscure se cocinaran
con mayor rapidez.
2= No es necesario precalentar el homo cuando se cocinan guises usando horneado
per convecci6n=
3. Cuando se usa horneado pot convecci6n con una sola parrilla, coloque la parrilla
del homo en la posici6n 2 o 3. Si cocina con parri!las m01tiples, coloque las
parrillas del homo en las posiciones 2 y 3 (para 2 parrillas; Vet Figura 2).
4. Se obtienen mejores resultados con los pasteles cuando se hornean con la tecla
Cake de la caracteristica de la Categoria de Alimentos.
mNSTRUCCmONES
Programaci6n de[ homo para horneado pot convecci6n y
temperatura a 350°F:
1= Arregle [as parrillas intedores del homo y coioque el alimento en el
homo=
2= Optima _o_= "CONV BAKE"" desteHara y ""== =°""aparecerb, en el
indicador (Figura 3)=
3= Oprima _ _ "CONV BAKE" y "350°''
apareceran en el indicador visual
4= Oprima ST_= ""CONV BAKE"" y ""PRE""apareceran en el indicador
A
visuai (Figura 5) hasta que el homo [[egue a 350°R Se emitira una
seSai sonora una vez que el homo haya alcanzado la temperatura
de 350°F y el indicador mostrara "350 ..... CONY BAKE"" y el icono
del ventilador (Figura 6)=
OPR[MA
©
[aPam[ia
--4_ Posici6nde
la Parrilla
Beneficioe del Homeado
por Convecci6n:
--AIgunos aiimentos se cocinan
hasta un 30% mas rapidamente,
ahorrando tiempo y energia.
--Se puede homear en parrilIas
m01tiples=
-- No se necesitan cacerolas o
utensilios especiaIes=
[ND[CADOR
Nota: El ventilador de convecci6n comenzara a funcionar un corto tiempo
despues de que ei homo haya side programado para homeado per
convecci6n= El simbolo del icono dei homo mostrara entonces un
ventilador girando= Este icono del ventilador girando indica cuando el
ventilador de convecci6n est_ en operaci6n (Ver Figura 6)=
Optima para detener el homeado per convecci6n o cancelar el
horneado per convecci6n en cualquier memento=
CLEAR
Figura 1
Figura 2
Figura 3
Figura 4
59
Page 60

Ajuste de los Contro[es de[ Homo
Timed Bake (Homeado Programado) y Convection Timed Bake
@ @
Las tedas HORNEAR o HORNEADO POR CONVECCmON y T[EMPO DE COCC[ON DEL HORNO OrE.COoK
controlan la caracteristica de horneado programado, El contador automatico de la caracteristica horneado programado apagara el
homo en la hora que usted seleccione con anterioridad.
[NSTRUCCiONES
Programaci6n de[ homo para horneado inmediato y
parada automat[ca: (el ejemp[o siguiente es para
homear a 350°F durante 30 minutos):
1. Aseg0rese de que el re[oj muestre la hora correcta del d[a.
2. Arregle la(s) parriIIa(s) [nterior(es) deI homo y si esta asando o
coc[nando un gu[so, coloque el aIimento en el homo.
3. Optima _. "- - - o. aparecera en el ind[cador (F[gura 1).
4. Oprima_3>_5_0)(Figura2)"BAKE"destellar, y"350 °"
aparecera en eI ind[cador visual.
5. Oprima ST_._. Se oira una seffai sonora una vez que la temperatura
del homo haya Ilegado a "350°F" y el [nd[cador v[suaI mostrara "350 °" y
"BAKE" (F[gura 3).
6. Optima OVENCOOK"TIMED" desteHara; "BAKE", "00:00" y "350 °"
apareceran en el [ndicador (Figura 4).
7. Programe et t[empo de homeado deseado oprimiendo __3 2_ _.0_.
"TIMED" desteiiara y "BAKE", "30:00" y "350 °" apareceran en ei
ind[cador visual (Figura 5). Nota: El t[empo de homeado puede set
programado para cualquier cant[dad de tiempo entre 1 m[nuto a 11
horas y 59 minutos.
8. Oprima ST_. LOSiconos "TIMED" y "BAKE" permaneceran
encend[dos en eI ind[cador (F[gura 6). Una vez que Ia caracter[stica de
horneado programado haya comenzado, la hora del dia aparecera en el
ind[cador visual
OPFIiMA
OVEN COOK
Nota: Despues de que se ha activado la caracterist[ca de homeado
OVEN COOK
programado, optima OVENC0OKpara desplegar el tiempo de horneado restante
en el modo de horneado programado.
_D cu '
Optima CL-'_'r anoo haya term[nado de homear o en cualqu[er momento STO_,
para cancelar la caracteristJca de homeado programado.
Cuando haya expirado e[ tiempo de homeado:
1. "End" aparecerb, en el indicador y el homo se apagara
automb,ticamente (F[gura 7).
2. EI control em[tira 3 seffaIes sonoras. El control continuara em[tiendo 3
Stop
so,ales sonoras cada 30 segundos hasta que se optima _CL-_-_-r_
_L'_R
Figura 1
Figura 2
Figura 3
Figura 4
Figura 5
Figura 6
Figura 7
NOTA: Recuerde que la temperatura mas baia para el HORNEO es de 170F y lamas baja para el HORNEO A CONVECCION es
de 300F.
_ Tenga mucho cuidado cuando eI contador automat[co. Use el contador autom_tico cuando coc[ne
use carries
curadas o congeladas, asi como Ia mayoria de las frutas y verduras. Los aHmentos que se puedan echar a perder fac[Imente tales
como la Ieche, huevos, pescado, came de res o de ave deben ser refdgerados primero. Ann cuando hart estado refrigerados, no
deben dejarse en et homo pot mas de 1 hora antes de comenzar Ia cocc[6n y se deben sacar rap[damente una vez que esten
Hstos. S[ se ingieren aHmentos echados a perder se puede enfermar de intox[caci6n pot aHmentos.
60
Page 61

Ajuste de ControRes Homo
De_ayed Time Bake (Homeado Programado Diferido)
@ @ 1--"
Las toclas HORNEAR o HORNEADO POR CONVECOION , TJENPO DE COCCION EN EL HORNO OVENCOOKy tNICIO
controlan la caracter(stica de homeado programado diferidoa El contador automatico de horneado programado diferido
encendera y apagara el homo en la hora que usted haya seleccionado con anterioridada
NOTA: Si su reloj ha sido programado para ei modo de despliegue normal de 12 horas, Ia caracterfstica de horneado programado diferido
no puede nunca set programada con mAs de 12 horas de anterioridad. Para programar el horneado programado diferido con 12 - 24
horas de anterioridad, yea en la pd_gina 56 las instrucciones como programar el control para desplegar la hora del dia en formato de
24 horas, mNSTRUCCmONES OPRIMA mNDICADOR
Programaci6n del homo para un tiempo de homeado diferido y
parada autom_tica (ejemplo: para homear a 350°F durante 50
minutos y iniciar alas 5:30):
1. Aseg0rese de que el re!oi muestre la hora correcta del dfa.
2. Arregle la(s) parrilla(s) interior(es) del homo y si est,. asando o cocinando un
guiso, co!oque e! alimento en el homo.
3. Oprima _. "- - -°" aparecerb, en el indicador (Figura 1).
aparecerfi en el indicador visUala
5. Optima ST_a Se emitir_ una se[_al sonora una vez que el homo Ilegue a
350°F y el indicador visual mostrar_ "350°" y "BAKE" (Vet Figura 3).
6. . OVENCOOK
Opnma _. ""TmMED""destellar&; ""BAKE"", "30:00" y "350 °" aparecer_tn
en el indicador visual (Figura 4).
7. Prog rame el tiempo de horneado deseado usando las teclas num6ricas
oprimiendo ___,3 2_ (0_. ""TIMED"" destellar#t; ""BAKE"", ":50" y "350 °"
aparecer&nenel indicador(FiguraS). Nota: EItiempode homeadopuede
ser programado para cualquier cantidad de tiempo desde 1 minuto hasta 11
horas y 59 minutos.
(_ n H n H H oH
8. Oprima . TIMED , BAKE y 350 aparecer_nenelindicador
visual (Figura 6).
9. Oprima @. Programe el tiempo de inicio deseado usando las teclas
10. Oprima @. Cuando comience el horneado programado diferido, la
temperatura del homo desaparecerb,, "TtMED DELAY", "BAKED" y la hora
del d[a aparecer&n en e! indicador (Figura 8).
11. Cuando entre el tiempo deseado, "350 °``aparecer_ en la pantalla y "DELAY"
desaparecerb,. El homo comienza a hornear a la temperatura que se eligi6
anteriormente (Figura 9).
QbdSbC>
OVENCOOK
@
QQdb
Figura 1
Figura 2
Figura 3
Figura 4
Figura 5
Figura 6
Figura 7
Figura 8
Figura 9
Nota: Una vez que haya comenzado el horneado programado diferido, oprima
OVEN COOK
_ para desplegar e!tiempo de horneado restantea
Oprima cuando naya _ermlnado de hornear o en cualquier momento para
cancelar la caracter[stica de homeado programado diferidoa
OVEN COOK
_LEAR
Cuando expire el tiempe de homeado programado:
1. "End" aparecer_ en el indicador y el homo se apagar_ autombtticamente
(Figura 9).
2. El control emitir_ 3 seflales sonoraSa El continuar_ emitiendo tres se[_ales
sonoras cada 30 segundos hasta que se optima :(_1_ a 61
Figura 10
Page 62

Ajuste de los Contro es Homo
Ajuste del dispositivo ServirTibio
E[ bot6n SERVIR TIBIO @ enc[ende e[ d[spos[t[vo Serv[r T[b[o y mantendr& una temperatura de 170°F. EU
dispositivo
SERV[R T[B[O mantendra los aHmentos t[b[os para serv[r hasta 3 horas despues de haber term[nado [acocc[6n, Luego de
estas 3 horas, e[ d[spos[t[vo se apagara., E[ d[spos[t[vo Serv[r T[b[o puede ser usado solo o [uego de haber term[nado [a
cocci6n con HORNEO A CONVECCUON o CARNES,
E[ d[spos[t[vo Servir Tibio tambien puede ser uti[izado con HORNEO CRONOMETRADO o HORNEO CRONOMETRADO
EN D[FER[DO si desea que el dispositivo Servir Tibio se encienda autom_.ticamente a[ momento de terminada de [a
cocci6n, Para uti[izar el dispositivo de HORNEO CRONOMETRADO necesita ajustar el tiempo de inicio y de duraci6n de
[a cocci6n, Con esta informaci6n, el control puede ca[cu[ar cuando se termina [a cocci6n y asi iniciar el dispositivo
SERV[R T[B[O autom6.ticamente,
INSTRUCCIONES
Para ajustar ServirTibio:
1, Arregle las grillas interiores del homo para colocar los alimentos
adentro, Si los a[imentos se encuentran ya adentro, pase a [a
etapa 2,
2, Presione @, El indicador [uminoso SERV[R T[B[O se
i
encender&
Nota: Si toca otros botones en los pr6ximos 25 segundos, el
dispositivo para encender SERV[R T[B[O se anu[ara.,
3, Presione _-A_, El indicador [uminoso SERV[R T[B[O se
encender_, constantemente para indicar que el dispositivo est,. en
marcha (Figura 1),
4, Para apagar el dispositivo Servir Tibio a cua[quier momento,
simp[emente presione @ otra vez, El indicador [uminoso
Servir Tibio se apagar& (Figura 2) El dispositivo Servir Tibio se
apagar6, autom_.ticamente despu6s de 3 horas,
Para que el dispositivo SERVIR TIBIO se encienda
automAticamente:
1, Arreg[e [as gri[[as interiores de[ homo y co[oque los a[imentos en el
homo, Ajuste el homo para Horneo cronometrado o Homeo
cronometrado en diferido,
2, Presione @, El indicador [uminoso Servir Tibio se encender&
Nota: Si toca otros botones en los pr6ximos 25 segundos, el
dispositivo para encender Servir Tibio se anular&
3, Presione _A_, El indicador [uminoso Servir Tibio se encender#,
constantemente para indicar que el dispositivo se pondrA en
marcha luego que elHorneo cronometrado o Homeo cronometrado
en diferido ha[[aterminado,
4, Para apagar el dispositivo Servir Tibio en todo momento, presione
una vez m_.s, El indicador luminoso Servir Tibio se
apagar& (Figura 2) El dispositivo Servir Tibio se apagar_.
autom_.ticamente despues de 3 horas,
Presionar ;(?_ en todo momento terminar_, todo procedimiento de
homeo,
62
OPRIMA
@
INDICADOR
SERVE
WARM
Figure 1
SERVE
WARM
:CL'-_-Ri_
@
Figure 2
Page 63

Ajuste de Contro es Homo
(ASAR A LA PARRILLA) - La Tecla _ controla Ia caractedstica de asar a la parrilIa. Cuando se asa a Ia
BROIL
parrilIa, el calor se irradia hacia abajo desde el asador dei homo para una cobertura uniforme. Para obtener mejores resultados,
asegOrese de que Ia asadera quede centrada directamente debajo del quemador del asador del homo. Las temperaturas de asar
a la parrilIa pueden set programadas de 400°F a 550°R La estufa inctuye una parrilIa de asar para carnes (vet Figura 6).
La asadera y el inserto se usan conjuntamente para permitir que la grasa se escurra y pueda mantenerse alejada del alto calor deI
quemador del homo (Figura 5). NO use la asadera sin el inserto. NO cubra el ineerto con papet de aluminio. La grasa expuesta
se puede incendiar.
En caso de que se produzca un incendio en el homo, cierre la puerta deJ homo y apaguelo. Si el incendio
continOa, arroje bicarbonato de soda o use un extinguidor de incendios. NO arroje agua o harina al fuego. La harina puede ser
explosiva y el agua puede causar un incendio de grasa que se extienda y cause alguna lesi6n personal.
mNSTRUCCmONES OPRIMA
ProgramacJ6n demhomo para asar a la parriiia a 550°F:
1. Coloque el inserto en Ia asadera. Luego coloque el alimento sobre el
inserto. NO use Ia asadera sin el inserto. NO cubra el inserto con papel
de aluminio. La grasa expuesta puede incendiarse.
2. Arregle Ia parrilla interior del homo y co!oque Ia asadera en Ia parrilIa
del homo. AsegOrese de colocar Ia asadera en ei centro directamente
debajo deI quemador del asador. Cierre mapuerta det homo cuando
este asando ama parriHa.
3. Optima _..aOl_,"BROIL" destellara y "550 °" aparecera en el indicador
(Figura 1).
4. Si desea una temperatura mas baja (minima temperatura de asado es
400F°), pulse Ia temperatura deseada antes de seguir con la etapa 5.
5. Optima sT_. Ei homo comenzara a asar a la parrilla. "BROIL" y
"550 °" apareceran en el indicador visual (Figura 2).
6. Primero ase un lado hasta que el al[mento este dorado; de vuelta y
cocine ei otto Iado. Sazone y s[rva. Nota: Siempre tire de Ia parrilla
hacia afuera hasta que Ilegue al tope antes de dar vuelta o sacar el
alimento.
7. Para cancelar la caracter[stica asar a la parr[lla o si ha term[nado de
asar a Ia parrilla optima CL'-L'_-R(F[gura 3). CLEAR
Tiempos de Asar a ia Parriila y Parriila de Asar
Use la tabla s[guiente para los t[empos de asar a Ia parrilla aproximados. Aumente o reduzca los
tiempos de asar a Ia parrilla o cambie Ia asadera a una posici6n diferente en Ia parrilIa segOn sea su
preferencia personal de cocci6n. Si el al[mento que usted esta asando no aparece en la tabla, siga
las instrucc[ones previstas en su 
Ajuste de ControRes deR Homo
Programacion de _a Caracteristica Categoriasde Alimentos:
Las teclas CARNES _EAT_, PASTELES _'AKE_ y PANES dA_ en la caracteristica de Categoria de Alimentos
se usan
v
cuando se cocinan ciertos tipos de afimentos, Estas tedas han side dise_adas para un rendimiento 6ptimo en UacocciOn de
Uosafimentos seUeccionados en cada categoria,
La teda MEAT (CARNES) combina un cicUo de cocci6n con eUventHador de convecci6n y un eUemento para asar carnes de
res y de aves, EUprecaUentamiento no es necesario para Uascames de res y de ave, EUaire cafiente circuUa aUrededor deU
afimento desde todos UosUados, seHando Uosjugos y sabores, Los afimentos son dorados per el exterior y se mantienen
hOmedos en el interior,
La teda CAKES (PASTELES) ofrece un precalentamiento con un ciclo suave de calor dando a los pasteles m_.s volumen y
permitiendo que los alimentos deficados se cocinen mas uniformemente,
La teda BREADS (PANES) agrega una caracteristica de precalentamiento al ciclo de horneado para calentar
completamente el homo desde arriba hasta abajo para producir alimentos mas uniformemente dorados, Consulte (Figura 4)
para los afimentos que puede cocinar en cada categoria,
mNSTRUCCIONES
Para programar _a caracteristica Categodas de
AHmentos (e_ ejemp_o es para Meats (Carnes)
usando una temperatura de cocci6n de 325°F):
1. Arregle las parrillas interiores del homo y coloque el alimento en el
homo.
2. Optima M_. "MEATS" destellara y "--°" se desplegara en el
indicador (Ver Figura 1).
3. Opr,ma___. "MEATS"desteHarb. y"350 °"
aparecera en e! indicador (Vet Figura 2).
4. Pulse _. "MEATS" y "350 °'' aparecerb, nen ia pantaJia. El
simbolo del ventiiador del convector rotativo aparecera minutes
despues de haber puisado START (Figura 3).
STOP
El icono del ventilador de convecci6n se encendera_ Oprima _CL'-_Rpara
terminar de cocinar carnes, pasteles o panes o para cancelar la cocci6n
de cames, pasteles o panes en cualquier memento.
OPRIMA mNDICADOR
G
Cb(Z)db
:C[--'_'Ri
A{imentos
recomendados que
pueden set cocinados
en carla categoHa
Figura 4
Carnes
Came de Res
Came de Ave
/.............................................................
Pasteies
Pasteles
Brownies
Pays (frescos y congelados)
Budines horneados
Pastel de Queso
Panes
Panes
Panecillos
Bizcochos
Panquecitos
Pan de Maiz
Figura t
Figura 2
Figura 3
mnstrucciones para Asar con la Tecla "Meat": Figura5
Cuando use Ia tecla "Meat" para asar, use la asadera y ei inserto junto con Ia parrilla de asar. La asadera colectara los derrames de
grasas y el inserto ayudara a evitar que Ia grasa salpique. La parrilla de asar permitJra que el calor circule alrededor de la came.
_Para que toque quemador y para prevenir salpicaduras grasa, use
evitar el alimento el etemento del de NO la
parrilla de asar cuando este asando a Ia parrilla.
1. Coloque la parrilla del homo en Ia parte inferior o iunto a la posici6n inferior de la parrilla. Vet Disposition de las ParriHas dem
Homo en este Manual del Usuario.
2. Coloque el inserto en la asadera. La parrilla de asar calza en e! inserto permitiendo que el aire caliente circule debaio deI
alimento o para cocci6n uniforme y ayuda a aumentar el dorado del lade inferior de los alimentos. AsegOrese de que Ia parrilIa
de asar este firmemente asentada en el inserto de la asadera. NO use la asadera sin el inserto ni cubra el inserto con papel de
aluminio.
3, CoIoque el alimento (ei lado con grasa hacia ardba) en la parrilla de asar (Vet Figura 5),
4. Coloque la asadera en la parrilla del homo,
64
Page 65

Limpieza Homo
Pr÷paracion para emCicio de Autolimpieza:
Un homo autolimpiante se limpia por si mismo a altas temperaturas, Io que elimina completamente Ia suciedad o la reduce a una
ceniza fina que se puede limpiar con un paso hQmedo. Estas temperaturas son bastante mas elevadas que las temperaturas de
cocci6n normales=
Reepete las siguientee precaucionee de mimpieza:
'_ Deje enfriar el homo para efectuar la Iimpieza previa=
,_ Use guantes de goma cuando haga la limpieza previa y cuando limpie los residuos
despues del ciclo de autolimpieza.
,_ NO use agentes de limpieza para homo o revestimientos protectores en las piezas del
homo autolimpiante o alrededor de elias=
,_ NO Iimpie Ia junta de la puerta del homo= EI material tejido de la junta de Ia puerta dei
homo es esencial para un buen sellado= Tenga cuidado de no frotar, daSar o sacar la
junta.
MANO LA
,_ NO use ningOn agente de limpieza en la junta de la puerta del homo, ya que se puede
PUERTA
da_ar=
Los vapores emitidos
durante eI cicto de
autolimpieza de cualquier
estufa pueden afectar la
salud de algunos pajaros.
Cambie Ios paiaros a otra
habitaci6n bien ventilada=
Figura !
Retire maparrilla de aear, maaeadera y el ineerto, todos Bos utensilios y empapeB de
aBuminio que pueda haber. Estoe objetos no pueden reeietir las altas temperaturas de ma
limpieza.
_NO coloque papeI en paredes en parrillas,
de aluminio Ias del
homo,
las
en Ia parte inferior ni en cualquier otra parte de la estufa pues podr[a afectar la distribuci6n
del calor, dar malos resultados en el horneado y causar daSo permanente al interior del
homo (el papet de aluminio se puede derretir en la superficie interior del homo)=
El homo tiene parrillas esmaltadas lubricadas, que pueden permanecer en e! homo durante
el cicto de autolimpieza= No etimine el aceite vegetal de Ias parrilIas= Es importante que los
laterates de las parrilIas permanencia con una delgada capa de aceite vegetal Para
mantener el funcionamiento correcto, aplique aceite vegetal despues de cada ciclo de
autolimpieza o cuando se dificulte el deslisamiento de la parrilla=
4. Limpie todos los derrames de la cavidad del homo antes de comenzar el ciclo de
autotimpieza. Para Iimpiar, use agua caliente con detergente y un paso. Los derrames
grandes pueden causar humo denso o un incendio cuando se exponen a altas temperaturas.
NO deje que queden en Ia superficie det homo derrames con alto contenido de azucar o
acido (tales como leche, tomates, chucrut, jugo de frutas o rellenos de tartas), pues pueden
deiar una mancha opaca incluso despues de Ia Iimpieza.
5. Limpie toda Ia suciedad dei marco del homo, del revestimiento de la puerta fuera de la junta
de la puerta del homo y del Area pequeSa en Ia parte delantera central de la parte inferior del ;............
homo. Estas Areas se calientan Io suficiente como para quemar la suciedad acumulada.
Limpie con iab6n y agua.
Si en cualquier momento cuando esta programando el homo para el ciclo de autolimpieza, eI
control deI homo emite sonidos continuos y el indicador visuaI muestra "dr"; cierre la puerta del
homo (Vet Figura 1)=
Figura 2
J
El elemento del homo
levantado aproximada-
mente 4 o 5 pulgadas
para limpiar la parte
inferior del homo.
NOTA: Antes de comenzar eI ciclo de Autolimpieza, se debe limpiar cualquier derrame que haya
en la parte inferior del homo=
El etemento ha sido diseSado para set Ievantado desde la parte delantera con su mano (ver
Figura 2). Esto permitira un acceso mas facil a Ia parte inferior deI homo para Iimpiarlo. Tenga
cuidado de no levantar el elemento del homo mas de 4 o 5 pulgadas desde su posici6n de
reposo=
65
Page 66

Limpieza Homo
Para Comenzar el Ciclo de Autolimpieza:
La tecla LIMPSEZA ______LEA_controla la caracter(stica de autolimpieza, Si est4 planeando usar el homo inmediatamente despues
de un cicJo de autolimpieza recuerde que es necesario esperar un tiempo hasta que et homo se enfr(e y Ia puerta deI homo se
pueda abrir. Esto normalmente demora aproximadamente una hora. Pot Io tanto si desea un ciclo de autolimpieza de 3 horas
en reatidad demorara 4 horas en comptetarse.
*Se recomienda usar un ciclo de 2 horas para suciedad leve, un cicto de 3 horas para suciedad normal y un ciclo de 4 horas
para un homo muy sucio (para garantizar resultados satisfactorios).
Durante el ciclo de autolimpieza la parte exterior de Ia estufa se calienta mucho. NO deie a los ni_os sin
vigilancia cerca del electrodomestico pues se pueden quemar si tocan las superficies calientes de Ia puerta del homo.
_NO fuerce la del homo abrirla. Esto da_ar el sistema de cierre automatico de Ia
puerta
para
puede puerta.
Tenga mucho cuidado cuando abra [a puerta despues de que se haya completado un ciclo de autolimpieza. Col6quese aI lado
del homo cuando abra Japuerta para dejar salir el aire o vapor caliente. El homo puede todavia ÷star MUY CALIENTE.
INSTRUCCIONES
Programaci6n de los controles para un ciclo de
autolimpieza de 3 horas que comience
inmediatamente y termine autom_ticamente:
1. AsegQrese de que eJ reloj muestre Jahora correcta del d[a y que Ja
puerta del homo este cerrada.
2. Optima _L_LEAN_."CLEAN" desteIIar4 y "3:00" HR se mostrara en el
Jndicador visual (Figura 1). El control autom#_ticamente Iimpiara
durante un periodo de tres horas (tiempo impFcito del cicto de
JJmpieza). Nota: Si se desean 2 o 4 horas de tiempo de JJmpieza,
optima _2_ para 2 horas u optima _4_ para un tiempo de
JJmpieza de 4 horas. Seleccione ei tiempo de limpieza basandose en
Jacantidad de suciedad que tenga el homo: leve, mediana o
bastante (*Ver arrJba).
3. Oprima _. EI icono "DOOR LOCKED" destellarb.; el icono
"CLEAN" y las letras "CLn" permaneceran encendJdas en el
indicador visual (Figura 2).
4. Tan pronto como el control sea programado, el cierre mecanico de Ja
puerta comenzara a cerrarse automaticamente. Una vez que la
puerta se ha cerrado la luz indicadora "DOOR LOCKED" dejar5 de
destellar y permanecera encendida. Ademas, el icono del homo
aparecera en el indicador visual (Figura 3).
Nota: La puerta del homo demora aproximadamente 15 segundos en
c@rrars@,
T_rmino del Ciclo de Autolimpieza:
1. La hora del dia, el [cono "DOOR LOCKED" y "CLEAN"
permaneceran en el indicador visual (Figura 4).
2. Una vez que ei homo se ha enfriado completamente durante
aproximadamente 1HORA y eI icono "DOOR LOCKED"
desaparezca del indicador visual, la puerta del homo puede
entonces ser abJerta (Figura 5).
Parada o hterrupci6n del Ciclo de AutoHmpieza:
Si es necesario detener o interrumpir un ciclo de autolimpieza debido a
humo excesivo o incendio en el homo:
1. Optima CL-Z'_-R"
2. Una vez que ei homo se haya enfriado durante aproximadamente
1HORA y el icono "DOOR LOCKED" no aparezca desplegado en el
Jndicador visual, Japuerta del homo puede ser abierta (Figura 5).
66
OPRIMA
CZ:)°Q
INDICADOR
Figura 1
Figura 2
Figura 3
Figura 4
Figura 5
Page 67

Limpieza de[ Homo
Para Comenzar el Ciclo de autoHmpieza Diferido
Las teclas UMPgEZA _LEtN_, TIEMPO DE INJCJO _ y el largo del ciclo de Iimpieza, controJan et cicto de autoJimpieza diferido. El
contador de tiempo automatico encendera y apagara et homo a la hora que usted seJeccione con anterioridad. Aseg0rese de revJsar
los tiempos de JJmpieza recomendados indicados en Ja secci6n PARA COMENZAR EL CICLO DE AUTOLIMPIEZA.
Durante el cicIo de autolimpieza la parte exterior de Ia estufa se calienta mucho+ NO deje a los niffos sin
vigilancia cerca del electrodomestico pues se pueden quemar si tocan las superficies calientes de Ia puerta del homo+
_NO fuerce la dei homo abrirla+ Esto da[_ar el sistema de cierre automatico de Ja
puerta para puede puerta. Tenga
mucho cuidado cuando abra Ia puerta despues de que se haya completado un ciclo de autolimpieza, Col6quese aI lado del homo
cuando abra la puerta para dejar salir el aire o vapor caliente+ El homo puede todavia estar MUY CALIENTE+
INSTFIUCCIONES
Programaci6n de[ control para que e[ cic[o de
autolimpieza comience en un tiempo diferido y se
apague autom_ticamente: (ejemp[o de un ciclo de
autolimpieza de 3 horas para iniciar a las 4:30):
1+ Aseg0rese de que el reloj muestre Jahora correcta del d[a y que Ja
puerta del homo este cerrada+
2+ Optima _FA_+ "CLEAN" destellara y "3:00" HR se desplegara en el
Jndicador (Figura 1)+ El control autom&ticamente limpiara durante un
periodo de 3 horas (duraci6n del cicio de autolimpieza implicito)+ Nota:
Si se desean 2 o 4 horas de tiempo de limpJeza, optima _ para 2
horas u optima (_4_) para un tiempo de JJmpieza de 4 horas+
Programe el tiempo de limpieza de acuerdo a Ia cantidad de suciedad
que tenga - leve, mediana o bastante suciedad (*Vet pagina 68)+
3, Oprima _, El icono "DOOR LOCKED" destellarA; el icono
"CLEAN" y las letras "CLn" permaneceran en el Jndicador visual
(FJgura 2).
4. Optima _ (Figura 3). Programe el tiempo de Jnicio deseado
usandolasteclasnum6ricas ( 9_(_(0_(Figura3).
5. Optima _. El icono "CLn" se apagarb4 los [conos "DELAY",
"DOOR LOCKED" y "CLEAN" permanecer4n encendidos.(figura 3)
6. Tan pronto como el control sea programado, el cierre mecanico de Ia
puerta comenzara a cerrarse automat+camente. Una vez que la puerta
se ha cerrado Ia Iuz indicadora "DOOR LOCKED" dejara de destellar y
permanecera encendida. El icono del homo aparecera en el indicador
visual.
7. El control calculara regresivamente desde e! tiempo de parada
seJeccionado para determinar cuando debe comenzar el ciclo de
autolimpieza. Ei ciclo de autolimpieza comenzara automaticamente en
Jahora calculada. En ese momento el [cono "DELAY" desaparecera;
"CLEAN" y "CLn" apareceran en el indJcador visual (FJgura 5).
T_rmino de[ Cic[o de Auto[impieza:
1+ La hora del d[a, los [COHOS"DOOR LOCKED" y "CLEAN"
permaneceran en el indicador visual (Figura 6)+
2+ Una vez que el homo se haya enfriado completamente durante
aproximadamente 1HORA y et [cono "DOOR LOCKED" desaparezca
del indicador visual, la puerta del homo puede entonces set abierta
(Figura 7).
67
OPFIIMA
GC>db
INDICADOR
Figura 1
Figura 2
Figura 3
Figura 4
Figura 5
Figura G
Figura 7
%?
Page 68

Limpieza deJ Homo
PARA COMENZAR EL CICLO DE AUTOUMPIEZA DIFERIDO (Continuaci6n)
INSTRUCCIONES
Parada o Jnterrupci6n de un CicJo de AutoHmpieza:
Si es necesario detener o interrumpir un ciclo de autolimpieza debido a
humo excesivo o incendio en el homo:
1. Oprima C[-L_R
2. Una vez que eI homo se haya enfriado durante aproximadamente 1
HORA y el icono "DOOR LOCKED" no aparezca desplegado en el
indicador visual, Ia puerta del homo puede set abierta (Figura 1).
OPRIMA INDJCADOR
_-EAR
Figura 1
NOTA: Si su reIoj esta programado para modo de desptiegue normal de 12 horas, el cicto de autoIimpieza diferido no puede nunca
set programado con 12 horas de anterioridad. Para programar un cicIo de autoIimpieza diferido con 12 - 24 horas de anterioridad, yea
en la pagina 56 las instrucciones como programar el control para despIegar la hora del dia en formato de 24 horas.
Ajuste de JaTemperatura deJ Homo
DESORJPOmON DE LA CARAOTERJSTJCA
La temperatura dei homo ha sido preajustada en la fabrica. Cuando use el homo pot primera vez,
asegOrese de seguir los tiempos y temperaturas indicados en la receta. Si usted cree que el homo
esta demasiado catiente o demasiado frio, la temperatura del homo puede ser ajustada. Antes de
ajustar, pruebe una receta usando un ajuste de temperatura que sea superior o inferior a la
temperatura recomendada. Los resultados del horneado Je ayudaran a decidir cuanto ajuste
necesita la temperatura.
mNSTRUOOmONES OPRIMA
Nota: Los ajustes de Ia
temperatura del homo hechos
con esta caracteristica no
cambiaran Ia temperatura del
ciclo de autolimpieza.
mNDICADOR
Para aumentar el ajuste de ia ternperatura deJ homo:
1. Optima __.A_ durante 6 segundos (Figura 2).
2. Para aumentar la temperatura use las teclas numericas para
programar el cambio deseado. (Ejemplo 30°F) L3_,_ L0_,,,_
(Figura 3). La temperatura puede set aumentada en 35° (17°C) cada
vez.
3. Optima (_ para aceptar el cambio de temperatura y el indicador
visual volvera a la hora del dia (Figura 4). Optima CL'_'_!{para
rechazar el cambio si es necesario.
STOP
u CL--_-R-R
Para disminuir eJ ajuste de ia ternperatura deJ homo:
1. Oprima _AK_ durante 6 segundos (Figura 5).
2. Para disminuir la temperatura use las teclas num@icas para
programar el cambio deseado. (Ejemplo -30°F) _3_ _-_ y
Juego oprima ____LEA,_(FJgura 6). La temperatura puede set
disminuida en 35°F (17°C) cada vez.
3. Optima _ para aceptar el cambJo de temperatura y e! indJcador
STOP
visuaJ volver4 a la hora del dia (Figura 7). Optima C['-_'_Rpara
rechazar el cambJo si es necesarJo.
O
dDoC)
Q
u _CL--'_R
Figura 2
Figura 3
Figura 4
Figura 5
68
Figura 6
Figura 7
Page 69

Cuidado y Limpieza GeneraJ
Superficies Como Limpiar
Aluminio y VinJlo Use agua caliente jabonosa y un paBo. Seque con un paBo limpJo.
Perillas de Control
Esmattadas y PIAsticas,
Piezas del Cuerpo y
Molduras Decorativas
Acero Inoxidabte, Panel de
Control de Cromo, Molduras
Decorativas
Asadera de Porcelana
EsmaItada e Inserto,
Revestimiento de la Puerta,
Piezas del Cuerpo, Gaveta
Calentadora
ParrilJas del Horno
Puerta del Homo
Para //mpieza general, use agua caliente jabonosa y un pa_o. Para manchas mas diffcfies y
grasa acumutada, aplique detergente Ifquido directamente en Ia mancha. Dejelo en la mancha
pot 30 a 60 minutos. Enjuague con un patio h0medo y seque. NO use agentes de limpieza
abrasivos en ninguno de estos materiales, pues pueden rayar. Para sacar Ias perilIas de
control, gfrelas hasta la posici6n 'OFF' (apagado); t6melas firmemente y tirelas derecho hacia
fuera del eje. Para voJver a cotocar las perilIas despues de JaJimpieza, aIinee los lados pianos
de la perilIa y del eje; luego inserte Japerilla en su lugar.
Antes de fimp/ar ei panel de control, cotoque todos los controIes en Ia posici6n 'OFF' y quite las
perillas de control. Para sacarlas, tire de elias derecho hacia afuera para sacarlas deI eje.
Limpie usando agua caliente jabonosa y un patio. Enjuague con agua limpia y un pa_o.
Aseg_Jrese de estrujar el exceso de agua deI pa_o antes de limpiar el panel; especialmente
cuando este limpiando alrededor de los controbs. El exceso de agua en los controbs o
alrededor de ellos puede da_ar eI electrodom6stico. Para volver a coIocar las perillas despu6s
de Ja Jimpieza, alinee los lados planos de JaperiJJay del eje; luego inserte JaperiJJaen su Jugar.
Limpie el acero inoxidable usando agua caliente jabonosa y un paFlo. Enjuague con agua
limpia y un patio. No use [impiadores con a[tas concentraeiones de c[oruroe o cloro. No use
limpiadores asperos. Use solamente limpiadores que ban sido especiaImente dise_ados para
limpiar acero inoxidabb. Siempre aseg0rese de enjuagar bien para quitar los Iimpiadores de
las superficies pues pueden ocurrir manchas azuladas con el caIor Jas cuaIes no pueden set
quitadas.
Restriegue suavemente con una esponja jabonosa de fregar para sacar la mayoria de
las manchas. Enjuague con una sotuci6n 1:1 de agua y amoniaco. Si es necesario, cubra Jas
manchas dificiles con una toalla de papel impregnada en amoniaco por 30 a 40 minutos.
Enjuague con agua limpia y con un paFsohOmedo y luego frote con una esponja jabonosa de
fregar. Enjuague y seque con un patio limpio. Saque todos los residuos de agentes de
limpieza o de Io contrario la porcelana se puede datiar cuando se vueIva a cabntar. NO use
agentes de limpieza para homo en aerosol en la cubierta de la estufa.
Las parrilIas deI homo deben set retiradas dei homo durante el cicto de autoJimpieza para su
limpieza. Cuando las retire, limpielas usando un Iimpiador abrasivo suave siguiendo Jas
instrucciones del fabricante. Eniuague con agua limpia y seque.
Si se Iimpian las parrillas en el cicto de autolimpieza, su color se volvera ligeramente azuI y se
opacara eI acabado. Luego de terminado el cicto de autolimpieza y se ha enfriado el homo,
frote los Jados de Ias parriIIas con papel de cera o con un patio impregnado de aceite para
bebe o aceite de cocina (esto permitira que JasparrilJas se deslicen con mayor facilidad).
Para Iimpiar la puerta del homo, JJmpiecon agua caliente iabonosa y un patio limpio. NO
sumerja la puerta en agua.
NO limpie la junta de Ia puerta del homo. En los modelos con autolimpieza, la junta de la puerta
esta hecha de un material tejido que es indispensable para que selle correctamente. Se debe
tenet mucho cuidado de no frotar, daBar ni sacar la junta de la puerta.
(,_tl
¸:¸11211?
%?
69
Page 70

Cuidado y Limpieza General
Limpieza y Mantenimiento de la Cubierta
Es esencial limpiar regularmente y en forma correcta la cubierta de vidrio cer4mico.
Antes de usar su cubierta per primera vez, apJique en la superficie de vidrio la crema de Jimpieza para cubiertas recomendada. Frote
con un paso o esponja no abrasiva. Esto facilitara la limpieza cuando se ensucie al cocinar. Esta crema especiaI de limpieza deja
una peJicula protectora sobre el vidrio que evita las rayaduras y abrasiones.
Si se deslizan sobre Jacubierta utensilios con fondo de aluminio o de cobre se pueden causar
marcas de metal en Ia superficie de Ia cubierta. Estas marcas deben ser quitadas
inmediatamente despues de que Ia cubierta se haya enfriado usAndo la crema de limpieza
para cubiertas. Las marcas de metal pueden set permanentes si no se sacan antes del pr6ximo
uso de Jaestufa.
Los utensilios de cocina (de hierro fundido, metal, cer4mJca o vidrio) con fondos asperos
pueden marcar o rayar Ia superficie de la cubierta. No desliee nada que sea de metal o de
vidrio a traves de Ia cubierta. No use Ia cubierta come una tabla de cortar o como superficie de
trabajo en la cocina. No cocine alimentos directamente sobre la cubierta sin usar un utensilio.
No deje caer objetos duros o pesados sobre Jacubierta de vidrJo, pues pueden quebrarJa.
Recomendaciones de Limpieza para Cubiertas deVidrio Cer_mico:
_ Antes de JJmpiarla cubierta, aseg0rese de que los controles esten en Japosici6n 'OFF' y que la cubierta este FRIA.
NO use Iimpiadores para Ia cubierta cuando este caIiente. Los vapores pueden set perjudiciales para su salud
y pueden daSar quimicamente la superficie de vidrio ceramico.
Para sucJedad leve y moderada
Para aplicar la crema de JJmpieza sobre Ja superficie de Jacubierta, use una esponja no abrasiva, un paBo o una toalla de papel.
Frote ta superficie hasta que toda la suciedad y la crema sean eliminadas. Tambien se puede usar un detergente para tavar ptatos
suave. Aseg0rese de que Ja cubierta sea enjuagada minuciosamente, sin dejar ning0n residue de detergente o de limpJador.
Para suciedad dura y quemada
Use ei mismo metodo que para suciedad leve y moderada. Vuelva a aplicar Ia crema de limpieza y cubra con una toalla de papei
h0meda. Deje reposar durante aproximadamente treinta minutos para aflojar la suciedad de la superficie. Frote con un paso para
quitar Ja suciedad restante.
Otro metodo de limpieza seria la esponia de restregar para prop6sitos
multiples (de color azuI) Scotch-Brite@ de 3M para suciedad excesiva.
Cuando use Ia esponja tenga cuidado de que Ia estufa se haya enfriado
comptetamente y sumeria la esponja en agua antes de restregar eJ_rea sucia
de Ia cubierta.
Si permanece suciedad, raspe cuidadosamente Ia suciedad con un
raspador con hoja de afeitar, sosteniendo el raspador en un b.ngulo de 30
grades en relaci6n con Ia cubierta. Retire la suciedad suelta con crema de
limpieza y frote la superficie hasta que quede limpia.
Plastico o aHmentos con un alto contenido de azucar
Estos tipos de suciedad necesitan ser quitados Jnmediatamente despues
de que se derraman o derriten sobre Ia superficie de vidrio ceramico.
Puede ocurrir daSo permanente (tal come picadura de la superficie de Ia
cubierta) si no se quitan inmediatamente, Despues de apagar los
eIementos superiores, use un raspador con hoja de afeitar o una esp_tuJa
de metal con un guante y raspe Ia suciedad de la superficie caliente
(come se muestra en Ia iIustraci6n). Espere que la cubierta se enfrie y use
el mismo metodo que para la suciedad dura y quemada.
70
Page 71

Cuidado y Limpieza Genera
_ Recomendaciones de Limpieza para Cubiertas de Vidrio
__ Cer_mico
No use mossiguientes productos en la cubierta de vidrio ceramico:
, No use limpiadores abrasivos ni esponjas de restregar, tames como esponjas de metam
y a_gunas esponjas de n}16no EHas pueden rayar macubierta, haciendo m&s dificil su
mimpieza.
, No use limpiadores abrasivos, tages como bianqueador de cloro, arnon_aco o
mimp}adores de hornos, pues pueden rayar o descolorar macubierta.
, No use esponjas, paSos o toaHas de papemsucias, pues pueden dejar suciedad o
pelgsas en la cubierta que pgeden quemarse y causar descoiorac}6n.
Advertencia para hoja de a_uminio y utensiHos en a_uminio
1) Hoja de aJuminio
La utilizaci6n de hojas de aluminio daSar_, la cocina, No utiliza en ning_n caso,
2) UtensiHos en aluminio
Tenga cuidado al utilizar utensilios en aluminio puesto que el punto de fusi6n es
este es m_.s bajo que el de otros metales, Si Io deja mucho tiempo en el calor, no
sol6 en utensilio se da_ara, pero tembi6n la superficie en fibra de vidrio,
Cierre en poeici6n normaJ
Figura 1
Agujero para Jabieagra
puerta quitada det homo
Figura 2
Cierre en poeici6n enganchada,
para eacar ta puerta
Figura 3
Cuidado y Limpieza de_ Acero mno×idab_e (algunos modelos):
AIgunos modelos est_.nequipados con piezas exteriores de acero inoxidable, Se
requiere cuidado y limpieza especial para mantener la apariencia de las piezas de
acero inoxidable, Pot favor consulte la tabla provista al comienzo de la secci6n
Cuidado y Limpieza OeneraJ de este Manual del Usuario,
Para retirar o remp_azar _a puerta de_ homo
_ La puerta es pesada, Para guardarla temporalmente de manera
segura, deposite la puerta horizontalmente, con el lado interior dirigido hacia abajo,
Para retirar Japuerta del homo:
1, Abrala puertacompletamente, ::tl
2, Tire el cierre situado en cada una de las bisagras de ambos lados y col6quelo en
las palancas de las bisagras (Figura 1), Tendr_. que aplicar una pequeSa presi6n '............
hacia abajo sobre lapuerta para poder retirar el cierre de sus ganchos,
3, Tome la puerta de cada lado, tire la base de la puerta para arriba y hacia Ud, para
desalojarla de sus soportes, Siga tirando la base de la puerta hacia Ud, y
haciendo un movimiento de rotaci6n de la parte superior hacia la cocina para
desalojar completamente de las bisagras (Figura 2),
4, Para limpiar la puerta del homo, siga las instrucciones proporcionadas en la tabla
Cuidado y Limpieza General
Para remplazar ta puerta del homo:
1, Tome la puerta por los lados; coloque los soportes sobre las ranuras de las
bisag ras, Abra la puerta completamente,
2, Desaloje el cierre de la palanca de las bisagras de ambos lados (Figura 3),
Nota: AsegOrese que los soportes de las bisagras est6n completamente en
posici6n antes de liberar las palancas de las bisagras,
3,
71
Page 72

Cuidado y Limpieza Generam
PaneJ de vidrio exterior de la puerta removable
Se encuentre soUamente en UosmodeUoscon paneUde vidrio exterior que no est& soportado con un armaz6n, Esta
caractefistica esterdiseSada para permitMe de Hmpiar Uaparte interior del panel de puerta exterior asi como la parte intema
del vidrio interior de la puerta,
Para retirar el panel de vidrio de ta puerta exterior:
1, Retire la puerta come se muestra arriba y coloquela en el suelo
2, Con la ayuda de un desarmador, retire los 5 tornillos,
3, Tome ambos lados del panel de vidrio y retirelo lentamente de su lugar, Coloque el vidrio en el suelo,
Para remptazar et panel de vidrio de ta puerta exterior.
1, Tome el panel de vidrio per los lados y deslizae el vidrio en la parte superior de la moldura de la puerta,
2, Vuelva a colocar los 5 tornillos en su lugar,
3, Coloque la puerta en la cocina,
Manipule el panel de vidrio con atenci6n, El panel de vidrio puede romperse si le deje caer sobre una
esquina,
Empuje hacia
picaportes
Empujar hacia abajo
con eNdedo
Figura 1
RH picaportes
Como Sacar y Volver a Colocar ta Gaveta CaJentadora (Warm & Ready M_)
Como sacar ta gaveta caJentadora:
1, _ Apague la estufa antes de sacar la gaveta calentadora,
2, Abracompletamentelagaveta,
3, Ubique la palanca de la corredera a cada lade de la gaveta, tire de la
palanca de la corredera del lado izquierdo y empuje hacia abajo en la
palanca de la corredera del lade derecho (Ver Figura 1),
5, Tire de la gaveta para sacada de la estufa,
ReinstaJaci6n de JaGaveta CaJentadora (Warm & ReadyM_):
1, Tire de las correderas con rodamiento hacia la parte detantera de la
corredera del chasis (Ver Figura 2),
2, Alinee la corredera en cada lado de la gaveta con las ranuras de la
corredera en la estufa,
3, Empuje la gaveta hacia la estufa hasta que las palancas hagan un
chasquido (aproximadamente 2"), Abra de nuevo lagaveta para colocar en
su posici6n las correderas de los cojinetes, Si no escucha eJ chasquido
que hacen Jas paJancas o pareciera que Jas correderas con rodamiento
no estuvieran asentadas, saque la gaveta y repita desde e! paso I al 3,
Esto reducir6, el posible daSo que se pueda causar alas correderas con
rodamiento,
NOTA: La gaveta calentadora NO funcionardt cuando est6n activados los
modos "Autolimpieza" y "Bloqueo del Homo",
Se puede provocar un choque el6ctrico y
ocasionar lesiones graves o fatales, Desconecte el suministro
el6ctrico del electrodom6stico antes de limpiar y efectuar el
mantenimiento de la gaveta calentadora,
72
Page 73

Luces deJ Homo
AsegL_rese de que la estufa este desenchufada y que todas las piezas est6,n FRIAS antes de
reemplazar la(s) luz (luces) del homo, Utilice un guante protegido con cuero en caso de que hayan vidrios rotos,
Funcionamiento de las Luces deJ Homo
Ambas luces interiores del homo se encienden automaticamente
cuando se abre la puerta del homo, Optima _ para ENCENDER
y APAGAR las luces cuando la puerta del homo se cierra, Cada luz
del homo est,. ubicada en la pared trasera del interior del homo y est,.
cubierta con un protector de vidrio sujeta con un soporte met_Jico
(Vet Figura 1), Los protectores de vidrio deben de estar en sus
lugares siempre que el homo este en uso,
ReempJazo de ia Luz deJ Homo:
1, Desconecte el suministro el6ctrico en la fuente principal o
desenchufe la estufa,
Figura 1 2, Oprima el soporte met_Jico en uno de los costados para liberar el
protector de vidrio,
3, Reemplace el foco antiguo con un foco nuevo para
electrodom6sticos de 40 watts,
4, Vuelva a colocar el protector de vidrio y cierre el soporte
met_Jico,
5, Vuelva a conectar el suministro el6ctrico en la fuente prinicipal (o
enchufe la estufa),
6, Se deber6, volver a programar el reloj, Para volver a programarlo,
vea la secci6n Prog_amaci6n det F{etoj en este Manual del
TabJas de Cocinar
AJimentos para la tecia Horneado
pot Convecci6n
*Disminuir
et tiempo de cocci6n normaJ:
AJimentos congeJados, 15 a 25%
pays, pasteJes y pizza
GaJletas refrigeradas 15 a 35 %
BJzcochos refrigerados 15 a 30 %
PanecJllos y Panes 20 a 25%
Pays y PasteJes Frescos 10 a 20 %
*Los tiempos recomendados de reducci6n
en la cocci6n se basan en las marcas de
los alimentos probados, Los tiempos de
cocci6n pueden vadar con su marca
AJirnentos para la tecJa (_EAT_
de Categorias de AHrnentos
*Disminuir
et tiempo de cocci6n normaJ:
Cames 15 a 30%
Polio (no relleno)
20 a 30%
*Los tiempos recomendados de reducci6n
en la cocci6n se basan en las marcas de
los alimentos probados, Los tiempos de
cocci6n pueden vadar con su marca
especifica de alimento,
:]iiii!i!!ii?
%?
73
Page 74

Antes de SoJicitar Servicio
SoJuciones de ProbJemas Comunes
ConsuUte UaHstasigubnte antes de so/icitarservicio. Puede ahorrarb tbmpo y dinero. La HstaincUuye bs incidentes m_.s
comunes que no son originados por Uafabrbaci6n o materiabs defectuosos de este eUectrodom6stbo.
SmTUACJON
La estufa est_ desnivetada.
POSIBLE CAUSA/SOLUCm6N
Unstabi6n inadecuada, Cobque UarejHUaen eUcentre del homo, Coloque un nivel
sobre la rejilla. Ajuste las patas niveladoras en la base de la estufa hasta que la
rejilla se niveb. Cuando la estufa esta nivelada, la plancha de cocinar puede
aparecer desnivelada si la plancha de cocinar no est,. nivelada.
Piso no solido, inestabb. AsegOrese que el piso est,. nivelado y que puede
soportar la cocina. Mame su carpintero para corregir un piso inclinado.
El desnivel del armario de la estufa puede hacer aparecer la estufa desnivelada.
AsegOrese que los armarios estan cuadrados y tienen suficiente espacio para la
cocina.
No puede mover el aparato
facitmente.EJ aparato no puede set
accesibJe facitmente.
Los armarios no son cuadrados o son fabricados muy angostos, Consulte un
carpintero para corregir el problema,
Consulte un carpintero para hacer el aparato m_.saccesible,
Las alfombras interfieren con la cocina, Deje suficentemente de espacio para
que la estufa pueda set levantada sobre la alformbra,
La estufa completa o el homo no
funcionan.
Aseg0rese que el cable este bien ajustado en el enchufe,
El alambrado no ha sido terminado, Consulte con su agente de servicio, agente
de instalaci6n o servicio autorizado,
Corte de electricidad, Verifique las luces de la casa para asegurarse, Llame a
su copahia de electricidad local para el servicio,
*El controJ del homo suena yen ta
pantaHa aparece F1, F2, F3 o F9
El control electr6nico ha detectado una anomalia, Pulse CLEAR para borrar la
pantalla y parar el sonido, Reprograme el homo, Si la anomalia se repite, tome
nota del n0mero de anomalia, Pulse CLEAR y consulte un servicio autorizado,
La tuz det homo no funciona
Coloque o ajuste la bombilla, Yea "Cambio de la luz del homo" en el Manual del
usuario para las instrucciones,
La unidad de superficie no caHenta No hay suministro electrico al aparato, Verifique las etapas en "La estufa
completa o el homo no funcionan" que se encuentra en esta lista,
Programado de los controles inadecuado, AsegOrese que el control adecuado
este encendido para que pueda usar la unidad de superficie,
Raspaduras o rasguhos sobre ta
plancha de cocinar.
Particulas dificiles como la sal o la arena entre la plancha de cocinar y los
utensilios pueden causar raspaduras, AsegOrese que la superficie de la plancha
de cocinar y la base de los utensilios est6n limpias antes de usarla, Pequehas
raspaduras no afectan la cocci6n y desaparecer6.n con el tiempo
Marcas de metal
Deslizando o rosando los utensilios de metal sobre la superficie de la plancha
de cocinar, No deslize los utensilios de metal sobre la superficie de la plancha
de cocinar, Use una crema de limpieza para retirar las mamas de la plancha de
estufa cera.mica, Vea "Para limpiar el vidrio de la plancha de cocinar" en
74
Page 75

Antes de So icitar Servicio
Solucionee de Problemae Comunee
Rayas o manchas marrones. Los derrames han sido cocidos en Uasuperficb, Use una Uamade afeitar para
retirar Uasmanchas, Vea "Para fimpiar eUvidrio de UapUanchade cocinar" en
Areas de descoloraci6n con britto Dep6sitos minerabs deUagua o de Uacomida, Retirebs con una crema de
met_Hco, fimpbza, Use recipbntes con Uasbases fimpias y secas,
MaJos resultados aJ hornear. Muchos factores afectan eUhorneo, AsegOrese que Uarejifla est,, en buen lugar,
Centre la comida y deje espacio para permitir al aire de circular, Precaliente el
homo a la temperatura deseada antes de colocar la comida, Trate de ajustar las
temperaturas recomendadas y el tiempo de homeo de sus recetas, Si cree que
el homo est,. muy caliente o muy frio, vea "Ajuste de ta temperatura det
homo" enel Manual del usuario,
Ruido del ventHador durante ta
funci6n de cucinado.
El ventilador puede encenderse o apagarse autom_.ticamente para enfriar
algunos componentes del electrodom6.stico, Es normal que el ventilador
continue trabajando ann cuando el homo este apagado,
Llamas desde et interior deJ homo o
vapor de ta rejitta de ventilaci6n.
Derrames excesivos dentro del homo, Ajuste el cicio de auto limpieza per un
tiempo mas largo,
Derrames excesivos dentro del homo, Esto es normal, especialmente para los
de pasteles o grasas en la base del homo, Limpie los derrames excesivos
antes de comenzar la auto-limpieza, Si observa llamas o vapor, pare el ciclo de
auto,limpieza y siga las etapas en "Para parar o interrumpir el ciclo de auto°
limpieza" en Gu_a de control det homo electr6nico
El homo produce demaeiado vapor aJ
aearo
Los controles no estan programados adecuadamente, Siga las instrucciones en
"Aiuste de Joe controles det homo" en "Guia de control del homo
electr6nico',
AsegOrese que el homo esta abierto a la Posici6n de parar e! asado,
Las carnes est_,nmuy cerca del elemento del asador, Vuelva a colocar la rejilla
paraobtenerunespaciosuficientoentreUascarnesoUoUomento,Preca,ente
el elemento del asador, Precaliente el elemento del asador para cocinar con la :i
La rejilla en la parrilla tiene el lado incorrecto hacia arriba y la grasa no est,.
goteando, Siempre coloque la rejilla sobre la parrilla con las varillas hacia arriba
y las ranuras hacia abajo para que lagrasa gotee en el recipiente,
Grasa se ha acumulado sobre la supedicie del homo, La limpieza frecuente es
necesaria cuando asa constantemente, Grasa que se queda inpregnada o
manchas de comida pueden causar vapor excesivo,
El cicto de auto-timpieza no funciona. Los controles no estan programados adecuadamente, Siga las instrucciones en
"Limpieza del homo" en "Guia de control del homo electr6nico",
El ciclo de limpieza rue interrumpido, El tiempo de termino debe set de 3 a 4
horas despues de haber comenzado, Siga las etapas en "Para parar o
interrumpir el ciclo de auto-limpieza" en "Guia de control del homo electr6nico',
Las manchae no hart eido retiradas
deepuee det cicto de auto-timpieza.
No ha limpiado la base, la parte superior, el cadre o la puerta al exterior de la
empaquetadura del homo, Estas areas no son limpiadas pot el ciclo de auto°
limpieza, pero se calientan Io suficiente para crear residuos, Limpie estas
partes antes de comenzar un nuevo ciclo de auto-limpieza, Los residuos
pueden set limpiados con un paso de nylon y agua o con una esponja de nylon,
Tenga cuidado de no da_ar la empaquetadura del homo,
75
Page 76

iiiiiiiiiiiiiiiiii_',¸'¸¸¸ ¥our.ome ,i:,i:,i:,i:,i:,i:,i:,i:,i:,i:,i:,i:,i:,i:,i:,:,:,.................
iiiiiiiiiiiiiiiiii For repair-in your home-of aH major brand appHiances, iiiiiiiiiiiiiiiii
iiiiiiiiiiiiiiiiii lawn and garden equipment, or heating and cooling systems, iiiiiiiiiiiiiiiii
iiiiiiiiiiiiiiiiii oomo_o_w.omodo,_.oo_o_o.w.o_o_d,....................................................iiiiiiiiiiiiiiiii
.................. iiiiiiiiiiiiiiiii
iiiiiiiiiiiiiiiiii For the replacement parts, accessories and iiiiiiiiiiiiiiiii
iiiiiiiiiiiiiiiiii owner'smanualsthatyouneedtodooit-yourself. ...................................................iiiiiiiiiiiiiiiii
.................. iiiiiiiiiiiiiiiii
iiiiiiiiiiiiiiiiii For Sears professiona_ installation of home appliances iiiiiiiiiiiiiiiii
iiiiiiiiiiiiiiiiii and items Hikegarage door openers and water heaters. ..................................iiiiiiiiiiiiiiiii
iiiiiiiiiiiiiiiiii 1-800-4-MY-HOME ® (1-800-469o4663) iiiiiiiiiiiiiiiii
iiiiiiiiiiiiiiiiii o_,,_oyt,_o.0oyo,-o,0ht_O.S.A.ao0oooo0o) ..................................iiiiiiiiiiiiiiiii
iiiiiiiiiiiiiiiiii www.soors.oomw_w.soor_.oo iiiiiiiiiiiiiiiii
iiiiiiiiiiiiiiiiii.................... Our Home _
For repair of carry-in items Hikevacuums, lawn equipment,
iiiiiiiiiiiiiiiiii and emectronics, call or go onqine for the Hocation of your nearest iiiiiiiiiiiiiiiii
_'iiiiiiiiiiiiiiiii SearsParts&R:pa,rCentero i'_'
1 800 488 1222
iiiiiiiiiiiiiiiiiiiiiiiiiiiiiiiii Callanytime, dayornight(U.S.A, only) iiiiiiiiiiiiiii
:i:i:i:i:i:i:i:i:i:i:i:i:i:i:iii iiiiiiiiiiiiiii
:i:i:i:i:i:i:i:i:i:i:i:i:i:i:iii iiiiiiiiiiiiiii
iiiiiiiiiiiiiiiiiiiiiiiiiiiiiiii To purchase a protection agreement (U.S.A.) iiiiiiiiiiiiiii
HHHHHHH_
HHHHHHH_
iiiiiiiiiiiiiiiiiiiiiiiiiiiiiiiior maintenance agreement (Canada) on a product serviced by Sears: iiiiiiiiiiiiiii
:i:i:i:i:i:i:i:i:i:i:i:i:i:i:iii iiiiiiiiiiiiiii
iiiiiiiiiiiiiiiiiiiiiiiiiiiiiiii1-800-827-6655 (U.S.A.) 1-800-361-6685 (Canada) iiiiiiiiiiiiiii
:i:i:i:i:i:i:i:i:i:i:i:i:i:i:iii iiiiiiiiiiiiiii
:i:i:i:i:i:i:i:i:i:i:i:i:i:i:iii............................... !!!!!!!!!!!!!!!
:i:i:i:i:i:i:i:i:i:i:i:i:i:i:iii iiiiiiiiiiiiiii
iiiiiiiiiiiiiii
iiiiiiiiiiiiiiiiiiiiiiiiiiiiiiiiPars pedir servicio de reparacidn Au Canada pour service en fran_ais: iiiiiiiiiiiiiii
:i:i:i:i:i:i:i:i:i:i:i:i:i:i:iii iiiiiiiiiiiiii_
iiiiiiiiiiiiiiiiiiiiiiiiiiiiiiiia domicilio, y para ordenarpiezas: lo800-LEoFOYER Mc iiiiiiiiiiiiiii
iiiiiiiiiiiiiii
iiiiiiiiiiiiiiiiiiiiiiiiiiiiiiii1°888°SU°HOGARSM (1=800o533o6937) iiiiiiiiiiiiiii
(1-888-784_6427) www.sears.ca
@ Registered Trademark / TMTrademark / SM Service Mark of Sears, Roebuck and Co.
@ Marca Registrada / TM Marca de Fabdca / SMMarca de Servicio de Sears, Roebuck and Co.
_c Marque de commerce / MDMarque ddposee de Sears, Roebuck and Co. @ Sears, Roebuck and Co.
 Loading...