

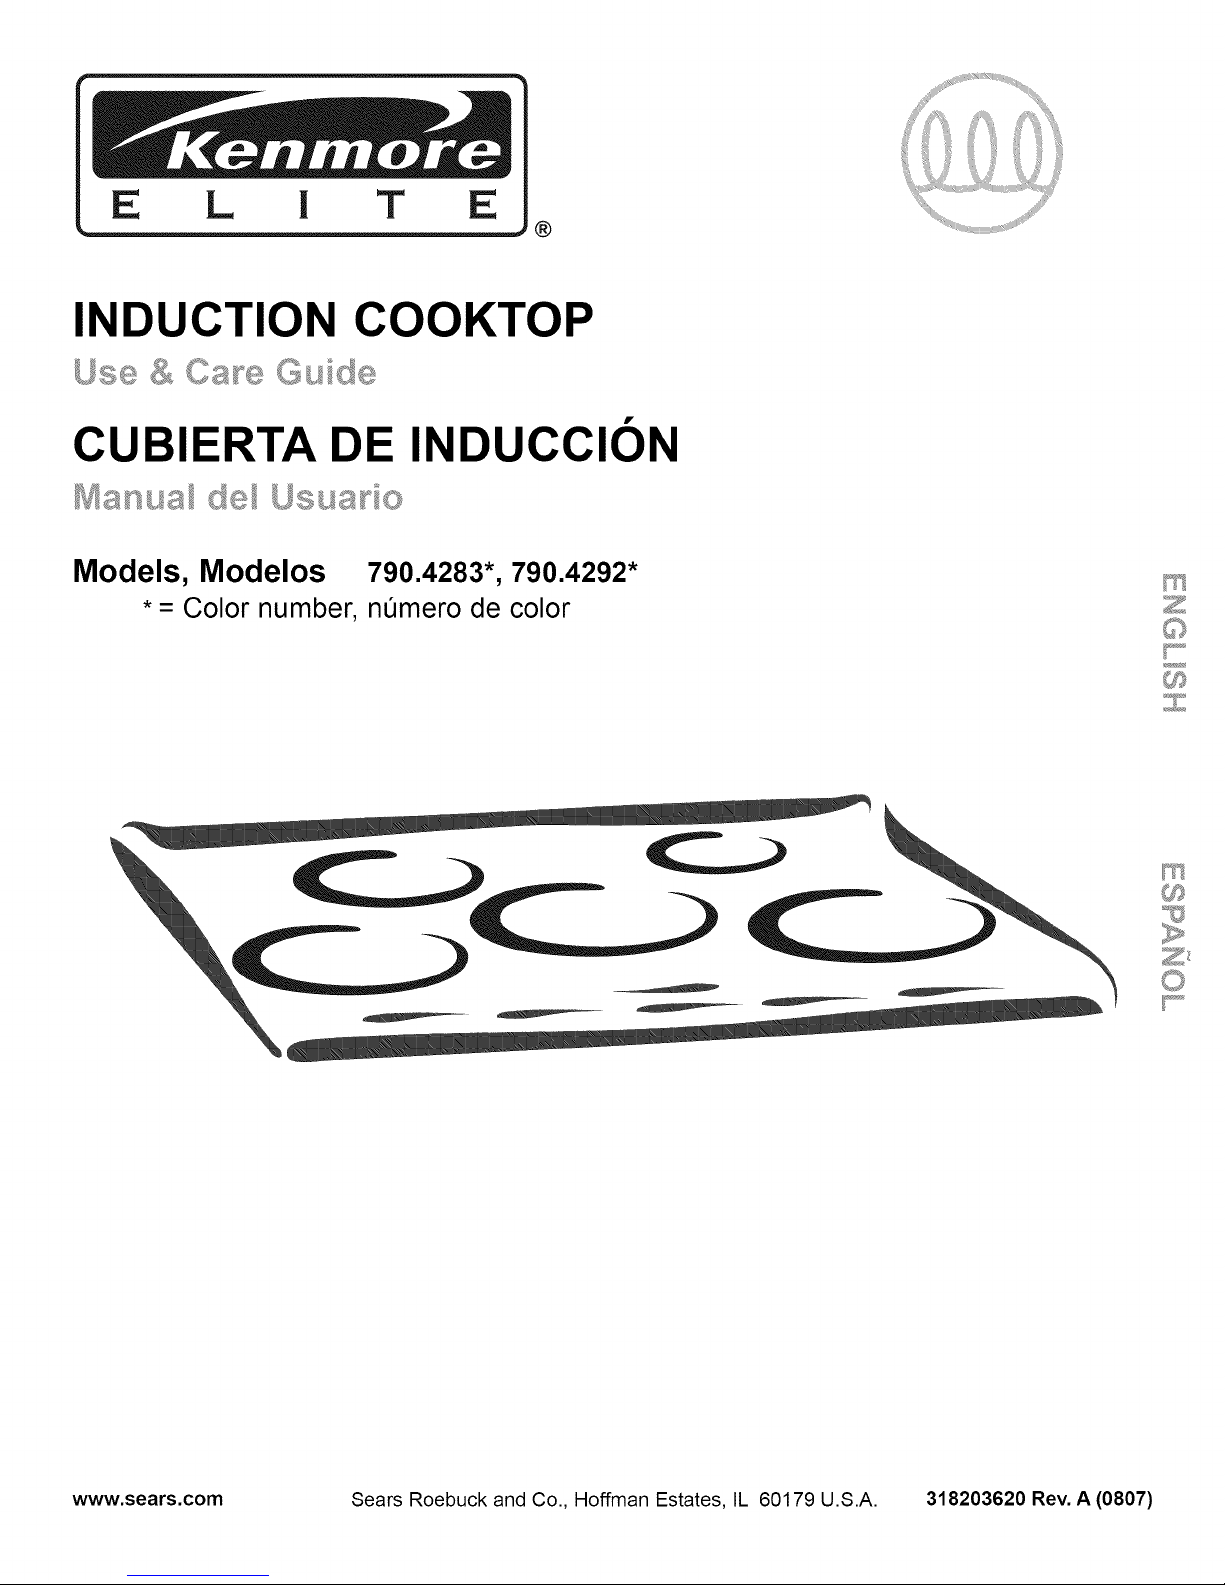
Kenmore 790.4292, 4283 - Elite 30 in. Induction Cooktop, Elite 790.4283 Series, Elite 790.4292 Series Use & Care Manual
E L I T E
®
INDUCTION COOKTOP
CUBIERTA DE INDUCCION
Models, Modelos 790.4283", 790.4292*
*= Colornumber, nOmero de color
r
www.sears.com Sears Roebuck and Co., Hoffman Estates, IL 60179 U.S.A. 318203620 Rev. A (0807)

Table of Contents
Cooktop Warranty .......................................................... 2
Product Record .............................................................. 2
Serial Plate Location ...................................................... 2
IMPORTANT SAFETY INSTRUCTIONS .................... 3 - 4
Induction Cooktop Features ..................................... 4 - 5
Induction Cooktop Display Messages .......................... 6
Kenmore Elite Warranty
When installed, operated and maintained according to all instructions supplied with the product, if this appliance fails due to a
defect in material and workmanship within one year from the date of purchase, call 1-800-4-MY-HOME® to arrange for free
repair.
For five years from the date of purchase, if the cooktop glass fails due to thermal shock or the cooktop elements are
defective, call 1-800-4-MY-HOME® to arrange for free part replacement. After the first year from purchase date, you must
pay the labor cost of part installation.
This warranty applies for only 90 days from the date of purchase if this appliance is ever used for other than private family
purposes.
This warranty covers only defects in material and workmanship. Sears will NOT pay for:
1. Cracks in a ceramic glass cooktop that are not a result of thermal shock.
2. Stains and scratches on a ceramic glass cooktop resulting from accident or improper operation or maintenance.
3. Expendable items that can wear out from normal use, including but not limited to filters, belts, light bulbs, and bags.
4. A service technician to instruct the user in correct product installation, operation or maintenance.
5. A service technician to clean or maintain this product.
6. Damage to or failure of this product if it is not installed, operated or maintained according to the all instructions
supplied with the product.
7. Damage to or failure of this product resulting from accident, abuse, misuse or use for other than its intended
purpose.
8. Damage to or failure of this product caused by the use of detergents, cleaners, chemicals or utensils other than
those recommended in all instructions supplied with the product.
9. Damage to or failure of parts or systems resulting from unauthorized modifications made to this product.
Disclaimer of implied warranties; limitation of remedies
Customer's sole and exclusive remedy under this limited warranty shall be product repair as provided herein. Implied
warranties, including warranties of merchantability or fitness for a particular purpose, are limited to one year or the
shortest period allowed by law. Sears shall not be liable for incidental or consequential damages. Some states and
provinces do not allow the exclusion or limitation of incidental or consequential damages, or limitation on the duration of
implied warranties of merchantability or fitness, so these exclusions or limitations may not apply to you.
This warranty applies only while this appliance is used in the United States or Canada.
This warranty gives you specific legal rights, and you may also have other rights which vary from state to state.
Sears, Roebuck and Co., Hoffman Estates, IL 60179
Sears Canada Inc., Toronto, Ontario, Canada M5B 2B8
Before Using the Cooktop ........................................ 7 - 9
Setting Cooktop Controls ........................................ 9 -12
General Care & Cleaning ........................................ 12-14
Before You Call ........................................................ 15-16
Protection Agreements ................................................ 17
Sears Service ................................................................ 18
Product Record READ AND SAVE THESE INSTRUCTIONS.
(See serial plate location illustration below) Save your sales receipt for future reference.
Model No. 790.
Serial No.
Date of Purchase:
Serial Plate Location
You will find the model and serial number printed on the
serial plate. The serial plate is located under the cooktop.
Please see the illustration for exact location. Remember to
record the serial number BEFORE INSTALLATION of the
cooktop (See Product Record above).
Printed in United States
Serial plate is located under
the burner box of cooktop.
2
Important Safety Instructions
Read all instructions before using this appliance. Save these instructions for future reference.
This manual contains important safety symbols & instructions. Please pay attention to these symbols & follow all instructions given.
This symbol wi!l help alert YOUto situations that may cause serious bodily haiml death 0r property damage l
This sYmb01will help alert you to situations that maY cause b0di!y injury or pr0perty damagel
This unit has been tested and found to comply with the
limits for a class B digital device, pursuant to Part 18 of the
FCC rules. These limits are designed to provide reasonable
protection against harmful interference in a residential
installation. This unit generates, uses and can radiate radio
frequency energy and, if not installed and used in accor-
dance with the instructions, may cause harmful interference
to radio communications. However there is no guarantee
that interference will not occur in a particular installation. If
this unit does cause harmful interference to radio or
television reception, which can be determined by turning
the unit off and on, the user is encouraged to try to correct
the interference by one or more of the following measures:
• Reorient or relocate the receiving antennae.
• Increase the distance between the unit and receiver.
• Connect the unit into an outlet or a circuit different
from that to which the receiver is connected.
Persons with a pacemaker or similar
medical device should exercise caution using or standing
near an induction unit while it is in operation, as the electro-
magnetic field may affect the working of the pacemaker or
similar medical device. It would be advisable to consult
your Doctor or the pacemaker or similar medical device
manufacturer about your particular situation.
• Remove all tape and packaging wrap before using
the appliance. Destroy the carton and plastic bags
after unpacking the appliance. Never allow children to
play with packaging material.
• Proper Installation. Be sure your appliance is properly
installed and grounded by a qualified technician in
accordance with National Electrical Code ANSI/NFPA
No.70-1atest edition and local code requirements.
Install only per installation instructions provided in the
literature package for this appliance.
• In case of an emergency, know how to disconnect
the electrical power to the appliance at the circuit
breaker or fuse box.
• User ServicingmDo not repair or replace any part of
the appliance unless specifically recommended in
the manuals. All other servicing should be done only by
a qualified technician to reduce the risk of personal
injury and damage to the cooktop. Sears Parts & Repair
is the recommended repair service for this appliance.
• Never modify or alter the construction of an
appliance by removing panels, wire covers or any
other part of the product.
• Storage on Appliance. Flammable materials should
not be stored near or on the cooking surface. This
includes paper, plastic and cloth items, such as
cookbooks, plasticware and towels, as well as
flammable liquids. Do not store explosives, such as
aerosol cans, on or near the appliance. Flammable
materials may explode and result in fire or property
damage.
Do not store items of interest to children
in the cabinets above the appliance.
• Do not leave children alone. Children should not be
left alone or unattended in the area where an
appliance is in use. They should never be allowed to sit
or stand on any part of the appliance.
DO NOT TOUCH COOKING ZONES OR
AREAS NEAR THESE SURFACES. Cooking Zones may
be hot from residual heat even though they are dark in
color. Areas near the Cooking Zones may become hot
enough to cause burns. During and after use, do not
touch, or let clothing or other flammable materials touch
these areas until they have had sufficient time to cool.
Never use your appliance for warming
or heating a room.
Wear Proper ApparelmLoose-fitting or hanging
garments should never be worn while using the
appliance. Do not let clothing or other flammable
materials contact hot surfaces.
• Do Not Use Water or Flour on Grease Fires. Smother
the fire with a pan lid, or use baking soda, a dry
chemical or foam-type extinguisher.
• When heating fat or grease, watch it closely. Fat or
grease may catch fire if allowed to become too hot.
• Use Only Dry Potholders. Moist or damp potholders
on hot surfaces may result in burns from steam. Do
not let the potholders touch hot heating surface units. Do
not use a towel or other bulky cloth instead of a
potholder.
• Do Not Heat Unopened Food Containers. Buildup of
pressure may cause the container to burst and
result in injury.
IMPORTANT INSTRUCTIONS FOR USING
YOUR INDUCTION COOKTOP
• Know which touch key pads controls each surface
of the Cooking Zones.
• Clean the appliance regularly to keep all parts free of
grease that could catch fire. Exhaust fan ventilation
hoods and grease filters should be kept clean. Do not
allow grease to accumulate on hood or filter. Greasy
deposits in the fan could catch fire. When flaming food
under the hood, turn fan on. Refer to hood
manufacturer's instructions for cleaning.
Important Safety Instructions
• Use Proper Pan Size. This appliance is equipped with
one or more COOKING ZONES of different sizes.
Select utensils having flat bottoms large enough to
cover the minimum Cooking Zones. The pan detection
sensors will not allow the affected Cooking Zone to
operate without a pan of sufficient size present.
• Utensil Handles Should Be Turned Inward and
Should Not Extend Over Adjacent Cooking Zones.
To reduce the risk of burns, ignition of flammable
materials, and spillage due to unintentional contact with
the utensil.
• Never Leave Prepared Food on the Cooking Zones
Unattended. Boilovers cause smoking and greasy
spillovers that may ignite, or a pan that has boiled dry
may melt or become damaged.
• Protective Liners. Do not use aluminum foil to line
any part of the cooktop. Only use aluminum foil as
recommended after the cooking process, if used as a
cover to be placed over the food. Any other use of
aluminum foil may result in the risk of electric shock,
fire or short circuit.
• Glazed Cooking Utensils. Only certain types of glass,
glass/ceramic, ceramic, earthenware, or other glazed
utensils are suitable for range top service without
breaking due to the sudden change in temperature.
Check the manufacturer's recommendations for
cooktop use.
• Ventilating hood. The ventilating hood above your
cooking surface should be cleaned frequently, so the
grease from cooking vapors does not accumulate on
the hood or filter.
FOR CERAMIC COOKTOP ONLY
• Do Not Clean or Operate a Broken Cooktop. If
cooktop should break, cleaning solutions and spillovers
may penetrate the broken cooktop and create a risk of
electric shock. Contact a qualified technician
immediately.
• Clean Cooktop with Caution. If a wet sponge or cloth
is used to wipe spills on a hot cooking area, be careful
to avoid a steam burn. Some cleaners can produce
harmful fumes if applied to a hot surface.
• Do Not Place Hot Cookware on Cold Cooktop
Glass. This could cause glass to break.
• Do not slide pans across the cooktop surface. They
may scratch the cooktop surface.
• Do not let pans boil dry. This may cause permanent
damage in the form of breakage, fusion, or marring
that can affect the ceramic-glass cooktop. (This type of
damage is not covered by your warranty).
IMPORTANT SAFETY NOTICE
The California Safe Drinking Water and Toxic
Enforcement Act requires the Governor of California to
publish a list of substances known to the state to cause
cancer, birth defects or other productive harm, and
requires businesses to warn customers of potential
exposure to such substances.
Induction Cooktop Features
A COOLER COOKTOP - A unique feature of the Induction Cooktop is whether turned ON or OFF, the cooktop surface
remains cooler than standard ceramic cooktops.
The Cooking Zones may appear to be cool while turned ON and after they have been turned OFF. But the
glass surface may be HOT from residual heat transferred from the cookware and burns may occur.
MAGNETIC DETECTOR - The coil sensor automatically detects if a pan is magnetic; if it is not, the Cooking Zone will not
activate.
PAN SIZE DETECTION - The pan detection sensor automatically adapts the size of Cooking Zones to the pan sizes in
use.
EFFICIENT - Induction cooking heats faster while using less energy. Induction power boils more quickly and simmers
more evenly.
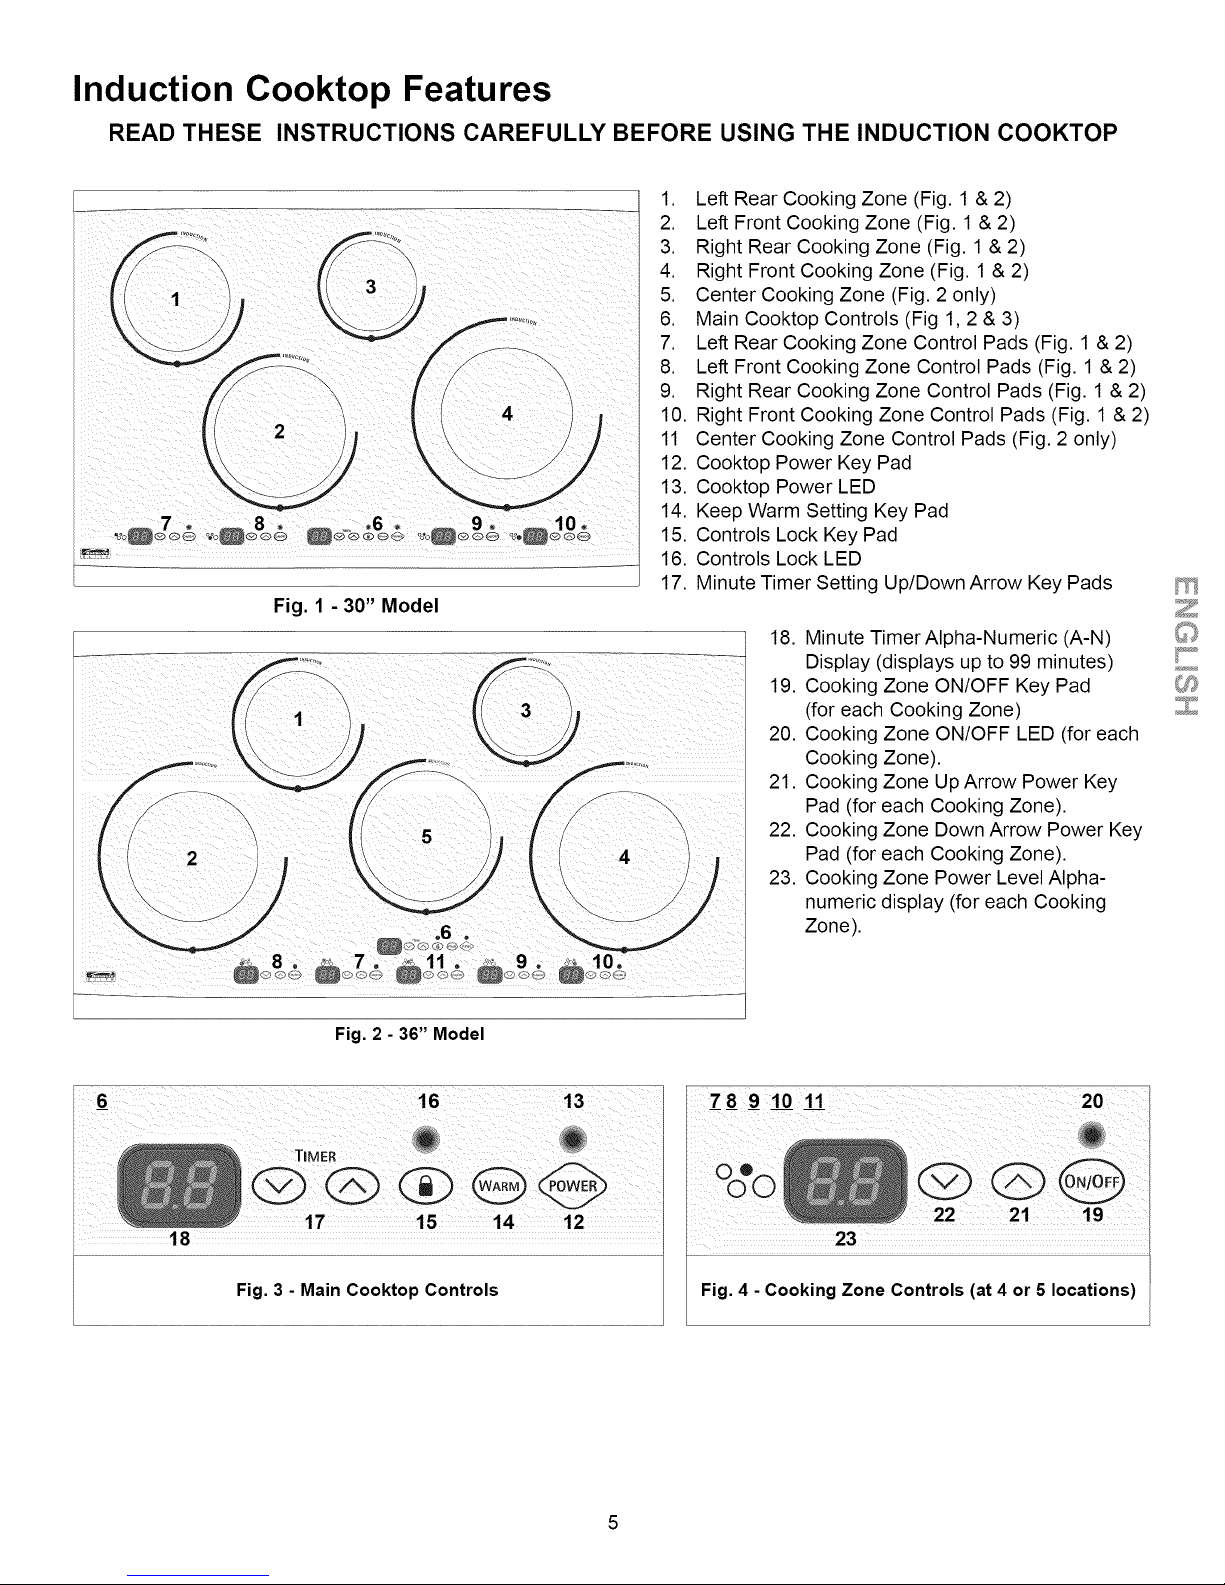
Induction Cooktop Features
READ THESE INSTRUCTIONS CAREFULLY BEFORE USING THE INDUCTION COOKTOP
1. Left Rear Cooking Zone (Fig. 1 & 2)
2. Left Front Cooking Zone (Fig. 1 & 2)
3. Right Rear Cooking Zone (Fig. 1 & 2)
4. Right Front Cooking Zone (Fig. 1 & 2)
5. Center Cooking Zone (Fig. 2 only)
6. Main Cooktop Controls (Fig 1,2 & 3)
7. Left Rear Cooking Zone Control Pads (Fig. 1 & 2)
8. Left Front Cooking Zone Control Pads (Fig. 1 & 2)
9. Right Rear Cooking Zone Control Pads (Fig. 1 & 2)
10. Right Front Cooking Zone Control Pads (Fig. 1 & 2)
11 Center Cooking Zone Control Pads (Fig. 2 only)
12. Cooktop Power Key Pad
13. Cooktop Power LED
14. Keep Warm Setting Key Pad
15. Controls Lock Key Pad
16. Controls Lock LED
17. Minute Timer Setting Up/Down Arrow Key Pads
Fig. 1 - 30" Model
18. Minute Timer Alpha-Numeric (A-N)
Display (displays up to 99 minutes)
19. Cooking Zone ON/OFF Key Pad
(for each Cooking Zone)
20. Cooking Zone ON/OFF LED (for each
Cooking Zone).
21. Cooking Zone Up Arrow Power Key
Pad (for each Cooking Zone).
22. Cooking Zone Down Arrow Power Key
Pad (for each Cooking Zone).
23. Cooking Zone Power Level Alpha-
numeric display (for each Cooking
Zone).
Fig. 2 - 36" Model
' IS 14 12
789 101'1 20
¸23¸¸¸¸
Fig. 4 - Cooking Zone Controls(at 4 or 5 locations)
Induction Cooktop Display Messages
LED Messages or Light Indicators Displayed by Main Control
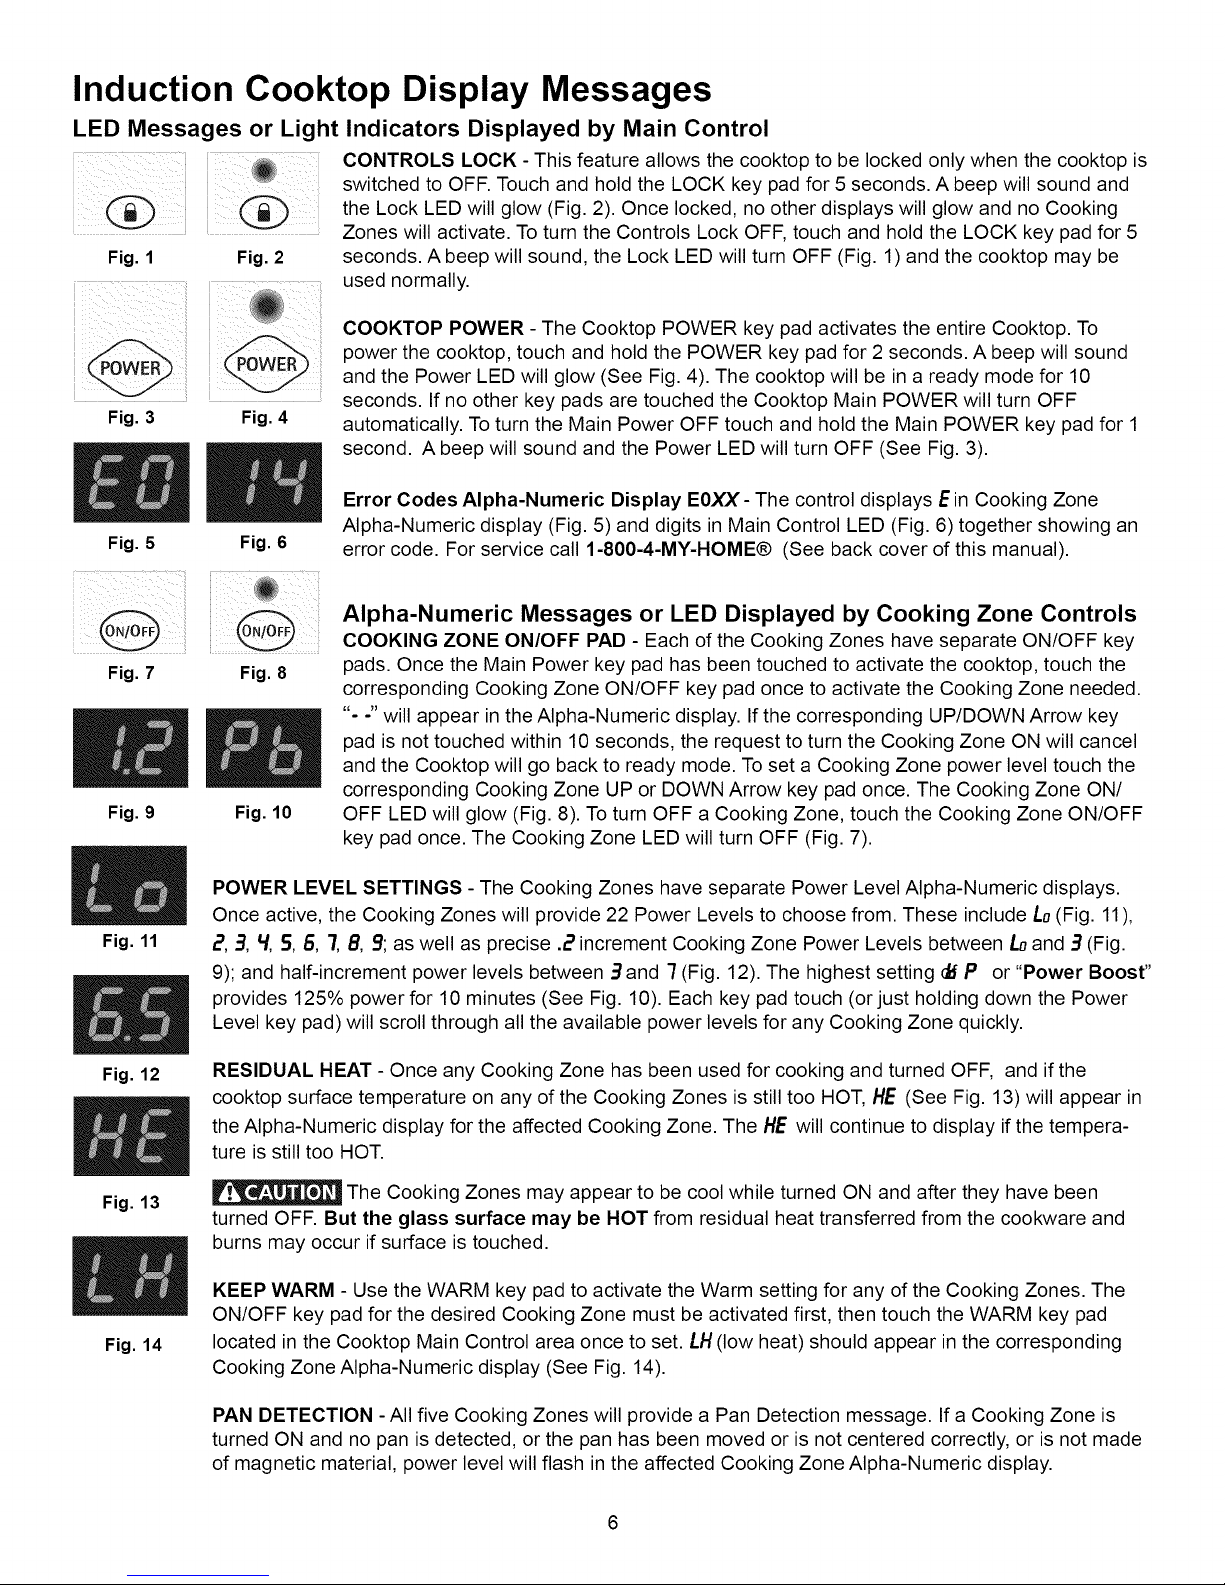
CONTROLS LOCK - This feature allows the cooktop to be locked only when the cooktop is
switched to OFF. Touch and hold the LOCK key pad for 5 seconds. A beep will sound and
the Lock LED will glow (Fig. 2). Once locked, no other displays will glow and no Cooking
Zones will activate. To turn the Controls Lock OFF, touch and hold the LOCK key pad for 5
Fig. 1 Fig. 2
Fig. 3 Fig. 4
Fig. 5 Fig. 6
Fig. 7 Fig. 8
Fig. 9 Fig. 10
seconds. A beep will sound, the Lock LED will turn OFF (Fig. 1)and the cooktop may be
used normally.
COOKTOP POWER - The Cooktop POWER key pad activates the entire Cooktop. To
power the cooktop, touch and hold the POWER key pad for 2 seconds. A beep will sound
and the Power LED will glow (See Fig. 4). The cooktop will be in a ready mode for 10
seconds. If no other key pads are touched the Cooktop Main POWER will turn OFF
automatically. To turn the Main Power OFF touch and hold the Main POWER key pad for 1
second. A beep will sound and the Power LED will turn OFF (See Fig. 3).
Error Codes Alpha-Numeric Display EOXX- The control displays E in Cooking Zone
Alpha-Numeric display (Fig. 5) and digits in Main Control LED (Fig. 6) together showing an
error code. For service call 1-800-4-MY-HOME® (See back cover of this manual).
Alpha-Numeric Messages or LED Displayed by Cooking Zone Controls
COOKING ZONE ON/OFF PAD - Each of the Cooking Zones have separate ON/OFF key
pads. Once the Main Power key pad has been touched to activate the cooktop, touch the
corresponding Cooking Zone ON/OFF key pad once to activate the Cooking Zone needed.
"- -" will appear in the Alpha-Numeric display. If the corresponding UP/DOWN Arrow key
pad is not touched within 10 seconds, the request to turn the Cooking Zone ON will cancel
and the Cooktop will go back to ready mode. To set a Cooking Zone power level touch the
corresponding Cooking Zone UP or DOWN Arrow key pad once. The Cooking Zone ON/
OFF LED will glow (Fig. 8). To turn OFF a Cooking Zone, touch the Cooking Zone ON/OFF
key pad once. The Cooking Zone LED will turn OFF (Fig. 7).
Fig. 11
Fig. 12
Fig. 13
Fig. 14
POWER LEVEL SETTINGS - The Cooking Zones have separate Power Level Alpha-Numeric displays.
Once active, the Cooking Zones will provide 22 Power Levels to choose from. These include L0(Fig. 11),
2, 3, _, 5, 6, 7, B, 9; as well as precise .2 increment Cooking Zone Power Levels between/._ and 3 (Fig.
9); and half-increment power levels between 3and "7(Fig. 12). The highest setting • P or "Power Boost"
provides 125% power for 10 minutes (See Fig. 10). Each key pad touch (or just holding down the Power
Level key pad) will scroll through all the available power levels for any Cooking Zone quickly.
RESIDUAL HEAT - Once any Cooking Zone has been used for cooking and turned OFF, and if the
cooktop surface temperature on any of the Cooking Zones is still too HOT, HE (See Fig. 13) will appear in
the Alpha-Numeric display for the affected Cooking Zone. The HE will continue to display if the tempera-
ture is still too HOT.
The Cooking Zones may appear to be cool while turned ON and after they have been
turned OFF. But the glass surface may be HOT from residual heat transferred from the cookware and
burns may occur if surface is touched.
KEEP WARM - Use the WARM key pad to activate the Warm setting for any of the Cooking Zones. The
ON/OFF key pad for the desired Cooking Zone must be activated first, then touch the WARM key pad
located in the Cooktop Main Control area once to set. LH (low heat) should appear in the corresponding
Cooking Zone Alpha-Numeric display (See Fig. 14).
PAN DETECTION - All five Cooking Zones will provide a Pan Detection message. If a Cooking Zone is
turned ON and no pan is detected, or the pan has been moved or is not centered correctly, or is not made
of magnetic material, power level will flash in the affected Cooking Zone Alpha-Numeric display.
 Loading...