

Page 1
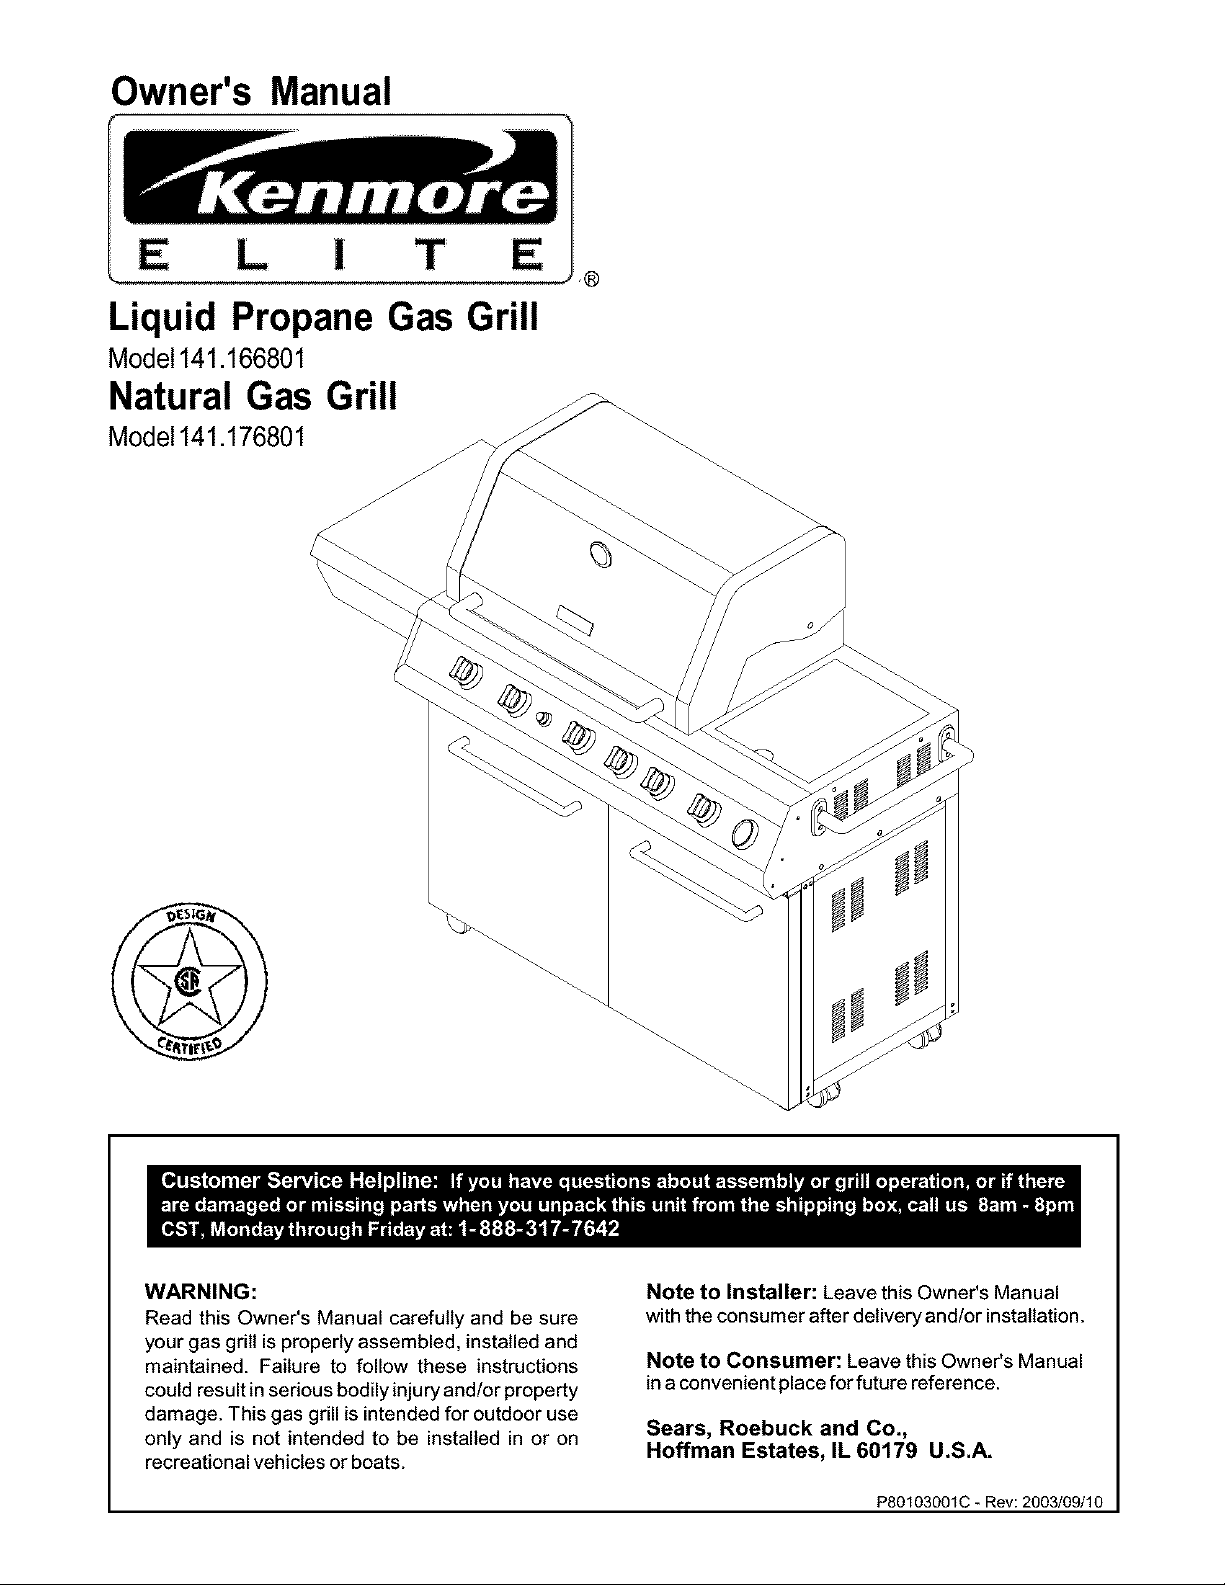
Owner's Manual
Liquid Propane Gas Grill
Model141.166801
Natural Gas Grill
Model141.176801
,®
WARNING:
Read this Owner's Manual carefully and be sure
your gas grill is properly assembled, installed and
maintained. Failure to follow these instructions
could result in serious bodily injury and!or property
damage. This gas grill is intended for outdoor use
only and is not intended to be installed in or on
recreational vehicles or boats.
Note to Installer: Leave this Owner's Manual
with the consumer after delivery and/or installation.
Note to Consumer: Leave this Owner's Manual
in a convenient place for future reference.
Sears, Roebuck and Co.,
Hoffman Estates, IL 60179 U.S.A.
P80103001C - Rev: 2003/09/10
Page 2
Warranty ..................................................... 2
Safety Instructions ..................................... 2
Hardware ............................................................ 6
Parts Diagram and Lists ........................ 7
Assembly Instructions ............................... 11
Lighting Instructions .................................. 16
Cleaning and Maintenance Instructions .... 18
Frequently Asked Questions .................. 20
Cooking Instructions ................................ 21
Cooking Guide and Recipes ................ 22
For the Lifetime of this Kenmore Elite Grill, Sears
will repair or replace, at our option, any Exterior
Stainless Steel or Aluminum Casting Parts (except for
paint loss).
Full 2-Year Warranty on Grill:
For 2 years from the date of purchase Sears will repair
or replace, at our option, any grill part (except for paint
loss, rusting and ignitor battery) that is defective in
material or workmanship.
/_k WARNING
Combustion byproducts produced when using
this product contain chemicals known to the
State of California to cause cancer, birth
defects, or other reproductive harm.
Z_ WARNING
Failure to comply with these instructions
could result in a fire or explosion that
could cause serious bodily injury, death, or
property damage.
Ak WARNING
Your grill will get very hot. Never lean over
the cooking area while using your grill. Do not
touch cooking surfaces, grill housing, Lid or any
other grill parts while the grill is in operation, or
until the grill has cooled down after use.
Failure to comply with these instructions
may result in serious bodily injury.
FOR YOUR SAFETY
1. Do not store or use gasoline or other flam-
mable material and liquids in the vicinity of this
or any other appliance.
2. ALP cylinder not connected for use must net
be stored in the vicinity of this or any other
appliance.
Limited 3 Year Warranty on Selected Grill Parts:
From 2 years after the date of purchase for a 3-year
period, Sears will replace Flame Tamers, Cooking
Grids, Burners and All Other Parts (except for ignitor
battery) if they are defective in material or workman-
ship. You will be charged for labor.
Warranty Service
Warranty service is available by contacting the ®
nearest Sears Service Center at 1-800-4-MY-HOME
Warranty Restrictions
• This warranty is void if grill is used for com-
mercial or rental purposes.
• This warranty applies only when the grill is
used in the United States.
• This warranty gives you specific legal rights,
and you may also have other rights which vary
from state to state.
Sears, Roebuck and Co., Dept. 817WA,
Hoffman Estates, IL 60179
FOR YOUR SAFETY
If you smell gas:
1. Shut off gas to the appliance.
2. Extinguish any open flame.
3. Open Lid.
4. If odor continues, immediately call your gas
supplier or your fire department.
IMPORTANT: Your Kenmore LP Gas Grill cannot
be converted to use Natural Gas. Attempting to do
so is extremely hazardous and will also void the
grill warranty.
Grill Installation Codes
This gas gdll must be installed in accordance with
all local codes. In areas without local codes, follow
the latest edition of the National Fuel Gas Code
ANSI Z223.1. and National Electrical Code ANSI!
NFPA 70 In Canada, installation must conform to
standard CAN/CGA lb149.1 or 1-b149.2 (Installation
Code for Gas Burning Appliances and Equipment)
and all local codes.
Correct LP Gas Tank Use
LP gas grill models are designed for use with a
standard 20 lb. Liquid Propane Gas (LP gas) tank,
not included with grill box. Never connect your gas
grill to an LP gas tank that exceeds this capacity.
A tank of approximately 12 inches in diameter by
©Sears, Roebuck and Co.
2
Page 3
18-1/2incheshighis the maximumsizeLPgas
tankto use.Youmust usean"OPD" gas tank
which offers an Overfill Prevention Device.
This safety feature prevents the tank from being
overfilled which can cause malfunction of the LP
gas tank, regulator and/or grill.
The LP gas tank must be constructed and
marked in accordance with specifications of the
U.S. Dept. of Transportation (DOT). In Canada, the
LP gas tank must meet the Canadian Transporta-
tion and Communications (CTC) specifications. Also
be sure to read and follow all LP instructions
below.
1. The LP gas tank has a shutoff valve, termi-
nating in an LP gas supply tank valve outlet,
that is compatible with a Type 1 tank con-
nection device. The LP gas tank must also
have a safety relief device that has a direct
connection with the vapor space of the tank.
2. The tank supply system must be arranged
for vapor withdrawal.
3. The LP gas tank used must have a collar
to protect the tank valve.
Proper Placement and Clearance of Grill
Never use your gas grill in a garage, porch, shed,
breezeway or any other enclosed area. Your gas gdll is
to be used outdoors only, at least 24 inches from the
back and side of any combustible surface. Your
gas grill should not be placed under any surface
that will burn. Do not obstruct the flow of ventilation
air around the gas grill housing.
This outdoor gas grill is not intended to be installed in
or on recreational vehicles and/or boats.
• Never connect an unregulated LP gas tank to
your gas grill. The gas regulator assembly
supplied with your gas gdll is adjusted to have
an outlet pressure of 11" water column (W.C.)
for connection to an LP gas tank.
• Only use the regulator and hose assembly
supplied with your gas grill. Replacement
regulators and hose assemblies must be those
specified by Sears.
• Have your LP gas tank filled by a reputable
propane gas dealer and visually inspected and
re-qualified at each filling.
• Never fill the gas tank beyond 80% full.
Have your propane gas dealer check the
release valve after every filling to ensure that it
remains free of defects.
• Always keep LP gas tanks in an upright
position.
• Do not store (or use) gasoline or other flammable
vapors and liquids in the vicinity of this gas grill.
• An LP gas tank that is not connected for use must
NOT be stored on bottom shelf or in the vicinity of
this or any other gas gdll.
• Do not subject the LP gas tank to excessive heat.
• Never store an LP gas tank indoors. If you
store your gas gdll in the garage or other indoor
location, always disconnect the LP gas tank
first and store it safely outside.
• LP gas tanks must be stored outdoors in a
well-ventilated area and out of the reach of
children. Disconnected LP gas tanks must not
be stored in a building, garage or any other
enclosed area.
• When your gas gdll is not in use the gas
must be turned off at the LP gas tank.
• The regulator and hose assembly must be
inspected before each use of the gdll. If there
is excessive abrasion or wear or if the hose
is cut, it must be replaced prior to the gdll
being used again.
• Keep the gas regulator hose away from hot
grill surfaces and dripping grease. Avoid
unnecessary twisting of hose. Visually inspect
hose prior to each use for cuts, cracks,
excessive wear or other damage. If the hose
appears damaged do not use the gas gdll.
Call Sears at 1-800-366-PART (1-800-366-7278)
for a Sears authorized replacement hose.
• Never light your gas gdll with the lid closed
or before checking to ensure the burner tubes
are fully seated over the gas valve orifices.
• Never allow children to operate your grill. Do
not allow children to play near your grill.
WARNING
A strong gas smell, or the hissing sound of
gas indicates a serious problem with your
gas grill or the LP gas tank. Failure to
immediately follow the steps listed below
could result in a fire or explosion that could
cause serious bodily injury, death, or prop-
erty damage.
• Shut off gas supply to the gas grill.
• Turn the Control Knobs to OFF position.
• Put out any flame with a proper fire extin-
guisher.
• Open Grill Lid.
• Get away from the LP gas tank.
• Do not try to fix the problem yourself.
• If odor continues or you have a fire you
cannot extinguish, call your fire department.
Do not call near the LP gas tank because
your telephone is an electdcal device and
could create a spark resulting in fire and/or
explosion.
NOTE: The normal flow of gas through the
regulator and hose assembly can create a
humming noise. A low volume of noise is
perfectly normal and will not interfere with
operation of the grill. If humming noise is
loud and excessive you may need to purge
air from the gas line or reset the regulator
excess gas flow device. This purging proce-
dure should be done every time a new LP
gas tank is connected to your gdll. For help
with this procedure refer to page 17, step 4,
or call the Customer Service Helpline for
assistance, 8am - 8pm CST, Monday through
Fdday 1-888-317-7642.
Page 4
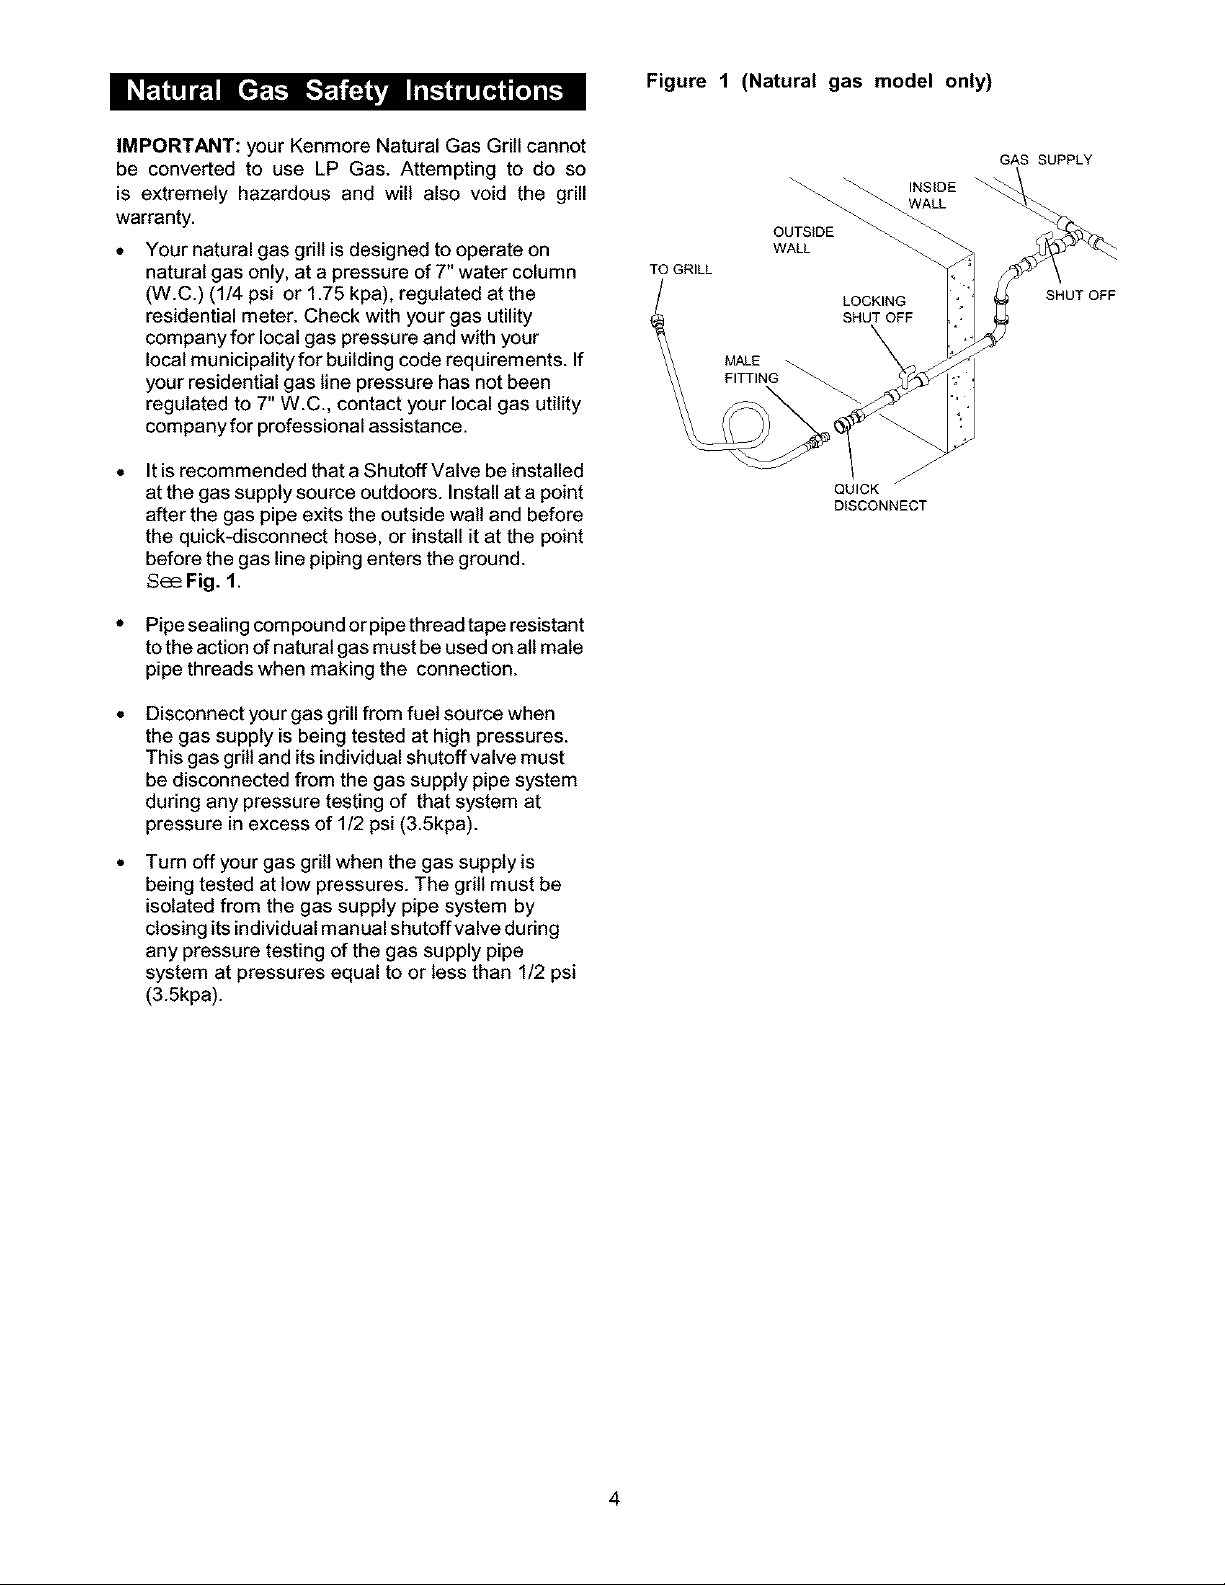
Figure 1 (Natural gas model only)
IMPORTANT: your Kenmore Natural Gas Grill cannot
be converted to use LP Gas. Attempting to do so
is extremely hazardous and will also void the grill
warranty.
Your natural gas grill isdesigned to operate on
natural gas only, at apressure of 7" water column
(W.C.) (1/4 psi or 1.75 kpa), regulated atthe
residential meter. Check with your gas utility
company for local gas pressure and with your
local municipality for building code requirements. If
your residential gas line pressure has not been
regulated to 7" W.C., contact your local gas utility
company for professional assistance.
It is recommended that aShutoff Valve be installed
at the gas supply source outdoors. Install at a point
after the gas pipe exits the outside walt and before
the quick-disconnect hose, or install it at the point
before the gas line piping enters the ground.
See Fig. 1.
• Pipe sealing com pound orpipe thread tape resistant
to the action of natural gas must be used on ait male
pipe threads when making the connection.
Disconnect your gas grill from fuel source when
the gas supply is being tested at high pressures.
This gas grill and its individual shutoff valve must
be disconnected from the gas supply pipe system
during any pressure testing of that system at
pressure in excess of 1/2 psi (3.5kpa).
TO GRILL
OUTSIDE
WALL
MALE --.
FITTING
LOCKING
SHUT OFF
QUICK
DISCONNECT
INSIDE
WALL
J
GAS SUPPLY
SHUT OFF
Turn off your gas grill when the gas supply is
being tested at low pressures. The grill must be
isolated from the gas supply pipe system by
closing its individual manual shutoff valve during
any pressure testing of the gas supply pipe
system at pressures equal to or less than 1/2 psi
(3.5kpa).
4
Page 5
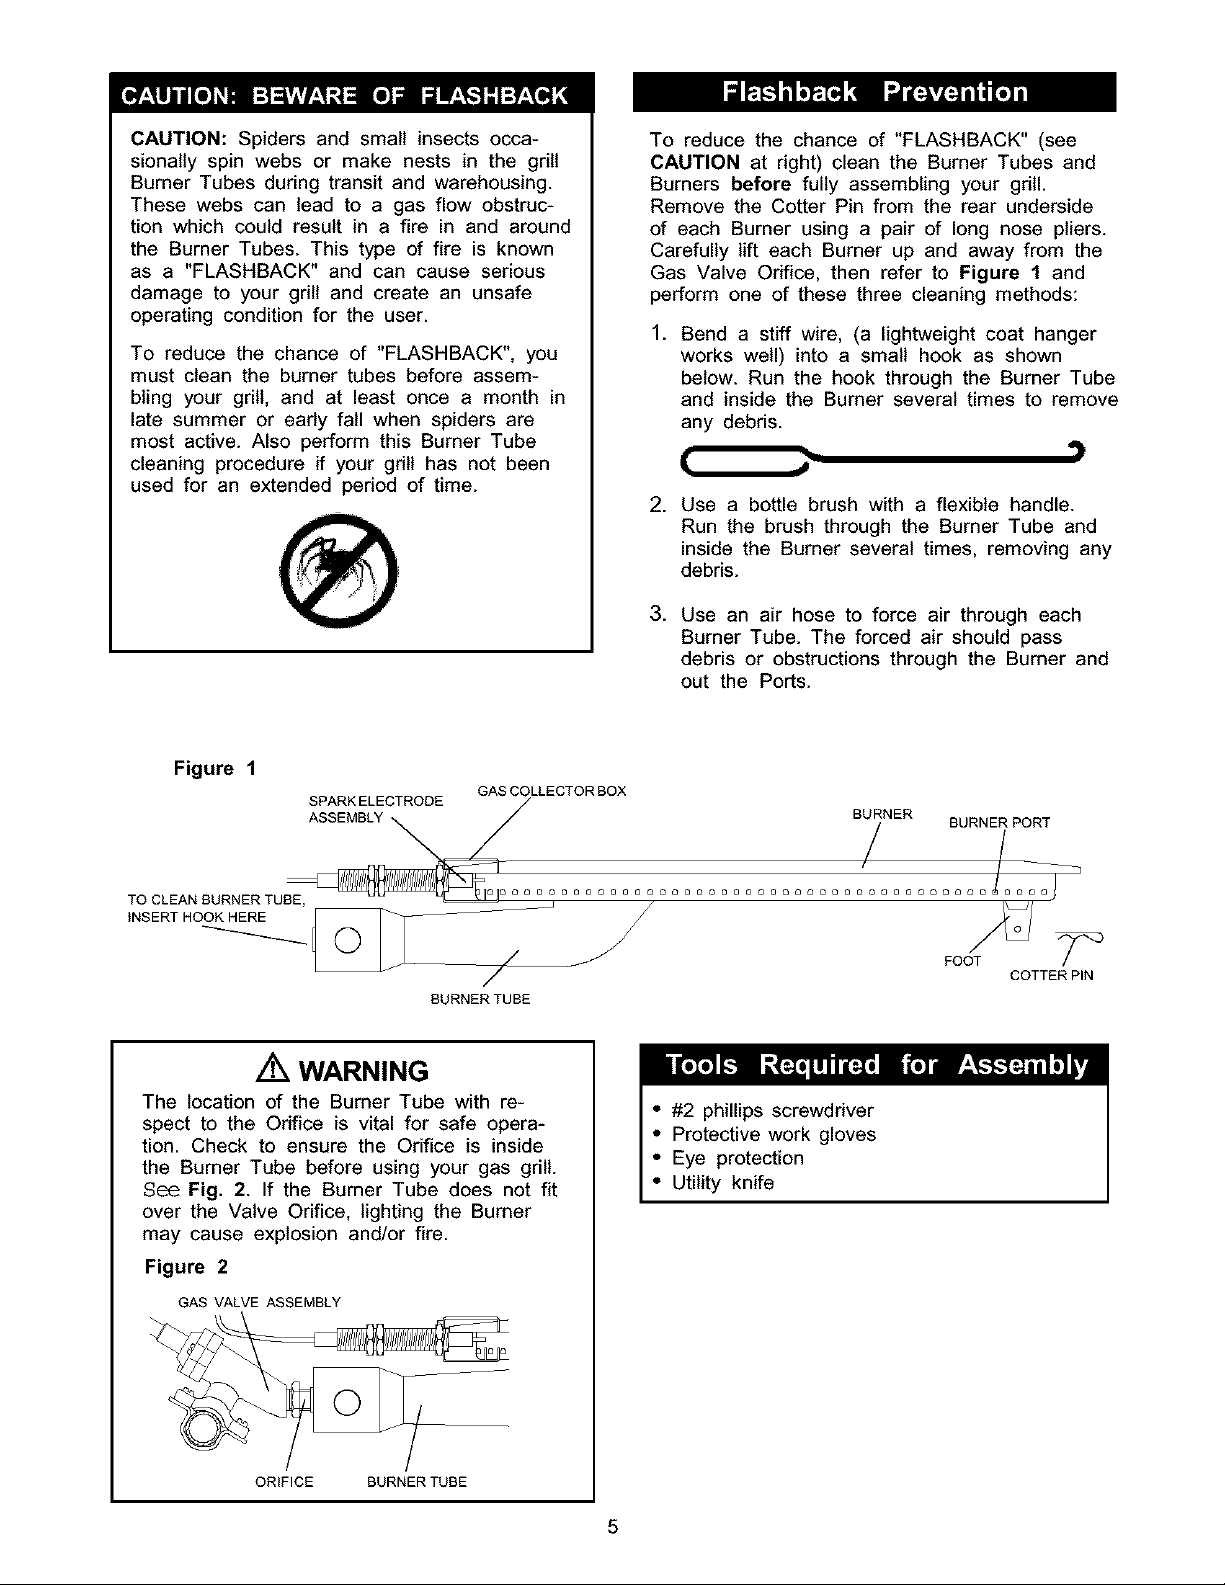
CAUTION:Spidersandsmallinsectsocca-
sionallyspinwebsor makenestsin the grill
BurnerTubesduringtransitandwarehousing.
Thesewebscanleadto a gasflowobstruc-
tionwhichcouldresultin a fire in andaround
theBurnerTubes.Thistypeof fire is known
as a "FLASHBACK"andcan causeserious
damageto yourgrillandcreatean unsafe
operatingconditionfor theuser.
To reducethechanceof "FLASHBACK",you
mustcleanthe burnertubesbeforeassem-
blingyourgrill, andat leastoncea monthin
latesummeror earlyfall whenspidersare
mostactive.Alsoperformthis BurnerTube
cleaningprocedureif yourgdllhas not been
usedfor an extendedperiodoftime.
To reducethe chanceof "FLASHBACK"(see
CAUTIONat right)cleanthe BurnerTubesand
Burnersbeforefully assemblingyourgdtl.
RemovetheCotterPinfromthe rearunderside
of eachBurnerusinga pairof longnosepliers.
Carefullylift eachBurnerupandawayfromthe
GasValveOdfice,thenreferto Figure1 and
performoneof thesethreecleaningmethods:
.
Bend a stiff wire, (a lightweight coat hanger
works well) into a small hook as shown
below. Run the hook through the Burner Tube
and inside the Burner several times to remove
any debris.
. Use a bottle brush with a flexible handle.
Run the brush through the Burner Tube and
inside the Burner several times, removing any
debris.
.
Use an air hose to force air through each
Burner Tube. The forced air should pass
debris or obstructions through the Burner and
out the Ports.
Figure 1
SPARK ELECTRODE
ASSEMBLY BURNER BURNER PORT
TO CLEAN BURNER TUBE,
INSERT HOOK HERE
GAS COLLECTOR BOX
BURNERTUBE
WARNING
The location of the Burner Tube with re-
spect to the Odfice is vital for safe opera-
tion. Check to ensure the Orifice is inside
the Burner Tube before using your gas grill.
See Fig. 2. If the Burner Tube does not fit
over the Valve Orifice, lighting the Burner
may cause explosion and/or fire.
Figure 2
GAS VALVE ASSEMBLY
FOOT
COTTER PIN
• #2 phillips screwdriver
• Protective work gloves
• Eye protection
• Utility knife
ORIFICE BURNER TUBE
5
Page 6
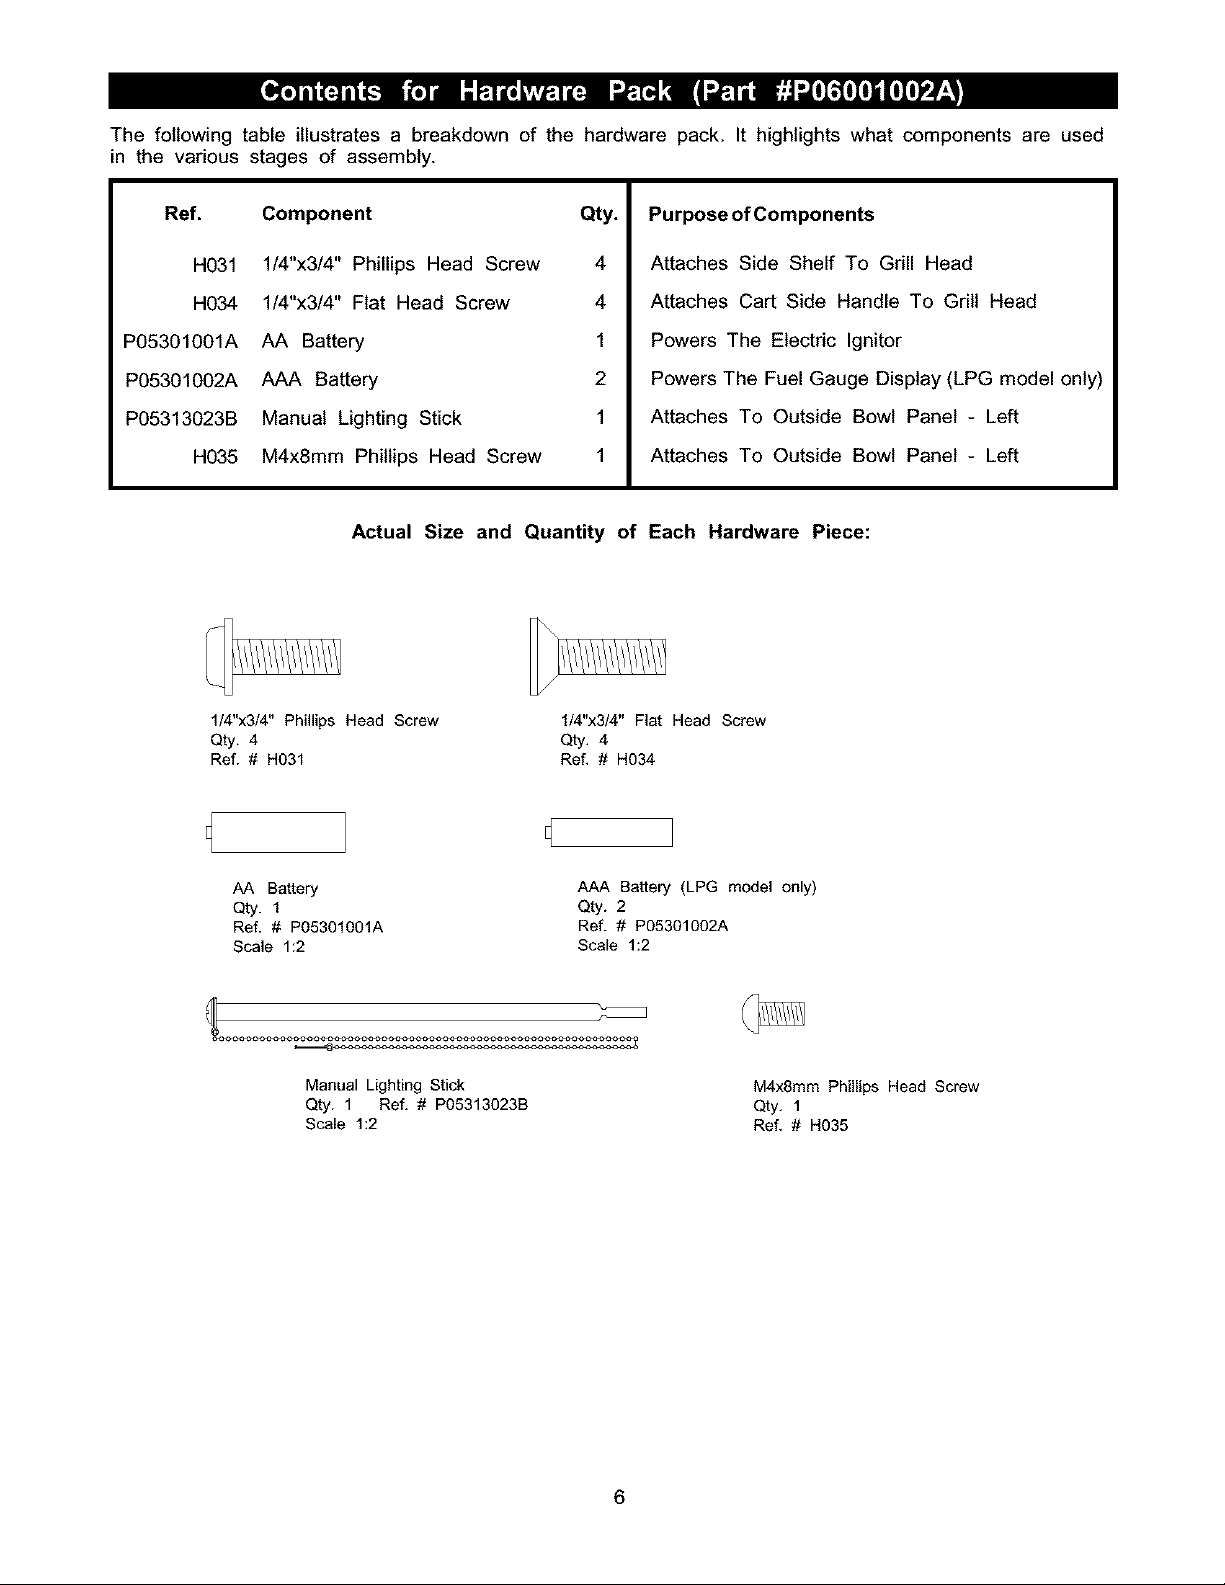
The following table illustrates a breakdown of the hardware pack. It highlights what components are used
in the various stages of assembly.
Ref. Component
H031
H034
P05301001A
P05301002A
AA Battery 1
AAA Battery 2
P05313023B
H035
1/4"x3/4" Phillips Head Screw
Qty. 4
Ref. # H031
Qty.
1/4"x3/4" Phillips Head Screw 4
1/4"x3/4" Flat Head Screw 4
Manual Lighting Stick 1
M4x8mm Phillips Head Screw 1
Actual Size and Quantity of Each Hardware Piece:
1/4"x3/4" Flat Head Screw
Qty, 4
Ref, # H034
PurposeofComponents
Attaches Side Shelf To Grill Head
Attaches Cart Side Handle To Grill Head
Powers The Electdc Ignitor
Powers The Fuel Gauge Display (LPG model only)
Attaches To Outside Bowl Panel - Left
Attaches To Outside Bowl Panel - Left
AA Battery
Qty. 1
Ref. # PO5301001A
Scale 1:2
Manual Lighting Stick
Qty. 1 Ref. # P05313023B
Scale 1:2
Battery (LPG model only)
Qty. 2
Ref. # P05301002A
Scale 1:2
M4x8mm Phillips Head Screw
Qty, 1
Ref, # H035
6
Page 7
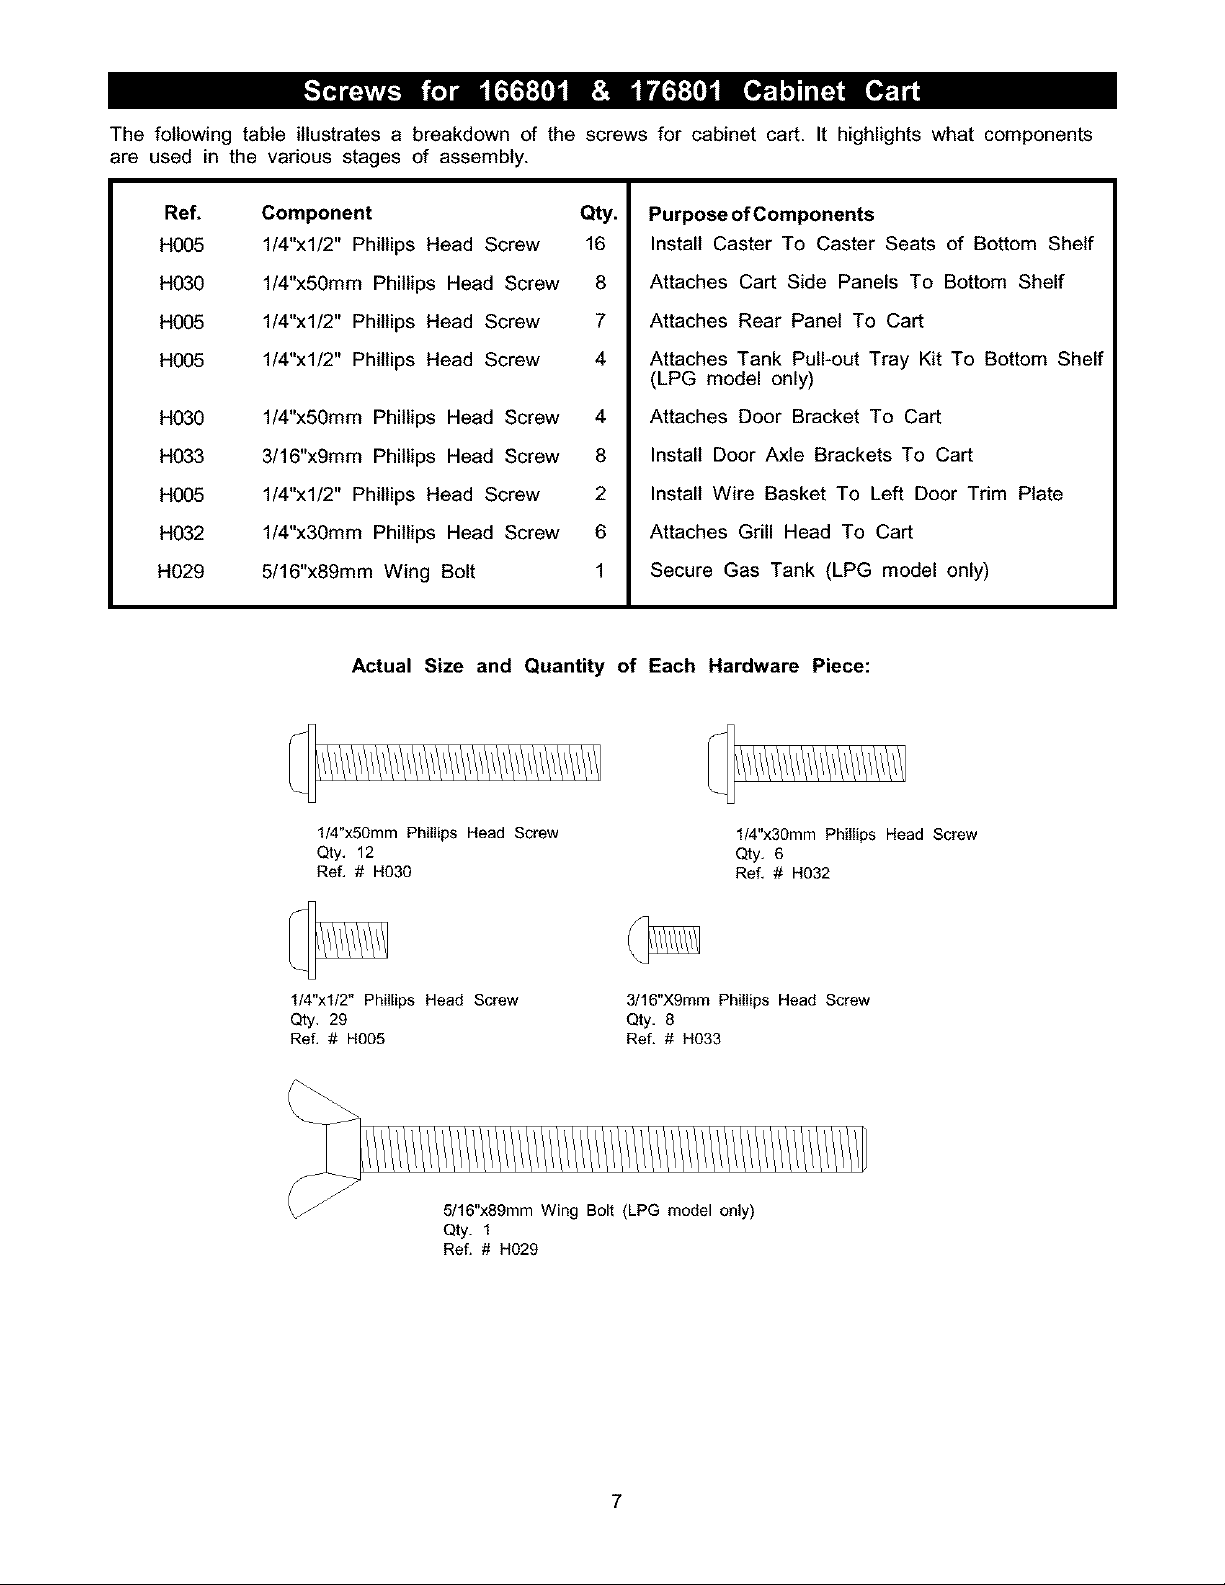
Thefollowingtableillustratesa breakdownof the screwsfor cabinetcart.It highlightswhatcomponents
areusedin thevariousstagesof assembly.
Ref.
H005
H030
H005
H005
H030
H033
H005
H032
H029
Component Qty.
1/4"xl/2"PhillipsHeadScrew 16
1/4"x50mmPhillipsHeadScrew 8
1/4"xl/2"PhillipsHeadScrew 7
1/4"xl/2"PhillipsHeadScrew 4
1/4"x50mmPhillipsHeadScrew 4
3/16"x9mmPhillipsHeadScrew 8
1/4"xl/2"PhillipsHeadScrew 2
1/4"x30mmPhillipsHeadScrew 6
5/16"x89mmWingBolt 1
Actual Size and Quantity of Each Hardware Piece:
Purpose of Components
Install Caster To Caster Seats of Bottom Shelf
Attaches Cart Side Panels To Bottom Shelf
Attaches Rear Panel To Cart
Attaches Tank Pull-out Tray Kit To Bottom Shelf
(LPG model only)
Attaches Door Bracket To Cart
Install Door Axle Brackets To Cart
Install Wire Basket To Left Door Trim Plate
Attaches Grill Head To Cart
Secure Gas Tank (LPG model only)
1/4"x50mm Phillips Head Screw
Qty. 12
Refl # H030
1/4"xl/2" Phillips Head Screw
Qty. 29
Refl # H005
5/16"x89mm Wing Bolt (LPG model only)
Qty. 1
Ref. # H029
1/4"x30mm Phillips Head Screw
Qty. 6
Refl # H032
3/16"X9mm Phillips Head Screw
Qty. 8
Ref. # H033
Page 8
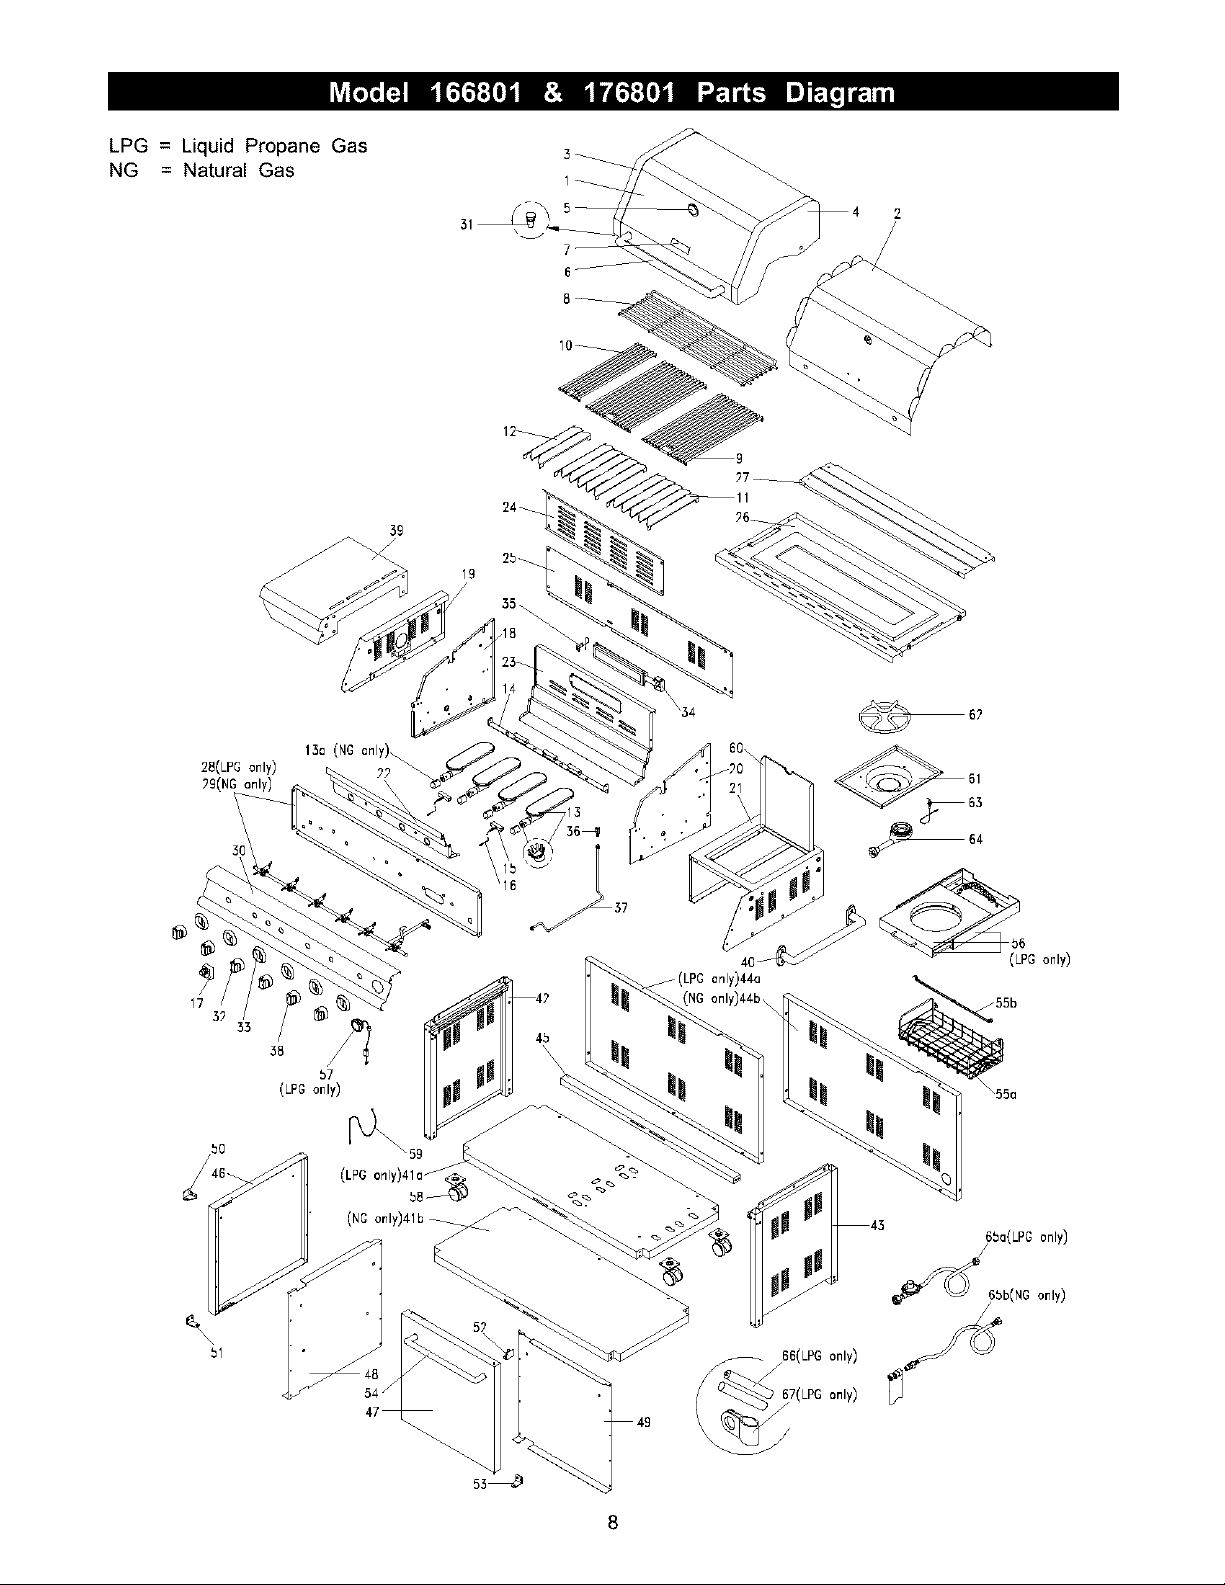
LPG = Liquid Propane Gas
NG = Natural Gas
3_
19
28(LPGonly)
29(NI
17
32
33
13a (NO only)\
38
(LPG only)
16
j(LPG only)44a
40
[NG only)44b\
b7
PG only)
/55b
only)
only)
8
Page 9
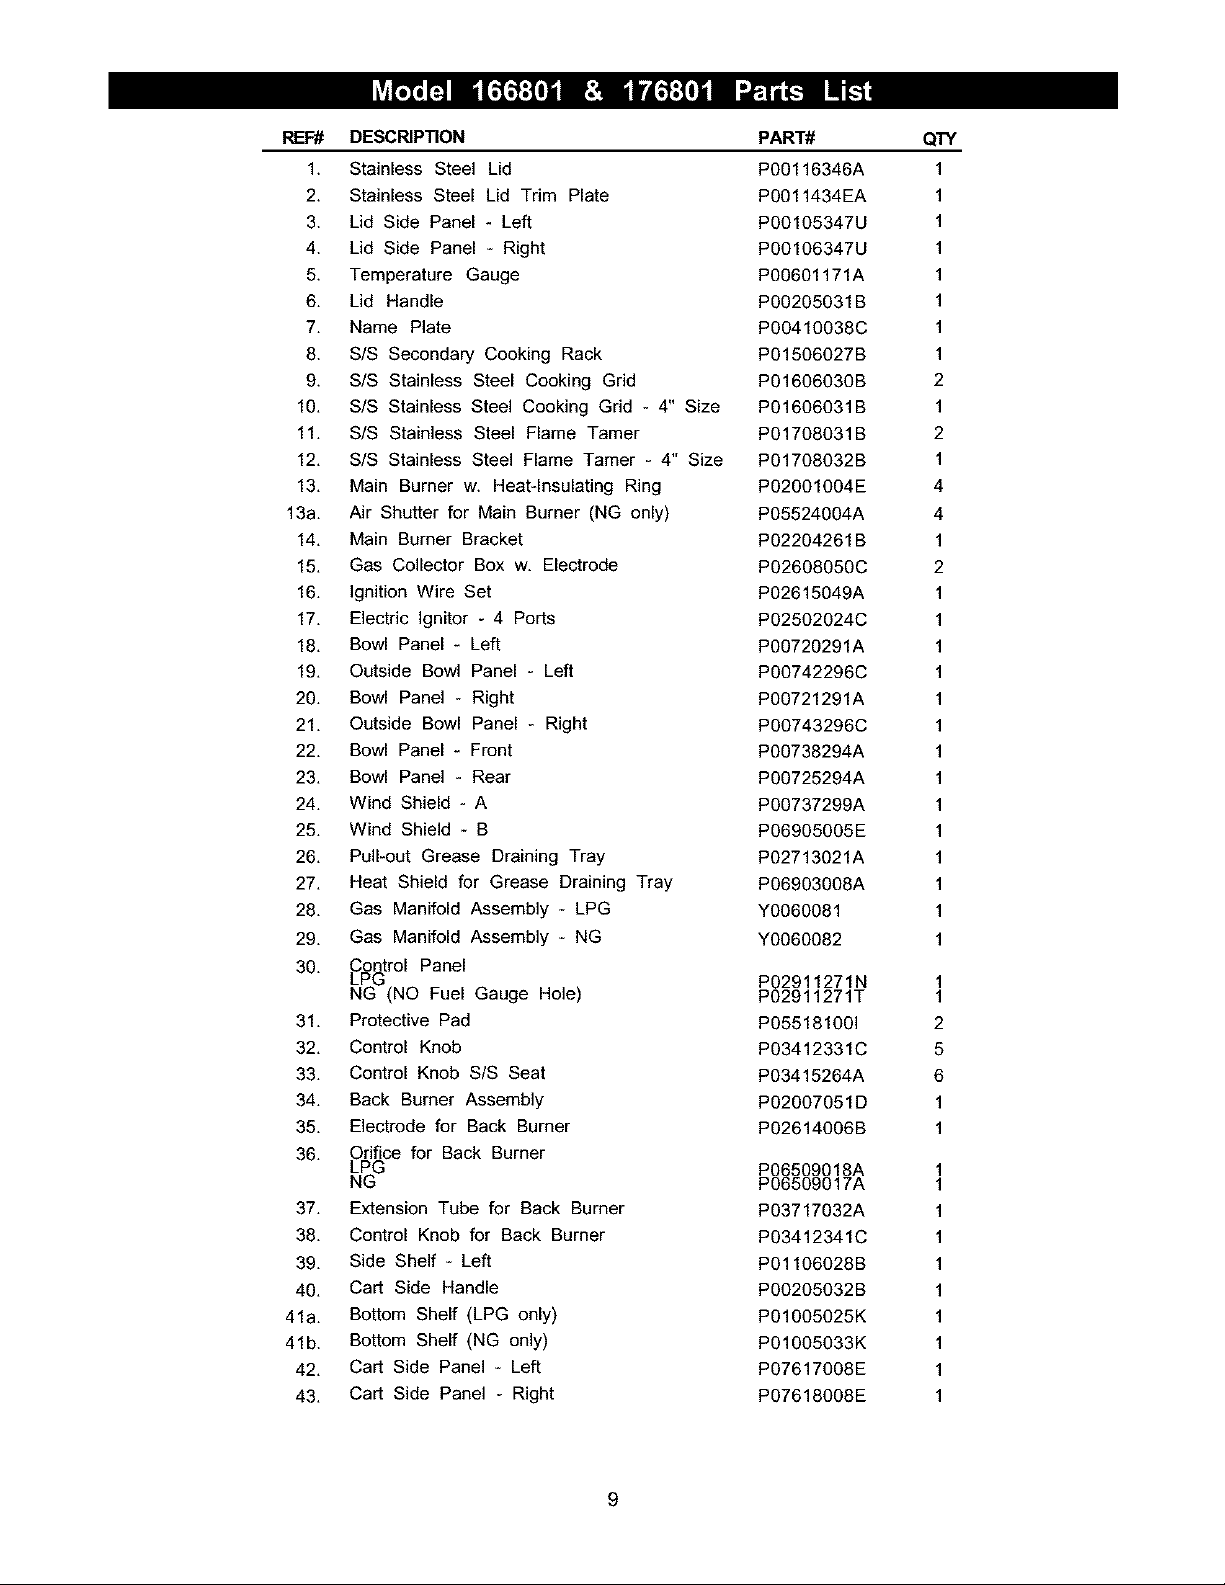
REF# DESCRIPTION
1. Stainless Steel Lid
2. Stainless Steel Lid Trim Plate
3. Lid Side Panel - Left
4. Lid Side Panel - Right
5. Temperature Gauge
6. Lid Handle
7. Name Plate
8. S/S Secondary Cooking Rack
9. S/S Stainless Steel Cooking Grid
10, S/S Stainless Steel Cooking Grid - 4" Size
11, S/S Stainless Steel Flame Tamer
12, S/S Stainless Steel Flame Tamer - 4" Size
13, Main Burner w. Heat-Insulating Ring
13a. Air Shutter for Main Burner (NG only)
14, Main Burner Bracket
15, Gas Collector Box w, Electrode
16, Ignition Wire Set
17, Electric Ignitor - 4 Ports
18, Bowl Panel- Left
19, Outside Bowl Panel - Left
20, Bowl Panel - Right
21, Outside Bowl Panel - Right
22, Bowl Panel- Front
23, Bowl Panel - Rear
24, Wind Shield - A
25, Wind Shield - B
26, Pull-out Grease Draining Tray
27, Heat Shield for Grease Draining Tray
28, Gas Manifold Assembly - LPG
29, Gas Manifold Assembly - NG
PART#
PO0116346A
P0011434EA
P00105347U
P00106347U
PO0601171A
P00205031B
P00410038C
P01506027B
P01606030B
P01606031B
P01708031B
P01708032B
P02001004E
PO5524004A
P02204261B
P02608050C
PO2615049A
P02502024C
PO0720291A
P00742296C
PO0721291A
P00743296C
PO0738294A
P00725294A
P00737299A
P06905005E
PO2713021A
P06903008A
Y0060081
Y0060082
QTY
1
1
1
1
1
1
1
1
2
1
2
1
4
4
1
2
1
1
1
1
1
1
1
1
1
1
1
1
1
1
30. LCl_trol Panel
NG (NO Fuel Gauge Hole)
31. Protective Pad
32. Control Knob
33. Control Knob SIS Seat
34. Back Burner Assembly
35. Electrode for Back Burner
36. Orifice for Back Burner
LPG
NG
37, Extension Tube for Back Burner
38, Control Knob for Back Burner
39, Side Shelf - Left
40, Cart Side Handle
41a. Bottom Shelf (LPG only)
41b. Bottom Shelf (NG only)
42, Cart Side Panel - Left
43, Cart Side Panel - Right
P02911271N
PO2911271T
P055181001
P03412331C
PO3415264A
P02007051D
P02614006B
PO6509018A
P06509017A
P03717032A
P03412341C
P01106028B
P00205032B
P01005025K
P01005033K
P07617008E
P07618008E
1
1
2
5
6
1
1
1
1
1
1
1
1
1
1
1
1
9
Page 10
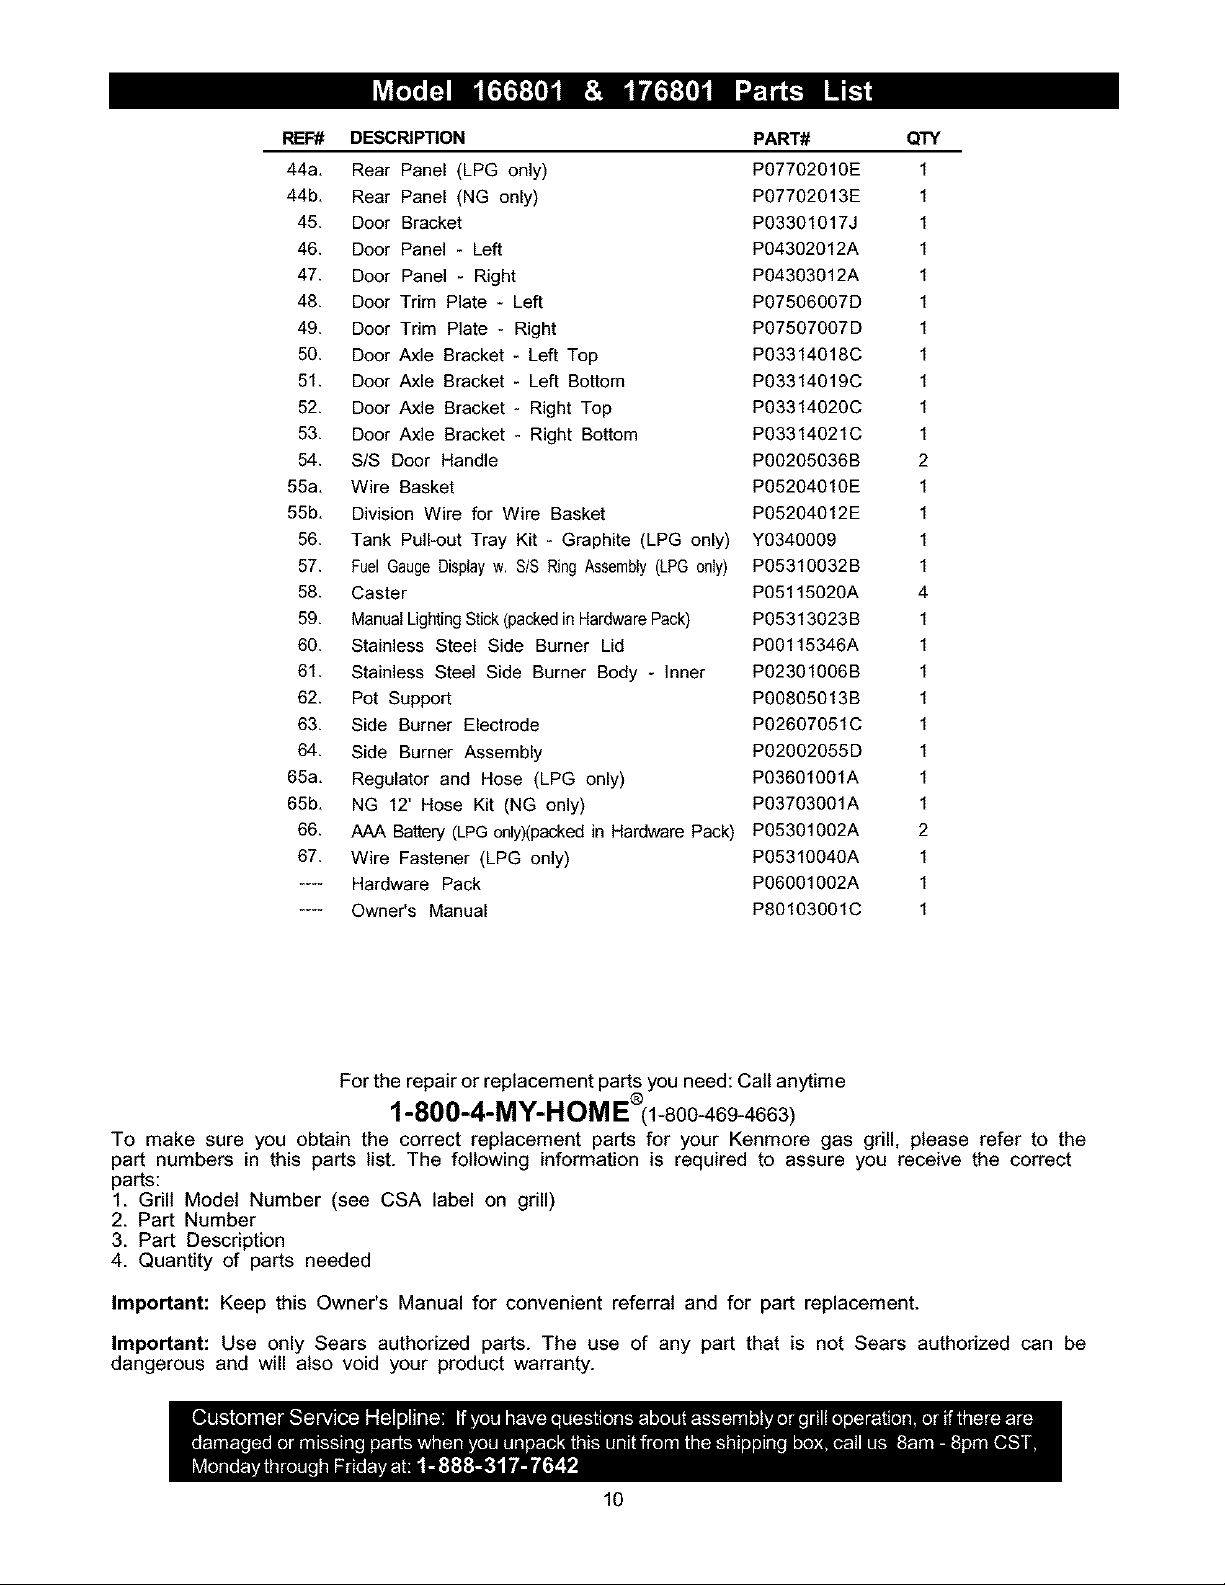
REF# DESCRIPTION PART#
44a. Rear Panel (LPG only) P07702010E
44b. Rear Panel (NG only) P07702013E
45. Door Bracket P03301017J
46. Door Panel - Left PO4302012A
47. Door Panel - Right P04303012A
48. Door Trim Plate - Left P07506007D
49. Door Trim Plate - Right P07507007D
50. Door Axle Bracket - Left Top P03314018C
51. Door Axle Bracket - Left Bottom P03314019C
52. Door Axle Bracket - Right Top P03314020C
53. Door Axle Bracket - Right Bottom P03314021C
54. S/S Door Handle P00205036B
55a. Wire Basket P05204010E
55b. Division Wire for Wire Basket P05204012E
56. Tank Pull.out Tray Kit - Graphite (LPG only) Y0340009
57. Fuel Gauge Displayw. SIS RingAssembly(LPG only) P05310032B
58. Caster PO5115020A
59. Manual LightingStick(packedin HardwarePack) P05313023B
60. Stainless Steel Side Burner Lid PO0115346A
61. Stainless Steel Side Burner Body - Inner P02301006B
62. Pot Support P00805013B
63. Side Burner Electrode P02607051C
64. Side Burner Assembly P02002055D
65a. Regulator and Hose (LPG only) PO3601001A
65b. NG 12' Hose Kit (NG only) P03703001A
66. AAA Battery (LPGonly)(packed in Hardware Pack) P05301002A
67. Wire Fastener (LPG only) P05310040A
.... Hardware Pack P06001002A
.... Owner's Manual P80103001C
QTY
2
1
1
1
1
4
2
1
1
1
For the repair or replacement parts you need: Call anytime
1-800-4-MY-HeM E°(1-800-469-4663)
To make sure you obtain the correct replacement parts for your Kenmore gas grill, please refer to the
part numbers in this parts list. The fallowing information is required to assure you receive the correct
parts:
1. Grill Model Number (see CSA label on grill)
2. Part Number
3. Part Description
4. Quantity of parts needed
Important: Keep this Owner's Manual for convenient referral and for part replacement.
Important: Use only Sears authorized parts. The use of any part that is not Sears authorized can be
dangerous and will also void your product warranty.
lO
Page 11
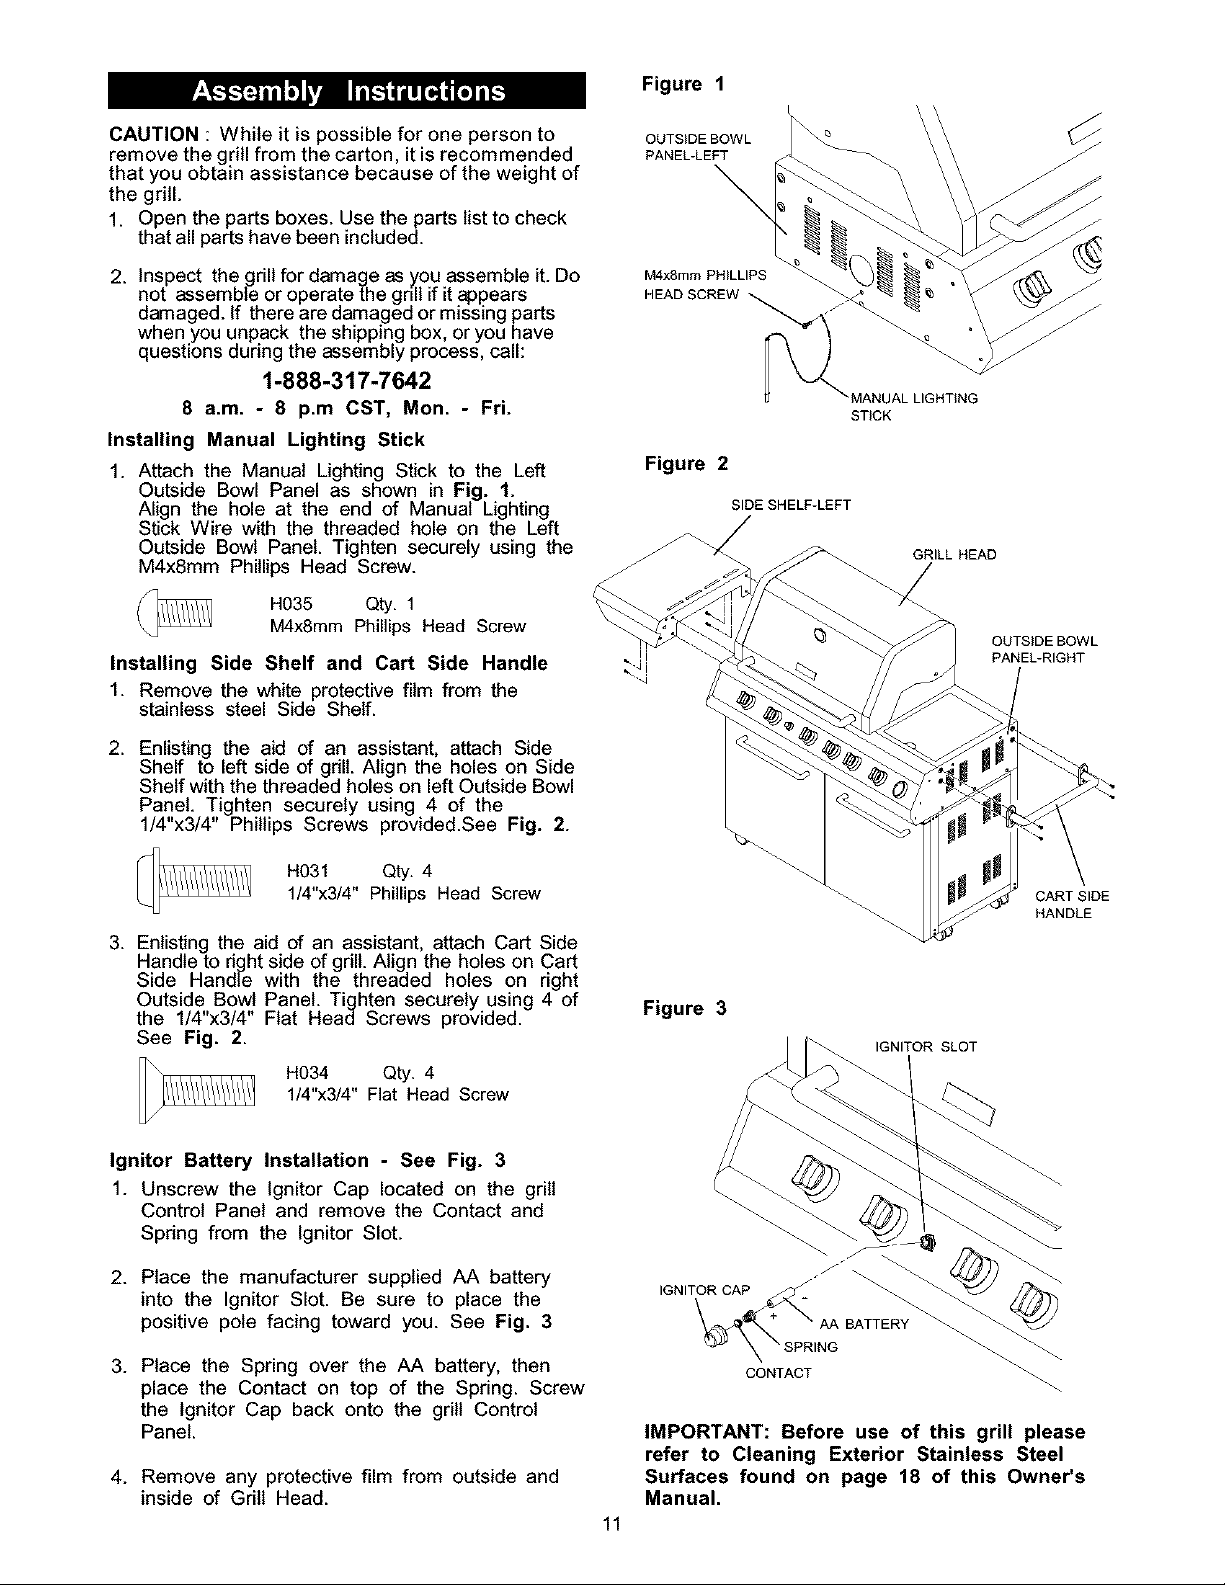
CAUTION : While it is possible for one person to
remove the grill from the carton, it is recommended
that you obtain assistance because of the weight of
the grill.
1. Open the parts boxes. Use the parts list to check
that all parts have been included.
2. Inspect the grill for damage as you assemble it. Do
not assemble or operate the grill if it appears
damaged. If there are damaged or missing parts
when you unpack the shipping box, or you have
questions during the assembly process, call:
1-888-317-7642
8 a.m. - 8 p.m CST, Mon. - Fri.
Installing Manual Lighting Stick
1. Attach the Manual Lighting Stick to the Left
Outside Bowl Panel as shown in Fig. 1.
Align the hole at the end of Manual Lighting
Stick Wire with the threaded hole on the Left
Outside Bowl Panel. Tighten securely using the
M4x8mm Phillips Head Screw.
H035 Qty. 1
M4x8mm Phillips Head Screw
Installing Side Shelf and Cart Side Handle
1. Remove the white protective film from the
stainless steel Side Shelf.
Figure 1
L
OUTSIDE BOWL
PANEL-LEFT
MAx8mm PHILLIPS
HEAD SCREW _.
MANUAL LIGHTING
STICK
Figure 2
SIDE SHELF-LEFT
GRILL HEAD
/
OUTSIDE BOWL
PANEL-RIGHT
2. Enlisting the aid of an assistant, attach Side
Shelf to left side of gdll. Align the holes on Side
Shelf with the threaded holes on left Outside Bowl
Panel. Tighten securely using 4 of the
1/4"x3/4" Phillips Screws provided.See Fig. 2.
H031 Qty. 4
1/4"x3/4" Phillips Head Screw
3. Enlisting the aid of an assistant, attach Cart Side
Handle to right side of grill. Align the holes on Cart
Side Handle with the threaded holes on right
Outside Bowl Panel. Tighten securely using 4 of
the 1/4"x3/4" Flat Head Screws provided.
See Fig. 2.
H034 Qty. 4
1/4"x3/4" Flat Head Screw
Ignitor Battery Installation - See Fig. 3
1. Unscrew the Ignitor Cap located on the grill
Control Panel and remove the Contact and
Spring from the Ignitor Slot.
2. Place the manufacturer supplied AA battery
into the Ignitor Slot. Be sure to place the
positive pole facing toward you. See Fig. 3
CART SIDE
HANDLE
Figure 3
IGNITOR SLOT
IGNITOR CAP _"
AA BATTERY
3. Place the Spring over the AA battery, then
place the Contact on top of the Spring. Screw
the Ignitor Cap back onto the grill Control
Panel.
4. Remove any protective film from outside and
inside of Grill Head.
CONTACT
IMPORTANT: Before use of this grill please
refer to Cleaning Exterior Stainless Steel
Surfaces found on page 18 of this Owner's
Manual.
11
Page 12

ElectrodeCheck- Requires an Assistant
Before placing the cooking components into your
grill, ensure that the Spark Electrode Tip is properly
positioned within each Gas Collector Box ( a
3-1/4" wide stainless mechanism found at the front
between each set of Burners.) The easiest way to
ensure this is to perform this Electrode Check:
1. Be sure all Control Knobs are set to "OFF"
and open the Grill Lid.
2. Have an assistant stand behind to the right of
the gdll and look down at each Gas Collector
Box. NEVER put your face inside Grill Head.
3. Press the Ignitor Cap. You should hear a
"clicking" sound and your assistant should see
a small blue spark within each Gas Collector
Box. If a spark is present the Electrode Tips
are properly positioned.
Installing Cooking Components
Important: Before cooking on your grill the first
time, wash the Cooking Grids and Cooking Rack
with warm, soapy water. Rinse and dry thoroughly.
After cooking is completed, turn gdll to HIGH
setting three to five minutes to bum off rear grease
or food residue.
1. Place the three Stainless Steel Flame Tamers
on the lower ledge above Burners. See Fig. 5
2. Evenly space the Stainless Steel Cooking Grids
(cross braces are bottom side) on the ledge
above the Flame Tamers.
.
Place the Stainless Steel Secondary Cooking
Rack into the slots on the upper left and
upper right of Grill Bowl Side Panels. See
Fig.5
4. If no spark is seen the Spark Gap shown in
Fig. 4 needs to be adjusted as follows:
Using an adjustable wrench, loosen the Inside
Nut just until the Gas Collector Box can be
maneuvered and turned upward.
The gap between the Spark Electrode Tip and
Spark receiver should be approximately 3/16".
If the gap is wider than 3/16" use a pair of long
nose pliers and gently squeeze the Gas Collector
Box until the gap is correct.
Return the Gas Collector Box to its original hori-
zontal position, secure the Inside Nut and try the
Electrode Check again.
5. If no "clicking" sound isheard check the following
common causes. If you need assistance call our
Customer Service Helpline
at 1-888-317-7642.
• Ignitor AA battery not installed properly.
• Ignitor wires may be loose. Remove the AA battery,
inspect the Ignitor Junction Box found behind the
Control Panel, and connect any loose wires.
4. Remove Fastening Band from Pot Support and
place the Pot Support into the Side Burner
Body-Inner. See Fig.5
Figure 5
S/S SECONDARY
COOKING
S/S COOKING
GRID,
S,/S FLAME
SLOTS FOR
RACK
POT
SUPPORT
Figure 4 - Side View Figure
GAS COLLECTOR BOX
SIDE BURNER
12
Page 13

Calibration Procedure.
1. Before installingbatteries be sure thegas tank isnot
mounted in the tank pull-out tray.
2. From the underside of the Control Panel, unscrew the
Fuel Gauge Display Cover on the Fuel Gauge Display
Box. See Fig.6a
3. Carefully remove the battery box from the back of the
Fuel Gauge Display Box and insert two "AAA" batter-
ies(provided). Be sure tofollow correct polaritywhen
inserting batteries.
4. Return the Battery Box with eiectdc wire into the Fuel
Gauge Display Box.
5. Screw the Fuel Gauge Display Cover onto the Fuel
Gauge Display Box.
6. During calibration the Fuel Gauge Display shows the
tank images of FULL and then EMPTY quickly.
Figure 6a
FUEL GAUGE
DISPLAY COVER
DISPLAY BOX
WIRE
AAABATTERY
BATTERYBOX
IMPORTANT: When the gas tank is removed from
the tank pull-out tray, thefuel gauge display will not
operate.
Figure 6b
IMPORTANT: When changing batteries or re-
connecting Plug "A" and "Plus "B" See Fig.6b,,
be sure to remove the gas tank from the tank pull-
out tray.
Fuel Gauge Display Operating - See Fig. 6c
Press the "CHECK" button to operate Fuel Gauge Dis-
play with the gas tank mounted in the Tank Pull-Out Tray.
NOTE: Tank must be positioned in tray for Fuel
Gauge Display check
1. Fuel Display: Indicates gas tank fill level.
2. Fuel Warning Display: When the gas tank fill level
is on the last row, a warning signal will sound for
approximately 3 seconds to warn you that the tank
volume is near empty.
3. Battery Warning Display: A low battery warning
light will illuminate when the battery voltage drops to
a low level. Replace the batteries.
NOTES:
1. The Fuel Gauge Display lasts for approximately 20
seconds each time you press the "CHECK" button.
After 20 seconds, the Fuel Gauge Display turns off
automatically. If you press the button a second time
within 20 seconds, the Fuel Gauge Display will be
turned off manually. Ifyou press the button a second
time after 20 seconds, the Fuel Gauge Display will
work and last for another 20 seconds.
Figure 6c
\
\
_FUEL INDiCATOR_
BATTERY
WARNING
DISPLAY
PLUG"A"
\
WiRE PLUG "B"
\
BUTTON
FUEL
WARNING
DISPLAY
2. The Fuel Gauge Display works only with a tank on
the Tank Pull-Out Tray. No readout will appear if a
tank is not mounted on the Tank Pull-Out Tray.
13
Page 14

Connecting A Liquid Propane Gas (LP gas) Figure 7a (LP gas model only)
Tank To Your Grill
1. Remove the Pull-out Grease Draining Traywith the
Heat Shield from Grill.
2. Locate hose and regulator assembly packed for
shipping purposes on front underside of grill head.
Remove fastening band. Push assemblyto back of
grill and pull down to connect to tank valve. Before
connecting, check valve and assembly threads to
be sure they match. (Type 1 connection per ANSI
Z21.58a- 1998)See Fig.7b.
3. Inspect thevatveconnectionportoftheregulator
FRONT
DOOR
\
assembly. Look for damage ordebris. Remove any
debris. Inspect hose for damage. Never use
damaged or plugged equipment.
4. Pull out the LPG Tank Pull-out Tray. Place a
20 Ib tank with foot ring into the hole in the
tray. See Fig.7a. Make sure the tank valve is
in the OFF positon.
5. Align the tank so the Tank Valve faces the rear
right corner of cabinet. Use the 516"x89mm Wing
Bolt to secure gas tank from rear of tray.
TANK
See Fig. 7a.
TANK PULL-OUT
6. Check the tank valve to ensure it has proper
TRAY
external mating threads to fit the hose &
regulator assembly provided (Type 1 connec-
tion per ANSI Z21.58a-1998). See Fig.7b
5/16'*x89mm
WING BOLT
7. Make sure all Burner knobs are in the OFF
position.
8. Co;qnect the hose and regulator assembly to the
tank valve (See Fig 7b) Hand tighten Quick Cou-
pling Nut clockwise to afull stop. DO NOT use a
wrench to tighten because it could damage the
Quick Coupling Nut and result in ahazardous
condition.
9. Open the tank valve fully (counterclockwise). Use a
soapy water solution to check all connections for
leaks before attempting to light your grill. See
"Checking for LP Gas Leaks" on page 15. If a leak
is found, turn the tank valve off and do not use your
grill until the leak is repaired.
Disconnecting A Liquid Propane Gas (LP gas)
Tank From Your Grill
1. Turn the Burner Knobs and LP gas tank valve
to the full OFF position. (Turn clockwise to
close.)
2. Detach the hose and regulator assembly from
the LP gas tank valve by turning the Quick
Coupling Nut counterclockwise. See Fig.7b
CAUTION: When the appliance is not in use, the
gas must be turned off at the supply tank.
Figure 7b (LP gas model only)
FRONT
DOOR
T_e 1
per ANSi _a-1998
TRAY
QUICK
COUPLING
NUT
GRILL HEAD
ALREADY CONNECTED
TO ADAPTOR UNDER
SIDE BURNER.
14
Page 15

Connecting Natural Gas To Your Grill
For Natural Gas grills: The 12 foot Natural Gas
Hose has already been connected to Gas Mani-
fold as shown in Fig.7c. Thread the 12 foot
Natural Gas Hose through the hole of Rear Panel
to outside. Also read the natural gas safety
instructions.(on page 4)
Figure 7c (Natural gas model only)
GAS MANIFOLD
NATURAL
GAS HOSE
HOLE FOR
NATURAL
GAS HOSE
Install Pull-out Grease Tray
Place Heat Shield into Pull-out Grease Draining
Tray. The Heat Shield must be present and
centered for your safety. Slide the Pull-out
Grease Draining Tray into the Tracks on the Cart
Side Panels and push until it stops.
See Fig. 8.
Figure 8
GRILL HEAD
/K WARNING
A strong gas smell, or the hissing sound of
gas indicates a serious problem with your gas
grill or the LP gas tank. Failure to immedi-
ately follow the steps below could result in a
fire or explosion that could cause serious
bodily injury, death, or property damage.
Shut off gas supply to the gas grill.
Turn the Control Knobs to OFF position.
Put out any flame with a proper fire extin-
guisher.
Open Grill Lid.
Get away from the LP gas tank.
Do not try to fix the problem yourself.
If odor continues or you have a fire you
cannot extinguish, call your fire department.
Do not call near the LP gas tank. Your tele-
phone is an electrical device and could create
a spark resulting in fire and/or explosion.
NOTE: The normal flow of gas through the
regulator and hose assembly can create a
humming noise. A low volume of noise is
normal and will not interfere with operation of
the grill. If humming noise is loud and exces-
sive you may need to purge air from the gas
line or reset the regulator excess gas flow
device. This purging procedure should be done
every time a new LP gas tank is connected
to your grill. For help with this procedure refer
to page 17, step 4, or call for assistance.
HEAT
SHIELD
PULL-OUT GREASE
DRAINING TRAY
CART S
PANEL-RIGHT
Congratulations
Your Kenmore Elite gas grill is now ready
for use. Before the first use and at the
beginning of each season (and whenever the
LP gas tank has been changed):
1. Read all safety, lighting and operating
instructions.
2. Check Gas Valve Orifices, Burner Tubes
and Burner Ports for any obstructions.
3. Perform gas leak check according to
instructions found on page 15 of this
manual.
Checking For LP Gas Leaks
Never test for leaks with a flame. Prior to first
use, at the beginning of each season, or every
time your LP gas tank is changed, you must
check for gas leaks. Follow these four steps:
1.Make a soap solution by mixing one part liquid
detergent and one part water.
2.Turn the grill Control Knobs to the full OFF
position, then turn the gas ON at source.
3. Apply the soap solution to all gas connections.
If bubbles appear in the solution the connec-
tions are not properly sealed. Check each
fitting and tighten or repair as necessary.
4. If you have a gas leak you cannot repair, tum
off gas at the source, disconnect fuel line from
your grill and call 1-800-4-MY-HOME ®or your
gas supplier for repair assistance.
15
Page 16

Basic Lighting Procedures
Machine oilsused inthe manufacturing process of
stainless steel can cause stainless steel to turn a tan
color. Before initialgrill use, remove protective PVC
film from Control Panel and inside and outside of Grill
Lid. Use a Stainless Steel Cleaner to polishthe
stainless steel and remove these excess oils from
yourgrill. Never use abrasive cleaners orscrubbers
because they wiltscratch and damage your gdll. For
details, see Cleaning Exterior Stainless Steel
Surfaces on page 18.
Gas Lighting Instructions
Familiarize yourself with the safety guidelines at the
front of this manual. Do not smoke while lighting grill or
checking gas supply connections.
1. If you have a LPgas grill be sure the LP gas tank is
filled, or if you have a NG gdll be sure that the
locking shut off valve is open.
2. Check that the end of each Burner Tube is propedy
located over each Valve Orifice.
3. Be sure all gas connections are securety tightened.
.
If the burner does not light, turn the Control Knob
to OFF, wait 5 minutes for gas to clear, then retry.
9.
Once the left grill burner is ignited, the adjacent
burner can be lit by simply turning its Control Knob
toHIGH.
10.
Adjust Control Knobs to your desired cooking
temperature.
Side Burner Lighting Instructions
1. Follow steps 1 through 5 of the Gas Lighting
Instructions.
2. Push and turn the control knob for Side Burner to
HIGH.
HIGH
OFF
BACK BURNER
DISPLAY
\
FUEL GAUGE
@ @o@
4. Open the Grill Lid or Side Burner Lid, depending
on the Burner you are lighting.
Z WARNING
Failure to open Grill Lid during the
lighting procedures could result in a fire
or explosion that could cause serious
bodily injury, death, or property damage.
5. Set ALL Control Knobs to OFF, and for LP Models,
open gas tank valve slowly until 1/4 to 1/2 open.
Open LP
gas tank
OFF
6. Push and turn the LEFT Control Knob to HIGH.
HIGH
SIDE BURNER
3. Immediately press the electric ignitor for 3-4
seconds to light the burner.
4. If the burner does not light, turn the control knob to
OFF, wait 5 minutes for gas to clear, then retry.
5. Adjust control knobs to your desired cooking
temperature.
Back Burner Lighting Instructions
Note: The location of the Back Burner makes it more
susceptible to winds that will decrease the perfor-
mance of your rotisserie cooking. For this reason you
should not operate the Back Burner dudng windy
weather conditions.
1. Follow steps 1through 5 of the Gas Lighting
Instructions.
2. Push and turn the Right Control Knob for Back
Burner to HIGH.
3. Then immediately press the Electric Ignitor for
3-4 seconds to light the Back Burner.
4. If the Burner does not light, turn the Control Knob
to OFF, wait 5 minutes for gas to clear, then retry.
OFF
7. Immediately press the Electric Ignitor for 3-4
seconds to light the Burner.
_\ PRESS
5. Once lit, the Back Burner will reach cooking
temperature quickty. The orange/red glow will even
out in about 5 minutes.
.
For best results, always rotisserie cook with the
grill Lid down and the Back Burner Control Knob
set to HIGH. Do not use the main gdll Burners
when the Back Burner is in operation.
16
Page 17

Manually Lighting Your Grill by Match
To light your main burners bymatch, insert a match
into the Manual Lighting Stick and follow steps 1
through 6 of the Gas Lighting Instructions. Then, light
the match and place Manual Lighting Stick through the
Lighting Hole on the left side of the grill. See Fig. 9.
Turn the nearest Control Knob to the HIGH setting to
release gas. The Burner should light immediately.
Figure 9
LIGHTING
HOLE
MANUAL
LIGHTING
STICK
MATCH
AX WARNING
Never lean over the grill cooking area while
lighting your gas gdll. Keep your face and
body a safe distance (at least 18 inches)
from the Lighting Hole or Burners, when
lighting your gdll by match.
If the grill fails to light :
1. Turn gas off at source and turn the Control Knob to
OFF. Wait at least five minutes for gas to clear,
then retry.
2. If your grill still fails to light, check gas supply
and connections.
3. Repeat lighting procedure. If your grill still fails
to operate, turn the gas off at source, turn the
Control Knobs to OFF, then check the following:
• Misatignment of Bumer Tubes over Orifices
Correction: Reposition BumerTubes over Ori-
fices.
• Obstruction ingas line
Correction: Remove fuel linefrom grill. Do not
smoker Open gas supply for one second to clear
any obstruction from fuel line. Close off gas supply
at source and reconnect fuel line to grill.
• Plugged Odfice
Correction: Remove Burners from gdll by pulling
Cotter Pin (beneath Burner) using Long nose
pliers. Carefully lift each Burner up and away
from gas valve Orifice. Remove the Odfice from
gas valve and gently clear any obstruction with a
fine wire. Then reinstall all Orifices, Burners,
Cotter Pins and cooking components.
If an obstruction is suspected in gas valves or
gas valve bracket, please call for repair service at
1-800-4-MY-HOME. o
• Obstruction in BurnerTubes
Correction: Follow the Burner Tube cleaning
procedure on page 19 of this Owner's Manual.
17
Misalignment of Ignitor on Burner
Correction: Check for proper position of the
Electrode Tip as shown in Figure 4 The gap
between the Spark Electrode Tip and Burner or
Spark Receiver should be approximately 3/16",
Adjust if necessary. With the gas supply closed
and all Control Knobs set to OFF press the
Electric Ignitor Cap and check for the presence
of a spark at the Electrode.
Disconnected Ignition Wires
Correction: Inspect the Ignitor Junction Box
found behind the Control Panel. Connect loose
Ignitor wires to Junction Box and try to light the
grill.
• Weak AA battery
Correction: Unscrew the Ignitor Cap and replace
the battery.
4.
If the gdll still does not light you may need
to purge air from the gas line or reset the
regulator excess gas flow device. Note: This
procedure should be done every time a new
LP gas tank is connected to your grill.
To purge air from your gas line and/or
reset the regulator excess gas flow device:
• Turn the Control Knobs to the OFF posi-
tion.
• Turn off the gas at the tank valve.
• Disconnect regulator from LP gas tank.
• Let unit stand for 5 minutes.
• Reconnect regulator to the LP gas tank.
• Turn the tank valve on slowly until 1/4 to
1/2 open.
• Open the Grill Lid.
• Set Control Knobs to OFF
• Push and turn the LEFT Control Knob to
HIGH.
5.
If all checks or corrections have been made and
you still have questions about operating your gas
grill, call the Customer Service Helpline
8am - 8pm CST, Monday through Friday at
1-888-317-7642.
WARNING
Should a "FLASHBACK" fire occur in/or
around the Burner Tubes, follow the
instructions below. Failure to comply with
these instructions could result in a fire or
explosion that could cause serious bodily
injury, death, or property damage.
• Shut off gas supply to the gas gdll.
• Turn the Control Knobs to OFF position.
• Put out any flame with a proper fire
extinguisher.
• Open Grill Lid.
• Once the grill has cooled down, clean the
Burner Tubes and Burners according to
the cleaning instructions found on page 19
in this manual.
Page 18

CAUTION:
BesureyourgrillisOFFandcootbeforecleaning.
Takecarenottochiporscratchthepaintedsurfaces
becauseitwillvoidyourwarrantyagainstrusting.
Aswithallappliances,propercareandmaintenance
willkeepyourgrillintopoperatingconditionand
prolongitslife.Byfollowingthesecleaningprocedures
onatimelybasis,yourgrillwillstaycleanandwork
properiywithminimumeffort.
CleaningThe Cooking Grids
.
Cover each Gas Valve Orifice with aluminum foil.
6.
Brush the inside and bottom of the grill with a fiber
pad or nylon brush, and wash with a mild soap and
warm water solution. Rinse thoroughly and let dry.
7,
Remove aluminum foil from Orifices and check
each Orifice for obstruction.
8.
Check each Spark Electrode, adjusting as needed.
The space between the Spark Electrode Tip and
Spark Receiver should be approximately 3/16".
g.
Replace the Burners and adjust the Gas Collector
Box. The edge of the collector box should be
overlapping the Burner Port.
Before initial use and periodically we suggest you wash
your Cooking Grids in a mild soap and warm water
solution. You can use a wash cloth or vegetable brush
to clean your Cooking Grids.
Cleaning The Flame Tamers
Periodically you should wash the Flame Tamers in a
soap and warm water solution. Use a vegetable brush
to remove stubborn burnt-on cooking residue. Drythe
Flame Tamers thoroughly before you reinstall them into
the cooking bowl.
Cleaning The Grease Tray and Receptacle
To reduce the chance of fire, the Grease Draining Tray
and Grease Receptacle should be visually inspected
before each grill use. Remove any grease and wash
Grease Tray and Receptacle with a mild soap and
warm water solution.
Cleaning the Inside of the Grill Lid
Grease can have a tendency to build up on the inside
of the Grill Lid and could drip onto deck or patio when
the lid is opened. Visually inspect the inside of the Grill
Lid before each grill use. Remove anygrease and wash
with a mild soap and warm water solution.
Annual Cleaning of The Grill Interior
Burning-off the grill after every cookout will keep it
ready for instant use. However, once a year you should
give the entire grill a thorough cleaning to keep it in top
operating condition. Follow these steps:
1. Turn all Burner Valves to the full OFF position.
2. Turn the LP gas tank valve to the full OFF position.
,
Detach the LP gas hose and regulator assemblyfrom
your gas grill. Use a7/8" open end wrench turning the
fitting counter-clockwise. Inspect for any damage
and replace as necessary with Kenmore replace-
ment part number found on the Parts List.
10.
Replace Flame Tamers and the Cooking Grids.
11.
Reconnect the gas source and observe the Burner
flame for correct operation.
Cleaning Exterior Surfaces:
Before initial use, and periodically thereafter, we
suggest you wash your grill using a mild soap and
warm water solution. You can use a wash cloth or
sponge for this process. Do not use astiff wire or
brass brush that might remove paint during the clean-
ing process.
Cleaning Exterior Stainless Steel Surfaces:
Weathering and extreme heat can cause exterior
stainless steel surfaces to turn tan in color. Machine
oils used in the manufacturing process of stainless
steel can also cause this tanning color. After removing
the protective PVC film from the Grill Lid and Control
Panel use a Stainless Steel Cleaner to polish the
stainless steel surfaces of your grill. Never use abra-
sive cleaners or scrubbers because they will scratch
and damage your grill. Follow these steps for the best
results.
1,
Turn the LP gas tank valve (clockwise) tothe full OFF
position. Disconnect the regulator and hose assem-
bly from LP gas tank. Cover exposed gas fitting with
aluminum foil.
2,
Remove dirt or grease using a soft cloth and polish
stainless surfaces. Wipe with a soft cloth.
3.
Remove aluminum foil from exposed gas fitting and
allow grill to air dry before attaching the regulator
and hose to your LP gas tank.
Keep outdoor cooking gas appliance area clear andfree
from combustible materials, gasoline and other flam-
mable vapors and liquids.
4. Remove and clean the Flame Tamers, Cooking
Grids, Cooking Rack and Grill Burners.
18
Page 19
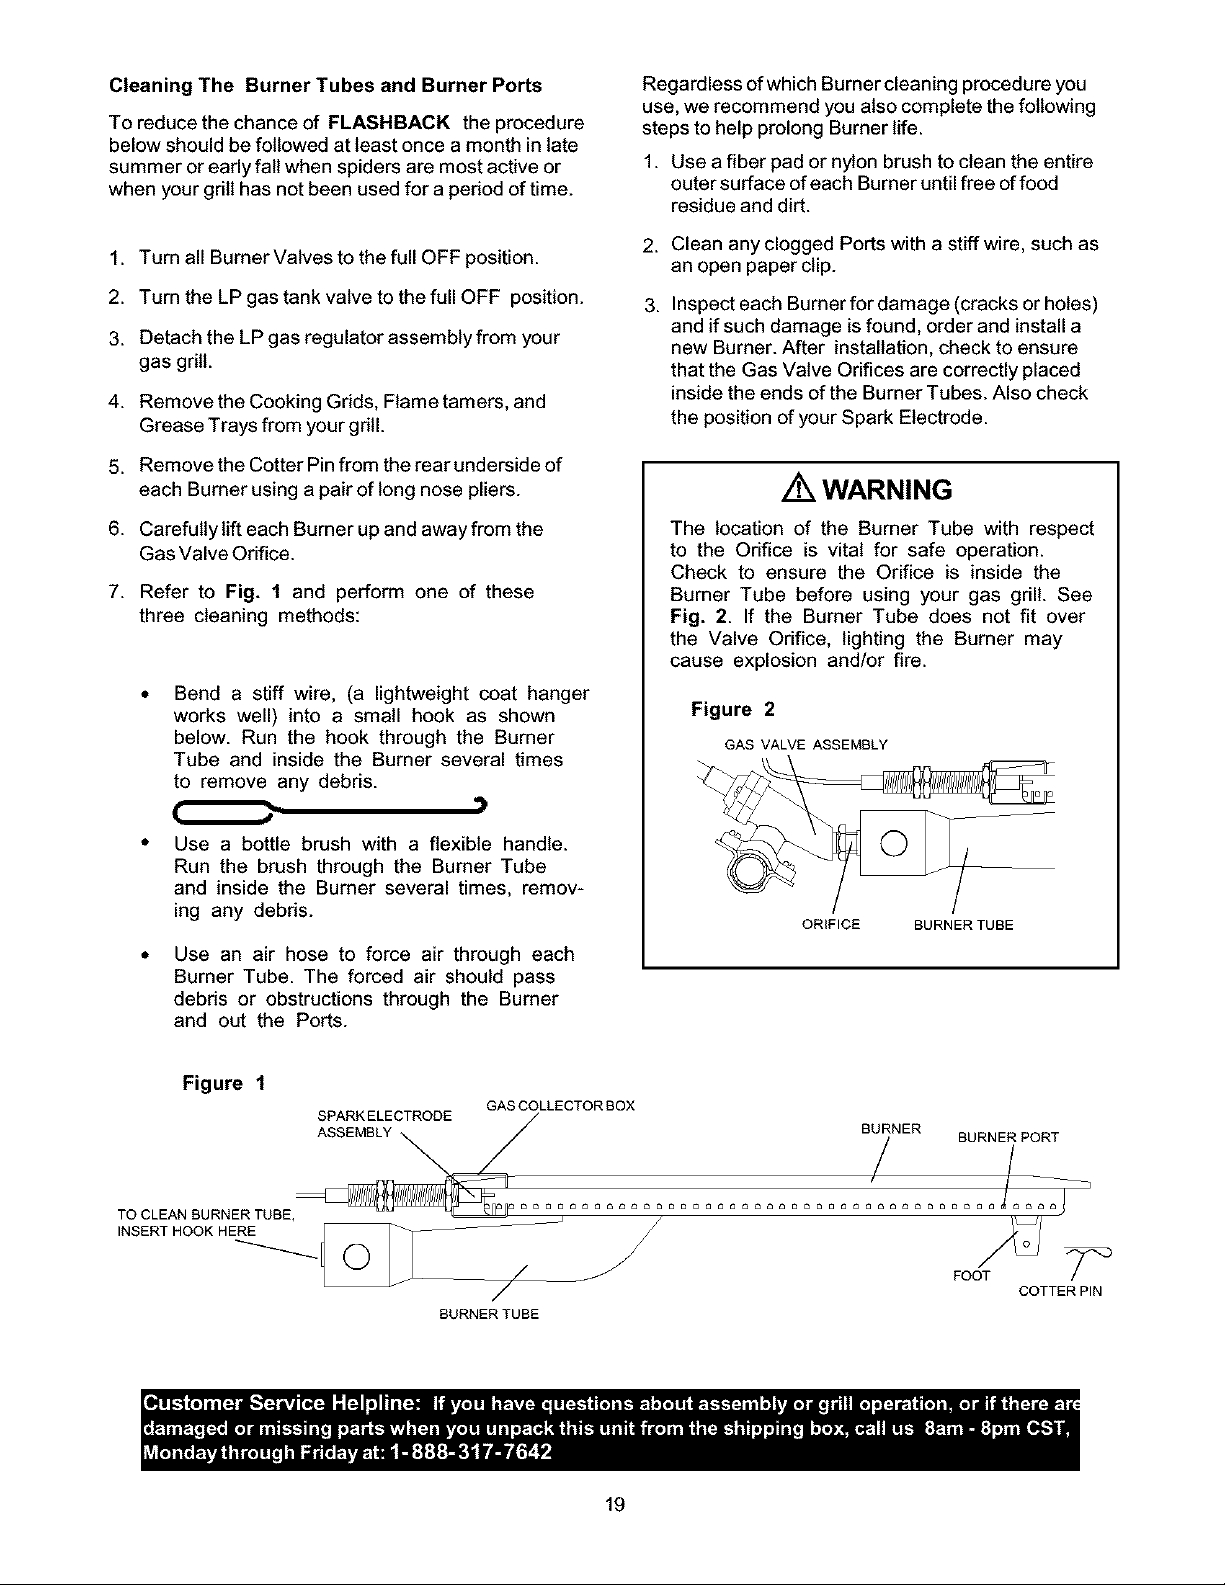
Cleaning The Burner Tubes and Burner Ports
To reduce the chance of FLASHBACK the procedure
below should be followed at least once a month in late
summer or early fall when spiders are most active or
when your grill has not been used for a period of time.
1. Turn all Burner Valves to the full OFF position.
2. Turn the LP gas tank valve to the full OFF position.
3. Detach the LP gas regulator assembly from your
gas grill.
4. Remove the Cooking Grids, Flame tamers, and
Grease Trays from your grill.
5. Remove the Cotter Pin from the rear underside of
each Burner using a pair of long nose pliers.
Regardless of which Burner cleaning procedure you
use, we recommend you also complete the following
steps to help prolong Burner life.
1. Use a fiber pad or nylon brush to clean the entire
outer surface of each Burner until free of food
residue and dirt.
2.
Clean any clogged Ports with a stiff wire, such as
an open paper clip.
3.
Inspect each Burner for damage (cracks or holes)
and if such damage is found, order and install a
new Burner. After installation, check to ensure
that the Gas Valve Orifices are correctly placed
inside the ends of the Burner Tubes. Also check
the position of your Spark Electrode.
WARNING
6. Carefully lift each Burner up and away from the
Gas Valve Orifice.
7. Refer to Fig. 1 and perform one of these
three cleaning methods:
Bend a stiff wire, (a lightweight coat hanger
works well) into a small hook as shown
below. Run the hook through the Burner
Tube and inside the Burner several times
to remove any debris.
Use a bottle brush with a flexible handle.
Run the brush through the Burner Tube
and inside the Burner several times, remov-
ing any debds.
Use an air hose to force air through each
Burner Tube. The forced air should pass
debris or obstructions through the Burner
and out the Ports.
Figure 1
SPARK ELECTRODE
ASSEMBLY BURNER BURNER PORT
GAS COLLECTOR BOX
The location of the Burner Tube with respect
to the Orifice is vital for safe operation.
Check to ensure the Orifice is inside the
Burner Tube before using your gas grill. See
Fig. 2. If the Burner Tube does not fit over
the Valve Orifice, lighting the Burner may
cause explosion and/or fire.
Figure 2
GAS VALVE ASSEMBLY
ORIFICE BURNER TUBE
TO CLEAN BURNER TUBE
/L oot COTTBRP,N
BURNER TUBE
19
Page 20

Question: Can I convert my Kenmore gas grill from
one fuel type to another?
Answer: Your Kenmore gas grill is manufactured to
exact specifications and isapproved bythe Canadian
Standards Association (CSA). For your own safety,
conversion kits are not available and any attempt to
convert your gdll from one gas type to another will void
your product warranty.
Question: Why doesn't the hose andregulator assem-
bly supplied with my new Kenmore grill fit the older LP
gas tank I've used for years?
Answer: The U.S.Government regulates gas appliances
and LP gastanks. Whenever new regulations are passed
the LP gas tank fittings are altered. If your tank does not
fit the hose and regulator supplied with your new grill, the
tank is outdated and must be replaced.
Question: What can cause grill parts to rust and what
affect does it have on the grill materials.
Answer: Rusting is a natural oxidation process and may
appear on cast-iron and steel parts. Rust will not affect
the short term performance of your grill or affect the taste
of your foods.
Stainless steel grill parts will not rust. However, weather-
ing and extreme heat can cause stainless steel Lid
surfaces to turn tan color. This is discoloration, not rust.
Question: How can I minimize the risk of rust or
stainless steel discoloration?
Answer: To protect against the natural rusting process,
the Grill Bowl and Burners have aporcelain finish.
However, dropping, scraping orscratching these items
will damage the porcelain finish and allow rusting.We
recommend you "season" these items before and after
each use. Consistent seasoning will help deter rusting
and will create an easy to clean cooking surface.
Weathering and extreme heat can cause exterior
stainless steel surfaces to turn tan in color - which is
not to be confused with rust. Machine oils used in the
manufacturing process of stainless steel can also
cause this tanning color. After removing the protective
PVC film from your Grill Lid use a Stainless Steel
Cleaner to polish the inside and outside of your grill
Lid. Never use abrasive cleaners or scrubbers. Follow
the easy "Cleaning Exterior Stainless Steel Surfaces"
procedures found in this Owner's Manual.
Question: Sometimes my grill does not light when I
push the Ignition Button. Why?
Answer: Refer to the Lighting Instructions in this
Owner's Manual. Also check these common causes:
•Ignition AA battery may need replacing.
•Ignition wires may be loose. Remove the AA battery,
inspect the Ignitor Junction Box found behind the
Control Panel, and connect any loose wires.
Question: What isthe best way to protect my new
Kenmore gas gdll from the weather?
Answer: A good quality grill cover should be used to
protect your grill when not in use. Sears offers a cover
that is made to fit this particular gdll model. Also, follow
the cleaning and maintenance instructions in this
Owner's Manual on a timely basis, and your new gdll will
give you years of enjoyment.
Question: Where can Ibuy replacement parts?
Answer: For the repair or replacement parts you need
call 6am - 11 pm CST, 7 days aweek 1-800-366-PART
(1-800-366-7278). Use only Sears authorized parts.
The use of any part that is not Sears authorized can be
dangerous and will also void your product warranty. You
wilt need your model number and serial number to
order parts.
Question:Are the serial and model numbers of my grill
listed somewhere for future reference?
Answer: This information is listed on a silver label found
on the right side of your Grill Head under the Side Shelf.
Question: Sometimes Ihear a humming sound
coming from my regulator. What causes this?
Answer: The humming noise is actually the gas
flowing through the regulator. A low volume of noise is
perfectly normal and will not interfere with the opera-
tions of the grill. If humming noise is loud and exces-
sive you may need to purge air from the gas line or
reset the regulator excess gas flow device. Note: This
purging procedure should be done every time a new LP
gas tank is connected to your grill. For help with this
procedure refer to page 17, step 4, or call the
Customer Service Helpline at the number shown
below.
Question: Why doesn't the Fuel Gauge Display show
the tank level after "CHECK" button pressing?
Answer: Make sure the Wire Plug "A" from Fuel Gauge
Display is connected with the Wire Plug "B" from rear of
Tank Pull-Out Tray. Take out the tank from Tank Pull-
Out Tray and follow the Calibration Procedure in page
13. After calibration, put the tank back onto Tank Pull-
Out Tray and press the "CHECK" button for tank level
measurement.
Another reason might be that 20 seconds have not
elapsed from the first time that you pressed "Check"
and therefore your second pressing of "Check" has manu-
ally turned thefuel gauge to "off'. Simply repress "Check"
to manually turn the fuel gauge to "on".
2O
Page 21

WARNING
Your grill will get very hot. Never lean
over the cooking area while using your grill.
Do not touch cooking surfaces, grill housing,
Grill Lid or any other gdll parts while the grill
is in operation, or until the grill has cooled
down after use.
Failure to comply with these instructions may
result in serious bodily injury.
Bum-Off
Before cooking on your gas grill for the first time, you will
want to "burn off" the gdll to eliminate any odor or
foreign matter. Just ignite the burners, lower the Lid, and
operate gdll onthe HIGH setting for three to five minutes.
CAUTION:
Operating your grill on the HIGH setting for longer than
five minutes may damage certain parts of your grill. Do
not leave your grill unattended.
Indirect Cooking
The indirect cooking method can also be used with the
supplied Cooking Grids, optional griddle or cooking
pan. To cook indirectly, the food should be placed on
the left or right side of your grill with the Burner lit on
the opposite side. Or place your food on the Second-
ary Cooking Rack mounted inside your gdll bowl and
light the 2 outer grill Burners. Either way, indirect
cooking must be done with the Lid down.
Seasoning Cooking Grids
Before and after each cookout, apply athin layer of
cooking oil, spray or vegetable shortening to each
Cooking Grid and/or optional cast-iron accessories. Be
sure to coat the entire surface including edges and any
areas with chipped porcelain. Insert the Cooking Grids
into your warm gdll for 2to 3 minutes.
Flare-Ups
The fats and juices ddpping from grilled food can cause
flare-ups. Since flare-ups impartafavorably, distinctive
taste and color to food cooked over an open flame,
they should be accepted upto a point. Nevertheless,
uncontrolled flaring can result in a ruined meal.
Preheating
To preheat, light your grill on HIGH, lower the Lid and
follow this timetable:
• For high temperature cooking, preheat grill
3 to 5 minutes.
• For low temperature cooking, preheat gdll
3 minutes.
• To slow cook, preheating is not necessary.
Cooking Temperatures
High setting: Only use this setting for fast warm-up,
searing steaks or chops and for burning food residue
off the grill after cooking is complete. Never use the
HIGH setting for extended cooking.
Medium to Low Settings: Most recipes specify
medium to low settings, includingall smoking, retis-
sede cooking and for cooking lean cuts such as fish.
NOTE: Temperature settings will vary with the tem-
perature and the amount of wind outside your home.
Direct Cooking
The direct cooking method can be used with the
supplied Cooking Gdds and food placed directly over
the lit grill Burners. Direct cooking requires the Grill
Lid to be up. This method isideal for searing and
whenever you want meat, poultry or fish to have an
open-flame barbecued taste. Deep frying and smoking
are also best cooked in this manner because they
require direct heat.
WARNING
Do not line the bottom of the grill housing
with aluminum foil, sand or any substance
that will restdct the flow of grease into the
Grease Draining Tray and Receptacle.
Failure to comply with these instructions
could result in a fire or explosion which
could cause serious bodily injury, death, or
property damage.
CONGRATULATIONS
You are now ready to grill. Remember to keep the
Lid up when cooking directly on the grill. For most
foods it's best to start grilling on high. Once the food is
seared, reduce the heat to medium. Foods marinated
with ingredients such as honey may burn because of
the high sugar content. You should begin their cooking
on medium. A favodte on the grill issausages. Always
cook them slowly and if they're particulady fatty, it
may be best to partially boil them first.
21
Page 22

Grilling Steak and Ribs
Turn the grill Burners on HIGH, close the Lid
and preheat your grill 3 to 5 minutes. Open
Lid and place the meat on the Cooking Grid
directly above the lit Burners. Cook the meat
on both sides until seared. Reduce the heat
to MEDIUM and cook meat until done. Grilling
times will vary according to meat thickness.
Grilling Hamburgers and Sausages
Turn the grill Burners on HIGH, close Lidand
preheat your grill 3 to 5 minutes. Open Lid
and place the meat on the Cooking Grid
directly above the lit Burners. Cook the meat
on both sides until seared. Reduce the heat
to MEDIUM and cook the meat until done.
Grilling times will vary according to meat
thickness.
Grilling Poultry
Turn the grill Burners on HIGH, close Lidand
preheat your grill 2 to 3 minutes. Then raise
the Lid, reduce heat to MEDIUM and cook
poultry directly over lit Burners until done.
Poultry skin is fatty so you should expect
some flare-ups when using this direct
method.
Cut of Meat
T-bone steak
Sirloin steak
Beef spare ribs
Porterhouse steak
New York strip steak
Hamburgers
Sausages
Chicken breast
(cook with bone down)
Chicken wings
Drumsticks
Approximate Cooking Times
Rare: 4-8 minutes
Medium: 10-14 minutes
Well done: 15-20 minutes
Rare: 4-6 minutes
Medium: 8-10 minutes
Well done: 10-15 minutes
Direct method:
approximately 15 minutes
Indirect method:
up to 30 minutes
To minimize flare-ups, try grilling poultry using
the indirect method. Place the poultry on one
side of the grill with the opposing Burners on
MEDIUM heat, and lower the grill Lid. Grilling
times will vary based on the size of your
poultry.
Grilling Pork
Turn Burners on HIGH and preheat your grill
3 to 5 minutes with the Lid closed. Raise Lid,
place pork on Cooking Grid and cook until
seared. Reduce heat to MEDIUM and cook
until done. Grilling times wilt vary according to
meat thickness.
Whole bird
(cook with breast up)
Pork spare ribs
Chops
Loins
Cutlets
Indirect method:
approximately 1 hour
Rare: 4-8 minutes
Medium: 10-14 minutes
Well done: 15-20 minutes
22
Page 23
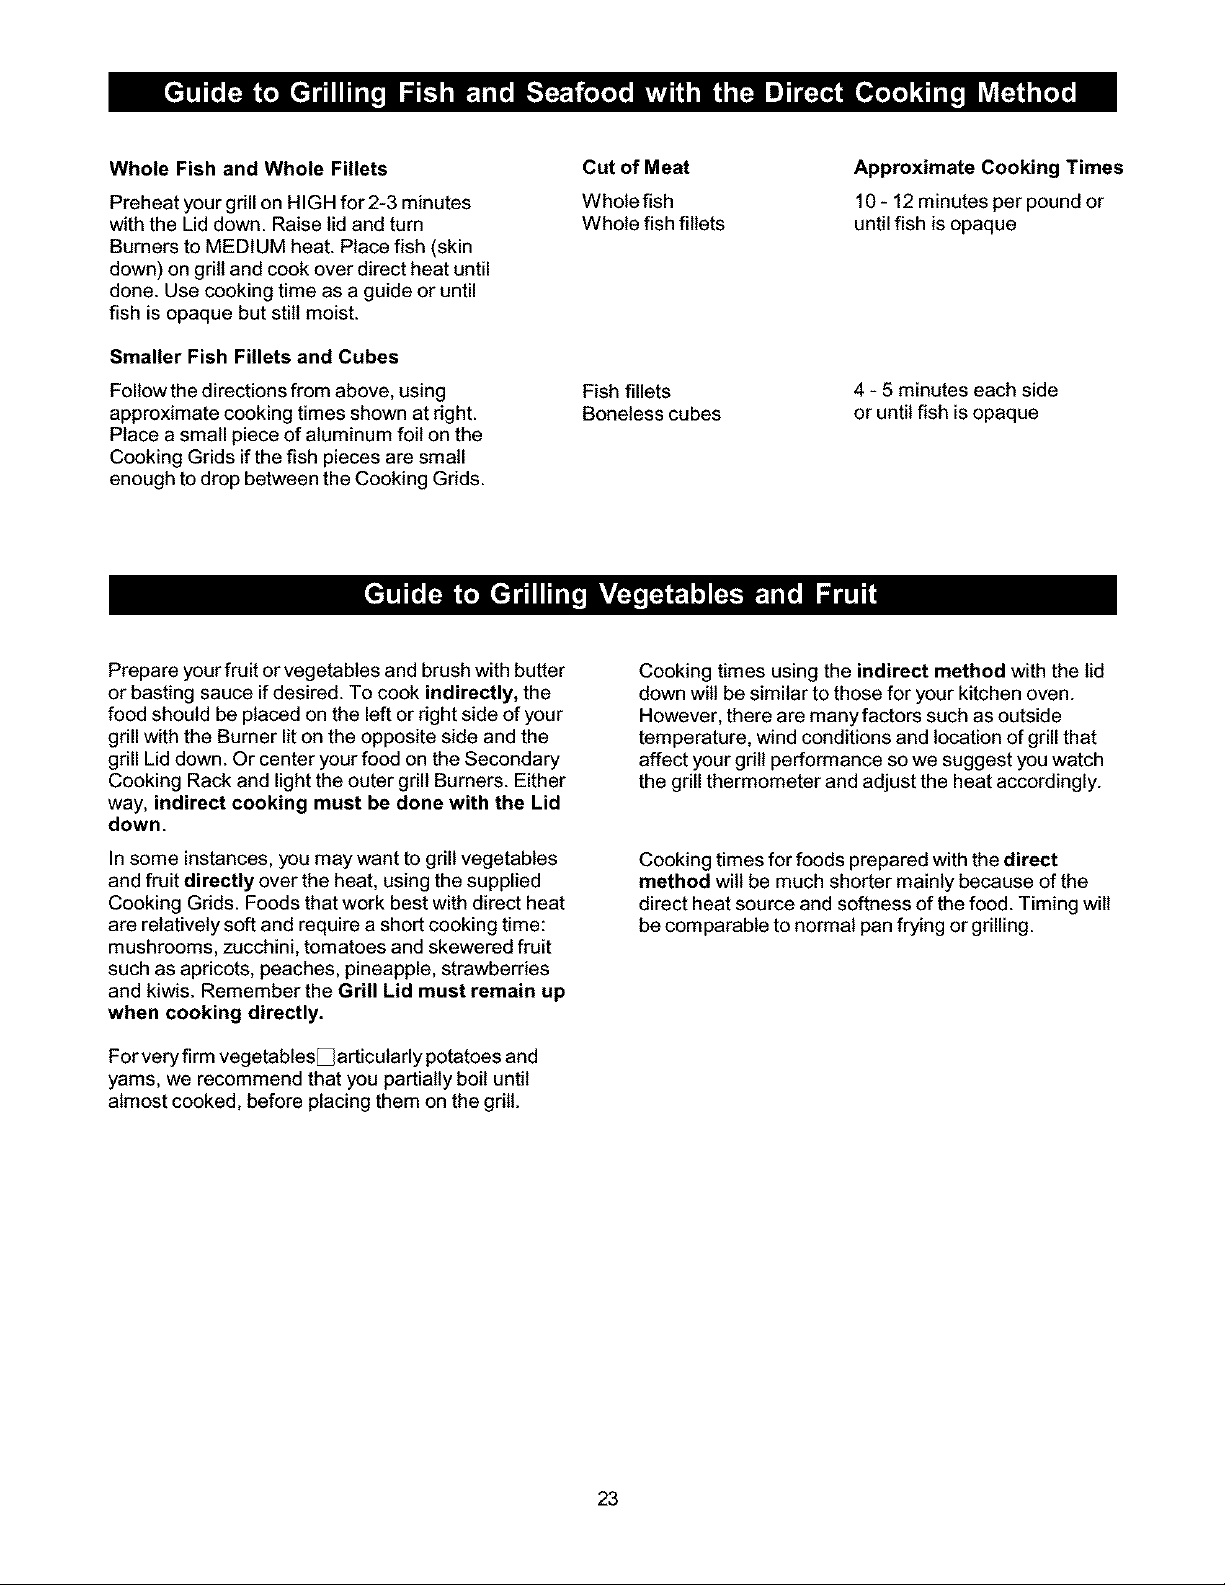
WholeFishandWholeFillets
Preheat your grill on HIGH for 2-3 minutes
with the Lid down. Raise lid and turn
Burners to MEDIUM heat. Place fish (skin
down) on grill and cook over direct heat until
done. Use cooking time as a guide or until
fish is opaque but still moist.
Smaller Fish Fillets and Cubes
Follow the directions from above, using
approximate cooking times shown at right.
Place a small piece of aluminum foil on the
Cooking Grids if the fish pieces are small
enough to drop between the Cooking Grids.
Cut of Meat
Wholefish
Whole fish fillets
Fish fillets
Boneless cubes
Approximate Cooking Times
10 - 12 minutes per pound or
untilfish is opaque
4 - 5 minutes each side
or until fish is opaque
Prepare your fruit orvegetables and brush with butter
or basting sauce if desired. To cook indirectly, the
food should be placed on the left or right side of your
grill with the Burner lit on the opposite side and the
grill Lid down. Or center your food on the Secondary
Cooking Rack and light the outer grill Burners. Either
way, indirect cooking must be done with the Lid
down.
In some instances, you may want to grill vegetables
and fruit directly over the heat, using the supplied
Cooking Grids. Foods that work best with direct heat
are relatively soft and require a short cooking time:
mushrooms, zucchini, tomatoes and skewered fruit
such as apricots, peaches, pineapple, strawberries
and kiwis. Remember the Grill Lid must remain up
when cooking directly.
For very firm vegetables_ articularly potatoes and
yams, we recommend that you partially boil until
almost cooked, before placing them on the grill.
Cooking times using the indirect method with the lid
down will be similar to those for your kitchen oven.
However, there are many factors such as outside
temperature, wind conditions and location of grill that
affect your grill performance so we suggest you watch
the grill thermometer and adjust the heat accordingly.
Cooking times for foods prepared with the direct
method wilt be much shorter mainly because of the
direct heat source and softness of the food. Timing wilt
be comparable to normal pan frying or grilling.
23
Page 24
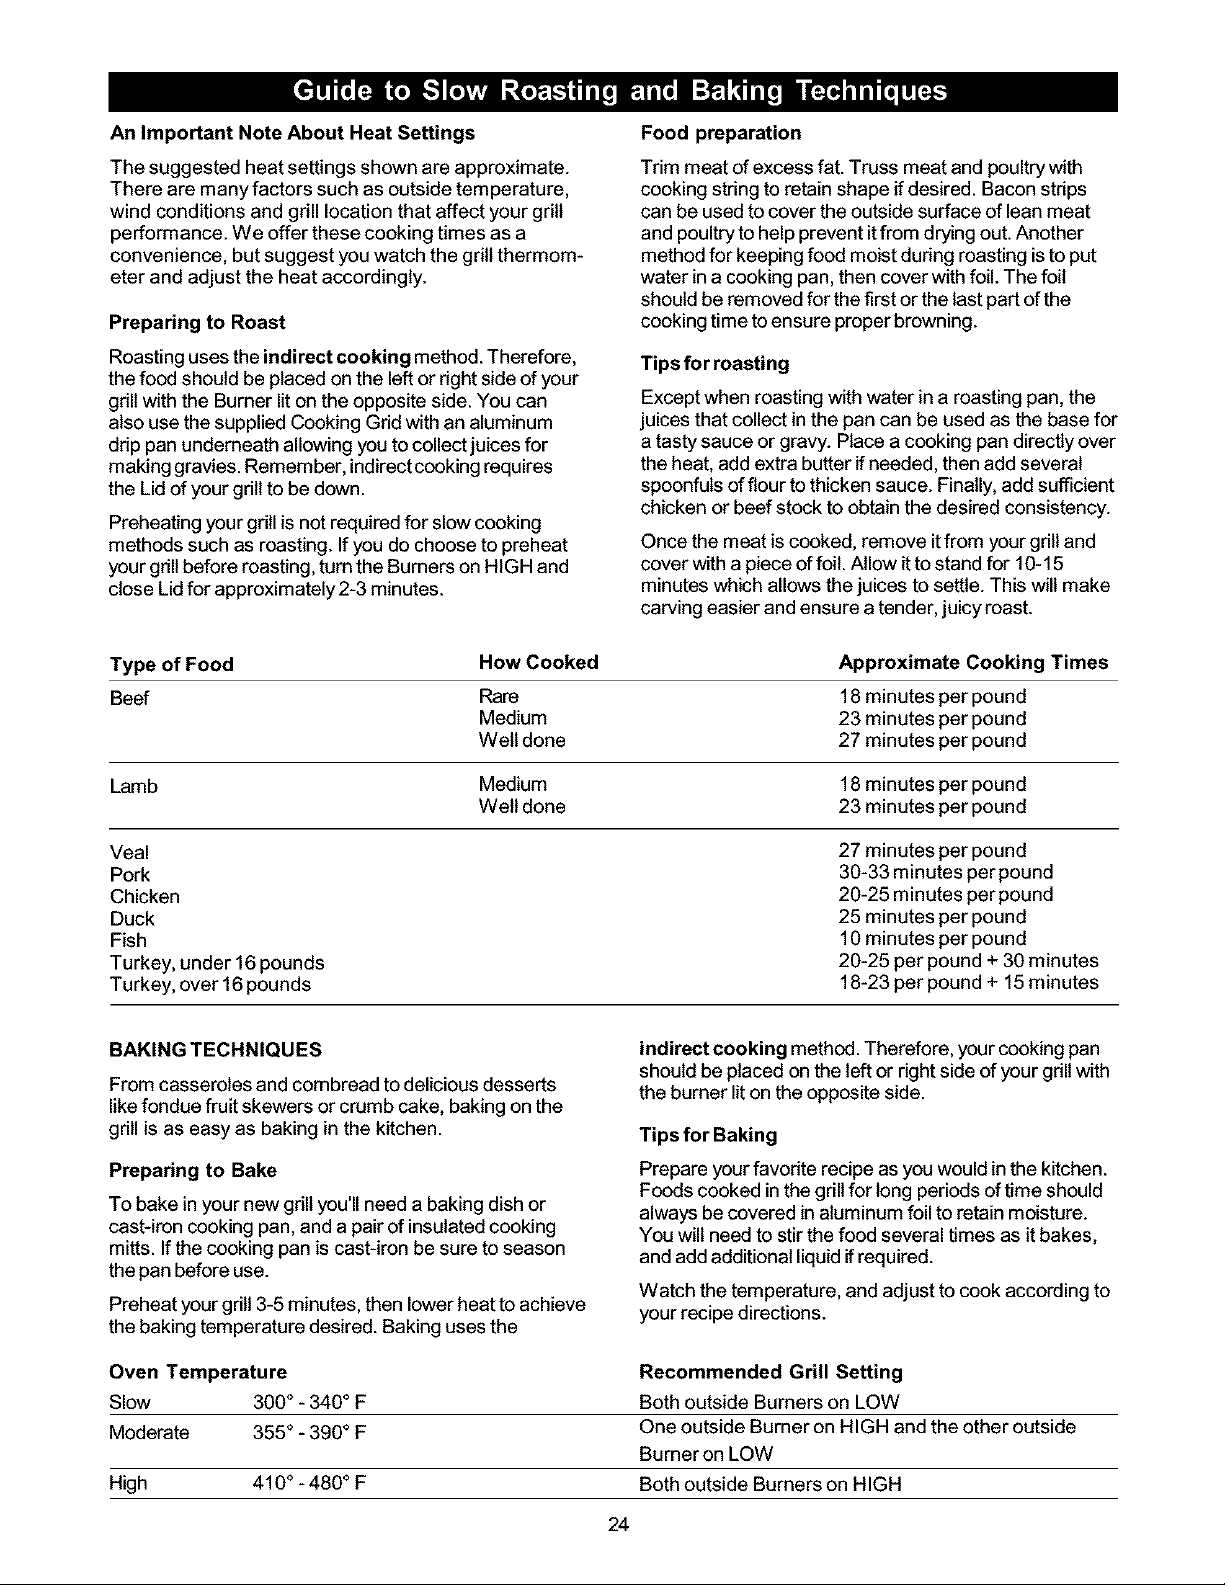
An Important Note About Heat Settings
The suggested heat settings shown are approximate.
There are many factors such as outside temperature,
wind conditions and grill location that affect your grill
performance. We offer these cooking times as a
convenience, but suggest you watch the grill thermom-
eter and adjust the heat accordingly.
Preparing to Roast
Roasting uses the indirect cooking method. Therefore,
the food should be placed onthe leftor right side of your
gdll with the Burner lit on the opposite side. You can
also use the supplied Cooking Grid with an aluminum
drip pan underneath allowing you to collect juices for
making gravies. Remember, indirectcooking requires
the Lidof your grill to be down.
Preheating your grill is not required for slow cooking
methods such as roasting. If you do choose to preheat
your gdll before roasting, turn the Burners on HIGH and
close Lid for approximately 2-3 minutes.
Type of Food How Cooked Approximate Cooking Times
Beef Rare 18 minutes per pound
Medium 23 minutes per pound
Well done 27 minutes per pound
Food preparation
Trim meat of excess fat. Truss meat and poultry with
cooking string to retain shape if desired. Bacon strips
can be used to cover the outside surface of lean meat
and poultry to help prevent itfrom drying out. Another
method for keeping food moist during roasting isto put
water in acooking pan, then cover with foil. The foil
should be removed for the first or the last part of the
cooking time to ensure proper browning.
Tips for roasting
Except when roasting with water in a roasting pan,the
juices that collect in the pan can be used as the base for
a tasty sauce or gravy. Place a cooking pan directly over
the heat, add extra butter if needed, then add several
spoonfuls of flour to thicken sauce. Finally, add sufficient
chicken or beef stock to obtain the desired consistency.
Once the meat is cooked, remove itfrom your grill and
cover with a piece of foil. Allow itto stand for 10-15
minutes which allows the juices to settle. This will make
carving easier and ensure a tender, juicy roast.
Lamb Medium 18 minutes per pound
Well done 23 minutes per pound
Veal
Pork
Chicken
Duck
Fish
Turkey, under 16 pounds
Turkey, over 16 pounds
BAKING TECHNIQUES
From casseroles and combread to delicious desserts
like fondue fruit skewers or crumb cake, baking on the
grill is as easy as baking in the kitchen.
Preparing to Bake
To bake in your new grill you'll need a baking dish or
cast-iron cooking pan, and a pairof insulatedcooking
mitts. If the cooking pan is cast-iron be sure to season
the pan before use.
Preheat your grill 3-5 minutes, then lower heat to achieve
the baking temperature desired. Baking uses the
indirect cooking method. Therefore, your cooking pan
should be placed on the left or right side of your gdll with
the burner lit on the opposite side.
Tips for Baking
Prepare your favorite recipe as you would in the kitchen.
Foods cooked inthe grillfor long periods oftime should
always be covered in aluminum foil to retain moisture.
You will need to stir the food several times as it bakes,
and add additional liquid ifrequired.
Watch the temperature, and adjust to cook according to
your recipe directions.
27 minutes per pound
30-33 minutes per pound
20-25 minutes per pound
25 minutes per pound
10 minutes per pound
20-25 per pound + 30 minutes
18-23 per pound + 15 minutes
Oven Temperature
Slow 300 ° - 340 ° F
Moderate 355 ° - 390° F
High 410 ° - 480 ° F
Recommended Grill Setting
Both outside Burners on LOW
One outside Burner on HIGH and the other outside
Burner oo LOW
Both outside Burnerson HIGH
24
Page 25

RotisserieCooking
Rotisserie cooking produces foods that are moist, flavorful and attractive. The optional rotisserie system is most
commonly used for cooking meat or poultry and is designed to cook food from the Back Burner using infrared heat.
The location of the Burner allows the placement of a cooking pan beneath the food to collect juices for basting and
gravy. To flavor the contents of the cooking pan you may add herbs, onions, or other spices of your choice. The Back
Burner is an infrared type, which provides intense searing radiant heat. The intense heat sears in the natural juices
and nutrients found in quality cuts of meat.
The cooking times on a rotisserie will be approximately the same as for oven cooking, but differences in wind, air
temperature and equipment will affect the cooking times. It is recommended that you use a meat thermometer to
test for the desired weii-doneness of any foods prepared on a rotisserie.
ROTISSERIE COOKING CAN BE CONSIDERABLY SLOWER THAN DIRECT HEAT COOKING, BUT TH E RE-
SULTS CAN BE WELL WORTH THE TIME AND EFFORT.
Balancing the Food
In rotisserie cooking, balancing the food is of utmost importance. The rotisserie must turn evenly or the stopping and
starting action will cause the food to cook unevenly and possibly burn the heavier side.
The easiest foods to balance are those of uniform shape and texture. To test ifthe food is balanced correctly when
secured, place the ends of the rotisserie spit loosely inthe palms of your hands. If there is no tendency to roll, give
the spit a quarter turn. If it is still stable, give it a final quarter turn. It should rest without turning in each of these
positions. Itcan then be attached to your grill.
Food Preparation
When preparing poultry, truss the birds tightly so that wings and drumsticks are close to the body of the bird. The
cavity of the bird may be stuffed prior to this. Pull the neck skin down and, using asmall skewer, fix it to the back of
the bird. Push the rotisserie spit through lengthwise, catching the bird in the fork of the wishbone. Center the bird and
tighten with the holding forks. Test the balance as described before.
A rolled piece of meat requires the rotisserie skewer to be inserted through the center of the length of meat, then
secured and balanced.
For meats that contain bones, it is best to secure the rotisserie skewer diagonally through the meaty sections. If
protruding bones or wings brown too quickly, cover with pieces of foil.
Tips for Using The Back Burner
For Back Burner lighting instructionsrefer to page 16 of this Owner's Manual.
The location of the Back Burner makes it more susceptible to winds that will decrease the performance of your
rotisserie cooking. For this reason you should not operate the Back Burner during windy weather conditions.
For best results, always rotisserie cook with the grill Lid down and the Back Burner Control Knob set to HIGH.
DO NOT USE THE MAIN GRILL BURNERS WHEN THE BACK BURNER IS IN OPERATION.
25
Page 26

Preparing to Smoke
Smoking gives food adistinctive, delicious flavor You wilt find a variety of wood chips or pellets available for use in
smoking grilled foods Pre-soaking of wood chips may be required so read and follow the manufacturers instructions
for preparation of smoking chips prior to filling the Smoker Drawer
Using The Optional Smoker Box
In order to get optimum performance from any smoker box, remove one of the stainless steel cooking grids Fill
the smoker box with your prepared smoking chips Dried herbs and spices may also be added to produce different
flavors Place the filled smoker box directly over the Flame Tamer and the heat wilt produce smoke and season
the food
Tips for Smoking
You can reduce the strength of the smoke flavor by only smoking for half or three quarters of the cooking time The
heat required for smoking is normally low to medium
Foods naturally high in oils lend themselves welt to smoking, while drier foods benefit from a marinade You can
also rub the food with herbs, spices or flavored oils Many foods can be smoked to produce stunning results with
very little effort Here are a few suggestions:
• Tuna steaks, marinated in Asian flavors of sesame oil, soy sauce and sherry
• Pork fillets, rubbed with ginger, orange rind and brushed with maple syrup
• Mussels, brushed with lemon rind and chili oit
• Lamb cutlets, marinated invirgin olive oil, lemon, oregano and black pepper The same marinade can be used
for a whole leg or rack of lamb
• Chicken, boneless chicken pieces_specially sliced breasts
• Fish, sliced filtets of firm fish, assorted seafood such as prawns, scallops and calamari
• Pork, sliced fillets, diced or minced pork, sliced leg steak, sliced chops
• Beef, sliced fillet, rib-eye, round, rump, sirloin
• Lamb, sliced fillet, round, loin
26
Page 27

STIR-FRYING TECHNIQUES
This method of cooking is popular around the world and
can be easily accomplished outdoors on your Kenmore
gas grill. It's a quick and healthful way of preparing a
complete meal using meat, poultry or seafood in
infinite combinations with other interesting ingredients
like vegetables, rice or noodles.
DEEP-FRYINGTECHNIQUES
A wide variety of foods can be deep-fried outdoors on
your grill, from potatoes, to seafood and chicken.
Deep-frying uses a large portion of oil, preferably
saturated. The outdoor location is ideal for deep-frying
as smoke, grease and smells reach for the sky_ot
the ceiling of your kitchen.
Preparing to Stir-fry
Although it is possible to stir fry in other dishes, a wok
is your best toot. Its high sides enable the cook to stir
food without spillage. Its construction allows you to
cook quickly at high temperatures, with instant control
of heat which is essential for successful stir frying.
Food preparation
Slice meat and poultry into long thin strips and cube
fish fillets. Remove all fat from meat and poultry and
cut large vegetables into even slices or cubes.
Marinate foods for extra flavor and tenderness. Marinat-
ing times will vary for red meat, fish and or various
cuts. Less tender cuts of meat should be marinated
longer. Remember to always chill marinating food in
the refrigerator prior to cooking.
Stir-fry meats, poultry or fish first. Next, add hard
vegetables like carrots. Then continue with softer
vegetables like snowpeas and peppers. To ensure even
cooking, continually stir and toss the food in the wok
using a wooden spoon or spatula.
Tips for Stir-frying
Place awok directtyover a HIGH heat on your grill or side
burner. Add only a small amount of food at a time to
ensure fast cooking and also to allow the wok to reheat
between ingredients.
Preparing to Deep-fry
Deep-fry on your grill usinga cooking pan or wok, over
direct heat.
Fill acooking pan no more than half full of vegetable or
corn oil. Start with LOW heat, then raise the heat
gradually. Check the temperature of the oil carefully
with a frying thermometer or test with a cube of bread.
The cube of bread should brown in about 30 seconds
for most cooking needs. A temperature between 350
and 400 degrees is optimal for preparing the majority
ofdeep-fried foods.
Food Preparation
Foods being deep-fried taste better when coated with
either batter or breadcrumbs to add flavor and prevent
moisture from escaping.
Tips for Deep-frying
Wear an insulated cooking glove and slowly lower
foods into the hot oil using a wire scoop or stainless
steel tongs. Add only a small quantity of food to the
oil, allow it to cook, then repeat with another small
quantity. This ensures the oil doesn't drop in tempera-
ture. Once the food is cooked, remove it carefully and
drain onto a paper towel. Turn the heat off as soon as
you have finished deep-frying and allow your pan to
cool. When the oil is cool, remove all remnants of friecl
foods by straining it through a fine metal sieve, and
store it in a clean bottle for future use.
Vegetables are generally easy to cook onthe grill. The
Cooking Racks makes it convenient because you can
still use the main cooking area while the vegetables
are suspended above the grids.
Pre-cook hard vegetables by briefly boiling or
microwaving them before cooking on the grill. Wrap
vegetables in a double thickness of foil to protect them
while cooking on the grill. Then, remove the foil if
desired, 10-15 minutes before the end of cooking,
brush vegetables with butter or oit and finish cooking.
The Cooking Racks can be used for purposes other
than just the obvious. Consider using the racks for
warming French bread, garlic bread, croissants or
even bagels.
A small whole fish wrapped in foil also cooks well on
the Cooking Racks. Parcels of seafood such as
scallops, prawns and sliced fish fillets prepared in a
sauce and portioned into small foil wraps cook well
this way, too.
27
Page 28

ONIONBURGERS
A honey and mustard sauce glazes the onion slices
as they cook alongside these delicious burgers. For
optimal sweetness, select Vidalia or Walta Walla
onions. Makes 4 open face burgers.
Ingredients
2
2
2
2
1
1/4
1/8
4
4
4 tomato slices
Preparing Onions
Place onions in a cooking pan or on a small piece of
aluminum foil. Combine melted margarine, mustard
and honey, then drizzle over onions. Cover pan with lid
or fold up edges of foil and seal with double fold to
completely enclose onionsFeaving space for steam to
build. Place pan or foil packet on grill directly over
medium heat for 15 minutes with the grill lid up.
Preparing Burgers
While onions are cooking, combine ground beef, salt
and pepper in a medium bowl and mix well. Shape
mixture intofour 3/4 inch burger patties and add to
grill, directly over heat. Grill burgers along with onions
for about 5 minutes, then turn burgers. Grill for 8 to 10
minutes more or until no pink remains inmeat, and
onions are tender. To serve, toast both sides of Texas
toast on grill. Then top each slice of Texas toast with a
burger, lettuce, tomato and onion. Sprinkle with pepper
if desired.
large sweet onions, sliced (12 to 16 ounces)
tablespoons margarine or melted butter
teaspoons dry mustard
teaspoons honey
pound lean ground beef
teaspoon salt
teaspoon pepper
slices Texas toast
lettuce leaves
1/4 teaspoon salt
1 1/2 poundslean ground beef
2 cups shredded lettuce
1/3 cup finely shredded cheddar cheese
1/4 cup dairy sour cream and/or guacamole
Preparing the Salsa
Combine tomato, green pepper, onion, jalapeno
peppers, garlic, cilantro and salt in a bowl. Set
aside 2 tablespoons of salsa. Cover and chill remain-
ing salsa until serving time.
Preparing Burgers
Inanother bowl, combine ground beef with 2 table-
spoons of reserved salsa, mix well. Shape mixture
into six 1/2 inch thick burgers and place on the grill
directly over medium heat with lid up. Grill for 13 to
15 minutes or until no pink remains. Turn burgers
once, halfway through grilling time. Arrange the
shredded lettuce on individual plates. Top lettuce
with a burger, cheddar cheese and salsa. Serve with
sour cream and/or guacamole.
CHICAGO STYLE HOT DOGS
Serve these hot dogs "Chicago-style" with pickled pep-
pers! Makes 4 servings.
Ingredients
1/3
1/4
2
2
1/4
4
4
Preparing the Relish
Combine ketchup, chopped pickled peppers, relish,
onion and poppy seed in a small bowl, then set aside.
cup ketchup
cup chopped pickled peppers
tablespoons pickle relish
tablespoons chopped onion
teaspoon poppy seed
fully cooked 4-ounce jumbo hot dogs
hot dog buns
DOUBLE SALSA BURGERS
A fresh tomato salsa flavors the beef mixture for a
zesty tasting burger. The salsa also serves as a
colorful topping. Makes 6 burger patties.
Ingredients
1
1/2
1/4
2
1
1
large tomato, seeded and finely chopped
cup finely chopped green pepper
cup finely chopped red onion
finetychopped, seeded jalapeno peppers
garlic clove, minced
tablespoon snipped cilantro
Preparing Hot Dogs
Place hot dogs on grill directly over MEDIUM heat 5 to
8 minutes with the lid up. Turn hot dogs and brush with
some of the relish mixture. Grill hot dogs 6 to 8
minutes more or until thoroughly cooked.
To Serve
Toast inner sides of hot dog buns on grill. Serve hot
dogs inside buns and top with remaining relish mixture.
28
Page 29

RIB EYE STEAKS WITH GRILLED GARLIC
As they cook, the garlic cloves mellow in flavor,
making a delicious sauce for any grilled meat. And for
an appetizer, spread the softened cloves over toasted
slices of french bread! Makes 4 servings.
Ingredients
1
2
1
whole Head of garlic
tablespoons olive oil or cooking oil
tablespoon snipped fresh basil, or 1/2
teaspoon dried basil, crushed
tablespoon snipped fresh rosemary or 1/2
teaspoon dried rosemary, crushed
twelve-oz, boneless rib eye steaks
Preparation
Combine ketchup, pepper, rosemary, basil and garlic
powder. Coat both sides of steak with mixture. Grill
steak with lid up, directly over medium heat for 6
minutes. Turn steak and grill for 8 to 12 minutes more
or until cooked as desired. Cut into serving size
pieces.
BARBECUED RIBS
Serve this tangy barbecue classic with corn-on-the-
cob, green salad, potato salad or coleslaw!
Makes 4 servings.
Preparing the Garlic
Use a cooking pan or tear off a 24xl 8-inch piece of
aluminum foil and fold long length in half, then trim to
make a 12-inch square. Remove the outer layer of
garlic Head, then cut off and discard the top 1/2-inch of
garlic Head to expose the garlic cloves. Place garlic
Head in center of a cooking pan or in center of foil with
all sides of the foil folded up around the garlic to form a
cup. Drizzle garlic with oil and sprinkle with basil and
rosemary. Cover pan or twist the ends of the foil to
completely enclose the garlic.
Preparing Steaks
Place steaks and the garlic pack on grill directly over
MEDIUM heat and cook about 7 minutes with the lid
up. Turn steaks and grill for 5 to 8 minutes more, or
until cooked to taste. Then remove steaks and place
on platter. Remove garlic and drizzle its juices over
your steak. Remove the softened garlic cloves and
spread over your steak. Season with salt and pepper
as desired and cut into serving-size pieces.
HERB-PEPPER SIRLOIN STEAK
Ingredients
2
1/2
1/2
2
Preparation
Place ribs intoa large glass or ceramic dish.
Combine remaining ingredients and pour over the
ribs. Refrigerate for several hours.
Preheat your grill 3 minutes and place the ribs on
cooking grid. Cook indirectly, over a low to medium
heat until cooked. During the last few minutes of
cooking you can cook the ribs over a direct fire for
added barbecue flavor and texture.
pounds American style pork spareribs
cup barbecue sauce
cup tomato sauce
cloves garlic, crushed
juice of 1 lemon
few drops of tobasco sauce
The hearty beef flavor iscomplemented with a deli-
cious herb coating! Makes 6 servings.
Ingredients
2 tablespoons ketchup
1/2 teaspoon coarselyground pepper
1 1/2 teaspoons snipped fresh rosemary or 1/2
teaspoon dried rosemary, crushed
1 1/2 teaspoons snipped fresh basil or 1/2teaspoon
dried basil, crushed
1/8 teaspoon garlic powder
1 1 1/2-pound boneless beef sirloin steak,
cut 1-inch thick
29
Page 30

MARINATEDTUNASTEAK
Experiment with unique dishes, like this tuna steak
recipe boasting a delicious wine marinad!!
Makes 4 servings.
Ingredients
4 6-ounce fresh or frozen tuna steaks cut 1 inch
thick. Thaw fish if frozen.
1!3 cup dry white wine
1 tablespoon lemon juice
1 tablespoon olive oil or cooking oil
1 clove garlic, minced
2 teaspoons snipped fresh rosemary, crushed,
or 1/2 teaspoon dried rosemary, crushed
1 teaspoon snipped fresh oregano, crushed, or
1/4teaspoon dried oregano, crushed
1/4 teaspoon salt
Preparation
Combine wine, oil, garlic, rosemary, oregano and
salt and pour into a plastic bag. Place tuna steak in
bag and seal. Rotate bag to coat fish well. Place
sealed bag into a shallow dish then chill for up to 2
hours, turning fish once.
Remove fish from bag and discard marinade. Place a
cooking pan with baking rack or roasting rack into
center of grill with outer burners on MEDIUM heat.
Cook tuna steak ontop of rack with lid down for 8 to
12 minutes or until fish begins to flake easily. Turn
fish once during cooking. When cooked, remove fish
from grill andserve.
Preparation
Combine thawed fish, margarine or butter, lemon
juice, mustard and basil into a cooking pan or
aluminum foil rectangle, and cook directly over low
flame until butter is melted. Brush mixture over both
sides of halibut fish steaks. Pour balance of mix-
ture into small bowl.
Place clean cooking pan or foil on center of grill with
both outer burners on MEDIUM. Place fish on grill
and close lid. Cook indirectly for 8 to 12 minutes or
just until fish begins to flake easily, turning once
and brushing as needed with remaining mixture.
ALMOND COATED TROUT
This delicious recipe isunique and easy to prepare on
yourgas grill. Makes 4 servings.
Ingredients
2 trout
1/2 cup all purpose flour
1 egg, lightly beaten
1 cup sliced almonds
1/3 cup parmesan cheese, grated
olive or peanut oil for frying
Preparation
Remove the Head and tail from trout and fillet.
Cut each fish in half to form 4 long fillets. Coat fish
in flour, dip in egg and roll in almonds. Refrigerate
for 1hour.
MUSTARD-GLAZED HALIBUT STEAKS
A simple sauce of melted margarine, lemon juice,
Dijon-style mustard and basil adds a scintillating note
to these sizzling fish steaks! Makes 4 servings.
Ingredients
4
2
2
1
2
6-ounce fresh or frozen halibut steaks, cut 1
inch thick
tablespoons margarine or butter
tablespoons lemon juice
tablespoon Dijon-style mustard
teaspoons snipped fresh basil or 1/2
teaspoons dried basil, crushed
Fill a cooking pan with 1 to 2 inches of oil, and
place over HIGH heat. Cook trout until golden brown.
Drain oil, sprinkle trout with parmesan cheese and
serve dght from the grill.
3O
Page 31
SOUTHWEST CHICKEN BREASTS
BARBECUEDCHICKEN
This popular recipe can also be a grilled chicken salad!
Slice chicken into small strips and place them on top
of shredded lettuce with avocado dressing and top with
cheese! Makes 6servings.
Ingredients
1/4
2
2
1/4
6
2
1
1
2
2
1
1
1
Preparing the Chicken
Combine wine, oil, tarragon and salt. Rinse chicken
and pat dry with paper towels. Place chicken in plastic
bag, add marinade and seal bag. Rotate chicken to
coat well. Place sealed bag into a shallow dish and
chill up to 24 hours, turning bag occasionally.
cup dry white wine
tablespoons olive oil or cooking oil
teaspoons snipped fresh tarragon or 1/4
teaspoon dried tarragon, crushed
teaspoon salt
skinless, boneless chicken breast halves
avocados, pitted, peeled and chopped
tomato, chopped
clove garlic, minced
tablespoons finetychopped seeded
green chili peppers of your choice
green onions, finely chopped
tablespoon snipped fresh cilantro
tablespoon honey
tablespoon lemon juice
Another backyard favorite, this recipe includes an
easy to make sweet and spicy sauce.
Makes 4 servings.
Ingredients
1/2
1/4
1
1/2
1/2
1/4 to 1/2 teaspoon bottled hot pepper sauce
1 2 1/2 to 3 pound broiler-fryer chicken, pre-cut
Preparing the Sauce
Combine ketchup, marmalade, vinegar, celery seed,
chili powder and hot pepper sauce ina cooking pan,
and cook directly over a LOW to MEDIUM heat.
Leave the cooked sauce in the pan and remove from
heat until chicken is prepared.
Preparing the Chicken
Wash chicken and pat dry with paper towels. Turn
outside burners on MEDIUM and place pre-cut
chicken pieces (bone side down) in center of grill.
Close lid and cook indirectlyfor 1 hour or until
chicken is no longer pink. Brush occasionally with
sauce. Remove chicken from grill once cooked, then
place cooking pan with sauce into center of grill and
reheat. Pour warmed sauce over chicken and serve.
cup ketchup
cuporange marmalade
tablespoon vinegar
teaspoon celery seed
teaspoon chili powder
Preparing the Avocado Dressing
Combine avocados, tomato, garlic, chili peppers,
onions, cilantro, honey and lemon juice. Toss well
then cover and chill up to 2 hours.
Grilling the Chicken
Remove the chicken from plastic bag and reserve the
marinade. Grill chicken directly over MEDIUM heat
with lid up for 5 minutes. Turn chicken and brush with
marinade, then grill for 5-10 minutes more or until
chicken is no longer pink. Serve with side of avocado
dressing.
31
Page 32

TRADITIONAL HOLIDAY TURKEY
PIZZA ON THE GRILL
imagine everyone's surprise when you serve your next
holiday turke_omplete with dressing_ elicious and
tender straight from the gdllt Serves 8 - 10
Ingredients for Turkey
8- 10 poundwholeturkey
4 ounces butter, softened
2 tablespoons chopped thyme
2 tablespoons lemon juice
2 teaspoons grated lemon rind
Ingredients for Dressing
2
2
8
2
1/4
2
4
ounces butter
onions, finely chopped
ounces bacon, chopped
tablespoons port wine
cup red wine
chicken stock cubes
ounces chopped cashews, hazelnuts or
pecans
1/2
1/2
cup chopped celery
cup diced carrot
1- 1 1/2 cups fresh white breadcrumbs
1 egg, lightly beaten
-- salt and pepper to taste
Preparing the Dressing
Prepare dressing in a cooking pan directly over
MEDIUM heat. Melt butter, add onions and bacon then
saute 3 minutes. Add port, red wine and stock cubes
and bring to a boil. Cook 2 minutes. Wear insulated
cooking mitts to remove the pan then allow ingredients
to cool. Add remaining ingredients and mix.
Preparing the Turkey
Although not required, you may wantto preheat your
grill 3 minutes.
Wash insideof turkey and pat dry with paper towels.
Pack breadcrumb seasoning into the turkey cavity.
Combine the butter, thyme, lemon juice and rind
together in a bowl. Using turkey baster, insertbutter
mixture under skin covering the turkey breast.
Truss the turkey with string and place it on a baking
pan or roasting rack that rests into a cooking pan.
Remove the cooking grids from your grill ifnecessary,
then place the cooking pan and turkey inthe center of
your grill. Tum one outside burner to LOW, the other
to MEDIUM, and close lid. Cook indirectly for 3 1/2 to
4 hours or until cooked. Haifwaythrough cooking
time you may alternate burner temperatures so that
the turkey browns evenly. Once cooked, remove
dressing from cooked turkey. Slice and serve turkey.
You may never want to call out for pizza again!
Follow this pizza dough recipe, or purchase ready-
made pizza dough found inyour grocers refrigerated
section_ext to the biscuits. Slice and serve directly
from the grill. Serves 6 - 8
Ingredients
1 1/2 teaspoons dried yeast
1 cup lukewarm water
1/2 teaspoon sugar
3 tablespoons olive oil
3 cups all purpose flour
1/4 cup tomato paste or Italian tomato sauce
6 ounces sliced pepperoni
1 red pepper, roasted and sliced
3/4 cup pitted black olives
8 ounces grated mozzarella cheese
It's easy to customize this recipe with toppings to
suit your family's taste. For spicier crust, lightly rub
the dough with olive oil then spice with pepper and
garlic salt before spreading your tomato sauce.
Preparing the Pizza Dough
Combine yeast, water and sugar together and let
stand in a warm place until mixture starts to foam.
Add this yeast mixture to flour and oil and combine to
form your pizza dough. Knead on a lightly floured
surface until smooth and elastic. Cover and stand in a
warm place until doubled in size. Knock back dough
and roll out to a rectangle the size of your cooking
pan or baking dish. Place dough into a lightly oiled
pan.
If you purchased a ready-made pizza dough, simply
open can and roll dough into a lightly oiled cooking
pan.
Preparing the Pizza
Spread tomato paste or Italiantomato sauce on top of
your pizza dough. Topwith pepperoni, red peppers,
olives, and lastly, mozzarella cheese. Or if you prefer,
you may place cheese first with toppings on last.
Place a cooking pan in center of grill and cook
indirectly,with one outside burner on HIGH and the
other on LOW, for approximately 20 minutes or until
bottom of crust is light brown. Lastly, raise the lidand
finish cooking pizza by turning burner under the
cooking pan on high for about 2 minutes. This will
insure the center of pizza gets brown. Then turn off
heat, slice and serve directly from pan.
32
Page 33

FRESH VEGETABLE STIR-FRY
GRILLED POTATO SKINS
Take a tripto the Orient with thiseasy, and healthy
vegetable recipe. Makes 4- 6 servings.
Ingredients
2
1
1
2
1
2
1
1/2
Preparation
Heat oil in a wok or saute pan, directly over a HIGH
heat. Add onion and cook 1 minute. Add carrot and
broccoli and stir-fry 2 minutes, then add red pepper,
celery and snow peas and continue cooking 1
minute more. Add chicken broth and toss veg-
etables until cooked to desired aloneness.
tablespoons oil
onion, cut into wedges
carrot, thinly sliced
cups broccoli, cut into small flowerets
red pepper, sliced
sticks celery, thinly sliced
cup snow peas
cup chicken broth
Serve these crispypotatoes as a snack or side dish.
We've included microwave instructionsfor atimesav-
ing short cut. Makes 12 servings.
Ingredients
6
3
1/2
1
3
1
1
1/2
Preparation
Puncture clean potatoes with a fork, wrap in aluminum
foil and place directly over LOW to MEDIUM heat.
Close lid and cook directly for 1 hour or until center is
tender. OR- Microwave clean, punctured potatoes
on HIGH for 15 to 20 minutes, or until center tender.
Allow cooked potatoes to cool, then unwrap and
discard foil.
baking potatoes (about 8 ounces each)
tablespoons margarine or butter, melted
cup picante sauce
cup shredded cheddar cheese (4 ounces)
slices bacon, crisp-cooked and crumbled
or use prepackaged bacon bits
chopped tomato (optional)
diced green onion (optional)
cup sour cream (optional)
ONION BLOSSOMS
Great served as a snack, or to dress up barbecued
meats, poultryor fish. Makes 4 servings.
Ingredients
4
1
1
1/8
1
1
Preparation
Peel onions, then cut almost completely through each
onion, forming 8 wedges. Onion will be loose, but still
be intact. Prepare four 12-inch squares of aluminum
foil. Place one onion inthe center of each foil square.
Stir margarine (or butter) with hot pepper sauce and
drizzle over onions. Spdnkte with brown sugar. Then
bring up two sides of foil square and double fold. Bring
remaining corners up and completely encloseEeaving
enough space for steam to build.
medium sweet onions (4-5 ounces each)
tablespoons margarine or butter, melted
teaspoon Dijon-style mustard
teaspoon hot pepper sauce
tablespoon brown sugar
pepper(optional)
Cut potatoes in half- lengthwise. Scoop out potato
pulp (serve separately or discard.) Be sure to leave
1/4-inch thick potato shell remaining. Brush the inside
of each potato shell with melted margarine. Spoon 2
teaspoons picante sauce into each potato shell,
sprinkle with cheese and top with bacon.
Place prepared potato skins on gdll, directly over
MEDIUM heat. Close lid and cook for 8 to 10 minutes
or until potato skins are cdsp. Spdnkte each potato
skin with tomato and green onion and then top with
sour cream, if desired.
Place wrapped onion blossoms on grill, directly over
MEDIUM heat. Close lid and cook 15 to 25 minutes
or until onions are nearly tender. Make a 2-inch
opening at the top of each onion wrapping, then close
lid and cook 5 to 10 minutes more, or until onions are
lightly browned. Spdnkle with pepper if desired and
servewarm.
33
Page 34

For repai r-Jn your homm-aH major brand a pp[iaaces,
lawn and garden equ ipment, or heating and ceol i_c! mistems,
_1oma_r who mad_ _ no ma_er wlhe s_H it_
For the _plseement pa_s a_es_ries and
_._w her s manual s that you nee d _ dcq byou Re if.
For Sears professional installation of home appl_anoes
and i_ms like garage door opene_ and w_er h_ters,
 Loading...