

Kenmore ELITE 11010036600, ELITE 11010032600, ELITE 11010037600, 11010036600 Use And Care Manual
Page 1

ORGANIZADOR DE LAVANDERiA
ORGANISATEUR DE BUANDERIE
Table of Contents / |ndice / Table des mati_res
LAUNDRY TOWER SAFETY ........................... 1
INSTALLATION REQUIREMENTS ................. 2
Tools and Parts ............................................. 2
Location Requirements ................................. 2
INSTALLATION INSTRUCTIONS ................... 2
Install the Console (optional) ......................... 2
Install the Laundry Tower .............................. 3
LAUNDRY TOWER USE .................................. 3
LAUNDRY TOWER CARE ............................... 4
WARRANTY ...................................................... 4
SERVICE NUMBERS ................. BACK COVER
I_ ! T
LAUNDRY TOWER
SEGURIDAD DEL ORGANIZADOR DE
LAVANDERiA ................................................... 5
REQUISITOS DE INSTALACI(_N .................... 5
Piezas y herrarnientas ................................... 5
Requisitos de ubicacion ................................ 5
INSTRUCCIONES DE INSTALACION ............ 6
Como instalar la oonsola .............................. 6
Como instalar el organizador de lavanderia. 6
USO DEL ORGANIZADOR DE
LAVANDERiA ................................................... 7
CUlDADO DEL ORGANIZADOR DE
LAVANDERiA ................................................... 7
GARANTiA ........................................................ 7
NUMEROS
DE SERVICIO .................... CONTRAPORTADA
®
SleCURITle DE L'ORGANISATEUR DE
BUANDERIE ..................................................... 8
EXIGENCES D'INSTALLATION ...................... 9
Outillage et pi_ces ......................................... 9
Exigences d'emplacement ........................... 9
INSTRUCTIONS D'INSTALLATION ................ 9
Installation de la console ............................... 9
Installation de I'organisateur de buanderie 10
UTILISATION DE L'ORGANISATEUR DE
BUANDERIE ................................................... 10
ENTRETIEN DE L'ORGANISATEUR DE
BUANDERIE ................................................... 11
GARANTIE ...................................................... 11
NUMleROS
DE SERVICE ............. COUVERTURE ARRIERE
LAUNDRY TOWER SAFETY
Your safety and the safety of others are very important.
We have provided many important safety messages in this manual and on your appliance. Always read and obey all safety
messages.
This is the safety alert symbol.
This symbol alerts you to potential hazards that can kill or hurt you and others.
All safety messages will follow the safety alert symbol and either the word "DANGER" or "WARNING."
These words mean:
All safety messages will tell you what the potential hazard is, tell you how to reduce the chance of injury, and tell you what can
happen if the instructions are not followed.
W10106780B
You can be killed or seriously injured if you don't immediately
follow instructions.
You can be killed or seriously injured if you don't follow
instructions.
Page 2
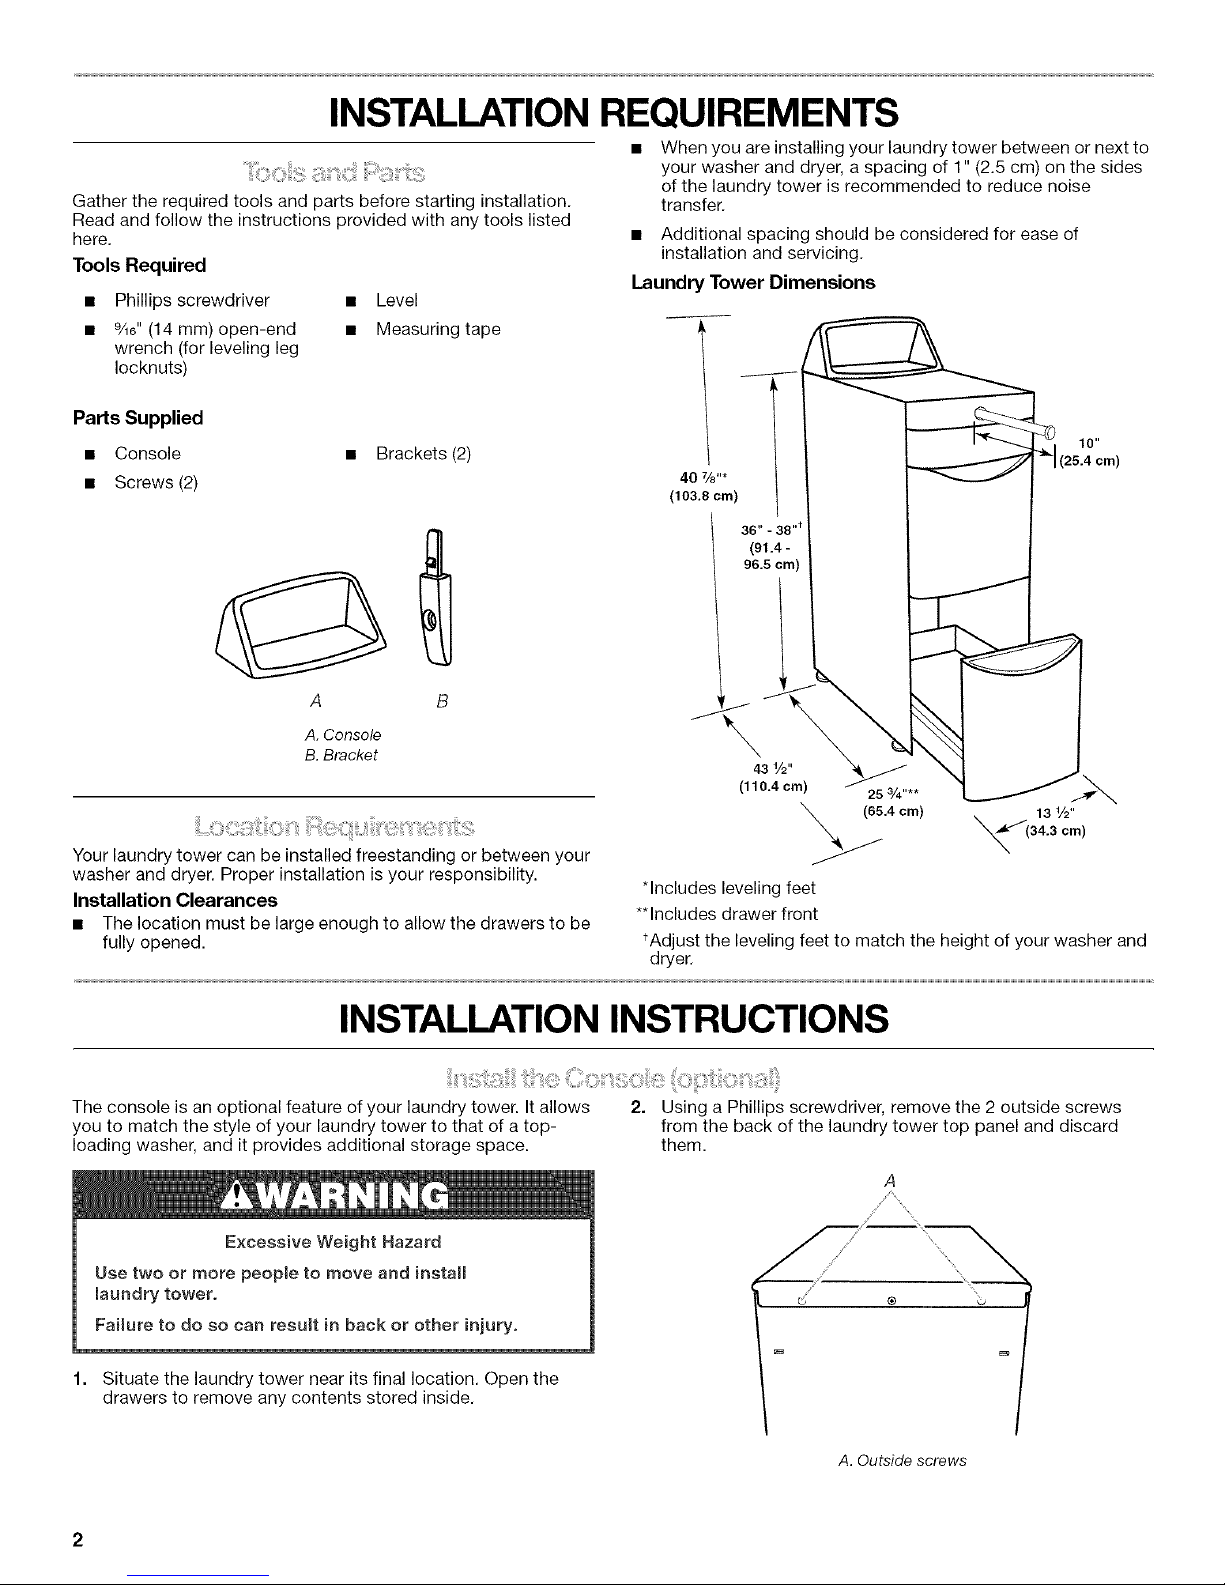
INSTALLATION REQUIREMENTS
Gather the required tools and parts before starting installation.
Read and follow the instructions provided with any tools listed
here.
Tools Required
Phillips screwdriver • Level
%6" (14 mm) open-end • Measuring tape
wrench (for leveling leg
Iocknuts)
Parts Supplied
• Console
• Screws (2)
• Brackets (2)
When you are installing your laundry tower between or next to
your washer and dryer, a spacing of 1" (2.5 cm) on the sides
of the laundry tower is recommended to reduce noise
transfer.
• Additional spacing should be considered for ease of
installation and servicing.
Laundry Tower Dimensions
40 %"*
(103.8 cm)
36" - 38 "t
(91.4 -
96.5 cm)
A B
A.Console
B.Bracket
Your laundry tower can be installed freestanding or between your
washer and dryer. Proper installation is your responsibility.
Installation Clearances
• The location must be large enough to allow the drawers to be
fully opened.
INSTALLATIONINSTRUCTIONS
The console is an optional feature of your laundry tower. It allows
you to match the style of your laundry tower to that of a top-
loading washer, and it provides additional storage space.
Excessive Weight Hazard
Use two or more people to move and install
laundry tower.
Failure to do so can result in back or other injury.
43 V2"
(110.4 cm) 25 3/4....
*Includes leveling feet
**Includes drawer front
tAdjust the leveling feet to match the height of your washer and
dryer.
2=
Using a Phillips screwdriver, remove the 2 outside screws
from the back of the laundry tower top panel and discard
them.
1. Situate the laundry tower near its final location. Open the
drawers to remove any contents stored inside.
A. Outside screws
Page 3

3,
Attach the brackets to the back of the laundry tower using the
screws (provided). Align the brackets so that the latch is
pointing up.
4.
Attach the console to the laundry tower. Align the Iocators on
the console with the brackets and push down until the
latches snap into place and the magnets on the bottom of the
console attach to the top panel.
NOTE: Once installed, the console can be removed only by
removing the 2 console screws.
A. Locator
B. Latch
7. Once the laundry tower is at the appropriate height and is
level, use a%6" (14 mm) open-end wrench to securely tighten
all four Iocknuts against the laundry tower.
A. Locknut
8. Using two or more people, slide the laundry tower into its final
location and confirm height and levelness.
LAUNDRY TOWER USE
Your laundry tower has several uses.
• The top drawer and console provide storage and organization
for small items.
• The bottom drawers provide convenient storage space for
large items such as detergent bottles.
Excessive Weight Hazard
Use two or more people to move and install
laundry tower.
Failure to do so can result in back or other injury.
1. Situate the laundry tower near its final location. Open the
drawers to remove any contents stored inside.
2. To determine how far to extend the leveling feet, measure the
height of the washer and/or dryer you are installing the
laundry tower next to or between.
NOTE: Refer to the laundry tower dimensions in "Location
Requirements."
3. Place a piece of cardboard on the floor and, using two or
more people, lay the laundry tower on its side.
\°
The retractable hanging rod may be used to hang several
clothing items. To open or close the hanging rod, push it in
until you hear it click.
4. Turn all four feet out to the dimension determined in Step 2.
5. Using two or more people, return the laundry tower to the
upright position.
6. Check the laundry tower height and levelness and adjust the
feet as needed.
Page 4
LAUNDRY TOWER CARE
To clean the interior and exterior:
• Use a soft damp cloth or sponge to wipe up any spills.
Occasionally wipe the surfaces of your laundry tower to help
keep it looking new.
KENMORE ELITE LAUNDRY PRODUCT WARRANTY
ONE YEAR LIMITED WARRANTY
When installed, operated and maintained according to all
instructions supplied with the product, if this laundry product fails
due to a defect in material or workmanship within one year from
the date of purchase, call 1-800-4-MY-HOME to arrange for free
repair. If this laundry product is used for other than private family
purposes, this warranty applies for only 90 days from the date of
purchase.
THIS WARRANTY COVERS ONLY DEFECTS IN MATERIAL
AND WORKMANSHIP. SEARS WILL NOT PAY FOR:
1. Expendable items that can wear out from normal use,
including but not limited to filters, belts, light bulbs, and bags.
2. A service technician to instruct the user in correct product
installation, operation or maintenance.
3. A service technician to clean or maintain this product.
4. Damage to or failure of this product if it is not installed,
operated or maintained according to all instructions supplied
with the product.
5. Damage to or failure of this product resulting from accident,
abuse, misuse or use for other than its intended purpose.
6. Damage to or failure of this product caused by the use of
detergents, cleaners, chemicals or utensils other than those
recommended in all instructions supplied with the product.
7. Damage to or failure of parts or systems resulting from
unauthorized modifications made to this product.
• Use mild soap and water; do not use abrasive products.
NOTE: Do not lift the front of the console off the laundry tower
without first removing the console screws.
DISCLAIMER OF IMPLIED WARRANTIES; LIMITATION OF
REMEDIES
Customer's sole and exclusive remedy under this limited
warranty shall be product repair as provided herein. Implied
warranties, including warranties of merchantability or fitness for a
particular purpose, are limited to one year or the shortest period
allowed by law. Sears shall not be liable for incidental or
consequential damages. Some states and provinces do not allow
the exclusion or limitation of incidental or consequential
damages, or limitations on the duration of implied warranties of
merchantability or fitness, so these exclusions or limitations may
not apply to you.
This warranty applies only while this laundry product is used in
the United States and Canada.
This warranty gives you specific legal rights, and you may also
have other rights which vary from state to state.
Sears, Roebuck and Co.
Hoffman Estates, IL 60179
Sears Canada Inc.
Toronto, Ontario, Canada M5B 2B8
PRODUCT RECORD
In the space below, record your complete model number, serial
number, and purchase date. You can find this information on the
model and serial number label located on the product.
Have this information available to help you obtain assistance or
service more quickly whenever you contact Sears concerning
your laundry product.
Model number ......
Serial number
Purchase date
Save these instructions and your sales receipt for future
reference.
Page 5

SEGURIDAD DEL ORGANIZADOR DE LAVANDERiA
Su seguridad y la seguridad de los demas es muy importante.
Hemos incluido muchos mensajes importantes de seguridad en este manual yen su electrodomestico. Lea y obedezca siempre
todos los mensajes de seguridad=
Este simbolo le llama la atencidn sobre peligros potenciales que pueden ocasionar la muerte o una lesi6n a
usted y a los demas.
Este es el sfmbolo de advertencia de seguridad.
Todos los mensajes de seguridad iran a continuacidn del simbolo de advertencia de seguridad y de la palabra
"PELIGRO" o "ADVERTENCIA". Estas palabras significan:
Si no sigue las instrucciones de inmediato, usted puede
morir o sufrir una lesi6n grave.
Si no sigue las instrucciones, usted puede morir o sufrir
una lesi6n grave.
Todos los mensajes de seguridad le diran el peligro potencial, le diran c6mo reducir las posibilidades de sufrir una lesidn y Io que
puede suceder si no se siguen las instrucciones.
REQUISITOS DE INSTALACION
• Cuando instale el organizador de lavanderia entre la lavadora
y la secadora o al lado de las mismas, se recomienda un
ReQna las herramientas y piezas necesarias antes de comenzar
la instalaci6n. Lea y siga las instrucciones provistas con
cualquiera de las herramientas enlistadas aqui.
Herramientas requeridas
Destornillador Phillips
Llave de boca de %6"
(14 mm) (para nivelar las
contratuercas de las patas)
• Nivel
• Cinta de medir
espacio de 1" (2,5 cm) a los lados del organizador de
lavanderia, para reducir la transferencia de ruido.
• Debe considerarse espacio adicional para facilitar la
instalaci6n y el servicio tecnico.
Dimensiones del organizador de lavanderia
Piezas suministradas
• Consola
• Tornillos (2)
A.Consola
B.Soporte
Su organizador de lavanderfa puede instalarse independiente o
entre la lavadora y la secadora. La instalaci6n correcta es su
responsabilidad.
Espacios libres para instalacibn
• El lugar debe set Io suficientemente grande para permitir que
los cajones se abran completamente.
• Soportes (2)
A B
40 7/8"*
(103,8 cm)
J
z\
43 1/2"
(110,4 cm) 25 3/4....
_ _(65,4 cm)
*lncluye las patas niveladoras
**lncluye el frente del caj6n
t Regule las patas niveladoras para hacer coincidir la altura de la
lavadora y de la secadora.
Page 6

INSTRUCCIONES DE INSTALACION
,iiiiii_';_:_i!i_iii'iiOii_i!!iSi!i!:_i;!:!ii!i_;i!_i;;i¸¸¸¸¸iiii_i!!_OO_i__!bOiii_ii!;_ii
La consola es una caractedstica optativa de su organizador de
lavandeda. Le permite hacer coincidir el estilo de su organizador
de lavander[a con el estilo de la lavadora de carga superior, a la
vez que proporciona un espacio adicional para el almacenaje.
Pe_igro de Peso E×cesive
Use dos o mas personas para mover e instalar e_
organizador de _avander_ao
No seguir esta instrucci6n puede ocasionar una _esi6n
en la espalda u otto tipo de lesioneso
1. Con la ayuda de dos o mas personas, coloque el organizador
de lavanderia cerca de su ubicaci6n final. Abra los cajones
para quitar Io que este guardado dentro.
2. Usando un destomillador Phillips, saque los 2 tornillos
exteriores que estan detras del panel superior del
organizador de lavanderia.
::::: :::
PeBigro de Peso Excesivo
Use dos o mas personas para mover e insta_ar el
organizador de _avanderia.
No seguir esta instrucci6n puede ocasionar una lesi6n
en la espa_da u otto tipo de lesiones.
1. Con la ayuda de dos o mas personas, coloque el organizador
de lavandeda cerca de su ubicaci6n final. Abra los cajones
para quitar Io que este guardado dentro.
2. Para determinar cuanto tendra que extender las patas
niveladoras, mida la altura de la lavadora y/o secadora allado
o entre las cuales va a colocar el organizador de lavanderia.
NOTA: Tome como referencia las dimensiones del
organizador de lavander[a en "Requisites de ubicaci6n".
3. Coloque un pedazo de cart6n en el piso y, con la ayuda de
dos o mas personas, coloque el organizador de lavanderia de
costado.
A. Outside screws
3=
Fije los soportes de la consola a la parte posterior del
organizador de lavander[a, usando los tornillos de la consola
(provistos). Alinee los soportes de manera que el seguro
quede mirando hacia arriba.
4.
Fije la consola al organizador de lavanderia. Alinee los
Iocalizadores con los soportes y empuje hacia abajo hasta
que los seguros encajen en su lugar y los imanes en la parte
inferior de la consola se fijen al panel superior.
NOTA: Una vez que se haya instalado la consola, se podra
retirar solamente sacando los 2 tornillos de la misma.
A. Locater
B. Latch
4. Gire las cuatro patas hacia afuera, segQn la dimensi6n que se
determin6 en el paso 2.
5. Con la ayuda de dos o mas personas, vuelva a colocar el
organizador de lavanderia en posici6n vertical.
6. Verifique la altura y la nivelaci6n del organizador de
lavanderia y ajuste las patas si es necesario.
7. Una vez que el organizador de lavanderia este a la altura
apropiada y nivelado, use una Ilave de boca de 9/16"(14 mm)
para apretar con seguridad las cuatro contratuercas contra el
organizador de lavanderia.
A. Contratuerca
8=
Con la ayuda de dos o mas personas, deslice el organizador
de lavandeda a su ubicaci6n final y confirme la altura y la
nivelaci6n.
Page 7

USO DEL ORGANIZADOR DE
CUlDADO DEL
LAVANDERiA
Su organizador de lavanderfa tiene varies uses.
• El caj6n superior y la consola proporcionan un lugar de
almacenamiento y organizaci6n para los articulos pequer_os.
• Los cajones inferiores proveen espacio conveniente para el
almacenaje de articulos grandes, come las botellas de
detergente.
J
I
°Ll
\
La barra retractil colgante puede usarse para colgar varias
prendas. Para abrir o cerrar la barra colgante, empQjela
hasta que escuche un ruido seco.
ORGANIZADOR DE
LAVANDERiA
Para limpiar el interior y el exterior:
• Use un paso suave y ht_medo o una esponja para limpiar
cualquier derrame. De vez en cuando, limpie las superficies
de su organizador de lavanderia para ayudar a que se vea
come nuevo.
• Use jab6n suave y agua; no use productos abrasivos.
NOTA: No saque el frente de la consola del organizador de
lavanderfa sin quitar primero los tornillos de la consola.
GARANTiA DE LOS
PRODUCTOS DE
LAVANDERiA
KENMORE ELITE
GARANTIA LIMITADA DE UN AI_IO
Cuando este electrodomestico haya side instalado, operado y
mantenido segQn las instrucciones provistas con el producto, si
este producto de lavanderfa falla por defectos de material o de
mano de obra dentro de un a_o a partir de la fecha de compra,
Ilame al 1-800-4-MY-HOME para gestionar la reparaci6n libre de
cargo. Si este producto de lavanderia es empleado para algQn
otro uso que no sea el domestico familiar, esta garantfa s61o tiene
vigencia por 90 dfas a partir de la fecha de compra.
ESTA GARANTiA CUBRE SOLAMENTE LOS DEFECTOS DE
MATERIAL Y MANO DE OBRA. SEARS NO PAGARA POR:
1. Los articulos no reutilizables que pueden gastarse per el use
normal, incluyendo, pero sin limitaci6n, filtros, correas, focos
y bolsas.
2. Un tecnico de servicio para ense_arle al usuario c6mo
instalar, operar o mantener el producto adecuadamente.
3. Un tecnico de servicio para limpiar o mantener este
producto.
4. Da_os a este producto o fallas del mismo en caso de no set
instalado, operado o mantenido conforme a todas las
instrucciones provistas con el producto.
5. Da_os a este producto o fallas del mismo como resultado de
accidente, abuso, uso indebido o un uso diferente de aquel
para el cual fue creado.
6. Da_os a este producto o fallas del mismo causados per el
uso de detergentes, limpiadores, productos qufmicos o
utensilios diferentes de los recomendados en todas las
instrucciones provistas con el producto.
7. Da_os a piezas o sistemas o fallas de los mismos come
resultado de modificaciones no autorizadas que se hayan
efectuado en este producto.
Page 8

EXCLUSION DE GARANT|AS IMPL|CITAS; LIMITACION DE
RECURSOS
El Qnico y exclusivo recurso del cliente seg_n los terminos de
esta garantia limitada sera el de reparar el producto segQn se
estipula en la presente. Las garantias implicitas, incluyendo las
garantfas de comerciabilidad o de capacidad para un prop6sito
particular, seran limitadas a un aSo o al periodo mas corto
permitido por ley. Sears no se hara responsable por da_os
incidentales o consecuentes. Algunos estados y provincias no
permiten la exclusi6n o limitaci6n de daSos incidentales o
consecuentes, o limitaciones acerca de cuanto debe durar una
garantfa implicita de comerciabilidad o capacidad, de modo que
las limitaciones o exclusiones arriba mencionadas pueden no
aplicarse en su case.
Esta garantia se aplica s61o mientras este producto de lavanderfa
se usa en los Estados Unidos y CanadA.
Esta garantfa le otorga derechos legales especificos, yes posible
que usted tenga tambien otros derechos, los cuales varian de un
estado a otro.
SI:!:CURITI:!:DE L'ORGANISATEUR DE BUANDERIE
Sears, Roebuck and Co.
Hoffman Estates, IL 60179
Sears Canada Inc.
Toronto, Ontario, Canada M5B 2B8
REGISTRO DEL PRODUCTO
En el espacio a continuaci6n, anote el n_mero complete de
modelo y serie asf como la fecha de compra. Usted puede
encontrar esta informaci6n en la etiqueta con el nt_mero de
modelo y de serie ubicada en el producto.
Tenga esta informaci6n disponible para facilitarle la obtenci6n de
asistencia o servicio con prontitud siempre que Ilame a Sears
con respecto a su producto de lavanderia.
Numero de modelo
Numero de serie
Fecha de compra
Guarde estas instrucciones y su comprobante de compra
para referencia futura.
Votre sdcuritd et celle des autres est tr_s importante.
Nous donnons de nombreux messages de securit6 importants dans ce manuel et sur votre appareil menager. Assurez-vous de
toujours lire tousles messages de securit6 et de vous y conformer.
Ce symbole d'alerte de securit6 vous signale les dangers potentiels de dec6s et de blessures graves &vous
et &d'autres.
Voici le symbole d'alerte de securit6.
Tousles messages de securite suivront le symbole d'alerte de securit6 et le mot "DANGER" ou
"AVERTISSEMENT". Ces mots signifient :
Risque possible de deces ou de blessure grave si vous ne
suivez pas immediatement les instructions.
Risque possible de deces ou de blessure grave si vous
ne suivez pas les instructions.
Tousles messages de securite vous diront quel est le danger potentiel et vous disent comment reduire le risque de blessure et
ce qui peut se produire en cas de non-respect des instructions.
Page 9

EXIGENCES D'INSTALLATION
Rassembler les outils et pi_ces necessaires avant de commencer
I'installation. Lire et suivre les instructions fournies avec les outils
indiques ici.
Outillage n_cessaire
Tournevis Phillips • Niveau
Cle plate de 9A6"(14 mm) • Metre ruban
(pour les ecrous de
blocage des pieds de
reglage de I'aplomb)
Pi_ces fournies
• Console
• Vis (2)
• Brides (2)
Ddgagements de s_paration a respecter
• L'emplacement dolt 6tre assez grand pour permettre d'ouvrir
completement les tiroirs.
• En cas d'installation de I'organisateur de buanderie entre la
laveuse et la secheuse ou a proximite, il est recommande de
laisser un espace de 1" (2,5 cm) sur les c6tes de
I'organisateur afin de reduire le transfert de bruit.
• Prevoir davantage d'espace pour faciliter I'installation et
I'entretien.
Dimensions de I'organisateur de buanderie
40 7/8"*
(103,8 cm)
36" - 38 "1
(91,4 -
96,5 cm)
A B
A. Console
B. Bride
L'organisateur de buanderie peut _tre installe en position
autoportante ou entre la laveuse et la secheuse. C'est &
I'utilisateur qu'incombe la responsabilite de realiser une
installation correcte.
INSTRUCTIONS D'INSTALLATION
La console est une caracteristique en option sur I'organisateur de
buanderie. EIle permet d'assortir le style de I'organisateur de
buanderie a celui de la laveuse &chargement par le dessus et
fournit un espace de rangement supplementaire.
Risque du poids excessif
Utiliser deu× ou plus de personnes pour d_placer et
installer m'organisateur de buanderieo
Le non=respect de cette instruction peut causer une
bmessure au dos ou d'autre blessure.
/
z\
43 1/2"
(110,4 cm) 25 3/4....
/
*Pieds de reglage de I'aplomb inclus
**lnclut I'avant du tiroir
tAjuster les pieds de nivellement afin de faire correspondre la
hauteur de la laveuse et de la secheuse.
2=
,&,I'aide d'un tournevis Phillips, 6ter les 2 vis externes de
I'arriere du panneau superieur de I'organisateur de buanderie.
A
© ®
A I'aide de deux personnes ou plus, placer I'organisateur de
buanderie a proximite de son emplacement final. Ouvrir les
tiroirs et retirer tout ce qui pourrait se trouver a I'interieur.
A. Vis extemes
Page 10

3=
Fixer les brides de la console & I'arriere de I'organisateur de
buanderie & I'aide des vis de la console (fournies), Aligner les
brides de fagon ace que le taquet pointe vers le haut.
4.
Fixer la console sur I'organisateur de buanderie, Aligner les
tiges de positionnement avec les brides et enfoncer jusqu'a
ce que les taquets s'emboitent et que les aimants en bas de
la console se fixent au panneau superieur.
REMARQUE : Une fois installee, la console ne peut _tre
retiree qu'en 6tant au prealable les 2 vis de la console.
7=
Une fois que I'organisateur de buanderie est a la hauteur
appropriee et d'aplomb, utiliser une cle plate de 9/16"(14 mm)
pour serrer solidement les quatre ecrous de blocage centre
I'organisateur de buanderie.
A. Ecrou de blocage
8. ,&,I'aide de deux personnes ou plus, faire glisser
I'organisateur de buanderie a son emplacement final et
verifier la hauteur et I'aplomb.
UTILISATION DE L'ORGANI-
SATEUR DE BUANDERIE
A. Tige de positionnement
B. Taquet
Risque du poids excessif
Utiliser deux ou plus de personnes pour d_placer et
installer m'organisateur de buanderieo
Le non-respect de cette instruction peut causer une
bmessure au dos ou d"autre biessure,
1. ,&,I'aide de deux personnes ou plus, placer I'organisateur de
buanderie a proximite de son emplacement final. Ouvrir les
tiroirs et retirer tout ce qui pourrait se trouver a I'interieur.
2. Afin de determiner la Iongueur de deploiement necessaire pour
les pieds de reglage de I'aplomb, mesurer la hauteur de la
laveuse et/ou de la secheuse a proximite desquelles ou entre
lesquelles vous desirez installer I'organisateur de buanderie.
REMARQUE : Consulter les dimensions de I'organisateur de
buanderie a la section "Exigences d'emplacement".
3. Placer une piece de carton sur le plancher eta I'aide de
deux personnes ou plus, placer I'organisateur de buanderie
sur le c6t&
Votre organisateur de buanderie peut remplir differentes fonctions.
• Le tiroir superieur et la console permettent le rangement et
I'organisation de petits articles.
• Les tiroirs du milieu fournissent un espace de rangement
pratique pour les articles de grande taille tels que les bidons
de detergent,
La barre de suspension retractable peut _tre utilisee pour
suspendre plusieurs v_tements. Pour deployer ou retracter la
barre de suspension, I'enfoncer jusqu'au declic.
4. Tourner les quatre pieds aux dimensions determinees &
I'etape 2.
5. ,&,I'aide de deux personnes ou plus, remettre I'organisateur
de buanderie en position verticale.
6. Verifier la hauteur et I'aplomb de I'organisateur de buanderie
et ajuster les pieds selon le besoin.
10
Page 11

ENTRETIEN DE L'ORGANISATEUR DE BUANDERIE
Nettoyage de I'int_rieur et de I'ext_rieur :
• Utiliser une eponge ou un chiffon doux humide pour essuyer
les renversements. Essuyer occasionnellement les surfaces
de I'organisateur de buanderie pour aider & maintenir son
apparence d'appareil neuf.
GARANTIE DES APPAREILS DE BUANDERIE
KENMORE ELITE
GARANTIE LIMITC:E DE UN AN
Lorsqu'il est installe, utilise et entretenu conformement a toutes
les instructions fournies avec le produit, si cet appareil de
buanderie fait defaut par suite d'un vice de materiau ou de
fabrication au cours de I'annee qui suit la date d'achat, composer
le 1-800-4-MY-HOME pour obtenir une reparation gratuite. Si
I'appareil de buanderie fonctionne a toute autre fin que
I'utilisation familiale privee, la presente garantie ne s'appliquera
que pendant 90 jours a partir de la date d'achat.
LA pRI_SENTE GARANTIE COUVRE UNIQUEMENT LES
VICES DE MATI_RIAUX ET DE FABRICATION. SEARS NE
PRENDRA PAS EN CHARGE :
1. Les pieces courantes qui peuvent s'user suite a une
utilisation normale, notamment les filtres, courroies,
ampoules et sacs.
2. L'intervention d'un technicien pour montrer a I'utilisateur
comment installer, utiliser et entretenir correctement le
produit,
3. L'intervention d'un technicien pour nettoyer ou entretenir ce
produit,
4. L'endommagement ou les defauts du produit si celui-ci n'est
pas installe, utilise ou entretenu conformement a toutes les
instructions fournies avec le produit.
5. L'endommagement ou les defauts du produit resultant
d'accident, usage impropre ou abusif ou utilisation autre que
pour laquelle il est destin&
6. L'endommagement ou les defauts du produit causes par
I'utilisation de detergents, agents de nettoyage, produits
chimiques ou ustensiles autres que ceux recommandes darts
toutes les instructions fournies avec le produit,
7. L'endommagement ou les defauts des pieces ou systemes
resultant d'une modification non autorisee faite au produit.
• Utiliser un savon doux et de I'eau; ne pas utiliser de produits
abrasifs.
REMARQUE : Ne pas soulever I'avant de la console pour la
retirer de I'organisateur de buanderie sans avoir au prealable 6te
les vis de la console.
CLAUSE D'EXONC:RATION DE RESPONSABILIT¢: AU TITRE
DES GARANTIES IMPLICITES; LIMITATION DES RECOURS
Le seul et exclusif recours du client dans le cadre de la presente
garantie limitee consiste en la reparation prevue ci-dessus, Les
garanties implicites, y compris les garanties applicables de
qualite marchande et d'aptitude a un usage particulier, sont
limitees &un an ou a la plus courte periode autorisee par la Ioi.
Sears n'assume aucune responsabilite pour les dommages
fortuits ou indirects. Certains Etats ou certaines provinces ne
permettent pas I'exclusion ou la limitation des dommages fortuits
ou indirects, ou la limitation de la duree des garanties implicites
de qualite marchande ou d'aptitude a un usage particulier, de
sorte que cette exclusion ou limitation peut ne pas _tre
applicable dans votre cas,
Cette garantie s'applique,seulement Iorsque cet appareil de
buanderie est utilise aux Etats-Unis et au Canada.
Cette garantie vous confere des droits juridiques specifiques et
vous pouvez egalement jouir d'autres droits qui peuvent varier
d'un Etat a I'autre.
Sears, Roebuck and Co.
Hoffman Estates, IL 60179
Sears Canada Inc.
Toronto, Ontario, Canada M5B 2B8
ENREGISTREMENT DU PRODUIT
Darts I'espace ci-dessous, inscrire les numeros de modele et de
serie complets et la date d'achat. Vous trouverez ces
renseignements sur la plaque signaletique situee sur le produit.
Gardez ces renseignements a disposition pour obtenir plus
rapidement assistance ou service Iorsque vous communiquez
avec Sears au sujet de votre appareil de buanderie.
Num_ro de module ....
Num_ro de s_rie
Date d'achat
Conservez ces instructions et votre regu de vente pour
r_f_rence ult_rieure.
11
Page 12

i i i i i i i i i i i i i i iiill YourHome
For repair- in your home - of all major brand appliances,
lawn and garden equipment orheating and cooling systems
nomatterwhomadeit, nomatterwhosoldit,
Forthereplacementparts, accessoriesand
owner'smanualsthatyou needtodo-it-yourself.
For Sears professional installation of home appliances
and items like garage door openers and water heaters.
1-800-4-MY-HOME ® (1-800-469-4663)
Callanytime, dayornight(U.S.A, andCanada)
www.sears.corn www.sears.ca
Forexperthomesolutionsadvice:www.managemyhome.com
OurHome
For repair of carry-in items like vacuums, lawn equipment,
R " TM SM •
® Registered Trademark / Trademark / Serwce Mark of Sears Brands, LLC Printed in China
WlOlO6780B ® Marca registrada / Marca de comerclo / Marca de servlclo de Sears Brands, LLC Impreso en China
© 2007 Sears Brands, LLC , . TN SM
® Marque deposee / Marque de commerce / Marque de service de Sears Brands, LLC Imprime en Chine
3/07
TM . SM . .
 Loading...