

Page 1
Use & Care Guide PART# 5 5 3 14 8 4 13
®
Grinder andCoffee Brewer
12-Cup Glass Carafe
Model 100.94006
• Safety
• Operation
• Care
_ _ i_ _ i__
CAUTION: Read, understand and follow all Important Safeguards
and Operation Instructions in this Use & Care Guide before using
this product. Save this Use & Care Guide for all future product use.
Sears Brands Management Corporation, Hoffman Estates, IL 60179 U.S.A.
www.kenmore.com www.sears.com
Page 2
KENMORE ELITE FULL WARRANTY
If this product fails due to a defect in material or workmanship within five years from
the date of purchase, return it to any Sears store or other Kenmore outlet in the United
States for free replacement.
This warranty does not cover the Gold-tone filter or the water filter, which are
expendable parts that can wear out from normal use within the warranty period.
This warranty applies for only 90 days if this product is ever used for other than private
household purposes.
This warranty applies only while this product is used in the United States.
This warranty gives you specific legal rights, and you may also have other rights which
vary from state to state
Sears, Roebuck and Co., Hoffman Estates, IL 60179
When using electrical appliances, basic safety precautions should always be
followed, including the following:
1. READ all instructions.
2. DO NOT touch hot surfaces. Use handles or knobs.
.
To protect against fire, electric shock and injury to persons, DO NOT immerse cord,
plug, or the coffeemaker in water or other liquids.
,
Close supervision is necessary when any appliance is used by or near children.
5.
ALWAYS UNPLUG coffeemaker from power outlet before cleaning, and when storing.
Allow to cool before putting on or taking off parts, cleaning or storing.
.
DO NOT operate any appliance with a damaged cord or plug, or after the appliance
malfunctions or has been dropped or damaged in any manner. Return appliance to
the nearest authorized service facility for examination, repair or adjustment.
7. The use of accessory attachments not recommended by the appliance manufacturer
may result in fire, electric shock or injury to persons.
8. DO NOT use outdoors.
9. NEVER let the cord hang over the edge of table or counter or touch hot surfaces.
10. DO NOT place coffeemaker on or near a hot gas or electric burner or in a heated oven.
11. DO NOT use this coffeemaker for anything other than its intended use.
2
Page 3
The carafe is designed for use only with this coffeemaker.
Scalding may occur if the lid is removed during the brewing cycles. ALWAYS keep
the lid on the carafe when in use.
14.
A short power supply cord (or detachable power supply cord) is provided to
reduce risks resulting from becoming entangled in or tripping over a longer cord.
15.
To protect against electric shock, this appliance is equipped with a cord having a
3-prong grounding-type plug for insertion into a proper grounding-type receptacle.
DO NOT alter the plug for use in a 2-prong receptacle. If the plug will not fit into a
receptacle, have the proper receptacle installed by a qualified electrician.
Avoid contacting moving parts.
This appliance is for household use only.
SAVE THESE INSTRUCTIONS!
18.
3
Page 4
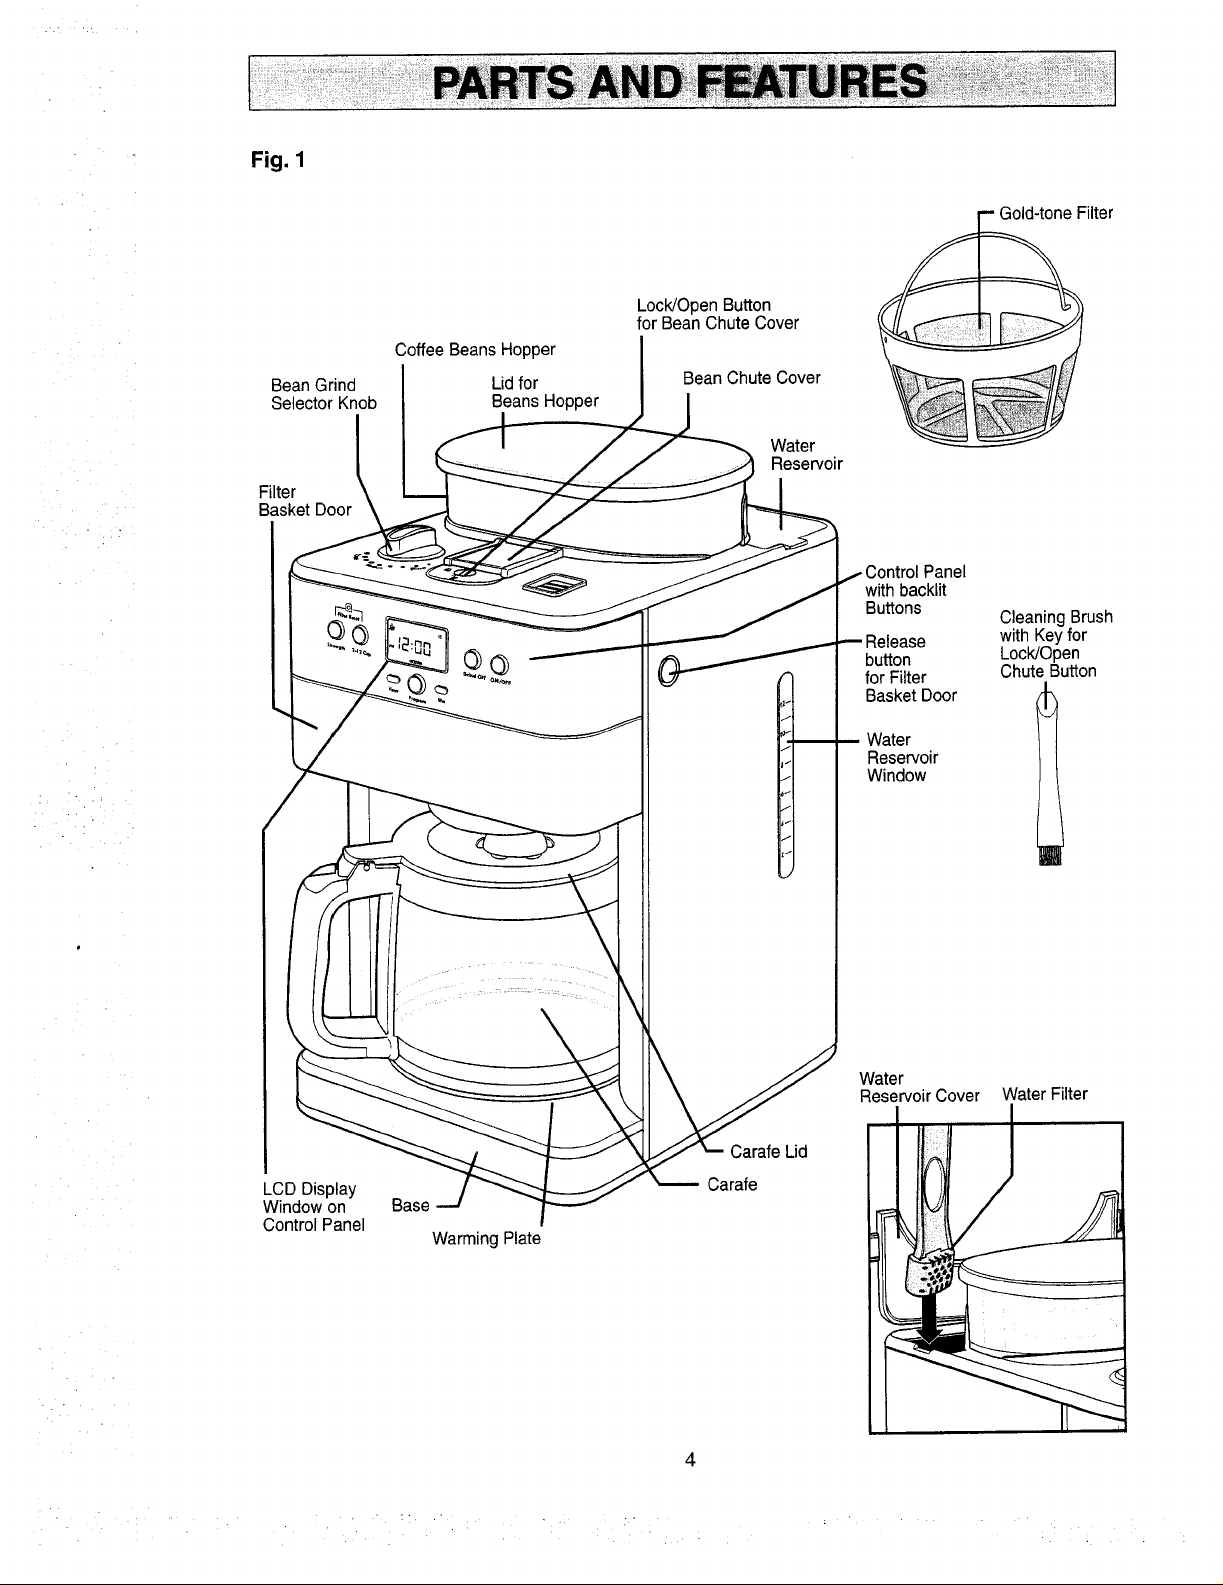
Fig. 1
Bean Grind
Selector Knob
Filter
Basket Door
Coffee Beans Hopper
Lidfor
Beans Hopper
Lock/Open Button
for Bean Chute Cover
Bean Chute Cover
Water
Reservoir
Panel
with backlit
Buttons
button
for Filter
Basket Door
Water
Reservoir
Window
ilter
Cleaning Brush
with Keyfor
Lock/Open
Chute Bu_on
LCD Display
Window on
Control Panel
Water
Reservoir Cover Water Filter
Carafe Lid
Carafe
Base
Warming Plate
Page 5
Before the first use of the coffeemaker wash the brew basket, the permanent gold-tone
filter, the carafe and carafe lid in either the top rack of your dishwasher, or by hand
in warm, sudsy water.
The exterior of the coffeemaker, the control panel area and the warming plate should
only be cleaned with a soft damp cloth.
NOTE: NEVER clean the warming plate unless it is completely cool.
I
NOTE: DO NOT use abrasive cleansers or scouring pads when cleaning
I
your coffeemaker. NEVER immerse the coffeemaker in water or any liquid.
After all parts are washed for the first time, pour cold water up to the 12 cup level mark
in the water reservoir. Brew it through as instructed in BREWING COFFEE, but do not
add coffee beans to the hopper or coffee grounds to the paper filter. When done, turn
off the coffeemaker and discard used filter and water from the carafe. This will remove
any possible residue left over from the manufacturing process.
NOTE: Allow the bean grinder to grind free of beans for this initial use.
I
I
I
I
The easy-to-use programmable digital controls let you know when the coffee is ready,
and even keep track of the freshness of each brewed carafe, shutting off after 2 hours.
It's never been easier to brew the perfect cup of coffee.
BREWING COFFEE
,
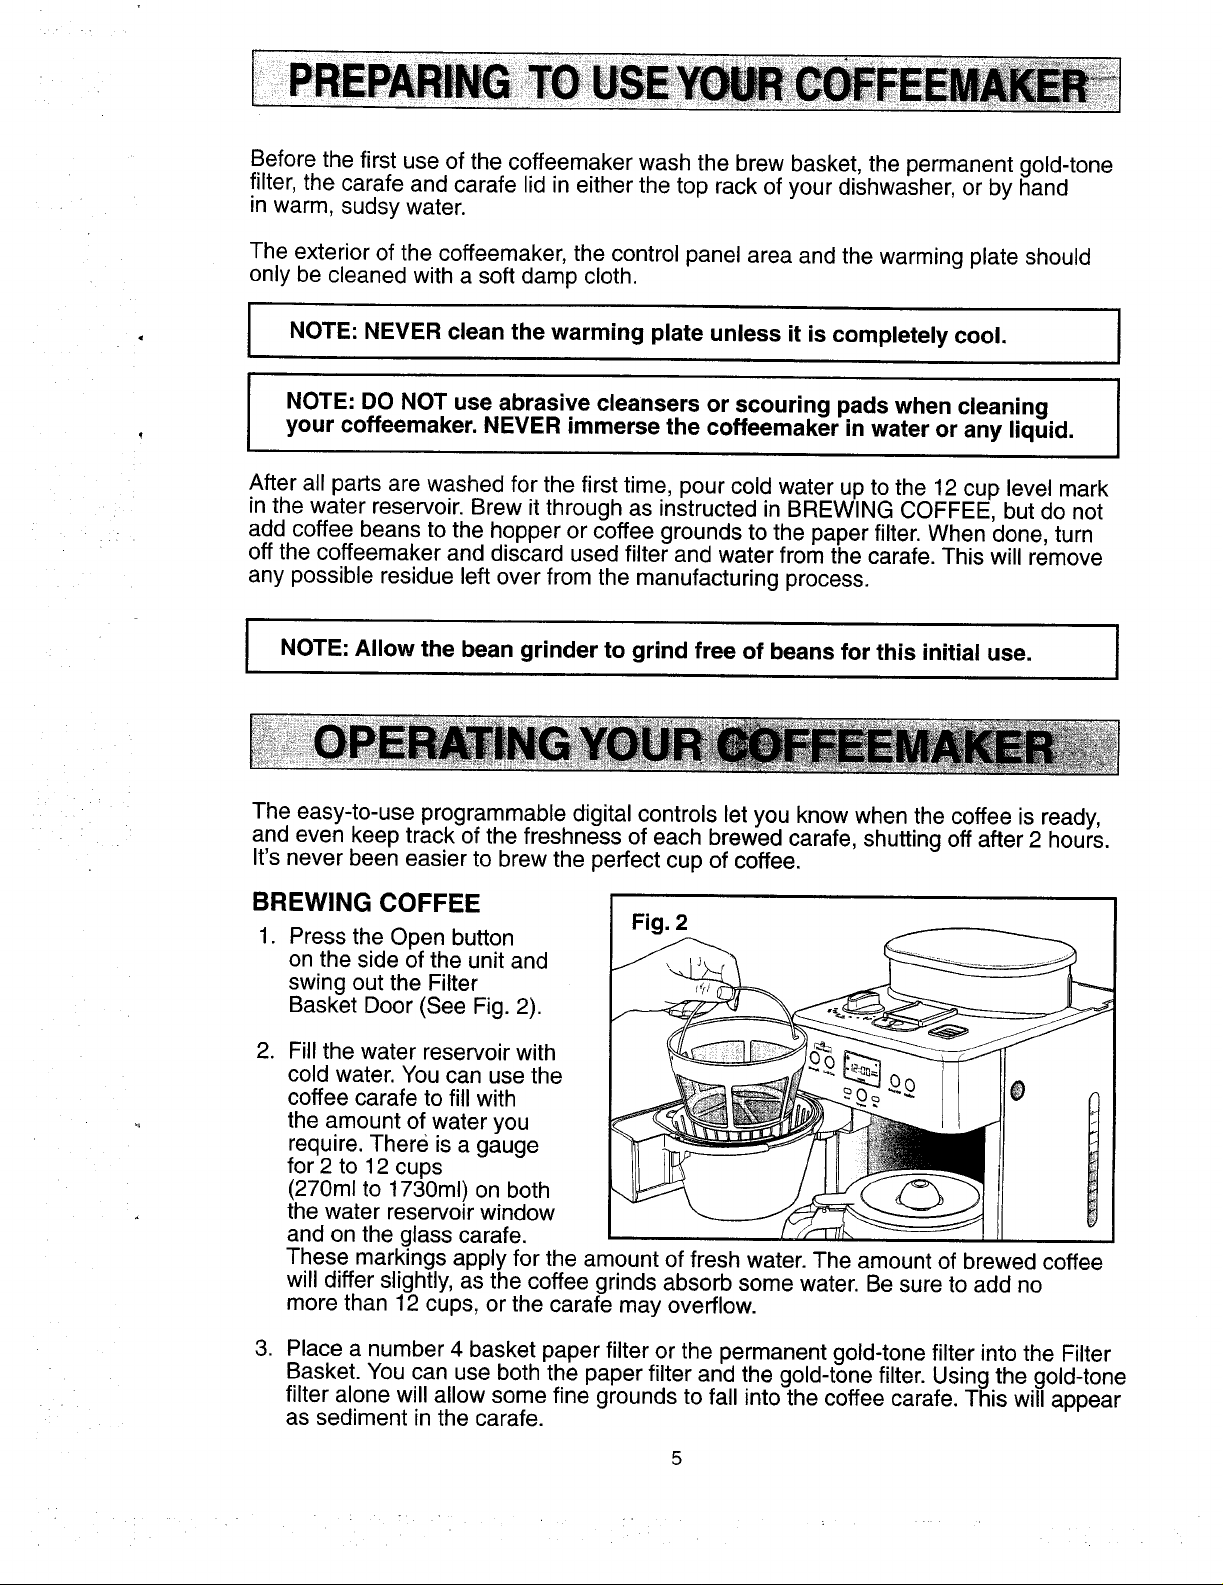
Press the Open button
on the side of the unit and
swing out the Filter
Basket Door (See Fig. 2).
.
Fill the water reservoir with
cold water. You can use the
coffee carafe to fill with 0
the amount of water you
require. There is a gauge
for 2 to 12 cups
(270ml to 1730ml) on both
the water reservoir window
and on the glass carafe.
These markings apply for the amount of fresh water. The amount of brewed coffee
will differ slightly, as the coffee grinds absorb some water. Be sure to add no
more than 12 cups, or the carafe may overflow.
.
Place a number 4 basket paper filter or the permanent gold-tone filter into the Filter
Basket. You can use both the paper filter and the gold-tone filter. Using the gold-tone
filter alone will allow some fine grounds to fall into the coffee carafe. This will appear
as sediment in the carafe.
Fig. 2
I
5
Page 6
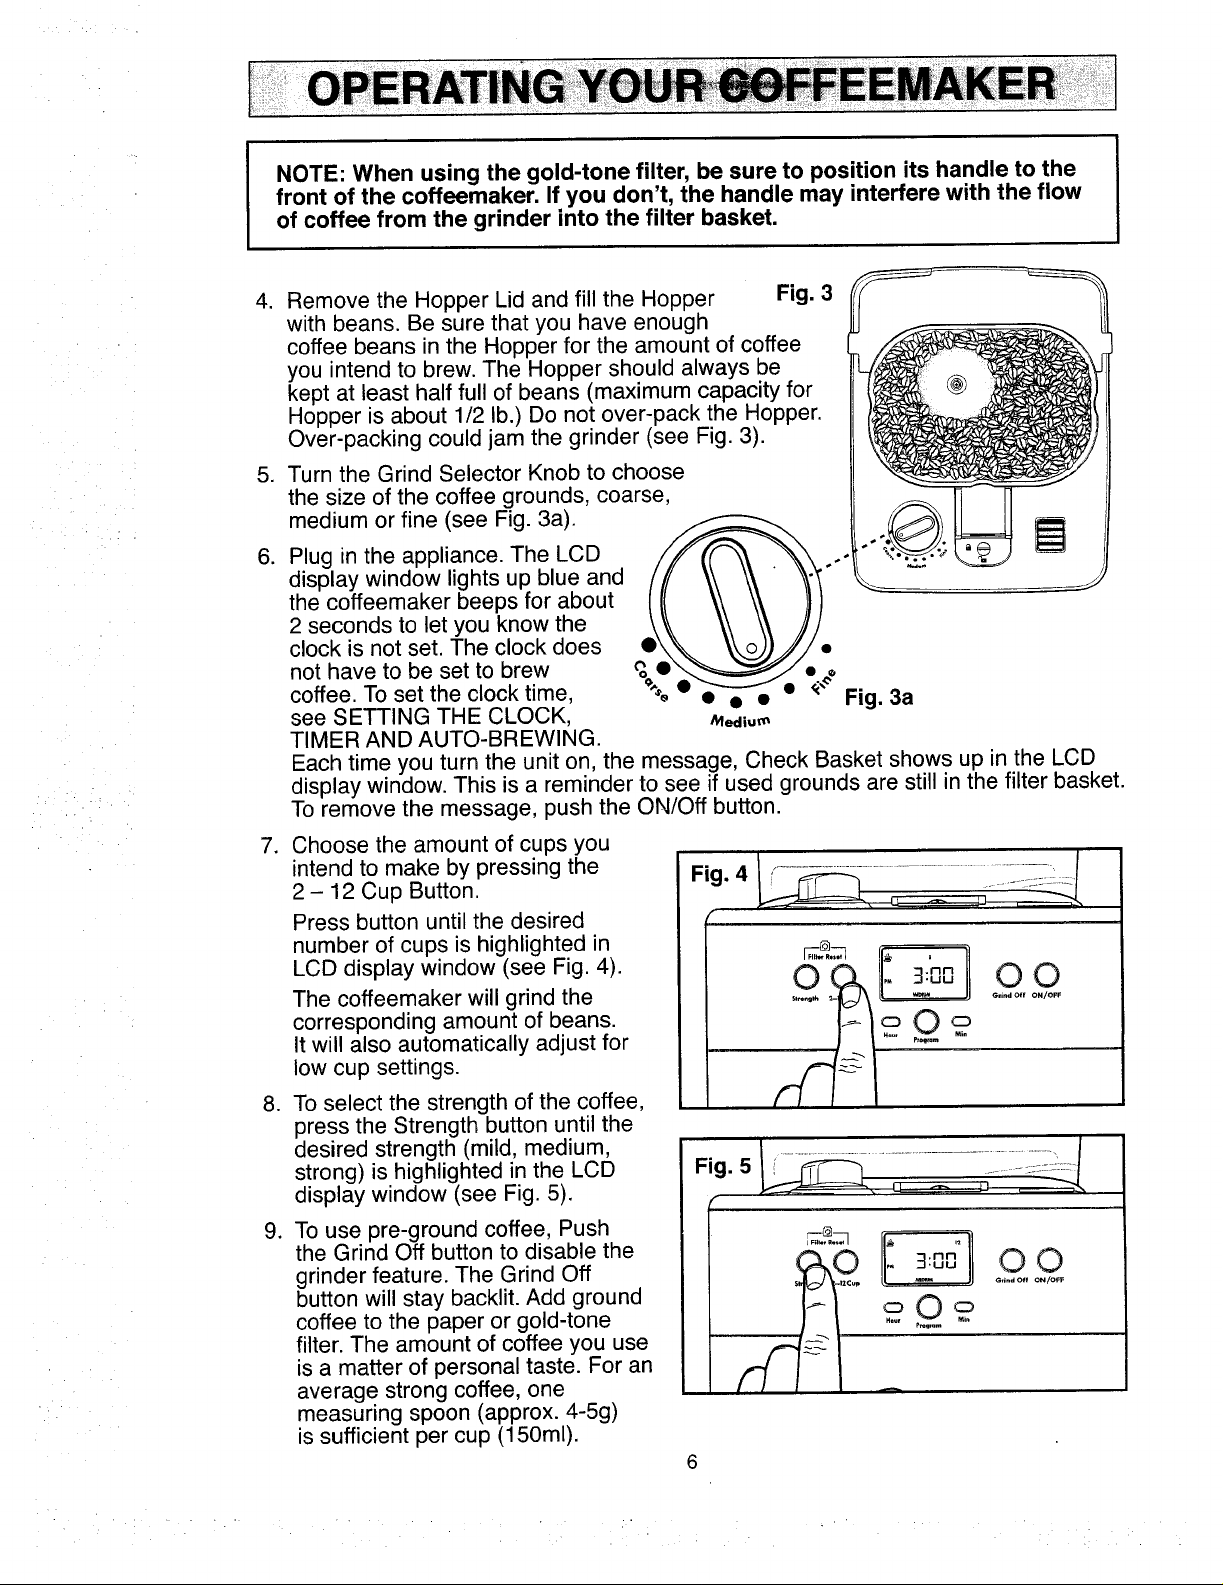
NOTE: When using the gold-tone filter, be sure to position its handle to the
front of the coffeemaker. If you don't, the handle may interfere with the flow
of coffee from the grinder into the filter basket.
.
Remove the Hopper Lid and fill the Hopper Fig. 3
with beans. Be sure that you have enough
coffee beans in the Hopper for the amount of coffee
you intend to brew. The Hopper should always be
kept at least half full of beans (maximum capacity for
Hopper is about 1/2 lb.) Do not over-pack the Hopper.
Over-packing could jam the grinder (see Fig. 3).
Turn the Grind Selector Knob to choose
.
the size of the coffee grounds, coarse,
medium or fine (see Fig. 3a).
,
Plug in the appliance. The LCD
display window lights up blue and
the coffeemaker beeps for about
2 seconds to let you know the
clock is not set. The clock does
not have to be set to brew
coffee. To set the clock time,
see SETTING THE CLOCK,
TIMER AND AUTO-BREWING.
Each time you turn the unit on, the message, Check Basket shows up in the LCD
display window. This is a reminder to see if used grounds are still in the filter basket.
To remove the message, push the ON/Off button.
.
Choose the amount of cups you
intend to make by pressing the
2- 12 Cup Button.
Press button until the desired
number of cups is highlighted in
LCD display window (see Fig. 4).
The coffeemaker will grind the
corresponding amount of beans.
It will also automatically adjust for
low cup settings.
.
To select the strength of the coffee,
press the Strength button until the
desired strength (mild, medium,
strong) is highlighted in the LCD
display window (see Fig. 5).
.
To use pre-ground coffee, Push
the Grind Off button to disable the
grinder feature. The Grind Off
button will stay backlit. Add ground
coffee to the paper or gold-tone
filter. The amount of coffee you use
is a matter of personal taste. For an
average strong coffee, one
measuring spoon (approx. 4-5g)
is sufficient per cup (150ml).
/ ,. 3:ooo,o
| I,. li
6
Page 7
BREWING COFFEE cont.
10.
Close the filter Basket Door. Place carafe on the Warming plate. Turn on the
coffeemaker by pressing the ON/OFF button. The ON/OFF button will be backlit.
When the brewing cycle is finished, the coffeemaker beeps 5 times. Coffee
continues to enter the carafe for several seconds. The Coffeemaker automatically
switches to the warming mode. The Coffee cup icon in the LCD display window
flashes. For delayed brewing, see SEI-FING THE CLOCK, TIMER AND
AUTO-BREWING.
11.
When you are finished using up the coffee in the carafe, press the ON/OFF
button to turn off the appliance, and remove the carafe from the warming plate.
NOTE: If the coffeemaker is not turned off, it will keep the coffee warm
for two hours and then automatically shut off.
PAUSE AND POUR FEATURE
The pause and pour feature enables you to remove the carafe from the Coffeemaker
and pour a cup of coffee before brewing is finished. When the carafe is removed,
a special valve stops the flow of coffee from the brew basket to the carafe. Brewing
does not stop. If the carafe is not replaced under the brew basket after 20 seconds,
water and coffee will overflow from the brew basket.
SE'n'ING THE CLOCK, TIMER AND AUTO-BREWING
Use the Hour and Minute Buttons TO SET THE CLOCK:
.
Set the time of day by pressing the Hour and Minute buttons. Be sure to set the
time with the correct AM and PM designation.
.
You can make the hours and minutes move more quickly in the clock display by
holding the buttons in. The clock starts a few seconds after you finish setting it.
USE THE Program Button TO PROGRAM AN AUTOMATIC BREW TIME:
1. First set the clock. See directions above.
.
Press and hold the Program button until the button's indicator light flashes to let
you know you are in programming mode.
.
Set the time you wish the coffeemaker to begin brewing by pressing the Hour
and Minute buttons. Be sure to set the correct designation of AM or PM.
.
You can make the hours and minutes move more quickly in the clock display
by holding the buttons down.
.
When you have set the brew time, press the Program button again and the
Coffeemaker will begin to count down to the programmed time. The Program
button stays backlit to show the Coffeemaker is in the program mode.
The coffeemaker will shut itself off 2 hours after the brewing finishes.
At this time another long beep will sound. A long beep also sounds when
the coffeemaker is turned OFF.
Page 8

ALWAYS UNPLUG the coffeemaker from the electric outlet before cleaning. The exterior
of the coffeemaker, the control panel area and the warming plate should only be cleaned
with a soft damp cloth.
NOTE: Always turn coffeemaker off and remove the plug from the
electrical outlet before cleaning unit.
• WARNING: NEVER immerse the coffeemaker in water or any liquid. I
WARNING: DO NOT clean the warming plate unless it is completely
cool. DO NOT use abrasive cleansers or scouring pads.
The exterior of the coffeemaker, the control panel area and the warming plate
should only be cleaned with a soft damp cloth.
After every use, open filter basket door by pressing filter basket door release button.
Remove filter basket, gold-tone filter or paper filter. Discard ground coffee and
paper filter.
Remove the carafe from the heating plate. Discard any remaining coffee.
Wash the coffee carafe, carafe lid, filter basket and gold-tone filter in warm sudsy
water and rinse thoroughly, or clean in the upper rack of the dishwasher. Dry all
parts after every use.
CARAFE CARE
A damaged carafe may result in possible burns from a hot liquid. To avoid breaking:
1. DO NOT allow all liquid to evaporate from the carafe while on the warming plate
and never heat the glass carafe when empty.
2. DISCARD the carafe if chipped, cracked, or damaged in any manner.
3. NEVER use abrasive scouring pads or cleansers; they will scratch and weaken
the glass.
4. DO NOT place the carafe on or near a gas or electric burner, in a heated oven,
or in a microwave oven.
5. Avoid rough handling and sharp blows.
6. DO NOT set a hot carafe down on a wet or cold surface, or fill with cold water.
8
Page 9

CLEANING THE COFFEE BEAN CHUTE
NOTE: Always turn coffeemaker off and remove the plug from the electrical
outlet before cleaning.
We suggest cleaning the Coffee Bean Chute every 1 to 2 weeks, depending
on frequency of use.
To clean the Chute, use the back end of t
he brush handle and insert in the Lock/Turn
button. Turn to the "_ position and
lift up the Chute Cover (see Fig. 6). Use the
brush to brush any ground coffee that
remains down into the lowest part of
chute. Be sure to have a filter in place.
Coffee grinds will go into filter.
Close Chute Door and turn button
back to Ill position.
NOTE: Failing to properly clean the coffee chute may lead to grind
accumulations, which can result in weak-tasting coffee.
CLEANING THE COFFEEMAKER AND CHANGING THE WATER FILTER
After every 70 cycles, or carafes of coffee, a Clean Filter 1_ icon will flash on and off in
the control panel display to tell the user it is time to clean the inside of the coffeemaker
of all mineral buildup, and to change the charcoal water filter (see Fig. 7).
Mineral deposits left
by hard water can
clog your coffeemaker.
Cleaning is
recommended about
every 70 uses, when
the coffeemaker's
reminder lets you
know you have
reached this point.
Fig. 7
O0 O0
Strength 2-12Cup (L_ ,,M_u_ Grind Off ON/OFF
°O°
Hour Min
Progmm
9
Page 10

TO CLEAN:
1. Open the lid of reservoir, and pull out the
water filter (Fig. 8).
2. Pour white vinegar into water reservoir up to
the 6-cup level shown in the reservoir's window.
3. Add cold water up to the 12-cup line.
4. Put a paper filter in the brew basket, close door,
and place empty carafe on the warming plate.
5. Turn ON the coffeemaker and let half of the
vinegar water solution brew through into carafe.
6. Turn the coffeemaker OFF at this point and let
it soak for at least 15 minutes tosoften any deposits.
7. Turn the coffeemaker back ON and brew the
remaining solution into the carafe. When brew
cycle has stopped, turn OFF coffeemaker,
empty carafe, and discard soiled paper filter.
8. Refill reservoir with cold water and turn ON to
run another brew cycle. You may want to repeat
again to eliminate any vinegar smell/taste.
9. Wash the brew basket and carafe.
I
TO CHANGE THE CHARCOAL WATER FILTER:
.
Remove new filter from wrapping and soak in cold tap water for 15 minutes.
2.
Grasp the water filter holder's stem in one hand, with the word Open facing up.
Using the thumb of the other hand, gently press down and pull toward you
(see Fig. 9). Compartment will flip open.
.
Place the filter in the holder and close
the water filter holder; you will hear a
snap indicating the filter is in place.
NOTE: Use caution when inserting
the new water filter so that the filter
skin does not tear.
,
Hold the filter under cold running tap water to flush, being sure to have the hole
openings in the unit directly under the water stream. Allow water to drain from
filter completely.
.
Place the new charcoal water filter into the water reservoir, pushing it all the
way down into the base. Coffeemaker is cleaned and ready for use.
To remove the Clean Filter icon in the Control Panel Display, push the Strength
and 2 - 12 Cup buttons simultaneously.
Fig. 9 _ f_
10
Page 11

Guiade Usoy Cuidado
®
Moledor
comercial v
elaborador
eca,e, ,aza
• .
PRECAUCION: Lea, entienda y siga
todas los Puntos de atenci6n e Instrucciones de operacion importantes
en este manual antes de usar este producto.
Corporacion de Administracion de Marcas Sears, c_,_l_),s
Hoffman Estates, IL 60179 EE.UU.
www.kenmore.com
Page 12

GARANT|A COMPLETA KENMORE
Si este producto falla debido a un defecto en material o a la ejecuci6n en el plazo de
cinco afios desde la fecha de la compra, devuelvalo a cualquier tienda Sears u otro
outlet Kenmore en los Estados Unidos para el reemplazo gratis.
Esta garantia no cubre el filtro de tono de Oroo el filtro de agua, que son la parte
consumible que puede desgastar en el uso normal dentro del periodo de garantia.
Esta garantia aplica solamente 90 dias si este producto se utiliza siempre para con
excepcion de los prop6sitos privados de casa.
Esta garantfa se aplica solamente mientras que este producto se utiliza en los
Estados Unidos.
Esta garantfa le da los derechos legales especfficos, y usted puede tambi_n tener otros
derechos que varian de estado a estado.
Sears, Roebuck y Co., Hoffman Estates, IL 60179
AI usar aparatos electricos, las medidas de seguridad basicas se deben seguir
siempre, incluyendo Io siguiente:
1. LEA todas las instrucciones.
2. No toque las superficies calientes. Utilice las manijas o las perillas.
3, Para proteger contra el fuego, la descarga electrica y lesi6n alas personas, NO
sumerja la cuerda, el enchufe, o la cafetera en agua u otros Ifquidos.
4. La supervisi6n cercana es necesaria cuando cualquier aparato es usado por o
cerca a nifios.
5. DESENCHUFE SIEMPRE la cafetera de la toma de energfa antes de limpiar, y al
almacenar. Permita enfriase antes de poner encima o sacar piezas, limpieza o
almacenar.
.
NO funcione ningL_naparato con una cuerda o un enchufe dafiado, o despues de
que el aparato funcione incorrectamente o se haya ca_do o se haya dafiado de
cualquier manera. Devuelva el aparato a la instalaci6n autorizada mas cercana del
servicio para la exarninaci6n, la reparaci6n o el ajuste.
,
El uso de los accesorios no recomendados por el fabricante del aparato puede
causan fuego, descarga electrica o a lesi6n alas personas.
8. NO utilice al aire libre.
.
NUNCA deje la cuerda colgar sobre el borde de la mesa o del contador o tocar
superficies calientes.
10.
NO coloque la cafetera encima ni cerca a un gas caliente o a una hornilla electrica
o en un homo calentado.
11. NO utilice esta cafetera para cualquier cosa con excepcion de su uso previsto.
Page 13

12.
La garrafa se disefia para el uso solamente con esta cafetera.
13.
El escaldar puede ocurrir si la tapa se quita durante el ciclo de elaboraci6n.
SIEMPRE guarde la tapa en la garrafa cuando estd en uso.
14.
Un cable corto de proveer energia (o cable desmontable de proveer energia) debe
ser proporcionado para reducir el riesgo resultado del enredo o tropezar sobre una
cuerda larga.
15.
Para proteger contra descarga electrica, este aparato se equipa de una cuerda
que tiene un enchufe tipo de poner a tierra de tres dientes para la inserci6n en un
recept_.culo tipo poner a tierra apropiado. NO altere el enchufe para el uso en un
receptaculo de 2 dientes. Si el enchufe no cabe en a el recept&culo, tenga el
recept&culo apropiado instalado por un electricista calificado.
16.
Evite entrar en contacto con partes m6viles.
17.
Este aparato esta solamente para el uso en casa.
GUARDE ESTAS INSTRUCCIONES!
18.
3
Page 14

Fig. 1
Perilla selector
de moler gr
Puerta de
cesta de fUtro
Tolva de granos
de caf_
Tapa para tolva
de grano
Boton Cerrar/Abrir para
cubierta del canal de grano
Cubierta del canal
inclinado de grano
Depbsito
deagua
de
control
con botones
retroiluminados
de
soltar para la
puertade la
cestade flltro
Ventana del
dep6sito
de agua
Filtro de tono
Cepillode
limpiezacon
teclaparaBotbn
deCerrar/Abrir
canal
Ventana de
pantalla LCD
en panel
de control
Base
Placa de calentar
: , • - ..
Tapa de garrafa
Garrafa
4
Cubieda
deldepOsito
de agua
Fillmde agua
Page 15

Antes de que el primer uso de la cafetera lave la cesta de elaboracion, el filtro de tono
de oro, garrafa y tapa de la garrafa en el estante superior de su lavaplatos, o a mano
en agua jabonosa caliente.
El exterior de la cafetera, el area del panel de control y la placa de calentar se debe
limpiar solamente con un paso hOmedo suave.
NOTA: NUNCA limpie la placa de calentar a menos que estd totalmente fHa.
I
NOTA: No utilice las despedregadoras abrasivas o los soportes de rayar al
I
limpiar su cafetera. NUNCA sumerja la cafetera en agua o cualquier liquido,
Despu_s de que todas las piezas se laven por primera vez, vierta el agua fria hasta la
marca del nivel de 12 tazas en el dep6sito de agua. Preparelo a traves de la cafetera
segt_n Io mandado en ELABORACION, pero no agregue los posos al filtro de papel.
Cuando sea hecho, apague la cafetera y deseche el agua de la garrafa.Esto quitara.
cualquier residuo posible quedado en el proceso de elaboraci6n.
NOTA: Permita que el moledor de grano muela libremente los granos para
este uso inicial.
Los controles num_ricos programables faciles de utilizar le dejan saber cu_.ndo el cafe
es listo, e incluso no perder de vista la frescura de cada garrafa elaborado, apagando
despu_s de 2 horas. Nunca fue mas facil elaborar la taza perfecta de caf_.
ELABORAClON DE CAFI_
. Presione el bot6n Abrir en el
lado de la unidad y saque la
puerta de la cesta del filtro
(v_ase fig. 2).
.
Llene el dep6sito del agua de
agua frfa. Usted puede utilizar
la garrafa de caf_ para Ilenar 0
de la cantidad de agua que
usted requiere. Hay una galga
para 2 a 12 tazas (270ml a
1730ml) en la ventana del
dep6sito del agua yen la
garrafa de cristal.
Estas marcas solicitan la cantidad de agua fresca. La cantidad de caf_ elaborado
diferenciara levemente, como el moler caf_ absorben un poco de agua. Sea seguro de
agregar no m&s de 12 tazas, o la garrafa puede derramar.
.
Coloque un filtro de papel de cesta nt]mero 4 o filtro permanente de tono de oro en la
cesta del filtro. Usted puede utilizar el filtro de papel y el filtro de tono de oro. Usando el
filtro de tono de oro solamente permitira, que algunos objetos finos caigan en la garrafa
de cafe. Esto aparecera, como sedimento en la garrafa.
Fig. 2
Page 16

NOTA: AI usar el filtro de tono de oro, sea seguro de colocar su manija al
frente de la cafetera. Si usted no Io hace, la manija puede interferir con el
flujo del caf_ del moledor en la cesta del fUtro.
,
Quite la tapa de tolva y Ilene la tolva de granos.
Sea seguro que usted tiene suficientes granos Fig. 3
de care en la tolva para la cantidad de cafe que
usted se prepone elaborar. La tolva siempre se
debe mantener por Io menos a mitad Ileno granos
(la capacidad m_xima para la tolva es el cerca de
1/2libra.) no sobre empaque la tolva. Sobre empacar
puede atorar el moledor (vease Fig. 3).
.
Gire la perilla del selector de moler para elegir el
tamafio de posos, grueso, medio o fino (vease Fig. 3a).
6.
Enchufe el aparato. La ventana de
pantalla LCD enciende azul y la
cafetera suena por cerca de 2
segundos dejandole saber que el
reloj no es ajustado. El reloj no
tiene que ser ajustado para
elaborar caf_. Para ajustar el
tiempo de reloj, vea AJUSTAR
RELOJ, CONTADOR Y AUTO
ELABORAR.
Cada vez que usted enciende la unidad, el mensaje, Revisar cesta se demuestra en la
ventana de pantalla LCD. Esto es un recordatorio para ver si los objetos usados todavia
est_n en la cesta del filtro. Para quitar el mensaje, empuje el bot6n Encender/Apagar.
.
Elija la cantidad de tazas que usted
se prepone hacer presionando el
bot6n 2-12 tazas.
Presione el bot6n hasta que el
nL_mero deseado de tazas se
destaca en ventana de pantalla del
LCD (vease Fig. 4).
La cafetera moler_5la cantidad
correspondiente de granos. Tambien
ajustara_autom_ticamente para que
haya ajustes de taza bajo.
.
Para seleccionar la fuer-za del carl@,
presione el bot6n de fuerza hasta la
fuerza deseada (suave, medio,
fuerte) se destaca en la ventana
de pantalla LCD (v@ase Fig. 5).
.
Para utilizar el care de pre molido,
empuje el bot6n de apagar Moler
para inhabilitar la caracterfstica de
moler. El bot6n apagar Moler
permanecera retroiluminado.
Agregue el car@molido al papel o al
filtro de tono de oro. La cantidad de
cafe que usted utiliza es una cuesti6n
de gusto personal. Para un cafe
fuerte medio, una cuchara de medir
(aproximadamente 4-5g) es
suficiente por taza (150ml).
,, II,_0 loo
0 . 0 0
_ --.o
Page 17

ELABORACION DE CAFI_ continuado.
10.
Cierre la puerta de la cesta del filtro. Ponga la garrafa en la placa de calentar.
Encienda la cafetera presionando el bot6n ENCENDER/APAGAR. El bot6n
ENCENDER/APAGAR. ser_, retroiluminado. Cuando se acaba el ciclo de la
elaboraci6n, la cafetera sonara 5 veces. El cafe contint]a entrando a la garrafa
por varios segundos. La cafetera cambia automaticamente al modo de calentar.
El icono de la taza de cafe en la ventana de pantalla LCD destella. Para la
elaboraci6n retrasada, vea AJUSTAR RELOJ, CONTADOR Y AUTO-ELABORAR.
11.
Cuando usted termina de usar el cafe en la garrafa, presione el bot6n ENCENDER/
APAGAR para apagar el aparato, y quite garrafa de la placa de calentar.
NOTA: Si la cafetera no se apaga, mantendra el cafe caliente por dos horas y
despues se apagar_ automa.ticamente.
CARACTERJSTICA DE PAUSA Y VERTIR
La caracterfstica de pausa y vertir le permite quitar la garrafa de la cafetera y vertir una
taza de caf_ antes que se termine la elaboraci6n. Cuando se quita el carafe, una
valvula especial detiene el flujo del cafe de la cesta de elaboraci6n a la garrafa. La
elaboraci6n no para. Si la garrafa no se substituye debajo de la cesta de la elaboraci6n
despues de 20 segundos, el agua y el cafe se derramaran de la cesta de elaboraci6n.
AJUSTAR RELOJ, CONTADOR Y AUTO ELABORAR
Utilice los botones Hora y Minuto PARA AJUSTAR EL RELOJ:
1. Fije la hora presionando los botones hora y minuto. Sea seguro de fijar la hora con
la designaci6n correcta de AM y PM.
2. Usted puede hacer las horas y minutos mover ra.pidamente en la pantalla del reloj
sosteniendo los botones. El reloj comienza algunos segundos despues de que
usted termine de ajustarlo.
UTILICE EL Bot6n Programa PARA PROGRAMAR ELTIEMPO DE AUTO ELABORAR:
1. Primero ajuste el reloj. Vea las direcciones arriba.
2. Presione y sostenga el bot6n de Programa hasta que la luz indicador del bot6n
destalla para dejarle sacar que usted esta. en el modo de programaci6n.
3. Ajuste el tiempo que usted desea que la cafetera comience a elaborar presionando
los botones hora y minuto. Sea seguro de fijar la designaci6n correcta de AM y PM.
4. Usted puede hacer las horas y minutos mover ra.pidamente en la pantalla del reloj
sosteniendo los botones.
,
Cuando usted ha fijado el tiempo de elaboraci6n, presione el bot6n Programa otra
vez y la cafetera comenzara a contar abajo al tiempo programado. El bot6n del
programa permanece retroiluminado para demostrar que la cafetera esta en el
modo de programa.
La cafetera se apagara 2 horas despues de que la elaboraci6n se termine.
En este momento otra sonido largo sonara. Un sonido largo tambien suena cuando la
cafetera se APAGA.
7
Page 18

DESENCHUFE SIEMPRE la cafetera de la toma el_ctrica antes de limpiar. El exterior
de la cafetera, el area del panel de control y la placa de calentar se debe limpiar
solamente con un paso h_medo suave.
NOTA: Apague siempre la cafetera y quite el enchufe de la toma
eldctrica antes de limpiar la unidad.
• ADVERTENCIA: sumerja en agua o cualquier I
liquido.
totalmente frio. No utilice las despedregadoras abrasivas o soportes
ADVERTENCIA: No limpie la placa de calentar a menos que estd
de rayar.
El exterior de la cafetera, el a.rea del panel de control y la placa de calentar se debe
limpiar solamente con un paso ht_medo suave.
Despues de cada uso, abra la puerta de la cesta del filtro presionando el bot6n de
soltar la puerta de la cesta del filtro. Quite la cesta del filtro, el filtro de tono de oro o
el filtro de papel. Deseche el caf_ molido y el filtro de papel.
Quite la garrafa de la placa de calentar. Deseche cualquier caf_ restante.
Lave el garrafa de cafe, tapa de garrafa, cesta del filtro y filtro de tono de oro en agua
jabonosa caliente y enjuague a fondo, o limpie en el estante superior del lavaplatos.
Seque todas las partes despu_s de cada uso.
NUNCA
la cafetera
I
CUIDADO DE GARRAFA
Una garrafa daSada puede causar quemaduras posibles de un liquido caliente.
Para evitar de romperse:
1. NO permita que todo el liquido se evapore de la garrafa mientras que esta. la placa
de calentar y nunca caliente la garrafa de cristal cuando es vacio.
2. DESECHE la garrafa siesta astillado, agrietado, o daSado de cualquier manera.
3. NUNCA utilice los soportes o despedregadoras abrasivos; rasgu5ar_,n y debilitar_.n
el cristal.
4. NO ponga la garrafa encime ni cerca a un gas o a una hornilla electrica, en un
homo calentado, o en un horno de microondas.
5. Evite el manejo brusco y soplo agudo.
6. NO fije una garrafa caliente bejo una superficie mojada o fria, o Ileno de agua fria.
Page 19

LIMPIAR EL CANAL DEL GRANO DE CAFI_
NOTA: Apague siempre la cafetera y quite el enchufe de la toma eldctrica antes
de limpiar.
Sugerimos la limpieza del canal del grano de cafe cada 1 a 2 semanas, dependiendo
de la frecuencia de uso.
Para limpiar el canal, use el extremo trasero
de la manija y e inserte en el bot6n Cerrar/
Girar. Gire a la posici6n abrir _ y levante
la cubierta del canal (vease Fig. 6). Utilice
el cepillo para cepillar cualquier cafe molido
quede en la parte inferior del canal. Sea
seguro tener un filtro en lugar.
El caf_ mollido entraran en el filtro.
Cerrar puerta del canal y gire el bot6n de
nuevo a la posici6n de cerrarlli.
NOTA: El no poder limpiar correctamente el canal del cafd puede conducir las
acumulaciones de moler, que pueden causar un sabor debfl del cafd.
LIMPIANDO LA CAFETERA Y CAMBIAR EL FILTRO DE CARBON
Despues de cada 70 ciclos, o garrafas de caf_, un I_ icono de Limpiar filtro destellar#,
en la pantalla del panel de control para decirle al usuario que es hora de limpiar el
interior de la cafetera de toda la acumulaci6n mineral, y cambiar el filtro del agu
a (vease Fig. 7).
Los dep6sitos mineral
dejados por el agua
dura pueden estorbar
su cafete_a. La limpieza
se recomienda sobre
cada 70 uisos, cuando
el recorda;torio de la
cafetera le deja saber
que tiene
Fig. 7
O0 .... 0II" ....I/ 0
Strength 2-12Cup [L j_ ilolul JJ Grind Off ON/OFF
°O°
Hour Min
Program
9
Page 20

Para limpiar:
°
Abra la tapa del depbsito, y saque el filtro Fig. 8
de agua (Fig. 8).
2.
Vierta vinagre blanco en el deposito de
agua hasta nivel de 6 tazas y demuestre
el dep6sito interior.
.
Agregue agua frfa hasta la Ifnea de 12 tazas.
4.
Ponga un filtro de papel en la cesta de
elaboraci6n, cierre la cubierta, y ponga la
garrafa vacfa en la placa de calentar.
,
Entienda la cafetera y deje la mitad de
la soluci6n del agua de vinagre para
preparar a trav6s yen la garrafa.
.
Apague la cafetera a este punto y d_jela
remojar por Io menos 15 minutos para
ablandar cualquier dep6sito.
.
Encienda la cafetera de nuevo y prepare la
soluci6n restante en la garrafa. Cuando el
ciclo de preparar es parado, APAGUE la
cafetera, vacfe lagarrafa, y descarte el filtro
de papel manchado.
.
Retlene el dep6sito con la agua frfa y encienda para funcionar otro ciclo de elaboraci6n.
Usted puede desear repetir otra vez para eliminar cualquier olor/sabor de vinagre.
9.
Lave la cesta y la garrafa de elaboraci6n.
Para cambiar el filtro de carb6n:
.
Quite el filtro nuevo de envolverse y emp_.pelo en agua frfa de grifo por 15 minutos.
2.
Agarre el tronco del sostenedor del filtro de agua en una mano, con el lado de de
palabra hacia arriba. Con el pulgar de la otra mano, apriete y jale suavemente
hacia usted (vease Fig 9). El
compartimiento movera de un jal6n.
Coloque el filtro en el sostenedor y cierre Fig. 9
°
el sostenedor del filtro de ag.ua; usted oir&
un broche indicando la presion que el filtro
esta. en su lugar.
NOTA: Tenga cuidado al insertar el
nuevo filtro de carb6n evitar quela
piel del filtro no se rasgue.
4. Sostenga el filtro debajo del agua frfa de grifo corriente para limpiar con un chorro
de agua, siendo seguro tener las aberturas del agujero en la unidad directamente
debajo de la corriente de agua. Permita que el agua escurra el filtro totalmente.
5. Coloque el filtro del agua con carb6n nuevo en el dep6sito de agua, empuj_mdolo
hasta el final en la base. La cafetera se limpia yes listo de usar.
Para quitar el icono de Limpiar filtro en la pantalla del panel de control, empuje
botones Fuerza y 2-12 tazas simult_.neamente.
10
, : :.. ., .. • • . .
Page 21

your
or ours!
Your Home
For expert troubleshooting and home solutions advice:
rnanage home
www.managemyhome.com
For repair - in your home - of all major brand appliances,
lawn and garden equipment, or heating and cooling systems,
no matter who made it, no matter who sold it!
For the replacement parts, accessories and
owner's manuals that you need to do-it-yourself.
For Sears professional installation of home appliances
and items like garage door openers and water heaters.
1-800-4-MY-HOME ® Call anytime, day or night
(1-800-469-4663) (U.S.A. and Canada)
www.sears.com www.sears.ca
Our Home
For repair of carry-in items like vacuums, lawn equipment,
and electronics, call anytime for the location of the nearest
Sears Parts & Repair Service Center
1-800-488-1222 (U.S.A.) 1-800-469-4663 (Canada)
www.sears.com www.sears.ca
To purchase a protection agreement on a product serviced by Sears:
1-800-827-6655 (u.s._.) 1-800-361-6665 (Canada)
Para pedir servicio de reparaci6n
a domicilio, y para ordenar piezas:
1-888-SU-HOGAR®
(1-888-784-6427)
Au Canada pour service en fran?ais:
1-800-LE-FOYER MC
(1-800-533-6937)
www.sears,ca
@SearsBrands,LLC
® Registered Trademark / TMTrademark / SMService Mark of Sears Brands, LLC
® Marca Registrada / TMMarca de F_brica / SMMarca de Servicio de Sears Brands, LLC
MCMarque de commerce MDMarque deposee de Sears Brands, LLC
: - .. ..
 Loading...