


Use & Care Guide
Guide d’utilisation et d’entretien
English / Français
Models / Modèles: 970.C4808*
®
Kenmore
Front Load Washer
Laveuse à Chargement Frontal
* = Color number, le numéro de couleur
P/N 137401000 (1012)
Sears Brands Management Corporation
Hoff man Estates, IL 60179 U.S.A.
www.kenmore.com
www.sears.com
Sears Canada Inc.
Toronto, Ontario, Canada M5B 2C3
www.sears.ca
TM
Record Model/Serial Numbers Important Safety Instructions
The model and serial numbers of your washer are found on
the washer serial plate located on the inside of the door.
Record and retain these numbers.
Model Number ____________________
Serial Number ____________________
Purchase Date ____________________
This
Use and Care Guide
instructions for your washer. It also contains information
about features for several other models. Your washer may
not have every feature included.
The instructions in this manual and all other literature
included with this washer are not meant to cover every
possible condition and situation that may occur. Good safe
practice and caution MUST be applied when installing,
operating and maintaining any appliance. Use the washer
only as instructed in this
provides general operating
Use & Care Guide
.
Table of Contents
Important Safety Instructions ............................................2-3
Warranty / Protection Agreement .......................................4
Features ....................................................................................5
Operating Instructions ...................................................... 6-16
Stain Removal Guide ......................................................17-18
Care and Cleaning ......................................................... 19-22
Solutions to Common Problems ....................................23-26
Français ................................................................................. 27
Recognize safety symbols, words and
labels
Safety items throughout this manual are labeled with
a WARNING or CAUTION based on the risk type as
described below:
Defi nitions
This is the safety alert symbol. It is used to alert you
to potential personal injury hazards. Obey all safety
messages that follow this symbol to avoid possible injury or
death.
DANGER
DANGER indicates an imminently hazardous situation
which, if not avoided, will result in death or serious injury.
WARNING
WARNING indicates a potentially hazardous situation
which, if not avoided, could result in death or serious
injury.
CAUTION
CAUTION indicates a potentially hazardous situation
which, if not avoided, may result in minor or moderate
injury.
IMPORTANT
IMPORTANT indicates installation, operation or
maintenance information which is important but not
hazard-related.
Save these instructions
for future reference.
2
Important Safety Instructions
Grounding type
ll receptacle
wer cord with
3-prong grgr
ounded plug
Do not,
under
y cir
cumstances,
cut,
removeve,
or b
ypass the
ounding pr
ong.
To reduce the risk of fi re, electrical shock, or injury to
persons when using this washer, comply with the basic
warnings listed below. Failure to comply with these
warnings could result in serious personal injuries.
You can be killed or seriously injured if you don’t follow
these Important Safety Instructions:
PREVENT FIRE
Do not wash items that have been previously cleaned in, •
soaked in, or spotted with gasoline, cleaning solvents,
kerosene, cooking oils, waxes, etc. Do not store these items
on or near the washer. These substances give off vapors or
chemical reactions that could ignite or explode.
Do not put oily or greasy rags or clothing on top of the •
washer. These substances give off vapors that could
ignite the materials.
Do not add gasoline, cleaning solvents, or other fl am-•
mable or explosive substances to the wash water. These
substances give off vapors that could ignite or explode.
Under certain conditions, hydrogen gas may be pro-•
duced in a hot water system that has not been used for
2 weeks or more. HYDROGEN GAS IS EXPLOSIVE. If the
hot water system has not been used for such a period,
before using the washer, turn on all hot water faucets
and let the water fl ow from each for several minutes.
This will release any accumulated hydrogen gas. Hydrogen gas is fl ammable; do not smoke or use an open
fl ame during this time.
Do not store or use gasoline or other fl ammable vapors •
or liquids in the vicinity of this or any other appliance.
Failure to comply with these warnings could result in fi re, •
explosion, serious bodily injury and/or damage to the
rubber or plastic parts of the washer.
PROTECT CHILDREN
Do not allow children to play on or in the washer. Close •
supervision of children is necessary when the washer is
used near children. As children grow, teach them the
proper, safe use of all appliances.
Destroy the carton, plastic bag and other packing ma-•
terials after the washer is unpacked. Children might use
them for play. Cartons covered with rugs, bedspreads or
plastic sheets can become airtight chambers.
Keep laundry products out of children’s reach. To prevent •
personal injury, observe all warnings on product labels.
Before the washer is removed from service or discarded, •
remove the washer door to prevent accidental entrapment.
Failure to comply with these warnings could result in seri-•
ous personal injuries.
PREVENT INJURY
To prevent shock hazard and assure stability during •
operation, the washer must be installed and electrically
grounded by a qualifi ed service person in accordance
with local codes. Installation instructions are packed in
the washer for installer’s reference. Refer to
TION INSTRUCTIONS
dures. If the washer is moved to a new location, have it
checked and reinstalled by a qualifi ed service person.
WARNING
INSTALLA-
for detailed grounding proce-
To prevent personal injury or damage to the washer, the •
electrical power cord of the washer must be plugged
into a properly grounded and polarized 3-prong outlet.
The third grounding prong must never be removed.
Never ground the
washer to a gas
pipe. Do not use an
extension cord or
an adaptor plug.
Grounding type
wawall receptacl
PoPower cord with
3-prong
ounded plug
Do not,
under
anany cir
cumstances,
cut,
remo
or b
ypass th
grgrounding pr
ong.
Follow package directions when using laundry products. •
Incorrect usage can produce poisonous gas - resulting in
serious injury or death.
Do not combine laundry products for use in 1 load unless •
specifi ed on the label.
Do not mix chlorine bleach with ammonia or acids such •
as vinegar.
PREVENT INJURY AND DAMAGE TO THE WASHER
To prevent serious personal injury and damage to the
washer:
All repairs and servicing must be performed by an au-•
thorized servicer unless specifi cally recommended in this
Use & Care Guide. Use only authorized factory parts.
Do not tamper with controls.•
Do not install or store the washer where it will be ex-•
posed to the weather.
Do not install on carpet. Install washer on a solid fl oor. It •
may be necessary to reinforce the fl oor to prevent vibra-
tion or movement.
To reduce the risk of electric shock, disconnect this appli-•
ance from the power supply before attempting any user
maintenance. Turning the controls to the OFF position
does not disconnect this appliance from the power supply.
To prevent injury, do not reach into the washer while •
parts are moving. Before loading, unloading or adding
items, push in the cycle selector knob and allow the drum
to coast to a complete stop before reaching inside.
This washer is equipped with an electrical overload pro-•
tector. The motor will stop if it becomes overheated.
Failure to comply with these warnings could result in seri-•
ous personal injuries.
3

Kenmore Appliance Warranty
Master Protection Agreements
One Year Limited Warranty
When installed, operated and maintained according to
all instructions supplied with the product, if this appliance
fails due to a defect in material or workmanship within one
year from the date of purchase, call 1-800-4-MY-HOME
to arrange for free repair.
If this appliance is used for other than private family purposes, this warranty applies for only 90 days from the date
of purchase.
This warranty covers only defects in material and workmanship. Sears will NOT pay for:
Expendable items that can wear out from normal use, 1.
including but not limited to fi lters, belts, light bulbs and
bags.
A service technician to instruct the user in correct 2.
product installation, operation or maintenance.
A service technician to clean or maintain this product.3.
Damage to or failure of this product if it is not installed, 4.
operated or maintained according to all instructions
supplied with the product.
Damage to or failure of this product resulting from 5.
accident, abuse, misuse or use for other than its
intended purpose.
Damage to or failure of this product caused by the use 6.
of detergents, cleaners, chemicals or utensils other than
those recommended in all instructions supplied with the
product.
Damage to or failure of parts or systems resulting from 7.
unauthorized modifi cations made to this product.
Disclaimer of implied warranties; limitation of remedies
Customer’s sole and exclusive remedy under this limited
warranty shall be product repair as provided herein. Implied warranties, including warranties of merchantability
or fi tness for a particular purpose, are limited to one year
or the shortest period allowed by law. Sears shall not be
liable for incidental or consequential damages. Some states
and provinces do not allow the exclusion or limitation of
incidental or consequential damages, or limitations on the
duration of implied warranties of merchantability or fi tness,
so these exclusions or limitations may not apply to you.
This warranty applies only while this appliance is used in
the United States and Canada.
This warranty gives you specifi c legal rights, and you may
also have other rights which vary from state to state.
Sears Brands Management Corporation, Hoff man Estates,
IL 60179
Sears Canada Inc., Toronto, Ontario, Canada M5B 2C3
®
Congratulations on making a smart purchase. Your new
Kenmore
of dependable operation. But like all products, it may require preventive maintenance or repair from time to time.
That’s when having a Master Protection Agreement can
save you money and aggravation.
The Master Protection Agreement also helps extend the life
of your new product. Here’s what the Agreement* includes:
Once you purchase the Agreement, a simple phone call is
all that it takes for you to schedule service. You can call
anytime day or night, or schedule a service appointment
online.
The Master Protection Agreement is a risk free purchase.
If you cancel for any reason during the product warranty
period, we will provide a full refund. Or, a prorated refund
anytime after the product warranty period expires. Purchase your Master Protection Agreement today!
Some limitations and exclusions apply. For prices and additional information in the U.S.A. call 1-800-827-6655.
* Coverage in Canada varies on some items. For full details call Sears Canada at 1-800-361-6665.
Sears Installation Service
For Sears professional installation of home appliances, garage door openers, water heaters, and other major home
items, in the U.S.A. or Canada call 1-800-4-MY-HOME
®
product is designed and manufactured for years
Parts and labor needed to help keep products •
operating properly under normal use, not just defects.
Our coverage goes well beyond the product warranty.
No deductibles, no functional failure excluded from
coverage – real protection.
Expert service by a force of more than 10,000 •
authorized Sears service technicians, which means
someone you can trust will be working on your product.
Unlimited service calls and nationwide service, as often •
as you want us, whenever you want us.
“No-lemon” guarantee – replacement of your covered •
product if four or more product failures occur within
twelve months.
Product replacement if your covered product can not be •
fi xed.
Annual Preventive Maintenance Check at your request – •
no extra charge.
Fast help by phone – we call it Rapid Resolution – •
phone support from a Sears representative on all
products. Think of us as a “talking owner’s manual”.
Power surge protection against electrical damage due •
to power fl uctuations.
$250 Food Loss Protection annually for any food •
spoilage that is the result of mechanical failure of any
covered refrigerator or freezer.
Rental reimbursement if repair of your covered product •
takes longer than promised.
10% discount off the regular price of any non-covered •
repair service and related installed parts.
®
.
4
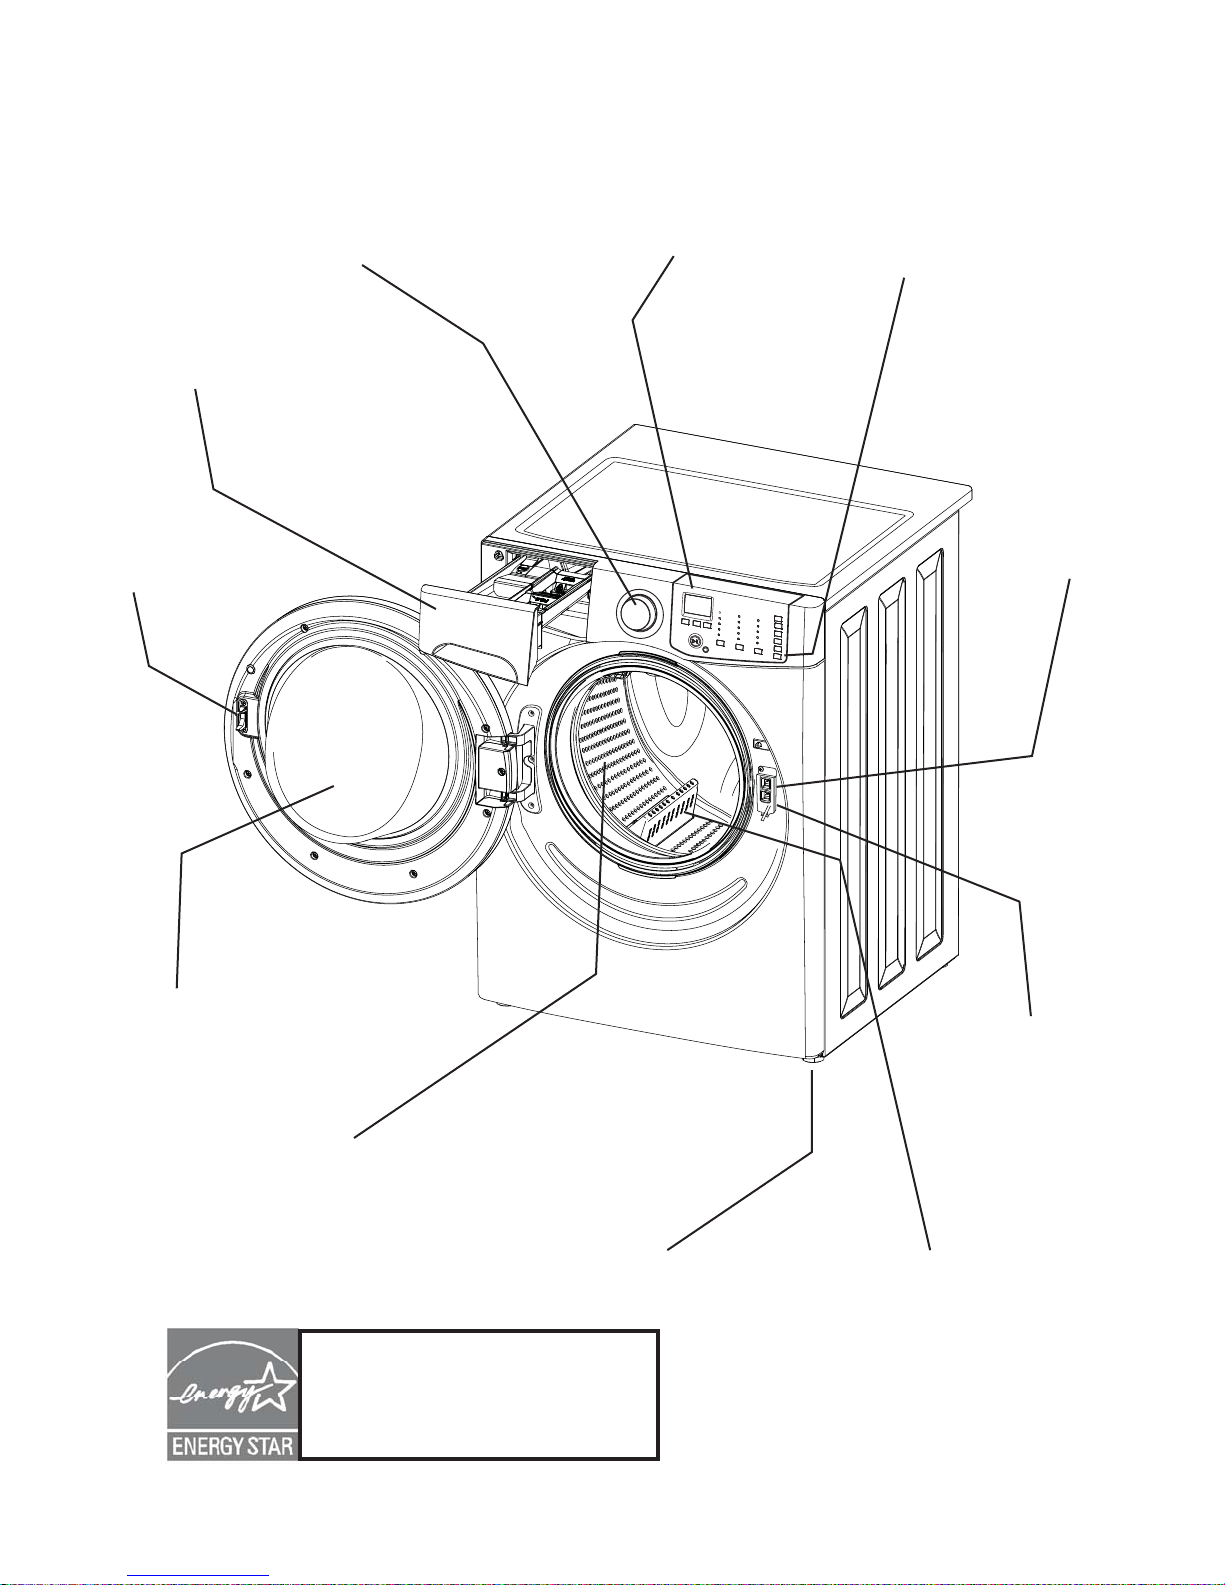
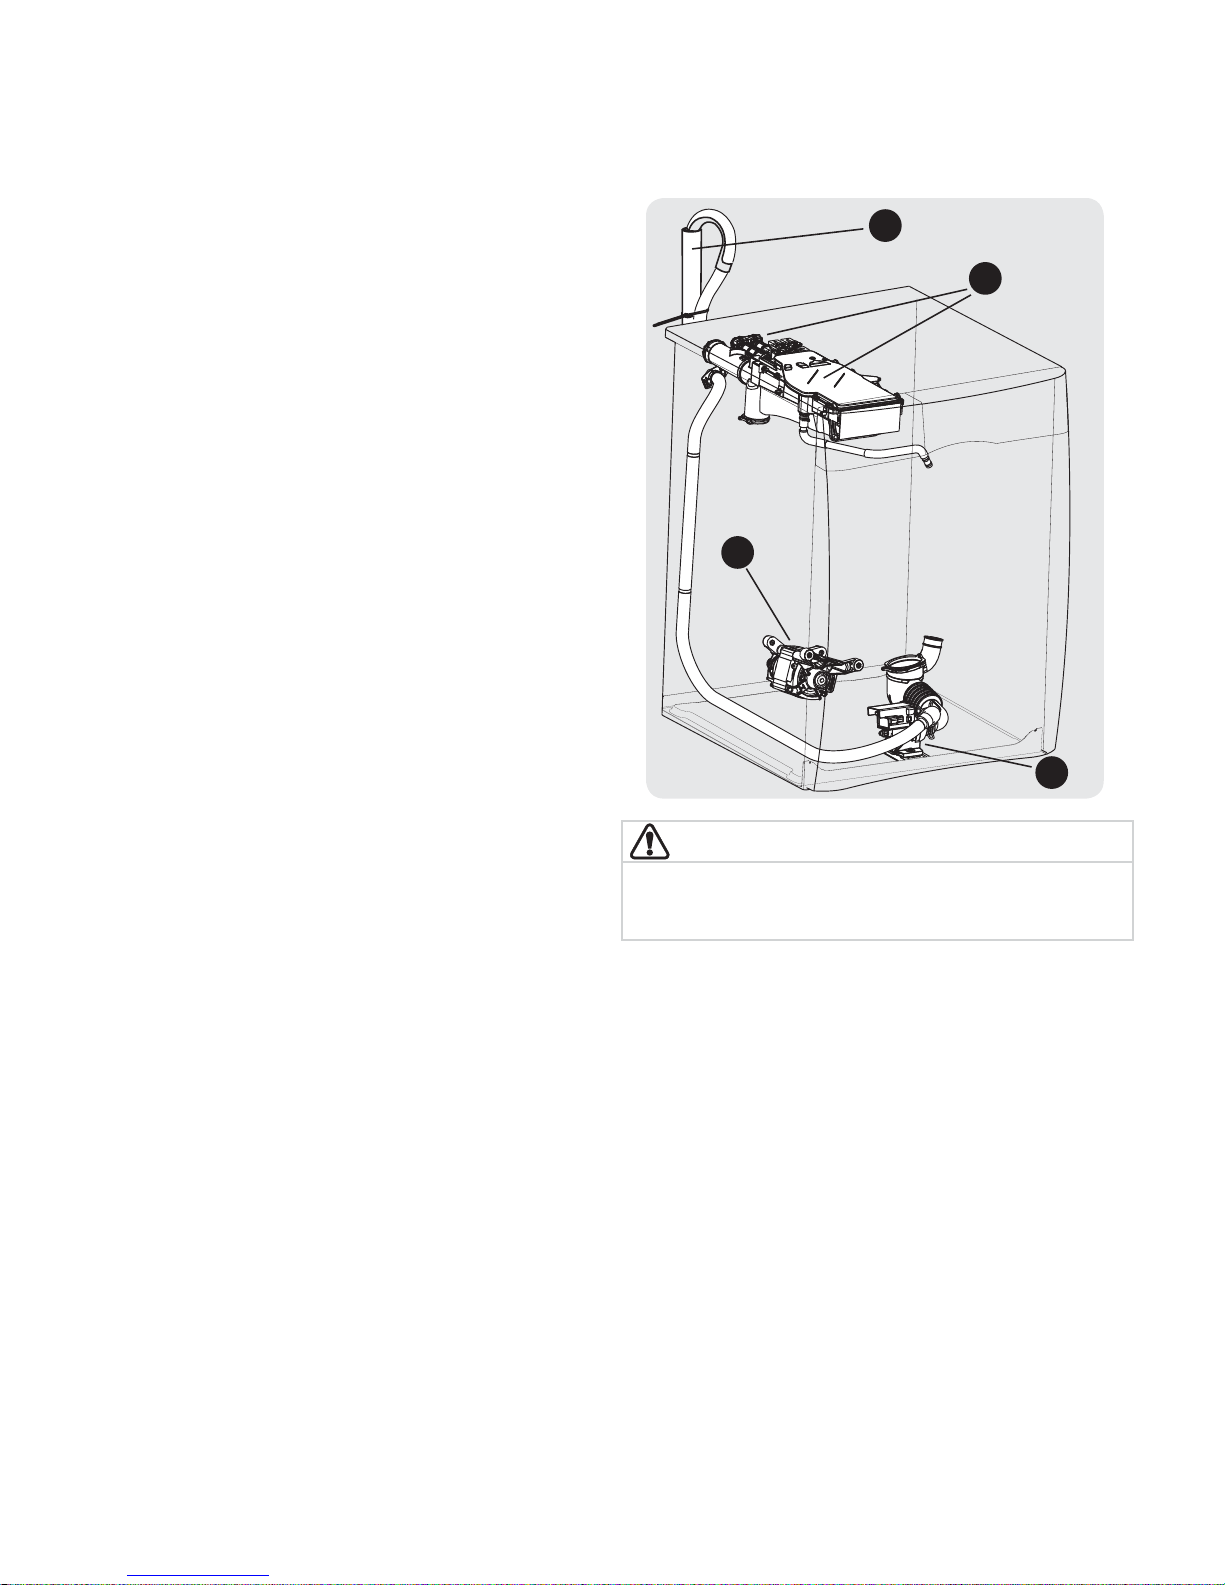
Features
Cycle Selector
Laundry Product Dispenser Drawer
Door Striker
LCD Display
Control Lock
Door Latch with
Safety Lock
Inner glass with small article redistribution ramp
Stainless Steel
Wash Drum
As an ENERGY STAR® Partner, Sears
Brands Management Corporation has
determined that this product meets the
ENERGY STAR® guidelines for energy
effi ciency.
Adjustable
Leveling Legs
5
Vent Latch
Cascading
Wash Vanes
Operating Instructions
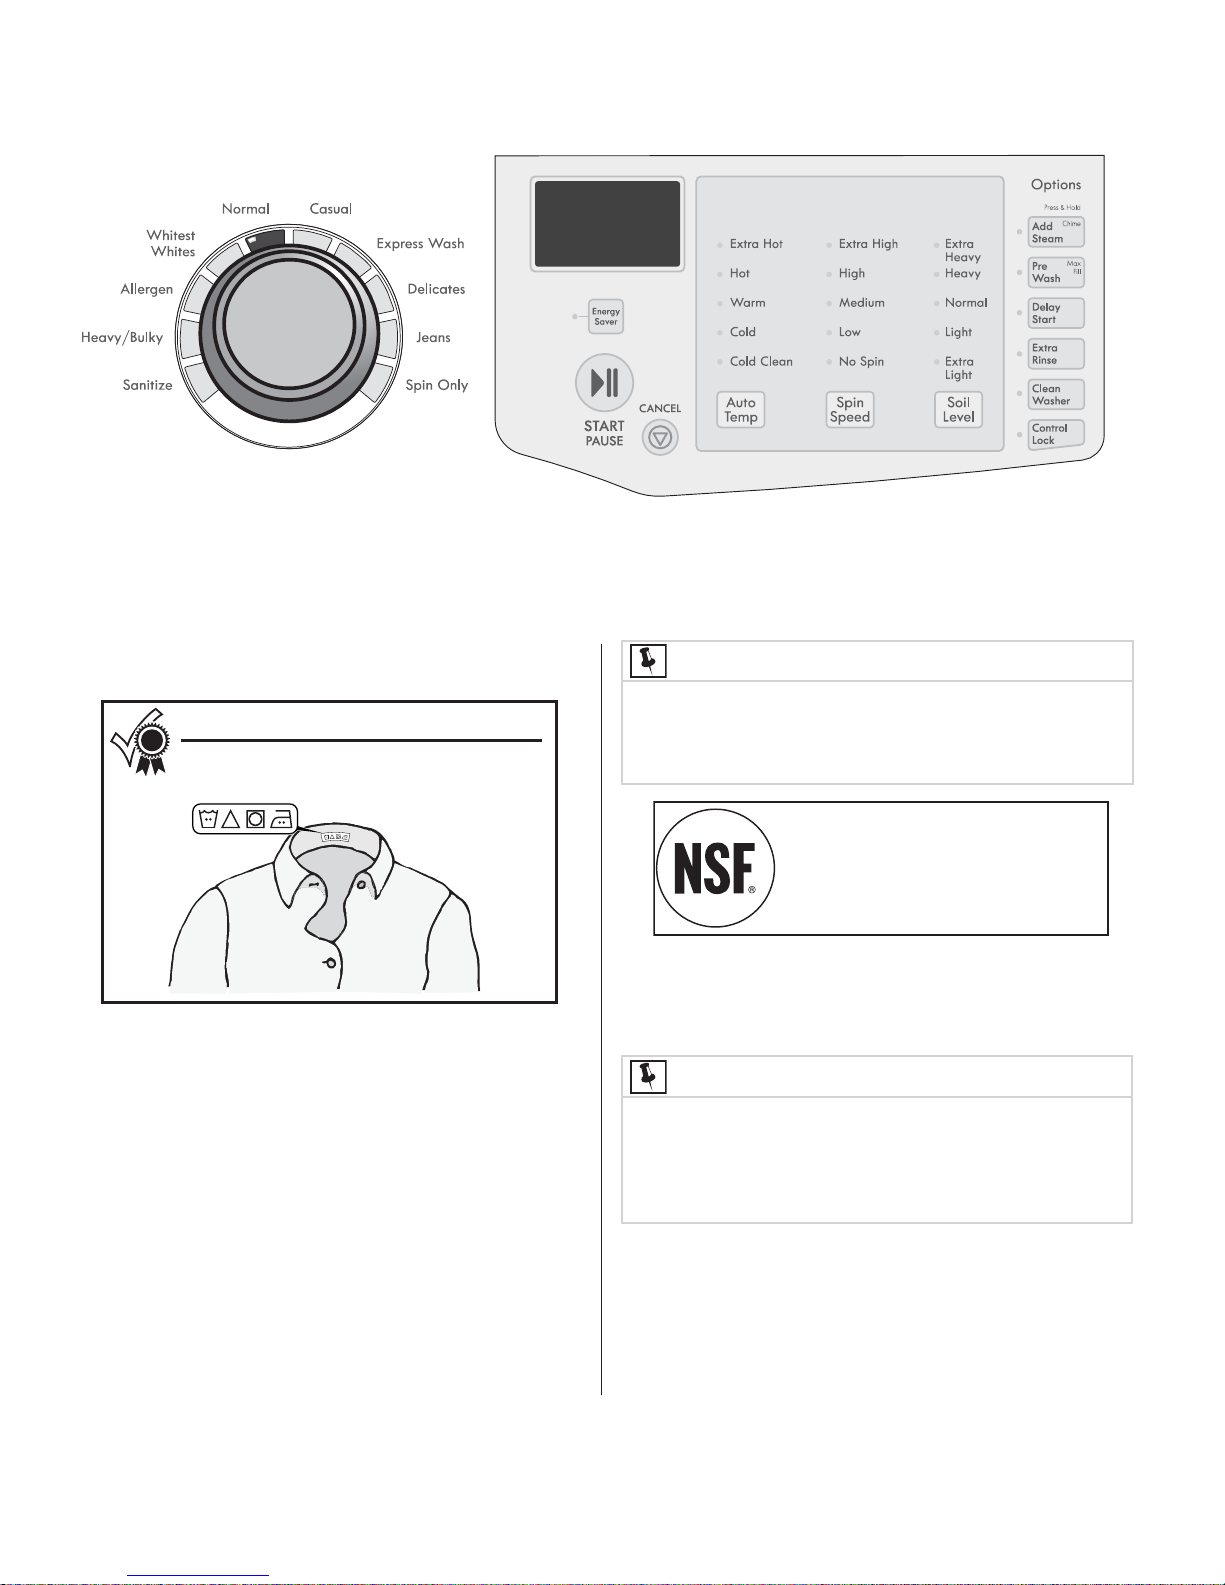
This manual covers many models and not all cycles, options, or features listed are available on every model. Console shown
above for reference only. Your model may diff er.
Cycle Selection
Turn the cycle selector in either direction to the cycle desired. The indicator for that cycle will be illuminated.
For best results
Follow the fabric care label instructions
on items to be washed.
NOTE
This cycle has been certifi ed by NSF International,
an independent third party testing and certifi cation
organization dedicated to public health, safety and
environmental protection.
To change the cycle once it has begun, press the CANCEL
button before selecting a new cycle. Just turning the cycle
selector knob to another selection will not change the
cycle.
Sanitize
Use the Sanitize cycle to clean and sanitize heavily
soiled, colorfast fabrics including towels, bedding, cloth
diapers, and children’s clothing.
It is recommended that you set your water heater to
120° F (49° C) or higher to ensure proper performance
during this cycle. If the setting is lower or the load is
extra large, the cycle time may be extended.
The Sanitize cycle will kill 99.9% of bacteria with no
carryover of bacteria between loads. No bleach or
harsh chemicals are needed, but higher temperatures
are required. Please check fabric care labels to prevent
damage.
Sanitization Performance of Residential
NSF Protocol P172
and Commercial, Family-Sized Clothes
Washers
The wash water is heated by an internal boost heater to
a maximum of 152° F (67° C) as the load tumbles. Cold
water is added to cool down the load prior to drain and
spin.
NOTE
If the voltage at your outlet is under 110 v, the internal
heater may not adequately heat the wash water. If
the cycle is interrupted while the water is heating, the
fi nal temperature of the wash water may be lower and
sanitation may be reduced.
As a precaution, the washer door is locked once the
water temperature reaches 130° F (55° C). If the cycle is
cancelled during the wash phase and the water temperature is greater than 150° F (66° C) an automatic cool
down rinse will occur before the door can be opened.
6
Cycle Selection, continued
Operating Instructions
Heavy/Bulky
Use this cycle for heavily soiled, durable garments - such
as towels, sports gear, or fabric tote bags. For best soil
and stain removal, use the hottest water safe for the
fabrics being washed.
Allergen
If you have asthma or allergy suff erers in your home, use
this cycle to combine hot water temperature (boosted
with internal heater), fast speed tumbling and multiple
rinses to help ensure the destruction of dust mites and
removal of pet dander.
NOTE
This cycle has been certifi ed by NSF International,
an independent third party testing and certifi cation
organization dedicated to public health, safety and
environmental protection.
NSF Protolcol P351
Allergen Reduction Performance
of Residential and Commercial,
Family-Sized Clothes Washers
The Allergen cycle will kill all dust mites and eliminate
at least 95% of pet dander. Since higher temperatures
are required, please check fabric care labels to prevent
damage.
Whitest Whites
Use this cycle for white fabrics and lightly colored clothing. Refer to fabric care label for use of liquid chlorine
bleach. Hot water is recommended to ensure optimal
bleach activation. For peak rinsing performance and to
avoid chlorine residues on your laundry add Extra Rinse
to this cycle.
Normal
Use this load for cotton, linen, towels, shirts, sheets, denims and mixed loads.
Casual
Use this cycle for cottons and blends with a permanent
press or no-iron fi nish.
Express Wash
Quickly wash a small, lightly soiled load in 25 minutes.
Delicates
Use this cycle for lightly soiled knits and delicates which
require gentle washing.
Jeans
Wash an entire load of denim jeans with the Jeans
cycle. It provides 20 minutes of reversing tumble wash
action.
Spin Only
Use the Spin Only cycle anytime you want to drain water
from the washer and spin out the load or as a follow-up
to a No Spin selection. Select the spin speed appropriate
to the load.
NOTE
To add a rinse prior to spin in the Spin Only cycle, select
the Extra Rinse option. Do this for loads that need a
cold water rinse or to add fabric softener that may have
been omitted in a regular cycle. Add the fabric softener
to the dispenser chamber.
7
Operating Instructions
Cycle Settings
For best results
Follow the fabric care label instructions
on items to be washed.
Appropriate wash temperature, spin speeds, soil level and
options will automatically be displayed for each cycle. The
settings can be changed before the cycle is started.
Hot
Use this setting for heavily soiled white or colorfast cottons and blends.
Warm
Use this setting for normally soiled white or colorfast cottons or blends.
Cold
Some warm water will automatically blend with cold
tap supply to achieve a precise Cold. Use this setting for
lightly soiled non-colorfast items, knits, delicates, and
hand washables.
Cold Clean
Wash and rinse temperatures are equivalent to temperature of cold tap supply. Use this selection for lightly
soiled non-colorfast items, knits, delicates, and hand
washables and other fabrics and colors that are prone to
dye transfer. For use with cold water
detergents.
WASH WATER TEMPERATURE
To change the preset temperature, press the Wash/Rinse
button to scroll to the desired setting. Select a wash water
temperature according to fi ber content, colorfastness and
soil level. A cold water rinse saves energy and reduces
wrinkling.
To protect your fabrics, not all temperatures are available
with every cycle. The indicator will not light if the setting is
not available with that cycle.
NOTE
To change the temperature once the cycle has begun,
press the PAUSE button, make the new selection and
press START again.
Auto Temp wash water temperatures are automatically
regulated to maximize detergent eff ectiveness and im-
prove washing performance. The water heater setting and
its distance from the washer, water usage in other parts of
the home, and seasonally low ground water temperature in
some geographic areas can aff ect water temperature.
Extra Hot
Use this setting for heavily soiled colorfast fabrics such
as towels, bedding, and children’s clothing. Extra Hot
provides wash water heated with an internal boost
heater.
SPIN SPEED
To protect your fabrics, not all spin speeds are available
with every cycle. The indicator will not light if the setting is
not available with that cycle.
Extra High, High, Medium and Low spin speeds are
available for appropriate cycles. The spin speed and/or
duration of fi nal spin vary from model to model and cycle
to cycle.
Increasing the spin speed will extract more water, decrease
drying time and conserve energy. Decreasing the spin
speed will reduce wrinkling.
Select Low spin speed to gently spin items that should be
line dried.
Use No Spin to omit the fi nal spin at the end of the cycle.
The load will be very wet. Remove items from the wash
drum to drip dry or select a Rinse & Spin cycle to remove
excess water at a more convenient time.
SOIL LEVEL
Adjust the wash time in 3-minute increments based on the
soil level of each load. Five soil levels are available.
8
Cycle Options
To add options, press the corresponding options buttons to
illuminate the selections desired. To delete options, press
the options buttons again and the indicator lights will turn
off . Some options require a “Press & Hold” eff ort to acti-
vate or deactivate the secondary function.
Not all options are available on every model. To protect
your fabrics, not all options are available with every cycle.
If an option is not appropriate for the cycle, the indicator
will not light. Occasionally, a setting and option in the same
cycle will confl ict with each other, such as Add Steam and
Energy Saver. When this happens, the option selected fi rst
will cause the confl icting option to not be selectable.
NOTE
To change the options after the cycle starts, press PAUSE,
adjust the setting and press START to resume the cycle.
Operating Instructions
Energy Saver
The Energy Saver option reduces the warm water temperature a few degrees to save energy and also extracts
more water to reduce drying time.
Pre Wash
Select this option to add a short initial wash period to a
cycle. Heavily soiled and stained loads will prewash for
approximately 5 minutes. The water will drain and the
load will automatically advance to the regular wash cycle
See step 5 in
guide for details on adding detergent to the dispenser.
Delay Start
Press Delay Start to select a wash time convenient to
your schedule or during off peak energy hours. The delay
time selected will be displayed and begin counting down
when you select START.
Extra Rinse
Use this option when additional rinsing is desired to
remove excess dirt and detergent. It is recommended for
heavily soiled loads or if household members have sensitive skin.
Clean Washer
To clean and freshen the washer, perform the Clean
Washer cycle. If you wish to begin the cycle, press select
when prompted. This maintenance cycle uses hot water
and two rinses to remove residue that may cause odor.
See
“Inside Routine Cleaning (Preventative)”
information about the Clean Washer cycle.
“Operating Your Washer”
section in this
for detailed
.
Add Steam
Select this option to add approximately 20 minutes of
tumbling in steam during the wash cycle. It is recommended for heavily soiled loads to help enhance the
release of tough stains from fabrics after initial agitation.
NOTE
Steam may not necessarily be visible inside drum •
during a steam wash cycle.
Steam may not be present during entire steam wash cycle.•
IMPORTANT
If steam is selected, rinse temperatures will be elevated.•
If washer is paused during a steam wash cycle, the door •
will remain locked due to higher temperature in drum.
DO NOT force open - it will unlock upon cooling.
During a steam cycle you may notice steam exiting •
from the rear vent of the washer - this is normal and
not cause for alarm.
NOTE
The washer will automatically prompt you to run the Clean
Washer cycle every 50 cycles. You may press the CANCEL
button to manually perform the cycle at another time.
Control Lock (Press & Hold)
To lock the controls between cycles, press and hold the
Control Lock button for 5 seconds. Repeat to unlock the
controls when you are ready to operate the washer. Use
this feature to reduce the likelihood of accidental operation by children.
Chime (Press & Hold)
A signal will sound at the end of the cycle if this option
is selected.
Max Fill (Press & Hold)
Increase the water fi ll level of the agitation portion of
any wash cycle.
9
Operating Instructions
Washer Settings Chart
These temperature, spin speeds, soil levels and options are available with the following cycles:
Sanitize
Auto Temp
Extra Hot
Hot
Warm
Cold
Cold Clean
Spin Speed
Extra High
High
Medium
Low
No Spin
Soil Level
Extra Heavy
Heavy
Normal
Light
Extra Light
Options
Energy Saver
Add Steam
Pre-Wash
Delay Start
Extra Rinse
Clean Washer
Chime (Press & Hold)
Max Fill (Press & Hold)
9 = Available selections. = Cycle defaults. = Non-modifi able presets.
9
99999 9 99
9999999 99
99999
9 9999 999
999
999
999999
999999 9
9999999999
9999999999
9999999999
999999999
Heavy/Bulky
9
9
Allergen
9 9
9
Whitest Whites
99
9 99999
99
99
99
9 999 9
999 9
Normal
Casual
Express Wash
Delicates
Jeans
Spin Only
9
9
9
9
9
9
9
9
9
9
9
99
99
9999
99
99
9
9
9
9
9
9
9
10

Other Features
1
2
3
Operating Instructions
Status Display/Status Lights
The estimated total cycle time will be displayed when the
cycle is selected. The time may increase if water pressure is
low, oversudsing occurs or the load becomes unbalanced.
The approximate time remaining will be displayed during
the cycle.
Oversuds Detection
A situation where oversudsing has been detected by the
washer will result in the washer automatically adding up to
4 extra rinses to attempt to clear the suds. Each extra rinse
the washer performs to clear the suds will add 5 minutes to
the cycle display time. If an excessive amount of detergent
has been added and additional rinsing has not corrected
the issue, “
Vent Latch
Help prevent odor buildup and mildew between washes by
utilizing your washer’s vent latch feature. To apply the vent
latch, (1) open the door slightly, (2) lift the latch arm and
then (3) press the arm down onto the plastic door strike,
snapping it in place.
The vent latch can be released either of two ways - by
pulling door out and manually returning latch arm to lower
position or by pushing door shut and allowing latch arm to
continue its pivot upward.
TOO MUCH DETERGENT” will be displayed.
STATUS DISPLAY
The following will also be displayed at the appropriate times during the cycle:
DOOR LOCK
PREWASHING
WASHING
ADDING STEAM
RINSING
DRAINING
SPINNING
CYCLE COMPLETE
SNAP
HINGE
IMPORTANT
Do not attempt to close door if vent latch arm is
disengaged and arm is in an outward position. Return
latch arm to lower position before closing and latching
the door.
NOTE
The vent latch may become dislodged from hinge point
if door closure is attempted while latch arm is not in
an acceptable closing position. The latch arm can be
snapped back in at the hinge location. Washer will still
operate without latch arm installed.
11
W
H
I
T
E
S
C
A
S
U
A
L
C
O
L
O
R
S
T
O
W
E
L
S
Operating Instructions
Operating Your Washer
WARNING
To reduce the risk of fi re, electric shock or injury to
persons, read these IMPORTANT SAFETY INSTRUCTIONS
in this
Use and Care Guide
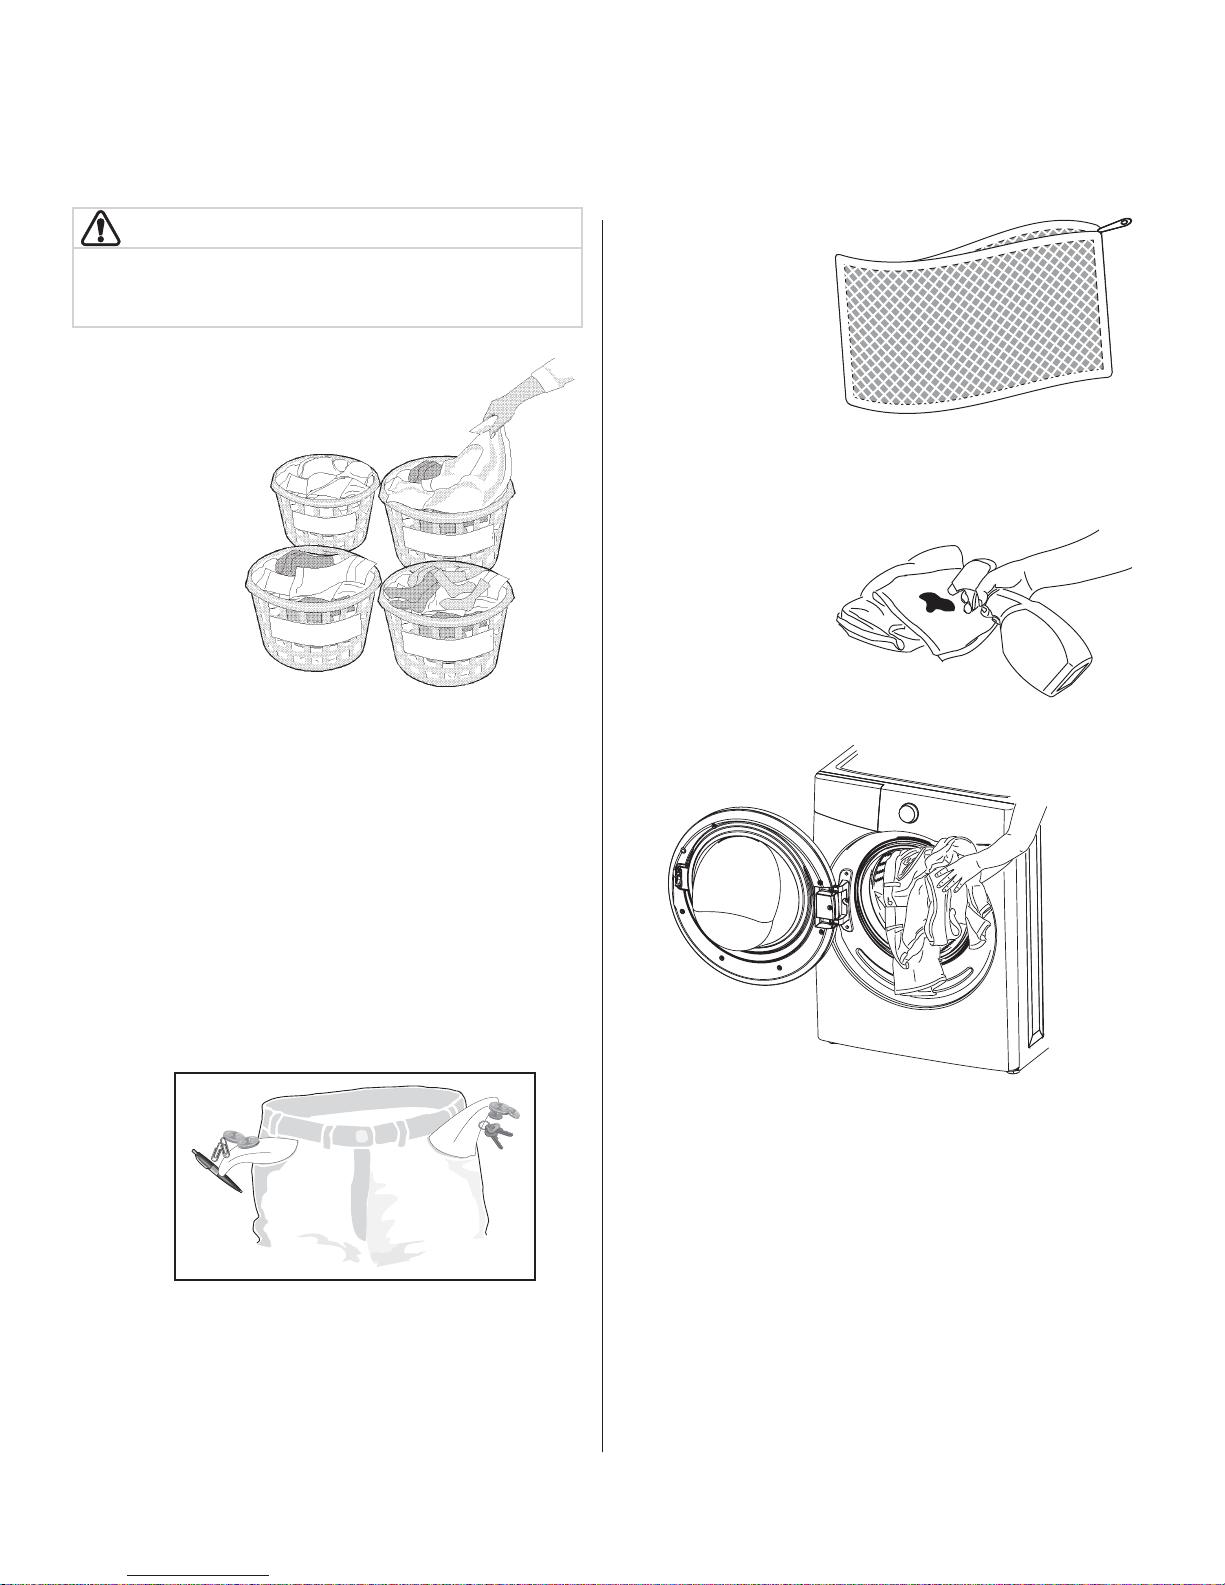
1 Sort laundry into loads that
can be washed together.
Sort items by •
recommended
cycle and water temperature.
Separate white, light and colorfast items from dark •
and non-colorfast items.
Separate items that shed lint from items that attract •
lint. Casual, synthetic, knit, and corduroy items will
pick up lint from towels, rugs, and bedspreads.
Separate heavily soiled items from lightly soiled •
items.
Separate lacy, sheer, loosely knit, or delicate items •
from durable items.
Do not machine wash items containing fi berglass. •
Small particles of fi berglass left in the drum may
transfer to fabrics in other loads and cause skin irritation and/or damage to fabrics.
2 Prepare items for washing.
Empty pockets.•
before operating your washer.
Place delicate and small items such as bras, hosiery •
and baby socks in a mesh bag.
(Mesh bag not included.)
3 Pretreat stains and heavy soil.
See • Stain Removal Guide in this guide
for safe, successful stain removal
instructions.
4 Add laundry load to washer.
Brush off lint and dirt. Shake out rugs and beach •
towels.
Close zippers, fasten hooks, button buttons, tie strings •
and sashes, and remove non-washable trims and
ornaments.
Mend rips and tears to prevent further damage dur-•
ing washing.
Turn knit items inside out to prevent pilling.•
Combine large and small items in a load.•
Load large items fi rst. Large items should not be more •
than half the total wash load.
Washing single items such as a sweater, towel or •
jeans is ineffi cient and may cause an out-of-balance
load. Add 1 or 2 similar items to help balance the
load.
Wash a single heavy item such as a king-sized com-•
forter, bedspread or sleeping bag separately.
The washer can be fully loaded, but the items should •
not be tightly packed. The door should close easily.
12
Operating Your Washer, continued
5 Add laundry products to the dispenser.
For best results
Use a low-sudsing, high effi ciency
detergent to prevent oversudsing in
front load washers. Look for this symbol
on the detergent label:
Detergent, liquid chlorine bleach and liquid fabric softener will be dispensed at the proper times in the cycle.
IMPORTANT
Open and close the dispenser drawer slowly. Closing the
drawer too quickly could result in early dispensing of the
bleach or fabric softener.
Use the cap or scoop provided by the detergent manufacturer to measure the amount recommended. Detergent dosage may need to be adjusted for water temperature, water hardness, load size and soil level.
Operating Instructions
Insert liquid cup when
using liquid detergent.
Liquid Detergent
Add the recommended amount of high effi ciency liq-•
uid detergent to the “Main Wash - Liquid Only” cup.
Do not exceed the • MAX fi ll line.
Liquid detergent can also be added directly to the •
“Main Wash” chamber when not using the “Pre-
Wash” option.
NOTE
From time to time you may see water in the “Main
Wash -Liquid Only” chamber. This is part of the normal
operation of the washer.
Powder Detergent
To use a high effi ciency powder detergent, remove the •
“Main Wash - Liquid Only” cup and add the powder
directly to the “Main Wash” detergent chamber.
IMPORTANT
Save the liquid cup insert for future use. DO NOT discard
it while you are using powder detergent.
Remove liquid cup when using
powder detergent! DO NOT
pour powder detergent into
liquid cup. It will not dis-
pense correctly!
13
Operating Instructions
Operating Your Washer, continued
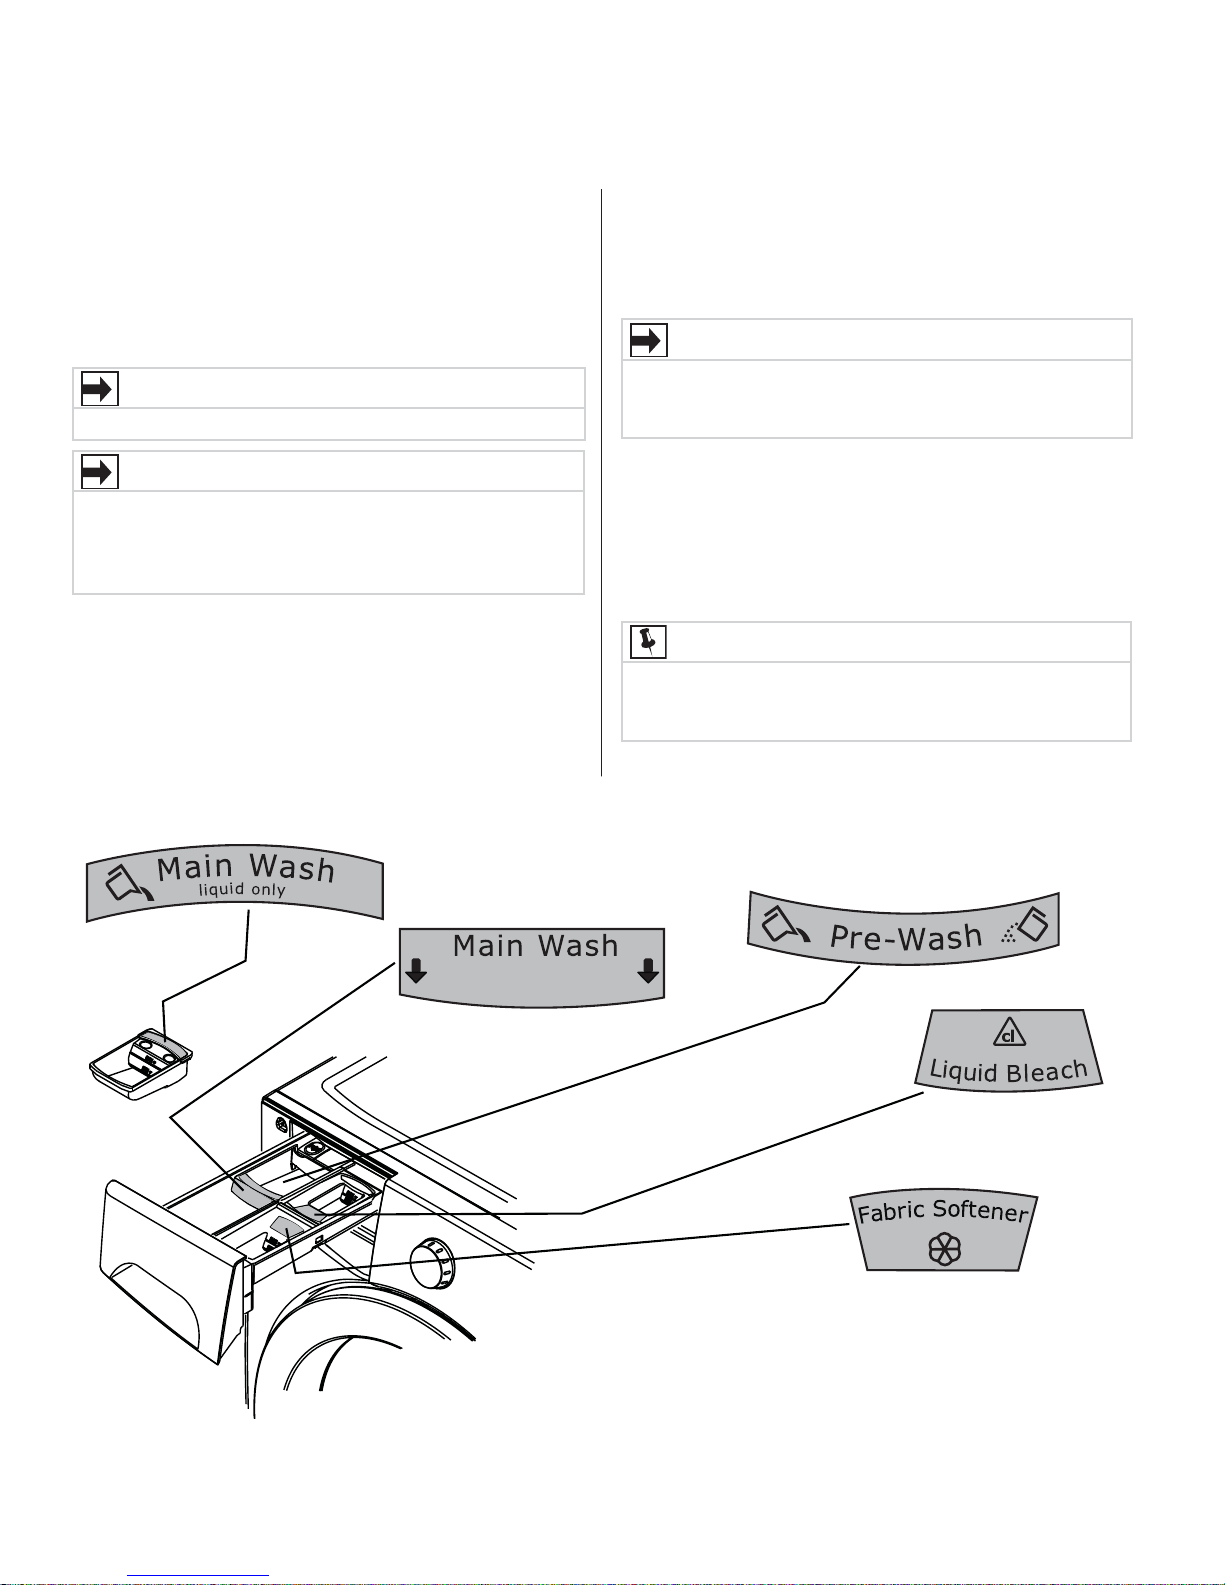
Other Wash Products
Water conditioner, detergent booster and enzyme •
products may be added with the detergent.
Put liquid products with liquid detergent in the • “Main
Wash - Liquid Only” chamber or powder products
with powder detergent in the “Main Wash” detergent
chamber.
IMPORTANT
Do not mix liquids and powders.
IMPORTANT
Use of multi-product (detergent plus softener) sheets or
color-absorbing sheets NOT recommended. They could
disable your machine and result in unwarranted repair
costs.
Detergent for Prewash
For heavily soiled or stained loads, select the • Prewash
option and add the recommended amount of detergent to the “Pre-Wash” detergent cup.
Liquid Chlorine Bleach
If desired, add liquid chlorine bleach to the chamber •
labeled “Liquid Bleach”.
Fill to the • MIN line for small loads or the MAX line for
large loads. DO NOT fi ll above the maximum fi ll line.
IMPORTANT
To prevent fabric damage, do not overfi ll the “Liquid
Bleach” chamber or pour liquid chlorine bleach directly
onto the load.
Liquid Fabric Softener
If desired, pour the recommended amount of liquid •
fabric softener into the chamber labeled “Fabric
Softener”.
Fill to the • MIN line for small loads or the MAX line for
large loads.
DO NOT fi ll above the maximum fi ll line.•
NOTE
To prevent staining, do not overfi ll the “Fabric Softener”
chamber or pour liquid fabric softener directly on the
wash load.
Use of a fabric softener-dispensing ball is not recom-•
mended in tumble action washers.
14
Operating Your Washer, continued
Operating Instructions
6 Select the appropriate cycle and settings for
the load.
Turn the cycle selector knob in either direction to se-•
lect the cycle desired. The indicator for that cycle will
be illuminated.
The estimated cycle time, suitable wash and rinse •
water temperatures, fi nal spin speed, soil level, and
options for each cycle will be indicated for the cycle
selected. See the
details.
To change the settings, press the • Auto Temp, Spin
Speed and Soil Level buttons to scroll to the desired
settings.
To select or delete an option, press the button for that •
option. The indicator will be illuminated when the option has been selected. The indicator will no longer be
lighted when the option has been deleted.
“Washer Settings Chart”
for more
NOTE
To provide the best care for your laundry, not every
setting or option is available with every cycle. If a setting
or option is not available for the cycle selected, the
indicator will not light.
Adjustments to a cycle will be remembered and re-•
called each time that cycle is selected in the future.
If changes to the settings or options are attempted •
after the cycle starts, you will hear several beeps
when the buttons are pressed. To change the settings
or options, press PAUSE, make the new selections and
press START again.
To change the cycle once the cycle has begun, press •
CANCEL, select a new cycle, and press Start again.
Just turning the cycle selector knob will not change the
cycle.
To stop the cycle, press • CANCEL.
NOTE
If the cycle is interrupted during spin, it will take
approximately 2-3 minutes for the door lock to release.
DO NOT force open the door.
A signal will sound at the end of the cycle if the •
Chime option has been selected.
Remove items from the washer when the cycle ends •
and place in dryer, line dry or dry fl at as directed on
the fabric care label.
For best results
Follow the fabric care label instructions
on items to be washed.
To return to factory
settings, press these
two buttons at the
same time and
hold until the signal
sounds.
7 Start the washer.
Close the door and press • START. The washer will not
operate with the door open. “
displayed as a reminder to close the door.
Select • Delay Start to delay the beginning of the cycle,
if desired.
As a safety measure, the door will automatically lock •
during the entire wash cycle.
To add a forgotten item to the washer any time during •
the wash portion of the cycle, press PAUSE. When the
door unlocks, open the door, add the item, close the
door and press START to resume the cycle
DOOR OPEN
” will be
Excess wrinkling, color transfer or odors may develop •
in items left in the washer after the cycle has ended, if
not removed promptly.
CAUTION
ENTRAPMENT and TIP-OVER HAZARD
Do not leave the door open if there are small children or
pets present. An open door could entice children to hang
on the door or crawl inside the washer. If there are no
small children present, you may leave the door ajar to
prevent odor build up.
15
Operating Instructions
Normal Operating Sounds
You may or may not hear the following sounds from your
new washer:
A. DRAIN HOSE The washer has a fl exible drain hose to
carry water from the washer to the stand pipe of your
home. You will hear water fl owing into your stand pipe.
This is a normal part of the operation of the washer.
B. WATER VALVES/DISPENSER As water enters the
dispenser system, it is common to hear a water fl owing
sound. This normal sound will vary slightly based on the
water pressure in your home.
C. DRAIN PUMP Your washer is equipped with a high
velocity drain pump. It is normal to hear humming and
gurgling sounds as water is pumped from the washer.
Both of these sounds are normal and indicate that your
pump is functioning correctly.
D. HIGH SPEED MOTOR A powerful motor is used to drive
the drum to high spin speeds to extract water from your
load. You will hear a sound associated with these higher
spin speeds. This sound is normal and will vary slightly as
the spin speed varies with load size and cycle selected.
A
B
D
C
CAUTION
Abnormal, on-going sounds may be an indication of a
pending washer failure and should be investigated by a
qualifi ed technician.
16
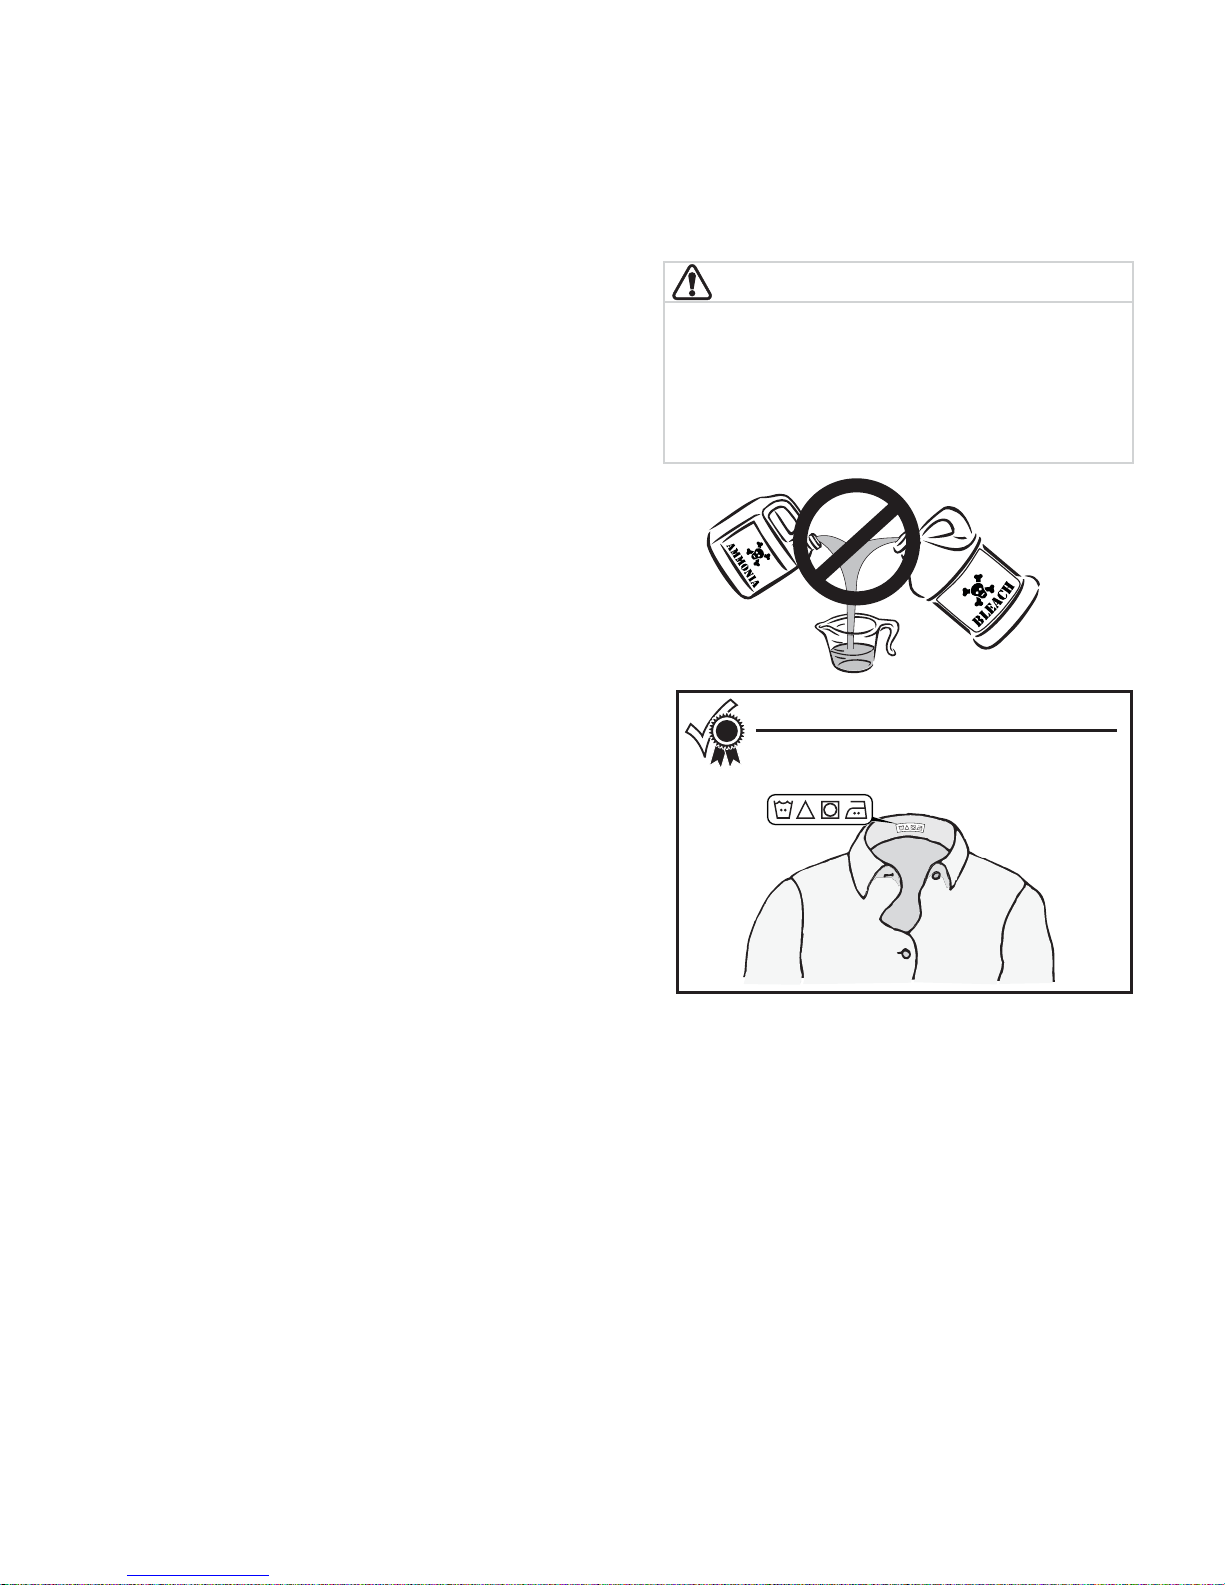
Safe Stain Removal Procedures
To reduce the risk of fi re or serious injury to persons or
property, comply with the basic warnings listed below:
Read and comply with all instructions on stain removal •
products.
Keep stain removal products in their original labeled •
containers and out of children’s reach.
Thoroughly wash any utensils used.•
Do not combine stain removal products, especially •
ammonia and chlorine bleach. Dangerous fumes can
result.
Never wash items which have been previously cleaned •
in, washed in, soaked in or spotted with gasoline, dry
cleaning solvents or other fl ammable or explosive sub-
stances because the items give off vapors that could
ignite or explode.
Never use highly fl ammable solvents, such as gasoline, •
inside the home. Vapors can explode on contact with
fl ames or sparks.
For Successful Stain Removal:
Treat stains promptly.•
Determine the kind of stain, then follow the recom-•
mended treatment in the stain removal chart on the
next page.
To pretreat stains, use a prewash product, liquid de-•
tergent, or a paste made from powder detergent and
water.
Use cold water on unknown stains as hot water can set •
stains.
Consult care label instructions for treatments to avoid •
on specifi c fabrics.
Check for colorfastness by testing stain remover prod-•
ucts on an inside seam.
Rinse and wash items after stain removal.•
Stain Removal Guide
WARNING
HARMFUL VAPOR HAZARD
Do not use or mix liquid chlorine bleach with other
household chemicals such as toilet cleaners, rust
removers, acid or products containing ammonia.
These mixtures can produce dangerous fumes which
can cause serious injury or death.
For best results
Follow the fabric care label instructions
on items to be washed.
17

Stain Removal Guide
Stain Removal Suggestions
STAIN TREATMENT
Adhesive tape, chewing
gum, rubber cement
Baby formula, dairy
products, egg
Beverages (coff ee, tea,
soda, juice, alcoholic
beverages)
Blood Rinse with cold water. Rub with bar soap. Or, pretreat or soak with product containing
Candle wax, crayon Scrape off surface wax. Place stain face down between paper towels. Press with warm
Chocolate Pretreat or soak in warm water using product containing enzymes. Wash using bleach
Collar or cuff soil, cos-
metics
Dye transfer on white
fabric
Grass Pretreat or soak in warm water using product containing enzymes. Wash using bleach
Grease, oil, tar (butter, fats, salad dressing,
cooking oils, car grease,
motor oils)
Ink Some inks may be impossible to remove. Washing may set some inks. Use prewash stain
Mildew, scorch Wash with chlorine bleach if safe for fabric. Or, soak in oxygen bleach and hot water
Mud Brush off dry mud. Pretreat or soak with product containing enzymes.
Mustard, tomato Pretreat with prewash stain remover. Wash using bleach safe for fabric.
Nail polish May be impossible to remove. Place stain face down on paper towels. Apply nail pol-
Paint, varnish WATER BASED: Rinse fabric in cool water while stain is wet. Wash. Once paint is dry, it
Perspiration Use prewash stain remover or rub with bar soap. Rinse. Wash using nonchlorine bleach in
Rust, brown or yellow
discoloration
Shoe polish LIQUID: Pretreat with a paste of powder detergent and water. PASTE: Scrape residue from
Tomato Pretreat with prewash stain remover. Wash using bleach safe for fabric.
Urine, vomit, mucus, feces Pretreat or soak in product containing enzymes. Wash using bleach safe for fabric.
Wine Pretreat or soak in cold water. Wash in hottest water and bleach safe for fabric
Apply ice. Scrape off excess. Place stain face down on paper towels. Saturate with pre-
wash stain remover or nonfl ammable dry cleaning fl uid.
Use product containing enzymes to pretreat or soak stains. Soak for 30 minutes or more.
Wash.
Pretreat stain. Wash using cold water and bleach safe for fabric.
enzymes. Wash using bleach safe for fabric.
iron until wax is absorbed. Replace paper towels frequently. Treat remaining stain with
prewash stain remover or nonfl ammable dry cleaning fl uid. Hand wash to remove solvent.
Wash using bleach safe for fabric.
safe for fabric.
Pretreat with prewash stain remover or rub with bar soap.
Use packaged color remover. Wash using bleach safe for fabric.
safe for fabric.
Scrape residue from fabric. Pretreat. Wash using hottest water safe for fabric. For heavy
stains and tar, apply nonfl ammable dry cleaning fl uid to back of stain. Replace towels
under stain frequently. Rinse thoroughly. Wash using hottest water safe for fabric.
remover, denatured alcohol or nonfl ammable dry cleaning fl uid.
before washing. Badly mildewed fabrics may be permanently damaged.
ish remover to back of stain. Repeat, replacing paper towels frequently. Do not use on
acetate fabrics.
cannot be removed. OIL BASED AND VARNISH: Use solvent recommended on can label.
Rinse thoroughly before washing.
hottest water safe for fabric.
Use rust remover safe for fabric. Do not use chlorine bleach because it may intensify
discoloration.
fabric. Pretreat with prewash stain remover or nonfl ammable dry cleaning fl uid. Rinse.
Rub detergent into dampened area. Wash using bleach safe for fabric.
18

Inside Routine Cleaning (Preventive)
To help prevent odors, mold or mildew, leave the door
open for a few hours after use or whenever the washer is
not in use.
CAUTION
ENTRAPMENT and TIP-OVER HAZARD
Do not leave the door open if there are small children or
pets present. An open door could entice children to hang
on the door or crawl inside the washer. If there are no
small children present, you may leave the door ajar to
prevent odor build up.
Care and Cleaning
TO REFRESH OR CLEAN INSIDE OF WASHER
To clean and freshen the washer, perform the Clean
Washer cycle. For best results use the Clean Washer
cycle once a month. To begin the cycle, press Select when
prompted during automated reminder mode or manually
select the cycle by following these directions:
Rotate cycle knob to Spin Only. Then press the Clean Washer
option button. The LCD screen will display “
CLEAN
”.
SYSTEM
NOTE
The washer will automatically prompt you to run the
Clean Washer cycle every 50 cycles. You may press
the CANCEL button to manually perform the cycle at
another time.
IMPORTANT
Items left in washer while performing the Clean Washer
cycle will cause a severe out-of-balance situation that
could damage the washing machine.
If installed, remove the “LIQUID ONLY” cup from the
dispenser. REMOVE ALL ITEMS FROM WASH DRUM before
fi lling the detergent chamber with one (1) cup of liquid
chlorine bleach OR one (1) pouch of TIDE
MACHINE CLEANER. DO NOT use both. Press START to
begin.
®
WASHING
For best results
Immediately follow up with a Rinse &
Spin cycle on Extra High Spin Speed
with no detergent or bleach to help
clear any residual bleach left after the
Clean Washer cycle.
Turn cycle selector to Spin Only and
then press Clean Washer button to enter
Clean Washer cycle.
REMOVE “LIQUID ONLY”
DISPENSER CUP
“MAIN WASH”
COMPARTMENT
WARNING
HARMFUL VAPOR HAZARD
Do not use or mix liquid chlorine bleach with other
household chemicals such as toilet cleaners, rust
removers, acid or products containing ammonia. These
mixtures can produce dangerous fumes which can cause
serious injury or death.
NOTE
If the Clean Washer cycle is cancelled or paused during
the cycle, the washer will go through 2 rinse cycles to
clean the drum of any residual bleach before unlocking
the door.
19

Care and Cleaning
Other Inside Routine Cleaning (Preventive)
Cleaning Dispenser Drawer Area
NOTE
Detergent and fabric softener may build up in the
dispenser drawer. Residue should be removed once or
twice a month.
Remove the drawer by pulling the drawer out until it •
stops.
Reach back into the left rear corner of the drawer cav-•
ity and press down fi rmly on the lock tab. Pull out the
drawer.
Remove the insert from the bleach and fabric softener •
compartments.
Rinse the drawer and inserts with a combination of ¾ •
cup liquid chlorine bleach and 1 gallon hot tap water
to remove traces of accumulated powders and liquids.
Large amounts of fabric softener residue may indicate
improper dilution or more frequent cleaning is required.
Rinse well with tap water.
To clean the drawer opening, use a small brush to clean •
the recess. Remove all residue from the upper and lower
parts of the recess.
Replace the insert by pressing it in place until you hear a •
slight click. Return the dispenser drawer.
Daily Preventive Maintenance
Remove items from the washer as soon as the cycle ends. •
Excess wrinkling, color transfer, and odors may develop
in items left in the washer.
If there are no small children or pets present, you may •
leave the door ajar when the washer is not in use.
Leave the dispenser drawer open slightly at the end of •
the wash day.
Dry around the washer door opening, fl exible gasket, and •
door glass. These areas should always be clean to ensure
a water tight seal.
When extremely soiled items have been washed, a dirty •
residue may remain on the drum. Remove this by wiping
the drum with a nonabrasive household cleanser. Rinse
thoroughly with water.
Periodically, wipe dry the folds in the bottom of the door •
fl exible gasket to remove lint and other debris.
20

Inside Cleaning (Aggressive)
In cases where the Clean Washer cycle along with care
and cleaning of rubber gasket folds isn’t done, and severe
odor, mold, mildew, or residue buildup have developed,
follow the below cleaning procedure to help alleviate the
problem.
CLEANING PROCEDURE - Washer Drum
Ensure the wash tub is empty (or no clothes load). If
installed, remove the “LIQUID ONLY” cup from the
dispenser. Open the detergent drawer and pour eight
(8) cups of bleach into the “MAIN WASH” detergent
compartment. Select Clean Washer cycle as described
previously in
Upon cycle completion inspect the interior of the washer
to see if the odor/residue has been eliminated. If any
additional cleaning is required, repeat the above procedure.
This may take several cycles depending on the severity
of the odor/residue. You may observe some remaining
discoloration due to the long term eff ects of this residue.
For especially contaminated areas visible inside the drum
(including the front rubber seal), these areas might be
more eff ectively cleaned by spraying a bleach cleaner on
a scrub brush, soft sponge, or towel and scrubbing.
Inside Routine Cleaning (Preventive)
.
Care and Cleaning
Turn cycle selector to Spin Only and
then press Clean Washer button to enter
Clean Washer cycle.
REMOVE “LIQUID ONLY”
DISPENSER CUP
IMPORTANT
Always wear rubber or latex gloves and protect fl oor
and clothing from damage.
If odor is still left after bleach cycle(s) and bleach cleaner,
open the detergent drawer and pour one (1) pouch of TIDE
WASHING MACHINE CLEANER in detergent drawer. Select
Clean Washer Cycle as above and start the washer.
®
For best results
Immediately follow up with a Rinse &
Spin cycle on Extra High Spin Speed
with no detergent or bleach to help
clear any residual bleach left after the
Clean Washer cycle.
IMPORTANT
See
Inside Routine Cleaning (Preventive)
cleaning maintenance which is necessary to avoid
repeating issues.
for future
NOTE
If the Clean Washer cycle is cancelled or paused during
the cycle, the washer will go through 2 rinse cycles to
clean the drum of any residual bleach before unlocking
the door.
“MAIN WASH”
COMPARTMENT
WARNING
HARMFUL VAPOR HAZARD
Do not use or mix liquid chlorine bleach with other
household chemicals such as toilet cleaners, rust
removers, acid or products containing ammonia. These
mixtures can produce dangerous fumes which can cause
serious injury or death.
21

Care and Cleaning
Outside Routine Cleaning
When washing is completed, wipe top and sides of washer •
with a damp cloth. Turn water faucets off to prevent pressure
build-up in the hoses.
Clean the cabinet with mild soap and water. Never use harsh, •
gritty or abrasive cleansers
If the cabinet becomes stained, clean with diluted chlorine •
bleach (1 part bleach to 8 parts water). Rinse several times
with clear water.
Remove glue residue from tape or labels with a mixture of •
warm water and mild detergent. Or, touch residue with the
sticky side of tape.
When cleaning chrome parts use a window cleaner with am-•
monia or mild soap and water.
Before moving the washer, place a strip of cardboard or thin •
fi berboard under the front leveling legs to prevent damage to
the fl oor.
IMPORTANT
Do not store or place laundry products on top of
washer at any time. They can damage the fi nish
or controls.
Winterizing Instructions
IMPORTANT
If the washer is stored in an area where freezing can occur
or moved in freezing temperatures, follow these winterizing
instructions to prevent damage to the washer:
1 Turn off water supply faucets.
2 Disconnect hoses from water supply and drain water
from hoses.
3 Plug electrical cord into a properly grounded electrical
outlet.
4 Add 1 gallon (3.8 L) nontoxic recreational vehicle (RV)
antifreeze to empty wash drum. Close door.
5 Select the Rinse & Spin cycle and deselect Extra Rinse.
Press Start and let the washer drain for 1 minute to drain
out all the water. Not all of the RV antifreeze will be
expelled.
6 Press POWER, unplug electrical power cord, dry off drum
interior and close door.
7 Remove dispenser drawer. Drain any water in
compartments and dry compartments. Replace drawer.
8 Store washer in an upright position.
9 To remove antifreeze from washer after storage, perform
Clean Washer cycle as described earlier.
RV
ANTIFREEZE
Follow WINTERIZING
INSTRUCTIONS for cold
weather storage and
care.
22

Solutions to Common Problems
Common Washing Problems
Many washing problems involve poor soil and stain removal, residues of lint and scum, and fabric damage. For satisfactory washing results, follow these suggestions provided by The Soap and Detergent Association.
PROBLEM POSSIBLE CAUSES SOLUTIONS PREVENTIVE MEASURES
Blue stains Undiluted liquid detergent •
Discoloration,
graying
or fabric softener dispensed
directly onto fabric.
Not enough detergent. •
Wash water temperature •
too low.
Incorrect sorting.•
If caused by detergent, mix 1 cup (240 •
ml) white vinegar with 1 quart (.95 L)
water in a plastic container. Soak item
1 hour. Rinse.
If caused by fabric softener, rub stains •
with bar soap. Wash.
Rewash with correct amount of deter-•
gent and hottest water safe for fabric.
Add bleach safe for fabric.•
Avoid overfi lling detergent and •
fabric softener compartments of
dispenser.
Sort items by soil level and color. •
Use correct amount of detergent, •
hottest water and bleach safe for
fabric.
Greasy, oily
stains
Holes, tears, or
snags
Lint Incorrect sorting.•
Pilling
(Fibers ball up
and cling to
fabric.)
Residue or
powder on dark
items;
Stiff , harsh
fabrics.
Wrinkling Overloading the washer.•
Not enough detergent.•
Undiluted liquid fabric •
softener poured directly on
fabric.
Incorrect use of chlorine •
bleach.
Unfastened zippers, hooks, •
buckles.
Rips, tears and broken •
threads.
Overloading the washer.•
Degradation of fabric.•
Tissues left in pocket.•
Overloading the washer.•
Not enough detergent.•
Undissolved detergent has •
left a residue resembling lint.
Static cling is attracting lint.•
Load washed too long.•
Pilling is normal with syn-•
thetic and permanent press
fabrics. This is due to abrasion from normal wear.
Undissolved detergent.•
Some granular detergents •
can combine with hard
water minerals to form a
residue.
Overloading the washer.•
Incorrect wash cycle for •
wash load.
Treat with prewash stain remover or •
liquid detergent.
Increase detergent and water tem-•
perature. Rewash.
Rub fabric softener stains with bar •
soap.
May be irreversible if rips, tears and •
seams cannot be mended.
Reduce load size. Rewash using correct •
water temperature, water level, and
amount of detergent.
Add nonprecipitating water condition-•
er to wash water to remove detergent
residue.
Add liquid fabric softener to fi nal •
rinse.
Dry load in dryer.•
Remove lint with lint brush or roller.•
Use a lint brush or shaver to remove •
pills.
Rewash load.• Increase water temperature using •
Reduce load size.•
Rinse in cold water with liquid fabric •
softener using the casual or delicate
cycle.
Use correct amount of detergent •
and hottest water safe for fabric.
Do not pour liquid fabric softener •
directly on fabric. See Operating
Your Washer, step 5.
Never pour chlorine bleach di-•
rectly on fabric.
Check condition of items before •
washing. See Operating Your
Washer, steps 2 and 5.
See Operating Your Washer, steps •
1 and 2.
Do not overload washer.•
Use correct temperature and •
amount of detergent, water and
wash time.
Use fabric softener in the washer •
to lubricate fi bers.
When ironing, use spray starch or •
fabric fi nish on collars and cuff s.
Turn items inside out to reduce •
abrasion.
hottest water safe for fabric.
Do not overload washer.•
Use liquid detergent or use nonpre-•
cipitating water conditioner with
powder detergent.
Do not overload washer.•
Remove items from washer as soon •
as cycle is completed.
Use liquid fabric softener.•
23

Solutions to Common Problems
Common Washing Problems, continued
PROBLEM POSSIBLE CAUSES SOLUTIONS PREVENTIVE MEASURES
Yellow buildup
of body soil on
synthetic fabrics
Yellow or brown
rust stains
Residue stains /
buildup, mold or
mildew stains in
gasket
Residue stains /
buildup, mold or
mildew stains in
dispenser drawer
Water in fold of
fl exible gasket
Odor Moisture in the washer.•
Agitation time too short.•
Wash water temperature •
too low.
Not enough detergent.•
Iron or manganese in water •
supply, water pipes, or water
heater.
Moisture in the washer.•
Use of non-HE detergent.•
Overdosing detergent.•
Overloading wash drum.•
Leaving a wet load set in •
washer.
Cold water washes which •
may not completely dissolve
and remove detergents.
Moisture in the washer.•
Use of non-HE detergent.•
Overdosing detergent.•
Result of washing and part •
of normal operation.
Use of non-HE detergent.•
Overdosing detergent.•
Leaving a wet load remain •
in washer.
Cold water washes which •
may not completely dissolve
and remove detergents.
Soak in detergent booster or product •
containing enzymes.
Wash in hottest water safe for fabric •
using casual cycle.
Increase detergent.•
Add bleach safe for fabric or treat •
with color remover.
To restore discolored load of whites, •
use rust remover safe for fabric.
Do not use chlorine bleach to remove •
rust stains. It may intensify discoloration.
Perform • Clean Washer cycle
Scrub gasket with Comet™ Spray Gel •
Mildew Stain Remover using brush to
remove stains.
Use only HE (high effi ciency detergent) •
along with recommended dosage.
Remove wash load immediately upon •
cycle completion.
Remove dispenser drawer and wipe •
dispenser and inserts with combination
of ¾ cup liquid chlorine bleach and
one gallon hot water. Rinse well, and
repeat if necessary. Return drawer to
location. NOTE: Wear rubber of latex
gloves. Protect fl oor and clothing from
bleach damage.
Use only HE (high effi ciency detergent) •
along with recommended dosage.
At the end of each wash, dry inside •
of gasket fold with clean dry towel all
around gasket.
Perform • Clean Washer cycle.
At the end of each wash, dry inside of •
gasket fold with clean, dry towel all
around gasket.
Use only HE (high effi ciency detergent) •
along with recommended dosage.
Remove wash load immediately upon •
cycle completion.
Pour one cup liquid chlorine bleach in •
standpipe; let remain a day and fl ush
with water.
Select correct wash cycle.•
Use correct amount of detergent.•
Wash synthetics frequently using •
hot or warm water.
Use nonprecipitating water soft-•
ener.
Before washing, run hot water for •
a few minutes to clear lines.
Drain water heater occasionally.•
For an ongoing problem, install •
an iron fi lter in your water supply
system.
Run dehumidifi er in laundry room.•
Avoid overfi lling detergent and •
fabric softener compartments of
dispenser.
Dry the inside of washer and gas-•
ket after every run.
Avoid overfi lling detergent and •
fabric softener compartments of
dispenser.
Leave door and dispenser drawer •
open for a few hours after use or
whenever washer is not in use.
24

Solutions to Common Problems
Avoid Service Checklist
Before calling for service, review this list. It may save both time and expense. The list includes common occurrences that are not the result of defective workmanship or materials in this washer.
IMPORTANT
Disconnect washer from electrical service before performing any work on unit or on associated
systems (including electrical supply, water inlet or water drainage).
OCCURRENCE POSSIBLE CAUSE SOLUTION
NOISE
High pitch “jet engine”
noise.
Rattling and clanking
noise.
Thumping sound. Heavy wash loads may produce
Vibrating noise. Washer is not resting fi rmly on fl oor. Move washer so it rests fi rmly on fl oor. Adjust
OPERATING
Washer does not start. Electrical power cord may not be
Washer won’t spin. Load is too small. Add 1 or 2 similar items to help balance the load.
Residue left in drum. Heavily soiled items. Wipe drum with a nonabrasive household cleans-
A certain amount of motor whine is
normal during the spin cycle.
Foreign objects such as coins or
safety pins may be in drum or pump.
Belt buckles and metal fasteners are
hitting wash drum.
a thumping sound. This is usually
normal. If sound continues, washer is
probably out of balance.
Shipping bolts and foam block have
not been removed during installation.
Wash load unevenly distributed in
drum.
plugged in or connection may be
loose.
House fuse blown, circuit breaker
tripped, or a power outage has occurred.
Water supply faucets are not turned
on.
Motor is overheated. Washer motor
will stop if it becomes overheated.
Washer door is not completely
closed.
Stop washer and check drum. If noise continues
after washer is restarted, objects may be in pump.
Call a Sears or other qualifi ed service dealer.
To prevent unnecessary noise and damage to
drum, fasten fasteners and turn items inside out.
Stop washer and redistribute wash load.
leveling legs. See
for details.
See
INSTALLATION INSTRUCTIONS
shipping bolts and foam block.
Stop washer and rearrange wash load.
Make sure plug fi ts tightly in wall outlet.
Reset circuit breaker or replace fuse. Do not
increase fuse capacity. If problem is a circuit overload, have it corrected by a qualifi ed electrician.
If problem is a power outage, call local electric
company.
Turn on water supply faucets.
It will automatically restart after a cool down
period of up to 30 minutes (if washer has not been
manually turned off ).
Close door completely.
er, then rinse. Shake or brush excess dirt and sand
from items before washing
INSTALLATION INSTRUCTIONS
for removing
25

Solutions to Common Problems
Avoid Service Checklist, continued
OCCURRENCE POSSIBLE CAUSE SOLUTION
WATER
Water collects in folds
of front door fl exible
gasket at the end of the
cycle.
Water collects in bleach
and fabric softener
compartments.
Wash load too wet
after spin.
Water does not enter
washer or it enters
slowly.
Warm or hot water is
not hot enough.
Water in washer does
not drain or drains
slowly.
Water leaks. Fill hose connection is loose at faucet
Oversudsing. Wrong detergent. Run rinse cycle. Use a low-sudsing, high effi ciency
Incorrect wash and rinse
temperatures.
Water is entering
washer but tub does
not fi ll.
This is a result of the washing action
and is part of the normal operation
of the washer.
This is a result of the siphoning action
and is part of the normal operation of
the washer.
Washer is overloaded. Do not overload washer. See Operating Your
Load is too small. Add 1 or 2 similar items to help balance the load.
Load is out of balance. Rearrange load to allow proper spinning.
Drain hose is kinked. Straighten drain hose.
Water supply is not adequate in area. Check another faucet in the house. Wait until water
Water supply faucets are not completely open.
Water is being used elsewhere in the
house. Water pressure must be at
least 30 psi (260 kPa).
Water inlet hoses are kinked. Straighten hoses.
Hot water heater is set too low or is a
distance from washer.
Hot water is being used elsewhere in
the house.
Drain hose is kinked or clogged. Clean and straighten the drain hose.
Drain hose standpipe is too tall. Maxi-
mum standpipe height is 8’ (2.4 m).
House drain pipes are clogged. Unclog drain pipes. Contact plumber if necessary.
or washer.
Too much detergent. Run rinse cycle. Use less detergent in future loads.
Hot and cold water hoses are con-
nected to wrong supply faucets.
Drain hose standpipe is too low. Stand-
pipe must be a minimum of 23.6” (60
cm) high to prevent siphoning.
Water may be removed by removing the dispenser
drawer (see
draining water into the empty drum or sink.
Washer, step 4.
supply and pressure increase.
Fully open hot and cold faucets.
Avoid running water elsewhere while washer is
fi lling.
Measure hot water temperature at nearby faucet
with candy or meat thermometer. Water temperature should be at least 120°F (49°C). Adjust water
heater as necessary.
Avoid using hot water elsewhere before or during
washer use. There may not be enough hot water
available for proper cleaning. If problem persists,
your hot water system may be unable to support
more than 1 use at a time.
Reduce standpipe height to less than 8’ (2.4 m).
See
INSTALLATION INSTRUCTIONS
Check and tighten hose connections. Install rubber
sealing washers provided.
detergent.
Connect hot water hose to hot water faucet and
cold water hose to cold water faucet.
Increase standpipe height to at least 23.6” (60
cm). See
Care and Cleaning
in this guide) and
.
INSTALLATION INSTRUCTIONS
.
26

Use & Care Guide
Guide d’utilisation et d’entretien
English / Français
Models / Modèles: 970.C4808*
®
Kenmore
Front Load Washer
Laveuse à Chargement Frontal
* = Color number, le numéro de couleur
Sears Brands Management Corporation
Hoff man Estates, IL 60179 U.S.A.
www.kenmore.com
www.sears.com
Sears Canada Inc.
Toronto, Ontario, Canada M5B 2C3
www.sears.ca
TM

Noter les numéros de modèle
Mesures de sécurité importantes
et de série
Les numéros de modèle et de série de la laveuse se
trouvent sur la plaque signalétique á la gauche de
l’ouverture de la porte. Noter et conserver ces numéros.
N° de modèle ___________________________
N° de série _____________________________
Date de l’achat _________________________
Le présent Guide de l’utilisateur décrit le mode d’emploi
général de la laveuse. Il contient également des
renseignements sur les caractéristiques de divers autres
modèles. Les caractéristiques décrites ici peuvent ne pas
s’appliquer à toutes les laveuses.
Les instructions comprises dans ce guide et toute autre
documentation fournie avec cet appareil ne sont pas
conçues pour couvrir toutes les éventualités ou situations
qui pourraient survenir. Vous DEVEZ faire preuve de bon
sens et de prudence durant l’installation, l’utilisation et
l’entretien de tout appareil ménager. N’utiliser la laveuse
que conformément au guide de l’utilisateur et à la Notice
de fonctionnement qui l’accompagnent.
Sachez reconnaître les symboles, les avertissements et les étiquettes de sécurité.
Les mesures de sécurité présentées dans ce guide sont
identifi ées par le mot AVERTISSEMENT ou ATTENTION
selon le type de risque présenté ci-dessous:
Défi nitions
Voici le symbole d’avertissement concernant la sécurité.
Il est utilisé pour vous avertir des risques de blessures
potentiels. Respectez tous les messages qui suivent ce
symbole afi n de prévenir les blessures ou la mort.
DANGER
La mention DANGER indique un risque imminent qui
causera la mort ou de graves blessures, s’il n’est pas évité.
AVERTISSEMENT
La mention AVERTISSEMENT indique une situation
potentiellement dangereuse qui, si elle n’est pas évitée,
pourrait entraîner des blessures graves ou même la mort.
Table des Matières
Mesures de Sécurité Importantes ................................ 28-29
Garantie / Contrats de Protection Principaux ................ 30
Caractéristiques .................................................................... 31
Instructions d’utilisation ................................................. 32-43
Guide d’élimination des taches ...................................44-45
Entretien et nettoyage ...................................................46-49
Solutions aux problèmes courants ............................... 50-53
Remarques ............................................................................ 54
ATTENTION
La mention ATTENTION signale la présence d’une
situation potentiellement dangereuse susceptible de
causer des blessures mineures ou moyennement graves si
elle n’est pas évitée.
IMPORTANT
IMPORTANT - Cette mention précède des
renseignements importants relatifs à l’installation, au
fonctionnement ou à l’entretien. Toutefois, ceux-ci
n’impliquent aucune notion de danger.
Conservez ces instructions pour
vous y reporter ultérieurement.
28

Mesures de sécurité importantes
Prise murale avec
mise à la terre
à la terre de cette che.
Ne coupez pas, n'enlevez
pas et ne mettez pas hors
circuit la broche de mise
Cordon électrique muni
avec mise à la terre
d’une che à trois broches
AVERTISSEMENT
Pour réduire les risques d’incendie, de choc électrique,
de blessures ou de dommages à la propriété lors
de l’utilisation de cette laveuse, suivez les consignes
ci-dessous : Tout défaut de se conformer à ces
avertissements pourrait entraîner de graves blessures.
Vous pouvez être tué ou blessé grièvement si vous ne
suivez pas ces instructions de sécurité importantes :
PRÉVENTION DES INCENDIES
Ne lavez pas d’articles qui ont préalablement été lavés, •
trempés ou éclaboussés avec de l’essence, des solvants, du
kérosène, des huiles de cuisson, de la cire, etc. Ne rangez pas
ces articles sur la laveuse ou près de celle-ci. Ces substances
dégagent des vapeurs ou peuvent entraîner une réaction
chimique qui pourrait causer un incendie ou une explosion.
Ne placez pas de chiff ons ni de vêtements huileux ou •
graisseux sur la laveuse. Ces substances dégagent des
vapeurs qui pourraient enfl ammer les tissus.
N’ajoutez pas d’essence, de solvant de nettoyage ni •
toute autre substance infl ammable ou explosive dans
l’eau de lavage. Ces substances dégagent des vapeurs
qui pourraient s’enfl ammer ou exploser.
Dans certaines conditions, de l’hydrogène gazeux peut •
être produit dans un système à eau chaude qui n’a pas
été utilisé depuis au moins deux semaines. L’HYDROGÈNE
GAZEUX EST EXPLOSIF. Si le système à eau chaude n’a
pas été utilisé depuis une certaine période, ouvrez tous
les robinets d’eau chaude et laissez l’eau couler pendant
plusieurs minutes avant d’utiliser la laveuse. Cela permet
d’évacuer tout hydrogène gazeux qui a pu s’accumuler.
L’hydrogène gazeux est infl ammable; ne fumez pas ou
n’utilisez pas une fl amme nue en présence de ce gaz.
Vous ne devez ni entreposer, ni utiliser d’essence ou •
d’autres vapeurs ou liquides infl ammables à proximité de
cet appareil ou de tout autre appareil électroménager.
Tout défaut de se conformer à ces avertissements pourrait •
entraîner un incendie, de graves blessures ou des dommages
aux pièces en plastique et en caoutchouc de la laveuse.
PROTECTION DES ENFANTS
Ne laissez pas les enfants grimper sur la laveuse ou jouer •
autour de celle-ci. Assurez une supervision attentive lorsque
l’appareil est utilisé près des enfants. Lorsque les enfants
grandissent, enseignez-leur la façon d’utiliser les appareils
électroménagers de façon appropriée et sécuritaire.
Détruisez le carton, les sacs en plastique et tout matériau •
d’emballage externe immédiatement après le déballage
de la laveuse. Les enfants pourraient les utiliser pour
jouer. Le carton recouvert de tapis, les couvertures et les
feuilles de plastique peuvent être étanches à l’air.
Tenez les produits de lavage hors de la portée des •
enfants. Pour prévenir les blessures, respectez tous les
avertissements des étiquettes des produits.
Avant de mettre la laveuse hors service ou au rebut, enle-•
vez la porte pour éliminer les risques d’enfermement.
Tout défaut de se conformer à ces avertissements pour-•
rait entraîner de graves blessures.
PRÉVENTION DES BLESSURES
Pour éliminer tout risque de choc électrique et assurer le •
bon fonctionnement de l’appareil, la laveuse doit être installée et mise à la terre par un technicien autorisé en vertu
des règlements locaux. Les instructions d’installation sont
situées dans la laveuse et sont destinées à l’installateur.
Reportez-vous aux INSTRUCTIONS D’INSTALLATION pour
consulter les procédures de mise à la terre détaillées. Si la
laveuse est déplacée vers un autre endroit, vous devez la
faire vérifi er et réinstaller par un technicien qualifi é.
Pour prévenir les blessures ou les dommages à la laveuse, •
le cordon d’alimentation de la laveuse doit être branché
dans une prise à trois fi ches mise à la terre et polarisée.
La fi che de mise
à la terre ne doit
jamais être retirée.
N’utilisez jamais un
tuyau de gaz pour
eff ectuer la mise
Prise murale avec
mise à la terre
Ne coupez pas, n'enlevez
pas et ne mettez pas hors
circuit la broche de mise
à la terre de cette che.
à la terre de la laveuse. N’utilisez pas
de rallonge électrique ni de fi che
d’adaptation.
Cordon électrique muni
d’une che à trois broches
avec mise à la terre
Suivez les directives de l’emballage lorsque vous uti-•
lisez des produits de lavage. Un usage incorrect peut
entraîner la production de gaz qui pourrait causer des
blessures graves, voire la mort.
Ne combinez pas des produits de lavage dans une même •
charge à laver, sauf si cela est indiqué sur l’étiquette.
Ne combinez pas •
de javellisant avec
de l’ammoniaque
ou de l’acide tel
le vinaigre.
PRÉVENTION DES BLESSURES ET DES DOMMAGES À LA LAVEUSE
Pour prévenir les blessures et les dommages à la laveuse :
Toutes les réparations et l’entretien doivent être eff ectués •
par un fournisseur autorisé à moins d’avis contraire dans
ce Guide d’utilisation et d’entretien. Utilisez seulement
des pièces d’origine autorisées.
Ne modifi ez pas les commandes.•
N’installez pas ou n’entreposez pas la laveuse dans un •
endroit où elle sera exposée aux intempéries.
N’installez pas l’appareil sur un tapis. Installez la laveuse •
sur un plancher solide. Il peut être nécessaire de renforcer le plancher pour prévenir la vibration ou le mouvement de l’appareil.
Pour réduire les risques de choc électrique, débranchez •
l’appareil de son alimentation électrique avant d’en faire l’entretien. Vous ne coupez pas l’alimentation électrique de cet
appareil en mettant les commandes à la position OFF (Arrêt).
Pour éviter tout risque de blessure, ne plongez pas la main •
à l’intérieur de la laveuse si celle-ci est en fonction. Avant
de charger ou de décharger la laveuse, ou d’y ajouter des
articles, appuyez sur le sélecteur de cycle pour permettre
au tambour de s’arrêter avant d’y insérer la main.
Cette laveuse est équipée d’un dispositif de protection •
contre les surcharges électriques. Le moteur de la laveuse
s’arrête s’il surchauff e. La laveuse redémarre automatique-
ment après une période de refroidissement allant jusqu’à
30 minutes si la minuterie n’a pas été éteinte manuellement.
Tout défaut de se conformer à ces avertissements pour-•
rait entraîner de graves blessures.
29

Garantie sur Appareil Kenmore
Garantie limitée d’un an
Si le produit est installé, utilisé et entretenu selon toutes
les instructions fournies et qu’il présente un problème relié à un défaut de fabrication ou à un vice de matériau
au cours de l’année suivant la date d’achat, téléphonez
au 1-800-LE-FOYER pour obtenir une réparation gratuite de l’appareil.
Si cet appareil est utilisé à d’autres fi ns que l’usage familial privé, cette garantie est valide seulement pendant
90 jours suivant la date d’achat.
Cette garantie couvre seulement les défauts de fabrication ou les vices de matériau. Sears ne couvre PAS
les frais liés :
Aux articles consomptibles qui sont sujets à l’usure 1.
normale, incluant, sans en exclure d’autres, filtres,
courroies, ampoules et sacs.
À la visite d’un réparateur pour démontrer 2.
l’installation, l’utilisation et l’entretien appropriés de
l’appareil.
À la visite d’un réparateur pour nettoyer ou entretenir 3.
l’appareil.
Aux dommages ou pannes causés par une mauvaise 4.
installation, une mauvaise utilisation ou un mauvais
entretien qui n’ont pas été eff ectués selon toutes les
instructions fournies avec ce produit.
Aux dommages ou pannes causés par un accident, 5.
un abus, une mauvaise utilisation ou toute utilisation
autre que celle pour laquelle il a été conçu.
Aux dommages ou pannes causés par l’utilisation 6.
de détergents, nettoyants, produits chimiques ou
accessoires autres que ceux recommandés dans
toutes les instructions fournies avec ce produit.
Aux dommages aff ectant les pièces ou les systèmes 7.
ou aux pannes causés par des modifications du
produit non autorisées.
Exonération de garanties implicites; limitations des recours
L’unique recours du client en vertu de cette garantie limitée est la réparation du produit comme décrit
précédemment. Les garanties implicites, y compris les
garanties implicites de qualité marchande et d’adaptation à un usage particulier, sont limitées à un an ou à la
période la plus courte permise par la loi. Sears ne peut
être tenue responsable des dommages directs et indirects. Certains États et certaines provinces ne permettent
pas de restriction ou d’exemption sur les dommages
directs ou indirects, ou de restriction sur les garanties
implicites de qualité marchande ou d’adaptation à un
usage particulier. Dans ce cas, ces restrictions ou exemptions pourraient ne pas être applicables.
Cette garantie est valide seulement si ce produit est
utilisé aux États-Unis ou au Canada.
Cette garantie vous donne des droits juridiques
spécifiques et vous pouvez aussi bénéficier d’autres
droits qui varient d’un État à un autre, ou d’une province
à une autre.
Sears Brands Management Corporation, Hoff man
Estates, IL 60179
Sears Canada Inc., Toronto, Ontario, Canada M5B 2C3
Contrats de Protection Principaux
Félicitations! Vous avez fait un bon achat. Votre nouvel appareil Kenmore
plusieurs années d’utilisation sans tracas. Cependant, comme
tout appareil, il peut nécessiter un entretien préventif ou des
réparations occasionnelles. C’est pourquoi un contrat de protection principal peut vous permettre d’épargner de l’argent et
vous éviter des problèmes.
Le contrat de protection principal contribue également à prolonger la durée de vie de votre nouvel appareil. Voici ce que
couvre le contrat* :
Les pièces et la main-d’oeuvre requises pour le •
fonctionnement adéquat de l’appareil dans des conditions
d’utilisation normales , pas seulement pour les défauts.
Notre couverture vous off re beaucoup plus que la simple
garantie du produit. Aucune franchise, aucune exclusion de
défaillance fonctionnelle, une véritable protection.
Un service professionnel off ert par une équipe de plus de •
10,000 techniciens de service Sears autorisés, ce qui signifi e
que votre appareil sera confi é à une personne de confi ance.
Des appels de service illimités et un service à la grandeur •
du pays, à tout moment, aussi souvent que vous le désirez.
La garantie « anti-citron » , vous assurant le remplacement •
de l’appareil couvert si quatre défaillances ou plus
surviennent à l’intérieur de douze mois.
Le remplacement de l’appareil couvert s’il ne peut être réparé.•
Une vérifi cation d’entretien préventive annuelle sur •
demande et sans frais.
Un service d’aide téléphonique rapide, appelé « Résolution •
rapide » , qui vous permet de bénéfi cier du soutien
téléphonique d’un représentant Sears pour tous les produits.
Nous sommes votre « guide d’utilisation parlant ».
Une protection contre les surtensions pour les dommages •
électriques causés par des fl uctuations électriques.
Une couverture annuelle de 250 $ pour la perte d’aliments •
à la suite de toute détérioration d’aliments résultant
d’une défaillance mécanique d’un réfrigérateur ou d’un
congélateur couvert.
Le remboursement de la location, si la réparation de •
l’appareil couvert prend plus de temps que prévu.
Un rabais de 10 % sur le prix régulier de tout service de •
réparation non couvert et les pièces installées qui en découlent.
Une fois le contrat acheté, un simple appel téléphonique suffi t
pour obtenir un service de réparation. Vous pouvez téléphoner
à toute heure du jour ou de la nuit, ou prendre rendez-vous en
ligne pour une réparation.
Le contrat de protection principal est un achat sans risque. Si,
pour quelque raison que ce soit, vous annulez le contrat durant
la période de garantie du produit, vous serez remboursé en totalité. En cas d’annulation après la période de garantie du produit,
vous recevrez un remboursement calculé au prorata. Procurezvous votre contrat de protection principal dès aujourd’hui!
Certaines restrictions et exclusions s’appliquent. Si vous êtes aux
États-Unis et que vous désirez connaître les prix et obtenir de
plus amples renseignements, téléphonez au 1 800 827-6655.
* Au Canada, la couverture de certains articles peut varier.
Pour connaître tous les détails, communiquez avec Sears Canada au 1 800 361-6665.
Service d’installation Sears
Pour bénéfi cier du service d’installation professionnel de Sears
pour électroménagers, ouvre-portes de garage, chauff e-eau et
autres appareils domestiques importants, aux États-Unis et au
Canada, téléphonez au 1-800-LE-FOYER.
®
est conçu et fabriqué dans le but de vous off rir
30

Caractéristiques
Sélecteur de programme
Tiroir distributeur
Gâche-porte
Affi chage
Verrouillage des
commandes
Loquet de porte
avec verrouillage
de sécurité
Vitre interne avec
rampe de redistribution
des petits articles
Cuve de lavage en
acier inoxydable
À titre de partenaire ENERGY STAR®,
Sears Brands Management Corporation
déterminé que cet appareil répond aux
normes ENERGY STAR® relativement à
l’effi cacité énergétique.
Pieds de mise à
niveau réglables
31
Loquet de
ventilation
Ailettes de lavage
en cascade

Instructions d’Utilisation
Ce manuel couvre plusieurs modèles et certaines options, cycles ou caractéristiques décrites ne sont pas disponibles sur des modèles particuliers. La
console montrée ci-haut est fournie à titre de référence seulement et votre modèle pourrait être diff érent.
Sélection d’un Programme
Tournez le sélecteur de programme dans un sens ou dans
l’autre vers le programme désiré. Le voyant du programme
sélectionné s’allumera.
Pour de meilleurs résultats
Suivez les instructions sur les étiquettes
des articles à laver.
REMARQUE
Ce programme est certifi é par NSF International, une
organisation d’essai et de certifi cation indépendante
spécialisée dans la santé publique, la sécurité et la
protection de l’environnement.
NSF Protocol P172
Sanitization Performance of Residential
and Commercial, Family-Sized Clothes
Washers
Pour changer de programme lorsque la sécheuse est en
marche, appuyez sur « CANCEL » (annuler) avant de
sélectionner un nouveau programme. Si vous modifi ez
simplement la sélection avec le bouton du sélecteur de
programme, le programme ne changera pas.
Sanitize (Désinfection)
Utilisez le programme « Sanitize » (désinfectant) pour
nettoyer et désinfecter les articles très souillés et grand
teint, dont les serviettes, la literie et les vêtements pour
enfants.
Nous vous recommandons de régler votre chauff e-eau
à 49 °C (120 °F) ou plus pour assurer une performance
adéquate de l’appareil durant ce programme. Si le
réglage de la température est inférieur à celui indiqué
ci-dessus ou que la lessive est très volumineuse, la durée
du programme sera prolongée de 30 minutes ou plus.
Le programme « Sanitize » (Désinfection) élimine
99,9 % des bactéries sans les transmettre d’une lessive
à l’autre. Il n’est pas nécessaire d’utiliser de javellisant ni
de produits chimiques forts, mais une eau à température
élevée est nécessaire. Reportez-vous aux étiquettes d’entretien des vêtements pour éviter de les endommager.
L’eau de lavage est chauff ée par une chauff erette in-
terne qui permet à l’eau d’atteindre une température de
67 °C (152 °F), pendant que le culbutage des articles. De
l’eau froide est ajoutée pour refroidir la charge avant la
vidange et l’essorage.
REMARQUE
Si la tension de votre prise électrique est inférieure à
110 V, la chauff erette interne peut ne pas être en mesure
de réchauff er adéquatement l’eau de lavage. Si le
programme est suspendu pendant le chauff age de l’eau,
la température maximale atteinte par l’eau peut être
plus basse, ce qui pourrait compromettre l’effi cacité de
la désinfection.
Par mesure de sécurité, la porte de la laveuse se verrouille lorsque la température de l’eau atteint 55 °C
(130 °F). Si le programme est annulé pendant le lavage
et que la température de l’eau est supérieure à 66 °C
(150 °F), un refroidissement de l’eau et une vidange
s’eff ectuent automatiquement avant que la porte puisse
être ouverte.
32

Sélection d’un Programme (suite)
Instructions d’Utilisation
Heavy/Bulky (Robuste/ Volumineux)
Utiliser ce cycle pour linge très sale, vêtements durables
-ex. serviettes, tenue de sport, ou grands sacs (fourre-tout). Pour une élimination effi cace de la saleté et
des taches, lavez les articles dans l’eau la plus chaude
convenant au tissu.
Allergen (Allergène)
Si des personnes souff rent d’asthme ou d’allergie dans
votre maison, utilisez ce programme pour combiner lavage à l’eau chaude (l’eau sera chauff ée par le chauf-
fe-eau interne), culbutage à grande vitesse et rinçages
multiples de façon à éliminer le plus d’acariens détriticoles et de squames d’animaux possible.
REMARQUE
Ce programme est certifi é par NSF International, une
organisation d’essai et de certifi cation indépendante
spécialisée dans la santé publique, la sécurité et la
protection de l’environnement.
NSF Protolcol P351
Allergen Reduction Performance
of Residential and Commercial,
Family-Sized Clothes Washers
Le programme « Allergen » (Allergène) détruira tous
les acariens détriticoles et au moins 95 % des squames
d’animaux. Reportez-vous aux étiquettes d’entretien des
vêtements pour éviter de les endommager.
Whitest Whites (Blancs Éclatants)
Utiliser ce cycle pour du linge blanc et des vêtements a
couleur claire. Voir l’instruction de lavage du tissu pour
l’utilisation du javellisant liquide. Nous vous recommandons d’utiliser de l’eau chaude pour optimiser l’action du
javellisant. Pour optimiser l’effi cacité du rinçage et éviter
que des résidus de chlore ne se déposent sur vos tissus,
ajoutez l’option « Extra Rinse » (Rinçage Additionnel) à
ce programme.
Normal (Normal)
Utiliser cette charge pour du coton, linge de maison, serviettes chemises, draps, denims (jeans) et charges mixtes.
Casual (Tout-Aller)
Utiliser ce cycle pour coton et tissus mélanges a pli permanent ou sans repassage nécessaire.
Express Wash (Lavage Rapide)
Laver rapidement une petite charge de linge légèrement
sale en 25 minutes.
Delicates (Délicats)
Utiliser ce cycle pour linge tricot légèrement sale et délicat qui a besoin d’un lavage doux.
Jeans (Jeans)
Le cycle Jeans permet de laver une charge complète de
jeans en denim. Il lavera la charge par culbutage inversé
pendant 20 minutes.
Spin Only (Essorage seulement)
Utilisez ce cycle à la suite d’une sélection ne comportant
« No Spin » (Pas d’essorage) ou en tout temps lorsque
vous désirez vidanger l’eau de la machine à laver et
essorer la charge. Choisissez la vitesse d’essorage appropriée à la charge.
REMARQUE
Pour ajouter un rinçage avant l’essorage au programme
« Spin Only » (Essorage seulement), sélectionnez l’option
« Extra Rinse » (Rinçage Additionnel). Utilisez cette
procédure pour les charges qui nécessitent un rinçage à
l’eau froide ou pour ajouter de l’assouplisseur de tissus
qui pourrait avoir été oublié au cours du cycle régulier.
Versez l’assouplisseur de tissus dans le compartiment du
dispensateur.
33

Instructions d’Utilisation
Réglage de cycles
Pour de meilleurs résultats
Suivez les instructions sur les étiquettes
des articles à laver.
La température de lavage, vitesse d’essorage, niveau de
saleté et options appropriée s’affi chera automatiquement
pour le programme sélectionné. Les réglages peuvent être
modifi és avant le début du cycle.
Hot (Chaude)
Utilisez ce réglage pour nettoyer les articles grand teint
très sales comme les serviettes, la literie et les vêtements
pour enfants.
Warm (Tiède)
Utilisez ce réglage pour laver les articles blancs ou
grand teint moyennement sales faits en coton ou en
fi bres mélangées.
Cold (Froide)
Pour obtenir une température d’eau froide précise, un
peu d’eau tiède sera automatiquement mélangée à l’eau
froide. Utilisez ce réglage pour nettoyer les articles légèrement sales autres que grand teint, les tricots, les articles
délicats et les articles lavables à la main.
Cold Clean (Lavage Froid)
Les températures de lavage et de rinçage seront les
mêmes que celle de l’alimentation d’eau froide. Choisissez cette option de température pour le lavage des
tissus dont les couleurs sont susceptibles de déteindre sur
d’autres tissus. Pour un lavage avec des détergents
pour l’eau froide.
TEMPÉRATURE DE LAVAGE
Pour changer la température, appuyez sur le bouton
« Auto Temp » (Température) pour naviguer vers le réglage
désiré. Sélectionnez une température d’eau de lavage qui
convient au type de fi bre des articles à laver, à la solidité
de la couleur et au niveau de saleté des articles. Un rinçage
à l’eau froide économise l’énergie et réduit le froissage.
Pour protéger vos articles, certaines températures ne sont
pas off ertes avec chaque programme. Si un réglage ne
convient pas à un programme en particulier, le voyant
correspondant à ce réglage ne s’allumera pas.
REMARQUE
Pour changer la température lorsque la sécheuse est
en marche, appuyez sur le bouton « PAUSE » (pause),
sélectionnez un nouveau réglage et appuyez de nouveau
sur « START » (démarrer).
Toutes les températures d’eau de lavage sont réglées automatiquement pour maximiser l’effi cacité du détergent et
améliorer les performances de lavage. Toutefois, le réglage
du chauff e-eau et la longueur des tuyaux entre le chauff e-
eau et la laveuse, l’utilisation d’eau dans d’autres sections
de la maison et la basse température de l’eau souterraine
selon la saison dans certaines régions sont des facteurs qui
peuvent infl uencer la température de l’eau.
Extra Hot (Extra-Chaude)
Utilisez ce réglage pour nettoyer les articles grand teint
très sales comme les serviettes, la literie et les vêtements
pour enfants. Le réglage « Extra Hot » (Extra-Chaude)
permet d’alimenter la machine en eau chaude chauff ée
par la chauff erette interne.
VITESSE D’ESSORAGE
Pour protéger vos articles, les vitesses d’essorage ne sont
pas toutes off ertes avec chaque programme. Si un réglage
ne convient pas à un programme en particulier, le voyant
correspondant à ce réglage ne s’allumera pas.
Les vitesses d’essorage « Extra High » (Extra-Rapide),
« High » (Rapide), « Medium » (Moyenne) et « Low »
(Lente) sont accessibles pour tous les programmes. La
vitesse et/ou le temps d’essorage fi nal varient selon le
programme.
L’accroissement de la vitesse d’essorage permet d’évacuer
plus d’eau des vêtements, de diminuer le temps de séchage
et d’économiser de l’énergie. La diminution de la vitesse
d’essorage réduit le froissage.
Sélectionnez la vitesse d’essorage « Low » (Lente) pour
essorer délicatement les articles à étendre.
Utilisez l’option « No Spin » (omettre essorage) pour que la
laveuse n’eff ectue pas d’essorage fi nal à la fi n du program-
me. Les vêtements seront très humides. Retirez les articles
de la laveuse pour égoutter les vêtements ou sélectionnez
le programme « Rinse & Spin » (Rinçage et Essorage) pour
retirer l’excédent d’eau à un moment plus opportun.
NIVEAU DE SALETÉ
Ajustez le temps de lavage par intervalles de 3 minutes
selon le niveau de saleté de chaque lessive. Cinq niveaux
de saleté sont off erts.
34

Options de cycles
Pour ajouter des options, appuyez sur les boutons des options désirées. Les voyants correspondants à celles-ci s’allumeront. Pour désactiver des options, appuyez de nouveau
sur les boutons des options désirées. Leur voyant respectif
s’éteindra. Certaines options exigent que l’on maintienne
des touches enfoncées après avoir appuyé sur elles pour
activer ou désactiver la fonction secondaire.
Les options ne sont pas toutes disponibles pour chaque
programme. Pour protéger vos articles, les options ne sont
pas toutes disponibles pour chaque programme. Si une
option ne convient pas à un programme en particulier, le
voyant correspondant à cette option ne s’allumera pas. Il
peut arriver que deux options d’un même cycle entrent un
confl it, par exemple « Add Steam » (ajout de vapeur) et
« Energy Saver » (Économiseur d’énergie). Lorsque cela se
produit, l’option qui a été sélectionnée en premier empêche la deuxième d’être sélectionnée.
REMARQUE
Pour changer les Options lorsque la sécheuse est en
marche, appuyez sur le bouton « PAUSE » (Pause),
sélectionnez les nouveaux réglages et appuyez de
nouveau sur « START » (Démarrer).
Instructions d’Utilisation
Add Steam (Ajout de vapeur)
Sélectionnez cette option pour augmenter d’environ 20
minutes la durée de culbutage à la vapeur pendant le
programme de nettoyage. Cette option est recommandée pour les articles très souillés afi n de faciliter le net-
toyage des taches tenaces après la première agitation.
REMARQUE
La vapeur n’est pas toujours visible à l’intérieur du •
tambour pendant le programme de nettoyage à la
vapeur.
Il se pourrait qu’aucune vapeur ne soit visible pendant •
tout le programme de nettoyage à la vapeur.
IMPORTANT
Si l’option vapeur est sélectionnée, la température de •
rinçage sera élevée.
Si la laveuse est mise en pause pendant le programme •
de lavage à la vapeur, la porte demeurera verrouillée
en raison de la température élevée dans le tambour.
Ne tentez PAS d’ouvrir la porte de force. Elle se
déverrouillera une fois le tambour refroidi.
Pendant le programme de nettoyage à la vapeur, vous •
remarquerez peut-être de la vapeur s’échappant de
l’évent arrière. C’est normal. Ne vous inquiétez pas.
Energy Saver (Économiseur d’Énergie)
L’option « Energy Saver » (Économiseur d’Énergie) réduit
de quelques degrés la température de l’eau chaude pour
économiser l’énergie et essore le linge plus en profondeur pour réduire le temps de séchage.
35

Instructions d’Utilisation
Options de cycles (suite)
Pre Wash (Prélavée)
Sélectionnez cette option pour ajouter une courte période
de lavage avant de commencer un programme. La lessive
très sale ou tachée sera prélavée pendant environ 5 minutes. L’eau sera ensuite évacuée, puis la laveuse passera
automatiquement au programme de lavage régulier.
Reportez-vous à l’étape 5 de la section
d’utilisation de votre laveuse »
pour connaître les détails concernant l’ajout de détergent
dans le distributeur.
Delay Start (Démarrage diff éré)
Appuyez sur « Delay Start » (Démarrage diff éré) pour
sélectionner l’heure de lavage la plus pratique en fonction de votre horaire ou hors des heures de pointe de
demande d’énergie. La durée du délai sélectionnée s’affi chera et le décompte débutera une fois que vous aurez
appuyé sur la bouton « START » (Démarrer).
Extra Rinse (Rinçage Supplémentaire)
Utilisez cette option lorsqu’un rinçage supplémentaire
est désiré pour enlever la saleté et le détersif excessifs.
Il est recommandé pour les charges très sales ou si des
membres de la famille ont la peau sensible.
contenue dans ce guide
« Instructions
Clean Washer (Nettoyage du système)
Pour nettoyer et rafraîchir la laveuse, utilisez le programme « Clean Washer » (nettoyage du système). Si vous
souhaitez commencer le programme, appuyez sur Select
(sélectionner) à l’invite. Ce programme d’entretien utilise
de l’eau chaude et eff ectue deux rinçages pour enlever
les résidus qui pourraient causer des odeurs. Reportezvous à la section
l’appareil (à des fi ns préventives) »
détails sur le programme « Clean Washer » (Nettoyage
du système).
« Nettoyage courant de l’intérieur de
pour obtenir des
REMARQUE
La laveuse vous invitera automatiquement à eff ectuer le
programme « Clean Washer » (Nettoyage du système)
tous les 50 programmes. Vous pouvez appuyer sur la touche « CANCEL » (Annuler) pour eff ectuer le programme
manuellement ultérieurement.
Control Lock (Verrouillage des commandes, appuyez et
tenir enfoncé)
Pour verrouiller les commandes, appuyez de nouveau sur
le bouton « Control Lock » (verrouillage des commandes)
et tenez-le enfoncé pendant 5 secondes. Répétez cette
procédure pour déverrouiller les commandes quand vous
êtes prêt à utiliser la sécheuse. Utilisez cette option pour
prévenir le risque de mise en marche accidentelle par
des enfants.
Chime (Carillon)
Un signal sonore est émis à la fi n du programme si cette
option est sélectionnée. Le volume peut être réglé ou mis
en sourdine.
Max Fill (Remplissage maximal, Appuyez et tenir enfoncé)
Permet d’augmenter le niveau de l’eau dans la cuve lors
du brassage pour tous les cycles de lavage.
36

Tableau de réglage de la laveuse
Ces températures, vitesses d’essorage, niveaux de saleté et options sont accessibles dans les programmes suivants :
Sanitize
(Désinfection)
Auto Temp (Température)
Extra Hot (Extra-Chaude)
Hot (Chaude)
Warm (Tiède)
Cold (Froid)
Cold Clean (Lavage Froid)
Spin Speed (Vitesse d’Essorage)
Extra High (Extra Rapide)
High (Rapide)
Medium (Moyenne)
Low (Lente)
No Spin (Omettre Essorage)
Soil Level (Niveau de Saleté)
Extra Heavy (Excessive)
Heavy (Élevée)
Normal (Moyen)
Light (Léger)
Extra Light (Très Léger)
Options (Options)
Energy Saver (Économiseur d’Énergie)
Add Steam (Ajout de Vapeur)
Pre-Wash (Prélavée)
Delay Start (Démarrage diff éré)
Extra Rinse (Rinçage Supplémentaire)
Clean Washer (Nettoyage du Laveuse)
Chime (Carillon, appuyez et tenir enfoncé)
Max Fill (Remplissage maximal, Appuyez et
tenir enfoncé)
9 = Valeurs défi nies en usine. = Paramètres par défaut. = Paramètres non-modifi able.
9
99999 9 99
9999999 99
99999
9 9999 999
999
999
999999
999999 9
9999999999
9999999999
9999999999
999999999
Instructions d’Utilisation
Heavy/Bulky
(Robuste/Volumineux)
Allergen
(Allergène)
Whitest Whites
(Blancs Éclatants)
Normal
(Normal)
Casual
(Tout-Aller)
Express Wash
(Lavage Rapide)
Delicates
(Délicats)
Jeans
(Jeans)
Spin Only
(Essorage Seulement)
9
9
9 9
9
99
9 99999
99
99
99
9 999 9
999 9
9
9
9
9
9
9
9
9
9
9
9
99
99
9999
99
99
9
9
9
9
9
9
9
37

Instructions d’Utilisation
1
2
3
Autres Caractéristiques
Affi chage des données du programme/Lumières d’état
La durée approximative totale du programme s’affi che
lorsque le programme est sélectionné. La durée réelle
peut être plus longue si la pression d’eau est faible, s’il y a
surmoussage ou si la charge se déséquilibre. La durée approximative qui reste au cycle s’affi che pendant le cycle.
Détection de Surmoussage
Lorsque du surmoussage est détecté par la laveuse, l’appareil tente de l’éliminer en ajoutant automatiquement
jusqu’à quatre programmes de rinçage. Chaque programme de rinçage supplémentaire eff ectué par l’appareil
ajoute 5 minutes au temps affi ché. Si vous avez ajouté une
quantité excessive de détergent, le message
DETERGENT
Loquet de ventilation
Vous pouvez aider à prévenir la formation de mauvaises
odeurs et de moisissure entre les lavages en utilisant le loquet de ventilation de votre laveuse. Pour utiliser le loquet
de ventilation, (1) ouvrez légèrement la porte de la laveuse,
(2) montez le bras du loquet, puis (3) abaissez le bras du
loquet dans la gâche en plastique de la porte pour qu’il
s’enclenche.
Le loquet de ventilation peut être désactivé de deux façons
– en ouvrant la porte de la laveuse et en replaçant le bras
du loquet à sa position initiale ou en appuyant sur la porte
fermée pour permettre au bras du loquet de pivoter vers le
haut.
» (Trop de détergent) s’affi chera.
« TOO MUCH
AFFICHAGE DES DONNÉES DU PROGRAMME
Aussi, les messages suivants s’affi chent à un
moment précis pendant le programme :
DOOR LOCK
PREWASHING
WASHING
ADDING STEAM
RINSING
DRAINING
SPINNING
CYCLE COMPLETE
DISPOSITIF
DE FIXATION
IMPORTANT
Ne tentez pas de fermer la porte si le bras du loquet de
ventilation est désengagé et que le bras est orienté vers
l’extérieur. Replacez le bras du loquet à sa position de
non-utilisation avant de fermer et de verrouiller la porte.
REMARQUE
Le loquet de ventilation peut se détacher de son dispositif
de fi xation si l’on tente de fermer la porte alors que le bras
du loquet n’est pas dans la bonne position de fermeture.
Si nécessaire, le bras du loquet peut être replacé dans son
dispositif de fi xation. La laveuse continuera à fonctionner
même si le bras du loquet n’est pas installé.
38

Instructions d’Utilisation
Instructions d’utilisation de votre laveuse
AVERTISSEMENT
Pour réduire les risques d’incendie, de choc électrique
ou de blessure, lisez les MESURES DE SÉCURITÉ
IMPORTANTES contenues dans ce guide d’utilisation et
d’entretien avant d’utiliser votre laveuse.
1 Triez les articles de la charge qui
peuvent être lavés ensemble.
B
L
A
S
N
C
Triez les ar-•
ticles selon la
température de
S
E
S
R
E
V
T
I
T
E
lavage recommandée et le temps de lavage.
Séparez les articles pâles, blancs et grand teint des •
articles noirs et qui ne sont pas grand teint.
Séparez les articles qui produisent de la charpie •
de ceux qui attirent celle-ci. Les articles tout-aller,
synthétiques, en velours côtelé et les tricots captent
la charpie des serviettes, des tapis et des couvertures
de chenille brodée.
Séparez les articles très sales de ceux qui le sont moins.•
Séparez les articles en dentelle, transparents et déli-•
cats des vêtements plus robustes.
N’utilisez pas la laveuse pour laver des articles •
contenant de la fi bre de verre. De petites particules
de fi bre de verre laissées dans le tambour pourraient
se fi xer à d’autres articles de lavages subséquents et
causer des irritations cutanées.
2 Préparez les articles à laver.
Videz les poches•
Brossez la charpie et la poussière. Secouez les tapis et •
les serviettes de plage.
Fermez les fermetures à glissière et les agrafes, attachez •
les cordes et les ceintures, retirez les décorations et les
garnitures non lavables.
Réparez les déchirures pour éviter d’aggraver les dom-•
mages pendant le lavage.
Placez les articles en tricot à l’envers pour minimiser le •
peluchage.
T
O
R
U
E
T
L
-
L
A
C
O
S
U
R
L
U
E
Placez les petits articles et les articles délicats comme •
les soutiens-gorge, les bonneteries et les bas
pour bébés dans un sac-fi let.
(Sac-fi let non compris.)
3 Eff ectuez un prétraitement des taches et de la
saleté tenace.
Reportez-vous au Guide •
d’élimination des
taches dans ce
guide pour obtenir
des instructions sur
l’élimination effi -
cace des taches.
4 Ajoutez la charge à la laveuse.
Combinez de grands et de petits articles dans le •
même lavage.
Chargez les grands articles en premier. Les grands •
articles ne doivent pas compter pour plus de la moitié
de la charge totale.
Le lavage d’articles seuls, comme un chandail, une •
serviette ou un jean peut causer le déséquilibre de la
charge. Ajoutez un ou deux articles pour équilibrer la
charge.
Lavez les articles volumineux comme les douillettes, •
les couvertures ou les sacs de couchage séparément,
un à la fois.
La laveuse peut être complètement chargée, mais les •
articles ne doivent pas être à l’étroit. La porte doit
pouvoir se fermer facilement.
39

Instructions d’Utilisation
Instructions d’utilisation de votre laveuse (suite)
5
Mettez les produits de lessive dans le distributeur.
Pour de meilleurs résultats
Utilisez un détergent haute effi cacité qui produit
peu de mousse pour éviter le surmoussage dans
la laveuse à chargement frontal. Recherchez ce
symbole sur l’étiquette du détergent :
Le détergent, le javellisant et l’assouplissant liquide seront distribués au bon moment durant le programme.
IMPORTANT
Ouvrez et fermez le tiroir distributeur lentement. Fermer
le tiroir trop rapidement pourrait entraîner une distribution
prématurée du javellisant ou de l’assouplissant.
Utilisez le capuchon ou la pelle fournie par le fabricant
pour mesurer la quantité recommandée. La quantité de
détergent utilisée peut devoir être ajustée en fonction de
la température de l’eau, de sa dureté, de l’importance de
la charge et du niveau de saleté.
Insérez le réservoir
de détergent liquide
lorsque vous utilisez un
détergent liquide.
Détergent liquide
Ajoutez la quantité recommandée de détergent •
liquide haute effi cacité dans le réservoir de détergent
principal.
Ne dépassez pas la ligne de remplissage MAX (maxi-•
male).
Le détergent liquide peut également être ajouté •
directement au compartiment «Main Wash» (de détergent principal) lorsque l’option de prélavage n’est
pas utilisée.
REMARQUE
De temps à autre, vous pouvez apercevoir de l’eau dans
les compartiment « Main Wash - liquid only » (réservoir
de détergent liquide principal seulement). Cela fait partie
du fonctionnement normal de l’appareil.
Détergent en poudre
Pour utiliser un détergent en poudre haute effi cacité, •
retirez le réservoir « Main Wash - liquid only » (liqui-
de) et ajoutez le détergent en poudre dans le compartiment « Main Wash » (de détergent principal).
IMPORTANT
Conservez la languette de distributeur de détergent
liquide pour un usage ultérieur. NE la JETEZ PAS si vous
utilisez du détergent en poudre.
Retirez le réservoir de détergent
liquide lorsque vous utilisez un
détergent en poudre! NE VERSEZ
PAS de détergent en poudre dans
le réservoir de détergent
liquide. Il ne sera pas distri-
bué correctement!
40

Instructions d’utilisation de votre laveuse (suite)
Instructions d’Utilisation
Autres produits de lessive
Du javellisant pour tissus de couleurs, de l’adoucisseur, •
un renforçateur pour détergents ou des enzymes peuvent être ajoutés au détergent.
Mettez les produits liquides avec le détergent liquide •
dans le réservoir de détergent principal ou les produits
en poudre avec le détergent en poudre dans le compartiment de détergent principal.
IMPORTANT
Ne mélangez pas les produits liquides avec les produits
en poudre.
IMPORTANT
L’usage de produit-multiple (détergent plus assouplissant)
feuilles ou feuilles d’absorptions de couleur N’EST PAS
recommandé. Ils peuvent mettre hors services votre
machine et causer une réparation qui n’est pas couvert
par la garantie.
Détergent pour le prélavage
Pour la lessive très sale ou tachée, sélectionnez l’op-•
tion de prélavage et ajoutez la quantité de détergent
recommandée dans le réservoir de détergent pour le
prélavage.
Javellisant liquide
Si désiré, ajoutez du javellisant liquide dans le compar-•
timent nommé
Remplissez le compartiment jusqu’à la ligne • « MIN »
(Minimum) pour les petites lessives et jusqu’à la ligne
« MAX » (Maximum) pour les grandes lessives. NE
DÉPASSEZ PAS la ligne de remplissage maximale.
« Liquid Bleach »
(Javellisant liquide).
IMPORTANT
Pour éviter d’endommager les tissus, ne remplissez pas
le compartiment du distributeur de façon excessive et ne
versez pas de javellisant liquide directement sur la lessive.
Assouplissant liquide
Si désiré, versez la quantité d’assouplissant liquide •
recommandée dans le compartiment nommé Fabric
Softener (Assouplissant).
Remplissez le compartiment jusqu’à la ligne • « MIN »
(Minimum) pour les petites lessives et jusqu’à la ligne
« MAX » (Maximum) pour les grandes lessives.
NE DÉPASSEZ PAS la ligne de remplissage maximale.•
REMARQUE
Pour éviter la formation de taches, ne remplissez pas le
compartiment du distributeur de façon excessive et ne
versez pas d’assouplissant liquide directement sur la lessive.
L’utilisation d’une balle de distribution d’assouplissant •
n’est pas recommandée dans les laveuses à culbutage.
41

Instructions d’Utilisation
Instructions d’utilisation de votre laveuse (suite)
6 Sélectionnez le programme et les réglages
appropriés pour la charge.
Tournez le sélecteur de programme dans un sens ou •
dans l’autre vers le programme désiré. Le voyant du
programme sélectionné s’allumera.
La durée approximative du programme, les tempéra-•
tures de lavage et de rinçage adéquates, la vitesse de
l’essorage fi nal, le niveau de saleté et les options de
chaque programme s’affi cheront pour le programme
sélectionné. Consultez les section
glages de la laveuse »
réglages off erts pour chaque programme.
Pour modifi er les réglages, appuyez sur les touches •
Auto Temp (Température), Spin Speed (Vitesse d’es-
sorage) et Soil Level (Niveau de saleté) pour naviguer
vers les réglages désirés.
Pour sélectionner ou désactiver une option, appuyez •
sur le bouton lié à l’option en question. Le voyant
s’allume lorsque l’option est sélectionnée. Le voyant ne
s’allume plus lorsque l’option est supprimée.
de ce guide pour connaître les
« Tableau des ré-
REMARQUE
Afi n d’assurer un lavage adéquat de vos articles, les
réglages et les options ne sont pas tous disponibles pour
chaque programme. Si un réglage ou une option ne
convient pas au programme sélectionné, le voyant ne
s’allume pas.
(Départ) pour reprendre le programme.
Si vous tentez de changer les réglages ou les options •
après le début du programme, l’appareil émettra
plusieurs bips lorsque vous appuierez sur les boutons.
Pour modifi er les réglages ou les options, appuyez sur
« PAUSE » (pause), sélectionnez les nouveaux réglages
et appuyez de nouveau sur « START » (démarrer).
Pour changer de programme lorsque la laveuse est •
en fonction, appuyez sur « CANCEL » (Annuler),
sélectionnez un nouveau programme, puis appuyez à
nouveau sur « START » (démarrer). Tourner le bouton
du sélecteur de programme ne suffi t pas pour changer
de programme.
Pour arrêter le programme, appuyez sur • « CANCEL »
(Annuler).
REMARQUE
Si le cycle est interrompu durant l’essorage, il faut
environ 2 à 3 minutes avant que le verrou de la porte se
déclenche. N’ouvrez PAS la porte de force.
Un signal sonore se fait entendre lorsque l’option •
Signal est sélectionnée.
À la fi n du programme, retirez les articles de la cuve •
de la laveuse et placez-les dans une sécheuse, sur une
corde à linge ou à plat, comme indiqué sur l’étiquette
de chaque article.
Les modifi cations apportées à un programme sont •
mémorisées et les réglages seront utilisés chaque fois
que ce programme sera sélectionné à l’avenir.
Appuyez sur les
deux boutons et
maintenez-les
enfoncés pendant
dix secondes pour
revenir aux réglages
en usine.
7 Démarrez la laveuse.
Fermez la porte et appuyez sur la touche • « START »
(Départ). La laveuse ne fonctionne pas si la porte est
ouverte et «
Sélectionnez • « Delay Start » (Départ diff éré) pour
retarder le début du programme, si désiré.
Par mesure de sécurité, la porte se verrouillera auto-•
matiquement pour toute la durée du programme de
lavage.
Pour pouvoir ajouter un article dans la cuve à n’im-•
porte quel moment durant la période de lavage du
programme, appuyez sur « PAUSE » (Pause). Lorsque
la porte se déverrouille, ouvrez-la, ajoutez l’article,
fermez la porte et appuyez sur la touche « START »
DOOR OPEN
» (Porte ouverte) s’affi che.
Pour de meilleurs résultats
Suivez les instructions sur les étiquettes
des articles à laver.
Un froissage excessif, un transfert de couleurs ou des •
odeurs peuvent apparaître si les articles sont laissés
dans la laveuse après la fi n du programme.
ATTENTION
RISQUE D’ENFERMEMENT et DE BASCULEMENT
Ne laissez pas la porte ouverte s’il y a de jeunes enfants
ou des animaux domestiques dans la maison. Une porte
ouverte pourrait inciter les enfants à s’y pendre ou à
pénétrer dans la laveuse. Vous pouvez laisser la porte
entrouverte pour prévenir la formation d’odeurs si aucun
enfant en bas âge n’est présent.
42

Instructions d’Utilisation
Bruits d’un fonctionnement normal
Il est possible que vous entendiez ou non des sons
provenant de votre nouvelle laveuse :
A. TUYAU DE VIDANGE La laveuse est pourvue d’un tuyau
de vidange fl exible qui achemine l’eau de la laveuse
vers la colonne montante de votre résidence. Vous
entendrez le débit d’eau dans votre colonne montante.
Ce bruit est tout à fait normal.
B. ROBINETS D’EAU/DISTRIBUTEUR Lorsque l’eau est
acheminée vers le système de distribution d’eau, il
est normal d’entendre un bruit de débit d’eau. Ce son
normal varie légèrement selon la pression d’eau de
votre résidence.
C. POMPE D’ÉVACUATION Votre laveuse est équipée
d’une pompe de vidange à grande vitesse. Il est normal
d’entendre des ronronnements et des gargouillements
lorsque l’eau de la laveuse est pompée. Ces deux sons
sont normaux et indiquent que votre pompe fonctionne
normalement.
D. MOTEUR HAUTE VITESSE Un puissant moteur est utilisé
pour entraîner la cuve à haute vitesse d’essorage afi n
d’extraire l’eau de vos vêtements. Ces essorages à haute
vitesse produisent des sons, ce qui est tout à fait normal.
L’intensité de ces bruits varie selon la vitesse d’essorage,
la charge et le programme choisi.
A
B
D
C
ATTENTION
Des bruits anormaux répétitifs pourraient indiquer une
panne imminente de la laveuse et devraient faire l’objet
d’un examen par un technicien qualifi é.
43

Guide d’élimination des taches
Procédures Sécuritaires d’élimination des Taches
Pour réduire les risques d’incendie, de choc électrique, de
blessures ou de dommages à la propriété, suivez les consignes ci-dessous :
Lisez et observez les instructions des produits d’élimi-•
nation des taches.
Conservez les produits d’élimination des taches dans •
leur contenant d’origine et hors de la portée des
enfants.
Lavez soigneusement tout ustensile utilisé pour mani-•
puler ces produits.
Ne combinez pas les produits d’élimination des •
taches, surtout l’ammoniaque et le javellisant. Des
vapeurs nocives pourraient être produites.
Ne lavez pas d’articles qui ont préalablement été •
lavés, trempés ou éclaboussés avec de l’essence, des
solvants de nettoyage à sec ou d’autres substances
infl ammables ou explosives, puisqu’ils dégagent des
vapeurs qui pourraient s’enfl ammer ou exploser.
N’utilisez jamais de solvants infl ammables, comme de •
l’essence, à l’intérieur de votre domicile. Les vapeurs
pourraient exploser au contact des fl ammes ou d’étin-
celles.
Pour Enlever Effi cacement les Taches :
Éliminez les taches rapidement.•
Déterminez le type de tache, puis suivez le traitement •
recommandé dans le tableau de la page suivante.
Pour eff ectuer un prétraitement des taches, utilisez un •
produit de prélavage, du détergent liquide ou de la
pâte composée de détergent en poudre et d’eau.
Utilisez de l’eau froide sur des taches de nature •
inconnue puisque l’eau chaude peut les rendre permanentes.
Consultez les instructions sur les étiquettes pour •
connaître les traitements à éviter selon le tissu.
Vérifi ez la solidité de la couleur en essayant le produit •
détachant sur une couture intérieure.
Rincez et lavez les articles après les avoir détachés.•
AVERTISSEMENT
DANGER DE VAPEUR NOCIVE
Ne combinez pas de javellisant avec d’autres produits
chimiques domestiques comme des produits de nettoyage
pour toilettes, des produits antirouille, de l’acide ou des
produits contenant de l’ammoniaque. Ces mélanges
peuvent entraîner la production de vapeurs nocives
pouvant causer des blessures graves, voire la mort.
Pour de meilleurs résultats
Suivez les instructions sur les étiquettes
des articles à laver.
44

Guide d’élimination des taches
Suggestions pour éliminer les taches
TACHE TRAITEMENT
Ruban adhésif, gomme à mâcher,
colle caoutchouc
Purée pour nourrissons, produits
laitiers, oeufs
Boissons (café, thé, boisson gazeuse, jus, boissons alcoolisées)
Sang Rincez à l’eau froide. Frottez avec un pain de savon ou prétraitez et trempez dans un produit contenant des
Cire de chandelle, crayon
Chocolat Prétraitez et trempez dans de l'eau chaude et un produit contenant des enzymes. Lavez avec du javellisant non
Saleté de col ou de manchette,
produits cosmétiques
Décoloration sur un tissu blanc
Gazon Prétraitez et trempez dans de l'eau chaude et un produit contenant des enzymes. Lavez avec du javellisant non
Graisse, huile, goudron (beurre,
matières grasses, vinaigrette, huile
de cuisson, graisse pour véhicule,
huile à moteur)
Encre
Moisissure, roussissement Lavez avec du javellisant s'il est non dommageable pour le tissu ou trempez dans du javellisant oxygéné et de
Boue Brossez la boue sèche. Prétraitez et trempez dans un produit contenant des enzymes.
Moutarde, tomate
Vernis à ongles
Peinture, vernis À BASE D'EAU : Rincez le tissu à l'eau froide alors que la tache est toujours humide. Lavez. Lorsque la peinture
Transpiration
Rouille, décoloration brune ou
jaune
Cirage
Tomate
Urine, vomissure, mucus, matière
fécale
Vin Prétraitez ou trempez dans l'eau froide. Lavez à l'eau chaude avec du javellisant non dommageable pour le
Appliquez des glaçons. Essuyez l'excédent. Placez la tache (face vers le bas) sur des papiers essuie-tout. Saturez de
produit détachant de prélavage ou d'un liquide de nettoyage à sec ininfl ammable.
Utilisez un produit contenant des enzymes pour prétraiter ou faire tremper les taches. Faites tremper pendant
au moins 30 minutes. Lavez.
Prétraitez la tache. Lavez à l'eau froide avec du javellisant non dommageable pour le tissu.
enzymes. Lavez avec du javellisant non dommageable pour le tissu.
Grattez l'excédent de cire. Placez la tache (face vers le bas) entre des papiers essuie-tout. Appuyez avec un fer à repas-
ser chaud jusqu'à ce que la cire soit absorbée. Remplacez fréquemment les papiers essuie-tout. Traitez la tache qui reste
avec un produit détachant de prélavage ou un liquide de nettoyage à sec ininfl ammable. Lavez à la main pour éliminer
le solvant. Lavez avec du javellisant non dommageable pour le tissu.
dommageable pour le tissu.
Prétraitez avec un produit détachant de prélavage ou frottez avec un pain de savon.
Utilisez un produit décolorant vendu dans le commerce. Lavez avec du javellisant non dommageable pour le tissu.
dommageable pour le tissu.
Grattez les résidus du tissu. Prétraitez. Lavez avec l'eau la plus chaude convenant au tissu. Pour les taches tena-
ces, appliquez un liquide de nettoyage à sec ininfl ammable au dos de la tache. Remplacez fréquemment les
papiers essuie-tout sous la tache. Rincez soigneusement. Lavez avec l'eau la plus chaude convenant au tissu.
Certaines encres peuvent être impossibles à éliminer. Le lavage peut rendre certaines taches permanentes. Utilisez un produit
détachant de prélavage, de l'alcool dénaturé ou un liquide de nettoyage à sec ininfl ammable.
l'eau chaude avant le lavage. Des vêtements gravement attaqués par la moisissure peuvent être endommagés
de façon permanente.
Prétraitez avec un produit détachant de prélavage. Lavez avec du javellisant non dommageable pour le tissu.
Certaines taches peuvent être impossibles à éliminer. Placez la tache (face vers le bas) sur des papiers essuie-tout.
Appliquez du dissolvant de vernis à ongles au dos de la tache. Répétez l'opération, en remplaçant fréquemment les
papiers essuie-tout. N'utilisez pas cette technique avec un tissu de soie à l'acétate de cellulose.
est sèche, la tache ne peut pas être éliminée. À BASE D'HUILE ET VERNIS : Utilisez le solvant recommandé sur
l'étiquette du contenant de produit. Rincez soigneusement avant de laver.
Utilisez un produit détachant de prélavage ou frottez avec un pain de savon. Rincez. Lavez avec un javellisant sans
chlorure décolorant dans l'eau la plus chaude convenant au tissu.
Utilisez un décapant pour la rouille sécuritaire pour le tissu. N'utilisez pas de javellisant contenant du chlorure
décolorant puisqu'il pourrait aggraver la décoloration.
LIQUIDE : Prétraitez avec une pâte composée de détergent en poudre et d'eau. PÂTE : Grattez l'excédent du tissu. Prétraitez
avec un produit détachant de prélavage ou un liquide de nettoyage à sec ininfl ammable. Rincez. Appliquez un détergent sur
la section détrempée et frottez. Lavez avec du javellisant non dommageable pour le tissu.
Prétraitez avec un produit détachant de prélavage. Lavez avec du javellisant non dommageable pour le tissu.
Prétraitez ou trempez dans un produit contenant des enzymes. Lavez avec du javellisant non dommageable
pour le tissu.
tissu.
45

Entretien et nettoyage
Nettoyage courant de l’intérieur de l’appareil (à des fi ns préventives)
Pour prévenir la formation de moisissures et de mauvaises odeurs,
laissez la porte ouverte pendant quelques heures après l’utilisation
de la laveuse ou en tout temps lorsqu’elle n’est pas utilisée.
ATTENTION
RISQUE D’ENFERMEMENT et DE BASCULEMENT
Ne laissez pas la porte ouverte s’il y a de jeunes enfants ou
des animaux domestiques dans la maison. Une porte ouverte
pourrait inciter les enfants à s’y pendre ou à pénétrer dans la
laveuse. Vous pouvez laisser la porte entrouverte pour prévenir
la formation d’odeurs si aucun enfant en bas âge n’est présent.
POUR RAFRAÎCHIR OU NETTOYER L’INTÉRIEUR DE LA LAVEUSE
Pour nettoyer et rafraîchir la laveuse, utilisez le programme
« Clean Washer » (Nettoyage du système). Pour obtenir
les meilleurs résultats de lavage, utilisez le programme
« Clean Washer » (Nettoyage du système) une fois par
mois. Pour commencer le programme, appuyez sur « Select
» (Sélectionner) lorsque vous y êtes invité par un rappel
automatique ou sélectionnez manuellement le programme en
suivant les instructions ci-dessous :
Tournez le sélecteur de programme à « Spin Only » (Essorage
seulement). Ensuite, appuyez sur la touche « Clean Washer »
(Nettoyage de la laveuse). L’écran ACL affi chera «
CLEAN
» (Nettoyage du système).
SYSTEM
Tournez le sélecteur de programme à « Spin
Only » (Essorage seulement), puis appuyez sur
la touche « Clean Washer » (Nettoyage de
la laveuse) pour sélectionner le cycle « Clean
Washer » (Nettoyage de la laveuse).
RETIREZ (« LIQUID ONLY »)
LE RÉSERVOIR DE DÉTERGENT
LIQUIDE LORSQUE
REMARQUE
La laveuse vous invitera automatiquement à eff ectuer le
programme « Clean Washer » (Nettoyage de la laveuse)
tous les 50 programmes. Vous pouvez appuyer sur la touche
sous « CANCEL » (Annuler) pour eff ectuer le programme
manuellement ultérieurement.
IMPORTANT
L
es articles laissés dans la laveuse durant le programme de
nettoyage du système causeront un déséquilibre important
dans le tambour qui pourrait endommager la machine à laver.
Si l’appareil comporte un réservoir pour LIQUID ONLY
(DÉTERGENT LIQUIDE SEULEMENT), retirez-le du distributeur
de détergent. RETIREZ TOUS LES ARTICLES DU TAMBOUR DE
LAVAGE avant de remplir le compartiment à détergent de 235 ml
(1 tasse) d’eau de javel OU d’un sachet de Nettoyant de machine
à laver TIDE® WASHING MACHINE CLEANER. N’UTILISEZ PAS
les deux produits. Pour démarrer le programme, appuyez sur le
bouton « START » (démarrer).
Pour de meilleurs résultats
Faites immédiatement suivre ce programme par un
cycle d’essorage seulement et sélectionnez Rinse &
Spin (Rinçage et Essorage) à la vitesse d’essorage maximale
sans détergent ni javellisant pour aider à éliminer tout résidu de
javellisant laissé par le programme de nettoyage du système.
« MAIN WASH »
RÉSERVOIR DE
DÉTERGENT PRINCIPAL
AVERTISSEMENT
DANGER DE VAPEUR NOCIVE
Ne combinez pas de javellisant avec d’autres
produits chimiques domestiques comme des
produits de nettoyage pour toilettes, des produits
antirouille, de l’acide ou des produits contenant de
l’ammoniaque. Ces mélanges peuvent entraîner la
production de vapeurs nocives pouvant causer des
blessures graves, voire la mort.
REMARQUE
Si le programme de nettoyage du système est annulé ou mis
en pause, la laveuse fera 2 cycles de rinçage pour éliminer
tout résidu de javellisant se trouvant sur la cuve avant de
déverrouiller la porte.
46

Entretien et nettoyage
Autres nettoyages courants à l’intérieur de l’appareil (à des fi ns préventives)
Nettoyage du Distributeur
REMARQUE
Le détergent et l’assouplissant peuvent s’accumuler dans
le tiroir distributeur. Les résidus doivent être éliminés une
ou deux fois par mois.
Retirez le tiroir en l’ouvrant jusqu’à ce qu’il repose contre •
la butée
Appuyez fermement sur la languette de verrouillage •
située à l’arrière gauche du tiroir. Retirez le tiroir.
Retirez les contenants des compartiments de prélavage, •
javellisant et d’assouplissant.
Rincez le tiroir et les contenants dans un mélange de 175 •
ml (¾ de tasse) d’eau de javel dans 3,8 l (1 gal) d’eau
chaude pour éliminer les accumulations de poudre et de
liquide. Une grande quantité de résidus d’assouplissant
peut indiquer une dilution inadéquate; un nettoyage plus
fréquent peut également être requis.
Pour nettoyer la cavité de l’orifi ce du tiroir, utilisez une •
petite brosse. Éliminez les résidus des parties supérieures
et inférieures de la cavité.
Replacez la languette en l’insérant dans son orifi ce •
jusqu’à ce que vous entendiez un clic. Remettez le tiroir
du distributeur en place.
Entretien Préventif Quotidien
Retirez les articles de la laveuse dès la fi n du cycle. Un •
froissage excessif, un transfert de couleurs ou des odeurs
peuvent apparaître sur des articles ayant été laissés dans
la laveuse.
Si aucun animal domestique ou enfant en bas âge n’est •
présent, vous pouvez laisser la porte entrouverte lorsque
la laveuse n’est pas utilisée.
À la fi n de la journée de lavage, laissez le tiroir distribu-•
teur légèrement entrouvert.
Asséchez le pourtour de l’ouverture de la porte, le joint •
fl exible et la vitre de la porte. Ces composants doivent
toujours être propres pour assurer un joint étanche.
Après le lavage d’articles très sales, un résidu de saleté •
peut demeurer sur le tambour. Éliminez ce résidu en essuyant le tambour avec un produit nettoyant domestique
non abrasif. Rincez soigneusement à l’eau.
À l’occasion, essuyez les plis inférieurs du joint fl exible •
pour éliminer la charpie et les autres débris.
47

Entretien et nettoyage
Nettoyage de l’intérieur de l’appareil (en profondeur)
Si le programme de nettoyage du système n’a pas été eff ectué,
que l’entretien et le nettoyage des plis du joint en caoutchouc
ont été négligés et que de fortes odeurs, de la moisissure ou des
accumulations de résidus se sont formées, suivez la procédure
de nettoyage ci-dessous pour aider à éliminer le problème.
PROCÉDURE DE NETTOYAGE - Cuve de la laveuse
Assurez-vous que la cuve est vide (ou qu’il ne s’y trouve aucun
vêtement). Si l’appareil comporte un réservoir pour LIQUID
ONLY (DÉTERGENT LIQUIDE SEULEMENT), retirez-le du
distributeur de détergent. Ouvrez le tiroir à détergent et versez
huit (8) tasses (1,9 L) de javellisant dans le compartiment
de détergent de gauche («MAIN WASH»). Sélectionnez le
programme Clean Washer (Nettoyage du système) en suivant
la procédure décrite dans la section Nettoyage courant de
l’intérieur de l’appareil (à des fi ns préventives).
Après la fi n du programme, vérifi ez l’intérieur de la laveuse
pour savoir si les odeurs ou les résidus ont été éliminés. S’il est
nécessaire d’eff ectuer un autre nettoyage, répétez la procédure
indiquée ci-dessus. Il est possible que le nettoyage nécessite
plusieurs programmes selon l’importance des odeurs ou des
résidus. Il se peut que les pièces de l’appareil conservent une
certaine décoloration en raison des eff ets qu’auront produits les
résidus à long terme.
Pour les zones particulièrement sales qui sont visibles à
l’intérieur de la cuve (dont le joint avant en caoutchouc), il est
possible de les nettoyer plus effi cacement en vaporisant un
nettoyant à base de javellisant sur une brosse à récurage, une
éponge douce ou un chiff on, puis en frottant ces zones.
Tournez le sélecteur de programme à « Spin
Only » (Essorage seulement), puis appuyez sur
la touche « Clean Washer » (Nettoyage de
la laveuse) pour sélectionner le cycle « Clean
Washer » (Nettoyage de la laveuse).
RETIREZ (« LIQUID ONLY »)
LE RÉSERVOIR DE DÉTERGENT
LIQUIDE LORSQUE
IMPORTANT
Portez toujours des gants en caoutchouc ou en latex, et
protégez le plancher et les vêtements contre tout dommage.
Si l’odeur persiste après les programmes de nettoyage au
javellisant et le nettoyage au moyen du nettoyant à base de
javellisant, ouvrez le tiroir à détergent et mettez-y un sachet de
nettoyant pour machines à laver TIDE® WASHING MACHINE
CLEANER. Sélectionnez un programme de nettoyage du système,
comme indiqué ci-dessus, et mettez la laveuse en marche.
Pour de meilleurs résultats
Faites immédiatement suivre ce programme par un
cycle d’essorage seulement et sélectionnez Rinse &
Spin (Rinçage y Essorage) à la vitesse d’essorage maximale
sans détergent ni javellisant pour aider à éliminer tout résidu de
javellisant laissé par le programme de nettoyage du système.
IMPORTANT
À l’avenir, reportez-vous à la section
de l’intérieur de l’appareil (à des fi ns préventives) »
eff ectuer le nettoyage de l’appareil, ce qui permettra d’éviter
que les problèmes ne se reproduisent.
« Nettoyage courant
REMARQUE
Si le programme de nettoyage du système est annulé ou mis
en pause, la laveuse fera 2 cycles de rinçage pour éliminer
tout résidu de javellisant se trouvant sur la cuve avant de
déverrouiller la porte.
« MAIN WASH »
RÉSERVOIR DE
DÉTERGENT PRINCIPAL
AVERTISSEMENT
DANGER DE VAPEUR NOCIVE
Ne combinez pas de javellisant avec d’autres
produits chimiques domestiques comme des
produits de nettoyage pour toilettes, des produits
antirouille, de l’acide ou des produits contenant de
l’ammoniaque. Ces mélanges peuvent entraîner la
production de vapeurs nocives pouvant causer des
blessures graves, voire la mort.
pour
48

Nettoyage courant de l’extérieur de l’appareil
Lorsque le lavage est terminé, essuyez le dessus et les côtés •
de la laveuse avec un linge humide. Fermez les robinets pour
empêcher une montée de pression dans les tuyaux.
Lavez le corps de l’appareil avec du savon doux et de l’eau. •
N’utilisez jamais de nettoyants puissants, granuleux ou abrasifs.
Si le corps de l’appareil est taché, nettoyez-le à l’aide de •
javellisant dilué (1 mesure de javellisant pour 8 d’eau). Rincez
plusieurs fois à l’eau claire.
Éliminez la colle laissée par le ruban ou les étiquettes à •
l’aide d’un mélange d’eau chaude et de détergent doux. Ou,
appliquez le côté collant du ruban.
Lorsque vous nettoyez les pièces chromées, utilisez du nettoie-•
vitres contenant de l’ammoniac ou du savon doux et de l’eau.
Avant de déplacer la laveuse, placez une lisière de carton ou •
un mince panneau de fi bres sous les pieds de mise à niveau
avant pour ne pas endommager le plancher.
Entretien et nettoyage
IMPORTANT
À tout moment, vous ne devez ni ranger ni
placer des produits de lessive sur le dessus de la
laveuse. Ils pourraient endommager son fi ni ou
ses commandes.
Instructions d’hivernement
IMPORTANT
Si la laveuse est entreposée dans un endroit propice au gel,
ou qu’elle est déplacée dans des conditions de gel, suivez
ces instructions d’hivernement pour prévenir tout dommage à
l’appareil :
1 Fermez les robinets d’alimentation en eau.
2 Débranchez les tuyaux de l’alimentation en eau et
purgez l’eau des tuyaux.
3 Branchez le cordon d’alimentation dans une prise mise à
la terre.
4 Ajoutez 1 gallon (3,8 l) de liquide antigel non toxique
pour véhicule récréatif (VR) dans le tambour. Fermez la
porte.
5 Sélectionnez le programme Spin Only (Essorage
seulement). Appuyez sur Start (démarrer) et laissez
vidanger l’appareil pendant 1 minute pour éliminer toute
l’eau. Une certaine quantité de liquide antigel pour VR
demeurera dans l’appareil.
6 Appuyez sur « POWER » (
cordon d’alimentation, asséchez l’intérieur du tambour et
fermez la porte.
7 Retirez le distributeur de détergent. Videz l’eau des
compartiments et asséchez-les. Replacez le tiroir.
8 Entreposez la laveuse en position debout.
9 Pour éliminer l’antigel de la laveuse après l’entreposage,
faites fonctionner l’appareil à vide pendant un
programme complet en utilisant du détergent. N’ajoutez
pas à la charge de lavage.
alimentation
), débranchez le
RV
ANTIFREEZE
Suivez les INSTRUCTIONS
D’HIVERNEMENT pour
l’entretien par temps froid.
49

Solutions aux problèmes courants
Problèmes de lavage fréquents
L’élimination inadéquate de la saleté et des taches, la présence de résidus de charpie ou d’écume et les dommages causés
aux tissus constituent les problèmes reliés au lavage les plus fréquents. Pour éviter ces problèmes et obtenir des résultats de
lavage optimaux, suivez ces suggestions fournies par la Soap and Detergent Association.
PROBLÈME CAUSES POSSIBLES SOLUTIONS MESURES PRÉVENTIVES
Taches bleues Détergent liquide ou assouplis-•
Décoloration,
grisonnement
Taches graisseuses et huileuses
Trous, déchirures
ou accrocs
Charpie Mauvais triage.•
Peluchage
(Les fi bres se dé-
tachent en formant des balles
qui s'accrochent
au tissu.)
Résidus ou
poudre sur les
articles foncés.
Tissus raides et
rugueux.
Froissage Surcharge de l'appareil.•
sant non dilué versé directement sur le tissu.
Quantité insuffi sante de déter-•
gent.
La température de l’eau est •
trop basse.
Mauvais triage.•
Quantité insuffi sante de déter-•
gent.
Assouplissant non dilué versé •
directement sur le tissu.
Usage incorrect de javellisant.•
Fermetures à glissière, agrafes •
ou boucles non fermées.
Déchirures et fi ls brisés. •
Surcharge de l'appareil.•
Dégradation du tissu.•
Mouchoirs laissés dans les •
poches.
Surcharge de l'appareil.•
Quantité insuffi sante de déter-•
gent.
Du détergent non dissous a •
laissé un résidu ressemblant à
de la charpie.
L'électricité statique attire la •
charpie.
La charge a été lavée trop •
longtemps.
Le peluchage est normal avec •
des tissus synthétiques et sans
repassage. Cela est causé par
l'usure normale.
Détergent non dissous.•
Certains détergents à granules •
peuvent se combiner aux minéraux contenus dans l'eau dure
pour former un résidu.
Surcharge de l'appareil.•
Programme de lavage incorrect •
pour la charge.
Si le détergent est en cause, mélangez •
1 tasse (240 ml) de vinaigre blanc
avec 1 litre d'eau dans un contenant
en plastique. Faites tremper l'article
pendant 1 heure. Rincez.
Si l'assouplissant est en cause, frottez les •
taches avec un pain de savon. Lavez.
Lavez de nouveau avec la quantité de •
détergent recommandée et l'eau la
plus chaude convenant au tissu.
Ajoutez du javellisant non dommagea-•
ble pour le tissu.
Traitez avec un produit détachant de •
prélavage ou un détergent liquide.
Augmentez la quantité de détergent •
ou la température de l'eau. Lavez de
nouveau.
Frottez les taches d'assouplissant avec •
un pain de savon.
Peut être irréversible si les déchirures •
et les coutures ne peuvent pas être
réparées.
Réduisez la taille de la charge. Lavez de •
nouveau en utilisant les bonnes quantités
d'eau (à la température recommandée)
et de détergent.
Ajoutez du conditionneur d'eau sans •
précipitation à l'eau de lavage pour
éliminer les résidus de détergent.
Ajoutez de l'assouplissant liquide au •
dernier rinçage.
Séchez la charge dans la sécheuse.•
Éliminez la charpie avec une brosse à •
charpie ou avec un rouleau.
Utilisez une brosse à charpie ou un •
grattoir pour éliminer les peluches.
Lavez de nouveau.• Augmentez la température de •
Réduisez la taille de la charge.•
Rincez à l'eau froide avec de l'as-•
souplissant liquide au programme
CASUAL (Tout-aller) ou DELICATE
(Délicat).
Évitez d'ajouter un surplus de •
détergent et d'assouplissant
dans les compartiments du
distributeur.
Triez les articles par degré de •
saleté et par couleur.
Utilisez la quantité de détergent •
recommandée, l'eau la plus chaude
convenant au tissu et un javellisant
non dommageable pour ce dernier.
Utilisez la quantité de détergent •
recommandée et l'eau la plus
chaude convenant au tissu.
Ne versez pas l'assouplissant •
directement sur le tissu. Consultez « Instructions d'utilisation de
votre laveuse » (Étape 5).
Ne versez jamais de javellisant •
directement sur le tissu.
Vérifi ez l'état des articles avant •
le lavage. Consultez « Instructions
d'utilisation de votre laveuse »
(Étapes 2 et 5).
Consultez « Instructions d'utilisa-•
tion de votre laveuse » (Étapes 1
et 2).
Ne surchargez pas l'appareil.•
Suivez toutes les recommanda-•
tions (température et quantité
d'eau, quantité de détergent et
durée du lavage).
Utilisez de l'assouplissant dans •
la laveuse pour lubrifi er les
fi bres.
Pendant le repassage, utilisez de •
l'empois ou un produit de fi nition
sur les cols et manchettes.
Placez les articles à l'envers pour •
minimiser le frottement.
l'eau, lavez avec l'eau la plus
chaude permise pour le tissu.
Ne surchargez pas l'appareil.•
Utilisez un détergent liquide •
ou un conditionneur d'eau sans
précipitation avec un détergent
en poudre.
Ne surchargez pas l'appareil.•
Retirez les articles de la laveuse •
dès la fi n du programme.
Utilisez de l'assouplissant •
liquide.
50

Solutions aux problèmes courants
Problèmes de lavage fréquents (suite)
PROBLÈME CAUSES POSSIBLES SOLUTIONS MESURES PRÉVENTIVES
Accumulation de
saleté corporelle
jaune sur les tissus synthétiques.
Taches de rouille
jaunes ou brunes
Taches et
accumulations
de résidus ou
croissance de
moisissures sur
le joint d’étanchéité
Taches et
accumulations
de résidus ou
croissance de
moisissures dans
le tiroir distributeur
Résidus d’eau
dans le pli du
joint fl exible
Odeurs Humidité dans la laveuse.•
Temps d'agitation trop court.•
La température de l’eau est •
trop basse.
Quantité insuffi sante de déter-•
gent.
Fer ou manganèse dans l'ali-•
mentation en eau, les conduites
ou le chauff e-eau.
Humidité dans la laveuse.•
Utilisation de détergents non •
classés HE.
Dosage trop grand de déter-•
gent.
Surcharge du tambour de •
lavage.
Oubli d’une charge mouillée •
dans la laveuse.
Lavages à l’eau froide qui ne •
dissoudraient ou n’élimineraient
pas complètement le détergent.
Humidité dans la laveuse.•
Utilisation de détergents non •
classés HE.
Dosage trop grand de déter-•
gent.
Résultat du lavage et fait partie •
du fonctionnement normal.
Utilisation de détergents non •
classés HE.
Dosage trop grand de déter-•
gent.
Oubli d’une charge mouillée •
dans la laveuse.
Lavages à l’eau froide qui ne •
dissoudraient ou n’élimineraient
pas complètement le détergent.
Trempez dans un renforçateur de dé-•
tergent ou dans un produit contenant
des enzymes.
Lavez avec l'eau la plus chaude •
convenant au tissu et utilisez le programme CASUAL (Tout-aller).
Ajoutez du détergent.•
Ajoutez du javellisant convenant au tissu •
ou traitez avec un produit décolorant.
Pour restaurer une charge de blancs •
décolorés, utilisez un décapant pour la
rouille non dommageable pour le tissu.
N'utilisez pas de javellisant pour élimi-•
ner les taches de rouille. Cela pourrait
accentuer la décoloration.
Eff ectuez un cycle de nettoyage du •
système (SYSTEM CLEAN)
Pour éliminer les taches, vaporisez •
le joint d’étanchéité de nettoyant
de moisissures Comet
Mildew Stain Remover et frottez-le à
l’aide d’une brosse.
N’utilisez seulement que des déter-•
gents de type HE (Haute effi cacité)
avec les dosages prescrits.
Retirez la charge lavée immédiate-•
ment après le cycle de lavage.
Retirez le tiroir distributeur et, avec •
un chiff on humecté d’une solution de
175 ml (¾ de tasse) d’eau de javel
mélangée à 3,8 l (1 gal) d’eau chaude,
essuyez-le ainsi que ses contenants.
Rincez à fond et répétez au besoin.
Remettez le tiroir en place. REMARQUE
: Portez des gants en latex d’élastomère-caoutchouc. Protégez le plancher et
vos vêtements des égouttements ou des
éclaboussures de javellisant.
N’utilisez seulement que des déter-•
gents de type HE (Haute effi cacité)
avec les dosages prescrits.
Après chaque lavage, essuyez l’inté-•
rieur du pli du joint avec une serviette
propre et sèche.
Eff ectuez un cycle de nettoyage du •
système (SYSTEM CLEAN).
Après chaque lavage, essuyez l’inté-•
rieur du pli du joint avec une serviette
propre et sèche.
N’utilisez seulement que des déter-•
gents de type HE (Haute effi cacité)
avec les dosages prescrits.
Retirez la charge lavée immédiate-•
ment après le programme de lavage.
Versez 235 ml (1 tasse) d’eau de javel •
dans le tuyau de drainage vertical;
laissez agir 24 heures et rincez à l’eau
courante.
MC
Spray Gel
Sélectionnez le bon programme •
de lavage.
Utilisez la quantité de détergent •
recommandée.
Lavez régulièrement les tissus •
synthétiques dans l'eau chaude
ou tiède.
Utilisez un adoucisseur d'eau •
sans précipitation.
Avant le lavage, faites couler •
l'eau chaude pendant quelques
minutes pour nettoyer les tuyaux.
Occasionnellement, vidangez le •
chauff e-eau.
Pour un problème persistant, •
installez un fi ltre à matières
ferreuses dans votre système
d'alimentation en eau.
Faites fonctionner un déshumidi-•
fi cateur dans la salle de lavage.
Évitez d’ajouter un surplus de •
détergent et d’assouplissant
dans les compartiments du
distributeur.
Essuyez l’intérieur de la laveuse •
et le joint d’étanchéité après
chaque lavage.
Évitez d’ajouter un surplus de •
détergent et d’assouplissant
dans les compartiments du
distributeur.
Laissez la porte de la laveuse •
et le tiroir distributeur ouverts
durant quelques heures après
les lavages ou en tout temps
lorsque la laveuse n’est pas
utilisée.
51

Solutions aux problèmes courants
Liste de vérifi cation avant service
Avant de faire appel au service après-vente, consultez cette liste. Cela pourrait vous faire économiser temps
et argent. Cette liste décrit des situations courantes qui ne sont causées ni par un défaut de fabrication ni par
un matériau défectueux de la laveuse.
IMPORTANT
Débranchez la laveuse de l’alimentation électrique avant d’entreprendre tout travail sur l’appareil
ou sur les systèmes connexes (incluant l’alimentation électrique, l’entrée d’eau ou le drainage).
PROBLÈME CAUSE POSSIBLE SOLUTION
BRUIT
Bruit aigu de « moteur
d'avion ».
Son de crécelle ou cognement.
Claquement. De lourdes charges peuvent produire un
Bruit de vibration. La laveuse ne repose pas correctement sur
EN MARCHE
La laveuse ne démarre
pas.
La laveuse n'essore pas. La charge est trop petite. Ajoutez un ou deux articles pour équilibrer la charge.
Résidus dans le tambour. Articles très souillés. Essuyez le tambour avec un nettoyant domestique non
Un certain bruit de moteur pendant le programme d'essorage est tout à fait normal.
Des corps étrangers, comme la monnaie ou
des épingles, peuvent s'être logés dans le
tambour ou la pompe.
Des boucles de ceinture ou des attaches
métalliques frappent le tambour.
bruit de cognement. Cela est habituellement
normal. Si les bruits persistent, la laveuse est
probablement déséquilibrée.
le plancher.
Les boulons d'expédition et le bloc en mousse n'ont pas été retirés pendant l'installation.
La charge est mal distribuée dans le tambour.
Le cordon d'alimentation n'est pas branché
ou la fi che est lâche.
Les fusibles domestiques sont grillés, le
disjoncteur du circuit est déclenché ou une
panne électrique est survenue.
Les robinets d'alimentation en eau ne sont
pas ouverts.
Le moteur surchauff e. Le moteur de la la-
veuse s'arrête s'il surchauff e.
La porte de la laveuse n'est pas complètement
fermée.
Arrêtez la laveuse et vérifi ez le tambour. Si le bruit
persiste après avoir redémarré la laveuse, des objets sont
peut-être logés dans la pompe. Téléphonez à votre technicien de service autorisé.
Pour éviter tout bruit inutile et tout dommage au tambour,
fermez les agrafes et retournez les articles à laver.
Arrêtez la laveuse et répartissez la charge de nouveau.
Déplacez la laveuse pour qu'elle repose fermement sur le
plancher. Réglez les pieds de mise à niveau. Reportez-vous
aux INSTRUCTIONS D'INSTALLATION pour plus de détails.
Consultez les INSTRUCTIONS D'INSTALLATION pour
savoir comment retirer les boulons d'expédition et le bloc
en mousse.
Arrêtez la laveuse et répartissez la charge.
Assurez-vous que la fi che est bien serrée dans la prise murale.
Remplacez le fusible ou réenclenchez le disjoncteur. N'augmentez
pas la capacité du fusible. Si le circuit est surchargé, faites corriger
le problème par un électricien qualifi é. Si le problème est lié à une
panne électrique, appelez votre fournisseur d'électricité.
Ouvrez les robinets d'alimentation en eau.
Il redémarre automatiquement après une période de
refroidissement allant jusqu'à 30 minutes (si la laveuse n'a
pas été arrêtée manuellement).
Fermez la porte.
abrasif, puis rincez. Secouez ou brossez l'excédent de
saleté et de sable des articles avant le lavage.
52

Solutions aux problèmes courants
Liste de vérifi cation avant service (suite)
PROBLÈME CAUSE POSSIBLE SOLUTION
EAU
De l'eau s'accumule dans les
plis du souffl et à la fi n du
programme.
De l'eau s'accumule dans les
compartiments d'assouplissant et de javellisant.
La charge est trop mouillée
après l'essorage.
L'eau ne pénètre pas dans
la laveuse ou elle y pénètre
très lentement.
L'eau chaude ou tiède n'est
pas assez chaude.
L'eau dans la laveuse ne
s'écoule pas ou s'écoule
lentement.
Fuites d'eau. Le raccord du tuyau de remplissage est lâche
Surmoussage. Mauvais détergent.
Températures de lavage et
de rinçage inadéquates.
L'eau pénètre dans la cuve
de lavage, mais ne la remplit pas.
C'est le résultat du lavage et cela fait partie
du fonctionnement normal de l'appareil.
Cela est dû au siphonnement et fait partie du
fonctionnement normal de l'appareil.
La laveuse est surchargée. Ne surchargez pas l'appareil. Consultez « Instructions
La charge est trop petite. Ajoutez un ou deux articles pour équilibrer la charge.
La charge est déséquilibrée. Redistribuez la charge pour permettre un essorage
Le tuyau de vidange est entortillé. Redressez le tuyau de vidange.
L'alimentation en eau n'est pas adéquate. Vérifi ez le fonctionnement d'un autre robinet de la
Les robinets d'alimentation en eau ne sont pas
complètement ouverts.
De l'eau est utilisée à un autre endroit dans
la maison. La pression de l'eau doit être d'au
moins 260 kPa (30 lb/po²).
Les tuyaux d'alimentation en eau sont entortillés.
La température du chauff e-eau est trop basse
ou le chauff e-eau est situé à une trop grande
distance de la laveuse.
L'eau chaude est utilisée à un autre endroit
dans la maison.
Le tuyau de vidange est entortillé ou obstrué. Redressez et nettoyez le tuyau de vidange.
Le tuyau d'évacuation est trop haut. La hau-
teur maximale du tuyau d'évacuation est de
2,4 m (8 pi).
Les tuyaux de vidange de la maison sont
obstrués.
au robinet ou à la laveuse.
Surplus de détergent. Eff ectuez un programme de rinçage. Utilisez moins de
Les tuyaux d'eau chaude et d'eau froide sont
raccordés aux mauvais robinets.
Le tuyau d'évacuation est trop bas. Le tuyau
d'évacuation doit être à au moins 60 cm
(23,6 po) de hauteur pour empêcher l'eff et de
siphon.
L'eau peut être retirée en retirant le tiroir distributeur
(reportez-vous à la section Entretien et nettoyage de ce
guide) et en vidangeant l'eau dans le tambour vide ou
dans l'évier.
d'utilisation de votre laveuse » (Étape 4).
adéquat.
maison. Attendez que l'alimentation en eau et la
pression augmentent.
Ouvrez complètement les robinets d'eau chaude et
d'eau froide.
Évitez d'utiliser de l'eau ailleurs pendant que la laveuse se remplit.
Redressez les tuyaux.
Mesurez la température de l'eau chaude près du robinet avec un thermomètre à friandise ou à viande. La
température de l'eau doit être d'au moins 49 °C (120
°F). Modifi ez les réglages du chauff e-eau au besoin.
Évitez d'utiliser l'eau chaude à un autre endroit de la
maison avant ou pendant un lavage. Il peut ne pas
y avoir suffi samment d'eau chaude pour eff ectuer
un lavage convenable. Si le problème persiste, votre
système d'eau chaude peut ne pas pouvoir alimenter
plus d'une source à la fois.
Réduisez la hauteur du tuyau d'évacuation à moins
de 2,4 m (8 pi). Reportez-vous aux INSTRUCTIONS
D'INSTALLATION.
Débouchez les tuyaux de vidange. Communiquez
avec un plombier au besoin.
Vérifi ez et serrez les raccords des tuyaux. Installez les
rondelles de caoutchouc fournies avec la laveuse.
Eff ectuez un programme de rinçage. Utilisez un déter-
gent haute effi cacité qui produit une faible quantité de
mousse.
détergent à l'avenir.
Raccordez le tuyau d'eau chaude au robinet d'eau
chaude et le tuyau d'eau froide au robinet d'eau
froide.
Augmentez la hauteur du tuyau d'évacuation à au
moins 60 cm (23,6 po). Reportez-vous aux INSTRUCTIONS D'INSTALLATION.
53

Remarques
54


Get it fixed, at your home or ours!
Your Home
For troubleshooting, product manuals and expert advice:
www.managemylife.com
For repair – in your home – of all major brand appliances,
lawn and garden equipment, or heating and cooling systems,
no matter who made it, no matter who sold it!
For the replacement parts, accessories and
owner’s manuals that you need to do-it-yourself.
For Sears professional installation of home appliances
and items like garage door openers and water heaters.
®
1-800-4-MY-HOME
Call anytime, day or night(U.S.A. and Canada)
www.sears.com www.sears.ca
(1-800-469-4663)
Our Home
For repair of carry-in items like vacuums, lawn equipment,
and electronics, call anytime for the location of your nearest
Sears Parts & Repair Service Center
1-800-488-1222 (U.S.A.) 1-800-469-4663 (Canada)
www.sears.com www.sears.ca
To purchase a protection agreement on a product serviced by Sears:
1-800-827-6655 (U.S.A.) 1-800-361-6665 (Canada)
Para pedir servicio de reparación
a domicilio, y para ordenar piezas:
1-888-SU-HOGAR
(1-888-784-6427)
www.sears.com
®
Au Canada pour service en français:
1-800-LE-FOYER
(1-800-533-6937)
www.sears.ca
MC
® Registered Trademark / TM Trademark of KCD IP, LLC in the United States, or Sears Brands, LLC in other countries
® Marca Registrada /
MC
Marque de commerce / MD Marque déposée de Sears Brands, LLC
TM
Marca de Fábrica de KCD IP, LLC en Estados Unidos, o Sears Brands, LLC in otros países
 Loading...