

Kenmore 911.9281 Series, 911.9222 Series, 911.9309 Series, 911.9322 Series, 911.9332 Series Use And Care Manual
...
_t,;_ii:! I I ] I
Electric Free-Standing Range
30" Self-Cleaning
Use & O_'e GL_id÷
Estufa El6ctrica
30" Tipo "lndependiente" de Autolimpieza
G_.!;_:,ps4_ae_Use y' Ouid_do
Models, Modelos 911.92098, 92228, 92818,
93098, 93228, 93328, 9381#, 93998, 9440@,
94418, 9449_, 9460>_, 9549@
8 = color number, nt'Jmero de color
r-
m
Zt
O
I-
229C4020P330-1 Sears, Roebuck and Co.,
(SR-10505-1) 293 JR Hoffman Estates, IL 60179 U.S.A. www, sears,com
20P330-1 ENVO2 1 71151_3 8:41 AM
SELF-CLEANING
FREE-STANDINGRANGE
Table of Contents
Range Safety 3-7
Anti-Tip Bracket 3, 4
Features of Your Range 8
Removal of Packaging Tape 8
Cooking Elements 9
Control Settings, 9
Home Canning Tips ., 9
Oven Control , 10-11
To Set the Clock : 12
To Set the Timer 12
To Reset the Timer 12
To Cancel the Timer 12
Baking , 13
Oven Cooking Tips 14-16
Strong Smell or Odor t4
Aluminum Foil t4
Oven Vent 14
Peeking I4
Preheating 14
Oven Light., 14
Baking With Margarine 14
Bakeware Placement 15
Bakeware 15
Element Cyciing 15
Oven Racks ,, t5
Broiling . 17-t8
Timed Baking
and Roasting 19-20
Special Features .... 21
Sabbath Feature 22-23
Self-Cleaning Cycle 24-25
Preparing Your Oven 24
Oven Door Gasket , 24
To Set A Clean Cycle 25
To Stop A Cycle 25
After The Cycle 25
Delay Start . 26
Control Panel 27
Broiler Panand Grid 27
Walls Of The Oven. 27
Cooktop and Area under
Cooktop . _ 27
Drawer and Sides of Range 27
Oven Door Glass 27
Door Vent Trim ..... 27
Removable Parts 28-33
Lift-Up Cooktop 28
Control Knobs 29
Oven Light Bulb 29
Cooktop Unit 30
Oven Racks 31
Oven Door _31-32
Storage Drawer 33
Before Caliing for
Service. 34-36
Temperature /_cljus_nent 16, 37
Warranty ..... 38
Consumer Service Numbers 76
For your convenience and future reference, please write down your model
and serial numbers in the space provlded_ They are located on the front
frame behind the storage drawer,
MODEL NUMBER: SERIAL NUMBER:
© Seats Roebuck and Co
IMPORTANTSAFETY
INSTRUCTIONS
SAVE THESE INSTRUCTIONS
Read all instructions before using this appliance. When using gas
or electrical sppliances, basic safety precautions should be followed,
including the following:
• AI_Ranges Can Tip
tnjury to Persons
Coutd Result
install Anti-Tip
Device Packed
With Range
• See nsta at on
instructions
,,i,.,,, ,,=,
r
WARN|NG!
To prevent accidental
tipping of the range
from abnormal use, including
excessive loading of the oven
door_ attach the range to the
wall or floor by installing the
Anti-Tip device supplied._ If the
range is moved for cleaning,
servicing or any reason, be
sure the Anti-Tip device is
re-engaged properly when
the range is slid back in the
opening. Failure to do so could
result in the range tipping and
may cause personal injury.
To inspect the Anti-Tip device,
remove the storage drawer and
look to see if the rear leg leveler
fully engages the slot in the
bracket.
If the Anti-Tip device supplied with
the range does not fit this application,
use the universal Anti-Tip device
WB2X7g09 Call 1-800-4-MY-HOME ®
These ANTI-TIP bracket installation
instructions are for wood or concrete
floors and walls Any other type of
construction may require special
installation techniques to provide
adequate fastening of the ANTI-TIP
bracket to the floor and wall
The use of this bracket does not
prevent tipping of the range when
bracket is net properly installed
NOTE: The installation of the
ANTI-TIP bracket must meet all local
codes for securing appliance
Step 1
Locating the bracket
A_Locate the bracket against the rear
wall and either the right or left
cabinet If the countertop
overhangs the cabinet, offset the
bracket from the cabinet by the
amount of overhang Ifthere is no
adjacent cabinet, position the edge
of the bracket at the desired
location of the range side panel
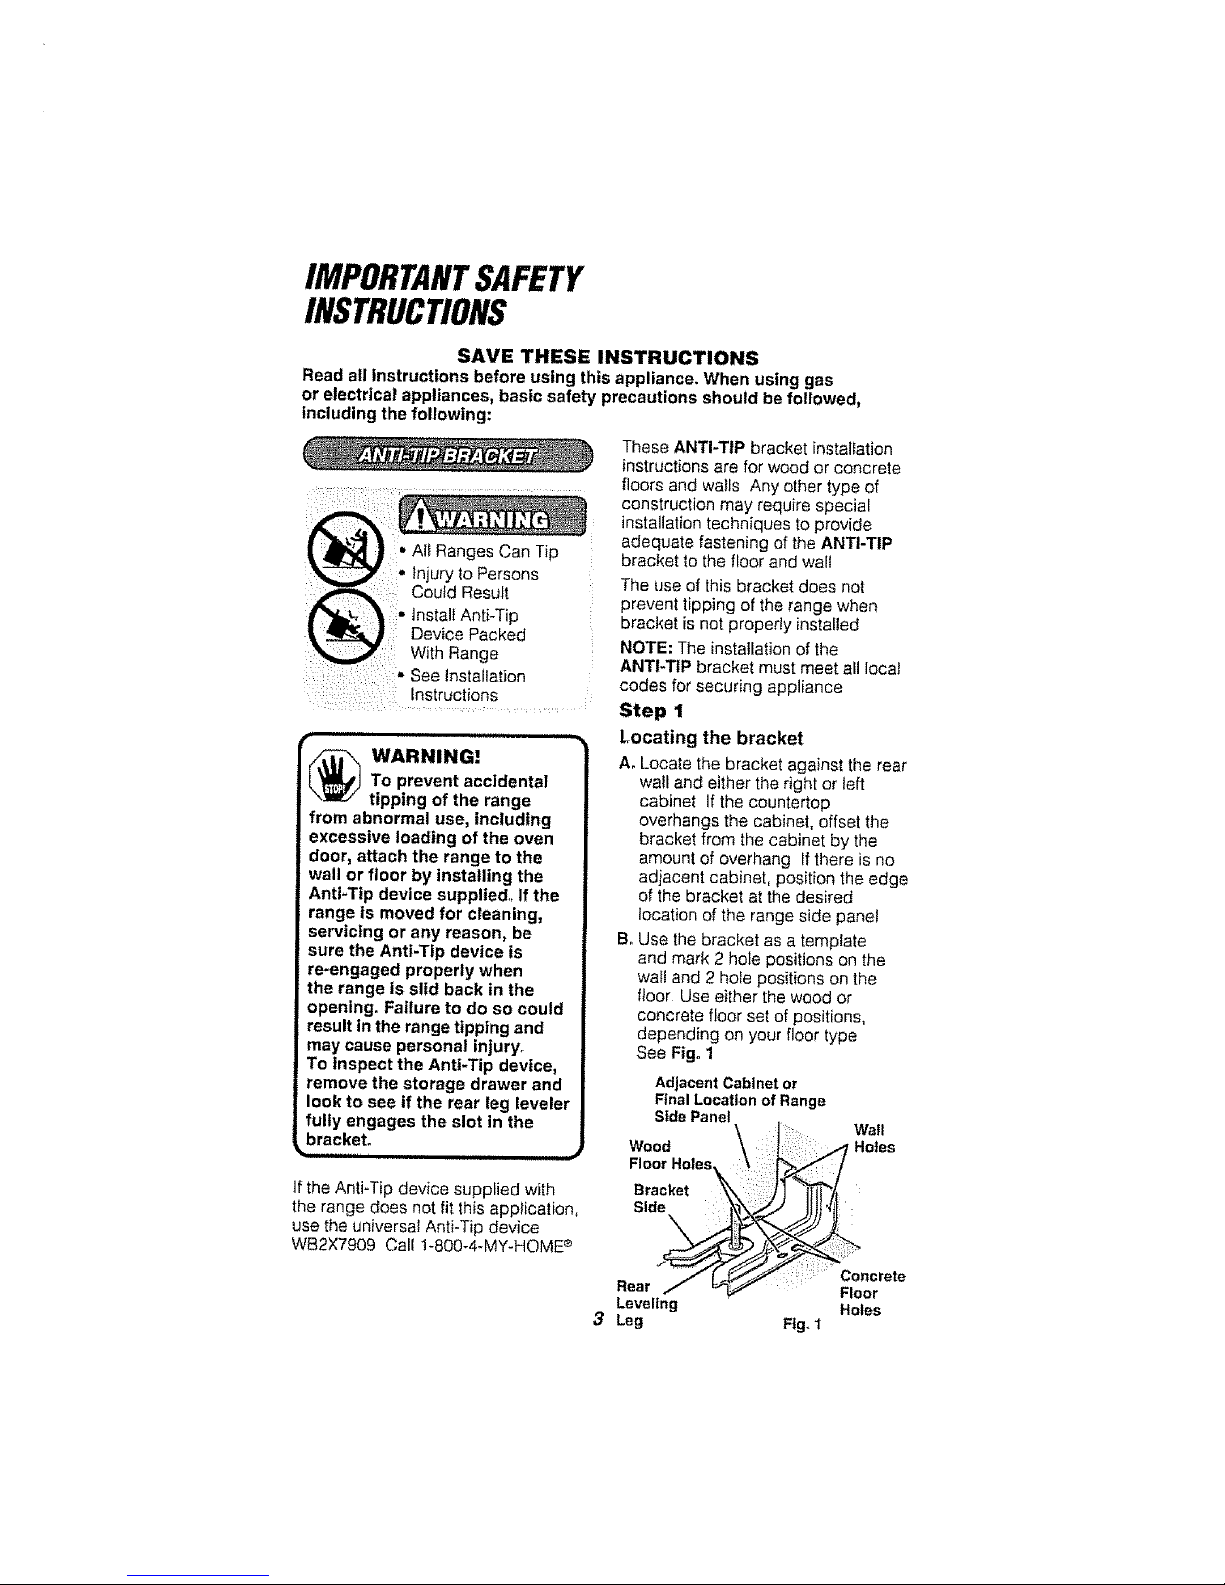
BoUse the bracket as a template
and mark 2 hole positions on the
wall and 2 hole positions on the
floor Use either the wood or
concrete floor set of positions,
depending on your floor type
See Fig. 1
AdjacentCabinetor
FinalLocationof Range
Side Panel
Wood :_ Holes
rete
Rear
Leveling Holes
3 Leg Fig. 1
IMPORTANTSAFETY
INSTRUCTIONS
Anti-Tip Bracket(contdo)
Step 2
Anti-tip bracket installation
Ao Wood Construction:
1_ Floor: Drill a Ve"pilot hole in
the center of each pre-marked
wood floor hole position (a nai!
or awl may be used if a ddlt is
not available),
AND
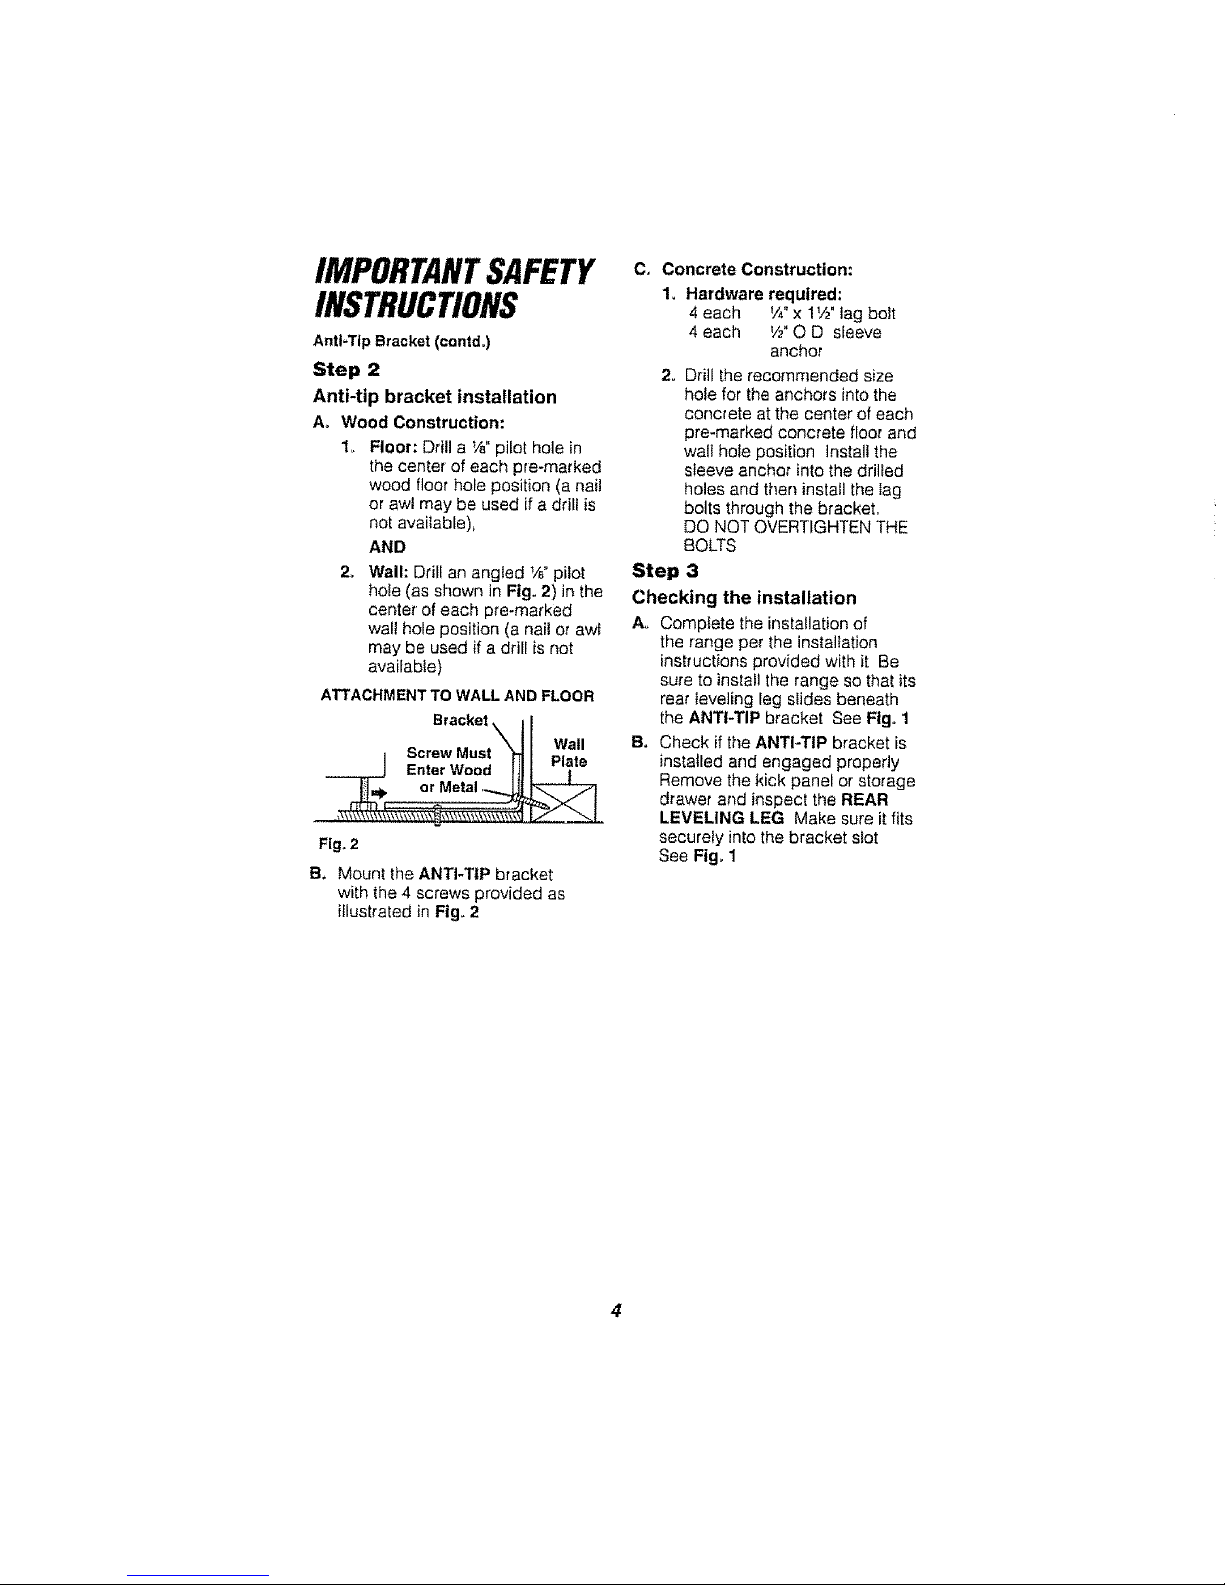
2o Wall: Drill an angled 1/_.plier
hole (as shown in Fig. 2) in the
center of each pre-marked
wal! hole position (a nail or awl
may be used if a drill is not
available)
ATTACHMENTTOWALL AND FLOOR
BracketXt Wall
I ScrewMust "Fr_
EnterWood tt_ Plate
&........o,?e,a,..4
Fig, 2
B. Mount the ANTI-TIP bracket
with the 4 screws provided as
illustrated in Flg_ 2
C, Concrete Construction:
1. Hardware required:
4 each _,4"x 1112'lag bolt
4 each W O D sleeve
anchor
2o Drill the recommended size
hole for the anchors into the
concrete at the center of each
pre-marked concrete floor and
wall hole position install the
sleeve anchor into the drilled
holes and then install the Iag
bolts through the bracket.
DO NOT OVERTIGHTEN THE
BOLTS
Step 3
Checking the installation
A. Cemptete the installation of
the range per the installation
instructions provided with it Be
sure to install the range so thai its
rear leveling leg slides beneath
the ANTI-TIP bracket See Fig° 1
B. Check if the ANTI-TIP bracket is
installed and engaged properly
Remove the kick panel or storage
drawer and inspect the REAR
LEVELING LEG Make sure it fits
securely into the bracket slot
See Ftg_1
IMPORTANTSAFETY
INSTRUCTIONS
Important: To ensure safety for
yourself, family, and home, please
read your Owner's Manual carefully
Keep it handy for reference Pay
close attention to Safety Sections
BE SURE your appliance is installed
and grounded by a qualified
technician
IMPORTANT SAFETY
NOTICE!
The California Safe Drinking
Water and Toxic Enforcement Act
requires the governor of California
to publish a list of substances
known to the state to cause birth
defects or other reproductive harm
and requires businesses to warn
their customers of potential
exposure to such substances.
The fiberglass insulation in a
self-cleaning oven will give off a
very small amount of carbon
monoxide during the cleaning
cycle° Exposure can be minimized
by venting with an open door or
window or using a ventilation fan
or hood,
IMPORTANT: The health of
some birds is extremely sensitive
to the fumes given off during
the self-cleaning cycle of any
range, Move birds to another
welFventilated room.
• DO NOT leave children alone
or unattended near an appliance
in use
" TEACH CHILDREN not to play with
controls or any part of the appliance
and not to sit, climb, or stand on the
door or any other parts of the
appliance
o CAUTION: NEVER STORE
items of interest to children on the
backguard or in cabinets above the
appliance Children climbing on the
appliance could be seriously
injured
• KEEP THIS book for later use
• NEVER TRY to repair or replace
any part of the appliance unless
instructions are given in this
manual All other work should be
done by a qualified technician
IMPORTANTSAFETY
INSTRUCTIONS
• NEVER USEyour appliance for
warming or heating the room
, ALWAYS KEEP combustible wall
coverings, curtains dishcloths, towels
pothoiders and otherlinens a safe
d{stance from the appliance
* DO NOT LEAVE closed containers on
the cooktop The pressure in closed
containers may fncrease which may
cause themto burst
• NEVER LEAVE containers of fat or
drippings inyour oven
• ALWAYS KEEP theappliance
area free from things thatwill burn
Food.wooden utensils and grease
buildup could catch fire Plastic
u_ensilscould mettand canned foods
could explode Your appliance should
never be used as a storage area
• ALWAYS KEEPyour appliance ctear
of things thatwilt bum (gasoline and
other flammable vapors or liquids)
• NEVERTRY to clean hot surfaces
Some cleaners producenoxious fumes
• NEVER WEAR toosefitting clothing
when using your appliance
• NEVER USEa towel or other bulky cloth
asa potholder Make sure the potholder
isdry Moist potholders andwet cloths
or sponges could cause steam burns
DO NOT letpotholders touchhot
heating elements
• DO NOTtouch heating eiements
surfaces near them or interioroven
surfaces These may be hot enough to
causeburns even though they aredark
incolor Duringand after use, do not
touchor let clothing or flammable
materialcontact the elementsor hot
surfaces unlil they have hadtime to
cool Othersurfaces near theoven vent
openings oven door andwindow, and
cooktop surfaces may also be hot
enough to cause burns
• ONLY CERT'A|Nkinds ofglass or
ceramic cookware can be usedfor
cooktop cooking Makesurethe
cookware you chooseto use is
designed forcooktop cooking
withoutbreaking dueto the sudden
temperaturechanges
• ALWAYS USE care when touching
cooktop elements They will retainheat
aftertherange has been turnedoff
• NEVERBLOCK theoven airvent under
the right rear element
• COOKWARE USED forcooktop
cooking should be flat on the bottom
and large enoughto cover the heating
area being used Undersized utens{ls
expose the heating e_ementand may
resultin direct contact or ignitionof
clothing Theproper size utensil willalso
improveelficiency
• ALWAYSUSE drip bowls to prevent
wiring and component damage DO
NOTuse aluminumliners orfoil in drip
bowls Improper use mayresult in risk of
electric shock or fire
• NEVER LEAVE surface units
unattendedat high settings Boilevers
result insmoking orgreasy spilSswhich
could catch fire
• ALWAYS TURN utensii bandies inward
and awayfrom other surface unitsto
reduce theriskofburns, ignition
unintended contact, and spillage
• NEVERput heating elements in water
',,WHEN PREPARING flaming
foods under the vent hood, turn
the fan on
• DO NOT _eaveplastic or flammable
itemson the cooktop--they may melt
ot ignite if left too close to thevent

IMPORTANTSAFETY
INSTRUCTIONS
° PLACE OVEN RACKS in the
desired position while the oven is
cool tf racks must be moved while
oven is hot, do not let potholder
contact the hot oven element
• AFTER BROILING, always take the
broiler pan and grid out of the oven
and clean them Leftover grease in
the broiler pan could catch fire the
next time you use your oven
• ALWAYS USE care when opening
the oven door Let hot air and steam
escape before moving foods
• NEVER USE aluminum foil to line the
oven bottom Improper use of foil
could start afire, or electrical shock
could result
• CLEAN ONLY the parts listed
in this manual Follow all cleaning
instructions Be sure to remove
the broiler pan and grid before
self-cleaning
,, NEVER RUB, move, clean, or
damage the door gasket on
self-cleaning ranges It is
essential for a good seal
• NEVER TRY to clean utensils,
cookware, removable parts, or
broiler pan and grid in the
self-clean cycle
• DO NOT USE oven cleaners-
No commercial oven cleaner or
protective coating of any kind
should be used in or around any
part of the oven
• IF THE SELF-CLEANING mode
malfunctions, turn the oven off and
disconnect the power supply Have
itserviced by a qualified technician
pllUlU H[
r_-_ CAUTION:
Never line the drip bowls
with aluminum foil, Foil
can block the normal heat flow
and damage the range° Always
use cookware and woks that
are fiat on the bottom and
the same size as the cooking
element being used° Cookware
should not extend more than 1"
beyond the edge of the cooking
element.
READ AND UNDERSTAND
THIS INFORMATION NOW!
Besureeveryonein your home
knowswhattodo in case of fire.
Neverusewateron a greasefire;
it wiltonly spreadtheflames=
COOKTOP GREASE FIRE:
Never pick up a flaming pan..,
1. Turn off the surface elements
2,, Smother the flame with a tightly
fitting lid, use baking soda, or
use a dry chemical, foam, or
halonotype extinguisher
OVEN FIRE:
Do not try to move the panl
1. Close the oven door and turn
controls off
2. If fire continues, carefully open
the door, throw baking soda on
the fire, or use a dry chemical,
foam, or halon-type extinguisher
OPERATION
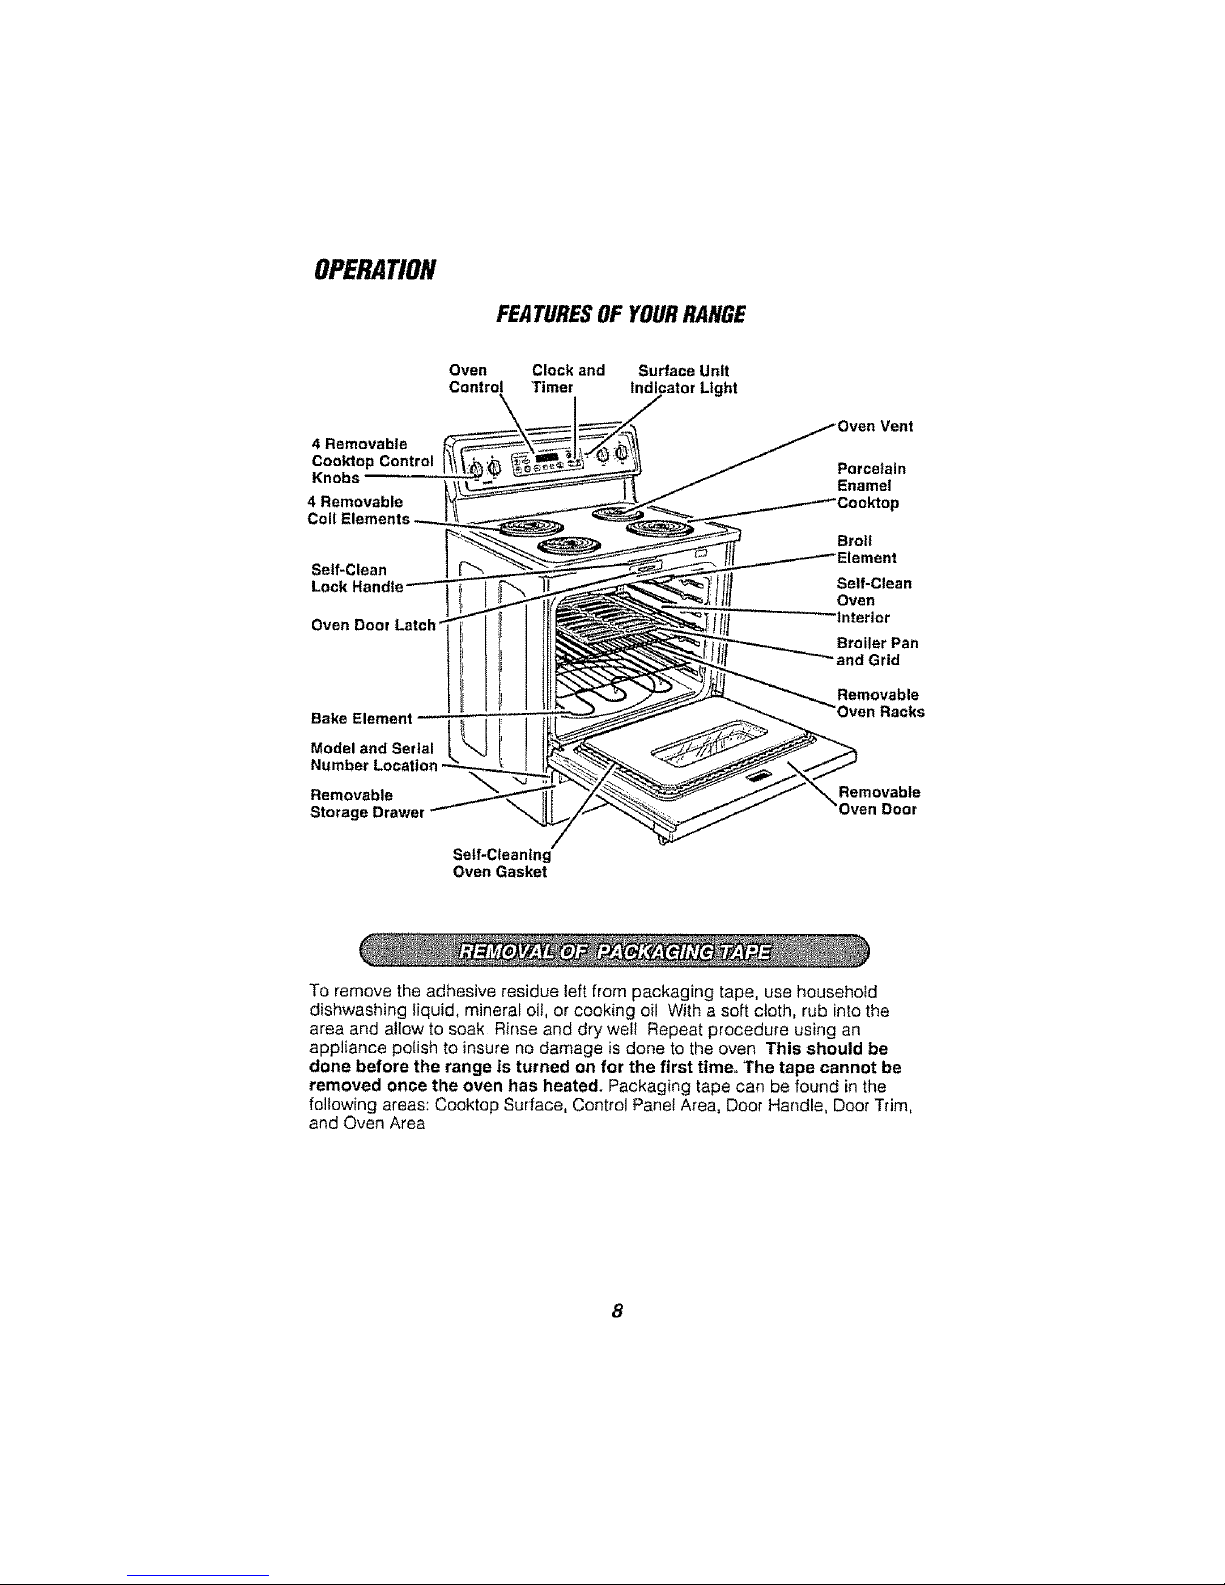
FEATURESOFYOURRANGE
Oven Clock and Surface Unit
Control Timer Indicator Light
Vent
4 Removable
Cook'top Control Porcelain
Knobs Enamel
4 Removable
Self-Clean
Oven Door Latch"
Bake Element | I
[
Model and Serial
Number Location
Self-Clean
Oven
Broiler Pan
and Grid
Removable
Racks
Removable Removable
Storage Drawer Door
Self-Cleaning
Oven Gasket
To remove the adhesive residue left from packaging tape, use household
dishwashing liquid, mineral oil, or cooking oil With a soft cloth, rub into the
area and allow to soak Rinse and dry welt Repeat procedure using an
appliance polish to insure no damage is done to the oven This should be
done before the range is turned on for the first time= The tape cannot be
removed once the oven has heated. Packaging tape can be found in the
following areas: Cooktop Surface, Control Panel Area, Door Handle, Door Trim,
and Oven Area
OPERATION
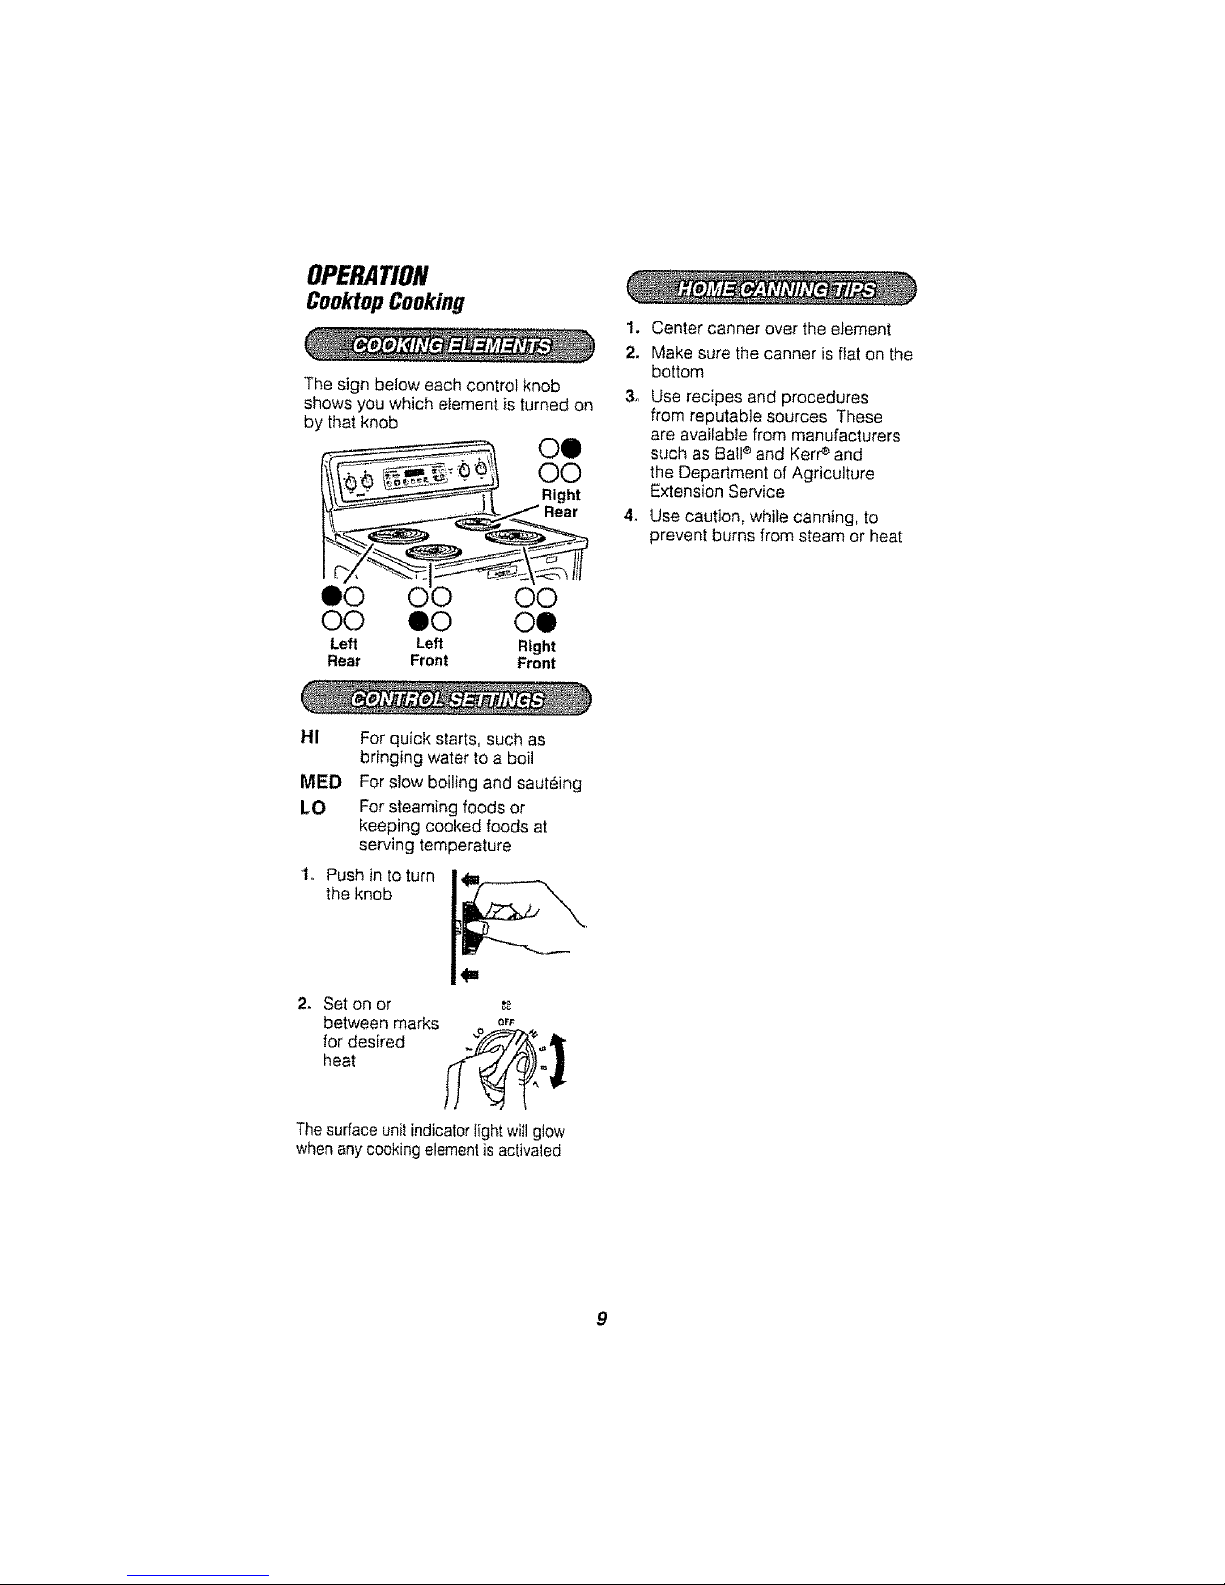
CooktopCooking
The sign below each control knob
shows you which element is turned on
by that knob
1. Center canner over the element
2. Make sure the canner is flat on the
bottom
3. Use recipes and procedures
from reputable sources These
are available from manufacturers
such as Ball®and Kerr_and
the Department of Agriculture
Extension Service
4_ Use caution, while canning, to
prevent burns from steam or heat
O0 QO 00
Left Left Right
Rear Front Front
HI For quick starts, such as
bringing water to a boil
MED For s!ow boiling and sauteing
LO For steaming foods or
keeping cooked foods at
serving temperature
1., Push in to turn
the knob
2. Set on or _
between marks o_F
for desired _,1_
heat Ij,P_ ?,:_.
Thesurface unit indicator light will glow
when any cookingelement is activaled

OPERATION
OvenControl
Bake/Temp Start
RecallPad Pad
O_IENCONTRI1LS
Broil HI/LO Stop/Clear
Pad Pad
SelfCtean
Pad
Display
I
Kitchen
Timer On/Off Crock
Pad Pad
TitVII.:CONTRO¢
KITCHEN
TIME
AU:
Automatic
Oven Light
Oven
Pad
Delay Start
On/Off Pad
.ight
Cec !tng
TimeOn/Off
Pad
BAKE/TEMPRECALLpad. Pressthispad
toselect thebake function
BAKElight,Rasheswhileinedit mode---
you can change theoven temperatureat
thispoint Glows when theovenis inbake
mode
STARTpad, Must be pressed tostartany
cookingor cleaning function
DISPLAY, Showsthetime ofday, oven
temperature,whether theovenis in lhe
bake.broil or self-cleaningmode and the
timesset lor thetimer or automatic oven
operations Thedisptay will showPRE
whileprehealing When theovenreaches
the selectedtemperature,theoven control
will beepand thedisplay will showthe
oventemperature
If"F- anda number or letter" flash in the
display and theovencontrotsignals,this
indicatesa functionerror code
Ifyourovenwas set for a timed oven
operationand a poweroutage occurred,
theclock arid allprogrammed functions
mustbe reset
Thetime elday wil! flashinthe display
when therehas beena poweroutage
Resettheclock
If"Err" appears in thedisplay, you have
triedtoset a Iimeor temperatureoutsideof
thecontrol's limits Pressthe STOP/
CLEAR padand entera newsetting
IftheIunctionerrorcode appearsduring
theself-cleaningcycte, check theoven
door latch Thelatch handtemay have
been moved, evenifonly slightly,fromthe
latched position Makesure the latchis
moved to theright as far as it willgo
Pressthe STOP/CLEARpad,Allow the
oventocoolfor one hour Puttheoven
back intooperation II thefunctionerror
code repeats,disconnect the powerto the
range andcall Searsforservice
KITCHENTIMERON/OFF pad. Pressthis
pad tosetect thetimerfeature Then press
the • and • pads to adiust the timer
TIMERlight, Flasheswhile inedit mode--
youcan change theset timeat thispoint
Glowswhen the timer hasbeen activated
Flashesagainwhen thetime hasrunout
untilthecontrolis reset
CLOCKpad. To setthe clock, press this
pad lwice andthen press theA and •
pads Thetimeof daywill flastlin the
disp+aywhen the oven is firstturned on
10
OPERATION
OvenControl(cont.)
DELAYSTARTON/OFFpad (on some
models).Use alongwith the COOKING
TIMEor SELFCLEAN padstosetthe
ovento start and stopautomaticallyal a
timeyouset
DELAY STARTON!OFFlight (on some
models),Flasheswhile inedil mode--you
canchange the start,time atthispoint
Glowswhenthe functionhas been
activated
COOKINGTtMEON/OFF pad (on some
models),Pressins pad and thenpress
the ,_,orT pads to set lheamount of time
you wantyourfoodto cook Theovenwill
shutoff whenthecookingtime has run out
COOKINGTIMEON/OFFlight (on some
models), Flasheswhilein edit mode--you
canchange the settimeat thispoint
Glowswhenthe functionhasbeen
activated Fiashesagain whenthe time has
runout unlitthe controlisreset
AUTOMATICOVENlight (on some
models).This lightsanytime the ovenhas
beenprogrammed using the COOKING
TIME or DELAYSTARTfunctions
OVENLIGHTpad.Pressthispad toturn
theoven light onoroff
_r pad, Shorttapstothis padwilI
decreasethe time or temperatureby
small amounts Pressand hold thepad
to decrease thetimeor temperatureby
largeramounts
,tkpad.Shed taps lo thispad wil!increase
the time or temperatureby small amounts
Pressand hold the pad to increase the
time or temperatureby larger amounls
SELFCLEANpad, Pressthispad to
select the self-cleaningfunction See the
Using theSelf-CleaningOven seclion
CLEAN light, Flasheswhile in edil
mode--you can change the length of time
for thesell-clean cycle atthis point Glows
whenthe oven is inthe self-cleancycle
Afterthe se!{-cieancycle, the light wiltturn
off Unlatch the door
STOP/CLEARpad. Press this pad to
cancel ALL over,operationsexcept the
clock and timer
BROIL HI/LOpad, Pressthis pad to
select thebroil function
BROIL light. Flasheswhile in edit mode--
youcan switchfrom HI to LO BROIL at
thispoint Glowswhen theoven is inbroil
mode
Indicatorlights (on some pads). EDIT
mode lastsseveralseconds after thelast
pad press DELAY START ON/OFF and
COOKINGTIME ON/OFFwill be theonly
pads tit ifeither of theseoptions is
selected (Example:DELAYSTART is
selectedwith BAKE--the DELAY START
pad will remainlit until the dock reaches
theprogrammed time, at which point it wilt
turnoffand theBAKE/TEMP RECALL
pad light wiltlightup)
11
OPERATION
Clock and Timer
®@ ®®®@ @@
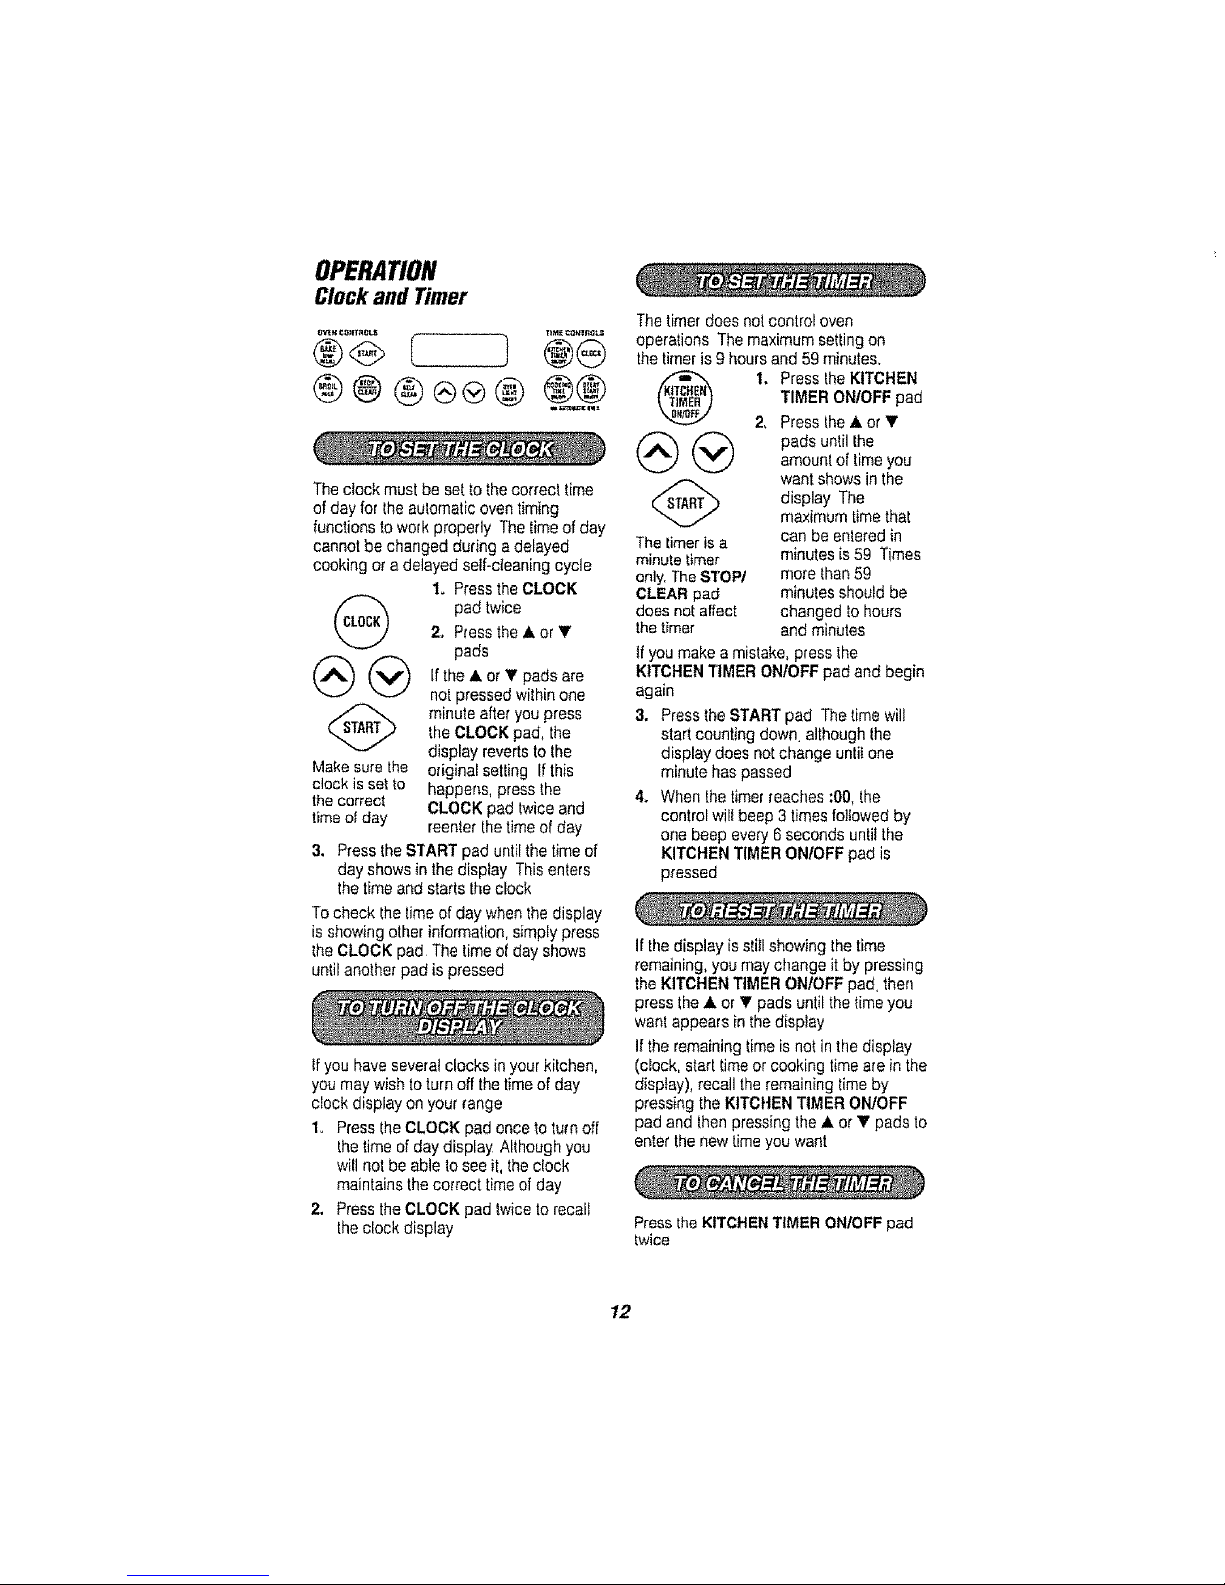
The clock must be setto thecorrect time
of day for the automaticoven timing
functions to work properly The timeof day
cannot be changed during a delayed
cooking or a delayed self-cleaning cycle
1o Press the CLOCK
pad twice2. Press the A or T
pads
(_ (_ lfthe•or"!'padsare
no_pressed within one
(_ minuteafter you press
theCLOCK pad, the
display reverts to lhe
Make surethe odginalsetting Ifthis
clock is setto happens, press the
the correct CLOCK pad twiceand
time of day reenterthe time of day
3. Press the START pad untilthe timeof
day shows in the display Thisenters
thetimeand startstheclock
Tocheck the timeof day when the display
is showing otherinformation,simply press
_heCLOCK pad The timeof day shows
untilanother pad is pressed
Ifyou have severWclocks in yourkitchen,
you may wishtoturn off thetimeofday
clock display on your range
1o PresstheCLOCK pad once to turnoff
the time of day display Althoughyou
will not be able to seeit, the dock
maintains the correct timeof day
2. Pressthe CLOCK pad twice to recall
the clock display
Thetimer does not control oven
operations The maximumsetting on
thetimer is9 hoursand 59 minutes,
I. Press theKITCHEN
TIMER ON/OFF pad
2. Press the& or T
(_(_) pads untilIhe
amount of timeyou
want shows in the
display The
maximum timethat
Thetimeris a can be entered in
minutetimer minutes is 59 Times
only.TheSTOP/ more than 59
CLEAR pad minutes shoutd be
doesnotaffect changed to hours
the timer and minutes
tfyou make a mistake,press the
KITCHENTIMER ON/OFF pad and begin
again
3. Pressthe START pad Thetime will
startcounting down although the
display does notchange until one
minute haspassed
& When the timerreaches :00,the
control will beep 3 times followedby
one beep every 6 seconds until the
KITCHENTIMER ON/OFF pad is
pressed
Ifthe display isstill showing lhe time
remaining,you may change it by pressing
the KITCHENTIMER ON/OFF pad.then
press the • or T padsuntil the time you
want appears in thedisplay
Ifthe remaining time is not inthe display
(clock, start timeor cooking timeare in the
display), recall theremaining timeby
pressing the KITCHENTIMER ON!OFF
pad and lhen pressing the• or "_'pads to
enter the new timeyou want
Press the KITCHEN TIMER ON/OFF pad
b,vice
12
OPERATION
ClockandTimer(cont.)
Clear the tones by pressing the padof the
function youare using
OPERATION
Baking
®
or
®
If aflashing time isin thedisplay,you
haveexperienced a powerfailure Rese!
the clock
Toreset the c_ock,press the CLOCK pad
Enterthe correct time of day bypressir_g
the _. or _' pads Pressthe STARTpad
1. Press the BAKE pad
2. Press the ,tk or Y pads unti_the
desired temperature is displayed
3. Press the START pad
The oven will start automatically
The display will show PRE while
preheating When the even reaches
the selected temperature, the even
control wiUbeep severa_ times and
the display wil! show the oven
temperature
To change the oven temperature
during BAKE cycle, press the BAKE
pad and then the A or V pads to get
the new temperature
4. Check food for doneness at
minimum time on recipe Cook
_onger if necessary
& Press the STOP/CLEAR pad when
baking is finished and then remove
the food from the oven
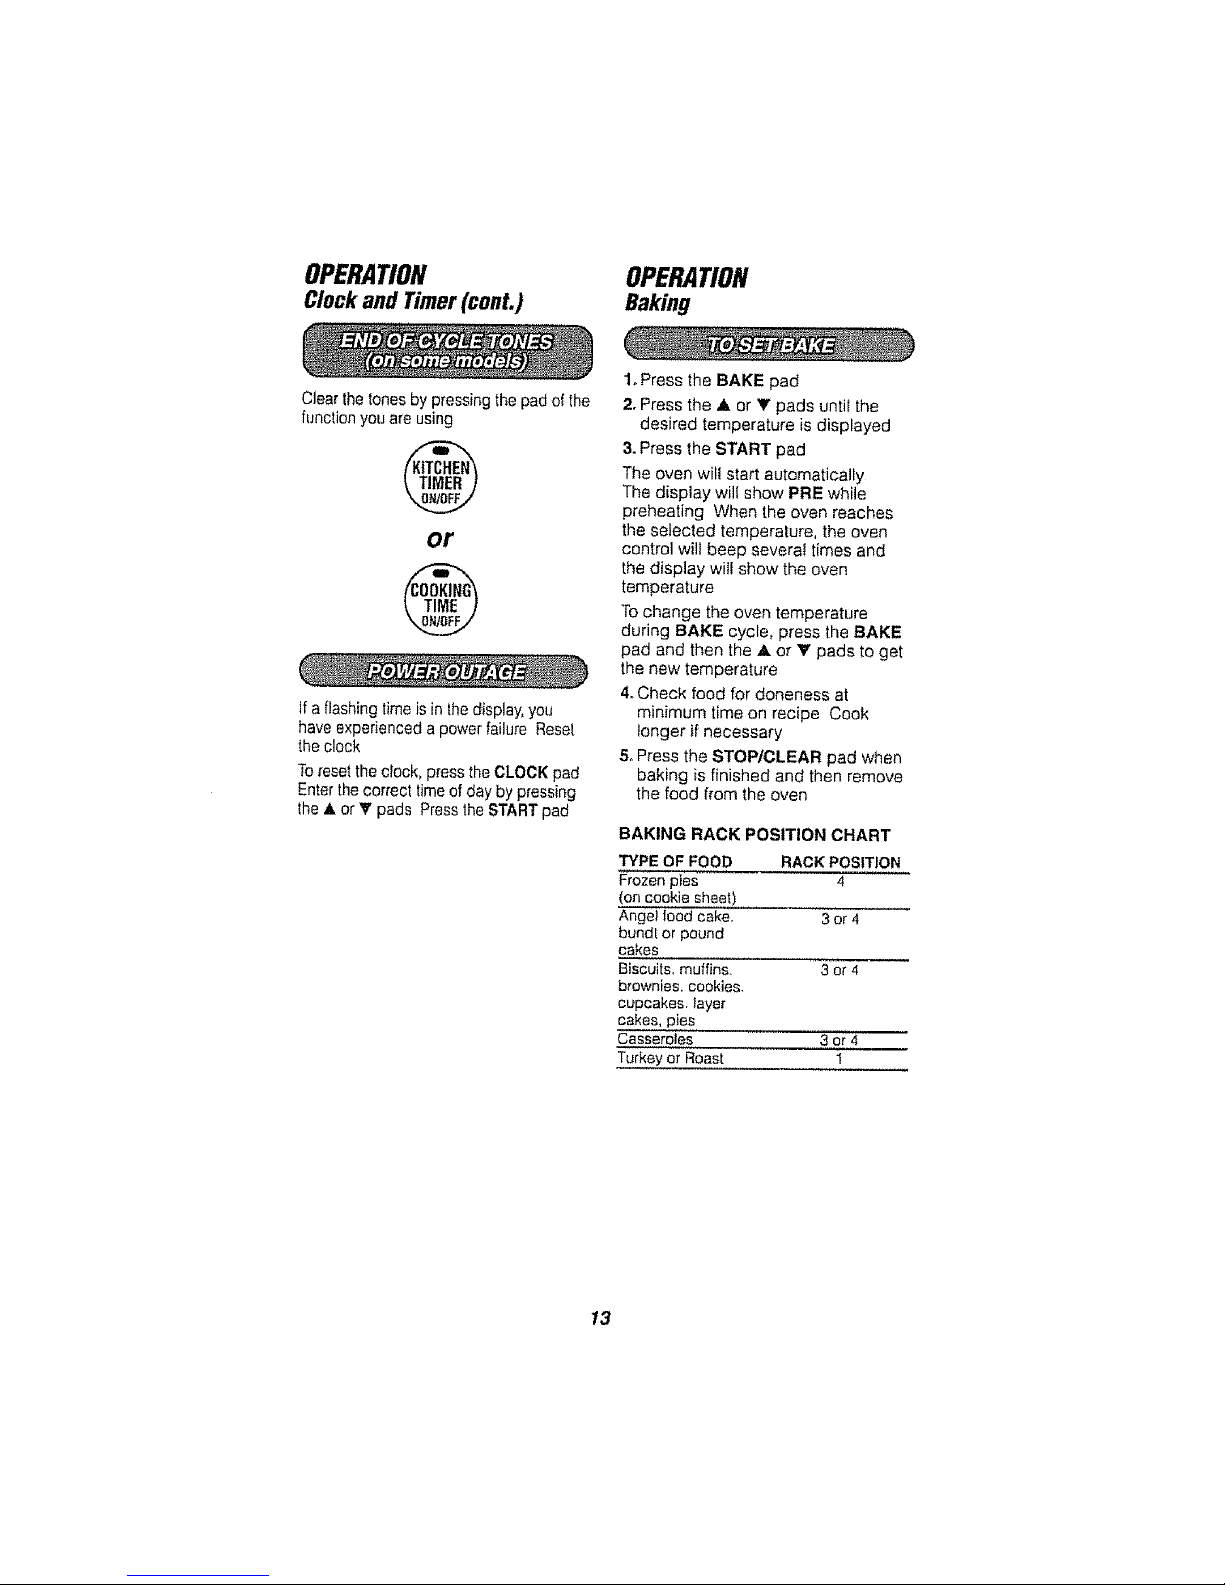
BAKING RACK POSITION CHART
TYPE OF FOOD RACK POSITION
Frozen pies 4
(on cookie sheet)
Angel lood cake. 3 or 4
bund[ or pound
cakes
Biscuits. muffins. 3 or 4
brewniee, cookies.
cupcakes, tayer
cakes, pies
Casserotes 3 or 4
Turkey or Roast 1
13
OPERATION
OvenCooking Tips
It is normal to have some odor when
using your oven for the first time To
hetp eliminate this odor, ventilate the
room by opening a window or using
a vent hood
Opening thedoor often to check foods wiiI
cause heat less and poor baking results
Preheating is bringing the oven
temperatureup tothe temperature you will
be using during baking Let theoven
preheat when recipes call forpreheating
Never cover the oven bottom with
aluminum foil.
You can use aluminum foil to line the
broiler pan and broiler grid, However,
you must mold the foil tightly to the
grid and cut slits in it }ust like the
grid
Aluminum foil may also be used to
catch a spillover To do so, place a
small sheet of foil on a lower rack
several inches below the food
Never entirely covet a rack with
aluminum foi! This will disturb the
heat circulation and result in poor
baking
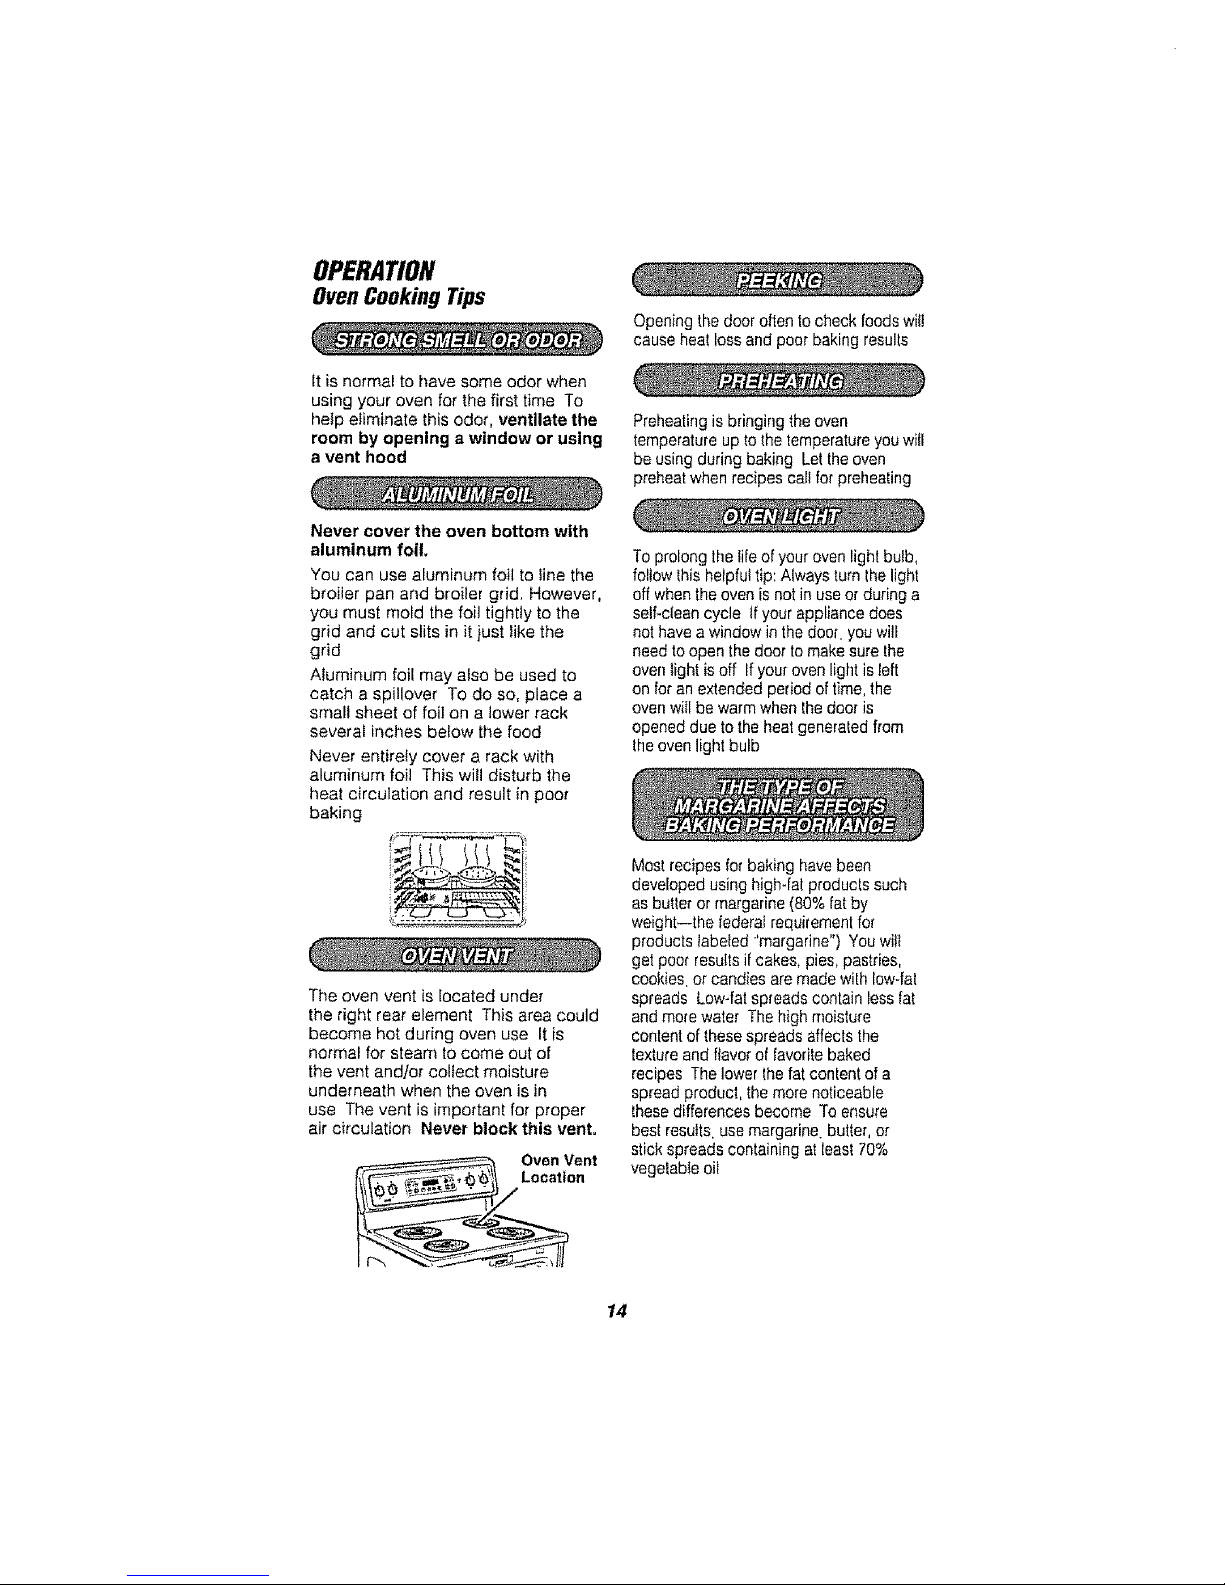
The oven vent is located under
the right rear element This area could
become hot during oven use It is
normal for steam to come out of
the vent and/or collect moisture
underneath when the oven is in
use The vent is important for proper
air circulation Never block this vent.
Oven Vent
Location
Toprolong thelife of your ovenlight bulb,
follow thisheipfuitip:Always turnthe light
off when theoven is not in useor during a
seGclean cycle If your appliance does
not have a window in the door. you will
need to open the door tomake sure the
ovenlight is off If your oven light is left
on for an extended period of time,the
ovenwill be warm when the door is
opened due tothe heatgenerated from
theoven light bulb
Mostrecipes for baking havebeen
developed using high-fatproducts such
asbutter or margarine (80% fat by
weight--the federal requirementfor
products tabeled 'margarine") Youwilt
get poor resultsifcakes, pies_pastries,
cookies or candies aremade with low-fat
spreads Low-fatspreads contain less fat
andmore water The high moisture
content ofthese spreads affects the
textureandflavorof Iavoritebaked
recipes Thelower the fat contentof a
spreadproduct, the morenoticeable
thesedifferences become To ensure
best results,use margarine butter, er
stick spreads containing at [easi70%
vegetable oil
14
OPERATION
OvenCookingTips(cont.)
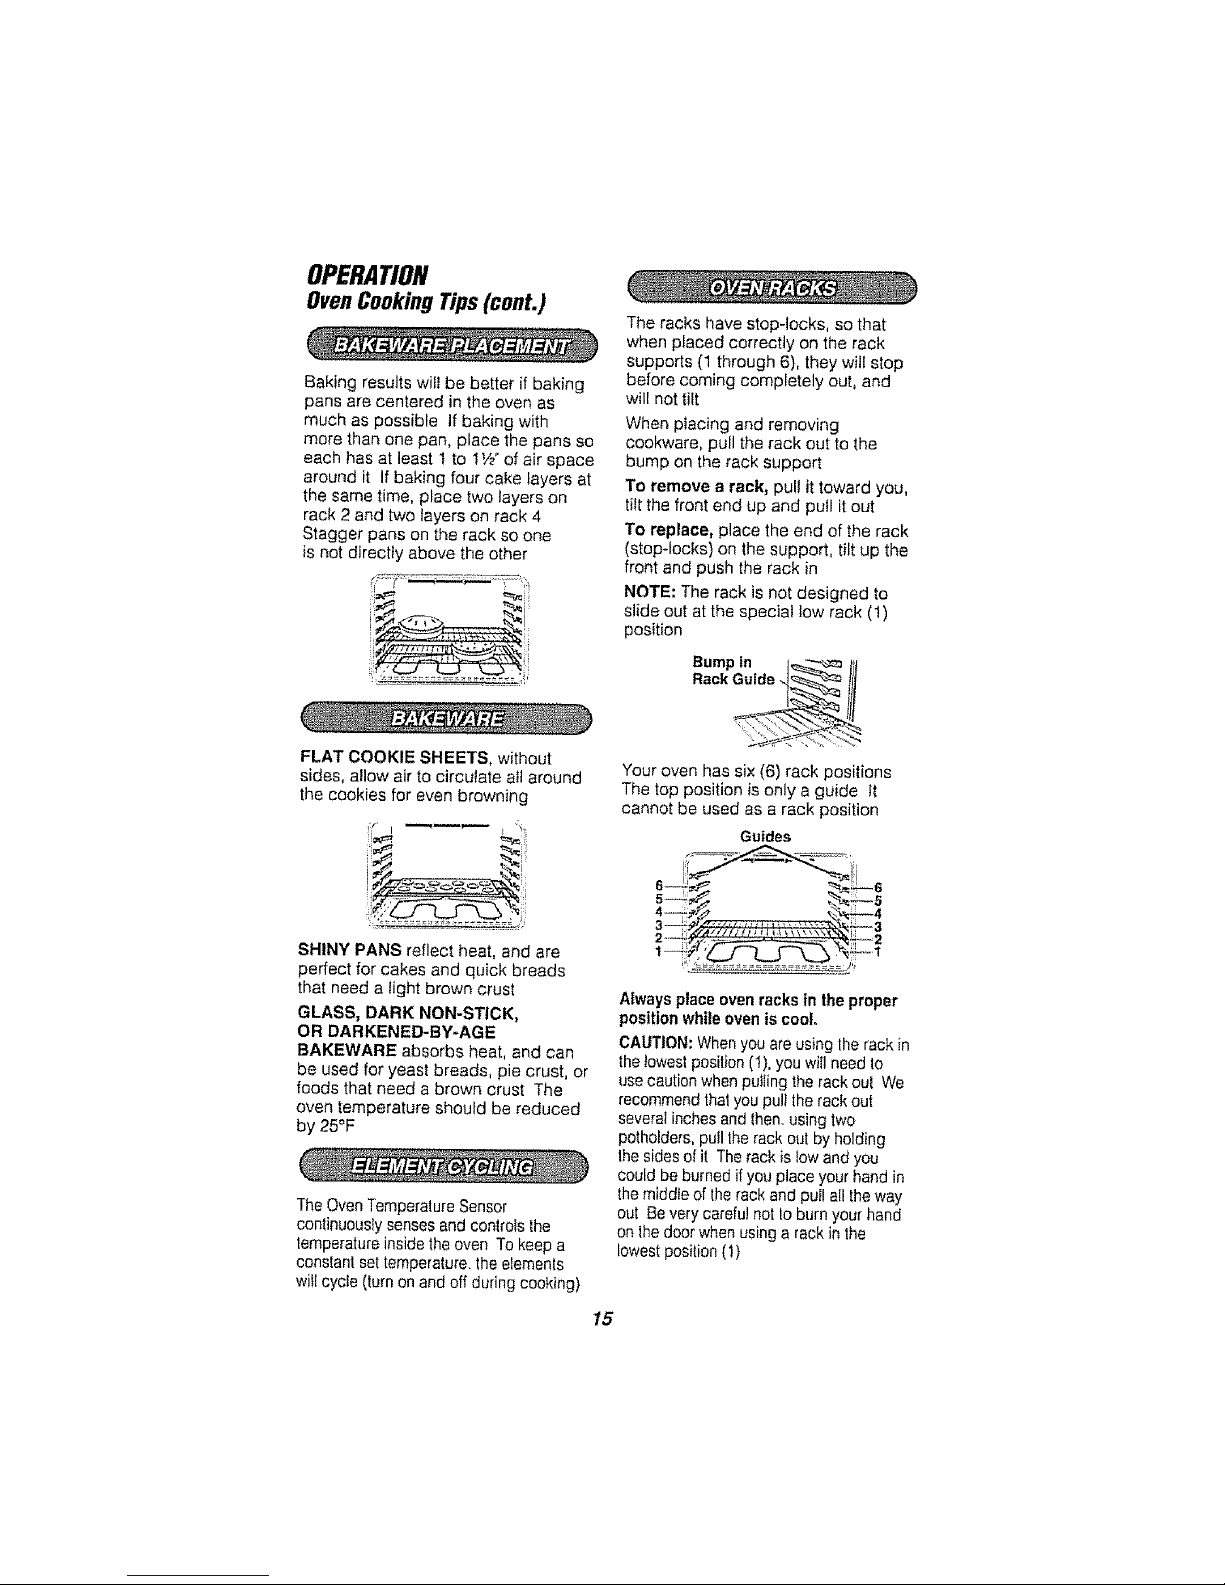
Baking results will be better if baking
pans are centered in the oven as
much as possible tf baking with
more than one pan, place the pans so
each has at least t to 1W of air space
around it If baking four cake layers at
the same time, place two layers on
rack 2 and two layers on rack 4
Stagger pans on the rack so one
is not directly above the other
i:
FLAT COOKIE SHEETS, without
sides, allow air to circulate att around
the cookies for even browning
!,i i ,i
SHINY PANS reflect heat, and are
perfect for cakes and quick breads
that need a light brown crust
GLASS, DARK NON-STICK,
OR DAFIKENED-BY_AGE
BAKEWARE absorbs heat, and can
be used for yeast breads, pie crust, or
foods that need a brown crust The
oven temperature should be reduced
by 25°F
The OvenTemperatureSensor
continuouslysensesand controls the
temperatureinside the oven To keep a
conslant set temperature, theelements
will cycle (turn on and off during cooking}
The racks have stop-locks, so that
when placed correctly on the rack
supports (1 through 6), they will stop
before coming completely out, and
will not tilt
When placing and removing
cookware, pull the rack out to the
bump on the rack support
To remove a rack, pult it toward you,
titt the front end up and pu_lit out
To replace, place the end of the rack
(stop-lacks} on the support, tilt up the
front and push the rack in
NOTE; The rack is not designed to
slide out at the special low rack (1)
position
Bumpin J_ tit
Rack Guide q_'_"_-"-'-'-'-'-'-'-'-'_III
Your oven has six (6) rack positions
The top position is only a guide tt
cannot be used as a rack position
Guides
i! ii
s
Alwaysplace oven racks in the proper
positionwhile oven is cool,
CAUTION:Whenyou areusing the rack in
the towestposilion (I), you will need to
use caution when pulling the rackout We
recommend thaiyou pul!the rack out
several inchesand then_using two
potholders, pullthe rack out by holding
Ihe sides of it The rack is lowand you
could be burned if you place your hand in
the middle of therack and pull all theway
out Be very careful not 1oburnyour hand
on the door when using arack in the
lowestposition (1)
15

OPERATION
OvenCookingTips(cont.)
You may feel that your new oven
cooks differently than the oven it
replaced We recommend that you
use your new oven a few weeks
to become more familiar with it,
following the times given in your
recipes as a guide If you feel
your oven is too hot or too cooi
for your cooking preference, see
Do-It-Yourself Temperature
Adjustment in the back of this
manua! to make the adjustment
16
OPERATION
Broiling
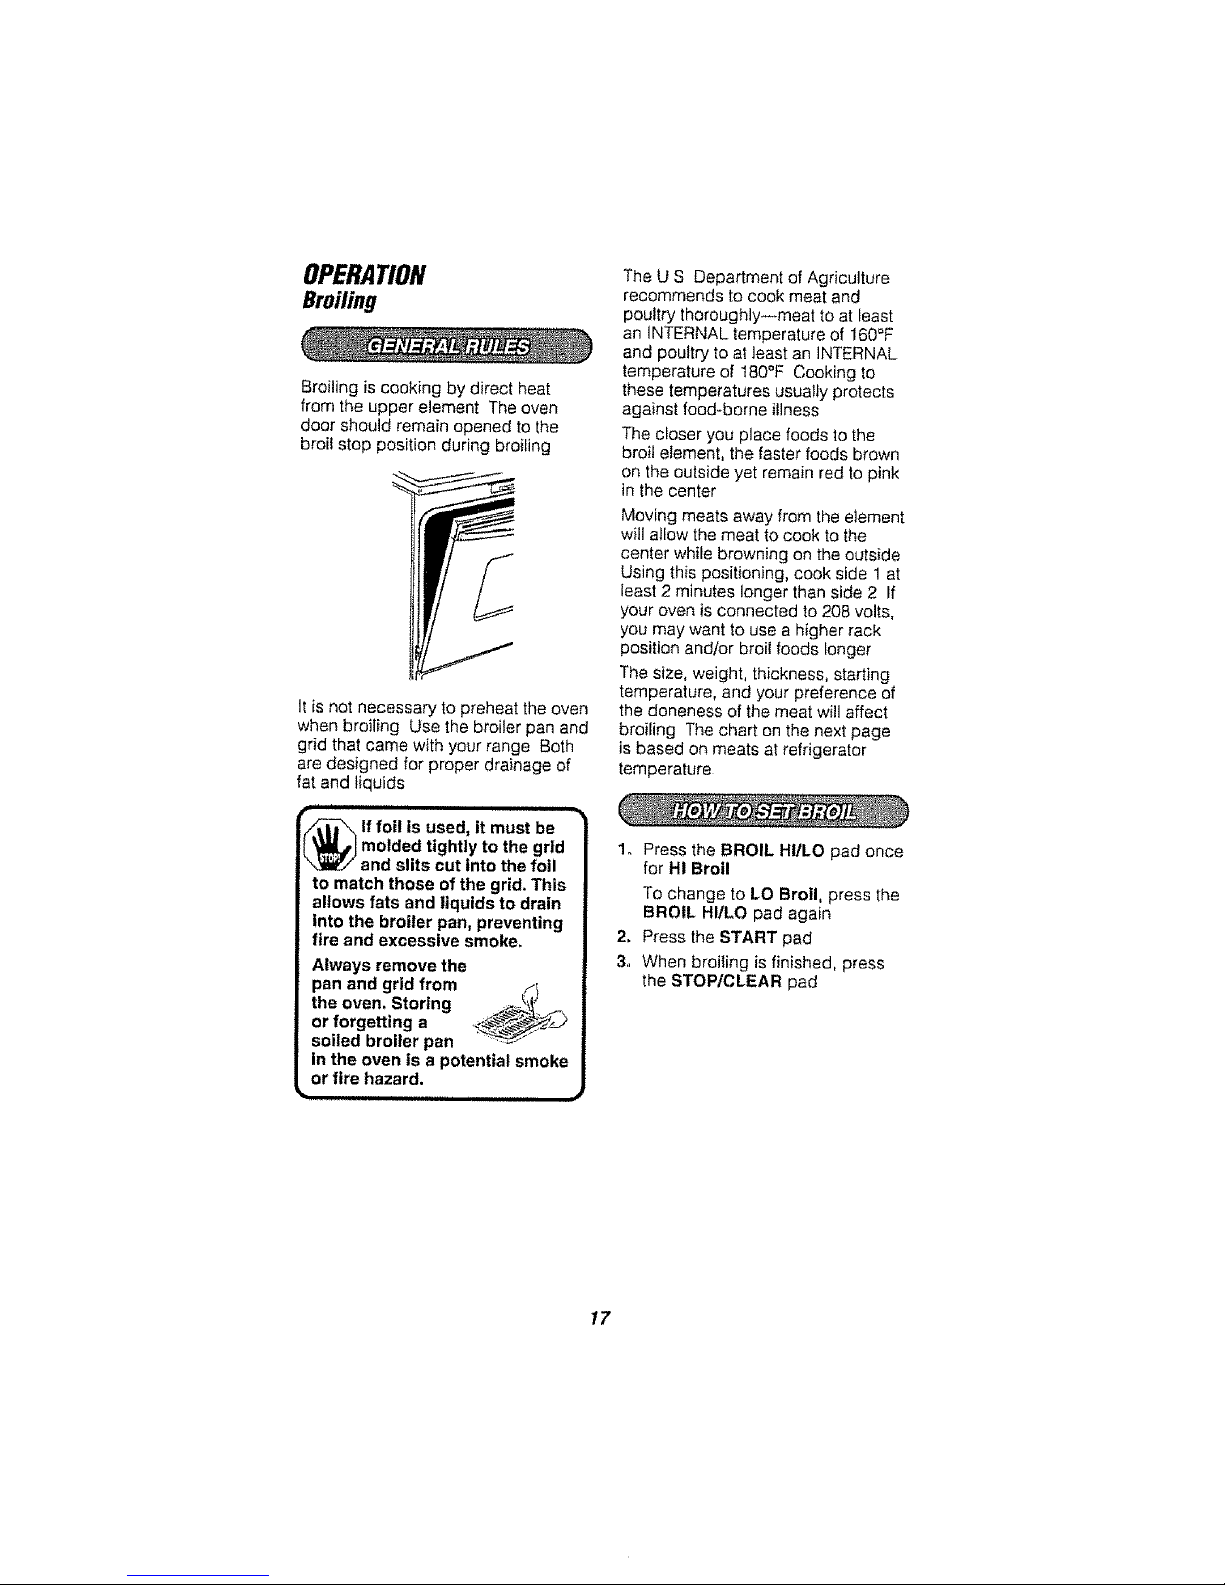
Broiling is cooking by direct heat
from the upper element The oven
door should remain opened to the
broit stop position during broiling
it is not necessary to preheat the oven
when broiling Use the broiler pan and
grid that came with your range Both
are designed for proper drainage of
fat and liquids
n = n,,,,,,,,,,,,,,,,, H i1
r
lf foi! is used, it must be
molded tightly to the grid
and slits cut into the foil
to match those of the grid. This
allows fats and liquids to drain
into the broiler pan, preventing
fire and excessive smoke.
Always remove the
pan and grid from . _
the oven. Storingor forgetting a .
soiled broiler pan ....... "
In the oven is a potential smoke
or fire hazard.
The U S Department of Agriculture
recommends to cook meat and
poultry thoroughly--meat to at least
an _NTERNAL temperature of 160_F
and poultry to at least an INTERNAL
temperature of t80°F Cooking to
these temperatures usually protects
against food-borne illness
The closer you place foods to the
broil element, the faster foods brown
on the outside yet remain red to pink
in the center
Moving meats away from the element
will allow the meat to cook to the
center while browning on the outside
Using this positioning, cook side 1 at
least 2 minutes longer than side 2 If
your oven is connected to 208 volts,
you may want to use a higher rack
positien andtor broil foods longer
The size, weight, thickness, starting
temperature, and your preference of
the aloneness of the meat will affect
broiling The chart on the next page
is based on meats at refrigerator
temperature
1. Press the BROIL HI/LO pad once
for HI Broil
To change to LO Broil, press the
BROIL HIILO pad again
2. Press the START pad
3,, When broiling is finished, press
the STOP/CLEAR pad
17
OPERATION
Broiling(cont.)
Guides
5--
3--7 iV_
FOOD
GroundBeef 1Ib(4pwliss)
WellDone V2"to Y,"thick
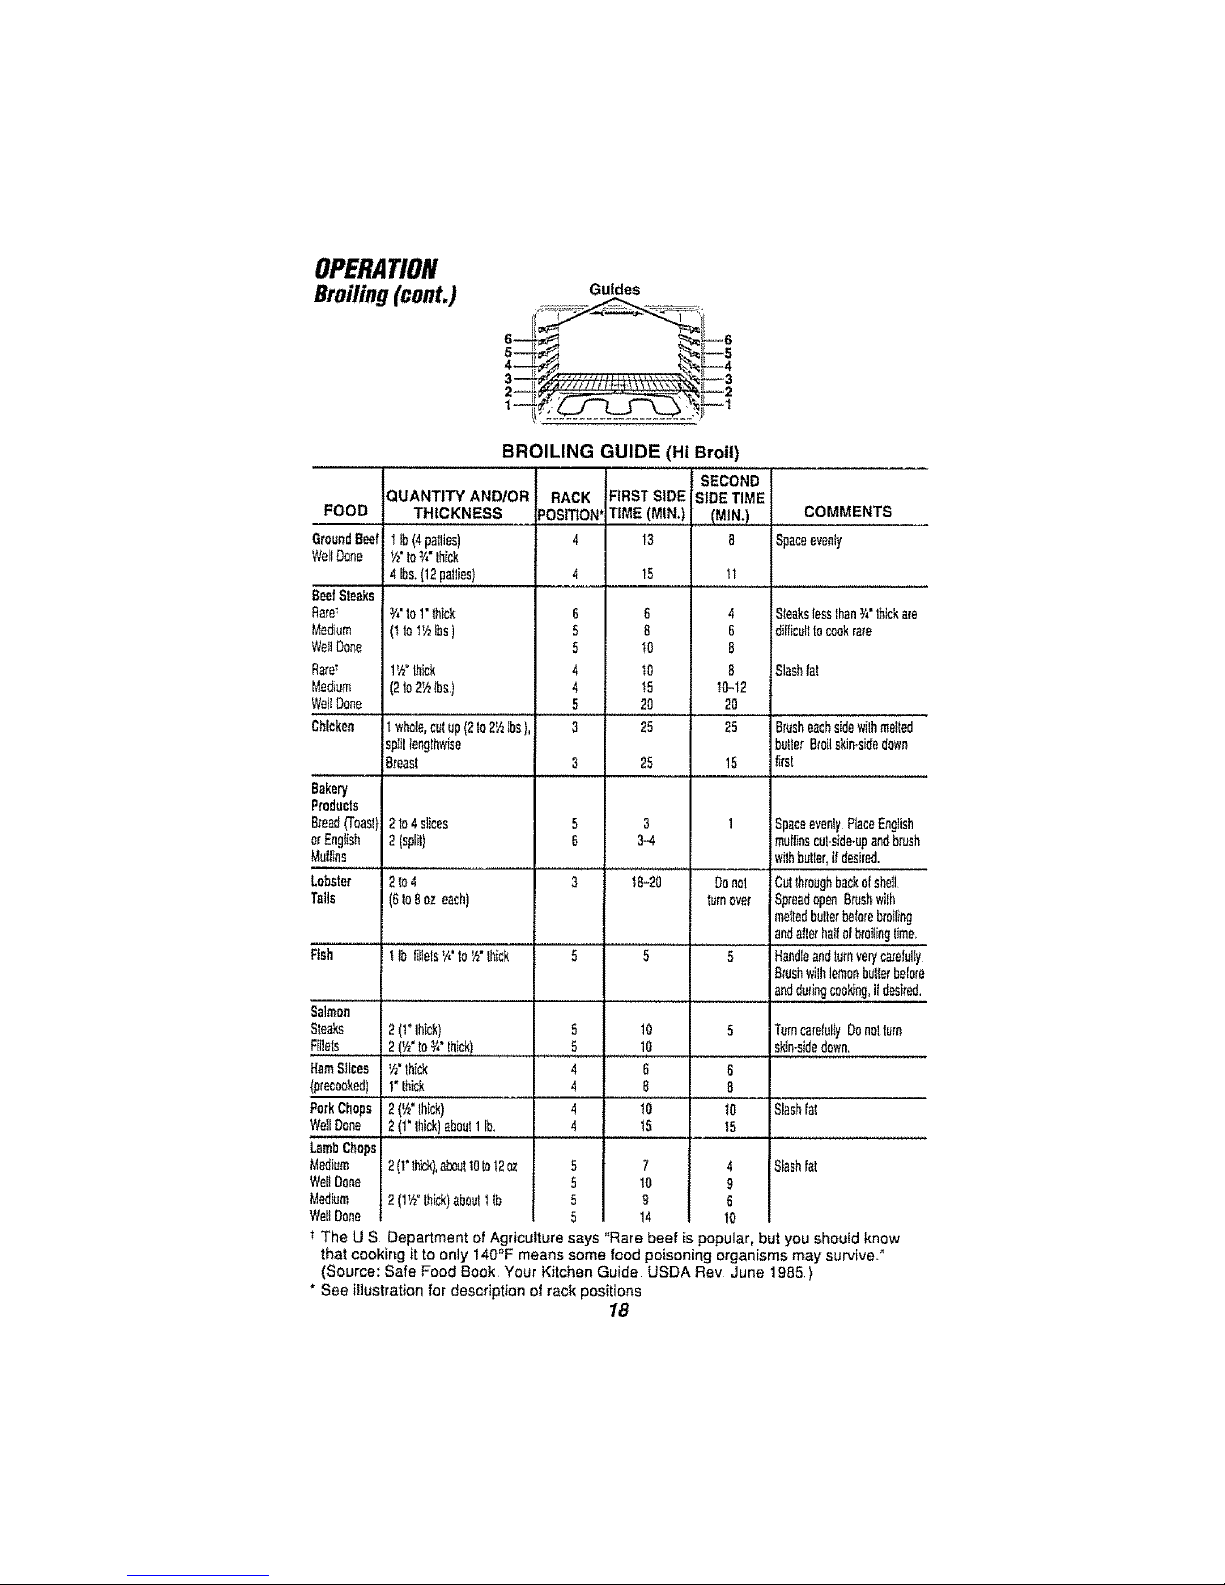
BROILING GUIDE (Hi Broil)
SECOND
QUANTITY AND/OR RACK FIRST SiDE SIDETIME
THICKNESS _OSITION*TIME (MIN+) (MIN.),,,,,i
4 13 8
4Ibs,(12pewee) 4 15
BeefSteaks
Rare_ Y4"to1"thick 6 6
Medium (t tol_hIbs) 5 8
,,Vel_Do_e 5 10
Rare7 l'h° thick 4 10
Medium (2to2½ths) 4 !5
_VellDone 5 20
4
6
B
B
t0-12
20
COMMENTS
Spaceevenly
SteakstessthanY+"lhlokare
diMcutitocookrare
Slashfat
"{am8Iisee
precooked)
:_orkChops
NellDone
LambChops
Medium
WeltDone
Medium
WellDone
Chicken Iwhole,cutup(2to2_Ibs),
spiltlengthwise
Breast
Bakery
P,rodtJcts
Breed_0asi)i 21o4slices
:+rEnglish 2 {split)
_,tulf+ns
Lobster 2 In4
rails (_to8eeeach)
:tah t Ibfillets'_'to_"thick
+simon
_tesks 2 (++Ihick)
:[ilets 2(½'to+i"thick)
'h"thick
1+thick
2('k"thick)
2(1"lhick)ab0uiIIb+
2(l'th!d,(),aboultOto|2oz
2(I_._°thick)abouiIib
3
3
5
5
4
4
4
4
25
25
3
3-4
181+20
10
10
@
B
'+0
15
7
10
S'
14
25 Brusheachsidewithmelted
butlerBroilskin+sidedown
15 _rst
1 jSpaceeventyRaceEnglish
muffinscutside+upandbrush
wi!hbutEer,i_desired.
Cutthroughbackelshell
SpreadopenBrashwiIh
me,tedbultorbeforeb,'silintj
andaIle_hz{ilotbrWiingtime,
5 HandleandturnveryearefWly
Brushwithlemonbutlerbolero
andduringcooing,ildesired.
5 TurncarefullyDonotlure
sldn-sidudown.
B
B
I0 Slash{al
15
Slashfat
Donot
turneve{
t The U S Department of Agriculture says '+Rarebeef is popular, but you should know
that cooking it to only 140"F means some food poisoning organisms may survive,"
(Source: Safe Food Book Your Kitchen Guide USDA Rev June 1985)
* See illustration for description at rack positions
18
OPERATION
TimedBaking and Roasting
(onsome models)
Do not lock the oven door with the
latch during timed baking. The latch
is used for self-cleaning only,,
The oven control allows you to turn
the oven on or off automatically at
specilic times that you set Examples
of Immediate Start (even turns on now
and you set it to turn off automatically)
and Delay Start and Stop (setting the
oven to turn on automatically at a later
time, cook for a preset amount of time
and then turn off automatically} will be
described
NOTE: Before beginning, make sure
the oven clock shows the correct time
of day See the Using the Clock and
Timer section
To avoid possible burns, place the
racks in the correct position before
you turn the oven on
The oven will turn on immediate+y and
cook for a selected length of time At
the end of the cooking time, the oven
will turn off automatically
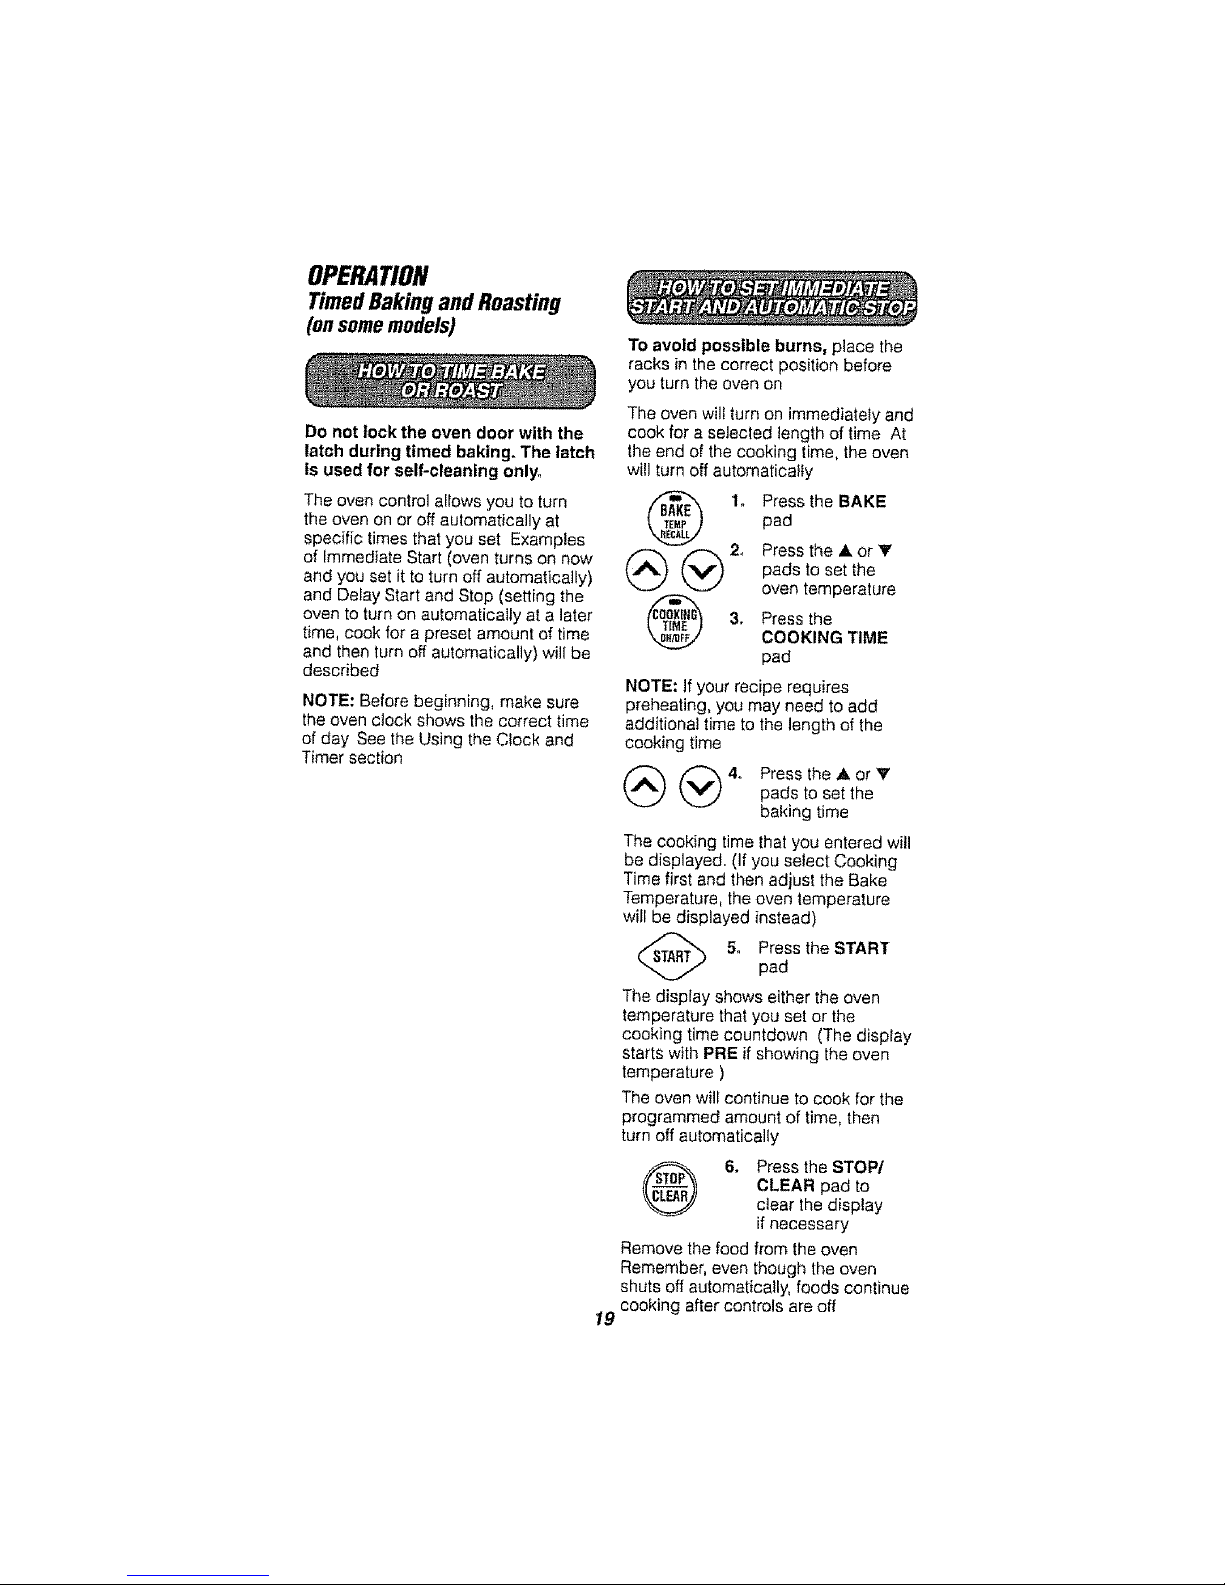
1. Press the BAKE
pad
2, Press the Aor Y
(_) (_ padstosetthe
oven temperature
3. Press the
COOKING TIME
pad
NOTE: If your recipe requires
preheating, you may need to add
additional time to the length of the
cooking time
(_ (_ 4+ Press the ,i,. or 'V'
pads to set the
baking time
The cooking time that you entered will
be displayed. (If you select Cooking
Time first and then adjust the Bake
Temperature, the oven temperature
will be displayed instead)
(_ 5o Press the START
pad
The display shows either the oven
temperature that you set or the
cooking time countdown (The display
starts with PRE if showing the oven
temperature )
The oven will continue to cook for the
programmed amount of time, then
turn off automatically
6. Press the STOP/
CLEAR pad to
clear the display
if necessary
Remove the food from the oven
Remember, even though the oven
shuts off automatically, foods continue
lg cooking after controls are off
OPERATION
TimedBaking and Roasting
(on some models) (cont.)
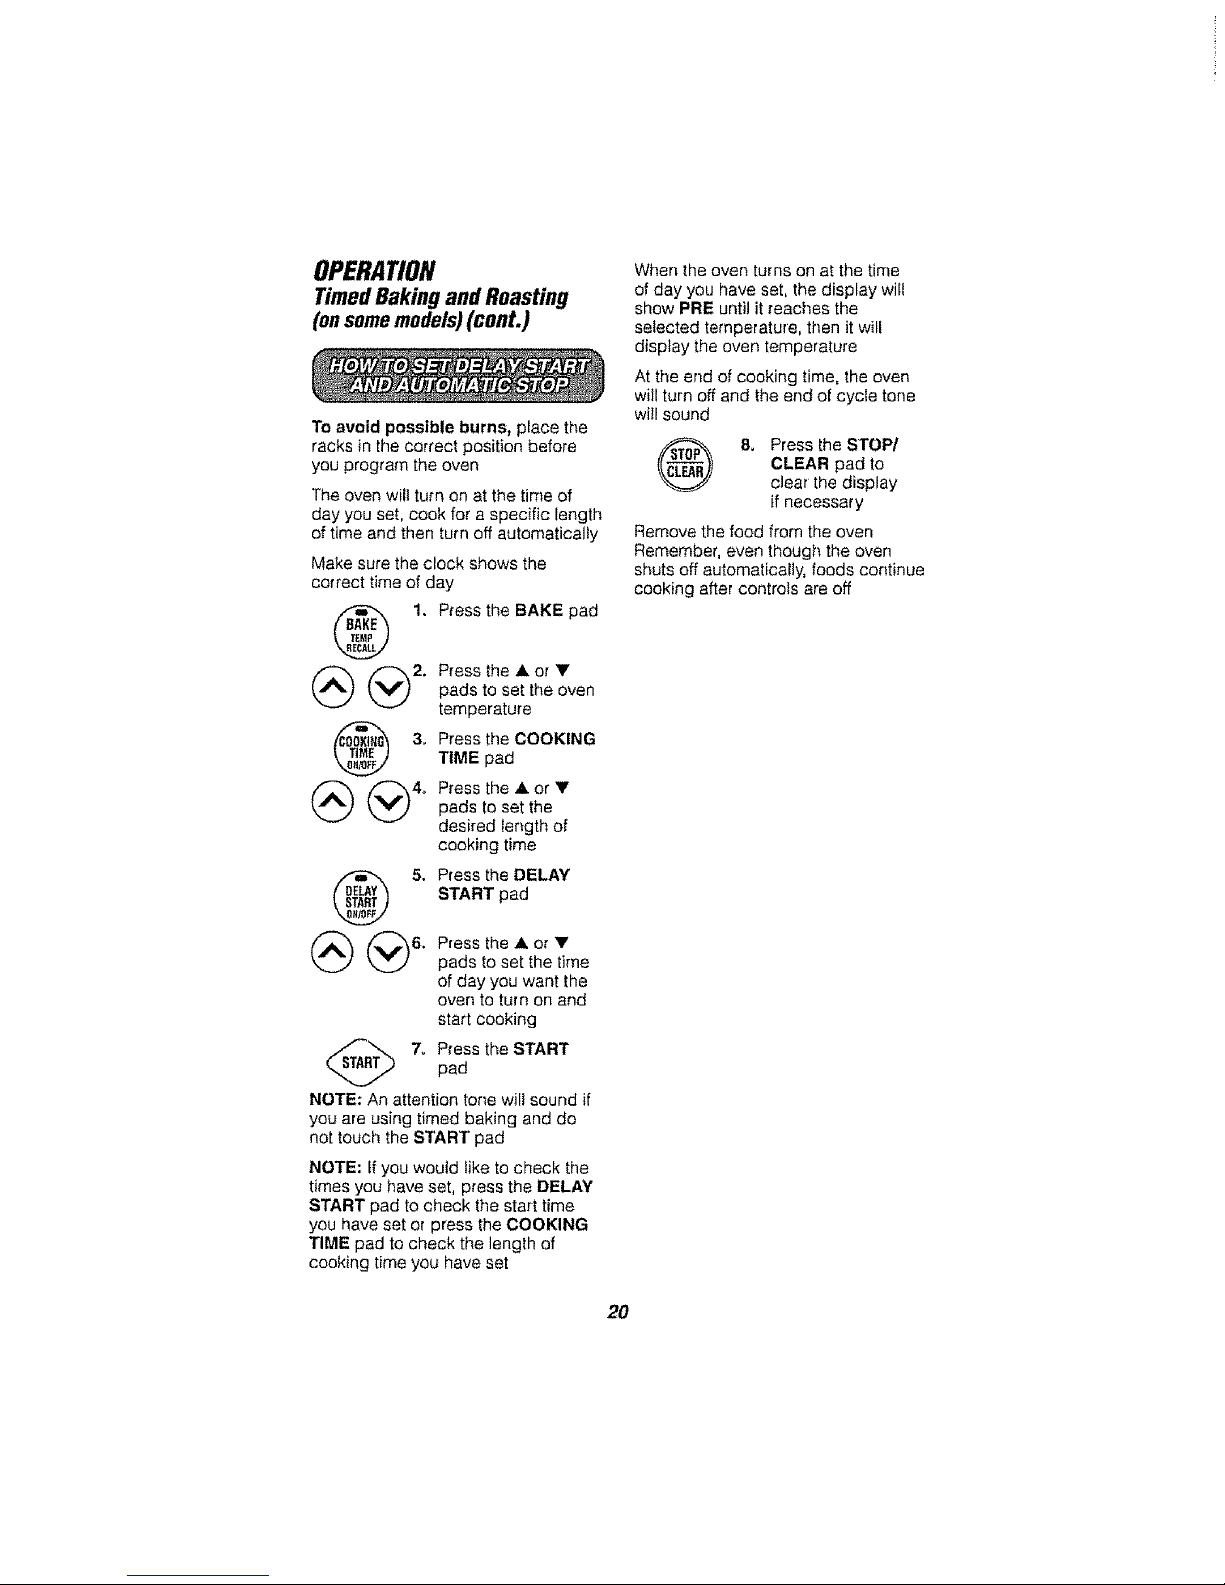
To avoid possible burns_ place the
racks in the correct position before
you program the oven
The oven wilt turn on at the time of
day you set, cook for a specific length
of time and then turn off automatically
Make sure the clock shows the
correct time of day
1. Press the BAKE pad
(_ (_2. Press the .& or •
pads to set the oven
temperature
3. Press the COOKINGTIME pad
_ (V_ 4o Pressthe'or"pads to set the
desired Iength of
cooking time
5. Press the DELAY
START pad
(_ (_6. P,essthe.or•
pads to set the time
of day you want the
oven to turn on and
start cooking
7o Press the START
pad
NOTE: An attention tone will sound if
you are using timed baking and do
not touch the START pad
NOTE: tf you would like to check the
times you have set, press the DELAY
START pad to check the start time
you have set or press the COOKING
TIME pad to check the length of
cooking time you have set
When the oven turns on at the time
of day you have set, the display wilt
show PRE until it reaches the
selected temperature, then it will
display the oven temperature
At the end of cooking time, the oven
will turn off and the end of cycle tone
will sound
& Press the STOP/
CLEAR pad to
clear the display
if necessary
Remove the food from the oven
Remember, even though the oven
shuts off automatically, foods continue
cooking after controls are off
20
OPERATION
Special Features of
YourOven Control
Your new pad control has additional
features that you may choose to use
The following are the features and
how you may activate them
The special feature modes can only
be activated while the display is
showing the time of day They remain
in the control's memory until the steps
are repeated
When the display shows your choice,
touch the START pad The special
features will remain in memory after a
power failure
NOTE: The Sabbath feature and the
Temperature Adjustment feature are
also Special Features, but they are
addressed in separate sections
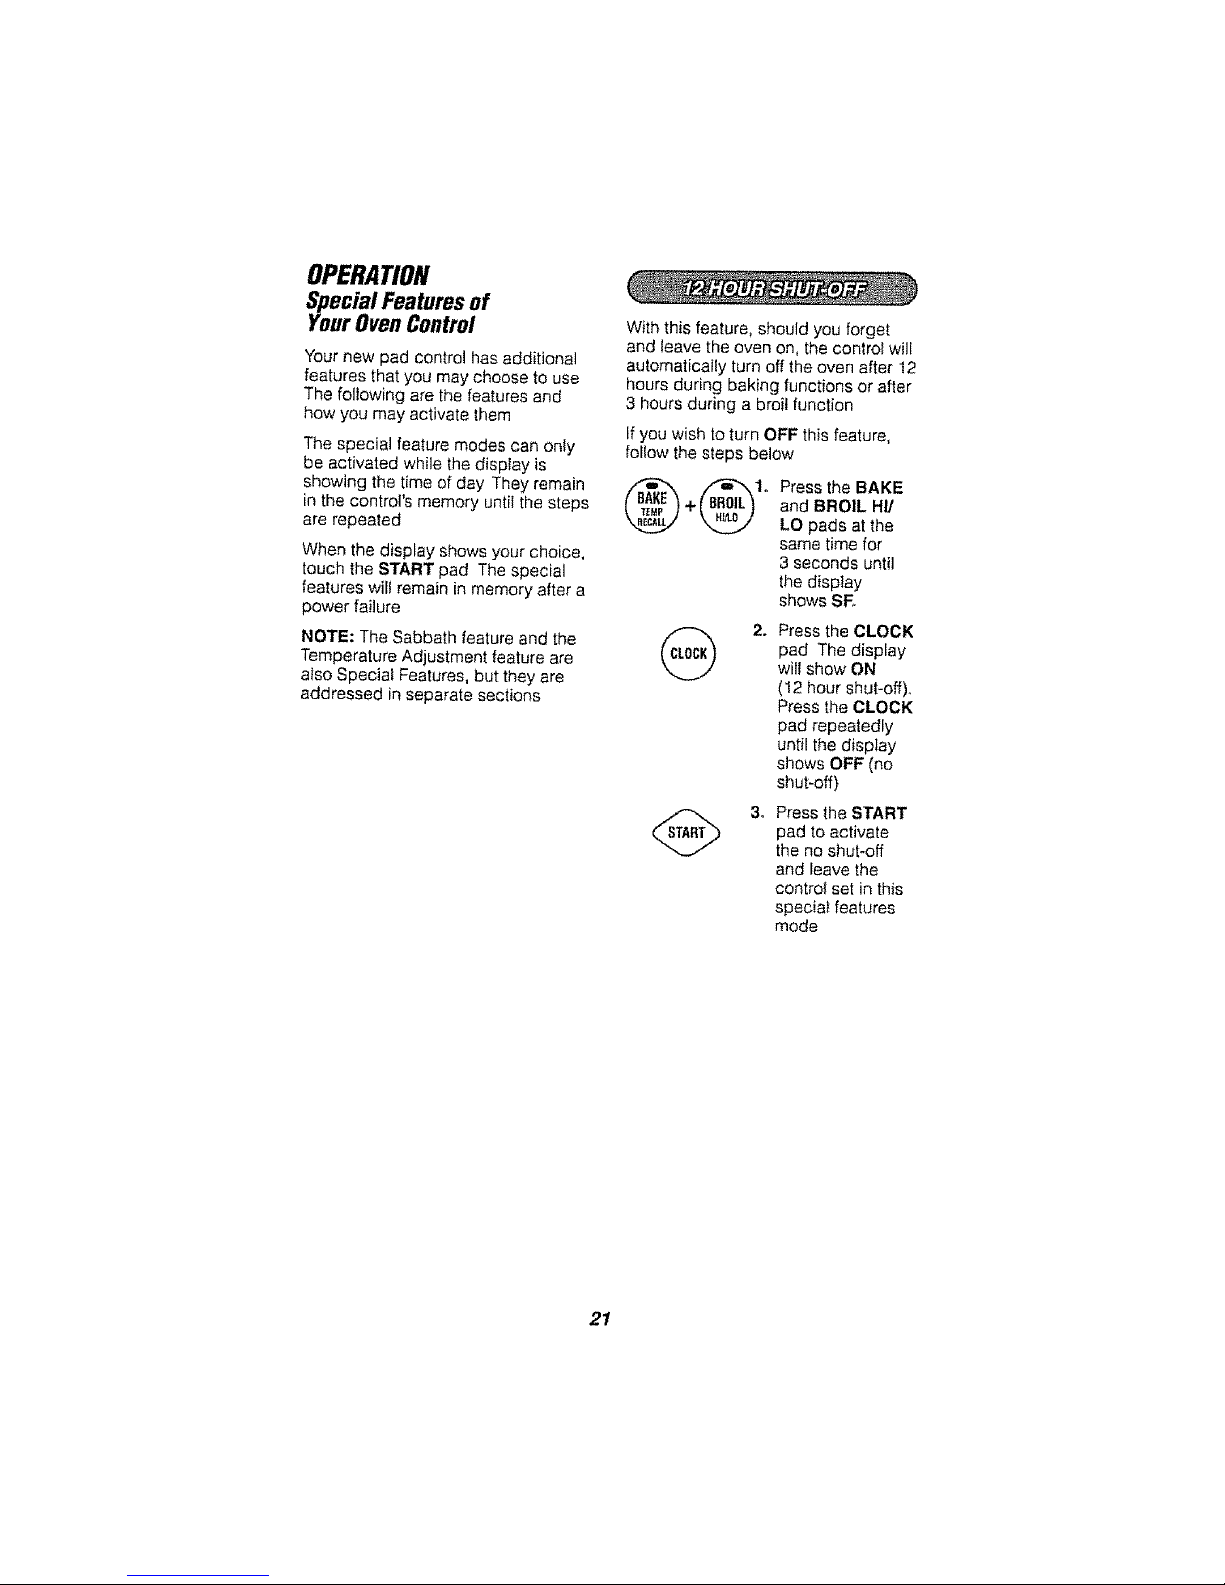
With this feature, should you forget
and leave the oven on, the control will
automatically turn off the oven after 12
hours during baking functions or after
3 hours during a broil function
Ifyou wish to turn OFF this feature,
follow the steps below
Press the BAKE
and BROIL HI/
LO pads at the
same time for
3 seconds until
the display
shows SF,,
2_
Press the CLOCK
pad The display
will show ON
(12 hour shut-off),
Press the CLOCK
pad repeatedly
until the display
shows OFF (no
shut-off)
3. Press the START
pad to activate
the no shut-off
and leave the
control set in this
special features
mode
21
OPERATION
SabbathFeature
(onsomemodels)
Designed lot use onthe Jewish Sabbath
andHolidays the Sabbath featurecan be
usedfor baking/roasting only tt cannot be
usedfor broiling, seGclean[ngor De_ay
Startcooking
NOTE: Theoven light comes on
automaticai}y(on some models) when the
door isopened and goes offwhen the
door isclosed. Thebulb may be removed
See the Oven LightReplacement section
On modeiswith a ligh_switch onthe
control panel, the oven light may be
turned on and left on
NOTE: To understand how the even
control works, practice using regular
baking (non*Sabbath)before entering
Sabbathmode
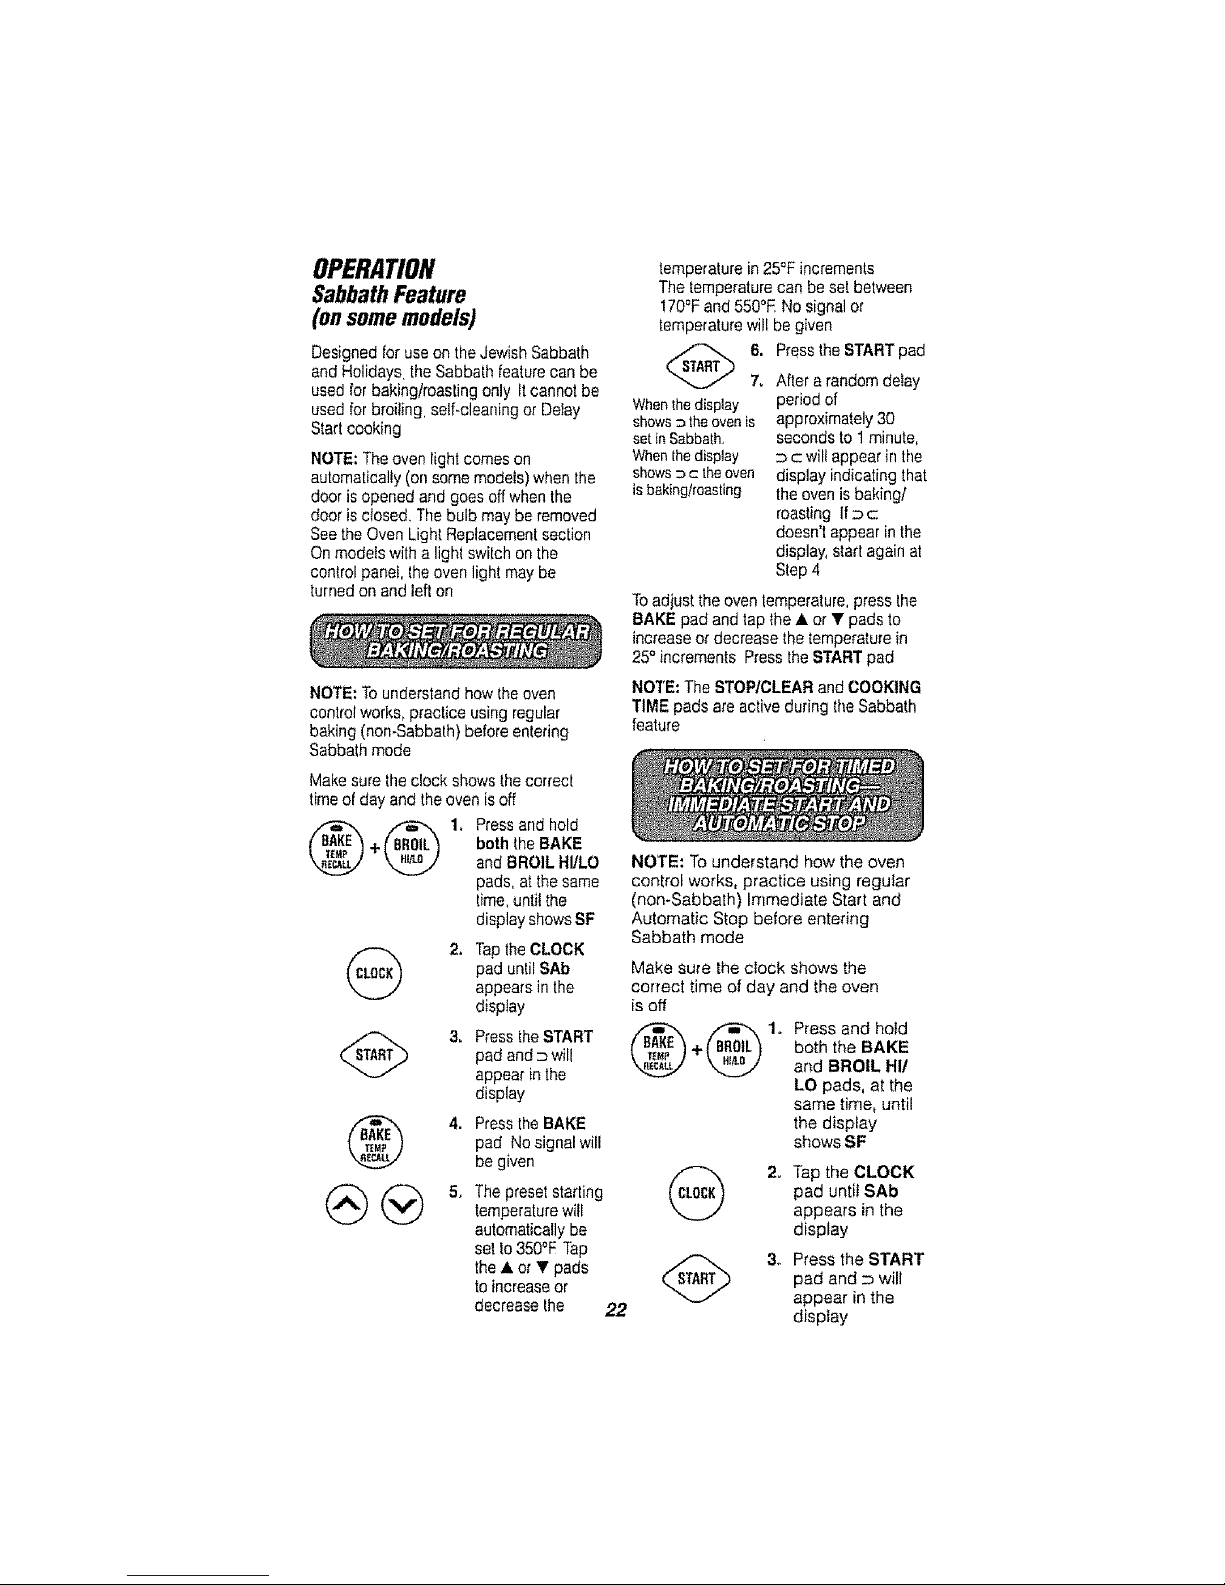
Makesure theclock shows thecorrect
timeof day and the oven isoff
G 1_ Pressand hold
+ both the BAKE
andBROILHI/LO
pads, atthe same
time,unlit the
displayshowsSF
2. Tap theCLOCK
pad untilSAb
appears in the
disptay
(_ 3. PresstheSTART
pad and_ will
appear in the
display
4. Pressthe BAKE
pad No signal will
be given
(_ _ 5, Thepresetstarting
temperaturewill
automaticallybe
set to350°F Tap
the • orT pads
toincrease or
decrease the 22
temperature in25QFincrements
The temperaturecan be set between
170°Fand 550°E No signal or
temperature will be given
_._ 6. Press the STARTpad
7. After arandom delay
When the display
shows 3 theoven is
set inSabbath,
When the display
shows _ c the oven
is baking/roasting
period of
approximately30
seconds to 1minute,
c wil_appear in the
display indicating that
the oven is baking/
roasting if _ c
doesn't appear in the
display, start again at
Step4
Toadjust the oven temperature,press the
BAKE pad andtap the • or T pads to
increase or decrease thetemperature in
25° increments PresstheSTARTpad
NOTE:The STOP/CLEAR and COOKING
TIME pads are active during the Sabbath
feature
NOTE: To understand how the oven
control works, practice using regular
(non-Sabbath) Immediate Start and
Automatic Stop before entering
Sabbath mode
Make sure the cIock shows the
correct time of day and the oven
is off
_1_ Press and hold
+ both the BAKE
and BROIL HI/
LO pads, at the
same time, until
the disptay
shows SF
(_ 2o Tap the CLOCK
pad until SAb
appears in the
display
(_ 3,, Press the START
pad and _ will
appear in the
disptay
OPERATION
SabbathFeature
(onsomemodels)(coot.)
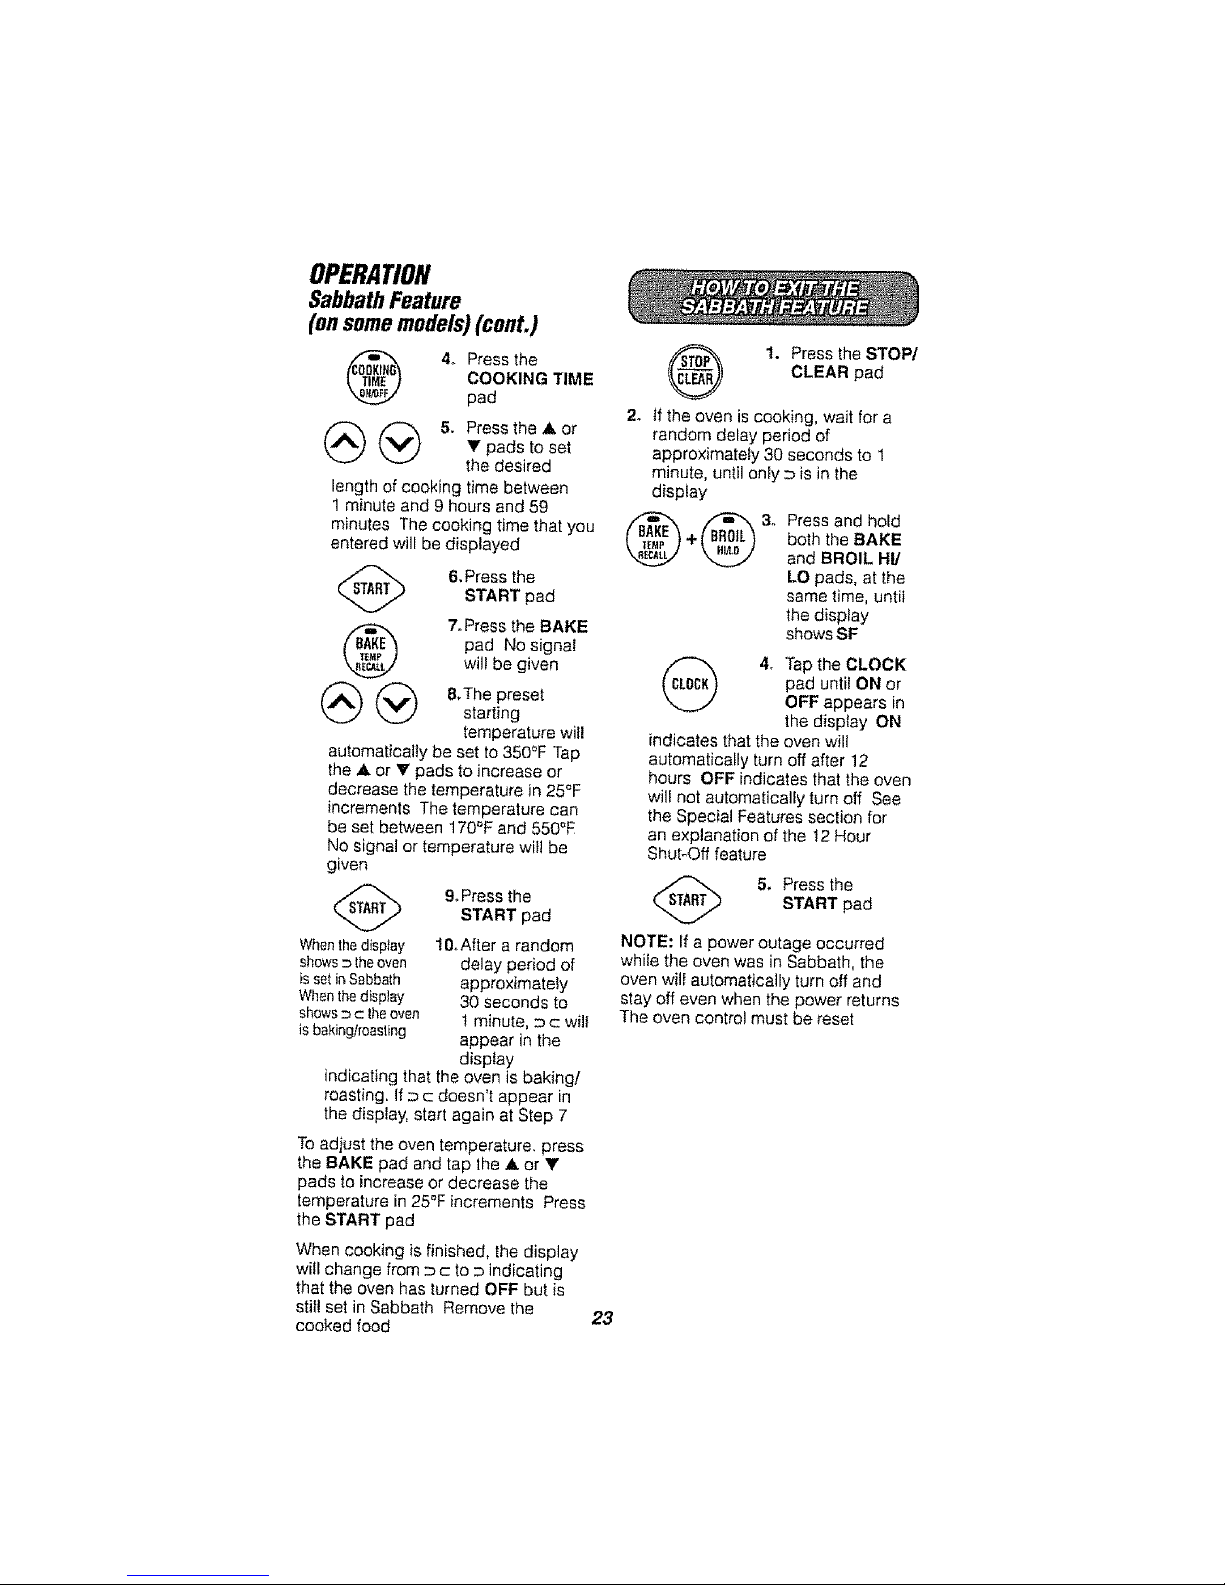
4o Press the
COOKING TIME
pad
(_ (_ 5. Press the A or
Y pads to set
the desired
length of cooking time between
1 minute and 9 hours end 59
minutes The cooking time that you
entered will be displayed
@
@@
6, Pressthe
START pad
7. Press the BAKE
pad No signal
will be given
8,The preset
starting
temperature will
automatically be set to 350°F Tap
the A or V pads to inorease or
decrease the temperature in 25°F
increments The temperature can
be set between 170'_Fand 550°E
No signal or temperature wilt be
given
9. Press theSTART pad
When the display 10, After a random
shows= theoven delay period of
is set in Sabbath approximately
When thedisplay 30 seconds to
shows_c theoven ! minute, _ c will
is baking/roasting appear in the
display
indicating that the oven is baking/
roasting. If _ c doesn't appear in
the display, start again at Step 7
To adiust the oven temperature, press
the BAKE pad and tap lhe ,,Lor •
pads to increase or decrease the
temperature in 25°F increments Press
the START pad
When cooking is finished, the display
will change from _c to _ indicating
that the oven has turned OFF but is
still set in Sabbath Remove the
cooked food
23
I. Press the STOP/
CLEAR pad
2o tf the oven is cooking, wait for a
random delay period of
approximately 30 seconds to 1
minute, until only = is in the
display
Press and hold
both the BAKE
and BROIL HI/
LO pads, at the
same time, until
the display
shows SF
(_ 4. Tap the CLOCK
pad until ON or
OFF appears in
the display ON
indicates that the oven will
automatically turn off after 12
hours OFF indicates that the oven
will not automatically turn off See
the Special Features section for
an explanation of the 12 Hour
Shut-Off feature
5, Press the
START pad
NOTE: If a power outage occurred
while the oven was in Sabbath, the
oven will automatically turn off and
stay off even when the power returns
The oven control must be reset
 Loading...