

30" Radiant
Electric Cooktop
Models 911.42675, 42676, 42679
229C4020P 185-1 Seam, Roebuck and Co.,
(SR-10393) Hoffman Estates, IL 60179 U.S.A. www.sears.com
Tableof Contents
®
ELECTRICRADIANTCOOKTOP
Appliance Safety ....... 34
Protecting the Cooktop .... 5
Features of Your Cooktop .. 6
Removal of Packaging
Tape .................. 6
Radiant Cooktop Cooking .. 7
Cooking Zones .......... 7
Cooking Utensils and
Woks .................. 7
Checking Your Cookware . . 7
Cookware Performance .... 7
Radiant Coils ........... 7
Home Canning Tips ...... 8
Radiant Unit Cycle ....... 8
Control Settings ......... 8
Dual Cooking Zone ....... 8
Glass-Ceramic Cooktop . . . 9
Daily Cleaning .......... 9
Special Care ............ 9
General Information ...... 9
Precautions ............ 10
Removable Knobs ....... 10
Before Calling For
Service ................ 11
Warranty .............. 13
Consumer Service
Numbers .............. 14
For your convenience and future reference, please write down your
model and serial numbers in the space provided, The model and
serial numbers of your cooktop can be found on a tag underneath the
unit.
MODEL NUMBER:
SERIAL NUMBER:
IMPORTANTSAFETY
®
INSTRUCTIONS
SAVETHESEINSTRUCTIONS
Read all instructions before using this appliance. When using gas or
electrical appliances, basic safety precautions should be followed,
including the following.
ALWAYS KEEP cooking zones
free from things that will burn.
Food, wooden utensils, and grease
buildup could catch fire. Plastic
utensils could melt and canned
IMPORTANT: To insure safety for
yourself, family and home, please
read your Owner's Manual carefully.
Keep it handy for reference. Pay
close attention to Safety Sections.
BE SURE your appliance is installed
and grounded by a qualified
technician.
• DO NOT leave children alone or
unattended near an appliance in
use.
• TEACH CHILDREN not to play
with controls or any part of the
appliance, and not to sit, climb or
stand on any part of the appliance.
• CAUTION: NEVER STORE items
of interest to children in cabinets
above the appliance. Children
climbing on the appliance could be
seriously injured.
• KEEP THIS manual for later use.
• NEVER USE your appliance for
warming or heating the room.
• NEVER TRY to repair or replace
any part of the appliance unless
instructions are given in this
manual. All other work should be
done by a qualified technician.
• ALWAYS KEEP combustible wall
coverings, curtains, dish cloths,
towels, potholders, and other
linens a safe distance from the
appliance.
foods could explode. Your
appliance should never be
used as a storage area.
• NEVER HEAT unopened food
containers. Pressure buildup can
cause the container to burst and
cause injury.
• NEVER LEAVE jars or cans of fat
or drippings on your cooktop.
• ALWAYS KEEP your appliance
clear of things that will burn
(gasoline and other flammable
vapors or liquids).
• NEVER TRY to clean a hot
surface. Some cleaners produce
noxious fumes, and wet cloths or
sponges could cause steam burns.
• NEVER WEAR loose-fitting
clothing when using your
appliance.
• NEVER USE a towel or other bulky
cloth as a potholder. Make sure the
potholder is dry. Moist potholders
and wet cloths or sponges could
cause steam burns. DO NOT let
potholders touch hot cooking
zones.
• DO NOT touch cooking zones or
surfaces near them. These may be
hot enough to cause burns even
though they are dark in color.
During and after use, do not touch
or let clothing or flammable
material contact the cooking zones
until they have had time to cool.
3

IMPORTANTSAFETY
INSTRUCTIONS
• ONLY SOME kinds of (heat proof)
glass or ceramic cookware can be
used for cooktop cooking. Make
sure the cookware you choose to
use is designed for cooktop
cooking, without breaking due to
sudden changes in temperatures.
• ALWAYS USE care when touching
the cooking zones. They will retain
heat after the cooktop has been
turned off.
• COOKWARE USED for cooktop
cooking should be flat on the
bottom and large enough to cover
the heating area being used. This
improves heating efficiency.
Undersized utensils expose the
element and may result in direct
contact or ignition of clothing.
• NEVER leave surface units
unattended at high heat settings.
Boilovers result in smoking or
greasy spills that could catch fire.
• ALWAYS turn utensil handles
inward and away from other
surface units to reduce the risk of
burns, ignition, unintended contact
and spillage.
• NEVER cook on a broken cooktop;
cleaning solutions and spillage
could penetrate it and create the
risk of electrical shock or fire.
READ ANDUNDERSTAND
THIS
INFORMATION
NOW!
Should you ever need it, you
will not have time for reading.
Be sure everyone in your home
knows what to do in case of
fire. Never use water on a
grease fire; it will only spread
_,_he flames, j
COOKTOP GREASE FIRE:
Never pick up a flaming pan...
1. Turn off the surface elements.
2. Smother the flames with a tightly
fitting lid, baking soda or use a
dry chemical, foam or halon type
extinguisher.
OPERATION
Protecting the Cooktop
• DO NOT slide cookware across
your cooktop.
• DO NOT use scouring powders
or metal cleaning pads on your
cooktop.
• DO NOT apply your cooktop
cleaning creme to the cooktop
surface if the surface is hot.
• READ the instruction label on the
cooktop cleaning creme bottle
before attempting to clean the
surface of your cooktop.
• AFTER cleaning the cooktop
surface, be sure to wipe off any
residue that may be left from the
creme with a dry paper towel.
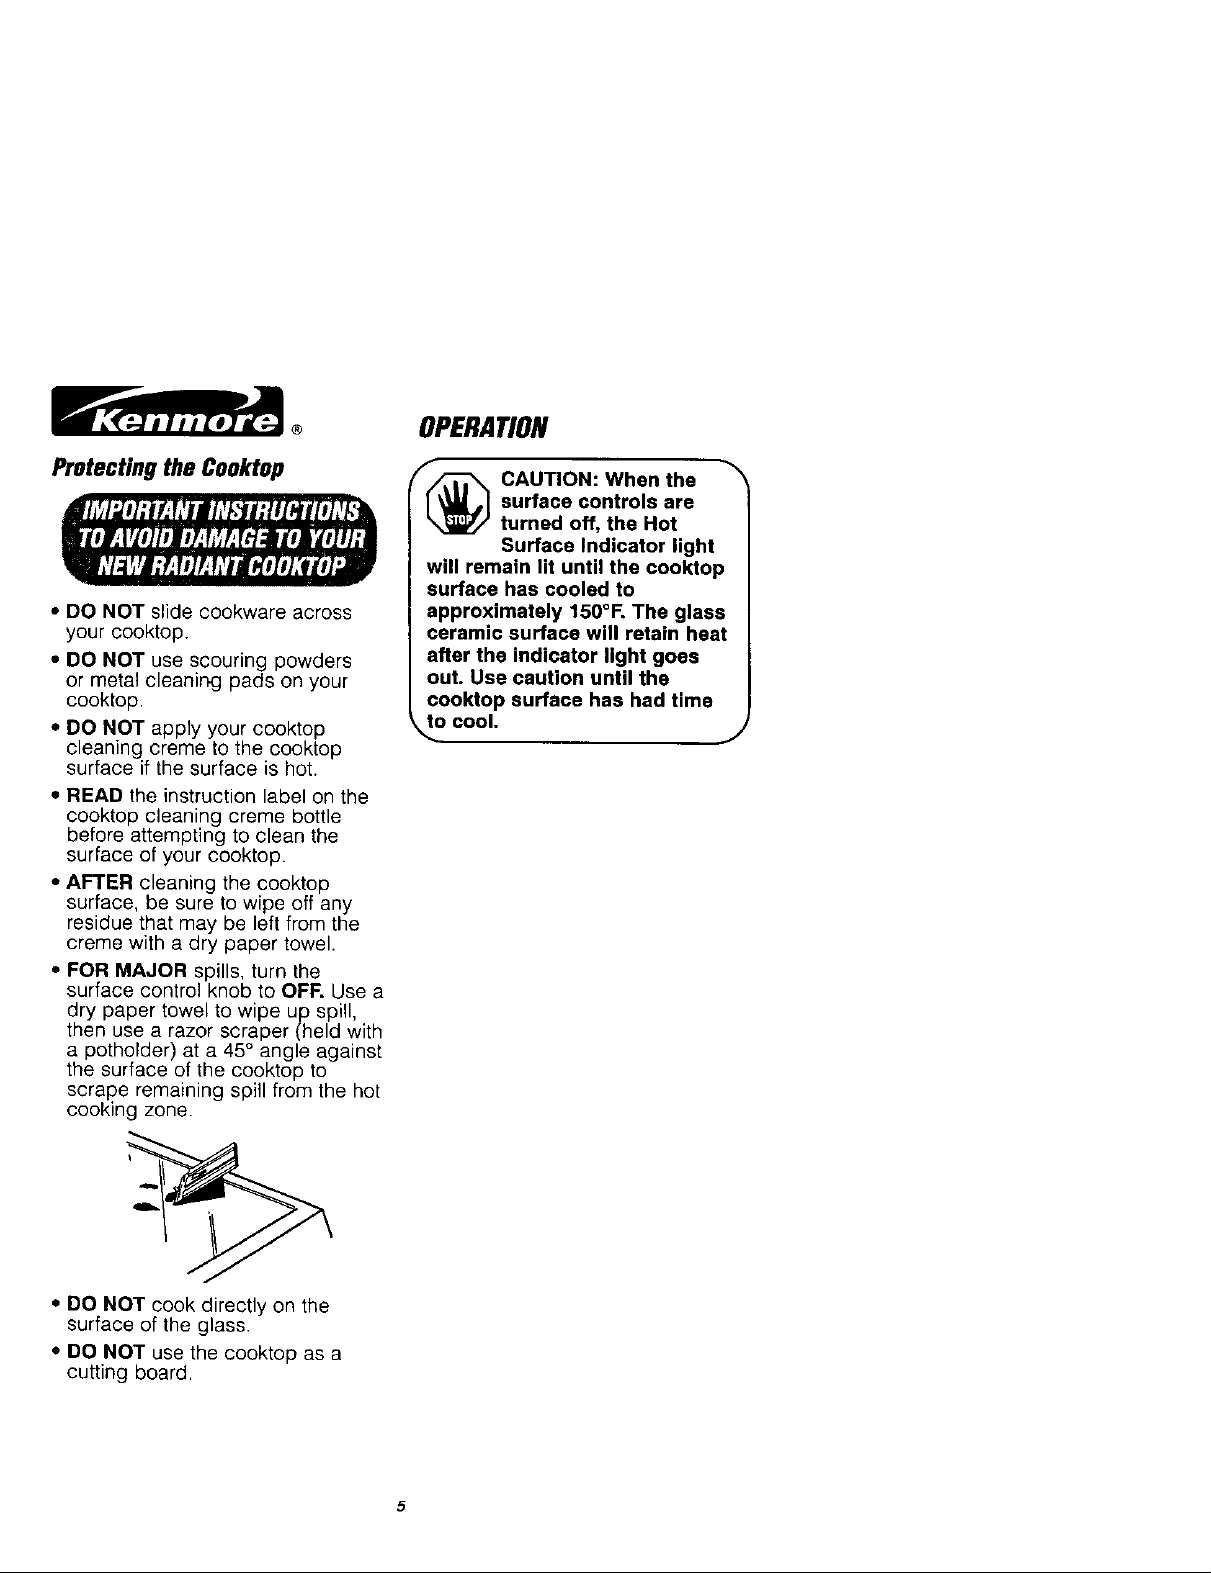
• FOR MAJOR spills, turn the
surface control knob to OFF. Use a
dry paper towel to wipe up spill,
then use a razor scraper (held with
a pothotder) at a 45° angle against
the surface of the cooktop to
scrape remaining spill from the hot
cooking zone.
CAUTION: When the
surface controls are
turned off, the Hot
Surface indicator light
will remain lit until the cooktop
surface has cooled to
approximately 150°1. The glass
ceramic surface will retain heat
after the indicator light goes
out. Use caution until the
cooktop surface has had time
to cool
• DO NOT cook directly on the
surface of the glass.
• DO NOT use the cooktop as a
cutting board.
5

OPERATION
FEATURESOF YOURCOOKTOP
Cook_g zones Coo_op con_o_
Glass cooktop Hot surface Dual cooking
indicator light zone
• t, t ", , '"
Cooktop indicator
light (Glows when
any cooking zone
is activated.)
To remove the adhesive left from packaging tape, use household
dishwashing liquid, mineral oil or cooking oil. With a soft cloth rub
into the area and allow to soak, Rinse and dry well. Repeat
procedure using an appliance polish to insure no damage is done
to the appliance. This should be done before the cooktop is
turned on for the first time. The tape cannot be removed once
the cooktop has heated.

OPERATION
Radiant Cooktop Cooking
Before you use the cooktop for the
first time, clean it with cooktop
cleaner. This will leave a protective
coating.
The cooking zones are shown by the
outline on the glass. The sign near
each control knob shows you which
radiant zone is turned on by the
knob.
Use pans and woks that are flat on
the bottom. The size of the pan
should match the size of the cooking
zone as closely as possible.
o#om_--_=_ Size of
B < cooking
of pan t zone
Pans should be
flat on bottom.
If you don't know if
your cookware is flat
on the bottom, try this
test. Turn your pan
upside down on the countertop and
place the edge of a ruler flat against
the surface of the pan. Rotate the
ruler a full circle, checking as you
turn for any space between the two
surfaces. The bottom of the pan and
the edge of the ruler should fit flush
against each other all the way across.
Stainless Steel: Highly
recommended for use with your new
cooktop. Especially good with a
sandwich clad bottom.
Aluminum: Heavyweight aluminum
cookware recommended.
Cast Iron: Cast iron cookware that is
completely covered with porcelain
enamel is recommended. Cast iron
that is not covered with porcelain
enamel may scratch the glass
ceramic surface of the cooktop.
Copper Bottom: Has good
performance, but it can leave a
residue on the cooktop surface if
allowed to boil dry.
Glass-Ceramic or Stoneware:
Usable, check for rough edges
or burrs which may scratch the
cooktop surface.
When the knobs are turned on, coils
beneath the glass radiate heat
through the glass to the cooking
utensil. It will take a few moments for
the coils to heat; as they do, a red
glow can be seen on the surface of
the cooktop.
7

OPERATION
Radiant Cooktop Cooking
Water-bath or pressure canners and
large diameter pots extending more
than 1" beyond the edge of the
cooking zone may be used for
canning. However, do not use large
diameter canners, pots or pans for
anything other than boiling water.
Most syrup or sauce mixtures, and all
types of frying, cook at temperatures
much higher than boiling water. Such
temperatures could eventually harm
the cooktop surfaces surrounding
the cooking zones.
The Limiters will turn the radiant coils
on and off while cooking or canning.
This procedure helps maintain an
even cooking temperature without
allowing the cooking zones to overheat.
HI Used for quick starts, such as
bringing water to a boil.
MED Used for slow boil and
sauteing.
LO Used for steaming foods or
keeping cooked foods at
serving temperature.
1. Push down to
turn the knob.
between marks
for desired heat.
2Se,onor
1. Center canner over the cooking
zone.
2. Make sure the canner is flat on the
bottom.
3. Use recipes and procedures from
reputable sources. These are
available from manufacturers such
as Ball®and Kerr®, and the
Department of Agriculture
Extension Service.
4. Use caution to prevent burns from
steam or heat.
It is normal to see the elements glow
red and then dark while cooking at
settings below HI. This cycling on and
off is used to maintain your selected
control setting. Cycling when the
selector is set on HI is due to poor
transfer of heat to cookware that is not
flat. The Temperature Limiters of the
cooking zones provide a protection
for your new cooktop.
The UNIT ON indicator light will glow
when any cooking element is activated.
The right front cooking zone has two
sizes.
Large 9" cooking
zone setting
zone setting
• To use the large 9" cooking zone,
push to turn the small control knob
to the dual setting.
• To use the small 6" cooking zone,
push to turn the small control knob
to the single small setting.
8

CAREAND CLEANING
Glass-CeramicCooktop
Cleaning
Cleaning a glass-ceramic cooktop is
different from cleaning a standard
porcelain cooktop. To maintain and
protect your glass-ceramic cooktop
follow these basic steps.
Use only Cooktop Cleaning Creme s
on glass-ceramic.
For normal, light soil:
1. Using a damp paper towel, rub a
few drops of creme onto soiled
area. Wipe until all soil and creme
are removed.
2. Clean surface with creme after
each cooktop use. Frequent
cleaning is essential in preventing
scratches and abrasions.
For heavy, burned-on soil:
1. Apply a few drops of cleaning
creme to the cool, soiled area.
Spread the creme across the
entire soiled area.
2. Hold scraper at a 45° angle
against the glass-ceramic surface.
The 45° angle makes the scraping
easier.
3. Scrape soil with the enclosed
razor scraper. Keep small amount
of creme on the soil as you
scrape. Heavily soiled areas may
require repeated applications of
creme. It will be necessary to
press down on the razor scraper
while scraping the soiled area with
cooktop creme.
4. If any soil remains, repeat the
steps listed above.
IMPORTANT: Using a
razor scraper will not
damage the surface if
the 45 ° angle is
maintained. Do not use a dull or
nicked razor blade on your
cooktop. Store the razor scraper
_,out of reach of children.
Sugar spills (such as jellies, fudge,
candy syrups) or melted plastic can
cause pitting of the cooktop surface
unless the spill is removed while it is
still hot. Special care should be
taken when removing hot
substances.
Follow these instructions carefully
and remove soil while spill is hot.
1. Turn off the cooking zone affected
by the spill. Remove the utensils.
2. Wearing an oven mitt, hold the razor
scraper at a 45° angle against the
cooktop and scrape hot spill to a
cool area outside the cooking zone.
3. With the spill in a cool area, use a
dry paper towel to remove any
spillover. Any spill remaining
should be left until the surface of
the cooktop has cooled. Do not
continue to use the soiled cooking
zone until all of the spill has been
removed. Follow the steps under
Heavy Soil to continue the
cleaning process.
As the creme cleans, it leaves a
protective coating that helps prevent
buildup of mineral deposits (water
spots) and will make future cleaning
easier. Dishwashing detergent removes
the protective coating and should not
be used.
J

®
CAREANDCLEANING
Glass-CeramicCooktopCleaning
• Most cleaners contain ammonia,
chemicals and abrasives that
damage the surface of your
cooktop. Use only the Cooktop
Cleaning Creme ®for proper
cleaning and protection of your
glass ceramic surface.
• If you slide aluminum or copper
bottom cookware across the
surface of the cooktop, they may
leave metal markings which appear
as scratches. Use the razor
scraper and cooktop creme to
remove these marks. Failure to
remove this residue immediately
may leave permanent marks.
• If pots with a thin overlay of
aluminum, copper or enamel boil
dry, bonding with the glass
ceramic surface of the cooktop
may occur. This black discoloration
should be removed immediately or
it could become permanent.
• Use of glass cleaner may leave an
iridescent film on the cooktop.
Cleaning creme will remove this film.
• Water stains (mineral deposits) are
removable using the creme or full
strength white vinegar.
• Do not use a dull or nicked razor
blade on your cooktop.
• Do not use abrasive cleaners or
abrasive scouring pads on your
cooktop.
• Plastic mesh pads, such as Dobie ®
may be used.
To order additional Cooktop Cleaning
Creme,_ call your nearest Sears
Service Center or Retail Store and
ask for Stock No. 40079.
All control knobs may be removed
for easy cleaning by pulling the knob
straight off the stem. Be sure that the
knob is in the OFF position before
removal.
HINT: Slip a thin cloth (such as a
handkerchief) or a piece of string
under and around the knob edge
and pull up.
CAUTION: Read these instructions
carefully before replacing the
knobs. Replacing the knobs
improperly will damage the knobs
and the spring clips on the stems.
If this happens, the knobs will fit
loosely.
To replace the knob:
1. The knob stem has a groove in
each side. The groove on one side
has a spring clip. The other
groove is clear (see illustration).
2. Check the inside of the knob and
find the molded rib.
3. Replace the knob by fitting the
molded rib inside the knob into the
clear groove on the stem.
1o

BEFORECALLINGFORSERVICE
To save you time and money, before making a service call, check the list
below for any problem you may feel you have with the performance of your
cooktop. [f the problem is something you cannot repair, use the Consumer
Service Numbers located at the back of this manual. When making any
calls, have the model number, repair parts list, Use and Care Manual and
the date of purchase available.
PROBLEM
Tiny scratches
or abrasions on
the cooktop.
Metal markings on Sliding or scraping Use recommended
the cooktop surface metal utensils and cleaning procedure
(may appear as cookware across to clean the eooktop
scratches), cooktop surface, surface.
Areas of Mineral deposits from Use recommended
discoloration on water or food. cleaning procedure
the cooktop surface, to clean the cooktop
Dark streaks and a. Encrusted boilovers a.Use a razor scraper and
specks on the or grease splatters, follow the directions in
cooktop surface, the Care and Cleaning
Cooktop zone Improper operation of Be sure the knob is
does not work. control, pushed in while turning.
Counter unit does No power to counter unit. Check household circuit
not work; totally breaker or fuse.
inoperative.
Foods cook slowly. Improper cookware. Use pans that have fiat
POSSIBLE CAUSE POSSIBLE SOLUTION
a. Use of incorrect
cleaning materials.
b. Coarse particles
(salt, etc.) between
cookware bottom
and cooking surface.
c. Cookware with rough
bottoms.
b. Incorrect cleaning b.Use only the Cooktop
materials. Cleaning Creme ® on the
a.Use only Cooktop
Cleaning Creme?
b.Make sure the cooktop
surface and bottom of
cookware are clean
before using.
c, Use only flat-bottomed
cookware.
surface.
section of this manual.
cooking surface.
bottoms and tight fitting
lids (ifapplicable). Pans
should match cooking
zone size. Read the
Radiant Cooktop
Cooking section for
complete information.
11

NOTES
12

® RADIANTCOOKTOPWARRANTY
'_FULLONEYEARWARRANTYONALLPARTS
If,withinoneyearfromthedateofinstallation,anypartfailstofunctionproperlyduetoadefectin
materialorworkmanship,Searswillrepairorreplaceit,atouroption,freeofcharge.
LIMITEDWARRANTYONRADIANTGLASSANDRADIANTSURFACEUNITSFORSECOND
THROUGHFIFTHYEAR:
Forthestartofthesecondyear,fromthedateofinstallation,throughthefifthyear,fromthedate
ofinstallation,Searswillrepairorreplace,atouroption,theradiantglassorradiantsurfaceunits
(youwillberesponsibleforanylabor),ifanyofthefollowingdefectsoccur:
• Crackingeftheradiantglasscooktopduetothermalshock
• Discolorationoftheradiantglasscooktop
• Wear-offofthepatternontheradiantglasscooktop
• Crackingoftherubbersealbetweentheradiantgrasscooktopandtheporcelainedge
• Burn-outofanyoftheradiantsurfaceunits.
Ifthisproductissubjectedtootherthanprivatefamilyuse,theabovewarrantiesareeffectivefor
only90days.
WARRANTYSERVICEISAVAILABLEBYCONTACTINGTHENEARESTSEARSSERVICECENTER
LNTHEUNITEDSTATES,
Thiswarrantygivesyouspecificlegalrights,andyoumayalsohaveotherrightswhichvaryfrom
statetostate.
k,... SearsRoebuckandCo.Dept.817WAHoffmanEstates,IL60179
To Further Add To The Value Of Your Cooktop,
Buy a Sears Maintenance Agreement.
f
Years of Ownership Coverage 1st Year 2rid Year 3rd Year
1. Replacement of Defective Parts other
than Radiant Glass and Radiant W MA MA
Surface Units
2o Radiant Glass and Radiant Surface
Unit Parts W W W
3. Labor W MA MA
4. Annual Preventive Maintenance
Check at your request MA MA MA J
W - Warranty MA - Maintenance Agmmnt
KenmoreAppliancesaredesigned,manufacturedandtestedforyearsofdependableoperation.Yet,
anyappliancemayrequireservicefromtimetotime.TheSearsMaintenanceAgreementoffersyou
anoutstandingserviceprogramforyourproduct.
ThetableaboveshowstheadditionalbenefitsaSearsMaintenanceAgreementofferscomparedtoa
SearsWarranty.
ContactyourSearsSalesAssociateorLocatSearsServiceCentertopurchaseaSears
MaintenanceAgreement.
J
13

For in-home major brand repair service:
Call 24 hours a day, 7 days a week
1-800-4-MY-HOME _ (1-800-469-4663)
Para pedir servicio de reparaci6n - 1-800-676-5811
Au Canada pour tout le service -
1-877-LE-FOYER s" (1-877-533-6937)
For the repair or replacement parts you need:
Call 6 a.m. - 11 p.m. CST, 7 days a week
PartsDirect °"
1-800-366-PART (1-800-366-7278)
www.sears.com/partsdirect
Para ordenar piezas - 1-800-659-7084
For the location of a Sears Service Center in your area:
Call 24 hours a day, 7 days a week
1-800-488-1222
To purchase or inquire about a
Sears Maintenance Agreement:
Call 7 a.m. - 5 p.m. CST, Monday - Saturday
1-800-827-6855
SEARS
HomeCentral
14
 Loading...