

Page 1
Use & Care Guide
Ken more
PfasmaWave™
True HEPA Air Cleaner
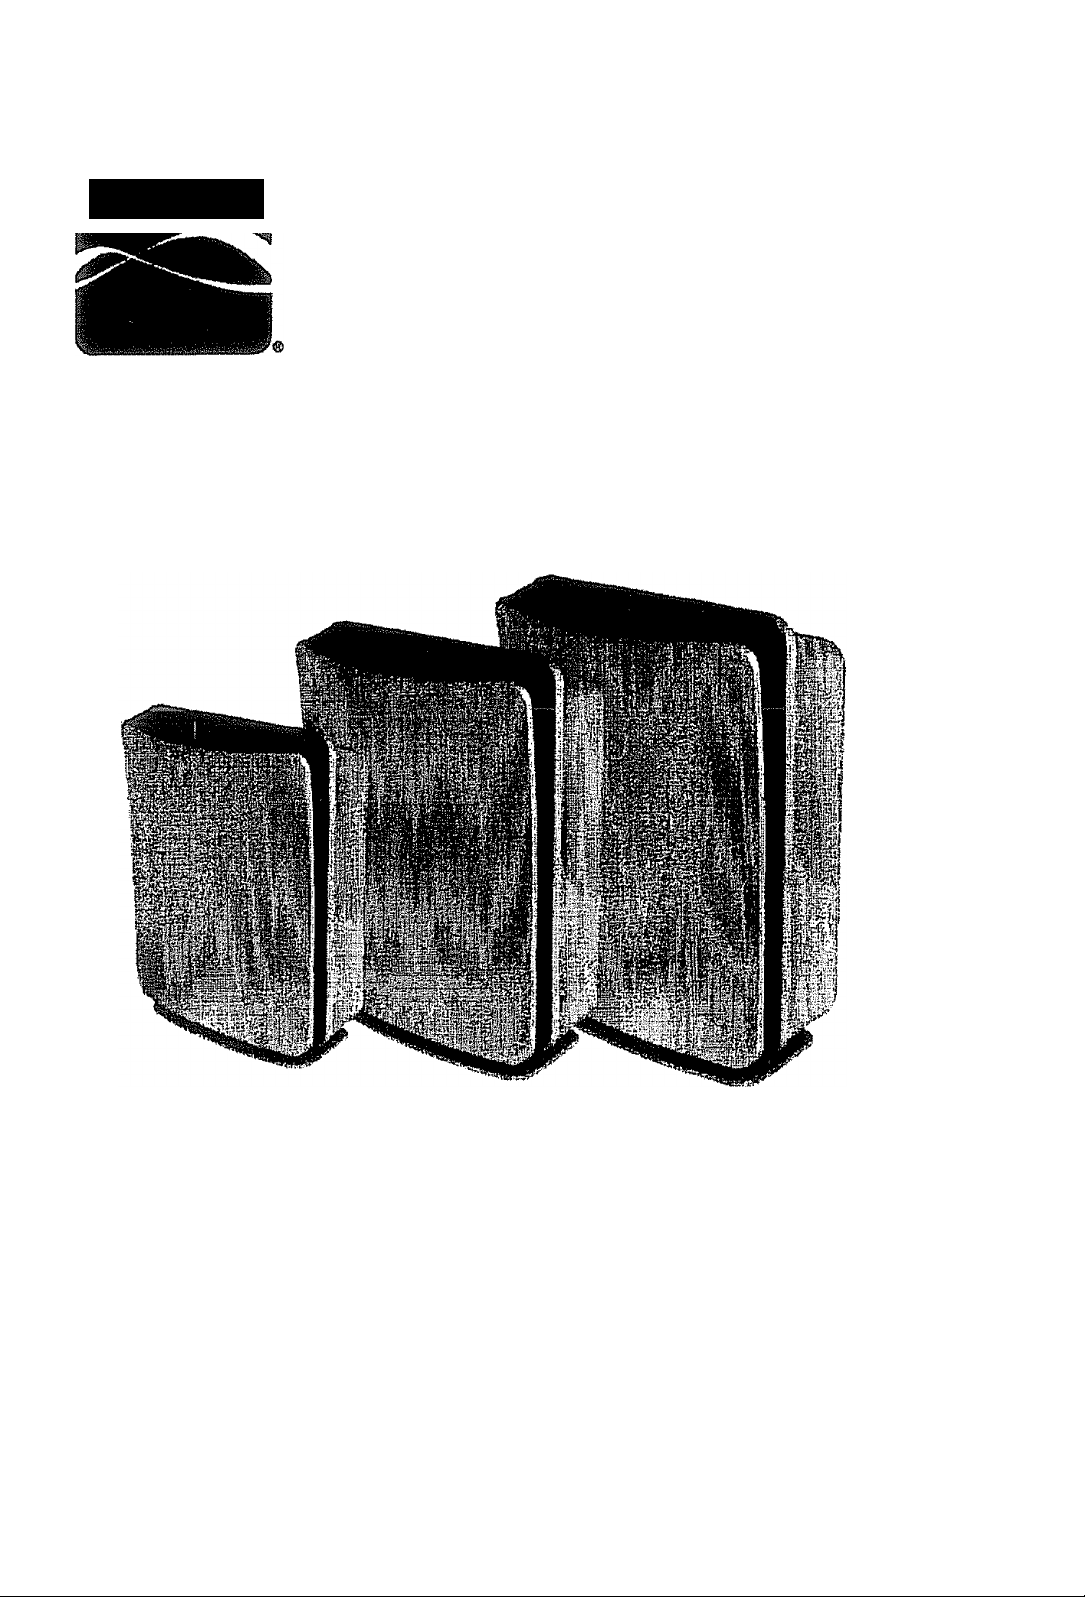
Models 85150 ® 85300 ® 85450
85150
85300
CAUTION:
Read and follow all safety rules and
instructions before operating this
equipment.
ADVERTENCIA:
Lea y siga todas las reglas e instrucciones
de seguridad antes de operar este equipo.
Sears Brand Management Corporation Hofftnan Estates, IL 60179 Ü.S
www.sears.com
85450
Printed in Korea
Page 2

TABLE OF CONTENTS
in order to be abie make the best
possible use of your air cleaner,
we recommend that you begin by
reading through the instructions
and that you keep the Instruction
manual for future reference.
WARRANTY
KENMORE FULL WARRANTY
Warranty.
Package Contents
Safety Instructions
Air Cleaner Features
Product Specifications..
Air Cleaner Set-Up
Control Panel.......................
Operation
Care and Maintenance........
Filter Replacement
Remote Control
Troubleshooting...
Get it Fixed
...................
..........................
..............
..........................
.......
..............
.............
............
......
...............
..............
.........
......
.....
.
..........
.
.
.............
...............
...........
................
.
...............
...............
.
...............
.......... ..........
...............
........
.
...
............
..............
10-11
.........
.....3
..3
.....5
7
8
8
9
12
13
14
4
6
if this Kenmore product faiis due to a defect in material or workmanship within one year
from the date of purchase, call 1-800-4-MY-HOME(r) to arrange for free repair
(or repiacement if repair is unavailable or not possible).
This warranty does not cover the air cleaner filters, which are expendable parts.
This warranty applies for only 90 days from the date of purchase if this product is ever
used for other than private household purposes.
This warranty applies only while this product is used In the United States,
This warranty gives you specific legal rights, and you may also have other rights which
vary from state to state.
Sears, Roebuck and Co,, Holfman Estates, IL 60179
PACKAGE CONTENTS
Models 85300 and 85450
• 1 Air Cleaner with True HEPA Filler
• 2 Carbon Pre-Filters with Sanitized™
in a resealable plastic bag
• 1 3V Lithium Battery (CR2025)
(installed in remote)
• 1 Remote Control
• 1 Wall-Mountable Remote Cradle
• 1 Remote Cradle Screw
• 1 Remote Cradle Adhesive
• 1 Use & Care Guide
• 1 Drywall Anchor for Screw
Models 85150
• 1 Air Cleaner with True HEPA Filter
• 2 Carbon Pre-Filters with Sanitized™
in a resealable plastic bag
• 1 Use & Care Guide
Page 3

¿^SAFETY INS7RUCTI0NS
Thank you for purchasing a Kenmore air cfeaner. Please read this manual carefully before
using, This product is for household use only.
IMPORTANT CAUTIONS FOR USING
YOUR AIR CLEANER
WARNING: Follow the instructions in this
manual to reduce the risk of electric shock,
short circuit, and/or fire:
• Do not repair or modify the unit unless
specilically recommended in this manual.
All other repairs should be completed by a
qualified technician.
• The plug for this unit Is polarized with one
blade wider than the other. Do not force
the plug Into an electrical outlet. Do not
alter the plug in any way. If the plug does
not fit into the outlet, reverse the plug. If It
still does not fit, contact a qualified techni
cian to install a proper outlet.
»Do not use If the power cord or plug is
damaged or the connection to the wall
outlet is loose.
» Use AC 120V only.
»Do not damage, break, forcefully bend,
pull, twist, bundle, coat, pinch, or place
heavy objects on the power cord.
«Periodically remove dust from the power
plug. This will reduce the risk of shock due
to humidity build up,
»If the power plug is damaged, it must be
replaced by the manufacturer or a quali*
fled technician.
• Remove the power plug from the outlet
before cleaning the unit. When removing
the power plug, grasp by holding the plug
itself, never hold by the cord.
• Remove the power plug from the outlet
when not in use.
• Do not handle the power plug with wet
hands,
»Do not operate the unit when using indoor
smoke-generating Insecticides
« Do not clean unit with benzene or paint
thinner. Do not spray insecticides on the
unit.
• Do not use the unit where it is humid or
where the unit may become wet, such as
in a bathroom.
» Do not insert fingers or foreign objects
into the air intake or outlet.
»Do not use the unit near flammable
gases. Do not use near cigarettes, in
cense, or other spark-creating items.
» Unit will not remove carbon monoxide
emitted from heating appliances or other
sources.
IMPORTANT PRECAUTIONS FOR USING
YOUR AIR CLEANER
• Do not block the intake or outlet vents.
■> Do not use near hot objects, such as a
stove.
» Do not use where the unit may come into
contact with steam,
» Do not use the unit on its side.
• Keep away from products that generate
oily residue, such as a deep fryer.
• Do not use detergent to clean the unit.
» Do not operate without a filter.
0 Do not wash and reuse the True HERA
Filter or the Carbon Pre-Filter.
• Hold the handle on the back of the unit to
transport.
• Do not hold by the front panel.
Page 4
AIR CLEANER FEATURES
CAUTION: Fully assemble air filter before using {See Air Cleaner Set-Up on
A
following page). Note: Features vary according to model.
> Quiet Operation
This Kenmore air cleaner has a four-
speed fan with quiet operation that is
ideal for nighttime,
° Air Quaitty Sensor
This Kenmore air cleaner has an AIR
QUALITY sensor that detects the presence
of various pollutants in the air The unit
automatically increases fan speed to
clean more air volume and remove the
impurities quickly.
> Light Sensor
The built-in light sensor detects when the
room is dark and automatically dims the
lights of the control pane! and lowers the
fan speed for quiet and energy-efficient
operation. Once the room is dark, the light
sensor will keep the lights dim, and not
allow the fan to increase speed despite
what the AIR QUALITY sensor detects.
> Multi-Stage Cleaning
The air passes through multiple stages of
cleaning before returning to the room.
«PlasmaWave™ Technology
PlasmaWave™ Technology uses a strong
corona discharge to attack pollutants at
the molecular level.
' Sanltlzedl™ Treated Carbon Pre-Filter
The Carbon Pre-Filter collects large
particles, such as dust, pet hair, and lint,
it absorbs odor-causing gases, such as
those caused by cigarette
smoke, organic decay, and
cooking, and is treated with
Sanitize™’ to effectively
reduce the development of
bacteria and fungi. For
best performance, replace
every three months.
■ True HEPA Filter
Captures 99.99% of particles
and impurities as small as
0.3 microns, including
smoke, dust, pollen, and
other allergens. Replace
when the CHECK FILTER
indicator light turns on.
Advanced PlasmaWave™* Technology
PlasmaWave™ uses a strong corona discharge to break apart airborne poilutante at the
molecular level.
In a fradion of a second, PlasmaWave™ combines with naturally occurring water molecules in the
air (H2O) to create billions of Hydroxyl Radical trolecules (OH),
OH is an unstable molecule that seeks equilibrium by stealing hydrogen atoms from adjacent
molecules containing hydrogen (the pollutants), thereby reforming them into harmless molecules of
water, carbon dioxide, and other acceptable molecules.
The resuit is a measurable reduction of pollutants after the air passes through the Plasma
Generator (PlasmaWave™).
By reforming mcrfecules, PlasmaWave™ technology can reduce odors, as well as VOCs (chemical
vapors). It is also effective at reducing airborne microorganisms—bacteria and viruses.
The PlasmaWave™ technology Is harmless and the OH molecule only lives for a nanosecond
while it reforms surrounding molecuies. Most importantiy—unlike oid style ion technology—
PlasmaWave™ does not produce high levels of ozone as a by-product.
When combined with a fan-and-filter air-cleaning system, PlasmaWave™ offers an effective and
efficient way of cleaning the air of unwanted pollutants including dust, smoke, and pollen, as well
as VOCs, allergens, micro-organisms, and odors.
Page 5
PRODUCT SPECIFICATIONS
Model
Room Size
Power Supply
Power Rate
Fan Speeds
Display
Control Type
Remote Control
Air Quality Sensor
Light Sensor
AHAM Certified
UL Listed
Sanitized™ Treated
Carbon Pre-Filter
Energy Star Qualified
851 eo 85300
150 sq, ft,
AC 120V/60(Hz)
Low 4W, Turbo 40W
4 Speeds
Digital
Auto/Manual
No
300 sq. ft.
AC 120V/60(Hz)
Low 4W, Turbo 60W
4 Speeds
Digital Digital
Auto/Manual
Yes
Yes Yes
Yes Yes
Yes
Yes
Yes Yes
Yes Yes
Yes Yes
85450
450 sq, ft.
AC 120V/60(Hz)
Low 11W,
Turbo 110W
4 Speeds
Auto/Manual
Yes
Yes
Yes
Yes
Yes
Yes
Yes
Check Filter Indicator
Cleaning System
- Carbon Pre-Filter
-True HEPAFilter
- Plasma Wave™
CADR
Unit Size (inches.
LxWxH)
Unit Weight (lbs)
Yes Yes
Yes Yes
Yes
Yes
Yes
Yes Yes
Smoke/Dust/Pollen Smoke/Dust/Polien
98/98/103
8.27x18.50x13 78
11.15
197/197/214
8 66 X 21.65 X 16.30
13.95
Yes
Yes
Yes
Smoke/Dust/Pollen
291/298/343
10.24 X 25.59 X 17.32
19.40
Page 6
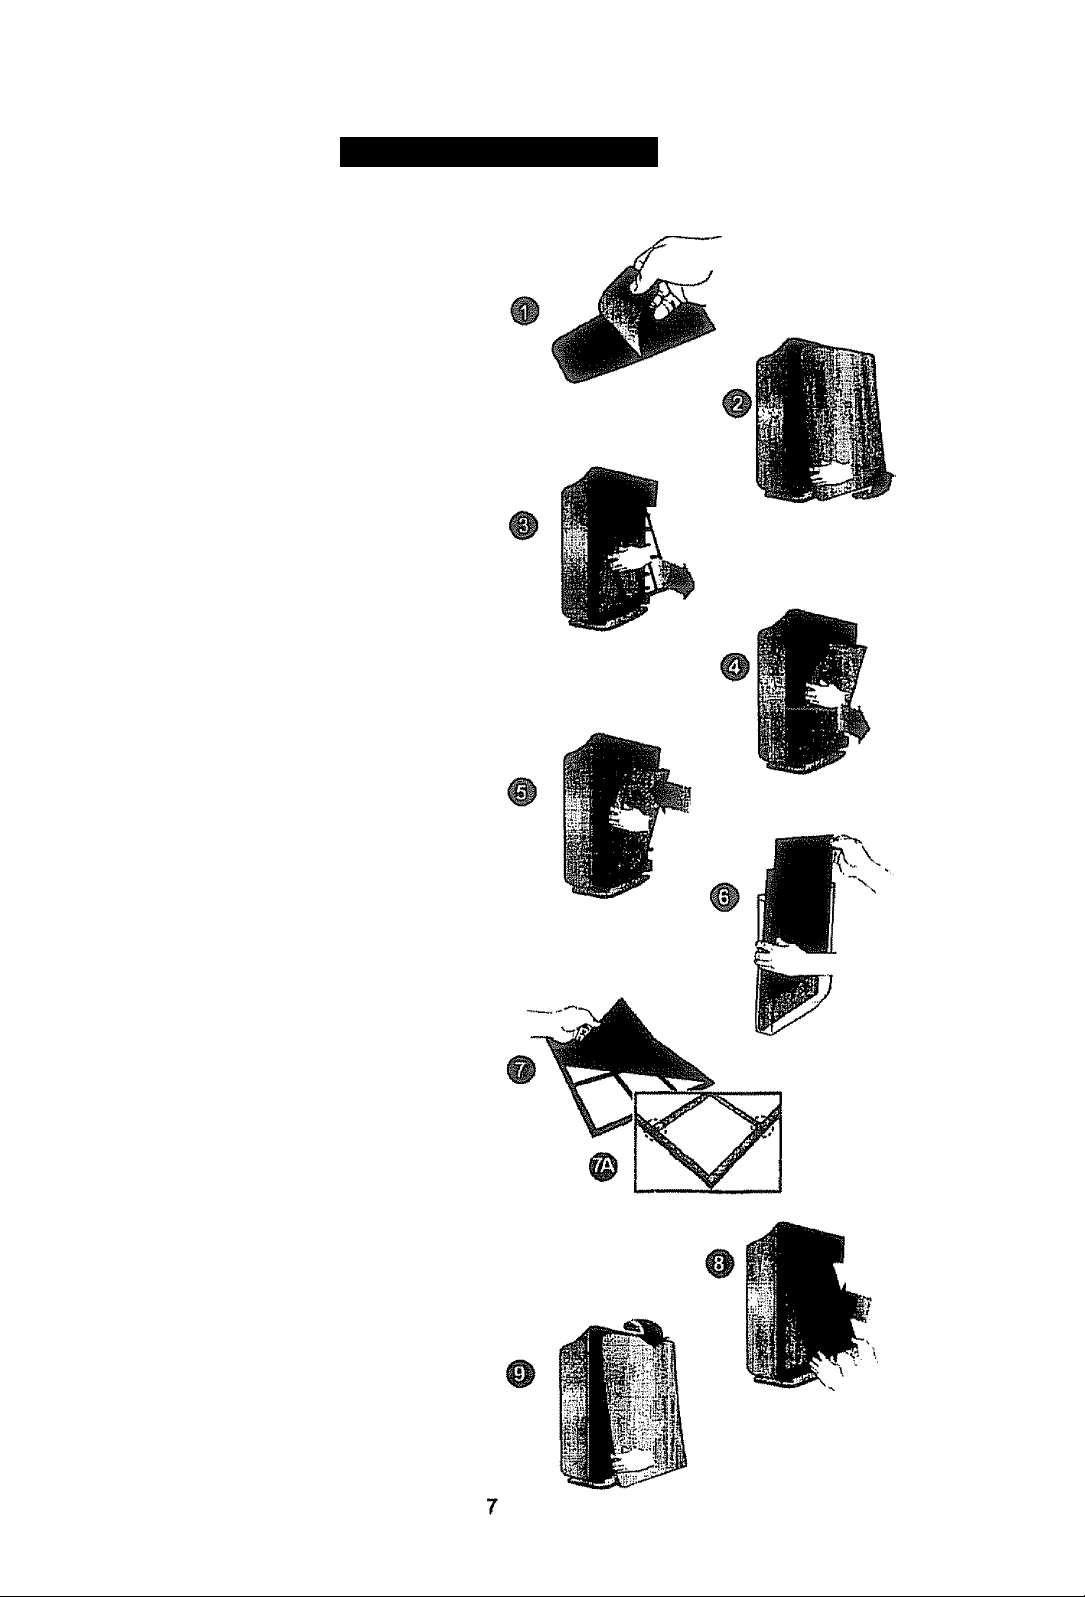
AIR CLEANER SET-UP
Set-Up Procedure
1. Remove protective film from the control
pefielr
2. Remove the front panel by pulling gently
from the lower portion of the panel. Do
not force; the panel should remove easily
3. Remove the plastic frame from the unit.
4. Remove the True HEPA Filter and re
move the plastic wrapper from the filter.
5. Install the True HEPA Filter with the
arrow showing “air flow” pointing in
toward the back of the air cleaner; the
white tabs at the top and bottom of the
HEPA filter will point out to the front of
the unit.
6,Open the resealable plastic bag con
taining the Carbon Pre-Filters and
remove one filter. Reseal the plastic
bag to maintain the freshness of the
remaining filter.
7.instaH the Carbon Pre-Filler onto the
plastic frame by pushing against six
"hook and loop" squares on the back of
the frame. (Diag. 7A)
6. Install the plastic frame by inserting tabs
up into the air cleaner and gently
pushing in at the bottom tab until the
frame fits Into place snuggly,
9, Replace the front panel by hooking
the panel on the top of the unit Swing
the panel in by pushing gentty on each
side of the unit and then lock it into place,
10. Plug the power cord into a wail ouHet,
11. Press and hold the POWER button until
a short “beep" sounds.
12. The air cleaner will take 3-4 minutes to
calibrate the AIR QUALITY sensor. During
this time the sensor lights will flash on
and off. Once the sensor has calibrated,
the lights will stop flashing and the unit
will begin in AUTO mode.
13. Remove tab from remote control
(85450/85300 only).
Note: For best results and to maximize air
flow:
• Place unit at least 2 feet away from the wall,
• Place the unit away from drafty areas, as
the sensors may not react accurately.
• Do not place near curtains, furniture, or
other items that might inhibit air flow,
• Place the unit on a stable surface.
Page 7
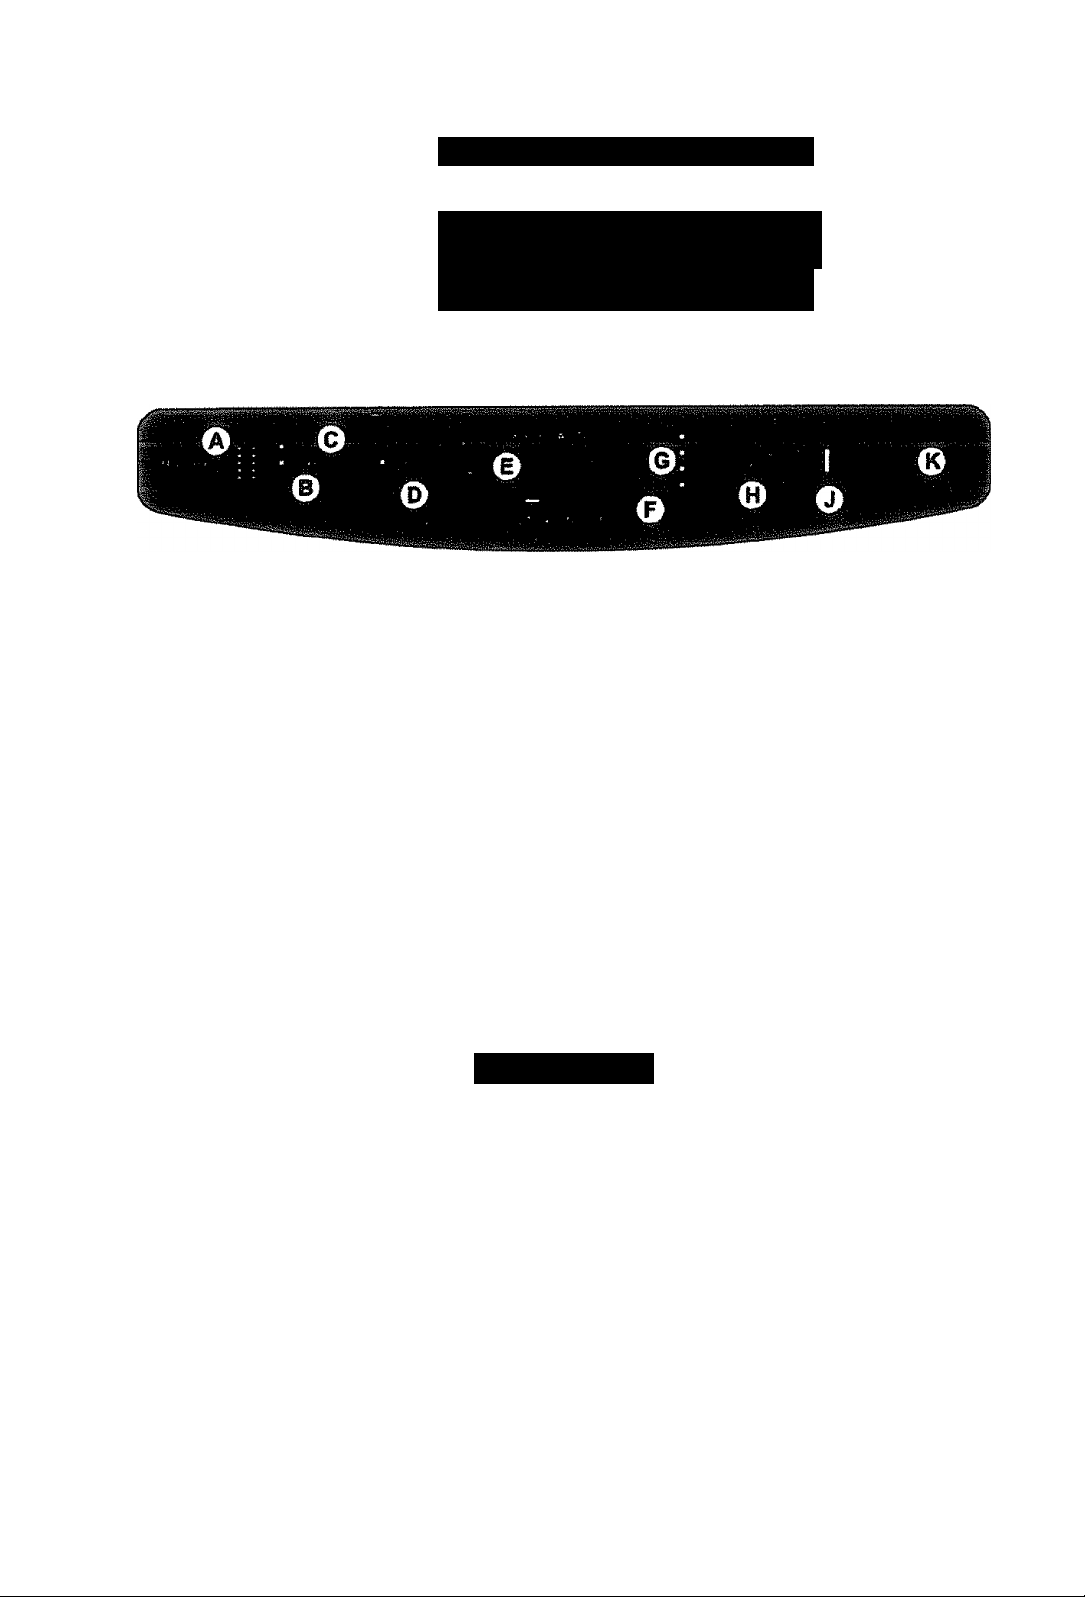
CONTROL PANEL
© ©: I
B5150
85300/85450
G>
A. A1IR QUALITY SENSOR: Automalicany
monitors tfi© air quality level and adjusts
fan speed accordingly.
B. CHECK FILTER INDICATOR: The indi
cator will signal when to replace the
True HEPA Filter.
C. RESET FILTER: Resets the CHECK
FILTER indicator light.
D. AUTO: Changes the fan speed to AUTO.
E. PLASMA INDICATOR: Displays the
PLASMA activity. (See page 2 for
PlasmaWave™^ Techno(ogy)
OPERATION
AUTOMATIC OPERATION: When in
AUTO mode, the air cleaner will automati
cally sense the amount of impurities in the
air and adjust the fan speed accordingly.
When the unit is first turned on it will default
to AUTO mode.
F. AIR QUALITY LEVEL INDICATOR:
Displays the current quality of the air.
G. FAN SPEED INDICATOR:
Displays current fan speed setting.
H. FAN SPEED: Once the machine is on
and in AUTO mode, switch to manual
operation by pressing FAN SPEED
button on the unit.
J. POWER BUTTON: Turns the unit on
and off.
K. LIGHT SENSOR: When in AUTO mode,
this keeps the control panel tights dim
and will not allow the fan to increase
above QUIET speed when the room
is dark.
■ QUIET, MEDIUM, HIGH: These levels are
recommended for standard, daytime use,
HIGH win activate automatically when
sensors delect high levels of impurities
in the air. QUIET, the lowest setting, is the
energy saving mode.
MANUAL OPERATION (Adjusting the
fan speed): Once the unit is on, switch to
manual operation by pressing the UP &
DOWN arrow buttons on the remote control
or the FAN SPEED button. Once in manual
operation, the fan speed wili not automati
cally adjust to the air quality or light level.
' TURBO: The TURBO level, the highest
fan speed, can be activated manually for
maximum air circutation. The TURBO
level will not automatically activate
8
Page 8

AIR QUALITY SENSOR: The air quality
sensor displays five levels of impurities
in the air. If the unit is set to automatic
operation, the air qualify sensor will adjust
fan speeds according to the air quality; fan
speed will decrease as air quality improves.
The AIR QUALITY sensor responds to
cigarette smoke and pet odors, as well as
other contaminants, such as insecticides,
cosmetics, and alcohol or aerosol sprajiS.
The AIR QUALITY LEVEL indicator shows
three colors: blue, orange, and red. The
blue light indicates clean air, the orange
light indicates unciean air, and the red iighl
indicates very unclean air. If the unit is set
to automatic operation, It will change fan
speeds to compensate for different levels
of air pollution.
Note: This equipment has been tested and
found to comply with the limits for a Class
B digital device, pursuant to 15 of the FCC
rules. These limits are designed to provide
reasonable protection against harmful
interference in a residential installation.
This equipment generates, uses, and can
radiate radio frequency energy and, if not
installed and used in accordance with the
instructions, may cause harmful interfer
ence to radio communications. However,
there Is no guarantee that interference will
not occur in a particular installation. If this
equipment does cause harmful interference
to radio or television reception, which can
be determined by turning the equipment
off and on, the user is encouraged to try
to correct the interference through one or
more of the following:
» Reorient or relocate the receiving
antenna.
• increase the distance between the
equipment and the air cleaner.
• Connect the air cleaner to an outlet on
a circuit different from that to which the
equipment Is connected.
«Consult an experienced television/
radio technician.
CARE AND MAINTENANCE
CAUTION: Turn off the air cleaner and unplug the electrtcai cord before performing
any maintenance.
Cleaning
• Clean unit as necessary by wiping with a
dry, soft cloth; for stubborn stains, use a
warm, damp cloth.
• Do not use volatile fluids such as ben
zene, paint thinner, or scouring powder,
as they may damage the surface.
• Keep the unit dry.
• Lightly vacuum the AIR QUALITY sensor
every three months.
AIR QUALITY SENSOR
Page 9

FILTER REPLACEIVIENT
Filter Replacement
0 There are two separate filters:
True HEPA Filter and Carbon Pre-Filter.
•> The CHECK FILTER indicator will signal
when to replace the True HEPA Filter. The
replacement period will vary depending on
the houre of usage, air quality, and location
of the unit. However, In most cases of
normal use the filter will need to be
replaced annually
» Change the True HEPA Filter when
the CHECK FILTER indicator is on.
» For best performance, change the
Carbon Pre-Filter every three months.
This filter should be disposed of when
changed.
Carbon Pre-Filter Replacement
1. Turn off the air cleaner and unplug the
electrical cord.
2. Remove the front panel by pulling gently
from the lower portion of the panel. Do
not force, toe panel should remove easily.
3. Remove toe Carbon Pre-Filler and
plastic frame by gently pulling out from
the bottom and down from the top.
4. Remove the Carbon Pre-Filter from the
plastic frame and dispose of it
5. Remove a replacement Carbon Pre
Filter from the resealable plastic bag
and reseal to maintain the freshness of
the remaining filter,
6. Install the Carbon Pre-Filter onto the
plastic frame by pushing against six
“hook and loop” squares on the back of
the frame. (Diag, 6A)
7. Install the plastic frame by Inserting tabs
up into the air cleaner and gently pushing
in at the bottom tab until the frame fits
into place snuggly
8. Replace the front panel by hooking the
panel on the top of the unit. Swing the
panel in by pushing gently on each side
of the unit and then lock It into place.
9. Plug in air cleaner and press POWER
button until short “beep" sounds
CAUTION: Do not wash and reuse the
True HEPA Filter or the Carbon Pre-Filter
as they will not work effectively.
10
Page 10

True HEPA Filter Replacement
1. Turn off the air cleaner and unplug the
electrical cord.
2. Remove the front panel by pulling gently
from the lower portion of the panel. Do
not force, the panel should remove easily.
3. Remove the Carbon Pre-Filter and
plastic frame by gently pulling out from
the bottom and down from the top,
4. Remove the True HEPA Filter and
dispose of if.
5- Remove the plastic wrap from the new
True HEPA Filler and insert it with the
arrow showing “air flow” pointing in
toward the back of the air cleaner. The
white labs at the top and bottom of the
True HEPA Filler will point out to the front
of the unit.
6. Reinstall the plastic frame and Carbon
Pre-Filter by inserting tabs up into the air
cleaner and gently pushing in at the
bottom fab uni the frame fits into place
snuggly.
7. Replace the front panel by hooking the
panel on the top of the unit. Swing the
panel in by pushing gently on each side
of the unit and then lock it into place.
8. Plug In air cleaner and press POWER
button until short “beep" sounds.
9. Press the RESET FILTER button by
gently inserting a paperclip into the
RESET FILTER hole on the control
panel. The light will flash 5 times before
a “beep” sounds to indicate the filter has
been reset. See figure C on page 8 or
Dtag. 9 to the right.
The air cleaner will take 3-4 minutes to
calibrate Bie AIR QUALITY sensor. During
this time the sensor lights will flash on
and off. Once the sensor has calibrated,
the lights will stop flashing and the unit
will begin In AUTO mode.
11
Page 11

REMOTE CONTROL îB54î)D B5300:Hnly;
BATTERY REPLACEMENT
1. Squeeze lab of battery cover,
2. At the same time pull cover out of remote.
3. Insert battery as shown.
4. Close the battery cover.
CRADLE: The remote control
has a separate wali-mountable
storage cradle that can
be conveniently attached to
any wall using a screw,
BATTERY USE
>» Insert 3V lithium battery CR2025 into the
remote control.
• Incorrect battery usage may cause battery
fluid leakage and/or damage.
» When not using remote control for an ex
tended period, remove the battery.
• Avoid dropping or damaging the remote
control. Keep remote control away from
direct sunlight or heaters.
PROPER OPERATING CONDITIONS
• Operate the remote control facing the air
cleaner.
• Operate within 20 feet of the air cleaner.
IMPROPER OPERATING CONDITIONS
« Any location where there is inverter light
ing equipment or electronic spontaneous
lighting equipment,
• When objects or furniture are located
between the remote and the air cleaner.
• When air cleaner unit is located in direct
sunlight, as sunlight may interfere with the
infrared sensor,
• In areas where fluorescent lighting is
flickering due to worn-out bulbs.
A. POWER; Use the power button to turn
the power on and off A short “beep" will
sound when the unit turns on or off.
B. AUTO: When in AUTO mode, the air
cleaner will automatically sense the
amount of impurities in the air and adjust
the fan speed accordingly. When the
unit Is first turned on it will default to
AUTO mode.
C. FAN SPEED
* UP; Use this button to switch from
automatic operation and increase the
fan speed.
® DOWN: Use this button to switch from
automatic operation and decrease the
fan speed.
D. TURBO; Use this button to switch from
automatic operation and begin the
maximum amount of room air cleaning
and air movement.
12
Page 12

TROUBLESHOOTING
Before Toy Call
Solutions to Common Problems
Before you call for service, review the list below, This list covers problems that are not the
result of defective materials or workmanship.
OCCURRENCE
The remote control
does not work.
The unit has stopped
removing odors
effectively, or seems
to be emitting an odor.
The AIR QUALITY
LEVEL indicator is
orange or red, but the
air seems clean.
Unit interferes with
radio or television
reception.
POSSIBLE CAUSE/SOLUTION
»Make sure the remote control battery is inserted correctly.
• Replace a worn-out battery.
“ Make sure that the remote control has a clear line of sight to
the air cleaner.
" Make sure the AIR QUALITY sensor is not blocked or
clogged.
• Move the unit closer to the offending odors.
• Replace the filtere as they may have reached their
capacity to absotb pollutants. You may need to replace filters
more frequently.
Clear the AIR QUALITY sensor with a vacuum cleaner as it
may be blocked or clogged.
Because this unit radiates radio frequency energy, try one or
more of the following suggestions:
" Reorient or relocate the receiving antenna.
" Increase the distance between the equipment and the air
cleaner,
• Connect the air cleaner to an outlet on a circuit different from
that to which the equipment is connected.
« Consult an experienced television/radio technician.
The CHECK FILTER
Indicator remains lit
after replacing the
True HEPA Filler.
Press the RESET FILTER button by gently inserting a paper
clip into the RESET FILTER button hole. Hold for 3-5 seconds
until a "beep” sounds to indicate the unit has been reset.
13
Page 13

Guía efe Uso y Mantenimiento
Kenmore
TM
Plasm a Wave
Limpiador de Aire True HEPA
Modelos SS15§ ® 8S300 ® 85450
85150
85300
CAUTION:
Read and follow all safety rules and
instructions before operating this
equipment
ADVERTENCIA:
Lea y siga todas las reglas e instrucciones
de seguridad antes de operar este equipo.
Ssars Brand Wanagemenl Corporation Hoffman Estates, IL 60179 U.S.A.
www.sear&.cotn
85450
Printed in Korea
Page 14

ìndice de contenidos
A fin de ser capaz de hacer el mejor
uso posible de su limpiador de aire,
recomendamos que usted comience
por leer rápidamente las Instruc
ciones y que usted conserve el
manual de instrucciones para futura
referencia.
Garantía .......................................
Contenido del paquete
instrucciones de seguridad..................18
Características del filtro de aire
Especificaciones de producto
Sistema de filtro de aire
Panel de instrumentos
Operación...............
Cuidado y mantenimiento
Reemplazo del filtro
Mando a distancia
Solución de problemas.
Repárelo
.......................................
.............. 17
..............
.......
...............
........................
...........................
...................
.......................
..............................
....................
17
............
24-25
.....28
19
20
21
22
22
23
26
27
GARANTIA
GARANTIA COMPLETA DE KENMORE
Sí este producto Kenmore fallase debido a un defecto en los materiales o en la mano de
obra en el período correspondiente a un año a partir de la fecha de compra, rogamos lo
devuelva cualquier tienda de Sears u otra tienda de Kenmore en los Estados Unidos, para
su reemplazo gratuito.
Esta garantía no cubre los filtros de los limpiadores aire, ya que son partes prescindibles.
Esta garantía sólo calificará durante 90 días a partir de la fecha de la compra en caso de
que este producto sea usado alguna vez para objetivos que no sean otros que el menaje
privado del hogar.
Esta garantía califica sólo mientras este producto sea usado en los Estados Unidos,
Esta garantía !e da derechos legales específicos, y usted también puede calificar para
otros derechos que varían de estado a estado.
»
Sears, Roebuck and Co., Hoffman Estafes, IL 60179
CONTENIDO DEL PAQUETE
Modelos 85300 y 85450
• 1 Filtro de Aire con Filtro True HEPA
' 2 Prefiífros de Carbono con Sanitized™
en una bolsa de plástico reseiiabte
• 1 Batería de Litio de 3V (CR2025)
o 1 Mando a Distancia
• 1 Abrazadera Remota de Instalación en
Pared
• 1 Tornillo de Abrazadera Remoto
• 1 Adhesivo de Abrazadera Remoto
• 1 Gula de Uso y Mantenimiento
Modelos 85150
• 1 Filtro de Aire con Filtro True HEPA
• 2 Preflitros de Carbono con Sanitized™
en una bolsa de plástico reseilable
• 1 Guia de Uso y Mantenimiento
I
Wm
Page 15

y\ INSTRUCCIONES DF, SEGURIDAD
Gracias рог comprar un llmpísdor de aire Kenmore. Por favor, lea este manual con deten
imiento antes de su utilización. Este producto es de uso doméstico únicamente.
PRECAUCIONES IMPORTANTES AL
USAR SU FILTRO DE AIRE
ADVERTENCIA: Siga las instrucciones de
este manual para reducir el riesgo de des
carga eiéctrica, cortocircuito, y/o fuego:
• No repare o modifique la unidad a menos
que expresamente sea recomendado en
este manual. Cualquier otra reparación
debe ser completada por personal técnico
cualificado.
• La clavija de esta unidad esté
polarizada mediante una patilla más
ancha que la otra. No fuerce la clavija en
la toma eléctrica. No modifique la clavija
de ningún modo. Si la clavija no cabe en
la toma, invierta la clavija. Si aún no cabe,
póngase en contacto con personal técnico
cualificado para instalar una toma apro
piada.
• No usar en case de que el cable de
corriente o la ciavija se encontraran
dañados o la conexión a la toma de pared
fuera débil.
• Uso de corriente aitema de 120V
únicamente.
»No dañe, ni quiebre, ni doble
enérgicamente, ni tire, ni enrosque, ni ate
un fardo, ni cubra, ni pellizque, ni coloque
ningún objeto pesado en el cable de
corriente.
O Elimine periódicamente el polvo de la
clavija de corriente. Esto reducirá el
riesgo de descarga debido a un aumento
de humedad.
• Si se daña la clavija de corriente, debe
ser sustituida por el fabricante o por
personal técnico cualificado,
• Extraiga la clavija de corriente de !a toma
antes de limpiar la unidad. Al extraer la
clavija de corriente, agarre de la misma
clavija, y nunca deí cable.
" Extraiga la ciavija de corriente de la toma
cuando no esté en uso.
» No manipule la clavija de corriente con
las manos mojadas.
- No haga uso de la unidad mientras use
insecticidas de interior que generen humo.
• No limpie la unidad con el benceno ni
disolvente para pintura. No rocíe ta unidad
de insecticida.
• No use la unidad en sitios húmedos, o en
sitios en los que la unidad corra ef riesgo
de, caso de un cuarto de baño.
• No inserte sus dedos u ni objetos
extraños en la toma de aire o toma.
»No use la unidad cerca de gases inflam
ables, No la use cerca de cigarritíos,
incienso, u otros artículos que generen
chispa.
o La unidad no eliminará el monóxido de
carbono emitido por calentadores u otras
fuentes,
PRECAUCIONES IMPORTANTES PARA
USAR SU FILTRO DE AIRE
• No bloquear las tomas de entrada ni de
salida.
- No usar cerca de objetos calientes, como
una estufa.
- No usar allá donde la unidad pueda entrar
en contacto con el vapor.
»No usar la unidad recostada sobre un
lado.
• Mantener la unidad alejada de productos
que generen residuos aceitosos, caso de
una freidora.
»No usar detergente para limpiar ia unidad.
» No usar la unidad sin un filtro,
• No lavar ni reutilizar su Filtro True HEPA ni
su Prefiltro de Carbono,
• Agarrar dei mango en la parte posterior de
la unidad para su transporte.
• No agairar por e! panel delantero.
Page 16

CARACTERÍSTICAS DEL FILTRO DE AIRE
PRECAUCIÓN: Ensamble totalmente el limpiador de aire antes de usar (Ver el Configuración
del Filtro de Aire en la página siguiente). Nota: Las características varían según el modelo.
• Operación Tranquila
Este limpiador de aire Kenmore tiene una
hélice de cuatro velocidades con una
operación tranquila que es ideal para la
noche.
• Sensor de Calidad de Aire
Este limpiador de aire Kenmore tiene un sen
sor de Calidad de Aire que detecla la presencia
de varios agentes contaminantes en el aire La
unidad aumentará automáticamanle la veloci
dad de hélice para limpiar más volumen de aire
y quitar las Impurezas rápidamente,
> Sensor de Luz
El sensor de luz Incorporado detecta el mo
mentó en que una sala se encuentre oscura y
automáticamente atenúa las luces del pane! de
Instrumentos y baja la velocidad de hélice para
una operación tranquila y ahorradora de
energía Una vez que la sata se oscurezca, el
sensor de luz mantendrá sus luces débiles, y
no permitirá que la hélice aumente de veloci
dad, Independientemente de lo detectado por el
sensor de Calidad de Aire.
• Limpieza Gradual
El aíre pasa por etapas múltiples de
limpieza antes de se devuelto a la sala.
•
• Tecnología PlasmaWave
La Tecnología PlasmaWave™ usa una
descarga de corona fuerte para atacar a tos
agentes contaminantes en el nivel molecular
• Preflitro Tratado de Carbono
Sanltlzed™
El Prefiltro de Carbono colecciona
partículas grandes como polvo,
pelo de mascota, e hilos.
También absorbe el olor que
causan gases como aquellos
causados por el humo de
cigarrillos, decaimiento orgánico
y producto del cocinado; y el olor
es tratado con Sanitized™ para
reducir con eficacia el desarrollo
de bacterias y hongos. Para un
rendimiento eficaz, sustituir
cada tres meses,
" Filtro True HEPA
Captura el 99.99 % de partícu
las e Impurezas tan pequeñas
como 0.3 micrones. Incluso
humo, polvo, polen y otros
alérgenos. Sustituir cuando
el Indicador de luz de
CHECK FILTER se active.
Tecnología Avanzada PlasmaWave™
PlasmaWave™ usa una descarga de corona fuerte para destruir agentes contaminantes aerolransportados
en el nivel molecular.
En una fracción de un segundo, PlasmaWave™ el se combina con moléculas de agua naturales que
ocurren en el aire (H2O) para crear mi! millones de moléculas Radicales de Hidróxyto (OH)
OH es una molécula inestable que busca el equilibrio robando átomos de hidrógeno de moléculas
adyacentes que contienen el hidrógeno (los agentes contaminantes), convirtiendo a aquellas de esa manera
en moléculas inocuas de agua, dióxido de carbono, y oirás moléculas aceptables,
El resultado es una reducción mensurable de agentes contaminantes después de que el aire pasa por el
Generador Plasma (PlasmaWave™).
Al convertir las moléculas, la tecnología PlasmaWave™ puede reducir olores, asi como VOCs (vapores
químicos). Es también eficaz en la reducción de bacterias de microorganismos aerotransportados y de virus.
La tecnología PlasmaWave™ es inocua y la molécula OH ten sólo vive un nanosegundo mientras convierte
0 las moléculas circundantes. Y, lo que es más importante — a diferencia de ia obsoleta tecnología ionizante
— PlasmaWave™ no produce niveles altos del ozono como un subproducto que es,
Al combinarse con una hélice y un sistema de fiilro limpiador de aire, PlasmaWave™ ofrece un modo eficaz
y eficiente de limpiar el aire de agentes contaminantes no deseados, como polvo, humo y poten asi como
VOCs, alérgenos, microorganismos y olores.
Page 17

ESPECIFICACIONES DE PRODUCTO
Modelo
Tamaño de la Sala 150 pies cuadrados
Aíimenlacíón AC 120V/60(Hz)
Tasa de Corriente
Velocidades de la
Hélice
Demostración
Tipo de Control
Mando a distancia No Sí
Sensor de Calidad
de Aíre
Sensor de Luz SI SI Sí
Certificado por la
AHAM
Publicado en la UL
Prefiitro Tratado de
Carbono Sanitized™
Calificado para
Enerav Star
Comprobar Indicador
de Filtro
Configuración
Limpiador
- Prefiltro de
Carbono
- Filtro TruB HEPA
BStSO
Baja 4W, Turbo 40W
4 Velocidades 4 Velocidades
Digital
Aulo/Manual
Sí SI
SI SI
Si
SI Sí
Sí Sí
Si Sí SI
Sí
Sí Sí Sí
85300 85450
300 píes cuadrados 450 pies cuadrados
AC 120V/60(Hz)
Baja 4W, Turbo 60W
4 Velocidades
Digital
Auto/Manual
Si Sí
SI Sí
Auto/Manuai
Sí
Sí
Sí
Sí
Sí
AC 120V/60(Hz)
Baja 11W,
Turbo 110W
Digital
- PlasmaWave™
CADR
Tamaño de la
Unidad (pulgadas,
LaraoxAnchoxAlto)
Peso de la Unidad (en
libras)
Sí
Humo/Polvo/Polen
98/98/103
8.27 X 18.50 X 13.78
11.15
SI Sí
Humo/Polvo/Polen
197/197/214
8.66 X 21.65 X 16.30 10 24 X 25 59 x 17 32
13.95 19.40
Humo/Polvo/Polen
291/298/343
Page 18

SISTEMA DE FILTRO DE AIRE
Procedimiento de Configuración
1, Extraiga la película profectora dei panel
de instrumentos. ,
2, Extraiga el panel delantero tirando
suavemente de la parte inferior del
panel. No lo fuerce: el panel deberla
poder salir fácilmente.
3, Extraiga el marco de plástico de la unidad.
4, Extraiga e! Filtro True HEPA y la envoltura
de plástico del filtro.
5, Instale el Filtro True HEPA con la flecha
que indica el “flujo de aire" apuntando a
la parte posterior del limpiador de aire; las
pestañas blancas apuntando hacia arriba
y el fondo del filtro de HEPA apuntando
hacia el frente de la unidad.
6, Abra la bolsa de plástico resellable que
contiene los Prefiltros de Carbono y extraiga
un filtro. Reselle la bolsa de plástico
para mantener la frescura del filtro.
7 Instale el Prefiltro de Cartono en el marco
de plástico empujándolo contra sets
cuadrados de "gancho y lazo" en el dorso
del marco, (Dtag 7A)
8. Instale el marco plástico Insertando las
pestañas hacia arriba en el limpiador de
aire y empuje suavemente en la pestaña
de fondo hasta que el marco quepa en el
lugar cómodamente.
9. Sustituya el panel delantero enganchando
el panel a la parle superior de la unidad.
Vuelva a colocar el panel en empujando
suavemente a cada lado de la unidad y
luego bloquéelo fijamente.
10. Enchufe el cable de corriente a una toma
de pared.
11. Presione y mantenga e! bolón de POWER
hasta que suene un “bip" brevemente
12. El limpiador de aire tardará de 3 a 4
minutos en calibrar e! sensor de Air
Qualily (calidad de aire) Durante este
tiempo, las luces de sensor desteüarán da
forma intermitente. Una vez calibrado el
sensor, ias luces dejarán de destellar y la
unidad se iniciará en modo AUTO.
&
»
Nota: Para mejores resultados y para maximizar
el flujo de aire:
• Coloque la unidad ai menos a 2 pies de distancia
de la pared.
• Coloque la unidad lejos de áreas llenas de cor
rientes de aire, ya que los sensores podrían no
reaccionar con exactitud
• No la coloque cerca de cortinas, mobiliario u
otros artícuios que puedan inhibir el flujo de aire
■ Cotoque ta unidad sobre una superficie estable.
Page 19

PANEL DE INSTRUMENTOS
О .
о ©: I
О
85150
85300/85450
A. SENSOR DE CALIDAD DE AIRE: Supervisa
de manera automática el nivet de calidad del
aire y ajusta la velocidad de hélice en con
secuencia.
B. INDICADOR DE CHECK FILTER
(COMPROBAR FILTRO): El Indicador
señalará cuándo hay qua sustituir el Filtro
True HEPA
C. RESET FILTER (RESETEO DE FILTRO):
Relnictaliza la luz de indicadora de CHECK
FILTER.
D. AUTO; Cambia la velocidad de hélice a modo
AUTO.
E. INDICADOR DE PLASMA:
Muestra la actividad PLASMA. (Consultar
Pàgina 2 para la tecnología P/asmalVava™)
OPERACION
OPERACIÓN AUTOMÁTICA: Estando en modo
AUTO, el limpiador de aire detectará aulomáticamenle la cantidad de Impurezas del aire y
ajustará la velocidad de hélice en consecuencia.
Cuando te unidad se encienda por vez primera,
ésta pasará por defecto a! modo AUTO.
F. INDICADOR DEL NIVEL DE CALIDAD DE
AIRE: Muestra la calidad actual del aire.
G. INDICADOR DE VELOCIDAD DE HÉLICE:
Muestra el ajuste de velocidad de hélice
actual.
H. VELOCIDAD DE HÉLICE: Una vez que
la máquina eslé conectada y en modo AUTO,
cambie a operación manual presionando el
botón de FAN SPEED (VELOCIDAD DE
HÉLICE) de la unidad
J. BOTÓN DE POWER: Enciende y apaga la
unidad.
K. SENSOR DE LUZ: Estando en modo AUTO,
éste mantiene las luces de panel de instru
mentos con carácter débil y no permite que
la hélice aumente por encima de la veloci
dad QUIET (TRANQUILA) cuando la sala
esté oscura.
> QUIET (TRANQUILO), MEDIUM (MEDIO),
HIGH (ALTO): Estos niveles son recomendados
un uso normal durante el día. HIGH se activará
automáticamente cuando ios sensores detecten
niveles altos de impurezas en el aire QUIET, el
ajuste más bajo, es el modo de ahorro de energía.
OPERACIÓN MANUAL (Ajuste de te velocidad
de hélice): Una vez que la unidad esté conecta
da, cambie a 1a operación manual apretando los
botones de flechas de UP y DOWN en el mando
a distancia o el botón de FAN SPEED (VE
LOCIDAD DE HÉLICE), Una vez en operación
manual, te velocidad de hélice no se adaptará
aulomáficamenle a la calidad de aire
' TURBO: El nivel de TURBO, la velocidad da
hélice más alta, puede ser activado a mano
para una máxima circulación de aire. El nivel
de TURBO no activará automáticamente
Page 20

SENSOR DE CALIDAD DE AIRE; B sensor
de calidad de aire muestra cinco niveles de
impurezas en el aìre. Si la unidad es puesta a
la operación automáüca, el sensor de calidad
de aire ajustaré las velocidades de hélice según
la calidad de aire; ia velocidad de hélice se
disminuirá cuando ía calidad de aire mejore. El
sensor de AIR QUAUTY (CALIDAD DE AIRE)
responde a humo de cigarrillos y olores de
mascotas, asi como oíros contaminantes, como
insecticidas, cosméticos, y aerosoles o alcohol.
El Indicador de AIR QUALItY LEVEL (NIVEL DE
CALIDAD DEL AIRE) muestra tres colores: azul,
de naranja, y rojo. La luz azul indica aire limpio,
la luz de naranja indica aire suelo, y la luz roja
indica aire muy sucio. Sí la unidad es puesta
en operación automática, esto cambiará las ve
locidades de hélice para compensar los niveles
diferentes de contaminación de aire.
Nota: Este equipo ha sido probado y aprobado
por cumplir con ios límites de un aparato digital
de Clase B, de acuerdo a 15 de las reglas
de FCC. Estos límites son diseñados para
proporcionar una protección razonable con
tra interferencias dañinas en una instalación
residencial Este equipo genera, usa, y puede
irradiar energía de radiofrecuencia y, si no
se ínstala ni se usa de acuerdo a tas Instruc
ciones, puede causar interferencias dañinas a
las comunicaciones por radio. Sin embargo, no
hay ninguna garantía de que no vayan a ocurrir
interferencias en una instalación en particular.
Si este equipo causa realmente interferencias
dañinas a la emisión de radio o a la recepción
de televisión, lo cual puede ser determinado
apagando y encendiefído el equipo, ei usuario
debe tratar de corregir la interferencia por medio
de uno o varios de ios siguientes:
• Reorienta o trasladar la antena de recepción.
• Aumentar la distancia entre ei equipo y el
limpiador de aire,
• Conectar ei limpiador de aire a una loma de un
circuito diferente de aquel at cual el equipo
esté conectado.
»Consultar con personal cualificado de
televisión (de radio.
CUIDADO Y MANTENIMIENTO
PRECAUCIÓN: Apague el limpiador de aire y desenchufe el cable eléctrico antes de realizar cual
quier mantenimiento
Limpieza
• Limpie la unidad según sea necesario con
un paño de lela seco y suave; para manchas
difíciles, use un paño caliente y húmedo,
• No use fluidos volátiles como benceno,
disolvente de pintura, o polvo de fregado, ya
que podrían dañar la superficie.
• Mantenga la unidad seca.
• Aspire el polvo de! sensor de CALIDAD DE
AIRE cada tres meses.
SENSOR DE CALIDAD DE AIRE
Page 21

cuándo hay que sustiluir el Filtro True HEPA.
El periodo de reemplazo variará según las
horas de uso, calidad de aire, y posición de
la unidad. Sin embargo, en la mayor parte
de casos de uso normal, el filtro tendrá que ser
sustituido anualmente.
Cambie el Fiitro True HEPA cuando el
indicador de CHECK FILTER esté conectado.
Para un rendimiento eficaz, cambie et Prefiltro
de Carbono cada tres meses. Este filtro debe
desecharse al ser cambiado.
Reemplazo de Prefiltro de Carbono
1. Apague el limpiador de aire y desenchufe ef
cable eléctrico,
2. Extraiga el panel delantero tirando
suavemente de la parte Inferior del panel. No
lo fuerce, el panel debe salir fácilmente.
3 Extraiga el Prefiltro de Carbono y el marco de
plástico tirando suavemente del fondo y hacia
abajo desde arriba.
4 Extraiga et Prefiilro de Carbono del marco
plástico y elimínelo.
5. Saque Prefiltro de Carbono de la bolsa de
plástico resellable y reséllela para mantener
la frescura del filtro restante.
6. instale el Prefiilro de Carbono en el marco
plástico empujando hacia los cuadrados de
"gancho y lazo’ ai dorso del marco (Diag. 6A)
7. Instale el marco plástico insertando las
pestañas hacia arriba en el limpiador de aire
y empuje suavemente en la pestaña de fondo
hasta que el marco quepa en el lugar cómo
damente.
8. Sustituya el panel delantero enganchando el
panel a la parte superior de !a unidad. Vuelva
a colocar el panel en empujando suavemente
a cada lado de la unidad y luego bloquéelo
fijamente.
9. Enchufe el limpiador de aire y presione el
botón de POWER hasta que se escuche
breves sonidos de "bip'
Page 22

Reemplazo de Filtro True HEPA
1. Apague el limpiador de aire y desenchufe el
cable eléctrico.
2. Extraiga el panel delantero tirando
suavemente de la parte inferior del panel. No
lo fuerce: el panel debe salir fácilmente,
3. Extraiga el Prefiltro de Carbono y el marco de
plástico tirando suavemente del fondo y hacia
abajo desde arriba.
4. Extraiga el Filtro True HEPA y elimínelo.
5. Extraiga la envoltura de plástico de su
nuevo Filtro True HEPA e insértelo con la
flecha apuntando hada “air flow", apuntando
hacia la parte posterior del limpiador de aire.
Las pestañas blancas por encima y por
debajo del Filtro True HEPA apuntarán hacia
la parte frontal de la unidad.
6. instale de nuevo el marco plástico y el
Prefiltro de Carbono insertando las pestañas
hacia arriba en el limpiador de aíre y
empujando suavemente hacia adentro en ta
pestaña de fondo hasta que el marco quepa
en el lugar cómodamente,
7. Sustituya el panel delantero enganchando el
panel a la parte superior de la unidad. Vuelva
a colocar el panel en empujando suavemente
a cada lado de la unidad y luego bioquéelo
fijamente.
8. Enchufe el limpiador de aire y presione
elbotón de POWER hasta que se escuche
breves sonidos de “bip".
9. Presione el botón de RESET FILTER
(RESETEO DE FILTRO) insertando suave
mente clip en el agujero de RESET FILTER
dei panel de instrumentos. La iuz parpadeará
5 veces hasta que suene un “bip" que indicará
que el fiiiro habrá sido reseteado. Ver !a figura
C de la Página 8 ó el Diag, 9 a la derecha.
El limpiador de aire tardará de 3 a 4 minutos en
calibrar el sensor de AIR QUALITY (calidad de
aire) Durante este tiempo, las luces de sensor
destellarán d© forma intermitente. Una vez
calibrado el sensor, las luces dejarán de
destellar y la unidad se Iniciará en modo AUTO.
Page 23

MANDO A DISTANCIA i3i3'i5o/ei330D suiu
PREPARACIÓN
1. Apriete la pestaña de la cubierta de la balería,
2. Al misrm tiempo, retíre la tapa del remoto.
3. Inserte la batería como se muestra.
4. Cierre la tapa de la batería.
©'
ABRAZADERA: El mando a
distancia tiene una abrazadera
Independiente de almacenaje/
instalación que puede instalarse
cómodamente en cualquier
pared usando un tornio.
USO DE LA BATERÍA
• Inserte urrà balería de litio de 3V CR2025 en el
mando a distancia.
• El uso incorrecto de la batería podría causar un
derrame de fluido de batería y/o daño a la misma,
• Cuando no vaya a usar el mando a distancia
durante un período amplb de tiempo, extraiga
la balería.
• Evite dejar caer o dañar el mando a distancia.
Mantenga el mando a distancia iejos de la luz
del sol dlrecla o de calentadores.
CONDICIONES DE FUNCIONAMIENTO
APROPIADAS
• Use el mando a distancia apuntando hacia
el limpiador de aire,
• Usar en un radio de 20 pies alrededor del limpia
dor de aire.
CONDICIONES DE FUNCIONAMIENTO
IMPROPIAS
• Cualquier lugar donde haya un equipo inversor
de luz o un equipo de iluminación espontánea
electrónica.
• Cuando haya objetos o mobiliario entre el
remoto y el limpiador de aire,
■ Cuando la unidad de limpiador de aire se en
cuenlre en contado con la luz del sol dlrecla,
ya que la luz del sol podría Interferir con el sen
sor infrarrojo.
• En áreas donde la iluminación de neón
parpadea debido a bombillas desgastadas.
A. POWER: Use el botón de corriente para
encender y apagar la corriente. Un
breve “bip” sonará cuando la unidad se
en cienda o se apague.
B. AUTO: Estando en modo AUTO, el
limpiador de aire detectará
automáticamente ia cantidad de
impurezas en el aire y ajustará la
velocidad de hélice en consecuencia.
Cuando ia unidad se encienda por vez
primera, la unidad pasará por defecto al
modo AUTO,
C. VELOCIDAD DE HÉLICE
•UP (ARRIBA): Use este botón para
cambiar la operación automática y au
mentar la velocidad de la hélice.
• DOWN (ABAJO): Use este botón para
cambiar la operación automática y dis
minuir la velocidad de hélice.
D. TURBO: Use este botón para cambiar
la operación automática y comenzar a
abarcar la cantidad máxima de iimpieza
y movimiento de aire de la sala.
Page 24

SOLUCION DE PROBLEMAS
Antes de Qye Usted Llame
Soluciones para Problemas Comunes
Antes de que usted líame a un servicio de reparación de averias, revise ia lista de abajo. Esta lista
cubre problemas que no son resultado de materiales defectuosos ni mano de obra defectuosa.
EVENTO
El mando a distancia no
functona.
La unidad ha parado de
quitar olores con eficacia,
0 parece emitir un olor.
El indicador de AIR
QUALITY LEVEL es
naranja o rojo, pero el
aire parece limpio.
La unidad interfiere con
la emisión de radio o la
recepción de televisión.
POSIBLE CAUSA/SOLUCIÓN
•Asegúrese de que fa batería del mando a distancia está insertada
correctamente.
• Sustituya una balería agotada..
• Asegúrese de que el mando a distancia tenga una línea clara de
visión hacia el limpiador de aire.
• Asegúrese que el sensor de AÍR QUAÜTY no se encuentre blo
queado ni obstruido,
• Acerque la unidad a los olores ofensivos.
• Sustituya los filtros, ya que puede que hayan alcanzado su capacidad
para absorber agentes contaminantes. Puede que usted puede tenga
que sustituir sus filtros con más frecuencia.
Despeje ei sensor de AIR QUALITY con una aspiradora ya que puede
liegar a bloquéame u obstmirse.
Ya que esta unidad irradia energía de radiofrecuencia, pruebe con una
0 varias de las sugerencias siguientes:
• Reorienta o trasladar !a antena de recepción,
•Aumentar la distancia entre el equipo y el limpiador de aire.
• Conectar el limpiador de aire a una toma de un circuito diferente de
aquel a! cual el equipo esté conectado.
• Consulte a un técnico de televisión/radio cualificado.
El Indicador de CHECK
FILTER permanece
encendido después de
sustituir el Filtro True
HEPA.
Presione el botón con RESET FILTER insertando suavemente clip de
papel en el agujero det botón de RESET FILTER. Manténgalo pulsado
de 3 a 5 segundos hasta que suene un “bip" indicador de que la unidad
fue reseteada.
Page 25

Su casa
Para consejo se solución de expertos y soluciones caseras:
manage home
www.manBgemyhomexom
Para la reparación - en su casa - da todo eteclrodomésHco de
ias principales marcas, da aparatos de césped y jardinería, o de
sistemas de calefacción y de refrigeración, isin Importar quién los
fabricó, ni quién los vendió!
Para repuestos, accesorios y manuales de uso que usíed necesita para
arreglar la averia por su cuenta.
Para la instalación profesional por parte de Sears de
electrodomésticos de casa y de artículos como abridores de puertas de
garaje y calentadores de agua.
1-80í-4-MY-HOME^ Llame en cualquier memento, de día o
(1-80CM694663) y
www.sears,coin www.sears.ca
Nuestra Casa
Para la reparación de artículos portátiles como aspiradoras,
equipos de césped, y artículos electrónicos, llame en cualquier
momento para saber acerca de! silfo más cercano de
Sears Parts & Repair Service Center
1-800-488-1222 (U.s.a.)
wvw.sears.com
Pera comprar un acuerdo da protección para un producto a ser inspeccionado por Sears:
1 >800~469‘4663 (Canada)
www.sears.ca
1-800-827-6655 (USA) 1 -800-361-6665 (Canada)
Para í^dir servido de reparadCh Au Canada pour service en français:
a domicflio, y para ordenar piezas: l.eOO-LE-FOYER”'^
1^-SU-HOGARÆ (1«053^6Э37)
(1-888-7846427) www.sears.ca
© Seas BwKis. tic
(¡EReglstered Trademark / ™ Trademark / Service Mark of Sears Brands. LLC
^Marca Regisfrada I ™ Marca de Ft brioa / Marca de Servicio da Sears Brar\ds, LLC
Marque de commerce /Marque d6posfe de Sears Brands. LLC
 Loading...