

Kenmore 790.79623, Pro 790.79623 Use And Care Manual
TM
DUAL FUEL GE
ESTUFA FU L
IViodel, modelo 790.79623
UAL
i:'1%
iii........
\
iii.........
Sears Roebuck and Co., Hoffman Estates, IL 60179 U.S.A.
www,sears,com
P/N 318203953 Rev. B (0707)
Table of Contents
Kenmere Pro Appliance Warranty ............................................ 2
iMPORTANT SAFETY iNSTRUCTiONS .................................. 3-5
Product Record .......................................................................... 5
Serial Plate Location ................................................................. 5
Conversion to Liquefied Petroleum Gas (or L.P. Gas) ............ 5
Range Features .......................................................................... 6
Before Setting Surface Controls .............................................. 7
Setting Surface Controls ...................................................... 8-10
Surface Cooking ................................................................. 11-12
Before Setting Oven Controls ............................................ 12=13
Please carefully read and save these instructions
This Use & Care Manual contains general operating instructions for your appliance and feature information for several
models. Your product may not have all the described features. The graphics shown are representative. The graphics on
your appliance may not look exactly like those shown. Common sense and caution must be practiced when installing,
operating and maintaining any appliance.
Kenmore Pro Appliance Warranty
One Year Limited Warranty
When installed, operated and maintained according to all instructions supplied with the product, if this appliance fails due
to a defect in material or workmanship within one year from the date of purchase, call 1-800-4-MY-HOME ®to arrange for
free repair. If this appliance is used for other than private family purposes, this warranty applies for only 90 days from the
date of purchase.
Five-Year Limited Warranty
For five years from the date of purchase, when this range is installed, operated, and maintained according to all instruc-
tions supplied with this product, Sears will replace the following range parts free of charge ifthey fail for the reasons below.
After the first year, customer must pay labor cost of installation.
• Cooktop glass if it fails due to thermal shock.
Cooktop elements if they are defective.
This warranty covers only defects in material and workmanship. Sears will NOT pay for:
1. Expendable items that can wear out from normal use, including but not limited to filters, belts, light bulbs, and bags.
2. A service technician to instructthe user in correct product installation,operation or maintenance.
3. A service technician to clean or maintain this product.
4. Damage to or failure of this product if it is not installed, operated or maintained according to all instructionssupplied with
the product.
5. Damage to or failure of this product resulting from accident, abuse, misuse or use for other than its intended purpose.
6. Damage to or failure of this product caused by the use of detergents, cleaners, chemicals or utensils other than those
recommended in all instructions supplied with the product.
7. Damage to or failure of parts or systems resulting from unauthorized modifications made to this product.
Disclaimer of implied warranties; limitation of remedies
Customer's sole and exclusive remedy under this limited warranty shall be product repair as provided herein, implied
warranties, including warranties of merchantability or fitness for a particular purpose, are limited to one year or the shortest
period allowed by law. Sears shall not be liable for incidental or consequential damages. Some states and provinces do not
allow the exclusion or limitation of incidental or consequential damages, or limitations on the duration of implied warranties
of merchantability or fitness, so these exclusions or limitations may not apply to you.
This warranty applies only while this appliance is used in the United States and Canada.
This warranty gives you specific legal rights, and you may also have other rights which vary from state to state.
Sears, Roebuck and Co., Hoffman Estates, IL 60179
Sears Canada inc., Toronto, Ontario, Canada M5B 2B8
Air Circulation in the Oven ...................................................... 13
Control Button Features .......................................................... 14
Setting the Clock ...................................................................... 14
Setting Oven Controls ........................................................ 15-19
Self-Cleaning ....................................................................... 20-21
Adjusting Oven Temperature .................................................. 21
General Care & Cleaning .................................................... 22-26
Before You Call .................................................................... 27-28
Protection Agreements ........................................................... 29
Sears Service ........................................................................... 30
2 Printed in United States
important Safety instructions
Read all instructions before using this appliance.
Save these instructions for future reference.
This manual contains many important safety messages. Always read and obey all safety messages.
The safety symbol _ calls your attention to safety messages that inform you of hazards that can kill or hurt you or
others, or cause damage to the product.
indicates an imminently hazardous situation which, if not avoided may result in death or
serious injury.
indicates an imminently hazardous situation which, if not avoided may result in minor or
moderate injury, or product damage.
All safety messages will identify the hazard, tell you how to reduce the chance of injury, and tell you what can happen if the
instructions are not followed.
if the information in this manual is not followed
exactly, a fire or explosion may result causing property damage,
personal injury or death.
FOR YOUR SAFETY:
-- Do not store or use gasoline or other flammable vapors and
liquids in the vicinity of this or any other appliance.
-- WHAT TO DO IF YOU SMELL GAS:
• Do not try to light any appliance.
• Do not touch any electrical switch; do not use any phone
in your building.
• Immediately call your gas supplier from a neighbor's
phone. Follow the gas supplier's instructions.
• if you cannot reach your gas supplier, call the fire department.
-- installation and service must be performed by a qualified
installer, servicer or the gas supplier.
• Remove all tape and packaging before using the
range. Destroy the carton and plastic bags after
unpacking the range. Never allow children to play with
packaging material.
= Proper Installation=Be sure your appliance is
properly installed and grounded by a qualified
technician in accordance with the National Fuel
Gas Code ANSi Z223.1 latest edition, and National
Electrical Code ANSI/NFPA No. 70--latest edition,
and local code requirements, install only per
installation instructions provided in the literature
package for this range.
• in case of an emergency, know how to disconnect
the electrical power to the appliance at the circuit
breaker or fuse box and how to turn off the gas
supply at the main shutoff valve.
• User Servicing--Do not repair or replace any part of
the appliance unless specifically recommended in
the manuals. All other servicing should be done only by
a qualified technician to reduce the risk of personal
injury and damage to the cooktop. Sears Parts & Repair
isthe recommended repair service for this appliance.
• Never modify or alter the construction of a range by
removing leveling legs, panels, wire covers, anti=tip •
brackets/screws, or any other part of the product.
Stepping, leaning or sitting on the door or
drawer of this range can result in serious injuries and also
cause damage to the range. Do not allow children to climb or
play around the range. The weight of a child on an open door
may cause the range to tip, resulting in serious burns or other
injury. An open drawer, when hot, may cause bums.
equipped) for storage.
in the cabinets above a range. Children climbing on the
range to reach items could be seriously injured.
heater to heat or warm the room. Doing so may result in
carbon monoxide poisoning and overheating of the oven.
• Storage in or on Appliance--Flammable materials should
not be stored in an oven, near surface burners or in the
drawer (if equipped). This includes paper, plastic and cloth
items, such as cookbooks, plasticware and towels, as well as
flammable liquids. Do not store explosives, such as aerosol
cans, on or near the appliance. Flammable materials may
explode and result in fire or property damage.
• Do not leave children alone--Children should not be
left alone or unattended in the area where appliance
is in use. They should never be allowed to sit or stand on
any part of the appliance.
DO NOT TOUCH SURFACE BURNERS, AREAS NEAR
THESE BURNERS, OVEN HEATING ELEMENTS OR
iNTERiOR SURFACES OF THE OVEN OR WARMER
DRAWER (if equipped). Both surface burners and oven
heating elements may be hot even though they are dark
in color. Areas near surface burners may become hot
_--_ All ranges can tip.
v, Injuryto persons could result.
_i install anti-tip device packed
the range must be secured by properly
installed anti-tip bracket(s) provided with the
range. To check if the bracket(s) is installed
properly, remove the lower trim and verify
that the anti-tip bracket(s) is engaged. Refer
to the installation instructions for proper
anti-tip bracket(s) installation.
Do not use the oven or warmer drawer (if
Do not store items of interest to children
NEVER use this appliance as a space
with range.
See installation instructions.
To reduce the risk of tipping,
iii........
....i....
important
enough to cause burns. During and after use, do not
touch, or let clothing or other flammable materials touch
these areas until they have had sufficient time to cool.
Among these areas are the cooktop, surfaces facing the
cooktop, the oven vent openings and surfaces near
these openings, oven door and window.
• Wear proper apparel--Loose=fitting or hanging
garments should never be worn while using the
appliance. Do not let clothing or other flammable
materials contact hot surfaces.
• Do not use water or flour on grease fires--Smother
the fire with a pan lid, or use baking soda, a dry
chemical or foam=type extinguisher.
• When heating fat or grease, watch it closely. Fat or
grease may catch fire if allowed to become too hot.
in case of fire or gas leak, be sure to turn
off the main gas shutoff valve.
• Use only dry potholders--Moist or damp potholders
on hot surfaces may result in burns from steam. Do
not let potholders touch hot heating elements. Do not
use a towel or other bulky cloth instead of a potholder.
• Do not heat unopened food containers--Buildup of
pressure may cause container to burst and result in
injury.
• Remove the oven door from any unused range if it is
to be stored or discarded.
IMPORTANT--Do not attempt to operate the oven
during a power failure, if the power fails, always turn
the oven off. If the oven is not turned off and the power
resumes, the oven may begin to operate again. Food left
unattended could catch fire or spoil.
Use proper flame size--Adjust flame
size so it does not extend beyond the edge of the
utensil. The use of undersized utensils will expose a
portion of the burner flame to direct contact and may result
in ignitionof clothing. Proper relation of utensil to flame will
also improve cooking efficiency.
Do not use stove top grills on the burner
grates of sealed gas burners. If you use a stove top grill on
a sealed gas burner, it will cause incomplete combustion
and can result in exposure to carbon monoxide levels
above allowable current standards. This can be hazardous
to your health.
Electronic controllers can be damaged
by cold temperatures. When you use your appliance for
the first time, or if it has not been used for a long
period of time, make sure that it has been exposed to a
temperature above 0°C/32°F for at least 3 hours before
connecting it to the power supply.
Safety Instructions
IMPORTANT INSTRUCTIONS FOR USING
YOUR COOKTOP
• Know which knob controls each surface heating
unit. Always turn the knob to the LITE position when
ignitingthe burners. Visually check that burner has lit.
Then adjust the flame so itdoes not extend beyond the
edge of the utensil.
• Use proper pan size. This appliance is equipped with one
or more surface burners of different sizes. Select utensils
having flat bottoms large enough to cover the surface
burner. The use of undersized utensils will expose a
portion of the surface burner to direct contact and may
result in ignition of clothing. Proper relationship of utensil to
the surface burner will also improve efficiency.
• Utensil handles should be turned inward and not
extend over adjacent surface burners--To reduce the
risk of burns, ignition of flammable materials, and spillage
due to unintentional contact with the utensil. The handle of
the utensil should be positioned so that it isturned inward,
and does not extend over adjacent surface burners.
• Never leave surface burners unattended at high heat
settings--Boilovers cause smoking and greasy
spillovers that may ignite, or a pan that has boiled dry
may melt.
• Protective liners--Do not use aluminum foil to line oven
bottom or any other part of the appliance. Only use
aluminum foil as recommended for baking if used as a
cover placed on the food. Any other use of protective
liners or aluminum foil may result in a risk of electric
shock or fire or short circuit.
• Glazed cooking utensils--Only certain types of glass,
glass/ceramic, ceramic, earthenware, or other glazed
utensils are suitable for rangetop service without
breaking due to the sudden change in temperature.
Check the manufacturer's recommendations for
rangetop use.
• Do not use decorative surface burner covets, if a
burner isaccidentally turned on, the decorative cover will
become hot and possibly melt. Burns will occur if the hot
covers are touched. Damage may also be done to the
cooktop or burners because the covers may cause
overheating. Air will be blocked from the burner and
cause combustion problems.
FOR GLASS COOKTOPS ONLY
• Do not clean or operate a broken cooktop--lf cooktop
should break, cleaning solutions and spillovers may
penetrate the broken cooktop and create a risk of electric
shock. Contact a qualified technician immediately.
• Clean cooktop glass with caution--If a wet sponge or
cloth is used to wipe spills on a hot cooking area, be
careful to avoid a steam burn. Some cleaners can
produce harmful fumes if applied to a hot surface.
• Avoid scratching the cooktop glass with sharp
objects.
IMPORTANT INSTRUCTIONS FOR USING
YOUR OVEN
• Use care when opening oven door or warmer drawer (if
equipped)--Stand to the side of the range when opening
the door of a hot oven. Let hot air or steam escape before
you remove or replace food inthe oven/warmer drawer.
• Keep oven vent ducts unobstructed. The oven vent is
located above the oven door. Touching the surfaces in
this area when the oven is operating may cause severe
burns. Also, do not place plastic or heat-sensitive items
important
on or near the oven vent. These items could melt or
ignite.
• Placement of oven/warmer drawer (if equipped)
racks. Always place oven racks in desired location while
oven/warmer drawer (if equipped) is cool. If rack must be
moved while oven is hot use extreme caution. Use
potholders and grasp the rack with both hands to
reposition. Do not let potholders contact the hot heating
elements in the oven/warmer drawer (if equipped).
Remove all utensils from the rack before moving.
• Do not use the broiler pan without its insert. The
broiler pan and its insert allow dripping fat to drain and be .
kept away from the high heat of the broiler.
• Do not cover the broiler insert with aluminum foil.
Exposed fat and grease could ignite.
• Do not touch a hot light bulb with a damp cloth.
Doing so could cause the bulb to break. Disconnect the
appliance or turn off the power to the appliance before
removing and replacing light bulb.
Safety Instructions
IMPORTANT INSTRUCTIONS FOR CLEANING
YOUR RANGE
• Clean the range regularly to keep all parts free of
grease that could catch fire. Exhaust fan ventilation
hoods and grease filters should be kept clean. Do not
allow grease to accumulate on hood or filter. Greasy
deposits in the fan could catch fire. When you are flaming
food under the hood, turn the fan on. Refer to the hood
manufacturer's instructionsfor cleaning.
SELF CLEANING OVENS
= in the self-Cleaning cycle only clean the parts listed
in this Use and Care Guide. Before self cleaning the
oven, remove the broiler pan and any utensils or foods
from the oven.
• Do not use oven cleaners--No commercial oven
cleaner or oven liner protective coating of any kind should
be used in or around any part of the oven.
Do not clean door gasket--The door gasket is essential
for a good seal. Care should be taken not to rub, damage
or move the gasket.
Remove oven racks and oven rack ladders. Oven
racks and ladder racks color will change if left in the oven
during a self-cleaning cycle.
®
sensitive to the fumes given off during the self-
cleaning cycle of the range. Move the birds to
another well ventilated room.
The health of some birds is extremely
Important Safety Notice
The California Safe Drinking Water and Toxic
Enforcement Act requires the Governor of California to
publish a list of substances known to the state to cause :;
cancer, birth defects or other reproductive harm, and
requires businesses to warn customers of potential _i_-i
exposure to such substances.
Product Record
in this space below, record the date of purchase, model and serial
number of your product. You will find the model and serial number
printed on the serial plate.
Model No.
Serial No.
Date of purchase
Save these instructions and your sales receipt for future reference.
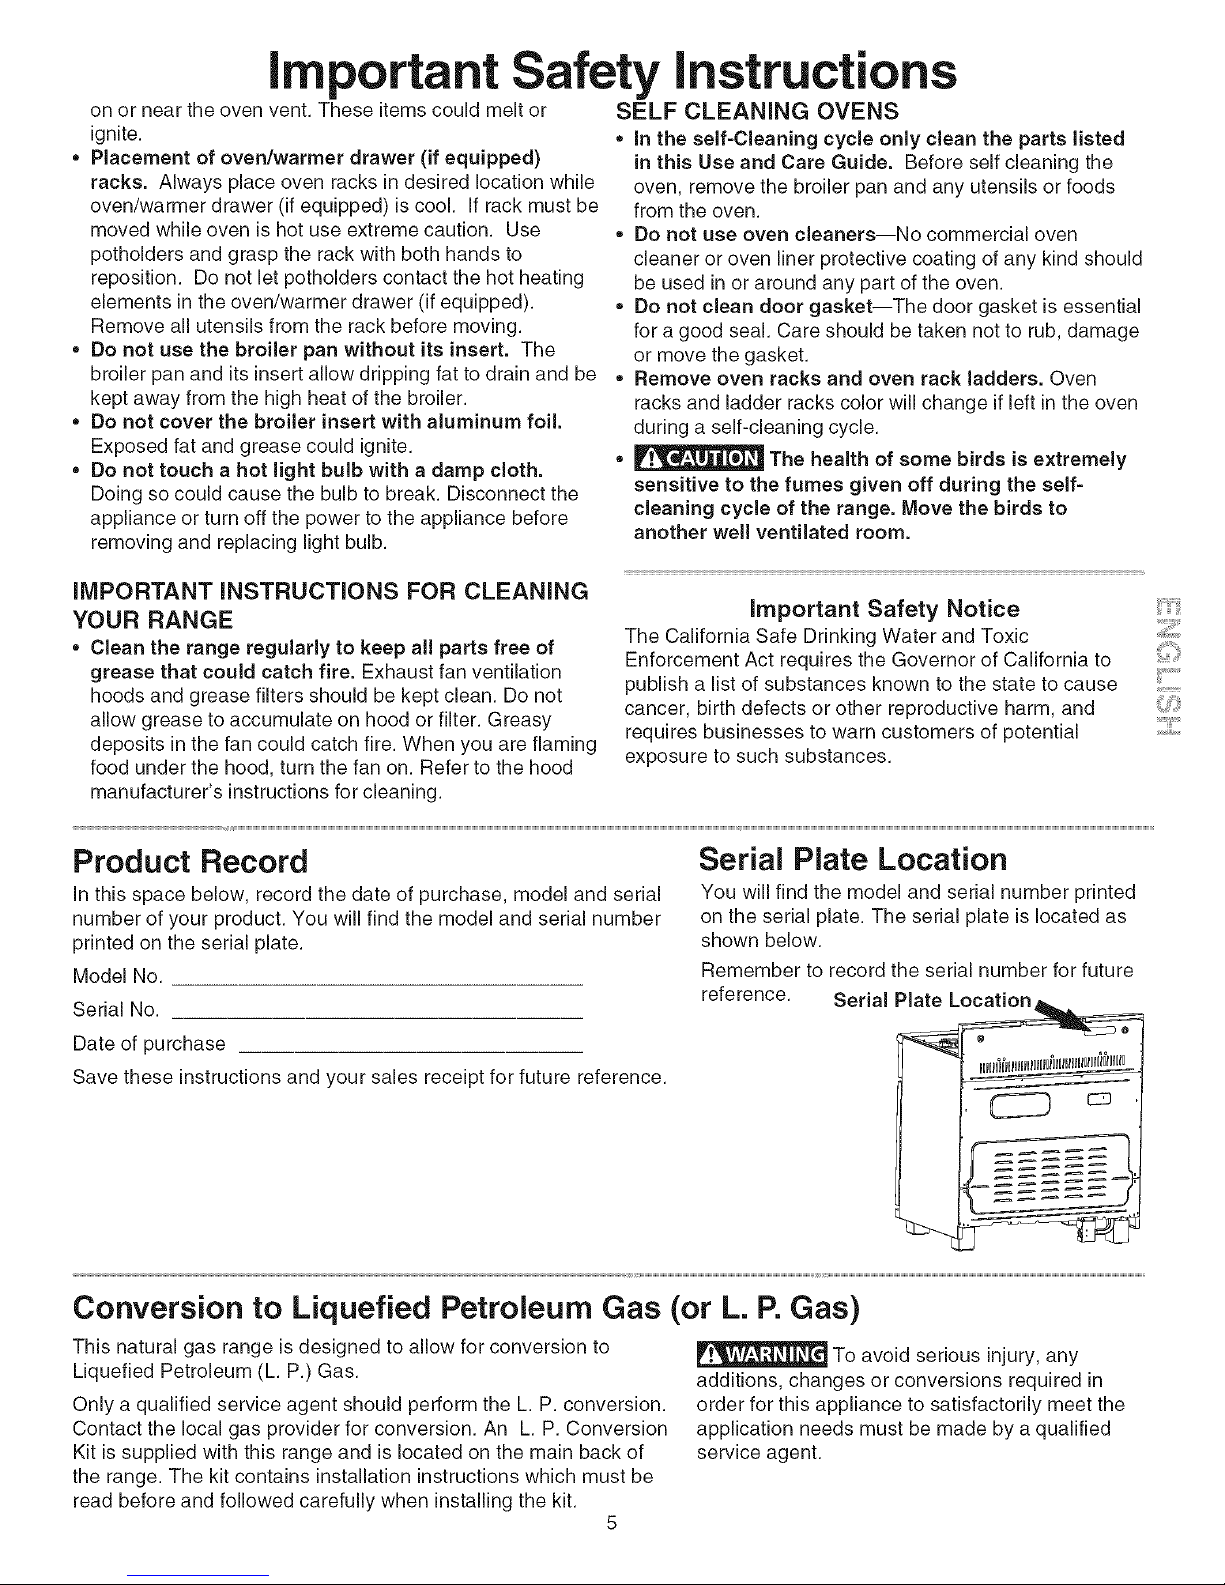
Serial Plate Location
You will find the model and serial number printed
on the serial plate. The serial plate is located as
shown below.
Remember to record the serial number for future
reference.
Serial Plate Lo_
Conversion to Liquefied Petroleum Gas (or L. P. Gas)
This natural gas range is designed to allow for conversion to
Liquefied Petroleum (L. P.) Gas.
Only a qualified service agent should perform the L. P. conversion.
Contact the local gas provider for conversion. An L. P. Conversion
Kit is supplied with this range and is located on the main back of
the range. The kit contains installation instructions which must be
read before and followed carefully when installing the kit.
5
additions, changes or conversions required in
order for this appliance to satisfactorily meet the
application needs must be made by a qualified
service agent.
To avoid serious injury, any
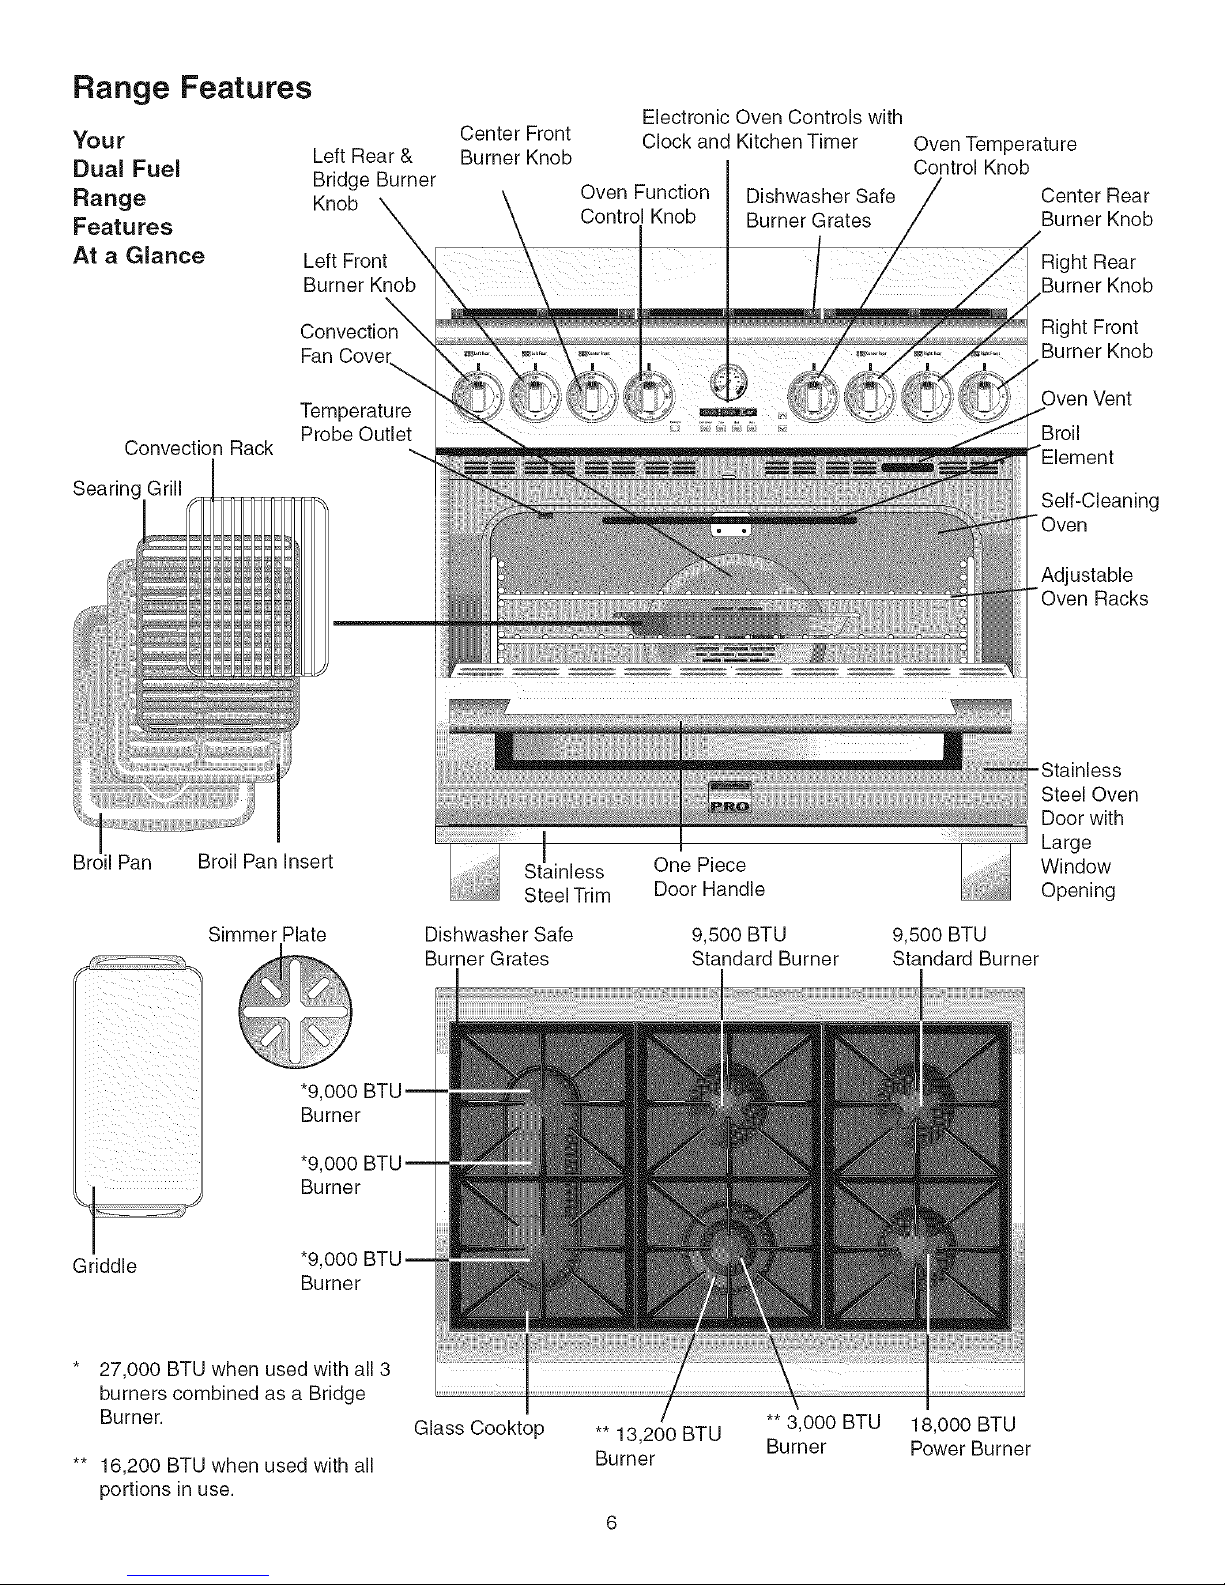
Range Features
Your
Dual Fuel
Range
Features
At a Glance
Left Rear &
Bridge Burner
Knob
Left Front
Burner Knob
Fan Covel
Center Front
Burner Knob
Electronic Oven Controls with
Clock and Kitchen Timer
Oven Function
Control Knob
Dishwasher Safe
Burner Grates
Oven Temperature
Control Knob
Center Rear
Burner Knob
Right Rear
Burner Knob
Right Front
Burner Knob
Temperature
Convection Rack
Probe Outlet
Searing
_;111iiiiiii_Hi_iii;iii1iiiiiii!i!i!iii%_%iiiiiii!i_[iii_iiiii_iiii_i:ii[i!i!_
Broil Pan Broil Pan Insert
Simmer Plate
Dishwasher Safe
Burner Grates
Stainless One Piece
Steel Trim Door Handle
9,5OOBTU
Standard Burner
Oven Vent
Broil
Self-Cleaning
Adjustable
Racks
Steel Oven
Door with
Large
Window
Opening
9,5OOBTU
Standard Burner
_iiill iii
iiil iii i i
i i
i_ili ii i iii _ i
i i
i i
iii i
ii
i ii
*9,000
Burner
*9,000
Burner
Griddle *9,000
Burner
* 27,000 BTU when used with all 3
burners combined as a Bridge
Burner.
** 16,200 BTU when used with all
portions in use.
Glass Cooktop
** 13,200 BTU ** 3,000 BTU 18,000 BTU
Burner Burner Power Burner

Before Setting Surface Controls
Assembly of the Surface Burner Heads, Burner Caps and Burner Grates
It is very important to make sure that all of the Surface Burner Heads, Surface Burner Caps and Surface Burner Grates
are installed correctly and at the correct locations.
1. Be sure to follow the installation instructions when
installing your new range.
2. Remove all packing tape from cooktop and burner
caps. Remove Bridge Burner Caps and Bridge
Burner Heads (See Figure 3).
3. Discard all packing material located under Bridge
Burner Heads (if applicable).
4. Replace Bridge Burner Caps. These include one
Bridge Burner Center Cap (rectangular shaped)
and the two Bridge Burner End Caps (The Bridge
Burner End Caps will fit either the front or rear 1_, "_
Bridge Burner Head locations). Make sure that the BridgeBurner Fig
tabs located under the Bridge Burner Caps fall into
the slots located in the Bridge Burner Head (See B,_ge B.....
arrows in Figure 3) and that all the Bridge Burner -B.,.er
Caps lie flat and evenly on the Bridge Burner EndCap
Head. B.dge
5. Unpack the grates and place them on the cooktop Burner B .....
- Center
as shown. NOTE: Do not force End Burner Grates cap
down on cooktop. Position Burner Grates on
cooktop and check that all the Burner Grate legs 8,_ge
- Burner
lie on the glass surface. Endcap
REMEMBER -- DO NOT ALLOW SPILLS, FOOD,
CLEANING AGENTS OR ANY OTHER MATERIAL
TO ENTER THE GAS ORIFICE HOLDER OPENING. Always keep the Burner Caps and Burner Heads in place
whenever the surface burners are in use.
Regular Burner
Triple Burner Figure 4
iii........
....i....
Locations of the Gas Surface Burners (See
Figure 5)
The STANDARD sized burners are used for most surface
cooking needs. These burners are located at the center
rear and right rear positions on the cooktop. They can also
be used as SIMMER burners with the simmer plate to
simmering delicate aliments as chocolate, sauces, etc.
The POWER burners are best used for bringing large
quantities of liquid rapidly up to temperature or when
preparing larger quantities of food. These burners are
located at the right front and center front (when both
portions of the burner are in use) positions on the cooktop.
The BRIDGE burner is best suited when using rectangular
or long shaped cookware. The left rear and left middle are
combined and controlled by the same control knob. The left
front burner may also be added for a total of 3 burners.
Figure 5
Setting Surface Controls
Do not place plastic items
such as salt and pepper shakers, spoon
holders or plastic wrappings on top of
the range when it is in use. These items
could melt or ignite. Potholders, towels or
wood spoons could catch fire if placed too
close to a flame.
In the event of an electrical power outage,
the surface burners can be lit manually. To
light a surface burner, hold a lit match to
the burner head, then rapidly turn the
surface control knob to Med. After burner
lights turn knob to desired setting. Use
caution when lighting surface burners
manually.
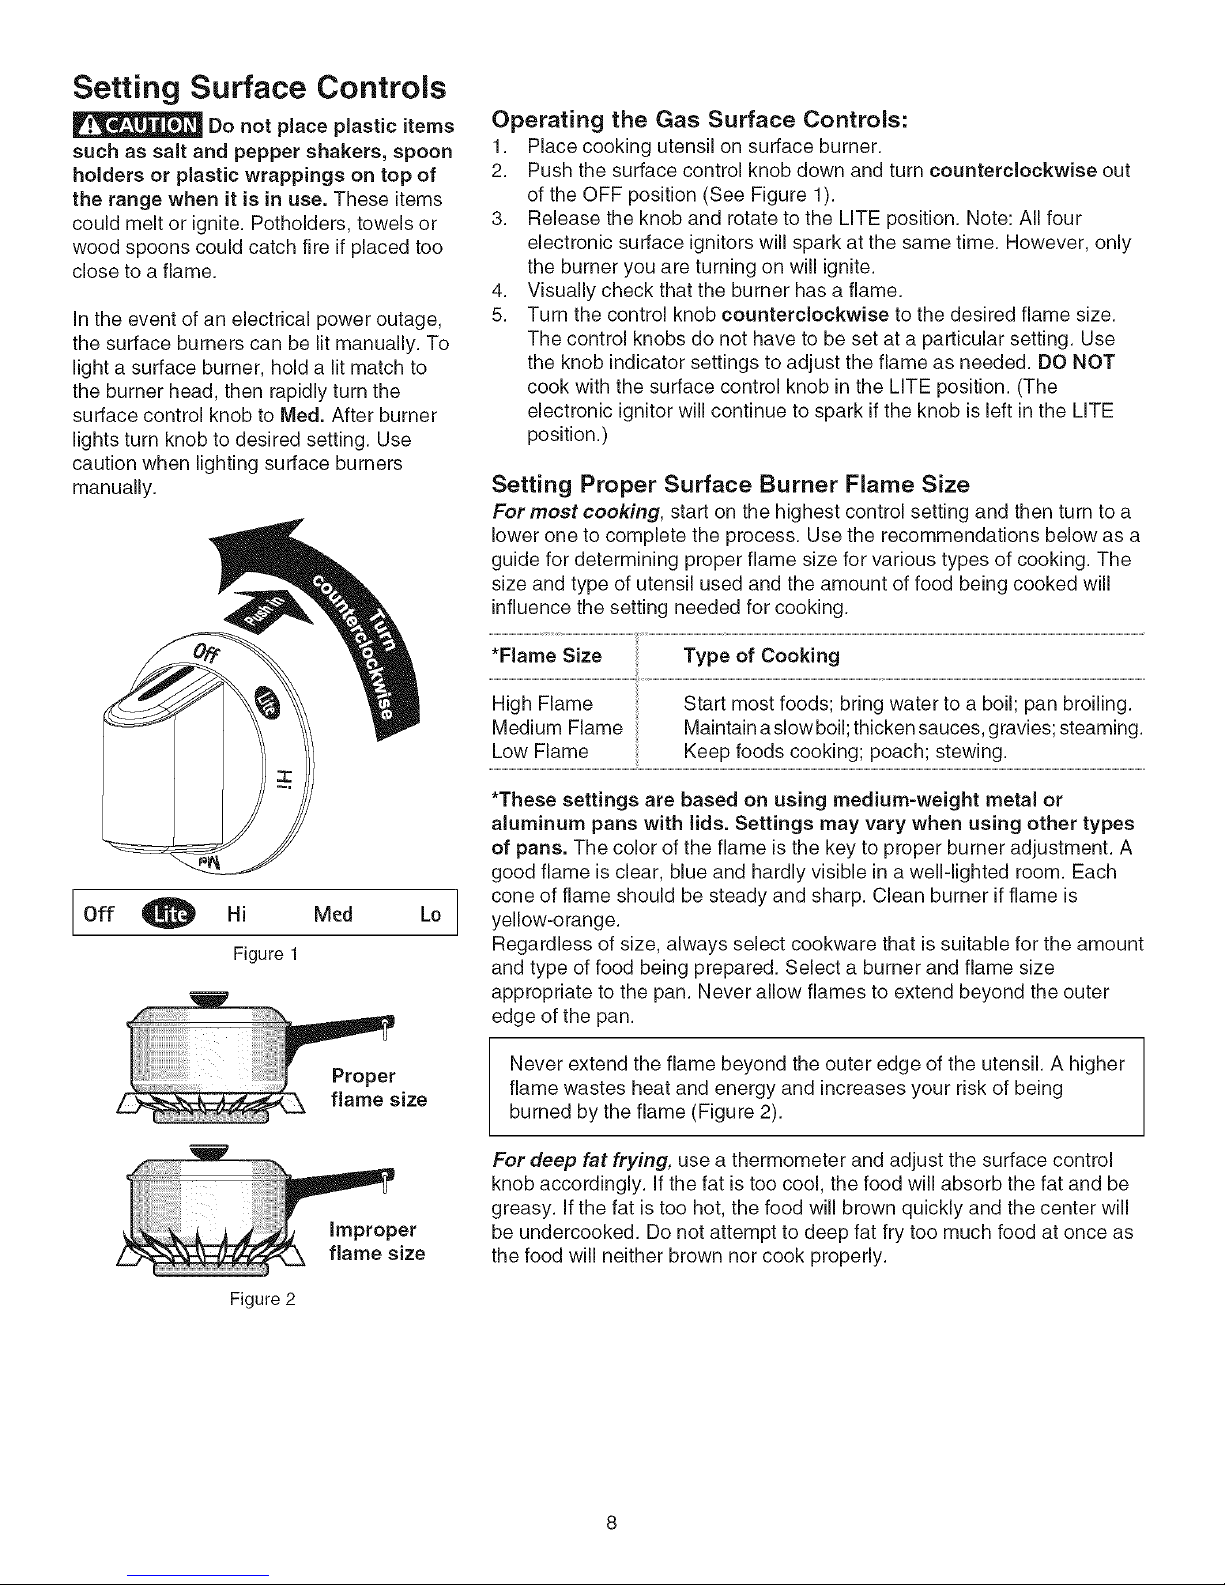
Operating the Gas Surface Controls:
t. Place cooking utensil on surface burner.
2. Push the surface control knob down and turn counterclockwise out
of the OFF position (See Figure t).
3. Release the knob and rotate to the LITE position. Note: All four
electronic surface ignitors will spark at the same time. However, only
the burner you are turning on will ignite.
4. Visually check that the burner has a flame.
5. Turn the control knob counterclockwise to the desired flame size.
The control knobs do not have to be set at a particular setting. Use
the knob indicator settings to adjust the flame as needed. DO NOT
cook with the surface control knob in the LITE position. (The
electronic ignitorwill continue to spark ifthe knob is left in the LITE
position.)
Setting Proper Surface Burner Flame Size
For most cooking, start on the highest control setting and then turn to a
lower one to complete the process. Use the recommendations below as a
guide for determining proper flame size for various types of cooking. The
size and type of utensil used and the amount of food being cooked will
influence the setting needed for cooking.
*Flame Size Type of Cooking
A
Off _ Hi Med Lo
Figure 1
Proper
flame size
Improper
flame size
High Flame Start most foods; bring water to a boil; pan broiling.
Medium Flame Maintain a slow boil; thicken sauces, gravies; steaming.
Low Flame Keep foods cooking; poach; stewing.
*These settings are based on using medium-weight metal or
aluminum pans with lids. Settings may vary when using other types
of pans. The color of the flame is the key to proper burner adjustment. A
good flame is clear, blue and hardly visible in a well-lighted room. Each
cone of flame should be steady and sharp. Clean burner if flame is
yellow-orange.
Regardless of size, always select cookware that is suitable for the amount
and type of food being prepared. Select a burner and flame size
appropriate to the pan. Never allow flames to extend beyond the outer
edge of the pan.
Never extend the flame beyond the outer edge of the utensil. A higher
flame wastes heat and energy and increases your risk of being
burned by the flame (Figure 2).
For deep fat frying, use a thermometer and adjust the surface control
knob accordingly. If the fat is too cool, the food will absorb the fat and be
greasy. If the fat is too hot, the food will brown quickly and the center will
be undercooked. Do not attempt to deep fat fry too much food at once as
the food will neither brown nor cook properly.
Figure 2
Setting Surface Controls
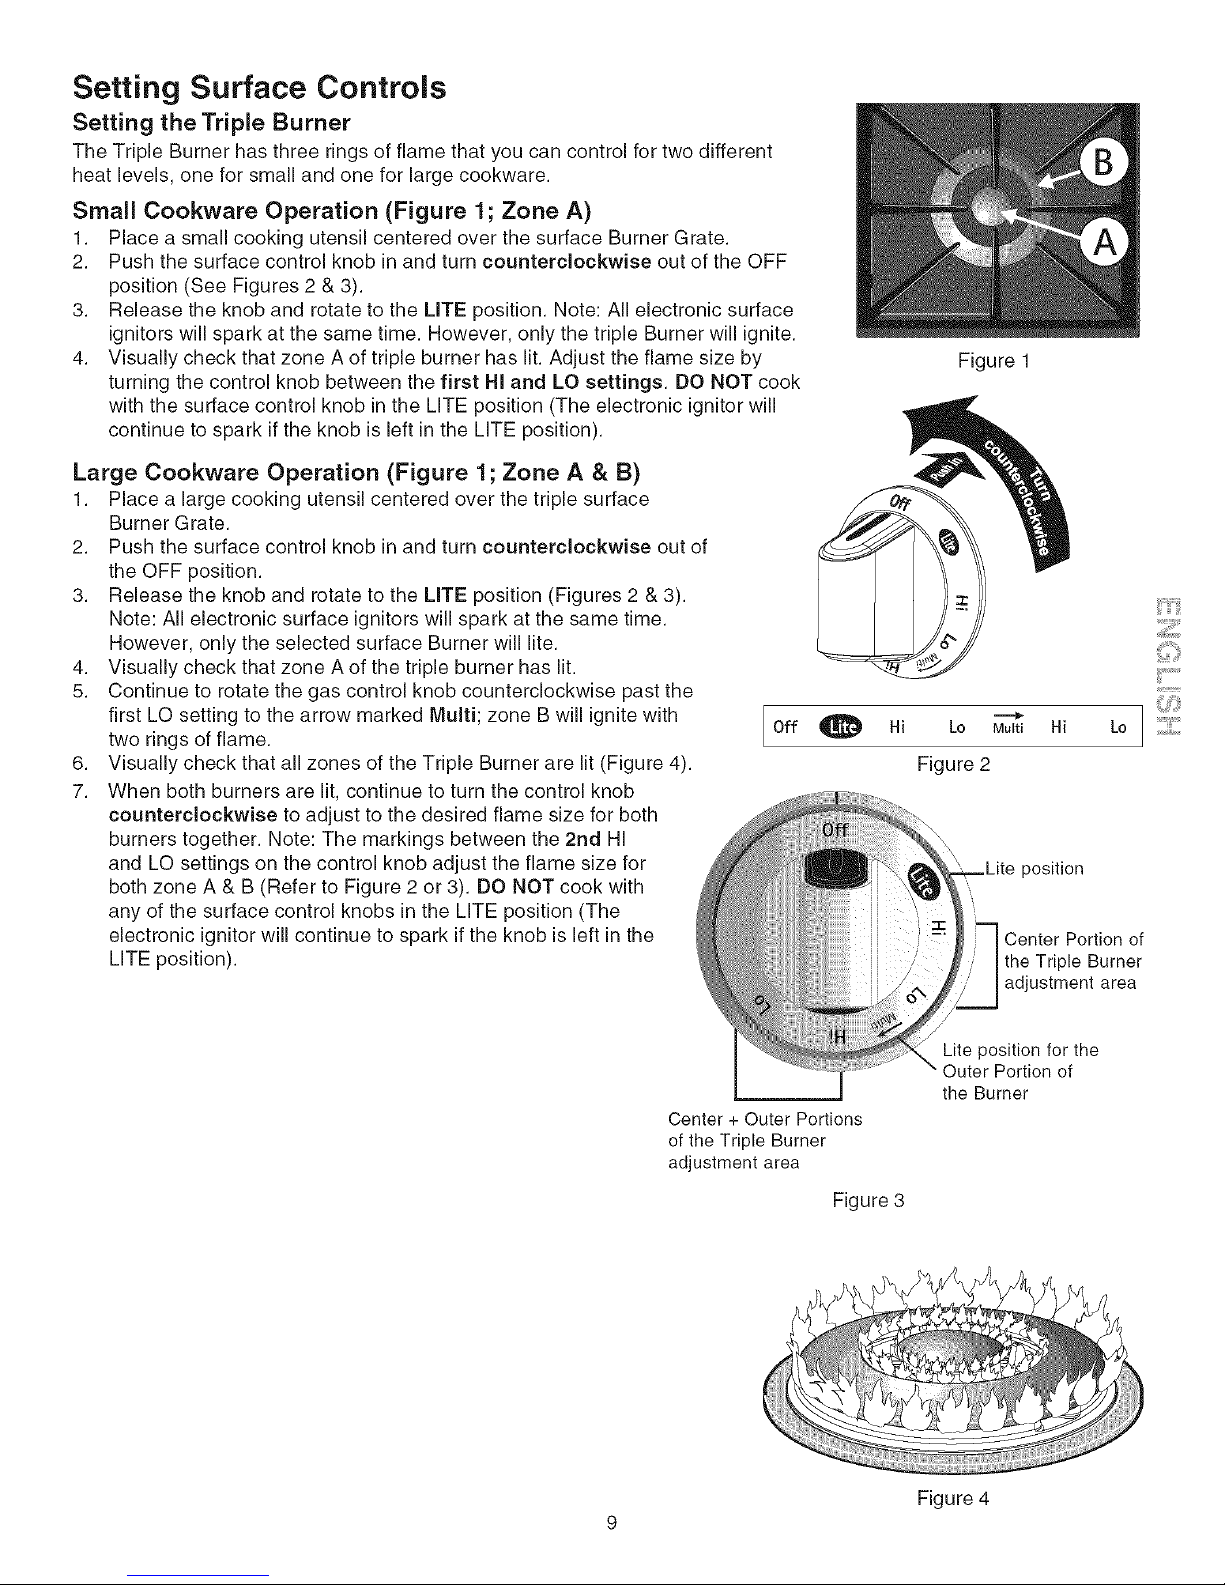
Setting the Triple Burner
The Triple Burner has three rings of flame that you can control for two different
heat levels, one for small and one for large cookware.
Small Cookware Operation (Figure 1 ; Zone A)
1. Place a small cooking utensil centered over the surface Burner Grate.
2. Push the surface control knob in and turn counterclockwise out of the OFF
position (See Figures 2 & 3).
3. Release the knob and rotate to the LITE position. Note: All electronic surface
ignitors will spark at the same time. However, only the triple Burner will ignite.
4. Visually check that zone A of triple burner has lit. Adjust the flame size by
turning the control knob between the first Hi and LO settings. DO NOT cook
with the surface control knob in the LITE position (The electronic ignitor will
continue to spark ifthe knob is left in the LITE position).
Large Cookware Operation (Figure 1 ; Zone A & B)
1. Place a large cooking utensil centered over the triple surface
Burner Grate.
2. Push the surface control knob in and turn counterclockwise out of
the OFF position.
3. Release the knob and rotate to the LITE position (Figures 2 & 3).
Note: All electronic surface ignitors will spark at the same time.
However, only the selected surface Burner will ((te.
4. Visually check that zone A of the triple burner has lit.
5. Continue to rotate the gas control knob counterclockwise past the
first LO setting to the arrow marked Multi; zone B will ignite with
two rings of flame.
6. Visually check that all zones of the Triple Burner are lit (Figure 4).
7. When both burners are lit, continue to turn the control knob
counterclockwise to adjust to the desired flame size for both
burners together. Note: The markings between the 2rid HI
and LO settings on the control knob adjust the flame size for
both zone A & B (Refer to Figure 2 or 3). DO NOT cook with
any of the surface control knobs in the LITE position (The
electronic ignitor will continue to spark if the knob is left in the
LITE position).
Figure 1
Off Hi Lo MuFti Hi
Figure 2
position
Center Portion of
the Triple Burner
adjustment area
)i)........
Lo ] ::'_?/;'::
/
Lite position for the
Outer Portion of
the Burner
Center 4-Outer Portions
of the Triple Burner
adjustment area
Figure 3
Figure 4
9
 Loading...