

Kenmore 79079653706, 79078531609, 79071362705, 79077433901, 79071369705 Instructions For
...
INSTALLATION AND SERVICE MUST BE PERFORMED BY
A QUALIFIED INSTALLER.
IMPORTANT: SAVE FOR LOCAL ELECTRICAL INSPECTOR'S USE.
READ AND SAVE THESE INSTRUCTIONS FOR FUTURE REFERENCE.
This conversion kit must be installed by a qualified service technician in accordance with the
manufacturer's instructions and all applicable codes and requirements ofthe authority having jurisdiction. Failure
to follow instructions may result in fire, explosion or production of carbon monoxide causing property damage,
personal injury or loss of life. The qualified service agency is responsible for the proper installation ofthis kit. The
installation is not proper and complete until the operation ofthe converted appliance is checked as specified in the
manufacturer's instructions supplied with this kit.
Before proceeding with the conversion, shut offthe gas supply before disconnecting electrical power
to the range. Be sure both power supplies are off before installing the conversion kit. Failure to do so could cause
serious bodily injury.
A
m
,.O
o
m,,_ _
.i
Choose the combination of top burners that are featured on your range to
determine the parts that are included in your kit.
Note: When burners are converted from Natural to LP the BTU rating is as
follows:
5,000 BTU* Natural Gas to 4,500 BTU* LP Gas
9,500 BTU* Natural Gas to 8,000 BTU* LP Gas
12,000 BTU* Natural Gas to 10,000 BTU* LP Gas
14,200 BTU* Natural Gas to 11,000 BTU* LP Gas
m
.o:3 __
_ i/
- = == ' :E
Surface Burner Orifice marked 0.68mm 4,500 BTU* (blue)
Surface Burner Orifice marked 0.89mm 8,000 BTU* (no color)
Surface Burner Orifice marked 0.95mm 10,000 BTU* (green)
Surface Burner Orifice marked 1.01mm 11,000 BTU* (red)
Installation Instructions
*Note: For operation at elevations above 2000 ft., appliance rating
shall be reduced at the rate of 4 percent for each 1000 ft. above sea
level.
NOTE: After replacing the natural gas to Lp orifices, be sure to
keep the original factory installed natural gas orifices for future
range conversion back to natural gas.
How to Convert the Range for use with LP/
Propane Gas
1. Convert the Pressure Regulator
To access the gas regulator, remove the storage drawer or warmer
drawer. If equipped with a storage drawer, open and remove the drawer
completely. For models equipped with warmer drawer, follow the
instructions below to remove warmer drawer.
a. _!_ Electrical Shock Hazard can occur and result in
serious injury or death. Disconnect electrical power to the range
before removing the warmer drawer for servicing.
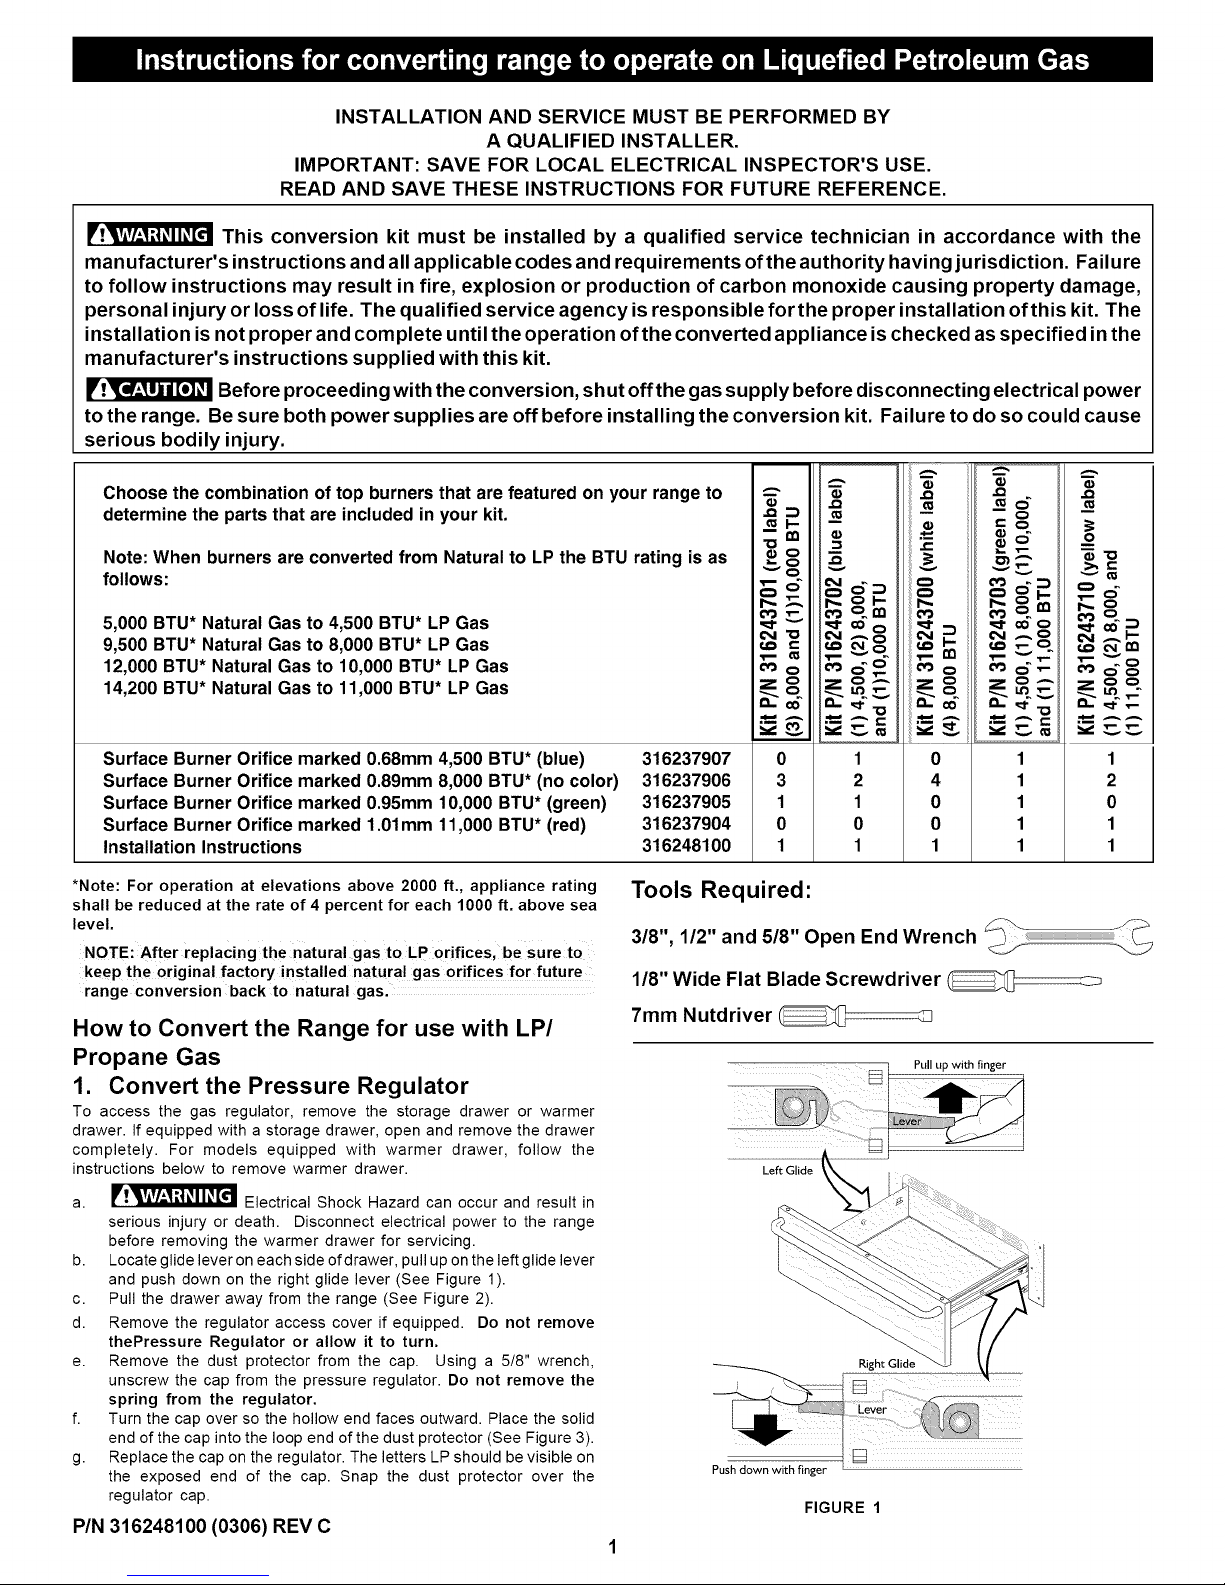
b. Locate glide lever on each side of drawer, pull up on the left glide lever
and push down on the right glide lever (See Figure 1).
c. Pull the drawer away from the range (See Figure 2).
d. Remove the regulator access cover if equipped. Do not remove
thePressure Regulator or allow it to turn.
e. Remove the dust protector from the cap. Using a 5/8" wrench,
unscrew the cap from the pressure regulator. Do not remove the
spring from the regulator.
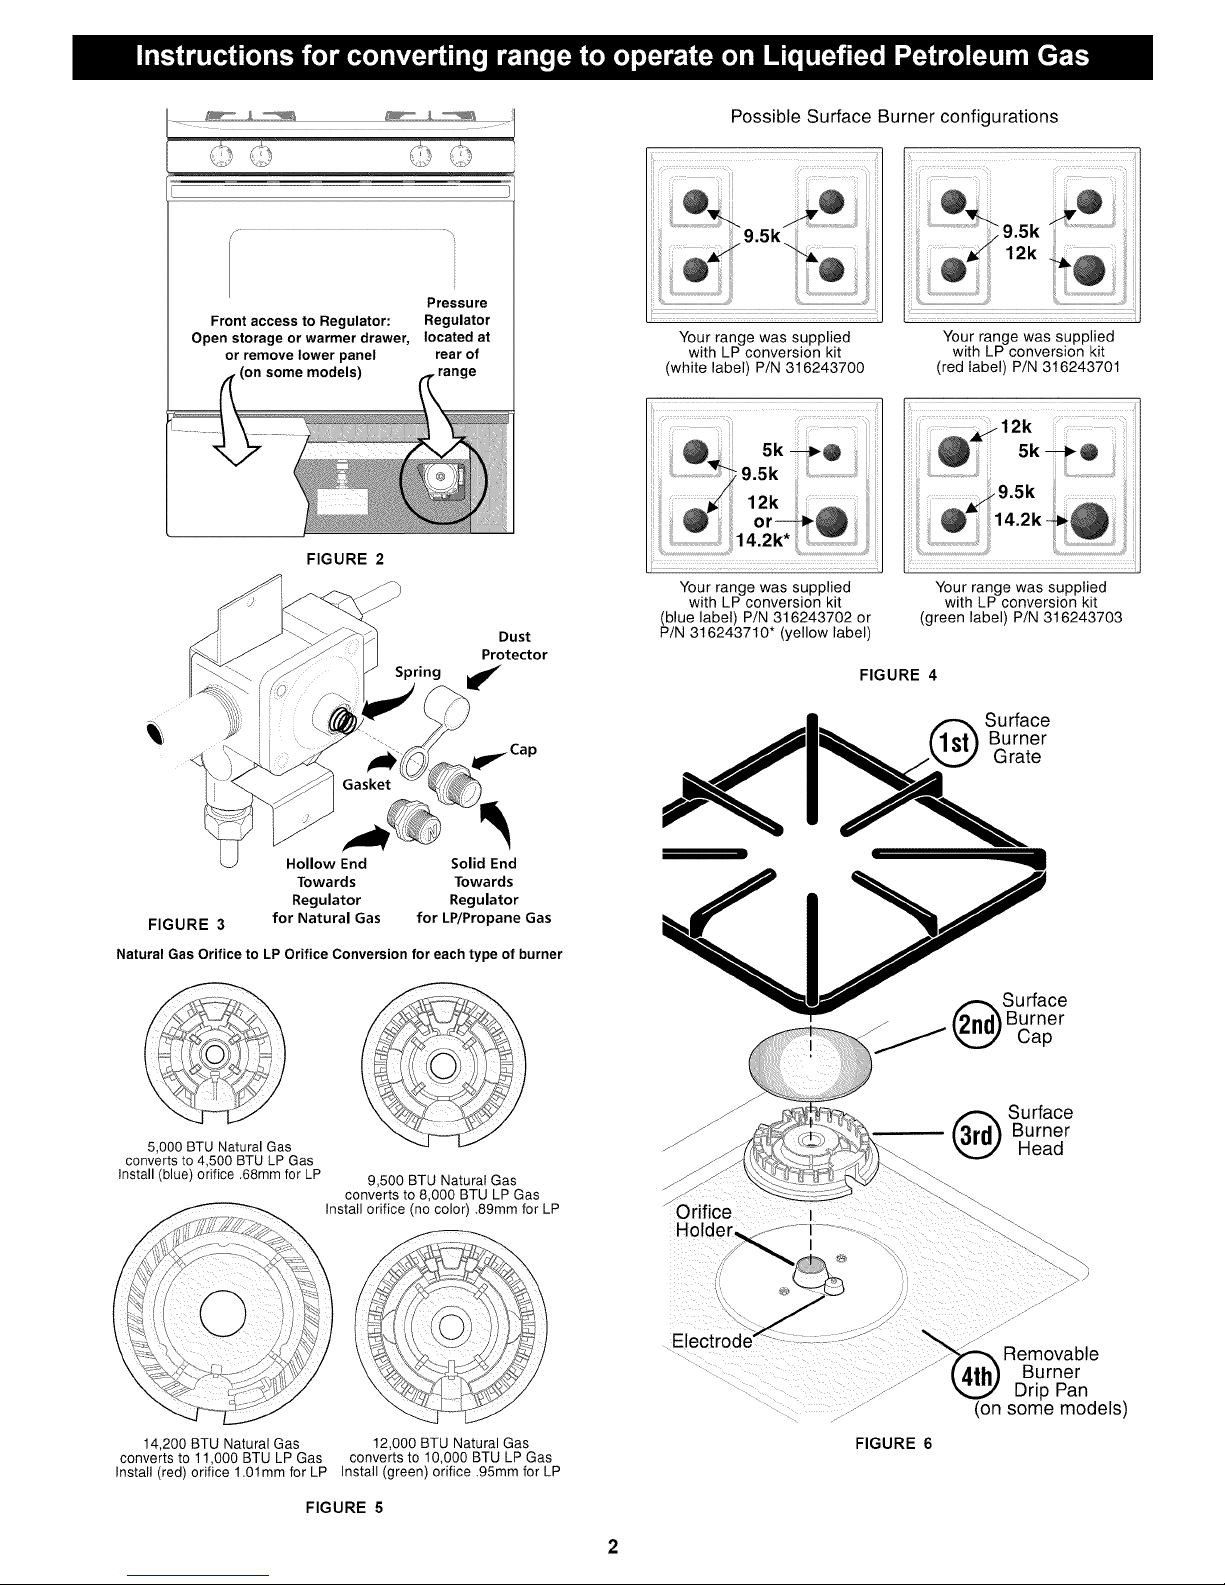
f. Turn the cap over so the hollow end faces outward. Place the solid
end of the cap into the loop end of the dust protector (See Figure 3).
g. Replace the cap on the regulator. The letters LP should be visible on
the exposed end of the cap. Snap the dust protector over the
regulator cap.
P/N 316248100 (0306) REV C
316237907 0 1 0
316237906 3 2 4
316237905 1 1 0
316237904 0 0 0
316248100 1 1 1
Tools Required:
3/8", 1/2" and 5/8" Open End Wrench
1/8" Wide Flat Blade Screwdriver
7mm Nutdriver
Left Glide
Push down with finger
FIGURE 1
1
Pull up with finger
1
1
1
1
1
1
2
0
1
1
f" \
Pressure
Front access to Regulator: Regulator
Open storage or warmer drawer, located at
or remove tower panel rear of
_ models) _,_range
FIGURE 2
Dust
Protector
Possible Surface Burner configurations
Your range was supplied
with LP conversion kit
(white label) P/N 316243700
Your range was supplied
with LP conversion kit
(blue label) P/N 316243702 or
P/N 316243710* (yellow label)
FIGURE 4
i :::ii i ii¸¸¸il! ii J
Your range was supplied
with LP conversion kit
(red label) P/N 316243701
12k
Your range was supplied
with LP conversion kit
(green label) P/N 316243703
Spring _
__ il_ Ca p
Hollow End
Towards
Regulator
FIGURE 3
Natural Gas Orifice to LP Orifice Conversion for each type of burner
5,000 BTU Natural Gas
converts to 4,500 BTU LP Gas
Install (blue) orifice .68mm for LP 9,500 BTU Natural Gas
for Natural Gas
converts to 8,000 BTU LP Gas
Install orifice (no color) .89mm for LP
Solid End
Towards
Regulator
for LP/Propane Gas
_J
Orifice
Hoh
• _ Surface
Burner
*e
Surface
Burner
Cap
Burner
(_ Surface
Head
14,200 BTU Natural Gas
converts to 1! ,000 BTU LP Gas
Install (red) orifice 1.01mm for LP
FIGURE 5
!2,000 BTU Natural Gas
converts to 10,000 BTU LP Gas
Install (green) orifice .95mm for LP
El
Removable
Burner
Drip Pan
(on some models)
FIGURE 6
 Loading...