

Kenmore 79047109400, 79047104400, 79047102400 Owner’s Manual

Dual Fuel Range
Slide-inmodels
Estufa e fuel ual
Modelos deslizables
Models, Modelos 790.4710;1."
.,. Color number, nOmero de color
®
i{_,S'ii,
ii'hY'lii
idi%
.......;ili'i'
i}t,,,,_iwiw,w
318200868(041O)Rev.C Sears Roebuck and Co., Hoffman Estates, IL60179 U.S.A. www,sears,com
Table of Contents
Slide-in Range Warranty .................................................. 2
Product Record ................................................................. 2
IMPORTANT SAFETYINSTRUCTIONS.............................. 3-5
Protection Agreements .................................................... 6
Range Features ................................................................. 7
Conversion to Mquified Petroleum Gas (or L.P.Gas) ...... 8
Setting Surface Controls ............................................. 8-10
Sizesof the Surface Gas Burners .......................................... 8
Assembly of the Surface Burner Heads, Burner Caps and
Burner Grates...................................................................... g
Setting Surface Controls ...................................................... 9
Operating the GasSurface Controls ................................... 10
Setting Proper Surface Burner Flame Size........................... 10
Before Setting Oven COntrols ....................................... 11
Air circulation in the Oven ............................................ 11
Setting Warmer Drawer Control (if equipped) ............. 12
Control Pad Functions .................................................... 13
Temperature Conversion ................................................ 13
Setting the Clock ............................................................ 14
Setting Oven Controls ................................................ 15-19
• ToSet or Change Temperature for Normal Baking .......... 15
• ToSetControl for Continuous Bake
or 12 Hour Energy Saving............................................... 15
ToSetControl for Oven Lockout ..................................... 15
Timed Bake Feature ....................................................... 16
Oven Baking Information ................................................ 17
Broil .......................................................................... 18-19
Oven Cleaning ............................................................ 20-21
General Cleaning ........................................................ 22-26
Changing Oven Light ..................................................... 27
Recalibrating Your Oven Temperature .......................... 27
Before You Call ........................................................... 28-29
EspaGol ........................................................................... 30
Sears Service ..................................................... Back Cover
Slide=In Range Warranty
ONE-YEAR FULL WARRANTY ON ALL PARTS
For one year from the date of purchase, when installed and operated according to the Installation Instructions and Use& Care
Guide, if any part of this appliance fails due to a defect in material or workmanship, Searswill repair or replace it, at our option,
free of charge.
ADDITIONAL FOUR-YEAR LIMITED WARRANTY ON APPLIANCE PARTS
For the second through the fifth year from the date of purchase, when installed and operated according to the
Installation Instructions and Use & Care Guide, Sears will supply the following appliance parts free of charge if they
fail for the reasons listed below. Customer must pay labor cost of installation.
Cooktop glass if it fails due to thermal shock
Cooktop cooking elements if they are defective
Rubber seal if it cracks between the cooktop glass and the porcelain edge.
What Sears will not cover:
Failure of the product if it isabused, misused, or used for other than the intended purpose.
Damage to the cooktop glass caused by the use of cleaners or utensils other than the recommended cleaning cream and
tools.
Damage to the cooktop glass caused by hardened spills of sugary materials (including starches from vegetables or pastas) or
melted plastic that are not cleaned off according to the directions in the Use & Care Guide.
Repairsto parts or systems resulting from unauthorized modifications made to the appliance.
If this product is subjected to other than private residential use, all warranty coverage is effective for only g0 days.
WARRANTY SERVICEISAVAILABLE BY CONTACTING SEARSAT 1-800-4-MY-HOME®.
This warranty gives you specific legal rights, and you may also have other rights which vary from state to state.
Sears, Roebuck and Co., Dept. 817WA, Hoffman Estates, IL60179
Product Record
In this space below, record the date of purchase, model and serial number of your product. You will find the model and serial
number printed on an identification plate. The identification plate is located on the left side of the range and are visible when
the oven door isopen or on the inside of the drawer along the side of the frame.
Model No. 790. Date of Purchase
Serial No.
Printed in United States 2
Savethese instructions and your sales receipt for reference.
I RTANT SAFETY iNSTRUCTiON
Read aJJ instructions before using this appliance.
Save these instructions for future reference.
This manual contains many important safety messages. Always read and obey all safety messages.
The safety alert symbol _J calls your attention to safety messages that inform you of hazards that can kill or hurt you or
others, or cause damage to the product.
Indicates an imminently hazardous situation which, if not avoided may result in death or serious injury.
Indicates an imminently hazardous situation which, if not avoided may result in minor or moderate injury, or
product damage.
All safety messages will identify the hazard, tell you how to reduce the chance of injury, and tell you what can happen if the
instructions are not followed.
If the information in this manual is not followed
exactly, a fire or explosion may result causing property damage,
personal injury or death.
FORYOUR SAFETY:
-- Do not store or use gasoline or other flammable vapors
and liquids in the vicinity of this or any other appliance.
-- WHAT TO DO IF YOU SMELL GAS:
• Do not try to Jight any appJiance.
Do not touch any eJectricaJ switch; do not use any phone
in your buiJding.
Immediately caJlyour gas suppJier from a neighbor's
phone. FoJJow the gas suppJier's instructions.
If you cannot reach your gas suppJier, calJ the fire
department.
-- InstaJJation and service must be performed by a quaJified
instaJJer,servicer or the gas suppJier.
To reduce the risk of tipping, the range
must be secured by properly installed
anti-tip bracket(s) provided with the range.
To check if the bracket(s) is installed
properly, remove the lower paneJ or
storage drawer and verify that the anti-tip
bracket(s) is engaged. Refer to the
InstalJation instructions for proper anti-tip
bracket(s) installation.
AJJranges can tip.
• Injury to persons couJd
resuJt.
• Install anti-tip device
packed with range.
• See Installation
Instructions.
Remove alJ tape and packaging before using the
range. Destroy the carton and plastic bags after
unpacking the range. Never allow children to play with
packaging material.
Proper Installation-Be sure your appliance isproperly
instaJJedand grounded by a quaJified technician in
accordance with the National FueJGas Code ANSi
Z223.1 Jatest edition, and NationaJ EJectricaJ Code
ANSI/NFPA No. 70 Jatest edition, and local code
requirements. Install only per installation instructions
provided in the literature package for this range.
Ask your dealer to recommend a qualified technician and an
authorized SearsServiceCenter. Know how to disconnect
the power to the range at the circuit breaker or fuse box and
gas supply at the main shutoff valve in caseof an emergency.
Remove the drawer to accessthe valve.
User servicing--Do not repair or replace any part of the
appJiance unJess specificaJJy recommended in the
manuals. All other servicing should be done only by a
qualified technician, This may reduce the risk of personal
injury and damage to the range.
Never modify or alter the construction of a range by
removing JeveJingJegs, paneJs, wire covers, anti-tip
brackets/screws, or any other part of the product.
Stepping, Jeaning or sitting on the door
or drawer of this range can result in serious injuries
and also cause damage to the range. Do not allow
children to climb or play around the range. The weight of a
child on an open door may cause the range to tip, resulting in
serious burns or other injury. An open drawer, when hot, may
cause burns.
Do not use the oven or warmer drawer
(if equipped) for storage.
Do not store items of interest to children
in the cabinets above a range. Children climbing on the
range to reach items could be seriously injured.
Never use your appliance for warming up
or heating up the room.

I RTANT SAFETY iNSTRUCTiON
Storage in or on Appliance--Flammable materials should
not be stored in an oven, near surface burners or in the
drawer (if equipped). Thisincludes paper, plastic and cloth
items, such as cookbooks, plasticware and towels, as well as
flammable liquids. Donot store explosives,suchasaerosol cans,
on ornearthe appliance. Flammable materialsmay explodeand
result infire or property damage.
Do not leave children alone--Children should not be
left alone or unattended in the area where appliance
is in use, They should never be allowed to sit or stand on
any part of the appliance.
DO NOTTOUCH SURFACEBURNERS, AREAS NEAR
THESEBURNERS,OVEN HEATING ELEMENTS OR
INTERIOR SURFACESOFTHE OVEN ORWARMER
DRAWER (if equipped). Both surface burners and oven
heating elements may be hot even though they are dark in
color. Areas near surface burners may become hot enough
to cause burns. During and after use, do not touch, or let
clothing or other flammable materials touch these areas
until they have had sufficient time to cool. Among these
areas are the cooktop, surfaces facing the cooktop, the
oven vent openings and surfaces near these openings,
oven door and window.
Wear proper apparel--Loose=fitting or hanging
garments should never be worn while using the
appliance. Do not let clothing or other flammable
materials contact hot surfaces.
Use proper pan size--Adjust flame size
so it does not extend beyond the edge of the utensil.
The use of undersized utensils will expose a portion of the
burner flame to direct contact and may result in ignition of
clothing. Proper relationship of utensil to flame will also
improve efficiency.
Do not usestove top grills on the burner
grates of sealed gas burners. If you use a stove top grill on a
sealed gas burner, it will cause incomplete combustion and
can result in exposure to carbon monoxide levels above
allowable current standards. This can be hazardous to your
health.
Electronic controllers can be damaged by
cold temperatures. When you use your appliance for the
first time, or if it has not been used for a long period of
time, make sure that it has been exposed to a
temperature above 0°C/32°F for at least 3 hours before
connecting it to the power supply.
IMPORTANT INSTRUCTIONS FOR USING YOUR
COOKTOP
• Know which knob controls each surface heating unit.
Always turn the knob to the LITEposition when igniting
the burners. Visually check that burner has lit. Then adjust
the flame so it does not extend beyond the edge of the
utensil.
Do not use water or flour on grease fires--Smother
the fire with a pan lid, or use baking soda, a dry
chemical or foam-type extinguisher.
When heating fat or grease, watch it closely. Fat or
grease may catch fire if allowed to become too hot.
In case of fire or gas leak, be sure to turn
off the main gas shutoff valve.
Use only dry potholders--Moist or damp potholders
on hot surfaces may result in burns from steam. Do
not let potholders touch hot heating elements. Do not use
a towel or other bulky cloth instead of a potholder.
Do not heat unopened food containers--Buildup of
pressure may cause container to burst and result in
injury.
Remove the oven door from any unused range if it is
to be stored or discarded.
IMPORTANT--Do not attempt to operate the oven
during a power failure. If the power fails, always turn
the oven off. If the oven is not turned off and the power
resumes, the oven may begin to operate again. (Food left
unattended could catch fire or spoil.)
Use proper pan size. This appliance is equipped with one
or more surface burners of different sizes. Select utensils
having flat bottoms large enough to cover the surface
burner. The use of undersized utensils will expose a portion
of the surface burner to direct contact and may result in
ignition of clothing. Proper relationship of utensil to the
surface burner will also improve efficiency.
Utensil handles should be turned inward and not
extend over adjacent surface burners. To reduce the
risk of burns, ignition of flammable materials, and spillage
due to unintentional contact with the utensil.
Never leave surface burners unattended at high heat
settings--Boilovers cause smoking and greasy
accumulations that may ignite, or a pan that has boiled dry
may melt.
Protective liners--Do not usealuminum foil to line oven
bottom or any other part of the appliance. Only use
aluminum foil as recommended for baking if used as a
cover placed on the food. Any other use of protective
liners or aluminum foil may result in a risk of electric shock
or fire or short circuit.
Glazed cooking utensils--Only certain types of glass,
glass/ceramic, ceramic, earthenware, or other glazed
utensils are suitable for rangetop service without breaking
IM RTANT SAFETY iNSTRUCTiONS
due to the sudden change in temperature. Check the • Do not cover the broiler insert with aluminum foil.
manufacturer's recommendations for rangetop use. Exposed fat and grease could ignite.
Do not use decorative surface burner covers. If a
burner is accidentally turned on, the decorative cover will
become hot and possibly melt. Burns will occur if the hot
covers are touched. Damage may also be done to the
cooktop or burners because the covers may cause
overheating. Air will be blocked from the burner and
cause combustion problems.
FOR GLASS COOKTOPS ONLY
• Do not clean or operate a broken cooktop--lf cooktop
should break, cleaning solutions and spillovers may
penetrate the broken cooktop and create a risk of electric
shock. Contact a qualified technician immediately.
Clean cooktop glass with caution--If a wet sponge or
cloth is used to wipe spillson a hot cooking area, be
careful to avoid a steam burn. Some cleaners can produce
harmful fumes if applied to a hot surface.
Avoid scratching the cooktop glass with sharp
objects,
IMPORTANT INSTRUCTIONS FOR USING YOUR
OVEN
Use care when opening oven door or warmer drawer
(if equipped)--Stand to the side of the range when
opening the door of a hot oven. Let hot air or steam
escape before you remove or replace food in the oven/
warmer drawer.
• Keep oven vent ducts unobstructed. The oven vent is
located at the rear of the cooktop. Touching the surfaces in
this area when the oven is operating may cause severe
burns. Also, do not place plastic or heat-sensitive items on
or near the oven vent. These items could melt or ignite.
• Placement of oven/warmer drawer (if equipped)
racks. Always place oven racks in desired location while
oven/warmer drawer (if equipped) is cool. If rack must be
moved while oven is hot use extreme caution. Use
potholders and grasp the rack with both hands to
reposition. Do not let potholders contact the hot heating
elements in the oven/warmer drawer (if equipped).
Remove all utensils from the rack before moving.
Do not touch a hot light bulb with a damp cloth,
Doing so could cause the bulb to break. Disconnect the
appliance or turn off the power to the appliance before
removing and replacing light bulb.
IMPORTANT INSTRUCTIONS FOR CLEANING
YOUR RANGE
Clean the range regularly to keep all parts free of
grease that could catch fire, Exhaust fan ventilation
hoods and grease filters should be kept clean. Do not allow
grease to accumulate on hood or filter. Greasy deposits in
the fan could catch fire. When you are flaming food under
the hood, turn the fan on. Refer to the hood manufacturer's
instructions for cleaning.
SELF-CLEANING OVENS
In the self-Cleaning cycle only clean the parts listed in _:
this Use and Care Guide. Before self-cleaning the oven,
remove the broiler pan and any utensils or foods from the
oven.
• Do not use oven cleaners--No commercial oven cleaner
or oven liner protective coating of any kind should be used
in or around any part of the oven.
• Do not clean door gasket--The door gasket is essential
for a good seal. Care should be taken not to rub, damage
or move the gasket.
• Remove oven racks. Oven racks color will change if left in
the oven during a self-cleaning cycle.
The health of some birds is extremely
sensitive to the fumes given off during the self-cleaning
cycle of the range, Move the birds to another well
ventilated room,
IMPORTANT SAFETY NOTICE
The California Safe Drinking Water and Toxic Enforcement Act
requires the Governor of California to publish a list of substances
known to the state to cause cancer, birth defects or other
reproductive harm, and requires businesses to warn customers of
potential exposure to such substances.
iiS!_ii
• Do not use the broiler pan without its insert. The
broiler pan and its insert allow dripping fat to drain and be
kept away from the high heat of the broiler.
SAVE THESE SAFETY INSTRUCTIONS
PROTECTION AGREEMENTS
in the U.S.A.
Master Protection Agreements
Congratulations on making a smart purchase. Your new
Kenmore ®product is designed and manufactured for years of
dependable operation. But like all products, it may require
preventive maintenance or repair from time to time. That's
when having a Master Protection Agreement can save you
money and aggravation.
Purchase a Master Protection Agreement now and protect
yourself from unexpected hassle and expense,
The Master Protection Agreement also helps extend the life of
your new product. Here's what's included in the Agreement:
I_ Expert service byour 12,000 professional repair
specialists
I_ Unlimited service and no charge for parts and labor on
all covered repairs
I_ "No-lemon" guarantee- replacement
of your covered product if four or more product failures
occur within twelve months
I_ Product replacement if your covered product can't be
fixed
I_ Annual Preventive Maintenance Check at your request
- no extra charge
I_ Fast help by phone- phone support from a Sears
technician on products requiring in-home repair, plus
convenient repair scheduling
12_ Power surge protection against electrical damage due
to powerfiuctuations
I_ Rental reimbursement if repair of your covered product
takes longer than promised
In Canada
Maintenance Agreements
Your purchase has added value because you can depend
on Sears HomeCentral®for service. With over 2400 Service
Technicians and more than a million parts and accessories,
we have the tools, parts, knowledge and skills to ensure
our pledge: We Service What We Sell.
Your Kenmore®product isdesigned, manufactured
and tested to provide years of dependable operation. But
like all products, it may require service from time to time.
The SearsMaintenance Agreement offers you an
outstanding serviceprogram, affordably priced.
The Sears Maintenance Agreement:
Isyour way to buy tomorrow's service at today's price
Eliminates repair bills resulting from normal wear and tear
Provides phone support from a Searstechnician on
products requiring in-home repair
Evenif you don't need repairs, provides an annual
Preventive Maintenance Check, at your request, to
ensure that your product is inproper running condition.
Some limitations apply. For more information about
Sears Canada Maintenance Ag reements,
call 1-800-361-6665
Once you purchase the Agreement, a simple phone call isall
that it takes for you to schedule service.You can call anytime
day or night, or schedule a serviceappointment online.
Searshas over 12,000 professional repair specialists, who have
accessto over 4.5 million quality parts and accessories.That's
the kind of professionalism you can count on to help prolong
the life of your new purchase for years to come. Purchase your
Master Protection Agreement today!
Some limitations and exclusions apply.
For prices and additional information call
1-800-827-6655.
Sears Installation Service
For Searsprofessional installation of home
appliances, garage door openers, water heaters,
and other major home items, in the U.S.A. call
1-800-4-MY-HOME®
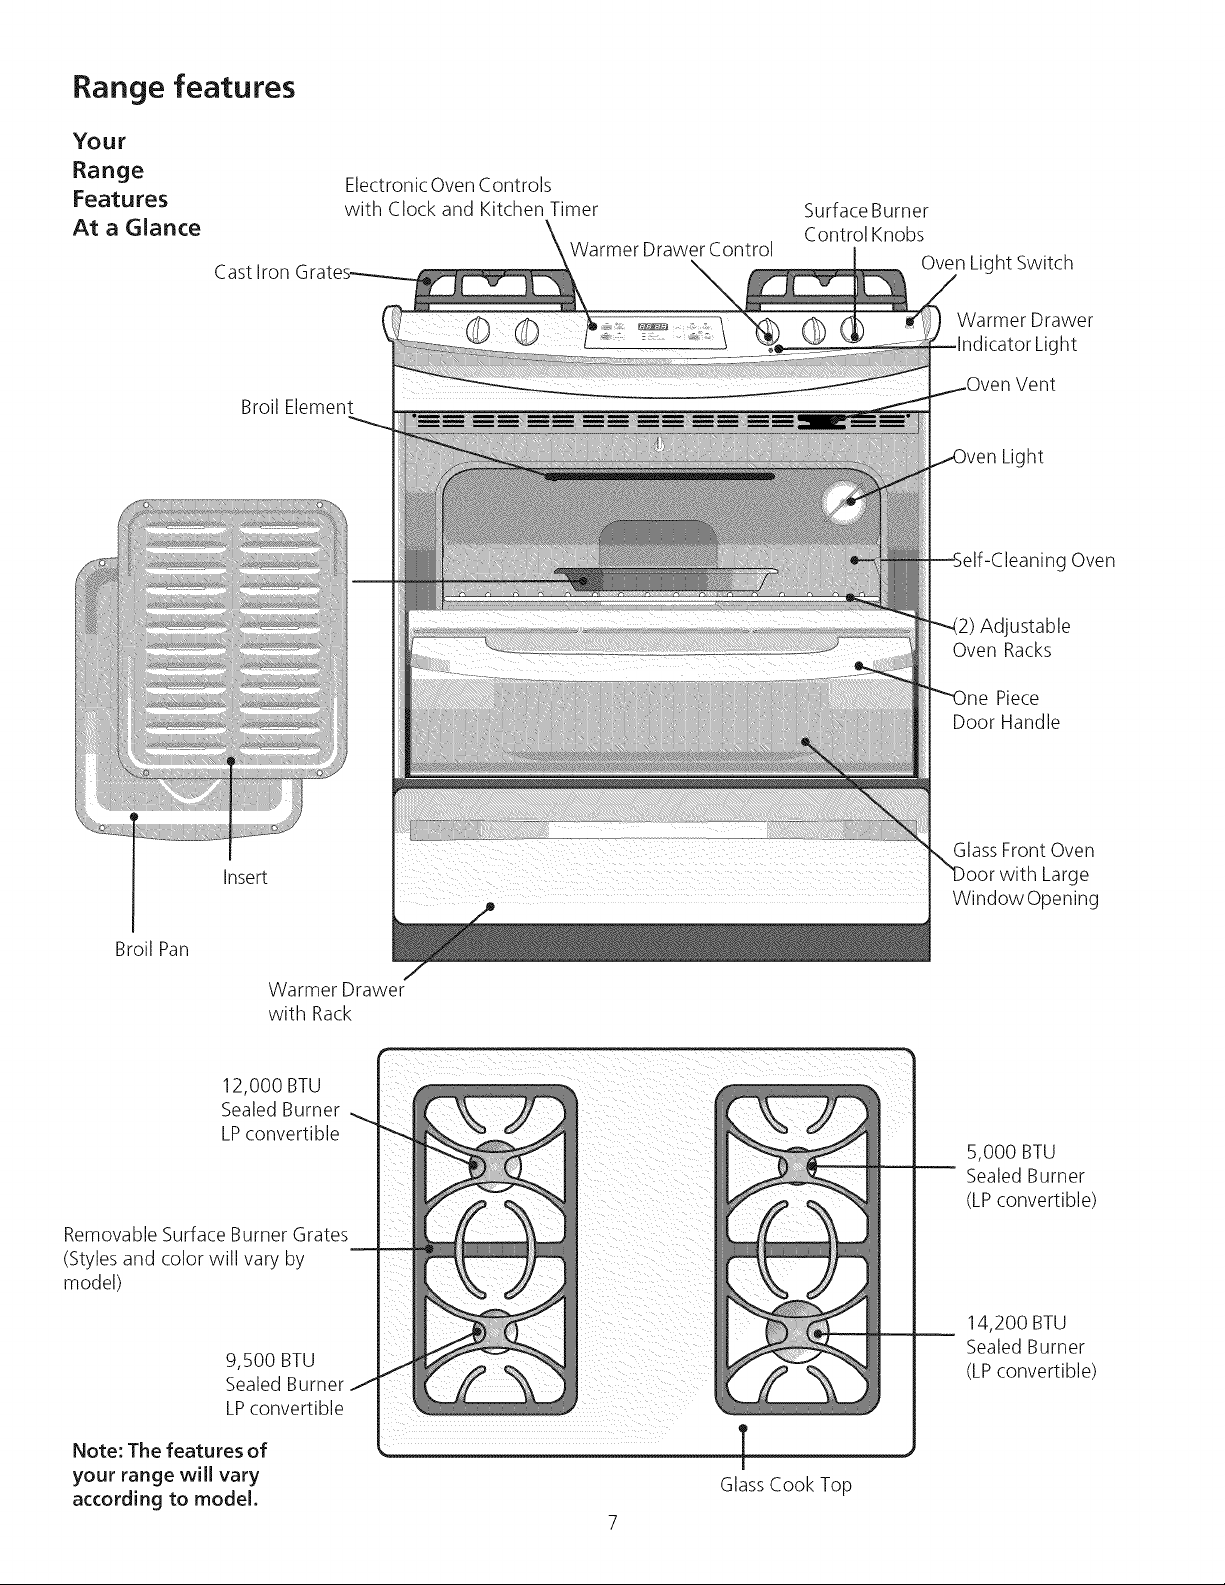
Range features
Your
Range
Features
At a Glance
Cast Iron
Broil Element
Electronic Oven Controls
with Clock and Kitchen Timer
Warmer Drawer Control
Surface Burner
Control Knobs
Oven Light Switch
Warmer Drawer
ght
Vent
Light
1111111
I Insert
Broil Pan
Warmer Drawer
with Rack
12,000 BTU
Sealed Burner ._.
LPconvertible
Removable Surface Burner Grates
(Styles and color will vary by
model)
g Oven
Adjustable
Oven Racks
Piece
Door Handle
GlassFront Oven
with Large
Window Opening
5,000 BTU
Sealed Burner
(LPconvertible
9,500 BTU
Sealed Burner _"
LPconvertible
Note: The features of
your range will vary
according to model.
14,200 BTU
Sealed Burner
(LPconvertible
GlassCook Top
Conversion to Liquefied Petroleum Gas (or
L.R Gas)
This appliance can be used with Natural Gas and Propane Gas. It isshipped from
the factory for use with natural gas.
If you wish to convert your range for use with LP/Propane gas, usethe supplied fixed
orifices located in a bag containing the literature marked, "FOR LP/PROPANEGAS
CONVERSION". Follow the instructions packaged with the orifices.
The conversion must be performed by a qualified service technician in accordance
with the installation instructions furnished with this range and all codes and
requirements of the authority having jurisdiction. Failure to follow instructions could
result in serious injury or property damage. The qualified agency performing this
work assumes responsibility for the conversion.
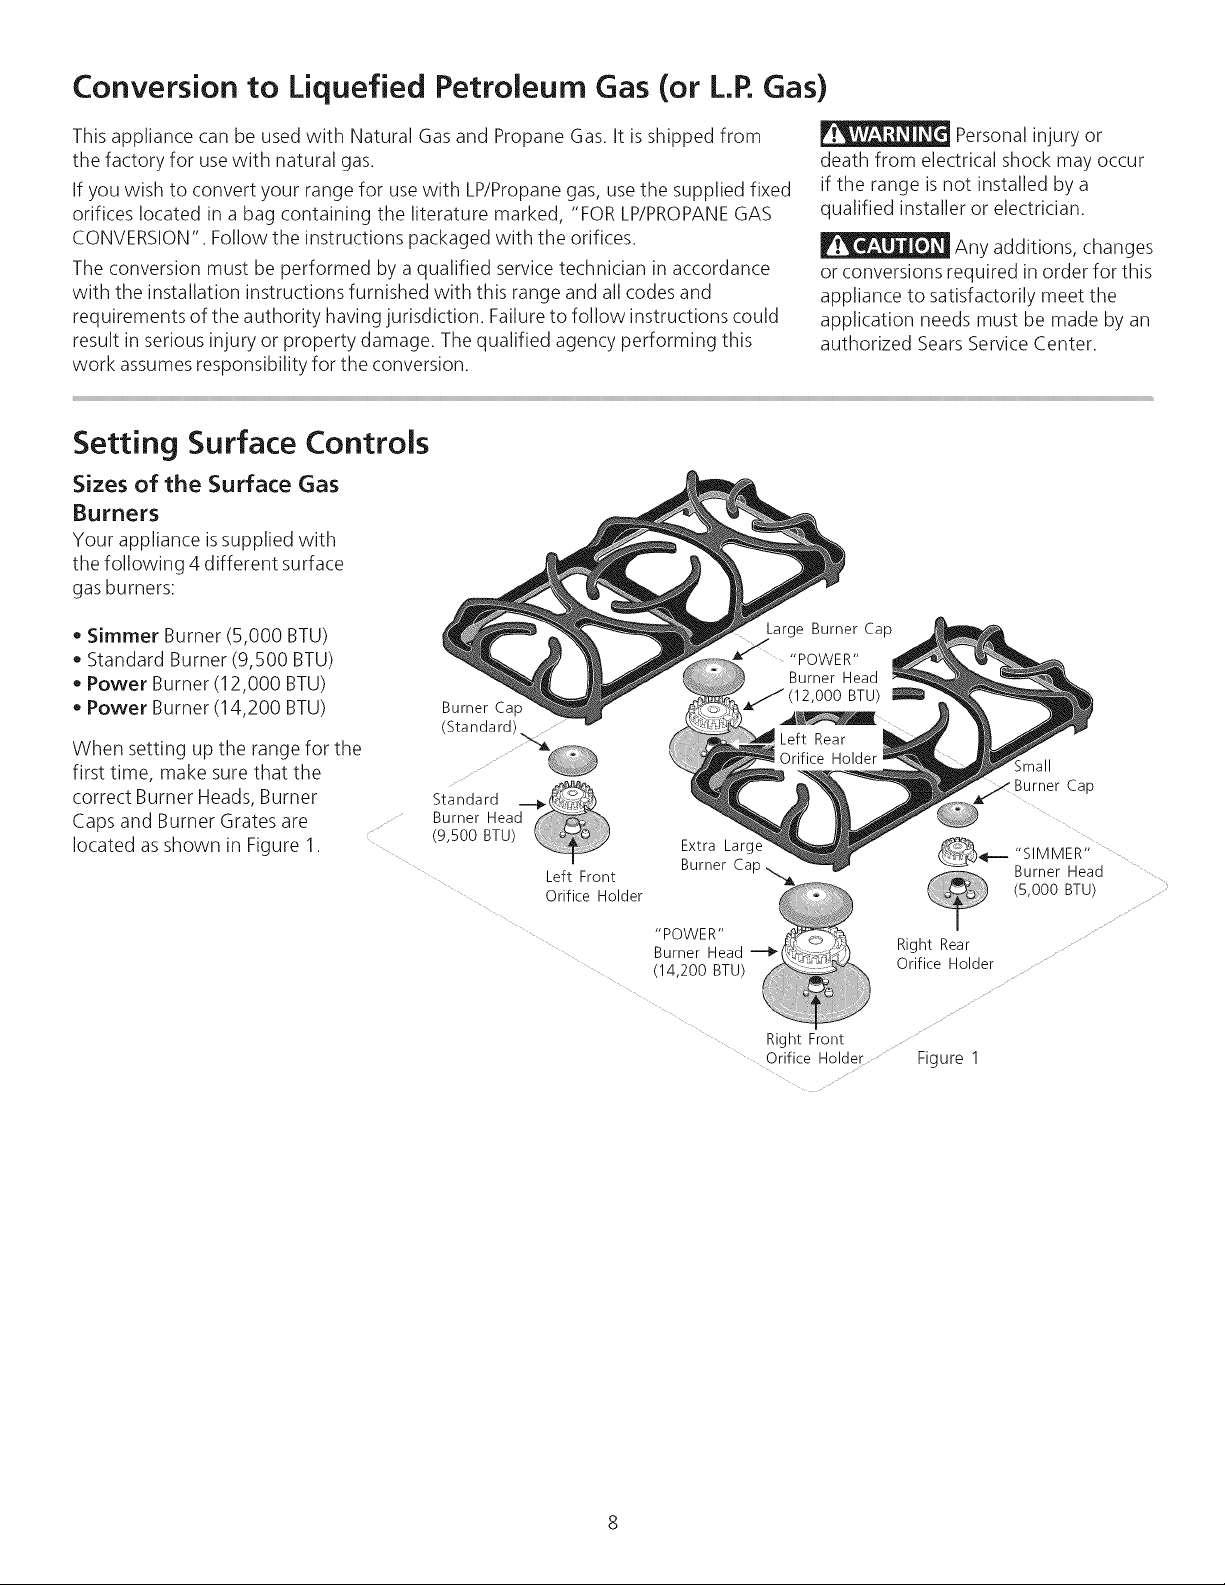
Setting Surface Controls
Sizes of the Surface Gas
Burners
Your appliance is supplied with
the following 4 different surface
gas burners:
• Simmer Burner (5,000 BTU)
• Standard Burner (9,500 BTU)
• Power Burner (12,000 BTU)
• Power Burner (14,200 BTU)
Burner Cap
Personal injury or
death from electrical shock may occur
if the range is not installed by a
qualified installer or electrician.
Any additions, changes
or conversions required in order for this
appliance to satisfactorily meet the
application needs must be made by an
authorized Sears Service Center.
When setting up the range for the
first time, make sure that the
correct Burner Heads, Burner
Caps and Burner Grates are
located as shown in Figure 1.
Extra Larg_
mall
Burner Cap
._ "SIMMER 'I
Burner Head .....
(5,000 BTU)
Right Rear
Orifice Holder
Right Front
Orifice Holder Figure 1
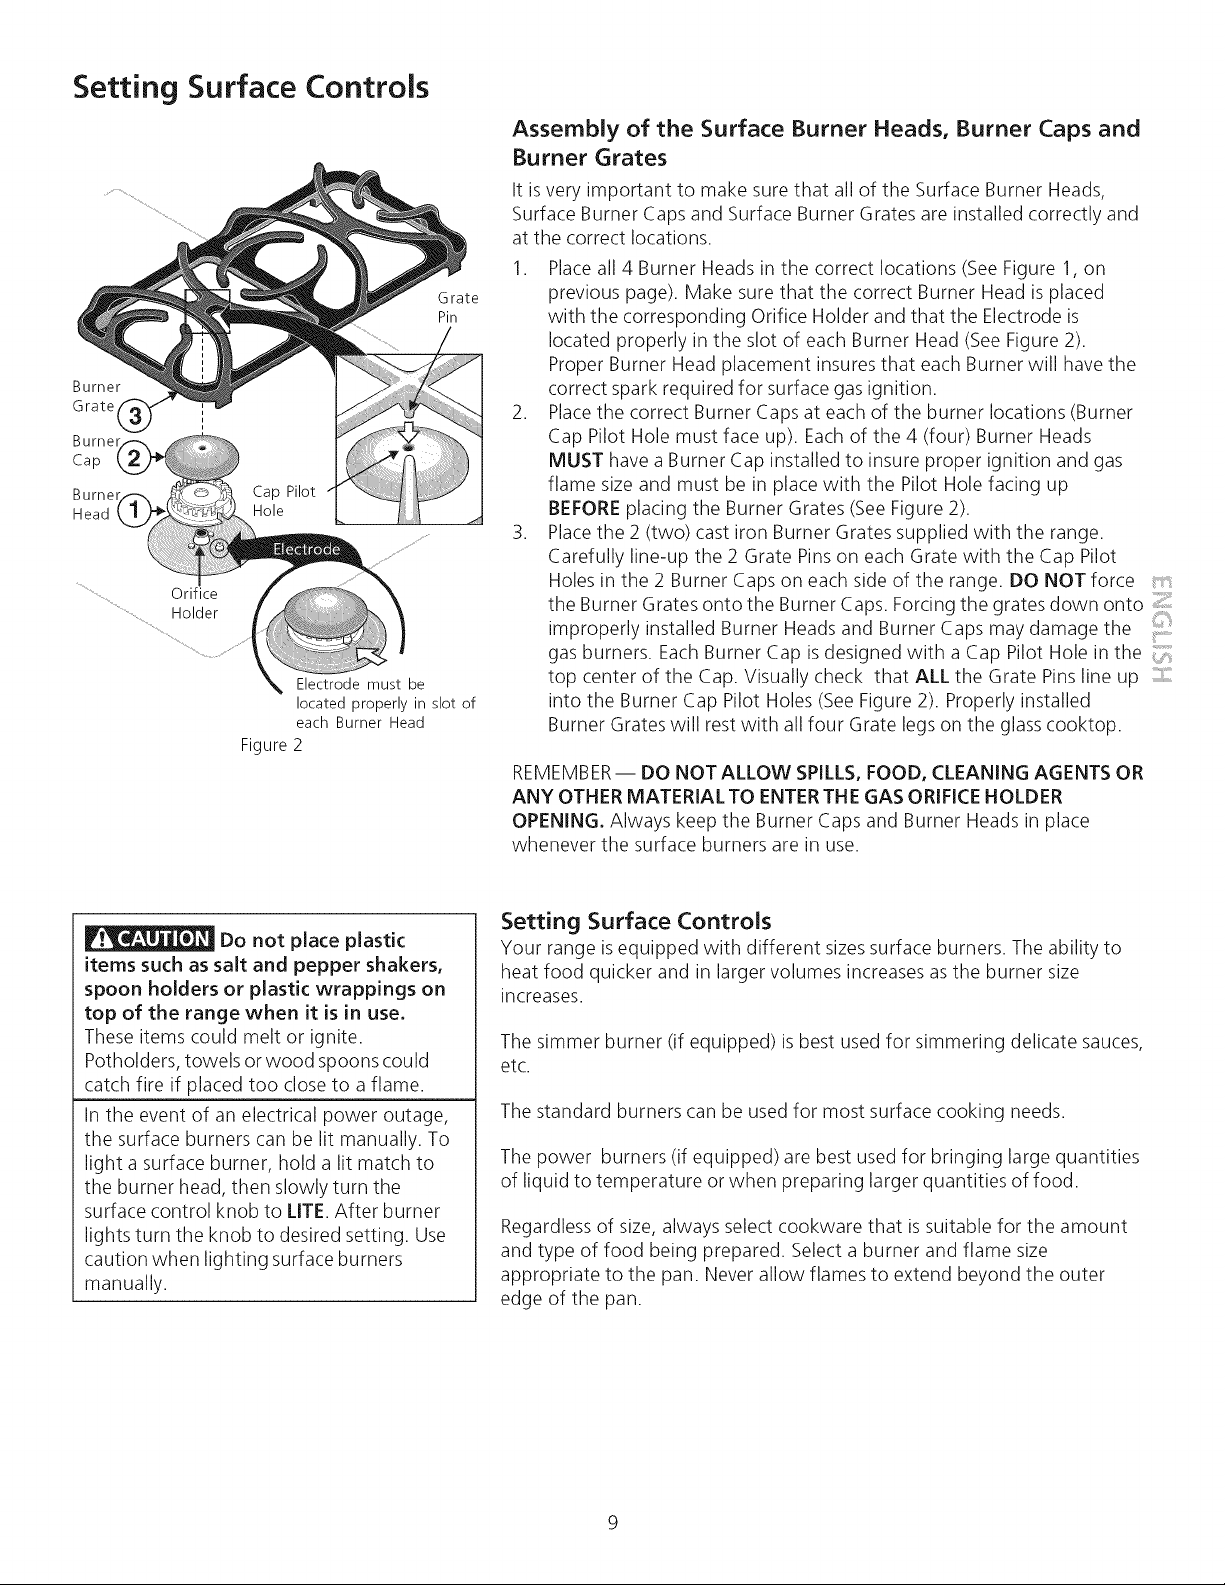
Setting
Burner
Grate
Burner
Cap
Burner
Head
....................... Orifice
...................Holder
Surface Controls
Electrode must be
located properly in slot of
each Burner Head
Figure 2
Grate
Pin
Assembly of the Surface Burner Heads, Burner Caps and
Burner Grates
It isvery important to make sure that all of the Surface Burner Heads,
Surface Burner Caps and Surface Burner Grates are installed correctly and
at the correct locations.
1. Placeall 4 Burner Heads in the correct locations (See Figure 1, on
previous page). Make sure that the correct Burner Head is placed
with the corresponding Orifice Holder and that the Electrode is
located properly in the slot of each Burner Head (See Figure 2).
Proper Burner Head placement insures that each Burner will have the
correct spark required for surface gas ignition.
2. Placethe correct Burner Caps at each of the burner locations (Burner
Cap Pilot Hole must face up). Eachof the 4 (four) Burner Heads
MUST have a Burner Cap installed to insure proper ignition and gas
flame size and must be in place with the Pilot Hole facing up
BEFORE placing the Burner Grates (See Figure 2).
3. Placethe 2 (two) cast iron Burner Grates supplied with the range.
Carefully line-up the 2 Grate Pinson each Grate with the Cap Pilot
Holes in the 2 Burner Caps on each side of the range. DO NOT force
the Burner Grates onto the Burner Caps. Forcing the grates down onto _:i:
improperly installed Burner Heads and Burner Caps may damage the
gas burners. Each Burner Cap is designed with a Cap Pilot Hole in the
top center of the Cap. Visually check that ALL the Grate Pinsline up
into the Burner Cap Pilot Holes (SeeFigure 2). Properly installed
Burner Grates will rest with all four Grate legs on the glass cooktop.
REMEMBER-- DO NOT ALLOW SPILLS, FOOD, CLEANING AGENTS OR
ANY OTHER MATERIAL TO ENTERTHE GAS ORIFICE HOLDER
OPENING. Always keep the Burner Caps and Burner Heads in place
whenever the surface burners are in use.
Do not place plastic
items such as salt and pepper shakers,
spoon holders or plastic wrappings on
top of the range when it is in use.
These items could melt or ignite.
Potholders, towels or wood spoons could
catch fire if placed too closeto a flame.
In the event of an electrical power outage,
the surface burners can be lit manually. To
light a surface burner, hold a lit match to
the burner head, then slowly turn the
surface control knob to LITE. After burner
lights turn the knob to desired setting. Use
caution when lighting surface burners
manually.
Setting Surface Controls
Your range isequipped with different sizes surface burners. The ability to
heat food quicker and in larger volumes increases asthe burner size
increases.
The simmer burner (if equipped) is best used for simmering delicate sauces,
etc.
The standard burners can be used for most surface cooking needs.
The power burners (if equipped) are best used for bringing large quantities
of liquid to temperature or when preparing larger quantities of food.
Regardless of size, always select cookware that is suitable for the amount
and type of food being prepared. Select a burner and flame size
appropriate to the pan. Never allow flames to extend beyond the outer
edge of the pan.
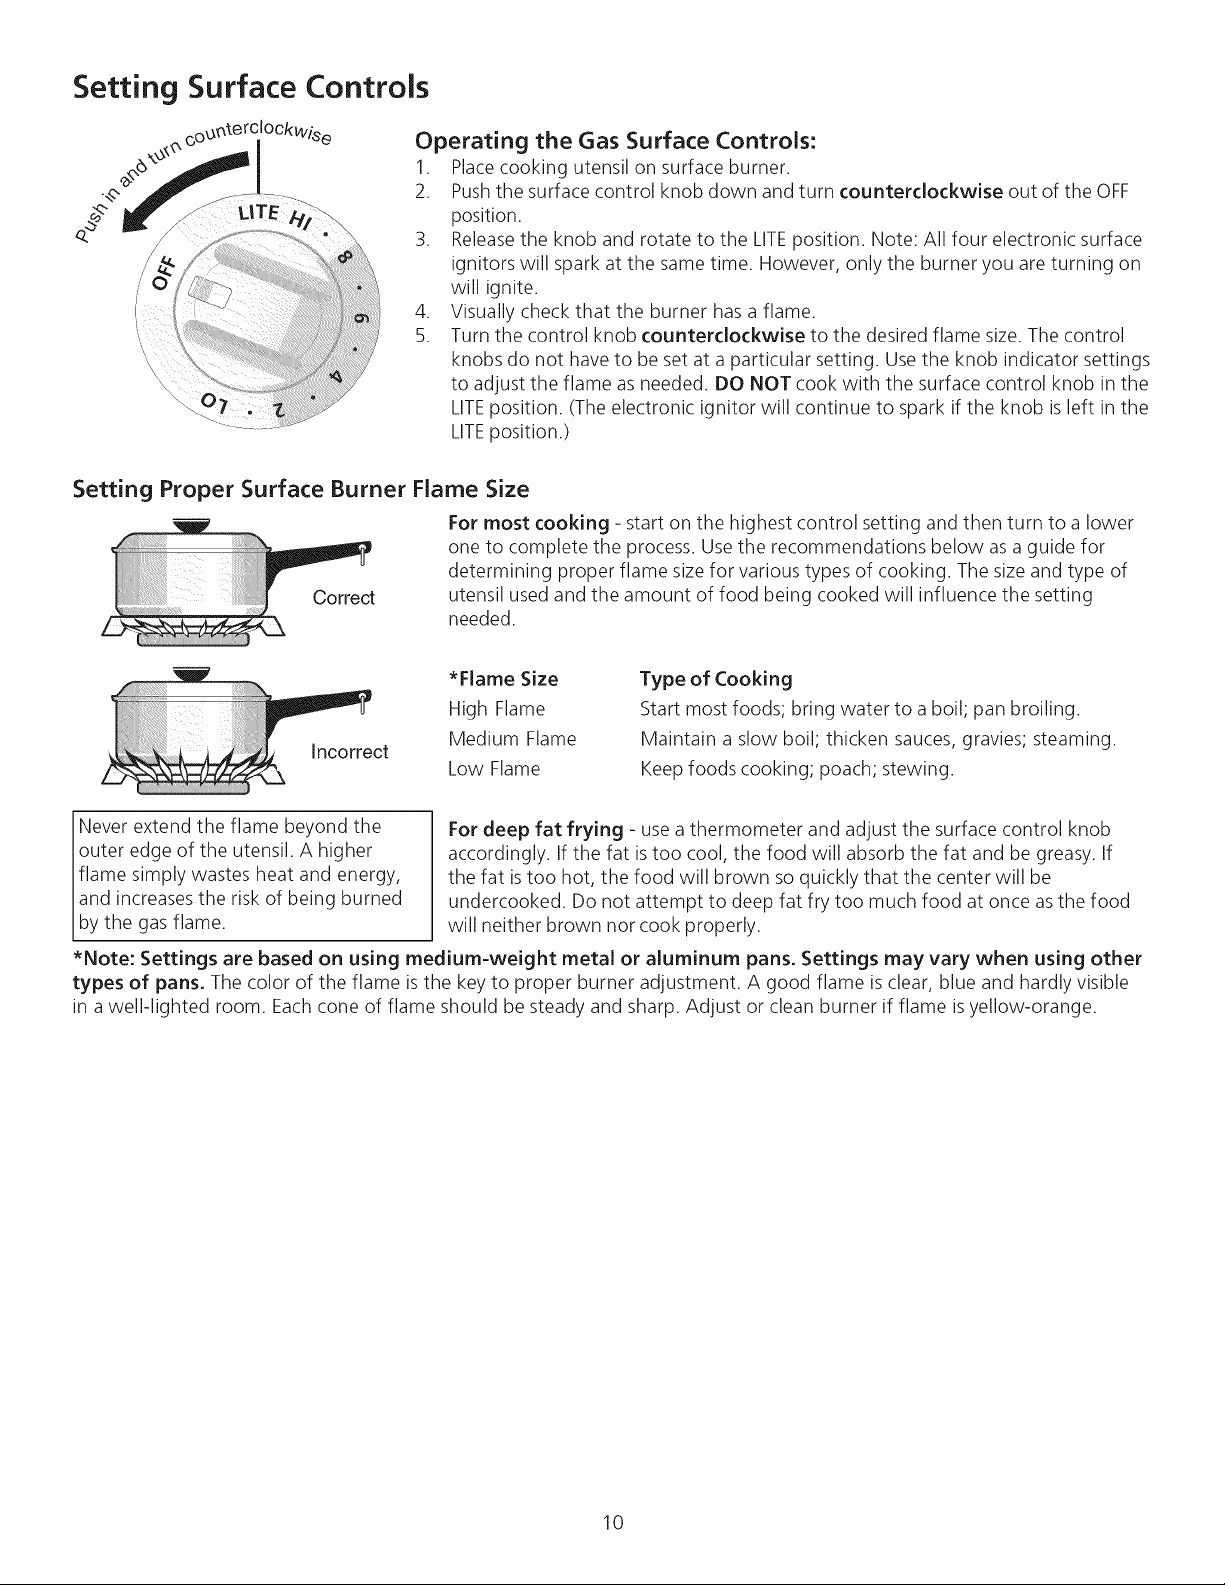
Setting Surface Controls
Operating the Gas Surface Controls:
1. Placecooking utensil on surface burner.
2. Pushthe surface control knob down and turn counterclockwise out of the OFF
position.
/
Setting Proper Surface Burner Flame Size
3. Releasethe knob and rotate to the LITEposition. Note: All four electronic surface
ignitors will spark at the same time. However, only the burner you are turning on
will ignite.
4. Visually check that the burner has a flame.
5. Turn the control knob counterclockwise to the desired flame size. The control
knobs do not have to be set at a particular setting. Use the knob indicator settings
to adjust the flame as needed. DO NOT cook with the surface control knob in the
LITEposition. (The electronic ignitor will continue to spark if the knob is left in the
LITEposition.)
For most cooking - start on the highest control setting and then turn to a lower
one to complete the process. Usethe recommendations below as a guide for
determining proper flame size for various types of cooking. The size and type of
utensil used and the amount of food being cooked will influence the setting
needed.
*Flame Size
High Flame
Incorrect
Never extend the flame beyond the
outer edge of the utensil. A higher
flame simply wastes heat and energy,
and increases the risk of being burned
by the gas fame.
*Note: Settings are based on using medium-weight metal or aluminum pans. Settings may vary when using other
types of pans. The color of the flame is the key to proper burner adjustment. A good flame is clear, blue and hardly visible
in a well-lighted room. Eachcone of flame should be steady and sharp. Adjust or clean burner if flame is yellow-orange.
Medium Flame
Low Flame
For deep fat frying - use a thermometer and adjust the surface control knob
accordingly. If the fat is too cool, the food will absorb the fat and be greasy. If
the fat istoo hot, the food will brown so quickly that the center will be
undercooked. Do not attempt to deep fat fry too much food at once asthe food
will neither brown nor cook properly.
Type of Cooking
Start most foods; bring water to a boil; pan broiling.
Maintain a slow boil; thicken sauces, gravies; steaming.
Keep foods cooking; poach; stewing.
10
Before Setting Oven Controls
_ This range has a fan that will turn "ON" and "OFF" by itself to keep the electronics cool. It may
contin ue to ru n after the range has been turned "OFF" but may also stop immediately to turn "ON" after a while.
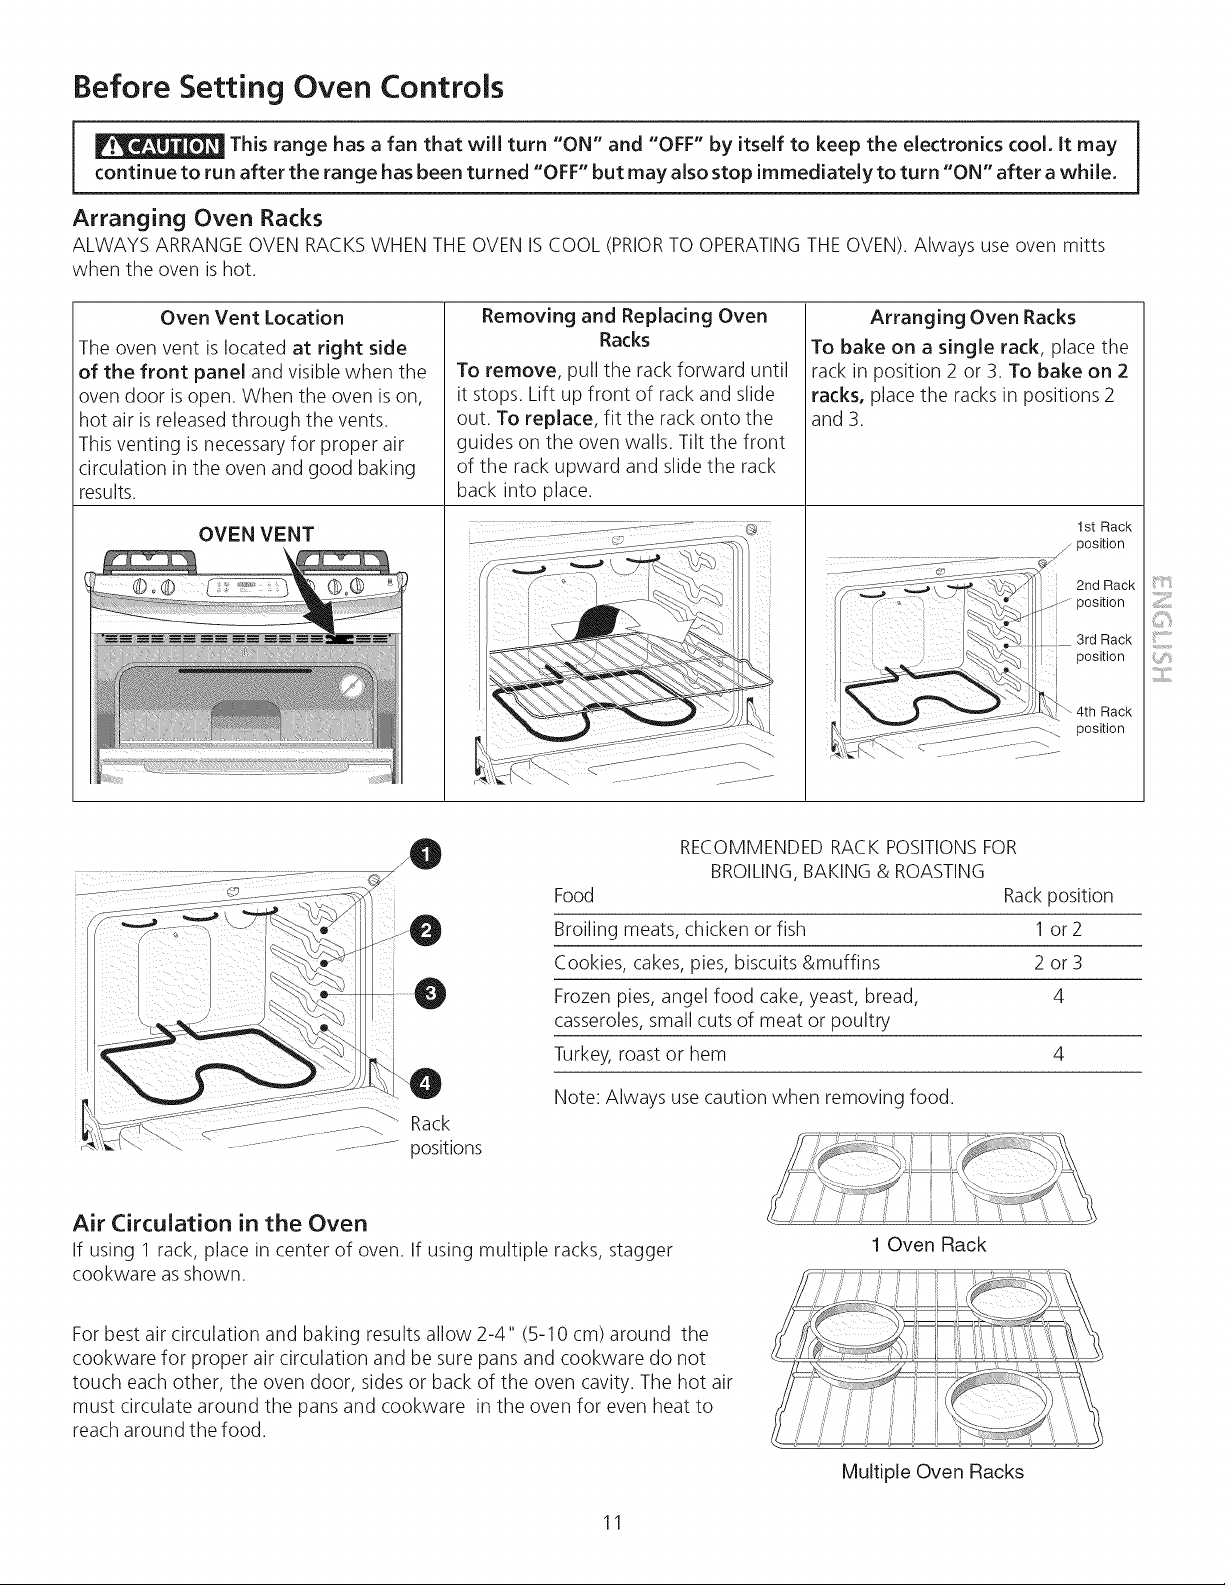
Arranging Oven Racks
ALWAYS ARRANGE OVEN RACKSWHEN THEOVEN ISCOOL (PRIORTO OPERATINGTHEOVEN). Always use oven mitts
when the oven is hot.
Oven Vent Location
The oven vent is located at right side
of the front panel and visible when the
oven door is open. When the oven is on,
hot air is released through the vents.
This venting is necessaryfor proper air
circulation in the oven and good baking
results.
OVEN VENT
Removing and Replacing Oven
Racks
To remove, pull the rack forward until
it stops. Lift up front of rack and slide
out. To replace, fit the rack onto the
guides on the oven walls. Tilt the front
of the rack upward and slide the rack
back into place.
Arranging Oven Racks
To bake on a single rack, place the
rack in position 2 or 3. To bake on 2
racks, place the racks in positions 2
and 3.
1st Rack
j position
2nd Rack
position
3rd Rack
position
4th Rack
position
1
i"'!iF'_i
---: ........ 2 .............
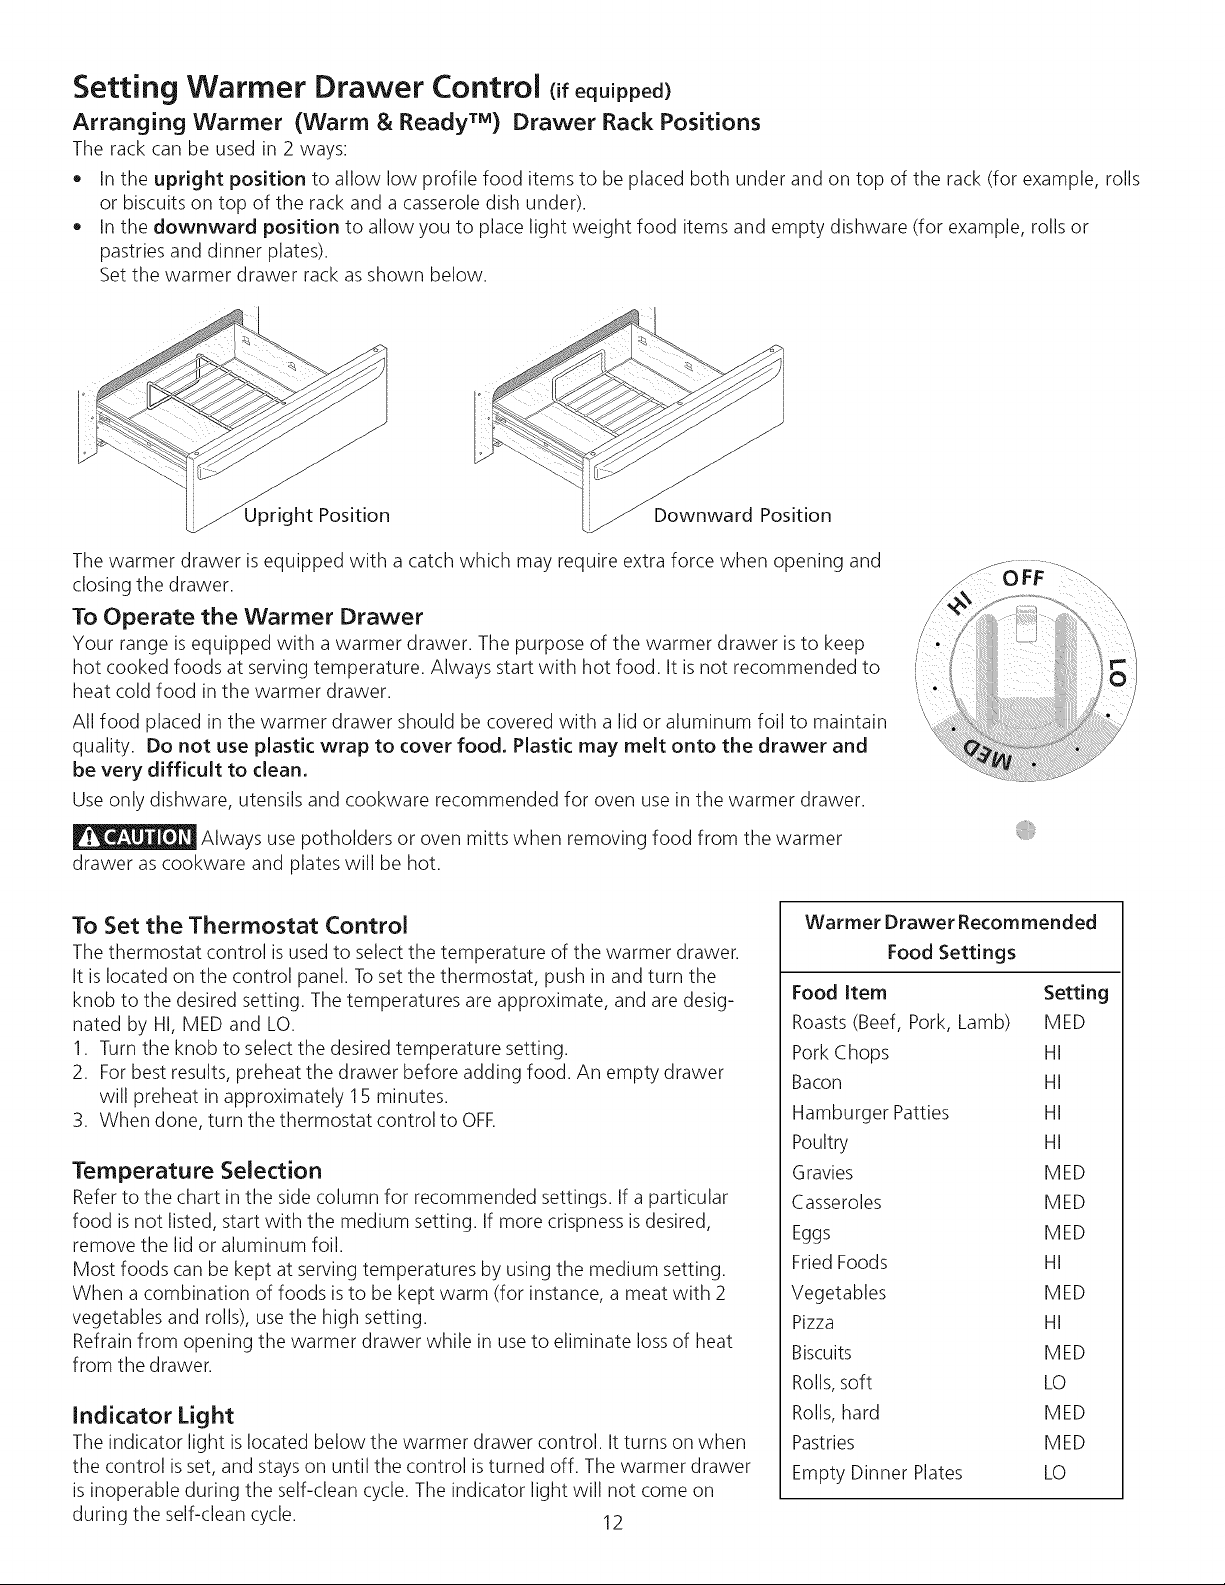
RECOMMENDED RACK POSITIONSFOR
BROILING,BAKING & ROASTING
Food Rackposition
Broiling meats, chicken or fish 1 or 2
Cookies, cakes, pies, biscuits &muffins 2 or 3
Frozen pies, angel food cake, yeast, bread, 4
casseroles,small cuts of meat or poultry
Turkey, roast or hem 4
Note: Always use caution when removing food.
Air Circulation in the Oven
If using 1 rack, place in center of oven. If using multiple racks, stagger
cookware as shown.
For best air circulation and baking results allow 2-4" (5-10 cm) around the
cookware for proper air circulation and be sure pans and cookware do not
touch each other, the oven door, sides or back of the oven cavity. The hot air
must circulate around the pans and cookware in the oven for even heat to
reach around the food.
1 Oven Rack
11
Multiple Oven Racks
Setting Warmer Drawer Control equipped)
Arranging Warmer (Warm & Ready TM) Drawer Rack Positions
The rack can be used in 2 ways:
• In the upright position to allow low profile food items to be placed both under and on top of the rack (for example, rolls
or biscuits on top of the rack and a casserole dish under).
• In the downward position to allow you to place light weight food items and empty dishware (for example, rolls or
pastries and dinner plates).
Set the warmer drawer rack asshown below.
ht Position
The warmer drawer is equipped with a catch which may require extra force when opening and
closing the drawer.
_,_Downwa rd Position
To Operate the Warmer Drawer
Your range is equipped with a warmer drawer. The purpose of the warmer drawer is to keep /
hot cooked foods at serving temperature. Always start with hot food. It is not recommended to
heat cold food in the warmer drawer, i..
All food placed in the warmer drawer should be covered with a lid or aluminum foil to maintain
quality. Do not use plastic wrap to cover food. Plastic may melt onto the drawer and
be very difficult to clean.
Use only dishware, utensils and cookware recommended for oven use in the warmer drawer.
Always use potholders or oven mitts when removing food from the warmer
drawer as cookware and plates will be hot.
To Set the Thermostat Control
The thermostat control is used to select the temperature of the warmer drawer.
It is located on the control panel. Toset the thermostat, push in and turn the
knob to the desired setting. The temperatures are approximate, and are desig-
nated by HI, MED and LO.
1. Turn the knob to select the desired temperature setting.
2. For best results, preheat the drawer before adding food. An empty drawer
will preheat in approximately 15 minutes.
3. When done, turn the thermostat control to OFE
Temperature Selection
Refer to the chart in the side column for recommended settings. If a particular
food is not listed, start with the medium setting. If more crispness isdesired,
remove the lid or aluminum foil.
Most foods can be kept at serving temperatures by using the medium setting.
When a combination of foods is to be kept warm (for instance, a meat with 2
vegetables and rolls), usethe high setting.
Refrain from opening the warmer drawer while in use to eliminate lossof heat
from the drawer.
Indicator Light
The indicator light islocated below the warmer drawer control. It turns on when
the control isset, and stays on until the control is turned off. The warmer drawer
is inoperable during the self-clean cycle. The indicator light will not come on
during the self-clean cycle. 12
Warmer Drawer Recommended
Food Settings
Food Item Setting
Roasts (Beef, Pork, Lamb) MED
Pork Chops HI
Bacon HI
Hamburger Patties HI
Poultry HI
Gravies MED
Casseroles MED
Eggs MED
FriedFoods HI
Vegetables MED
Pizza HI
Biscuits MED
Rolls,soft LO
Rolls,hard MED
Pastries MED
Empty Dinner Plates LO
Control Pad Functions
Note: The appearance of your oven control may differ slightly from the one illustrated below. However, all functions are the
same. Also, push buttons or pads may be shaped differently than those appearing in this Use and Care Guide.
READ THE INSTRUCTIONS CAREFULLY BEFORE USING THE OVEN, For satisfactory useof your oven, become familiar with
the various functions of the oven as described below.
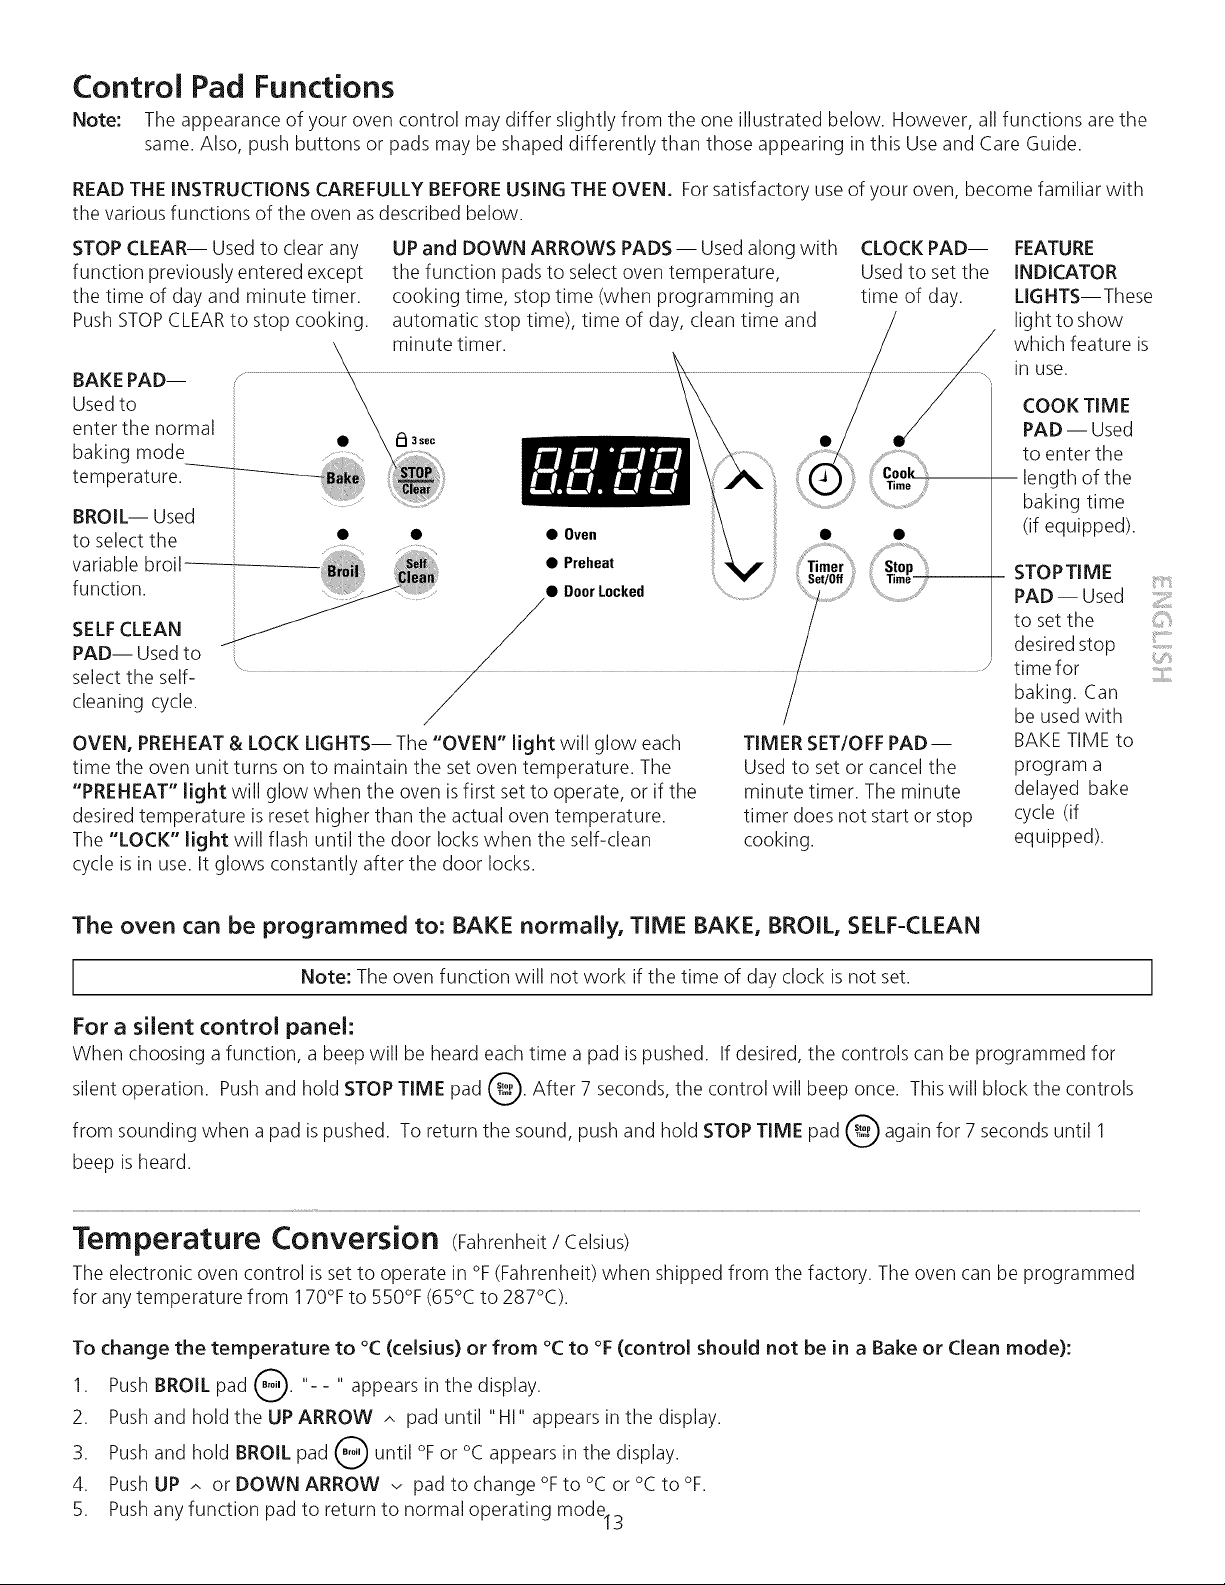
STOP CLEAR-- Used to clear any
function previously entered except
the time of day and minute timer.
Push STOPCLEARto stop cooking.
BAKE PAD--
Used to
enter the normal
baking mode
temperature.
BROIL-- Used
to select the
variable broil
function.
SELFCLEAN
PAD-- Used to
select the self-
cleaning cycle.
OVEN, PREHEAT & LOCK LIGHTS-- The "OVEN" light will glow each
time the oven unit turns on to maintain the set oven temperature. The
"PREHEAT" light will glow when the oven isfirst set to operate, or if the
desired temperature is reset higher than the actual oven temperature.
The "LOCK" light will flash until the door locks when the self-clean
cycle isin use. It glows constantly after the door locks.
UP and DOWN ARROWS PADS -- Used along with
the function pads to select oven temperature,
cooking time, stop time (when programming an
automatic stop time), time of day, clean time and
minute timer.
• • • Oven
CLOCK PAD--
Used to set the
time of day.
TIMER SET/OFF PAD--
Used to set or cancel the
minute timer. The minute
timer does not start or stop
cooking.
FEATURE
INDICATOR
LIGHTS--These
light to show
which feature is
in use.
COOK TIME
PAD -- Used
to enter the
length of the
baking time
(if equipped).
STOPTIME
PAD -- Used
to set the ::
desired stop
time for
baking. Can
be used with
BAKE TIME to
program a
delayed bake
cycle (if
equipped).
iiS!_i;
The oven can be programmed to: BAKE normally, TIME BAKE, BROIL, SELF-CLEAN
Note: The oven function will not work if the time of day clock is not set.
For a silent control panel:
When choosing a function, a beep will be heard each time a pad is pushed. If desired, the controls can be programmed for
silent operation. Push and hold STOPTIME pad @. After 7 seconds, the control will beep once. Thiswill block the controls
from sounding when a pad ispushed. To return the sound, push and hold STOP TIME pad @ again for 7 seconds until 1
beep is heard.
Temperature Conversion (Fahrenheit / Celsius)
The electronic oven control isset to operate in °F(Fahrenheit) when shipped from the factory. The oven can be programmed
for any temperature from 170% to 550% (65°C to 287°C).
To change the temperature to °C (celsius) or from °C to °F (control should not be in a Bake or Clean mode):
1. Push BROIL pad _. "-- " appears in the display.
2. Push and hold the UP ARROW ^ pad until "HI" appears in the display.
3. Push and hold BROIL pad _ until °For °C appears in the display.
4. Push UP ^ or DOWN ARROW -, pad to change °F to °C or °C to °F.
5. Pushany function pad to return to normal operating model3
f
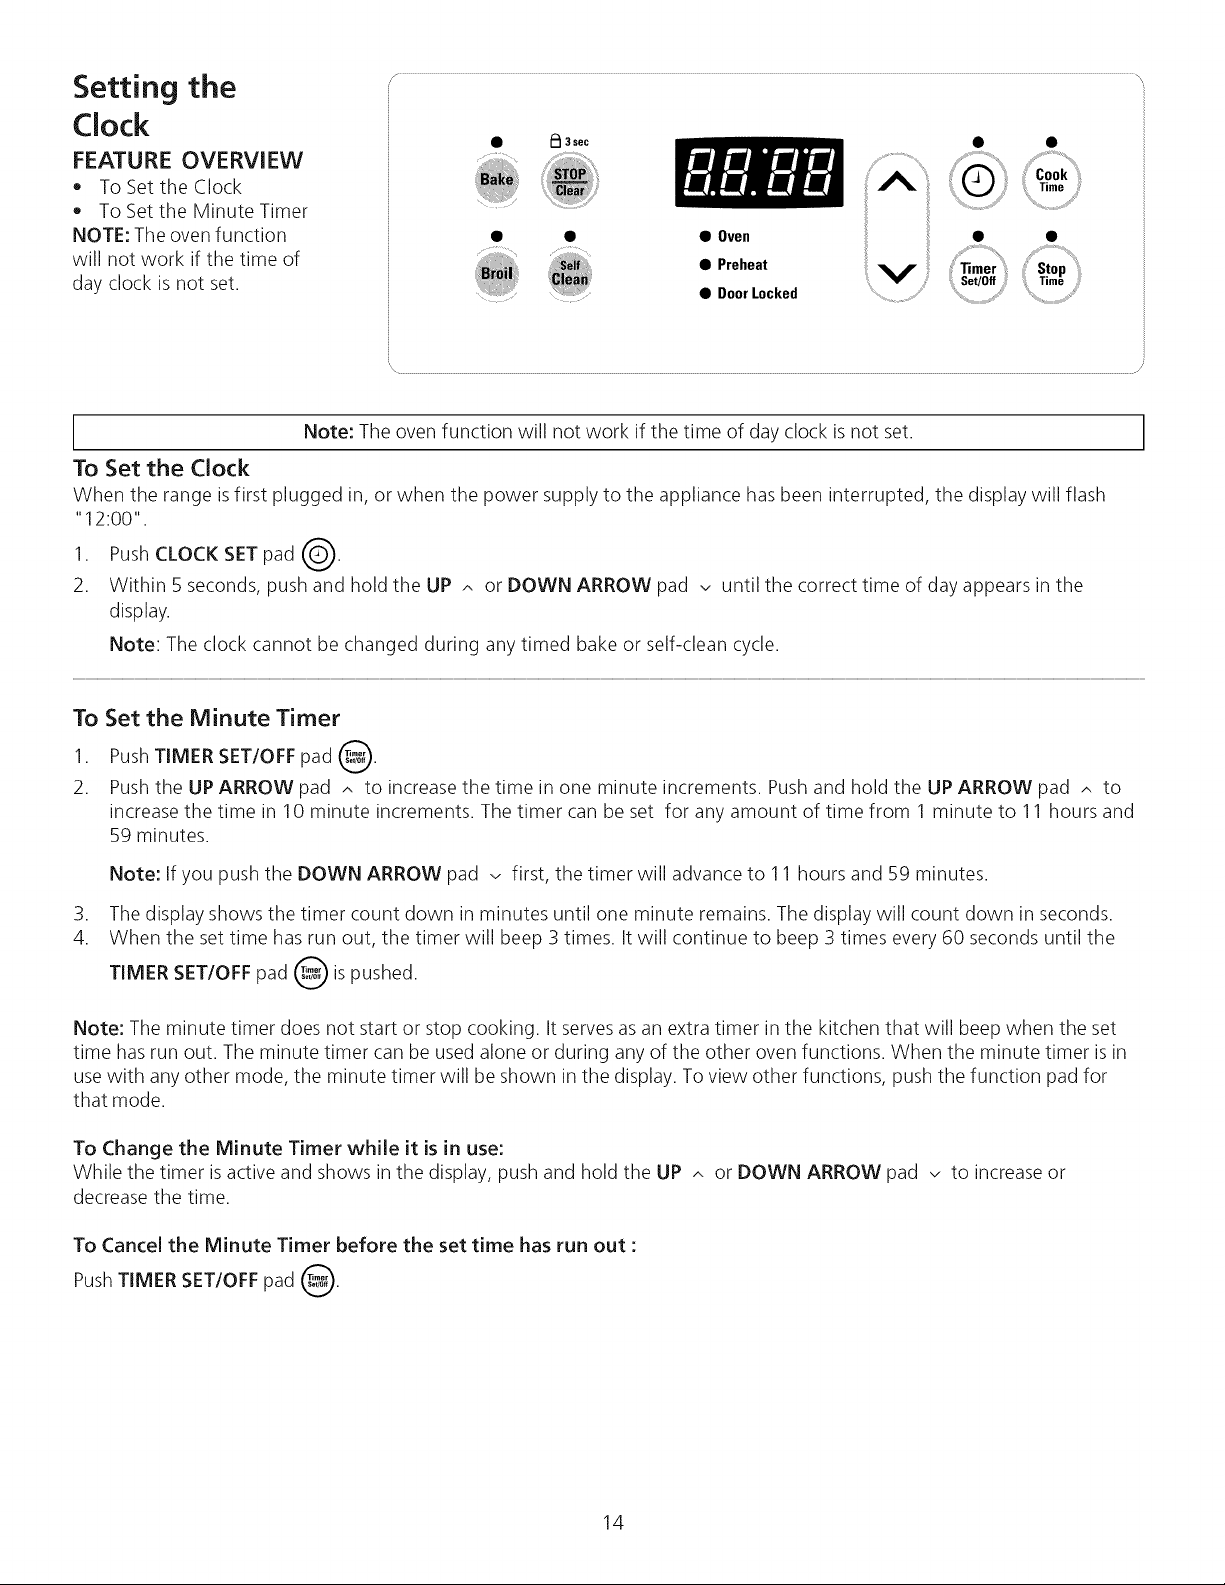
Setting the
Clock
FEATURE OVERVIEW
* To Set the Clock
o To Set the Minute Timer
NOTE: The oven function
will not work if the time of
clay clock is not set.
Note: The oven function will not work if the time of clay clock is not set.
To Set the Clock
When the range isfirst plugged in, or when the power supply to the appliance has been interrupted, the display will flash
"12:00".
1. PushCLOCK SETpad @.
2. Within 5 seconds, push and hold the UP ^ or DOWN ARROW pad v until the correct time of clay appears in the
display.
Note: The clock cannot be changed during any timed bake or self-clean cycle.
• _ 3 sec
• Oven • •
• Preheat
• DoorLocked
Cook
Time
To Set the Minute Timer
1. PushTIMER SET/OFF pad @.
2. Push the UP ARROW pad ^ to increase the time in one minute increments. Pushand hold the UP ARROW pad ^ to
increase the time in 10 minute increments. The timer can be set for any amount of time from 1 minute to 11 hours and
59 minutes.
Note: If you push the DOWN ARROW pad v first, the timer will advance to 11 hours and 59 minutes.
.
The display shows the timer count clown in minutes until one minute remains. The display will count down in seconds.
4.
When the set time has run out, the timer will beep 3 times. It will continue to beep 3 times every 60 seconds until the
TIMER SET/OFF pad _ is
pushed.
Note: The minute timer does not start or stop cooking. It servesasan extra timer in the kitchen that will beep when the set
time has run out. The minute timer can be used alone or during any of the other oven functions. When the minute timer isin
usewith any other mode, the minute timer will be shown in the display. To view other functions, push the function pad for
that mode.
To Change the Minute Timer while it is in use:
While the timer isactive and shows in the display, push and hold the UP ^ or DOWN ARROW pad v to increase or
decrease the time.
To Cancel the Minute Timer before the set time has run out :
PushTIMER SET/OFF pad _.
14
Setting Oven
Controls
FEATURE OVERVIEW
• To Set or Change
Temperature for Normal
Baking
NOTE: The oven function
will not work if the time of
day clock is not set.
Note: The oven function will not work if the time of day clock isnot set.
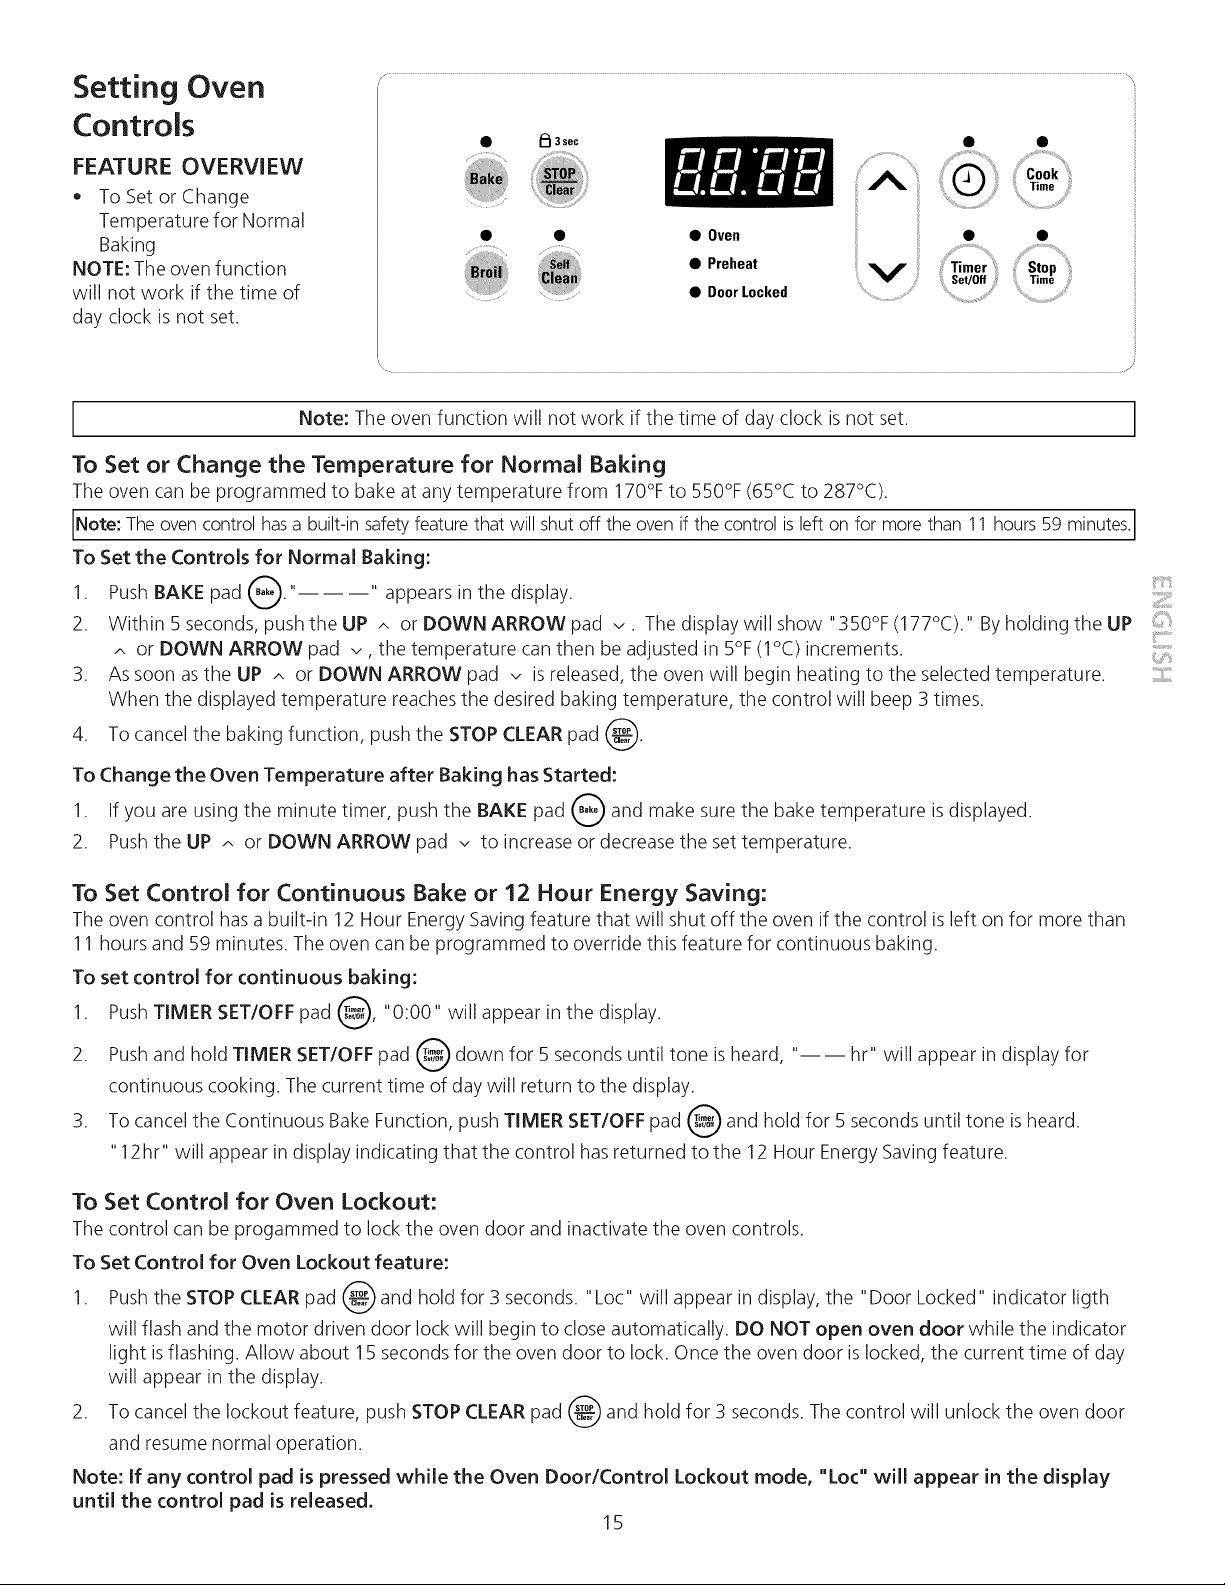
To Set or Change the Temperature for Normal Baking
The oven can be programmed to bake at any temperature from 170% to 550% (65°C to 287°C).
Note: Theovencontrol hasa built-insafetyfeaturethat will shut off the oven if the control isleft on for morethan 11 hours 59 minutes.
To Set the Controls for Normal Baking:
1. Push BAKE pad _-'_."III" appears in the display.
2. Within 5 seconds, pushtheUP ^ or DOWN ARROW pad v. The display will show "350°F (177°C). '' Byholding the UP
^ or DOWN ARROW pad v, the temperature can then be adjusted in 5% (1°C) increments.
3. As soon as the UP ^ or DOWN ARROW pad v is released,the oven will begin heating to the selected temperature.
When the displayed temperature reaches the desired baking temperature, the control will beep 3 times.
,:i}i{i_iiiiiiiiii_ii,i:::i,
IQI 3 sec
• Oven
• Preheat
• Door Locked
v ,!
Timer
:} Set/Off
CookTime
2!!Liiill
4. To cancel the baking function, push the STOP CLEARpad @.
To Change the Oven Temperature after Baking has Started:
1. If you are using the minute timer, push the BAKE pad @ and make sure the bake temperature is
2. Pushthe UP ^ or DOWN ARROW pad v to increase or decrease the set temperature.
displayed.
To Set Control for Continuous Bake or 12 Hour Energy Saving:
The oven control hasa built-in 12 Hour Energy Saving feature that will shut off the oven if the control isleft on for more than
11 hours and 59 minutes. The oven can be programmed to override this feature for continuous baking.
To set control for continuous baking:
1. Push TIMER SET/OFF pad @, "0:00" will appear in the
2. Pushand hold TIMER SET/OFF pad @ down for 5 seconds until tone is heard, ,,I I hr" will appear in display for
continuous cooking. The current time of day will return to the display.
3. To cancel the Continuous Bake Function, push TIMER SET/OFF pad @ and hold for 5 seconds until tone is heard.
"12hr" will appear in display indicating that the control hasreturned to the 12 Hour Energy Savingfeature.
To Set Control for Oven Lockout:
The control can be progammed to lock the oven door and inactivate the oven controls.
To Set Control for Oven Lockout feature:
1. Push the STOP CLEAR pad @ and hold for 3 seconds. "Loc" will appear in display, the "Door Locked" indicator ligth
will flash and the motor driven door lock will begin to close automatically. DO NOT open oven door while the indicator
light is flashing. Allow about 15 seconds for the oven door to lock. Once the oven door is locked, the current time of day
will appear in the display.
display.
2. To cancel the lockout feature, push STOP CLEAR pad @ and hold for 3 seconds. The control will unlock the oven door
and resume normal operation.
Note: If any control pad is pressed while the Oven Door/Control Lockout mode, "Lot" will appear in the display
until the control pad is released.
15
Setting Oven
Controls
FEATURE OVERVIEW
• Timed Bake Feature
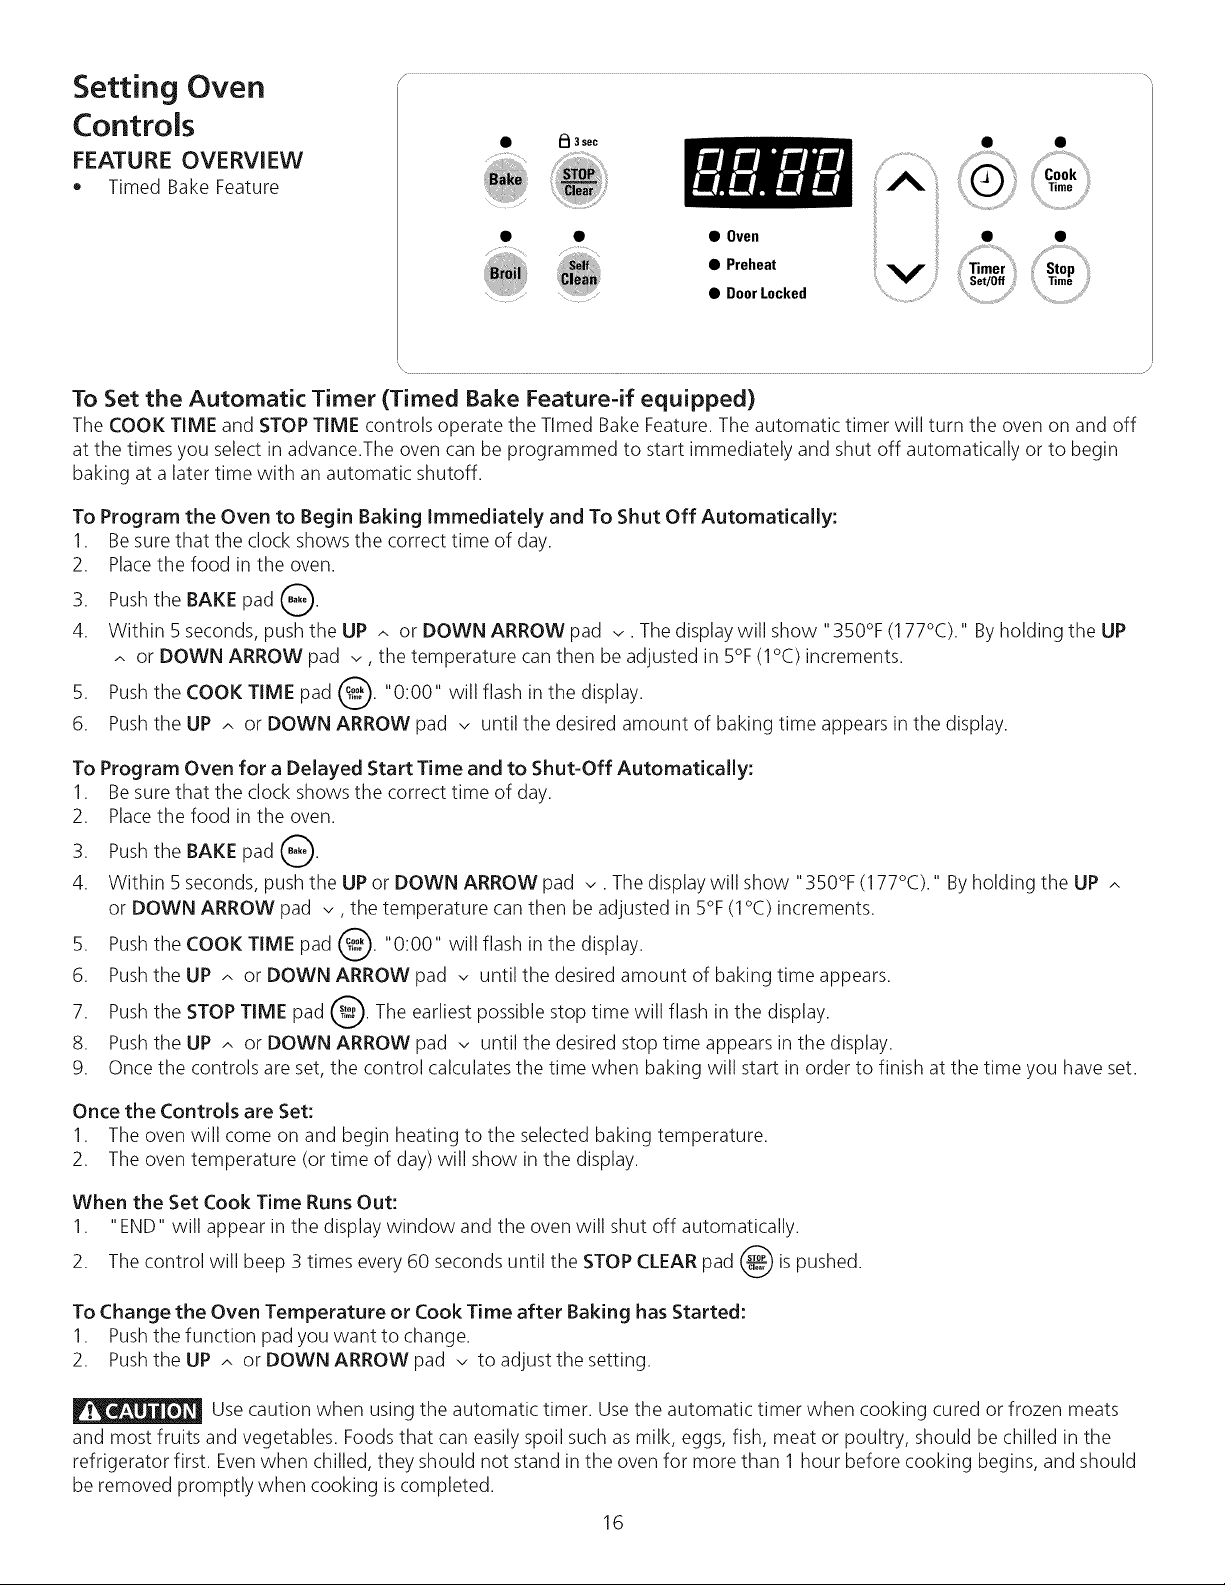
To Set the Automatic Timer (Timed Bake Feature-if equipped)
The COOK TIME and STOP TIME controls operate the Timed Bake Feature. The automatic timer will turn the oven on and off
at the times you select in advance.The oven can be programmed to start immediately and shut off automatically or to begin
baking at a later time with an automatic shutoff.
To Program the Oven to Begin Baking Immediately and To Shut Off Automatically:
1. Be sure that the clock shows the correct time of day.
2. Placethe food in the oven.
3. Pushthe BAKE pad _.
4. Within 5 seconds, pushtheUP ^ or DOWN ARROW pad ,_.Thedisplaywillshow"350°F(177°C). '' Byholding the UP
^ or DOWN ARROW pad -_, the temperature can then be adjusted in 5% (1°C) increments.
iQi 3 sec
ii"Q"'ii..........................................Cook"",
• • Oven • •
_i_ • DoorLocked ......................................
• Preheat V Set/Off Time
Timer Stop
Time
5. Pushthe COOK TIME pad _. "0:00" will flash in the
display.
6. Pushthe UP ^ or DOWN ARROW pad v until the desired amount of baking time appears in the display.
To Program Oven for a Delayed Start Time and to Shut-Off Automatically:
1. Be sure that the clock shows the correct time of day.
2. Placethe food in the oven.
3. Pushthe BAKE pad _'_.
4. Within 5 seconds, push the UP or DOWN ARROW pad v. The display will show "350% (177°C)." By holding the UP ^
or DOWN ARROW pad v, the temperature can then be adjusted in 5% (1°C) increments.
5. Pushthe COOK TIME pad _. "0:00" will flash in the
display.
6. Pushthe UP ^ or DOWN ARROW pad v until the desired amount of baking time appears.
7. Pushthe STOP TIME pad _. The earliest possible stop time will flash in the
display.
8. Pushthe UP ^ or DOWN ARROW pad v until the desired stop time appears in the display.
9. Once the controls are set, the control calculates the time when baking will start in order to finish at the time you have set.
Once the Controls are Set:
1. The oven will come on and begin heating to the selected baking temperature.
2. The oven temperature (or time of day) will show in the display.
When the Set Cook Time Runs Out:
1. "END" will appear in the display window and the oven will shut off automatically.
2. The control will beep 3 times every 60 seconds until the STOP CLEAR pad _ is
pushed.
To Change the Oven Temperature or Cook Time after Baking has Started:
1. Push the function pad you want to change.
2. Pushthe UP ^ or DOWN ARROW pad v to adjust the setting.
Use caution when using the automatic timer. Use the automatic timer when cooking cured or frozen meats
and most fruits and vegetables. Foods that can easily spoil such as milk, eggs, fish, meat or poultry, should be chilled in the
refrigerator first. Even when chilled, they should not stand in the oven for more than 1 hour before cooking begins, and should
be removed promptly when cooking iscompleted.
16
Setting Oven Controls
Oven Baking Informations
For best results, preheat the oven before baking cookies, breads, cakes, pies or pastries, etc. There is no need to preheat the
oven for roasting meat or baking casseroles.
The cooking times and temperatures needed to bake a product may vary slightly from your previously owned appliance.
Refer to "Recalibrating Your Oven Temperature" section.
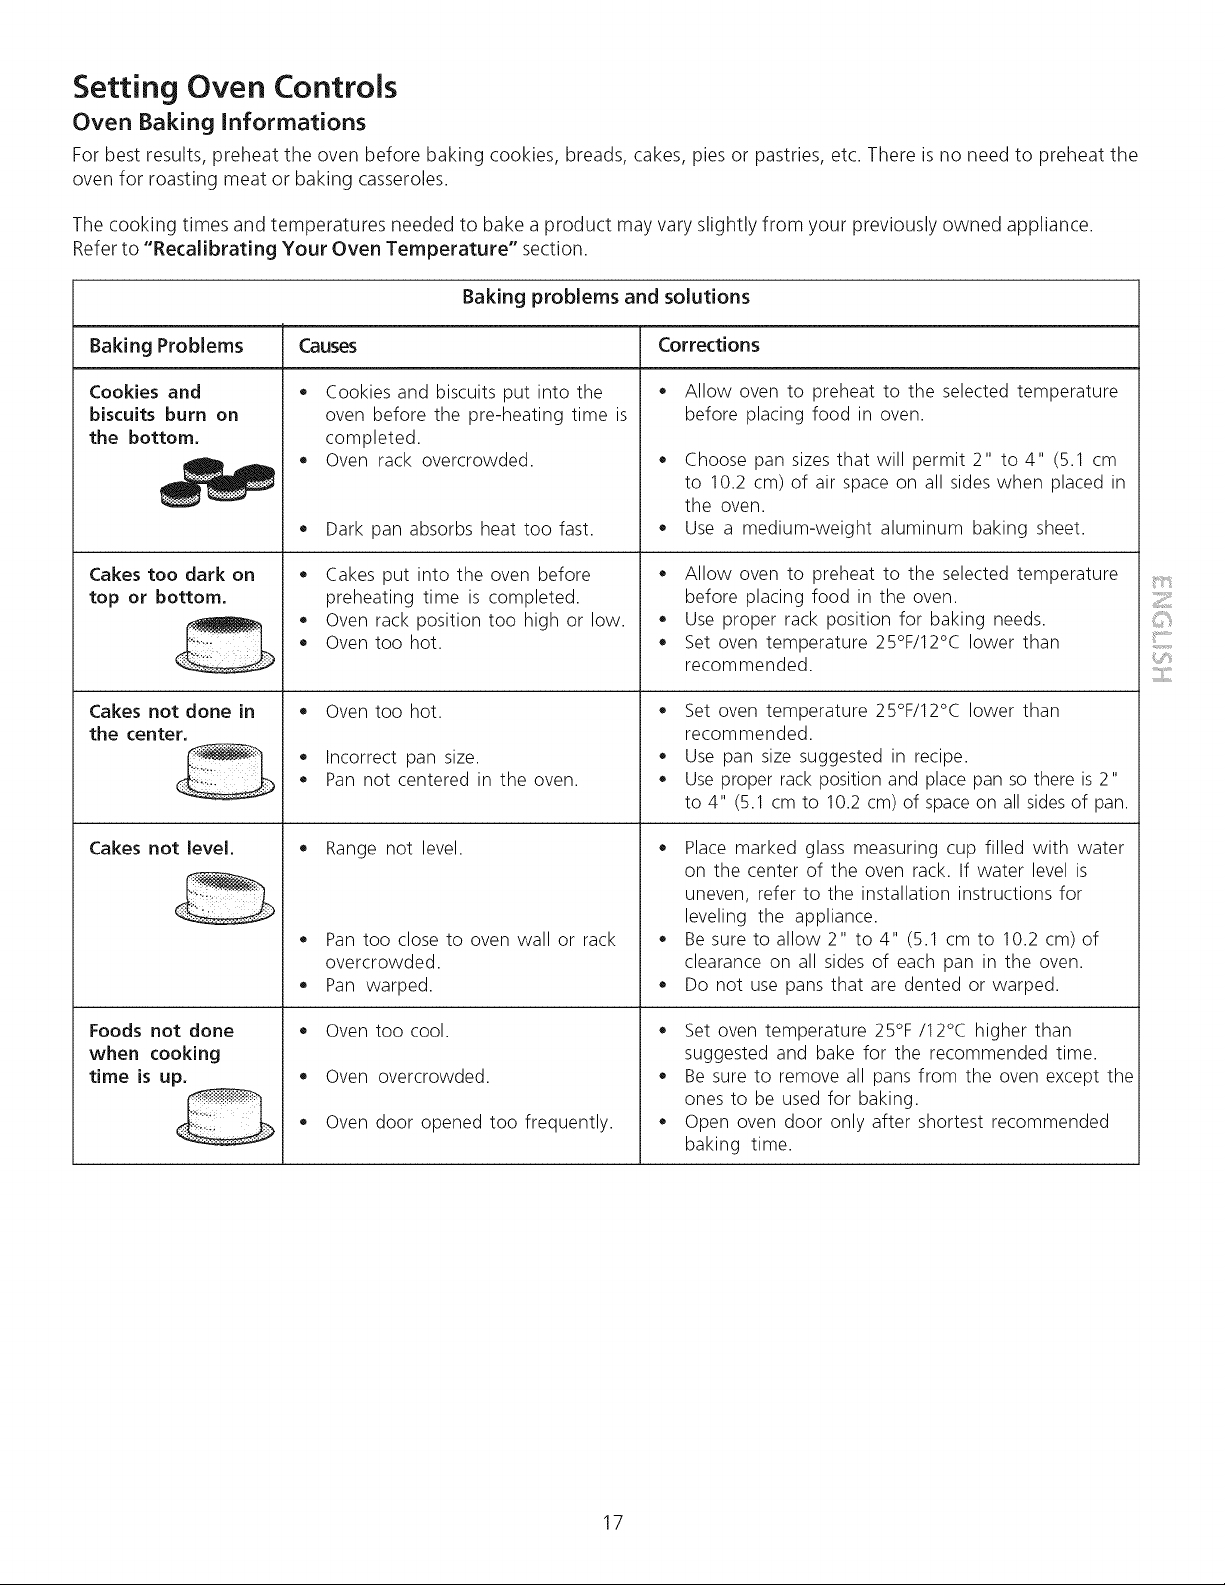
Baking problems and solutions
Baking Problems Causes Corrections
Cookies and
biscuits burn on
the bottom,
Cakes too dark on
top or bottom.
Cakes not done in
the center,
Cakes not level.
e
Cookies and biscuits put into the
oven before the pre-heating time is
completed.
Oven rack overcrowded.
= Dark pan absorbs heat too fast.
= Cakes put into the oven before
preheating time is completed.
= Oven rack position too high or low.
= Oven too hot.
= Oven too hot.
= Incorrect pan size.
= Pan not centered in the oven.
= Range not level.
= Pan too close to oven wall or rack
overcrowded.
= Pan warped.
= Allow oven to preheat to the selected temperature
before placing food in oven.
= Choose pan sizes that will permit 2" to 4" (5.1 cm
to 10.2 cm) of air space on all sides when placed in
the oven.
= Use a medium-weight aluminum baking sheet.
= Allow oven to preheat to the selected temperature
before placing food in the oven.
= Use proper rack position for baking needs.
= Set oven temperature 25°F/12°C lower than
recommended.
= Set oven temperature 25°F/12°C lower than
recommended.
= Use pan size suggested in recipe.
= Use proper rack position and place pan so there is 2"
to 4" (5.1 cm to 10.2 cm) of space on all sides of pan.
= Place marked glass measuring cup filled with water
on the center of the oven rack. If water level is
uneven, refer to the installation instructions for
leveling the appliance.
= Be sure to allow 2" to 4" (5.1 cm to 10.2 cm) of
clearance on all sides of each pan in the oven.
= Do not use pans that are dented or warped.
Foods not done
when cooking
time is up,
= Oven too cool.
= Oven overcrowded.
= Oven door opened too frequently.
= Set oven temperature 25°F/12°C higher than
suggested and bake for the recommended time.
= Be sure to remove all pans from the oven except the
ones to be used for baking.
= Open oven door only after shortest recommended
baking time.
17
Setting Oven
Controls
FEATURE OVERVIEW
- Broil
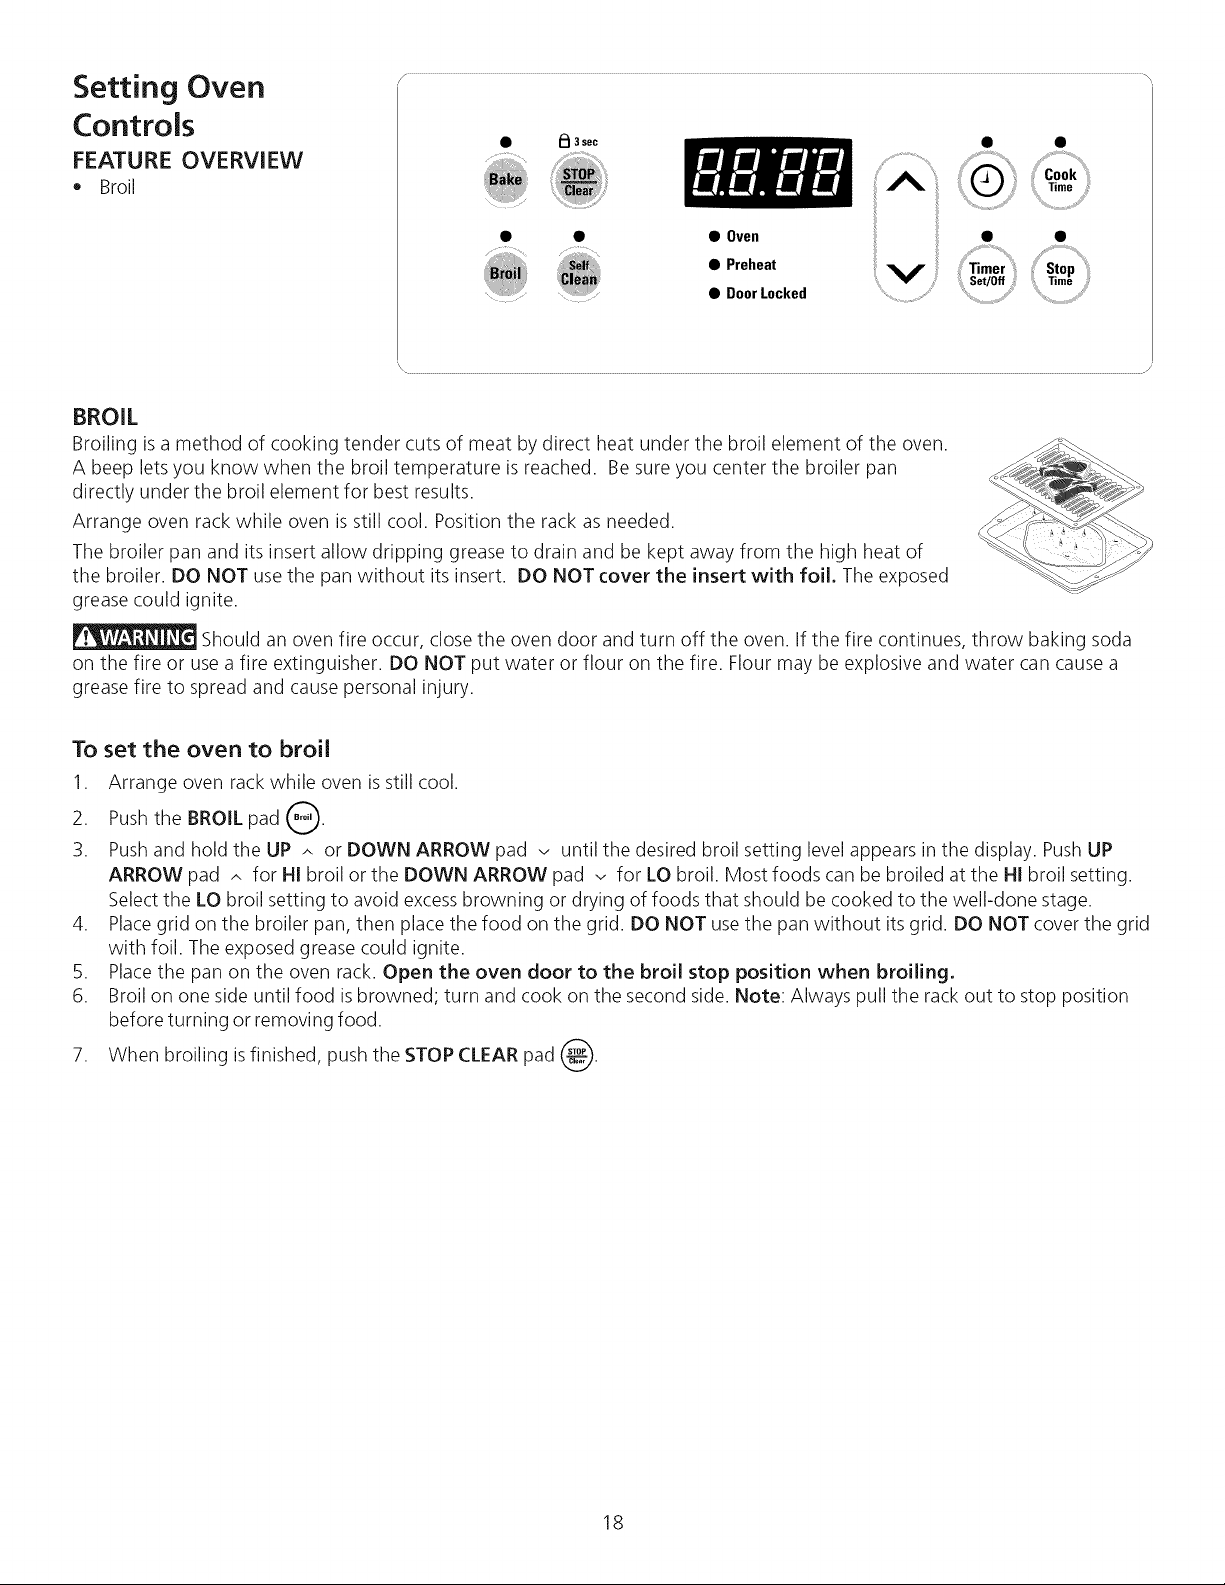
BROIL
Broiling is a method of cooking tender cuts of meat by direct heat under the broil element of the oven.
A beep lets you know when the broil temperature is reached. Be sure you center the broiler pan
directly under the broil element for best results.
Arrange oven rack while oven isstill cool. Position the rack as needed.
The broiler pan and its insert allow dripping grease to drain and be kept away from the high heat of
the broiler. DO NOT use the pan without its insert. DO NOT cover the insert with foil. The exposed
grease could ignite.
Should an oven fire occur, close the oven door and turn off the oven. If the fire continues, throw baking soda
on the fire or use afire extinguisher. DO NOT put water or flour on the fire. Flour may be explosive and water can cause a
grease fire to spread and cause personal injury.
iQi 3 sec
ii"Q"'ii..........................................Cook"",
• • Oven • •
_i_ • DoorLocked ......................................
• Preheat V Set/Off Time
Timer Stop
Time
To set the oven to broil
1. Arrange oven rack while oven isstill cool.
2. Push the BROIL pad G
3. Pushand hold the UP ^ or DOWN ARROW pad v until the desired broil setting level appears in the display. Push UP
ARROW pad ^ for HI broil or the DOWN ARROW pad ,/ for LO broil. Most foods can be broiled at the HI broil setting.
Select the LO broil setting to avoid excessbrowning or drying of foods that should be cooked to the well-done stage.
4. Placegrid on the broiler pan, then place the food on the grid. DO NOT use the pan without its grid. DO NOT cover the grid
with foil. The exposed grease could ignite.
5. Placethe pan on the oven rack. Open the oven door to the broil stop position when broiling.
6. Broil on one side until food isbrowned; turn and cook on the second side. Note: Always pull the rack out to stop position
before turning or removing food.
7. When broiling is finished, push the STOP CLEARpad _.
18
 Loading...