

Kenmore 580.76t, 76100 - 10, 000 BTU Single Room Air Conditioner Owner's Manual
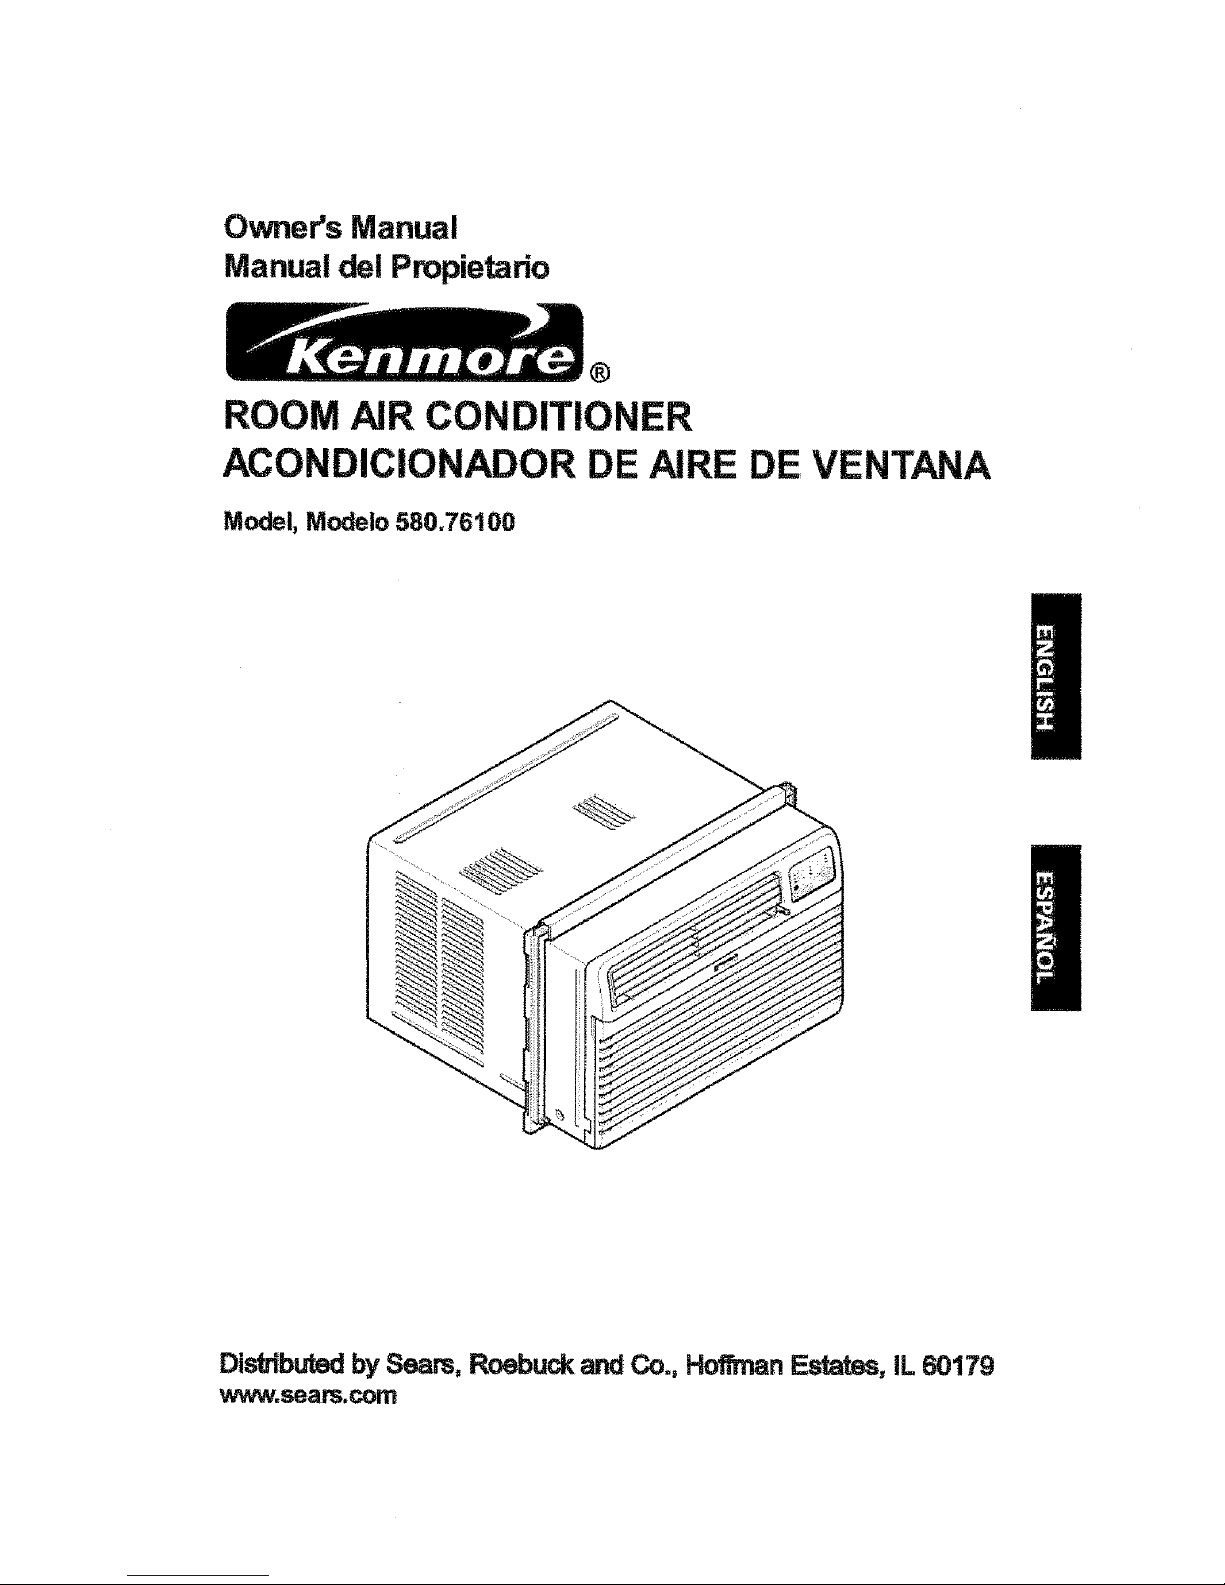
OwneYs Manual
Manual dei Propietario
®
ROOM AIR CONDITIONER
ACONDICIONADOR DE AIRE DE VENTANA
Model, Modelo 580.76t 00
Distributed by Sears, Roebuck and Co., Hoffman Estates, IL 60179
wv_f, seal_com
TABLE OF CONTENTS ........................2
WARRANTY ..............................................2
SAFETY, .....................................................3
ImportantSafety Instructions...................... 3
ELECTRICAL REQUIREMENTS .......4
INSTALLING THE POWER CORD .......4
iNSTALLATION ........................................5
Installation Requirements ......................... 5
Installation ................................................ 6
How to Install ............................................ 6
Removal from Window................................. 8
OPERATION .............................................9
How and Why ........................................... 9
Normal Sounds ........................................ 9
Capacity and Running Time ..................... 9
Features ..................................................I0
Us{ngthe Air Conditioner ....................... .t0
ControlPanel..........................................11
Remote Control ...................................... 12
MAINTENANCE .....................................13
Air Filter Cleaning ................................... 13
Air Conditioner Cleaning ........................ 13
Howto Remove the Front Grille.................. 13
How to Replace the Front Grille.................. 13
TROUBLESHOOTING .........................14
BeforeCallingforService......................14
ESPAI_OL ................................................15
MASTER PROTECTION
AGREEMENTS ......................................30
SERVICE NUMBERS ............Back Cover
FULL ONE YEAR WARRANTY ON
ROOM AIR CONDITIONER
For one year from the dateof purchase, whenthis
airconditioneris operatedand maintained for
normal room cooling according to theinstructions
inthis owner'smanual, Searswillrepair thisair
conditioner, free of charge,if defective in material or
workmanship.
FULL FIVE-YEAR WARRANTY ON
SEALED REFRIGERATION SYSTEM
For five years from the date of purchase, when this
air conditioner is operated and maintained for
normal room cooling according to the instructions
in this owners manual, Sears wilt repair the seated
refrigeration system (consisting of refrigerant,
connecting tubing, and compressor), free of charge.
if defective in material or workmanship.
WARRANTY SERVICE IS AVAILABLE BY
CONTACTING SEARS SERVICE AT
1-800-4-MY-HOME e.
Warranty coverage applies only to air condiSoners
used for non-commercial, private household
purposes.
This warranty applies only while this product is in
use in the United States.
This warranty gives you specific legal dghts, and
you may aLso have other right which vary from state
to state.
Distributedby Seam, Roebuckand Co,,
Hoffn"ranEstates, IL80179
-2-
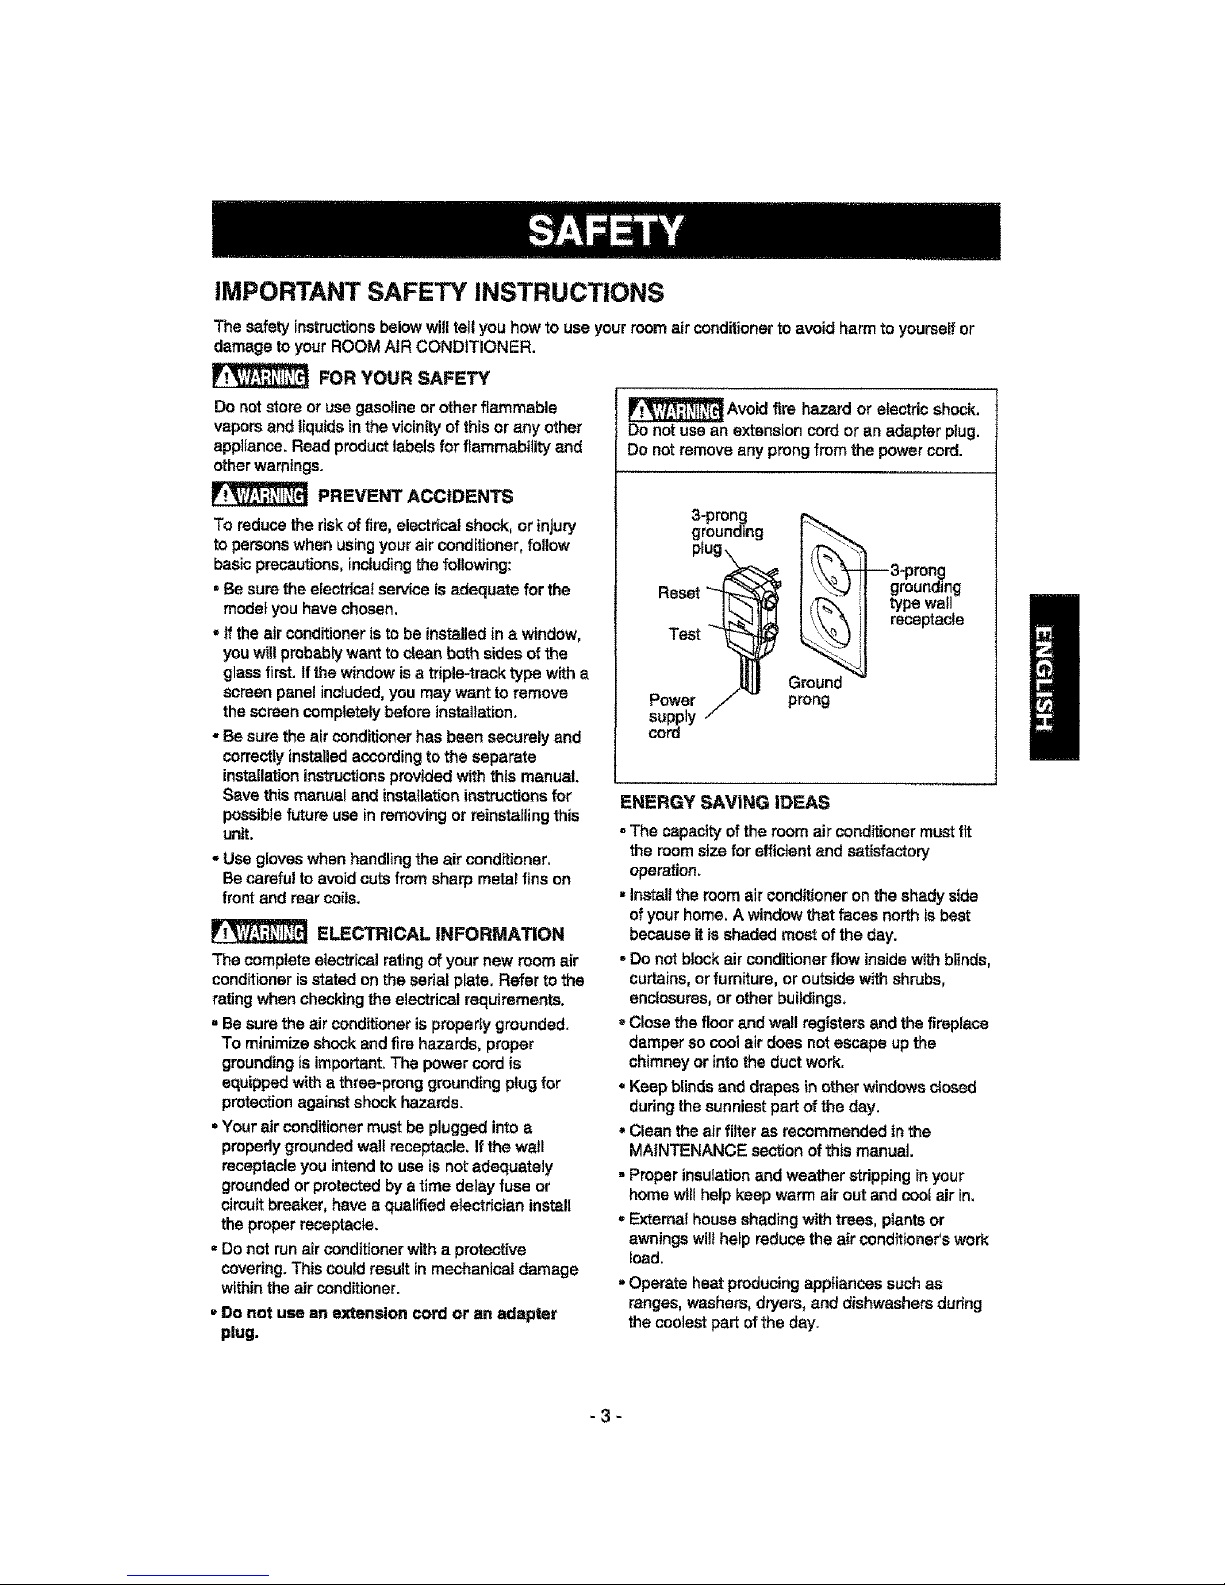
IMPORTANT SAFETY INSTRUCTIONS
The safetyinstructionsbelowwilltellyou howto useyour roomair conditionertoavoidharmto yourselfor
damage to yourROOMAlR CONDITIONER.
FOR YOUR SAFETY
Do netstoreor use gasolineorotherflammable
vaporsand liquids in thevicinityofthisor anyether
appliance,Readproductlabelsfor flammability and
otherwarnings.
PREVENT ACCIDENTS
To reducethe riskof fire,electr_c,al shock,or injury
to personswhenusingyour airconditioner,follow
basicprecautions,includingthe following:
• Besure the electrica!serviceis adequate forthe
modelyouhavechosen.
. tfthe air conditioneris tobe installed in a window,
youwillprobablywantto cleanboth sidesof the
glassfirst. Ifthe windowis atriple-tracktype witha
screenpanelincluded,you may want to remove
the screencompletelybefore instaUation.
• Be surethe air conditionerhasbeen securelyand
correctlyinstalledaccordingto the separate
installation instructionsprovidedwiththis manual.
Save this manual and insta{lationinstructionsfor
possiblefuture use inremoving or reinstallingthis
unit.
- Use gloves whenhandlingtheair conditioner.
Be carefulto avoidcutSfrom sharpmetal finson
frontandrearcoils.
ELECTRICAL INFORMATION
The completeelectrical rat}ngof yournew room air
conditioneris statedon the serial plate, Referto the
rating whencheckingtheelectricalrequirements.
. Be surethe air conditioner is properly grounded.
To minimize shockand fire hazards, proper
groundingis important.The power cord is
equipped witha three-pronggroundingplug for
protectionagainstshockhazards.
• Your airconditionermust be pluggedintoa
propedygroundedwall receptacle, Ifthe wall
receptacleyou intendto useis notadequately
grounded orprotectedby atime delayfuse or
circuitbreaker,have aqualified alectrielan install
the properreceptacle.
, Do not runair conditionerwitha protective
covering.Thiscouldresult in mechanical damage
withinthe airconditioner.
, Do not use an extension cord or an adapter
plug.
Avoid fire hazard or electric shock.
Do not use an extension cord or an adapterplug.
Do notremoveanyprongfrom the powercord.
Test _ _
--3-prong
grounding
type wall
receptacle
ENERGY SAVINGIDEAS
=The capacityof the room air conditionermust fit
the room size forefficientand satisfactory
operation.
=Installthe room air conditioneronthe shadyside
ofyourhome,Awindowthat facesnorthis best
becauseitis shadedmostof the day.
- Do not block air conditionerflowinsidewithblinds,
curtains,orfurniture, or outside withshrubs,
enclosures,or other buildings_
- Closethe floor and wall registersand thefireplace
damperso cootair does notescape upthe
chimneyorinto theductwork.
oKeepblindsand drapes inother windows closed
duringthe sunniestpartof the day.
• Cleantheair filteras recommendedinthe
MAINTENANCE sectionofthismanual
. Properinsulationand weather strippinginyour
homewill helpkeep warmair out and cool air in,
,,External house shadingwithtrees, plantsor
awningswilthelp reduce the air conditioce¢swork
load.
•Operateheat producingappliances suchas
ranges,washers,dryers, and dishwashers durfng
the coolest part of the day.
-3-
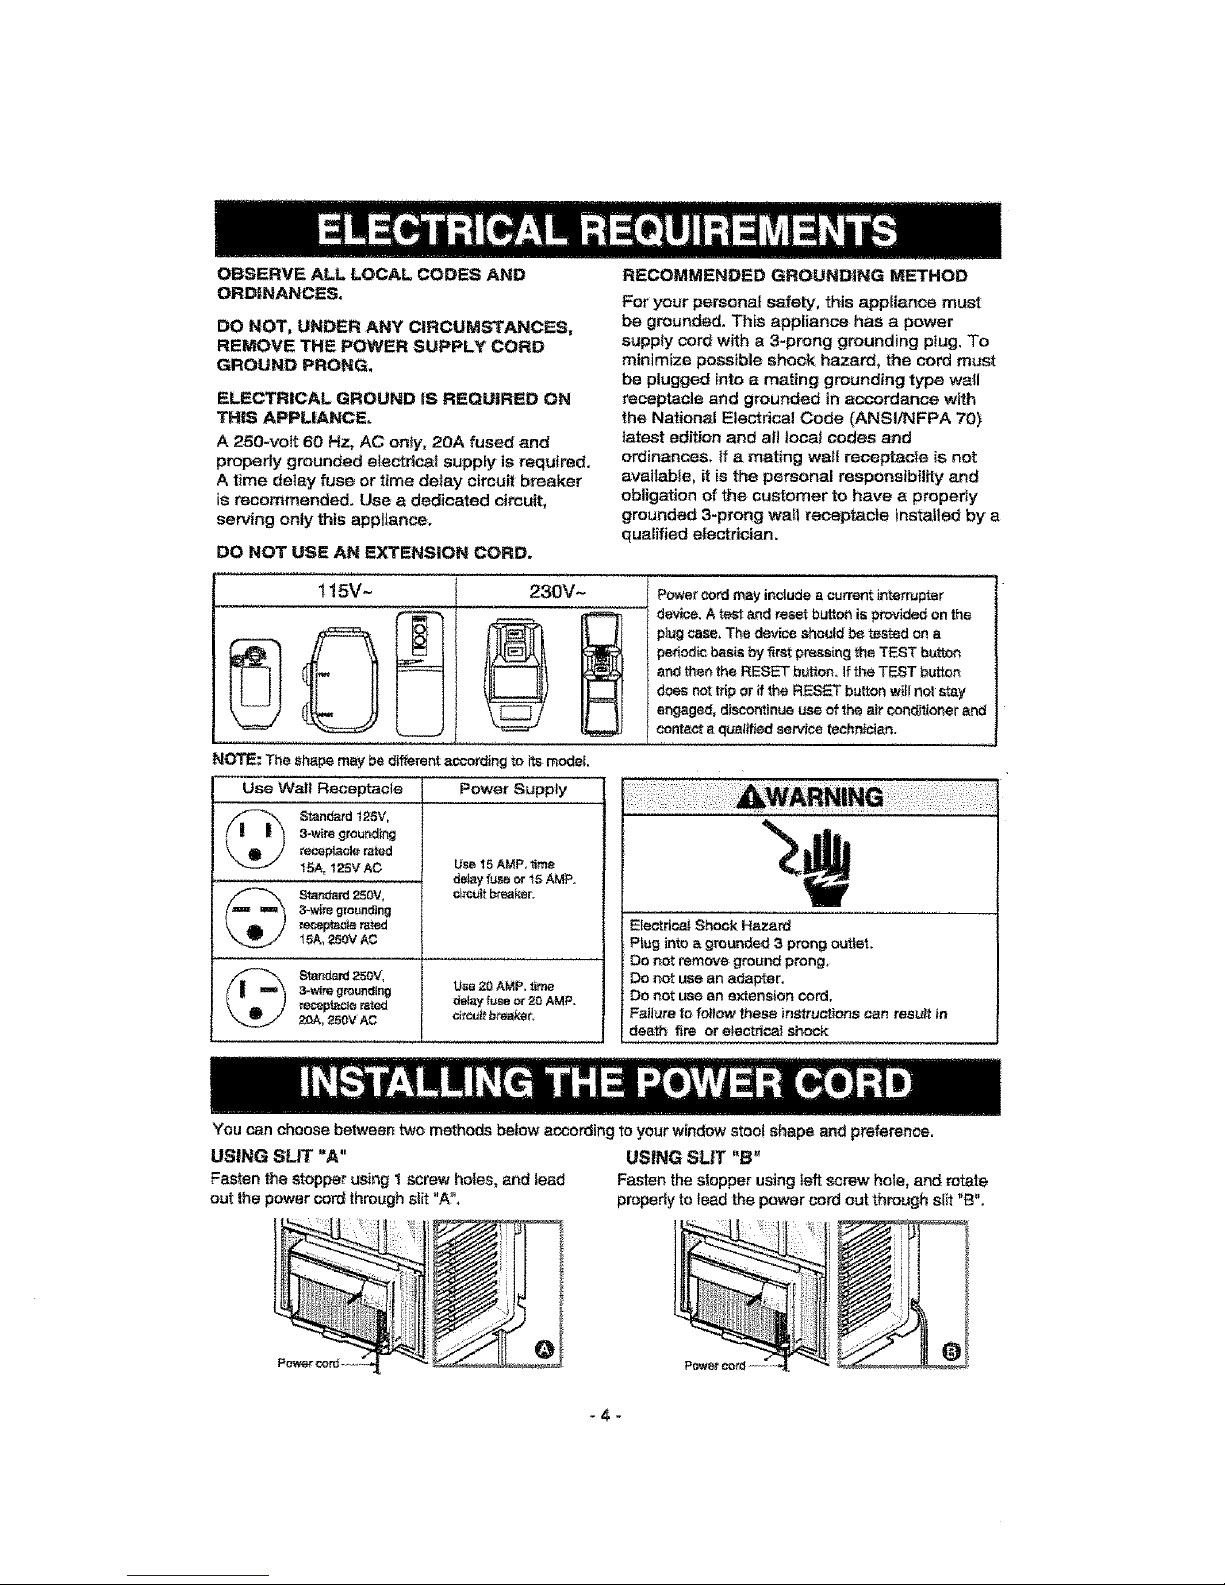
OBSERVE ALL LOCAL CODES AND
ORDINANCES.
DO NOT, UNDER ANY CIRCUMSTANCES,
REMOVE TH_ POWER SUPPLY CORD
GROUND PRONG.
ELECTRICAL GROUND iS REQUIRED ON
THiS APPLIANCE.
k 250-volt 60 Hz, kC onty, 20A fused and
properly grounded e_ectrica_ supply is required.
A time detay fuse or time deiay circuit breaker
is recommended. Use a dedicated circuit,
serving only this appliance.
DO NOT USE AN EXTENSION CORD.
RECOMMENDED GROUNDING METHOD
For your personal safety, this appliance must
be grounded. This appliance has a power
supply cord with a 3-prong grounding plug, To
minimize possible shock hazard, the cord must
be plugged into a mating grounding type wall
receptacle and grounded in accordance with
the National Electrical Code (ANSI/NFPA 70)
latest edition and all loca!codes and
ordinances, if a mating wail receptacle is not
available, it is the personal responsibility and
obligation of the customer to have a property
grounded 3-prong wall receptacle installed by a
qualified electrician.
115V~
2aOV~
Powercordmayinc|ude a currentinterrupter
dev*_.._.A test and reset buttot_is providedon the
plug_, The device shouldb_ tested on a
ped_dicbasisby f_rstpressing _heTEST butt_m
and_en the RESET"b_tton.Ifthe TEST button
does nott_ipor ifMe RESET buttonwillnotstay
engaged, discontinue use of the air condIlionerand
contact0qu0#fied service techn_cien.
NOTE: The shape may be d;fferentaccording _e itsmodel
Use Wail Receptacle Power Supply
_I ,_ 5_andardt25V,
3-_re grouttdtng
receptaclerated
15A, 125VAC UseJ5AMP,_me
.................. de_y fLIse Or_5AMP,
Standard 250V, ,circuitbreaker.
a-w_m grounding
Ie_pt_t_ r_d
15A,?_50VAC
St_r_ord25or.
3-w_re grounding
_cept_c_on_ted
2:0_.._OV AC
Use;20AMP.t_e
de_ay_uBeor20AMP.
Electr|ca_ Shock Haza_
Plugintoa grounded 3 prong outlet.
Do not remove ground prong,
De notuse an adapter.
Do not use an extension cord,
Failure to f_low these inStruclJone can result tn
death fire or aieetdca_ shock
You canchoose between two methods below according to your windowstool shape and preference.
USING SLIT "A"
Fastenthe stopperusing I screw holes,and tead
out the power cordthroughslit "A",
USING SLIT "B"
Fastenthe stopper using leftscrewhole, and rotate
prc_perfyto lead the power cord outthrough slit"B".
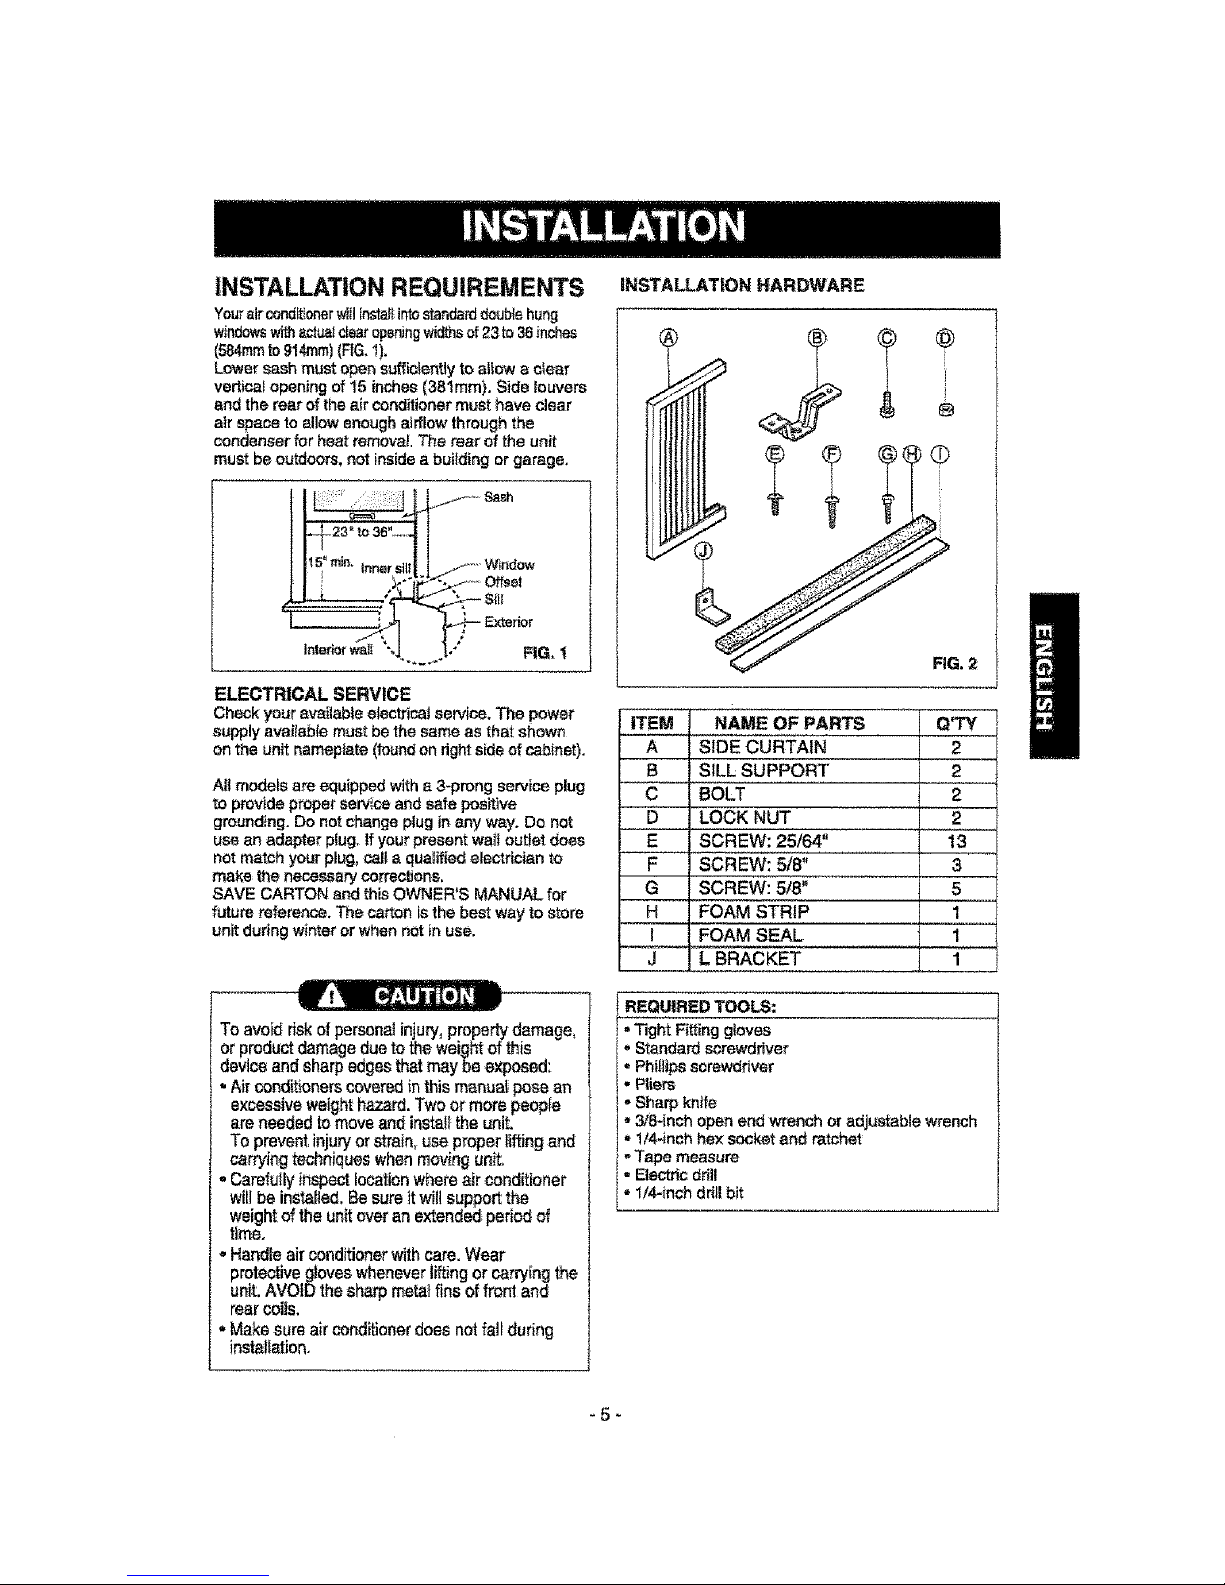
INSTALLATION REQUIREMENTS
Yoursirconditionerwillirrstalintostandarddoublehung
w_ndowswith_ctuatclearopeningwidthsof 23to38inches
(584mmto914mm)(FIG,1),
Lowersashmust open sufficientlyto allow a e_eer
verticalopening of t_5inches(381mm), Side louvers
andthe rear ofthe alr conditionermust haveclear
air spacetoallow enoughairflow throughthe
condenserfor heat removal.The rear of the unit
must beoutdoors,not insidea building or garage,
I I /_-- Sash
,_ Exterior
lnlet_orw_1%J ..... ," RG, t
ELECTRICAL SERVICE
Check your availableelectrical service. The power
st@plyavalabte must be the same as that shown
on the unit nameplate(foundon dghtside of Pab_net).
All models are equipped with a 3-prong service plug
to provide proper service and safe positive
grounding. Do not change plug in any w_y. Do not
use an adapter plug, if your present wal outlet does
not match your plug, c81 a qualfied electrician to
make the necessart correc4_ons,
SAVE CARTON and this OWNER'S MANUAL for
future reference. The Patton Is the best way to store
unit during wfnter or when not in use.
Toavoid risk of personal injury,property damage,
or product damage duetothe weightof this
device and sharpedgesthat may be exposed:
• Air conditioners coveredin thismanual pose an
excessive weighthazard. Two or morepeopfe
are needed tomove and install the unit
To prevent injuryorstrain, use proper lifting and
car_ing techniques when moving unit
. Carefu|ly inspect iocalonwhere air conditioner
willbe instaled. Be sure ttwillsupport the
weightof the unt over an extended period of
time,
- Handle air conditioner withcare, Wear
protective gloves wheneverliftingor carryingthe
unit. AVOID the sharp motetfins of front and
rear coils.
, Makesure air conditioner does notfall during
installation.
INSTALLATION HARDWARE
NAME OF PARTS
A SIDE CURTAIN
B SILL SUPPORT
C BOLT
D LOCK NUT
E
F
G
H
I
J
2
2
2
2
SCREW: 25164" 13
SCREW: 5/8" 3
SCREW: 5/8" 5
FOAM STRIP 1
-- FOAM SEAL i......................
L BRACKET t 1
REQUIRED TOOLS:
=Tight Filing gloves
,' Standard screwdrive_
- Phillips screwdriver
, Pliers
- Sharp knife
• 3tSAnch open end wrench or adjustable wrench
. lt4-inch he× socket and ratchet
Tape measure
- Bectric drill
• ll4-mch drill bit
-5-
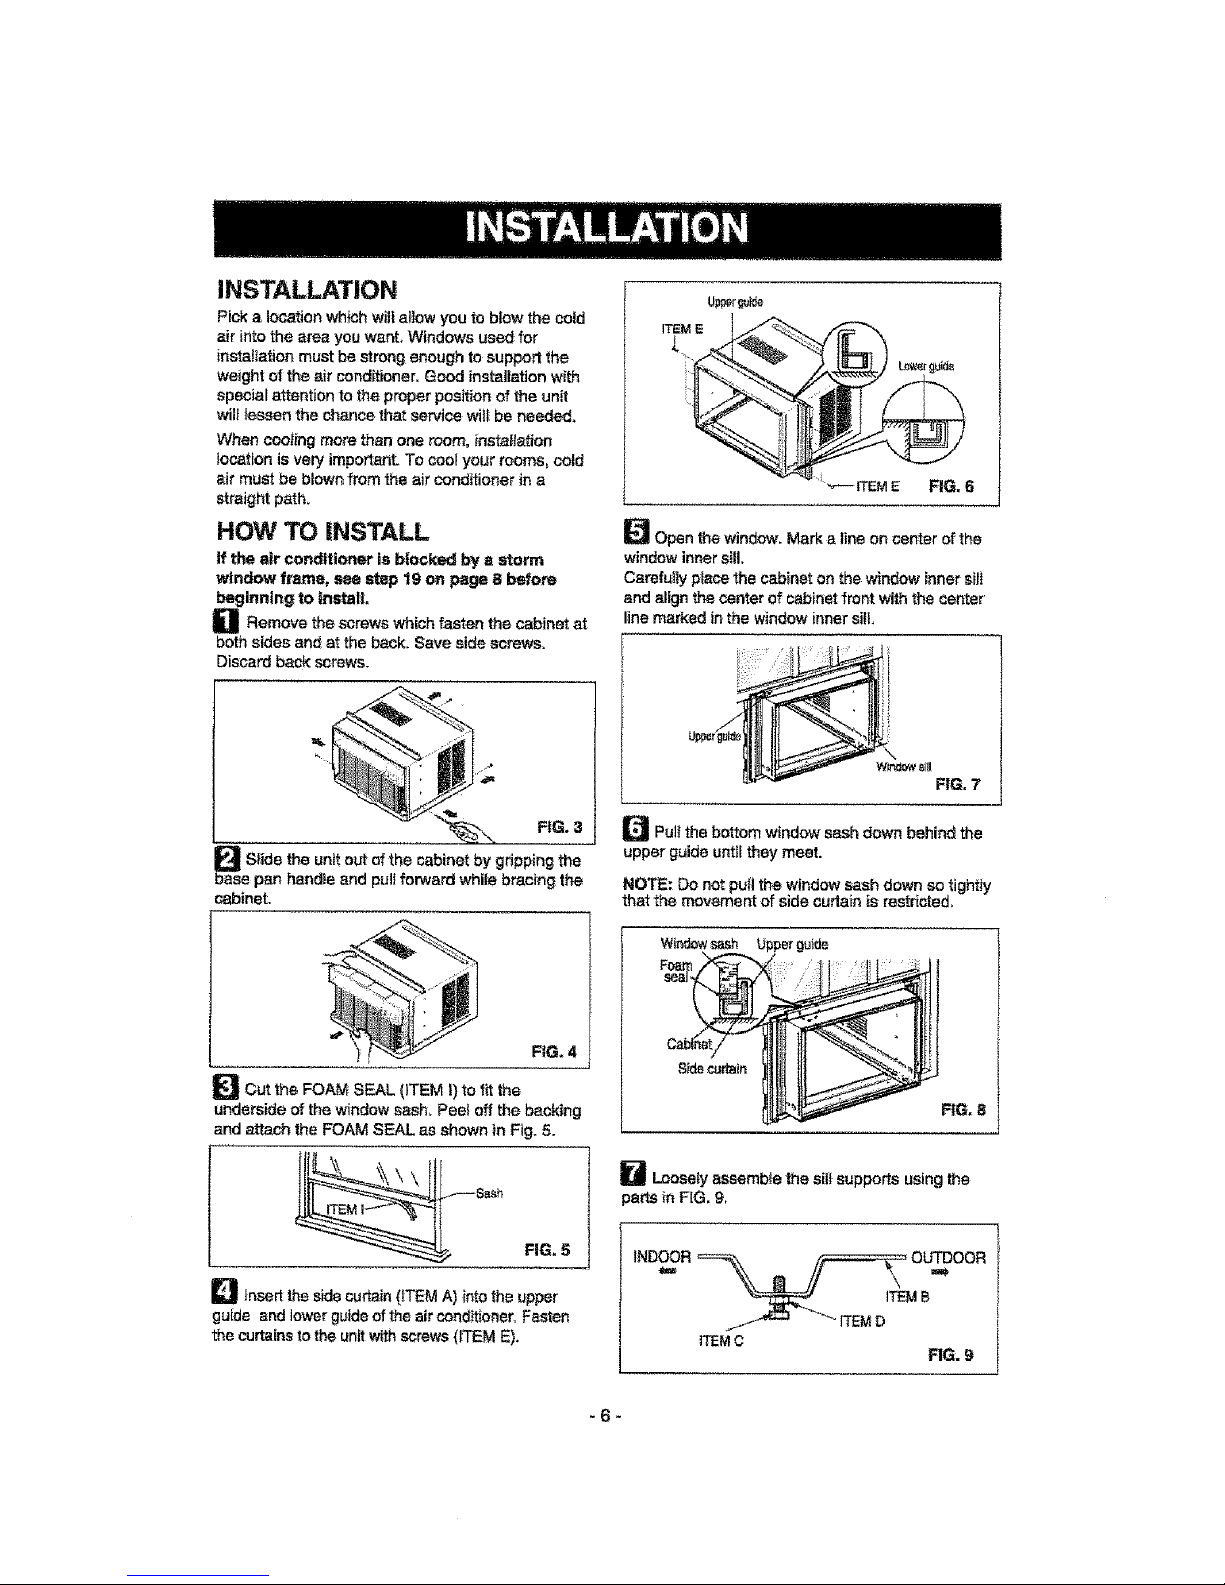
INSTALLATION
Pick a location wh_h wi_lallow you to blow the cold
air into the area you want, Windows used for
installation must be strong enough to support the
weight of the air conditioner_ Gcod installation with
special attention to the proper position of the unit
wilt tessen the chance that service wi_tbe needed,
When cooling more than one room, instalta_on
location is very important. To coo! your morns, cold
sir must be blown from the sir conditioner in a
straight path.
HOW TO INSTALL
if the air conditioner is blacked by a storm
window frame, see step 19 o_npage 8 befo_e
bsglnnlng to install
_]1 Flemove the screws which fasten the cabinet at
both sides and at the back. Save side screws.
Discard b_ck screws.
p S_ide the unit out of the _abit'rat by gdpping the
ass pan handle and pull forward while bracing the
cabinet.
FiG. 4
_Cut the FOAM SEAL {iTEM 1)to fit the
underside of the window st,sh, Pee_ off the backing
and attach the FOAM SEAL as shown in Fig. 5.
FIG, 5
D insert the side curtain {ITEM A) into the upper
guide and towsr guide of the air cond_oner, Fasten
the curtains to the unit w_h screws (tTEM E},
ITEM5" RG. 6
_Open the window. Mark a line on cen_er of the
window inner sill,
Carefuliy place the cabinet on the window tuner sill
and align the center of cabinet front with the center
line marked in the window inner sill,
D PulI the bottom window sash down behin_ the
upper g_ide until they meet.
NOTE: Do not pull the window sash down so tightly
that the movement of side curla_n is restricted=
F_G. 8
_ Loosely assemble the silt supports using the
parts in FIG, 9,
_TEMB
ITEMC
FIG. 9
-6-
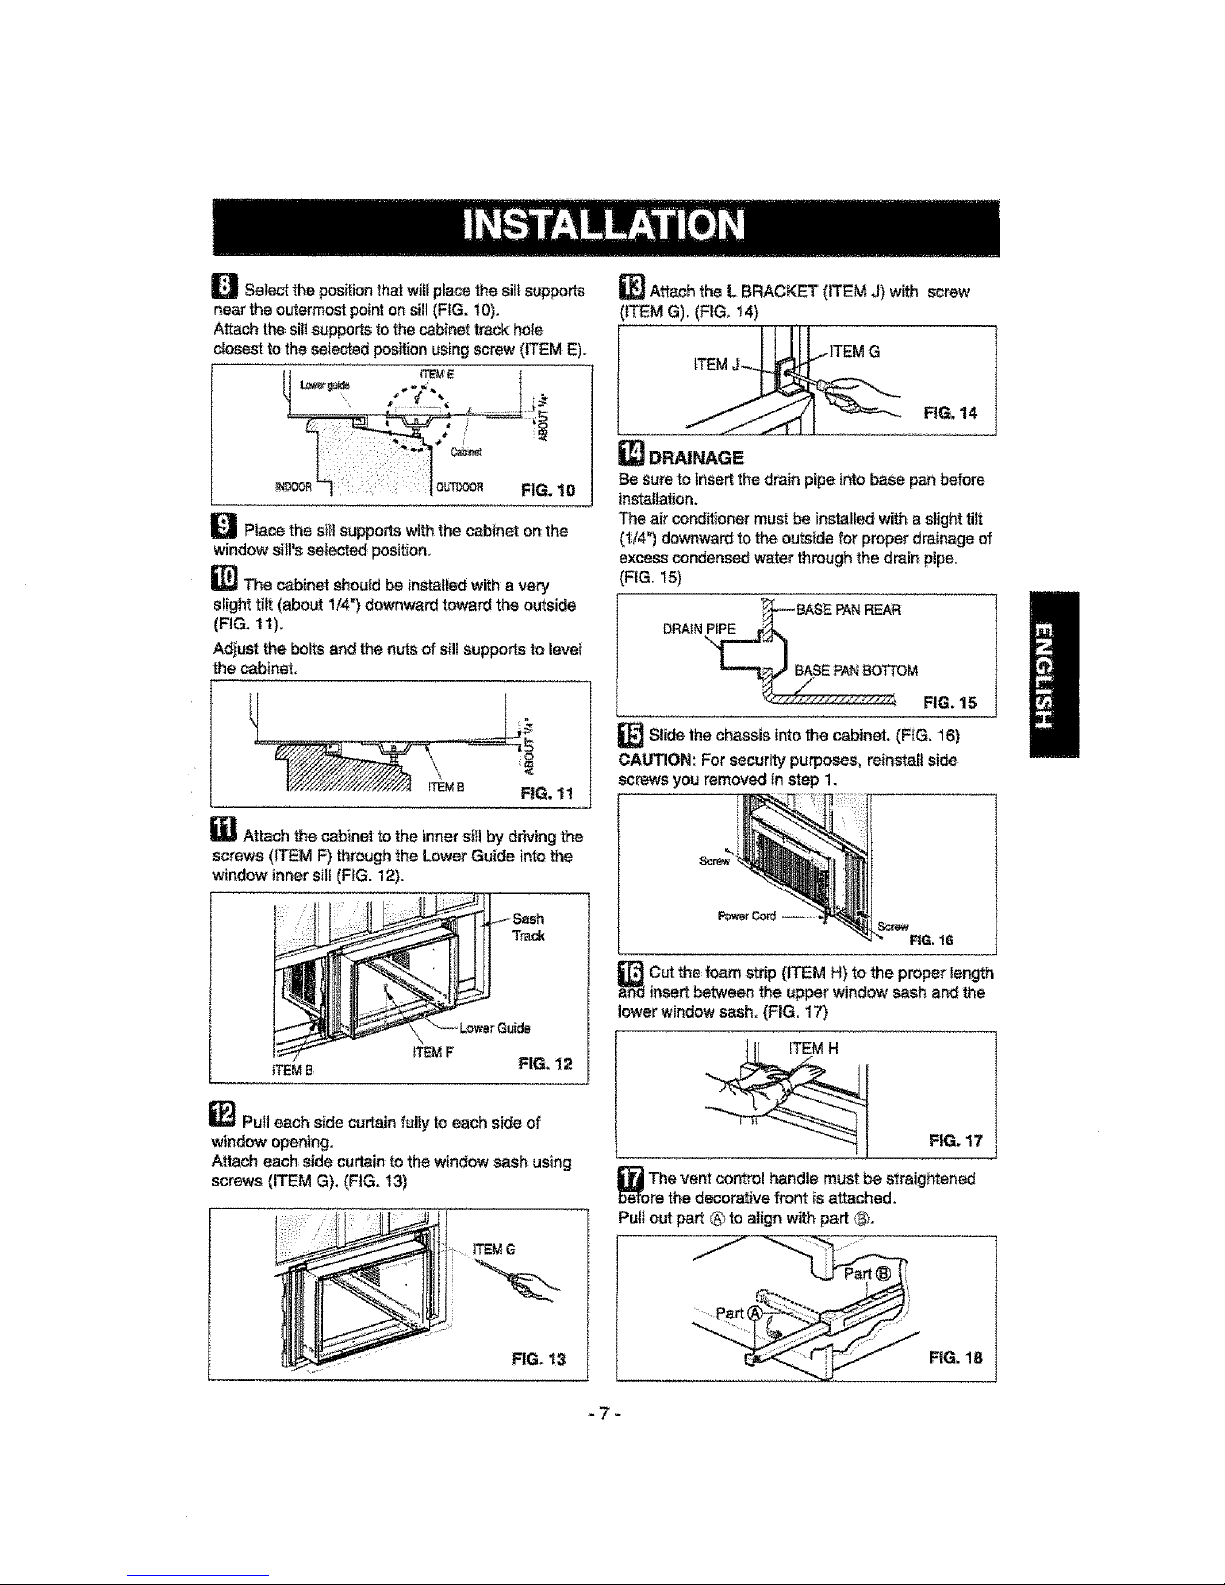
Q Select the pcsition that wifl place the silt supports
near the outermost point on sill (FIG. 10).
Attach the: sitlsupports to the cabinet track hole
ctosest to the selected position using screw (ITEM E).
O Place the s}i! supports with the cabinet on;the
window sill's selected position.
[]The cabinet should be inSt_lted with a very
slight tilt (about 1!4") downward toward the outside
(FIG. tl).
Adjust the bolts end the nuts of s_llsupports to leve_
the cabinet.
_TEMB F_G, 11
W Attach _ cabinet to the inner sill by driving the
screws (ITEM F) through the Lower Guide i_o the
window inner sili (FIG. 12).
f _ _-_ kow0rGuide
_TEMB FIG. 12
_Pull each sidecurtainfully to each sideof
window opening,
Attach each side curtainto the windowsashusing
screws (ITEM G). (FIG. 13)
_ Attach the L BRACKET (ITEM J) with screw
(iTEM G). (F_G. _4)
FiG. 14
_ DRAINAGE
Be sure to Insert the drain pipe into base pan before
Instatlat_on.
The air conditfoner must be installed with a slightUtt
(_/4 ") downward to the outside for proper drainage of
excess condensed water t-}rough the drain pipe.
(FtG,is)
D'N_ -BASEPA'"EA" ]
_OTTOM F'G'" 1
_ Slide the chassis into the cabinet.
(F}G.16)
CAUTION: For security purposes, reinstall side
screws you removed In step 1.
l
RG, 16
a_Out the: foam strip {ITEM H) to the proper length
insert between t_ upper window sash and the
lower window sash. (FIG. 17}
FIG. 17
_oThe vent control handle must be
straightened
re the decoretive front is attached.
Puli out part _ to align with part _3.
FiG. 1B
-7-

_ FRONT INSTALLATION
Instali the front grille(packed separately) onto. f_e
cabinet as follows:
• Hook upper tabs of front grille into slots on the
cabins top_ (FIG, 19}
= Push front gdlWs tips towards the cabinet in order
to snap side tabs intothe cabinet. {FIG. 19)
, Open the inlet grille. (FIG. 20)
, Install the ecr_t_ (ITEM E) through the front gri|te.
(FIG, 20>
- Close inletgrille. (FIG. 2i}
Front tnetatlatlo_
RG. 19
tl'£M -?_.
FrontInstallation
FIG, 20
Front installation
FIG. 21
_IF AIR CONDITIONER IS BLOCKED ;BY
STORM WINDOW FP,_ME
• tf storm windowpresentsinterference,f_sten a 2"
widewoodstripto theinnerwindowsillacrossthefull
widthofthesillThewoodstripshouldbe thick
enoughtoraise the heightof the windowsiil so that
the unit can beinstalledwithoutinterferencefrom the
thestormwindowframe. See FtG.P2.
Top of wood strip should be approximately 3/4"
higher than the storm wir_ow frame to help
condensation to drain properly to the outside,
, Install a second wood strip (approximately 6° long by
1V2_wide and same thickness as first strip) in the
center of the outer sill _h against the back of the
inner sill Screw the L brackets into this strip.
This will raise the L bracket as shown in FIG. 22.
11F,#mlr_.
WOODSTRIPMOUNTED {38mm_
ON TOP OF INNE-3'_SILL _ _ E3_,__,_
"I" I / #_"'_ WINDOW
_NNER ILBRACKET/ L FRAME
k I
J"=_l I ou_mE
FIG. 22
REMOVAL FROM WINDOW
• Turn offand unplug the air conditioner.
• Removethe front _Iie_ See HOW TO REMOVE THE
FROI'_ GF_ILLE,Referto page t3,
• Unscrew thesidescrews thatyou installedinSt_,,p15.
•Slide the air conditione_outof_e cabinet.
BE CAREFUL NOT TO DROP iT, Hold onto it _im_Iythe
_,vholewayslidingitou_:.Once removed, set it safetyout
of theway,
• Remove the L bracket from window frame and the sash
sealfrom betweenthewir_Iows.
- Unscrew thes,idecurtains from thewindowframe. Fold
thsm back to the s_es of thecabinet.
, Remove screws attaching cabinetto inner sill Be carefuI
not tolet cabinet fall once screws ate remo_,
• Removecabinet from window opening.
• Piece air conditioner intocabinet. Reinsta]_sidescrews
and FrontGrilie.
, Place unit _nd allassembly hardware in air conditioner
s_ipping carton, and store in ck_an,dr/piece.
, Air conditionerscovered in this m_nua_pose_n
excessiveweight hazard.Two or more people
are neededto moveand instal/the unit,
To preventinjury orstrain,use proper filling and
caring techniqueswhenmoving unit,
=Whenhandling the air conditioner, be carefu_to
avoid cutsf_omsharp metal fins on front and
rear colts,
• Make sure air conditioner does not _il during
removal.
-8-
HOW AND WHY
Your room air conditioner provides the following
functions to make hot weather I]ving more
comfortable:
• Cools and circu{ates room sir,
- Lowers humidity by removing excess moisture.
, Fiite_ out aumtr_rtime dust, dirt, and some
airborne impurities,
The air conditioner performs these fun_ons by
drawing room air through a filter which traps dust
and dirtparticles_ The air then passes over a
cooling coil which refrigerates the air and removes
excess moisture, The same air is then returned to
the room- cooter_ drier, and cleaner. Moisture
removed from the room air is carried to the outside
and evaporated_
Your sir conditioner is designed to be easy to
operate and to provide plenty of cooling power,
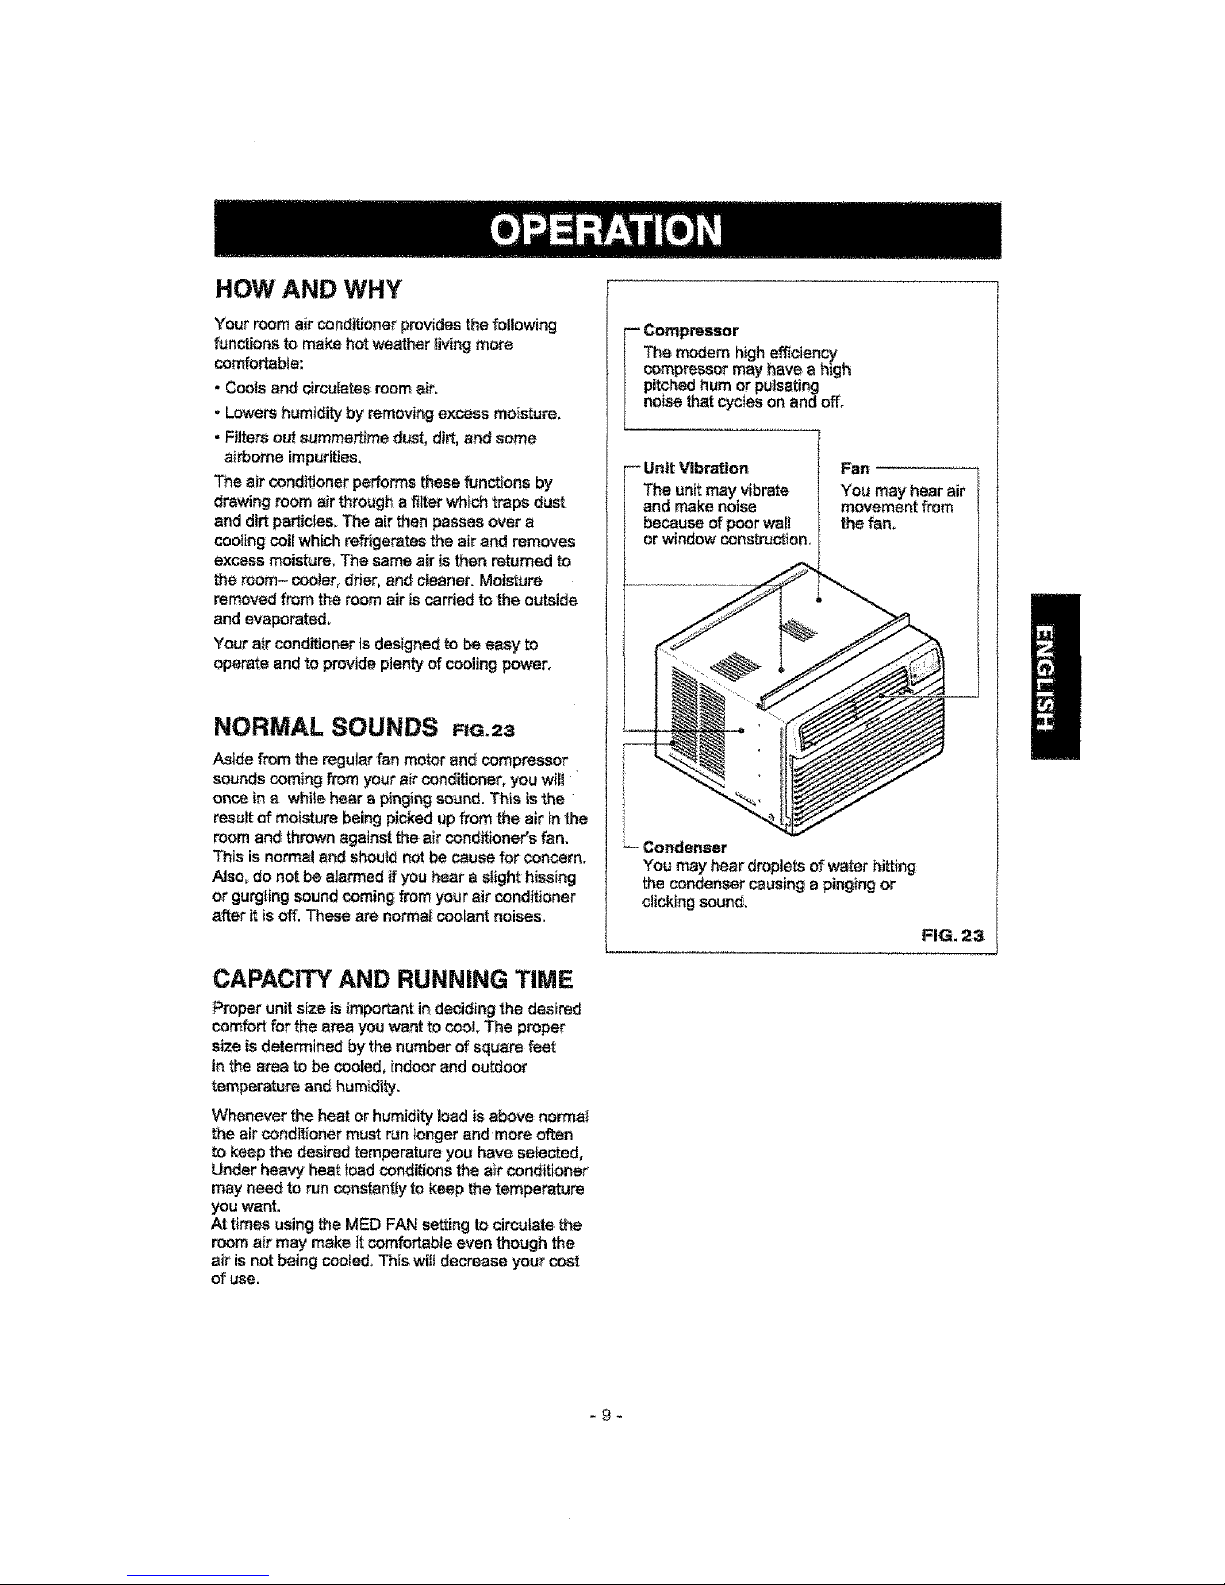
NORMAL SOUNDS FtG. ,3
Aside from the regular fan motor and:compn_ssor
sounds coming from your air conditioner, you will
once in s white hear a pinging sound. This is the
result of moisture being picked up from the air in the
room an_ thrown against the air conditioners fan,
This is normal and should not be cause for concern,
Also_ do not be alarmed if you hear a slight hissing
or gurgling sound coming from your air conditioner
after it is off. These are normal coolant noises.
CAPACITY AND RUNNING TIME
Proper unit size is important in deciding the desired
comfort for the area you want to cool The proper
size is determined by the number of square feet
in thearea to be cooled, indoor and outdoor
temperature and hum{dlty.
Whenever the heat or humidity load is above: norms}
the air conditioner must run longer and more olten
to keep the desired temperature you have selected,
Under heavy heat icad conditions the a_r cenc_itioner
may need to run constantly to keep the temperature
you want,
At times using the MED FAN setting to circulate
room air may make it comfortable even though the
air is not being ccoied. This wdti decrease your cost
of use.
--Compressor
The mo_em high efficiency
compressor may have a high
pitched hum or pulsating
noise that cycles on andoff,
-- Unit Vibration
The unitmay vibrate
and make noise
because of poor wall
orwindow construction,
Fan
You may hear air
movement from
the fan,
-- Condenser
You may hear droplets ofwater hitting
the condenser causing a pinging or
clicklng sound,
FIG. 23
-9-

FEATURES
1 15 6 5 4 32714
F_G. 24,
1. Cabinet
2. Vertical Air
Direction Louvers
3. Horizontal Air
Direction Louvers
4. thtef Grille
5. Air FHter
6. Front Gdlle
7. Control Panel
8, Power Cord
9. EvaporatorCoiI
10, Condenser
11. Compressor
'_2.5ass pan
_3, Brace
"_4.Upper Guide
I5. Curtain
16, Remote Control
USING THE AIR CONDITIONER
To r_duce the r_k of fire, elec_c
shock, or injury to persons, read the important
SAFETY instructions sectionbefore operating this
applianos
To begin operating the air condltlorterafter
installation, foJ!ow these steps:
t. Plug in the air conditioner. (To prevent eiectrica_
hazards, do not use an extension cord or an
adapter piucj.)
2. Set the exhaust vent to the CLOSE position.
3. Set the TEMP Control to the coolest setting.
4. Set the MODE con+rot at the highest COOL level.
5. Adjust the louvers for comfortable air flow.
6. Once the room has cooled, adjust the TEMP and
Mode Control to the setting you find most
comfortable.
NOTE :If the air conditioner isturned off, wait 3
minutes before resta_ng. This attows prassurs
|r_6e the compressor to equalize. Failure to wait 3
minutes before restarting may cause inefficient
operation.
if you move the TEMP Control to a warmer, then
fmmediate_y back to a cooler setting, the unit will
shut off. WaN 3 minutes before restarting.
VENT CONTROL
The Vent Control aitows the air cottdltioner to
either r_c_rcuiz_e inside air (CLOSE) or exhaust
air to the outside (OPEN), (F_G, 25)
- The CLOSE position Ssused when maximum
coo|ing is desired, tt may also be us_d for a_r
recirculetton without cooling when the air
conditioner is set in the FAN position.
* The OPEN position removes sta_e air from the
room and exhausts it to the outside. Fresh air is
dr_wn into the room through your home's
norrna_ air passages.
* The OPEN or CLOSE position can be used with
any mode setsc_Jon.
PULL OPEN / PUSH CLOSE
FIG. 25
-_0-
 Loading...