

SP6553 EngSpa Manual 68192 7/8/04 9:2_ Page 1
f
SAVE THIS MANUAL
FOR FUTURE
REFERENCE
SWAIRS
owner's
manual
Stock No.
42°14417
IVlodeiNo.
758.144171
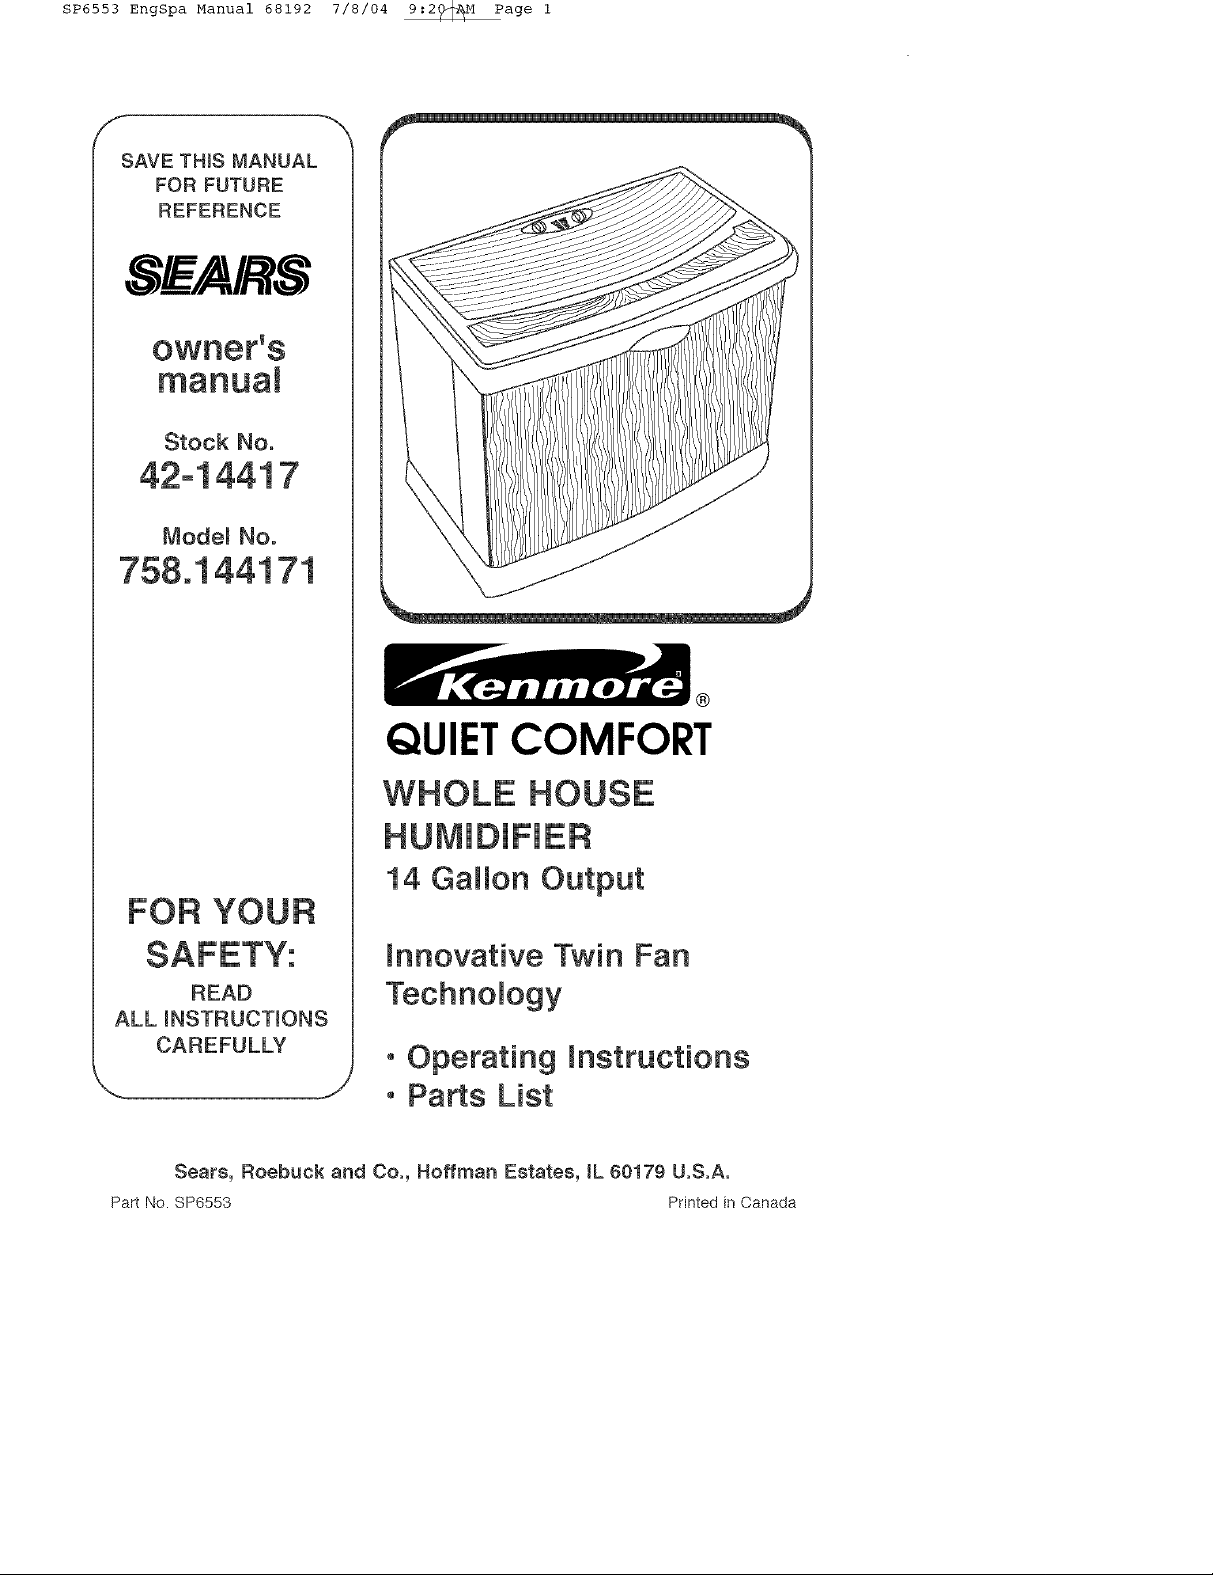
QUIETCOMFORT
WHOLE HOUSE
HUMiDiFiER
t4 Gallon Output
FOR YOUR
tnnovative Twin Fan
READ
ALL INSTRUCTIONS
CAREFULLY
J
Sears, Roebuck and Co., Hoffman Estates, tL 60179 U.S.A.
Part No. SP6553 Printed in Canada
Technology
oOperating instructions
° Parts List
SP6553 EngSpa Manual 68192 7/8/04 9:2Q_AM Paqe 2
FULL ONE YEAR WARRANTY ON HUNmIDmFmER
If within one (1) year from the date of purchase, this humidifier fails due to a defect in
material or workmanship, Sears will repair it, free of charge. _f within two (2) years from
the date of purchase, the motor fails due to defect in material or workmanship, Sears
will repair it free of charge.
This warranty service is available by simply returning the humidifier to the nearest Sears
Store, and it will be repaired or replaced, at Sears option, free of charge.
This warranty applies only while this product is used in the United States.
This warranty gives you specific _egal rights, and you may also have other rights which
vary from state to state.
Sears, Roebuck and Co., D/817 WA, Hoffman Estates, IL 60179
GENERAL SAFETY
Safety Signam Words 4.
DANGER: means if the safety information 5.
is not followed, someone will be seriously
iniured or killed. 6.
WARNmNG: means if the safety information
is not followed, someone could be serious- 7.
ly iniured or killed.
CAUTION: means if the safety information
is not followed, someone may be seriously 8.
iniured or killed.
1. To reduce the risk of fire or shock hazard,
plug humidifierdirectly intoa 120V,A.C. ebc_
trical outlet. Do not use extension cords. 9.
2. Keep the electric cord out of traffic areas.
To reduce the risk of fire hazard, never put
the electric cord under rugs, near heat
registers, radiators, stoves or heaters.
3. Always unplug the humidifier before
moving it, before cbaning, or whenever
the humidifier is not in service.
INSTRUCTIONS
Keep the humidifier clean.
Do not put foreign objects inside the
humidifier.
Never use your humidifier while any part
is missing or damaged in any manner.
To reduce the risk of electrical hazard or
damage to humidifier, do not tilt, jolt or
tip humidifier while unit is running.
To reduce the risk of damage to humidi-
tier, unplug humidifier, when water bot-
tles are empty or when the humidifier is
not in use.
To reduce the risk of accidental electri-
cal shock, do not touch the cord or con-
trols with wet hands.
10.Note the warning label shown below.
WARNRNG: To reduce risk of fire, elec=
tric shock, or injury always unplug
[beforef ng, servcngoreeenng.
TableofContents
Warranty Information .................................. 2
General Safety instructions ........................ 2
To Save A Service Call ............................... 2
Know Your Humidifier ................................. 3
Humidifier Operations ................................ 4
Assembly .................................................... 4
Location instructions ............................... 4-5
Electrical Hook-Up ...................................... 5
To Save a Service Carl __
Chock the following if your humidifier will 3. Is airflow control in operating position?
not operate. 4. Is humidity control set high enough?
1. Is power cord attached to outlet? 5. Is the cabinet sitting on a level surface?
2. Is there electrical power to outlet?
Water Fill .................................................. 5-6
Operating Humidifier Controls ................... 7
Manual Dryout ............................................. 7
Using Your Humidifier ................................. 8
Operating Tips for Best Performance ......... 8
Replacement and Care of Filters ........... 9-10
Cleaning Your Humidifier ..................... 11-12
Troubleshooting ....................................... 13
Repair Parts ......................................... 14-15
2
SP6553 EngSpa Manual 68192 7/8/04 9=20_1_M P_ae
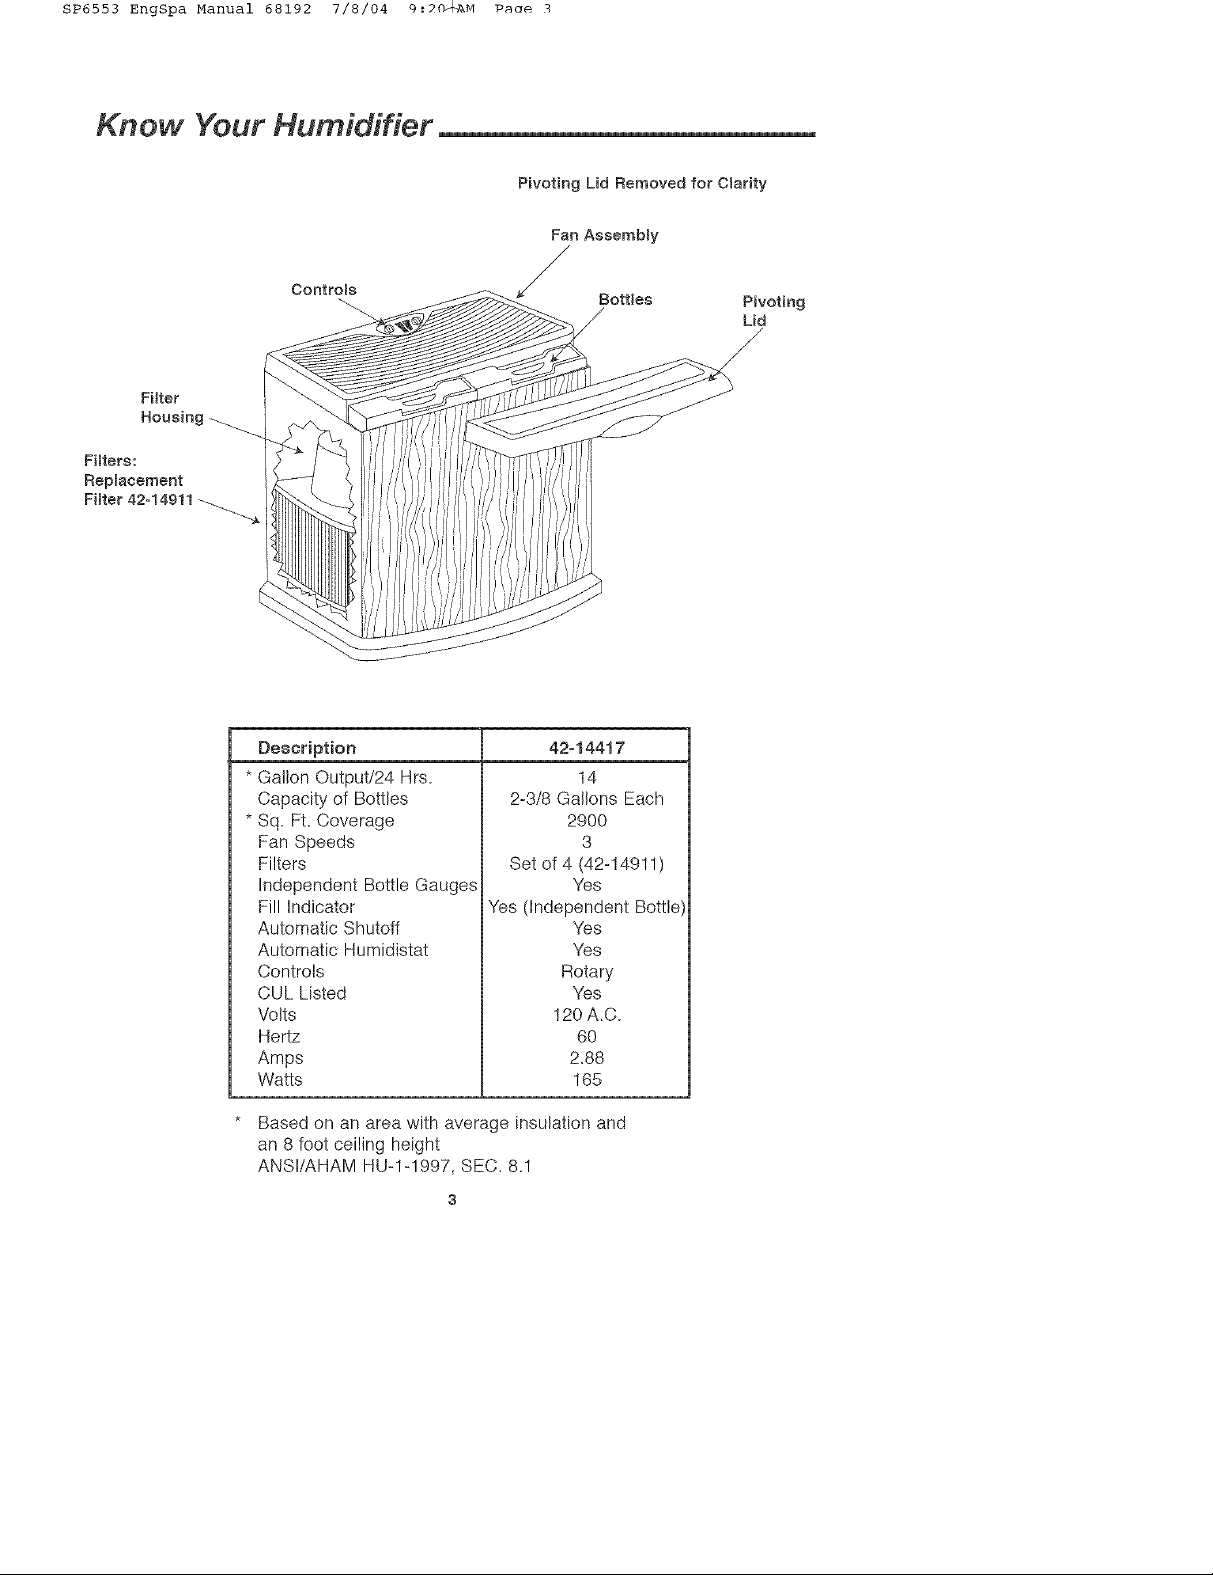
Know Your Humidifier
Filter
Housing
Fitters:
Replacement
Fitter 42=14911 _
Pivoting Lid Removed for Clarity
/
Pivoting
L_d
/
Description
Gallon Output/24 Hrs.
Capacity of Bottles
Sq. Ft Coverage
Fan Speeds
Filters
Independent Bottle Gauges
Fill Indicator
Automatic Shutoff
Automatic Humidistat
Controls
CUL Listed
Volts
Hertz
Amps
Watts
Yes dndependent Bottle)
42=14417
14
2-3/8 Gallons Each
2900
3
Set of 4 (42-14911)
Yes
Yes
Yes
Rotary
Yes
120 A.C.
80
2.88
165
Based on an area with average insulation and
an 8 foot ceiling height
ANSI/AHAM HU-1-1997, SEC. 8.1
SP6553 EngSpa Manual 68192 7/8/04 9:2Q_AM Paqe 4
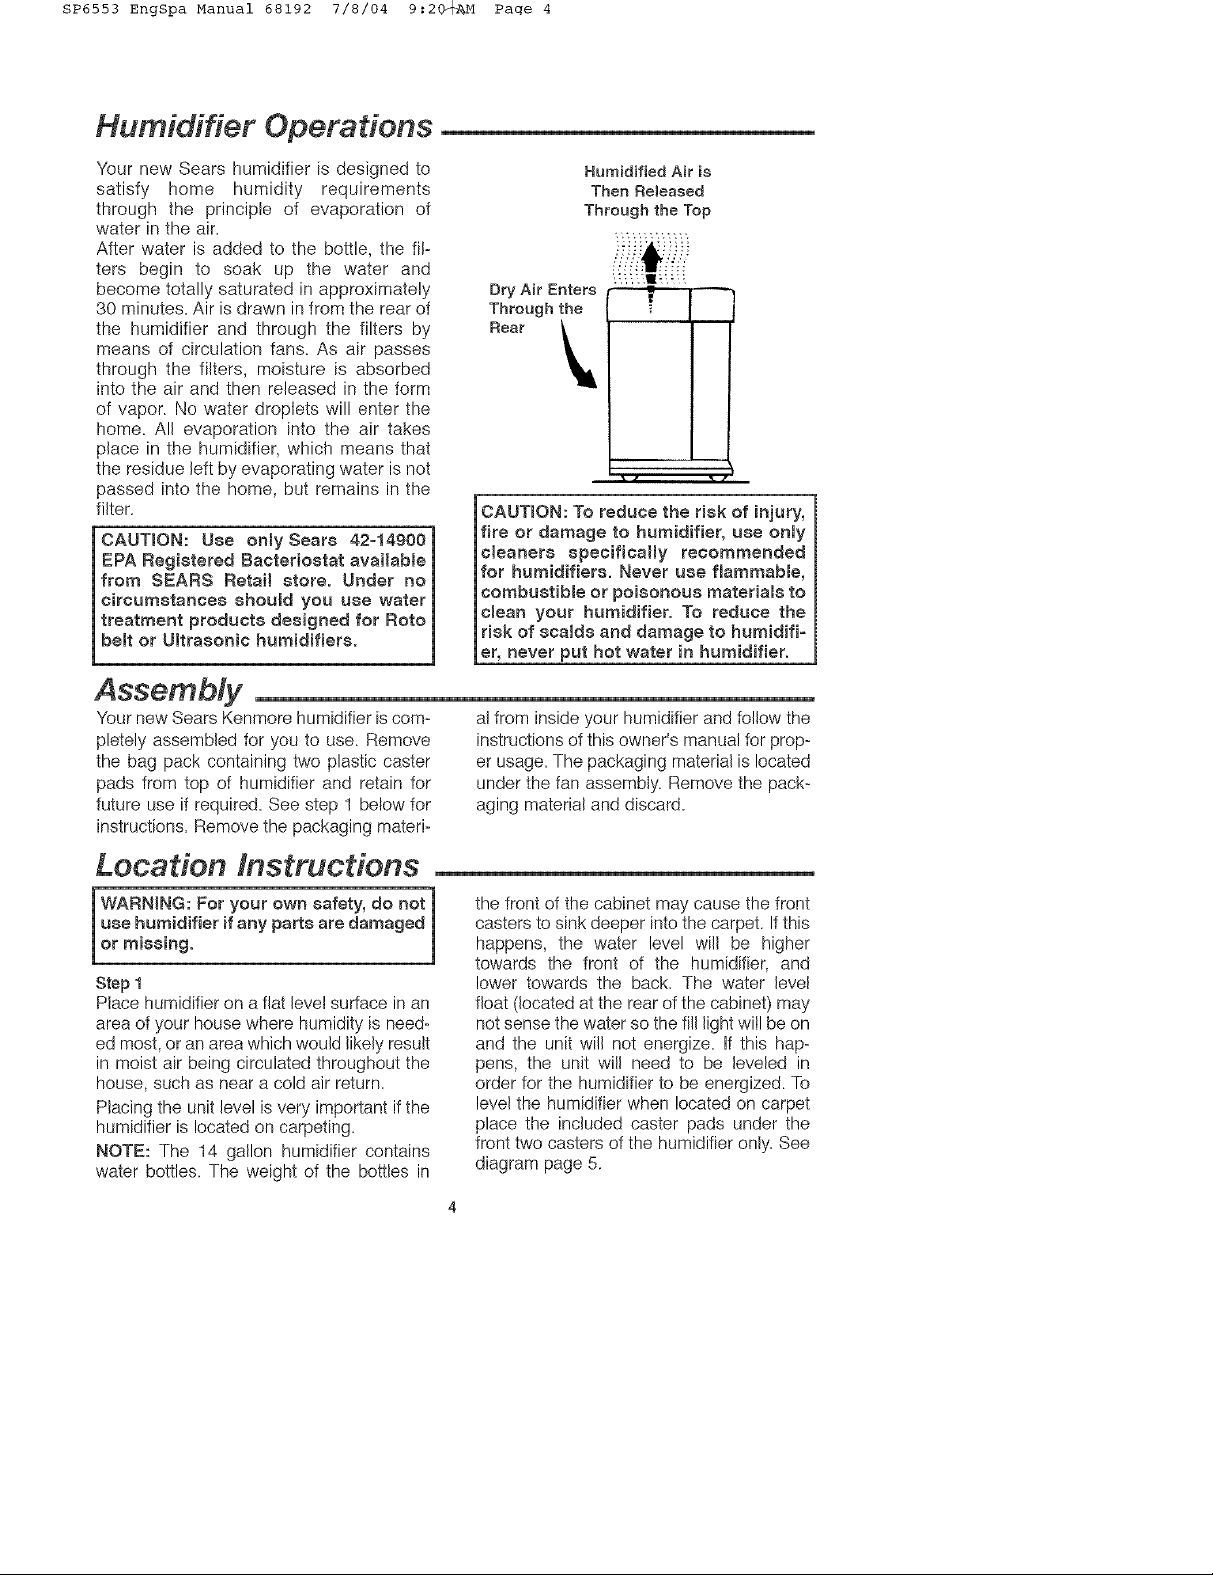
Humidifier Operations
Your new Sears humidifier is designed to
satisfy home humidity requirements
through the principle of evaporation of
water in the air.
After water is added to the bottle, the fil-
ters begin to soak up the water and
become totally saturated in approximately
30 minutes. Air is drawn in from the rear of
the humidifier and through the filters by
means of circulation fans. As air passes
through the filters, moisture is absorbed
into the air and then released in the form
of vapor_ No water droplets will enter the
home. All evaporation into the air takes
place [n the humidifier, which means that
the residue left by evaporating water is not
passed into the home, but remains in the
filter.
iCAUTION: Use only Sears 42_149001
EPA Registered BaoteNostat available|
from SEARS Retail store. Under no|
circumstances should you use water|
treatment products designed for Roto|
i be t or U traaon o hum d f era. i
l !
Dry Air Enters
Through the
Rear
CAUTmON: To reduce the risk of injury,
fire or damage to humidifier, use onty
cleaners specifically recommended
for humidifiers. Never use flammable,
combustible or poisonous materials to
clean your humidifier. To reduce the
risk of scalds and damage to humidifF
or, never put hot water in humidifier
Humidified Air is
Then Released
Through the Top
Assembly
Your new Sears Kenmore humidifier iscorn- a] from inside your humidifier and follow the
pletely assembled for you to use. Remove instructions of this owner's manual for prop-
the bag pack containing two plastic caster er usage. The packaging material is located
pads from top of humidifier and retain for under the fan assembly. Remove the pack-
future use if require& See step 1 below for aging material and discard.
instructions. Remove the packaging materi-
Location lnstrucdons
WARNING: For your own safety, do not 1
use humidifier if any
_or missing. 1
Step 1
Place humidifier on a fiat level surface in an
area of your house where humidity is need-
ed most, or an area which would likely result
in moist air being circulated throughout the
house, such as near a cold air return.
Placing the unit level is very important if the
humidifier is located on carpeting.
NOTE: The 14 gallon humidifier contains
water bottles. The weight of the bottles in
parts are damaged |
the front of the cabinet may cause the front
casters to sink deeper intothe carpet. If this
happens, the water level will be higher
towards the front of the humidifier, and
lower towards the back. The water level
float (located at the rear of the cabinet) may
not sense the water so the fill light will be on
and the unit will not energize. If this hap-
pens, the unit will need to be leveled in
order for the humidifier to be energized. To
level the humidifier when located on carpet
place the included caster pads under the
front two casters of the humidifier only. See
diagram page 5.
'SP6553 EngSpa Manual 68192 7/8/04 9:2Q_AM Paqe 5
Location Instructions (continued)
NOTE: Due to release of cool, moist air
from humidifier, it is best to direct air away
from home thermostat and hot air registers.
It is best to position humidifier next to an
inside wall. Hot air registers and cold air
from outside walls can affect the efficiencies
of the controls. Unit should not be placed
where warm air from a hot air register blows
directly on unit.
Moist air (humidity) produced will disperse
into the whole house, but area closest to the
unit will have the highest humidity. If the unit
is positioned close to a window, condensa-
tion may form on the window pane. Ifthis is
not appropriate the unit should be reposi-
tioned in another location.
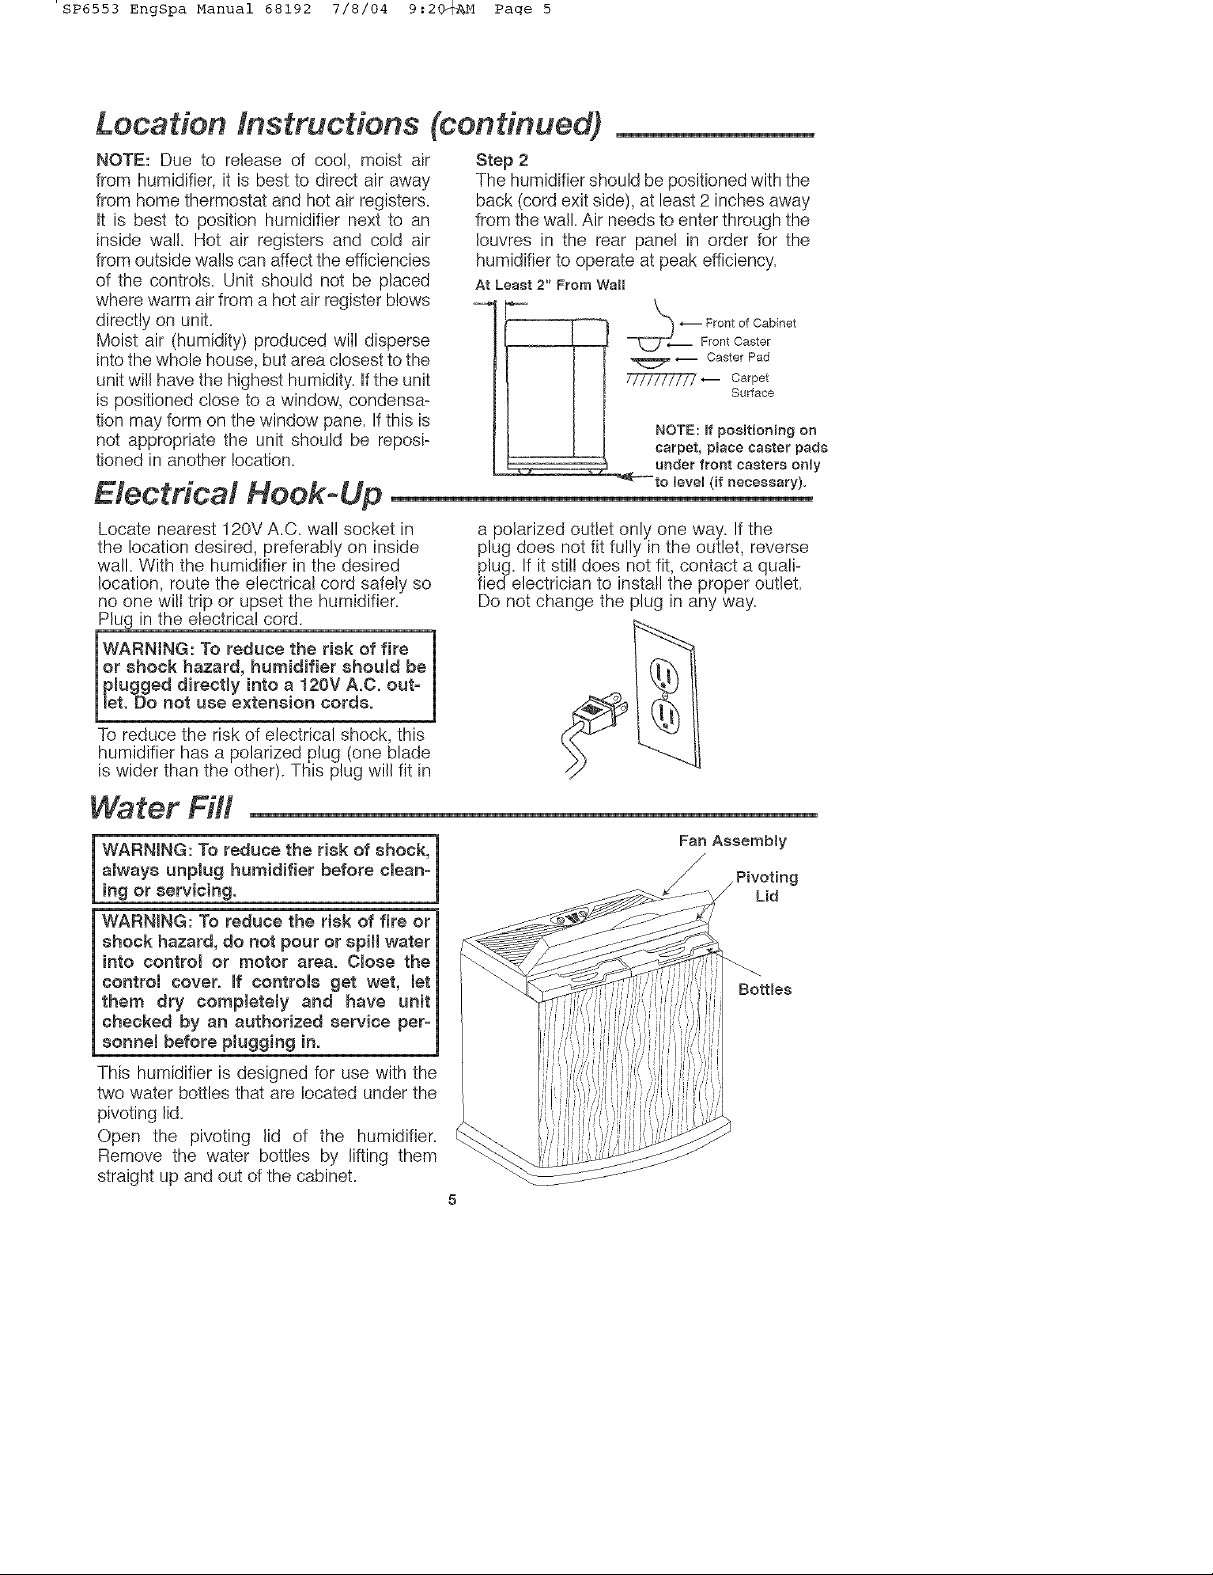
Step 2
The humidifier should be positioned with the
back (cord exit side), at least 2 inches away
from the wall. Air needs to enter through the
Iouvres in the rear panel in order for the
humidifier to operate at peak efficiency.
At Least2" FromWall
Electrical Hook-Up
Locate nearest 120V A.C. wall socket in
the location desired, preferably on inside
wall. With the humidifier in the desired
location, route the electrical cord safely so
no one wilt trip or upset the humidifier.
Hug in the electrical cord.
a polarized outlet only one way. Ifthe
plug does not fit fully in the outlet, reverse
plug. If it still does not fit, contact a quali-
fied electrician to install the proper outlet.
Do not change the plug in any way.
_ Caster Pad
T777_7777 _ Carpet
NOTE: ff positioning on
carpet, place caster pads
under front casters only
"_'_to level (if necessary).
Surface
or shock hazard, humidifier should be I
plugged directJy into a t20V A.C. out- m
IWARNtNG: To reduce the risk of fire :m
let.Denotuseextens,encords,m
To reduce the risk of electrical shock, this
humidifier has a polarized plug (one blade
is wider than the other). This plug will fit in
Water Fill
WARNBNG: To reduce the risk of shock,
always unplug humidifier before clean-
ing or servicing.
WARNUNG: To reduce the risk of fire or
shock hazard, do not pour or spill water
into control or motor area. Close the
control cover, ff controls get wet, let
them dry somp_etemy and have unit
checked by an authorized service per-
sonnel before plugging in.
This humidifier is designed for use with the
two water bottles that are located under the
pivoting lid.
Open the pivoting lid of the humidifier.
Remove the water bottles by lifting them
straight up and out of the cabinet.
Fan Assembly
/
Pivoting
/ Lid
BottJes

SP6553 EngSpa Manual 68192 7/8/04 9:2Q_AM Paqe 6
Water Fill (continued)
Notice the water bottles are designed as
right and left hand units. Position them in the
correct location so the humidifier can func_
tion properly. The water bottles should rest
in the front of the cabinet. Each "E_Z_Fil!
Side-Cap" must be facing the rear of the
unit.
Each water bottle is designed with an "E-Z-
Fill Side-Cap" that is easily removable.
Remove the "E-Z-Fiil Side-Cap" on the side
of the water bottle by twisting counterciocb
wise•
Place the opening of the water bottle under
a water faucet (the bottle should fit under a
four-inch clearance faucet)• Fill with recom-
mended mixture of cold water and Sears
Bacteriostat #42-14900 (if necessary) only.
Solid debris could make the valve leak•
nnstall the "E-Z-Fill Side-Cap" by twisting
Iockwise. Hand tighten only.
;heek for possible _eaks by performing
he following:
• Grasp bottle handle and hold the bottle
upright over a sink.
:. Press up on valve cap plunger for about
one second to let out a little water.
;. Release the plunger.
• Listen for air bubbles. Look for leaks
around the "E=Z-Fill Side-Cap".
,. If you hear air bubbles or see leaks,
retighten the "E-Z-Fill Side=Cap" and
repeat steps 1=4.
Vipe off excess water from the bottle.
_ositionthe water bottle back into the unit by
irasping the water bottle handle and lower it
_to the cabinet until the bottle sits on pads
t bottom of cabinet The "E-Z=Fi!ISide-Cap"
"lust be facing the rear of the cabinet. When
,ositioned properly, the plunger wil! open
nd water wil! flow into the cabinet. The
,,ater level will automatically remain at
pproximately 1/2" until the bottles are
,mpty.
dlow the filters to saturate for 30 minutes
,efore operaton.
4ote: Ensure that the raised section of the
,,ater bottle falls into the hole in stationary
d in order for the bottle gauges to function
,roperly.
Should Always Face Rear
Pivoting Lid Raised
Removed Section
for Clarity
Rear of
Humidifier
--,.j
"E-Z-FIH Side-Cap"
Turn Counterclockwise
to Remove Cap
Valve
Cap Plunger
Stationary
Lid Ho_e
/

SP6553 EngSpa Manual 68192 7/8/04 9:2_ Page 7
Operating Humidifier Controls
The operating controls of your Kenmore
Quiet Comfort whole house humidifier are
located on the top center of the humidifier.
The controls are found under the smoked
control cover, located between the air circu-
lating fans.
Lift the control cover by placing your finger
in the round cutout and lifting. The cover will
stay open. Now you can clearly see the con-
trol area. Familiarize yourself with the con-
trols and reference the diagram of the con-
trol area for the correct naming used in this
manual.
To Operate the Controls
Humidity Control: _)
Adjust the amount of humidity depending on
your needs. The humidifier will turn on and
off as required to maintain level of humidity
selected. A medium setting is recommend-
ed, but there are times when low or high
amount of humidity may be preferred. For
constant operation of humidifier, rotate
humidity knob all the way clockwise. This
allows for the maximum amount of humidity
to be evaporated into the air continuously.
m£,IPOF_TANT:Water damage may resumt if
condensation starts to form on windows or
walla. Humidity Control setting should be
lowered until condensation no longer forms.
Speed Control
The unit is adjusted from off " I " to high
" * * " " with a rotary speed control. The
higher the air flow speed, the more water is
evaporated and released into the air. Low
speed"" "is the quietest and is provided for
conditions that may not require as high an
evaporation rate.
VIS_=FILL Water Bottle Gauges and
FHI Lights
This humidifier is equipped with indepen-
dent (left and right) water level bottle
gauges. When the unit is energized the cen-
ter area of the control panel containing the
gauges and fill indicators will illuminate red
to depict the operation mode. The right bot-
tle as viewed from the front of the humidifier
wil! always empty first. As it empties the
number of red bars will decrease. When it is
totally empty the Fill Indicator immediately
beside the bars will Illuminate. NOTE: The
humidifier will not shut off at this stage.
Once the right bottle empties, the humidifier
will begin to use the water from the left bottle
until it is depleted. At this time the Fill
Indicator beside it will illuminate. There wil!
still be a slight delay in the unit shutting off
while it depletes the water in the bottom of
the cabinet. At this time or anytime during
normal operation you may fill the water bot=
ties to continue operation. Note: A small
amount of water remains incabinet after both
Fill Indicators turn on and the unit shuts off.
Bottle _<__, "_x / Right
Gauge // _ -'_ Bottle
Le'ft Bottle Right Gauge
Fill Indicator Bottle
Manual Dryout
At the end of the humidification season or if
you do not plan to run the humidifier for ORe
week or more, you can override the auto-
matic shutoff function to completely dry the
humidifier cabinet out.
Todothis, simply slide the float retainer locat-
ed at the back of the humidifier cabinet to the
top position of the slot it is located in. This wilt
hold the float in an upward position and the
fans will run until you turn the power off.
NOTE: Be sure to position float retainer to
the normal operating mode (lowest position
in slot) for humidifier operation.
Below is a diagram of the slot the float retain-
er is located in at the back of the cabinet.
Back of Cabinet
Fill indicator
TOP POSmON
IS FOR MANUAL
DRYOUT
BOTTOM POSITION
IS FOR NORMAL
OPERATION MODE
FLOAT
RETAINER
SLOT

SP6553 EngSpa Manual 68192 7/8/04 9:2Q_M Page 8
Using Your Humidifier __
Step 1
Be sure humidifier is full of water and
plugged in.
Step 2
Set Speed Control low speed " " "
Step 3
Set Humidity Control " %_ " to medium
position.
NOTE: Humidifier should operate with
humidity control on the recommended
medium setting. If it does not, the humidity
is at a relatively high level. To test the unit
under this condition, turn Humidity Control
all the way to clockwise and unit should
begin to operate. After the unit has been
tested, set Humidity Control to medium or
desired level.
Allow 24 hours for humidifier to adjust.
If humidity level in home is sufficient, the
humidifier will only operate with Humidity
Control turned all the way clockwise.
IMPORTANT: Water damage may result
if condensation starts to form on win=
clews or walls. Humidity Control setting
should be lowered untit condensation
no longer forms.
Step 4
If humidifier stops running and BOTH Fil!
indicators are not on, the humidity level is
at the normal requirements for that setting
or it is adjusting to the home conditions.
The chart below shows recommended
indoor humidity levels.The figure below
shows approximate relative humidity per-
centages which correspond to the various
settings of the Humidity Control.
Recommended
When Outdoor
Temperature is:
-10°F
0°F
10°F
20°F & above
indoor Relative
Humidity is:
20%
25%
30%
35%
Operating Tips for Best Performance
1. Position the humidifier at least 2 inches
from any wal! and away from any heat
registers.
2. Do not restrict airflow from entering or
exiting the humidifier.
3. Use Sears recommended bacteriostat
42-14900 to retard bacteria growth that
may cause odors and may be harmful
to your health.
4. Perform regular cleaning as instructed
in "Cleaning Your Humidifier" section of
this manual
5. Replace the evaporative wicking filters
at least once per humidification season
or more depending on water conditions
in your area.
Retative Humidity

SP6553 EngSpa Manual 68192 7/8/04 9:2Q_M Page 9
Replacement and Care of Filters
WARNmNG: "To reduce the risk of shock
or injury from moving parts, always
unplug humidifier before removing or
repmacing any parts.
CAUTmON: To he_p retard bacteria
growth and keep maximum efficiency,
the filters shoumd be replaced at meast
once per season, or more often under
hard water conditions. Use Sears rec-
ommended replacement filter 424 4911.
The filters may be rinsed periodica!ly inclear
water only. Take care not to damage paper.
Toreplace evaporative wicking filters in your
Kenmore Quiet Comfort Whole House
humidifier, follow the instructions below.
1. Unplug humidifier and proceed to clean.
Before removing the filters, we recom-
mend moving the humidifier to an area
where floor coverings are not suscepti-
ble to water damage, i.e. kitchen or bath
areas.
2. Open the pivoting lid and remove water
bottles and set aside. Grasp the fan
assembly front center and rear center.
Lift off and set aside on a clean flat sur-
face. The filter housings are now acces-
sible.
3. Lift filter housing out of cabinet and place
where you may work on them comfort-
ably. With a soft, absorbent cloth remove
any remaining water or loose mineral
deposits not trapped in the filter from the
humidifier cabinet.
4. To open filter housing for easy access to
filters:
a. Deflect the two spring tabs on top of
filter housing. Lift top cover off of the
filter housing and set aside.
b. Remove the two filters and dispose
of properly'. Clean internal parts of
humidifier per the "Cleaning of
Humidifier" section of your owner's
manual.
Front of Humidifier
Pivoting Lid
Fan Assembly
Cabinet
Spring Tabs

SP6553 EngSpa Manual 68192 7/8/04 9:2_M Page i0
Replacement and Care of Filters (continued)__
c. Install new filters in the filter housing
track with the glue beads of the wick-
ing pad to the inside of the filter hous-
ing.
Spring Tabs
d. Return the top cover of the filter
housing by installing the cover over r_,
the fixed tabs on the rear of the lower
filter housing and pivoting the cover
down over the top of the filters. Snap
the cover over the two spring tabs.
e. Replace the filter housing in the cab-
inet. Note: There is a front and back
orientation. To position the filter
housings correctly: Front of
Humidifier
" Be sure that the spring tabs of filter
housings are towards front of cabi-
net.
, Align the lower portion of the filter
assembly over the six ribs located at
the bottom rear of the humidifier cab-
inet.
f. Position fan assembly onto the cabi-
net. Make sure the fan venturi (low-
est cylinder section below the fan) is
placed inside the filter housing.
g. Replace water bottles.
h. Close the pivoting lid. Spring
i. The unit is ready for use or to be Tabs
stored away for next season.
FixedTabs
Filter
_g
Rear of
Humidifier
Top
Cover
Flat Portion of FHter Housing
Towards Bask of Cabinet
Spring Tabs Towards Front of Cabinet
Step 4 e.
10

SP6553 EngSpa Manual 68192 7/8/04 9:2Q_AM Page ii
C/eaning Your Humidifier
WARNING: To reduce the risk of
injury, fire or damage to humidifier,
use only cleaners specificallyrec-
ommended for humidifiers, Never
use flammable, combustible or poi-
sonous materiams to clean your
humidifier.To reduce the risk of
scalds and damage to humidifier,
never put hot water in humidifier.
CAUTmON: Local water purity varies
from area to area and under certain
conditions water impurities and air-
borne bacteria may promote the
growth of microorganisms in the
reservoir of the humidifier.
To retard bacteria growth that may
cause odors end be harmful to your
health, use only Sears replacement
filters. We aJso recommend using
EPA approved bacteriostet 42-14900
end humidifier cmeaner 42°14713,
avaimabmeat your iota[ Sears store.
NOTE: if it is necessary to use approved
bactefiostat, follow directions correctly.
The bottles of the whole house humidifier
win hold 2-3/8 gallons of water each.
Step 1
To make cleaning easier, the humidifier
cabinet should be empty and completely
dried out. To accomplish this, use the fol-
lowing method:
a. On the back side of the humidifier cab-
inet, find the float retainer. In normal
operating mode, the retainer will be
positioned in the bottom of the slot in
the cabinet. Push the retainer up to the
top slot position in the cabinet until it
locks in place. (See "Manual Dryout"
section on page 7.)
b. Allow the humidifier to run until there is
no water left in the cabinet
c. Unplug humidifier.
p_ugged, fan coutd start after housing
i ARNING: if humidifier is not un_ I
is removed.
Step 2
To Remove Parts
a. Open the pivoting lid and remove water
bottles and set aside. Grasp the fan
assembly front center and rear center.
Lift off and set aside on a clean flat sur-
face. The filter housings are now
accessible.
b. Before removing the internal parts of
the humidifier cabinet, we recommend
moving the humidifier to an area where
floor coverings are not susceptible to
water damage, i.e., kitchen or bath
area. Lift the filter housing assemblies
out of the cabinet and set to the side.
c. Remove the water level float from the
humidifier cabinet by pinching the float
retainer to release it from the cabinet.
The cabinet should be empty before
cleaning. The cabinet consists of the
lower areas of the humidifier where the
filters are during normal operation time.
d. Empty cabinet of any remaining water.
e. Proceed to "Bi=Weekly Maintenance"
or "End of Season Maintenance/'
f. Remove old filters and dispose of prop-
erly as described on page 9 and 10.
Step 3
Install new filters (purchase the correct
evaporative wicking filter pads 42-14911
for your humidifier) into the location where
the old filters were positioned. Install the
filter housings with the new filters into the
correct location. Reinstall the water level
float. NOTE: Float retainer should be posi-
tioned in normal operating mode. Assure
that it is positioned in the bottom of the stot
in the back of the cabinet. (See page 7 for
diagram of slot.) Position the fan assembly
on top of the cabinet and return the humid-
ifier to the desired location for use.
Refill humidifier bottles with fresh cool water
and return them to the cabinet. Plug the unit
into a 120 volt A.C. power outlet and set the
controls per the "Operating Humidifier
Controls" section of this manual.
11

SP6553 EngSpa Manual 68192 7/8/04 9:2Q_AM Paqe 12
Cleaning of Humidifier (continued)
BFWeek_y Maintenance
Removing Scale
1. Fill the humidifier cabinet with one 8
oz. cup of undiluted white vinegar. Let
solution stay 20 minutes.
2. Clean all interior surfaces with a soft
brush. Dampen a soft cloth with undi=
luted white vinegar and wipe out the
cabinet to remove scale.
3. Rinse thoroughly with clean warm
water to remove scale and cleaning
solution before disinfecting cabinet.
4. Dust the fan assembly and outside sur-
faces with a soft cloth only.
Disinfecting Humidifier Cabinet
and Water Bottles
1. Fill humidifier cabinet with 1 teaspoon
chlorine bleach in 1 gallon of water. Let
solution stay for 20 minutes, swishing
every few minutes. Wet all surfaces
normally exposed to water.
2. Empty humidifier cabinet after 20 min-
utes. Rinse with water until bleach
smell is gone. Allow unit to dry out
completely.
3. Water bottles should be cleaned in the
same manner.
End of Season Maintenance
1. Follow "Bi-Weekly Maintenance"
instructions at end of humidification
season.
2. Remove and throw away filters.
3. Let humidifier dry completely before
storing. Do not store with water inside
cabinet or water bottles.
4. Store in coo!, dry location.
5. Install new filters in clean humidifier
before next season begins.
6. "Bi-Weekly" is also recommended if
you do not plan to run the humidifier for
one week or more.
12

SP6553 EngSpa Manual 68192 7/8/04 9=2_ Page 13
Troubleshooting
Troub{e Probable Cause Remedy
Unit will not run and no • No Power. • Check 120 volt power
control panel lights are source.
illuminated.
Unit will not shut off. • Float retainer is positioned • Slide float retainer down to
Unit will not dry out
completely.
Bottles continue to empty.
Neither bottle emptying.
Left bottle not emptying.
Fill Indicators turn on before
bottles are empty.
Note: There may be a little
water still in bottle when Fill
indicator is illuminated. This
is normal.
in "Manual Dryout" position, normal operation mode.
• Float is not free.
• Float is positioned in
normal operation mode.
, Air is entering water bottles.
• Bottle cap plunger missing
post in bottom of cabinet
• Dirty filters
• Right bottle contains water
, Unit is not set up on a level
surface. (Float will not
sense water at the rear of
the cabinet.)
Refer to "Manual Dryout"
section on page 7.
• Free float from obstruction.
, This is normal. A small
amount of water remains in
the cabinet after Fill Lights
come on. Position float
retainer in "Manual Dryout"
position to completely dry out.
See page 7.
, Check "E-ZoFill Side-Caps"
and valve assembly caps to
ensure tightness.
, Check for leak in water bottles.
, Ensure gaskets for "E-Z-Fill
Side Caps" are in place.
• Check orientation of bottles.
Reposition so that bottle cap
plunger (stem) is depressed
by post in bottom of cabinet.
• Change to fresh new filters.
(42-14911 )
, The humidifier is designed so
the right bottle empties first.
Continue to run until both fill
lights come on.
• Position unit level. (Some
carpet padding may allow
unit to sit lower in front than
rear with the additional
weight of water bottles in
the front of the cabinet.
install caster pads under
front casters. (See page 4).
CAUTION: Use only 42-14900 EPA Begiatered Bacteriostat available from Sears Retail
store.
Use of other water treatment products may damage the fi_ter elements.
Under no circumstances should you use water treatment products designed for Boto
be_t or U_trasonic humidifiers,
13

J
27
t
27
24 _
23
I _--- f
]
i
<--w S
26
33
23

r_
Key Part No. Description
No.
1
828743
2
828756
3
830891
4
828741_1
828855-1
5
6
822409
7
823912
8
828753
9
828755
10
828750
11
828751
12
828752
13
828749
14
828854
15
824690
16
828192
17
828726
18
509229-I
19
828998
* Standard Hardware Item - May be purchased locally.
NOTE: Any attempt to repair the assembly or motor may create a hazard unless repair is done by a qualified service techni-
cian. Repair service is available at your nearest Sears store.
Cover, Dust
Knob
Label, Control
Lid, Stationary
Lid, Pivoting
Humidistat
Switch, Rotary
Cover, Actuator Arm
Spring, Compression
Light, Pilot
Arm, LH Actuator
Arm, RH Actuator
Retainer, Micro Switch
Switch, Micro
'Easy-Fill Side-Cap"
Bottle, Left (includesKey No's 15& 18)
Bottle, Right (IncludesKey No's15 & 18)
Cap, Valve Assembly
Cabinet
Key Part No. Description
No.
20 823726
21 STD601!07
22 828515
23 830560-1
24 42-14911
25 828197
26 828534
27 828115-1
28 822406_1
29 828197
30 828858
31 816069-5
32 816069_6
33 STD600805
34 824101-I
35 828200
36 828745
37 828920
- SP6553
t Stock Item - May Be Secured Through Sears Retail
and Catalogue Stores.
Rail, Kick
* Screw, Pan Hd. Ty "AB" #10 x 3/4
Caster, Twin Wheel
Support, Filter Lower
1-Fitter, Evaporative
Support, Upper Filter
Support, Motor
Motor (includes mounting hardware)
Fan
Support, Upper Filter
Cord w/Plug
* Screw, Pan Hd. Ty "AB" #6 x 1/2
* Screw, Pan Hd. Ty "AB" #6 x 3/4
* Screw, Pan Hd. Ty "AB"" #8 x 1/2
Retainer, Float
Float, Water Level
Enclosure, Electronics
Pad, Caster (Two)
Owner's Manual (not illustrated)
o
R _
_r _

SP6553 EngSpa Manual 68192 7/8/04 9:2_M Page 32
Your Home
For repair-in your home-of all major brand appliances,
lawn and garden equipment, or heating and cooling systems,
no matter who made it, no matter who sold it,
For the replacement parts, accessories and
owner's manuals that you need to do-it-yourself.
For Sears professional installation of home appliances
and items like garage door openers and water heaters.
1-800-4-MY-HOME _°_ (1-800-469-4663)
Call anytime, day or night (U.S.A. and Canada)
www.sears.oom www.seare.ca
Our Home
For repair of carry-in items like vacuums, lawn equipment,
and electronics, call or go on-line for the location of your nearest
Sears Parts & Repair Center.
1-800-488-1222
Call anytime, day or night (U.S.A. only)
www.sears.com
iiiiiiiiiiii
iiiiiiiiiiii
iiiiiiiiiiii
iiiiiiiiiiii
iiiiiiiiHH
To purchase a protection agreement (U.S.A.)
or maintenance agreement (Canada) on a product serviced by Sears:
1-800-827-6655 (U.S.A.) 1-800-361-6665 (Canada)
a domicilio, y para ordenar piezas:
1-888-SU-HOGAR sM
(1-888-784-6427)
SEARS
® Regbt_red Trademark / _w Trademark / sw Service Mark ol S_ars, Rueb_lck and Co.
® Ma_a Ru_rada / Tw Marca _ F&bdca / sw Ma_a du S_rv_o _ Suar% R_ebuck and C_
MCMarque de c_me_e /w Ma_ue deposee de Sear& Roebuck and Co ® Sear& Roebuck and Co
Part No. SP6553 Form. No. SP6553 Pdnted in Canada 6/04
Parapedir servicio de reparacien Au Canada pour service en frangais:
 Loading...